

Page 1
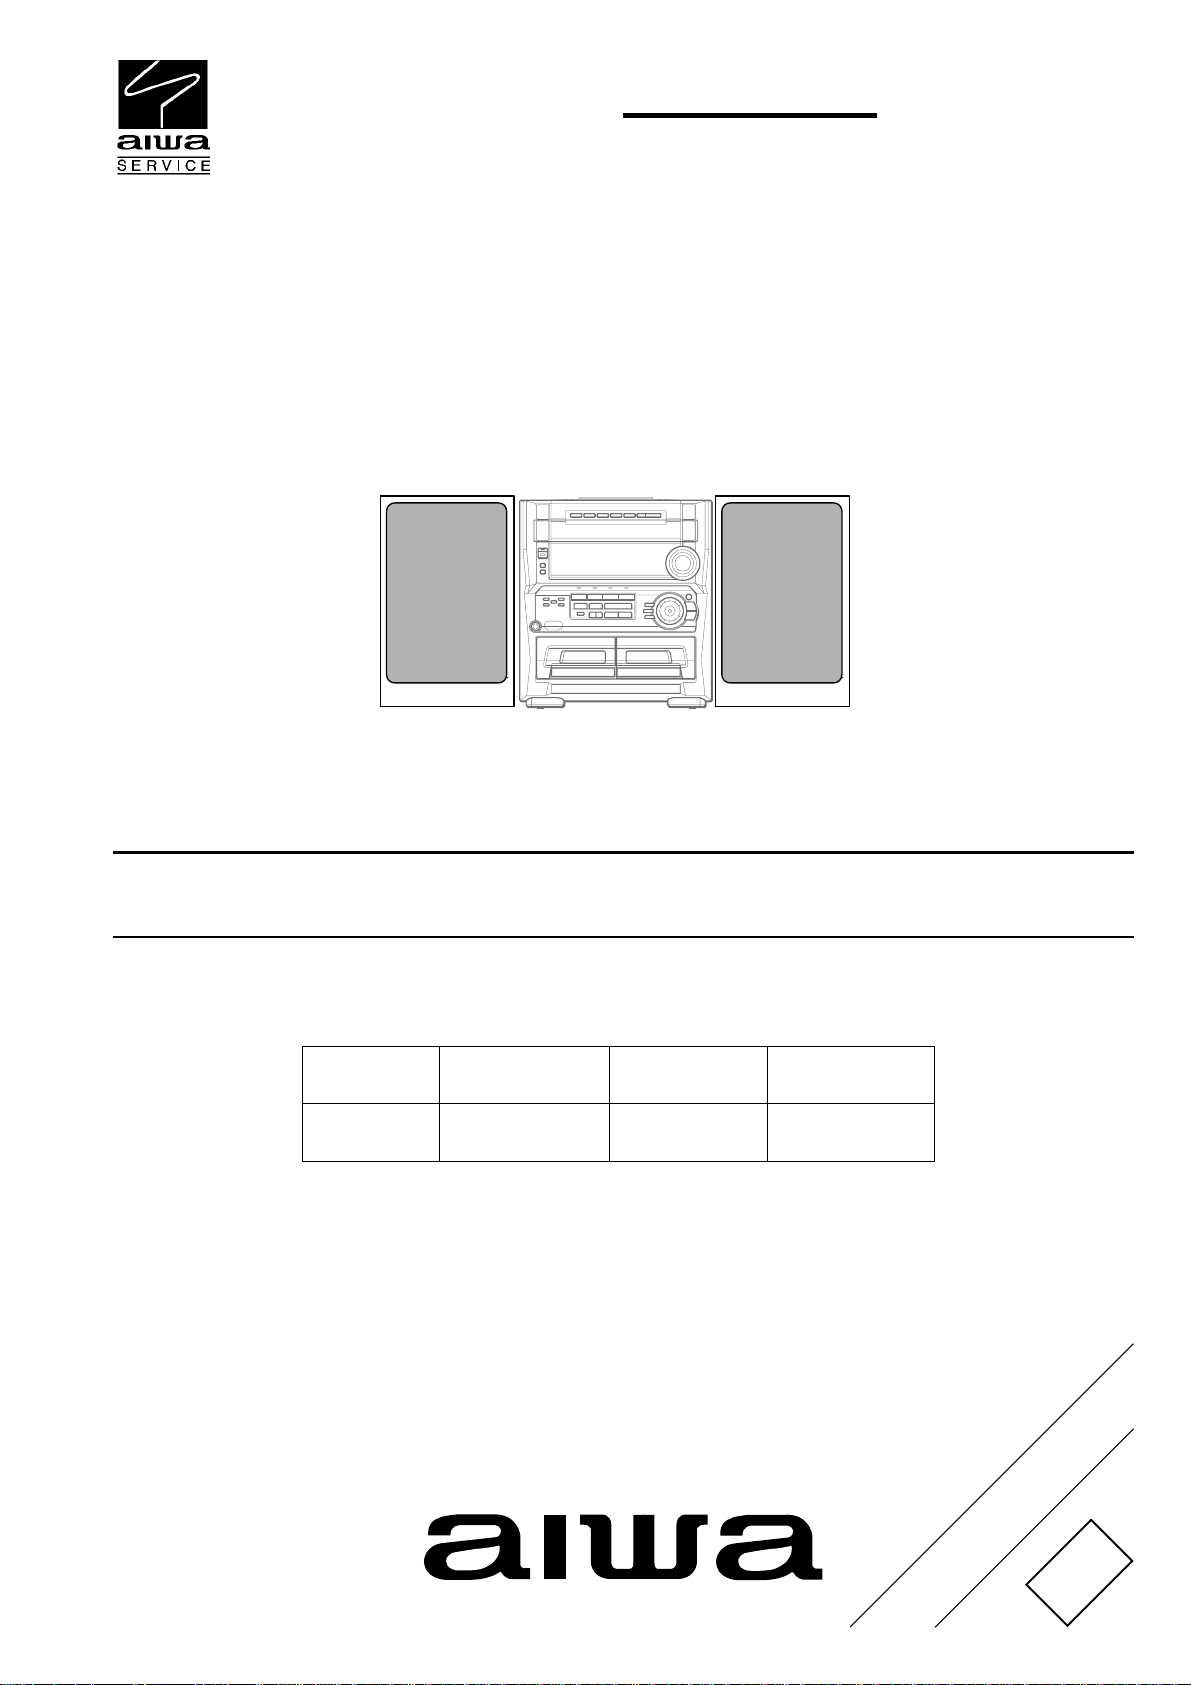
Z-HK550
HR
SERVICE MANUAL
COMPACT DISC STEREO
CASSETTE RECEIVER
CD
CASSEIVER
Z–HK550
• This Service Manual is the "Revision Publishing" and replaces "Simple Manual"
Z-HK550 (HR), (S/M Code No. 09-005-428-5T1).
• If requiring information about the CD mechanism, see Service Manual of
6ZG-1, (S/M Code No. 09-001-338-7N4).
BASIC TAPE MECHANISM : ZZM-3 PR1NM
BASIC CD MECHANISM : 6ZG-1 VZRDM
SPEAKERSYSTEM
SX–WZHK550CX–ZHK550
REMOTE
CONTROLLER
RC–ZAS07
S/M Code No. 09-005-428-5R1
REVISION
DATA
Page 2

SPECIFICATIONS
<FM tuner section>
Tuning range 87.5 MHz to 108 MHz
Usable sensitivity (IHF) 13.2 dBf
Antenna terminals 75 ohms (unbalanced)
<AM tuner section>
Tuning range 531 kHz to 1602 kHz (9 kHz step)
Usable sensitivity 350 µV/m
Antenna Loop antenna
<Amplifier section>
Mid-high frequency amplifier
Power output Rated: 20 W + 20 W (8 ohms,
Total harmonic distortion
Low frequency amplifier
Power output Rated: 60 W + 60 W (6 ohms,
Total harmonic distortion
Inputs VIDEO/AUX/PHONO IN: 300 mV
Outputs VIDEO OUT: 1.0 V
530 kHz to 1710 kHz (10 kHz step)
T.H.D. 1 %, 1 kHz)
Reference: 25 W + 25 W (8 ohms,
T.H.D. 10 %, 1 kHz)
0.15 % (15 W, 1 kHz, 8 ohms)
T.H.D. 1 %, 75 Hz)
Reference : 75 W + 75 W (6 ohms,
T.H.D. 10 %, 75 Hz)
0.15 % (45 W, 75 Hz, 6 ohms)
MIC1, MIC2: 1.4 mV (20 kohms)
CD DIGITAL OUT (OPTICAL)
SPEAKERS HIGH FREQ:
accept speakers of 8 ohms or more
SPEAKERS LOW FREQ:
accept speakers of 6 ohms or more
PHONES (stereo jack):
accepts headphones of 32 ohms or
more
(75 ohms)
P-P
<Compact disc player section>
Laser Semiconductor laser (λ =780 nm)
D-A converter 1 bit dual
Signal-to-noise ratio 85 dB (1 kHz, 0 dB)
Harmonic distortion 0.05 % (1 kHz, 0 dB)
Wow and flutter Unmeasurable
Video Signal NTSC / PAL color format
(selectable)
Video Data MPEG1
Audio Data MPEG1, LAYER 2
<Speaker system SX–WZHK550>
Cabinet type 3 way, built-in subwoofer
Speakers Subwoofer:
220 mm (83/4 in.) cone type
Full range:
120 mm (43/4 in.) cone type
Super tweeter:
20 mm (13/16 in.) ceramic type
Impedance 6 ohms/8 ohms
Output sound pressure level 89 dB/W/m
Dimensions (W x H x D) 260 x 444 x 296 mm
(101/4 x 171/2 x 113/4 in.)
Weight 7.3 kg (16 lbs. 2 oz.)
<General>
Power requirements 120 V/220 - 230 V/240 V AC
switchable 50/60 Hz
Power consumption 155 W
Dimensions of main unit 360 x 395.3 x 402.3 mm
(W x H x D) (141/4 x 155/8 x 157/8 in.)
Weight of main unit 12.5 kg (27 lbs. 9 oz)
<Cassette deck section>
Track format 4 tracks, 2 channels stereo
Frequency response 50 Hz – 12500 Hz
Recording system AC bias
Heads Deck 1 : Playback head x 1
Deck 2 : Recording/Playback head
x 1, erase head x 1
• Design and specifications are subject to change without notice.
• The word "BBE"and the "BBE symbol" are trademarks of BBE
Sound, Inc.
Under license from BBE Sound,Inc.
– 2 –
Page 3
PROTECTION OF EYES FROM LASER BEAM DURING SERVICING
This set employs laser. Therefore, be sure to follow carefully
the instructions below when servicing.
WARNING!!
WHEN SERVICING, DO NOT APPROACH THE LASER
EXIT WITH THE EYE TOO CLOSELY. IN CASE IT IS
NECESSARY TO CONFIRM LASER BEAM EMISSION.
BE SURE TO OBSERVE FROM A DISTANCE OF MORE
THAN 30cm FROM THE SURFACE OF THE OBJECTIVE LENS ON THE OPTICAL PICK-UP BLOCK.
s Caution: Invisible laser radiation when
open and interlocks defeated avoid
exposure to beam.
s Advarsel: Usynlig laserståling ved åbning,
når sikkerhedsafbrydere er ude af funktion.
Undgå udsættelse for stråling.
VAROITUS!
Laiteen Käyttäminen muulla kuin tässä käyttöohjeessa
mainitulla tavalla saataa altistaa käyt-täjän
turvallisuusluokan 1 ylittävälle näkymättömälle
lasersäteilylle.
VARNING!
Om apparaten används på annat sätt än vad som
specificeras i denna bruksanvising, kan användaren
utsättas för osynling laserstrålning, som överskrider
gränsen för laserklass 1.
CAUTION
Use of controls or adjustments or performance of procedures other than those specified herin may result in
hazardous radiation exposure.
ATTENTION
L’utillisation de commandes, réglages ou procédures
autres que ceux spécifiés peut entraîner une dangereuse
exposition aux radiations.
ADVARSEL
Usynlig laserståling ved åbning, når sikkerhedsafbrydereer
ude af funktion. Undgå udsættelse for stråling.
This Compact Disc player is classified as a CLASS 1
LASER product.
The CLASS 1 LASER PRODUCT label is located on the
rear exterior.
CLASS 1 LASER PRODUCT
KLASSE 1 LASER PRODUKT
LUOKAN 1 LASER LAITE
KLASS 1 LASER APPARAT
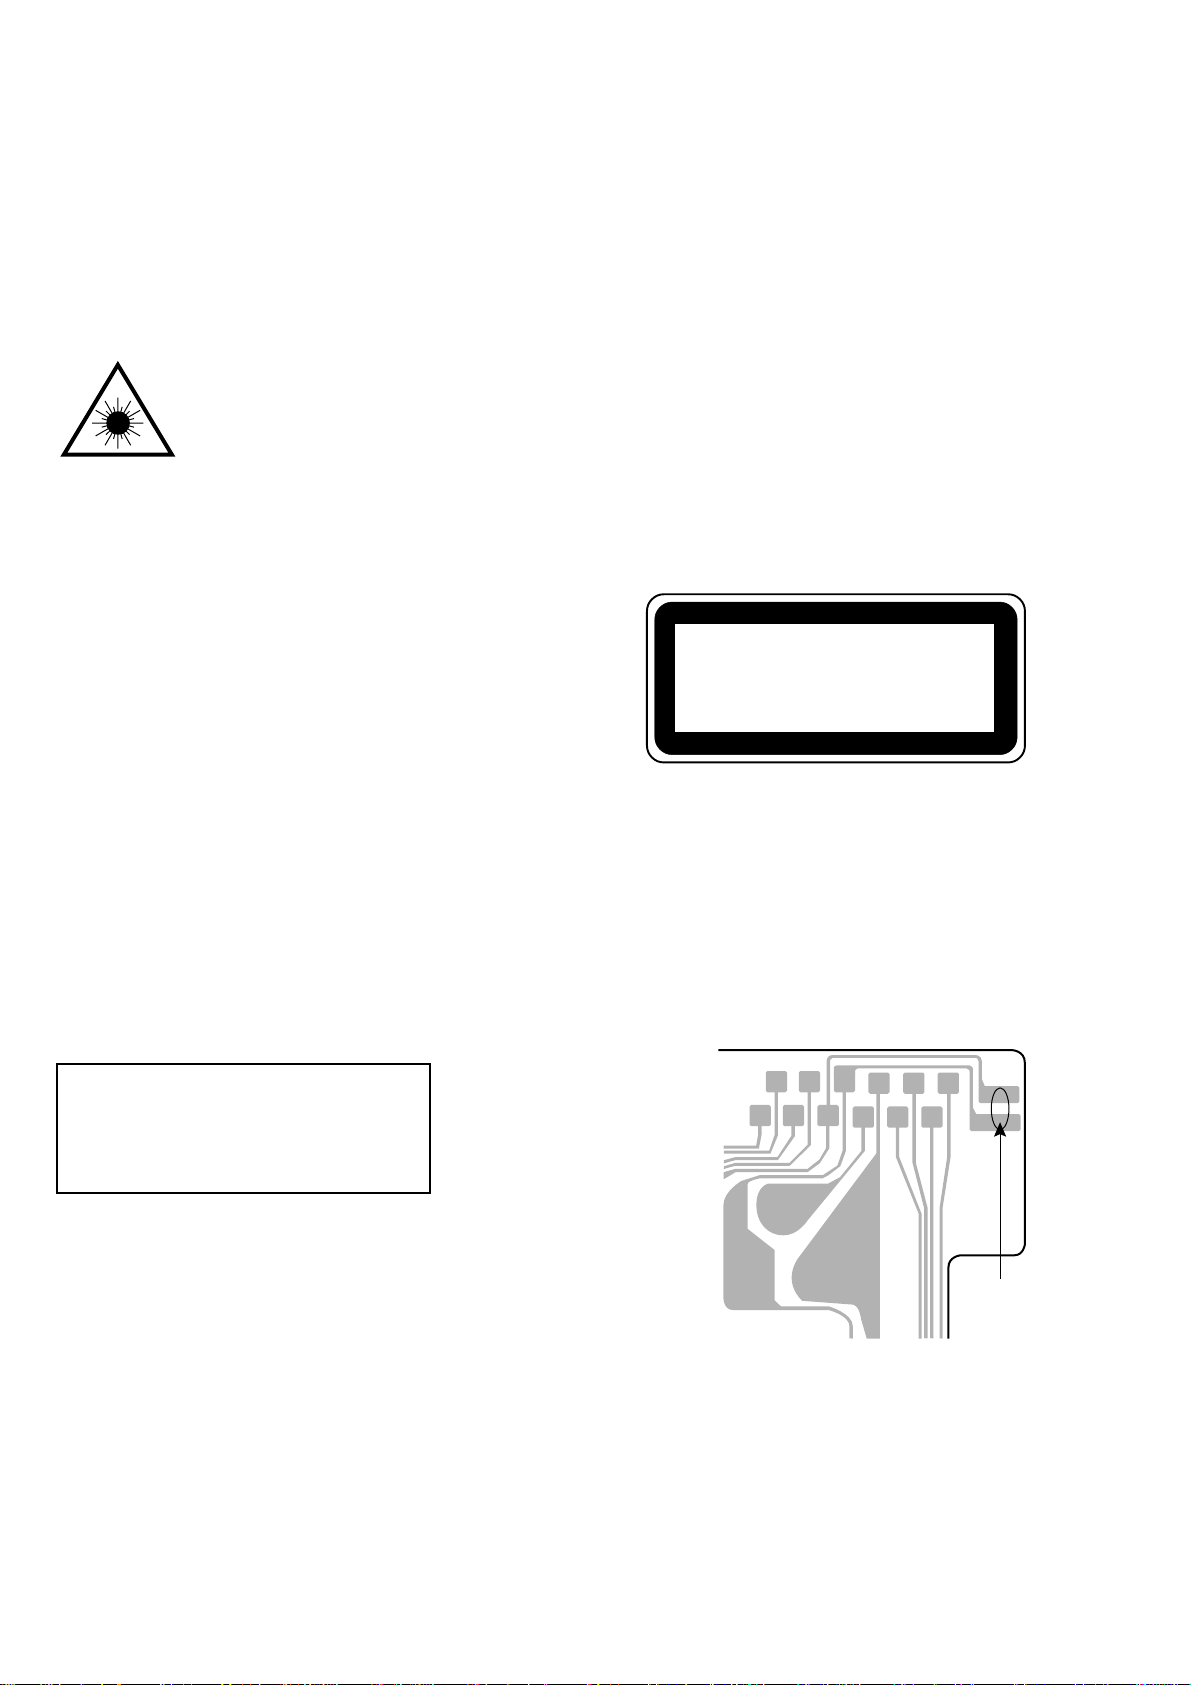
Precaution to replace Optical block
(KSS-213F)
Body or clothes electrostatic potential could
ruin laser diode in the optical block. Be sure
ground body and workbench, and use care the
clothes do not touch the diode.
1) After the connection, remove solder shown in
right figure.
PICK-UP Assy P.C.B
Solder
– 3 –
Page 4
NOTE ON BEFORE STARTING REPAIR
1. Forced discharge of electrolytic capacitor of power supply block
When repair is going to be attempted in the set that uses relay circuit in the power supply block, electric potential is kept charged across
the electrolytic capacitors (C101, 102) even though AC power cord is removed. If repair is attempted in this condition, secondary defect
can occur.
In order to prevent the secondary trouble, perform the following measures before starting repair work.
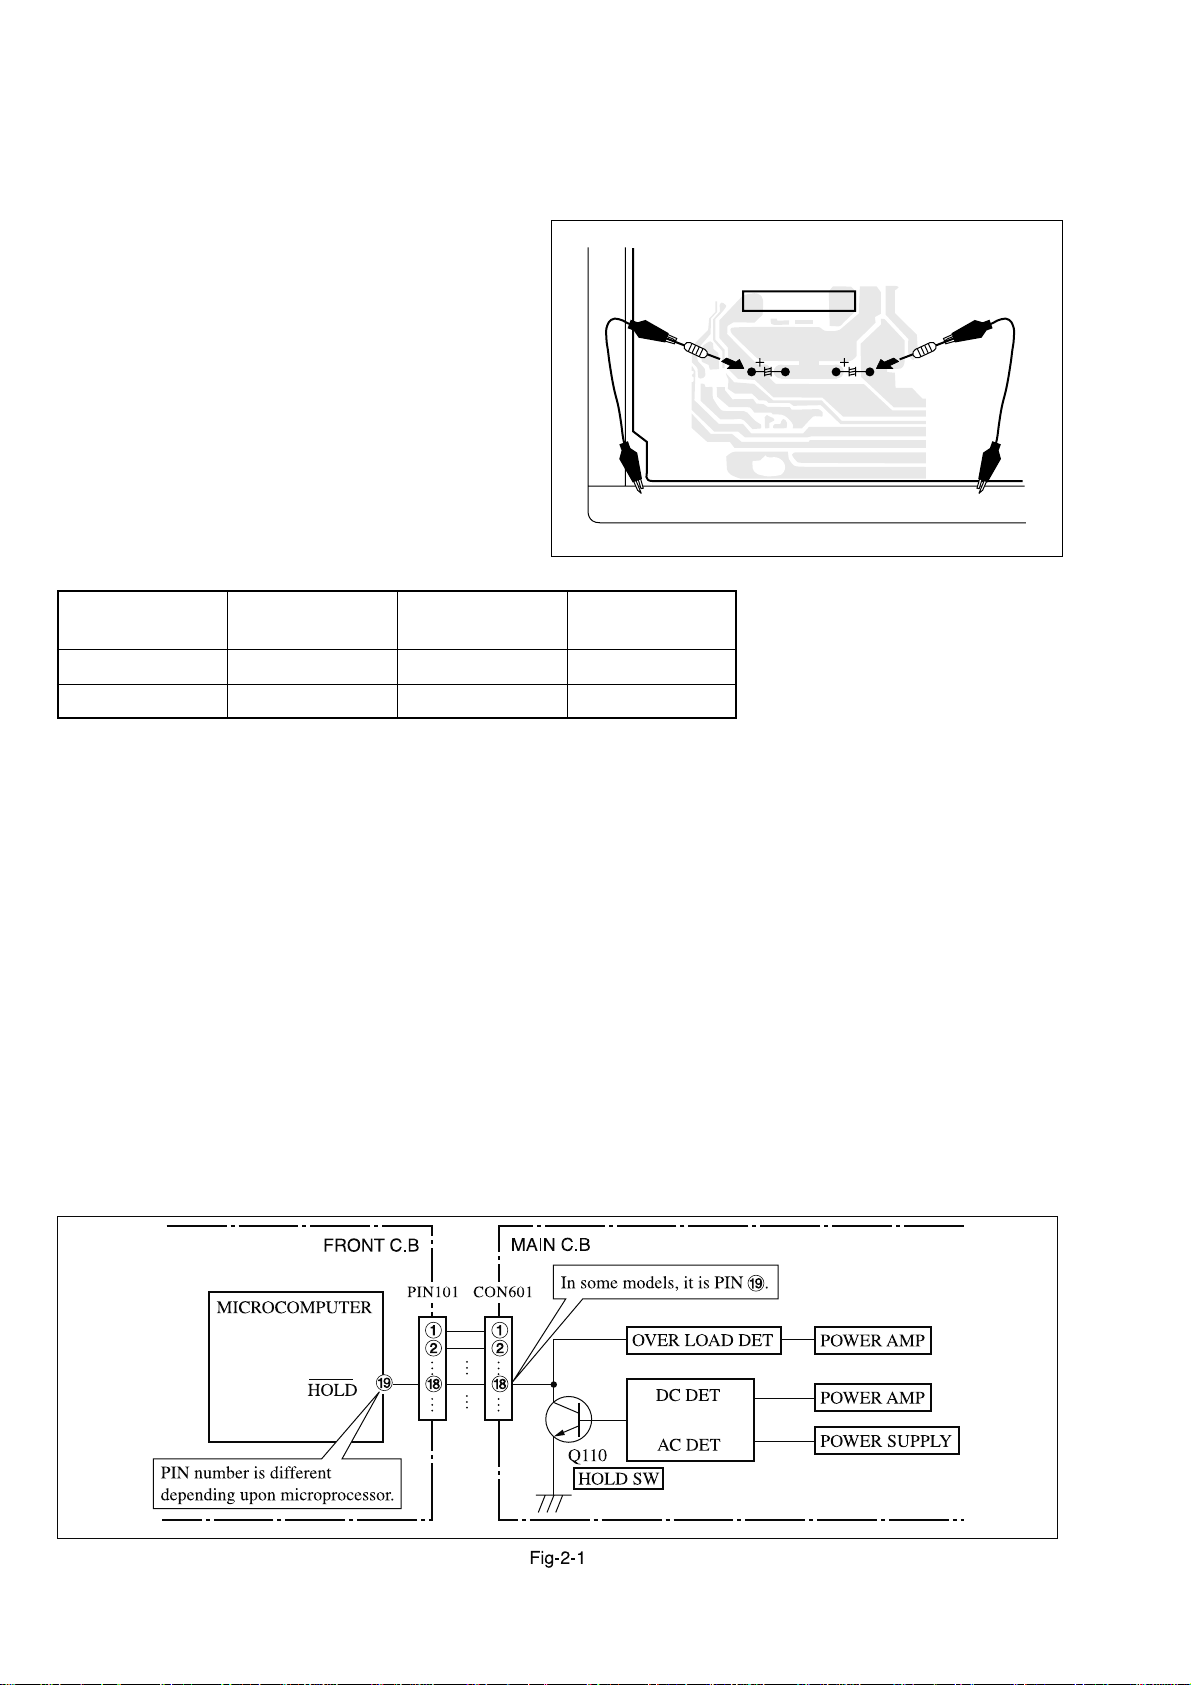
Discharge procedure
11
1 Remove the AC power cord.
11
22
2 Connect a discharging resistor at an end of lead wire that
22
has clips at both ends. Connect the other end of the lead
wire to metal chassis.
33
3 Contact the other end of the discharging resistor to the
33
positive (+) side (+VH) of C101. (For two seconds)
44
4 Contact the same end of the discharging resistor as step
44
33
3 to the negative (-) side (-VH) of C102 in the same way.
33
(For two seconds)
55
5 Check that voltage across C101 and C102 has decreased
55
to 1 V or less using a multimeter or an oscilloscope.
Select a discharging resistor referring to the following table.
Charging voltage (V) Discharging
(C101, 102) resistor (Ω)
25-48 100 3 87-A00-247-090
49-140 220 5 87-A00-232-090
Note: The reference numbers (C101, C102) of the electrolytic capacitors can change depending on the models. Be sure to check the
reference numbers of the charging capacitors on schematic diagram before starting the discharging work.
Rated power (W) Parts number
MAIN C.B
D101
3
C101 C102
22
Fig-1
4
2. Check items before exchanging the MICROCOMPUTER
Be sure to check the following items before exchanging the MICROCOMPUTER. Exchange the MICROCOMPUTER after confirming
that the MICROCOMPUTER is surely defective.
2-1. Regarding the HOLD terminal of the MICROCOMPUTER
When the HOLD terminal (INPUT) of the MICROCOMPUTER is “H”, the MICROCOMPUTER is judged to be operating correctly.
When this terminal is “L”, the main power cannot be turned on. Therefore, be sure to check the terminal voltage of the HOLD
terminal before exchange.
When the MICROCOMPUTER is not defective, the HOLD terminal can also go “L” when the POWER AMPLIFIER has any
abnormalities that triggers the abnormality detection circuit on the MAIN C. B. that sets the HOLD terminal to “L”.
• Good or no good judgement of the MICROCOMPUTER
11
1 Turn on the AC main power.
11
22
2 Confirm that the main power is turned on and the HOLD terminal of the MICROCOMPUTER keeps the “H” level or not.
22
33
3 When the HOLD terminal is “L” level, the abnormality detection circuit is judged to be working correctly and the
33
MICROCOMPUTER is judged to be good.
– 4 –
Page 5
In such a case, check also if the POWER AMPLIFIER circuit or power supply circuit has any abnormalities or not.
2-2. Regarding reset
There are cases that the machine does not work correctly because the MICROCOMPUTER is not reset even though the AC power
cord is re-inserted, or the software reset (pressing the STOP key + POWER key) is performed.
When the above described phenomenon occurs, it can lead to wrong judgement as if the MICROCOMPUTER is defective and to
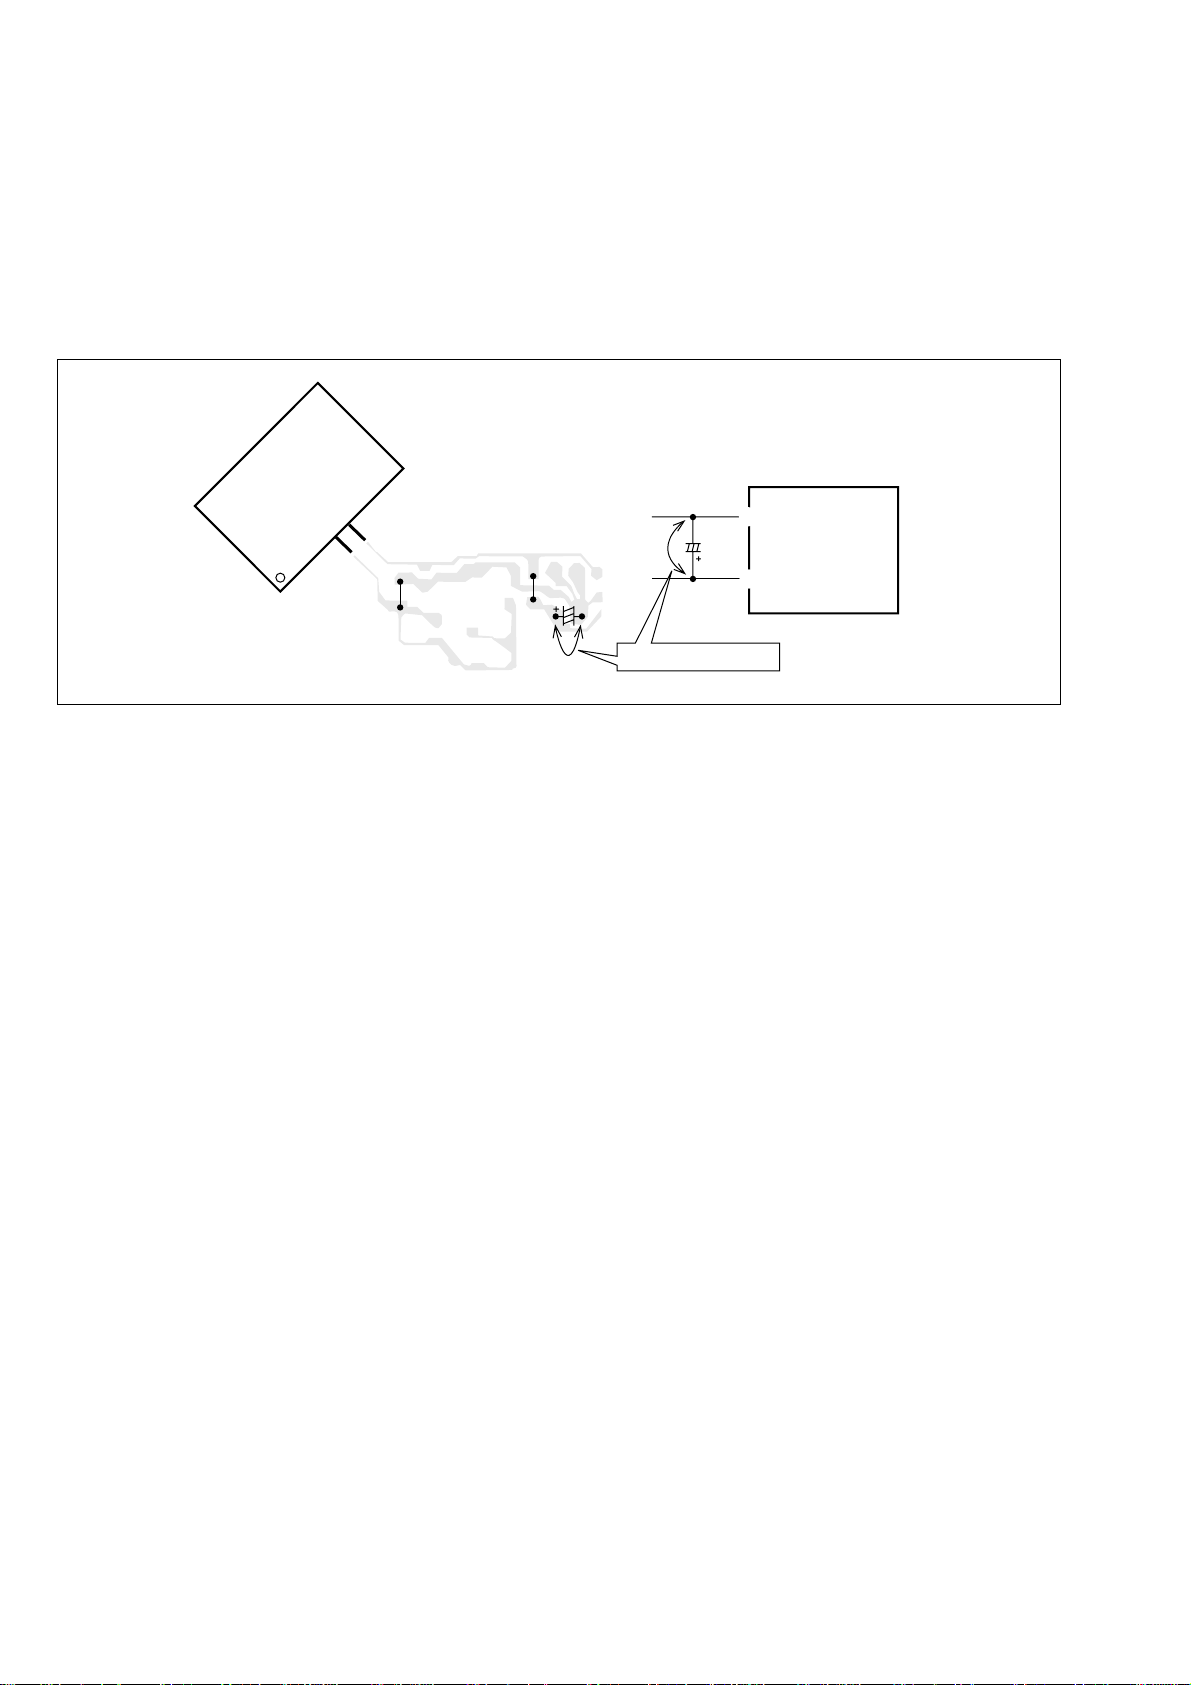
exchange the MICROCOMPUTER. In such a case, perform the forced-reset by the following procedure and check good or no
good of the MICROCOMPUTER.
11
1 Remove the AC power cord.
11
FRONT C.B
18
MICROCOMPUTER
FRONT C.B
22
2 Short both ends of the electrolytic capacitor C113 that is connected to VDD of the MICROCOMPUTER with tweezers.
22
33
3 Connect the AC power cord again. If the MICROCOMPUTER returns to the normal operation, the MICROCOMPUTER is
33
good.
Note: The reference number or MICROCOMPUTER pin number of transistor (Q110) and electrolytic capacitor (C113) can change depending
on the models. Be sure to check the reference numbers on schematic diagram before starting the discharging work.
15
C113
Short with tweezers.
Fig-2-2
C113
%
*
VSS
VDD
MICROCOMPUTER
2-3. Confirmation of soldering state of MICROCOMPUTER
Check the soldering state of the MICROCOMPUTER in addition to the above described procedures. Be sure to exchange the
MICROCOMPUTER after surely confirming that the trouble is not caused by poor soldering but the MICROCOMPUTER itself.
– 5 –
Page 6

ELECTRICAL MAIN PARTS LIST
REF. NO.
IC
8A-MG5-656-010 C-IC,LC876580W-5R45
87-A21-417-010 IC,STK490-340
87-A21-396-010 IC,STK490-040
87-A21-021-040 C-IC,BU2099FV
87-A20-783-040 C-IC,BA7762AFS
87-A21-577-040 C-IC,M61506FP
87-A21-482-010 IC,RPM6938-H4
87-A21-018-040 C-IC,M65849BFP631D
87-A21-452-030 C-IC,BD3876KS2
87-A21-560-010 IC,LA1844L-A
87-070-127-110 IC,LC72131 D
87-A20-561-040 C-IC,M65847AFP
87-A21-269-010 IC,EW732
TRANSISTOR
87-026-609-080 TR,KTA1266GR
87-026-610-080 TR,KTC3198GR
87-A30-076-080 C-TR,2SC3052F
87-A30-075-080 C-TR,2SA1235F
87-A30-318-080 TR,CSA952K
89-213-702-010 TR,2SB1370E
87-A30-257-080 C-TR,2SD1306E
87-A30-107-070 C-TR,CMBT5401
87-026-245-080 TR,DTC114ES
87-A30-198-080 TR,KTC3199GR
87-A30-484-080 C-TR,KRA 102S
87-A30-269-040 C-FET,2SJ461-T1
87-A30-087-080 C-FET,2SK2158
87-A30-468-080 C-TR,KRC 102S-RTK
87-A30-107-080 C-TR,CMBT5401
87-A30-329-080 TR,CD1585BC
87-A30-063-080 C-TR,KRA 104S
87-A30-074-080 C-TR,RT1P 141C
89-327-143-080 TR,2SC2714O(0.1W)
87-A30-489-080 C-TR,KRA107S
87-A30-234-080 TR,CSC4115BC
DIODE
87-020-465-080 DIODE,1SS133 (110MA)
87-A40-673-090 DIODE,D10XB20
87-A40-553-080 DIODE,1N4003 LES
87-A40-780-080 ZENER,UZ33BSD
87-A40-764-080 ZENER,UZ10BSC
87-A40-313-080 C-DIODE,MC 2840
87-A40-270-080 C-DIODE,MC2838
87-A40-269-080 C-DIODE,MC2836
87-A40-768-080 ZENER,UZ 16BSA
87-017-447-010 DIODE,GBU4DL
87-017-154-080 ZENER,HZS6C3L
87-020-331-080 CHIP-DIODE,DAN202K
87-017-654-060 DIODE,GBU6J
87-A40-751-080 ZENER,UZ6.2BSB
87-A40-747-080 ZENER,UZ5.1BSB
87-A40-438-080 ZENER,MTZJ4.7A
87-017-149-080 ZENER,HZS6A2L
MAIN C.B
C3 87-A10-712-080 C-CAP,S 0.22-50 F
C4 87-A10-712-080 C-CAP,S 0.22-50 F
C21 87-016-035-090 CAP, E 6800-35 VR
C22 87-016-035-090 CAP, E 6800-35 VR
C25 87-016-300-080 CAP, ELECT 22-100
C26 87-016-300-080 CAP, ELECT 22-100
C27 87-016-300-080 CAP, ELECT 22-100
C28 87-016-300-080 CAP, ELECT 22-100
PART NO. DESCRIPTIONREF. NO. KANRI
KANRI
NO.
DESCRIPTION
PART NO.
NO.
C31 87-010-263-080 CAP, ELECT 100-10V
C32 87-010-197-080 CAP, CHIP 0.01-25
C34 87-010-247-080 CAP, ELECT 100-50V
C35 87-010-406-080 CAP, ELECT 22-50V
C36 87-010-381-080 CAP, ELECT 330-16V
C38 87-010-394-080 CAP, ELECT 220-35V
C39 87-010-394-080 CAP, ELECT 220-35V
C40 87-010-197-080 CAP, CHIP 0.01-25
C60 87-010-403-080 CAP, ELECT 3.3-50V
C61 87-010-260-080 CAP, ELECT 47-25V
C104 87-010-196-080 CHIP CAPACITOR,0.1-25
C105 87-010-196-080 CHIP CAPACITOR,0.1-25
C111 87-010-401-080 CAP, ELECT 1-50 M
C112 87-010-401-080 CAP, ELECT 1-50 M
C113 87-010-545-080 CAP, ELECT 0.22-50V
C114 87-010-545-080 CAP, ELECT 0.22-50V
C115 87-010-546-080 CAP, ELECT 0.33-50V
C116 87-010-546-080 CAP, ELECT 0.33-50V
C117 87-010-196-080 CHIP CAPACITOR,0.1-25
C121 87-010-404-080 CAP, ELECT 4.7-50V
C122 87-010-404-080 CAP, ELECT 4.7-50V
C160 87-010-196-080 CHIP CAPACITOR,0.1-25
C171 87-012-368-080 C-CAP,S 0.1-50 F
C172 87-012-368-080 C-CAP,S 0.1-50 F
C173 87-012-368-080 C-CAP,S 0.1-50 F
C174 87-012-368-080 C-CAP,S 0.1-50 F
C301 87-010-318-080 C-CAP,S 47P-50 CH
C302 87-010-318-080 C-CAP,S 47P-50 CH
C303 87-012-157-080 C-CAP,S 330P-50 CH
C304 87-012-157-080 C-CAP,S 330P-50 CH
C305 87-012-157-080 C-CAP,S 330P-50 CH
C306 87-012-157-080 C-CAP,S 330P-50 CH
C307 87-010-196-080 CHIP CAPACITOR,0.1-25
C309 87-010-196-080 CHIP CAPACITOR,0.1-25
C310 87-010-196-080 CHIP CAPACITOR,0.1-25
C311 87-010-198-080 CAP, CHIP 0.022-25
C312 87-010-198-080 CAP, CHIP 0.022-25
C313 87-010-179-080 CHIP CAP 1200P-50
C314 87-010-179-080 CHIP CAP 1200P-50
C315 87-010-178-080 CHIP CAP 1000P-50
C316 87-010-178-080 CHIP CAP 1000P-50
C321 87-012-142-080 CAP, S 0.33-16
C322 87-012-142-080 CAP, S 0.33-16
C324 87-010-260-080 CAP, ELECT 47-25V
C325 87-010-370-080 CAP,E 330-6.3 SME
C327 87-010-404-080 CAP, ELECT 4.7-50V
C328 87-010-404-080 CAP, ELECT 4.7-50V
C332 87-010-196-080 CHIP CAPACITOR,0.1-25
C335 87-010-401-080 CAP, ELECT 1-50V
C336 87-010-401-080 CAP, ELECT 1-50V
C337 87-010-196-080 CHIP CAPACITOR,0.1-25
C339 87-010-196-080 CHIP CAPACITOR,0.1-25
C340 87-010-196-080 CHIP CAPACITOR,0.1-25
C351 87-012-140-080 CAP 470P-50
C352 87-012-140-080 CAP 470P-50
C354 87-010-175-080 CAP 560P-50
C355 87-010-178-080 C-CAP,S 1000P-50 KB
C356 87-010-260-080 CAP, ELECT 47-25V
C357 87-010-197-080 CAP, CHIP 0.01-25 KB
C358 87-010-183-080 C-CAP,S 2700P-50 B
C359 87-010-183-080 C-CAP,S 2700P-50 B
C360 87-010-183-080 C-CAP,S 2700P-50 B
C370 87-010-196-080 CHIP CAPACITOR,0.1-25
C373 87-A11-177-080 C-CAP,S 0.15-16 K B
C374 87-A11-177-080 C-CAP,S 0.15-16 K B
C378 87-010-196-080 CHIP CAPACITOR,0.1-25 ZF
C379 87-010-406-080 CAP, ELECT 22-50
C380 87-010-406-080 CAP, ELECT 22-50
C386 87-010-196-080 CHIP CAPACITOR,0.1-25 ZF
C388 87-012-156-080 C-CAP,S 220P-50 J CH
– 6 –
Page 7

PART NO.
NO.
C391 87-010-319-080 C-CAP,S 56P-50 J CH
C392 87-010-319-080 C-CAP,S 56P-50 J CH
C393 87-010-319-080 C-CAP,S 56P-50 J CH
C394 87-010-319-080 C-CAP,S 56P-50 J CH
C501 87-010-263-080 CAP, ELECT 100-10V
C502 87-010-196-080 CHIP CAPACITOR,0.1-25
C503 87-016-460-080 C-CAP,S 0.22-16 K B
C504 87-016-460-080 C-CAP,S 0.22-16 K B
C505 87-016-460-080 C-CAP,S 0.22-16 K B
C506 87-010-184-080 CHIP CAPACITOR 3300P-50
C507 87-010-177-080 C-CAP,S 820P-50 SL
C508 87-016-669-080 C-CAP,S 0.1-25 K B
C509 87-016-669-080 C-CAP,S 0.1-25 K B
C510 87-010-184-080 CHIP CAPACITOR 3300P-50
C511 87-010-177-080 C-CAP,S 820P-50 SL
C512 87-016-460-080 C-CAP,S 0.22-16 K B
C513 87-010-544-080 CAP, ELECT 0.1-50V
C514 87-010-374-080 CAP, ELECT 47-10V
C515 87-010-401-080 CAP, ELECT 1-50 M
C516 87-010-401-080 CAP, ELECT 1-50 M
C517 87-010-183-080 C-CAP,S 2700P-50 B
C518 87-010-183-080 C-CAP,S 2700P-50 B
C531 87-010-405-080 CAP, ELECT 10-50 M
C532 87-010-196-080 CHIP CAPACITOR,0.1-25
C533 87-010-196-080 CHIP CAPACITOR,0.1-25
C534 87-012-156-080 C-CAP,S 220P-50 CH
C535 87-010-178-080 CHIP CAP 1000P-50
C536 87-010-196-080 CHIP CAPACITOR,0.1-25
C537 87-010-318-080 C-CAP,S 47P-50 CH
C538 87-010-318-080 C-CAP,S 47P-50 CH
C539 87-010-318-080 C-CAP,S 47P-50 CH
C541 87-010-178-080 CHIP CAP 1000P-50
C611 87-010-956-080 CHIP-CAP,S 0.068-25B
C612 87-010-369-080 C-CAP,S 0.033-25 K B
C613 87-010-190-080 S CHIP F 0.01-50
C614 87-016-669-080 C-CAP,S 0.1-25 K B
C616 87-010-185-080 C-CAP,S 3900P-50 K B
C617 87-010-194-080 CAP, CHIP 0.047-25ZF
C618 87-010-401-080 CAP, ELECT 1-50V
C619 87-010-263-080 CAP, ELECT 100-10V
C620 87-016-669-080 C-CAP,S 0.1-25 K B
C621 87-010-197-080 CAP, CHIP 0.01-25 KB
C623 87-010-401-080 CAP, ELECT 1-50V
C624 87-010-401-080 CAP, ELECT 1-50V
C626 87-A11-590-080 CAP, CHIP 0.047-16 KB
C627 87-010-400-080 CAP, ELECT 0.47-50V
C628 87-010-400-080 CAP, ELECT 0.47-50V
C629 87-A11-590-080 CAP, CHIP 0.047-16 KB
C630 87-010-383-080 CAP, ELECT 33-25V
C631 87-010-185-080 C-CAP,S 3900P-50 K B
C632 87-010-185-080 C-CAP,S 3900P-50 K B
C634 87-010-196-080 CHIP CAPACITOR,0.1-25
C635 87-A10-307-080 CAP-M,S 0.1-50
C636 87-A10-307-080 CAP-M,S 0.1-50
C637 87-A10-307-080 CAP-M,S 0.1-50
C638 87-A10-307-080 CAP-M,S 0.1-50
C639 87-010-405-080 CAP, ELECT 10-50V
C643 87-010-196-080 CHIP CAPACITOR,0.1-25
C644 87-010-401-080 CAP, ELECT 1-50V
C671 87-010-322-080 C-CAP,S 100P-50 CH
C672 87-010-322-080 C-CAP,S 100P-50 CH
C673 87-010-190-080 C-CAP,S 0.01-50 ZF
C679 87-010-196-080 CHIP CAPACITOR,0.1-25 ZF
C680 87-010-190-080 C-CAP,S 0.01-50 ZF
C685 87-010-197-080 CAP, CHIP 0.01-25 KB
C771 87-010-263-080 CAP, ELECT 100-10V
C772 87-010-197-080 CAP, CHIP 0.01-25KB
C782 87-010-197-080 CAP, CHIP 0.01-25KB
C783 87-010-197-080 CAP, CHIP 0.01-25KB
C784 87-010-197-080 CAP, CHIP 0.01-25KB
DESCRIPTIONREF. NO. KANRI
PART NO.
NO.
C785 87-010-197-080 CAP, CHIP 0.01-25KB
C786 87-010-197-080 CAP, CHIP 0.01-25KB
C788 87-010-149-080 C-CAP,S 5P-50 CH
C789 87-A12-052-080 C-CAP,S 0.033-25 J B
C790 87-A12-052-080 C-CAP,S 0.033-25 J B
C791 87-010-196-080 CHIP CAPACITOR,0.1-25
C792 87-010-197-080 CAP, CHIP 0.01-25KB
C793 87-010-404-080 CAP, ELECT 4.7-50V
C795 87-010-197-080 CAP, CHIP 0.01-25KB
C796 87-010-197-080 CAP, CHIP 0.01-25KB
C797 87-010-405-080 CAP, ELECT 10-50V
C798 87-010-197-080 CAP, CHIP 0.01-25KB
C799 87-010-407-080 CAP, ELECT 33-50V
C800 87-010-194-080 CAP, CHIP 0.047-25ZF
C801 87-010-403-080 CAP, ELECT 3.3-50V
C802 87-010-194-080 CAP, CHIP 0.047-25 ZF
C803 87-010-198-080 CAP, CHIP 0.022-25KB
C804 87-010-263-080 CAP, ELECT 100-10V
C807 87-010-400-080 CAP, ELECT 0.47-50V
C808 87-010-401-080 CAP, ELECT 1-50V
C809 87-010-401-080 CAP, ELECT 1-50V
C810 87-010-196-080 CHIP CAPACITOR,0.1-25
C811 87-010-403-080 CAP, ELECT 3.3-50V
C812 87-010-403-080 CAP, ELECT 3.3-50V
C814 87-010-197-080 CAP, CHIP 0.01-25
C815 87-010-403-080 CAP, ELECT 3.3-50V
C816 87-010-403-080 CAP, ELECT 3.3-50V
C819 87-010-179-080 CAP,CHIP S 1200P-50
C820 87-010-179-080 CAP,CHIP S 1200P-50
C821 87-010-405-080 CAP, ELECT 10-50V
C823 87-010-177-080 CAP, CHIP 820P-50 J SL
C824 87-010-404-080 CAP, ELECT 4.7-50
C825 87-010-596-080 CAP, S 0.047-16
C842 87-010-197-080 CAP, CHIP 0.01-25 KB
C844 87-010-197-080 CAP, CHIP 0.01-25 KB
C850 87-010-260-080 CAP, ELECT 47-25V
C851 87-010-197-080 CAP, CHIP 0.01-25 KB
C852 87-010-197-080 CAP, CHIP 0.01-25 KB
C853 87-010-197-080 CAP, CHIP 0.01-25 KB
C858 87-010-196-080 CHIP CAPACITOR,0.1-25
C859 87-010-196-080 CHIP CAPACITOR,0.1-25
C860 87-010-197-080 CAP, CHIP 0.01-25
C959 87-010-196-080 CHIP CAPACITOR,0.1-25
C960 87-010-196-080 CHIP CAPACITOR,0.1-25
C961 87-010-152-080 C-CAP,S 8P-50 CH
C963 87-015-785-080 CHIP CAPACITOR, 0.1-25ZF
C971 87-010-381-080 CAP, ELECT 330-16V
C972 87-010-404-080 CAP, ELECT 4.7-50V
C973 87-010-197-080 CAP, CHIP 0.01-25KB
C974 87-010-197-080 CAP, CHIP 0.01-25KB
C979 87-010-322-080 C-CAP,S 100P-50 CH
C981 87-010-260-080 CAP, ELECT 47-25V
C982 87-010-196-080 CHIP CAPACITOR,0.1-25
C983 87-010-197-080 CAP, CHIP 0.01-25KB
C984 87-010-197-080 CAP, CHIP 0.01-25KB
C987 87-010-197-080 CAP, CHIP 0.01-25KB
C991 87-010-312-080 C-CAP,S 15P-50 CH
C992 87-010-312-080 C-CAP,S 15P-50 CH
C993 87-010-178-080 CHIP CAP 1000P-50
C995 87-010-178-080 CHIP CAP 1000P-50
C997 87-010-196-080 CHIP CAPACITOR,0.1-25
C998 87-010-260-080 CAP, ELECT 47-25V
C999 87-A11-155-080 CAP,TC U 0.01-16 Z F
CF831 87-008-261-010 FILTER, CFSFE10.7MA5
CF832 87-008-261-010 FILTER, CFSFE10.7MA5
CN1 87-A60-996-010 CONN,13P V BLK TAC-L13X-A3
CN101 87-A60-996-010 CONN,13P V BLK TAC-L13X-A3
CN301 87-A60-620-010 CONN,3P V 2MM JMT
CN351 87-A60-625-010 CONN,8P V 2MM JMT
CN601 87-099-719-010 CONN,30P TYK-B(X)
DESCRIPTIONREF. NO. KANRI
– 7 –
Page 8

PART NO.
NO.
CN602 87-A60-131-010 CONN,6P V FE
CNA1 8A-NF8-653-010 CONN ASSY,9P TID-A(480)
CNA2 8A-NF6-640-010 CONN ASSY,3P (VM) ANF-6
CN606 87-099-566-010 CONN,7P TUC-P7P-B1
FB501 87-008-372-080 FILTER, EMI BL OIRNI
FC602 88-906-321-110 FF-CABLE,6P 1.25 320MM
FFE831 A8-8ZA-190-030 8ZA-1 FEUNM
J101 87-A60-483-010 JACK,DIA6.3 BLK ST W/S KM
J102 87-A60-238-010 TERMINAL,SP 4P
J602 87-A60-881-010 JACK,PIN 2P MSP 242VO5 PBSN
J831 87-A60-202-010 TERMINAL,ANT 4P MSP-154V-02
L101 87-A50-610-010 COIL,1UH K (MDEC)
L102 87-A50-610-010 COIL,1UH K (MDEC)
L301 87-A50-049-010 COIL,TRAP 85K(COI)
L302 87-A50-049-010 COIL,TRAP 85K(COI)
L351 87-007-342-010 COIL,OSC 85K BIAS
L801 87-A50-608-010 COIL,FM DET-N(TOK)
L802 87-A91-551-010 FLTR,PCFJZH-450 L(TOK)
L811 87-005-847-080 COIL,2.2UH(CECS)
L832 87-005-847-080 COIL,2.2UH(CECS)
L951 8A-NF8-667-010 COIL,AM PACK 4(TOK)
R117 87-010-805-080 C-CAP,S 1-16 ZF
R118 87-010-805-080 C-CAP,S 1-16 ZF
R161 87-A00-441-050 RES,270-1/2W J RP
R162 87-A00-441-050 RES,270-1/2W J RP
R163 87-A00-441-050 RES,270-1/2W J RP
R164 87-A00-441-050 RES,270-1/2W J RP
R790 87-010-197-080 C-CAP,S 0.01-25 KB
R991 87-010-322-080 C-CAP,S 100P-50 J CH
R993 87-010-322-080 C-CAP,S 100P-50 J CH
R995 87-010-322-080 C-CAP,S 100P-50 J CH
SFR351 87-A90-433-080 SFR,50K H NVZ6TLTA
SFR352 87-A90-433-080 SFR,50K H NVZ6TLTA
WH1 87-A90-510-010 HLDR,WIRE 2.5-9P
X991 87-A70-061-010 VIB,XTAL 4.500MHZ CSA-309
MICON C.B
C101 87-010-498-040 CAP,E 10-16 M 5L SRE
C102 87-010-194-080 CAP, CHIP 0.047-25 Z F
C103 87-010-194-080 CAP, CHIP 0.047-25 Z F
C105 87-A11-242-040 CAP,E 220-10 M 5L SRM
C106 87-A11-242-040 CAP,E 220-10 M 5L SRM
C107 87-010-196-080 CHIP CAPACITOR,0.1-25
C111 87-016-460-080 C-CAP,S 0.22-16 K B
C112 87-010-493-040 CAP,E 0.47-50 GAS
C113 87-010-178-080 CHIP CAP 1000P-50
C114 87-018-209-080 CAP TC U 0.1-50 ZF UP 050
C116 87-010-196-080 C-CAP,S 0.1-25 ZF C2012
C117 87-010-174-080 C-CAP,S 470P-50
C122 87-012-369-080 C-CAP,S 0.047-50F
C123 87-010-408-040 CAP,E 47-50 SME
C124 87-010-421-040 CAP,E 4.7-50 5L
C125 87-010-421-040 CAP,E 4.7-50 5L
C132 87-012-156-080 C-CAP,S 220P-50 CH
C133 87-010-316-080 C-CAP,S 33P-50 CH
C135 87-018-209-080 CAP, TCU 0.1-50
C137 87-010-313-080 CAP, CHIP 18P-50
C138 87-010-196-080 CHIP CAPACITOR,0.1-25
C171 87-010-213-080 C-CAP,S 0.015-25
C172 87-010-183-080 C-CAP,S 2700P-50
C188 87-010-194-080 CAP, CHIP 0.047-25
C193 87-010-197-080 CAP, CHIP 0.01-25
C251 87-010-196-080 CHIP CAPACITOR,0.1-25
C252 87-012-156-080 C-CAP,S 220P-50 CH
C253 87-010-322-080 C-CAP,S 100P-50 CH
C301 87-012-358-080 C-CAP,S 0.47-10 F Z
C302 87-012-158-080 C-CAP,S 390P-50 CH
C303 87-012-358-080 C-CAP,S 0.47-10 F Z
C304 87-012-358-080 C-CAP,S 0.47-10 F Z
DESCRIPTIONREF. NO. KANRI
PART NO.
NO.
C305 87-010-196-080 CHIP CAPACITOR,0.1-25
C306 87-010-196-080 CHIP CAPACITOR,0.1-25
C310 87-010-196-080 CHIP CAPACITOR,0.1-25
C311 87-010-405-040 CAP,E 10-50
C411 87-012-157-080 C-CAP,S 330P-50 CH
C412 87-010-405-040 CAP,E 10-50
C421 87-010-197-080 CAP, CHIP 0.01-25
C422 87-010-182-080 C-CAP,S 2200P-50 B
C940 87-012-145-080 CAP, CHIP S 270P-50
C941 87-012-145-080 CAP, CHIP S 270P-50
C942 87-012-145-080 CAP, CHIP S 270P-50
C943 87-012-145-080 CAP, CHIP S 270P-50
C944 87-012-145-080 CAP, CHIP S 270P-50
C945 87-012-145-080 CAP, CHIP S 270P-50
C946 87-012-145-080 CAP, CHIP S 270P-50
C947 87-012-145-080 CAP, CHIP S 270P-50
C948 87-012-145-080 CAP, CHIP S 270P-50
C949 87-012-145-080 CAP, CHIP S 270P-50
C950 87-012-145-080 CAP, CHIP S 270P-50
C951 87-012-145-080 CAP, CHIP S 270P-50
C952 87-012-145-080 CAP, CHIP S 270P-50
CN101 87-099-720-010 CONN,30P TYK-B(P)
CN102 87-A60-162-010 CONN,14P H FE
CN103 87-A60-164-010 CONN,16P H FE
CN104 87-A60-159-010 CONN,11P H FE
CNA302 8A-MA5-652-010 CONN ASSY,2P V 230MM
FB001 87-A90-896-080 F-BEAD,035600STY7
FC102 88-914-231-110 FF-CABLE,14P 1.25
FC104 88-911-151-110 FF-CABLE,11P 1.25
FL101 8A-MA5-651-010 FL,BJ746GNK
L101 87-A50-333-010 COIL,OSC 9.43MHZ
LED131 87-A40-317-080 LED,SLR-342VCT31 RED
LED201 87-A40-496-040 LED,SLR-342PCT31 GRN
LED202 87-A40-317-080 LED,SLR-342VCT31 RED
LED204 87-A40-496-040 LED,SLR-342PCT31 GRN
LED205 87-A40-317-080 LED,SLR-342VCT31 RED
LED208 87-A40-496-040 LED,SLR-342PCT31 GRN
LED210 87-A40-317-080 LED,SLR-342VCT31 RED
LED211 87-A40-496-040 LED,SLR-342PCT31 GRN
LED212 87-A40-317-080 LED,SLR-342VCT31 RED
S401 87-A90-095-080 SW,TACT EVQ11G04M
S402 87-A90-095-080 SW,TACT EVQ11G04M
S403 87-A90-095-080 SW,TACT EVQ11G04M
S404 87-A90-095-080 SW,TACT EVQ11G04M
S405 87-A90-095-080 SW,TACT EVQ11G04M
S421 87-A91-625-010 SW,RTRY EC12E24308-30MM
CNTL C.B
C602 87-010-069-040 CAP,E 0.33-50
C603 87-010-319-080 C-CAP,S 56P-50
C604 87-010-178-080 C-CAP,S 1000P-50
C606 87-015-785-080 C-CAP,S 0.1-25
C607 87-010-060-040 CAP,E 100-16
C611 87-010-186-080 C-CAP,S 4700P-50
C612 87-015-699-040 CAP,E 10-50
C651 87-010-182-080 C-CAP,S 2200P-50 B
C652 87-010-197-080 CAP, CHIP 0.01-25
C661 87-010-196-080 C-CAP,S 0.1-25 ZF
C663 87-012-156-080 C-CAP,S 220P-50 CH
C846 87-010-196-080 C-CAP,S 0.1-25 ZF
CN661 87-A60-164-010 CONN,16P H FE
CNA602 8A-MA3-655-010 CONN ASSY,2P V 60MM
FC661 88-916-151-110 FF-CABLE,16P 1.25
LED675 87-A40-317-080 LED,SLR-342VCT31 RED
LED676 87-A40-317-080 LED,SLR-342VCT31 RED
LED677 87-A40-317-080 LED,SLR-342VCT31 RED
LED678 87-A40-317-080 LED,SLR-342VCT31 RED
LED679 87-A40-317-080 LED,SLR-342VCT31 RED
DESCRIPTIONREF. NO. KANRI
– 8 –
Page 9

PART NO.
NO.
LED682 87-A40-619-040 LED,SLR-56PT-T31-W GRN
LED683 87-A40-619-040 LED,SLR-56PT-T31-W GRN
LED684 87-A40-619-040 LED,SLR-56PT-T31-W GRN
LED685 87-A40-619-040 LED,SLR-56PT-T31-W GRN
LED698 87-A40-619-040 LED,SLR-56PT-T31-W GRN
S651 87-A91-624-010 SW,RTRY EC12E1240405-20MM
S805 87-A90-095-080 SW,TACT EVQ11G04M
S806 87-A90-095-080 SW,TACT EVQ11G04M
S807 87-A90-095-080 SW,TACT EVQ11G04M
S808 87-A90-095-080 SW,TACT EVQ11G04M
S809 87-A90-095-080 SW,TACT EVQ11G04M
S813 87-A90-095-080 SW,TACT EVQ11G04M
S814 87-A90-095-080 SW,TACT EVQ11G04M
S815 87-A90-095-080 SW,TACT EVQ11G04M
S816 87-A90-095-080 SW,TACT EVQ11G04M
S821 87-A90-095-080 SW,TACT EVQ11G04M
S822 87-A90-095-080 SW,TACT EVQ11G04M
S823 87-A90-095-080 SW,TACT EVQ11G04M
S824 87-A90-095-080 SW,TACT EVQ11G04M
S826 87-A90-095-080 SW,TACT EVQ11G04M
S827 87-A90-095-080 SW,TACT EVQ11G04M
S828 87-A90-095-080 SW,TACT EVQ11G04M
S829 87-A90-095-080 SW,TACT EVQ11G04M
S830 87-A90-095-080 SW,TACT EVQ11G04M
S831 87-A90-095-080 SW,TACT EVQ11G04M
S842 87-A90-095-080 SW,TACT EVQ11G04M
S843 87-A90-095-080 SW,TACT EVQ11G04M
S845 87-A90-095-080 SW,TACT EVQ11G04M
S846 87-A90-095-080 SW,TACT EVQ11G04M
S849 87-A90-095-080 SW,TACT EVQ11G04M
S850 87-A90-095-080 SW,TACT EVQ11G04M
S851 87-A90-095-080 SW,TACT EVQ11G04M
KEY CD C.B
S751 87-A90-095-080 SW,TACT EVQ11G04M
S752 87-A90-095-080 SW,TACT EVQ11G04M
S753 87-A90-095-080 SW,TACT EVQ11G04M
S754 87-A90-095-080 SW,TACT EVQ11G04M
S755 87-A90-095-080 SW,TACT EVQ11G04M
S756 87-A90-095-080 SW,TACT EVQ11G04M
S757 87-A90-095-080 SW,TACT EVQ11G04M
AMP 1F C.B
C3 87-010-186-080 CAP,CHIP 4700P-50
C101 87-010-178-080 CHIP CAP 1000P-50
C102 87-010-178-080 CHIP CAP 1000P
C103 87-010-405-080 CAP, ELECT 10-50V
C104 87-010-405-080 CAP, ELECT 10-50V
C107 87-010-405-080 CAP, ELECT 10-50V
C108 87-010-405-080 CAP, ELECT 10-50V
C113 87-010-260-080 CAP, ELECT 47-25V
C114 87-010-260-080 CAP, ELECT 47-25V
C115 87-A10-119-080 CAP, ELECT 10-100 REA
C116 87-A10-119-080 CAP, ELECT 10-100 REA
C119 87-010-197-080 CAP, CHIP 0.01-25
C120 87-010-197-080 CAP, CHIP 0.01-25
C133 87-010-186-080 CAP,CHIP 4700P-50
C205 87-010-186-080 C-CAP,S 4700P-50 SL
C206 87-010-186-080 C-CAP,S 4700P-50 SL
C207 87-010-403-080 CAP, ELECT 3.3-50V
C208 87-010-403-080 CAP, ELECT 3.3-50V
C209 87-010-184-080 CHIP CAPACITOR 3300P-50
C210 87-010-184-080 CHIP CAPACITOR 3300P-50
C211 87-010-403-080 CAP, ELECT 3.3-50V
C212 87-010-403-080 CAP, ELECT 3.3-50V
C215 87-012-156-080 C-CAP,S 220P-50
C216 87-012-156-080 C-CAP,S 220P-50
C217 87-010-260-080 CAP, ELECT 47-25V
DESCRIPTIONREF. NO. KANRI
PART NO.
NO.
C218 87-010-260-080 CAP, ELECT 47-25V
C221 87-010-405-080 CAP, ELECT 10-50V
C222 87-010-405-080 CAP, ELECT 10-50V
C223 87-010-197-080 CAP, CHIP 0.01-25
C224 87-010-197-080 CAP, CHIP 0.01-25
C251 87-010-993-080 C-CAP,S 0.056-25 B
C252 87-010-196-080 CHIP CAPACITOR,0.1-25
C253 87-010-196-080 CHIP CAPACITOR,0.1-25
C254 87-010-993-080 C-CAP,S 0.056-25 B
C255 87-010-190-080 S CHIP F 0.01-50
C256 87-010-190-080 S CHIP F 0.01-50
C291 87-010-374-080 CAP, ELECT 47-10V
CNA101 8A-NF8-656-010 CONN ASSY,5P TID-A 400
CON101 87-A61-011-010 CONN,13P H BLK TAC-L13P-A3
CON102 87-A61-011-010 CONN,13P H BLK TAC-L13P-A3
J201 87-A61-158-010 JACK,PIN 2P R/W BLUE
L251 87-A50-610-010 COIL,1UH-S
L252 87-A50-610-010 COIL,1UH-S
R131 87-A00-669-080 RES,M/F 0.22-2W J
R132 87-A00-669-080 RES,M/F 0.22-2W J
R231 87-A00-258-080 RES,M/F 0.22-1W J
R232 87-A00-258-080 RES,M/F 0.22-1W J
WH101 87-A90-459-010 HLDR 2.5-5P
MIC C.B
C601 87-010-196-080 CHIP CAPACITOR,0.1-25
CN601 87-A60-619-010 CONNECTOR 2P V 2MM
FB603 83-XM1-617-080 C-COIL,BK 2125HM 601
J601 87-099-659-010 JACK,6.3 JY-6314-01130
J602 87-099-659-010 JACK,6.3 JY-6314-01130
VM C.B
KEY CON C.B
C551 87-A10-060-080 C-CAP,S 0.18-16 KB
C552 87-A10-060-080 C-CAP,S 0.18-16 KB
C553 87-012-154-080 C-CAP,S 150P-50
C554 87-012-154-080 C-CAP,S 150P-50
C555 87-012-145-080 C-CAP,S 270P-50
C556 87-012-145-080 C-CAP,S 270P-50
C557 87-010-183-080 C-CAP,S 2700P-50 B
C559 87-010-196-080 CHIP CAPACITOR,0.1-25
C560 87-010-177-080 C-CAP,S 820P-50 SL
C561 87-010-177-080 C-CAP,S 820P-50 SL
C562 87-010-196-080 CHIP CAPACITOR,0.1-25
C563 87-010-374-080 CAP, ELECT 47-10V
C564 87-010-196-080 CHIP CAPACITOR,0.1-25
C565 87-010-263-080 CAP, ELECT 100-10V
C567 87-010-183-080 C-CAP,S 2700P-50 B
C571 87-016-460-080 C-CAP,S 0.22-16 K B
C572 87-016-460-080 C-CAP,S 0.22-16 K B
C573 87-016-460-080 C-CAP,S 0.22-16 K B
C577 87-010-196-080 CHIP CAPACITOR,0.1-25
CN551 87-A60-689-010 CONN,7P H GRY TUC-PO7X-C1
PT C.B
C1 87-A11-148-080 CAP,TC U 0.1-50 Z F
C2 87-A11-148-080 CAP,TC U 0.1-50 Z F
C3 87-A11-148-080 CAP,TC U 0.1-50 Z F
C4 87-A11-148-080 CAP,TC U 0.1-50 Z F
C5 87-A11-148-080 CAP,TC U 0.1-50 Z F
C6 87-A11-148-080 CAP,TC U 0.1-50 Z F
C7 87-A11-148-080 CAP,TC U 0.1-50 Z F
C8 87-A11-148-080 CAP,TC U 0.1-50 Z F
C101 87-010-387-080 CAP,E 470-25 SME
C103 87-A11-148-080 CAP,TC U 0.1-50 Z F
C104 87-A11-148-080 CAP,TC U 0.1-50 Z F
DESCRIPTIONREF. NO. KANRI
– 9 –
Page 10

PART NO.
C105 87-A11-148-080 CAP,TC U 0.1-50 Z F
C106 87-A11-148-080 CAP,TC U 0.1-50 Z F
C107 87-A11-148-080 CAP,TC U 0.1-50 Z F
C108 87-A11-148-080 CAP,TC U 0.1-50 Z F
C109 87-A11-148-080 CAP,TC U 0.1-50 Z F
C110 87-A11-148-080 CAP,TC U 0.1-50 Z F
C111 87-A10-520-000 CAP,E 3300-35 M SMG
C112 87-A10-520-000 CAP,E 3300-35 M SMG
C113 87-016-520-090 CAP,E 3300-65 M SMG
C114 87-016-520-090 CAP,E 3300-65 M SMG
C116 87-010-403-040 CAP,E 3.3-50 SME
CN1 87-A61-110-010 CONN,9P V TID-A
CN2 87-A61-108-010 CONN,5P V TID-A
F101 87-035-458-010 FUSE,4A 250V T W/C
!
F102 87-035-458-010 FUSE,4A 250V T W/C
!
!
FC101 87-033-213-080 CLAMP, FUSE
FC102 87-033-213-080 CLAMP, FUSE
!
!
FC103 87-033-213-080 CLAMP, FUSE
!
FC104 87-033-213-080 CLAMP, FUSE
!
PR103 87-026-682-080 PROTECTOR,10A 60V491
!
PR106 87-026-682-080 PROTECTOR 10A 49/SERIES 60V
!
PT1 8A-MG5-664-010 PT,AMG-5 HR
!
PT2 8A-NF8-673-010 PT,SUB ANF-8 (H)KAMI
!
RY101 87-A91-300-010 RELAY,AC 12V-ALA2PF12
!
S101 87-A90-165-010 SW,SL 1-2-3 SWS2301
T101 87-A60-317-010 TERMINAL, 1P MSC
!
T102 87-A60-317-010 TERMINAL, 1P MSC
!
NO.
DESCRIPTIONREF. NO. KANRI
DECK C.B
CN1 87-099-753-010 CONN,11P H 9604
SFR1 87-024-581-010 SFR,3.3K DIA6V K0A
SW1 87-A90-673-010 SW,MICRO ESE11SH1C
SW2 87-A91-500-010 SW,MICRO MPU11470MLB0
SW3 87-A91-500-010 SW,MICRO MPU11470MLB0
SW4 87-A91-500-010 SW,MICRO MPU11470MLB0
SW5 87-A90-673-010 SW,MICRO ESE11SH1C
CHIP RESISTOR PART CODE
Chip Resistor Part Coding
88
A
Resistor Code
Chip resistor
Wattage Type Tolerance
1/16W 1005 5% CJ
1/16W
1/10W
1/8W
1608
2125
3216
5%
5%
5%
Symbol
CJ
CJ
CJ
Figure
Value of resistor
Form
L
Dimensions (mm)
t
W
0.55
Resistor Code
108
118
128
LW t
1.0 0.5 0.35 104
1.6 0.8 0.45
2 1.25 0.45
3.2
1.6
: A
: A
– 10 –
Page 11
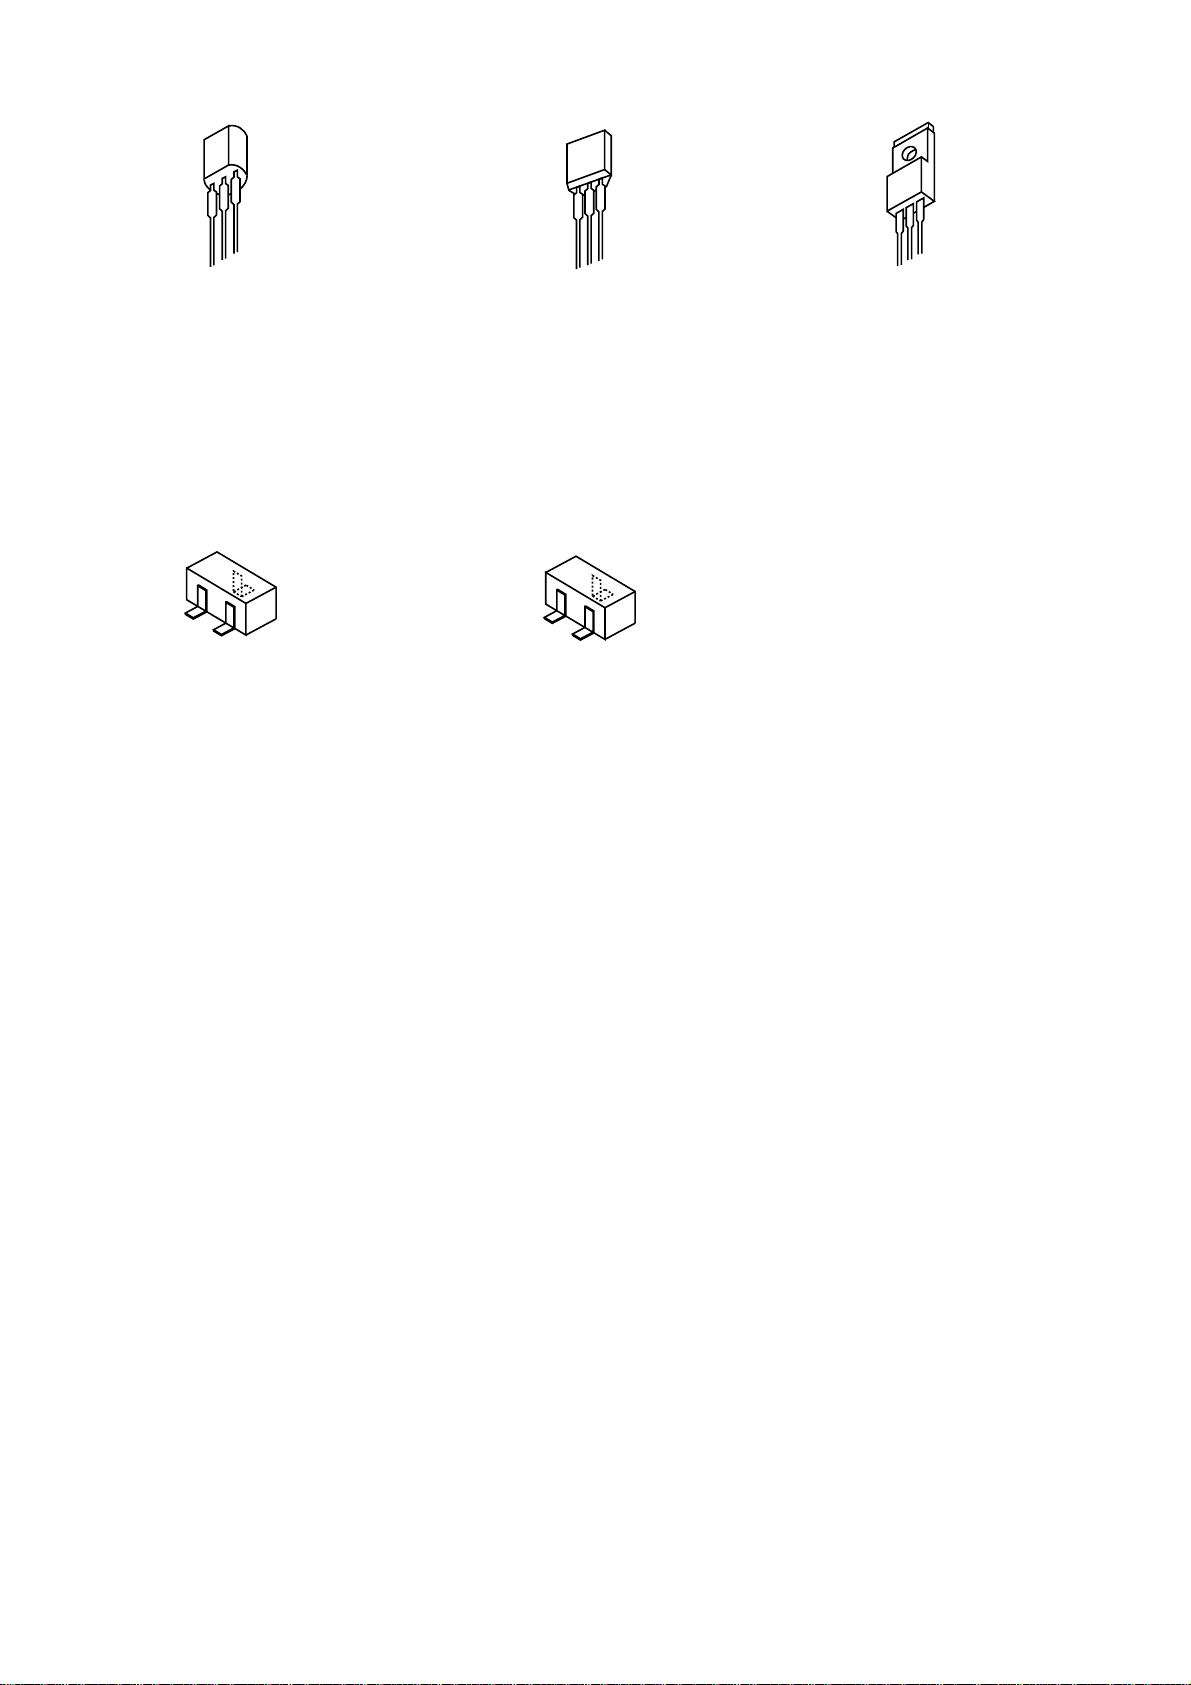
TRANSISTOR ILLUSTRATION
B
2SA1235
2SC2714
2SC3052
2SD1306
CMBT5401
E C B
CD1585
CSA952
CSC4115
KTA1266
KTC3198
KTC3199
C
E
KRA102
KRA104
KRA107
KRC102
RT1P141C
E C B
DTC114ES
G
S
2SJ461-T1
2SK2158
B C E
2SB1370
D
– 11 –
Page 12
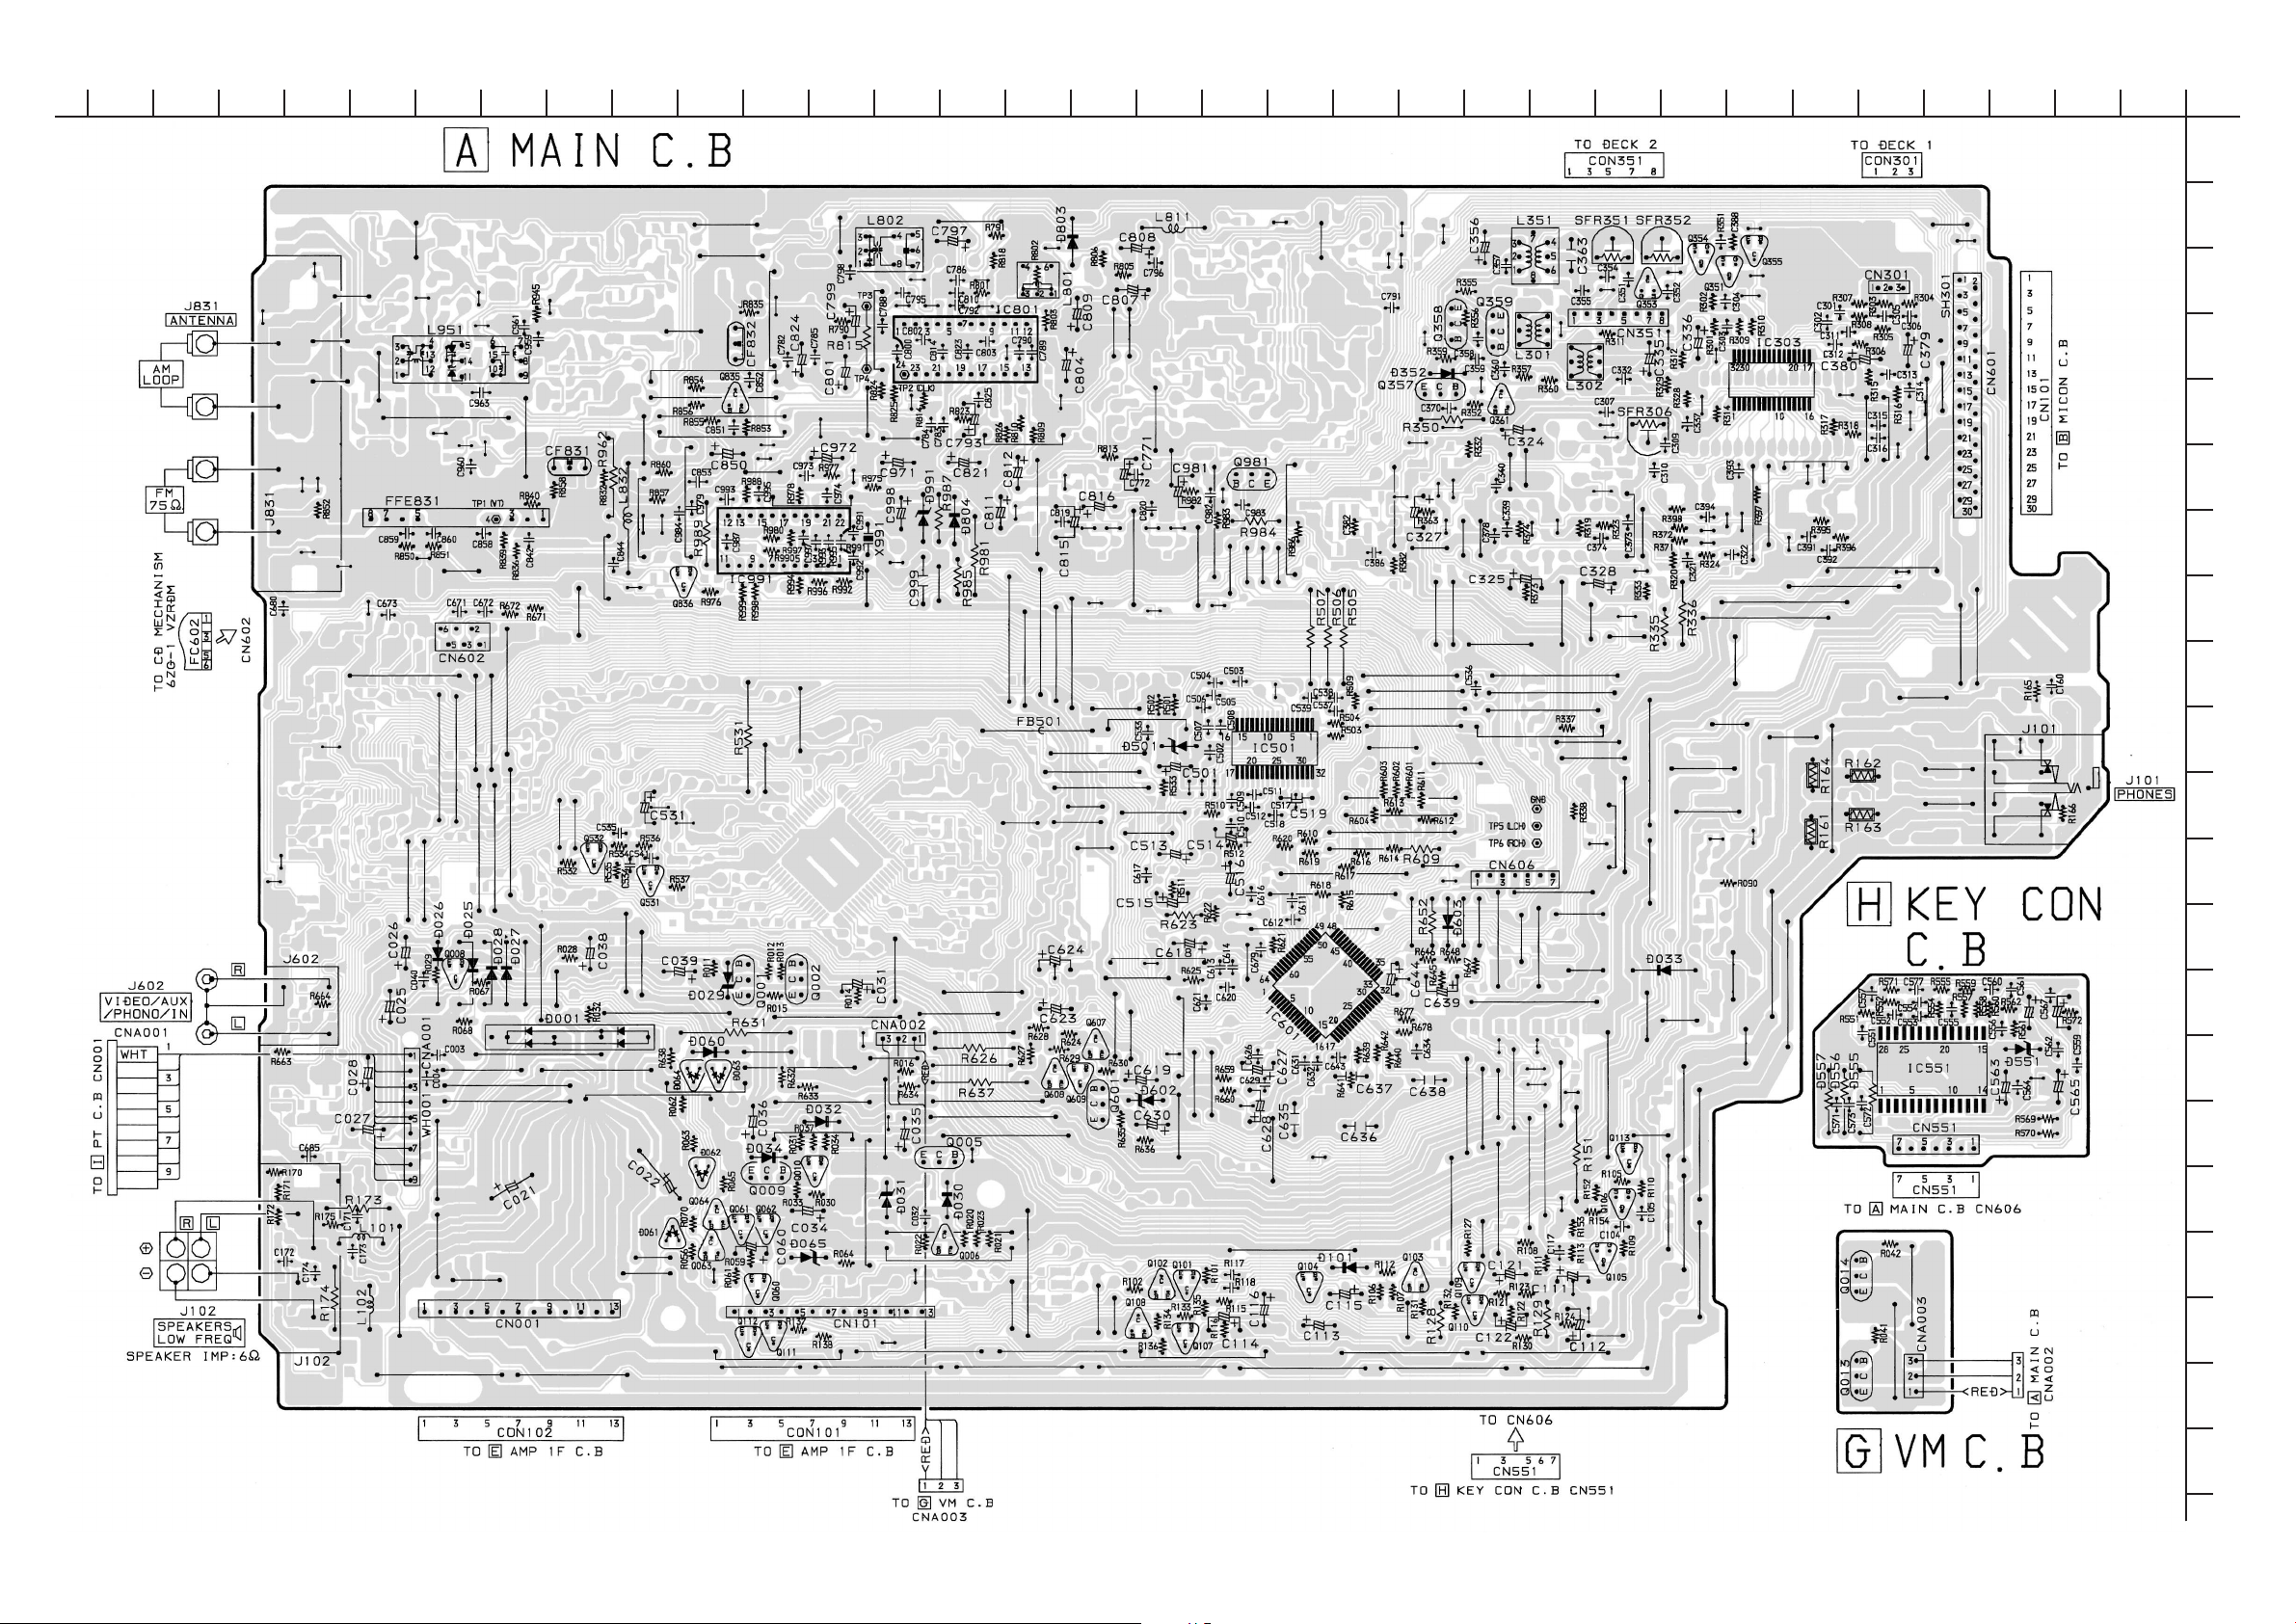
WIRING – 1 (MAIN / VM / KEY CON)
101112131415161718192021222324
1234567892526272829303132
A
B
C
D
E
F
G
H
I
J
K
L
M
N
O
P
Q
– 12 –
R
S
T
U
Page 13
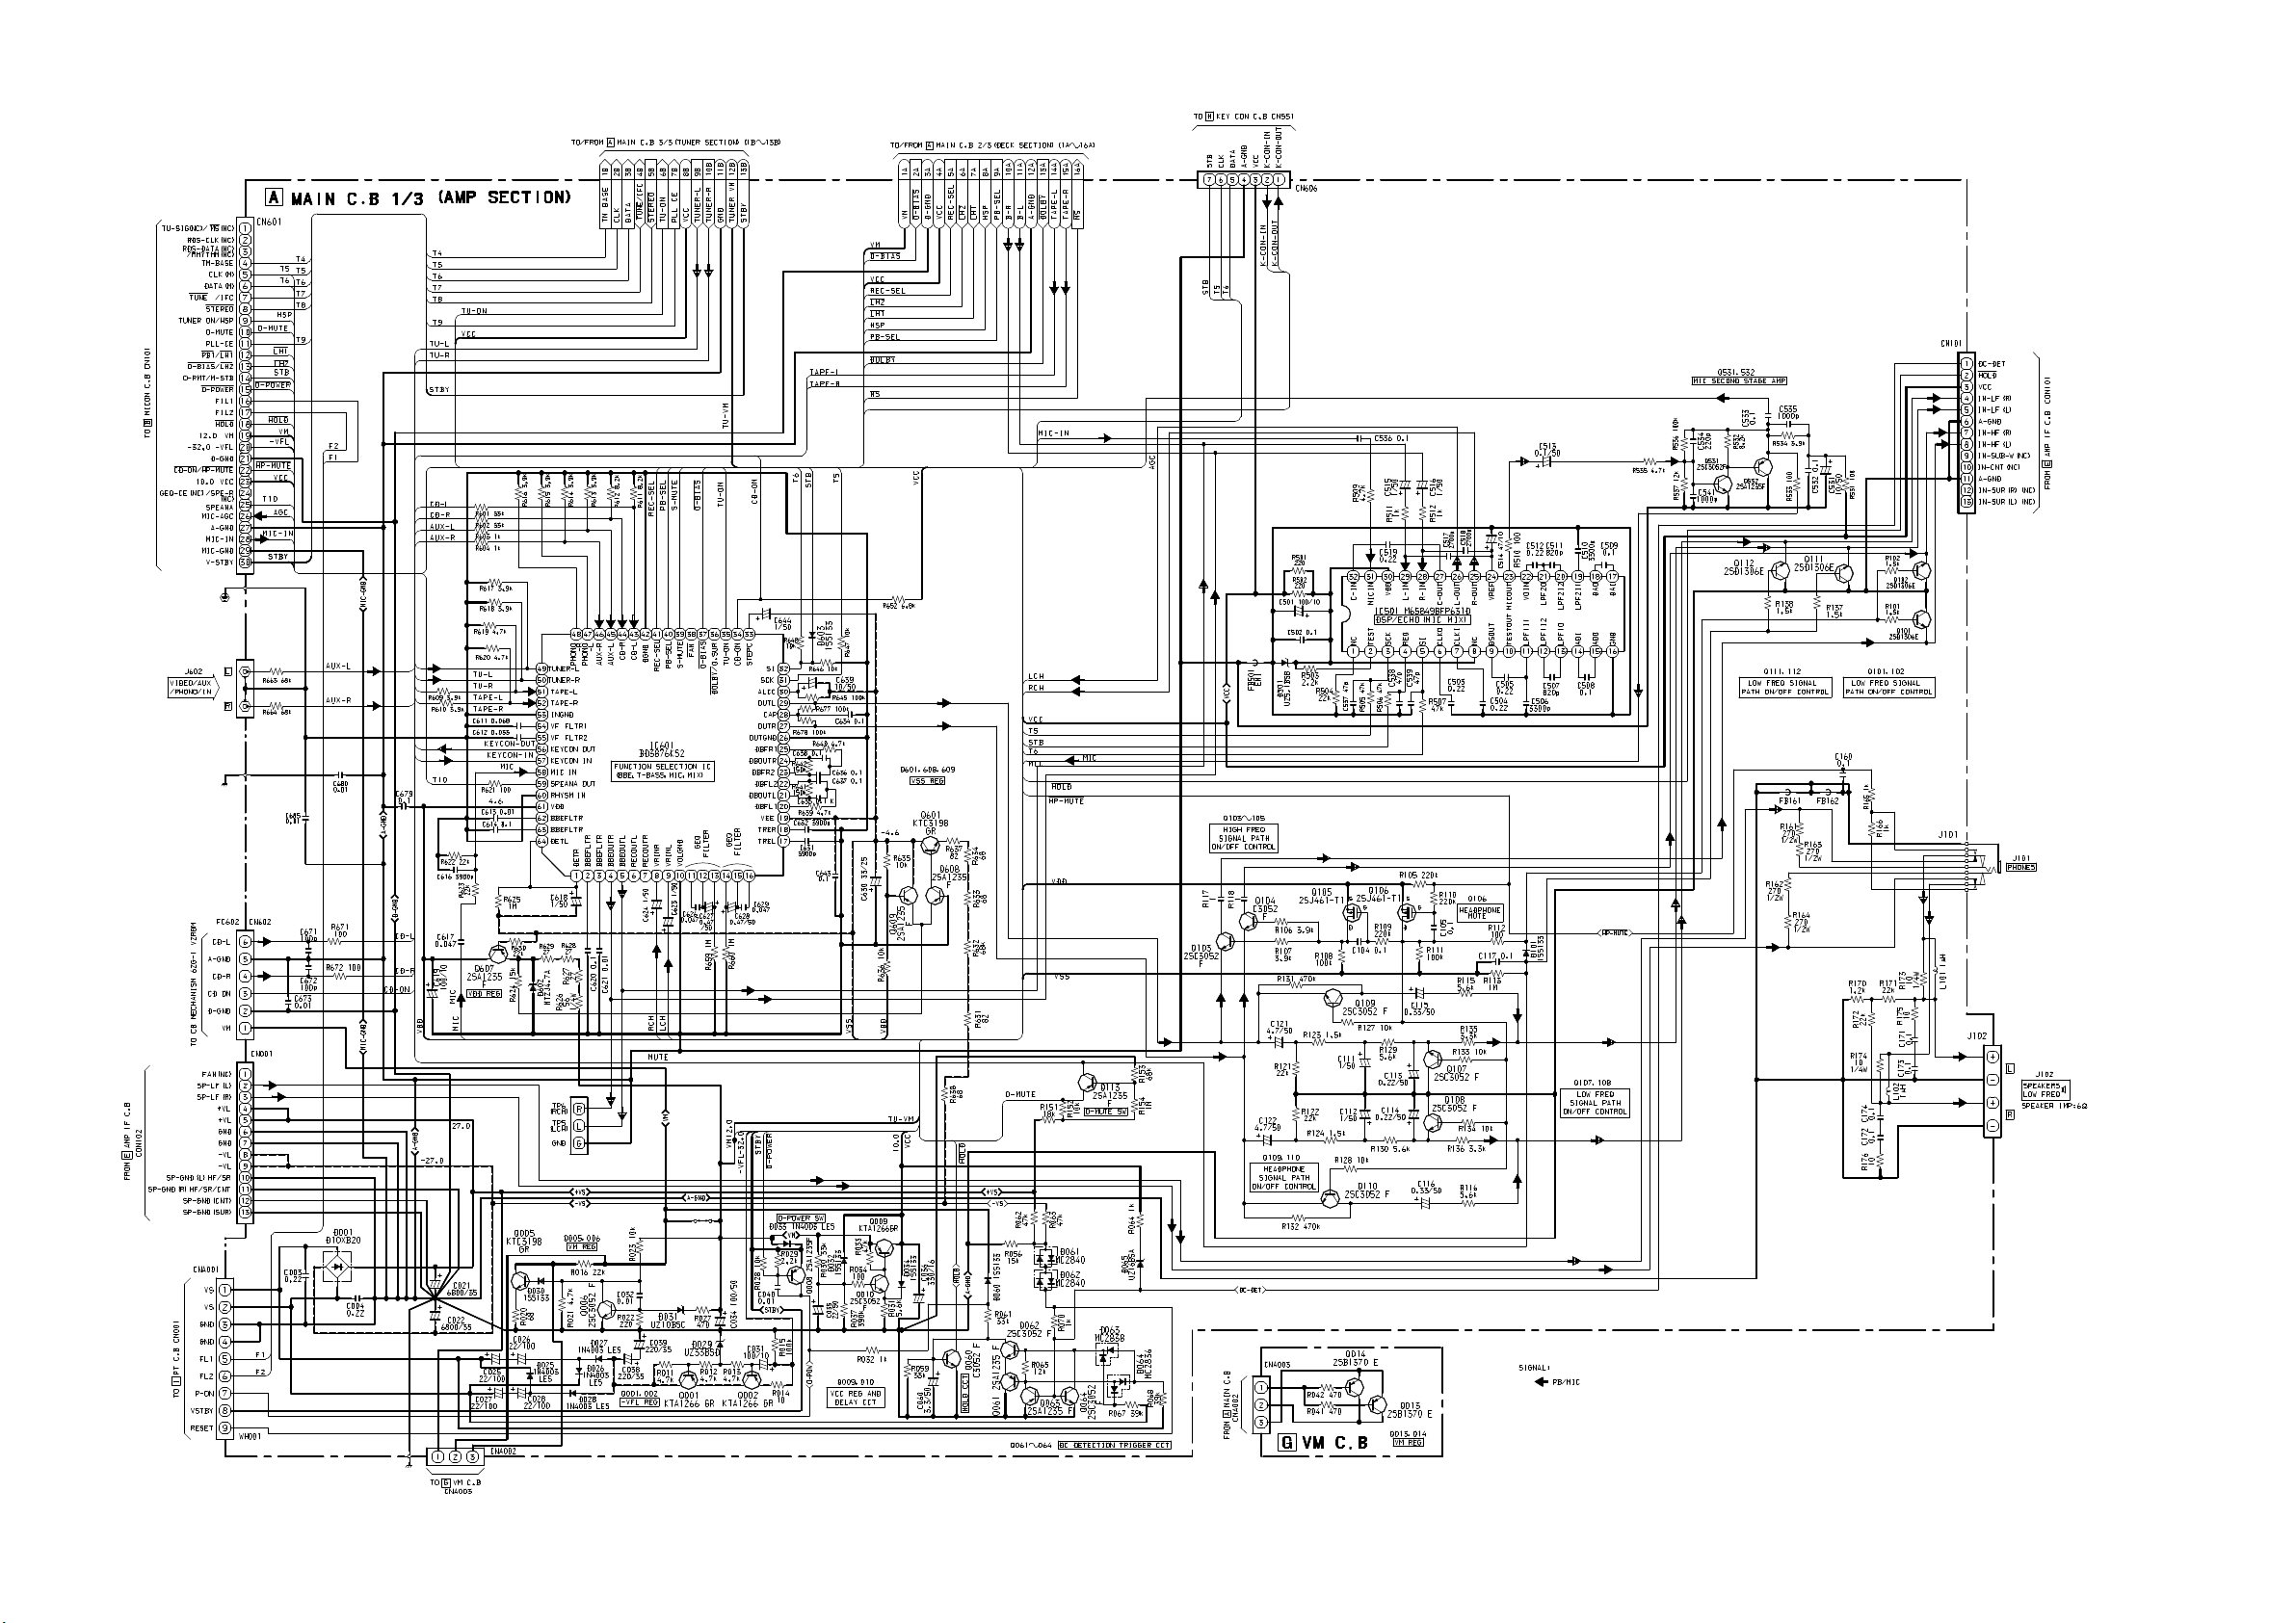
SCHEMATIC DIAGRAM – 1 (MAIN 1 / 3: AMP SECTION / VM)
– 13 –
Page 14
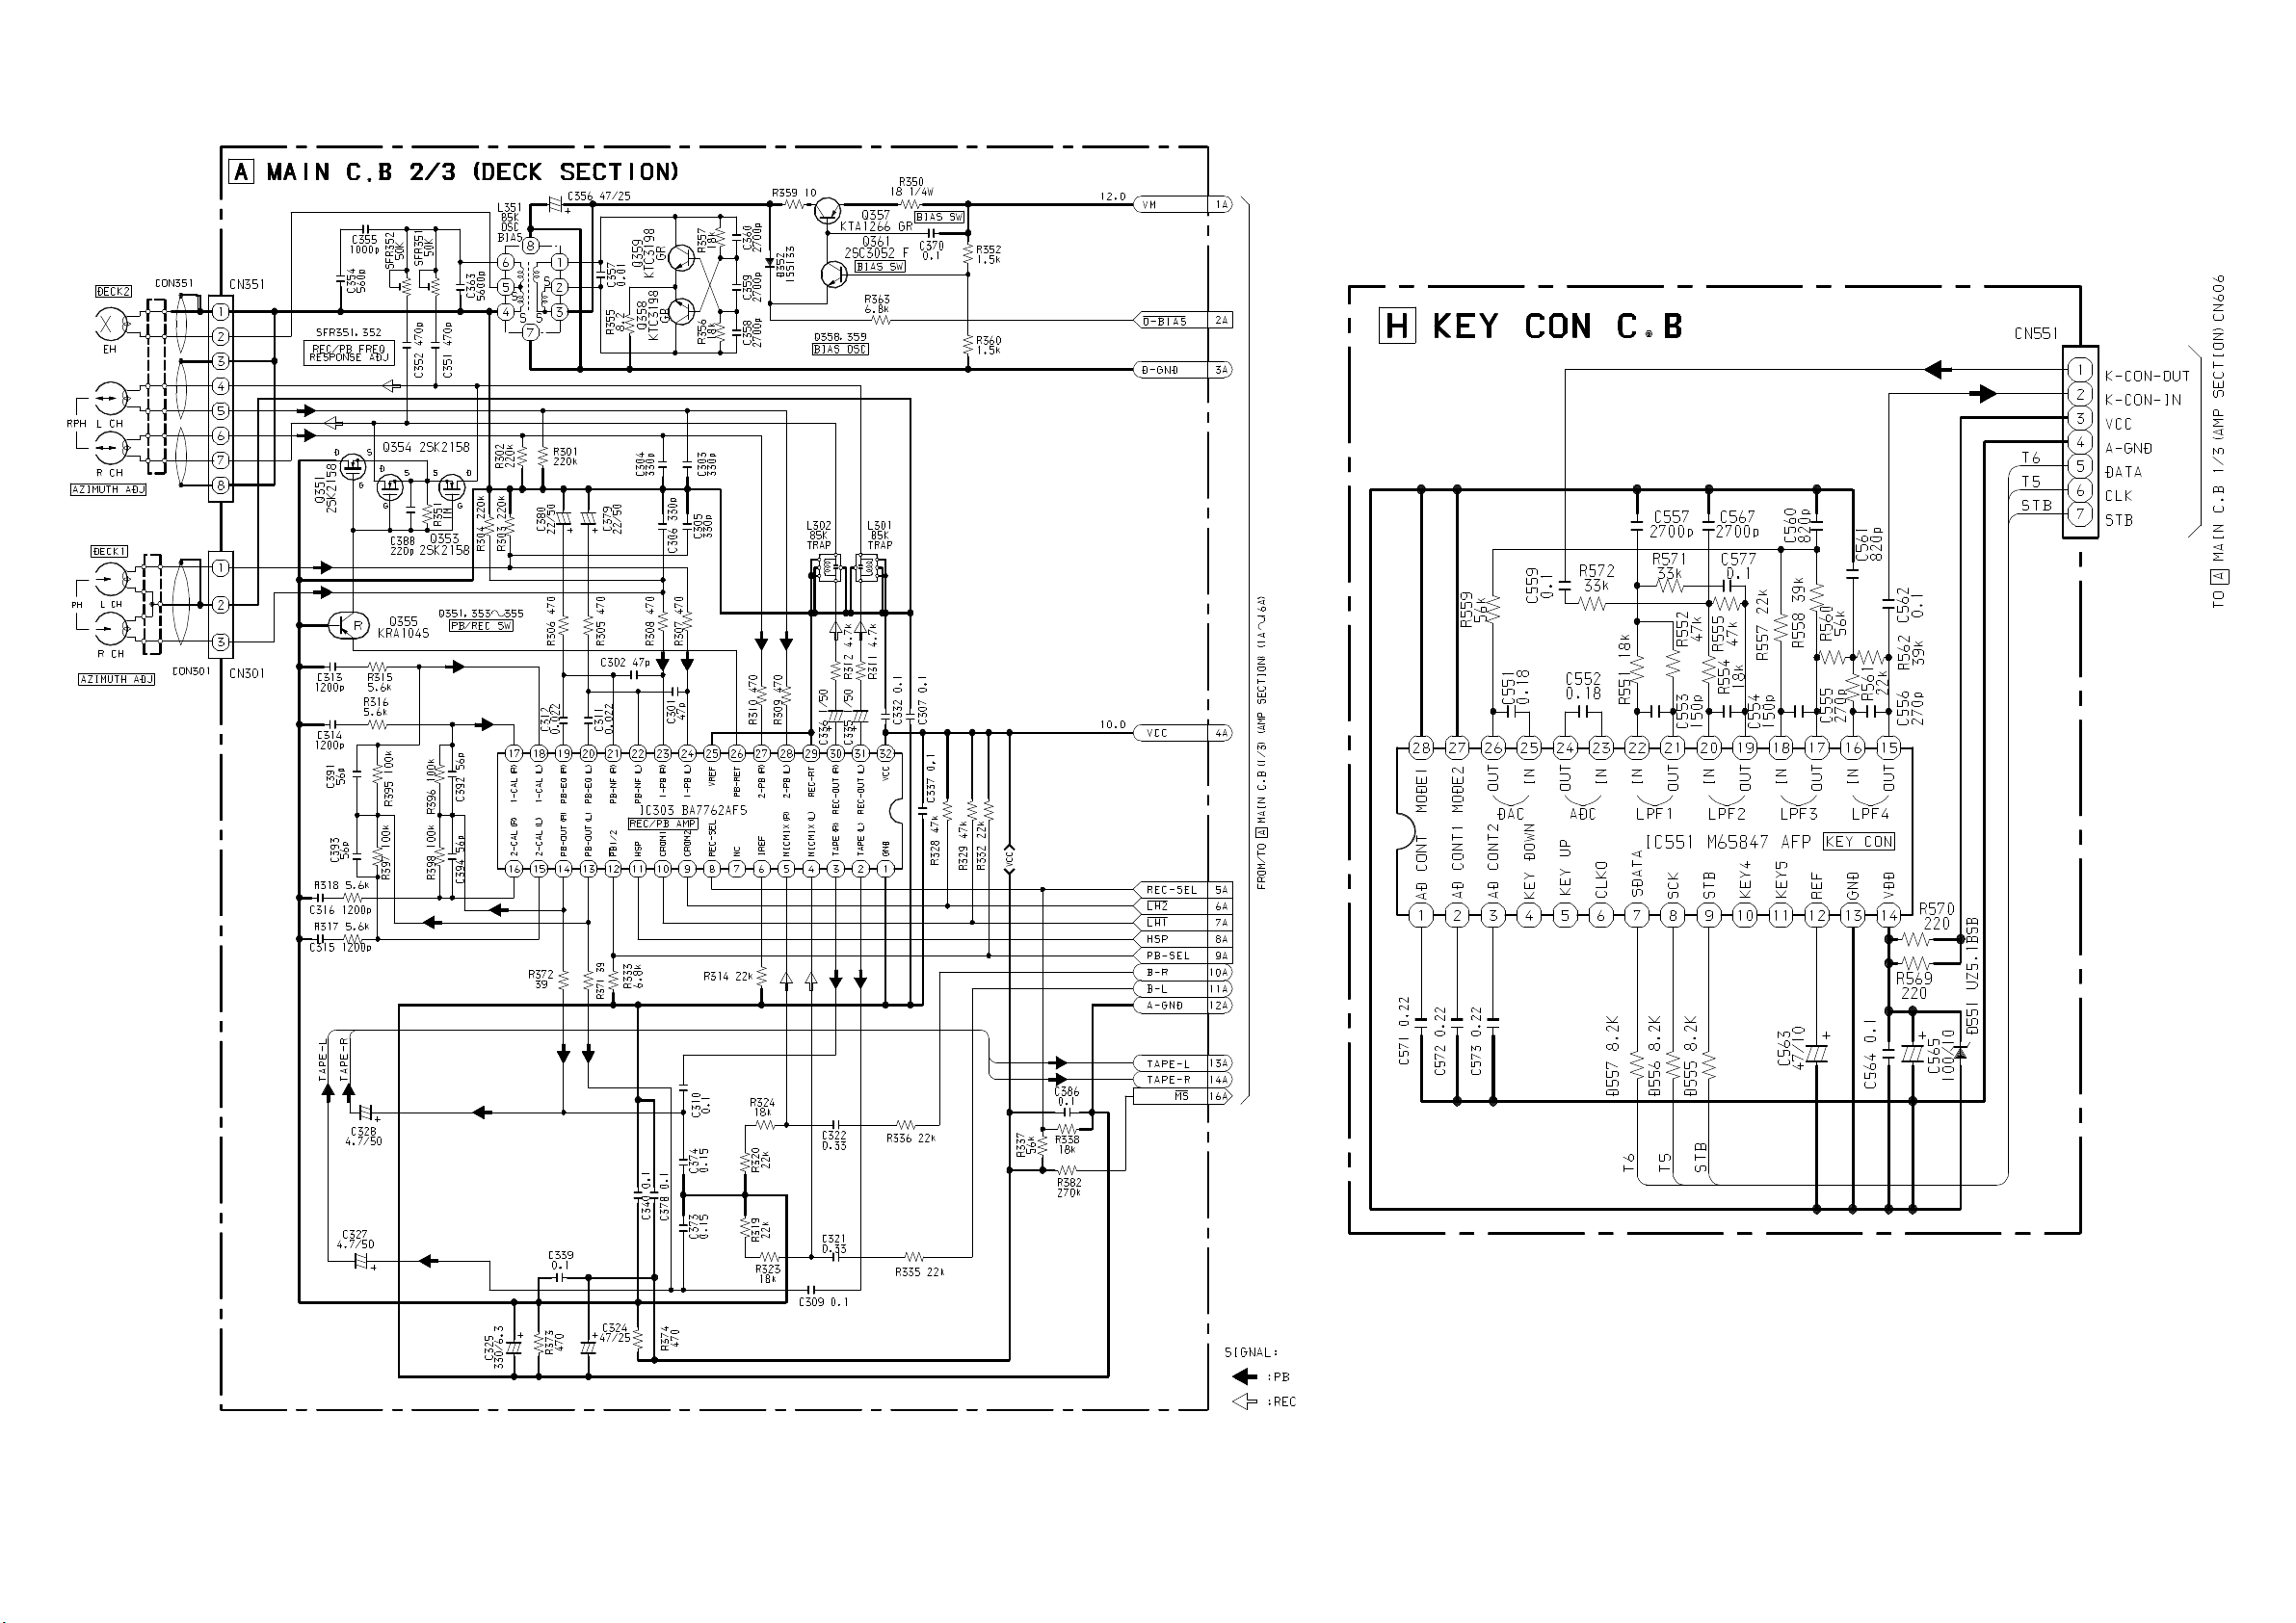
SCHEMATIC DIAGRAM – 2 (MAIN 2 / 3: DECK SECTION / KEY CON)
– 14 –
Page 15
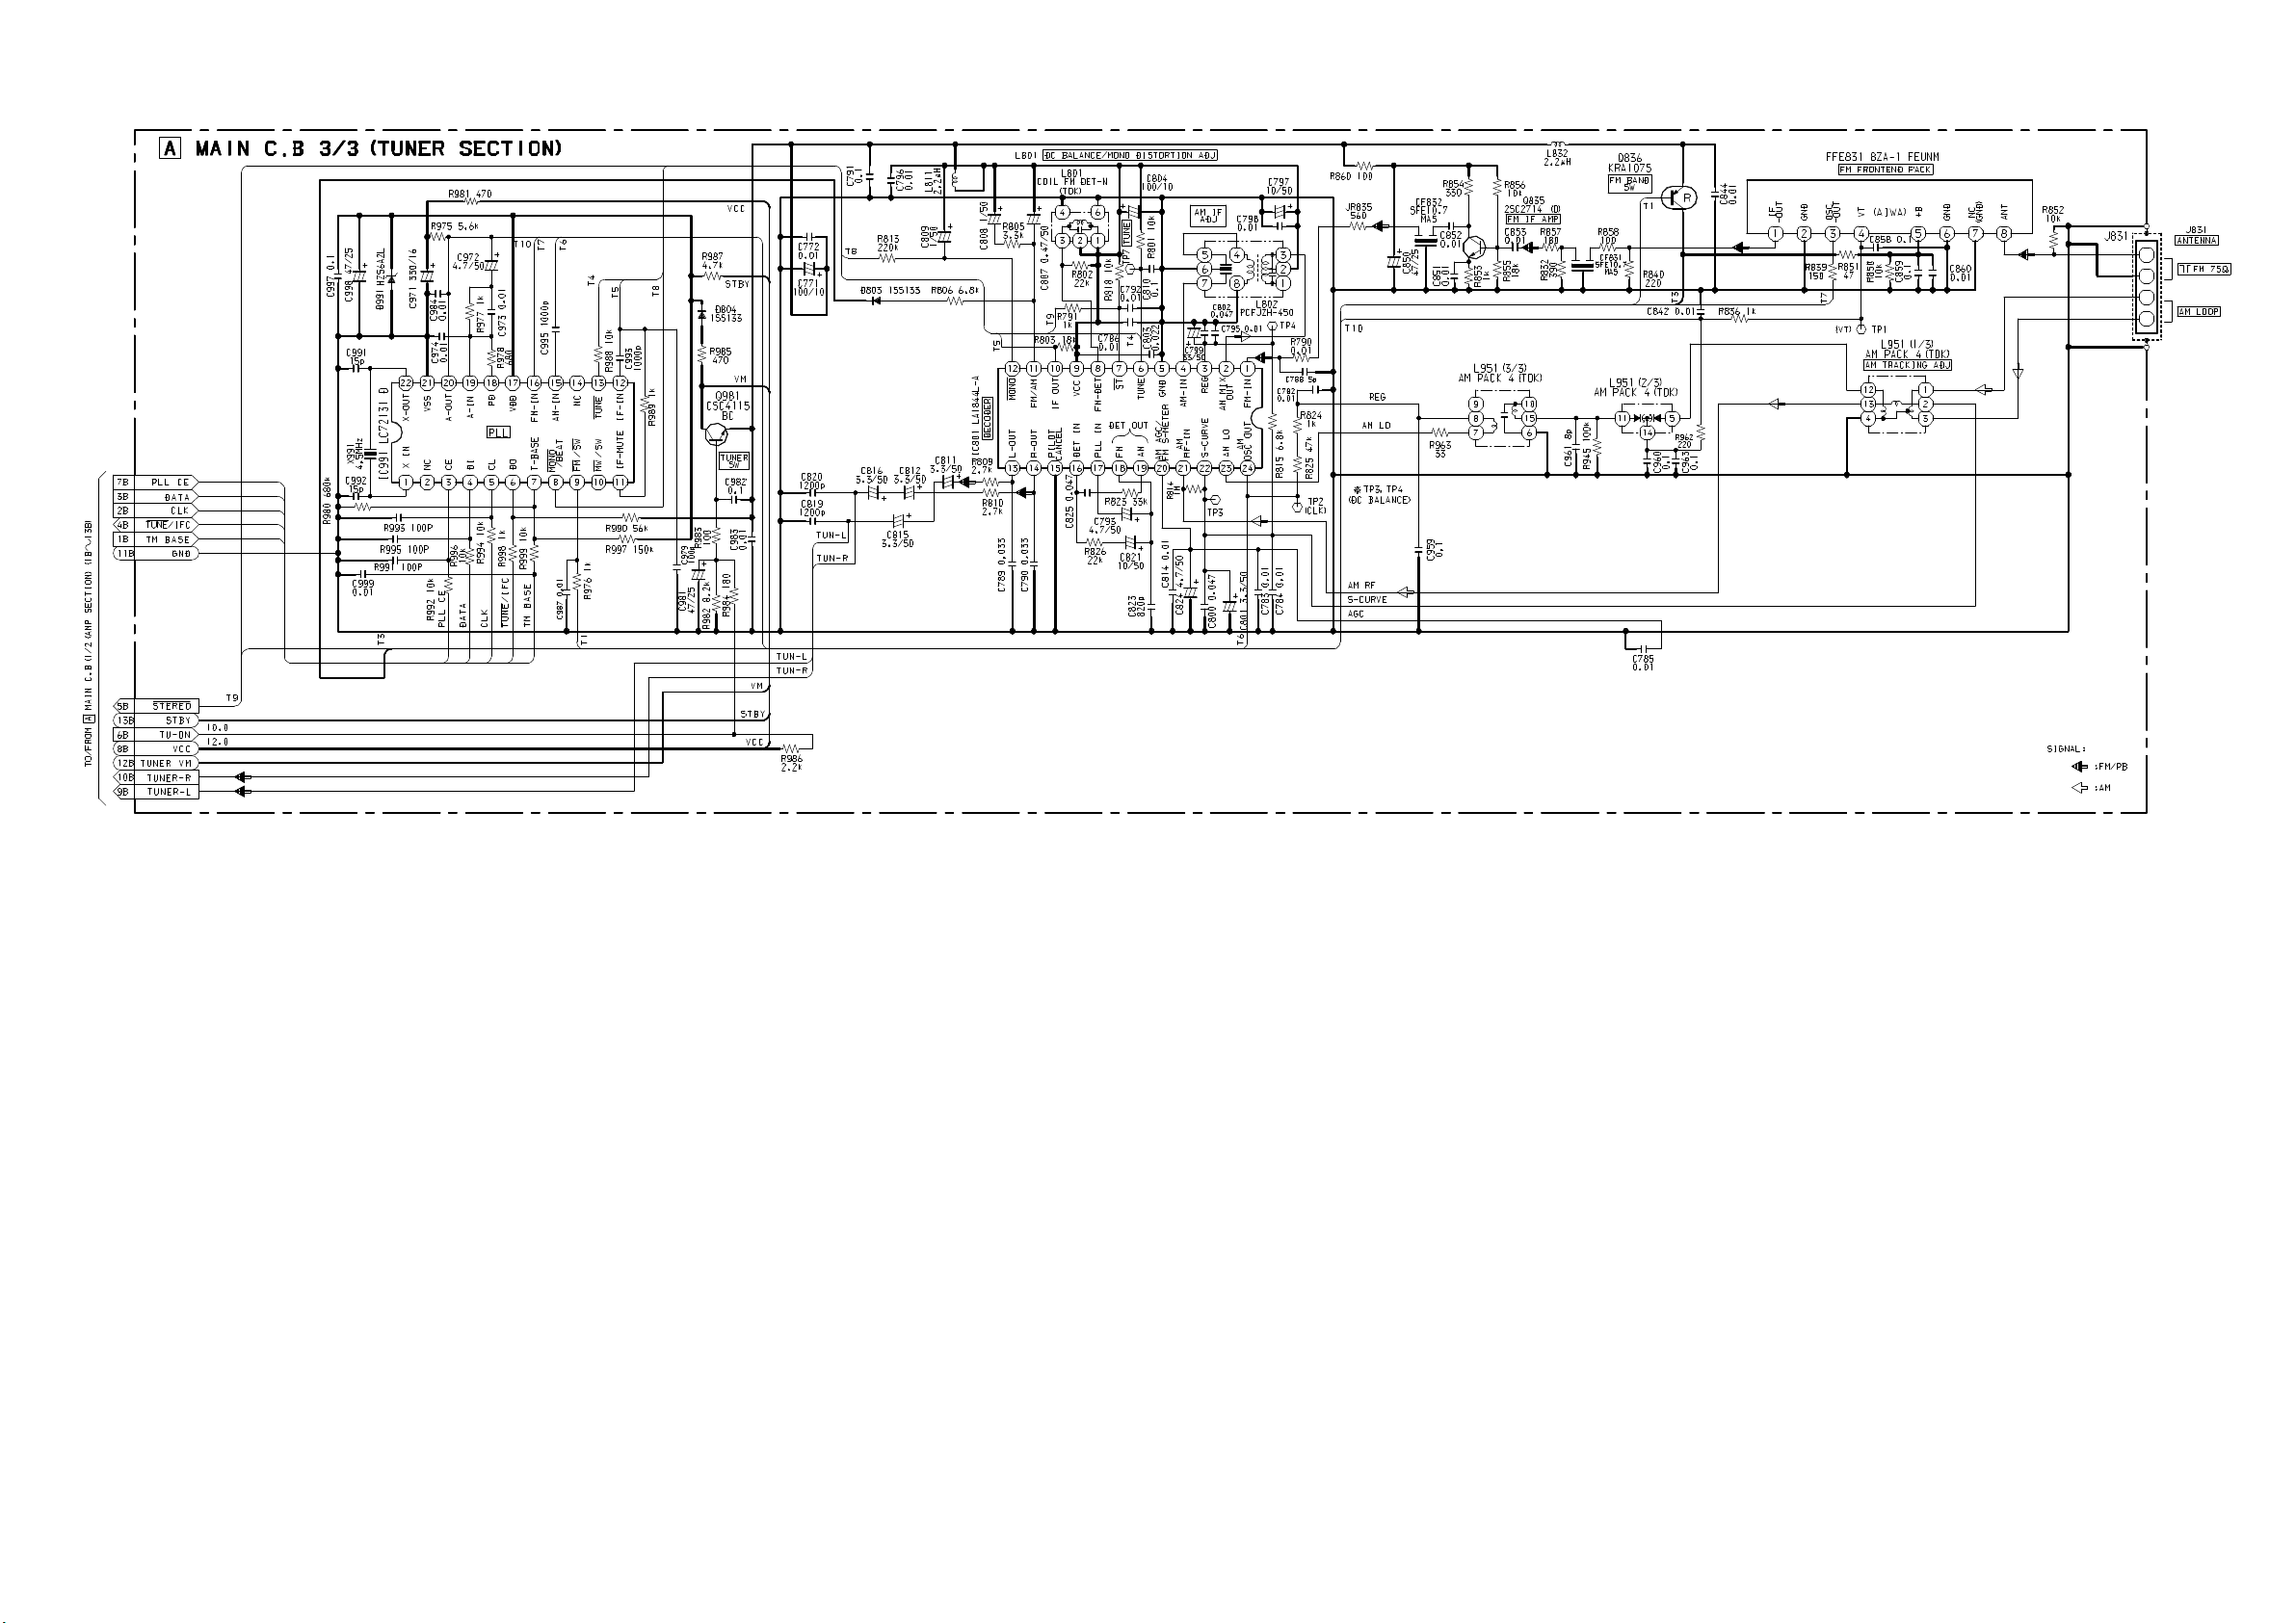
SCHEMATIC DIAGRAM – 3 (MAIN 3 / 3: TUNER SECTION)
– 15 –
Page 16
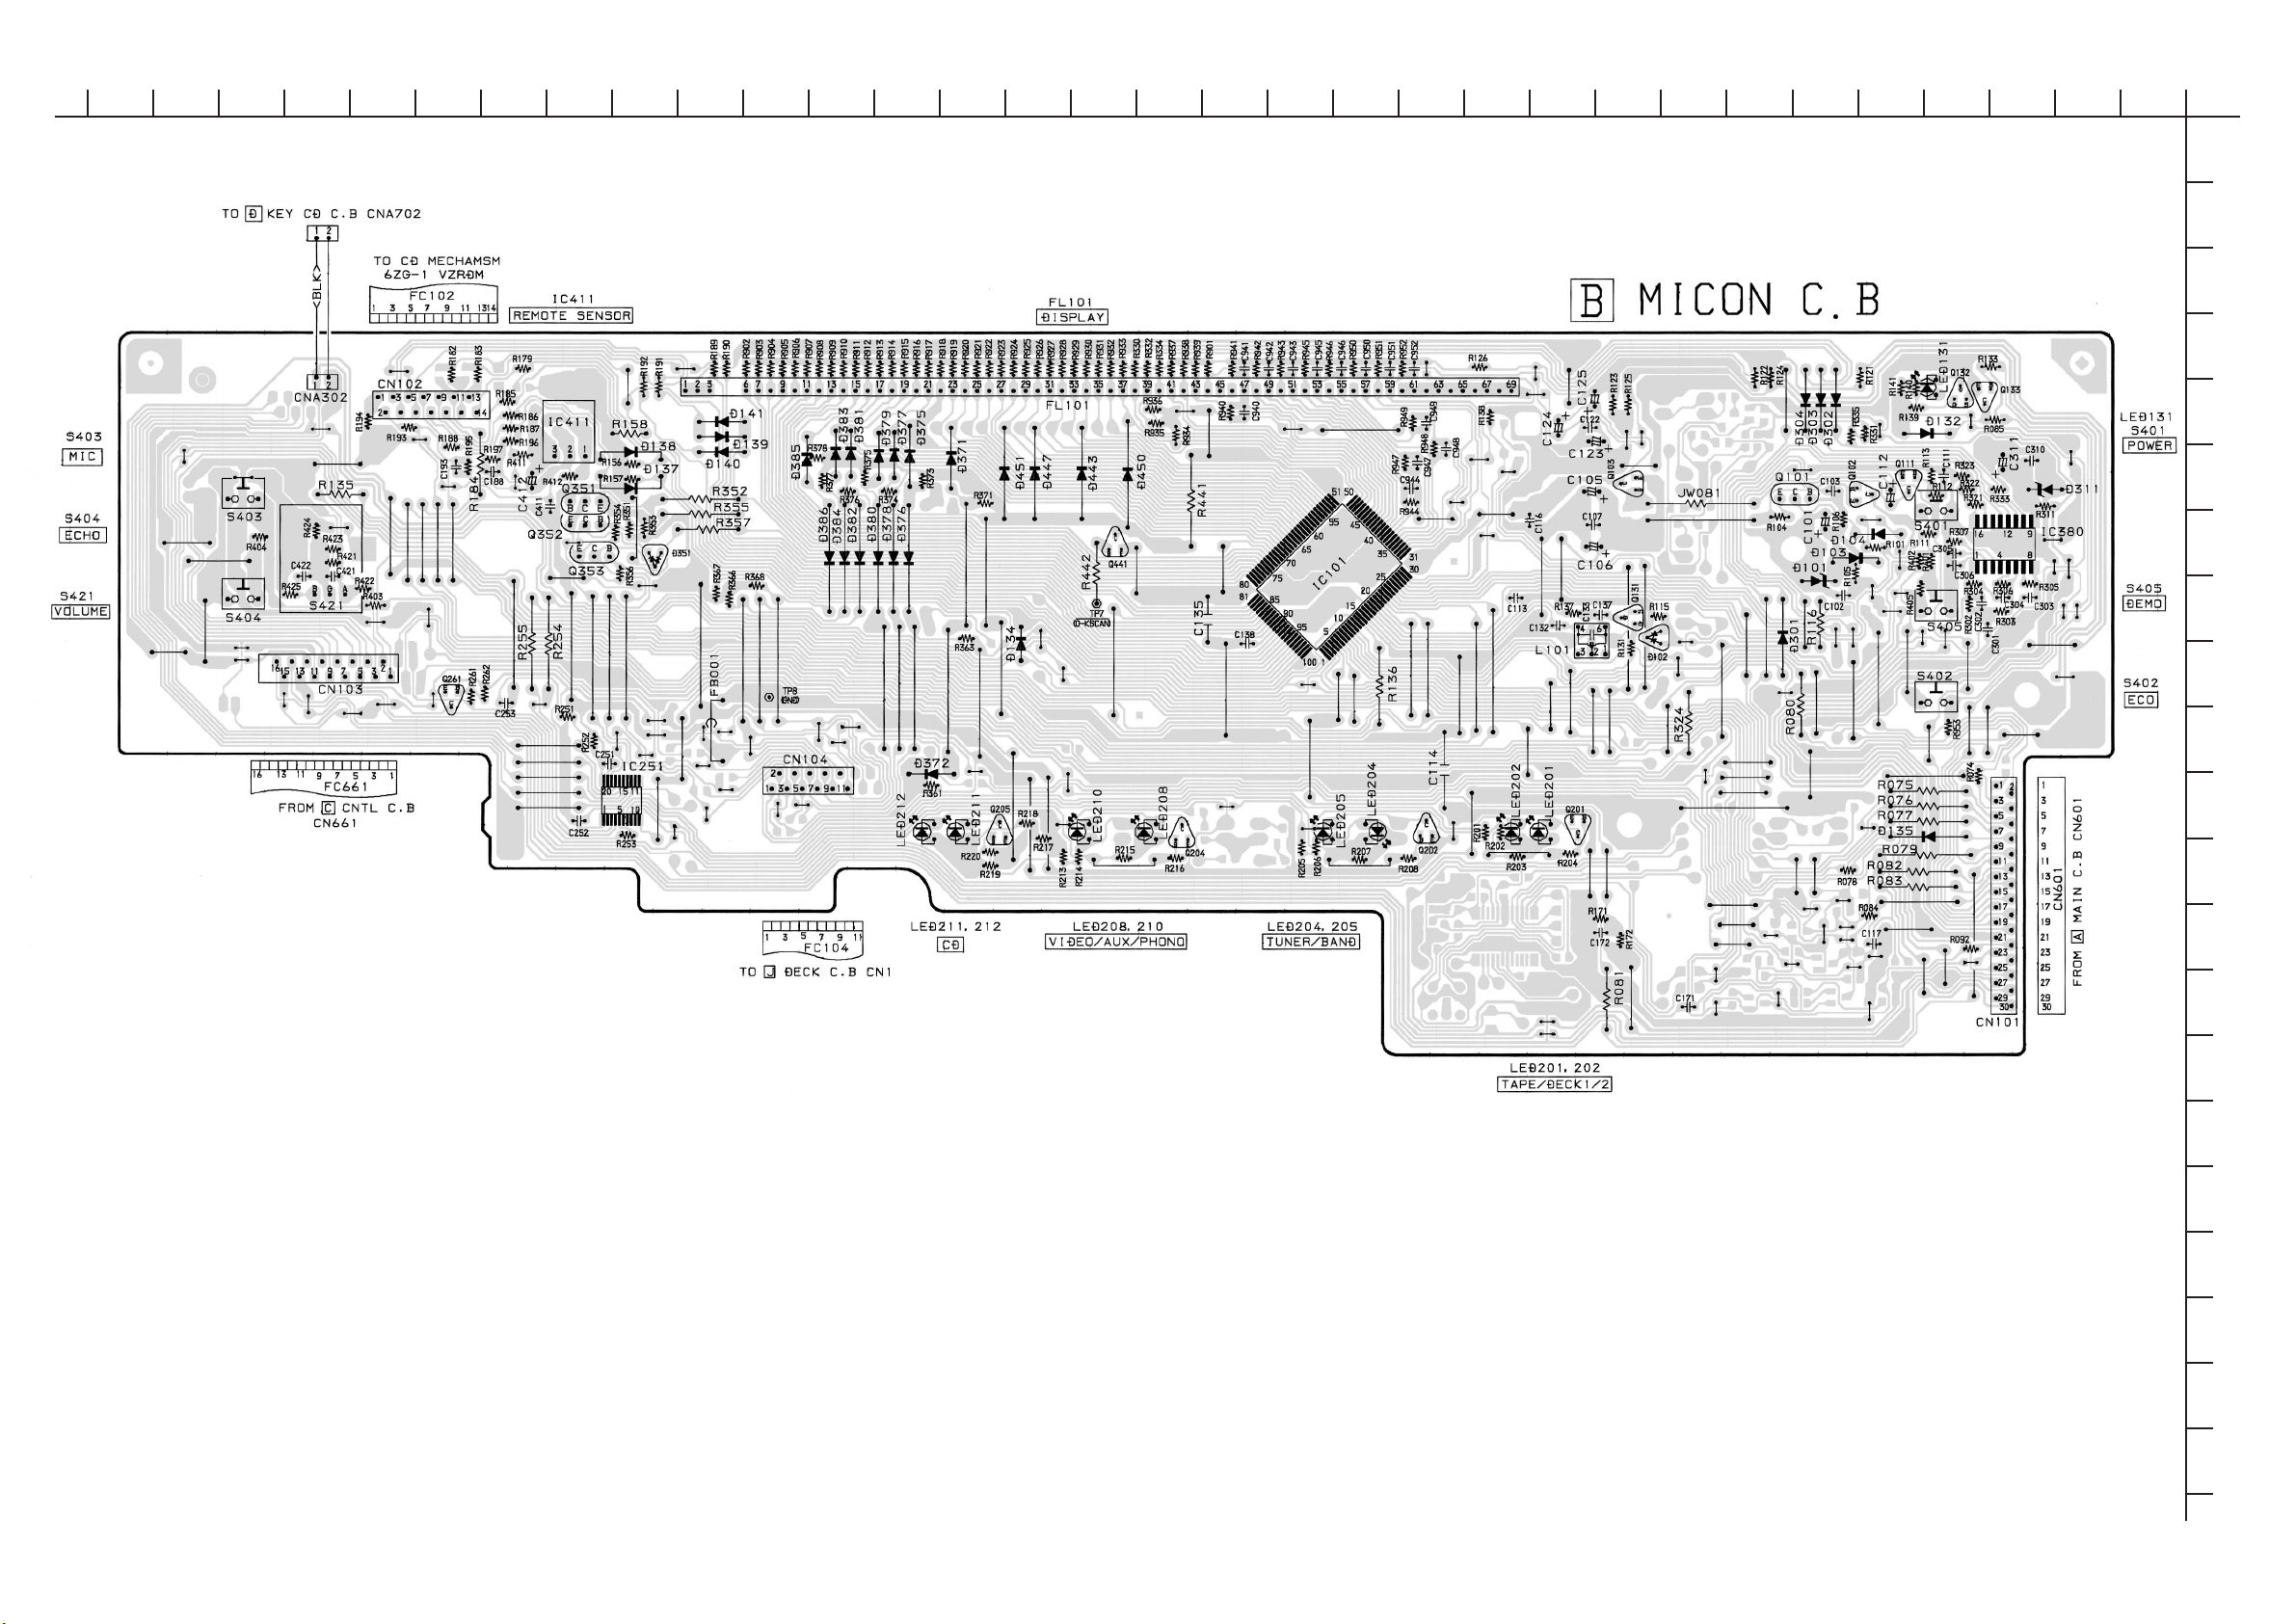
WIRING – 2 (MICON)
101112131415161718192021222324
1234567892526272829303132
A
B
C
D
E
F
G
H
I
J
K
L
M
N
O
P
Q
– 16 –
R
S
T
U
Page 17
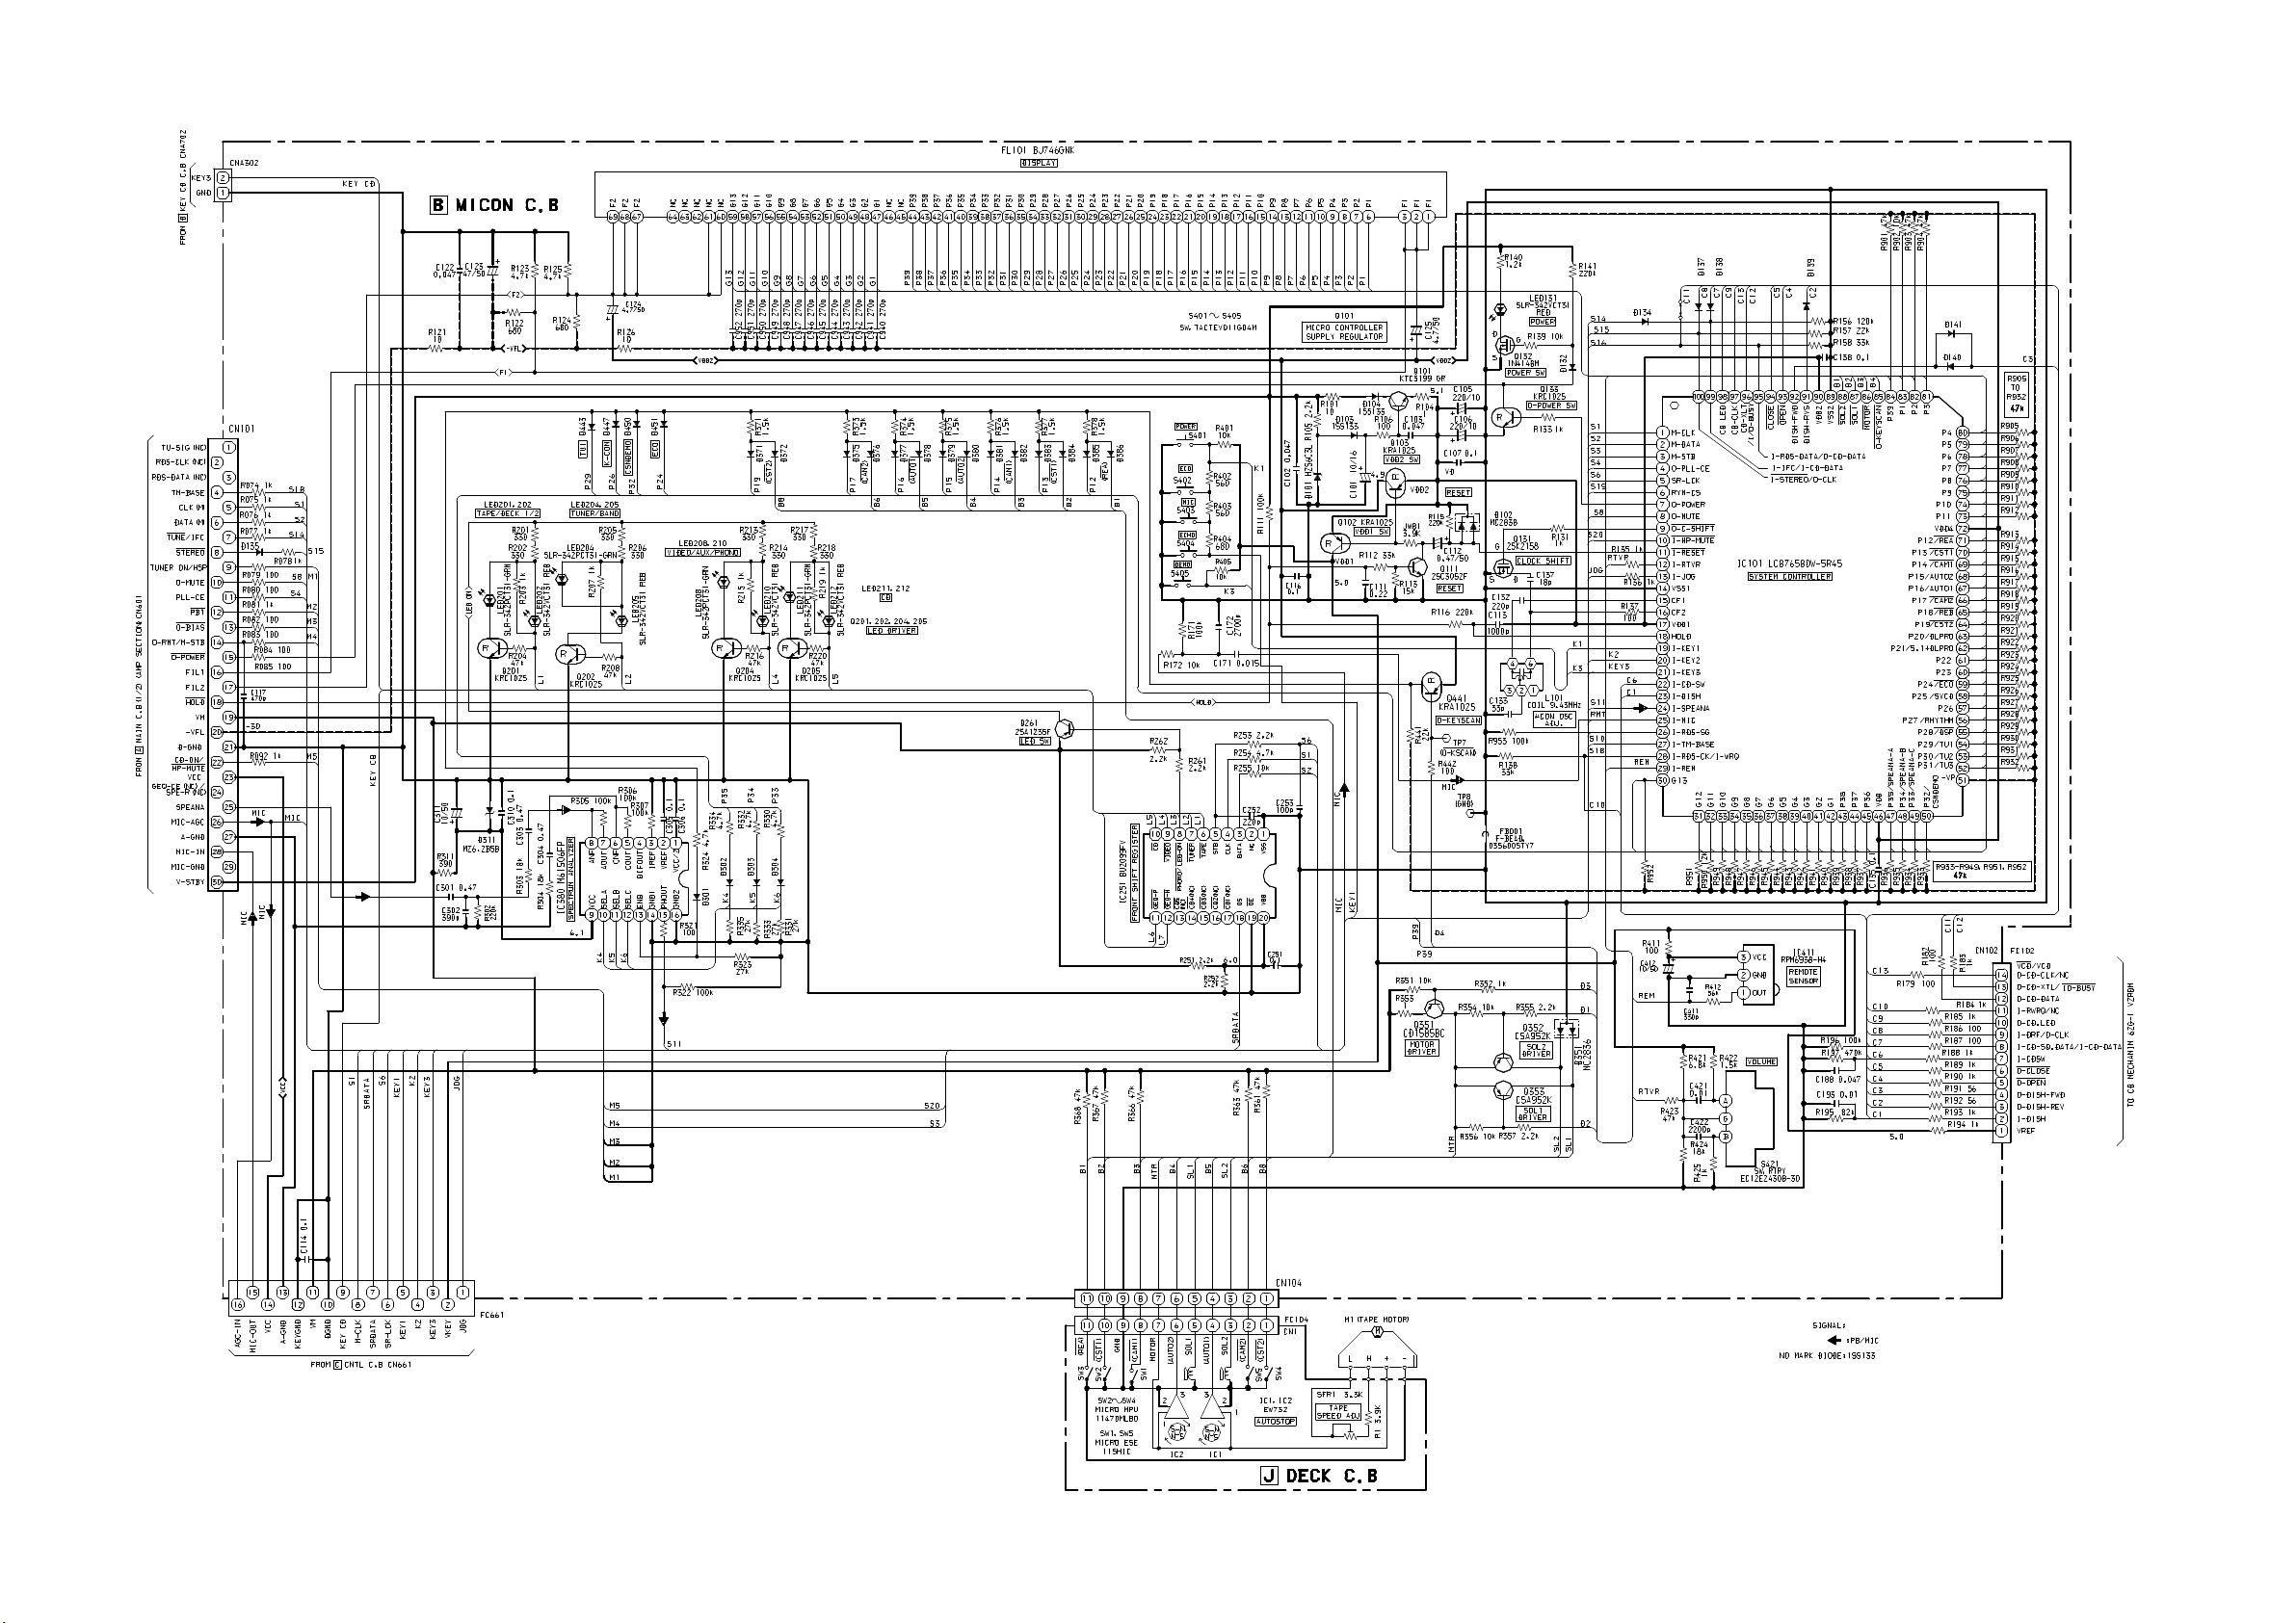
SCHEMATIC DIAGRAM – 4 (MICON / DECK)
– 17 –
Page 18
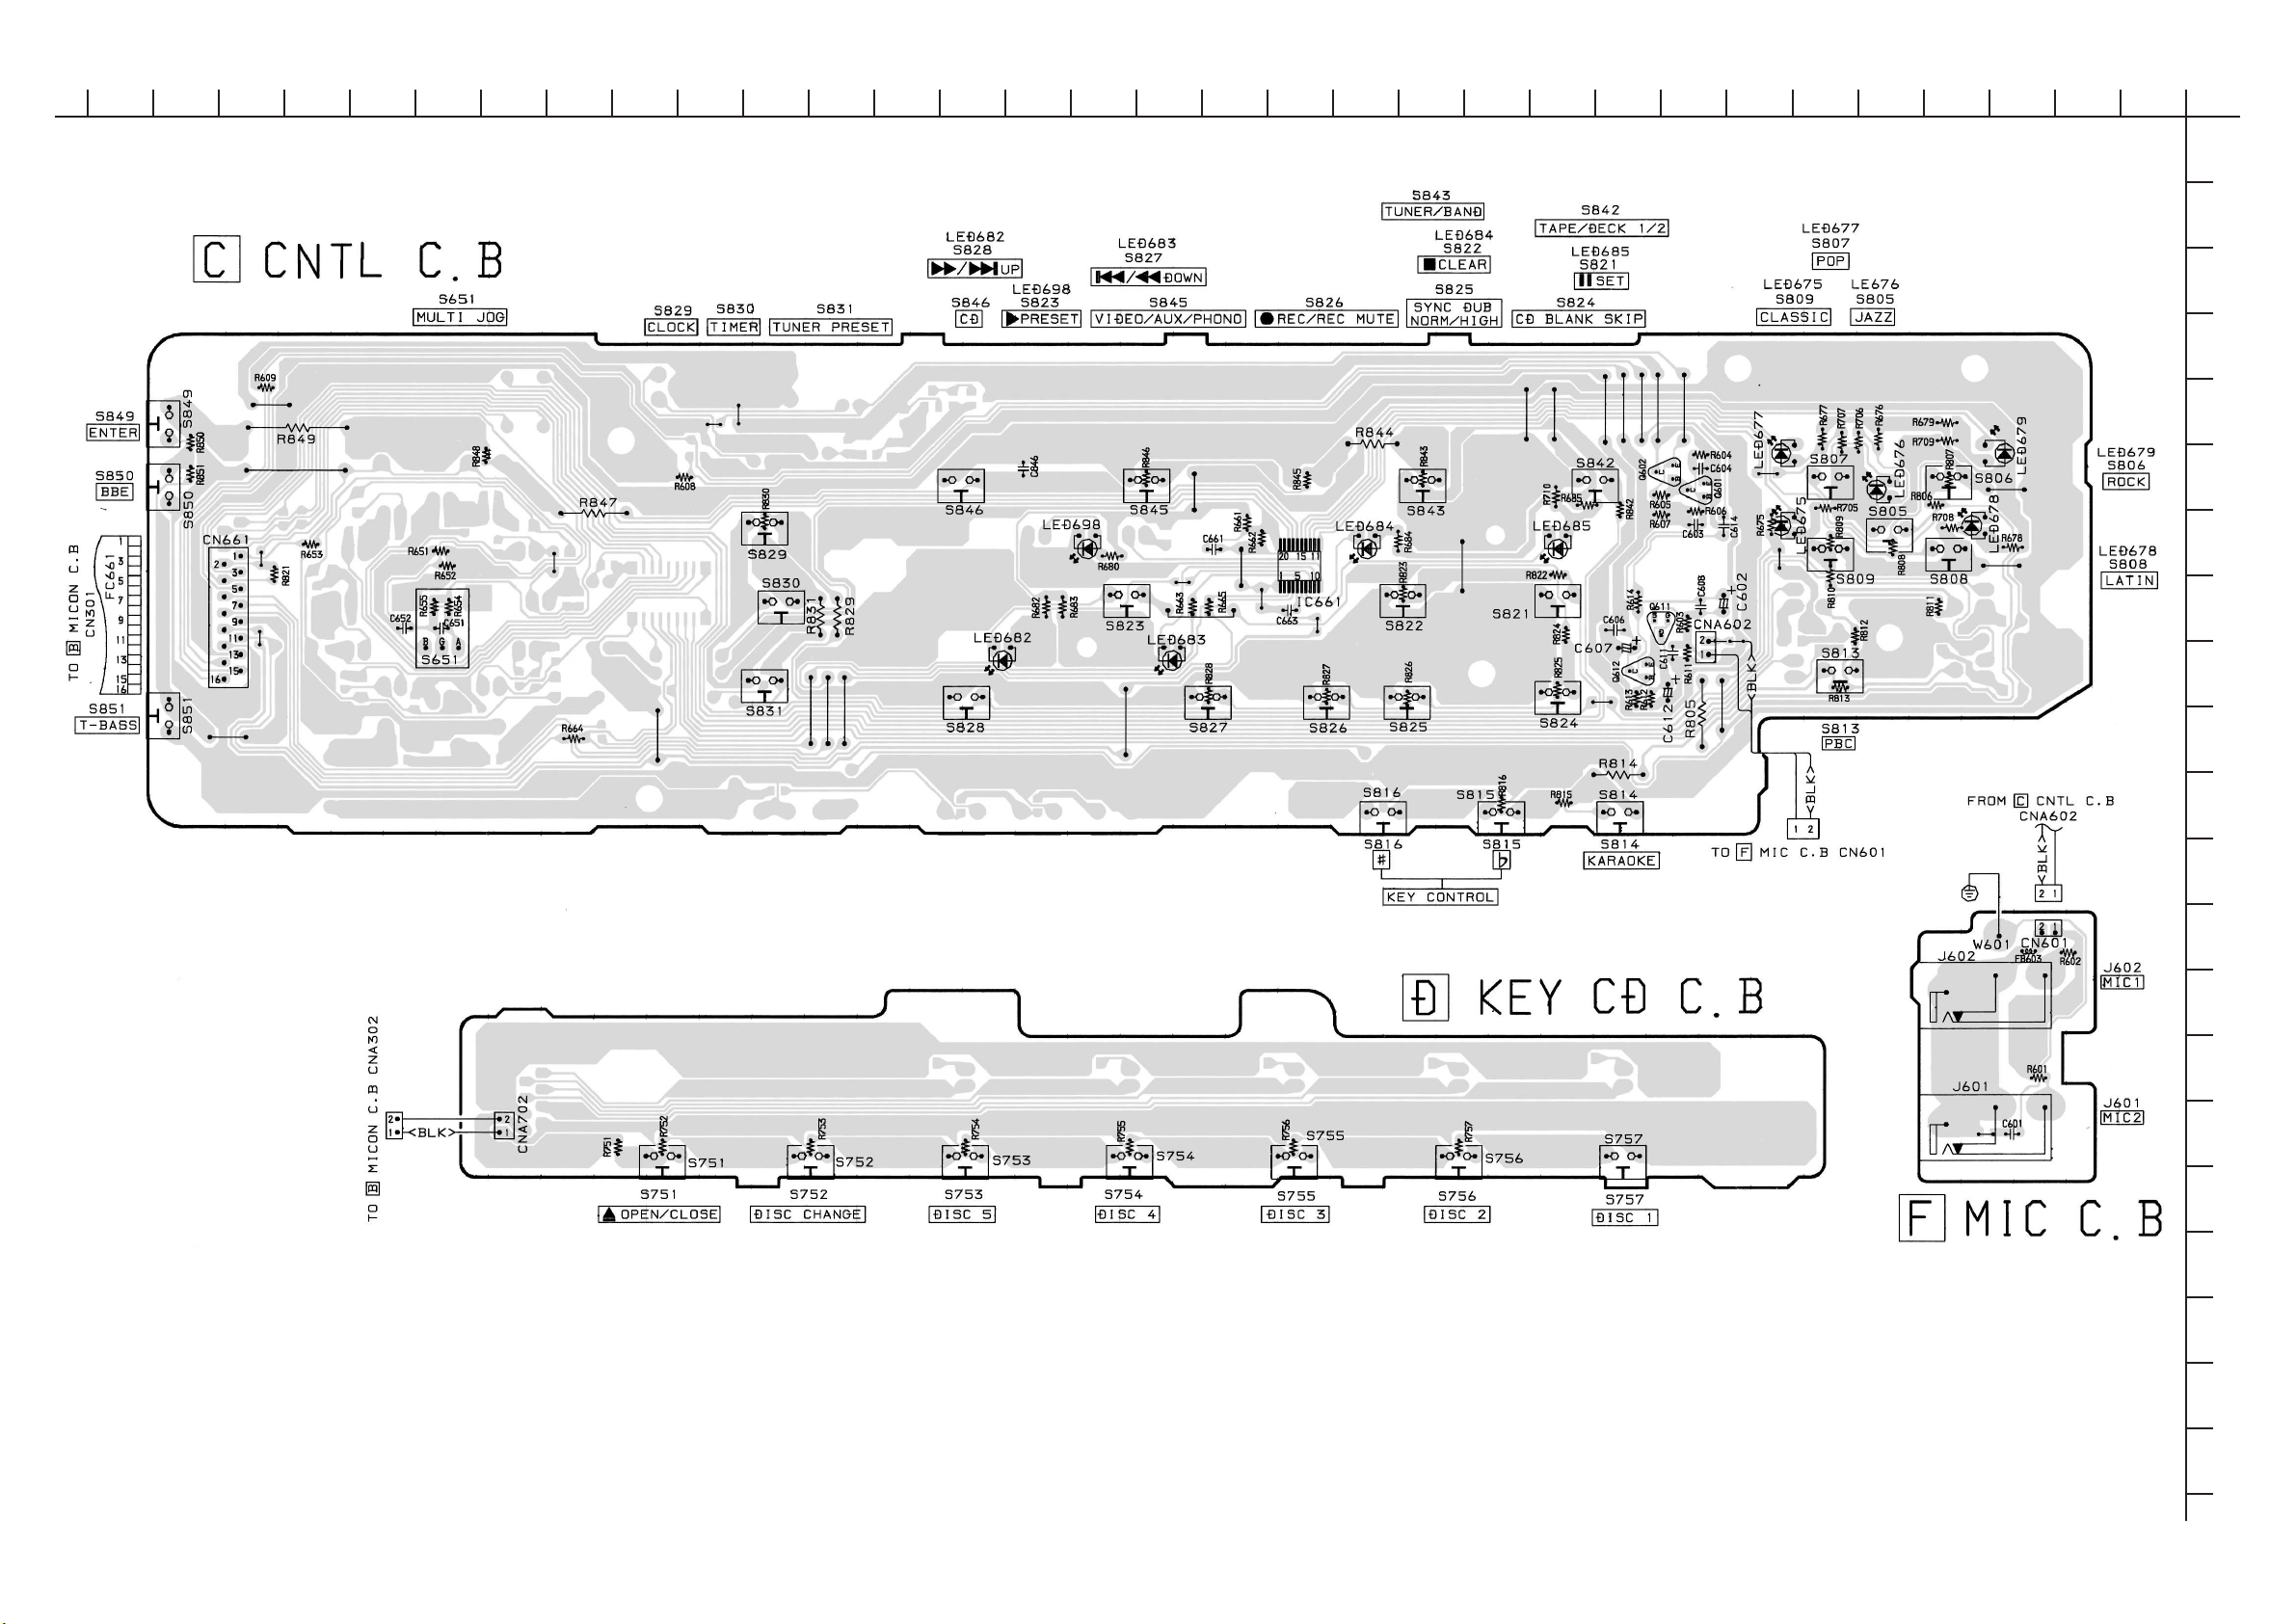
WIRING – 3 (CNTL / KEY CD / MIC)
101112131415161718192021222324
1234567892526272829303132
A
B
C
D
E
F
G
H
I
J
K
L
M
N
O
P
Q
– 18 –
R
S
T
U
Page 19
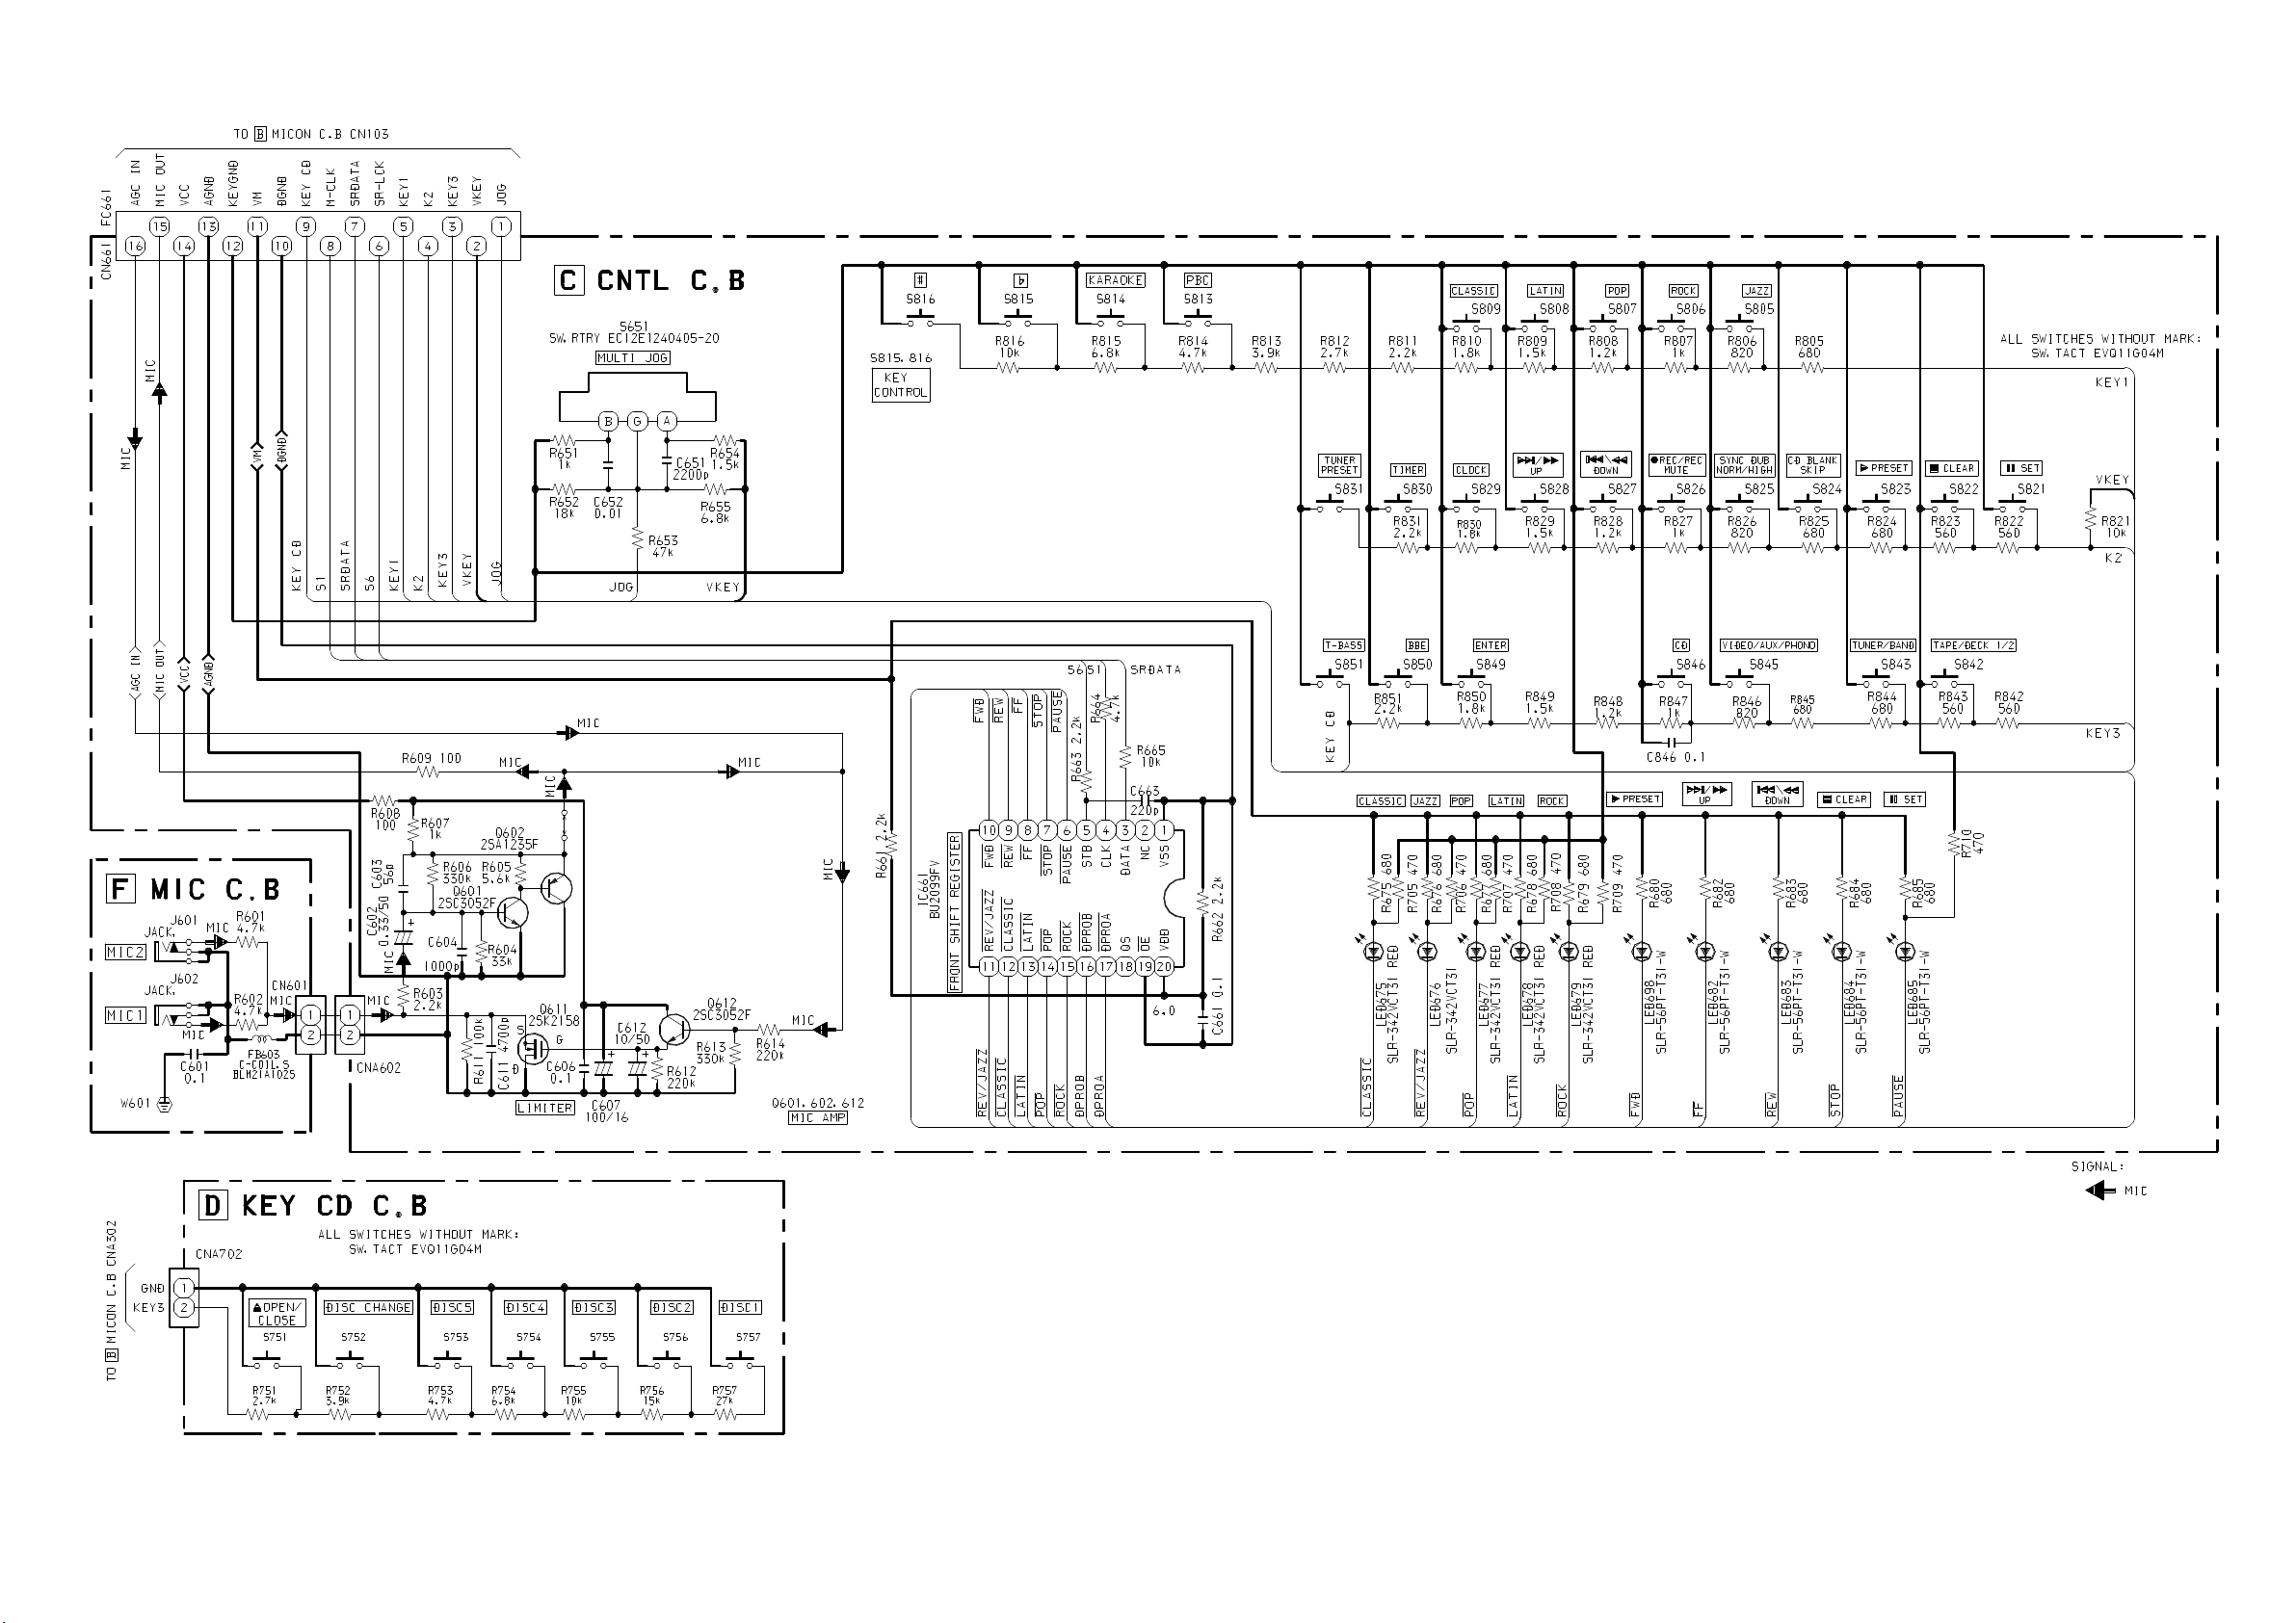
SCHEMATIC DIAGRAM – 5 (CNTL / KEY CD)
– 19 –
Page 20
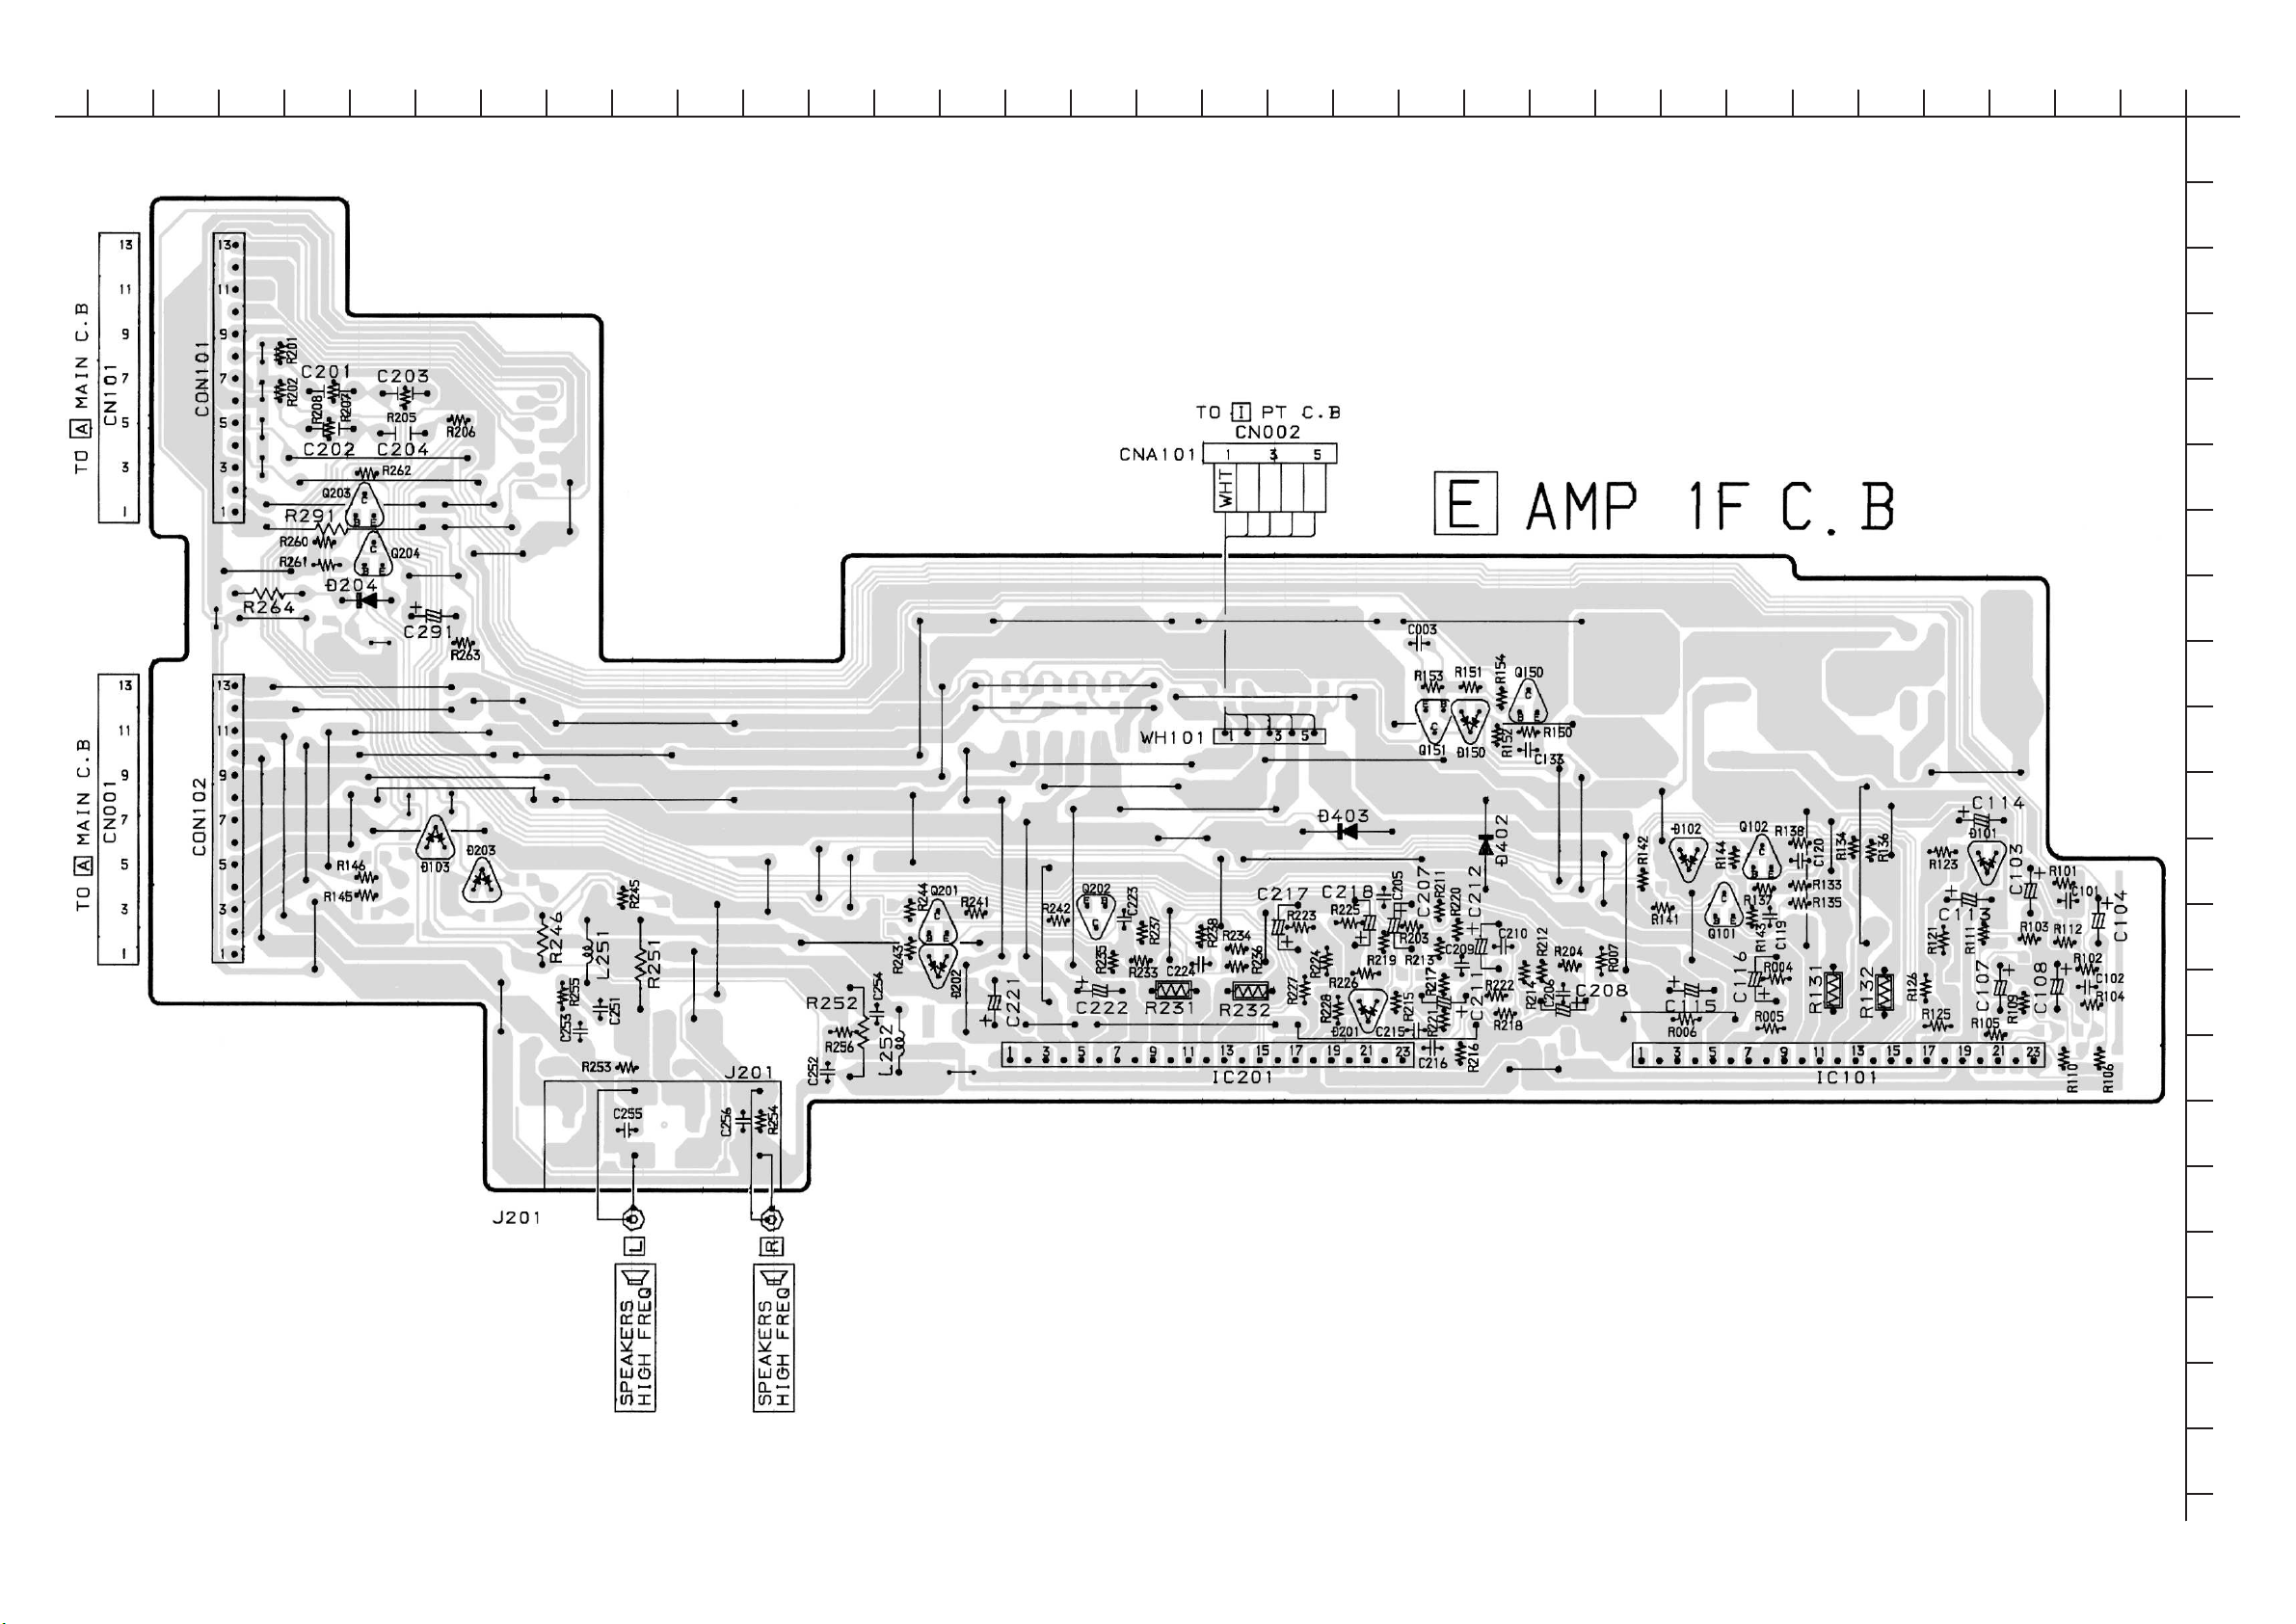
WIRING – 4 (AMP 1F)
101112131415161718192021222324
1234567892526272829303132
A
B
C
D
E
F
G
H
I
J
K
L
M
N
O
P
Q
– 20 –
R
S
T
U
Page 21
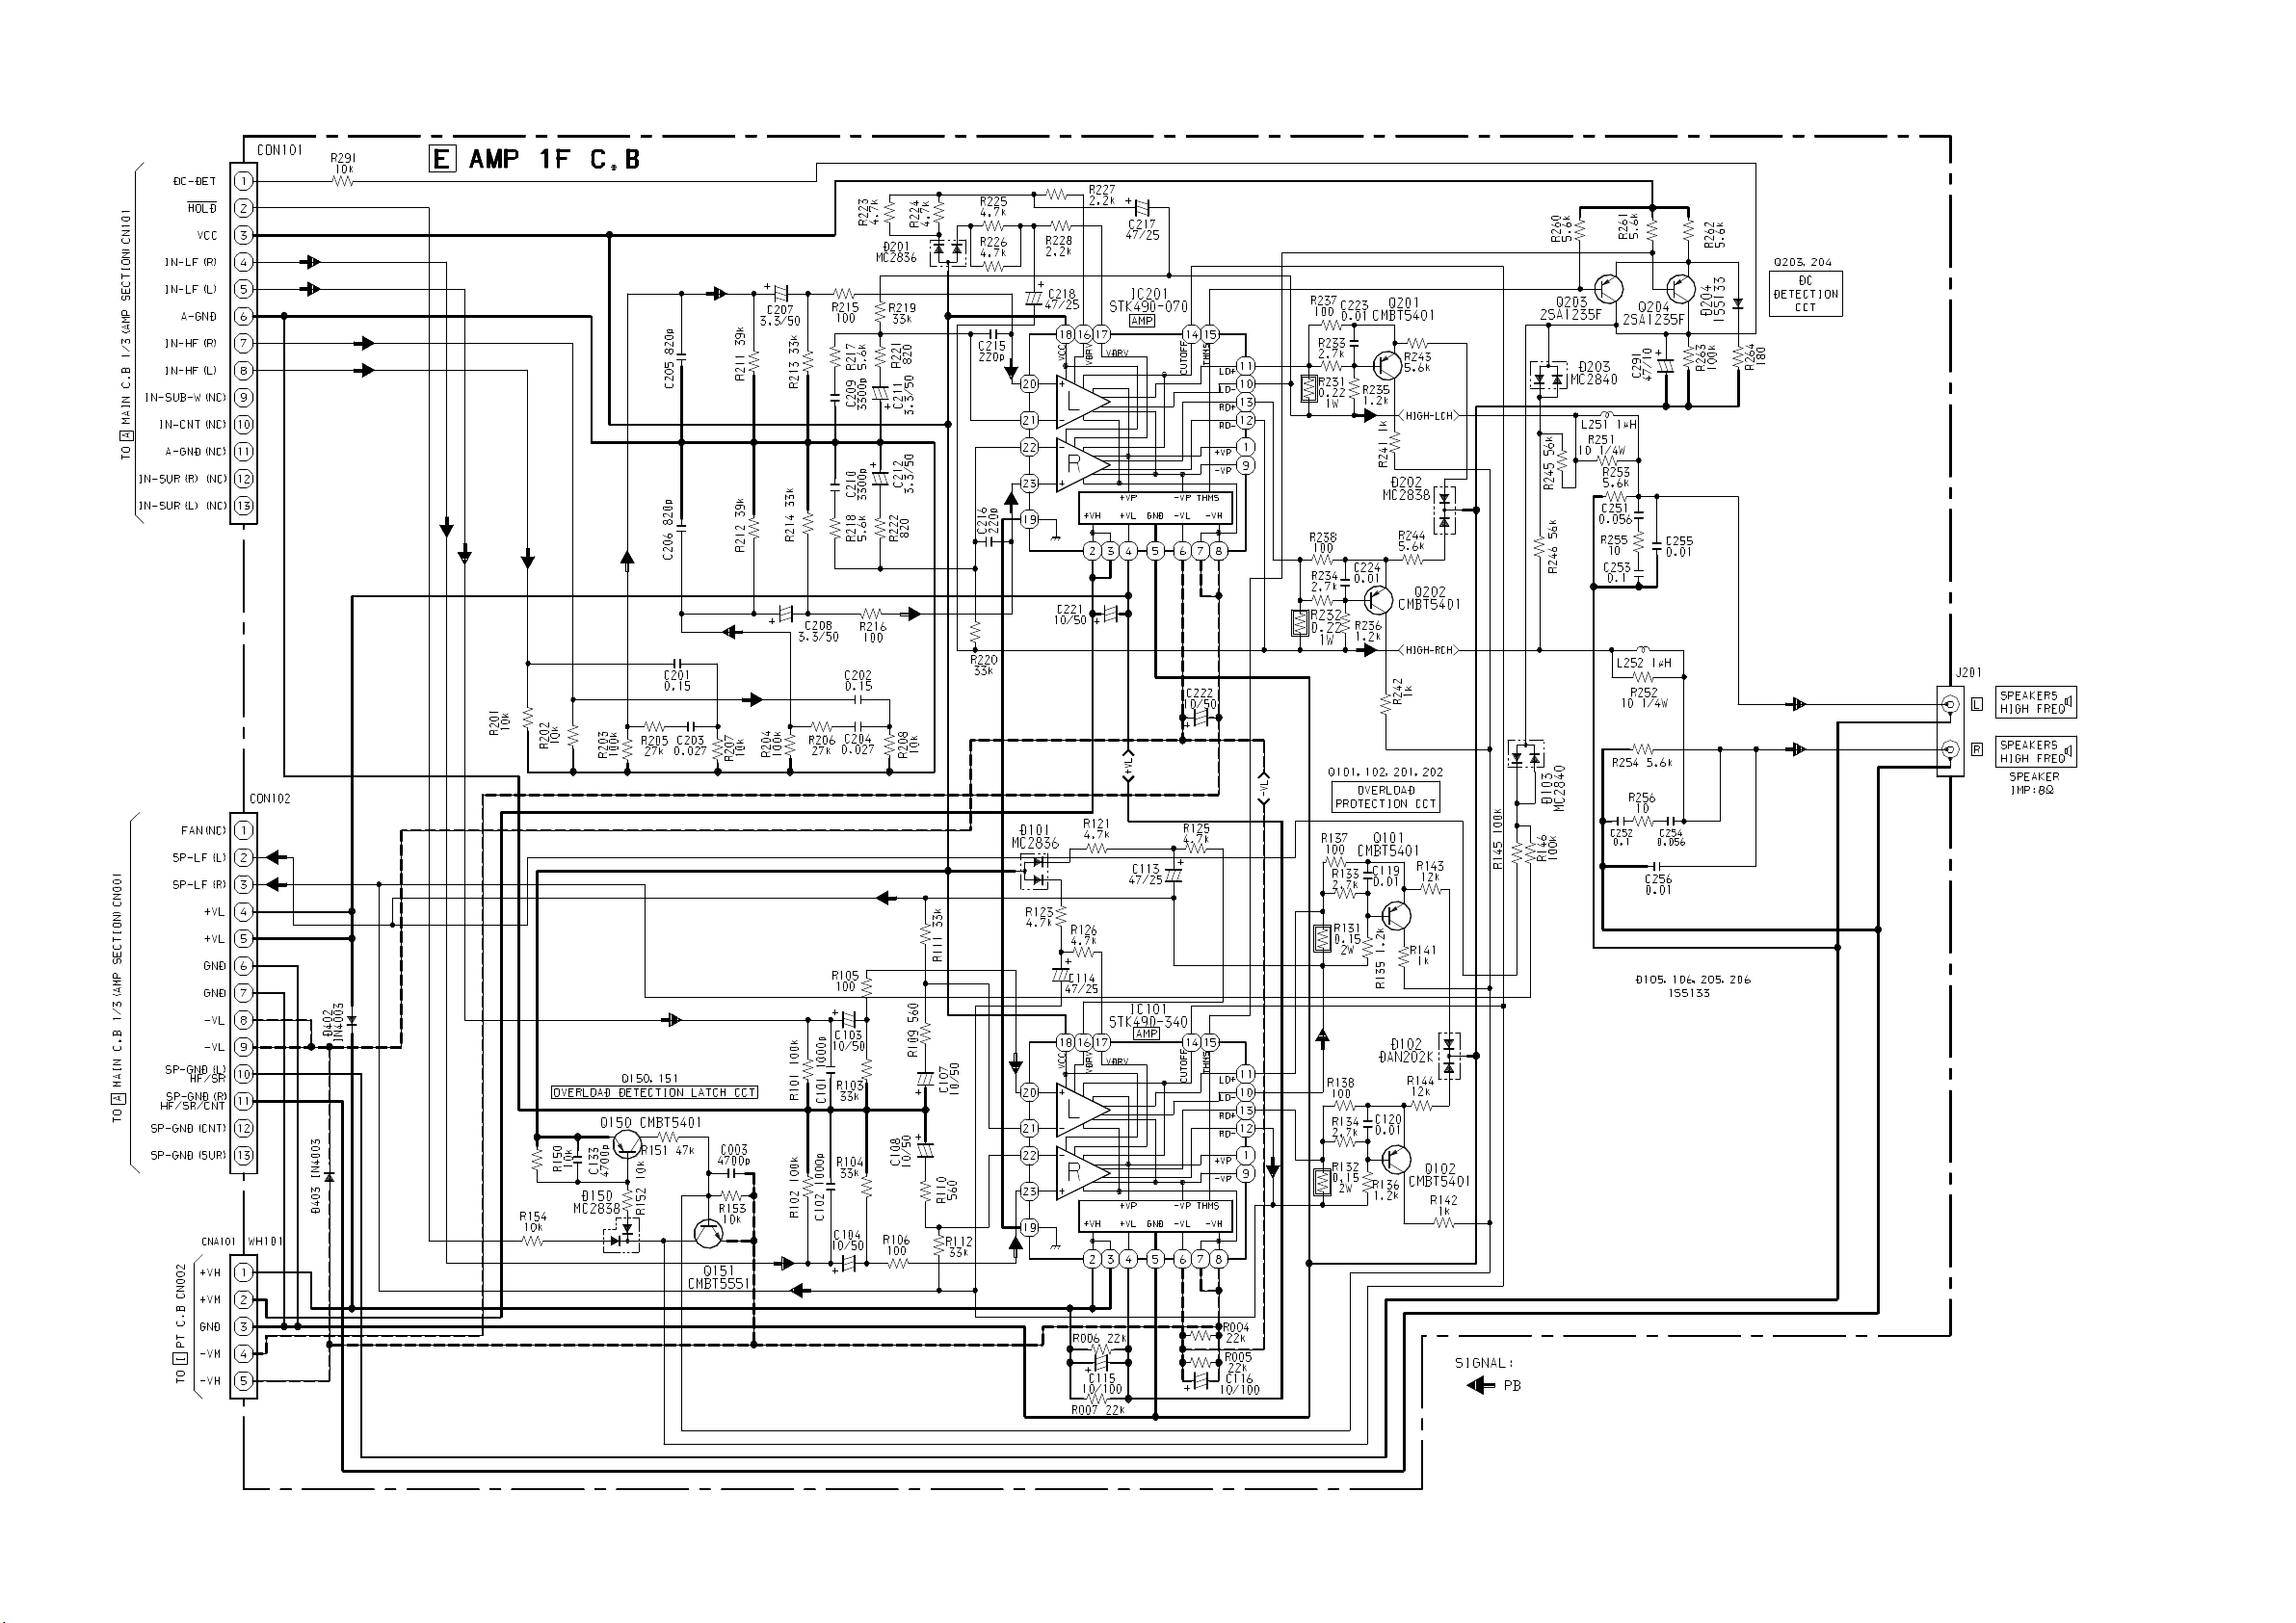
SCHEMATIC DIAGRAM – 6 (AMP 1F)
– 21 –
Page 22
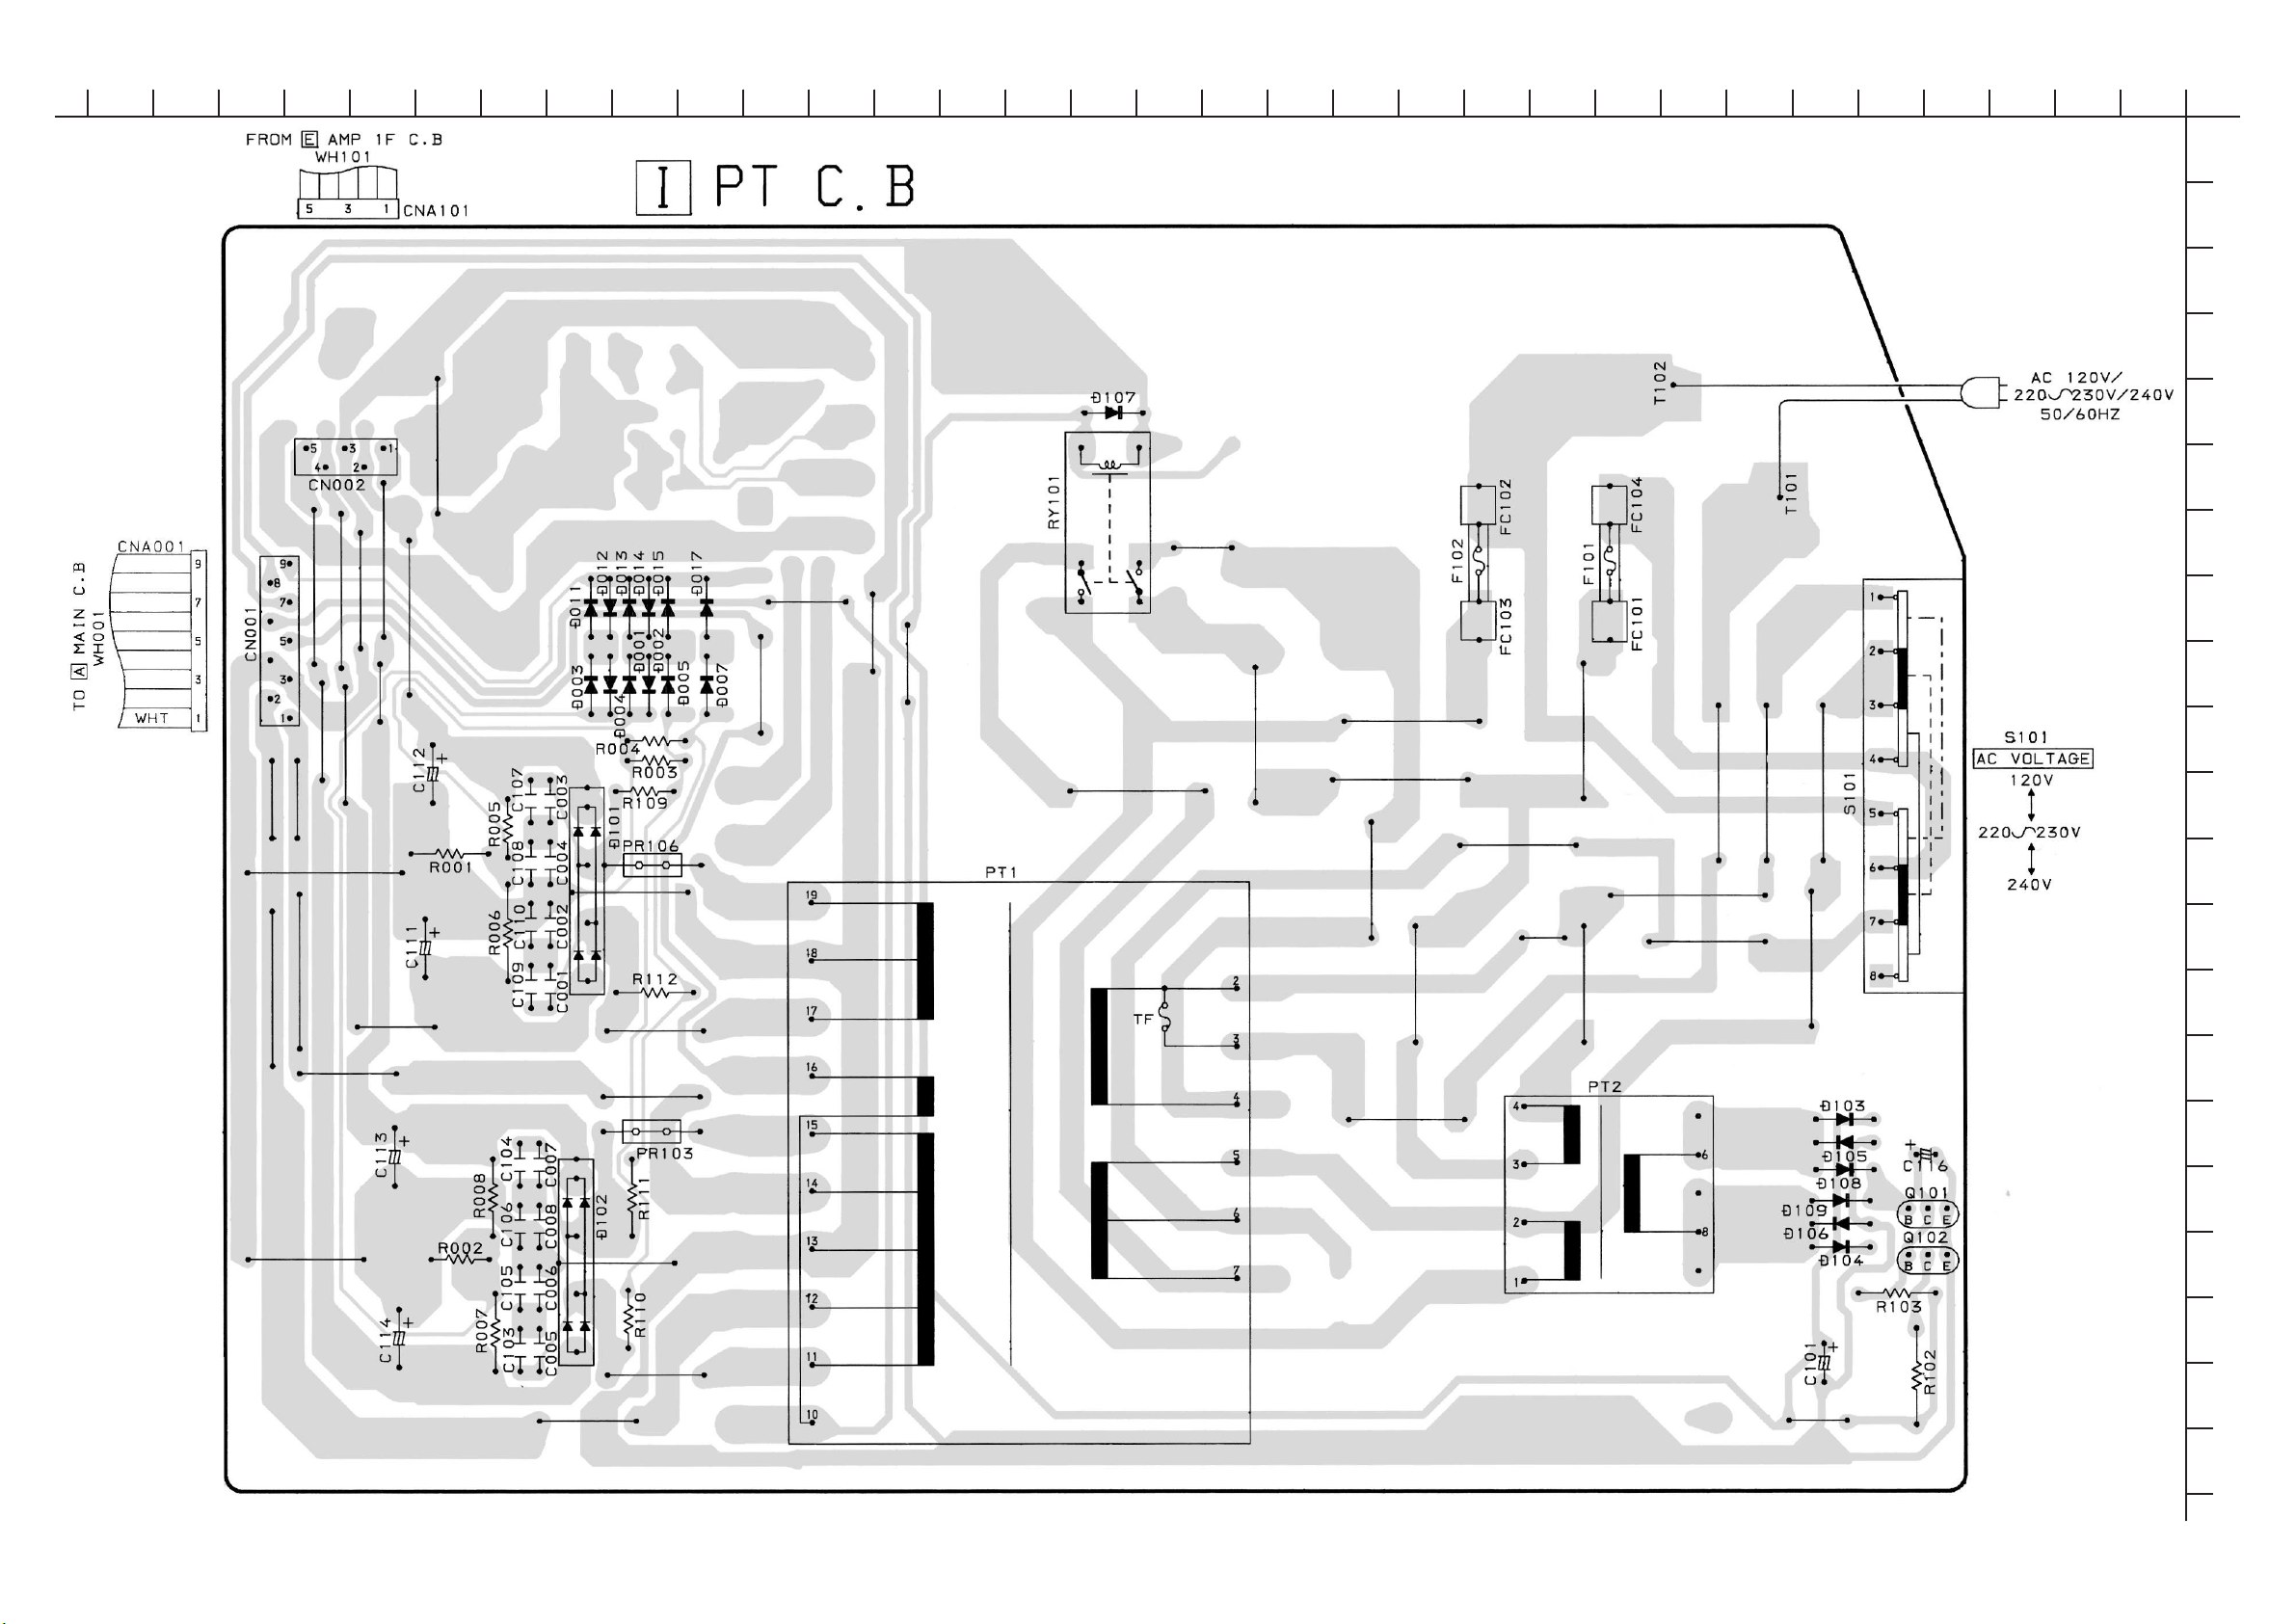
WIRING – 5 (PT)
101112131415161718192021222324
1234567892526272829303132
A
B
C
D
E
F
G
H
I
J
K
L
M
N
O
P
Q
– 22 –
R
S
T
U
Page 23
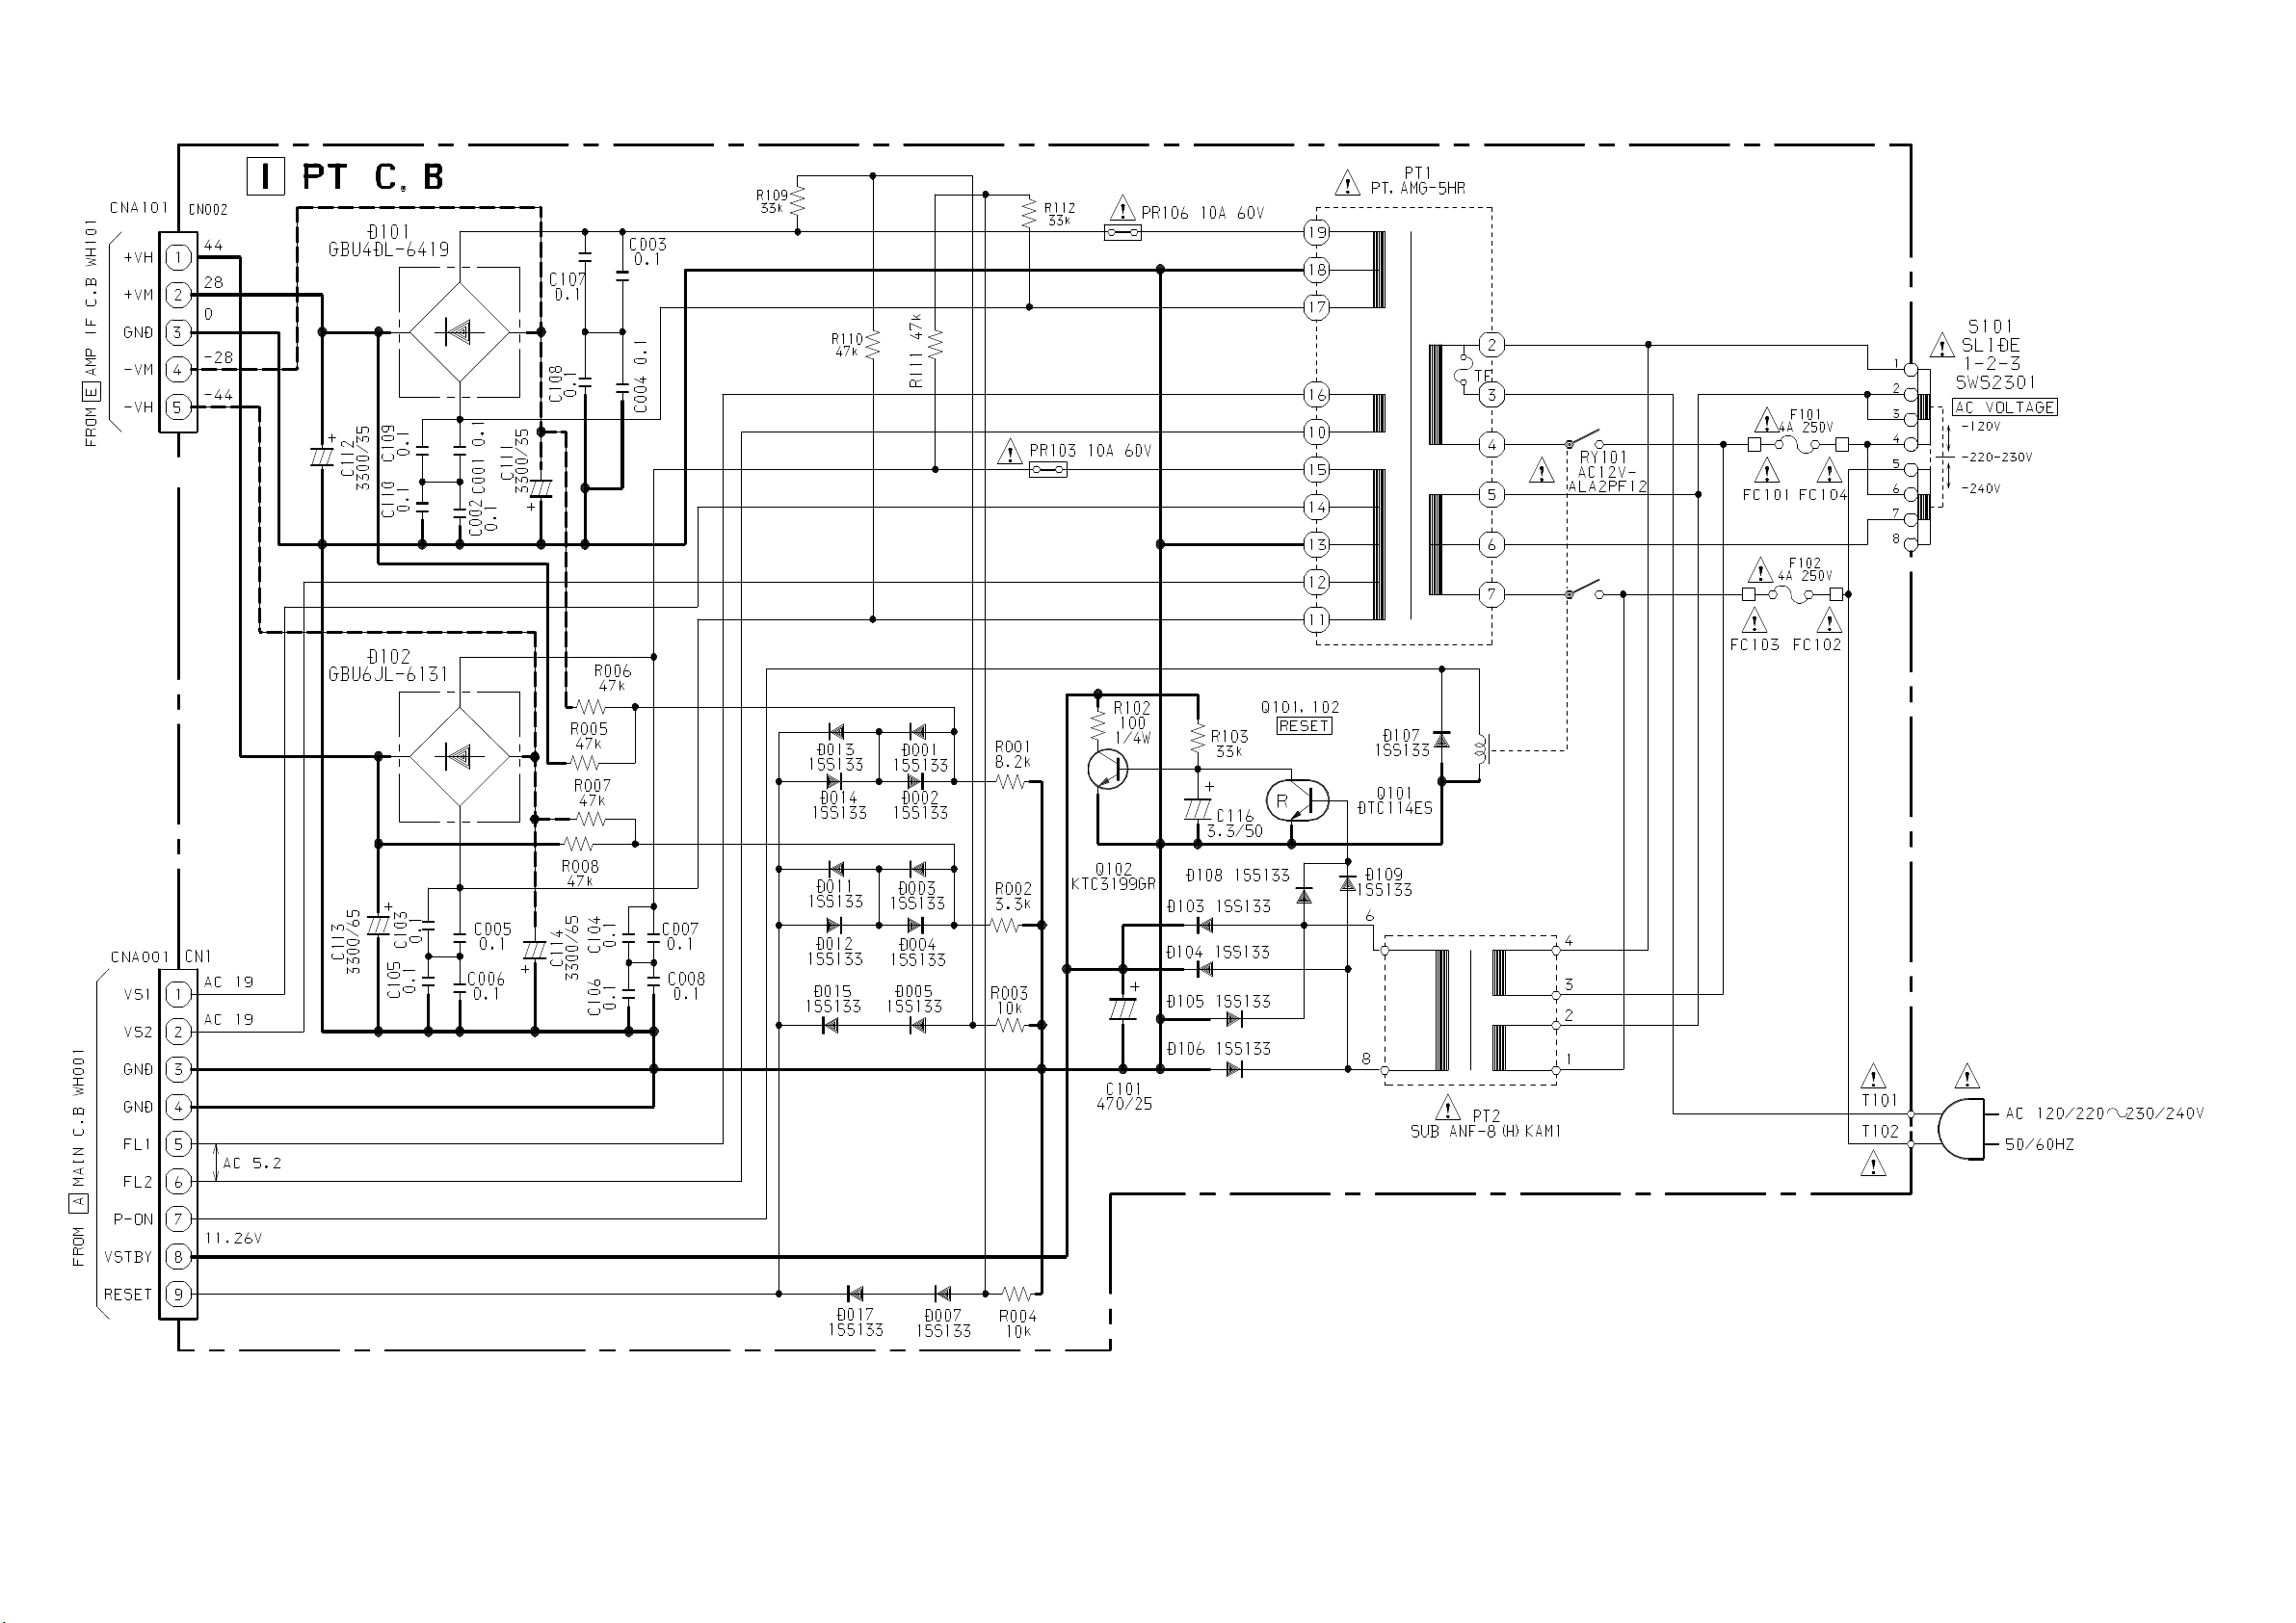
SCHEMATIC DIAGRAM – 7 (PT)
– 23 –
Page 24
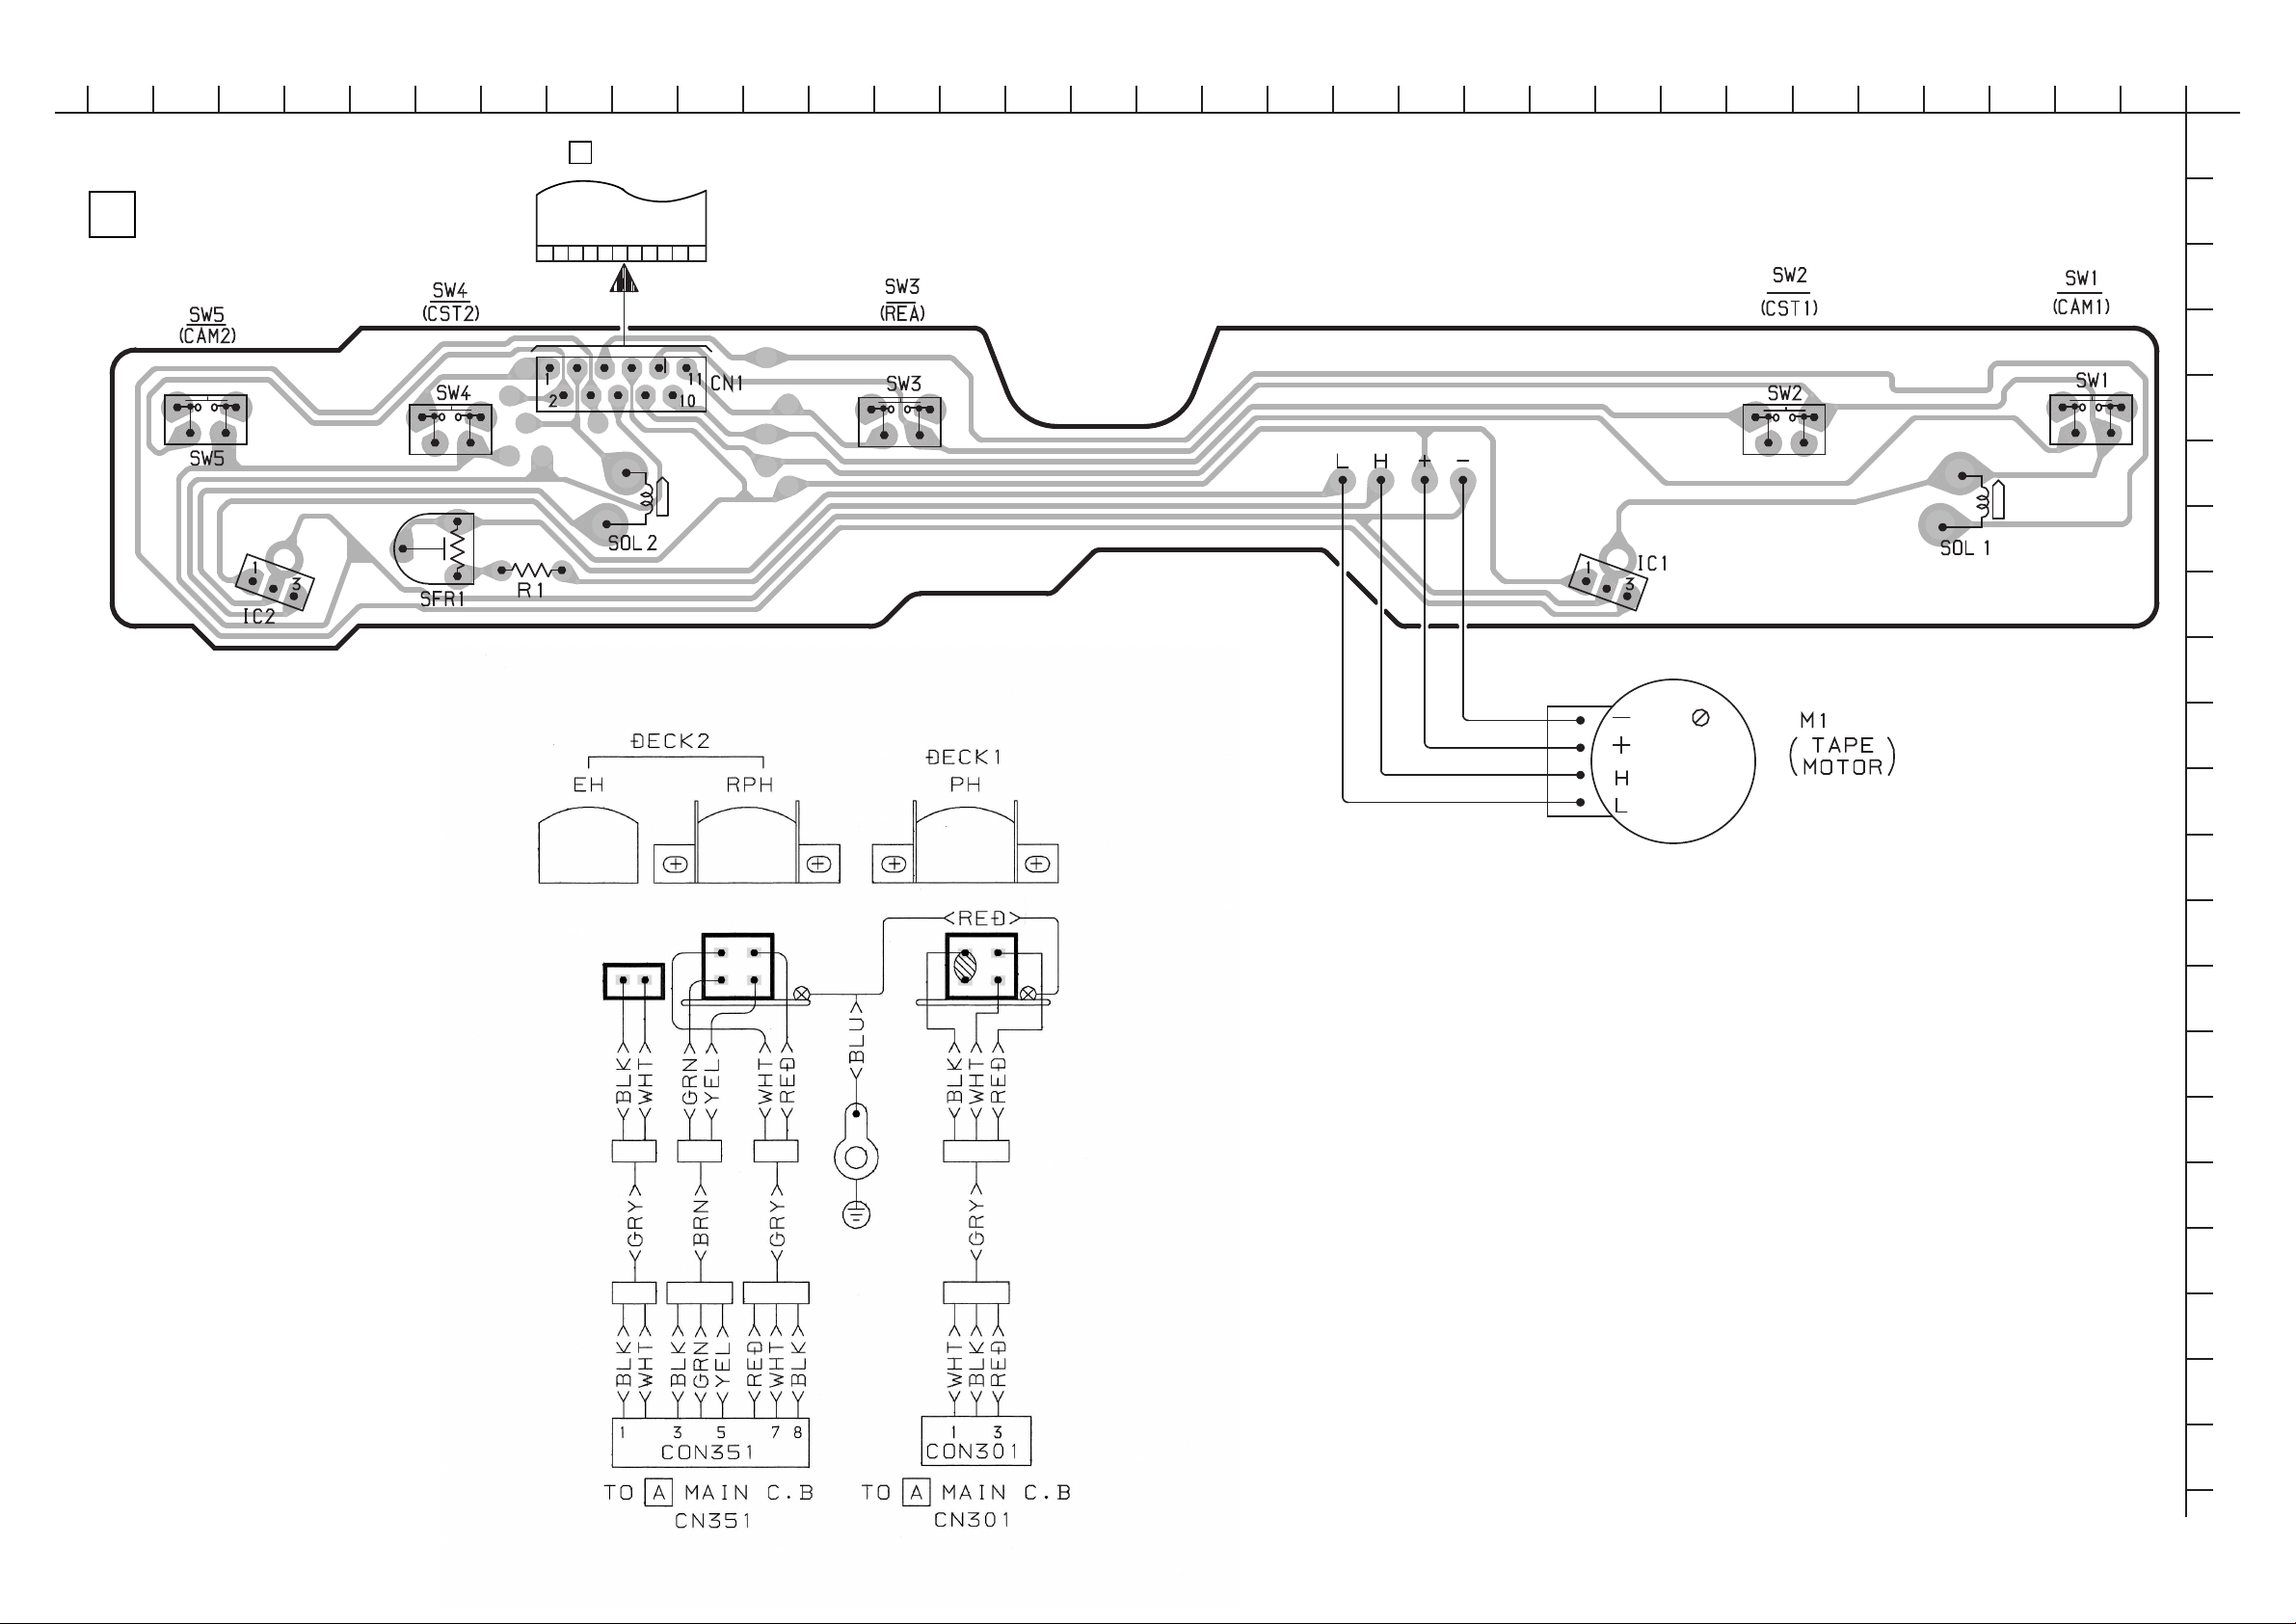
WIRING – 6 (DECK)
101112131415161718192021222324
1234567892526272829303132
J DECK C . B
FROM
B MICON C. B CN104
FC104
1 3
5
7
11
9
A
B
C
D
E
F
G
H
I
J
K
L
M
N
O
P
Q
R
– 24 –
S
T
U
Page 25
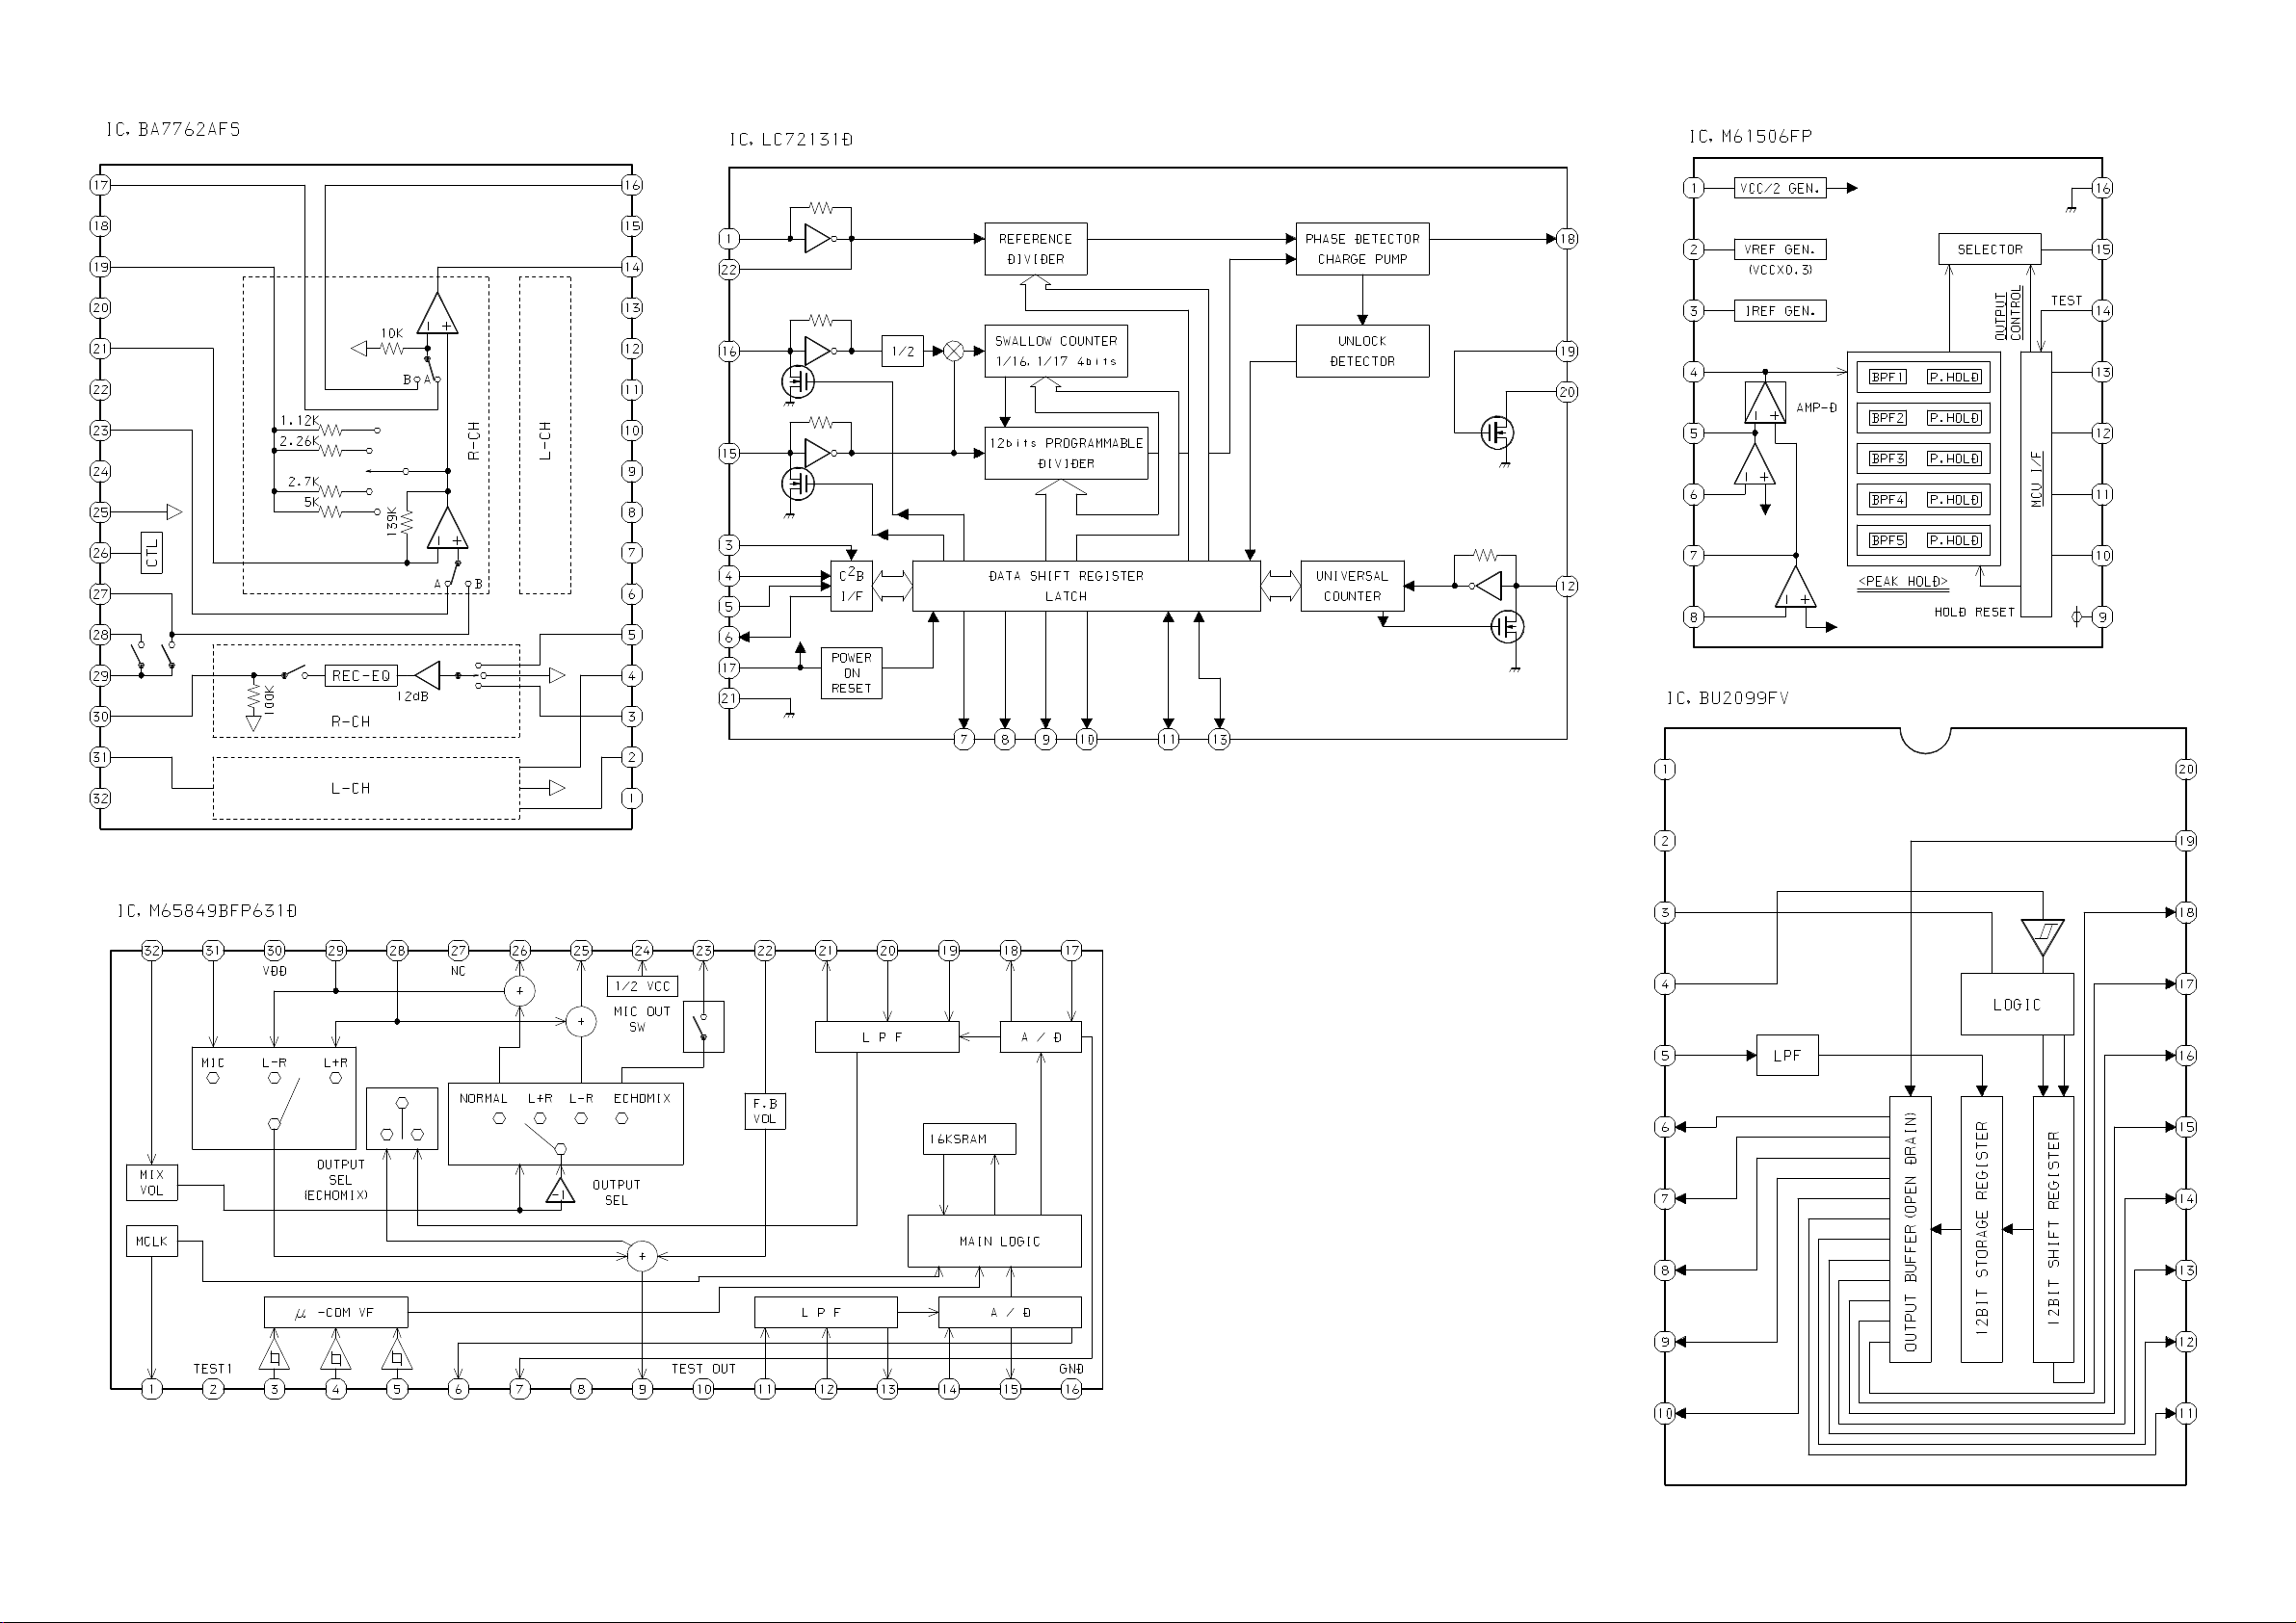
IC BLOCK DIAGRAM
– 25 –
Page 26
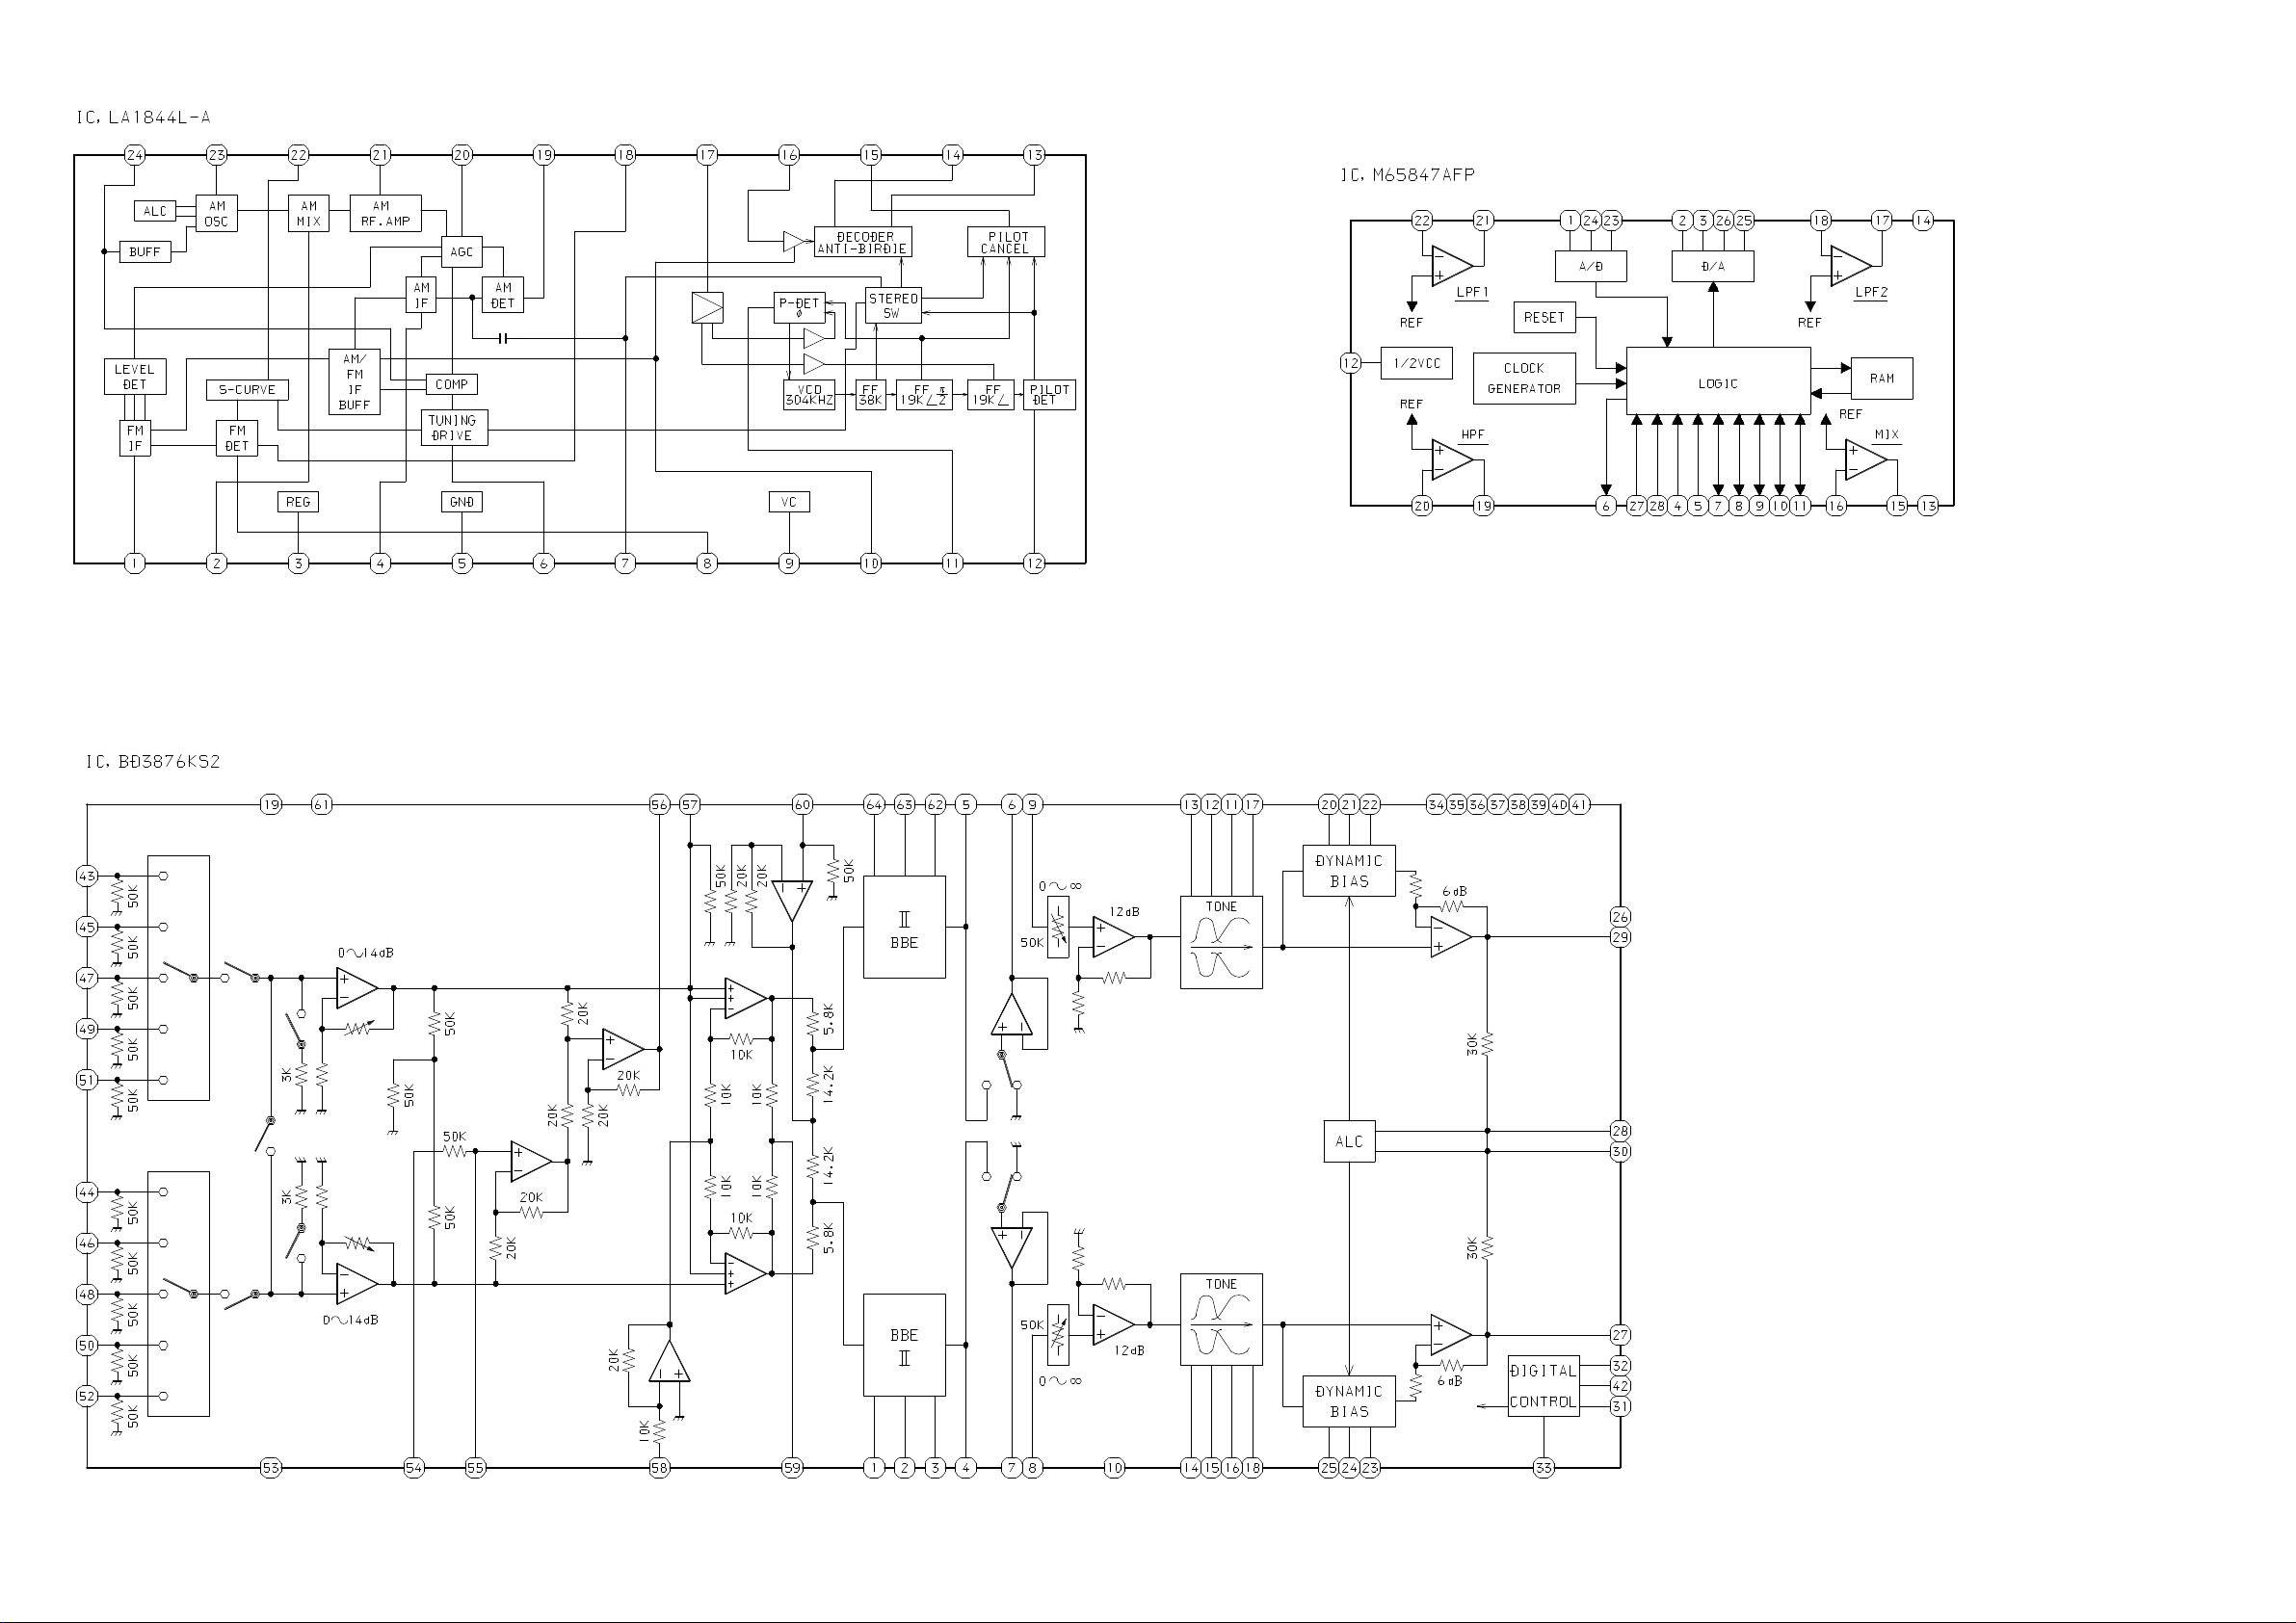
– 26 –
Page 27
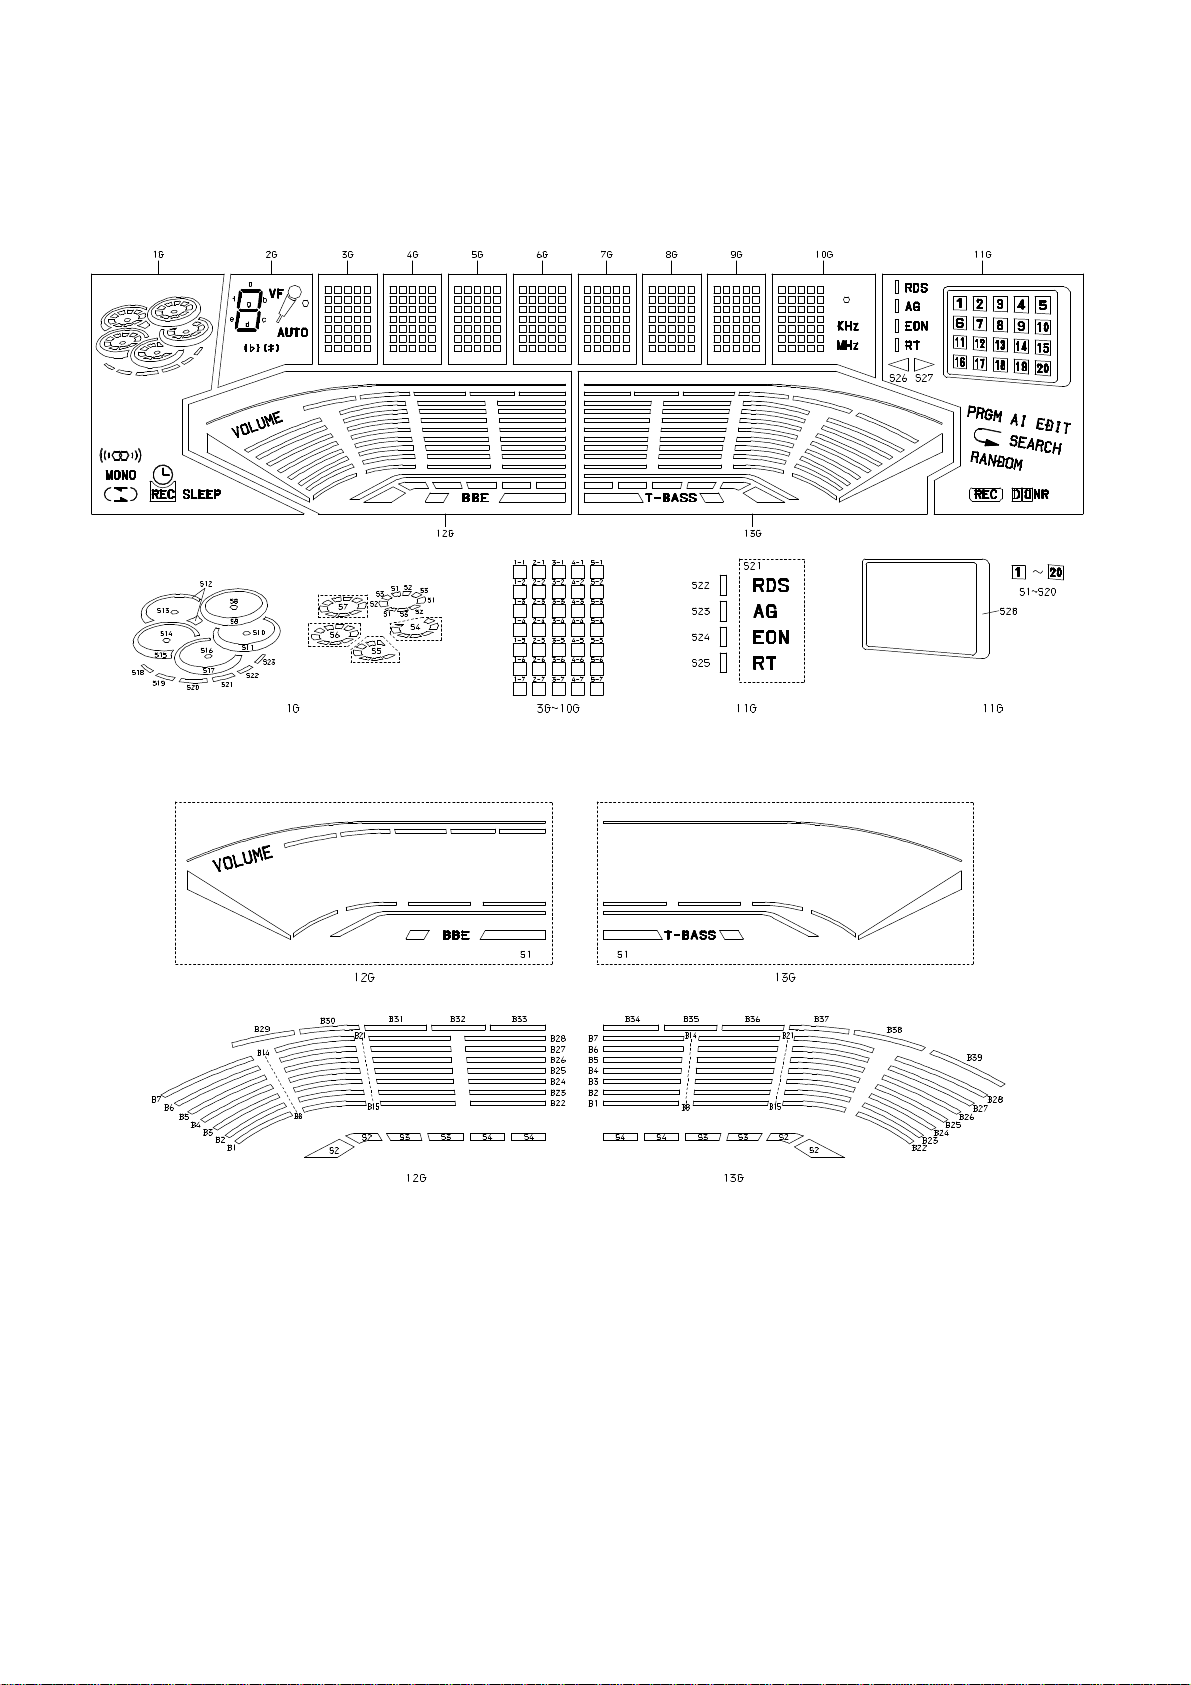
FL (BJ746GNK) GRID ASSIGNMENT & ANODE CONNECTION
GRID ASSIGNMENT
– 27 –
Page 28
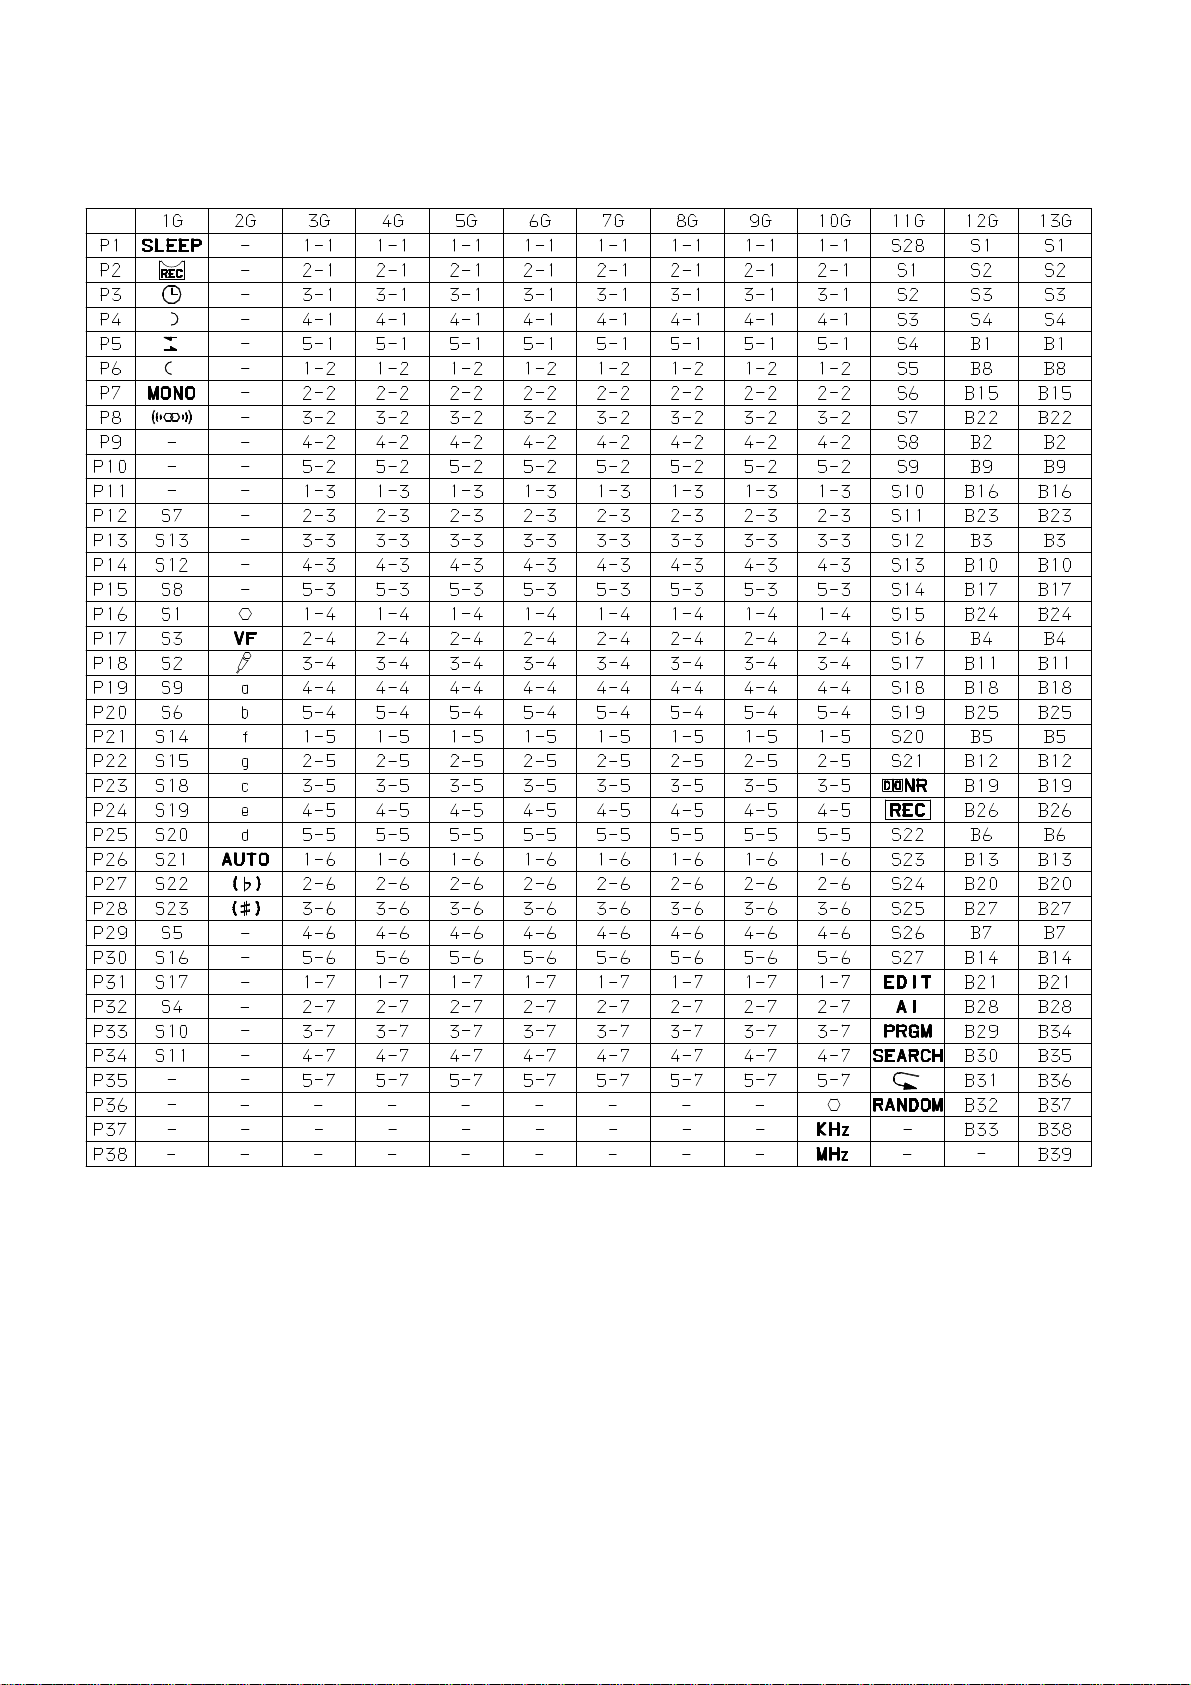
ANODE CONNECTION
– 28 –
Page 29
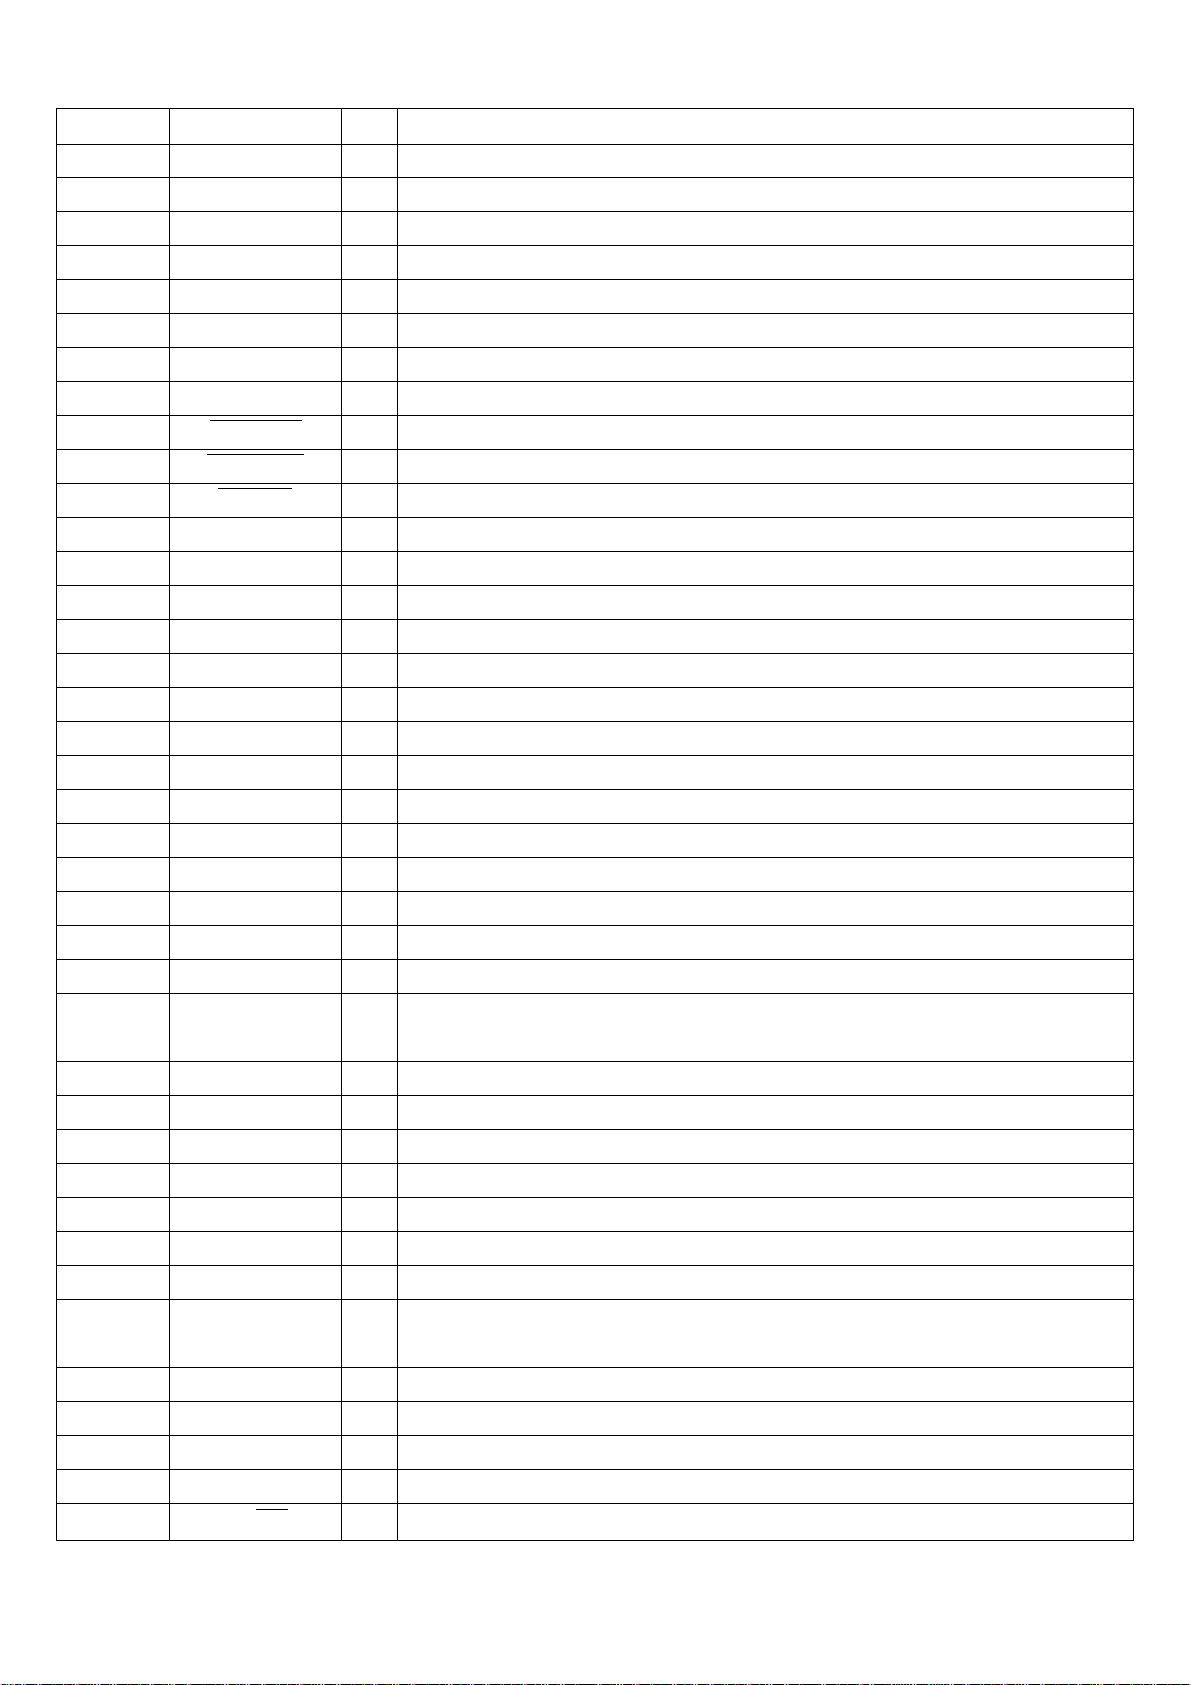
IC DESCRIPTION
IC, LC876580W-5R45
Pin No.
1 M-CLK O Main IC control serial CLOCK output.
2 M-DATA O Main IC control serial DATA output.
3 M-STB O Common serial strobe.
4 O-PLL-CE O TUNER PLL IC control CHIP ENABLE output.
5 SR-LCK O SHIFT REGISTER IC control LATCH CLOCK output.
6 RYM-CS O RHYTHM IC chip select.
7 O-POWER O System power control output. H: POWER ON.
8 O-MUTE O System mute control output. H: MUTE ON.
9 O-C-SHIFT O Microcomputer CLOCK SHIFT control output. L: SHIFT UP (initial H).
10 I-HP-MUTE I Headphone jack detection. L: MUTE.
11 I-RESET I Reset input.
12 I-RTVR I Waveform input for VOL rotary encoder.
13 I-JOG I Waveform input for JOG rotary encoder.
14 VSS1 – Connected to GND.
15 CF1 I Oscillator input for system clock (9.43MHz).
Pin Name I/O
Description
16 CF2 O Oscillator output for system clock (9.43MHz).
17 VDD1 – Power supply.
18 HOLD I System HOLD input (A/D level port).
19 ~ 21 I-KEY1 ~ 3 I Tact key matrix 1 ~ 3 input.
22 I-CD-SW I CD MECHA SW matrix input.
23 I-DISH I CD turntable photo sensor input.
24 I-SPEANA I Spectrum analyser level detection input.
25 I-MIC I MIC input level detection.
26 I-RDS_SG I During TUNER FUNC, RDS Signal level input (Not Used).
27 I-TM-BASE I Reference signal input for clock.
28
29 I-REM I Remote control signal input.
30 ~ 42 G13 ~ G1 O FL grid G13 ~ G1 output.
43 ~ 45 P38 ~ P36 O FL segment P38 ~ P36 output.
46 VDD3 – Power supply.
47 P35/SPEANA–A O FL segment P35 output/Spectrum analyser BPF switching control A output.
48 P34/SPEANA–B O FL segment P34 output/Spectrum analyser BPF switching control B output.
I-RDS-CK/
I-WRQ CD read write request.
During TUNER FUNC, RDS serial clock input (Not Used)./
I
49 P33/SPEANA–C O FL segment P33 output/Spectrum analyser BPF switching control C output.
50 P32/CSNDEMO O/I
51 –VP – Power supply for FL input.
52 P31/TU3 O/I FL segment P31 output/TUNER location switching 3 input.
53 P30/TU2 O/I FL segment P30 output/TUNER location switching 2 input.
54 P29/TU1 O/I FL segment P29 output/TUNER location switching 1 input.
55 P28/DSP O/I FL segment P28 output/DSP setting switching input. H: Absent (Not used).
FL segment P32 output/While initializing, DEMO MODE switching input. L: Normal DEMO.
H: CASINO DEMO.
– 29 –
Page 30
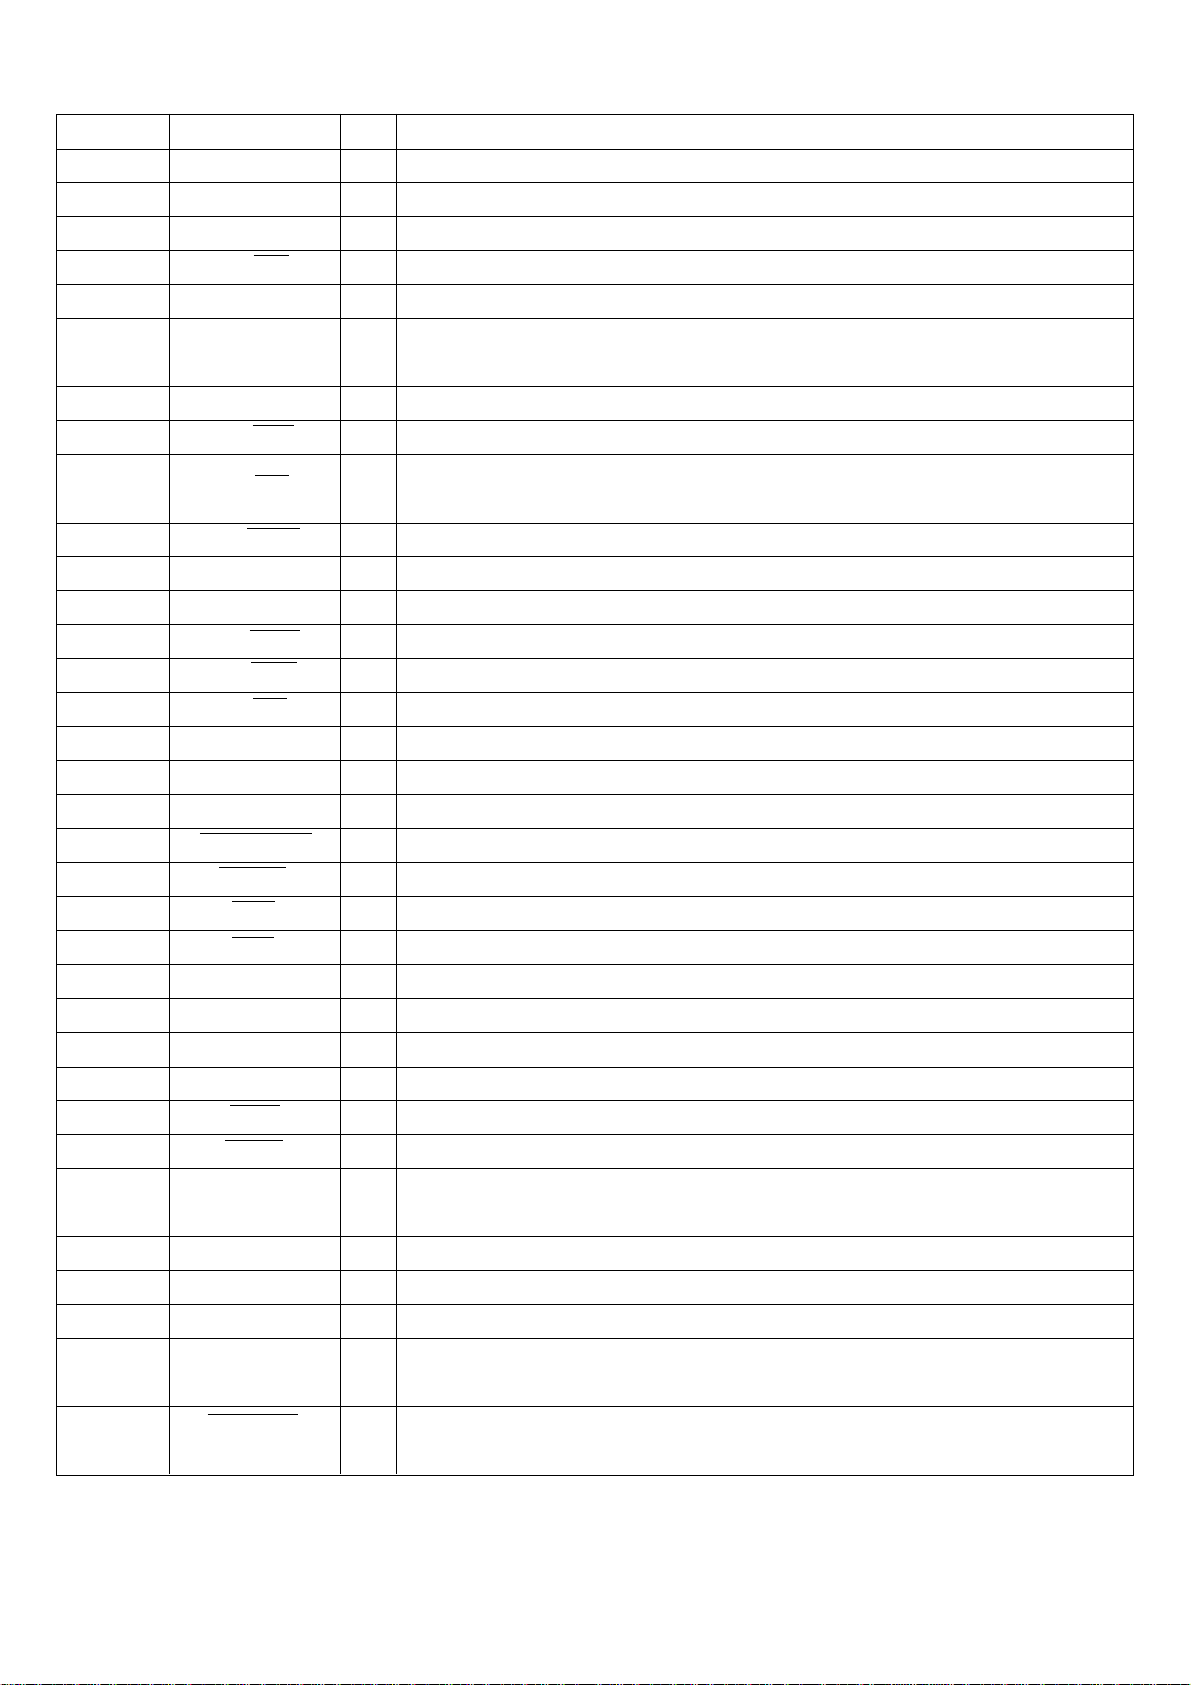
Pin No.
56 P27/RHYTHM O/I FL segment P27 output/RHYTHM setting switching input. H: Present (Not used).
57 P26/K-CON O FL segment P26 output/KEYCON function detection.
58 P25/SVCD O/I FL segment P25 output/Super VCD detection (Not used).
59 P24/ECO O/I FL segment P24 output/ECO setting switching input. H: ECO mode off.
Pin Name I/O
Description
60, 61 P23, P22 O
62 P21/5.1+DPRO O/I
63 P20/DPRO O/I FL segment P20 output/DOLBY PROLOGIC setting switching input. H: Existent (Not used).
64 P19/CST2 O/I FL segment P19 output/Deck 2 cassette existence detection SW input. L: Existent.
65 P18/REB O/I
66 P17/CAM2 O/I FL segment P17 output/Deck 2 cam-operation detection SW input. L: ON.
67 P16/AUTO1 O/I FL segment P16 output/Deck 1 reel-rotation detection signal input.
68 P15/AUTO2 O/I FL segment P15 output/Deck 2 reel-rotation detection signal input.
69 P14/CAM1 O/I FL segment P14 output/Deck 1 cam-operation detection SW input. L: ON.
70 P13/CST1 O/I FL segment P13 output/Deck 2 cassette existence detection SW input. L: Existent.
71 P12/REA O/I FL segment P12 output/Deck 2 side-A recording able/disable detection SW input. L: Able.
72 VDD4 – Power supply.
73 ~ 83 P11 ~ P1 O FL segment P11 ~ P1 output.
84 P39 O/I FL segment P39 output.
85 O-KEYSCAN O Segment input timing output. L: Input timing.
86 MOTOR O DECK MECHA motor control output. L: ON.
FL segment P23, P22 output.
FL segment P21 output/5.1CH+DOLBY PROLOGIC setting switching input.
H: Existent (Not used).
FL segment P18 output/Deck 2 side-B recording able/disable detection SW input.
L: Able (Not used).
87 SOL1 O DECK 1 MECHA plunger control output. L: ON.
88 SOL2 O DECK 2 MECHA plunger control output. L: ON.
89 VSS2 – Connected to GND.
90 VDD2 – Power supply.
91 DISH-RVS O CD turntable control output. H: Reverse rotation.
92 DISH-FWD O CD turntable control output. H: Forward rotation.
93 OPEN O CD tray control output. L: OPEN.
94 CLOSE O CD tray control output. L: CLOSE.
95
96 CD-XLT/I/O-BUSY O CD DSP control serial LATCH output. LATCH when drop (Not Used)/Input/Output status.
97 CD-CLK O CD DSP control serial CLOCK output (Not Used).
98 CD-LED O CD flash window LED control output. H: ON
99
100
I-RDS-DATA/
O-CD-DATA During CD FUNC, CD control serial data output.
I-IFC/
I-CD DATA Serial data from VCD.
I-STEREO/
O-CLK Serial clock output.
During TUNER FUNC, RDS serial data input (Not used)./
I/O
During TUNER FUNC, IF COUNT data input./
I
During TUNER STEREO signal input./
I/O
– 30 –
Page 31
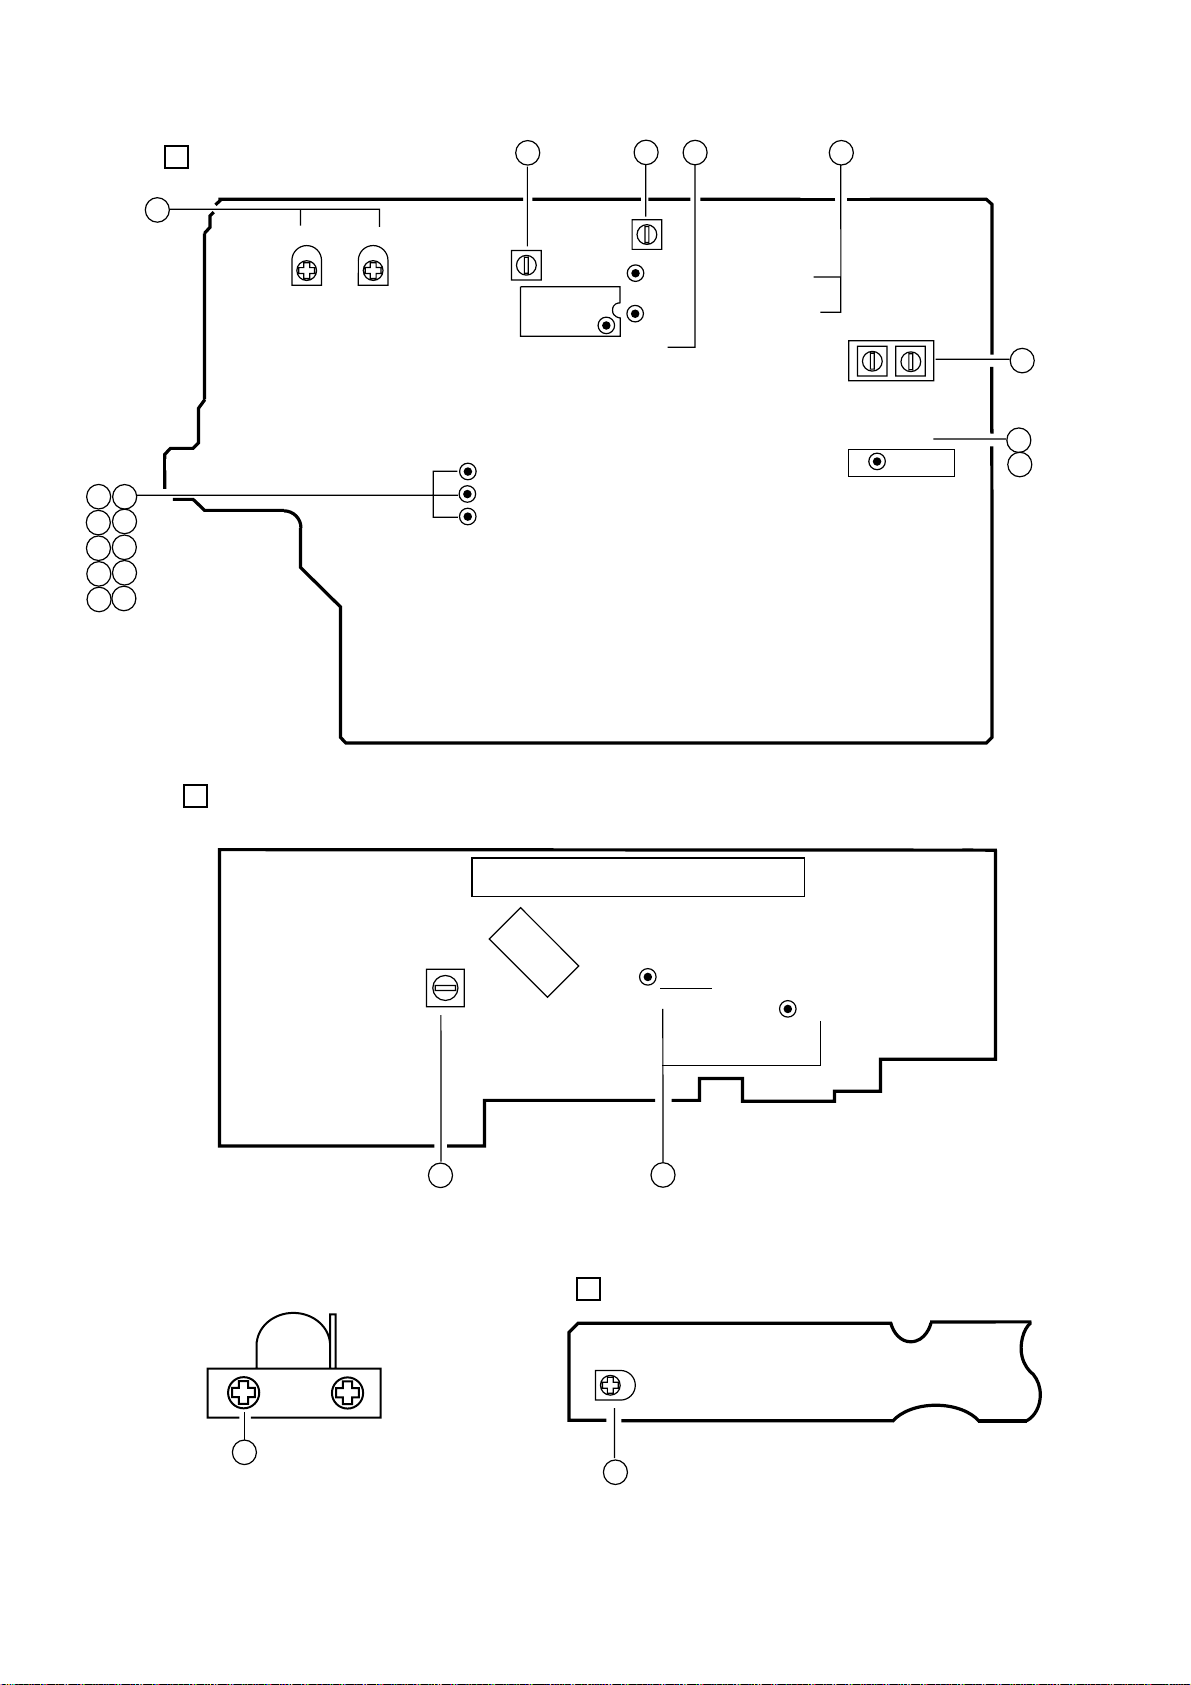
ADJUSTMENT <TUNER / DECK / MICON>
A
12
MAIN C.B
SFR352
SFR351
7
L801
IC801
6
L802
TP3 (DC BALANCE)
1
7
TP4 (DC BALANCE)
TP2 (CLK)
GND
4
9
10
5
11
6
12
7
13
8
B
MICON C.B
TP5 (LCH)
TP6 (RCH)
L951
(3/3) (1/3)
TP1 (VT)
FFE831
4
2
3
FL101
9
FWD
L101
14
IC101
DECK–1 P HEAD
DECK–2 R/P/E HEAD
TP7
(O-KSCAN)
14
J
DECK C.B
SFR1
8
TP8(GND)
– 31 –
Page 32

< TUNER SECTION >
1. Clock frequency Check
Settings : • Test point : TP2 (CLK)
Method : Set to AM 1602kHz and check that the test point is
2052kHz ± 45Hz.
2. AM VT Check
Settings : • Test point : TP1 (VT)
Method : Set to AM 1602kHz, 531kHz and check that the test
point is less than 8.0V (1602kHz) and more than
0.6V (531kHz).
3. FM VT Check
Settings : • Test point : TP1 (VT)
Method : Set to FM 87.5MHz, 108.0MHz and check
that the test point is more than 0.5V
(87.5MHz) and less than 8.0V (108.0MHz).
< DECK SECTION >
8. Tape Speed Adjustment (DECK 2)
Settings : • Test tape : TTA–100
• Test point : TP5(Lch), TP6(Rch)
• Adjustment location : SFR1
Method : Play back the test tape and adjust SFR1 so that the
frequency counter reads 3000Hz ± 5Hz and ± 45Hz
(REV) with respect to forward speed.
9. Head Azimuth Adjustment (DECK 1, DECK 2)
Settings : • Test tape : TTA–330
• Test point : TP5(Lch), TP6(Rch)
• Adjustment location : Head azimuth
adjustment screw
Method : Play back (FWD) the 8kHz signal of the test tape and
adjust screw so that the output becomes maximum.
Next, perform on REV PLAY mode.
4. AM Tracking Adjustment
Settings : • Test point : TP5(Lch), TP6(Rch)
• Adjustment location :
L951(1/3) ........................................999kHz
Method : Set to AM 999kHz and adjust L951(1/3) to MAX.
5. FM Tracking Check
Settings : • Test point : TP5(Lch), TP6(Rch)
Method : Set to FM 98.0MHz and check that the test point is
less than 9dBµV.
6. AM IF Adjustment
Settings : • Test point : TP5(Lch), TP6(Rch)
• Adjustment location :
L802 ................................................450kHz
7. DC Balance / Mono Distortion Adjustment
Settings : • Test point : TP3, TP4 (DC balance)
• Test point : TP5(Lch), TP6(Rch)
• Adjustment location : L801
• Input level : 60dBµV
Method : Set to FM 98.0MHz and adjust L801 so that the
distortion is minimum. Then check the voltage
between TP3 and TP4 is 0V ± 300mV.
10. PB Frequency Response Check (DECK 1, DECK 2)
Settings : • Test tape : TTA–330
• Test point :TP5(Lch), TP6(Rch)
Method : Play back the 315Hz and 8kHz signals of the test
tape and check that the output ratio of the 8kHz
signal with respect to that of the 315Hz signal is
within 5dB.
11. PB Sensitivity Check (DECK 1, DECK 2)
Settings : • Test tape : TTA–200
• Test point : TP5(Lch), TP6(Rch)
Method : Play back the test tape and check that the output
level of the test point is 230mV ± 3dB.
12. REC/PB Frequency Response Adjustment (DECK 2)
Settings : • Test tape : TTA–602
• Test point : TP5(Lch), TP6(Rch)
• Input signal : 1kHz / 8kHz (LINE IN)
• Adjustment location : SFR351 (Lch)
SFR352 (Rch)
Method : Apply a 1kHz signal and REC mode. Then adjust
OSC attenuator so that the output level at the TP5,
TP6 becomes -20VU. Record and play back the
1kHz and 8kHz signals and adjust SFRs so that the
output of the 8kHz signals becomes 0dB ± 0.5dB
with respect to that of the 1kHz signal.
13. REC/PB Sensitivity Check (DECK 2)
Settings : • Test tape : TTA–602
• Test point : TP5(Lch), TP6(Rch)
• Input signal : 1kHz (LINE IN)
Method : Apply a 1kHz signal and REC mode. Then adjust
OSC attenuator so that the output level at TP5, TP6
becomes 0VU. Record and play back the 1kHz
signals and check that the output is 0dB ± 3.5dB.
< MICON SECTION >
14. µ-CON OSC Adjustment
Settings : • Test point : TP7 (O-KSCAN), TP8 (GND)
• Adjustment location : L101
Method : Insert AC plug while pressing TUNER function key.
Adjust L101 so that the frequency at the test point is
208.80Hz ± 0.21Hz.
– 32 –
Page 33
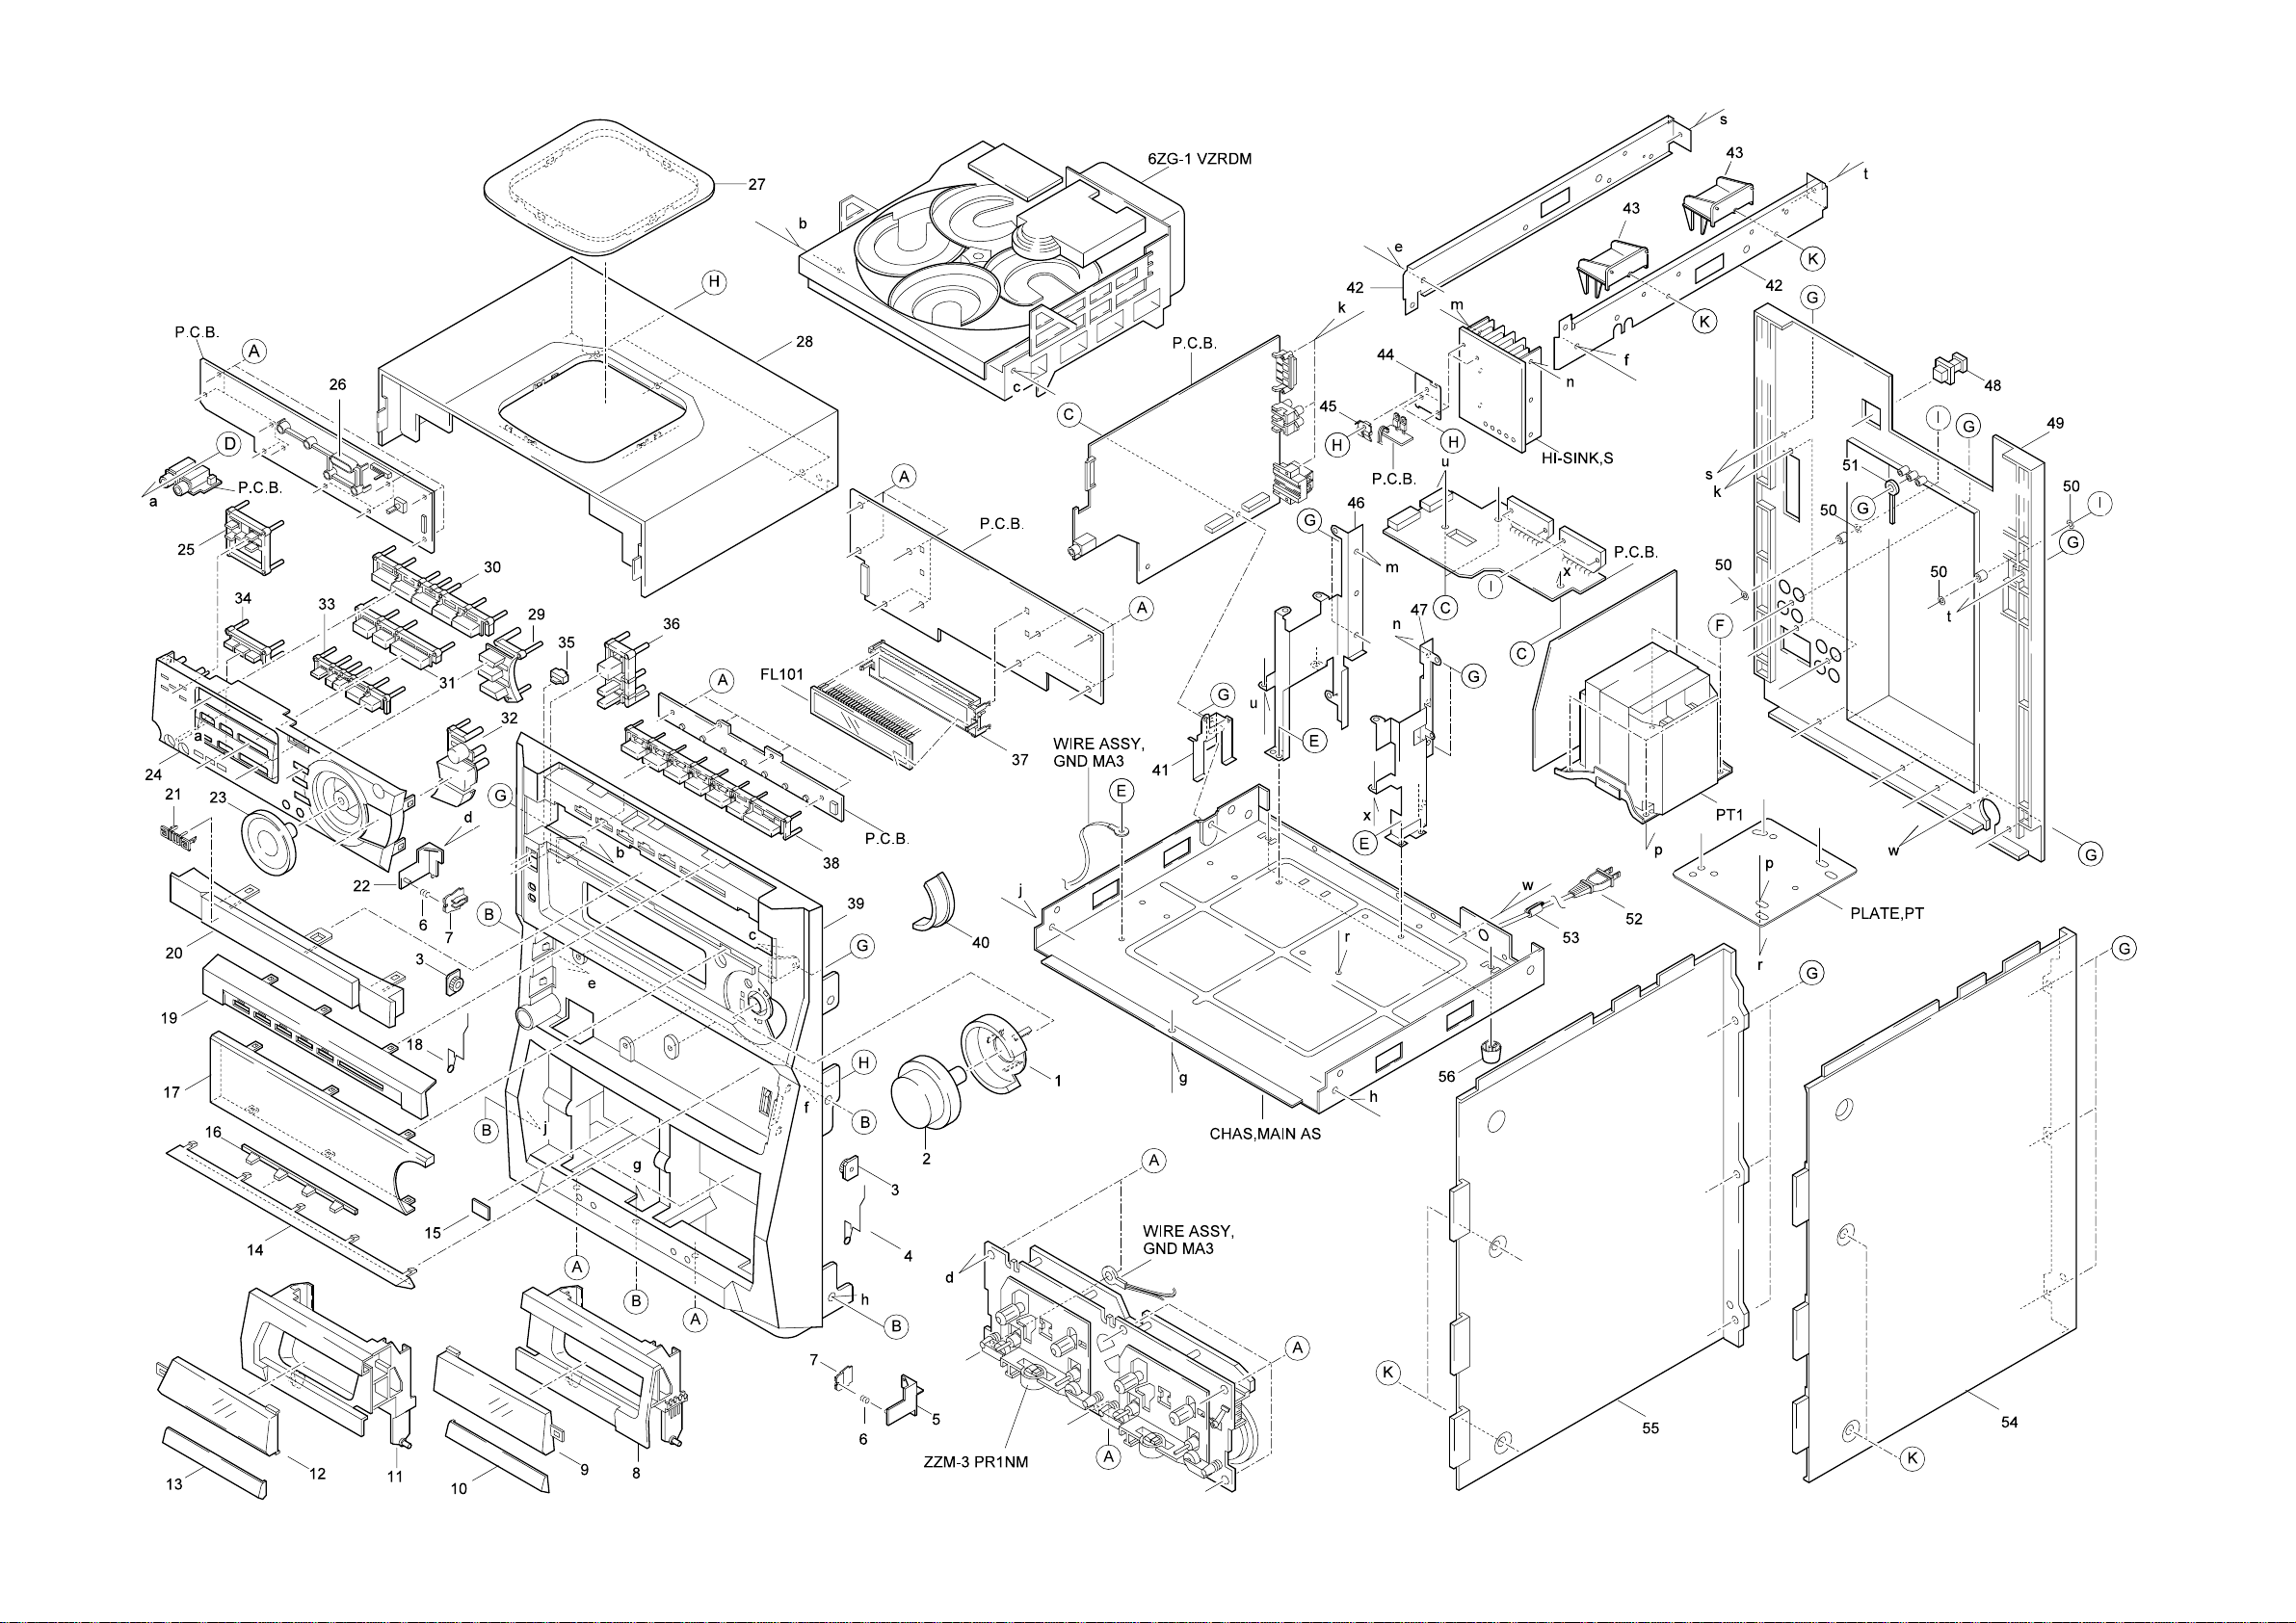
MECHANICAL EXPLODED VIEW 1 / 1
– 33 –
Page 34

MECHANICAL PARTS LIST 1 / 1
PART NO.
NO.
1 8A-MA3-094-010 RING,MAIN
2 8A-MA3-090-110 KNOB,RTRY MAIN
3 87-NF8-220-010 DMPR,150
4 8A-MA5-208-010 SPR-T,EJECT 2
5 87-NF4-217-110 HLDR,LOCK 2
6 86-NF9-224-010 SPR-C,LOCK
7 82-NF5-229-010 PLATE,LOCK
8 8A-MA3-026-110 BOX,CASS R
9 8A-MA3-056-010 WINDOW,CASS R
10 8A-MA5-036-010 PANEL,CASS R 5
11 8A-MA3-025-110 BOX,CASS L
12 8A-MA3-055-010 WINDOW,CASS L
13 8A-MA5-035-010 PANEL,CASS L 5
14 8A-MA5-041-010 PANEL,FUN 4F
15 81-532-080-010 LABEL, CASS. COMPT
16 8A-MA5-102-010 REFLECTOR,FUN 4F
17 8A-MG5-050-010 WINDOW,DISP VCD 5
18 8A-MA5-207-010 SPR-T,EJECT 1
19 8A-MA5-034-010 PANEL,CD
20 8A-MG5-037-010 PANEL ASSY,TRAY VCD 5
21 87-B00-002-010 BADGE,AIWA 30 ABS SIL
22 87-NF4-216-010 HLDR,LOCK 1
23 8A-MA3-093-010 KNOB ASSY,RTRY JOG
24 8A-MG5-030-010 PANEL,FR VCD 5
25 8A-MG5-080-010 KEY ASSY,PBC 5
26 8A-MA3-210-010 GUIDE,LED OPE
27 8A-MA3-057-010 WINDOW,TOP
28 8A-MA3-020-110 CABI,TOP
29 8A-MA3-071-010 KEY,TIMER
30 8A-MA5-066-010 KEY,FUN 4F
31 8A-MA5-081-010 KEY ASSY,PLAY
32 8A-MA3-073-010 KEY,ENTER
33 8A-MA3-084-010 KEY ASSY,FF
34 8A-MG5-070-010 KEY,CONT 5
35 8A-MA3-101-010 REFLECTOR,POWER
DESCRIPTIONREF. NO. KANRI
PART NO.
36 8A-MA3-075-010 KEY,POWER
37 87-MA5-203-110 GUIDE,FL
38 8A-MA3-061-010 KEY,CD
39 8A-MG5-001-010 CABI,FR VCD 5
40 8A-MA3-062-010 KEY,MIC
41 8A-MA3-207-010 HLDR,PWB MAIN H
42 88-MA1-208-210 JOINT,CABI
43 8A-MA3-212-010 HLDR,PWB PT
44 8A-MA3-213-010 PLATE,TR
45 86-NF6-211-010 HLDR,IC T1.6
46 8A-MA3-205-010 HLDR,HT-SINK L
47 8A-MA3-206-010 HLDR,HT-SINK R
48 84-ZG1-245-210 CAP,OPTICAL
49 8A-MG5-011-010 CABI,REAR HR 5
50 8A-MA3-214-010 W,3.5-6.5-1 W/ADH
51 87-064-185-010 HLDR,WIRE
!
52 87-A80-148-010 AC CORD ASSY,E BLK
53 87-085-185-010 BUSHING, AC CORD (E)
54 8A-MA3-046-010 PANEL,SIDE R 3
55 8A-MA3-045-010 PANEL,SIDE L 3
56 87-MA3-062-010 FOOT, H17
A 87-078-060-010 BVIT3PB+3-10
B 87-591-095-410 TAPPING SCREW, QIT+3-8 (GLD)
C 87-NF4-224-010 S-SCREW,IT3B+3-8 CU
D 81-MK1-210-010 S-SCREW,VFT2+3-16
E 87-067-688-010 BVTT+3-6
F 87-067-975-010 S-SCREW,IT+4-8
G 87-067-703-010 TAPPING SCREW, BVT2+3-10
H 87-067-758-010 BVT2+3-12 W/O SLOT
I 87-067-581-010 TAPPING SCREW, BVT2+3-15
J 87-067-641-010 UTT2+3-8(W/O SLOT)BL
NO.
DESCRIPTIONREF. NO. KANRI
COLOR NAME TABLE
Basic color symbol Color Basic color symbol Color Basic color symbol Color
B Black C Cream D Orange
G Green H Gray L Blue
LT Transparent Blue N Gold P Pink
R Red S Silver ST Titan Silver
T Brown V Violet W White
WT Transparent White Y Yellow YT Transparent Yellow
LM Metallic Blue LL Light Blue GT Transparent Green
LD Dark Blue DT Transparent Orange GM Metallic Green
YM Metallic Yellow DM Metallic Orange
– 34 –
Page 35
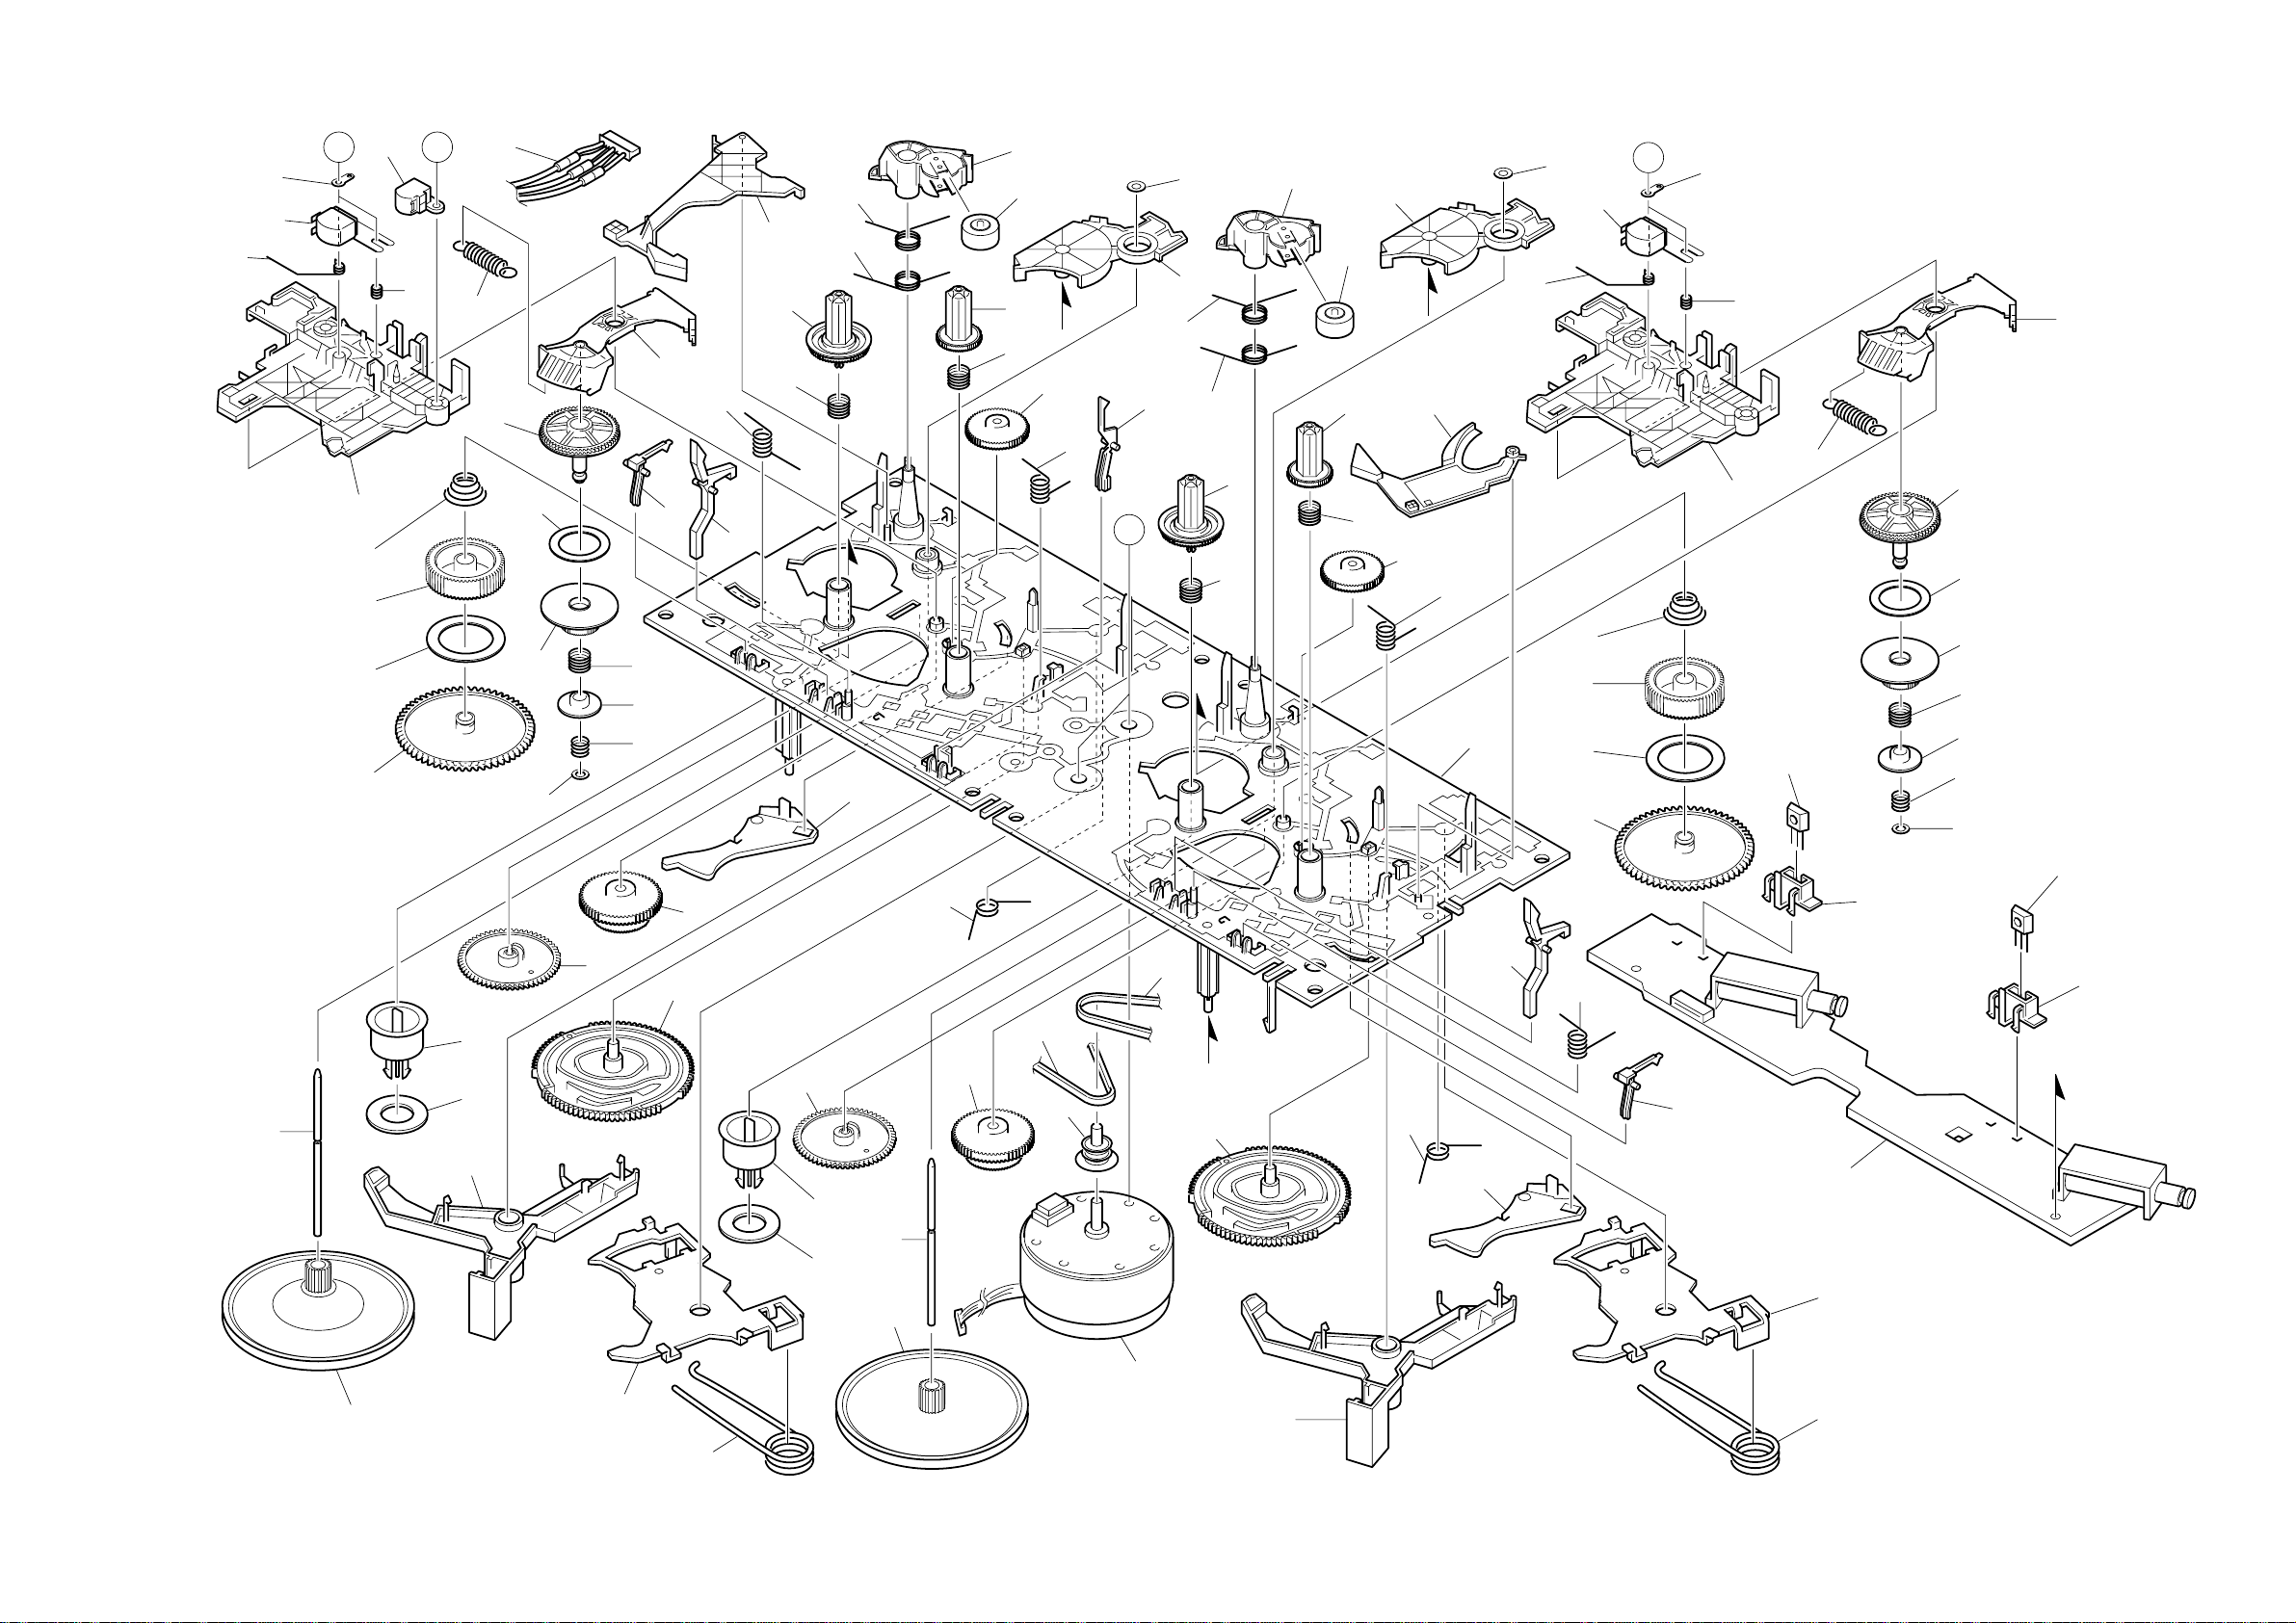
TAPE MECHANISM EXPLODED VIEW 1 / 1
TERMINAL,
LB1
33
31
AA
34
32
30
21
20
19
18
55
35
28
27
26
22
25
24
23
29
37
39
38
36
41
40
43
42
16
44
52
33
31
21
20
19
18
41
44
45
46
51
b
53
47
48
49
56
50
52
51
43
42
40
b
45
46
47
a
a
48
49
B
A
TERMINAL,LB1
32
35
30
IC, EW732
29
28
27
26
25
24
23
22
IC, EW732
5
6
14
10
11
7
15
17
12
6
10
11
9
16
38
39
37
P.C.B
1
2
14
c
9
15
5
3
7
8
4
54
54
c
12
13
13
– 35 –
Page 36

TAPE MECHANISM PARTS LIST 1 / 1
PART NO.
NO.
1 8Z-ZM3-227-010 BELT,MAIN M3
2 8Z-ZM3-235-010 BELT,MAIN L
3 8Z-ZM1-235-010 PULLEY,MOT
4 87-045-347-010 MOT,SHU2L 70
5 8Z-ZM1-232-010 GEAR,IDL FF/REW
6 8Z-ZM3-244-010 GEAR,CAM TD20
7 8Z-ZM3-242-010 SHAFT,CAP M3
8 8Z-ZM3-228-010 FLY-WHL,M3
9 8Z-ZM3-231-010 SPR-T,TRIG
10 8Z-ZM3-213-010 CLR,MG
11 82-ZM3-616-010 RING MAGNET 4
12 8Z-ZM3-243-010 LEVER ASSY,HD UP
13 8Z-ZM3-238-010 SPR-T,HD UP
14 8Z-ZM3-219-010 GEAR,CAM M3
15 8Z-ZM3-206-010 LEVER,TRIG
16 8Z-ZM3-209-010 LEVER,CAM FR
17 8Z-ZM2-211-010 FLY-WHL,ZZM-2
18 8Z-ZM1-228-010 GEAR,SLIP T-UP B
19 8Z-ZM1-265-010 FELT,T-UP
20 8Z-ZM1-227-010 GEAR,SLIP T-UP A
21 8Z-ZM1-251-110 SPR-C,T-UP SLIP
22 8Z-ZM1-275-010 W-L,1,47-4-0.25
23 8Z-ZM1-257-010 SPR-C,F/R
24 8Z-ZM1-236-010 CLR,SLIP FF/REW
25 8Z-ZM3-226-010 SPR-C,FR M3
26 8Z-ZM3-250-010 GEAR,SLIP F/R A M3
27 8Z-ZM1-269-010 FELT,FF/REW 2
28 8Z-ZM1-238-110 GEAR,SLIP FF/REW B 2
29 8Z-ZM3-220-010 LEVER,FR M3
30 8Z-ZM3-205-010 LEVER,PLAY M3
DESCRIPTIONREF. NO. KANRI
PART NO.
NO.
31 8Z-ZM3-233-010 SPR-T,BRG M3
32 84-ZM2-227-310 SPR-C,AZIMUTH
33 87-A90-403-110 HEAD,RPH MS15R
34 87-A90-404-010 HEAD,EH LE15B
35 8Z-ZM3-239-010 SPR-E,FR
36 8Z-ZM3-211-010 LEVER,EJECT R
37 8Z-ZM3-225-010 LEVER,STOP
38 8Z-ZM3-221-010 LEVER,CAS
39 8Z-ZM3-234-010 SPR-T,LVR CAS
40 8Z-ZM3-223-010 SPR-C,REEL R M3
41 8Z-ZM1-225-110 GEAR,REEL R
42 8Z-ZM3-240-010 SPR-T,T-UP M3
43 8Z-ZM3-237-010 SPR-T,PINCH M3
44 8Z-ZM3-215-010 LEVER,PINCH M3
45 8Z-ZM1-261-110 ROLLER ASSY,PINCH
46 8Z-ZM1-226-010 GEAR,REEL L
47 8Z-ZM3-222-010 SPR-C,REEL L M3
48 8Z-ZM3-251-010 GEAR,IDL REW M3
49 8Z-ZM3-236-010 SPR-T,PLAY M3
50 82-ZM1-240-110 LVR,REC(*)
51 8Z-ZM3-216-010 LEVER,T-UP M3
52 87-B10-301-010 W-L,1.63-3.2-05 SLIT
53 8Z-ZM3-212-010 LEVER,EJECT L
54 8Z-ZM3-214-010 HLDR,IC
55 86-ZM3-605-110 CONN ASSY,8P -RPB
56 8Z-ZM3-203-010 CHAS ASSY,M3
A 84-ZM2-242-010 S-SCREW,AZ1-2-6.4
B 8Z-ZM2-220-110 V+2.6 ZZM-2
DESCRIPTIONREF. NO. KANRI
– 36 –
Page 37
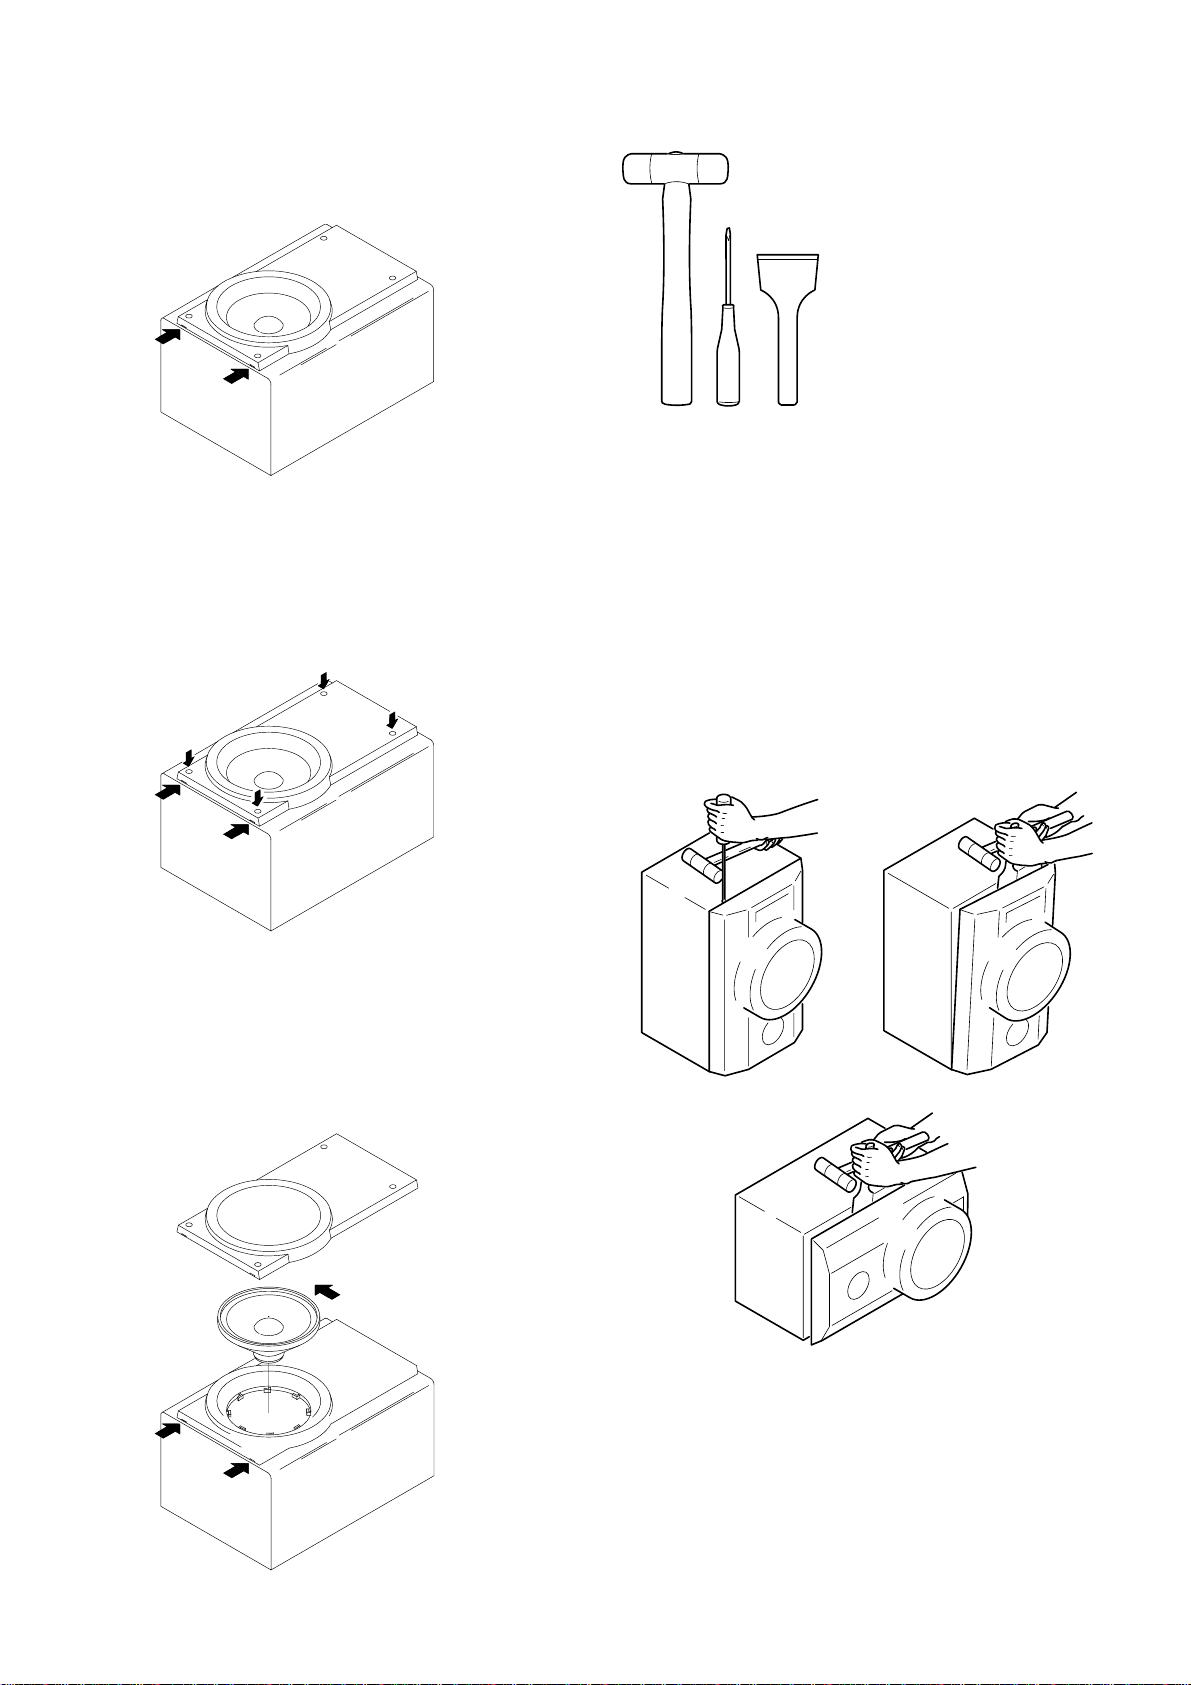
SPEAKER DISASSEMBLY INSTRUCTIONS
Type.1
Insert a flat-bladed screwdriver into the position indicated by the
arrows and remove the panel. Remove the screws of each speaker
unit and then remove the speaker units.
Type.2
Remove the grill frame and four pieces of rubber caps by pulling
out with a flat-bladed screwdriver. Remove the screws from hole
where installed rubber caps. Insert a flat-bladed screwdriver into
the position indicated by the arrows and remove the panel. Remove the screws of each speaker unit and then remove the speaker
units.
Type.4
TOOLS
1 Plastic head hammer
2 (() flat head screwdriver
3 Cut chisel
12 3
How to Remove the PANEL, FR
1. Insert the (() flat head screwdriver tip into the gap
between the PANEL, FR and the PANEL, SPKR. Tap the
head of the (() flat head screwdriver with the plastic
hammer head, and create the clearance as shown in Fig-1.
2. Insert the cut chisel in the clearance, and tap the head of
the cut chisel with plastic hammer as shown in Fig-2, to
remove the PANEL, FR.
Type.3
Insert a flat-bladed screwdriver into the position indicated by the
arrows and remove the panel. Turn the speaker unit to counterclockwise direction while inserting a flat-bladed screwdriver into
one of the hollows around speaker unit, and then remove the speaker
unit. After replacing the speaker unit, install it turning to clockwise
direction until "click" sound comes out.
3. Place the speaker horizontally. Tap head of the cut chisel
with plastic hammer as shown in Fig-3, and remove the
PANEL, FR completely.
Fig-1 Fig-2
How to Attach the PANEL, FR
Attach the PANEL, FR to the PANEL, SPKR. Tap the four
corners of the PANEL, FR with the plastic hammer to fit the
PANEL, FR into the PANEL, SPKR completely.
– 37 –
Fig-3
Page 38

SPEAKER PARTS LIST SX-WZHK550 (YJ7SL)
PART NO.
NO.
1 8Z-MS3-010-010 PANEL,FR 550
2 8Z-MS4-003-010 PROTECTOR
3 8Z-MS2-601-010 SPKR,W 200
4 8A-MS3-603-010 SPKR,M 120
5 88-MS1-608-010 SPKR,CERAMIC
6 88-NS3-605-010 CAP,
7 88-MS1-610-010 CORD,SPKR
8 88-NS5-611-010 CORD,SPKR B/L
DESCRIPTIONREF. NO. KANRI
ACCESSORIES / PACKAGE LIST
PART NO.
1 8A-MG5-901-010 IB,HR(ECA) M
2 8Z-NH8-702-010 RC UNIT,RC-ZAS07
3 87-043-115-010 FEEDER-ANT,FM
4 87-A90-030-010 ANT,LOOP AM-NC C
5 87-050-103-010 CORD,PIN 1PY 1.5M
!
6 87-099-789-010 PLUG,ADPTR IR44
NO.
DESCRIPTIONREF. NO. KANRI
– 38 –
Page 39
2–11, IKENOHATA 1–CHOME, TAITO-KU, TOKYO 110, JAPAN TEL:03 (3827) 3111
Printed in Singapore9420208 9630472 0251431
 Loading...