

Sony XR-CA650X User Manual
3-248-252-11 (2)
FM/AM
Cassette Car Stereo
Operating Instructi on s
Mode d’emploi
Owner’s Record
The model and serial numbers are located on the bot tom of the unit.
Record these numbers in the spa ce provided below.
Refer to these numbers whenever you call upon your Sony dealer regarding this produc t.
Model No. XR-CA650X Serial No.
For installation and connections, see the supplied installation/connections manual.
En ce qui concerne l’installation et les connexions, consulter le manuel
d’installation/raccordement fourni.
US
FR
XR-CA650X
© 2003 Sony Corporation

Warning
–
–
–
–
Welcome !
This equipment has been tested and found to
comply with the limits for a Class B digital
device, pursuant to Part 15 of the FCC Rules.
These limits are designed to provide reasonable
protection against harmful interference in a
residential installation. This equipment
generates, uses, and can radiate radio frequency
energy and, if not installed and used in
accordance with the instructions, may cause
harmful interference to radio communications.
However, there is no guarantee that interference
will not occur in a particular installation. If this
equipment does cause harmful interference to
radio or television reception, which can be
determined by turning the equipment off and on,
the user is encouraged to try to correct the
interference by one or more of the following
measures:
Reorient or relocate the receiving antenna.
Increase the separation between the equipment
and receiver.
Connect the equipment into an outlet on a
circuit different from that to which the receiver
is connected.
Consult the dealer or an experienced radio/TV
technician for help.
You are cautioned that any changes or
modifications not expressly approved in this
manual could void your authority to operate this
equipment.
Thank you for purchasing this Sony Cass et te
Player. You can enjoy its various features even
more with:
• Optional CD/MD units (both changers and
players)*
• CD TEXT information (displayed when a CD
TEXT disc*
CD unit with the CD TEXT function).
• Supplied controller accessory
Card remote commander RM-X119
• Optional controller accessory
Rotary commander RM-X4S
*1 This unit works with Sony products only.
*2 A CD TEXT disc is an audio CD that includes
1
.
2
is played on a connected optional
information such as the disc name, artist name,
and track names. This information is recorded on
the disc.
2

Table of Contents
Location of controls. . . . . . . . . . . . . . . . . . . . 4
Precautions . . . . . . . . . . . . . . . . . . . . . . . . . . 6
Notes on Cassettes. . . . . . . . . . . . . . . . . . . . . 6
Getting Started
Resetting the unit. . . . . . . . . . . . . . . . . . . . . . 7
Detaching the front panel . . . . . . . . . . . . . . . 7
Setting the clock . . . . . . . . . . . . . . . . . . . . . . 8
Cassette Player
Listening to a tape . . . . . . . . . . . . . . . . . . . . . 9
Playing a tape in various modes . . . . . . . . . . 9
Radio
Storing stations automatically
— Best Tuning Memory (BTM). . . . . . . 10
Receiving the stored stations. . . . . . . . . . . . 10
Storing only the desired stations . . . . . . . . . 11
Storing station names
— Station Memo. . . . . . . . . . . . . . . . . . . 11
Tuning in a station through a list
— List-up . . . . . . . . . . . . . . . . . . . . . . . . 12
Other Functions
Using the rotary commander. . . . . . . . . . . . 13
Adjusting the soun d characteristics . . . . . . . 14
Quickly attenuating the sound. . . . . . . . . . . 14
Changing the sound and display settings
— Menu . . . . . . . . . . . . . . . . . . . . . . . . . 15
Selecting the sound position
— My Best sound Position (MBP). . . . . 16
Setting the equalizer (EQ7). . . . . . . . . . . . . 16
CD/MD Unit (optional)
Playing a CD or MD. . . . . . . . . . . . . . . . . . 17
Display items . . . . . . . . . . . . . . . . . . . . . . . 18
Playing tracks repeatedly
— Repeat Play . . . . . . . . . . . . . . . . . . . . 19
Playing tracks in random order
— Shuffle Play. . . . . . . . . . . . . . . . . . . . 19
Labeling a CD
— Disc Memo . . . . . . . . . . . . . . . . . . . . 19
Locating a disc by name
— List-up. . . . . . . . . . . . . . . . . . . . . . . . 20
Additional Information
Maintenance . . . . . . . . . . . . . . . . . . . . . . . . 21
Removing the unit. . . . . . . . . . . . . . . . . . . . 22
Specifications . . . . . . . . . . . . . . . . . . . . . . . 23
Troubleshooting . . . . . . . . . . . . . . . . . . . . . 24
Error displays/Messages. . . . . . . . . . . . . . . 25
3
Location of controls
D
S
E
D
O
M
MBP
O
F
F
Refer to the pages listed for details.
SOURCE
P
L
L
R
C
S
XR-CA650X
O
P
E
N
L
U
I
N
E
M
S
O
U
N
S
T
R
P
E
/
S
C
E
S
I
T
D
SEEK
D
I
S
C
D
EQ7
T
E
S
/
P
E
R
R
E
T
N
E
a MBP button 16
b MODE (o) button
To change the oper at i on.
c DSPL (display mode change) button
18, 20
d Volume control dial
e Display window
f Z (eject) button (located on the front sid e
of the unit, behind the front panel) 9
g MENU button
To change the menus.
h LIST button 12, 20
i OPEN button 7, 9
j OFF (Stop/Power off) button* 7, 9, 17
k RESET button (locate d on the fron t side of
the unit, behind the fr ont panel) 7
l SOURCE (Power on/Tape/Radio/CD/
MD) button
T o select the source.
m SCRL (scroll) button 18
n Receptor for the card remote
commander
o SOUND button 14, 16
p ENTER button
To ent er a se tting.
q EQ7 button 16
* Warning when installing in a car without
an ACC (accessory) position on the
ignition switch
After turning off the ignition, be sure to press
and hold (OFF) on the unit until the display
disappears.
Otherwise, the display does not turn off and
this causes bat tery drain.
4
Card remote commander RM-X119
O
P
E
N
L
U
I
S
R
P
E
/
S
C
E
S
I
T
D
SEEK
D
I
T
S
E
C
S
/
P
E
R
N
D
E
(DISC/PRESET)
P
/
C
S
I
D
SEEK
D
I
S
C
/
P
(DISC/PRESET)
T
EQ7
R
E
T
(SEEK)
E
T
E
S
T
(+): to select
rightwards/
>
R
E
S
R
E
(SEEK)
(–): to select
leftwards/
.
N
E
M
S
O
U
N
(+): to select upwards
(–): to select downwards
In menu mode, the currently selectable button(s) of
these f our are indicated with a “ M” in the display.
r DISC/PRESET buttons (+/–)
T o receive preset sta t i ons, change th e disc*
skip albums*
*1 When an optional CD/MD unit is connected.
*2 Available only when optional CD unit with the
MP3 file control function is connected.
2
, and select a menu.
s SEEK buttons (–/+)
To skip tracks, fast-forward, reverse a track,
tune in stations automatically, find a station
manually, and select a setting.
DSPL
REP SHUF
1
2
4
5
MODE
EQ7MBP
LIST
+
DISC
MENU
SOURCE
–
SEEK
SOUND
DISC
VOL
SEEK
–
ENTER
ATTOFF
The correspondin g buttons of th e ca rd
remote commander control the same
functions as those on this unit.
a DSPL button
b Number buttons
1
,
(1) REP
(2) SHUF
To store stations, receive stored stations.
c MBP button
d MENU button
e SOURCE button
f SEEK (</,) buttons
g SOUND button
h OFF button
i VOL (+/–) buttons
j EQ7 button
k MODE (o) button
l LIST button
m DISC (M/m) buttons
n ENTER button
o ATT button
Note
If the display disappears by pressing (OFF), it cannot
be operated with the card remote commander unless
(SOURCE) on the unit is pressed, or a cassette tape is
inserted to activate the unit first.
Tip
See “Replacing the lithium battery” on page 21 for
details on how to replace the batteries.
3
6
+
5
Precautions
Notes on Cassettes
• If your car was parked in direct sunlight, allow
the unit to cool off before operating it.
• If no power is being supplied to the unit, check
the connections first. If everythin g i s i n order,
check the fuse.
• If no sound com es from the speakers of a 2speaker system, set the fader control to the
center position.
• When a tape is played back for a long period,
the cassette may be come warm because of th e
built-in power amplifier. However, this is not a
sign of malfunction.
If you have any quest ions or proble m s
concerning your unit that are not covered in this
manual, please co nsult your nearest Sony dealer.
To maintain high quality sound
Be careful not to splash juice or other soft drinks
onto the unit or tapes.
Cassette care
• Do not touch t he t ape surface of a cassette, as
any dirt or dust will contaminate the heads.
• Keep cassettes away fr om equipment with
built-in magnets such as speakers and
amplifie rs, as erasure or di st ortion on the
recorded tape could occur.
• Do not expose cas settes to direct sunlight,
extremely cold temperatures, or moisture.
• Slack in the tape may cause the tape to be
caught in the machine. Before you insert the
tape, use a pencil or similar object to turn the
reel and take up any slack.
Slack
• Distorted cassettes and loose labels can cause
problems when inserting or ejecting tapes.
Remove or replace loos e l abels.
• The sound may become distorted while playing
the cassette. The cassette player head should be
cleaned after each 50 hours of use.
The use of cassettes longer than 90 minutes
is not recommended except for long
continuous pla y
The tape used for th ese cassettes is very thin and
tends to stretch easily.
Frequent playing and stopping of these ta pes
may cause them to become entangled in the
cassette deck mechanism.
6
Getting Started
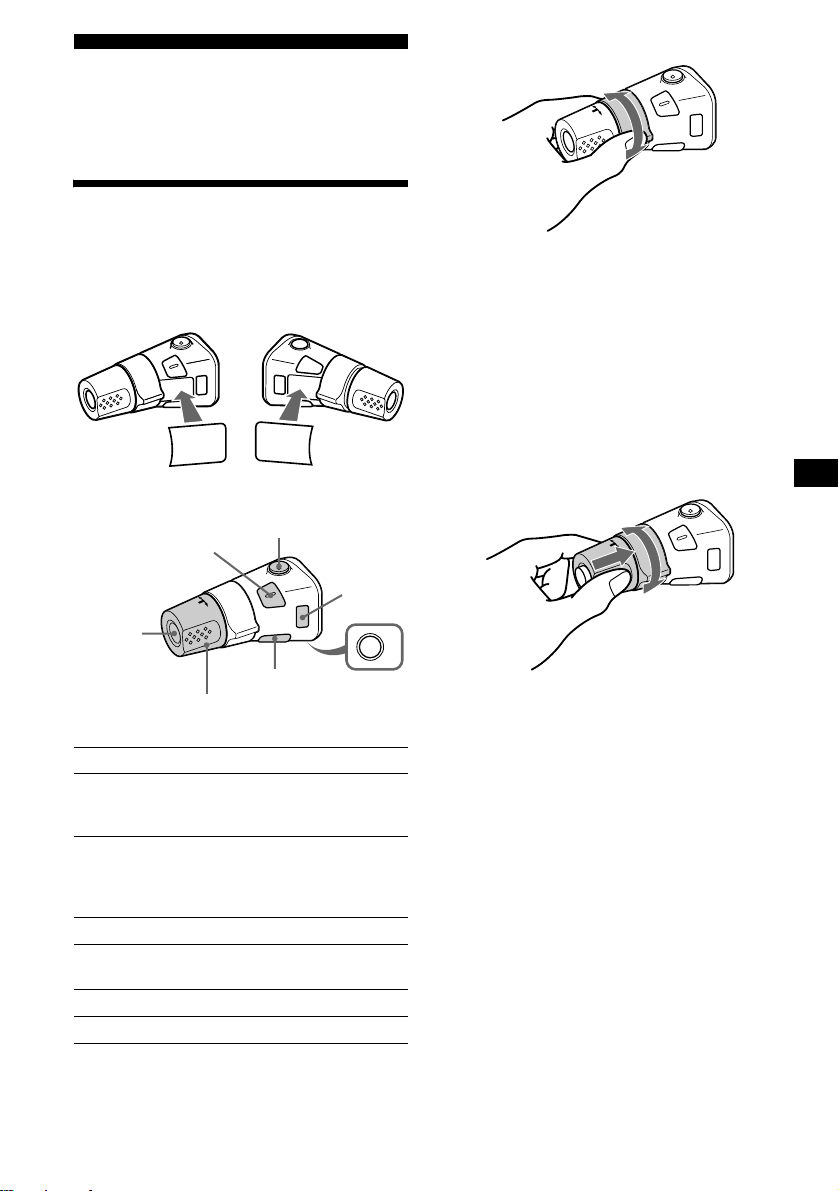
Detaching the front panel
You can detach the front panel of this unit to
protect the unit from being stolen.
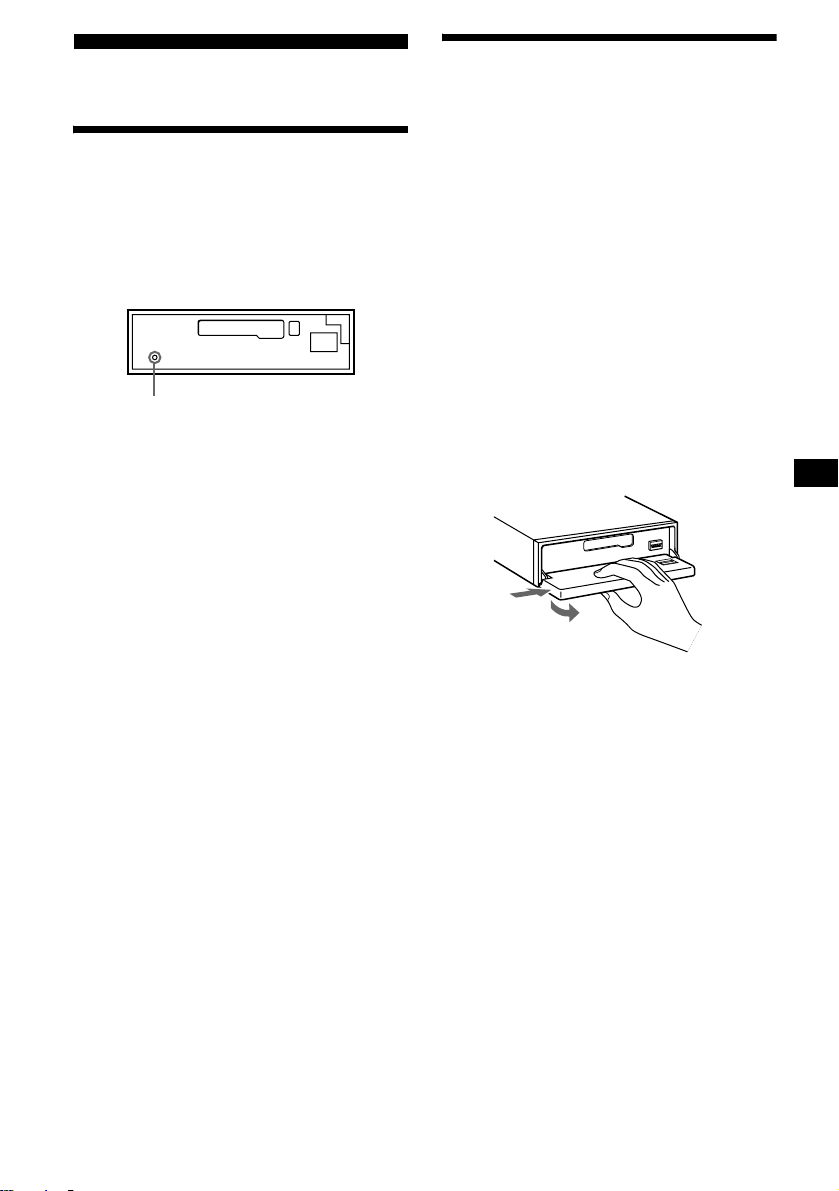
Resetting the unit
Before operating the unit for the first time, or
after replacing the car battery or chan ging the
connections, you must reset the unit.
Remove the front panel and press the RESET
button with a pointed object, such as a ball-point
pen.
RESET button
Note
Pressing the RESET button will erase the clock setting
and some stored contents.
Caution alarm
If you turn the ignition switch to the OFF
position without removing the front panel, the
caution alarm will beep for a few seconds.
If you connect an op ti onal amplifier and do not
use the built-in amplifier, the beep sound will be
deactivated.
1 Press (OFF)*.
Tape playback or radio reception sto ps (the
key illumination and display remain on).
* If your car has no ACC position on the ignition
switch, be sure to turn the unit off by pressing
(OFF) until the display disappears to avoid car
battery drain.
2 Press (OPEN), then slide the f ront
panel to the right, and gently pull out
the left en d of the front p a n el.
1
2
Notes
• If you detach the panel while the unit is still turned
on, the power will turn off automatically to prevent
the speakers from being damaged.
• Do not drop or put excessive pressure on the front
panel and its display window.
• Do not subject the front panel to heat/high
temperature or moisture. Avoid leaving it in parked
cars or on dashboards/rear trays.
Tip
When carrying the front panel with you, use the
supplied front panel case.
continue to next page t
7
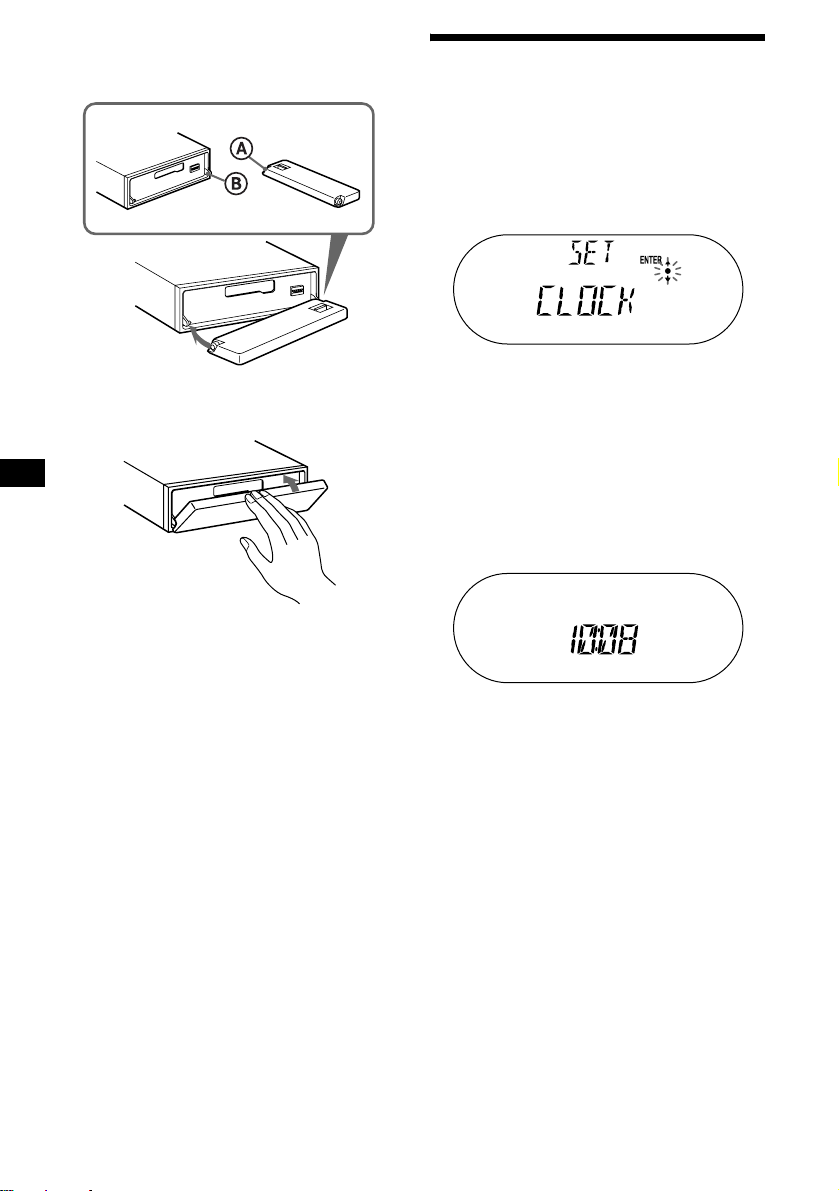
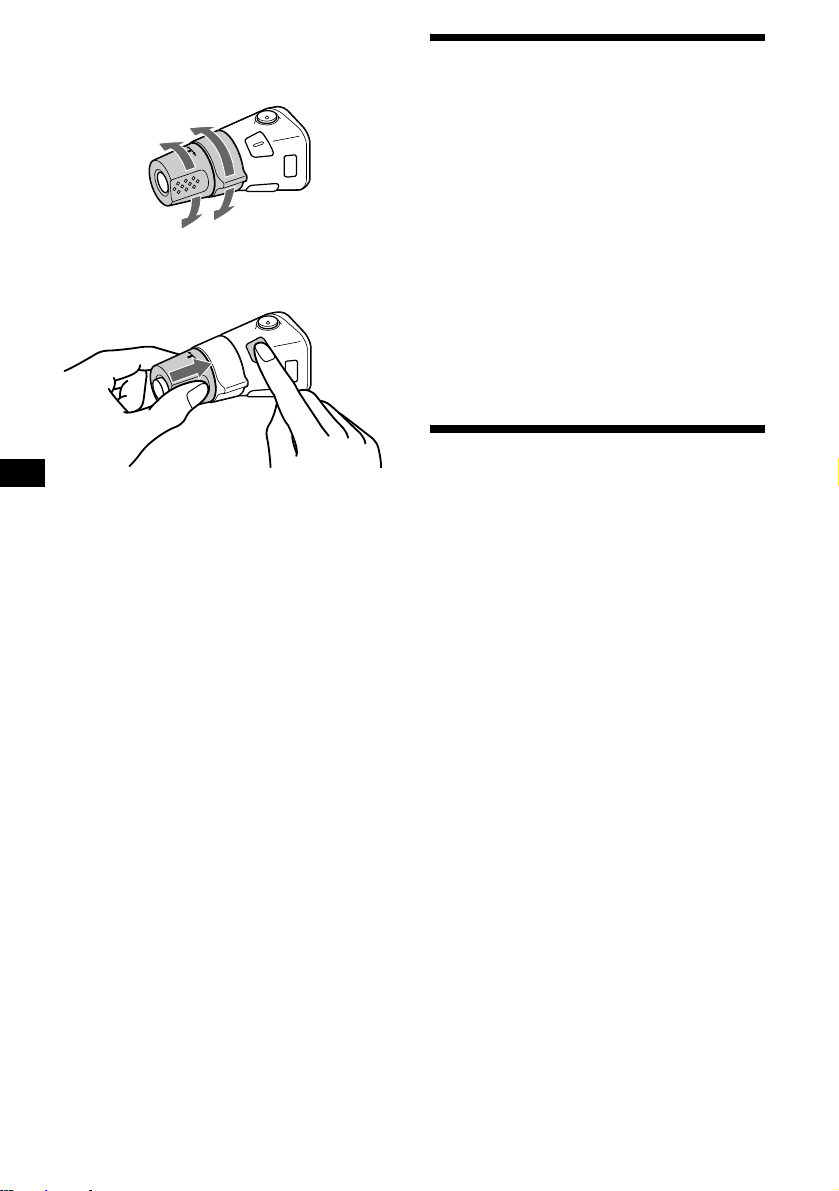
Attaching the front panel
Place hole A of the front panel onto the spindle
B on the unit, then lightly push the left side in.
x
Setting the clock
The clock uses a 12-hour digital indica tion.
Example: To set the clock to 10:08
1 Press (MENU), then press either side
of (DISC/PRESET) repeatedly until
“CLOCK” appears.
1Press (ENTER).
The hour indica tion flashes.
2Press either side of (DISC/PRESET)
to set the h o ur.
3Press the (+) side of (SEEK) .
The minute indi cation flashes.
4Press either side of (DISC/PRESET)
to set the minute.
2 Press (ENTER).
Note
Do not put anything on the inner surface of the front
panel.
8
The clock starts. Aft er th e cl ock setting is
completed, the display retu rn s to normal play
mode.
Tip
When D.INFO mode is set to ON, the time is always
displayed (page 15).
Cassette Player
Listening to a tape
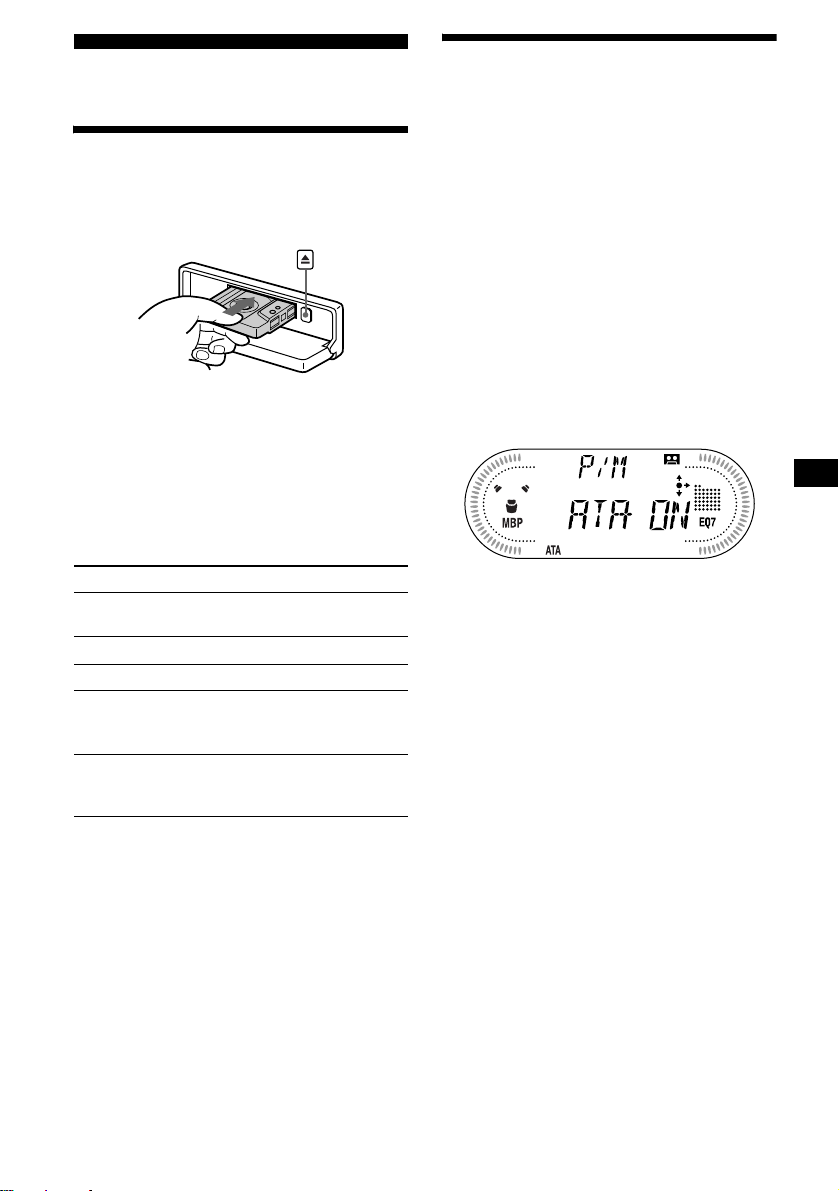
1 Press (OPEN) and insert a cassette.
Playback starts automatically.
2 Close the front panel.
If a cassett e is alre ady insert ed, pre ss (SOURCE)
repeatedly until “FO RWARD” or “REVERSE”
appears to start playback.
FORWARD: The side facing up is played.
REVERSE: The side facing down is played.
Playing a tape in various
modes
You can play the tape in various modes:
• REP (Repea t P la y) the current track .
• BL.SKP (Blank Skip) skips blanks longer than
8 seconds.
• ATA (Automatic Tuner Activation) turns on the
tuner automatically when fast-winding the tape .
• METAL (Metal) lets you play a metal or C rO
tape.
1 During tape playback, press (MENU).
2 Press either side of (DISC/PRESET)
repeatedly until the desired mode
appears.
3 Press (+) side of (SEEK) to select
“ON.”
Example: ATA mode
2
To Press
Change the tape’s
playback direction
Stop playba ck (OFF)
Eject the cassette (OPEN) then Z
Skip tracks
–Automatic
Music Sensor
Fast-forward/
reverse
–Manual Search
Note
The AMS function may not work when:
– the blanks between tracks are shorter than 4
seconds.
– there i s noise between tracks.
– there are long sections of low volume or quiet
sections.
(MODE) (o)
(SEEK) (./>)
[once for each tr ack]
(SEEK) (m/M)
[hold to desired p o i nt ]
Play mode starts.
4 Press (ENTER).
To return to normal playback mode , sel ect
“OFF” in step 3.
Playing tracks repeatedly
— Repeat Play
During playback, press (1) on the
card remote commander repeatedly
until “REP-ON” in the display appears.
To return to normal play mode, select “REPOFF.”
Tip
During repeat playback, press (MODE). “REP”
disappears from the display and repeat mode is
canceled.
9

Radio
The unit can stor e up to 6 stations pe r band
(FM1, FM2, FM3, A M1, and AM2).
Caution
When tuning in stations while driving, use Best
Tuning Memory to prevent accidents.
Storing stations
automatically
— Best Tuning Memory (BTM)
The unit selects the stations with the strongest
signals within the selected band, and stores them
in the order of their frequency.
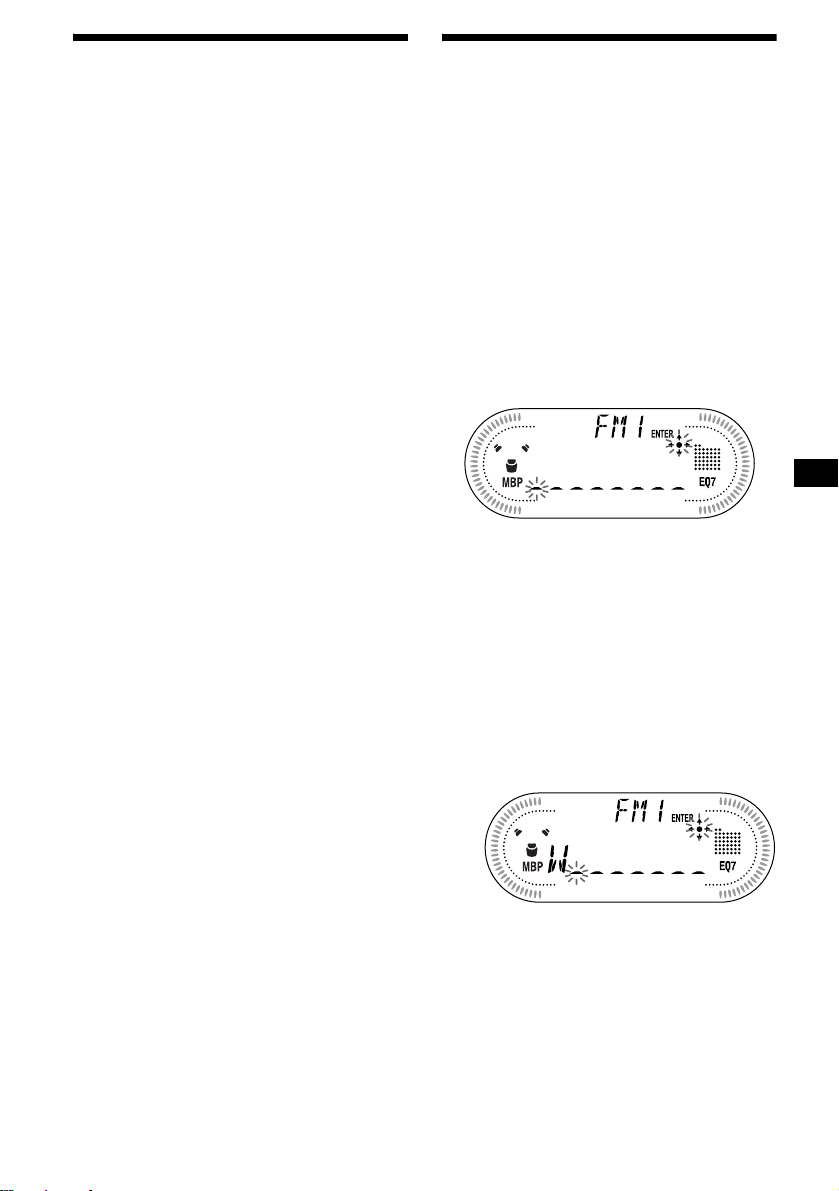
1 Press (SOURCE) repeatedly to select
the radio.
2 Press (MODE) repeatedly to select the
band.
3 Press (MENU), then press either side
of (DISC/PRESET) repeatedly until
“BTM” appears.
4 Press (ENTER).
A beep sounds when the setting is stored.
Notes
• If only a few stations can be received due to weak
signals, some number buttons will retain their former
settings.
• When a number is indicated in the displa y, the unit
starts storing stations from the one currently
displayed.
Receiving the stored stations
1 Press (SOURCE) repeatedly to select
the radio.
2 Press (MODE) repeatedly to select the
band.
3 Press the number button ((1) to (6))
on the card remote command er on
which the desired station is stored.
Tip
Press either side of (DISC/PRESET) to receive the
stations in the order they are stored in the memory
(Preset Search function).
If preset tuning does not work
Press eith er side of (SEEK) to search
for the station (automatic tuning).
Scanning stops when the unit receives a
station. Repeat until the desired station is
received.
Tips
• If automatic tuning stops too frequently, turn on the
Local Seek to limit seek to stations with stronger
signals (see “Changing the sound and display
settings” on page 15).
• If you know the frequency of the station you want to
listen to, press and hold either side of (SEEK) to
locate the approximate frequency, then press
(SEEK) repeatedly to fine adjust to the desired
frequency (manual tuning).
If FM stereo reception is poor
Select monaural reception mode
(see “Changing the sound and display
settings” on page 1 5).
The sound improves, but become s monaura l
(“ST” disappears).
Note
If interference occurs, this unit will automatically
narrow the reception frequency to eliminate noise (IF
AUTO function). In such cases, some FM stereo
broadcasts may become monaural while in the stereo
reception mode.
Tip
To always hear FM stereo broadcasts in stereo, you
can change the IF AUTO setting and widen the
frequency signal reception (see “Changing the sound
and display settings” on page 15). Note that some
interference may occur in this setting.
10
Storing only the desired
stations
You can manually preset the desired stations on
any chosen number button.
1 Press (SOURCE) repeatedly to select
the radio.
2 Press (MODE) repeatedly to select the
band.
3 Press either side of (SEEK) to tune in
the station that you want to store.
4 Press the desired number button ((1)
to (6)) on the car d re mote co mmander
for 2 seconds until “MEM” appears.
The number button in di cation appears in the
display.
Note
If you try to store another station on the same number
button, the previously stored station will be erased.
Storing station names
— Station Memo
You can assign a name to each radio station and
store it in memory. The name of the station
currently tuned in appears in the di splay. You can
assign a name usi ng up to 8 characters for a
station.
Storing the station names
1 Tune in a station whose name you
want to store.
2 Press (MENU), then press either side
of (DISC/PRESET) repeatedly until
“NAMEEDIT” appears.
3 Press (ENTER).
4 Enter the characters.
1
1 Press the (+) *
(DISC/PRESET) repeatedly to select
the desired character.
A t B t C ... t 0 t 1 t 2 ... t +
t – t
*1 For reverse order, press the (–) side of
(DISC/PRESET).
*2 (blank space)
2 Press the (+) side of (SEEK) after
locating the desired character.
side of
... t _*2 t A
*
If you press the (–) side of (SEEK), you can
move back to the left.
3 Repeat steps 1 and 2 to enter the
entire name.
5 Press (ENTER).
continue to next page t
11

Tips
• Simply overwrite or enter “
name.
• There is another way to start storing station names:
Press (LIST) for 2 seconds instead of performing
steps 2 and 3. You can also complete the operation
by pressing (LIST) for 2 seconds instead of step 5.
Erasing the station name
_” to correct or erase a
1 During radio reception, press (MENU),
then press either side of
(DISC/PRESET) repeatedly until “NAME
DEL” appears.
2 Press (ENTER).
3 Press either side of (DISC/PRESET)
repeatedly to select the station w hose
name you want to erase.
4 Press (ENTER) for 2 seconds.
The name is erased.
Repeat steps 3 to 4 if yo u wa nt to era se other
names.
5 Press (MENU) twice.
The unit returns to no rmal radio recept io n
mode.
Note
If you have already erased all of the station names,
“NO DATA” appears in step 4.
Tuning in a station through a
list
— List-up
1 During radio reception, press (LIST)
momentarily.
The frequency or the name assigned to the
current station appears in the display.
2 Press eith er side of (DISC/PRESET)
repeatedly until you find the desired
station.
If no name is assigned to the selected station,
the frequency appea rs in the display.
3 Press (ENTER) to tune in the desired
station.
12
Other Functions
You can also control the unit (and optional C D /
MD units) with a rotary commander (optional).
Using the rotary commander
By rotating the control
SEEK/AMS
control
First, attach the appropriate label depending on
how you want to mount the rotary commander.
The rotary commander works by pressin g
buttons and/or rotating controls.
SOUND
MODE
DSPL
MODE
SOUND
DSPL
By pressing buttons
(SOUND)
(SOURCE)
Rotate the VOL control
to adjust the volume.
Press To
(SOURCE) Change source
(ATT)
(DSPL)
(radio/CD*
(MODE)
(OFF)
1
/MD*1/Tape)/
Power on
(MODE) Change operation
(radio band/CD uni t*
1
unit*
/Tape playback
1
/MD
direction)
(ATT) Attenuate soun d
2
(OFF)*
Stop playback or ra di o
reception/Power off
(SOUND) Adjust the sound menu
(DSPL) Change the display item
Rotate and release to:
– Locate the beginning of tr acks on the tape.
– Tune in stations automatically.
– Skip tracks on the disc.*
1
Rotate, hold, and release to:
– Fast-wind the tape.
– Find a station manually.
– Fast-forward/reverse a track.*
Tip
To start playback w hile fast-winding the tape, press
(MODE).
By pushing in and rotating the control
PRESET/DISC
control
OFF
Push in and rotate the control to:
– Receive preset stations.
– Change the disc during CD(MD)
playback.*
During playba ck of a CD containi n g M P3
3
files*
1
Push in and repeat rotating quickly to:
– Change discs one by one.
Push in, then rotate and hold to:
– Change albums.
*1 Only if the corresponding optional equipment is
connected.
*2 If your car has no ACC (accessory) position on the
ignition key switch, after turning off the ignition, be
sure to press and hold (OFF) until the display
disappears.
*3 Available only when optional CD unit with the MP3
file control function is connected.
continue to next page t
1
13
Changing the operative direction
The operative direction of controls is factory-set
as shown below.
To increase
To decrease
If you need to mount the rotary commander on
the right hand side of the steering column, you
can reverse the operative direction.
Press (SOUND) for 2 seconds while
pushing the VOL control.
Tip
You can also change the operative direction of these
controls with the unit (page 15).
Adjusting the sound
characteristics
You can adjust the bass, treble, balance and fader.
1 Select the item you want to adjust by
pressing (SOUND) repeatedly.
Each time you press (SOUND), the item
changes as follows:
BAS (bass) t TRE (treble) t
BAL (left-right) t F AD (front-rear)
2 Adjust the selected item by pressi ng
either side of (SEEK).
When adjusting w i th the rotary comman der,
press (SOUND) and rotate the VOL control.
Note
Adjust within 3 seconds after selecting the item.
Quickly attenuating the
sound
(With the card remote commander o r the
rotary commander)
Press (ATT) on the card remote
commander or ro tary commander.
After “ATT-ON” momentarily appears,
“ATT” appe ars in the display.
14
To restore the previous volume level, press
(ATT) again.

Changing the sound and
display settings
— Menu
The following items can be set:
SET (Set Up)
• CLOCK (page 8)
• BEEP — to turn the beeps on or off.
• RM (Rotary Com m ander) — to change the
operative direction of th e controls of the rotar y
commander.
– Select “NORM” to use the rotary commander
at the factory-set position.
– Select “REV” when you mount the rotary
commander on the right side of the st eering
column.
DSPL (Display)
• D.INFO (Dual Informatio n) — to display the
clock and the play mode at th e same time (ON).
• M.DSPL (Motion Display) — to select the
Motion Display mode from “1,” “2,” and
“OFF.”
– Select “1” to show decoration patterns in the
display and activate Demo display.
– Select “2” to show decoration patterns in the
display and deact ivate Dem o di splay.
– Select “OFF” to deactivate the Motion
Display.
• A.SCRL (Aut o Scroll)*
– Select “ON” to scroll all automatically
displayed nam es exceeding 8 characters.
– When A.SCRL is set to off and the disc/track
name is changed, the disc/track name does
not scroll.
* When no CD or MD is playing, this item will not
appear.
P/M (Play Mode)
• LOCAL (Local seek mode) (page 10)
– Select “ON” to only tune into stations with
stronger signal s.
• MONO (Monaural mode) (page 10)
– Select “ON” to hear FM stereo broadcast in
monaural. Select “OFF” to return to normal
mode.
• IF AUTO/W IDE (page 10)
SND (Sound)
• EQ7 TUNE (page 1 7) — t o adjus t th e equa lizer
curve.
• LOUD (Loudness) — to enjoy bass and treble
even at low volumes. The bass and trebl e w i ll
be reinforced.
1 Press (MENU).
To set A.SCRL, press (MENU) during CD/
MD playback.
2 Press either side of (DISC/PRESET)
repeatedly until the desired item
appears.
3 Press the (+) side of (SEEK) to select
the desired setting (Example: “ON” or
“OFF”).
4 Press (ENTER).
After the mode setting is completed, the
display returns to normal play mode.
Note
The displayed item will differ depending on the source.
Tip
You can easily switch among categories (“SET,”
“DSPL,” “P/M,” “SND,” and “EDIT”) by pressing either
side of (DISC/PRESET) for 2 seconds.
15
Selecting the sound position
— My Best sound Position (MBP)
When you drive without passengers, you can
enjoy the most comfortable sound environment
with “My Best sound Position.”
“My Best sound Position” has 2 presets, which
are best suited for the front seat s. You can select
one very easily with the MB P button.
MBP-A: best suited for the person in the front-
left seat.
MBP-B: best suited for the person in the front-
right seat.
Press (MBP) repeatedly for the desired
listening position.
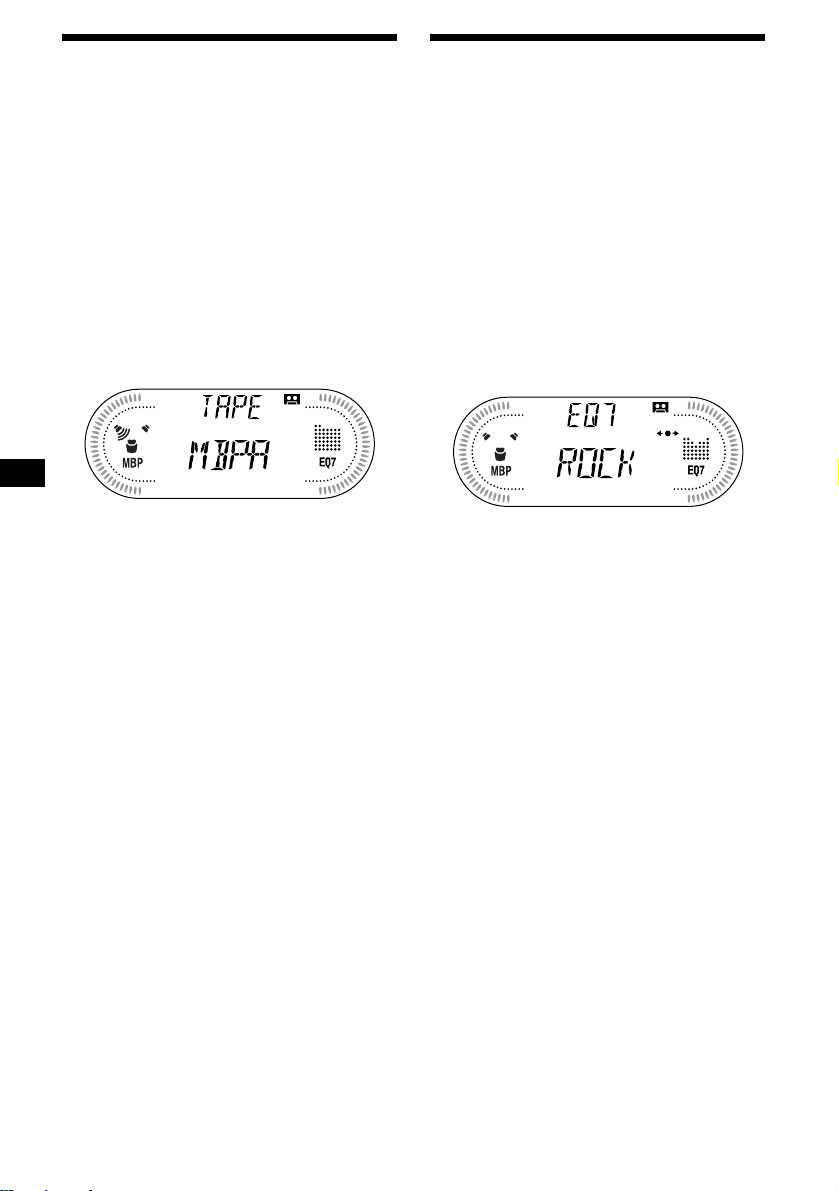
Setting the equalizer (EQ7)
You can select an equal i zer curve for 7 music
types (XPLOD, VOCAL, CLUB, JAZZ, NEW
AGE, ROCK, CUSTOM, and OFF (equalizer
OFF)).
You can store a different eqalizer setting for each
source.
Selecting the equalizer curve
1 Press (SOURCE) to select a source
(radio, tape, CD, or MD).
2 Press (EQ7) repeatedly until the
desired equalizer curve.
Each time you press (EQ7), the item
changes.
After 1 second, th e di splay goes back to
normal play mode.
To cancel the MBP function, select “MBP-OFF.”
If you want to adjust t h e s ound characteristi cs
more precisely, you can do it using the
(SOUND) button (see “Adjusting the sound
characteristics” on page 14).
Notes
• If you adjust any sound characteristics by using the
(SOUND) button (page 14), the MBP setting returns
to OFF.
• When MBP is set to OFF, the sound setting you
adjusted (page 14) is activated.
To cancel the equalizing effect, select “OFF.”
After 3 seconds, the disp lay retu rns to normal
play mode.
16
 Loading...