

Sony XEL-1 Operating Manual
OLED Digital TV


Operating Instructions
GB
GB
3

Owner’s Record
The model, serial numbers and the date of manufacture are
written on rating label. It is located at the bottom of the TV.
Record these numbers in the spaces provided below. Refer to
them whenever you call upon your Sony dealer regarding this
TV.
Model Name
Serial No.
NOTICE FOR CUSTOMERS
IN THE UNITED KINGDOM
A moulded plug complying with BS1363 is fitted to this equipment
for your safety and convenience.
Should the fuse in the plug supplied need to be replaced, a 10 AMP
fuse approved by ASTA or BSI to BS 1362 (i.e., marked with
or ) must be used.
When an alternative type of plug is used it should be fitted with a 10
AMP FUSE otherwise the circuit should be protected by a 10 AMP
FUSE at the distribution board.
If the plug supplied with this equipment has a detachable fuse cover,
be sure to attach the fuse cover after you change the fuse. Never use
the plug without the fuse cover. If you should lose the fuse cover,
please contact your nearest Sony service station.
FUSE
How to replace the fuse
Open the fuse compartment with a blade screwdriver, and replace
the fuse.
Please refer to the illustration that actually equipped with the
product.
Introduction
Thank you for choosing this Sony product.
Before operating the TV, please read this manual thoroughly and
retain it for future reference.
The manufacturer of this product is Sony Corporation, 1-7-1
Konan Minato-ku Tokyo, 108-0075 Japan. The Authorized
Representative for EMC and product safety is Sony
Deutschland GmbH, Hedelfinger Strasse 61, 70327 Stuttgart,
Germany. For any service or guarantee matters please refer to
the addresses given in separate service or guarantee
documents.
CAUTION
Bright, stationary images, such as TV station logos or photos,
displayed on your TV can become permanently imprinted
onto the screen. This type of imprint is known as “Image
Retention”. Please take the following steps to reduce the risk
of this occurring:
View a variety of programme sources or programming
material. Changing the programme material viewed reduces
the possibility that a single image will become imprinted on
the TV screen.
When using video games, set-top boxes, or similar products
with your TV, or when viewing a TV station whose logo
always stays on the screen, select the appropriate “Picture”
settings for the room brightness and set “Picture Mode” to
“Standard” (see page 31 for instructions on adjusting
“Picture” settings).
This TV was designed primarily for viewing TV broadcasts
in wide screen mode (16:9 aspect ratio). Therefore, when
viewing conventional (4:3) TV programmes, select “Smart”
in the “Screen Format”.
To reduce the risk of image retention, turn off the On Screen
Display (OSD) by pressing the / button, and turn off
the menus of connected equipment (see page 19, 29).
IMAGE RETENTION IS NOT COVERED BY YOUR
WARRANTY. Un-repairable damage can occur and is not
covered under warranty.
Trademark information
s is a registered trademark of the DVB Project
s HDMI, the HDMI logo and High-Definition Multimedia
Interface are trademarks or registered trademarks of HDMI
Licensing LLC.
s “XMB” and “xross media bar” are the trademarks of Sony
Corporation and Sony Computer Entertainment Inc.
s Manufactured under license from Dolby Laboratories. Dolby
and the double-D symbol are trademarks of Dolby Laboratories.
s Adobe is a registered trademark or a trademark of Adobe
Systems Incorporated in the United States and/or other
countries.
Notice for Digital TV function
s Any functions related to Digital TV ( ) will only work in
countries or areas where DVB-T (MPEG2 and MPEG4 AVC)
digital terrestrial signals are broadcast or where you have access
to a compatible DVB-C (MPEG2 and MPEG4 AVC) cable
service. Please confirm with your local dealer if you can receive
a DVB-T signal where you live or ask your cable provider if
their DVB-C cable service is suitable for integrated operation
with this TV.
s The cable provider may charge an additional fee for such a
service and you may be required to agree to their terms and
conditions of business.
s Although this TV set follows DVB-T and DVB-C
specifications, compatibility with future DVB-T digital
terrestrial and DVB-C digital cable broadcasts cannot be
guaranteed.
s Some Digital TV functions may not be available in some
countries/regions and DVB-C cable may not operate correctly
with all providers.
s For more information about DVB-C functionality please see
our cable support site:
http://support.sony-europe.com/TV/DVBC/
GB
4

Table of Contents
XEL-1 Overview 6
Welcome to the World of OLED ...................................................................................................... 6
Start-up Guide
Safety Information.......................................................................................................................... 15
Precautions..................................................................................................................................... 17
Remote and TV Controls/Indicators ............................................................................................. 18
Watching TV
Watching TV.................................................................................................................................... 21
Using the Digital Electronic Programme Guide (EPG) ..................................................... 23
Using the Digital Favourite List .......................................................................................... 24
Using Optional Equipment
Connecting Chart ........................................................................................................................... 25
Viewing Pictures from Connected Equipment............................................................................. 27
Playing Back Photo via USB ......................................................................................................... 27
Using Control for HDMI.................................................................................................................. 28
Protecting the TV Screen
Precautions to Protect the Screen from Damage........................................................................ 29
Using MENU Functions
Navigating through TV Home Menu (XMB™)............................................................................... 30
Settings ........................................................................................................................................... 31
Additional Information
Specifications ................................................................................................................................. 40
Troubleshooting ............................................................................................................................. 41
: for digital channels only
Before operating the TV, please read the “Safety Information” section of this manual.
Retain this manual for future reference.
GB
GB
5

XEL-1 Overview
Welcome to the World of OLED
Organic light-emitting diode TV
“XEL-1” realises unparalleled
picture quality
OLED Display
The OLED (organic light-emitting diode)
display contains organic materials that emit
light when an electric current is passed
through them (see Figure 1). As the light
emissions are self-generated, the level can be
controlled by altering the strength of the
current.
Because there is no need for a backlight, an
OLED display is much thinner and lighter than
a conventional LCD panel. It also features
high contrast, high brightness, excellent colour
reproduction and rapid response to moving
pictures.
Light
Cathode
Electron
transport layer
Emissive
layer
Hole
transport layer
Anode
Figure 1
Picture Quality
Brightness
Enjoy stunning pictures of stars twinkling in a
pitch-black sky or fireworks spectacularly
lighting up the night sky.
With its light-emitting structure, the OLED
display can reproduce virtually any colour by
combining the red, green and blue light
emitted by the organic materials, while black
is shown by no light emission. True black is
created by preventing all light emission
completely, achieving the high contrast that
conventional displays cannot match.
There are broadly two ways to extract the light
emitted by the organic materials (see Figure
2). In the bottom emission method, the light is
extracted from the TFT substrate side. Since
GB
6

the drive circuits and wires are present on the
TFT substrate, the area from which light can
be extracted is limited. In top emission, on the
other hand, light is extracted from the opposite
side of the TFT substrate. Because there are
almost no obstacles, the light can be extracted
efficiently. Sony’s OLED displays use the top
emission method, ensuring high brightness and
superb picture quality.
Cathode
Transparent
anode
Semitransparent
cathode
Organic
layer
TFT
Bottom emission method
decreases, the colour purity of the light passing
through the semitransparent cathode increases.
As a result, each colour is vividly and clearly
reproduced. The colour purity is further
enhanced by passing the light through a colour
filter.
The self-luminous nature of the OLED display
not only generates the full colour spectrum of
bright images, but delivers vivid colour
reproduction capability at nearly all brightness
levels to produce stunning pictures (see Figure
5).
Polarising film used to be the common method
of preventing reflection of ambient light. The
use of such polarising film, however, causes a
reduction in brightness that would
compromise the properties of the OLED
display. The use of colour filters, on the other
hand, prevent reflection of ambient light and
lessen its effects while enabling the image to
be reproduced in its essential colours.
In addition to the high brightness and high
efficiency of the top emission method, by
selecting the film thickness to match the
wavelength of the light and using colour
filters, Sony has succeeded in producing
brighter, more colourful images. This unique
system of Sony’s is called “Super Top
Emission”.
XEL-1 Overview
Organic
layer
Anode
Top emission method
Figure 2
TFT
Vividness
Enjoy colourful pictures of gardens full of
spring flowers and gorges bathed in vibrant
autumn colours.
Colours are reproduced using the red, green
and blue organic layers. The film thickness is
selected to match the wavelength for each
colour (see Figure 3).
The light emitted in the organic layer is
reflected back and forth between the anode
and the cathode. Only light whose wavelength
matches the thickness of the film interferes,
increasing in strength (see Figure 4). As the
light of other superfluous wavelengths
red green blue
Figure 3
Figure 4
Glass substrate
Colour filter
Semitransparent
cathode
Organic layer
Anode
TFT
Glass substrate
Glass substrate
Semitransparent
cathode
Organic layer
Anode
Glass substrate
(Continued)
GB
7

Brightness
v'
Colour reproduction area
Figure 5
u'
Depth and Spatial Effect
Enjoy dramatic pictures of the soaring
Himalayas stretching into the distance or drift
ice floating out to sea.
The high contrast, high peak brightness and
wide colour reproduction featured by the
OLED display produce realistic images with
the texture of the original. Exquisite shades of
black make the surrounding colours stand out,
creating a sharp image and enabling the OLED
display to reproduce depth and perspective as
well as texture.
Stable Moving Pictures
Enjoy clear pictures of a fast-moving football
match or an action-packed film with little
image lag.
The OLED display’s organic materials emit
light when subjected to an electric current. The
light emission level changes instantly when
the current is altered, and the panel’s
responsiveness is such that the slightest
change in colour tone is performed as quickly
as a colour shift from white to black, ensuring
minimal image lag regardless of the pictures
displayed.
The XEL-1 features unique image processing
technology called “Fine Motion”.
Creating enhanced motion based on the image
content, coupled with the OLED display’s
unique features, “Fine Motion” reproduces
fast-moving scenes with incredible
smoothness and clarity.
GB
8
Main Unit
Display
A significant benefit of the self-luminous
OLED display is that, unlike conventional
liquid crystal displays, it does not require a
backlight. The organic layer is so thin that it is
measured in nanometers (nm). An OLED
display is about as thick as the glass panels
aligned on either side of the light-emitting
organic material layer, protecting it.
Arm
The lightness of the panel allows great
flexibility in the position of the arm. The panel
design with its offset arm creates the
impression of floating in mid-air.
Pedestal
The main high-density mounting board and
compact speakers are incorporated into the
pedestal, which is distanced from the panel.
Storing the highly compact components in the
pedestal contributes to the impression of the
panel floating in mid-air.
XEL-1 Overview
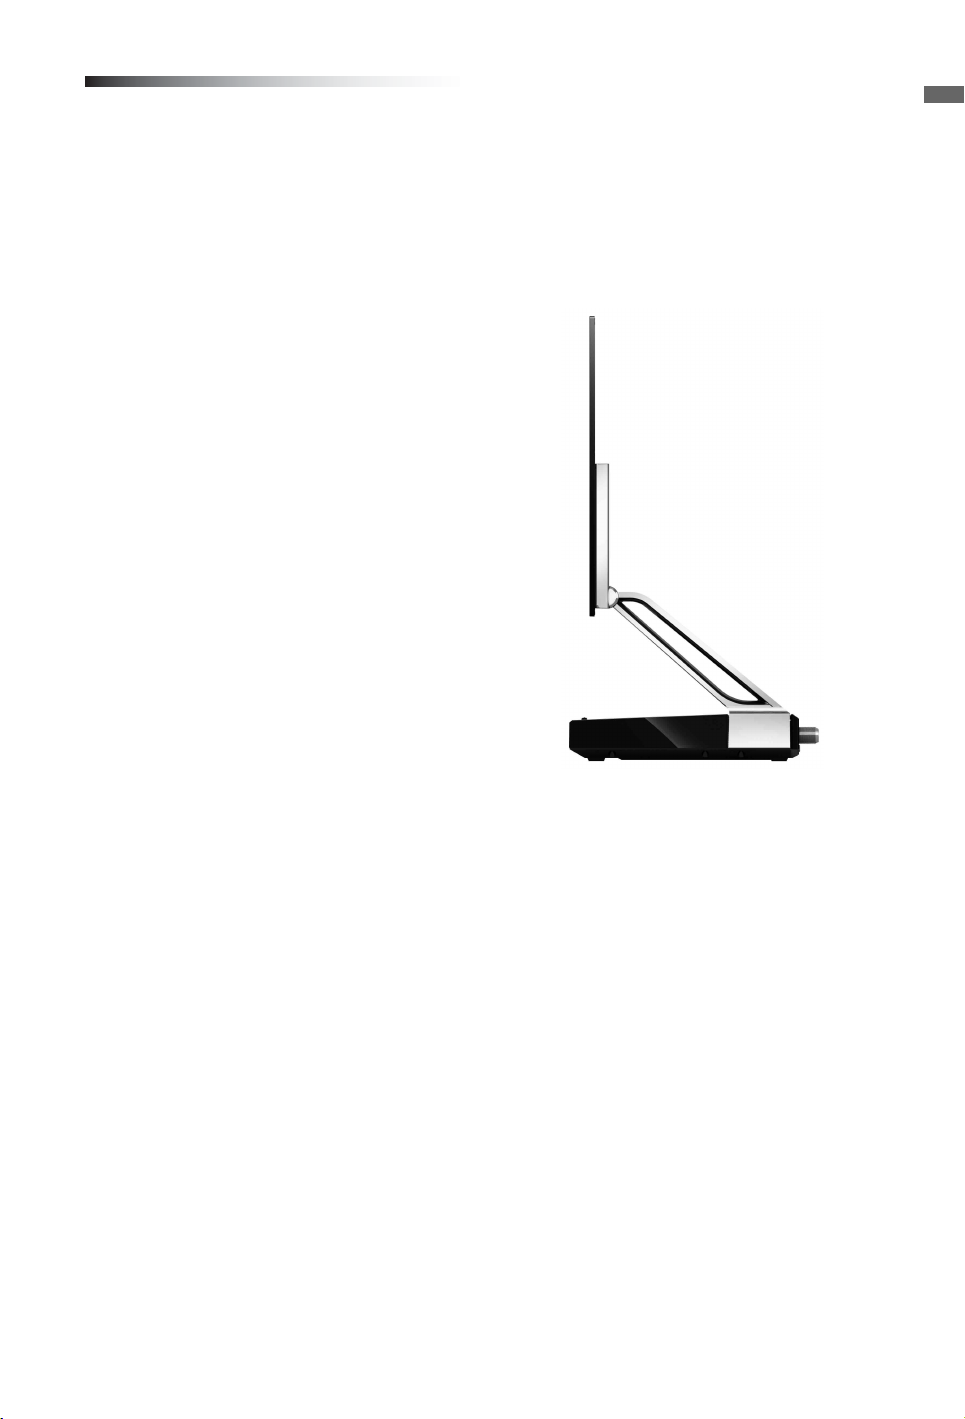
Rear View
Whether placed against a wall or standing on a
desk, the XEL-1 is stylish and elegant. When
standing alone, its sophisticated design can be
appreciated from all sides. The rear panel has a
mirror-like metal surface, creating a sense of
oneness with the pedestal and arm.
Enjoy the XEL-1’s stunning pictures to your
heart’s content.
GB
9

Start-up Guide
Before Use
To check the accessories
Mains lead (Type C) (1)
~
• Except for the United Kingdom.
Mains lead (Type BF) (1)
~
• Only for the United Kingdom.
• See “NOTICE FOR CUSTOMERS IN THE
UNITED KINGDOM” on page 4 when using this
mains lead.
Mains adaptor AC-ED002 (1)
When changing the battery
Unlock the battery holder by pushing a pen tip
into the hole located on the rear of the remote.
Slide the battery holder out. Replace the
battery with CR2032 (lithium) battery with e
side up in the battery holder of the remote.
Slide to open
~
• Observe the correct polarity when inserting
batteries.
• Dispose of batteries in an environmentally
friendly way. Certain regions may regulate the
disposal of batteries. Please consult your local
authority.
• Handle the remote with care. Do not drop or step
on it, or spill liquid of any kind onto it.
• Do not place the remote in a location near a heat
source, a place subject to direct sunlight, or a
damp room.
Remote RM-ED015 (1)
CR2032 (lithium) battery (1)
Cleaning cloth (1)
To insert a battery into the remote
When using the remote for the first time
Pull the insulation film out from the remote.
10
GB

1: Connecting an aerial/Set
Top Box/recorder (e.g. DVD
recorder)
Connecting a Set Top Box/recorder (e.g.
DVD recorder) with HDMI
2: Connecting the mains
lead
Before connecting the mains adaptor to the
TV, complete all connections with the
equipment.
1 Connect the mains adaptor to the TV.
2 Connect the mains adaptor with the mains
lead.
3 Connect the mains lead to the mains
socket (220-240V AC, 50Hz).
~
• The type of mains lead varies depending on the
region where the TV is used. See “To check the
accessories” on page 10.
Start-up Guide
Set Top Box/recorder (e.g. DVD recorder)
1
DC IN
16V
Mains adaptor
2
Mains lead
3
11
GB
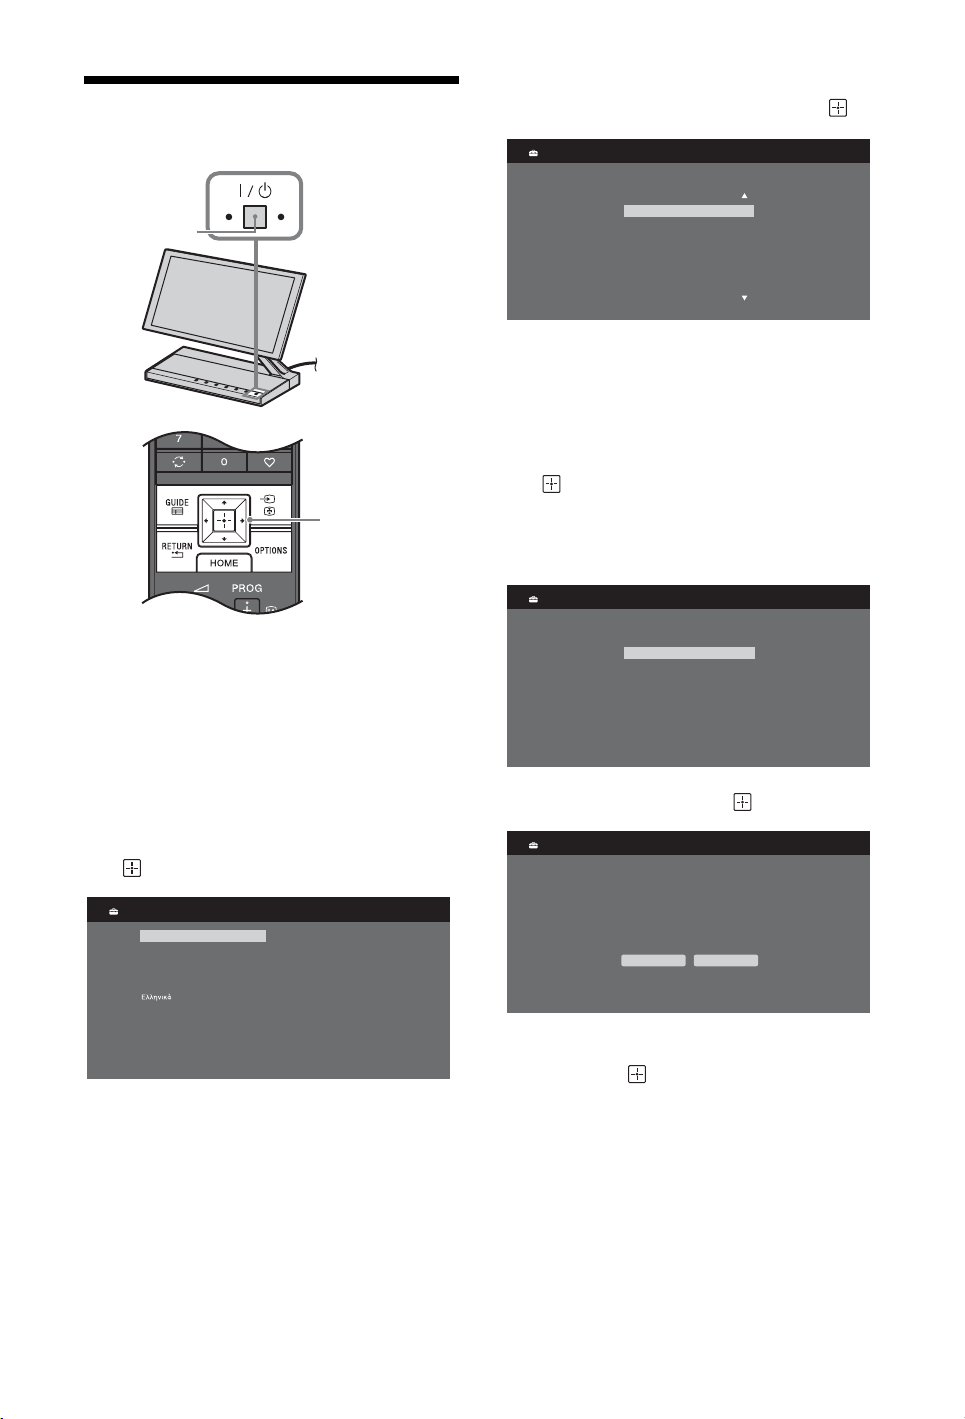
3: Performing the initial setup
2
4 Press V/v to select the country in which
you will operate the TV, then press .
Country
Select country.
-
United Kingdom
Ireland
Nederland
België/Belgique
Luxembourg
France
Italia
1
To mains socket
3-11
1 Connect the TV to your mains socket
(220-240V AC, 50Hz).
2 Press "/1 on the TV.
When you switch on the TV for the first
time, the language menu appears on the
screen.
3 Press V/v/B/b to select the language
displayed on the menu screens, then press
.
Language
English
Nederlands
Français
Italiano
Deutsch
Türkçe
Español
Català
Português
Polski
Česky
Magyar
Русский
ББлгар
Suomi
Dansk
Svenska
Norsk
Slovenčina
Română
ски
If the country in which you want to use
the TV does not appear in the list, select
“-” instead of a country.
5 Press V/v to select the location type in
which you will operate the TV, then press
.
~
• Select “Home” for the best TV settings to use
the TV in the home.
Location
Select location.
Home
Shop
6 Select “OK” then press .
Auto Tuning
Do you want to start Auto Tuning?
OK Cancel
7 Press V/v to select “Antenna” or “Cable”,
then press .
If you select “Cable”, the screen for
selecting the scan type appears. See “To
tune the TV for cable connection”
(page 13).
The TV starts searching for all available
digital channels, followed by all available
analogue channels. This may take some
time, so do not press any buttons on the
TV or remote while proceeding.
12
GB

If a message appears for you to confirm
the aerial connection
No digital or analogue channels were
found. Check all the aerial/cable
connection and then press to start autotuning again.
8 When the “Programme Sorting” menu
appears on the screen, follow the steps of
“Programme Sorting” (page 36).
If you do not change the order in which
the analogue channels are stored on the
TV, press RETURN to go to step 9.
9
Quick Start
TV turns on more quickly but standby power consumption is increased.
Do you want to enable Quick Start?
Yes No
For details, see page 32.
10
Control for HDMI
Do you want to enable control for compatible
HDMI devices?
Yes No
For details, see page 28.
11 Press .
The TV has now tuned in all the available
channels.
To tune the TV for cable connection
1 Press .
2 Press V/v to select “Quick Scan” or “Full
Scan”, then press .
“Quick Scan”: channels are tuned
according to the cable provider
information within the broadcast signal.
This option is recommended for fast
tuning when supported by your cable
provider.
If the “Quick Scan” does not tune, please
use the “Full Scan” method below.
“Full Scan”: all available channels are
tuned and stored. This procedure may take
some time.
This option is recommended when “Quick
Scan” is not supported by your cable
provider.
For further information about supported
cable providers, refer to support web site:
http://support.sony-europe.com/TV/
DVBC/
3 Press v to select “Start”, then press .
The TV starts searching for channels. Do
not press any buttons on the TV or
remote.
~
• Some cable providers do not support “Quick
Scan”. If no channels are detected using “Quick
Scan”, perform “Full Scan”.
• XEL-1 screen saver may appear if no operation is
performed for a few minutes.
Start-up Guide
~
• When a digital broadcast channel cannot be
received, or when selecting a country in which
there are no digital broadcasts in step 4, the time
must be set after performing step 8.
• XEL-1 screen saver may appear if no operation is
performed for a few minutes.
13
GB

Adjusting the Viewing
Angle of the TV
This TV’s display panel can be adjusted to tilt
back and forth within the angles as illustrated
below.
Left view
55° 15°
Front
~
• When adjusting, do not directly touch or bend the
display panel.
• When adjusting the display panel backward, take
care not to catch your fingers between the panel
and arm of the TV.
• When adjusting the angle, hold the right side of
the display panel.
Display
Panel
ArmPedestal
14
GB
Safety Information
Installation/Set-up
Install and use the TV set in accordance with the instructions below
in order to avoid any risk of fire, electrical shock or damage and/or
injuries.
Installation
s The TV set should be installed near an easily accessible mains
socket.
s Place the TV set on a stable, level surface.
s Do not place the TV or remote in a place subject to extreme
temperature, such as in direct sunlight, near a radiator, near a
heating vent or near fire. Otherwise, overheating may result and
cause enclosure deformation or a malfunction. Do not install the
TV in a place directly exposed to air conditioning. If the TV is
installed in such a location, moisture may condense inside and
cause a malfunction.
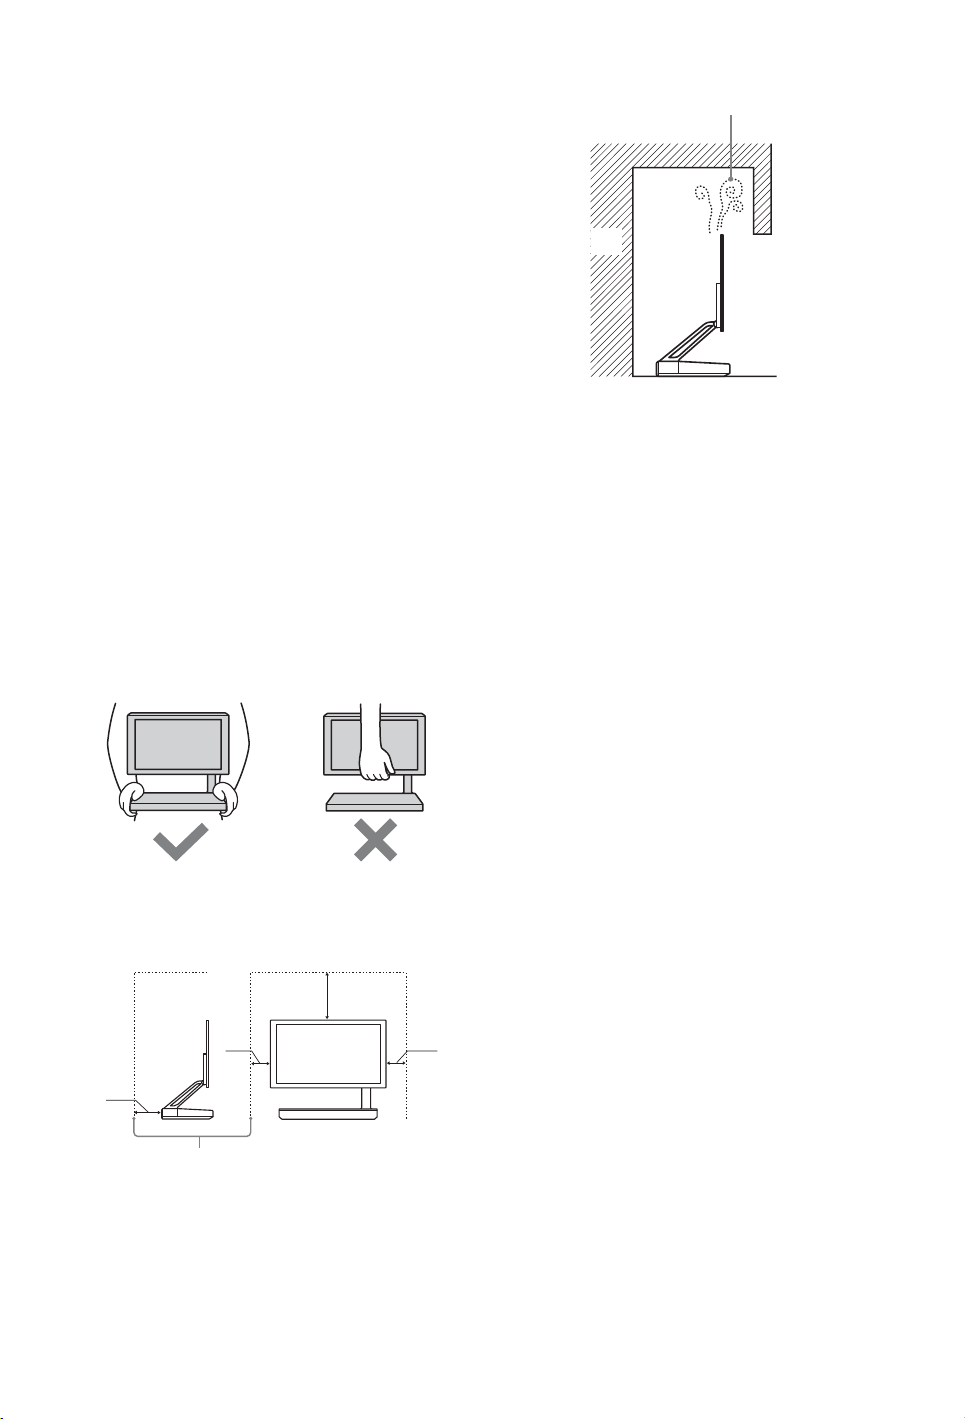
Transporting
s Before transporting the TV set, disconnect all cables.
s When you transport the TV, place your hand as illustrated and
hold it securely. Do not put stress on the screen.
s Do not transport the TV by holding the screen. It may cause
damage to the TV and/or serious injury.
s When lifting or moving the TV, hold it firmly with both hands
from the bottom.
s When transporting the TV set, do not subject it to jolts or
excessive vibration.
s When transporting the TV set for repairs or when moving, pack
it using the original carton and packing material.
– Do not install the TV set as shown below.
Air circulation is blocked.
Wall
Mains lead
Handle the mains lead and socket as follows in order to avoid any
risk of fire, electrical shock or damage and/or injuries:
– Use only mains leads supplied by Sony, not other suppliers.
– Insert the plug fully into the mains socket.
– Operate the TV set on a 220-240 V AC supply only.
– When wiring cables, be sure to unplug the mains lead for your
safety and take care not to catch your feet on the cables.
– Disconnect the mains lead from the mains socket before
working on or moving the TV set.
– Keep the mains lead away from heat sources.
– Unplug the mains plug and clean it regularly. If the plug is
covered with dust and it picks up moisture, its insulation may
deteriorate, which could result in a fire.
Notes
s Do not use the supplied mains lead on any other equipment.
s Do not pinch, bend, or twist the mains lead excessively. The
core conductors may be exposed or broken.
s Do not modify the mains lead.
s Do not put anything heavy on the mains lead.
s Do not pull on the mains lead itself when disconnecting the
mains lead.
s Do not connect too many appliances to the same mains socket.
s Do not use a poor fitting mains socket.
Ventilation
s Never cover the ventilation holes or insert anything in the
cabinet.
s Leave space around the TV set as shown below.
15 cm
5 cm
10 cm
Leave at least this space around the set.
s To ensure proper ventilation and prevent the collection of dirt
or dust:
– Do not lay the TV set flat, install upside down, backwards,
or sideways.
– Do not place the TV set on a shelf, rug, bed or in a closet.
– Do not cover the TV set with a cloth, such as curtains, or
items such as newspapers, etc.
5 cm
Prohibited Usage
Do not install/use the TV set in locations, environments or
situations such as those listed below, or the TV set may malfunction
and cause a fire, electrical shock, damage and/or injuries.
Location:
Outdoors (in direct sunlight), at the seashore, on a ship or other
vessel, inside a vehicle, in medical institutions, unstable locations,
near water, rain, moisture or smoke.
Environment:
Places that are hot, humid, or excessively dusty; where insects may
enter; where it might be exposed to mechanical vibration, near
flammable objects (candles, etc).
The TV set shall not be exposed to dripping or splashing and no
objects filled with liquids, such as vases, shall be placed on the TV.
Situation:
Do not use when your hands are wet, with the cabinet removed, or
with attachments not recommended by the manufacturer.
Disconnect the TV set from mains socket and aerial during
lightning storms.
(Continued)
15
GB
 Loading...