

Page 1

Digital Link
Sound System
4-299-669-12(1)
Operating Instructions US
Manual de instrucciones ES
Owner’s Record
The model and serial numbers are located on the bottom of the DSP
master unit.
Record the serial number in the space provided below.
Refer to these numbers whenever you call upon your Sony dealer
regarding this product.
Model No. XDP-MU110 Serial No.
XDP-MU110
Page 2

Warning
This equipment has been tested and found
to comply with the limits for a Class B
digital device, pursuant to Part 15 of the
FCC Rules.
These limits are designed to provide
reasonable protection against harmful
interference in a residential installation.
This equipment generates, uses, and can
radiate radio frequency energy and, if not
installed and used in accordance with the
instructions, may cause harmful
interference to radio communications.
However, there is no guarantee that
interference will not occur in a particular
installation. If this equipment does cause
harmful interference to radio or television
reception, which can be determined by
turning the equipment off and on, the user
is encouraged to try to correct the
interference by one or more of the
following measures:
– Reorient or relocate the receiving
antenna.
– Increase the separation between the
equipment and receiver.
– Connect the equipment into an outlet on
a circuit different from that to which the
receiver is connected.
– Consult the dealer or an experienced
radio/TV technician for help.
Note on the lithium battery
Do not expose the battery to excessive heat
such as direct sunlight, fire or the like.
Warning if your car’s ignition has no
ACC position
To prevent battery drain, turn off the
system after use by pressing and holding
the SOURCE/OFF button on the remote
commander/cradle more than two
seconds. The LED indicators on the DSP
master unit and cradle turn off when the
system is off.
You are cautioned that any changes or
modifications not expressly approved in
this manual could void your authority to
operate this equipment.
For the State of California, USA only
Perchlorate Material – special handling
may apply, See
www.dtsc.ca.gov/hazardouswaste/perchlorate
Perchlorate Material: Lithium battery
contains perchlorate
iPhone, iPod, iPod classic, iPod nano, and
iPod touch are trademarks of Apple Inc.,
registered in the U.S. and other countries.
2
Page 3

Table of contents
Introduction . . . . . . . . . . . . . . . . . . . . . . . . . . . . . . . . . . . . . . . . . . . . . . . . . . . . . . . 4
Getting Started . . . . . . . . . . . . . . . . . . . . . . . . . . . . . . . . . . . . . . . . . . . . . . . . . . . . . 4
Resetting the unit . . . . . . . . . . . . . . . . . . . . . . . . . . . . . . . . . . . . . . . . . . . . . . . . . . . . . . . . .4
The System Components. . . . . . . . . . . . . . . . . . . . . . . . . . . . . . . . . . . . . . . . . . . . .5
DSP master unit . . . . . . . . . . . . . . . . . . . . . . . . . . . . . . . . . . . . . . . . . . . . . . . . . . . . . . . . . .5
Cradle . . . . . . . . . . . . . . . . . . . . . . . . . . . . . . . . . . . . . . . . . . . . . . . . . . . . . . . . . . . . . . . . . . . 6
RM-X251 Card remote commander . . . . . . . . . . . . . . . . . . . . . . . . . . . . . . . . . . . . . . . . . 7
Sound Settings. . . . . . . . . . . . . . . . . . . . . . . . . . . . . . . . . . . . . . . . . . . . . . . . . . . . . .8
Optimized sound setting based on your vehicle . . . . . . . . . . . . . . . . . . . . . . . . . . . . . . . 8
Setting the sound balance based on your listening preference . . . . . . . . . . . . . . . . . . . 9
Setting up the Cradle . . . . . . . . . . . . . . . . . . . . . . . . . . . . . . . . . . . . . . . . . . . . . . .10
Precautions . . . . . . . . . . . . . . . . . . . . . . . . . . . . . . . . . . . . . . . . . . . . . . . . . . . . . . . . . . . . . 10
Parts List . . . . . . . . . . . . . . . . . . . . . . . . . . . . . . . . . . . . . . . . . . . . . . . . . . . . . . . . . . . . . . . 10
Before Installation . . . . . . . . . . . . . . . . . . . . . . . . . . . . . . . . . . . . . . . . . . . . . . . . . . . . . . .11
Installation. . . . . . . . . . . . . . . . . . . . . . . . . . . . . . . . . . . . . . . . . . . . . . . . . . . . . . . . . . . . . . 11
Arranging the cradle cable . . . . . . . . . . . . . . . . . . . . . . . . . . . . . . . . . . . . . . . . . . . . . . . .14
Attaching an iPod/iPhone. . . . . . . . . . . . . . . . . . . . . . . . . . . . . . . . . . . . . . . . . . . . . . . . . 15
Playback . . . . . . . . . . . . . . . . . . . . . . . . . . . . . . . . . . . . . . . . . . . . . . . . . . . . . . . . . .17
Precautions . . . . . . . . . . . . . . . . . . . . . . . . . . . . . . . . . . . . . . . . . . . . . . . . . . . . . . . . . . . . . 17
Setting up the system . . . . . . . . . . . . . . . . . . . . . . . . . . . . . . . . . . . . . . . . . . . . . . . . . . . . . 17
Enjoying an iPod/iPhone . . . . . . . . . . . . . . . . . . . . . . . . . . . . . . . . . . . . . . . . . . . . . . . . . 17
Playing from a car audio unit . . . . . . . . . . . . . . . . . . . . . . . . . . . . . . . . . . . . . . . . . . . . . .17
Additional Information . . . . . . . . . . . . . . . . . . . . . . . . . . . . . . . . . . . . . . . . . . . . .18
Precautions . . . . . . . . . . . . . . . . . . . . . . . . . . . . . . . . . . . . . . . . . . . . . . . . . . . . . . . . . . . . . 18
Maintenance . . . . . . . . . . . . . . . . . . . . . . . . . . . . . . . . . . . . . . . . . . . . . . . . . . . . . . . . . . . . 19
Specifications. . . . . . . . . . . . . . . . . . . . . . . . . . . . . . . . . . . . . . . . . . . . . . . . . . . . . . . . . . . . 19
Troubleshooting . . . . . . . . . . . . . . . . . . . . . . . . . . . . . . . . . . . . . . . . . . . . . . . . . . . . . . . . .20
3
Page 4

Introduction
Thank you for purchasing the Digital Link Sound System (XDP-MU110).
This system allows you to digitally integrate an iPod/iPhone into your existing car audio unit.
You can enjoy exciting sound from your car audio unit and iPod/iPhone via this system, which
features sound settings optimized for your vehicle type by using Sony’s original digital sound
technology.
The DSP master unit makes a natural “front sound field” possible, so that you can feel bass as
though it comes from directly in front of the driver’s seat even though the subwoofer is located
at the rear of your car, e.g., in a cargo area.
There is also a digital connection for an iPod/iPhone so that you can enjoy high quality sound
in your car without noise/distortion.
Enjoy the new sound experience with this Digital Link Sound System.
Getting Started
Resetting the unit
Before operating the system for the first time, or after replacing the car battery or changing
connections, you should reset the system (page 5).
Press the RESET button of the DSP master unit.
4
Page 5

The System Components
This section contains explanations on the location of controls and their basic operations.
DSP master unit
23 41
Sound setting switches page 8
Set each switch according to your car
type/interior.
SOURCE indicator
You can check the status of the DSP
master unit.
Indicator Status
Turns blue. A car audio unit is selected as
Turns red. An iPod/iPhone is selected as
Flashes blue. Diagnostic error. See
Flashes red. Overload error when an
Flashes blue
and red
alternately.
the source.
the source.
“Troubleshooting” (page 20).
iPod/iPhon e is selected as the
source. See
“Troubleshooting” (page 20).
Temperature detection is
working. See
“Troubleshooting” (page 20).
INPUT SELECT switch
Select either 2-channel or 4-channel
sound from the car audio unit. Select
“2ch” if you connect only the front car
speakers to the DSP master unit, with
High Level Input connection.
RESET
Press to reset the DSP master unit
settings.
Note
• Avoid touching the top of the DSP master unit
during use, as it becomes hot over time.
5
Page 6
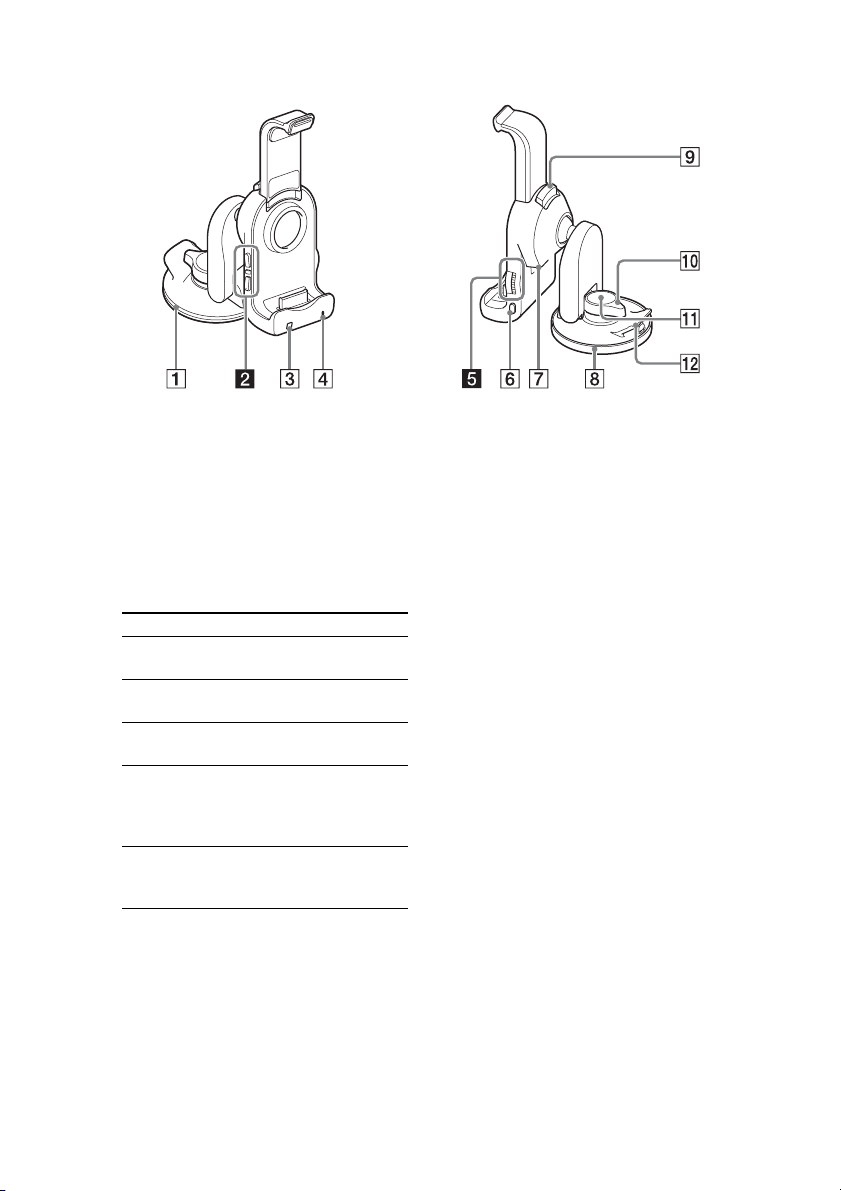
Cradle
Suction cup
SEEK / buttons*
1*2
Press to skip tracks.
Remote sensor
Indicator
You can check the status of the DSP
master unit.
Indicator Status
Turns blue. A car audio unit is selected as
Turns red. An iPod/iPhone is selected as
Flashes blue. Diagnostic error. See
Flashes red. Overload error when an
Flashes blue
and red
alternately.
the source.
the source.
“Troubleshooting” (page 20).
iPod/iPhone is selected as the
source. See
“Troubleshooting” (page 20).
Temperature detection is
working. See
“Troubleshooting” (page 20).
VOLUME (VOL) +/–*
2
SOURCE/OFF button
Press to turn on the power/change the
source between a car audio unit and an
iPod/iPhone.
Press and hold more than two seconds
to turn off the system. The indicator
() turns off.
Port for the cradle cable
Used for connecting the cradle cable.
Cover for the suction cup
PUSH RELEASE button
Push to stretch the arm.
LOCK/RELEASE lever
Turn to lock/release the suction cup.
PUSH button
Press hard to secure the cradle on the
dashboard.
Tab
Pull up to remove the cradle from the
dashboard.
*1 has a tactile dot.
*2 These buttons work only when an iPod/
iPhone is selected as the source and the music
player on an iPod/iPhone is activated.
6
Page 7
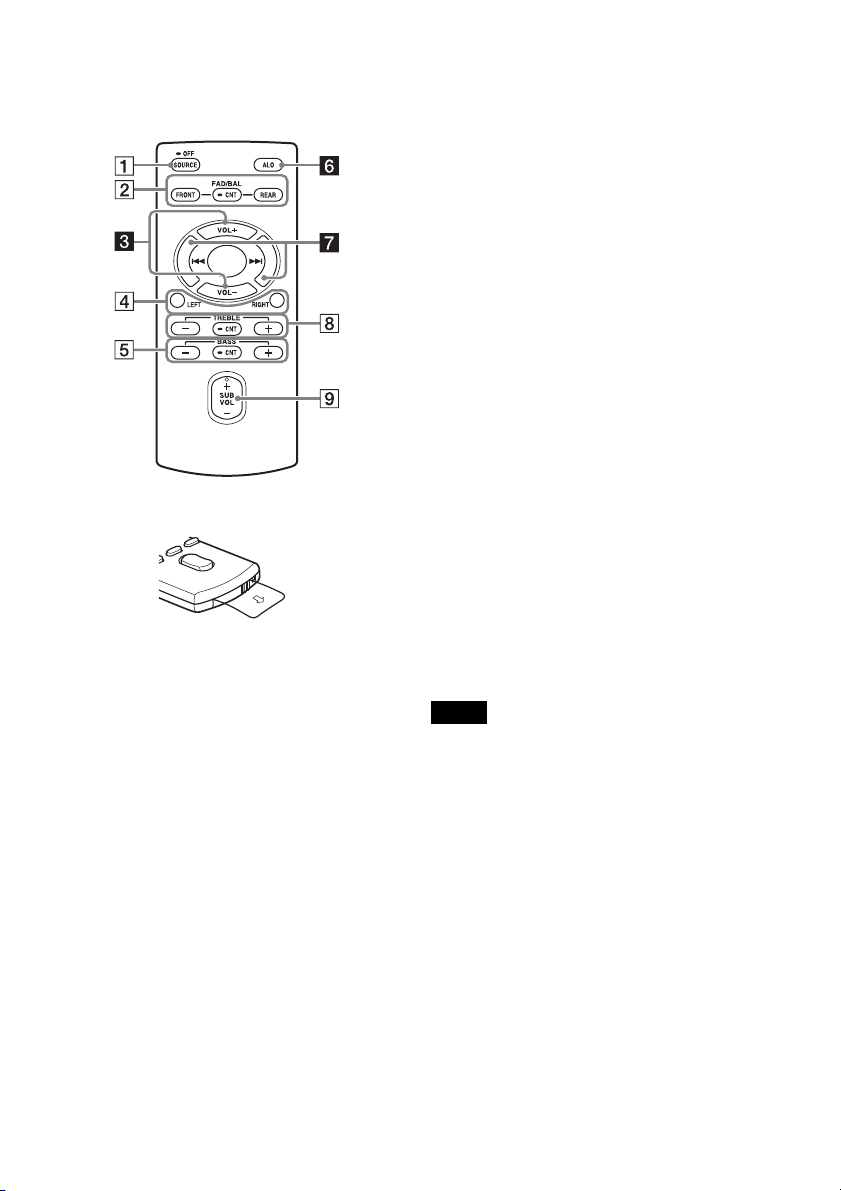
RM-X251 Card remote
commander
Remove the insulation film before use.
SOURCE/OFF button
Press to turn off the power/change the
source between a car audio unit and an
iPod/iPhone.
Press and hold more than two seconds
to turn off the system. The indicators on
the DSP master unit and the cradle turn
off.
FAD/BAL (FRONT/CNT/REAR)
buttons page 9
Press to adjust the balance between the
speakers.
VOL +/– buttons*
1
LEFT/RIGHT buttons page 9
Press to adjust the speaker balance.
Press and hold the CNT button () to
return to the default setting.
BASS (–/CNT/+) buttons page 9
Press to adjust the bass level.
ALO (Automatic Level Optimizer)
1
button*
page 10
Adjust the playback volume level of an
iPod/iPhone to the optimum level:
“ON,” “OFF.”
/ buttons*
1
Press to skip tracks.
TREBLE (–/CNT/+) buttons page 9
Press these buttons to adjust the treble
level.
2
SUB VOL +/– button*
page 9
Press to adjust the subwoofer volume if
you connect a subwoofer to the system
and the SUBWOOFER switch on the
DSP master unit is set to “Y.”
*1 These buttons work only when an iPod/
iPhone is selected as the source and the music
player on an iPod/iPhone is activated.
*2 SUB VOL + has a tactile dot.
Note
• If the system is turned off and the indicators on
the cradle/DSP master unit are off, remote
commander operation is not possible. To
activate the system again, press the SOURCE/
OFF button on the cradle, and make sure that
the indicators on the cradle/DSP master unit
are lit.
7
Page 8
Sound Settings
Optimized sound setting
based on your vehicle
This system provides well balanced sound,
which appears to come from in front of the
driver’s seat, optimized for the vehicle type
by setting the DSP master unit. 12 different
settings are available.
Warning
• Avoid touching the top of the DSP master unit
when setting the switches, as it becomes hot
during use.
Notes
• Set the sound of the car audio unit (BASS/
TREB/Loudness, etc.) to the flat position.
• Set the switches on the front panel of the DSP
master unit with your fingers. Do not use any
tools when setting these switches.
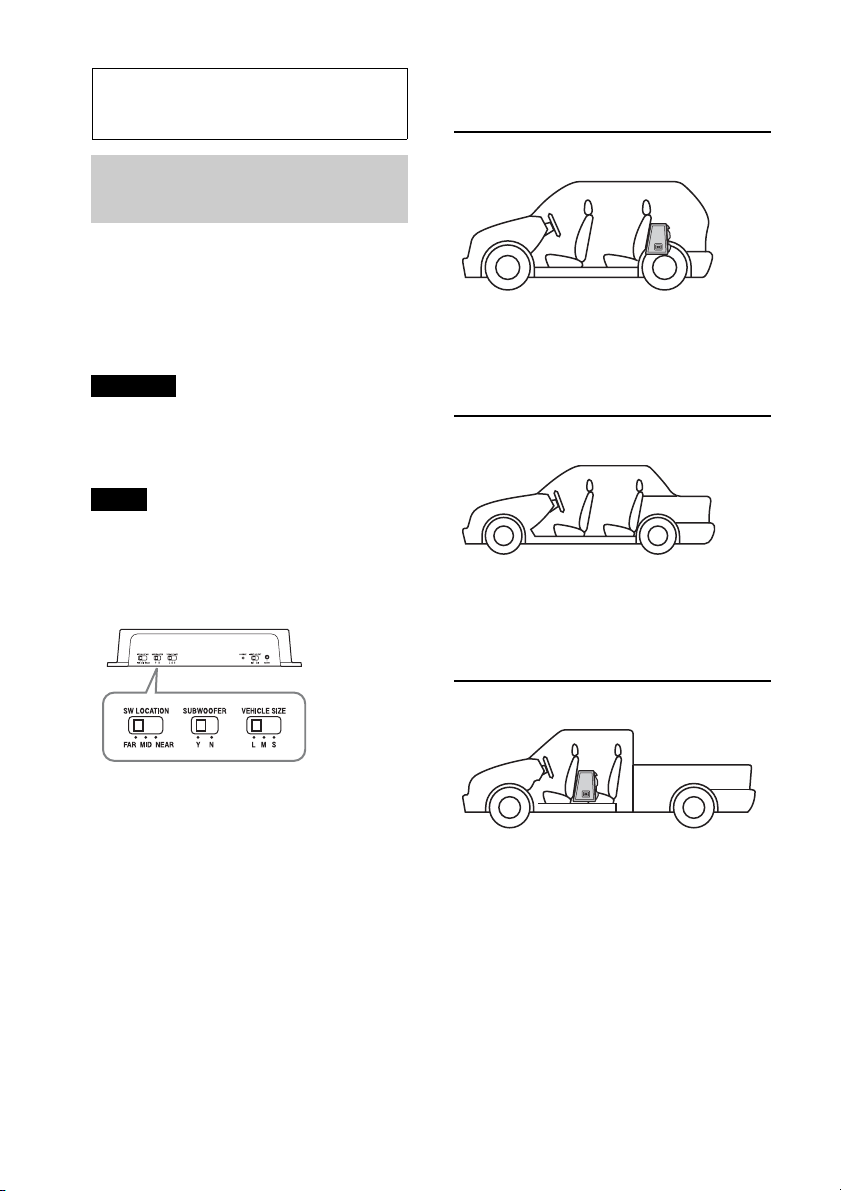
See the following examples.
Compact hatchback
VEHICLE SIZE: S
SUBWOOFER: Y
SW LOCATION: MID
Middle sized sedan
VEHICLE SIZE: M
SUBWOOFER: N
SW LOCATION: –
SW LOCATION switch
Select from one of three positions (FAR/
MID/NEAR) based on the distance between
the driver’s seat and where the subwoofer is.
This function only works when a subwoofer
is connected to the system and the
SUBWOOFER switch on the DSP master
unit is set to “Y.”
SUBWOOFER switch
Select “Y” (yes) or “N” (no) depending on
whether the subwoofer is connected to the
system. Select “Y” when the subwoofer is
connected.
VEHICLE SIZE switch
Select from one of three sizes (L/M/S) based
on the air volume of your car.
8
Pickup Truck
VEHICLE SIZE: S
SUBWOOFER: Y
SW LOCATION: NEAR
Page 9
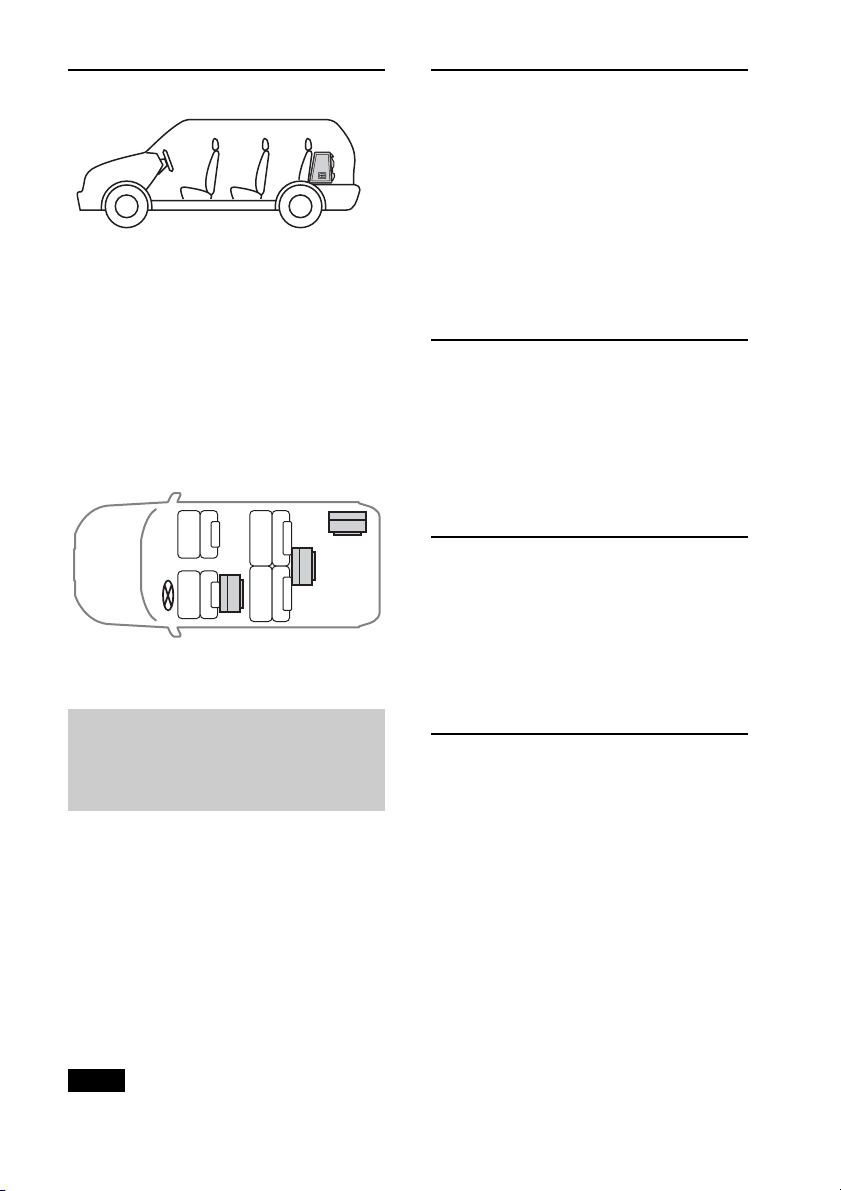
Full sized SUV
VEHICLE SIZE: L
SUBWOOFER: Y
SW LOCATION: FAR
Adjusting the speaker
balance
Press the FRONT/REAR/LEFT/RIGHT
buttons to adjust the balance between
the speakers.
An adjustment range of 7 steps is available
for each speaker setting. Press and hold the
CNT button to return to the default setting.
The default setting is CNT (center).
Tip for setting the SW LOCATION switch
If you are not sure about these sound
settings, set the VEHICLE SIZE switch first,
and then set the SW LOCATION switch to
where bass sound appears to come from in
front of the driver’s seat.
FAR
MIDNEAR
Setting the sound balance
based on your listening
preference
You can adjust the sound balance easily by
using the supplied remote commander
(page 7).
The system allows you to make separate
settings for each source (car audio unit,
iPod and iPhone)*. The setting you make
for a source is applied each time that source
is selected.
*The ALO button works only for an iPod/
iPhone selected as the source.
Adjusting the treble level
Press the TREBLE (–/CNT/+) button.
Available settings are -7 to +7, in 1-step
increments. Press and hold the CNT button
to return to the default setting. The default
setting is 0.
Adjusting the bass level
Press the BASS (–/CNT/+) button.
Available settings are -7 to +7, in 1-step
increments. Press and hold the CNT button
to return to the default setting. The default
setting is 0.
Adjusting the subwoofer
level
Press the SUB VOL +/– button.
Available settings are from -7 (no sound) to
+6, in 1-step increments. The default setting
is 0.
This function only works when a subwoofer
is connected to the system and the
SUBWOOFER switch on the DSP master
unit is set to “Y.”
Tip
• Turn off the EQ of your iPod/iPhone before
adjusting the following sound settings.
9
Page 10
Adjusting the input volume
from the iPod/iPhone
Press the ALO button.
Adjust the playback volume level of an
iPod/iPhone to the optimum level.
Press the ALO button repeatedly to switch
between ON and OFF. The default setting is
ON. This function is available only when an
iPod/iPhone is selected as the source.
• ON: A high-pitched beep
• OFF: A low-pitched beep
Setting up the Cradle
Precautions
• Install the cradle on a dashboard properly so
that the unit will not interfere with normal
driving.
• Follow the instructions on this manual about
dealing with the suction cup to secure the
cradle on a dashboard. If you fail to do so,
the adhesive strength of the suction cup may
decrease, and the cradle may fall down.
• If the cradle becomes detached, a traffic
accident may result. To prevent this, use the
supplied strap.
• Keep the cradle out of the reach of children.
Should a small part of the cradle be
swallowed, immediately consult a doctor.
• Remove the cradle from the dashboard and
keep it out of direct sunlight after use.
Leaving it on a dashboard or in a car where it
will be exposed to high temperature may
cause malfunction, and it may also damage
the dashboard.
• An iPod/iPhone may not be charged if you
put it on the cradle when the temperature in
the car is extremely high/low.
• Be careful not to splash water on the cradle.
It may cause a malfunction.
• To disconnect the cradle cord, pull it out by
its connector, not the cord.
10
Parts List
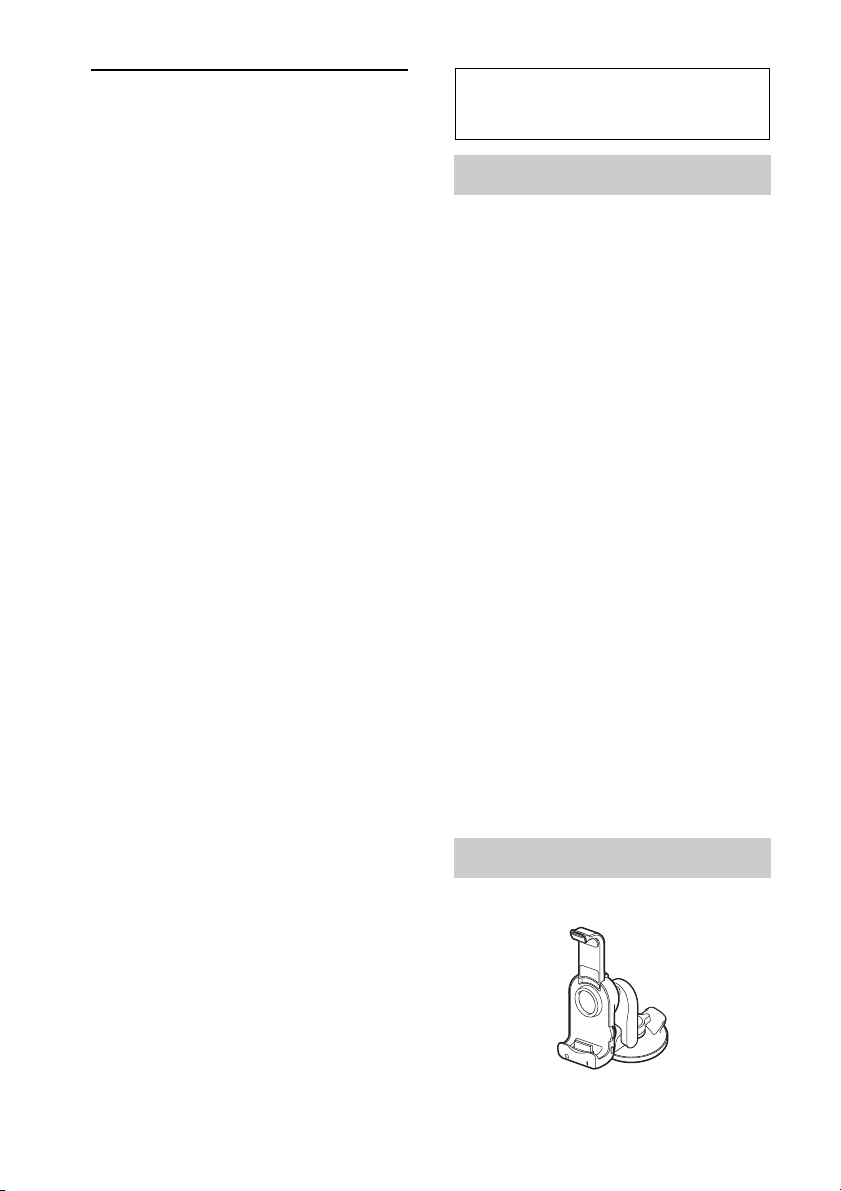
Cradle
Page 11
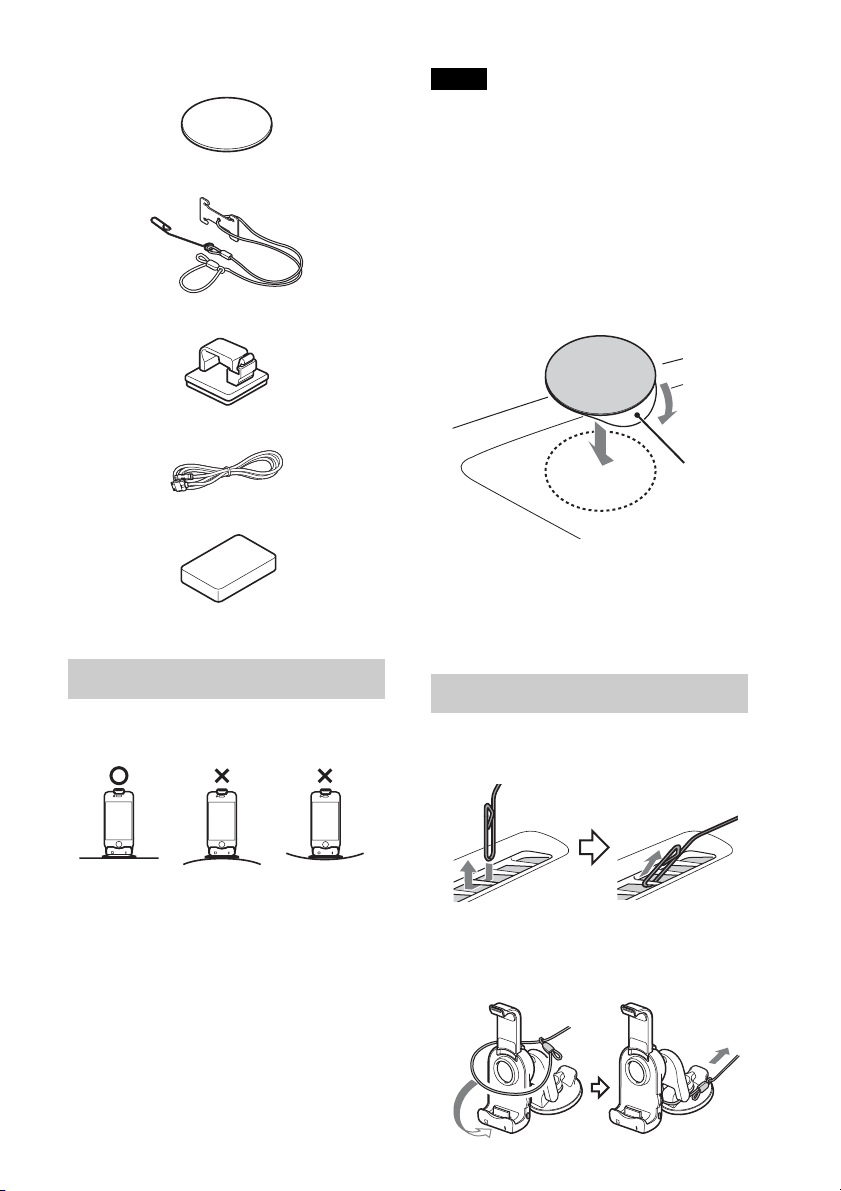
Mounting sheet
Strap
Cord clamp
Cradle cable
Cleaning sponge for suction cup
Notes
• Choose the mounting location carefully.
Practice installation before you actually mount
the sheet, if necessary.
• Removing the mounting sheet from the
dashboard decreases the adhesive strength of
the mounting sheet. It should not be reused
after removal.
1 Peel the paper from the mounting sheet, and
then stick the mounting sheet to the
dashboard.
Peel off paper
Allow 24 hours after sticking the mounting
sheet on the dashboard before installing the
cradle on it.
Before Installation
• Mount the cradle on the dashboard where it
is smooth and horizontal.
• Make sure that the surface of the dashboard
where you intend to install the cradle is
clean. Dirty surfaces will make the adhesive
strength of the suction cup weak, and may
cause unstable installation of the cradle.
• The suction cup may leave a mark on the
dashboard, depending on the surface
material. Your consideration is requested.
To attach the mounting sheet
Attach the mounting sheet to the dashboard
before installing the cradle.
Installation
1 Mount the clip of the strap on the
defroster of your car.
2 Place the hoop of the strap over the
cradle and attach the strap as shown in
the illustrations below.
11
Page 12

Notes
• After you attach the strap to the cradle, pull
the strap gently to make sure that the strap
is securely attached to the cradle.
• Do not forcefully pull the cradle after
attaching the strap. Doing so may damage
your car.
3 Remove the cover from the suction cup
gently.
Cover
Tip
• The suction cup may contain tiny holes.
This can occasionally occur in the
production process, and should not cause a
malfunction.
5 Turn the LOCK/RELEASE lever
counterclockwise 90 degrees to secure
the cradle on the dashboard.
Note
• It may be difficult to remove the cover from
the suction cup as the adhesive strength of
the suction cup is strong.
4 Press down the suction cup gradually,
expelling the air under the suction cup
(), and press the PUSH button firmly
enough to secure the cradle on the
dashboard ().
Notes
• If the suction cup contains air, the adhesive
strength of the suction cup will be
weakened.
• Make sure that the suction cup is dry before
mounting the cradle.
12
Note
• Before turning the LOCK/RELEASE lever,
make sure that you have pressed the PUSH
button hard and expelled the air from under
the suction cup.
6 Connect the cradle cable.
Rotate the arm of the cradle to the
horizontal position, and connect the
cradle cable.
Notes
• Make sure that the marks on the
connector are visible, as shown in the
illustration, when connecting the cradle
cable.
• Do not use any cable other than the supplied
cradle cable.
Page 13
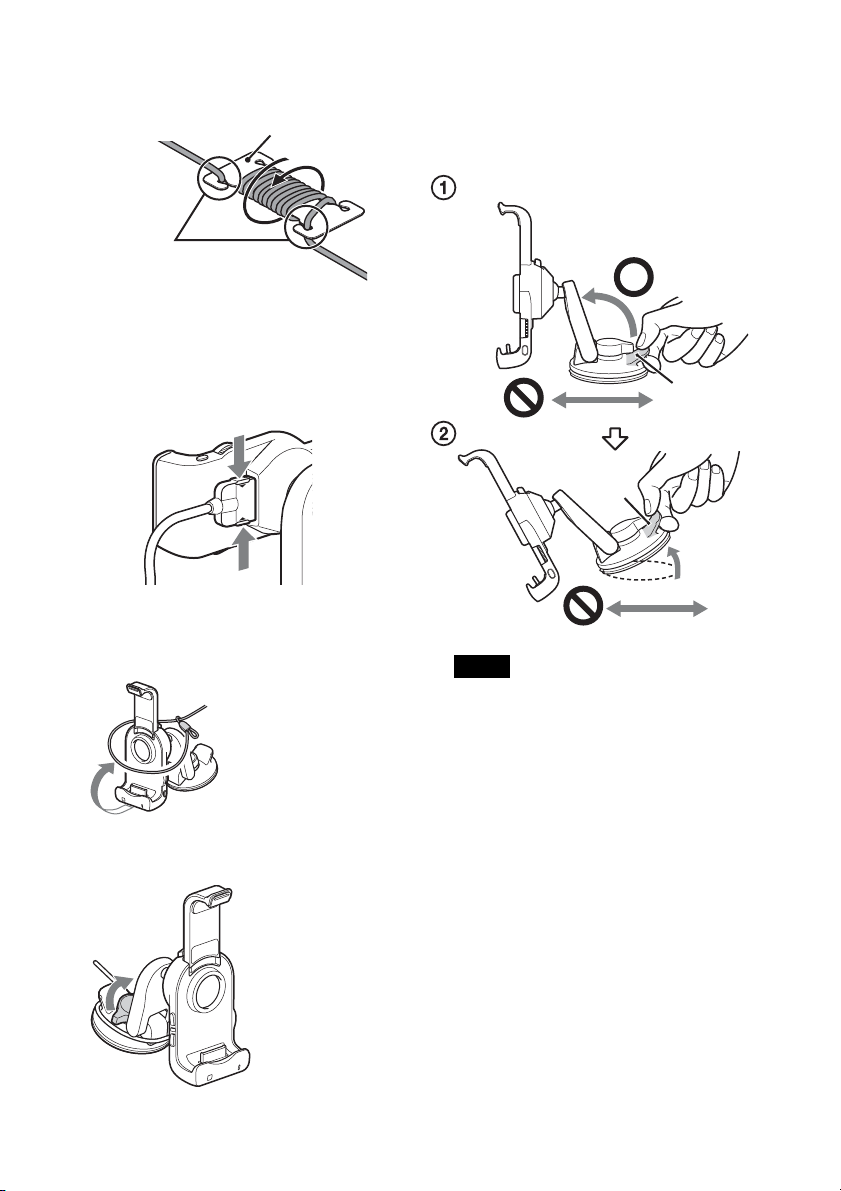
7 Adjust the strap.
Adjust the strap by using the adjuster.
Adjuster
Insert the cord
To remove the cradle
1 Press the ridges to remove the cradle cable
from the cradle.
2 Loosen the strap from the adjuster.
3 Take the hoop of the strap off from the
cradle.
4 Turn the LOCK/RELEASE lever clockwise
by 90 degrees.
5 Pull the tab of the cradle for a few seconds in
the direction of the arrow marked in the
illustration below (), and then slowly
(over 3 to 5 seconds) remove the suction cup
().
Tab
Tab
Notes
• Pull the cradle by its tab when you remove
the suction cup from the dashboard.
• Doing any of the following may damage the
suction cup.
– press/pull the cradle by its tab in a
horizontal direction.
– insert a hard object (key, blade, finger,
etc.) between the suction cup and the
dashboard to remove the suction cup
from the dashboard.
• The suction cup may be damaged if it is
forcefully removed, or the cradle is forced in
a horizontal direction while still attached to
the dashboard, or put the pressure on the
cradle in the horizontal direction before
completely taking off the suction cup from
the dashboard.
• If the temperature of the surface of the
dashboard is low, for example, in winter or
when used in a cold region, removal of the
suction cup may be difficult.
13
Page 14
6 Replace the cover on the suction cup.
Cover
Note
• Put the cover on the suction cup when you
take the cradle off the dashboard. If the
suction cup becomes dirty or scratched, its
adhesive strength will be reduced.
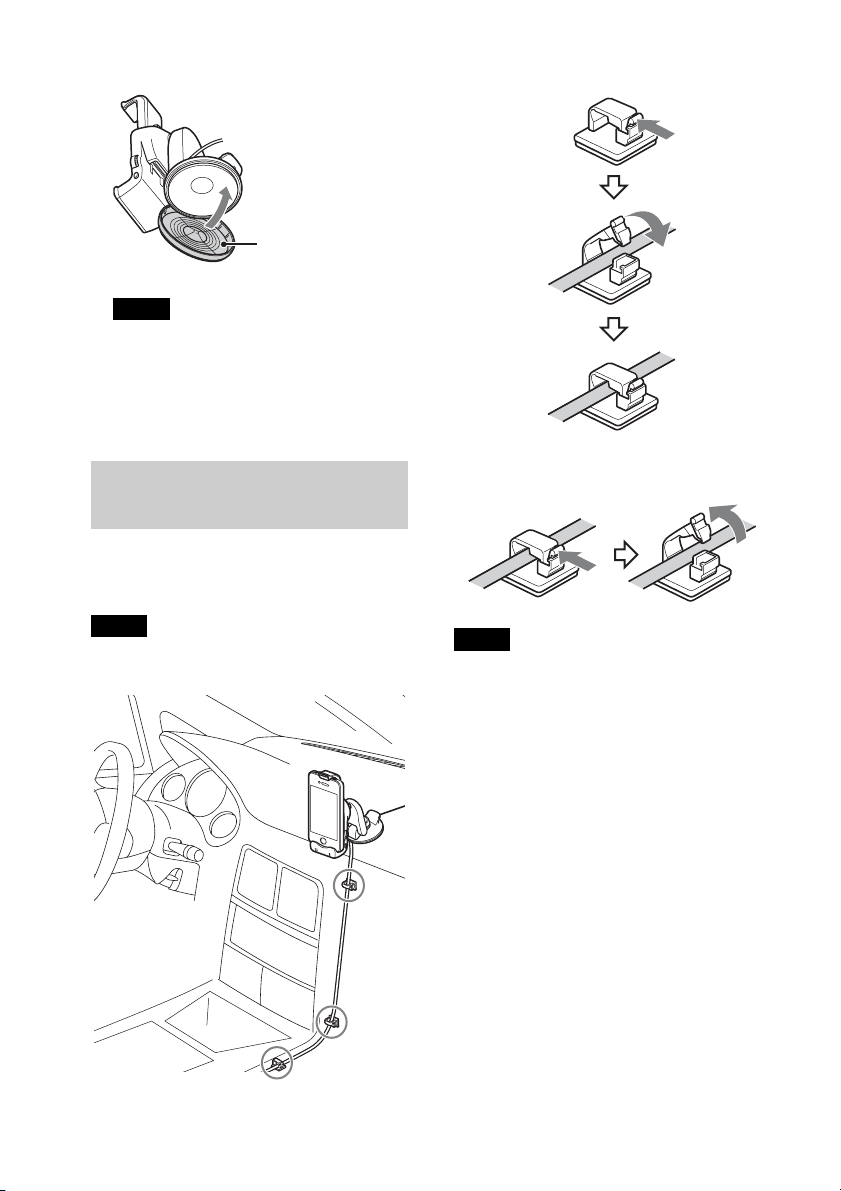
To secure the cradle cable
Arranging the cradle
cable
Use the cord clamp to secure the cradle
cable.
Note
• Clean the surface where you intend to install
the cord clamp.
To release the cradle cable
Note
• You should not reuse the cord clamp once it has
been removed as the adhesive strength will be
reduced.
14
Page 15

Attaching an iPod/iPhone
Compatible iPod/iPhone models
See “About iPod/iPhone” (page 18) or visit
the support page:
http://esupport.sony.com
http://www.sony.com/caraudio
Notes
• Start the car’s engine before connecting the
iPod/iPhone. Depending on the device,
malfunction or damage may occur if it is
connected before starting the engine.
• Remove the case or cover from the iPod/iPhone
before setting it in the cradle to ensure a stable
installation.
• Sony cannot accept responsibility in the event
that data recorded to an iPod/iPhone is lost or
damaged when using an iPod/iPhone
connected to the cradle.
• For details on environmental conditions for
operating the iPod/iPhone, check the website of
Apple Inc.
1 Push the PUSH RELEASE button to
stretch the arm of the cradle (), and
then set the iPod/iPhone in the cradle
().
2 Press the arm down gently and set your
iPod/iPhone in the cradle.
Press the iPod/iPhone backward until it
touches to the cushion in the center of
the cradle (), and hold the iPod/
iPhone securely while pressing the arm
down ().
Notes
• Make sure that there is no gap between the
iPod/iPhone and the arm when setting the
iPod/iPhone in the cradle.
Notes
• When setting the iPod/iPhone, hold the
iPod/iPhone at the same angle as that of the
connector on the cradle.
• When setting the iPod/iPhone, hold the
cradle securely.
Gap
• Make sure that the arm holds the iPod/iPhone
securely. When the temperature is low, it may
be difficult to lock the iPod/iPhone in place.
Tips
• The system plays back music from the iPod/
iPhone when the iPod/iPhone is in the play
mode as you set it on the cradle.
• An iPod/iPhone is charged when set in the
cradle, and the system is turned on.
15
Page 16

To adjust the angle of the cradle
You can adjust the angle of the cradle as
shown in the illustration below. Do not use
force to adjust the angle, as a malfunction may
result.
To remove the iPod/iPhone from the
cradle
1 Press the PUSH RELEASE button to stretch
the arm of the cradle ().
2 Remove the iPod/iPhone, following the
same angle as the connector on the cradle
().
• When removing the iPod/iPhone, do not twist
or bend the iPod/iPhone as it may result in
connector damage.
• When removing the iPod/iPhone, hold the
cradle securely.
Tip
Arm head
• If you cannot remove the iPod/iPhone after
pressing the PUSH RELEASE button, hold
the upper part of the iPod/iPhone and push
the front of the arm head of the cradle, then
remove the iPod/iPhone.
Notes
• If you remove the iPod/iPhone from the cradle
when it is in the play mode, the iPod/iPhone
stays selected as the source.
16
Page 17

Playback
1 Press the SOURCE/OFF button on the
cradle or the remote commander
repeatedly until the LED indicator on
the cradle turns red (page 6).
Precautions
• For safety reasons, keep your car audio unit
and iPod/iPhone volume moderate so that
you can still hear sounds outside your car.
• Do not watch an iPod/iPhone while driving.
It is dangerous and may cause a traffic
accident. If you need to operate the iPod/
iPhone or the cradle, or take a phone call, be
sure to stop your car in a safe place before
operating the iPod/iPhone or the cradle or
taking a phone call.
• An iPod/iPhone’s Screen Rotation function
may work on rare occasions, which changes
the display to the landscape/portrait mode
unexpectedly.
Setting up the system
Follow the steps below when using the
system for the first time.
1 When the system is turned on, press
the RESET button on the DSP master
unit (page 5).
2 Make sure that the LED indicators on
the DSP master unit and the cradle are
lit.
3 Set the sound setting switches
according to your vehicle (page 8).
Tip
• If you set an iPod/iPhone on the cradle
when the system is on, the iPod/iPhone is
selected as the source. If the iPod/iPhone is
in play mode when you set it on the cradle,
the music/video on the iPod/iPhone will
automatically play back.
2 Play back music on the iPod/iPhone.
3 Adjust the volume with the remote
commander or the cradle.
4 Adjust the sound characteristics by
pressing the buttons on the remote
commander.
For details on sound settings, see
page 9.
Playing from a car audio
unit
You can play music, etc., from your car
audio unit via this system.
1 Press the SOURCE/OFF button on the
cradle or the remote commander
repeatedly until the LED indicator on
the cradle turns blue (page 6).
2 Turn on your car audio unit and select
the source you want to play.
Enjoying an iPod/iPhone
You can enjoy the music of an iPod/iPhone
via the system.
Note
• If the battery of the iPod/iPhone is extremely
low, charge it for a while before operation.
3 Adjust the volume by the car audio unit
itself.
Notes
• Do not turn off the system when the car audio
unit is turned on. If you fail to do so, the system
could malfunction.
• Adjust the volume by the car audio unit itself.
You cannot adjust the volume by the system’s
remote commander/cradle when the car audio
unit is selected as the source.
17
Page 18

Additional
Information
Precautions
• If your car is parked in direct sunlight and
there is a considerable rise in temperature
inside the car, allow the system to cool down
before use.
• Do not use the system on a weak battery as
its optimum performance depends on a good
power supply.
• For safety reasons, keep your car audio unit
and iPod/iPhone volume moderate so that
you can still hear sounds outside your car.
• If you have any questions or problems
concerning the system that are not covered
in this manual, please consult your nearest
Sony dealer.
Fuse replacement for the DSP master
unit
If a fuse blows, check the power connection
and replace the fuse. If the fuse blows again
after replacement, there may be an internal
malfunction. In such a case, consult your
nearest Sony dealer.
Warning
When replacing the fuse, be sure to use one
matching the amperage stated above the fuse
holder. Never use a fuse with an amperage rating
exceeding the one supplied with the system as
this could damage the system.
DSP master unit
About iPod/iPhone
• You can connect to the following iPod/
iPhone models.
Update your iPod/iPhone devices to the
latest software before use.
Made for
– iPod touch (4th generation)
– iPod touch (3rd generation)
–iPhone 4
–iPhone 3GS
• “Made for iPod,” and “Made for iPhone”
mean that an electronic accessory has been
designed to connect specifically to iPod or
iPhone, respectively, and has been certified
by the developer to meet Apple performance
standards. Apple is not responsible for the
operation of this device or its compliance
with safety and regulatory standards. Please
note that the use of this accessory with iPod
or iPhone may affect wireless performance.
Note
• Use an appropriate tool to replace a fuse.
18
Page 19

Maintenance
1
Specifications
Replacing the lithium battery of the
remote commander
When the battery becomes weak, the range
of the remote commander becomes shorter.
Replace the battery with a new CR2025
lithium battery. Use of any other battery
may present a risk of fire or explosion.
RM-X251
+ side up
2
c
Notes on the lithium battery
• Keep the lithium battery out of the reach of
children. Should the battery be swallowed,
immediately consult a doctor.
• Wipe the battery with a dry cloth to assure a
good contact.
• Be sure to observe the correct polarity when
installing the battery.
• Do not hold the battery with metallic tweezers,
otherwise a short-circuit may occur.
WARNING
Battery may explode if mistreated.
Do not recharge, disassemble, or dispose
of in fire.
Cleaning the cradle
• Clean the suction cup with the supplied
cleaning sponge, in order to maintain adhesive
strength.
• Do not use alcohol, thinner or benzene to clean
the cradle, as the cradle may be damaged.
• Do not use liquid detergent to clean the cradle.
• Do not use a specialized cleaning cloth. Doing
so may cause discoloration.
• Do not spray the cradle with a volatile
substance, such as an insecticide or a hair spray.
Doing so may cause deterioration of the cradle.
• Do not place the cradle with a rubber, vinyl
product or repellent close together. Doing so
might be deteriorated the cradle.
DSP Master Unit
AUDIO POWER SPECIFICATIONS
CEA2006 Standard
Power Output: 17 Watts RMS 4 at
4 Ohms < 1% THD+N
SN Ratio: 80 dBA
(reference: 1 Watt into 4 Ohms)
Power-AMP
Output: Speaker outputs 4 CH
(Front L/R, Rear L/R)
Speaker impedance: 4 Ω – 8 Ω
Maximum power output: 45 W × 4 (at 4 Ω)
General
Outputs:
Audio output terminals: (Front/Rear)
Subwoofer output terminal (mono)
Power amplifier control terminal
Inputs:
iPod signal input terminal (dock connector)
Hi-level input terminal
Sound controls:
Bass/Treble ±7 dB
Fader/Balance ±7 steps
SUB-W Volume* +/- 6Step , No sound
Power requirements: 12 V DC car battery
(negative ground (earth))
Dimensions: (Mounting dimensions)
Approx. 210.6 mm × 40 mm × 156.6 mm
3
/8 in × 1 5/8 in × 6 1/4 in) (w/h/d)
(8
Mass: Approx. 0.92 kg (2 lb 1 oz)
Supplied accessories:
Card remote commander: RM-X251
Parts for installation and connections (1set)
* This function only works when a subwoofer is
connected to the system and the SUBWOOFER
switch on the DSP master unit is set to “Y.”
Cradle
Dimensions:
Approx. 65 mm × 138.8* mm × 105.3 mm
5
/8 in × 5 1/2 in × 4 1/4 in) (w/h/d)
(2
Mass: Approx. 0.14 kg (5 oz)
* Arm fully extended: 147.1 mm (5
Your dealer may not handle some of the above
listed accessories. Please ask the dealer for
detailed information.
Design and specifications are subject to change
without notice.
7
/8 in) (h)
19
Page 20

Troubleshooting
The following checklist will help you remedy
problems you may encounter with your unit.
Before going through the checklist below,
check the connection and operating
procedures.
For details on removing the unit, refer to the
installation/connections manual supplied with
this system.
Should any problem persist, stop using the
system and consult your nearest Sony dealer.
DSP Master Unit
The SOURCE indicator on the DSP master
unit flashes blue.
If the SOURCE indicator stops flashing when
you press any button on the remote
commander/cradle, one or more connections
are incorrect.
– Refer to the Installation/Connections
manual supplied with this system.
If the SOURCE indicator continues to flash
blue when pressing any button on the remote
commander/cradle, there may be an internal
malfunction.
– Check the connection. If the SOURCE
indicator continues to flash, consult your
nearest Sony dealer.
The SOURCE indicator on the DSP master
unit flashes red.
The power supply from the cradle to the iPod/
iPhone is overloaded.
– Remove the iPod/iPhone from the cradle,
and change the source by pressing the
SOURCE/OFF button on the cradle. After
checking the iPod/iPhone is working
correctly, set it on the cradle again.
Cradle
The adhesive strength of the suction cup is
reduced.
The surface of the suction cup dirty.
– Clean the suction cup with the supplied
cleaning sponge.
Do not use the liquid detergent to clean the
cradle.
Make sure that the surface of the suction cup is
not moistened before mounting the cradle.
The / buttons on the cradle do not
work.
The car audio unit is selected as the source.
These buttons are available only when an iPod/
iPhone is selected as the source and the music
player on the iPod/iPhone is activated.
The indicator on the cradle flashes blue.
If the indicator stops flashing when you press
any button on the remote commander/cradle,
one or more connections are incorrect.
– Refer to the Installation/Connections
manual supplied with this system.
If the indicator continues to flash blue when
pressing any button on the remote
commander/cradle, there may be an internal
malfunction.
– Check the connection. If the indicator
continues to flash, consult your nearest Sony
dealer.
The indicator on the cradle flashes red.
The power supply from the cradle to the iPod/
iPhone is overloaded.
– Remove the iPod/iPhone from the cradle,
and change the source by pressing the
SOURCE/OFF button on the cradle. After
checking the iPod/iPhone is working
correctly, set it on the cradle again.
The SOURCE indicator on the DSP master
unit flashes blue and red alternately.
Temperature detection is activated.
– Be sure to place the system in a well
ventilated location.
– Reduce the volume.
20
The indicator on the cradle flashes blue and
red alternately.
Temperature detection is activated.
– Be sure to place the system in a well
ventilated location.
– Reduce the volume.
The cradle is dirty.
See page 19 for details on cleaning the cradle.
Page 21

The arm does not hold the iPod/iPhone
properly.
The rubber used in the upper part of the arm
becomes hard at low temperature.
– Allow the ambient temperature to increase,
then set the iPod/iPhone.
Remote commander
The / buttons on the remote
commander do not work.
The car audio unit is selected as the source.
These buttons are available only when an iPod/
iPhone is selected as the source and the music
player on the iPod/iPhone is activated.
The remote commander does not work.
Make sure the remote commander is pointed
at the remote sensor on the cradle.
Replace the lithium battery.
Make sure that the cradle cable is connected to
the cradle securely.
Remove the iPod/iPhone from the cradle and
then press the RESET button on the DSP
master unit.
Other issues
Sound is heard only from the front speakers.
Set the INPUT SELECT switch on the DSP
master unit to “2ch.”
Sound reduces suddenly.
Temperature detection could be activated.
– Be sure to place the system in a well
ventilated location.
– Reduce the volume.
Suddenly there is no sound.
Temperature detection could be activated.
– Be sure to place the system in a well
ventilated location.
– Reduce the volume.
Volume range is limited.
Temperature detection could be activated.
– Be sure to place the system in a well
ventilated location.
– Reduce the volume.
The iPod/iPhone Screen Rotation function
works unexpectedly when the car is being
driven.
The Screen Rotation can be caused by
vibration, according to the road condition.
– Turn this function off.
No sound is heard from the subwoofer.
Ensure that the subwoofer is connected
properly to the system, and the SUBWOOFER
switch is set to “Y” on the DSP master unit.
There is no sound when the car audio unit is
selected as the source.
Press the SOURCE/OFF button on the cradle
or the remote commander repeatedly until the
LED indicator on the cradle turns blue.
Make sure that the car audio unit is turned on.
There is no sound when an iPod/iPhone is
selected as the source.
Press the SOURCE/OFF button on the cradle
or the remote commander repeatedly until the
LED indicator on the cradle turns red.
If there is still no sound, even though the LED
indicator on the cradle is red:
• Make sure that the iPod/iPhone is set on the
cradle securely.
• Remove any case or cover from the iPod/
iPhone.
• Operate playback on the iPod/iPhone
directly.
21
Page 22

iPhone, iPod, iPod classic, iPod nano, y
iPod touch son marcas comerciales de
Apple Inc., registradas en los Estados
Unidos y otros países.
Nota sobre la pila de litio
No exponga la pila a fuentes de calor
excesivo como luz solar directa, fuego o
similar.
Advertencia: si el encendido del
automóvil no dispone de una
posición ACC
Para evitar el desgaste de la batería,
apague el sistema después de su uso
manteniendo presionado el botón
SOURCE/OFF por más de dos segundos
en el soporte/control remoto. Cuando la
unidad esté apagada, los indicadores LED
de la unidad maestra del DSP y del
soporte también se apagarán.
2
Page 23

Tabla de contenido
Introducción . . . . . . . . . . . . . . . . . . . . . . . . . . . . . . . . . . . . . . . . . . . . . . . . . . . . . . .4
Procedimientos iniciales . . . . . . . . . . . . . . . . . . . . . . . . . . . . . . . . . . . . . . . . . . . . . 4
Reinicio de la unidad . . . . . . . . . . . . . . . . . . . . . . . . . . . . . . . . . . . . . . . . . . . . . . . . . . . . . .4
Componentes del sistema . . . . . . . . . . . . . . . . . . . . . . . . . . . . . . . . . . . . . . . . . . . .5
Unidad maestra del DSP . . . . . . . . . . . . . . . . . . . . . . . . . . . . . . . . . . . . . . . . . . . . . . . . . . . 5
Soporte . . . . . . . . . . . . . . . . . . . . . . . . . . . . . . . . . . . . . . . . . . . . . . . . . . . . . . . . . . . . . . . . . . 6
Control remoto de tarjeta RM-X251 . . . . . . . . . . . . . . . . . . . . . . . . . . . . . . . . . . . . . . . . . 7
Configuración del sonido . . . . . . . . . . . . . . . . . . . . . . . . . . . . . . . . . . . . . . . . . . . .8
Ajustes de sonido optimizados según el tipo de vehículo . . . . . . . . . . . . . . . . . . . . . . . 8
Configuración del balance de sonido según sus preferencias de escucha . . . . . . . . . .9
Colocación del soporte . . . . . . . . . . . . . . . . . . . . . . . . . . . . . . . . . . . . . . . . . . . . .10
Precauciones . . . . . . . . . . . . . . . . . . . . . . . . . . . . . . . . . . . . . . . . . . . . . . . . . . . . . . . . . . . . 10
Lista de componentes . . . . . . . . . . . . . . . . . . . . . . . . . . . . . . . . . . . . . . . . . . . . . . . . . . . . 11
Antes de la instalación . . . . . . . . . . . . . . . . . . . . . . . . . . . . . . . . . . . . . . . . . . . . . . . . . . . .11
Instalación . . . . . . . . . . . . . . . . . . . . . . . . . . . . . . . . . . . . . . . . . . . . . . . . . . . . . . . . . . . . . . 12
Colocación del cable del soporte . . . . . . . . . . . . . . . . . . . . . . . . . . . . . . . . . . . . . . . . . . . 14
Colocación de un iPod o iPhone . . . . . . . . . . . . . . . . . . . . . . . . . . . . . . . . . . . . . . . . . . . 15
Reproducción . . . . . . . . . . . . . . . . . . . . . . . . . . . . . . . . . . . . . . . . . . . . . . . . . . . . .17
Precauciones . . . . . . . . . . . . . . . . . . . . . . . . . . . . . . . . . . . . . . . . . . . . . . . . . . . . . . . . . . . . 17
Configuración del sistema. . . . . . . . . . . . . . . . . . . . . . . . . . . . . . . . . . . . . . . . . . . . . . . . . 17
Disfrutar de un iPod o iPhone . . . . . . . . . . . . . . . . . . . . . . . . . . . . . . . . . . . . . . . . . . . . . 18
Reproducción desde el sistema de audio del automóvil . . . . . . . . . . . . . . . . . . . . . . . .18
Información complementaria. . . . . . . . . . . . . . . . . . . . . . . . . . . . . . . . . . . . . . . .19
Precauciones . . . . . . . . . . . . . . . . . . . . . . . . . . . . . . . . . . . . . . . . . . . . . . . . . . . . . . . . . . . . 19
Mantenimiento . . . . . . . . . . . . . . . . . . . . . . . . . . . . . . . . . . . . . . . . . . . . . . . . . . . . . . . . . .20
Especificaciones . . . . . . . . . . . . . . . . . . . . . . . . . . . . . . . . . . . . . . . . . . . . . . . . . . . . . . . . . 20
Solución de problemas. . . . . . . . . . . . . . . . . . . . . . . . . . . . . . . . . . . . . . . . . . . . . . . . . . . .21
3
Page 24

Introducción
Gracias por comprar el Digital Link Sound System (XDP-MU110).
Este sistema permite integrar de manera digital un iPod o iPhone al sistema de audio de su
vehículo.
Este sistema le permite disfrutar de un sonido de alta calidad desde el sistema de audio de su
automóvil y desde un iPod o iPhone, el cual incluye ajustes de sonido optimizados según el tipo
de vehículo, puesto que utiliza la tecnología de sonido digital original de Sony.
La unidad maestra del DSP permite lograr un “campo de sonido frontal” natural, de manera
que pareciera que los graves provienen directamente de la parte frontal del asiento del
conductor, aunque el altavoz potenciador de graves se encuentre en la parte trasera del
automóvil como, por ejemplo, en un área de carga.
Además, el sistema cuenta con una conexión digital para iPod o iPhone que permite disfrutar
de sonido de alta calidad en su automóvil sin ruidos ni distorsiones.
Disfrute de la nueva experiencia de sonido con el Digital Link Sound System.
Procedimientos iniciales
Reinicio de la unidad
Antes de utilizar el sistema por primera vez o después de haber reemplazado la batería del
automóvil o cambiado las conexiones, deberá reiniciar el sistema (página 5).
Presione el botón RESET en la unidad maestra del DSP.
4
Page 25

Componentes del sistema
Esta sección describe la ubicación de los controles y sus operaciones básicas.
Unidad maestra del DSP
23 41
Interruptores de configuración de
sonido página 8
Ajuste cada interruptor según el interior
y el tipo de automóvil.
Indicador SOURCE
Le permite verificar el estado de la
unidad maestra del DSP.
Indicador Estado
Se vuelve azul. Se ha seleccionado el sistema
Se vuelve rojo. Se ha seleccionado un iPod o
Parpadea en
azul.
Parpadea en
rojo.
Parpadea en
azul y rojo de
manera alterna.
de audio del automóvil como
fuente.
iPhone como fuente.
Error de diagnóstico.
Consulte “Solución de
problemas” (página 21).
Error de sobrecarga cuando
se ha seleccionado un iPod o
iPhone como fuente.
Consulte “Solución de
problemas” (página 21).
El detector de temperatura
está funcionando. Consulte
“Solución de problemas”
(página 21).
Interruptor INPUT SELECT
Seleccione sonido de 2 canales o de
4 canales en el sistema de audio del
automóvil. Seleccione “2ch” si conecta
solamente los altavoces frontales del
automóvil a la unidad maestra del DSP
con una conexión de entrada de alto
nivel.
RESET
Presione para reiniciar la configuración
de la unidad maestra del DSP.
Nota
• Debido a que la unidad maestra del DSP se
calienta a medida que se utiliza, evite tocar la
parte superior mientras está en uso.
5
Page 26

Soporte
Ventosa
Botones SEEK /*
1*2
Presione estos botones para omitir pistas.
Sensor remoto
Indicador
Le permite verificar el estado de la
unidad maestra del DSP.
Indicador Estado
Se vuelve azul. Se ha seleccionado el sistema
Se vuelve rojo. Se ha seleccionado un iPod o
Parpadea en
azul.
Parpadea en
rojo.
Parpadea en
azul y rojo de
manera alterna.
de audio del automóvil como
fuente.
iPhone como fuente.
Error de diagnóstico.
Consulte “Solución de
problemas” (página 21).
Error de sobrecarga cuando
se ha seleccionado un iPod o
iPhone como fuente.
Consulte “Solución de
problemas” (página 21).
El detector de temperatura
está funcionando. Consulte
“Solución de problemas”
(página 21).
VOLUME (VOL) +/–*
2
Botón SOURCE/OFF
Presione este botón para encender la
alimentación o cambiar la fuente entre
el sistema de audio del automóvil y el
iPod o iPhone.
Manténgalo presionado más de dos
segundos para apagar el sistema. El
indicador () se apaga.
Puerto para el cable del soporte
Se utiliza para conectar el cable del
soporte.
Cubierta para la ventosa
Botón PUSH RELEASE
Pulse este botón para desplegar el brazo.
Palanca LOCK/RELEASE
Gire la palanca para asegurar o liberar la
ventosa.
Botón PUSH
Presione firmemente para fijar el
soporte al tablero.
Lengüeta
Tire hacia arriba la lengüeta para quitar
el soporte del tablero.
*1 tiene un punto táctil.
*2 Estos botones están disponibles únicamente
cuando se ha seleccionado un iPod o iPhone
como fuente y el reproductor de música de
éstos está activado.
6
Page 27

Control remoto de tarjeta
RM-X251
Retire la lámina de aislamiento antes de
utilizarlo.
Botón SOURCE/OFF
Presione este botón para apagar la
alimentación o cambiar la fuente entre
el sistema de audio del automóvil y el
iPod o iPhone.
Manténgalo presionado más de dos
segundos para apagar el sistema. Se
apagarán los indicadores de la unidad
maestra del DSP y del soporte.
Botones FAD/BAL (FRONT/CNT/
REAR) página 9
Presione estos botones para ajustar el
balance entre los altavoces.
Botones VOL +/–*
1
Botones LEFT/RIGHT página 9
Presione estos botones para ajustar el
balance de los altavoces. Mantenga
presionado el botón CNT () para
restaurar la configuración
predeterminada.
Botones BASS (–/CNT/+) página 10
Presione estos botones para ajustar el
nivel de los sonidos graves.
Botón ALO (Optimizador de nivel
1
automático)*
página 10
Ajuste el volumen de reproducción de
un iPod o iPhone al nivel óptimo: “ON”
u “OFF”.
Botones /*
1
Presione estos botones para omitir
pistas.
Botones TREBLE (–/CNT/+) página 9
Presione estos botones para ajustar el
nivel de los sonidos agudos.
Botón SUB VOL +/–*2 página 10
Presione estos botones para ajustar el
volumen del altavoz potenciador de
graves si lo conecta al sistema y el
interruptor SUBWOOFER de la unidad
maestra del DSP se encuentra en la
posición “Y”.
*1 Estos botones están disponibles únicamente
cuando se ha seleccionado un iPod o iPhone
como fuente y el reproductor de música de
éstos está activado.
*2 SUB VOL + tiene un punto táctil.
Nota
• No se podrá utilizar el control remoto si el
sistema y los indicadores del soporte y de la
unidad maestra del DSP están apagados. Para
volver a activar el sistema, presione el botón
SOURCE/OFF en el soporte y asegúrese de que
se enciendan los indicadores del soporte o de la
unidad maestra del DSP.
7
Page 28

Configuración del
sonido
Ajustes de sonido
optimizados según el tipo
de vehículo
Al configurar la unidad maestra del DSP,
este sistema ofrece un sonido balanceado,
que parece provenir por delante del asiento
del conductor, optimizado para el tipo de
automóvil. Hay 12 tipos diferentes de
configuración disponibles.
Advertencia
• Debido a que la unidad maestra del DSP se
calienta a medida que se utiliza, evite tocar la
parte superior mientras ajusta los interruptores.
Notas
• Ajuste el sonido del sistema de audio del
automóvil (BASS/TREB/volumen, etc.) en
posición llana.
• Manipule los interruptores del panel frontal de
la unidad maestra del DSP con los dedos. No
utilice ninguna herramienta al utilizar estos
interruptores.
Interruptor SUBWOOFER
Seleccione “Y” (sí) o “N” (no), según el
altavoz potenciador de graves esté o no
conectado al sistema. Seleccione “Y” cuando
el altavoz potenciador de graves esté
conectado.
Interruptor VEHICLE SIZE
Seleccione uno de los tres tamaños (L/M/S)
según el volumen de aire del automóvil.
A continuación, se muestran algunos
ejemplos.
Auto compacto
VEHICLE SIZE: S
SUBWOOFER: Y
SW LOCATION: MID
Sedán de tamaño medio
Interruptor SW LOCATION
Seleccione una de las tres posiciones (FAR/
MID/NEAR) según la distancia entre el
asiento del conductor y el altavoz
potenciador de graves.
Esta función sólo funciona cuando un
altavoz potenciador de graves está
conectado al sistema y el interruptor
SUBWOOFER de la unidad maestra del
DSP se encuentra en la posición “Y”.
8
VEHICLE SIZE: M
SUBWOOFER: N
SW LOCATION: –
Camioneta pick up
VEHICLE SIZE: S
SUBWOOFER: Y
SW LOCATION: NEAR
Page 29

SUV de tamaño grande
VEHICLE SIZE: L
SUBWOOFER: Y
SW LOCATION: FAR
Sugerencia para ajustar el interruptor
SW LOCATION
Si no está seguro de cómo utilizar estas
configuraciones de sonido, ajuste primero el
interruptor VEHICLE SIZE y, a
continuación, el interruptor SW
LOCATION en la posición en la que parece
que los sonidos graves provienen del frente
del asiento del conductor.
FAR
MIDNEAR
Configuración del balance
de sonido según sus
preferencias de escucha
El control remoto suministrado le permite
ajustar fácilmente el balance de sonido
(página 7).
El sistema permite realizar configuraciones
separadas para cada tipo de fuente (sistema
de audio del automóvil, iPod y iPhone)*. La
configuración que realiza para cada fuente
se aplicará cada vez que se seleccione esa
fuente.
*El botón ALO sólo funciona cuando se ha
seleccionado un iPod o iPhone como
fuente.
Sugerencia
• Apague el EQ del iPod o iPhone antes de
realizar los siguientes ajustes de sonido.
Ajuste del balance del altavoz
Presione los botones FRONT/REAR/
LEFT/RIGHT para ajustar el balance
entre los altavoces.
Cada ajuste de altavoz cuenta con un rango
de ajuste de 7 intervalos. Mantenga
presionado el botón CNT para restaurar la
configuración predeterminada. El valor
predeterminado es CNT (centro).
Ajuste del nivel de agudos
Presione el botón TREBLE (–/CNT/+).
Se pueden realizar incrementos de un
intervalo de -7 a +7. Mantenga presionado
el botón CNT para restaurar la
configuración predeterminada. El valor
predeterminado es 0.
9
Page 30

Ajuste del nivel de graves
Presione el botón BASS (–/CNT/+).
Se pueden realizar incrementos de un
intervalo de -7 a +7. Mantenga presionado
el botón CNT para restaurar la
configuración predeterminada. El valor
predeterminado es 0.
Ajuste del nivel del altavoz
potenciador de graves
Presione el botón SUB VOL +/–.
La configuración disponible permite
incrementos de 1 intervalo desde
-7 (silencio) a +6. El valor predeterminado
es 0.
Esta función sólo funciona cuando un
altavoz potenciador de graves está
conectado al sistema y el interruptor
SUBWOOFER de la unidad maestra del
DSP se encuentra en la posición “Y”.
Ajuste del volumen de
entrada del iPod y iPhone
Presione el botón ALO.
Ajuste el volumen de reproducción de un
iPod o iPhone al nivel óptimo.
Presione el botón ALO reiteradamente para
cambiar entre ON y OFF. El valor
predeterminado es ON. Esta función sólo
está disponible cuando se ha seleccionado
un iPod o un iPhone como fuente.
• ON: pitido de tono alto
• OFF: pitido de tono bajo
Colocación del
soporte
Precauciones
• Instale el soporte en el tablero
adecuadamente de manera que la unidad no
interfiera con las operaciones normales de
conducción.
• Siga las instrucciones de este manual que
explican cómo utilizar la ventosa para fijar el
soporte al tablero. Si no se la fija
correctamente, la fuerza adhesiva de la
ventosa podría reducirse y ocasionar la caída
del soporte.
• La caída del soporte puede causar un
accidente automovilístico. Utilice la correa
suministrada para evitar estos accidentes.
• Mantenga el soporte fuera del alcance de los
niños. Consulte inmediatamente a un
médico en caso de ingerir cualquier pieza
pequeña del soporte.
• Retire el soporte del tablero y manténgalo
fuera de la luz directa del sol luego de
utilizarlo. Se pueden producir fallas de
funcionamiento si se deja el soporte en el
tablero o en el automóvil expuesto a altas
temperaturas. También, se puede dañar el
tablero.
• Es posible que un iPod o iPhone no se cargue
si se lo coloca en el soporte cuando la
temperatura del automóvil sea
extremadamente alta o baja.
• Procure no mojar el soporte. Esto puede
ocasionar fallas de funcionamiento.
• Para desconectar el cable del soporte, tire del
conector y no del cable.
10
Page 31

Lista de componentes
Antes de la instalación
Soporte
Lámina de montaje
Correa
Abrazadera de cables
Cable del soporte
Esponja de limpieza para la ventosa
• Ubique el soporte en una parte del tablero
que sea lisa y horizontal.
• Asegúrese de que la superficie del tablero
donde se ubicará el soporte esté limpia. Una
superficie sucia reducirá la fuerza adhesiva
de la ventosa, lo cual puede causar que el
soporte quede instalado de manera inestable.
• Según el material de la superficie, puede que
la ventosa deje una marca. Ubique la ventosa
según su criterio.
Para colocar la lámina de montaje
Coloque la lámina de montaje en el tablero
antes de instalar el soporte.
Notas
• Elija la ubicación de montaje con cuidado. Si
fuera necesario, practique la instalación antes
de efectivamente colocar la lámina.
• Retirar la lámina de montaje del tablero reduce
su fuerza adhesiva. No reutilice la lámina luego
de despegarla.
1 Retire el papel adhesivo de la lámina de
montaje y, a continuación, adhiera la
lámina de montaje al tablero.
Papel para
despegar
Deje pasar 24 horas luego de haber colocado
la lámina de montaje antes de colocar el
soporte en ella.
11
Page 32

Instalación
1 Enganche el clip de la correa en el
desempañador del automóvil.
2 Coloque el aro formado por la correa
alrededor del soporte y átela como se
ilustra a continuación.
Notas
• Una vez que haya colocado la correa en el
soporte, tire suavemente de la correa para
asegurarse de que esté firmemente atada al
soporte.
• No tire con fuerza del soporte una vez
colocada la correa. Si lo hace, el automóvil
podría dañarse.
3 R etire cuidadosamen te la cubi erta de la
ventosa.
4 Presione la ventosa de manera gradual
y permita que se expulse todo el aire
que esté debajo (); después presione
firmemente el botón PUSH para
adherir el soporte al tablero ().
Notas
• Si la ventosa contiene aire, su fuerza
adhesiva se verá reducida.
• Asegúrese de que la ventosa esté seca antes
de colocar el soporte.
Sugerencia
• La ventosa puede presentar pequeños
orificios. Estos son a veces el resultado del
proceso de fabricación y no deberían causar
ninguna falla de funcionamiento.
5 Gire la palanca LOCK/RELEASE 90
grados en sentido contrario a las agujas
del reloj para sujetar el soporte al
tablero.
12
Cubierta
Nota
• Puede resultar difícil retirar la cubierta de la
ventosa debido a su potente fuerza adhesiva.
Nota
• Antes de girar la palanca LOCK/RELEASE,
asegúrese de haber presionado con fuerza el
botón PUSH y de haber retirado todo el aire
atrapado debajo de la ventosa.
Page 33

6 Conecte el cable del soporte.
Gire el brazo del soporte hasta que esté
en posición horizontal y conecte el cable
del soporte.
Notas
• Asegúrese de que las marcas del
conector sean visibles, como se muestra en
la ilustración, al conectar el cable del
soporte.
• No utilice ningún cable que no sea el cable
del soporte suministrado.
7 Ajuste la correa.
Ajuste la correa con el tensor.
Tensor
3 Retire el aro de la correa del soporte.
4 Gire la palanca LOCK/RELEASE 90 grados
en sentido de las agujas del reloj.
5 Tire de la lengüeta del soporte por unos
segundos en la dirección que muestra la
flecha marcada con el símbolo en la
siguiente ilustración () y después retire
lentamente (en unos 3 o 5 segundos) la
ventosa ().
Introduzca el
cable
Para retirar el soporte
1 Presione los rebordes para quitar el cable
del soporte del soporte.
2 Libere la correa del tensor.
Lengüeta
Lengüeta
13
Page 34

Notas
• Tire de la lengüeta del soporte cuando retire
la ventosa del tablero.
• La ventosa puede dañarse si:
– presiona o tira de la lengüeta del soporte
en dirección horizontal.
– intenta retirar la ventosa del tablero
colocando un objeto duro (llave, objeto
filoso, dedo, etc.) entre la ventosa y el
tablero.
• La ventosa puede resultar dañada si se la
retira con fuerza, si se tira con fuerza del
soporte en dirección horizontal mientras
aún está adherido al tablero o si se ejerce
presión en el soporte en dirección
horizontal antes de haber retirado
completamente la ventosa del tablero.
• Puede resultar difícil retirar la ventosa del
tablero si la temperatura de la superficie es
muy baja, por ejemplo durante el invierno o
en regiones frías.
6 Vuelva a colocar la cubierta en la ventosa.
Colocación del cable del
soporte
Utilice la abrazadera de cables para sujetar
el cable del soporte.
Nota
• Limpie la superficie en la cual desea instalar la
abrazadera de cables.
14
Cubierta
Para sujetar el cable del soporte
Nota
• Coloque la cubierta en la ventosa cuando
retire el soporte del tablero. La fuerza
adhesiva de la ventosa disminuirá si se
ensucia o se raya.
Page 35

Para liberar el cable del soporte
Nota
• No reutilice la abrazadera de cables una vez que
la haya retirado, ya que su fuerza adhesiva
quedará reducida.
Colocación de un iPod o
iPhone
Modelos de iPod y iPhone compatibles
Consulte “Acerca del iPod y iPhone”
(página 19) o visite la página de soporte
técnico en:
http://esupport.sony.com
http://www.sony.com/caraudio
Notas
• Arranque el motor del automóvil antes de
conectar el iPod o iPhone. Según el dispositivo,
pueden ocasionarse fallas de funcionamiento si
se lo conecta antes de encender el motor.
• Para una instalación firme, retire el estuche o la
cubierta del iPod o iPhone antes de colocarlo en
el soporte.
• Sony no se hace responsable si la información
almacenada en el iPod o iPhone se pierde o se
daña al conectar estos dispositivos al soporte.
• Para obtener más información sobre las
condiciones ambientales a la hora de utilizar un
iPod o iPhone, consulte el sitio web de Apple
Inc.
1 Presione el botón PUSH RELEASE
para desplegar el brazo del soporte ()
y, a continuación, coloque el iPod o
iPhone en el soporte ().
Notas
• Al colocar el iPod o iPhone, manténgalo en
el mismo ángulo en el que se encuentra el
conector en el soporte.
• Al colocar el iPod o iPhone, sujete el soporte
con firmeza.
2 Presione hacia abajo y con cuidado el
brazo del soporte para dejar ajustado el
iPod o iPhone en el soporte.
Presione el iPod o iPhone hacia atrás
hasta que toque la almohadilla del centro
del soporte () y sostenga firmemente
el iPod o iPhone mientras presiona el
brazo hacia abajo ().
15
Page 36

Notas
• Asegúrese de que no haya un espacio entre el
iPod o iPhone y el brazo al colocar el iPod o
iPhone en el soporte.
Espacio
• Asegúrese de que el brazo sostenga firmemente
el iPod o iPhone. Puede resultar difícil asegurar
el iPod o iPhone en su lugar cuando la
temperatura sea baja.
Sugerencias
• El sistema reproduce música del iPod o iPhone
cuando uno de ellos se encuentra en el modo de
reproducción, según se lo haya configurado en
el soporte.
• Un iPod o iPhone se carga al colocarlo en el
soporte y el sistema se enciende.
Para ajustar el ángulo del soporte
Puede ajustar el ángulo del soporte como se
muestra en la ilustración a continuación. No
ejerza presión para ajustar el ángulo de
posición ya que podría ocasionar una falla de
funcionamiento.
Para retirar el iPod o iPhone del soporte
1 Presione el botón PUSH RELEASE para
desplegar el brazo del soporte ().
2 Retire el iPod o iPhone en el mismo ángulo
en el que se encuentra el conector en el
soporte ().
Notas
• Si retira el iPod o iPhone del soporte mientras
se encuentran en modo de reproducción, estos
quedarán seleccionados como fuente.
• Evite girar o doblar el iPod o iPhone al
retirarlos, ya que podría dañar el conector.
16
• Al retirar el iPod o iPhone, sujete el soporte con
firmeza.
Page 37

Sugerencia
Parte superior del brazo
• Si no puede retirar el iPod o iPhone tras
presionar el botón PUSH RELEASE,
sostenga la parte superior del iPod o iPhone,
presione la parte delantera superior del
brazo del soporte y retire el iPod o iPhone.
Reproducción
Precauciones
• Por cuestiones de seguridad, mantenga el
volumen del sistema de audio del automóvil
y del iPod o iPhone en un nivel moderado
para poder escuchar los sonidos procedentes
del exterior.
• No fije la vista en su iPod o iPhone al
conducir. Puede ser peligroso y ocasionar un
accidente automovilístico. Frene el
automóvil en un lugar seguro antes de
utilizar el iPod, el iPhone o el soporte, o
antes de atender una llamada telefónica.
• Cada tanto, la función de giro de pantalla del
iPod o del iPhone se puede activar, lo cual
cambia de repente la pantalla a modo
horizontal o vertical.
Configuración del sistema
Siga las instrucciones a continuación al
utilizar el sistema por primera vez.
1 Cuando el sistema está encendido,
presione el botón RESET en la unidad
maestra del DSP (página 5).
2 Asegúrese de que los indicadores LED
de la unidad maestra del DSP y del
soporte estén encendidos.
3 Ajuste los interruptores de
configuración de sonido según el
vehículo (página 8).
17
Page 38

Disfrutar de un iPod o
iPhone
El sistema le permite disfrutar de la música
del iPod o iPhone.
Nota
• En caso de que la batería del iPod o iPhone esté
extremadamente baja, cárguela antes de su uso.
1 Presione el botón SOURCE/OFF en el
soporte o en el control remoto
reiteradamente hasta que el indicador
LED del soporte se ilumine en rojo
(página 6).
Sugerencia
• Si coloca un iPod o iPhone en el soporte
cuando el sistema está encendido, el iPod o
iPhone se selecciona como fuente. Si el iPod
o iPhone está en modo de reproducción al
colocarlo en el soporte, la música o el video
se reproducirá automáticamente en el iPod
o iPhone.
2 Reproduzca la música en el iPod o
iPhone.
3 Ajuste el volumen con el control
remoto o el soporte.
4 Ajuste las características del sonido
mediante los botones del control
remoto.
Para obtener más detalles sobre la
configuración del sonido, consulte la
página 9.
Reproducción desde el
sistema de audio del
automóvil
Puede utilizar este sistema para reproducir
música y demás elementos desde el sistema
de audio del automóvil.
1 Presione el botón SOURCE/OFF en el
soporte o en el control remoto
reiteradamente hasta que el indicador
LED del soporte se ilumine en azul
(página 6).
2 Encienda el sistema de audio del
automóvil y seleccione la fuente que
desea reproducir.
3 Ajuste el volumen desde el sistema de
audio mismo.
Notas
• No apague el sistema cuando el sistema de
audio del automóvil esté encendido. Caso
contrario, pueden ocasionarse fallas de
funcionamiento en el sistema.
• Ajuste el volumen desde el sistema de audio
mismo. No puede ajustar el volumen desde el
control remoto del sistema o soporte cuando se
ha seleccionado el sistema de audio del
automóvil como fuente.
18
Page 39

Información
complementaria
Precauciones
• Si el automóvil se encuentra estacionado en
contacto directo con la luz del sol y hay un
aumento considerable de la temperatura en
el interior del automóvil, deje que el sistema
se enfríe antes de utilizarlo.
• No utilice el sistema con una batería que
disponga de poca energía, ya que se necesita
una buena fuente de alimentación para un
rendimiento óptimo.
• Por cuestiones de seguridad, mantenga el
volumen del sistema de audio del automóvil
y del iPod o iPhone en un nivel moderado
para poder escuchar los sonidos procedentes
del exterior.
• Si tiene consultas o problemas relacionados
con el sistema que no han sido tratados en
este manual, póngase en contacto con su
distribuidor Sony más cercano.
Reemplazo del fusible para la unidad
maestra del DSP
Si un fusible se funde, compruebe la
conexión de alimentación y reemplácelo. Si
vuelve a fundirse después de reemplazarlo,
es posible que exista una falla de
funcionamiento interno. En tal caso,
póngase en contacto con el distribuidor
Sony más cercano.
Unidad maestra del DSP
Acerca del iPod y iPhone
• Puede conectarse a los siguientes modelos de
iPod y iPhone.
Actualice sus dispositivos iPod y iPhone a la
última versión de software antes de
utilizarlos.
Made for
– iPod touch (4ª generación)
– iPod touch (3ª generación)
–iPhone 4
–iPhone 3GS
• “Made for iPod” y “Made for iPhone”
indican que un accesorio electrónico se
diseñó para conectarse específicamente a los
dispositivos iPod o iPhone respectivamente,
y que el fabricante obtuvo la certificación
necesaria para que cumpla con los estándares
de rendimiento de Apple. Apple no se hace
responsable del funcionamiento de este
dispositivo en cumplimiento de los
estándares de seguridad y normativa. Tenga
en cuenta que el uso de este accesorio con el
iPod o el iPhone puede afectar al
rendimiento inalámbrico.
Advertencia
Al reemplazar el fusible, asegúrese de utilizar uno
cuyo amperaje coincida con el portafusibles.
Nunca utilice un fusible con un amperaje
superior al del suministrado con el sistema, ya
que podría dañar el sistema.
Nota
• Utilice una herramienta adecuada para
reemplazar el fusible.
19
Page 40

Mantenimiento
Especificaciones
Reemplazo de la pila de litio del control
remoto
El alcance del control remoto disminuye a
medida que la pila pierde su carga.
Reemplace la pila con una pila de litio
CR2025 nueva. Existe el riesgo de incendio
o explosión si se utiliza otro tipo de pila.
RM-X251
2
c
1
Notas sobre la pila de litio
• Mantenga la pila de litio fuera del alcance de los
niños. En caso de ingerir la pila, consulte
inmediatamente a un médico.
• Limpie la pila con un paño seco para asegurar
un buen contacto.
• Asegúrese de colocar la polaridad de la pila en la
posición correcta al instalarla.
• No sujete la pila con pinzas metálicas ya que
podría ocasionar un cortocircuito.
ADVERTENCIA
La pila puede explotar si no se emplea
adecuadamente. No recargue la pila;
tampoco la desmonte ni la arroje al fuego.
Limpieza del soporte
• Limpie la ventosa con la esponja de limpieza
suministrada para mantener la fuerza adhesiva.
• No utilice alcohol, disolvente o benceno para
limpiar el soporte, ya que podría dañarlo.
• No utilice detergente líquido para limpiar el
soporte.
• No utilice un paño de limpieza especializado.
Caso contrario, el soporte podría descolorarse.
• No rocíe el soporte con una sustancia volátil,
como insecticidas o aerosol para el cabello.
Caso contrario, puede ocasionarse el deterioro
del soporte.
• No coloque cerca del soporte un repelente o un
producto de vinilo o de caucho. Caso contrario,
podría ocasionarse el deterioro del soporte.
20
Lado + hacia arriba
Unidad maestra del DSP
Amplificador de potencia
Salida: Salidas de altavoces de 4 canales
(Frontal I/D, posterior I/D)
Impedancia de altavoz: 4 Ω – 8 Ω
Salida de potencia máxima: 45 W × 4 (a 4 Ω)
Generales
Salidas:
Terminales de salida de audio: (Frontal/
Posterior)
Terminal de salida de altavoz potenciador de
graves (mono)
Terminal de control del amplificador de
potencia
Entradas:
Terminal de entrada de señal de iPod (conector
de base)
Terminal de entrada de alto nivel
Controles de sonido:
Graves/Agudos ±7 dB
Equilibrio/Balance ±7 niveles
Volumen del altavoz potenciador de graves*
+/- 6 niveles, silencio
Requisitos de alimentación: Batería de automóvil
de cc de 12 V (negativo a masa)
Dimensiones: (Dimensiones de montaje)
Aprox. 210,6 mm × 40 mm × 156,6 mm
(an/al/prf )
Peso: Aprox. 0,92 kg
Accesorios suministrados:
Control remoto de tarjeta: RM-X251
Componentes de instalación y conexiones
(1 conjunto)
* Esta función sólo funciona cuando un altavoz
potenciador de graves está conectado al sistema
y el interruptor SUBWOOFER de la unidad
maestra del DSP se encuentra en la posición
“Y”.
Soporte
Dimensiones:
Aprox. 65 mm × 138,8* mm × 105,3 mm
(an/al/prf)
Peso: Aprox. 0,14 kg
* Brazo totalmente extendido: 147,1 mm (al)
Es posible que su distribuidor no trabaje con
algunos de los accesorios mencionados.
Consulte a su distribuidor para más
información.
Los diseños y especificaciones están sujetos a
cambios sin previo aviso.
Page 41

Solución de problemas
La siguiente lista le resultará útil para
solucionar los problemas que pueda tener con
la unidad.
Antes de consultar la siguiente lista, examine
los procedimientos de conexión y
funcionamiento.
Para obtener más información sobre cómo
quitar la unidad, consulte los manuales de
instalación y conexión suministrados con el
sistema.
En caso de que algún problema persista, deje
de usar el sistema y consulte con su
distribuidor Sony más cercano.
Unidad maestra del DSP
El indicador SOURCE de la unidad maestra
del DSP parpadea en azul.
Si el indicador SOURCE deja de parpadear al
presionar cualquier botón del control remoto o
del soporte, las conexiones son incorrectas.
– Consulte los manuales de conexiones e
instalación suministrados junto con el
sistema.
Si el indicador SOURCE continúa
parpadeando en azul al presionar cualquier
botón del control remoto o del soporte, puede
que exista una falla de funcionamiento interna.
– Verifique la conexión. Si el indicador
SOURCE continúa parpadeando, consulte
con su distribuidor Sony más cercano.
El indicador SOURCE de la unidad maestra
del DSP parpadea en rojo.
La fuente de alimentación del soporte al iPod o
iPhone se encuentra sobrecargada.
– Retire el iPod o iPhone del soporte y cambie
la fuente presionando el botón SOURCE/
OFF del soporte. Después de verificar que el
iPod o iPhone funciona correctamente,
vuelva a colocarlo en el soporte.
El indicador SOURCE de la unidad maestra
del DSP parpadea de manera alterna en azul
y rojo.
Se ha activado la detección de temperatura.
– Asegúrese de colocar el sistema en un lugar
bien ventilado.
– Reduzca el volumen.
Soporte
Se redujo la fuerza adhesiva de la ventosa.
La superficie de la ventosa está sucia.
– Limpie la ventosa con la esponja de limpieza
suministrada.
No utilice detergente líquido para limpiar el
soporte.
Asegúrese de que la superficie de la ventosa no
esté húmeda antes de colocar el soporte.
No funcionan los botones / en el
soporte.
Se ha seleccionado el sistema de audio del
automóvil como fuente. Estos botones están
disponibles únicamente cuando se ha
seleccionado un iPod o iPhone como fuente y
el reproductor de música de estos está
activado.
El indicador del soporte parpadea en azul.
Si el indicador deja de parpadear al presionar
cualquier botón del control remoto o del
soporte, las conexiones son incorrectas.
– Consulte los manuales de conexiones e
instalación suministrados junto con el
sistema.
Si el indicador continúa parpadeando en azul
al presionar cualquier botón del control
remoto o del soporte, puede que exista una
falla de funcionamiento interna.
– Verifique la conexión. Si el indicador
continúa parpadeando, consulte con su
distribuidor Sony más cercano.
El indicador del soporte parpadea en azul.
La fuente de alimentación del soporte al iPod o
iPhone se encuentra sobrecargada.
– Retire el iPod o iPhone del soporte y cambie
la fuente presionando el botón SOURCE/
OFF del soporte. Después de verificar que el
iPod o iPhone funciona correctamente,
vuelva a colocarlo en el soporte.
El indicador del soporte parpadea de manera
alterna en azul y rojo.
Se ha activado la detección de temperatura.
– Asegúrese de colocar el sistema en un lugar
bien ventilado.
–Reduzca el volumen.
21
Page 42

El soporte está sucio.
Consulte la página 20 para obtener más
información sobre cómo limpiar el soporte.
El brazo no sostiene el iPod o iPhone
adecuadamente.
El caucho utilizado en la parte superior del
brazo se endurece en temperaturas bajas.
– Permita que la temperatura de ambiente
aumente y, a continuación, ajuste el iPod o
iPhone.
Control remoto
No funcionan los botones / en el
control remoto.
Se ha seleccionado el sistema de audio del
automóvil como fuente. Estos botones están
disponibles únicamente cuando se ha
seleccionado un iPod o iPhone como fuente y
el reproductor de música de estos está
activado.
El control remoto no funciona.
Asegúrese de que el control remoto apunte al
sensor remoto del soporte.
Reemplace la pila de litio.
Asegúrese de que el cable del soporte esté
conectado al soporte firmemente.
Quite el iPod/iPhone del soporte y, a
continuación, presione el botón RESET en la
unidad maestra del DSP.
Otros problemas
El sonido se oye únicamente de los altavoces
frontales.
Coloque el interruptor INPUT SELECT en
“2ch” en la unidad maestra del DSP.
No hay sonido cuando el sistema de audio
del automóvil se selecciona como fuente.
Presione el botón SOURCE/OFF en el soporte
o en el control remoto reiteradamente hasta
que el indicador LED del soporte se ilumine en
azul.
Asegúrese de que el sistema de audio del
automóvil esté encendido.
No hay sonido cuando se ha seleccionado un
iPod o iPhone como fuente.
Presione el botón SOURCE/OFF en el soporte
o en el control remoto reiteradamente hasta
que el indicador LED del soporte se ilumine en
rojo.
Si aún no hay sonido, aunque el indicador LED
del soporte esté en rojo:
• Asegúrese de que el iPod o iPhone esté
colocado en el soporte de manera segura.
• Retire el estuche o la cubierta del iPod o
iPhone.
• Encienda la reproducción directamente en el
iPod/iPhone.
El sonido se atenúa de repente.
Puede que se haya activado la detección de
temperatura.
– Asegúrese de colocar el sistema en un lugar
bien ventilado.
– Reduzca el volumen.
De repente, no se escucha nada.
Puede que se haya activado la detección de
temperatura.
– Asegúrese de colocar el sistema en un lugar
bien ventilado.
– Reduzca el volumen.
El rango de volumen es limitado.
Puede que se haya activado la detección de
temperatura.
– Asegúrese de colocar el sistema en un lugar
bien ventilado.
– Reduzca el volumen.
La función de giro de pantalla del iPod o del
iPhone se puede activar de repente cuando
el automóvil está en marcha.
El giro de pantalla puede ser producto de
vibraciones, según el estado del camino.
– Desactive esta función.
El altavoz potenciador de graves no emite
ningún sonido.
Asegúrese de que el altavoz potenciador de
graves esté conectado correctamente al sistema
y de que el interruptor SUBWOOFER se
encuentre en la posición “Y” en la unidad
maestra del DSP.
22
Page 43

Page 44

http://esupport.sony.com
http://www.sony.com/caraudio
If you have any questions/problems
regarding this product, try the following:
1
Read Troubleshooting in these
Operating Instructions.
2
Please contact (U.S.A. only);
Call 1-800-222-7669
URL http://www.SONY.com
http://www.sony.net/
©2011 Sony Corporation Printed in Thailand
 Loading...