

SONY XDM-S500, XDM-S700 User Manual
2-067-591-12(1)
Portable IC
Audio Player
Operating Instructions........................................................................... |
GB |
|
........................................................................................................... |
CS |
|
|
||
|
|
|
|
|
|
XDM-S500/S700
©2004 Sony Corporation
WARNING
To prevent fire or shock hazard, do not expose the unit to rain or moisture.
Do not install the appliance in a confined space, such as a bookcase or built-in cabinet.
To prevent fire, do not cover the ventilation of the apparatus with news papers, table cloths, curtains, etc. And don’t place lighted candles on the apparatus.
To prevent fire or shock hazard, do not place objects filled with liquids, such as vases, on the apparatus.
Note on installation
If you use the unit at a place subject to static or electrical noise, the track’s transferring information may be corrupted. This would prevent successful transferring authorization on your computer.
Notice for users
On the supplied software
•Copyright laws prohibit reproducing the software or the manual accompanying it in whole or in part, or renting the software without the permission of the copyright holder.
•In no event will SONY be liable for any financial damage, or loss of profits, including claims made by third parties, arising out of the use of the software supplied with this player.
•In the event a problem occurs with this software as a result of defective manufacturing, SONY will replace it.
However, SONY bears no other responsibility.
•The software provided with this player cannot be used with equipment other than that which is so designated.
•Please note that, due to continued efforts to improve quality, the software specifications may be changed without notice.
•Operation of this player with software other than that provided is not covered by the warranty.
Program ©2001, 2002, 2003, 2004 Sony Corporation Documentation ©2004 Sony Corporation
This manual explains how to operate your Portable IC Audio Player and how to use the MP3 File Manager (pre-installed software). For details on how to use the SonicStage (supplied software), refer to the SonicStage operating instructions.
OpenMG and its logo are trademarks of Sony Corporation.
SonicStage and SonicStage logo are trademarks or registered trademarks of Sony Corporation.
ATRAC, ATRAC3, ATRAC3plus and their logos are trademarks of Sony Corporation.
Microsoft, Windows and Windows Media are trademarks or registered trademarks of Microsoft Corporation in the United States and/or other countries.
All other trademarks and registered trademarks are trademarks or registered trademarks of their respective holders.
In this manual, TM and ® marks are not specified.
2-GB

Table of Contents
Overview ............................................ |
4 |
What you can do with your |
|
Portable IC Audio Player .......... |
4 |
Other features ................................. |
5 |
Step 1: Checking the package |
|
contents ........................................ |
6 |
Step 2: Inserting the battery ................ |
7 |
Locating controls ................................ |
8 |
Front side ........................................ |
8 |
Rear side ......................................... |
8 |
Display ............................................ |
9 |
Basic Operations |
|
Transferring audio files from the |
|
computer to your Portable |
|
IC Audio Player .......................... |
10 |
Note on playing songs with a |
|
limited playing period |
|
(Timeout contents) .................. |
11 |
Note on playing songs with a |
|
limited playing count .............. |
11 |
Listening to music with your |
|
Portable IC Audio Player ........... |
12 |
What is the Group function? ......... |
13 |
On other operations ...................... |
13 |
Advanced Operations |
|
Repeat mode ..................................... |
14 |
Selecting the repeat mode ............. |
14 |
Playing the tracks repeatedly |
|
(Track Repeat) ........................ |
15 |
Playing a specified section |
|
repeatedly (A-B Repeat) ......... |
15 |
Playing specified sentences |
|
repeatedly |
|
(Sentence Repeat) ................... |
16 |
Setting the repeat counts ............... |
17 |
Changing the display mode .............. |
17 |
Selecting the group display |
|
mode ....................................... |
18 |
Adjusting treble and bass |
|
(Digital sound preset) ................. |
19 |
Selecting the Sound quality .......... |
19 |
Adjusting the sound quality .......... |
19 |
Locking the controls (HOLD) .......... |
20 |
Storing non-audio data ..................... |
21 |
Using the radio |
|
Adjusting the settings of your Portable IC Audio Player
Adjusting the time setting of your |
|
|
|
Portable IC Audio Player to a |
|
|
|
computer’s built-in clock ............ |
24 |
|
|
Adjusting the current time setting |
|
|
|
(DATE-TIME) ............................ |
25 |
|
|
Limiting the volume (AVLS) ............ |
26 |
|
|
Setting the volume using the preset |
|
|
|
volume function ......................... |
26 |
|
|
Setting a volume level of the |
|
|
|
preset mode ............................ |
26 |
|
|
Switching to the manual mode ..... |
27 |
|
|
Turning off the beep sound |
|
|
|
(BEEP) ....................................... |
28 |
|
|
Changing the backlight setting ......... |
28 |
|
|
Changing the blink setting of |
|
|
|
OPERATION lamp .................... |
29 |
|
|
Turning off the power after a |
|
GB |
|
specified time (TIMER) |
30 |
||
|
Other functions
Regrouping songs (REGROUP) ....... |
31 |
Formatting the memory |
|
(FORMAT) ................................. |
32 |
Other Information
Precautions ....................................... |
33 |
Troubleshooting ................................ |
34 |
To reset the player ......................... |
34 |
What happened? ........................... |
34 |
Messages ....................................... |
37 |
Specifications ................................... |
38 |
Glossary ............................................ |
39 |
Menu list ........................................... |
40 |
MP3 File Manager software operation
What you can do with the MP3 File |
|
Manager ..................................... |
41 |
Transferring MP3 audio files from |
|
the computer to your Portable |
|
IC Audio Player .......................... |
41 |
Display of MP3 File Manager .......... |
43 |
Erasing audio file .............................. |
44 |
Changing the order of audio files ..... |
44 |
Index ....................................... |
45 |
Listening to the radio ........................ |
22 |
|
Presetting radio stations .................... |
23 |
3-GB |
|
|

Overview
What you can do with your Portable IC Audio Player
First, you need to install the “SonicStage” software into your computer (MP3 File Manager software is preinstalled in your Portable IC Audio Player). You can easily transfer digital audio files from your computer to the built-in flash memory and carry it anywhere to enjoy.
1 Store digital audio files on your computer.
|
|
|
|
MP3, WAV and |
EMD (Electric Music |
|
|
|
|
|
|
|
Windows® Media |
|
Audio CDs |
|
|||
Distribution) Services |
|
|
Format Audio Files |
|
|
|
|
||
|
|
|
|
|
2 Transfer files to your Portable IC Audio Player.
When you transfer MP3 format audio files to your Portable IC Audio Player, use MP3 File Manager software (preinstalled software) to transfer and store them as MP3 format audio files.
Download the latest audio files!
Store favorite songs!
USB connection
3 Enjoy music with your Portable IC Audio Player.
You can display the data stored in the built-in flash memory using Windows Explorer when your Portable IC Audio Player is connected to the computer. However, an MP3 format audio file cannot be played back if you drag or copy the file directly on the Windows Explorer screen. When you transfer an MP3 format audio file to your Portable IC Audio Player, be sure to use the MP3 File Manager software (see page 41).
4-GB

Other features
•Compact size, light weight, skip-proof operation, high portability.
•The pre-installed MP3 File Manager software enables you to transfer MP3 format audio files to your Portable IC Audio Player and listen to them with your Portable IC Audio Player as MP3 format files.
•Continuous playback time with a battery XDM-S500/XDM-S700: Approximately 100*1 hours
•Recording time*2
XDM-S500: 128MB built-in flash memory, more than 5 hours 50 minutes. XDM-S700: 256MB built-in flash memory, more than 11 hours 40 minutes.
•The supplied SonicStage software enables you to record songs from audio CDs to the hard disk of your computer using the ATRAC3plus format (high sound quality, high compression).
•Sentence Repeat: Useful function for learning a foreign language.
•High-speed data transfer using the dedicated USB cable.
•Backlight LCD screen: song titles and artist names can be displayed.
•Group function: you can select songs to be played by album.
•FM radio tuner: you can listen to FM broadcasts in addition to playing audio files.
•Timer function: you can set your Portable IC Audio Player to turn off automatically after a certain period of time.
•Storage function: you can store a variety of data as well as audio files.
*1 Differs according to the data format. In this case, the figure for the battery duration is when continuously playing ATRAC3 format audio files.
*2 Differs according to the bit rate when recording. In this case, the figure for the recordable time is when recording at 48kbps ATRAC3plus format.
NOTES:
•The recorded music is limited to private use only. Use of the music beyond this limit requires permission of the copyright holders.
•Sony is not responsible for incomplete recording/downloading or damaged data due to problems of the Portable IC Audio Player or computer.
5-GB
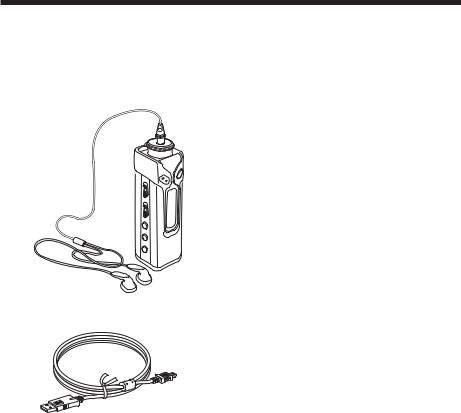
Step 1: Checking the package contents
Please check the accessories in the package. XDM-S500/S700:
•Portable IC Audio Player (1)
•Headphones (1)
•Carrying pouch (1)
•Neck strap (1)
•Headphones extension cord (1)
•CD-ROM (1)
•Operating instructions (1)
•SonicStage operating instructions (1)
•Card Warranty (1)
• Dedicated USB cable (1)
6-GB
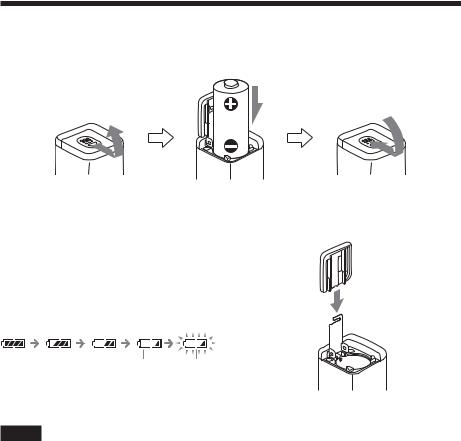
Step 2: Inserting the battery
Insert one LR6 (size AA) alkaline battery with correct polarity. Be sure to insert it from the E side as illustrated. Push forward the battery compartment lid until it locks completely.
Battery duration*
ATRAC3 format: Approximately 100 hours ATRAC3plus format: Approximately 90 hours MP3 format: Approximately 80 hours
FM radio reception: Approximately 40 hours
*The battery life may be shorter due to operating conditions and the temperature of the location.
On the remaining battery indication
The battery icon in the display changes as shown below.
If the battery compartment lid is accidentally detached, attach it as illustrated.
low battery change the battery
If “LOW BATT” is displayed in the display, you need to change the battery.
Notes
•When the player is not turned on, even if it puts in a battery, put in a battery again after waiting for a while.
•If you do not use the battery correctly, it may become damaged from leakage and corrosion. For best results:
–Use the alkaline battery.
–Make sure the polarity is correct.
–Do not charge a dry cell battery.
–Remove the battery, if you do not intend to use the player for an extended period of time.
–If you have battery leakage, replace with a new battery after cleaning the battery compartment.
7-GB

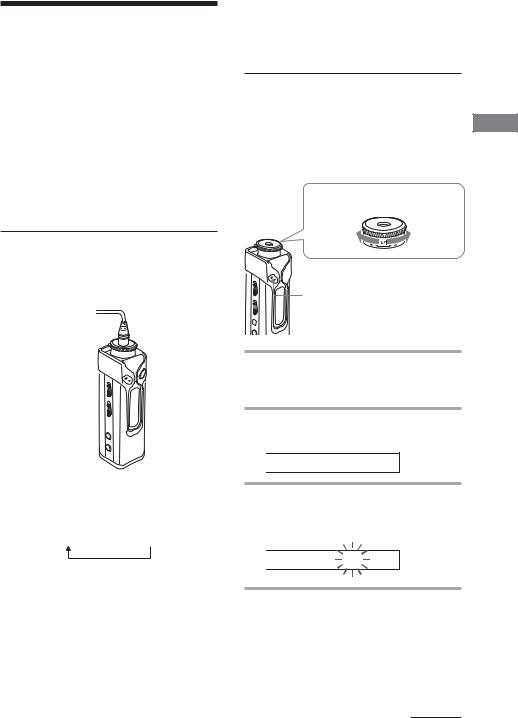
Locating controls
For details about each part, refer to the pages in parentheses.
Front side
1 |
|
|
2 |
9 |
|
3 |
||
0 |
||
4 |
|
5

 qz 6
qz 6 7
7 8
8
1Shuttle switch (./>, VOL (volume)) (pages 12 to 20, 22 to 32)
2 Headphone jack (page 12)
3 Nx button (pages 12, 14 to 20, 22 to 32)
4 HOLD (Locking controls) switch (page 20)
5RADIO ON/OFF switch (pages 12 to 14, 17 to 18, 22 to 23, 30)
6 SOUND button (page 19)
7GROUP/TUNE MODE button (pages 13, 18, 23)
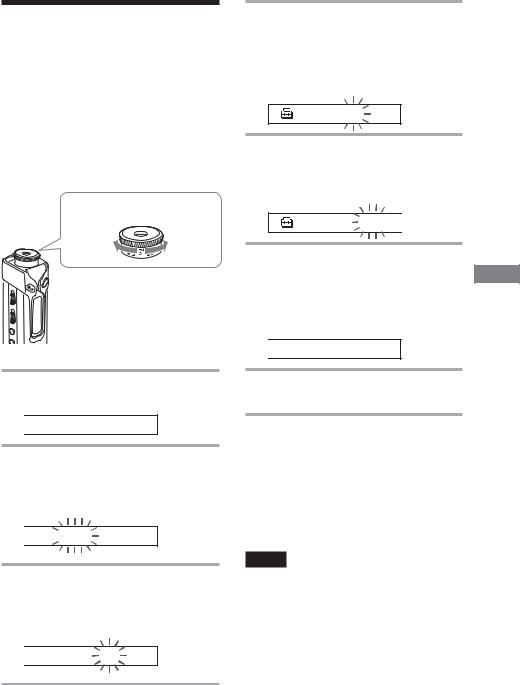
Rear side
qs
qd
8 REPEAT button (pages 15 to 16)
9ACCESS lamps (pages10, 41) Blinks in orange.
OPERATION lamp (pages 29) Blinks or lights in green.
0 MENU button (pages 14, 17 to 20, 22 to 32)
qa Display (pages 9, 13, 15, 17)
For details on the display and icons, refer to page 9.
qs Battery compartment (page 7) qd USB jack (pages 10, 41)
8-GB

Display
1Text/graphic information display (page 15) Displays track number, track name, current date and time (page 17 to 25), MESSAGE (page 11,
37) and menu.
Press the MENU button to switch the display mode. For details, refer to “Changing the display mode” on page 17.
2Repeat mode indication (page 14) The current repeat mode is displayed.
3AVLS indication (page 26)
The indication appears while the AVLS function is activated.
4Digital sound preset indication (page 19 to 20)
The current sound setting is displayed.
5Remaining battery indication (page 7) The remaining battery power is displayed.
9-GB
Basic Operations
Transferring audio files from the computer to your Portable IC Audio Player
Note
Before connecting your Portable IC Audio Player to the computer for the first time, be sure to install the “SonicStage” software from the supplied CD-ROM in your computer. Even if the SonicStage software is already installed, you need to install the SonicStage software supplied with this Portable IC Audio Player before connecting your Portable IC Audio Player to the computer (update programs may be available).
You can transfer ATRAC3, ATRAC3plus format audio files from the computer to your Portable IC Audio Player using the installed SonicStage software. Follow the procedure below.
You can also transfer MP3 format audio files, using the MP3 File Manager that is pre-installed in your Portable IC Audio Player. For details, refer to “MP3 File Manager software operation” on page 41.
1 Install the SonicStage software in your computer using the supplied CD-ROM.
Follow step 1 only for the first time when you connect your Portable IC Audio Player to the computer. For details, refer to the SonicStage operating instructions.
2 Import audio files into the SonicStage software.
For details, refer to the manual “SonicStage operating instructions.”
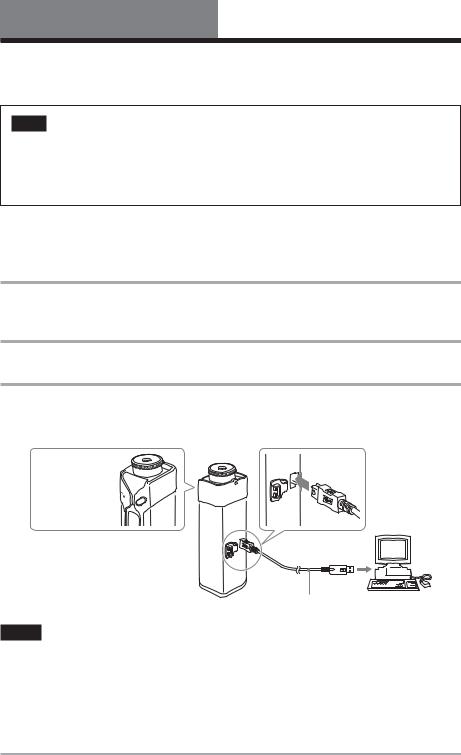
3 Connect your Portable IC Audio Player to your computer.
Connect the small connector of the dedicated USB cable into the USB jack on the Portable IC Audio Player, then the large connector to a USB port on your computer.
“CONNECT” appears in the display.
ACCESS lamp 
to a USB port
to the USB jack |
Dedicated USB cable (supplied) |
Notes
•The orange ACCESS lamp blinks while your Portable IC Audio Player accesses the computer.
•Do not disconnect the USB cable when the orange ACCESS lamp is blinking. The data being transferred may be destroyed.
•Use of your Portable IC Audio Player with a USB hub or a USB extension cable is not guaranteed. Always connect your Portable IC Audio Player to the computer directly using the dedicated USB cable.
•Some USB devices connected to the computer may interfere with the proper operation of your Portable IC Audio Player.
•The control buttons on your Portable IC Audio Player are all disabled while it is connected to a computer.
•You can display the data stored in the built-in flash memory using Windows Explorer when your Portable IC Audio Player is connected to the computer.
10-GB
4 Transfer audio files to your Portable IC Audio Player.
For information on transferring audio files to the built-in flash memory, refer to the separate manual “SonicStage operating instructions.”
z Tip
For information on transferring audio files back to the computer, refer to the manual “SonicStage operating instructions” or online Help for the SonicStage software.
Note on playing songs with a limited playing period (Timeout contents)
Some songs distributed via the Internet (EMD service) have a limited playing period.
If you try to play an expired song, “EXPIRED” blinks and the next song will be played after a moment.
In addition, an expired song cannot be played using the SonicStage software, or transferred to your Portable IC Audio Player. Delete such songs as needed.
Note on playing songs with a limited playing count
Your Portable IC Audio Player does not support contents with a limited playing count.
When you try to play a song with a limited playing count, “EXPIRED” will be displayed and the song will not be played.
Operations Basic
11-GB
Listening to music with your Portable IC Audio Player
Please insert a battery before use (see page 7).
Note
When using Portable IC Audio Player, be sure do disconnect it from the computer.
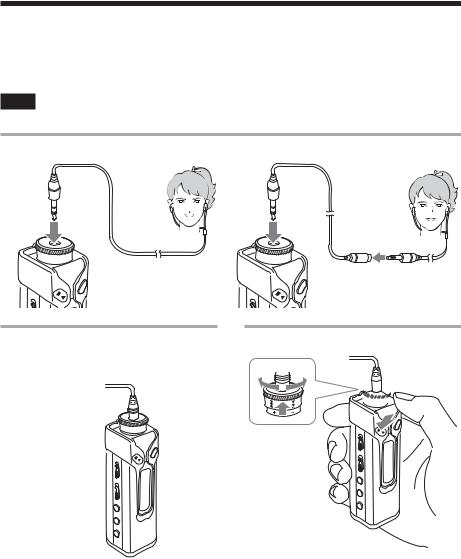
1 Connect the headphones. |
To use the headphones extension cord |
 Headphones to i jack extension
cord
2 Turn off the radio.
Slide the RADIO ON/OFF switch in the direction of RADIO OFF.
RADIO ON/OFF 
 switch
If playback does not start
Make sure that the HOLD switch is set to off (page 20).
To stop playback
Press the Nx button.
To adjust the volume
The volume can be set in the PRESET and MANUAL mode (pages 26 to 27).
12-GB
3 Start playback.
2
 1
1
1 Press the Nx button.
2Pull and rotate the Shuttle switch to adjust the volume.
z Tip
If your Portable IC Audio Player is not operated for 5 seconds while in stop mode, the display automatically turns off.
When scrolling track titles, etc., the display turns off after scrolling is finished.
When the normal playback mode is selected, playback stops automatically after the last song is played.

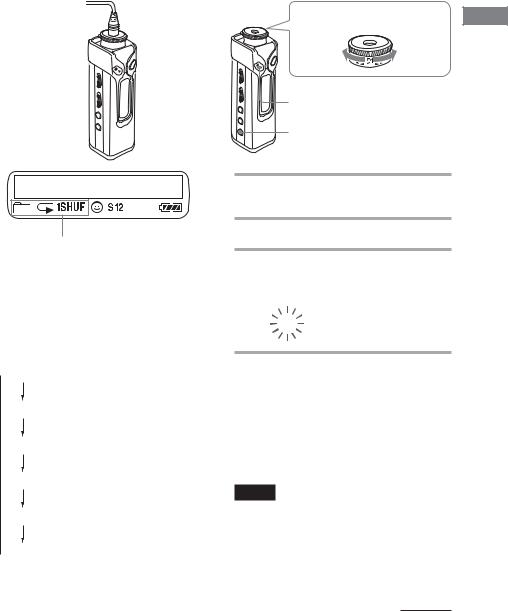
What is the Group function?
The Group function enables you to select favorite music conveniently on your Portable IC Audio Player. You can transfer audio files or play songs by album or artist using the Group function.
Track1
Group1 Track2
Track3
Track1
Group2 Track2
Track3
Track1
Group3 Track2
Track3
•The track number is the order of songs in each group.
•You can switch between Track Name mode and Group mode by pressing the GROUP/TUNE MODE button.
•In the Group mode, group names are displayed instead of track names. In addition, any shift operations, such as Skip or Repeat, are performed by group.
Track1 |
|
|
Track1 |
Transferring by group |
|
|
The audio files transferred to the SonicStage software are |
||
|
|
|||
Track2 |
|
Track2 |
||
|
always grouped when transferred to the built-in flash |
|||
|
||||
Track3 |
|
Track3 |
memory. |
|
|
||||
z Tip
|
|
|
|
|
|
|
A group created by SonicStage software has priority over |
|
|
Track1 |
|
|
|
Track1 |
one created by MP3 File Manager software on your |
|
|
|
|
|
Portable IC Audio Player. |
||
|
|
|
|
||||
|
|
|
|
|
|
|
|
|
|
|
|
|
|
|
|
On other operations
Shuttle switch
to (>) to (.)
 Nx button
 RADIO ON/OFF switch
 GROUP/TUNE MODE button
z Tip
You can switch to the Group mode by pressing the GROUP/TUNE MODE button with the RADIO ON/OFF switch set to RADIO OFF.
To |
Shuttle switch operation |
Skip to the beginning |
Rotate the Shuttle switch |
of the next track/ |
clockwise once (>). |
group*1 |
|
Skip to the beginning |
Rotate the Shuttle switch |
of the current track/ |
counterclockwise once |
group*1 |
(.). |
Fast-forward*2 |
Rotate the Shuttle switch |
|
clockwise (>) and hold it. |
|
|
Fast-rewind*2 |
Rotate the Shuttle switch |
|
counterclockwise (.) and |
|
hold it. |
|
|
*1 Rotating and holding of the Shuttle switch during stop mode allows you to skip to the beginning of the next (current and previous) track/group continuously.
*2 Fast-forward and fast-rewind speed become faster if the operation is continued for five seconds.
Operations Basic
13-GB
Advanced Operations
Repeat mode
There are three types of repeat mode: Track Repeat, A-B Repeat and Sentence Repeat.
•Track Repeat (TRK Rep)
This mode plays back tracks repeatedly in the following five ways.
Track Repeat mode |
Operation |
All Repeat |
All tracks repeatedly |
|
|
Single Repeat |
Current track repeatedly |
|
|
Group Repeat |
Current group repeatedly |
|
|
Group Shuffle |
Current group repeatedly |
Repeat |
in random order |
|
|
All Groups Shuffle |
All groups repeatedly |
Repeat |
in random order |
•A-B Repeat (A-B Rep)
This mode plays back the specified section in a track repeatedly.
•Sentence Repeat (SENTENCE Rep)
This mode plays back voice data within a specified section in a track repeatedly.
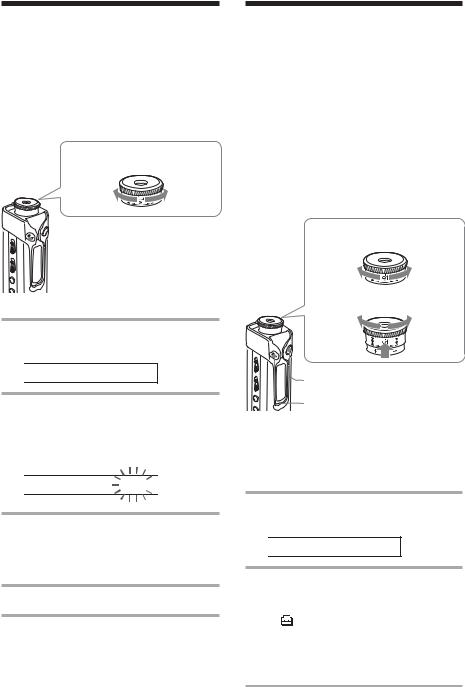
Selecting the repeat mode
Shuttle switch
to (>) to (.)
 MENU button
 Nx button
RADIO ON/OFF switch
1 Turn off the radio.
Slide the RADIO ON/OFF switch in the direction of RADIO OFF.
2 Press the MENU button in stop mode.
The menu screen is displayed.

 R E P E A TM O D E >
3 Rotate the Shuttle switch to select “REPEAT MODE >” and press the Nx button to confirm.
4 Rotate the Shuttle switch to select a desired repeat mode and press the Nx button to confirm.

 T R K R e p
You can choose one mode among “TRK Rep,” “A-B Rep” and “SENTENCE Rep.”
5 Press the MENU button.
The display returns to the normal screen. You can operate each repeat mode you selected, as referred to below.
•TRK Rep: see “Playing the tracks repeatedly (Track Repeat).”
•A-B Rep: see “Playing a specified section repeatedly (A-B Repeat).”
•SENTENCE Rep: see “Playing specified sentences repeatedly (Sentence Repeat).”
To cancel the Menu mode
Select [RETURN] in the menu screen or press the MENU button.
Notes
•The display automatically returns to the normal playback screen if you do not operate any button for 60 seconds.
•When there are no audio files in the built-in flash memory, you cannot set any repeat mode.
•When you connect the Portable IC Audio Player to your computer, the selected mode will be cancelled.
•You can select repeat mode only in stop mode.
14-GB
Playing the tracks repeatedly (Track Repeat)
The Track Repeat mode is changed by pressing the REPEAT button. You can check the current Track Repeat mode with the icon of the display.
REPEAT  button
Track Repeat icon
Select the Track Repeat mode (TRK Rep) first (page 14).
Then, press the REPEAT button repeatedly to select the repeat mode you want.
Each press changes the Track Repeat icon as follows:
 none (Normal play)
 (All Repeat)

 (Single Repeat)


 (Group Repeat)


 (Group Shuffle Repeat)


 (All Groups Shuffle Repeat)
Playing a specified section repeatedly (A-B Repeat)
While playing a track, you can set the start point
(A) and end point (B) for a section you wish to play repeatedly.
Shuttle switch |
|
to (>) |
to (.) |
|
Advanced |
Nx button |
Operations |
|
|
REPEAT button |
|
1 Select the A-B Repeat mode (A-B Rep) (page 14).
2 Press the Nx button to start playback.
3 Press the REPEAT button to set the start point (A) while playing back.
“B” blinks.
A B 0 1 |
0 0: 0 0 |
|
|
4 Press the REPEAT button to set the end point (B).
“A B” is displayed and the specified section is played back repeatedly.
|
A B 0 1 |
0 0: 5 5 |
|
|
|
|
|
|
|
|
|
Notes
•You cannot set A-B Repeat for a section that overlaps two or more tracks.
•If you do not set the end point (B), the end point is automatically set at the end of the track.
•You cannot use A-B Repeat in the Group mode or when the current time is displayed.
continued
15-GB
Repeat mode (continued)
z Tips
•You can fast-forward or fast-rewind by rotating the Shuttle switch, after the start point (A) is set. If the track reaches the end while fast-forwarding, the end point is set as point (B) and fast-forwarding continues. A-B Repeat starts when you release the Shuttle switch. If the track reaches the beginning while fast-rewinding, it jumps to the end of the track, the end point is set as point (B), and fast-rewinding continues.
•You can fast-forward or fast-rewind by rotating the Shuttle switch, during A-B Repeat playback. If the track reaches the track start/end while fast-forwarding or fast-rewinding, playback is stopped (enters Standby). A-B Repeat restarts when you release the Shuttle switch.
To clear the start point (A) and end point
(B)
•Press the REPEAT button during A-B Repeat playback.
•Press the MENU button during A-B Repeat playback.
•Select the Group mode by pressing the GROUP/ TUNE MODE during A-B Repeat playback.
•Select the previous or next track by rotating the Shuttle switch during A-B Repeat playback.
To cancel the A-B Repeat mode
Changing the Repeat mode in the menu screen (page 14).
Playing specified sentences repeatedly (Sentence Repeat)
This function automatically detects only voice data from the setting point and repeats the voice data for setting counts. It is useful for learning a foreign language.
z Tip
The default repeat counts setting is twice for one sentence. But you can change the repeat counts setting. Refer to “Setting the repeat counts” on page 17.
16-GB
Shuttle switch
to (>) to (.)
Nx button
 REPEAT button
1 Select the Sentence Repeat mode (SENTENCE Rep) (page 14).
2 Press the Nx button to start playback.
3 Press the REPEAT button to place the setting point during playback.
The Portable IC Audio Player detects spoken sections and non-spoken sections from the set point, and Sentence Repeat starts. (The spoken section is repeated once (during detection), and the setting is counted.)
0 1 0 0 :1 2
Notes
•You cannot use Sentence Repeat in the Group mode, or when the current time is displayed.
•A spoken or non-spoken section of less than 1 second will not be detected.
•If a non-spoken section is not detected until the track end, the track end point is recognized as a non-spoken section and Sentence Repeat begins from the previous spoken section.
To clear the setting point
•Press the REPEAT button during Sentence Repeat playback.
•Press the MENU button during Sentence Repeat playback.
•Select the Group mode by pressing the GROUP/ TUNE MODE during Sentence Repeat playback.
•Select the previous or next track by rotating the Shuttle switch during Sentence Repeat playback.
To cancel the Sentence Repeat mode
Changing the Repeat mode in the menu screen (page 14).

Setting the repeat counts
You can set the repeat counts (1-9) of one sentence for the Sentence Repeat mode.
Shuttle switch
to (>) to (.)
 MENU button
 Nx button
RADIO ON/OFF switch
1 Turn off the radio.
Slide the RADIO ON/OFF switch in the direction of RADIO OFF.
2 Press the MENU button.
The menu screen is displayed.

 R E P E A T M O D E >
3 Rotate the Shuttle switch to select “REPEAT MODE >” and press the Nx button to confirm.
4 Rotate the Shuttle switch to select “SENTENCE Rep” and press the Nx button to confirm.
“COUNT:” is displayed on the screen.

 C O U N T : 2
5 Rotate the Shuttle switch to select a desired repeat counts and press the Nx button to confirm.
6 Press the MENU button.
The display returns to the normal screen.
To cancel the Menu mode
Select [RETURN] in the menu screen or press the MENU button.
Changing the display mode
You can view information such as track numbers or titles in the display while music is played or stopped. Change the display mode by operating the Shuttle switch in the Menu mode.
• Lap Time: Elapsed time display mode |
Advanced |
|||||||||||
|
||||||||||||
The following will be displayed after a music title and |
|
|||||||||||
artist name are displayed. |
|
|
|
|
|
|||||||
|
|
Track number |
Elapsed time |
|
||||||||
|
|
|
|
|
|
|
|
|
|
|
|
Operations |
|
|
|
|
|
|
|
|
|
|
|
|
|
|
|
|
|
|
0 0 9 |
|
0 1 : 3 6 |
|
|
|||
|
|
|
|
|
|
|
|
|
|
|
|
|
|
|
|
|
|
|
|
|
|
|
|
|
|
|
Play status* |
|
|
|
|
|
|
|
||||
* Play: Displays |
and |
alternately. |
|
|||||||||
Stop: Displays |
. |
|
|
|
|
|
|
|||||
Search track: Displays > or .. Fast-forward/Fast-rewind: Displays M or m.
•Title: Title display mode
When the music title includes more than 12 characters, the title will be automatically scrolled.
T i t l e / A r t i s
•Track info: Track information display mode
The track title, CODEC, and bit rate are displayed. When the information includes more than 12 characters, the information will be automatically scrolled.
T i t l e / C o d e c /
While searching, fast-forwarding, or fast-rewinding a track, the current playing position is displayed.
continued
17-GB

Changing the display mode (continued)
Shuttle switch
to (>) to (.)
 MENU button
 Nx button
RADIO ON/OFF switch
1 Turn off the radio.
Slide the RADIO ON/OFF switch in the direction of RADIO OFF.
2 Press the MENU button.
The menu screen is displayed.

 R E P E A TM O D E >
3 Rotate the Shuttle switch to select “DISPLAY >” and press the Nx button to confirm.
The selected display mode blinks.

 L a p T i m e
4 Rotate the Shuttle switch to select a desired display mode and press the Nx button to confirm.
The display switches to the selected display mode.

 D I S P L A Y >
5 Press the MENU button.
The display returns to the normal screen.
To cancel the menu mode
Select [RETURN] in the menu screen or press the MENU button.
Note
The display automatically returns to the normal playback screen if you do not press any buttons for 60 seconds.
Selecting the group display mode
For any menu mode, you can select the group display by pressing the GROUP/TUNE MODE button with the RADIO ON/OFF switch set to RADIO OFF.
RADIO ON/OFF  switch
GROUP/TUNE  MODE button
To cancel the group mode
Press the GROUP/TUNE MODE button in the group mode screen.
z Tip
The backlight lights in green in group mode and lights in blue when not in group mode (if backlight is set to “ON”(see page 28)).
Note
The display automatically returns to the normal playback screen if you do not operate any button for 30 seconds.
18-GB
Adjusting treble and bass (Digital sound preset)
You can adjust the treble and bass. You can preset two settings, which can be selected during playback.
Selecting the Sound quality
Default settings
Sound |
SOUND 1 |
SOUND 2 |
SOUND OFF |
quality |
(S1) |
(S2) |
(NORMAL SOUND) |
Bass |
+1 |
+3 |
±0 |
|
|
|
|
Treble |
±0 |
±0 |
±0 |
|
|
|
|
Adjusting the sound quality
You can adjust the sound quality of bass and treble parts.
Sound quality |
Emphasis level |
Bass |
-4 to +3 |
|
|
Treble |
-4 to +3 |
|
|
You can preset desired sound quality settings as “Sound 1” and “Sound 2.” While playing music, you can assign a preset sound quality to music.
Shuttle switch
to (>) to (.)
 MENU button
Nx button
 RADIO ON/OFF switch
Operations Advanced
SOUND button 
Press the SOUND button repeatedly
The Sound quality setting change as follows:
S1  S2
S2  (none)
To return to the normal Sound quality
Select “SOUND OFF.”
1 Turn off the radio.
Slide the RADIO ON/OFF switch in the direction of RADIO OFF.
2 Press the MENU button.
The menu screen is displayed.

 R E P E A TM O D E >
3 Rotate the Shuttle switch to select “SOUND >” and press the Nx button to confirm.

 S O U N D : 2 >
continued
19-GB

Adjusting treble and bass (Digital sound preset) (continued)
4 Set the tone for “SOUND 1.”
1Rotate the Shuttle switch to select “SOUND 1 >” and press the Nx button to confirm.
2“BASS:+1” appears, rotate the Shuttle switch to adjust the emphasis level of bass sound and press the Nx button to confirm.
3“TREBLE: 0” appears, rotate the Shuttle switch to adjust the emphasis level of treble sound and press the Nx button to confirm.
5 Press the MENU button.
The display returns to the normal screen.
Locking the controls (HOLD)
You can protect your Portable IC Audio Player against accidental operation by using the HOLD function when carrying it.
HOLD switch 
To adjust the “SOUND 2” setting
Select “SOUND 2” in step 4.
To cancel the menu mode
Select [RETURN] in the menu screen or press the MENU button.
Note
You cannot use this function when the RADIO ON/OFF switch is set to RADIO ON.
Slide the HOLD switch in the direction of the arrow.
All operation buttons and switches (except the RADIO ON/OFF switch) are disabled.
If you try to operate buttons and switches while the HOLD function is on, “HOLD” blinks in the display.
To release the HOLD function
Slide the HOLD switch in the opposite direction of the arrow.
Note
Only the RADIO ON/OFF switch activates when the HOLD function is on.
20-GB
Storing non-audio data
You can transfer data from the hard disk of your computer to the built-in flash memory using Windows Explorer.
The built-in flash memory is displayed in Windows Explorer as an external drive (for example: as the D drive).
Notes
•You cannot operate the SonicStage software while operating the data storage function of your Portable IC Audio Player to use files stored in the built-in flash memory. The error message “Cannot access the Device/ media.” will be displayed when you try to operate both of them simultaneously.
•If you store a lot of non-audio data into the built-in flash memory, the space for audio data is reduced by the same amount.
Operations Advanced
21-GB

Using the radio
Listening to the radio
You can listen to FM broadcasts.
Shuttle switch
to (>) to (.)
to (VOL +) |
to (VOL –) |
 MENU button
 RADIO ON/OFF switch
1 Set the RADIO ON/OFF switch to RADIO ON to turn on the radio.
F M 8 7 . 5 0 M Hz
2 Press the GROUP/TUNE MODE button to select the manual tuning mode (see tip below).
3 Rotate the Shuttle switch clockwise (>) or counterclockwise (.) and hold it.
The Player starts scanning the frequencies and stops when it finds a receivable station. If you rotate the Shuttle switch repeatedly, the frequency changes step by step.
To turn off the radio
Set the RADIO ON/OFF to RADIO OFF.
If it is hard to hear the FM broadcast
If the FM broadcast is noisy, switch to the monaural reception mode.
1Slide the RADIO ON/OFF switch in the direction of RADIO ON to turn on the radio.
2Press the MENU button. “FM SOUND” is displayed.
3Press the Nx button.
4Rotate the Shuttle switch to select “FM SOUND: MONO.”
5Press the Nx button to confirm.
To change the setting to “STEREO”
Select “FM SOUND: STEREO” in step 4.
To adjust the volume
Pull and rotate the Shuttle switch.
To improve the reception
The headphone cord functions as the FM antenna. Extend the cord to improve the reception.
z Tip
There are two modes in tuning in the station; manual tuning mode and preset tuning mode.
In manual tuning mode, you can tune in by changing the frequency as step 3 above.
In preset tuning mode, you can tune in by changing the preset number (see page 23).
To switch between manual tuning mode and preset tuning mode, press the GROUP/TUNE MODE button. Only in preset tuning mode, the preset number appears on the right side of the display. The backlight lights in blue in manual tuning mode and lights in green in preset tuning mode (if backlight is set to “ON”(see page 28)).
22-GB

Presetting radio stations
You can preset up to 30 FM radio stations.
Shuttle switch
to (>) to (.)
 MENU button
Nx button
 RADIO ON/OFF switch
 GROUP/TUNE MODE button
To preset stations automatically (Auto preset)
1 Turn on the radio.
Slide the RADIO ON/OFF switch in the direction of RADIO ON.
2 Press the MENU button.
3 Rotate the Shuttle switch to select “FM AUTO PRESET” and press the Nx button to confirm.
4 Rotate the Shuttle switch to select “FM RUN.”
5 Press the Nx button.
The Player starts scanning for stations from the lower frequencies.
F M 8 7 . 5 0 M H z |
1 |
|
|
The first received station is preset on the preset number 1, and then the player starts scanning for the next receivable station.
If you press the Nx button during auto presetting, the player stops scanning and exits the auto preset mode.
To preset a station manually (Manual preset)
If there is a station that cannot be preset automatically, you can preset it manually by the following procedure.
Before starting, you must exit the preset mode (the preset numbers should not be displayed).
1 Tune in the station you want to preset in manual tuning mode (see tip on page 22).
2 Press and hold the Nx button for more than 2 seconds.
The preset numbers flash in the display.
3 Within 30 seconds, rotate the Shuttle switch to select the preset number you want to store the station on.
The selected preset number starts flashing.
4 Press the Nx button. |
Using |
||
To tune in a preset station |
|||
the |
|||
|
|
||
1 |
Turn on the radio. |
radio |
|
|
|||
|
Slide the RADIO ON/OFF switch in the |
|
|
|
direction of RADIO ON. |
|
|
2 Press the GROUP/TUNE MODE button to select the preset tuning mode (see tip on page 22).
The preset number appears on the right side of the display.
3 Rotate the Shuttle switch to select the preset number of the station you want to tune in.
23-GB

Adjusting the settings of your Portable IC Audio Player
Adjusting the time setting of your Portable IC Audio Player to a computer’s built-in clock
If the function is set to “ON,” the time setting of your Portable IC Audio Player is automatically adjusted to the computer’s built-in clock when your Portable IC Audio Player is connected and audio file transferring is executed (the SonicStage software must be started). “ON” is selected by default.
You cannot play a song with a limited playing period without the time setting of your Portable IC Audio Player. Be sure to adjust the time setting.
To set the date and time on your Portable IC Audio Player, refer to “Adjusting the current time setting (DATE-TIME)” on page 25.
Shuttle switch
to (>) to (.)
 MENU button
Nx button
 RADIO ON/OFF switch
Changing the setting to “OFF”
The time setting of your Portable IC Audio Player does not change even when your Portable IC Audio Player is connected to a computer.
1 Turn off the radio.
Slide the RADIO ON/OFF switch in the direction of RADIO OFF.
2 Press the MENU button.
The menu screen is displayed.

 R E P E A TM O D E >
3 Rotate the Shuttle switch to select “PC CLK:” and press the Nx button to confirm.

 P C C L K : O N
4 Rotate the Shuttle switch to select “OFF” and press the Nx button to confirm.
5 Press the MENU button
The display returns to the normal screen.
To change the setting to “ON”
Select “ON” in step 4.
To cancel the menu mode
Select [RETURN] in the menu screen or press the MENU button.
24-GB
Adjusting the current time setting (DATETIME)
You can set and display the current time.
You can also adjust the time setting of your Portable IC Audio Player to a computer’s built-in clock by connecting your Portable IC Audio Player to the computer (page 24).
Shuttle switch
to (>) to (.)
 MENU button
 Nx button
1 Press the MENU button.
The menu screen is displayed.

 R E P E A TM O D E >
2 Rotate the Shuttle switch to select “DATE-TIME” and press the Nx button to confirm.
The “year” digit blinks.

 2 0 0 4 y 1 m 1 d
3 Rotate the Shuttle switch to adjust the “year” setting and press the Nx button to confirm.
The “month” digit blinks.

 2 0 0 4 y 1 m 1 d
4 As you did in step 3, adjust the settings for “month” and “date.”
After rotating the Shuttle switch to adjust the “date” setting and pressing the Nx button to confirm, the display switches to the time setting screen.
 0 : 0 0
5 Rotate the Shuttle switch to adjust the “hour” setting and press the Nx button to confirm.
The “minute” digit blinks.
0 : 0 0

6 As you did in step 5, adjust the setting for “minute.”
After rotating the Shuttle switch to adjust the “minute” setting and pressing the Nx button to confirm, the display switches to the time setting screen.

 D A T E - T I M E
7 Press the MENU button.
The display returns to the normal screen.
To cancel the menu mode
Select [RETURN] in the menu screen or press the MENU button.
To display the current time
Press the MENU button and hold it.
You can display the current time while pressing the button.
If you set the timer function (page 30), the preset time will be displayed before the current time.
Notes
•If the unit is not used for a long time, your settings of the date and time may be reset.
•If the current time is not set, the display for the date and time will be “-- --.”
•If PC CLK is set to “ON” (page 24), the time setting of your Portable IC Audio Player is automatically adjusted to a computer’s built-in clock when your Portable IC Audio Player is connected to the computer.
•Depending on the shipping area, the time display format of the unit is set to a 12-hour display or a 24hour display.
You cannot switch between a 12-hour display and a 24hour display in the unit.
A 24-hour display is shown in this manual.
the Adjusting of settings Portable your
Audio IC Player
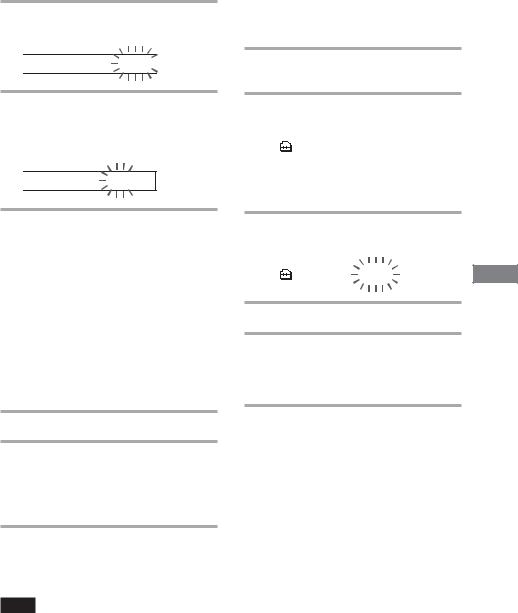
Limiting the volume (AVLS)
You can set AVLS (Automatic Volume Limiter System) to limit the maximum volume to prevent auditory disturbance or distraction. With AVLS, you can listen to music at a comfortable volume level.
Shuttle switch
to (>) to (.)
 MENU button
 Nx button
1 Press the MENU button.
The menu screen is displayed.

 R E P E A TM O D E >
2 Rotate the Shuttle switch to select “AVLS” and press the Nx button to confirm.
“OFF” blinks.

 A V L S : O F F
3 Rotate the Shuttle switch to select “ON” and press the Nx button to confirm.
The  (AVLS) indication is displayed. The volume is kept at a moderate level.
4 Press the MENU button.
To change the setting to “OFF”
Select “OFF” in step 3.
To cancel the menu mode
Select [RETURN] in the menu screen, or press the MENU button.
26-GB
Setting the volume using the preset volume function
There are two modes to adjust the volume level.
Manual mode: Pull and rotate the Shuttle switch to adjust the volume level in the range of 0 to 31.
Preset mode: |
Rotate the Shuttle switch to set |
|
|
the volume level to any of three |
|
|
preset levels: LO, MID, or HI. |
|
|
Shuttle switch |
|
|
to (>) |
to (.) |
to (VOL +) |
to (VOL –) |
MENU button
Nx button
Setting a volume level of the preset mode
1 Press the MENU button.
The menu screen is displayed.

 R E P E A TM O D E >
2 Rotate the Shuttle switch to select “VOL: MAN.”
|
V O L |
: M A N |
|
|
|
|
|
|
|
|
|
3 Press the Nx button to confirm.
“MAN” blinks.
4 Rotate the Shuttle switch to select “SET >.”

 V O L : S E T >
5 Press the Nx button to confirm.
“VOL LO xx”* blinks.
*“xx” stands for numeric values of the volume level.

 V O L L O x x
6 Set volume levels of three preset levels: LO, MID, or HI.
1Pull and rotate the Shuttle switch to set the volume level of the LO preset.
2Return the shuttle swith to the original position and rotate the Shuttle switch to select “VOL MID xx,” and then pull and rotate the Shuttle switch to set the volume level of the MID preset.
3Return the shuttle swith to the original position and rotate the Shuttle switch to select “VOL HI xx,” and then pull and rotate the Shuttle switch to set the volume level of the HI preset.
7 Press the Nx button to confirm.
8 Press the MENU button.
The display returns to the normal screen. With these settings, you can adjust the volume level to any of three preset levels: LO, MID, or HI.
To cancel the menu mode
Select [RETURN] in the menu screen or press the MENU button.
Note
If AVLS (page 26) is set, the actual volume may be lower than the settings.
Switching to the manual mode
1 Press the MENU button.
The menu screen is displayed.
2 Rotate the Shuttle switch to select “VOL: SET.”
|
V O L |
: S E T > |
|
|
|
|
|
|
|
|
|
3 Press the Nx button to confirm.
“SET >” blinks.
4 Rotate the Shuttle switch to select “MAN.”
V O L |
: M A N |
|
|
5 Press the Nx button to confirm.
6 Press the MENU button.
The display returns to the normal screen. With this setting, you can adjust the volume level by rotating the Shuttle switch.
the Adjusting of settings Portable your
Audio IC Player
27-GB
Turning off the beep sound (BEEP)
You can turn off the beep sounds of your Portable IC Audio Player.
Shuttle switch
to (>) to (.)
 MENU button
 Nx button
1 Press the MENU button.
The menu screen is displayed.

 R E P E A TM O D E >
2 Rotate the Shuttle switch to select “BEEP:” and press the Nx button to confirm.
“ON” blinks.

 B E E P : O N
3 Rotate the Shuttle switch to select “OFF” and press the Nx button to confirm.

 B E E P : O F F
4 Press the MENU button.
The display returns to the normal screen.
To change the setting to “ON”
Select “ON” in step 3.
To cancel the menu mode
Select [RETURN] in the menu screen, or press the MENU button.
28-GB
Changing the backlight setting
You can select ON or OFF.
Menu |
Backlight mode |
|
OFF |
Always off |
|
|
|
|
ON |
Turns on for three seconds |
|
|
after each operation |
|
|
(or until scrolling is complete) |
|
|
|
|
|
Shuttle switch |
|
|
to (>) |
to (.) |
 MENU button
 Nx button
To set “ON”
1 Press the MENU button.
The menu screen is displayed.

 R E P E A TM O D E >
2 Rotate the Shuttle switch to select “LIGHT:” and press the Nx button to confirm.
“OFF” blinks.

 L I G H T : O F F
3 Rotate the Shuttle switch to select “ON” and press the Nx button to confirm.

 L I G H T : O N
4 Press the MENU button.
The display returns to the normal screen.
To change the setting to “OFF”
Select “LIGHT: OFF” in step 3.
To cancel the menu mode
Select [RETURN] in the menu screen or press the MENU button.

|
To cancel the menu mode |
|
Changing the |
||
Select [RETURN] in the menu screen or press the MENU |
||
|
||
blink setting of |
button. |
|
|
||
OPERATION lamp |
|
The OPERATION lamp blinks or lights in green according to operation.
You can select from three patterns of setting, or
OFF.
If you set to “OFF,” the OPERATION lamp is always off.
Shuttle switch
to (>) to (.)
 MENU button
OPERATION lamp
Nx button
1 Press the MENU button.
The menu screen is displayed.

 R E P EA TM O D E >
2 Rotate the Shuttle switch to select “LED:” and press the Nx button to confirm.
“LED:” blinks.
|
L E D |
: L 1 |
|
|
|
|
|
|
|
|
|
3 Rotate the Shuttle switch to select “LED: L1” (blinks according to operation)
“LED: L2”(always blinks) “LED: L3”(always on) “LED: OFF”(always off)
and press the Nx button to confirm.
L E D |
: L 1 |
|
|
4 Press the MENU button.
the Adjusting of settings Portable your
Audio IC Player
29-GB
 Loading...