

4-732-877-11(1)
Television
Téléviseur
Reference Guide
Manuel de référence
Sony Customer Support
U.S.A.:
http://www.sony.com/tvsupport
Canada:
http://www.sony.ca/support
United States Canada
1.800.222.SONY 1.877.899.SONY
Please Do Not Return the Product to
the Store
US
FR
XBR-65A8F / 55A8F
Service à la clientèle Sony
Canada :
http://www.sony.ca/support
États-Unis :
http://www.sony.com/tvsupport
Canada États-Unis
1.877.899.SONY 1.800.222.SONY
Ne retournez pas le produit au magasin
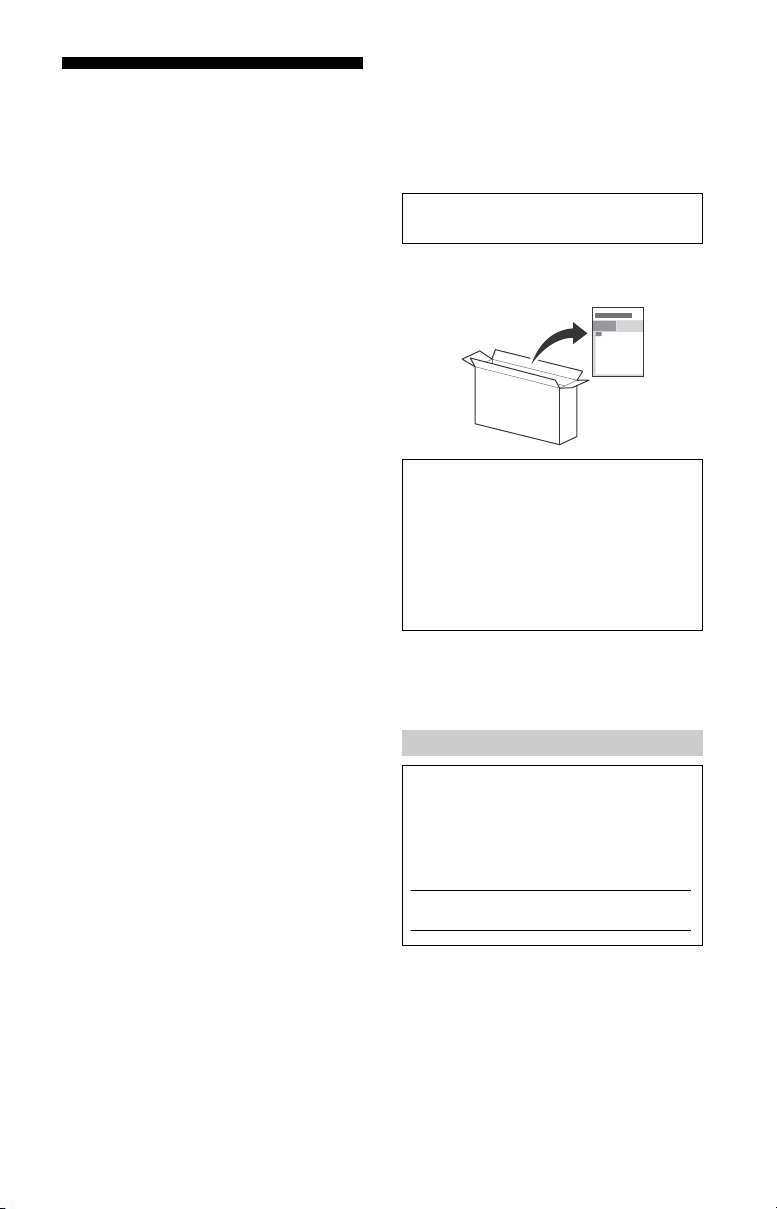
Table of Contents
Note
Note
IMPORTANT NOTICE . . . . . . . . . . . . . . . . 2
Safety Information . . . . . . . . . . . . . . . . . 3
Precautions . . . . . . . . . . . . . . . . . . . . . . . 5
Protecting the TV Screen (OLED TV) . . . 7
Parts and Controls . . . . . . . . . . . . . . . .8
Controls and Indicators . . . . . . . . . . . . . 8
Using Remote Control . . . . . . . . . . . . .9
Remote Control Parts Description. . . . . 9
Connection Diagram . . . . . . . . . . . . . 11
Installing the TV to the Wall . . . . . . . 13
Detaching the Table-Top Stand
from the TV . . . . . . . . . . . . . . . . . . . . . . 15
Installing the TV against a wall or
enclosed area. . . . . . . . . . . . . . . . . . .16
Troubleshooting. . . . . . . . . . . . . . . . . 17
Troubles and Solutions. . . . . . . . . . . . . 17
Specifications . . . . . . . . . . . . . . . . . . .19
Introduction
Thank you for choosing this Sony product.
Before operating the TV, please read this manual
roughly and retain it fo r future reference.
tho
• Images and illustrations used in the Setup Guide and this
manual are for reference only and may differ from the
actual product.
The 65” class has a 64.5 inch (163
size and the 55” class has a 54.6 inch (138.8 cm) viewable
image size (measured diagonally).
.9 cm) viewable image
Attaching the Table-Top Stand to the TV
Refer to the Setup Guide on top of the cushion.
Help
Find more troubleshooting and other useful information
directly from your TV. Press HELP on the remote control
to display a list of topics, or to search by keyword.
Help Guide (Manual)
For more detailed information, select [Help Guide] from
the Help menu on your TV. You can also check the Help
Guide from your PC or smartphone (information
provided on the back cover).
Location of the identification label
Labels for the TV Model No. and Power Supply rating are
located on the rear of the TV. They can be found by
removing the stand cover.
IMPORTANT NOTICE
Owner’s Record
The model and serial numbers are located at the side
and/or rear of the TV. Record these numbers in the
spaces provided below. Refer to them whenever you call
upon your Sony dealer regarding this TV.
Model Name
Serial No.
CAUTION
To prevent electric shock and blade exposure, do not use
this AC plug with an extension cord, receptacle or other
outlet unless the blades can be fully inserted.
• Operate the TV only on 110 V - 240 V AC (U.S.A./Canada
0 V
AC)
12
US
2

US
Note
Note
This television includes a QAM demodulator which should
allow you to receive unscrambled digital cable television
programming via subscription service to a cable service
provider. Availability of digital cable television
programming in your area depends on the type of
programming and signal provided by your cable service
provider.
Safety Information
Declaration of Conformity
Trad e Nam e: SO NY
Model: XBR-65A8F/XBR-55A8F
Responsible Party: Sony Electronics Inc.
Address: 16535 Via Esprillo,
San Diego, CA 92127 U.S.A.
Telephone Number: 858-942-2230
This device complies with part 15 of the FCC rules.
at
ion is subject to the following two conditions:
Oper
(1) This device may not cause harmful interference, and
this device must accept any interference received,
(2)
including interference that may cause undesired
operation.
FCC Related Information
This equipment has been tested and found to comply with
the limits for a Class B digital device, pursuant to Part 15 of
the FCC Rules. These limits are designed to provide
reasonable protection against harmful interference in a
residential installation. This equipment generates, uses and
can radiate radio frequency energy and, if not installed and
used in accordance with the instructions, may cause
harmful interference to radio communications. However,
there is no guarantee that interference will not occur in a
particular installation. If this equipment does cause harmful
interference to radio or television reception, which can be
determined by turning the equipment off and on, the user
is encouraged to try to correct the interference by one or
more of the following measures:
• Reorient or relocate the receiving antenna.
• Increase the separation between the equipment and
cei
ver.
re
• Connect the equipment into an outlet on a circuit
from that to which the receiver is connected.
different
• Consult the dealer or an experienced r
for help.
Pursuant to FCC regulations, you are cautioned that any
modifications not expressly approved in this
hanges or
c
manual could void your authority to operate this
equipment.
adio/TV technician
This device and its antenna(s) must not be co-located or
ing with any other antenna or transmitter except
operat
Grant condition.
High-power radars are allocated as primary users (i.e.
users) of the bands 5250-5350 MHz and 5650-
priority
5850 MHz and that these radars could cause interference
r damage to LE-LAN devices.
and/o
WARNING
Stability Hazard
The television set may fall, causing serious personal injury
or death.
Never place a television set in an unstable location. A
set may fall, causing serious personal injury or
television
death. Many injuries, particularly to children, can be
avoided by taking simple precautions such as:
• Using cabinets or stands recommended by the
anuf
acturer of the television set.
m
• Only using furniture that can safely support the television
set.
Ensuring the television set is not overhanging the edge of
•
rting furniture.
the suppo
• Not placing the television set on tall furniture (for
ple, cupboards or bookcases) without anchoring
exam
both the furniture and the television set to a suitable
support.
• Not placing the television set on cloth or other materials
t m
ay be located between the television set and
tha
supporting furniture.
• Educating children about the dan
furniture to reach the television set or its controls.
If your existing television set is being retained and
ated, the same considerations as above should be
reloc
applied.
gers
of climbing on
Before setting up your TV
Some TV models are packaged with a detached Table-Top
Stand so you can mount your TV to a wall right away. See
page 13 (Installing the TV to the Wall) if you want to mount
the TV to a wall. If you are not mounting the TV to a wall,
will nee
d to attach the Table-Top Stand. You will need a
you
Phillips screwdriver (not supplied) and the supplied screws
to complete the task, refer to the Setup Guide.
Be sure to consider the following while setting up your TV:
• Disconnect all cables when carrying the TV.
• Carry the TV with the adequat
size TVs require two or more people.
• Correct hand placement while carrying the TV is very
ant for safety and to avoid damage.
import
mber of people; larger
e nu
Safety and Regulatory
This device complies with Industry Canada’s licenceexempt RSSs. Operation is subject to the following two
conditions:
(1) This device may not cause interference; and
(2) This device must accept any interference, including
erf
erence that may cause undesired operation of the
int
device.
To prevent radio interference to the licensed service, this
intended to be operated indoors and away from
device is
windows to provide maximum shielding. Equipment (or its
transmit antenna) that is installed outdoors is subject to
licensing.
5 GHz bands are restricted to indoor operations only.
This equipment complies with FCC/IC radiation exposure
forth for an uncontrolled environment and meets
limits set
the FCC radio frequency (RF) Exposure Guidelines and
RSS-102 of the IC radio frequency (RF) Exposure rules. This
qu
ipment should be installed and operated keeping the
e
radiator at least 20 cm or more away from person’s body
(excluding extremities: hands, wrists, feet and ankles).
• When handling or
mount
ing the TV set, do
not lay down the TV.
• Ensure your TV has adequate ventilation, see page 16.
• For best picture quality, do not e
illumination or sunlight.
• Avoid installing the TV in a room with reflective wall and
aterials.
floor m
xpose th
e screen to direct
US
3
• Avoid moving the TV from a cold area to a warm area.
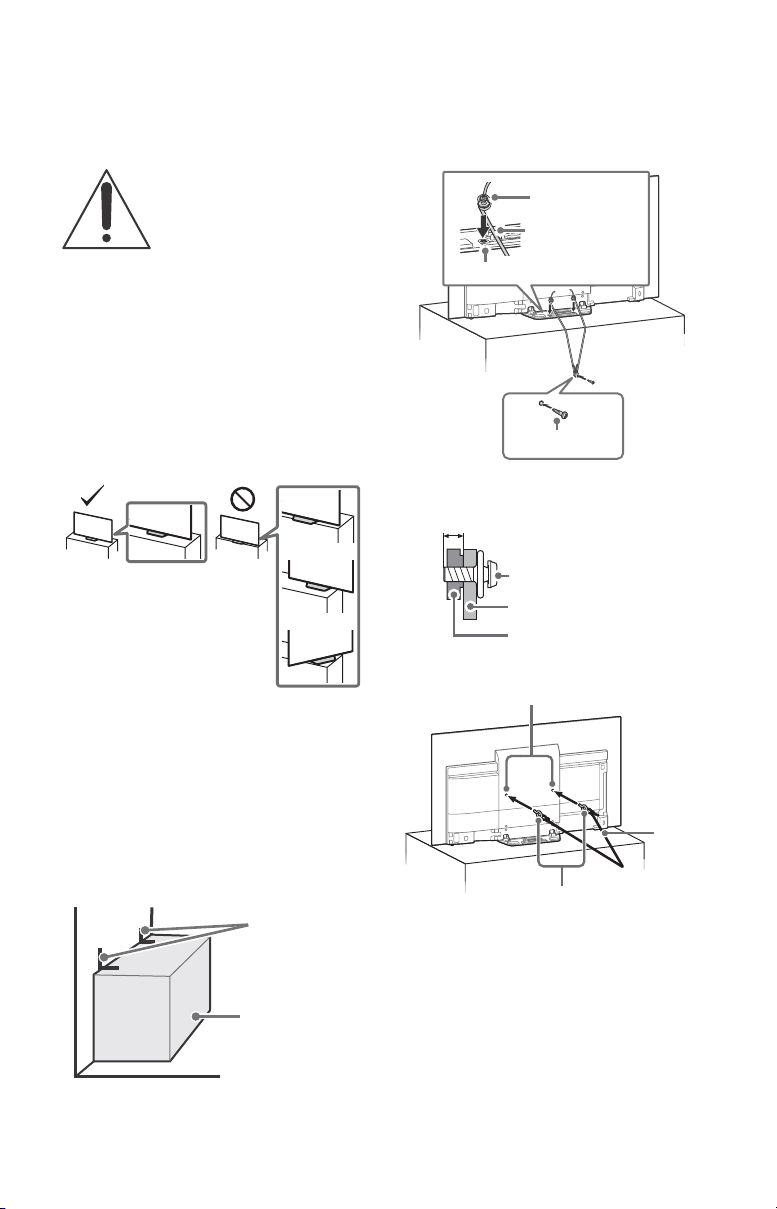
Angle brace
(not supplied)
Stand
Rope or chain
(not supplied)
Screw
(not supplied)
M4 machine screw
(not supplied)
Screw hole on the stand base
6 mm - 7 mm
Screw (M4)
Rope or chain
TV’s stand base
M6 eye bolts (not supplied)
Wall-mount holes
Rope or
chain
(not
supplied)
Sudden room temperature changes may cause moisture
condensation. This may cause the TV to show poor
picture and/or poor color. Should this occur, allow
moisture to evaporate completely before powering the TV
on.
Securing the TV
Sony strongly recommends taking
measures to prevent the TV from
er.
toppling ov
Unsecured TVs may topple and result in
y damage, serious bodily injury or
propert
even death.
Preventing the TV from Toppling
• Secure the TV to a wall and/or Stand.
• Do not allow children to play or climb on furniture and TV
sets.
Avoid placing or hanging items on the TV.
•
• Never install the TV on:
lippery, unstable and/or uneven surfaces.
S
Furniture that can easily be used as steps, such as a
chest o
f drawers.
• Install the TV where it cannot be pulled, pushed, or
knocked over
• Install the TV so that the TV bottom does n
from the Stand (not supplied). If the TV bottom protrudes
out from the Stand, it may cause TV set to topple over, fall
down, and cause personal injury or damage to the TV.
.
ot protrude out
2 Secure the TV to the Stand.
Use the optional hardware listed as follows (not
supplied):
• M4 machine screw (screwed into the TV’s stand base).
• A screw or similar (attach it to the Stand).
• Rope or chain (strong enough to support the weight of
the TV). Make sure that there is no excess slack in the
rope or chain.
The length of the M4 machine screw differs depending
th
e rope or chain diameter. Please refer to below
on
illustration.
• Route all AC power cords and connecting cables so that
e not accessible to curious children.
hey ar
t
Recommended Measures to Secure the
TV
Consider the following measures when securing your TV to
a Stand (not supplied).
1 Secure the Stand for the TV.
Make sure the Stand can adequately support the weight
of the TV. Use two angle braces (not supplied) to secure
the Stand. For each angle brace use the appropriate
hardware to:
• Attach one side of the angle brace to the wall stud.
• Attach the other side to the Stand.
4
US
3 Anchor the TV to the wall by using bolts, wall anchor and
chain (or rope).
US
Note
Note
Wall-anchor
(not supplied)
10 mm - 14 mm
TV’s rear cover
M6 eye bolt
1.5 mm max.
(Reference drawing for an F type plug)
7 mm max.
Please refer to below illustration for M6 eye bolt length.
• Your TV is shipped with screws attached to the rear of the
TV depending on the TV model. (They are fastened in the
screw holes for wall mounting.) Be sure to remove the
upper two screws prior to anchoring the TV to a wall.
• Securing the TV to the Stand without securing the TV and
the Stand to the wall provides minimum protection
against the TV toppling over. For further protection, be
sure to follow the three measures recommended.
Precautions
How to care for your BRAVIA TV
Safety is very important. Please read and follow the safety
documentation (Safety Booklet) separately provided.
Unplug the TV and other
nected equipment from
con
the wall outlet before you
begin cleaning your TV.
• Wipe the screen gently with
clo
th.
a soft
• Stubborn stains may be
d with a cloth slightly
remove
moistened with a solution of
mild soap and warm water.
• If using a chemically
ret
reated cloth, please
p
follow the instruction provided on the package.
• Never spray water or detergent directly on the TV set. It
y drip t
o the bottom of the screen or exterior parts and
ma
enter the TV set, and may cause damage to the TV set.
• Never use strong solvents such as a thinner, alcohol or
e fo
r cleaning.
benzin
• Do not plug in the TV into the wall outlet until the
ture from cleaning has evaporated.
mois
• Do not touch the TV if your hand is covered in any
l substance such as hand cream or sunblock.
chemica
The TV should also be placed on a stable surface to prevent
oppling over (see page 4). If you have young
it from t
children or pets at home, check regularly to ensure the TV is
astened.
securely f
Recommendation for an F type plug
Projection of the inner wire from the connection part must
be less than 1.5 mm.
US
5
Note
Note
The BRAVIA® 4K TV Experience
Thank you for choosing Sony! Your new BRAVIA® TV opens the door to the “4K TV Experience”. This document will help you
get the most out of your TV. Please take a moment to register your TV at:
U.S.A.: http://productregistration.sony.com
Canada: http://www.sony.ca/registration
Four Steps to a 4K TV Experience
Set, Source, Sound, and Setup.
Set
1
Now that you have made the best selection in OLED TV technology, be su
packaging before setting up your TV.
Source
2
To experience the stunning detail of your BRAV
• Upgrade your signal or content source to high-definition (4K) by contacting your HD service provider.
• Bring the astonishing resolution of your Sony 4K Ultra HD TV t
availability depends on region)
• Receive over-the-air HD broadcasts with an HD-quality antenna connected directly to the back of your TV.
p://www.antennaweb.org fo
Visit htt
• Discover the wealth of entertainment now available on super-high r
equipment.
Sound
3
Complete the high-definition experience with a BRAV
Setup
4
Install your TV and connect your sources. See page 11 for sample conne
for your HD experience, use Premium High Speed HDMI (High-Definition Multimedia Interface) cables.
IA TV, you need access to HD programming.
r more information on antenna selection and setup.
IA Sync™ surround sound system or A/V receiver from Sony.
re to remove all of the accessories from the
o life with Sony 4K Ultra HD Blu-ray Player. (The
esolution Blu-ray Disc™ player and other Sony HD
ction diagrams. To help assure the highest quality
To learn more about 4K TV, visit:
U.S.A.: http://www.sony.com/HDTV
Canada: http://www.sony.ca/hdtv
This TV displays all video input signals in a re
• For details of supported formats, refer to the “Specifications” in this manual.
• For supported PC formats, refer to the Help Guide.
solution of 3,840 dots × 2,160 lines.
US
6

US
Protecting the TV Screen (OLED TV)
Precautions to Protect the Screen from
Damage
Image retention
OLED TV‘s are susceptible to image retention (burn-in) due
to the characteristics of the materials used. Image retention
may occur if images are displayed in the same location on
the screen repeatedly or over extended periods of time.
This is not a malfunction of the TV. Avoid displaying images
that may cause image retention.
The following are examples of images that
may cause image retention:
• Content with black bars either on the top and bottom
and/or the left and right sides of the screen. (for example,
Letterboxed, 4:3 screen, Standard definition)
• Static images such as photos.
• Video games that might have static content in some part
scr
een.
of the
• On-screen menus, program guides, channel logos etc.
• Static content from applications.
• On-screen tickers, such as those used for news and
adlines.
he
To reduce the risk of image retention:
• Sony recommends that you turn off the TV normally by
pressing the power button on the remote control or the
TV.
• Fill the screen by changing [Wide mode] to eliminate the
ba
rs. Select [Wide mode] other than [Normal].
black
• Turn off the OSD (On Screen Display) by pressing the
DISPLAY button,
equipment. For details, refer to the instruction manuals
for the connected equipment.
• Avoid displaying static images with bright colors
(includin
screen.
• Set the picture settings based on the ambient conditions.
he S
T
when viewing content that often displays the station
logos, etc.
The TV has following features to help reduce/ prevent
age r
im
Panel refresh
Panel refresh will automatically run to adjust the uniformity
of the TV screen after it has been in use for long periods of
time. Panel refresh can also be performed manually and
should only be used if image retention is very noticeable or
you see the following message: [Panel refresh did not
finish…]
Caution:
• The Panel refresh function may affect the panel. As a
reference, perform the Panel refresh only once a year, do
not perform it more than once a year as it may affect the
usable life of the panel.
• Panel refresh takes about one hour to complete.
• A white line may be displayed on the screen during the
anel r
P
• Panel refresh will only work when the room temperature
is betwe
Pixel shift
Automatically moves the image on the screen to prevent
image retention.
Other feature
The screen brightness is automatically reduced when
displaying still images, clocks, bright colors or logos etc.
and turn off the menus from connected
g w
hite), clocks or logos on any portion of the
tandard Picture is recommended for home use and
etention.
efresh, this is not a malfunction of the TV.
en 50 ºF and 104 ºF (10 ºC and 40 ºC).
US
7

Parts and Controls
ȩ
Controls and Indicators
(Power) / + / –
When the TV is off,
Press to power on.
When the TV is on,
Press and hold to power off.
Press repeatedly to change the
function, then press + or - button to:
•Adjust the volume.
• Select the channel.
• Select the input source of TV.
Remote Control sensor* /
Light sensor* / Illumination LED
The illumination LED lights up or blinks
according to the status of the TV.
For more information, refer to the Help
Guide.
* Do not place anything near the sensor.
US
8
US
MIC
* The Google Assistant will be available when
software is updated.
Using Remote Control
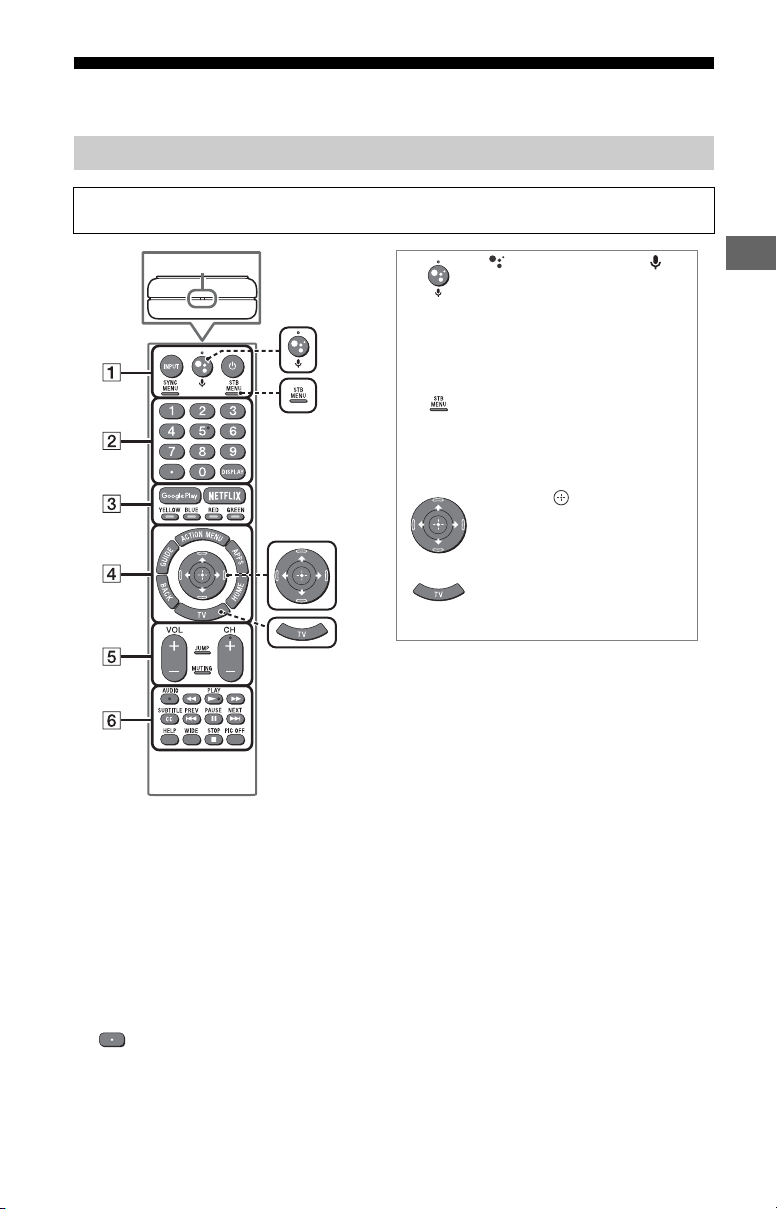
Remote Control Parts Description
The remote control shape, location, availability and function of remote control buttons may
vary depending on yo ur region/country/TV model.
(Google Assistant) /
(Microphone)
Use the Google Assistant* (only
on limited region/country/
language/TV model) or Voice
Search. (e.g., Search various
content by voice.)
STB MENU
Display the connected Set Top
Box (cable/satellite box) menu
after connecting and setting up
the IR Blaster (page 12).
//// (Navigation
D-Pad)
On screen menu navigation
and selection.
TV
Switch to a TV channel or input
and display the TV Menu Bar.
INPUT
Display and select the input source.
(TV standby)
Turn on or turn off the TV (standby
mode).
SYNC MENU
Display the BRAVIA Sync Menu.
Number buttons
Use with the 0-9 buttons to select
digital channels.
DISPLAY
Display information about the channel/
program/input you are viewing.
Google Play
Access the “Google Play” online service.
NETFLIX (Only on limited region/
country/TV model)
Access the “NETFLIX” online service.
Color buttons
Execute corresponding function at that
time.
US
9

ACTION MENU
Display a list of contextual functions.
GUIDE
Display the digital program guide.
APPS
Access various services and
applications.
BACK
Return to the previous screen.
HOME
Display the TV Home Menu.
VOL +/– (Volume)
Adjust the volume.
JUMP
Jump back and forth between two
channels or inputs. The TV alternates
between the current channel or input
and the last channel or input that was
selected.
MUTING
Mute the sound. Press again to restore
the sound.
CH +/– (Channel)
Select the channel.
AUDIO
Change the language for the program
currently being viewed.
//////
Operate media contents on the TV and
connected BRAVIA Sync-compatible
device.
SUBTITLE/CC
Turn subtitles on or off (when the
feature is available).
HELP
Display the Help menu. Help Guide can
be accessed from here.
WIDE
Change the screen format.
PIC OFF
Turn the picture off, while sound
remains on.
Guidelines for IR Remote Control
• Point your remote control directly at
the IR sensor located on your TV.
• Make sure that no objects are blocking
the path between the rem ote control
and the IR sensor on your TV.
• Fluorescent lamps can interfere with
your remote control; try turning off the
fluorescent lamps.
• If you are having problems with the
remote control, reinsert or replace your
batteries and make sure that they are
correctly inserted.
10
US

US
Note
Note
HDMI
Device
VCR/Video game
equipment/DVD player/
Camcorder
Audio
System
with
Optical
Audio
Input
Home Controller
Cable/
Antenna
Router
IR Blaster
HDMI
Device
Digital still
camera/
Camcorder/
USB storage
media
Headphone/Audio
System/Subwoofer
Audio
System
with
ARC/
HDMI
Device
< 14 mm
Home
Controller
HDMI Device
Digital still camera/
Camcorder/USB
storage media
Connection Diagram
For more information on connections, refer to the Help Guide by pressing HELP on the
remote control.
• When connecting the cable to the Cable/Antenna input, finger tighten only, over tightening the
connection can damage the TV.
US
11
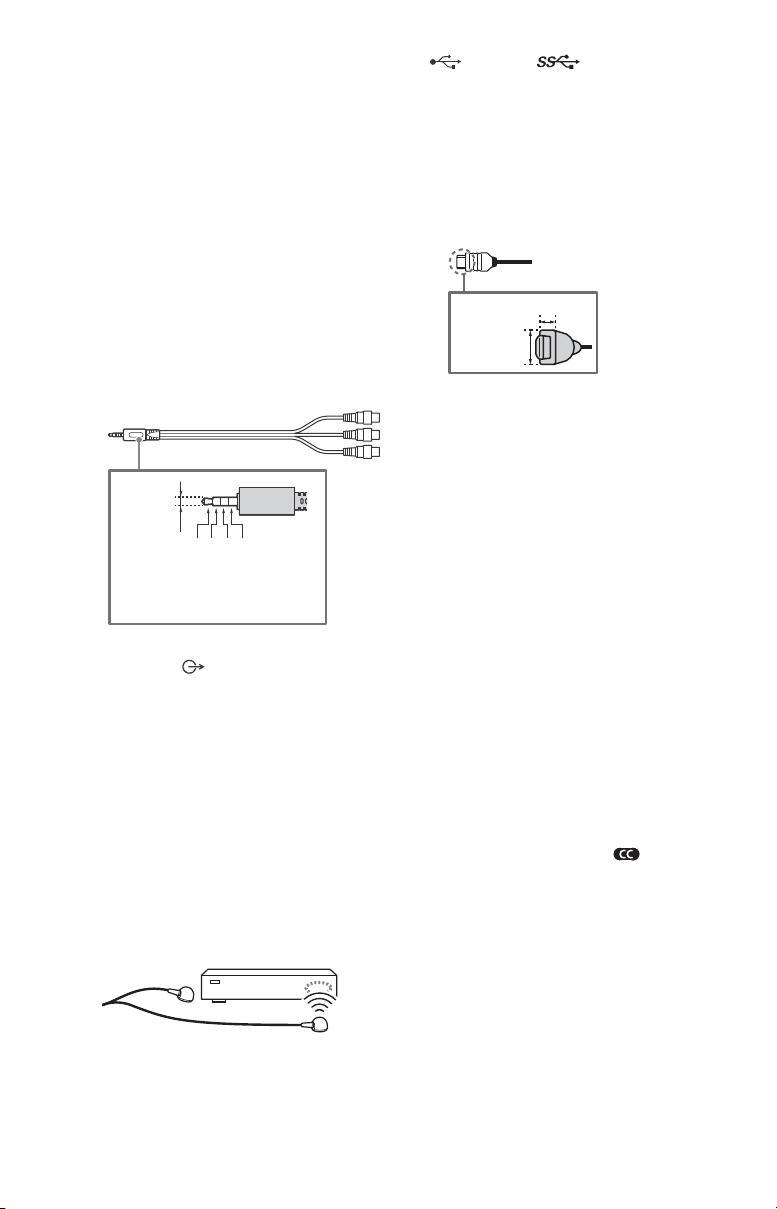
REMOTE RS-232C
Note
Note
3.5 mm
1234
1: L
2: Video
3: Ground
4: R
< 12 mm
< 21 mm
REMOTE IR IN
• These jacks are for receiving the
external control signal. Enables
extended control of the TV using RS232C via the RS-232C and IR IN jacks.
RS-232C: connect to the RS-232C
terminal of
the home controller.
IR IN: connect to the IR out terminal
of the home co
ntroller.
• Take care to not connect to
headphones or an ex
ternal audio
system.
/ VIDEO IN
• For a composite connection, use an
Analog Extension Cable (not
supplied).
•
AUDIO OUT /
• Supports 3-pole stereo mini jack only.
• To listen to the TV's sound through
the connected equipment, press
HOME. Select [Settings] [Sound]
[Headphone/Audio out] and then
select the desired item.
IR BLASTER*
• Use your Sony remote control to
control your Set Top Box (cable/
satellite box). Connect the IR Blaster
Cable (supplied) to the IR Blaster port
on your TV. Place one or both of the
other two ends as shown below.
USB 1/2, USB 3
• Connecting a large USB device may
interfere with other connected
devices beside it.
• When connecting a large USB device,
connect to the USB 1 port.
HDMI IN 1/2/3/4
• HDMI interface can transfer the digital
video and audio on a single cable.
•
• HDMI IN 2/3
To enjoy high quality 4K 50p/60p
contents, connect a Premium High
Speed HDMI cable to the HDMI IN 2/3
and set the [HDMI signal format] to
[Enhanced format].
For details of supported formats, refer
to the “Specifications“ in this manual
(page 19-20).
• HDMI IN 3 ARC (Audio Return
Channel)
Connect your audio system to the
HDMI IN 3 to route TV audio to your
audio system. An audio system that
supports HDMI ARC can send video to
the TV, and receive audio from the TV
via the same HDMI cable. If your
audio system does not support HDMI
ARC, an additional connection with
DIGITAL AUDIO OUT (OPTICAL) is
necessary.
* Only on limited region/country/TV model.
• You cannot attach the side cover while the
cables are connected to side terminal.
• Be sure to store the side cover in a safe place for
fu
use.
ture
• To perform IR Blaster setup, press
HOME and select [Settings]
[External inputs] [IR Blaster setup].
12
US
US
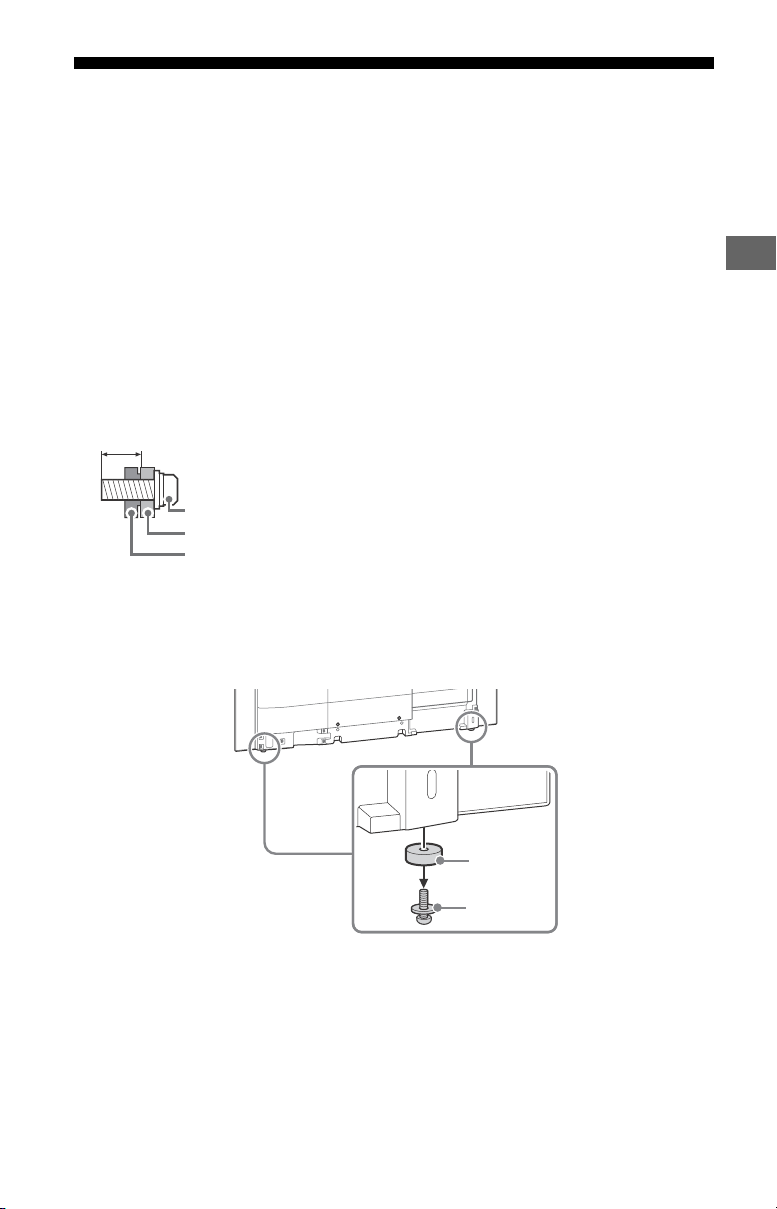
Installing the TV to the Wall
Note
Note
Wall-Mount Bracket
Screw (M6)
10 mm - 14 mm
TV’s rear cover
Foot part
Screw
This TV’s instruction manual only provides the steps to prepare the TV for Wall-Mount
installation before it is installed on the wall.
Your TV can be mounted on a wall using a Wall-Mount Bracket (not supplied) out of the box
as packaged. If the TableTable-Top Stand; see page 15 (Detaching the Table-Top Stand from the TV).
Prepare the TV for the Wall-Mount Bracket before making cable connections.
For product protection and safety reasons, Sony strongly recommends that installation of
your TV on the wall be performed by qualified professionals. Do not attempt to install it
yourself.
• Follow the instruction guide provided with the Wall-Mount Bracket for your model.
Sufficient expertise is required in installing this TV, especially to determine the
strength of the wall for withstanding the TV’s weight.
• The length of the screw for Wall-Mount Bracket differs depending on the Wall-Mount
ack
et thickness. Please refer to below illustration.
Br
Top Stand is attached to the TV, the TV may require detaching the
• Be sure to store the unused screws and Table-Top Stand in a safe place until you are
r
y to attach the Table-Top Stand. Keep the screws away from small children.
ead
• Read the supplied Safety Booklet for additional safety information.
• You can remove the foot parts and screws after the TV is completely installed to the wall.
• Be sure to store the removed foot parts and screws in a safe plac
• Be sure to attach the foot parts and screws at original position when using the Table-Top Stand. If using an
ele
ctric screwdriver, set the torque at approximately 0.4 N·m {4 kgf·cm}.
e, keeping them away from children.
13
US

Installing the TV to the Wall from Table-Top Stand
Note
Note
ʕ
ʖ
ʔ
ʓ
Wall-Mount Bracket
(not supplied)
Screw (not supplied)
1 Remove the stand cover and terminal covers.
2 Remove the screws from the rear of the TV.
3 Attach the Wall-Mount Bracket (not supplied) using the screws (not supplied).
• If using an electric screwdriver, set the torque at approximately 1.5 N·m {15 kgf·cm}.
• You cannot use some of the cable holders on the rear of the TV when using a Wall-Mount Bracket (not
supplied).
14
US

US
4 Detach the stand base.
Note
Note
Detaching the Table-Top Stand from the TV
To detach the Table-Top Stand from the TV, remove the screws .
• Do not remove the Table-Top Stand for any reason other than to install corresponding accessories on the
TV.
• Be sure the TV is vertical before turning on. To avoid uneven picture uniformity do not power on the TV
with the panel facing down.
• When attaching the Table-Top Stand again, be sure t
original holes on the rear of the TV.
sten the screws (previously removed) to the
o fa
15
US

Installing the TV against a wall or enclosed area
Note
Note
11 7/8 inches
(30 cm)
4 inches
(10 cm)
4 inches
(10 cm)
2 3/8 inches
(6 cm)
Leave at least this much space around the set.
4 inches
(10 cm)
4 inches
(10 cm)
Leave at least this much space around the set.
4 inches (10 cm)
11 7/8 inches
(30 cm)
Never install the TV set as follows:
Air circulation is blocked.
Do not block the air circulation area.
Air circulation
Wall
Wall
Ventilation
• Never cover the ventilation holes or insert anything in the cabinet.
• Leave space around the TV s
Installed with stand
Installed on the wall
et as shown below.
• Inadequate ventilation can lead to overheating of the TV and may cause damage to your TV or cause a
fire.
US
16

US
Updating...
Troubleshooting
General troubleshooting for issues like:
black screen, no sound, frozen picture, TV
does not respond, or network is lost, do the
following steps.
1 Restart your TV by pressing the power
button on the remote control until a
message appears. The TV will restart. If
the TV does not recover, try unplugging
the TV from the AC power cord for three
minutes and then plug it in again.
2 Refer to the Help menu by pressing HELP
on the remote control.
3 Connect your TV to the Internet and
perform a software update.
4 Visit Sony support website (information
provided on the front cover).
5 Perform the factory data reset. Refer to
“How to reset the TV to factory settings”
(page 17).
When [A new TV system software update
is available…] message is displayed.
Sony strongly recommends you to update
the TV software by selecting [Update Now].
These software updates improve your TV
performance or add new features.
The following screen with [Updating…] will
appear and the illumination LED flashes
white while software is updating.
Do not unplug the AC power cord during
the software update. If you do, the software
update may not finish completely, and it
may cause a software malfunction.
Software updates can take up to 15
minutes.
When you plug in the TV, the TV may not
be able to turn on for a while even if you
press the power button on the remote
control or the TV.
It takes time to initialize the system. Wait
for about one minute, then operate it
again.
How to reset the TV to factory settings
WARNING: The reset will clear all of your
customized settings including the parental
lock setting.
Turn on the TV. You can reset the TV to
factory settings by pressing HOME, then
select [Settings] [Storage & reset]
[Factory data reset].
To force factory data reset, unplug the AC
power cord. Press and hold both and –
buttons on the TV, then plug in the AC power
cord. Release both buttons when the
illumination LED blinks in green.
For security purposes, be sure to remove all
personal and account information before
discarding, selling or passing your TV to
someone else by: unlinking/unregistering,
signing out of and deactivating all network
services as well as factory reset the TV.
Troubles and Solutions
When the illumination LED is flashing in
red.
Count how many times it flashes (interval
time is three seconds).
Reboot the TV by disconnecting the AC
power co
rd from the TV for three minutes,
then turn on the TV.
If the problem persists, disc
power cord, and contact Sony Customer
Support (information provided on the front
cover) with the number of times the
illumination LED flashes.
There is no picture (screen is dark) and no
sound.
Check the cable/antenna connection.
Connect the TV to the AC power, and press
the power button on the TV or the remote
control.
Some programs cannot be tuned.
Check the cable/antenna connection.
The remote control does not function.
Replace the batteries.
The STB MENU button on the remote
control does not work.
Check the connection and set up of the IR
Blaster (page 12).
The parental lock password has been
forgotten.
Enter 4357 for the password and select
[Change PIN].
onnect the AC
US
17

The restricted profile password has been
Note
Note
forgotten.
Perform the force factory data reset. Refer to
“How to reset the TV to factory settings”
(page 17).
The TV and its surroundings become
warm.
When the TV is used for an extended period
of time, the TV and its surroundings may
become warm to the touch. This is not a
malfunction of the TV.
The screen becomes darker while
watching TV.
If the whole image or part of the image
remains still, the screen brightness will be
gradually reduced to prevent image
retention. This is not a malfunction of the TV.
You are concerned about image
retention.
If the same image is displayed repeatedly
or for long periods of time, image retention
may occur. To reduce image retention, we
recommend that you turn off the TV
normally by pressing the power button on
the remote control or the TV.
• Perform Panel refresh manually only when
image retention is particularly noticeable. As a
reference, perform it only once a year. Avoid
performing it more than once a year because it
may affect the usable life of the panel.
• Images that include clocks, logos and bright
colors (including white) easily cause image
retention. Avoid displaying these types of
images for long periods of time, otherwise
image retention may occur.
A white line appears on the screen.
Panel refresh automatically runs after the TV
has been used for long periods of time to
reduce image retention. Panel refresh starts
after the TV is turned off and takes about
one hour to complete. A white line may be
displayed on the screen during the Panel
refresh. This is not a malfunction of the TV.
The message [Panel refresh did not
finish…] is displayed.
Panel refresh automatically runs after the
TV has bee
n used for long periods of time
to reduce image retention. If the TV is
turned on, the AC power cord is unplugged,
or the room temperature falls outside of the
range between 50 ºF and 104 ºF (10 ºC and
40 ºC) during the Panel refresh, the process
will not be completed and this message will
appear.
If Panel refresh started automatically, it will
restart when you turn off the TV with the
remote control.
If Panel refresh initiated manually, you must
select it again.
18
US

US
Specifications
System
Television system
NTSC: American TV standard
ATSC (8VSB terrestrial): ATSC compliant 8VSB
QAM on cable: ANSI/SCTE 07 2000 (Does not
incl
ude CableCARD functionality)
Channel coverage
Analog terrestrial: 2 - 69 / Digital terrestrial:
2 - 69
Analog Cable: 1 - 135 / Digital Cable: 1 - 135
Panel system
OLED (Organic Light Emitting Diode) Panel
Speaker output
10 W + 10 W + 10 W + 10 W + 10 W
Wireless technology
Protocol IEEE802.11ac/a/b/g/n
Bluetooth Version 4.1
Input/Output jacks
CABLE/ANTENNA
75 ohm external terminal for RF inputs
VIDEO IN
Video / Audio input (mini jack)
HDMI IN 1/2/3/4 (Support 4K resolution,
HDCP 2.2-compatible)
Video:
4096 × 2160p (60 Hz)*
1
(24 Hz)*
, 3840 × 2160p (60 Hz)*2,
3840 × 2160p (24, 30 Hz), 1080p
(30, 60 Hz), 1080/24p, 1080i (60 Hz), 720p
(30, 6
0 Hz), 720/24p, 480p, 480i, PC
3
Formats*
*
*
*
Audio:
5.1 channel linear PCM: 32/44.1/48/88.2/
96/1
Digital, Dolby Digital Plus and DTS
1
When 4096 × 2160p is input and [Wide
mode] is set to [Normal], the resolution is
displayed as 3840 × 2160p. To display
4096 × 2160p, set [Wide mode] setting to
[Full 1] or [Full 2].
2
HDMI IN 2/3 only. To support 18 Gbps, set
[HDMI signal format] to [Enhanced
format].
3
Refer to the Help Guide for details.
76.4/192 kHz 16/20/24 bits, Dolby
ARC (Audio Return Channel) (HDMI IN 3
only)
(Two channel linear PCM: 48 kHz 16 bits,
Dolby Digital, Dolby Digital Plus, DTS)
1*2
, 4096 × 2160p
DIGITAL AUDIO OUT (OPTICAL)
Digital optical jack (Two channel linear PCM:
48 kHz 16 bits, Dolby Digital, DTS)
AUDIO OUT / (Stereo mini jack)
Headphone, Audio output, Subwoofer
1, 2, 3
USB port 1 and 2 support High Speed USB
(USB 2.0)
USB port 3 supports Super Speed USB
(USB 3.1 Gen 1)
LAN
10BASE-T/100BASE-TX connector
(Connection speed may differ depending on
the network environment. 10BASE-T/
100BASE-TX communication rate and
communication quality are not guaranteed
for this TV.)
Refer to the Help Guide for supported files
and f
ts in Home Network.
orma
REMOTE
RS-232C mini jack, IR IN mini jack
These jacks are for receiving the external
cont
rol signal.
IR BLASTER *
IR Blaster Cable input (mini jack)
1
Others
Operating temperature
32 ºF – 104 ºF (0 ºC – 40 ºC)
Power and others
Power requirement
110 V - 240 V AC, 50/60 Hz (U.S.A./Canada
120 V AC, 60 Hz)
Power consumption
in use
XBR-65A8F: 480 W
XBR-55A8F: 371 W
in standby*
Less than 0.5 W with 120 V AC and less than
0.5 W with 240 V AC
Screen size (measured diagonally) (Approx.)
XBR-65A8F: 64.5 inches (65” class)
XBR-55A8F: 54.6 inches (55” class)
Display resolution
3,840 dots (horizontal) × 2,160 lines (vertical)
Output Rating
USB 1/2
5 V , 500 mA MAX
USB 3
5 V , 900 mA MAX
2*3
US
19

Dimensions (Approx.)
Note
Note
with stand
XBR-65A8F: 1,447 × 841 × 255 mm /
1
57 × 33
/8 × 10 1/8 inches
XBR-55A8F: 1,226 × 717 × 255 mm /
3
48
/8 × 28 1/4 × 10 1/8 inches
without stand
XBR-65A8F: 1,447 × 836 × 55 mm /
57 × 33 × 2
XBR-55A8F: 1,226 × 712 × 55 mm /
48
wall-mount hole pattern
XBR-65A8F: 300 × 300 mm
XBR-55A8F: 300 × 200 mm
wall-mount screw size (mm)
M6 (length: refer to diagram on page 13.)
1
/4 inches
3
/8 × 28 1/8 × 2 1/4 inches
Mass (Approx.)
with stand
XBR-65A8F: 28 kg / 61.7 lb.
XBR-55A8F: 22.2 kg / 48.9 lb.
without stand
XBR-65A8F: 24.4 kg / 53.8 lb.
XBR-55A8F: 18.7 kg / 41.2 lb.
*1Only on limited region/country/TV model.
2
*
Specified standby power is reached after the
TV finishes necessary internal processes.
3
*
Standby power consumption will increase
when your TV is connected to the network.
• Optional accessories availability depends on
countries/region/TV model/stock.
• Design and specifications are subject to change
without notice.
Licensing Information
• The terms HDMI and HDMI High-
Definition Multimedia Interface, and
the HDMI Logo are trademarks or
registered trademarks of HDMI
Licensing Administrator, Inc. in the
United States and other countries.
• Manufactured under license from
ories.
Dolby Labor
Dolby, Dolby Audio, and the double-D
symbol
Laboratories.
•“BRAVIA”, and BRAVIA Sync
are trademarks or registered marks of
Sony C
• Gracenote, the Gracenote logo and
logotyp
logo are either registered trademarks
or trademarks of Gracenote, Inc. in the
United States and/or other countries.
at
are trademarks of Dolby
orpor
ation.
e, “Powered by Gracenote”
• Vewd® Core. Copyright 1995-2017
ewd S
oftware AS. All rights reserved.
V
• Google, Android TV, Google Play,
ome
cast built-in, YouTube and
Chr
other related marks and logos are
trademarks of Google LLC.
• Wi-Fi®, Wi-Fi Alliance®, Wi-Fi Direct®
and Mirac
ast® are registered
trademarks of Wi-Fi Alliance.
• Wi-Fi Protected Setup™ is a trademark
Wi
-Fi Alliance.
of
• The Wi-Fi CERTIFIED™ Logo is a
ert
ification mark of Wi-Fi Alliance.
c
• For DTS patents, see
ac
http://patents.dts.com. Manuf
tured
under license from DTS, Inc.
DTS, the Symbol, & DTS and the
bol together are registered
Sym
trademarks, and DTS Digital Surround
is a trademark of DTS, Inc. © DTS, Inc.
All Rights Reserved.
• The Bluetooth® word mark and logos
re
registered trademarks owned by
a
the Bluetooth SIG, Inc. and any use of
such marks by Sony Corporation is
under license. Other trademarks and
trade names are those of their
respective owners.
• Netflix is a registered trademark of
tf
lix, Inc.
Ne
• TUXERA is a registered trademark of
era Inc. in the US and other
Tux
countries.
• USB-IF SuperSpeed USB Trident logo is
re
gistered trademark of USB
a
Implementers Forum, Inc.
• All other trademarks are the property
f
their respective owners.
o
20
US

US
US
21

Table des matières
Remarque
Remarque
AVIS IMPORTANT. . . . . . . . . . . . . . . . . . . 2
Consignes de sécurité . . . . . . . . . . . . . . 3
Précautions . . . . . . . . . . . . . . . . . . . . . . . 5
Protection de l’écran du téléviseur
(Téléviseur DELO) . . . . . . . . . . . . . . . . . . 7
Pièces et commandes . . . . . . . . . . . . .8
Commandes et indicateurs . . . . . . . . . . 8
Utilisation de la télécommande . . . . .9
Description des pièces de la
télécommande . . . . . . . . . . . . . . . . . . . . 9
Schéma de connexion . . . . . . . . . . . . 11
Fixer le téléviseur au mur . . . . . . . . .14
Démonter le support de table du
téléviseur. . . . . . . . . . . . . . . . . . . . . . . . 16
Installation du téléviseur contre un
mur ou dans un endroit fermé . . . . . 17
Dépannage. . . . . . . . . . . . . . . . . . . . .18
Problèmes et solutions . . . . . . . . . . . . 19
Spécifications . . . . . . . . . . . . . . . . . . 20
Introduction
Merci d’avoir choisi ce produit Sony.
Avant de faire fonctionner le téléviseur, lisez attentivement
nuel et conservez-le pour toute référence ultérieure.
ce ma
• Les images et illustrations utilisées dans le Manuel de
configuration et ce manuel sont fournies uniquement à
titre de référence et peuvent différer de l’aspect réel du
produit.
La taille d’image visualisable de la classe 65” est de 64,5
ces (163,9 cm) et la taille d’image visualisable de la
pou
classe 55” est de 54,6 pouces (138,8 cm) (mesurée en
diagonale).
Fixation du support de table du
téléviseur
Reportez-vous au Manuel de configuration que vous
trouverez sur le rembourrage.
Aide
Trouver davantage de dépannages et d’autres
informations utiles directement depuis votre téléviseur.
Appuyer sur HELP sur la télécommande pour afficher
une liste de sujets ou pour faire une recherche par
mot-clé.
Manuel d’aide (Manuel)
Pour plus de détails, sélectionner [Manuel d'aide] dans
le menu Aide de votre téléviseur. Vous pouvez
également consulter le Manuel d’aide depuis votre
ordinateur ou votre smartphone (coordonnées
indiquées sur le dos de couverture de ce document).
Emplacement de l’étiquette
d’identification
Les étiquettes indiquant le numéro de modèle et les
caractéristiques nominales de l’alimentation du téléviseur
se trouvent à l’arrière du téléviseur. Vous pouvez les trouver
en retirant le couvercle de support.
AVIS IMPORTANT
Fiche d’identification
Les numéros de modèle et de série sont indiqués à
l’arrière et/ou sur le côté du téléviseur. Inscrivez ces
numéros dans les espaces ci-dessous. Faites-y référence
chaque fois que vous appelez votre détaillant Sony au
sujet de ce téléviseur.
N° de modèle
N° de série
FR
2

FR
Remarque
Remarque
ATT EN TIO N
Pour prévenir les chocs électriques et l’exposition des
broches, n’utilisez pas cette fiche CA avec une rallonge, une
prise de courant ou une autre sortie de courant, sauf si les
broches peuvent être insérées jusqu’au fond.
• Faites uniquement fonctionner le téléviseur sur un
our
ant de 110 V - 240 V CA (États-Unis/Canada 120 V CA)
c
Ce téléviseur comporte un démodulateur QAM qui devrait
vous permettre de recevoir une programmation numérique
décodée de câblodistribution par le biais d’un service
d’abonnement auprès d’un câblodistributeur. La
disponibilité d’une programmation télévisée numérique
par câblodistribution dans votre région dépend du type de
programmation et de signal fournis par votre
câblodistributeur.
Consignes de sécurité
Déclaration de conformité
Appellation commerciale : SONY
Modèle : XBR-65A8F/XBR-55A8F
Partie responsable : Sony Electronics Inc.
Adresse : 16535 Via Esprillo,
San Diego, CA 92127 U.S.A.
Numéro de téléphone : 858-942-2230
Cet appareil est conforme à la section 15 des réglements
la FCC.
L’utilisation de ce dispositif est autorisée
de
seulement aux conditions suivantes :
(1) Cet appareil ne doit pas pr
gênantes; et
(2) cet appareil doit pouvoir accepter les interférences
y compris les interférences risquant de
reçues,
déclencher des opérations non désirées.
ovoquer des inter
férences
Information relative aux réglements de la
FCC
Cet appareil a été soumis à l’essai et s’est avéré conforme
aux limites pour un appareil numérique de classe B,
conformément à la section 15 des réglements de la FCC. Ces
normes sont conçues pour assurer une protection
raisonnable contre les interférences nuisibles dans un
environnement résidentiel. Cet appareil génère, utilise et
peut émettre de l’énergie radioélectrique et, s’il n’est pas
installé ou utilisé selon les directives, peut causer des
interférences nuisibles aux communications radio.
Cependant, il n’existe aucune garantie que des
interférences ne se produiront pas dans une installation
particulière. Si ce matériel est source d’interférences
nuisibles pour la réception radio ou télévisée, ce qui peut
être déterminé en mettant l’appareil hors tension, puis sous
tension, il est recommandé de tenter d’éliminer ces
interférences en appliquant l’une ou plusieurs des mesures
suivantes :
• Réorienter ou déplacer l’antenne réceptrice.
• Éloigner l’appareil du récepteur.
• Brancher l’appareil dans une prise d’un circuit différent de
elui
qui alimente le récepteur.
c
• Consulter le détaillant ou un technicien ra
qualifié pour obtenir de l’aide.
Conformément aux réglements de la FCC, vous êtes
ti que tous les changements ou modifications non
aver
expressément approuvés dans ce manuel pourraient
annuler tous vos droits relatifs à l’utilisation de ce
produit.
dio ou télévision
Sécurité et réglementation
Le présent appareil est conforme aux CNR d’Industrie
Canada applicables aux appareils radio exempts de licence.
L’exploitation est autorisée aux deux conditions suivantes :
(1) l’appareil ne doit pas produire de brouillage; et
(2) l’utilisateur de l’appareil doit accepter tout brouillage
ad
ioélectrique subi, même si le brouillage est susceptible
r
d’en compromettre le fonctionnement.
Pour empêcher que cet appareil cause du brouillage au
e faisant l’objet d’une licence, il doit être utilisé à
servic
l’intérieur et devrait être placé loin des fenêtres afin de
fournir un écran de blindage maximal. Si le matériel (ou son
antenne d’émission) est installé à l’extérieur, il doit faire
l’objet d’une licence.
Les bandes 5 GHz sont uniquement limitées aux utilisations
térieure
s.
in
Cet équipement est conforme aux limites d’exposition aux
rayonnem
ents énoncées pour un environnement non
contrôlé et respecte les règles les radioélectriques (RF) de la
FCC lignes directrices d’exposition et d’exposition aux
fréquences radioélectriques (RF) CNR-102 de l’IC. Cet
équipement doit être installé et utilisé en gardant une
distance de 20 cm ou plus entre le radiateur et le corps
ain (à l'exception des extrémités : mains, poignets,
um
h
t chevilles).
pieds e
Cet appareil et sa ou ses antennes ne doivent pas être
placés à pr
oximité d’autres antennes ou émetteurs ni
fonctionner avec eux, sauf autorisation spéciale.
Les radars de haute puissance sont désignés utilisateurs
principaux (c.-à-d.
5 250-5 350 MHz et 5 650-5 850 MHz, et ces radars
pourraient
dispositifs LAN-EL.
, qu’ils ont la priorité) pour les bandes
causer du brouillage et/ou des dommages aux
AVERTISSEMENT
Danger de stabilité
Le téléviseur pourrait tomber, entraînant de graves
blessures voire un décès.
Ne jamais poser le téléviseur à un endroit instable. Le
pourrait tomber, entraînant de graves blessures
téléviseur
voir un déc ès. De nombre uses b lessu res, en part iculie r chez
les enfants, peuvent être évitées en prenant de simples
précautions, par exemple :
• Utiliser des meubles ou supports recommandés par le
abric
ant du téléviseur.
f
• N’utiliser que des meubles capables de soutenir en toute
urité le téléviseur.
séc
• S’assurer que le téléviseur ne surplombe pas le bord du
meuble suppor
• Ne pas placer le téléviseur sur un meuble haut (tel qu’un
placar
téléviseur à un support adapté.
• Ne pas poser le téléviseur sur du tissu ou autre matière
cé
pla
support.
• Informer les enfants des dangers liés à l’escalade des
meubles en
commandes du téléviseur.
Si vous conservez et deplacez votre téléviseur actuel, les
êmes pr
m
t.
d ou une bibliothèque) sans fixer le meuble et le
e par exemple entre le téléviseur et le meuble
vue d’
atteindre le téléviseur ou les
écautions doivent être prises.
FR
3

Avant d’installer votre téléviseur
Attache angulaire
(non fournie)
Base
Avec certains modèles de téléviseur, le support de table
n’est pas fixé afin de vous permettre de monter
directement le téléviseur au mur. Reportez-vous à la
page 14 (Fixer le téléviseur au mur) si vous souhaitez
installer ce téléviseur au mur. Si vous ne comptez pas
éléviseu
installer le t
de table. Vous aurez besoin d’un tournevis Phillips (non
fourni) et des vis fournies pour compléter cette tâche;
reportez-vous au Manuel de configuration.
Tenez compte de ce qui suit pendant l’installation du
lévis
eur :
té
• Débranchez tous les câbles avant de transporter le
télévis
• Transportez le téléviseur avec le nombre de personnes
approprié; un
transporté par au moins deux personnes.
• Lors du transport du téléviseur, le bon emplacement des
ain
s est très important pour votre sécurité, ainsi que
m
pour éviter de causer des dommages.
• Lors de la manipulation ou
du mon
ne couchez pas le
téléviseur.
• Assurez-vous que le téléviseur est entouré d’une
ilat
vent
• Pour obtenir une qualité d’image optimale, n’exposez pas
n à la lumière directe d’une lampe ou du soleil.
l’écra
• Évitez d’installer le téléviseur dans une pièce dont le sol et
les murs sont
• Évitez de déplacer le téléviseur d’un endroit froid à un
endroit ch
peut provoquer de la condensation. Ce phénomène peut
affecter la qualité de l’image et/ou des couleurs affichées
par le téléviseur. Si cela se produit, laissez la condensation
s’évaporer complètement avant de mettre le téléviseur
sous tension.
r au mur, vous devez installer le support
eur.
téléviseur de grande taille doit être
tage du téléviseur,
ion adéquate; reportez-vous à la page 17.
d’un matériau réfléchissant.
aud. Un changement soudain de température
Fixer le téléviseur
Sony recommande fortement de prendre
les mesures nécessaires pour prévenir le
basculement du t
Des téléviseurs qui ne sont pas fixés
solidement peuven
des dommages matériels, des blessures
corporelles graves ou même mortelles.
éléviseur.
t basculer et entraîner
• Installez le téléviseur de manière à ce que la partie
infér
ieure du téléviseur ne dépasse pas du support de
téléviseur (non fourni). Si la partie inférieure du téléviseur
dépasse du support de téléviseur, le téléviseur pourrait
basculer, tomber et causer des blessures ou des
dommages au téléviseur.
• Acheminer les cordons d’alimentation CA et les cordons
cteurs afin qu’ils ne soient pas accessibles aux
onne
c
enfants curieux.
Mesures recommandées pour fixer
solidement le téléviseur
Tenez compte des mesures suivantes lorsque vous fixez
votre téléviseur à une base (non fournie).
1 Fixer solidement la base du téléviseur.
S’assurer que la base peut supporter adéquatement le
poids du téléviseur. Utiliser deux attaches angulaires
(non fournies) pour fixer solidement la base. Avec chaque
attache angulaire, utiliser la quincaillerie appropriée
pour :
• Fixer un côté de l’attache angulaire au poteau mural.
• Fixer l’autre côté à la base.
2 Fixer solidement le téléviseur à la base.
Utiliser la quincaillerie optionnelle mentionnée (non
fournie) :
• Vis à métal M4 (vissée dans la base du support de
téléviseu r).
• Une vis ou l’équivalent (la fixer à la base).
Prévenir le basculement du téléviseur
• Fixer solidement le téléviseur à un mur et/ou à un
support.
• Ne pas laisser les enfants jouer ou monter sur les meubles
s téléviseurs.
et le
• Éviter de placer ou d’accrocher des objets sur le téléviseur.
• Ne jamais installer le téléviseur sur :
rfaces glissantes, instables et/ou inégales.
des su
un meuble qui peut facilement servir d’escalier, comme
une c
ommode à tiroirs.
• Installer le téléviseur où il ne peut pas ê
renversé.
FR
4
tre tiré, poussé ou

FR
• Une corde ou une chaîne (assez solide pour supporter
Remarque
Remarque
Corde ou chaîne
(non fournie)
Vis
(non fournie)
Vis à métal M4
(non fournie)
Trou de vis sur la base du support
6 mm - 7 mm
Vis (M4)
Corde ou chaîne
Base du support de téléviseur
Boulons à œil M6 (non fourni)
Trous de montage au mur
Corde ou
chaîne
(non
fournie)
Dispositif
d’ancrage au
mur
(non fourni)
10 mm - 14 mm
Couvercle arrière du téléviseur
Boulon à œil M6
1,5 mm max.
(Schéma de référence pour une prise de type F)
7 mm max.
le poids du téléviseur). Vous assurer qu’il n’y a pas de
mou excessif dans la corde ou la chaîne.
La longueur des vis à métal M4 diffère selon le diamètre
de la corde ou de la chaîne. Reportez-vous à l’illustration
ci-dessous.
3 Fixer le téléviseur au mur avec des boulons, un dispositif
d’ancrage au mur et une chaîne (ou une corde).
Veuillez consulter l’illustration ci-dessous pour connaître
la longueur du boulon
• À la livraison de votre téléviseur, selon le modèle, les vis
sont fixées à l’arrière du téléviseur. (Elles sont fixées dans
les orifices servant au montage mural.) Veillez à retirer les
2 vis du haut avant de fixer le téléviseur à un mur.
• Fixer solidement le téléviseur à la base sans fixer le
téléviseur et la base au mur fournit une protection
minimale contre le basculement du téléviseur. Pour une
protection additionnelle, suivre toutes les trois mesures
recommandées ci-dessus.
à œil M6.
Précautions
Entretien de votre téléviseur BRAVIA
La sécurité étant de première importance, veuillez lire la
documentation de sécurité (Feuillet de consignes de
sécurité) fournie séparément et vous y conformer.
Débranchez le téléviseur et les
reils raccordés de la prise
appa
de courant avant de nettoyer
le téléviseur.
• Essuyez l’écran délicatement
l’aide d’u
n chiffon doux.
à
• Les taches tenaces peuvent
e enlevées à l’aide d’un
êtr
chiffon légèrement imbibé
d’une solution de savon
doux et d’eau tiède.
• Si vous utilisez un chiffon
ét
raité avec un produit chimique, suivez bien les
pr
directives indiquées sur l’emballage.
• Ne vaporisez jamais d’eau ou de détergent directement
r le té
léviseur. Le liquide pourrait couler au bas de
su
l’écran ou sur les parties extérieures, voire pénétrer dans
le téléviseur et l’endommager.
• N’utilisez jamais de solvants corrosifs tels qu’un diluant,
l’a
lcool ou du benzène pour nettoyer l’appareil.
de
• Attendez que l’humidité laissée par le nettoyage se soit
ée avant de rebrancher le téléviseur dans la prise
évapor
de courant.
• Ne touchez pas au téléviseur si votre main est couverte
une su
bstance chimique quelconque, telle que de la
d’
crème pour les mains ou un écran solaire.
Le téléviseur doit aussi être placé sur une surface stable
fin de
prévenir son basculement (consultez la page 4). Si
a
vous avez des enfants ou des animaux domestiques,
ifiez régulièrement que le téléviseur est fixé solidement
vér
pour une utilisation en toute sécurité.
Recommandation pour une prise de
type F
La partie saillante de la tige centrale du connecteur doit
être de moins de 1,5 mm.
FR
5

Remarque
Remarque
Fonctionnalités de l’expérience télévision BRAVIAMD en 4K
Nous vous remercions d’avoir choisi Sony! Votre nouveau téléviseur BRAVIAMD est la clé d’une « expérience télévision
en 4K ». Le présent document vous aidera à préparer votre nouveau té
pour compléter l’enregistrement de votre téléviseur à l’adresse suivante :
Canada : http://www.sony.ca/fr/registration
États-Unis : http://productregistration.sony.com
léviseur pour l’utilisation. Prenez quelques instants
Les quatre éléments d’une expérience télévision en 4K
L’installation, la source, le son et la configuration.
Installation
1
Maintenant que vous avez choisi la meilleure technologie qui soit en ma
accessoires de l’emballage avant d’installer votre téléviseur.
Source
2
Pour faire l’expérience du niveau de détail incroyable qu’offre votre téléviseur BRAV
service de télévision haute définition.
• Obtenez un signal ou une source en haute définition (4K) en co
• Donnez vie à la résolution époustouflante de votre téléviseur Sony
(La disponibilité dépend des régions)
• Recevez des émissions en HD diffusées sur les ondes par l’intermédiaire d’une antenne de qualité HD branchée
ent à l’arrière du téléviseur.
directem
Visitez le site http://www
• Découvrez tout un monde de divertissement maintenant off
Son
3
Complétez l’expérience haute définition avec une chaîne de ciné
récepteur audio-vidéo de Sony.
Configuration
4
Installez votre téléviseur et raccordez vos sources de signal. Reporte
de connexion. Pour vous aider à obtenir la meilleure qualité d’image possible lors de votre expérience HD, utilisez des
câbles Premium High Speed HDMI (High-Definition Multimedia Interface) de Sony.
Blu-ray Disc
MC
et autres appareils HD de Sony.
.antennaweb.org pour plus de renseignements sur le choix et l’installation d’une antenne.
tière de téléviseurs DELO, veillez à retirer tous les
IA, vous devez vous abonner à un
mmuniquant avec votre fournisseur de services HD.
Ultra HD 4K avec le Lecteur Blu-ray Sony Ultra HD 4K.
ert en super-haute définition sur les lecteurs
ma maison ambiophonique BRAVIA SyncMC ou un
z-vous à la page 11 pour des exemples de schémas
Pour en savoir plus sur le téléviseur 4K, visitez :
Canada : http://www.sony.ca/fr/hdtv
États-Unis : http://www.sony.com/HDTV
Ce téléviseur affiche tous les types de format d’image en ré
solution de 3 840 points × 2 160 lignes.
• Pour plus de détails sur les formats pris en charge, reportez-vous à la section « Spécifications » de ce manuel.
• Pour connaître les formats de signal pris en charge en provenance d’un ordinateur, reportez-vous au Manuel d’aide.
FR
6

FR
Protection de l’écran du téléviseur (Téléviseur DELO)
Précautions pour protéger l’écran contre
les dommages
Persistance d’image
Les téléviseurs DELO sont susceptibles de présenter de la
persistance d’image (rémanente) en raison des
caractéristiques des matériaux utilisés. La persistance
d’image peut se produire si des images sont affichées au
même endroit sur l’écran à plusieurs reprises ou pendant
des durées prolongées. Il ne s’agit pas d’un problème de
fonctionnement du téléviseur. Évitez d’afficher des images
qui pourraient causer de la persistance d’image.
Voici des exemples d’images qui pourraient
causer de la persistance d’image :
• Contenus avec des barres noires dans le haut et le bas et/
ou sur les côtés gauche et droit de l’écran. (par exemple,
format Boîte aux lettres, écran 4:3, définition standard)
• Images immobiles telles que des photos.
• Jeux vidéo pouvant afficher des contenus immobiles dans
e partie de l’
un
• Menus à l’écran, guides de programmes, logos de canal,
etc.
Contenus immobiles des applications.
•
• Messages défilants à l’écran, comme ceux utilisés pour les
nou
Pour réduire le risque de persistance
d’image :
• Sony recommande que vous éteigniez le téléviseur
normalement en appuyant sur la touche d’alimentation
de la télécommande ou du téléviseur.
• Remplissez l’écran en modifiant le [Mode cinéma] pour
éliminer les
autre que [Normal].
• Désactivez l’affichage à l’écran (OSD) en appuyant sur la
ouche DI
t
raccordés. Pour plus de détails, reportez-vous aux modes
d’emploi des appareils raccordés.
• Évitez d’afficher des images immobiles avec des couleurs
ves (y
vi
une partie quelconque de l’écran.
• Configurez les réglages d’image en fonction des
ondit
c
recommandée pour l’utilisation à la maison et le
visionnement de contenus affichant souvent des logos de
station, etc.
Le téléviseur propose les fonctions suivantes pour aider à
éduir
r
Actualisation panneau
Actualisation panneau fonctionnera automatiquement
pour régler l’uniformité de l’écran du téléviseur après son
utilisation pendant de longues durées. La fonction
Actualisation panneau peut également être exécutée
manuellement et doit uniquement être utilisée si la
persistance d’image est très visible ou si le message
suivant s’affiche : [L'actualisation du panneau ne s'est pas
terminée… ]
Attention :
• La fonction Actualisation panneau pourrait affecter le
panneau. Comme référence, exécutez la fonction
Actualisation panneau seulement une fois par année; ne
l’exécutez pas plus d’une fois par année, car elle pourrait
affecter la durée de vie du panneau.
• L’exécution de la fonction A
environ une heure.
• Une ligne blanche pourrait s’afficher à l’écran pendant
l’ex
s’agit pas d’un problème de fonctionnement du
téléviseu r.
• Actualisation panneau fonctionne uniquement lorsque la
emp
t
et 104 ºF).
écran.
velles e
t manchettes.
bar
res noires. Sélectionnez un [Mode cinéma]
SPLAY et désactivez les menus des appareils
compris le blanc), des horloges ou des logos sur
ions ambiantes. L’image standard est
e/éviter la persistance d’image.
ctu
alisation panneau prend
écution de la fonction Actualisation panneau; il ne
érature ambiante se situe entre 10 ºC et 40 ºC (50 ºF
Décalage pixel
Cette fonction déplace automatiquement l’image à l’écran
pour éviter la persistance d’image.
Autre fonction
La luminosité de l’écran est automatiquement réduite lors
de l’affichage d’images fixes, d’horloges, de couleurs vives
ou de logos, etc.
FR
7

Pièces et commandes
ȩ
Commandes et indicateurs
(Alimentation) / + / –
Lorsque le téléviseur est éteint,
Appuyez sur pour l’allumer.
Lorsque le téléviseur est allumé,
Appuyez longtemps sur pour mettre
le système hors tension.
Appuyez sur de façon répétitive pour
changer la fonction, puis appuyez sur la
touche + ou – pour :
• Régler le volume.
• Sélectionner le canal.
• Sélectionner la source d’entrée du
téléviseur.
Capteur de télécommande* /
Capteur de lumière* / DEL
d’éclairage
La DEL d’éclairage s’allume ou clignote
en fonction de l’état du téléviseur.
Pour plus d’informations, reportez-vous
au Manuel d’aide.
* Ne placez aucun objet près du capteur.
FR
8

FR
Utilisation de la télécommande
(Assistant Google) /
(Micro)
Utilisez le Assistant Google*
(uniquement pour certaines
régions/pays/langues/
modèles de téléviseurs limités)
ou la Recherche vocale. (p. ex.,
recherche de divers contenus à
l’aide de la voix.)
STB MENU
Affichez le menu du décodeur
connecté (câble/décodeur
satellite) après la connexion et
la configuration du IR Blaster
(page 12).
//// (D-Pad de
navigation)
Navigation et sélection dans le
menu à l’écran.
TV
Permet de passer à un canal ou
une entrée du téléviseur et
d’afficher la Barre de menu du
téléviseur.
* Le Assistant Google sera disponible à la mise à
jour du logiciel.
MIC
Description des pièces de la télécommande
La forme de la télécommande, l’emplacement, la disponibilité et la fonction des touches de
la télécommande peuvent varier selon votre région ou pays ou le modèle de téléviseur.
INPUT
Permet d’afficher et de sélectionner la
source d’entrée.
(Veille du téléviseur)
Permet d’allumer ou éteindre le
téléviseur (mode de veille).
SYNC MENU
Affiche le menu BRAVIA Sync.
Touches numériques
Utilisez cette touche avec les touches
0-9 pour sélectionner des canaux
numériques.
DISPLAY
Affiche des informations sur le canal/
l’émission/l’entrée que vous regardez.
FR
9

Google Play
Permet d’accéder au service « Google
Play » en ligne.
NETFLIX (Uniquement pour
certaines régions/pays/modèles de
téléviseurs limités)
Permet d’accéder au service « NETFLIX »
en ligne.
Touches de couleur
Permet d’exécuter la fonction
correspondante à ce moment.
ACTION MENU
Affiche une liste de fonctions
contextuelles.
GUIDE
Affiche le guide des programmes
numérique.
APPS
Permet d’accéder à divers services et
applications.
BACK
Permet de retourner à l’écran
précédent.
HOME
Affiche le menu d’accueil du téléviseur.
VOL +/– (Volume)
Régler le volume.
JUMP
Permet d’alterner entre deux canaux ou
entrées. Le téléviseur alterne entre le
canal ou l’entrée en cours et le dernier
canal ou entrée que vous avez
sélectionné.
MUTING
Permet de couper le son. Appuyez de
nouveau pour rétablir le son.
CH +/– (Canal)
Permet de sélectionner le canal.
AUDIO
Permet de changer la langue de
l’émission en cours de visionnement.
//////
Permet de faire fonctionner les
contenus média sur le téléviseur et
l’appareil compatible BRAVIA Sync
raccordé.
SUBTITLE/CC
Active ou désactive les sous-titres
(lorsque la fonction est disponible).
HELP
Affiche le menu d’Aide. Le Manuel
d’aide est accessible ici.
WIDE
Permet de modifier le format d’écran.
PIC OFF
Permet de désactiver l’image tout en
maintenant le son activé.
Directives pour la télécommande IR
• Pointez la télécommande en direction
du capteur infrarouge du téléviseur.
• Assurez-vous qu’aucun objet ne se
ve entre la télécommande et le
trou
capteur infrarouge.
• Les lampes fluorescentes peuvent
er le fonctionnement de votre
turb
per
télécommande; le cas échéant,
éteignez les lampes fluorescentes
dans la pièce.
• Si vous éprouvez des difficultés avec la
él
écommande, réinsérez ou
t
remplacez les piles et assurez-vous
qu’elles sont correctement placées
dans le logement.
10
FR

FR
Remarque
Remarque
Appareil
HDMI
Magnétoscope/Console
de jeux vidéo/Lecteur
DVD/Caméscope
Système
audio
avec
Entrée
audio
optique
Contrôleur domestique
Câble/
Antenne
Routeur
IR Blaster
Appareil
HDMI
Appareil
photo
numérique/
Caméscope/
Dispositif de
stockage USB
Écouteurs/Système
audio/Infragrave
Système
audio
avec
appareil
ARC/
HDMI
< 14 mm
Contrôleur
domestique
Appareil HDMI
Appareil photo
numérique/Caméscope/
Dispositif de stockage
USB
Schéma de connexion
Pour plus d’informations sur les raccordements, reportez-vous au Manuel d’aide en appuyant
sur la touche HELP de la télécommande.
• Lorsque vous branchez le câble au Câble / Antenne, serrez-le à la main uniquement, car le serrage
excessif de la connexion peut endommager le téléviseur.
FR
11

REMOTE RS-232C
3,5 mm
123
4
1 : G
2 : Vidéo
3 : Masse
4 : D
< 12 mm
< 21 mm
REMOTE IR IN
• Ces prises permettent de recevoir le
signal de commande externe. Elles
permettent le contrôle étendu du
téléviseur à l’aide d’une liaison
RS-232C via les prises RS-232C et IR
IN.
RS-232C : raccordez à la borne
RS-232C du contrôleur domestique.
IR IN : raccordez à la borne de sortie
IR du contr
ôleur domestique.
• Assurez-vous de ne pas effectuer le
raccordement à un casque d’écoute
ou un système audio externe.
/ VIDEO IN
• Pour un raccordement composite,
utilisez un câble de rallonge
analogique (non fourni).
•
AUDIO OUT /
• Prend en charge la mini prise stéréo à
3 broches uniquement.
• Pour écouter le son du téléviseur à
l’aide de l’appareil raccordé, appuyez
sur HOME. Sélectionnez [Paramètres]
[Son] [Écouteurs/sortie audio],
puis sélectionnez l’élément souhaité.
IR BLASTER*
• Utilisez votre télécommande Sony
pour contrôler votre décodeur (câble/
décodeur satellite). Raccordez le
câble IR Blaster (fourni) au port IR
Blaster de votre téléviseur. Placez une
ou les deux autres extrémités comme
indiqué ci-dessous.
• Pour effectuer la configuration IR
Blaster, appuyez sur HOME et
sélectionnez [Paramètres] [Entrées
externes] [Configurer IR Blaster].
USB 1/2, USB 3
• Le raccordement d’un appareil USB
de grande capacité pourrait interférer
avec les autres appareils raccordés à
proximité.
• Lors du raccordement d’un appareil
USB de grande capacité, effectuez le
raccordement au port USB 1.
HDMI IN 1/2/3/4
• L’interface HDMI peut transférer la
vidéo et l’audio numérique sur un
câble unique.
•
• HDMI IN 2/3
Pour apprécier des contenus 4K 50p/
60p de haute qualité, connectez un
câble HDMI haute vitesse de qualité
supérieure à la prise HDMI IN 2/3 et
réglez le [Format du signal HDMI] à
[Format amélioré].
Pour plus de détails sur les formats
pris en charge, reportez-vous à la
section « Spécifications » de ce
manuel (page 20-21).
• HDMI IN 3 ARC (Audio Return
Channel)
Raccordez votre système audio au
HDMI IN 3 pour acheminer l’audio TV
vers votre système audio. Un système
audio qui prend en charge le HDMI
ARC peut envoyer la vidéo au
téléviseur, et recevoir l’audio depuis
le téléviseur via le même câble HDMI.
Si votre système audio ne prend pas
en charge le HDMI ARC, un
raccordement supplémentaire avec
DIGITAL AUDIO OUT (OPTICAL) est
nécessaire.
* Uniquement pour certaines régions/pays/
modèles de téléviseurs limités.
FR
12

FR
Remarque
Remarque
• Vous ne pouvez pas fixer le couvercle latéral
pendant que les câbles sont raccordés à la
borne latérale.
• Assurez-vous de ranger le couvercle latéral dans
un endr
oit sûr pour une ut
ilisation ultérieure.
FR
13

Fixer le téléviseur au mur
Remarque
Remarque
Support de fixation murale
Vis (M6)
10 mm - 14 mm
Couvercle arrière du téléviseur
Pièce de
pied
Vis
Le mode d’emploi de ce téléviseur montre uniquement les étapes permettant de préparer le
téléviseur pour une fixation murale avant son installation au mur.
Votre téléviseur peut être installé
sa sortie de l’emballage. Il se peut que le support de table soit fixé au téléviseur, dans ce cas,
vous devez d’abord démonter le support de table du téléviseur ; reportez-vous à la page 16
(Démonter le support de table du téléviseur).
Préparez le téléviseur pour l’installation du support de fixation murale avant d’effectuer le
raccordement des câbles.
au mur avec un support de fixation murale (non fourni) dès
Pour des raisons de sécurité et de protection du produit, Sony
recommande fortement
que l’installation de votre téléviseur sur le mur soit effectuée par un professionnel
qualifié. N’essayez pas de l’installer vous-même.
• Suivez le guide d’instructions fourni avec le support de fixation murale pour votre
modèle. Une certaine expertise est nécessaire pour l’installation de ce téléviseur, en
particulier en ce qui concerne la solidité du mur en relation avec le poids de l’appareil.
• La longueur des vis pour le support de fixation murale diffère selon l’épaisseur du
t de fixation mur
suppor
ale. Reportez-vous à l’illustration ci-dessous.
• Assurez-vous de ranger les vis non utilisées et le support de table dans un endroit sûr
qu’à ce que vous soyez prêt à fixer le support de table. Gardez les vis hors de la
jus
portée des jeunes enfants.
• Lisez le Feuillet de consignes d’utilisation et de sécurité fourni pour plus de renseignements sur
l’utilisation en toute sécurité.
• Vous pouvez retirer les pièces de pied et les vis une fois le téléviseur complètement installé au mur.
• Assurez-vous de ranger les pièces de pied et les vis reti
enfants.
• Assurez-vous de fixer les pièces de pied et les vis à la position d’
table. Si vous utilisez une visseuse électrique, réglez le couple à environ 0,4 N·m {4 kgf·cm}.
FR
14
rées dans un endroit sûr, hors de la portée des
lors de l’utilisation du support de
origine

FR
Remarque
Remarque
ʕ
ʖ
ʔ
ʓ
Support de fixation
murale (non fourni)
Vis (non fournie)
Fixer le téléviseur au mur à partir du support de table
1 Retirez le couvercle de support et les couvercles de borne.
2 Retirez les vis à l’arrière du téléviseur.
3 Fixez le support de fixation murale (non fourni) à l’aide des vis (non fournies).
• Si vous utilisez une visseuse électrique, réglez le couple à environ 1,5 N·m {15 kgf·cm}.
• Vous ne pouvez pas utiliser certains supports de câble de l’arrière du téléviseur lorsque vous utilisez
un support de fixation murale (non fourni).
15
FR

4 Détachez la base du support.
Remarque
Remarque
Démonter le support de table du téléviseur
Démonter le support de table du téléviseur en retirant d’abord les vis .
• N’enlevez pas le support de table pour aucune raison autre que l’installation des accessoires
correspondants sur le téléviseur.
• Assurez-vous que le téléviseur est en position verticale avant de l’allumer. Pour éviter des irrégularités de
l’uniformité de l’image, n’allumez pas le téléviseur avec l’écran vers le bas.
• Pour fixer de nouveau le support de table, veillez à utiliser les vis (que vous avez enlevées précédemment)
dans
s orifices à l’arrière du téléviseur.
les même
FR
16

FR
Remarque
Remarque
30 cm
(11 7/8 pouces)
(4 pouces)
10 cm
(4 pouces)
10 cm
6 cm
(2 3/8 pouces)
Laissez au moins cet espace autour du téléviseur.
(4 pouces)
10 cm
(4 pouces)
10 cm
Laissez au moins cet espace autour du téléviseur.
10 cm (4 pouces)
30 cm
(11 7/8 pouces)
N’installez jamais le téléviseur de la manière suivante :
La circulation d’air est bloquée.
N’obstruez pas la zone de circulation d’air.
Circulation d'air
Mur
Mur
Installation du téléviseur contre un mur ou dans un endroit fermé
Ventilation
• Ne couvrez jamais les orifices de ventilation, ni insérez aucun objet à l’intérieur de la
carcasse du téléviseur.
• Laissez un espace suffisant autour du téléviseur comme indiqué ci-dessous.
Installation sur support
Installation au mur
• Une ventilation inadéquate peut surchauffer le téléviseur et causer des dommages ou déclencher un
incendie.
FR
17

Dépannage
Updating...
En cas de problèmes tels que : écran noir,
aucun son, image figée, aucune réponse du
téléviseur ou réseau perdu, suivez les
étapes suivantes du dépannage général.
1 Redémarrez votre téléviseur en appuyant
sur la touche de marche de la
télécommande jusqu’à ce qu’un
message s’affiche. Le téléviseur
redémarrera. Si le problème persiste,
débranchez le cordon d’alimentation CA
du téléviseur et attendez trois minutes
avant de le rebrancher.
2 Reportez-vous au menu Aide en
appuyant sur la touche HELP de la
télécommande.
3 Connectez votre téléviseur à Internet et
effectuez une mise à jour logicielle.
4 Consultez le site Web d’assistance de
Sony (coordonnées indiquées sur la
couverture de ce document).
5 Effectuez un rétablissement de la
configuration par défaut. Reportez-vous
à la rubrique « Comment réinitialiser le
téléviseur à ses réglages d’usine » (page
18).
Le message [Un nouveau logiciel pour le
système de la télé est disponible…]
s’affiche.
Sony vous recommande vivement de
mettre à jour le logiciel du téléviseur en
sélectionnant [Mettre à niveau]. Ces mises
à jour logicielles améliorent les
performances de votre téléviseur ou
ajoutent de nouvelles fonctions.
L’écran suivant avec la mention
[Updating…] (Mise à jour…) apparaît et la
DEL d’éclairage clignote en blanc pendant
la mise à jour du logiciel.
Ne débranchez pas le cordon
d’alimentation CA pendant la mise à jour du
logiciel. Sinon, la mise à jour du logiciel
pourrait ne pas s’effectuer complètement,
ce qui risquerait de causer un problème de
fonctionnement du logiciel. Les mises à
jour du logiciel peuvent prendre jusqu’à 15
minutes.
Lorsque vous branchez le téléviseur, il est
possible que vous ne puissiez pas
allumer le téléviseur immédiatement
même si vous appuyez sur la touche de
marche de la télécommande ou du
téléviseur.
L’initialisation du système prend du temps.
Attendez environ 1 minute, puis utilisez-le
normalement.
Comment réinitialiser le téléviseur à ses
réglages d’usine
AVERTISSEMENT : La réinitialisation effacera
tous vos réglages personnalisés, y compris
le contrôle parental.
Allumez le téléviseur. Vous pouvez
réinitialiser le téléviseur aux réglages d’usine
en appuyant sur HOME, puis en
sélectionnant [Paramètres] [Stockage et
réinitialisation] [Rétablir config. par
défaut].
Pour forcer le rétablissement de la
configuration par défaut, débranchez le
cordon d’alimentation CA. Appuyez
simultanément sur les touches et – du
téléviseur en les maintenant enfoncées, puis
branchez le cordon d’alimentation CA.
Relâchez les touches lorsque la DEL
d’éclairage clignote en vert.
Pour plus de sécurité, assurez-vous d’effacer
toutes les données à caractère personnel et
informations relatives à votre compte avant
de vous défaire de votre téléviseur ou de le
vendre à un tiers, en procédant à la
désynchronisation/désinscription,
déconnexion et désactivation de tous les
services de réseau et en rétablissant les
paramètres d’usine du téléviseur.
18
FR

FR
Remarque
Remarque
Problèmes et solutions
La DEL d’éclairage clignote en rouge.
Comptez le nombre de clignotements (un
intervalle de trois secondes entre les
clignotements).
Redémarrez le téléviseur en débranchant le
cor
don d’alimentation CA pendant trois
minutes, puis allumez le téléviseur.
Si le problème persiste, débranchez le
cor
don d’alimentation CA, puis contactez le
service à la clientèle de Sony (coordonnées
indiquées sur la couverture de ce document)
en indiquant le nombre de fois que la DEL
d’éclairage clignote.
Il n’y aucune image (l’écran est noir) et
aucun son.
Vérifiez la connexion de câble/antenne.
Branchez le téléviseur à l’alimentation CA,
puis appuyez sur la touche de marche du
téléviseur ou de la télécommande.
Impossible de syntoniser certaines
émissions.
Vérifiez la connexion de câble/antenne.
La télécommande ne fonctionne pas.
Remplacez les piles.
La touche STB MENU de la télécommande
ne fonctionne pas.
Vérifiez la connexion et configurez l’IR Blaster
(page 12).
Vous avez oublié le mot de passe du
contrôle parental.
Saisissez le code 4357 en mot de passe et
sélectionnez [Modifier le NIP].
Vous avez oublié le mot de passe du
profil d’utilisateur restreint.
Effectuez un rétablissement forcé de la
configuration par défaut. Reportez-vous à la
rubrique « Comment réinitialiser le téléviseur
à ses réglages d’usine » (page 18).
Le téléviseur et les objets qui l’entourent
deviennent chauds au toucher.
Lorsque le téléviseur est utilisé pendant une
longue période, le téléviseur et les objets qui
l’entourent peuvent devenir chauds au
toucher. Il ne s’agit pas d’un problème de
fonctionnement du téléviseur.
L’écran devient plus sombre pendant que
vous regardez le téléviseur.
Si la totalité ou une partie de l’image
demeure immobile, la luminosité de l’écran
est progressivement réduite pour éviter la
persistance d’image. Il ne s’agit pas d’un
problème de fonctionnement du téléviseur.
Vous êtes préoccupé par la persistance
d’image.
Si la même image est affichée à plusieurs
reprises ou pendant de longues durées, la
persistance d’image peut se produire. Pour
réduire la persistance d’image, nous vous
recommandons d’éteindre le téléviseur
normalement en appuyant sur la touche
d’alimentation de la télécommande ou du
téléviseur.
• Exécutez manuellement la fonction
Actualisation panneau uniquement lorsque la
persistance d’image est particulièrement visible.
Comme référence, exécutez-la seulement une
fois par année. Évitez de l’exécuter plus d’une
fois par année, car elle pourrait affecter la durée
de vie du panneau.
• Les images comprenant des horloges, logos et
couleurs vives (y compris le blanc) causent
facilement de la persistance d’image. Évitez
d’afficher ces types d’images pendant de
longues durées, sinon de la persistance d’image
pourrait se produire.
Une ligne blanche apparaît à l’écran.
Actualisation panneau fonctionne
automatiquement après l’utilisation du
téléviseur pendant de longues durées pour
réduire la persistance d’image. Actualisation
panneau démarre après que vous éteigniez
le téléviseur et l’exécution de la fonction
prend environ une heure. Une ligne blanche
pourrait s’afficher à l’écran pendant
l’exécution de la fonction Actualisation
panneau. Il ne s’agit pas d’un problème de
fonctionnement du téléviseur.
Le message [L'actualisation du panneau
ne s'est pas terminée…] s’affiche.
Actualisation panneau fonctionne
automatiquement après l’utilisation du
téléviseur pendant de longues durées pour
réduire la persistance d’image. Si le
téléviseur est allumé, le cordon
d’alimentation CA est débranché ou la
température ambiante est à l’extérieur de la
plage de 10 ºC à 40 ºC (50 ºF à 104 ºF)
pendant l’exécution de la fonction
Actualisation panneau, le processus n’est
pas complété et ce message apparaît.
Si la fonction Actualisation panneau a
démarré automatiquement, elle redémarre
lorsque vous éteignez le téléviseur avec la
télécommande.
Si la fonction Actualisation panneau est
initiée manuellement, vous devez la
sélectionner de nouveau.
FR
19

Spécifications
Système
Système de télévision
NTSC : Norme de télévision en Amérique
ATSC (8VSB terrestre) : 8VSB conforme avec
ATSC
QA
M sur le câble : ANSI/SCTE 07 2000
(n’incl
ut pas la fonctionnalité CableCARD)
Plages de canaux
Analogique terrestre : 2 - 69 / Numérique
terrestre : 2 - 69
Câble analogique : 1 - 135 / Câble
numérique : 1 - 135
Système de l’écran
Panneau DELO (diode électroluminescente
organique)
Puissance des haut-parleurs
10 W + 10 W + 10 W + 10 W + 10 W
Technologie sans fil
Protocole IEEE802.11ac/a/b/g/n
Bluetooth version 4.1
Connecteurs d’entrée et de sortie
CABLE/ANTENNA
Borne extérieure de 75 ohms pour entrées RF
VIDEO IN
Entrée vidéo/audio (mini-prise )
HDMI IN 1/2/3/4 (Prend en charge la
résolution 4K, compatible HDCP 2.2)
Video :
4 096 × 2 160p (60 Hz)*
1
(24 Hz)*
, 3 840 × 2 160p (60 Hz)*2,
3 840 × 2 160p (24, 30 Hz), 1 080p
(30, 60 Hz), 1 080/24p, 1 080i (60 Hz), 720p
(30,
60 Hz), 720/24p, 480p, 480i, formats
Ordinateur*
*1 Lorsqu’une résolution de 4 096 × 2 160p
est entrée et que [Mode cinéma] est
réglé sur [Normal], la résolution s'affiche
comme 3 840 × 2 160p. Pour afficher la
résolution 4 096 × 2 160p, définissez le
réglage [Mode cinéma] sur [Plein écran 1]
ou [Plein écran 2].
2
*
HDMI IN 2/3 uniquement. Pour la prise
en charge de 18 Gbps, réglez [Format du
signal HDMI] sur [Format amélioré].
3
*
Reportez-vous au Manuel d’aide pour
connaître les détails.
Audio :
5,1 canaux linéaires PCM : 32/44,1/48/88,
2/96/176,4/192 kHz 16/20/24 bits, Dolby
Digit
3
al, Dolby Digital Plus et DTS
1*2
, 4 096 × 2 160p
ARC (Audio Return Channel) (HDMI IN 3
uniquement)
(Deux canaux linéaires PCM : 48 kHz 16 bits,
Dolby Digital, Dolby Digital Plus, DTS)
DIGITAL AUDIO OUT (OPTICAL)
Prise optique numérique (Deux canaux
linéaires PCM : 48 kHz 16 bits, Dolby Digital,
DTS)
AUDIO OUT / (mini-prise stéréo)
Écouteur, Sortie audio, Infragrave
1, 2, 3
Les ports USB 1 et 2 prennent en charge la
connectivité USB haute vitesse (USB 2.0)
Le port USB 3 prend en charge la connectivité
USB s
uper vitesse (USB 3.1 Gen 1)
LAN
Connecteur 10BASE-T/100BASE-TX
(La vitesse de connexion peut varier selon
l’envir
onnement réseau. Le débit 10BASE-T/
100BASE-TX et la qualité de la
communication ne sont pas garantis pour ce
téléviseur.)
Reportez-vous au Manuel d’aide pour
con
naître les fichiers et formats pris en
charge dans le réseau domestique.
REMOTE
Mini-prise RS-232C, mini-prise IR IN
Ces prises permettent de recevoir le signal
de comma
IR BLASTER *
Entrée du câble IR Blaster (mini-prise)
nde externe.
1
Autres
Température de service
0 °C – 40 °C (32 °F – 104 °F)
Alimentation et autres
Alimentation
110 V - 240 V CA, 50/60 Hz (États-Unis/
Canada 120 V CA, 60 Hz)
Consommation d’énergie
en cours d’utilisation
XBR-65A8F : 480 W
XBR-55A8F : 371 W
2*3
en veille*
Moins de 0,5 W pour les modèles 120 V CA
et moins de 0,5 W pour les modèles 240 V
CA
Taille de l’écran (mesurée en diagonale)
(Environ)
XBR-65A8F : 64,5 pouces (classe 65”)
XBR-55A8F : 54,6 pouces (classe 55”)
Résolution de l’écran
3 840 points (horizontal) × 2 160 lignes
(vertical)
20
FR

FR
Remarque
Remarque
Puissance de sortie
USB 1/2
5 V , 500 mA MAX
USB 3
5 V , 900 mA MAX
Dimensions (Environ)
avec support
XBR-65A8F : 1 447 × 841 × 255 mm /
1
57 × 33
/8 × 10 1/8 pouces
XBR-55A8F : 1 226 × 717 × 255 mm /
3
48
/8 × 28 1/4 × 10 1/8 pouces
sans support
XBR-65A8F : 1 447 × 836 × 55 mm /
57 × 33 × 2
XBR-55A8F : 1 226 × 712 × 55 mm /
48
schéma des trous pour la fixation murale
XBR-65A8F : 300 × 300 mm
XBR-55A8F : 300 × 200 mm
taille des vis de fixation murale (mm)
M6 (longueur : reportez-vous au schéma de
la page 14.)
1
/4 pouces
3
/8 × 28 1/8 × 2 1/4 pouces
Poids (Environ)
avec support
XBR-65A8F : 28 kg / 61,7 lb.
XBR-55A8F : 22,2 kg / 48,9 lb.
sans support
XBR-65A8F : 24,4 kg / 53,8 lb.
XBR-55A8F : 18,7 kg / 41,2 lb.
*1 Uniquement pour certaines régions/pays/
modèles de téléviseurs limités.
2
*
La consommation d’énergie en mode de
veille est obtenue lorsque les processus
internes nécessaires du téléviseur sont
terminés.
3
*
La consommation d’énergie en mode de
veille augmente lorsque votre téléviseur est
connecté au réseau.
• La disponibilité des accessoires en option
dépend des régions/pays/modèles de
téléviseurs/stocks.
• La conception des produits et les
caractéristiques techniques peuvent changer
sans préavis.
Information de licence
• Les termes HDMI et HDMI HighDefinition Multimedia Interface, de
même que le logo HDMI sont des
marques commerciales ou des
marques déposées de HDMI Licensing
Administrator, Inc. aux États-Unis et
dans d’autres pays.
• Fabriqué sous licence de Dolby
at
ories.
Labor
Dolby, Dolby Audio et le symbole
double-D sont des
commerce de Dolby Laboratories.
•« BRAVIA », et BRAVIA Sync
sont des marques de commerce ou
s marqu
de
Corporation.
• Gracenote, le logo Gracenote et la
enti
on « Powered by Gracenote »
m
sont des marques de commerce ou
des marques déposées de Gracenote,
Inc. aux États-Unis et/ou dans d’autres
pays.
• Vewd® Core. Copyright 1995-2017
ewd Softw
V
réservés.
• Google, Android TV, Google Play,
ro
mecast built-in, YouTube et les
Ch
autres marques et logos associés sont
des marques de commerce de Google
LLC.
• Wi-Fi®, Wi-Fi Alliance®, Wi-Fi Direct® et
ra
cast® sont des marques déposées
Mi
de la Wi-Fi Alliance.
• Wi-Fi Protected Setup™ est une
ar
que de commerce de la Wi-Fi
m
Alliance.
• Le logo Wi-Fi CERTIFIED™ est une
rq
ue de certification de la Wi-Fi
ma
Alliance.
• Pour les brevets DTS, voir
http://patents.dts.com. Fabriqué sous
ic
ence de DTS, Inc.
l
DTS, le symbole, et DTS et son
bole ensemble sont des marques
sym
déposées, et DTS Digital Surround est
une marque déposée de DTS, Inc. ©
DTS, Inc. Tous droits réservés.
marques de
es déposées de Sony
are AS. Tous droits
FR
21

• Le symbole et les logos Bluetooth®
sont des marques déposées de
Bluetooth SIG, Inc. ; toute utilisation de
ces marques par Sony Corporation est
soumise à une licence. Les autres
marques déposées et appellations
commerciales sont la propriété de
leurs détenteurs respectifs.
• Netflix est une marque déposée de
tfli
x, Inc.
Ne
• TUXERA est une marque déposée de
ra Inc. aux États-Unis et dans
Tuxe
d’autres pays.
rSpee
•Le logo USB-IF Supe
d USB
Trident est une marque déposée d’USB
Implementers Forum, Inc.
• Toutes les autres marques
om
merciales sont la propriété de
c
leurs détenteurs respectifs.
22
FR

MEMO

For Your Convenience
Help Guide
Manuel d’aide
http://rd1.sony.net/help/tv/fusltn1/h_usltn/
© 2018 Sony Visual Products Inc. Printed in Mexico
Online
Registration:
Software
Updates:
Enregistrement
en ligne
:
Mise à jour du
logiciel :
Be sure to register your TV.
United States
Canada
Your TV is capable of receiving software updates. For the
latest information about software updates for your TV, visit:
United States
Canada
NOTE: If your TV is connected to the Internet, you can check
for software updates by pressing HELP, and select [System
software update].
http://productregistration.sony.com
http://www.sony.ca/registration
http://www.sony.com/tvsupport
http://www.sony.ca/support
Pour votre commodité
Faire en sorte de compléter l’enregistrement de votre
téléviseur.
Canada
États-Unis
Votre téléviseur est en mesure de recevoir des mises à jour
logicielles. Pour obtenir les renseignements les plus à jour
sur les mises à jour du logiciel de votre téléviseur, visitez :
Canada
États-Unis
REMARQUE : Si votre téléviseur est connecté à Internet, vous
pouvez vérifier les mises à jour logicielles en appuyant sur
HELP et en sélectionnant [Mise à jour du logiciel].
http://www.sony.ca/registration
http://productregistration.sony.com
http://www.sony.ca/support
http://www.sony.com/tvsupport
 Loading...