

Page 1
Media Center/Receiver
XAV-7W
3-243-055-12(1)
Media Center/
Receiver
Operating Instructions
Mode d’emploi
Manual de instrucciones
Owner’s Record
The model and serial numbers are located on the bottom of the unit.
Record the serial number in the space provided below.
Refer to these numbers whenever you call upon your Sony dealer regarding this product.
Model No. XAV-7W Serial No.
For installation and connections, see the supplied Installation/Connections manual.
En ce qui concerne l’installation et les connexions, consulter le manuel d’Installation/Connexions
fourni.
Para obtener información sobre la instalación y las conexiones, consulte el manual de Instalación/
Conexiones suministrado.
US
FR
ES
XAV-7W
© 2002 Sony Corporation
Page 2

Warning
To prevent fire or shock hazard, do not expose
the unit to rain or moisture.
This symbol is intended to alert
the user to the presence of
uninsulated “dangerous
voltage” within the product’s
enclosure that may be of
sufficient magnitude to
constitute a risk of electric shock
to persons.
This symbol is intended to alert
the user to the presence of
important operating and
maintenance (servicing)
instructions in the literature
accompanying the appliance.
WARNING
This equipment has been tested and found to
comply with the limits for a Class B digital
device, pursuant to Part 15 of the FCC Rules.
These limits are designed to provide
reasonable protection against harmful
interference in a residential installation. This
equipment generates, uses, and can radiate
radio frequency energy and, if not installed
and used in accordance with the instructions,
may cause harmful interference to radio
communications. However, there is no
guarantee that interference will not occur in a
particular installation. If this equipment does
cause harmful interference to radio or
television reception, which can be
determined by turning the equipment off and
on, the user is encouraged to try to correct the
interference by one or more of the following
measures:
— Reorient or relocate the receiving antenna.
— Increase the separation between the
equipment and receiver.
— Connect the equipment into an outlet on a
circuit different from that to which the
receiver is connected.
— Consult the dealer or an experienced
radio/TV technician for help.
You are cautioned that any changes or
modifications not expressly approved in this
manual could void your authority to operate
this equipment.
2
Page 3

Table of Contents
Features .................................................................................................................... 4
Precautions ............................................................................................................... 5
Getting Started
Preparations ............................................................................................................. 6
Location of Controls ................................................................................................ 8
Basic Operation
Listening to Radio or CD/MD/”MG Memory Stick”.............................................10
Watching TV/Other Video Components................................................................12
Setting the Clock.................................................................................................... 14
Advanced Operation
FM/AM Reception
Reading the monitor and display
window......................................................15
Storing stations automatically
— Best Tuning Memory (BTM) .............. 17
Storing stations manually ..........................19
Assigning a name to a station
(Station Memo).........................................20
Searching for a station by name (List)......22
CD/MD/”MG Memory Stick” Playback
Reading the monitor and display
window......................................................23
Repeat playback ..........................................25
Shuffle playback ..........................................26
Labeling a CD - Disc Memo (CD unit with
the CUSTOM FILE function).................. 27
Locating a disc by name (List)...................29
TV/Other Video Components
Storing channels .......................................... 30
Selecting the screen mode .......................... 31
Sound Settings
Dynamic Soundstage Organizer (DSO) ...32
Using the equalizer (EQ7) .......................... 33
Adjusting the sound characteristics
(BAS/TRE/BAL/FAD/SUB) .................35
Setting the low-pass filter (LPF)................36
Setting the high-pass filter (HPF)..............37
Setting the sound level for connected AUX
components............................................... 38
Other Functions
Sound and display settings........................39
Using the rotary commander.....................42
Other Features
Additional Information
Card remote commander precautions...... 44
About the liquid crystal display (LCD)
panel ..........................................................44
Replacing the lithium battery ....................44
If movement of the monitor has been
impeded during the monitor setting.....45
Dismounting the unit..................................45
Troubleshooting................................... 47
Specifications ....................................... 50
3
Page 4

Features
Welcome!
Thank you for purchasing this Sony Media Center/Receiver. Before operating the unit,
please read this manual thoroughly and retain it for future reference.
7-inch in-dash motorized TFT monitor
Innovative in-dash monitor design allows the unit to be mounted in a single DIN slot. At
the touch of a button, a 7-inch wide-aspect-ratio screen slides out, for comfortable TV or
DVD viewing. (Sony TV tuner unit and DVD changer system are optionally available.)
Sony bus control and FM/AM tuner
The built-in FM/AM tuner as well as an optional Sony CD/MD changer and MG Memory
Stick system-up player can be conveniently operated from the unit. The XAV-7W is the
ideal centerpiece for a sophisticated car audio/video system.
Built-in amp with 45 watts × 4
In spite of its compact size, the XAV-7W has 4 powerful amplifier channels delivering 45
watts each, for effortless music reproduction.
DSO creates a virtual soundstage
The DSO (Dynamic Soundstage Organizer) developed by Sony improves the listening
experience by creating a soundstage with “virtual speakers”. These are located right out
front, not buried in the lower part of the doors. The result is clearer, more transparent
sound.
EQ7 frequency curves
7 preprogrammed equalizer curves for various types of music can be selected at the press
of a button. In addition, you can fine-tune each curve by adjusting the signal level in 7
frequency bands, to create your very own sound.
2 A/V inputs and 1 rear monitor output
Additional to optional TV tuner unit, up to 2 optional A/V devices can be connected
simultaneously.
The “XM Ready” logo indicates that this product will control a Sony XM tuner module
(sold separately).
Please see your nearest authorized Sony dealer for details on the XM tuner module.
For instructions on XM tuner operation, please refer to the XM tuner module’s included
instruction manual.
4
Page 5

Precautions
To avoid the risk of injury or accident, read
the following precautions before installing
and operating the unit.
On safety
Comply with your local traffic rules and
regulations.
•
While driving
–You must not watch or operate the monitor. It
may lead to distraction and cause an accident.
Park your car in a safe place to watch the
monitor and operate the unit.
•
While operating
– Do not insert your hands, fingers or foreign object
into the unit while the monitor is functioning. It
may cause injury or damage to the unit.
– Keep small articles out of the reach of children.
•
Do not touch the TV antenna and monitor at the
same time during storms. You may get an electric
shock.
•
If your car was parked in direct sunlight resulting
in a considerable rise in temperature inside the car,
allow the unit to cool off before operating it.
Preventing accidents
The TV/video pictures appear only after
you park the car and set the parking brake.
When the car starts moving, the TV/video
pictures automatically disappear for safety
reasons, after displaying the following
caution.
PICTURE OFF
FOR
YOUR SAFETY
Do not operate equipment connected to
the TV tuner unit or watch the monitor
while driving. You may cause a traffic
accident if your attention is distracted by
the monitor.
• Do not use the CUSTOM FILE feature while
driving, or perform any other function which could
divert your attention from the road.
On installation
•
We recommend this unit should be installed by a
qualified technician or service personnel
– If you try to install this unit by yourself, refer to
the supplied “Installation/Connections” manual
and read it carefully. Make sure to install this
unit properly.
– Improper installation may cause battery drain or
a short circuit.
•
If the unit does not work properly, check the
connections first (refer to the supplied
“Installation/Connections” manual). If everything
in order, check the fuse.
•
Replacing the fuse
– When replacing the fuse, be sure to use only a
fuse of the same rating (ampere rating).
Fuse Fuse
5
– Using a different fuse or bridging the contacts
with wire is highly dangerous and can lead to
serious damage.
•
Protect unit surface from damage
– Do not expose the unit surface to chemicals such
as insecticide, hair spray, insect repellent, etc.
– Do not leave rubber or plastic materials in
contact with the unit for a long time. Otherwise
the finish of the unit may be impaired, or
deformation may occur.
•
When installing, be sure to turn the ignition key to
off position. If the ignition is on and try to install
this unit may cause battery drain or a short circuit.
•
When installing, be sure not to damage any car
parts such as pipes, tubes, fuel tank or wiring by
using a drill. It can cause a fire or an accident.
•
Moisture condensation
If the ambient temperature of the unit changes
rapidly, moisture condensation may occur inside
the display window. Simply wait for a while, until
the moisture evaporates and the unit returns to
normal.
Installing location
•
Do not install this unit where:
– the driver’s view will be obstructed when the
monitor is in either open or close position.
– the operation of the car or the airbag system will
be obstructed.
– It will obstruct the operation of the vehicle,
especially the steering wheel, shift lever or brake
pedal.
If you have any questions or problems concerning
your unit, please consult your nearest Sony dealer.
5
Page 6
Getting Started
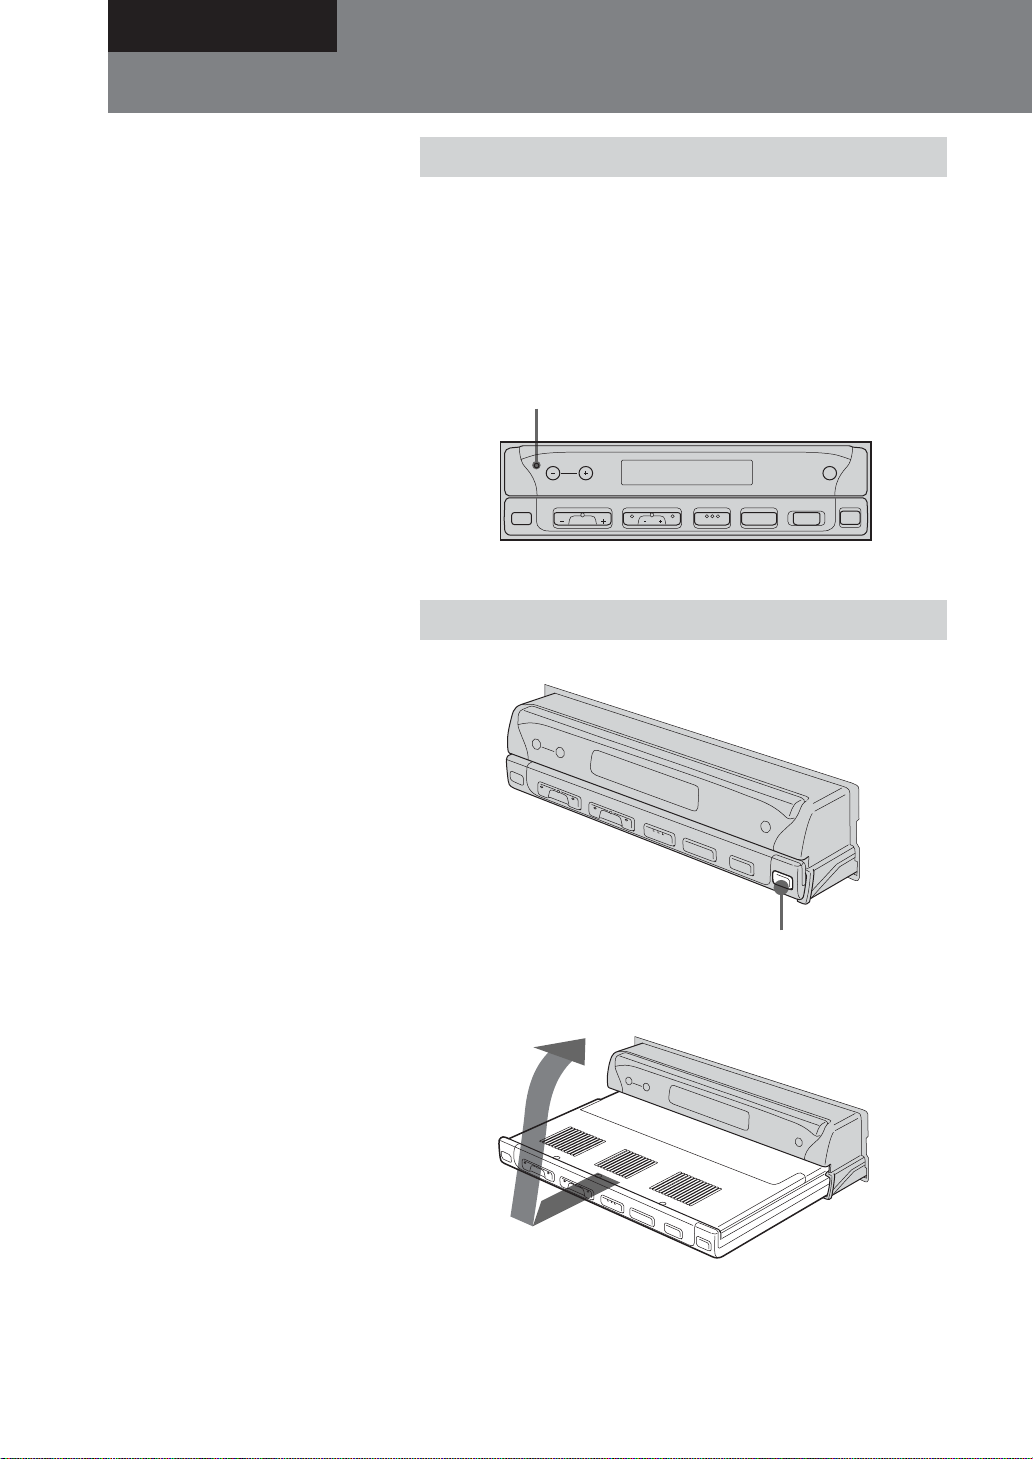
Preparations
Resetting the unit
Notes
• When the Reset button is pushed, the
time and all stored settings are lost and
will have to be reprogrammed.
• The reset procedure takes about 10
seconds after the Reset button is
pushed.
• When the reset procedure is
completed, press OPEN/CLOSE and
verify that the monitor opens up
properly.
Notes
• The card remote commander cannot be
used for opening up or closing the
monitor.
• If movement of the monitor during
opening or closing has been impeded
by the gear shift lever or another
obstacle, see “If movement of the
monitor has been impeded during the
monitor setting” (page 45).
Before operating the unit for the first time, or after
replacing the car battery or changing the connections, you
must reset the unit.
Use a pointed object such as a ball point pen to push the
Reset button. To avoid the possibility of damage, you
should not use a needle or push the button too strongly.
Push Reset.
Reset button
DISC
SOURCE MODE ATT
SEEK
.>
VOL
OFF
OPEN/
CLOSE
Opening up the monitor
Press OPEN/CLOSE on the monitor.
OPEN/CLOSE
The monitor slides out of the main unit, and the picture
comes on.
6
Page 7

Note
Do not move the monitor by hand.
Notes
• When the monitor is closed, MENU,
LIST, and ENTER on the card remote
commander cannot be used.
• If movement of the monitor during
opening or closing has been impeded
by the gear shift lever or another
obstacle, see “If movement of the
monitor has been impeded during the
monitor setting” (page 45).
• If OPEN/CLOSE was pressed while
the monitor was opening or closing,
the monitor may not stop at the
original angle. In such a case, press
ANGLE –/+ to adjust the angle.
Adjusting the monitor angle
You can adjust the angle of the monitor for best viewing.
Press ANGLE –/+ repeatedly.
The buttons adjust monitor position in discrete steps.
ANGLE –/+
+ button: Monitor is tilted backward.
– button: Monitor is tilted forward.
The adjustment is memorized, and the monitor will move
to the same angle the next time it is opened up again after
having been closed.
Closing the monitor
Press OPEN/CLOSE.
The monitor retracts into the unit, and you can use only the
audio functions of the unit.
OPEN/CLOSE
Tip
If you have pressed OFF when opening
up the monitor, you can press SOURCE
to turn the picture on again.
*Warning when installing in a car
without an ACC (accessory) position
on the ignition key
After turning off the ignition, be sure to
press OFF on the unit for 2 seconds to
turn off the clock display.
Otherwise, the clock display does not
turn off and this causes battery drain.
To turn on the unit when it is turned
off, press SOURCE on the unit. (You
cannot turn on the unit with the card
remote commander.)
OFF
Shutting down
• If you press OFF on the card remote commander while
the monitor is opened up, the sound is turned off, and
the unit switches to the standby mode, in which only the
clock indication is shown.
• If you set the ignition key of the car to OFF, power to the
unit is automatically turned off.*
7
Page 8
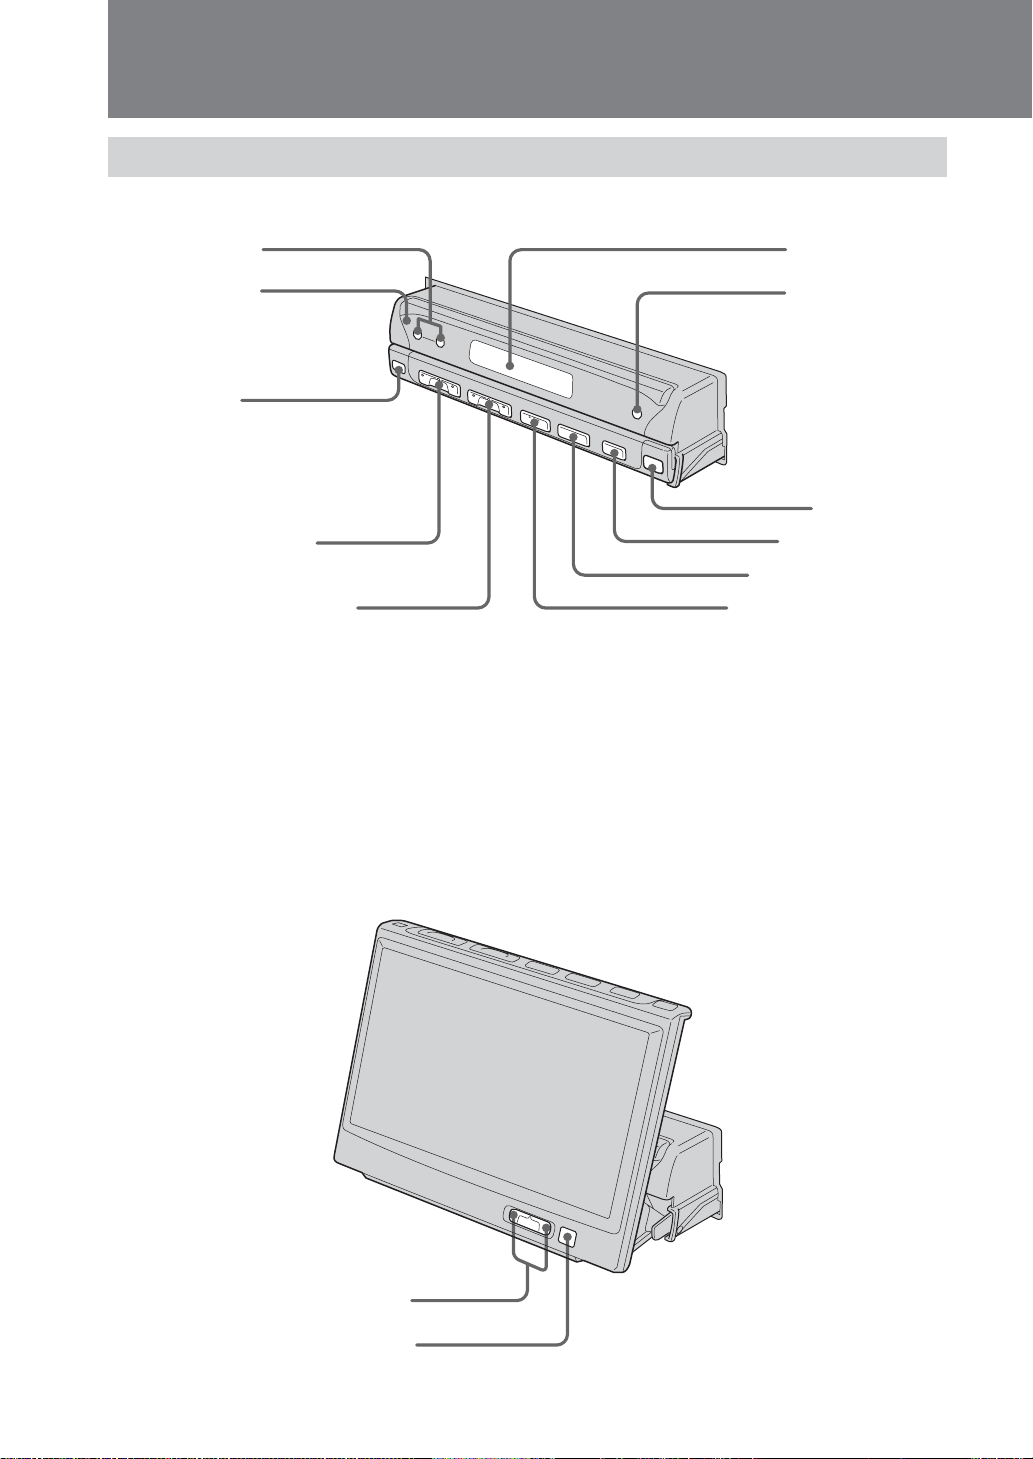
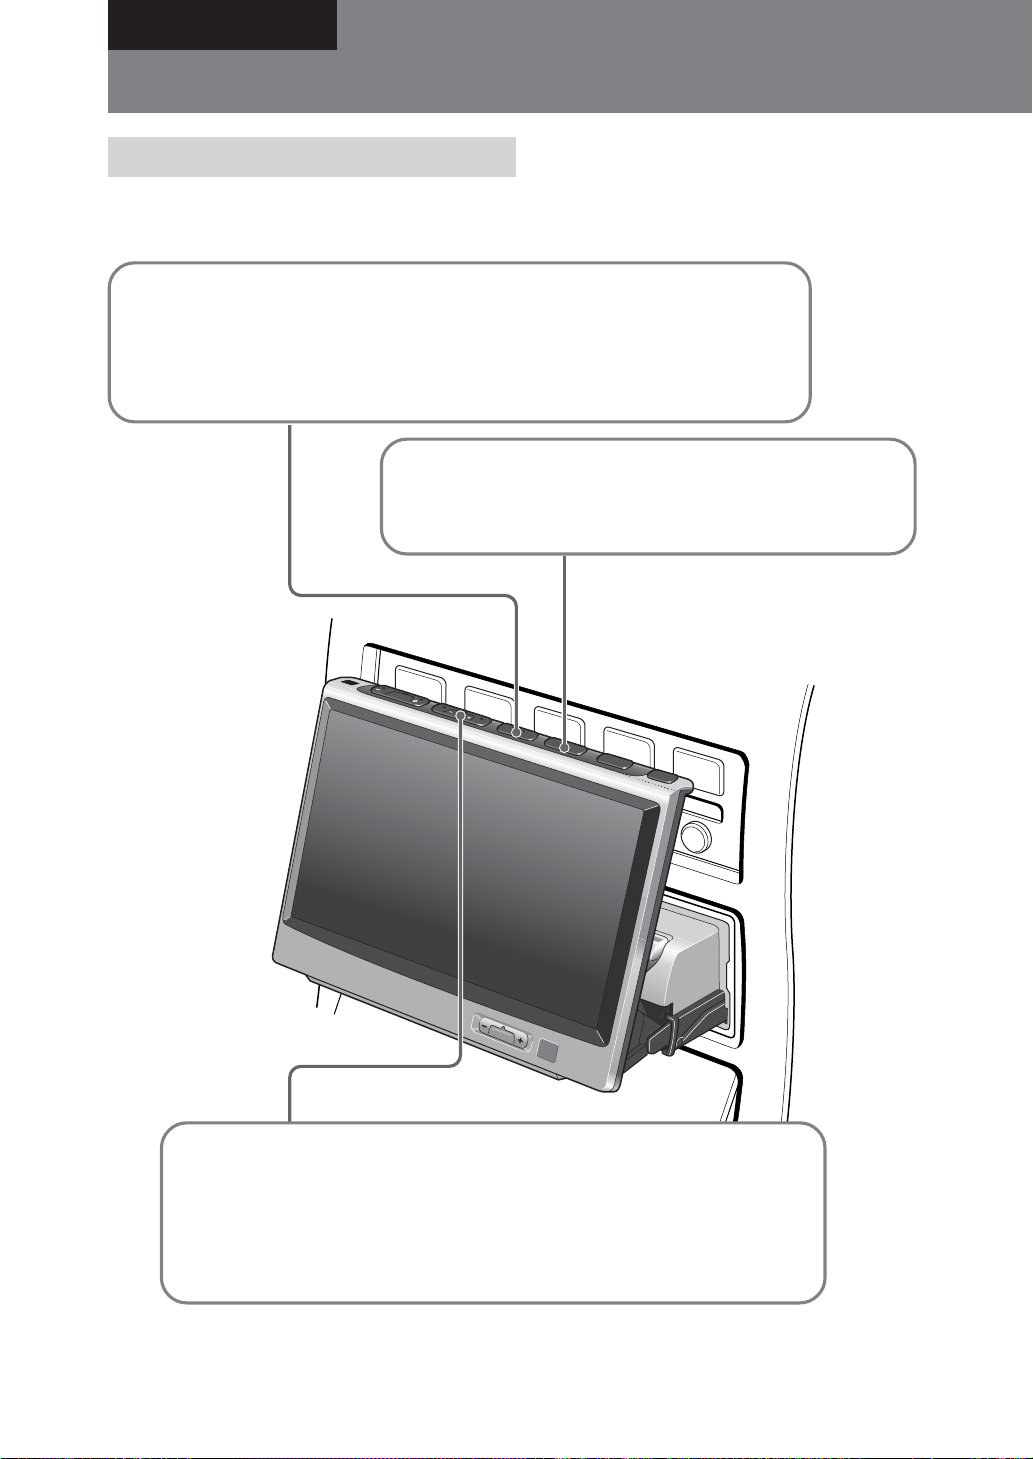
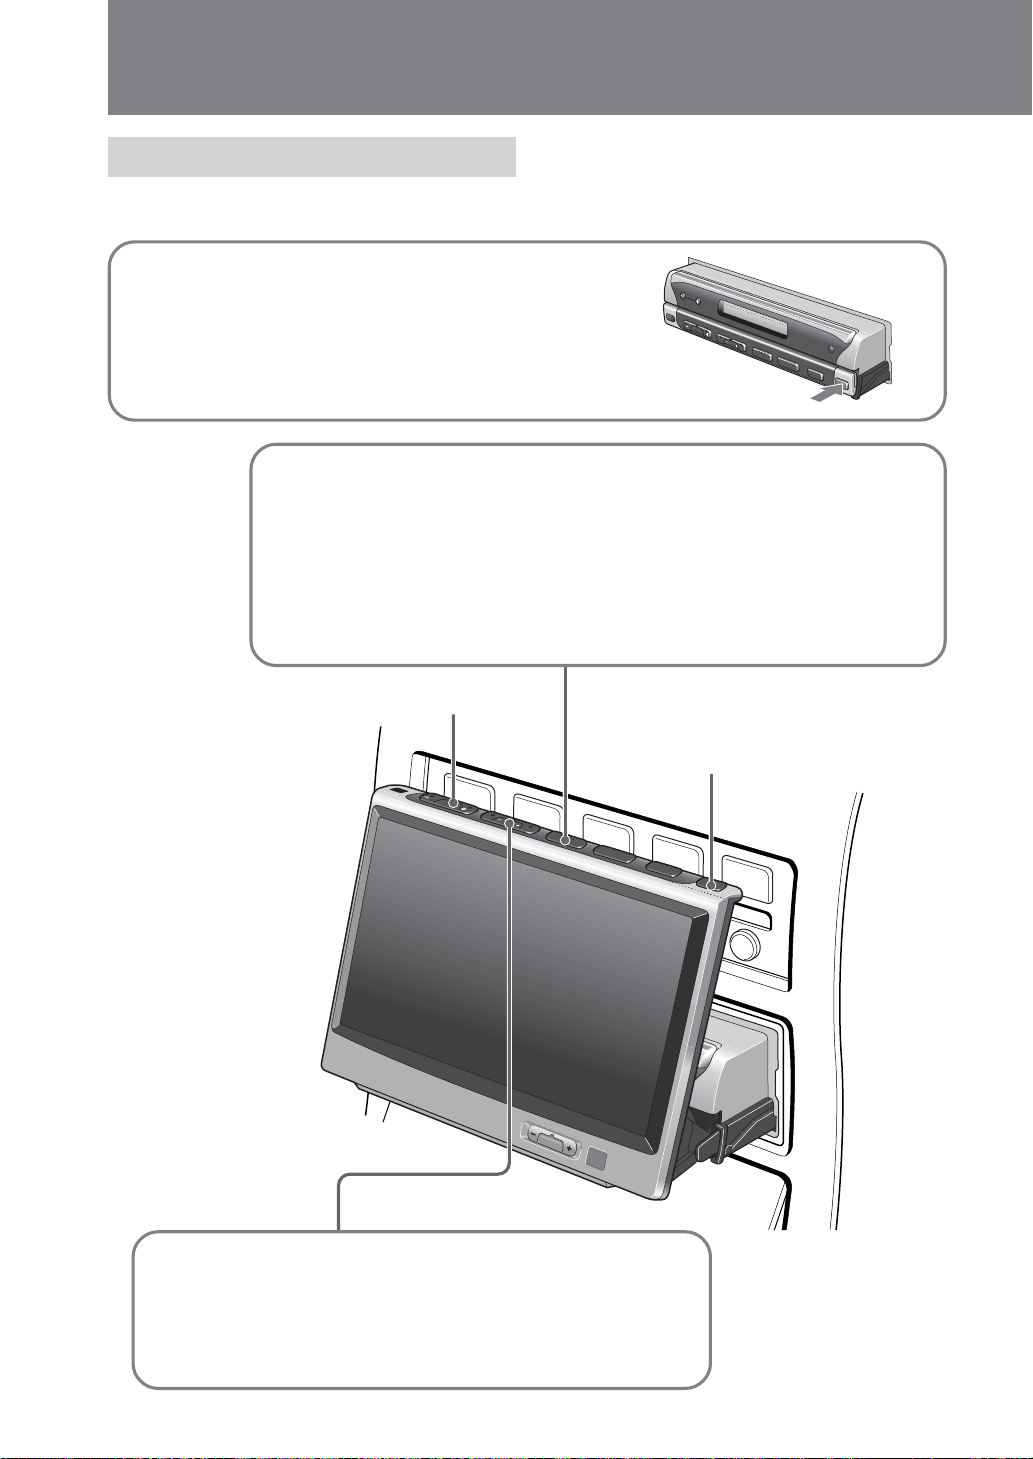
Location of Controls
Main unit
Monitor closed
1
6
2
7
3
8
4
9
0
5
1 DISC –/+ buttons
2 Reset button
3 Sensor for card remote commander
4 VOL (volume adjust) –/+ buttons
5 SEEK/AMS –/+ buttons
* Warning when installing in a car without an ACC (accessory) position on the ignition key
After turning off the ignition, be sure to press OFF on the unit for 2 seconds to turn off the clock display.
Otherwise, the clock display does not turn off and this causes battery drain.
6 Display window
7 OFF (Standby/Power off) button*
8 OPEN/CLOSE button
9 ATT button
0 MODE button
qa SOURCE (Power on/Radio/CD/MD/VIDEO or TV)
button
qa
Monitor opened up
1 ANGLE (monitor angle adjust) –/+ buttons
2 Sensor for card remote commander
8
1
2
Page 9

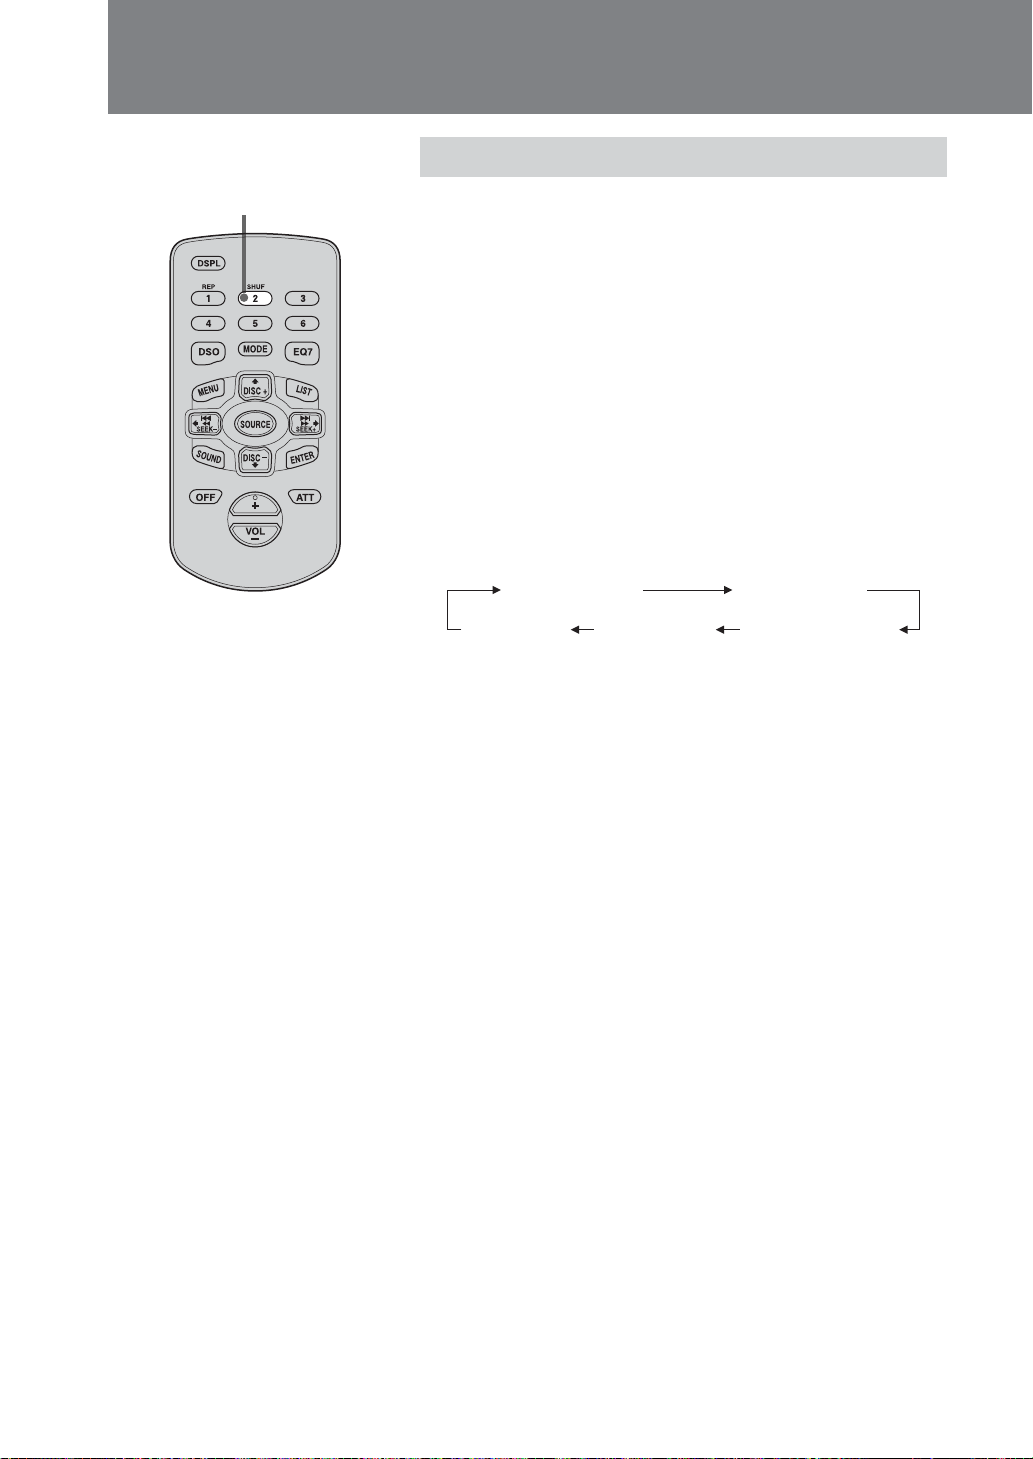
Card remote commander
The unit can be operated with the card remote commander. For safety, stop the car before
using the card remote commander, or have a passenger operate it.
1
2
3
4
5
6
7
8
9
1 DSPL (display mode change) button
2 Number buttons
3 DSO button
4 MENU button
5 SOURCE (Power on/Radio/CD/MD/AUX) button
6 B/b SEEK/AMS –/+ buttons
7 SOUND button
8 OFF (Standby/Power off) button
9 VOL (volume adjust) +/– buttons
0
qa
qs
qd
qf
qg
0 EQ7 button
qa MODE button
qs LIST button
qd V/v DISC +/– buttons
qf ENTER button
qg ATT button
Note
If the unit is turned off by pressing OFF for 2 seconds, it cannot be operated with the card remote commander unless
SOURCE on the unit is pressed to activate the unit first.
Tip
See “Replacing the lithium battery” for details on how to replace the battery (page 44).
9
Page 10
Basic Operation
Listening to Radio or CD/MD/”MG Memory Stick”
Listening to the radio
Note
Listening to radio or CD/MD/”MG Memory Stick” is
possible regardless of the monitor setting (opened or
closed).
1 Select tuner.
With each press of SOURCE, the selection is switched in the order:
FM/AM t CD* t MD*/MS* t TV*.
* Displayed only if respective optional component is connected.
2 Select desired band.
With each press of MODE, the selection is switched in the
order: FM1 t FM2 t FM3 t AM1 t AM2.
V
O
L
.
S
E
E
K
>
S
O
U
R
C
E
M
O
D
E
A
T
T
O
P
C
E
L
N
O
/
S
E
10
A
N
G
LE
3 Select desired station.
Using auto tuning
Press SEEK/AMS –/+ lightly until the desired station is received.
Using manual tuning
For details, see “Storing stations manually” (page 19).
Tip
The power antenna will extend automatically while you select the radio reception.
Page 11

Listening to CD/MD/”MG
Memory Stick”
1 Select CD, MD, or MS
With each press of the SOURCE button, the selection is switched in the order:
FM/AM t CD* t MD*/MS* t TV*.
* Displayed only if respective optional component is connected.
Adjust volume
V
O
3 Select a
L
disc.
Press V or v on
the card remote
commander to
select a disc
(page 9).
Preparation: To listen CDs, MDs, or “MG Memory
Sticks” on this unit, an optional Sony CD/MD changer
and/or MG Memory Stick system-up player must be
connected to the connection box.
2 Select changer.
With each press of the MODE button, the
selection is switched in the order:
CD: CD1 t CD2 t CD3 t ...
MD: MD1 t MD2 t MD3 t ...
.
S
E
E
K
>
S
O
U
R
C
E
M
O
D
E
A
T
T
O
P
C
E
L
N
O
/
S
E
ANGLE
Locating a desired spot (manual search)
Hold down SEEK/AMS –/+ and release it at the desired spot.
Locating the start of a track
(Automatic Music Sensor [AMS])
Press SEEK/AMS –/+ lightly once for each track you want to skip.
Cautions when connecting MGS-X1 and MD unit(s)
This unit recognizes MGS-X1 as an MD unit.
• When you want to play MGS-X1, press SOURCE to select “MS” or “MD.” If “MS” appears in the source display,
MGS-X1 starts to play. If “MD” appears in the source display, press MODE to select “MS”, to start playback.
• When you want to play an MD unit, press SOURCE to select “MD” or “MS.” If your desired MD unit appears in the
source display, it starts to play. If “MS” or another MD unit appears in the source display, press MODE to select
your desired MD unit, to start playback.
11
Page 12
Watching TV/Other Video Components
Watching TV
Preparation: To view TV programs on this unit, an
optional Sony TV tuner unit XT-63V must be connected
to the connection box.
1 Open up the monitor (page 6).
2 Select TV.
With each press of SOURCE, the selection is switched in the order:
FM1 t CD* t MD*/MS* t TV*.
Pressing MODE when “TV” is selected switches the selection in the order:
TV1* t TV2* t VIDEO1 t VIDEO2.
*
Displayed only if respective optional component is connected.
Adjust volume
D
IS
C
V
O
L
.
S
E
E
K
>
S
O
U
R
C
E
OFF
M
O
D
E
A
T
T
O
P
E
N
/
C
L
O
S
E
3 Select a channel.
Using auto tuning
Open up/Close the
monitor
V
O
L
.
S
E
E
K
>
S
O
U
R
C
E
M
O
D
E
A
T
T
O
P
C
E
L
N
O
/
S
E
AN
G
LE
12
Press SEEK/AMS –/+ lightly until the desired channel is
received.
Page 13

Watching other video
components
Preparation: To view DVDs on this unit, an optional
Sony DVD changer system must be connected to the
connection box.
1 Open up the monitor (page 6).
2 Select VIDEO1 or VIDEO2.
With each press of SOURCE, the selection is switched in the order:
FM1 t CD* t MD*/MS* t TV*.
Pressing MODE when “TV” is selected switches the selection in the order:
TV1* t TV2* t VIDEO1 t VIDEO2.
*
Displayed only if respective optional component is connected.
V
O
L
.
S
E
E
K
>
S
O
U
R
C
E
M
O
D
E
D
IS
C
V
O
L
.
S
E
E
K
>
S
O
U
R
C
E
A
T
T
O
P
C
E
L
N
O
/
S
E
O
FF
M
O
D
E
A
T
T
O
P
E
N
/
C
L
O
S
E
ANGLE
13
Page 14

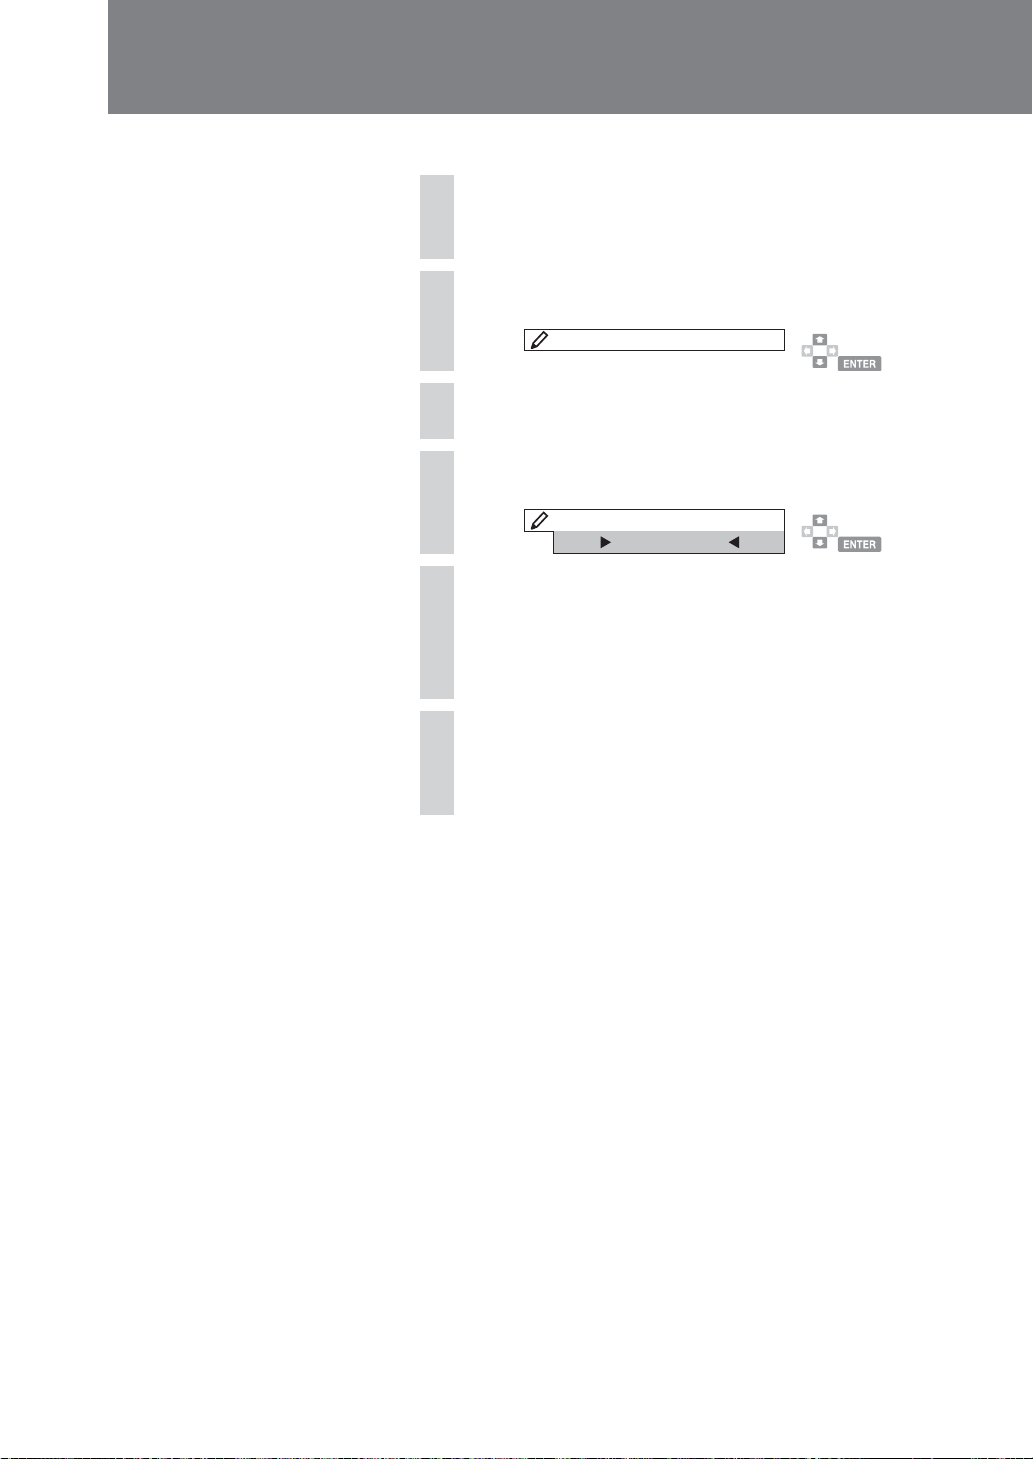
Setting the Clock
This unit uses 12-hour time indication.
To set the clock, use the card remote commander while the
monitor is open.
1
MENU
B/b
V/v
2
ENTER
Tip
When “Dual Information” is set to “on”,
the time is always displayed (page 39).
Press MENU.
Press V or v to select “Clock”.
Clock
Press ENTER.
Clock
1:00
1 Press V or v to set the hours.
2 Press b to move to the minutes, and pressV or v to set the
minutes.
V: increases the value
v: decreases the value
Press ENTER.
3
The regular display appears again.
14
Page 15

1
23
Advanced Operation
FM/AM Reception
Reading the monitor and display window
Standby mode
When the unit is in standby mode with
only the clock indication shown, pressing
SOURCE shows the selected source on
the monitor or the display window.
Note
When the monitor is open, DSPL on the
card remote commander cannot be used
during radio reception.
Information on the selected source is shown on the monitor
or display window (when monitor is closed).
Monitor indication during radio reception
4
5
6
ST
M1F
No.
6977MHz
AIONTST
DSO EQ7
New
.
LOUD
Age
1 0:30
1 Source type and frequency band
2 Preset number (1 - 6)
3 Frequency
4 Station memo (name of station, etc.)
5 Pictograms
6 Graphics display
7 Clock indication
7
Notes
• Up to 8 characters. (Only upper-case characters are available.)
• “........” appears when no name assigned.
Various settings are shown as pictograms.
Example)
ST: Stereo reception
LOUD: “Loudness” is set to “on”
Normally, the current settings for DSO (page 32) and EQ7
(page 33) are shown here.
Pressing LIST on the card remote commander brings up a list
of stored stations (page 22).
While setting the equalizer curve, the graphic equalizer is
shown (page 34).
When “Dual Information” is set to “on”, the time is also
shown (page 39).
continue to next page t
15
Page 16

FM/AM Reception
Note
The following information is not shown
on the display window:
• List display
• Menu display
Display window indication during radio reception
12 3
1 Source type and frequency band
2 Preset number
3 Frequency/clock/ATT status/station name
When “Dual Information” is set to “on”, the time is shown
here (page 39).
“ATT” is shown constantly while attenuation is on.
By pressing the following buttons on the card remote
commander , the corresponding information can be called
up in fields 1 - 3.
DSPL: Displays the name stored by the Station Memo function
(page 20).
DSO: Displays the virtual speakers setting by the DSO (Dynamic
Soundstage Organizer) function (page 32).
The setting changes with each press of the button.
EQ7: Displays the preprogrammed equalizer curve setting by the
EQ7 function (page 33).
The setting changes with each press of the button.
SOUND: Displays the sound characteristics (bass, treble, balance,
fader and subwoofer) settings (page 35).
The displayed setting item changes with each press of the
button, and the B and b buttons can be used to change the
setting.
16
Page 17

MODE
MENU
SOURCE
1-6
B/b
V/v
ENTER
Storing stations automatically — Best Tuning Memory (BTM)
You can have the unit automatically select stations with the
strongest signals in the selected band and store these in the
order of their frequency. 6 stations each can be stored in the
FM1, FM2, FM3, AM1, and AM2 bands, resulting in a total
of 18 FM stations and 12 AM stations.
Follow the steps below with the card remote commander
while the monitor is open.
Press SOURCE to switch to radio reception.
1
Press MODE to select the frequency band in
2
which you want to store stations.
Notes
• When there are not enough broadcast
stations or when the signal is weak,
automatic storing may not be
performed.
• When a preset station number is shown
on the monitor, stations will be stored
in subsequent numbers.
With each press of the button, the unit cycles through the
bands in the following order:
FM1 t FM2 t FM3 t AM1 t AM2
Press MENU.
3
Press V or v to select “BTM” (Best Tuning
4
Memory).
BTM
Press ENTER.
5
“BTM” flashes, and strong stations in the selected band are
memorized in the order of their frequency.
When the storing process is completed, the regular display
appears again.
17
Page 18

FM/AM Reception
To listen to stored stations
In radio reception, press the number buttons
or V and v to select the desired station.
When you cannot receive stored
stations, such as when driving in a
different area
Lightly press B or b. The unit automatically
searches for a station and stops when one is
found. Continue this process until you have
found a station you want to listen to.
If the station search stops very often, you can
restrict the search to strong stations only, by
selecting the local mode as follows.
Follow the steps below with the card remote
commander while the monitor is open.
Press MENU in radio reception.
1
Press V or v to select “Local Seek”.
2
Press b to select “on”, and press
3
ENTER.
You can now search for local stations by
lightly pressing B or b.
When there is noise during stereo
reception
Selecting mono reception as follows may
improve the sound.
Follow the steps below with the card remote
commander while the monitor is open.
Press MENU in FM radio reception.
1
Press V or v to select “Mono”.
2
Press b to select “on”, and press
3
ENTER.
To return to normal reception
Select “off” in step 3.
Automatically adjusting reception
bandwidth (IF Auto mode)
When reception conditions deteriorate while
listening to a stereo broadcast, automatic
bandwidth limiting may result in a switch to
mono. You can enable stereo reception also
under such conditions.
Follow the steps below with the card remote
commander while the monitor is open.
To return to normal reception
Select “off” in step 3.
18
Press MENU in FM radio reception.
1
Press the V or v to select “IF”.
2
Press b to select “Wide”, and press
3
ENTER.
Note
When “IF Auto” is set to “Wide”, there may be increased
noise during reception.
Page 19

Storing stations manually
1-6
You can also store manually desired stations in memory.
Press SOURCE to switch to radio reception.
1
B/b
SOURCE
Note
When a station is stored in a number
button where another station is already
stored in the same band, the previous
content will be overwritten.
Tips
•You can store 6 stations each in the
FM1, FM2, FM3, AM1, and AM2
bands, resulting in a total of 18 FM
stations and 12 AM stations.
• If you know the frequency of the
station you want to listen to, press and
hold B or b to locate the approximate
frequency, then press B or b repeatedly
to fine adjust to the desired frequency
(manual tuning).
ENTER
Press MODE to select the frequency band in
2
which you want to store stations.
With each press of the button, the unit cycles through the
bands in the following order:
FM1 t FM2 t FM3 t AM1 t AM2
Lightly press B or b.
3
The unit automatically searches for stations and stops when
one is found. Continue to search until the desired station is
found.
Hold down the desired number button for
4
more than 2 seconds until the indication
“Memory” (on monitor) or “MEM” (on display
window) is shown.
M1F
No.
6977MHz
ryoMem
The number of the selected number button is shown, and the
station is stored in that button.
.
19
Page 20

FM/AM Reception
Assigning a name to a station (Station Memo)
When you have assigned a name to a broadcast station, the
name will be shown while the station is being received. Up
to 62 station names can be stored, and each name can be up
to 8 characters long.
MENU
Tips
• Each press of the V button cycles
through A t B t C t ... Z t 0 t 1
t 2 t ... t 9 t + t - t * t / t
\ t > t < t . t u (space).
The v button cycles in the opposite
order.
• Holding down the V or v button moves
quickly through the character selection.
• Only upper-case characters are
available.
• Select u to insert a space between
characters.
• When you have made a mistake, press
the B button until the character flashes
and then enter the correct character.
B/b
V/v
ENTER
Follow the steps below with the card remote commander
while the monitor is open.
Receive the station to which you want to
1
assign a name, and press MENU.
Press V or v to select “Name Edit”.
2
N ame Ed i t
Press ENTER.
3
N ame Ed i t
Press V or v to select the character, and press
4
b to move to the next character.
N ame Ed i t
B
To insert a space, press b again.
Repeat step 4 until all desired characters are
5
input. Then press ENTER.
The regular display appears again.
20
Page 21

Deleting a name
Press MENU in tuner mode.
1
Press V or v to select “Name Delete”.
2
N ame De l e t e
Press ENTER.
3
Press V or v to select the station name to
4
delete.
N ame De l e t e
BBC R
Press and hold ENTER for more than 2 seconds.
5
The name for the selected station is deleted.
To delete other station names, repeat steps 4 - 5.
1
Tip
When all stored names are deleted, the
regular display appears automatically.
Press MENU twice.
6
The regular display appears again.
21
Page 22

FM/AM Reception
V/v
Note
Reception frequency is displayed on the
station name list screen when no name is
assigned.
LIST
ENTER
Searching for a station by name (List)
When names have been assigned to broadcast stations, you
can search for them by name. For information on how to
assign names, see page 20.
To activate list display, follow the steps below with the card
remote commander while the monitor is open.
Press LIST in tuner mode.
1
The list display of preset station names appears.
M1F
.
89
99
07
.6
.8
.2
1:300
LOUD
0
0
0
4
5
6
S
T
LIST
No.
1977MHz
CR1BB
1BBCR1
2BBCR2
3
ABC 1
Tips
•To cancel the station selection, press
LIST before step 3.
• The indication “Bb“ is used to
indicate the currently received station.
Press V or v to select the desired station.
2
Press ENTER.
3
When the selection is completed, the regular display appears
again.
22
Page 23

CD/MD/”MG Memory Stick” Playback
Preparation: To listen CDs, MDs, or “MG
Memory Sticks” on this unit, an optional
Sony CD/MD changer and/or MG
Memory Stick system-up player must be
connected to the connection box.
Standby mode
When the unit is in standby mode with
only the clock indication shown, pressing
SOURCE shows the selected source on
the monitor or the display window.
*1 When pressing DSPL, “NO Disc
Name”, “NO Album Name”, “NO
Track Name”, or “NO ID3 Tag”
indicates that there is no disc name,
album name, track name, or ID3 tag.
*2 Labeling a CD (page 27).
*3 “LP2” or “LP4” is displayed only
when an optional MD unit with the
MDLP function is connected, and an
MDLP disc is played.
*4 “MP3” is displayed only when an
optional MP3 compatible CD unit is
connected, and an MP3 file is played.
Notes
• Some characters cannot be displayed.
Characters and signs which cannot be
displayed appear as “*”.
• For some CD TEXT discs with very
many characters, information may not
scroll. Or information may not be
displayed.
• This unit cannot display the artist
name for each track of a CD TEXT disc
or an album.
Tip
When Auto Scroll is set to off, and the
disc/track/album is changed, the disc/
track/album name does not scroll.
Reading the monitor and display window
Information on the selected source is shown on the monitor
or display window (when monitor is closed).
Monitor indication during CD playback
1
CD1 D I SC
5
6
7
1 Source type and changer number
2 Disc number/Album number (only when an MP3 file is
played)
3 Track number
4 Play time
5 Disc name*
6 Pictograms*3*
Various settings are shown as pictograms.
Example)
: Track
: Album
: Disc
: Changer
7 Graphics display
Normally, the current settings for DSO (page 32) and EQ7
(page 33) are shown here.
Pressing LIST on the card remote commander brings up a list
of disc names (page 29).
While setting the equalizer curve, the graphic equalizer is
shown (page 34).
8 Clock indication
When “Dual Information” is set to “on”, the time is also
shown (page 39).
1*2
4
23 4
RTACK
1225.4
Disc
Name
REP LOUD
DSO EQ7
continue to next page t
New
Age
10:30
8
23
Page 24

CD/MD/”MG Memory Stick” Playback
Note
The following information is not shown
in the display window:
• List display
• Menu display
Tip
For MP3 file playback:
• Disc and album number is not
available.
• Album name, ID3 tag can also be
displayed with pressing DSPL button.
Display window indication during CD playback
13245
1 Source type and changer number
2 Disc number
3 Track number
4 Play time
When “Dual Information” is set to “on”, the time is shown
here (page 39).
“ATT” is shown constantly while attenuation is on.
5 Clock/ATT status/disc name
By pressing the following buttons on the card remote
commander , the corresponding information can be called
up in fields 1 - 5.
DSPL: Displays disc name, track name with each press of the
button when available (page 27).
DSO: Displays the virtual speakers setting by the DSO (Dynamic
Soundstage Organizer) function (page 32).
The setting changes with each press of the button.
EQ7: Displays the preprogrammed equalizer curve setting by the
EQ7 function (page 33).
The setting changes with each press of the button.
SOUND: Displays the sound characteristics (bass, treble, balance,
fader and subwoofer) settings (page 35).
The displayed setting item changes with each press of the
button, and B and b can be used to change the value.
*
*
24
*When the track number is more than 99 and the play time
is over 100 minutes, the play time is not displayed
correctly.
Example) Track number: 100, Play time: 123.59
Display window indication: 10023.59
Page 25

Repeat playback
REP
Note
The repeat playback cannot be used for
“MG Memory Sticks”.
You can repeatedly play back the current track, or all tracks
on the current album/disc.
REPEAT••TRACK: Repeat of current track
REPEAT
REPEAT
••ALBUM: Repeat of current album (during playback of
MP3 files)
••DISC: Repeat of current disc
Pressing the number button 1 (REP) during CD or MD
playback selects the repeat playback mode.
With each press of the button, the monitor indication cycles
through the following settings.
REPEAT••TRACK REPEAT••ALBUM
REPEAT
To cancel repeat playback
••off REPEAT••DISC
Select “REPEAT••off”.
25
Page 26
CD/MD/”MG Memory Stick” Playback
Shuffle playback
SHUF
Tip
During shuffle playback, the same track
may be played more than once.
Notes
• The shuffle playback cannot be used
for “MG Memory Sticks”.
• “SHUFFLE••All” does not enable
random sequencing of CD and MD
sources.
• “SHUFFLE••All” can be selected when
2 or more optional changers of the
same media are connected.
You can play back all tracks on the current album/disc or
all discs in the changer in random order.
SHUFFLE••ALBUM: Shuffle playback of current album (during
playback of MP3 files)
SHUFFLE
SHUFFLE
••DISC: Shuffle playback of current disc
••CHANGER: Shuffle playback of all discs in current
changer
SHUFFLE
••ALL: Shuffle playback of all discs or albums in current
source (CD or MD).
Pressing the number button 2 (SHUF) during CD or MD
playback selects the shuffle playback mode.
With each press of the button, the monitor indication cycles
through the following settings.
SHUFFLE••ALBUM SHUFFLE••DISC
SHUFFLE••
off
SHUFFLE••
ALL
SHUFFLE••
CHANGER
To cancel shuffle playback
Select “SHUFFLE••off”.
26
Page 27

MENU
B/b
V/v
ENTER
Tips
• Each press of the V button cycles
through A t B t C t ... Z t 0 t 1
t 2 t ... t 9 t + t - t * t / t
\ t > t < t . t u (space).
The v button cycles in the opposite
order.
• Holding down the V or v button
moves quickly through the character
selection.
• Only upper-case characters are
available.
• Select u to insert a space between
characters.
• When you have made a mistake, press
the B button until the character flashes
and then enter the correct character.
Labeling a CD - Disc Memo (CD unit with the CUSTOM FILE function)
What is a Custom File?
This feature allows you to store a title for a CD and display
it every time the disc is played. When you use an optional
available Sony CD changer compatible with the Custom
File feature, each CD can have a name of up to 8 characters,
and you can use the Disc Memo and List functions.
Follow the steps below with the card remote commander
while the monitor is open.
CAUTION
Do not use the CUSTOM FILE feature while driving, or
perform any other function which could divert your
attention from the road.
Press MENU during CD playback.
1
Press V or v to select “Name Edit”.
2
N ame Ed i t
Press ENTER.
3
N ame Ed i t
Press V or v to select the character, and press
4
b to move to the next character.
Note
Repeat/shuffle play is suspended until
the Name Edit is complete.
N ame Ed i t
B
To insert a space, press b again.
Repeat step 4 until all desired characters are
5
input. Then press ENTER.
The regular display appears again.
27
Page 28
CD/MD/”MG Memory Stick” Playback
Deleting a name
Press MENU while selecting CD unit with
1
CUSTOM FILE function.
Press V or v to select “Name Delete”.
2
N ame De l e t e
Press ENTER.
3
Press V or v to select the disc name to delete.
4
N ame
Press and hold ENTER for more than 2 seconds.
5
The name is deleted.
To delete other disc names, repeat steps 4 - 5.
De l e te
BAC
H
Press MENU twice.
6
The regular display appears again.
28
Page 29

LIST
Locating a disc by name (List)
In the following cases, you can select a disc by name.
• CDs using Disc Memo (page 27)
• MDs
• CDs using CD TEXT information, when you play CD
TEXT disc on a CD unit with CD TEXT function.
To activate list display, follow the steps below with the card
remote commander while the monitor is open.
V/v
ENTER
Note
The following indications may appear on
the disc name list screen.
• “– – – – – – – –”: No disc inserted.
• “········”: No name assigned.
• “????????”: Disc information has not
been read yet.
Tip
To cancel the disc selection, press LIST
before step 3.
Press LIST while playing a disc in the CD/MD
1
changer.
D1CDSCI
catacTo
REP LOUD
1
LIST
The list display of disc names appears.
Press V or v to select the desired disc.
2
Press ENTER.
3
Playback starts.
Toc a tca
2
3
4
5
TACKR
12254
.
6
7
8
9
01
1:300
29
Page 30

TV/Other Video Components
Preparation: To view TV programs on
this unit, an optional Sony TV tuner unit
XT-63V must be connected to the
connection box.
MODE
MENU
SOURCE
Tips
• Storing desired channels beforehand
makes it easy to select a program for
viewing.
•You can store 6 stations each in the TV1
and TV2 bands, resulting in a total of 12
stations.
• When no button is operated for about 5
seconds, the regular display appears
again.
• The LIST function can be used for TV
as well as radio reception.
B/b
V/v
ENTER
Storing channels
Follow the steps below with the card remote commander
while the monitor is open.
Press SOURCE to select “TV” or “VIDEO”.
1
When “VIDEO” is displayed, go to step 2.
Press MODE to switch between “TV1” and
2
“TV2”.
Press MENU.
3
Press V or v to select “Auto Memory”.
4
A uto Memory
Press ENTER.
5
“Auto Memory” flashes, and strong stations are memorized
in the order of their frequency.
When the storing process is completed, the regular display
appears again.
TV operation
Selection/search Operation steps
Selecting a channel
Store a channel
manually
Assign name to a TV
station
Press SOURCE to select “TV” or “VIDEO”. Press
MODE to select “TV1” or “TV2”. Press number
buttons 1 - 6 or V and v.
1 Press SOURCE to select “TV” or “VIDEO”.
2 Press MODE to switch between “TV1” and
“TV2”.
3 Proceed steps 3 and 4 of “Storing stations
manually” (page 19).
Proceed steps described in “Assigning a name to a
station” (page 20). (Receive “TV1” or “TV2” in
step 1.)
30
Page 31

MENU
B/b
V/v
Selecting the screen mode
Besides the normal mode (4:3), the screen can also be set to
full mode, zoom mode, or widezoom mode.
The screen mode can be selected using the card remote
commander, after opening up the monitor.
Select TV or VIDEO, then press MENU.
1
Press V or v to select “Wide Mode”.
2
ENTER
Press B or b to select the desired screen mode.
3
Screen mode changes with each press of , as follows.
Normal: Original picture
with 4:3 aspect ratio
Full: Original 4:3 picture is
expanded sideways to fill
the screen; top and bottom
are squashed.
,
M
WideZoom: Only right and
left portions of original 4:3
picture are expanded
sideways.
Zoom: Original 4:3 picture
is expanded sideways to
fill the screen; top and
bottom are cut off.
m
<
Press ENTER.
4
The screen changes to the selected mode.
31
Page 32

Sound Settings
DSO
B/b
Notes
• When listening to FM broadcasts,
turning DSO off may sometimes yield
better results.
• In some cars and with some program
material, the DSO effect may not be
very pronounced.
Dynamic Soundstage Organizer (DSO)
If your speakers are installed into the lower part of the
doors, the sound will come from below and may not be
clear. The DSO (Dynamic Soundstage Organizer) function
is designed to improve the listening experience by creating
a soundstage with “virtual speakers”. Sound is perceived
as coming from locations in which no actual speakers are
installed.
You can store the DSO setting for each source.
Selecting the DSO mode
Setting Function
DSO••1 Soundstage located in lower front area
DSO••2 Soundstage located in dashboard area
DSO••3 Soundstage located at about face height
DSO••off Cancel DSO
Select the source (CD, MD, radio, etc.) for
1
which you want to use DSO.
Press DSO to select the DSO mode.
2
Each press of the button (or the B/b after having pushed the
DSO button once) cycles through the following settings.
DSO··1 DSO··2 DSO··3
DSO··off
After about 3 seconds, the regular display appears again.
To cancel DSO
Select “DSO••off” in step 2.
32
Page 33

EQ7
MENU
B/b
V/v
ENTER
Note
While DSO is being used, the equalizer
action is reduced to optimize the effect.
Tip
When no button is operated for about 3
seconds, the regular display appears
again.
Using the equalizer (EQ7)
This unit incorporates 7 preset equalizer curves for various
types of music. In addition, you can also alter the curves
and store your own settings.
You can store different equalizer settings for each source.
Selecting the equalizer curve
Select the source (CD, MD, radio, etc.) for
1
which you want to use the equalizer.
Press EQ7 to select the best curve.
2
Each press of the button (or B/b after having pressed EQ7
once) cycles through the following settings.
EQ7··Vocal EQ7··Club EQ7··Jazz EQ7··New Age
EQ7··offEQ7··Xplod EQ7··Custom EQ7··Rock
To cancel the equalizer
Select “EQ7••off” in step 2.
33
Page 34

Sound Settings
Tip
Pressing EQ7 for more than 2 seconds
displays the EQ7 tune setting instead of
executing steps 2 - 4.
Storing a personalized equalizer curve
Follow the steps below with the card remote commander
while the monitor is open.
Select the source (CD, MD, radio, etc.) for
1
which you want to use the equalizer.
Press MENU.
2
Press V or v to select “EQ7 Tune”.
3
EQ7 T une
Notes
• When “EQ••off” is selected, the
equalizer curve cannot be adjusted.
• The following figure on the monitor
does not change when the EQ7 tune
setting is changed.
Tip
The level adjustment range is ±10 dB.
Press ENTER.
4
Press B or b (or the EQ7 button) to select an
5
equalizer curve.
EQ7 T une
V ocal
Press ENTER.
6
Press B or b to select the frequency.
7
With each press of the button, the unit cycles through the
frequencies in the following order:
62 Hz 1.0 kHz396 Hz157 Hz
6.3 kHz16 kHz 2.5 kHz
Press V or v to adjust the level.
8
Repeat steps 7 and 8 to adjust the equalizer curve.
Press MENU twice.
9
The regular display appears again.
34
To return the equalizer curve to the factory default setting
Hold down ENTER in step 7 or 8 for at least 2 seconds.
Page 35

Adjusting the sound characteristics (BAS/TRE/BAL/FAD/SUB)
In addition to the functions described in the preceding
sections, this unit allows adjusting the following items.
B/b
SOUND
ATT
Tip
When no button is operated for about 3
seconds, the regular display appears
again.
BAS (Bass): Bass level
TRE (Treble): Treble level
BAL (Balance): Left/right speaker balance (output in opposite
channel is attenuated)
FAD (Fader): Front/rear speaker balance (output in opposite
channel is attenuated)
SUB (Subwoofer): Subwoofer output level
The adjustment procedure is the same for every item. The
example below is for adjusting the balance.
Adjusting the balance
Select the source (CD, MD, radio, etc.).
1
Press SOUND and select “BAL”.
2
BAL
LR
Within 3 seconds, press B or b to make the
3
adjustment.
Tip
When the interface cable of a car
telephone is connected to the ATT lead,
the unit decreases the volume
automatically when a telephone call
comes in (Telephone ATT function).
Quickly attenuating the sound
Press the ATT button.
“ATT••on” is shown, and the volume is attenuated.
While attenuation is on, an icon is shown at the bottom of
the monitor screen, or the indication “ATT” is shown on
the display window.
To restore the original volume, press ATT again or press
VOL +. “ATT••off” is shown, and the volume is restored.
Source Sound Memory
This unit automatically memorizes the DSO and equalizer
settings separately for each source (FM, AM, CD, MD/MS,
TV, VIDEO). This feature is called Source Sound Memory. It
lets you listen to each source with optimized settings.
35
Page 36

Sound Settings
MENU
Setting the low-pass filter (LPF)
This setting lets you control the frequency response of a
subwoofer connected to the subwoofer audio output. By
choosing the appropriate low-pass filter cutoff frequency,
you can ensure that the subwoofer provides solid bass
without drawing attention to itself. For example, if the
B/b
78 Hz setting is selected, only signal components below
78 Hz are sent to the subwoofer.
V/v
Cut-off frequency
off
Level
Frequency (Hz)
Selecting the subwoofer cutoff frequency
Follow the steps below with the card remote commander
while the monitor is open.
Select the source (CD, MD, radio, etc.).
1
Press MENU.
2
Press V or v to select “LPF”.
3
LPF
78Hz
Press B or b to select the cutoff frequency.
4
Each press of the button cycles through the following
settings:
78 Hz y 125 Hz y off (default setting)
Press MENU.
5
The regular display appears again.
36
Page 37

MENU
Setting the high-pass filter (HPF)
This setting lets you control the frequency response to fit
the characteristics of installed speakers. By choosing the
appropriate high-pass filter cutoff frequency, you can
ensure that the speakers produce crisp mid/high-range
sound. For example, if the 78 Hz setting is selected, only
B/b
signal components above 78 Hz are sent to the speakers.
V/v
Selecting the speaker output cutoff
frequency
Proceed the following steps with the card remote
commander while the monitor is open.
Select the source (CD, MD, radio, etc.).
1
Press MENU.
2
Press V or v to select “HPF”.
3
HPF
Cut-off frequency
off
Level
Frequency (Hz)
78Hz
Press B or b to select the cutoff frequency.
4
Each press of the button cycles through the following
settings:
off (default setting) y 78 Hz y 125 Hz
Press MENU.
5
The regular display appears again.
37
Page 38

Sound Settings
MENU
Setting the sound level for connected AUX components
The sound output level of external video components can
be adjusted when they are connected to the, INPUT1 and
INPUT2 of the supplied connection box.
V/v
Selecting the source
SOURCE
ENTER
Note
If the indication “VIDEO1” or “VIDEO2”
does not appear when pressing SOURCE,
see “Sound and display settings” (page
39) and set “AUX-Video” to “on”.
Note
External components’ sound output may
vary. Adjusted sound level of one
component may be too loud for another.
Press SOURCE to select “VIDEO1, VIDEO2”.
Adjusting the output level
Press MENU.
1
Press V or v to select “Aux Sound Level”.
2
Aux Sound Level
Press ENTER.
3
Press V or v to select a setting that matches
4
the output level of the connected component.
The level adjustment range is ±6 dB.
Aux Sound Leve
1dB
Press ENTER.
5
The regular display appears again.
l
38
Page 39

Other Functions
Sound and display settings
Outline
If the setting applies only to a particular
source, the menu item does not appear while
that source is not selected. In the following
explanation, the name of the source is given
in brackets for such cases.
For setting operation, see “Changing a
setting” on page 41.
Setup menu
• Clock
See page 14.
• Beep
To turn beeps on or off.
• RM Direction
Selects the operation direction of the
optional rotary commander. (See page 42)
rev: Rotation direction suits mounting at
right side of steering column.
norm: Rotation direction suits mounting at
left side of steering column.
• Monitor Tune
To adjust the picture.
With each press of the V button, the setting
item cycles through the following order:
Brightness Color Hue
Brightness: T darker, brighter t
Color: T less, more t
Hue: T reddish, greenish t
• Auto Scroll (when CD, MD is selected)
When an MD or a CD TEXT compatible CD
is played and SOURCE is set to CD or MD,
a disc or track change will cause the disc
name or track name to scroll automatically
if this setting is “on”. On the monitor, the
name will scroll if it is more than 12
characters long and on the display window
if it is more than 8 characters long. During
playback of an MP3 disc, the album name
and ID3 tag will also scroll.
on: Scroll display of more than 12 characters
for the monitor or 8 characters for the
display window.
off: Auto-scroll is disabled.
• AUX-Video (standy mode)
To set video source selectable.
Display menu
• Dual Information
To turn clock display always on or off.
•Dimmer
To change the brightness of the monitor.
Auto: Dimmed when the car lights are turned
on (only when connected to the car power
supply).
on: Dimmed.
off: Not dimmed.
• Rear Monitor Out
To select the source output to a rear
monitor.
Video1
Video2
Front: Selected source is output to a rear
monitor. When the selected source is not a
video source, no video signal is output.
• Wide Mode (when TV, VIDEO, CD* is selected)
To change the screen mode. (See page 31)
With each press of the b button cycles
through the following setting:
WideZoom NormalFull Zoom
* When “Video Mix Play” is “on”.
•Video Mix Play (CD only)
To display video while playing CDs*.
on: On screen display (OSD) is off, when CD
is selected.
auto/off: On screen display (OSD) is on.
* An optional CD changer and an optional video
source such as video camera recorder must be
connected. The video cable, originating from the
video source, must be connected to the terminal
(yellow) labeled “INPUT” of the supplied
connection box.
39
Page 40

Other Functions
Reception mode menu
• Local Seek (when FM, AM is selected)
To turn local reception on or off. (See page
18)
• Mono (when FM is selected)
To fix FM reception in Mono. (See page 18)
• IF (when FM is selected)
When noise impairs broadcast reception,
the reception frequency bandwidth is
automatically adjusted. (See page 18)
Auto: Reception frequency bandwidth is
automatically controlled.
Wide: Reception frequency bandwidth is
increased.
Sound menu
• EQ7 Tune
To adjust the preset equalizer curves. (See
page 34)
•HPF
To set the high-pass filter. (See page 37)
Edit menu
• Name Edit (when FM, AM, TV, CD is selected)
To assign names to CDs. (See page 20, 27)
• Name Delete (when FM, AM, TV, CD is
selected)
To delete names assigned to CDs. (See page
21, 28)
• BTM (when FM, AM is selected)
To store strong broadcast stations
automatically in memory. (See page 17)
• Auto Memory (when TV is selected)
To store strong broadcast stations
automatically in memory. (See page 30)
• LPF
To set the low-pass filter. (See page 36)
• Loudness
The loudness function emphasizes bass and
treble at low volume levels, to maintain a
natural sound balance.
• AUX Sound Level (when AUX-Video is
selected)
To adjust the sound level of external video
components when the AUX-Video is
selected. (See Page 38)
40
Page 41

Changing a setting
Settings can be changed using the card
remote commander, after opening up the
monitor.
MENU
Press MENU.
1
Press V or v to select the desired
2
item.
Press B or b to select the desired
3
setting (for example “on” or “off”).
Press ENTER or MENU.
4
B/b
V/v
ENTER
41
Page 42

Other Functions
Using the rotary commander
The XAV-7W can be controlled with the
optional rotary commander RM-X4S.
After installing the rotary commander, attach
the appropriate label according to the
orientation of the commander.
ATT
DSPL
MODE
SOUND
DSPL
MODE
OFF
OFF
SOURCE
SOUND
SOUND
VOL knob
DSPL
MODE
Pressing MODE
In tuner mode: FM1 t FM2 t FM3 t AM1
t AM2
In CD mode*: CD1 t CD2 t CD3 t ...
In MD mode*: MD1 t MD2 t MD3 t ...
In video mode: TV1* t TV2* t VIDEO1 t
VIDEO2
* Displayed only if respective component (available
separately) is connected to the supplied connection
box.
Rotating VOL knob
Changes the listening volume.
Pressing ATT
Instantly attenuates the sound. Press the
button again or operate the VOL knob to
restore the volume.
Pressing OFF
One brief push sets the unit to the standby
mode. A long push (2 seconds or more) turns
power off.
Pressing SOURCE
When the XAV-7W is in the standby
condition, pressing SOURCE once turns
power on. Each subsequent push of the
button cycles through the following program
source selections:
FM/AM t CD * t MD/MS * t
TV*/VIDEO t FM/AM t ...
* Displayed only if respective optional component is
connected.
Pressing SOUND
Allows adjusting the sound characteristics.
Has the same effect as SOUND on the card
remote commander.
Pressing DSPL
Changes the screen display. Has the same
effect as the DSPL button on the card remote
commander.
42
Page 43

Briefly rotating and releasing SEEK/AMS knob
In tuner mode: Tune in stations
automatically. Hold longer to adjust to a
desired frequency.
In CD/MD/MS mode*: Skip tracks. Hold
longer to fast-forward, and release to
return to playback.
In TV mode*: Tune in stations automatically.
Hold longer to adjust to a desired channel.
Pushing in and rotating VOL knob
Changing the operative direction
The operative direction of controls is factoryset as shown below.
To increase
To decrease
If you need to mount the rotary commander
on the right hand side of the steering column,
you can reverse the operative direction.
Press SOUND for 2 seconds while pushing the
VOL knob.
FM/AM/TV*: Receive preset stations.
CD/MD*: Change disc.
To change stations or discs, you need to push
in and rotate the knob every time.
After several seconds, the regular display
appears again.
* When an optional Sony CD/MD changer, MG Memory
Stick System-up Player or TV tuner unit is connected.
Tip
You can also change the operative direction of these
controls with the unit (page 39).
43
Page 44

Other Features
Additional Information
Card remote commander precautions
• Do not leave the card remote commander
on the dashboard, on the steering wheel, or
in other locations exposed to direct
sunlight. Especially in summer, very high
temperatures can occur in such locations,
causing deformation of the commander.
•When parking the car in sunlight, remove
the card remote commander from its
mounting location and store it in the glove
compartment or in another protected
location.
• In direct sunlight, the signals from the card
remote commander may sometimes not be
picked up properly by the unit.
In such a case, move the commander closer
to the remote sensor on the front panel of
the main unit.
About the liquid crystal display (LCD) panel
segments are defective and may not light up
properly. However, these segments will not
interfere with your viewing.
Replacing the lithium battery
Under normal conditions, batteries will last
approximately 1 year. (The service life may be
shorter, depending on the conditions of use.)
When the battery becomes weak, the range of
the card remote commander becomes shorter.
Replace the battery with a new CR2025
lithium battery. Use of any other battery may
present a risk of fire or explosion.
+ side up
• Do not press on the LCD panel on the
monitor unit as doing so can distort the
picture or cause a malfunction. The picture
may become unclear, or the LCD panel may
be damaged.
•Notes on cleaning
— Clean the LCD panel with a slightly
damp soft cloth.
— Do not use solvents such as benzine,
thinner, commercially available cleaners
or antistatic spray.
• Do not use this unit in temperatures under
5 °C or over 45 °C.
• If your car was parked in a cold or hot
place, the picture may not be clear. The
monitor is not damaged. The picture will
become clear after the temperature in your
car becomes normal.
Some stationary blue or red dots may appear
on the monitor.
These are called bright spots, and can happen
with any LCD.
The LCD panel is highly sophisticated, and
more than 99.99 % of the segments used in
the panel are flawless. However, there is a
possibility that less than 0.01 % of the
Notes on lithium battery
• Keep the lithium battery out of the reach of
children. Should the battery be swallowed,
immediately consult a doctor.
•Wipe the battery with a dry cloth to assure
a good contact.
• Be sure to observe the correct polarity when
installing the battery.
• Do not hold the battery with metallic
tweezers, otherwise a short-circuit may
occur.
WARNING
Battery may explode if mistreated.
Do not recharge, disassemble, or dispose of
in fire.
44
Page 45

If movement of the monitor has been impeded during the monitor setting
If movement of the monitor during opening
or closing has been impeded by the gear shift
lever or another obstacle, follow the steps
below to set again.
Set the ignition key of the car to
1
OFF.
Take off obstacle .
Press the bottom of the monitor
2
frames to tilt the monitor forward.
Do not touch nor press the remote sensor nor
monitor display.
Dismounting the unit
Press and hold OFF for more than 2
1
seconds to turn off the unit.
Insert the supplied tool between
2
the unit and the frame, and rotate
90° to release the hidden
mounting spring. Repeat on the
opposite side and remove the
frame.
13
10 mm (
/32 in.)
Tip
To tilt the monitor forward smoothly, press the
designated position by your thumbs of both hands
while putting your forefingers at the back side of
the monitor.
Set the ignition key to ON and
3
press the Reset button on the unit.
(See “Resetting the unit” on page 6.)
Note
When the Reset button is pushed, the memorized angle
is reset to the status of your purchase.
90°
continue to next page t
45
Page 46

Additional Information
Insert a flathead screwdriver
3
between the bracket and
mounting spring. Gently pry the
spring toward the unit while
pulling the unit out a little. Repeat
on the opposite side and remove
the unit.
4 mm (3/16 in.)
46
Page 47

Troubleshooting
When there seems to be a problem with the
unit, check the following points first. For
more details on optional units, please refer to
supplied instruction manual of each pruduct.
If the problem persists, there may be a
connection fault, or the unit may be defective.
In such a case, contact the Technical
Information Center, your dealer, or the
nearest Sony service center.
General
No sound.
, Raise the volume.
, Cancel the ATT function.
, Check the speaker output settings.
, When only 2 speakers are used, set the
fader fully to the front or rear.
The contents of the memory were
lost.
, The reset button was pressed.
, The battery lead or battery was
disconnected.
, Power supply wiring is not connected
correctly.
No beep sound when controls are
operated.
, The beep sound was turned off.
, Set “Beep” (page 39) to “on”.
, An optional power amplifier is connected
and you are not using the built-in amplifier.
Nothing is shown in the display
window.
, The clock display was turned off by
pressing OFF for 2 seconds.
, Press SOURCE.
, Check the “Video Mix Play” setting.
Power does not come on.
, Power supply wiring is not connected
correctly.
, Check the connection. If everything is in
order, check the fuse.
, The unit is installed in a car without ACC
position of the ignition key.
, Press SOURCE.
Power does not go off.
, The unit is installed in a car without ACC
position of the ignition key.
,Press OFF for more than 2 seconds.
Stored stations and correct time
are erased.
, The fuse has blown.
Makes noise when the ignition key
is in the ON, ACC, or OFF position.
, The leads are not matched correctly with
the car’s accessory power connector.
“ATT” appears in the display, and
volume is reduced.
, The telephone ATT control lead is shorting
on a metal part of the car.
,Insulate any exposed wires with
electrical tape to avoid any short circuit.
Noise is heard.
, Keep antenna cable, bus cable, and audio
cables as far away as possible from power
supply wiring.
Power antenna does not extend.
, The power antenna does not have a relay
box.
Controls have no effect.
, Press the reset button.
No response when pressing the
buttons on the card remote
commander.
, The card remote commander battery
maybe exhausted.
No picture, or no sound when you
connect the optional equipment.
, The cord has been disconnected.
Connect the cord securely.
47
Page 48

Troubleshooting
CD/MD
A disc cannot be loaded.
, The CD/MD is forcibly inserted upside
down or in the wrong way.
The sound skips from vibration.
, The unit is not installed in a sturdy part of
the car.
Playback skips. Sound is
interrupted. Sound is distorted.
, Disc is dirty.
, Clean the disc.
, Disc is scratched or otherwise damaged.
No sound from MD playback.
, Unrecorded MD is being played.
, Insert a recorded MD.
Playback does not begin.
, Defective MD or dirty CD.
, CD-R/CD-RW that is not finalized.
, You tried to playback a CD-R/CD-RW not
designed for audio use.
, Some CD-Rs/CD-RWs may not play due to
its recording equipment or the disc
condition.
A disc is automatically ejected.
, The ambient temperature exceeds 50 °C
(122 °F).
Radio/TV
Cannot receive. Only noise is
heard.
, Connect the power antenna control lead
(blue) or accessory power supply lead (red)
to the power supply lead of the car’s
antenna booster (for cars with imprinted
antenna in rear or side window). For
details, consult your dealer.
, Check car antenna connections.
, Power antenna not raised.
, Check power antenna control lead.
, Check reception frequency.
, Set DSO to “off” (page 32).
Cannot select “VIDEO1” and
“VIDEO2”.
, Check connection of the connection box.
, Check if connections are made correctly.
, If “Aux-Video” is set to “off”, “VIDEO1”
and “VIDEO2” cannot be selected.
, Set “Aux-Video” to “on” (page 39).
Tuner does not stop on desired
station when SEEK button is
pressed.
, If “Local Seek” is set to “on”, only strong
stations will be received.
, Set “Local Seek” to “off” (page 25).
, Signal is too weak for automatic tuning.
, Hold down B or b for manual tuning.
Stereo broadcast sounds noisy or
distorted. ST indicator flashes.
, Check reception frequency.
, Signal is weak.
, Select mono reception (page 25).
, Set DSO to “off” (page 32).
A program broadcast in stereo is
heard in monaural.
, The unit is in monaural reception mode.
, Cancel monaural reception mode
(page 18).
Preset tuning is not possible.
, Store the correct frequency in the memory.
, The broadcast signal is too weak.
Interference occurs in during FM
reception.
, The wide mode is selected.
, Set the IF mode to “IF Auto” (page 18).
48
Sound settings
No sound, or very low volume.
,Incorrect balance adjustment caused low
level in a certain speaker.
, Adjust balance (page 35).
Page 49

CD/MD error messages
When there is a problem related to a CD or MD changer connected to the unit, an alarm tone is
heard and a flashing error indication is shown for 5 seconds.
Error displays
BLANK
(Blank Disc*)
ERROR
(Error*)
HI TEMP
(High Temp*)
NO DISC
(NO Disc*)
NO MAG
(NO Magazine*)
NO MUSIC
(NO Music*)
NOTREADY
(Not Ready*)
RESET
(Push Reset*)
* Shown in the LCD monitor.
Messages
LCL Seek +/–
“ “ or
“ “
Cause
MD is not recorded.
Disc is inserted upside down.
MD cannot be played.
CD is dirty.
Unit has become too hot.
No disc is inserted in changer.
No magazine is inserted in changer.
CD does not contain music information.
MD changer panel is open.
Operation is impaired due to an unspecified
problem.
Description
The Local Seek mode is on during automatic tuning (page 20).
You have reached the beginning or the end of the disc and you cannot go any further.
Remedy
Insert other MD.
Insert disc correctly.
Insert other MD.
Clean CD.
Turn power off and wait a while.
Insert disc.
Insert magazine.
Insert other CD.
Close panel.
Press the reset button on the unit.
49
Page 50

Specifications
AUDIO POWER SPECIFICATIONS
POWER OUTPUT AND TOTAL HARMONIC DISTORTION
22 watts per channel minimum continuous average power into 4 ohms, 4 channels driven from
20 Hz to 20 kHz with no more than 5 % total harmonic distortion.
Media center/receiver
Monitor section
Display type Wide LCD color monitor
Size 7 in.
System TFT active matrix
Number of pixel
336,960 pixels
Tuner section
FM
Tuning range
87.5 - 107.9 MHz
Intermediate frequency
10.7 MHz
Usable sensitivity
8 dBf
Frequency response
30 - 15,000 Hz
Selectivity 75 dB (400 kHz)
S/N ratio 66 dB (stereo)
72 dB (mono)
Harmonic distortion at 1 kHz
0.6% (stereo)
0.3% (mono)
Separation 35 dB at 1 kHz
AM
Tuning range
530 - 1,710 kHz
Intermediate frequency
10.7 MHz/450 kHz
Usable sensitivity
30 µV
General
Power requirements
12 V DC, from car battery (negative
ground)
Inputs FM/AM antenna (1)
Power supply (1)
Telephone ATT control lead (1)
Illumination control lead (1)
Remote control input connector (1)
Outputs Front audio (1)
Rear audio (1)
Subwoofer (mono)
Power antenna relay control lead (1)
Power amplifier control lead (1)
I/O connector
Dedicated 22-pin connector
Tone controls Bass ±7.5 dB at 100 Hz
Treble ±7.5 dB at 10 kHz
Loudness +8 dB at 100 Hz
+2 dB at 10 kHz
Dimensions With monitor closed
Approx. 178 × 50 × 185 mm (7
Mass Approx. 1.7 kg (3 lb 12 oz)
Supplied accessories
Card remote commander RM-X118
Connection box (1)
Parts for installation and
Operating Instructions (1 set)
Optional accessories
TV tuner unit XT-63V
Rotary commander RM-X4S
3
2 × 7
/8 in.) (W × H × D)
(1) (incl. 1 lithium battery)
connections (1 set)
1
/8 ×
Amplifier section
Outputs Speaker outputs
(sure seal connectors)
Speaker impedance
4 - 8 ohms
Maximum power output
45 W × 4 (into 4 ohms, at 1 kHz)
50
Page 51

Connection box
Inputs Video/audio
(Sony bus compatible, 1)
BUS control input connector (1)
Video/audio (2)
Outputs Video/audio (1)
Connection to main unit
Dedicated 22-pin connector
Dimensions Approx. 136 × 77 × 30 mm (5
Mass Approx. 260 g (9 oz)
Design and specifications are subject to
change without notice.
1
3
/8 × 1 3/16 in.) (W × H × D)
3
/8 ×
51
Page 52

2
Page 53

Table des matières
Caractéristiques ............................................................................................... 4
Précautions ...................................................................................................... 5
Démarrage
Préparatifs........................................................................................................ 6
Position des commandes ................................................................................ 8
Opérations de base
Ecoute de la radio ou de CD/MD/”MG Memory Stick”............................... 10
Visualisation de la télévision/d’autres composants vidéo ......................... 12
Réglage de l’horloge ..................................................................................... 14
Opérations avancées
Réception FM/AM
Indications du moniteur et de
l’afficheur ..................................................15
Mémorisation automatique des stations
— Mémoire des meilleurs accords
(BTM) .........................................................17
Mémorisation manuelle de stations .........19
Dénomination d’une station (Mémo
stations) ..................................................... 20
Recherche d’une station par son nom
(Liste) .........................................................22
Lecture de CD/MD/”MG Memory Stick”
Lecture du moniteur et de l’afficheur.......23
Lecture répétée ............................................25
Lecture aléatoire ..........................................26
Etiquetage d’un CD - Disc Memo
(lecteur CD à fonction CUSTOM
FILE)...........................................................27
Localisation d’un disque par son titre
(Liste) .........................................................29
Télévision/Autres composants vidéo
Mémorisation de chaînes ...........................30
Sélection du mode d’écran.........................31
Réglage du son
Dynamic Soundstage Organizer
(DSO)(organisateur de plateau musical
dynamique)...............................................32
Emploi de l’égaliseur (EQ7) .......................33
Ajustement des caractéristiques du son
(BAS/TRE/BAL/FAD/SUB) .................35
Réglage du filtre passe-bas (LPF)..............36
Réglage du filtre passe-haut (HPF)...........37
Réglage du niveau sonore des composants
AUX raccordés..........................................38
Autres fonctions
Réglages de son et d’affichage...................39
Emploi de la commande rotative ..............42
Autres caractéristiques
Informations additionnelles
Précautions concernant la carte
télécommande ..........................................44
Panneau d’affichage à cristaux liquides
(LCD) .........................................................44
Remplacement de la pile au lithium.........44
Si le mouvement du moniteur a été gêné
pendant son réglage ................................45
Démontage de l’appareil ............................45
Dépannage......................................... 47
Spécifications ..................................... 50
3
Page 54

Caractéristiques
Bienvenue
Merci d’avoir porté votre choix sur le récepteur/Media Center Sony. Lisez attentivement ce
mode d’emploi avant de mettre l’appareil en service, puis conservez-le pour toute
référence ultérieure.
Moniteur TFT motorisé dans le tableau de bord 7 pouces
Cette conception de moniteur dans le tableau de bord innovatrice permet le montage de
l’appareil dans une seule fente DIN. A la pression d’une touche, un écran à rapport
d’aspect large 7 pouces glisse en avant pour la visualisation agréable de la télévision ou
d’un DVD. (Tuner de télévision et système de changeur DVD Sony sont disponibles en
option.)
Contrôle de bus Sony et tuner FM/AM
Le tuner FM/AM intégré, ainsi qu’un changeur CD/MD Sony et un lecteur Memory Stick
MG, peuvent commodément être opérés à partir de l’appareil. Le XAV-7W est l’élément
central idéal d’une chaîne audio/vidéo automobile sophistiquée.
Ampli intégré 45 W × 4
Malgré sa compacité, le XAV-7W est doté de 4 canaux d’amplificateur puissants
fournissant chacun 45 W, pour une reproduction musicale sans effort.
Le DSO crée un plateau musical virtuel
Le DSO (Dynamic Soundstage Organizer) développé par Sony améliore l’écoute en créant
un plateau musical avec “enceintes virtuelles”. Elles sont placées directement à l’avant, et
non pas dissimulées dans la partie inférieure des portes. Le résultat: un son plus net et plus
transparent.
Courbes de fréquence EQ7
7 courbes d’égalisation préprogammées pour différents types de musique sont
sélectionnables à la pression d’une touche. Vous pouvez aussi régler précisément chaque
courbe en ajustant le niveau du signal dans les 7 bandes de fréquences, pour créer un son
très personnalisé.
2 entrées A/V et 1 sortie arrière moniteur
Outre le tuner de télévision en option, deux dispositifs A/V optionnels peuvent être
raccordés simultanément.
Le logo “XM Ready” indique que ce produit commande un tuner XM Sony (vendu
séparément).
Consultez votre revendeur agréé Sony le plus proche pour obtenir plus d’informations sur
le tuner XM. Pour en savoir plus sur le fonctionnement du tuner XM, reportez-vous au
manuel utilisateur fourni avec le tuner XM.
4
Page 55

Précautions
Pour éviter tout risque de blessure ou d’accident,
lisez les précautions suivantes avant l’installation
et la mise en service de l’appareil.
Sécurité
Respectez les règles et les réglementations de la
circulation locales.
• Pendant la conduite
–Vous ne devez pas regarder ou opérer le
moniteur. Cela pourrait vous distraire et
provoquer un accident.
Garez votre voiture à un endroit sûr pour
regarder le moniteur et opérer l’appareil.
• Pendant le fonctionnement
– N’insérez pas vos mains, doigts ou des objets
extérieurs dans l’appareil pendant le
fonctionnement du moniteur. Cela pourrait
provoquer des blessures ou endommager
l’appareil.
– Conservez les petits éléments hors de portée
des enfants.
• Ne touchez pas l’antenne de télévision et le
moniteur en même temps par temps orageux.
Une électrocution est possible.
• Si la voiture est restée garée au soleil, ce qui a
provoqué une augmentation de température
importante dans la voiture, laissez l’appareil
refroidir avant de l’utiliser.
Prévention des accidents
L’image du téléviseur/vidéo apparaît
seulement une fois que vous avez garé la
voiture et mis le frein de stationnement.
Quand la voiture se met en mouvement,
l’image du téléviseur/vidéo disparaît pour des
raisons de sécurité, après affichage de la note
suivante.
PICTURE OFF
FOR
YOUR SAFETY
N’opérez pas un appareil raccordé au tuner de
télévision et ne regardez pas le moniteur
pendant la conduite. Distrait par l’image sur le
moniteur, vous pourriez provoquer un accident
de la circulation.
• N’utilisez pas la fonction CUSTOM FILE
pendant la conduite, et n’effectuez aucune autre
fonction susceptible de détourner votre attention
de la route.
Installation
•L’installation de l’appareil par un technicien ou
un agent de service qualifié est recommandée.
– Si vous essayez d’installer l’appareil vous-
même, lisez attentivement le manuel
“Installation/Raccordements” fourni. Vérifiez
bien que l’appareil est installé correctement.
– Une installation incorrecte peut provoquer
une fuite de la batterie ou un court-circuit.
• Si l’appareil ne fonctionne pas correctement,
vérifiez d’abord les raccordements (voir le
manuel “Installation/Raccordements” fourni.).
Si tout est correct, vérifiez le fusible.
• Remplacement du fusible
– Au remplacement, utilisez uniquement un
fusible de même ampérage.
Fusible Fusible
5
–L’emploi d’un fusible différent ou le pontage
des contacts avec un fil est très dangereux et
peut causer de sérieux dommages.
•Protégez la surface de l’appareil contre les
dommages
– N’exposez pas sa surface à des produits
chimiques tels qu’insecticides, sprays pour
cheveux, insectifuges etc.
– Ne laissez pas des matériaux en caoutchouc
ou plastique en contact avec l’appareil
pendant longtemps. Sinon, sa finition pourrait
être affectée, ou une déformation pourrait
apparaître.
•A l’installation, mettez bien la clé de contact en
position d’arrêt. Si elle est sur marche et que
vous essayez d’installer l’appareil, une fuite de
la batterie ou un court-circuit sont possibles.
•A l’installation, prenez garde de n’endommager
aucune partie de la voiture, par exemple tuyaux,
flexibles, réservoir de carburant ou câbles
électriques en utilisant une perceuse. Un
incendie ou un accident pourraient survenir.
• Condensation d’humidité
Si la température ambiante de l’appareil change
brutalement, de l’humidité peut se condenser à
l’intérieur de l’afficheur. Attendez simplement
que l’humidité s’évapore et que l’appareil
revienne à la normale.
Emplacement d’installation
• N’installez pas l’appareil à un emplacement:
– où la vue du conducteur sera obstruée quand
le moniteur est en position sortie ou fermée.
– Le fonctionnement de la voiture ou du
système airbag pourrait être gêné.
– Cela gênera le fonctionnement de la voiture,
en particulier le volant, le levier de vitesses ou
la pédale de frein.
Pour toute question ou problème
concernant cet appareil, consultez le
revendeur Sony le plus proche.
5
Page 56

Démarrage
Préparatifs
Réinitialisation de l’appareil
Remarques
• A la pression du bouton Reset, l’heure
et tous les réglages mémorisés sont
perdus et doivent être reprogrammés.
• La réinitialisation prend environ dix
secondes après la pression du bouton
Reset.
•A la fin de la réinitialisation, appuyez
sur OPEN/CLOSE et vérifiez que le
moniteur sort correctement.
Remarques
• La carte télécommande est inutilisable
pour sortir ou rentrer le moniteur.
• Si le mouvement de sortie ou de retrait
du moniteur a été gêné par le levier de
vitesses ou un autre obstacle, voir “Si le
mouvement du moniteur a été gêné
pendant son réglage” (page 45).
Avant de faire fonctionner l’appareil pour la première fois,
après le remplacement de la batterie du véhicule ou la
modification des raccordements, vous devez réinitialiser
l’appareil.
Appuyez sur le bouton Reset avec un objet pointu comme
un stylo à bille. N’utilisez pas d’aiguille et n’appuyez pas
trop fort sur le bouton pour éviter tout dommage.
Appuyez sur Reset
Bouton Reset
DISC
VOL
.>
SEEK
SOURCE MODE AT T
OFF
OPEN/
CLOSE
Sortie du moniteur
Appuyez sur OPEN/CLOSE sur le moniteur.
OPEN/CLOSE
Le moniteur glisse hors de l’appareil, et l’image apparaît.
6
Page 57

Remarque
Ne déplacez pas le moniteur de la main.
Remarques
• Quand le moniteur est rentré, MENU,
LIST et ENTER sur la carte
télécommande sont inutilisables.
• Si le mouvement de sortie ou de retrait
du moniteur a été gêné par le levier de
vitesses ou un autre obstacle, voir “Si le
mouvement du moniteur a été gêné
pendant son réglage” (page 45).
• Si OPEN/CLOSE est pressé pendant la
sortie ou le retrait du moniteur, il peut
ne pas s’arrêter à l’angle d’origine.
Dans ce cas, appuyez sur ANGLE –/+
pour ajuster l’angle.
Ajustement de l’angle du moniteur
L’angle du moniteur peut être ajusté pour améliorer la
visibilité.
Appuyez plusieurs fois sur ANGLE –/+.
L’ajustement du moniteur s’effectue par étapes discrètes.
ANGLE –/+
Touche +: Le moniteur est incliné en arrière.
Touche –: Le moniteur est incliné en avant.
Le réglage est mémorisé, et le moniteur sera remis au
même angle à la sortie suivante après sa rentrée.
Rentrée du moniteur
Appuyez sur OPEN/CLOSE.
Le moniteur se rétracte dans l’appareil, et seules les
fonctions audio de l’appareil sont utilisables.
OPEN/CLOSE
A noter
Si vous avez appuyé sur OFF à la sortie
du moniteur, vous pouvez appuyer sur
SOURCE pour faire réapparaître l’image.
* Avertissement à l’installation dans
une voiture à clé de contact sans
position ACC (accessoire)
Après la mise de la clé de contact en
position d’arrêt, appuyez bien sur OFF
sur l’appareil pendant 2 secondes pour
éteindre l’affichage de l’horloge.
Sinon, cet affichage ne s’éteindra pas et
la batterie s’usera.
Pour mettre l’appareil sous tension
quand il est hors tension, appuyez sur
SOURCE sur l’appareil. (Il ne peut pas
être mis sous tension avec la carte
télécommande.)
OFF
Mise hors tension
•
Si vous appuyez sur OFF sur la carte télécommande
quand le moniteur est sorti, le son sera coupé, et l’appareil
passera en mode d’attente, dans lequel seule l’indication de
l’horloge est active.
•L’appareil sera automatiquement mis hors tension en
mettant la clé de contact sur OFF*.
7
Page 58

Position des commandes
Appareil
Moniteur rentré
1
6
2
7
3
8
4
9
0
5
1 Touches DISC –/+
2 Bouton Reset
3 Capteur pour la carte télécommande
4 Touches VOL –/+ (réglage du volume)
5 Touches SEEK/AMS –/+
* Avertissement à l’installation dans une voiture à clé de contact sans position ACC (accessoire)
Après la mise de la clé de contact en position d’arrêt, appuyez bien sur OFF sur l’appareil pendant 2 secondes pour
éteindre l’affichage de l’horloge. Sinon, cet affichage ne s’éteindra pas et la batterie s’usera.
6 Afficheur
7 Touche OFF (attente/mise hors tension)*
8 Touche OPEN/CLOSE
9 Touche ATT
0 Touche MODE
qa Touche SOURCE (mise sous tension/radio/CD/MD/
VIDEO ou TV)
qa
Moniteur sorti
1 Touches ANGLE (réglage de
l’angle du moniteur) –/+
2 Capteur pour la carte télécommande
8
1
2
Page 59

Carte télécommande
Cet appareil est opérable avec la carte télécommande. Par mesure de sécurité, arrêtez la
voiture avant d’utiliser la télécommande, ou demandez à un passager de le faire.
1
2
3
4
5
6
7
8
9
1 Touche DSPL (changement de mode d’affichage)
2 Touches numériques
3 Touche DSO
4 Touche MENU
5 Touche SOURCE (mise sous tension/radio/CD/MD/
AUX)
6 Touches B/b SEEK/AMS –/+
7 Touche SOUND
8 Touche OFF (attente/mise hors tension)
9 Touches VOL (réglage du volume) +/–
0
qa
qs
qd
qf
qg
0 Touche EQ7
qa Touche MODE
qs Touche LIST
qd Touches V/v DISC +/–
qf Touche ENTER
qg Touche ATT
Remarque
Si l’appareil est mis hors tension en appuyant sur OFF 2 secondes, il pourra être opéré avec la carte télécommande
seulement si SOURCE sur l’appareil est pressé d’abord pour l’activer.
A noter
Voir “Remplacement de la pile au lithium” pour les détails sur le remplacement de la pile (page 44).
9
Page 60

Opérations de base
Ecoute de la radio ou de CD/MD/”MG Memory Stick”
Ecoute de la radio
Remarque
L’écoute de la radio ou de CD/MD/”MG Memory Stick”
(Memory Stick MG) est possible indépendamment du
réglage du moniteur (sorti ou rentré).
1 Sélectionnez le tuner.
A chaque pression de SOURCE, la sélection change dans l’ordre:
FM/AM t CD* t MD*/MS* t TV*.
* Affiché seulement si le composant correspondant en option est raccordé.
2 Sélectionnez la bande
souhaitée.
A chaque pression de MODE, la sélection change dans
l’ordre: FM1 t FM2 t FM3 t AM1 t AM2.
V
O
L
.
S
E
E
K
>
S
O
U
R
C
E
M
O
D
E
A
T
T
O
P
C
E
L
N
O
/
S
E
10
ANGLE
3 Sélectionnez la station souhaitée.
Accord automatique
Appuyez légèrement sur SEEK/AMS –/+ jusqu’à la réception de la station souhaitée.
Accord manuel
Voir “Mémorisation manuelle de stations” (page 19).
A noter
L’antenne s’étendra automatiquement pendant la sélection de la réception radio.
Page 61

Ecoute de CD/MD/”MG
Memory Stick”
1 Sélectionnez CD, MD ou MS.
A chaque pression de SOURCE, la sélection change dans l’ordre:
FM/AM t CD* t MD*/MS* t TV*.
* Affiché seulement si le composant correspondant (en option) est raccordé.
Réglez le volume.
3
Sélectionnez
un disque.
Appuyez sur V ou
vsur la carte
télécommande
pour sélectionner
un disque (page 9).
V
O
L
.
S
E
E
K
Préparatifs: Pour écouter des CD, MD, ”MG Memory
Stick” sur cet appareil, un changeur CD/MD Sony en
option et/ou un lecteur Memory Stick MG doit être
raccordé à la boîte de raccordement.
2
Sélectionnez le changeur.
A chaque pression de la touche MODE,
la sélection est commuté à l’ordre:
CD: CD1 t CD2 t CD3 t ...
MD: MD1 t MD2 t MD3 t ...
>
S
O
U
R
C
E
M
O
D
E
A
T
T
O
P
C
E
L
N
O
/
S
E
A
N
G
LE
Recherche de l’emplacement souhaité (recherche manuelle)
Maintenez SEEK/AMS –/+ pressé et relâchez-le à l’emplacement souhaité.
Localisation du début d’une plage
(Capteur automatique de musique [AMS])
Appuyez sur SEEK/AMS –/+ une fois pour chaque plage que vous souhaitez sauter.
Précautions au raccordement de lecteur(s) MGS-X1 et MD
Cet appareil reconnaît le MGS-X1 en tant que lecteur MD.
• Pour lire sur le MGS-X1, appuyez sur SOURCE pour sélectionner “MS” ou “MD”. Si “MS” apparaît dans l’affichage
de source, la lecture commence sur le MGS-X1. Si “MD” apparaît dans l’affichage de source, appuyez sur MODE
pour sélectionner “MS” pour commencer la lecture.
• Pour lire sur un lecteur MD, appuyez sur SOURCE pour sélectionner “MD” ou “MS”. Si le lecteur MD souhaité
s’affiche, la lecture commence. Si “MS” ou un autre lecteur MD s’affiche, appuyez sur MODE pour sélectionner le
lecteur MD souhaité et commencer la lecture.
11
Page 62

D
IS
C
S
O
U
R
C
E
S
E
E
K
M
O
D
E
A
T
T
OFF
OPEN/
CLOSE
.
>
V
O
L
Visualisation de la télévision/d’autres composants vidéo
Visualisation de la télévision
1 Faites sortir le moniteur
(page 6).
2 Sélectionnez TV.
A chaque pression de SOURCE, la sélection change dans l’ordre:
FM1 t CD* t MD*/MS* t TV*.
La pression de MODE quand “TV” est sélectionné commute la sélection dans
l’ordre: TV1* t TV2* t VIDEO1 t VIDEO2.
*
Affiché seulement si le composant correspondant en option est raccordé.
Réglez le volume.
Préparatifs: Pour regarder des programmes de télévision
sur cet appareil, un tuner de télévision Sony XT-63V en
option doit être raccordé à la boîte de raccordement.
Sortie/rentrée du moniteur
V
O
L
.
S
E
E
K
>
S
O
U
R
C
E
M
O
D
E
A
T
T
O
P
C
E
L
N
O
/
S
E
ANGLE
3 Sélectionnez une chaîne.
Emploi de l’accord automatique
12
Appuyez légèrement sur SEEK/AMS –/+ jusqu’à la réception
de la chaîne souhaitée.
Page 63

Visualisation d’autres
composants vidéo
Préparatifs: Un système de changeur DVD Sony en
option doit être raccordé à la boîte de raccordement pour
pouvoir visualiser des DVD sur cet appareil.
1 Faites sortir le moniteur
(page 6).
2 Sélectionnez VIDEO1 ou VIDEO2.
A chaque pression de SOURCE, la sélection change dans l’ordre:
FM1 t CD* t MD*/MS* t TV*.
La pression de MODE quand “TV” est sélectionné commute la sélection dans
l’ordre: TV1* t TV2* t VIDEO1 t VIDEO2.
*
Affiché seulement si le composant correspondant (en option) est raccordé.
V
O
L
.
S
E
E
K
>
S
O
U
R
C
E
D
IS
C
V
O
L
.
S
E
E
K
>
S
O
U
R
C
E
M
O
D
E
A
T
T
O
P
C
E
L
N
O
/
S
E
O
FF
M
O
D
E
A
T
T
O
P
E
N
/
C
L
O
S
E
ANGLE
13
Page 64

Réglage de l’horloge
Cet appareil utilise l’indication de l’heure 12 heures.
Pour régler l’horloge, utilisez la carte télécommande quand
le moniteur est sorti.
Appuyez sur MENU.
1
MENU
B/b
V/v
ENTER
A noter
Quand “Dual Information” est réglé à
“on”, l’heure est toujours affichée (page
39).
Appuyez sur V ou v pour sélectionner “Clock”.
Appuyez sur ENTER.
2
1 Appuyez sur V ou v pour régler les heures.
2 Appuyez sur b pour passer aux minutes, puis appuyez
sur V ou v pour régler les minutes.
V: augmente la valeur
v: diminue la valeur
Clock
Clock
1:00
Appuyez sur ENTER.
3
L’affichage normal réapparaît.
14
Page 65

1
23
Opérations avancées
Réception FM/AM
Indications du moniteur et de l’afficheur
Mode d’attente
Quand l’appareil est en mode d’attente
avec seulement l’indication de l’horloge
affichée, la pression de SOURCE montre
la source sélectionnée sur le moniteur ou
l’afficheur.
Remarque
Quand le moniteur est sorti, DSPL sur la
carte télécommande n’est pas utilisable
pendant la réception radio.
Les informations sur la source sélectionnée sont indiquées
sur le moniteur ou l’afficheur (quand le moniteur est
rentré).
Indications du moniteur pendant la réception radio
4
5
6
ST
M1F
No.
6977MHz
AIONTST
DSO EQ7
New
.
LOUD
Age
1 0:30
1 Type de source et bande de fréquences
2 Numéro de préréglage (1 - 6)
3 Fréquence
4 Mémo station (nom de la station etc.)
5 Pictogrammes
6 Affichage graphique
7 Indication de l’horloge
7
Remarques
•8 caractères maximum. (Seules les majuscules sont disponibles.)
• “........” apparaît si aucun nom n’est affecté.
Différents réglages sont indiqués sous forme de
pictogrammes.
Exemple:
ST: réception stéréo
LOUD: “Loudness” est réglé sur “on”
Normalement, les réglages actuels pour DSO (page 32) et EQ7
(page 33) sont indiqués ici.
La pression de LIST sur la carte télécommande fait apparaître
la liste des stations mémorisées (page 22).
L’égaliseur graphique est indiqué (page 34) pendant le réglage
de la courbe d’égalisation.
Quand “Dual Information” est réglé sur “on”, l’heure apparaît
aussi (page 39).
suite sur la plage suivante t
15
Page 66

Réception FM/AM
Remarque
Les informations suivantes
n’apparaissent pas sur l’afficheur:
• Liste
• Menu
Indication de l’afficheur pendant la réception radio
12 3
1 Type de source et bande de fréquences
2 Numéro de préréglage
3 Fréquence/horloge/état ATT/nom de station
Quand “Dual Information” est réglé à “on”, l’heure apparaît
ici (page 39).
“ATT” apparaît en continu quand l’atténuation est activée.
En appuyant sur les touches suivantes sur la carte
télécommande, les informations suivantes peuvent être
rappelées dans les zones 1 - 3.
DSPL: Affiche le nom mémorisé avec la fonction Station Memo
(page 20).
DSO: Affiche le réglage des enceintes virtuelles par la fonction
DSO (Dynamic Soundstage Organizer) (page 32).
Le réglage change à chaque pression de la touche.
EQ7: Affiche le réglage de la courbe d’égaliseur préprogrammé
avec la fonction EQ7 (page 33).
Le réglage change à chaque pression de la touche.
SOUND: Affiche les caractéristiques sonores (graves, aigus,
balance, fader et subwoofer) (page 35).
Le réglage affiché change à chaque pression de la touche et les
touches B et b sont utilisables pour modifier le réglage.
16
Page 67

MODE
MENU
SOURCE
1-6
B/b
V/v
ENTER
Mémorisation automatique des stations — Mémoire des meilleurs accords (BTM)
Cet appareil peut sélectionner automatiquement les
stations à signaux les plus puissants sur la bande
sélectionnée et les mémoriser dans l’ordre des fréquences.
6 stations peuvent être mémorisées pour chaque bande
FM1, FM2, FM3, AM1 et AM2, ce qui fait un total de 18
stations FM et 12 stations AM.
Procédez comme suit sur la carte télécommande quand le
moniteur est sorti.
Appuyez sur SOURCE pour commuter à la
1
réception radio.
Remarques
• Quand le nombre de stations radio est
insuffisant ou que le signal est faible, la
mémorisation automatique peut ne pas
se faire.
• Quand un numéro de station préréglée
apparaît sur le moniteur, les stations
sont mémorisées sur des numéros
subséquents.
Appuyez sur MODE pour sélectionner la bande
2
de fréquences pour laquelle vous souhaitez
mémoriser des stations.
A chaque pression de la touche, l’appareil passe
cycliquement entre les bandes dans l’ordre suivant:
FM1 t FM2 t FM3 t AM1 t AM2
Appuyez sur MENU.
3
Appuyez sur V ou v pour sélectionner “BTM”
4
(Mémoire des meilleurs accords).
BTM
Appuyez sur ENTER.
5
“BTM” clignote, et les stations puissantes de la bande
sélectionnée sont mémorisées dans l’ordre de leur fréquence.
A la fin du processus de mémorisation, l’affichage normal
réapparaît.
17
Page 68

Réception FM/AM
Pour écouter des stations
mémorisées
En réception radio, appuyez sur les touches
numérotées ou V et v pour sélectionner la
station souhaitée.
Si la réception des stations
mémorisées est impossible, par
exemple si vous conduisez dans
une zone différente
Appuyez légèrement sur B ou b. L’appareil
recherche automatiquement une station et
s’arrête quand il en trouve une. Continuez
cette procédure jusqu’à ce que vous trouviez
la station que vous voulez écouter.
Si la recherche de station s’arrête très souvent,
vous pouvez limiter la recherche aux stations
puissantes seulement en sélectionnant le
mode local comme suit.
Procédez comme suit sur la carte
télécommande quand le moniteur est sorti.
Appuyez sur MENU en réception
1
radio.
Appuyez sur V ou v pour
2
sélectionner “Local Seek”.
Appuyez sur b pour sélectionner
3
“on”, puis appuyez sur ENTER.
En cas de bruit pendant la
réception stéréo
La sélection de la réception mono comme suit
peut améliorer le son.
Procédez comme suit sur la carte
télécommande quand le moniteur est sorti.
Appuyez sur MENU en réception
1
radio FM.
Appuyez sur V ou v pour
2
sélectionner “Mono”.
Appuyez sur b pour sélectionner
3
“on”, et appuyez sur ENTER.
Pour revenir en réception normale
Sélectionnez “off” à l’étape 3.
Ajustement automatique de la
largeur de la bande de réception
(mode IF auto)
Si les conditions de réception se dégradent
pendant l’écoute d’une émission stéréo, la
limitation automatique de la largeur de bande
peut se traduire par une commutation à
mono. Vous pouvez aussi valider la réception
stéréo dans ces conditions.
Procédez comme suit sur la carte
télécommande quand le moniteur est sorti.
La recherche sur les stations locales est
maintenant possible en appuyant légèrement
sur B ou b.
Pour revenir en réception normale
Sélectionnez “off” à l’étape 3.
18
Appuyez sur MENU réception radio
1
FM.
Appuyez sur V ou v pour
2
sélectionner “IF”.
Appuyez sur b pour sélectionner
3
“Wide”, et appuyez sur ENTER.
Remarque
Quand “IF Auto” est réglé à “Wide”, il peut y avoir plus
de bruit pendant la réception.
Page 69

SOURCE
1-6
B/b
ENTER
Mémorisation manuelle de stations
Les stations souhaitées peuvent aussi être mémorisées
manuellement.
Appuyez sur SOURCE pour commuter à la
1
réception radio.
Appuyez sur MODE pour sélectionner la bande
2
de fréquences dans laquelle vous souhaitez
mémoriser des stations.
A chaque pression de la touche, l’appareil passe
cycliquement entre les bandes dans l’ordre suivant:
FM1 t FM2 t FM3 t AM1 t AM2
Remarque
Quand une station est mémorisée sur
une touche numérique sur laquelle une
autre station est déjà mémorisée sur la
même bande, le contenu précédent sera
écrasé.
A noter
•Vous pouvez mémoriser 6 stations sur
chacune des bandes FM1, FM2, FM3,
AM1 et AM2, ce qui fait un total de 18
stations FM et 12 stations AM.
• Si vous connaissez la fréquence de la
station que vous souhaitez écouter,
maintenez B ou b pressé pour localiser
la fréquence approximative, puis
appuyez plusieurs fois sur B ou b pour
ajuster précisément à la fréquence
souhaitée (accord manuel).
Appuyez légèrement sur B ou b.
3
L’appareil recherche automatiquement des stations et
s’arrête quand il en trouve une. Continuez à chercher jusqu’à
ce que la station souhaitée soit trouvée.
Maintenez la touche de numéro souhaité
4
pressée au moins 2 secondes jusqu’à ce que
l’indication “Memory” (au moniteur) ou
“MEM” (sur l’afficheur) apparaisse.
M1F
No.
6977MHz
ryoMem
Le numéro de la touche sélectionnée s’affiche, et la station est
mémorisée dessus.
.
19
Page 70

Réception FM/AM
MENU
B/b
V/v
ENTER
Dénomination d’une station (Mémo stations)
Quand vous avez assigné un nom à une station radio, ce
nom apparaîtra à la réception de la station. Jusqu’à 62
noms de station peuvent être mémorisés, chacun d’un
maximum de 8 caractères.
Procédez comme suit sur la carte télécommande quand le
moniteur est sorti.
Captez la station que vous souhaitez
1
dénommer, et appuyez sur MENU.
Appuyez sur V ou v pour sélectionner
2
“Name Edit”.
N ame Ed i t
Appuyez sur ENTER.
3
N ame Ed i t
A noter
• Chaque pression de la touche V fait
passer cycliquement entre A t B t C
t ... Z t 0 t 1 t 2 t ... t 9 t +
t - t * t / t \ t > t < t .
t u (espace).
La touche v fait passer cycliquement en
sens inverse.
• Maintenir la touche V ou v pressée fait
passer rapidement dans la sélection de
caractères.
• Seules les majuscules sont utilisables.
• Sélectionnez u pour insérer un espace
entre des caractères.
• En cas d’erreur, appuyez sur la touche
B jusqu’à ce que le caractère clignote,
puis entrez le caractère correct.
Appuyez sur V ou v pour sélectionner un
4
caractère, puis sur b pour passer au caractère
suivant.
N ame Ed i t
B
Appuyez à nouveau sur b pour insérer un espace.
Répétez l’étape 4 jusqu’à ce que tous les
5
caractères souhaités soient entrés, puis
appuyez sur ENTER.
L’affichage normal réapparaît.
20
Page 71

Suppression d’un nom
Appuyez sur MENU en mode tuner.
1
Appuyez sur V ou v pour sélectionner
2
“Name Delete”.
N ame De l e t e
Appuyez sur ENTER.
3
Appuyez sur V ou v pour sélectionner le nom
4
de la station à supprimer.
N ame De l e t e
BBC R
Maintenez ENTER pressé au moins 2 secondes.
5
Le nom de la station sélectionnée est supprimé.
Répétez les étapes 4 et 5 pour supprimer d’autres noms de
station.
1
A noter
Vous pouvez mémoriser un réglage DSO
pour chaque source.
Appuyez deux fois sur MENU.
6
L’affichage normal réapparaît.
21
Page 72

Réception FM/AM
Recherche d’une station par son nom (Liste)
Si des noms ont été assignés aux stations radio, vous
pouvez les chercher par leur nom. Voir la page 20 pour
l’assignation des noms.
V/v
Remarque
La fréquence de réception est affichée sur
l’écran de liste des noms des stations
quand aucun nom n’est assigné.
A noter
• Appuyez sur LIST avant l’étape 3 pour
annuler la station sélectionnée.
• L’indication “Bb“ indique la station
actuellement reçue.
LIST
ENTER
Procédez comme suit sur la carte télécommande quand le
moniteur est sorti pour activer l’affichage de liste.
Appuyez sur LIST en mode tuner.
1
La liste des noms des stations préréglées apparaît.
M1F
No.
1977MHz
CR1BB
S
T
1BBCR1
LIST
2BBCR2
3
ABC 1
Appuyez sur V ou v pour sélectionner la
2
.
89
99
07
.6
.8
.2
1:300
LOUD
0
0
0
4
5
6
station souhaitée.
Appuyez sur ENTER.
3
L’affichage normal réapparaît une fois la sélection terminée.
22
Page 73

Lecture de CD/MD/”MG Memory Stick”
Préparatifs: Pour écouter des CD, MD,
”MG Memory Stick” sur cet appareil, un
changeur CD/MD Sony en option et/ou
un lecteur Memory Stick MG doit être
raccordé à la boîte de raccordement.
Mode d’attente
Quand l’appareil est en mode d’attente
avec seulement l’indication de l’horloge
visible, appuyer sur SOURCE fait
apparaître la source sélectionnée au
moniteur ou sur l’afficheur.
*1 A la pression de DSPL, “NO Disc
Name”, “NO Album Name” ou la
marque ID3. “NO Track Name” ou
“NO ID3 Tag” indique qu’il n’y a pas
de titre de disque, titre d’album, titre
de plage ou de marque ID3.
*2 Etiquetage d’un CD (page 27).
*3 “LP2” ou “LP4” est affiché seulement
quand un lecteur MD en option avec
fonction MDPL est raccordé, et qu’un
disque MDPL est lu.
*4 “MP3” est affiché seulement quand
une platine CD compatible MP3 en
option est raccordée et qu’un fichier
MP3 est lu.
Remarques
• Certains caractères peuvent ne pas être
affichés. Les caractères et signes non
affichables apparaissent sous la forme
“*”.
• Pour certains disques CD TEXT à
nombreux caractères, les informations
peuvent défiler. Ou les informations
peuvent ne pas être affichées.
• Cet appareil ne peut pas afficher le
nom d’artiste pour chaque plage d’un
disque CD TEXT ou d’un album.
A noter
Quand Auto Scroll est désactivé, et que le
disque/plage/album est changé, le nom
du disque/plage/album ne défile pas.
Lecture du moniteur et de l’afficheur
Les informations sur la source sélectionnée sont indiquées
au moniteur ou sur l’afficheur (quand le moniteur est
rentré).
Indications du moniteur pendant la lecture de CD
1
CD1 D I SC
5
6
7
1 Type de source et numéro de changeur
2 Numéro de disque/numéro d’album (seulement à la lecture
d’un fichier MP3)
3 Numéro de plage
4 Temps de lecture
5 Titre du disque*
6 Pictogrammes*3*
Divers réglages sont indiqués sous forme de pictogramme.
Exemple:
: Plage
: Album
: Disque
: Changeur
7 Affichage graphique
Normalement, les réglages actuels pour DSO (page 32) et EQ7
(page 33) sont indiqués ici.
La pression de LIST sur la carte télécommande fait apparaître
la liste des titres de disque (page 29).
L’égaliseur graphique apparaît pendant le réglage de la courbe
d’égalisation (page 34).
8 Indication de l’horloge
Quand “Dual Information” est réglé à “on”, l’heure apparaît
également (page 39).
23 4
RTACK
1225.4
Name
Disc
REP LOUD
DSO EQ7
1*2
4
suite sur la plage suivante t
New
Age
10:30
8
23
Page 74

L
ecture de CD/MD/”MG Memory Stick”
Remarque
Les informations suivantes apparaissent
sur l’afficheur:
•Affichage de liste
•Affichage de menu
A noter
Pour la lecture de fichiers MP3:
• Le numéro de disque et d’album n’est
pas disponible.
• Le nom d’album et la marque ID3
peuvent aussi être affichés en appuyant
sur la touche DSPL.
Afficheur indiquant la lecture de CD
13245
1 Type de source
2 Numéro de disque
3 Numéro de plage*
4 Temps de lecture*
Quand “Dual Information” est réglé à “on”, l’heure apparaît
ici (page 39).
“ATT” est visible en continu quand l’atténuation est activée.
5 Horloge/état ATT/titre de disque
La pression des touches suivantes sur la carte
télécommande permet le rappel des informations
correspondantes dans les zones 1 - 5.
DSPL: Affiche le titre du disque, le titre de la plage, si disponible,
à chaque pression de la touche (page 27).
DSO: Affiche le réglage des enceintes virtuelles par la fonction
DSO (Dynamic Soundstage Organizer) (page 32).
Le réglage change à chaque pression de la touche.
EQ7: Affiche le réglage de la courbe d’égaliseur préprogrammé
avec la fonction EQ7 (page 33).
Le réglage change à chaque pression de la touche.
SOUND: Affiche les caractéristiques sonores (graves, aigus,
balance, fader et subwoofer) (page 35).
Les paramètres de réglage affichés changent à chaque pression
de la touche, et B et b sont utilisables pour modifier la valeur.
24
* Quand le numéro de la plage est supérieur à 99 et le
temps de lecture supérieur à 100 minutes, le temps de
lecture n’est pas affiché correctement.
Exemple: Numéro de plage: 100, Temps de lecture: 123.59
Indications sur l’afficheur: 10023.59
Page 75

Lecture répétée
REP
Note
La lecture répétée est inutilisable pour les
“MG Memory Stick”.
La lecture de la plage actuelle, ou de toutes les plages de
l’album/disque actuel peut être répétée.
REPEAT••TRACK: Répétition de la plage actuelle
REPEAT
REPEAT
••ALBUM: Répétition de l’album actuel (pendant la
lecture de fichiers MP3)
••DISC: Répétition du disque actuel
La pression de la touche numérique 1 (REP) pendant la
lecture de CD ou MD sélectionne le mode de lecture
répétée.
A chaque pression de la touche, l’indication du moniteur
passe cycliquement entre les réglages suivants.
REPEAT••TRACK REPEAT••ALBUM
REPEAT
Pour annuler la lecture répétée
••off REPEAT••DISC
Sélectionnez “REPEAT••off”.
25
Page 76

L
ecture de CD/MD/”MG Memory Stick”
SHUF
A noter
Pendant la lecture aléatoire, la même
plage peut être lue plus d’une fois.
Remarques
• La lecture aléatoire est inutilisable pour
les “MG Memory Stick”.
• “SHUFFLE••ALL” ne permet pas la
mise en séquence des sources CD et
MD.
• “SHUFFLE••ALL” est sélectionnable
quand 2 changeurs en option ou plus
du même support sont raccordés.
Lecture aléatoire
Vous pouvez lire toutes les plages de l’album/disque
actuel ou de tous les disques dans le changeur en ordre
aléatoire.
SHUFFLE••ALBUM: Lecture aléatoire de l’album actuel (pendant
la lecture de fichiers MP3)
SHUFFLE
SHUFFLE
SHUFFLE
La pression de la touche numérique 2 (SHUF) pendant la
lecture d’un CD ou MD sélectionne le mode de lecture
aléatoire.
A chaque pression de la touche, l’indication du moniteur
passe cycliquement entre les réglages suivants.
Pour annuler la lecture aléatoire
Sélectionnez “SHUFFLE••off”.
••DISC: Lecture aléatoire du disque actuel
••CHANGER: Lecture aléatoire de tous les disques dans
le changeur actuel
••ALL: Lecture aléatoire de tous les disques ou albums de
la source actuelle (CD ou MD)
SHUFFLE••ALBUM SHUFFLE••DISC
SHUFFLE••
off
SHUFFLE••
ALL
SHUFFLE••
CHANGER
26
Page 77

MENU
B/b
V/v
ENTER
A noter
• Chaque pression de la touche V fait
passer cycliquement entre A t B t C
t ... Z t 0 t 1 t 2 t ... t 9 t +
t - t * t / t \ t > t < t .
t u (espace).
La touche v fait passer cycliquement en
sens inverse.
• Maintenir la touche V ou v pressée fait
passer rapidement dans la sélection de
caractères.
• Seules les majuscules sont utilisables.
• Sélectionnez u pour insérer un espace
entre des caractères.
• En cas d’erreur, appuyez sur la touche
B jusqu’à ce que le caractère clignote,
puis entrez le caractère correct.
Remarque
La lecture répétée/aléatoire est
suspendue jusqu’à la fin de Name Edit.
Etiquetage d’un CD - Disc Memo (lecteur CD à fonction CUSTOM FILE)
Qu’est-ce qu’un fichier personnalisé?
Cette fonction vous permet de mémoriser un titre pour un
CD et de l’afficher à chaque lecture du disque. Si vous
utilisez un changeur de CD Sony en option compatible
avec la fonction fichier personnalisé, chaque CD peut avoir
un titre de 8 caractères maximum, et les fonctions mémo de
disque et liste sont utilisables.
Procédez comme suit avec la carte télécommande quand le
moniteur est sorti.
ATTENTION
N’utilisez pas la fonction CUSTOM FILE pendant la
conduite, et n’effectuez aucune autre fonction qui pourrait
détourner votre attention de la route.
Appuyez sur MENU pendant le lecture du CD.
1
Appuyez sur V ou v pour sélectionner “Name
2
Edit”.
N ame Ed i t
Appuyez sur ENTER.
3
N ame Ed i t
Appuyez sur V ou v pour sélectionner le
4
caractère, puis sur b pour passer au caractère
suivant.
N ame Ed i t
B
Appuyez à nouveau sur b pour insérer un espace.
Répétez l’étape 4 jusqu’à ce que tous les
5
caractères souhaités soient entrés. Puis
appuyez sur ENTER.
L’affichage normal réapparaît.
27
Page 78

L
ecture de CD/MD/”MG Memory Stick”
Suppression d’un titre
Appuyez sur MENU pendant la sélection du
1
lecteur CD avec la fonction CUSTOM FILE.
Appuyez sur V ou v pour sélectionner
2
“Name Delete”.
N ame De l e t e
Appuyez sur ENTER.
3
Appuyez sur V ou v pour sélectionner le titre
4
de disque à supprimer.
N ame
Maintenez ENTER pressé au moins 2 secondes.
5
Le nom est supprimé.
Pour supprimer d’autres noms de disque, répétez les étapes
4 et 5.
Appuyez deux fois sur MENU.
6
L’affichage normal réapparaît.
De l e te
H
BAC
28
Page 79

V/v
LIST
ENTER
Localisation d’un disque par son titre (Liste)
Dans les cas suivants, vous pouvez sélectionner un disque
par son titre.
• CD utilisant Disc Memo (page 27)
•MD
• CD utilisant des informations CD TEXT, à la lecture de
disques CD TEXT sur un lecteur CD avec fonction CD
TEXT.
Procédez comme suit sur la carte télécommande pour
activer l’affichage de liste quand le moniteur est sorti.
Appuyez sur LIST en lisant un disque dans le
1
changeur de CD/MD.
Remarque
Les indications suivantes peuvent
apparaître sur l’écran de liste des titres
de disques.
• “– – – – – – – –”: Pas de disque inséré
• “········”: Pas de titre assigné
• “????????”: Informations de disque pas
encore lues
A noter
Appuyez sur LIST avant l’étape 3 pour
annuler la sélection de disque.
D1CDSCI
catacTo
REP LOUD
1
LIST
La liste des titres de disque s’affiche.
Appuyez sur V ou v pour sélectionner le
2
Toc a tca
2
3
4
5
TACKR
12254
6
7
8
9
01
.
1:300
disque souhaité.
Appuyez sur ENTER.
3
La lecture démarre.
29
Page 80

Télévision/Autres composants vidéo
Préparatifs: Pour regarder des
programmes de télévision sur cet
appareil, un tuner de télévision Sony
XT-63V en option doit être raccordé à la
boîte de raccordement.
MODE
MENU
SOURCE
A noter
• Mémoriser préalablement les chaînes
facilite la sélection d’un programme à
visualiser.
•Vous pouvez mémoriser 6 chaînes sur
chacune des bandes TV1 et TV2, soit un
total de 12.
• Si aucune touche n’est pressée environ
5 secondes, l’affichage ordinaire
réapparaît.
• La fonction LIST est utilisable aussi
bien pour la réception de la télévision
que de la radio.
B/b
V/v
ENTER
Mémorisation de chaînes
Procédez comme suit avec la carte télécommande quand le
moniteur est sorti.
Appuyez sur SOURCE pour sélectionner “TV”
1
ou “VIDEO”.
Quand “VIDEO” est affiché, passez à l’étape 2.
Appuyez sur MODE pour commuter entre
2
“TV1” et “TV2”.
Appuyez sur MENU.
3
Appuyez sur V ou v pour sélectionner
4
“Auto Memory”.
A uto Memory
Appuyez sur ENTER.
5
“Auto Memory” clignote, et les chaînes puissantes sont
mémorisées dans l’ordre de leur fréquence.
La mémorisation terminée, l’affichage normal réapparaît.
Fonctionnement de la télévision
Sélection/recherche Procédure
Sélection d’une chaîne
Mémoriser
manuellement une
chaîne
Dénommer une chaîne
de télévision
Appuyez sur SOURCE pour sélectionner “TV” ou
“VIDEO”. Appuyez sur MODE pour sélectionner
“TV1” ou “TV2”. Appuyez sur les touches
numériques 1 - 6 ou V et v.
1 Appuyez sur SOURCE pour sélectionner “TV”
ou “VIDEO”.
2 Appuyez sur MODE pour commuter entre
“TV1” et “TV2”.
3 Effectuez les étapes 3 et 4 de la procédure
“Mémorisation manuelle de stations” (page
19).
Effectuez la procédure “Dénomination d’une
station” (page 20). (Captez “TV1” ou “TV2” à
l’étape 1.)
30
Page 81

MENU
B/b
V/v
ENTER
Sélection du mode d’écran
Outre le mode normal (4:3), l’écran peut aussi être réglé au
mode plein écran, au mode zoom ou au mode wide zoom.
Le mode d’écran est sélectionnable en utilisant la carte
télécommande, après sortie du moniteur.
Sélectionnez TV ou VIDEO, puis appuyez sur
1
MENU.
Appuyez sur V ou v pour sélectionner
2
“Wide Mode”.
Appuyez sur B ou b pour sélectionner le mode
3
d’écran souhaité.
Le mode d’écran change comme suit à chaque pression de
, .
Normal: Image d’origine au
rapport d’aspect 4:3
M
WideZoom: Seules les
parties droite et gauche de
l’image d’origine 4:3 sont
élargies latéralement.
Appuyez sur ENTER.
4
L’écran passe au mode sélectionné.
Full: L’image d’origine 4:3
est élargie latéralement
pour remplir l’écran; le
haut et le bas sont
comprimés.
,
m
Zoom: L’image d’origine 4:3
est élargie latéralement
pour remplir l’écran; le
haut et le bas sont coupés.
<
31
Page 82

Réglage du son
DSO
B/b
Remarques
•A l’écoute de stations FM, désactiver
DSO peut parfois donner de meilleurs
résultats.
• Dans certaines voitures et avec certains
matériaux programmés, l’effet DSO
peut ne pas être très prononcé.
Dynamic Soundstage Organizer (DSO)(organisateur de plateau musical dynamique)
Si vos haut-parleurs sont installés dans la partie inférieure
des portières, le son est émis à un niveau proche du sol et il
se peut qu’il ne soit pas clair. La fonction DSO (Dynamic
Soundstage Organizer) est conçue pour améliorer l’écoute
en créant un plateau musical avec “enceintes virtuelles”. Le
son est perçu comme venant d’emplacements où aucune
enceinte réelle n’est installée.
Vous pouvez mémoriser le réglage DSO pour chaque
source.
Sélection du mode DSO
Réglage Fonction
DSO••1 Plateau musical situé dans la zone avant inférieure
DSO••2 Plateau musical situé dans la zone du tableau de bord
DSO••3 Plateau musical situé environ à hauteur du visage
DSO••off Annule DSO
Sélectionnez la source (CD, MD, radio etc.)
1
pour laquelle vous souhaitez utiliser DSO.
Appuyez sur DSO pour sélectionner le mode
2
DSO.
Chaque pression de la touche (ou B/b après une pression de
la touche DSO) fait passer cycliquement entre les réglages
suivants.
DSO··1 DSO··2 DSO··3
DSO··off
L’affichage normal réapparaîtra au bout d’environ
3 secondes.
Pour annuler DSO
Sélectionnez “DSO••off” à l’étape 2.
32
Page 83

MENU
EQ7
B/b
Emploi de l’égaliseur (EQ7)
Cet appareil incorpore 7 courbes d’égalisation préréglées
pour différents types de musique. Vous pouvez aussi
modifier les courbes et mémoriser vos propres réglages.
Vous pouvez mémoriser un réglage d’égaliseur différent
pour chaque source.
V/v
ENTER
Remarque
Quand DSO est utilisé, l’action de
l’égaliseur est réduite pour optimiser
l’effet.
A noter
Si aucune touche n’est sollicitée environ
3 secondes, l’affichage normal réapparaît.
Sélection de la courbe d’égalisation
Sélectionnez la source (CD, MD, radio etc.)
1
pour laquelle vous souhaitez utiliser
l’égaliseur.
Appuyez sur EQ7 pour sélectionner la
2
meilleure courbe.
Chaque pression de la touche (ou de B/b après une pression
de EQ7) fait passer cycliquement entre les réglages suivants.
EQ7··Vocal EQ7··Club EQ7··Jazz EQ7··New Age
EQ7··offEQ7··Xplod EQ7··Custom EQ7··Rock
Pour annuler l’égaliseur
Sélectionnez “EQ7••off” à l’étape 2.
33
Page 84

Réglage du son
A noter
La pression de EQ7 pendant plus de
2 secondes affiche le réglage d’accord
EQ7 au lieu d’exécuter les étapes 2 - 4.
Remarques
• Quand “EQ••off” est sélectionné, la
courbe d’égalisation ne peut pas être
ajustée.
• La figure ci-dessous sur le moniteur ne
change pas à la modification du
réglage d’accord EQ7.
Mémorisation d’une courbe d’égalisation
personnalisée
Procédez comme suit avec la carte télécommande quand le
moniteur est sorti.
Sélectionnez la source (CD, MD, radio etc.)
1
pour laquelle vous souhaitez utiliser
l’égaliseur.
Appuyez sur MENU.
2
Appuyez sur V ou v pour sélectionner
3
“EQ7 Tune”.
EQ7 T une
Appuyez sur ENTER.
4
Appuyez sur B ou b (ou la touche EQ7) pour
5
sélectionner une courbe d’égalisation.
A noter
La plage d’ajustement du niveau est de
±10 dB.
34
EQ7 T une
Vocal
Appuyez sur ENTER.
6
Appuyez sur B ou b pour sélectionner la
7
fréquence.
A chaque pression de la touche, l’appareil passe
cycliquement entre les fréquences dans l’ordre ci-dessous.
62 Hz 1.0 kHz396 Hz157 Hz
6.3 kHz16 kHz 2.5 kHz
Appuyez sur V ou v pour ajuster le niveau.
8
Répétez les étapes 7 et 8 pour ajuster la courbe d’égalisation.
Appuyez deux fois sur MENU.
9
L’affichage normal réapparaît.
Pour remettre la courbe d’égalisation au
réglage usine par défaut
Maintenez ENTER pressé au moins 2 secondes à l’étape 7
ou 8.
Page 85

Ajustement des caractéristiques du son (BAS/TRE/BAL/FAD/SUB)
Outre les fonctions décrites dans les sections précédentes,
cet appareil vous permet d’ajuster les paramètres suivants.
B/b
SOUND
ATT
A noter
Si aucune touche n’est sollicitée environ
3 secondes, l’affichage normal réapparaît.
BAS (Bass): Niveau des graves
TRE (Treble): Niveau des aigus
BAL (Balance): Balance des enceintes gauche/droite (la sortie au
canal opposé est atténuée)
FAD (Fader): Balance des enceintes avant/arrière (la sortie au
canal opposé est atténuée)
SUB (Subwoofer): Niveau de sortie du haut-parleur d’extrême
grave
La procédure d’ajustement est la même pour chaque
paramètre. L’exemple ci-dessous est celui pour l’ajustement
de la balance.
Ajustement de la balance
Sélectionnez la source (CD, MD, radio etc.).
1
Appuyez sur SOUND et sélectionnez “BAL”.
2
BAL
LR
Dans les trois secondes, appuyez sur B ou b
3
pour faire l’ajustement.
Conseil
Lorsque le câble de jonction d’un
téléphone de voiture est raccordé au fil
ATT, l’appareil réduit automatiquement
le volume en cas d’appel téléphonique
entrant (fonction ATT Téléphone).
Diminution momentanée du volume
Appuyez sur la touche ATT.
“ATT••on” apparaît, et le volume est atténué.
Pendant l’activation de l’atténuation, une icône apparaît
dans le bas de l’écran du moniteur, ou l’indication “ATT”
sur l’afficheur.
Pour rétablir le volume d’origine, appuyez à nouveau sur
ATT ou sur VOL.
“ATT••off” apparaît, et le volume est rétabli.
Mémoire de source sonore
Cet appareil mémorise automatiquement les réglages DSO
et d’égaliseur séparément pour chaque source (FM, AM,
CD, MD/MS, TV, VIDEO). Cette fonction est appelée
Source Sound Memory (Mémoire de source sonore). Elle
vous permet d’écouter chaque source à réglages optimisés.
35
Page 86

Réglage du son
MENU
Réglage du filtre passe-bas (LPF)
Ce réglage vous permet de contrôler la réponse en
fréquence d’un haut-parleur d’extrême grave raccordé à la
sortie audio haut-parleur d’extrême grave. En choisissant
la fréquence de coupure du filtre passe-bas correcte, vous
assurez que le haut-parleur d’extrême grave fournira des
graves solides sans attirer l’attention. Par exemple, si le
B/b
réglage 78 Hz est sélectionné, seuls les composants de
V/v
signal au-dessous de 78 Hz seront envoyés au haut-parleur
d’extrême grave.
Fréquence de coupure
Désactivé
Niveau
Fréquence (Hz)
Sélection de la fréquence de coupure du hautparleur d’extrême grave
Procédez comme suit sur la carte télécommande quand le
moniteur est sorti.
Sélectionnez la source (CD, MD, radio etc.).
1
Appuyez sur MENU.
2
Appuyez sur V ou v pour sélectionner “LPF”.
3
LPF
78Hz
Appuyez sur B ou b pour sélectionner la
4
fréquence de coupure.
Chaque pression de la touche fait passer cycliquement entre
les réglages suivants:
78 Hz y 125 Hz y désactivé (réglage par défaut)
Appuyez sur MENU.
5
L’affichage normal réapparaît.
36
Page 87

MENU
Réglage du filtre passe-haut (HPF)
Ce réglage vous permet de contrôler la réponse en
fréquence correspondant aux caractéristiques des enceintes
installées. En choisissant la fréquence de coupure du filtre
passe-haut correcte, vous pouvez assurez que les enceintes
produiront des sons nets de gamme moyenne et haute. Par
exemple, si le réglage 78 Hz est sélectionné, seuls les
B/b
composants de signal au-dessus de 78 Hz seront envoyés
V/v
aux enceintes.
Fréquence de coupure
Niveau
Niveau
Fréquence (Hz)
Sélection de la fréquence de coupure des
enceintes
Procédez comme suit sur la carte télécommande quand le
moniteur est sorti.
Sélectionnez la source (CD, MD, radio etc.).
1
Appuyez sur MENU.
2
Appuyez sur V ou v pour sélectionner “HPF”.
3
HPF
78Hz
Appuyez sur B ou b pour sélectionner la
4
fréquence de coupure.
Chaque pression de la touche fait passer cycliquement entre
les réglages suivants:
désactivé (réglage par défaut) y 78 Hz y 125 Hz
Appuyez sur MENU.
5
L’affichage normal réapparaît.
37
Page 88

Réglage du son
MENU
Réglage du niveau sonore des composants AUX raccordés
Le niveau de sortie sonore des composants vidéo extérieurs
peut être ajusté quand ils sont raccordés à INPUT1 et
INPUT2 à la boîte de raccordement fournie.
V/v
Sélection de la source
SOURCE
ENTER
Remarque
Si l’indication “VIDEO1” ou “VIDEO2”
n’apparaît pas à la pression de SOURCE,
consultez “Réglages de son et
d’affichage” (page 39) et réglez
“AUX-Video” à “on”.
Remarque
La sortie sonore des composants
extérieurs raccordés à l’appareil peut
varier. Le niveau sonore ajusté pour un
composant peut être trop fort pour un
autre.
Appuyez sur SOURCE pour sélectionner
“VIDEO1, VIDEO2”.
Ajustement du niveau de sortie
Appuyez sur MENU.
1
Appuyez sur V ou v pour sélectionner
2
“Aux Sound Level”.
Aux Sound Level
Appuyez sur ENTER.
3
Appuyez sur V ou v pour sélectionner un
4
réglage correspondant au niveau de sortie du
composant raccordé.
La plage d’ajustement du niveau est de ±6 dB.
Aux Sound Leve
1dB
l
38
Appuyez sur ENTER.
5
L’affichage normal réapparaît.
Page 89

Autres fonctions
Réglages de son et d’affichage
Aperçu
Si le réglage s’applique seulement à une
source particulière, le paramètre du menu
n’apparaît pas quand cette source n’est pas
sélectionnée. Dans l’explication suivante, le
nom de la source est donné entre parenthèses
dans un tel cas.
Pour les opérations de réglage, consultez
“Changement réglage” à la page 41.
Menu de configuration
• Clock (horloge)
Voir la page 14.
• Beep (tonalité bip)
Active ou désactive la tonalité bip.
• Direction
Sélectionne la direction de fonctionnement
de la commande rotative en option. (Voir la
page 42.)
rev: Direction de rotation convenant au
montage sur le côté droit de la colonne de
direction
norm: Direction de rotation convenant au
montage sur le côté gauche de la colonne
de direction
• AUX-Video (mode d’attente)
Règle la source vidéo sélectionnable.
Menu d’affichage
• Dual Information (double information)
Active ou désactive l’affichage de l’horloge.
• Dimmer (gradateur)
Modifie la luminosité du moniteur.
Auto: Assombri quand les phares de la
voiture sont allumés (seulement si raccordé
à l’alimentation auto).
on: Assombri.
off: Non assombri.
• Rear Monitor Out (sortie moniteur arrière)
Sélectionne la source sortie à un moniteur
arrière.
Video1
Video2
Front: La source sélectionnée est sortie au
moniteur arrière. Si la source sélectionnée
n’est pas une source vidéo, aucun signal
vidéo n’est sorti.
• Monitor Tune (accord du moniteur)
Ajuste l’image.
Le paramètre change dans l’ordre suivant à
chaque pression de la touche V.
Brightness Color Hue
Brightness (Luminosité): T plus sombre,
plus clair t
Color (Couleur): T moins , plus t
Hue (Teinte): T rougeâtre, verdâtre t
• Auto Scroll (défilement automatique) (quand
CD, MD est sélectionné)
A la lecture d’un MD ou d’un CD
compatible CD TEXT avec SOURCE réglé à
CD ou MD, un changement de disque ou
de plage provoquera le défilement
automatique du nom du disque ou de la
plage si ce réglage est “on”. Le nom défilera
au moniteur s’il a plus de 12 caractères de
long et sur l’afficheur s’il a plus de 8
caractères de long. Pendant la lecture d’un
disque MP3, le nom de l’album et la
marque ID3 défileront aussi.
on: Défilement de l’affichage de plus de
12 caractères pour le moniteur ou de
8 caractères pour l’afficheur.
off: Défilement automatique invalidé.
• Wide Mode (mode écran large) (quand TV,
VIDEO, CD* est sélectionné)
Change le mode d’écran. (Voir la page 31.)
Chaque pression de la touche b fait passer
cycliquement entre les réglages suivants:
WideZoom NormalFull Zoom
* Quand “Video Mix Play” est “on”.
•Video Mix Play (lecture vidéo mixte) (CD
seulement)
Affiche la vidéo pendant la lecture de CD*.
on: L’affichage sur écran (OSD) est désactivé
quand CD est sélectionné.
auto/off: L’affichage sur écran (OSD) est
activé.
* Un changeur de CD et une source vidéo en
option, comme une vidéocaméra enregistreuse,
doivent être raccordés. Le câble vidéo, en
provenance de la source vidéo, doit être raccordé
à la borne (jaune) marquée “INPUT” de la boîte
de raccordement fournie.
39
Page 90

Autres fonctions
Menu du mode de réception
• Local Seek (recherche locale) (quand FM, AM
est sélectionné)
Active et désactive la réception locale. (Voir
la page 18.)
• Mono (monaural) (quand FM est sélectionné)
Règle la réception FM à Mono. (Voir la page
18.)
• IF (commutation IF) (quand FM est
sélectionné)
Quand du bruit affecte la réception des
émissions, la largeur de la bande de
fréquences de réception est
automatiquement ajustée. (Voir la page 18.)
Auto: La largeur de la bande de fréquences de
réception est automatiquement contrôlée.
Wide: La largeur de la bande de fréquences de
réception est augmentée.
Menu son
• EQ7 Tune (accord EQ7)
Permet le réglage précis des courbes
d’égalisation préréglées et la mémorisation
du résultat. (Voir la page 34.)
Menu d’édition
• Name Edit (édition de titre/nom) (quand FM,
AM, TV, CD est sélectionné)
Titre les CD. (Voir les pages 20, 27.)
• Name Delete (suppression de titre/nom)
(quand FM, AM, TV, CD est sélectionné)
Supprime les titres assignés aux CD. (Voir
les pages 21, 28.)
• BTM (mémoire des meilleurs accords) (quand
FM, AM est sélectionné)
Mémorise automatiquement les stations
radio puissantes. (Voir la page 17.)
• Auto Memory (quand TV est sélectionné)
Mémorise automatiquement les stations
émettrices puissantes. (Voir la page 30.)
• HPF (filtre passe-haut)
Règle le filtre passe-haut. (Voir la page 37.)
• LDP (filtre passe-bas)
Règle le filtre passe-bas. (Voir la page 36.)
• Loudness (intensité sonore)
La fonction Loudness accentue les graves et
les aigus aux volumes d’écoute bas, pour
maintenir l’équilibre sonore naturel.
• AUX Sound Level (niveau sonore AUX)(quand
AUX-Video est sélectionné)
Pour ajuster le niveau sonore des
composants vidéo extérieurs quand AUXVideo est sélectionné. (Voir la page 38.)
40
Page 91

Changement de réglage
Les réglages sont modifiables sur la carte
télécommande, après sortie du moniteur.
MENU
Appuyez sur MENU.
1
Appuyez sur V ou v pour
2
sélectionner le paramètre souhaité.
Appuyez sur B ou b pour
3
sélectionner le réglage souhaité
(par exemple “on” ou “off”).
B/b
V/v
ENTER
Appuyez sur ENTER ou MENU.
4
41
Page 92

Autres fonctions
Emploi de la commande rotative
Le XAV-7W est contrôlable avec la
commande rotative RM-X4S en option.
Après l’installation de la commande rotative,
fixez l’étiquette correcte selon son
orientation.
ATT
DSPL
MODE
SOUND
DSPL
MODE
OFF
OFF
SOUND
MODE
DSPL
SOUND
SOURCE
Bouton VOL
Pression de SOURCE
Quand le XAV-7W est en mode d’attente, une
pression sur SOURCE le met sous tension.
Chaque pression subséquente fait passer
cycliquement entre les sélections de source de
programme suivantes:
FM/AM t CD* t MD/MS* t
TV*/VIDEO t FM/AM t ...
Pression de MODE
En mode tuner: FM1 t FM2 t FM3 t
AM1 t AM2
En mode CD*: CD1 t CD2 t CD3 t ...
En mode MD*: MD1 t MD2 t MD3 t ...
En mode video: TV1* t TV2* t VIDEO1 t
VIDEO2
*Affiché seulement si le composant correspondant
(disponible séparément) est raccordé à la boîte de
raccordement fournie.
Rotation du bouton VOL
Modifie le volume d’écoute.
Pression d’ATT
Atténue instantanément le son. Pressez à
nouveau ou tournes le bouton VOL pour
rétablir le volume.
Pression de OFF
Une pression brève met l’appareil en mode
d’attente. Une pression longue (au moins 2
secondes) le met hors tension.
Pression de SOUND
Permet d’ajuster les caractéristiques du son.
A le même effet que SOUND sur la carte
télécommande.
Pression de DSPL
Modifie l’affichage de l’écran. A le même effet
que la touche DSPL sur la carte
télécommande.
*Affiché seulement si le composant correspondant en
option est raccordé.
42
Page 93

Rotation brève et libération du bouton SEEK/
AMS
En mode tuner: Accorde automatiquement
des stations. Maintenez plus longtemps
pour ajuster la fréquence souhaitée.
En mode CD/MD/MS*: Saute des stations.
Maintenez plus longtemps pour l’avance
rapide, et relâchez pour revenir en lecture.
En mode TV*: Accorde automatiquement les
chaînes. Maintenez plus longtemps pour
régler la chaîne souhaitée.
Pression et rotation du bouton VOL
Modification du sens d’opération
Le sens d’opération des commandes est réglé
à l’usine comme suit.
Pour augmenter
Pour diminuer
Si vous devez monter la commande rotative
sur le côté droit de la colonne de direction,
vous pouvez inverser le sens d’opération.
Appuyez sur SOUND 2 secondes en pressant sur
la touche VOL.
FM/AM/TV*: Reçoit les stations/chaînes
préréglées.
CD/MD*: Change de disque.
Pour changer de station ou de disque, le
bouton doit être pressé et tourné à chaque
fois.
Au bout de quelques secondes, l’affichage
normal réapparaît.
* Quand un changeur CD/MD Sony en option, un
Lecteur MG Memory Stick System-up ou un tuner de
télévision est raccordé.
Conseil
Vous pouvez aussi changer le sens d’opération de ces
commandes sur l’appareil (page 39).
43
Page 94

Autres caractéristiques
Informations additionnelles
Précautions concernant la carte télécommande
•Ne laissez pas la carte télécommande sur le
tableau de bord, sur le volant ou à un autre
emplacement en plein soleil. En été en
particulier, la température est très élevée à
ces emplacements, et la télécommande
pourrait être déformée.
• En garant la voiture au soleil, retirez la
carte télécommande de son emplacement
de montage et rangez-la dans la boîte à
gants ou à un autre emplacement protégé.
• En plein soleil, les signaux de la carte
télécommande peuvent parfois ne pas être
bien captés par l’appareil.
Dans ce cas, rapprochez la télécommande
du capteur de télécommande du panneau
avant de l’appareil.
Panneau d’affichage à cristaux liquides (LCD)
défaut. Il est cependant possible que moins
de 0,01% des segments soient défectueux et
ne s’allument pas correctement. Mais ils ne
gêneront pas votre visionnage.
Remplacement de la pile au lithium
Ordinairement, la pile durera environ 1 an.
(Sa vie de service pourra être plus courte,
selon les conditions d’utilisation.) Quand la
pile est affaiblie, la portée de la carte
télécommande devient plus courte.
Remplacez la pile par une nouvelle pile au
lithium CR2025. L’emploi d’une autre pile
présente des risques d’incendie ou
d’explosion.
•N’appuyez pas sur le panneau LCD du
moniteur, cela pourrait déformer l’image
ou provoquer un mauvais fonctionnement.
L’image pourrait devenir vague ou le
panneau LCD pourrait être endommagé.
• Remarques sur le nettoyage
—Nettoyez le panneau LCD avec un
chiffon doux légèrement humide.
—N’utilisez pas de solvant comme la
benzine, un diluant, un nettoyant
disponible dans le commerce ou un
spray antistatique.
•N’utilisez pas cet appareil à des
températures au-dessous de 5˚C ou audessus de 45˚C.
• Si votre voiture a été garée à un endroit
froid ou chaud, l’image pourra ne pas être
nette. Le moniteur n’est pas endommagé.
L’image deviendra nette quand la
température dans la voiture redeviendra
normale.
Des points bleus ou rouges permanents
peuvent apparaître sur le moniteur.
C’est ce qu’on appelle les taches brillantes,
qui peuvent apparaître sur tout LCD.
Le panneau LCD est hautement sophistiqué,
avec plus de 99,99% des segments sans
Côté + vers le haut
Remarques sur les piles au lithium
•Maintenez la pile au lithium hors de portée
des enfants. En cas d’avalement, consultez
immédiatement un médecin.
• Essuyez la pile avec un chiffon sec pour
assurer un bon contact.
• Respectez les polarités à l’installation de la
pile.
• Ne saisissez pas la pile avec une pince
métallique, sinon un court-circuit est
possible.
AVERTISSEMENT
Une pile mal traitée peut exploser.
Ne rechargez pas, de démontez pas et ne
jetez pas la pile au feu.
44
Page 95

Si le mouvement du moniteur a été gêné pendant son réglage
Si le mouvement de sortie ou de retrait du
moniteur a été gêné par le levier de vitesses
ou un autre obstacle, procédez comme suit
pour le régler.
Mettez la clé de contact de la
1
voiture sur OFF.
Retirez l’obstacle.
Appuyez sur le dessous du cadre
2
du moniteur pour l’incliner en
avant.
Ne touchez pas et n’appuyez pas sur le
capteur de télécommande ou l’affichage du
moniteur.
Démontage de l’appareil
Maintenez OFF pressé plus de 2
1
secondes pour mettre l’appareil
hors tension.
Insérez l’outil fourni entre
2
l’appareil et le cadre, et tournez-le
de 90˚ pour libérer le ressort de
montage caché. Répétez sur l’autre
côté et retirez le cadre.
10 mm (13/32 po.)
A noter
Pour incliner le moniteur en avant sans à-coup,
appuyez sur la position désignée avec les pouces
des deux mains en plaçant les index à l’arrière du
moniteur.
Mettez la clé de contact sur ON et
3
appuyez sur le bouton Reset de
l’appareil.
(Voir “Réinitialisation de l’appareil” à la page
6.)
Remarque
A la pression du bouton Reset, l’angle mémorisé est
remis à son réglage à l’achat.
90•
suite sur la plage suivante t
45
Page 96

Informations additionnelles
Insérez le tournevis plat entre le
3
cadre et le ressort de montage.
Soulevez doucement le ressort vers
l’appareil en tirant un peu sur
l’appareil. Répétez sur l’autre côté
pour retirer l’appareil.
4 mm (3/16 po.)
46
Page 97

Dépannage
S’il semble y avoir un problème avec
l’appareil, vérifiez d’abord les points
suivants. Consultez le mode d’emploi de
chaque produit pour obtenir plus de détails
sur les équipements en option. Si le problème
persiste, il peut y avoir un problème de
raccordement, ou l’appareil peut être
défaillant. Dans ce cas, contactez le centre
d’information technique, votre revendeur ou
le centre de service Sony le plus proche.
Généralités
Pas de son.
, Augmentez le volume.
, Annulez la fonction ATT.
, Vérifiez les réglages de sortie des enceintes.
, Quand seulement 2 enceintes sont
utilisées, réglez le fader entièrement
pour l’avant ou l’arrière.
Le contenu de la mémoire est
perdu.
, Le bouton d’initialisation a été pressé.
, Le conducteur de la pile ou la pile a été
déconnecté.
, Le câblage d’alimentation est incorrect.
Pas de tonalité bip à l’opération
des commandes.
, La tonalité bip a été désactivée.
, Réglez “Beep” (page 39) sur “on”.
, Un amplificateur de puissance en option
est raccordé et vous n’utilisez pas
l’amplificateur intégré.
Rien n’apparaît sur l’afficheur.
, L’affichage de l’horloge a été désactivé en
appuyant sur OFF pendant 2 secondes.
, Appuyez sur SOURCE.
, Vérifiez le réglage “Video Mix Play”.
L’appareil ne se met pas sous
tension.
, Le câblage d’alimentation est incorrect.
, Vérifiez le raccordement. S’il n’y a pas
de problème, vérifiez le fusible.
, L’appareil est installé dans une voiture à clé
de contact sans position ACC.
, Appuyez sur SOURCE.
L’appareil ne se met pas hors
tension.
, Il est installé dans une voiture à clé de
contact sans position ACC.
, Appuyez sur OFF au moins 2 secondes.
Les stations mémorisées et l’heure
correcte sont effacées.
, Le fusible est grillé.
Emission de bruits lorsque la clé de
contact est en position ON, ACC ou
OFF.
, Les fils ne sont pas raccordés correctement
au connecteur d’alimentation de la voiture
destiné aux accessoires.
“ATT” s’affiche, et le volume est
réduit.
, Le fil de contrôle ATT du téléphone est
court-circuité sur une partie métallique de
la voiture.
, Isolez tout fil exposé avec du chatterton
pour éviter tout court-circuit.
Du bruit est audible.
, Maintenez le câble d’antenne, le câble bus
et les câbles audio aussi loin que possible
du câblage d’alimentation.
L’antenne d’alimentation ne
s’étend pas.
, L’antenne de puissance n’a pas de boîte de
relais.
Les commandes sont sans effet.
, Appuyez sur le bouton de réinitialisation.
Pas de réponse à la pression des
touches sur la carte
télécommande.
, La pile de la carte télécommande est peut-
être épuisée.
Aucune image ni son au
raccordement d’un composant en
option.
, Le cordon a été déconnecté.
Raccordez-le fermement.
47
Page 98

Dépannage
CD/MD
Chargement de disque impossible.
, Un CD/MD a été inséré de force à l’envers
ou de manière incorrecte.
Sautes de son en raison de
vibrations.
, L’appareil n’est pas installé à un endroit
suffisamment robuste de la voiture.
Sautes de lecture. Coupures du
son. Son déformé.
, Le disque est sale.
, Nettoyez-le.
, Le disque est rayé ou endommagé d’une
autre manière.
Aucun son de la lecture de MD.
, Un MD non enregistré est lu.
, Insérez un MD enregistré.
La lecture ne démarre pas.
, MD défectueux ou CD sale.
, CD-R/CD-RW non finalisé.
, Vous avez essayé de lire un CD-R/CD-RW
non conçu pour l’emploi audio.
, La lecture de certains CD-R/CD-RW peut
être impossible à cause de l’équipement
d’enregistrement ou de l’état du disque.
Un disque est automatiquement
éjecté.
, La température ambiante dépasse 50˚C
(122˚F).
Radio/téléviseur
Un programme diffusé en stéréo
est audible en monaural.
, L’appareil est en mode de réception
monaurale.
, Annulez le mode de réception
monaurale (page 18).
Impossible d’accorder une
présélection.
, Enregistrez la fréquence correcte dans la
mémoire.
, Le signal d’émission est trop faible.
Interférence pendant la réception FM
, Le mode Wide est sélectionné.
, Réglez le mode IF à “IF Auto” (page 18).
48
Réception impossible. Seulement
du bruit est audible.
, Raccordez le fil de contrôle de l’antenne
d’alimentation (bleu) ou le fil
d’alimentation accessoire (rouge) au
connecteur d’alimentation de
l’amplificateur d’antenne de la voiture
(pour les voitures à antenne imprimée dans
la vitre arrière ou latérale). Consultez votre
revendeur pour les détails.
, Vérifiez les raccordements des antennes de
la voiture.
, L’antenne de puissance n’est pas sortie.
, Contrôlez le fil de contrôle de l’antenne.
, Vérifiez la fréquence de réception.
, Réglez DSO à “off” (page 32).
Sélection de “VIDEO1” et
“VIDEO2” impossible.
, Vérifiez la connexion à la boîte de
raccordement.
, Vérifiez si les connexions sont faites
correctement.
, Si “Aux-Video” est réglé à “off”, “VIDEO1”
et “VIDEO2” ne peuvent pas être
sélectionnés.
, Réglez “Aux-Video” à “on” (page 39).
Le tuner ne s’arrête pas à la station
souhaitée à la pression de la
touche SEEK.
, Si “Local Seek” est réglé sur “on”, seules les
stations puissantes seront reçues.
, Réglez “Local Seek” sur “off” (page 25).
, Le signal est trop faible pour l’accord
automatique.
, Maintenez B ou b pressé pour l’accord
manuel.
Les émissions stéréo sont
parasitées ou déformées.
L’indicateur ST clignote.
, Vérifiez la fréquence de réception.
, Le signal est faible.
, Sélectionnez la réception monaurale
(page 25).
, Réglez DSO à “off” (page 32).
Réglage du son
Pas de son, ou volume très faible.
,L’ajustement de balance incorrect a causé
un niveau faible dans une enceinte.
, Ajustez la balance (page 35).
Page 99

Messages d’erreur CD/MD
En cas de problème en relation avec le changeur de CD ou MD raccordé à l’appareil, une
tonalité d’alarme retentit et une indication d’erreur clignote pendant 5 secondes.
Affichages d’erreur
BLANK
(Blank Disc*)
ERROR
(Error*)
HI TEMP
(High Temp*)
NO DISC
(NO Disc*)
NO MAG
(NO Magazine*)
NO MUSIC
(NO Music*)
NOTREADY
(Not Ready*)
RESET
(Push Reset*)
* Indiqué sur le moniteur LCD.
Messages
LCL Seek +/–
“ ” ou
“ ”
Cause
MD non enregistré.
Disque inséré à l’envers.
Lecture de MD impossible.
CD sale.
Appareil trop chaud.
Pas de disque inséré dans le changeur.
Pas de magasin inséré dans le changeur.
Le CD ne contient pas d’informations
musicales.
Panneau du changeur de MD ouvert.
Fonctionnement affecté par un problème non
spécifié.
Description
Le mode de recherche locale est activé en cours d’accord automatique (page 20).
Vous avez atteint le début ou la fin du disque et vous ne pouvez pas aller plus loin.
Solution
Insérez un autre MD.
Insérez le disque correctement.
Insérez un autre MD.
Nettoyez le CD.
Mettez hors tension et attendez un moment.
Insérez un disque.
Insérez un magasin.
Insérez un autre CD.
Fermez le panneau.
Appuyez sur le bouton de réinitialisation sur
l’appareil.
49
Page 100

Spécifications
Media center/récepteur
Section moniteur
Type d’affichage
Moniteur couleur LCD large
Taille 7 po.
Système Matrice active TFT
Nombre de pixels
336.960 pixels
Section tuner
FM
Plage d’accord
87,5 - 107,9 MHz
Fréquence intermédiaire
10,7 MHz
Sensibilité utilisable
8 dBf
Réponse en fréquence
30 - 15.000 Hz
Sélectivité 75 dB (400 kHz)
Rapport signal/bruit
66 dB (stéréo)
72 dB (mono)
Distorsion harmonique à 1 kHz
0,6 % (stéréo)
0,3% (mono)
Séparation 35 dB à 1 kHz
AM
Plage d’accord
530 - 1.710 kHz
Fréquence intermédiaire
10,7 MHz/450 kHz
Sensibilité utilisable
30 µV
Section amplificateur
Sorties Sortie aux enceintes
(connecteurs Sure Seal)
Impédance des enceintes
4 - 8 ohms
Puissance de sortie maximum
45 W × 4 (sous 4 ohms, à 1 kHz)
Généralités
Alimentation
12 V c.c. sur la batterie de la voiture
(masse négative)
Entrées Antenne FM/AM (1)
Alimentation (1)
Fil de contrôle ATT téléphone (1)
Fil de contrôle d’éclairage (1)
Connecteur d’entrée de
télécommande (1)
Sorties Audio avant (1)
Audio arrière (1)
Haut-parleur d’extrême grave
(mono)
Fil de contrôle de relais d’antenne
de puissance (1)
Fil de contrôle d’amplificateur de
puissance (1)
Connecteur d’E/S
Connecteur 22 broches dédié
Commandes de tonalité
Graves ±7,5 dB à 100 Hz
Aigus ±7,5 dB à 10 kHz
Intensité sonore
+8 dB à 100 Hz
+2 dB à 10 kHz
Dimensions Avec moniteur rentré
Env. 178 × 50 × 185 mm
1
(7
/8 × 2 × 7 3/8 po.) (L × H × E)
Poids Env. 1,7 kg (3 livres 12 onces)
Accessoires fournis
Carte télécommande RM-X118 (1)
(incluant 1 pile au lithium)
Boîte de raccordement (1)
Pièces pour l’installation et le
raccordement (1 lot)
Mode d’emploi (1 lot)
Accessoires en option
Tuner de télévision XT-63V
Commande rotative RM-X4S
50
 Loading...