

Sony VX2000/150, VX-2000 Operating Manual
Operating Guide for Sony VX2000/150
APS Work Order Required
Proficiency Required
Media Loan VX-2000 Package includes:
Sony VX-2000 Digital Camcorder
AC Adapter with DC Cable
Remote Control
RCA & S-VHS Dubbing Cables
Density Case
Specifications:
Image Device: 3 CCDʼs (Charged Coupled Device)
Video Recording System: Two rotary heads, helical
scanning system
Video Signal: NTSC color
Format: Use mini DV cassette ME (metal evaporative)
Recording and Playback Time: 1 hour with a DVM60ME
tape @SP
Resolution: Over 500 lines
Viewfinder: Color LCD
Zoom: 12x optical; 48x digital;
Photo shot: Captures more than 510 images in SP mode on
a 60-minute tape
Minimum Illumination: 2 lux (F 1.6);
Audio Recording Format: Rotary heads, PCM (Pulse Code
Modulation) system:16 bit
Mic: 4-capsule stereo w/external mini jack
Battery Power: Typical recording time (with a full charged
battery) 40 min with standard, 4.5 hours with extended
(48 kHz)
3 Chip Digital Camcorder
, or 12 bit
(32kHz)
Avoid mechanical shock
Keep camcorder away from strong magnetic
fields or mechanical vibration
Keep Power switch set to off when not in use
Do NOT get wet or use near water
Do NOT aim at the sun or other bright objects
Do NOT
temperatures
Do NOT leave unattended (remember borrower is totally responsible for loss or damage)
Do NOT touch lens surface
Do NOT try to clean viewfinder or LCD panel
Do NOT lift or carry by viewfinder
Do NOT wrap up the camcorder and use, to
prevent internal heat buildup
Do NOT force camera to accept tape
Make sure that there are no protruding labels
on the tape (may interfere with cassette insertion)
Remember to always test equipment before
checking out & returning to Media Loan
expose camcorder to
extreme
Special Features:
A/V Digital Fader and Overlap Transitions: Fades to
from black or from previous still pictures
Photo Mode: Records still image and audio signal
for 7 seconds
Interval and Frame Recording: For six frame recording
and time-lapse effects
2-Speed Search Feature
Steadyshot Picture Stabilization
Zebra-Pattern Feature: Indicates overexposed areas
Full Range Auto Focus: From macro to infinity
ND Filter: Prevents picture from going out of focus under
bright conditions
Manual Controls:
Program Auto Exposure (3-mode AE): Shutter priority, Iris
priority, and Natural night mode
Manual exposure: Iris and gain (20 step), shutter speed
(16 speeds)
Manual White Balance
Custom Preset: Controls auto exposure shift, white balance
shift, color level control, gain shift and
sharpness control
Manual Focus Ring: With focus indicator
Media Loan The Library Group (360) 867-6253
The Evergreen State College Olympia, WA 98505
Recycled & Recyclable
Editing:
DV Interface: For direct input and output, digital-to digital
audio and video editing with virtually no quality
loss (A/V control)
Time Code: For hour, minute, second, and frame; identifies
and locates scenes for editing
Control L (LANC): Local Application Control Bus
System; used for controlling the tape transport of
video equipment and attached peripherals
http://www.evergreen.edu/media
VX-2000150camcorder/1/27/06/lc
Sony VX-2000
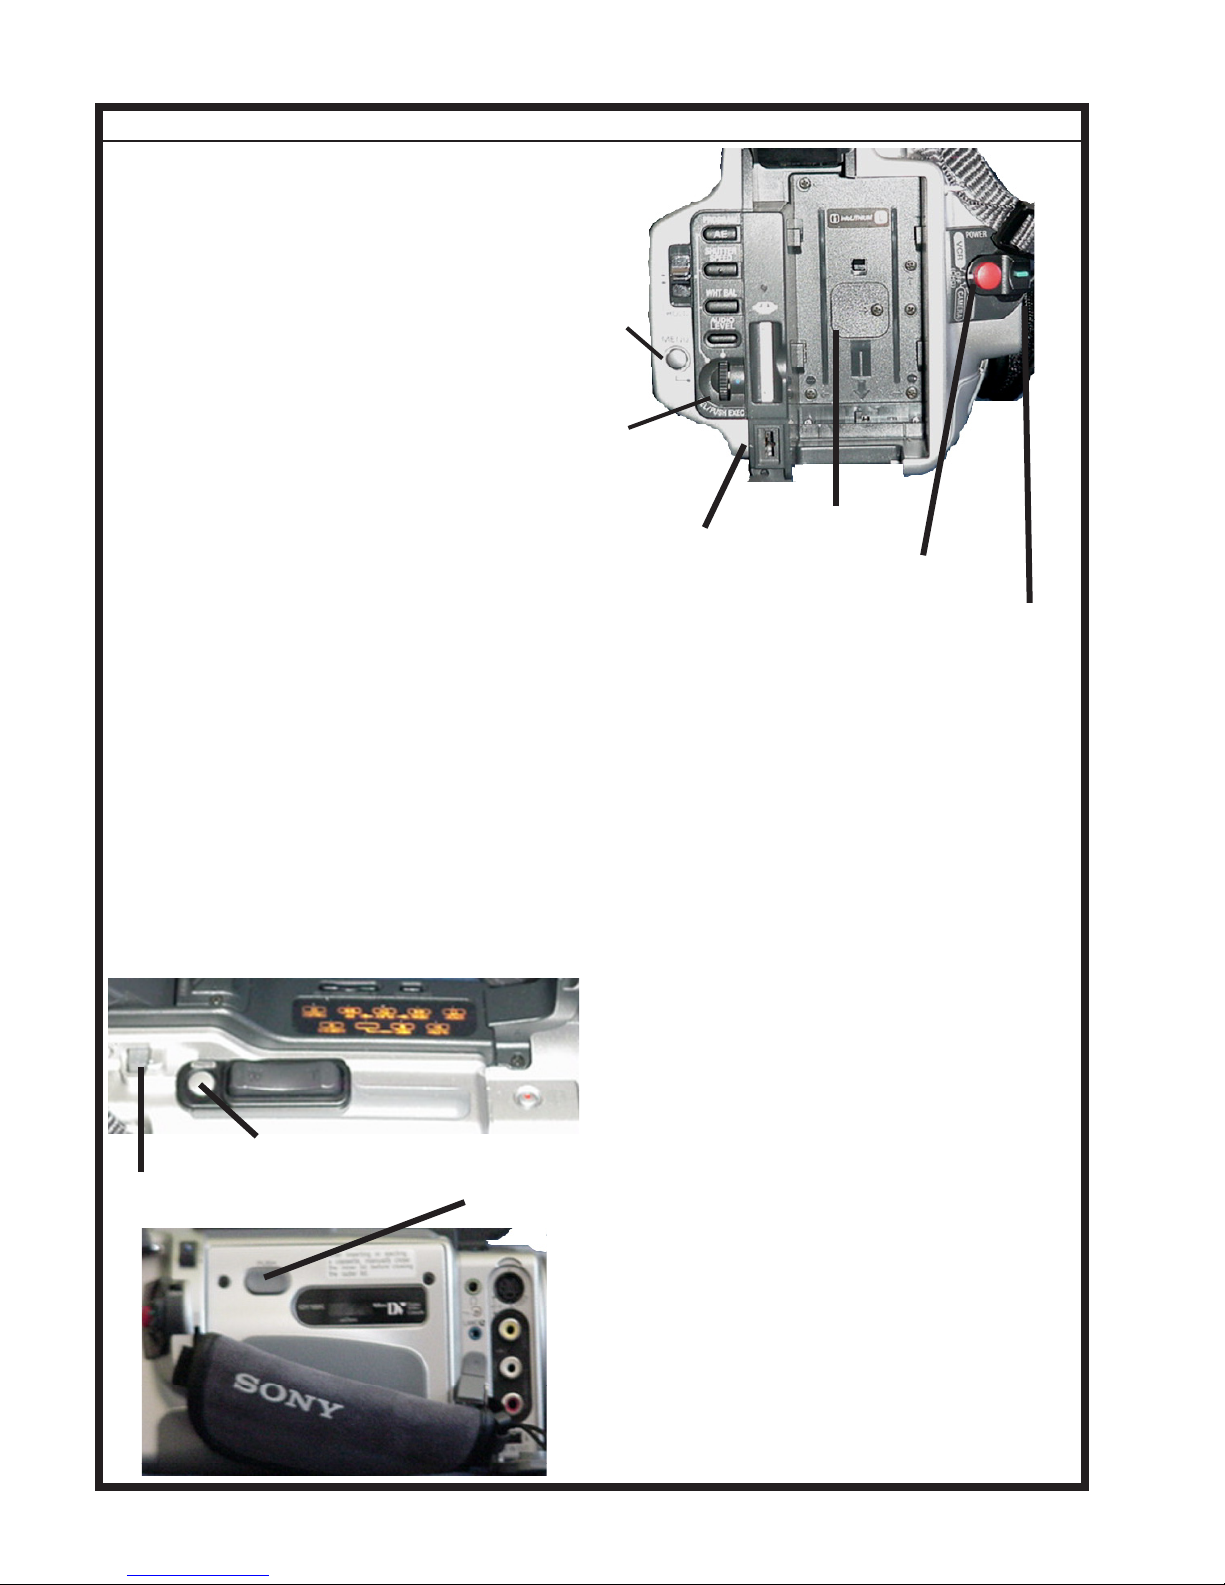
Supply Power with a Battery Pack:
1. Lift up the Viewfinder.
2. Insert the battery pack with the downward arrow on the battery pack facing down.
3. Slide the battery pack down until it clicks
into place.
MENU
button
Supply Power with the AC adapter:
1. Connect the AC adapter to a power outlet.
2. Connect the camcorder and the AC power
adapter using the supplied cord.
SEL/PUSH EXEC
dial
Charging the Battery:
Simply supply power with the AC adapter while
battery is inserted, and leave POWER switch
set to OFF. Approx. charging time for full battery: normal battery 2.5 hours, extended life
battery: 6.5 hours
Cassette Insertion:
Note: Use only Mini DV cassettes.
1. Connect the camcorder to a power source.
2. Slide the EJECT button. The cassette compartment automatically opens.
3. Insert a cassette with the write-protect tab
facing upward and the window side facing out.
4. Gently press the PUSH button on the outside
of the compartment until the door clicks shut.
Battery Com-
DC input
partment
START/STOP Button
POWER Switch
Video Recording:
1. Remove the hood cap.
2. While pressing the green center button on the
POWER switch, set it to CAMERA.
3. Press the red START/STOP button to start
recording. The ʻRecʼ indicator appears in the
viewfinder and the red lamp indicator lights up
in the front of the camcorder.
4. Press the START/STOP button again to stop
recording.
Photo Recording:
1. Set the POWER switch to CAMERA.
2. Press the PHOTO button lightly until a still
picture appears in the viewfinder. To change the
still picture, release the Photo button and repeat.
3. Press the PHOTO button deeper, The still
image and sound are recorded for seven seconds.
PHOTO button
EJECT Button
PUSH Close Button
Changing Mode Settings:
1. Press the MENU button.
2. Use the SEL/PUSH EXEC dial to select the
desired item, and then press down on the SEL/
PUSH EXEC dial to execute.
3. Use the SEL/PUSH EXEC dial to select the
desired mode and then press down on the dial
to execute.
4. Press the MENU button to erase the
menu display.
2
Sony VX-2000
Using the Fader/Overlap Function:
To fade in:
1. While in Standby, press the FADER button
until the desired fader indicator flashes in the
viewfinder.
2. Press the START/STOP button; the shot will
automatically fade in.
To fade out:
1. While recording, press the FADER button
repeatedly until desired fader mode flashes in the
Viewfinder.
2. Press the START/STOP button; the shot will
automatically fade out.
After the fade is completed, the camcorder returns to the normal mode.
The fade modes are as follows:
Fader, Monotone, Overlap*, Wipe*, Dot*, none
*= fade in only
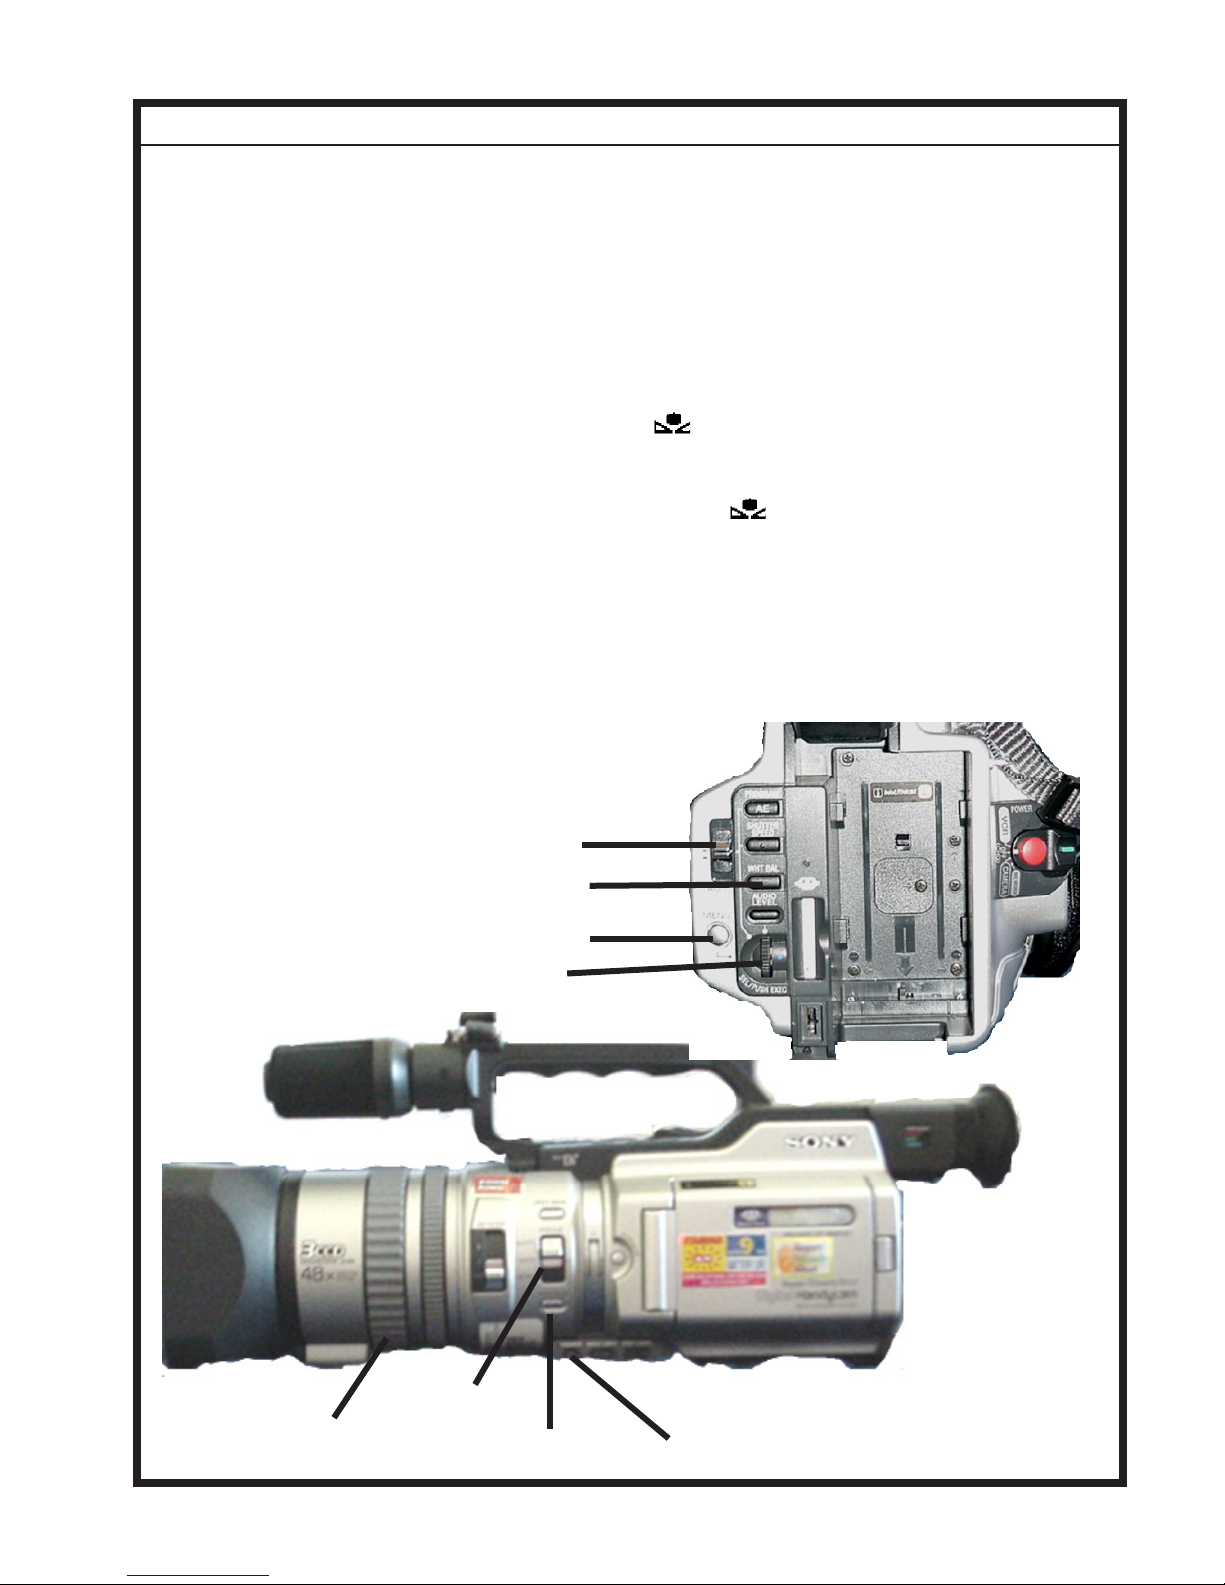
Manual Focus:
1. Set the FOCUS switch to MANUAL.
2. Rotate the FOCUS RING.
3. Press the PUSH AUTO button to auto focus
momentarily.
Adjusting White Balance:
1. Set HOLD/AUTO LOCK switch to the center position.
2. Press the WHT BAL button, the white balance indicator appears in the viewfinder.
3. Use the SEL/PUSH EXEC dial to the appropriate white balance mode: one-push (manual
calibration), outdoor, or indoor.
4. To use one-push manual adjustment mode--
the camcorder must be in standby. Fill
the frame with a white object such as paper, and
press the SEL/PUSH EXEC dial. The indicator
flashes rapidly, to indicate storage of new
balance setting. The indicator stops flashing
when white balance has been adjusted.
4. To return to automatic adjustment, set the
AUTO LOCK switch to Auto Lock or press the
WHT BAL button. The indicator disappears
from the viewfinder.
HOLD/AUTO LOCK switch
WHT BAL button
MENU button
SEL/PUSH EXEC dial
FOCUS Switch
FOCUS RING
PUSH AUTO Button
FADER Button
3
Sony VX-2000
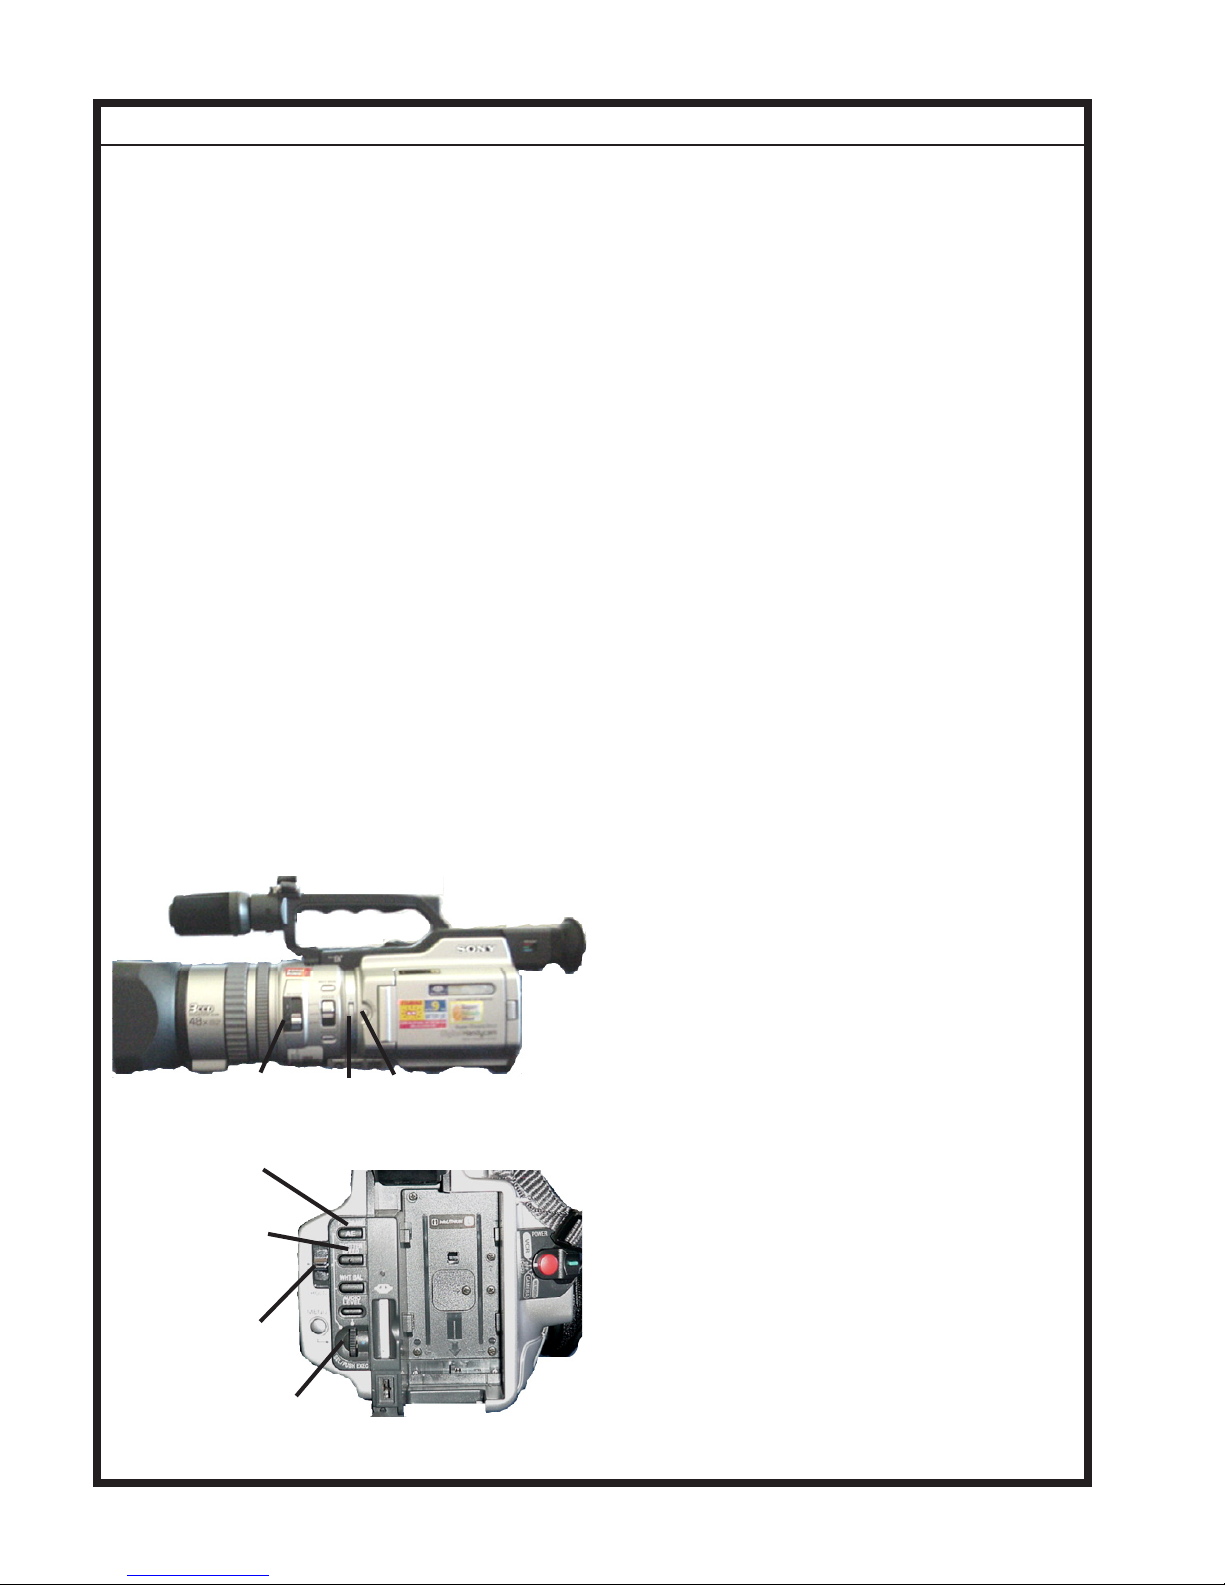
Using the Program AE function:
You can select from five AE (auto
exposure) modes:
Aperture Priority: Select the aperture manually
to determine best depth of field. Gain and shutter speed are set automatically for
best exposure.
Shutter Speed Priority: Select shutter speed
manually. Exposure is set automatically.
Sports: For capturing high speed action at
a distance.
Sunset and Moon: For capturing sunset, night
views, fireworks, neon signs, etc.
Low Lux: For capturing a subject in insufficient
light. Subject becomes bright.
1. Set the AUTO LOCK switch to the center
position.
2. Press the PROGRAM AE button, the indicator appears in the viewfinder.
3. Turn the SEL/PUSH EXEC dial to select the
desired auto exposure mode. Press the SEL/
PUSH EXEC dial to select.
4. In aperture priority or shutter speed priority
modes turn the SEL/PUSH EXEC dial to select
the aperture value or shutter speed, respectively.
Adjusting Exposure Manually:
For use in unusual lighting.
1. Set the AUTO LOCK switch to the
center position.
2. Press the EXPOSURE button, the exposure
indicator appears in the viewfinder.
3. Turn the
EXPOSURE DIAL. To brighten
the picture, adjust the level to the + side.
4. To return to automatic exposure mode set the
AUTO LOCK switch to the Auto Lock position
or press the EXPOSURE or the PROGRAM
AE button.
Adjusting Shutter Speed Manually:
1. Set the AUTO LOCK switch to the center
position. If the PROGRAM AE indicator is
lit in the viewfinder, press the PROGRAM AE
button repeatedly until the indicator disappears.
2. Press the SHUTTER SPEED button. The
shutter speed indicator appears in
the viewfinder.
3. Turn the SEL/PUSH EXEC dial to select
the desired speed. The shutter speed ranges
from 1/4 to 1/10000.
4. To return to automatic shutter speed mode,
set the AUTO LOCK selector to Auto Lock,
or press the SHUTTER SPEED button. The
shutter speed indicator disappears from the
viewfinder.
ND FILTER
switch
PROGRAM AE
button
SHUTTER SPEED
button
AUTO LOCK
switch
SEL/PUSH EXEC
dial
EXPOSURE
dial
EXPOSURE
button
Using the ND Filter:
The Neutral Density Filter can allow you to
shoot clearly even under too bright conditions.
ND Filter setting 1 corresponds to 1/4 of the
quantity of light, and ND Filter setting 2 corresponds to 1/32. It is recommended that you
set the ND filter in standby mode, as it can cause
audio and video noise during recording.
1. When the ND1 or ND2 indicator flashes in
the viewfinder, set the ND FILTER switch to the
corresponding setting.
2. When the ND OFF indicator flashes in the
viewfinder, the filter is not necessary. Set the
ND FILTER switch to off.
4
 Loading...