

Page 1

DVD Writer
4-138-185-13(1)
DVDirect Express
VRD-P1
2008 Sony Corporation
Operating Instructions
Mode d’emploi
Bedienungsanleitung
Istruzioni per l’uso
Manual de instrucciones
Инструкция по эксплуатации
Manual de Instruções
Gebruiksaanwijzing
GB
FR
DE
IT
ES
RU
PT
NL
Page 2

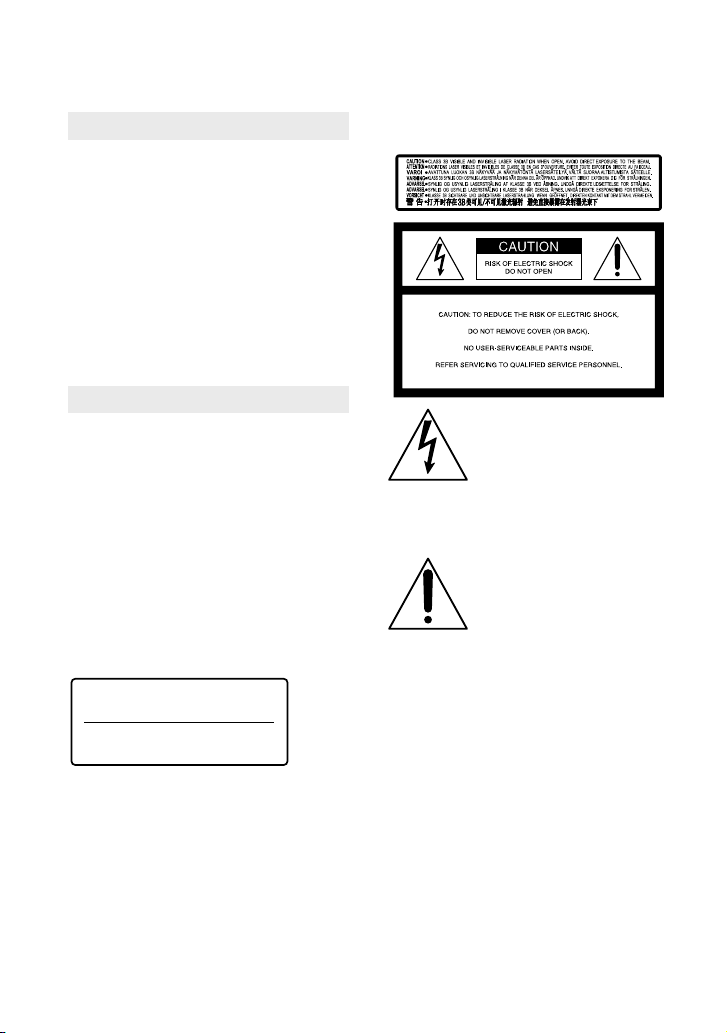
CLASS 1
LASER PRODUCT
LASER KLASSE 1
PRODUKT
Safety Regulations
WARNING
To reduce the risk of fire or electric
shock, do not expose this apparatus to
rain or moisture.
To prevent fire or shock hazard, do not
place objects filled with liquids, such as
vases, on the apparatus.
Do not install this equipment in a
confined space such as a bookshelf or
similar unit.
CAUTION
The use of optical instruments with this
product will increase eye hazard. As
the laser beam used in this DVD writer
is harmful to eyes, do not attempt
to disassemble the cabinet. Refer
servicing to qualified personnel only.
This appliance is classified as a CLASS
1 LASER product. The CLASS 1 LASER
PRODUCT MARKING is located on the
bottom exterior.
LUOKAN 1 LASERLAITE
KLASS 1 LASER APPARAT
This label is located on the laser protective
housing inside the enclosure.
This symbol is intended to
alert the user to the presence
of uninsulated “dangerous
voltage” within the product’s
enclosure that may be of
sufficient magnitude to
constitute a risk of electric
shock to persons.
This symbol is intended to
alert the user to the presence
of important operating and
maintenance (servicing)
instructions in the literature
accompanying the appliance.
This graphical symbol is located on the
bottom of the unit.
2 GB
Page 3

Important Safety Instructions
1) Read these instructions.
2) Keep these instructions.
3) Heed all warnings.
4) Follow all instructions.
5) Do not use this apparatus near water.
6) Clean only with dry cloth.
7) Do not block any ventilation
openings. Install in accordance with the
manufacturer’s instructions.
8) Do not install near any heat sources
such as radiators, heat registers, stoves, or
other apparatus (including amplifiers) that
produce heat.
9) Do not defeat the safety purpose of
the polarized or grounding-type plug. A
polarized plug has two blades with one
wider than the other. A grounding type
plug has two blades and a third grounding
prong. The wide blade or the third prong
are provided for your safety. If the provided
plug does not fit into your outlet, consult
an electrician for replacement of the
obsolete outlet.
10) Protect the power cord from being
walked on or pinched particularly at plugs,
convenience receptacles, and the point
where they exit from the apparatus.
11) Only use attachments/accessories
specified by the manufacturer.
12) Use only with the cart, stand,
tripod, bracket, or table specified by the
manufacturer, or sold with the apparatus.
When a cart is used, use caution when
moving the cart/apparatus combination to
avoid injury from tip-over.
14) Refer all servicing to qualified service
personnel. Servicing is required when
the apparatus has been damaged in any
way, such as power-supply cord or plug
is damaged, liquid has been spilled or
objects have fallen into the apparatus, the
apparatus has been exposed to rain or
moisture, does not operate normally, or has
been dropped.
GB
13) Unplug this apparatus during lightning
storms or when unused for long periods
of time.
3 GB
Page 4

FCC Compliance Statements
This equipment has been tested and found
to comply with the limits for a Class B
digital device, pursuant to Part 15 of the
FCC Rules. These limits are designed to
provide reasonable protection against
harmful interference in a residential
installation.
This equipment generates, uses, and
can radiate radio frequency energy and,
if not installed and used in accordance
with the instructions, may cause harmful
interference to radio communications.
However, there is no guarantee that
interference will not occur in a particular
installation.
If this equipment does cause harmful
interference to radio or television
reception, which can be determined
by turning the equipment off and on,
the user is encouraged to try to correct
the interference by one or more of the
following measures:
Reorient or relocate the receiving antenna.
Increase the separation between the equipment
and receiver.
Connect the equipment into an outlet on a
circuit different from that to which the receiver
is connected.
Consult the dealer or an experienced radio/TV
technician for help.
You are cautioned that any changes or
modifications not expressly approved in
this manual could void your authority to
operate this equipment.
Disposal of Old Electrical &
Electronic Equipment
(Applicable in the
European Union and other
European countries with
separate collection
This symbol on the product or on its
packaging indicates that this product
shall not be treated as household waste.
systems)
Instead it shall be handed over to the
applicable collection point for the recycling
of electrical and electronic equipment.
By ensuring this product is disposed of
correctly, you will help prevent potential
negative consequences for the environment
and human health, which could otherwise
be caused by inappropriate waste handling
of this product. The recycling of materials
will help to conserve natural resources. For
more detailed information about recycling
of this product, please contact your local
Civic Office, your household waste disposal
service or the shop where you purchased
the product.
The manufacturer of this product is Sony
Corporation, 1-7-1 Konan Minato-ku
Tokyo, 108-0075 Japan. The Authorized
Representative for EMC and product safety
is Sony Deutschland GmbH, Hedelfinger
Strasse 61, 70327 Stuttgart, Germany. For
any service or guarantee matters please
refer to the addresses given in separate
service or guarantee documents.
The nameplate is located on the bottom of
the unit.
For Customers in U.S.A
Owner’s Record
The product label is located on the bottom
of the unit. Record the serial number in
the space provided below. Refer to them
whenever you call upon your Sony dealer
regarding this product.
Model: VRD-P1
Serial Number: _______
4 GB
Page 5

Table of contents
Safety Regulations .................................................................................................................................2
Read this first ...........................................................................................................................................6
Supplied items ...........................................................................................................................6
Notes on use ...............................................................................................................................6
Main features ...........................................................................................................................................7
Compatible device ....................................................................................................................7
Supported discs .........................................................................................................................7
Parts and controls...................................................................................................................................8
Inserting a disc ...........................................................................................................................9
Recording ............................................................................................................................................... 10
Playback .................................................................................................................................................. 11
Video Lengths and Recording Time ..............................................................................................12
Disc space (recordable time) available for recording videos ..................................12
Time required for recording ............................................................................................... 12
About HD (High Definition) disc compatibility ........................................................................13
Troubleshooting .............................................................................................................................. 14
Precautions ............................................................................................................................................ 15
Specifications ........................................................................................................................................16
Also refer to the operating instructions of your Handycam
This unit can be used only by connecting to a Handycam. For details on operation, also
refer to the operating instructions of your Handycam.
In this document, “Handycam” refers to a Sony camcorder.
5 GB
Page 6

Read this first
Supplied items
Please confirm that the package contains
the following items. If any of these items
are missing or damaged, please contact
your dealer.
Operating instructions (this document)
Notes on use
Operation and storage conditions
Do not apply shock or vibration to the
unit. The unit may not operate properly.
Do not use the unit in very loud areas.
The unit may not operate properly.
When connecting the unit’s USB cable
to the Handycam, be sure to insert
the connector plug in the correct way.
Pushing the plug forcibly into the
terminal may damage the terminal and
may result in a malfunction of the unit or
the Handycam.
On recording
Television programs, movies, video
tapes, and other materials may be
copyrighted. Unauthorized recording of
such materials may be contrary to the
copyright laws.
6 GB
Page 7
Main features
By connecting the unit to your Handycam, you can easily record videos to a disc without
using a computer (One Touch Disc Burn). The created disc can be played by connecting the
unit to the Handycam (One Touch Play). Also, you can play videos on a TV by connecting
the Handycam to the TV.
In addition, operating the unit from the Handycam, you can enjoy some useful functions.
The functions differ according to the Handycam. For details, refer to the operating
instructions of your Handycam.
Compatible device
This unit is designed exclusively for use with a Handycam. Connect the unit to
a Handycam compatible with the DVDirect Express. For details on compatible
Handycam models, refer to the following address:
http://www.sony.com/DVDirect/Compatibility
You cannot use this unit with an incompatible Handycam or video camera other than
Sony.
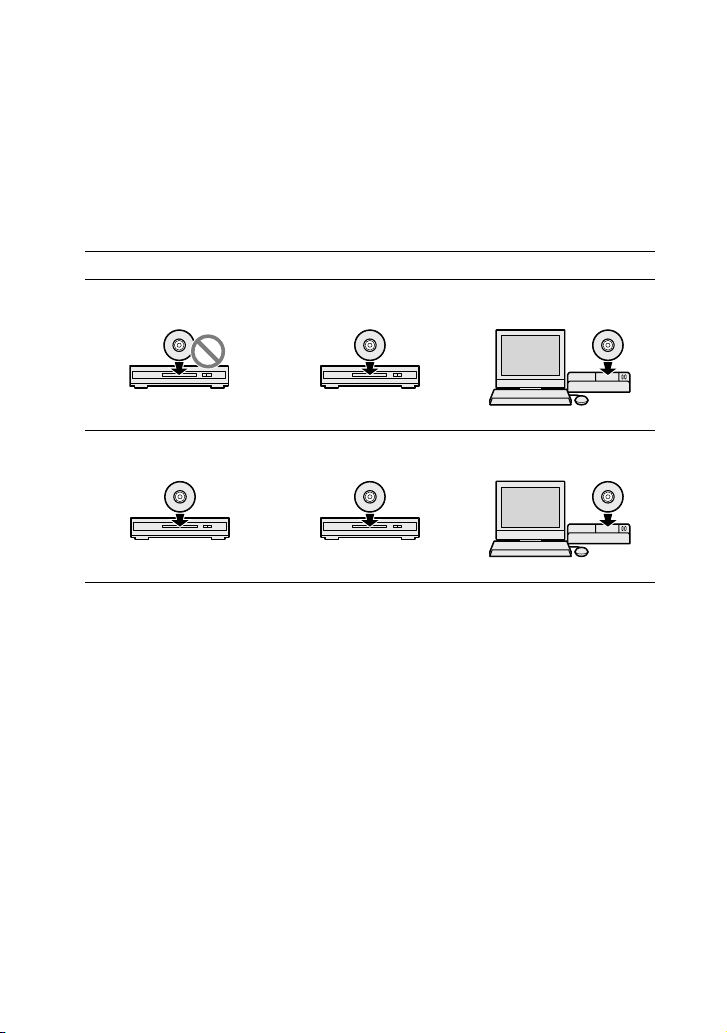
You cannot use this unit for copying or playback of a disc by connecting to a computer;
neither can it be used as an external disc drive.
Supported discs
The following writable new or unused 12 cm discs are compatible with this unit.
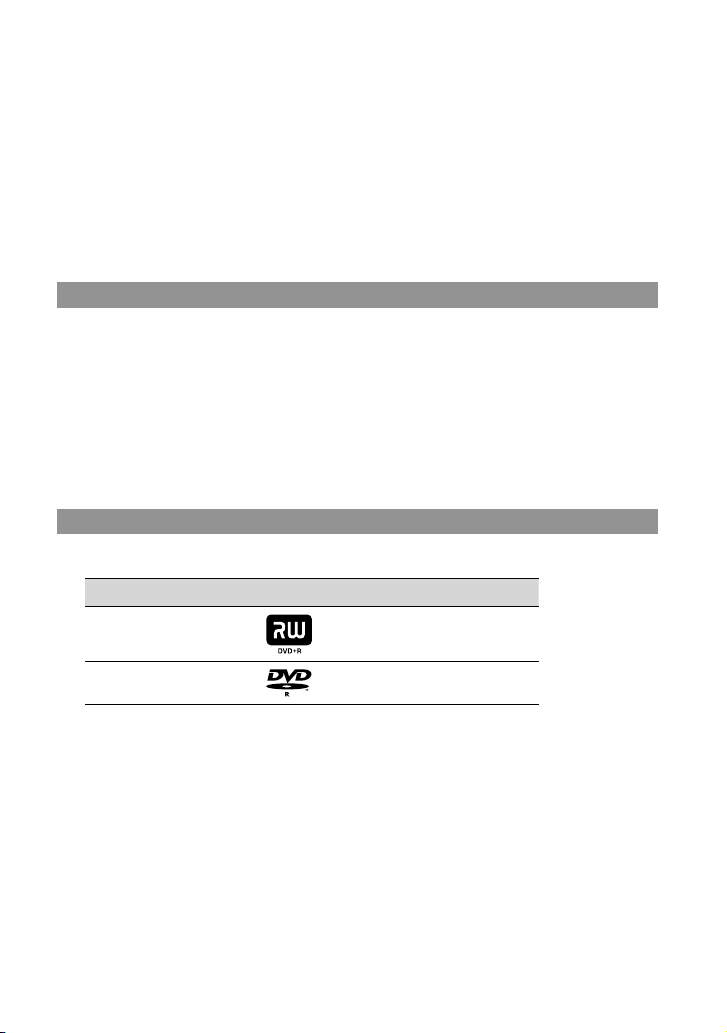
Disc type Logo Writing speed
DVD+R Up to 16x
DVD-R Up to 16x
Double/dual layer discs and 8cm discs are not supported.
DVD+RW and DVD-RW discs are not supported.
Notes on using discs
Only new or unused discs can be used for this unit.
The quality of commercially made recordable discs can vary. Sub-standard discs may not
record normally.
Some recorded discs may not be playable due to recording quality or physical condition of
the disc, or the characteristics of the playback device.
You cannot play back discs recorded on other video devices, or commercially prerecorded
discs.
7 GB
Page 8

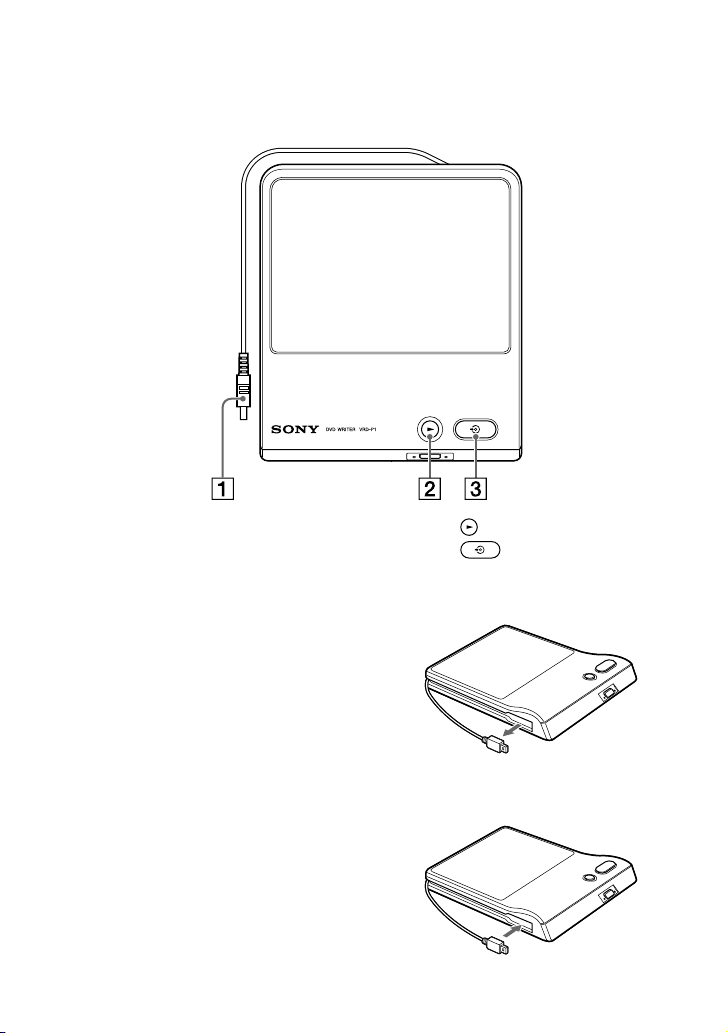
Parts and controls
Top panel
USB cable (page 10, 11)
About the USB cable
Pulling out the USB cable
Pull out the connector of the USB cable from the
side groove of the unit.
If you have any difficulty doing this, push the tip
of the connector so that the connector protrudes
from the unit, then pull out.
Storing the USB cable
Store the USB cable in the side groove of the unit.
8 GB
(play) button (page 11)
(DISC BURN) button (page 10)
Page 9
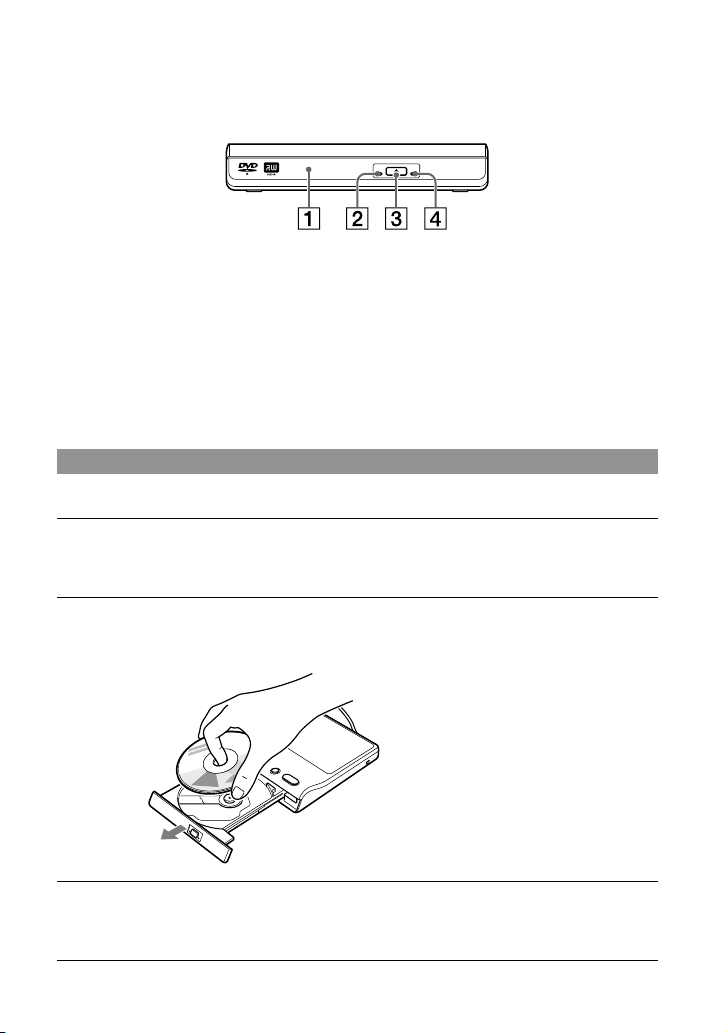
Front side
Disc tray
ACCESS lamp
(eject) button
Emergency eject hole
If you cannot open the disc tray with the
(eject) button, insert a pin or straightened
paper clip into this hole to open the disc tray.
About the power supply
The power of the unit is supplied from the connected Handycam. Make sure to connect the
Handycam to a power outlet using an AC adapter. You do not need to connect the unit to a
power outlet.
Inserting a disc
The unit can open its disc tray only when it is connected to a Handycam.
Press the (eject) button to open the disc tray.
The disc tray opens only halfway. Open it fully by hand.
Place the disc on the disc tray, recording side down.
The disc should click into place.
Do not touch the recording
surface of the disc.
Push the disc tray to close.
Push the disc tray until it clicks.
9 GB
Page 10
Recording
Connecting this unit to the Handycam, you can record videos to the disc by simply pressing
the (DISC BURN) button.
Turn on the Handycam.
1
Make sure to connect the Handycam to a power outlet using an AC adapter.
If you do not use an AC adapter for the Handycam, the unit does not work when it is
connected to the Handycam.
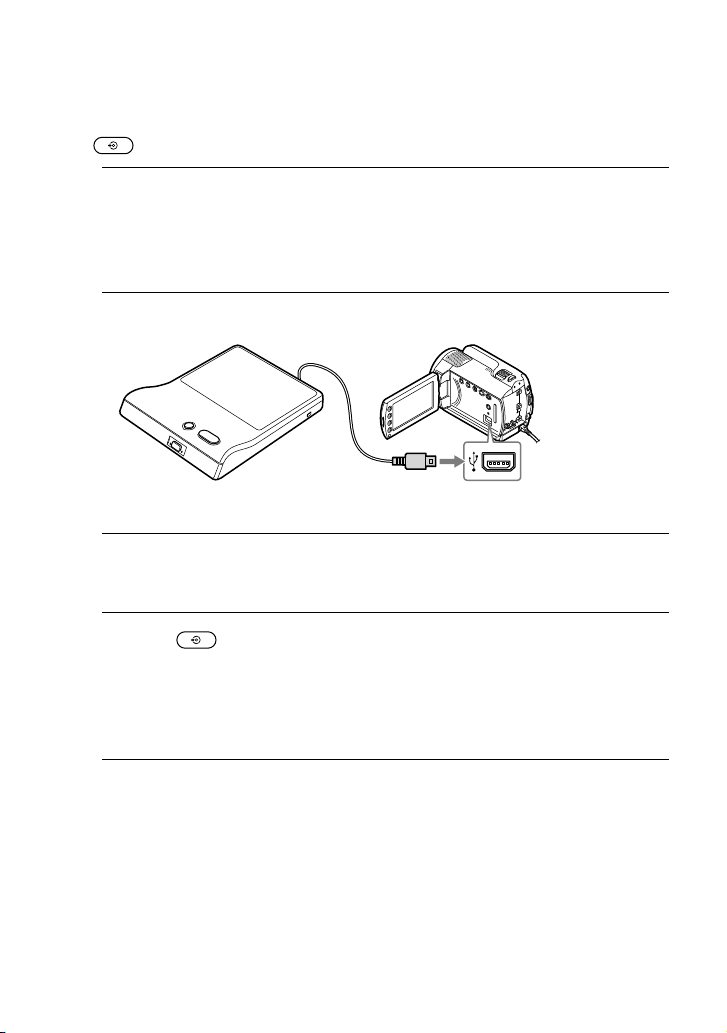
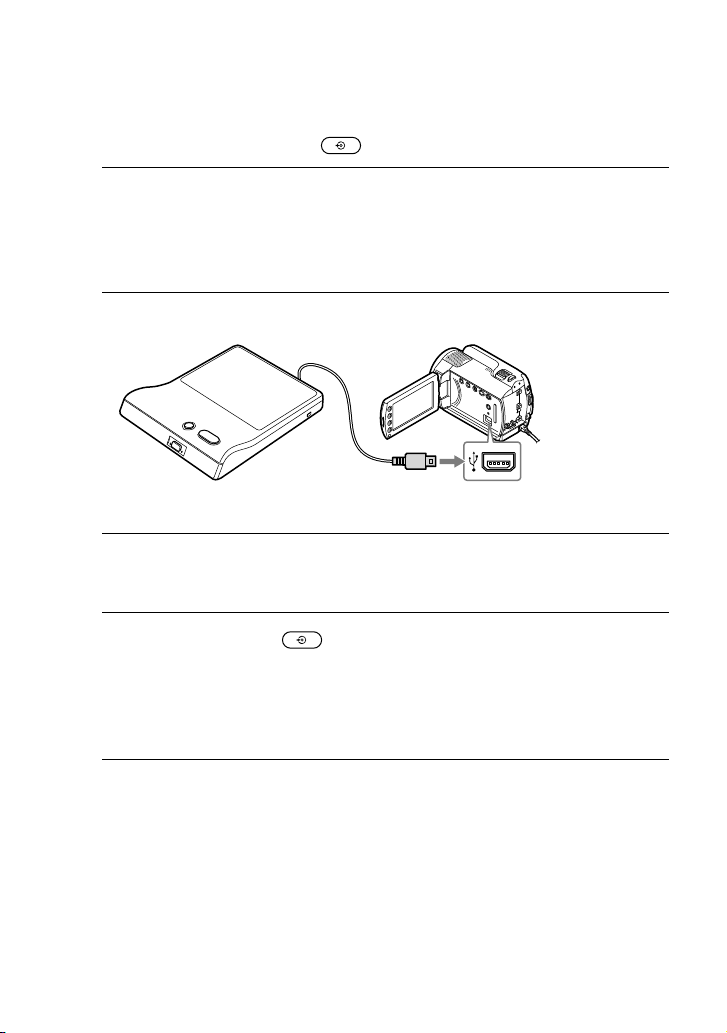
Connect the unit to the USB port of the Handycam.
2
USB port
(Type Mini-AB)
You cannot use a USB extension cable.
Insert a new or unused disc.
3
For details, see “Inserting a disc” (page 9).
Press the (DISC BURN) button.
4
The videos which were newly recorded by the Handycam and were not copied yet are
recorded to the disc.
If the video content exceeds a single disc, repeat steps 3 and 4.
You cannot add videos to a disc already recorded on by this unit.
Operating from a Handycam
Operating from a Handycam, several convenient recording functions are available. For
instance, you can select scenes to record. For details, refer to the operating instructions of
your Handycam.
Checking your recording
When you record videos to a disc by this unit, make sure that the recording was successful by
playing the disc before erasing the video from the Handycam.
10 GB
Page 11

Playback
You can use this unit to play back created discs, viewing them either in the display of a
connected Handycam or on a TV. To view on a TV, you need to connect a Handycam
to the TV. For details about connecting to a TV, refer to the operating instructions of your
Handycam.
Turn on the Handycam.
1
Make sure to connect the Handycam to a power outlet using an AC adapter.
If you do not use an AC adapter for the Handycam, the unit will not work when it is
connected to the Handycam.
Connect the unit to the USB port of the Handycam.
2
USB port
(Type Mini-AB)
You cannot use a USB extension cable.
Insert the disc recorded by this unit.
3
For details, see “Inserting a disc” (page 9).
Press the (play) button.
4
Playback starts from the beginning of the disc.
Operating from a Handycam
You can also play videos by operating the Handycam itself. For details, refer to the
operating instructions of your Handycam.
About playing the created disc on other devices
With a High Definition Handycam, you can create High Definition discs (AVCHD format).
For details on playing a disc on other devices, refer to page 13.
11 GB
Page 12
Video Lengths and Recording Time
Disc space (recordable time) available for recording videos
Available recording time of video on a disc depends on the Handycam REC mode setting.
High Definition (HD) Standard Definition (SD)
REC mode Recordable time* REC mode Recordable time*
HD FH approx. 30 minutes STD HQ/HQ approx. 1 hour
HD HQ approx. 55 minutes SP approx. 1 hour 30
HD SP approx. 1 hour 10
minutes
HD LP approx. 1 hour 35
minutes
LP approx. 3 hours
* Single disc
Hints
When down-converting to SD (Standard Definition) with an appropriate Handycam model, you can
record up to approx. 2 hours 40 minutes on a disc. (Picture quality may depend on the recording time.)
Available REC modes vary between Handycam models.
Time required for recording
When recording video, the length of time required for recording depends on the model of
Handycam, the REC mode setting used to shoot the video and the number of scenes the
video contains. Typically, more time is required to record videos onto a disc if the video has
been recorded at a higher image quality (bit rate) setting. Down-converting to SD (Standard
Definition) video takes more than the actual video time.
minutes
Recording HD (High Definition) video or SD
(Standard Definition) video as is
Down-converting to SD (Standard Definition) video approx. 1 hour 5 minutes ~ 3 hours
approx. 20 minutes ~ 1 hour
Notes
You cannot record HD (High Definition) video taken in REC mode at a bit rate exceeding 18Mbps, such
as in [HD FX] mode (for example, High Definition Handycam) in AVCHD format.
If the time of a scene exceeds the disc’s capacity, recording will not be possible. In this case, divide the
scene using the edit function of the Handycam.
12 GB
Page 13
About HD (High Definition) disc compatibility
An HD (High Definition) disc cannot be played on an AVCHD incompatible DVD player or
recorder.
Do not insert an HD (High Definition) disc in an AVCHD incompatible DVD player or
recorder. The DVD player or recorder may fail to eject the disc and may erase its contents.
An HD (High Definition) disc can be played on an AVCHD compatible Blu-ray Disc player/
recorder, Playstation 3 or other compatible device.
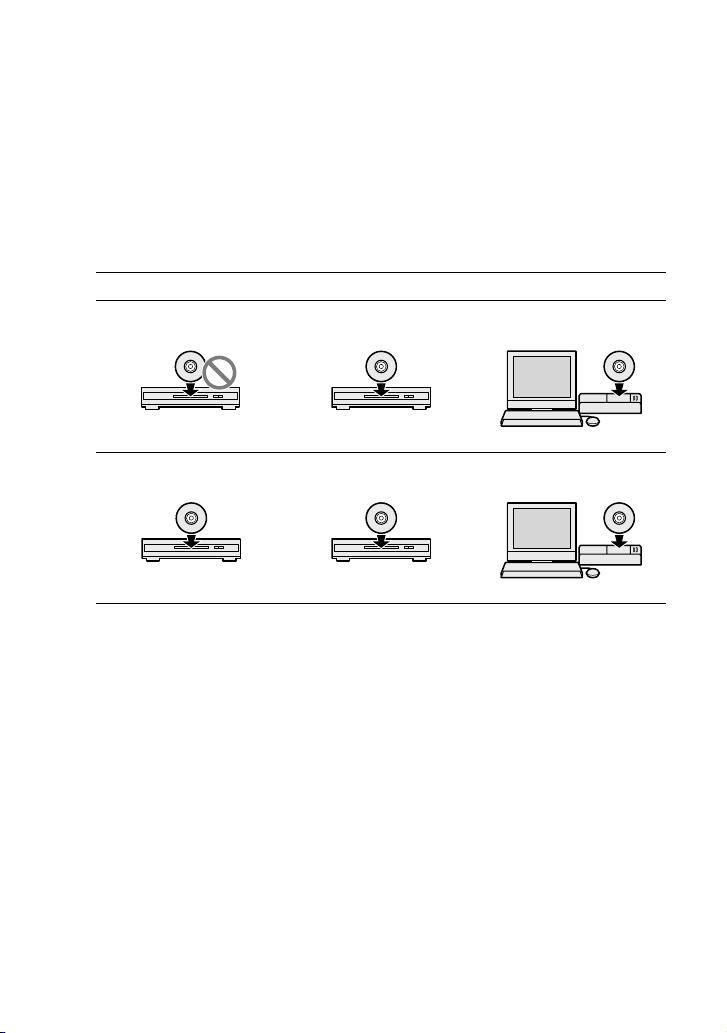
Type of created disc and compatible devices
HD (High Definition) disc (containing High Definition videos)
No
Yes
Yes
DVD device
AVCHD format
compatible device
Computer*
SD (Standard Definition) disc (containing Standard Definition videos)
Yes
DVD device
* Install the AVCHD compatible application on your computer beforehand. Even in the case of a
computer environment that satisfies system requirements, there may be noise in video playback,
frames may be dropped, or sound may be lost intermittently. (This does not depend on the quality
of the created disc.)
Yes
AVCHD format
compatible device
Yes
Computer*
13 GB
Page 14

Troubleshooting
If you experience any of the following
difficulties while using the unit, use this
troubleshooting guide to help remedy the
problem before requesting repairs. Refer
also to the operating instructions of your
Handycam. If the problem persists,
contact your Sony dealer.
The Handycam is connected, but the
unit does not work.
Make sure that your Handycam is supported
by this unit (page 7).
Make sure that the Handycam is connected
to a power outlet by its AC adapter.
Make sure that the Handycam is configured
correctly and the USB cable is connected
properly to the Handycam.
Disconnect the USB cable from the
Handycam. Turn off the Handycam, and
then turn it on again. Then connect the USB
cable to the Handycam again.
Video cannot be recorded to the disc.
Video recorded using the (DISC BURN)
button on the Handycam cannot be recorded
using the (DISC BURN) button again. (The
same disc cannot be created again using the
(DISC BURN) button.) To create copies of the
same disc, select the [DISC BURN OPTION]
setting on the Handycam.
Make sure that the disc is compatible with this
unit (page 7).
Make sure that the disc is new or unused.
A disc that has already been recorded on or
formatted by another device cannot be used.
Make sure that the disc has no dust, dirt or
fingerprints on the recording side.
Make sure that the disc is placed on the disc
tray with its recording side down.
Vibration of the unit may cause a malfunction
of the Handycam. Do not place the
Handycam on the unit.
A disc cannot be played.
You can play back only discs created by this
unit. You cannot play back discs recorded on
other video devices, or commercially prerecorded discs.
Make sure that the disc has no dust, dirt or
fingerprints on the playback side.
Make sure that the disc is placed on the disc
tray with its playback side down.
The disc cannot be ejected.
The (eject) button does not work.
Disconnect the USB cable from the
Handycam, turn off the power of the
Handycam, then turn it on again, reconnect
the USB cable to the Handycam, and then
press the (eject) button. If this does not
work, open the disc tray using the emergency
eject hole (page 9).
The unit can open its disc tray only when it
is connected to the Handycam. Make sure
that the unit is connected to the Handycam
properly.
Make sure that the Handycam is connected
to a power outlet using an AC adapter.
The disc cannot be ejected while recording or
playing a disc.
14 GB
Page 15

Precautions
On use and care
Do not use or store the unit and accessories in the
following locations:
Anywhere extremely hot, cold or humid.
Never leave exposed to temperatures above
60 ºC, such as under direct sunlight, near
heaters or in a car parked in the sun. They may
malfunction or become deformed.
Near strong magnetic fields or mechanical
vibration.
The unit may malfunction.
Near strong radio waves or radiation.
The unit may not be able to record properly.
On a sandy beach or anywhere dusty.
If sand or dust gets in the unit, malfunction or
irreparable damage may result.
On handling the casing
If the casing is soiled, clean it with a soft cloth
lightly moistened with water, and then wipe the
casing with a dry soft cloth.
Avoid the following to avoid damage to the
finish:
Chemicals such as thinner, benzene, alcohol,
chemical cloths, repellent, insecticide and
sunscreen
Handling the unit with the above substances
on your hands
Leaving the casing in contact with rubber or
vinyl objects for a long period of time
Transportation
Please repack the unit in its original carton when
shipping.
If the unit is to be shipped, remove any disc
beforehand.
Condensation
Do not expose the unit to sudden temperature
changes. Do not use the unit immediately
after moving it from a cold to warm location
or raising the room temperature suddenly, as
condensation may have formed within the unit.
If the temperature changes suddenly while using
the unit, turn off the power and stop use for at
least one hour.
When moving the unit between temperature
extremes, place it in an air-tight plastic bag.
Allow at least one hour for the unit to adapt to
the ambient temperature before use.
Handling discs
Handle the discs only by the edges. Never touch
the playback/recording surface.
Do not affix labels on discs.
Do not store discs in dusty or humid locations,
in direct sunlight, or near heat generating
devices.
To protect important data, always keep discs in
their cases.
Clean the disc with a cleaning cloth. Wipe the
disc from the center out.
Data may not be recorded properly if there
are scratches or dust on writable discs. Handle
discs very carefully.
15 GB
Page 16

Specifications
Recording
Supported devices
Handycam supported by the DVDirect Express
For details about Handycam supported by the
unit, see the following address:
http://www.sony.com/DVDirect/Compatibility
Recordable discs
DVD+R, DVD-R 12cm discs
Playback
Playable discs
Discs created with VRD-P1 (Other commercial or
recorded discs are not supported.)
General
Consumption: 7 W (max.)
Operating temperature: 5 ºC to 35 ºC
Storage temperature: -20 ºC to + 60 ºC
Size: Approx. 143 × 162.5 × 25 mm (W×D×H)
including the projecting parts
Weight: Approx. 400 g
Design and specifications are subject to change
without notice.
“Handycam” and are
registered trademarks of Sony Corporation.
“DVDirect” and DVDirect logo are trademarks
of Sony Corporation.
Other system and product names used herein
are registered trademarks or trademarks of their
respective manufacturers, although the and
marks are not used in the text.
16 GB
Page 17

Page 18
CLASS 1
LASER PRODUCT
LASER KLASSE 1
PRODUKT
Consignes de sécurité
AVERTISSEMENT
Pour réduire le risque d’incendie ou
d’électrocution, placez cet appareil à
l’abri de la pluie et de l’humidité.
Pour prévenir tout risque d’incendie ou
d’électrocution, ne placez pas d’objets
remplis de liquides, comme des vases,
sur l’appareil.
N’installez pas cet appareil dans
un espace confiné comme une
bibliothèque ou une armoire similaire.
ATTENTION
L’utilisation d’instruments optiques
avec ce produit augmente les risques
pour les yeux. Comme le rayon laser
utilisé dans ce graveur de DVD est
dangereux pour les yeux, n’essayez
pas de démonter son boîtier. Seul
un technicien qualifié peut effectuer
l’entretien.
Cet appareil fait partie des produits
CLASS 1 LASER. L’étiquette CLASS
1 LASER se trouve sur le dessous, à
l’extérieur de l’appareil.
Cette étiquette se trouve sur le boîtier de
protection du laser, à l’intérieur du coffret.
Ce symbole est destiné à
avertir l’utilisateur de la
présence, dans le boîtier
du produit, d’une « tension
dangereuse » non isolée
dont l’amplitude peut être
suffisante pour présenter un
risque d’électrocution.
Ce symbole est destiné à
avertir l’utilisateur de la
présence d’instructions
d’utilisation et de
maintenance (entretien)
importantes dans la
documentation qui
accompagne l’appareil.
Ce symbole graphique se trouve sur le
dessous de l’appareil.
2 FR
Page 19

Consignes de sécurité importantes
1) Lisez ces instructions.
2) Conservez ces instructions.
3) Tenez compte de tous les avertissements.
4) Respectez toutes les instructions.
5) N’utilisez pas cet appareil à proximité
de l’eau.
6) Nettoyez l’appareil uniquement avec un
chiffon sec.
7) Ne bloquez pas les ouvertures
de ventilation. Installez l’appareil
conformément aux instructions du
fabricant.
8) N’installez pas l’appareil à proximité
d’une source de chaleur, telle qu’un
radiateur, un poêle, une cuisinière ou
d’autres appareils (notamment des
amplificateurs) qui produisent de la
chaleur.
9) Pour des raisons de sécurité, veillez à
utiliser une fiche polarisée ou une fiche
avec terre. Une fiche polarisée possède deux
lames dont une est plus large que l’autre.
Une fiche avec terre possède deux lames
et une broche de mise à la masse. La lame
large ou la troisième broche sont prévues
pour votre sécurité. Si la fiche fournie
n’est pas adaptée à la prise, consultez un
électricien pour remplacer la prise obsolète.
10) Protégez le cordon d’alimentation
afin d’éviter qu’il soit piétiné ou pincé, en
particulier au niveau des fiches, des prises
multiples et du point de sortie de l’appareil.
11) Utilisez uniquement des options/
accessoires spécifiés par le fabricant.
12) Utilisez l’appareil uniquement avec le
chariot, le socle, le trépied, le support ou la
table spécifiés par le fabricant, ou vendus
avec l’appareil. Si vous utilisez un chariot,
soyez prudent lors du déplacement de la
combinaison chariot/appareil afin d’éviter
de vous blesser lors du transport.
13) Débranchez l’appareil pendant les
orages ou lorsque vous ne l’utilisez pas
pendant des périodes prolongées.
14) Tout entretien ne peut être effectué que
par un technicien qualifié. Un entretien est
nécessaire si l’appareil a été endommagé
d’une quelconque manière, par exemple
si le cordon ou la fiche d’alimentation est
endommagé, si du liquide a pénétré dans
l’appareil ou si des objets sont tombés à
l’intérieur de celui-ci, s’il a été exposé à la
pluie ou à l’humidité, s’il ne fonctionne pas
normalement ou s’il a subi une chute.
FR
3 FR
Page 20

Déclarations de conformité de la FCC
Cet équipement a été testé et déclaré
conforme aux normes relatives au matériel
numérique de la classe B, fixées par l’article
15 des règlements de la FCC. Ces limites
sont destinées à assurer une protection
suffisante contre les interférences dans une
installation résidentielle.
Cet équipement génère, utilise et peut
dégager de l’énergie hautes fréquences qui,
en cas d’installation et d’utilisation non
conformes aux instructions, peuvent être à
l’origine d’interférences dans la réception
radio et télévision.
Toutefois, rien ne garantit qu’il n’y aura pas
interférences dans une installation donnée.
En cas d’interférences dans la réception
radio et télévision, il est possible de
déterminer si elles sont dues au matériel
en éteignant et en rallumant l’appareil,
et si c’est le cas, l’utilisateur est invité à
corriger le problème de l’une des manières
suivantes :
Modifier l’orientation ou l’emplacement de
l’antenne de réception.
Eloigner l’appareil du récepteur.
Raccorder l’appareil à une prise située sur un
circuit différent de celui du récepteur.
Consulter le revendeur ou un technicien radio/
TV expérimenté pour obtenir une assistance.
N’oubliez pas que toute modification non
expressément approuvée dans ce manuel
peut annuler votre droit d’utilisation de cet
équipement.
Traitement des appareils
électriques et
électroniques en fin de vie
(Applicable dans les pays
de l’Union Européenne et
aux autres pays européens
disposant de systèmes de
collecte sélective)
Ce symbole, apposé sur le produit ou sur
son emballage, indique que ce produit
ne doit pas être traité avec les déchets
ménagers. Il doit être remis à un point de
collecte approprié pour le recyclage des
équipements électriques et électroniques.
En s’assurant que ce produit est bien mis au
rebut de manière appropriée, vous aiderez
à prévenir les conséquences négatives
potentielles pour l’environnement et la
santé humaine. Le recyclage des matériaux
aidera à préserver les ressources naturelles.
Pour toute information supplémentaire
au sujet du recyclage de ce produit, vous
pouvez contacter votre municipalité, votre
déchetterie ou le magasin où vous avez
acheté le produit.
Le fabricant de ce produit est Sony
Corporation, 1-7-1 Konan Minatoku Tokyo, 108-0075 Japon. Le
représentant agréé pour la compatibilité
électromagnétique et la sécurité du produit
est Sony Deutschland GmbH, Hedelfinger
Strasse 61, 70327 Stuttgart, Allemagne.
Pour toute question relative à la garantie ou
aux réparations, adressez-vous aux adresses
reprises dans les documents de garantie et
de réparation.
4 FR
La plaque signalétique se trouve sur le
dessous de l’appareil.
Page 21

Table des matières
Consignes de sécurité ...........................................................................................................................2
A lire avant utilisation ...........................................................................................................................6
Accessoires fournis ...................................................................................................................6
Remarques sur l’utilisation ....................................................................................................6
Principales fonctions .............................................................................................................................7
Appareil compatible.................................................................................................................7
Disques pris en charge ............................................................................................................7
Eléments et commandes .....................................................................................................................8
Insertion d’un disque ...............................................................................................................9
Enregistrement .....................................................................................................................................10
Lecture.....................................................................................................................................................11
Durée de la vidéo et temps d’enregistrement ..........................................................................12
Espace disque (durée enregistrable) disponible pour l’enregistrement de
vidéos .........................................................................................................................................12
Temps nécessaire à l’enregistrement ..............................................................................12
À propos de la compatibilité des disques HD (haute définition) ....................................... 14
Dépannage ........................................................................................................................................15
Précautions ............................................................................................................................................ 16
Caractéristiques techniques ............................................................................................................ 17
Reportez-vous également au mode d’emploi de votre Handycam
Cet appareil ne peut être utilisé qu’en le raccordant à un Handycam. Pour de plus
amples informations sur le fonctionnement, reportez-vous au mode d’emploi de votre
Handycam.
Dans le présent document, « Handycam » fait référence à un caméscope Sony.
5 FR
Page 22

A lire avant utilisation
Accessoires fournis
Veuillez vous assurer que l’emballage
contient les éléments listés ci-dessous. Si
l’un de ces éléments manque ou est abîmé,
veuillez contacter votre revendeur.
Mode d’emploi (présent document)
Remarques sur l’utilisation
Normes de fonctionnement et de
stockage
Evitez tout choc ou vibration de
l’appareil. Il risquerait de ne pas
fonctionner correctement.
N’utilisez pas l’appareil dans des zones
très bruyantes. Il risquerait de ne pas
fonctionner correctement.
Avant de raccorder le câble USB de
l’appareil au Handycam, veillez à
insérer la fiche du connecteur dans le
bon sens. Si vous forcez pour insérer le
connecteur, vous risquez d’endommager
la borne et de provoquer un mauvais
fonctionnement de l’appareil ou du
Handycam.
Enregistrement
Les programmes de télévision,
les films, les cassettes vidéo et les
autres enregistrements peuvent être
protégés par des droits d’auteur. Leur
enregistrement non autorisé peut être
contraire à la législation sur les droits
d’auteur.
6 FR
Page 23
Principales fonctions
Vous pouvez raccorder l’appareil à votre Handycam pour enregistrer aisément des vidéos
sur un disque sans utiliser d’ordinateur (One Touch Disc Burn). Vous pouvez lire le disque
créé en raccordant l’appareil au Handycam (One Touch Play). Il est également possible de
lire des vidéos sur un téléviseur en raccordant le Handycam au téléviseur.
Par ailleurs, l’utilisation de l’appareil à partir du Handycam permet de bénéficier de
certaines fonctions utiles. Ces fonctions varient selon le Handycam. Pour de plus amples
informations, reportez-vous au mode d’emploi de votre Handycam.
Appareil compatible
Cet appareil est destiné exclusivement à une utilisation avec un Handycam. Raccordez-le
à un Handycam compatible avec DVDirect Express. Pour de plus amples informations
sur les modèles de Handycam compatibles, reportez-vous à l’adresse suivante :
http://www.sony.com/DVDirect/Compatibility
Vous ne pouvez pas utiliser cet appareil avec un Handycam ou un caméscope
incompatible d’une marque autre que Sony.
Vous ne pouvez pas utiliser cet appareil pour la copie ou la lecture d’un disque en le
raccordant à un ordinateur, ou l’utiliser comme lecteur de disque externe.
Disques pris en charge
Les disques de 12 cm inscriptibles suivants neufs ou inutilisés sont compatibles avec cet
appareil.
Type de disque Logo Vitesse d’écriture
DVD+R Jusqu’à 16×
DVD-R Jusqu’à 16×
Les disques double couche et les disques de 8 cm ne sont pas pris en charge.
Les disques DVD+RW et DVD-RW ne sont pas pris en charge.
Remarques concernant l’usage des disques
Seuls des disques neufs ou inutilisés peuvent être utilisés dans cet appareil.
La qualité des disques enregistrables vendus dans le commerce peut varier. Les disques non
standard risquent de ne pas s’enregistrer normalement.
Certains disques enregistrés peuvent être illisibles en raison de la qualité d’enregistrement
ou de l’état physique du disque, ou encore des caractéristiques du dispositif de lecture.
Il est impossible de lire les disques enregistrés à l’aide d’autres appareils vidéo ou les
disques commerciaux préenregistrés.
7 FR
Page 24
Eléments et commandes
Panneau supérieur
Câble USB (page 10, 11)
A propos du câble USB
Retrait du câble USB
Retirez le connecteur du câble USB de la rainure
latérale de l’appareil.
Si cette opération pose problème, appuyez sur
la pointe du connecteur afin qu’il dépasse de
l’appareil, puis retirez-le.
Rangement du câble USB
Rangez le câble USB dans la rainure latérale de
l’appareil.
8 FR
Bouton (lecture) (page 11)
Bouton (DISC BURN) (page 10)
Page 25

Face avant
Tiroir à disque
Témoin ACCESS
Bouton (éjection)
Orifice d’éjection d’urgence
Si vous n’arrivez pas à ouvrir le tiroir à disque
avec le bouton (éjection), insérez une
épingle ou un trombone droit dans cet orifice
pour ouvrir le tiroir à disque.
A propos de l’alimentation
L’alimentation de l’appareil est fournie par le Handycam raccordé. Veillez à raccorder le
Handycam à une prise électrique à l’aide d’un adaptateur secteur. Vous n’avez pas besoin de
raccorder l’appareil à une prise électrique.
Insertion d’un disque
L’appareil ne peut ouvrir son tiroir à disque que s’il est raccordé à un Handycam.
Appuyez sur le bouton (éjection) pour ouvrir le tiroir à disque.
Le tiroir à disque ne s’ouvre qu’à moitié. Ouvrez-le complètement à la main.
Posez le disque sur le tiroir à disque, face d’enregistrement vers le bas.
Vous devez entendre un déclic.
Ne touchez pas la surface
d’enregistrement du disque.
Appuyez sur le tiroir à disque pour le fermer.
Appuyez sur le tiroir à disque jusqu’au déclic.
9 FR
Page 26
Enregistrement
Vous pouvez raccorder cet appareil au Handycam afin d’enregistrer des vidéos sur le disque
en appuyant simplement sur le bouton (DISC BURN).
Mettez le Handycam sous tension.
1
Veillez à raccorder le Handycam à une prise électrique à l’aide d’un adaptateur secteur.
Si vous n’utilisez pas d’adaptateur secteur pour le Handycam, l’appareil ne fonctionne
pas lorsqu’il est raccordé au Handycam.
Raccordez l’appareil au port USB du Handycam.
2
Port USB
(Type Mini AB)
Vous ne pouvez pas utiliser de câble d’extension USB.
Insérez un disque neuf ou inutilisé.
3
Pour plus de détails, voir « Insertion d’un disque » (page 9).
Appuyez sur le bouton (DISC BURN).
4
Les dernières vidéos, qui ont été enregistrées par le Handycam et qui n’ont pas encore
été copiées, sont enregistrées sur le disque.
Si le contenu vidéo est supérieur à un disque unique, répétez les étapes 3 et 4.
Vous ne pouvez pas ajouter de vidéo à un disque déjà enregistré par cet appareil.
Utilisation à partir d’un Handycam
L’utilisation à partir d’un Handycam vous permet de bénéficier de plusieurs fonctions
d’enregistrement utiles. Par exemple, vous pouvez sélectionner les scènes à enregistrer. Pour
de plus amples informations, reportez-vous au mode d’emploi de votre Handycam.
Contrôle de votre enregistrement
Lorsque vous enregistrez des vidéos sur un disque à l’aide de cet appareil, vérifiez que
l’enregistrement s’est exécuté correctement en lisant le disque avant d’effacer la vidéo du
Handycam.
10 FR
Page 27

Lecture
Vous pouvez utiliser cet appareil pour lire des disques créés et les visionner sur l’écran du
Handycam raccordé ou sur un téléviseur. Pour une visualisation sur un téléviseur, vous
devez raccorder le Handycam au téléviseur. Pour de plus amples informations sur le
raccordement à un téléviseur, reportez-vous au mode d’emploi de votre Handycam.
Mettez le Handycam sous tension.
1
Veillez à raccorder le Handycam à une prise électrique à l’aide d’un adaptateur secteur.
Si vous n’utilisez pas d’adaptateur secteur pour le Handycam, l’appareil ne fonctionne
pas lorsqu’il est raccordé au Handycam.
Raccordez l’appareil au port USB du Handycam.
2
Port USB
(Type Mini AB)
Vous ne pouvez pas utiliser de câble d’extension USB.
Insérez le disque enregistré à l’aide de cet appareil.
3
Pour plus de détails, voir « Insertion d’un disque » (page 9).
Appuyez sur le bouton (lecture).
4
La lecture commence depuis le début du disque.
Utilisation à partir d’un Handycam
Vous pouvez également lire des vidéos en utilisant le Handycam proprement dit. Pour de
plus amples informations, reportez-vous au mode d’emploi de votre Handycam.
A propos de la lecture de disques créés à l’aide d’autres appareils
Avec un Handycam haute définition, vous pouvez créer des disques haute définition
(format AVCHD). Pour plus d’informations sur la lecture d’un disque sur d’autres dispositifs,
reportez-vous à la page 14.
11 FR
Page 28

Durée de la vidéo et temps d’enregistrement
Espace disque (durée enregistrable) disponible pour l’enregistrement de
vidéos
Le temps d’enregistrement d’une vidéo disponible sur un disque dépend du réglage du mode
ENREG. du Handycam.
Haute définition (HD) Définition standard (SD)
Mode ENREG. Durée
enregistrable*
HD FH environ 30 minutes STD HQ/HQ environ 1 heure
HD HQ environ 55 minutes SP environ 1 heure
HD SP environ 1 heure
HD LP environ 1 heure
10 minutes
35 minutes
Conseils
Durant la rétro-conversion qualité SD (définition standard) avec un modèle de Handycam approprié,
vous pouvez enregistrer jusqu’à 2 heures 40 minutes environ sur un disque (la qualité d’image peut
dépendre de la durée d’enregistrement).
Les modes ENREG. disponibles varient selon les modèles de Handycam.
Temps nécessaire à l’enregistrement
Lors de l’enregistrement d’une vidéo, la durée requise pour l’enregistrement dépend du
modèle de Handycam, du réglage du mode ENREG. utilisé pour enregistrer la vidéo et du
nombre de scènes que la vidéo contient. Généralement, le temps nécessaire à l’enregistrement
d’une vidéo sur un disque est plus long si la vidéo a été enregistrée dans une qualité d’image
(débit binaire) supérieure. La rétro-conversion en une vidéo SD (définition standard) prend
plus de temps que la durée réelle de la vidéo.
Mode ENREG. Durée
enregistrable*
30 minutes
LP environ 3 heures
* Disque unique
12 FR
Enregistrement d’une vidéo HD (haute définition)
ou SD (définition standard) telle quelle
Rétro-conversion en une vidéo SD (définition
standard)
environ 20 minutes ~ 1 heure
environ 1 heure 5 minutes ~ 3 heures
Page 29

Remarques
Vous ne pouvez pas enregistrer une vidéo HD (haute définition) enregistrée en mode ENREG. à un débit
binaire supérieur à 18 Mbits/s, comme en mode [HD FX] (Handycam
au format AVCHD.
Si la durée d’une scène excède la capacité du disque, l’enregistrement n’est pas possible. Dans ce cas,
divisez la scène à l’aide de la fonction de modification du Handycam.
haute définition, par exemple)
13 FR
Page 30
À propos de la compatibilité des disques HD
(haute définition)
Un disque HD (haute définition) ne peut pas être lu sur un lecteur ou graveur de DVD non
compatible AVCHD.
N’insérez pas de disque HD (haute définition) dans un lecteur ou graveur de DVD non
compatible AVCHD. Le lecteur ou graveur de DVD risquerait de ne pas pouvoir éjecter le
disque et d’effacer son contenu.
Un disque HD (haute définition) peut être lu sur un lecteur/graveur de Blu-ray Disc
compatible AVCHD, sur un système Playstation 3 ou sur d’autres dispositifs compatibles.
Type de disque créé et dispositifs compatibles
Disque HD (haute définition) (contenant des vidéos haute définition)
Non
Oui
Oui
14 FR
Dispositif DVD
Disque SD (définition standard) (contenant des vidéos en définition standard)
Oui
Dispositif DVD
* Installez d’abord l’application compatible AVCHD sur votre ordinateur. Même dans un
environnement informatique possédant la configuration requise, vous pouvez constater la présence
de bruit lors de la lecture vidéo, l’omission de certaines images ou la coupure du son par
intermittence. (Cela ne dépend pas de la qualité du disque créé.)
Appareil compatible
avec le format AVCHD
Oui
Appareil compatible
avec le format AVCHD
Ordinateur*
Oui
Ordinateur*
Page 31

Dépannage
Si vous rencontrez l’une des difficultés
suivantes lors de l’utilisation de cet
appareil, consultez ce guide de dépannage
pour tenter de remédier au problème.
Reportez-vous également au mode
d’emploi de votre Handycam. Si le
problème persiste, contactez votre
revendeur Sony.
Le Handycam est raccordé, mais cet
appareil ne fonctionne pas.
Vérifiez que votre Handycam est pris en
charge par cet appareil (page 7).
Vérifiez que le Handycam est raccordé à
une prise électrique à l’aide de son adaptateur
secteur.
Assurez-vous que le Handycam est
correctement configuré et que le câble USB est
correctement raccordé au Handycam.
Débranchez le câble USB du Handycam.
Mettez le Handycam hors tension, puis
remettez-le sous tension. Ensuite, raccordez à
nouveau le câble USB au Handycam.
Impossible d’enregistrer la vidéo sur le
disque.
Une vidéo enregistrée à l’aide du bouton
(DISC BURN) du Handycam ne peut pas
être à nouveau enregistrée à l’aide du bouton
(DISC BURN). (Le même disque ne peut
pas être à nouveau créé à l’aide du bouton
(DISC BURN).) Pour créer des copies du
même disque, sélectionnez le réglage
[OPT.GRAVURE DIS.] du Handycam.
Vérifiez que le disque est compatible avec cet
appareil (page 7).
Vérifiez que le disque est neuf ou inutilisé.
Vous ne pouvez pas utiliser de disque déjà
enregistré ou formaté par un autre appareil.
Vérifiez que la face d’enregistrement du disque
est exempte de poussières, de saletés ou de
traces de doigts.
Vérifiez que le disque est installé dans le tiroir
à disque avec sa face d’enregistrement vers
le bas.
Des vibrations de l’appareil risqueraient
de provoquer un dysfonctionnement du
Handycam. Ne posez pas le Handycam sur
l’appareil.
Impossible de lire un disque.
Vous ne pouvez lire que les disques créés
à l’aide cet appareil. Il est impossible de
lire les disques enregistrés à l’aide d’autres
appareils vidéo ou les disques commerciaux
préenregistrés.
Vérifiez que la face de lecture du disque est
exempte de poussières, de saletés ou de traces
de doigts.
Vérifiez que le disque est installé dans le tiroir
à disque avec sa face de lecture vers le bas.
Impossible d’éjecter le disque.
Le bouton (éjection) ne fonctionne pas.
Débranchez le câble USB du Handycam,
mettez le Handycam hors tension, puis
remettez-le sous tension, raccordez le câble
USB au Handycam, puis appuyez sur le
bouton (éjection). Si cela ne fonctionne
pas, ouvrez le tiroir à disque à l’aide de l’orifice
d’éjection d’urgence (page 9).
L’appareil ne peut ouvrir son tiroir à disque
que s’il est raccordé au Handycam. Assurezvous que l’appareil est correctement raccordé
au Handycam.
Vérifiez que le Handycam est raccordé à
une prise électrique à l’aide d’un adaptateur
secteur.
Il est impossible d’éjecter le disque pendant
son enregistrement ou sa lecture.
15 FR
Page 32

Précautions
Remarques sur l’utilisation et l’entretien
N’utilisez pas et ne conservez pas l’appareil et les
accessoires dans les emplacements suivants :
Dans des endroits extrêmement chauds, froids
ou humides.
Ne les exposez jamais à des températures
supérieures à 60 °C, comme en plein soleil, à
proximité d’un chauffage ou dans un véhicule
garé au soleil. Ils pourraient ne pas fonctionner
correctement ou être déformés.
À proximité de forts champs magnétiques ou
de vibrations mécaniques.
L’appareil risquerait de ne pas fonctionner
correctement.
À proximité d’ondes radio ou de radiations
fortes.
L’appareil risquerait de ne pas enregistrer
correctement.
À la plage ou dans des endroits poussiéreux.
Si du sable ou de la poussière pénètre dans
l’appareil, il est possible qu’il ne fonctionne pas
correctement ou que cela entraîne des dégâts
irréparables.
Manipulation du boîtier
Si le boîtier est sale, nettoyez-le avec un chiffon
doux légèrement humidifié, puis essuyez-le
avec un chiffon doux et sec.
Afin de ne pas abîmer la surface, évitez les
opérations suivantes :
Utilisation de solvants tels que des diluants,
de l’essence, de l’alcool, des chiffons imbibés
de produits chimiques, des répulsifs, de
l’insecticide et du filtre solaire.
Manipulation de l’appareil avec les substances
décrites ci-dessus sur les mains.
Mise en contact du boîtier avec des objets en
caoutchouc ou en vinyle pendant une longue
période.
Condensation
N’exposez pas l’appareil à des changements
soudains de température. N’utilisez pas l’appareil
immédiatement après l’avoir déplacé d’un
endroit frais vers un endroit chaud ou après
avoir subitement augmenté la température de
la pièce car il se peut que de la condensation
se soit formée à l’intérieur de l’appareil. Si la
température change subitement pendant que vous
utilisez l’appareil, mettez-le hors tension et cessez
de l’utiliser pendant au moins une heure.
Lorsque vous déplacez l’appareil entre des
températures extrêmes, placez-le dans un sac en
plastique étanche à l’air.
Laissez au moins une heure à l’appareil pour
s’adapter à la température ambiante avant de
l’utiliser.
Manipulation des disques
Tenez uniquement les disques par les
bords. Ne touchez jamais la surface de
lecture/enregistrement.
Ne collez pas d’étiquettes sur le disque.
Ne rangez pas les disques dans des endroits
poussiéreux ou humides, exposés aux rayons du
soleil ou à proximité de dispositifs qui génèrent
de la chaleur.
Pour protéger des données importantes,
conservez systématiquement les disques dans
leur boîtier.
Nettoyez le disque avec un chiffon de nettoyage.
Nettoyez le disque du centre vers l’extérieur.
Il se peut que les données ne soient pas
enregistrées correctement s’il y a des rayures ou
de la poussière sur la zone non enregistrée d’un
disque inscriptible. Manipulez les disques avec
beaucoup de précautions.
Transport
Veuillez replacer l’appareil dans son emballage
d’origine lorsque vous l’expédiez.
Si l’appareil doit être transporté, pensez à vérifier
qu’il ne contient pas de disque.
16 FR
Page 33

Caractéristiques
techniques
Enregistrement
Appareils pris en charge
Handycam pris en charge par DVDirect Express
Pour de plus amples informations sur les
Handycam pris en charge par l’appareil,
reportez-vous à l’adresse suivante :
http://www.sony.com/DVDirect/Compatibility
Disques enregistrables
Disques DVD+R, DVD-R de 12 cm
Lecture
Disques lisibles
Disques créés à l’aide du VRD-P1 (Les autres
disques disponibles dans le commerce ou
enregistrés ne sont pas pris en charge.)
Généralités
Consommation : 7 W (max.)
Température de fonctionnement : 5 ºC à 35 ºC
Température de stockage : -20 ºC à +60 ºC
Taille : Environ 143 × 162,5 × 25 mm (L×P×H) à
l’exclusion des parties saillantes
Poids : Environ 400 g
La conception et les caractéristiques techniques
sont sujettes à modification sans préavis.
« Handycam » et sont des
marques déposées de Sony Corporation.
« DVDirect » et le logo DVDirect sont des
marques commerciales de Sony Corporation.
Les autres noms de système et de produits
utilisés dans le présent manuel sont des marques
déposées ou commerciales de leurs fabricants
respectifs bien que les symboles et ne sont
pas utilisés dans le document.
17 FR
Page 34

CLASS 1
LASER PRODUCT
LASER KLASSE 1
PRODUKT
Sicherheitsbestimmungen
ACHTUNG
Um Feuergefahr und die Gefahr eines
elektrischen Schlags zu verringern,
darf dieses Gerät weder Regen noch
Feuchtigkeit ausgesetzt werden.
Um Feuergefahr und die Gefahr eines
elektrischen Schlags zu vermeiden,
stellen Sie keine Gefäße mit
Flüssigkeiten darin, wie z. B. Vasen, auf
das Gerät.
Stellen Sie das Gerät nicht in einem
geschlossenen Bücherregal, einem
Einbauschrank u. Ä. auf, wo eine
ausreichende Belüftung nicht gegeben
ist.
VORSICHT
Die Verwendung optischer Instrumente
zusammen mit diesem Produkt stellt
ein Gesundheitsrisiko für die Augen
dar. Der Laser-Strahl, den dieser
DVD-Brenner erzeugt, kann die Augen
schädigen. Versuchen Sie daher nicht,
das Gerät zu zerlegen. Überlassen Sie
Wartungsarbeiten stets qualifiziertem
Fachpersonal.
Dieses Gerät wurde als Laser-Gerät der
Klasse 1 (LASER KLASSE 1) klassifiziert.
Das entsprechende Etikett (LASER
KLASSE 1 PRODUKT) befindet sich
außen an der Unterseite des Geräts.
2 DE
Dieses Etikett befindet sich auf dem LaserSchutzgehäuse innerhalb des Gehäuses.
Entsorgung von
gebrauchten elektrischen
und elektronischen
Geräten (anzuwenden in
den Ländern der
Europäischen Union und
anderen europäischen
Ländern mit einem separaten
Sammelsystem für diese Geräte)
Das Symbol auf dem Produkt oder seiner
Verpackung weist darauf hin, dass dieses
Produkt nicht als normaler Haushaltsabfall
zu behandeln ist, sondern an einer
Annahmestelle für das Recycling von
elektrischen und elektronischen Geräten
abgegeben werden muss. Durch Ihren
Beitrag zum korrekten Entsorgen dieses
Produkts schützen Sie die Umwelt und die
Gesundheit Ihrer Mitmenschen. Umwelt
und Gesundheit werden durch falsches
Entsorgen gefährdet. Materialrecycling
hilft, den Verbrauch von Rohstoffen zu
verringern. Weitere Informationen über
das Recycling dieses Produkts erhalten Sie
von Ihrer Gemeinde, den kommunalen
Entsorgungsbetrieben oder dem Geschäft,
in dem Sie das Produkt gekauft haben.
Der Hersteller dieses Produkts ist
Sony Corporation, 1-7-1 Konan
Minato-ku Tokio, 108-0075 Japan.
Autorisierter Vertreter für EMV und
Produktsicherheit ist die Sony Deutschland
GmbH, Hedelfinger Straße 61, 70327
Stuttgart, Deutschland. Für Fragen im
Zusammenhang mit Kundendienst oder
Garantie wenden Sie sich bitte an die
in den separaten Kundendienst- oder
Garantieunterlagen genannten Adressen.
Das Typenschild befindet sich an der
Geräteunterseite.
Page 35

Inhalt
Sicherheitsbestimmungen .................................................................................................................2
Bitte zuerst lesen! ...................................................................................................................................4
Lieferumfang ..............................................................................................................................4
Hinweise zum Gebrauch .........................................................................................................4
Wichtigste Merkmale und Funktionen ...........................................................................................5
Kompatible Geräte ....................................................................................................................5
Unterstützte Discs .....................................................................................................................5
Teile und Bedienelemente ..................................................................................................................6
Einlegen einer Disc ...................................................................................................................7
Aufnahme .................................................................................................................................................8
Wiedergabe ..............................................................................................................................................9
Videolänge und Aufnahmezeit ......................................................................................................10
Verfügbarer Discspeicher (Aufnahmezeit) für die Aufnahme von Videos .........10
Für die Aufnahme erforderliche Zeit ...............................................................................10
Hinweise zur Kompatibilität von HD-Medien (High Definition) .........................................12
Störungsbehebung ........................................................................................................................ 13
Sicherheitsmaßnahmen ....................................................................................................................14
Technische Daten ................................................................................................................................15
Schlagen Sie bitte auch in der Bedienungsanleitung zu Ihrer Handycam nach
Dieses Gerät kann nur verwendet werden, wenn es an eine Handycam angeschlossen ist.
Einzelheiten zur Bedienung entnehmen Sie der Bedienungsanleitung zu Ihrer Handycam.
In dieser Anleitung bezeichnet „Handycam“ einen Camcorder von Sony.
DE
3 DE
Page 36

Bitte zuerst lesen!
Lieferumfang
Bitte überprüfen Sie, ob die Verpackung die
folgenden Teile enthält. Falls Teile fehlen
oder beschädigt sind, wenden Sie sich an
Ihren Händler.
Bedienungsanleitung (das vorliegende
Dokument)
Hinweise zum Gebrauch
Betriebs- und Lagerbedingungen
Setzen Sie das Gerät keinen Stößen
oder Erschütterungen aus. Andernfalls
können am Gerät Fehlfunktionen
auftreten.
Verwenden Sie das Gerät nicht in sehr
lauter Umgebung. Andernfalls können
am Gerät Fehlfunktionen auftreten.
Wenn Sie das USB-Kabel des Geräts an
die Handycam anschließen, achten
Sie darauf, den Stecker richtig herum in
den Anschluss zu stecken. Wenn Sie den
Stecker mit Gewalt falsch herum in den
Anschluss stecken, können am Gerät
oder an der Handycam Fehlfunktionen
auftreten.
Hinweise zum Aufnehmen
Fernsehsendungen, Filme, Videobänder
und andere Materialien können
dem Urheberrecht unterliegen. Das
unberechtigte Aufzeichnen von
solchem Material kann gegen die
Urheberrechtsgesetzgebung verstoßen.
4 DE
Page 37

Wichtigste Merkmale und Funktionen
Wenn Sie dieses Gerät an eine Handycam anschließen, können Sie mühelos Videos auf
Disc aufzeichnen, ohne dass dazu ein Computer erforderlich ist (One Touch Disc Burn).
Eine so erstellte Disc können Sie wiedergeben lassen, indem Sie das Gerät an die Handycam
anschließen (One Touch Play). Außerdem können Sie Videos über ein Fernsehgerät
wiedergeben lassen, indem Sie die Handycam an das Fernsehgerät anschließen.
Wenn Sie das Gerät über die Handycam bedienen, stehen Ihnen darüber hinaus noch weitere
praktische Funktionen zur Verfügung. Diese Funktionen variieren je nach Handycam.
Erläuterungen dazu finden Sie in der Bedienungsanleitung zu Ihrer Handycam.
Kompatible Geräte
Dieses Gerät kann ausschließlich in Verbindung mit einer Handycam verwendet werden.
Schließen Sie das Gerät an eine Handycam an, die mit DVDirect Express kompatibel ist.
Einzelheiten zu kompatiblen Handycam-Modellen finden Sie unter folgender Adresse:
http://www.sony.com/DVDirect/Compatibility
Mit einer inkompatiblen Handycam oder einer Videokamera von einem anderen
Hersteller als Sony kann dieses Gerät nicht verwendet werden.
Sie können mit diesem Gerät keine Discs kopieren oder abspielen, indem Sie es an einen
Computer anschließen; auch als externes Disc-Laufwerk kann dieses Gerät nicht verwendet
werden.
Unterstützte Discs
Die folgenden neuen oder unbenutzten beschreibbaren 12-cm-Discs sind mit diesem Gerät
kompatibel.
Disctyp Logo Schreibgeschwindigkeit
DVD+R Bis zu 16×
DVD-R Bis zu 16×
Double Layer-/Dual Layer-Discs und 8-cm-Discs werden nicht unterstützt.
DVD+RWs und DVD-RWs werden nicht unterstützt.
Hinweise zu Discs
In diesem Gerät können ausschließlich neue oder unbenutzte Discs verwendet werden.
Die Qualität handelsüblicher bespielbarer Discs kann variieren. Discs von schlechter
Qualität können unter Umständen nicht ordnungsgemäß bespielt werden.
Einige bespielte Discs können aufgrund der Aufnahmequalität oder des physischen
Zustands der Disc oder wegen der Eigenschaften des Wiedergabegeräts unter Umständen
nicht wiedergegeben werden.
Discs, die mit anderen Videogeräten bespielt wurden, oder im Handel erhältliche, bespielte
Discs lassen sich nicht wiedergeben.
5 DE
Page 38

Teile und Bedienelemente
Oberseite
USB-Kabel (Seite 8, 9)
Hinweis zum USB-Kabel
Herausziehen des USB-Kabels
Ziehen Sie den Stecker des USB-Kabels aus der
seitlichen Vertiefung am Gerät heraus.
Wenn sich der Stecker nicht problemlos
herausziehen lässt, drücken Sie auf die Spitze
des Steckers, so dass der Stecker aus dem Gerät
herausschaut, und ziehen Sie ihn dann heraus.
Verstauen des USB-Kabels
Verstauen Sie das USB-Kabel in der seitlichen
Vertiefung am Gerät.
6 DE
Taste (Wiedergabe) (Seite 9)
Taste (DISC BURN) (Seite 8)
Page 39

Vorderseite
Disc-Lade
Anzeige ACCESS
Taste (Auswerfen)
Notauswurföffnung
Wenn sich die Disc-Lade nicht mit der
Taste (Auswerfen) öffnen lässt, führen
Sie eine Nadel oder eine gerade gebogene
Büroklammer in diese Öffnung ein, um die
Disc-Lade zu öffnen.
Hinweis zur Stromversorgung
Das Gerät wird über die angeschlossene Handycam mit Strom versorgt. Verbinden Sie die
Handycam unbedingt über das Netzteil mit einer Netzsteckdose. Das Gerät selbst braucht
nicht an eine Netzsteckdose angeschlossen zu werden.
Einlegen einer Disc
Die Disc-Lade öffnet sich nur, wenn das Gerät an eine Handycam angeschlossen ist.
Drücken Sie die Taste (Auswerfen), um die Disc-Lade zu öffnen.
Die Disc-Lade wird nur zur Hälfte ausgefahren. Ziehen Sie sie von Hand ganz auf.
Legen Sie die Disc mit der Aufnahmeseite nach unten in die Disc-Lade ein.
Die Disc sollte mit einem Klicken einrasten.
Berühren Sie nicht die
Aufnahmeseite der Disc.
Schieben Sie die Disc-Lade zu.
Schieben Sie die Disc-Lade zu, bis sie mit einem Klicken einrastet.
7 DE
Page 40

Aufnahme
Wenn Sie dieses Gerät an eine Handycam anschließen, können Sie Videos auf eine Disc
aufnehmen, indem Sie einfach die Taste (DISC BURN) drücken.
Schalten Sie die Handycam ein.
1
Verbinden Sie die Handycam unbedingt über das Netzteil mit einer Netzsteckdose.
Wenn die Handycam nicht über das Netzteil mit Strom versorgt wird, funktioniert das
Gerät nicht, nachdem Sie es an die Handycamangeschlossen haben.
Verbinden Sie das Gerät mit dem USB-Anschluss der Handycam.
2
USB-Anschluss
(Typ Mini-AB)
Verwenden Sie kein USB-Verlängerungskabel.
Legen Sie eine neue oder unbenutzte Disc ein.
3
Erläuterungen dazu finden Sie unter „Einlegen einer Disc“ (Seite 7).
Drücken Sie die Taste (DISC BURN).
4
Neu mit der Handycam aufgezeichnete und noch nicht kopierte Videos werden auf
der Disc aufgezeichnet.
Wenn das Video für eine einzige Disc zu lang ist, bespielen Sie wie in Schritt 3 und 4
erläutert weitere Discs.
Auf eine Disc, auf die Sie mit diesem Gerät bereits ein Video aufgezeichnet haben,
können Sie keine weiteren Videos aufzeichnen.
Bedienung über Handycam
Wenn Sie das Gerät über die Handycam bedienen, stehen Ihnen mehrere praktische
Aufnahmefunktionen zur Verfügung. Beispielsweise können Sie Szenen zum Aufnehmen
auswählen. Erläuterungen dazu finden Sie in der Bedienungsanleitung zu Ihrer Handycam.
Überprüfen einer Aufnahme
Wenn Sie mit diesem Gerät Videos auf Disc aufnehmen, lassen Sie die Disc wiedergeben,
um zu prüfen, ob die Aufnahme erfolgreich war, bevor Sie das Video von der Handycam
löschen.
8 DE
Page 41

Wiedergabe
Mit diesem Gerät können Sie bespielte Discs wiedergeben lassen und sie dabei entweder auf
dem Display der angeschlossenen Handycam oder am Fernsehgerät anzeigen. Wenn Sie
sie am Fernsehgerät anzeigen wollen, müssen Sie die Handycam mit dem Fernsehgerät
verbinden. Erläuterungen zum Anschließen an ein Fernsehgerät finden Sie in der
Bedienungsanleitung zu Ihrer Handycam.
Schalten Sie die Handycam ein.
1
Verbinden Sie die Handycam unbedingt über das Netzteil mit einer Netzsteckdose.
Wenn die Handycam nicht über das Netzteil mit Strom versorgt wird, funktioniert das
Gerät nicht, nachdem Sie es an die Handycam angeschlossen haben.
Verbinden Sie das Gerät mit dem USB-Anschluss der Handycam.
2
USB-Anschluss
(Typ Mini-AB)
Verwenden Sie kein USB-Verlängerungskabel.
Legen Sie eine Disc ein, die mit diesem Gerät bespielt wurde.
3
Erläuterungen dazu finden Sie unter „Einlegen einer Disc“ (Seite 7).
Drücken Sie die Taste (Wiedergabe).
4
Die Wiedergabe beginnt am Anfang der Disc.
Bedienung über Handycam
Sie können Videos auch wiedergeben lassen, indem Sie die Bedienfunktionen an der
Handycam ausführen. Erläuterungen dazu finden Sie in der Bedienungsanleitung zu Ihrer
Handycam.
Hinweis zur Wiedergabe bespielter Discs auf anderen Geräten
Mit einer High Definition Handycam können Sie High Definition-Discs erstellen
(AVCHD-Format). Weitere Informationen zur Wiedergabe einer Disc auf anderen Geräten
finden Sie auf Seite 12.
9 DE
Page 42

Videolänge und Aufnahmezeit
Verfügbarer Discspeicher (Aufnahmezeit) für die Aufnahme von Videos
Die verfügbare Aufnahmezeit eines Videos auf einer Disc hängt von der RECModuseinstellung der Handycam ab.
High Definition (HD) Standard Definition (SD)
REC-Modus Aufnahmezeit* REC-Modus Aufnahmezeit*
HD FH ca. 30 Minuten STD HQ/HQ ca. 1 Stunde
HD HQ ca. 55 Minuten SP ca. 1 Stunde
HD SP ca. 1 Stunde
10 Minuten
HD LP ca. 1 Stunde
35 Minuten
LP ca. 3 Stunden
* Einzeldisc
Tipps
Wenn Sie Material mit einem entsprechenden Handycam-Modell auf SD (Standard Definition)
abwärtskonvertieren, können Sie bis 2 Stunden 40 Minuten auf eine Disc auf nehmen. (Die Bildqualität
kann von der Aufnahmezeit abhängen.)
Die verfügbaren REC-Modi variieren bei den verschiedenen Handycam-Modellen.
Für die Aufnahme erforderliche Zeit
Wenn Sie Videos aufzeichnen, hängt die Länge der für die Aufnahme erforderlichen
Zeit vom Modell der Handycam, von der für die Videoaufnahme verwendeten RECModuseinstellung und von der Anzahl der Szenen ab, die das Video enthält. Normalerweise
ist mehr Zeit erforderlich, um Videos auf einer Disc aufzuzeichnen, wenn das Video mit einer
höheren Bildqualitätseinstellung (Bitrate) aufgezeichnet wurde. Die Abwärtskonvertierung in
SD-Videos (Standard Definition) nimmt mehr als die tatsächliche Wiedergabezeit des Videos
in Anspruch.
30 Minuten
10 DE
Aufnahme von HD-Videos (High Definition) oder
SD-Videos (Standard Definition) ohne Änderung
Abwärtskonvertierung auf SD-Video (Standard
Definition)
ca. 20 Minuten ~ 1 Stunde
ca. 1 Stunde 5 Minuten ~ 3 Stunden
Page 43

Hinweise
Sie können kein HD-Video (High Definition), das im REC-Modus mit einer Bitrate von über 18 MBit/s
aufgezeichnet wurde, wie zum Beispiel im [HD FX]-Modus (z. B. High Definition Handycam
AVCHD-Format aufnehmen.
Wenn die Zeit einer Szene die Kapazität der Disc übersteigt, ist die Aufnahme nicht möglich. Teilen Sie
in diesem Fall die Szene mit der Bearbeitungsfunktion der Handycam.
), im
11 DE
Page 44

Hinweise zur Kompatibilität von HD-Medien
(High Definition)
Ein HD-Medium (High Definition) kann auf einem nicht mit AVCHD kompatiblen DVDPlayer oder -Recorder nicht wiedergegeben werden.
Setzen Sie ein HD-Medium (High Definition) nicht in einen nicht mit AVCHD kompatiblen
DVD-Player oder -Recorder ein. Andernfalls kann der DVD-Player oder -Recorder das
Medium möglicherweise nicht mehr auswerfen oder die Inhalte werden unter Umständen
gelöscht.
Ein HD-Medium (High Definition) kann auf einem mit AVCHD kompatiblen Blu-ray DiscPlayer/-Recorder, einer Playstation 3 oder einem anderen kompatiblen Gerät
wiedergegeben werden.
Typ des erstellten Mediums und kompatible Geräte
HD-Medium (High Definition) (mit High Definition-Videos)
Nein
Ja
Ja
12 DE
DVD-Gerät
SD-Medium (Standard Definition) (mit Standard Definition-Videos)
Ja
DVD-Gerät
* Installieren Sie auf dem Computer zunächst eine AVCHD-kompatible Anwendung. Auch wenn
die Computerumgebung die Systemvoraussetzungen erfüllt, kann es bei der Videowiedergabe dazu
kommen, dass Bildstörungen auftreten, Vollbilder übersprungen werden oder der Ton kurzfristig
aussetzt. (Diese Phänomene sind nicht auf die Qualität des erstellten Mediums zurückzuführen.)
Mit AVCHD-Format
kompatibles Gerät
Ja
Mit AVCHD-Format
kompatibles Gerät
Computer*
Ja
Computer*
Page 45

Störungsbehebung
Wenn beim Gerät eins der folgenden
Probleme auftritt, versuchen Sie bitte,
dieses Problem anhand der folgenden
Störungsbehebungsmaßnahmen zu
lösen, bevor Sie das Gerät zur Reparatur
bringen. Schlagen Sie bitte auch in der
Bedienungsanleitung zu Ihrer Handycam
nach. Wenn sich das Problem nicht
beheben lässt, wenden Sie sich an Ihren
Sony-Händler.
Das Gerät ist an die Handycam
angeschlossen, aber es funktioniert nicht.
Vergewissern Sie sich, dass die Handycam
dieses Gerät unterstützt (Seite 5).
Vergewissern Sie sich, dass die Handycam
über das Netzteil an eine Netzsteckdose
angeschlossen ist.
Vergewissern Sie sich, dass die Handycam
korrekt konfiguriert und das USB-Kabel
korrekt an die Handycam angeschlossen ist.
Lösen Sie das USB-Kabel von der
Handycam. Schalten Sie die Handycam aus
und wieder ein. Schließen Sie dann das USBKabel erneut an die Handycam an.
Es lassen sich keine Videos auf die Disc
aufnehmen.
Videos, die mit der Taste (DISC BURN)
der Handycam aufgezeichnet wurden,
können nicht erneut mit der Taste (DISC
BURN) aufgezeichnet werden. (Die gleiche
Disc kann nicht erneut mit der Taste (DISC
BURN) erstellt werden.) Um Kopien der
gleichen Disc zu erstellen, aktivieren Sie
die Einstellung [DISC-BRENN-OPT.] der
Handycam.
Vergewissern Sie sich, dass die Disc mit
diesem Gerät kompatibel ist (Seite 5).
Vergewissern Sie sich, dass die Disc neu oder
unbenutzt ist. Eine Disc, auf die bereits etwas
aufgezeichnet oder die mit einem anderen
Gerät formatiert wurde, kann nicht verwendet
werden.
Vergewissern Sie sich, dass die Aufnahmeseite
der Disc frei von Staub, Verunreinigungen
oder Fingerabdrücken ist.
Vergewissern Sie sich, dass die Disc mit der
Aufnahmeseite nach unten in der Disc-Lade
liegt.
Erschütterungen des Geräts können zu
Fehlfunktionen an der Handycam führen.
Stellen Sie die Handycam daher nicht auf
das Gerät.
Eine Disc lässt sich nicht wiedergeben.
Sie können nur Discs wiedergeben, die mit
diesem Gerät bespielt wurden. Discs, die mit
anderen Videogeräten bespielt wurden, oder
im Handel erhältliche, bespielte Discs lassen
sich nicht wiedergeben.
Vergewissern Sie sich, dass die
Wiedergabeseite der Disc frei von Staub,
Verunreinigungen oder Fingerabdrücken ist.
Vergewissern Sie sich, dass die Disc mit der
Wiedergabeseite nach unten in der Disc-Lade
liegt.
Die Disc lässt sich nicht auswerfen.
Die Taste (Auswerfen) funktioniert
nicht.
Lösen Sie das USB-Kabel von der
Handycam, schalten Sie die Handycam aus
und wieder ein, schließen Sie das USB-Kabel
erneut an die Handycam an und drücken
Sie dann die Taste (Auswerfen). Wenn das
nicht funktioniert, öffnen Sie die Disc-Lade
über die Notauswurföffnung (Seite 7).
Die Disc-Lade öffnet sich nur, wenn das
Gerät an eine Handycam angeschlossen ist.
Vergewissern Sie sich, dass das Gerät korrekt
an die Handycam angeschlossen ist.
Vergewissern Sie sich, dass die Handycam
über das Netzteil an eine Netzsteckdose
angeschlossen ist.
Die Disc lässt sich nicht auswerfen, während
sie gerade bespielt oder wiedergegeben wird.
13 DE
Page 46

Sicherheitsmaßnahmen
Verwendung und Pflege des Geräts
Lagern und verwenden Sie das Gerät und das
Zubehör nicht an folgenden Orten:
In extrem heißer, kalter oder feuchter
Umgebung.
Setzen Sie das Gerät auf keinen Fall
Temperaturen über 60 ºC aus, wie sie in
direktem Sonnenlicht, in der Nähe von
Heizgeräten oder in einem in der Sonne
geparkten Auto entstehen können. Andernfalls
kann es zu Fehlfunktionen kommen oder Gerät
bzw. Zubehör können sich verformen.
In der Nähe von starken Magnetfeldern oder
mechanischen Erschütterungen.
Andernfalls kann es am Gerät zu
Fehlfunktionen kommen.
In der Nähe starker Radiowellen oder
Strahlung.
Andernfalls kann das Gerät möglicherweise
nicht richtig aufnehmen.
An Sandstränden oder in staubiger Umgebung.
Wenn Sand oder Staub in das Gerät gelangen,
kann es zu Fehlfunktionen oder irreparablen
Schäden kommen.
Umgang mit dem Gehäuse
Wenn das Gehäuse dieses Geräts verschmutzt
ist, reinigen Sie es mit einem weichen, leicht
mit Wasser angefeuchteten Tuch und trocknen
es dann mit einem trockenen, weichen Tuch ab.
Beachten Sie Folgendes, damit die Oberfläche
nicht beschädigt wird:
Verwenden Sie keine Chemikalien wie
Verdünner, Benzin, Alkohol, keine
chemisch imprägnierten Reinigungstücher,
Insektenabwehr- oder -vernichtungsmittel
und keine Sonnenschutzmittel.
Berühren Sie das Gerät nicht, wenn Ihre
Hände durch die oben genannten Substanzen
verunreinigt sind.
Achten Sie darauf, dass das Gehäuse
nicht längere Zeit mit Gummi- oder
Vinylmaterialien in Berührung kommt.
Feuchtigkeitskondensation
Schützen Sie das Gerät vor starken
Temperaturschwankungen. Verwenden Sie das
Gerät nicht unmittelbar, nachdem Sie es aus einer
kalten in eine warme Umgebung gebracht haben
oder nachdem die Raumtemperatur plötzlich
angestiegen ist, da sich im Inneren des Geräts
möglicherweise Feuchtigkeit niedergeschlagen
hat. Wenn sich die Temperatur während des
Betriebs plötzlich ändert, schalten Sie das Gerät
aus und lassen Sie es mindestens eine Stunde lang
unbenutzt stehen.
Wenn Sie das Gerät starken
Temperaturschwankungen aussetzen müssen,
verpacken Sie es zuvor in einem luftdichten
Plastikbeutel.
Lassen Sie das Gerät vor Gebrauch gegebenenfalls
mindestens eine Stunde lang stehen, damit es sich
an die Umgebungstemperatur anpassen kann.
Umgang mit Discs
Fassen Sie Discs immer am Rand an. Berühren
Sie die Wiedergabe-/Aufnahmeseite nicht.
Bringen Sie keine Aufkleber auf Discs an.
Lagern Sie Discs nicht in staubiger oder feuchter
Umgebung, in direktem Sonnenlicht oder in der
Nähe von Wärme erzeugenden Geräten.
Bewahren Sie Discs zum Schutz wichtiger
Daten immer in ihren Hüllen auf.
Reinigen Sie die Disc mit einem
Reinigungstuch. Wischen Sie von der Mitte
nach außen.
Wenn beschreibbare Discs zerkratzt oder
verstaubt sind, werden die Daten eventuell
nicht korrekt aufgezeichnet. Gehen Sie daher
sehr sorgsam mit Discs um.
Transport
Wenn Sie das Gerät transportieren möchten,
verpacken Sie es bitte im Originalkarton.
Wenn Sie das Gerät transportieren möchten,
nehmen Sie vorher gegebenenfalls die Disc heraus.
14 DE
Page 47

Technische Daten
Aufnahme
Unterstützte Geräte
Handycam mit DVDirect ExpressUnterstützung
Erläuterungen zu Handycam-Modellen, die das
Gerät unterstützen, finden Sie unter folgender
Adresse:
http://www.sony.com/DVDirect/Compatibility
Beschreibbare Discs
DVD+Rs und DVD-Rs im 12-cm-Format
Wiedergabe
Abspielbare Discs
Mit dem VRD-P1 bespielte Discs (Andere im
Handel erhältliche oder bespielte Discs werden
nicht unterstützt.)
Allgemeines
Leistungsaufnahme: 7 W (max.)
Betriebstemperatur: 5 ºC bis 35 ºC
Lagertemperatur: -20 ºC bis +60 ºC
Abmessungen: ca. 143 × 162,5 × 25 mm (B×T×H)
einschließlich vorstehender Teile
Gewicht: ca. 400 g
Änderungen, die dem technischen Fortschritt
dienen, bleiben vorbehalten.
„Handycam“ und
sind eingetragene Markenzeichen der Sony
Corporation.
„DVDirect“ und das DVDirect-Logo sind
Markenzeichen der Sony Corporation.
Andere in diesem Dokument verwendete
System- und Produktnamen sind Markenzeichen
oder eingetragene Markenzeichen der jeweiligen
Hersteller, auch wenn im Text die Symbole
und nicht verwendet werden.
15 DE
Page 48

CLASS 1
LASER PRODUCT
LASER KLASSE 1
PRODUKT
Norme di sicurezza
ATTENZIONE
Per ridurre il rischio di incendi o
di scosse elettriche, non esporre
l’apparecchio a pioggia o umidità.
Per evitare il rischio di incendi o
scosse elettriche, non collocare
sull’apparecchio oggetti contenenti
liquidi, ad esempio vasi o simili.
Evitare di installare l’apparecchio
in spazi limitati, ad esempio su una
libreria o luoghi simili.
AVVERTIMENTO
L’uso di strumenti ottici con il presente
prodotto può causare problemi alla
vista. Il raggio laser impiegato in
questo registratore DVD è pericoloso
per gli occhi. Non cercare di aprire
la scocca esterna dell’apparecchio.
Rivolgersi solo a personale qualificato
per l’assistenza.
Questo apparecchio è classificato
come prodotto LASER di CLASSE
1. L’etichetta di PRODOTTO LASER
di CLASSE 1 è collocata sulla parte
inferiore esterna.
Questa etichetta si trova sull’alloggiamento
di protezione dai raggi laser all’interno del
rivestimento.
Trattamento del
dispositivo elettrico od
elettronico a fine vita
(applicabile in tutti i paesi
dell’Unione Europea e in
altri paesi europei con
sistema di raccolta
differenziata)
Questo simbolo sul prodotto o sulla
confezione indica che il prodotto non
deve essere considerato come un normale
rifiuto domestico, ma deve invece essere
consegnato ad un punto di raccolta
appropriato per il riciclo di apparecchi
elettrici ed elettronici. Assicurandovi che
questo prodotto sia smaltito correttamente,
voi contribuirete a prevenire potenziali
conseguenze negative per l’ambiente e per
la salute che potrebbero altrimenti essere
causate dal suo smaltimento inadeguato. Il
riciclaggio dei materiali aiuta a conservare
le risorse naturali. Per informazioni più
dettagliate circa il riciclaggio di questo
prodotto, potete contattare l’ufficio
comunale, il servizio locale di smaltimento
rifiuti oppure il negozio dove l’avete
acquistato.
2 IT
Questo prodotto è stato realizzato da
Sony Corporation, 1-7-1 Konan Minatoku Tokyo, 108-0075 Giappone. Il
rappresentante autorizzato per le direttive
EMC e la sicurezza dei prodotti è Sony
Deutschland GmbH, Hedelfinger Strasse
61, 70327 Stoccarda, Germania. Per
qualsiasi questione relativa all’assistenza o
alla garanzia, consultare gli indirizzi forniti
a parte nei relativi documenti.
La targhetta si trova nella parte inferiore
dell’apparecchio.
Page 49

Sommario
Norme di sicurezza.................................................................................................................................2
Informazioni da leggere prima dell’uso .........................................................................................4
Contenuto della confezione ..................................................................................................4
Note sull’utilizzo ........................................................................................................................4
Caratteristiche principali......................................................................................................................5
Dispositivi compatibili .............................................................................................................5
Dischi supportati .......................................................................................................................5
Componenti e comandi .......................................................................................................................6
Inserimento di un disco ..........................................................................................................7
Registrazione ...........................................................................................................................................8
Riproduzione............................................................................................................................................9
Lunghezza dei video e tempi di registrazione ..........................................................................10
Capacità disco (tempo di registrazione) disponibile per la registrazione dei
video ...........................................................................................................................................10
Tempo necessario alla registrazione ...............................................................................10
Informazioni sulla compatibilità dei dischi HD (High Definition) ......................................12
Risoluzione dei problemi .............................................................................................................13
Precauzioni ............................................................................................................................................14
Caratteristiche tecniche .................................................................................................................... 15
Consultare anche le istruzioni per l’uso della Handycam
Questo apparecchio può essere utilizzato solo se è collegato a una Handycam. Per
informazioni dettagliate sulle modalità di utilizzo, consultare anche le istruzioni per l’uso
della Handycam.
In questo documento, il termine “Handycam” indica una videocamera Sony.
IT
3 IT
Page 50

Informazioni da
leggere prima dell’uso
Contenuto della confezione
Verificare che la confezione contenga
quanto indicato di seguito. Se uno dei
seguenti articoli dovesse risultare mancante
o danneggiato, rivolgersi al negoziante.
Istruzioni per l’uso (questo documento)
Note sull’utilizzo
Condizioni di utilizzo e di
immagazzinamento
Non sottoporre l’apparecchio a urti o
vibrazioni. L’apparecchio potrebbe non
funzionare correttamente.
Non impiegare l’apparecchio in ambienti
molto rumorosi. L’apparecchio potrebbe
non funzionare correttamente.
Quando si collega il cavo USB
dell’apparecchio alla Handycam, fare
attenzione a inserire il connettore nel
verso corretto. Se si cerca di inserirlo
a forza, si potrebbe danneggiare il
terminale con conseguente rischio di
malfunzionamento dell’apparecchio o
della Handycam.
Informazioni sulla registrazione
I programmi televisivi, i film, le
videocassette e altri materiali potrebbero
essere protetti da copyright. La
registrazione non autorizzata di tali
materiali potrebbe costituire una
violazione delle leggi sul copyright.
4 IT
Page 51

Caratteristiche principali
Collegando questo apparecchio alla Handycam, è possibile registrare i video su un disco
senza passare tramite computer (One Touch Disc Burn). Il disco registrato può essere
riprodotto collegando l’apparecchio alla Handycam (One Touch Play). Inoltre, i filmati
possono anche essere riprodotti su un televisore collegato alla Handycam.
Inoltre, comandando l’apparecchio tramite la Handycam, si hanno a disposizione
molte funzioni utili. Tali funzioni variano a seconda del modello Handycam in uso. Per
informazioni dettagliate, consultare le istruzioni per l’uso della Handycam.
Dispositivi compatibili
Questo apparecchio è progettato per essere impiegato esclusivamente con una
Handycam. Collegare l’apparecchio a una Handycam compatibile con il DVDirect
Express. Per informazioni sui modelli di Handycam compatibili, consultare la seguente
pagina Web:
http://www.sony.com/DVDirect/Compatibility
Questo apparecchio non può essere utilizzato con un modello di Handycam non
compatibile o con videocamere di produttori diversi da Sony.
Questo apparecchio non può essere utilizzato per copiare o riprodurre un disco tramite
collegamento a un computer; inoltre non può essere utilizzato come hard disk esterno.
Dischi supportati
Questo apparecchio può essere utilizzato con i seguenti dischi scrivibili da 12 cm nuovi o non
utilizzati.
Tipo di disco Logo Velocità di scrittura
DVD+R Fino a 16×
DVD-R Fino a 16×
I dischi a doppio strato e i dischi da 8 cm non sono supportati.
I dischi DVD+RW e DVD-RW non sono supportati.
Note sull’utilizzo dei dischi
Questo apparecchio può essere utilizzato solo con dischi nuovi o non ancora utilizzati.
La qualità dei dischi registrabili disponibili in commercio può variare. I dischi di scarsa
qualità potrebbero non consentire di eseguire la registrazione in modo normale.
Alcuni dischi registrati potrebbero non essere riproducibili a causa della qualità di
registrazione o delle condizioni fisiche del disco, oppure delle caratteristiche del dispositivo
di riproduzione.
Non è possibile riprodurre dischi registrati su altri apparecchi video, o dischi preregistrati
disponibili in commercio.
5 IT
Page 52

Componenti e comandi
Pannello principale
Cavo USB (pagina 8, 9)
Informazioni sul cavo USB
Estrazione del cavo USB
Tirare il connettore del cavo USB per estrarlo
dalla scanalatura laterale dell’apparecchio.
Se l’operazione risulta difficoltosa, spingere la
punta del connettore in modo che quest’ultimo
fuoriesca dall’apparecchio, quindi estrarlo.
Quando il cavo USB non è in uso
Quando il cavo USB non è in uso, riporlo
nell’apposita scanalatura laterale dell’apparecchio.
6 IT
Tasto (riproduzione) (pagina 9)
Tasto (DISC BURN) (pagina 8)
Page 53

Lato anteriore
Vassoio porta disco
Spia ACCESS
Tasto (espulsione)
Foro di espulsione di emergenza
Se il vassoio porta disco non si apre premendo
il tasto (espulsione), inserire una punta o
il filo metallico di una graffetta in questo foro
per aprire il vassoio.
Informazioni sull’alimentazione
L’apparecchio è alimentato dalla Handycam quando è collegato ad essa. Si raccomanda di
collegare la Handycam a una presa di corrente tramite un adattatore CA. Non è necessario
collegare l’apparecchio a una presa di corrente.
Inserimento di un disco
Il vassoio porta disco dell’apparecchio può essere aperto solo quando l’apparecchio è
collegato a una Handycam.
Premere il tasto (espulsione) per aprire il vassoio porta disco.
Il vassoio porta disco si apre solo a metà. Aprirlo completamente con una mano.
Collocare il disco sul vassoio porta disco, con il lato da registrare rivolto
verso il basso.
Il disco dovrebbe bloccarsi in posizione.
Evitare di toccare la superficie
di registrazione del disco.
Spingere il vassoio porta disco per chiuderlo.
Spingere il vassoio porta disco finché non si udirà uno scatto.
7 IT
Page 54

Registrazione
Collegando l’apparecchio alla Handycam, è possibile registrare i video su un disco
semplicemente premendo il tasto (DISC BURN).
Accendere la Handycam.
1
Si raccomanda di collegare la Handycam a una presa di corrente tramite un adattatore
CA.
Se non si utilizza un adattatore CA per alimentare la Handycam, l’apparecchio non
può funzionare quando è collegato alla Handycam.
Collegare l’apparecchio alla porta USB della Handycam.
2
Porta USB
(tipo Mini-AB)
Non è possibile utilizzare un cavo di prolunga USB.
Inserire un disco nuovo o non ancora utilizzato.
3
Per informazioni dettagliate, vedere “Inserimento di un disco” (pagina 7).
Premere il tasto (DISC BURN).
4
Sul disco verranno registrati i video nuovi registrati dalla Handycam e non ancora copiati.
Se un video è troppo lungo per essere contenuto in un solo disco, ripetere le operazioni
descritte ai punti 3 e 4.
Questo apparecchio non consente di aggiungere altri video a un disco già registrato.
Comando dell’apparecchio tramite la Handycam
Comandando l’apparecchio tramite la Handycam, si hanno a disposizione molte funzioni
utili. Ad esempio, è possibile selezionare le scene da registrare. Per informazioni dettagliate,
consultare le istruzioni per l’uso della Handycam.
Verifica della registrazione
Quando si registrano dei video con questo apparecchio, è bene verificare che la registrazione
sia stata eseguita correttamente riproducendo il disco prima di cancellare i video dalla
Handycam.
8 IT
Page 55

Riproduzione
Questo apparecchio può essere utilizzato per riprodurre i dischi creati, visionarli nel display
della Handycam collegata o sullo schermo di un televisore. Per visionare i filmati su un
televisore, è necessario collegare la Handycam al televisore. Per informazioni dettagliate sul
collegamento a un televisore, consultare le istruzioni per l’uso della Handycam.
Accendere la Handycam.
1
Si raccomanda di collegare la Handycam a una presa di corrente tramite un adattatore
CA.
Se non si utilizza un adattatore CA per alimentare la Handycam, l’apparecchio non
funziona quando è collegato alla Handycam.
Collegare l’apparecchio alla porta USB della Handycam.
2
Porta USB
(tipo Mini-AB)
Non è possibile utilizzare un cavo di prolunga USB.
Inserire il disco registrato con questo apparecchio.
3
Per informazioni dettagliate, vedere “Inserimento di un disco” (pagina 7).
Premere il tasto (riproduzione).
4
Il disco viene riprodotto dall’inizio.
Comando dell’apparecchio tramite la Handycam
I video possono essere anche riprodotti controllando la riproduzione dalla Handycam. Per
informazioni dettagliate, consultare le istruzioni per l’uso della Handycam.
Informazioni sulla riproduzione di dischi creati con altri apparecchi
Con una High Definition Handycam è possibile creare dischi di alta definizione (in formato
AVCHD). Per ulteriori informazioni sulla riproduzione di un disco su altri dispositivi, vedere
pagina 12.
9 IT
Page 56

Lunghezza dei video e tempi di registrazione
Capacità disco (tempo di registrazione) disponibile per la registrazione dei
video
Il tempo di registrazione disponibile per la registrazione di un video su un disco dipende
dall’impostazione della modalità REC della Handycam.
Alta definizione (HD) Definizione standard (SD)
Modalità REC Tempo di
registrazione*
HD FH circa 30 minuti STD HQ/HQ circa 1 ora
HD HQ circa 55 minuti SP circa 1 ora e
HD SP circa 1 ora e
HD LP circa 1 ora e
10 minuti
35 minuti
Suggerimenti
La conversione in SD (definizione standard) con un adeguato modello Handycam consente di
registrare su disco circa 2 ore e 40 minuti (la qualità delle immagini potrebbe dipendere dal tempo di
registrazione).
Le modalità REC disponibili variano in base ai modelli di Handycam.
Tempo necessario alla registrazione
In fase di registrazione di un video, la durata del tempo necessario alla registrazione dipende
dal modello di Handycam, dall’impostazione della modalità REC utilizzata per riprendere
il video e dal numero di scene contenute nel video stesso. In genere, il tempo necessario a
registrare un video su un disco aumenta se il video è stato registrato con un’impostazione
di qualità dell’immagine superiore (velocità in bit). La conversione in video SD (definizione
standard) richiede un tempo maggiore della durata effettiva del video.
Modalità REC Tempo di
registrazione*
30 minuti
LP circa 3 ore
* Disco singolo
10 IT
Registrazione di un video HD (alta definizione) o di
un video SD (definizione standard) come è
Conversione in video SD (definizione standard) circa 1 ora e 5 minuti ~ 3 ore
circa 20 minuti ~ 1 ora
Page 57

Note
Non è possibile registrare un video HD (alta definizione) ripreso in modalità REC a una velocità in bit
superiore a 18 Mbps, come in modalità [HD FX] (ad esempio, High Definition Handycam) in formato
AVCHD.
Se la durata di una scena supera le dimensioni del disco, la registrazione non è possibile. In questo caso,
dividere la scena mediante la funzione di modifica della Handycam.
11 IT
Page 58

Informazioni sulla compatibilità dei dischi HD
(High Definition)
Non è possibile riprodurre un disco HD (High Definition) su un lettore o registratore DVD
non compatibile con il formato AVCHD.
Non inserire un disco HD (High Definition) in un lettore o registratore DVD non
compatibile con il formato AVCHD. Il lettore o registratore DVD potrebbe non riuscire ad
espellere il disco e cancellarne il contenuto.
È possibile riprodurre un disco HD (High Definition) su un lettore/registratore Blu-ray Disc
compatibile, una Playstation 3 o un altro dispositivo compatibile.
Tipo di disco creato e dispositivi compatibili
Disco HD (High Definition) (contenente video High Definition)
No
Sì
Sì
12 IT
Dispositivo DVD
Disco SD (Standard Definition) (contenente video Standard Definition)
Sì
Dispositivo DVD
* Installare preventivamente l’applicazione compatibile con il formato AVCHD sul computer.
Anche quando il computer soddisfa i requisiti di sistema, potrebbero esservi disturbi durante la
riproduzione di video, fotogrammi saltati o audio intermittente (tali fenomeni non dipendono dalla
qualità del disco creato).
Dispositivo compatibile
con il formato AVCHD
Sì
Dispositivo compatibile
con il formato AVCHD
Computer*
Sì
Computer*
Page 59

Risoluzione dei
problemi
Se durante l’utilizzo dell’apparecchio
si verifica uno dei problemi descritti
di seguito, consultare questa guida per
cercare di risolverli prima di richiedere una
riparazione. Consultare anche le istruzioni
per l’uso della Handycam. Se il problema
persiste, rivolgersi a un rivenditore Sony.
La Handycam è collegata, ma
l’apparecchio non funziona.
Assicurarsi che il modello della Handycam
sia compatibile con questo apparecchio
(pagina 5).
Verificare che la Handycam sia collegata
a una presa di corrente tramite il relativo
adattatore CA.
Verificare che la Handycam sia configurata
correttamente e che il cavo USB sia collegato
correttamente alla Handycam.
Scollegare il cavo USB dalla Handycam.
Spegnere la Handycam e riaccenderla.
Quindi ricollegare il cavo USB alla
Handycam.
Non è possibile registrare i video su un
disco.
Video registrati mediante il tasto
BURN) sulla
Handycam non possono essere
registrati di nuovo mediante il tasto
BURN) (non è possibile creare di nuovo lo
stesso disco mediante il tasto
BURN)). Per creare copie dello stesso disco,
selezionare l’impostazione [OPZ.MAST.
DISCO] sulla
Assicurarsi che il disco sia compatibile con
Handycam.
questo apparecchio (pagina 5).
Verificare che il disco sia nuovo o non ancora
utilizzato. Non è possibile utilizzare dischi già
registrati o formattati con altri apparecchi.
Verificare che la superficie di registrazione del
disco non sia impolverata o sporca e che non
siano presenti ditate.
(DISC
(DISC
(DISC
Verificare che il disco sia stato inserito nel
vassoio porta disco con la superficie di
registrazione rivolta verso il basso.
Le vibrazioni dell’apparecchio possono
provocare anomalie di funzionamento della
Handycam. Non appoggiare la Handycam
sull’apparecchio.
Non è possibile riprodurre un disco.
È possibile riprodurre solo dischi registrati con
questo apparecchio. Non è possibile riprodurre
dischi registrati su altri apparecchi video, o
dischi preregistrati disponibili in commercio.
Verificare che la superficie di riproduzione del
disco non sia impolverata o sporca e che non
siano presenti ditate.
Verificare che il disco sia stato inserito nel
vassoio porta disco con la superficie di
riproduzione rivolta verso il basso.
Il disco non viene espulso.
Il tasto (espulsione) non funziona.
Scollegare il cavo USB dalla Handycam,
spegnere la Handycam, quindi riaccenderla,
ricollegare il cavo USB alla Handycam e
premere nuovamente il tasto (espulsione).
Se questa operazione non dà i risultati sperati,
aprire il vassoio porta disco utilizzando il foro
di espulsione di emergenza (pagina 7).
Il vassoio porta disco dell’apparecchio si apre
solo quando l’apparecchio è collegato alla
Handycam. Verificare che l’apparecchio sia
collegato correttamente alla Handycam.
Verificare che la Handycam sia collegata a
una presa di corrente tramite un adattatore
CA.
Il disco non può essere espulso mentre è in
corso la registrazione o la riproduzione.
13 IT
Page 60

Precauzioni
Uso e manutenzione
Non utilizzare o conservare l’apparecchio e i
relativi accessori in luoghi che presentano le
seguenti caratteristiche:
Luoghi estremamente caldi, freddi o umidi.
Non lasciare l’apparecchio in luoghi con
temperature superiori a 60 ºC, ad esempio
esposto alla luce diretta del sole, in prossimità
di stufe o radiatori o in una vettura
parcheggiata al sole. In tali casi si potrebbero
verificare anomalie di funzionamento, oppure
l’apparecchio potrebbe deformarsi.
In prossimità di forti campi magnetici o in
luoghi in cui può essere soggetto a vibrazioni
meccaniche.
In queste situazioni l’apparecchio potrebbe non
funzionare correttamente.
In prossimità di forti onde radio o radiazioni.
L’apparecchio potrebbe non essere in grado di
registrare correttamente.
Su una spiaggia sabbiosa o in ambienti
polverosi.
Se la sabbia o la polvere dovesse penetrare
all’interno dell’apparecchio, si potrebbero
verificare anomalie di funzionamento o danni
irreparabili.
Manipolazione della scocca
Se il rivestimento della scocca è sporco, pulirlo
con un panno morbido leggermente inumidito
con acqua, quindi passare il rivestimento con
un panno morbido asciutto.
Evitare quanto segue, per non danneggiare il
rivestimento esterno:
Evitare di utilizzare prodotti chimici, quali
ad esempio solventi, benzene, alcol, panni
detergenti contenenti prodotti chimici,
repellenti, insetticidi e creme solari
Evitare di toccare l’unità con le mani sporche
di tali sostanze
Evitare di lasciare la scocca a contatto con
oggetti in gomma o vinilici per periodi
prolungati
Condensa
Non esporre l’apparecchio a sbalzi di temperatura
improvvisi. Se l’apparecchio è stato portato
da un ambiente freddo a un ambiente caldo,
o se la temperatura ambiente è aumentata
improvvisamente, attendere prima di utilizzarlo,
in quanto potrebbe essersi formata della
condensa al suo interno. Se si verifica un forte
sbalzo di temperatura mentre si sta utilizzando
l’apparecchio, spegnerlo ed evitare di utilizzarlo
per almeno un’ora.
Se si deve spostare l’apparecchio fra ambienti
con temperature estreme, riporlo in una busta di
plastica ermetica.
Lasciare riposare l’apparecchio nel nuovo
ambiente per almeno un’ora prima di utilizzarlo.
Manipolazione dei dischi
Per spostare i dischi, impugnarli per
i bordi. Non toccare la superficie di
registrazione/riproduzione.
Non incollare delle etichette sui dischi.
Non conservare i dischi in ambienti umidi o
polverosi, in luoghi esposti alla luce diretta del
sole, o in prossimità di fonti di calore.
Per proteggere i dati importanti, conservare
sempre i dischi nelle relative custodie.
Pulire il disco con un apposito panno.
Procedere dal centro verso l’esterno.
Se i dischi scrivibili sono graffiati o impolverati,
i dati potrebbero non essere registrati
correttamente. Usare molta cautela durante la
manipolazione dei dischi.
Trasporto
Durante la spedizione e il trasporto, si consiglia di
riporre l’apparecchio nella confezione originale.
Se l’apparecchio deve essere spedito, rimuovere
preventivamente l’eventuale disco presente al suo
interno.
14 IT
Page 61

Caratteristiche
tecniche
Registrazione
Dispositivi supportati
Modelli di Handycam supportati da DVDirect
Express
Per informazioni dettagliate sui modelli di
Handycam compatibili con questo apparecchio,
visitare il seguente sito Web:
http://www.sony.com/DVDirect/Compatibility
Dischi registrabili
Dischi DVD+R, DVD-R da 12 cm
Riproduzione
Dischi riproducibili
Dischi registrati con l’apparecchio VRD-P1
(non è possibile riprodurre dischi preregistrati
disponibili in commercio o registrati in altro
modo).
Informazioni generali
Consumo di energia: 7 W (max.)
Temperature di utilizzo: da 5 ºC a 35 ºC
Temperature di immagazzinamento: da -20 ºC
a +60 ºC
Dimensioni: ca. 143 × 162,5 × 25 mm (L×P×H),
incluse le parti sporgenti
Peso: ca. 400 g
Design e caratteristiche tecniche soggetti a
modifiche senza preavviso.
“Handycam” e sono
marchi registrati di Sony Corporation.
“DVDirect” e il logo DVDirect sono marchi di
Sony Corporation.
Gli eventuali altri nomi di sistemi o prodotti citati
nel presente documento sono marchi o marchi
registrati dei rispettivi produttori, anche se nel
testo non compaiono i simboli e .
15 IT
Page 62

CLASS 1
LASER PRODUCT
LASER KLASSE 1
PRODUKT
Normas de seguridad
ADVERTENCIA
Para reducir el riesgo de incendios o
descargas eléctricas, no exponga esta
unidad a la lluvia ni a la humedad.
Para evitar el riesgo de incendios o
electrocución, no coloque sobre la
unidad objetos que contengan líquidos
como, por ejemplo, jarrones.
No instale este equipo en un espacio
cerrado como una estantería o similar.
PRECAUCIÓN
El uso de instrumentos ópticos con
este producto aumentará el riesgo de
daños oculares. El haz láser que utiliza
este grabador de DVD puede provocar
lesiones oculares, por lo que nunca
debe intentar desmontar el aparato.
Solicite servicio técnico únicamente a
personal cualificado.
Este dispositivo está clasificado como
un producto láser de clase 1. La marca
de producto láser de clase 1 (CLASS 1
LASER PRODUCT) está ubicada en la
parte inferior externa.
2 ES
Esta etiqueta se encuentra en el receptáculo
protector del láser situado en el interior de
la unidad.
Tratamiento de los
equipos eléctricos y
electrónicos al final de su
vida útil (aplicable en la
Unión Europea y en países
europeos con sistemas de
recogida selectiva de
residuos)
Este símbolo en el equipo o el embalaje
indica que el presente producto no puede
ser tratado como residuos domésticos
normales, sino que debe entregarse en
el correspondiente punto de recogida
de equipos eléctricos y electrónicos. Al
asegurarse de que este producto se desecha
correctamente, Ud. ayuda a prevenir las
consecuencias negativas para el medio
ambiente y la salud humana que podrían
derivarse de la incorrecta manipulación
en el momento de deshacerse de este
producto. El reciclaje de materiales ayuda
a conservar los recursos naturales. Para
recibir información detallada sobre el
reciclaje de este producto, póngase en
contacto con el ayuntamiento, el punto de
recogida más cercano o el establecimiento
donde ha adquirido el producto.
Este producto está fabricado por Sony
Corporation, 1-7-1 Konan Minato-ku
Tokyo, 108-0075 Japón. El representante
autorizado de EMC y de la seguridad del
producto es Sony Deutschland GmbH,
Hedelfinger Strasse 61, 70327 Stuttgart,
Alemania. Para cualquier cuestión
relacionada con la garantía o el servicio
técnico, consulte las direcciones incluidas
en los documentos de garantía o de servicio
técnico independientes.
La placa de características se encuentra en
la parte inferior de la unidad.
Page 63

Índice
Normas de seguridad ...........................................................................................................................2
Información importante ......................................................................................................................4
Componentes suministrados ................................................................................................4
Notas sobre la utilización .......................................................................................................4
Características principales ...................................................................................................................5
Dispositivo compatible ...........................................................................................................5
Discos admitidos .......................................................................................................................5
Componentes y controles ...................................................................................................................6
Introducción de un disco........................................................................................................7
Grabación ..................................................................................................................................................8
Reproducción ..........................................................................................................................................9
Tamaños de vídeo y tiempo de grabación .................................................................................10
Espacio en disco (tiempo de grabación) disponible para grabar vídeos ...........10
Tiempo necesario para la grabación ............................................................................... 10
Acerca de la compatibilidad de los discos HD (alta definición) ..........................................11
Solución de problemas................................................................................................................................12
Precauciones ......................................................................................................................................... 13
Especificaciones ................................................................................................................................... 14
Consulte también las instrucciones de la Handycam
Esta unidad solo puede utilizarse a través de la conexión con una Handycam. Para
obtener más información, consulte las instrucciones de la Handycam.
En el presente documento, “Handycam” hace referencia a una videocámara Sony.
ES
3 ES
Page 64

Información importante
Componentes suministrados
Compruebe que el paquete contiene
los elementos siguientes. Si falta algún
componente o hay alguno dañado, póngase
en contacto con su distribuidor.
Manual de instrucciones
(este documento)
Notas sobre la utilización
Condiciones de funcionamiento y
almacenamiento
No someta la unidad a golpes o
vibraciones, ya que podría no funcionar
correctamente.
No utilice la unidad en lugares
especialmente ruidosos, ya que podría no
funcionar correctamente.
Al conectar el cable USB de la unidad
a la Handycam, procure introducir
el conector correctamente. No fuerce
el conector al intentar insertarlo en
el terminal, ya que podría dañarlo y
provocar problemas de funcionamiento
en la unidad o la Handycam.
Sobre la grabación
Es posible que determinados programas
de televisión, películas, cintas de vídeo u
otros materiales estén protegidos contra
copia. La grabación sin permiso de estos
materiales podría infringir la legislación
en materia de derechos de copia.
4 ES
Page 65

Características principales
Si conecta la unidad a la Handycam, podrá grabar vídeos en un disco sin necesidad de
utilizar el ordenador y de una forma muy sencilla (One Touch Disc Burn). Posteriormente, el
disco creado puede reproducirse conectando la unidad a la Handycam (One Touch Play).
Además, puede reproducir los vídeos en un televisor conectando la Handycam al televisor.
Asimismo, si utiliza la unidad desde la Handycam podrá acceder a una serie de prácticas
funciones, que varían en función del modelo de Handycam. Para obtener más información,
consulte las instrucciones de la Handycam.
Dispositivo compatible
Esta unidad está pensada para utilizarse exclusivamente con una Handycam. Conecte la
unidad a una Handycam compatible con el sistema DVDirect Express. Para obtener más
información sobre los modelos de Handycam compatibles, consulte la siguiente página:
http://www.sony.com/DVDirect/Compatibility
No puede utilizar la unidad con una Handycam incompatible o con una videocámara que
no sea de la marca Sony.
No puede utilizar la unidad para copiar o reproducir un disco conectándola a un
ordenador, ni como unidad de disco externa.
Discos admitidos
Pueden utilizarse con la unidad los siguientes discos grabables de 12 cm, nuevos o todavía sin
usar.
Tipo de disco Logotipo Velocidad de grabación
DVD+R Hasta 16×
DVD-R Hasta 16×
La unidad no admite los discos dobles o de doble capa ni los discos de 8 cm.
No se admiten los discos DVD+RW ni DVD-RW.
Notas sobre el uso de los discos
Solo pueden utilizarse con esta unidad discos nuevos o todavía sin usar.
La calidad de los discos grabables disponibles en el mercado puede variar. Es posible que
los discos con una calidad insuficiente no se graben correctamente.
Es posible que algunos discos grabados no puedan reproducirse a causa de la calidad de la
grabación o del estado del disco, o bien de las características del reproductor.
No puede reproducir discos grabados en otros dispositivos de vídeo ni discos
comercializados en el mercado.
5 ES
Page 66

Componentes y controles
Panel superior
Cable USB (páginas 8, 9)
Acerca del cable USB
Extracción del cable USB
Tire del conector del cable USB situado en la
ranura lateral de la unidad.
Si tiene problemas para hacerlo, presione
ligeramente el extremo del conector hasta que el
conector sobresalga de la unidad y, seguidamente,
extráigalo.
Almacenamiento del cable USB
Introduzca el cable USB en la ranura lateral de la
unidad.
6 ES
Botón (reproducción) (página 9)
Botón (DISC BURN) (página 8)
Page 67

Parte anterior
Bandeja del disco
Indicador de acceso
Botón (expulsar)
Botón de expulsión de emergencia
Si no puede abrir la bandeja del disco con el
botón (expulsar), inserte una aguja o la
punta de un clip en este orificio para abrir la
bandeja.
Acerca de la fuente de alimentación
La alimentación de la unidad procede de la Handycam conectada. Conecte la Handycam
a una toma de corriente mediante un adaptador de CA. No es necesario conectar la unidad a
ninguna toma de corriente.
Introducción de un disco
La bandeja de la unidad solo puede abrirse si se conecta a una Handycam.
Pulse el botón (expulsar) para abrir la bandeja del disco.
La bandeja del disco solo se abre hasta la mitad. Para abrirla del todo, deberá hacerlo
manualmente.
Coloque el disco en la bandeja, con la cara de grabación hacia abajo.
El disco debe quedar bien fijado en su posición.
No toque la superficie de
grabación del disco.
Presione la bandeja del disco para cerrarla.
Presione la bandeja hasta que oiga un clic.
7 ES
Page 68

Grabación
Si conecta la unidad a una Handycam, podrá grabar vídeos en el disco simplemente
pulsando el botón (DISC BURN).
Encienda la Handycam.
1
Conecte la Handycam a una toma de corriente mediante un adaptador de CA.
Si no utiliza un adaptador de CA con la Handycam, la unidad no funcionará al
conectarla a la Handycam.
Conecte la unidad al puerto USB de la Handycam.
2
Puerto USB
(Tipo Mini-AB)
No utilice nunca un cable alargador USB.
Introduzca un disco nuevo o todavía sin utilizar.
3
Para obtener más información, consulte “Introducción de un disco” (página 7).
Pulse el botón (DISC BURN).
4
Los vídeos grabados con la Handycam y todavía sin copiar se graban en el disco.
Si el tamaño del vídeo supera los límites de un disco, repita los pasos 3 y 4.
Recuerde que no podrá añadir vídeos a un disco grabado con esta unidad.
Operaciones desde una Handycam
Si utiliza la unidad desde una Handycam, dispondrá de prácticas funciones de grabación.
Por ejemplo, puede seleccionar las escenas que desea grabar. Para obtener más información,
consulte las instrucciones de la Handycam.
Visualización de la grabación
Al grabar vídeos en un disco a través de la unidad, puede comprobar los resultados de la
grabación reproduciendo el disco antes de borrar el vídeo de la Handycam.
8 ES
Page 69

Reproducción
La unidad puede utilizarse para reproducir discos creados y visualizarlos en la pantalla de
la Handycam conectada o en un televisor. Para visualizar el disco en un televisor, primero
debe conectar la Handycam al televisor. Para obtener más información sobre la conexión de
la cámara al televisor, consulte las instrucciones de la Handycam.
Encienda la Handycam.
1
Conecte la Handycam a una toma de corriente mediante un adaptador de CA.
Si no utiliza un adaptador de CA con la Handycam, la unidad no funcionará al
conectarla a la Handycam.
Conecte la unidad al puerto USB de la Handycam.
2
Puerto USB
(Tipo Mini-AB)
No utilice nunca un cable alargador USB.
Introduzca el disco grabado con la unidad.
3
Para obtener más información, consulte “Introducción de un disco” (página 7).
Pulse el botón (reproducción).
4
La reproducción empieza desde el principio del disco.
Operaciones desde una Handycam
También puede reproducir vídeos desde la Handycam. Para obtener más información,
consulte las instrucciones de la Handycam.
Reproducción de un disco creado en otros aparatos
Con una Handycam de alta definición, es posible crear discos de alta definición (formato
AVCHD). Para obtener más información acerca de la reproducción de un disco en otros
dispositivos, consulte la página 11.
9 ES
Page 70

Tamaños de vídeo y tiempo de grabación
Espacio en disco (tiempo de grabación) disponible para grabar vídeos
El tiempo de grabación disponible de un vídeo en un disco depende del ajuste del modo REC
de la Handycam.
Alta definición (HD) Definición estándar (SD)
Modo REC Tiempo de
grabación*
HD FH aprox. 30 minutos STD HQ/HQ aprox. 1 hora
HD HQ aprox. 55 minutos SP aprox. 1 hora
HD SP aprox. 1 hora
HD LP aprox. 1 hora
10 minutos
35 minutos
Sugerencias
Cuando se pasa de HD (alta definición) a SD (definición estándar) con el modelo adecuado de
Handycam, es posible grabar hasta aprox. 2 horas 40 minutos en un disco. (La calidad de la imagen
puede depender del tiempo de grabación.)
Los modos REC disponibles varían según los modelos de Handycam.
Tiempo necesario para la grabación
Al grabar vídeos, la cantidad de tiempo necesario para la grabación depende del modelo
de Handycam, el ajuste del modo REC que se utilizó para tomar el vídeo y el número de
escenas que contiene el vídeo. En general, se necesitará más tiempo para grabar vídeos en un
disco si el vídeo se ha grabado en un ajuste de calidad de imagen más elevado (velocidad de
bits). Se tarda más tiempo en convertir vídeo a SD (definición estándar) que el tiempo real del
vídeo.
Modo REC Tiempo de
grabación*
30 minutos
LP aprox. 3 horas
* Un único disco
Grabación de un vídeo HD (alta definición) o SD
(definición estándar) tal cual
Conversión de vídeo a SD (definición estándar) aprox. 1 hora 5 minutos ~ 3 horas
aprox. 20 minutos ~ 1 hora
Notas
No es posible grabar un vídeo HD (alta definición) tomado en el modo REC a una velocidad de bits
superior a 18 Mbps, como en el modo [HD FX] (por ejemplo, Handycam de alta definición) en formato
AVCHD.
Si el tiempo que dura una escena excede la capacidad del disco, la grabación no será posible. En este caso,
divida la escena mediante la función de edición de la Handycam.
10 ES
Page 71

Acerca de la compatibilidad de los discos HD (alta definición)
Un disco HD (alta definición) no puede reproducirse en un reproductor o grabadora de DVD
que no sea compatible con el formato AVCHD.
No inserte un disco HD (alta definición) en un reproductor o grabadora de DVD
incompatible con el formato AVCHD. Es posible que el reproductor o la grabadora de DVD
no pueda expulsar el disco y borre su contenido.
Un disco HD (alta definición) puede reproducirse en reproductores o grabadoras de Blu-ray
Disc compatibles con AVCHD, consolas Playstation 3 u otros dispositivos compatibles.
Tipo de disco creado y dispositivos compatibles
Disco HD (alta definición) (con vídeos de alta definición)
No
Sí
Sí
Dispositivo de DVD
Dispositivo compatible con
el formato AVCHD
Ordenador*
Disco SD (definición estándar) (con vídeos de definición estándar)
Sí
Dispositivo de DVD
* Instale previamente la aplicación compatible con AVCHD en el ordenador. Incluso en un entorno
informático que cumpla con los requisitos del sistema, es posible que se genere ruido en la
reproducción de vídeo, que se pierdan fotogramas o que el sonido se silencie de forma intermitente
(esto no depende de la calidad del disco creado).
Dispositivo compatible con
Sí
el formato AVCHD
Sí
Ordenador*
11 ES
Page 72

Solución de problemas
Si le surge cualquiera de las siguientes
dificultades mientras utiliza la unidad,
utilice esta guía de solución de problemas
para resolver el problema antes de solicitar
asistencia técnica. Consulte también las
instrucciones de la Handycam. Si el
problema persiste, póngase en contacto con
su distribuidor Sony.
La Handycam está conectada, pero la
unidad no funciona.
Compruebe que la unidad sea compatible con
su Handycam (página 5).
Asegúrese de que la Handycam está
conectada a una toma de corriente mediante el
adaptador de CA.
Compruebe que la Handycam esté
bien configurada y que el cable USB esté
correctamente conectado a la Handycam.
Desconecte el cable USB de la Handycam.
Apague la Handycam y vuelva a encenderla.
A continuación, vuelva a conectar el cable USB
a la Handycam.
No es posible grabar vídeos en el disco.
Un vídeo grabado mediante el botón
(DISC BURN) de la Handycam no se
puede volver a grabar mediante el botón
(DISC BURN). (No es posible crear el
mismo disco otra vez mediante el botón
(DISC BURN)). Para crear copias del
mismo disco, seleccione el ajuste [OPC.GRAB.
DISCO] de la Handycam.
Compruebe que el disco sea compatible con
esta unidad (página 5).
Asegúrese de que el disco es nuevo o todavía
sin utilizar. No pueden utilizarse discos ya
grabados o formateados por otro dispositivo.
Compruebe que la superficie de grabación del
disco no presenta suciedad, polvo ni huellas
dactilares.
Asegúrese de que el disco está colocado en la
bandeja con la cara de grabación hacia abajo.
Si la unidad experimenta vibraciones, la
Handycam podría dejar de funcionar
correctamente. No coloque la Handycam
encima de la unidad.
12 ES
Un disco no puede reproducirse.
Solo puede reproducir los discos creados con
esta unidad. Por tanto, no puede reproducir
discos grabados en otros dispositivos de vídeo
ni discos comercializados en el mercado.
Compruebe que la cara de reproducción del
disco no presenta suciedad, polvo ni huellas
dactilares.
Compruebe que el disco esté colocado en la
bandeja con la cara de reproducción hacia
abajo.
El disco no puede expulsarse.
El botón (expulsar) no funciona.
Desconecte el cable USB de la Handycam,
apague la Handycam y vuelva a encenderla,
vuelva a conectar el cable USB a la
Handycam y pulse el botón (expulsar). Si
esta operación no funciona, abra la bandeja
del disco mediante el botón de expulsión de
emergencia (página 7).
La bandeja de la unidad solo puede abrirse
si se conecta a una Handycam. Compruebe
que la unidad esté bien conectada a la
Handycam.
Compruebe que la Handycam esté conectada
a una toma de corriente mediante el adaptador
de CA.
El disco no puede expulsarse durante una
grabación o una reproducción.
Page 73

Precauciones
Uso y mantenimiento
Evite utilizar o guardar la unidad y sus accesorios
en lugares como:
Sitios especialmente calurosos, fríos o húmedos.
Nunca exponga la unidad a temperaturas
superiores a 60 ºC ni la deje bajo la luz directa
del sol, cerca de radiadores o en el interior de
un coche aparcado a pleno sol. De lo contrario,
podría sufrir una avería o deformaciones.
Cerca de lugares sometidos a fuertes campos
magnéticos o vibraciones mecánicas.
La unidad podría experimentar problemas de
funcionamiento.
Cerca de lugares sometidos a fuertes ondas de
radio o radiaciones.
La unidad podría tener problemas para grabar
correctamente.
En lugares con mucha arena o polvo.
Si entra arena o polvo en la unidad, podría
experimentar daños irreversibles.
Manipulación de la unidad
Si la unidad está sucia, límpiela con un
paño suave ligeramente humedecido y,
seguidamente, seque la estructura con la ayuda
de un paño seco.
Para evitar que el acabado sufra daños, siga las
recomendaciones siguientes:
No utilice productos químicos, como
disolvente, benceno, alcohol, paños con
soluciones químicas, repelentes, insecticidas
o filtros solares.
No manipule la unidad si tiene rastros de las
sustancias anteriores en las manos.
No permita que la unidad pase demasiado
tiempo en contacto con objetos de caucho
o vinilo.
Condensación
No exponga la unidad a cambios de temperatura
bruscos. No utilice la unidad inmediatamente
después de trasladarla de un sitio frío a uno cálido
o después de un cambio brusco de temperatura en
la estancia, ya que es posible que se haya formado
condensación en su interior. Si la temperatura
cambia de forma repentina mientras se utiliza la
unidad, apáguela y deje de utilizarla durante al
menos una hora.
Si desplaza la unidad entre puntos con
temperaturas opuestas, transpórtela en el interior
de una bolsa de plástico hermética.
Antes de utilizarla, deje la unidad expuesta a la
temperatura ambiente por lo menos una hora.
Manipulación de discos
Sujete los discos solo por los extremos, sin tocar
la superficie de reproducción o grabación.
No pegue etiquetas en los discos.
No guarde los discos en lugares húmedos o
con polvo, expuestos a la luz solar o cerca de
dispositivos que generen calor.
Para proteger los datos importantes, guarde
siempre los discos en sus cajas.
Limpie el disco con un paño de limpieza.
Limpie el disco desde el centro hacia los bordes.
Si el área de grabación del disco grabable tiene
arañazos o polvo, es posible que los datos no
se graben correctamente. Manipule los discos
con cuidado.
Transporte
Para transportar la unidad, vuelva a utilizar su
paquete original.
Si debe enviar la unidad, extraiga primero
cualquier disco de su interior.
13 ES
Page 74

Especificaciones
Grabación
Dispositivos compatibles
Handycam compatible con DVDirect Express
Para obtener más información sobre los modelos
de Handycam admitidos por la unidad, visite la
dirección siguiente:
http://www.sony.com/DVDirect/Compatibility
Discos grabables
Discos DVD+R y DVD-R de 12 cm
Reproducción
Discos reproducibles
Discos creados con VRD-P1 (no se admiten otros
discos comercializados ni grabados.)
Datos generales
Consumo: 7 W (máx.)
Temperatura de funcionamiento: 5 ºC a 35 ºC
Temperatura de almacenamiento: -20 ºC a +60 ºC
Tamaño: Aprox. 143 × 162,5 × 25 mm
(an×al×prf), con los salientes
Peso: Aprox. 400 g
El diseño y las especificaciones están sujetos a
cambios sin previo aviso.
“Handycam” y son marcas
comerciales registradas de Sony Corporation.
“DVDirect” y el logotipo DVDirect son marcas
comerciales registradas de Sony Corporation.
Todos los demás nombres de sistemas y
productos son marcas comerciales o marcas
comerciales registradas de sus respectivos
propietarios, aunque en el texto no se utilicen los
símbolos y .
14 ES
Page 75

Page 76

CLASS 1
LASER PRODUCT
LASER KLASSE 1
PRODUKT
Правила техники
безопасности
ПРЕДУПРЕЖДЕНИЕ
Во избежание возникновения
пожара и поражения электрическим
током предохраняйте устройство
от попадания в него воды и от
воздействия влаги.
Для предотвращения возгорания
или поражения электрическим
током не ставьте на устройство
предметы, наполненные
жидкостями, например вазы.
Не устанавливайте устройство в
тесном пространстве, например на
книжной полке и т. д.
ОСТОРОЖНО!
Использование оптических
измерительных приборов с этим
изделием увеличивает опасность
ухудшения зрения. Так как
используемый в этом устройстве для
записи дисков DVD луч лазера опасен
для зрения, не пытайтесь вскрыть
корпус. Предоставьте обслуживание
квалифицированному персоналу.
Данное устройство классифицируется
как ЛАЗЕРНЫЙ продукт КЛАССА 1
(CLASS 1 LASER). МАРКИРОВКА CLASS
1 LASER PRODUCT расположена на
нижней части корпуса.
Эта наклейка расположена на защитном
кожухе лазера внутри корпуса.
2 RU
Утилизaция
электрического и
электронного
оборудования
(директива применяется
в странах Eвpоcоюзa и
других европейских
странах, где действуют системы
раздельного сбора отходов)
Дaнный знак на устройстве или его
упаковке обозначает, что данное
устройство нельзя утилизировать
вместе с прочими бытовыми отходами.
Eго следует сдать в соответствующий
приемный пункт переработки
электрического и электронного
оборудования. Heпpaвильнaя
утилизация данного изделия может
привести к потенциально негативному
влиянию на окружающую среду
и здоровье людей, поэтому для
предотвращения подобных последствий
необходимо выполнять специальные
требования по утилизации этого
изделия. Пepepaботкa данных
материалов поможет сохранить
природные ресурсы. Для получения
более подробной информации о
переработке этого изделия обратитесь в
местные органы городского управления,
службу сбора бытовых отходов или в
магазин, где было приобретено изделие.
Производитель данного устройства:
Sony Corporation, 1-7-1 Konan Minato-ku
Tokyo, 108-0075 Japan. Уполномоченным
представителем по электромагнитной
совместимости (EMC) и безопасности
изделия является компания Sony
Deutschland GmbH, Hedelfinger Strasse
61, 70327 Stuttgart, Germany. По всем
вопросам, связанным с гарантийными
обязательствами в отношении
настоящего изделия или с его
обслуживанием, обращайтесь по адресу,
указанному в отдельной сервисной или
гарантийной документации.
Табличка с названием модели и ее
характеристиками расположена на
нижней части устройства.
Page 77

Содержание
Правила техники безопасности .....................................................................................................2
Прочтите перед началом работы..................................................................................................4
Компоненты в комплекте поставки ................................................................................4
Примечания по эксплуатации ...........................................................................................4
Основные функции ..............................................................................................................................5
Совместимые устройства ....................................................................................................5
Поддерживаемые диски ......................................................................................................5
Детали и регуляторы ..........................................................................................................................6
Установка диска .......................................................................................................................7
Запись ........................................................................................................................................................8
Воспроизведение .................................................................................................................................9
Продолжительность видео и время записи .........................................................................10
Место на диске (время записи), доступное для записи видео ........................10
Время, необходимое для выполнения записи .......................................................10
Примечания о совместимости дисков высокой четкости ..............................................11
Поиск и устранение неисправностей ..................................................................................12
Меры предосторожности ..............................................................................................................13
Технические характеристики .......................................................................................................14
Кроме того, см. инструкции по эксплуатацию видеокамеры Handycam
Это устройство можно использовать только путем его подключения к видеокамере
Handycam. Подробнее о его работе также см. в инструкции по эксплуатации
видеокамеры Handycam.
Встречающийся в настоящей документации термин “Handycam” относится к
видеокамере Sony.
RU
3 RU
Page 78

Прочтите перед
началом работы
Компоненты в комплекте
поставки
Убедитесь в наличии следующего
содержимого в упаковке. Если что-либо
из перечисленного ниже отсутствует или
повреждено, обратитесь к продавцу.
Инструкция по эксплуатации (данный
документ)
Примечания по эксплуатации
Условия эксплуатации и хранения
Не подвергайте это устройство
механическому воздействию или
вибрации. В противном случае
устройство может работать
неправильно.
Не используйте это устройство в
очень шумных местах. В противном
случае устройство может работать
неправильно.
При подключении этого устройства
к видеокамере Handycam с
помощью кабеля USB убедитесь
в правильности подсоединения
штекерного разъема. Вставка разъема
в гнездо с усилием может привести к
повреждению гнезда и неполадкам в
работе устройства или видеокамеры
Handycam.
Запись
Телевизионные программы, фильмы,
видеоленты и другие материалы могут
быть защищены авторским правом.
Несанкционированная запись таких
материалов может противоречить
законодательству об авторских
правах.
4 RU
Page 79

Основные функции
Подключив устройство к видеокамере Handycam, можно легко записывать видео на
диск без использования компьютера (One Touch Disc Burn). Созданный диск можно
воспроизвести путем подключения устройства к видеокамере Handycam (One Touch
Play). Кроме того, можно воспроизводить видео на телевизоре путем подключения
видеокамеры Handycam к телевизору.
Кроме того, управляя устройством с видеокамеры Handycam, можно воспользоваться
некоторыми полезными функциями. Эти функции зависят от конкретной модели
видеокамеры Handycam. Подробнее см. в инструкции по эксплуатации видеокамеры
Handycam.
Совместимые устройства
Это устройство предназначено исключительно для использования с видеокамерами
Handycam. Подключите устройство к видеокамере Handycam, поддерживающей
функцию DVDirect Express. Подробнее о совместимых моделях видеокамеры
Handycam см. по следующему адресу:
http://www.sony.com/DVDirect/Compatibility
Это устройство нельзя использовать с неподдерживаемыми видеокамерами
Handycam или видеокамерами других производителей (не Sony).
Это устройство нельзя использовать для копирования или воспроизведения диска
путем подключения к компьютеру; его также нельзя использовать в качестве внешнего
диска.
Поддерживаемые диски
С этим устройством совместимы следующие новые или неиспользованные диски
диаметром 12 см с возможностью записи.
Тип диска Логотип Скорость записи
DVD+R До 16×
DVD-R До 16×
Двухсторонние/двухслойные диски и диски диаметром 8 см не поддерживаются.
Диски DVD+RW и DVD-RW не поддерживаются.
Примечания относительно использования дисков
Для этого устройства можно использовать только новые или неиспользованные диски.
Имеющиеся в продаже диски с возможностью записи бывают разного качества.
Возможно, не удастся успешно выполнить запись на некондиционных дисках.
Возможно, некоторые записанные диски не удастся воспроизвести из-за
качества записи, физического состояния диска или характеристик устройства
воспроизведения.
Нельзя воспроизводить диски, записанные на других видеоустройствах, а также
предварительно записанные диски.
5 RU
Page 80

Детали и регуляторы
Верхняя панель
Кабель USB (стр. 8, 9)
О кабеле USB
Извлечение кабеля USB
Извлеките разъем кабеля USB из паза на
боковой части устройства.
Если при этом возникают затруднения,
нажмите на кончик разъема, чтобы разъем
вышел из устройства, а затем извлеките его.
Хранение кабеля USB
Кабель USB следует хранить в пазе на боковой
части устройства.
6 RU
Кнопка (воспроизведение) (стр. 9)
Кнопка (DISC BURN) (стр. 8)
Page 81

Передняя панель
Лоток для дисков
Индикатор ACCESS (доступа)
Кнопка (извлечение)
Отверстие для аварийного
извлечения
Если не удается открыть лоток для дисков
с помощью кнопки (извлечение),
вставьте булавку или выпрямленную
канцелярскую скрепку в это отверстие,
чтобы открыть лоток для дисков.
Об источнике питания
Питание на устройство подается с подключенной видеокамеры Handycam. Обязательно
подключите видеокамеру Handycam к электрической розетке с помощью адаптера
переменного тока. Устройство не нужно напрямую подключать к электрической розетке.
Установка диска
Лоток для дисков можно открыть, только когда устройство подключено к видеокамере
Handycam.
Нажмите кнопку (извлечение), чтобы открыть лоток для дисков.
Лоток для дисков откроется наполовину. Полностью откройте его вручную.
Поместите диск в лоток стороной для записи вниз.
Диск должен встать на место со щелчком.
Не прикасайтесь к записываемой
поверхности диска.
Нажмите на лоток для дисков, чтобы закрыть его.
Нажмите на лоток для дисков до щелчка.
7 RU
Page 82

Запись
Подключив это устройство к Handycam, можно записывать видеофрагменты на диск
путем простого нажатия кнопки (DISC BURN).
Включите видеокамеру Handycam.
1
Обязательно подключите видеокамеру Handycam к электрической розетке с
помощью адаптера переменного тока.
Если не использовать адаптер переменного тока для видеокамеры Handycam,
устройство не будет работать при его подключении к видеокамере Handycam.
Подключите устройство к порту USB видеокамеры Handycam.
2
Порт USB
(тип Mini-AB)
Нельзя использовать удлинительный кабель USB.
Вставьте новый или неиспользованный диск.
3
Подробнее см. в разделе “Установка диска” (стр. 7).
Нажмите кнопку (DISC BURN).
4
Видеофрагменты, вновь записанные с помощью видеокамеры Handycam и еще
не скопированные, будут записаны на диск.
Если видеофрагмент не умещается на один диск, повторите шаги 3 и 4.
Не удастся добавить видеофрагменты на диск, который уже записан с помощью
этого устройства.
Управление с видеокамеры Handycam
При управлении с помощью видеокамеры Handycam доступны несколько удобных
функций. Например, можно выбрать сцены для записи. Подробнее см. в инструкции
по эксплуатации видеокамеры Handycam.
Проверка записи
При записи видеофрагментов на диск с помощью этого устройства перед стиранием
видеофрагмента с видеокамеры Handycam убедитесь, что запись выполнена успешно
путем воспроизведения диска.
8 RU
Page 83

Воспроизведение
Это устройство можно использовать для воспроизведения созданных дисков, а также
их просмотра на дисплее подключенной видеокамеры Handycam или на экране
телевизора. Для просмотра на экране телевизора потребуется подключить видеокамеру
Handycam к телевизору. Подробнее о подключении к телевизору см. в инструкции по
эксплуатации видеокамеры Handycam.
Включите видеокамеру Handycam.
1
Обязательно подключите видеокамеру Handycam к электрической розетке с
помощью адаптера переменного тока.
Если не использовать адаптер переменного тока для видеокамеры Handycam,
устройство не будет работать при его подключении к видеокамере Handycam.
Подключите устройство к порту USB видеокамеры Handycam.
2
Порт USB
(тип Mini-AB)
Нельзя использовать удлинительный кабель USB.
Вставьте диск, записанный с помощью этого устройства.
3
Подробнее см. в разделе “Установка диска” (стр. 7).
Нажмите кнопку (воспроизведение).
4
Начнется воспроизведение с начала диска.
Управление с видеокамеры Handycam
Кроме того, видеофрагменты можно воспроизводить с самой видеокамеры
Handycam. Подробнее см. в инструкции по эксплуатации видеокамеры Handycam.
О воспроизведении записанного диска на других устройствах
C помощью High Definition Handycam можно создавать диски высокой четкости
(формат AVCHD). Для получения информации о воспроизведении диска на других
устройствах см. стр. 11.
9 RU
Page 84

Продолжительность видео и время записи
Место на диске (время записи), доступное для записи видео
Доступное время записи видео на диск зависит от настройки режима ЗАПИСИ на
Handycam.
Высокая четкость (HD) Стандартная четкость (SD)
Режим ЗАПИСИ Время записи* Режим ЗАПИСИ Время записи*
HD FH прибл. 30 минут STD HQ/HQ прибл. 1 час
HD HQ прибл. 55 минут SP прибл. 1 час
HD SP прибл. 1 час
10 минут
HD LP прибл. 1 час
35 минут
LP прибл. 3 часа
* Один диск
Советы
При понижающей конвертации в формат стандартной четкости (SD) с подходящей моделью
Handycam, можно записать, приблизительно, до 2 часов 40 минут на диск. (Качество
изображения может зависеть от времени записи.)
На различных моделях Handycam режимы ЗАПИСИ могут отличаться.
Время, необходимое для выполнения записи
При записи видео время, необходимое для записи, зависит от модели Handycam, а
также настройки режима ЗАПИСИ, используемого для съемки видео и количества
сцен. Как правило, для записи на диск видео, снятого с настройкой более высокого
качества изображения (скорости передачи в битах), требуется больше времени.
Процесс преобразования в видео стандартной четкости (SD) может занять больше
времени, чем фактическая продолжительность видео.
30 минут
Запись видео высокой четкости (HD) или видео
стандартной четкости (SD) без изменений
Преобразование в видео стандартной четкости
(SD)
прибл. 20 минут ~ 1 час
прибл. 1 час 5 минут ~ 3 часа
Примечания.
Не удастся выполнить запись видео высокой четкости (HD) в режиме ЗАПИСИ со скоростью
передачи данных, превышающей 18 Мбит/с, например в режиме [HD FX] (например, High
Definition Handycam), в формате AVCHD.
Если сцена по времени превышает свободное место на диске, запись выполнить не удастся. В этом
случае разделите сцену с помощью функции редактирования на Handycam.
10 RU
Page 85

Примечания о совместимости дисков высокой четкости
Диск высокой четкости нельзя воспроизвести на AVCHD-несовместимых DVDпроигрывателях или устройствах записи DVD-дисков.
Не загружайте диск высокой четкости в AVCHD-несовместимые DVD-проигрыватели
или устройства записи DVD-дисков. Возможно не удастся извлечь диск из DVDпроигрывателя или устройства записи DVD-дисков, а его содержимое может быть
удалено.
Диск высокой четкости можно воспроизводить на AVCHD-совместимых
проигрывателях/устройствах записи Blu-ray Disc, Playstation3 или других
совместимых устройствах.
Тип создаваемого диска и совместимые устройства
Диск высокой четкости (содержащий видео высокой четкости)
Нет
Да
Да
Устройство DVD
Устройство, совместимое с
форматом AVCHD
Компьютер*
Диск стандартной четкости (содержащий видео стандартной четкости)
Да
Устройство DVD
* На компьютере заранее следует установить AVCHD-совместимое приложение. Даже при
наличии компьютерной среды, отвечающей системным требованиям, возможно появление
помех при воспроизведении видео, пропадание кадров или периодическая потеря звука. (Это
не зависит от качества созданного диска.)
Устройство, совместимое с
Да
форматом AVCHD
Да
Компьютер*
11 RU
Page 86

Поиск и устранение
неисправностей
При появлении каких-либо из
перечисленных ниже трудностей
при использовании устройства
используйте руководство по устранению
неисправностей для помощи при
решении проблемы, прежде чем
обращаться в ремонтную службу. См.
также инструкцию по эксплуатации
видеокамеры Handycam. Если
проблема не устраняется, обратитесь к
ближайшему дилеру фирмы Sony.
Видеокамера Handycam подключена,
однако устройство не работает.
Убедитесь, что видеокамера Handycam
поддерживается этим устройством (стр. 5).
Убедитесь, что видеокамера Handycam
подключена к электрической розетке с
помощью адаптера переменного тока.
Убедитесь, что Handycam правильно
настроена, а кабель USB правильно
подключен к видеокамере Handycam.
Отключите кабель USB от видеокамеры
Handycam. Выключите видеокамеру
Handycam, а затем снова включите.
Затем снова подключите кабель USB к
видеокамере Handycam.
Не удается записать видеофрагмент на
диск.
Фильмы, записанные при нажатии
кнопки (DISC BURN) на Handycam, не
удастся снова записать нажатием кнопки
(DISC BURN). (Один и тот же диск не
удастся создать снова нажатием кнопки
(DISC BURN).) Для копирования диска
выберите параметр [ФУНК.ЗАП.ДИСК.] на
Handycam.
Убедитесь, что этот диск поддерживается
этим устройством (стр. 5).
Убедитесь, что диск новый или
неиспользованный. Не удастся
использовать диск, который был
записан или отформатирован на другом
устройстве.
12 RU
Убедитесь, что на записываемой стороне
диска нет пыли, загрязнений или
отпечатков пальцев.
Убедитесь, что диск размещен в лотке для
дисков записываемой стороной вниз.
Вибрация устройства может привести к
неисправности видеокамеры Handycam.
Не кладите видеокамеру Handycam на
устройство.
Не удается воспроизвести диск.
Можно воспроизводить только диски,
записанные с помощью этого устройства.
Нельзя воспроизводить диски, записанные
на других видеоустройствах, а также
предварительно записанные диски.
Убедитесь, что на воспроизводимой
стороне диска нет пыли, загрязнений или
отпечатков пальцев.
Убедитесь, что диск размещен в лотке для
дисков воспроизводимой стороной вниз.
Не удается извлечь диск.
Кнопка (извлечение) не работает.
Отключите кабель USB от видеокамеры
Handycam, выключите питание
видеокамеры Handycam, затем снова
включите его, подключите кабель USB к
видеокамере Handycam, а затем нажмите
кнопку (извлечение). Если кнопка
не работает, откройте лоток для дисков
с помощью отверстия для аварийного
извлечения (стр. 7).
Лоток для дисков можно открыть,
только когда устройство подключено к
видеокамере Handycam. Убедитесь, что
устройство правильно подключено к
видеокамере Handycam.
Убедитесь, что видеокамера Handycam
подключена к электрической розетке с
помощью адаптера переменного тока.
Диск нельзя извлечь при его записи или
воспроизведении.
Page 87

Меры
предосторожности
Использование устройства и уход за
ним
Не используйте и не храните устройство и
принадлежности в следующих условиях.
В слишком жарких или холодных местах, а
также в местах с высокой влажностью.
Не подвергайте устройство воздействию
температур, превышающих 60°C, например,
не оставляйте его под прямыми солнечными
лучами, около нагревательных приборов
или в автомобиле в солнечную погоду. Это
может привести к его неисправности или
деформации.
Вблизи сильных магнитных полей или
в местах, подверженных механической
вибрации.
Это может привести к неисправности
устройства.
Рядом с источниками сильных радиоволн
или излучения.
Возможно, устройство не запишет
изображение должным образом.
На песчаном пляже или в местах скопления
пыли.
Если в устройство попадет песок или пыль,
это может привести к его неисправности
или невосстановимому повреждению.
Обращение с корпусом
В случае загрязнения корпуса устройства
очистите его мягкой тканью, слегка
смоченной в воде, а затем протрите мягкой
сухой тканью.
Во избежание повреждения покрытия не
следует:
использовать химические вещества,
например, разбавитель, бензин,
спирт, химические салфетки, средства
отпугивания насекомых, инсектициды или
лосьон от загара;
брать видеокамеру при наличии
указанных выше веществ на руках;
допускать соприкосновения корпуса
камеры с резиновыми или виниловыми
предметами в течение долгого времени.
Транспортировка
При транспортировки устройство следует
укладывать в оригинальную упаковку.
Перед транспортировкой убедитесь, что в
устройстве нет диска.
Конденсация
Не подвергайте устройство резким перепадам
температур. Не используйте устройство
сразу же после его переноса из холодного
места в теплое или после резкого повышения
температуры в помещении, так как внутри
корпуса возможно образование конденсата.
При резком изменении температуры во время
использования устройства отключите питание
и не используйте его по крайней мере один
час.
При перемещении устройства в места с
резким перепадом температур поместите его в
герметическую пластиковую упаковку.
Не используйте устройство по крайней
мере один час, чтобы оно адаптировалось к
окружающей температуре.
Обращение с дисками
Берите диски только за края. Ни в коем
случае не касайтесь воспроизводимой/
записываемой поверхности.
Не помещайте наклейки на диски.
Не храните диски в местах повышенной
запыленности, местах, подверженных
высокой влажности и действию прямого
солнечного света, а также вблизи устройств,
выделяющих тепло.
Для защиты важных данных всегда храните
диски в футлярах (коробках).
Очищайте поверхность диска специальной
чистящей тканью. Протирайте диск в
направлении от центра.
Данные могут быть записаны неправильно
при наличии царапин или пыли на
незаписанных участках диска. Обращайтесь
с дисками очень осторожно.
13 RU
Page 88

Технические
характеристики
Выполнение записи
Поддерживаемые устройства
Видеокамеры Handycam, поддерживаемые
DVDirect Express
Подробнее о видеокамерах Handycam,
поддерживаемых этим устройством см. по
следующему адресу:
http://www.sony.com/DVDirect/Compatibility
Диски для записи
Диски DVD+R, DVD-R 12 см
Воспроизведение
Диски, которые можно воспроизвести
Диски, созданные с помощью VRD-P1 (другие
имеющиеся в продаже или записанные диски
не поддерживаются.)
Общие технические характеристики
Потребляемая мощность: 7 Вт (макс.)
Рабочая температура: от 5 ºC до 35 ºC
Температура хранения: от -20 ºC до +60 ºC
Размер: прибл. 143 × 162,5 × 25 мм (Ш×Г×В),
включая выступающие части
Вес: прибл. 400 г
Конструкция и технические характеристики
могут изменяться без предварительного
уведомления.
“Handycam” и являются
зарегистрированными товарными знаками
Sony Corporation.
“DVDirect” и логотип DVDirect являются
товарными знаками Sony Corporation.
Прочие названия систем и продуктов,
встречающиеся в настоящем документе,
являются зарегистрированными товарными
знаками или товарными знаками их
соответствующих производителей, несмотря
на то, что символы и в тексте не
используются.
14 RU
Page 89

Page 90

CLASS 1
LASER PRODUCT
LASER KLASSE 1
PRODUKT
Normas de segurança
AVISO
Para reduzir o risco de incêndio ou
choque eléctrico, não exponha o
aparelho à chuva ou à humidade.
Para evitar riscos de incêndio ou
choque eléctrico, não coloque objectos
que contenham líquidos, como jarras,
em cima do aparelho.
Não instale este equipamento num
espaço confinado, como uma estante
ou uma unidade semelhante.
ATENÇÃO
A utilização de instrumentos ópticos
com este produto aumenta o risco
de lesões oculares. Como o raio laser
utilizado neste gravador de DVD é
prejudicial para a vista, não tente
desmontar a caixa do aparelho. Remeta
a assistência apenas para técnicos
devidamente qualificados.
Este aparelho está classificado
como um produto CLASS 1 LASER. A
indicação CLASS 1 LASER PRODUCT
está localizada na parte inferior
exterior do aparelho.
A etiqueta está localizada na estrutura de
protecção laser no interior da caixa.
Tratamento de
Equipamentos Eléctricos e
Electrónicos no final da
sua vida útil (Aplicável na
União Europeia e em
países Europeus com
sistemas de recolha
selectiva de resíduos)
Este símbolo, colocado no produto ou
na sua embalagem, indica que este não
deve ser tratado como resíduo urbano
indiferenciado. Deve sim ser colocado num
ponto de recolha destinado a resíduos de
equipamentos eléctricos e electrónicos.
Assegurando-se que este produto é
correctamente depositado, irá prevenir
potenciais consequências negativas para
o ambiente bem como para a saúde, que
de outra forma poderiam ocorrer pelo
mau manuseamento destes produtos. A
reciclagem dos materiais contribuirá para
a conservação dos recursos naturais. Para
obter informação mais detalhada sobre
a reciclagem deste produto, por favor
contacte o município onde reside, os
serviços de recolha de resíduos da sua área
ou a loja onde adquiriu o produto.
O fabricante deste produto é a Sony
Corporation, 1-7-1 Konan Minato-ku
Tokyo, 108-0075 Japão. O Representante
Autorizado para EMC e segurança de
produto é a Sony Deutschland GmbH,
Hedelfinger Strasse 61, 70327 Stuttgart,
Alemanha. Para informações sobre
assuntos relacionados com assistência
técnica ou garantia, consulte os endereços
indicados nos documentos relativos a
assistência técnica ou garantia, fornecidos
à parte.
2 PT
A etiqueta de denominação está localizada
na parte inferior da unidade.
Page 91

Índice
Normas de segurança ...........................................................................................................................2
Leia isto primeiro ....................................................................................................................................4
Itens fornecidos .........................................................................................................................4
Notas acerca da utilização......................................................................................................4
Funções principais .................................................................................................................................5
Dispositivo compatível ............................................................................................................5
Discos suportados.....................................................................................................................5
Peças e controlos ....................................................................................................................................6
Introduzir um disco ..................................................................................................................7
Gravação ....................................................................................................................................................8
Reprodução ..............................................................................................................................................9
Duração dos Vídeos e Tempo de Gravação ................................................................................ 10
Espaço em disco (tempo de gravação) disponível para gravar vídeos ...............10
Tempo necessário para a gravação ..................................................................................10
Sobre a compatibilidade de discos HD (Alta Definição)........................................................11
Resolução de problemas .............................................................................................................. 12
Precauções .............................................................................................................................................13
Especificações .......................................................................................................................................14
Consulte também as instruções de funcionamento da sua Handycam
Esta unidade apenas pode ser utilizada através de uma ligação a uma Handycam.
Para obter informações sobre o funcionamento, consulte também as instruções de
funcionamento da sua Handycam.
Neste documento, “Handycam” refere-se a uma câmara de vídeo da Sony.
PT
3 PT
Page 92

Leia isto primeiro
Itens fornecidos
Confirme se a embalagem contém os itens
seguintes. Se algum destes itens estiver em
falta ou danificado, contacte o seu agente.
Manual de Instruções (este documento)
Notas acerca da utilização
Funcionamento e condições de
armazenamento
Não aplicar choques ou vibrações
à unidade. A unidade poderá não
funcionar correctamente.
Não utilize a unidade em áreas com
muito ruído. A unidade poderá não
funcionar correctamente.
Quando ligar o cabo USB da unidade
à Handycam, certifique-se de que
introduz a ficha do conector de modo
correcto. Se empurrar a ficha com
demasiada força no terminal poderá
danificar o terminal, o que poderá
causar uma avaria da unidade ou da
Handycam.
Gravação
Programas de televisão, filmes, cassetes
de vídeo e outros materiais podem estar
protegidos pelas leis dos direitos de
autor. A gravação não autorizada destes
materiais pode infringir as leis de direitos
de autor.
4 PT
Page 93

Funções principais
Ao ligar a unidade à sua Handycam, pode gravar facilmente vídeos para um disco sem
utilizar um computador (One Touch Disc Burn). O disco criado pode ser reproduzido
ligando a unidade à Handycam (One Touch Play). Também pode reproduzir vídeos no
televisor ligando a Handycam ao televisor.
Para além disso, utilizando a unidade a partir da Handycam, pode desfrutar de algumas
funções úteis. As funções diferem de acordo com a Handycam. Para mais informações,
consulte as instruções de funcionamento da sua Handycam.
Dispositivo compatível
Esta unidade foi exclusivamente concebida para ser utilizada com uma Handycam. Ligue
a unidade a uma Handycam compatível com DVDirect Express. Para mais informações
sobre modelos Handycam compatíveis, consulte o endereço seguinte:
http://www.sony.com/DVDirect/Compatibility
Não pode utilizar esta unidade com uma Handycam incompatível ou câmara de vídeo que
não da Sony.
Não pode utilizar esta unidade para copiar ou reproduzir um disco ligando-a a um
computador, nem poderá ser utilizada como uma unidade de disco externo.
Discos suportados
Os seguintes discos graváveis de 12 cm novos ou não utilizados são compatíveis com esta
unidade.
Tipo de disco Logótipo Velocidade de gravação
DVD+R Até 16×
DVD-R Até 16×
Discos de camada dupla/dois lados e discos de 8 cm não são suportados.
Discos DVD+RW e DVD-RW não são suportados.
Notas sobre a utilização dos discos
Apenas discos novos ou não utilizados podem ser usados nesta unidade.
A qualidade de discos graváveis disponíveis no mercado pode variar. Discos de qualidade
inferior ao padrão podem não gravar normalmente.
Alguns discos gravados podem não ser reproduzidos devido à qualidade da gravação, às
condições físicas do disco, ou às características do dispositivo de reprodução.
Não é possível reproduzir discos gravados noutros dispositivos de vídeo ou discos
pré-gravados comercialmente.
5 PT
Page 94

Peças e controlos
Painel superior
Cabo USB (página 8, 9)
Sobre o cabo USB
Retirar o cabo USB
Puxe o conector do cabo USB da ranhura lateral
da unidade.
Caso tenha dificuldade em fazê-lo, empurre a
ponta do conector de forma a que o conector
fique saliente em relação à unidade, em seguida,
puxe-o.
Guardar o cabo USB
Guarde o cabo USB na ranhura lateral da
unidade.
6 PT
Botão (reproduzir) (página 9)
Botão (DISC BURN) (página 8)
Page 95

Parte frontal
Tabuleiro
Luz de ACESSO
Botão (ejectar)
Orifício de ejecção de emergência
Se não conseguir abrir o tabuleiro com o
botão (ejectar), introduza um alfinete ou
um clipe de papel esticado neste orifício para
abrir o tabuleiro.
Sobre a alimentação
A alimentação da unidade é efectuada a partir de uma Handycam ligada. Certifique-se de
que liga a Handycam a uma tomada de alimentação utilizando um transformador de CA.
Não necessita de ligar a unidade a uma tomada de alimentação.
Introduzir um disco
A unidade apenas pode abrir o respectivo tabuleiro quando se encontra ligada a uma
Handycam.
Prima o botão (ejectar) para abrir o tabuleiro.
O tabuleiro abre apenas até meio. Abra-o na totalidade manualmente.
Coloque o disco no tabuleiro, com o lado de gravação virado para baixo.
O disco deve fazer um clique.
Não toque na superfície de
gravação do disco.
Empurre o tabuleiro para fechar.
Empurre-o até ouvir um clique.
7 PT
Page 96

Gravação
Ligando esta unidade à Handycam, pode gravar vídeos no disco, premindo simplesmente o
botão (DISC BURN).
Ligue a Handycam.
1
Certifique-se de que liga a Handycam a uma tomada de alimentação utilizando um
transformador de CA.
Se não utilizar um transformador de CA para a Handycam, a unidade não funciona
quando é ligada à Handycam.
Ligue a unidade à porta USB da Handycam.
2
Porta USB
(Tipo Mini-AB)
Não pode utilizar um cabo de extensão USB.
Introduza um disco novo ou não utilizado.
3
Para mais informações, consulte “Introduzir um disco” (página 7).
Prima o botão (DISC BURN).
4
Os vídeos que foram recentemente gravados pela Handycam e que ainda não foram
copiados são gravados no disco.
Se o conteúdo do vídeo exceder a capacidade de um disco, repita os passos 3 e 4.
Não consegue adicionar vídeos a um disco que já foi gravado nesta unidade.
Utilizar a partir de uma Handycam
Estão disponíveis várias funções úteis de gravação através da utilização a partir de uma
Handycam. Por exemplo, pode seleccionar as cenas a gravar. Para mais informações,
consulte as instruções de funcionamento da sua Handycam.
Verificar a sua gravação
Quando gravar vídeos para um disco através desta unidade, certifique-se de que a gravação
foi bem sucedida, reproduzindo o disco antes de apagar o vídeo da Handycam.
8 PT
Page 97

Reprodução
Pode utilizar esta unidade para reproduzir vídeos criados, visualizando-os no visor da
Handycam ligada ou num televisor. Para os visualizar num televisor, necessita de ligar a
Handycam ao televisor. Para mais informações sobre a ligação a um televisor, consulte as
instruções de funcionamento da sua Handycam.
Ligue a Handycam.
1
Certifique-se de que liga a Handycam a uma tomada de alimentação utilizando um
transformador de CA.
Se não utilizar um transformador de CA para a Handycam, a unidade não funcionará
quando for ligada à Handycam.
Ligue a unidade à porta USB da Handycam.
2
Porta USB
(Tipo Mini-AB)
Não pode utilizar um cabo de extensão USB.
Introduza o disco gravado nesta unidade.
3
Para mais informações, consulte “Introduzir um disco” (página 7).
Prima o botão (reproduzir).
4
A reprodução começa no início do disco.
Utilizar a partir de uma Handycam
Também pode reproduzir vídeos utilizando a própria Handycam. Para mais informações,
consulte as instruções de funcionamento da sua Handycam.
Sobre a reprodução de discos noutros dispositivos
Com uma Handycam de Alta Definição, pode criar discos de Alta Definição (formato
AVCHD). Para obter informações sobre a reprodução de discos noutros dispositivos,
consulte a página 11.
9 PT
Page 98

Duração dos Vídeos e Tempo de Gravação
Espaço em disco (tempo de gravação) disponível para gravar vídeos
O tempo de gravação de vídeo disponível num disco depende da definição do modo REC da
Handycam.
Alta Definição (HD) Definição Normal (SD)
Modo REC Tempo de
gravação*
HD FH aprox. 30 minutos STD HQ/HQ aprox. 1 hora
HD HQ aprox. 55 minutos SP aprox. 1 hora e
HD SP aprox. 1 hora e
HD LP aprox. 1 hora e
10 minutos
35 minutos
Sugestões
Convertendo para SD (Definição Normal) com um modelo adequado de Handycam, pode gravar até
aprox. 2 horas e 40 minutos num disco. (A qualidade de imagem pode depender do tempo de gravação.)
Os modos REC disponíveis variam consoante os modelos da Handycam.
Tempo necessário para a gravação
Ao gravar vídeos, a duração do tempo necessário para a gravação depende do modelo da
Handycam, da definição do modo REC utilizada para gravar o vídeo e do número de cenas
que o vídeo contém. Geralmente, é necessário mais tempo para gravar vídeos num disco
se o vídeo tiver sido gravado com uma definição de qualidade de imagem (velocidade de
transmissão) mais elevada. Converter para vídeo SD (Definição Normal) demora mais do que
o tempo de vídeo real.
Modo REC Tempo de
gravação*
30 minutos
LP aprox. 3 horas
* Disco único
Gravar vídeo HD (Alta Definição) ou vídeo SD
(Definição Normal) no estado em que se encontra
Converter para vídeo SD (Definição Normal) aprox. 1 hora e 5 minutos ~ 3 horas
aprox. 20 minutos ~ 1 hora
Notas
Não é possível gravar vídeo HD (Alta Definição) capturado no modo REC a uma velocidade de
transmissão que exceda os 18 Mbps, como no modo [HD FX] (por exemplo, Handycam de Alta
Definição) no formato AVCHD.
Se o tempo de uma cena exceder a capacidade do disco, não será possível gravar. Nesse caso, divida a
cena, utilizando a função de edição da Handycam.
10 PT
Page 99

Sobre a compatibilidade de discos HD (Alta Definição)
Não é possível reproduzir um disco HD (Alta Definição) num leitor ou gravador de DVD
incompatível com AVCHD.
Não introduza um disco HD (Alta Definição) num leitor ou gravador de DVD incompatível
com AVCHD. O leitor ou gravador de DVD poderá não ejectar o disco e poderá apagar o seu
conteúdo.
Um disco HD (Alta Definição) pode ser reproduzido num leitor/gravador de Blu-ray Disc
compatível com AVCHD, numa Playstation 3 ou num outro dispositivo compatível.
Tipo de disco criado e dispositivos compatíveis
Disco HD (Alta Definição) (contendo vídeos de Alta Definição)
Não
Sim
Sim
Dispositivo de DVD
Dispositivo compatível com
o formato AVCHD
Computador*
Disco SD (Definição Normal) (contendo vídeos de Definição Normal)
Sim
Dispositivo de DVD
* Instale previamente a aplicação compatível com AVCHD no seu computador. Mesmo no
caso de um ambiente de computador que satisfaça os requisitos de sistema, poderá haver
ruído na reprodução de vídeo, os fotogramas poderão ser cortados ou poderá perder-se o som
ocasionalmente. (Tal não depende da qualidade do disco criado.)
Dispositivo compatível com
Sim
o formato AVCHD
Sim
Computador*
11 PT
Page 100

Resolução de
problemas
Se durante a utilização da unidade surgir
alguma das dificuldades seguintes, antes
de pedir uma reparação, consulte primeiro
este guia de resolução de problemas para
ver se consegue resolvê-lo. Consulte as
instruções de funcionamento da sua
Handycam. Se o problema persistir,
contacte o seu agente da Sony.
A Handycam está ligada mas a unidade
não funciona.
Certifique-se de que a sua Handycam é
suportada por esta unidade (página 5).
Certifique-se de que a Handycam se
encontra ligada a uma tomada de alimentação
através do respectivo transformador de CA.
Certifique-se de que a Handycam está
correctamente configurada e de que o
cabo USB está ligado de forma adequada à
Handycam.
Retire o cabo USB da Handycam. Desligue a
Handycam e, em seguida, ligue-a novamente.
De seguida, ligue novamente o cabo USB à
Handycam.
Não consegue gravar vídeos no disco.
Vídeos gravados através do botão (DISC
BURN) da Handycam não podem ser
gravados novamente através do botão
(DISC BURN). (O mesmo disco não pode
ser criado novamente através do botão
(DISC BURN).) Para criar cópias do
mesmo disco, seleccione a definição [OPÇÃO
DISC BURN] da Handycam.
Certifique-se de que o disco é compatível com
esta unidade (página 5).
Certifique-se de que o disco é novo ou não
utilizado. Um disco que já foi gravado ou
formatado noutro dispositivo não pode ser
utilizado.
Certifique-se de que o disco não tem pó,
sujidade ou impressões digitais no lado de
gravação.
Certifique-se de que o disco é colocado no
tabuleiro com o lado de gravação virado para
baixo.
A vibração da unidade pode causar uma avaria
da Handycam. Não coloque a Handycam
na unidade.
Não consegue reproduzir um disco.
Apenas pode reproduzir discos criados por
esta unidade. Não é possível reproduzir discos
gravados noutros dispositivos de vídeo ou
discos pré-gravados comercialmente.
Certifique-se de que o disco não tem pó,
sujidade ou impressões digitais no lado de
reprodução.
Certifique-se de que o disco é colocado no
tabuleiro com o lado de reprodução virado
para baixo.
Não consegue ejectar o disco.
O botão (ejectar) não funciona.
Retire o cabo USB da Handycam, desligue
a Handycam, depois, ligue-a novamente,
volte a ligar o cabo USB à Handycam, e, em
seguida, prima o botão (ejectar). Se isto
não solucionar o problema, abra o tabuleiro
utilizando o orifício de ejecção de emergência
(página 7).
A unidade apenas pode abrir o respectivo
tabuleiro quando se encontra ligada à
Handycam. Certifique-se de que a unidade se
encontra correctamente ligada à Handycam.
Certifique-se de que a Handycam se
encontra ligada a uma tomada de alimentação
utilizando um transformador de CA.
O disco não pode ser ejectado enquanto um
disco está a ser gravado ou reproduzido.
12 PT
 Loading...