

Page 1

IT
N0709(1)
Multi-Function
DVD Recorder
Operating Instructions
Supplement
JP
FR
DE
ES
IT
CS
VRD-MC5
© 2007 Sony Corporation
Page 2

About this manual
The VRD-MC5 unit in this package is equipped with the latest system software (2007,
December). The following functions have been added.
• Dubbing video from “Memory Stick Duo”
Create a DVD using video taken with a Handycam
Insert a “Memory Stick Duo” in the Memory Stick Duo slot of the DVDirect.
• Incremental Dubbing from Handycam
Incremental Dubbing can be completed from HDD, “Memory Stick Duo” or embedded
memory in a Handycam
This manual explains about the additional function (Dubbing video from “Memory Stick
Duo”). Read this Operating Instructions supplement together with the original Operating
Instructions.
®
.
®
(HYBRID Plus/HYBRID)
®
(Memory Stick).
2
Page 3

Table of Contents
About this manual .................................................................................................. 2
Dubbing From a Handycam
Troubleshooting ..................................................................................................... 8
®
(Memory Stick)
–Using the Dubbing Mode– .............................................. 4
3
Page 4
Dubbing From a Handycam® (Memory
Stick) –Using the Dubbing Mode–
You can dub video recorded in a “Memory Stick Duo” by inserting a “Memory
Stick Duo” into the Memory Stick Duo slot. You can simply dub video without
connecting the Handycam
You may dub video by connecting a Handycam
(page 35 of the operating instructions).
Before selecting a dubbing mode…
When using the Navigation Display function, follow the procedure below.
When the Menu appears in the DVDirect’s display window, follow the
procedure of “To dub video with the “Menu” function” (page 5).
1 Press the 1 (power) button to turn on the DVDirect, and insert a
disc (page 19 of the operating instructions).
The DVDirect starts reading the inserted disc.
Note
Insert a new disc when creating the AVCHD disc.
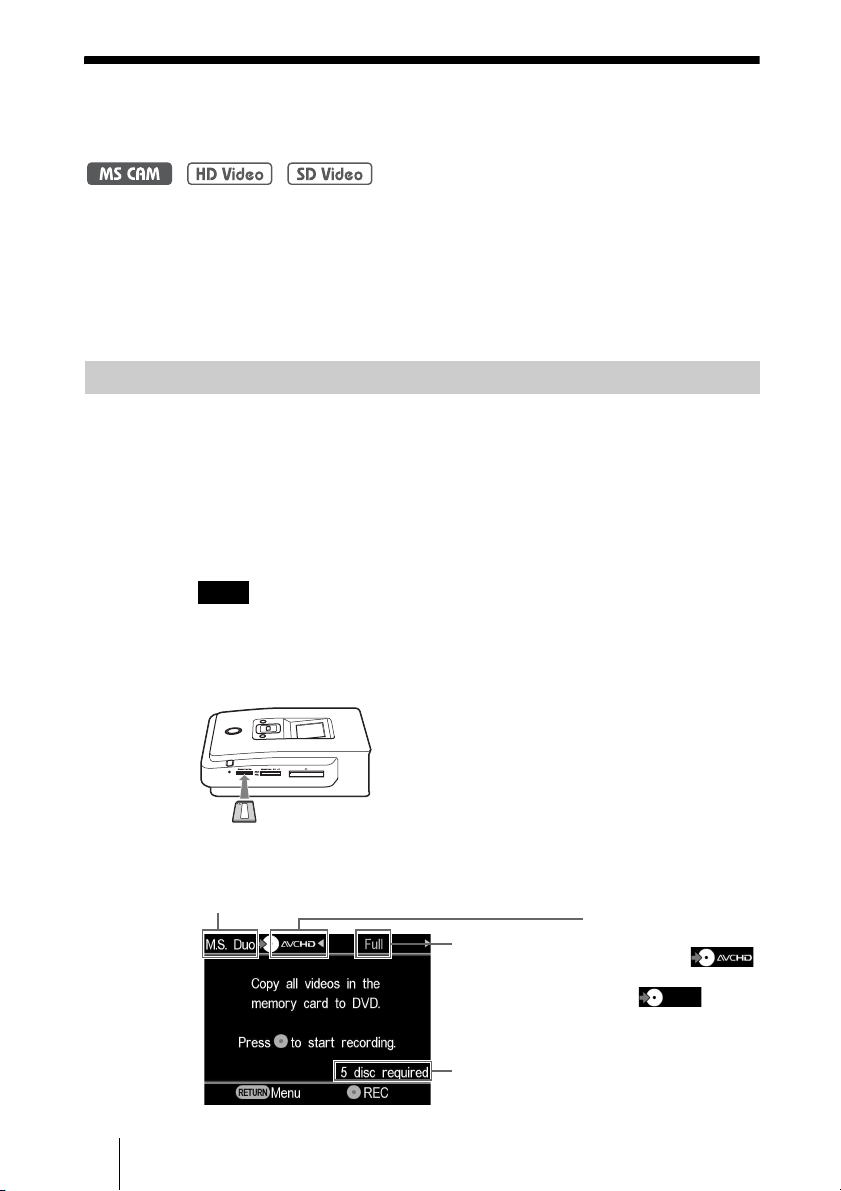
2 Insert a “Memory Stick Duo” into the Memory Stick Duo slot of
the DVDirect.
®
(Memory Stick) to DVDirect.
®
(Memory Stick) to DVDirect
3 The following appears in the DVDirect’s display window.
Type of input
Dubbing mode
Number of required
discs
Type of disc created
When creating an
•
AVCHD disc:
• When creating a video
DVD:
4
Page 5

You can select a dubbing mode, which can be displayed in the top right of
the display window by pressing < or ,.
For selecting each dubbing mode, refer to the page of the operating
instructions below.
• Full (All) Dubbing page 37
• Incremental Dubbing page 38
• Playlist Dubbing page 40
• Scene Selection Dubbing page 41
Hint
When storing both HD (High Definition) video and SD (Standard Definition) video in
“Memory Stick Duo,” the DVDirect automatically detects HD (High Definition) video and
records it on the disc using the Navigation Display function.
To dub video with the “Menu” function
You can also dub video with the operating “Menu.”
x To dub HD (High Definition) video
1 Press the RETURN button to display the “Menu.”
2 Press M or m to select “AVCHD dubbing” and press the
(select) button.
Hint
With the camcorder connected to the DVDirect by USB cable, and a “Memory Stick Duo”
inserted in the Memory Stick Duo slot of the DVDirect, the input select display will appear.
Select “Memory Card” by pressing M or m.
5
Page 6

3 The following appears in the DVDirect’s display window.
You can select a dubbing mode, which can be displayed in the top right of the
display window by pressing < or ,.
For selecting each dubbing mode, refer to the page of the operating instructions
below.
• Full (All) Dubbing page 37
• Incremental Dubbing page 38
• Playlist Dubbing page 40
• Scene Selection Dubbing page 41
x To dub SD (Standard Definition) video
1 Press the RETURN button to display the “Menu.”
2 Confirm the selection of “Video , DVD” and press the
(select) button.
3 Press M or m to select “Memory card” and press the (select)
button.
6
Page 7

4 The following appears in the DVDirect’s display window.
You can select a dubbing mode, which can be displayed in the top right of the
display window by pressing < or ,.
For selecting each dubbing mode, refer to the page of the operating instructions
below.
• Full (All) Dubbing page 37
• Incremental Dubbing page 38
• Playlist Dubbing page 40
• Scene Selection Dubbing page 41
7
Page 8

Troubleshooting
If you experience any of the following
difficulties while using the DVDirect,
use this troubleshooting guide to help
remedy the problem before requesting
repairs. Refer also to the operating
instructions of your Handycam
video devices.
General
To create an SD (Standard
Definition) video DVD by downconverting an HD (High Definition)
video
c Connect a Handycam® to the DVDirect
using an AV cable or AV cable with S
VIDEO (page 52 of the operating
instructions). A USB cable is unusable.
To change the input
c When using Navigation Display function
(page 17 of the operating instructions), the
DVDirect automatically detects input
signals from connected devices and selects
the input jack. Turn on connected devices
and set up to dub video.
c To change the input manually, select the
input jack from “Menu” (page 18 of the
operating instructions).
c When dubbing an HD (High Definition)
video, select “USB” or “Memory card” of
“AVCHD dubbing” in “Menu.” When
dubbing an SD (Standard Definition) video,
select “VIDEO IN,” “S-VIDEO IN,” “DV
IN,” “USB,” or “Memory Card” of “Video
, DVD” in “Menu.”
Power
The power does not turn on.
c Check that the AC power cord is connected
securely.
c Disconnect a plug and cable. Remove the
memory card. Reconnect video device to
the DVDirect.
®
or
Connection and operation
The DVDirect cannot be operated
even when a Handycam
connected via a USB cable.
c Check that a Sony Handycam® is
compatible with the DVDirect.
c Check the setup of a Handycam
Connection to the DVDirect is similar to
connecting to a computer.
c Disconnect the USB cable from the
DVDirect, and turn the connected
Handycam
again.
c Accessing functions from the menu (page
18 of the operating instructions)
c Using the Navigation Display function
(page 17 of the operating instructions)
®
and DVDirect off, then on
When dubbing an HD (High Definition)
video, select “USB” of “AVCHD
dubbing” in “Menu.” When dubbing an
SD (Standard Definition) video, select
“USB” of “Video , DVD” in “Menu.”
The DVDirect is automatically operated
by the image quality (High Definition
video or Standard Definition video)
stored in a Handycam
message shown in the display window.
The DVDirect cannot be operated
even when a Handycam® is
connected via DV cable.
c Check that the Handycam® is set to
[PLAY]. If [REC] is set, a video cannot be
dubbed (page 48 of the operating
instructions).
c Disconnect a DV cable from the DVDirect,
and turn the connected Handycam
DVDirect off and on again.
There is no video when connected
to the DV IN or S-VIDEO IN jack.
c Check that the DVDirect and video device
are correctly connected.
c The DVDirect cannot detect input signals
from connected devices. Turn on the
connected video device. And operate the
video device to start video playback.
c Check that “Video , DVD” is set to
“VIDEO IN” or “S-VIDEO IN” in “Menu”
(page 53 of the operating instructions).
®
is
®
®
. Follow the
.
®
and
8
Page 9

Playback
The created video DVD or photo
DVD cannot be played on other
video devices.
c The disc may not be finalized. Complete the
disc by finalizing (page 65 of the operating
instructions).
c Some video devices may not work correctly
for the created disc.
c Your video device may not correspond to
recordable discs like DVD+R, DVD+RW,
DVD+R L, etc. Check whether your video
device is a compatible recordable discs like
DVD+R, DVD+RW, DVD+R L, etc. device.
c When creating a photo backup DVD, the
photo backup DVD cannot be played on
other commercial video devices (page 56 of
the operating instructions).
c A video recorded on DVD-RW or DVD-R
disc compatible CPRM can be played on a
compatible CPRM disc player.
The created AVCHD disc cannot be
played on other video devices.
c An AVCHD disc cannot be played on an
AVCHD incompatible video device. An
AVCHD disc can be played on a compatible
Blu-ray Disc player/recorder, Playstation3
or other compatible device (page 26 of the
operating instructions).
When playing a slideshow DVD,
picture noise appears.
c The picture quality of the photos played
back in a slideshow is equivalent to that of
video DVDs. Using a DVD player capable
of playing JPEG files, higher quality photos
can be played (page 56 of the operating
instructions).
Message
Unusable disc inserted. Insert a
compatible disc.
c An incompatible disc is inserted. Insert a
compatible disc (page 78 of the operating
instructions).
c DVD-RW or DVD+RW discs recorded on
other video devices are not supported. Erase
videos or photos recorded on a disc with
“Erase disc” of “Setup” in “Menu.” The
erased disc is reusable as a blank disc (page
76 of the operating instructions).
No input signal.
c Connector may not be selected correctly.
Select input connection to a video device
with “Video , DVD” in “Menu” (page 18
of the operating instructions).
c The DVDirect cannot detect input signals
from connected devices. Turn on the
connected video device.Operate the video
device to start video playback.
c Check that the DVDirect is correctly
connected to the output on the video device.
c Disconnect all cables. Turn the DVDirect
and video device off, then on again.
Reconnect the video device to the
DVDirect.
Insert DVD created by this unit.
c An disc created by another unit has been
inserted. A disc created by another video
device will not play back.
Cannot record to this disc in the
selected operation.
c Usable discs differ by dubbing types (page
78 of the operating instructions). (For
example, a video stored to a Handycam
connected with a USB cable cannot be
dubbed to DVD+R DL disc.)
®
Setup camcorder for USB
connection.
c Setup for USB connection on a Handycam®
may not be correct. Connection to the
DVDirect is similar to connecting to a
computer.
Unknown USB device found.
Connect supported camcorder.
c Incompatible USB device is connected to
the USB connector of the DVDirect.
Set USB SPEED setting on the
camcorder to “AUTO.”
c USB SPEED setting on a Handycam® may
be set any other than “AUTO.” Set USB
SPEED setting on a Handycam
(page 28 of the operating instructions).
®
to “Auto”
9
Page 10

No valid video or photo found in the
camcorder.
c Videos or photos being able to dub are not
stored in a Handycam
®
or memory card.
No valid video found in the
camcorder.
c Videos that can be dubbed are not stored in
a Handycam
c When storing only HD (High Definition)
video in a Handycam
in “Menu” may be selected. When dubbing
an HD (High Definiton) video, select
“AVCHD dubbing” in “Menu” (page 18 of
the operating instructions).
®
or memory card.
®
, “Video , DVD”
No valid photo found in the
camcorder.
c Photos that can be dubbed are not stored in
the Handycam
®
or memory card.
Camcorder error. Check the
camcorder.
c Check that a camcorder is correctly
connected to the DVDirect with USB cable.
Check that a camcorder is turned on.
c Incompatible “Memory Stick Duo” is
inserted in the Memory Stick slot on the
Handycam
Stick Duo” containing video recorded by a
video device other than a Handycam
“Memory Stick Duo” containing video
recorded by a computer cannot be played.
®
. For example, a “Memory
®
, or a
Memory card error. Check the
memory card.
c Incompatible “Memory Stick Duo” or
memory card is inserted. For example, a
memory card containing video recorded by
a video device other than a Handycam
incompatible.
®
is
System error.
c When this message appears repeatedly, the
DVDirect may be damaged.
10
Page 11

Page 12

P/N 7819901998
Sony Corporation Printed in China
 Loading...