


User Guide
Personal Computer
VPCL13 Series
N

Contents
2
nN
Before Use.......................................................................... 4
Finding More about Your VAIO Computer .................... 5
Ergonomic Considerations............................................ 7
Getting Started.................................................................... 9
Locating Controls and Ports........................................ 10
About the Indicator Lights ........................................... 14
Setting Up Your Computer .......................................... 15
Shutting Down Your Computer Safely ........................ 23
Using the Power Saving Mode.................................... 24
Keeping Your Computer in Optimum Condition .......... 26
Using Your VAIO Computer.............................................. 28
Using the Keyboard.....................................................29
Using the Mouse .........................................................35
Using the Touch Screen..............................................40
Using the Built-in Camera ........................................... 44
Using the Optical Disc Drive ....................................... 45
Using the TV Function................................................. 53
Using the HDMI/VIDEO Input Function....................... 56
Using the Remote Commander................................... 61
Using "Memory Stick".................................................. 65
Using Other Modules / Memory Cards........................ 72
Using the Internet ........................................................ 76
Using the Network (LAN) .............................................77
Using the Wireless LAN...............................................78
Using the Bluetooth Function ......................................83
Using Peripheral Devices..................................................88
Connecting External Speakers or Headphones ..........89
Connecting an External Microphone ...........................90
Connecting a USB Device ...........................................91
Connecting an i.LINK Device.......................................93
Customizing Your VAIO Computer....................................95
Setting the Password...................................................96
Using Intel(R) VT .......................................................103
Using the VAIO Control Center .................................104
Upgrading Your VAIO Computer.....................................105
Adding and Removing Memory .................................106

3
nN
Precautions..................................................................... 112
Safety Information ..................................................... 113
Care and Maintenance Information........................... 116
Handling Your Computer...........................................117
Handling the LCD Screen/Touch Screen .................. 119
Using the Power Source ........................................... 120
Handling the Built-in Camera .................................... 121
Handling Discs ..........................................................122
Handling "Memory Stick"........................................... 123
Handling the Built-in Storage Device ........................ 124
Troubleshooting .............................................................. 125
Computer Operations ................................................ 127
System Update / Security..........................................132
Recovery ................................................................... 134
Built-in Camera ......................................................... 136
Networking (LAN/Wireless LAN) ...............................137
Bluetooth Technology ............................................... 140
Optical Discs ............................................................. 144
Display ...................................................................... 149
Printing ...................................................................... 151
Microphone ............................................................... 152
Mouse ....................................................................... 153
Speakers ................................................................... 155
Touch Screen............................................................ 157
Keyboard ...................................................................158
Floppy Disks ..............................................................159
Audio/Video ...............................................................160
HDMI/VIDEO Input Function .....................................163
"Memory Stick" ..........................................................165
Peripherals ................................................................166
Trademarks .....................................................................167
Notice ..............................................................................169

Before Use >
nN
Before Use
Congratulations on your purchase of this Sony VAIO® computer and welcome to the on-screen User Guide. Sony has
combined leading-edge technology in audio, video, computing, and communications to provide you with a state-of-the-art
computing experience.
!
External views illustrated in this manual may look slightly different from those of your computer.
How to find specifications
Some features, options, and supplied items may not be available on your computer.
To find out about the configuration of your computer, see the Specifications (supplied with your computer).
4

Before Use >
Finding More about Your VAIO Computer
5
nN
Finding More about Your VAIO Computer
This section provides support information about your VAIO computer.
1. Printed Documentation
❑ Quick Start Guide — An overview of components connection, set-up information, etc.
❑ Specifications — The hardware configurations of your VAIO computer.
❑ Recovery, Backup and Troubleshooting Guide
❑ Safety Regulations
✍
Before activating the wireless functions such as the wireless LAN and Bluetooth technology, read the Safety Regulations carefully.
2. On-screen Documentation
❑ VAIO Manual — General information and technical assistance for your VAIO computer.
To access VAIO Manual, double-click VAIO Manual on the desktop.
❑ Windows Help and Support — A comprehensive resource for practical advice, tutorials, and demonstrations to help you
learn to use your computer.
To access Windows Help and Support, click Start and Help and Support, or press and hold the Microsoft Windows
key and press the F1 key.

Before Use >
Finding More about Your VAIO Computer
3. Support Web Sites
❑ Sony online support web site
The Sony online support web site provides instant access to information on commonly encountered problems:
http://www.sony-asia.com/support/vaio/onlinesupport
❑ Online registration
You can register your computer online at the following URL:
http://www.sony-asia.com/support/vaio/registration
❑ Contact information
You can contact us at the following URL:
http://www.sony-asia.com/support/vaio/contactus
6
nN
❑ For other Sony products, visit the web site at http://www.sony-asia.com/
.

Before Use >
Ergonomic Considerations
Ergonomic Considerations
Whenever possible, you should attempt to take account of the following ergonomic considerations:
7
nN
❑ Position of your computer – Place the display directly in front of you. Keep your forearms horizontal, with your wrists in
a neutral, comfortable position while using the keyboard or the pointing device. Let your upper arms hang naturally at your
sides. Take frequent breaks while using your computer. Excessive use of the computer may strain eyes, muscles, or
tendons.
❑ Furniture and posture – Sit in a chair with good back support. Adjust the level of the chair so your feet are flat on the
floor. A footrest may make you more comfortable. Sit in a relaxed, upright posture and avoid slouching forward or leaning
far backwards.

Before Use >
Ergonomic Considerations
8
nN
❑ Viewing angle of the display – Use the display tilting feature to find the best position. You can reduce eye strain and
muscle fatigue by adjusting the tilt of the display to the proper position. Adjust the brightness level of the display as well.
!
While adjusting the viewing angle, do not exert excessive pressure on your computer to eliminate a risk of mechanical damage.
❑ Lighting – Choose a location where windows and lights do not cause glare and reflection on the display. Use indirect
lighting to avoid bright spots on the display. Proper lighting adds to your comfort and work efficiency.
❑ Ventilation – Make sure you leave at least 10 cm of space behind and at least 20 cm of space on each side of the main
unit.

Getting Started >
Getting Started
This section describes how to get started using your VAIO computer.
❑ Locating Controls and Ports (page 10)
❑ About the Indicator Lights (page 14)
❑ Setting Up Your Computer (page 15)
❑ Shutting Down Your Computer Safely (page 23)
❑ Using the Power Saving Mode (page 24)
❑ Keeping Your Computer in Optimum Condition (page 26)
9
nN

Getting Started >
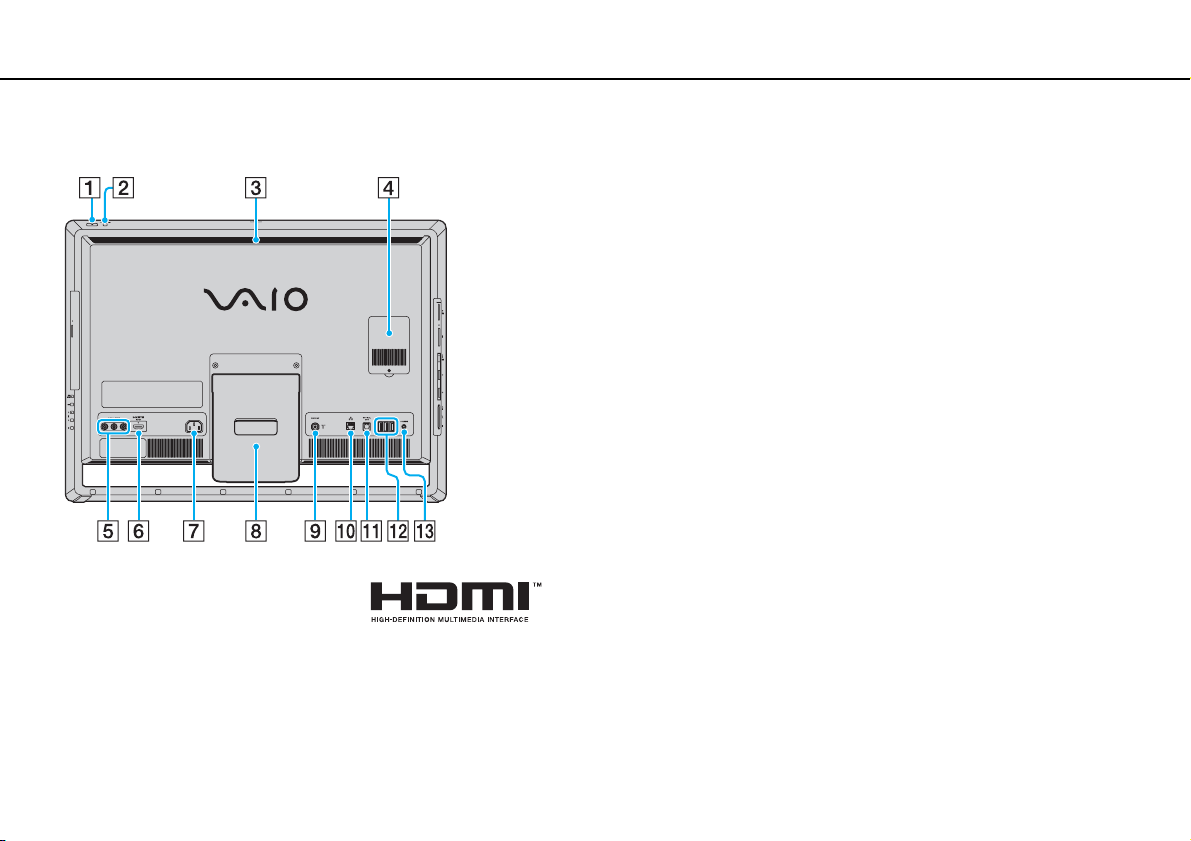
Locating Controls and Ports
Locating Controls and Ports
Take a moment to identify the controls and ports shown on the following pages.
!
The appearance of your computer may be different from those illustrated in this manual due to variations in specifications.
Front
A Built-in microphone (monaural)
B Built-in MOTION EYE camera indicator (page 14)
C Built-in MOTION EYE camera (page 44)
D HDMI/VIDEO input indicator
E WIRELESS indicator (page 14)
F Disc drive indicator (page 14)
G Power indicator (page 14)
H Built-in speakers (stereo)
I LCD screen/touch screen (page 40)
!
Due to the mechanical design of the touch screen of your computer, some areas
of the screen surface may become warm while you are using the computer for
an extended period of time. This is normal and does not indicate a malfunction.
J Bottom chassis frame (page 113)
K Remote sensor
Point the supplied remote commander to this sensor for
operations.
* On selected models only.
*
*
(page 14)
10
nN
Getting Started >
Locating Controls and Ports
Back
!
The area around the air exhaust vent (3) becomes extremely hot while your computer
is on. Be sure to wait until the computer cools down before you touch it.
A Power button
B DISPLAY OFF button/DISPLAY OFF indicator (page 14)
Press this button to turn off the LCD backlight. While the HDMI
input or the video input is selected as the audio/video input
source by the INPUT SELECT button (page 12), pressing this
button also turns off the volume.
C Air exhaust vent
D Memory module compartment cover (page 106)
E VIDEO INPUT jacks
F HDMI INPUT port
*1
(page 56)
*1
(page 56)
G AC input port (page 15)
H Prop-up stand (page 113)
I VHF/UHF input port
*1
(page 53)
J Network (LAN) por t (page 77)
K OPTICAL OUT port (page 89)
(Output Sampling Rate: 44.1 KHz/48.0 KHz/96.0 KHz)
L USB ports
*2
(page 91)
M CONNECT button (page 34), (page 38)
*1
On selected models only.
*2
Compliant with the USB 2.0 standard and support high-/full-/low- speeds.
11
nN

Getting Started >
Locating Controls and Ports
Right
A Optical disc drive (page 45)
B Manual eject hole (page 144)
C Drive eject button (page 45)
D INPUT SELECT button
INPUT SELECT indicator
E MENU button
*
(page 58)
F V/v (Up/Down) buttons
G OK button
* On selected models only.
*
(page 58)
*
(page 58)/
*
(page 14)
*
(page 58)
12
nN

Getting Started >
Locating Controls and Ports
Left
13
nN
A "Memory Stick Duo" slot*
1
(page 65)
B Media Access indicator (page 14)
C SD memory card slot (page 72)
D i.LINK 4-pin (S400) port (page 93)
E USB ports
*2
(page 91)
F Headphones jack (page 89)
G Microphone jack (page 90)
H Line In jack
Connect an external audio device to receive audio signals.
*1
Your computer supports only Duo-size "Memory Stick".
*2
Compliant with the USB 2.0 standard and support high-/full-/low- speeds.

Getting Started >
About the Indicator Lights
About the Indicator Lights
Your computer is equipped with the following indicator lights:
Indicator Functions
Power 1 Illuminates in green while the computer is on, illuminates in orange while the computer is in Sleep mode, and
HDMI/VIDEO input
Built-in MOTION EYE camera Illuminates while the built-in camera is in use.
Media Access Illuminates while data access to a memor y card, such as "Memory Stick" and an SD memory card, is in
INPUT SELECT
DISPLAY OFF Illuminates in orange while the LCD backlight is off.
Disc drive
WIRELESS Illuminates while one or more wireless options are enabled.
* On selected models only.
*
*
turns off when the computer is turned off.
Illuminates in green while the HDMI input or the video input is selected as the audio/video input source.
progress. (Do not place the computer into Sleep mode or turn it off while this indicator light is lit.) When the
indicator light is unlit, the memory card is not in use.
Illuminates in green while the HDMI input or the video input is selected as the audio/video input source.
Illuminates while data access to the built-in storage device or the optical disc drive is in progress. Do not place
the computer into Sleep mode or turn it off while this indicator light is lit.
14
nN

Getting Started >
Setting Up Your Computer
Setting Up Your Computer
Connecting a Power Source
You need a power cord to connect your computer to an AC power source.
✍
Use only the supplied power cord for your computer.
15
nN

Getting Started >
Setting Up Your Computer
16
nN
To connect the power cord
1 Plug one end of the power cord (1) into an AC outlet (2).
2 Route the power cord through the hole (3) of the prop-up stand and plug the other end into the AC input port (4) on the
computer.
✍
To disconnect your computer completely from AC power, turn off the computer and unplug the power cord.
Make sure that an AC outlet is easily accessible.
!
If you unplug the power cord from your computer while the computer is on or in Sleep mode, you may lose all unsaved data.

Getting Started >
Setting Up Your Computer
17
nN
Preparing for Wall Mounting
Four mounting studs and six screws, which are compliant with the Video Electronics Standards Association (VESA) mounting
standard, are supplied with your computer for connecting the computer to your mounting system.
!
Before connecting your computer to your mounting system or changing your computer setup from the desktop type to the wall-mount type, make sure
that:
The weight of your computer is within the range of supported weight of your mounting system. See the manual that came with your mounting
system for the weight information.
A wireless connection is established both between the computer and the keyboard and between the computer and the mouse. If not, follow the
instructions described in
You shut down the computer, turn off all peripheral devices, disconnect the power cord and the peripheral devices from the power source, and
then wait about an hour until the computer cools down before proceeding.
While your computer is wall mounted, observe the following so as not to break the frame and cause the main unit to fall from the wall, resulting in
damage to the computer or personal injuries.
Do not place any objects on top of your computer.
Do not place or hang any objects from the bottom chassis frame of your computer.
Keep children from hanging from the bottom chassis frame of your computer.
To connect the wireless keyboard (page 34) and To connect the wireless mouse (page 38).

Getting Started >
Setting Up Your Computer
To set up the computer for mounting
1 Gently face down your computer on a flat surface.
!
When facing down your computer, be sure to place it on a soft cloth to avoid damage to the screen frame.
2 Remove the four screws (1) and take the prop-up stand (2) off the computer.
18
nN

Getting Started >
Setting Up Your Computer
3 Remove the 13 screws (3) from the back of the prop-up stand and take off the mounting base plate (4).
!
Be sure to keep the removed screws for future use.
19
nN

Getting Started >
Setting Up Your Computer
nN
4 Flip over the mounting base plate (5) and screw it onto the back of the computer using the four screws (6) that you
removed in step 1.
20

Getting Started >
Setting Up Your Computer
5 Secure the mounting base plate additionally with the supplied two long screws (7).
!
Be sure to tighten the screws with adequate torque.
21
nN

Getting Started >
Setting Up Your Computer
22
nN
6 Screw the supplied four mounting studs (8) onto the mounting base plate.
!
Be sure to use the supplied accessory tool and tighten the mounting studs with adequate torque.
7 Secure your wall mount attachment to your computer with the supplied four short screws.
!
Do not use any screws other than the supplied ones.
8 Follow the instructions described in the manual that came with your mounting system to mount your computer using the
hole on each mounting stud.

Getting Started >
Shutting Down Your Computer Safely
23
nN
Shutting Down Your Computer Safely
To avoid losing unsaved data, be sure to shut down your computer properly, as described below.
To shut down your computer
1 Turn off any peripherals connected to the computer.
2 Click Start and the Shut down button.
3 Respond to any prompts warning you to save documents or to consider other users and wait for the computer to turn off
automatically.
The power indicator light turns off.

Getting Started >
Using the Power Saving Mode
Using the Power Saving Mode
In addition to the normal operating mode, your computer has a distinct power saving mode called Sleep mode.
!
Turn off your computer if you do not intend to use it for an extended period of time.
Mode Description
Normal mode This is the normal state of your computer while it is in use. The green power indicator light is lit while the
computer is in this mode.
Sleep mode Sleep mode turns off the LCD screen and places the built-in storage device(s) and the CPU into a low power
consumption mode. The orange power indicator light illuminates while your computer is in this mode.
24
nN

Getting Started >
Using the Power Saving Mode
25
nN
Using Sleep Mode
To activate Sleep mode
Click Start, the arrow next to the Shut down button, and Sleep.
✍
Alternatively, you can press the sleep button on the wireless keyboard or the remote commander (if supplied) to place your computer into Sleep mode.
To return to Normal mode
❑ Press any key on the wireless keyboard or the sleep button on the remote commander (if supplied).
❑ Press the power button on your computer.
!
Make sure that the batteries of your wireless keyboard and remote commander (if supplied) are properly installed and not running out of power.
If you press and hold the power button for more than four seconds, your computer will turn off automatically. You will lose all unsaved data.
If the computer is not used for a certain period of time, it will enter Sleep mode. To modify this, you can change the Sleep
mode settings.
To change the Sleep mode settings
1 Click Start, Control Panel, Hardware and Sound, and Power Options.
2 Click Change plan settings under the current power plan.
3 Change the time to place the computer into Sleep mode and click Save Changes.

Getting Started >
Keeping Your Computer in Optimum Condition
26
nN
Keeping Your Computer in Optimum Condition
Updating Your Computer
Be sure to update your VAIO computer with the following software applications for enhancing your computer's efficiency,
security, and functionality.
The VAIO Update automatically notifies you of new updates available on the Internet, and downloads and installs them on
the computer.
❑ Windows Update
Click Start, All Programs, and Windows Update and then follow the on-screen instructions.
❑ VAIO Update 5
Click Start, All Programs, and VAIO Update 5 and then follow the on-screen instructions.
!
Your computer must be connected to the Internet to download the updates.

Getting Started >
Keeping Your Computer in Optimum Condition
27
nN
Using the VAIO Care
With the VAIO Care, you can regularly conduct performance checks and tune-ups on your computer to keep it running at an
optimum level. Launch the VAIO Care whenever a problem is found on your computer. The VAIO Care will provide
appropriate measures to solve the problem.
To launch the VAIO Care
❑ On models with the ASSIST button
Press the ASSIST button while your computer is on.
❑ On models without the ASSIST button
Click Start, All Programs, VAIO Care, and VAIO Care.
✍
See the help file included with the VAIO Care for more information.
On models with the ASSIST button, pressing the ASSIST button while the computer is off launches the VAIO Care Rescue. The VAIO Care Rescue can
be used to recover your computer in case of emergency, for example, when the Windows does not start.

Using Your VAIO Computer >
Using Your VAIO Computer
This section describes how to get the most out of using your VAIO computer.
❑ Using the Keyboard (page 29)
❑ Using the Mouse (page 35)
❑ Using the Touch Screen (page 40)
❑ Using the Built-in Camera (page 44)
❑ Using the Optical Disc Drive (page 45)
❑ Using the TV Function (page 53)
❑ Using the HDMI/VIDEO Input Function (page 56)
❑ Using the Remote Commander (page 61)
❑ Using "Memory Stick" (page 65)
❑ Using Other Modules / Memory Cards (page 72)
❑ Using the Internet (page 76)
❑ Using the Network (LAN) (page 77)
❑ Using the Wireless LAN (page 78)
❑ Using the Bluetooth Function (page 83)
28
nN
Using Your VAIO Computer >
Using the Keyboard
29
nN
Using the Keyboard
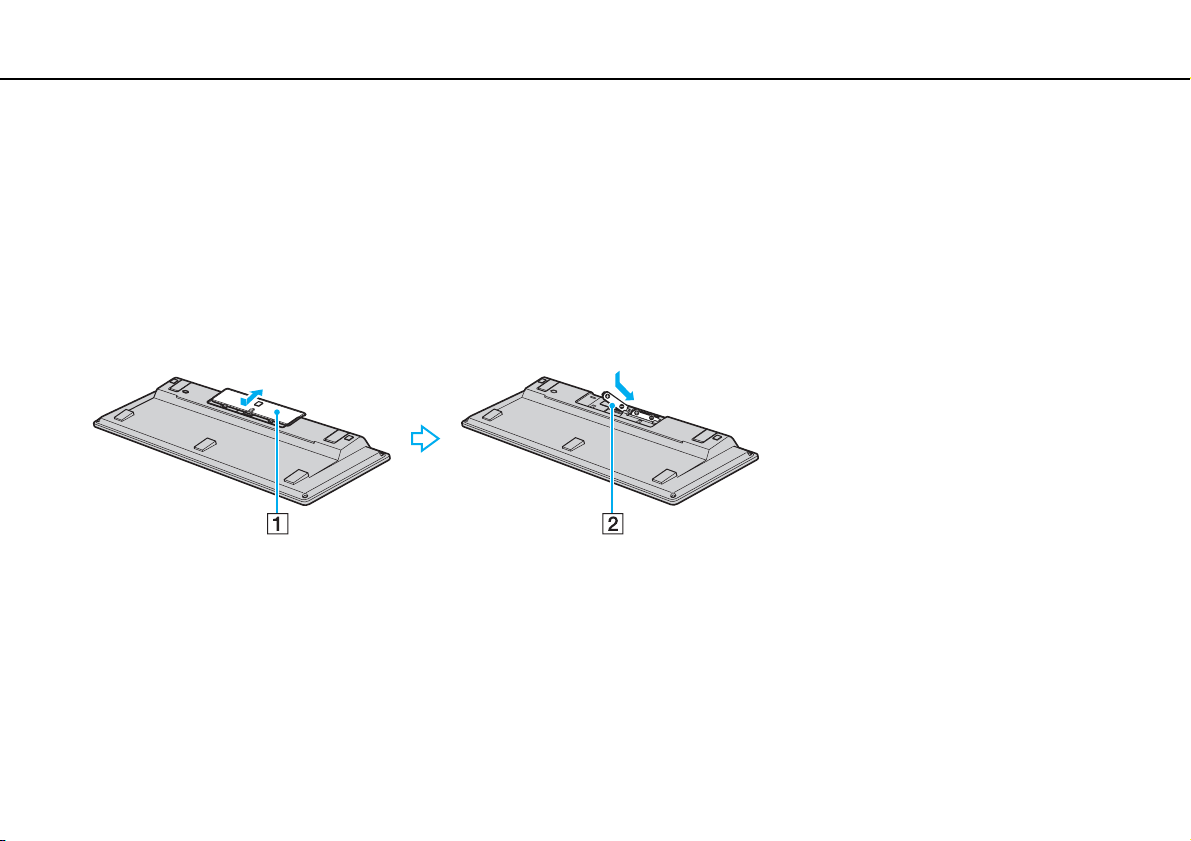
A wireless keyboard is supplied with your computer.
The wireless keyboard uses a standard key arrangement with additional keys that perform specific functions.
Using the Wireless Keyboard
Two AA alkaline batteries are supplied with your wireless keyboard. Before attempting to use the wireless keyboard, remove
the battery compartment cover (1) from the bottom of the wireless keyboard and install the supplied two AA batteries (2) into
the battery compartment.
✍
If the wireless keyboard does not operate properly, the batteries may need to be replaced. If you do not intend to use the wireless keyboard for an
extended period of time, remove the batteries to avoid possible damage from battery leakage.
If the wireless keyboard is left unused for 20 minutes or longer, your computer enters Sleep mode. To bring it back into Normal mode, press any key
on the wireless keyboard.

Using Your VAIO Computer >
Using the Keyboard
!
To maintain good communication, operate the wireless keyboard within the distance limitations of keyboard: 10 m from your computer.
You cannot use the wireless keyboard in conjunction with the HDMI/VIDEO input function (page 56).
If you find your wireless keyboard not working, for example after you used the keyboard with another VAIO model, reconnect the keyboard. See To
connect the wireless keyboard (page 34) for the detailed procedure.
Avoid using any wireless devices that exchange radio signals on the 2.4 GHz band near your wireless keyboard. These devices may create radio
interference, causing the keyboard to stop working properly.
Do not place metal furniture or objects near your computer or wireless keyboard, as this may create radio interference, causing the keyboard to stop
working properly.
Do not mix old (used) and new batteries when replacing batteries in the wireless keyboard. Be sure to use the same type and manufacture of the battery.
Do not mix alkaline with manganese batteries. Using incompatible batteries or mixing used, new or different types of batteries can damage the wireless
keyboard.
30
nN
 Loading...