

Sony VGF-AP1 User Manual

Portable Music Player
VGF-AP1 Series
Operating Instructions

Trademarks
• VAIO, , SonicStage, VAIO music transfer, ATRAC, ATRAC3, ATRAC3plus
and the associated logos are trademarks of Sony Corporation.
• Microsoft and Windows are registered trademarks of Microsoft Corporation in the United States
and/or other countries.
• Other system names and product names appearing in this document are generally registered
trademarks or trademarks of their manufacturers.
•™ and ® marks are not shown in this document.
Portions of this software are based in part on the work of the Independent JPEG group.
• In this manual, Microsoft® Windows® 98 Second Edition is referred to as Windows 98
Second Edition.
• In this manual, Microsoft® Windows® 2000 Professional is referred to as Windows 2000.
• In this manual, Microsoft® Windows® Millennium Edition is referred to as Windows Me.
• In this manual, Microsoft® Windows® XP Home Edition, Microsoft® Windows® XP
Professional, and Microsoft® Windows® XP Media Center Edition* are referred to as
Windows XP.
* Support for Microsoft® Windows® XP Media Center Edition is provided only in U.S.A. and Canada.
2

Table of Contents
Introduction
What you can do with the portable music
player ............................................... 4
System requirements ........................... 5
Names of parts ..................................... 6
Portable music player ................... 6
Cradle ............................................ 7
Reading the display ....................... 9
G-sense pad buttons ........................... 10
Basic playback buttons ............... 10
Navigation buttons ...................... 11
Advanced operation buttons ....... 12
Advanced playback buttons ........ 13
Operation
Listening to music ............................. 15
Finding songs .................................... 18
Searching by album genre, artist
name, album title, and
song title.................................. 18
Searching among previously played
songs ....................................... 19
Searching by group or
group jacket ............................ 19
Using playlists ................................... 20
Registering a playlist .................. 20
Playing songs from a playlist ...... 20
Removing songs from
a playlist .................................. 21
Viewing still images .......................... 21
Transferring still images from a
digital camera.......................... 21
Viewing the transferred still
images ..................................... 23
Using the portable music player as a
hard disk drive ............................... 24
Deleting music files ........................... 24
Other Information
Setup items and settings .................... 25
About the internal battery .................. 27
Precautions ........................................ 28
Usage and storage ....................... 28
Overheating ................................. 28
Condensation .............................. 28
Disk handling .............................. 28
Hard disk precautions ................. 29
Removing the internal battery .... 29
Maintenance ...................................... 30
Cleaning the cabinet ................... 30
Disc cleaning .............................. 30
Getting help ....................................... 30
Sony support options .................. 30
Specifications .................................... 31
Troubleshooting ................................. 32
Power .......................................... 32
Operation .................................... 32
G-sense pad ................................. 34
“SonicStage” software ................ 34
“VAIO music transfer”
software................................... 35
Other problems ........................... 36
Before using this manual, read the separate Quick Start Guide, which provides
information necessary prior to using the player, from unpacking to hardware
preparation and software installation.
3
Introduction
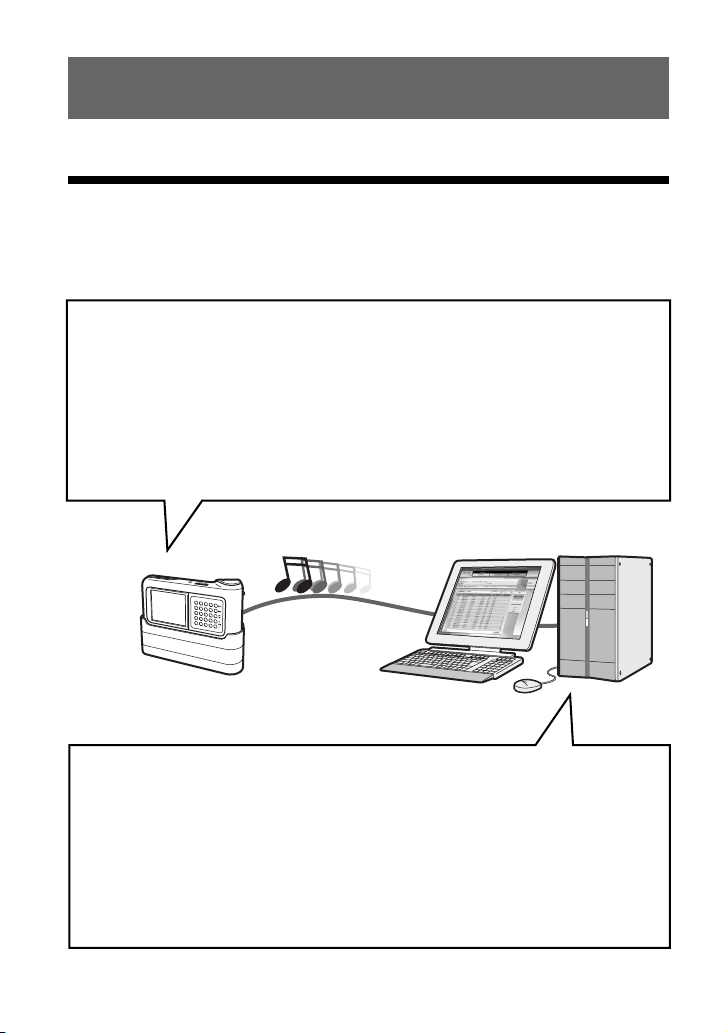
What you can do with the portable music player
The Portable Music Player VGF-AP1 / AP1L incorporates a 20 GB* or 40 GB* hard disk, and
allows you to carry an entire music library wherever you go.
* Some portion of hard disk capacity is reserved for application / data management function.
Portable music player
• Easy-to-carry player with built-in 20 GB / 40 GB hard disk. The player also serves as an
external hard disk for your computer.
• 2.2 inch high-resolution LCD panel and unique “G-sense” touchpad (subsequently referred
to as the “G-sense pad”) make it a breeze to operate the player and find the songs you
want.
• Simply placing the player on its cradle when not in use recharges the battery.
• By connecting the player to a digital still camera (subsequently referred to as “digital
camera”) by using the cradle, the player can be used as a storage device for digital photos
(JPEG images). You can also view a slide show of pictures while listening to music.
Supplied software for transferring music from a computer
• “SonicStage” software
This software lets you control the entire process from saving songs from music CDs to
transferring them to the player. The application also supports net-based electronic music
distribution (EMD) services, letting you purchase and download songs from the Internet
for use on your player.
• “VAIO music transfer” software
Drag and drop MP3 files, WMA files, or other music files already on your computer to
transfer them to the player.
4

System requirements
To use the player, the following hardware and software requirements must be met.
Computer
IBM PC/AT compatible
CPU
Pentium II processor, 400 MHz or above (Pentium III, 450 MHz or above recommended)
Free hard disk space
200 MB or more (1.5 GB recommended)
Depending on the Windows version and the number of music files, more space may be required.
RAM
64 MB or more (128 MB or more recommended)
Operating system
Windows XP Professional, Windows XP Home Edition, Windows XP Media Center Edition 1),
Windows 2000 Professional (Service Pack 3 or higher), Windows Millennium Edition, or Windows
98 Second Edition
Display
16-bit color or higher, 800 × 600 resolution or higher (1024 × 768 or higher recommended)
Other requirements
• Internet connection (for obtaining song data from CDDB or using net-based music distribution
services “EMD”)
• Windows Media Player 7.0 or higher (for playback of WMA files)
• CD-ROM drive (supporting WDM digital playback)
• Sound support
• USB port
1)
Support for Microsoft Windows XP Media Center Edition is provided only in U.S.A. and Canada.
2)
Hi-Speed support is not mandatory, but if the connected computer does not support USB 2.0, file
transfer will occur at a lower speed and take longer.
2)
Introduction
Notes
• Even if the above requirements are met, the player will not work with every computer.
• Operation of the player is not assured in the following environments:
– Operating system not listed above
– Operating system not factory-installed (upgraded later to a different version)
– Multi-boot environment
– Multi-monitor environment
5

Names of parts
12 34 5 67
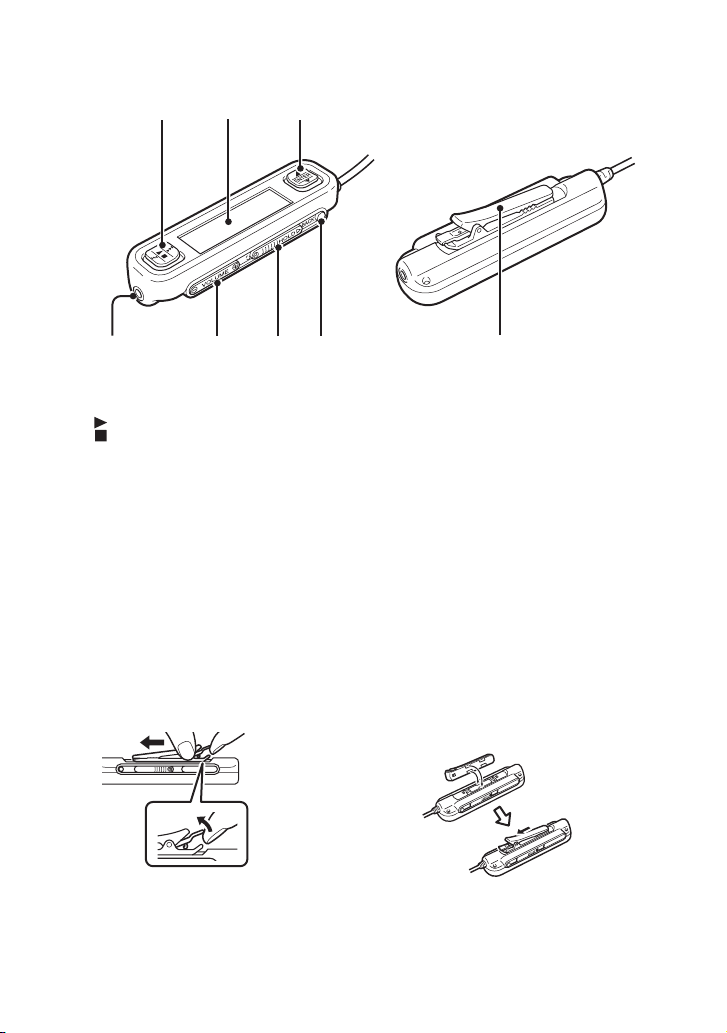
Portable music player
1 Display (page 9)
2 POWER/HOLD switch
When you slide this control in the arrow direction, operation of the player is disabled.
3 Headphone connector (page 15)
4 G-sense pad (page 10)
5 Carrying strap ring
6 Reset button
If the player has ceased to operate normally, try pressing this button with a pointed object (such
as a bent paper clip). The player's display turns white, and the settings such as G-sense
sensitivity, language, and clock are returned to the factory default values. It takes several tens of
seconds for the player to finish resetting.
7 Cradle connector
6
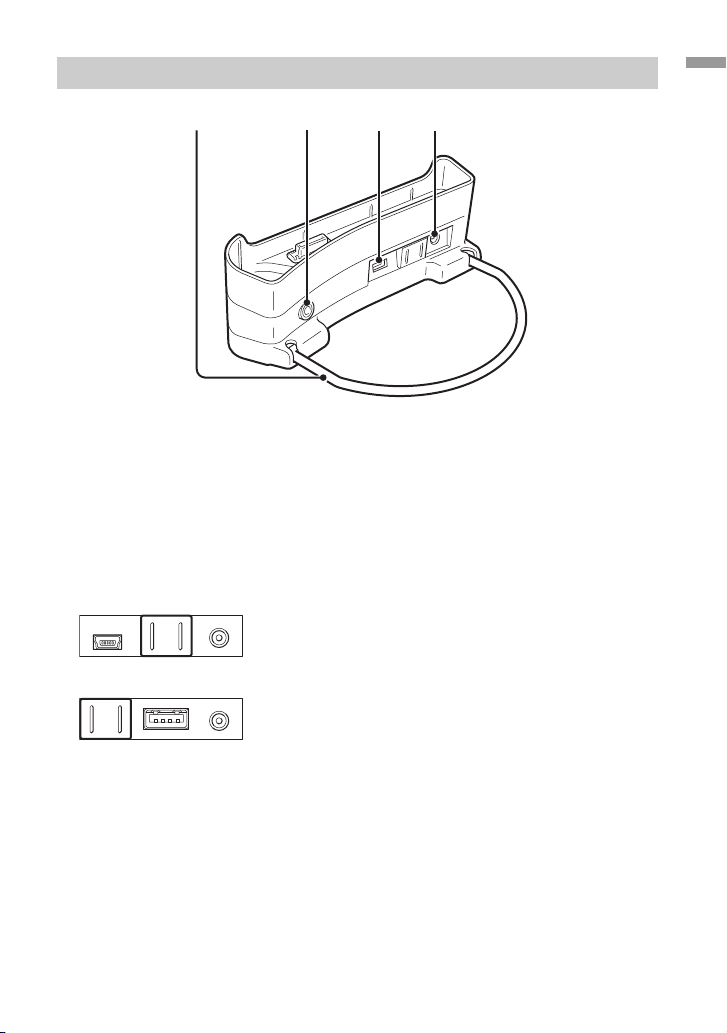
Cradle
1234
1 Support bracket
Supports the cradle when in use. When the cradle is not in use, the bracket can be folded.
2 LINE OUT connector
Lets you connect external speakers to the player. When a cable is plugged in here, the
headphone output is cut off.
To use the LINE OUT connector, disconnect the USB cable from the cradle. While a USB cable
is plugged in, the player automatically is in Data Transfer Mode and no sound will be heard
from the external speakers.
3 USB ports
Left side: Mini-B connector (for connecting the player to a computer)
Introduction
Right side: Type A connector (for connecting the player to a digital camera)
4 DC IN connector
7
Remote control
1
23
4567 8
1 Basic operation button
: Play/Stop
. : Rewind/Skip back
> : Fast forward/Skip ahead
2 Display
3 Selector button
v : Scroll cursor up
ENTER: Select item on menu
V : Scroll cursor down
Using the remote control clip
To make it easy to fasten the remote control anywhere and still keep the display oriented for easy
viewing, the clip can be reversed.
1 Remove the clip.
4 Headphone connector
5 Volume button
6 Hold switch
Sliding this switch in the direction of the
arrow until the yellow marker is visible
disables the remote control.
7 BACK button
Moves up one menu level.
8 Clip
2 Reattach it in the opposite
direction.
8

Reading the display
Display on the player
1
3
4
56 7
Introduction
2
1 Play status icon
2 Song title
3 Playback time
4 Equalizer setting
Remote control display
Main menu screen Play screen
1
4
1 Cursor
2 Timer icon
3 Equalizer icon
4 Volume indicator
5 AVLS icon
6 Battery charge icon
5
2
5 Battery charge icon
6 Timer icon
7 Time
8
3
6
7
9
0
7 Song icon/song title
8 Artist icon/album icon/artist name/
album title
9 Play status icon
0 Repeat mode icon
qa Shuffle mode icon
qs Play time
qa
qs
9
G-sense pad buttons
Various features of the player are controlled by on-screen buttons accessed by using the G-sense
pad. These buttons are hidden until you choose to display them.
The following types of operation buttons are available:
• Basic playback buttons (this page)
• Navigation buttons (page 11)
• Advanced operation buttons (page 12)
• Advanced playback buttons (page 13)
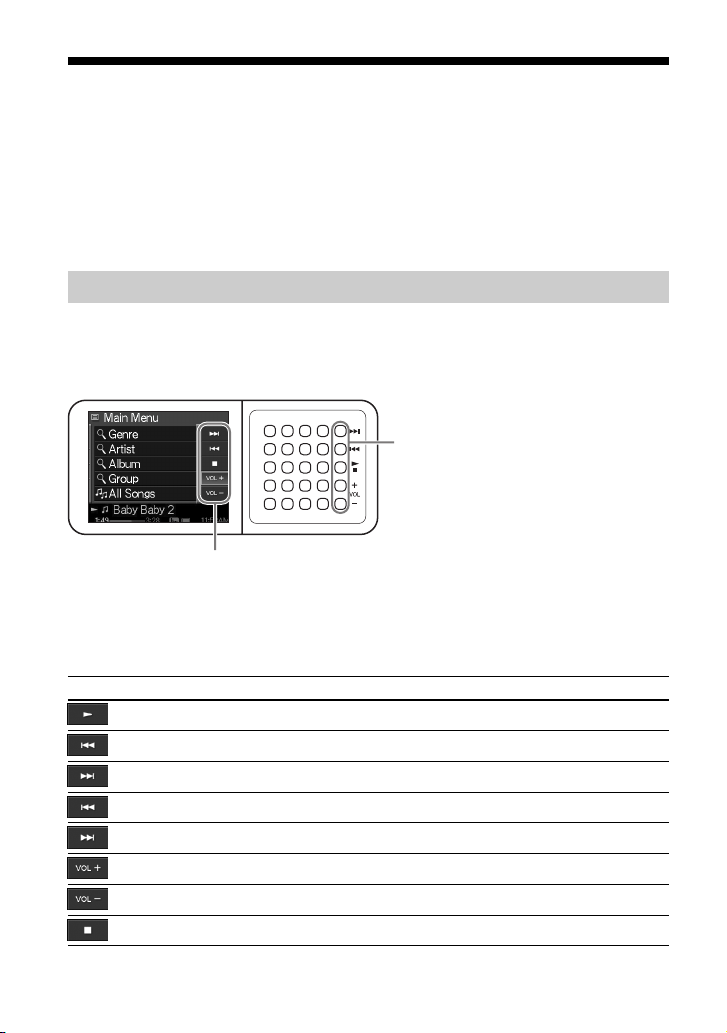
Basic playback buttons
Use the basic playback buttons to control basic music playback, such as starting or stopping songs,
jumping to the next song, or changing the volume. The basic playback buttons are always available
while music is playing, even if the buttons are not displayed on the screen.
To display the basic playback buttons, touch any button in the right column on the G-sense pad.
Touch here
z Hint
Basic playback buttons
Whenever the basic playback buttons of the G-sense pad are active, the selector button on the remote
control can also be used.
Move your finger up or down on right column of buttons on the G-sense pad to select a button.
Press to activate the selected button.
Button Function
Start playback
Jump to the start of the current song
Jump to the start of the next song
(keep pressing) Fast reverse
(keep pressing) Fast forward
Raise the volume
Lower the volume
Stop playback
10

Navigation buttons
Use the navigation buttons to move between display screens and change the sort order of lists.
To display the navigation buttons, touch any button in the left column on the G-sense pad.
Touch here
Navigation buttons
Move your finger up or down on left column of buttons on the G-sense pad to select a button. Press
to activate the selected button.
Note
Available buttons differ on for different screens.
Button Function Remarks
Return to the main menu screen
Move up one menu level
Scroll up one page
Show the play screen
for the song being played
Sort the currently
displayed list
Scroll down one page
With each push, the sort order changes. The current sort
order is indicated by an icon at the top right of the screen.
Alphabetical order (ascending)
Alphabetical order (descending)
Rating order (ascending)
Rating order (descending)
Track order
When sort based on rating is selected, songs will be listed
based on frequency of play and on playback status.
Introduction
11

Advanced operation buttons
Use the advanced operation buttons to modify the displayed list.
To display the advanced operation buttons, move the cursor to the appropriate item in the displayed
list by sliding your finger up and down the middle three columns of buttons on the G-sense pad.
When the cursor is on the desired item, press and hold the current button until the advanced
operation buttons appear.
Press and hold here
Advanced operation buttons
When the advanced operation buttons appear, move your finger up or down on the right column of
buttons on the G-sense pad to select a button. Press to activate the selected button.
Note
Available buttons differ on for different screens.
Button Function
Close the advanced operation button display
Add the currently selected song or album to the playlist
Play the selected song
Move the selected song up in the list
Move the selected song down the in list
Remove all songs from the playlist
Remove the selected songs from the playlist
12
 Loading...