

Sony VGC-RC204 User Manual

User Guide
VGC-RC Series
N

nN
1
User Guide
Before Use
Congratulations on your purchase of this Sony VAIO computer, and welcome to the on-screen User Guide. Sony has combined
leading-edge technology in audio, video, computing, and communications to provide state-of-the-art personal computing.
Notice
© 2006 Sony Corporation. All rights reserved.
This manual and the software described herein, in whole or in part, may not be reproduced, translated, or reduced to any machinereadable form without prior written approval.
Sony Corporation provides no warranty with regard to this manual, the software, or other information contained herein and hereby
expressly disclaims any implied warranties or merchantability or fitness for any particular purpose with regard to this manual, the
software or such other information. In no event shall Sony Corporation be liable for any incidental, consequential, or special damages, whether based on tort, contract, or otherwise, arising out of or in connection with this manual, the software, or other information contained herein or the use thereof.
In the manual, the ™ or ® marks are not specified.
Sony Corporation reserves the right to make any modification to this manual or the information contained herein at any time without
notice. The software described herein is governed by the terms of a separate user license agreement.
nN
2
User Guide
Documentation
Your documentation includes printed information and user guides to read on your VAIO computer.
Guides are provided in PDF format, which you can easily browse through and print out.
The My Club VAIO portal is a perfect starting point to use your computer — a comprehensive collection of everything you need to get
the most from your computer.
The user guides are collected under Documentation, which can be shown as follows:
1 Click Start and then the My Club VAIO icon .
2 Click Documentation.
3 Select the guide you want to read.
You can manually browse to the user guides by going to My Computer > VAIO (C:) (your C drive) > Documentation > Documentation and opening the folder
for your language.
Printed Documentation
❑ A Setting Up Poster — Describes the process from unpacking to starting up your VAIO.
❑ Troubleshooting Guide — Contains solutions to common problems.
❑ Recovery Guide — Contains an explanation of how to recover your computer's system if you need to.
❑ Booklets containing the following information: Sony Guarantee conditions, Safety Regulations, Modem Regulations and
Wireless LAN Regulations.

nN
3
User Guide
Non-printed Documentation
❑ User Guide (this manual) — Contains features of your computer. It also includes information about the software programs
included with your computer, as well as information on solving common problems.
❑ Specifications — The online Specifications describe the hardware and software configuration of your VAIO computer.
To view the online Specifications:
1 Connect to the Internet.
2 Go to the Sony VAIO-Link online support Web site at www.vaio-link.com
❑ VAIO Recovery Guide — Provides information about restoring individual software programs, software drivers, and drive
partition(s) or your entire hard disk drive to the original factory installed settings.
My Club VAIO
In My Club VAIO you can find:
Documentation, which gives you:
❑ Access to the User Guide. This manual explains the features of your computer in detail, how to use these features confidently
and safely, connect peripheral devices and more.
❑ Access to Help and Training. This is the portal of VAIO Help and Support Center.
❑ Important information about your computer, in the form of notices and announcements.
In My Club VAIO you can also find:
❑ Accessories
Want to expand the capabilities of your computer? Click on this icon and have a look at your compatible accessories.
❑ Software
Feeling creative? Click this icon for an overview of your software and check out our upgrade options.

User Guide
Wallpapers
❑
Click this icon and check out our most popular Sony and Club VAIO wallpapers.
❑ Links
Click this icon and check out our most popular Sony and Club VAIO web sites.
nN
4

nN
5
User Guide
Help and Support Center
Help and Support Center is a comprehensive resource for practical advice, tutorials, and demonstrations to help you learn to use
Microsoft Windows XP and your computer.
Use the Search feature, Index, or table of contents to view all Windows Help resources, including those that are on the Internet.
To access Help and Support Center, click Start and then Help and Support. Or go to the Help and Support Center by pressing
the Microsoft Windows key and the F1 key.
Further Sources
Consult the Online Help files of the software you are using for detailed information on features and troubleshooting.
Go to www.club-vaio.com
to find online tutorials about your favorite VAIO software.

nN
6
User Guide
Ergonomic considerations
Whenever possible, try and take into account the following ergonomic considerations when using your new computer, whether at
home or in the office:

nN
7
User Guide
Position of the keyboard and mouse – Place the keyboard directly in front of you (1). Keep your forearms horizontal, with your
❑
wrists in a neutral, comfortable position (2) while using the keyboard or mouse – not at an angle. Let your upper arms hang
naturally at your sides. Use the palm rest only briefly, to relax your wrists when you are not typing. Place the mouse at the same
level as the keyboard and use your whole arm to move it.
❑ Position and viewing angle of the monitor – Set the display at a comfortable viewing distance (3). Make sure the display screen
is at eye level or slightly lower. Use the display’s tilting feature, if available, to find the best position. You can reduce eye-strain
and muscle-fatigue by adjusting the tilt of the display to the proper position. Remember to adjust the brightness setting of the
display. If you are using a CRT monitor, make sure that the refresh rate is at an optimal level, that is, at least 75Hz.
❑ Furniture and posture – Sit in a chair with good back support (4). Adjust the level of the chair so your feet are flat on the floor.
A footrest may make you more comfortable. Sit in a relaxed, upright posture and avoid slouching forward or leaning too far
backwards.
❑ Lighting – Choose a location where windows and lights do not create glare or reflection on the display. Use indirect lighting to
avoid bright spots reflecting on the display. You can also purchase accessories for your display that help reduce glare. Proper
lighting adds to your comfort and work effectiveness.
❑ Ventilation – Make sure you leave at least 25 cm of space behind and on the left and the right of the main unit (5).
❑ And finally – Remember to have breaks during sessions with your computer. Excessive use of the computer may strain muscles
or tendons.

nN
8
User Guide
Using your VAIO computer
Using your VAIO computer
Once you have read and followed the information on the Setting up poster, you can start using your computer safely and confidently.
Read on to get the most out of using your VAIO computer.
❑ Shutting down your computer safely (page 9)
❑ Using VAIO Control Center (page 10)
❑ Using the keyboard (page 11)
❑ Using the pointing device (page 15)
❑ Using the TV function (page 17)
❑ Using the mouse (page 20)
❑ Using the disc drives (page 23)
❑ Using the modem (page 27)
❑ Using power modes (page 28)
❑ Using the media slots (page 31)
❑ Using PC Cards (page 40)
❑ Expansion capabilities (page 43)

nN
9
User Guide
Using your VAIO computer
Shutting down your computer safely
It is important that you shut down your computer properly so you do not lose unsaved data.
To shut down your computer, proceed as follows:
1 Turn off any peripherals connected to your computer.
2 Click the Start button.
3 Click Turn Off Computer.
The Turn off computer window appears.
4 Click Tur n Off.
5 Respond to any prompts warning you to save documents or to consider other users and wait for your computer to turn off
automatically.
The power indicator turns off.
✍ See the printed Troubleshooting Guide if you have problems shutting down your computer.

nN
10
User Guide
Using your VAIO computer
Using VAIO Control Center
VAIO Control Center contains a selection of the most frequently used settings you can also find in Windows’ Control Panel.
VAIO Control Center offers you quick access to your VAIO’s settings, enabling you to easily consult or change them.
To consult/change your VAIO’s settings using VAIO Control Center, proceed as follows:
1 Go to Start, select All Programs, then VAIO Control Center.
2 In VAIO Control Center, you can consult/change your VAIO’s settings via one of the following three tab sheets:
❑ Categories: Here you get on overview of all the settings, ordered in categories. Each category contains a list of all settings
you can consult/change.
❑ List: Here you find all the settings you can consult/change in a list view.
❑ Recent Settings: Here you get a list of all the settings you have recently consulted/changed.
3 Highlight the setting you want to consult and click Open or double-click it.
You can now consult or change the selected setting.
nN
11
User Guide
Using your VAIO computer
Using the keyboard
Your VAIO is delivered with a wireless keyboard. You can place the keyboard anywhere you find comfortable within a range of
approx. 10 m* from the receiver.
The keyboard has a standard key arrangement and additional keys that perform specific functions. For more information on the
standard keys and shortcuts, please go to the Help and Support Center (Start > Help and Support). The VAIO-Link website
(www.vaio-link.com
* Effective usage distance depending on the environment.
) also contains glossary information to help you use the keyboard.

nN
12
User Guide
Using your VAIO computer
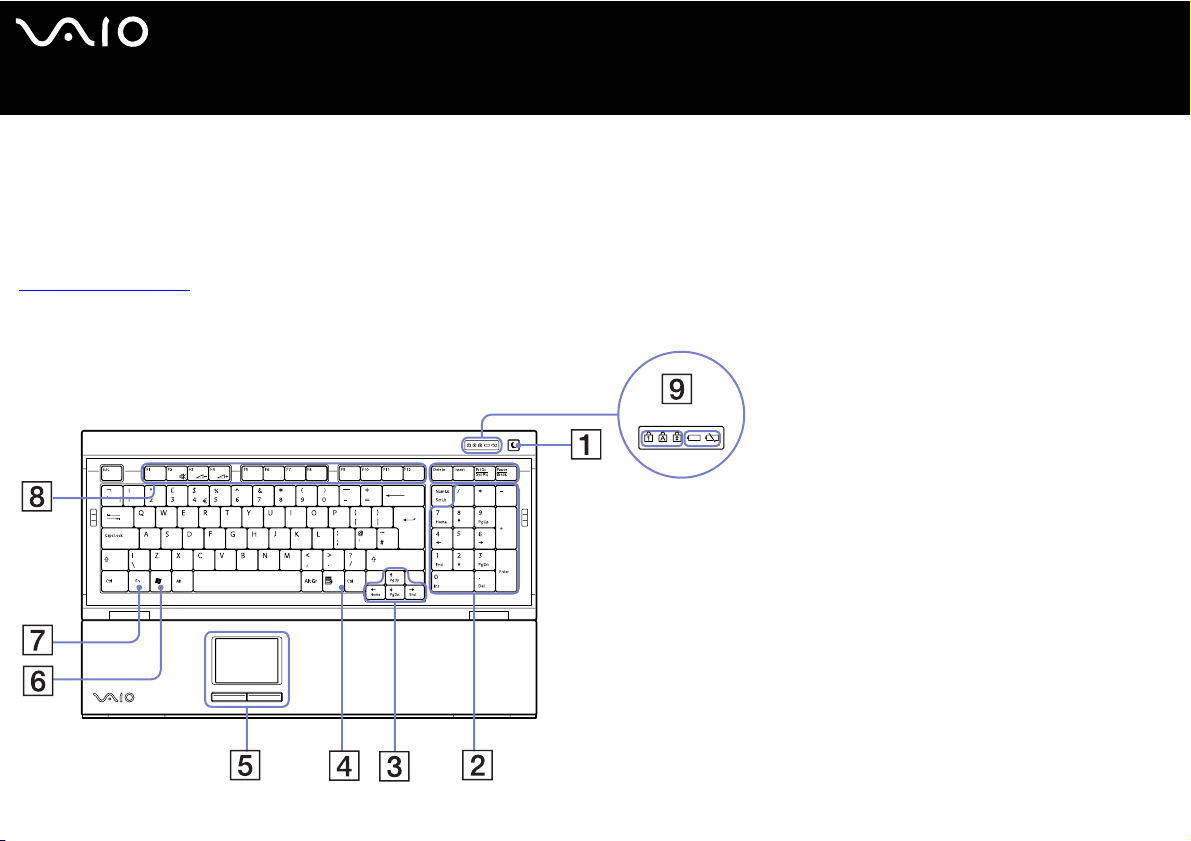
KEY FUNCTION
1 Standby Press the button to place the computer in Standby mode. Press the power button or Standby key briefly to resume normal
2 Numeric keypad Use the numeric keypad to type numbers or to perform basic maths calculations. Press the Num Lock key to activate the
3 Directional arrows The Up, Down, Left, and Right arrow keys move the pointer on the screen.
4 Applications The Applications key displays a shortcut menu in certain software programmes. Pressing this key is equivalent to clicking
operation.
numeric keypad. Press the Num Lock key again to deactivate the numeric keypad.
the right mouse button.
5 Pointing device See Before using the keyboard (page 14) for more information.
6 Windows The Microsoft Windows key displays the Start menu. Pressing this key is equivalent to clicking Start on the taskbar.

nN
13
User Guide
Using your VAIO computer
KEY FUNCTION
7 <Fn> key Used in combination with other keys to execute commands.
8 Function keys The 12 function keys along the top of the keyboard are used to perform certain tasks. The task associated with each function
9LED screen Num Lock:
10 Battery compartment Storage compartment for the AA batteries.
11 Keyboard feet Extend to adjust the keyboard height.
12 CONNECT button Press to enable the keyboard to communicate with the system unit.
<Fn>+<F2>: Turns off the speaker sound.
<Fn>+<F3>: Decreases the volume of the speakers.
<Fn>+<F4>: Increases the volume of the speakers.
key may vary from one application to the next.
Turns on when the number keys in the numeric keypad are active.
Caps Lock:
Turns on when the letters appear in uppercase as you type. The <Shift> key lowers the case of typed characters when
Caps Lock is on.
Scroll Lock:
Turns on when the screen scrolls differently (not all applications support this function).
Battery:
A battery LED indicator shows you when the battery is full or empty.
nN
14
User Guide
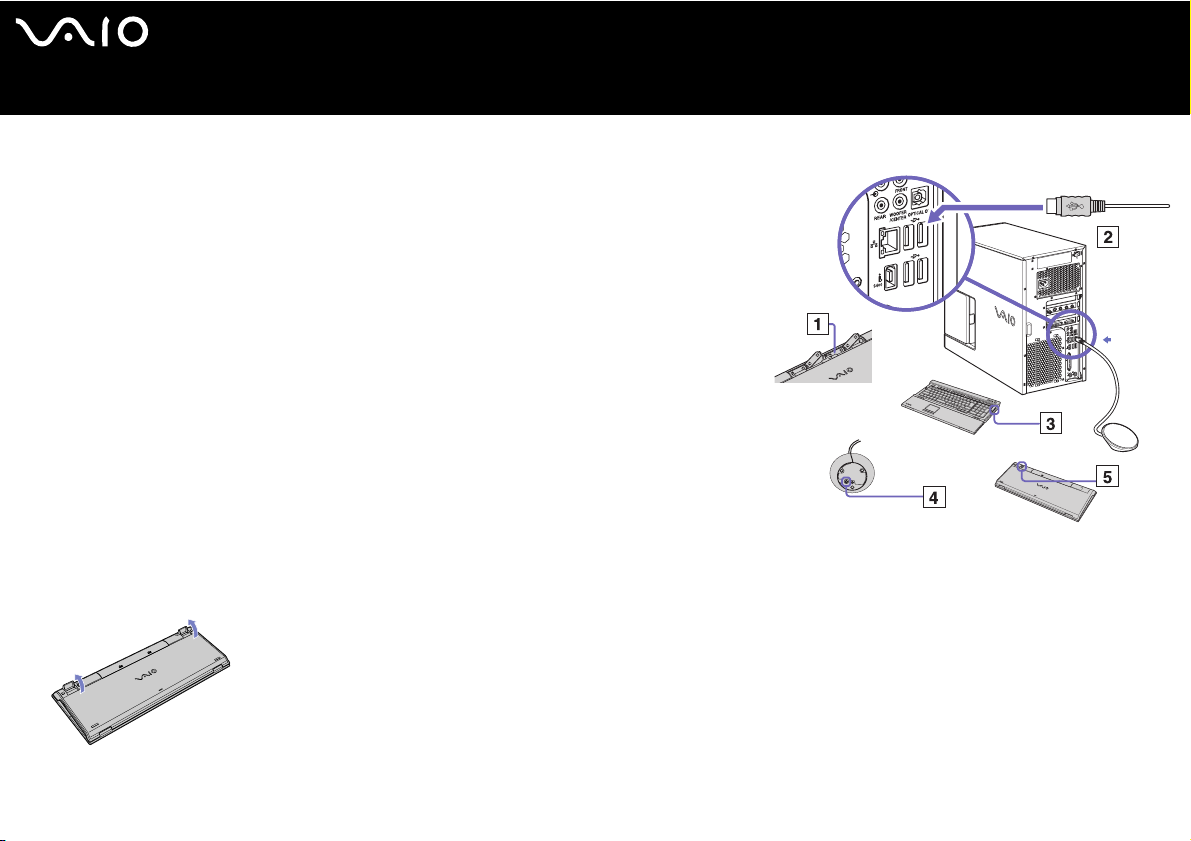
Before using the keyboard
Before attempting to use the wireless keyboard, you must enable communication
between the computer and the keyboard. 4 AA batteries, for use in the wireless
keyboard, are supplied with your VAIO.
To connect the wireless keyboard, proceed as follows:
1 Insert the 4 AA batteries into the wireless keyboard as shown (1).
2 Connect the receiver to a USB connector on the main unit (2).
3 Turn on the computer.
4 Slide the power switch on the right-hand side of the keyboard to turn on the
keyboard (3).
5 Press the CONNECT button on the receiver (4).
6 Turn the wireless keyboard over and press the CONNECT
button (5). You need to press the CONNECT button within 30 cm of the receiver!
Communication between the wireless keyboard and the computer is now active.
✍ If your wireless keyboard does not operate properly, the batteries may need to be replaced. To avoid battery
leakage, switch off the wireless keyboard when not used for an extended period of time. Always use new batteries from the same brand.
If you want to put the keyboard in a more ’ergonomical’ position, open the keyboard feet.
Using your VAIO computer

nN
15
User Guide
Using your VAIO computer
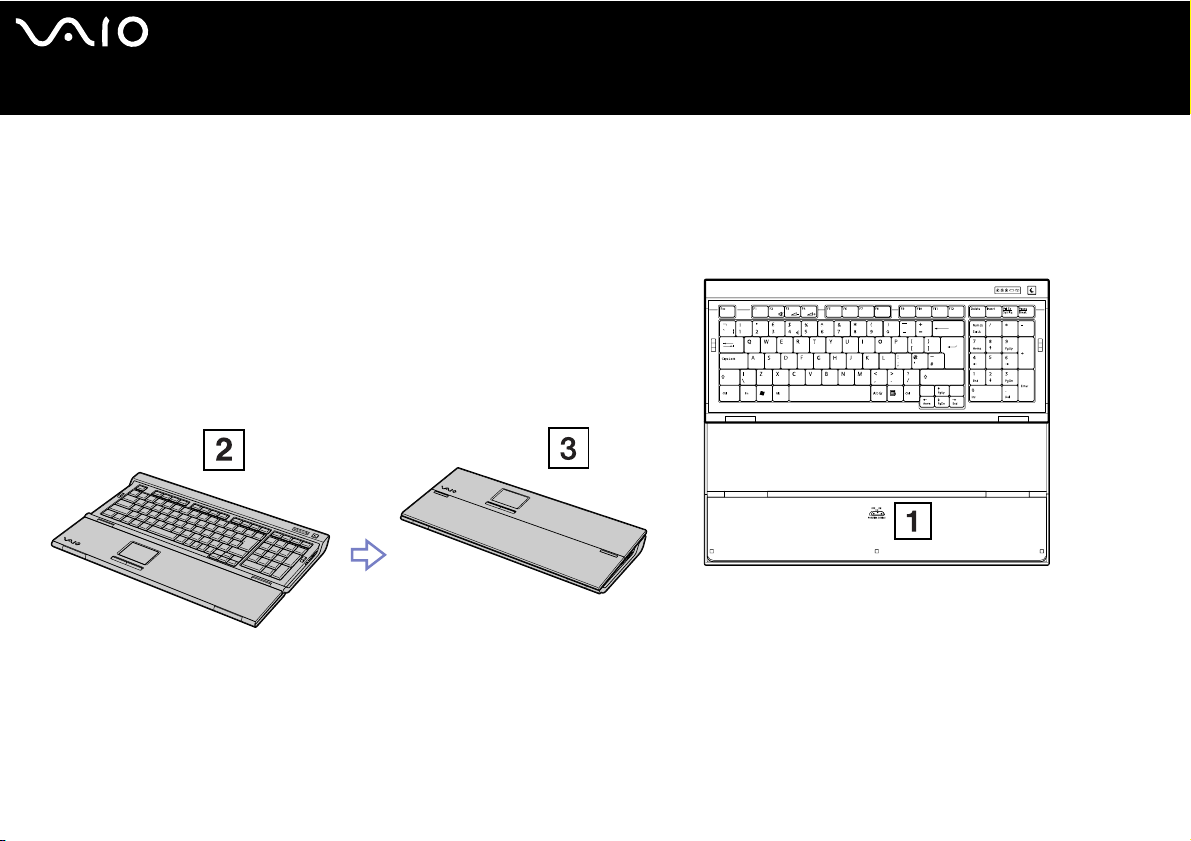
Using the pointing device
The keyboard features a pointing device (1), which controls the cursor on the screen. You can point to, select and drag objects on
the screen using the built-in pointing device.
Action Description
Point Slide one finger on the pointing device to place the pointer (2) on an item or object.
Click Press the left button (3) once.
Double-click Press the left button twice.
Right-click Press the right button (4) once. In many applications, this action displays a shortcut menu.
Drag and select Slide one finger while pressing the left button.
nN
16
User Guide
Before using the pointing device
Before attempting to use the pointing device, you must activate it.
To activate the pointing device, proceed as follows:
1 Fold the keyboard out.
2 Turn on the Pointing Device switch (1).
3 Close the lower part of the cover as shown (2).
You can now use the pointing device together with your keyboard.
4 If you only want to use the pointing device, close the cover completely
as shown (3).
Using your VAIO computer

nN
17
User Guide
Using your VAIO computer
Using the TV function
Your computer is equipped with a TV-tuner board. It allows you to:
❑ Watch, record and play back analogue broadcasted cable and terrestrial TV programmes, all by remote control;
❑ Digitise analogue video and audio using the S-Video or composite and audio inputs;
❑ Set up a timer to record channels at a repeated time;
❑ Suspend viewing TV (time-shifting);
❑ Stream your recorded TV contents via Ethernet (or WLAN) to connected PCs.
✍ Sony cannot guarantee the streaming of recorded content if it is beyond a certain level of high quality.
nN
18
User Guide
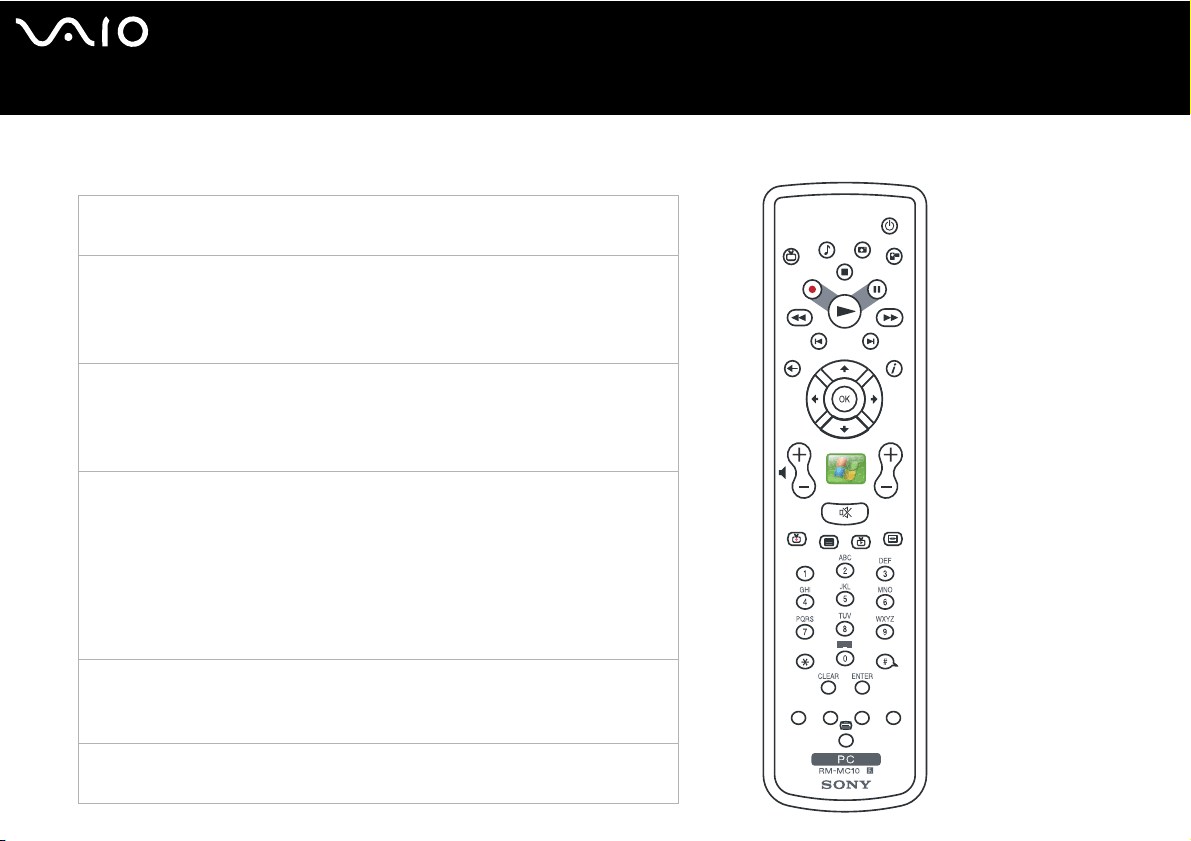
Using the Remote Commander
This section describes the basic functions of the remote commander.
Start MY TV, MY MUSIC, MY PICTURES, MY VIDEOS in Media
Center. Press STANDBY to place your computer in Standby mode.
Control the playback for TV, MUSIC, VIDEOS, and end a side
show. Buttons include: STOP, PAUSE, FWD, SKIP, REPLAY,
REW, and RECORD. The right arrow button serves as a PLAY
button.
Use the arrow buttons to move to a specific location, the OK
button to make your selection, the BACK button to go to the
previous screen, and the MORE button to view additional
information.
Use the START button to open Media Center. Volume Controls
(VOL) are on the left and Channel (CH) or Page (PG) on the right of
the START button. A MUTE button is also provided to suppress
sound.
Important Note: The VAIO
sound for your TV. You must use the remote control that you are
currently using to control the sound for your TV.
®
remote control will NOT control the
Using your VAIO computer
Open the following screens RECORDED TV, GUIDE, LIVE TV,
DVD MENU. (DVD MENU is available only when Media Center is
active.)
Use these buttons to change channels and enter text or numbers
in a specific location.
E

nN
19
User Guide
Using your VAIO computer
Before using the Remote Commander
Before using the remote commander, you need to insert the supplied AA batteries and connect the remote sensor to enable
communication between the computer and the remote commander.
To insert batteries
1 Turn the remote commander over.
2 Press in the tab (1) and lift the battery cover up.
3 Insert the two AA batteries into the remote commander.
4 Align the battery cover to the remote commander.
5 Press down until the cover clicks into place.
✍ If the remote commander does not operate properly, you may need to replace the batteries. When the remote commander is not being used for extended periods of time,
batteries to avoid possible damage from battery leakage.
nN
20
User Guide
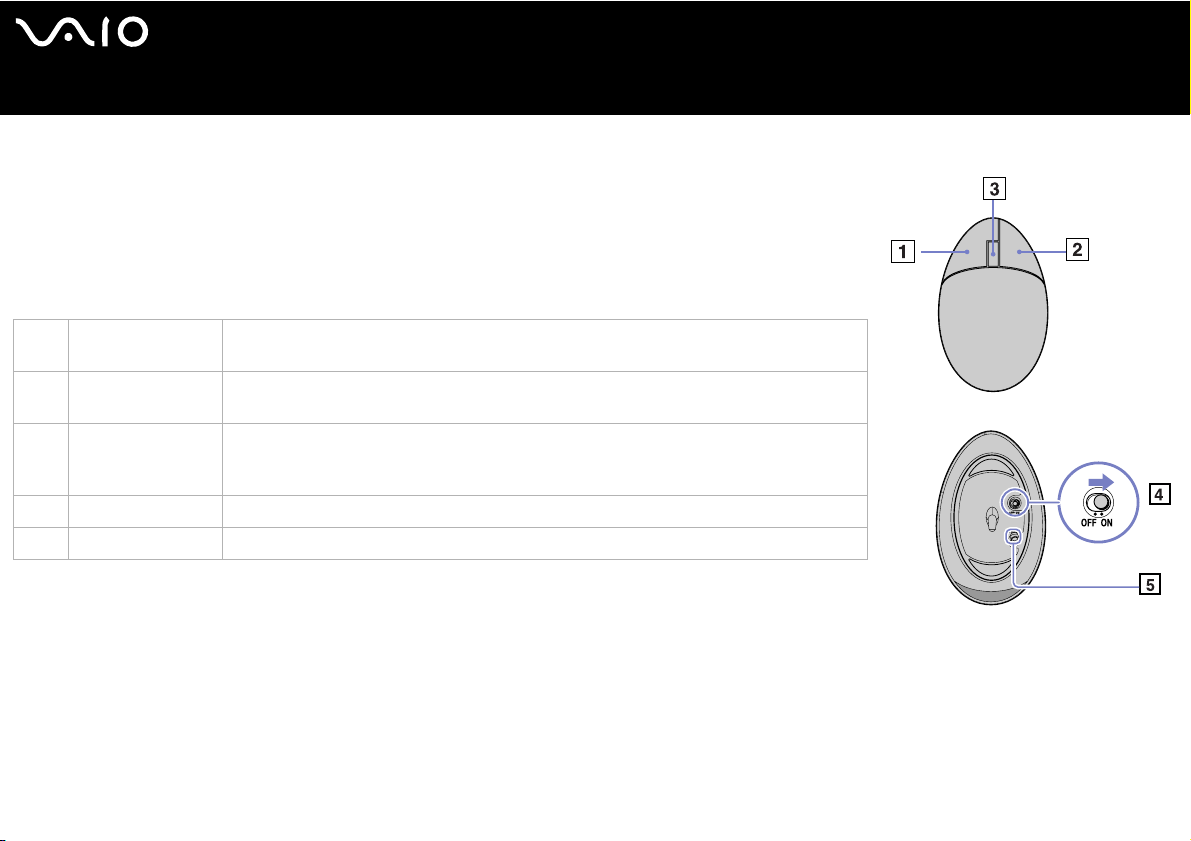
Using the mouse
Your computer is delivered with a wireless optical mouse, which has no cables to plug in and uses
a light-emitting diode (LED) instead of a ball. You can use the mouse anywhere you feel
comfortable within a range of approx. 10 m* of the receiver. Avoid using the mouse on a piece of
glass or other transparent material, as this can interfere with smooth cursor movement on the
screen.
* Effective usage distance depending on the environment.
1 Left button Click or double-click the left button to select items. To drag and drop items, hold the left
button down while sliding the mouse, then release the button to drop the item.
2 Right button Press the right button once to display a context-sensitive shortcut menu (not always an
active function).
3 Central wheel Turn the central wheel to scroll up or down a page. Press the wheel once to lock the scroll
action and control the movement by moving the entire mouse (The scroll function is
available only with applications that support it).
4 Power switch Slide switch to turn the mouse on and off. This will help you save battery power.
5 CONNECT button Press to enable communication between your VAIO computer and the wireless mouse.
You can adjust the mouse pointer speed and other functions under Mouse Properties. To display
Mouse Properties, go to VAIO Control Center, select Keyboard and Mouse, then select Mouse.
✍ When the remaining battery level is low, the back end of the mouse lights up.
Using your VAIO computer
nN
21
User Guide
Using your VAIO computer
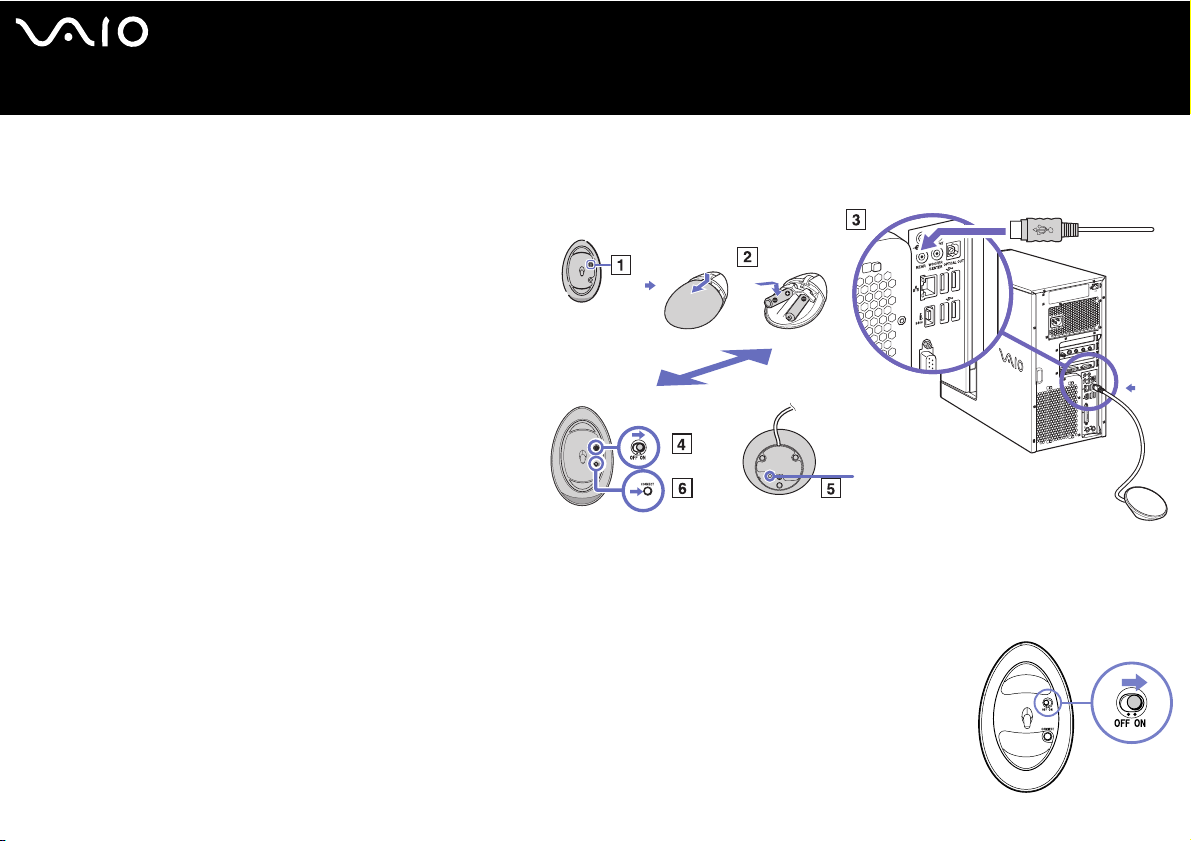
Before using the mouse
Before attempting to use the wireless mouse, you must enable communication between the computer and the mouse.
Two AA batteries, specific for use in the wireless mouse,
are supplied with your VAIO.
To connect the wireless mouse, proceed as follows:
1 Turn the wireless mouse over and slide the power
button to the OFF position (1).
2 Insert the two specific AA batteries into the wireless
mouse as shown (2).
3 Make sure the wireless receiver is connected to a USB
connector (3) on the main unit.
4 Turn on the computer.
5 Turn the wireless mouse over and slide the power
button to the ON position (4).
6 Press the CONNECT button on the wireless receiver (5).
7 Press the CONNECT button on the underside of the mouse (6). Press this button within 30 cm of the receiver.
Communication between the wireless mouse and the computer is now active.
✍ Steps 6 and 7 must be carried out within 10 seconds of each other.
If your wireless mouse does not operate properly, the batteries may need to be replaced. To avoid battery leakage, switch off the wireless
mouse when not used for an extended period of time. Always use new batteries from the same brand.

nN
22
User Guide
Setting up the mouse for left-handed users
To set your mouse up for left-handed users, proceed as follows:
1 Go to Start, select All Programs and then VAIO Control Center.
2 Click Keyboard and Mouse and then Mouse.
The Mouse Properties dialog box appears.
3 In the Buttons tab, select the option button next to Switch primary and secondary buttons.
4 Click OK.
The new mouse settings are now in place.
Using your VAIO computer

nN
23
User Guide
Using the disc drives
Your computer is equipped with two separate optical drives.
❑ A Blu-ray drive (upper drive) that reads data from and writes data onto BD, DVD and CD.
❑ A DVD-ROM drive (lower drive) that reads data from DVD and CD.
To insert a disc, proceed as follows:
1 Turn on the computer.
2 Press the appropriate eject button to open the drive..
The tray slides out.
3 Place a disc in the tray with the label side facing upwards.
Make sure the disc is secure in the centre of the tray.
4 Close the tray by pushing it gently.
✍ See the printed Troubleshooting Guide if you have problems using discs.
Using your VAIO computer

nN
24
User Guide
To remove a disc, proceed as follows:
1 Make sure the disc indicator light is not on.
2 Press the appropriate eject button to open the drive and remove the disc carefully.
Using your VAIO computer
✍ Do not use the eject button when the LED indicator is turned on. Otherwise, data may be lost.
Using the Blu-ray drive
With the integrated Blu-ray drive you can:
❑ Play BD-ROM discs or self-made Blu-ray discs, with the software InterVideo WinDVD BD for VAIO.
❑ Capture, edit, and write HD videos in the BDAV format for use with BD-RE or BD-R, using the software Ulead BD DiscRecorder.
❑ Write data discs, using the software Roxio Digital Media.
✍ For more information, on these software please refer to their online help files.
This Blu-ray drive is subject to the following limitations:
❑ BD recorded on the integrated Blu-ray drive of your VAIO VGC-RC204 can only be played back on the same drive or on the Blu-
ray drive of other VAIO computers.
❑ You can write DTV content to BD-RE or BD-R discs (except copy-protected DTV content) that has been recorded using the
integrated TV Tuner card of your computer.
❑ To achieve optimum performance, you should close all open applications before playing Blu-ray discs.
❑ If your external display is not compliant with the HDCP (High-bandwidth Digital Content Protection) standard, it is not capable
of displaying images stored on copyright protected Blu-ray discs..
❑ You may need to connect to the Internet when playing copyright protected Blu-ray discs.
❑ Region settings are required for Movies and BD-ROM contents. If the region setting and the region of the disc do not match,
playback is not possible.

nN
25
User Guide
Your computer uses a software-based decoder to play Blu-ray discs. This means Blu-ray disc playback generates a certain
❑
Using your VAIO computer
amount of load on your hardware resources and may make some operations and/or functions unavailable. Additionally,
depending on your hardware specifications including the CPU performance, you may find sound interruptions and/or dropped
frames during Blu-ray disc playback.
Writing CDs, DVDs & BDs
To achieve optimum performance when writing data on to disc (also called ’burning’), follow these recommendations:
❑ Only use circular discs. Do not use discs with any other shape (star, heart, card, etc.), as this may damage the disc drive.
❑ Do not strike or shake the computer while writing data to a disc.
❑ For optimal writing speed, deactivate the screensaver before writing data to a disc.
❑ Memory-resident disc utilities may cause unstable operation or data loss. Deactivate these utilities before writing data to a disc.
❑ When using a software application to burn discs, make sure you exit and close all other applications.
❑ Never touch the surface of the disc. Fingerprints and dust on the surface of a disc may cause writing errors.
❑ Never put stickers on discs. This will affect the use of the disc irreparably.
Playing DVDs
To achieve optimum performance when playing DVDs, you should follow these recommendations:
❑ Close all open applications before playing a DVD movie.
❑ You can play DVDs with the software WinDVD.
❑ Do not switch power saving modes while playing a DVD.
❑ Do not use utility applications to speed up the access of discs, because they may cause the system to become unstable.
❑ Make sure that the screensaver is deactivated.
 Loading...