

Sony Vaio VGX-TP1 Series User Manual
~,o
~2
Before Use 5
Documentation 5
Getting Started 8
Locating Controls and Ports 9
About the Indicator Lights 13
Setting
Up
Your Computer 14
Shutting Down Your Computer Safely
21
Using Your VAIO Computer 22
Using the Keyboard 23
Using the Touch Pad
31
Using the Optical Disc Drive 32
Using the TV Function 42
Using the Memory Stick Media 60
Using Other Memory Cards 66
Using the Internet 69
Using Wireless LAN (WLAN) 70
~fO
~3""
Using Peripheral Devices 78
Selecting Display Modes 79
Using the Multiple Monitors Function 80
Connecting a Universal Serial Bus (USB) Device 82
Connecting a Printer 85
Connecting
an
i.LINK Device 86
Connecting to a Network (LAN) 88
Customizing Your VAIO Computer 90
Setting the Password
91
SettingUpYour Computer with VAIO Central 94
Using the Power Saving Modes 95
Upgrading Your VAIO Computer 97
Adding and Removing Memory 98
Precautions 105
On Using the Power Source 106
On Handling Your Computer 107
On Handling Floppy Disks
11
0
On Handling Discs
111
On Using Headphones
111
On Handling Memory Stick Media 112
On Handling the Hard Disk 113
Troubleshooting 114
Computer 115
System Security
121
Networking 122
Optical Discs 125
Display 129
Printing
131
Microphone 132
Speakers 133
Keyboard 134
Touch Pad 135
Floppy Disks 136
Audio/Video 137
Memory Stick Media 138
Peripherals 139
Support Options 140
Sony Support Information 140
Program Support Information 142

"-5~
~
f0 Before Use
Before Use
Congratulations on your purchase of this Sony VAIO® computer, and welcome to the on-screen User Guide. Sony has
combined leading-edge technology
in
audio, video, computing, and communications to provide state-of-the-art personal
computing.
!
External
views
illustratedinthis
manual
may
look
slightly
different
from
thoseofyour
computer.
Documentation
Your documentation includes printed information and user guides to read on your VAIO computer.
Printed Documentation
o Welcome mat - Contains an overview of connections, setting up information, etc.
o Safety Information - Contains safety guidelines and owner information.
Non-printed Documentation
D
User
Guide (this manual) - Contains features of yourcomputer. It also includes information about the software programs
included with your computer, as well as information on solving common problems.
D
Specifications
- The online
Specifications
describe the hardware and software configuration of your VAIO computer.
To view the online
Specifications:
1 Connect to the Internet.
2 Go to the Sony online support Web site at:
http://esupport.sony.com/EN/VAIOI for customers
in
USA,
http://www.sony.ca/support for customers
in
Canada,
http://esupport.son~com/ES/VAIO/
for customersinSpanish· speaking Latin American countries or areas, or
http://esupport.sony.com/ES/VAIO/BR/ for customers
in
Brazil.
D
VAIO Recovery
Guide
- Provides information about restoring individual software programs, software drivers, and drive
partition(s) or your entire hard disk drive to the original factory installed settings.
To access this on-screen guide:
1 Click
Start
and Help
and
Support.
2 Click Manuals &
Specifications.
3 Click VAIO
Recovery
Guide.
D MCE Guide (Selected models only) - Provides information about using
Windows
Media Center.
To access this on-screen guide:
1 Click
Start
and
Help
and
Support.
2 Click Manuals &
Specifications.
3 Click MCE Guide.
Help and Support
Help and Support is easy to access and provides a single location for information and technical assistance for your VAIO
computer. Choose from the following categories to find the answers you need.
To access
Help and Support, click Start and Help and Support.
o Manuals & Specifications
Here you will find the on-screen User Guide, warranty information, other VAIO documents, and system and software
information for your computer.
OVAlO
Support
Access interactive helpinthe form of VAIO tutorials,anescalation page containing support and contact information, and
various links to VAIO online support Web sites.
o Backup & Recovery
Find information on how to back up and restore your operating system, system software, and your personal data.
o Wireless & Network
Learn about wireless connections including Bluetooth Wireless technology and Wireless LAN. Run utilities that include
VAIO Media Setup and Windows Network and Sharing, and access to wireless tutorials.
o Security
Keep your data safe and your computer running efficiently with updates and maintenance programs from Microsoft and
Sony.
OVAlO
Sites
Contains links to other Internet sites you might find interesting and useful.
,
~8~
'\.A
0 Getting Started
Getting Started
This section describes how to get started using your VAIO computer.
!
Before
starting
your
computer
for
the
first
time,donot
connect
any
other
hardware,
exceptadisplay
(TV),
that
did
not
originally
come
with
your
computer.
Make
suretostartupyour
computer
with
only
the
supplied
accessories
connected
and
setupyour
system.
Upon
completion,
connect
one
device
(for
example,aprinter,anexternal
hard
disk
drive,ascanner,
andsoon)ata
time,
following
the
manufacturers'
instructions.
o
Locating
Controls
and Ports (page 9)
o
About
the
Indicator
Lights
(page 13)
o Setting Up Your Computer (page 14)
o
Shutting
Down Your Computer Safely (page 21)
~9
~
,0 Getting Starte
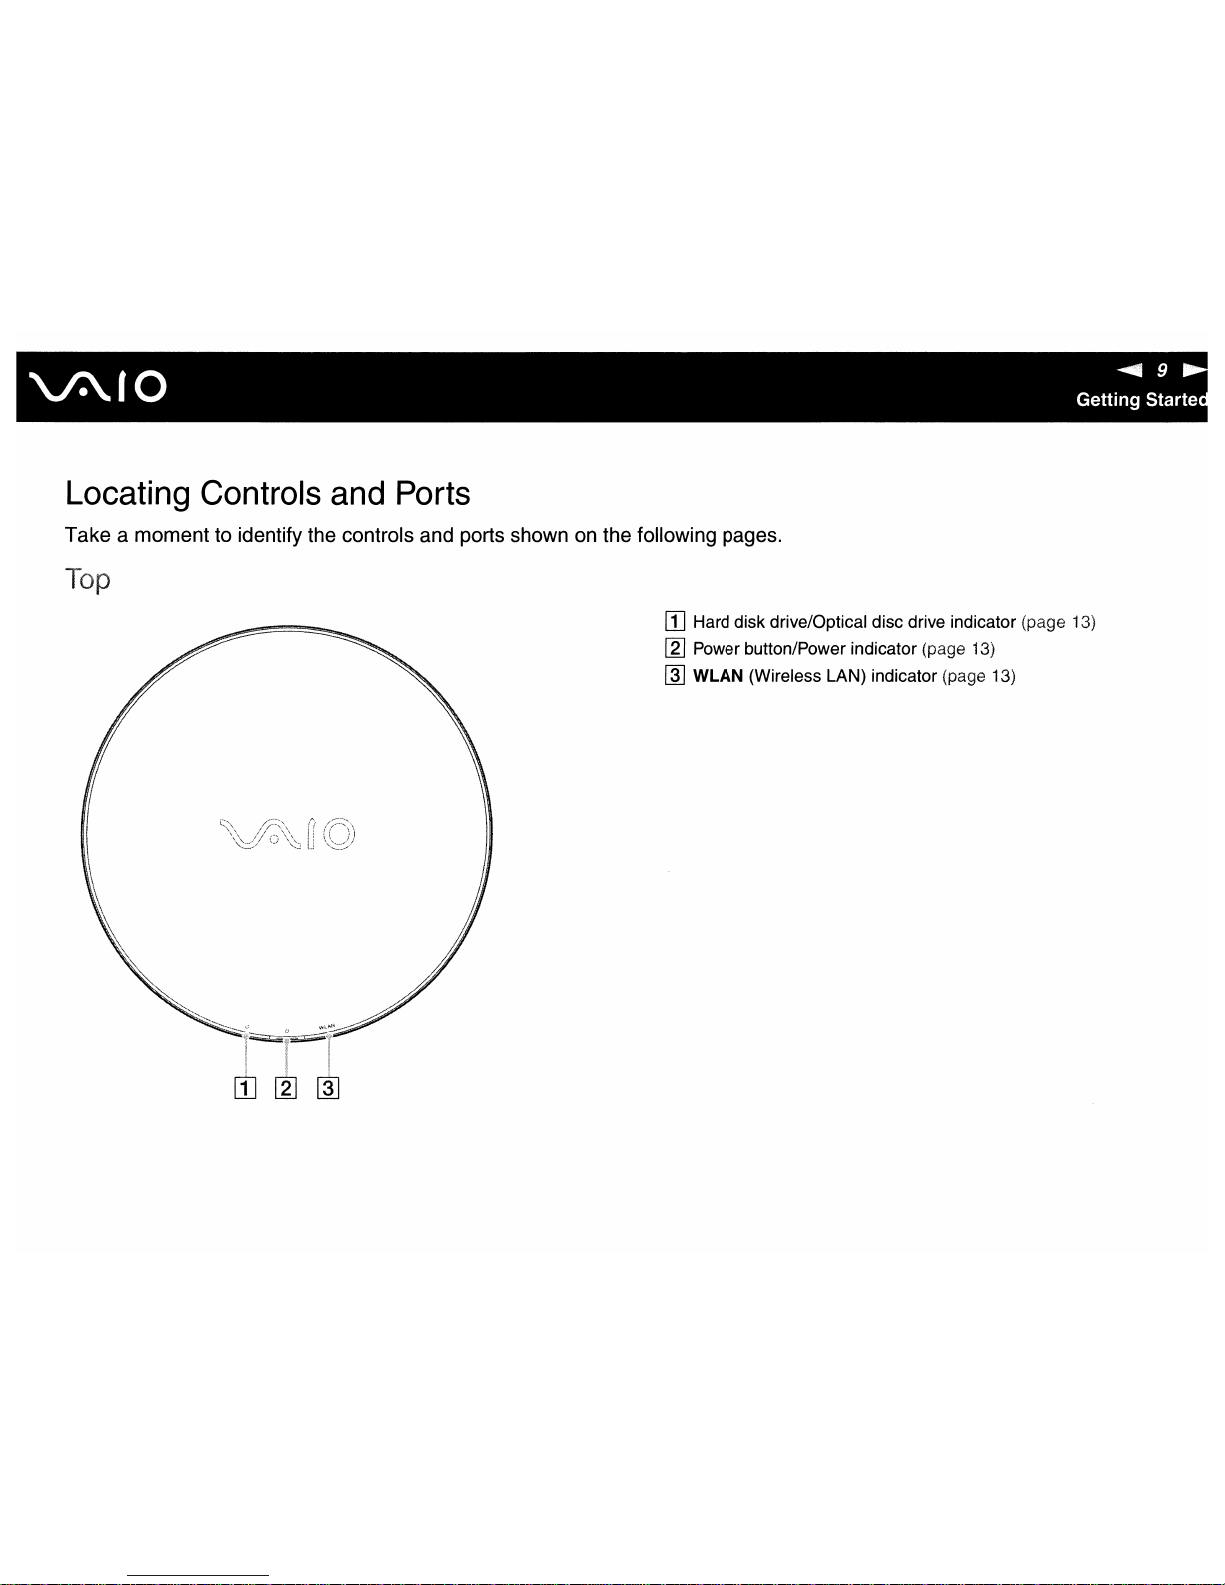
Locating
Controls
and
Ports
Take a
momenttoidentify
the
controls
and
ports
shownonthe
following
pages.
Top
[1]
Hard
disk
drive/Optical
disc
drive
indicator
(page 13)
[gJ
Power
button/Power
indicator
(page 13)
~
WLAN (Wireless
LAN)
indicator
(page 13)
'-AIO
~
10~
Getting Started
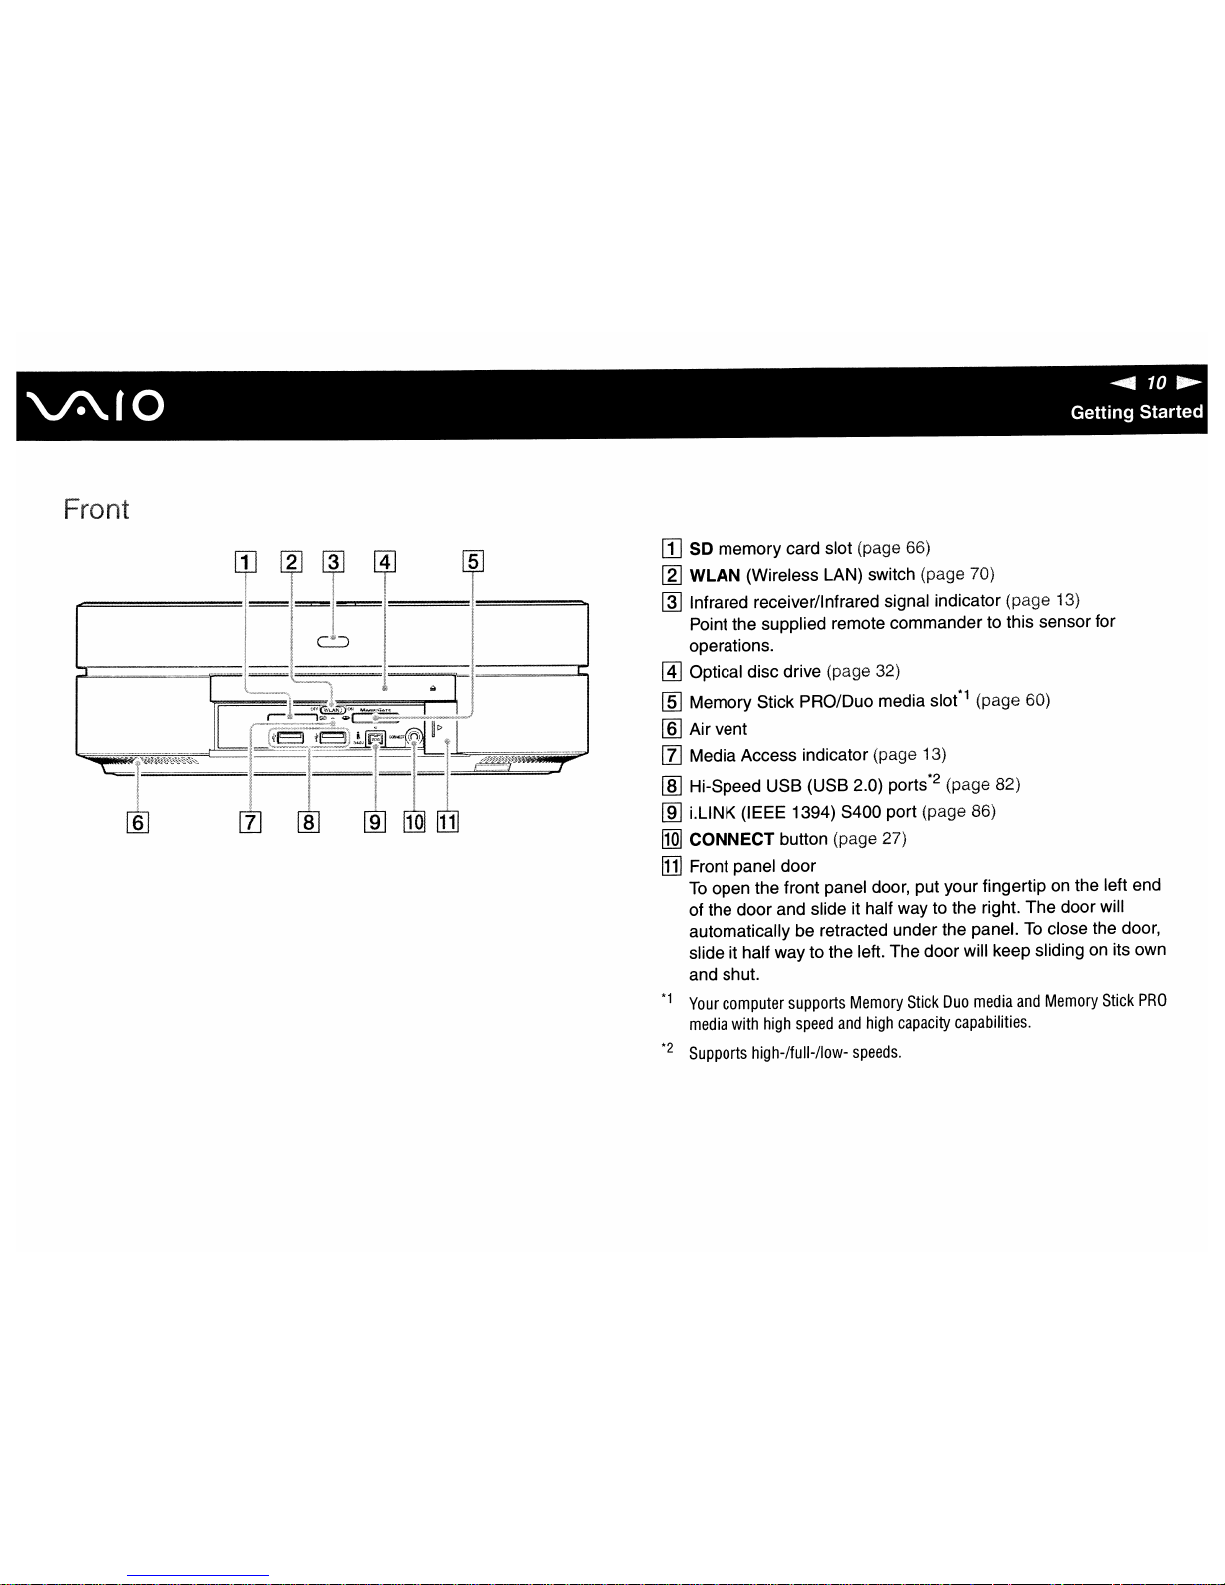
Frorlt
[1]
SO
memory card slot (page 66)
[2J
WLAN (Wireless LAN) switch (page 70)
~
Infrared receiver/Infrared signal indicator (page 13)
Point the supplied remote commander to this sensor for
operations.
@]
Optical disc drive (page 32)
[§]
Memory Stick PRO/Duo media
slot*1
(page 60)
[§]
Air vent
[1]
Media Access indicator (page 13)
[ID
Hi-Speed USB (USB 2.0) ports*2 (page 82)
[ID
LLINK (IEEE 1394) S400 port (page 86)
[QJ
CONNECT button (page 27)
[j] Front panel door
To
open the front panel door, put your fingertiponthe left end
of the door and slide it half way to the right. The door will
automatically be retracted under the panel.
To
close the door,
slide it half way to the left. The door will keep sliding
on
its own
and shut.
*1
Your
computer
supports
Memory
Stick
Duo
media
and
Memory
Stick
PRO
media
with
high
speed
and
high
capacity
capabilities.
*2
Supports
high-/full-/low-
speeds.
r
I
~~~~;;;;;;;;:::;;;;;;;;;;;;;;;~
;;;;;;;;;;;;;;;;;;;;;;;;;;;;;;;;;;;;;;::~I~::
{;;;;;;_;";_"_;;:_~"3
~
[!]
[§]
i~
*
~~~~~~~I=!~I~I~~~~I~~===~~
t

~
11
'\.A
f0 Getting Started
Back
~~~~::~i:_::~:::~~:I~~I~I·~jl~~~~~~
==",I===LJ==!=;=I=j===~
':':~':'=':
.•
::.::=':.::.::__._-.::::.:..:::
(:
if
'::====:::;:T
==
-
==::=::=~=::
HIGH·DEFINITiON MULTIMEDIA INTERFACE
The
area
around
the
air
vent
(1)
becomes
hot
while
your
computerison.Besure
to
wait
until
the
computer
cools
down
before
you
touch
it.
HDMI,
the
HDMIIogo
and
High-Definition
Multimedia
Interface
are
trademarks
or
registered
trademarksofHDMI
Licensing
LLC.
[I] Air vent
[g] VHF/UHF (ANALOG) port (page 43)
~
WIRELESS LAN ANTENNA port (page 72)
@]
INFRARED TRANSMITTER OUT jack (page 58)
[§] Hi-Speed USB (USB 2.0) ports* (page 82)
~
Headphones jack
Connect external headphones.
[I]
Microphone jack
Connect an external microphone.
rnJ
OPTICAL OUT port
Connect a digital device, such as an AVamplifier.
[ID
Network (Ethernet) port (page 88)
[jQ]
AUDIONIDEO INPUT port (page 50)
[1]
HDMI OUT port (page 15)
[12]
Monitor (VGA) port (page 17)
~
DC IN port (page 18)
*
Supports
high-/full-/low-
speeds.

~
12-......
'.A
,0 Getting Started
Bottom
[jJ
Air
vents
[2J
Security
slot
I0
......-
13
~
~
Getting Started
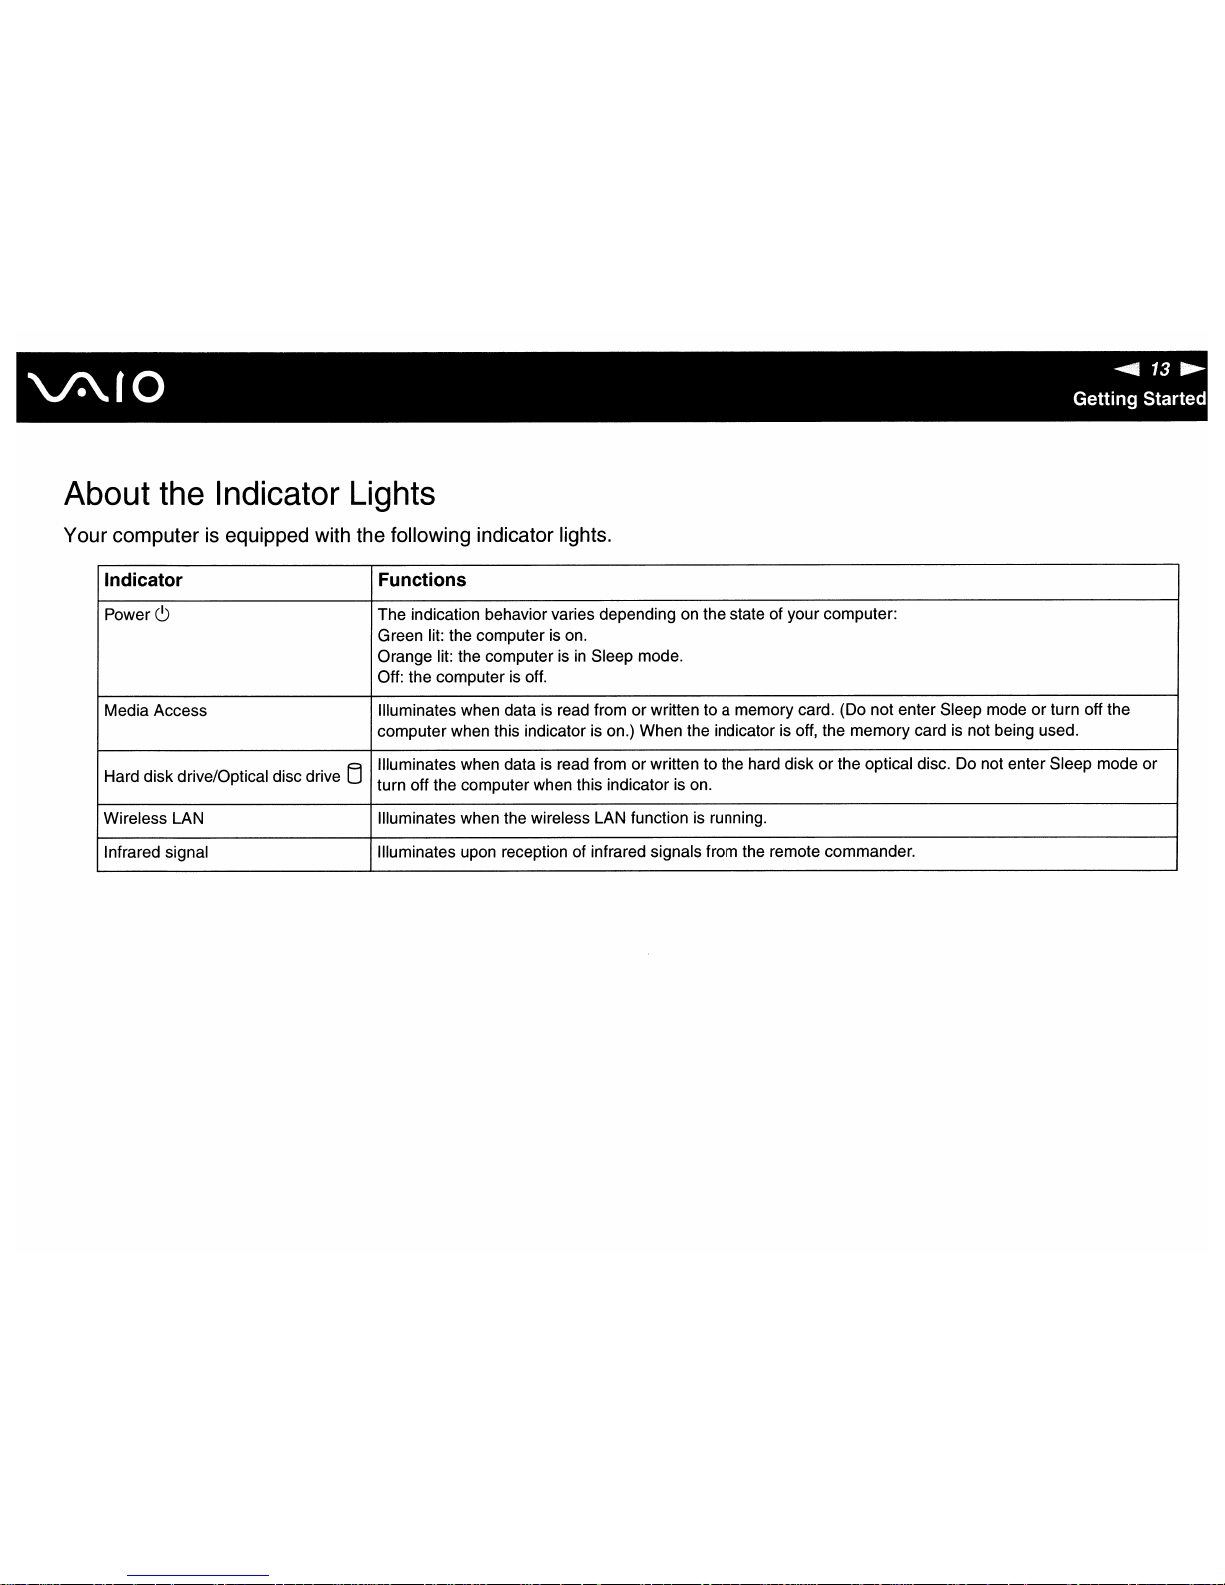
About the Indicator Lights
Your computer is equipped with the following indicator lights.
Indicator
Functions
Power
C)
The indication behavior varies depending on the state of your computer:
Green lit: the computer
is
on.
Orange lit: the computer is
in
Sleep mode.
Off: the computer is off.
Media Access
Illuminates when data is read from or written to a memory card. (Do not enter Sleep mode or turn off the
computer when this indicator is on.) When the indicator is off, the memory card is not being used.
Hard disk drive/Optical disc drive
EJ
Illuminates when data is read from or written to the hard disk or the optical disc. Do not enter Sleep mode or
turn off the computer when this indicator is on.
Wireless LAN
Illuminates when the wireless LAN function is running.
Infrared signal
Illuminates upon reception of infrared signals from the remote commander.

~
14~
\.A
f0 Getting Started
Setting
Up
Your
Computer
Conn cting a Display
Connect a
display
(not
supplied)toyour
computer.
When
connecting
it,
see
the
manual
that
came
with
your
displayaswell.
......-
15
".A
f0 Getting Starte
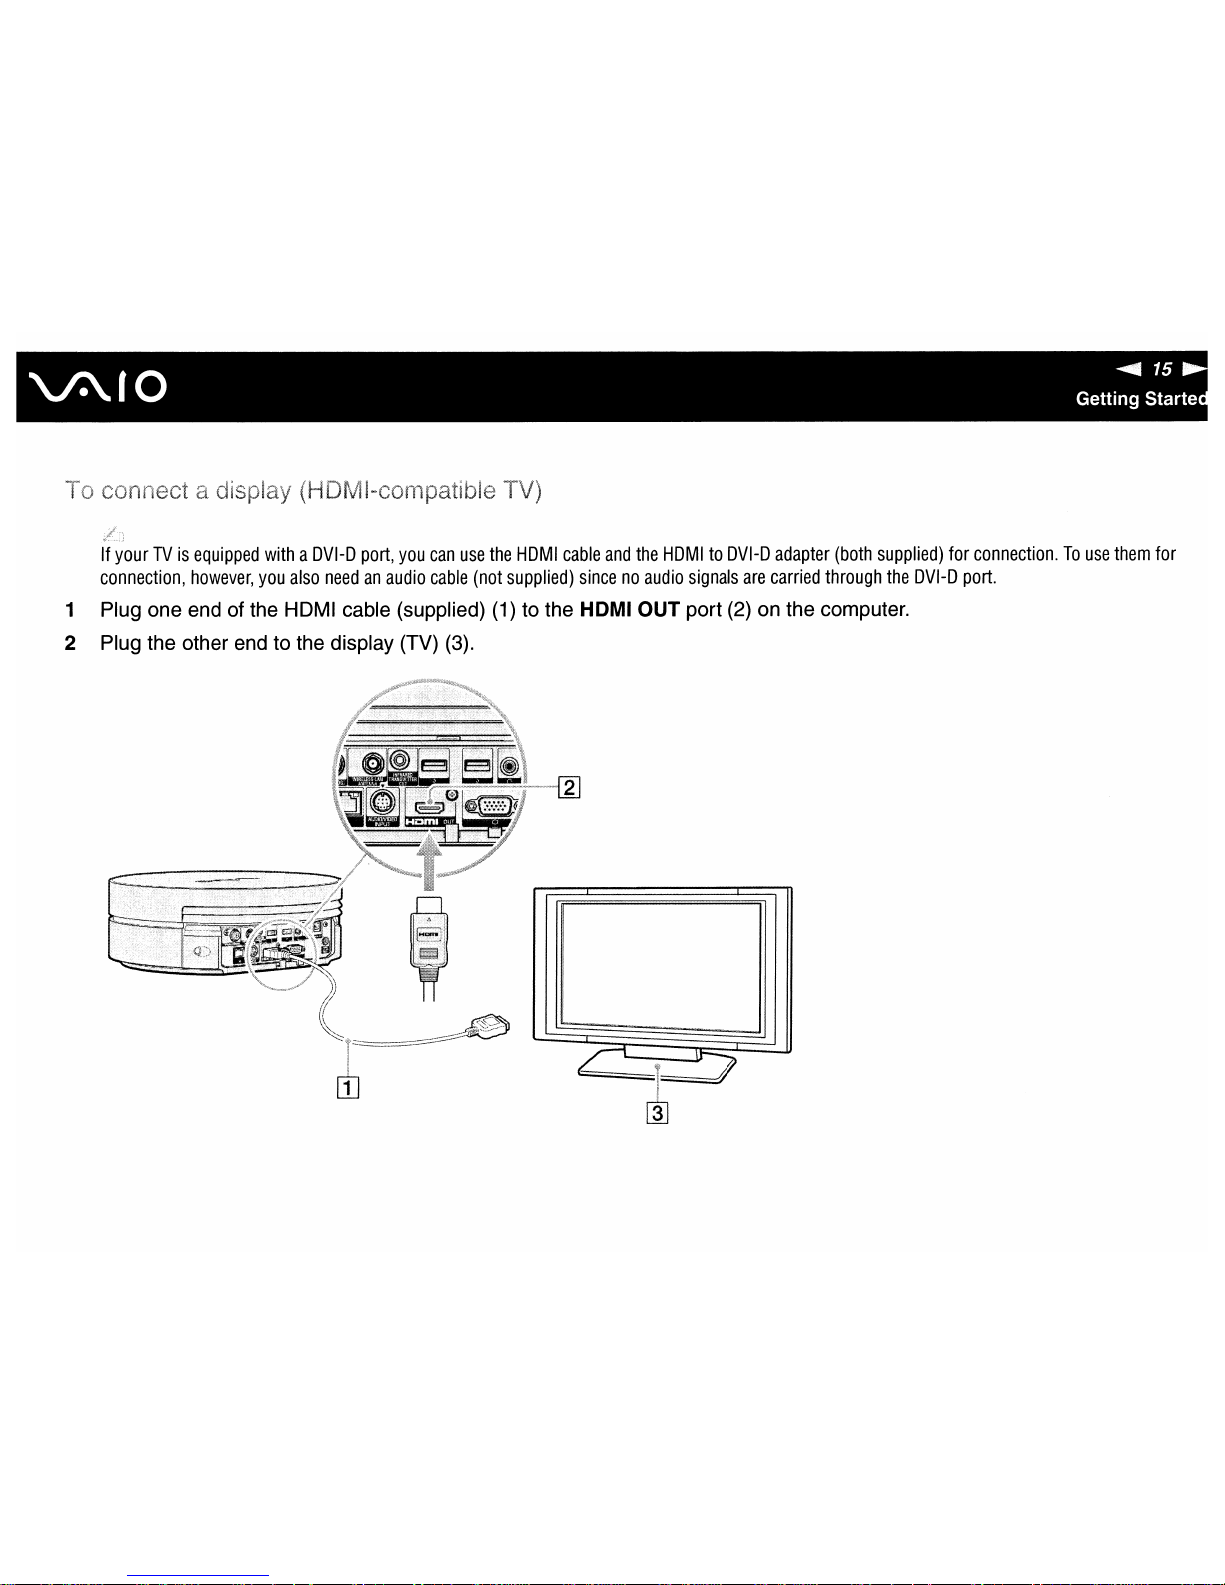
o
If
yourTVis
equipped
withaDVI-D
port,
you
can
use
the
HDMI
cable
and
the
HDMItoDVI-D
adapter
(both
supplied)
for
connection.Touse
them
for
connection,
however,
you
also
needanaudio
cable
(not
supplied)
sincenoaudio
signals
are
carried
through
the
DVI-D
port.
1 Plug one end of the HDMI cable (supplied) (1) to the HOMI OUT port
(2)onthe computer.
2 Plug the other end to the display (TV)
(3).

~
16~
'\.A
,0 Getting Started
!
If
yourTVis
equipped
withanHDMI
port
andaDVI-D
port,werecommend
that
you
use
the
HDMI
port.
The
HDMI
cable
carries
both
video
and
audio
signals.
Ifadevice
driver
other
than
the
one
providedbySonyisused,
the
image
will
notbedisplayed
and
the
audio
will
notbeheard.
Always
use
the
device
driver
providedbySony
for
updates.
Your
computeriscompliant
with
the
HDCP
standard
and
capableofencrypting
the
transmission
channelofdigital
video
signals
for
the
purpose
of
copyright
protection,
which
enables
youtoplay
and
viewawide
varietyofcopyright
protected,
high-quality
contents.
Note
that
you
needtoconnect
an
HDCP-compliant
external
displaytoyour
computertoview
the
copyright
protected
contents.Ifyour
computer
hasanon-compliant
display
connected,
you
will
notbeabletoplayorview
any
copyright
protected
contents,
including
Blu-ray
movie
contents.
Uild
If you do not hear sound from the device connected to the HOMI port, you need to change the device for sound output.
1 Close all open programs.
2 Click
Start and Control Panel.
3 Click Hardware and Sound.
4 Click Manage
audio
devices under Sound.
S On the Playback tab, select the desired device for sound output and click Set Default.
......-
17
~
,0 Getting Starte
("\
;:.~~
(
~/;
_....
\
1
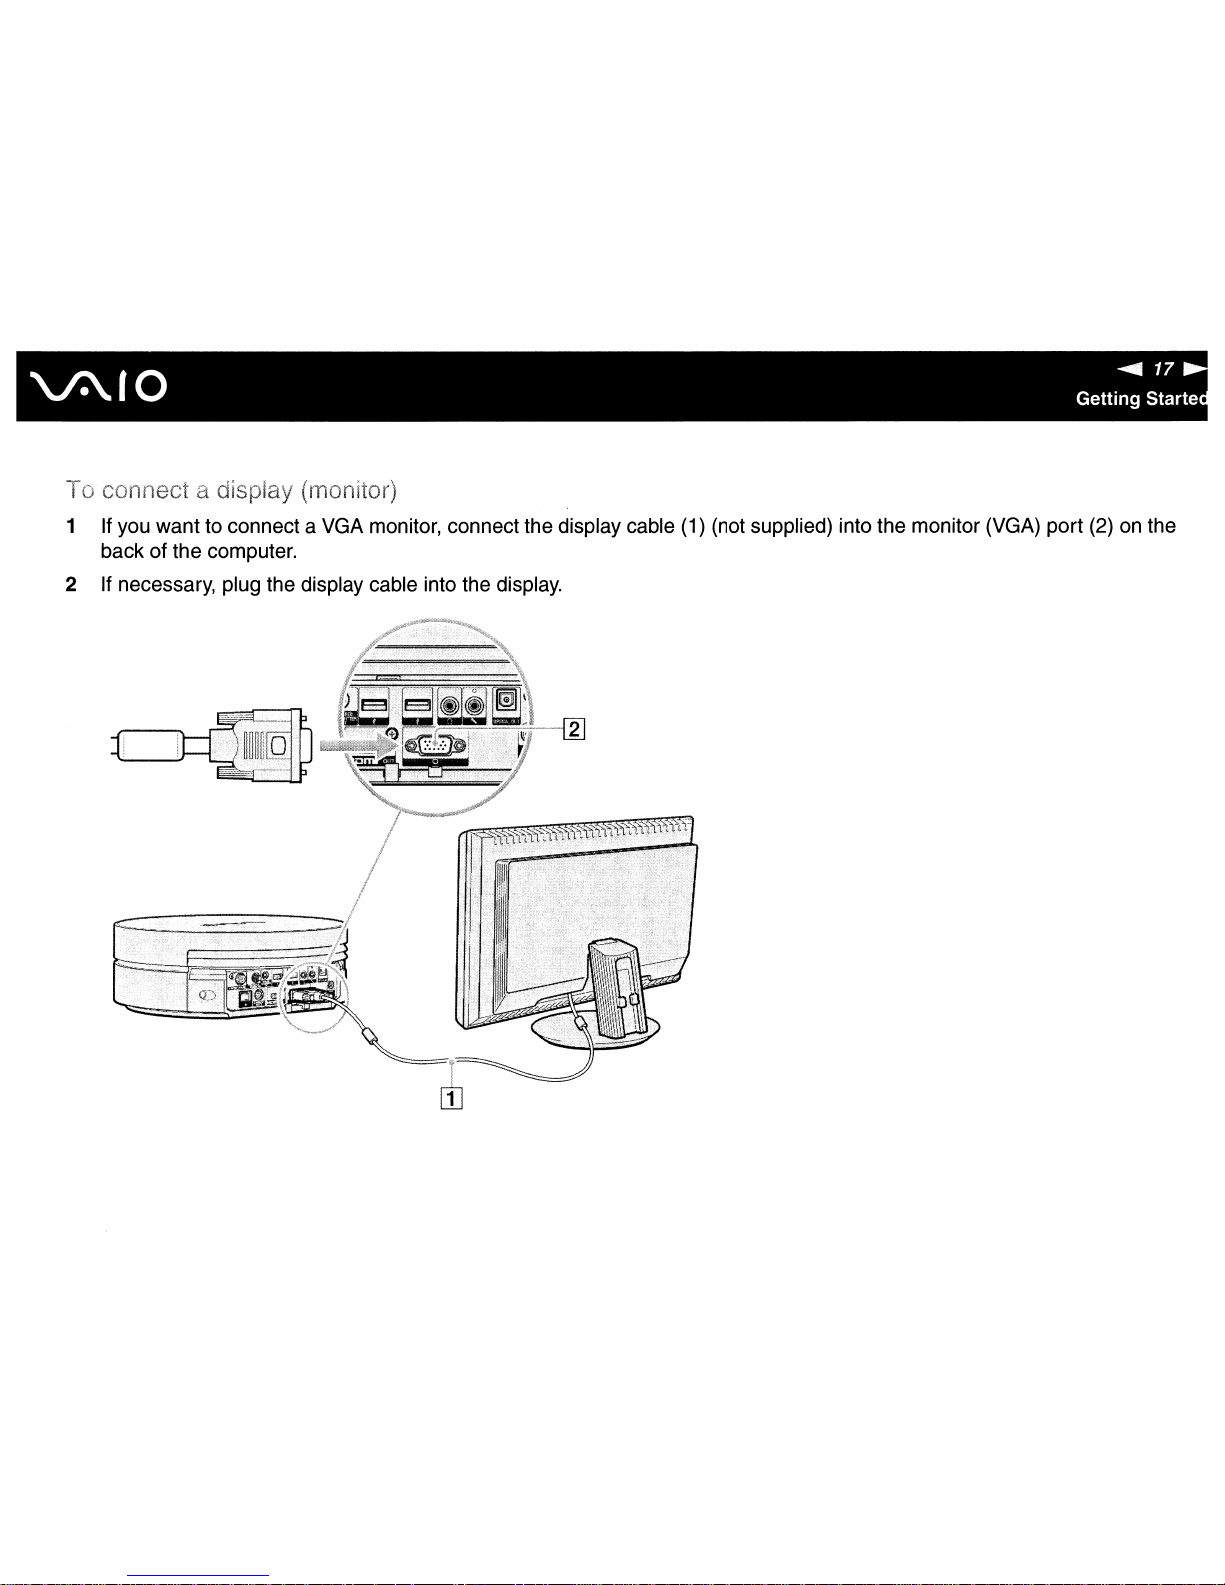
If
you
wanttoconnectaVGA
monitor,
connect
the
display
cable
(1)
(not
supplied)
into
the
monitor
(VGA)
port
(2)onthe
backofthe
computer.
2
If
necessary,
plug
the
display
cable
into
the
display
.
......
-
D}
!\(
...
<
)
','
\
.....•...
.
..........
\
/"
,.
"Ill!
"'.'
......
'.'.
<
:)
"
~,
" "
.".,.
JlltU'fS
11~;"''''
)
IV
~r
-
t>
'"
~~-
r<
·•·•.,,···,
••••
,.XA
'-.
""
~~
..
,~~
-~
~
18~
~
,0 Getting Started
C nnectin
ower Source
You need an
AC
adapter to connect to an AC power source and it must be plugged into the power source before you can
establish communication with your wireless keyboard.
Use
your
computer
only
with
the
suppliedACadapter.
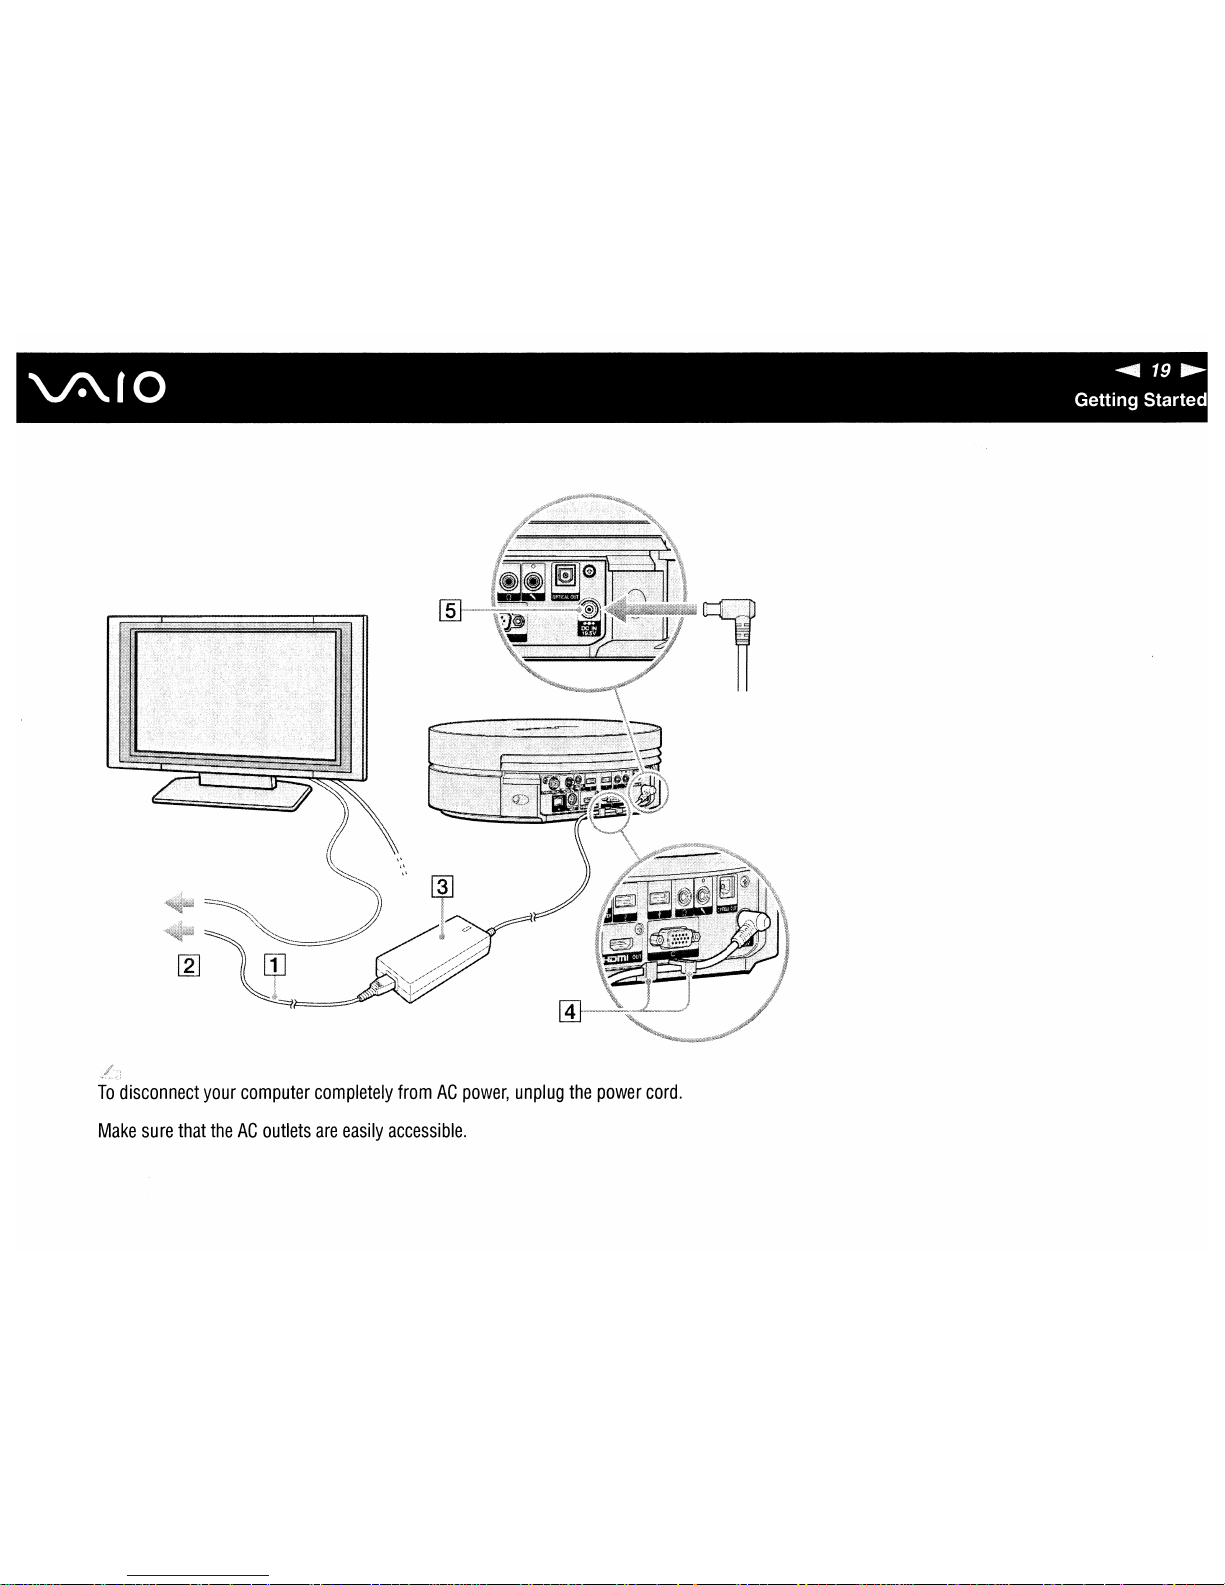
1 Plug one end of the power cord (1) into the AC adapter (3).
2 Plug the other end of the power cord and the power cord from your display (TV) into AC outlets (2).
3 Route the cable from the AC adapter (3) through the hooks (4) on the back
of
your computer and plug it into the DC
IN
port
(5).
.....-
19
~
\..A.
f0 Getting Started
To
disconnect
your
computer
completely
fromACpower,
unplug
the
power
cord.
Make
sure
that
theACoutlets
are
easily
accessible.
~20~
\.A
,0 Getting Started
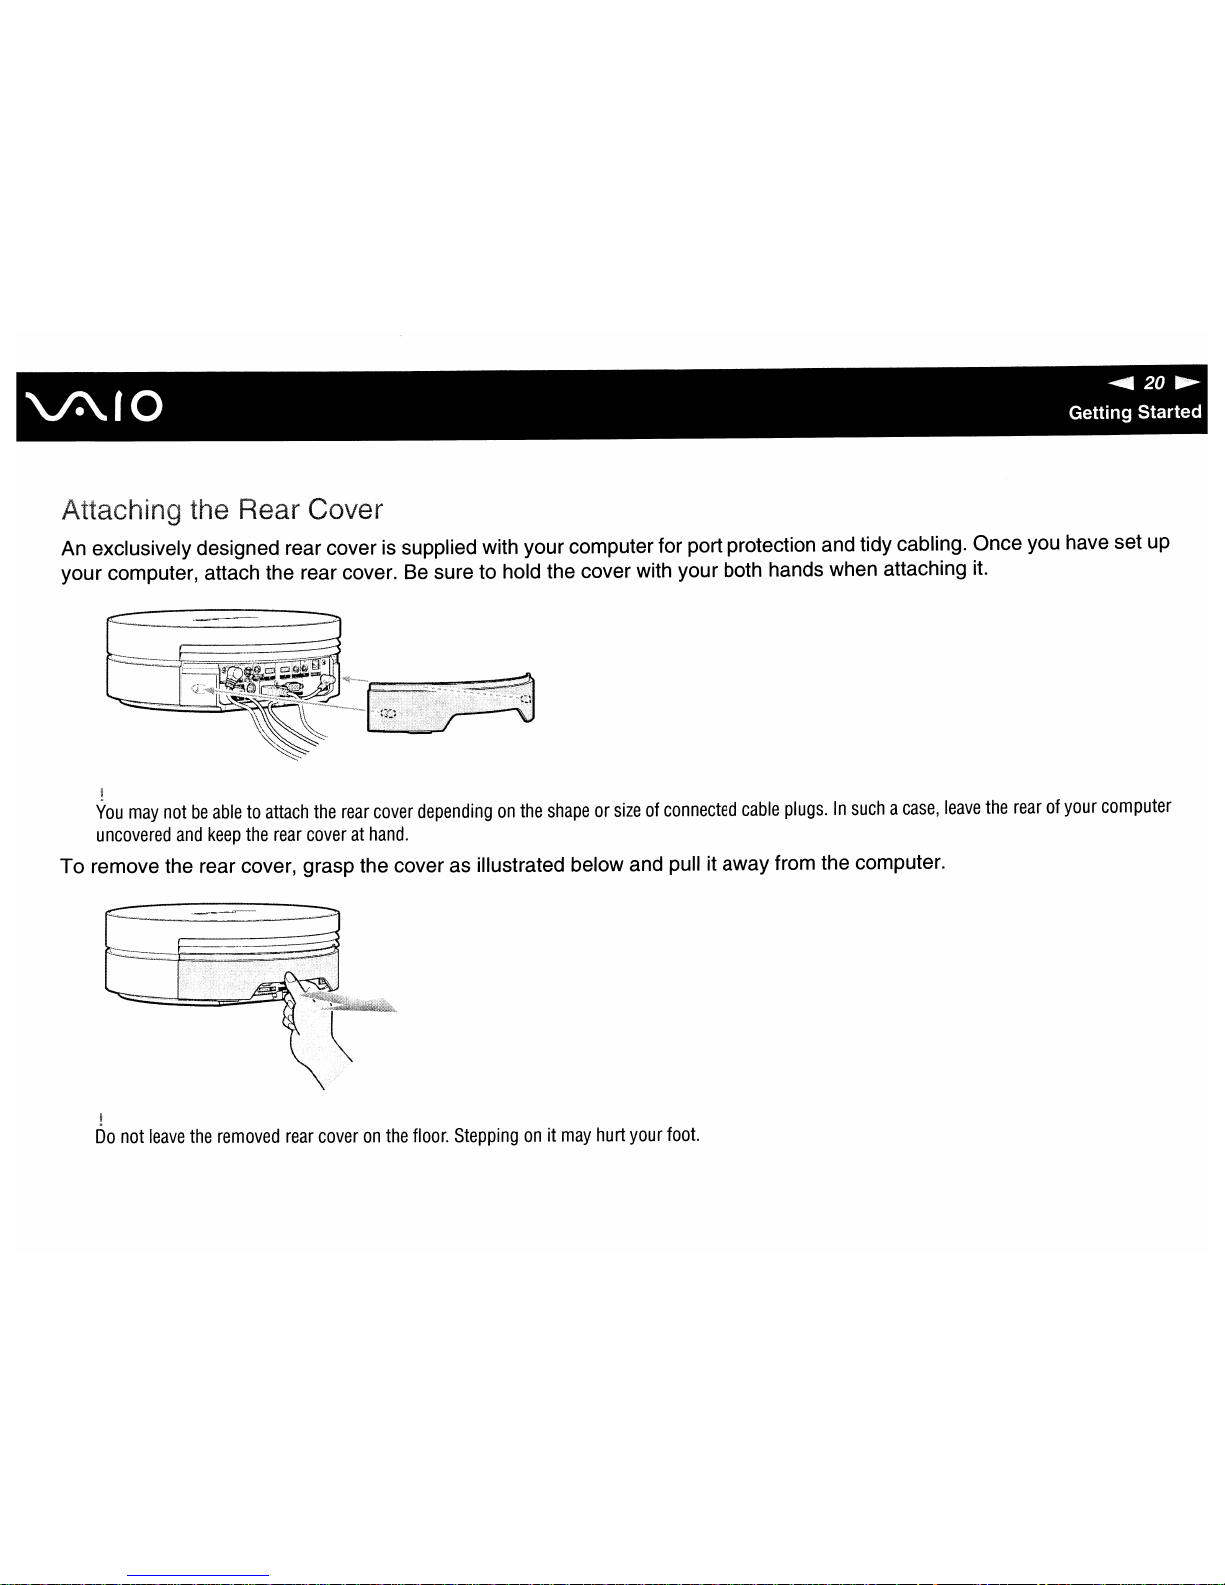
Attaching the Rear Cover
An exclusively designed rear cover is supplied with your computer for port protection and tidy cabling. Once you have set up
your computer, attach the rear cover.
Be
sure to hold the cover with your both hands when attaching it.
You
may
notbeabletoattach
the
rear
cover
dependingonthe
shapeorsizeofconnected
cable
plugs.Insuchacase,
leave
the
rearofyour
computer
uncovered
and
keep
the
rear
coverathand.
To
remove the rear cover, grasp the cover as illustrated below and pull it away from the computer.
Do
not
leave
the
removed
rear
coveronthe
floor.
Steppingonit
may
hurt
your
foot.
~
21
'\.A
r0 Getting Starte
Shutting Down Your Computer Safely
To avoid losing unsaved data, be sure to shut down your computer properly, as described below.
1 Turn off any peripherals connected to the computer.
2 Click
Start, the
arrow.
next to the
Lock
button, and Shut Down.
3 Respond to any prompts warning you to save documents or to consider other users and wait for the computer to turn off
automatically.
The power indicator light turns
off.
~22~
\.A.
f0 Using Your
VAIO
Computer
Using Your VAIO Computer
This section describes how to get the most out of using your VAID computer.
o
Using
the
Keyboard (page 23)
o
Using
the
Touch Pad (page 31)
o
Using
the
Optical Disc Drive (page 32)
o
Using
theTVFunction
(page 42)
o
Using
the
Memory
Stick
Media (page 60)
o
Using
Other
Memory
Cards (page 66)
o
Using
the Internet (page 69)
o
Using
Wireless LAN (WLAN) (page 70)
~23
~
lOUSing
Your VAIO Compute
Using the Keyboard
A wireless keyboard is supplied with your computer.
The wireless keyboard uses a standard key arrangement with additional keys that perform specific functions.
......-
24
~
'.A
,0 Using Your VAIO Computer
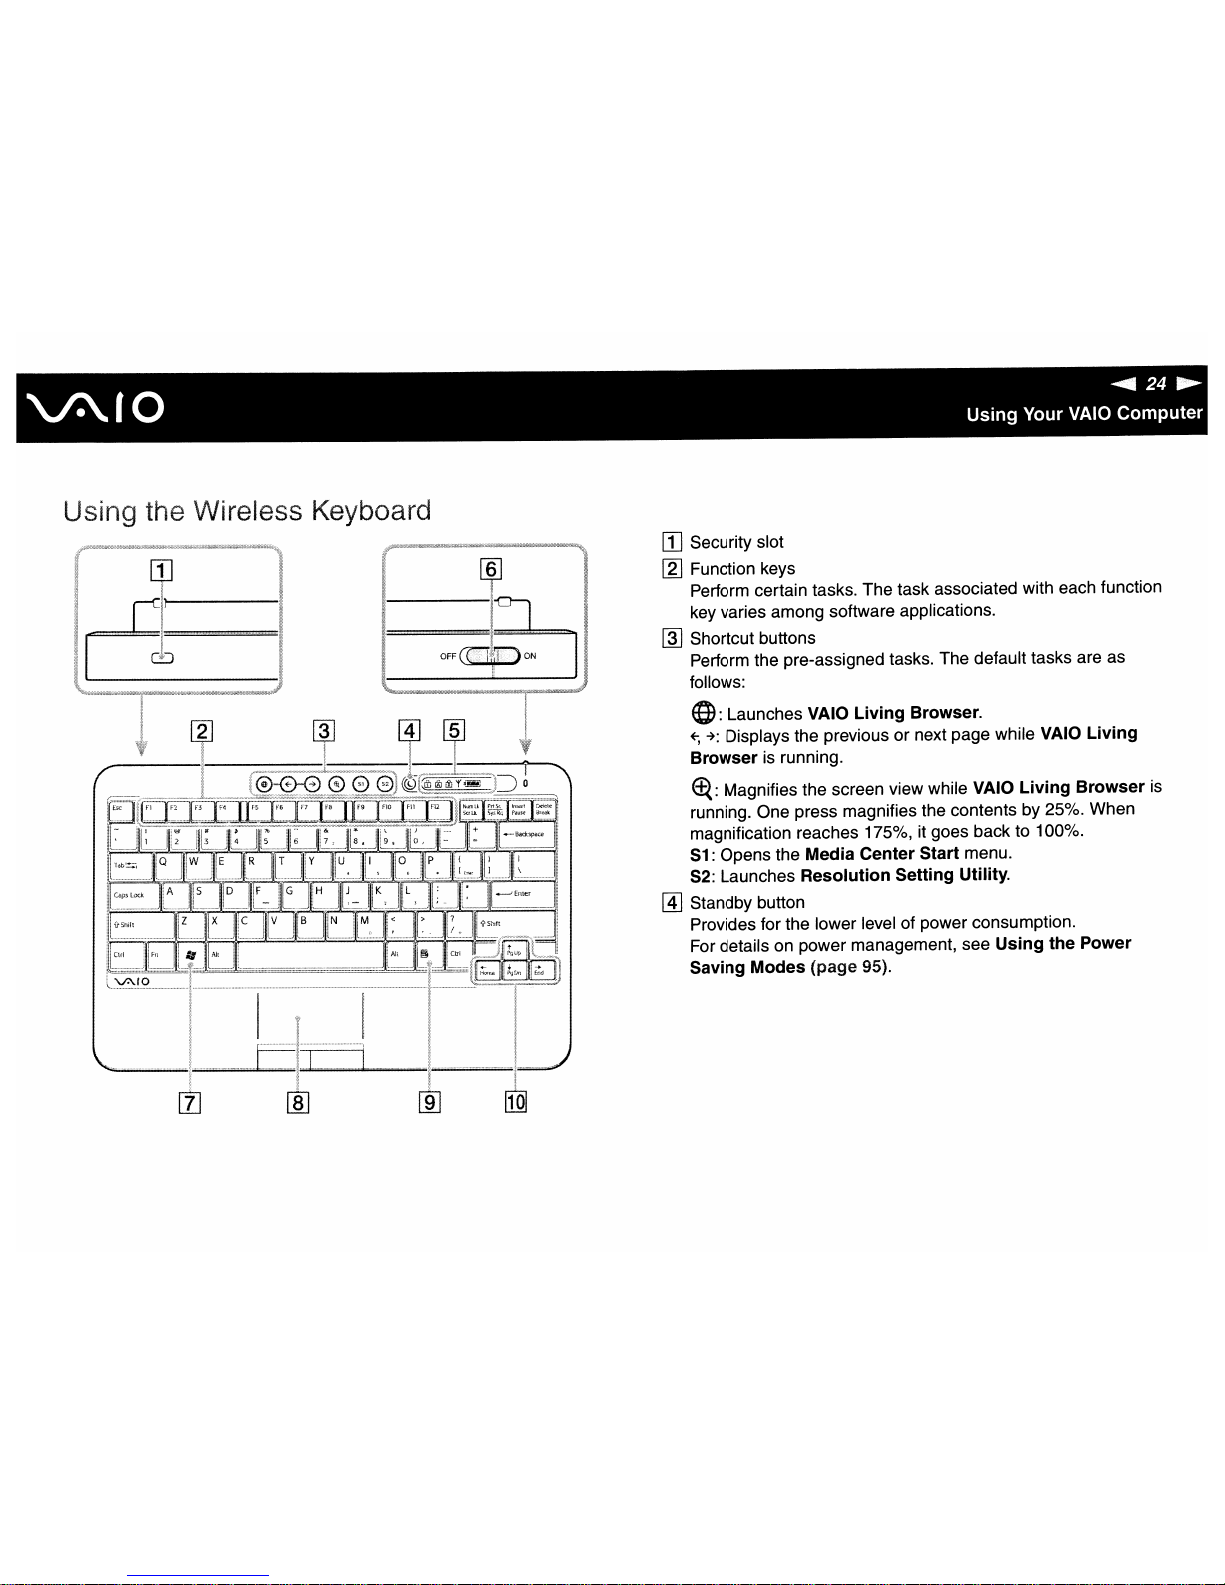
U ing the Wireless Keyboard
[]
Security slot
I1J
Function keys
Perform certain tasks. The task associated with each function
key varies among software applications.
~
Shortcut buttons
Perform the pre-assigned tasks. The default tasks are as
follows:
e:
Launches VAIO
Living
Browser.
+;
-+:
Displays the previous or next page while VAIO
Living
Browser
is
running.
<±<:
Magnifies the screen view while VAIO
Living
Browser
is
running. One press magnifies the contents by 25%. When
magnification reaches 175%, it goes back to 100%.
S1
: Opens the Media Center Start menu.
S2:
Launches Resolution Setting Utility.
@]
Standby button
Provides for the lower level of power consumption.
For details on power management, see
Using
the Power
Saving Modes (page 95).
OFF~~J
~-----l
..
--_------
---
-
::~------------~
~
~
[gJ
[ID
[!]
[§]
~J
~
.::~;
.---
li
__
::l
__
--.l.>O---.....

~25
'\.A
,0 Using Your
VAIO
Compute
[ID
Indicators
C1J
(Num lock): Turns on whileinthe Num Lock state.
lAl
(Caps lock): Turns on whileinthe Caps Lock state.
[jJ
(Scroll lock): Turns on while in the Scroll Lock state.
'f
(Connect): Turns on while connection between the computer and
the wireless keyboard is in place to indicate that the keyboard is
ready for use (page 28).
Qr.,..1
(Battery):
~rlAtiI
turns on while the AA batteries for the
wireless keyboard are sufficient and switches to
a:::i]
when the
batteries wear out.
[ID
Power switch
Slide the power switch to turn on and off the wireless keyboard.
[l] Windows key
Displays the
Start menu.
rn:J
Touch pad
See
Using the Touch Pad
(page
31) for more information.
rID
Applications key
Displays a shortcut menu
in
certain software applications.
[j]] Directional arrow keys
Move the pointer on the screen.
10
~~~
'\.A
Using Your VAIO Computer
/""',................................ . _ _ _ _ _ -......................•- _ _ _ - ___...•......-
_,.
IlQn
·
~~~mj-"t
I
~ill
I
!
i
I
I
I
j
i
I
!
I
I
j
i
\",._Q;.=.~.·--:::::::::::::.":"
:.=.'::-:
":":::.~_::_.=.b._
__
..mum
m u m..mm.m.J.J
L/.
J
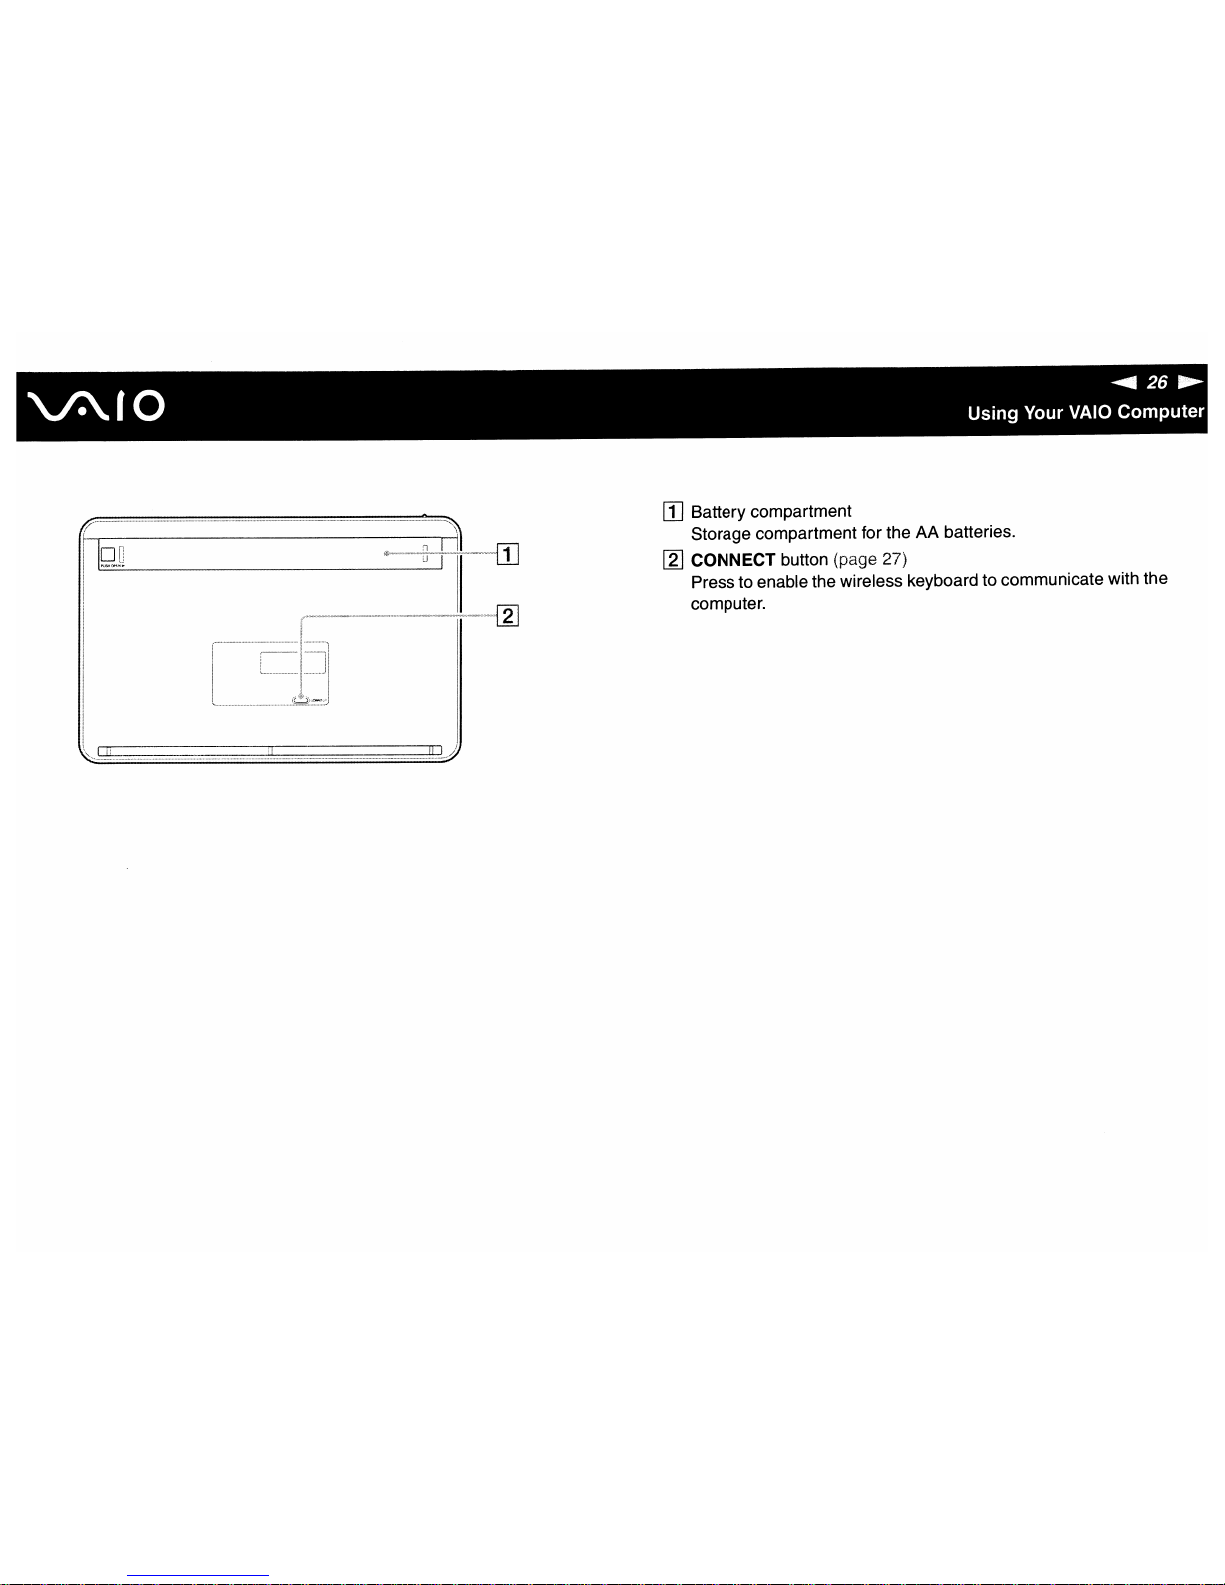
[1]
Battery
compartment
Storage
compartment
for
theAAbatteries.
[2] CONNECT
button
(page 27)
Presstoenable
the
wireless
keyboardtocommunicate
with
the
computer.

~27
'\.A
f0 Using Your VAIO Compute
Before you use the keyboard
Four AA alkaline batteries are supplied with your computer for use in the wireless keyboard. Before attempting to use the
wireless keyboard, you must install the batteries and establish communication between the computer and the keyboard.
!
To
maintain
good
communication,
operate
the
wireless
keyboard
within
the
distance
limitationsofkeyboard:
approximately
32.8
feet
(10m)
from
your
computer.
Confirm
that
the
suppliedAAbatteries
are
properly
installed.
Press
the
CONNECT
button
locatedonthe
frontofyour
computer
first,
and
then
press
the
CONNECT
buttononthe
bottomofthe
wireless
keyboard.
Avoid
using
any
wireless
devices
that
exchange
radio
signalsonthe
2.4
GHz
frequency
band
near
the
wireless
keyboard.
These
devices
may
cause
interference,
causing
the
keyboardtostop
working
properly.
Do
not
place
metal
furniture
near
your
computerorwireless
keyboard,asthis
may
create
interference,
causing
the
keyboardtostop
working
properly.
Do
not
mix
old
(used)
and
new
batteries
when
replacing
batteriesinthe
wireless
keyboard.
Always
use
the
same
type
and
manufactureofbattery.
Do
not
mix
alkaline
with
manganese
batteries.
Using
incompatible
batteriesormixing
used,
newordifferent
typesofbatteries
can
damage
the
wireless
keyboard.
~28~
'\.A.
,0 Using Your
VAIO
Computer
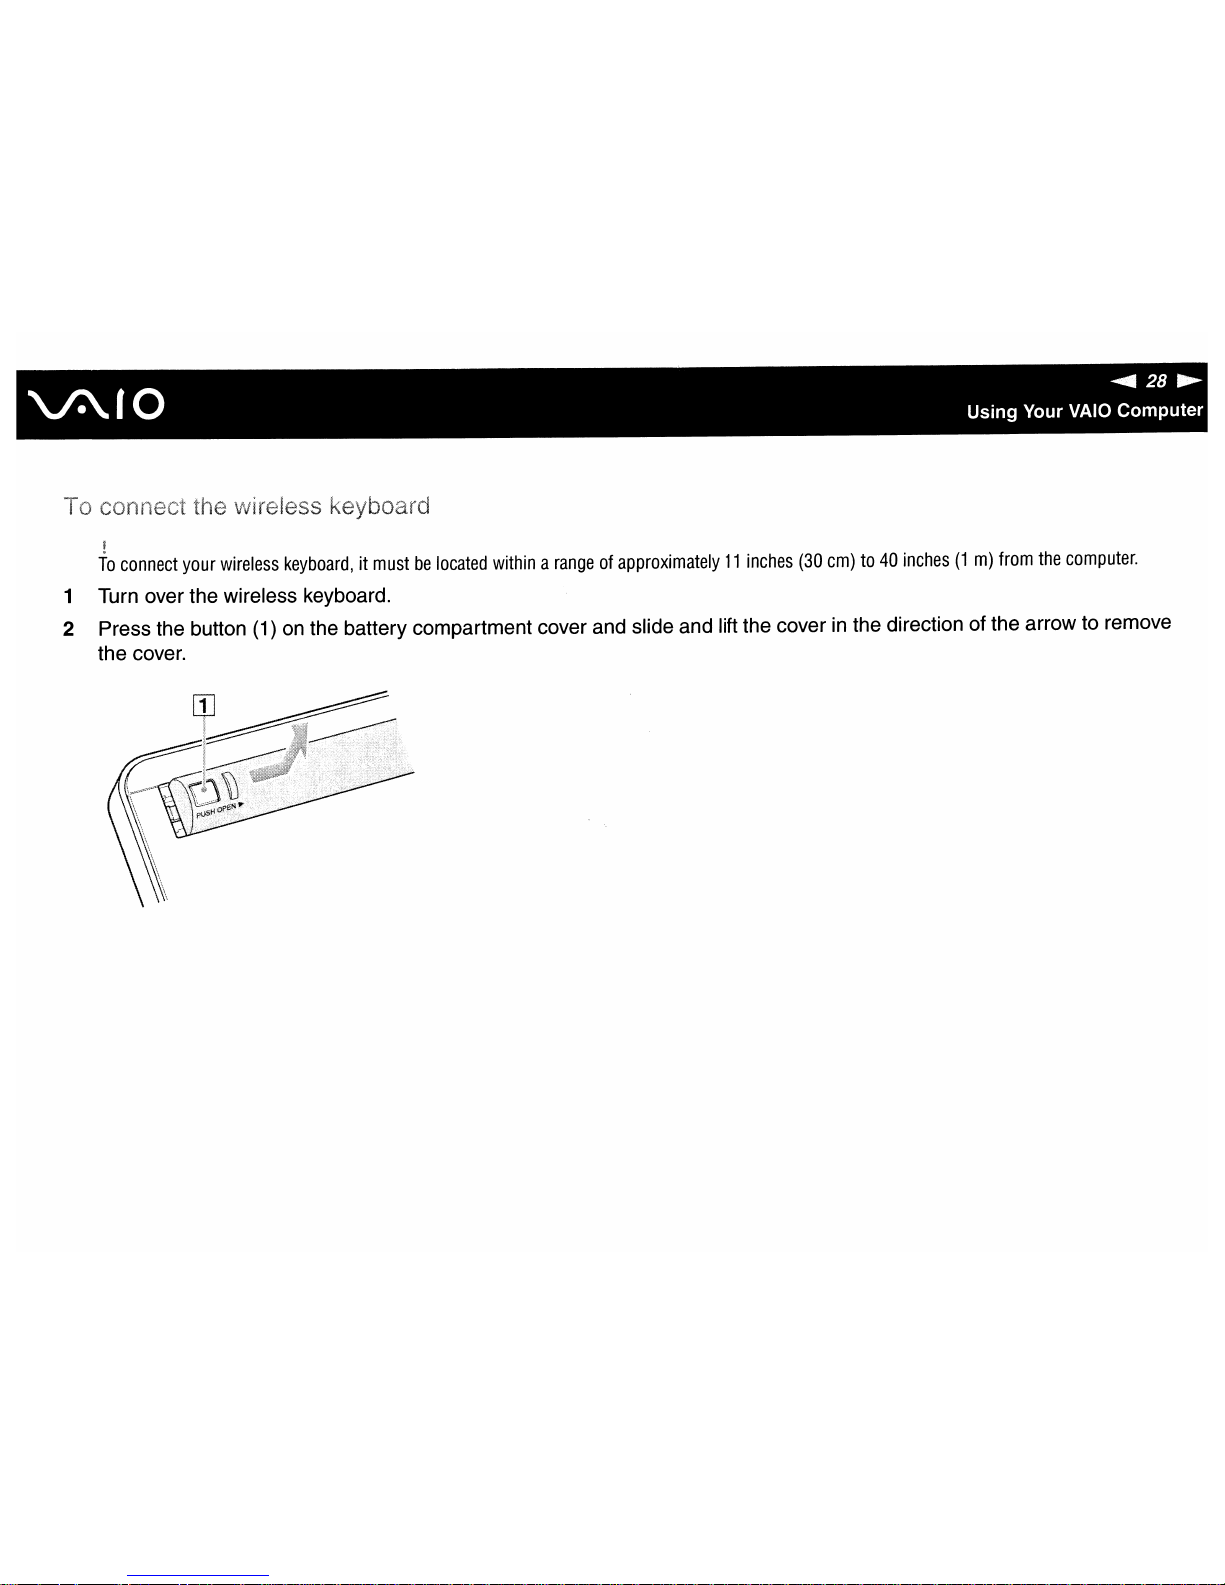
o
To
connect
your
wireless
keyboard,itmustbelocated
withinarangeofapproximately11inches
(30
em)to40
inches(1m)
from
the
computer.
1 Turn over the wireless keyboard.
2 Press the button
(1)
on
the battery compartment cover and slide and lift the cover in the direction of the arrow to remove
the cover.
~29
'.A
f0 Using Your
VAIO
Compute
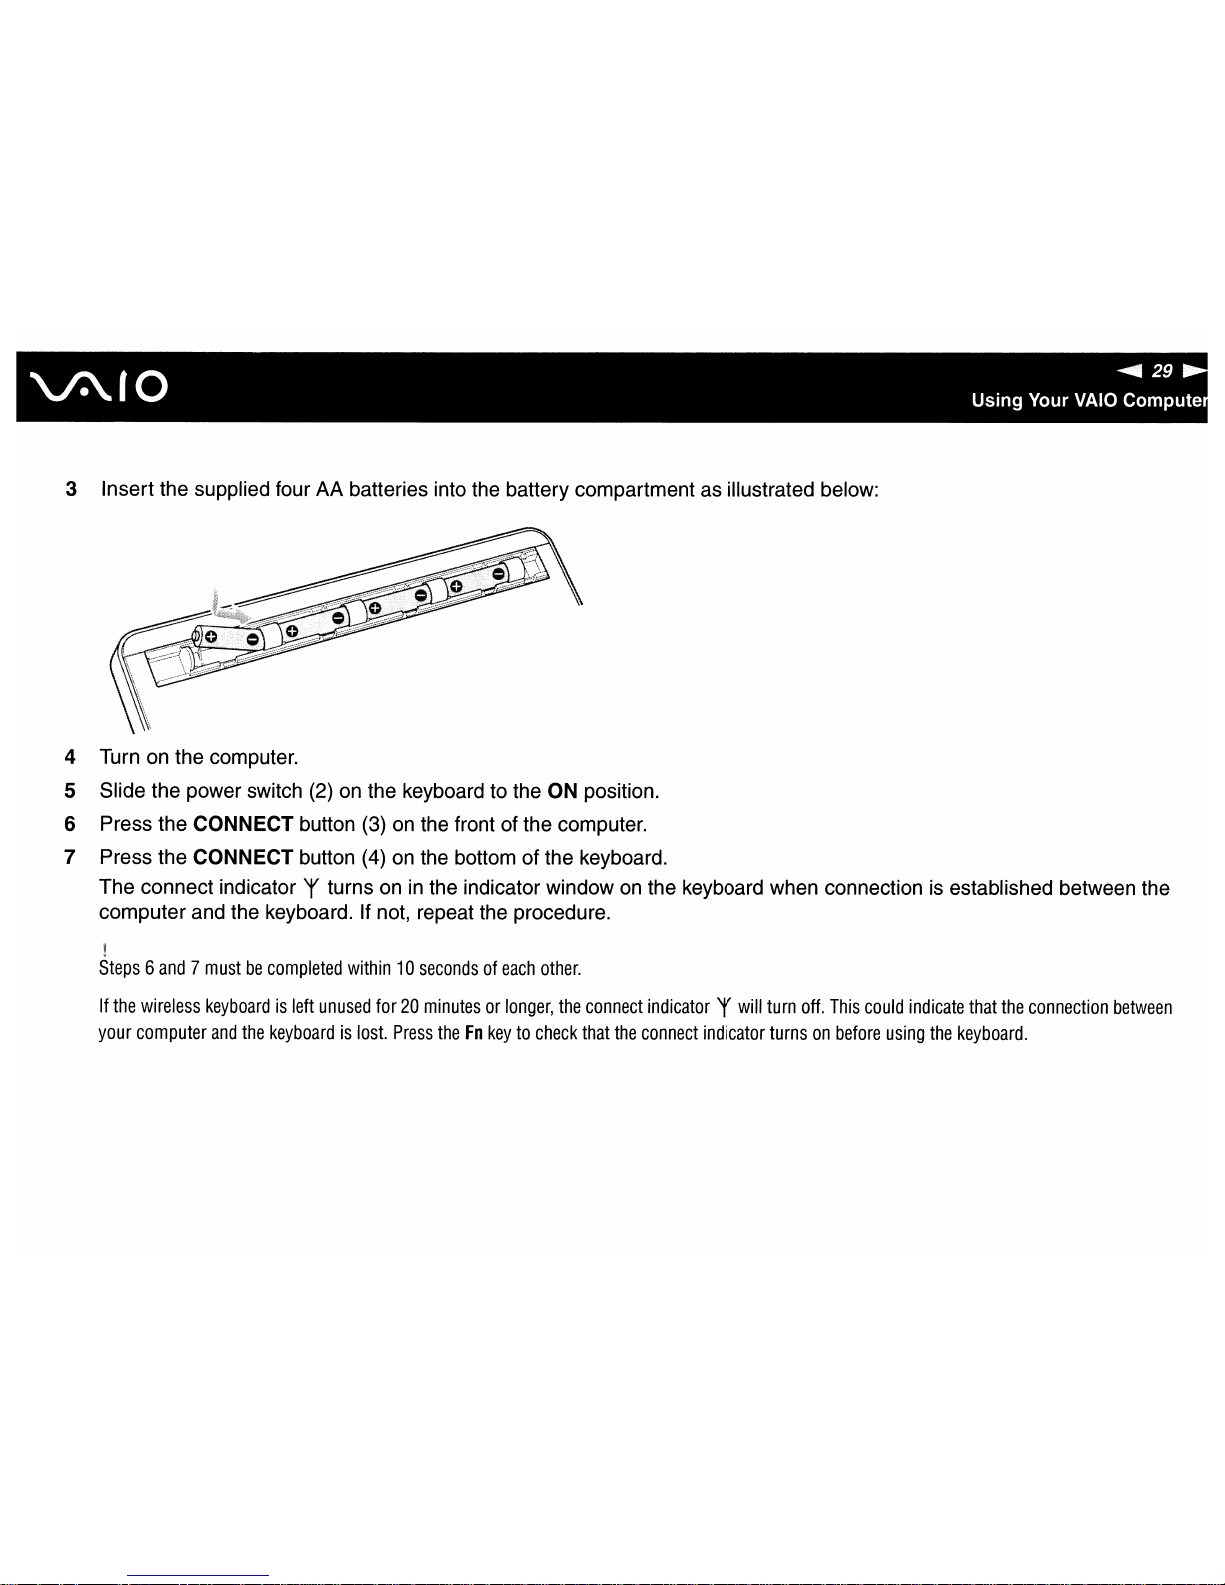
3 Insert the supplied four AA batteries into the battery compartment as illustrated below:
4 Turn on the computer.
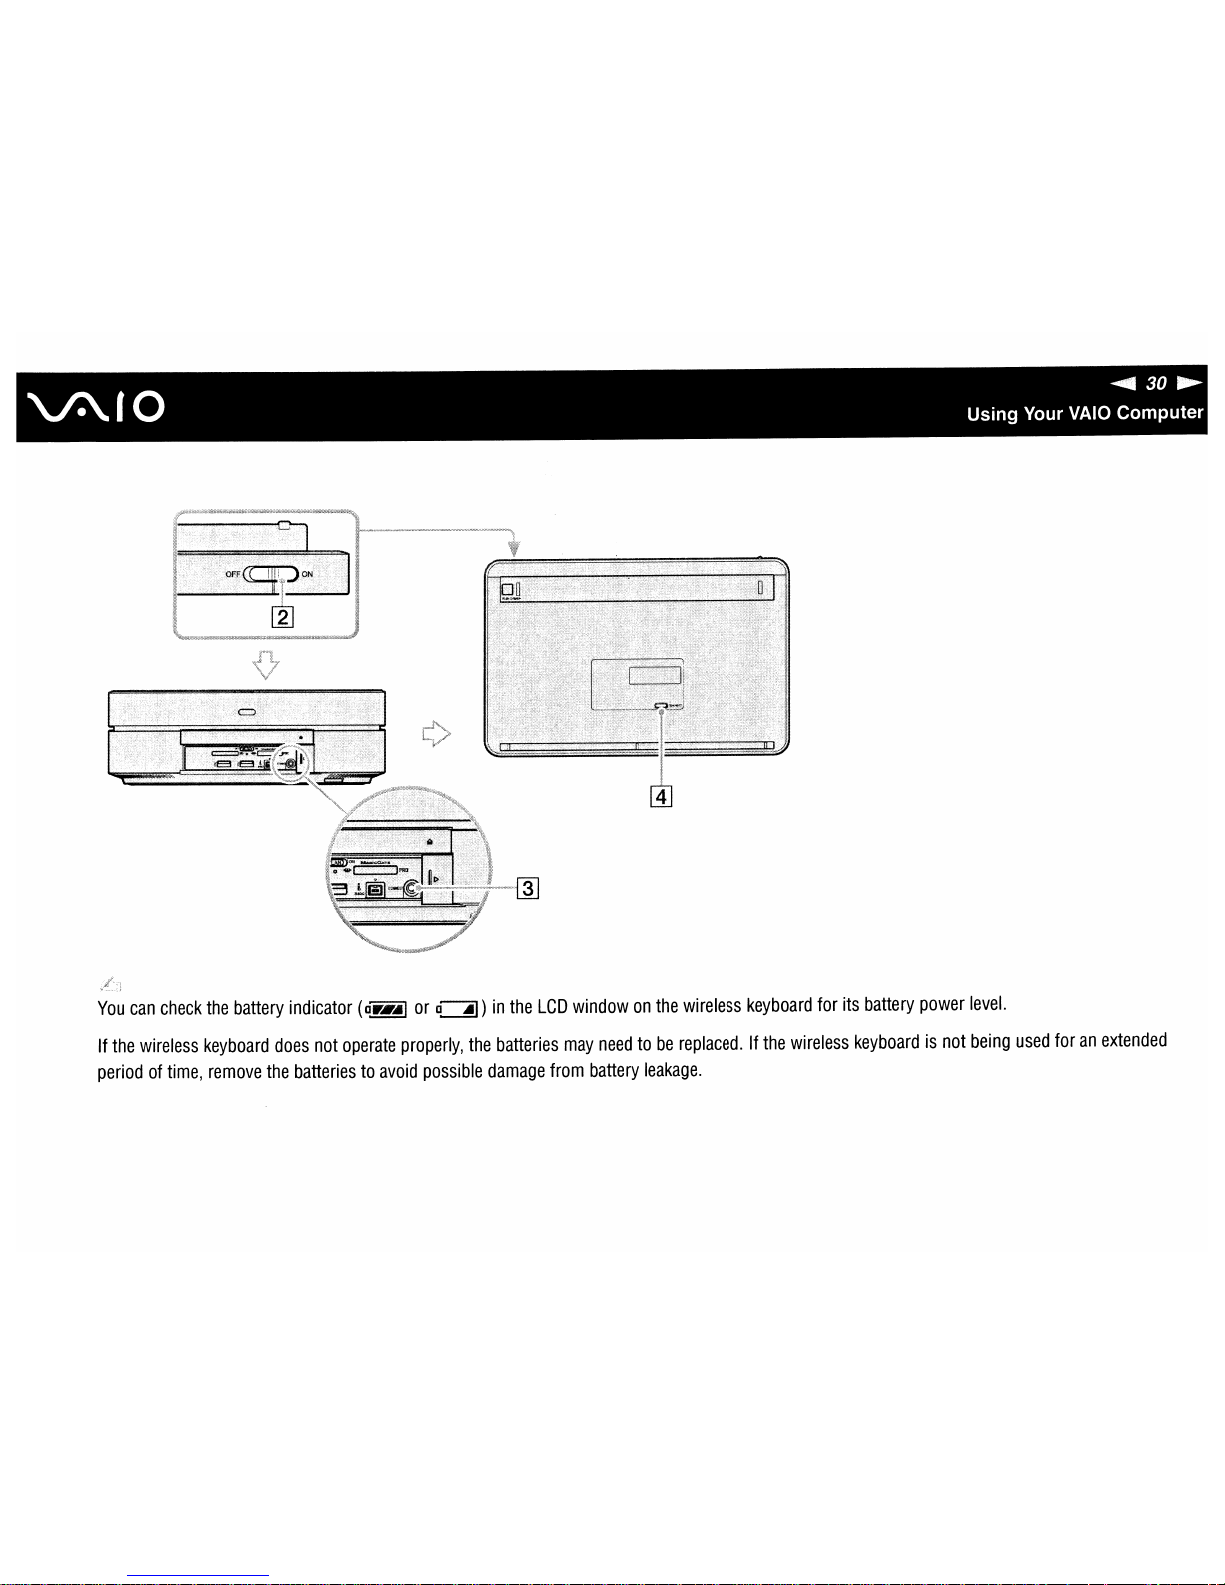
S Slide the power switch
(2)onthe keyboard to the
ON
position.
6 Press the CONNECT button (3)
on
the front of the computer.
7 Press the CONNECT button (4)
on
the bottom of the keyboard.
The connect indicator
r turns
oninthe indicator windowonthe keyboard when connectionisestablished between the
computer and the keyboard. If not, repeat the procedure.
Steps6and7mustbecompleted
within10secondsofeach
other.
If
the
wireless
keyboardisleft
unused
for20minutesorlonger,
the
connect
indicatorrwill
turn
off.
This
could
indicate
that
the
connection
between
your
computer
and
the
keyboardislost.
Press
theFnkeytocheck
that
the
connect
indicator
turnsonbefore
using
the
keyboard.
~30~
~
,0 Using Your
VAIO
Computer
You
can
check
the
battery
indicator
(Qr
...
'
or
D~)
in
the
LCD
windowonthe
wireless
keyboard
for
its
battery
power
level.
If
the
wireless
keyboard
does
not
operate
properly,
the
batteries
may
needtobe
replaced.Ifthe
wireless
keyboardisnot
being
used
foranextended
periodoftime,
remove
the
batteriestoavoid
possible
damage
from
battery
leakage.
 Loading...