

Sony VAIO VGP-MR100 Operating Instructions Manual

Network Media Receiver
VGP-MR100
Operating Instructions
2
English
WARNING
To prevent fire or shock hazard,
do not expose the unit to rain or
moisture.
To avoid electrical shock, do not
open cabinet. Refer servicing to
qualified personnel only.
• The power socket outlet you are using must
be installed near the equipment and must
be easily accessible.
• Audio and picture distortion may occur if
this equipment is positioned in close
proximity to any equipment emitting
electromagnetic radiation.
For customers in the USA and
Canada
Owner’s record
The model number and serial number are
located on the bottom of your Network Media
Receiver.
Record the serial number in the space
provided below. Refer to this number
whenever you call your Sony dealer regarding
this product.
Model No. VGP-MR100
Serial No. __________________________
FCC Notice
This equipment has been tested and found to
comply with the limits for a Class B digital
device, pursuant to Part 15 of the FCC Rules.
These limits are designed to provide
reasonable protection against harmful
interference in a residential installation. This
equipment generates, uses, and can radiate
radio frequency energy and, if not installed
and used in accordance with the instructions,
may cause harmful interference to radio
communications. However, there is no
guarantee that interference will not occur in a
particular installation. If this equipment does
cause harmful interference to radio or
television reception, which can be determined
by turning the equipment off and on, the user
is encouraged
to try to correct the interference using one or
more of the following measures:
– Reorient or relocate the receiving antenna.
– Increase the separation between the
equipment and receiver.
– Connect the equipment into an outlet on a
circuit different from that to which the
receiver is connected.
– Consult the dealer or an experienced radio/
TV technician for help.
The shielded interface cable recommended in
this manual must be used with this equipment
in order to comply with the limits for a digital
device pursuant to subpart B of Part 15 of
FCC.
You are cautioned that any changes or
modifications not expressly approved in this
manual could void your authority to operate
this equipment.
For questions regarding your product or for
the Sony Customer Information Service
Center nearest you,call 1-888-476-6972 in the
United States or 1-800-961-7669 in Canada.
The number below is for FCC related matters
only.
Declaration of Conformity
Trade Name: SONY
Model No.: VGP-MR100
Responsible Party: Sony Electronics Inc.
Address: 16450 W. Bernard Dr.,
San Diego, CA 92127
U.S.A
Telephone No.: 858-942-2230
This device complies with Part 15 of the
FCC Rules.
Operation is subject to the following two
conditions: (1) This device may not cause
harmful interference, and (2) this device
must accept any interference received,
including interference that may cause
undesired operation.

3
Introduction
FCC Radiation Exposure Statement
The available scientific evidence does not
show that any health problems are associated
with using low power wireless devices. There
is no proof, however, that these low power
wireless devices are absolutely safe. Low
power Wireless devices emit low levels of
radio frequency energy (RF) in the microwave
range while being used. Whereas high levels
of RF can produce health effects (by heating
tissue), exposure to low level RF that does not
produce heating effects causes no known
adverse health effects. Many studies of low
level RF exposures have not found any
biological effects. Some studies have
suggested that some biological effects might
occur, but such findings have not been
confirmed by additional research. The VGPMR100 has been tested and found to comply
with the Federal Communications
Commission (FCC) guidelines on radio
frequency energy (RF) exposures. The
maximum SAR levels tested for the [ product
name (model name) ] has been shown to be
[value] W/kg at [position].
This device and its antenna(s) must not be colocated or operating with any other antenna or
transmitter. Users are not permitted to modify
this transmitter device. Any unauthorized
changes made to this device could void your
authority to operate this device.
For customers in Canada
This Class B digital apparatus complies with
Canadian ICES-003.
The term “IC:” before the radio certification
number only signifies that the Industry
Canada technical specifications were met.
Operation is subject to the following two
conditions: (1) This device may not cause
harmful interference, and (2) this device must
accept any interference received, including
interference that may cause undesired
operation of the device.
IC Exposure of Humans to RF Fields
The installer of this radio equipment must
ensure that the antenna is located or pointed
such that it does not emit RF field in excess of
Health Canada limits for the general
population; consult Safety Code 6, obtainable
from Health Canada’s website: www.hcsc.gc.ca/rpb.
To prevent radio interference to the licensed
service, this device is intended to be operated
indoors and away from windows to provide
maximum shielding. Equipment (or its
transmit antenna) that is installed outdoors is
subject to licensing.
If a problem occurs with this product as a
result of defective manufacturing, Sony will
replace it.
However, Sony bears no other responsibility.
Please note that, due to continued efforts to
improve quality, the firmware specifications
may be changed without notice.
Television programs, films, videotapes, CDs
and other materials may be copyrighted. Such
materials recorded with your device are for
your personal use only. Unauthorized
recording of such material may be contrary to
the provisions of the copyright laws. The law
prohibits adding any modification to the
recorded materials including but not limited to
motion pictures, images and audio, without
authorization from the copyright holder.
Some of these materials may be duplicationprotected to disable unlawful recording.
Television programs, films, videotapes, CDs
and other materials may be copyrighted.
Recorded materials are for your personal use
only. Unauthorized recording of such material
may be contrary to the provisions of the
copyright laws.

4
Trademarks
• VAIO, , and VAIO Media are
registered trademarks of Sony Corporation.
• Microsoft and Windows are registered
trademarks of Microsoft Corporation in the
United States and/or other countries.
• Manufactured under license from Dolby
Laboratories.
• “Dolby”, “Pro Logic”, “MLP Lossless”,
and the double-D symbol are trademarks of
Dolby Laboratories.Confidential
unpublished works. Copyright 1992–1998
Dolby Laboratories. All rights reserved.
• ATHEROS and Atheros Total 802.11
Super G are trademarks of Atheros
Communications, Inc. The Atheros and
Atheros Total 802.11 Super G logos are
registered trademarks of Atheros
Communications, INC.
• Other system names and product names
appearing in this document are generally
registered trademarks or trademarks of their
manufacturers.
•™ and ® marks are not shown in this
document.
• In this manual, Microsoft® Windows® XP
Home Edition and Microsoft® Windows
®
XP Professional are referred to as Windows
XP.
-
About the supplied guides
The following guides are included with
this Network Media Receiver.
• User’s Guide (this document)
Contains information on how to use the
Network Media Receiver.
• Quick Connection Guide
Contains information on how to setup
the Network Media Receiver.
z Illustrations used in this manual
Illustrations and screens used in this guide
may vary from the actual screens.

5
Introduction
Table of Contents
Introduction
What this product can do ..................... 7
Operating environment ...................... 10
Computers that can be connected to
this product: ............................ 10
Check the supplied accessories ......... 11
Names of parts ................................... 12
Setup
Setup overview .................................. 15
Connection between Network Media
Receiver and computer ........... 15
Getting ready .............................. 16
1 Prepare remote control for use ...... 17
Inserting the batteries .................. 17
Programming the remote control 18
2 Connect Network Media Receiver to
TV .................................................. 20
3 Connect Network Media Receiver to
computer via network cable........... 23
Network cable connection .......... 23
To connect the Network Media
Receiver to a network ............. 27
Assigning a fixed IP address to the
computer ................................. 29
4 Connect power ............................... 31
5 Make wireless LAN settings ......... 32
Using the software keyboard ...... 34
6 Change settings of Network Media
Receiver to match network
connection ..................................... 35
7 Make required settings at
computer ........................................ 37
Operation
Operation flow ................................... 38
Power-on ........................................... 40
To turn power off ........................ 41
Selecting a server ............................... 41
To select a server ........................ 42
To refresh the server list ............. 42
Removing a server from
the list...................................... 43
Selecting content ............................... 43
Changing the display format ....... 44
Changing the sort order .............. 45
Watching video sources ..................... 46
Video playback ........................... 46
Using the film roll function ........ 47
Using the time search function ... 47
Listening to music ............................. 48
Music playback ........................... 48
Assigning background music
(BGM) to a slide show ............ 50
Viewing photos .................................. 50
Using the slide show function ..... 50
Watching a slide show with
background music ................... 52
Changing the slide show
settings .................................... 53
Other Functions
How to get the most out of your
Network Media Receiver ............... 54
Having the computer start up
automatically ........................... 54
Checking/changing the time
required to enter standby ........ 55
Changing the settings of the Network
Media Receiver .............................. 56
To bring up the ??? “System Setup”
??? screen ................................ 56

6
Settings available on the ???
“System Setup” ??? screen ..... 57
To update the software ................ 57
To return the unit to the default
condition ................................. 58
To select the TV type .................. 58
To control the file playback
method .................................... 59
To change the display
language .................................. 59
About the STATUS and WIRELESS
indicators ....................................... 60
Operation of STATUS and
WIRELESS indicators during
hardware diagnosis ................. 61
Notes on Use ..................................... 62
Specifications .................................... 64
Getting Help ...................................... 65
Troubleshooting
Power ................................................. 66
Power does not come on ............. 66
Network Media Receiver cannot be
switched off ............................ 66
Computer does not come on (does
not start up from the standby or
hibernation condition) ............. 67
Remote control .................................. 67
Remote control does not work .... 67
Video, audio ...................................... 68
Sound or picture from Network
Media Receiver is not reproduced
on TV ...................................... 68
Picture/sound sometimes stops or is
distorted .................................. 68
Video playback suffers from
dropped frames ....................... 68
A screen saver image is shown on
the TV ..................................... 68
Connection, registration .................... 69
Cannot connect to computer
(“Cannot connect to server”
message appears) .................... 69
Cannot register Network Media
Receiver in computer .............. 70
Computer does not show up on ???
“Server List” ??? screen.......... 70
Can no longer connect to computer
after recovery .......................... 70
Introduction
7
Introduction
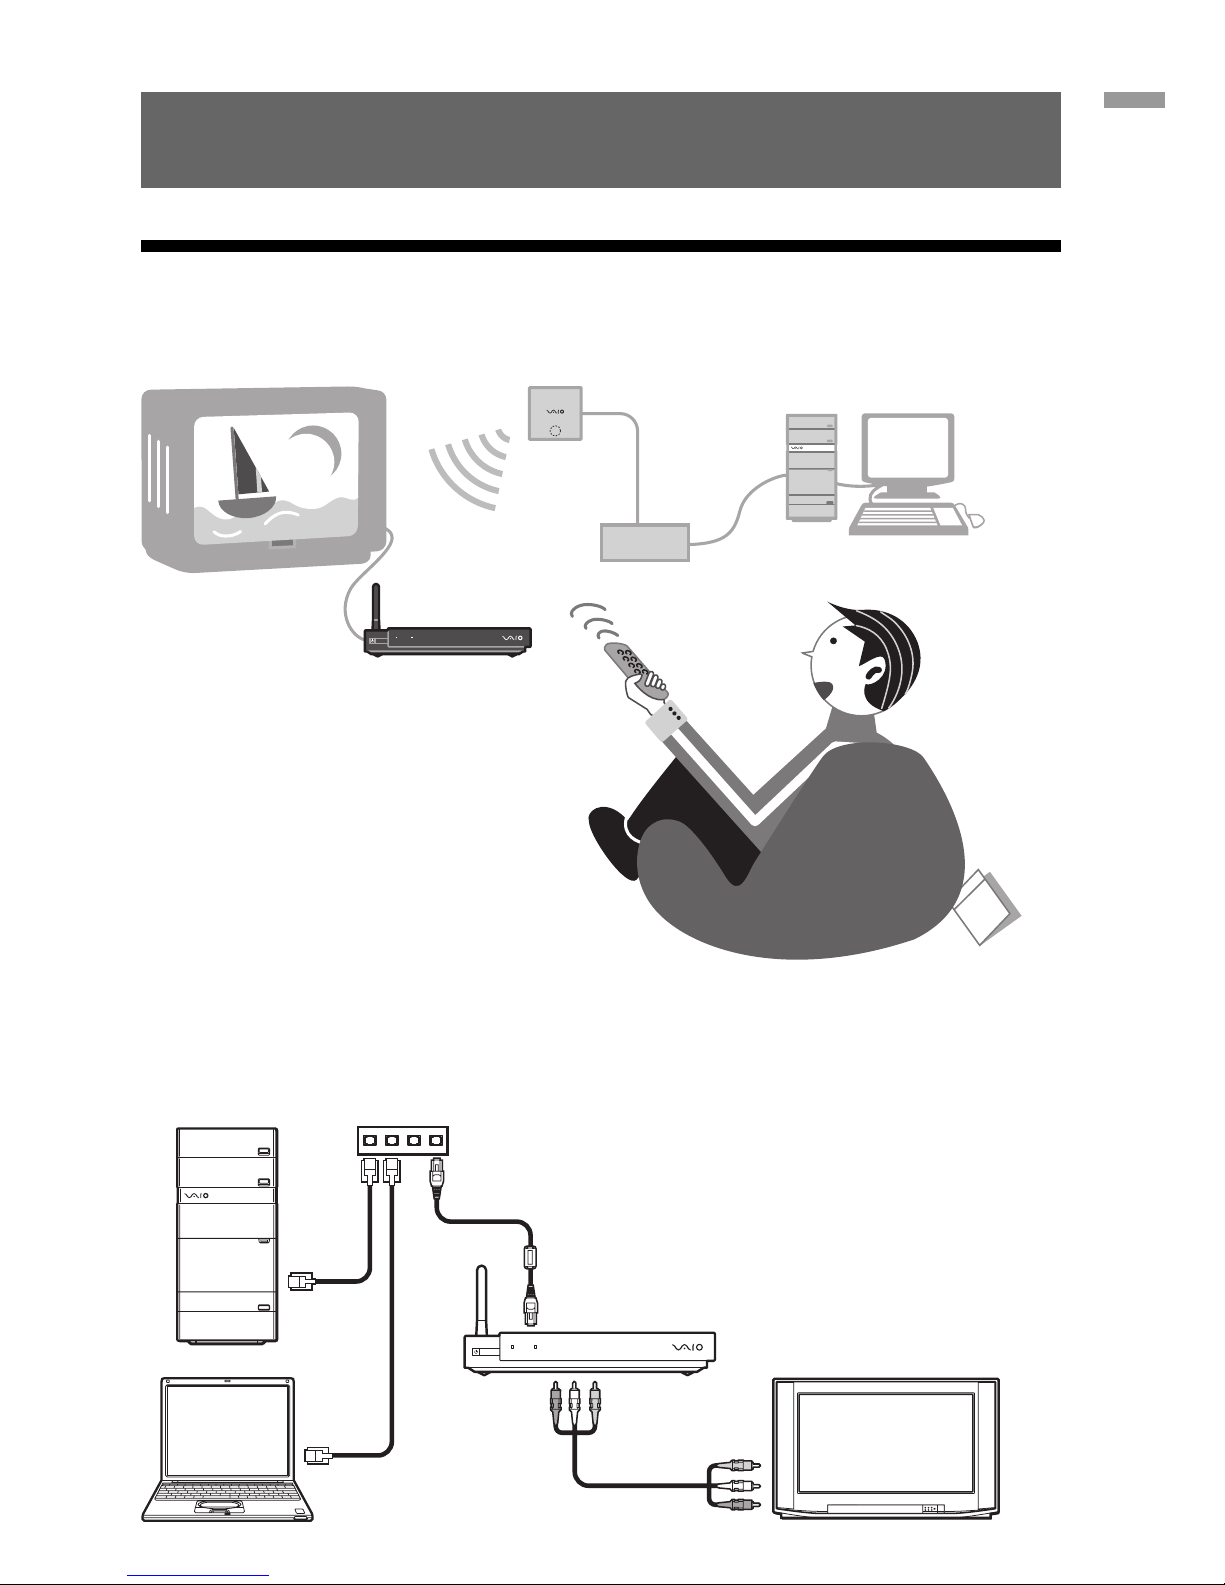
What this product can do
You can use your TV set to enjoy photos, video, or music stored on your computer.
Support for connection of multiple computers
Multiple computers can be connected via a router with hub capability (or a conventional hub).
When multiple computers are connected, you can switch between them.
8
The VAIO web site always has the latest information and allows you to download software
upgrades that may be useful in resolving various issues. To get the most out of this product,
periodically visit the site listed in “Getting Help”.
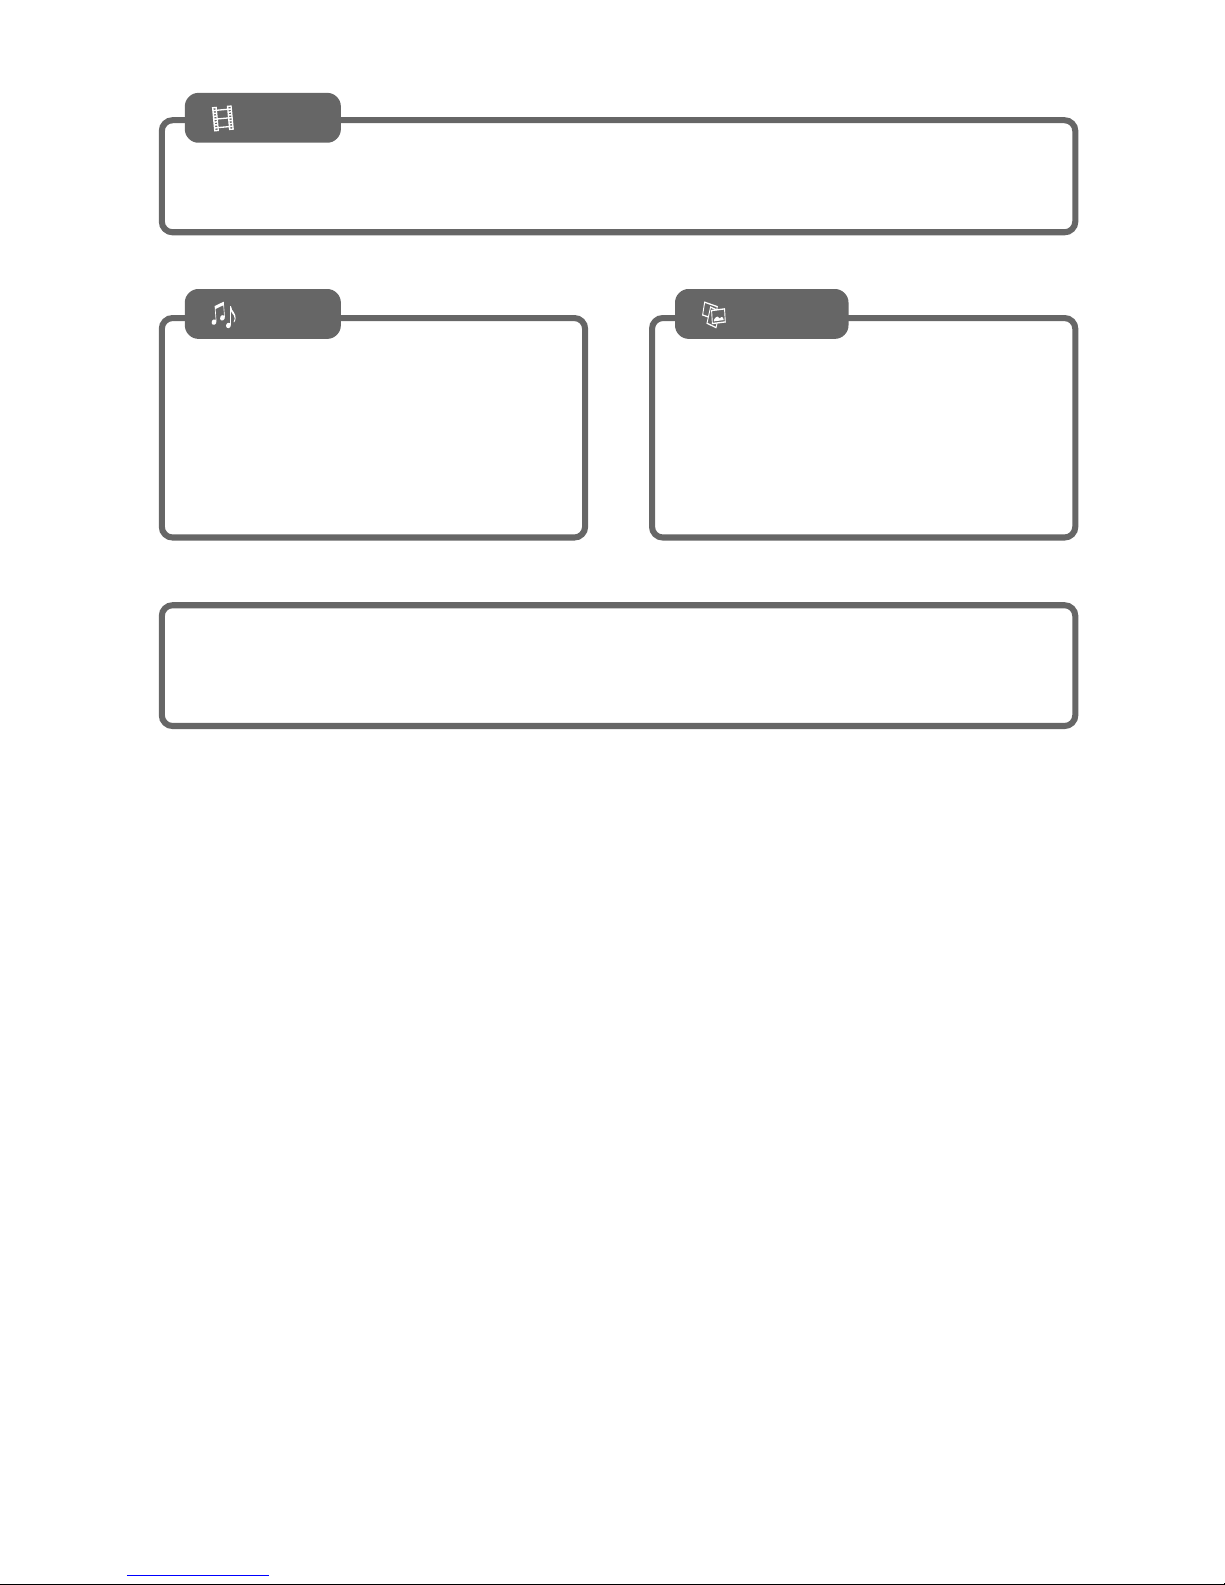
Music
• Play back music files stored on the
computer (page 68)
• Locate songs (page 69)
• Perform repeat playback (page 70)
Photos
• View photos stored on the computer as
a slide show (page 72)
• Listen to background music during a
slide show (page 74)
• Select a single photo for viewing
(page 76)
Video
• Play back video files stored on the computer (page 60)
• Use the film roll feature to search for a desired scene during video playback (page 64)
Introduction
9
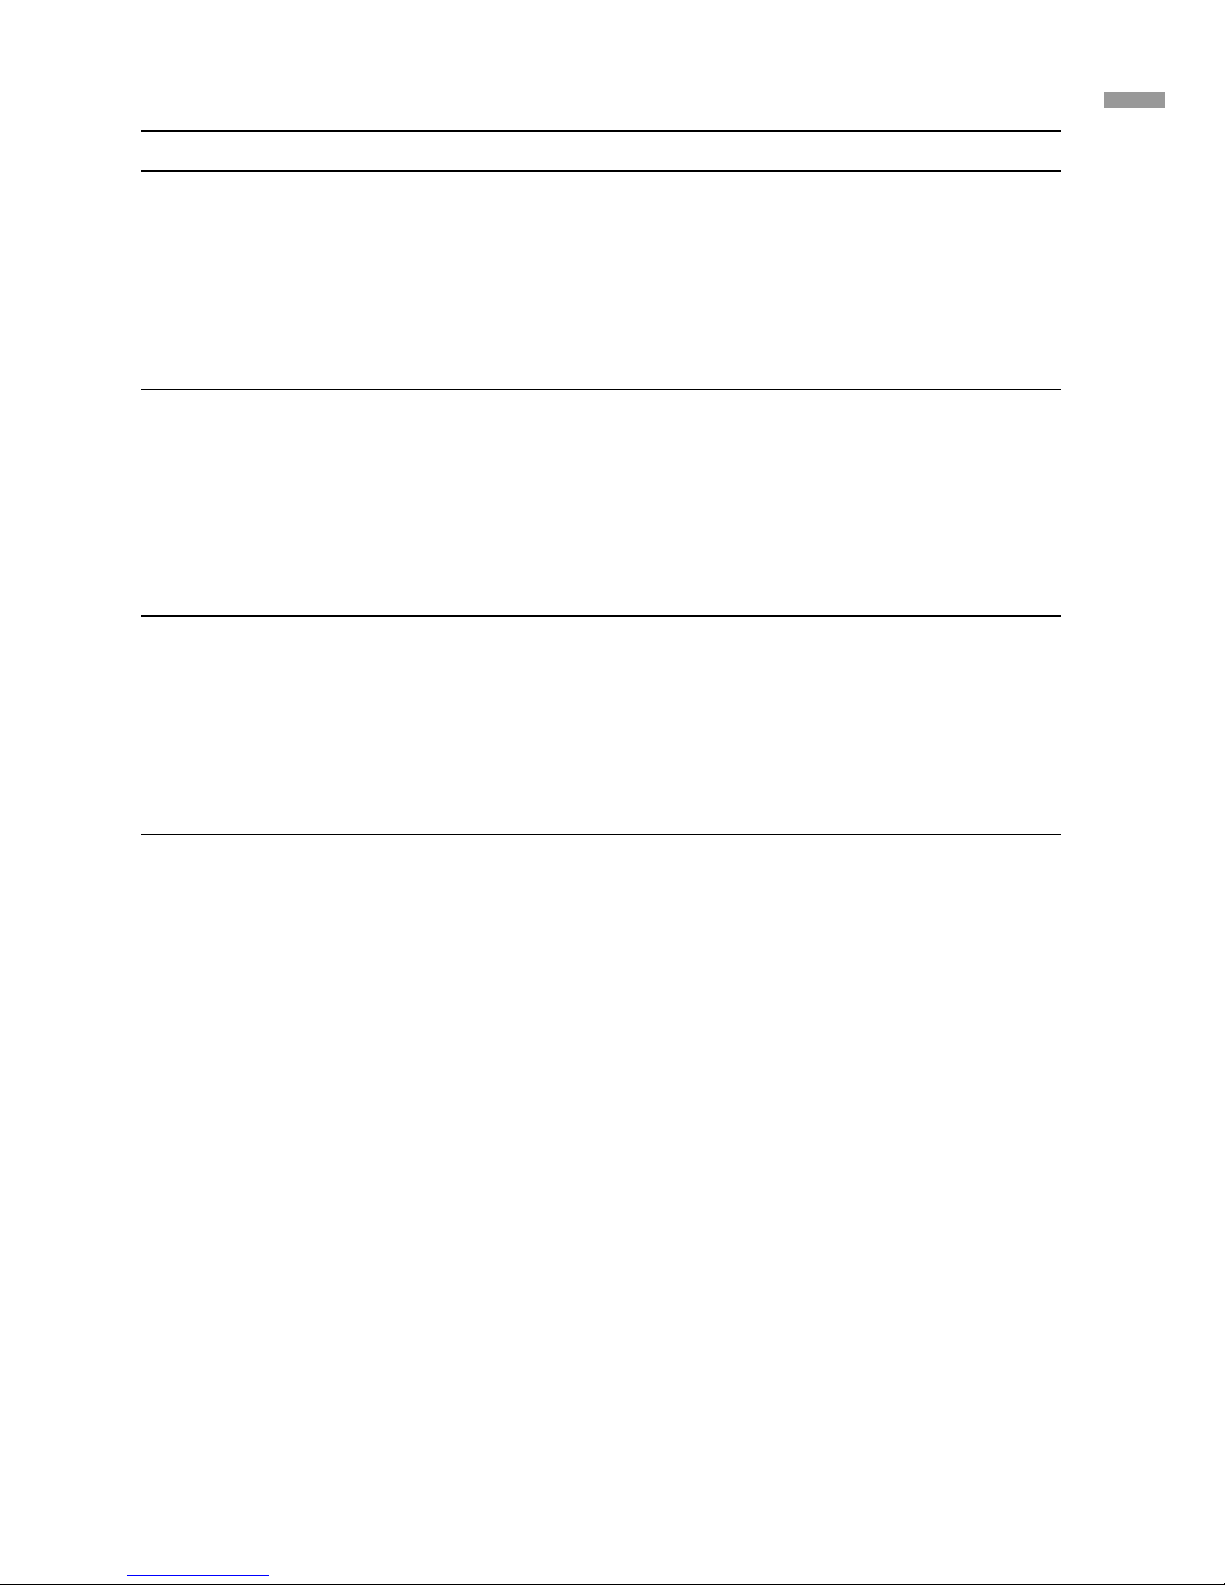
Files that can be played back
Category Content Supported file types
Video Video capsules recorded on the
VAIO with Giga Pocket, or
other video files stored on the
computer
Music Music files and playlists stp•Ñ¥
on the computer
Photos Photo (still image) files stored
on the computer or in a
specific folder on the computer
• Video capsule
• MPEG1
• MPEG2
• Depending on the connected computer, the
following file type may also be supported:
– WMV
• LPCM (WAV) format
• MP3 format
• Depending on the connected computer, the
following file types may also be supported:
– WMA format
– ATRAC3 format
– ATRAC3plus format
• JPEG format
• PNG format
• Depending on the connected computer, the
following file types may also be supported:
– Bitmap format
– GIF format
– TIFF format

10
Operating environment
Computers that can be connected to this product:
• Sony VAIO series computer with Windows XP installed and VAIO Media
Version 4.1 preinstalled
• Sony VAIO series computer sold after September 2002 with VAIO Media
Version 2.0 preinstalled and upgraded with VAIO Media Upgrade Program
4.1
Note
• Depending on the usage environment of your computer, certain operation limitations may apply. For
the latest information, check the web site listed in “Getting Help”.
• For VAIO Media updates, visit the web site listed in “Getting Help”.
• Equipment corresponding to the DLNA guidelines (DLNA HNv1 PreCertification compliant)

Introduction
11
Check the supplied accessories
After unpacking the unit, make sure that the accessories listed below are present. If anything is
missing, contact the Sony dealer where you purchased this product or a Sony service representative
in your area.
You can use the boxes ❏ to tick off items.
❏
Main unit (1)
❏
Remote control (1)
❏
IEC R6 (size AA) battery (2)
❏
AC adapter (1)
❏
Power cord (1)
❏
Audio/video connection cable (1)
❏
Network cable (1)
❏
Crossover cable (1)
❏
Connection adapter (1)
❏
Operating Instructions (this document) (1)
❏
Quick Start Guide (1)
❏
Quick Connection Guide (1)
❏
Warranty Card (1)
❏
CD-ROM (1)

12
Names of parts
This section briefly identifies the parts of the unit. For details, see the pages shown in brackets ( ).
Front view
1 Power button/standby indicator (Page 26, page 00)
Pressing this button turns the unit on and off.
z Hint
When the standby indicator is lit in red, the unit is in the standby condition and can be turned on.
When the unit is on, the standby indicator is lit in green.
Note
If the standby indicator does not light up in red about 20 seconds after the power cord was connected,
contact the web site. See “Getting Help”.
2 Remote control sensor (page 27)
3 STATUS indicator (page 00)
4 WIRELESS indicator (page 00)
Side view
1 Ventilation holes
2 SET UP button (page 00)
If you press this button while the standby indicator is lit in green, the ??? “System Setup” ???
screen appears.
Introduction
13
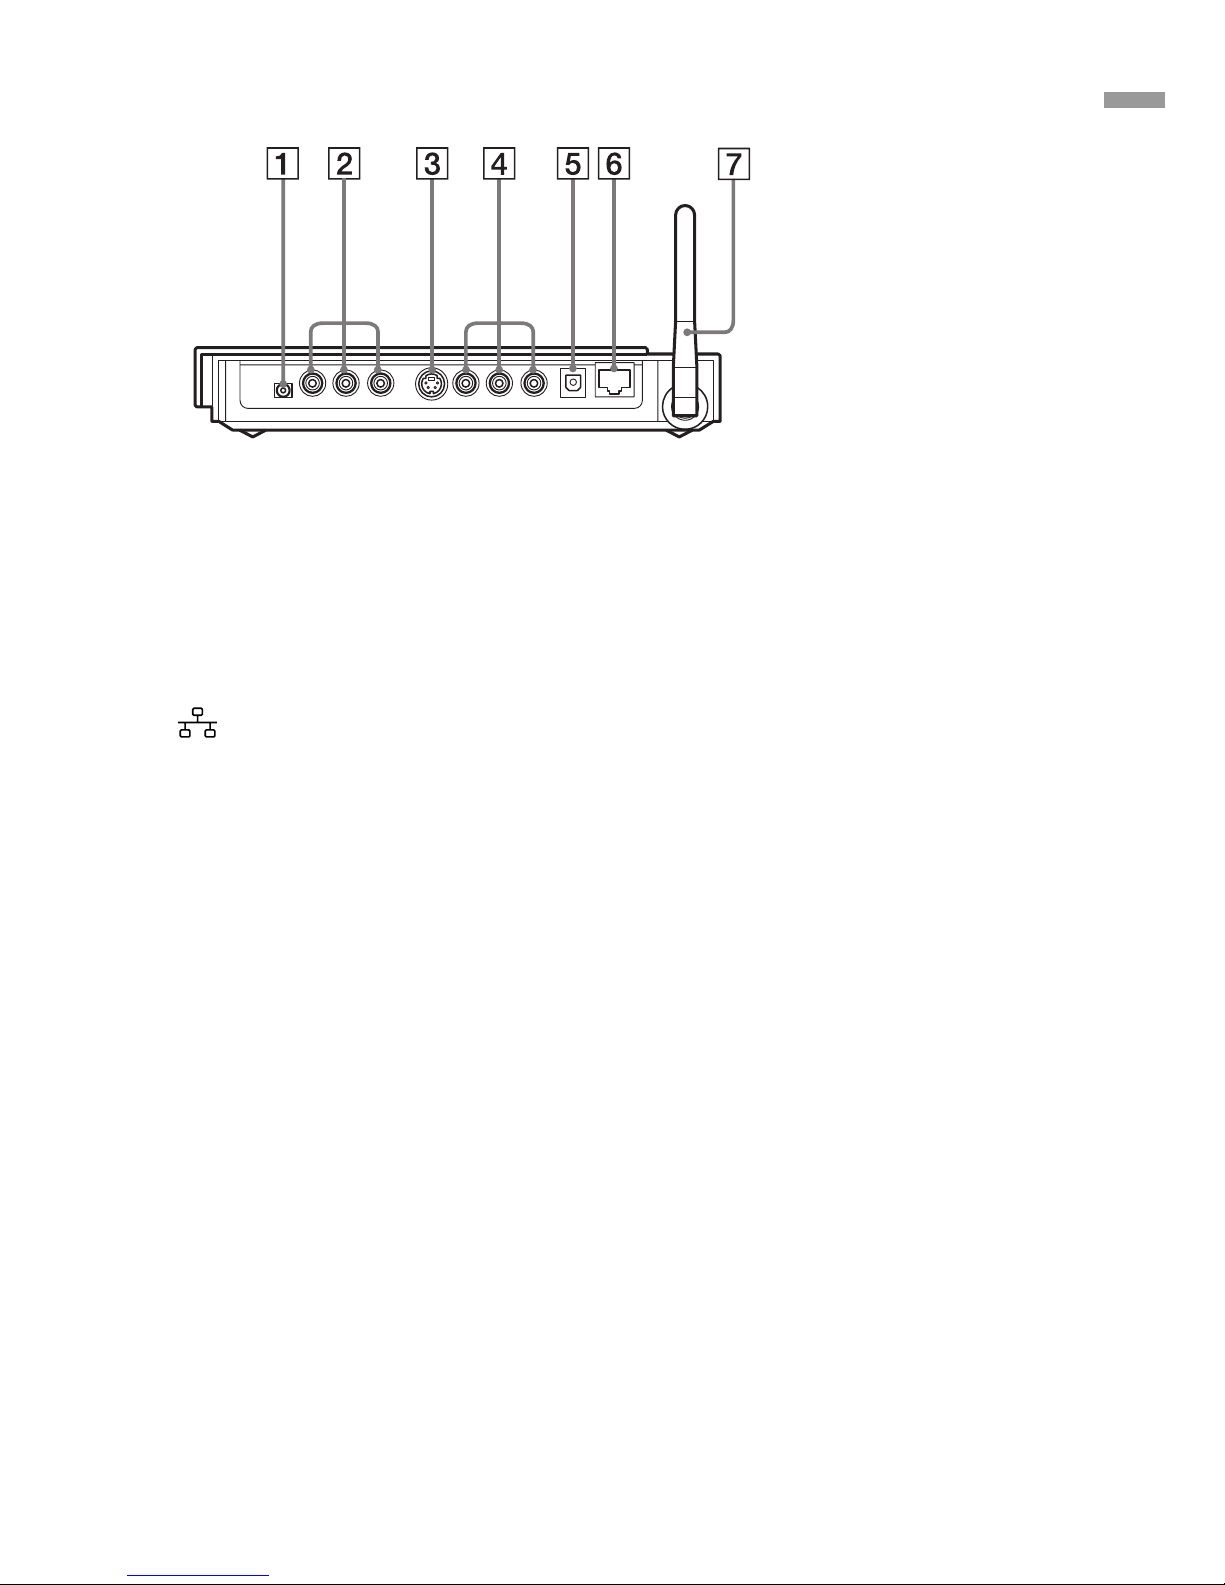
Rear view
1 1 DC IN 5.2V connector (page 00)
2 COMPONENT VIDEO OUT connectors (page 00)
3 S VIDEO OUT connector (page 00)
4 VIDEO OUT connector
AUDIO OUT (left/right) connectors (page 00)
5 OPTICAL OUT connector (page 00)
6 / NETWORK connector (page 21)
7 Antenna (page 00)
When connecting the unit to a wireless LAN, raise the antenna to the upright position by
rotating it clockwise.
14
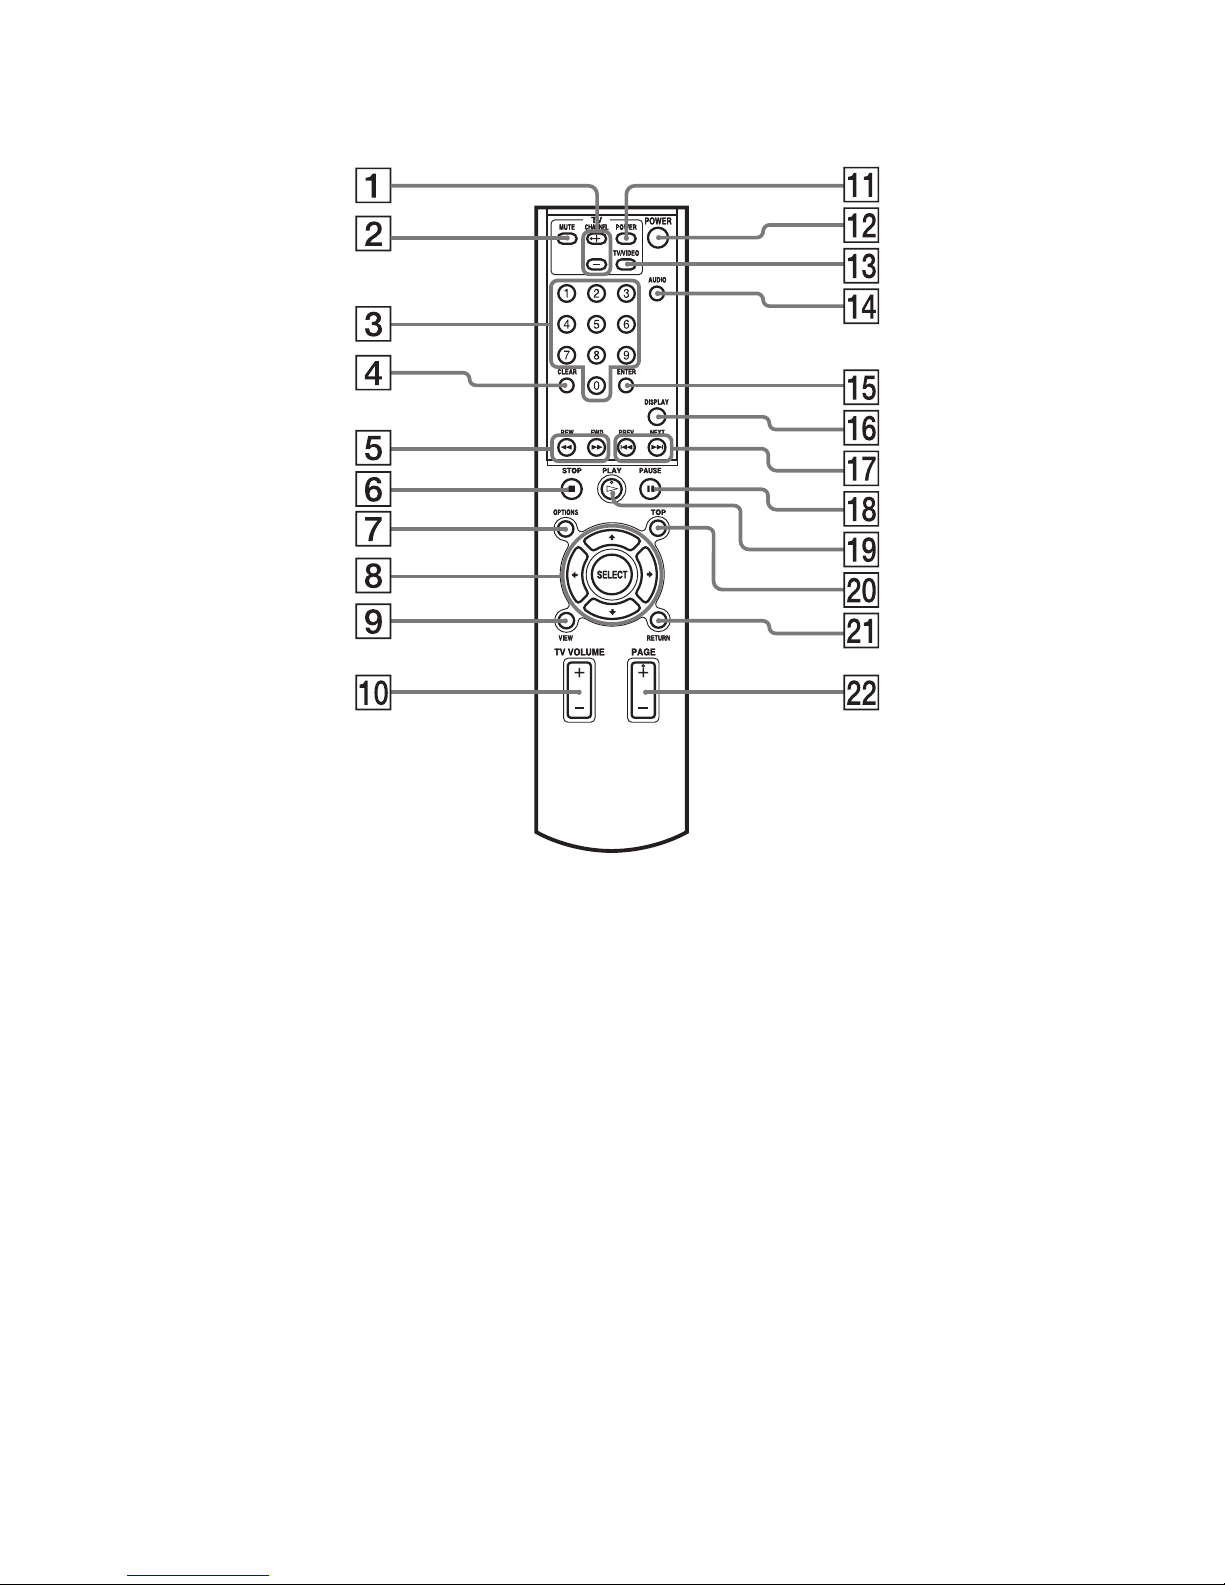
Remote control
1
TV CHANNEL +/– buttons (page 29)
2 TV MUTE button (page 29)
3 Number buttons (page 28, 51)
4 CLEAR button (page 65)
5 REW/FWD buttons (page 69)
6 STOP BUTTON (page 61)
7 OPTIONS button (page 42)
8 V/v/B/b buttons (page 28)
9 VIEW button (page 50)
0 TV VOLUME +/– buttons (page 29)
qa TV POWER button (page 29)
qs Network Media Receiver POWER
button (page 36)
qd TV/VIDEO button (page 29, 36)
qf AUDIO button (page 51)
qg ENTER button (page 51)
qh DISPLAY button (page 55)
qj PREV/NEXT buttons (page 69)
w; TOP button (page 43)
wa RETURN button (page 61)
ws PAGE
+/–
buttons
(page 51, 75)
Setup
15
Setup
Setup overview
Connection between Network Media Receiver and computer
This product incorporates two network interfaces. For connecting the Network Media Receiver to
the computer, select the type of network interface that is best suited to your requirements.
Note
If both network interfaces are used at the same time, the cable connection has priority.
Wireless connection
The wireless LAN interface built into the Network Media Receiver can be used to connect to a
computer via a wireless LAN access point.
Note
The Network Media Receiver always operates in
wireless LAN infrastructure mode (access point
network mode). Ad-Hoc (Peer-to-Peer) mode is
not supported.
This method can be used also without a
separate access point, provided that the
computer is equipped with a wireless LAN
interface.
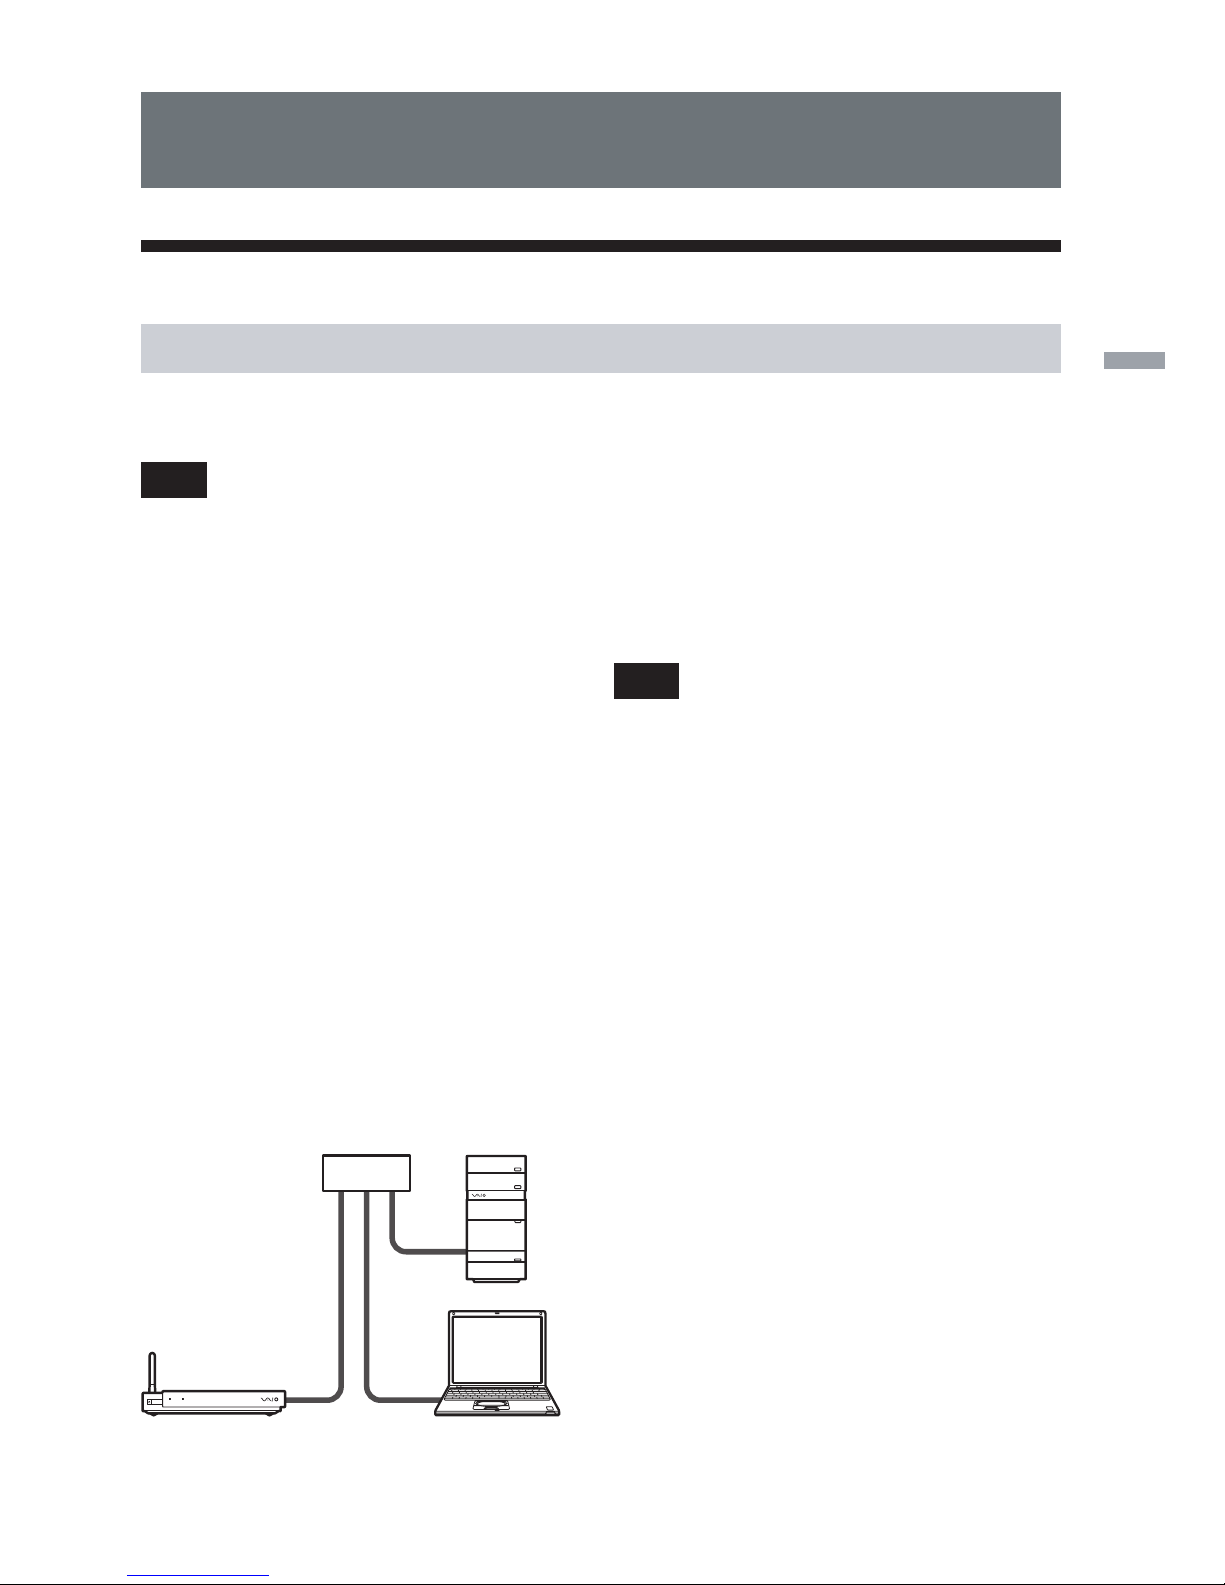
Cable based connection
In this method, the Network Media Receiver is connected to the computer using network cable.
Depending on the number of computers and type of equipment, various configurations are possible.
The illustration below shows an example for connecting the Network Media Receiver to the
computer via a hub (a device for connecting multiple devices on a network).
16
Getting ready
he steps to be taken when preparing the unit for use will differ, depending on whether a wireless
LAN or network cable is used for connection to the computer.
1. Prepare remote control for use c Page 00
The remote control is necessary for operation of the unit.
2. Connect Network Media Receiver to TV c Page 00
Select a suitable connector and cable according to the requirements of the TV monitor. It is also
possible to make the connection to the TV via a VCR.
3. Connect Network Media Receiver to computer via network cable c Page 00
Connect the Network Media Receiver to the computer using network cable. When using a
wireless connection, this step is not required.
4. Connect power c Page 00
Connect the supplied AC adapter to the Network Media Receiver to supply power.
5. Make wireless LAN settings c Page 00
When the Network Media Receiver is to be connected to the computer via a wireless link,
without using network cable, a number of wireless LAN settings must be made. When using a
network cable connection, this step is not required.
6. Change settings of Network Media Receiver to match c Page 00
network connection
Depending on the network environment, some settings of the Network Media Receiver may
have to be changed, deciding whether to obtain an IP address automatically or use a fixed
address. In the default condition, the Network Media Receiver is set to ??? “Obtain an IP
address automatically” ???.
7. Make required settings at computer c Page 00
Prepare the computer for sending and receiving data.
When using a VAIO computer, VAIO Media settings must be made.
When using a different kind of computer, corresponding settings must be made.

Setup
17
1 Prepare remote control for use
Inserting the batteries
As shown in the illustration, open the battery cover lid of the remote control and insert two IEC R6
(size AA) batteries (supplied).
Using the remote control
To use the remote control, point it towards the remote control sensor on the Network Media
Receiver.
z Hints
• If the operation range of the remote control decreases, replace both batteries with fresh ones.
• After replacing the batteries, the TV manufacturer code (page 28) must be set again.
Verify e/E polarity and insert
the batteries from the E side.
Remote control sensor
18
Programming the remote control
Your remote control is preprogrammed to control certain TVs. Refer to your TV manufacturer’s
code table for more information. The remote control may not be compatible at all with some TV
models, even when the appropriate TV manufacturer code is entered.
If you are using a Sony TV set, you do not need to program the remote control, as it is set by
default.
To program the remote control, proceed as follows:
1 Press and hold the SELECT button.
2 Enter your TV code number, using the channel number buttons.
3 Release the SELECT button after you have entered the TV code number.
Note
After replacing the batteries in your remote control, the TV manufacturer’s code may require resetting.
Reset the code each time you replace the batteries.
For customers in the U.S.A. and Canada
TV Manufacturer Code Number
Admiral 02, 09, 14
AOC 12
Bell & Howell 09, 14
Brocsonic 03, 12
Craig 20, 21, 22, 23
Croslex 11
Curtis Mathis 03, 19, 23
Daewoo 3, 35, 36
Daytron 13
Emerson 03, 13, 15, 20, 21, 22, 23
Fisher 25
GE 02, 03, 18
Goldstar/LG 03, 12, 13, 30
Hitachi 03, 13, 31
JC Penney 02, 03, 30
JVC 28
KTV 3, 13, 23
LXI (Sears) 02, 03, 11, 12, 19, 25
Magnavox 03, 11, 12, 13
Mitsubishi 03, 12, 24
TV Manufacturer Code Number
NEC 03, 12
Panasonic 16, 18
Philco 03, 11, 13
Philips 11
Pioneer 18, 19,37
Portland 03
Quasar 18
Radio Shack 02, 12, 23, 24
RCA/PROSCAN 02, 03
Samsung 03, 12, 13, 26
Sanyo 25
Scott 12, 23
Sharp 13, 14, 15
Signature 09, 14
Sony 01
Sylvania 03, 11, 12
Symphonic 23
Toshiba 14, 19
Vidtech 03, 12, 31
Wards 03, 12, 13, 15
Zenith 09
Setup
19
TV Manufacturer Code Number
Akai 02, 04
Beko 25
Daewoo 04, 05, 06
Finlux 26
Goldstar/LG 04, 07
Grundig 07
Hitachi 04, 27, 28
JVC 02, 11
Loewe 04, 07
Medion 04
Mitsubishi 13, 14
Mivar 15
TV Manufacturer Code Number
NEC 16
Panasonic 17
Philips 04
Pioneer 19
Samsung 04, 07
Sanyo 02
Schneider 02, 03, 04
Sharp 21
Thomson 22
Toshiba 03, 24
For customers in the Europe
20
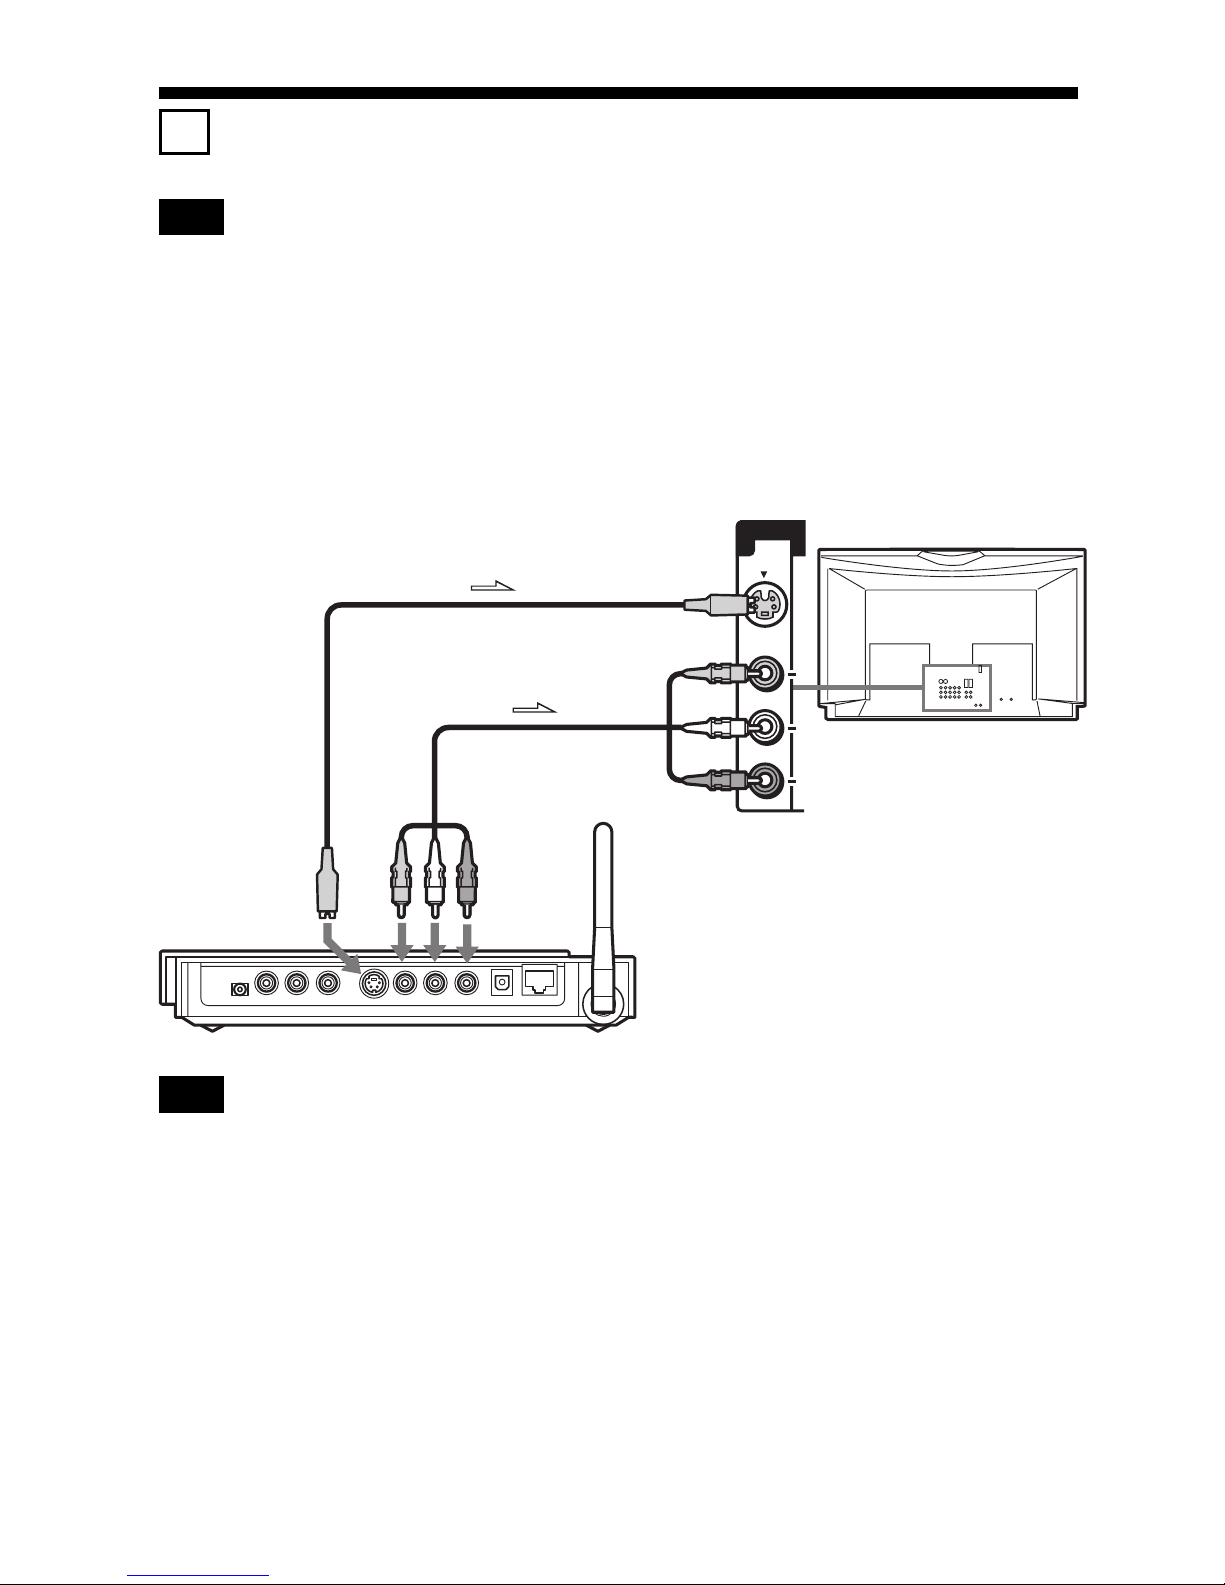
2 Connect Network Media Receiver to TV
Note
If this step is carried out while the Network Media Receiver is connected to the power supply, operation
errors may occur. Make sure that the power cord is not plugged into an AC outlet when connecting the
Network Media Receiver to the TV.
Use the supplied audio/video cable to connect the Network Media Receiver to the TV.
The plugs of the audio/video cable are color-coded. Insert each plug into the connector of the same
color.
When using an S-Video cable (not supplied), do not connect the video plug (yellow) of the audio/
video cable.
1
Note
Do not place the Network Media Receiver on top of the TV. Also avoid other high locations, where the
unit could be dislodged by the cables, causing it to fall.
To video input
Audio/video cable
(supplied)
To S VIDEO
OUT connector
l : Signal flow
S-Video cable
(not supplied)
To AUDIO/
VIDEO OUT
connectors
Setup
21
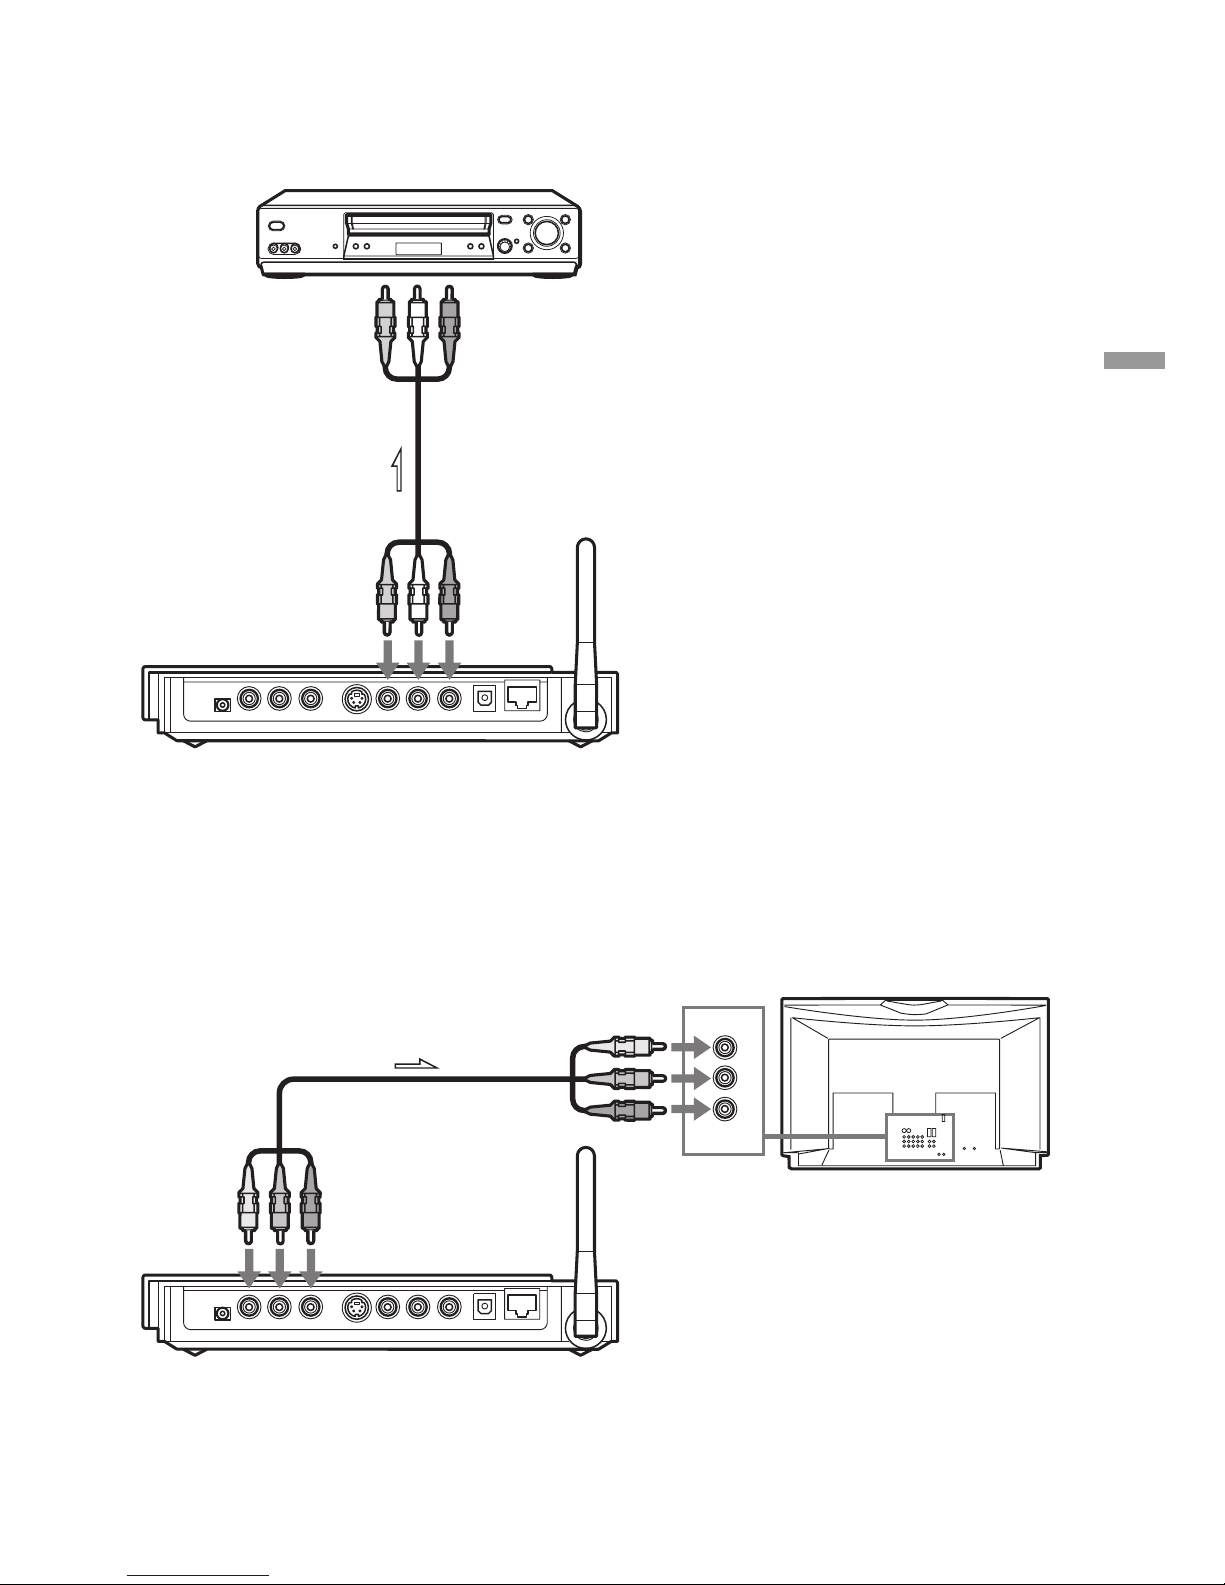
To connect the Network Media Receiver to a TV via a VCR
Make the connection as shown below.
To connect the Network Media Receiver to a TV with component video
input
Use a component video cable (not supplied) to connect the Network Media Receiver to the
component video input on the TV, as shown below. Insert each plug into the connector of the same
color.
To video input
Audio/video cable
(supplied)
To AUDIO/VIDEO
connectors
Component video
cable (not supplied)
To COMPONENT
VIDEO OUT connectors
To component
video input
l : Signal flow
l : Signal flow
22
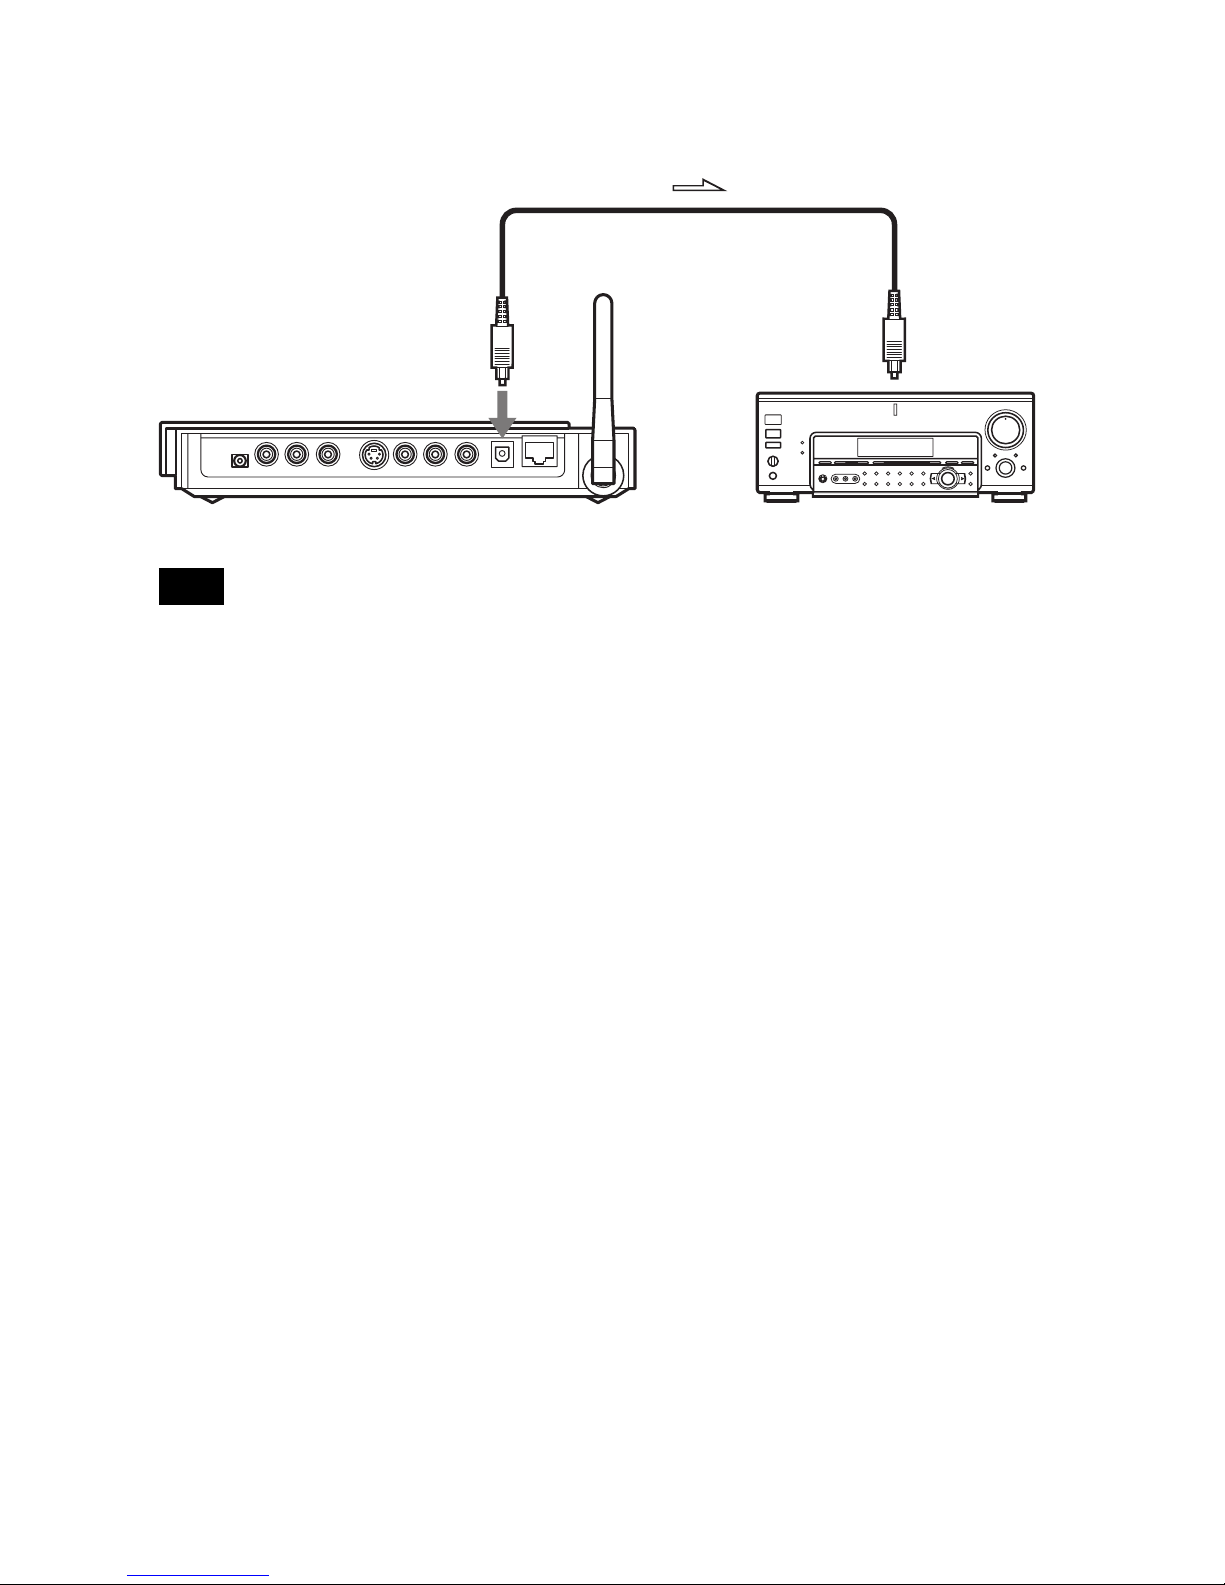
To digital
input (optical)
Optical fiber cable
(not supplied)
To OPTICAL OUT
connector
l : Signal flow
To use the digital audio output
Make connections to an amplifier with digital input, as shown below.
Note
When using the digital output to reproduce sound via an amplifier with digital input, leave the audio plugs
(white and red) of the audio/video cable unconnected.
 Loading...