

Sony VAIO VAIO Slimtop Computer, PCV-LX920, VAIO Slimtop User Manual

VAIO Slimtop™
Computer User Guide

VAIO Slimtop Computer User Guide
2

3
Contents
Welcome.................................................................5
Locating Controls and Connectors .....................7
Front Panel Overview..................................................................... 7
Back Panel Overview ................................................................... 10
Sony Pen Tablet Display.............................................................. 12
Additional System Capabilities .................................................... 13
To Use the Sony Pen Tablet
and Accessories ..................................................17
About the Pen Tablet Display and Accessories ............................ 17
Using the VAIO Pen ..................................................................... 19
Configuring the VAIO Pen Functions ........................................... 21
VAIO Action Setup...............................................29
Using the Programmable Power Keys ......................................... 30
Setting the Internal Timer............................................................. 31
Changing the Sony Software Window Design .............................. 32
Using the AutoAlert E-mail Notification System........................... 33
VAIO AV Applications .........................................35
Overview of Preinstalled Software ............................................... 35
DigitalPrint Software ................................................................... 37
DVgate Software.......................................................................... 45
MovieShaker Software................................................................. 48
PictureGear Software................................................................... 55
Smart Capture Software .............................................................. 58
SonicStage Software ................................................................... 67
VisualFlow Software .................................................................... 74

VAIO Slimtop Computer User Guide
4
Configuring Your VAIO Computer .................... 77
Hard Disk Drive Partition.............................................................. 77
i.LINK (IEEE1394) Compatibility .................................................. 78
To Enable Ethernet Connectivity................................................... 79
System, Application,
and Driver Recovery CD(s) ................................ 81
To Use the System Recovery CD(s) ............................................. 81
To Use the Application Recovery CD(s) ....................................... 83
To Use the Driver Recovery CD.................................................... 84
Troubleshooting ................................................. 85
Topics ...........................................................................................85
Notes on Use ............................................................................... 98
For Answers to Your Software Questions .................................. 103
Resources.................................................................................. 106
Index .................................................................. 107

5
Welcome
Thank you for purchasing your Sony VAIO Slimtop™ computer! Your new
computer is a superb blend of high technology and easy-to-use
functionality. This User Guide contains information about the features of
your new computer, configuring your system, and contact information for
software vendors.

VAIO Slimtop Computer User Guide
6

7
Locating Controls and
Connectors
Front Panel Overview
The front panel of your VAIO Slimtop™ Computer enables access to the
CD-RW/DVD combo drive, and the Memory Stick® and PC card slots. It also
contains Universal Serial Bus (USB) and i.LINK® ports to connect compatible
peripheral devices.
✍
i.LINK is a trademark of Sony used only to designate that a product contains an
IEEE1394 connection. The i.LINK connection may vary, depending on the software
applications, operating system and compatible i.LINK devices. All products with an
i.LINK connection may not communicate with each other.
Please refer to the documentation that came with your compatible i.LINK device for
information on operating conditions and proper connection. Before connecting
compatible i.LINK PC peripherals to your system, such as an optical or hard disk drive,
confirm their operating system compatibility and required operating conditions.

VAIO Slimtop Computer User Guide
8
Front Panel
1 Optical drive eject button
Ejects a disc from the optical drive.
2 Optical drive
See Specifications sheet for optical drive information.
3 Memory Stick® media access indicator light
Lights in amber while reading and writing data from and to a Memory Stick media.
4 Hard disk drive access indicator light
Lights in amber while reading and writing data from and to the hard disk.
5 Optical drive access indicator light
Lights in amber while reading and writing data from and to an optical disc.
6 Power button and indicator light
Turns the computer and display on and off. The indicator light is green while the power
is on and amber when the computer is in Stand by mode.
7 Front panel cover
A sliding panel that covers the Memory Stick and PC card slots, and the USB and
i.LINK ports.
OPEN/CLOSE
MEMORY
STICK
HD
DISC
Front Panel Overview
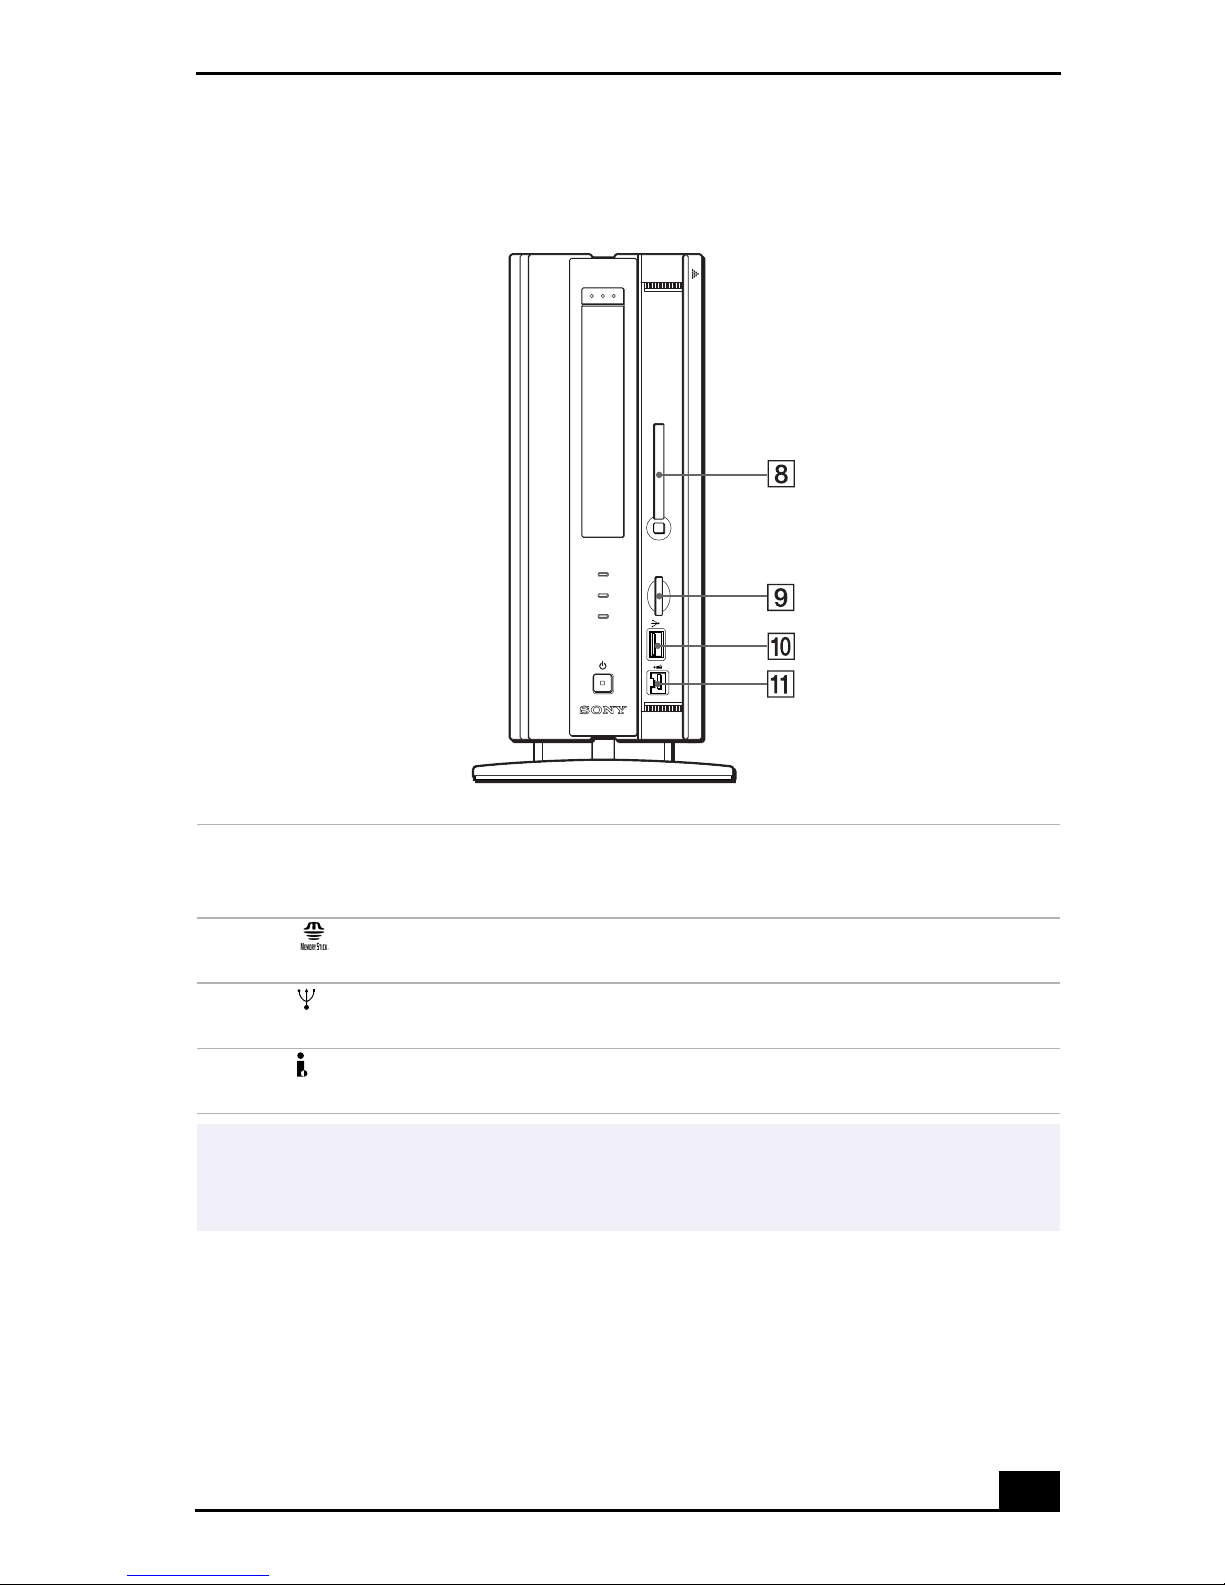
9
Front Panel (cont.)
8 PC Card slot
A PC card (also called a PCMCIA card) can be installed in this slot. PC cards enable
you to add functionality to your system.
9 MEMORY STICK media slot
Insert a Sony Memory Stick media into this slot.
10 Universal Serial Bus (USB) port
Connection for a USB device.
11 i.LINK® 4-pin port (IEEE1394)
Connection for a compatible i.LINK digital device.
✍
For your convenience, your computer includes USB and i.LINK ports on both the front
and the back panels. The 4-pin i.LINK port is located on the front panel and the 6-pin
i.LINK port is located on the back.
OPEN/CLOSE
MEMORY
STICK
MEMORY
STICK
USB
i.LINK S400
HD
PC CARD
DISC

VAIO Slimtop Computer User Guide
10
Back Panel Overview
The back panel of your computer contains the ports and jacks for supplied and
optional peripheral equipment or accessories. The icons on the back panel help
locate and identify the ports and jacks on your computer.
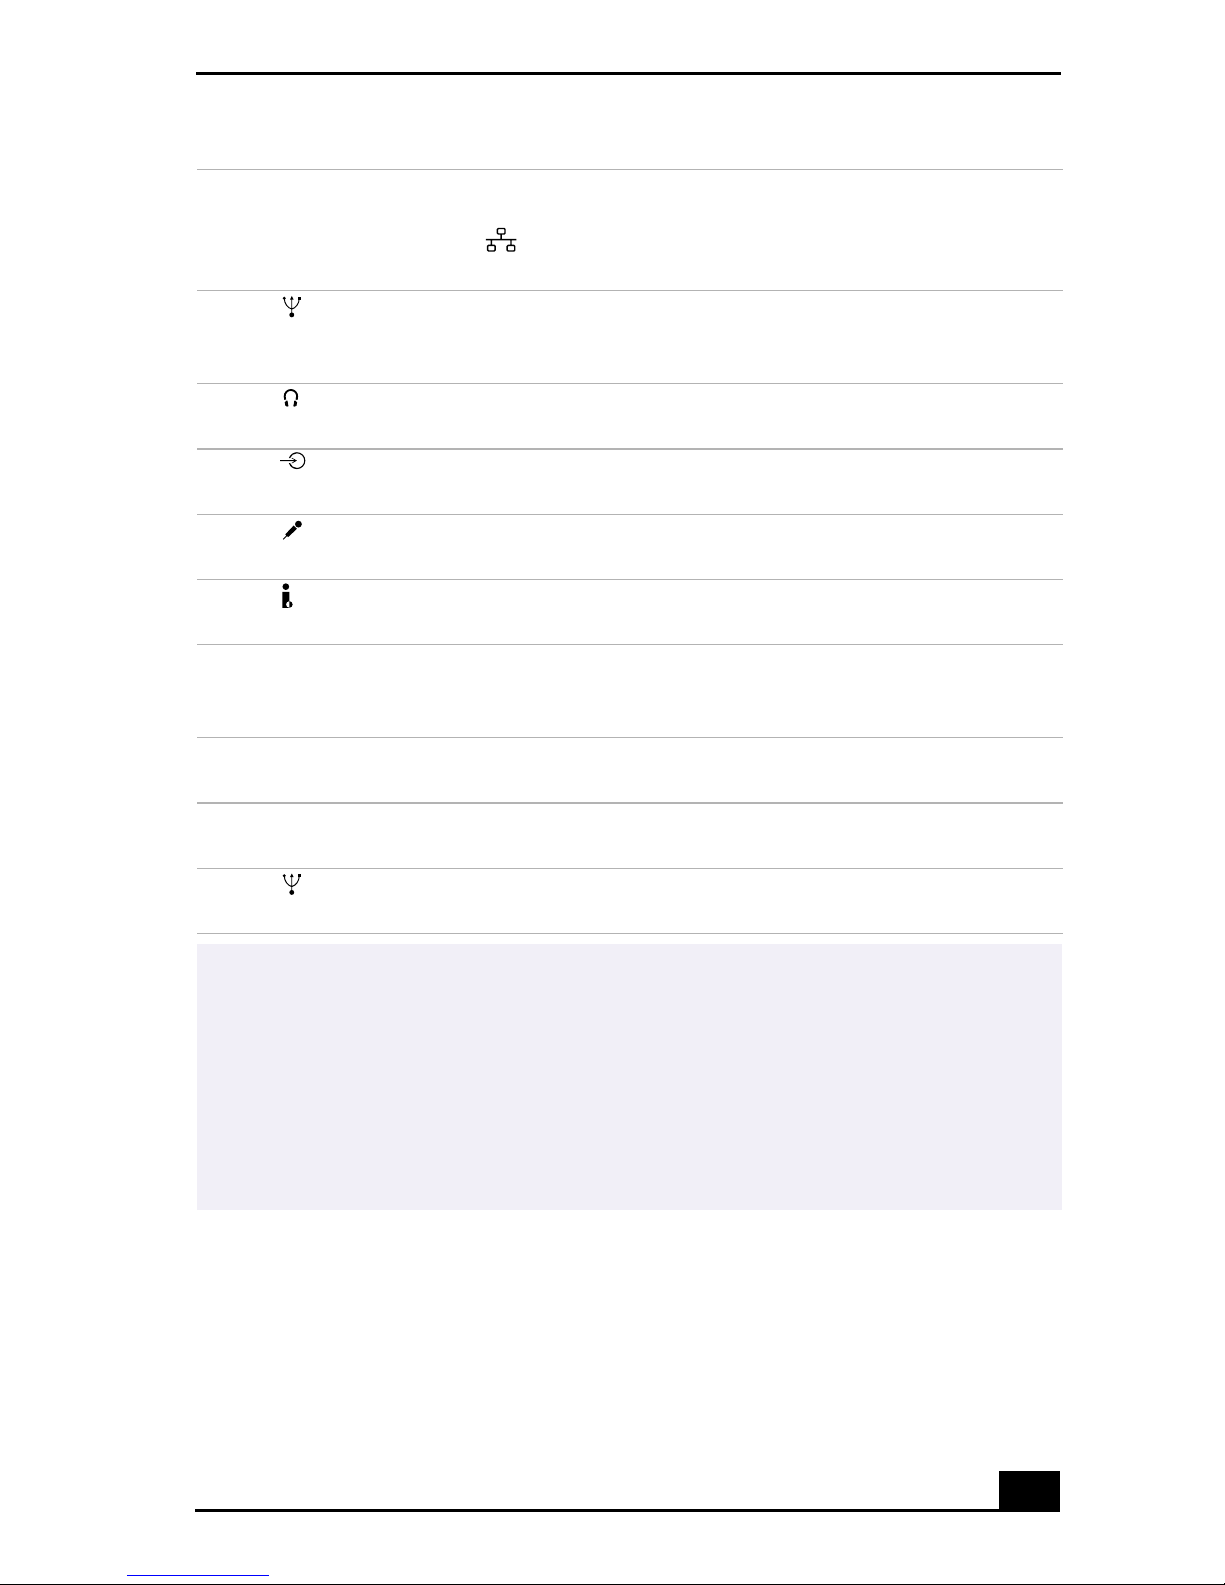
Back Panel
✍
Your computer may not be supplied with all of the features listed, depending on the
system configuration you purchased.
1 AC Input port
Connection for the supplied power cord.
2 T-Lever
A handle that is used to remove the unit’s cover.
3 Monitor port
Connection for a standard CRT display.
MONITOR
MIC
PHONES
NETWORK/USB
LINE IN
i.LINK S400
LCD
LINE PHONE
USB
Back Panel Overview
11
4 Ethernet port
10Base-T/100Base-TX Fast Ethernet interface.
(The port marked with (Network) is for LAN (Local Area Network) connections
only.)
5 Universal Serial Bus (USB) ports (2)
Connections for USB devices. Two USB ports are located on the back panel and one USB
port is located on the modem card (See No. 13).
6 Headphones jack
Connection for optional headphones or computer speakers.
7 Line In jack
Connection for an optional audio device.
8 Microphone jack
Connection for an optional microphone.
9 i.LINK® 6-pin port (IEEE1394)
Connection for a compatible digital device.
10 LCD display (monitor) port
Connection for an LCD display or Sony Pen Tablet.
Note: Do not connect any other display to this port.
11 Modem line jack
Connection for the supplied modem cable to the wall jack.
12 Telephone jack
Connection for the phone cable (optional) to the computer.
13 Universal Serial Bus (USB) port
Connection for a USB device.
✍
i.LINK is a trademark of Sony used only to designate that a product contains an
IEEE1394 connection. The i.LINK connection may vary, depending on the software
applications, operating system, and compatible i.LINK devices. All products with an
i.LINK connection may not communicate with each other.
Please refer to the documentation that came with your compatible i.LINK device for
information on operating conditions and proper connection. Before connecting
compatible i.LINK PC peripherals to your system, such as an optical or hard disk drive,
confirm their operating system compatibility and required operating conditions.

VAIO Slimtop Computer User Guide
12
Sony Pen Tablet Display
Your VAIO Slimtop™ Computer is supplied with a Pen Tablet display. This
section describes the features and connection capabilities of your Sony Pen
Tablet.
Sony Pen Tablet display (Shown in an upright position)
1 Power indicator light
Light is green while the power is on. When the computer enters Stand by mode, this
indicator light turns amber.
2 Information LED light
Light turns red to alert the user to activities, such as the arrival of e-mail. See “Using the
AutoAlert E-mail Notification System.”
3 Brightness control
Adjusts the brightness of the screen.
4 Volume control
Adjusts the volume of the integrated Harmon/Kardon® speakers built into the LCD
display.
5 PS/2® mouse port
Connection for a mouse.
6 Universal Serial Bus (USB) port
Connection for a USB device.
7 PS/2® keyboard port
Connection for the supplied VAIO® Convertible Keyboard.
USB
MOUSE
13
Additional System Capabilities
To use the Memory Stick Media slot
Your VAIO Slimtop™ computer is designed to support the Sony Memory Stick®
media. A Memory Stick media is a compact, portable, and versatile data storage
device designed for exchanging and sharing digital data with similarly equipped
products.
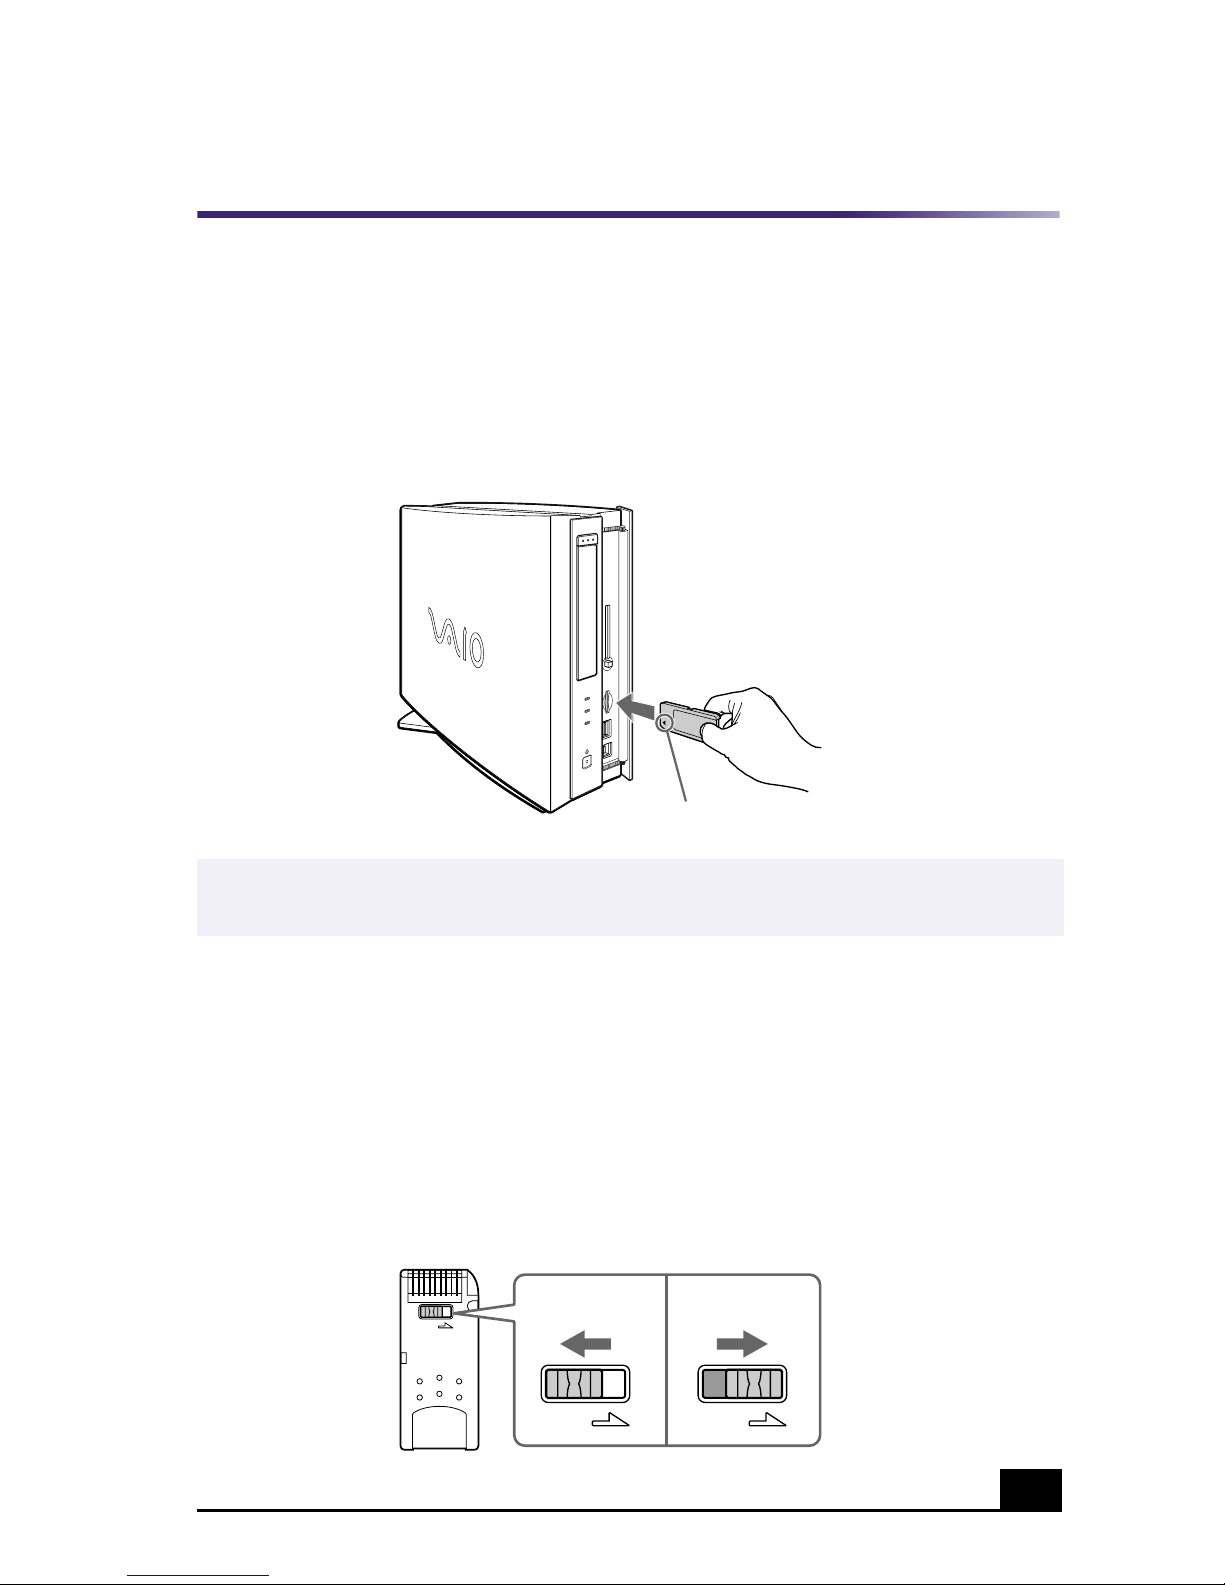
To protect data on a Memory Stick media
Memory Stick media contains a write-protect tab. The write-protect tab prevents
accidental changes to information recorded on your Memory Stick media. When
you slide the write-protect tab to the LOCK position, your Memory Stick media
is write-protected. This means that you cannot delete, copy, or save information
on the media. When you slide the tab to the un-LOCK position, you can write to
or modify your Memory Stick media’s contents.
Inserting the Memory Stick Media
✍
Memory Stick media does not support AVI file playback. To play an AVI file stored on a
Memory Stick media, copy the file to your hard disk drive.
Locking the Memory Stick
Media
Insert Memory Stick media facing this direction
LOCK
LOCK LOCK
To u n l o c k
To l o c k
VAIO Slimtop Computer User Guide
14
Using PC Cards
Your computer has a card bus PC card slot that supports Type I or Type II PC
(PCMCIA) cards. You do not need to shut down your computer when inserting a
PC card.
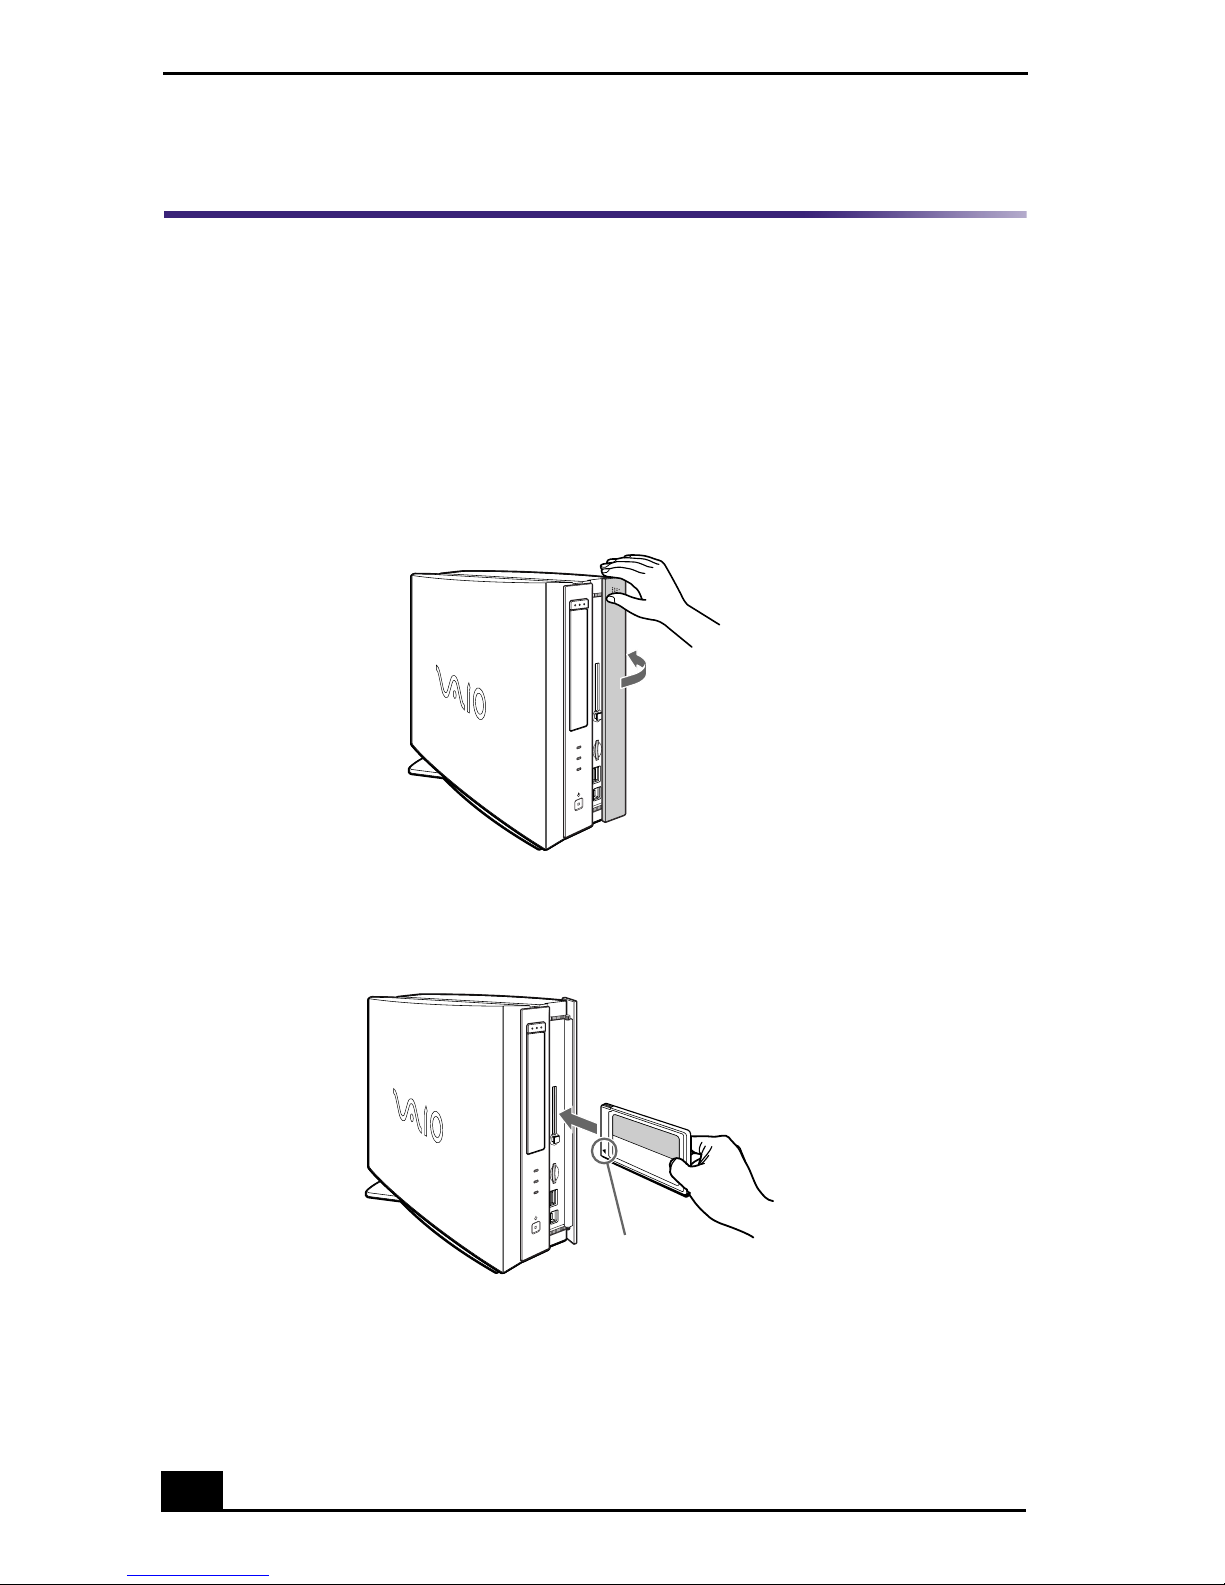
To insert a PC card
1 Slide front panel cover in the direction of arrow as shown, to open the front
panel.
2 Insert the PC card into the PC card slot until it clicks into position.
If the PC card does not insert easily, verify the card is not being inserted upsidedown or backwards. Carefully reinsert the card into the slot, but do not force it in.
See the instructions supplied with the PC card for details on proper use.
Opening the front panel
Inserting a PC card
Insert with card facing this direction

Using PC Cards
15
Ejecting a PC card
1 Double-click the Safely Remove Hardware icon in the Windows® task tray.
2 Click the name of the card that you want to eject, then click Stop. The Stop a
Hardware device window appears.
3 Click OK.
4 When the message “Safe to Remove Hardware” appears, push the PC card
Eject button on the front panel of the system unit. You may need to extend
the Eject button out from the computer before you can eject the card.
5 When the PC card ejects from the PC card slot, remove it by holding the
edges and pulling it out carefully.
✍
If you eject the PC card incorrectly, the system may not work correctly.
Ejecting a PC card

VAIO Slimtop Computer User Guide
16
To Use the Sony Pen Tablet and Accessories
17
To Use the Sony Pen
Tablet and Accessories
Your VAIO Slimtop™ Computer is supplied with a Sony Pen Tablet display, a
VA I O ® Pen, and accessories. This section provides information on using the Pen
Tablet display and accessories.
About the Pen Tablet Display and Accessories
The Sony Pen Tablet is a graphic interface that provides a pressure-sensitive work
area. The VAIO Pen is a cordless input device that controls the movement of the
cursor on the surface of the tablet screen. The pen stand, pen tip replacements,
and pen tip removing tool help you protect and care for your VAIO Pen.
✍
Place the VAIO Pen in the supplied pen stand when it is not in use, to maintain the
sensitivity of the pen tip and to avoid interference with other pointing devices, such as
your mouse.
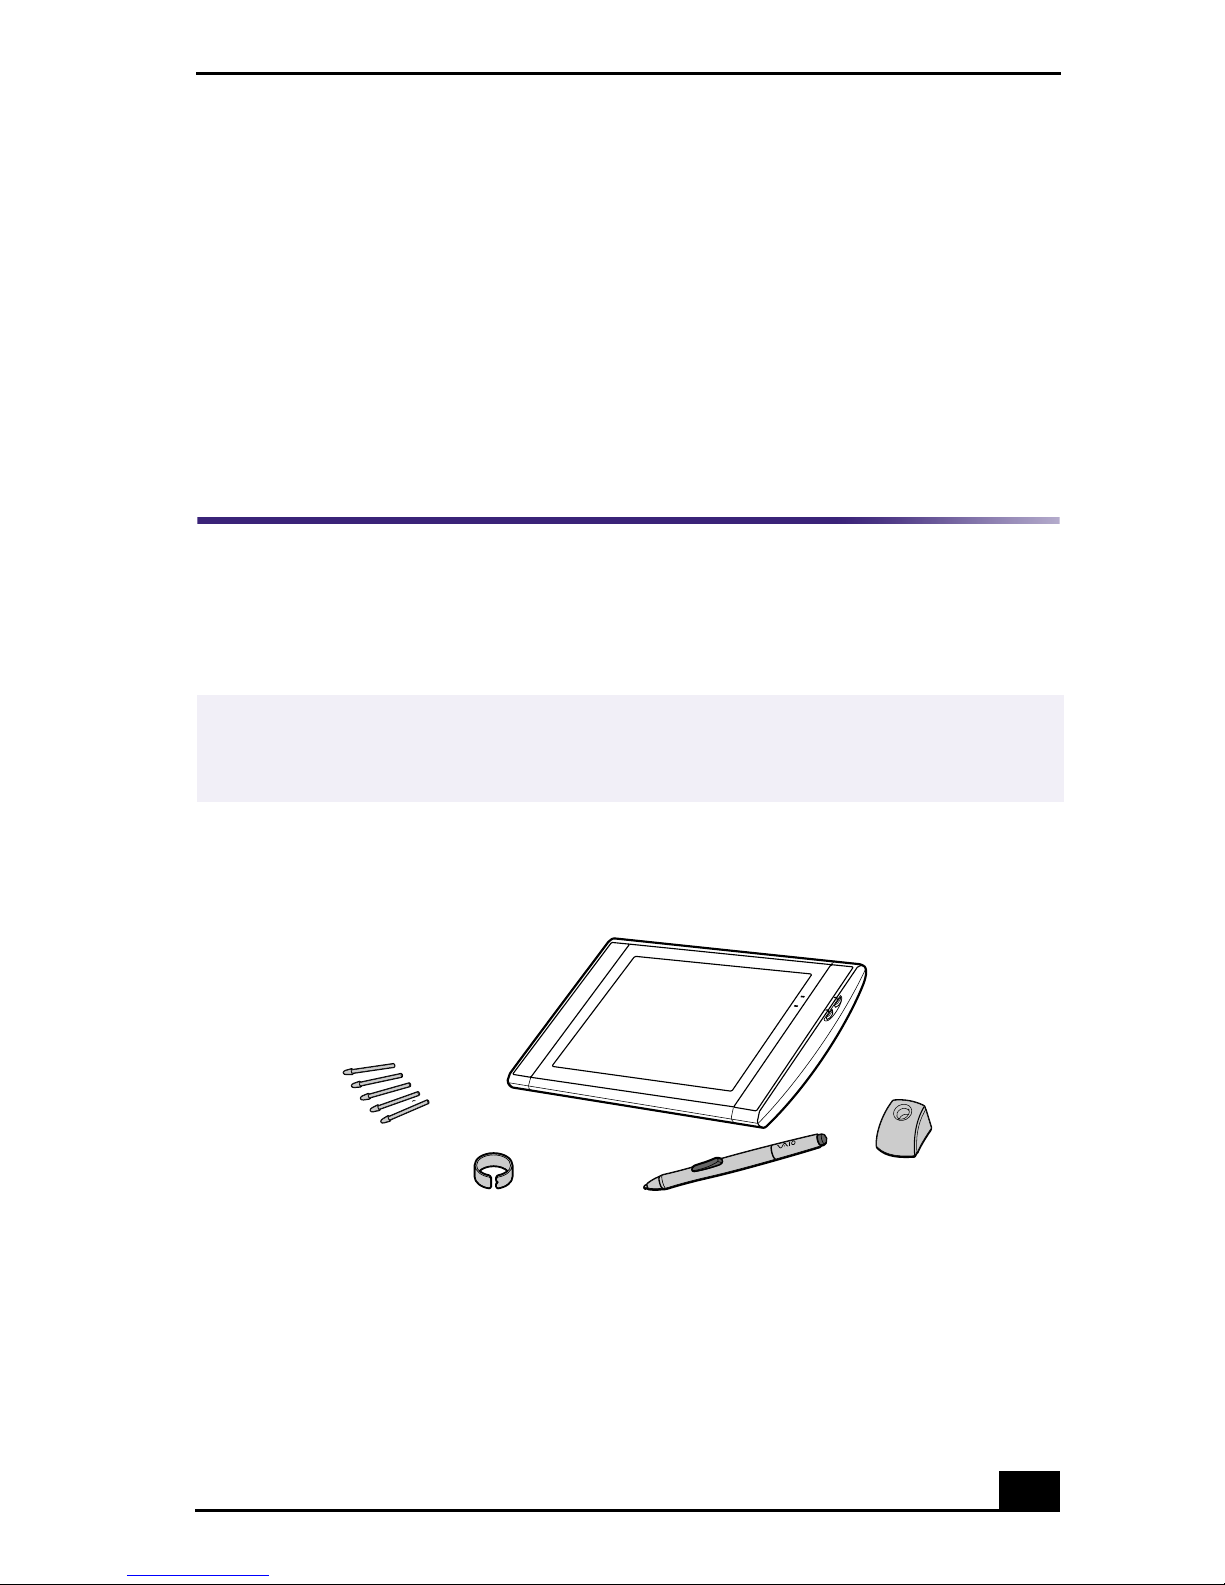
Sony Pen Tablet and accessories
Sony Pen Tablet display
(Shown in lowered position)
Pen stand
VAIO Pen
Pen tip replacements (5)
Pen tip removing tool
VAIO Slimtop Computer User Guide
18
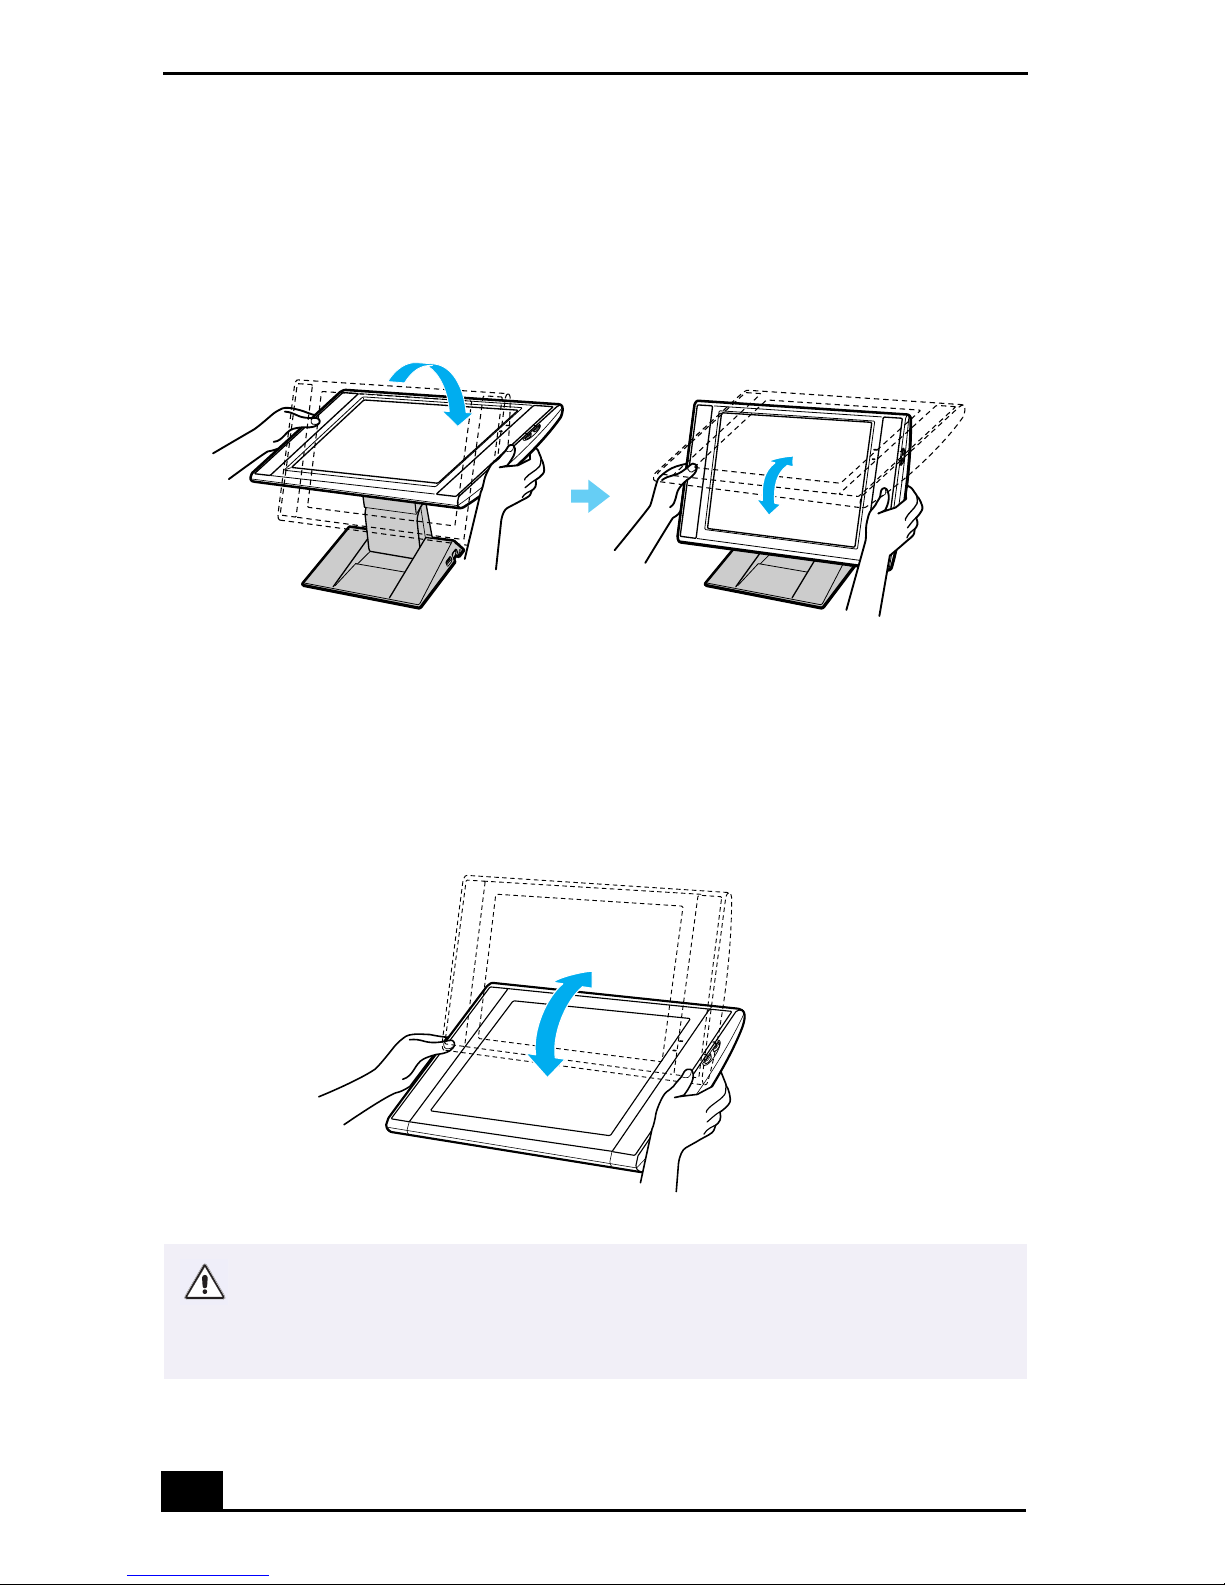
To Adjust the Sony Pen Tablet Display
Adjust your Pen Tablet display by holding both sides of the display, and then
pushing the display panel out and up.
Setting the display height and viewing angle
Set the display height so that it covers the keyboard, and adjust the screen for a
viewing angle that enables you to work with the tablet and VAIO pen
comfortably.
Adjusting the viewing angle
Adjusting viewing angle for working with the VAIO pen
The Sony Pen Tablet operates with radio-frequency energy. This may cause
interference with radio and television reception, if the display is not installed
and used correctly. If your tablet is interfering in this manner, move the
equipment away from the radio or television.
Using the VAIO Pen
19
Using the VAIO Pen
The VAIO® Pen controls the cursor movements on the Sony Pen Tablet screen.
Hold the pen in the same manner as a pen or pencil, making sure that the rocker
switch on the side is within reach of your thumb or forefinger, but cannot be
accidentally pressed while drawing or writing.
The VAIO Pen is activated when it is held within close proximity to the pen tablet
screen. You can position the cursor on the pen tablet screen, or use the rocker
switch, without touching the pen tip to the tablet surface.
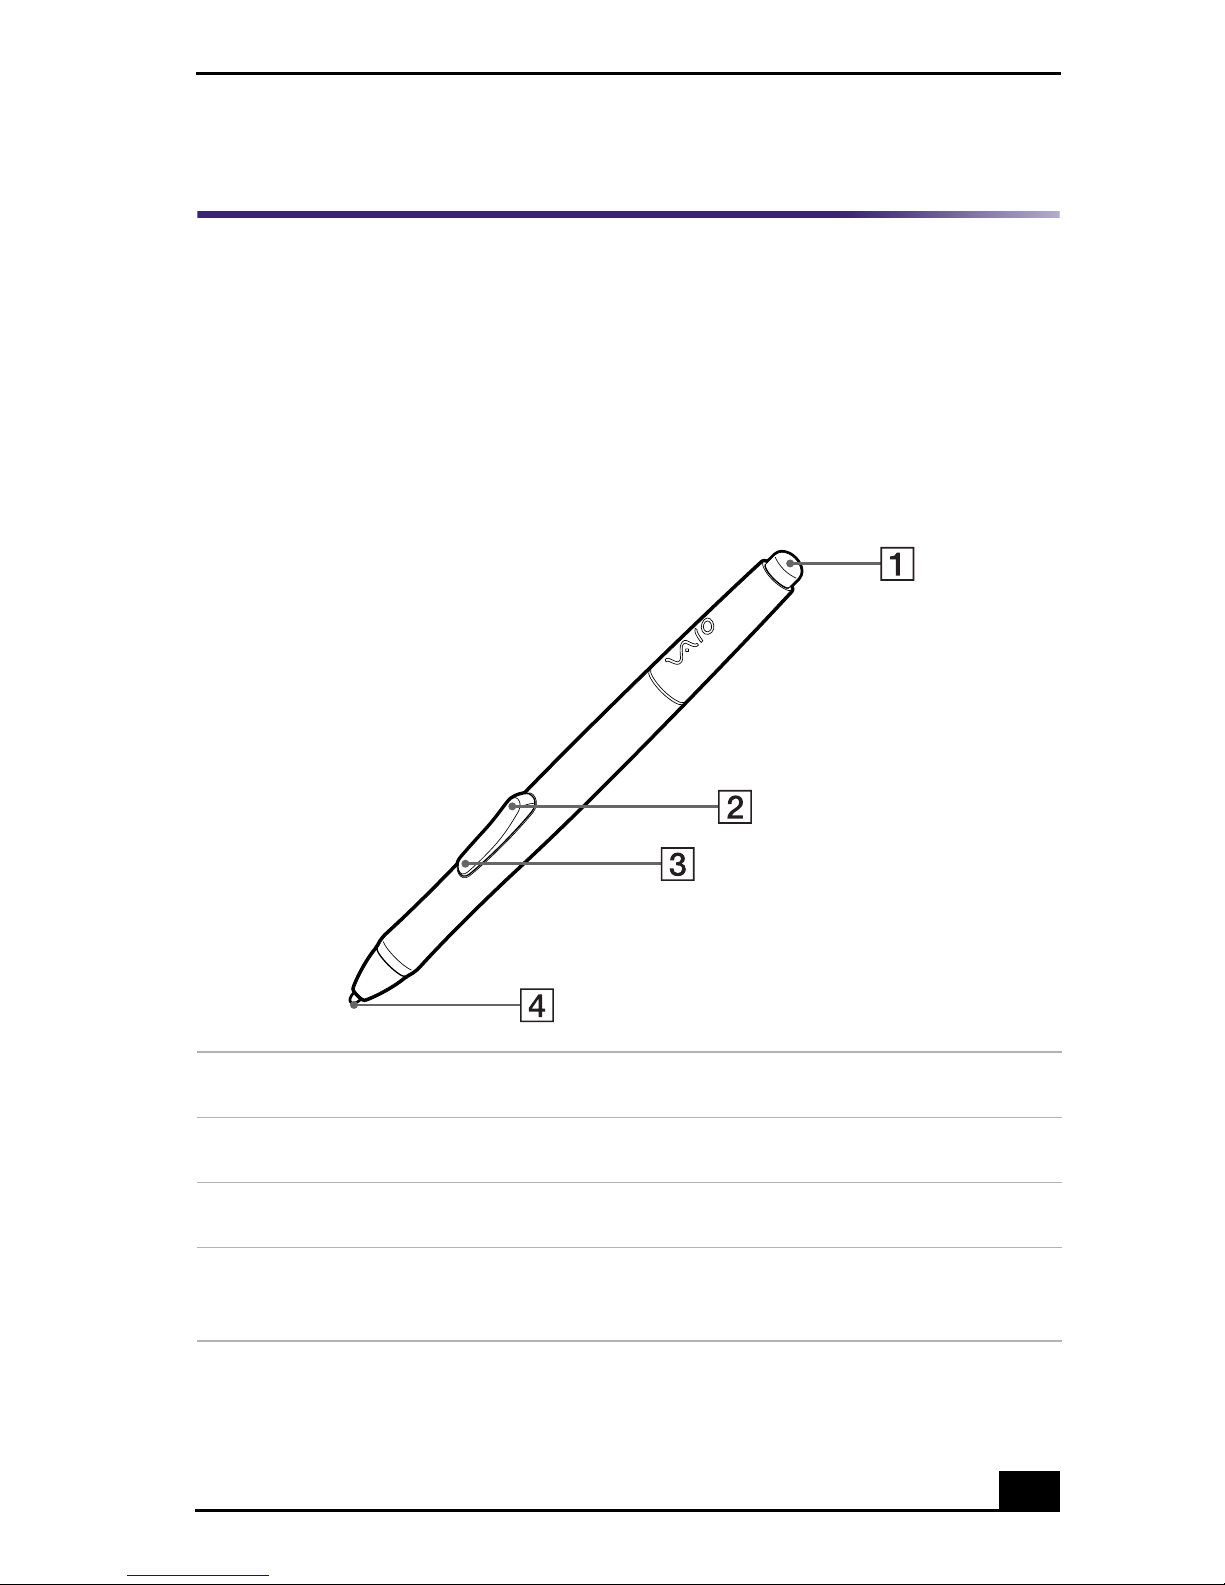
VAIO Pen
1 Eraser
Delete unwanted portions of your work, depending on the application in use.
2 Upper switch position
The upper side of the rocker switch is set to deliver a double left click by default.
3 Lower switch position
The lower side of the rocker switch is set to deliver a right click by default.
4 Pen tip
You can use the pen tip to draw or write. Tapping the pen tip against the tablet screen
delivers a click in the same manner as the left button on a mouse.
Rocker Switch
VAIO Slimtop Computer User Guide
20
To change the settings of your VAIO Pen
Your VAIO® Pen tip, eraser, and the upper/lower switch positions are
programmable.
By default, the basic functions performed by the VAIO Pen are:
❑ Pointing — Place the tip of the pen anywhere on the pen tablet screen and
the screen cursor will automatically correspond to that point.
❑ Clicking — Tap the pen tablet screen once with the tip of the pen, or press
the pen tip against the screen with enough pressure to register a single click.
❑ Double-clicking — Quickly tap the pen tablet screen twice in the same
place with the tip of the pen. You can also register a double click by pressing
the upper switch position of the pen’s rocker switch.
❑ Dragging — Point to and select an object by pressing the pen to the pen
tablet screen. Slide the pen tip across the tablet to move the object to the
desired location. To select text, point to the beginning of the text, and then
drag the pen across the tablet until all of the desired text is highlighted.
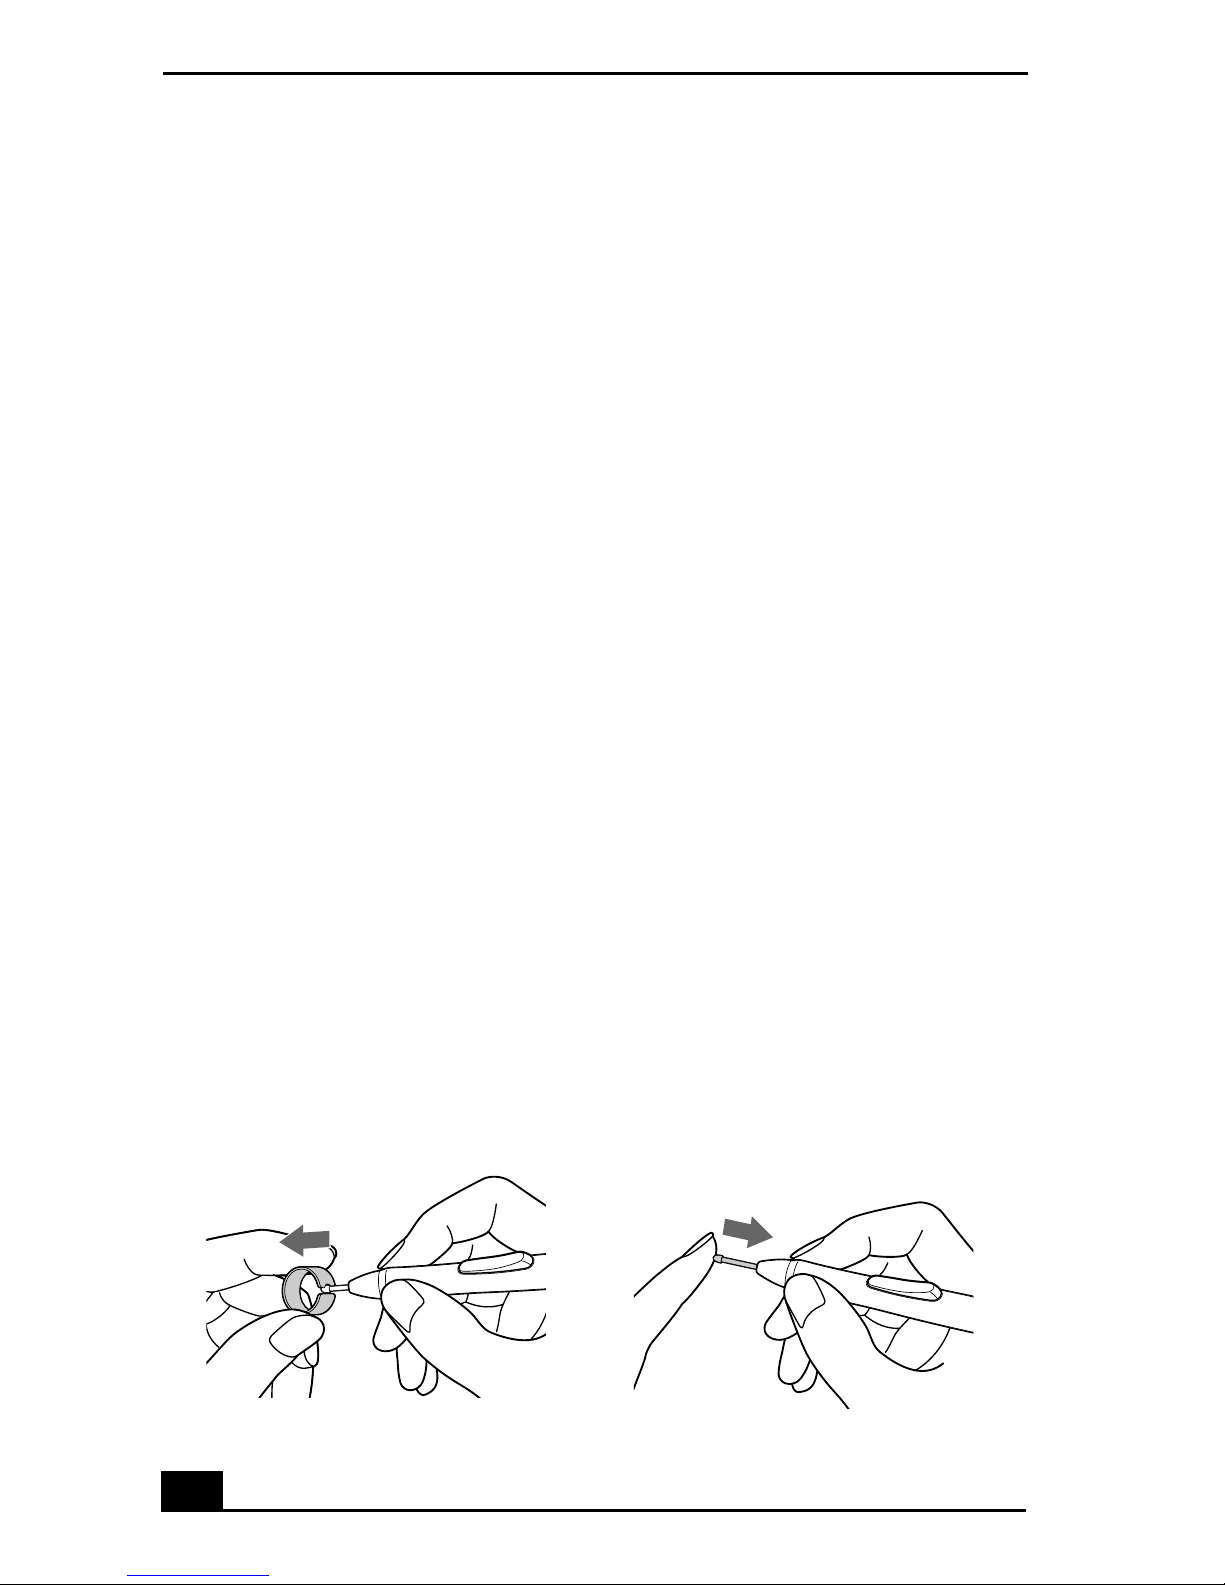
To replace the Pen tip
Your VAIO Pen is supplied with pen tip replacements. The pen tip wears with
normal use and must be replaced when the tip becomes too short or develops a
flat point. Follow these steps to replace the pen tip:
1 Clasp the worn pen tip with the pen tip removing tool and pull it straight out
of the VAIO Pen barrel.
2 Slide the flat end of a new pen tip straight into the barrel, pushing the tip
firmly until it stops.
Removing the Pen tip
Step One
Step Two
Configuring the VAIO Pen Functions
21
Configuring the VAIO Pen Functions
The eraser, upper and lower switch positions can be programmed to perform
different functions. See the Sony Pen Tablet online Help for more information on
VAIO Pen settings.
To change the pen tip, eraser and upper/lower switch
functions
1 Click Start in the Windows® Taskbar, then click Control Panel.
2 Click Other Control Panel Options.
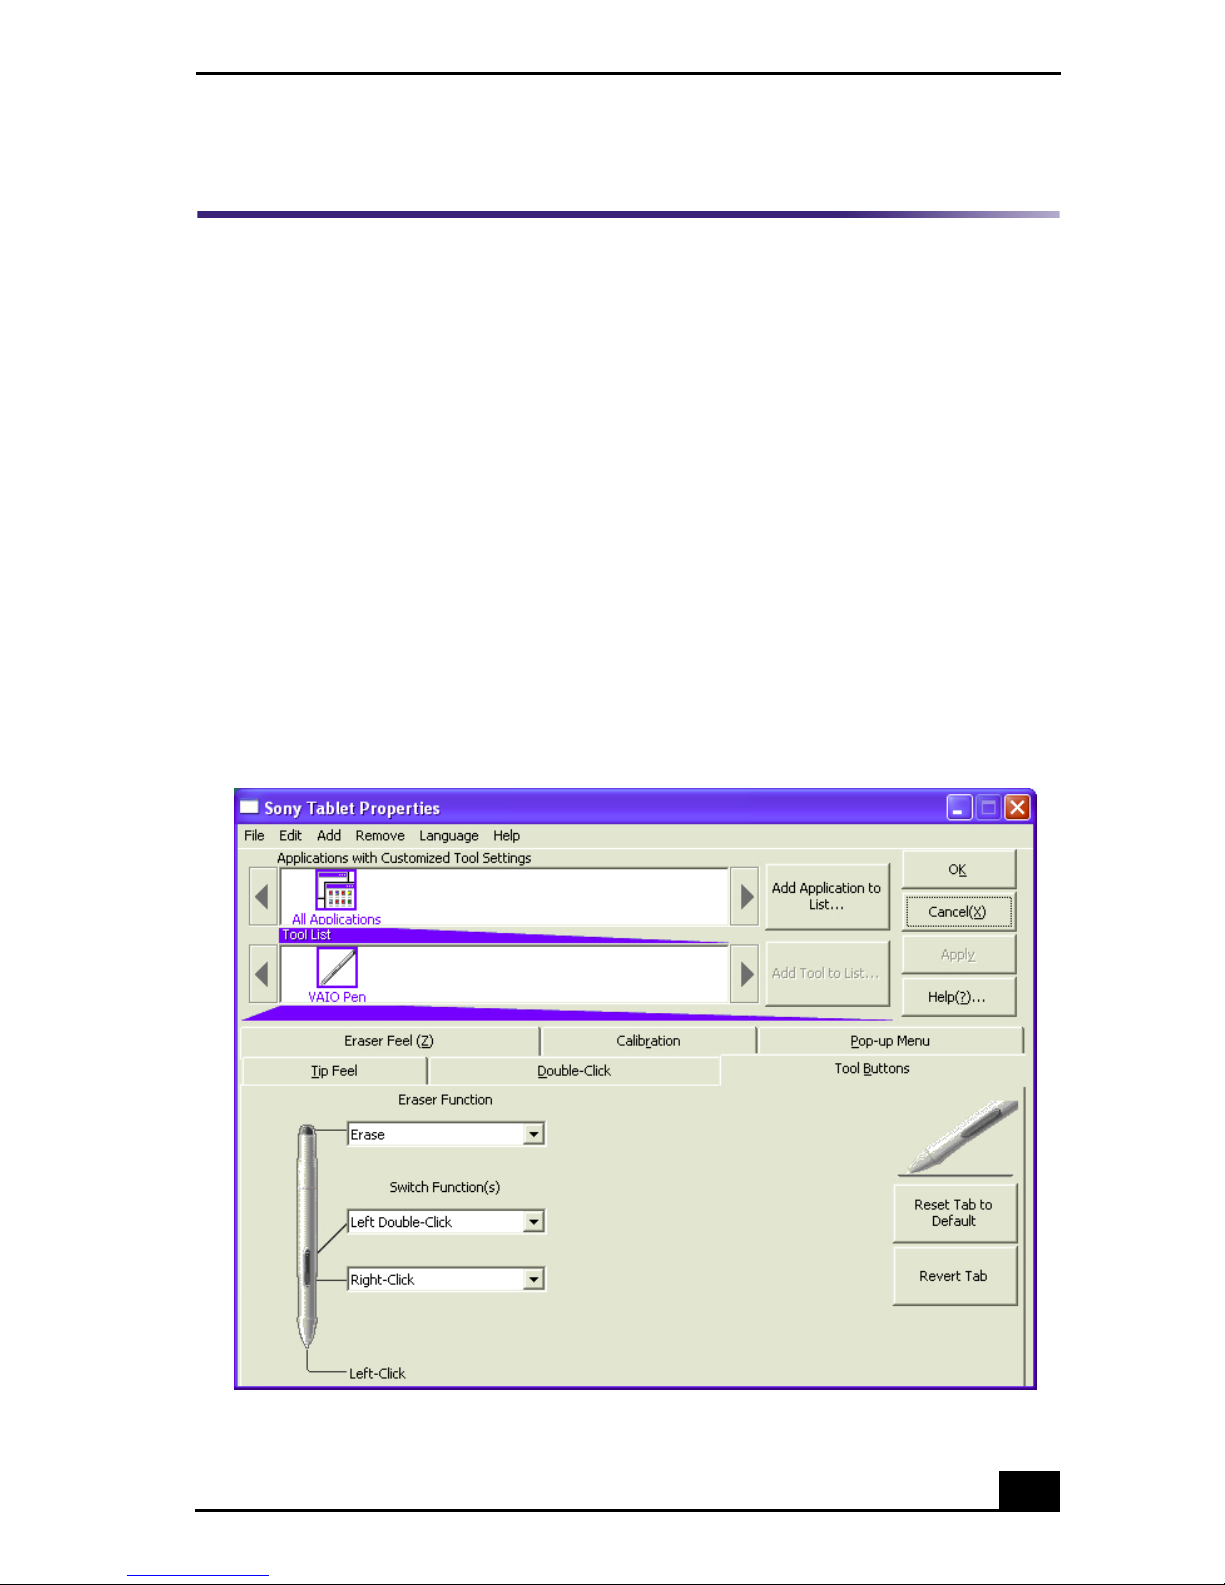
3 Click Sony Tablet. The Sony Tablet Properties window appears.
4 From the Tool Buttons tab, click the drop-down list for the pen function you
wish to change. Select the desired function for the pen tip, eraser, or the
upper/lower switch positions.
Sony Tablet Properties main window

VAIO Slimtop Computer User Guide
22
To calibrate your pen to the tablet screen
1 From the Sony Tablet Properties screen, click the Calibration tab.
2 Click the “Calibrate...” button. Follow the on-screen instructions to align
your pen’s cursor positioning to the tablet screen coordinates.
Function Description
Left-Click
Single click of the left mouse button.
Left Double-Click
Double-click of the left mouse button.
Right-Click
Single click of the right mouse button.
Middle-Click
Clicking the center wheel button of a wheel mouse.
Left-Click Lock
Holds down the left mouse button.
Keystroke
Performs a programmed keystroke.
Modifier
Operates as the Shift, Alt, or Ctrl key (as programmed).
Pressure Hold
Keeps the pen tip pressure constant.
Mode Toggle
Switches between Pen (absolute coordinate) and Mouse modes.
Pop-up Menu
Displays a pop-up menu at the cursor position.
Erase
Operates as an eraser.
Ignored
No function is assigned.
✍
The Left-Click function is assigned by default to the pen tip. Before you change the
pen tip setting to perform a different function, assign the Left-Click function to another
switch. Sony suggests assigning the Left-Click function to the pen tip when using the
pen with drawing applications.
Calibration Tab
Configuring the VAIO Pen Functions
23
3 Click Apply. The on-screen cursor location is adjusted to correspond to the
pen tip.
To adjust the pen tip pressure and feel
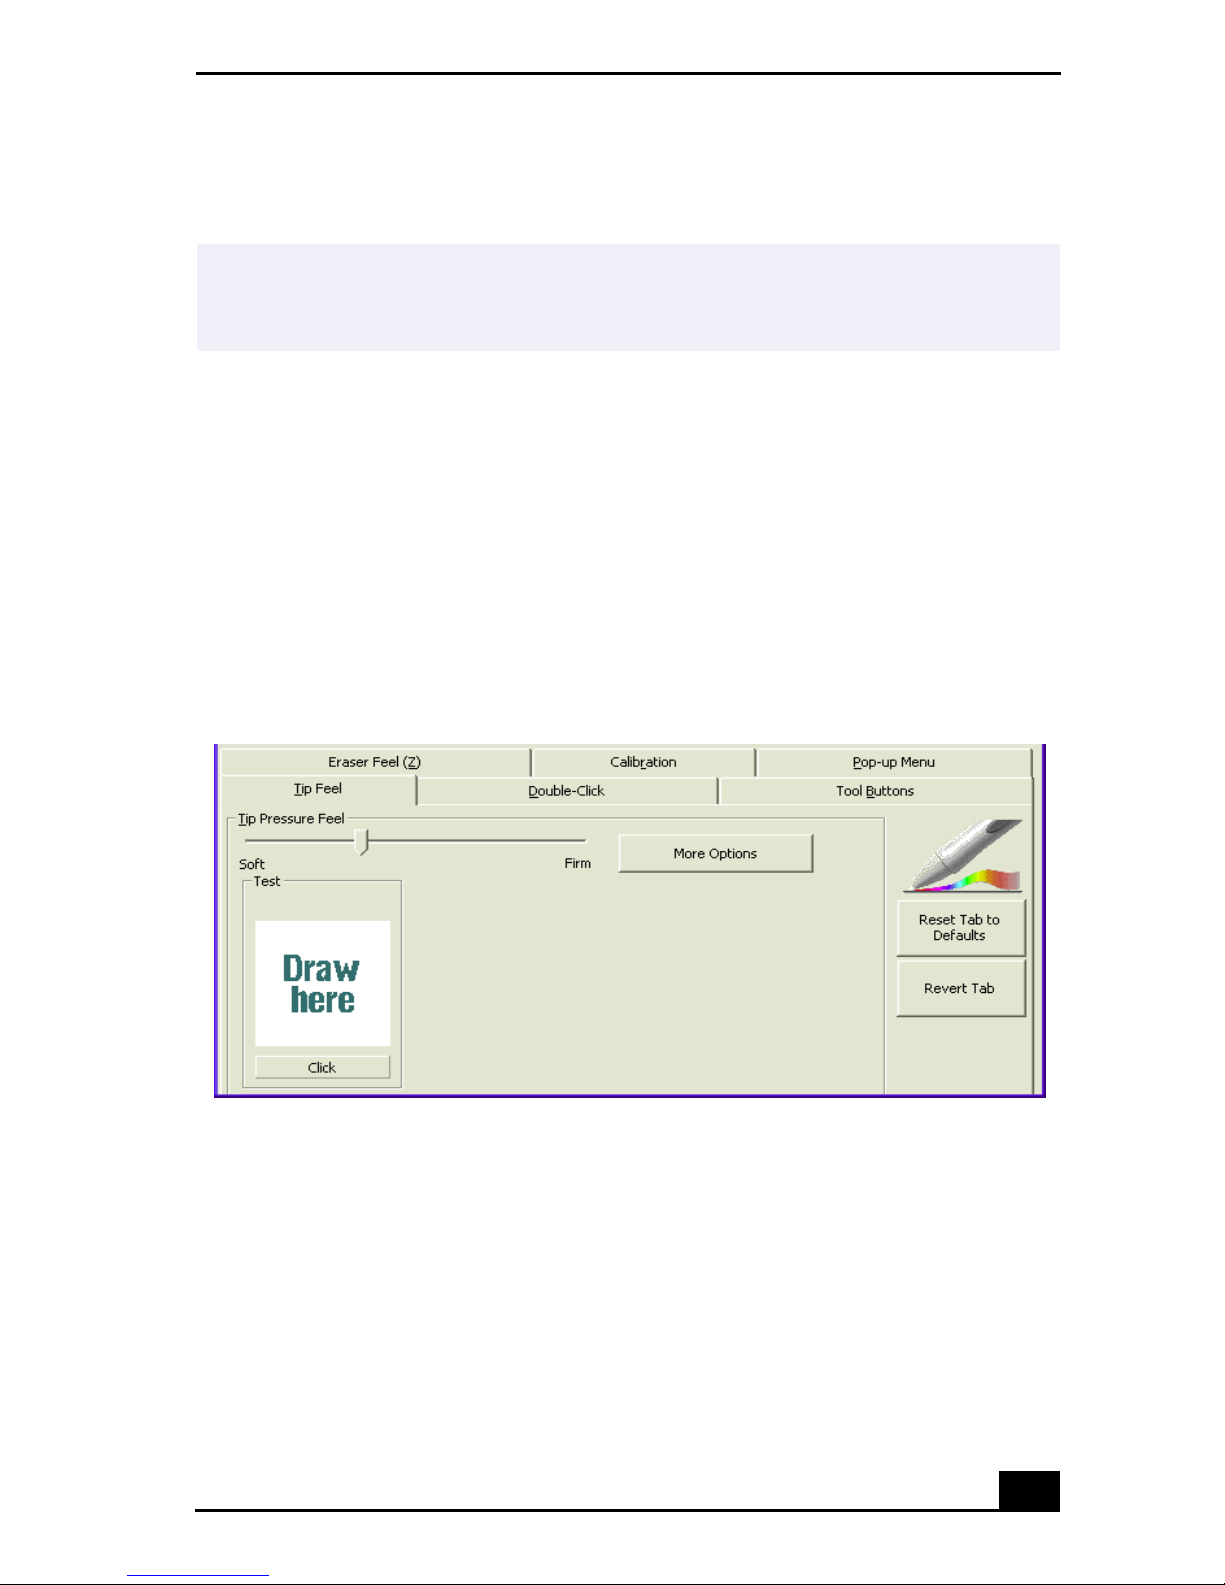
1 From the Sony Tablet Properties screen, click the Tip Feel tab.
2 Test the pen tip feel by drawing lines in the “Draw here” Test area. The lines
are drawn with the current pen pressure settings.
3 Check the pen’s clicking pressure by tapping the Click button in the Test
area. If you tap more forcefully than the pen’s current settings, the Click
button changes color.
4 Adjust the pen tip pressure feel by moving the measurement slider to a
desired level. The pressure settings range from Soft, which requires light
pressure, to Firm, which requires more forceful pressure.
5 Click More Options if you wish to make a more in-depth adjustment to the
pen tip pressure feel.
✍
You can reset your VAIO® Pen functions to the default settings by using the “Reset
Tab to Default” button. You can revert to a previously saved setting by using the
“Revert Tab.”
Tip Feel Tab

VAIO Slimtop Computer User Guide
24
6 Click Apply. The new tip pressure feel settings are applied to the pen.
To adjust the pen’s double-click speed and distance
1 From the Sony Tablet Properties screen, click the Double-Click tab.
2 To allow the Sony Tablet software to automatically adjust the double-click
speed and distance, place a check mark in the box located next to DoubleClick Assist.
3 Automatically set both the double-click speed and distance by tapping twice
on the (target icon) in the “Automatic” area.
4 You can manually change “Set Double-Click Distance” to a distance
between 1-25 pixels by clicking on the up/down arrows. You can also
manually change “Set Double-Click Speed” by moving the measurement to
a desired speed.
✍
You can reset your pen tip pressure feel to the default settings by using the “Reset Tab
to Default” button. You can revert to previously saved pen tip pressure feel settings by
using the “Revert Tab.”
Double-Click Tab
✍
You can disable the Double-Click Assist for specific applications. When Double-Click
Assist is disabled, you can only double-click by using the upper switch position. For
more information about disabling the settings for specific applications, see
“Customizing the pen settings for specific software applications.”
Configuring the VAIO Pen Functions
25
5 You may test your double-click speed and distance settings by tapping twice
on in the Test area. If your tapping matches the current double-click
settings, the button icon changes ( ) to indicate a successful test. If the icon
does not change after several tests, review your double-click speed and
distance settings.
6 Click Apply. The new double-click speed and distance settings are applied to
the pen.
To adjust the eraser pressure and feel
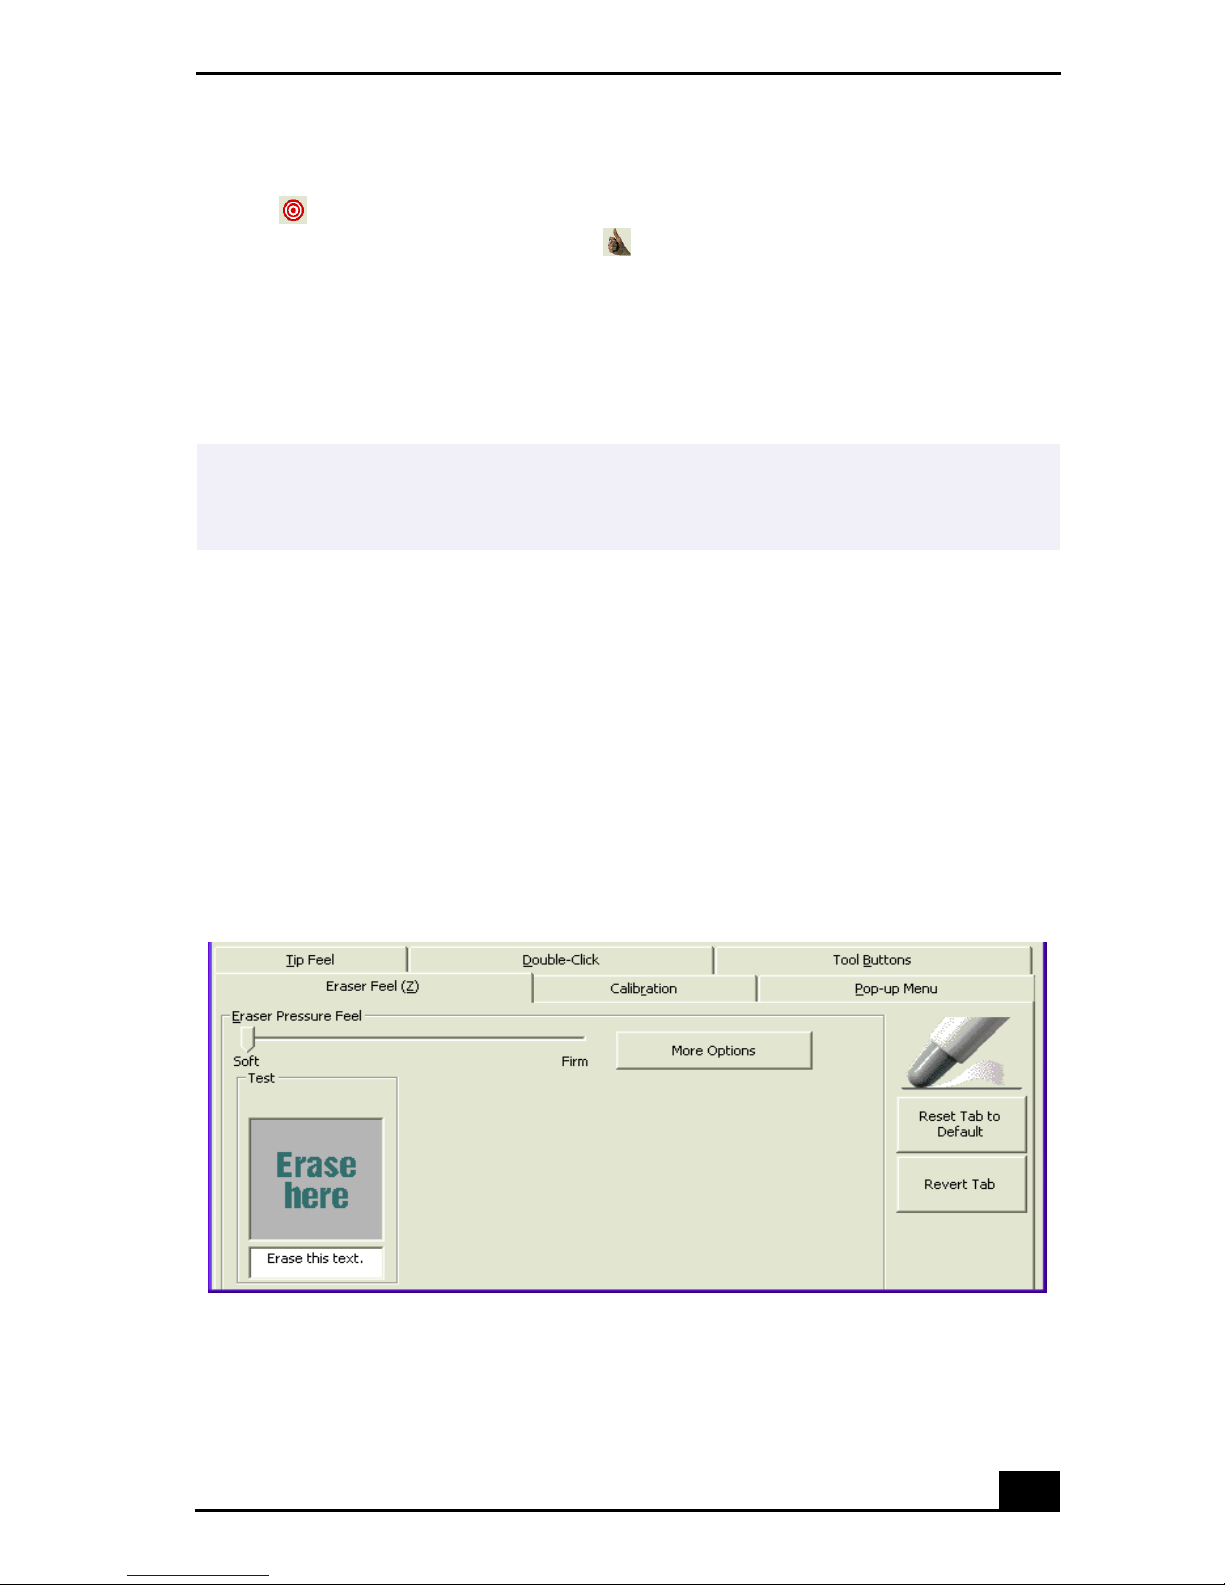
1 From the Sony Table Properties screen, click the Eraser Feel tab.
2 To check the current erase pressure feel, erase the phrase “Erase this text” in
the Test area. The text disappears when you are erasing more forcefully than
the current setting.
3 Test the eraser feel by erasing in the “Erase here” Test area. The erased area
changes color when you are erasing more forcefully than the current setting.
4 Adjust the eraser pressure feel by moving the measurement slider to a
desired position. The pressure settings range from Soft, which requires light
pressure, to Firm, which requires more forceful pressure.
✍
You can reset your double-click speed and distance to the default settings by using the
“Reset Tab to Default” button. You can revert to previously saved double-click settings
by using the “Revert Tab.”
Eraser Feel Tab
VAIO Slimtop Computer User Guide
26
5 Click More Options if you wish to make a more in-depth adjustment to the
eraser pressure feel.
6 Click Apply. The new eraser pressure feel settings are applied to the pen.
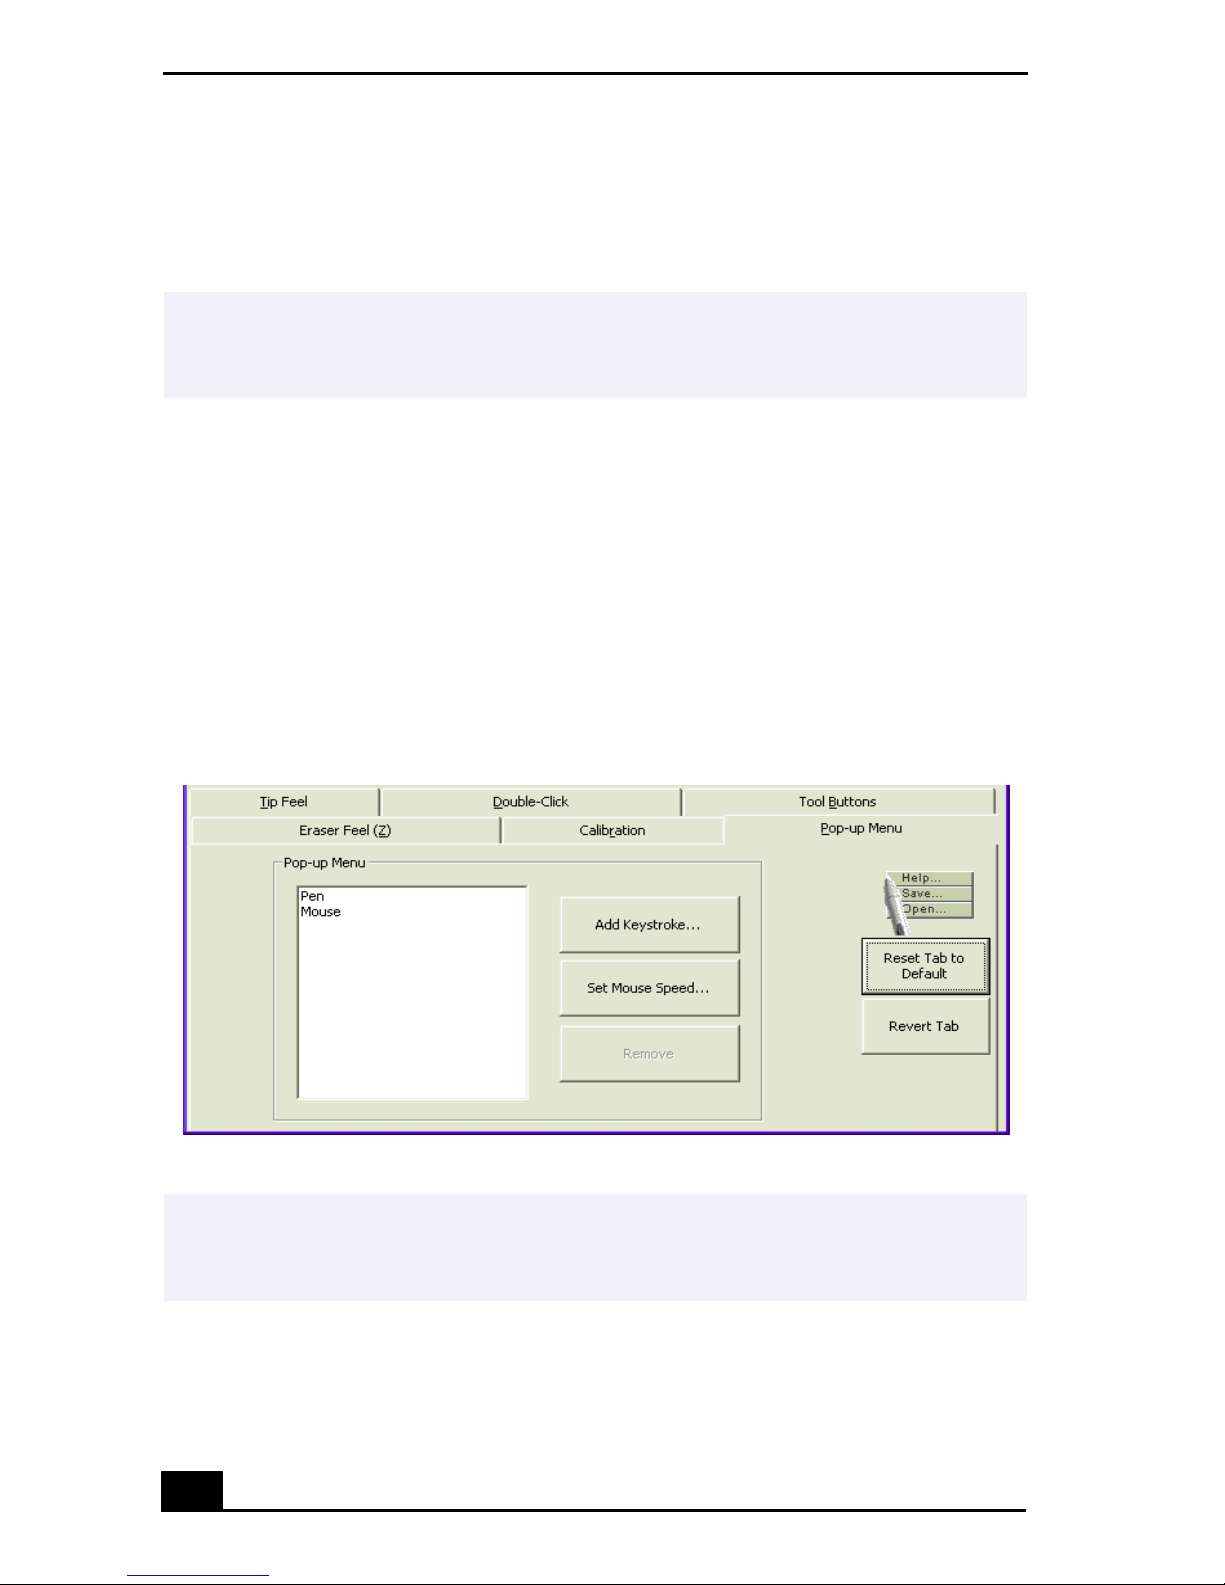
Configuring the Pop-up Menu
The Sony Tablet Properties window has a Pop-up Menu tab that can be used to
configure on-screen pop-up menus. The Pop-up Menu function can be assigned
to the VAIO® Pen. If you press a pen switch position that is assigned to the Pop-
up Menu function, a small pop-up menu appears at the on-screen cursor position.
You can execute a predetermined operation by selecting settings from the Pop-up
Menu. For more information on configuring Pop-up Menus, see the Sony Tablet
online Help.
✍
You can reset your eraser pressure feel to the default settings by using the “Reset Tab
to Default” button. You can revert to previously saved eraser pressure feel levels by
using the “Revert Tab.”
Pop-up Menu Tab
✍
You can reset the Pop-up Menu function to the default settings by using the “Reset
Tab to Default” button. You can revert to previously saved Pop-up Menu settings by
using the “Revert Tab.”

Configuring the VAIO Pen Functions
27
Customizing the pen settings for specific software
applications
You can customize your pen settings for a specific software application. When
you use different software, the associated pen settings are applied automatically,
enabling you to take full advantage of each software application’s features.
To add an application to the custom settings list
1 From the Sony Tablet Properties window, click “Add Application to List...”.
The “Add Application for Custom Settings” dialog box appears.
2 You may select a currently open application to add to the Application List, or
click Browse to select any other application to add.
3 Click OK.
To create custom settings for an application
1 Select a software application from the “Applications with Customized Tool
Settings” list.
2 Customize the pen settings for each software application according to the
software’s features. The settings apply only to the selected application.
3 Click Apply.
To remove an application from the custom settings list
1 Click the Remove menu, then click “Custom Settings for Application.”
2 Select the application(s) to be removed.
3 Click OK.
✍
If you have pen settings that you want all software applications to share, select “All
Other Apps” before changing the setting.

VAIO Slimtop Computer User Guide
28

29
VAIO Action Setup
VAIO ® Action Setup manages the settings for your computer's
Programmable Power Keys (PPKs) and internal timer. For more
information on changing these settings using VAIO Action Setup, see the
VAIO Action Setup Help file.
Accessing the VAIO Action Setup Help file
1 Click Start in the Windows® Taskbar and select All Programs.
2 Select VAIO Action Setup and click VAIO Action Setup Help.
VAIO Slimtop Computer User Guide
30
Using the Programmable Power Keys
Your VAIO® computer is equipped with technology that enables you to access
your favorite applications quickly. Each Programmable Power Key (PPK) on
your VAIO Convertible keyboard is programmed to launch a preset application
with a single press of the key. If you wish, you can use VAIO Action Setup to
change the PPK functions.
The Programmable Power Keys are located at the right side of your keyboard,
and are numbered P1 through P4. The keys work even when the computer is
turned off. Pressing one of the PPK buttons turns on the computer and launches
the preset application.
The four Programmable Power Keys are preprogrammed to perform the
following functions.
To change the PPK settings
1 Click Start in the Windows® Taskbar, and select All Programs.
2 Select VAIO® Action Setup, then click VAIO Action Setup.
3 Click the PPK you want to change.
4 From the Select Application dialog box, click the option for the desired
function. The corresponding applications appear in the list box on the right.
5 Select an application. Click Next.
6 The Confirmation Application Name window appears. Click Next.
7 You can type a new name and description, if desired. Click Finish.
Key Function
P1 (MAIL) Starts Microsoft® Outlook® Express.
P2 (INTERNET) Starts Microsoft® Internet Explorer for Windows XP.
P3 (PICTURE) Starts PictureGear™.
P4 (HELP) Starts Windows® XP Home Edition Help.
✍
You can also double-click the VAIO Action Setup icon, located in the Windows
taskbar, to launch VAIO Action Setup.
✍
You can drag an application to place it in the list box.
 Loading...