

Page 1
3-203-973-11(1)
Digital Photo Printer
Operating Instructions Page 2
Mode d’emploi Page 37
GB
FR
UP-DP10
2000 Sony Corporation
Page 2

WARNING
THIS APPARATUS MUST BE EARTHED.
WARNING
To prevent fire or shock hazard,
do not expose the unit to rain or
moisture.
To avoid electrical shock, do not
open the cabinet. Refer servicing
to qualified personnel only.
If you have any questions about this product, you
may call : SONY Customer Information Center 1800-222-SONY (7669) or write to : Sony
Customer Information Center 1 Sony Drive, Mail
Drop #T1-11, Park Ridge, NJ 07656.
Declaration of Conformity
Trade Name: SONY
Model No: UP-DP10
Responsible Party: Sony Electronics Inc.
Address: 1 Sony Drive, Park Ridge,
NJ.07656 USA
Telephone No.: 201-930-6972
This device complies with Part 15 of the FCC
Rules. Operation is subject to the following two
conditions: (1) This device may not cause
harmful interference, and (2) this device must
accept any interference received, including
interference that may cause undesired
operation.
For the customers in the USA
This equipment has been tested and found to
comply with the limits for a Class B digital device,
pursuant to Part 15 of the FCC Rules. These
limits are designed to provide reasonable
protection against harmful interference in a
residential installation. This equipment generates,
uses and can radiate radio frequency energy and,
if not installed and used in accordance with the
instructions, may cause harmful interference to
radio communications. However, there is no
guarantee that interference will not occur in a
particular installation. If this equipment does
cause harmful interference to radio or television
reception, which can be determined by turning the
equipment off and on, the user is encouraged to
try to correct the interference by one or more of
the following measures:
— Reorient or relocate the receiving antenna.
— Increase the separation between the
equipment and receiver.
— Connect the equipment into an outlet on a
circuit different from that to which the receiver
is connected.
— Consult the dealer or an experienced radio/TV
technician for help.
This device requires shielded interface cable to
comply with FCC emission limits.
You are cautioned that any changes or
modifications not expressly approved in this
manual could void your authority to operate this
equipment.
Page 3

Table of Contents
Introduction ............................................................................. 4
Names of Parts ........................................................................ 6
Setup and Connection ............................................................ 7
Installing the Printer Driver .................................................... 9
Preparing to Print.................................................................. 14
Making Printer Setting from your Computer ...................... 20
Miscellaneous........................................................................ 31
What the Digital Photo Printer Can Do ..................................4
Checking the Packing List......................................................4
Requirements..........................................................................5
Attaching the Stands to the Printer .........................................7
Connecting the Printer to a Computer .................................... 7
Connecting the Power Supply ................................................8
Turning the Power On/Off......................................................8
With Windows 98................................................................... 9
With Windows 95................................................................. 12
With the Macintosh OS ........................................................13
Preparing a Print Pack ..........................................................14
Loading the Ink Ribbon Cartridge and Printing Paper .........16
Removing the Ink Ribbon Cartridge and the Printing Paper 19
With Windows...................................................................... 20
With the Macintosh .............................................................. 25
Maintaining the Performance of the Printer ......................... 31
Troubleshooting.................................................................... 31
If the Paper Jams .................................................................. 33
Main Specifications .............................................................. 35
GB
English
Table of Contents 3
Page 4
Introduction
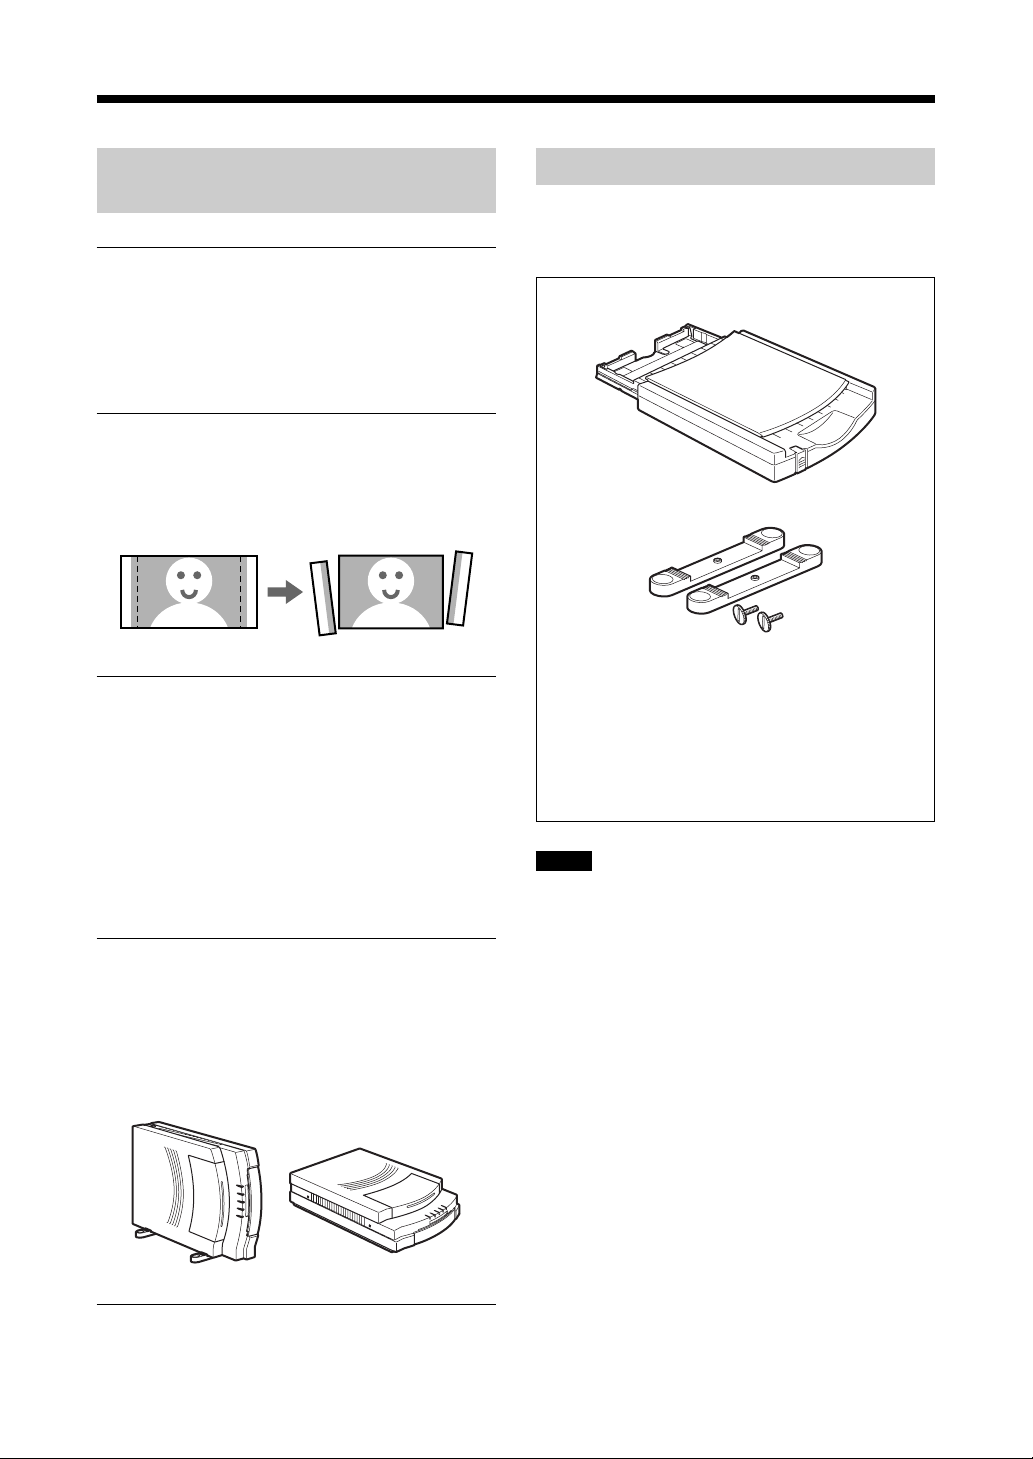
What the Digital Photo Printer
Can Do
High-quality Photo Printing
The sublimation printing process used by this
printer makes it possible to print images with fine
photographic quality.
Prints with no white border
The paper that is used for printing has
perforations near both edges that allow you to
tear off the blank strips of paper on each edge.
Laminate Patterns
Because laminate processing is performed while
photos are printed, the photos will not become
discolored over time. You can select from
among the following laminate options:
• Glossy: Produces a glossy print.
• Texture: Produces a textured print.
• Matte: Produces a matte print.
Compact, Thin, and Light Design
The printer itself is thin and the size of an A4
sheet. The printer can operate either in a vertical
position or in a horizontal position. The printer
weighs only 2.7kg, making it light and easy to
handle.
Checking the Packing List
Check the contents of the box against the packing
list.
Paper supply/eject tray (1)
Stands (2)
Power cord (1)
Tray case (1)
Ink ribbon cartridge (sufficient for printing 10 sheets) (1)
Print paper (5 sheets each of UPC-10P23 and UPC10P34) (1)
CD-ROM (driver, application) (1)
Operating Manual (this manual) (1)
Software license agreement (1)
Warranty (1)
Notes
• We recommend saving the box and the packing
materials in case it is necessary to transport or
ship the printer.
• When shipping the printer, remove the ink
cartridge and the paper supply/eject tray from
the printer.
Paper Jams Can Be Cleared Easily
If the paper jams, it can be easily cleared simply
by removing the cover.
4
Page 5
Requirements
When using a Macintosh
Printing processing is performed faster when
there is more memory and hard disk space
available. Therefore, we recommend allocating
as much memory and hard disk space as possible.
The following environment is required in order to
use the UP-DP10.
When using a Windows computer
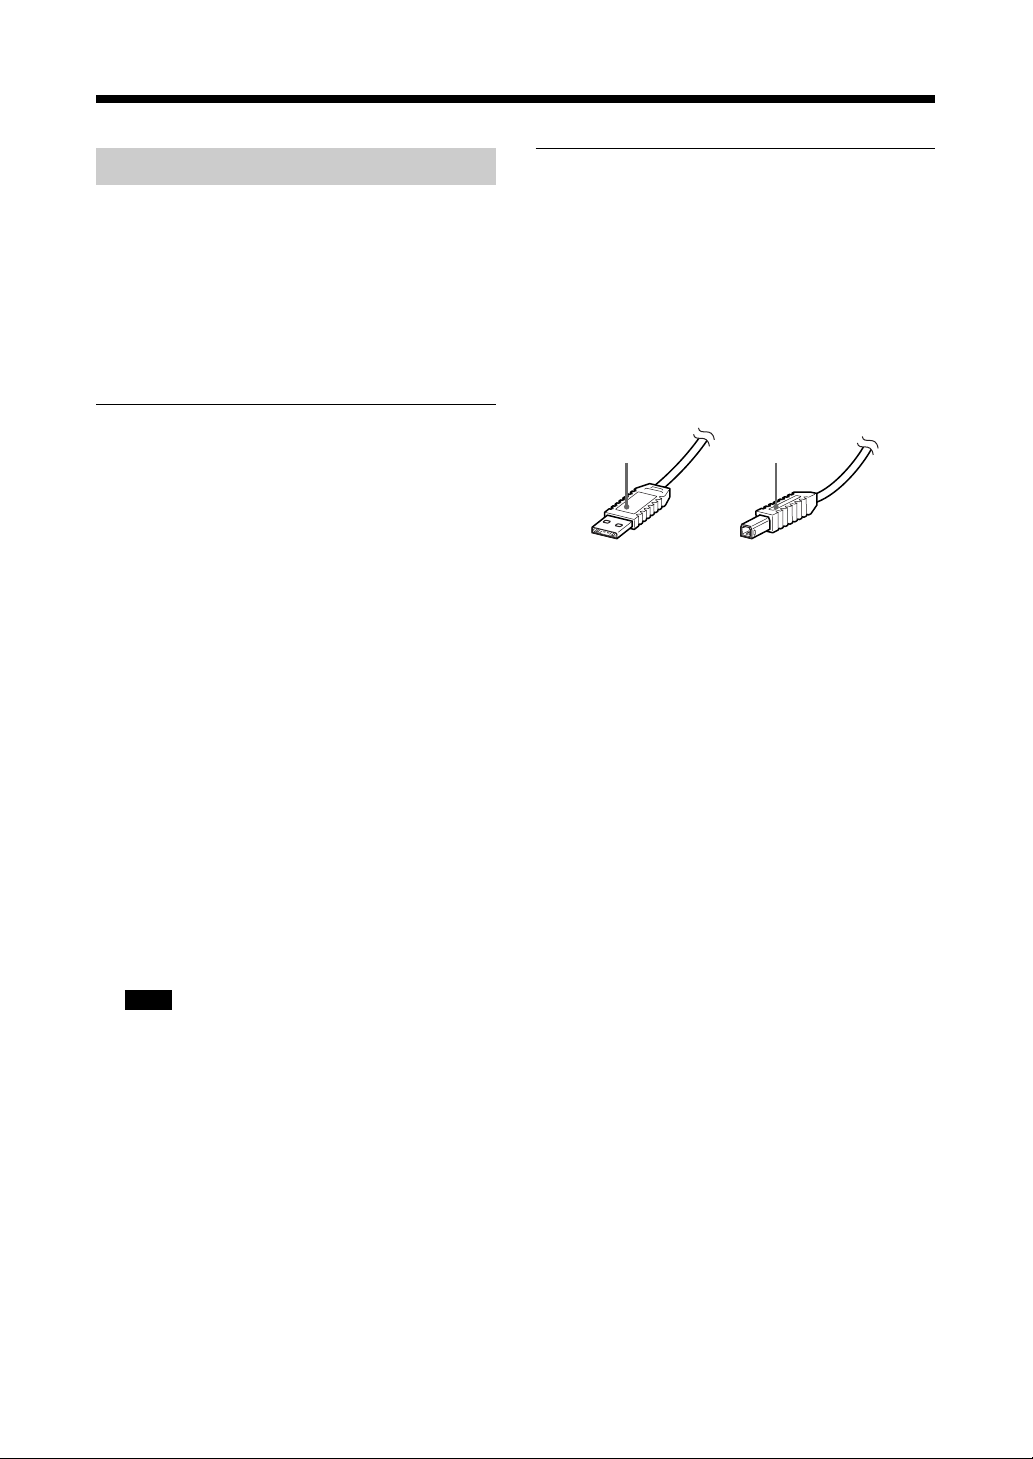
< Requirements in order to connect to a
USB port:
• A personal computer on which Microsoft
Windows 98 runs normally
• At least 32MB of RAM
• At least 30MB of hard disk space
• A USB port*
*Connection requires a USB cable with a
male type A connector and a male type B
connector. (Refer to the illustration
elsewhere on this page.)
< Requirements in order to connect to a
printer port:
• A personal computer on which Microsoft
Windows 98 or Windows 95 runs normally
• At least 32MB of RAM
• At least 30MB of hard disk space
• A printer port*
*Please see the user's manual provided with
your computer for the appropriate type of
printer cable.
• A Power Macintosh computer running Mac OS
8.6 or later, and which is equipped with a USB
port as a standard feature
• ColorSync2.5 or later
• At least 64MB of RAM
• At least 30MB of hard disk space
*Connection requires a USB cable with a male
type A connector and a male type B connector.
(Refer to the illustration below.)
Male type A
connector
Male type B
connector
Note
When using device driver
(Windows\system\lpt.vxd) version 4.00.953
in Windows 95, normal printing might be
impossible. In this event, obtain the most
recent driver from your Windows 95
distributor.
5
Page 6
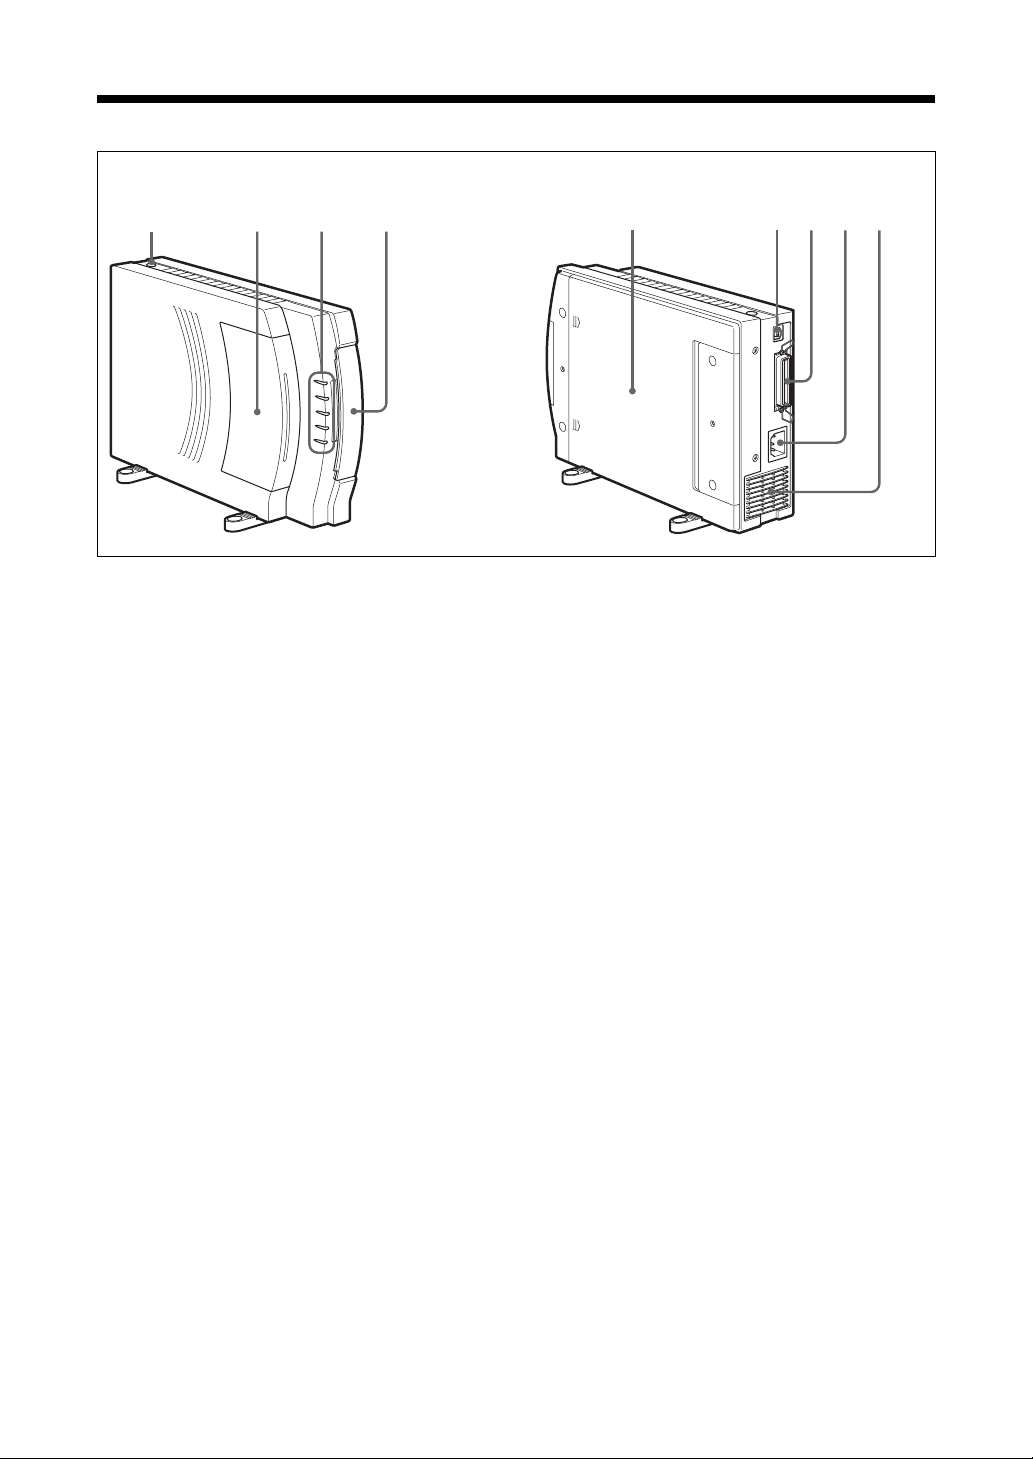
Names of Parts
<Front View> <Rear View>
1234
1 Operation switch
2 Ribbon cartridge cover
3 Lamps
POWER lamp
PRINT lamp
PAPER lamp
RIBBON lamp
ALARM lamp
The lamps indicate the printer status by
lighting or flashing. For details, refer to
page 32.
75 6 8 9
5 Bottom cover
6 USB port
7 Parallel port
8 AC power inlet
9 Ventilation holes
4 Paper supply/eject tray cover
6
Page 7
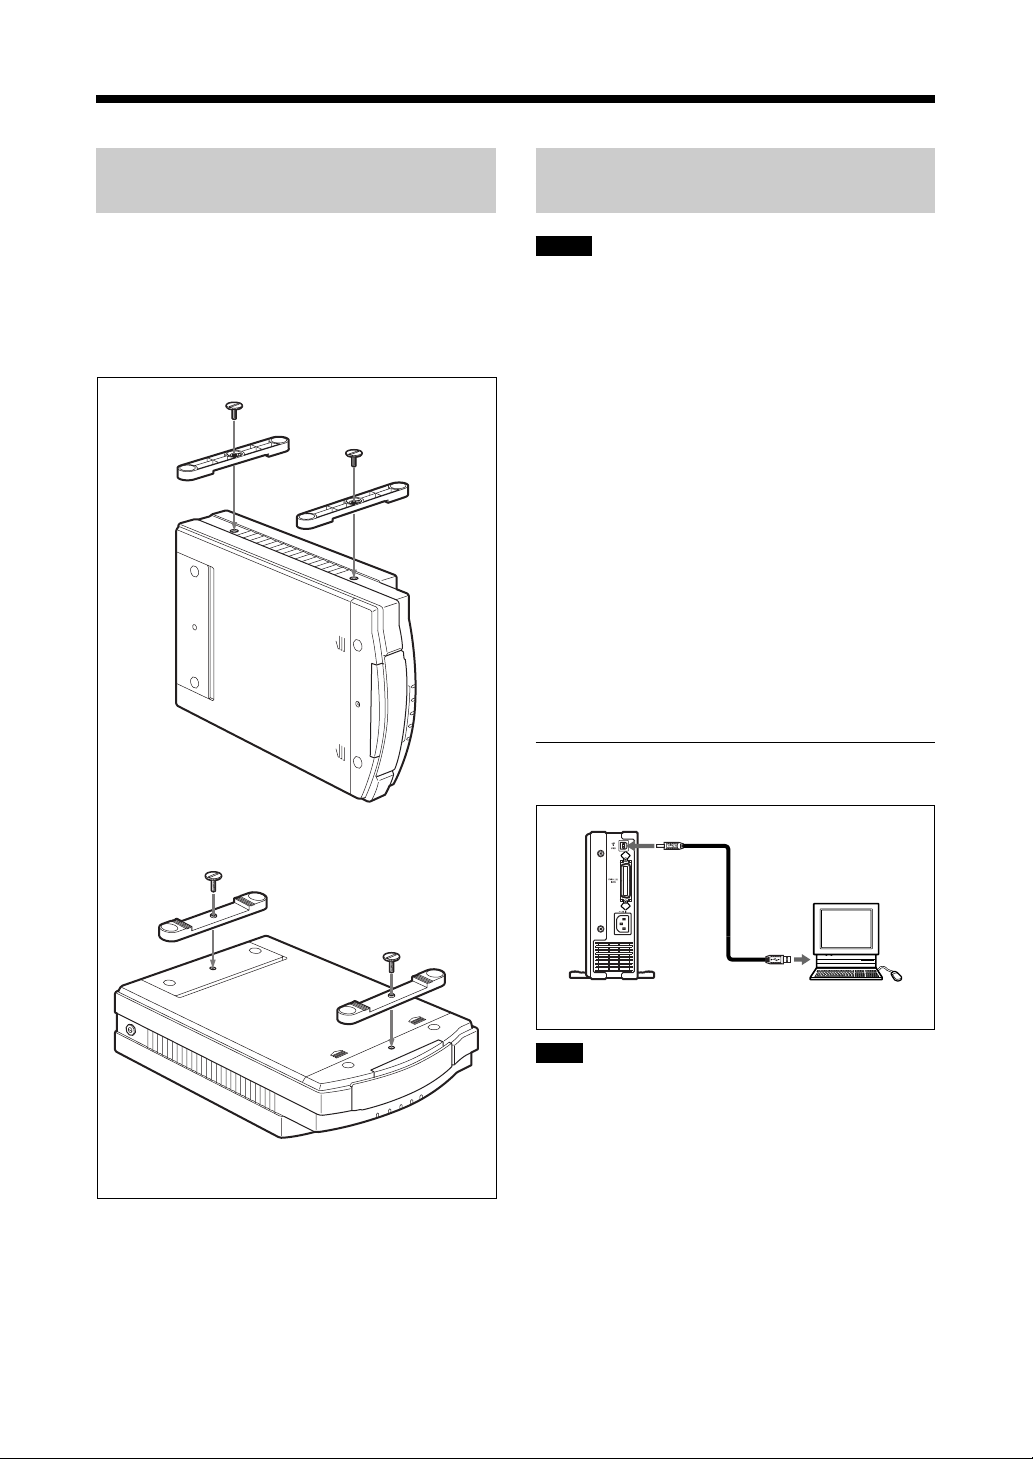
Setup and Connection
Attaching the Stands to the
Printer
The stands can be attached by screws. The
mounting of the stands depends on whether the
printer is going to be used in the vertical position
or the horizontal position. (Refer to the
illustration.)
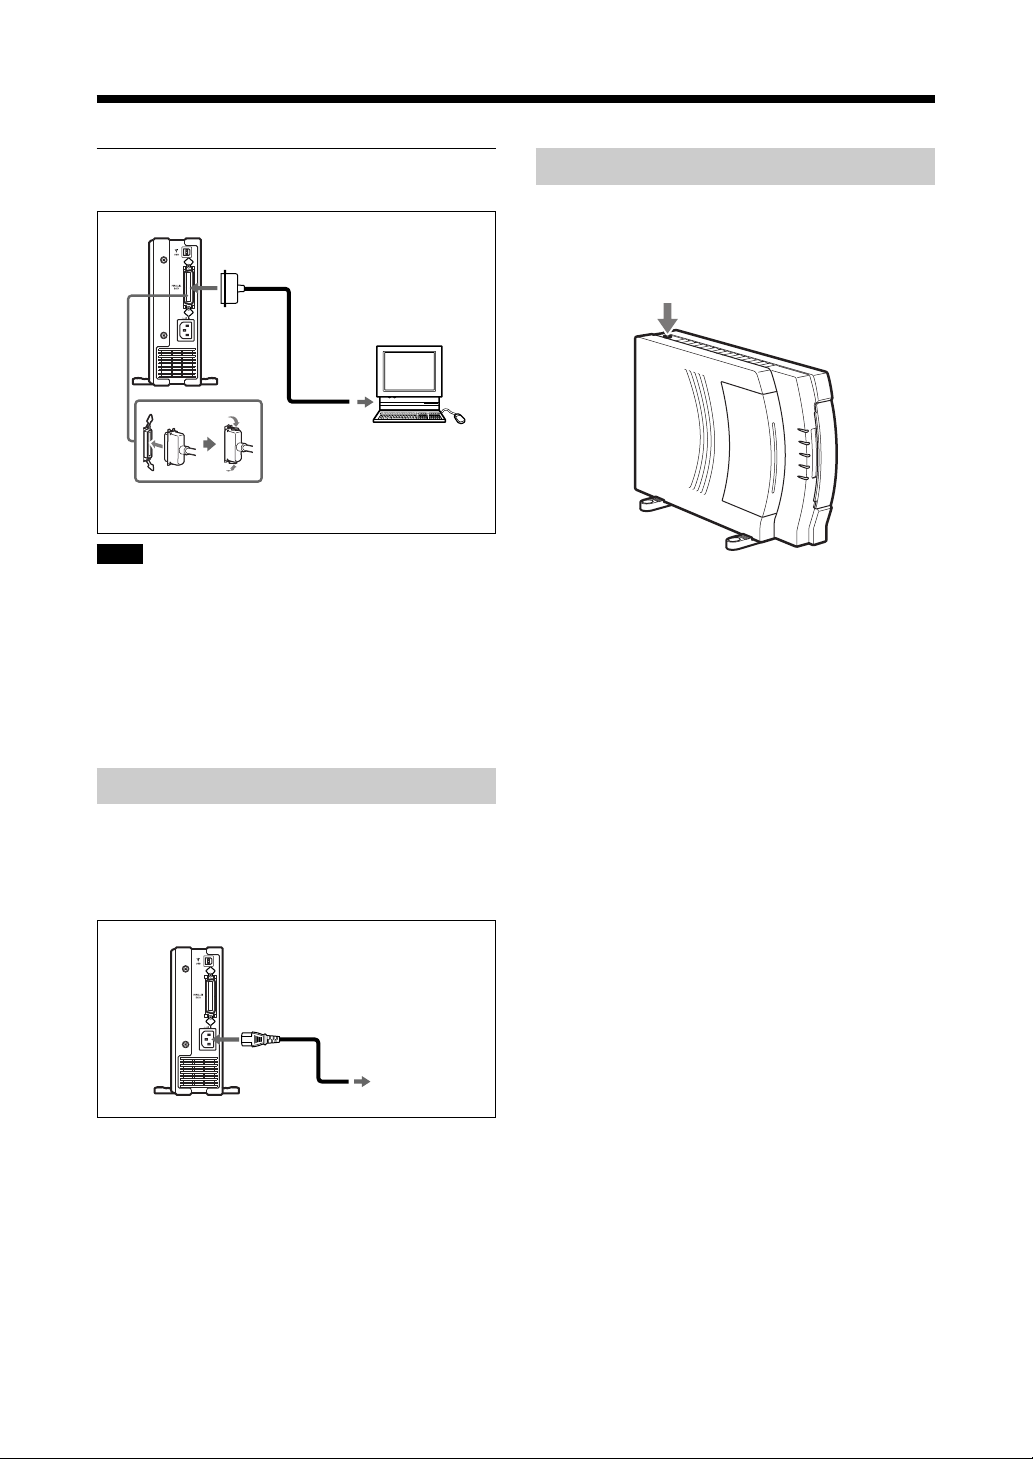
Connecting the Printer to a
Computer
Notes
• Before connecting the printer to a computer, be
certain to first turn off the power for the printer,
the computer, the monitor, etc.
• Read the operating manual for the personal
computer carefully.
• When connecting to a printer port, we
recommend using a shielded printer cable not
more than 2m long and with a double-ended
ferrite core.
• Make sure that you insert the cable connectors
all of the way when making the connections.
• The driver provided with this printer does not
support usage through a network.
• Proper operation can not be assured when USB
connection is made through a hub.
• The printer cannot be connected using both a
USB cable and a parallel cable. Connect it using
one type of cable or the other.
<For vertical orientation>
<For horizontal orientation>
When connecting to a USB port
To USB port (B connector end)
USB cable
(purchased separately)
To USB port
(A connector
end)
Note
Only the USB port can be used for connection to
a Macintosh computer. (This printer cannot be
used with a Macintosh that does not have a USB
port as a standard feature.)
Windows 98 computer
Macintosh
7
Page 8
Setup and Connection
When connecting to a printer port
Printer cable
(purchased separately)
To printer port
Windows 95/98
computer
To parallel port
(Amphenol 36-pin connector)
Note
When using the printer in fast transfer mode
(ECP mode), use an IEEE1284-compliant cable.
Note that in order to use fast transfer mode, the
parallel port must be set up on the personal
computer side. For details, refer to the operating
manual for the personal computer.
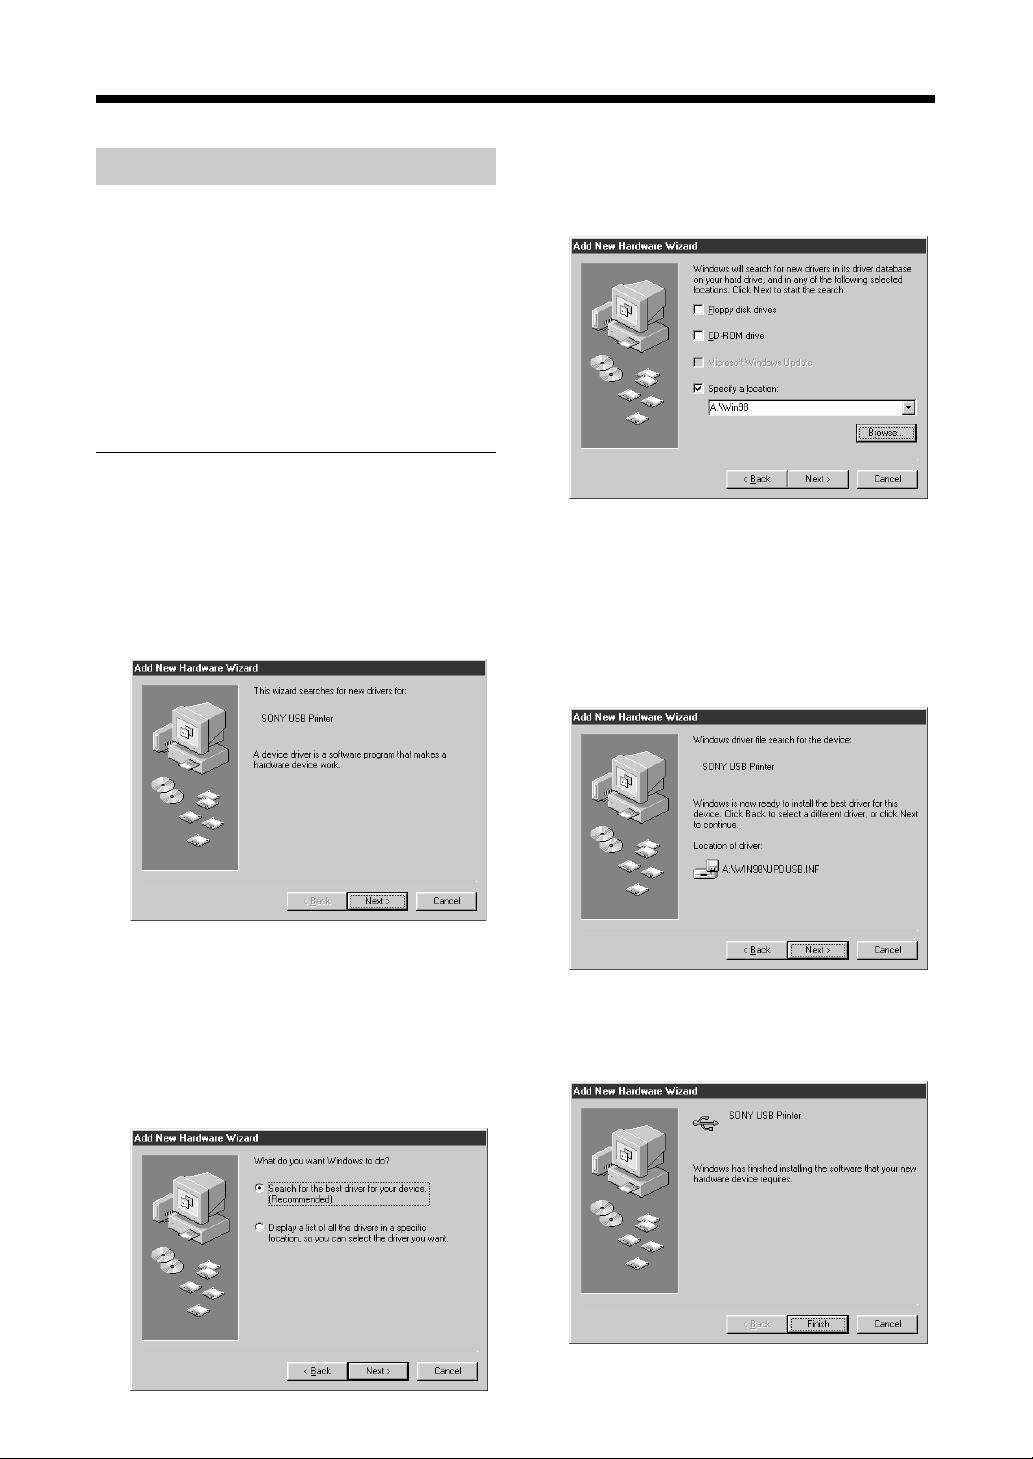
Turning the Power On/Off
Press the Operation switch so that the POWER
lamp is on. To turn the printer off, press the
Operation switch again.
Connecting the Power Supply
Plug the female end of the power cord into the
AC power inlet on the printer, and then plug the
other end into an AC power outlet.
Plug
To outlet
8
Page 9
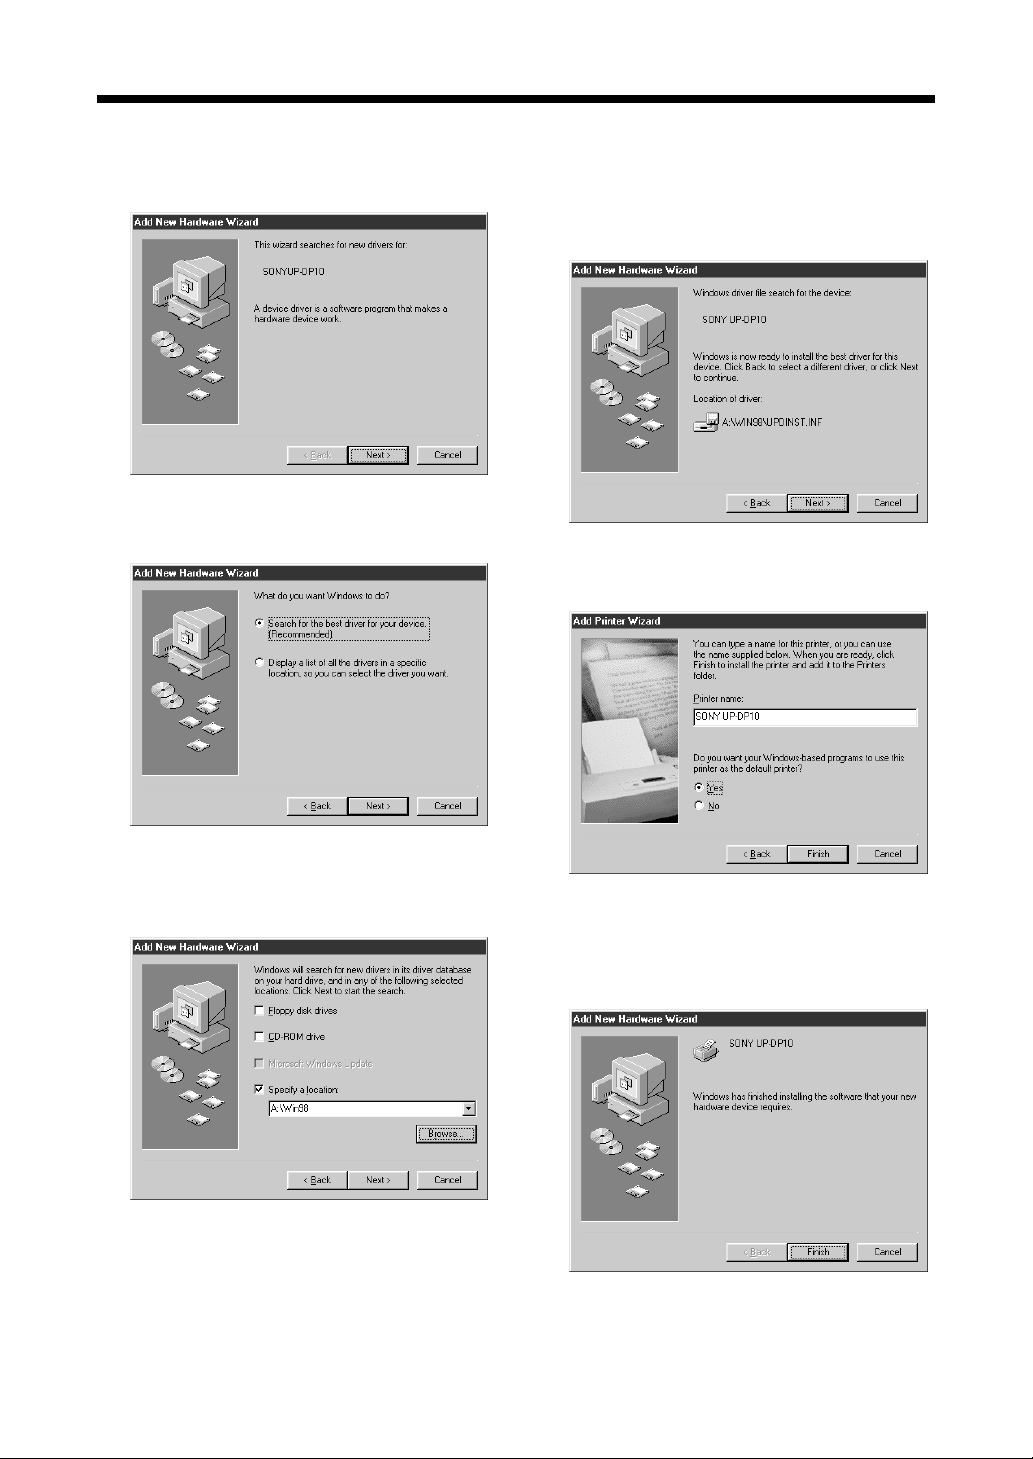
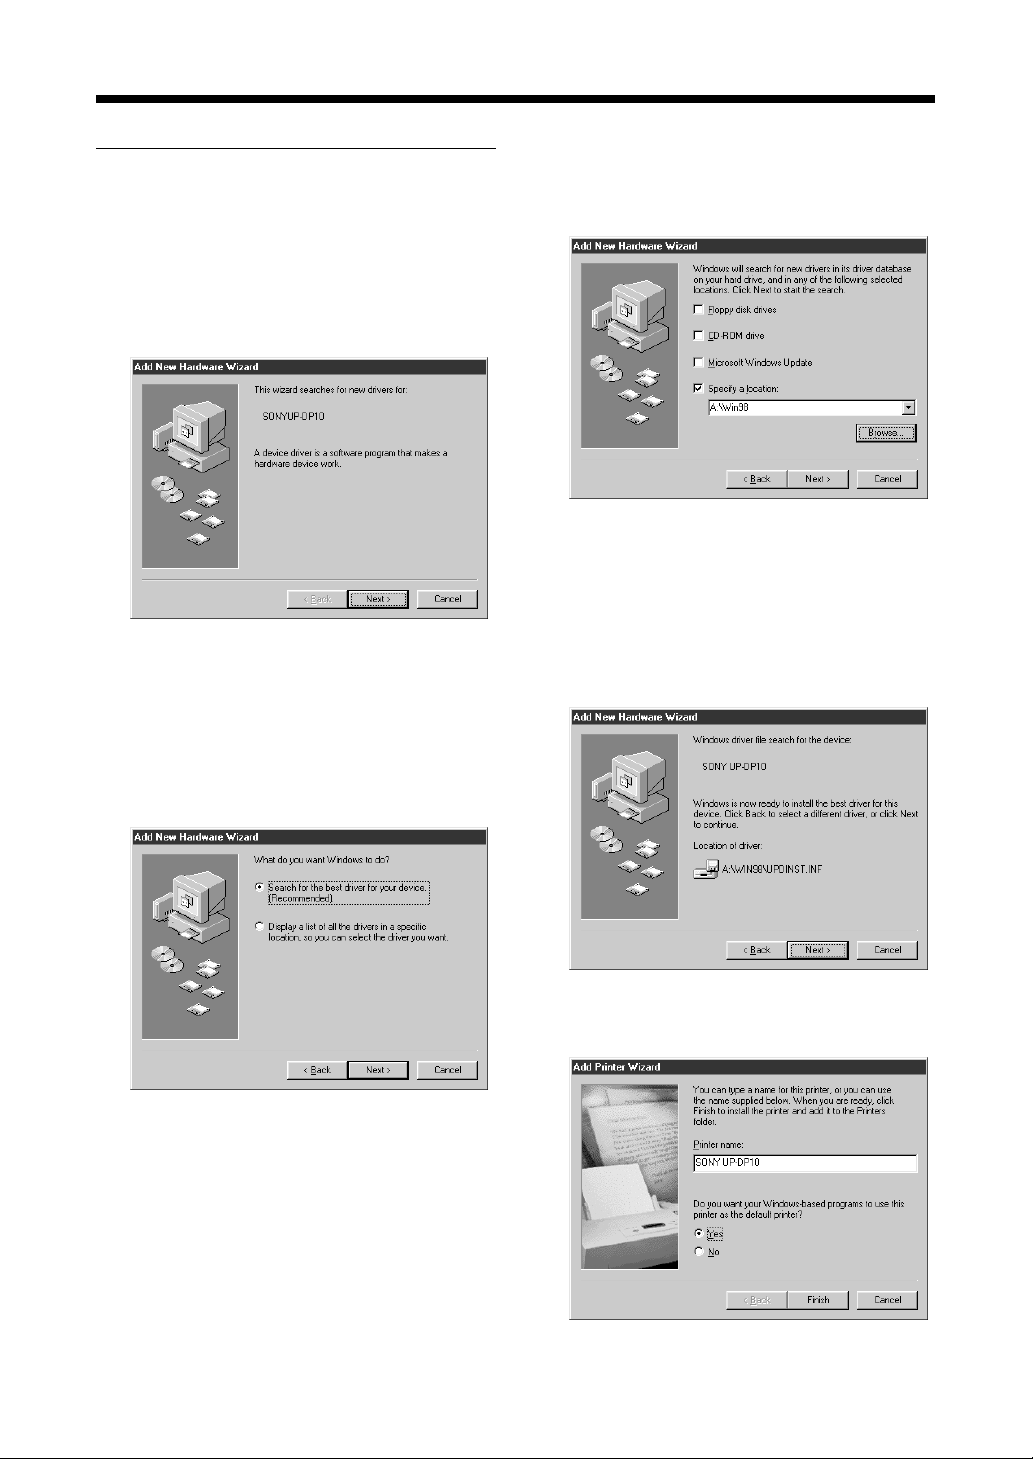
Installing the Printer Driver
With Windows 98
Install the printer driver that is contained in the
CD-ROM that is provided with the printer. The
“printer driver” is the software that allows you to
print on the UP-DP10, using the Print function of
typical application software.
Before installing the printer driver, turn the
computer and the printer off, and then connect
the printer to the computer.
When the Printer Is Connected by a
USB Cable
1 Turn the printer on first, and then turn the
computer on. Once Windows 98 starts up,
the “Add New Hardware Wizard” window
appears.
3 Select [Search for the best driver for your
device], and then click [Next].
The window changes as shown below.
4 Place the “Printer Software UP-DP10” CD-
ROM in the CD-ROM drive.
5 Select the [Specify a location] option, click
[Browse], specify the [Win98\English] folder
in the CD-ROM, and then click [Next].
The window changes as shown below.
If the “Add New Hardware Wizard” dialog
box does not appear when Windows 98 starts
up, install the printer by selecting [Start] t
[Settings] t [Printers] t [Add Printer].
2 Click [Next].
The window changes as shown below.
6 Click [Next].
After the file is copied, the window changes
as shown below.
9
Page 10
Installing the Printer Driver
7 Click [Finish].
The window changes as shown below.
8 Click [Next].
The window changes as shown below.
10Select the [Specify a location] option, click
[Browse], specify the [Win98\English] folder
in the CD-ROM, and then click [Next].
The window changes as shown below.
11Click [Next].
The window changes as shown below.
9 Select [Search for the best driver for your
device], and then click [Next].
The window changes as shown below.
10
12If necessary, you can type a name for the
printer in the [Printer name] field. Then,
click [Finish].
The window changes as shown below.
13Click [Finish].
The wizard ends. Installation is now
complete.
Page 11
When the Printer Is Connected by a
Printer Cable
1 Turn the printer on first, and then turn the
computer on. Once Windows 98 starts up,
the “Add New Hardware Wizard” window
appears.
If the “Add New Hardware Wizard” dialog
box does not appear when Windows 98 starts
up, install the printer by selecting [Start] t
[Settings] t [Printers] t [Add Printer].
3 Select [Search for the best driver for your
device], and then click [Next].
The window changes as shown below.
4 Place the “Printer Software UP-DP10” CD-
ROM in the CD-ROM drive.
5 Select the [Specify a location] option, click
[Browse], specify the [Win98\English] folder
in the CD-ROM, and then click [Next].
The window changes as shown below.
2 Click [Next].
The window changes as shown below.
6 Click [Next].
The window changes as shown below.
11
Page 12

Installing the Printer Driver
7 If necessary, you can type a name for the
printer in the [Printer name] field. Then,
click [Finish].
After the file is copied, the window changes
as shown below.
8 Click [Finish].
The wizard ends. Installation is now
complete.
With Windows 95
1 Turn the printer on first, and then turn the
computer on. Once Windows 95 starts up,
the “Update Device Driver Wizard” window
appears.
If the “Update Device Driver Wizard” dialog
box does not appear when Windows 95 starts
up, install the printer by selecting [Start] t
[Settings] t [Printers] t [Add Printer].
2 Click [Next].
The window changes as shown below.
Install the printer driver that is contained in the
CD-ROM that is provided with the printer. The
“printer driver” is the software that allows you to
print on the UP-DP10, using the Print function of
typical application software.
Before installing the printer driver, turn the
computer and the printer off, and then connect
the printer to the computer.
Notes
• The driver does not support connection with a
USB cable under Windows 95. Use a printer
cable.
• The installation procedure may differ from the
procedure described here, depending on the
Windows 95 version that you are using. If that
is the case, refer to your Windows 95 operating
manual for instructions.
3 Select [Other Locations].
The window changes as shown below.
4 Place the “Printer Software UP-DP10” CD-
ROM in the CD-ROM drive.
12
Page 13

5 Click [Browse], specify the [Win95\English]
folder in the CD-ROM, and then click [OK].
The window changes as shown below.
6 Click [Finish].
The window changes as shown below.
With the Macintosh OS
Install the printer driver that is contained in the
CD-ROM that is provided with the printer.
1 Place the “PRINTER SOFTWARE UP-
DP10” CD-ROM in the Macintosh’s CDROM drive.
The “PRINTER SOFTWARE” icon appears
on the desktop.
2 Double-click the “Driver” icon to open the
folder.
3 Double-click the “Chooser” icon to open the
folder.
4 Double-click the “UP-DP10 Install-E” icon
to start installation.
5 Follow the instructions displayed on the
screen in order to complete the installation
process.
7 If necessary, you can type a name for the
printer in the [Printer name] field. Then,
click [Finish].
After the file is copied, the wizard ends.
Installation is now complete.
z Hint
If a message such as "Cannot find XX"
appears when the file is supposed to be
copied, click [Browse], specify the
[Win95\English] folder on the CD-ROM
again, and then click [OK].
6 After installation is complete, restart the
Macintosh.
Note
Before using the printer driver, please take a
moment to read the “ReadMe” file in the
“Chooser” folder.
13
Page 14

Preparing to Print
Preparing a Print Pack
In order to print, it is necessary to prepare a Sony Print Pack (printing paper
and an ink ribbon cartridge, sold as a set). A Sony Print Pack must be
purchased separately. The following table lists the types of Sony Print Packs
available.
Product No.
UPC10P23
UPC10P34
UPC10S01
Note
Type
Photocards
Photocards
Glossy
photostickers
Size/number of sheets
100 × 180 mm
(100 × 152 mm
after cutting)
25 sheets
100 × 180 mm
(100 × 134 mm
after cutting)
25 sheets
100 × 180 mm
25 sheets
Features
These sheets produce prints that
have no white border when
photos taken with a digital camera
that has a 2:3 aspect ratio (V:H)
are printed on these sheets and
the border is then cut off along
the perforations.
These sheets produce prints that
have no white border when
photos taken with a digital camera
that has a 3:4 aspect ratio (V:H)
are printed on these sheets and
the border is then cut off along
the perforations.
These sheets have no
perforations, and are backed with
an adhesive.
The maximum printing area is 100
× 155 mm.
If “Border” is selected in the printer driver, each of the print sizes will be
reduced somewhat.
Notes on Using Print Packs
• The ink ribbon cartridge is designed to allow you to print an image on each
of the sheets in the Print Pack.
• If photos taken with a digital camera that has a 3:4 aspect ratio (V:H) are
printed on the paper in a UPC-10P23 Print Pack, a white border may remain
even after cutting along the left and right perforations, or a portion of the
top and bottom of the image may not be printed on the paper.
14
Page 15

• If photos taken with a digital camera that has a 2:3 aspect ratio (V:H) are
printed on the paper in a UPC-10P34 Print Pack, the printed image may
extend beyond the left and right perforations, or white border may appear at
the top and bottom of the paper.
• Use the ink ribbon cartridge and paper that share the same product number
together. Using an ink ribbon cartridge from one type of Print Pack with
paper from another type of Print Pack may result in poor image quality,
malfunction or other difficulties.
• When changing the ink ribbon cartridge and paper from one type of Print
Pack to another, be sure to change BOTH the ink ribbon cartridge and the
paper, as a set.
• Never touch the printing side (the blank, glossy side) of the paper or the ink
ribbon. Doing so could leave fingerprints, which will harm image quality.
• If it is necessary to change the ink ribbon cartridge or to add more paper
while printing is in progress, do not turn off the printer. If you turn off the
printer, the image that is stored in the printer’s memory will be lost.
• Ink ribbon cartridges cannot be re-used.
• If a paper jam occurs, do not just pull the paper out. Remove the paper by
following the procedure described in “If the Paper Jams” (page 33).
• If the ink ribbon breaks, you can tape it back together with cellophane tape.
For details, refer to “If the Ink Ribbon Breaks” (page 34).
Notes on Storing Ink Ribbon Cartridges and Paper
• Do not keep partially used ink ribbon cartridges or unused, opened paper in
dusty locations. Dust on the printing surfaces will harm image quality.
• If you will not be using a partially used ink ribbon cartridge or unused,
opened paper for an extended period of time, place them back in their
original bags for storage.
• Do not store ink ribbon cartridges and paper in hot or humid locations, or in
direct sunlight.
15
Page 16

Preparing to Print
Loading the Ink Ribbon Cartridge and Printing Paper
Loading the Ink Ribbon Cartridge
Note
Do not touch the ink ribbon. Fingerprints on the ink ribbon may harm the
image quality.
1 Take up any slack in the ink ribbon by turning in the direction indicated
by the arrow.
The ink ribbon could become damaged if you load the ribbon while it is
slack.
2 Open the ribbon cartridge cover.
16
WARNING
Components located behind the ribbon cartridge door become very hot.
To avoid burns, never put your hand inside the opening.
3 Grasp the handle on the ink ribbon cartridge, and make sure that the ink
ribbon cartridge is facing the right way. Align the protuberances on the
cartridge with the grooves in the printer and slide the cartridge in as far
as it will go.
Page 17

4 Close the ribbon cartridge cover, and then make sure that the RIBBON
lamp has turned off.
Loading the Printing Paper
Note
Never touch the printing side (the blank, glossy side) of the paper. Doing so
could leave fingerprints, which will harm image quality.
1 Fan the paper thoroughly.
If the paper is curled, uncurl it.
2 With the printing surface (glossy side) facing up, place the paper in the
paper supply/eject tray, making sure that the paper is under the tabs at the
end of the tray.
Stopper
Printing surface
Tabs
17
Page 18

Preparing to Print
Notes
• Do not place more than 25 sheets in the tray at one time.
• When loading printing paper in the tray, make sure that all of the paper
is completely inside of the tray.
• Do not use paper that is significantly curled.
• When outputting multiple sheets of paper to the eject surface of the
paper supply/eject tray, raise the stopper.
3 Open the paper supply/eject tray cover.
4 Align the protuberances on the tray with the grooves in the printer, slide
the tray in as far as it will go, and then make sure that the PAPER lamp
has turned off.
18
Stopper
Notes
• Do not allow more than 10 sheets of paper to accumulate on the eject
surface of the paper supply/eject tray.
• To prevent dust contamination, attach the provided tray cover to the
paper supply/eject tray when you take the tray out of the printer.
The printer is now ready to print. To print, first read “Preparing to Print”
(page 14). Once printer setup is complete, use the Print function in any
typical application software to print.
Page 19

Removing the Ink Ribbon Cartridge and the Printing Paper
Removing the ink ribbon cartridge
1 Open the ribbon cartridge cover.
2 Grasp the handle and pull the cartridge out.
Removing the printing paper
1 Pull the paper supply/eject tray out of the printer.
2 Lift the metal plate at the bottom of the paper supply/eject tray, and then
pull out the printing paper.
19
Page 20

Making Printer Setting from your Computer
With Windows
Before printing from an application, it is necessary to set the printer
properties. The printer properties can be displayed by means of either of the
following methods:
• Select [Start] t [Settings] t [Printers]. Select the UP-DP10 icon, and
then select [File] t [Properties]. Settings made through this method
become the initial printer settings for printing in all applications.
• From an application’s [File] menu, select the item that is used for printer
setup. In some applications, these settings can be made in the print dialog
box. Settings made by this method are generally only valid until you quit
the application.
The “SONY UP-DP10: Properties” dialog box has tabs that are standard for
the OS, and tabs that are specific to the UP-DP10. The following section
explains the tabs that are specific to the UP-DP10: [Paper] and [Graphics].
Note also that although the sample screens are taken from Windows 98, the
setting items, methods, etc., are identical in Windows 95.
[Paper] tab settings
This tab is used to make basic printing settings, such as the paper type,
number of copies, the printing quality, etc. Make sure these settings have
been made before printing anything.
< [Paper Type]
Select the type of Print Pack that has been loaded in the printer from
among Photocard [UPC-10P23], Photocard [UPC-10P34], and Glossy
photosticker [UPC-10S01].
20
< [Orientation]
Select the printing orientation as either [Portrait] or [Landscape].
Page 21

< [Copies]
The number of copies can be set in a range from “1” to “25.”
< [Scaling]
Specify the enlargement/reduction ratio. Any integer value ranging from
“10%” to “400%” can be set for this ratio.
< [Border]
If this checkbox is checked (on), prints are printed with a white border
around the edges. If this option is selected, the image size that can be
printed is reduced.
< [Image Layout]
This item becomes valid if “UPC-10S01” is selected for the paper type.
• If [1 up] is selected, then only one image is printed on each sheet.
• If [16 up] is selected, then 16 identical thumbnail images are printed on
each sheet.
< [Laminate Pattern]
Use this item to select one of the following three laminate processing
options for the print surface:
• If [Glossy] is selected, prints are produced with a glossy finish.
• If [Texture] is selected, prints are produced with a textured finish.
• If [Matte] is selected, prints are produced with a matte finish.
< [About...]
Clicking this button displays the version information for the printer
driver.
< [Restore Defaults]
Clicking this button restores all of the settings under the [Paper] tab to
their initial values.
21
Page 22

Making Printer Setting from your Computer
[Graphics] tab settings
This tab is used to make settings related to images, such as the printing color
and brightness. Adjust these settings when you are not satisfied with the final
results of printing or when you need to make advanced adjustments.
Select either [Digital Camera Correction], [Color Balance], [Tone Curve], or
[Sharpness] in the [Color Correction] list box. The settings that can be made
underneath change, depending on which choice is selected.
To cancel any changes you have made and restore the initial settings, click
[Restore Defaults] on each screen.
< [Digital Camera Correction]
22
Select this screen when printing an image from a digital camera in order
to correct the intensity and the saturation.
• If you click the [Use Digital Camera Correction] checkbox so that it is in
the checked (on) state, image correction processing that is suited for
digital camera images is performed on the image.
• Optimal processing can be performed by selecting [Auto].
• Selecting [Custom] allows you to manually set [Intensity] and
[Saturation].
Note
Setting [Saturation] to “0” causes the original saturation component to
be used, but setting [Intensity] to “0” does not cause the original
intensity component to be used.
Page 23

< [Color Balance]
Use this screen to adjust the color balance of the printer, either by
dragging the sliders left or right, clicking on [ v ] or [ V ], or by inputting
a value directly through the keyboard.
< [Tone Curve]
You can adjust values output by the printer with respect to values input by
choosing a tone curve setting of [Hard] or [Soft].
23
Page 24

Making Printer Setting from your Computer
< [Sharpness]
Use this screen to adjust the contour emphasis of the image, either by
dragging the sliders left or right, clicking on [ v ] or [ V ], or by inputting
a value directly through the keyboard.
Increasing the setting increases the contour emphasis of the image.
24
Page 25

With the Macintosh
Selecting the UP-DP10 with the Chooser
This operation with the Chooser must be performed the first time that you use
the UP-DP10,, and whenever you have been using another printer and now
want to use the UP-DP10.
1 Select the Chooser from the Apple menu.
The Chooser window opens.
2 Select the UP-DP10 icon from among the icons displayed on the left side
of the Chooser window.
The UP-DP10 printers that are connected are then listed in the listbox on
the right side of the Chooser window.
3 Select the UP-DP10 name in the listbox.
4 Close the Chooser window.
25
Page 26

Making Printer Setting from your Computer
Page Setup
The “Page Setup” dialog box is used to make basic printing settings, such as
the paper type, the printing quality, etc. Make sure these settings have been
made before printing anything.
To display the “Page Setup” dialog box, select “Page Setup” from the “File”
menu. All of the items in the “Page Setup” dialog box are described below.
< “Paper Type”
Select the type of Print Pack that has been loaded in the printer from
among “UPC-10P23,” “UPC-10P34,” and “UPC-10S01.”
< “Scale”
Specify the enlargement/reduction ratio. Any integer value ranging from
“25%” to “400%” can be set for this ratio.
< “Orientation”
Select the printing orientation.
< “Image Layout”
This item becomes valid if “UPC-10S01” is selected for the paper type.
• If “1 up” is selected, then only one image is printed on each sheet.
• If “16 up” is selected, then 16 identical thumbnail images are printed on
each sheet.
< “Laminate Pattern”
Use this item to select one of the following three laminate processing
options for the print surface:
• If “Glossy” is selected, prints are produced with a glossy finish.
• If “Texture” is selected, prints are produced with a textured finish.
• If “Matte” is selected, prints are produced with a matte finish.
< “Border”
If this checkbox is checked (on), prints are printed with a white border
around the edges. If this option is selected, the image size that can be
printed is reduced.
26
Page 27

Printing Settings
The “Print” dialog box appears if “Print” is selected from the “File” menu.
Select either “General” or “Color Correction” from the pop-up menu near the
top of the dialog box to set various items.
“General” settings
< “Copies”
Set a value from 1 to 25.
< “Pages”
Specify the range of pages to be printed.
• If “All” is selected, all pages will be printed.
• If “From: To:” is selected, the specified range of pages is printed. Input
the values in these fields through the keyboard.
“Color Correction” settings
The “Color Correction” screen is used to make settings related to images,
such as the printing color and brightness. Adjust these settings when you are
not satisfied with the final results of printing or when you need to make
advanced adjustments.
When “Color Correction” is selected in the “Print” dialog box, a new pop-up
menu appears. Each if these items is explained below.
27
Page 28

Making Printer Setting from your Computer
< “Digital Camera Correction”
Select this screen when printing an image from a digital camera in order
to correct the intensity and the saturation.
• If you click the “Use Digital Camera Correction” checkbox so that it is
in the checked (on) state, image correction processing that is suited for
digital camera images is performed on the image.
• Optimal processing can be performed by selecting “Auto.”
• Selecting “Custom” allows you to manually set “Intensity” and
“Saturation.”
Note
Setting “Saturation” to “0” causes the original saturation component to
be used, but setting “Intensity” to “0” does not cause the original
intensity component to be used.
• Click “Restore Defaults” to return all of the settings on this screen to
their initial values.
< “Color Balance”
Use the scroll bars on this screen to adjust the color balance of the printer.
• Click “Restore Defaults” to return all of the settings on this screen to
their initial values.
28
Page 29

< “Tone Curve”
You can adjust values output by the printer with respect to values input by
choosing a tone curve setting of “Hard” or “Soft”.
< “Sharpness”
Use the scroll bar on this screen to adjust the contour emphasis of the
image. Increasing the setting increases the contour emphasis of the
image.
• Click “Restore Defaults” to return the settings on this screen to their
initial values.
29
Page 30

Making Printer Setting from your Computer
< “ColorSync”
The following items can be set if the “Use ColorSync” option is on:
• In the “Profile” pop-up menu, specify the UP-DP10 profile.
• In the “Intent” pop-up menu, select one of the following for color
reproduction mapping:
Perceptual (Images)
Saturation (Graphics)
Relative Colormetric
Absolute Colormetric
• In the “Quality” pop-up menu, select one of the following for the color
mapping quality:
Best
Normal
Draft
30
Page 31

Miscellaneous
Maintaining the Performance
of the Printer
The following items should be noted in order to
maintain the performance of the printer. Also
refer to the sections “Warning” (page 2).
Notes on Use
• If the printer will not be used for an extended
period of time, remove the paper supply/eject
tray from the printer and store it in the tray case,
turn off the printer, and then unplug the power
cord.
• When transporting the printer, remove all
accessories from the printer. Carrying the
printer while any accessories are still in the
printer can result in damage to the printer.
Condensation
Water droplets (called “condensation”) may form
inside the printer if it is moved from a cold
location to a warm one, or if it is placed in a
humid room. Operating the printer while
condensation is present could not only cause the
printer to operate incorrectly, but could also
result in damage to the printer. If there is any
possibility that there is condensation inside the
printer, turn the power off and allow the printer
to sit until the condensation evaporates.
Cleaning the Printer
• Before cleaning the printer, turn the power off
and unplug the power cord.
• If the cabinet is dirty, dampen a cloth with
water or a mild, dilute detergent solution, wring
the cloth out thoroughly, and then wipe the dirt
away. Afterwards, wipe away any moisture
with a dry cloth.
• Do not use paint thinner, benzene, alcohol,
chemical dust cloths, or other materials that
could harm the finish of the cabinet.
Troubleshooting
What to do
Before sending the printer for repair, repeat the
checks. If it still doesn’t operate properly, please
consult the store from which you purchased the
printer or you Sony service center.
Symptom
Power
does not
go on.
Printer
does not
print
Cannot
remove
the ink
ribbon
cartridge
Cause/Remedy
• Check that the printer’s power cord
is plugged in properly.
t Properly connect the power
cord as explained in
“Connecting the Power
Supply” (page 8).
• Check that the ink ribbon cartridge
and printing paper are properly
loaded.
t Properly load the ink ribbon
cartridge and printing paper
as explained in “Loading the
Ink Ribbon Cartridge and
the Printing Paper”
(page 16).
• Check that the ink ribbon cartridge
cover is closed.
t Close the ink ribbon
cartridge cover.
• Check that the bottom cover is
closed.
t Close the bottom cover.
• The printer may have overheated.
t Wait for a while, then try
printing again.
• Operation of the printer may have
been prematurely interrupted,
leaving the teeth of the ink ribbon
cartridge gear engaged.
t Turn the printer’s operation
switch back on, then
remove the ink ribbon
cartridge after the sound of
operation stops.
31
Page 32

Miscellaneous
Symptom
Paper
jams
The
ALARM
lamp is lit
The
printed
result
does not
look
clean.
Cause/Remedy
• Check whether you have loaded
more than 25 sheets of paper in the
paper supply/eject tray.
t Load no more than 25
sheets of paper in the paper
supply/eject tray at a time.
• Check whether more than 10
sheets of paper have accumulated
on the eject surface of the paper
supply/eject tray.
t Do not allow more than 10
sheets of paper to
accumulate on the eject
surface.
• Check whether the paper is
wrinkled or curled.
t Remove any wrinkled or
curled paper.
• Check whether paper has jammed.
t Clear the jam as explained
in “If the Paper Jams”
(page 33).
• Check whether the ink ribbon has
broken.
t Correct the problem as
explained in “If the Ink
Ribbon Breaks” (page 34).
• Check whether you are printing on
the right side of the paper.
t Properly load the printing
paper as explained in
“Loading the Printing Paper”
(page 17)
• Check whether the ink ribbon
cartridge or printing paper are dirty.
t Load a new ink ribbon
cartridge or clean printing
paper.
Status Indications
The printer status is indicated by the POWER,
PRINT, PAPER, RIBBON, and ALARM lamps
lighting or flashing. If the printer is in an
abnormal condition, take whatever action is
called for by the status indicated by the lamps.
Lamp
POWER
PRINT
PAPER
RIBBON
Lit
a • The power is on.
a • Printing is in progress.
a • The printer is out of paper.
a • The end of the ink ribbon
Printer status and action
Flashing
a • The printer is receiving
image data.
t Load more paper in
the paper supply/
• There is too much
• The printer cannot use the
• No ink ribbon cartridge has
• The ink ribbon cartridge that
eject tray. (page 17)
accumulated ejected paper
in the paper supply/eject
tray.
t Remove the
accumulated ejected
paper from the paper
supply/eject tray.
type of paper that has been
loaded.
t Once the paper has
been ejected, load
the correct type of
paper in the paper
supply/eject tray.
(pages 14, 17)
has been reached.
t Install a new ink
ribbon cartridge.
(pages 16, 19)
been installed.
t Install an ink ribbon
cartridge. (page 16)
has been installed is not
compatible with this printer.
t Install the correct ink
ribbon cartridge.
(pages 14, 16)
32
Page 33

Lamp
ALARM
All
lamps
Lit
a • There is a paper jam inside
a • The ribbon cartridge cover
a • A problem has occurred
Printer status and action
Flashing
the printer.
t Remove the jammed
• The ink ribbon has broken.
• The bottom cover is open.
paper. (see below)
t Repair the ink ribbon
with cellophane
tape. (page 34)
is open.
t Close the cover.
t Close the cover.
that requires repair by
service personnel.
t Contact your dealer
or the nearest Sony
Service Center.
If the Paper Jams
If the paper jams while the printer is printing, the
ALARM lamp will light. Press the Operation
switch to turn the printer off, and then press the
Operation switch to turn the printer on again.
The paper inside the printer will be ejected
automatically.
If this procedure does not clear the paper jam and
the ALARM lamp remains lit, follow the
procedure described below to remove the
jammed paper.
1 Turn the printer off and unplug the power
cord.
2 If there are any printed sheets in the paper
supply/eject tray, remove those sheets, and
then remove the tray.
3 Open the ribbon cartridge cover, and remove
the ink ribbon cartridge.
Note
If you cannot remove the ink ribbon
cartridge, contact your dealer or the nearest
Sony Service Center.
4 Remove the jammed paper.
• If you cannot remove the jammed paper, or
if you cannot see the jammed paper, follow
the procedure described below.
• If you were able to completely remove all
of the jammed paper, skip ahead to step 7.
5 Remove the bottom cover by pressing on the
marks and then sliding the cover down.
33
Page 34

Miscellaneous
6 Remove the jammed paper.
If it is hard to remove the jammed paper, turn
the dial in the direction indicated by the
arrow.
Notes
• If you cannot remove the jammed paper,
contact your dealer or the nearest Sony
Service Center.
• Do not attempt to print again on the
jammed paper that you removed.
WARNING
Never touch components inside the unit.
• Injury can result from sharp edges inside
the unit.
• Burns can result from touching hot internal
components.
If the Ink Ribbon Breaks
1 Use scissors to cut off any segment of the
ribbon that is crinkled, and then use clear
cellophane tape to mend the ink ribbon.
2 Turn the ink ribbon cartridge over, turn the
gear in the direction indicated by the arrow,
and advance the ribbon until the cellophane
tape is no longer visible.
Cellophane tape
7 Replace the bottom cover, the paper supply/
eject tray, and the ink ribbon cartridge.
8 Plug the power cord back in, and then turn on
the printer.
Note
Any image that was in the printer’s memory will
have been lost. Perform the print operation on
the personal computer again.
34
Page 35

Main Specifications
Power supply
100 to 120 VAC (50 Hz/60 Hz)
Current consumption
1.0 Amax. at 120 VAC
Operating temperature
5 to 35 ˚C
Storage/transport temperature
–20 to 60 ˚C
Operating humidity
20 to 80 %
Maximum dimensions
208 × 303 × 71 mm
(W × H × D)
Weight Approximately 2.7 kg (main unit only)
Printing method
Four-surface sequential sublimation
thermal transfer process
(yellow, magenta, cyan, laminate)
Printing resolution
295 × 295 dpi
Printing gradations
256 gradations
(yellow, magenta, cyan)
Approximately 16.77 million colors
Number of printing pixels (maximum)
Print Pack
Type
UPC-10P23
UPC10P34
UPC10S01
Printing time
85 seconds or less
(during full printing; excludes image
transfer time)
Number of copies that can be set
1 to 25 sheets
Paper supply method
Autofeed from paper supply tray
Maximum capacity of paper supply tray
25 sheets
Paper eject method
Front ejection
Sheets are ejected in order on top of
paper supply tray
Effective
printing pixels
1162 × 1765 dots
1162 × 1563 dots
1162 × 1800 dots 1200 × 1800 dots
Image transfer
pixels
1200 × 1800 dots
1200 × 1600 dots
Ribbon cartridge
Can print 25 sheets
Inputs AC IN (power inlet)
Thermal head
11.6 dots/mm
Accessories
Paper supply/eject tray (1)
Power cord (1)
Stands (2)
Tray case (1)
Ink ribbon cartridge (sufficient for
printing 10 sheets) (1)
Print paper (5 sheets each of UPC-
10P23 and UPC-10P34) (1)
CD-ROM (1)
Operating Manual (1)
Software license agreement (1)
Warranty (1)
Supplies sold separately
Photocard Print Pack UPC-10P23
Photocard Print Pack UPC-10P34
Glossy Photostickers Print Pack UPC-
10S01
Parallel Interface
Control connectors
IEEE1284-B connector (D-sub 36 pin)
Input: 5V maximum (TTL)
Output: 5V maximum (TTL)
Data transfer method
8 bits, parallel, IEEE STD 1284-1994
compliant
• Compatible
• Reverse Nibble
• ECP
Logic level
TTL
35
Page 36

Miscellaneous
Parallel Interface Connector Pin
Assignments
Pin No.
1 I nStrobe HostClk HostClk
2 I/O Data1 (LSB)
3 I/O Data2
4 I/O Data3
5 I/O Data4
6 I/O Data5
7 I/O Data6
8 I/O Data7
9 I/O Data8 (MSB)
10 O nACK PtrClk PeriphClk
11 O Busy PtrBusy PeriphAck
12 O PError
13 O Select Xflag Xflag
14 I nAutoFd HostBusy HostAck
15 Not defined
16-17 GND
18 O Peripheral Logic High
19-30 GND
31 I nInit nInit
32 O nFault nDataAvail
33 Not defined
34 Not defined
35 Not defined
36 I
I/O Signal
Interface mode
Compatible
(pull up to +5V with 1k Ω)
nSelectln
Nibble ECP
AckDataReq nAckReverse
IEEE 1284 Active
nReverseRequest
nPeriphRequest
IEEE 1284 Active
USB Interface
Data transfer method
Complies with Universal Serial Bus
Specification Revision 1.0
USB Interface Connector Pin
Assignments
Pin No.
The specifications and appearance of this printer
are subject to change without notice.
I/O Signal Function
VCC Cable power, maximum
current
I/O -Data Data
I/O +Data Data, pull up to +3.3V by
a 1.5 Ω resistor
Ground Cable ground
Within the bi-directional parallel interface (IEEE
STD 1284-1994) standard, the UP-DP10 supports
Compatible mode, Reverse Nibble mode, and
ECP mode.
36
 Loading...