

Sony UPA-PC110 Operating Instructions Manual

Digital Photo
System
3-206-324-11(1)
Operating Instructions Version 1.00
UPA-PC110
© 2001 Sony Corporation

English
Owner’s Record
The model and serial numbers are located in the rear.
Record these numbers in the spaces provided below. Refer
to them whenever you call upon your Sony dealer regarding
this product.
Model No.
Serial No.
WARNING
To prevent fire or shock hazard, do not
expose the unit to rain or moisture.
To avoid electrical shock, do not open
the cabinet. Refer servicing to qualified
personnel only.
THIS APPARATUS MUST BE EARTHED.
For the customers in the U.S.A
This equipment has been tested and found to comply with
the limits for a Class A digital device, pursuant to Part 15 of
the FCC Rules. These limits are designed to provide
reasonable protection against harmful interference when the
equipment is operated in a commercial environment. This
equipment generates, uses, and can radiate radio frequency
energy and, if not installed and used in accordance with the
instruction manual, may cause harmful interference to radio
communications. Operation of this equipment in a residential
area is likely to cause harmful interference in which case the
user will be required to correct the interference at his own
expense.
You are cautioned that any changes or modifications not
expressly approved in this manual could void your authority
to operate this equipment.
The shielded interface cable recommended in this manual
must be used with this equipment in order to comply with the
limits for a digital device pursuant to Subpart B of Part 15 of
FCC Rules.

Table of Contents
Overview............................................................................. 4
Important Features ..................................................................4
Operating Instructions.............................................................4
Accessory Check List ....................................................... 5
Parts and Controls ............................................................ 6
Front View ..............................................................................6
Back View...............................................................................7
Connections....................................................................... 8
Connecting the Power Cord ....................................................8
Connecting Peripheral Devices...............................................8
Starting Up and Shutting Down ..................................... 10
Starting Up ............................................................................10
Shutting Down ......................................................................10
Setting Media ................................................................... 11
Using Memory Sticks............................................................11
Using a CompactFlash Card .................................................11
Using a SmartMedia Card.....................................................12
Using PC Cards.....................................................................12
Using a Floppy Disk .............................................................12
Using a CD-ROM or CD-R ..................................................13
Appendix .......................................................................... 15
Precautions ............................................................................15
Troubleshooting ....................................................................18
Specifications ........................................................................23
3

Accessory Check List
Overview
Thank you for purchasing this product. Before you begin, we would like to describe the main features of this
product and give an overview of these Operating Instructions.
Important Features
Touch Panel Display
The touch-panel display allows you to touch the
display directly for easy operation.
Variety of Media Supported
Image data can be read from a variety of different
media, including those primarily used with digital
cameras: Memory Stick, CompactFlash, and
SmartMedia. Digital images can also be read from
storage media commonly used with computers: floppy
disks, PC cards, and CD-ROMs.
CD-R Drive Provided
The built-in CD-R drive reads CD-ROM data at 24×
speed and writes to CD-Rs at 8× speed, allowing you
to write image data to CD-Rs as well as read from
standard CD-ROMs.
Operating Instructions
This document consists of the following sections:
•Parts Names and Their Functions
•Connections
•Starting Up and Shutting Down
•Setting Media
•Troubleshooting
For more details about how to use the software made
for use with this system, please refer to the User’s
Guide. The following storage media names are
trademarks of their respective owners.
•Memory Stick and MagicGate Memory Stick are
trademarks of Sony Corporation.
•CompactFlash is a trademark of SanDisk
Corporation.
•SmartMedia is a registered trademark of Toshiba
Corporation.
Note
Use a new CD-R. You cannot write to a CD-R that has
been written to, or to a CD-RW.
Multiple Interface Options
The unit is equipped with SCSI and USB interfaces, as
well as parallel, serial, and LAN connectors, allowing
it to be incorporated into a wide variety of system
environments.
4

Accessory Check List
Make sure that you have everything.
•Power cord 1
•SCSI cable 1
•Operating Instructions 1 (this manual)
•CD eject pin 1
Note
Save the box and packing material. Do not discard
these items. You may need them again to pack the
printer for moving or shipping to another location.
5
Parts and Controls
Parts and Controls
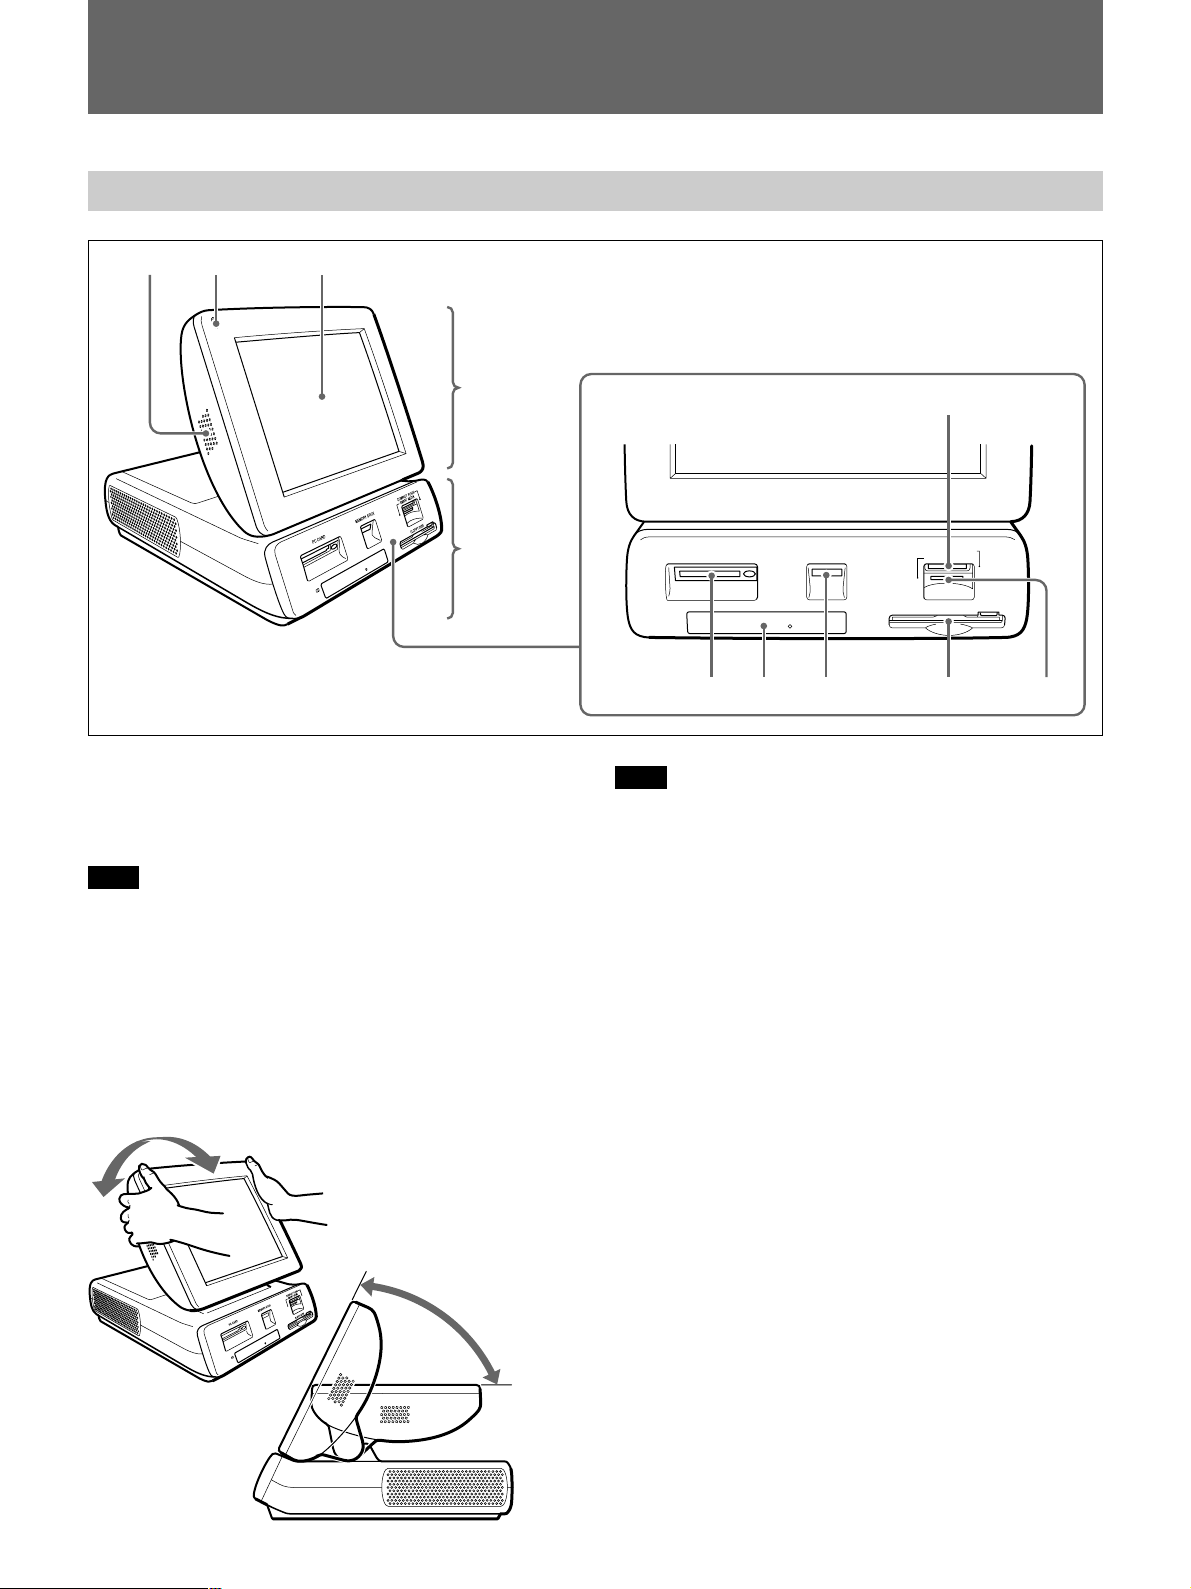
Front View
91 2
Operation panel
User interface
panel
1 Power lamp
Lights green with the power to the operation panel is
switched on.
Note
Does not light when only the main power is switched
on.
3
MEMORY STICKPC CARD
CD
COMPACT FLASH
SMART MEDIA
FLOPPY DISK
87 6 5 4
Note
When you adjust the angle, be careful to avoid
touching the Power switch (page 7) on the back of the
display.
3 CompactFlash card slot
Holds a CompactFlash with stored image data.
2 Display
Displays the user interface panel. The screen is a
touch-panel so the user can touch the display directly
to perform selections. The angle of the display can also
be adjusted from 0 (horizontal) to 65 degrees. Hold the
top of the display and then gently adjust the angle.
o
65
0o (Level)
6
4 SmartMedia slot
Holds a SmartMedia card with stored image data.
5 Floppy disk drive
Insert a floppy disk with stored image data into this
drive.
6 Memory Stick slot
Holds a Memory Stick with stored image data.
7 CD-R drive
Holds a CD-R to read image data stored on a CDROM, or record data on a CD-R.
8 PC card (Type II) slot
Holds a Type II PC card with stored image data.
Note
To avoid loss of image data or damage to the main
unit, never attempt to mount a Memory Stick,
Compact Flash card, Smart Media card, or SD card by
inserting it in a PC card type adapter setting it into the
PC card slot.
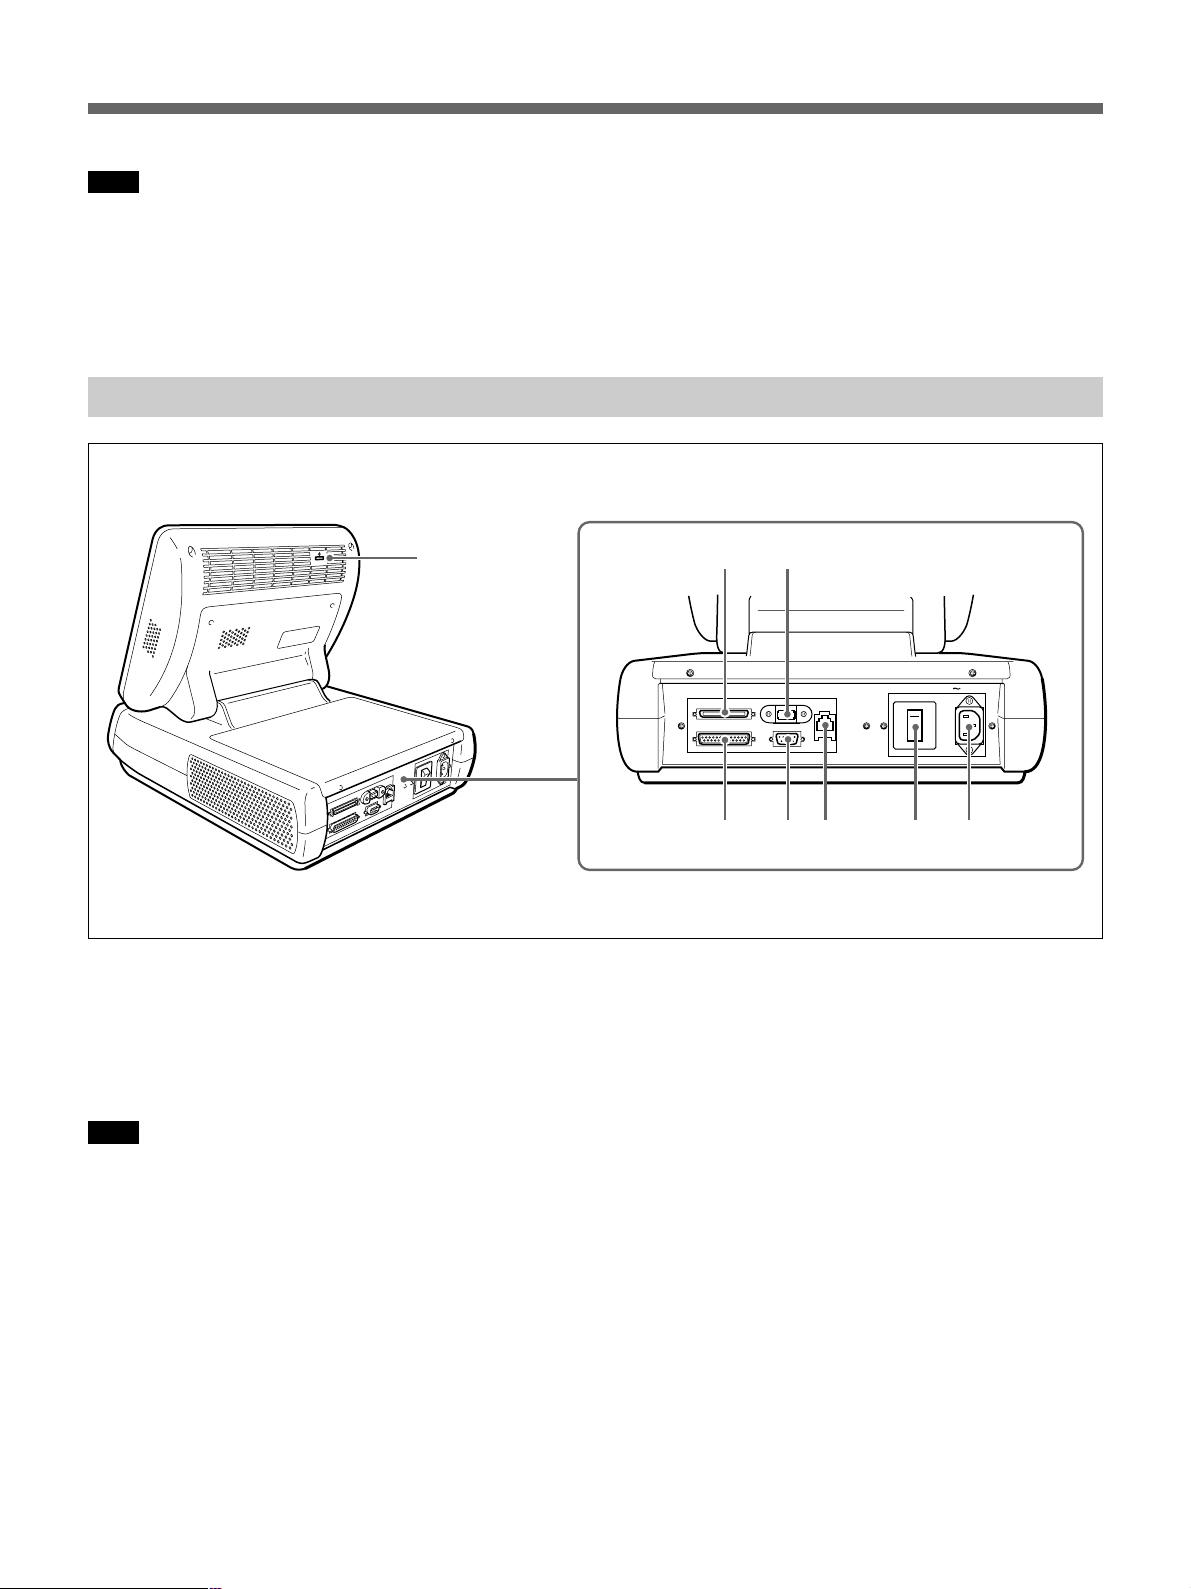
Back View
9 Speaker
A sound is emitted when you touch the display.
8
1 AC power connector
Connects the provided AC power cord.
2 Main power switch
Switch ON/OFF to switch the main power on and off.
Note
Never switch the main power switch off when the
operation panel power lamp is on.
3 LAN Connector (RJ-45 Type)
Connects to a LAN cable. Currently not used but
provided for expanded applications in the future.
4 RS-232C connector (D-Sub 9-pin)
Connects to a credit card reader or other reader device.
Currently not used but provided for expanded
applications in the future.
6
SCSI
PARALLEL
7
USB
RS-232C
LAN
AC IN
I
O
543 21
5 Parallel connector (D-Sub 25-pin)
Connects a printer to receipts.
6 SCSI connector (Half-pitch 50-pin)
Connects to a UP-DR100 or UP-D70AP Printer, or a
UY-S90 Film Scanner.
7 USB connector
Connects to USB devices. Currently not used but
provided for expanded applications in the future.
8 Power switch
After switching the main power switch on, switch this
power switch on to start the unit.
7
Connections
Connections
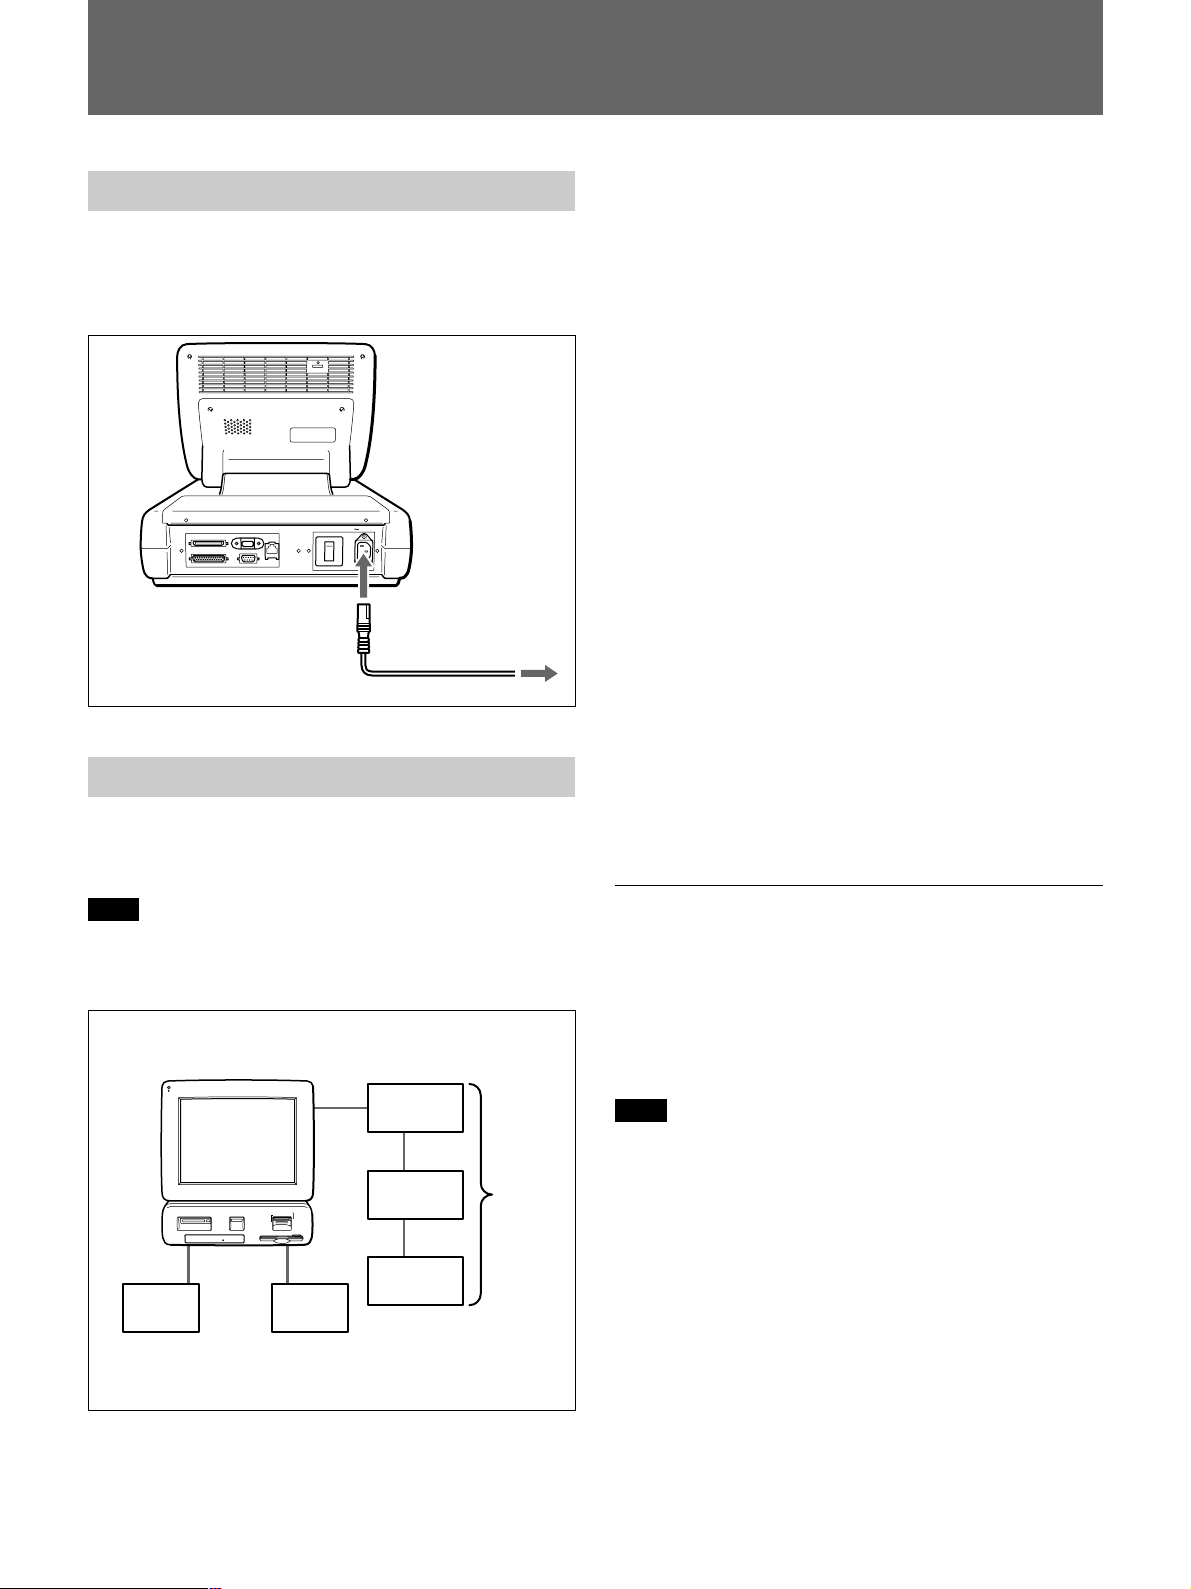
Connecting the Power Cord
Connect the provided power cord to the AC power
connector on the back of the unit, and then connect the
plug to a power outlet.
SCSI
PARALLEL
USB
LAN
RS-232C
Power cord
(provided)
AC IN
I
O
Power outlet
Connecting Peripheral Devices
The peripheral devices shown below can be connected
to the unit.
Parallel Devices
A printer for receipts can be connected to the parallel
connector. For details about compatible printers,
contact a Sony Authorized Dealer. For details about
how to connect the printer for receipts, refer to the
instructions provided with the printer.
RS-232C (Serial) Devices
A credit card reader and other read devices can be
connected to the RS-232C connector. Currently not
used but provided for expanded applications in the
future.
SCSI Devices
The devices listed below can be connected to the SCSI
connector. For details about connection, refer
“Connecting a Peripheral Device to the SCSI
Interface”.
•UP-DR100 (printer)
* Up to two units can be connected.
•UP-D70AP (8 × 10 size compatible printer)
•UY-S90 Film Scanner
•Flatbed Scanner
For more details about what devices can be connected,
contact a Sony Authorized Dealer.
Note
To prevent causing a fire or damage to the system,
never attempt to connect any peripheral device other
than those specified.
SCSI
UP-DR100
SCSI
Device
Parallel
COMPACT FLASH
MEMORY STICKPC CARD
SMART MEDIA
CD
FLOPPY DISK
RS232C
RS232C DeviceParallel Device
UP-D70AP
UY-S90
Connecting a Peripheral Device to the
SCSI Interface
This section describes how to connect a peripheral
device to the SCSI connector.
For details about the SCSI ID and terminator, refer to
the instructions that you received with the device.
Note
•Before connected the device to the unit, make sure
that the device and the unit are switched off.
•Connect the power cord last.
8
 Loading...