

Sony UPA-PC105,UPA-PC100 User Manual
Digital
Photofinishing
System
A-C3Q-100-81 (1)
User’s Guide Version 4.250
Guía del usuario Versión 4.250
GB
ES
IT
© 2005 Sony Corporation

Table of Contents
Overview
Features .............................................................. 3
Guides for This Unit .......................................... 3
Operation
Operation Overview .............................................. 4
Printing Pictures .................................................... 5
Operation Flow ................................................... 5
How to Print Stored Pictures .............................. 5
Printing Pictures Stored on the System .............. 8
Scanning Pictures and Printing ........................... 9
Operation Flow ................................................... 9
How to Scan and Print Pictures ........................ 10
Cancelling Printing ............................................. 13
Editing Pictures ................................................... 14
Adjusting the Picture Composition .................. 14
Adding Dates .................................................... 17
Printing Matte Pictures ..................................... 18
Adjusting Skin Complexion ............................. 19
Enhancing a Picture ......................................... 19
Selecting Sepia or Black and White ................. 20
Removing Red Eye .......................................... 21
Add Text to Pictures ......................................... 22
Output Services ................................................... 24
Specifying Paper Sizes ..................................... 24
Creative Printing .............................................. 25
Using Index Printing ........................................ 29
Print All Pictures on Your Media ..................... 30
Print Packages .................................................. 30
Writing Pictures to a CD-R .............................. 31
Appendix
Notes on Using Media ..........................................49
About Error Message ..........................................51
Changing the Settings
Changing Settings ................................................ 35
Settings ................................................................. 37
Administration Screen Buttons ........................ 37
[Screens] Tab .................................................... 38
[Pricing] Tab ..................................................... 39
[Promotions] Tab .............................................. 40
[Templates] Tab ................................................ 41
[Accounting] Tab ............................................. 41
[System] Tab .................................................... 43
[Custom] Tab .................................................... 46
Optional Operations
Printing Standard - Size Pictures ....................... 48
2

Overview
This section describes the capabilities of this software
and outlines the contents of this guide.
Features
The Digital Photo System can be used to take pictures
stored on digital camera storage media or CD-ROM and
print them on a printer connected to the system. With a
scanner connected to the system, you can also scan
pictures. In addition, the unit also features the following.
Variety of Output Services
• A variety of printing features, such as picture
enlargement for printing on large paper sizes,
printing pictures in combination with decorative
borders, and so on.
• Writing pictures to CD-R.
For details, see “Output Services” (page 24).
Editing Pictures
Pictures can be edited before printing using cropping,
color correction, and so on.
Guides for This Unit
The following guides are supplied with this unit.
User’s Guide
The user’s guide describes the following:
• Printing pictures
• Scanning and printing pictures
• Editing pictures
• Using the various output services
• Modifying the settings of the unit
Operating Instructions
The operating instructions describe the following:
• Part names and their functions
• Connections
• Starting up and shutting down the system
• Inserting media
• Troubleshooting
Overview
For details, see “Editing Pictures” (page 14).
Configuring Settings
Use the Administration screen to set up passwords,
prices for output services, and so on.
For details, see “Changing Settings” (page 35).
3
Operation
Operation Overview
Customer Data
Operation
• “Memory Stick”
• “Memory Stick Pro”
• CompactFlash card
• SmartMedia card
•SD card
• MultiMediaCard
•PC Card
• xD-Picture Card
• Floppy disk
• CD-ROM
Stored Pictures
Loading pictures
Selecting pictures to output
Scanning
Pictures
Scanning
Selecting pictures to output
Editing Pictures
• Cropping • Rotating • Reorienting • Stamping dates • Removing red eye
• Correcting colors • Selecting sepia or black and white • Adding Text • More
Note
You cannot edit pictures to
be written to CD-R.
Stock Data
Stored Pictures
Photo Library
(pictures stored
on the system)
Selecting pictures to output
Editing pictures
• Selecting sepia or black
and white
• Adding Text
• Matte (8 × 10 prints only)
Output Services
Printing or writing to CD-R
Note
The storage media you can use will differ depending on
the hardware you are using.
These instructions describe general procedures for
capturing and printing pictures according to the type of
original data used:
• Printing Pictures (page 5)
• Scanning Pictures and Printing (page 9)
• Editing Pictures (page 14)
4
Operation Overview
Printing
See the appropriate sections for details about how to
perform the procedures below after using one of the
general procedures above.
For details about how to edit pictures, see “Editing
Pictures” (page 14).
For details about how to write pictures to a CD-R and
selecting other output services, see “Output Services”
(page 24).

Printing Pictures
This section describes how to print pictures stored on
media.
Note
How to Print Stored Pictures
This section describes how to load and print pictures
from a “Memory Stick”, “Memory Stick Pro”, floppy
disk, CD-ROM, SmartMedia card, Compact Flash card,
SD card, PC Card, xD-Picture Card, or
MultiMediaCard.
A compatible printer (UP-DR100, etc.) must be
connected to this system to print pictures.
For details about printers that can be used with this
display, refer to the Operating Instructions.
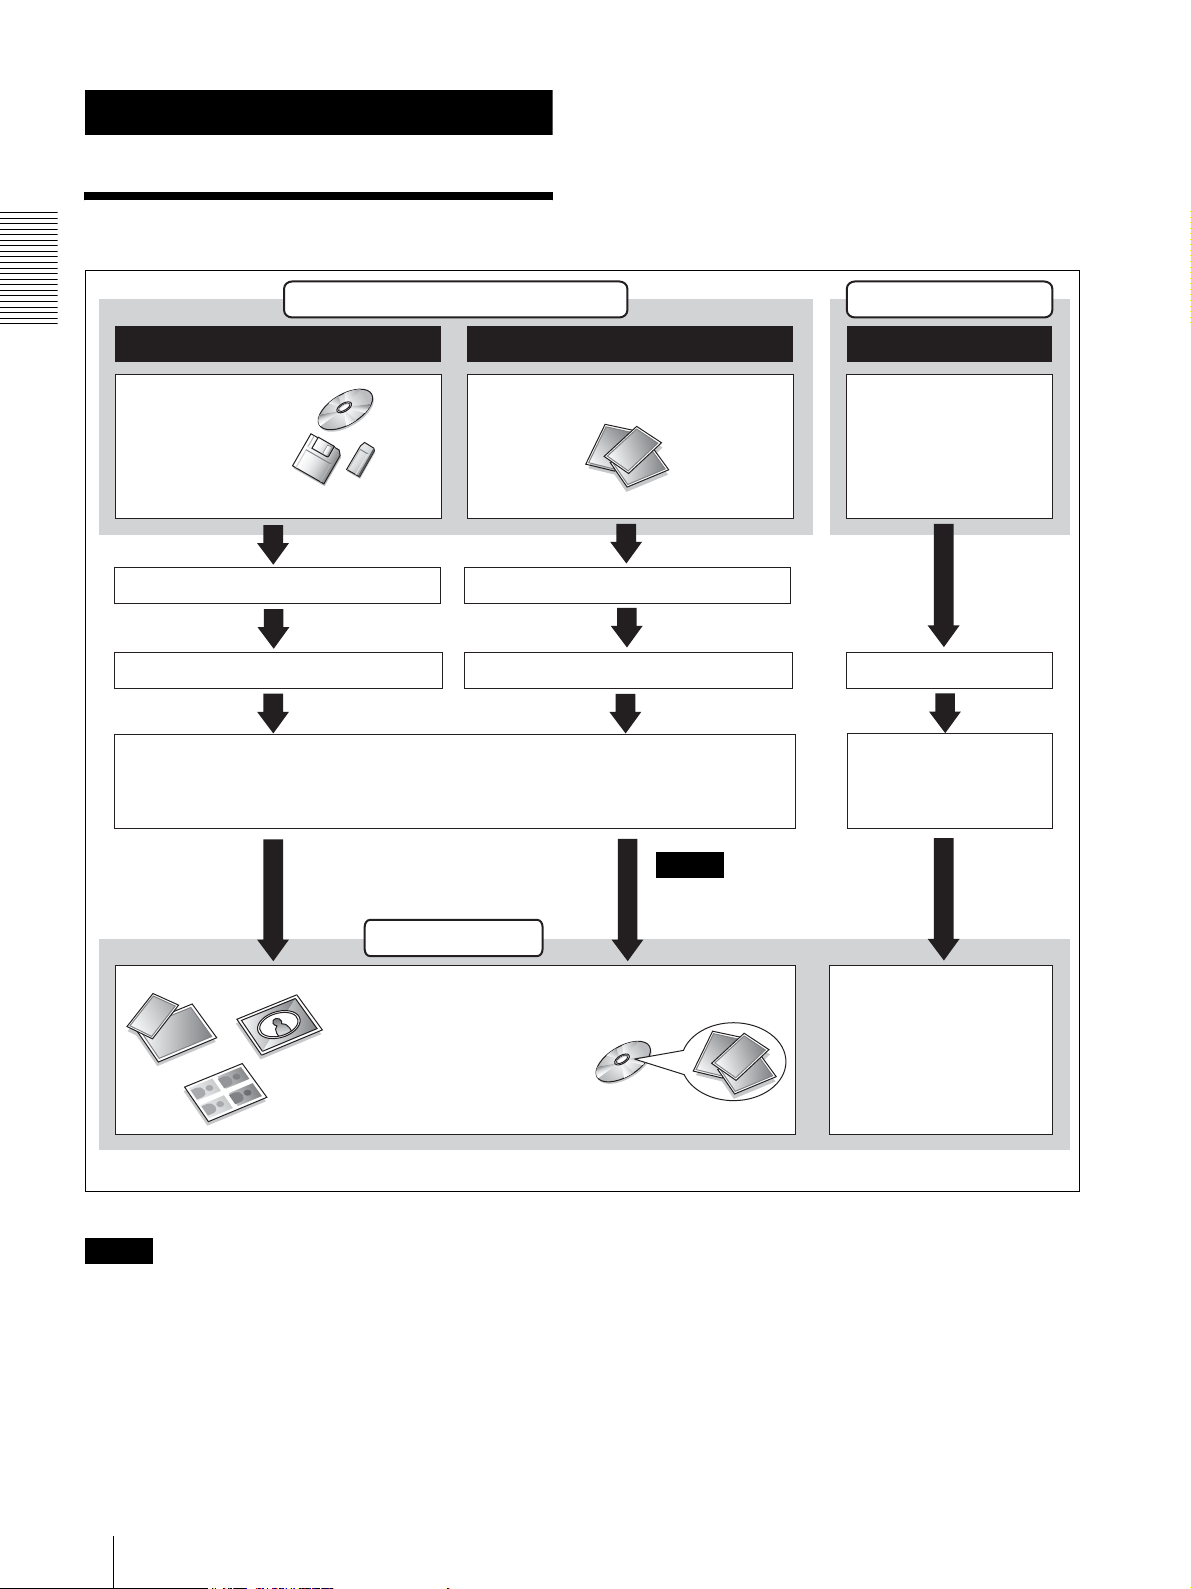
Operation Flow
The general procedure for printing pictures stored on
various media is described below.
Select the media containing pictures and
inserting it into the unit
Select the output service
You can insert multiple media
containing pictures when
writing pictures to CD-R.
Insert the media
1)
When printing
pictures stored on
the system.
2)
Note
The storage media you can use will differ depending on
the hardware you are using.
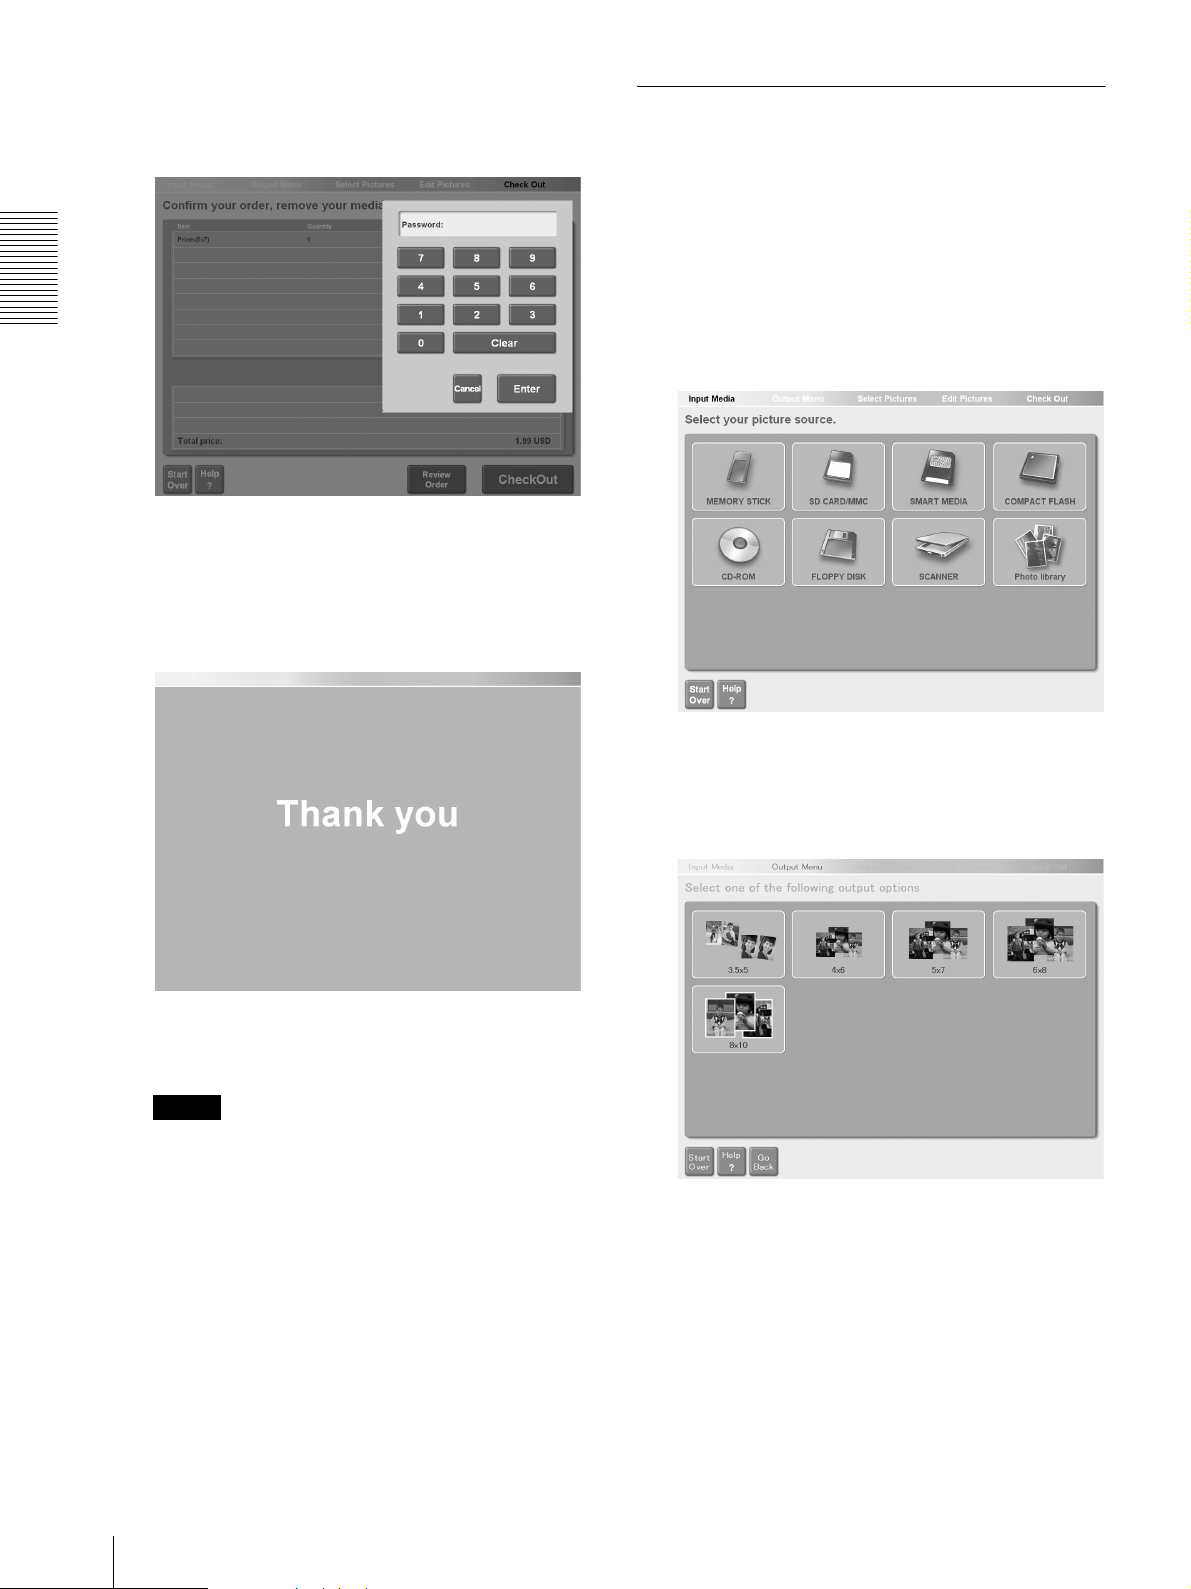
Selecting the Media Containing Pictures
and Inserting It into the Unit
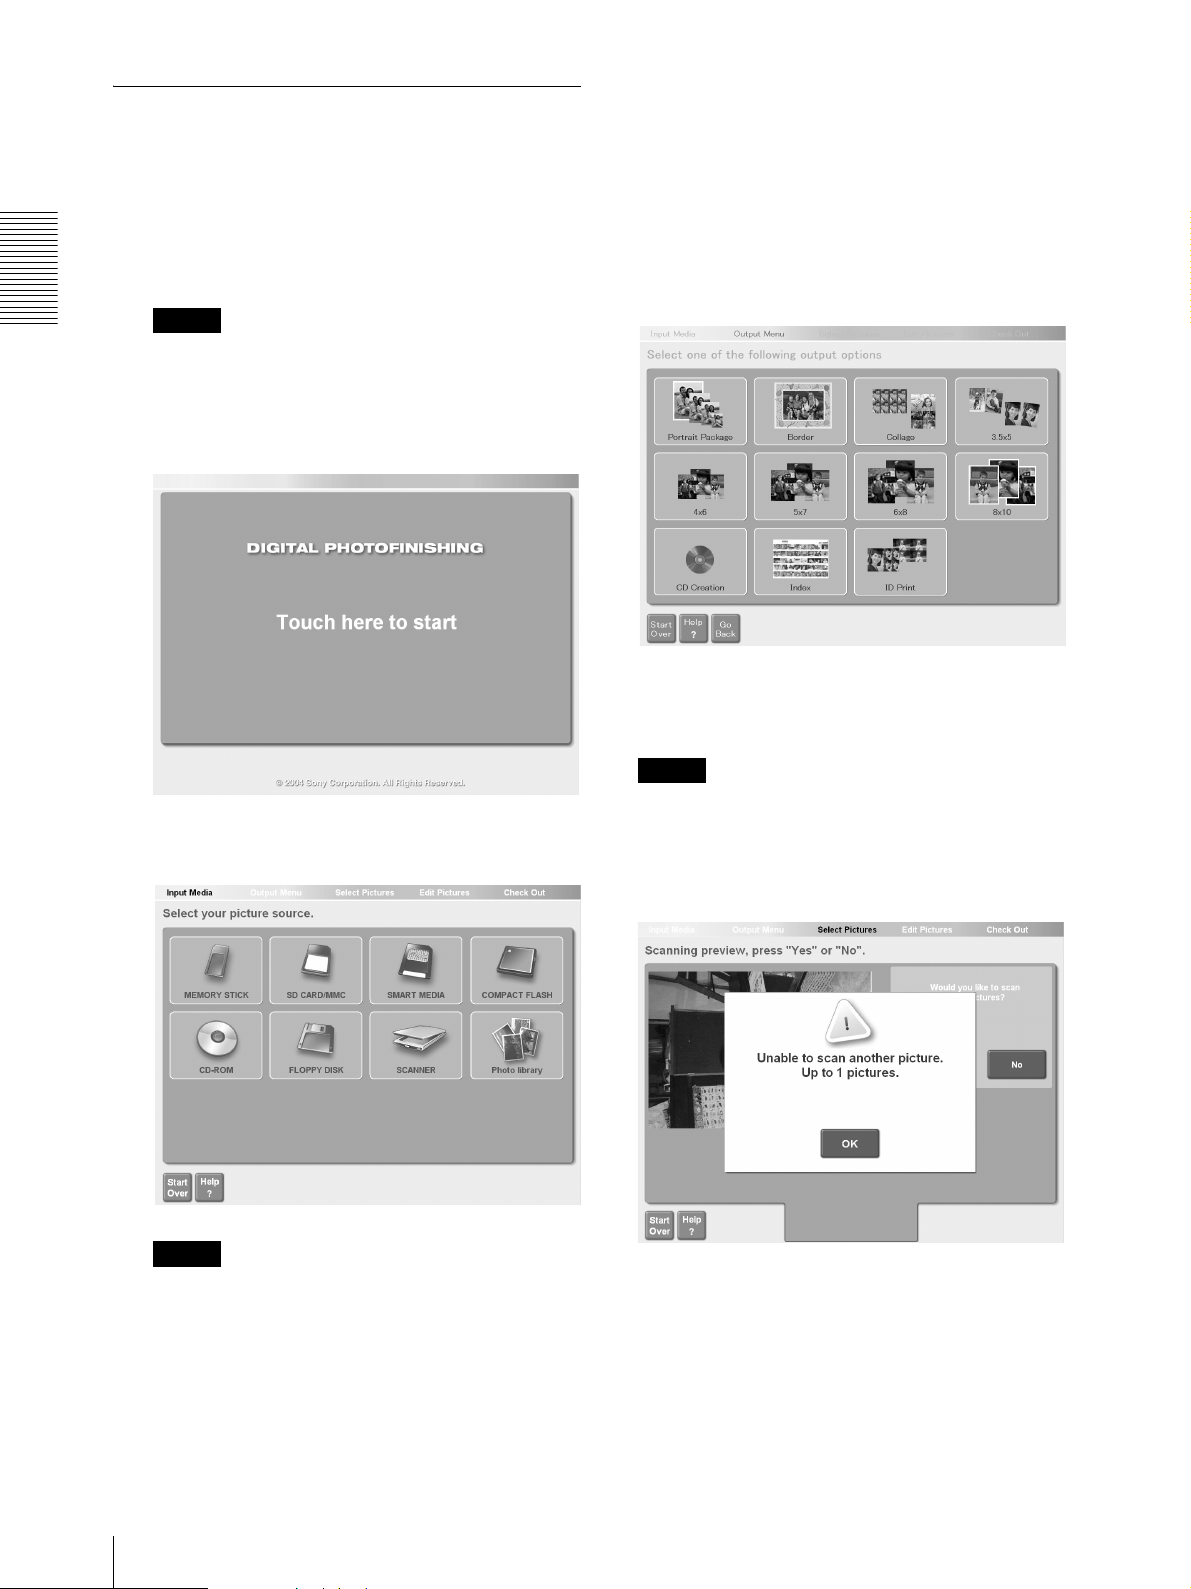
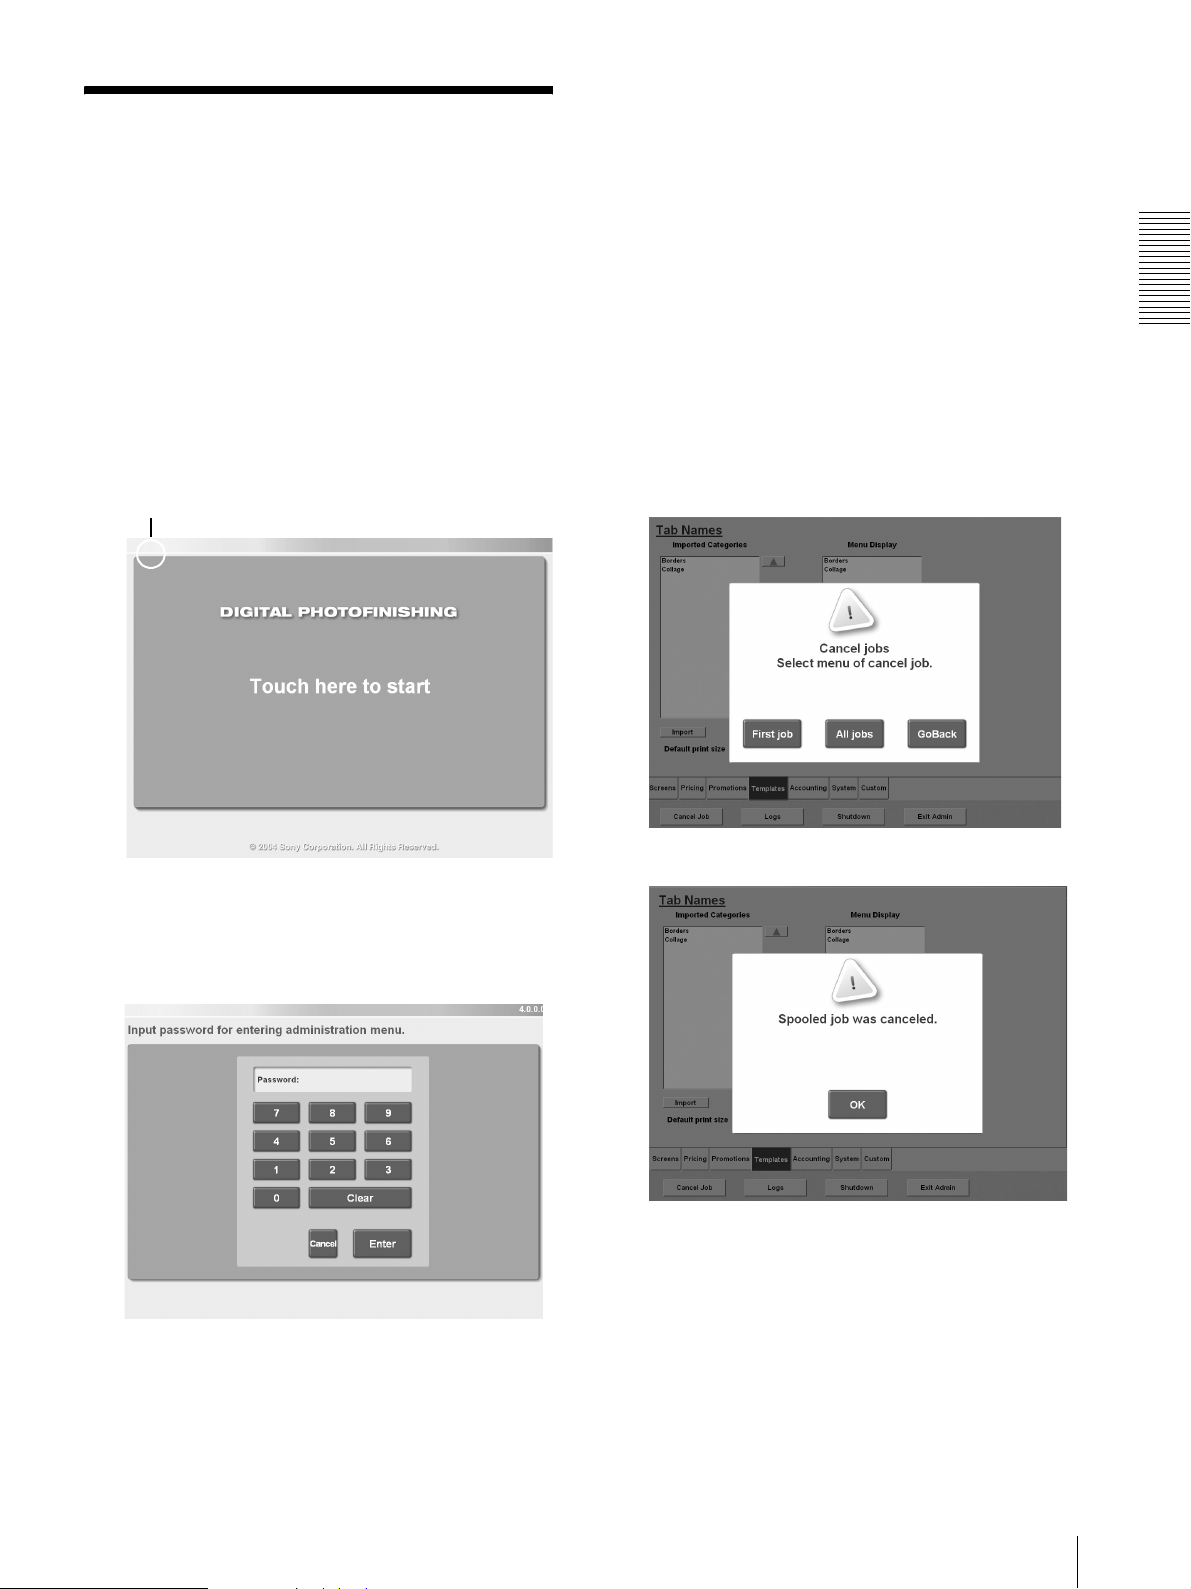
1
Touch the screen once.
Note
Depending on the settings made in the
Administration screen, the buttons appearing on the
screens that follow may vary. Touch the appropriate
buttons.
For details about see “[Screens] Tab” (page 38).
Operation
Select the pictures and specify the number of
copies to print
Verify the order and enter a password
Output
1)
You must use media of the same type as removed.
2)
For details about how to perform this procedure, see “Printing
Pictures Stored on the System” (page 8).
The media selection screen appears.
2
Touch the icon that corresponds to the media
containing your pictures.
You are prompted to insert your media into the unit.
Once you have inserted the media into the unit, it is
automatically detected. Proceed to “Selecting the
Output Service” .
Printing Pictures
5

Notes
• Do not remove the storage media from the unit until
you are prompted to do so. Doing so may lead to data
loss or damage.
• The following is a list of formats compatible with this
display (up to a size of approximately 8000 × 6000
pixels):
– Exif version 2.1 or later (JPEG standard, file
extension: .jpg)
Operation
For details about the media supported by the
system, refer to the Operating Instructions.
– BMP (uncompressed, 24-bit Windows format, file
extension: .bmp)
– TIFF (uncompressed, file extension: .tif)
• The thumbnails approximate the printed result.
Depending on the data loaded to the unit, some
thumbnails may appear slightly cropped (horizontally
or vertically).
Note
• The following buttons are available in this screen
and the screens that follow. Touch the buttons
when required.
– If you touch the [Start Over] button, a message
prompts you to verify that you want to
completely cancel the current operation and
return to the start screen. If you touch the [OK]
button, the display returns to the screen in
step1.
– [Help]. Touch to display online Help for a
description about procedures that apply to the
current screen.
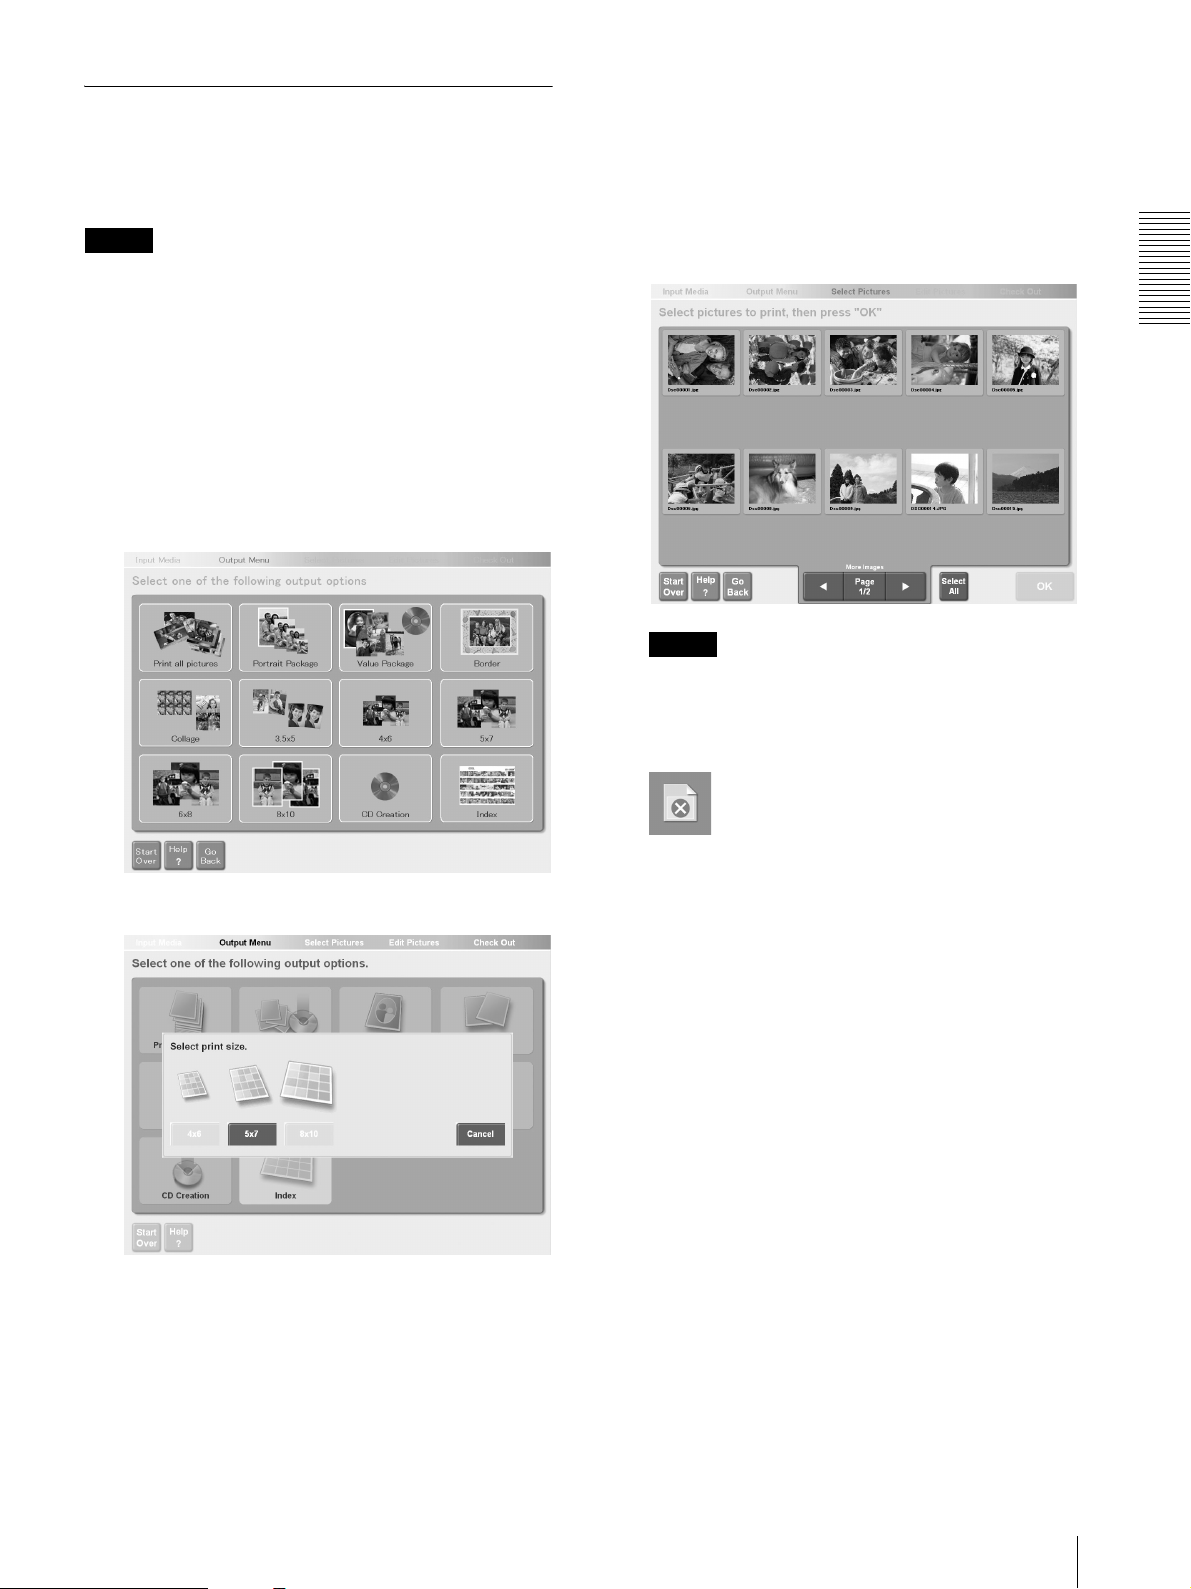
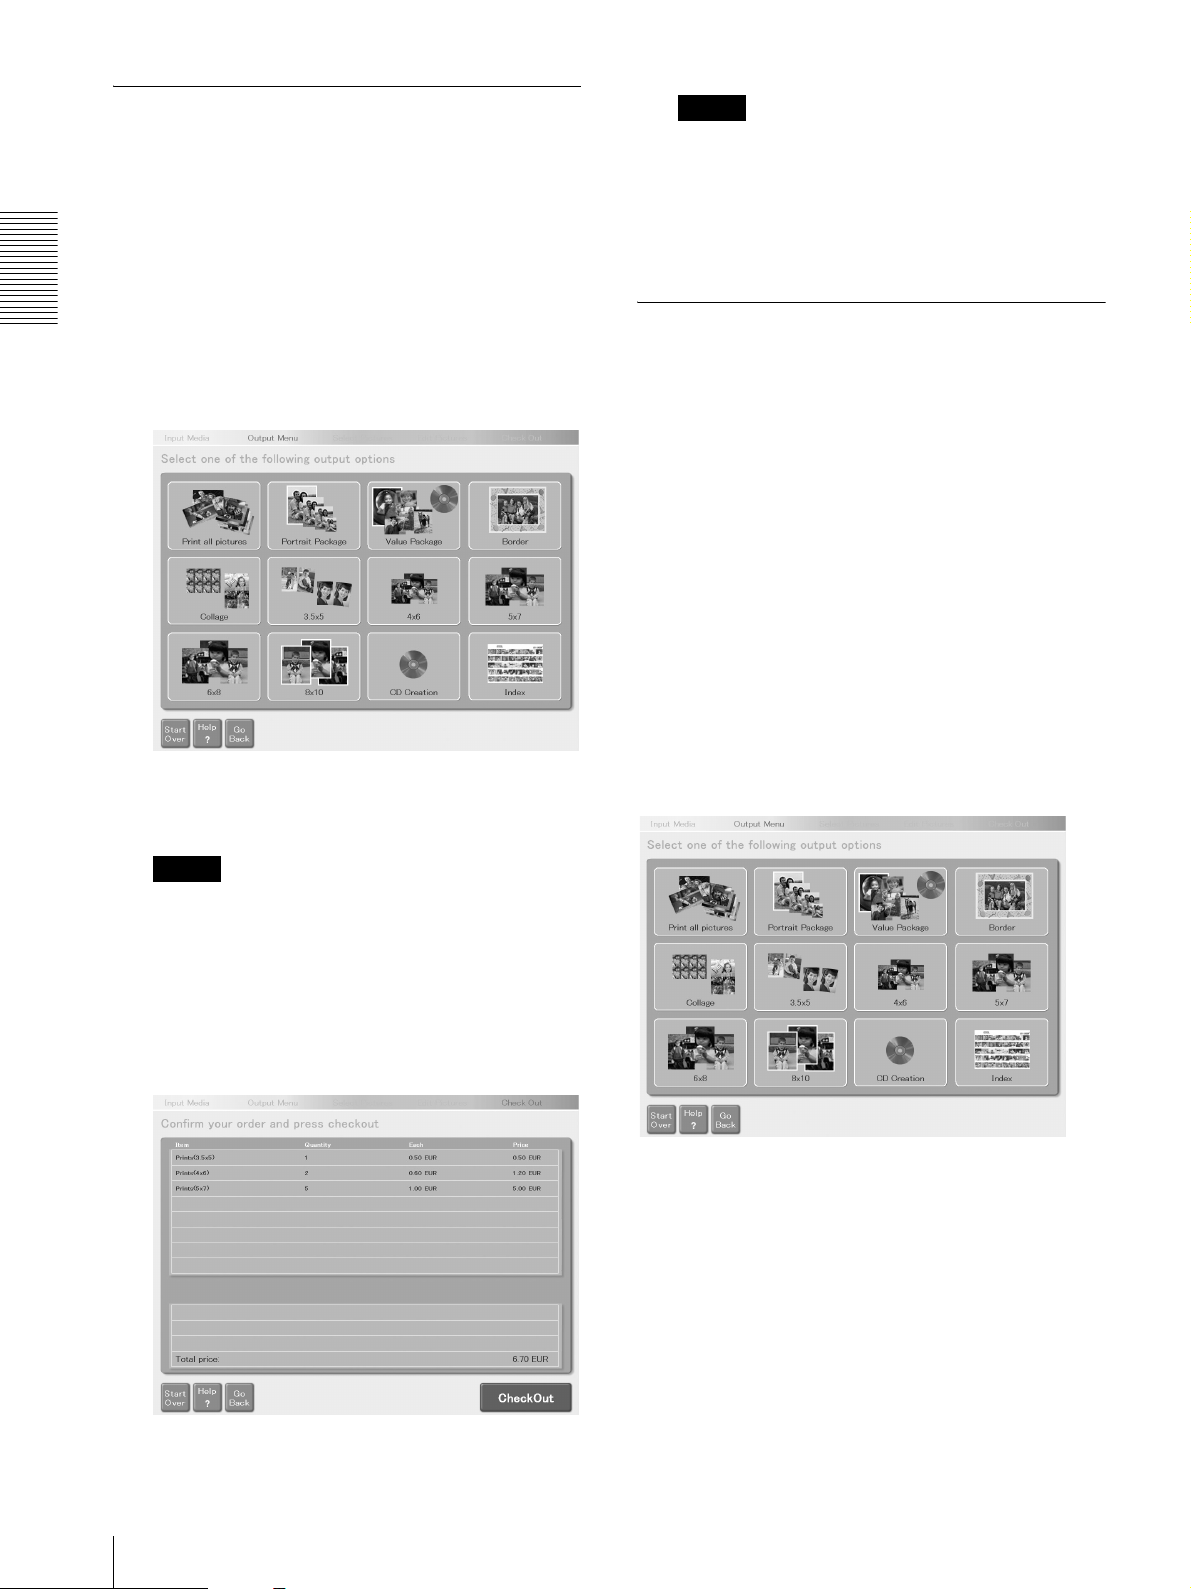
Selecting the Output Service
Touch the appropriate button to select the output service.
For details, see “Output Services” (page 24).
For example, touch [5 × 7].
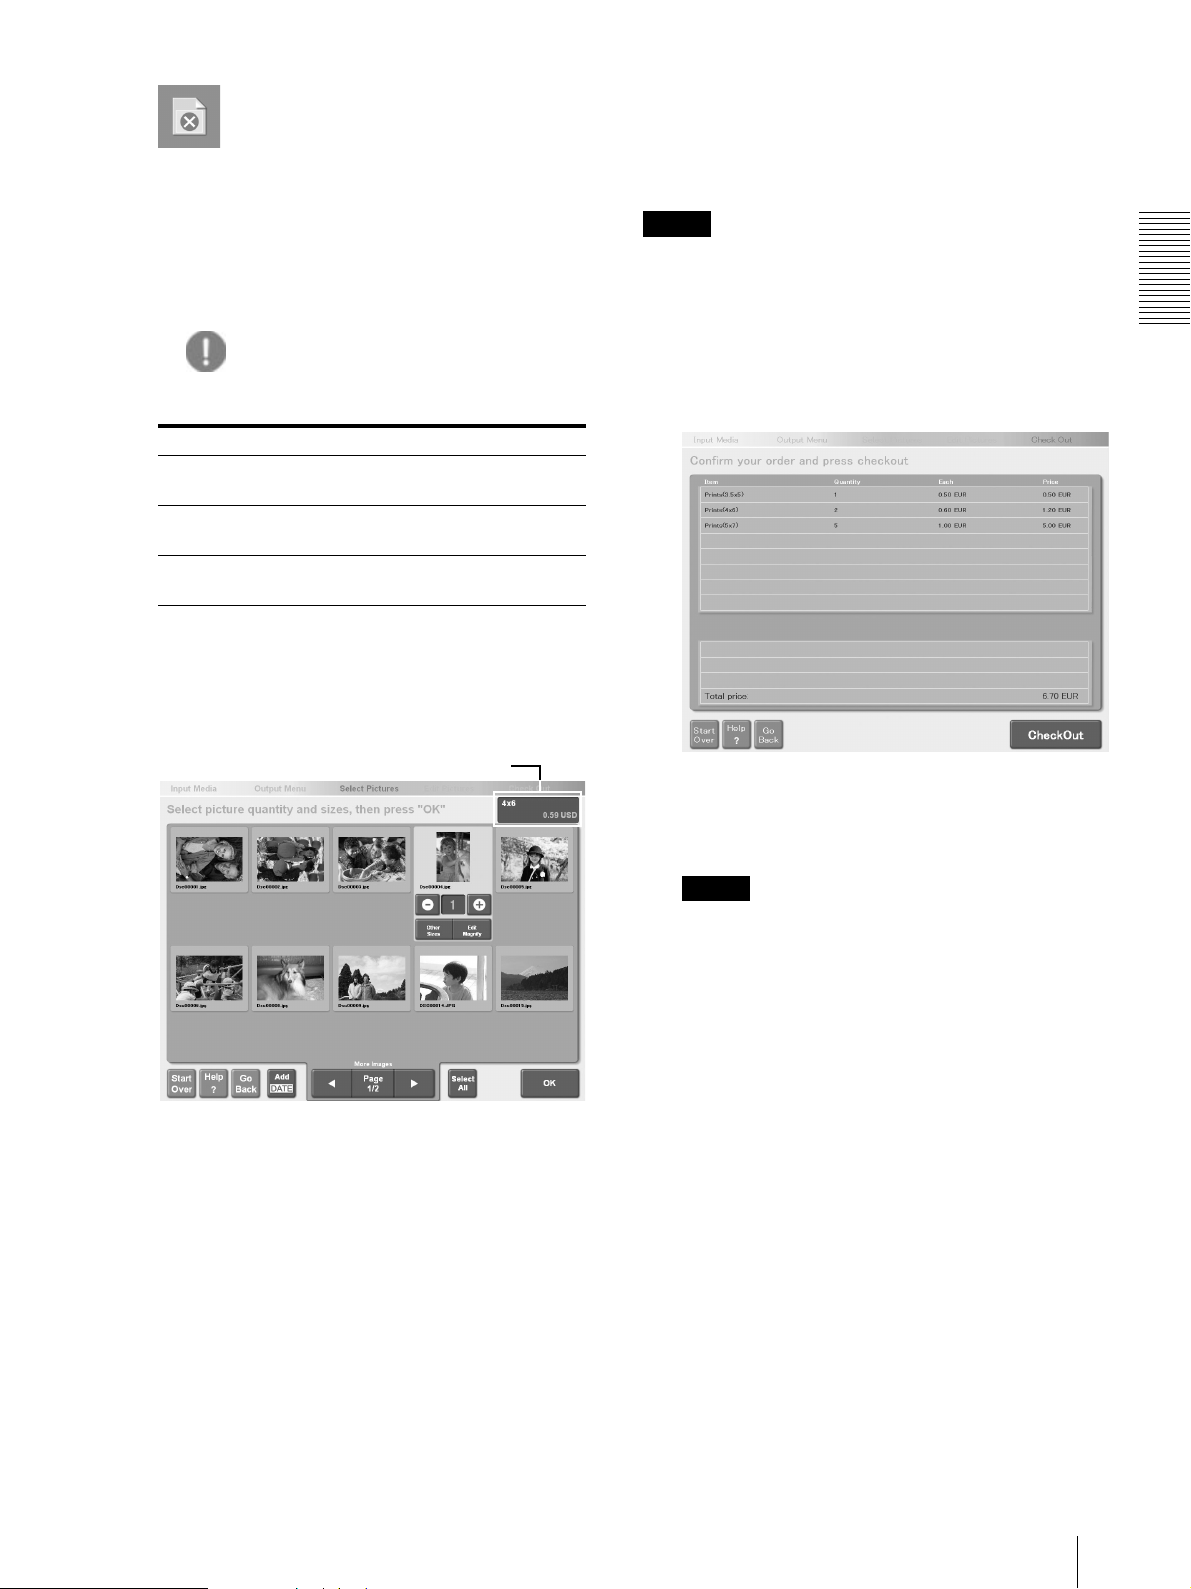
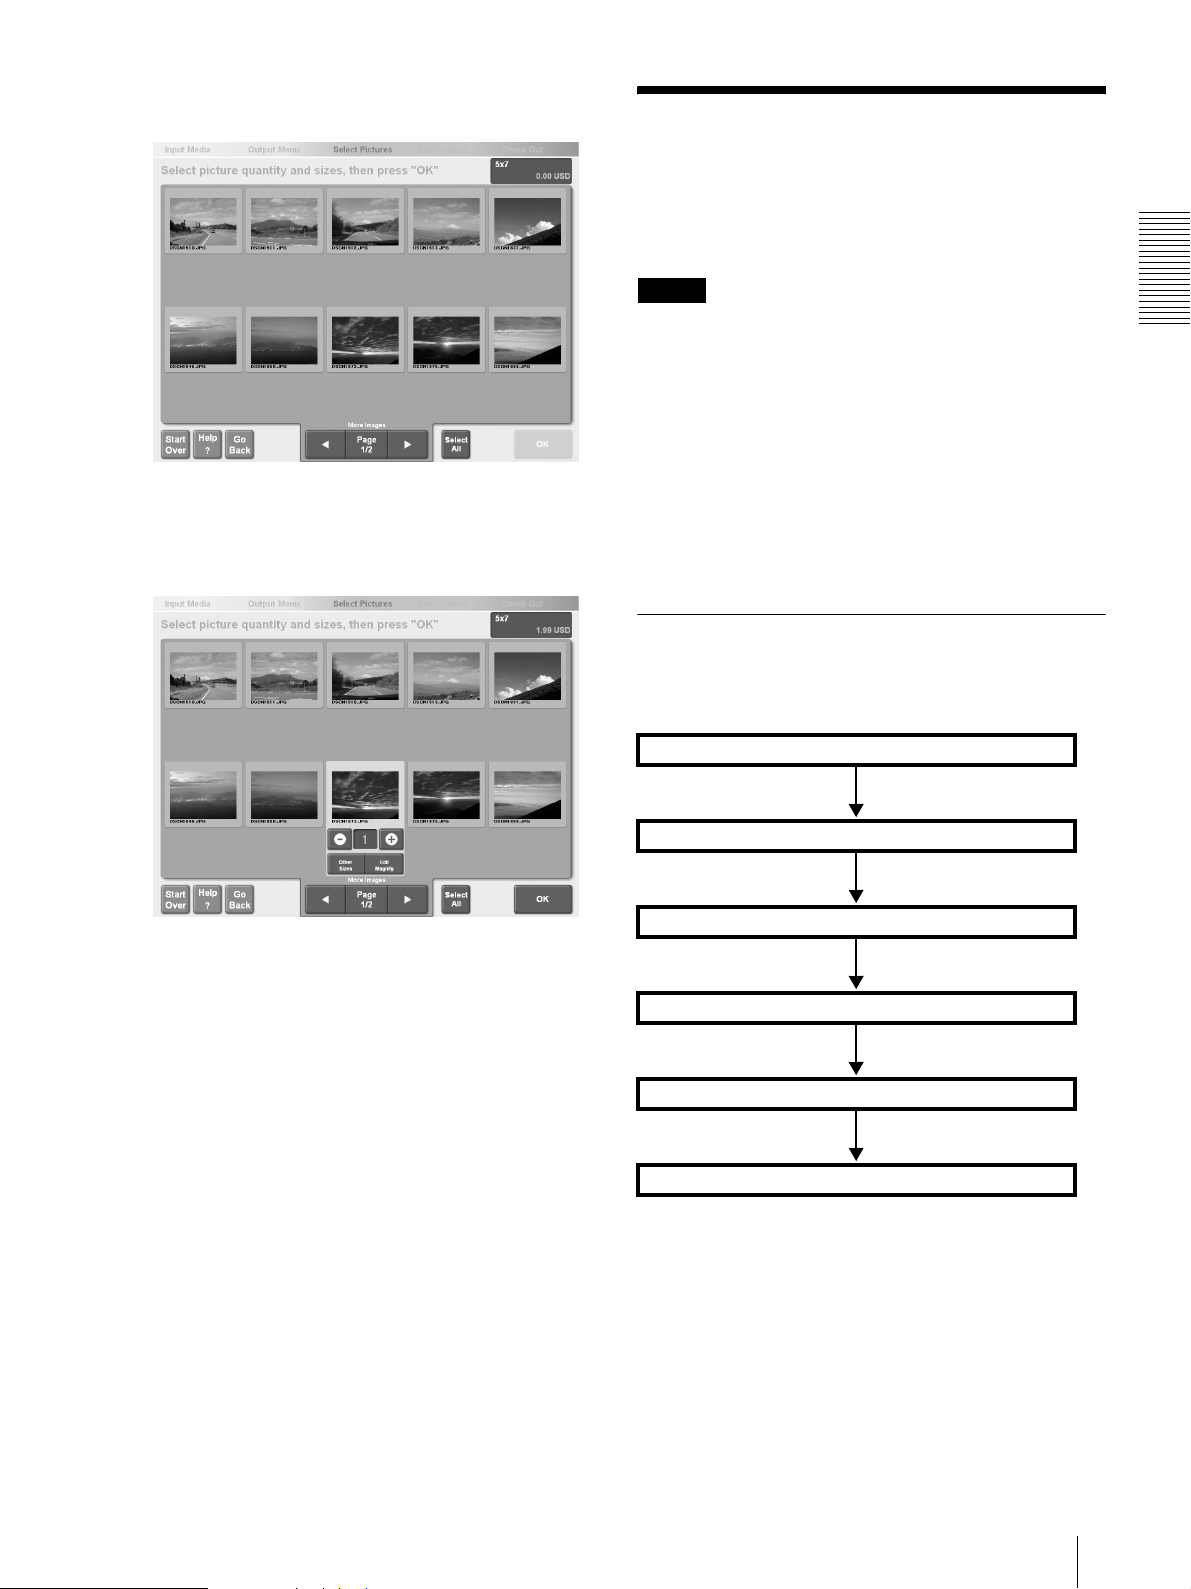
Selecting the Pictures and Specifying the
Number of Copies to Print
Select the pictures that you want to print and specify the
number of copies that you want.
1
Touch the pictures that you want to print to select
them.
To cancel a selection, touch the picture again, and
then touch the [-] button to reduce the displayed
value to zero. To select all the loaded pictures,
touch the [Select All] button. To select more than
one picture (but not all), touch them individually,
and reduce their values to zero with the [-] button.
If all the pictures cannot be displayed on one page,
touch the [b] or [B] button to display more pages.
The pictures are loaded and thumbnails of all the
pictures loaded from the media are displayed.
6
Printing Pictures
Notes
• If the pictures loaded by the unit contain
unsupported file formats and/or unreadable files,
they are represented by the following icon and
cannot be selected.
• If pictures are smaller than the minimum size
supported by the selected paper size, an
exclamation mark indicating low image
resolution appears on the upper-left corner of its
thumbnail. The minimum size of pictures
according to the output service is as follows.
Output Service Minimum Picture Size
3.5 × 5", 4 × 6", 5 × 7" Short edge less than 600
pixels
6 × 8" Short edge less than 1024
8 × 10", 8 × 12" Short edge less than 1200
2
Specify the number of copies to print.
Touch a picture to select it, and then touch the [+]
or [-] button to increase or decrease the number of
copies.
pixels
pixels
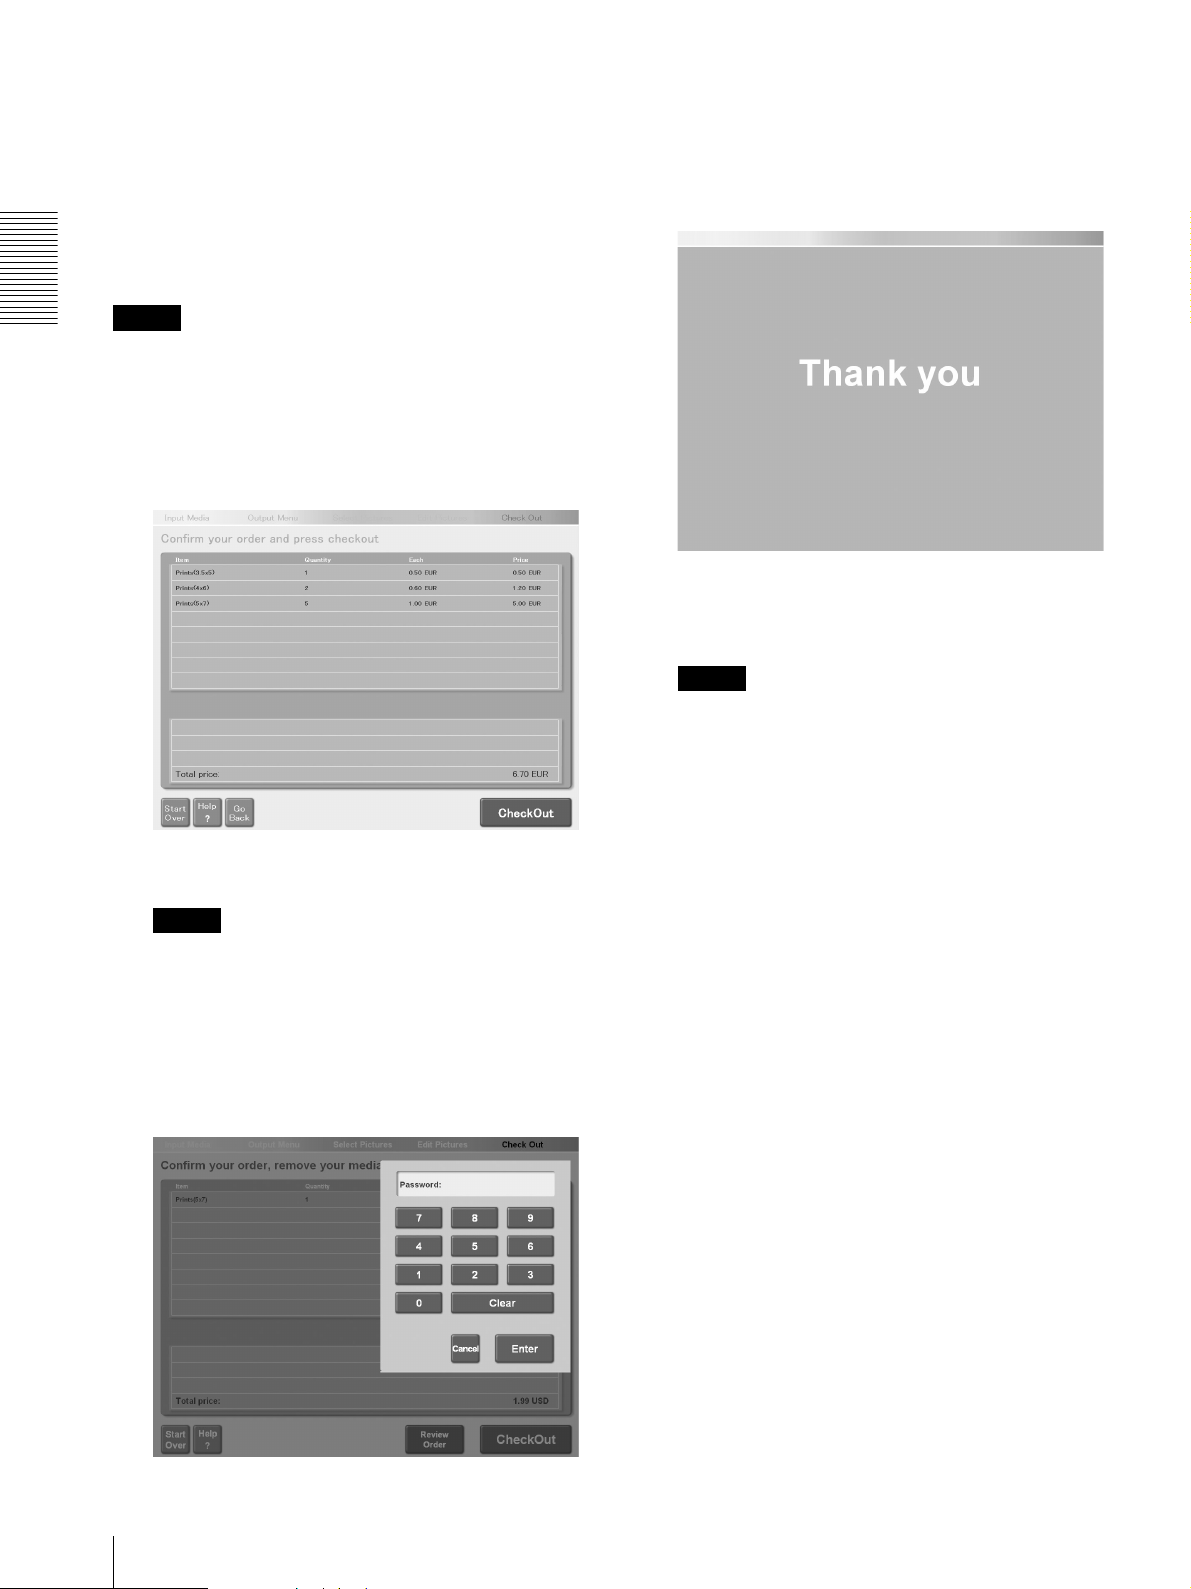
Verifying the Order and Entering a
Password
You must enter a password to print. The default
password is the sales clerk password, “0000”.
Note
You can use the Administration screen to set whether a
password must be entered before printing and to change
passwords.
For details, see “[System] Tab” (page 43).
1
Verify the order, and then touch the [Check Out]
button.
Operation
Price information displays
At this step you can also perform the following
procedures:
• You can edit pictures by adjusting the brightness
or contrast, or cropping them.
For details, see “Editing Pictures” (page 14).
• You can add dates to your pictures.
For details, see “Adding Dates” (page 17).
• You can select other print sizes for the picture
currently selected.
For details, see “Specifying Paper Sizes”
(page 24)
2
When the message prompts you to remove the
media, remove it.
The password entry screen appears.
Notes
• If you remove your media from the unit while the
order confirmation screen is displayed, you are
not prompted to remove your media. Proceed to
step 3.
• If you used the Administration screen to set
printing without password entry, the screen in
step 1 of “Output” (page 8) appears.
3
When you are done specifying the number of copies
to print, touch the [OK] button.
Data is loaded from the storage media, and then a
screen appears, allowing you to verify your order.
Printing Pictures
7
3
Touch the appropriate keys to enter the password.
If you need to cancel password entry and start
again, touch the [Clear] button.
Operation
Printing Pictures Stored on the System
Along with pictures on storage media, you can also print
pictures imported to the system and stored in the Photo
Library. You can add and/or delete Photo Library data
with the [Import] button in the Administration screen.
For details, see “[Photo library]” (page 39).
1
In the media selection screen, touch [Photo library].
For details, see “Selecting the Media Containing
Pictures and Inserting It into the Unit” (page 5).
Output
1
Touch the [Enter] button.
The print job starts and the following screen
appears.
After a moment, the display returns to the screen in
step 1 of “Selecting the Media Containing Pictures
and Inserting It into the Unit” (page 5).
Notes
• If you use the Administration screen to set the
unit to inhibit all other operations during printing
([Background Printing] off), the “Thank you”
screen does not appear until printing ends, and
then returns to the screen in step 1 of “Selecting
the Media Containing Pictures and Inserting It
into the Unit” (page 5), effectively preventing the
user from performing other operations during
printing.
• A receipt is printed if a receipt printer is
connected to the unit and settings necessary for
printing receipts have been made within the
Administration screen. When output finishes, the
receipt is automatically printed.
2
Touch the appropriate button to select the output
service.
For details, see “Output Services” (page 24).
For example, touch [5 × 7].
3
Touch the pictures that you want to print to select
them. To cancel a selection, touch the picture again,
and then touch the [-] button to reduce the displayed
value to zero. To select all the loaded pictures,
touch the [Select All] button. To select more than
one picture (but not all), touch them individually,
and reduce their values to zero with the [-] button.
8
Printing Pictures
If all the pictures cannot be displayed on one page,
touch the [b] or [B] button to display more pages.
4
Specify the number of copies to print.
Touch a picture to select it, and then touch the [+]
or [-] button to increase or decrease the number of
copies.
Scanning Pictures and Printing
This section describes how to scan pictures and print
them.
Notes
• A compatible printer (UP-DR100, etc.) and scanner
(sold separately) must be connected to this system to
scan and print pictures.
For details, refer to the hardware instruction manual.
• To perform scans, the [SCANNER] option under
[Input Icons] on the [Screens] tab on the
Administration screen must be set to “on”.
• If you plan to connect and use a scanner, you must
install the driver for the scanner.
For details, contact your dealer or a Sony
representative.
Operation Flow
The following represents the normal flow of operations
to scan pictures and print them.
Operation
At this step, you can also perform the following
procedures:
• Add text to pictures.
For details, see “Add Text to Pictures” (page 22),
step 2.
• Select sepia or black-and-white picture color.
For details, see “Selecting Sepia or Black and
White” (page 20), step 2.
• Print matte pictures (8 × 10/8 × 12 prints only).
For details, see “Printing Matte Pictures”
(page 18), step 2.
5
When you are done specifying the number of copies
to print, touch the [OK] button.
A screen appears, allowing you to verify your order.
From here, the procedures are the same as those for
pictures stored on media. Proceed to step 1 of
“Verifying the Order and Entering a Password”
(page 7).
Select the scanner as the input device
Select the output service
Scan pictures
Specify the number of copies to print
Verify the order and enter a password
Output
Scanning Pictures and Printing
9
How to Scan and Print Pictures
This section describes how to scan pictures, and then
print them.
Selecting the Scanner as the Input Device
• [Help]. Touch to display online Help for a
description of procedures that apply to the current
screen.
Selecting the Output Service
Touch the appropriate button to select the output service.
1
Touch the screen once.
Operation
Note
Depending on the settings made in the
Administration screen, the buttons appearing on the
screen that follows may vary. Touch the appropriate
button.
For details about see “[System] Tab” (page 43).
For details, see “Output Services” (page 24).
For example, touch [5 × 7].
Scanning Pictures
Scan a picture. Repeat as many times as necessary.
Note
The media selection screen appears.
2
Touch [SCANNER].
You can scan up to 999 pictures per order. However, if
you write the scanned pictures to CD-R, you can only
scan up to the number set [Scan Max for CD] in the
Administration screen.
For details, see “[Pricing] Tab” (page 39).
Notes
The following buttons are available in this screen
and the screens that follow. Touch the buttons when
required.
• If you touch the [Start Over] button, a message
prompts you to verify that you want to
completely cancel the current operation and
return to the start screen. If you touch the [OK]
button, the display returns to the screen in step 1.
10
Scanning Pictures and Printing
1
Follow the on-screen message and place the picture
in the scanner.
For details about how to position pictures for
scanning, refer to the scanner instructions.
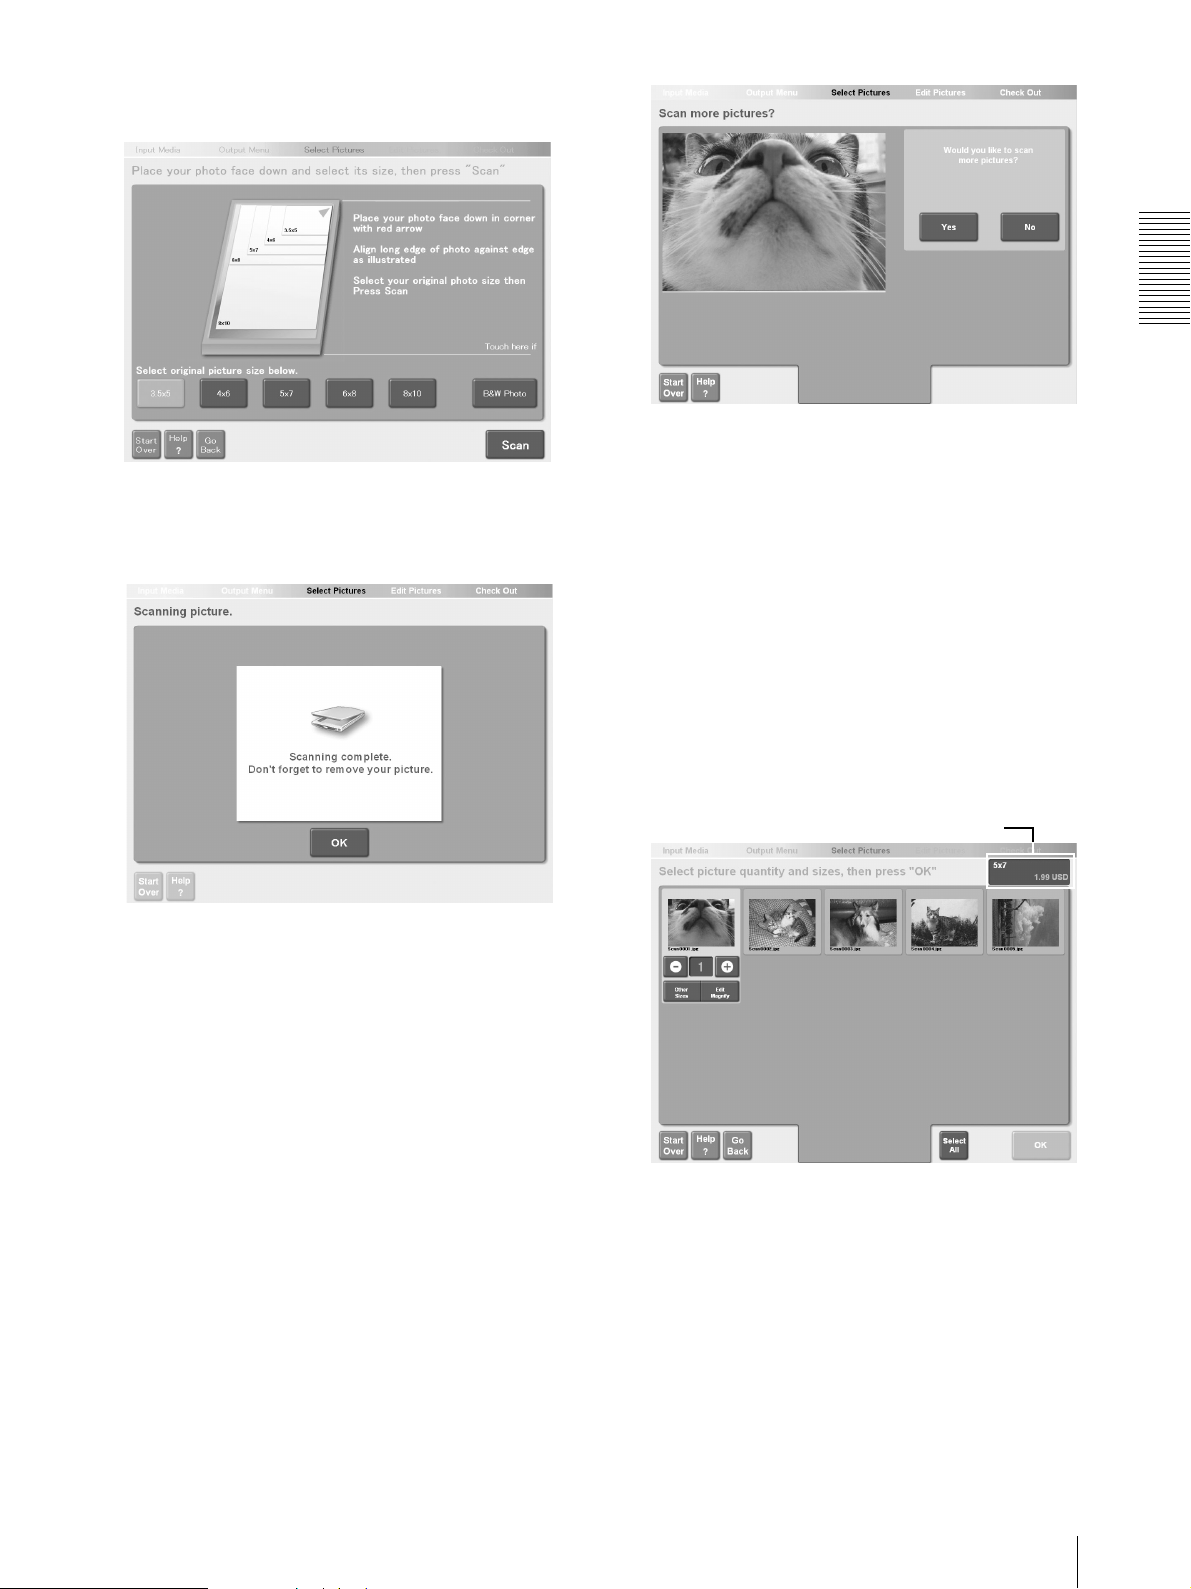
2
If you need to, touch a button according to the size
of the picture that you want to scan.
3
Touch the [Scan] button.
Operation
At this step you can also perform the following
procedure:
• If all the images cannot be displayed, touch [b]
or [B] to display the previous or next page.
Scanning begins. When scanning is complete, the
following screen appears.
4
Remove the picture from the scanner, then touch
the [OK] button.
The scanned picture appears.
5
Repeat the procedure to scan as many pictures as
you need.
Specifying the Number of Copies to Print
1
Specify the number of copies to print.
Touch a picture to select it, and then touch the [+]
or [-] button to increase or decrease the number of
copies. To select all the scanned pictures, touch the
[Select All] button. To deselect all scanned
pictures, touch the button again.
If the list contains more than one page, touch [b] or
[B] to change the page display.
Price information displays
• To continue scanning, touch the [Yes] button,
place a picture in the scanner, and then repeat
from step 2.
• If you touch the [No] button, the screen to specify
the number of copies appears. Proceed to step 1
of “Specifying the Number of Copies to Print”
(see below).
At this step you can also perform the following
procedures:
• You can edit pictures by cropping them or
adjusting the brightness and contrast.
For details, see “Editing Pictures” (page 14).
• You can select other print sizes for the picture
currently selected.
For details, see “Specifying Paper Sizes”
(page 24).
Scanning Pictures and Printing
11
2
Touch the [OK] button.
The next screen allows you to verify your order.
Output
1
Touch the [Enter] button.
Verifying the Order and Entering a
Password
You must enter a password to print. The default
password is the sales clerk password, “0000”.
Operation
Note
You can use the Administration screen to set whether a
password must be entered and to change passwords.
For details, see “[System] Tab” (page 43).
1
Verify the order, and then touch the [Check Out]
button.
The password entry screen appears.
Note
If you used the Administration screen to set
printing without password entry, the screen in step
1 of “Output” (see below) appears.
The print job starts and the following screen
appears.
After a moment, the display returns to the screen in
step 1 of “Selecting the Scanner as the Input
Device” (page 10).
Notes
• If you use the Administration screen to set the
unit to inhibit all other operations during printing
([Background Printing] off), the “Thank you”
screen does not appear until printing ends, and
then returns to the screen in step 1 of “Selecting
the Scanner as the Input Device” (page 10),
effectively preventing the user from performing
other operations during printing.
• A receipt is printed if a receipt printer is
connected to the unit and settings necessary for
printing receipts have been made within the
Administration screen. When output finishes, the
receipt is automatically printed.
2
Touch the appropriate keys to enter the password.
If you need to cancel password entry and start
again, touch the [Clear] button.
12
Scanning Pictures and Printing
4
Touch the [Enter] button.
Cancelling Printing
This procedure varies depending on the settings made in
the Administration screen. Follow the procedure that
applies to your situation.
If the unit is set to allow other operations during
printing
1
Make sure that the screen in step 1 of “Output”
(page 8) changes to the screen in step 1 of
“Selecting the Scanner as the Input Device”
(page 10).
2
Touch the screen twice successively at the location
indicated below.
Touch here twice.
The Administration screen appears. The screen
differs according to the password that you enter
(administrator or sales clerk password).
5
Touch the [Cancel Job] button.
A screen allowing you to verify the cancellation
appears.
6
Select the items that you want to cancel.
• If you touch the [First job] button, only the
current print job is cancelled.
• If you touch the [All jobs] button, all the print
jobs are cancelled.
• If you touch the [Go Back] button, printing
continues normally.
Operation
3
Touch the number buttons to reenter the password
that you entered prior to printing.
To correct the entry clear it by touching the [Clear]
button and reenter the password.
7
Read the message and touch the [OK] button.
8
Touch the [Exit Admin] button.
The screen in step 2 appears again.
Cancelling Printing
13

If the unit is set to inhibit other operations
during printing
1
Touch the screen twice successively at the location
indicated below.
Touch here twice.
Operation
Editing Pictures
With this display you can use the following processes
and correction methods with pictures to output.
• Adding Text
• Adjusting the picture composition
• Correcting colors (brightness, contrast, color balance,
backlight compensation)
• Correcting complexion
• Correcting red eye
• Printing matte pictures
• Selecting sepia or black and white
• Stamping dates
Note
Certain of the functions described here are not available
with some output services.
2
Touch the number buttons to reenter the password
that you entered prior to printing.
To correct the entry clear it by touching the [Clear]
button and reenter the password.
3
Touch the [Enter] button.
All the print jobs are cancelled and the display
changes to the screen appearing in the first note in.
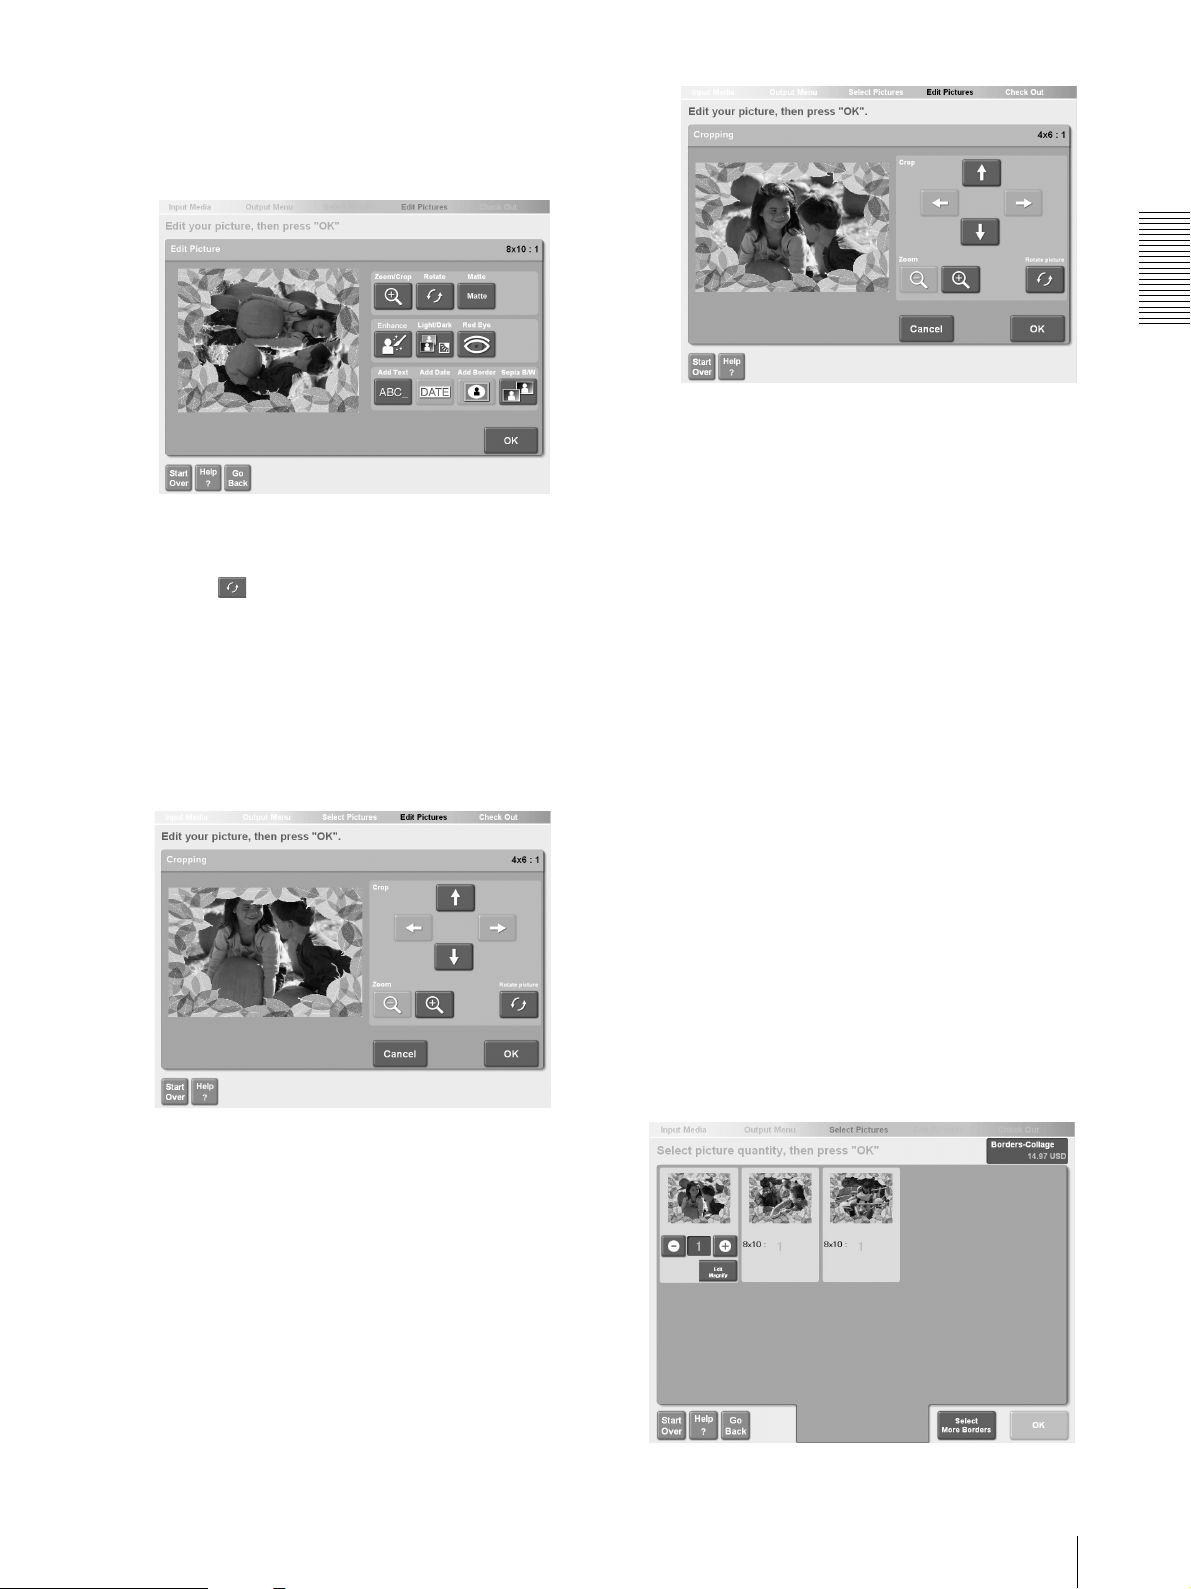
Adjusting the Picture Composition
Cropping a Picture
The composition of a picture can be changed by
enlarging or moving it.
1
To select a picture for cropping, touch the picture in
the screen used to specify the number of copies.
For details, see “Selecting the Pictures and
Specifying the Number of Copies to Print”
(page 6), step 2, or “Specifying the Number of
Copies to Print” (page 11), step 1.
14
Editing Pictures
2
Touch the [Edit/Magnify] button.
The picture editing screen appears.
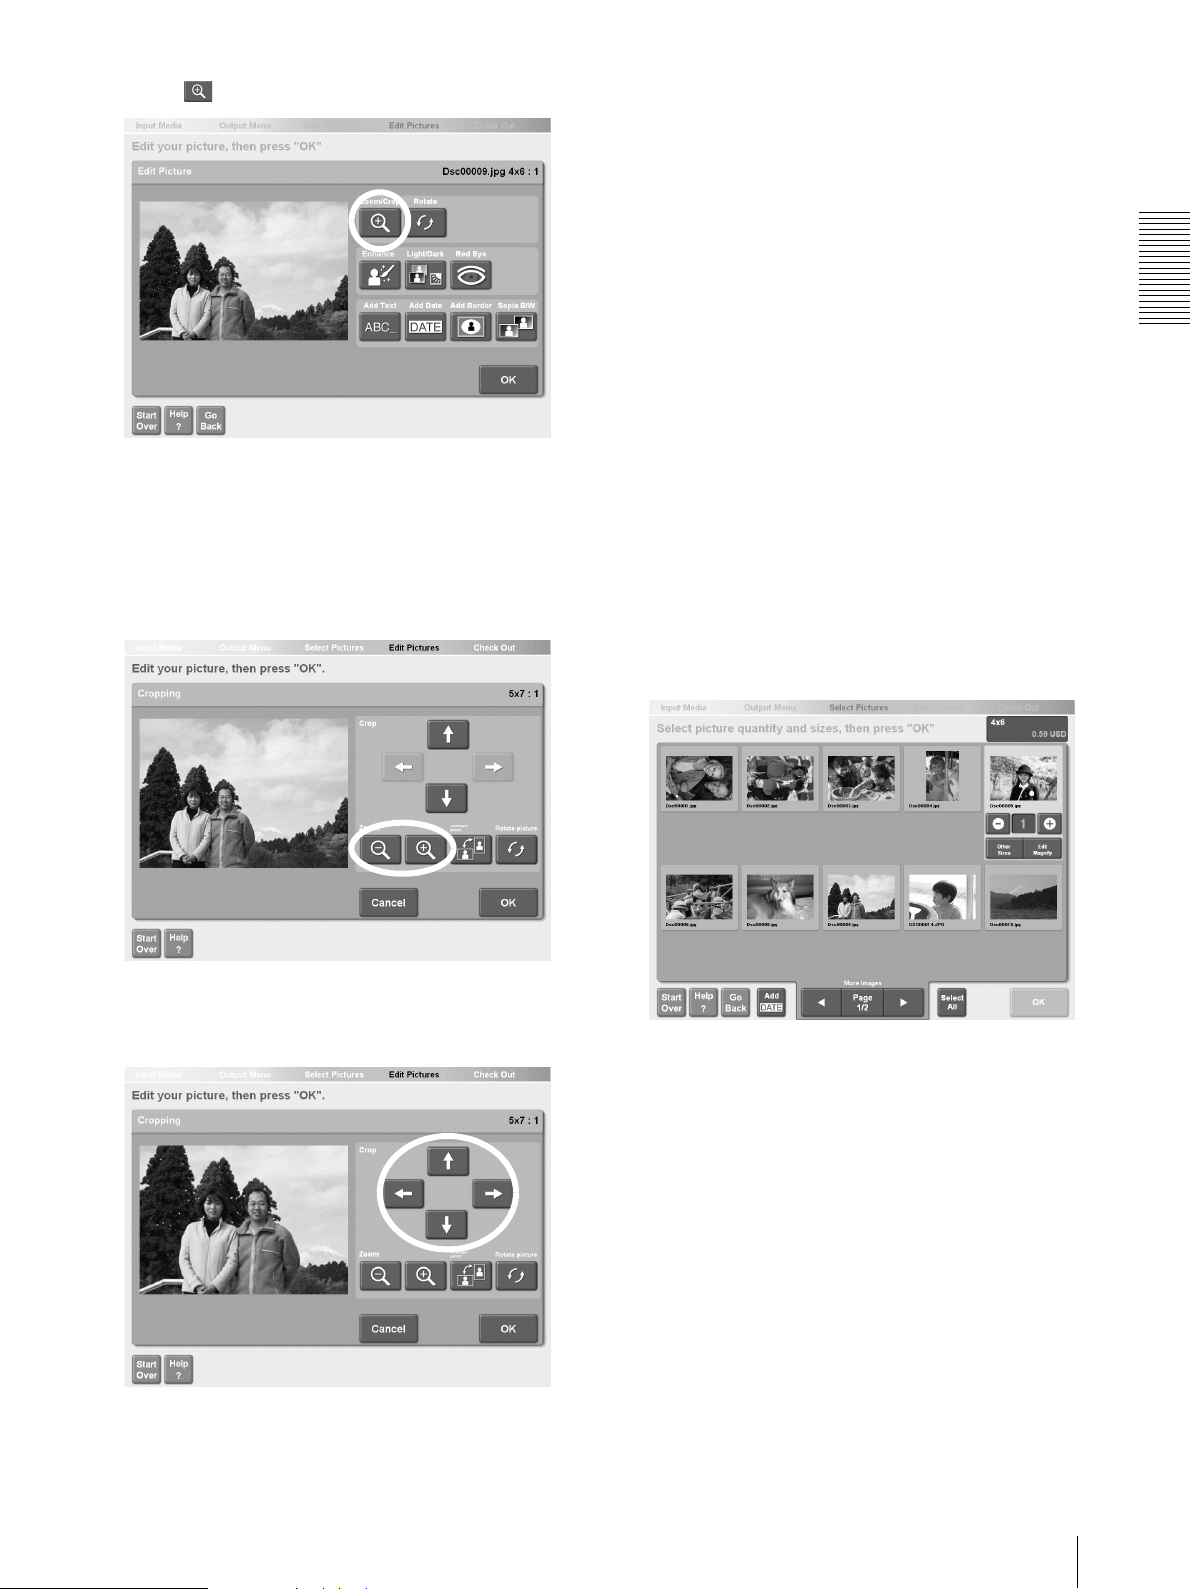
3
Touch
The composition adjustment screen appears.
4
Touch the zoom [+] button.
• Touch [+] repeatedly until the desired enlarged
size is achieved.
• To reduce the size of the picture, touch the zoom
[-] button.
6
Repeat steps 4 and 5 to achieve the desired picture
composition.
7
When you are finished trimming the picture, touch
the [OK] button.
The display returns to the screen at step 3.
8
Touch the [OK] button.
The display returns to the screen at step 1. You can
continue editing other pictures or return to the
output operation.
Picture Orientation
Change the printing orientation of pictures without
having to rotate them.
1
To select a picture for reorientation, touch the
image in the screen used to specify the number of
copies.
For details, see “Selecting the Pictures and
Specifying the Number of Copies to Print”
(page 6), step 2, or “Specifying the Number of
Copies to Print” (page 11), step 1.
Operation
5
Use the crop arrow buttons to set the picture
position.
2
Touch the [Edit/Magnify] button.
The picture editing screen appears.
Editing Pictures
15

3
Touch
6
Touch the [OK] button.
The display returns to the screen at step 1. You can
continue editing other pictures or return to the
output operation.
Rotating a Picture
Follow this procedure to rotate a picture relative to the
direction of printing.
Operation
The composition adjustment screen appears.
4
Touch
The picture is re oriented and enlarged so that blank
margins do not show.
1
To select a picture for rotation, touch the picture in
the screen used to specify the number of copies.
For details, see “Selecting the Pictures and
Specifying the Number of Copies to Print”
(page 6), step 2, or “Specifying the Number of
Copies to Print” (page 11), step 1.
Note
Rotating pictures in this way does not affect the
printing orientation.
5
When you are finished re-orienting the picture,
touch the [OK] button.
The display returns to the screen at step 3.
2
Touch the [Edit/Magnify] button.
The picture editing screen appears.
3
Touch
The adjustment screen appears.
16
Editing Pictures

The picture is rotated 90º counterclockwise.
4
Touch the [OK] button.
The display returns to the screen at step 1. You can
continue editing other pictures or return to the
output operation.
2
Touch the [Add DATE] button.
The date is added to all selected pictures, and the
[DATE] icon appears beneath them. If you want to
remove the date, simply touch the [Add DATE]
button again. You can continue editing other
pictures or return to the output operation.
DATE Icon
Operation
Adding Dates
Image data in Exif (Exchangeable Image File Format)
format can be stamped with the date the picture was
taken. Exif is a file format for digital camera pictures
that allows the recording of the date the picture was shot,
the shutter speed, and other information.
Note
This function cannot be used with the [Border],
[Collage], or [CD Creation] output services.
Adding Dates on All the Selected Pictures
1
On the screen used to specify the number of copies,
touch the [Select All] button.
For details, see “Selecting the Pictures and
Specifying the Number of Copies to Print”
(page 6), step 2.
Adding Dates on Specific Pictures
1
To select a picture for date stamping, touch the
picture in the screen used to specify the number of
copies.
For details, see “Selecting the Pictures and
Specifying the Number of Copies to Print”
(page 6).
All pictures are selected.
2
Touch the [Edit/Magnify] button.
The picture editing screen appears.
Editing Pictures
17
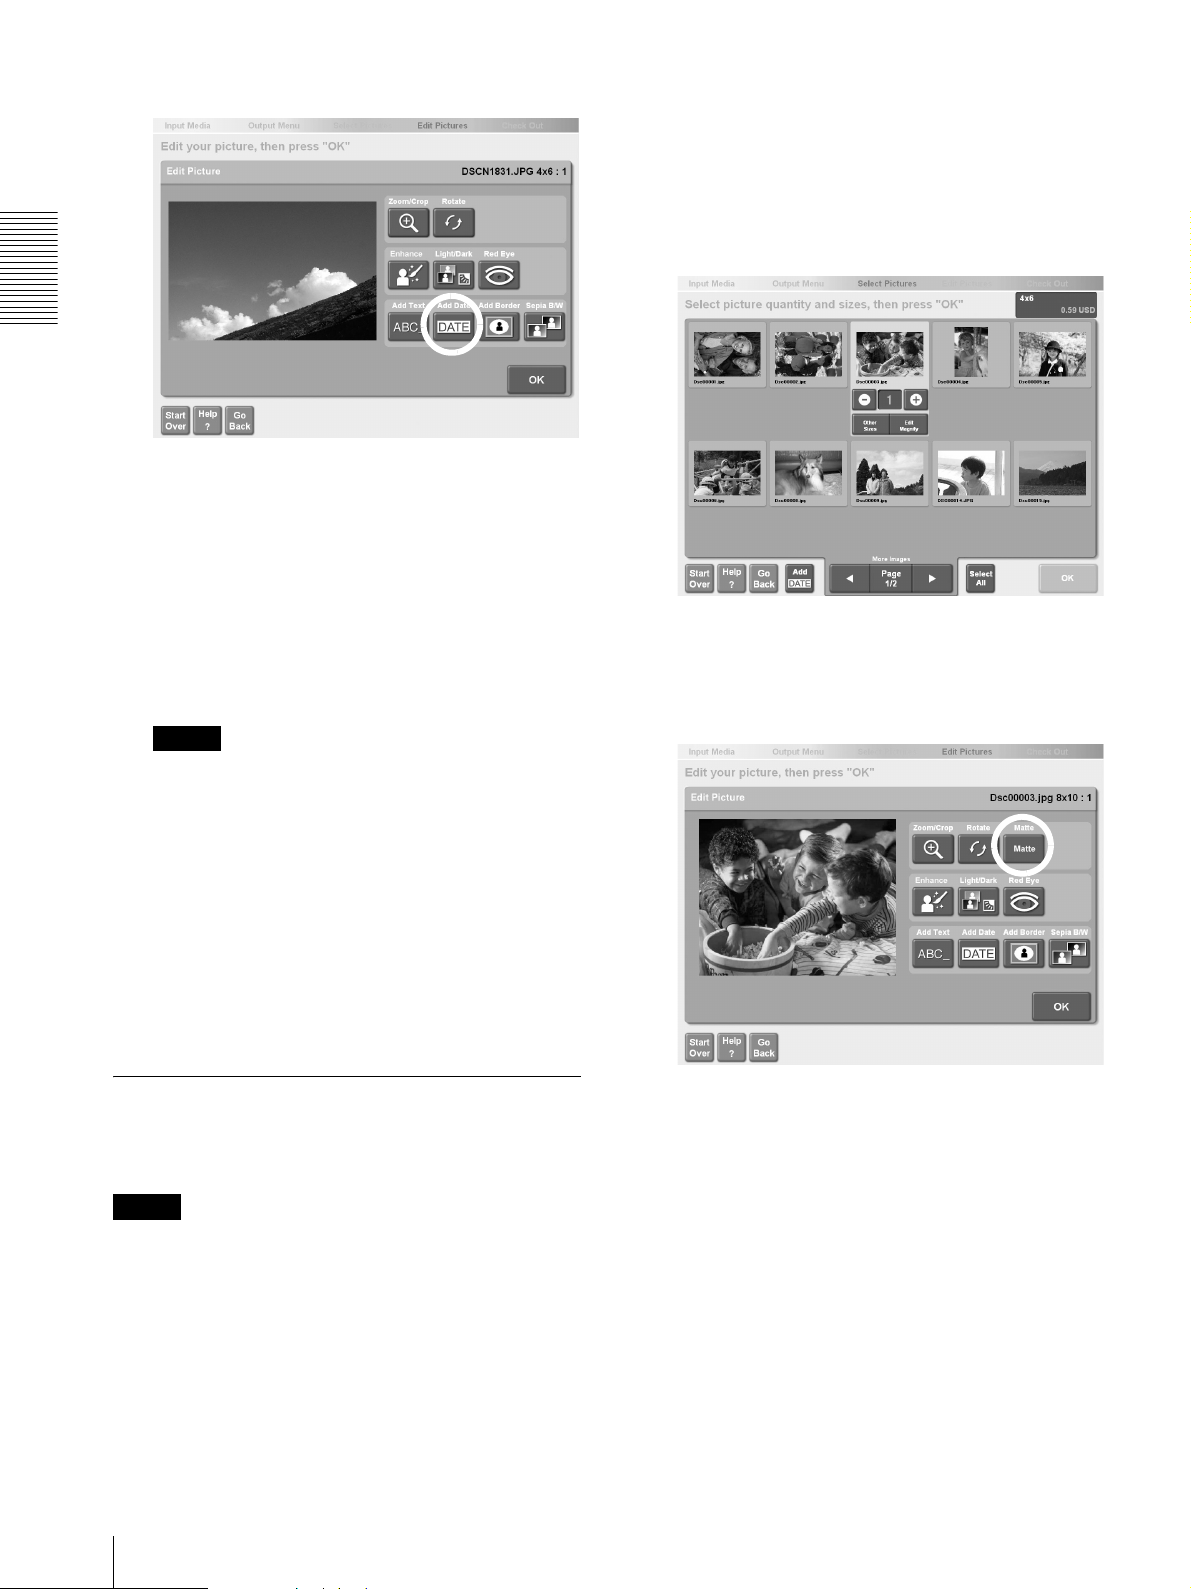
3
Touch the [DATE] button.
Operation
The picture is stamped with the date. If you want to
remove the date, simply touch the [DATE] button
again.
4
When you are finished stamping dates on pictures,
touch the [OK] button.
1
To select a picture for matte printing, touch the
picture in the screen used to specify the number of
copies.
For details, see “Selecting the Pictures and
Specifying the Number of Copies to Print”
(page 6), step 2, or “Specifying the Number of
Copies to Print” (page 11), step 1.
The display returns to the screen at step 1. At this
point, the [DATE] icon appears beneath the datestamped pictures. You can continue editing other
pictures or return to the output operation.
Note
The presence of the [DATE] icon indicates that the
date has been added to a picture, but only applies to
pictures at the paper size you selected during
“Selecting the Output Service” (page 7). If you
specify additional paper sizes when selecting
pictures, you can still set the date stamp for each
additional paper size, but the [DATE] icon will not
reflect this.
For details on adding paper sizes, see “Specifying
Additional Paper Sizes When Selecting Pictures”
(page 25).
Printing Matte Pictures
You can adjust your pictures so that they are matte when
printed.
Note
This function can only be used with 8 × 10/8 × 12 size
paper.
2
Touch the [Edit/Magnify] button.
The picture editing screen appears.
3
Touch the [Matte] button.
The picture is set to be printed as a matte picture. To
cancel this setting, touch the [Matte] button again.
4
When you are finished, touch the [OK] button.
The display returns to the screen at step 1. You can
continue editing other pictures or return to the
output operation.
18
Editing Pictures

Adjusting Skin Complexion
You can adjust the complexion of the subjects in the
picture so that blemishes or other such outstanding
marks are minimized.
1
To select a picture for complexion correction touch
the picture in the screen used to specify the number
of copies.
For details, see “Selecting the Pictures and
Specifying the Number of Copies to Print”
(page 6), step 2, or “Specifying the Number of
Copies to Print” (page 11), step 1.
4
When you are finished, touch the [OK] button.
The display returns to the screen at step 1. You can
continue editing other pictures or return to the
output operation.
Enhancing a Picture
The following items can be adjusted:
• Backlight
•Brightness
• Color balance
•Contrast
Notes
• This function cannot be used with the [CD Creation]
output service.
• The backlight correction function cannot be used with
the [Border] or [Collage] output services.
1
To select a picture for color correction, touch the
picture in the screen used to specify the number of
copies.
For details, see “Selecting the Pictures and
Specifying the Number of Copies to Print”
(page 6), step 2, or “Specifying the Number of
Copies to Print” (page 11), step 1.
Operation
2
Touch the [Edit/Magnify] button.
The picture editing screen appears.
3
Touch
The complexion of the subject in the picture is
corrected. To cancel this setting, touch the
complexion button again.
Note
2
Touch the [Edit/Magnify] button.
The picture editing screen appears.
You cannot see the result of the correction on this
screen. It will appear in the prints.
Editing Pictures
19
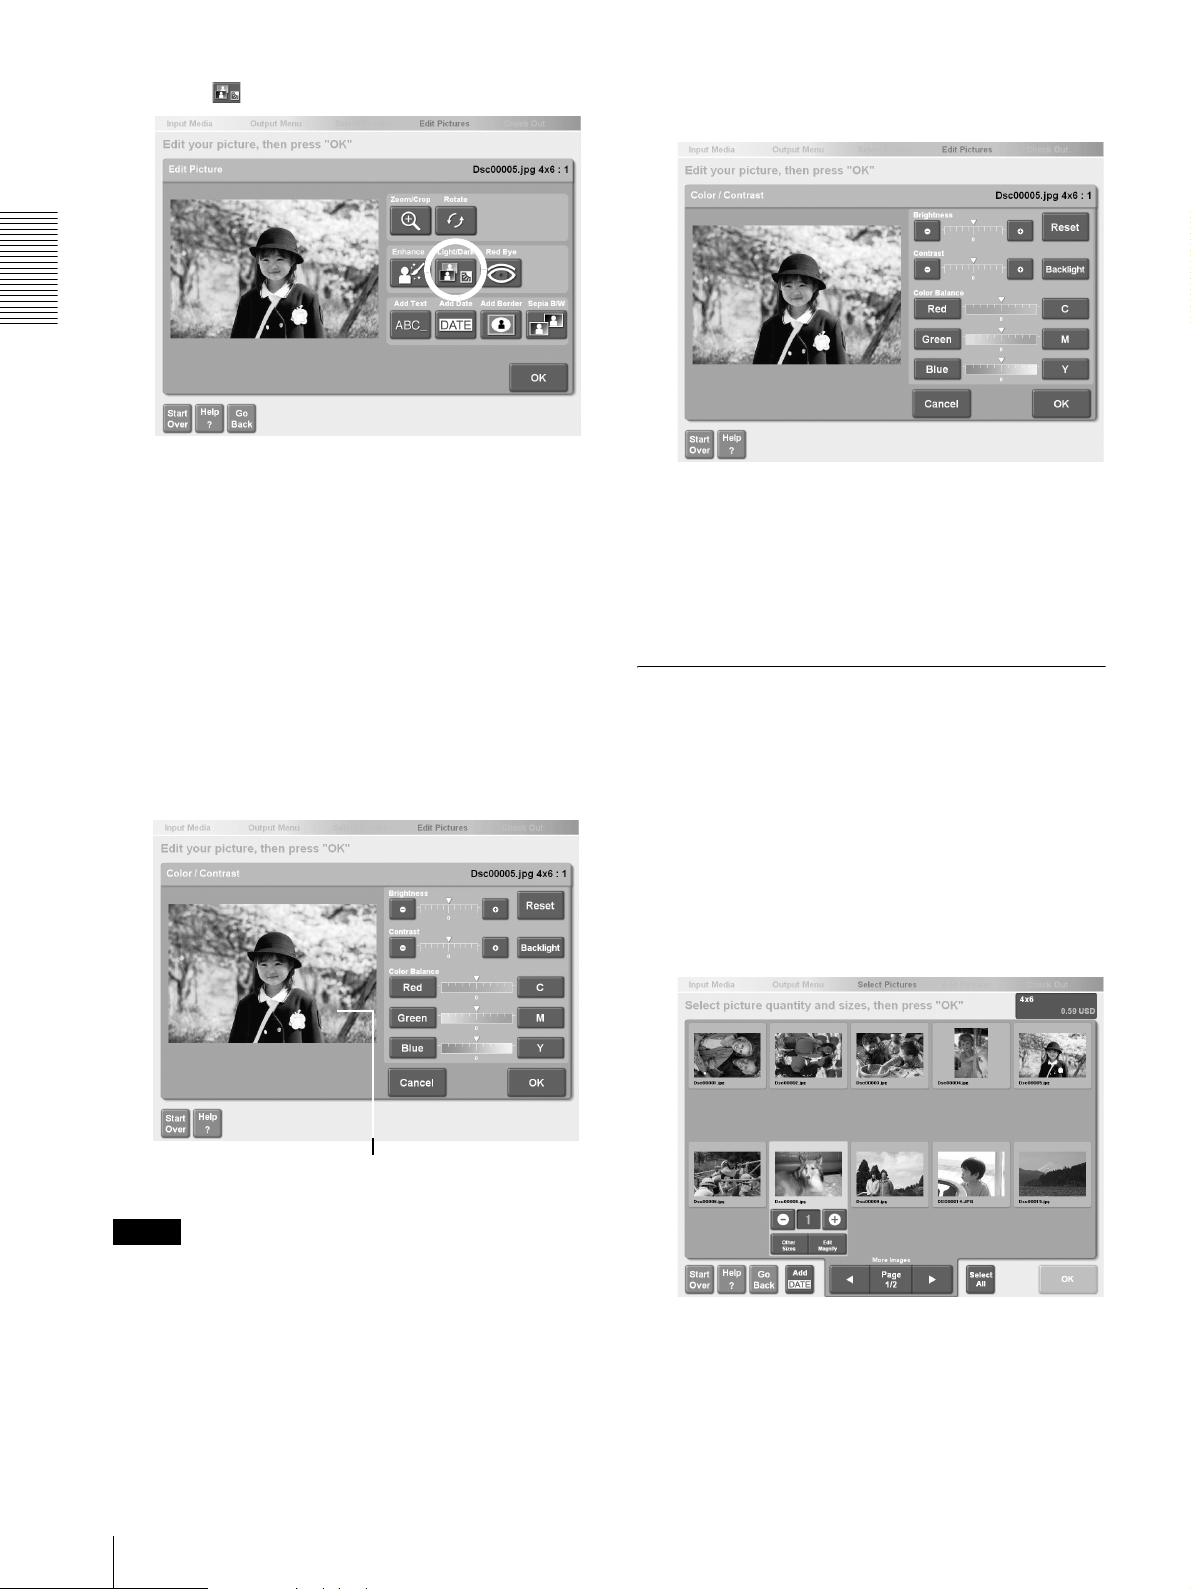
3
Touch
Operation
The [Light/Dark] screen appears.
4
Touch the [+] or [-] button for each item to adjust
the setting.
5
When you are finished with color correction, touch
the [OK] button.
The display returns to the screen at step 3.
6
Touch the [OK] button.
• [Brightness]. Touch [+] for a brighter picture or
[-] for a darker picture.
• [Contrast]. Touch [+] for higher contrast or [-] for
lower contrast.
• [Enhance Picture]. Touch the various [+] or [-] to
adjust colors.
• Touch the [Backlight] button to compensate for
excessive lighting behind the subject.
If you want to cancel the color correction settings,
touch the [Cancel] button.
The display returns to the screen at step 1. You can
continue editing other pictures or return to the
output operation.
Selecting Sepia or Black and White
Sepia or black and white can be selected as the picture
color.
1
To select a picture for sepia or black and white
printing, touch the picture in the screen used to
specify the number of copies.
For details, see “Selecting the Pictures and
Specifying the Number of Copies to Print”
(page 6), step 2, or “Specifying the Number of
Copies to Print” (page 11), step 1.
Preview
(reflects color correction settings)
Note
If [RGB Display] is set to [OFF] on the [Custom] Tab,
the RGB adjustment buttons are not displayed.
20
Editing Pictures
2
Touch the [Edit/Magnify] button.
The picture editing screen appears.
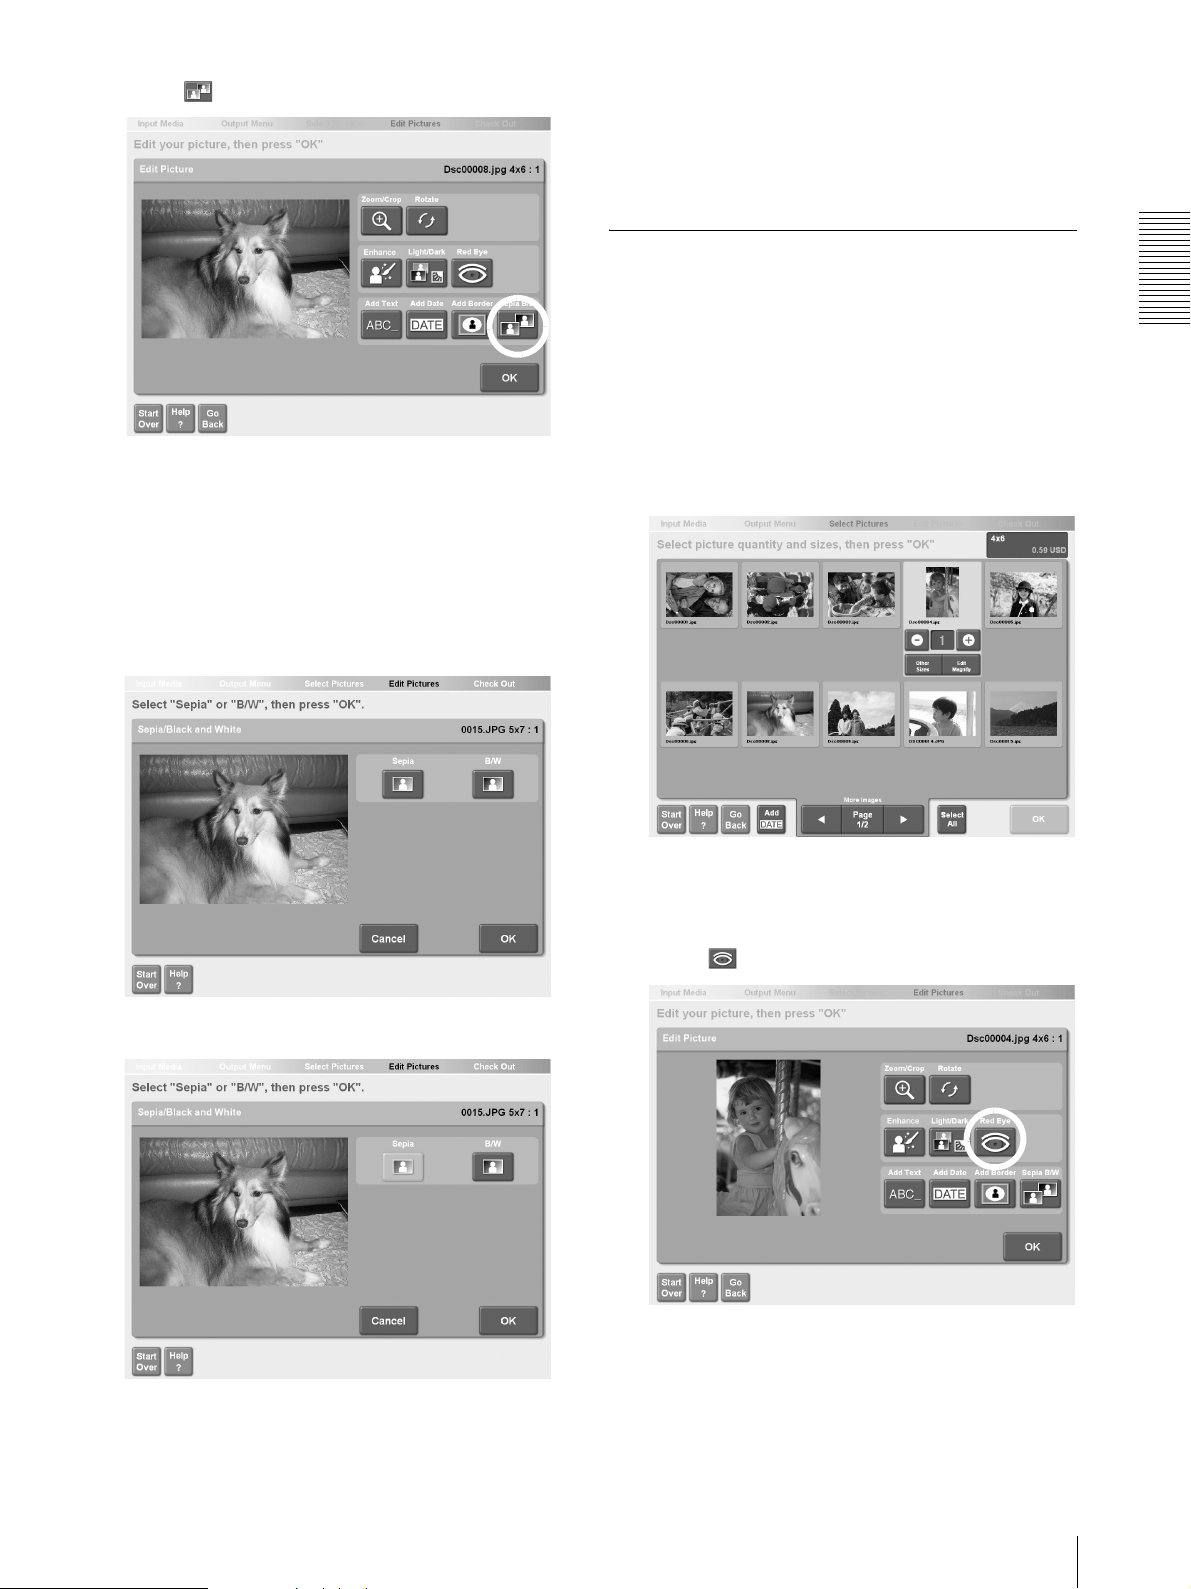
3
Touch
The screen for selecting sepia or black and white
appears.
4
Select sepia or black and white.
• [Sepia]. Converts the picture to sepia tone.
• [Black and White]. Converts the picture to black
and white.
To cancel the selection, touch the [Cancel] button.
6
Touch the [OK] button.
The display returns to the screen at step 1. You can
continue editing other pictures or return to the
output operation.
Removing Red Eye
You can reduce red eye in pictures.
1
To select a picture for red eye correction, touch the
picture in the screen used to specify the number of
copies.
For details, see “Selecting the Pictures and
Specifying the Number of Copies to Print”
(page 6), step 2, or “Specifying the Number of
Copies to Print” (page 11), step 1.
Operation
5
When you are finished, touch the [OK] button.
The display returns to the screen at step 3.
2
Touch the [Edit/Magnify] button.
The picture editing screen appears.
3
Touch
Red eye is automatically corrected. The red eye
correction area (green frame) appears at the center
of the picture.
Editing Pictures
21
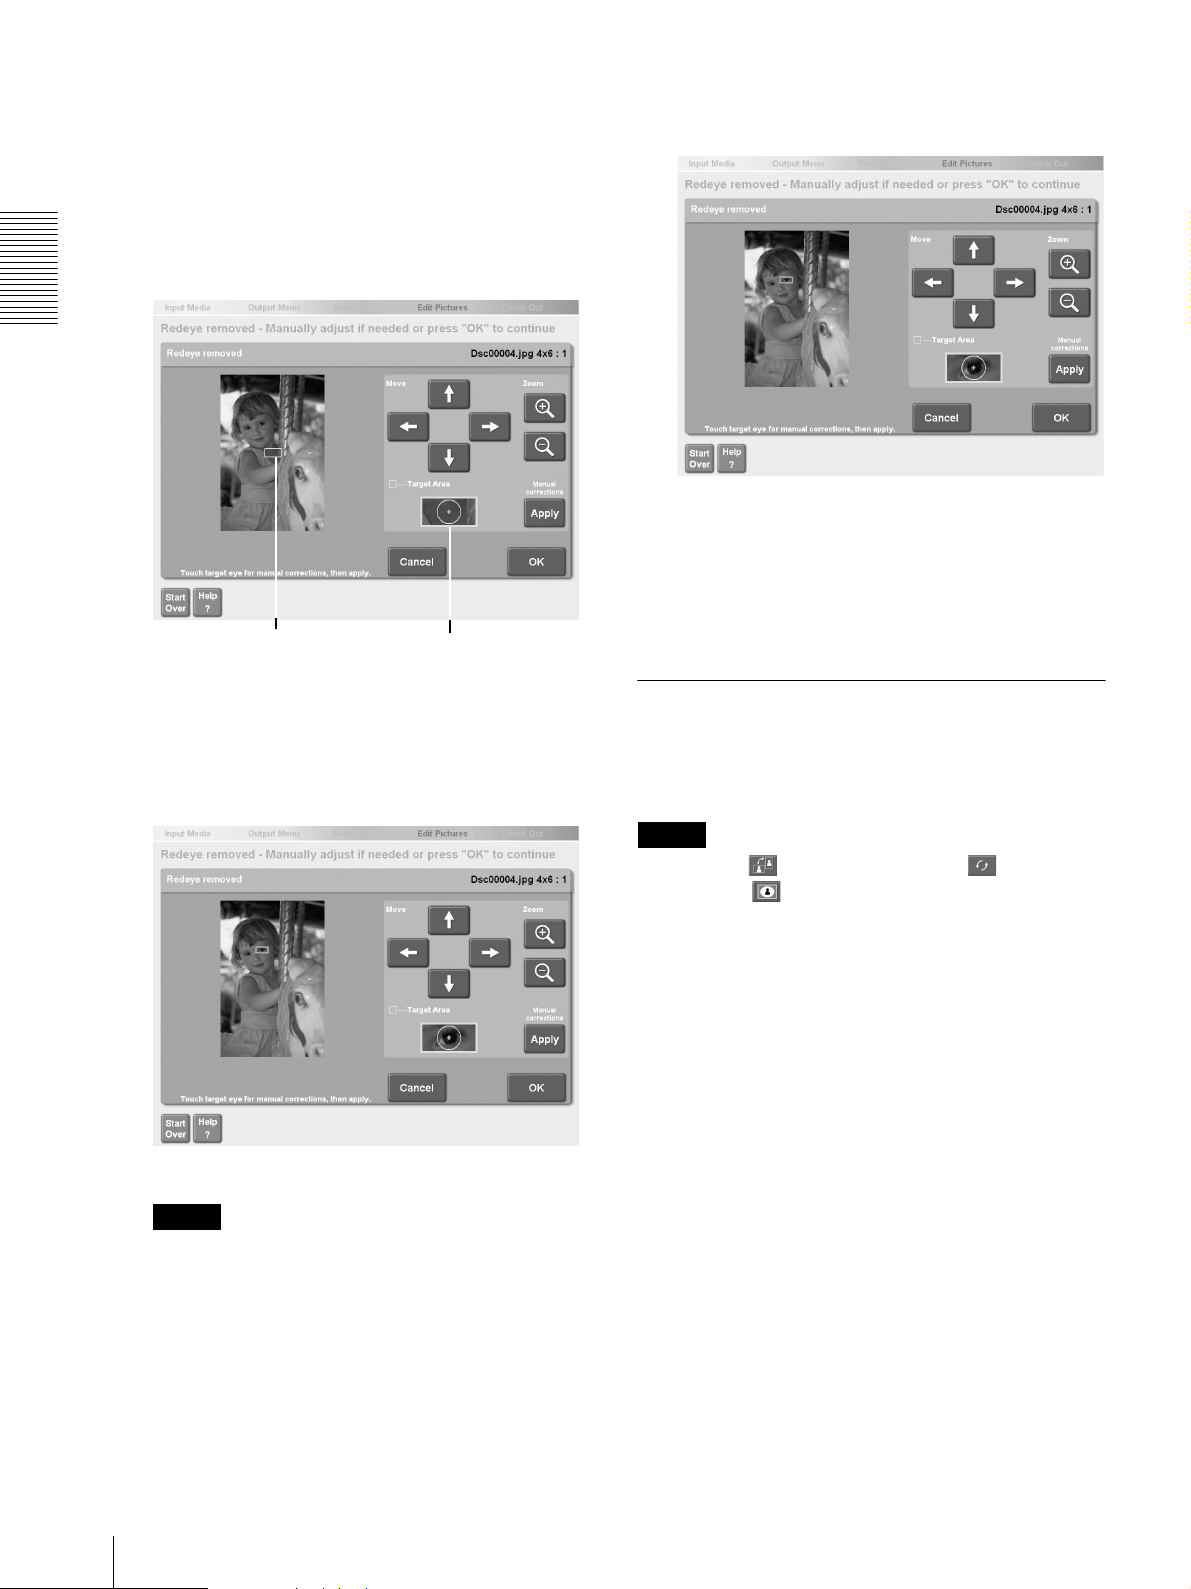
4
Verify the result.
8
When you are done, touch the [OK] button.
If red eye was corrected to your satisfaction,
proceed to step 8. If not, proceed to step 5 and
correct it manually.
5
Touch the screen or the [Move] arrow buttons to
move the green frame and place it over the affected
eye.
Operation
Correction area (green frame) View inside the green frame
6
Under [Zoom], touch the [+] button.
Align the cross in the green frame with the center of
the affected red eye.
7
Touch the [Apply] button.
To cancel the correction, touch the [Cancel] button.
The display returns to the screen at step 3.
9
Touch the [OK] button.
The display returns to the screen at step 1. You can
continue editing other pictures or return to the
output operation.
Add Text to Pictures
You can annotate pictures with any text that you want.
You can at a maximum of 4 blocks of text, each up to 30
characters long, to picture.
Note
If you select (Landscape/portrait), (Picture
Rotation), or (Add Border) after adding text to a
picture, the added text will be lost. Make sure you
perform these operations before adding text to a picture.
22
The red eye is corrected.
Note
With some pictures, complete correction may not
be possible.
Editing Pictures
1
To select a picture for annotation, touch the picture
in the screen used to specify the number of copies.
For details, see “Selecting the Pictures and
Specifying the Number of Copies to Print”
(page 6), step 2, or “Specifying the Number of
Copies to Print” (page 11), step 1.
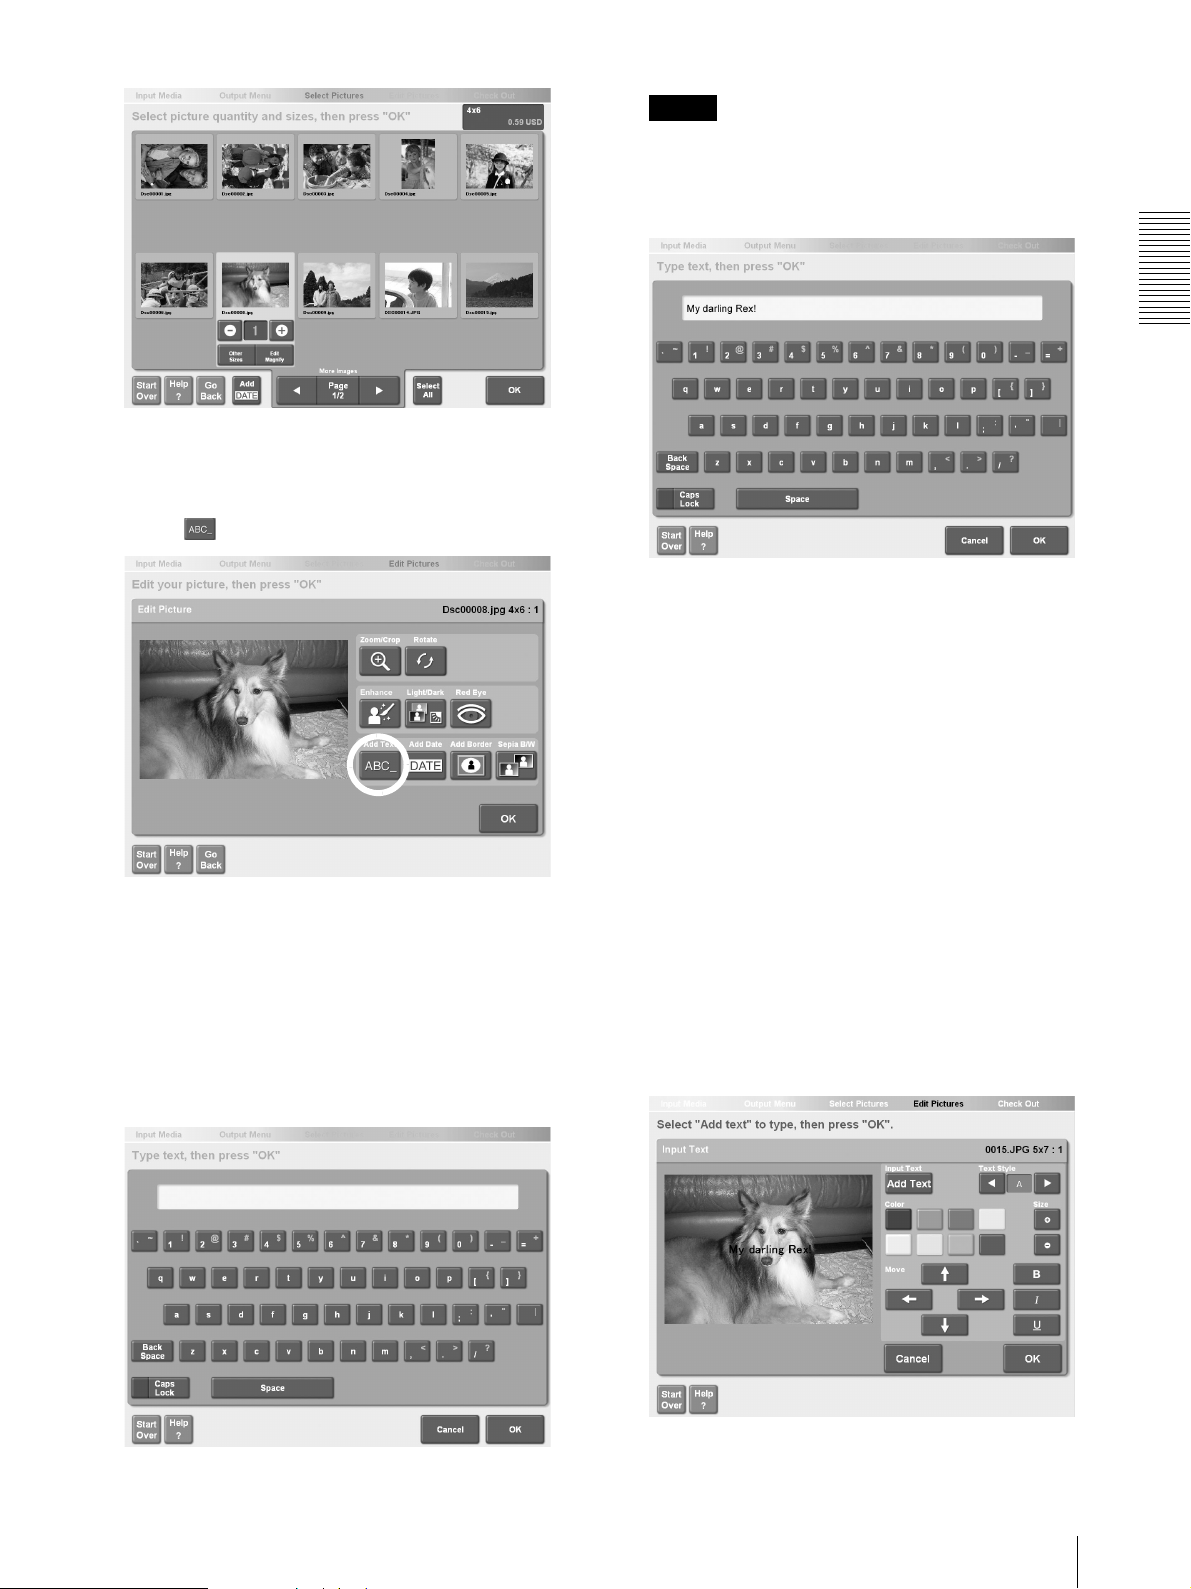
2
Touch the [Edit/Magnify] button.
The picture editing screen appears.
3
Touch
Note
The annotation has a maximum length of 30
characters.
5
Touch the [OK] button.
The text is superimposed on the picture.
A green border appears around text immediately
after it is added, indicating that the text is selected.
6
Select the style of the text.
You can change the attributes of the selected text
using the following buttons.
Operation
The text entry screen appears.
4
Input the desired text by touching the displayed
keyboard.
• [Caps Lock]. Touch to switch between
lowercase/uppercase characters and between
symbols/numbers.
• [Back Space]. Touch to delete the last character
input.
• [Move]. Touch the arrow buttons to change the
position of the text.
• [Color]. Touch the buttons to change the color of
the text.
• [Size]. Touch the [+] or [-] button to change the
size of the text.
• [Text Style]. Touch the [b] or [B] button to
change the font of the text.
• [Bold]. Touch to set the text in boldface. Touch
again to revert to normal typeface.
• [Italic]. Touch to set the text in italics. Touch
again to revert to normal typeface.
• [Underline]. Touch to underline the text. Touch
again to delete the underline.
Editing Pictures
23

Notes
• To add another block of text, touch the desired
location, and then touch the [Add Text] button.
When the text entry screen appears, repeat steps
4 to 6 above.
• To change a text block added previously, touch
the desired text so it is selected with the green
frame, and then touch the [Edit Text] button.
• Touch the [Cancel] button to erase the annotation.
Operation
7
When you are done, touch the [OK] button.
Output Services
A variety of output services are available on this system.
Note
The availability of some output services is determined
by what peripheral devices are connected to the system.
For details, see the output services described below in
this section.
Specifying Paper Sizes
The following paper sizes are available on this system.
• 3.5 × 5 size (90 × 130 mm)
• 4 × 6 size (100 × 150 mm)
• 5 × 7 size (130 × 180 mm)
• 6 × 8 size (150 × 200 mm)
• 8 × 10 size (200 × 250 mm)
• 8 × 12 size (200 × 300 mm)
Notes
• To print on the selected paper size, the paper must
already be set in a printer (the UP-DR100 or UP-
The display returns to the screen at step 3.
8
Touch the [OK] button.
The display returns to the screen at step 1. You can
continue editing other pictures or return to the
output operation.
D70A) that uses this paper size. For example, if 5 × 7
size paper is in the printer, you can also print 3.5 × 5
size pictures.
• You cannot use the 8 × 10 and 8 × 12 sizes at the same
time. When you set the UPC-747 print pack, you can
print 8 × 12 size pictures. When you set the
UPC-740/741 print pack, the system automatically
switches to 8 × 10 size.
• You can select which paper sizes are available on the
Administration screen.
For details, see “[Screens] Tab” (page 38).
24
Specifying the Paper Size at the
Beginning
Touch the desired paper size in the output service
selection screen.
For details, see “Selecting the Output Service”
(page 6).
Note
Depending on the settings of the Administration screen,
the [Other Size] output icon may be displayed in the
output service selection screen. If this is the case,
touching this button displays another screen where you
can select paper sizes set to [Other Size].
For details, see “[Screens] Tab” (page 38).
Output Services
The next procedures are the same as those for a normal
print job.
• To print stored pictures
Step 1 of “Selecting the Pictures and Specifying the
Number of Copies to Print” (page 6)
• To scan pictures and print them
Step 1 of “Scanning Pictures” (page 10)
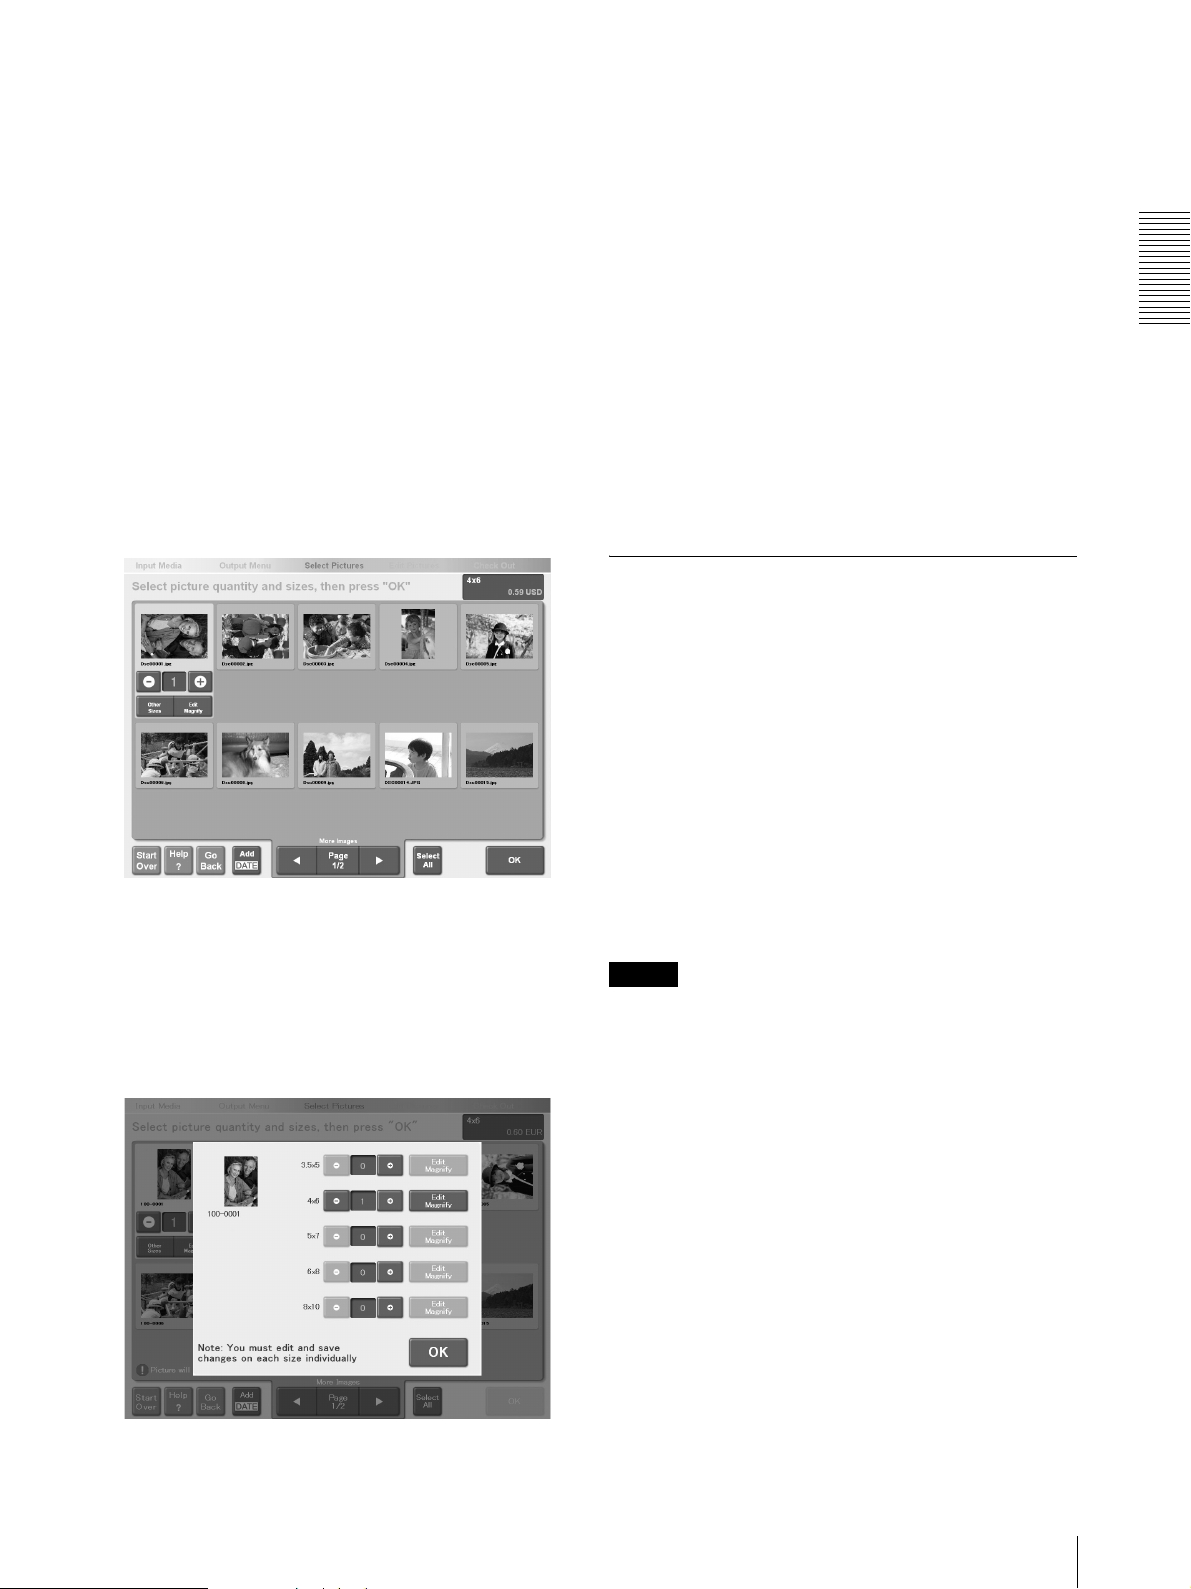
Specifying Additional Paper Sizes When
Selecting Pictures
1
To specify additional paper sizes, touch the picture
in the screen used to specify the number of copies.
To cancel a selection, touch the picture again, and
then touch the [-] button to reduce the displayed
value to zero.
If all the pictures cannot be displayed on one page,
touch the [b] or [B] button to display more pages.
2
Touch the [Other Sizes] button of the selected
picture.
A screen allowing you to add paper sizes appears.
3
Touch the [+] and/or [-] buttons of the sizes that you
want to add or adjust the number of copies that you
want to print for that size.
At this step, you can also perform the following
procedure:
• You can edit pictures of sizes for which you have
specified more than one copy by touching their
respective [Edit/Magnify] buttons and adjusting
the brightness, contrast, etc.
4
Touch the [OK] button.
The display returns to the screen at step 1.
The next procedures are the same as those for a
normal print job.
• To print stored pictures
Step 2 of “Selecting the Pictures and Specifying
the Number of Copies to Print” (page 6)
• To scan pictures and print them
Step 1 of “Specifying the Number of Copies to
Print” (page 11)
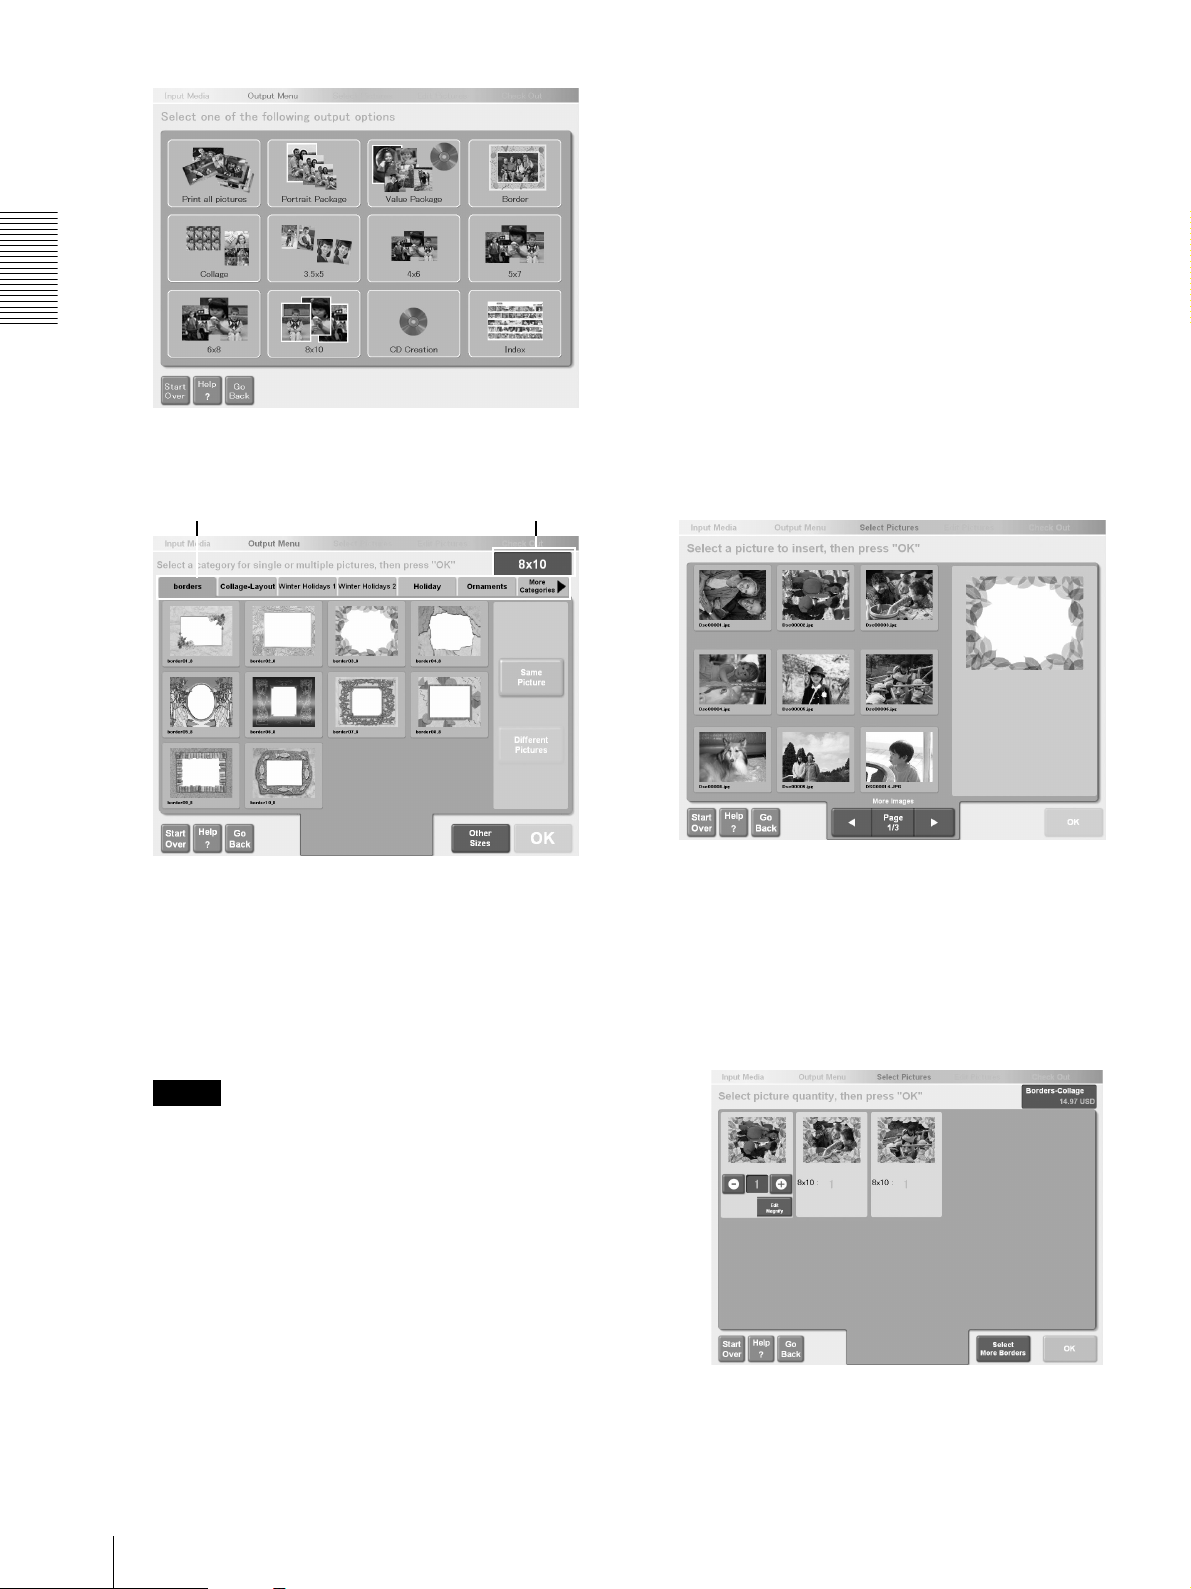
Creative Printing
This feature allows you to create and combine pictures
with a border and print them. A border is a ready-made
graphic that can be combined with pictures as a frame.
The following types of templates are available.
• Single-picture layout
–[Border]
Allows you to print pictures in fantasy frames.
– [Collage]
Allows you to create several same-size versions of
the same picture on one sheet.
• Multiple-picture layout
– [Collage]
Allows you to create several different pictures on
one sheet.
Notes
• You can use the Administration screen to add and
delete templates.
For details, see “[Templates] Tab” (page 41).
• When you print pictures using the multiple-picture
[Collage] layout, even if you specify a number of
pictures less than that which can fit on the template,
you must still pay the same price.
Operation
Selecting Creative Photos and Printing
1
Touch [Border] or [Collage] in the output service
selection screen.
For details, see “Selecting the Output Service”
(pages 6 and 10).
Output Services
25
5
Perform one of the following procedures:
• To print stored pictures
The pictures on the media inserted into the unit
are loaded. Proceed to the next step.
• To scan pictures and print them
Steps 1 to 6 of “Scanning Pictures” (page 10)
6
Touch the pictures to be combined for printing, then
touch the [OK] button.
Operation
2
Touch the [Same Picture] or [Different Pictures]
buttons to select the type of templates you will use.
Category Tab
To change the print size, touch the [Other Sizes]
button and select the desired size.
3
Touching the category tabs will switch to the next
category of templates.
If the category tabs do not fit on one screen,
touching [More Categories] will switch to the next
screen of category tabs.
Print Size
To cancel the selection, touch the picture again.
If all the pictures cannot be displayed on one page,
touch the [b] or [B] button to display more pages.
At this step, you can also perform the following
procedure:
• Touch the [Go Back] button to return to the
screen in step 2 and select a different template.
The pictures and template appear.
7
Specify the layout of the composite picture.
If all the pictures cannot be displayed, touch [b] or
[B] to display the previous or next page.
1 To select the template of the composite picture
touch the picture in the screen and touch the
[Edit/Magnify] button.
4
26
Note
The [More Categories] button appears when 6 or
more templates have been loaded on the [Menu
Display] list on the [Templates] tab on the
Administration screen.
For details, see “[Templates] Tab” (page 41).
Select the desired template, and then touch the
[OK] button.
The picture editing screen appears.
Output Services
2 Touch [Zoom/Crop]
A screen allowing you to specify the layout
appears.
Operation
7 Repeat steps 5 and 6 to achieve the desired
composition.
3 If you selected a
step 2, touch the pictures that you want to use.
4 Touch to rotate the picture
90º counterclockwise.
5 Under [Zoom] touch the [+] button to enlarge
the picture.
• Touch the [+] button repeatedly to achieve
the desired size.
• To reduce the size of the picture if it is too
large, touch the [-] button.
6 Under [Crop] touch the arrow buttons to
position the image.
[Different Pictures]
layout in
If you selected a
step 2, you may have to repeat steps 3 to 7
depending on the number of pictures that you
selected for composition. When you are done,
proceed to step 9.
8 If necessary, edit the composite image.
At this step, you can perform the following
procedures:
• Add text to pictures
• Enhance picture (backlight correction not
available)
• Print sepia or black-and-white pictures
For details, see “Editing Pictures” (page 14).
9 When you are finished adjusting the layout,
touch the [OK] button.
The next screen allows you to specify the
number of copies to print.
8
Touch a composite picture to select it, and then
specify the number of copies to print.
Touch a picture to select it, and then touch the [+]
or [-] button to increase or decrease the number of
copies.
[Different Pictures]
layout in
Output Services
27
At this step, you can also perform the following
procedure:
• Touch the [Select More Borders] button to return
to the screen in step 2 and select an additional
template of your picture.
9
Touch the [OK] button.
The screen allowing you to verify your order
appears.
3
Touch
Operation
Next, perform one of the following procedures:
• To print stored pictures
Step 1 of “Verifying the Order and Entering a
Password” (page 7)
• To scan pictures and print them
Step 1 of “Verifying the Order and Entering a
Password” (page 12)
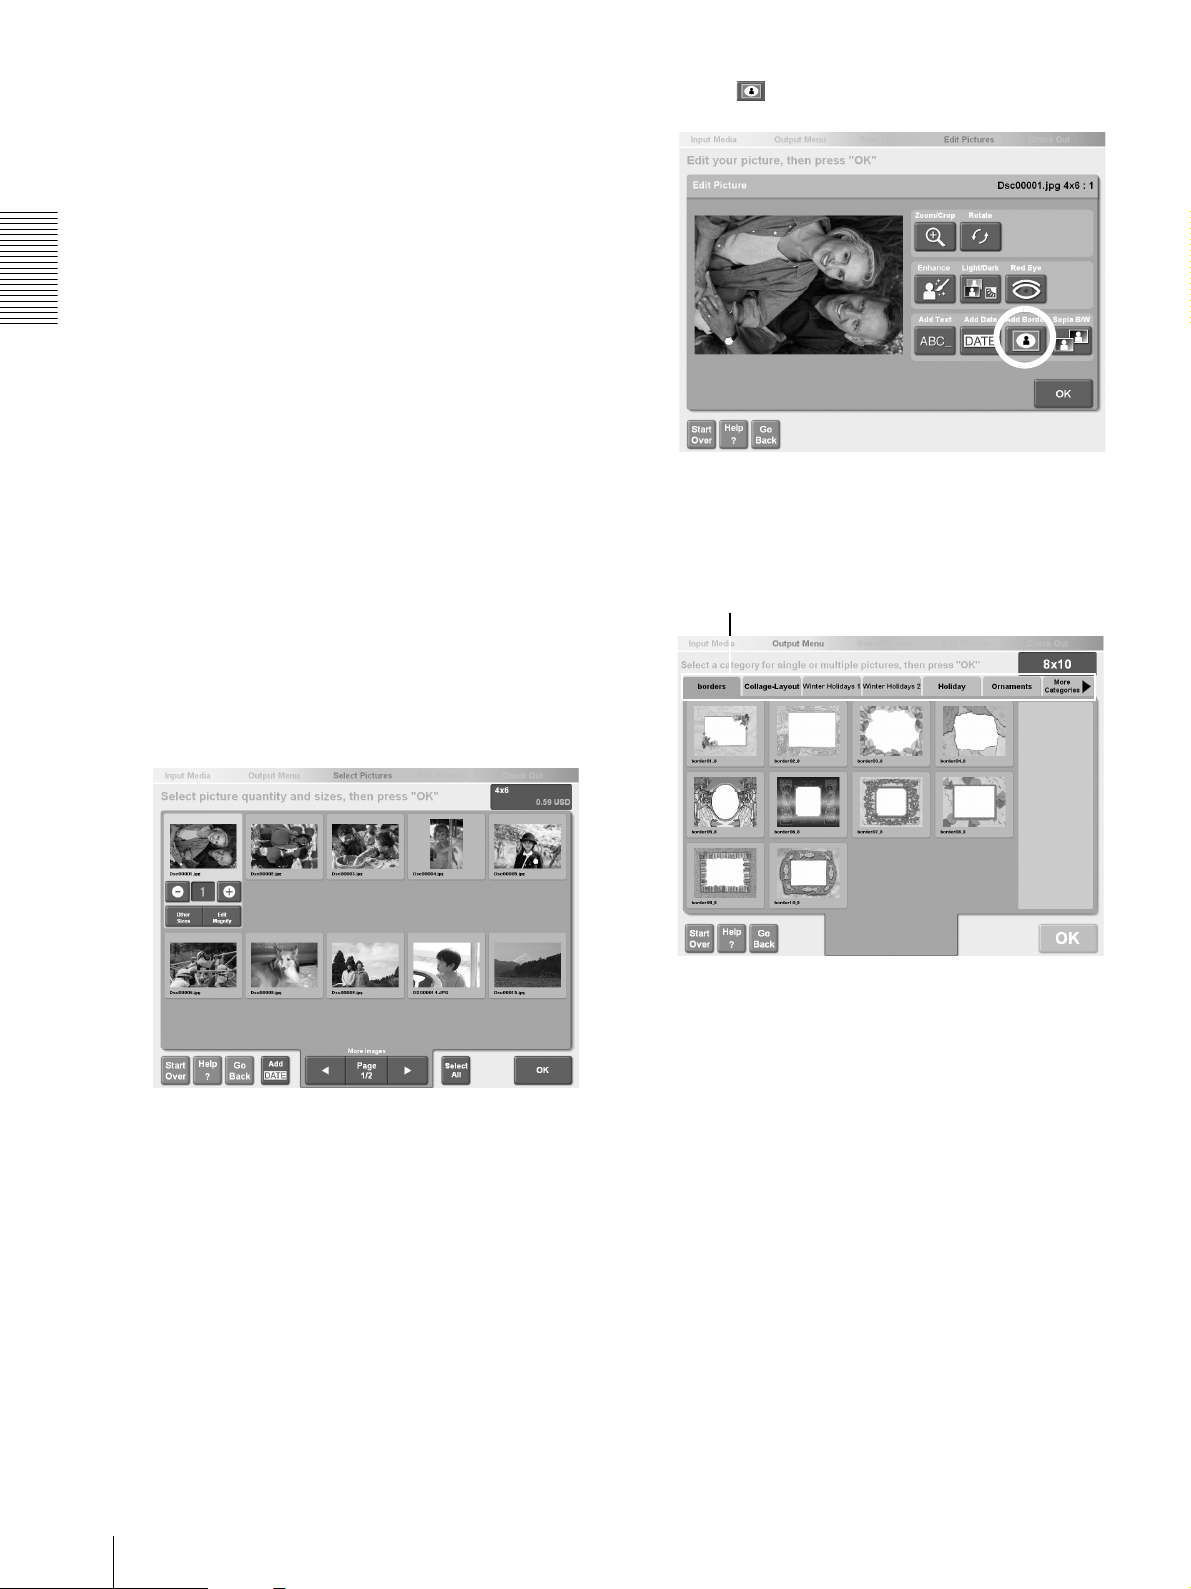
Adding borders When Selecting Pictures
1
To specify creative prints, touch the picture that you
want to compose in the screen used to specify the
number of copies.
For details, see “Selecting the Pictures and
Specifying the Number of Copies to Print”
(page 6), step 2, or “Specifying the Number of
Copies to Print” (page 11), step 1.
A screen allowing you to compose the picture
appears.
4
Touching the category tabs will switch to the next
category of templates.
Category Tab
2
28
Touch the [Edit/Magnify] button.
The picture editing screen appears.
Output Services
5
Select the desired template, and then touch the
[OK] button.
The picture is composited and the display returns to
the screen at step 3.
At this step, you can also perform the following
procedures:
• Correct colors (only backlight correction not
available)
• Correct red eye
• Print sepia or black-and-white pictures
For details, see “Editing Pictures” (page 14).
6
Touch the [OK] button.
The display returns to the screen at step 1. You can
continue editing other pictures or return to the
output operation.
Using Index Printing
An index (a sheet of thumbnails of the selected pictures,
arranged in rows) can be printed. The date and other
information can be printed on the index.
Notes
• A UP-DR100 printer is necessary for index printing.
• You cannot edit the selected pictures when you print
an index.
• You can use the Administration screen to set up index
printing when writing pictures to CD-R.
For details, see “[Add Index for CD]” (page 46).
1
Touch [Index] in the output service selection
screen.
For details, see “Selecting the Output Service”
(pages 6 and 10).
4
Touch the pictures that you want to include in the
index.
To cancel the selection, touch the pictures again. To
select all the pictures, touch the [Select All] button.
To select or deselect more than one picture (but not
all), touch them individually, one at a time.
If all the pictures cannot be displayed on one page,
touch the [b] or [B] button to display more pages.
Note
If the pictures on the media that you insert in the
unit contains unsupported files formats and/or
unreadable files, they are represented by the
following icon and cannot be selected.
Operation
2
Touch the button for the size of the index to print.
3
Perform one of the following procedures.
• To print stored pictures
The pictures on the media inserted into the unit
are loaded. Proceed to the next step.
• To print an index of scanned pictures
Steps 1 to 6 of “Scanning Pictures” (page 10)
5
Touch the [OK] button.
The screen allowing you to verify your order
appears.
Perform one of the following procedures.
• To print an index of stored pictures
Step 1 of “Verifying the Order and Entering a
Password” (page 7)
• To print an index of scanned pictures
Step 1 of “Verifying the Order and Entering a
Password” (page 12)
Output Services
29
Print All Pictures on Your Media
You can print all the pictures on your storage media at
once, which allows you to verify the price of your order
immediately after you set your media into the unit, since
selection operations are reduced to a minimum. The
print size for this output service is set in the
Administration screen.
For details, see “[Custom] Tab” (page 46).
Note
If you touch the [Review Order] button, a screen
allowing you to browse all pictures on your media.
From here on, the procedure is the same as the one
outlined from step 1 of “Verifying the Order and
Entering a Password” (page 7).
1
Operation
Touch [Print All Pictures] in the output service
selection screen.
For details, see “Selecting the Output Service”
(page 6).
Print Packages
This system includes two types of package (Portrait
Package and Value Package) that enable you to print one
or more selected pictures according to preset package
content. Both packages can print at a package price.
The content of each package can be set on the
Administration screen.
Portrait Package
The Portrait Package option prints the selected pictures
according to a preset package content (size, number of
prints, and price). Set the content for this package on the
Administration screen.
For details, see “[Promotions] Tab” (page 40).
Touch [Portrait Package] in the output service selection
screen.
Insert your media when you are prompted. All the
pictures on the media are loaded, and the screen
allowing you to verify your order appears.
Note
If you insert your media into the unit before the
media selection screen appears, your media is
automatically detected by the system, and you are
not prompted to insert your media. Proceed to step
2.
For details, see “Selecting the Output Service”
(page 6).
2
30
Verify the order, and then touch the [Check Out]
button.
Next, perform one of the following procedures:
• To print stored pictures
Step 1 of “Selecting the Pictures and Specifying the
Number of Copies to Print” (page 6)
• To scan pictures and print them
Step 1 of “Scanning Pictures” (page 10)
Output Services
 Loading...