

Page 1

English
Addendum for the UPA-PC100
UPA-PC100
This document provides additional information about
specification changes and new features added since
the release of Ver. 2.04. Please use this document
together with the Ver. 1.00 manuals (User’s Guide and
Operating Instructions), and the addendum for Ver.
2.04.
Changes: Ver. 2.04 to Ver. 2.05
The following specifications have been added:
• UP-DR100 Update Function
The firmware of the UP-DR100 printer can be updated to the latest version.
• UY-S100 Compatibility and UY-S90/100 Lookup Table Settings
Compatibility is now provided for Film Scanner UY-S100 with SCSI
connection. Further, the UY-S90/100 lookup table can now be selected.
• “Shop staff only” Output Service
The [Shop staff only] output service allows printing several prints of one
image together in standard sizes.
• Addition of Currency Unit
A wider variety of currency unit options for charges are displayed on the
control screen than were available with the old version. It is also possible to
select non-display of the currency unit.
Updating the UP-DR100
Version Updates
The following notice applies to each FIRMWARE PROGRAM provided by
Sony Corporation (hereinafter referred to as Sony). Please read the following
notice before upgrading the firmware.
By upgrading the firmware, you accept to the following terms and condition.
• Execute the update procedure carefully. Failure to update the firmware
properly could cause the equipment to malfunction.
Sony shall not be liable for any damages or losses caused by a procedural
error by the customer during the firmware upgrade.
• Cost to repair damage to the product caused updating the firmware incorrectly
shall be borne by the customer, even if the product is still under warranty.
• Sony authorized service facilities provide firmware upgrade assistance on
request for a fee. If you require assistance, please contact the dealer where you
purchased the product or any Sony authorized service facility.
Changing the UY-S90/100 Lookup Table
The lookup table of the Film Scanner UY-S90/100 connected to the UPA-PC100
can be changed.
The lookup table can be changed on the [Setting – H/W – Scanner – UY-S90/
100] screen of the Configuration Utility. For details about how to start and end
the Configuration Utility, refer to the User’s Guide (separate booklet). For
details about the differences in scanned images caused by changing the lookup
table, please refer to the instructions provided with the UY-S90/100.
This function updates the firmware of the UP-DR100 connected to the UPA-PC100
with the most recent version.
The version update is performed on the Configuration Utility’s [Setting – H/W
– Printer – UP-DR100] screen. For details about how to start and end the
Configuration Utility, refer to the User’s Guide (separate booklet).
After you touch the [Version Up] button, a message prompts you to confirm that
you want to update the UP-DR100 firmware. Touch the [OK] button and then
follow the instructions displayed on the screen to perform the procedure.
Note
After the version update is completed, be sure to switch off all UP-DR100s
connected to the UPA-PC100 and the UPA-PC100 itself, then switch the
equipment on again.
The lookup table used by the UY-S90/100 is selected from [Photo] and
[Publishing]. Touch the [LUT] button to open a screen, touch the button of the
desired lookup table, then touch the [OK] button.
Printing a Photo in Standard Sizes
Several prints of one image can be output in standard sizes.
Note
The size of print paper cannot be selected once the procedure has been started.
Before beginning this procedure, please select the print paper size with the
Configuration Utility. For details about how to change the Configuration Utility
settings, please refer to “Changing the Settings” below.
Sony Corporation ©2002 3-206-885-13(1)
1
Page 2
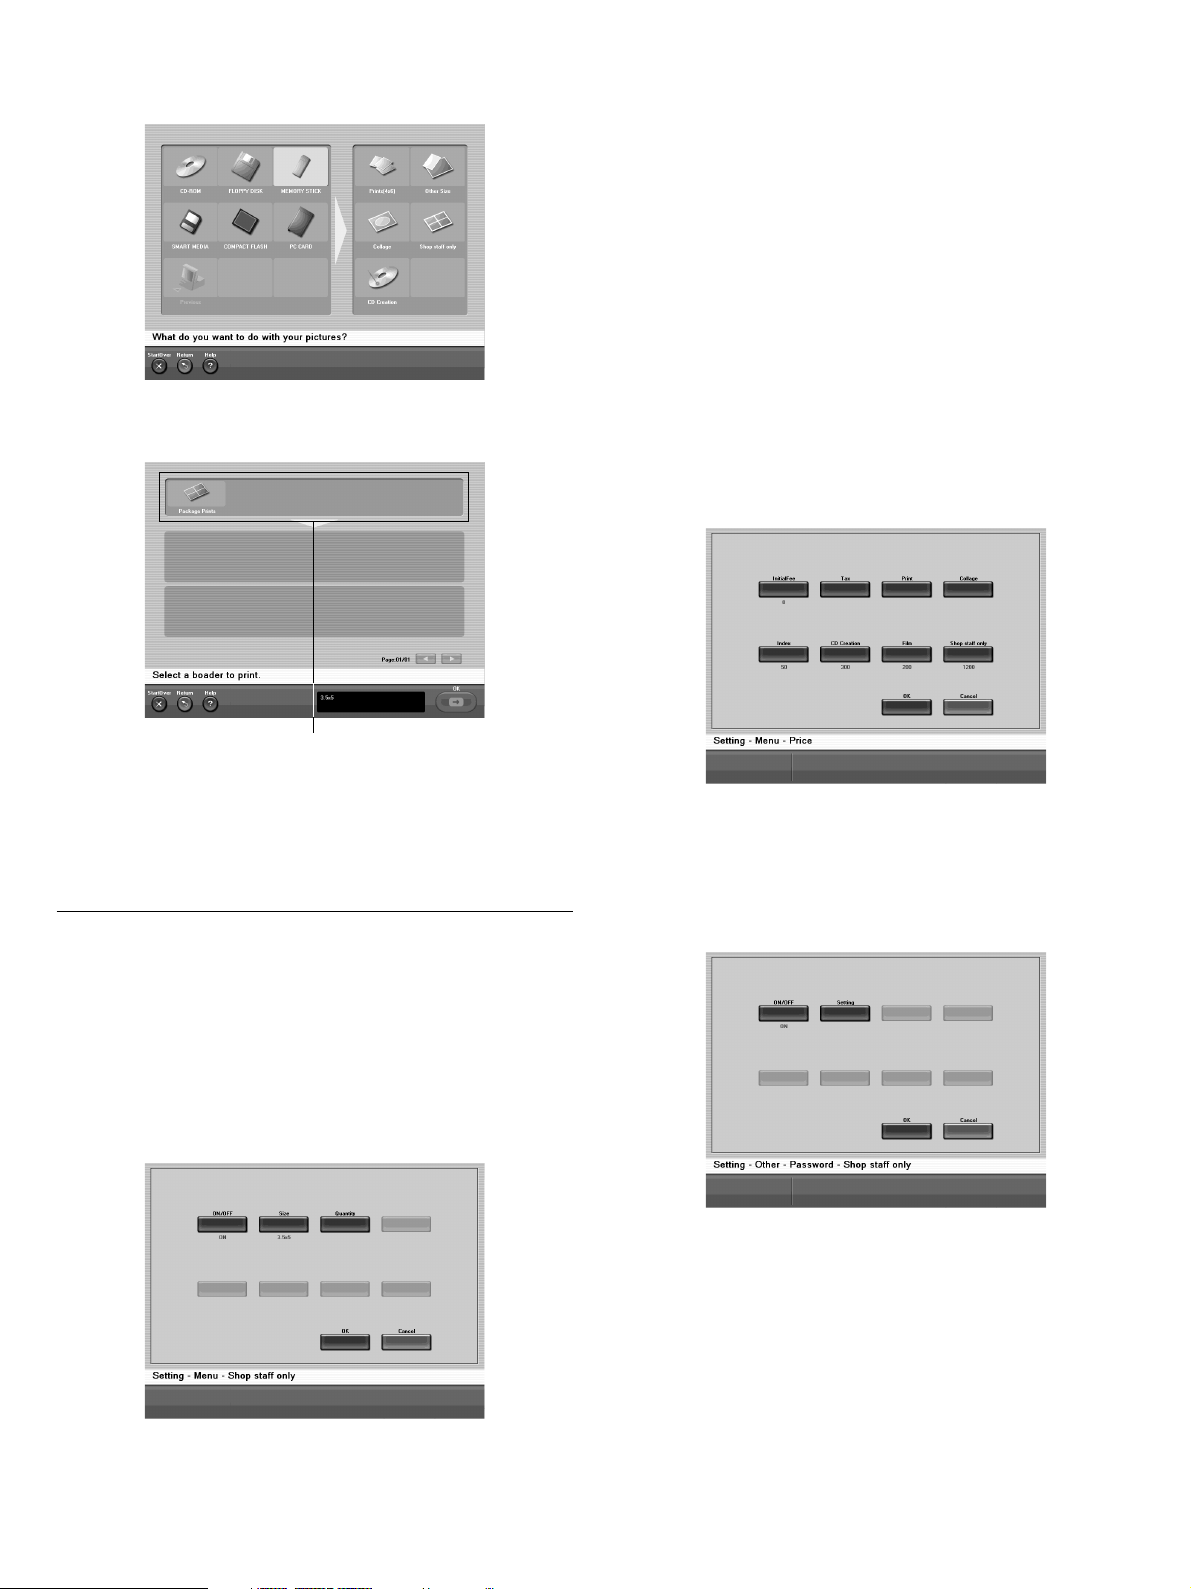
1 At the screen for changing the output size, touch [Shop staff only]. (Refer
to pp. 8, 14, 19, “Selecting the Output Service” in the User’s Guide
(separate booklet).)
The border selection screen opens.
2 Touch the type of border to use.
• [ON/OFF] Button
When this setting is [ON], [Shop staff only] output service settings can be
selected in the output service selection screen. You can switch this setting
[ON] (settings selectable) or [OFF] (settings not selectable) by touching this
button.
• [Size] Button
Touch to select the paper size for output with [Shop staff only]. Touch this
button to open the paper size selection screen, then touch the [L], [KG], or
[2L] button and touch the [OK] button.
• [Quantity] Button
Touching this button opens a screen that allows you to set the initial number
of prints displayed when [Shop staff only] is selected as the output service.
- [Default Qty] Button
This button sets the default number of prints for [Shop staff only] output
service. A screen for setting the default number appears when this button is
pressed. You can set a number between 0 and 10.
- [MaxQty] Button
This button sets the maximum number of prints that can be output at once
with [Shop staff only] output service. A screen for setting the maximum
number of prints appears when this button is pressed. You can set a number
between 1 and 255.
[Setting – Menu – Price] Screen
You can set the unit price of [Shop staff only] output service.
Border types
The standard size borders included in the selected type are listed.
Subsequent procedures are the same as with creative printing. Continue from
Step 4 of the “Creative Printing” procedure in the User’s Guide (separate
booklet). When referring to the User’s Guide, read “Collage Print” as “Printing
in Standard Sizes.”
Changing the Settings
You can use the [Shop staff only] item of the Configuration Utility to change
variables such as the size of the print paper and the unit price. For details about
how to start and end the Configuration Utility, refer to the User’s Guide
(separate booklet).
The settings in the screens of the Configuration Utility can be changed as
described below.
[Setting – Menu – Shop staff only] Screen
To display this screen, at the [Setting – Menu] screen touch [Shop staff only].
Then make the [Shop staff only] output service settings.
A screen for setting the unit price is displayed when this button is pressed. You
can set the unit price between 0 and 99999999.
[Setting – Other – Password – Shop staff only] screen
This screen appears when you touch the [Shop staff only] button in the [Setting
– Other – Password] screen. You can use a password that must be entered in
order to use [Shop staff only] output service procedures.
• [ON/OFF] Button
When this is set to [ON], password entry is required when using procedures.
You can switch this setting [ON] (password used ) or [OFF] (password not
used) by touching this button.
• [Setting] Button
Touch to open the screen for entering the password. You can set a password
between 0 and 99999999.
2
Page 3
Changes: Ver. 2.05 to Ver. 2.06
The following specifications have been added:
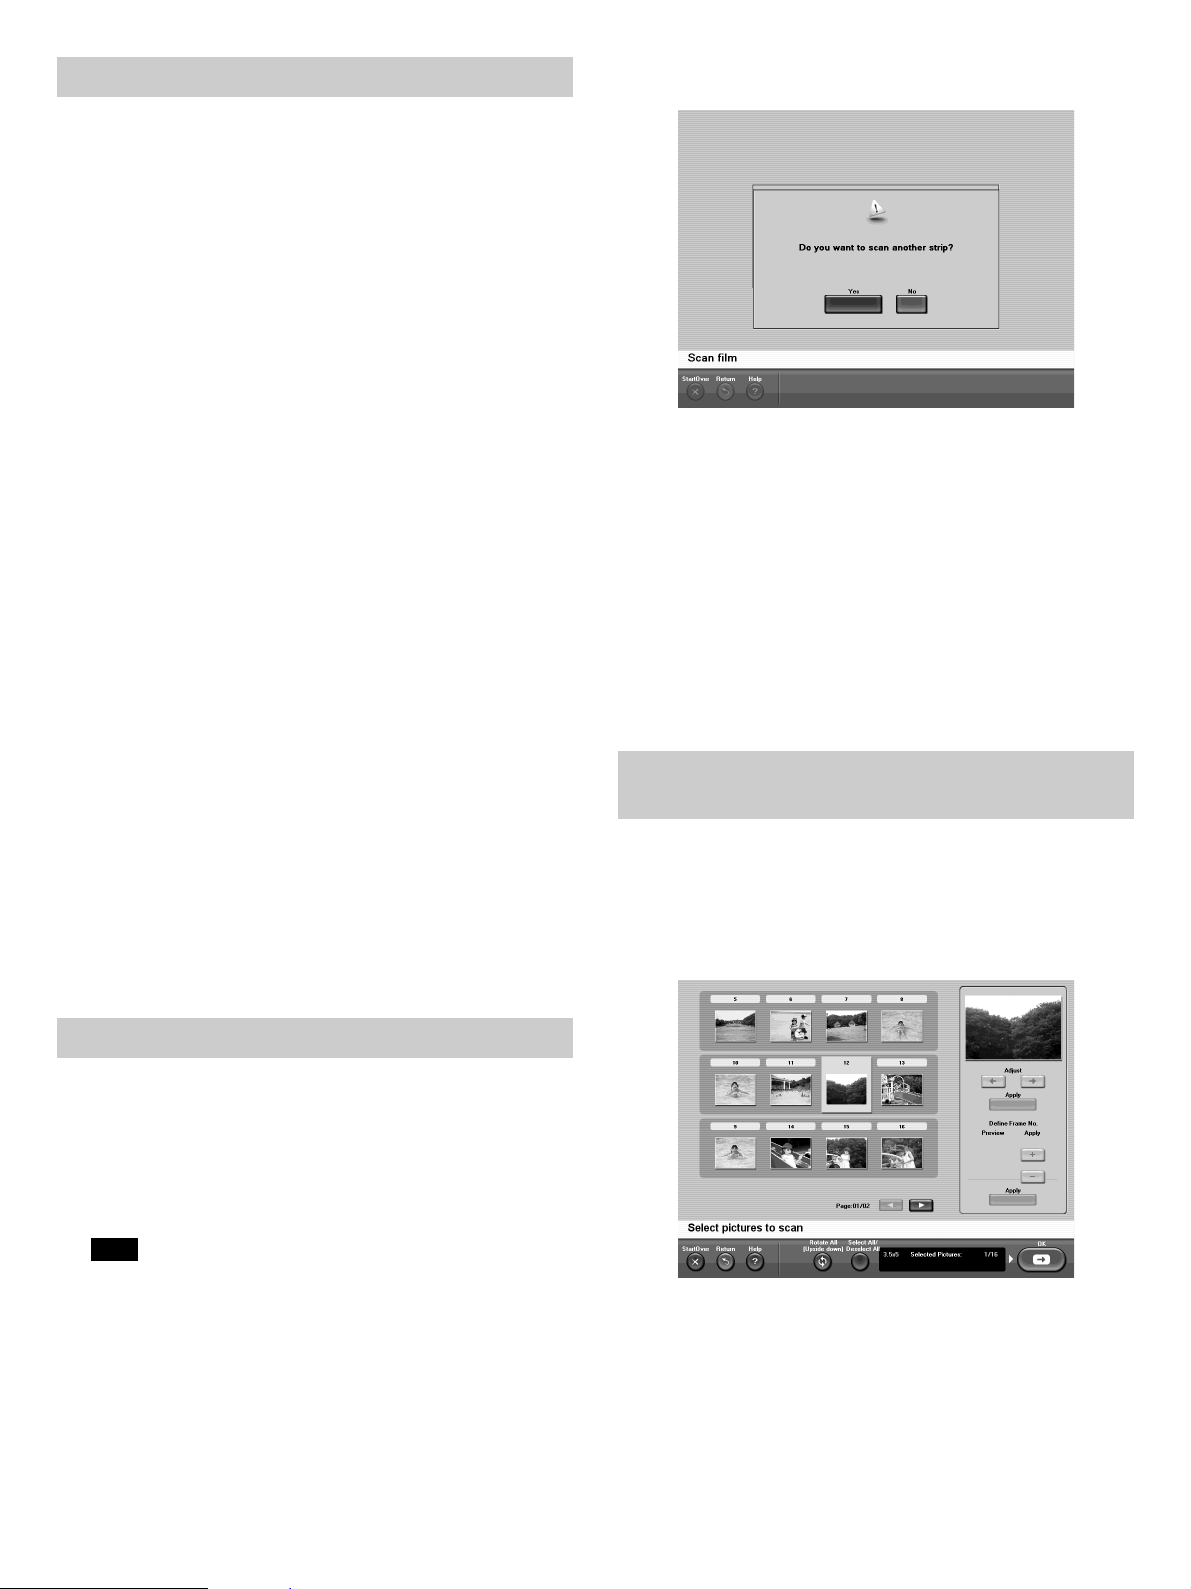
• Scanning More than One Film (35-mm Film Only)
Images can be scanned from several film strips, and then printed or written to
CD-R all at once.
• Selecting and Deselecting All the Images when Scanning
When scanning you can select or deselect all the images in the screen used to
select images for output.
• Correcting Red Eye
You can reduce red eye in images.
• Annotating Images
Prints can be annotated with comments.
• Writing Viewing Software to CD-R
When you write image data to a CD-R, viewing software (Windows) and
HTML files are also written to the CD-R so the images can be viewed easily
on other computers.
• New Print Size for the UP-D70A Printer
The 8 × 12 Size print (200 × 300 mm) is available for the UP-D70A printer.
• Setting the Image Format when Scanning
During scanning you can select a data format for images scanned from
photographs or films.
• Annotating Receipts
You can enter two, 20-characater lines of text that appear at the bottom of
receipts.
• Setting the Button Sound
You can activate or deactivate the sound emitted when you touch the buttons
on the screen.
• Adding and Deleting Templates for Collage Prints
You can add or delete templates used in creating collage prints, as necessary.
• Screensaver for the Initial and Printing Screens
You can set the interval after which the screensaver for the initial or printing
screen appears. Still images or movies can be selected as the screensaver for
the initial screen, but only still images can be selected as the screensaver for
the printing screen.
• Modifications to the Diagnostic Function
The diagnostic possible through the Configuration Utility is limited to SCSI
peripheral devices.
• Configuration Utility Setting Management
You can return the Configuration Utility settings to their default settings, as
well as import or export the settings.
2 Touch the [Yes] button.
A message prompts you to set the film.
3 Follow the procedure from Step 3 of “Setting the Film and Prescanning”
on p. 21 to “Scanning the Film” on p. 22 of the User’s Guide.
4 Repeat Steps 1 to 3, as necessary.
5 When you are done, touch the [No] button at Step 2, above.
The screen allowing you to select the number of prints is displayed.
The remainder of the procedure is the same as when scanning then printing an
image from film. Continue the procedure from Step 1 of “Selecting the Number
of Copies to Print” on p. 22 of the User’s Guide.
Selecting and Deselecting All the Images
when Scanning
When scanning you can select or deselect all the images in the screen used to
select images for output.
At Step 1 of “Selecting the Image for Output and Making the Scanner Settings”
on p. 21 of the User’s Guide, touch the [Select All/Deselect All] button to select
or deselect all the images. To select or deselect only some images, touch the
desired images.
Scanning More than One Film
You can scan images from several film strips, and then print the images or write
them to CD-R all at once.
1 Display the screen to start film scanning, and then touch the [OK] button.
(Refer to “Scanning the Film” on p. 22 of the User’s Guide.)
Only the image in the selected frame is scanned. When scanning ends, a
screen prompts you to confirm whether you want to scan another film.
Note
• When you scan several film strips, do not mix different types together
(negative, positive, black and white).
• When the number of scanned frames reaches the maximum number of
prints set in the Configuration Utility, you are not prompted to confirm
whether you want to scan another film. Instead, the screen allowing you
to select the number of copies to print is displayed. For details, refer to
“Selecting the Number of Copies to Print” on p. 22 of the User’s Guide.
• When you write scanned film strips to CD-R and the volume of data that
can be written to CD-R reaches the maximum set in the Configuration
Utility, you are not prompted to confirm whether you want to scan
another film. Instead, the screen allowing you to confirm the prices is
displayed. Continue from Step 2 of “Writing Image Data to a CD-R” in
the User's Guide.
3
Page 4
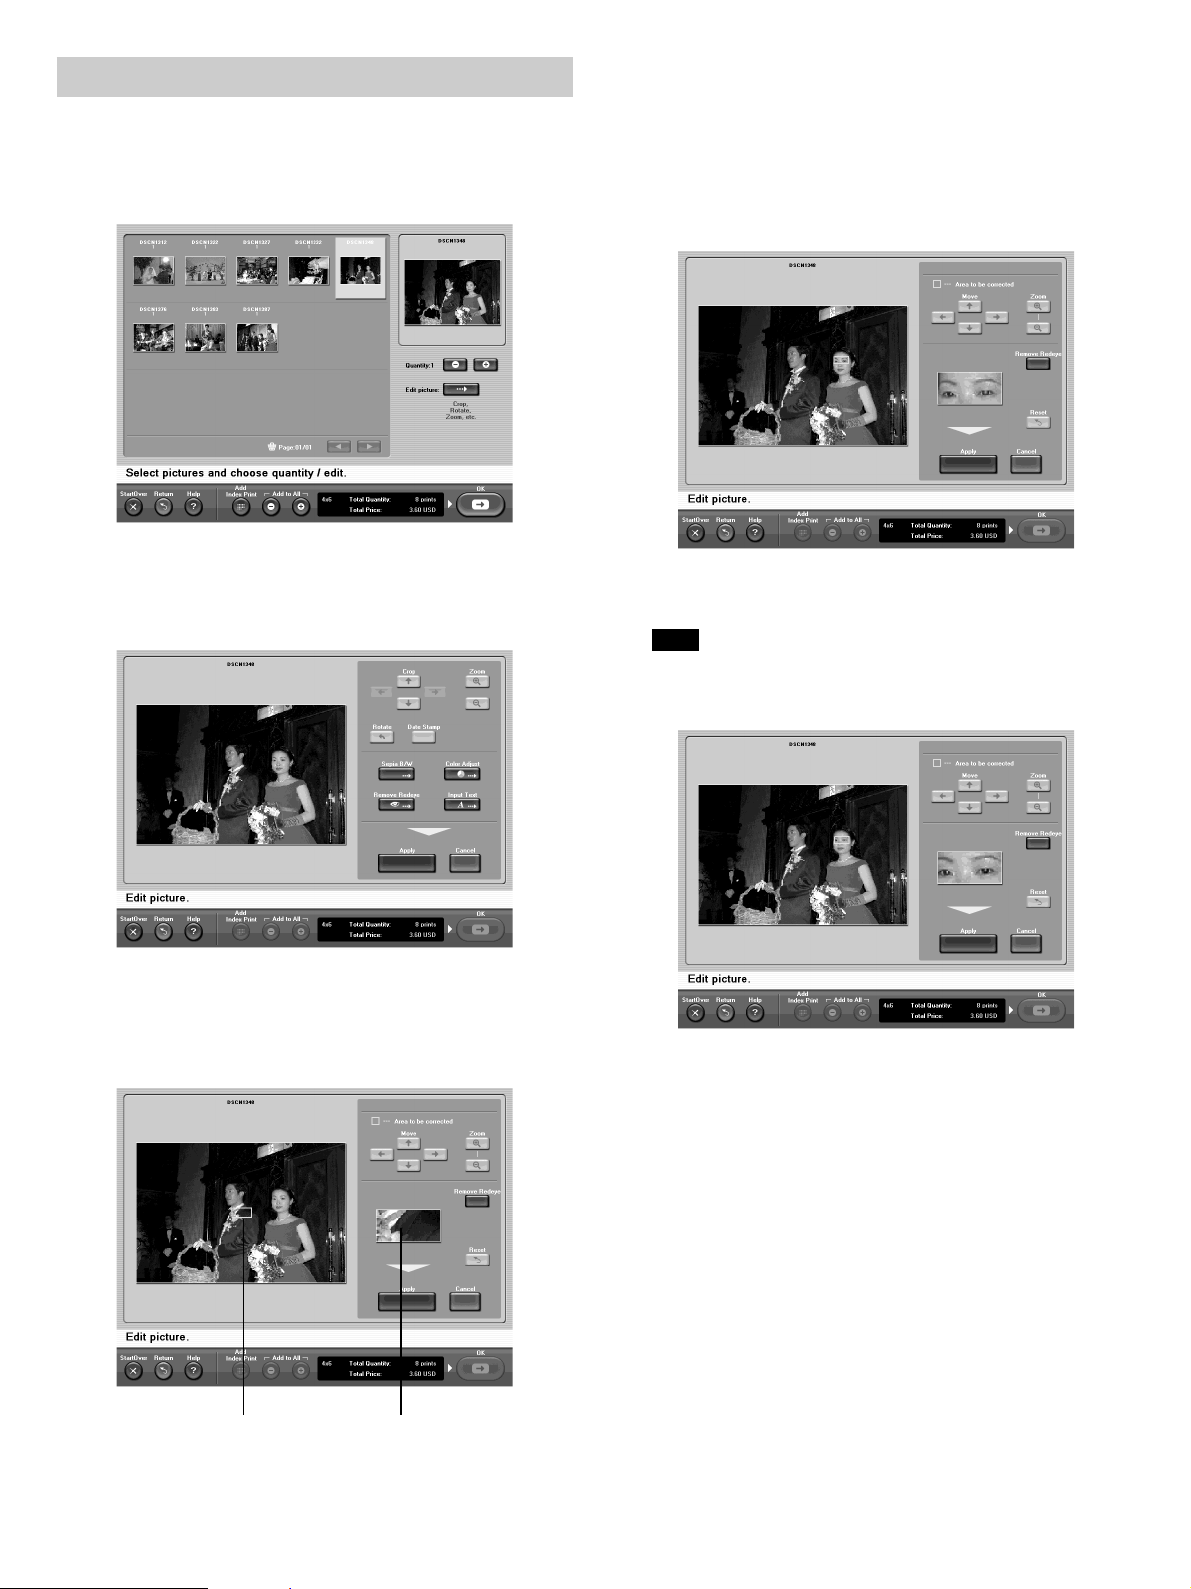
Correcting Red Eye
You can reduce red eye in images.
1 At the screen used to select prints (refer to pp. 9, 15, 22, “Selecting the
Number of Copies to Print” in the User’s Guide), touch the image that you
want to correct.
2 Touch the [Edit picture] button.
This image editing screen is displayed.
3 Touch the [Remove Redeye] button.
5 Under [Zoom], touch the [+] button.
• Touch the [+] button repeatedly until only the red color of the pupil is
enclosed by the green frame.
• If any part of the red in the pupil is outside the green frame, touch the [–]
button to zoom out or touch the [Move] button arrow to adjust the green
frame position.
6 Touch the [Remove Redeye] button.
The red eye is corrected.
To cancel the correction, touch the [Reset] button.
Note
With some images, full correction may not be possible.
The red eye correction screen is displayed along with the red eye
correction area (green frame) in the center of the screen.
4 Touch the [Move] arrow buttons to move the green frame and place it over
the pupil of the eye affected by red eye.
7 When you are done, touch the [Apply] button.
The display returns to the screen at Step 3.
8 Touch the [Apply] button.
The display returns to the screen at Step 1. You can continue by editing
another image or returning to the output operation.
Correction area (green frame)
View inside the green frame
4
Page 5

Annotating Images
You can annotate prints with any text that you desire.
1 At the screen for selecting the number of prints (refer to pp. 9, 15, 22,
“Select the Number of Copies to Print” in the User’s Guide), touch the
image that you want to annotate.
2 Touch the [Edit picture] button.
The image editing screen is displayed.
3 Touch the [Input Text] button.
Note
The annotation has a maximum length of 30 characters.
6 Touch the [Enter] button.
A text processing screen is displayed.
4 Touch the [Input Text] button.
The text entry screen is displayed.
The text is superimposed on the image.
7 Select the style of the text.
• [Move]. Touch the arrow buttons to change the position of the text.
• [Color]. Touch the [v] or [V] button to change the color of the text.
• [Size]. Touch the [+] or [–] button to change the size of the text.
• [Font]. Touch the [v] or [V] button to change the font of the text.
• [Bold]. Touch to set the text in boldface. Touch again to revert to
normal typeface.
• [Italic]. Touch to set the text in italics. Touch again to revert to normal
typeface.
• [Underline]. Touch to underline the text. Touch delete the underline.
Touch the [Reset] button to erase the annotation.
5 Input the desired text by touching the displayed keyboard.
• [Caps Lock]. Touch to switch between lowercase/uppercase characters
and between symbols/numbers.
• [Back Space]. Touch to delete the last character input.
5
Page 6

8 When you are done, touch the [Apply] button.
The display returns to the screen at Step 3.
9 Touch the [Apply] button.
The display returns to the screen at Step 1. You can continue by editing
another image or returning to the output operation.
Writing Viewing Software to CD-R
• When you select several images, click [Slide Show] to display all the enlarged
images one by one.
• If the list does not fit onto one page, touch [v] or [V] to scroll through the
pages.
• Click [Save] to give the image a name and save it as a file on your hard disk.
• Click [Open], select a folder, and then select the images that you want to open.
Using the Preview Screen
[Save][To Thumbnail Screen]
When you write image data to a CD-R, viewing software (Windows) and
HTML files are also written to the CD-R so the images can be viewed easily on
other computers.
Viewing Images on CD-R with a Windows
Computer
Images can be viewed on a Windows computer with CD Viewer (software
written to the CD-R).
When the CD-R containing the image data is inserted into the CD-ROM drive
of your computer, CD Viewer starts automatically and a list of the images on
the CD-R is displayed.
Note
• If CD Viewer does not start automatically, access the CD-R with Windows
Explorer, and then double-click Viewer.exe in the root folder.
• Do not remove the CD-R from the CD-ROM drive of your computer when
CD Viewer is starting.
CD Viewer is operated through the [Thumbnail Screen] and [Preview Screen].
Using the Thumbnail Screen
[Zoom in]
[Zoom out]
[Brightness/Contrast]
[Flip vertical]
[Flip horizontal]
[Rotate left]
[Rotate right]
[Copy to clipboard]
•[v] or [V]. Click to display the previous or next page.
• [Zoom in]. Click to enlarge the image. If the image does not fit in the display
area, drag the image with the mouse to scroll through the display area.
• [Zoom out]. Click to reduce the image.
• [Brightness/Contrast]. Click to open the image brightness and contrast
adjustment dialog box.
• [Flip vertical]. Click to flip the image vertically.
• [Flip horizontal]. Click to flip the image horizontally.
• [Rotate left]. Click to rotate the image 90° counterclockwise.
• [Rotate right]. Click to rotate the image 90° clockwise.
• [Copy to clipboard]. Click to copy the image data to the Clipboard.
• [Save]. Click to give the image a name and save it.
• [To Thumbnail Screen]. Click to go to the Thumbnail screen.
Viewing Images on CD-R with a Web Browser
[To Preview Screen]
• Double-click an image to preview it, enlarged full screen.
• Click on image to select it. To select several images, hold the Shift or Ctrl
key, and then click the images. After selecting the desired image, click [To
Preview Screen] to preview the image.
[Save][Open]
[Slide Show]
Images can be viewed with a Web browser. Simply open the HTML file on the
CD-R.
Insert the CD-R containing the image data into the CD-ROM drive of your
computer, and then open the index.htm file in the root folder of the CD-R with
your Web browser.
A list of the image on the CD-R is displayed.
Note
Do not remove the CD-R from the CD-ROM drive while your Web browser is
starting.
6
Page 7

Thumbnail Screen
Click a thumbnail in the screen to preview an enlarged version.
Preview Screen
Setting the Image Format when Scanning
You can set the data format of images scanned from photographs or film.
This setting is done with Configuration Utility. You can adjust the settings in
the [Setting – H/W – Scanner – UY-S90/100] screen (film scanner) or in the
[Setting – H/W – Scanner – FlatbedScanner] screen (flatbed scanner). For
details about how to access the Configuration Utility, refer to the User’s Guide.
You can select from [JPEG] or [BMP] format for images scanned from
photographs or film. Touching the [Format] button toggles the selection
between [JPEG] and [BMP].
[To Thumbnail Screen]
The following operations can be done on the enlarged display.
•[b] [B]. Click to display the previous or next image.
• [To Thumbnail Screen]. Click to go to the Thumbnail screen.
Changing the Print Size of the UP-D70A
Printer
You can change the print size used UPA-D70A printer.
Changing the print size is done in the [Setting – H/W – Printer – UP-D70A]
screen. For details about how to use the Configuration Utility, refer the User’s
Guide.
Annotating Receipts
You can enter two, 20-characater lines of text that appear at the bottom of
receipts. Specify the text of your annotation in the Configuration Utility,
[Setting – Receipt – Text strings] screen. For details about the Configuration
Utility, refer to the User’s Guide.
Touch the [Text strings1] button (text entry of the first line) or touch the [Text
strings2] button (text entry of the second line) to open the text input screen.
Follow the procedure from Step 5 of “Annotating Images”.
Use this screen to set the print size of the UP-D70A printer. Touching the [Size]
button toggles the setting between [8×10] and [8×12].
Note
Use print pack UPC-747 when you select [8×12].
7
Page 8

Setting the Button Sound
You can activate or deactivate the sound emitted when you touch buttons.
You can set the beep in the Configuration Utility, [Setting – Other] screen. For
details about how access the Configuration Utility, refer to the User’s Guide.
Deleting Templates
You can delete templates of each size. On the [Setting – Menu – Collage]
screen, touch a size button: [3.5×5], [4×6], [5×7], or [8×10/8×12]. The setting
screen corresponding to the button that you touched is displayed.
When the setting of the [Beep] button is [ON], a beep is emitted each time you
touch a button. Touching the [Beep] button toggles the setting [ON] and [OFF]
(no beep is emitted when you touch a button).
Note
This setting takes effect when you save the changes, and then exit the
Configuration Utility.
Adding and Deleting Templates for
Collage Prints
You can add and delete templates used for collage prints, as necessary.
You can add or delete templates in the Configuration Utility, [Setting – Menu –
Collage] screen. For details about how access the Configuration Utility, refer to
the User’s Guide.
Adding Templates
Touch the [Delete] button to display the screen where you can delete collage
print templates. Touch the [Delete] button to select it, and then touch the [OK]
button. If you want to clear the selection, touch the [Delete] button again.
Note
• If you delete a preinstalled system template, you cannot restore the template.
• Seven templates are displayed on the screen. If you do not see the template
that you want to delete, touch the [More] button to go to the next screen.
• When you touch the [8×10/8×12] button, the template set in “Changing the
Print Size of the UP-D70A Printer” of this addendum is deleted.
Setting the Screensaver for the Initial
and Printing Screens
You can set the data interval after which the screensaver for the initial or
printing screen appears. Still images or movies can be selected as the
screensaver for the initial screen, but only still images can be selected as the
screensaver for the printing screen.
You can set the screensaver in the Configuration Utility, [Setting – Other –
ScreenSaver] screen. For details about how access the Configuration Utility,
refer to the User’s Guide.
Note
• You can use the following file formats for the screensavers: *.bmp for still
images, *.avi or *.mpg (MPEG-1 format only) file formats for movies.
• Up to four files can be selected for the initial screensaver and the print
screensaver.
• Still image files used by screensavers should be 800 × 600 pixels, while movie
files should be 800 × 600 pixels or less. The file names should be [Startup1.*]
to [Startup4.*] for the initial screen screensaver and [Printing1.*] to
[Printing4.*] for the printing screen screensaver (where the asterisk (*)
represents the bmp, avi, or mpg file extension). They should be saved in the
root directory of a “Memory Stick”. The files can be installed from the
“Memory Stick”.
Touch the [Install] button to display the screen where you can add collage print
templates. For more details about how to perform this operation, contact the
store where you purchased this system.
8
Page 9

• [Start up] button
Used to make the initial screen screensaver settings. Touch the [Start up]
button to display settings screen.
- [Startup1] to [Startup4]
Touching the buttons switches the file display [ON] or [OFF].
After the interval set in [Time(sec)] elapses when the initial screen is
displayed, the selected still images or movies (set to [ON]) are displayed
on the screen. [Startup1] to [Startup4] correspond to the files installed as
[Startup1.*] to [Startup4.*].
- [Time(sec)] button
Time interval before the screensaver is displayed. Touch this button to
display the time input (seconds) screen. The interval must be between 1
and 600 seconds.
• [Printing] button
Used to make the settings for the functioning of the screen saver display
during printing. Touch the [Printing] button to display the setting screen.
- [Printing1] to [Printing4]
Touching the buttons switches the file display [ON] or [OFF].
After the interval set in [Time(sec)] elapses when the printing screen is
displayed, the selected still images (set to [ON]) are displayed on the
screen. [Printing1] to [Printing4] correspond to the files installed as
[Printing1.*] to [Printing4.*]
- [Time(sec)] button
Time interval before the screensaver is displayed. Touch this button to
display the time input (seconds) screen. The interval must be between 1
and 600 seconds.
• [Interval] button
Time interval during which the still pictures are displayed (when more than
one file is selected as the screensaver). Touch this button to display the time
input (seconds) screen. The interval must be between 1 and 600 seconds.
Configuration Utility Setting Management
You can return the Configuration Utility settings to their default settings, as
well as import or export the settings. You can perform this management in the
Configuration Utility, [Setting – Setting] screen.
• [Initialize] button
When you touch this button a message asking you to confirm that you want to
revert to the default settings is displayed. Follow the instructions on the screen
to perform the operation.
• [Import] button
Touch this button to display the setting import screen. Follow the instructions
on the screen to perform the operation.
Note
• If only one still image is selected as the screensaver, it is displayed
continuously.
• If a movie is selected as the screensaver, the movie plays to its end,
regardless of the [Interval] button setting.
• [Install] button
Touch this button to display the screen where still images or movies are
added. Follow the instructions on the screen to perform the operation.
Modifications to the Diagnostic Function
The diagnostic possible through the Configuration Utility is limited to SCSI
peripheral devices. Replace the information of “[Diagnostic Settings] Screen” in
the User’s Guide with the following.
Note
Before performing this operation, be sure to touch the [Export] button and
save the setting file (*.ini) on a floppy disk.
• [Export] button
Touch this button to display the setting export screen. Follow the instructions
on the screen to perform the operation.
Note
When this operation is performed, the setting file (*.ini) is saved to floppy
disk.
• [All] button
Touch this button to run a diagnostic of all the SCSI peripheral devices
connected to the UPA-PC100. If an abnormality is detected, a message
appears. For details about messages, refer to the Operating Instructions. Touch
the [OK] button to close the message.
• [UP-DR100], [UP-D70A], [UY-S90/100], [FlatbedScanner] buttons
Touch the appropriate button to run the diagnostic for that device. If an
abnormality is detected, a message appears. For details about messages, refer
to the Operating Instructions. Touch the [OK] button to close the message.
9
Page 10

Changes: Ver. 2.06 to Ver. 2.07
Applying Two Taxes
The following specifications have been added:
• Print Finishing Settings for the UP-DR100 and UP-D70A
You can now select the surface finish of prints output with a UP-DR100 or
UP-D70A through a SCSI connection.
• Two Taxes
When calculating output service charges, you can now apply two tax rates.
• Printing File Names when Printing an Index
When printing an index you can select whether the selected images appear on
the index with consecutive numbers or arranged by file names.
• Detailed Settings for Prescanning Film
When prescanning film, you can now make lookup table and frame detection
interval settings. When the film manufacturer is not detected automatically,
you can specify it from a list of manufacturers.
• Detailed Settings for Scanning Film
When scanning film, you can now make detailed color balance and density
correction settings.
Setting Print Finishing for the UP-DR100
and UP-D70A
When the UPA-PC100 is connected to a UP-DR100 or UP-D70A, you can
change how the prints are finished.
In the Configuration Utility, open the [Setting – H/W – Printer – UP-DR100] or
[Setting – H/W – Printer – UP-D70A] screen. For details about how to start and
close the Configuration Utility, refer to the User's Guide.
You can apply two taxes when calculating output service charges.
To set and modify the tax rates, open the [Setting – Menu – Price – Tax] screen
of the Configuration Utility. For details about how to start and close the
Configuration Utility, refer to the User's Guide.
• [Tax1], [Tax2] buttons
Touch these buttons to set the taxes applied when calculating output service
charges.
- [Tax Rate] button
Touch this button to set the tax rate of the selected tax. You can enter a tax
rate between 0 and 100%.
- [Text strings] button
Touch this button to enter the name of the selected tax. The name that you
enter here is displayed on the screen where you confirm charges. For
details, refer to “Confirming Charges, Entering Passwords” Step 1 on
pages 10 and 16, or “Confirm and output charges” Step 1, on page 23 of
the User's Guide.
When printing with the UP-DR100 or UP-D70A, touch the [Surface] button,
and select [Glossy], or [Texture].
Printing File Names when Printing an
Index
When printing an index you can select whether the selected images appear on
the index with consecutive numbers or arranged by file names.
In the Configuration Utility, open the [Setting – Menu – Print – Index] screen.
For details about how to start and close the Configuration Utility, refer to the
User's Guide.
When printing indexes, select the type of image title that you want to use.
Touch the [File name] button, to switch between [ON] (images are arranged by
file name) or [OFF] (images appear with consecutive numbers).
Note
If [File name] is [ON] when you scan film and then write to CD-R, the frame
numbers displayed on the screen after prescanning appear on the index print.
However, the images are arranged by consecutive numbers on the CD-R.
10
Page 11

Detailed Settings for Prescanning Film
Detailed Settings for Scanning Film
When prescanning film, you can make lookup table and frame detection interval
settings.
Touch the [OK] button on the screen where you select the type of film to scan
(User's Guide, “Setting the Film and Prescanning” Step 2, page 21) to open the
screen where you make prescanning settings.
You can make the following settings on this screen.
• You can select the lookup table used by the Film Scanner UY-S90/100. Touch
the [LUT] button to change to [Photo1], [Photo2], or [Publishing].
Note
Because setting the lookup table for prescanning with Ver. 2.07 is now
possible, this item was removed from the Configuration Utility settings of
Ver. 2.06.
• You can select the frame interval scanned. Press [Frame detection] to switch
between [Auto] and [Fixed]. For details about how changing this setting
affects scanning results, refer to the following file
\Document\English\Driver.pdf on the UY-S90/100 driver installation CDROM.
• You can select whether to correct the density and grayscale of each scanned
frame. Press [Density correction] to switch between [Auto] and [Fixed].
When scanning film, the color balance and density of images can be corrected.
For details, refer to “Selecting the image for output and making the scanner
settings” and replace Step 2, on page 21 of the User's Guide with the following.
2 Adjust the scanning position precisely and change the frame number, as
necessary.
1 Touch the frame that you want to modify, then touch the [Adjust]
button.
A screen opens so you can adjust the position and the frame number.
2 Precisely adjust the scanning position and change the frame number.
• If the position of the image is shifted left or right, touch the frame of
the image that you want to correct, touch the [Adjust] arrow buttons
to adjust the image, then touch the [Apply] button.
• If a portion of the leading edge of the film contains no photo or the
frame number on the film is not read, the actual frame numbers and
output frame numbers may not match when the images from the film
appear with file names on an index.
In this situation, adjust the frame numbers with [Define Frame No.].
Touch the frame that you want to modify, press the [+] or [–] button
under [Define Frame No.] to change the number, then touch the
[Apply] button.
Touch the [OK] button. A message prompting you to set the film appears.
Continue from Step 3 of “Setting the Film and Prescanning”, on page 21 of the
User's Guide.
Setting the Film Manufacturer
When you set the film (User's Guide, “Setting the Film and Prescanning” Step
3, page 21) and the film manufacturer is not correctly detected, a screen
allowing you to select the manufacturer opens.
Touch the button of the film manufacturer that you want to select, then touch
the [OK] button. If the name of the manufacturer that you want to select does
not appear on the screen, touch the [Others] button, then touch the [OK] button.
3 When you are done, touch the [Apply] button.
A screen opens to confirm that the images were updated.
4 Touch the [OK] button.
The new settings are applied on the image list and the display returns to
the image selection screen.
3 Change the film scanner's level of color balance correction, as necessary.
For details about how changing this setting affects scanning results, refer
to the following file \Document\English\Driver.pdf on the UY-S90/100
driver installation CD-ROM.
Note
You cannot perform this procedure to scan monochrome film.
1 Touch the frame that you want to modify, then touch the [Scene
correction] button.
A screen opens so you can select the level of correction.
2 Touch the button of the desired level of correction, then touch the [OK]
button.
The correction level is changed and the display returns to the image
selection screen.
Prescanning starts and a screen opens to select images and make scan settings.
11
Page 12

4 Make color adjustment settings for scanning, as necessary.
1 Touch the [Color] button.
A screen opens so you can make the color adjustment settings.
2 Make the color adjustment settings.
You can make the following settings on this screen.
• You can set whether color adjustment is performed frame by frame or
the same adjustment applied to all the frames. Touch the button on
the upper-right of the screen to switch between [Each frame] and [All
frames].
• When scanning a color negative or positive, you can adjust [C], [M],
and [Y]. Touch [+] for stronger hues or [–] for weaker hues.
• When scanning a monochrome negative, you can adjust [Contrast].
Touch [+] for higher contrast or [–] for lower contrast.
• Touch the [+] button next to [Density] for higher density or [–] for
lower density.
• To cancel all adjustments, touch the [Reset] button.
• Touch the [Apply] button to apply the adjustments on the image list.
3 When you are done, touch the [Apply] button.
The display returns to the image selection screen.
12
 Loading...