

Page 1
3-856-977-04(2)
各部のなまえ
カセットコーダー
取扱説明書 Operating Instructions
お買い上げいただきありがとうございます。
警告
この取扱説明書には、事故を防ぐための重要な注意事項と製品の取り扱いかたを示
しています。この取扱説明書と別冊の「安全のために」をよくお読みのうえ、製品
を安全にお使いください。
お読みになったあとは、いつでも見られるところに必ず保管してください。
電気製品は安全のための注意事項を守らないと、火災や人身事故
になることがあります。
TCM-AP10/AP10V
Sony Corporation 1996 Printed in Japan
ご注意
• 録り直しのきかない録音の場合は、必ず事前にためし録りをしてくださ
い。
• カセットコーダーの不具合により録音されなかった場合の録音内容の補
償については、ご容赦ください。
• 長時間テープについて
分をこえるテープは非常に薄く伸びやすいので、こきざみな走行、停
90
止、早送り、巻き戻しなどを繰り返さないでください。テープが機械に
巻き込まれる場合があります。
主な特長
• 再生スピードに加え、再生ピッチ(音の高さ)が調節できる
デジタル ピッチ コントロール
Digital Pitch Control
• 約+
る、ワイドな再生スピードコントロール範囲。
• テープの表裏を気にせず早送り、巻き戻しができる簡単オートリバー
ス。
•2段階のランプで知らせる録音/電池残量ランプと、電池の交換時期を
知らせる電池交換ランプ。
• 一定の強さ以上の音声を検知して自動的に録音が始まり、それ以下の音
声になるとテープが止まる
•
発言者の声を明瞭にとらえる
イク内蔵。
(2倍速)〜−
100%
(デジタル音程調整)機能。
(半分速)の範囲で速めたり遅めたりでき
50%
(自動音声録音スタート)機能。
VOR
バウンダリー エフェクト
Boundary effect
収音方式の、フラットマ
DPC -
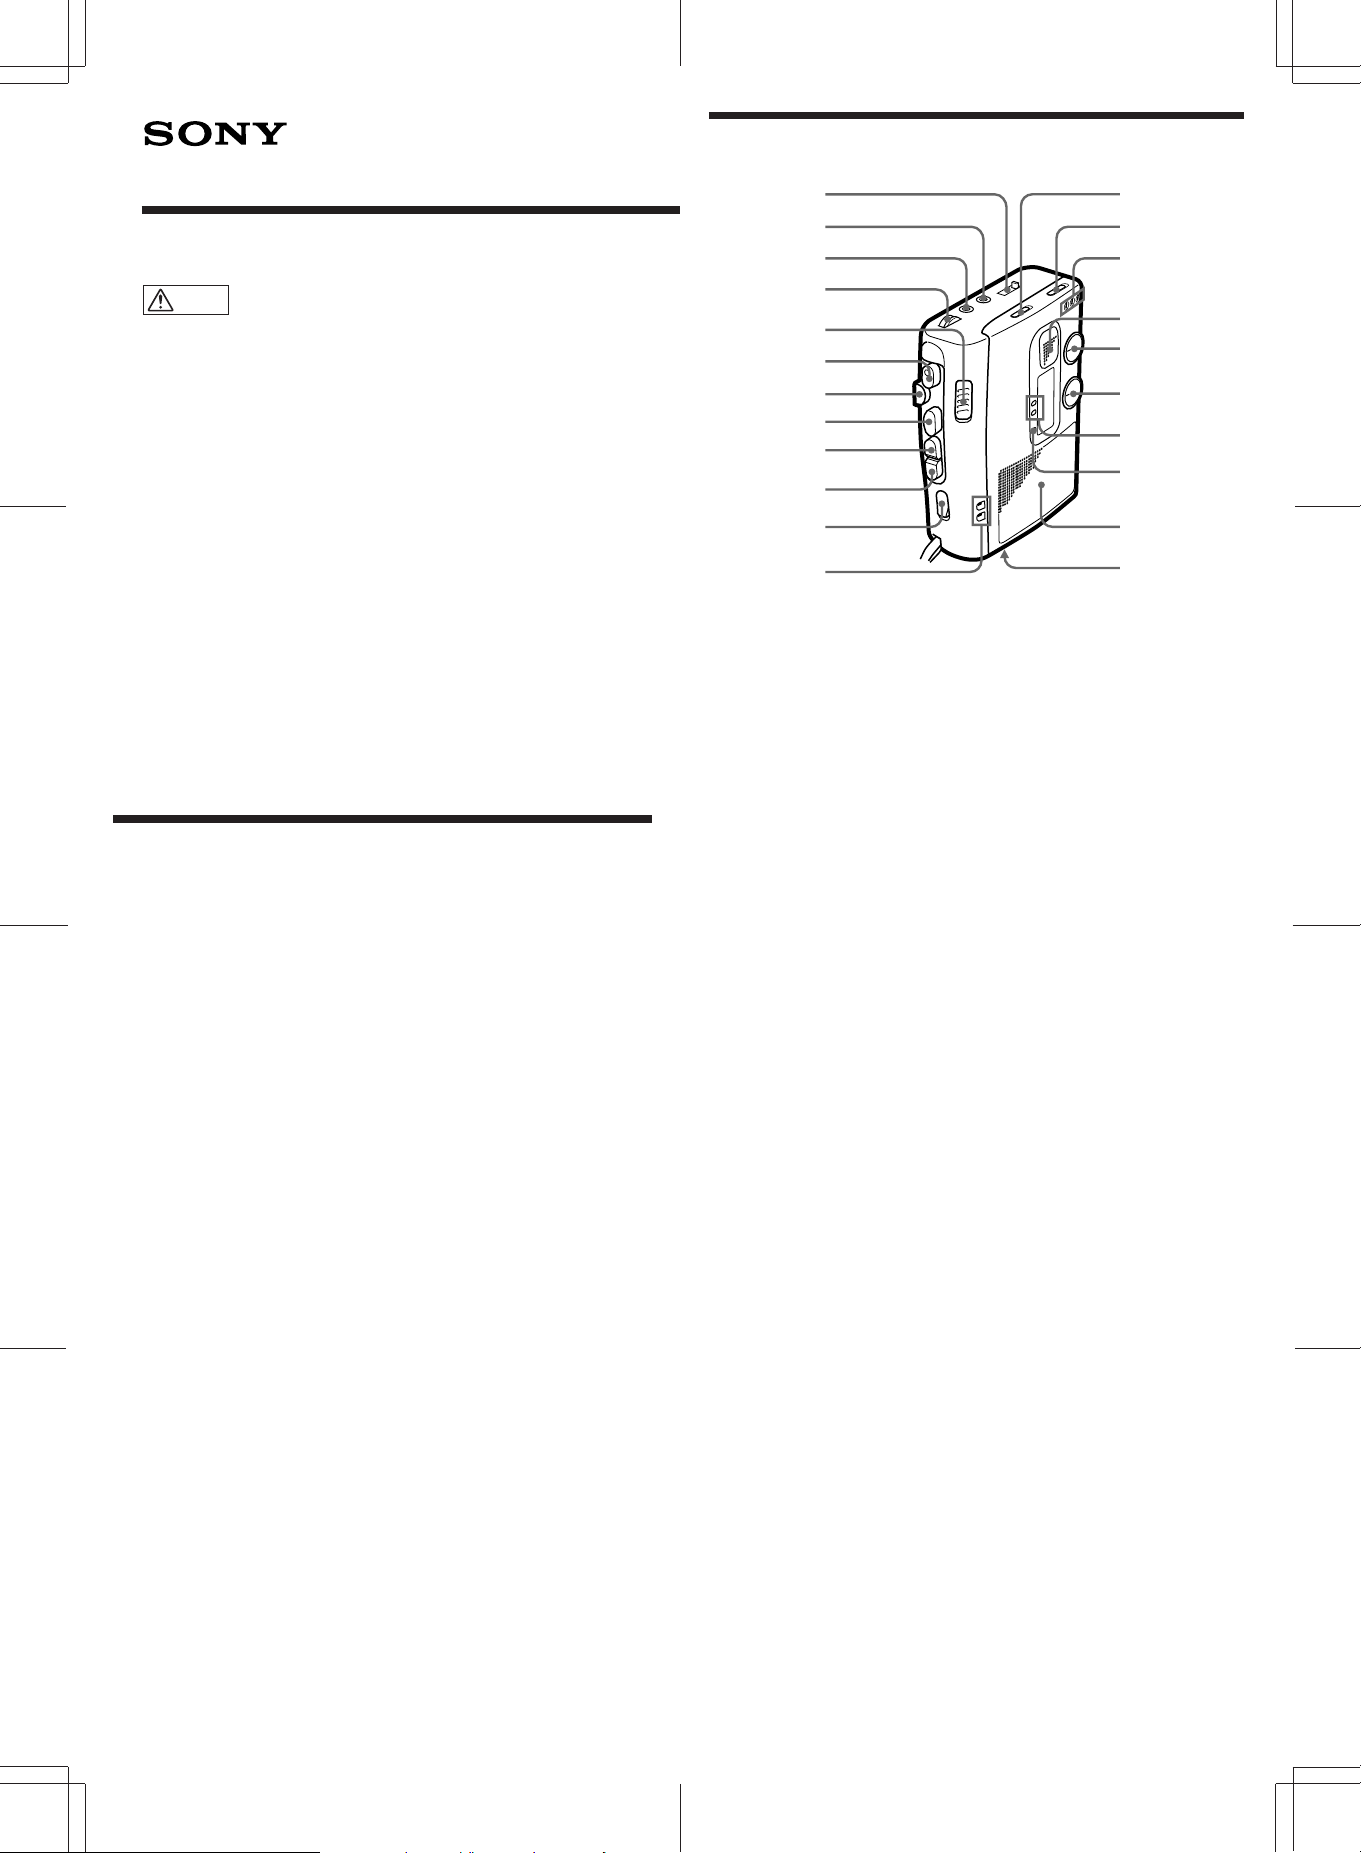
1
2
3
4
5
6
7
8
9
!º
!¡
!™
テープカウンター
1
イヤホンジャック
2
マイクジャック
3
音量つまみ
4
一時停止cボタン
5
6 r録音ボタン
7 p停止ボタン
再生ボタン
8
巻戻し/レビューボタン
9
早送り/キューボタン
0
!¡ 反転c
走行方向表示窓
!™
!£ VOR
!¢ DPC
!∞ DPC
フラットマイク
!§
スピードコントロールつまみ
!¶
ピッチコントロールつまみ
!•
録音/電池残量ランプ
!ª
電池交換ランプ
@º
スピーカー
@¡
@™ DC IN 3V
ボタン
スイッチ
スイッチ
ポジション表示窓
ジャック
!£
!¢
!∞
!§
!¶
!•
!ª
@º
@¡
@™
Page 2
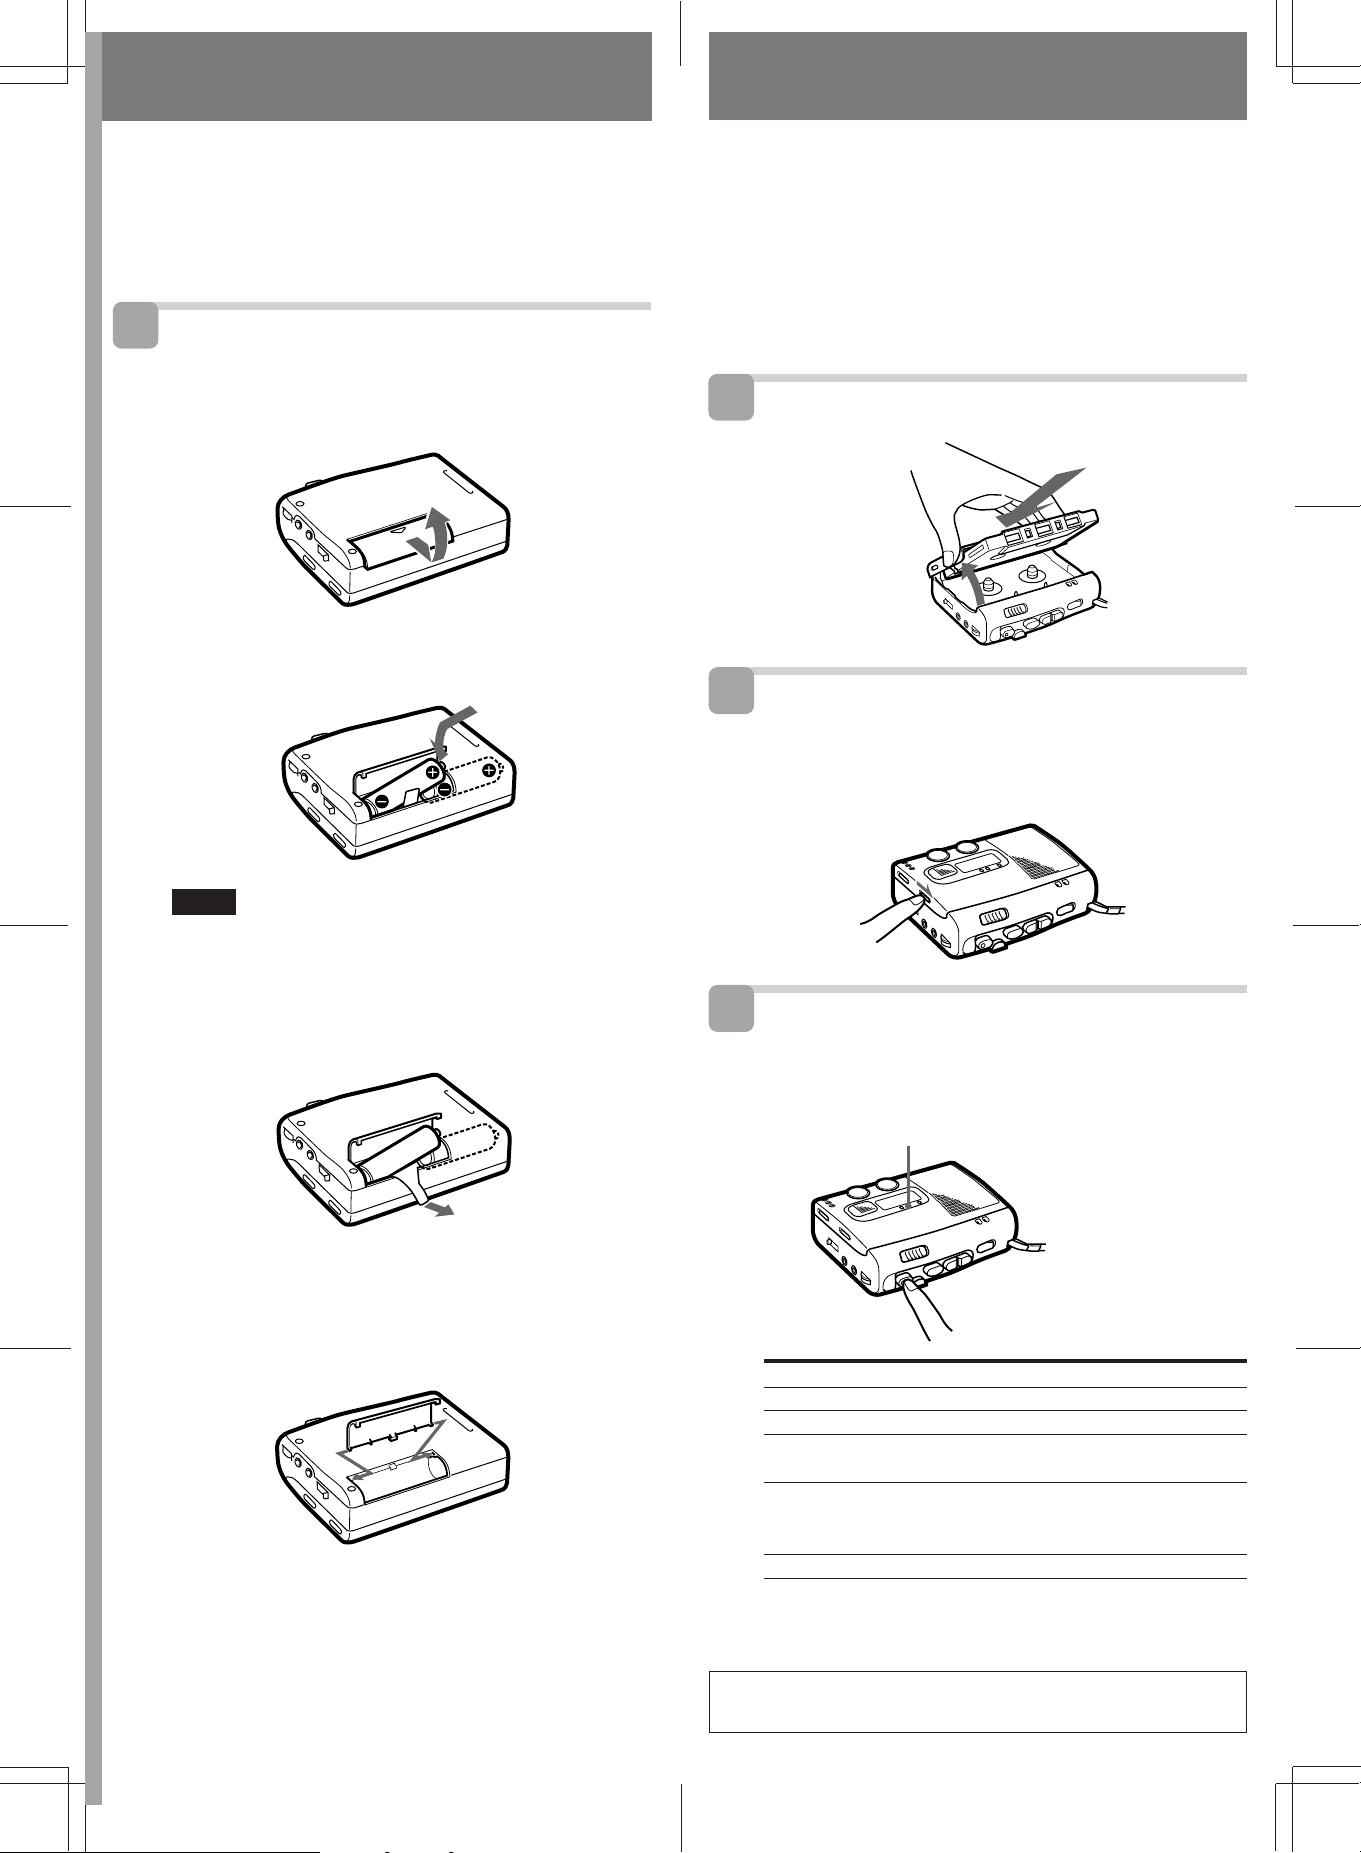
乾電池を入れる
録音する
ここでは乾電池での使いかたを説明します。コンセントでの使いかたは、
「電源について」をご覧ください。
1
付属の乾電池を入れる
押しながら矢印の方向へずらし、持ち上げる
1
単
形乾電池2本を入れる
2
3
A
-a
内蔵マイクですぐに録音できます。
発信者の声をフラットマイクで明瞭に録音するために、本機を机などの固
い面に水平に置いてください(
録音にはノーマルテープ
ハイポジション(
とがあります。
1
カセットを入れる
2
VOR
B
ここでは通常の録音のしかたを説明します。
音については「いろいろな録音のしかた」をご覧ください。
TYPEII
1手でふたを
開ける
スイッチを「切」にする
-b
Boundary effect
(TYPE I)
)、メタル(
をお使いください。
TYPE IV
方式)。
)では正しく録音できないこ
-a
B
2録音を始める
面をふた側に
してカセット
を入れる
3ふたを
閉める
機能を使った録
VOR
本とも‘側を奥にして
2
入れる
ご注意
新しい乾電池と使用した乾電池、または種類の違う乾電池を混ぜて使用しな
いでください。
乾電池を取り出すときは
電池入れのふたがはずれたときは
電池入れのふたは、開けるときに過大な力を加えると、はずれるようにな
っています。はずれた場合は図のようにふたを少しまげて取り付けてくだ
さい。
A
-b
A
-c
3
録音する
おもて面から録音が始まり、うら面も続けて録音されます(オート
リバース)。うら面が終わると自動的にテープが止まります。ただ
し、つめが折れている面は録音されません。
録音ランプ
操作
録音を止める
後追い録音をする 再生中にr録音 (録音状態になる)
録音内容をすぐ聞く 録音中に巻き戻し/レビュー
(ワンタッチレビュー) (指を離すとそこから再生する)
一時停止する
カセットを取り出す
-c
B
録音ボタンを押す
r
再生ボタンが同時に押され、
録音が始まります。
押すボタン、ずらすつまみ
■停止
一時停止c
一時停止を解除するには、一時停止
を元に戻す
c
停止を押してから、手でふたを開ける
p
*
*
一時停止はp停止ボタンを押した場合にも自動的に解除されます(ストップ
ポーズリリース機能)。
あなたが録音したものは、個人として楽しむなどのほかは、著作権法上、権利者
に無断では使用できません。
Page 3
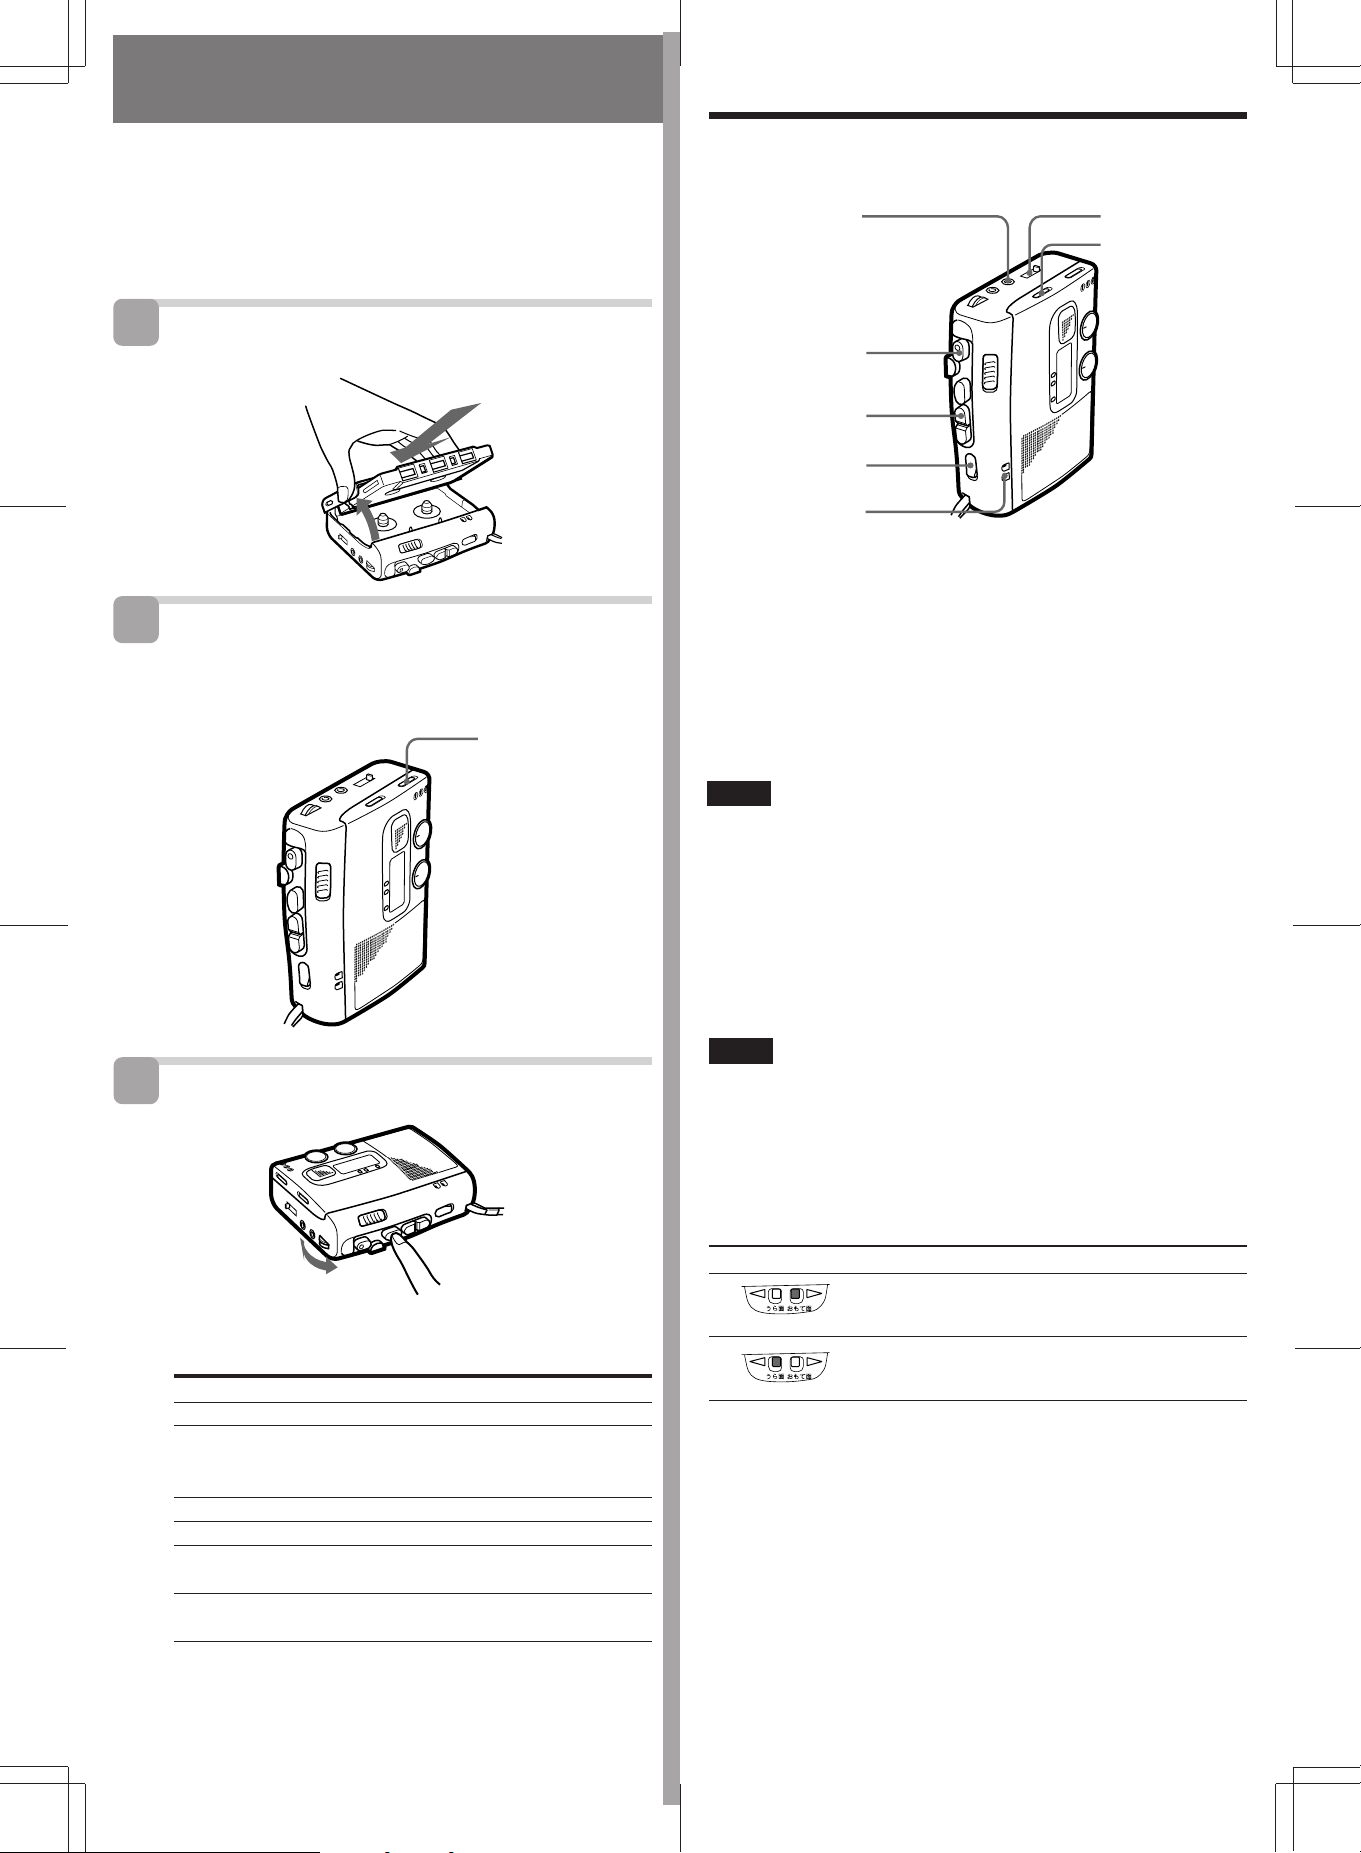
テープを聞く
内蔵スピーカーから音が聞こえます。
ノーマルテープ
1
2
DPC
ここでは通常の再生のしかたを説明します。
生については「
(TYPE I)
カセットを入れる
1手でふたを
開ける
をお使いください。
C
スイッチを「切」にする
機能を使う」をご覧ください。
DPC
-a
2再生を始める
面をふた側に
してカセット
を入れる
3ふたを
機能を使った再
DPC
スイッチ
DPC
閉める
いろいろな録音のしかた D
イヤホンジャック テープカウンター
スイッチ
VOR
録音ボタン
r
巻戻し/レビュー
ボタン
反転cスイッチ
走行方向表示窓
録音する面を選ぶ
両面を続けて録音する
1 録音を始める面をふた側にしてカセットを入れる。
2 テープ走行表示がうら面になっているときは、反転
らして走行表示をおもて面にして(緑色になる)から録音する。
おもて面(ふた側の面)の録音が終わると、自動的にうら面(本体側の面)
から録音が始まります。うら面の録音が終わると自動的に停止します。
スイッチをず
c
3
再生する
2音量つまみで音量
を調節する
操作 押すボタン、ずらすつまみ
テープを止める ■停止
一時停止する 一時停止c
早送りする
巻き戻す
音を聞きながら 再生中に早送り/キューを押し続ける
早送りする(キュー)
音を聞きながら 再生中に巻戻し/レビューを押し続け
巻き戻す(レビュー) る
*
**
**
**
一時停止はp停止ボタンを押した場合にも自動的に解除されます(ストッ
プポーズリリース機能)。
早送り、巻き戻しのときはテープの終わりで自動的に止まり、電源が切
れます。
C
-b
1再生ボタンを押す
一時停止を解除するには、一時停止
を元に戻す
c
早送り/キュー
巻戻し/レビュー
*
ご注意
おもて面、うら面ともにツメが折れていないことを確認してください。
片面だけを録音する
1 録音する面を本体側にしてカセットを入れる。
2 テープ走行表示がおもて面になっているときは、反転
ずらして走行表示をうら面にして(緑色になる)から録音する。
録音はうら面から始まります。うら面の録音が終わると自動的に停止しま
す。
ご注意
うら面のツメが折れていないことを確認してください。
停止中にふたを開けると、テープの走行方向は自動的におもて面になりま
す(フォワード復帰機能)。再び録音を始めると、必ずおもて面に録音しま
す。
テープ走行方向を表示窓で確認できます
録音/再生時の表示 録音/再生中の面
おもて面
うら面
テープカウンターの見かた
テープカウンターはおもて面を走行中は数字が増え、うら面を走行中は数
字が減っていきます。テープカウンターのリセットボタンを押すと000
に戻ります。
音がしたとき自動的に録音を始める(VOR機能)
スイッチを高または低に切り換えておきます。
VOR
録音ボタンを押すと、ある大きさ以上の音をマイクが拾うと自動的に録音
が始まり、音が小さくなると止まります。録音の途中でテープを止める手
間がはぶけるので口述録音するときに便利です。また、空録音の部分がな
くなり、テープが有効に使えます。録音中に
こともできます。
スイッチを「入」にする
VOR
c
スイッチを
Page 4

録音状態 つまみの位置
小さな音でも録音が始まる 高
(会議などを録音するとき)
比較的大きな音のときだけ録音が始まる 低
(近くの会話の録音やメモとして使うとき)
ご注意
機能は周囲の環境に左右されます。状況に合わせて
•
VOR
は「高」にしてください。
は、
音を感じてから録音が始まるので、言葉の初めの部分は録音されないことがありま
•
す。大切な録音のときは
スイッチは「切」にしてください。
VOR
スイッチを操作しても思い通りに録音できないとき
VOR
スイッチを「切」にしてください。
VOR
スイッチを「低」また
VOR
録音中の音を聞くには
別売りのイヤホンをイヤホンジャックにつなぎます。
モニター音は音量つまみで調節できます。テープに録音される音の大きさ
は一定に保たれます。
後追い録音をする
再生中にr録音ボタンを押すと、そこから録音状態になります。録音した
ものの一部分を修正したいときなどに便利です。
録音したものをすぐに聞く(ワンタッチレビュー)
録音中に巻戻し/レビューボタンを押すとテープが巻き戻され、手を離す
とそこから再生が始まります。
テープが終わりまでくると(フルオートシャットオフ機構)
録音/再生状態だけでなく、早送り、巻き戻しのときも、テープが終わり
まで巻き取られると、自動的にボタンが解除されテープが止まり、電源が
切れます。
ご注意
•再生中に
•
DPC
ります。
•電池が消耗しているときに、スピードコントロールつまみを急に動かすと停止する
ことがあります。ゆっくり動かすか、電池を交換してください。
•スピードコントロールの操作中または再生中に音量を調節すると、録音/電池残量
ランプがちらつくことがあります。
スイッチを切り換えると一瞬音がとぎれます。
DPC
機能を使用したとき、原音と同じピッチにはなりません。また音質も多少異な
外部マイクや他の機器から録音する
本機で録音中の音を別売りのイヤホンを使って聞くことができます。
状況に合わせて
ご注意
•接続コード類のプラグはしっかり差し込んでください。
•接続や音量調節の失敗を防ぐため、本番前に試し録音をしてください。
•下の例はソニー製品の場合です。他社製品との接続がうまくいかないときは、その
製品の説明書をご覧ください。
録音する前に
外部マイク(別売り)で録音する
マイクジャックにプラグをしっかり差し込むと、内蔵マイクは自動的に切
れ、外部マイクの音を録音します。プラグインパワー対応のマイクを使う
と、マイクの電源は本機から供給されます。
マイクへ
機能もお使いいただけます。
VOR
F
ミニプラグ付きマイクロホン
国内)、
ECM-T115、T145
-a
ECM-T15
(別売り、海外)など
(別売り、日本
DPC
機能を使う E
スイッチ
DPC
スピードコントロール
つまみ
ピッチコントロールつまみ
再生速度に合わせてピッチを自動調整する
スイッチを「オート」にしてください。
DPC
本体のスピードコントロールつまみを次のように調節してください。
再生速度 つまみの位置
ゆっくり再生する 遅い
通常の速度で再生する 中央
速く再生する 速い
再生音のピッチ(音の高さ)と再生速度を別々に調節する
スイッチを「マニュアル」にし、スピードコントロールとピッチコン
DPC
トロールをそれぞれ次のように調節してください。好みのスピード、ピッ
チで再生できます。
再生速度 スピードコントロールつまみの位置
ゆっくり再生する 遅い
通常の速度で再生する 中央
速く再生する 速い
ピッチ ピッチコントロールつまみの位置
音が低くなる 低
通常 中央
音が高くなる 高
TCM-AP10/AP10V
本機にカセットを入れ、r録音ボタンを押します。
他の機器から録音する
マイクへ
TCM-AP10/AP10V
-b
F
(別売り、日本
RK-G64
国内)、
RK-G64HG
売り、海外)
EAR
EARPHONE
、または
@
OUT
(別
テープレコーダー、
テレビ、ラジオなど
、
、
REC
、†などへ
1 本機にカセットを入れます。
2 他の機器の録音する音を出し、聞きやすい音量にします。(テレビやラ
ジオの
REC OUT
を変えても録音には影響しません。)
本機のr録音ボタンを押します。
3
や†ジャックなどから録音するときは、他機の音量
電源について
乾電池の持続時間
使用電池 録音時
ソニーアルカリ乾電池 約
LR6 (SG)
ソニー乾電池ニュースーパー 約
R6P (SR)
*
EIAJ
テープをスピーカーで再生した場合。
使用時
使用時
(日本電子機械工業会)の測定基準に基づき、音量7分目程度でミュージック
(EIAJ)
時間 約7時間 約5時間
7.5
時間 約
2
乾電池は持続時間の長いアルカリ乾電池をおすすめします。
再生時
(EIAJ*)
時間 約1時間
1.5
倍速再生/
「入」時
DPC
つづくc
Page 5

乾電池を交換する時期
乾電池の残量は録音/電池残量ランプでお知らせします。
電池が消耗すると、テープ走行が不安定になったり雑音が多くなったりし
ます。再生/録音中に電池交換ランプが点滅したら、乾電池を2本とも新し
いものと交換してください。
新しい乾電池で使用時
乾電池が消耗してくると
乾電池を交換してください
ご注意
早送り(キュー)/巻き戻し(レビュー)中に電池交換ランプが点滅することがあり
•
ます。テープが正常に動かないときのみ、電池を交換してください。
•再生中に音量を上げたときなどに録音/電池残量ランプが音に応じて一時的にちら
つくことがあります。
•電池交換ランプが点滅し始めても、しばらくはテープが正常に動きますが、内蔵ス
ピーカーから大きな雑音が出たり正しく録音されていないことがありますので、必
ず乾電池を交換してください。
•テープの動きはじめやテープの終わりで、電池交換ランプが瞬間的に点灯すること
があります。ランプがすぐに消えた場合は、乾電池を交換する必要がありません。
点灯
消える
点灯
消える
点滅
乾電池について
乾電池の使いかたを誤ると、液もれや破裂のおそれがあります。次のことは必ずお守
りください。
•‘と’の向きを正しく入れてください。
•乾電池は充電できません。
•長い間使わないときは、取り出しておいてください。
•液もれが起こったときは、液をよくふきとってから新しい乾電池を入れてくださ
い。
•持ち運ぶときはキーホルダーなどの金属類と一緒にポケットに入れないでくださ
い。乾電池の‘’が金属とつながるとショートし、発熱して危険です。
•別売りの
いでいると、乾電池ではお使いになれません。
パワーアダプターやカーバッテリーコードを
AC
DC IN 3V
ジャックにつな
取り扱いについて
•落としたり、強いショックを与えたりしないでください。故障の原因になります。
•次のような場所には置かないでください。
ー温度が非常に高いところ
ー直射日光のあたる場所や暖房器具の近く。
ー窓を閉めきった自動車内(特に夏季)。
ー風呂場など湿気の多いところ。
ー磁石、スピーカー、テレビなど磁気を帯びたものの近く。
ーほこりの多いところ。
•長い間使わなかったときは、再びお使いになる前に、数分間再生状態にして空回を
してください。良い状態でお使いいただけます。
キャッシュカードや定期券など、磁気を利用したカード類をスピーカーに近づける
と、マグネットの影響で磁気が変化してカードが使えなくなることがありますので、
ご注意ください。
万一故障した場合は、内部を開けずにお買い上げ店またはソニーサービス窓口にご相
談ください。
(60
℃以上)。
故障かな?
コンセントにつないで使う
1 別売りの
E30HG
2
パワーアダプターをコンセントにつなぎます。
AC
ご注意
この製品には、別売りのACパワーアダプター
たは
AC-E30HG
格
をご使用ください。上記以外のACパワーアダプターを
)
使用すると、故障の原因になることがあります。
パワーアダプター
AC
(海外用)を本体の
(別売り)(極性統一形プラグ・
DC IN 3V
AC-E30L
(日本国内用)、または
ジャックにつなぎます。
AC-E30L
規
EIAJ
AC-
ま
極性統一形プラグ
ご注意
録音について
•録音には、必ずノーマルテープ(
タルテープでは正しく録音できないことがあります。)
•マイクジャックに外部マイクや接続コードが差し込まれていると、内蔵マイクを使
っての録音はできません。
•内蔵マイクを強く押さないでください。 マイクが変形し、雑音の原因となります。
•録音中、マイクを電灯線や蛍光灯に近づけすぎると、ノイズが入ることがありま
す。
•録音中はスピーカーから音は出ません。
•録音中の音をイヤホンで聞いているとき、音量をあげすぎるとイヤホンの音をマイ
クが拾い、ピーという音が生じることがあります(ハウリング現象)。この場合は音
量を下げてください。
•録音中はテープスピードの調節はできません。
大切な録音を守るには G
カセットのツメを折ると録音状態にできなくなるので、録音した音声を誤って消して
しまうミスが防げます。ツメを折っても穴をふさぐと再び録音できます。
)をお使いください。(ハイポジション/メ
TYPE I
別売りのイヤホンで聞いてください。
録音面
修理に出す前にもう1度お調べください。
症状
カセットが入らない。
カセット入れのふたが閉まら
ない。
再生ボタンを押しても再生さ
れない。
録音ボタンが押し込めな
r
い。
録音できない。
キュー/レビュー中、途中で
止まる。または動かない。
早送りや巻き戻しができな
い。
操作ボタンを押しても動作し
ない。
原因/処置
•カセットの向きが正しくない。
•再生ボタンが押し込まれている。
•カセットを本体側に入れている。(カセットはふた側
に入れる。)
•テープが終わりまで巻き取られている。
•乾電池が消耗している。
いものと交換する。
•カセットが入っていない。
カセットのツメが折れている。n録音内容を消して
•
もよい場合は穴をふさぐ。
•乾電池が消耗している。
いものと交換する。
•録音/再生ヘッドが汚れている。nクリーニングす
る。
•
使用時に感度の調整が不適切。
VOR
•接続が正しくない。
•乾電池が消耗している。
いものと交換する。
•乾電池の+と−の向きが正しくない。
•乾電池が消耗している。
いものと交換する。
•一時停止スイッチが矢印の方向へずらされている。
•
パワーアダプターが正しく接続されていない。
AC
•
パワーアダプターやカーバッテリーコードが本体
AC
に差したままになっている。
ーやカーバッテリーコードがジャックに差してある
と、それが優先されるので、乾電池使用時には本体
から抜いておく。
本とも同じ種類の新し
n
2
本とも同じ種類の新し
n
2
本とも同じ種類の新し
n
2
本とも同じ種類の新し
n
2
パワーアダプタ
n
AC
ツメ
セロハンテープ
Page 6

スピーカーから音が出ない。
再生速度が速すぎたり、遅すぎ
たりする。
再生音の音程が違う。
•イヤホンが差し込まれている。
•音量が最小になっている。
•スピードコントロールつまみが中央以外の位置にあ
る。
•
スイッチが入っている
DPC
•
スイッチが入っている。
DPC
•ピッチコントロールつまみが中央以外の位置にあ
る。(原音と全く同じ音程にはなりません。)
お手入れ H
ピンチローラー
消去ヘッド
音が小さい。
音質がよくない。
雑音が入る。
録音が途中で止まる。
前の音が完全には消えない。
スピードコントロールつまみを
まわしてもスピードが変わらな
い。
ピッチコントロールつまみをま
わしてもピッチが変わらない。
•音量が絞られている。
•乾電池が消耗している。
いものと交換する。
•
録音/再生ヘッドが汚れている。nクリーニングす
る。
•再生音のピッチを調節すると多少音質が変わります
が故障ではありません。
•ピッチを調節したときは、デジタル処理によりうな
りが聞こえたりエコーがかかったように聞こえるこ
とがありますが、故障ではありません。
•カセットテープをスピーカーの上に直接置いてい
た。(直接置くと音質が劣化することがあります。)
•ハイポジション、メタルのテープを使っている。
•
が働いている。
VOR
ッチを「切」にする。
•消去ヘッドが汚れている。
•
スイッチが「切」になっている。
DPC
•
スイッチが「切」か「オート」になっている。
DPC
本とも同じ種類の新し
n
2
を使用しないときはスイ
VOR
クリーニングする。
n
主な仕様
トラック方式 コンパクトカセットモノラル
スピーカー 直径
周波数範囲(
入力端子 マイク(ミニジャック/プラグインパワー対応)(1)
出力端子 イヤホン
実用最大出力
テープスピード可変範囲
ピッチコントロール可変範囲
電源
最大外形寸法 約
質量 本体
付属品 ソニー乾電池
別売りアクセサリーACパワーアダプター
EIAJ*) TYPE I
(DC時) 330 mW ( EIAJ)
36mm
(ノーマル)カセット
150〜8,000 Hz
最小入力レベル
インピーダンス3kΩ以下のマイク用
負荷インピーダンス
約+
100%〜−50 %
オクターブ〜−
約+
1
DC 3V、単3
88.7 × 113 × 38.5 mm (幅/高さ/
最大突起部含む
0.21mV
ミニジャック)(1)
(
8〜300
オクターブ
1.5
形乾電池2本使用
Ωのイヤホン用
奥行き
約230g
ご使用時 約
含む)
C-60HF
取扱説明書
(海外用)(極性統一形プラグ・
カーバッテリーコード
エレクトレットコンデンサーマイクロホン
ECM-T15
接続コード
モノラルイヤーレシーバー
クリーニングキット
クリーニングカセット
(乾電池
310g
LR6 (SG) (2)
、保証書
(1)
(日本国内)、
(日本国内)、
RK-G64
KK-41
R6P (SR) 2
、キャリングケース
、ソニーご相談窓口のご案内
(1)
AC-E30L
(日本国内用)、
EIAJ
DCC-E230
ECM-T115、T145
RK-G64HG
MDR-E213M
CHK-1W
) (EIAJ)
本、カセットテープ
(1)
AC-E30HG
規格)
(海外用)
(海外用)
(1)
録音/再生ヘッド
綿棒
キャプスタン
よい音でテープを聞くために
時間程度使ったら、再生ボタンを押し込んだあとに、別売りのクリーニ
10
ングキット
(KK-41)
でヘッド、キャプスタン、ピンチローラーをきれいに
してください。録音/再生ヘッドはピカピカ光るような状態になるように
してください。
本体表面が汚れたときは
水気を含ませた柔らかい布で軽くふいたあと、からぶきします。シンナーや
ベンジン、アルコール類は表面の仕上げを傷めますので使わないでくださ
い。
保証書とアフターサービス
保証書
•この製品には保証書が添付されていますので、お買い上げの際お買い上げ店でお受
け取りください。
•所定事項の記入および記載内容をお確かめのうえ、大切に保存してください。
•保証期間はお買い上げ日より
アフターサービス
調子が悪いときはまずチェックを
この説明書をもう一度ご覧になってお調べください。
それでも具合の悪いときはサービスへ
お買い上げ店または添付の「ソニーご相談窓口のご案内」にあるお近くのソニーサー
ビス窓口にご相談ください。
保証期間中の修理は
保証書の記載内容に基づいて修理させていただきます。詳しくは保証書をご覧くださ
い。
保証期間経過後の修理は
修理によって機能が維持できる場合は、ご要望により有料修理させていただきます。
部品の保有期間について
当社ではカセットコーダーの補修用性能部品(製品の機能を維持するために必要な部
品
を、製造打ち切り後最低6年間保有しています。この部品保有期間を修理可能な期
)
間とさせていただきます。保有期間が経過した後も、故障箇所によっては修理可能の
場合がありますので、お買い上げ店またはサービス窓口にご相談ください。なお、補
修用性能部品の保有期間は通商産業省の指導にもよるものです。
ワールドモデルをお買い上げのお客様へ
海外での保証とアフターサービスについて
• 保証期間は、日本国内ではお買い上げ日より1年間、海外では90日です。
• 海外での修理やアフターサービスについてご不明な点は、保証書に記載の海外
ソニーサービス特約店にお問い合わせください。
年間です。
1
*
日本電子機械工業会)規格による測定値です。
EIAJ (
本機の仕様および外観は、改良のため予告なく変更することがありますが、ご了承く
ださい。
Page 7

English
REV FWD
REV FWD
As you read, refer to the illustrations in the Japanese corresponding text (labeled with
A, B, etc.)
z Getting Started
Preparing a Power Source
Choose one of the following power sources.
Dry Batteries A-a
Make sure that nothing is connected to the DC IN 3V jack.
1 Open the battery compartment lid.
2 Insert two size AA (R6) batteries with correct polarity and close the lid.
To take out the batteries A-b
To attach the battery compartment lid if it is accidentally
detached A-c
Attach as illustrated.
Battery life (Approximate hours)
Pecording Playback Playback at twice normal
Sony alkaline LR6 (SG) 7.5 7 5
Sony R6P(SR) 2 1.5 1
We recommend to use long-life alkaline batteries.
Notes
• Do not charge a dry battery.
• Do not use a new battery with an old one.
• Do not use different types of batteries.
• When you do not use the unit for a long time, remove the batteries to avoid any damage caused by
battery leakage and subsequent corrosion.
• Dry batteries will not be expended when another power source is connected.
speed/DPC ON
When to replace the batteries
Replace the batteries with new ones when the BATT/REC lamps go off and the i
lamp flashes.
The BATT/REC lamps change as illustrated:
When batteries are new When batteries become weak Replace batteries
light
go off
go off
light
flash
Notes
• During FF(CUE) or REW(REVIEW), the i lamp may flash. Only when the tape does not run
properly, replace the batteries.
• In some cases when the unit is used with rechargeable batteries, only one BATT/REC lamp will
light even though the batteries have been fully charged.
• After the batteries have been used for a while, the BATT/REC lamp(s) may flash with the playback
sound when you turn up the volume; however, this does not mean that you need to replace the
batteries.
• The unit will play back normally for a while even after the i lamp flashes. However, replace the
batteries as soon as you can. If you do not, a loud noise may be emitted by the built-in speaker or
subsequent recording will not be done correctly.
• When the tape starts running or at the end of the tape the i lamp may momentarily light. If the
lamp goes off, you do not need to replace the batteries.
House Current
Connect the AC power adaptor to DC IN 3V and to
the wall outlet. Use the AC-E30L (in Japan) or AC E30HG (in other countries) AC power adaptor (not
supplied). Do not use any other AC power adaptor.
Polarity of the plug
z Operating the Unit
Recording
You can record the sound easily with the built-in microphone. Use a normal (TYPE I)
tape.
Make sure that nothing is connected to the MIC jack.
1 Open the cassette compartment lid.
2 Take out any slack in the tape and insert the cassette with the side to start
recording facing the lid. B-a
3 Close the cassette compartment lid.
4 Set VOR to L , H or OFF. For details, see “VOR (Voice Operated Recording)”.
B-b
5 Press r REC. B-c
PLAY is pressed simultaneously and recording starts.
Place the unit on a hard surface such as a desk with the cassette holder side up so
that the flat mic can record effectively.
While the tape runs, the REC lamp lights and flashes depending on the strength of
the sound.
Note
Make sure the tab on the upper (forward) side is not removed; otherwise, recording cannot be
made.
If you start recording from the upper (forward) side, recording automatically goes on
to the reverse side and the unit turns off automatically when the tape comes to the end
of the reverse side. If the tab is removed, however, you cannot record on that side.
To Press or slide
Stop recording p STOP
Start recording r REC during playback
during playback
Review the portion Press and hold REW/REVIEW just recorded during recording.
Pause recording PAUSE c
Take out a cassette Press p STOP and open the cassette compartment lid by hand.
* PAUSE c will be also automatically released when p STOP is pressed (stop-pause-release
function).
Note
Do not use a CrO2 (TYPE II) or metal (TYPE IV) tape, otherwise the sound may be distorted when
you play back the tape, or the previous recording may not be erased completely.
Release the button at the point to start playback.
To release pause recording, release PAUSE c*.
To prevent a tape from being accidentally recorded over G
Break out and remove the cassette tabs. To reuse the tape for recording, cover the tab
hole with adhesive tape.
Playing a Tape
1 Open the cassette compartment lid.
2 Insert a cassette with the side to start playing facing the lid. C-a
3 Close the cassette compartment lid.
4 Press PLAY then adjust the volume. There is a raised dot to show the direction to
turn down volume beside VOL. C-b
If the playback starts from the upper (forward) side, playback goes on to the reverse
side and the unit turns off automatically.
To Press or slide
Stop playback p STOP
Pause playback PAUSE c
Fast forward** FF/CUE during stop
Rewind** REW/REVIEW during stop
Search forward Press and hold FF/CUE and release it at the point
during playback (CUE) you want
Search backward during Press and hold REW/REVIEW and
playback (REVIEW) release it at the point you want
* PAUSE c will be also automatically released when p STOP is pressed (stop-pause-release
function).
** When fast forward and rewind, the tape stops at the end of the tape and the power is turned off
automatically (automatic shut-off mechanism).
To release pause playback, release PAUSE c*.
Using Various Functions D
To select the side to be recorded
To record on both sides continuously
1 Insert a cassette with the side to start recording facing the lid.
2 Start recording on the upper (forward) side.
If the REV indicator lights in green, slide DIR c so that the FWD indicator
turns green.
When recording reaches the end of the upper side, it will automatically continue on
the reverse side. When recording reaches the end of the reverse side, it will
automatically stop.
Note
Make sure the tabs on both sides are not removed.
To Record on one side only
1 Insert a cassette with the side to start recording facing away from the lid (reverse
side).
2 Start recording on the reverse side.
If the FWD indicator lights in green, slide DIR c so that the REV indicator
turns green.
When recording reaches the end of the reverse side, it will automatically stop.
Note
Make sure the tab on the reverse side is not removed.
Whenever you open the cassette compartment lid, the FWD indicator turns green and
recording starts form the upper (forward) side.
To check the direction of the tape in the display window
Display during recording/playbadk Side of the tape during recording/playback
Upper (forward) side
Reverse side
Page 8

Tape counter
While the upper side of the tape is running, the numbers in the tape counter increase.
While the reverse side is running, they decrease. Press the reset button of the TAPE
COUNTER to return to 000.
VOR (Voice Operated Recording)
Set VOR to L or H. Press r REC, and the unit automatically starts recording the sound
and pauses when there is no sound (you can save tapes and batteries).
H: To record at meetings or in a quiet place.
L: To record for dictation in a noisy place.
When you use this system in a noisy place the unit stays in the recording mode. If the
sound is too soft, on the contrary, the unit will not start recording. Set VOR to L (low)
or H (high) depending on the conditions. When you do not use this function, set VOR
to OFF.
Notes
• The VOR system depends on the environment conditions. If you cannot get the desired results, set
VOR to OFF.
• When using the VOR system, the unit starts recording only when a sound is detected, therefore,
the beginning of the word may not be recorded. For an important recording, we recommend
setting VOR to OFF.
To monitor the sound
Connect an earphone (not supplied) firmly to the EAR jack. The sound for monitoring
can be adjusted by VOL. The recording sound is fixed.
Start recording during playback
Press r REC during playback, recording starts immediately. It is useful when you
want to re-record the portion which was just recorded.
Review the portion just recorded
Press REW/REVIEW during recording. Release the button at the point to start
playback.
Recording from Another Equipment F-b
Connect another equipment to the MIC jack using the RK-G64HG connecting cord (not
supplied).
1 Insert a cassette.
2 Adjust the sound of the connected equipment.
3 Press r REC.
z Additional Information
Precautions
On power
Operate the unit only on 3V DC. For AC operation, use the AC power adaptor
recommended for the unit. Do not use any other type. For battery operation, use two
size AA (R6) batteries.
On the unit
• Do not leave the unit in a location near heat sources, or in a place subject to direct
sunlight, excessive dust or mechanical shock.
• Should any solid object or liquid fall into the unit, remove the batteries or disconnect
the AC power adaptor, and have the unit checked by qualified personnel before
operating it any further.
• If the unit has not been used for a long time, set it in the playback mode and warm it
up for a few minutes before inserting a tape.
Keep personal credit cards using magnetic coding or spring-wound watches etc. away
from the unit to prevent possible damage from the magnet used for the speaker.
On tapes longer than 90 minutes
We do not recommend the use of tapes longer than 90 minutes except for a long
continuous recording or playback. They are very thin and tend to be stretched easily.
If you have any questions or problems concerning your unit, please consult your
nearest Sony dealer.
DPC (Digital Pitch Control) and Speed
Control Function E
How to adjust the pitch combined with the tape playback speed
Set the DPC switch to AUTO.
Adjust SPEED CONTROL as follows:
To play back Set SPEED CONTROL to
slower SLOW
at normal speed Center
faster FAST
How to adjust the pitch and the tape playback speed separately
Set the DPC switch to MANUAL.
Use the DPC switch and the PITCH CONTROL switch.
You can make the sound more comprehensible by changing the tape speed.
To play back Set SPEED CONTROL to
slower SLOW
at normal speed Center
faster FAST
To adjust the pitch Set PITCH CONTROL to
lower LOW
normal Center
higher HIGH
Notes
• The sound is interrupted for a moment when you change the DPC switch during playback.
• Even though you use the DPC switch, you cannot acquire the same pitch as the original. The tone
will be somewhat different from the original.
• When the power of the batteries becomes weak, SPEED CONTROL may stop if you turn it fast. In
this case turn it slowly or change the batteries.
• When SPEED CONTROL is turned or the volume is adjusted during playback, BATT/REC lamps
may flicker.
Recording from Various Sound Sources
You can monitor the recording sound by connecting an earphone (not supplied).
Use VOR system depending on the environment condition.
Notes (Before recording)
• When connecting cords, be sure you connect plugs firmly.
• Make a trial recording to make sure that you made connections correctly and adjusted the volume
properly.
• The following examples use Sony products. If you have any problem when using other products,
read the instruction manual of those products.
Recording with an External Microphone F-a
Connect a microphone to the MIC jack. There is a small projection to show the position
of the MIC jack near the jack. The built-in microphone will be disconnected and the
sound through the external microphone will be recorded.
When using a plug-in-power system microphone, the power to the microphone is
supplied from this unit.
To start recording, insert a cassette and press r REC.
Troubleshooting
Should any problem persist after you have made these checks, consult your nearest
Sony dealer.
You cannot insert the cassette.
m The cassette is inserted front side back.
m PLAY is pressed.
You cannot close the cassette compartment lid.
m The cassette is inserted into the wrong part (it should be inserted into the lid
side).
Playback is not possible even if you press PLAY
m The tape has reached the end. Rewind the tape.
m The batteries are weak. Replace both batteries with new ones.
You cannot press r REC.
m There is no cassette.
m The tab on the tape has been removed. To reuse the tape for recording, cover
the tab hole with adhesive tape.
Recording cannot be made.
m The batteries are weak. Replace both batteries with new ones.
m The record/playback head is contaminated.
m VOR has been set to the improper position when VOR function works.
m Connection is made incorrectly.
During CUE/REVIEW the tape stops or does not run.
You cannot fast-forward or rewind.
m The batteries are weak. Replace both batteries with new ones.
The unit does not operate.
m The batteries have been inserted with incorrect polarity.
m The batteries are weak. Replace both batteries with new ones.
m PAUSE c is slid in the direction of the arrow.
m The AC power adaptor or car battery cord is not firmly connected.
m The batteries have been inserted, but simultaneously the AC power adaptor is
connected and not to be done to the wall outlet.
No sound comes from the speaker.
m The earphone is plugged in.
m The volume is turned down completely.
Tape speed is too fast or too slow in the playback mode.
m SPEED CONTROL is set at a point other than the center.
m DPC is set to AUTO or MANUAL.
The pitch of the sound is different from the original.
m DPC is active.
m PITCH CONTROL is set at a point other than the center. (The pitch cannot be
the same as the original.)
The sound drops out, sound quality becomes worse or sound
has excessive noise.
m The volume is turned down completely.
m The batteries are weak. Replace both batteries with new ones.
m The record/playback head is contaminated.
m The tone will be somewhat different even though you adjust the pitch. This is
not a malfunction.
m When you adjust the pitch, you sometimes hear buzzing or echoing. This is
caused by the digital processing and is not a malfunction.
m If the cassette has been put on a speaker without its case, the sound quality
may be distorted.
m CrO
Recording is interrupted.
m VOR is set to L or H. When you do not use VOR, set it to OFF.
Recording cannot be erased completely.
m The erase head is contaminated.
The tape speed cannot be changed even if SPEED CONTROL is
turned.
m DPC is set to OFF.
The pitch cannot be changed even if PITCH CONTROL is turned.
m DPC is set to OFF or AUTO.
(TYPE II) or metal (TYPE IV) tape is used.
2
 Loading...