

Page 1
SONY
3-800-053-31(1)
► Getting Started
Cassette-Corder
Operating Instructions
TCM-59V
©1995 by Sony Corporation Printed in Japan
Owner's Record
The model number is located at the bottom and the serial
number is located inside the tape holder. Record the
serial number in the space provided below. Refer to
whenever you call upon your Sony dealer regarding this
product.
Model No. TCM-.59V
WARNING
This device complies with Part 15 of the FCC Rules.
Operation is subject to the following two conditions; (1)
This device may not cause harmful interference, and (2)
this device must accept any interference received,
including interference that may cause undesired
operation.
Serial No.-
Preparing a Power Source
Choose one of the following power sources.
Dry Batteries
Make sure that nothing is connected to the DC IN 3V
jack. *'
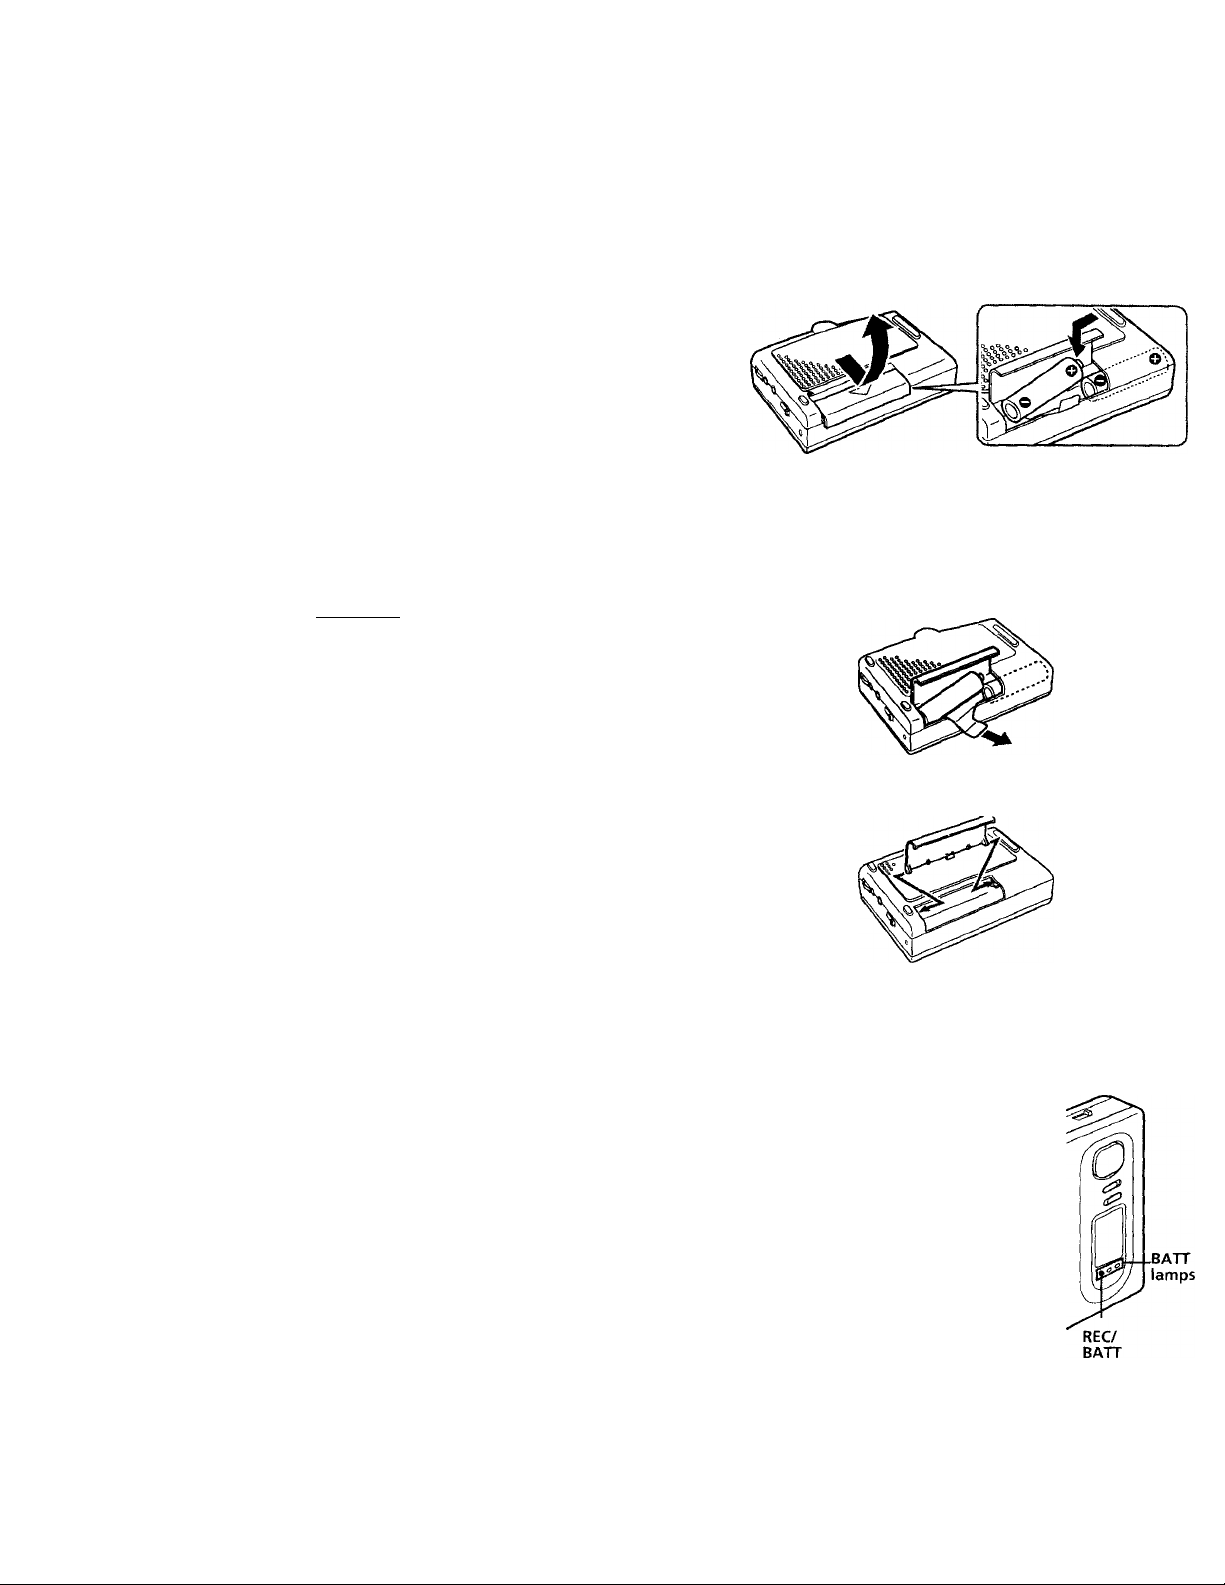
1 Open the battery compartment lid.
2 Insert two size AA (R6) batteries (not supplied) with
correct polarity and close the lid.
To take out the batteries
To attach the battery compartment lid if it is accidentally detached
You are cautioned that any changes or modifications not
expressly approved in this manual could void your
authority to operate this equipment.
Welcome!
Thank you for purchasing the Sony Cassette-Corder.
Some features are:
•Automatic reverse in recording and playing back mode.
•Twin speakers for powerful sound (monaural).
• Three ВАТТ lamps (including the REC/BATT lamp)
indicate the battery condition step by step.
• Built-in flat microphone for clear recording of speaker's
voice.
• VOR (Voice Operated Recording) system that starts and
stops recording automatically in response to the sound,
to save tapes and batteries.
When to replace the batteries
Replace the batteries with new ones when the REC/
T3ATT lamp ( a ) dims.
The ВАТТ lamps change as follows;
When batteries . Ш
are new
When batteries
have been used
for a while
When batteries
become weak
•
•
• • • • «
\
!
Light
Ш Ш
• • •
\ /
Light
m О
• • • • • •
Lights
о
• • •
о
lamp
Page 2

Notes
• In some cases when the unit is used with rechargeable
batteries, only the ( О ) REC/BATT and ( О ) ВАТТ lamps
will light even though the batteries have been fully charged.
• After the batteries have been used for a while, the ВАТТ
lamp(s) may flash with the playback sound when you turn up
the volume; however, this does not mean that you need to
replace the batteries.
• The unit will play back normally for a while even after the
REC/BATT lamp dims. However, replace the batteries as soon
as you can. If you do not, a loud noise may be emitted by the
built-in speaker or subsequent recording will not be done
correctly.
Battery life (Approximate hours)
Playback Recording
Sony alkaline LR6 (SG) 7.5 9
Sony SUM-3 R6P(SR)
Notes
2 2
• Do not charge a dry battery.
• Do not use a new battery with an old one.
• Do not use different types of batteries.
• When you do not use the unit for a long time, remove the
batteries to avoid any damage caused by battery leakage and
subsequent corrosion.
• Dry batteries will not be expended when another power source
is connected.
► Operating the Unit
Recording
You can record the sound easily with the built-in
microphone.
Make sure that nothing is connected to the MIC jack.
Flat mic
House Current
DC IN 3V
AC power
adaptor
Connect the AC power adaptor to DC IN 3V and to the
wall outlet. Use the AC-E30HG AC power adaptor (not
supplied). Do not use any other AC power adaptor.
Polarity of the plug
Press the counter reset button to reset the tape
counter.
Insert a normal (TYPE I) tape.
Slide DIR so that the FWD indicator turns green to
record on both sides.
The tape starts recording from the side facing the
cassette holder window (forward side).
Slide DIR so that the REV indicator turns green to
record on a single side.
The tape starts recording from the side facing away
from the cassette holder window (reverse side).
Note
When you open the cassette holder, the recording side is set
to the forward side.
4 Set VOR to:
ON to start and pause recording automatically to the
sound.
OFF to start and stop recording manually.
Page 3

5 Set MIC SENS to select the sensitivity of the
microphone to:
HIGH to record at meetings or in a quiet and/or
spacious place.
LOW to record for dictation or in a noisy place.
Note
When the sound to be recorded is not loud enough, set the
VOR switch to OFF, or the unit may not start recording.
6 Press • REC.
Recording starts.
Place the unit on a hard surface such as a desk with
the cassette holder side up so that the flat mic can
record effectively.
While the tape runs, the REC/ВАТТ lamp lights and
flashes depending on the strength of the sound.
At the end of the tape, recording stops and the unit turns
off automatically.
To Press or slide
Stop recording ■ STOP
Pause recording
Review the portion
just recorded
PAUSE —
Press and hold ◄◄ REW/REVIEW
during recording.
Release the button at the point to start
playback.
Recording from Various Sound Sources
MIC PLUG IN
POWER
Recording with an External Microphone
Connect a microphone to the MIC jack. There is a small
projection to show the position of the MIC jack near the
jack. Use a microphone of low impedance (less than 3
kilohms) such as ECM-TIO (not supplied).
When using a plug-in-power system microphone, the
power to the microphone is supplied from this unit.
Note
• When recording with an external microphone, the VOR system
may not work properly because of the difference in sensitivity.
Recording from Another Equipment
Connect another equipment to the MIC jack using the
RK-G64HG connecting cord (not supplied).
To monitor the sound
Connect an earphone (not supplied) firmly to the EAR
jack.
Notes
• Do not use a CrOi (TYPE II) or metal (TYPE IV) tape, otherwise
the sound may be distorted when you play back the tape, or
the previous recording may not be erasecf compfetely.
• The SPEED CONTROL switch works in the playback mode
only. Recording will be made independent of this control.
Notes on VOR (Voice Operated Recording) system
• When you use the system in a noisy place, noise will be
recorded and the unit will stay in the recording mode. In this
case, set MIC SENS to LOW to pick up necessary sound only.
• VOR system depends on the environmental conditions. If you
cannot get the desired results even though you adjust MIC
SENS, set VOR to OFF.
To prevent a tape from being accidentally
recorded over
Break out and remove the cassette tabs. To reuse the tape
for recording, cover the tab hole with adhesive tape.
Page 4

Specifications
Recording system
2-track 1 channel monaural
Frequency range
150 - 8,000 Hz
Speaker
Twin speakers, approx. 3.6 cm (1 '’/16 in.) dia.
Power output
350 mW (at 10 % harmonic distortion)
Input
Microphone input jack (minijack) sensitivity 0.21 mV for
3 kilohms or lower impedance microphone
Output
Earphone jack (minijack) for 8 - 300 ohms earphone
Power requirements
•Two size AA (R6) batteries (not supplied): 3V DC
E)C IN 3 V jack accepts:
• SonyAC=E30HG AC power adaptor (not supplied) for use
on 120 V AC, 60 Hz
• Sony EXZC-E130L car battery cord (not supplied) for use on
12 V car battery.
Dimensions (w/h/d) (incl. projecting parts and
controls)
Approx. 88.7 X 113.0 X 37.2 mm
(3 ’/2x4 '/2X 1 ’/2 in.)
Mass (not incl. batteries)
Approx. 220 g (7.8 oz.)
Taoe Cassene Playef/Recordef/CD Plaver/Mini Disc
SONY*
DAT/fladio/Head Phone/Speakef/MIC/Ftersonals
f Portable Audio ]
LIMITED WARRANTY
SONY ELECTRONICS INC. ("SONY") warrants this Product (including any accessories! against
defects in material or workmanship as follows:
1. LABOR: For a period of 90 days from the date of purchase, if this Product is determined
to be defective, Sony will repair the Product at no charge, or pay the labor charges to any SONY
authorized service facility. After the Warranty ^riod. you must pay for ali labor charges.
2. PARTS: In addition, SONY will supply, at rvs charge, new or rebuilt replacements in ex
change for defective parts for a period of one HI year. After 90 days from the date of purchase
labor for removal and installation is available from SONY authorized service facilities or a Sony
Service Center at your expense
To obtain warranty service you must take the Product, or deliver the Product freight prepaid, in
either its original packagirtg or packaging affording an equal degree of protection, to any autho
rized SONY service facility.
This warranty does r>ot cover customer instruction, installation,
reception problems.
This warranty does not cover cosmetic damage or damage due to acts of God, accident, misuse,
abuse, negligence commercial use or modification of. or to any part of the Product, including the
antenna. This warranty does rwjt cover damage due to improper operatioh or maintenance con
nection to improper voltage supply, or attempted repair by anyone other than a facility authorized
by Sony to service the Product This warrarrty does not cover Products sold AS IS or WITH ALL
FAULTS, or consumables (such as fuses or batteries). This warranty is valid only in the United
States.
Proof of purchase in the form of a bill of sale or receipted invoice which is evidarKe that the unit
is within the Warranty period must be presented to obtain warranty service
Th's warranty is invalid if the factory applied serial number has been altered or removed from the
Product.
REPAIR OR REPLACEMENT AS PROVIDED UNDER THIS WARRANTY IS THE EXCLUSIVE REMEDY OF THE CONSUMER. SONY SHAU NOT BE LIABLE FOR ANY INCIDENTAL OR CONSE
QUENTIAL DAMAGES FOR BREACH OF ANY EXPRESS OR IMPUED WARRANTY ON THIS
PRODUCT. EXCEPT TO THE EXTENT PROHIBITED BY APR.ICABLE LAW. ANY IMPLIED WAR
RANTY OF MERCHANTABIUTY OR FfTNESS FOR A PARTICULAR PURPOSE ON THIS PRODUCT
IS LIMITED IN DURATION TO THE DURATION OF THIS WARRANTY.
Some states do r>ot allow the exclusion or limitation of irKidental or consequential damages, or
allow limitations on how long an implied warranty lasts, so the above limitations or exclusions
may not apply to you. In addition, if you enter into a service contract with the Sony Partnership
within 90 days of the date of sale the limitation on how lor>g an implied warranty lasts does not
apply to you. This warranty gives you specific legal rights, and you may have other rights which
vary from state to state
t up adjustments or signal
Design and specifications are subject to change without notice.
For your convenience SONY ELECTRONICS INC has established telephone numbers for frequent
ly asked questions:
To locate the servicer or dealer r>earest you. call:
1-(800l-342-5721
For service assistarv:e or resolution of a service problem, call:
SONY CUSTOMER RELATIONS CENTER
V(800)-262-2848
For Product information or operation, caM:
SONY CUSTOMER mFORMATION CENTER
12011-368-9272
or write to:
Sony Customer Information Center
One Sony Drive
Park Ridge New Jersey 07656-8003
For an accessory or pan not available from your authorized dealer, call:
1-ieOO)-488-SONY (7669)
Page 5

Troubleshooting Maintenance
Should any problem persist after you have made these
checks, consult your nearest sony dealer.
You cannot press • REC.
The tab on the tape has been removed.
You cannot press ► PLAY.
-> The tape has reached the end. Rewind the tape.
The unit does not operate.
-> The batteries have been inserted with incorrect
polarity.
The batteries are weak.
-> PAUSE is slid in the direction of the arrow.
The AC power adaptor or car battery cord is not
firmly connected.
The batteries have been inserted, but
simultaneously the AC power adaptor is connected
and not to be done to the wall outlet.
No sound comes from the speaker.
-> The earphone is plugged in.
-> The volume is turned down completely.
Tape speed is too fast or too slow in the playback mode.
•> SPEED CONTROL is set at a point other than the
center.
The sound drops out or comes with excessive noise.
^ The volume is turned down completely.
■> The batteries are weak.
-> The heads are contaminated. See "Maintenance."
Recording cannot be made.
-> Connection is made incorrectly.
-> The batteries are weak.
-> The record/playback head is contaminated.
-> VOR or MIC SENS has been set to the improper
position when VOR function works.
Recording is'intefrupted.
-> VOR is set to ON. When you do not use VOR, set it
to OFF.
Recording cannot be erased completely.
-> The erase head is contaminated.
Recording or erasing is being made using recorded
C1O2 (TYPE II) or metal (TYPE IV) tape.
--------
Cotton
s
swab
j
y
--------
Capstan
----------
Erase
Record/playback head
--------
Pinch-roller
V
____
VAlJJ--LJLJ -
To clean the tape heads and path
Wipe the heads, pinch rollers, and the capstans with a
cotton swab moistened with alcohol every 10 hours of
use.
To clean the exterior
Use a soft cloth slightly moistened in water. Do not use
alcohol, benzine or thinner.
Page 6

Playing a Tape
^ Additional Information
Precautions
On power
Operate the unit only on 3V DC. Eor AC operation, use
the AC power adaptor recommended for the unit. Do not
use any other type. For battery operation, use two size
AA (R6) batteries.
1 Insert a cassette to the cassette holder.
2 Adjust the tape playback speed.
Set SPEED CONTROL to;
SLOW to play back a tape slower.
Center position to playback a tape at normal speed.
EAST to playback a tape faster.
3 Press ► PLAY then adjust the volume. There is a
raised dot to show the direction to turn down volume
beside VOL.
The tape starts playback from the side facing the
cassette holder (forward side) and ends after playing
back the other side (reverse side).
At the end of the tape, playback stops and the unit turns
off automatically.
To
Stop playback ■ STOP
Pause playback PAUSE —
Play back the side
facing away from the
cassette holder
Play back the other
side of the tape
Search forward
during playback
(CUE)
Search backward
during playback
(REVIEW)
Fast forward*
Rewind’
Start recording
during playback
Press or slide
Slide DIR so that the REV indicator
turns green, then press ►PLAY.
DIR
Press and hold ►► FF/CUE and release
it at the point you want
Press and hold ◄◄ REW/REVIEW and
release it at the point you want
►► FF/CUE during stop
◄◄ REW/REVIEW during stop
• REC
On the unit
• Do not leave the unit in a location near heat sources, or
ir
in a place subject to direct sunlight, excessive dust or
mechanical shock.
• Should any solid object or liquid fall into the unit,
remove the batteries or disconnect the AC power
adaptor, and have the unit checked by qualified
personnel before operating it any further.
• If the unit has not been used for a long time, set it in the
playback mode and warm it up for a few minutes
before inserting a tape.
Keep personal credit cards using magnetic coding or
spring-wound watches etc. away from the unit to prevent
possible damage from the magnet used for the speaker.
On tapes longer than 90 minutes
We do not recommend the use of tapes longer than 90
minutes except for a long continuous recording or
playback. They are very thin and tend to be stretched
easily.
If you have any questions or problems concerning your
unit, please consult your nearest Sony dealer.
At the end of fast forward or rewind, the tape stops and the
power turns off automatically.
 Loading...