

Page 1

Search
VAIO User Guide VAIO Duo SVJ2021 Series Back | Back to Top
Troubleshooting
Read This First
How to Use
Parts Description
Setup
Network / Internet
Connections
Settings
Playback
Backup / Recovery
Security
Other Operations
Notifications
Congratulations on your purchase of this VAIO(R) computer.
About your VAIO computer’s configuration
To find out about the configuration of your VAIO computer, visit the Sony online support
website. [Details]
Some features, options, and supplied items may not be available on your VAIO computer.
Features
Available features vary depending on the model or options you selected. Not all features
described in this manual are available depending on your model.
Illustrations
Illustrations, photos, or screenshots in this manual may look slightly different depending on
the model or options you selected.
Apps
The preinstalled apps may vary depending on the model or options you selected. The apps
described in this manual may not be preinstalled on your VAIO computer.
Supplied manuals
The following manuals are supplied with your VAIO computer.
On-screen documentation
User Guide - Introduction Version [Details]
A preinstalled manual with limited information of your VAIO computer, focused on
support and Internet connection. The User Guide - Introduction Version is
replaced with a complete version of the User Guide (this manual), after update.
User Guide (this manual)
General information and operation instructions about your VAIO computer including
support and troubleshooting information
Printed documentation
Quick Start Guide
An overview of how to set up and get started with your VAIO computer
Recovery, Backup and Troubleshooting Guide
Information on how to recover and back up your VAIO computer, as well as
troubleshooting information
Safety Regulations
Read carefully before activating the wireless functions such as the wireless LAN and
BLUETOOTH technology.
Other references
Windows Help and Support [Details]
A comprehensive resource for practical advice, tutorials, and demonstrations to help you
learn to use your VAIO computer.
App help files
Page 2
App help files may be included with the preinstalled apps on your VAIO computer. You
may be able to access the help files from the help menu.
Notice
Copyright 2012 Sony Corporation. All rights reserved.
This manual and the software described herein, in whole or in part, may not be
reproduced, translated, or reduced to any machine-readable form without prior written
approval.
Sony Corporation provides no warranty with regard to this manual, the software, or other
information contained herein and hereby expressly disclaims any implied warranties or
merchantability or fitness for any particular purpose with regard to this manual, the
software, or such other information. In no event shall Sony Corporation be liable for any
incidental, consequential, or special damages, whether based on tort, contract, or
otherwise, arising out of or in connection with this manual, the software, or other
information contained herein or the use thereof.
In the manual, the (TM) or (R) marks are not specified.
Sony Corporation reserves the right to make any modification to this manual or the
information contained herein at any time without notice.
The software described herein is governed by the terms of a separate user license
agreement.
Sony Corporation is not liable and will not compensate for any lost recordings made to
your VAIO computer, external recording media, or recording devices or any relevant
losses, including when recordings are not made due to reasons including the computer
failure, or when the contents of a recording are lost or damaged as a result of the
computer failure or repair undertaken to the computer. Sony Corporation will not restore,
recover, or replicate the recorded contents made to the computer, external recording
media, or recording devices under any circumstances.
Features and specifications are subject to change without notice.
© 2012 Sony Corporation
Related Topic
About Online Support Website
Page 3
Search
VAIO User Guide VAIO Duo SVJ2021 Series Back | Back to Top
Troubleshooting
Welcome
How to Use
Parts Description
Setup
Network / Internet
Connections
Settings
Playback
Backup / Recovery
Security
Other Operations
Notifications
Congratulations on the purchase of this VAIO(R) computer.
This User Guide - Introduction Version provides you with limited information about
your VAIO computer. To update this file to the complete version of the User Guide, see
Updating the User Guide to the Latest Version [Details] for more information.
Your VAIO computer does not support touch screen operations depending on the model you
purchased. In such a case, use a mouse for computer operations.
Read this first
Updating the User Guide to the Latest Version
Connecting to the Internet
Updating Your VAIO Computer
Solving Problems on Your VAIO Computer Using VAIO Care
Finding Support Information
Windows 8 basic operations
Overview
Opening the Charms Bar
Searching/Starting Apps or Files
Showing the Start Screen
Showing the Running Apps List
Showing App commands or All Apps
Activating Sleep Mode or Shutting Down or Restarting Your VAIO Computer
Trademarks
^ Go to top
Read This First
Updating the User Guide to the Latest Version
By updating this User Guide - Introduction Version through the Internet, you can get
the complete version of the User Guide with detailed information on your VAIO computer.
Once the User Guide is updated to the complete version, you can access it anytime even
if you are offline.
With the complete version of the User Guide, you can view information about:
Parts description
Feature and operating instructions
Precautions
Troubleshooting information
Windows 8 basic operations
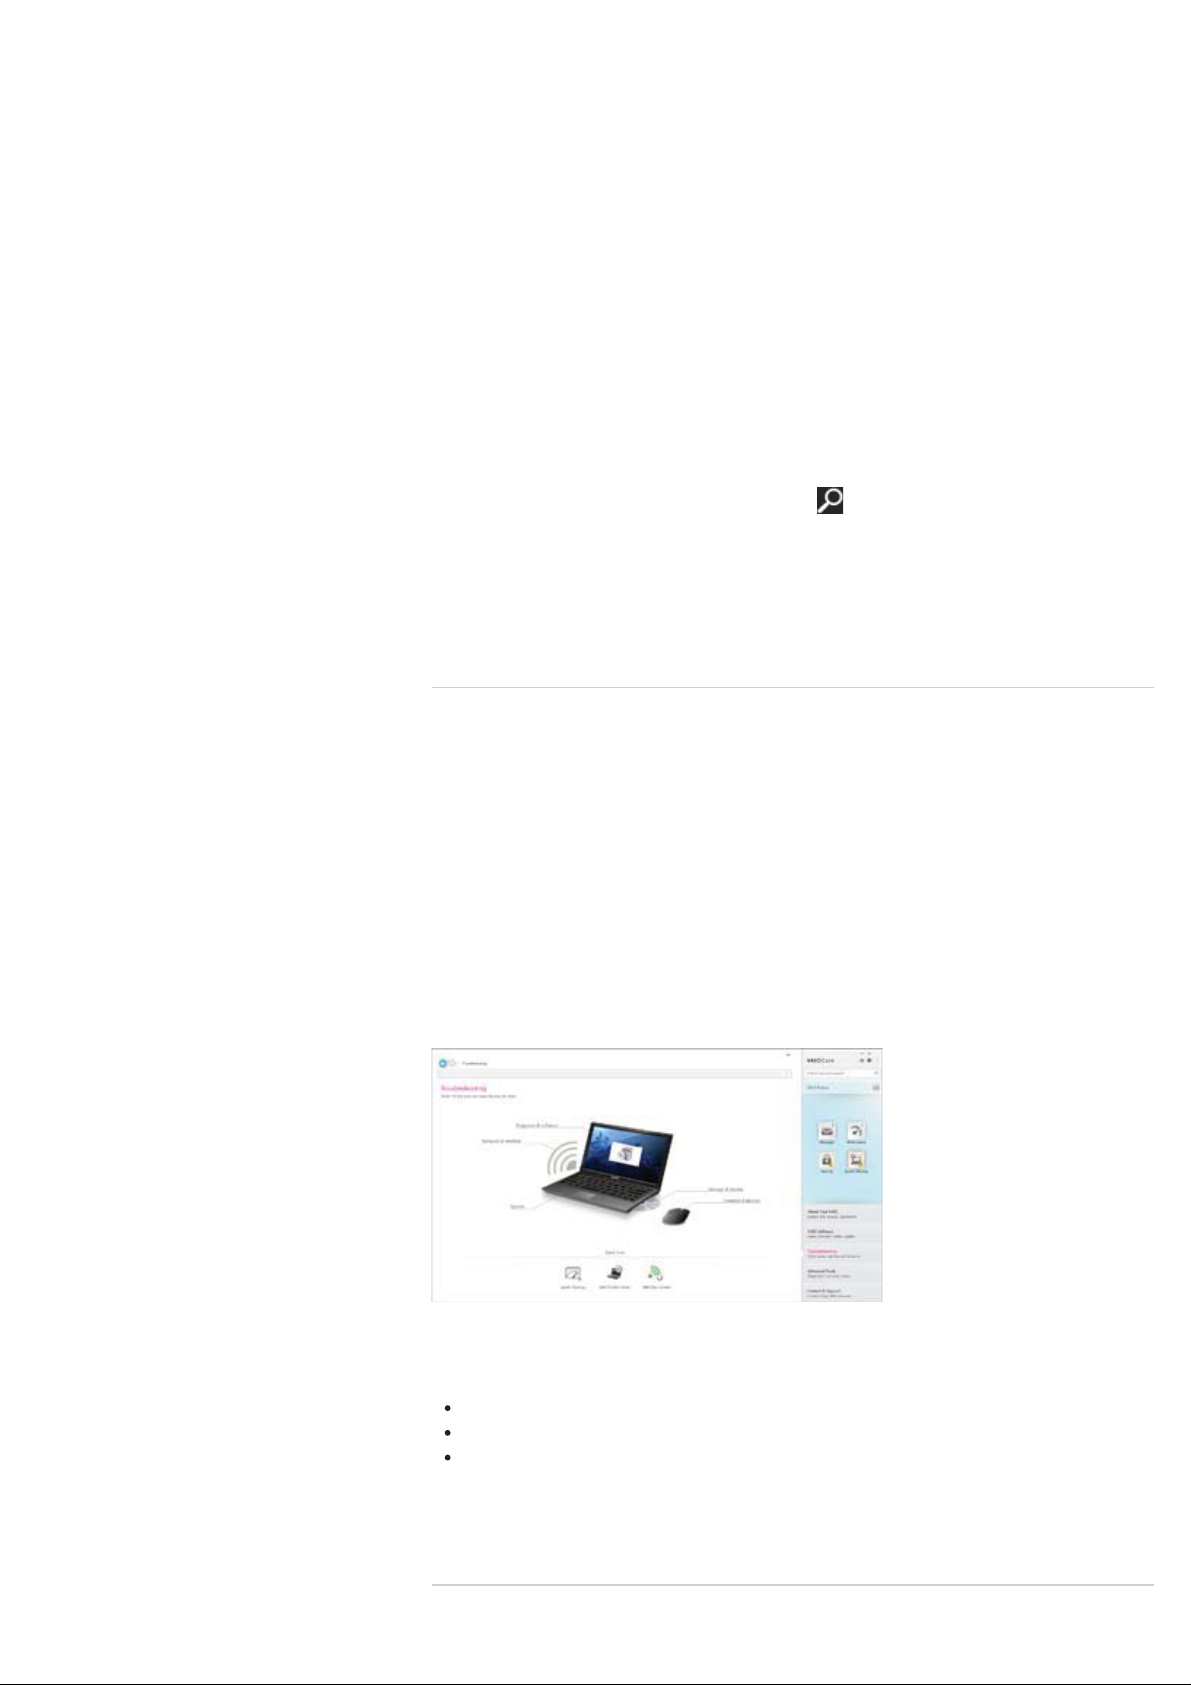
Below is an example of a screenshot in English.
Page 4
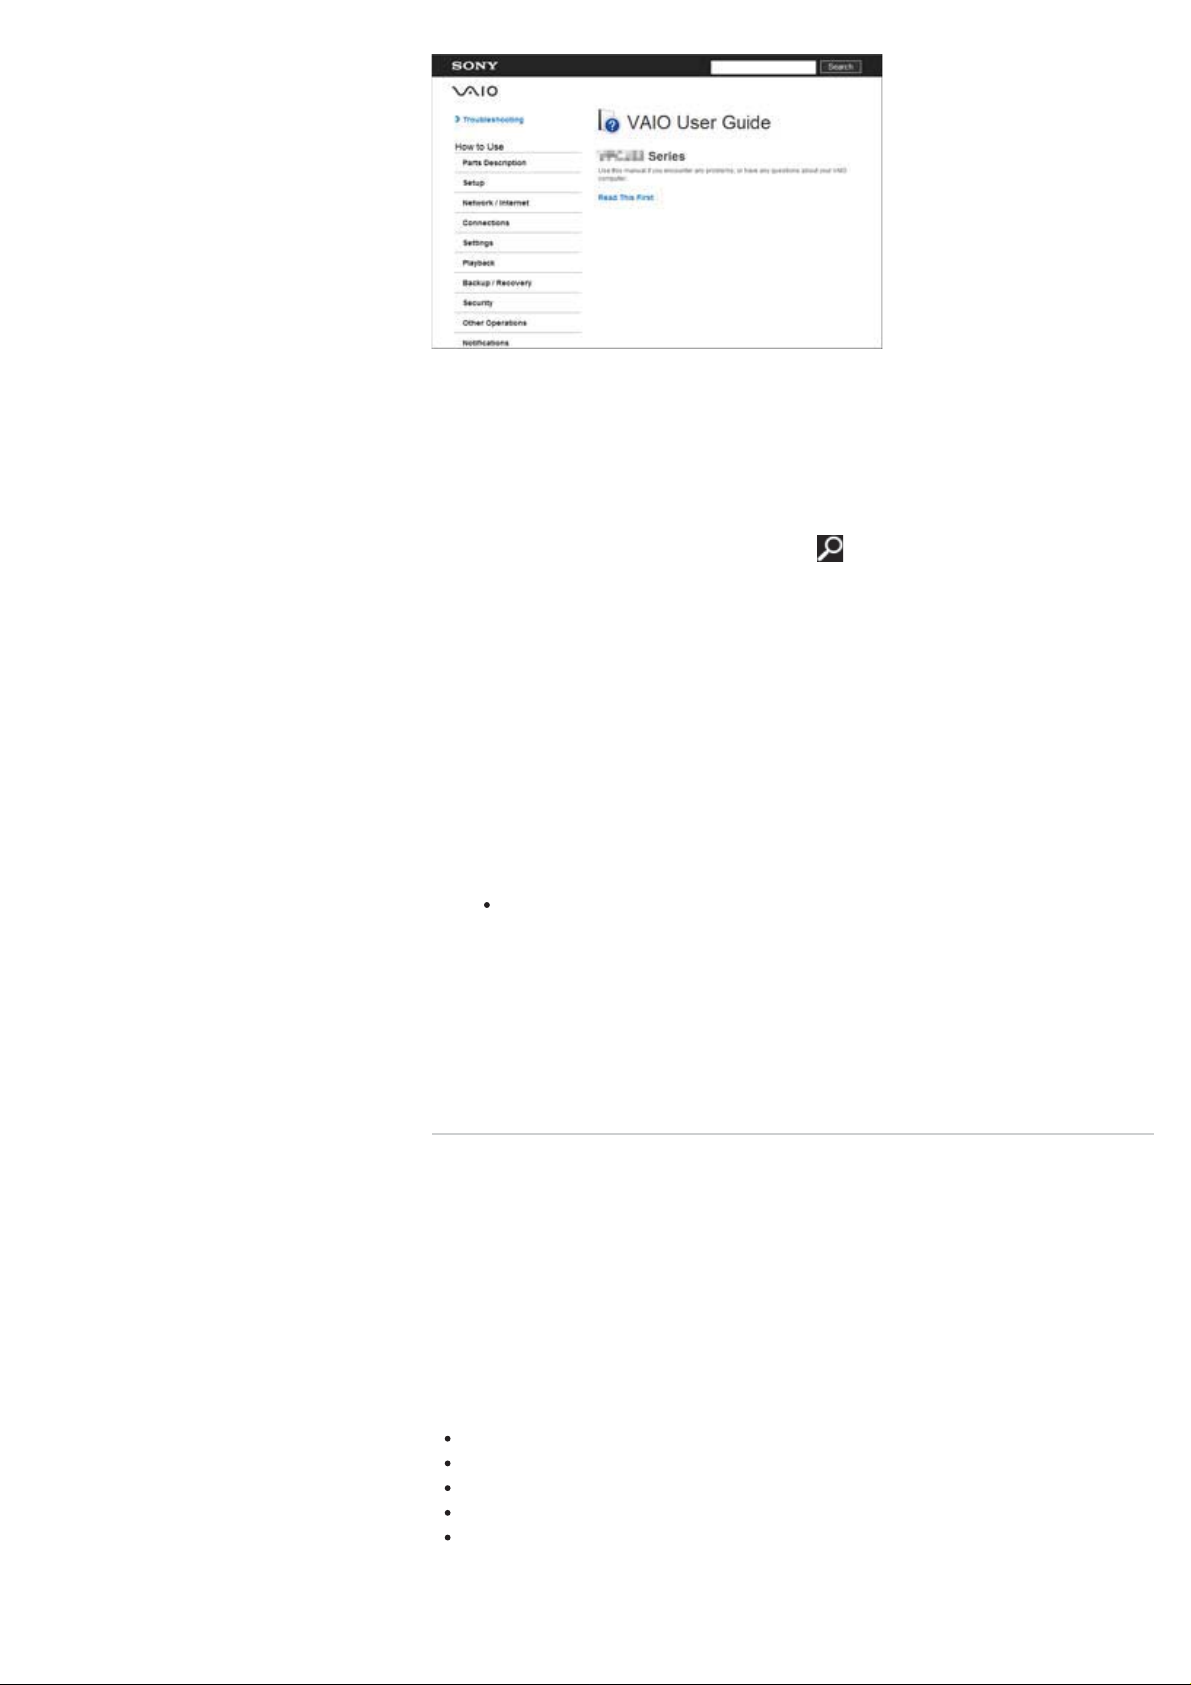
* Design and content of the screen are subject to change.
To get the complete version of the User Guide
1. Connect your VAIO computer to the Internet. [Details]
2. Exit this User Guide - Introduction Version.
3. Open the Charms bar [Details], then select
4. Select Apps.
5. Enter “VAIO Manual” in the Search box.
6. Select VAIO Manual from the list.
7. After a window prompting you to update the manual appears, follow the on-screen
instructions to complete the updates.
This file will automatically update to the complete version of the User Guide.
If the window prompting you to update the User Guide does not appear, make sure
your VAIO computer is connected to the Internet and repeat the above steps.
If the update window still does not appear, launch VAIO Update so you can find and
download the User Guide manually. See Updating Your VAIO Computer
[Details] for more information on VAIO Update.
Hint
It may take some time to complete the update.
(Search).
To view help files for Windows OS and app operations
When you have trouble operating your VAIO computer, try referring to Windows Help
and Support or help files included with your apps.
To access Windows Help and Support, open the Charms bar, then enter “Help and
Support” in the Search box. [Details]
^ Go to top
Connecting to the Internet
You will need to connect your VAIO computer to the Internet before updating to the complete
version of the User Guide.
Before connecting to the Internet
Before using the Internet, you will need to sign up with an Internet Service Provider (ISP)
and set up devices required for connecting your VAIO computer to the Internet.
The following types of Internet connection services may be available from your ISP:
Fiber to the Home (FTTH)
Digital Subscriber Line (DSL)
Cable modem
Satellite
Dial-up
For more information on devices required for Internet access and how to connect your VAIO
computer to the Internet, ask your ISP.
Page 5
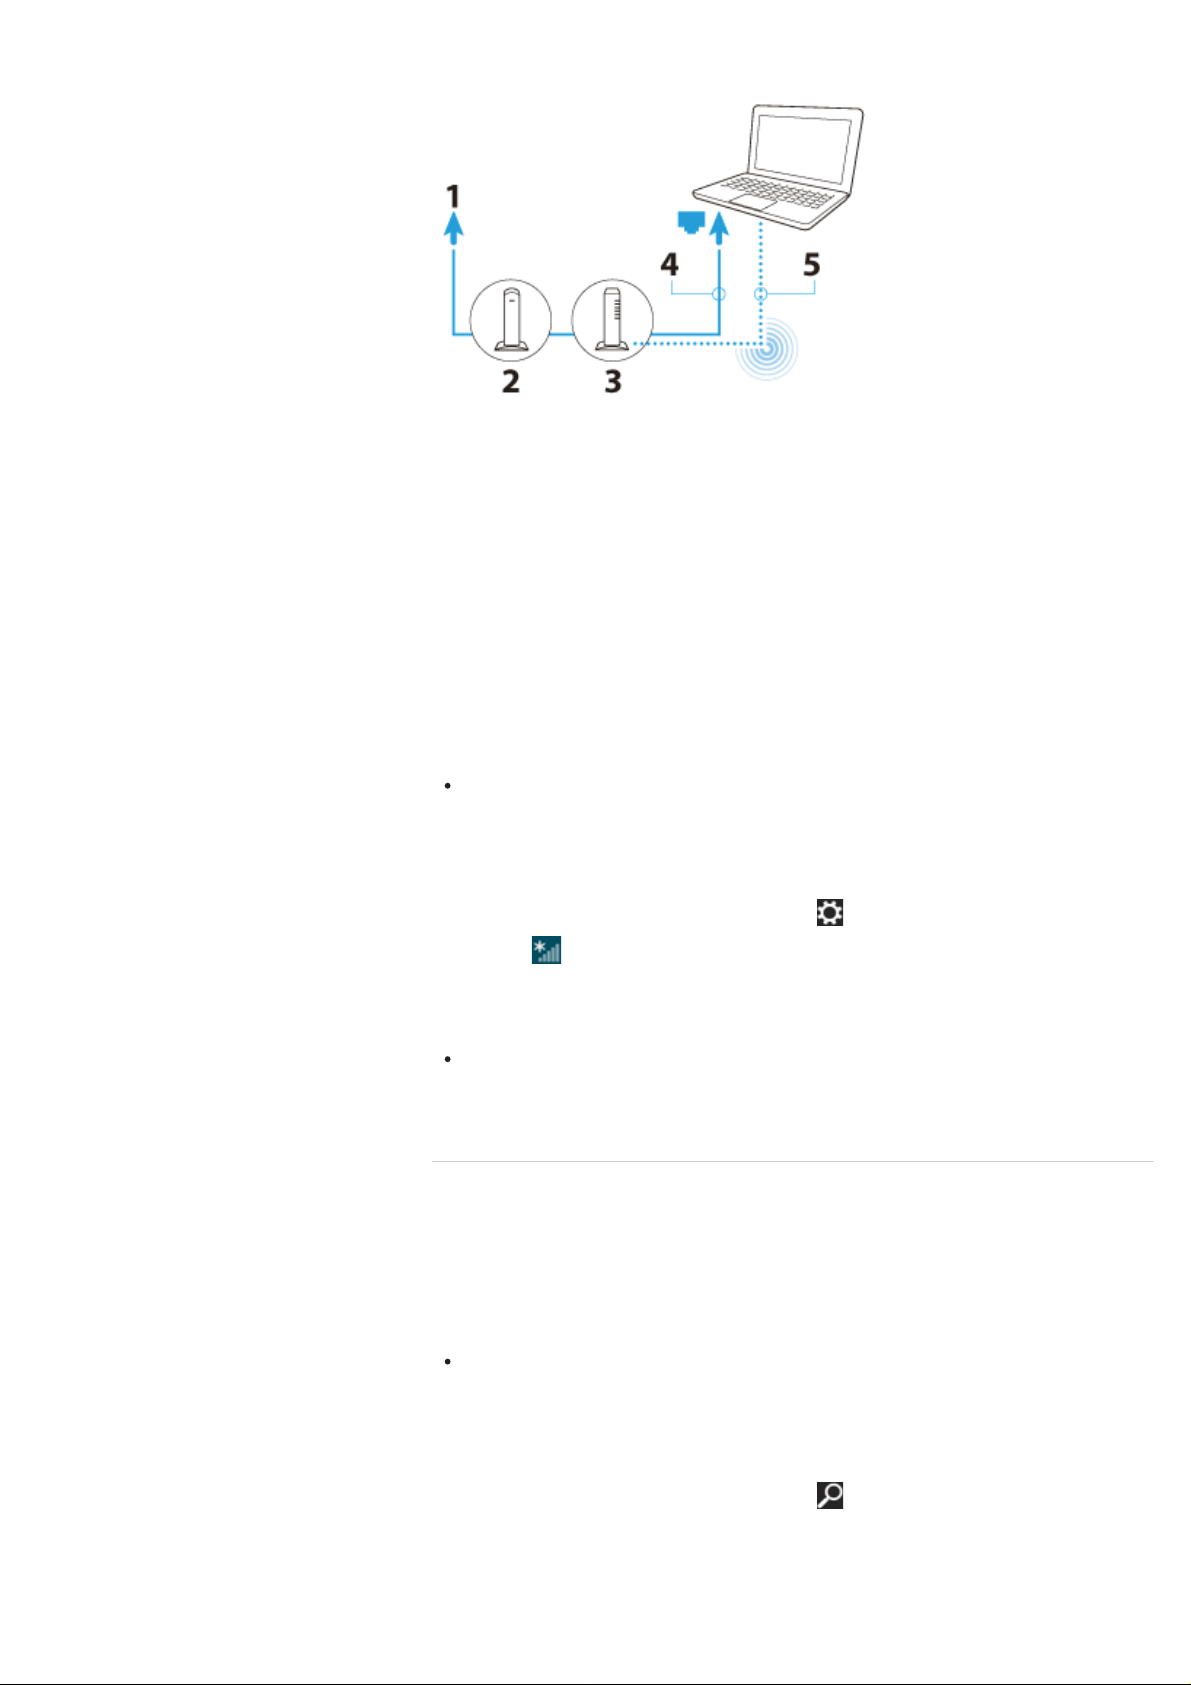
The following is one of the Internet connection methods as an example.
1. Internet
2. Modem
3. Router/access point
4. LAN cable (not supplied)
5. Wireless LAN
To use the network (LAN)
You can connect your VAIO computer to networks with a LAN cable. Connect one end of a
LAN cable to the LAN port on the computer and the other end to your network. For detailed
settings and devices required for LAN access, ask your network administrator.
Note
The connection, setting method, or required devices may vary depending on your
network environment.
To use the wireless LAN network (Wi- Fi)
1. Open the Charms bar [Details], then select (Settings).
2. Select
3. Select your desired network from the list and @@Connect@@.
Note
For detailed information on network settings and devices, refer to the information from
your Internet Service Provider (ISP) or the manuals that came with your network
devices.
(Network).
^ Go to top
Updating Your VAIO Computer
Be sure to update your VAIO computer with the following apps to enhance the computer’s
efficiency, security, and functionality.
Note
Your VAIO computer must be connected to the Internet to download the updates.
To use Windows Update
Windows Update enables you to make your VAIO computer more stable.
1. Open the Charms bar [Details], then select
2. Select Settings.
3. Enter “Windows Update” in the Search box.
4. Select Windows Update from the list.
(Search).
Page 6
5. Follow the on-screen instructions to complete the updates.
To use VAIO Update
VAIO Update automatically notifies you of new updates available on the Internet then
downloads and installs them on your VAIO computer.
1. Press the ASSIST button while your VAIO computer is on.
VAIO Care starts.
2. Select @@Maintenance@@ and VAIO Update.
3. Follow the on-screen instructions to complete the updates.
To update the antivirus app
Help protect your VAIO computer against security threats by keeping Internet security
programs current with the latest updates. You can download and install the updates from the
website of the manufacturer.
1. Open the Charms bar [Details], then select
2. Select Apps.
3. Enter the antivirus app name in the Search box.
4. Select the antivirus app from the list.
5. Follow the on-screen instructions to complete the updates.
(Search).
^ Go to top
Solving Problems on Your VAIO Computer Using
VAIO Care
With VAIO Care, you can regularly conduct performance checks and system tune-ups on
your VAIO computer to keep it running at optimum level. Launch VAIO Care whenever a
problem arises. VAIO Care will provide appropriate measures and support information to
solve the problem.
To launch VAIO Care
Press the ASSIST button while your VAIO computer is on.
Below is an example of a screenshot in English.
* Design and content of the screen are subject to change.
Hint
Alternatively, search VAIO Care on the Charms bar to launch VAIO Care.
Refer to the help file included with VAIO Care for more information.
Pressing the ASSIST button while your VAIO computer is off displays the VAIO Care
Rescue Mode screen. You can recover the computer by selecting @@Recover or
maintain your system@@ in case of emergency, for example, when Windows does
not start.
^ Go to top
Page 7

Finding Support Information
The Sony online support website provides instant access to information on commonly
encountered problems. You can find support information such as the support website URL in
Contact & Support on VAIO Care or the supplied Quick Start Guide.
^ Go to top
Windows 8 Basic Operations
Overview
1. Start screen
Main app tiles and the shortcut to the desktop
2. Charms bar
@@Search@@, @@Share@@, @@Start@@, @@Devices@@,
@@Settings@@
3. @@App bar@@
@@Save@@, @@Edit@@, @@All apps@@, other operations (Alternatively, the
app bar appears at the top of the screen.)
4. Running apps list
Opening the Charms Bar
Touch screen operation
^ Go to top
Swipe your finger from the right edge of the screen to the center.
Mouse operation
Page 8
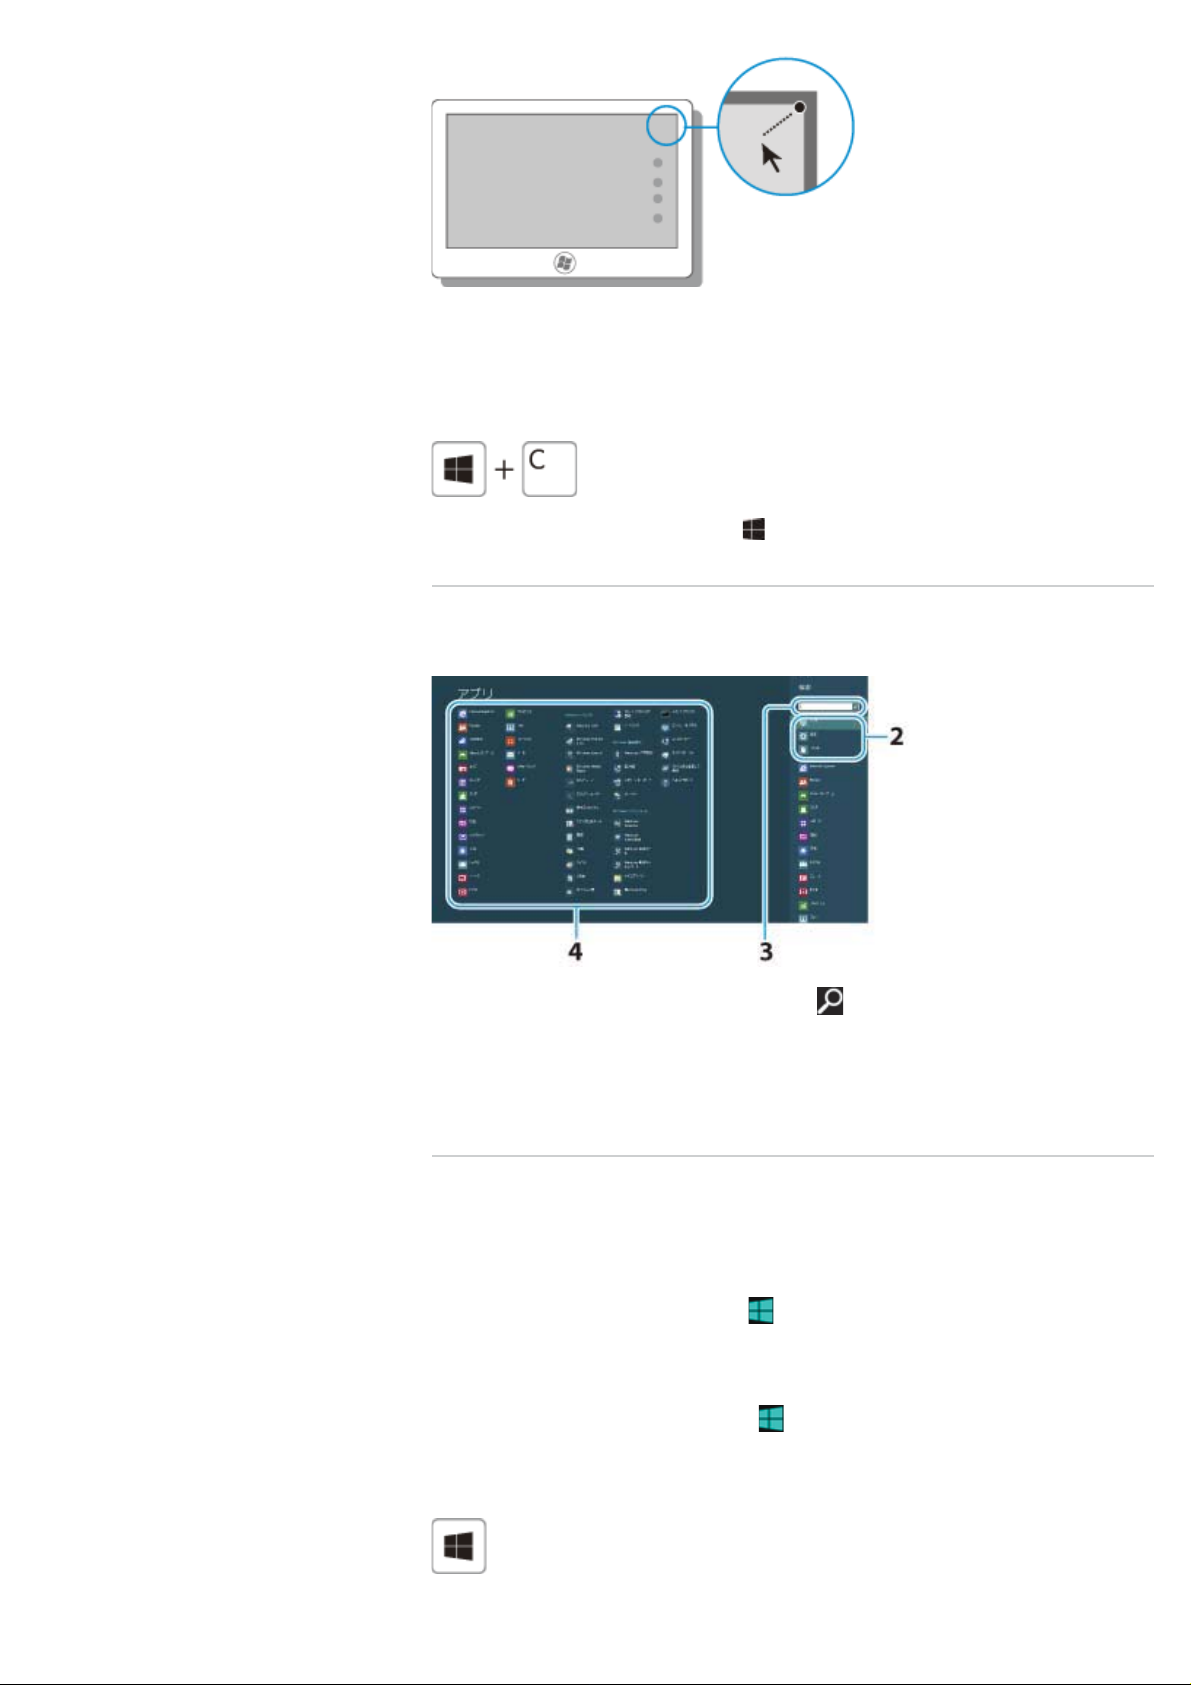
Place the pointer at the top right corner of the screen, then move the pointer down when the
Charms appear.
Keyboard operation
Press the C key while holding down the (Windows) key.
^ Go to top
Searching/Starting Apps or Files
1. Open the Charms bar [Details], then select (Search).
2. Select Apps or @@File@@.
3. Enter keywords in the Search box.
4. Select your desired app or file.
Showing the Start Screen
Touch screen operation
Open the Charms bar [Details], then tap (Start).
Mouse operation
Open the Charms bar [Details], then click (Start).
Keyboard operation
^ Go to top
Page 9
Press the (Windows) key.
^ Go to top
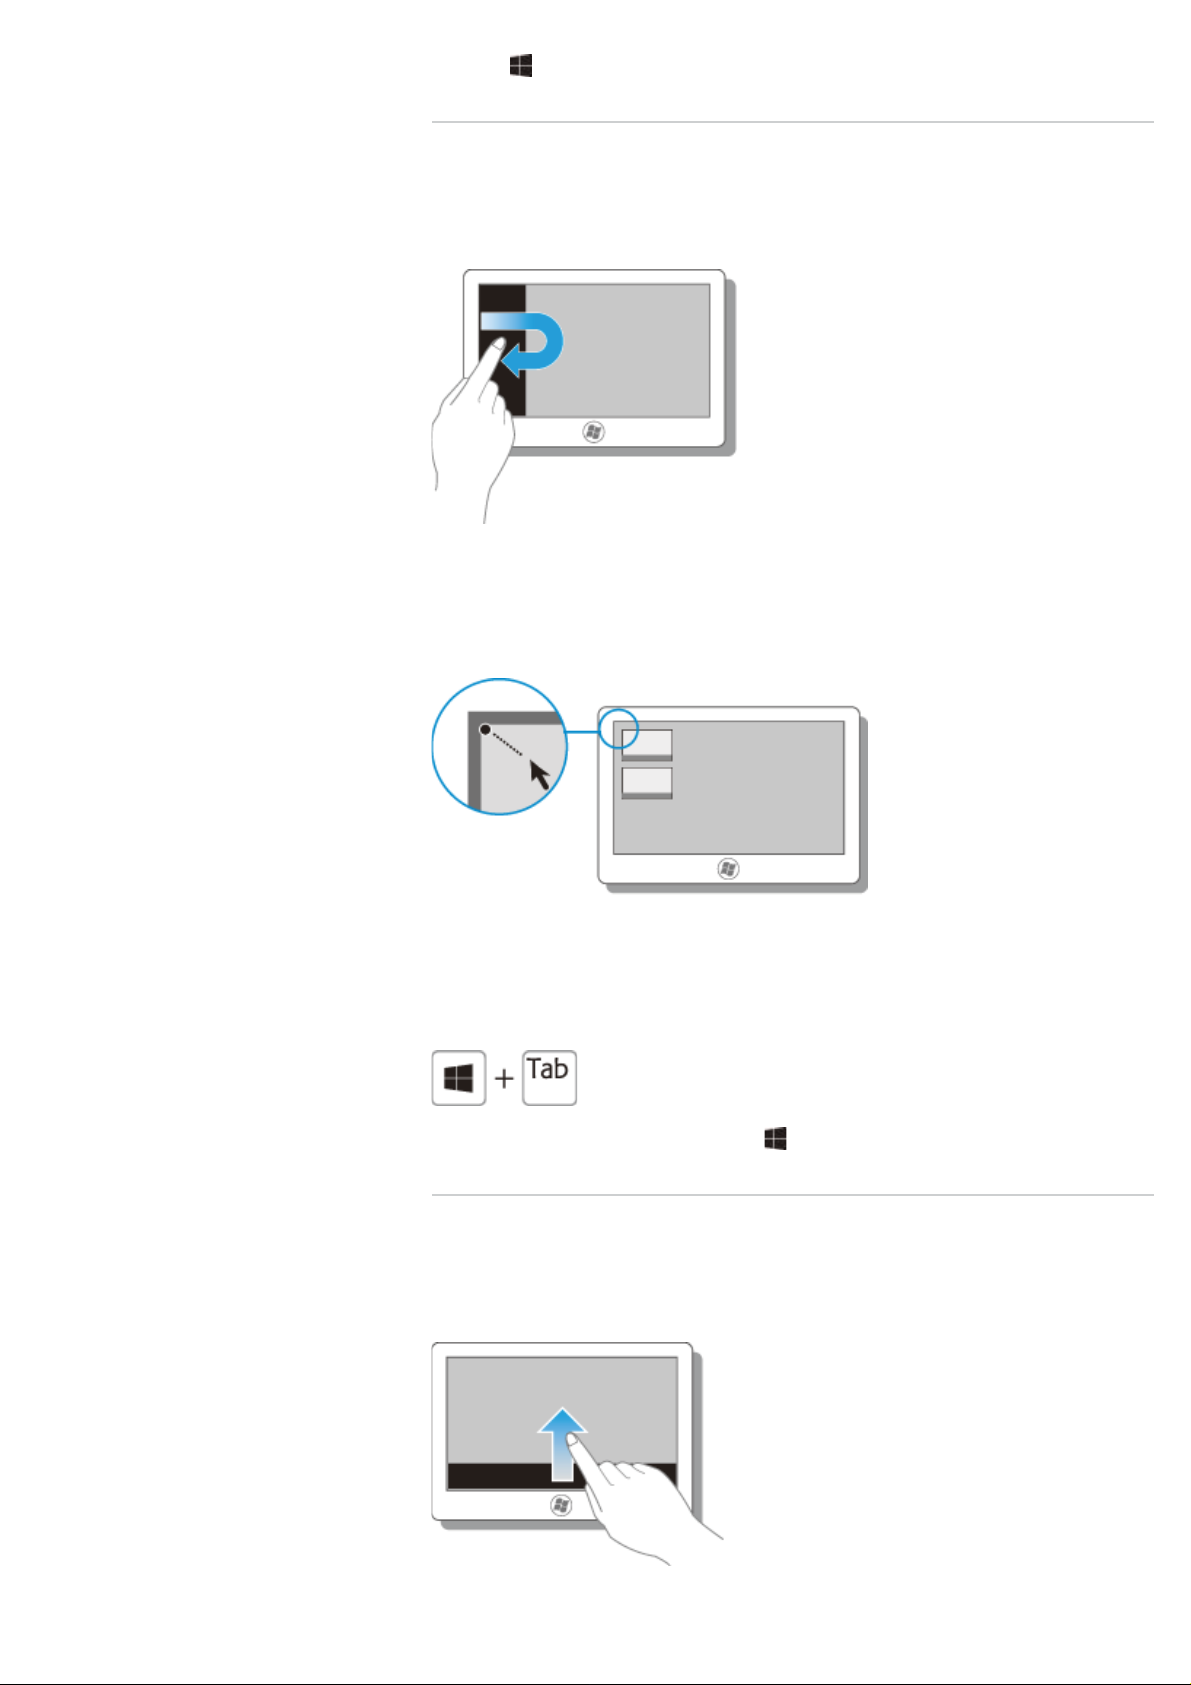
Showing the Running Apps List
Touch screen operation
Slide your finger from the left edge of the screen to show an app icon(s), then slide the
finger back to the edge.
Mouse operation
Place the pointer at the top left corner of the screen to show an app icon(s), then move the
pointer down.
Keyboard operation
Press the Tab key while holding down the (Windows) key.
^ Go to top
Showing App commands or All Apps
Touch screen operation
Swipe your finger from the bottom or top edge of the screen to the center.
Page 10
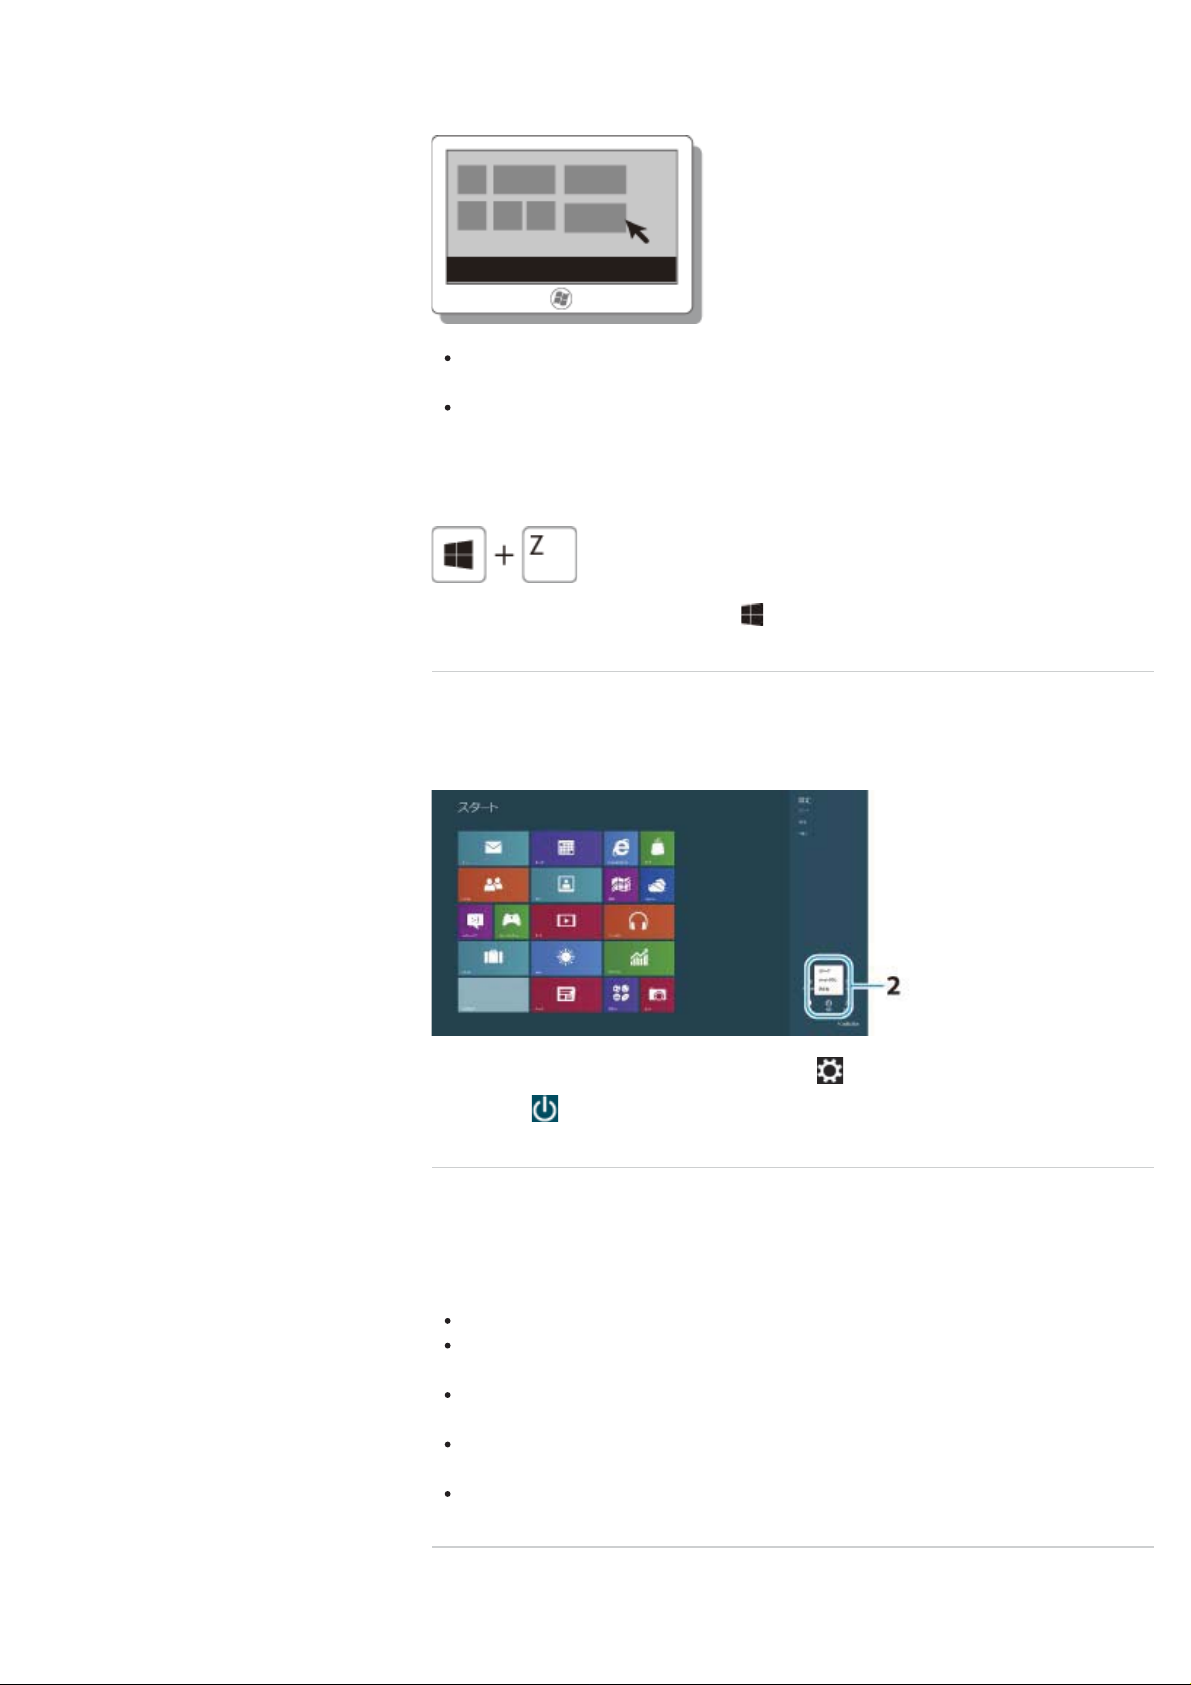
Mouse operation
To show @@App commands@@:
Right-click. (When the Start screen is displayed, select an app and right-click.)
To show @@All apps@@:
Right-click on the Start screen.
Keyboard operation
Press the Z key while holding down the (Windows) key.
^ Go to top
Activating Sleep Mode or Shutting Down or
Restarting Your VAIO Computer
1. Open the Charms bar [Details], then select (Settings).
2. Select
(Power) and Sleep, Shut down, or Restart.
Trademarks
^ Go to top
SONY and the SONY logo are registered trademarks of Sony Corporation.
VAIO, the VAIO logo, and other Sony product or service names are trademarks or
registered trademarks of Sony Corporation or any of its affiliates.
Windows and the Windows logo are either registered trademarks or trademarks of
Microsoft Corporation in the United States and/or other countries.
All other names of system, products, and services are trademarks of their respective
owners.
In the manual, the TM or (R) marks are not specified.
^ Go to top
Copyright 2012 Sony Corporation
Page 11

© 2012 Sony Corporation
Page 12
Search
VAIO User Guide VAIO Duo SVJ2021 Series Back | Back to Top
Troubleshooting
Checking Supplied Items
How to Use
Parts Description
Setup
Network / Internet
Connections
Settings
Playback
Backup / Recovery
Security
Other Operations
Notifications
Check all items packed with the product before use.
Wireless keyboard*
USB keyboard*
Wireless mouse*
USB mouse*
Remote commander*
AA batteries
Alkaline batteries for the keyboard and mouse (2)*
Manganese batteries for the remote commander (2)*
* Not supplied with all models. Availability depends on your computer’s specifications.
AC adapter
Power cord
Hint
No Recovery Media is included because your VAIO computer can be recovered using
data stored in the hard disk drive or SSD. See Recovering from the Recovery
Area for more information.[Details]
© 2012 Sony Corporation
Page 13
Search
VAIO User Guide VAIO Duo SVJ2021 Series Back | Back to Top
Troubleshooting
Parts and Controls on the Front
How to Use
Parts Description
Setup
Network / Internet
Connections
Settings
Playback
Backup / Recovery
Security
Other Operations
Notifications
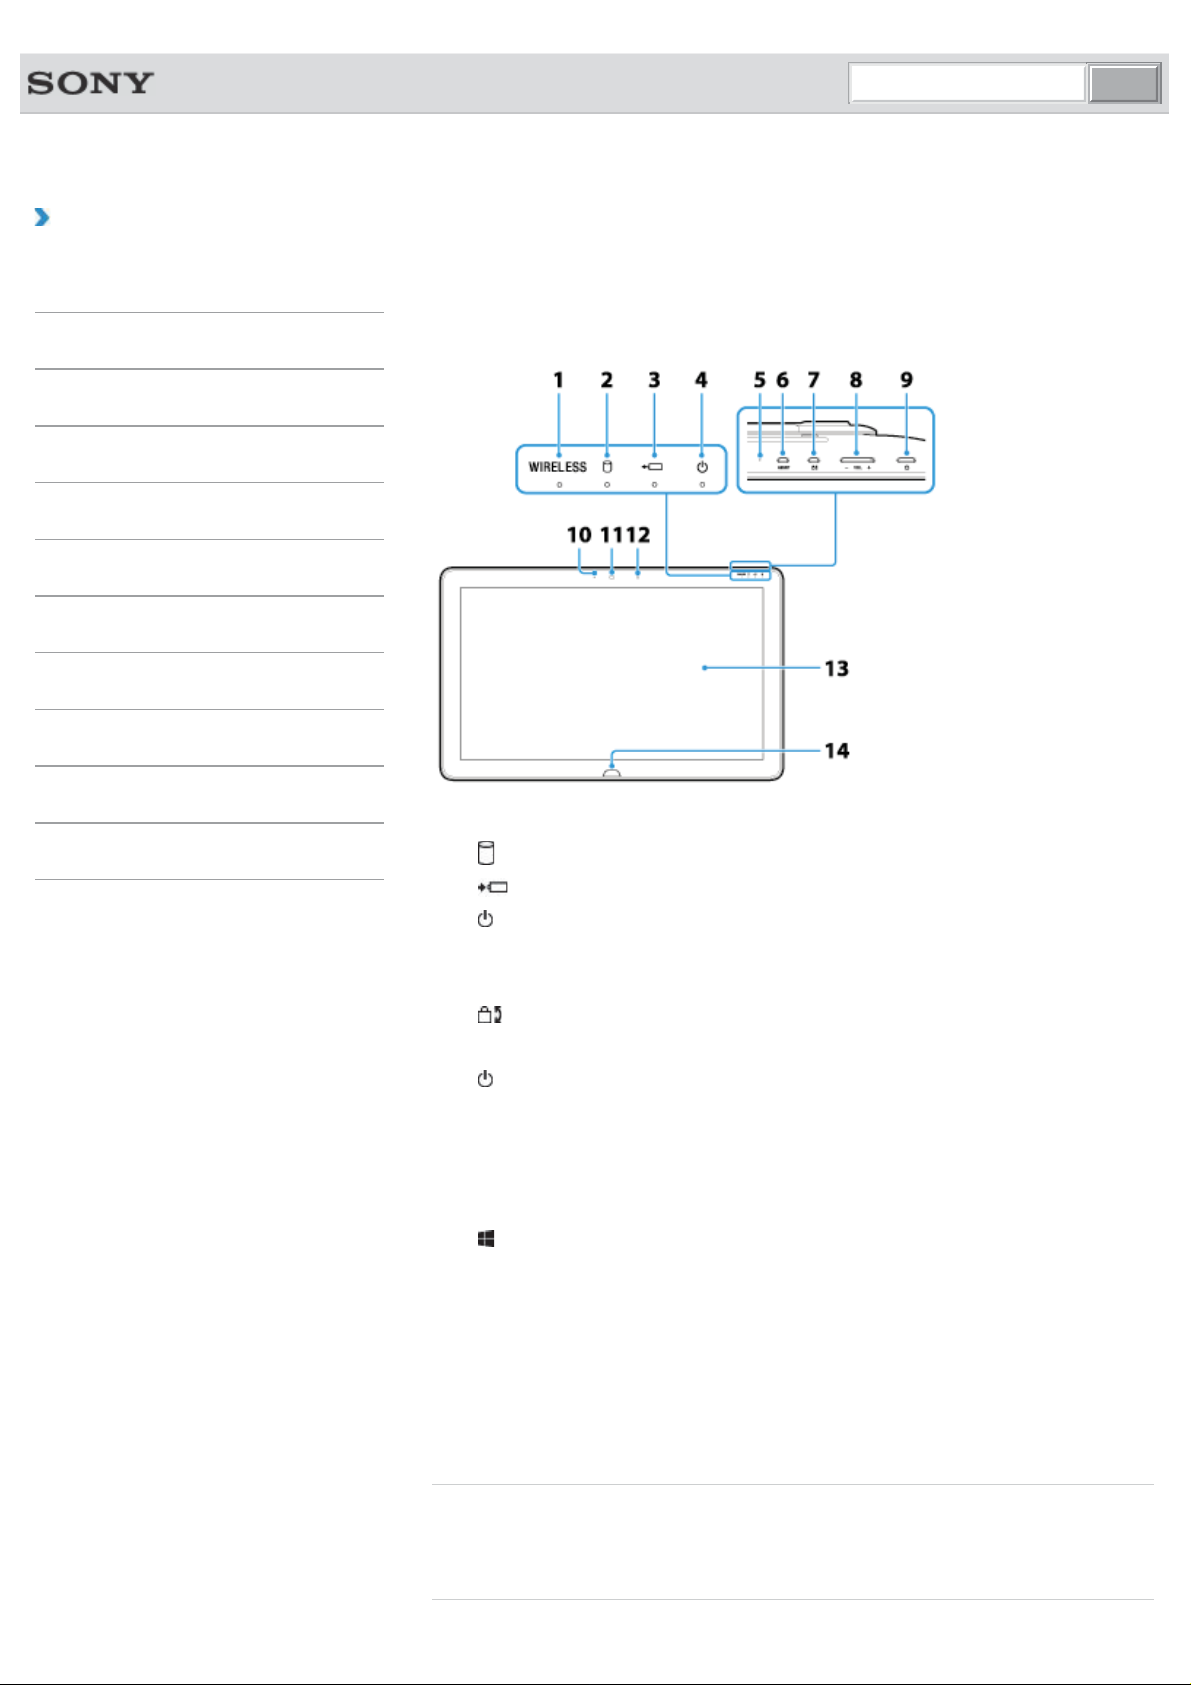
Describes the features on the front of the VAIO computer, such as buttons and indicator
lights.
1. WIRELESS indicator [Details]
2.
Disc drive indicator
Charge indicator [Details]
3.
4.
Power indicator [Details]
5. Built-in microphone (monaural)
6. ASSIST button [Details]
7.
Rotation lock button
8. VOL (Volume) buttons
9.
Power button [Details]
10. Built-in camera indicator [Details]
11. Built-in camera [Details]
12. Ambient light sensor [Details]
13. Touch screen [Details]
14.
Windows button
Notes on the LCD screen
The LCD screen is manufactured using high-precision technology. You may, however, see
tiny black points and/or bright points (red, blue, or green) that continuously appear on the
LCD screen. The ratio of defective pixels to all available pixels of the LCD screen is less
than 0.0006 %. Also, depending on the viewing angle, uneven stripes of changes in color
and luminance may appear. These are normal results of the LCD screen construction and do
not indicate a malfunction. Take note that returns and replacements are not accepted.
Related Topic
Parts and Controls on the Sides
Parts and Controls on the Back
Page 14

© 2012 Sony Corporation
Page 15
Search
VAIO User Guide VAIO Duo SVJ2021 Series Back | Back to Top
Troubleshooting
Parts and Controls on the Sides
How to Use
Parts Description
Setup
Network / Internet
Connections
Settings
Playback
Backup / Recovery
Security
Other Operations
Notifications
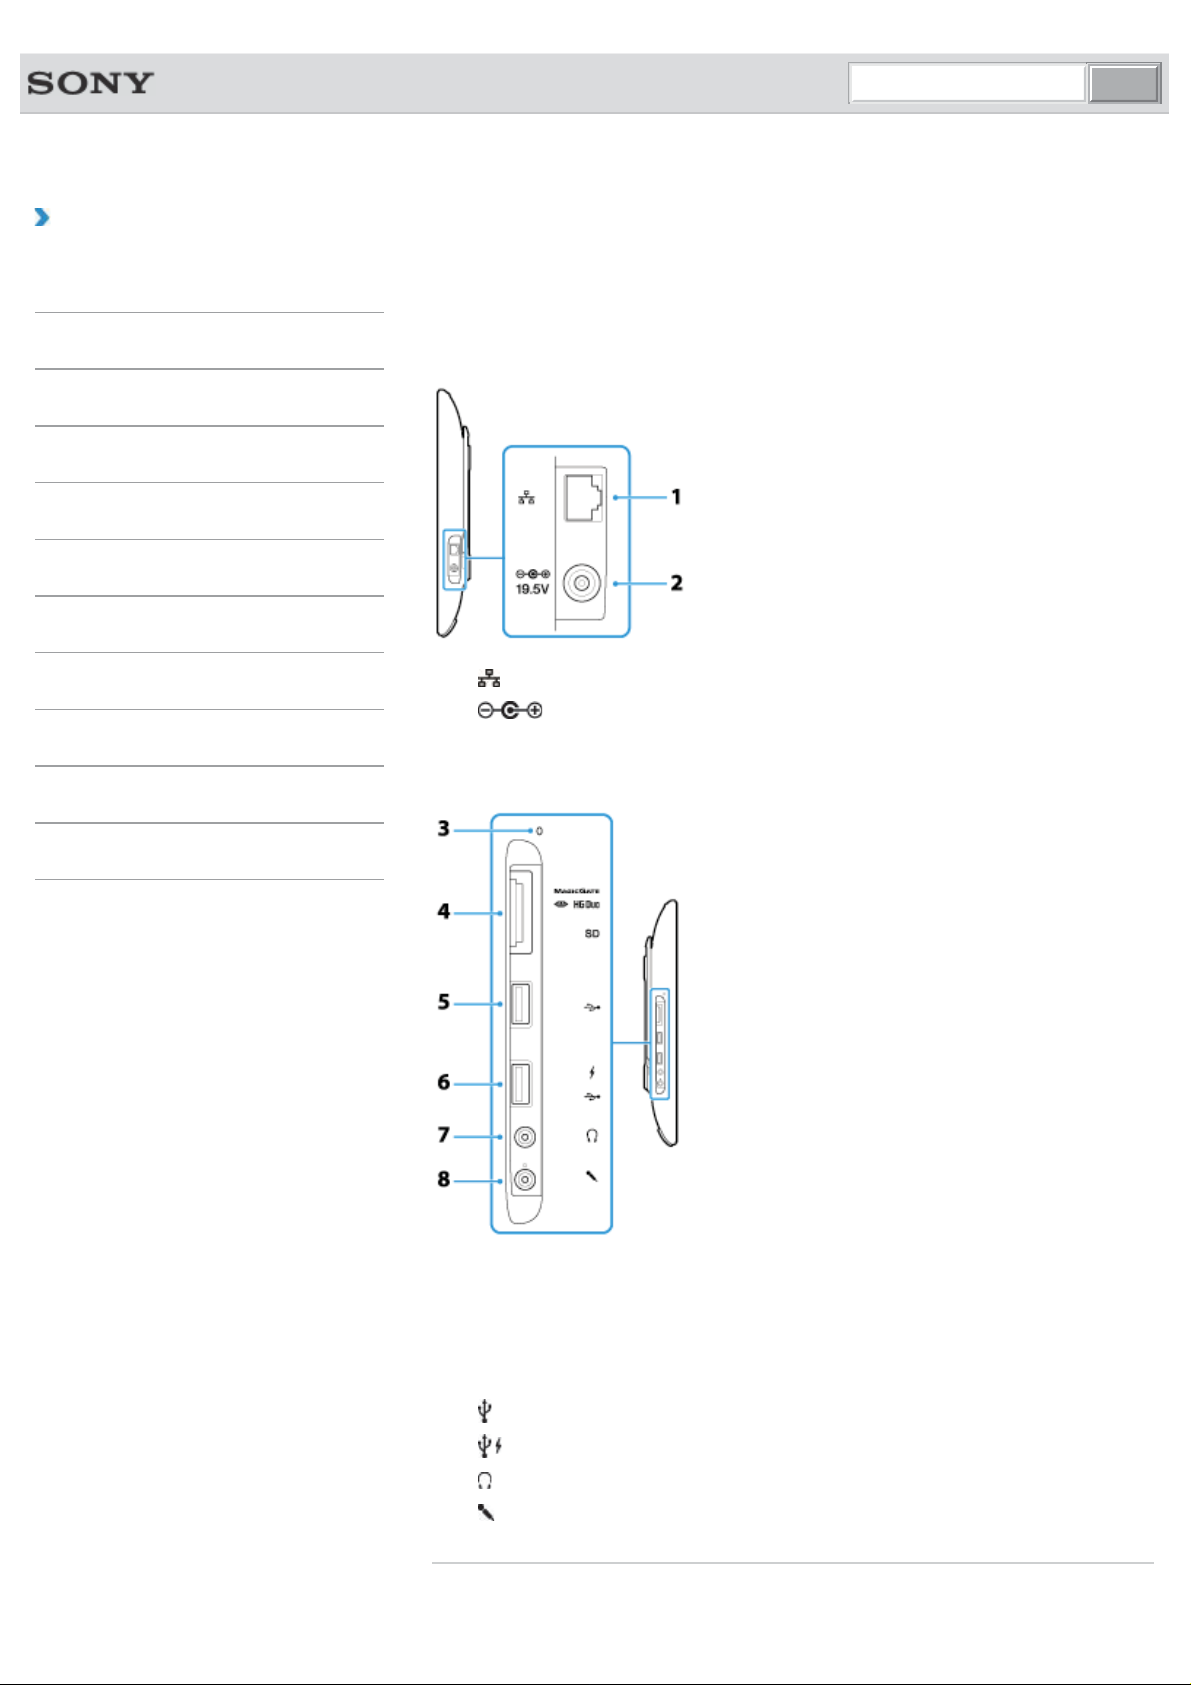
Describes the features on the sides of the VAIO computer, such as connection ports.
Right side
1. LAN port [Details]
2.
Left side
DC IN port [Details]
3. Media access indicator (“Memory Stick Duo” [Details], SD memory card [Details])
4. “Memory Stick Duo” / SD memory card combined slot (“Memory Stick Duo” [Details],
SD memory card [Details])
“Memory Stick Duo” and an SD memory card cannot be inserted into the slot
simultaneously.
USB port [Details]
5.
USB port [Details]
6.
Headphones jack [Details]
7.
8.
Microphone jack [Details]
Related Topic
Page 16

© 2012 Sony Corporation
Parts and Controls on the Front
Parts and Controls on the Back
Page 17

Search
VAIO User Guide VAIO Duo SVJ2021 Series Back | Back to Top
Troubleshooting
Parts and Controls on the Back
How to Use
Parts Description
Setup
Network / Internet
Connections
Settings
Playback
Backup / Recovery
Security
Other Operations
Notifications
Describes the features on the back of the VAIO computer, such as connection ports.
1. Air exhaust vent
2.
3. Rating plate
4. Built-in speakers (stereo)
5. Air intake vent
Note
NFC port
There is a rating plate on the back or in the back panel of the computer.
The air exhaust vent may get hot during use. Take care when touching it.
© 2012 Sony Corporation
Related Topic
Parts and Controls on the Front
Parts and Controls on the Sides
Page 18
Search
VAIO User Guide VAIO Duo SVJ2021 Series Back | Back to Top
Troubleshooting
Parts and Controls of the Keyboard
How to Use
Parts Description
Setup
Network / Internet
Connections
Settings
Playback
Backup / Recovery
Security
Other Operations
Notifications
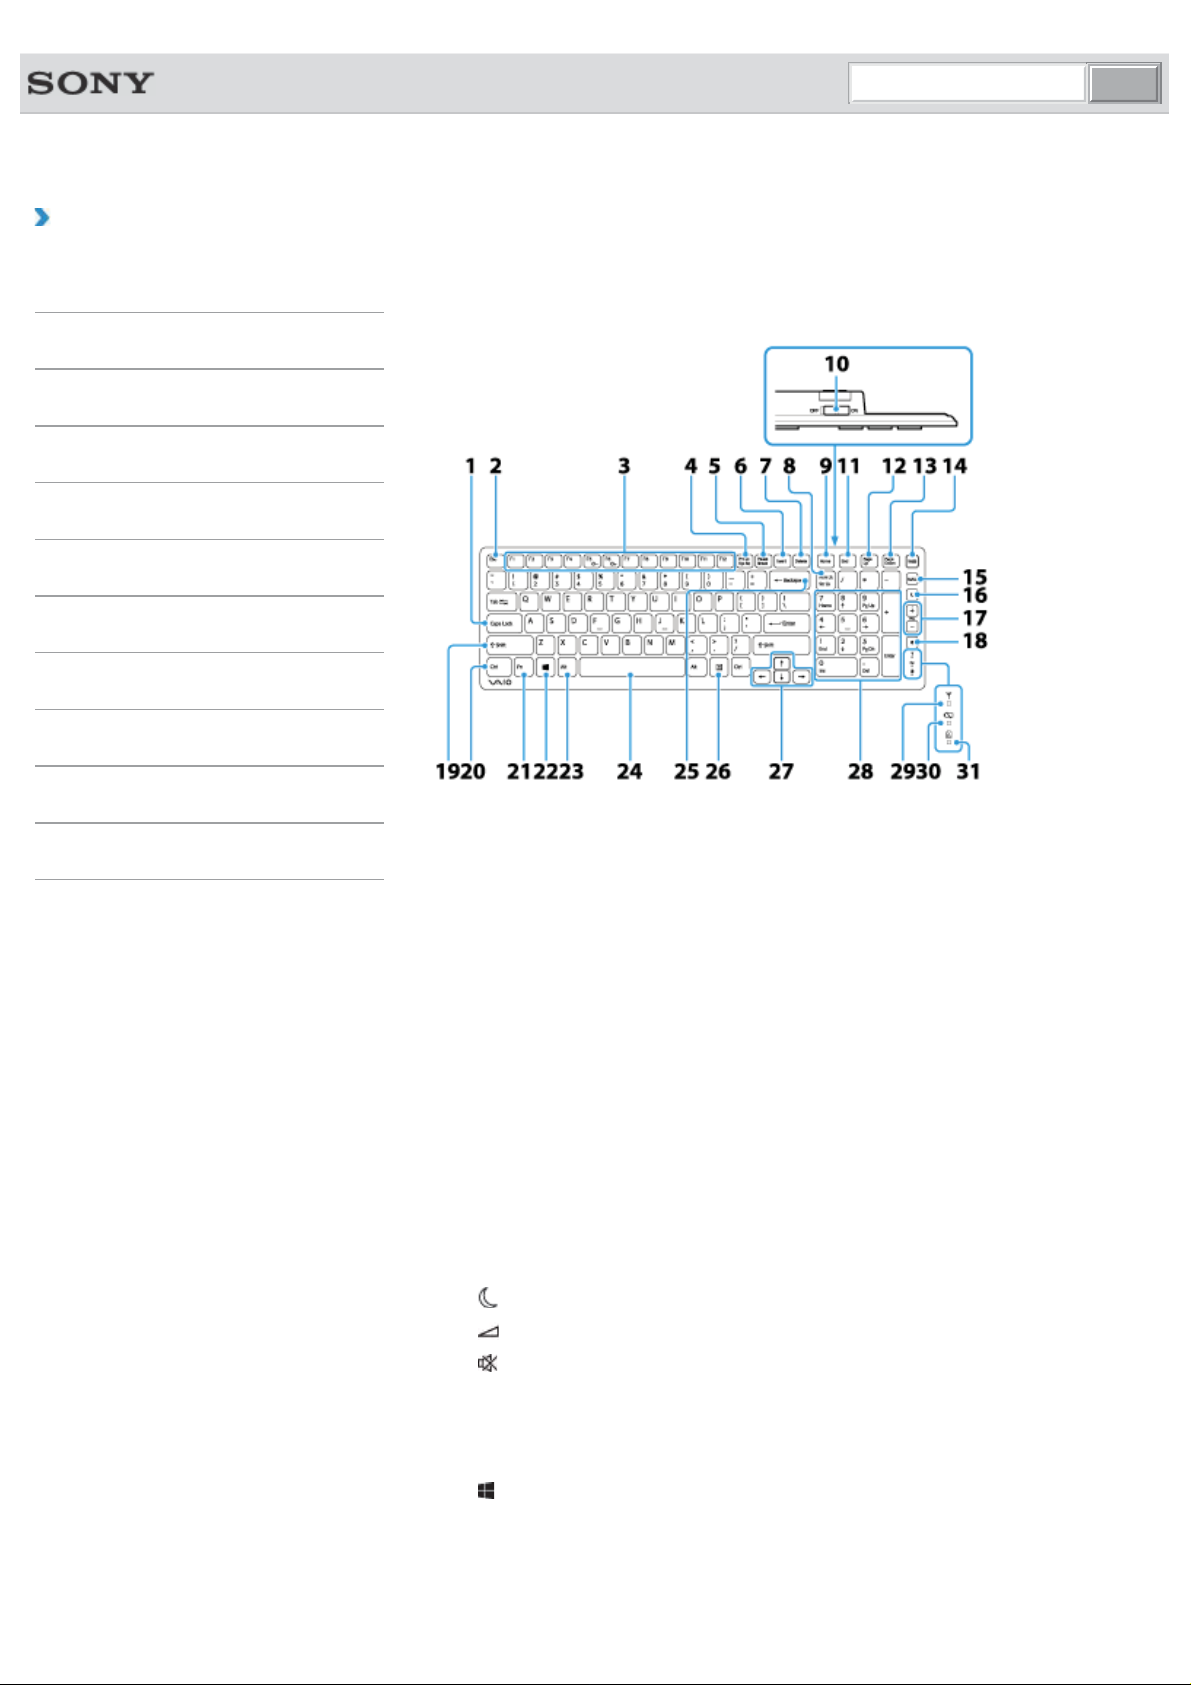
Describes the features of the keyboard, such as keys, buttons and indicator lights.
1. Caps Lock key [Details]
2. Esc key
3. Function keys [Details]
4. Prt Sc key
5. Pause / Break key
6. Insert key
7. Delete key
8. Num Lk / Scr Lk key [Details]
9. Home key
10. Power switch of the keyboard
11. End key
12. Page Up key
13. Page Down key
14. WEB button
15. MAIL button
16.
17.
18.
19. Shift key
20. Ctrl key
21. Fn key [Details]
22.
23. Alt key
24. Space bar
25. Backspace key
Sleep button [Details]
Volume control buttons [Details]
Muting button [Details]
(Windows) key
Page 19

© 2012 Sony Corporation
26. Applications key
27. Directional arrow keys
28. Numeric keypad
29.
Connect indicator [Details]
30.
31.
Battery indicator [Details]
Caps lock indicator [Details]
Hint
There is a raised dot on the F, J and 5 keys.
After 10 minutes of idle time, the keyboard enters the power saving mode and all
indicator lights turn off.
Related Topic
Replacing the AA Battery of the Keyboard
Checking the Remaining Battery Power of the Keyboard
About the Usage Environment for the Keyboard
Connecting the Wireless Keyboard
Page 20
Search
VAIO User Guide VAIO Duo SVJ2021 Series Back | Back to Top
Troubleshooting
Parts and Controls of the Mouse
How to Use
Parts Description
Setup
Network / Internet
Connections
Settings
Playback
Backup / Recovery
Security
Other Operations
Notifications
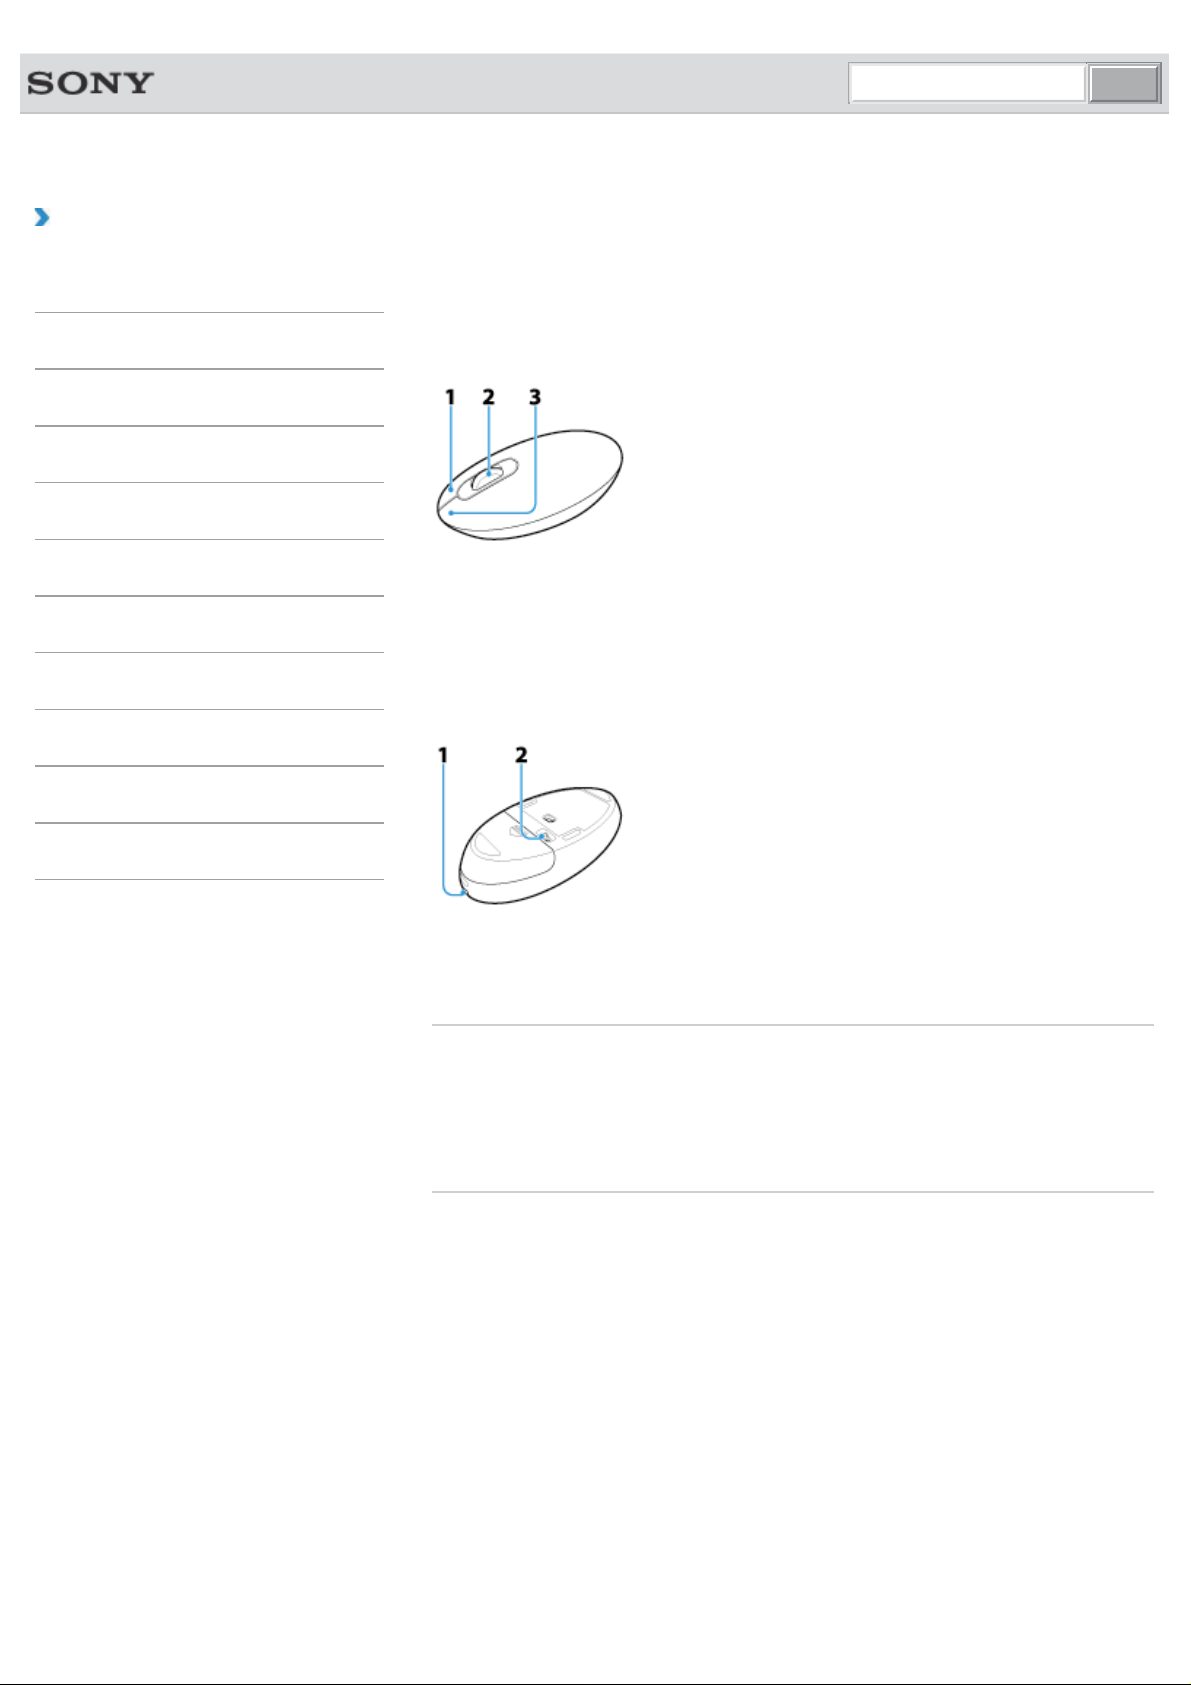
Describes the features of the mouse, such as buttons.
Top
1. Right button
2. Central wheel
3. Left button
Bottom
© 2012 Sony Corporation
1. Status light [Details]
2. Power switch of the mouse
Related Topic
Replacing the AA Battery of the Mouse
Checking the Remaining Battery Power of the Mouse
About the Usage Environment for the Mouse
Connecting the Wireless Mouse
Page 21

Search
VAIO User Guide VAIO Duo SVJ2021 Series Back | Back to Top
Troubleshooting
Setting the Stand
How to Use
Parts Description
Setup
Network / Internet
Connections
Settings
Playback
Backup / Recovery
Security
Other Operations
Notifications
This section describes how to set the stand.
1. Place your VAIO computer gently face down on a soft cloth, etc.
2. Pull up the stand, holding the bottom of your VAIO computer, as in the illustration
below.
Note
Pull up the stand with slight force until it clicks.
Related Topic
Adjusting the Angle of the Screen
© 2012 Sony Corporation
Page 22
Search
VAIO User Guide VAIO Duo SVJ2021 Series Back | Back to Top
Troubleshooting
Adjusting the Angle of the Screen
How to Use
Parts Description
Setup
Network / Internet
Connections
Settings
Playback
Backup / Recovery
Security
Other Operations
Notifications
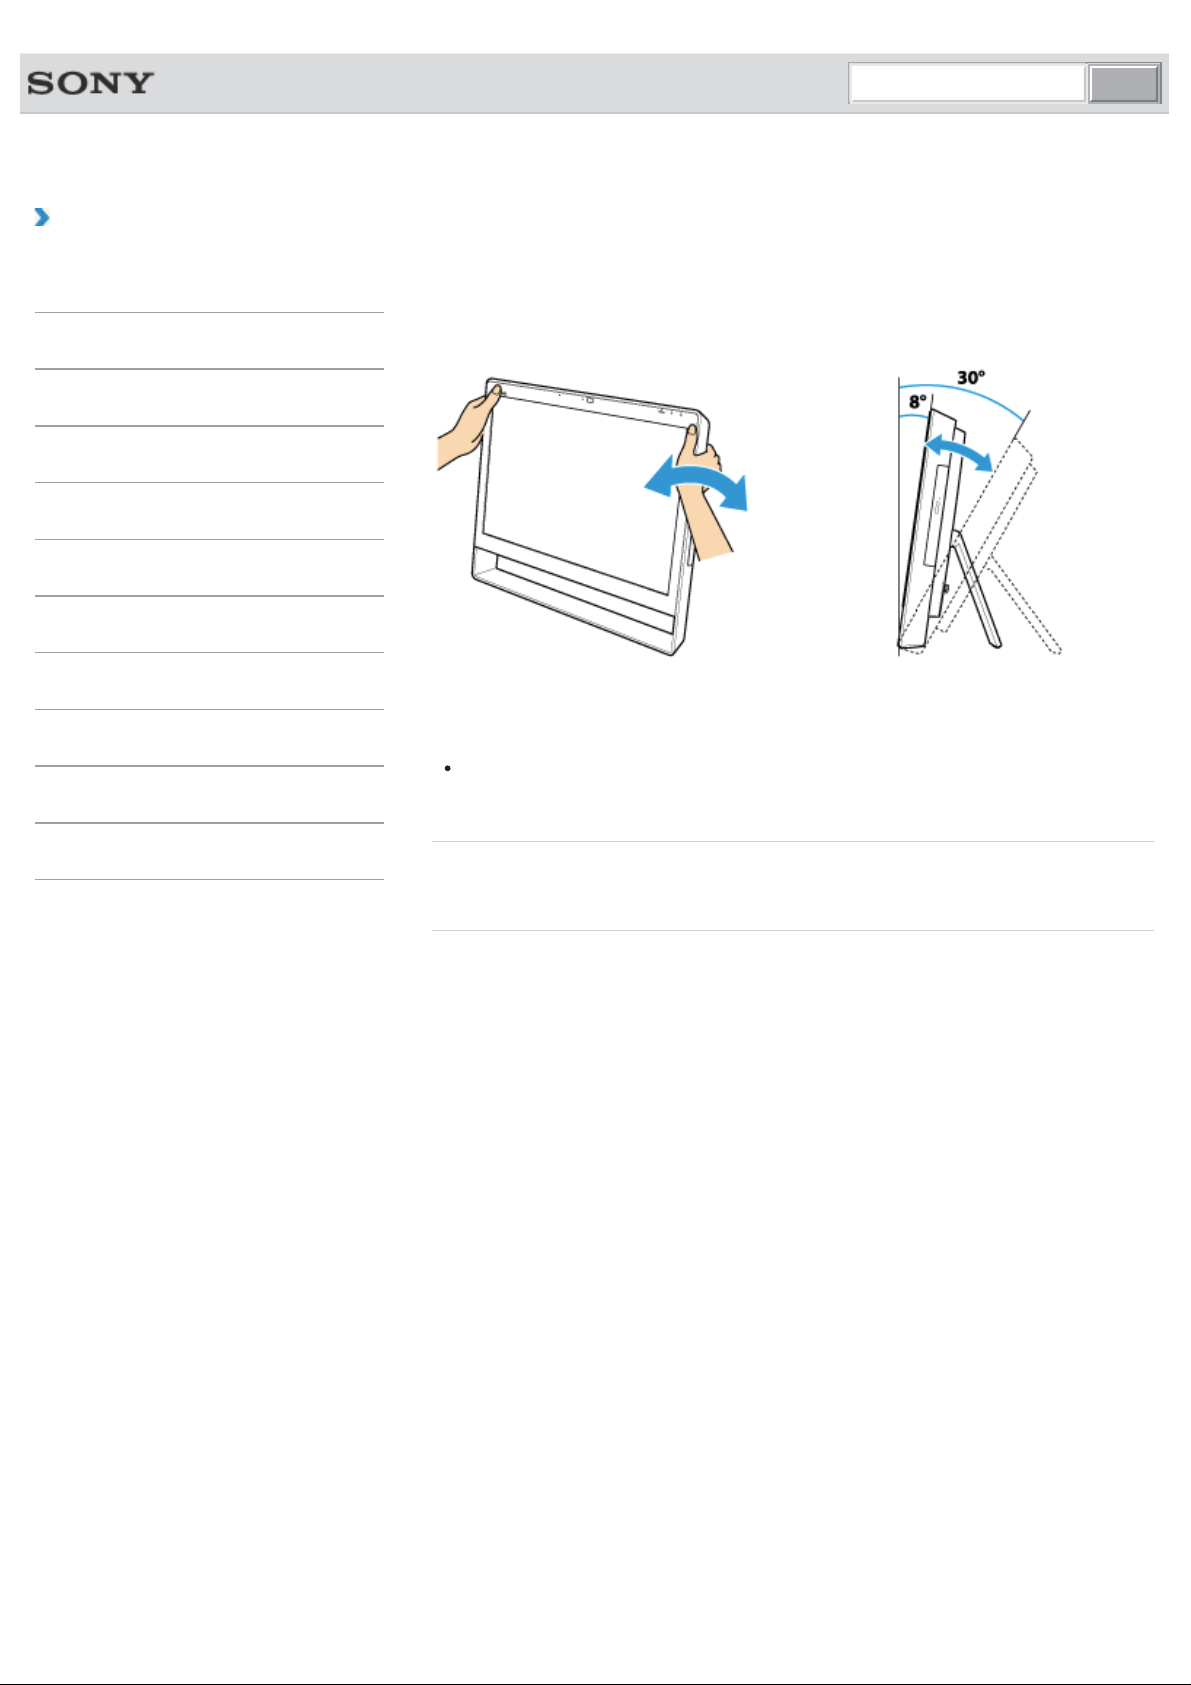
You can adjust the screen angle of your choice.
Adjust the angle, holding the upper part of the screen.
The angle of your VAIO computer can be adjusted from approximately 8 to 30 degrees.
Note
Do not exert excessive pressure on your VAIO computer while adjusting the angle of the
screen, as damage may result.
Related Topic
Setting the Stand
© 2012 Sony Corporation
Page 23
Search
VAIO User Guide VAIO Duo SVJ2021 Series Back | Back to Top
Troubleshooting
Replacing the AA Battery of the Keyboard
How to Use
Parts Description
Setup
Network / Internet
Connections
Settings
Playback
Backup / Recovery
Security
Other Operations
Notifications
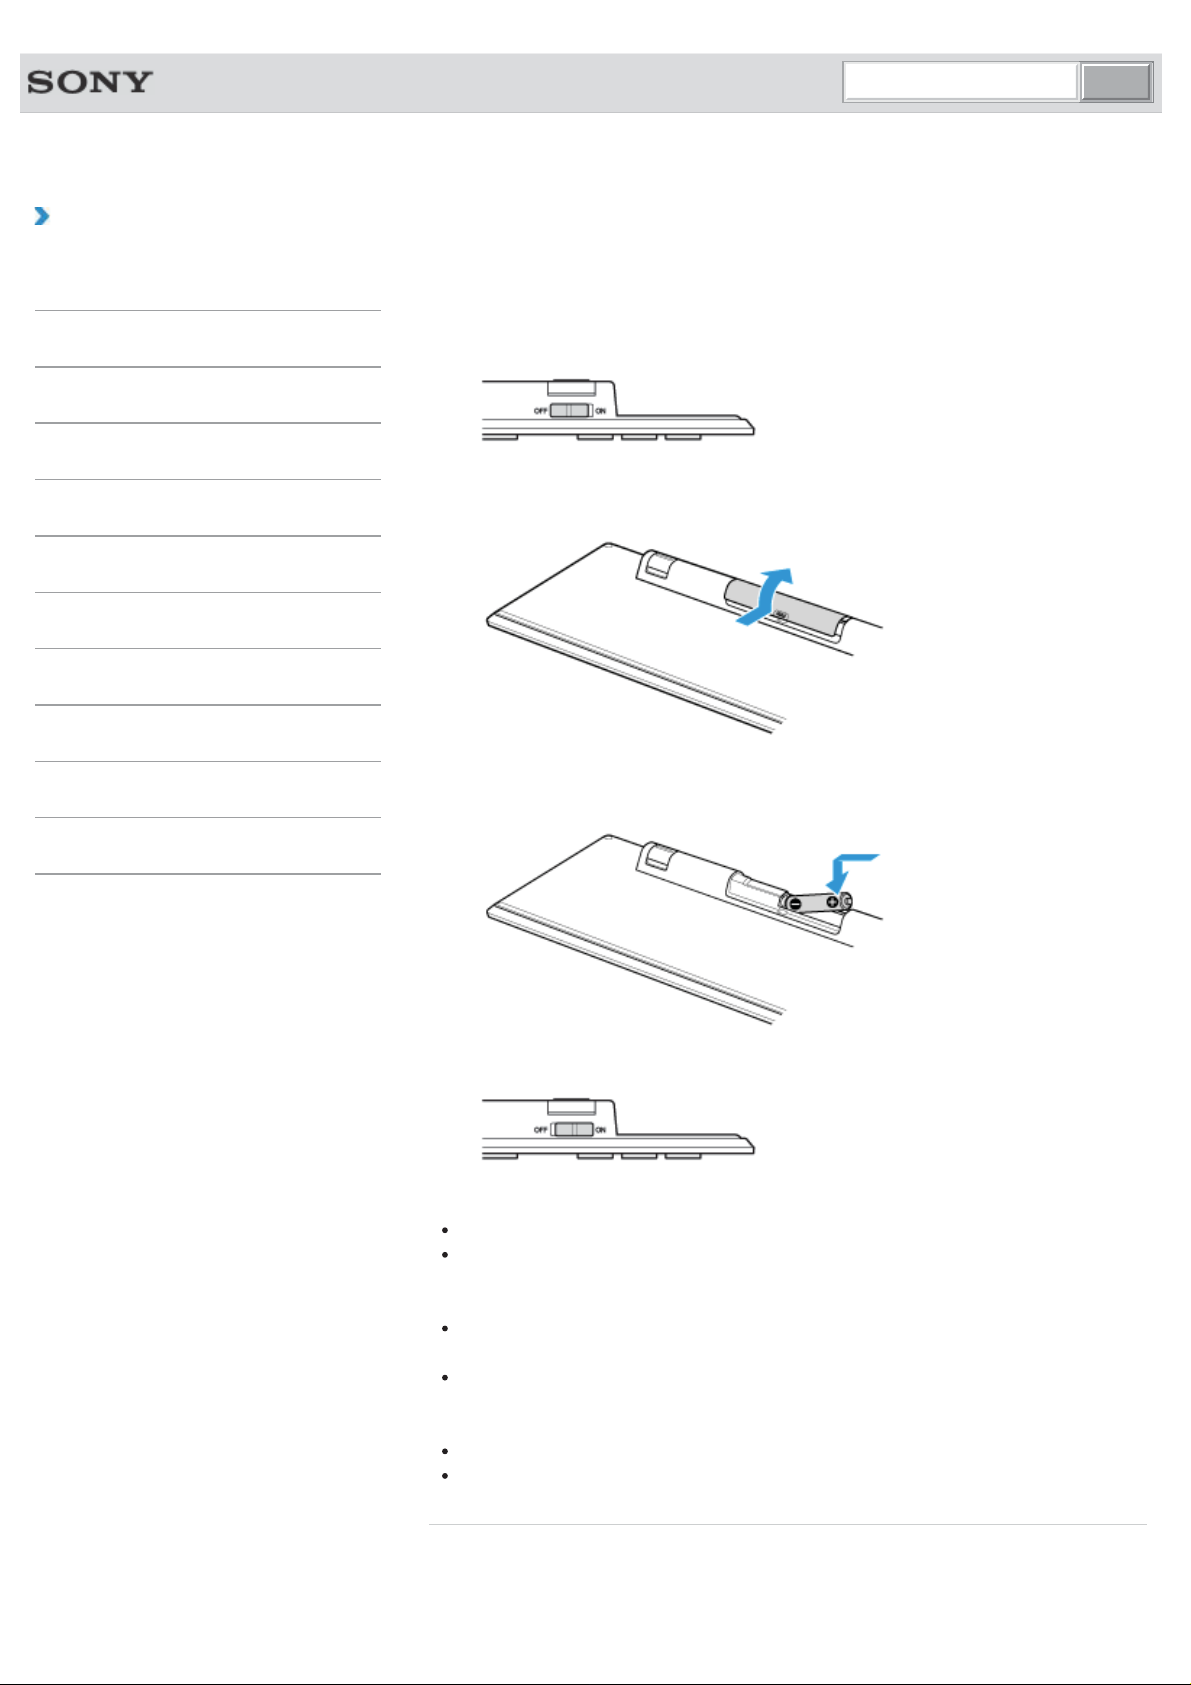
Change the AA battery in the keyboard when the battery power becomes low.
1. Set the power switch of the keyboard to OFF.
2. Turn over the keyboard, and then push the center of the cover in the direction shown
in the illustration below.
3. Remove the old battery and insert a new AA alkaline battery (minus (-) end first), then
close the cover.
4. Set the power switch of the keyboard to ON.
Note
Use a new AA alkaline replacement battery.
If you do not intend to use the keyboard for a while, set the power switch of the
keyboard to OFF. If you do not intend to use the keyboard for an extended period of
time, remove its AA battery.
When the battery power becomes low, replace with a new AA battery promptly. Keeping
a depleted battery in the keyboard may cause battery leakage.
Since the keyboard cannot be used with a commercially available rechargeable battery,
use a non-rechargeable AA battery. If you use a rechargeable battery, battery leakage
may occur, resulting in a malfunction.
Do not recharge a dry cell AA battery.
Refer to the supplied safety information manual.
Related Topic
Parts and Controls of the Keyboard
Checking the Remaining Battery Power of the Keyboard
Page 24

© 2012 Sony Corporation
Page 25

Search
VAIO User Guide VAIO Duo SVJ2021 Series Back | Back to Top
Troubleshooting
Checking the Remaining Battery Power of the
How to Use
Keyboard
Parts Description
Setup
Network / Internet
Connections
Settings
Playback
Backup / Recovery
Security
Other Operations
Notifications
The remaining battery power of the keyboard can be checked by the battery indicator.
1. Check the
It blinks when the battery is running out of power.
The indicator is only a guide and may not show the remaining battery power accurately,
depending on the AA battery.
Hint
If you intend not to use the keyboard for a long time, slide the power switch to OFF to
extend battery life.
Related Topic
Parts and Controls of the Keyboard
Replacing the AA Battery of the Keyboard
battery indicator of the keyboard.
© 2012 Sony Corporation
Page 26
Search
VAIO User Guide VAIO Duo SVJ2021 Series Back | Back to Top
Troubleshooting
About the Usage Environment for the Keyboard
How to Use
Parts Description
Setup
Network / Internet
Connections
Settings
Playback
Backup / Recovery
Security
Other Operations
Notifications
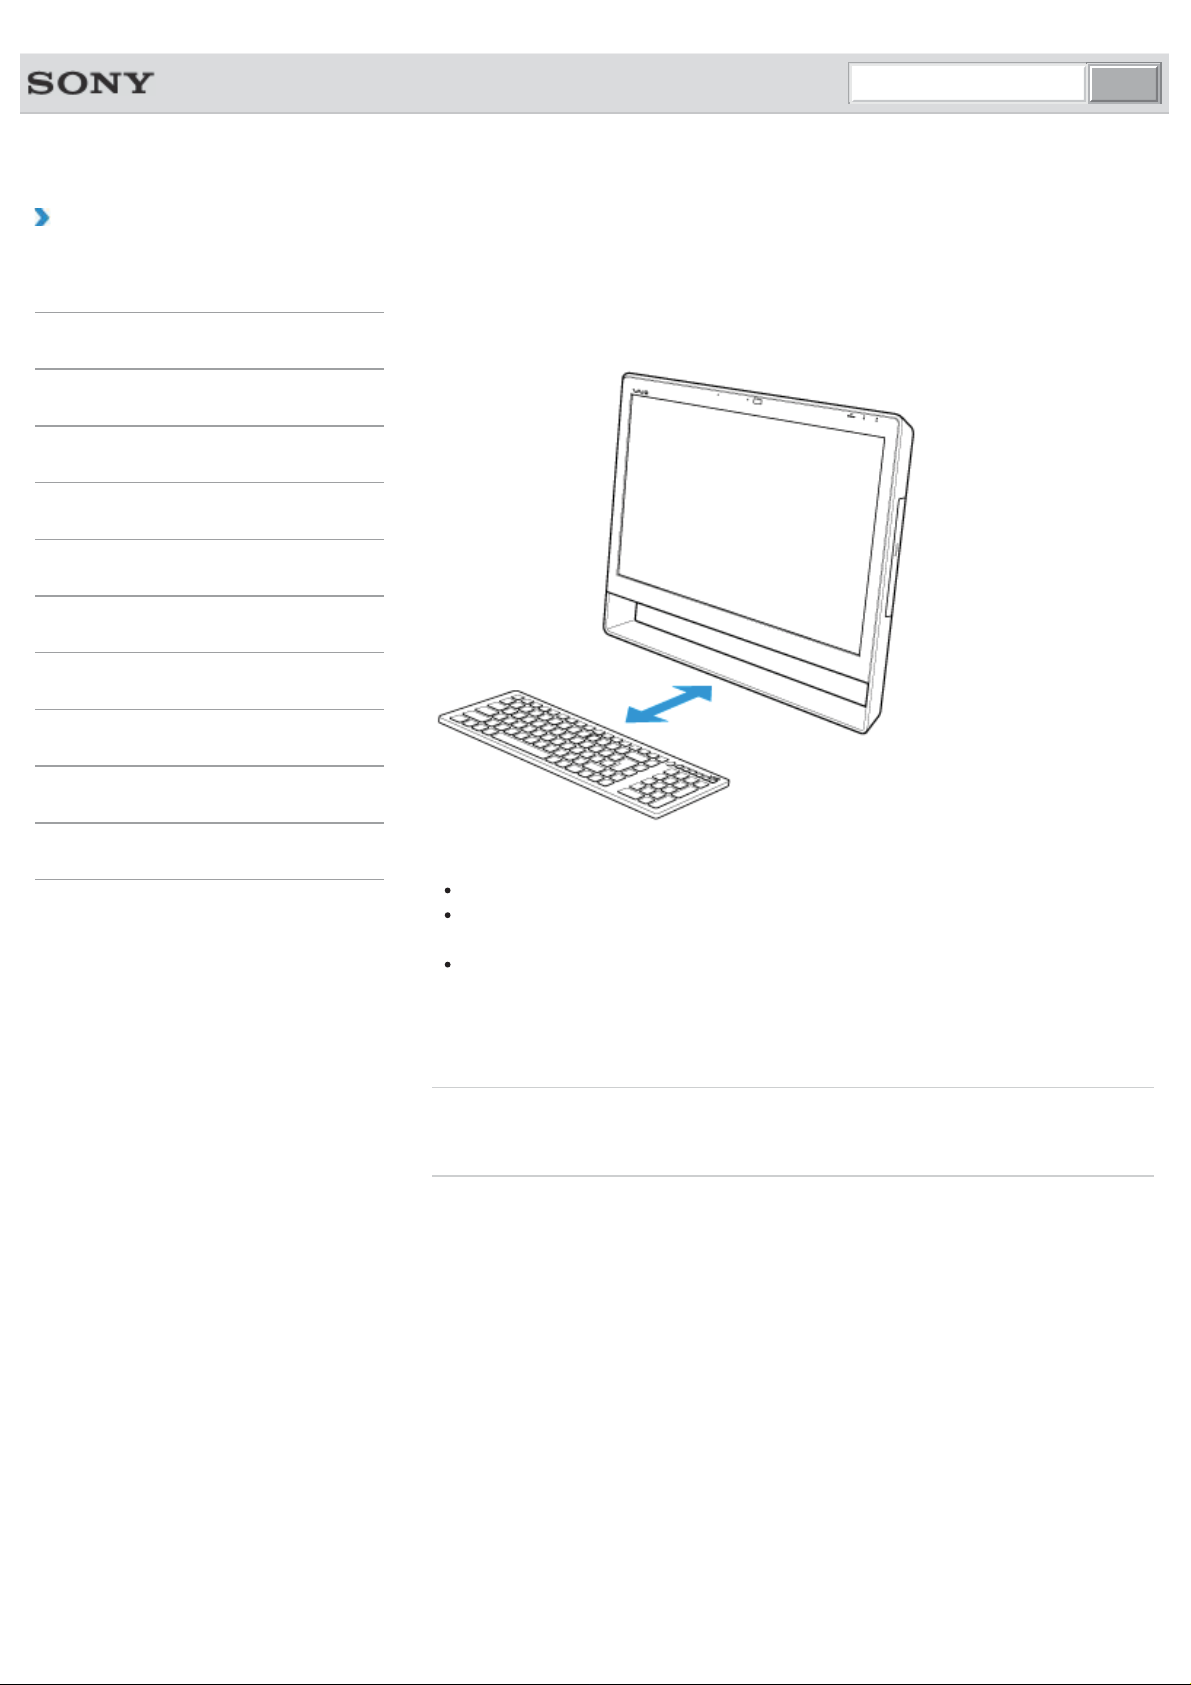
This section explains how to use the wireless keyboard.
You can use the wireless keyboard up to 33 ft. / 10 m away from your VAIO computer.
Note
Do not allow water to enter the wireless keyboard as malfunction may result.
Depending on the usage environment, the communication range between the wireless
keyboard and your VAIO computer may be less than 33 ft. / 10 m.
If you use the wireless keyboard too close to your VAIO computer (within 4 inches / 10
cm), wireless communication may be affected and keyboard input may become
unstable. We recommend that you use the wireless keyboard at least 6 inches / 15 cm
away from metal objects and your VAIO computer.
© 2012 Sony Corporation
Related Topic
Connecting the Wireless Keyboard
Page 27

Search
VAIO User Guide VAIO Duo SVJ2021 Series Back | Back to Top
Troubleshooting
Connecting the Wireless Keyboard
How to Use
Parts Description
Setup
Network / Internet
Connections
Settings
Playback
Backup / Recovery
Security
Other Operations
Notifications
If you cannot use the wireless keyboard supplied with the computer, it is likely that wireless
connection setup is required between the wireless keyboard and your VAIO computer.
Use the mouse to perform wireless setup. You can also use a USB keyboard (not supplied),
etc.
1. Check that an AA battery is inserted in the wireless keyboard you want to connect,
and then set the power switch of the keyboard to OFF.
2. Press the
3. If there are multiple Windows user accounts, select the administrator account.
When you have set the Windows password, click
screen. Click the Use the computer without a keyboard (On-Screen
Keyboard) check box. Click OK. Enter the password using the on-screen keyboard
by mouse operation, then click
Hint
If you cannot enter the password using the on-screen keyboard, click the password
entry field by the mouse. The cursor starts to blink, and you can use the on-screen
keyboard again.
4. When Windows starts, click
5. Double-click Local Disk C:, WConnectTool, and WConnect.
If the User Account Control window appears, click Yes.
6. After the connection utility window appears, set the power switch of the keyboard to
ON.
It may take a few moments to display the connection utility window.
7. Close the screen after the connection utility window changes, and you can use the
wireless keyboard.
(Power) button on your VAIO computer to turn it on.
in the lower left corner of the
.
(Start), and My Computer.
© 2012 Sony Corporation
Note
The connection procedure is not usually required to use the wireless keyboard with your
VAIO computer.
Do not perform the connection procedure if you can use the wireless keyboard normally.
Doing so may cause computer malfunction.
Hint
You can start your VAIO computer using the on-screen keyboard if you set the Windows
password. However, to set your password by BIOS setup, you need an USB keyboard
(not supplied), as starting your VAIO computer by mouse operation alone is not
possible.
Related Topic
About the Usage Environment for the Keyboard
Page 28
Search
VAIO User Guide VAIO Duo SVJ2021 Series Back | Back to Top
Troubleshooting
Checking the Caps Lock / Num Lock / Scroll Lock
How to Use
States
Parts Description
Setup
Network / Internet
Connections
Settings
Playback
Backup / Recovery
Security
Other Operations
Notifications
You can check if the keyboard is in the Caps Lock/Num Lock/Scroll Lock states by the
indicator light of the keyboard and the icons in the notification area.
To check if the keyboard is in the Caps Lock state
1. Check if the
To check if the keyboard is in the Num Lock/Scroll Lock state
1. Check if the
Hint
To make the Num lock icon and Scroll lock icon always visible in the notification
area of the desktop, click
change the behavior of the icons to Show icon and notifications.
Related Topic
Parts and Controls of the Keyboard
Caps lock indicator light is on.
Num lock icon or Scroll lock icon in the notification area is green.
in the notification area, click Customize..., and then
© 2012 Sony Corporation
Page 29
Search
VAIO User Guide VAIO Duo SVJ2021 Series Back | Back to Top
Troubleshooting
Replacing the AA Battery of the Mouse
How to Use
Parts Description
Setup
Network / Internet
Connections
Settings
Playback
Backup / Recovery
Security
Other Operations
Notifications
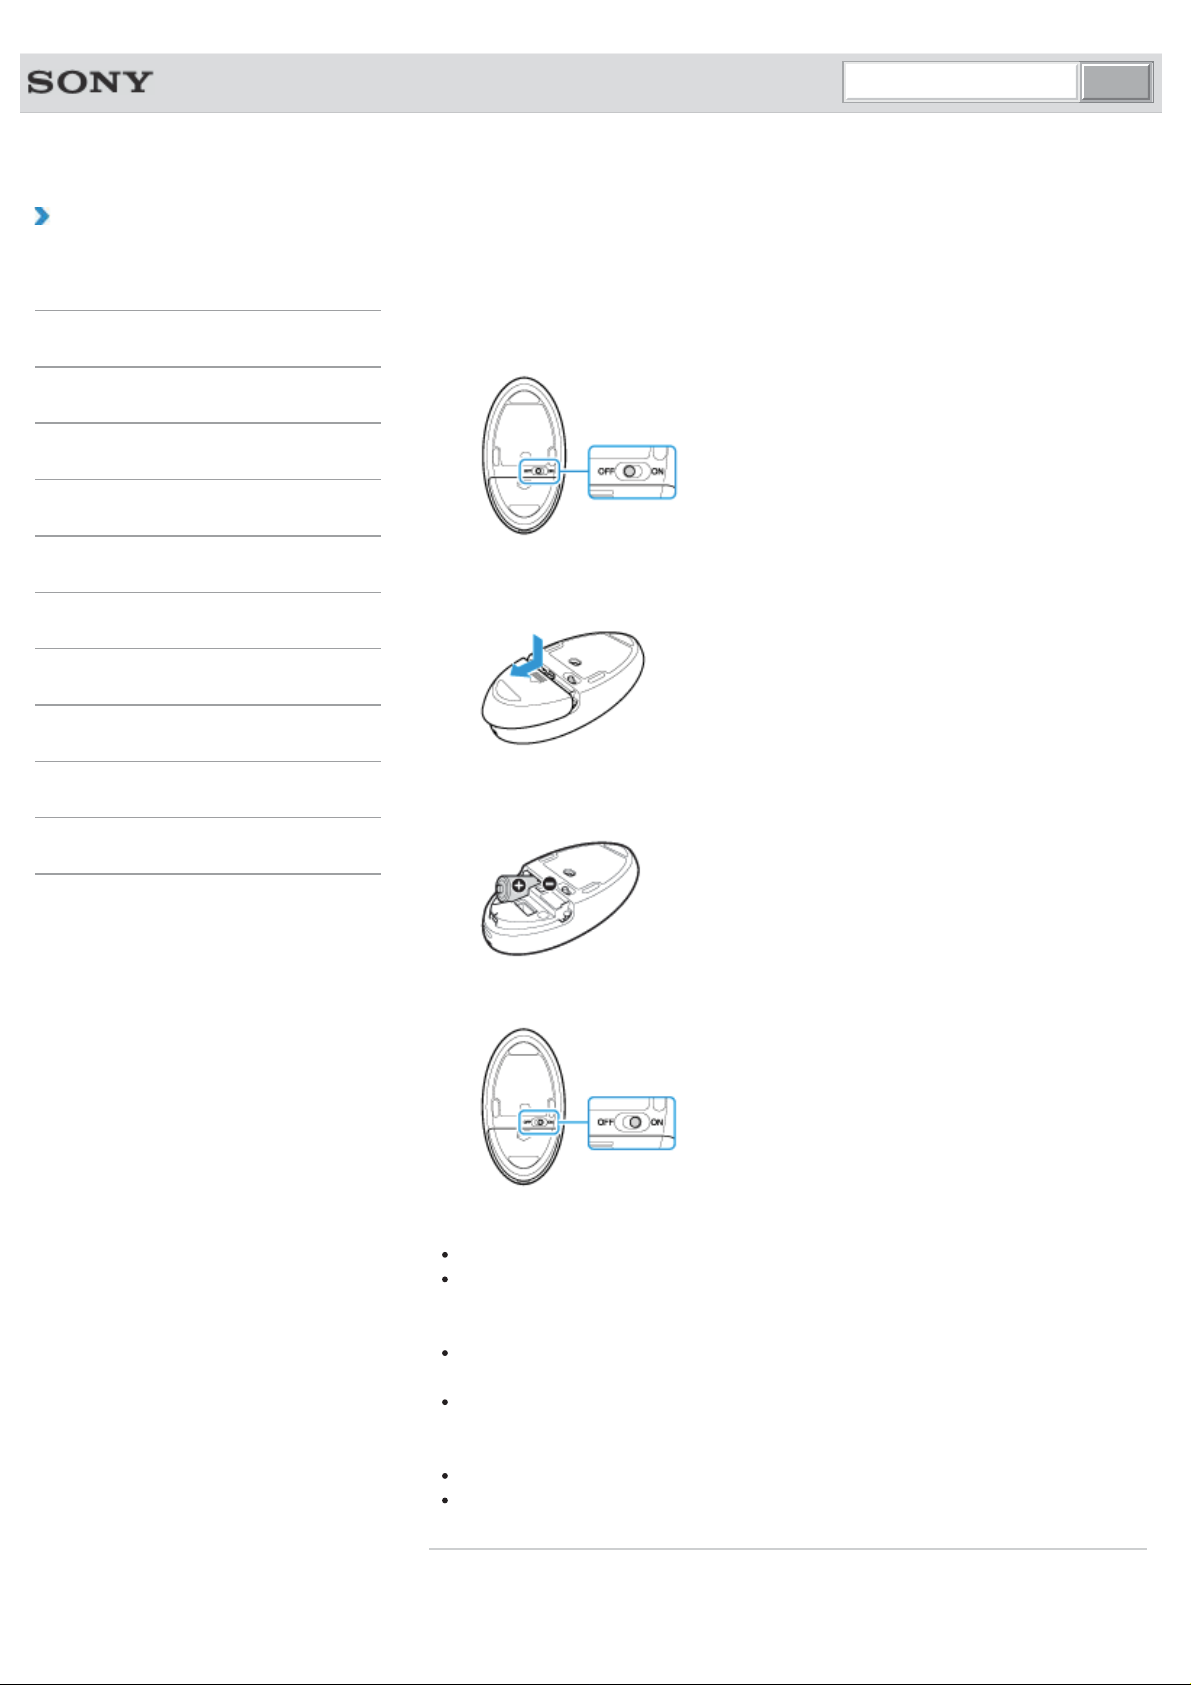
Change the AA battery in the mouse when the battery power becomes low.
1. Set the power switch of the mouse to OFF.
2. Turn the mouse upside down. Hold the center of the cover and slide the battery cover
in the direction of the arrow.
3. Remove the old battery and insert a new AA alkaline battery (minus (-) end first), then
close the cover.
4. Set the power switch of the mouse to ON.
Note
Use a new AA alkaline replacement battery.
If you do not intend to use the mouse for a while, set the power switch of the mouse to
OFF. If you do not intend to use the mouse for an extended period of time, remove its
AA battery.
When the battery power becomes low, replace with the battery promptly. Keeping a
depleted battery in the mouse may cause battery leakage.
Since the mouse cannot be used with a commercially available rechargeable battery,
use a non-rechargeable AA battery. If you use a rechargeable battery, battery leakage
may occur, resulting in a malfunction.
Do not recharge a dry cell AA battery.
Refer to the supplied safety information manual.
Related Topic
Parts and Controls of the Mouse
Page 30

© 2012 Sony Corporation
Checking the Remaining Battery Power of the Mouse
Page 31

Search
VAIO User Guide VAIO Duo SVJ2021 Series Back | Back to Top
Troubleshooting
Checking the Remaining Battery Power of the
How to Use
Mouse
Parts Description
Setup
Network / Internet
Connections
Settings
Playback
Backup / Recovery
Security
Other Operations
Notifications
The remaining battery power of the mouse can be checked by the status light.
1. Check the status light of the mouse.
The status light flashes orange when the remaining power of the AA battery is low. The
status light is only a guide and may not show the remaining battery power accurately,
depending on the AA battery.
Hint
If you do not intend to use the mouse for a long time, set the power switch to OFF to
extend battery life.
Related Topic
Parts and Controls of the Mouse
Replacing the AA Battery of the Mouse
© 2012 Sony Corporation
Page 32

Search
VAIO User Guide VAIO Duo SVJ2021 Series Back | Back to Top
Troubleshooting
About the Usage Environment for the Mouse
How to Use
Parts Description
Setup
Network / Internet
Connections
Settings
Playback
Backup / Recovery
Security
Other Operations
Notifications
This section explains how to use the wireless mouse.
You can use the wireless mouse up to 33 ft. / 10 m away from your VAIO computer.
Note
The wireless mouse supplied with your VAIO computer uses a laser sensor. Mouse
operation may become unstable depending on the usage environment.
Depending on the usage environment, the communication range between the wireless
mouse and your VAIO computer may be less than 33 ft. / 10 m.
If you use the wireless mouse too close to your VAIO computer (within 4 inches / 10
cm), wireless communication may be affected and mouse operation may become
unstable. We recommend that you use the wireless mouse at least 6 inches / 15 cm
away from metal objects and your VAIO computer.
© 2012 Sony Corporation
Related Topic
Connecting the Wireless Mouse
Page 33

Search
VAIO User Guide VAIO Duo SVJ2021 Series Back | Back to Top
Troubleshooting
Connecting the Wireless Mouse
How to Use
Parts Description
Setup
Network / Internet
Connections
Settings
Playback
Backup / Recovery
Security
Other Operations
Notifications
If you cannot use the wireless mouse supplied with your VAIO computer, it is likely that
wireless connection setup is required between the wireless mouse and the computer.
Use a keyboard to perform wireless setup. You can also use a USB mouse (not supplied),
etc.
1. Check that an AA battery is inserted in the wireless mouse you want to connect, then
set the power switch of the mouse to OFF.
2. Press the
3. If there are multiple Windows user accounts, press the
administrator account, then press the Enter key.
4. After Windows starts, press the Windows key on the keyboard.
The start menu window appears.
5. Enter wconnect, then press the Enter key.
If the User Account Control window appears, press the
Yes, then press the Enter key.
6. After the connection utility window appears, set the power switch of the wireless
mouse to ON.
It may take a few moments to display the connection utility window.
7. After the connection utility window changes, close the window. You can now use the
wireless mouse.
Note
The connection procedure is not usually required to use the wireless mouse with your
VAIO computer.
Do not perform the connection procedure if you can use the wireless mouse normally.
Doing so may cause computer malfunction.
(Power) button on your VAIO computer to turn it on.
or key to select the
or key to select
© 2012 Sony Corporation
Related Topic
About the Usage Environment for the Mouse
Page 34

Search
VAIO User Guide VAIO Duo SVJ2021 Series Back | Back to Top
Troubleshooting
Adding and Removing Memory Modules
How to Use
Parts Description
Setup
Network / Internet
Connections
Settings
Playback
Backup / Recovery
Security
Other Operations
Notifications
If you want to increase your computer’s speed or improve performance when running
programs simultaneously, increase the amount of memory by installing optional memory
modules.
Before you upgrade your computer’s memory, see Notes on Adding and Removing
Memory Modules.[Details]
If you install memory modules into two or more slots, the dual-channel mode is enabled to
help improve performance.
The type of module and the amount of memory installed on your computer may differ
depending on the model.
1. Turn off your VAIO computer and peripheral devices, and disconnect the power cord
and all connection cables.
2. Wait for a while until your VAIO computer cools down.
The inner parts of your VAIO computer may be hot just after turning off. Be careful to
avoid burns while handling your VAIO computer in this state.
3. Lay a clean cloth on a level, flat surface, place your VAIO computer on it as illustrated
below. Remove the screws with a cross slot screwdriver to open the memory module
compartment cover.
The screw locations are indicated by the arrows in the illustration below.
On some models, captive screws are used on the memory module compartment cover
and cannot be detached from the cover.
4. Touch an external metal object to discharge static electricity.
Do not touch any metal parts inside your VAIO computer.
5. If there is no free slot, remove the currently installed memory module. Pull the latches
in the direction of the arrows to pop up the module at an angle (1), then pull the
module out in the direction of the arrow (2).
6. Remove the new memory module from its antistatic bag.
7. Hold the memory module by its edge and slide it into the memory module slot with its
end terminal facing downward while aligning the notch on the module with the small
projection in the slot.
Page 35

8. Hold the memory module by its edge and push in until it clicks into place as shown in
the illustration.
The latches on both sides of the slot snap into place to secure the module. Do not
touch any ICs (black components) on the memory module.
9. Replace the memory module compartment cover and secure it with the screws you
removed in step 3.
10. Connect all connection cables and peripherals that you removed in Step 1, and turn on
the computer.
11. Check that the amount of system memory has correctly changed. [Details]
If the amount of indicated system memory is correct, memory module installation was
successful.
Related Topic
Notes on Adding and Removing Memory Modules
© 2012 Sony Corporation
Page 36

Search
VAIO User Guide VAIO Duo SVJ2021 Series Back | Back to Top
Troubleshooting
Notes on Adding and Removing Memory Modules
How to Use
Parts Description
Setup
Network / Internet
Connections
Settings
Playback
Backup / Recovery
Security
Other Operations
Notifications
Before adding or removing memory modules, read the following precautions thoroughly.
Your VAIO computer and memory modules use high precision components and
electronic connector technology. To avoid invalidation of the warranty during your
product warranty period, we recommend that:
You should contact your dealer to install a new memory module.
You should not install a memory module by yourself, if you are not familiar with
upgrading memory on a computer.
You should not touch the connectors or open the memory module compartment
cover.
For assistance, contact an authorized Sony service/support center. To find the nearest
center or agent, refer to online support website.[Details]
If you add or remove memory modules by yourself, your VAIO computer may result in
malfunction or accident caused by breakage of slot and module, or connection mistake.
In this case, repair fee will be charged.
Be careful not to injure your hands or fingers with sharp edges of the memory module,
inner components, or circuit boards of your VAIO computer.
Be careful not to catch your fingers on any inner cables of your VAIO computer, as the
cable may become loose or disconnected.
If your VAIO computer is turned on while liquid such as water or other foreign object
remains inside, it may cause a fire. Be sure to remove any foreign objects and attach the
memory module compartment cover before turning on your VAIO computer.
Sony does not guarantee that third party memory modules will work in your VAIO
computer. For information on third party memory modules, consult the respective sales
dealers.
Be sure to turn off your VAIO computer and peripherals and disconnect all attachments
and connection cables before adding or removing memory modules. Failure to do so
may cause damage to the memory module, your VAIO computer, or peripheral devices.
To prevent damage from electrostatic discharge to memory modules, follow the
instructions below:
Do not work at a place that produces static electricity easily, such as on a carpet.
Before adding or removing memory modules, touch an external metal object from
your VAIO computer to eliminate static electricity. Do not touch any metal parts inside
the computer.
Do not open the memory module package before you are ready to install the module.
The package protects the module from ESD (electrostatic discharge). To store the
module, cover it with an antistatic bag or a sheet of aluminum foil.
When holding a memory module, do not touch the chips or electrical terminal of the
module.
Do not insert a memory module into the slot facing in wrong direction. It may cause
damage to the module or slot, or cause the circuit board to catch fire.
Use a screwdriver that matches the size of the screw (such as a miniature screwdriver).
Do not remove or loosen screws that are not specified to be removed.
© 2012 Sony Corporation
Related Topic
Adding and Removing Memory Modules
Viewing the System Information
Page 37

Search
VAIO User Guide VAIO Duo SVJ2021 Series Back | Back to Top
Troubleshooting
Installing/Removing the Battery Pack
How to Use
Parts Description
Setup
Network / Internet
Connections
Settings
Playback
Backup / Recovery
Security
Other Operations
Notifications
Install the battery pack into the battery compartment on the bottom of your VAIO computer.
Note
You will lose all unsaved data if you remove the battery pack while your VAIO computer
is on or in Sleep mode and not connected to the AC adapter.
Be sure to turn off the computer before removing the battery pack.
Related Topic
Charging the Battery Pack
Notes on Using the Battery Pack
Shutting Down Your VAIO Computer
© 2012 Sony Corporation
Page 38

Search
VAIO User Guide VAIO Duo SVJ2021 Series Back | Back to Top
Troubleshooting
Charging the Battery Pack
How to Use
Parts Description
Setup
Network / Internet
Connections
Settings
Playback
Backup / Recovery
Security
Other Operations
Notifications
The battery pack can be charged even while you are using your VAIO computer when the
computer is connected to a power source. The charging time may vary depending on
operating conditions.
1. Install the battery pack into your VAIO computer. [Details]
2. Plug your VAIO computer into an AC outlet. [Details]
Hint
The charging time varies depending on ambient temperature.
Note that at a low ambient temperature, it takes longer time to charge the battery pack.
To check the battery status of your VAIO computer, click the battery icon, such as
(on battery) or (plugged in), in the desktop notification area.
Related Topic
Charge Indicator Status List
Checking the Battery Charge Capacity
Extending the Battery Life
© 2012 Sony Corporation
Page 39

Search
VAIO User Guide VAIO Duo SVJ2021 Series Back | Back to Top
Troubleshooting
Extending the Battery Life
How to Use
Parts Description
Setup
Network / Internet
Connections
Settings
Playback
Backup / Recovery
Security
Other Operations
Notifications
When your VAIO computer is running on battery power, you can extend the battery life using
the following methods.
Use Sleep mode. [Details]
When you do not need to use your VAIO computer temporarily, you can use Sleep
mode. To extend the battery life, use Sleep mode frequently. If you do not intend to use
the computer for an extended period of time, turn off the computer.
Resuming the computer from Sleep mode is faster than from booting up the computer.
Decrease the LCD brightness of the computer screen. [Details]
Turn down the volume of the speakers and headphones. [Details]
Disconnect peripheral devices that are not in use.
Related Topic
Checking the Battery Charge Capacity
Charging the Battery Pack
Notes on Using the Battery Pack
Using Sleep Mode
© 2012 Sony Corporation
Page 40

Search
VAIO User Guide VAIO Duo SVJ2021 Series Back | Back to Top
Troubleshooting
Notes on Using the Battery Pack
How to Use
Parts Description
Setup
Network / Internet
Connections
Settings
Playback
Backup / Recovery
Security
Other Operations
Notifications
Before using the battery pack, read the following precautions for correct use.
About the battery pack
The supplied battery pack is designed specifically for your VAIO computer.
For your safety, only use the supplied battery pack or an optional battery pack that is
specified by Sony.
For safety reasons, battery charging may be suspended at higher or lower temperatures.
While your VAIO computer is connected to an AC outlet with the AC adapter, it runs on
AC power, even if the battery pack is installed.
The battery pack is not fully charged at the time of delivery.
While the battery pack is in use or being charged, heat builds up in the battery pack.
This is normal and is not cause for concern.
Do not use your VAIO computer without installing the battery pack as it may cause the
computer to malfunction.
About battery discharge
After battery charge, the battery pack will gradually discharge over time even while not in
use. If it is left unused for an extended period of time, the battery power may be depleted. It
is recommended that you recharge the battery pack before use.
About battery life
© 2012 Sony Corporation
Battery life varies depending on usage and settings.
About battery deterioration and replacement
The battery pack is consumable. The capacity gradually declines through repeated
cycles of recharging and discharging. As a result, the battery life becomes short even if it
is fully charged and eventually the battery pack reaches the end of its life.
If the battery pack quickly runs out of power after being fully charged or it has reached
the end of its life, replace it with a new one.
When the battery pack is running out of power
If the battery pack runs out during your absence, power will be cut off and any data you are
working on will be lost.
While your VAIO computer is running on battery power, save data frequently.
Related Topic
Notes on Using the Power Source
Page 41

Search
VAIO User Guide VAIO Duo SVJ2021 Series Back | Back to Top
Troubleshooting
Connecting a Power Source
How to Use
Parts Description
Setup
Network / Internet
Connections
Settings
Playback
Backup / Recovery
Security
Other Operations
Notifications
Connect your VAIO computer to an AC power source. Carefully read the precautions in
Notes on Using the Power Source before connection. [Details]
1. Plug one end of the power cord (1) into the AC adapter (3).
2. Plug the other end of the power cord into an AC outlet (2).
3. Plug the cable from the AC adapter (3) into the DC IN port (4) on your VAIO computer.
Note
Do not plug more than one device into the same AC outlet.
The shape of the AC adapter varies depending on the model you purchased.
Make sure that the power plug is firmly plugged into your VAIO computer.
Hint
You can purchase a power strip with a surge protector to help prevent damage to your
VAIO computer caused by sudden power surges (in an electrical storm, for example).
Related Topic
Installing/Removing the Battery Pack
Charging the Battery Pack
Notes on Using the Battery Pack
Turning on Your VAIO Computer
Shutting Down Your VAIO Computer
Notes on Using the Power Source
© 2012 Sony Corporation
Page 42

Search
VAIO User Guide VAIO Duo SVJ2021 Series Back | Back to Top
Troubleshooting
Turning on Your VAIO Computer
How to Use
Parts Description
Setup
Network / Internet
Connections
Settings
Playback
Backup / Recovery
Security
Other Operations
Notifications
Turn on your VAIO computer to start Windows. Carefully read the precautions in Notes on
Using the Power Source before turning on. [Details]
1. Install the battery pack on your VAIO computer [Details], and then connect to an AC
outlet. [Details]
2. Lift the LCD screen lid.
3. Press and hold down the
green.
Your VAIO computer is turned on, and Windows starts after a while.
Note
If you press and hold down the (Power) button for more than four seconds, your VAIO
computer will not turn on.
Press the
light turns on.
Do not use your VAIO computer without installing the battery pack as it may cause the
computer to malfunction.
When opening the LCD screen lid, do not hold the built-in camera as it may cause your
VAIO computer to malfunction. (Built-in camera equipped models)
If you press the (Power) button with the LCD screen lid closed, your VAIO computer
will not turn on.
Hint
By default, your VAIO computer automatically enters Sleep mode after a certain period
of inactivity while the computer is connected to an AC outlet. [Details]
(Power) button lightly, and release it immediately when the power indicator
(Power) button until the power indicator light turns on in
© 2012 Sony Corporation
Related Topic
Installing/Removing the Battery Pack
Charging the Battery Pack
Notes on Using the Battery Pack
Connecting a Power Source
Shutting Down Your VAIO Computer
Restarting Your VAIO Computer
Notes on Using the Power Source
Page 43

Search
VAIO User Guide VAIO Duo SVJ2021 Series Back | Back to Top
Troubleshooting
Shutting Down Your VAIO Computer
How to Use
Parts Description
Setup
Network / Internet
Connections
Settings
Playback
Backup / Recovery
Security
Other Operations
Notifications
Shut down your VAIO computer properly to avoid losing unsaved data.
1. Turn off any peripherals connected to your VAIO computer.
2. Save your data and close all running apps.
3. Open the Charms bar [Details] and select
4. Select
After a short time, your VAIO computer automatically turns off and the green power
indicator light turns off.
Before closing the LCD screen lid, make sure the power indicator is off.
Note
An improper shutdown may cause loss of unsaved data or your VAIO computer to
malfunction.
To disconnect your VAIO computer completely from an AC power source, turn off the
computer and unplug the power cord from the AC outlet.
Related Topic
Turning on Your VAIO Computer
Restarting Your VAIO Computer
Using Sleep Mode
Notes on Using the Power Source
(Power) and Shut down.
(Settings).
© 2012 Sony Corporation
Page 44

Search
VAIO User Guide VAIO Duo SVJ2021 Series Back | Back to Top
Troubleshooting
Restarting Your VAIO Computer
How to Use
Parts Description
Setup
Network / Internet
Connections
Settings
Playback
Backup / Recovery
Security
Other Operations
Notifications
After changing the settings or installing an app on your VAIO computer, you may be required
to restart the computer.
1. Save your data and close all running apps.
2. Open the Charms bar [Details] and select
3. Select
Your VAIO computer will restart.
Related Topic
Turning on Your VAIO Computer
Shutting Down Your VAIO Computer
(Power) and Restart.
(Settings).
© 2012 Sony Corporation
Page 45

Search
VAIO User Guide VAIO Duo SVJ2021 Series Back | Back to Top
Troubleshooting
Charge Indicator Status List
How to Use
Parts Description
Setup
Network / Internet
Connections
Settings
Playback
Backup / Recovery
Security
Other Operations
Notifications
The charge indicator light turns on or blinks differently according to conditions.
Lit in orange
The battery pack is charging. (Turns off when charging is completed.)
Blinks in orange along with the green power indicator
The battery pack is running out of power. (Normal mode)
Blinks fast in orange
A battery error has occurred due to a failed battery pack or an unlocked battery pack.
Related Topic
Charging the Battery Pack
Checking the Battery Charge Capacity
Extending the Battery Life
© 2012 Sony Corporation
Page 46

Search
VAIO User Guide VAIO Duo SVJ2021 Series Back | Back to Top
Troubleshooting
Using Sleep Mode
How to Use
Parts Description
Setup
Network / Internet
Connections
Settings
Playback
Backup / Recovery
Security
Other Operations
Notifications
In Sleep mode, all unnecessary devices of your VAIO computer are turned off, though some
devices stay on to retain the computer’s state including data you are working on. Sleep
mode is useful when you take a short rest, for example.
With the default Sleep mode settings, Rapid Wake is enabled and the computer’s state is
saved to the built-in storage device.
To activate Sleep mode
1. Open the Charms bar [Details] and select (Settings).
2. Select
The power indicator light turns off when your VAIO computer enters Sleep mode.
Hint
By default, your VAIO computer enters Sleep mode automatically after about 30
minutes of inactivity while running on AC power.
The operations below also place your VAIO computer into Sleep mode.
Press the
Note that if you press and hold down the
seconds, your VAIO computer will turn off automatically. Doing this will erase all
unsaved data.
Close the LCD screen lid and leave the computer unused for a few seconds.
(Power) and Sleep.
(Power) button (with the default setting).
(Power) button for more than four
To return to Normal mode
1. Press the (Power) button.
Note
By default, your VAIO computer automatically enters Hibernate mode when the battery
pack becomes weak. However, depending on the operating conditions, the computer
may fail to enter Hibernate mode.
If this occurs and the battery pack is running out of power, the computer will be turned
off, resulting in loss of unsaved data.
While the computer is running on battery power, save data frequently.
Before moving your VAIO computer, make sure that the power indicator light is off to
avoid impact or vibration to the running hard disk drive.
Hint
If you press and hold down the (Power) button for more than four seconds, your VAIO
computer will turn off automatically. Doing this will erase all unsaved data.
You can restore your VAIO computer from Sleep mode to Normal mode by opening the
LCD screen lid.
To change the action when you open the lid, start VAIO Control Center [Details] and
change the settings in @@@Power Management@@@.
Related Topic
Notes on Using the Power Source
Notes on Sleep Mode
Extending the Battery Life
Changing the Rapid Wake (Sleep Mode) Settings
Page 47

© 2012 Sony Corporation
Page 48

Search
VAIO User Guide VAIO Duo SVJ2021 Series Back | Back to Top
Troubleshooting
Selecting a Power Plan
How to Use
Parts Description
Setup
Network / Internet
Connections
Settings
Playback
Backup / Recovery
Security
Other Operations
Notifications
Power management helps you set up power plans to suit your requirements for power
consumption.
1. Open Control Panel. [Details]
2. Select Hardware and Sound and Power Options.
3. Select your desired power plan.
4. If you want to change the power plan settings, select Change plan settings on the
right of your desired power plan in the Power Options window.
By selecting Change advanced power settings, you can change the advanced
settings.
Refer to Windows Help and Support for more information on the power plan
settings. [Details]
Hint
The power status icon indicates what kind of power source your VAIO computer is
currently using, and you can see the computer’s power status by selecting this icon.
© 2012 Sony Corporation
Page 49

Search
VAIO User Guide VAIO Duo SVJ2021 Series Back | Back to Top
Troubleshooting
Notes on Using the Power Source
How to Use
Parts Description
Setup
Network / Internet
Connections
Settings
Playback
Backup / Recovery
Security
Other Operations
Notifications
Read the following precautions before plugging your VAIO computer into an AC power
source.
If you remove the battery pack while your VAIO computer is turned on or in Sleep mode
but it is disconnected from an AC power source, you may lose all unsaved data.
If you leave your VAIO computer without connecting it to an AC power source for an
extended period of time, turn off the computer.
Notes on the AC adapter
Use the AC adapter supplied with your VAIO computer or genuine Sony products. Do
not use any other AC adapter as it may cause a malfunction.
Do not connect the AC adapter to a power conversion device such as a travel power
converter. It may cause overheating or a malfunction.
If the AC adapter cable becomes damaged or broken, do not use it.
Notes on turning on your VAIO computer
Because your VAIO computer contains magnetic components, keep magnetic storage
media, such as floppy disks, away from the computer, as it may cause data corruption.
Your VAIO computer will automatically enter Sleep mode (with the default settings)
when you move magnetic devices closer to the computer. Keep magnetic devices away
from the computer.
© 2012 Sony Corporation
Related Topic
Connecting a Power Source
Turning on Your VAIO Computer
Shutting Down Your VAIO Computer
Restarting Your VAIO Computer
Page 50

Search
VAIO User Guide VAIO Duo SVJ2021 Series Back | Back to Top
Troubleshooting
Notes on Sleep Mode
How to Use
Parts Description
Setup
Network / Internet
Connections
Settings
Playback
Backup / Recovery
Security
Other Operations
Notifications
Read the following precautions before using Sleep mode.
Some apps may not support Sleep mode. When running such apps, exit them before
placing your VAIO computer into Sleep mode.
Some USB devices may not support Sleep mode. When your VAIO computer resumes
from Sleep mode, the computer may not recognize such USB devices, depending on the
type and number of connected USB devices.
If you cannot place the computer into Sleep mode, disconnect all USB devices before
placing the computer into Sleep mode.
If your VAIO computer enters Sleep mode when Windows or the computer is unstable, it
may not resume from Sleep mode. The following operations are recommended:
Before placing your VAIO computer into Sleep mode, save your files and exit all
running apps.
Shut down your VAIO computer periodically.
Depending on the condition of Windows, your VAIO computer cannot enter Sleep mode.
If your VAIO computer enters Sleep mode while running a task, such as DVD writing,
the task may be suspended.
Related Topic
Using Sleep Mode
Notes on Using the Power Source
Notes on Using the Battery Pack
© 2012 Sony Corporation
Page 51

Search
VAIO User Guide VAIO Duo SVJ2021 Series Back | Back to Top
Troubleshooting
About the Touch Screen
How to Use
<Touch screen equipped models>
Parts Description
Setup
Network / Internet
Connections
Settings
Playback
Backup / Recovery
Security
Other Operations
Notifications
The touch screen enables direct interaction with your VAIO computer using your finger(s).
You can perform various gestures on the touch screen instead of mouse operations, such as
selecting items and scrolling.
Your VAIO computer supports multi-touch input.
Note
Your VAIO computer is equipped with a capacitive touch screen. When using it, note the
following characteristics of the capacitive touch screen.
The touch screen will not work if you touch it with fingernails, or if you wear gloves.
If tapping triggers an unintentional operation, make sure that no other parts of your
body, including your clothes, are in contact with the touch screen.
The surface of the touch screen may get hot. This is normal and does not indicate a
malfunction.
Even though the surface of the touch screen is tempered glass, it could still become
damaged. Treat it with adequate care. If it breaks, small granular shards may scatter
and cause injury.
Do not drop the touch screen or subject it to a strong impact. Do not scratch the
surface. A surface flaw may cause the glass to break.
A protection sheet may be attached to the LCD screen frame at the factory. Remove
the sheet before use; otherwise the touch screen may not work correctly.
Some apps do not accept touch screen operations.
Related Topic
<ERROR>
© 2012 Sony Corporation
Page 52

Search
VAIO User Guide VAIO Duo SVJ2021 Series Back | Back to Top
Troubleshooting
How to Use the Touch Screen
How to Use
<Touch screen equipped models>
Parts Description
Setup
Network / Internet
Connections
Settings
Playback
Backup / Recovery
Security
Other Operations
Notifications
You can tap the touch screen or make a simple motion with your fingers to operate your
VAIO computer.
Basic operations
To click (tap)
Tap on the touch screen once with a finger. You can select a button, such as OK and
Cancel, or an item in a menu by tapping it.
To double-click (double-tap)
Tap on the touch screen twice in quick succession with a finger. You can start an app, such
as a word processor or a spreadsheet program, or open a file by double-tapping its icon.
To right-click (touch and hold)
Touch and hold the desired point on the touch screen for a few seconds and lift your finger
off the screen. Depending on the point you touch, you can display various shortcut menus.
To drag
Put a finger on the touch screen and slide it while keeping the finger in contact with the
screen. You can move a file or change the window size.
To drag and drop
Touch the desired file icon, slide to another folder, window or software icon, and then lift your
finger off the screen. You can move or copy a file.
Advanced operations
You can make a simple motion (gesture) with your fingers on the touch screen to operate
your VAIO computer.
The response to a gesture varies depending on the apps.
This section describes the operations for Internet Explorer and @@Photo@@.
To scroll
Touch and slide a scrollable area of a window, such as an Internet Explorer window.
You can also drag the slider on the vertical scroll bar of the selected window to scroll it.
To zoom in or out on an image such as a photo (zoom)
Pinch on the touch screen with two fingers for zooming on an image, such as a photo on
@@Photo@@. Pinch open to zoom in or pinch close to zoom out.
Page 53

To rotate an image such as a photo (rotate)
Put two fingers on the touch screen and slide them in circles to rotate an image, such as a
photo.
To flick
Put a finger on the touch screen and slide it quickly in a straight line. The response by your
VAIO computer is determined by the direction of the flick. There are four default responses:
flick left moves forward, flick right moves backward, flick up scrolls up, and flick down scrolls
down.
© 2012 Sony Corporation
Related Topic
<ERROR>
Page 54

Search
VAIO User Guide VAIO Duo SVJ2021 Series Back | Back to Top
Troubleshooting
Enable/Disable the Touch Screen
How to Use
<Touch screen equipped models>
Parts Description
Setup
Network / Internet
Connections
Settings
Playback
Backup / Recovery
Security
Other Operations
Notifications
By default, the touch screen of your VAIO computer is enabled. To disable/enable the touch
screen, follow these steps:
1. Open Control Panel [Details] and select Hardware and Sound and Pen and
Touch.
2. Select the Touch tab.
3. Select or clear the Use your finger as an input device check box.
Select the check box to enable the touch screen or clear it to disable the touch screen.
4. Select OK.
Related Topic
How to Use the Touch Screen<Touch screen equipped models>
© 2012 Sony Corporation
Page 55

Search
VAIO User Guide VAIO Duo SVJ2021 Series Back | Back to Top
Troubleshooting
Enlarging the Text Size (DPI)
How to Use
<Touch screen equipped models>
Parts Description
Setup
Network / Internet
Connections
Settings
Playback
Backup / Recovery
Security
Other Operations
Notifications
You can change the DPI to enlarge the font size, making it easier to touch specific text.
1. Open Control Panel [Details] and select Customize Desktop and Make text
and other items larger or smaller.
2. Select the desired settings from the options on the screen and Apply.
3. If a message prompts you to log off, select Log off now.
4. Log on again.
The text font size for Windows changes.
Hint
You can select Set custom text size (DPI) on the left of the Display window to
set the text size more easily.
© 2012 Sony Corporation
Page 56

Search
VAIO User Guide VAIO Duo SVJ2021 Series Back | Back to Top
Troubleshooting
Notes on Using the Touch Screen
How to Use
<Touch screen equipped models>
Parts Description
Setup
Network / Internet
Connections
Settings
Playback
Backup / Recovery
Security
Other Operations
Notifications
Before using the touch screen, read the following precautions for correct use.
Do not push the touch screen roughly.
Gentle touches always work. The degree of pressing force does not count for operations
as your VAIO computer is equipped with a capacitive touch screen.
Do not use an object other than your finger to use the touch screen.
The touch screen may be damaged or a malfunction may occur. Be sure to touch only
with your finger.
Keep the touch screen clean for good touch sensitivity. Dirt may cause damage or a
malfunction.
© 2012 Sony Corporation
Page 57

Search
VAIO User Guide VAIO Duo SVJ2021 Series Back | Back to Top
Troubleshooting
Changing the Resolution (Size) of the Screen
How to Use
Image
Parts Description
Setup
Network / Internet
Connections
Settings
Playback
Backup / Recovery
Security
Other Operations
Notifications
You can change the screen resolution to adjust the size of the characters and images on the
computer screen.
Refer to Windows Help and Support [Details] for more information.
1. Right-click on the desktop [Details] and select Screen resolution.
2. Select the current screen resolution next to Resolution and move the slider to
change the screen resolution.
Note
You may not be able to play high-resolution videos depending on the amount of video
memory on your VAIO computer. In such a case, lower the screen resolution.
Do not change the display resolution while using video/image apps or playing DVDs, as
it may cause unsuccessful playback/display or unstable system operations.
Related Topic
Notes on the LCD screen
© 2012 Sony Corporation
Page 58

Search
VAIO User Guide VAIO Duo SVJ2021 Series Back | Back to Top
Troubleshooting
Notes on the LCD screen
How to Use
Parts Description
Setup
Network / Internet
Connections
Settings
Playback
Backup / Recovery
Security
Other Operations
Notifications
Read the following precautions for correct use of the LCD screen.
The LCD screen is manufactured using high-precision technology. You may, however,
see tiny black points and/or bright points (red, blue, or green) that continuously appear
on the LCD screen. This is a normal result of the manufacturing process and does not
indicate a malfunction.
Do not scratch the surface of the LCD screen or exert pressure on it. This could cause
damage.
Do not exert pressure on the LCD screen lid with the lid closed as it may scratch the
LCD screen or soil it.
The LCD screen may become warm during operation. This is normal and does not
indicate a malfunction.
Due to the mechanical design of your VAIO computer’s LCD screen/touch screen, the
screen surface may become warm while you are using the computer for an extended
period of time. This is normal and does not indicate a malfunction. (Touch screen
equipped models)
The LCD screen/touch screen is made of reinforced glass to implement high durability,
however, treat the screen with care as it is not 100% unbreakable. In case the screen
breaks into small pieces, be careful not to cut yourself on the pieces of broken glass.
(Touch screen equipped models)
Do not leave the LCD screen facing the sun. This could damage the LCD screen. Be
sure to block direct sunlight when using your VAIO computer near a window.
Do not exert pressure on the LCD screen or its edges when opening the LCD screen lid
or lifting your VAIO computer. The LCD screen may be sensitive to pressure or added
stress, and exerting pressure may damage the screen or cause it to malfunction. When
opening the computer, hold the base with one hand and gently lift the LCD screen lid
with the other. To carry the computer with the lid open, be sure to hold the computer
with both hands.
Using your VAIO computer in low temperature conditions may produce a residual image
on the LCD screen. This does not indicate a malfunction. When the computer returns to
normal temperature, the screen returns to normal.
A residual image may appear on the LCD screen if the same image is displayed for an
extended period of time. The residual image disappears after a while. You can use a
screen saver to prevent residual images.
© 2012 Sony Corporation
Page 59

Search
VAIO User Guide VAIO Duo SVJ2021 Series Back | Back to Top
Troubleshooting
Adjusting the Speakers Volume
How to Use
Parts Description
Setup
Network / Internet
Connections
Settings
Playback
Backup / Recovery
Security
Other Operations
Notifications
You can change the volume level of the speakers and headphones.
To reduce the volume using the Fn key
1. Press the F3 key while holding down the Fn key.
The volume is turned down.
To increase the volume using the Fn key
1. Press the F4 key while holding down the Fn key.
The volume is turned up.
Hint
You can press the Fn+F2 keys to turn off the speakers and headphones. Press the
Fn+F2 keys once more to turn on the volume.
You can also press the Fn+F4 keys to turn on the volume.
Related Topic
Adjusting the Volume in Windows
Adjusting the Microphone Volume
Connecting External Speakers or Headphones
© 2012 Sony Corporation
Page 60

Search
VAIO User Guide VAIO Duo SVJ2021 Series Back | Back to Top
Troubleshooting
Connecting External Speakers or Headphones
How to Use
Parts Description
Setup
Network / Internet
Connections
Settings
Playback
Backup / Recovery
Security
Other Operations
Notifications
You can connect external sound output devices (such as speakers or headphones) to your
VAIO computer.
1. Connect external speakers to the headphones jack
(not supplied).
Note
Turn down the volume of the speakers before turning them on.
Hint
Refer to the manual that came with your speakers or headphones.
[Details] with a speaker cable
© 2012 Sony Corporation
Related Topic
Adjusting the Speakers Volume
Connecting an External Microphone
Changing the Sound Output Device
Adjusting the Volume in Windows
Page 61

Search
VAIO User Guide VAIO Duo SVJ2021 Series Back | Back to Top
Troubleshooting
Connecting an External Microphone
How to Use
Parts Description
Setup
Network / Internet
Connections
Settings
Playback
Backup / Recovery
Security
Other Operations
Notifications
You can connect an external microphone to your VAIO computer and enjoy voice chat, etc.
1. Plug the microphone cable into the microphone jack
Note
If you connect or disconnect the microphone to/from your VAIO computer while running
a voice recording app, voice recording may fail or the app may exit.
Connect the microphone and select it as the sound recording device for Windows before
starting the app.
Hint
Use a plug-in-power microphone.
Refer to the manual that came with your microphone.
If microphone feedback occurs, move the microphone away from your speakers.
Related Topic
Adjusting the Microphone Volume
Connecting External Speakers or Headphones
[Details].
© 2012 Sony Corporation
Page 62

Search
VAIO User Guide VAIO Duo SVJ2021 Series Back | Back to Top
Troubleshooting
Changing the Sound Output Device
How to Use
Parts Description
Setup
Network / Internet
Connections
Settings
Playback
Backup / Recovery
Security
Other Operations
Notifications
If there is no sound from the device connected to your VAIO computer, you need to change
the device for sound output.
1. Open Control Panel. [Details]
2. Select Hardware and Sound.
3. Select Sound.
4. Select the Playback tab.
5. Ensure there is a check mark next to the icon of the device you intend to output
computer sound from.
If there is no check mark next to the icon, select it and Set Default.
6. Select OK.
© 2012 Sony Corporation
Page 63

Search
VAIO User Guide VAIO Duo SVJ2021 Series Back | Back to Top
Troubleshooting
Adjusting the Volume in Windows
How to Use
Parts Description
Setup
Network / Internet
Connections
Settings
Playback
Backup / Recovery
Security
Other Operations
Notifications
You can adjust the volume on each app from Control Panel.
1. Open Control Panel. [Details]
2. Select Hardware and Sound.
3. Select Adjust system volume under Sound.
4. Move a slider in Device up and down to your desired volume level.
When the volume is turned off (
volume (
slider.
). When the volume has been minimized, turn the volume up with the
), select (Deactivate muting) to turn on the
To turn off the Windows startup sound
1. Open Control Panel. [Details]
2. Select Hardware and Sound.
3. Select Sound.
4. Select the Sounds tab.
5. Clear the Play Windows Startup sound check box.
6. Select OK.
Related Topic
Adjusting the Speakers Volume
Adjusting the Microphone Volume
Connecting External Speakers or Headphones
© 2012 Sony Corporation
Page 64

Search
VAIO User Guide VAIO Duo SVJ2021 Series Back | Back to Top
Troubleshooting
Adjusting the Microphone Volume
How to Use
Parts Description
Setup
Network / Internet
Connections
Settings
Playback
Backup / Recovery
Security
Other Operations
Notifications
You can adjust the volume level of the microphone.
1. Open Control Panel [Details].
2. Select Hardware and Sound.
3. Select Sound.
4. Select the Recording tab.
5. Double-click the microphone icon.
6. Select the Levels tab in the Microphone Properties window.
7. Move a slider in Microphone right and left to your desired volume level.
If the microphone volume is still not loud enough even at the maximum volume level,
move a slider in Microphone Boost right and left to adjust the volume level.
8. Select OK.
Related Topic
Connecting an External Microphone
Adjusting the Speakers Volume
Adjusting the Volume in Windows
© 2012 Sony Corporation
Page 65

Search
VAIO User Guide VAIO Duo SVJ2021 Series Back | Back to Top
Troubleshooting
Playing Surround Sound Using S-FORCE Front
How to Use
Surround 3D
Parts Description
Setup
Network / Internet
Connections
Settings
Playback
Backup / Recovery
Security
Other Operations
Notifications
S-FORCE Front Surround 3D is a virtual surround technology which allows you to enjoy
powerful and realistic surround sound using the built-in speakers. Its effect is especially
noticeable when you are watching movies.
1. Start VAIO Control Center. [Details]
2. Select Sound.
3. Select Use S-FORCE Front Surround 3D in Sound Effect Settings.
Note
S-FORCE Front Surround 3D works only on sound output from the built-in speakers.
Simultaneous use of S-FORCE Front Surround 3D and Dolby Home Theater v4 is not
possible.
Simultaneous use of S-FORCE Front Surround 3D and Dolby Home Theater v4 or
ClearAudio+ is not possible.
Hint
To achieve maximum effect of S-FORCE Front Surround 3D, place your VAIO computer
directly across from your listening position and stay within the optimum distance:
approximately 3.3 feet (1 m) from the computer.
Related Topic
Adjusting the Speakers Volume
Adjusting the Volume in Windows
© 2012 Sony Corporation
Page 66

Search
VAIO User Guide VAIO Duo SVJ2021 Series Back | Back to Top
Troubleshooting
Connecting an External Drive
How to Use
Parts Description
Setup
Network / Internet
Connections
Settings
Playback
Backup / Recovery
Security
Other Operations
Notifications
Connect an external disc drive or hard disk drive to a USB port on your VAIO computer.
1. Plug the power cord of your external drive into an AC outlet (1).
2. Plug one end of a USB cable (3) (not supplied) into the USB port (2), and the other
end to the external drive. [Details]
Note
Be sure to connect an external drive to a power source with an AC adapter (if supplied).
Hint
You may need to install a driver depending on the external drive you use.
In addition, procedures to connect and use an external drive vary depending on the
drive you use. Refer to the manual that came with your external drive for more
information.
© 2012 Sony Corporation
Related Topic
Connecting a USB Device
Page 67

Search
VAIO User Guide VAIO Duo SVJ2021 Series Back | Back to Top
Troubleshooting
Inserting/Removing a Disc
How to Use
<Optical disc drive equipped models>
Parts Description
Setup
Network / Internet
Connections
Settings
Playback
Backup / Recovery
Security
Other Operations
Notifications
Insert/remove a disc to/from your VAIO computer that is turned on.
To insert a disc
1. Insert a disc into the optical disc drive slot.
When the optical disc drive has a vertical slot, insert a disc with the label side facing
toward you.
When the optical disc drive has a horizontal slot, insert a disc with the label side facing
upward.
Note
Slide the disc straight into the slot without applying excessive pressure to the disc.
Make sure there is no disc inserted in the optical disc drive before inserting a disc
into the slot.
© 2012 Sony Corporation
To remove a disc
1. Press the drive eject button.
The disc slides out.
Note
Do not forcibly pull out the disc from the optical disc drive before it completely slides out.
Related Topic
Supported Discs<Optical disc drive equipped models>
About Region Codes<Optical disc drive equipped models>
Page 68

Search
VAIO User Guide VAIO Duo SVJ2021 Series Back | Back to Top
Troubleshooting
Supported Discs
How to Use
<Optical disc drive equipped models>
Parts Description
Setup
Network / Internet
Connections
Settings
Playback
Backup / Recovery
Security
Other Operations
Notifications
This topic explains media types that are playable/recordable on your VAIO computer.
The installed optical disc drive varies depending on the model you purchased. Check the
specifications before use.
For DVD SuperMulti Drive equipped models
The optical disc drive supports playback and/or recording of the following media.
Playback and recording
CD-R/RW *1
DVD-R/RW
DVD+R/RW
DVD+R DL (Double Layer)
DVD-R DL (Dual Layer)
DVD-RAM *2*3
Playback only
CD-ROM
DVD-ROM
For Blu-ray Disc(TM) Drive with DVD SuperMulti equipped
models
The optical disc drive supports playback and/or recording of the following media.
Playback and recording
CD-R/RW *1
DVD-R/RW
DVD+R/RW
DVD+R DL (Double Layer)
DVD-R DL (Dual Layer)
DVD-RAM *2*3
BD-R/RE *4*5*6
Playback only
CD-ROM
DVD-ROM
BD-ROM
For Blu-ray Disc(TM) ROM Drive with DVD SuperMulti equipped
models
The optical disc drive supports playback and/or recording of the following media.
Playback and recording
CD-R/RW *1
DVD-R/RW
DVD+R/RW
DVD+R DL (Double Layer)
DVD-R DL (Dual Layer)
DVD-RAM *2*3
Page 69

Playback only
CD-ROM
DVD-ROM
BD-ROM
*1 Writing data to Ultra Speed CD-RW media is not supported.
*2 The optical disc drive does not support the DVD-RAM cartridge. Use non-cartridge discs
or discs with a removable cartridge.
*3 Writing data to single-sided DVD-RAM media (2.6 GB) compliant with DVD-RAM Version
1.0 is not supported.
DVD-RAM Version 2.2/12X-SPEED DVD-RAM Revision 5.0 media are not supported.
*4 BD-RE Disc media in Version 1.0 format and Blu-ray Disc media with a cartridge are not
supported.
*5 Writing data to BD-R Part1 Version 1.1/1.2/1.3 media (single-layer media with the
capacity of 25 GB, dual-layer media with the capacity of 50 GB) and BD-RE Part1 Version
2.1 media (single-layer media with the capacity of 25 GB, dual-layer media with the
capacity of 50 GB) is supported.
*6 BDXL(TM) media are not supported.
Note
Your optical disc drive may not support writing or playback of some types of media.
Your optical disc drive does not support 8 cm disc reading/writing and an 8 cm disc
adapter.
Your optical disc drive supports only circular discs. Do not use discs in any other shape
(star, heart, card, etc.) or damaged discs, as it may cause your VAIO computer to
malfunction.
DVD-Video format data can be written to DVD+R (single layer or dual layer),
DVD+RW/DVD-R (single layer or dual layer), and DVD-RW media. DVD-Video
Recording format data can be written to DVD-R (single layer or dual layer), DVD-RW,
and DVD-RAM media. Writable media differ depending on the disc burning app you use.
Refer to the help file included with the app for more information.
It is recommended that you use Sony branded media: DVD+R, DVD+RW, DVD-R, DVDRW, CD-R, CD-RW, BD-R, or BD-RE.
You cannot write data to DVD-RW media (6x writing) unless your optical disc drive
supports at least 6x writing for DVD-RW media.
You cannot write data to DVD+RW media (8x writing) unless your optical disc drive
supports at least 8x writing for DVD+RW media.
Your VAIO computer is designed to playback discs that conform to the Compact Disc
(CD) standard. DualDiscs and some music discs encoded with copyright protection
technologies do not conform to the CD standard. Therefore, these discs may not be
compatible with the computer.
When you buy pre-recorded or blank discs for use with your VAIO computer, be sure to
read the notices on the disc package carefully to check both playback and recording
compatibility with your computer’s optical disc drives. Sony does NOT guarantee the
compatibility of VAIO optical disc drives with discs that are not compliant with the official
“CD,” “DVD,” or “Blu-ray Disc” standard. USING NON-COMPLIANT DISCS CAN
CAUSE FATAL DAMAGE TO YOUR VAIO COMPUTER OR CREATE SOFTWARE
CONFLICTS AND CAUSE SYSTEM HANGING.
For inquiries about disc formats, contact the individual publisher of the pre-recorded disc
or the manufacturer of the recordable disc.
Your VAIO computer needs to be connected to the Internet to play DVD-RW, DVDRAM, and DVD-R (single layer or dual layer) media that are compliant with the Content
Protection for Recordable Media (CPRM) standard.
To record, edit, or play copyright protected content, Blu-ray Disc media employs the
Advanced Access Content System (AACS) technology. To use Blu-ray Disc media
continually, you need to update the AACS key.
You can update the AACS key through the Internet. Follow a message displayed on a
recording, editing, or playback app you are using. Without updating the AACS key, you
may become unable to record, edit, or play copyright protected content.
To record, edit, or play content without copyright protection, you do not need to update
the AACS key. You can update the AACS key for the Blu-ray Disc recording or playback
app installed on your VAIO computer for five years after purchase. After that, we will
Page 70

© 2012 Sony Corporation
inform you about the update on the support website.
Region settings are required for some contents of DVD and BD-ROM Disc media. If the
region setting on the optical disc drive does not match the region code on the disc,
playback is not possible.
Unless your external display is compliant with the High-bandwidth Digital Content
Protection (HDCP) standard, you cannot play or view the contents of copyright protected
Blu-ray Disc media through an HDMI connection.
Some Blu-ray Disc content may restrict video output to standard definition or prohibit
analog video output.
Related Topic
About Region Codes<Optical disc drive equipped models>
Page 71

Search
VAIO User Guide VAIO Duo SVJ2021 Series Back | Back to Top
Troubleshooting
About Region Codes
How to Use
<Optical disc drive equipped models>
Parts Description
Setup
Network / Internet
Connections
Settings
Playback
Backup / Recovery
Security
Other Operations
Notifications
The following is a list of DVD region codes indicating playable regions of DVD media.
You can check the region codes of DVD media sold in the following countries or regions.
1. USA, Canada
2. Europe, Middle East, South Africa, Japan
3. Southeast Asia, Taiwan, South Korea, Hong Kong
4. Central America, South America, Mexico, Australia, New Zealand
5. North Africa, Asia, Russia, Ukraine, Belarus, India
6. China
7. Reserved for future use
8. International aircraft, international cruise ship, international conference hall, etc.
Region code indicators are labeled on the discs or packages to indicate in which region and
on what type of player you can play the disc. If the region code indicates “all,” you can play
this disc in most regions of the world. If the region code for your residence area is different
from the label, you cannot play the disc on your VAIO computer.
Related Topic
Supported Discs<Optical disc drive equipped models>
© 2012 Sony Corporation
Page 72

Search
VAIO User Guide VAIO Duo SVJ2021 Series Back | Back to Top
Troubleshooting
Handling Discs
How to Use
<Optical disc drive equipped models>
Parts Description
Setup
Network / Internet
Connections
Settings
Playback
Backup / Recovery
Security
Other Operations
Notifications
Read the following to protect data stored on discs and take proper care of discs.
Be sure to hold the disc by its edges and central hole without touching the recording
surface (playing surface), as shown below.
Fingerprints and dust on the surface of a disc may cause a read or write error. Be sure
to keep the disc clean.
Sony assumes no liability for any problems and damages to discs arising out of
adhesive labels affixed to discs. Refer to the manual carefully that came with the label
app or label paper, and use the labels under your responsibility.
To take proper care of discs
For normal cleaning, hold the disc by its edges and use a soft cloth to wipe the surface
from the center out, as shown below.
© 2012 Sony Corporation
If the disc is badly soiled, moisten a soft cloth with water, wring it out well, and use it to
wipe the surface of the disc. Wipe off any remaining moisture with a dry soft cloth.
Do not use solvents such as benzine, thinner, commercially available cleaners, or antistatic spray which may cause damage to the disc.
Page 73

Search
VAIO User Guide VAIO Duo SVJ2021 Series Back | Back to Top
Troubleshooting
Notes on Using Discs
How to Use
<Optical disc drive equipped models>
Parts Description
Setup
Network / Internet
Connections
Settings
Playback
Backup / Recovery
Security
Other Operations
Notifications
Observe the following notes when using discs on your VAIO computer.
Notes on playing discs
Depending on system environment, you may find sound interruptions and/or dropped
frames during DVD/BD/AVCHD playback. In addition, some discs may not be able to
play on your VAIO computer.
When you are playing discs:
The CPU load increases. Close all running apps other than the playback app you are
currently using to enjoy smoother playback.
Do not switch the display output between the computer screen and an external
display.
Notes on playing recorded discs on other players
Some CD players may not be able to play audio CDs created with CD-R or CD-RW
media.
Some DVD players may not be able to play DVDs created with DVD+R DL, DVD-R DL,
DVD+R, DVD+RW, DVD-R, DVD-RW, or DVD-RAM media.
Blu-ray Disc recorders that support only BD-RE Ver.1.0 cannot play BD-R or BD-RE
media created with your VAIO computer. (Blu-ray Disc Drive with DVD SuperMulti
equipped models)
© 2012 Sony Corporation
Tips for successful writing
Do not plug or unplug cables, such as the AC adapter or the power cord while the optical
disc drive is writing data to a disc.
The writing process may take longer to complete than theoretically predicted because
some apps write and verify data simultaneously.
Sony assumes no liability for any loss or damage of any kind arising out of writing
failure.
Page 74

Search
VAIO User Guide VAIO Duo SVJ2021 Series Back | Back to Top
Troubleshooting
Using the Built-in Camera
How to Use
<Built-in camera equipped models>
Parts Description
Setup
Network / Internet
Connections
Settings
Playback
Backup / Recovery
Security
Other Operations
Notifications
If your VAIO computer is equipped with a built-in camera, you can make a video call through
the Internet using communication software, such as Windows Live Messenger.
For detailed information on how to use the software, refer to the help file included with the
software.
The built-in camera indicator light is on while the built-in camera is in use.
Hint
The software installed on your VAIO computer varies depending on the computer’s
configurations.
1. Built-in microphone (monaural)
2. Built-in camera indicator
3. Built-in camera
To make a video call using Windows Live Messenger
1. Click (Start), All Programs, an d Windows Live Messenger.
You need to sign in to Windows Live Messenger to make a video call.
To display images from the built-in camera
1. Click (Start), All Programs, ArcSoft Webcam Suite, and WebCam
Companion 4.
2. Click Capture.
Hint
If you cannot capture images properly, for example captured images are not displayed
smoothly, click the current resolution of the capturing image in the upper right of the
main window and lower the resolution.
Related Topic
Notes on the Built-in Camera<Built-in camera equipped models>
Page 75

© 2012 Sony Corporation
Page 76

Search
VAIO User Guide VAIO Duo SVJ2021 Series Back | Back to Top
Troubleshooting
Notes on the Built-in Camera
How to Use
<Built-in camera equipped models>
Parts Description
Setup
Network / Internet
Connections
Settings
Playback
Backup / Recovery
Security
Other Operations
Notifications
Do not scratch or soil the area on and around the built-in camera, as it may cause poorquality images.
Do not let direct sunlight enter the lens of the built-in camera regardless of your VAIO
computer’s power state, as it may cause the camera to malfunction.
Care and cleaning of the built- in camera
If the area on and around the built-in camera is soiled, gently wipe it with a soft cloth, such
as a lens cleaning cloth. Do not rub the area too hard, as it can be easily scratched.
Related Topic
Using the Built-in Camera<Built-in camera equipped models>
© 2012 Sony Corporation
Page 77

Search
VAIO User Guide VAIO Duo SVJ2021 Series Back | Back to Top
Troubleshooting
About the Network (LAN)
How to Use
Parts Description
Setup
Network / Internet
Connections
Settings
Playback
Backup / Recovery
Security
Other Operations
Notifications
The network (LAN) enables you to connect your VAIO computer to the Internet and transfer
data between the computer and other devices.
You can connect your VAIO computer to 1000BASE-T/100BASE-TX/10BASE-T type
networks with a LAN cable (not supplied). Connect one end of a LAN cable to the LAN port
on the computer and the other end to your network.
For information on peripheral devices required for LAN access, ask your Internet Service
Provider (ISP) or refer to the manual that came with your modem.
For information on how to connect your VAIO computer to the network, refer to your ISP’s
instructions or the manual that came with the modem and other peripheral devices. If you
require information on the network settings at your workplace, ask the network administrator.
Related Topic
About the Internet Connection Services
Starting Wi-Fi (Wireless LAN) Communications
© 2012 Sony Corporation
Page 78

Search
VAIO User Guide VAIO Duo SVJ2021 Series Back | Back to Top
Troubleshooting
About the Internet Connection Services
How to Use
Parts Description
Setup
Network / Internet
Connections
Settings
Playback
Backup / Recovery
Security
Other Operations
Notifications
The following types of Internet connection services are available.
You can select from among the services according to your preference, for example,
communication speed or a usage fee. For detailed information on a variety of connection
services, contact Internet Service Providers (ISPs).
Fiber to the Home (FTTH)
Cable modem
Digital Subscriber Line (DSL)
Satellite
Dial-up
Related Topic
Connecting to the Internet with a Wired Connection
Starting Wi-Fi (Wireless LAN) Communications
© 2012 Sony Corporation
Page 79

Search
VAIO User Guide VAIO Duo SVJ2021 Series Back | Back to Top
Troubleshooting
Connecting to the Internet with a Wired
How to Use
Connection
Parts Description
Setup
Network / Internet
Connections
Settings
Playback
Backup / Recovery
Security
Other Operations
Notifications
Before using the Internet, you need to sign up with an Internet Service Provider (ISP) and
set up devices required for connecting your VAIO computer to the Internet.
Connect one end of a LAN cable (not supplied) to the LAN port on your VAIO computer and
the other end to your network.
Note
For detailed information on devices required for Internet access and how to connect
your VAIO computer to the Internet, ask your ISP.
When connecting your VAIO computer to the Internet, be sure to use a cable with
network or Ethernet printed on it.
Do not plug a telephone cable into the LAN port on your VAIO computer.
If the computer is connected to the one of the networks or the LAN port is connected to
the telephone lines mentioned below, high electric current to the port may cause
damage, overheating, or fire.
Any network, except 1000BASE-T/100BASE-TX/10BASE-T type networks
Public telephone subscriber line
Private branch exchange (PBX)
Home (intercom speakerphone) or business-use telephone lines (multi-line business
telephone)
© 2012 Sony Corporation
Hint
To connect your VAIO computer to the Internet using the wireless LAN function, you
need to set up the wireless LAN network. [Details]
Related Topic
About the Internet Connection Services
About the Network (LAN)
Starting Wi-Fi (Wireless LAN) Communications
Page 80

Search
VAIO User Guide VAIO Duo SVJ2021 Series Back | Back to Top
Troubleshooting
Launching the Web Browser (WEB Button)
How to Use
<WEB Button equipped models>
Parts Description
Setup
Network / Internet
Connections
Settings
Playback
Backup / Recovery
Security
Other Operations
Notifications
By pressing the WEB button, you can launch the default web browser.
Even when your VAIO computer is off, pressing the WEB button starts Windows, and
launches the web browser.
© 2012 Sony Corporation
Page 81

Search
VAIO User Guide VAIO Duo SVJ2021 Series Back | Back to Top
Troubleshooting
About the Wi-Fi (Wireless LAN) Standards
How to Use
Parts Description
Setup
Network / Internet
Connections
Settings
Playback
Backup / Recovery
Security
Other Operations
Notifications
The Wireless Local Area Network (WLAN) allows your VAIO computer to connect to a
network through a wireless connection.
The WLAN uses the following IEEE 802.11a/b/g/n standard, which specifies the type of
technology used.
Refer to the specifications to find out about the configuration of the computer.
IEEE 802.11a (Frequency band:5 GHz)
Exclusive to models compliant with the IEEE 802.11a/b/g/n standard.
IEEE 802.11b/g (Frequency band:2.4 GHz)
The IEEE 802.11g standard provides higher-speed communications than the IEEE 802.11b.
IEEE 802.11n (Frequency band:2.4 GHz/5 GHz)
For models compliant with the IEEE 802.11b/g/n standard, only 2.4 GHz band can be used.
Related Topic
Starting Wi-Fi (Wireless LAN) Communications
Stopping Wi-Fi (Wireless LAN) Communications
Notes on Using the Wi-Fi (Wireless LAN) Function
© 2012 Sony Corporation
Page 82

Search
VAIO User Guide VAIO Duo SVJ2021 Series Back | Back to Top
Troubleshooting
Starting Wi-Fi (Wireless LAN) Communications
How to Use
Parts Description
Setup
Network / Internet
Connections
Settings
Playback
Backup / Recovery
Security
Other Operations
Notifications
You can establish Wi-Fi (wireless LAN) communications between your VAIO computer and
an access point (not supplied).
Before using Wi-Fi (wireless LAN), make sure a access point (not supplied) is on and
operating.
1. Connect an access point to your VAIO computer.
Refer to Windows Help and Support [Details] and the manual that came with the
access point for more information.
2. Open the Charms bar [Details] and select
3. Select Change PC settings at the lower right corner of the bar.
4. Select Wireless in the left pane of the PC settings screen.
5. Make sure Airplane mode is Off and the Wi-Fi setting under Wireless devices
is On.
Hint
Refer to Windows Help and Support for more information on Airplane
mode. [Details]
6. Open the Charms bar [Details] and select
7. Select
8. Select the desired access point and Connect.
After the connection is established, Connected appears in the selected wireless
access point field.
If a security key [Details] entry window appears, enter the security key as required and
select OK.
Note that security keys are case-sensitive.
(the Network icon).
(Settings).
(Settings).
Note
On IEEE 802.11a/b/g/n equipped models, when only the 2.4 GHz Wi-Fi (wireless LAN)
function is enabled, your VAIO computer cannot connect to a 5 GHz Wi-Fi (wireless
LAN) access point. Also, when only the 5 GHz Wi-Fi (wireless LAN) function is enabled,
the computer cannot connect to a 2.4 GHz Wi-Fi (wireless LAN) access point.
On IEEE 802.11b/g/n equipped models, when the 2.4 GHz Wi-Fi (wireless LAN) function
is disabled, the computer cannot connect to an access point. Also, the computer cannot
connect to a 5 GHz Wi-Fi (wireless LAN) access point.
It may take some time to find and connect to a Wi-Fi (wireless LAN) access point before
starting communications via Wi-Fi (wireless LAN).
Hint
Once you connect your VAIO computer to the access point by entering the security key,
the access point will be registered in the computer. You do not have to enter the security
key for subsequent connections.
To check Wi - Fi (wireless LAN) connection status
Show the desktop [Details] and move the mouse pointer over (the Network icon) in the
desktop notification area to check the Wi-Fi (wireless LAN) connection status, such as the
access point currently connected to your VAIO computer.
Related Topic
About the Wi-Fi (Wireless LAN) Standards
Page 83

© 2012 Sony Corporation
Stopping Wi-Fi (Wireless LAN) Communications
Notes on Using the Wi-Fi (Wireless LAN) Function
About a Security Key for Wi-Fi (Wireless LAN)
Page 84

Search
VAIO User Guide VAIO Duo SVJ2021 Series Back | Back to Top
Troubleshooting
Stopping Wi-Fi (Wireless LAN) Communications
How to Use
Parts Description
Setup
Network / Internet
Connections
Settings
Playback
Backup / Recovery
Security
Other Operations
Notifications
You can stop Wi-Fi (wireless LAN) communications by following these steps.
1. Open the Charms bar [Details] and select
2. Select
3. Select the desired access point and @@@Disconnect@@@.
Note
Do not disable the Wi-Fi (wireless LAN) function while accessing remote documents,
files, or resources, as it may result in data loss.
Related Topic
About the Wi-Fi (Wireless LAN) Standards
Starting Wi-Fi (Wireless LAN) Communications
Notes on Using the Wi-Fi (Wireless LAN) Function
Disabling the Wi-Fi (Wireless LAN) Function
(the Network icon).
(Settings).
© 2012 Sony Corporation
Page 85

Search
VAIO User Guide VAIO Duo SVJ2021 Series Back | Back to Top
Troubleshooting
Disabling the Wi-Fi (Wireless LAN) Function
How to Use
Parts Description
Setup
Network / Internet
Connections
Settings
Playback
Backup / Recovery
Security
Other Operations
Notifications
You can disable the Wi-Fi (Wireless LAN) function by following these steps.
1. Open the Charms bar [Details] and select
2. Select Change PC settings at the lower right corner of the bar.
3. Select Wireless in the left pane of the PC settings screen.
4. Change the Wi-Fi setting under Wireless devices to Off.
Hint
To enable the Wi-Fi (wireless LAN) function, turn off Airplane mode and change the
Bluetooth setting under Wireless devices to On.
You can disable all wireless functions by turning on Airplane mode.
The wireless function(s) whose setting is on will be enabled when you turn off Airplane
mode. When any wireless function is enabled, the WIRELESS indicator light turns on.
Refer to Windows Help and Support for more information on Airplane mode.
[Details]
Related Topic
About the Wi-Fi (Wireless LAN) Standards
Starting Wi-Fi (Wireless LAN) Communications
Notes on Using the Wi-Fi (Wireless LAN) Function
(Settings).
© 2012 Sony Corporation
Page 86

Search
VAIO User Guide VAIO Duo SVJ2021 Series Back | Back to Top
Troubleshooting
About a Security Key for Wi-Fi (Wireless LAN)
How to Use
Parts Description
Setup
Network / Internet
Connections
Settings
Playback
Backup / Recovery
Security
Other Operations
Notifications
A security key is a security protocol for Wi-Fi (wireless LAN) that encrypts data transmitted
on Wi-Fi (wireless LAN). It is also referred to as an encryption key or a WEP (Wired
Equivalent Privacy) key.
The security key allows wireless devices that have the same key, such as a Wi-Fi (wireless
LAN) access point and a computer, to communicate with each other on Wi-Fi (wireless
LAN).
The security key is assigned to each access point by default. (Make sure the default security
key has been changed to protect data from unauthorized use.) If you cannot find the default
security key, refer to the manual that came with your access point.
If you enter a wrong security key, follow these steps to re-enter the security key.
1. Open the Charms bar [Details] and select
2. Select
3. Right-click the desired network and select @@@Display connection
property@@@.
4. Select the Security tab.
5. Enter a security key in the Network security key field and select OK.
Related Topic
About the Wi-Fi (Wireless LAN) Standards
Starting Wi-Fi (Wireless LAN) Communications
Notes on Using the Wi-Fi (Wireless LAN) Function
(the Network icon).
(Settings).
© 2012 Sony Corporation
Page 87

Search
VAIO User Guide VAIO Duo SVJ2021 Series Back | Back to Top
Troubleshooting
Notes on Using the Wi-Fi (Wireless LAN) Function
How to Use
Parts Description
Setup
Network / Internet
Connections
Settings
Playback
Backup / Recovery
Security
Other Operations
Notifications
Before using the Wi-Fi (wireless LAN) function, read the following precautions for correct
use.
In some countries or regions, using the Wi-Fi (wireless LAN) products may be restricted
by the local regulations.
Wireless devices work on the 2.4 GHz band, which is used by a variety of devices.
Wireless devices use the technology to minimize radio interference from other devices
that use the same band; however, radio interference may still slow communication
speeds, reduce communication range, or cause communication failure.
If both the BLUETOOTH function and the 2.4 GHz Wi-Fi (wireless LAN) function of your
VAIO computer are enabled, interference may occur and cause slower communication
speeds or other problems.
To communicate via Wi-Fi (wireless LAN) while you are on the road, you may need to
contract with a Wi-Fi (wireless LAN) connection service provider.
If your VAIO computer is equipped with the IEEE 802.11a/b/g/n standard, outdoor use of
the 5 GHz Wi-Fi (wireless LAN) function is prohibited by law.
The communication speed and range may vary depending on the following conditions:
Distance between devices
Existence of obstacles between devices
Device configuration
Radio conditions
Ambient environment (including wall material, etc.)
Apps in use
Communications may be cut off depending on radio conditions.
The data transfer rate specified in the specification is the theoretical maximum, and may
not reflect actual data transfer rate.
Actual communication speed may not be as fast as the one displayed on your VAIO
computer.
The 2.4 GHz and 5 GHz Wi-Fi (wireless LAN) frequency bands are not communicable
with one another.
The data transfer rate of IEEE 802.11g and IEEE 802.11n (2.4 GHz) may be affected by
interference when used with an IEEE 802.11b product. Also, IEEE 802.11g and IEEE
802.11n automatically lower the transfer rate to maintain compatibility with an IEEE
802.11b product. The transfer rate may be regained by changing the channel settings of
your access point.
The IEEE 802.11a standard and the IEEE 802.11n standard are not available on ad-hoc
networks.
To stop the Wi-Fi (wireless LAN) function abruptly, turn off your VAIO computer.
The WLAN standard includes the encryption methods: Wired Equivalent Privacy (WEP),
which is a security protocol, Wi-Fi Protected Access 2 (WPA2), and Wi-Fi Protected
Access (WPA). Proposed jointly by the IEEE and Wi-Fi Alliance, both WPA2 and WPA
are specifications of standards based on interoperable security enhancements that
increase the level of data protection and access control for existing Wi-Fi networks.
WPA is designed to be forward compatible with the IEEE 802.11i specification. It utilizes
the enhanced data encryption Temporal Key Integrity Protocol (TKIP) in addition to user
authentication using 802.1X and Extensible Authentication Protocol (EAP). Data
encryption protects the vulnerable wireless link between clients and access points.
Besides that, there are other typical LAN security mechanisms to ensure privacy, such
as: password protection, end-to-end encryption, virtual private networks, and
authentication. WPA2, the second generation of WPA, provides stronger data protection
and network access control and is also designed to secure all versions of 802.11
devices, including 802.11b, 802.11a, 802.11g, and 802.11n standards, multi-band and
multi-mode. In addition, based on the ratified IEEE 802.11i standard, WPA2 provides
Page 88

© 2012 Sony Corporation
government grade security by implementing the National Institute of Standards and
Technology (NIST) FIPS 140-2 compliant AES encryption algorithm and 802.1X-based
authentication. WPA2 is backward compatible with WPA.
Related Topic
About the Wi-Fi (Wireless LAN) Standards
Starting Wi-Fi (Wireless LAN) Communications
Stopping Wi-Fi (Wireless LAN) Communications
Notes on Using the BLUETOOTH(R) Function
Page 89

Search
VAIO User Guide VAIO Duo SVJ2021 Series Back | Back to Top
Troubleshooting
About the BLUETOOTH(R) Function
How to Use
Parts Description
Setup
Network / Internet
Connections
Settings
Playback
Backup / Recovery
Security
Other Operations
Notifications
You can establish wireless communications between your VAIO computer and other
BLUETOOTH devices, such as another computer, a smartphone, a mobile phone, a headset,
or a mouse.
You can transfer data between these devices without cables at a range of up to 33 feet / 10
meters in an open area.
One BLUETOOTH device can connect with up to seven devices via wireless network to
exchange data.
When a device requires connection to another device, it sends out an inquiry to neighboring
BLUETOOTH devices. If any device responds to the inquiry, the two devices can connect
with each other.
© 2012 Sony Corporation
Related Topic
Communicating with Another BLUETOOTH(R) Device such as a Mouse
Stopping BLUETOOTH(R) Communications
Notes on Using the BLUETOOTH(R) Function
About BLUETOOTH(R) Security
Page 90

Search
VAIO User Guide VAIO Duo SVJ2021 Series Back | Back to Top
Troubleshooting
Communicating with Another BLUETOOTH(R)
How to Use
Device such as a Mouse
Parts Description
Setup
Network / Internet
Connections
Settings
Playback
Backup / Recovery
Security
Other Operations
Notifications
You can connect BLUETOOTH devices to your VAIO computer.
For details on BLUETOOTH communication, see About the BLUETOOTH Function.
[Details]
1. Open the Charms bar [Details] and select
2. Select Change PC settings at the lower right corner of the bar.
3. Select Wireless in the left pane of the PC settings screen.
4. Make sure that Airplane mode is Off and the Bluetooth setting is On.
Hint
If your VAIO computer is compliant with BLUETOOTH high speed technology and
you intend to use it for high-speed communications, change the Wi-Fi setting
under Wireless devices to On, too.
Make sure that the WIRELESS indicator light on your VAIO computer is on.
5. Select Devices in the left pane of the PC settings screen.
6. When connecting a BLUETOOTH mouse, turn it on and press the button to connect
the mouse.
Hint
Refer to the manual that came with your BLUETOOTH device for the procedure to
have the device ready for connection.
7. Select (wi1070).
Your VAIO computer searches for devices and displays a device list. Follow the onscreen instructions to register your device.
(Settings).
Note
Depending on the BLUETOOTH device, it may take some time for your VAIO computer
to find the device. If your device does not appear in the list, repeat the procedure to
have the device ready for connection (for example, pressing the button for connection).
Depending on the BLUETOOTH device, the procedure to establish connection may
vary. Refer to the manual that came with the device for the procedure.
Hint
For details on the operations, open Windows Help and Support [Details], and enter
“BLUETOOTH” in the search box.
A window appears for passcode input if a BLUETOOTH device is requesting
authentication to establish connection. Follow the on-screen instructions to share the
passcode between the BLUETOOTH device and your VAIO computer. If you do not wish
to connect, select the (wi1080) button in the window.
A passcode is a secret number that is entered by a user to use for the authentication
process to allow two BLUETOOTH devices to communicate with each other. Enter
the same alphanumeric string (case-sensitive) for both devices to allow them to
communicate with each other. You can change the passcode every time you perform
authentication, providing you enter the same passcode for both devices during the
authentication process. For details on the passcode of a BLUETOOTH device, refer
to the manual that came with the device. If no BLUETOOTH passcode is entered for
a certain time, the connection process will be terminated for security. In this case, try
again.
Related Topic
About the BLUETOOTH(R) Function
Page 91

© 2012 Sony Corporation
Stopping BLUETOOTH(R) Communications
Notes on Using the BLUETOOTH(R) Function
About BLUETOOTH(R) Security
Page 92

Search
VAIO User Guide VAIO Duo SVJ2021 Series Back | Back to Top
Troubleshooting
Stopping BLUETOOTH(R) Communications
How to Use
Parts Description
Setup
Network / Internet
Connections
Settings
Playback
Backup / Recovery
Security
Other Operations
Notifications
You can stop BLUETOOTH communications by following these steps.
1. Open the Charms bar [Details] and select
2. Select Change PC settings at the lower right corner of the bar.
3. Select Wireless in the left pane of the PC settings screen.
4. Change the Bluetooth setting under Wireless devices to Off.
Hint
When Airplane mode is Off, the WIRELESS indicator light on your VAIO computer
stays on.
Related Topic
About the BLUETOOTH(R) Function
Communicating with Another BLUETOOTH(R) Device such as a Mouse
Notes on Using the BLUETOOTH(R) Function
(Settings).
© 2012 Sony Corporation
Page 93

Search
VAIO User Guide VAIO Duo SVJ2021 Series Back | Back to Top
Troubleshooting
About BLUETOOTH(R) Security
How to Use
Parts Description
Setup
Network / Internet
Connections
Settings
Playback
Backup / Recovery
Security
Other Operations
Notifications
The BLUETOOTH wireless technology has an authentication function, which allows you to
control communication with other devices.
The authentication function helps you prevent unwanted anonymous BLUETOOTH devices
from accessing your VAIO computer. The first time two BLUETOOTH devices communicate,
a common passcode (a password required for authentication) should be identified to register
both devices. Once a device is registered, there is no need to re-enter the passcode.
For details, open Windows Help and Support [Details], and enter “BLUETOOTH” in the
search box.
Related Topic
About the BLUETOOTH(R) Function
Communicating with Another BLUETOOTH(R) Device such as a Mouse
Stopping BLUETOOTH(R) Communications
Notes on Using the BLUETOOTH(R) Function
© 2012 Sony Corporation
Page 94

Search
VAIO User Guide VAIO Duo SVJ2021 Series Back | Back to Top
Troubleshooting
Notes on Using the BLUETOOTH(R) Function
How to Use
Parts Description
Setup
Network / Internet
Connections
Settings
Playback
Backup / Recovery
Security
Other Operations
Notifications
Before using the BLUETOOTH function, read the following precautions for correct use.
In some countries or regions, using the BLUETOOTH function may be restricted by the
local regulations.
The BLUETOOTH function may not work with some devices, depending on the
manufacturer or the app version employed by the manufacturer. Check the system
requirements of the BLUETOOTH device before purchasing.
For information on BLUETOOTH devices, visit the VAIO Support website.
Some BLUETOOTH devices require authentication (pairing) before establishing
connection with another device. Perform the authentication process before connecting to
such devices.
BLUETOOTH devices work on the 2.4 GHz band, which is used by a variety of devices.
BLUETOOTH devices use the technology to minimize radio interference from other
devices that use the same band; however, radio interference may still cause slower
communication speeds, reduce communication range, or in some cases, cause
communication failure.
Communication speed and range may vary depending on the following conditions:
Distance between communication devices
Existence of obstacles between devices
Ambient environment that includes existence of walls and materials of such walls
Device configuration
Apps in use
Radio conditions
Communications may be cut off depending on radio conditions.
If your VAIO computer is compliant with BLUETOOTH high speed technology and you
intend to use it for high-speed communications, enable both the wireless LAN and
BLUETOOTH functions on the computer.
Large files may occasionally be corrupted during continuous transfer due to limitations of
the BLUETOOTH standard and electromagnetic interference in the environment.
Connecting multiple BLUETOOTH devices to your VAIO computer may cause channel
congestion, resulting in poor device performance. This is normal with BLUETOOTH
technology and does not indicate a malfunction.
Video and audio may not be synchronized if you play videos on your VAIO computer
with audio output from a connected BLUETOOTH device. This is a frequent occurrence
with BLUETOOTH technology and does not indicate a malfunction.
All BLUETOOTH devices must be certified through the procedure stipulated by
Bluetooth SIG to ensure that they are compliant with the BLUETOOTH standard.
Even if the BLUETOOTH devices are compliant with the BLUETOOTH standard,
individual device performance, specifications, and operation procedures may vary. Data
exchange may not be possible in all situations.
Not all BLUETOOTH devices are guaranteed of compatibility with your VAIO computer.
If you urgently need to disable the BLUETOOTH function, turn off your VAIO computer.
© 2012 Sony Corporation
Related Topic
About the BLUETOOTH(R) Function
Communicating with Another BLUETOOTH(R) Device such as a Mouse
Stopping BLUETOOTH(R) Communications
About BLUETOOTH(R) Security
Notes on Using the Wi-Fi (Wireless LAN) Function
Page 95

Page 96

Search
VAIO User Guide VAIO Duo SVJ2021 Series Back | Back to Top
Troubleshooting
About Built-In Sensors
How to Use
Parts Description
Setup
Network / Internet
Connections
Settings
Playback
Backup / Recovery
Security
Other Operations
Notifications
A built-in accelerometer and digital compass (magnetometer) enable you to use the
following functions.
Screen rotation using the built-in accelerometer
When you rotate your VAIO computer by 90 degrees or 270 degrees with the slide-out
keyboard closed, the built-in accelerometer automatically detects the movement and rotates
the computer screen to portrait or landscape orientation depending on the computer
orientation.
Navigation assistance using the built- in digital compass
The built-in digital compass provides navigation assistance on compatible software by
detecting the direction your VAIO computer is facing.
Hint
You need to calibrate the built-in digital compass when the software does not show the
current location or direction correctly.
Click @@@Location Info/GPS@@@ and @@@Adjust Digital
Compass@@@ on VAIO Control Center and follow the on-screen instructions to
calibrate the built-in digital compass.
© 2012 Sony Corporation
Page 97

Search
VAIO User Guide VAIO Duo SVJ2021 Series Back | Back to Top
Troubleshooting
Notes on Built-In Sensors
How to Use
Parts Description
Setup
Network / Internet
Connections
Settings
Playback
Backup / Recovery
Security
Other Operations
Notifications
Before using built-in sensors, read the following precautions for correct use.
Notes on using the built-in accelerometer
If you change the computer screen orientation without exiting the running software, such
as video playback software, all unsaved data may be lost.
You cannot change the computer screen orientation while your VAIO computer is
connected to an external display. If you connect the computer to an external display
while using the computer in portrait orientation, the computer screen automatically
changes to landscape (horizontal) orientation.
The computer screen may become distorted if you change the computer screen
orientation while the screen saver is activated.
Some software does not support portrait orientation and not work correctly. In this case,
use your VAIO computer in landscape orientation.
Notes on using the built-in digital compass
The built-in digital compass works by detecting a magnetic direction. Do not rely solely
on the location information the built-in digital compass provides.
Especially at the following locations, the accuracy of the digital compass can be easily
affected by magnetic interference and it may not work correctly.
Inside an elevator or a room built with ferrous materials, such as iron frames or
reinforced concrete
Near a reinforced concrete structure, such as a footbridge or an airport or a train
station concourse
Near or inside a train or a car
Near a transformer on the ground or high-voltage power lines
Near a metallic product, such as a metal frame desk or metallic furniture
Near a material that has a high level of magnetic interference, such as a magnet, a
magnetic holder, or speakers
Adjusting the angle of the LCD screen may reduce the accuracy of the built-in digital
compass; however, this is normal and does not indicate a malfunction. If this occurs, you
need to calibrate the digital compass on VAIO Control Center.
© 2012 Sony Corporation
Note on handling your VAIO computer
Do not hold the bottom of your VAIO computer for an extended period of time. Use of the
computer for an extended period of time will heat up the bottom of the computer, resulting in
low-temperature burns.
Page 98

Search
VAIO User Guide VAIO Duo SVJ2021 Series Back | Back to Top
Troubleshooting
Combinations and Functions with the Fn Key
How to Use
Parts Description
Setup
Network / Internet
Connections
Settings
Playback
Backup / Recovery
Security
Other Operations
Notifications
Press and hold down the Fn key and another key simultaneously to perform a keyboard
shortcut action.
For example, to adjust the LCD brightness: Fn+F5ĺ3UHVVDQGKROGGRZQWKHFn key,
then press the F5 key.
Some keyboard functions can only be used while Windows is running.
Wireless keyboard supplied models
Fn + / (F5/F6)
Press the button repeatedly to adjust the LCD brightness of your computer screen. [Details]
To decrease lighting intensity, press the Fn+F5 keys.
To increase lighting intensity, press the Fn+F6 keys.
Fn + Scr Lk (Scroll Lock)
Works differently depending on the software you use. Refer to the help file included with the
software for more information.
USB keyboard supplied models
Fn + / (F5/F6)
Press the button repeatedly to adjust the LCD brightness of your computer screen. [Details]
To decrease lighting intensity, press the Fn+F5 keys.
To increase lighting intensity, press the Fn+F6 keys.
Fn + Scr Lk (Scroll Lock)
Works differently depending on the software you use. Refer to the help file included with the
software for more information.
Fn + Pause (Pause)
Works differently depending on the software you use. Refer to the help file included with the
software for more information.
Fn + Break (Break)
Works differently depending on the software you use. Refer to the help file included with the
software for more information.
Fn + Pg Up (Page Up)
Goes to the previous page.
Fn + End (End)
Moves the cursor to the end of a line or page.
Fn + Pg Dn (Page Down)
Goes to the next page.
Fn + Home (Home)
Moves the cursor to the top of a line or page.
Fn +
Ejects a disc from the optical disc drive.
(E)
Page 99

© 2012 Sony Corporation
Page 100

Search
VAIO User Guide VAIO Duo SVJ2021 Series Back | Back to Top
Troubleshooting
Changing the LCD Brightness
How to Use
Parts Description
Setup
Network / Internet
Connections
Settings
Playback
Backup / Recovery
Security
Other Operations
Notifications
You can adjust the LCD brightness.
1. Press the Fn+F5 key or Fn+F6 keys.
To decrease lighting intensity, keep pressing the Fn+F5 keys. To increase lighting
intensity, keep pressing the Fn+F6 keys.
When you press the keys, the brightness indicator is displayed for a few seconds.
Hint
The LCD brightness setting is retained even after your VAIO computer is turned off and
restarted.
Related Topic
Combinations and Functions with the Fn Key
© 2012 Sony Corporation
 Loading...