

Page 1

DAB/FM/AM
Tuner
Operating Instructions
2-886-257-12 (1)
ST-SDE700
©2006 Sony Corporation
Page 2
WARNING
To reduce the risk of fire or electric
shock, do not expose this apparatus to
rain or moisture.
To prevent fire, do not cover the ventilation of the
apparatus with newspapers, table-cloths, curtains,
etc. And don’t place lighted candles on the
apparatus.
To prevent fire or shock hazard, do not place objects
filled with liquids, such as vases, on the apparatus.
Do not install the appliance in a confined space,
such as a bookcase or built-in cabinet.
Don’t throw away batteries with
general house waste; dispose of
them correctly as chemical waste.
Disposal of Old Electrical & Electronic
Equipment (Applicable in the European
Union and other European countries
with separate collection systems)
This symbol on the product or on its
packaging indicates that this product
shall not be treated as household waste.
Instead it shall be handed over to the
applicable collection point for the
recycling of electrical and electronic
equipment. By ensuring this product is
disposed of correctly, you will help
prevent potential negative
consequences for the environment and
human health, which could otherwise
be caused by inappropriate waste
handling of this produ ct. The recycling
of materials will help to conserve
natural resources. For more detailed
information about recycling of this
product, please contact your local
Civic Office, your household waste
disposal service or the shop where you
purchased the product.
About This Manual
The instructions in this manual describe the controls
on the supplied remote. You can also use the controls
on the tuner if they have the same or similar names
as those on the remote.
GB
2
Page 3
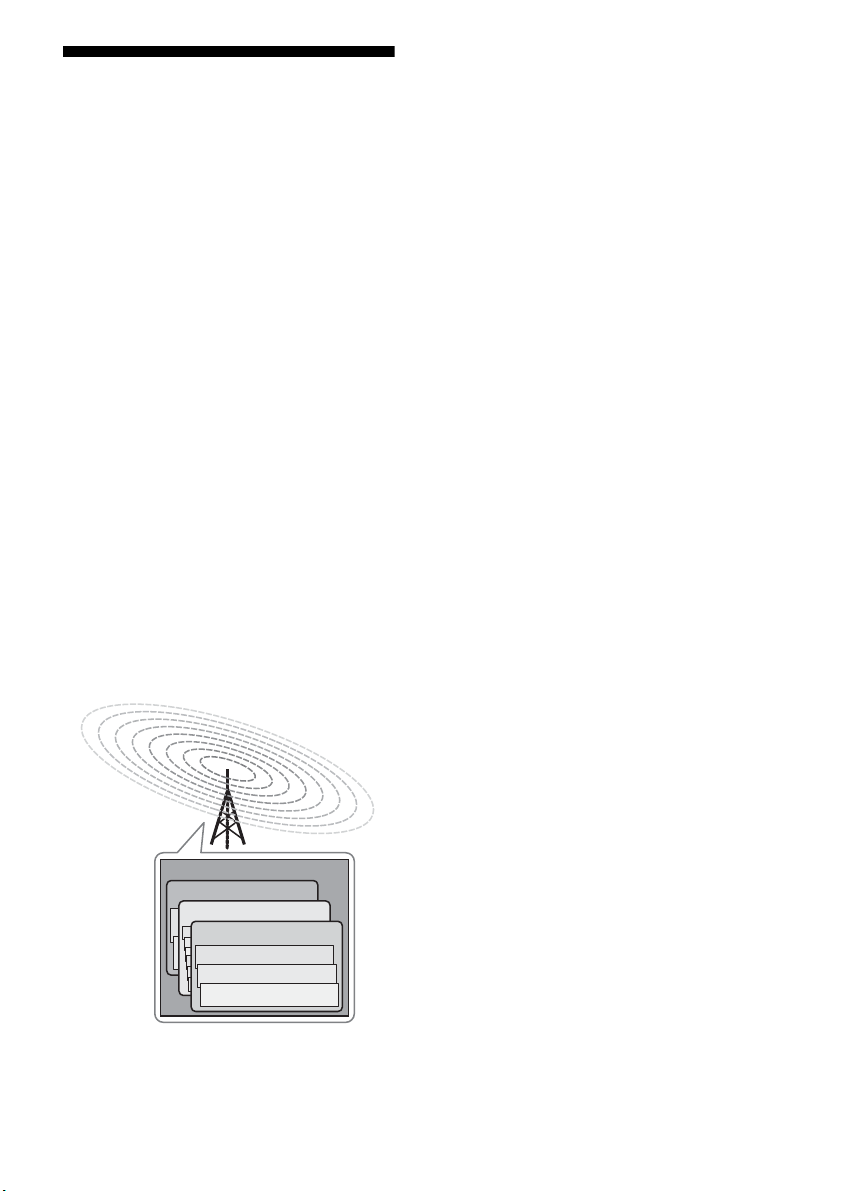
Overview of DAB
DAB (Digital Audio Broadcasting) is a new
multimedia broadcasting system that replaces
the current FM/AM broadcast to transmit
audio programmes with a quality comparable
to that of CDs
Each DAB multiplex radio station converts
programmes (services) into an ensemble,
which it then broadcasts. Each service
contains one or more components. All services
and components are identified by name, so you
can access any of them without having to know
their frequencies.
Furthermore, additional information (called
programme associated data) can be broadcast
along with the services in the form of text.
With DAB digital radio, you can enjoy:
– CD sound quality without any hiss or crackle to
spoil the sound
– both music and data services from a single tuner
(this tuner does not support data services)
– the same radio stations of the same frequency
from anywhere in the country
– multiple programmes (services) from a single
frequency
* Some service components may not match CD
quality sound.
*
.
*
Notes
• The status of the DAB broadcast depends on your
country or region. It may not be broadcasted or
may be in test phase.
• DAB programmes are broadcast in Band-III (174
to 240 MHz) and/or L-Band (1,452 to 1,491 MHz),
with each band divided into channels. Each of
these channels has its own channel label. For
details on the channel labels and frequencies that
this tuner supports, see the Frequency Table on
page 30.
• This tuner supports Band-III and L-Band.
• This tuner does not support data services.
• This tuner does not support reception in countries
outside of Europe.
Ensemble
Service
Service
Service
Component
Component
Component
GB
3
Page 4

Table of Contents
Getting Started
Description and location of parts...................5
1: Connecting the audio components ..........10
2: Connecting the antennas..........................13
3: Preparing the tuner and the remote..........14
Receiving DAB Broadcasts
Before you can receive DAB stations
(DAB INITIAL SCAN)..........................15
Presetting DAB stations...............................16
Receiving FM/AM
Broadcasts
Listening to FM/AM radio ..........................18
Storing FM stations automatically
(AUTOBETICAL)..................................20
Presetting radio stations...............................21
Using the Radio Data System (RDS) ..........23
Other Operations
Changing the display ...................................25
Customizing the display..............................26
Additional Information
Precautions ..................................................26
Troubleshooting...........................................27
Specifications...............................................29
Index............................................................31
GB
4
Page 5
Getting Started
1 4 52 7 83 6
Description and location of parts
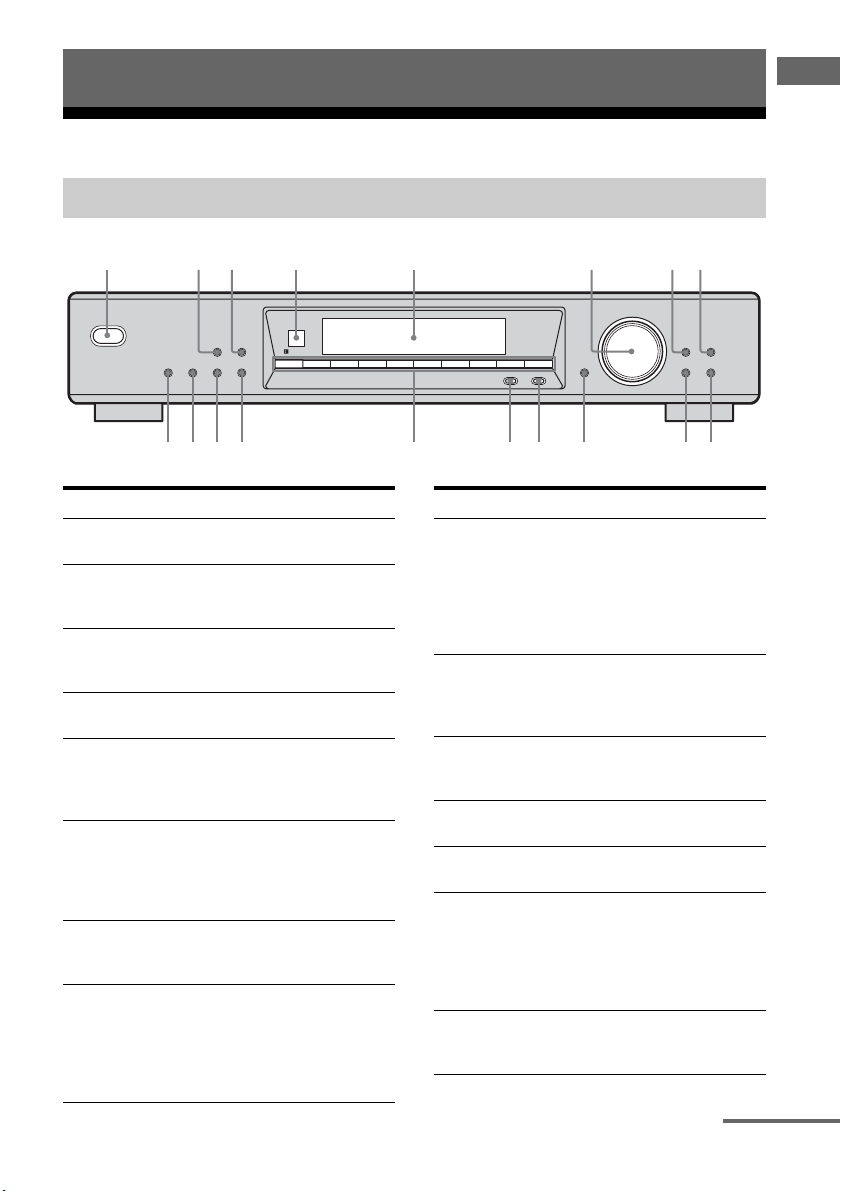
Front panel
POWER
AUTO-BETICAL
SELECT
DAB
INIT SCAN
DIMMER DISPLAY
NAME IN FM MODE
1234567890
PRESET
Getting Started
TUNING/SELECT
TUNING MODE
RETURN
MEMORY
DIRECT
ENTERBAND
9q;qaqgqhqjqk qsqdqf
Name Function
A POWER switch Press to turn the tuner on
Name Function
I ENTER Press to
or off (page 15, 20).
B DIMMER Press to change the
brightness of the display
(page 26).
C DISPLAY Press to select information
displayed on the display
(page 24, 25).
J MEMORY Press to
D Remote sensor Receives signals from
remote commander.
E Display The current status of the
K BAND Press to select DAB, FM
selected station or a list of
selectable items appears
here (page 7).
L DIRECT Press to select direct
F TUNING/SELECT Tur n t o
– select a preset station.
– scan a station.
M PRESET Press to select preset
– select character during
Name In function.
N Numeric buttons Press to
G TUNING MODE Press to select the tuning
mode (page 16, 18, 19,
22).
H RETURN Press to return to the
previous display during
Name In, Auto-betical
O FM MODE Press to select FM
Select and DAB
Initialization Scan
function.
– enter the selection when
selecting the settings.
– move to the next
character position
during Name In
function.
– store a preset station.
– store the name of a
preset station.
or AM band (page 15, 16,
18, 19, 20, 22).
tuning mode (page 19).
tuning mode.
– preset a radio station.
– tune to preset stations.
– direct tune to the FM/
AM station when using
with DIRECT.
monaural or stereo
reception (page 19).
continued
5
GB
Page 6

Name Function
P NAME IN Press to name in preset
Q DAB INIT SCAN Press to select DAB
R AUTO-BETICAL
SELECT
station for FM and AM
band only (page 22).
Initialization Scan
function (page 15).
Press to select Autobetical Select function
(page 20).
GB
6
Page 7
About the indicators on the display
Name Function
A Tune r
indicators
B MEMORY Lights up when a memory
Lights up when using the tuner
to tune in radio stations (page
18), etc.
function, such as Preset
Memory (page 17, 21), etc., is
activated.
1 2
RDS
STEREO MONO
MEMORY
Getting Started
GB
7
Page 8
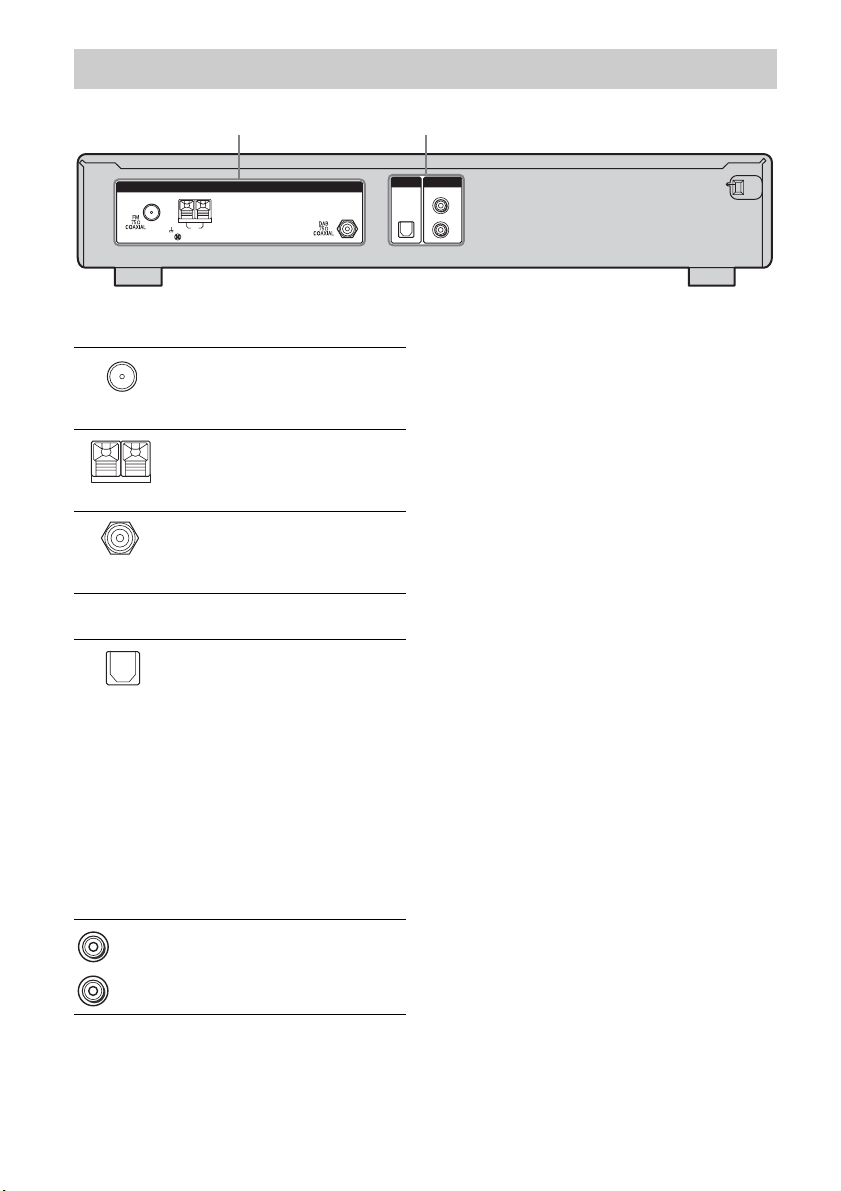
Rear panel
1 2
ANTENNA
AM
A ANTENNA section
FM
ANTENNA
AM
ANTENNA
DAB
ANTENNA
B AUDIO OUTPUT section
OPTICAL
OUT jack
White (L)
ANALOG
OUT jack
Connects to the FM
wire antenna
supplied with this
tuner (page 13).
Connects to the AM
loop antenna
supplied with this
tuner (page 13).
Connects to the
DAB wire antenna
supplied with this
tuner (page 13).
Connects to a DAT
deck or MD
recorder for digitalto-digital recording
(page 11).
With this
connection, you can
obtain the highest
possible sound
quality when
recording DAB
digital broadcasts,
even if you use the
analog outputs for
listening purposes.
Connects to an
amplifier (page 12).
DIGITAL
DAB
OPTICAL OUT
ANALOG
OUT
L
R
Red (R)
GB
8
Page 9

Remote commander
You can use the supplied remote RM-S900D
to operate the tuner.
qa
0
9
8
FM MODE
7
>
10
FM AM
10/0
DAB
PRESET
DISPLAY
321
654
98
ENTER
MEMORY
AUTO
TUNING
1
2
3
4
5
6
7
Name Function
A DISPLAY Press to select information
B Numeric
buttons
C ENTER Press to enter the selection
D MEMORY Press to store a station (page
E DAB Press to select DAB band
F AM Press to select AM band (page
G AUTO
TUNING +/–
H PRESET
+/–
I FM Press to select FM band (page
J >10 Press to select preset tuning
K FM MODE Press to select FM monaural
displayed on the display (pa ge
7).
Press to preset/tune to preset
stations (page 17, 21, 22).
when selecting the settings
(page 17, 19, 21).
17, 21).
(page 15, 16, 17).
18, 21, 22).
Press to
– scan a station (for FM and
AM band).
– select a station (for DAB
band).
Press to select preset stations
(page 17, 22).
18, 21, 22).
mode, especially for preset
station over 10.
or stereo reception (page 19).
Getting Started
GB
9
Page 10

1: Connecting the audio components
How to hook up your
components
This section describes how to hook up your
components to this tuner. Before you begin,
refer to “Component to be connected” below
for the pages which describe how to connect
each component.
After hooking up all your components,
proceed to “2: Connecting the antennas” (page
13).
Component to be connected
Component With Page
DAT deck/
MD recorder
Amplifier Analog audio input
a)
Model equipped with DIGITAL OPTICAL IN
jacks, etc.
b)
Model equipped with AUDIO IN L/R jacks, etc.
Digital optical input
a)
11
b)
12
10
GB
Page 11

Connecting components with
digital optical jacks
The following illustration shows how to
connect a component which has digital optical
jacks such as DAT deck or MD recorder, etc.
With this connection, you can do digital-todigital recording and obtain the highest
possible sound quality when recording DAB
digital broadcasts.
ANTENNA
DAT deck/
MD recorder
A
DIGITAL
DAB
OPTICAL OUT
Getting Started
ANALOG
OUT
L
AM
A Optical digital cord (not supplied)
Notes
• The DIGITAL DAB OPTICAL OUT jack has a
retractable cover. Insert the plug into the jack.
• When connecting optical digital cords, insert the
plugs straight in until they click into place.
• Do not bend or tie optical digital cords.
• FM/AM broadcast signals are not output from the
DIGITAL DAB OPTICAL OUT jack.
• When you use a recorder which does not support
the 48kHz sampling frequency mode, you cannot
play or record the digital signals from the
DIGITAL DAB OPTICAL OUT jack.
R
GB
11
Page 12

Connecting components with
analog audio jacks
The following illustration shows how to
connect a component which has analog jacks
such as amplifier, etc.
ANTENNA
Amplifier
A
DIGITAL
DAB
OPTICAL OUT
ANALOG
OUT
L
AM
A Audio cord (supplied)
Notes
• When connect ing audio cord, insert the white plugs
to the white (L) jacks and the red plugs to the red
(R) jacks.
• Insert the plugs completely into the jacks;
incomplete connections may cause noise.
GB
12
R
Page 13

2: Connecting the antennas
Connect the supplied AM loop antenna, FM
wire antenna and DAB wire antenna.
AM loop antenna (supplied)
Getting Started
FM wire antenna
(supplied)
ANTENNA
AM
Notes
• To prevent noise pickup, keep the AM loop antenna
away from the tuner and other components.
• Be sure to fully extend the FM wire antenna.
• After connecting the FM wire antenna, keep it as
horizontal as possible.
• With a DAB outdoor antenna, you can obtain a
higher DAB broadcast sound quality. We
recommend that you use the supplied DAB wire
antenna only temporary until you install a DAB
outdoor antenna.
DAB wire antenna
(supplied)
ANALOG
DIGITAL
DAB
OPTICAL OUT
L
R
OUT
13
GB
Page 14

3: Preparing the tuner and the remote
Connecting the AC power cord
Connect the AC power cord to a wall outlet.
AC power cord
To the wall outlet
Note
Install this system so that the power cord can be
unplugged from the wall socket immediately in the
event of trouble.
Inserting batteries into the
remote
Insert two R6 (size-AA) batteries in the
RM-S900D remote commander.
Observe the correct polarity when installing
batteries.
Notes
• Do not leave the remote in an extremely hot or
humid place.
• Do not use a new battery with old ones.
• Do not mix alkaline batteries and other kinds of
batteries.
• Do not expose the remote sensor to direct sunlight
or lighting apparatuses. Doing so may cause a
malfunction.
• If you do not intend to use the remote for an
extended period of time, remove the batteries to
avoid possible damage from battery leakage and
corrosion.
Tip
Under normal conditions, the batteries should last
for about 3 months. When the remote no longer
operates the tuner, replace all the batteries with new
ones.
14
GB
Page 15

Receiving DAB Broadcasts
Before you can receive
DAB stations
(DAB INITIAL SCAN)
Before you can receive DAB stations, you
must register the contents of broadcast (service
components) so that they can be received by
this tuner using the DAB INITIAL SCAN
procedure.
Be sure to use the buttons on the tuner for this
operation.
Notes
• If you have not registered the contents of broadcast
(service compon ents) in DAB band, “DAB TUNE”
appears in the display for a while, then
“DAB _ _ _ _” appears. “PLEASE RUN DAB
SCAN FOR DAB STATION” will then scroll
across the display. In this case, do the DAB
INITIAL SCAN procedure (page 15).
• Buttons on the tuner or supplied remote will not
function during DAB INITIAL SCAN procedure,
except POWER.
• If you move to another area, repeat this procedure
to store stations in your new area.
• This procedure does not create any presets.
• This procedure clears all previously stored presets.
• For details on presets, see “Presetting DAB
stations” on page 16.
Receiving DAB Broadcasts
POWER
DIMMER DISPLAY
DAB
AUTO-BETICAL
INIT SCAN
SELECT
NAME IN FM MODE
1234567890
TUNING/SELECT
DIRECT
PRESET
231
1 Press BAND repeatedly to
select the DAB band.
2 Press DAB INIT SCAN.
“DAB SCAN” flashes on the display.
3 Press ENTER.
“SCAN ON” appears in the display and
the tuner scans and stores all the DAB
broadcasting contents and registers them
in this tuner.
When done, “FINISH” appears in the
display momentarily and the tuner returns
to the normal operation.
TUNING MODE
RETURN
MEMORY
ENTERBAND
Automatic tuning
>
10
10/0
DAB
ENTER
MEMORY
1
FM AM
AUTO
TUNING
PRESET
2
1 Press DAB to select the DAB
band.
The last received station is tuned in.
When selecting DAB, “DAB TUNE” will
appear in the display while the tuner is
collecting DAB data. Please wait until
this message disappears.
continued
15
GB
Page 16

2 Press AUTO TUNING + or AUTO
TUNING – to select the DAB
station you want.
Using the controls on the tuner
1 Press BAND repeatedly to select the DAB
band.
2 Press TUNING MODE repeatedly to select
“AUTO T.” .
3 Turn TUNING/SELECT.
Presetting DAB stations
You can preset up to 30 DAB stations. Then
you can easily tune in the stations you often
listen to.
Presetting DAB stations
Notes
• When tuning in a DAB station, it may take a few
seconds before you hear any sound.
• Before you can receive DAB stations, you must
complete the DAB INITIAL SCAN procedure
(page 15).
• Preset your favourite DAB stations so that you can
use the supplied remote to tune to the stations you
want. For details, refer “Presetting DAB stations”
(page 16).
321
654
7
>
10
10/0
98
ENTER
MEMORY
4
5
3,5
DAB
FM AM
TUNING
PRESET
AUTO
1
2
1 Press DAB to select the DAB
band.
The last received station is tuned in.
When selecting DAB, “DAB TUNE” will
appear in the display while the tuner is
collecting DAB data. Please wait until
this message disappears.
16
2 Press AUTO TUNING + or AUTO
TUNING – to select the DAB
station you want.
GB
Page 17

3 Press MEMORY.
You can also use MEMORY on the tuner.
The cursor flashes and you can select a
preset station number.
4 Press the numeric buttons to
select a preset station number.
You can also use numeric buttons or
TUNING/SELECT on the tuner to select
a preset station number.
5 Press ENTER or MEMORY.
You can also use ENTER or MEMORY
on the tuner.
The station is stored as the selected preset
number.
Tuning to preset stations
321
654
7
>
10
10/0
98
ENTER
MEMORY
Numeric
buttons
ENTER
Receiving DAB Broadcasts
6 Repeat steps 1 to 5 to preset
another station.
Notes
• When you preset a DAB station that is
broadcasting station name information, the station
name is automatically stored in the station preset.
• The DAB INITIAL SCAN procedure clears all
DAB presets.
DAB
1
FM AM
AUTO
TUNING
2
PRESET
1 Press DAB to select the DAB
band.
The last received station is tuned in.
When selecting DAB, “DAB TUNE” will
appear in the display while the tuner is
collecting DAB data. Please wait until
this message disappears.
2 Press PRESET + or PRESET –
repeatedly to select the preset
station you want.
Each time you press the button, you can
select a preset station as follows:
01 02 03 04 05 27...
30 29 28
You can also press the numeric buttons to
select the preset station you want. Then,
press ENTER to enter the selection.
continued
17
GB
Page 18

Using the controls on the tuner
1 Press BAND repeatedly to select the DAB
band.
2 Press TUNING MODE repeatedly to select
“PRESET T.”.
3 Turn TUNING/SELECT to select the preset
station you want.
Tip
If you have not preset any DAB stations, “DAB NO
PRESET” scrolls across the display when you press
PRESET + or PRESET –.
Receiving FM/AM Broadcasts
Listening to FM/AM radio
You can listen to FM and AM broadcasts
through this tuner. Before operation, make
sure you have connected the FM and AM
antennas to the tuner (page 13).
Tip
The tuning scale is:
FM: 50 kHz
AM: 9 kHz
Automatic tuning
>
10
ENTER
10/0
MEMORY
DAB
18
FM AM
TUNING
PRESET
AUTO
1
2
1 Press FM or AM to select the
FM or AM band.
2 Press AUTO TUNING + or AUTO
TUNING –.
Press AUTO TUNING + to scan from
low to high frequency; press AUTO
TUNING – to scan from high to low
frequency.
The tuner stops scanning whenever a
station is received.
GB
Page 19

Using the controls on the tuner
1 Press BAND repeatedly to select the FM or
AM band.
2 Press TUNING MODE repeatedly to select
“AUTO T.”.
3 Turn TUNING/SELECT.
In case of poor FM stereo
reception
If the FM stereo reception is poor and
“STEREO” flashes on the display, select
monaural audio so that the sound will be less
distorted.
Press FM MODE repeatedly to select FM
MONO. The “FM MONO” appears and
“MONO” indicator lights up on the display.
To return to stereo mode, press FM MODE.
The “FM AUTO” appears and “MONO”
indicator do not lights up on the display.
Direct tuning
Be sure to use the buttons on the tuner for this
operation.
POWER
DIMMER DISPLAY
DAB
AUTO-BETICAL
INIT SCAN
SELECT
NAME IN FM MODE
1234567890
TUNING/SELECT
TUNING MODE
RETURN
MEMORY
PRESET
DIRECT
ENTERBAND
1234
1 Press BAND repeatedly to
select the FM or AM band.
You can also use FM or AM on the
remote.
2 Press DIRECT.
3 Press the numeric buttons to
enter the frequency.
You can also use the numeric buttons on
the remote.
Example 1: FM 102.50 MHz
Select 1 b 0 b 2 b 5 b 0
Example 2: AM 1,350 kHz
Select 1 b 3 b 5 b 0
Receiving FM/AM Broadcasts
4 Press ENTER.
You can also use ENTER on the remote.
If you have tuned in an AM station, adjust
the direction of the AM loop antenna for
optimum reception.
If you cannot tune in a station
Make sure you have entered the right
frequency. If not, repeat steps 2 to 4. If you still
cannot tune in a station, the frequency is not
used in your area.
19
GB
Page 20

Storing FM stations
automatically
(AUTOBETICAL)
This function lets you store up to 30 FM and
FM RDS stations in alphabetical order without
redundancy. Additionally, it only stores the
stations with the clearest signals.
If you want to store FM or AM stations one by
one, see “Presetting radio stations” (page 21).
Be sure to use the buttons on the tuner for this
operation.
1
POWER
DIMMER DISPLAY
DAB
AUTO-BETICAL
INIT SCAN
SELECT
NAME IN FM MODE
1234567890
TUNING/SELECT
TUNING MODE
RETURN
MEMORY
PRESET
DIRECT
ENTERBAND
342
1 Press POWER to turn on the
tuner.
Notes
• Buttons on the tuner or supplied remote will not
function during autobetical operation, except
POWER.
• If you move to another area, repeat this procedure
to store stations in your new area.
• For details on tuning the stored stations, see
“Tuning to preset stations” (page 22).
• If you move the antenna after storing stations with
this procedure, the stored settings may no longer be
valid. If this happens, repeat this procedure to store
the stations again.
2 Press BAND repeatedly to
select the FM band.
3 Press AUTO-BETICAL SELECT.
“A. BETICAL” flashes on the display.
4 Press ENTER.
“AUTO-BETICAL SELECT” scrolls
across the display and the tuner scans and
stores all the FM and FM RDS stations in
the broadcast area.
For RDS stations, the tuner first checks
for stations broadcasting the same
program, then stores only the ones with
the clearest signal. The selected RDS
stations are sorted alphabetically by their
Program Service name, then assigned a 2character preset code. For more details on
RDS, see page 23.
Regular FM stations are assigned 2character preset codes and stored after the
RDS stations.
GB
20
Page 21

Presetting radio stations
You can preset up to 30 FM stations and 30
AM stations. Then you can easily tune in the
stations you often listen to.
Presetting radio stations
3 Press MEMORY.
You can also use MEMORY on the tuner.
The cursor flashes and you can select a
preset station number.
4 Press numeric buttons to select
a preset station number.
You can also use numeric buttons or
TUNING/SELECT on the tuner to select
a preset station number.
Receiving FM/AM Broadcasts
321
654
7
>
10
10/0
98
ENTER
MEMORY
4
5
3,5
DAB
FM AM
TUNING
PRESET
AUTO
1
1 Press FM or AM to select the
FM or AM band.
5 Press ENTER or MEMORY.
You can also use ENTER or MEMORY
on the tuner.
The station is stored as the selected preset
number.
6 Repeat steps 1 to 5 to preset
another station.
2 Tune in the station that you
want to preset using Automatic
Tuning (page 18) or Direct
Tuning (page 19).
Switch the FM reception mode, if
necessary (page 19).
21
GB
Page 22

Tuning to preset stations
321
654
Numeric
buttons
Using the controls on the tuner
1 Press BAND repeatedly to select the FM or
AM band.
2 Press TUNING MODE repeatedly to select
“PRESET T.”.
3 Turn TUNING/SELECT to select the preset
station you want.
7
>
10
10/0
98
ENTER
ENTER
MEMORY
DAB
FM AM
AUTO
TUNING
2
PRESET
1
1 Press FM or AM to select the
FM or AM band.
2 Press PRESET + or PRESET –
repeatedly to select the preset
station you want.
Each time you press the button, you can
select a preset station as follows:
01 02 03 04 05 27...
30 29 28
You can also press the numeric buttons to
select the preset station you want. Then,
press ENTER to enter the selection.
Naming preset stations
Be sure to use the buttons on the tuner for this
operation.
POWER
DIMMER DISPLAY
DAB
AUTO-BETICAL
INIT SCAN
SELECT
NAME IN FM MODE
1234567890
TUNING/SELECT
TUNING MODE
RETURN
MEMORY
DIRECT
PRESET
ENTERBAND
431
1 Press BAND repeatedly to
select the FM or AM band.
You can also use FM or AM on the
remote.
2 Tune in the preset station you
want to create an index name
for (page 22).
3 Press NAME IN.
“NAME IN” flashes on the display.
Perform step 4 before “NAME IN” goes
out.
4 Press ENTER.
The cursor flashes and you can select a
character. Follow the procedure given in
“To create an index name” below.
To return to the previous display
Press RETURN.
22
GB
Page 23

To create an index name
1 Use TUNING/SELECT to create an index
name.
Turn TUNING/SELECT to select a
character, then press ENTER to confirm the
selected character and move to the next
character position.
If you made a mistake
Press RETURN.
You need to return to step 3 of “Naming
preset stations”.
Tip
You can enter a name up to 8 characters.
2 Press MEMORY.
The entered name is registered.
Notes
• When you name an RDS station and tune in that
station, the Program Service name appears instead
of the name you entered. (You cannot change the
Program Service name. The name you entered will
be overwritten by the Program Service name.)
• You cannot name DAB stations. The service
component label appears when you tune in DAB
stations.
Using the Radio Data System (RDS)
This tuner also allows you to use RDS (Radio
Data System), which enables radio stations to
send additional information along with the
regular program signal. You can display RDS
information.
Notes
• RDS is operable only for FM stations.
• Not all FM stations provide RDS service, nor do
they provide the same type of services. If you are
not familiar with the RDS services in your area,
check with your local radio stations for details.
Receiving RDS broadcasts
Simply select a station on the FM
band using direct tuning (page 19),
automatic tuning (page 18), or
preset tuning (page 22).
When you tune in a station that provides RDS
services, “RDS” lights up and the program
service name appears on the display.
Note
RDS may not work properly if the station you tuned
to is not transmitting the RDS signal properly or if
the signal strength is weak.
Receiving FM/AM Broadcasts
23
GB
Page 24

Displaying RDS information
While receiving an RDS station,
press DISPLAY repeatedly on the
tuner.
Each time you press the button, RDS
information on the display changes cyclically
as follows:
Program Service name t Frequency t
Program Type indication
indication
b)
t Current Time indication (in
24-hour system mode)
a)
Type of program being broadcast.
b)
Text messages sent by the RDS station.
Notes
• If there is an emergency announcement by
government authorities, “ALARM” flashes in the
display.
• When the message consists of 9 characters or more,
the message scrolls across the display.
• If a station does not provide a particular RDS
service, “NO XXXX” (such as “NO TEXT”)
appears on the display.
a)
t Radio Text
Description of program types
Program type
indication
NEWS News programs
AFFAIRS Topical programs that expand on
INFO Programs offering information on
SPORT Sports programs
EDUCATE Educational programs, such as
DRAMA Radio plays and serials
CULTURE Programs about national or
SCIENCE Programs about the natural
Description
current news
a wide spectrum of subjects,
including consumer affairs and
medical advice
“how-to” and advice programs
regional culture, such as l anguage
and social concerns
sciences and technology
Program type
indication
VARIED Other types of programs such as
POP M Popular music programs
ROCK M Rock music programs
EASY M Easy Listening
LIGHT M Instrumental, vocal, and choral
CLASSICS Performances of major
OTHER M Music that does not fit into any
WEATHER Weather information
FINANCE Stock market reports and trading,
CHILDREN Programs for children
SOCIAL Programs about people and the
RELIGION Programs of religious content
PHONE IN Programs where members of the
TRAVEL Programs about travel. Not for
LEISURE Programs on recreational
JAZZ Jazz programs
COUNTRY Country music programs
NATION M Programs featuring the popular
OLDIES Programs featuring oldies music
FOLK M Folk music programs
DOCUMENT Investigative features
NONE Any programs not defined above
Description
celebrity interviews, panel
games, and comedy
music
orchestras, chamber music,
opera, etc.
categories above, such as Rhythm
& Blues and Reggae
etc.
things that affect them
public express their views by
phone or in a public forum
announcements that are located
by TP/TA.
activities such as gardening,
fishing, cooking, etc.
music of the country or region
24
GB
Page 25

Other Operations
Changing the display
You can check the status of this tuner and the
information about the programme using the
display.
Be sure to use the buttons on the tuner for this
operation.
Press DISPLAY.
Each time you press the button, the display
changes cyclically as follows.
FM and AM band
Program Service namea) or index name of the
preset station
Type indication
t Current Time indication (in 24-hour
system)
a)
During RDS reception only (page 23).
b)
Index name appears only when you have assigned
one to the preset station (page 23). Index name
does not appear when only blank spaces have been
entered.
b)
t Frequency t Program
a)
t Radio Text indication
a)
a)
Note
When “STEREO” appears in the display, the current
program is broadcasted in the stereo/joint (intensity)
stereo mode.
Other Operations
DAB band
Service Component Label t Frequency t
Program Type indication
segment t Current Time indication
hour system)
b)
info
a)
Time information appearing in the display is sent
by the DAB station. As a result, the time may not
be displayed properly if the station is located in a
different time zone.
“_ _H _ _M” will display until time information is
received.
b)
Audio information on bit rate (32kbps - 256kbps),
signal type (stereo, dual, mono) and sampling type
(F: 48kHz, H: 24kHz) is displayed.
Example: 128K S F
c)
The DAB station signal quality is displayed.
“Q. _ _ _” is displayed until the signal quality
information is received.
a)
t Channel label t Audio
t Signal Qualityc)
t Dynamic label
(in 24-
25
GB
Page 26

Customizing the display
Additional Information
You can select the brightness of the display.
Be sure to use the buttons on the tuner for this
operation.
Press DIMMER.
Lets you adjust the brightness of the display in
3 steps.
Precautions
On safety
Should any solid object or liquid fall into the
unit, unplug the tuner and have it checked by
qualified personnel before operating it any
further.
On power sources
• Before operating the tuner, check that the
operating voltage is identical with your local
power supply.
The operating voltage is indicated on the
nameplate on the back of the tuner.
• The unit is not disconnected from the AC
power source (mains) as long as it is
connected to the wall outlet, even if the unit
itself has been turned off.
• If you are not going to use the tuner for a
long time, be sure to disconnect the tuner
from the wall outlet. To disconnect the AC
power cord, grasp the plug itself; never pull
the cord.
• The AC power cord must be changed only at
a qualified service shop.
26
GB
Page 27

On placement
• Do not place heavy objects on the tuner
which might cause malfunctions.
• Place the tuner in a location with adequate
ventilation to prevent heat buildup and
prolong the life of the tuner.
• Do not place the tuner near heat sources, or
in a place subject to direct sunlight,
excessive dust, or mechanical shock.
• Do not place the tuner near equipment such
as a television, VCR, or tape deck. (If the
tuner is being used in combination with a
television, VCR, or tape deck, and is placed
too close to that equipment, noise may
result, and picture quality may suffer. This is
especially likely when using an indoor
antenna. Therefore, we recommend using an
outdoor antenna.)
• Use caution when placing the tuner on
surfaces that have been specially treated
(with wax, oil, polish, etc.) as staining or
discoloration of the surface may result.
On operation
Before connecting other components, be sure
to turn off and unplug the tuner.
On cleaning
Clean the cabinet, panel, and controls with a
soft cloth slightly moistened with a mild
detergent solution. Do not use any type of
abrasive pad, scouring powder, or solvent,
such as alcohol or benzine.
If you have any questions or problems
concerning your tuner, please consult your
nearest Sony dealer.
Troubleshooting
If you experience any of the following
difficulties while using the tuner, use this
troubleshooting guide to help you remedy the
problem. Should any problem persist, consult
your nearest Sony dealer.
There’s no sound.
• Connect the antennas.
• Set the source setting on the amplifier to
TUNER.
• Connect the tuner to the amplifier using an
audio cord (page 12) or optical digital cord
(page 11).
• The specified station has temporarily
stopped broadcast.
• Perform the DAB INITIAL SCAN
procedure (page 15).
• FM/AM broadcast signals are not output
from the DIGITAL DAB OPTICAL OUT
jack.
You cannot tune in a frequency.
• Adjust the position of the antenna.
• Connect an external antenna for DAB/FM/
AM broadcasts.
• Preset the stations again if you have
moved.
There is severe hum and/or
background noise.
• Adjust the position or direction of the
antenna.
• Tune to a correct frequency.
• Connect an external antenna for DAB/FM/
AM broadcasts.
• Move the tuner away from the source of
the noise.
Additional Information
RDS isn’t working.
• Make sure that you tune in an FM station.
• Select a stronger FM station.
continued
27
GB
Page 28

The appropriate display or information
does not appear.
• Contact the radio station and find out
whether or not they actually provide the
service in question. The service may be
temporarily out of order.
You cannot name the preset station.
• You cannot name DAB/FM RDS stations.
The tuner malfunctions.
• The microprocessor in the tuner has
malfunctioned. Turn off the tuner, then
turn it on again.
“DAB _ _ _ _” appears in the display.
(DAB reception only)
• Check all antenna connections, then turn
TUNING/SELECT to select a service.
• The current DAB service is not available.
Turn TUNING/SELECT to select a
different service.
• If you have moved to another area, some
services/frequencies may have changed
and you may not be able to tune into your
usual broadcast.
Perform the DAB INITIAL SCAN
procedure to re-register the contents of
broadcasts. (Performing this procedure
clears all previously stored presets.)
There’s no sound from the DIGITAL
DAB OPTICAL OUT jack, or you cannot
record a programme.
• Make sure that the optical digital cord is
properly connected.
• The connected recorder does not support
the 48kHz sampling frequency mode. Use
a recorder that supports this mode.
• The sound of the FM and AM programme
does not output from the DIGITAL DAB
OPTICAL OUT jack of the tuner. Connect
the recorder to the ANALOG OUT jack of
the tuner.
The FM reception is poor.
• Use a 75-ohm coaxial cable (not supplied)
to connect the tuner to an outdoor FM
antenna as shown below. If you connect
the tuner to an outdoor antenna, ground it
against lightning. To prevent a gas
explosion, do not connect the ground wire
to a gas pipe.
Outdoor FM antenna
Tuner
ANTENNA
AM
Ground wire (not supplied)
To ground
Remote control
The remote does not function.
• Point the remote at the remote sensor ( )
on the tuner.
• Remove any obstacles in the path between
the remote and the tuner.
• Replace both batteries in the remote with
new ones if they are weak (page 14).
Error messages
If there is a malfunction, the display shows a
message. You can check the condition of the
tuner by the message. Refer to the following
table to solve the problem.
DAB EROR
The tuner is unable to collect the DAB data.
Turn off the tuner and turn it on again.
28
GB
Page 29

Specifications
DAB tuner section
Frequency range
Band-III: 174.928 (5A) –
239.200 (13F) MHz
L-Band: 1452.960 (LA) –
1490.624 (LW) MHz
For details, see “DAB
frequency table” on page
30.
Sensitivity –99 dBm
Signal-to-noise ratio 97 dB
THD+N 0.009% (1 kHz)
Channel separation 87 dB (1 kHz)
Selectivity 40 dB (at adjacent channel)
Frequency response +0.5/–0.5 dB
(5 Hz – 20 kHz)
Digital output Optical
Sampling frequency:
48 kHz
Aerial terminal 75 ohms, F female
Analog output level 2 Vrms
AM tuner section
Frequency range 531 – 1,602 kHz
(9 kHz step)
Intermediate frequency
450 kHz
Sensitivity (with AM loop aerial)
330 µV/m
Signal-to-noise ratio
54 dB
THD+N 0.5% (400 Hz)
Selectivity at 9 kHz 35 dB
Aerial terminal Push lever
General
Power requirements 230 V AC, 50/60 Hz
Power consumption 16 W
Dimensions (w/h/d) (Approx.)
430 × 85 × 290 mm
Weight (Approx.) 2.8 kg
Remote control capability
IR
Station preset capacity
DAB maximum of 30
FM maximum of 30
AM maximum of 30
Additional Information
FM tuner section
Frequency range 87.5 – 108.0 MHz
(50 kHz step)
Intermediate frequency
10.7 MHz
IHF Sensitivity 1.0 µV
Signal-to-noise ratio at 40 kHz deviation
70 dB (stereo)
THD+N 1 kHz, 40 kHz deviation
0.5% (stereo)
Channel separation 45 dB (1 kHz)
Selectivity at 400 kHz 60 dB
Frequency response +0.5/–2.0 dB
(30 Hz – 15 kHz)
Aerial terminal 75 ohms, IEC male
Supplied accessories
Audio cord (1)
AM loop antenna (1)
FM wire antenna (1)
DAB wire antenna (1)
Remote commander RM-S900D (1)
R6 (size-AA) batteries (2)
Design and specifications are subject to
change without notice.
continued
29
GB
Page 30

DAB frequency table
Band-III (174 to 240 MHz)
Frequency Label Frequency Label
174.928MHz 5A 209.936MHz 10A
176.640MHz 5B 211.648MHz 10B
178.352MHz 5C 213.360MHz 10C
180.064MHz 5D 215.072MHz 10D
181.936MHz 6A 216.928MHz 11A
183.648MHz 6B 218.640MHz 11B
185.360MHz 6C 220.352MHz 11C
187.072MHz 6D 222.064MHz 11D
188.928MHz 7A 223.936MHz 12A
190.640MHz 7B 225.648MHz 12B
192.352MHz 7C 227.360MHz 12C
194.064MHz 7D 229.072MHz 12D
195.936MHz 8A 230.784MHz 13A
197.648MHz 8B 232.496MHz 13B
199.360MHz 8C 234.208MHz 13C
201.072MHz 8D 235.776MHz 13D
202.928MHz 9A 237.488MHz 13E
204.640MHz 9B 239.200MHz 13F
206.352MHz 9C
208.064MHz 9D
L-Band (1,452 to 1,491 MHz)
Frequency Label Frequency Label
1452.960MHz LA 1473.504MHz LM
1454.672MHz LB 1475.216MHz LN
1456.384MHz LC 1476.928MHz LO
1458.096MHz LD 1478.640MHz LP
1459.808MHz LE 1480.352MHz LQ
1461.520MHz LF 1482.064MHz LR
1463.232MHz LG 1483.776MHz LS
1464.944MHz LH 1485.488MHz LT
1466.656MHz LI 1487.200MHz LU
1468.368MHz LJ 1488.912MHz LV
1470.080MHz LK 1490.624MHz LW
1471.792MHz LL
GB
30
Page 31

Index
A
Automatic tuning 15, 18
C
Changing information in
display 25
Connecting
AC power cord 14
Amplifier 12
Antenna 13
DAT deck 11
MD recorder 11
D
DAB (Digital Audio
Broadcasting)
DAB INITIAL SCAN
15
Dynamic label segment
25
Frequency table 30
Overview 3
Direct tuning 19
I
Indications in the display 7
T
Tuning
automatically 15, 18
directly 19
FM AUTOBETICAL 20
to preset stations 17, 22
Additional Information
P
Preset station 16, 21
R
RDS (Radio Data Service)
23
Receiving broadcasts 15, 18
S
Service Component Label
25
Supplied accessories 29
31
GB
Page 32

Sony Corporation Printed in Malaysia
 Loading...