

Page 1

DAB/FM/AM
Tuner
Operating Instructions
4-255-834-12(1)
ST-SDB900
©2004 Sony Corporation
Page 2
WARNING
To prevent fire, do not cover the ventil at ion of the
apparatus with news papers, table-cloths, curtains, etc.
And don’t place lighted candle s on the apparatus.
To prevent fire or shock hazard, do not place obje c ts
filled with liquids, such as vases , on the ap pa ratus.
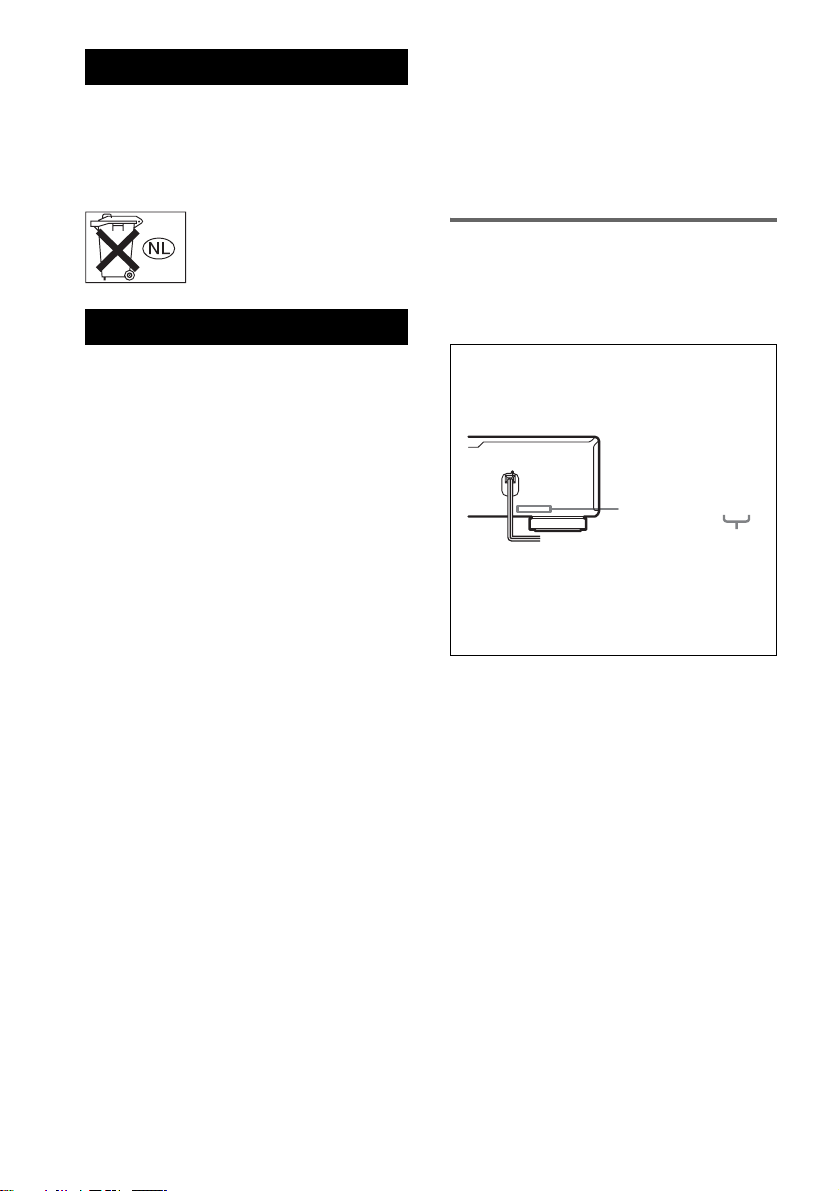
Don’t throw away batter ie s w ith
general house waste; dispose of
them correctly as chemical waste.
Precautions
On safety
Should any liquid or solid object fall into the unit,
unplug the unit and have the unit checked by qualified
personnel before operating it any further.
On power sources
• Before operating the un it, be sure that the operating
voltage of your unit is identical with that of your
local power su pply.
• Unplug the unit from the wall outlet if it is not to be
used for an e xtended period of time . To disconnect
the cord, pull it out by grasping the plug. Never pull
the cord itself.
• AC power cord must be changed only at the qualified
service shop.
• The unit is not disconnected from the AC power
source (mains) as long as it is connected to the wall
outlet, even if th e unit itself has been turned of f.
On placement
• Place the unit i n a l ocati on wi th a dequa te venti lati on
to prevent heat buildup and prolong the life of its
components.
• Do not place the unit near heat sources, or in a place
subject to direct sunlight, exce ssive dust or
mechanical shock.
• Do not place anything on top of the cabinet which
might block the ventilation hole s a nd c aus e
malfunctions.
• Do not install the appliance in a confine d space, such
as a bookcase or built-in cabine t.
On cleaning the cabinet
Clean the cabinet, panels and controls with a soft cloth
lightly moistened wi th a mild detergent solution. D o
not use any type of abrasive pad, scouring powder or
solvent such as alcohol or benzine .
On repacking
Do not throw away the c arton and the pac king materia l.
This makes an ideal container when tra nsporting the
unit. When shipping the unit, repack it as it was packed
at the factory.
If you have any questions or problems concerning your
unit that is not covered in this manual, please consult
your nearest Sony dealer.
About This Manual
The instructions in this manual are described using the
controls on the tuner. You may also use the controls on
the remote if they ar e of the same or similar name as
those on the tuner.
About area codes
The area code of the tuner you purchased is shown
on the lower portion of the rear panel (see the
illustration below).
4-XXX-XXX-XX AA
Area code
Any differences in op eration, according to t he area
code, are clearly ind icated in the text, for example,
“Models of area code AA only”.
GB
2
Page 3
Overview of DAB
DAB (Digital Audio Broadcasting) is a new
multimedia broadcasting system that replaces
the current FM/AM broadcast to tra ns mit audio
programmes with a quality comparable to that of
CDs*.
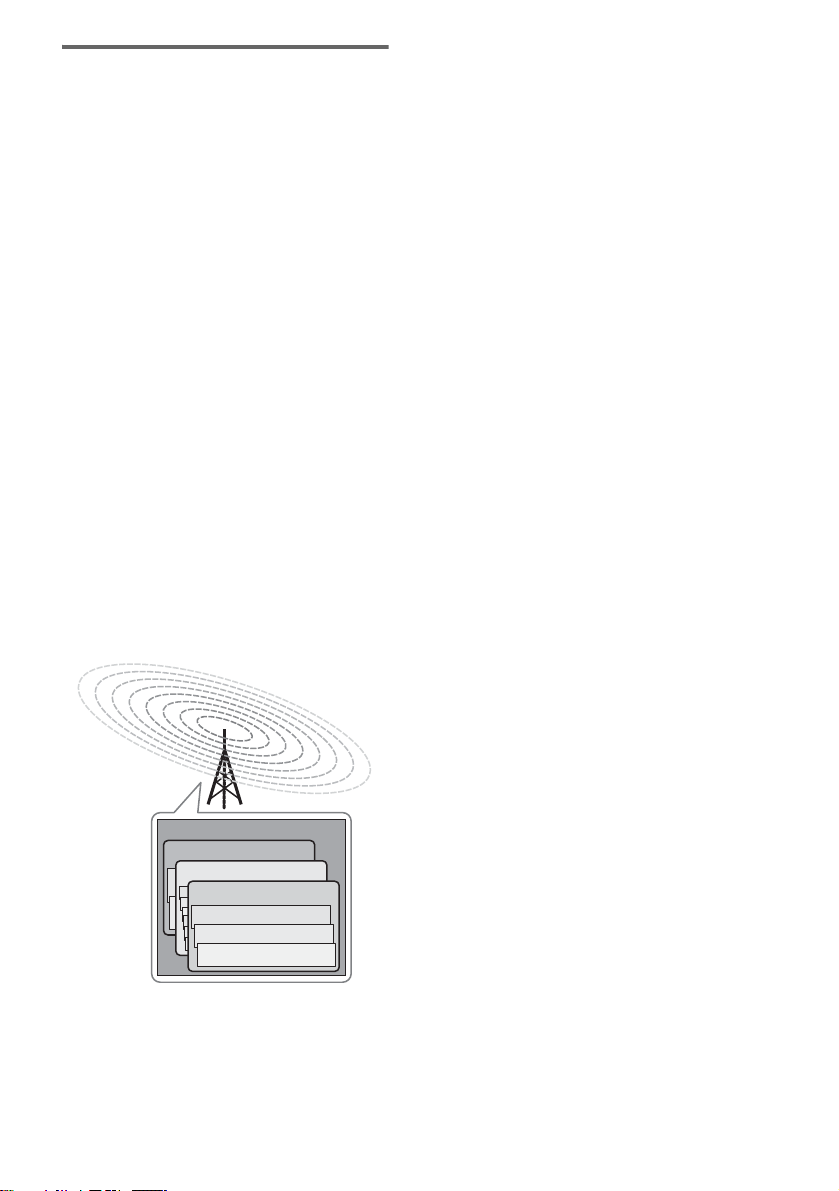
Each DAB multiplex radio station converts
programmes (services) into an ense mble, which
it then broadcasts. Each service contains one or
more components. All service s and compone nts
are identified by name, so you can access any of
them without having to know their frequencies.
Furthermore, additional information (called
programme asso ci at ed data) can be broadcast
along with the se rvices in the form of text.
With DAB digital radio, you can enjoy:
– CD sound quality without any hiss or crackle to
spoil the sound
– both music and data se rv ices from a single tuner
(this tuner does not suppor t da ta services)
– the same radio stations of the same frequency from
anywhere in the country
– multiple progr a mmes (services) from a single
frequency
* Some service components may not match CD quality
sound.
*
Notes
• The status of the DAB broadcast depends on your
country or region. It may not be broadcasted or may
be in test phase.
• DAB programmes are broadcast in Band-III (174 to
240 MHz) and/or L-Band (1,452 to 1,491 MHz),
with each band divided into channe ls. Each of these
channels has its own channel label. For details on the
channel labels and frequencies that this tuner
supports, see the Frequency Table on page 22.
• This tuner supports Band-III only.
• This tuner does not support data services.
• This tuner does not support reception in countries
outside of Europe.
Ensemble
Service
Service
Service
Component
Component
Component
GB
3
Page 4

Table of Contents
Getting Started
Unpacking...............................................5
Hooking up the system...... ... ...................5
Basic menu operation..............................9
Before you can receive DAB stations.....9
— DAB INIT SCAN
Storing FM stations automatically........10
— AUTOBETICAL
Receiving Broadcasts
Receiving DAB/FM/AM broadcas ts.....11
Storing stations manually......................12
Receiving preset stations.......................13
Using the Radio Data System (RDS)....14
Description of program types f or DAB
and FM RDS...................................15
Advanced Tuner Operations
Naming preset stations..........................16
Tips for better FM reception.................17
Listening at low volumes......................17
— DRC (Dynamic Range
Control)
Checking reception sensit ivit y..............18
— DAB TUNE AID
Changing the display.............................18
About the indications in the display......20
Additional Information
Troubleshooting....................................21
Specifications........................................22
List of button locations and refer e nce
pages...............................................23
Index .....................................................25
GB
4
Page 5
Getting Started
Unpacking
Check that you received the following items
with the tuner:
• Audio cord (1)
•AM loop aerial (1)
• FM wire aerial (1)
• DAB wire aerial (1)
• Remote commander (1)
• R6 (size AA) batteries (2)
Hooking up the system
Getting Started
Before you get started
• Turn off the power to all components before
making any connections.
• Do not connect the AC power cord until all of
the connections are completed.
• Be sure to make connections firmly to avoid
hum and noise.
• When connecting an audio cord, be sure to
match the colour-coded pins to the
appropriat e jacks: White (lef t) t o White; and
Red (right) to Red.
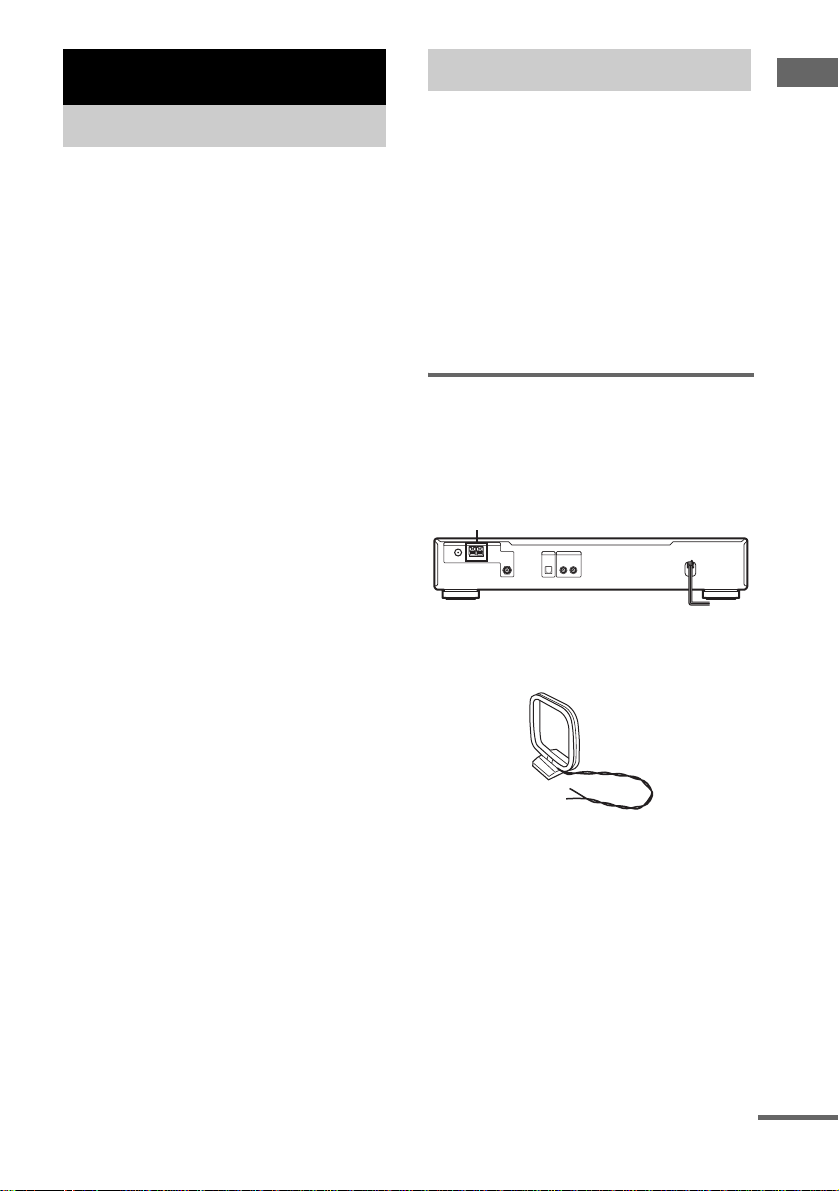
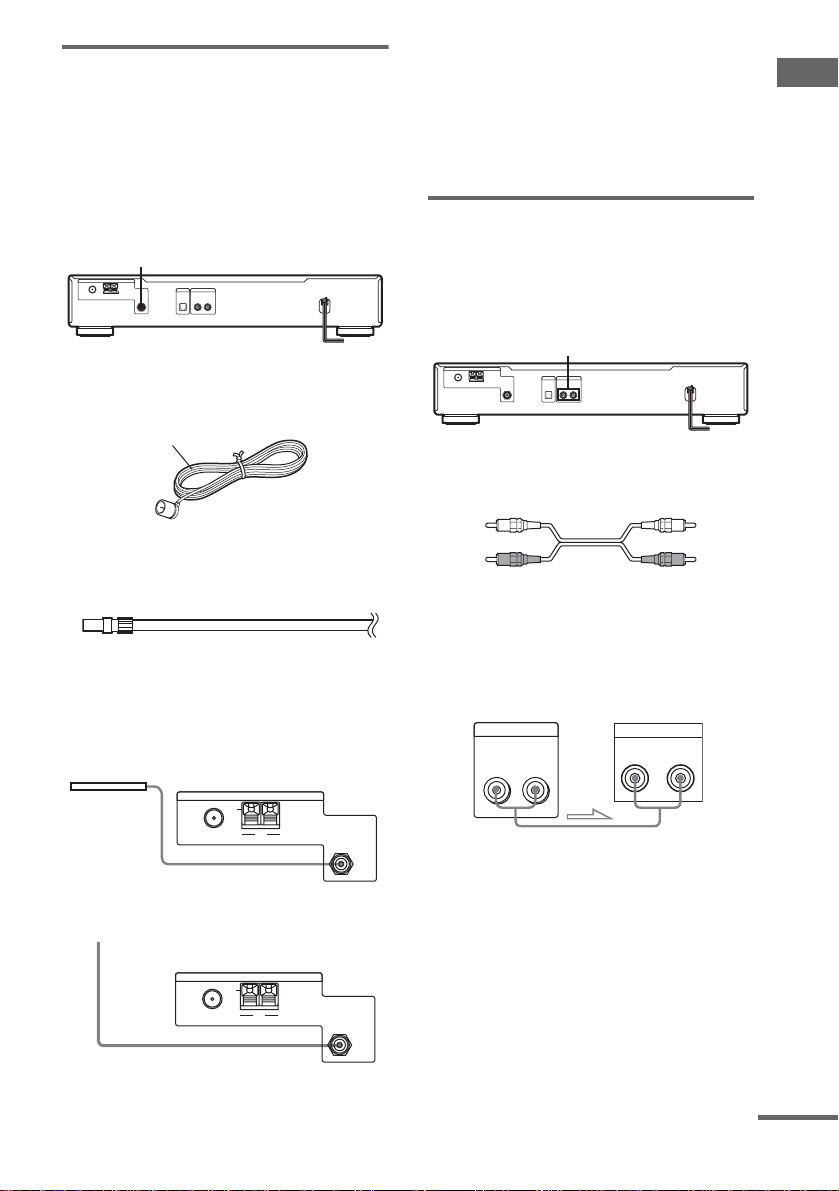
AM aerial hookups
This section describes how to connect the
supplied AM loop aerial to the AM ANTENNA
terminals. For the specific location of the
terminals, see the illustratio n below.
AM ANTENNA
What will I need?
• AM loop aerial (supplied) (1)
1 Unwrap 2 lengths of the braided lead
wire from around the frame of the
aerial. Be careful to unwrap only the
braided section of the lead wire. Do not
unwrap more than 2 l engths of the lead
wire. Also, be careful not to unbraid the
lead wire.
continued
GB
5
Page 6
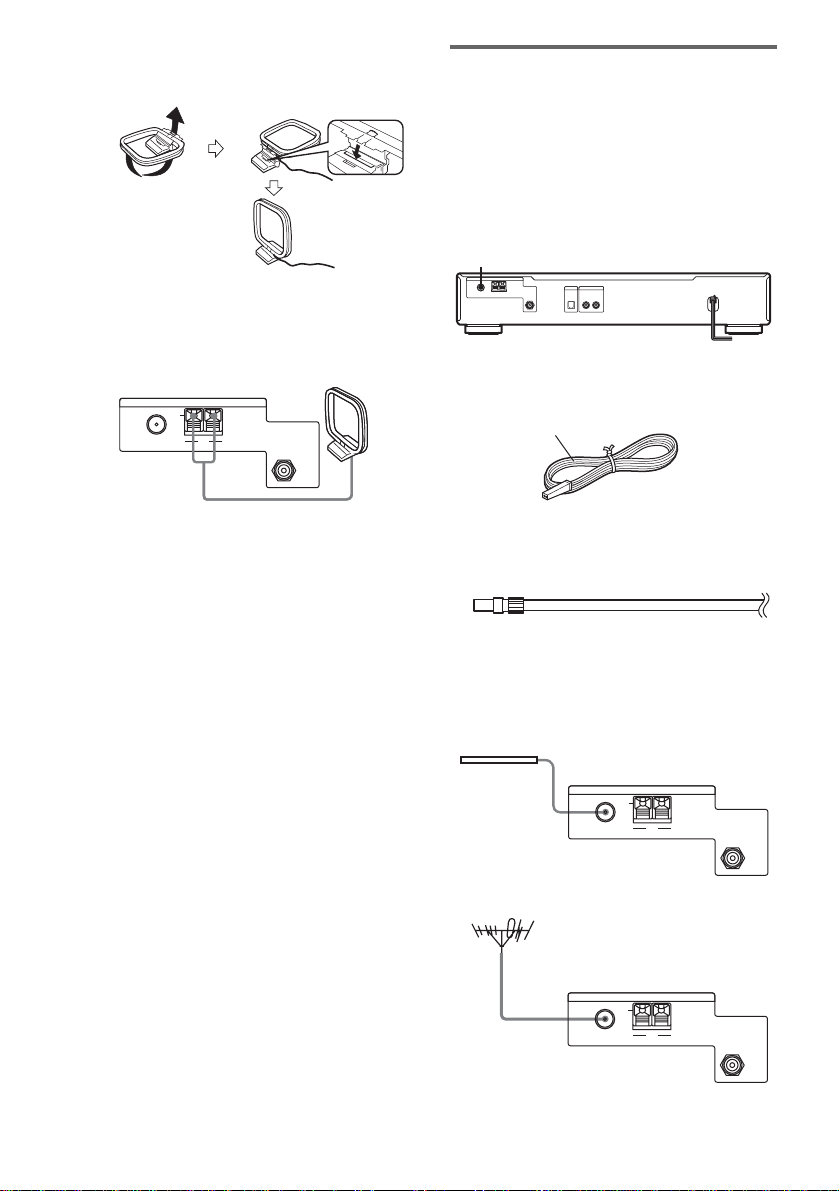
2 Assemble the supplied aerial as shown
below.
3 Connect the AM loop aerial to the AM
terminals on the back of this unit.
AM loop aerial
ANTENNA
75Ω
U
COAXIAL
AMFM
DAB
75Ω
COAXIAL
FM aerial hookups
With an FM outdoo r aerial, you can obtain a
higher FM broadca st sound quality. We
recommend that you use the supplied FM wire
aerial only temporarily until you install an FM
outdoor aerial. For the specific loca t io n of the
FM ANTENNA terminal, see the illustration
below.
FM ANTENNA
What will I need?
• FM wire aerial (supplied) (1)
White
4 Adjust the aerial direction for the best
reception.
The AM loop aerial has a directivity which
detects the sign al from some angles mo r e
strongly than others. Set the aerial to the
orientation which provides the best
receiving condition.
If a high pitched noise (beat noise) occurs
when recording AM broadcasts, adjust the
position of the AM loop aerial so that the
noise disappears.
If you live in a building constructed of
reinforced concrete, or with a steel frame,
you may not be able to ac hieve good
reception since th e radio waves becom e
weaker indoors. In this case, we
recommend connecting an optional aerial.
Tip
If you are having difficulty receiving stations, try
repositioning the loop aerial while tuning. Placing the
supplied AM loop aerial near a window will help
improve reception quality.
• FM outdoor aerial (not supplied) (1) and
75-ohm coaxial cable with IEC female type
connector (not supplied) (1)
Connect the supplied FM wire aerial or an FM
outdoor aerial (not supplied) to the FM terminal
on the back of this unit.
FM wire aerial
ANTENNA
75Ω
U
COAXIAL
FM outdoor aerial
75Ω
COAXIAL
ANTENNA
U
AMFM
AMFM
DAB
75Ω
COAXIAL
DAB
75Ω
COAXIAL
GB
6
Page 7
DAB aerial hookups
With a DAB outdoor aerial, you can obtain a
higher DAB broadca st sound quality. We
recommend that you use the supplied DAB wire
aerial only temporarily until you install a DAB
outdoor aerial. Fo r the specific locatio n of the
DAB ANTENNA terminal, see the illustration
below.
DAB ANTENNA
What will I need?
• DAB wire aerial (s up plied) (1)
Black
• DAB outdoor aerial (not supplied) (1) and
75-ohm coaxial cable with F male type
connector (not su pplied) (1)
Connect the supplied DAB wire aerial or a DAB
outdoor aerial (n ot supplied) to the DAB
terminal on the back of this unit.
DAB wire aerial
ANTENNA
75Ω
U
COAXIAL
AMFM
DAB
75Ω
COAXIAL
Connecting a ground wire
If you connect an outdoor aerial, be sur e to
connect an earth lead (not supplied) to the AM
ANTENNA terminal with the “U” indica tion (in
addition to the AM loop aerial) for lightning
protection.
Amplifier hookups
Connect the tuner to an amplifier. Be sur e to turn
off both components before connection. For the
specific location of the terminals, see the
illustration below.
ANALOG OUT
What cords will I need?
• Audio cord (s upplied) (1)
Connect the white plugs to the white (L) jacks
and the red plugs to the red (R) jacks. Insert the
plugs completely into the jacks; incomplete
connections ma y cause noise.
ST-SDB900 Amplifier
ANALOG
OUT
RL
TUNER IN
RL
Getting Started
to DAB outdoor aerial
75Ω
COAXIAL
ANTENNA
U
AMFM
DAB
75Ω
COAXIAL
continued
GB
7
Page 8
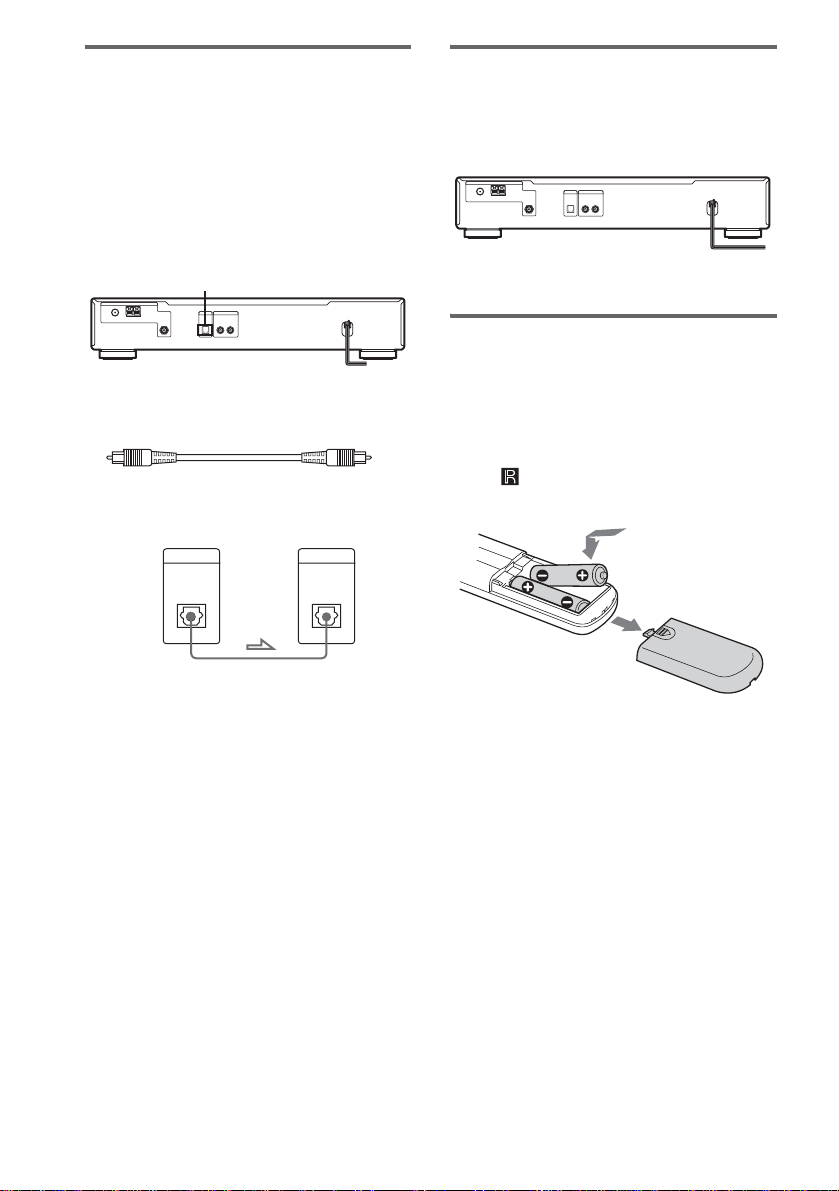
MD/DAT hookups
This section describes how to connect the tuner
to a DAT deck or MD recorder for digital-todigital recording. With this connection, you can
obtain the highest possibl e sound quality wh en
recording DAB digital broadcasts, even if you
use the analog out p uts for listenin g pu rposes.
For specific locations of the jacks, see the
illustration below.
DAB OPTICAL OUT
Connecting the AC power
cord
Connect the AC power cord to a wall outlet after
completing all of the previous connections.
to a wall outlet
Inserting batteries into the
remote
What cables will I need?
• Digital optical cable (not supplied) (1)
ST-SDB900 MD/DAT
DIGITAL
DAB
OPTICAL OUT
Notes
• When you use a recorder which does not support the
48kHz sampling frequency mode, you cannot play or
record the digital signals fro m the DIGIT AL DAB
OPTICAL OUT jack.
• The DIGITAL DAB OPTICAL OUT jack has a
retractable cover. Insert the plug into the jack.
• FM/AM broadcast signals are not output from the
DIGITAL DAB OPTICAL OUT jack.
DIGITAL IN
OPTICAL
You can control this unit using the supplied
remote. Insert two R6 (size AA) batteries by
matching the + and – o n th e batteries. When
using the remote, point it at the remote
sensor on this unit.
Tip
With normal use, the batteries should last for about six
months. When the remote no longer operates the tuner,
replace both batteries with new ones.
Notes
• Do not leave the remote in an extremely hot or humid
place.
• Do not drop foreign objects into the remote casing,
particularly when replacing the batteries.
• Do not expose the remote sensor to direct sunlight or
lighting apparatus. Doing so may cause a
malfunction.
• If you will not use the remote for an extended period
of time, remove the batterie s to a void possible
damage from battery leaka ge and c or ro sion.
GB
8
Page 9
Basic menu operation
This tuner uses a menu entry system which
allows you to operate various functions by
following messa ges on the display. Use the
following cont rols for basic menu operation.
TUNING/SELECT
MENU
ENTER
Before you can receive DAB stations
— DAB INIT SCAN
Before you can receive DAB, yo u must reg is ter
the contents of broadc asts (ser vice comp onents )
so that they can be received by the DAB tuner
using the DAB Initialization Scan procedure.
POWER TUNING/SELECT
BAND MENU
Getting Started
Use the To
MENU button Enter/Exit menu mode.
TUNING/SELECT
control
ENTER button Select the currently displayed
Display different items or
settings.
item or setting.
ENTER
1 Press POWER to turn on the tuner.
2 Press BAND repeatedly to select DAB.
“DAB Tuning” will appear in the display
while the tuner is collecting DAB data.
Please wait until this message disappears.
3 Press MENU.
4 Turn TUNING/SELECT to display “DAB
INIT SCAN”.
5 Press ENTER.
6 Turn TUNING/SELECT to display
“Yes”.
7 Press ENTER.
Scanning begins. Depending on the DAB
services available in your area, this may
take a few minutes.
8 When scanning is complete, “End”
appears in the display momentarily
and the tuner returns to normal
operation.
Turn TUNING/SELECT to select a service.
Notes
• Do not press any button on the tuner or suppl ie d
remote during DAB INIT SCAN, except POWER.
• If you move to another area, repeat this procedure to
store the stations for your new area.
• This procedure does not create any pres ets.
• This procedure clears all prev iously stored presets.
• For details on presets, see “Storing stations
manually” on page 12.
GB
9
Page 10

Storing FM stations automatically
— AUTOBETICAL
This function lets you store up to 30 FM and FM
RDS stations in alphabetical order without
redundancy. Add i ti onally, it only stores the
stations with the clearest signals.
If you want to store FM or AM s ta tions one by
one, see “Stori ng stati ons manu ally” on page12.
POWER TUNING/SELECT
BAND
MENU
ENTER
1 Press POWER to turn on the tuner.
2 Press BAND repeatedly to select FM.
3 Press MENU.
4 Turn TUNING/SELECT to display
“AUTO-BETICAL”.
5 Press ENTER.
6 Turn TUNING/SELECT to display
“Yes”.
7 Press ENTER.
Depending on the number of stations in
your area, it may take longer than 5 minutes
until storing is complete.
“AUTO-BETICAL” appears in the display
and the tuner scans and stores all the FM
and FM RDS stations in the broadcast area.
For RDS stations, the tuner first checks for
stations broadcasting the same program,
then stores only the one with the clearest
signal. The s electe d RDS stat ions are s orted
alphabeticall y by their Program Service
name, then assigned a 2-character pr eset
code. For more deta ils o n RDS, see “Using
the Radio Data System (RDS)” on page 14.
Regular FM stations are assigned
2-character preset codes and stored after the
RDS stations.
8 When done, “End” appears in the
display momentarily and the tuner
returns to normal operation.
Turn TUNING/SELECT to select a service.
Notes
• Do not press any button on the tuner or supplied
remote during autobetical opera tion, except
POWER.
• If you move to another area, repeat this procedure to
store the stations for your new area.
• For details on tuning in stored stati ons, se e
“Receiving preset stations ” on pa ge13.
• If you move the aerial after storing stations with this
procedure, the stored settings may no longer be valid.
If this happens, repeat this proce dur e to stor e the
stations again.
10
GB
Page 11

Receiving Broadcasts
Receiving DAB/FM/AM broadcasts
Receiving broadcasts by
scanning stations
(Automatic Tuning)
With automatic tuning you can quickly tune in a
station without having to know its frequency.
BAND TUNING/SELECT
TUNING MODE
1 Press BAND repeatedly to select DAB,
FM or AM for the desired type of
broadcast.
When selecting DAB, “DAB Tuning” will
appear in the display while the tuner is
collecting DAB data. Please wait until this
message disappears.
2 Press TUNING MODE to display AUTO.
3 Turn TUNING/SELECT slight ly a nd
release it when the service component
(DAB) or frequency (FM/AM) numbers
start changing.
Turn the control to the right or l eft to tune in
a service component (DAB) or frequency
(FM/AM).
When the tuner locates a station, it stops
automatically. “TUNED” appears in the
display.
4 Repeat step 3 until you tune in the
appropriate station.
To store the station, operate steps 4 to 6 in
“Storing stations manually” (page 12).
Notes
• When tuning in a DAB station, it may take a few
seconds before you hear any sound.
• Before you can receive DAB, you mus t complete the
DAB INIT SCAN procedure (see “Before you can
receive DAB stations” on page 9).
If you cannot tune in the station
you want (Manual Tuning)
(FM/AM bands only)
With manual tuning you can search through all
stations broadcasting on each band, and tune in
stations with ext re m el y w eak signals that you
might not be able to receive with automatic
tuning.
1 Press BAND repeatedly to select FM or
AM for the desired type of broadcast.
2 Press TUNING MODE so that
“MANUAL” appears in the display.
3 Turn TUNING/SELECT until you tune in
the station you want.
Turn the cont rol to the right fo r a higher
frequen c y ; turn it to the left for a lo wer
frequency.
Receiving Broadcasts
11
GB
Page 12

Storing stations manually
This sectio n sho ws yo u h ow to st or e up to 99 of
your favorite DAB , 30 of FM or 30 of AM
stations manually onto preset numbers.
BAND ENTER
TUNING/SELECT
page 17). You will not have the stereo effect but the
distortion will be reduced.
Notes
• When you preset a DAB or RDS station that is
broadcasting station name inf or m at ion, the sta tion
name is automatica lly stored in the station pr e set.
• The DAB INIT SCAN procedure clears all DAB
presets.
TUNING MODE
MEMORY
1 Press BAND repeatedly to select DAB,
FM or AM for the desired type of
broadcast.
2 Press TUNING MODE repeatedly so
that the tuner is set to automatic or
manual tuning mode.
Manual tuning mode is only available with
FM and AM band reception.
3 Turn TUNING / SELECT to tune in the
station you want to store.
4 Press MEMORY.
“MEMORY” appears along with the preset
number and the previously stored station.
The default station presets are as follows:
DAB: DAB01 (Empty), FM: FM01 87.50
MHz, AM: AM01 5 31 kHz.
5 Turn TUNING/SELECT to select the
desired number.
6 Press ENTER.
The tuner stores the service/station at the
preset number. Any previously stored
service/station is overwritten.
7 Repeat steps 1 through 6 to store other
stations.
Tips
• To label a station, se e “Namin g preset stations” on
page 16.
• When tuning in AM stations, adjust the direction of
the AM loop aerial for optimum reception.
• If the STEREO indicator remains off, switch to
stereo mode (see “Tips for better FM reception” on
page 17).
• If an FM stereo programme seems disto rt e d, switc h
to monaural (see “Tips for better FM receptio n” on
12
GB
Page 13

To store stations using the
ENTER
MEMORY
>
10
321
654
98
10/0
7
DAB
FM AM
AUTO
remote
Using the remote ’s number buttons.
1 Press DAB, FM or AM to select the
desired broadcast type.
2 Press MEMORY.
“MEMORY” flashes in the display.
3 Press the number button for which you
want to store the preset.
The tuner stores th e s ta tion at the preset
number.
Number Buttons
MEMORY
DAB, FM, AM
Storing presets at num bers above 10.
1 Perform steps 1 and 2 as described
above.
2 Press >10.
The PRESET number cha nges to “_ _”
(underbars) and the left under bar flashes.
3 Press the number buttons on the
remote for which you want to st ore t he
preset.
To input a “0” press 10 /0.
Example: To store a station at PRESET
number “30”
Press MEMORY first, press >10 next, then
3 and 10/0.
Tip
To input a “10” simply press 10 /0.
Receiving preset stations
This section shows you how to receive preset
stations.
BANDPOWER TUNING/SELECT
TUNING MODE
1 Make sure you have hooked up the
tuner and stored preset stations. (See
“Hooking up the system” on page 5,
“Storing FM stations automatically” on
page 10 and “Storing stations
manually” on page12.)
2 Turn down the volume on the amplifier,
then turn on the amplifier and select
the TUNER mode.
3 Press POWER to turn on the tuner.
4 Press BAND repeatedly to select DAB,
FM or AM for the desired type of
broadcast.
5 Press TUNING MODE repeatedly so
that “PRESET” appears in the display.
6 Turn TUNING/SELECT.
Each time you turn TUNING/SELECT, a
preset station is received and th e settings
(Preset ID, fre quency, and station n am e,
etc.) appear in the display.
7 Adjust the volume of the amplifier.
Receiving Broadcasts
continued
13
GB
Page 14

To receive a preset station by
MEMORY
DAB
FM
AM
PRESET
AUTO
TUNING
DAB, FM, AM
PRESET +/–
using the remote
Select the desired broadcast band by pressing
the corresponding buttons on the remote, then
specify the desired preset number using the
number button on the remote.
You can also swit ch to the next/previ ous preset
number by pressing PRESET +/– instead of
specifying the preset number directly.
Tips
• To tune in a non-preset station, see “Receiving DAB/
FM/AM broadcasts” on page 11.
• When you directly specify a preset station numbered
over 10, press >10 first, then the co rresponding
number buttons. To enter “0”, use the but ton 10/0.
Example: To tune the preset number 30
Press >10 first, then 3 and 10/0.
Notes
• When you tune in a DAB broadcast, do not turn up
the volume on the amplifier too loud. Since DAB
broadcasts have a wide dynamic range, a loud sound
may affect your ears or cause the amplifier or
speakers to be damaged.
• When tuning in a DAB station, it may take a few
seconds before you hear any sound.
Using the Radio Data System (RDS)
(FM band only)
This tuner allows you to receive and display
RDS (Radio Data System) information. RDS
enables radio stations to send information along
with the regula r program signal.
Receiving RDS broadcasts
Simply select a station on the FM band
using automatic or manua l tuning
(page 11).
When you tune in a stat io n t hat pr ovides RDS
services, the RDS indicator lig hts and the
program servic e name appears in the display.
Note
RDS may not work properly if the station you tuned to
is not transmitting the RDS sig na l pr ope r ly or if th e
signal strength is weak.
Displaying RDS information
While receiving an RDS station, press
DISPLAY.
Each time you press the button, RDS
information on the display change s cyclically.
(See “When tuning in an FM RDS station” on
page 19.)
Notes
• If there is an emergency announceme nt by
government authorit ies, “ALARM” flashes in the
display.
• If a station does not provide a particular RDS service,
“No XX” (suc h as “No Time Dat a”) appears in the
display.
• When a station broadcasts radio text data, it is
displayed at the rate at w hich it is sent from the
station. Any change in th is rate is reflected in the
display rate of the data.
14
GB
Page 15

Description of program types for DAB and FM RDS
Program type
indication
News News programs
Current Affairs Topical programs that expand on
Information Programs offering information on
Sport Sports programs
Education Educational programs, such a s
Drama Radio plays and serials
Cultures Programs about national or
Science Programs about the natural
Varied Speech Other types of programs such as
Pop Music Popular music programs
Rock Music Rock music programs
Easy Listening Easy Listening
Light Classics M Instrumental, vocal, and choral
Serious Classics Performances of major orchestras,
Other Music Music that does not fit into any
Weather & Metr Weather information
Finance Stock market reports and trading,
Children’s Progs Programs for children
Social Affairs Programs about people and the
Religion Programs of religious content
Phone In Programs where members of the
Travel & Touring P r ogr a ms about travel. Not for
Description
current news
a wide spectrum of subjects,
including consumer affairs a nd
medical advice
“how-to” and advice programs
regional culture, such as language
and social concerns
sciences and technology
celebrity interviews, panel games,
and comedy
music
chamber music, opera, etc.
categories above, such as Rhythm
& Blues and Reggae
etc.
things that affect th em
public express their views by
phone or in a public forum
announcements that are located by
TP/TA.
Program type
indication
Leisure & Hobby Programs on recreational
Jazz Music Jazz programs
Country Music Country music programs
National Music Programs featuring the popular
Oldies Music Programs featuring oldies music
Folk Music Folk music programs
Documenta r y Investigative features
(No PTY Data) Other programs not defined above
Description
activities such as gardening,
fishing, cooking, etc.
music of the country or region
Receiving Broadcasts
15
GB
Page 16

Advanced Tuner Operations
Naming preset stations
You can assign a na m e of up to 16 characters
long to each preset station except DAB and FM
RDS stations. When the station is tuned in, the
station name will appear.
TUNING/SELECT
TUNING MODE
MENU
• “No Name” appears when you display a preset
station without a preset name.
• You cannot use a “ ” (blank space) for a preset
name.
ENTER
MEMORY
1 Press TUNING MODE to display
“PRESET”.
2 Tune in the preset station you want to
name.
3 Press MENU.
4 Turn TUNING/SELECT to display
NAME.
5 Press ENTER.
6 Turn TUNING/SELECT to select a
character.
7 When the character you want appears,
press ENTER to move the cursor into
position for the next character.
If you make a mistake
Press ENTER repeatedly until the character
you want to change flashes ( every time you
press ENTER, the n ext character flashes).
Then turn TUNING/SELECT to select a
new character.
8 Press MEMORY.
The tuner stores the preset name.
9 Repeat steps 1 to 8 to name other
preset stations.
Notes
• You can only name stations that are stored under
PRESET.
• If you name a station which has a preset name
already, the previous preset name is deleted.
16
GB
Page 17

Tips for better FM
Listening at low volumes
reception
If the FM stereo programme you are listen ing to
is distorted, switch to monaural mode.
The tuner stores the f ol lo w i ng adjustments,
together wi t h th e frequency when yo u m ak e a
station pr eset.
The following settings do not change even if the
frequency changes.
Switching to monaural mode
You will not have the stereo effect but the
distortion will be reduced.
1 Press MENU.
2 Turn TUNING/SELECT to display “FM
MODE”.
3 Press ENTER.
4 Turn TUNING/SELECT to display
“MONO”.
5 Press ENTER.
The FM mode is set and the disp lay returns
to MENU mode.
Tips
• To return to stereo mode, c hoos e “STEREO ” in step
4 above.
• You can also switch back and forth from “STEREO”
to “MONO” mode simply by pre ssi ng the “FM
MODE” button on the remote.
• This setting does not change when you select another
frequency in MANUAL/AUTO tuning modes.
• When in PRESET tuning mode, any changes you
make are restored to the original settings once you
switch to a different preset. In order to avoid this,
make sure you store any new settings in the sta ti on
preset (see “Storing stations manually” on page 12).
Note
This procedure is only available with FM band
reception.
— DRC (Dynamic Range Control)
(DAB only)
Allows you to com press the dynam ic range of
the programme. T hi s m ay be useful when you
want to listen to the tuner at low volume late at
night.
Switching the setting
This feature is only available when using DAB
service that carries DRC data. “DRC” lights in
the display when it is activated.
You can automatically adjust the signal leve l of
broadcasts whic h have wide dynamic ran ges:
i.e. programmes that have soft as well as loud
sounds.
1 Press BAND repeatedly to select DAB.
2 Press MENU.
3 Turn TUNING/SELECT to display
“DAB DRC”.
4 Press ENTER.
5 Turn TUNING/SELECT to select the
desired setting.
The initial setting is “DRC OFF”.
DRC OFF: The dynamic range is not
compressed.
DRC AUTO: The dynamic range is
compressed automatically.
6 Press ENTER.
The DRC setting is registered and the
display returns to MENU mode.
Note
The DAB INIT SCAN procedure resets DRC setting to
DRC OFF.
Advanced Tuner Operations
17
GB
Page 18

Checking reception sensitivity
— DAB TUNE AID
Changing the display
(DAB only)
Allows you to check the DAB reception status.
A numerical value is displayed as a guide f or
aerial adjustment. A higher numerical value
indicates better reception. (Maximum value:
100)
1 Press BAND repeatedly to select DAB.
2 Press MENU.
3 Turn TUNING/SELECT to di splay “DAB
TUNE AID”.
4 Press ENTER.
5 Turn TUNING/SELECT to change
Channel label.
Check your local radio listings and select
the appropriate frequency. Use the
displayed num ber as a guide for where to
best place your aer i al . T ry to position the
aerial so that the numer ical r eading is 70 or
higher. (For best results, a reading of 90 or
higher is recom mended.)
6 Press ENTER.
Notes
• No sound is output while the DAB TUNE AID
function is being used.
• Depending on the broadcast stati ons available in
your area, the numerical reading displayed may not
be ideal.
• With readings below 70, DAB reception may be
distorted.
DISPLAY
Display Information
You can check th e st atus of this tune r and the
information ab out the programme using the
display.
When tuning in a DAB station
Each time you press D I SPLAY, the display
changes as follows:
Channel label (Norm al di splay) t
Ensemble label t PTY (Program Type ) t
Dynamic label segment
t Frequency t Audio Info
system)
Signal Quality
a)
Time information appearing in the display is sent by
the DAB station. As a re sult, the time may not be
displayed properly if the statio n is located in a
different time zone.
“--:--” will display unt il time information is
received.
b)
Audio information on bit rate (32kbps - 256kbps),
signal type (stereo, dual, mono ) and sa mpling type
(F: 48kHz, H: 24kHz) is displayed.
Example: 128kbps stereo F
c)
“Quality _ _ _” is displayed until infor mation is
received.
Note
When “STEREO” appears in the display , th e cu rrent
programme is broadcasted in th e stereo/joint
(intensity) stereo mode.
c)
t Time
t Channel label t...
a)
(in 24-hour
b)
t
18
GB
Page 19

When tuning in an FM RDS station
Each time you press DISPLAY, the display
changes as follows:
Frequency
Radio Textc) t Time
t Frequency t...
a)
b)
c)
d)
Note
The DISPLAY button is only available with DAB and
FM RDS reception.
a)
t PTY (Program Type)
This information also appears for non-RDS FM
stations.
Type of program being broadcast (see “Description
of program types for DAB and FM RDS” on
page 15).
Text messages sent by the RDS stati on.
Time information appearing in the display is sent by
the RDS station. As a res u lt, the time may not be
displayed properly if the stati on is located in a
different time zone.
d)
(in 24-hour sy st em)
b)
t
Customizing the display
You can select the appearance of the d is pl ay
from one of the foll owing two display modes.
1 Press MENU.
2 Turn TUNING/SELECT to display
DIMMER.
3 Press ENTER.
4 Turn TUNING/SELECT to select the
desired mode.
DIMMER OFF: The Display is on full
brightness.
DIMMER ON: The Display is 50%
dimmed.
5 Press ENTER.
The display returns to MENU mode.
To exit MENU mode, press MENU.
Advanced Tuner Operations
19
GB
Page 20

About the indications in the display
1
q
qgqhq
5234 7890qaqsq
6
d
DUAL
SECONDARYRDS STEREO
DAB
FM
AM
j
MONO
1 RDS: Lights when recei vi ng RDS
information. This is only available with FM
reception (page 14).
2 SECONDARY: Lights when a secondary
service component is being received. This is
only available w ith DAB reception.
3 STEREO: Lights during stereo broadc ast
reception. However, th is indicator does not
light when FM MODE is set to “MONO” and
an FM band is being received.
4 MONO: Lights when F M M ODE is set to
“MONO” and an FM band is being received
(page 17).
5 DUAL: Lights during DUAL audio reception.
This is when two separate audio tracks are
transmitted through the left and right channels.
For example, bilingual broadcast reception
(page 18).
6 DRC: Lights when Dynamic Range Control is
activated (page 17).
7 TUNED: Lights when a station is being
received (page 11).
8 b/B: Lights when TUNING/SELECT is
turned to the left/right or when Automatic
Tuning towards a lesser/higher fre quency is
performed (page 11).
9 AUTO: Lights during Auto Tuning mode
(page 11).
0 PRESET: Lights duri ng P res et Tuni ng m ode
(page 13).
qa MANUAL: Lights during Manual Tun ing
mode (page 11).
qs PTY: Lights when the Program Type is
displayed (pages 15 and 18).
DRC
TUNED
f
AUTO
MANUALPRESET
PTY
MEMORY
qd MEMORY : Lights while stations are being
preset (page12).
qf Display window: Displays the following
messages to operate various functions.
DAB INIT SCAN
Registering service components of DAB
broadcasting (page 9).
AUTO-BETICAL
Storing FM and FM RDS stations
automatically (page 10).
DAB TUNE AID
Checking DAB s ignal sensitivity (page 1 8) .
DAB DRC
Switching the DRC (Dynamic Range Control)
function of DAB (page 17).
FM MODE
Switching th e FM programme stereo or
monaural (page 17).
NAME
Setting th e pr eset statio n name (page 16).
DIMMER
Setting the brightness of the display (page 18).
qg AM: Lights during AM band reception
(page 11).
qh FM: Lights during FM band reception
(page 11).
qj DAB: Lights during DAB band reception
(page 11).
20
GB
Page 21

Additional Information
Troubleshooting
If you experience any of the following
difficulties while using the tuner, use this
troubleshooting gu ide to help you remed y th e
problem. Should any problem persist, consu lt
your nearest Son y dealer.
There’s no sound.
• Connect the aerials .
• Set the source set ting on the am plifi er to T UNER.
• Connect the tuner to the amplifier using an audio
cord (page 7) or digital optica l cable (page 8).
• The specified station has temporarily stopped
broadcast.
• Perform the DAB Initialization Scan pr oc e dur e
(page 9).
• FM/AM broadcast signals are not output from the
DIGITAL DAB OPTICAL OUT jack.
You cannot tune in a frequency.
• Adjust the position of the aerial.
• Connect an external aerial for DAB/FM
broadcasts.
• Preset the stations again if you have moved.
There is severe hum and/or background
noise.
• Adjust the position or direction of the aer ia l.
• Tune to a correct frequency.
• Connect an external aerial for DAB/FM
broadcasts.
• Move the tuner a way fr om th e sour ce o f the n oise .
RDS isn’t working.
• Make sure that you tune in an FM station.
• Select a stronger FM station.
The appropriate display or information does
not appear.
• Contact the radio station and find out whether or
not they actually provide the service in question.
The service may be temporarily out of order.
You cannot name the preset station.
• You cannot name DAB/FM RDS stations.
The tuner malfunctions.
• The microprocessor in the tune r has
malfunctioned. Tur n of f the tuner, then turn it on
again.
(No Service Now) is displayed. (DAB reception
only)
• Check all aerial connections, then turn TUNING/
SELECT to select a service.
• The current DAB service is not available. Turn
TUNING/SELECT to select a different service.
• If you have moved to another area, some services/
frequencies may have changed a nd you m ay not
be able to tune into your usual broadc a st.
Perform the DAB INIT SCAN procedure to
re-register the contents of broad casts.
(Performing this procedu re cl ears all previously
stored presets.)
There’s no sound from the DIGITAL DAB
OPTICAL OUT jack, or you cannot record a
programme.
• Make sure that the digital optical cable is properly
connected.
• The connected recorder does not support the
48kHz sampling frequency mode. Use a record er
that supports this mode.
• The sound of the FM and AM programme does
not output from the DIGITAL DAB OPTICAL
OUT jack of the tuner. Connect the recorder to the
ANALOG OUT jack of the tuner.
Remote control
The remote does not function.
• Point the remote at the remote sensor ( ) on the
tuner.
• Remove any obstacles in the pa th bet ween the
remote and the tuner.
• Replace both batteries in the remote with new
ones if they are weak (page 8).
Additional Information
21
GB
Page 22

Specifications
DAB tuner section
Frequency range 174.928 (5A) –
239.200 (13F) MHz
For details, se e “DAB
frequency table” below.
Sensitivity –99 dBm
Signal-to-noise ratio 97 dB
THD+N 0.009% (1 kHz)
Channel separation 87 dB (1 kHz)
Selectivity 40 dB (at adjacent channel)
Frequency response +0.5/–0.5 dB
(5 Hz – 20 kHz)
Digital output Optical
Sampling frequency:
48 kHz
Aerial terminal 75 Ω, F female
Analog output level 2 Vrms
FM tuner section
Frequency range 87.5 – 108.0 MHz
(50 kHz step)
IHF Sensitivity 1.0 µV
Signal-to-noise ratio at 40 kHz deviation
70 dB (stereo)
THD+N 1 kHz, 40 kHz deviation
0.5% (stereo)
Channel separation 45 dB (1 kHz)
Selectivity at 400 kHz 60 dB
Frequency response +0.5/–2.0 dB
(30 Hz – 15 kHz)
Aerial terminal 75 Ω, IEC male
AM tuner section
Frequency range 531 – 1,602 kHz
(9 kHz step)
Sensitivity (with AM loop aerial)
330 µV/m
Signal-to-noise ratio 54 dB
THD+N 0.5% (400 Hz)
Selectivity at 9 kHz 35 dB
Aerial terminal Push lever
General
Power requirements 230 V AC,
50/60 Hz
Power consumption 12 W
Dimensions 430 × 85 × 300 mm
(w/h/d)
Weight 4.5 kg
Remote control ca p ability IR
Station preset capacity DAB maximum of 99
FM maximum of 30
AM maximum of 30
Supplied accessories See page 5.
Design and specifications are subject to change
without notice.
DAB frequency table
Band-III (174 to 240 MHz)
Frequency Label Frequency Label
174.928MHz 5A 209.936MHz 10A
176.640MHz 5B 211.648MHz 10B
178.352MHz 5C 213.360MHz 10C
180.064MHz 5D 215.072MHz 10D
181.936MHz 6A 216.928MHz 11A
183.648MHz 6B 218.640MHz 11B
185.360MHz 6C 220.352MHz 11C
187.072MHz 6D 222.064MHz 11D
188.928MHz 7A 223.936MHz 12A
190.640MHz 7B 225.648MHz 12B
192.352MHz 7C 227.360MHz 12C
194.064MHz 7D 229.072MHz 12D
195.936MHz 8A 230.784MHz 13A
197.648MHz 8B 232.496MHz 13B
199.360MHz 8C 234.208MHz 13C
201.072MHz 8D 235.776MHz 13D
202.928MHz 9A 237.488MHz 13E
204.640MHz 9B 239.200MHz 13F
206.352MHz 9C
208.064MHz 9D
22
* This tuner does not support L-Band rec ept ion.
GB
Page 23

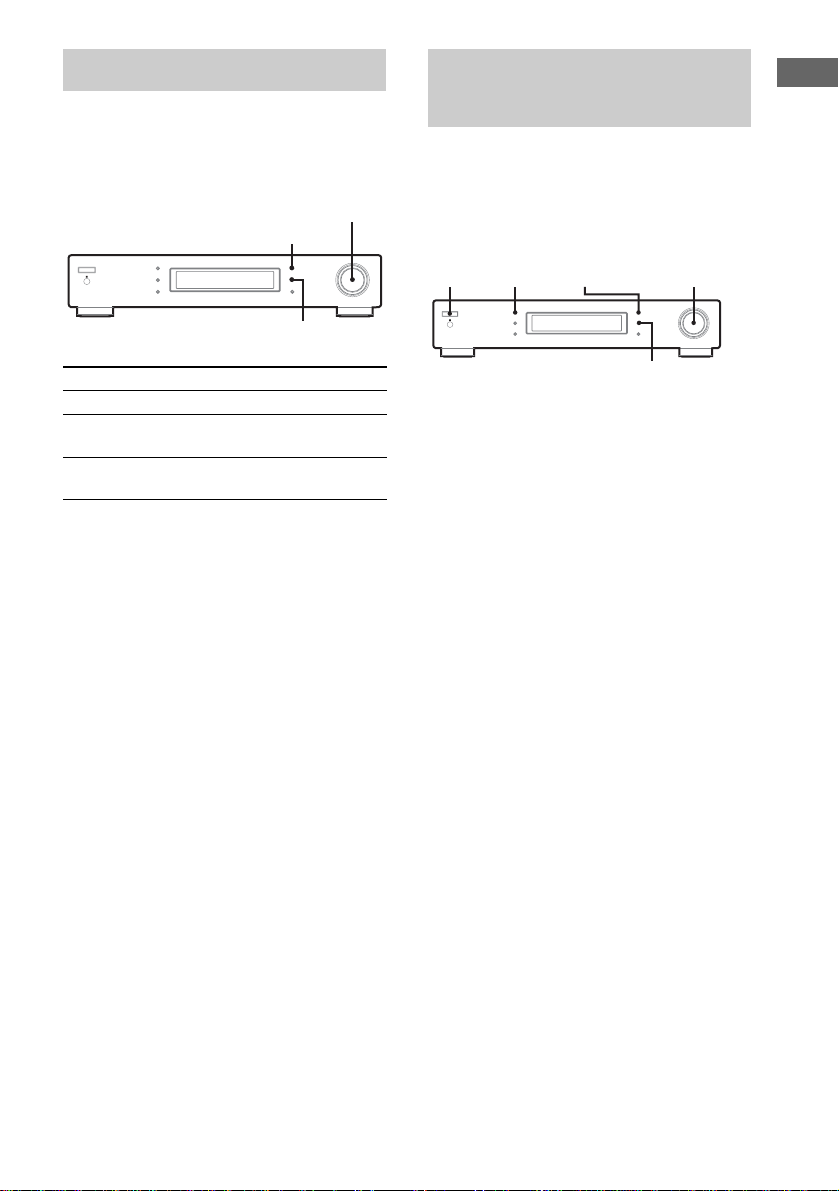
List of button locations and reference pages
Illustrati
2
6534
1
How to use this page
Use this page to find the location of buttons and other
parts of the system mentioned in the main text.
Main unit
1 (remote sensor) (21)
2 POWER switch (9, 13)
3 BAND (11-13)
4 Display window (20)
5 MENU (9, 10, 16)
6 TUNING/SELECT (9-13, 16, 17)
7 ENTER (9, 10, 12, 16-18)
8 MEMORY (12, 16 )
9 DISPLAY (18)
q; TUNING MODE (11-13)
r
Name of button/part Reference page
on number
9 DISPLAY (18)
R R
Additional Information
q;
9
8
7
GB
23
Page 24

Remote
1 FM MODE (17)
2 >10 (14)
3 FM (11, 12, 14)
4 PRESET +/– (14)
5 DISPLAY (14, 18, 19)
6 Number buttons (13)
7 ENTER (9, 10, 12, 16-18)
8 MEMORY (12, 16)
9 DAB (11, 14)
0 AM (11, 12, 14)
qa AUTO TUNING +/– (11, 14)
4
FM MODE
7
>
10
FM
10/0
DAB
PRESET
MEMORY
AM
DISPLAY
321
654
98
ENTER
AUTO
TUNING
51
6
72
8
9
03
qa
24
GB
Page 25

Index
A
Automatic tuning 11
C
Changing information in display 18
Connecting
AC power cord
5
aerial
Amplifier
MD/DAT
8
7
8
D
DAB (Digital Audio Broadc ast ing )
DAB INIT SCAN
DAB tune aid
Dynamic label segment
Frequency table
Overview
DRC (Dynamic Range Control)
9
18
18
22
3
17
E
Ensemble 18
I
Indications in the display 20
T
Tuning
Automatically
FM AUTOBETICAL
Manually
Preset
11
13
11
10
Additional Information
M
Manual tuning 11
P
Preset station 13
R
RDS (Radio Data Service) 14
Receiving broadcasts
11
S
Supplied acces sor ies 5
25
GB
Page 26

Page 27

Page 28

Sony Corporation Printed in Malaysia
 Loading...