

Page 1

User guide
Xperia™ go
ST27i/ST27a
Page 2

Contents
Important information..................................................................7
Water resistance..........................................................................8
IP (Ingress Protection) rating..............................................................
Android™ – what and why?.......................................................10
Applications.....................................................................................10
Getting started............................................................................11
Assembly.........................................................................................11
Turning the phone on and off .........................................................12
Setup guide......................................................................................13
Screen lock......................................................................................13
Accounts and services.....................................................................14
Getting to know your phone......................................................15
Phone overview................................................................................15
Using the keys.................................................................................16
Battery..............................................................................................16
Using the touchscreen.....................................................................18
Home screen....................................................................................20
Accessing and using applications...................................................22
Status and notifications...................................................................24
Phone settings menu.......................................................................25
Typing text.......................................................................................26
Customising your phone..................................................................30
Memory............................................................................................32
Using a headset with your phone....................................................34
Internet and messaging settings......................................................34
Turning off data traffic......................................................................35
Data roaming...................................................................................35
Mobile network settings...................................................................36
8
Calling..........................................................................................37
Emergency calls...............................................................................37
Call handling....................................................................................37
Voicemail..........................................................................................38
Multiple calls....................................................................................39
Conference calls..............................................................................39
Call settings.....................................................................................40
Contacts .....................................................................................41
Transferring contacts to your new phone........................................41
Contacts screen overview...............................................................43
Managing your contacts..................................................................43
2
This is an Internet version of this publication. © Print only for private use.
Page 3

Communicating with your contacts.................................................45
Sharing your contacts......................................................................45
Backing up contacts........................................................................45
Messaging...................................................................................47
Using text and multimedia messaging.............................................
Text and multimedia message options............................................48
47
Email............................................................................................50
Using email......................................................................................50
Using email accounts.......................................................................53
Gmail™ and other Google™ services ............................................53
Google Talk™ ............................................................................55
Timescape™...............................................................................56
Timescape™ main view...................................................................56
Using Timescape™..........................................................................56
Timescape™ settings......................................................................58
Timescape™ Feed widget...............................................................58
Timescape™ Friends widget...........................................................59
Timescape™ Share widget..............................................................60
Getting started with Google Play™..........................................61
Downloading from Google Play™....................................................61
Clearing your application data.........................................................61
Permissions......................................................................................62
Installing applications not from Google Play™ ...............................62
PlayNow™ service.....................................................................63
Before you download content..........................................................63
Downloading from the PlayNow™ service......................................63
Video Unlimited™.......................................................................64
Video Unlimited™ menu overview...................................................64
Creating a Video Unlimited™ account.............................................64
Exploring the Video Unlimited™ selection.......................................64
Renting or buying a video................................................................64
Watching a video from Video Unlimited™.......................................65
Music Unlimited™......................................................................66
Getting organised.......................................................................67
Calendar...........................................................................................67
Alarm clock......................................................................................67
Scanning with the NeoReader™ application...........................70
NeoReader™ application menu overview.......................................70
Synchronising data on your phone...........................................71
Synchronising with Google™..........................................................71
Synchronising your corporate email, calendar and contacts..........71
3
This is an Internet version of this publication. © Print only for private use.
Page 4

Synchronising with Facebook™......................................................72
Synchronising using SyncML™.......................................................73
Connecting to wireless networks.............................................75
Wi-Fi® .............................................................................................75
Virtual private networks (VPNs)........................................................78
Web browser...............................................................................
Toolbar.............................................................................................80
Browsing the web............................................................................80
Navigating web pages.....................................................................81
Managing bookmarks......................................................................81
Managing text and images..............................................................82
Multiple windows.............................................................................83
Downloading from the web..............................................................83
Browser settings..............................................................................83
80
Music...........................................................................................85
Protecting your hearing....................................................................85
Copying media files to your memory card ......................................85
Using the music player ...................................................................85
Identifying music using TrackID technology...........................90
Using TrackID™ technology results................................................90
Using the FM radio.....................................................................92
FM radio overview............................................................................92
Using your favourite radio channels................................................92
Making a new search for radio channels.........................................93
Switching the radio sound between devices...................................93
Switching between mono and stereo sound mode.........................93
Identifying radio tracks using TrackID™..........................................93
Sharing the details of music you like on Facebook™......................94
Taking photos and recording videos........................................95
Camera controls overview...............................................................95
Using the still camera......................................................................95
Using the video camera.................................................................102
3D camera ................................................................................105
3D Camera overview......................................................................105
Viewing photos and videos in Gallery....................................107
Mobile BRAVIA® Engine................................................................107
Working with albums.....................................................................107
Working with photos in Gallery......................................................109
Viewing photos in 3D Album...................................................112
Managing your photos in 3D Album..............................................112
4
This is an Internet version of this publication. © Print only for private use.
Page 5

Sharing content with DLNA Certified™ devices...................113
Playing files from DLNA Certified™ devices on your phone.........113
Preparing to play phone content on DLNA Certified™ devices....113
Playing phone content on other DLNA Certified™ devices...........114
Bluetooth™ wireless technology............................................115
Naming your phone.......................................................................115
Pairing with another Bluetooth™ device.......................................115
Sending and receiving items using Bluetooth™ technology.........116
Connecting your phone to a computer..................................118
Transferring and handling content using a USB cable..................118
Transferring files using Media transfer mode via Wi-Fi®...............118
PC Companion...............................................................................
Media Go™ ...................................................................................119
119
Using location services to find your position........................121
Using GPS.....................................................................................121
Google Maps™..............................................................................122
Using Google Maps™ to get directions.........................................122
Locking and protecting your phone.......................................123
IMEI number...................................................................................123
SIM card protection.......................................................................123
Setting a screen lock.....................................................................124
Updating your phone...............................................................126
Updating your phone wirelessly.....................................................126
Updating your phone using a USB cable connection....................126
Phone settings overview.........................................................128
Status and notification icons overview..................................129
Status icons...................................................................................129
Notification icons...........................................................................129
Application overview................................................................131
User support.............................................................................133
Troubleshooting.......................................................................134
My phone is not working as expected...........................................134
Resetting the phone.......................................................................134
No battery charging icon appears when phone starts charging....135
The battery performance is low.....................................................135
I cannot transfer content between my phone and the computer,
when using a USB cable................................................................135
I cannot use Internet-based services.............................................135
Error messages..............................................................................135
Recycling your phone..............................................................136
5
This is an Internet version of this publication. © Print only for private use.
Page 6

Legal information.....................................................................137
Index..........................................................................................138
6
This is an Internet version of this publication. © Print only for private use.
Page 7

Important information
Please read the Important information leaflet before you use your mobile phone.
Some of the services and features described in this User guide are not supported in all
countries/regions or by all networks and/or service providers in all areas. Without limitation,
this applies to the GSM International Emergency Number 112. Please contact your network
operator or service provider to determine availability of any specific service or feature and
whether additional access or usage fees apply.
7
This is an Internet version of this publication. © Print only for private use.
Page 8
Water resistance
In order for your phone to be water resistant, the covers for the micro USB port and
the headset connector must be firmly closed. Also, make sure that the back cover is
attached correctly.
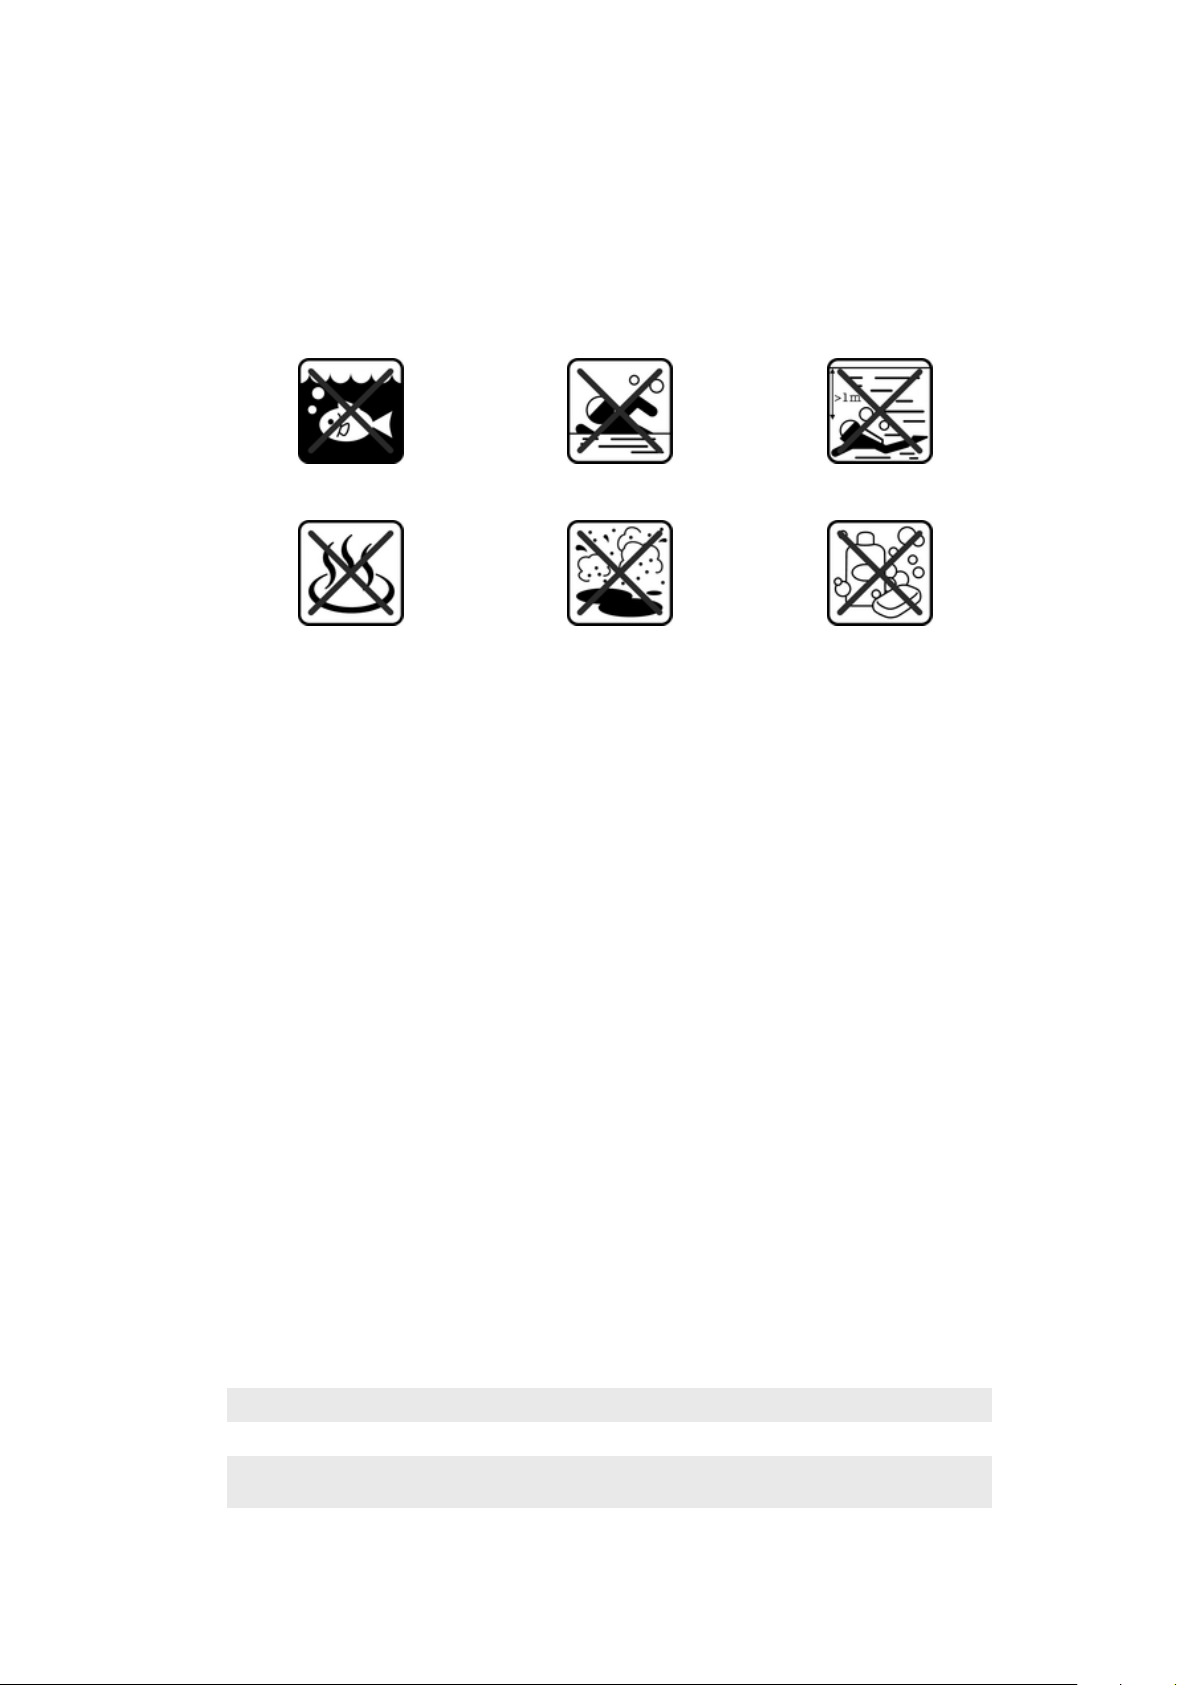
Avoid exposing your phone to environments with excessive dust or moisture. Normal
wear and tear along with damage to your device can reduce its ability to resist dust
or moisture. Do not use your phone in the following conditions:
Ocean water Swimming pool Diving
Hot water Sand/mud Other liquid
chemicals
Never submerge the mobile phone, the micro USB port or the headset connector in
water, expose the mobile phone to any liquid chemicals, or expose your mobile
phone to moist environments with extreme high or low temperatures. If water or liquid
gets on the micro USB port and the headset connector, wipe it off with a dry cloth.
The water resistance of the micro USB port and the headset connector is not
guaranteed in all environments or conditions.
All compatible accessories including batteries, chargers, handsfree devices, micro
USB cables, microSD™ cards, and straps are not dust and water resistant on their
own.
Your warranty does not cover damage or defects caused by abuse or improper use
of your device. If you have any further questions about the use of your product, get
help from our Customer support service.
IP (Ingress Protection) rating
Your phone has an IP rating, which means it has undergone certified tests to
measure its resistance levels to both dust and water. The first digit in the two-digit IP
rating indicates the level of protection against solid objects, including dust. The
second digit indicates how resistant the phone is to water. The higher the numbers,
the higher the respective protection.
The IP rating of your phone is 67. This IP67 rating means that your phone is both dust
tight and protected against the effects of immersion. So you can use the phone in
extreme weather conditions, for example, when it's snowing or raining, or when
humidity levels are high. You can also use the phone in dusty or sandy environments,
and when your fingers are wet. See the table for more details.
Resistance to solid objects and dust Resistance to water
0. No special protection 0. No special protection
1. Protected against solid objects > 50 mm in
diameter
This is an Internet version of this publication. © Print only for private use.
1. Protected against dripping water
8
Page 9

2. Protected against solid objects > 12 mm in
diameter
3. Protected against solid objects > 2.5 mm in
diameter
4. Protected against solid objects > 1 mm in
diameter
5. Protected against dust; limited ingress (no harmful
deposit)
6. Dust tight 6. Protected against heavy jet spray
7. Protected against the effects of immersion
8. Protected against submersion
2. Protected against dripping water when tilted up
to 15 degrees from normal position
3. Protected against spraying water
4. Protected against splashing water
5. Protected against water jet spray
9
This is an Internet version of this publication. © Print only for private use.
Page 10

Android™ – what and why?
Your Xperia smartphone from Sony runs on the Android platform. Android phones
can perform many of the same functions as a computer and you can customise them
to your own needs. For example, you can add and delete applications, or enhance
existing applications to improve functionality. On Google Play™ you can download a
range of applications and games from a constantly growing collection. You can also
integrate applications on your Android™ phone with other applications and with
online services that you use. For example, you can back up your phone contacts,
access your different email accounts and calendars from one place, keep track of
your appointments, and engage in social networking.
Android™ phones are constantly evolving. When a new software version is available
and your phone supports this new software, you can update your phone to get new
features and the latest improvements.
Your Android™ phone is pre-loaded with Google™ services. To get the most out of the
provided Google™ services, you should have a Google™ account and sign in to it when you
first start your phone. You also need to have Internet access to use many of the features in
Android™.
New software releases may not be compatible with all phones.
Applications
An application is a phone program that helps you perform a task. For example, there
are applications to make calls, take photos and download more applications.
10
This is an Internet version of this publication. © Print only for private use.
Page 11
Getting started
Assembly
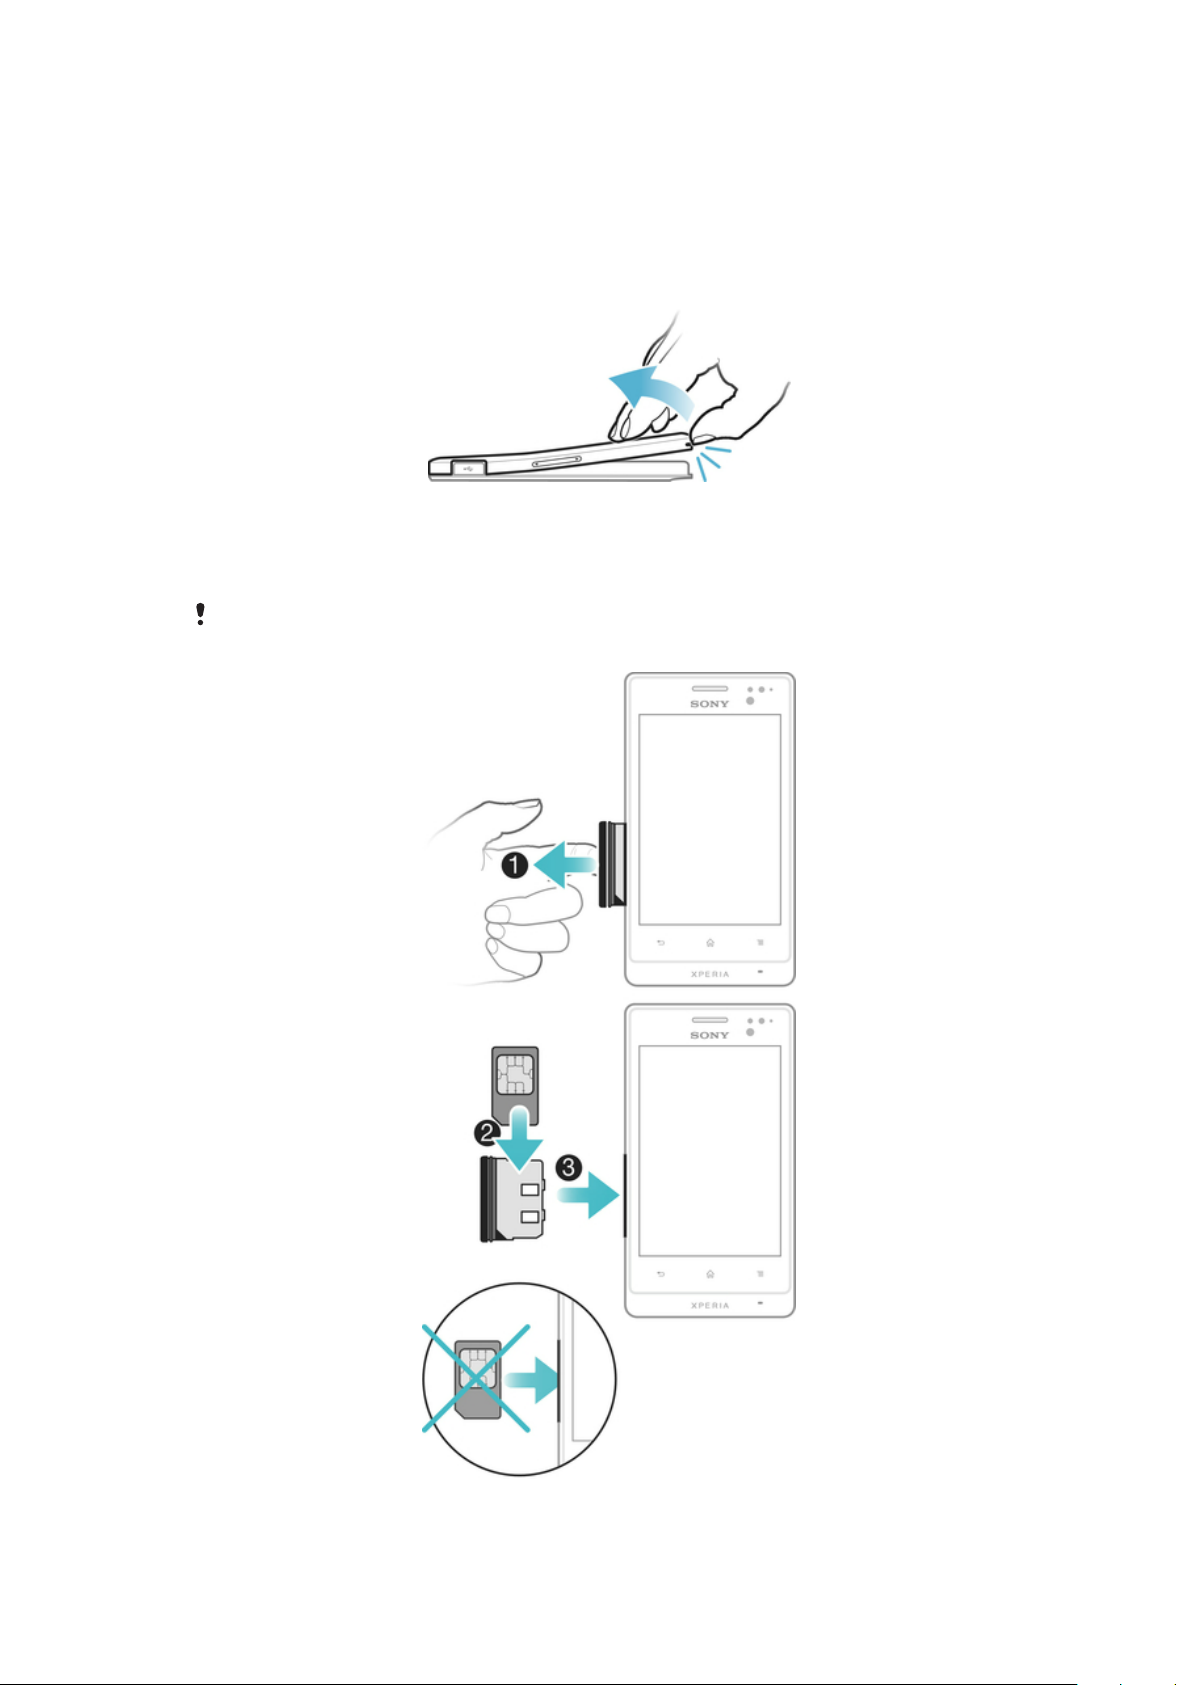
To remove the back cover
•
Insert a thumbnail into the strap hole opening on the back cover, then use your
thumb to firmly lift up the cover.
To insert the SIM card
Do not insert an incompatible SIM card, for example, a micro SIM card, in the SIM card slot.
Doing so could permanently damage your SIM card or your phone.
11
This is an Internet version of this publication. © Print only for private use.
Page 12
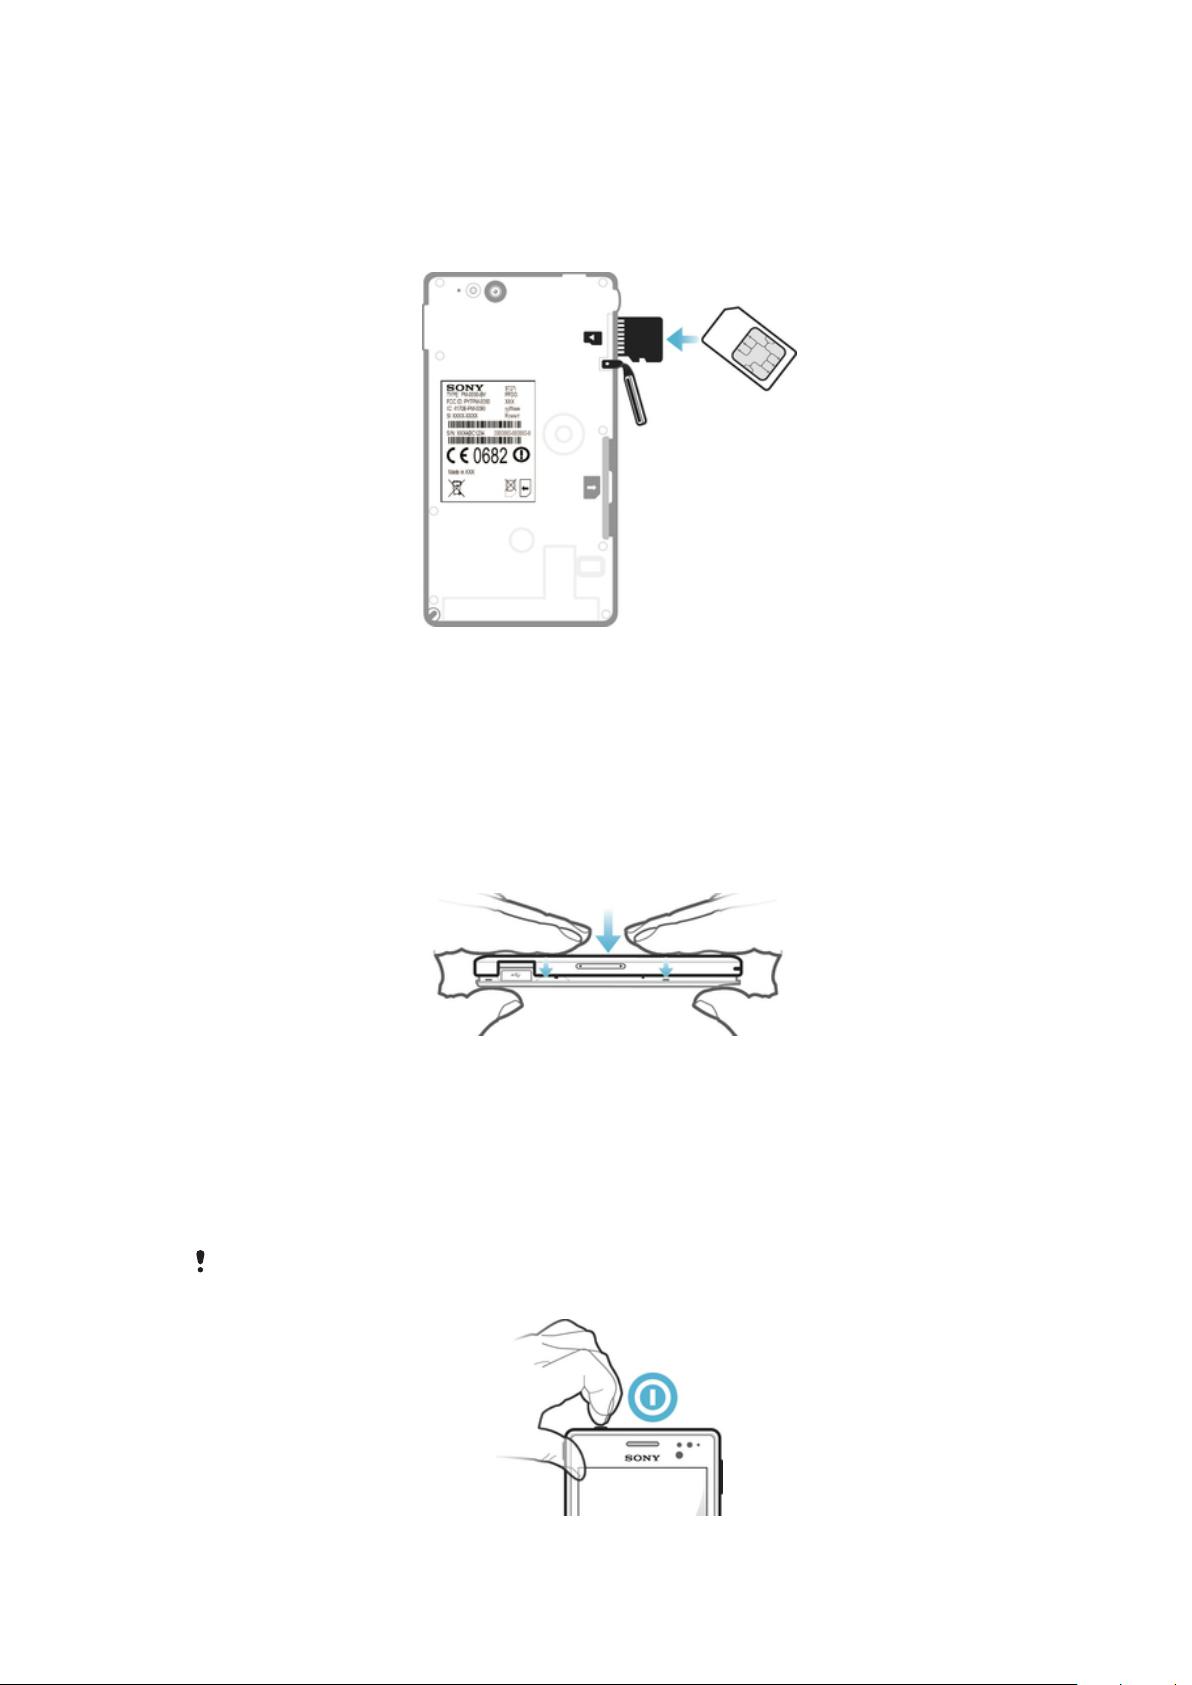
1
Remove the back cover, then pull out the SIM card holder from the side of the
phone.
2
Place the SIM card into the SIM card holder, with the contacts facing up.
3
Insert the SIM card and holder into the phone.
To insert a memory card
1
Remove the back cover from the phone.
2
To remove the memory card slot cover, insert a fingernail into the gap between
the memory card slot cover and the headset connector, then pull out the cover.
3
Insert the memory card into the memory card slot with the gold-coloured
contacts facing up.
4
Using the edge of a SIM card or other similarly sized card, push the memory
card further into the slot until you hear a locking sound.
5
Push the memory card slot cover back into position so that it is fully latched.
To attach the back cover
1
Place the back cover over the back of the phone, then fit it into the slots.
2
Slide the cover towards the bottom end of the phone. You hear a sound when
the back cover locks into place.
Turning the phone on and off
To turn on the phone
Make sure that the battery is charged for at least 30 minutes before you turn on the phone for
the first time.
12
This is an Internet version of this publication. © Print only for private use.
Page 13

1
Press and hold down the power key on the top of the phone until the phone
vibrates.
2
If your screen goes dark, briefly press the power key
3
To unlock the screen, drag
4
Enter your SIM card PIN when requested, and select OK.
5
Wait a while for the phone to start.
Your SIM card PIN is initially supplied by your network operator, but you can change it later
from the Settings menu. To correct a mistake made while entering your SIM card PIN, tap .
To turn off the phone
1
Press and hold down the power key until the options menu opens.
2
In the options menu, tap Power off.
3
Tap OK.
It may take a while for the phone to shut down.
to the right across the screen.
to activate the screen.
Setup guide
The first time you start your phone, a setup guide opens to explain basic phone
functions and help you enter essential settings. This is a good time to configure the
phone to your specific needs. You can also access the setup guide later from the
Application screen.
To access the setup guide manually
1
From the Home screen, tap .
2
Find and tap Setup guide.
Screen lock
When your phone is on and left idle for a set period of time, the screen darkens to
save battery power, and locks automatically. This lock prevents unwanted actions on
the touchscreen when you are not using it. On the lockscreen, you can still view
notifications, for example, notifications of missed calls and messages that arrived
since the phone was last locked. You can also control the playback of audio tracks
without unlocking the screen.
To activate the screen
•
Briefly press the power key
To view missed calls from the lockscreen
1
To activate the screen, briefly press the power key
2
Drag to the right across the screen.
To view new text messages from the lockscreen
1
To activate the screen, briefly press the power key .
2
Drag
To play an audio track from the lockscreen
1
To activate the screen, briefly press the power key
2
To display music player controls, place a finger on the time and date area and
flick to the left.
3
Tap
to the right across the screen.
.
.
.
.
13
This is an Internet version of this publication. © Print only for private use.
Page 14

To pause an audio track from the lockscreen
1
To activate the screen, briefly press the power key .
2
When the music player controls appear, tap
To change the currently playing audio track from the lockscreen
1
To activate the screen, briefly press the power key
2
When the music player controls appear, tap or .
To unlock the screen
•
Drag to the right across the screen.
To lock the screen manually
•
When the screen is active, briefly press the power key
.
.
.
Accounts and services
Sign in to your online service accounts from your phone and benefit from a range of
services. Combine services and get even more out of them. For example, collect
contacts from your Google™ and Facebook™ accounts and integrate them into your
phonebook, so you have everything in one place.
You can sign up to online services from your phone as well as from a computer.
When you sign up for the first time, an account is created with your user name,
password, settings and personal information. The next time you sign in, you get a
personalised view.
Google™ account
Having a Google™ account is key to using a range of applications and services with
your Android phone. You need a Google™ account, for example, to use the Gmail™
application in your phone, to chat with friends using Google Talk™, to synchronise
your phone calendar with your Google Calendar™, and to download applications and
games, music, movies and books from Google Play™.
Microsoft® Exchange ActiveSync® account
Synchronise your phone with your corporate Microsoft® Exchange ActiveSync
account. This way, you keep your work email, contacts and calendar events with you
at all times.
®
Facebook™ account
Facebook™ connects you with friends, family and colleagues all over the world. Log
in now to share your world with others.
SyncML™ account
Synchronise your phone with an Internet server using SyncML™. View and manage
contacts, calendar events and bookmarks from your phone just as easily as you
would from a computer.
14
This is an Internet version of this publication. © Print only for private use.
Page 15
Getting to know your phone
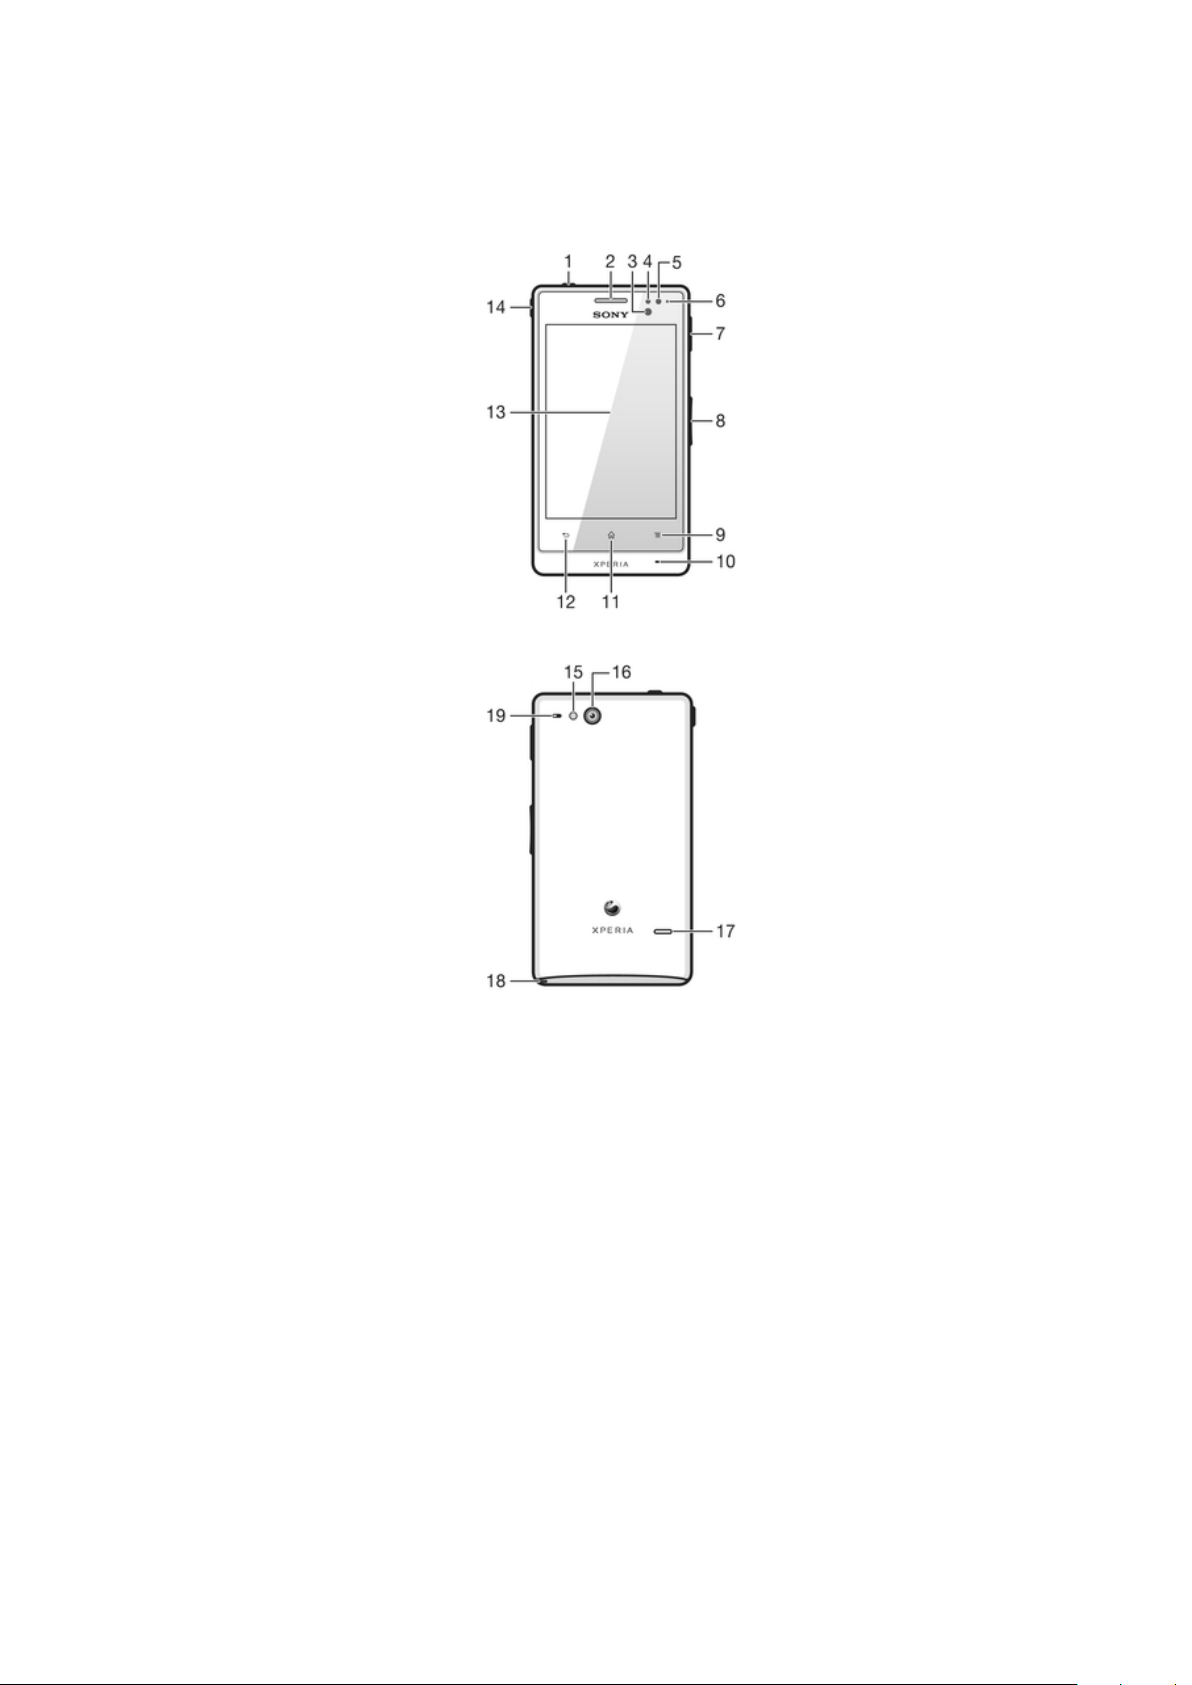
Phone overview
1. Power key
2. Ear speaker
3. Proximity sensor 1
4. Proximity sensor 2
5. Light sensor
6. Notification LED
7. Port for charger/USB cable
8. Volume/Zoom key
9. Menu key
10. Main microphone
15
11. Home key
12. Back key
13. Touchscreen
14. Headset connector
15. Camera LED light
16. Camera lens
17. Speaker
18. Strap hole
19. Second microphone
This is an Internet version of this publication. © Print only for private use.
Page 16
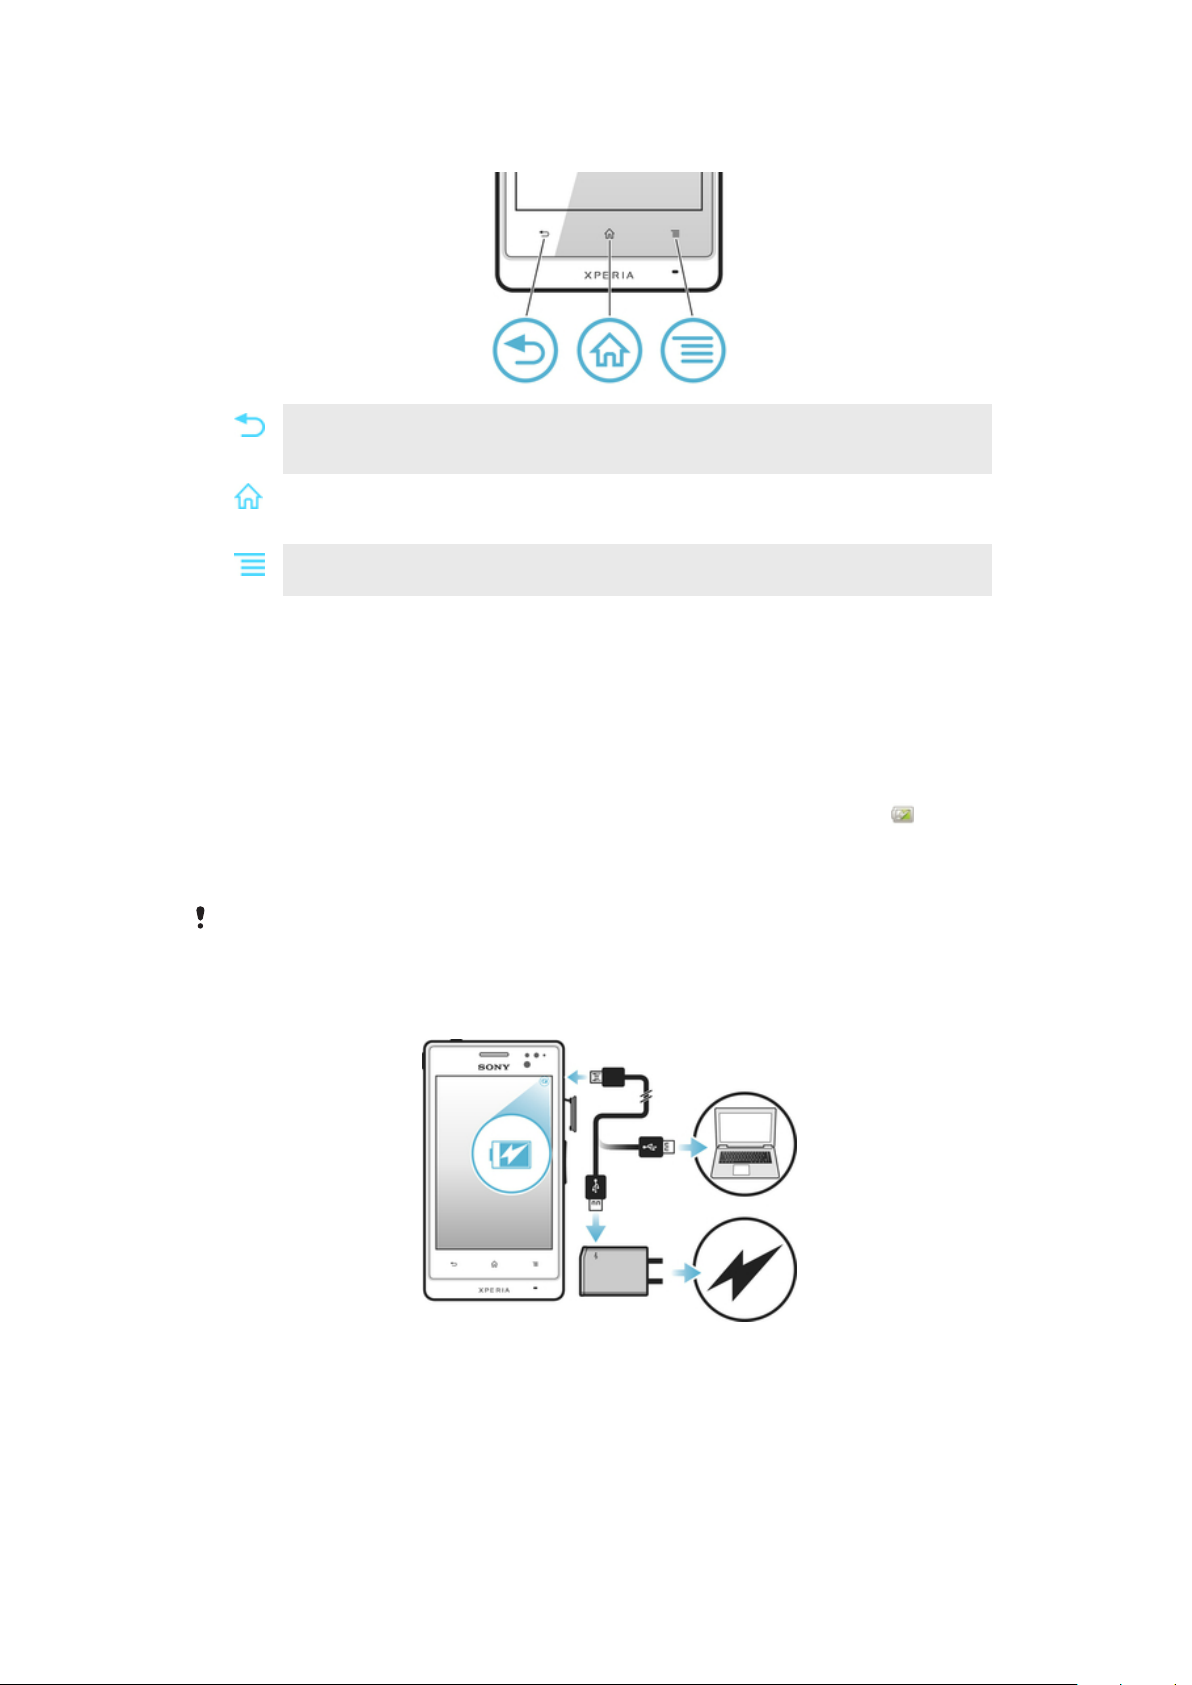
Using the keys
Back
•
Go back to the previous screen
•
Close the on-screen keypad, a dialog box, an options menu, or the Notification panel
Home
•
Go to the Home screen
•
Press and hold to open a window showing your most recently used applications
Menu
•
Open a list of options available in the current screen or application
Battery
Your phone has an embedded battery.
Charging the battery
Charge your phone for at least 30 minutes before you turn on the phone for the first
time. When you connect the phone charger cable to a power source, such as a USB
port or a phone charger, it may take a few minutes before the battery icon appears
on the screen. You can still use your phone while it is charging. Charging the phone
over a long period of time, for example, overnight, does not damage the battery or
the phone.
The battery will start to discharge a little after it is fully charged and then charges again after a
certain time when the phone charger is connected. This is to extend battery life and may result
in the charge status showing a level below 100 percent.
To charge the phone
16
This is an Internet version of this publication. © Print only for private use.
Page 17
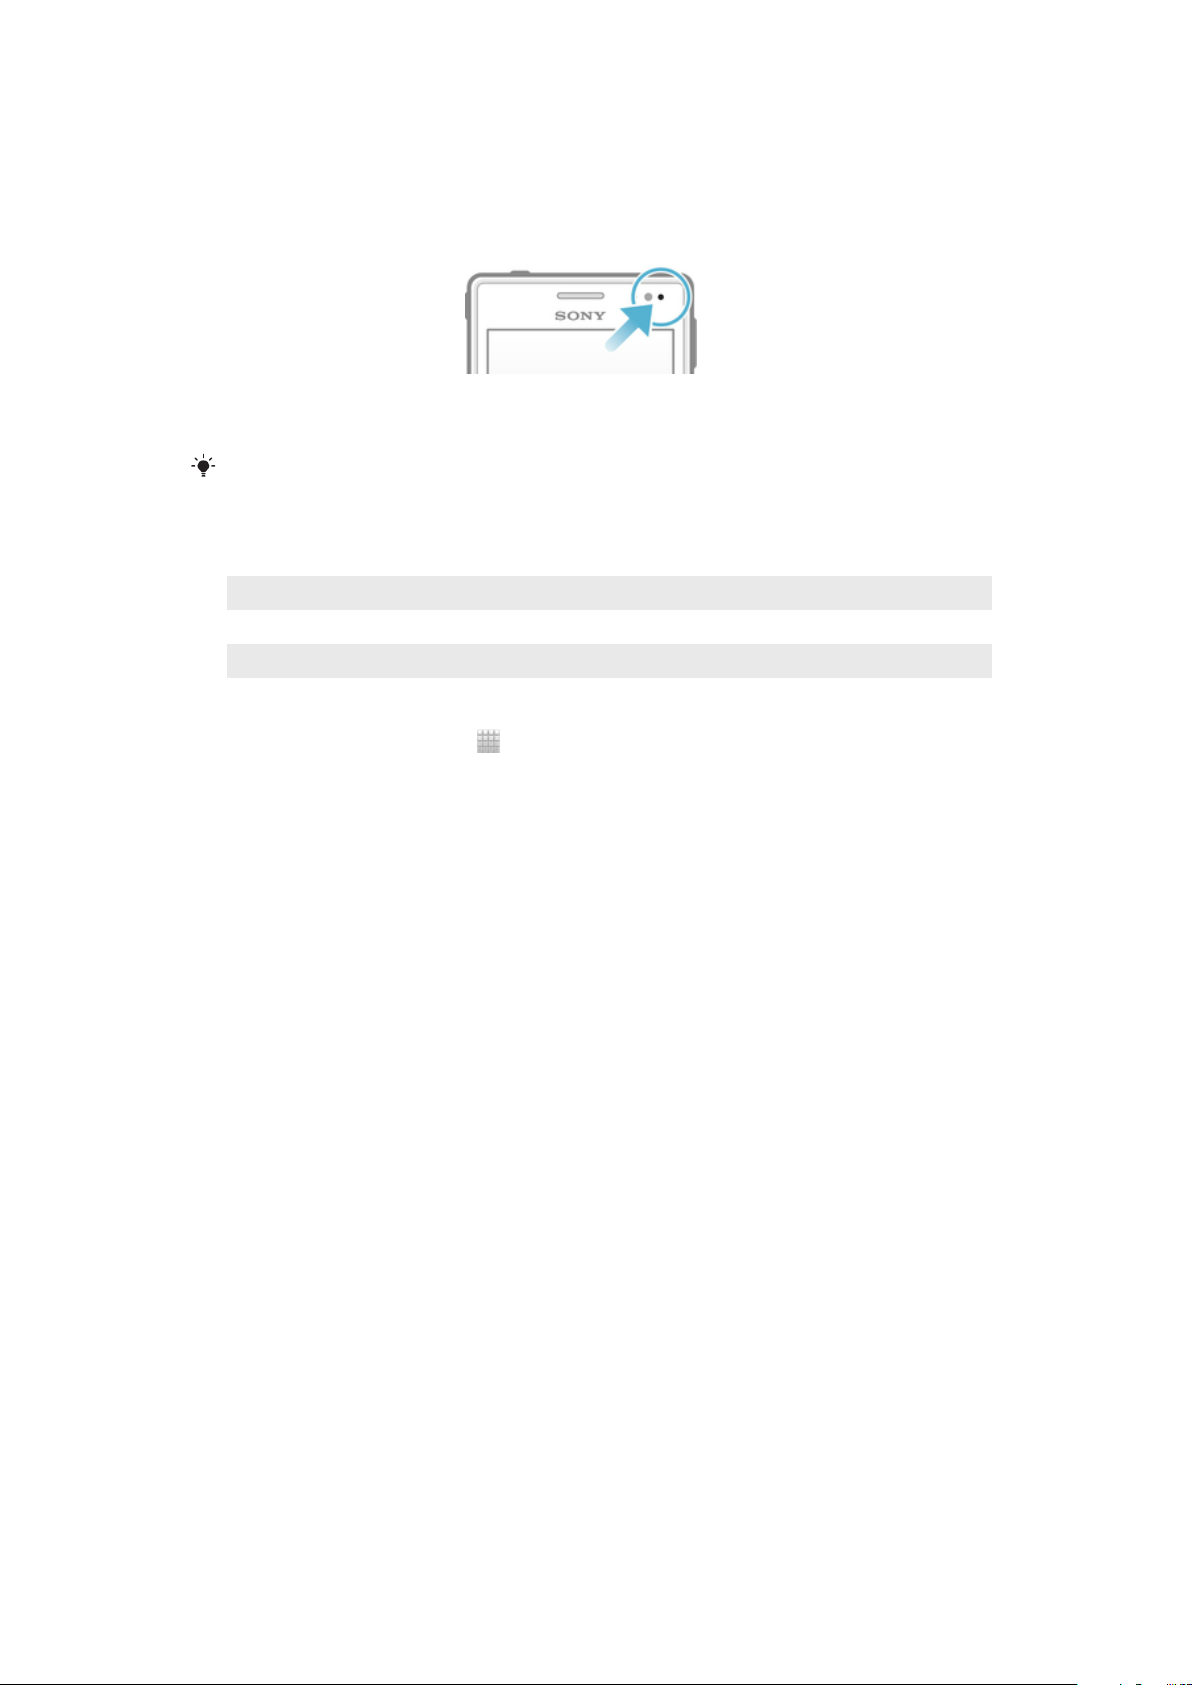
1
Plug the phone charger into a power outlet.
2
Plug one end of the USB cable into the charger (or into the USB port of a
computer).
3
Plug the other end of the cable into the micro USB port on your phone, with
the USB symbol facing down. The battery status LED lights up when charging
starts.
4
When the battery status LED is green, the phone is fully charged. Disconnect
the USB cable from your phone by pulling it straight outwards. Make sure not
to bend the connector when removing the cable from the phone.
If the battery is completely discharged, it may take a few minutes before the LED lights up
after you connect the phone charger cable to a power source.
Battery LED status
Green The battery is fully charged
Flashing red The battery level is low
Orange The battery is charging. The battery level is between low and full
To check the battery level
1
From the Home screen, tap
2
Find and tap Settings > About phone > Status.
.
Improving battery performance
The following tips can help you improve battery performance:
•
Charge your phone often. This will not affect the lifetime of the battery.
•
Downloading data from the Internet is power consuming. When you're not using the
Internet, you can save power by disabling all data connections over mobile networks.
This setting does not prevent your phone from transmitting data over other wireless
networks.
•
Turn off GPS, Bluetooth™ and Wi-Fi® when you don't need these features. You can
turn them on and off more easily by adding the Quick settings widget to your Home
screen. You do not need to turn off 3G.
•
Use the Power Saver feature to reduce battery consumption. You can select the
power saving mode that best suits the way you use your phone. You can also
customise the settings of each power saving mode.
•
Set your synchronisation applications (used to synchronise your email, calendar and
contacts) to synchronise manually. You can also synchronise automatically, but
increase the synchronisation intervals.
•
Check the battery usage menu in the phone to see which applications use the most
power. Your battery consumes more power when you use video and music streaming
applications, such as YouTube™. Some Android Market™ applications also consume
more power.
•
Close and exit applications that you are not using.
•
Lower the screen display brightness level.
•
Turn off your phone or activate the Airplane mode setting if you are in an area with
no network coverage. Otherwise, your phone repeatedly scans for available
networks, and this consumes power.
•
Use a Sony original handsfree device to listen to music. Handsfree devices demand
less battery power than the phone's loudspeakers.
•
Keep your phone in standby whenever possible. Standby time refers to the time
during which the phone is connected to the network and is not being used.
•
Go to www.sonymobile.com to get the latest battery performance tips for your phone
model.
17
This is an Internet version of this publication. © Print only for private use.
Page 18

To access the battery usage menu
1
From the Home screen, tap .
2
Find and tap Settings > About phone > Battery use to see which installed
applications consume the most battery power.
To add the Data traffic widget to your Home screen
1
From your Home screen, press
2
Tap Add > Widgets > Tools.
3
Flick left to find and select the Data traffic widget. You can now turn on and off
.
your data connection more easily.
To add the Quick settings widget to your Home screen
1
From your Home screen, press
2
Tap Add > Widgets > Tools.
3
Select the Quick settings widget.
.
Reducing battery consumption with Power Saver
Use pre-set power saving modes to manage power consuming applications and
reduce battery consumption. With Power Saver, you can also customise the settings
within each power saving mode to the way you use your phone.
To activate a power saving mode
1
From your Home screen, tap .
2
Find and tap Power Saver.
3
Tap the icon next to the power saving mode that you want to activate.
To deactivate a power saving mode
1
From your Home screen, tap
2
Find and tap Power Saver.
3
Tap the illuminated icon next to the active power saving mode to turn it off.
.
To change the settings for a power saving mode
1
From your Home screen, tap
2
Find and tap Power Saver.
3
To open the settings menu, tap the name of a power saving mode.
4
Mark the features that you want to turn off to save power.
5
Tap Done.
.
To display power saver notifications
1
From your Home screen, tap
2
Find and tap Power Saver.
3
Press , then select Settings.
4
Mark the Notifications checkbox.
.
Using the touchscreen
A protective plastic sheet is attached to the screen of your phone when you buy it.
You should peel off this sheet before using the touchscreen. Otherwise, the
touchscreen might not function properly.
When your phone is on and left idle for a set period of time, the screen darkens to
save battery power, and locks automatically. This lock prevents unwanted actions on
the touchscreen when you are not using it. You can also set personal locks to protect
your subscription and make sure only you can access your phone content.
Your phone screen is made from glass. Do not touch the screen if the glass is cracked or
shattered. Avoid trying to repair a damaged screen yourself. Glass screens are sensitive to
drops and mechanical shocks. Cases of negligent care are not covered by the Sony warranty
service.
18
This is an Internet version of this publication. © Print only for private use.
Page 19
To open or highlight an item
•
Tap the item.
To mark or unmark options
•
Tap the relevant checkbox or list option.
Marked checkbox
Unmarked checkbox
Marked list option
Unmarked list option
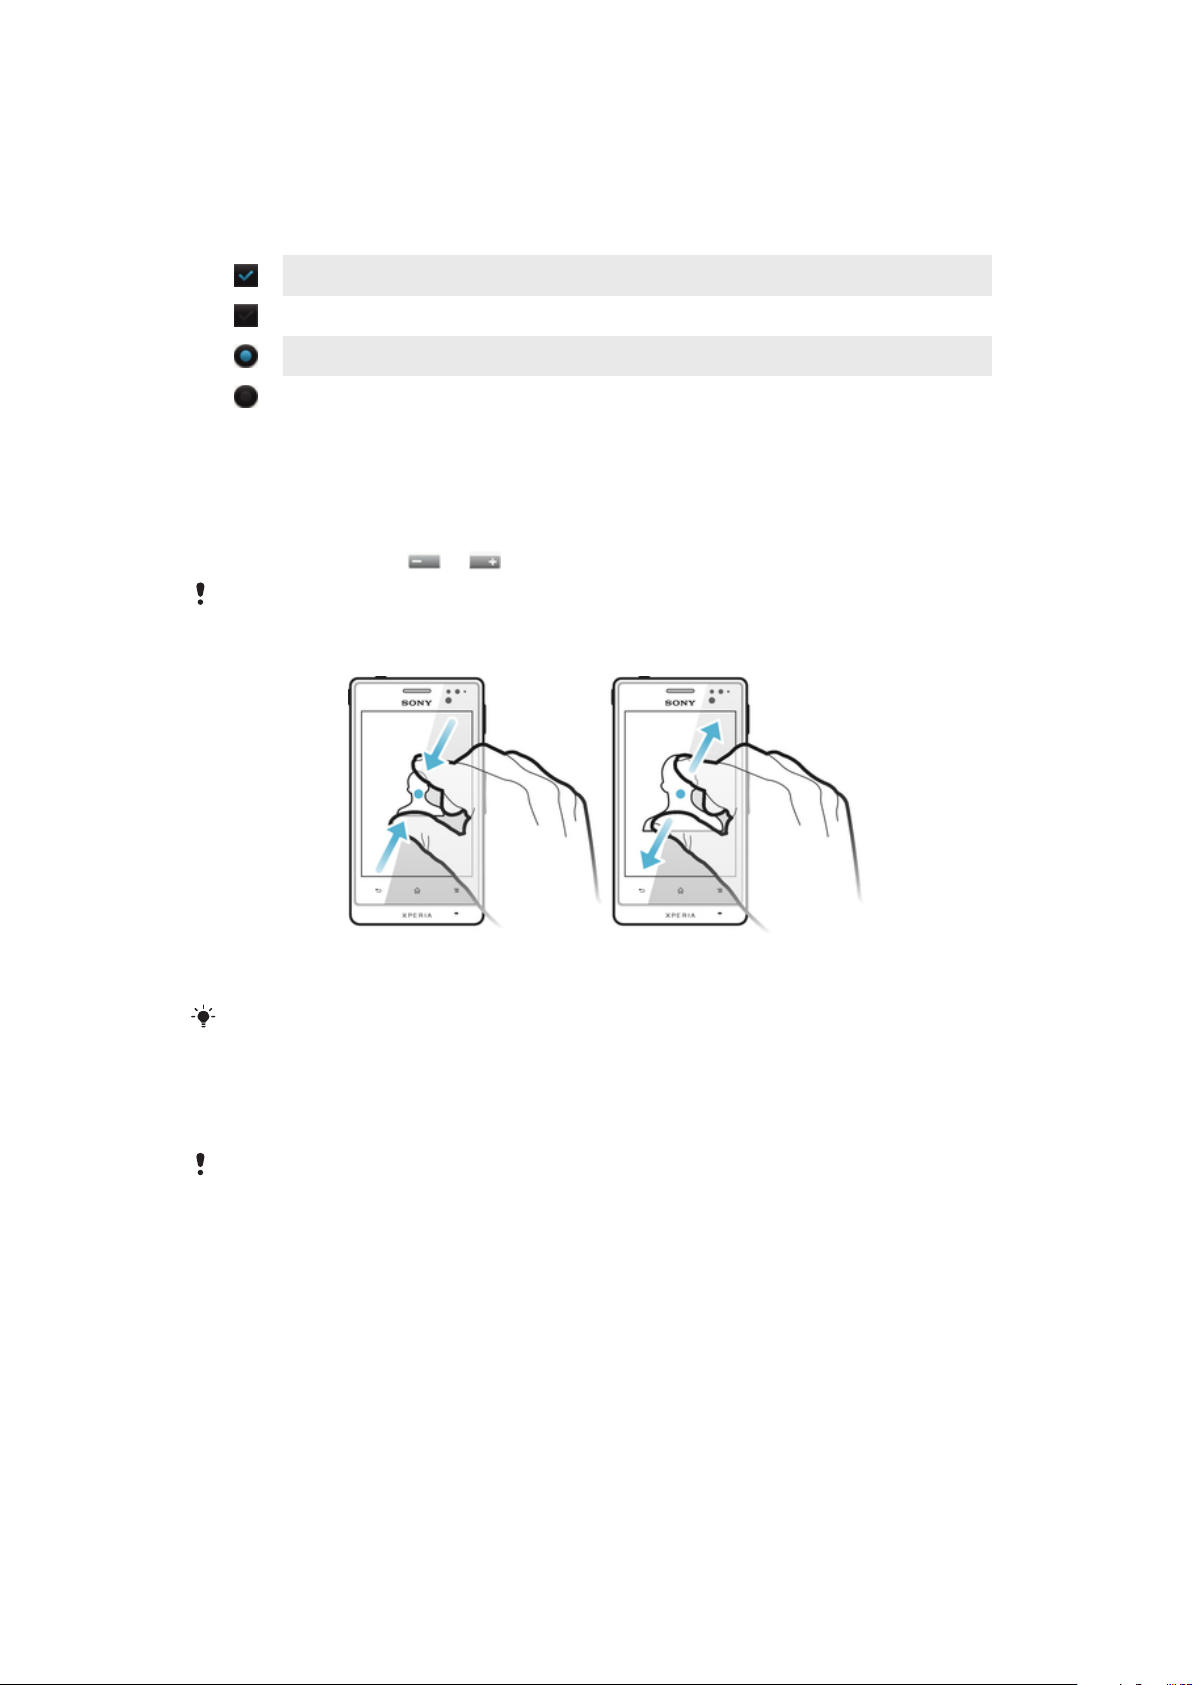
Zooming
The zoom options available depend on the application you are using.
To zoom
•
When available, tap or to zoom in or out.
You may have to drag the screen (in any direction) to make the zoom icons appear.
To zoom with two fingers
•
Place two fingers on the screen at once and pinch them together (to zoom out)
or spread them apart (to zoom in).
Use the zoom function when viewing photos and maps, or when browsing the web.
Scrolling
Scroll by moving your finger up or down on the screen. On some web pages you can
also scroll to the sides.
Dragging or flicking will not activate anything on the screen.
19
This is an Internet version of this publication. © Print only for private use.
Page 20
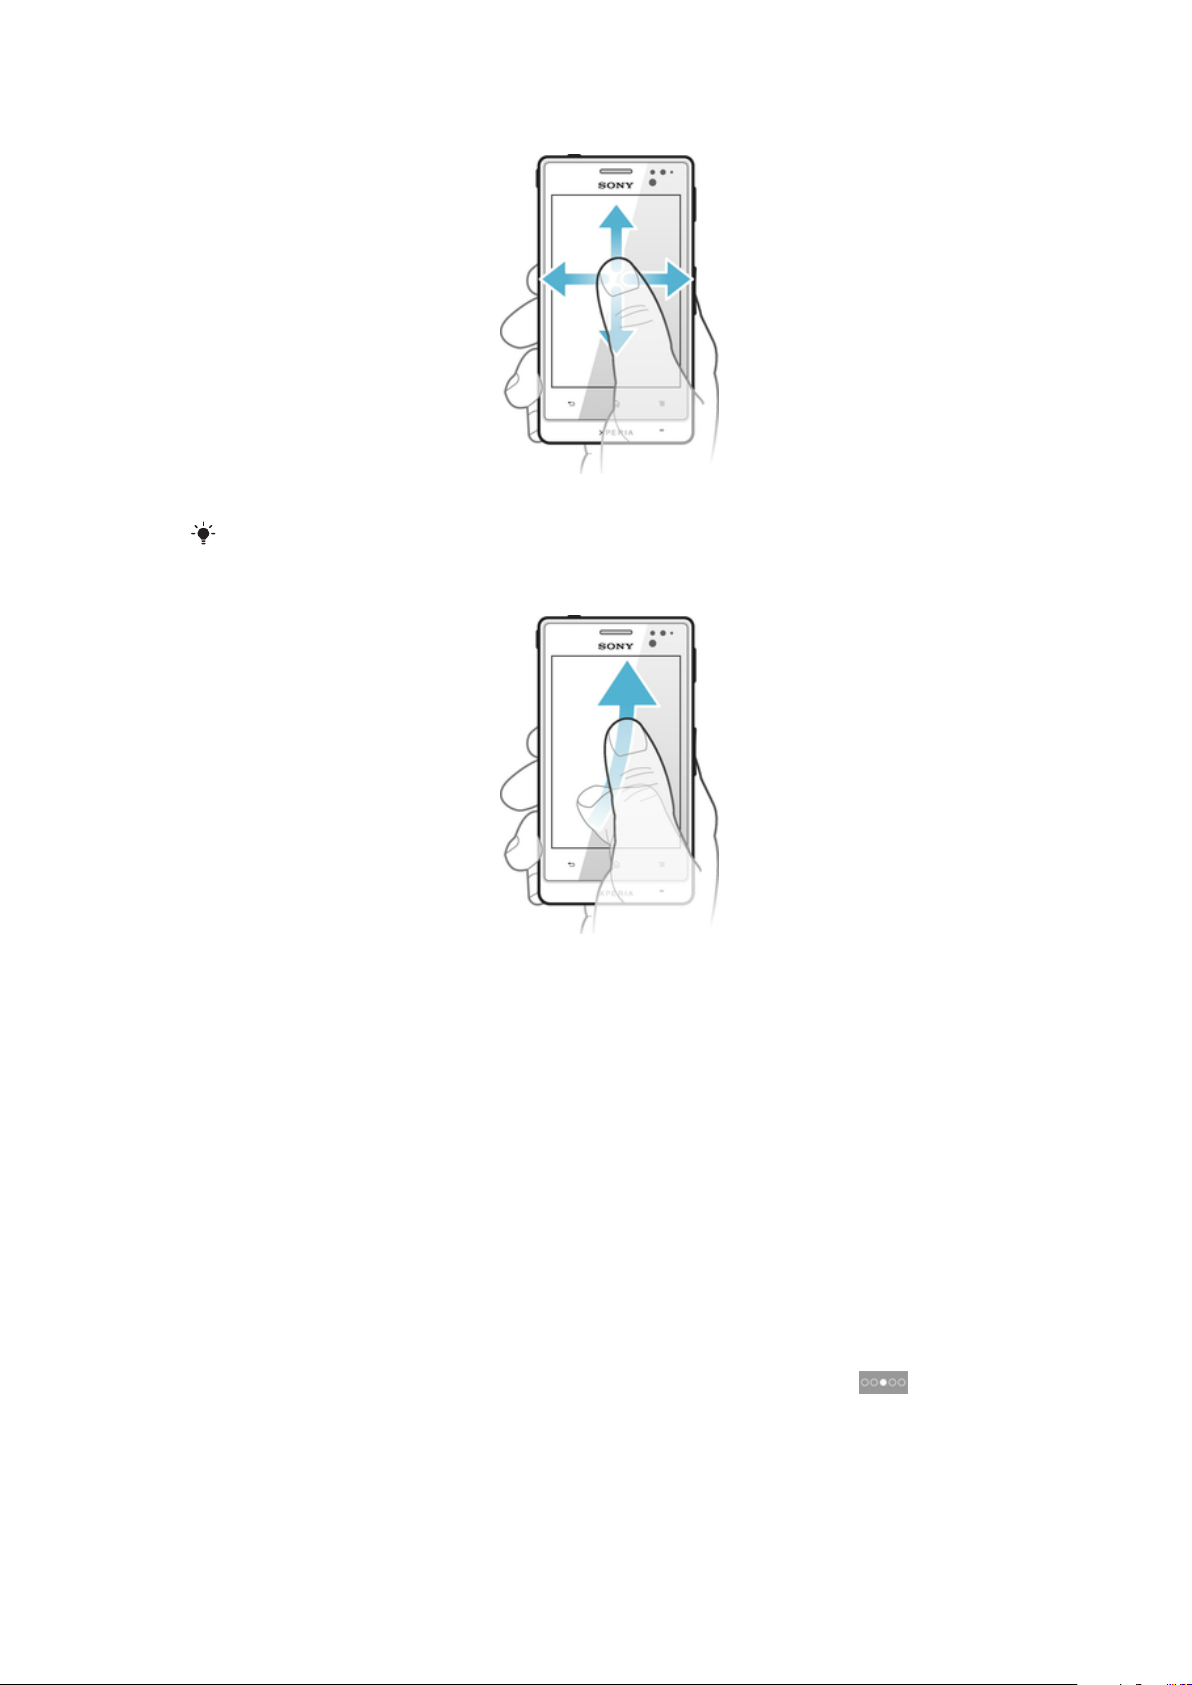
To scroll
•
Drag or flick your finger in the direction you want to scroll on the screen.
To scroll more quickly, flick your finger in the direction you want to go on the screen.
To flick
•
To scroll more quickly, flick your finger in the direction you want to go on the
screen. You can wait for the scrolling movement to stop by itself, or you can
stop it immediately by tapping the screen.
Sensors
Your phone has sensors that detect both light and proximity. The light sensor detects
the ambient light level and adjusts the brightness of the screen accordingly. The
proximity sensor turns the touch screen off when your face touches the screen. This
prevents you from unintentionally activating phone functions when you are engaged
in a call.
Home screen
Your phone Home screen is the equivalent of the desktop on a computer. It's your
gateway to the main features in your phone. You can customise your Home screen
with widgets, shortcuts, folders, themes, wallpaper and other items.
The Home screen extends beyond the regular screen display width, so you need to
flick left or right to view content in one of the screen's four extensions.
which part of the Home screen you are in.
shows
20
This is an Internet version of this publication. © Print only for private use.
Page 21

The items in the bar at the bottom of the screen are always available for quick
access.
To go to the Home screen
•
Press .
To browse the Home screen
•
Flick right or left.
To share an item from your Home screen
1
Press
2
Touch and hold an item until it magnifies and the phone vibrates, then drag the
item to
3
Select an option and confirm, if necessary. You can now share the applications
and widgets you like with your friends so they can download and use them.
to open your Home screen.
.
Widgets
Widgets are small applications that you can use directly on your Home screen. For
example, the Music player widget allows you to start playing music directly.
To add a widget to the Home screen
1
From your Home screen, press .
2
Tap Add > Widgets.
3
Tap a widget.
To get an overview of all widgets on your Home screen
•
Pinch on any area of your Home screen. All widgets from different parts of your
Home screen are now displayed in one view.
When all Home screen widgets are combined in one view, tap on any widget to go to the part
of the Home screen containing that widget.
Rearranging your Home screen
Customise the appearance of your Home screen and change the features that you
can access from it. Change the screen background, move items around, create
folders, and add shortcuts to contacts.
To open the options menu of your Home screen
You can open the Home screen options menu in two ways:
•
From your Home screen, press
•
Touch and hold on any part of your Home screen.
.
21
This is an Internet version of this publication. © Print only for private use.
Page 22

To add a shortcut to the Home screen
1
From your Home screen, press .
2
Tap Add > Shortcuts.
3
Find and select a shortcut.
Add an application shortcut directly from the Application screen by touching and holding the
application.
To add a folder to the Home screen
1
From your Home screen, press .
2
Tap Add > Folder.
3
Enter a name for the folder and tap Done.
Drag and drop an item on top of another item on your Home screen to create a folder
automatically.
To add items to a folder
•
Touch and hold an item until it magnifies and the phone vibrates, then drag the
item to the folder.
To rename a folder
1
Tap the folder to open it.
2
Touch the folder's title bar to show the Folder name field.
3
Enter the new folder name and tap Done.
To move an item on the Home screen
1
Press
2
Touch and hold an item until it magnifies and the phone vibrates, then drag the
to open your Home screen.
item to the new location.
To delete an item from the Home screen
•
Touch and hold an item until it magnifies and the phone vibrates, then drag the
item to .
Changing the background of your Home screen
Adapt the Home screen to your own style using wallpapers and different themes.
To change your Home screen wallpaper
1
From your Home screen, press
2
Tap Wallpaper, then select a wallpaper.
You can use a photo you have taken, or an animation. Go to Android Market™ and other
sources to download, for example, live wallpapers that change with the changing hours of the
day.
.
To set a theme
1
From your Home screen, press
2
Tap Theme, then select a theme.
When you change a theme, the background also changes in some applications.
.
Accessing and using applications
Open applications from shortcuts on your Home screen or from the Application
screen.
22
This is an Internet version of this publication. © Print only for private use.
Page 23

Application screen
The Application screen, which you open from your Home screen, contains the
applications that come installed with your phone as well as the applications you
download.
The Application screen extends beyond the regular screen width, so you need to flick
left and right to view all content.
To open the Application screen
•
From your Home screen, tap
To browse the Application screen
•
Open the Application screen, then flick right or left.
To create a shortcut to an application on the Home screen
1
From your Home screen, tap
2
Touch and hold an application until it appears on your Home screen, then drag
it to the desired location.
To share an application from your Application screen
1
From your Home screen, tap .
2
Touch and hold an application until it appears on your Home screen, then drag
the item to
3
Select an option and confirm, if necessary. You can now share the applications
you like with your friends so they can download and use them.
.
.
.
Opening and closing applications
To open an application
•
From your Home screen or the Application screen, tap the application.
To close an application
•
Press .
Some applications are paused when you press to exit, while other applications may
continue to run in the background. In the first case, the next time you open the application,
you can continue where you left off.
Recently used applications window
You can view and access recently used applications from this window.
To open the recently used applications window
•
Press and hold down .
Application menu
You can open a menu at any time when you are using an application by pressing the
key on your phone. The menu will look different depending on which application
you are using.
23
This is an Internet version of this publication. © Print only for private use.
Page 24
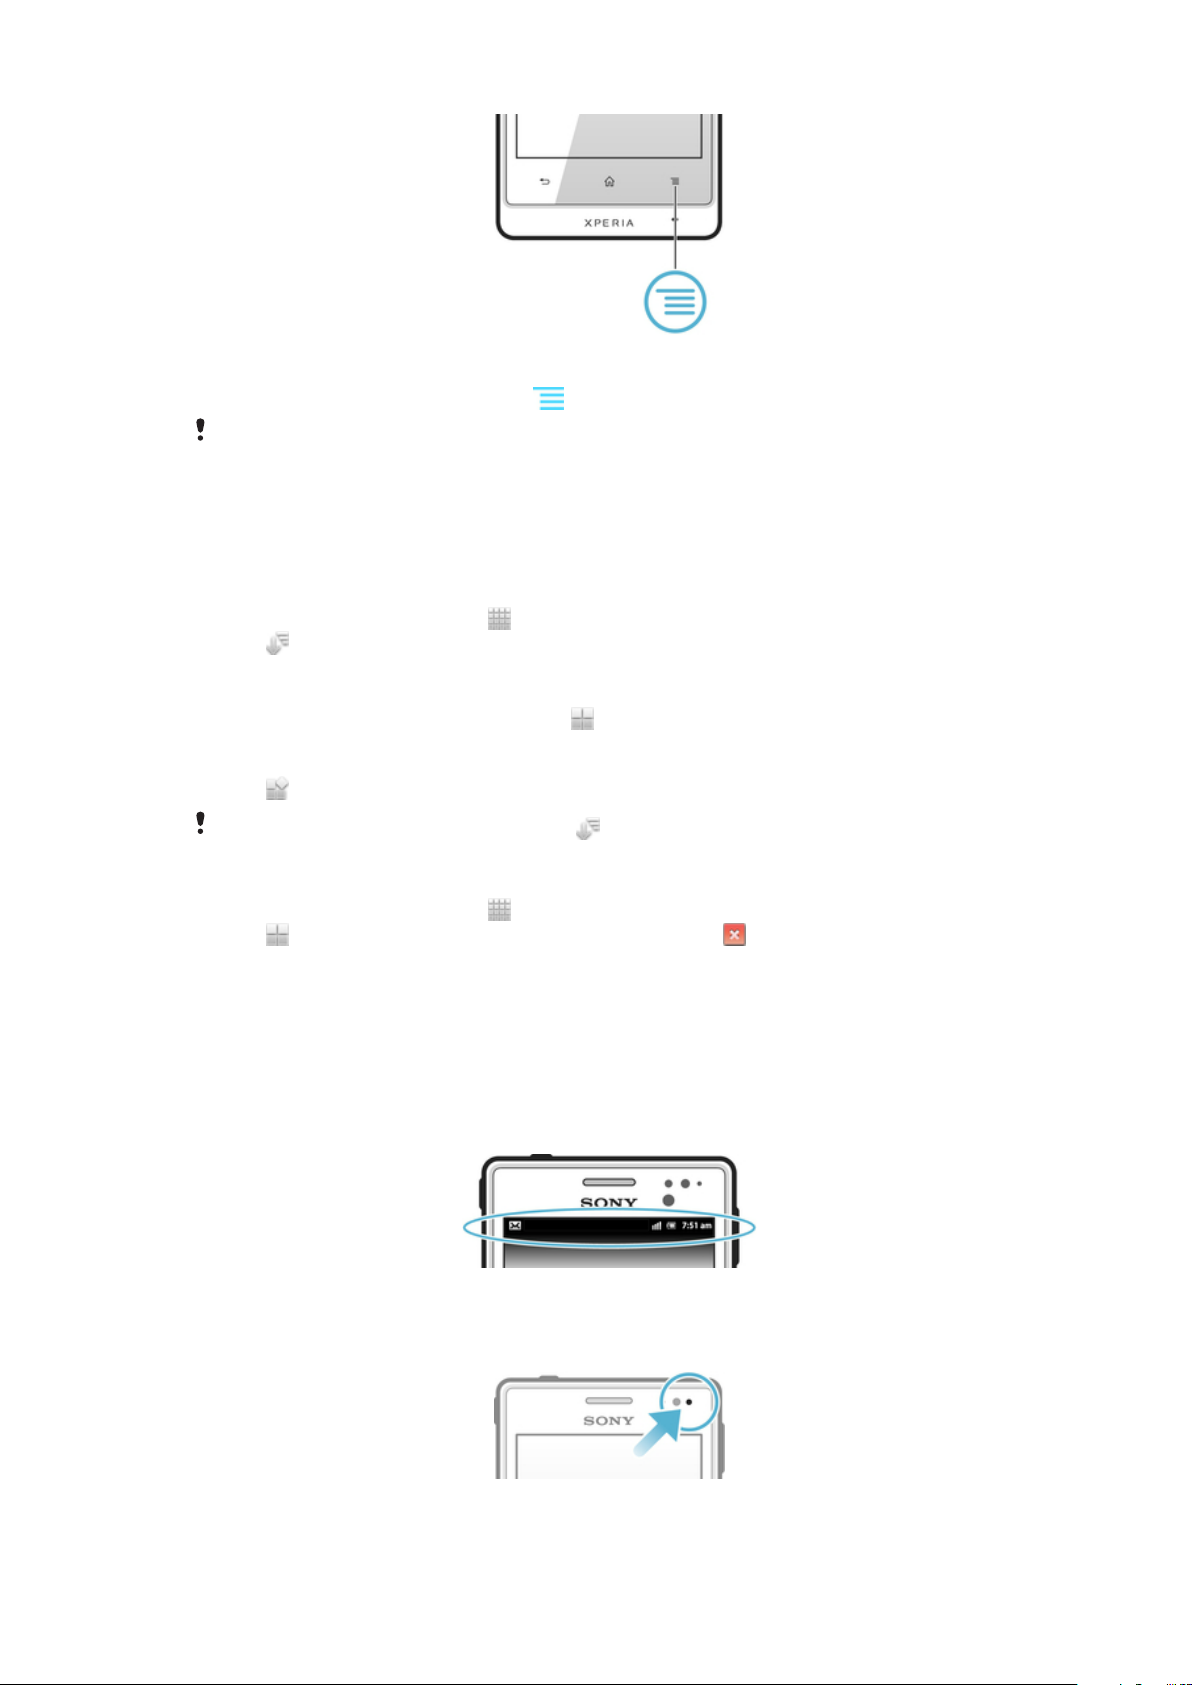
To open a menu in an application
•
While using the application, press
A menu is not available in all applications.
.
Rearranging your Application screen
Move the applications around on the Application screen according to your
preferences.
To arrange applications on the Application screen
1
From your Home screen, tap to go to the Application screen.
2
Tap
To move an application on the Application screen
1
Open the Application screen, then tap
2
Touch and hold an item until it magnifies and the phone vibrates, then drag the
item to the new location.
3
Tap
You can only move your applications when is selected.
To uninstall an application from the Application screen
1
From your Home screen, tap
2
Tap
3
Tap the application you want to uninstall, then tap OK.
and select an option.
.
to exit edit mode.
.
. All uninstallable applications are marked with a icon.
Status and notifications
The status bar at the top of your screen shows what's going on in your phone. To the
left you get notifications when there is something new or ongoing. For example, new
message and calendar notifications appear here. The right side shows the signal
strength, battery status, and other information.
A notification light also gives you battery status information and some notifications.
For example, a flashing blue light means there is a new message or a missed call.
The notification light may not work when the battery level is low.
24
This is an Internet version of this publication. © Print only for private use.
Page 25
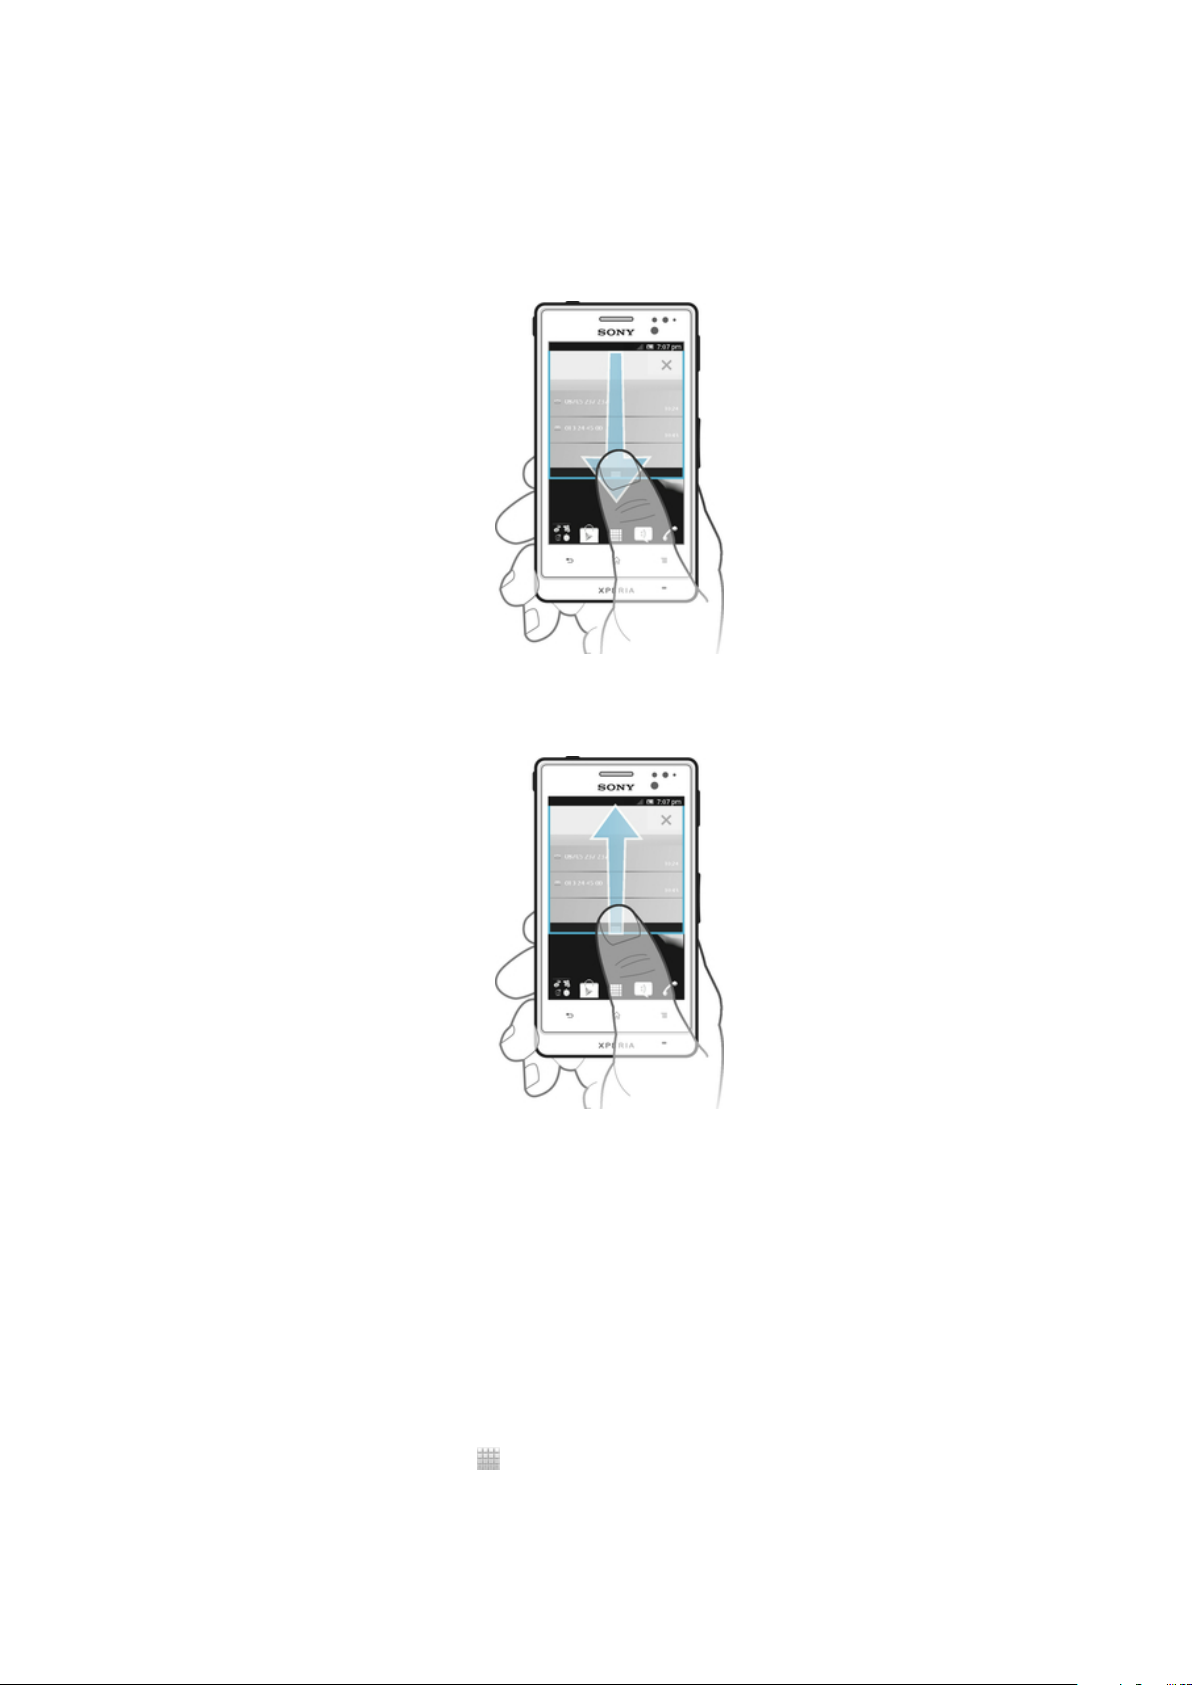
Checking notifications and ongoing activities
You can drag down the status bar to open the Notification panel and get more
information. For example, you can use the panel to open a new message or view a
calendar event. You can also open some applications that run in the background,
such as the music player.
To open the Notification panel
•
Drag the status bar downwards.
To close the Notification panel
•
Drag the tab at the bottom of the Notification panel upwards.
To open a running application from the Notification panel
•
From the Notification panel, tap the icon for the running application to open it.
To clear the Notification panel
•
From the Notification panel, tap Clear.
Phone settings menu
View and change your phone settings from the Settings menu.
To access the phone settings
1
From the Home screen, tap .
2
Tap Settings.
25
This is an Internet version of this publication. © Print only for private use.
Page 26
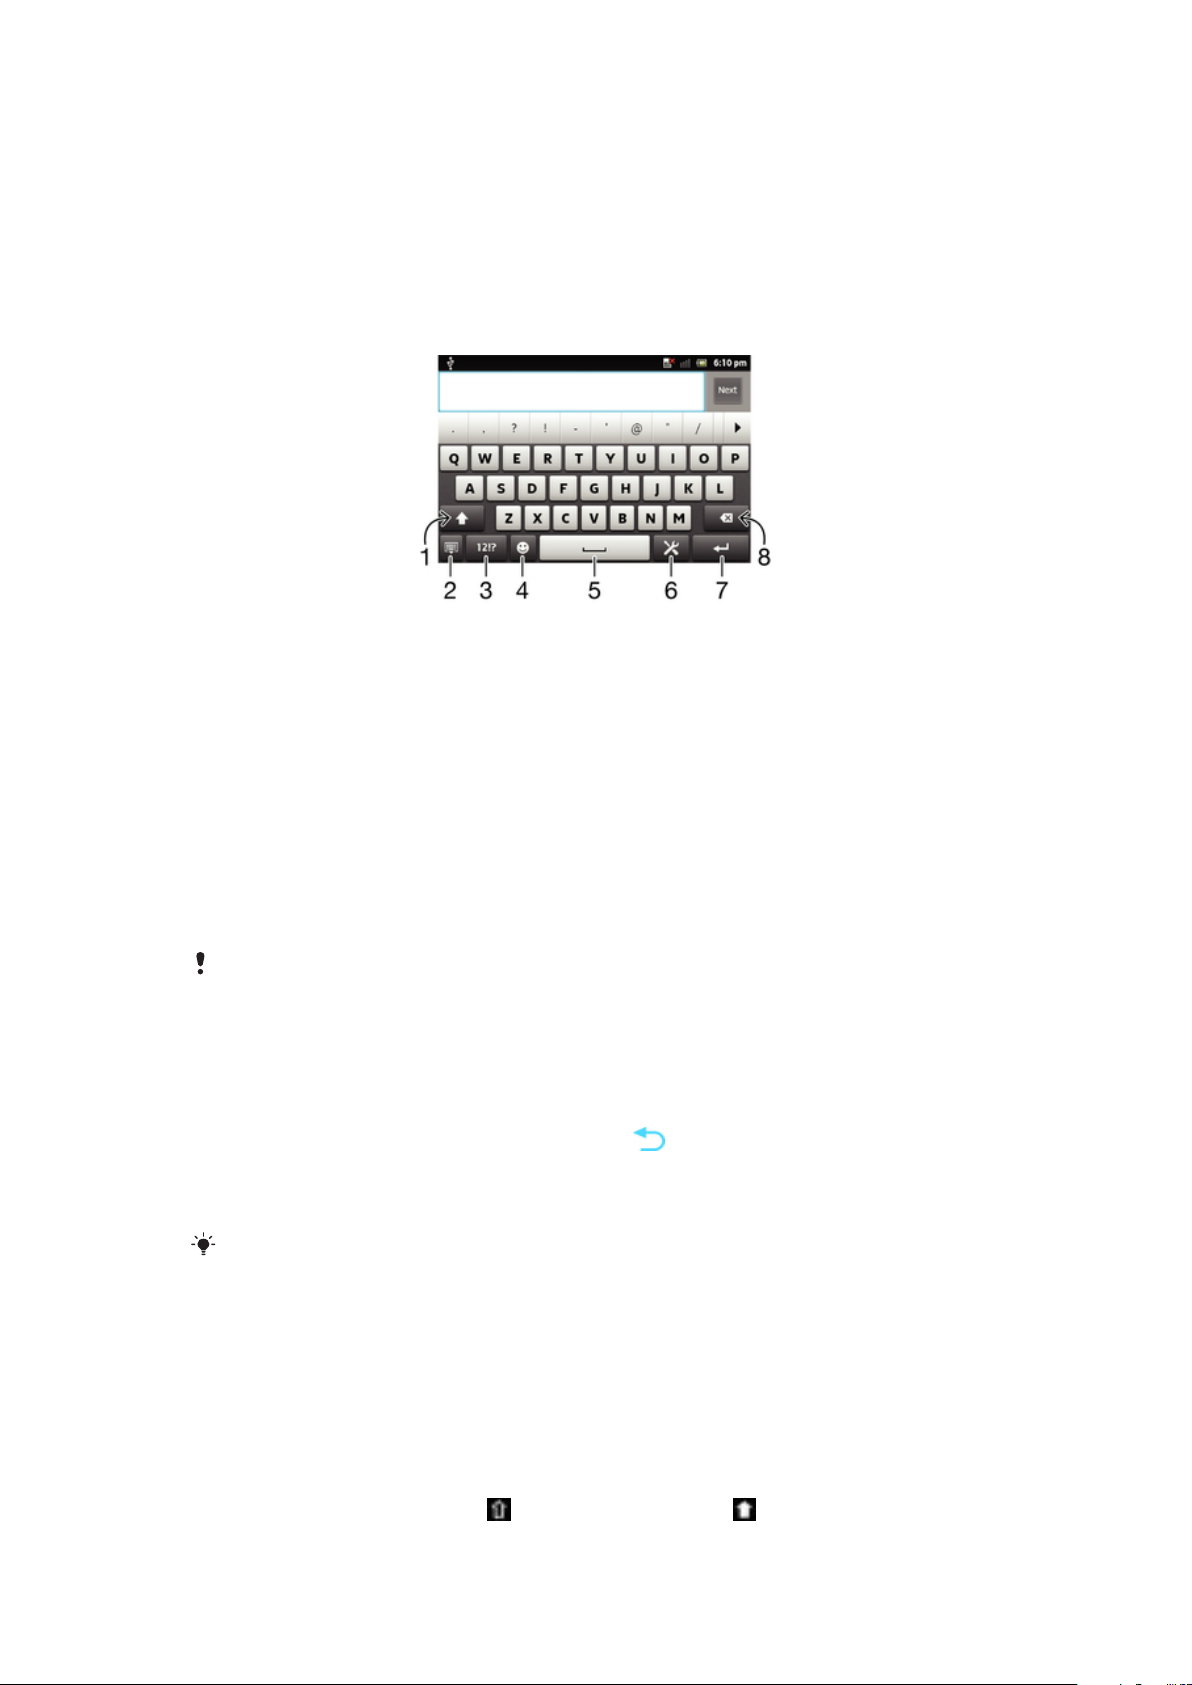
Typing text
On-screen keyboard
Tap the keys of the on-screen QWERTY keyboard to enter text conveniently. Some
applications open the on-screen keyboard automatically. You can also open this
keyboard by touching a text field.
Using the on-screen keyboard
1 Change the character case and turn on the caps lock. For some languages, this key is used to access
extra characters in the language.
2 Close the on-screen keyboard view. Please note that this icon does not show in portrait mode.
3 Display numbers and symbols.
4 Display smileys.
5 Enter a space.
6 Open the input settings menu to make a change, for example, under Writing languages. This key also
changes the writing language when more than one input language is selected.
7 Enter a carriage return or confirm text input.
8 Delete a character before the cursor.
All illustrations are for illustration purposes only and may not accurately depict the actual
phone.
To display the on-screen keyboard to enter text
•
Tap a text entry field.
To hide the on-screen keyboard
•
When the on-screen keyboard is open, press .
To use the on-screen keyboard in landscape orientation
•
When you enter text, turn the phone sideways.
For the keyboard to support this feature, landscape mode must be supported by the
application you are using, and your screen orientation settings must be set to automatic.
To enter text using the on-screen keyboard
1
To enter a character visible on the keyboard, tap the character.
2
To enter a character variant, touch and hold a regular keyboard character to
get a list of available options, then select from the list. For example, to enter
"é", touch and hold "e" until other options appear, then, while keeping your
finger pressed on the keyboard, drag to and select "é".
To shift between upper-case and lower-case letters
•
Before you enter a letter, tap to switch to upper-case , or vice versa.
26
This is an Internet version of this publication. © Print only for private use.
Page 27

To turn on the caps lock
•
Before you type a word, tap or until appears.
To enter numbers or symbols
•
When you enter text, tap
. A keyboard with numbers and symbols appears.
Tap to view more options.
To enter common punctuation marks
1
When you finish entering a word, tap the space bar.
2
Select a punctuation mark from the candidate bar. The selected mark is
inserted before the space.
To quickly enter a full stop, tap the space bar twice when you finish entering a word.
To insert a smiley
1
When you enter text, tap
2
Select a smiley.
.
To delete characters
•
Tap to place the cursor after the character you want to delete, then tap
To enter a carriage return
•
When you enter text, tap to enter a carriage return.
.
To edit text
1
When you enter text, touch and hold the text field until the Edit text menu
appears.
2
Select an option.
Using the Gesture input function to write words
You can input text by sliding your finger from letter to letter on the on-screen
keyboard. You can lift your finger between words so that the phone recognises them.
Gesture input is only available when you use the on-screen keyboard.
To change the Gesture input settings
1
When you enter text using the on-screen keyboard, tap . If you have
selected more than one writing language, touch and hold the input language
key instead. For example, touch and hold
2
Tap Keyboard settings > Text input settings.
3
Mark or unmark the Gesture input checkbox.
4
If you want to automatically add a space between gestures without having to
tap the space bar each time, mark the Space between gestures checkbox.
To enter text using the Gesture input function
1
When you enter text using the on-screen keyboard, slide your finger from letter
to letter to spell the word you want to write. Lift up your finger when you’ve
finished entering a word.
2
The phone suggests a word based on the letters you have traced. If necessary,
select the correct word in the candidate bar. To view more options, scroll right
or left in the word candidate bar. If you cannot find the desired word, tap once
to delete the entire word. Then you can try again or tap each letter to enter the
word.
3
If the Space between gestures setting is activated, slide on the keyboard to
enter the next word. Otherwise, enter a space and then slide to enter the next
word.
.
To enter joined compound words when the Space between gestures setting is activated, you
may need to slide to enter the first part of the word, then tap each letter to enter the rest of
the word.
27
This is an Internet version of this publication. © Print only for private use.
Page 28
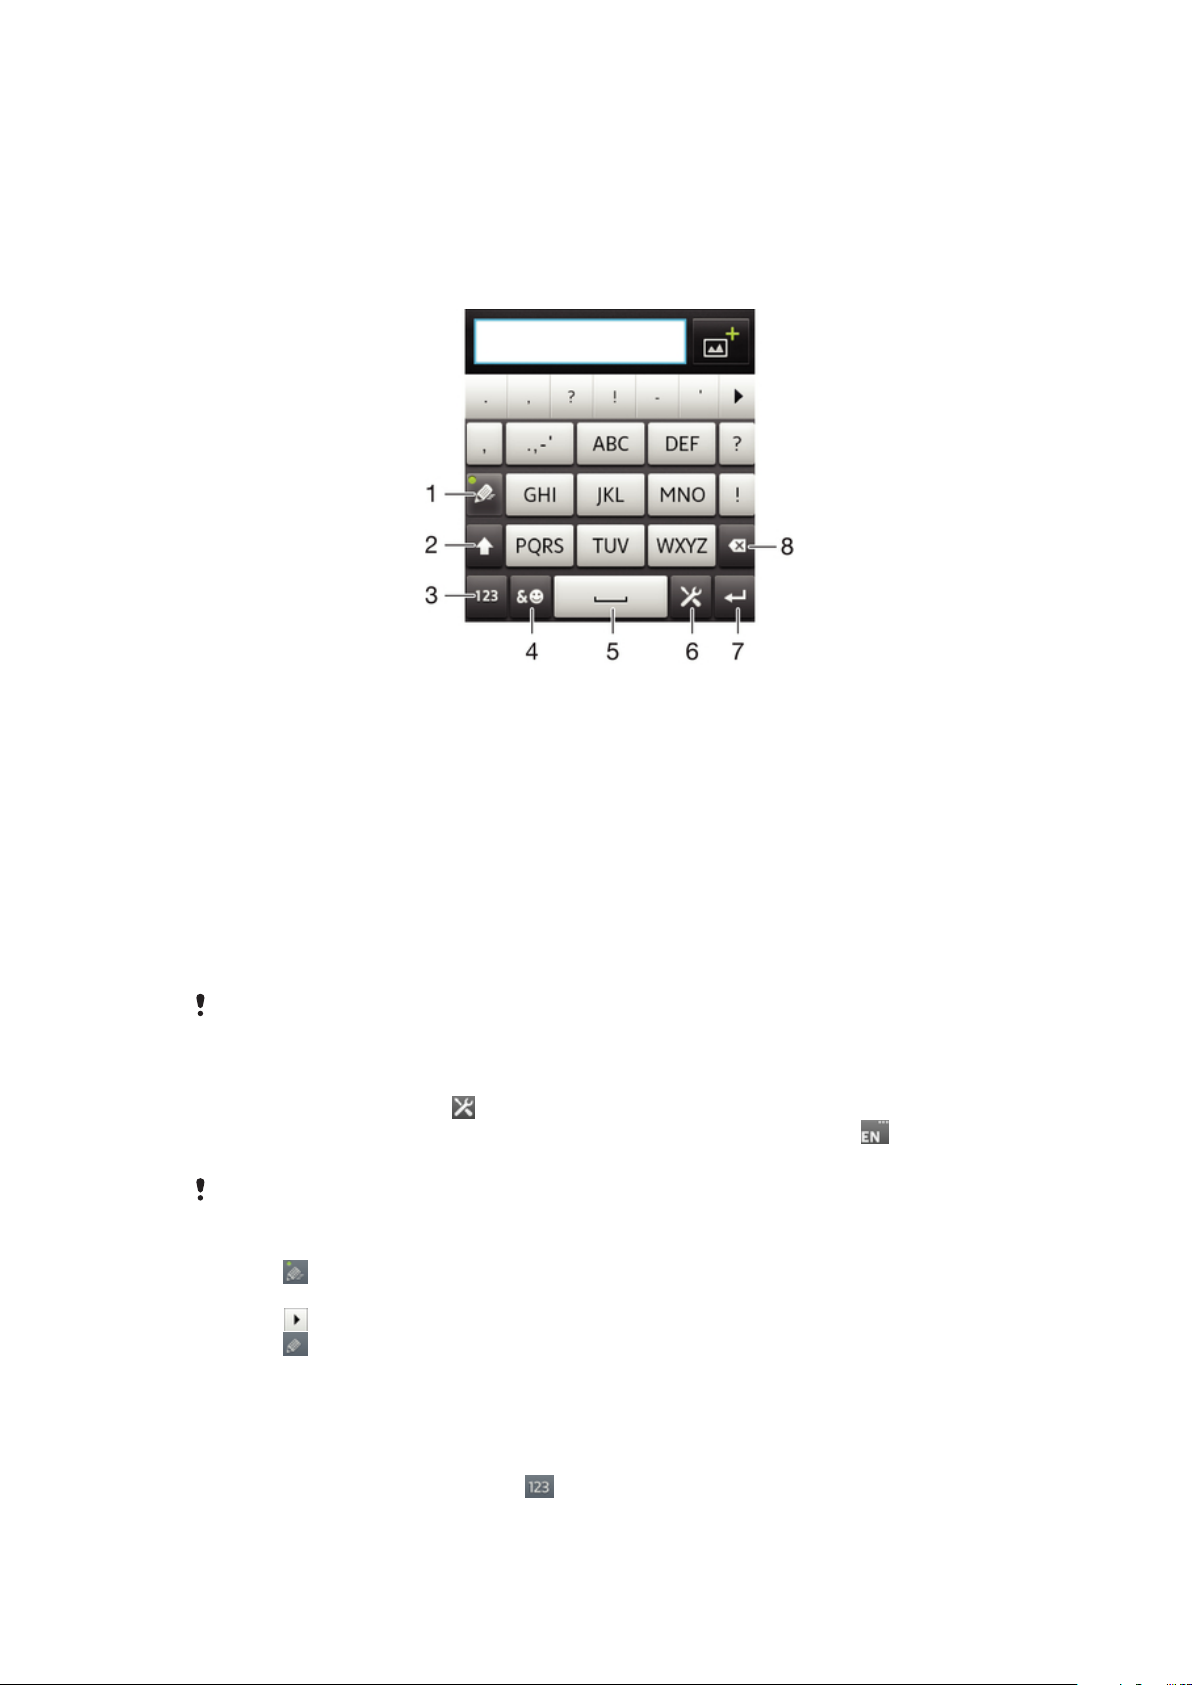
Phonepad
The Phonepad is similar to a standard 12-key telephone keypad. It gives you
predictive text and multi-tap input options. You can activate the Phonepad text input
method via the keyboard settings. The Phonepad is only available in portrait
orientation.
Using the Phonepad
1 Choose a text input option
2 Change the character case and turn on the caps lock
3 Display numbers
4 Display symbols and smileys
5 Enter a space
6 Open the input settings menu to change, for example, the Writing languages. This key also changes
the writing language when more than one input language is selected.
7 Enter a carriage return or confirm text input
8 Delete a character before the cursor
All illustrations are for illustration purposes only and may not accurately depict the actual
phone.
To switch between the on-screen keyboard and the Phonepad
1
When you enter text, tap . If you have selected more than one writing
language, touch and hold the input language key instead, for example, .
2
Tap Keyboard settings > Portrait keyboard, then select an option.
The Phonepad is only available in portrait orientation.
To enter text using the Phonepad
•
When appears in the Phonepad, tap each character key only once, even if
the letter you want is not the first letter on the key. Tap the word that appears
or tap
•
When appears in the Phonepad, tap the on-screen key for the character
to view more word suggestions and select a word from the list.
you want to enter. Keep pressing this key until the desired character is
selected. Then do the same for the next character you want to enter, and so
on.
To enter numbers using the Phonepad
•
When the Phonepad is open, tap
. A Phonepad with numbers appears.
28
This is an Internet version of this publication. © Print only for private use.
Page 29

To insert symbols and smileys using the Phonepad
1
When the Phonepad is open, tap . A grid with symbols and smileys
appears.
2
Scroll up or down to view more options. Tap a symbol or smiley to select it.
Keyboard and Phonepad settings
You can select settings for the on-screen keyboard and the Phonepad, such as
writing language and automatic correction.
To access the on-screen keyboard and Phonepad settings
1
When you enter text using the on-screen keyboard or Phonepad, tap
have selected more than one writing language, touch and hold the input
language key instead, for example,
2
Tap Keyboard settings.
To add a writing language to the on-screen keyboard or the Phonepad
1
When you enter text using the on-screen keyboard or Phonepad, tap . If you
have selected more than one writing language, touch and hold the input
language key instead, for example,
2
Tap Writing languages and mark the checkbox for the languages you want to
use for writing. When you have finished, press
3
To switch between languages, tap the input language key, for example, .
.
.
to confirm.
. If you
Text input settings
When entering text using the on-screen keyboard or the Phonepad, you can access a
text input settings menu that helps you set options for text prediction. For example,
you can decide how you want the phone to present word alternatives and correct
words as you type, or enable the text input application to remember new words you
write.
To change the text input settings
1
When you enter text using the on-screen keyboard or the Phonepad, tap
you have selected more than one writing language, touch and hold the input
language key instead, for example, .
2
Tap Keyboard settings > Text input settings.
3
Select the desired settings.
. If
Entering text using voice input
When you enter text, you can use the voice input function instead of typing the
words. Just speak the words that you want to enter. Voice input is an experimental
technology from Google™, and is available for a number of languages and regions.
You must have a data connection on a mobile or Wi-Fi® network to use this service. Additional
charges may apply.
To enable voice input
1
When you enter text, tap . If you have selected more than one writing
language, touch and hold the input language key instead, for example, .
2
Tap Keyboard settings > Voice input fr. keyboard.
3
Mark the Google voice typing key checkbox, read the information carefully,
then tap OK to confirm.
4
To set a language for voice input, tap Language, then select the language you
want to use.
5
To automatically insert the most likely word suggestion, mark the Use best
choice checkbox.
6
Press to save your settings. A microphone icon appears on your onscreen keyboard or Phonepad.
29
This is an Internet version of this publication. © Print only for private use.
Page 30

To enter text using voice input
1
When you enter text, make sure that the voice input function is enabled and
that you have a working data connection.
2
When appears on your on-screen keyboard or Phonepad, tap it. When the
input language key, for example, appears, touch and hold it. An arrow
appears. Move the arrow until it points to the microphone, then release your
finger.
3
When Speak now appears on your screen, speak to enter text.
4
When the Use best choice function is activated, the most likely word
suggestion appears underlined. If the word is not correct, tap once to
delete it, then start again. When the Use best choice function is not activated,
the search results appear in a list. Select the word you want.
To access Xperia™ keyboard settings when voice input is enabled
•
When
select Keyboard settings.
•
When the input language key, for example,
or Phonepad, touch and hold it. An arrow appears. Move the arrow until it points to
appears on your on-screen keyboard or Phonepad, touch and hold it, then
appears on your on-screen keyboard
, then release your finger.
Customising your phone
Adapt the phone to your needs by adjusting, for example, your personal ringtone,
phone language and your Privacy settings.
Adjusting the volume
You can adjust the ringtone volume for phone calls and notifications as well as for
music and video playback.
To adjust the ring volume with the volume key
•
Press the volume key up or down.
To adjust the media playing volume with the volume key
•
When playing music or watching video, press the volume key up or down.
To set the phone to silent and vibrate mode
1
From the Home screen, tap .
2
Find and tap Settings > Sound.
3
Mark the Silent mode checkbox.
4
Select Vibrate and choose an option.
To enhance the speaker loudness
1
From the Home screen, tap
2
Find and tap Settings > Sound.
3
Mark the xLOUD™ checkbox.
.
Time and date
You can change the time and date in your phone.
To set the date manually
1
From the Home screen, tap .
2
Find and tap Settings > Date & time.
3
Unmark the Automatic checkbox, if it is marked.
4
Tap Set date.
5
Adjust the date by scrolling up and down.
6
Tap Set.
This is an Internet version of this publication. © Print only for private use.
30
Page 31

To set the time manually
1
From your Home screen, tap .
2
Find and tap Settings > Date & time.
3
Unmark the Automatic checkbox, if it is marked.
4
Unmark the Use 24-hour format checkbox, if it is marked.
5
Tap Set time.
6
Scroll up or down to adjust the hour and minute.
7
Tap am to change to pm, or vice versa.
8
Tap Set.
To set the time zone
1
From the Home screen, tap
2
Find and tap Settings > Date & time.
3
Unmark the Automatic checkbox, if it is marked.
4
Tap Select time zone.
5
Select an option.
To set the date format
1
From your Home screen, tap
2
Find and tap Settings > Date & time > Select date format.
3
Select an option.
.
.
Ringtone settings
To set a phone ringtone
1
From your Home screen, tap .
2
Find and tap Settings > Sound > Phone ringtone.
3
Select a ringtone.
4
Tap Done.
To enable touch tones
1
From your Home screen, tap
2
Find and tap Settings > Sound.
3
Mark the Audible touch tones and Audible selection checkboxes.
To select a notification ringtone
1
From your Home screen, tap
2
Find and tap Settings > Sound > Notification ringtone.
3
Select a ringtone.
4
Tap Done.
To set a vibrating alert
1
From your Home screen, tap
2
Find and tap Settings > Sound.
3
Select Vibrate and choose an option.
.
.
.
Screen settings
To adjust the screen brightness
1
From your Home screen, tap .
2
Find and tap Settings > Display > Brightness.
3
Drag the slider to adjust the brightness.
4
Tap OK.
The brightness level affects your battery performance. For tips on how to improve battery
performance, see Improving battery performance on page 17.
31
This is an Internet version of this publication. © Print only for private use.
Page 32

To set the screen to vibrate
1
From your Home screen, tap .
2
Find and tap Settings > Sound.
3
Mark the Haptic feedback checkbox. The screen now vibrates when you tap
soft keys and certain applications.
To adjust the idle time before the screen turns off
1
From your Home screen, tap
2
Find and tap Settings >Display > Screen timeout.
3
Select an option.
To turn off the screen quickly, briefly press the power key .
.
To keep the screen on while charging the phone
1
From the Home screen, tap .
2
Find and tap Settings > Applications > Development.
3
Mark the Stay awake check box.
Phone language
You can select a language to use in your phone.
To change the phone language
1
From your Home screen, tap
2
Find and tap Settings > Language & keyboard > Select language.
3
Select an option.
4
Tap Done.
.
If you choose the wrong language and cannot read the menu texts, find and tap the Settings
icon . Then select the entry beside , and select the first entry in the following menu. You
can then select the language you want.
Airplane mode
In Airplane mode, your phone's network and radio transceivers are turned off to
prevent disturbance to sensitive equipment. However, you can still play games, listen
to music, watch videos and other content, as long as all this content is saved on your
memory card or internal storage. You can also be notified by alarms, if alarms are
activated.
Turning on Airplane mode reduces battery consumption.
To turn on Airplane mode
1
From your Home screen, tap .
2
Find and tap Settings > Wireless & networks.
3
Mark the Airplane mode checkbox.
You can also select Airplane mode from the Phone options menu. To access the Phone
options menu, press and hold the power key .
Memory
You can save content to a memory card, to your phone's internal storage and to the
phone memory. Music, video clips and photos are saved to the internal storage or the
memory card while applications, contacts and messages are saved to the phone
memory.
You can move some applications from the phone memory to the internal storage.
32
This is an Internet version of this publication. © Print only for private use.
Page 33

To move an application to the phone's internal storage
1
From your Home screen, tap .
2
Find and tap Settings > Applications > Manage applications.
3
Select the application that you want to move to the internal storage.
4
Tap Move to internal storage.
It is not possible to move some applications from the phone memory to the internal storage.
Memory card
You may have to purchase a memory card separately.
Your phone supports a microSD™ memory card, which is used for media content.
This type of card can also be used as a portable memory card with other compatible
devices.
Safely removing the memory card
You can safely remove the memory card from your phone any time when the phone
is turned off. If you want to remove the memory card when your phone is on, you
must first unmount the memory card before you physically remove it from the phone.
This can prevent damaging the memory card or losing data stored on the memory
card.
To unmount the memory card
1
From your Home screen, tap
2
Find and tap Settings > Storage > Unmount SD card.
.
Formatting the memory card
You can format the memory card in your phone, for example, to free up memory. This
means that you erase all data on the card.
All content on the memory card gets erased when you format it. Make sure you make backups
of everything you want to save before formatting the memory card. To back up your content,
you can copy it to your computer. For more information, refer to the chapter Connecting your
phone to a computer on page 118.
To format the memory card
1
From your Home screen, tap
2
Find and tap Settings > Storage > Unmount SD card.
3
After you have unmounted the memory card, tap Erase SD card.
.
33
This is an Internet version of this publication. © Print only for private use.
Page 34
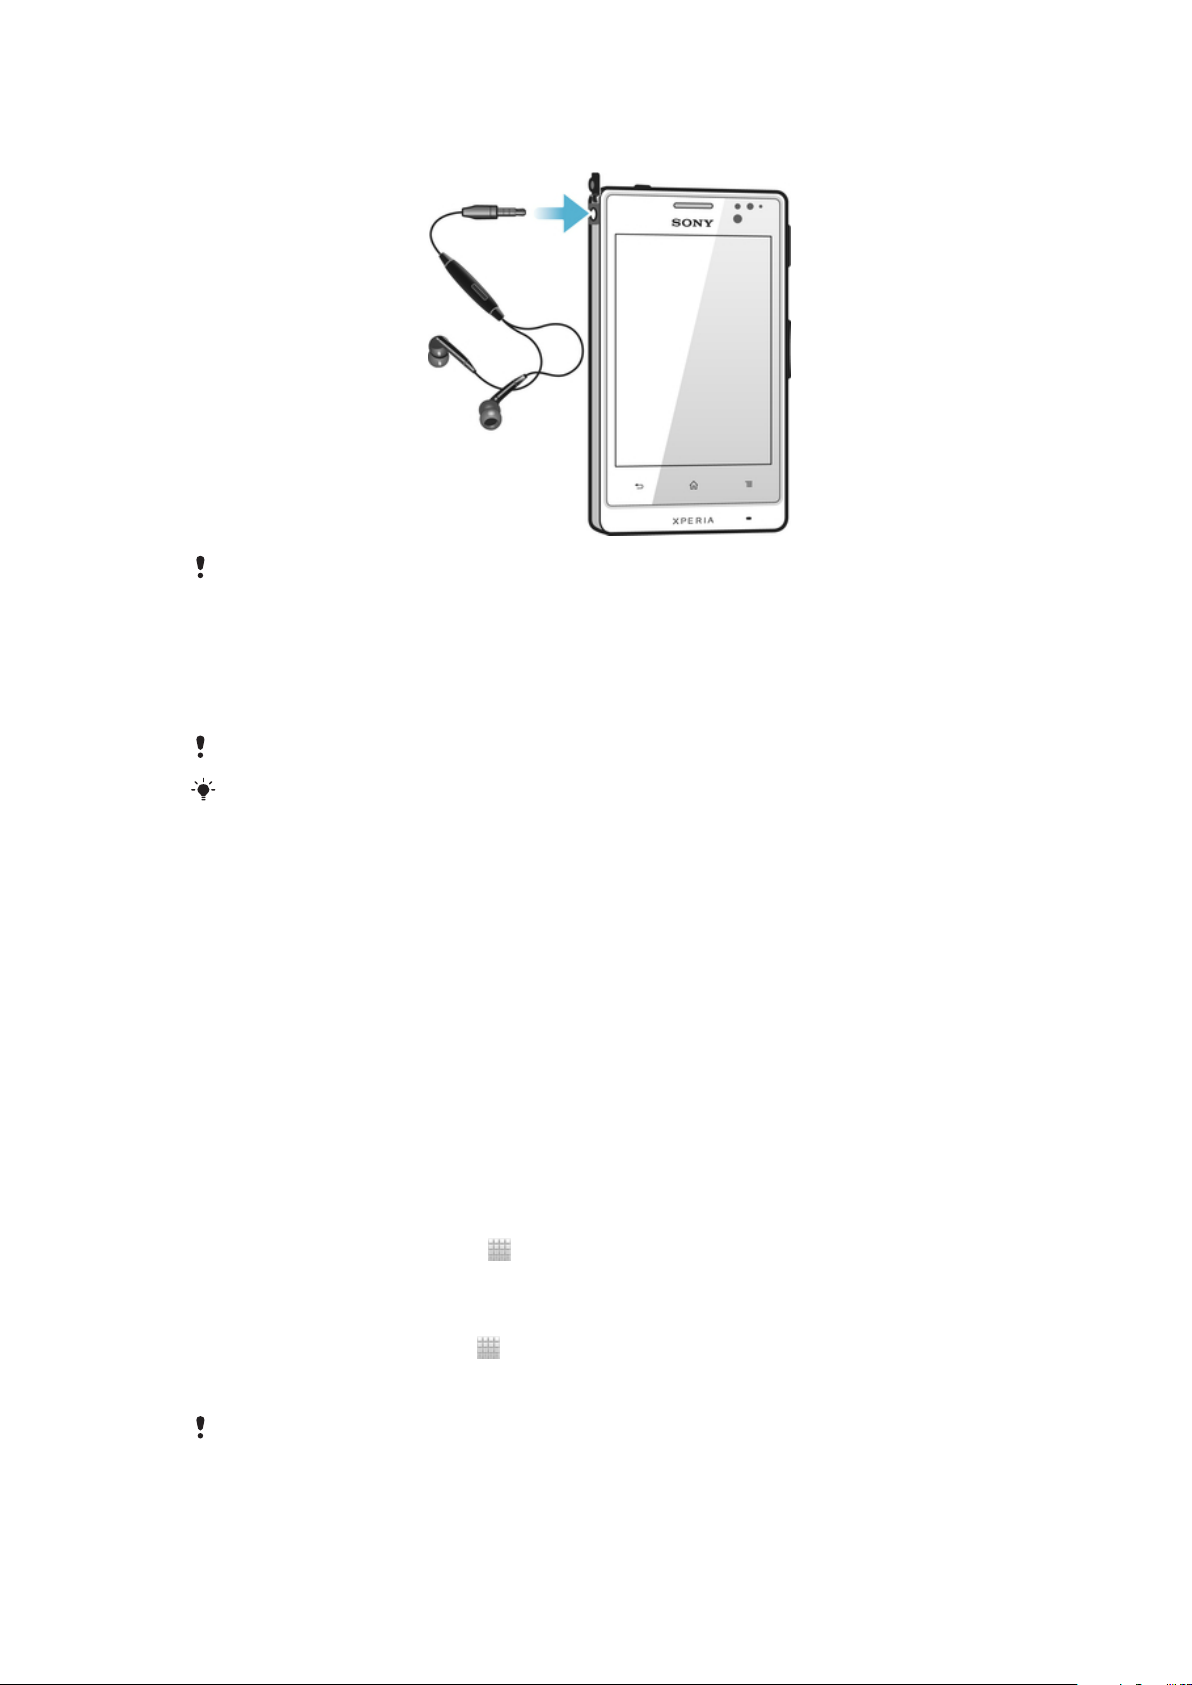
Using a headset with your phone
Use the accessories provided with your phone, or other compatible accessories, for optimal
performance.
To use a headset
1
Connect the headset to your phone.
2
To answer a call, press the call handling key.
3
To end the call, press the call handling key.
If a headset is not included with the phone, you may purchase one separately.
If you are listening to music, the music stops when you answer a call and resumes after you
end the call.
Internet and messaging settings
To send text and multimedia messages and to access the Internet, you must have a
2G/3G mobile data connection and the correct settings. There are different ways to
get these settings:
•
For most mobile phone networks and operators, Internet and messaging settings
come preinstalled on your phone. You can then start using the Internet and send
messages right away.
•
In some cases you will get the option to download Internet and messaging settings
the first time you turn on your phone. It is also possible to download these settings
later from the Settings menu.
•
You can manually add and change Internet and network settings in your phone at any
time. Contact your network operator for detailed information on your Internet and
messaging settings.
To download Internet and messaging settings
1
From your Home screen, tap .
2
Find and tap Settings > Xperia™ > Internet settings.
To view the current Access Point Name (APN)
1
From the Home screen, tap
2
Find and tap Settings > Wireless & networks > Mobile networks.
3
Tap Access Point Names.
.
If you have several available connections, the active network connection will be indicated by a
marked button to the right.
34
This is an Internet version of this publication. © Print only for private use.
Page 35

To configure APN settings manually
1
From the Home screen, tap .
2
Find and tap Settings > Wireless & networks > Mobile networks > Access
Point Names.
3
Press
4
Tap New APN.
5
Tap Name and enter the name of the network profile you want to create.
6
Tap APN and enter the access point name.
7
Enter all other information required by your network operator.
8
Press
Contact your network operator for detailed information about your network settings.
.
and tap Save .
To reset the default Internet settings
1
From your Home screen, tap
2
Tap Settings > Wireless & networks > Mobile networks.
3
Tap Access Point Names, then press
4
Tap Reset to default.
.
.
Usage info
For quality purposes, Sony collects anonymous bug reports and statistics regarding
your phone usage. None of the information gathered includes personal data.
To allow the sending of usage info
1
From your Home screen, tap
2
Find and tap Settings > Xperia™ > Usage info settings.
3
Mark the Send usage info checkbox if it is not already marked.
4
Tap Agree to allow the sending of usage information.
.
Turning off data traffic
You can disable all data connections over 2G/3G networks with your phone to avoid
any unwanted data downloads and synchronisations. Contact your network operator
if you need detailed information about your subscription plan and data traffic costs.
When data traffic is turned off, you can still use Wi-Fi® and Bluetooth™ connections. You can
also send and receive multimedia messages.
To turn off all data traffic
1
From your Home screen, tap
2
Find and tap Settings > Wireless & networks > Mobile networks.
3
Unmark the Data enabled checkbox.
.
Data roaming
Depending on your network operator, it might be possible to allow mobile data
connections via 2G/3G outside of your home network (roaming). Please note that
data transmission charges may apply. Contact your network operator for more
information.
Applications may sometimes use the Internet connection in your home network without any
notification, for example, when sending search and synchronisation requests. Additional
charges may apply for data roaming. Consult your service provider.
To activate data roaming
1
From the Home screen, tap .
2
Find and tap Settings > Wireless & networks > Mobile networks.
3
Mark the Data roaming checkbox.
You can’t activate data roaming when data connections have been deactivated
35
This is an Internet version of this publication. © Print only for private use.
Page 36

Mobile network settings
Your phone automatically switches between mobile networks depending on what
mobile networks are available in different areas. You can also manually set your
phone to access a particular mobile network type, for example, WCDMA or GSM.
To select a network type
1
From your Home screen, tap .
2
Find and tap Settings > Wireless & networks > Mobile networks.
3
Tap Network Mode.
4
Select a network type.
To select another network manually
1
From the Home screen, tap
2
Find and tap Settings > Wireless & networks > Mobile networks > Network
operators.
3
When a pop-up window appears, tap Search mode > Manual.
4
Select a network.
If you select a network manually, your phone will not search for other networks, even if you
move out of range of the manually selected network.
To activate automatic network selection
1
From the Home screen, tap .
2
Find and tap Settings > Wireless & networks > Mobile networks > Network
operators.
3
When a pop-up window appears, tap Search mode.
4
Tap Automatic.
.
36
This is an Internet version of this publication. © Print only for private use.
Page 37

Calling
Emergency calls
Your phone supports international emergency numbers, for example, 112 or 911. You
can normally use these numbers to make emergency calls in any country, with or
without the SIM card inserted if you are within range of a network.
To make an emergency call
1
From your Home screen, tap .
2
Find and Tap Phone.
3
Enter the emergency number and tap Call. To delete a number, tap
You can make emergency calls when no SIM card is inserted or when outgoing calls are
barred.
To make an emergency call while the SIM card is locked
1
Tap Emergency call.
2
Enter the emergency number and tap Call. To delete a number, tap .
Call handling
You can make a call by manually dialling a phone number, by tapping a number
saved in your phone's contact list, or by tapping the phone number in your call log
view. You can also use the smart dial feature to quickly find numbers from your
contact list and call logs.
.
To make a call by dialling
1
From your Home screen, tap
2
Find and tap Phone.
3
Enter the number of the recipient and tap Call. To delete a number, tap
To end a call
•
Tap
To make an international call
1
From your Home screen, tap
2
Find and tap Phone.
3
Touch and hold 0 until a “+” sign appears.
4
Enter the country code, area code (without the first 0) and phone number, then
tap Call.
To answer a call
•
Drag to the right across the screen.
If you are using regular headphones without a microphone, you have to remove the
headphones from the headset connector to be able to answer the call.
To decline a call
•
Drag to the left across the screen.
.
.
.
.
To change the ear speaker volume during a call
•
Press the volume key up or down.
37
This is an Internet version of this publication. © Print only for private use.
Page 38

To turn on the loudspeaker during a call
•
Tap .
To mute the microphone during a call
•
Tap
To activate the screen during a call
•
Press .
To enter numbers during a call
1
During a call, tap . A keypad appears.
2
Enter numbers.
To mute the ringtone for an incoming call
•
When you receive the call, press the volume key.
.
Recent calls
In the call log, you can view recently missed
To view your missed calls
1
When you have missed a call,
downwards.
2
Tap Missed call.
appears in the status bar. Drag the status bar
, received and dialled calls.
To call a number from your call log
1
From your Home screen, tap .
2
Find and tap Phone.The call log view appears on the upper part of the screen.
3
To call a number directly, tap the number. To edit a number before calling,
touch and hold the number, then tap Edit number before call.
You can also call a number by tapping > Call back.
To add a number from the call log to your contacts
1
From your Home screen, tap .
2
Find and tap Phone.The call log view appears on the upper part of the screen.
3
Touch and hold the number, then tap Add to contacts.
4
Tap the desired contact, or tap Create new contact.
5
Edit the contact details and tap Done.
Voicemail
If your subscription includes a voicemail service, callers can leave voice messages for
you when you can't answer calls. Your voicemail service number is normally saved on
your SIM card. If not, you can get the number from your service provider and enter it
manually.
To enter your voicemail number
1
From the Home screen, tap
2
Find and tap Settings > Call settings > Voicemail settings > Voicemail
number.
3
Enter your voicemail number.
4
Tap OK.
.
To call your voicemail service
1
From your Home screen, tap
2
Find and tap Phone.
3
Touch and hold 1.
This is an Internet version of this publication. © Print only for private use.
.
38
Page 39

Multiple calls
If you have activated call waiting, you can handle multiple calls at the same time.
When it is activated, you will be notified by a beep if you receive another call.
To activate or deactivate call waiting
1
From the Home screen, tap .
2
Find and tap Settings > Call settings > Additional settings.
3
To activate or deactivate call waiting, tap Call waiting.
To reject a second call
•
When you hear repeated beeps during a call, tap Busy.
To answer a second call and end the ongoing call
•
When you hear repeated beeps during a call, tap End current call and answer.
To answer a second call and put the ongoing call on hold
•
When you hear repeated beeps during a call, tap Answer.
To make a second call
1
During an ongoing call, tap
2
Enter the number of the recipient and tap .
3
If the recipient answers, the first call is put on hold.
The same procedure applies to subsequent calls.
.
To switch between multiple calls
•
To switch to another call and put the current call on hold, tap the desired
number or contact.
To end the ongoing call and return to the next call on hold
•
Tap .
Conference calls
With a conference or multiparty call, you can have a joint conversation with two or
more persons.
To make a conference call
1
During an ongoing call, tap
2
Dial the number of your second participant and tap
3
If the second participant answers, the first call is put on hold.
4
Tap .
To add more participants, repeat steps 1 to 4.
To have a private conversation with a conference call participant
1
During an ongoing conference call, tap the button showing the number of
participants. For example, tap 3 participants if there are three participants on
the call.
2
Tap the name of the participant you want to talk to privately.
3
To end the private conversation and return to the conference call, tap .
.
.
To release a participant from a conference call
1
During an ongoing conference call, tap the button showing the number of
participants. For example, tap 3 participants if there are three participants.
2
Tap next to the participant you want to release.
To end a conference call
•
During the conference call, tap End conference call.
39
This is an Internet version of this publication. © Print only for private use.
Page 40

Call settings
Barring calls
You can bar all or certain categories of incoming and outgoing calls. When you use
call barring for the first time, you need to enter your PUK (Personal Unblocking Key)
and then a new password to activate the call barring function.
To bar incoming or outgoing calls
1
From your Home screen, tap
2
Find and tap Settings > Call settings > Call blocking.
3
Select an option.
4
Enter the password and tap Enable.
Forwarding calls
You can forward calls, for example, to another phone number, or to an answering
service.
To forward calls
1
From your Home screen, tap
2
Find and tap Settings > Call settings > Call forwarding.
3
Select an option.
4
Enter the number you want to forward the calls to, then tap Enable.
To turn off call forwarding
1
From your Home screen, tap
2
Find and tap Settings > Call settings > Call forwarding.
3
Select an option, then tap Disable.
.
.
.
Showing or hiding your phone number
You can select to show or hide your phone number on call recipients' devices when
you call them.
To show or hide your phone number
1
From your Home screen, tap .
2
Find and tap Settings > Call settings > Additional settings > Caller ID.
Fixed Dialling Numbers
If you have received a PIN2 code from your service provider, you can use a list of
Fixed Dialling Numbers (FDN) to restrict outgoing calls.
To enable or disable fixed dialling
1
From your Home screen, tap
2
Find and tap Settings > Call settings > Fixed dialling numbers.
3
Tap Activate fixed dialling or Deactivate fixed dialling.
4
Enter your PIN2 and tap OK.
To access the list of accepted call recipients
1
From your Home screen, tap
2
Find and tap Settings > Call settings > Fixed dialling numbers > Fixed
dialling numbers.
.
.
40
This is an Internet version of this publication. © Print only for private use.
Page 41
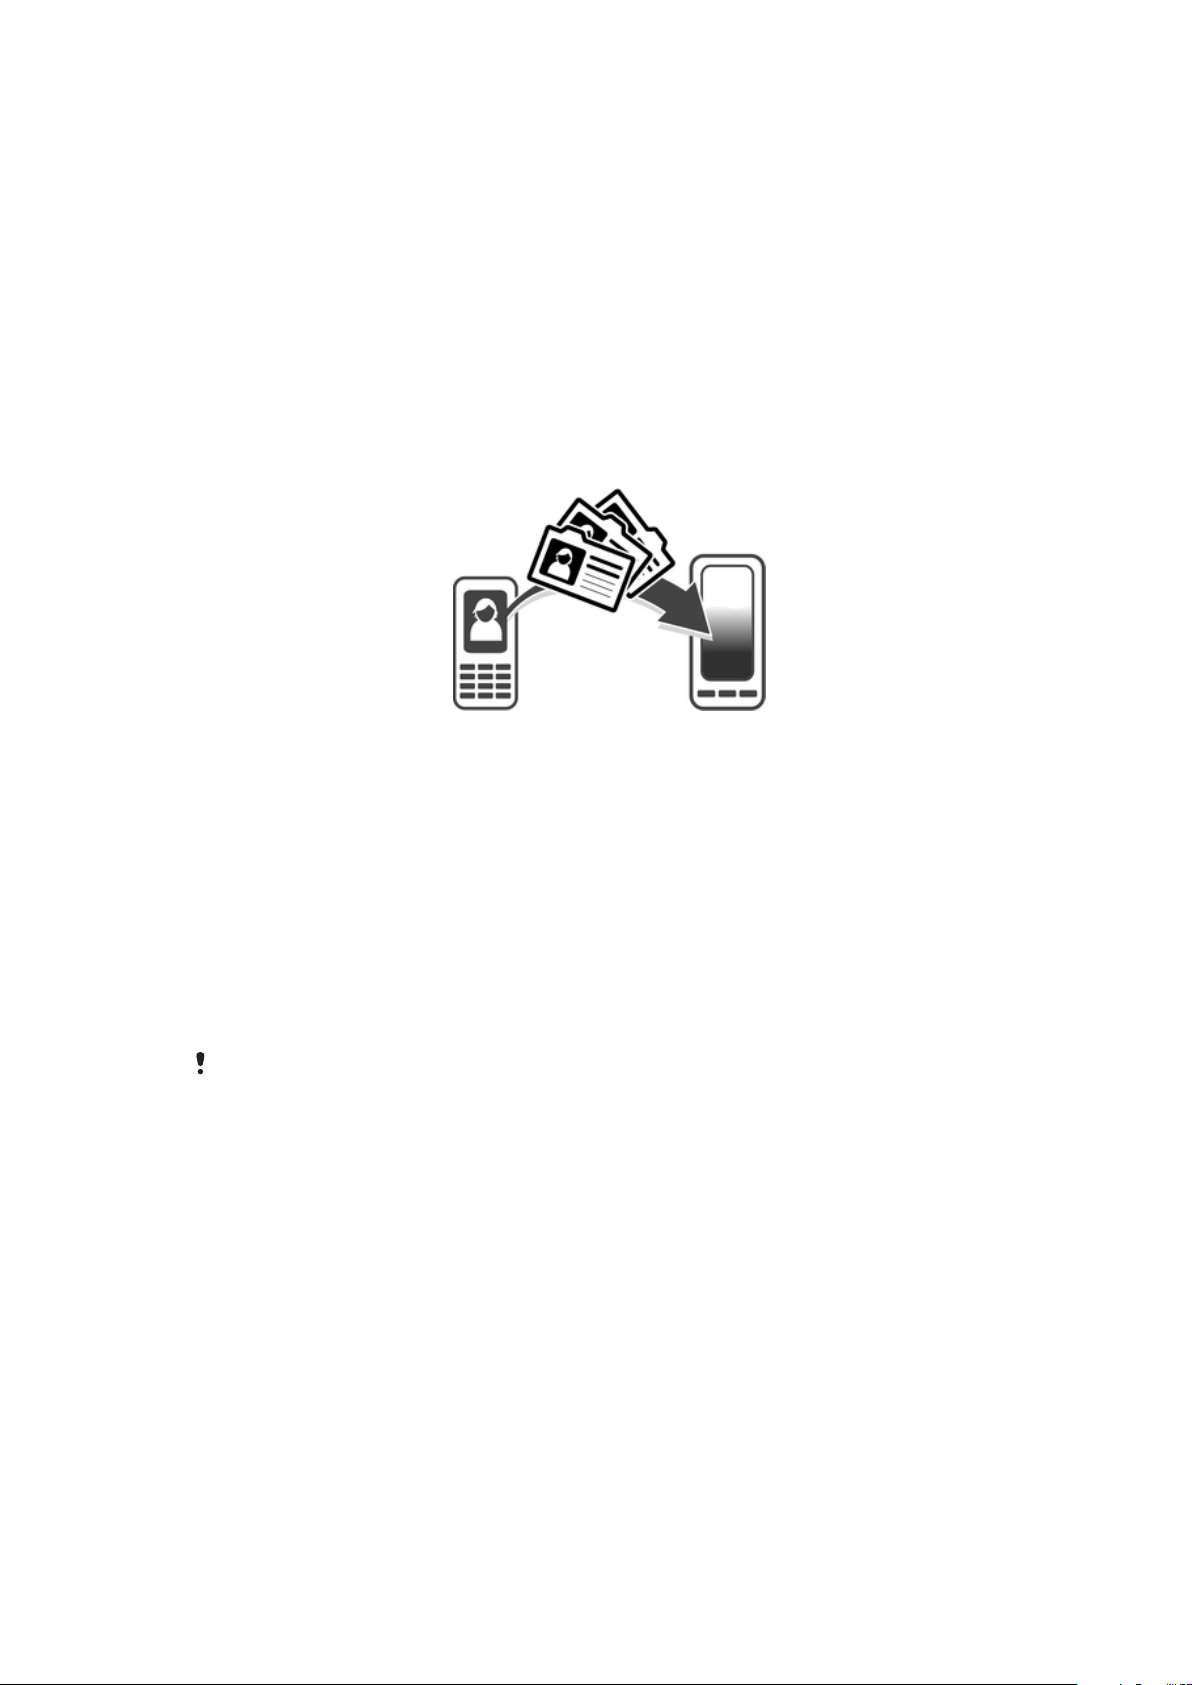
Contacts
Use the Contacts application to store and manage all your numbers, email
addresses, and other contact data in one place. Just tap on a contact to see all
communications with that contact in one easy overview.
You can add new contacts in your phone and synchronise them with contacts saved
in your Google™ account, Microsoft® Exchange ActiveSync® account, or other
accounts that support synchronisation. The Contacts application automatically
creates new entries and also helps you match data such as email addresses with
existing entries. You can also manage this process manually. For more information,
go to www.sonymobile.com.
Transferring contacts to your new phone
There are several ways to transfer contacts to your new phone. Select a transfer
method that best suits your situation.
Transferring contacts using a PC
You can use a PC to transfer contacts from several phone brands, including iPhone,
Samsung, HTC and Nokia.
You need:
•
An Internet-connected PC running Windows®
•
A USB cable for your old phone
•
A USB cable for your new Android™ phone
•
Your old phone
•
Your new Android™ phone
If you don't have access to all of the items listed above, go to www.sonymobile.com to find
out about other ways to transfer your contacts.
Using the PC Companion program to transfer contacts
If you are transferring contacts using a PC, use the PC Companion progam. It's free,
and the installation files are already saved on your new phone. PC Companion also
offers a range of other features, including help to update your phone software.
To install PC Companion
1
New phone: Turn on your new Android™ phone and connect it to a PC using a
USB cable.
2
New phone: Tap Install to install PC Companion on the PC.
3
Computer: If a popup window appears, select Run Startme.exe. In the new
popup window that appears, click Install to start the installation and then follow
the instructions to complete the installation.
To transfer contacts to your new phone using PC Companion
1
Make sure that PC Companion is installed on your PC.
2
Open the PC Companion program on the PC, then click Contacts Setup and
follow the instructions to transfer your contacts.
41
This is an Internet version of this publication. © Print only for private use.
Page 42

Transferring contacts using an Apple® Mac® computer
For detailed instructions on how to use an Apple Mac computer to transfer contacts
from your old phone, go to www.sonymobile.com.
Transferring contacts using synchronisation accounts
Your phone works with popular online synchronisation accounts such as Google
Sync™, Microsoft® Exchange ActiveSync®or Facebook™. If you have synced the
contacts in your old phone or your computer with an online account, you can transfer
your contacts to your new phone using that account. For more detailed information
about synchronisation, see Synchronising data on your phone on page 71.
To synchronise your phone contacts with a synchronisation account
1
From your Home screen, tap , then tap .
2
Press
3
To set up a synchronisation account, tap Add account and follow the onscreen instructions. If you have already set up a synchronisation account and
you want to sync with that account, tap the account, press , and tap Sync
now.
To import contacts from a SIM card
1
From your Home screen, tap
2
Press
3
If you have set up a synchronisation account, you can choose to add the SIM
card contacts under that account. Or you can choose to only use these
contacts in the phone. Select your desired option.
4
To import an individual contact, find and tap the contact. To import all
contacts, tap Import all.
, then tap Settings > Accounts & sync.
, then tap .
, then tap Import contacts > SIM card.
To import contacts from a memory card
1
From your Home screen, tap
2
Press , then tap Import contacts > Memory Card.
3
If you have set up a synchronisation account, you can add the imported
memory card contacts under that account. Or you can choose to only use the
imported contacts in the phone. Select your desired option.
4
If you have more than one vCard file on the Memory card, a list appears
showing different batches of phone contacts, with the corresponding dates for
when they were created. Select the batch you want to import.
To receive contact data sent using Bluetooth™ technology
1
Make sure you have the Bluetooth™ function turned on and your phone set to
visible. If not, then you cannot receive data from other devices.
2
When you are asked to confirm whether you want to receive the file, tap
Accept.
3
Drag down the Notification panel and tap the file you received to import the
contact data.
To receive contacts sent using a messaging service
1
When you receive a new text message, multimedia message, or email
message, open the message.
2
The received contact data appears as a vCard attachment. Tap, or touch and
hold the vCard file to open a menu so you can save the contact data.
, then tap .
42
This is an Internet version of this publication. © Print only for private use.
Page 43
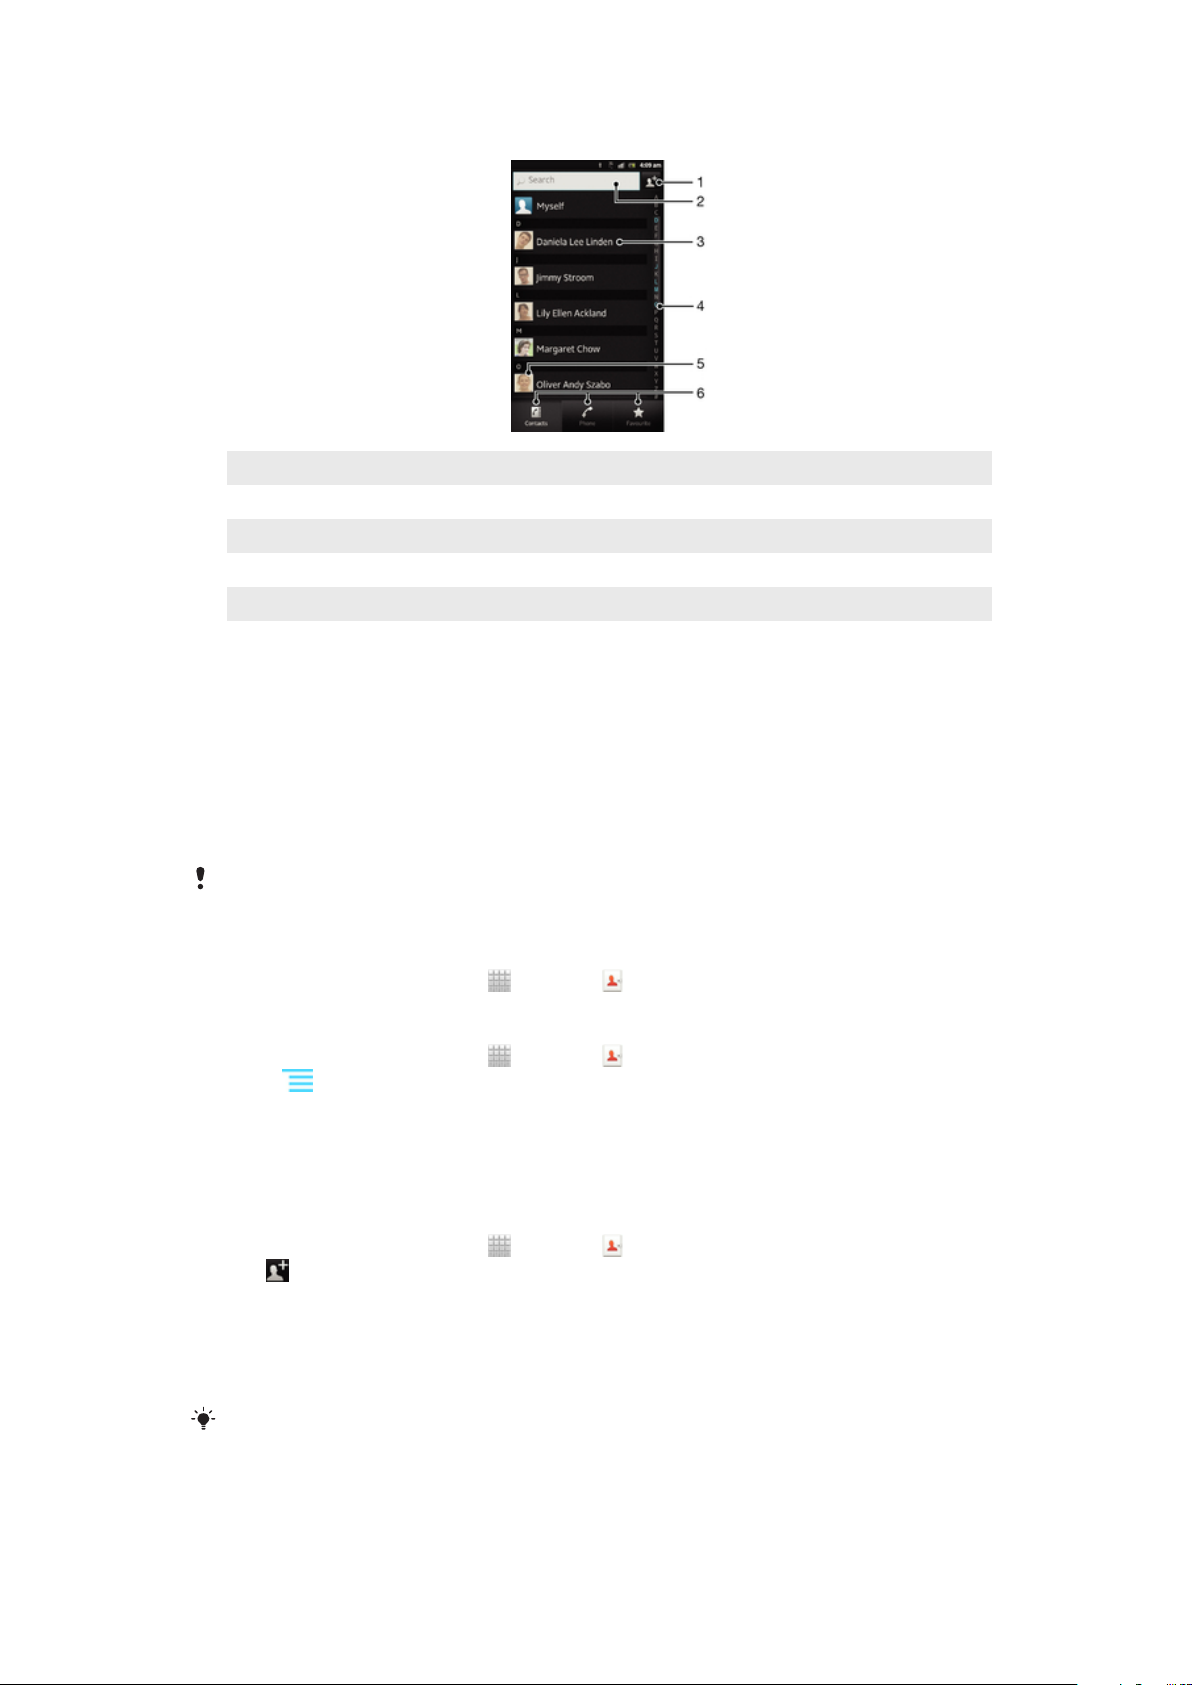
Contacts screen overview
1 Tap here to create a contact
2 Contact search field
3 Touch a contact to view its details
4 Alphabetical index for browsing contacts
5 Tap a contact thumbnail to access the Quick Contact menu
6 Shortcut tabs
Managing your contacts
You can create, edit and synchronise your contacts in a few simple steps. You can
select contacts saved in different accounts and manage how you display them in the
phone.
If you synchronise your contacts with more than one account, you can join contacts
in your phone to avoid duplicates.
Some synchronisation services, for example, some social networking services, do not allow
you to edit contact details.
To view your contacts
•
From your Home screen, tap
, then tap . Your contacts are listed here.
To select which contacts to display in the Contacts application
1
From your Home screen, tap
2
Press
3
In the list that appears, mark and unmark the desired options. If you have
, then tap Filter.
, then tap .
synchronised your contacts with a synchronisation account, that account
appears in the list. To further expand the list of options, tap the account.
4
When you are finished, tap OK.
To add a contact
1
From your Home screen, tap
2
Tap .
3
If you have synchronised your contacts with one or more accounts, select the
, then tap .
account to which you want to add this contact, or tap Phone contact if you
only want to use this contact in your phone.
4
Enter or select the desired information for the contact.
5
When you are finished, tap Done.
If you add a plus sign and the country code before a contact phone number, you can use the
number when you make calls from other countries.
43
This is an Internet version of this publication. © Print only for private use.
Page 44

To edit a contact
1
From the Home screen, tap , then tap .
2
Touch and hold the contact you want to edit, then tap Edit contact.
3
Edit the desired information. When you are finished, tap Done.
To associate a picture with a contact
1
From your Home screen, tap
2
Touch and hold the contact you want to edit, then tap Edit contact.
3
Tap
4
When you have added the picture, tap Done.
To view your communication with a contact
1
From the Home screen, tap
2
Tap the contact you want to view.
3
To view your communication with the contact for different media, tap or flick
through the filter items at the bottom of the screen.
To delete contacts
1
From your Home screen, tap
2
Press
3
Mark the contacts you want to delete, or tap Mark all if you want to delete all
contacts.
4
Tap Delete > OK.
and select the desired method for adding the contact picture.
You can also add a picture to a contact directly from the Gallery application.
, then tap Delete contacts.
, then tap .
, then tap .
, then tap .
To edit contact information about yourself
1
From your Home screen, tap
2
Touch and hold Myself at the top of the contact list, then tap Edit contact.
3
Enter the new information or make the changes you want.
4
When you are done, tap Done.
, then tap .
Avoiding duplicate entries in the Contacts application
If you synchronise your contacts with a new account or import contact information in
other ways, you could end up with duplicate entries in the Contacts application. If this
happens, you can join such duplicates to create a single entry. And if you join entries
by mistake, you can separate them again later.
To link contacts
1
From your Home screen, tap , then tap .
2
Touch and hold the contact you want to link with another contact, then tap
Link contact.
3
From the list that appears, tap the contact whose information you want to join
with the first contact, then tap OK to confirm. The information from the first
contact is merged with the second contact, and the first contact is no longer
displayed in the Contacts list.
To separate linked contacts
1
From your Home screen, tap
2
Touch and hold the linked contact you want to edit, then tap Edit contact.
3
Tap Unlink contact.
4
Tap OK.
, then tap .
Favourites
You can mark a contact as a favourite. The Favorites tab gives you quick access to
your marked contacts. In Favorites, you can also find a list of the contacts you
communicate with most frequently.
44
This is an Internet version of this publication. © Print only for private use.
Page 45

To mark or unmark a contact as a favourite
1
From the Home screen, tap , then tap .
2
Tap the contact you want to add to or remove from your favourites.
3
Tap
.
Communicating with your contacts
To search for a contact
1
From your Home screen, tap , then tap .
2
Enter the first few letters of the contact name in the Search field. All contacts
beginning with those letters appear.
The quick contact menu
Tap a contact's thumbnail to view quick communication options for a particular
contact. Options include calling the contact, sending a text or multimedia message,
and starting a chat using the Google Talk™ application.
For an application to appear as an option in the quick contact menu, you may need to set up
the application in your phone and be logged in to the application. For example, you need to
start the Gmail™ application and enter your login details before you can use Gmail™ from the
quick contact menu.
Sharing your contacts
To send your business card
1
From your Home screen, tap
2
Tap Myself.
3
Press
4
Select an available transfer method and follow the on-screen instructions.
To send a contact
1
From your Home screen, tap
2
Tap the contact whose details you want to send.
3
Press
4
Select an available transfer method and follow the on-screen instructions.
To send several contacts at once
1
From your Home screen, tap , then tap .
2
Press
3
Mark the contacts you want to send, or select all if you want to send all
contacts.
4
Tap Send, then tap OK to confirm.
5
Select an available transfer method and follow the on-screen instructions.
, then tap Send contact > OK.
, then tap Send contact > OK.
, then tap Send contacts.
, then tap .
, then tap .
Backing up contacts
You can use a memory card, a SIM card or an online synchronisation tool such as
Microsoft® Exchange ActiveSync® to back up contacts.
To export all contacts to a memory card
1
From your Home screen, tap , then tap .
2
3
Press
Tap OK.
, then tap Back up contacts > Memory Card.
This is an Internet version of this publication. © Print only for private use.
45
Page 46

To export contacts to a SIM card
1
From your Home screen, tap , then tap .
2
Press
3
Mark the contacts you want to export, or tap Mark all if you want to export all
, then tap Back up contacts > SIM card.
your contacts.
4
Tap Back up.
5
Select Add contacts if you want to add the contacts to existing contacts on
your SIM card, or select Replace all contacts if you want to replace the
existing contacts on your SIM card.
When you export contacts to a SIM card, not all information may get exported. This is due to
memory limitations on SIM cards.
46
This is an Internet version of this publication. © Print only for private use.
Page 47

Messaging
Using text and multimedia messaging
You can send and receive text messages from your phone using SMS (Short
Message Service). If your subscription includes MMS (Multimedia Messaging
Service), you can also send and receive messages that contain media files, for
example, pictures and videos. The number of characters you can send in a single text
message varies depending on the operator and the language you use. If you exceed
the character limit, then all your single messages are linked together and sent as one
message. You are charged for each single text message you send. When you view
your messages, they appear as conversations, which means that all messages to and
from a particular person are grouped together.
To send multimedia messages, you need the correct MMS settings in your phone. See Internet
and messaging settings on page 34.
To create and send a message
1
From your Home screen, tap , then find and tap .
2
Tap
3
To add a recipient, tap
recipient name. To add more than one recipient, mark the checkboxes for the
desired recipients. You can also enter the full number in the search field
manually, then tap Add.
4
When you are finished adding recipients, tap Done.
5
Tap Write message and enter your message text.
6
If you want to add a media file, tap and select an option.
7
To send the message, tap Send.
.
, then find and mark the checkbox next to the
If you exit a message before sending, it gets saved as a draft. The conversation gets tagged
with the word Draft:.
To read a received message
1
From your Home screen, tap , then find and tap .
2
Tap the desired conversation.
3
If the message is not yet downloaded, tap and hold the message, then tap
Download message.
You can also open messages from the status bar when appears there. Just drag down the
bar and tap the message.
To reply to a message
1
From your Home screen, tap
2
Tap the conversation containing the message.
3
Enter your reply and tap Send.
To forward a message
1
From your Home screen, tap , then find and tap .
2
Tap the conversation containing the message you want to forward.
3
Touch and hold the message you want to forward, then tap Forward message.
4
Select a recipient from the list, or tap
list.
5
Edit the message and tap Send.
, then find and tap .
to add a recipient who is not in the
To delete a message
1
From your Home screen, tap
2
Tap the conversation containing the message you want to delete.
3
Touch and hold the message you want to delete, then tap Delete message >
Yes.
This is an Internet version of this publication. © Print only for private use.
, then find and tap .
47
Page 48

To delete conversations
1
From your Home screen, tap , then find and tap .
2
Press
3
Mark the checkboxes for the conversations you want to delete, then tap
Delete.
To save a message sender's number
1
From your Home screen, tap
2
Tap a conversation.
3
Press , then tap Add to Contacts.
4
If you want to add the number to an existing contact, select the relevant
contact. Or tap
5
Select the account to which you want to save the contact.
6
Edit the contact information and tap Done.
To call a message sender
1
From your Home screen, tap
2
Tap a conversation.
3
Tap the recipient name or number at the top of the screen, then select the
recipient name or number from the list that appears.
4
If the recipient is saved in your contacts, tap the phone number that you want
to call. If you have not saved the recipient in your contacts, tap .
To save a file contained in a message you receive
1
From your Home screen, tap
2
Tap the conversation you want to open.
3
If the message has not been downloaded yet, tap and hold the message, then
tap Download message.
4
Touch and hold the file you want to save, then select the desired option.
, then tap Delete several.
, then find and tap .
if you want to create a new contact.
, then find and tap .
, then find and tap .
To star a message
1
From your Home screen, tap , then find and tap .
2
Tap the conversation you want to open.
3
In the message you want to star, tap
4
To unstar a message, tap
To view starred messages
1
From your Home screen, tap
2
Press , then tap Starred messages.
3
All starred messages appear in a list.
To search for messages
1
From your Home screen, tap
2
Press
3
Tap Search Messaging.
4
Enter your search keywords, then tap
, then tap Search.
.
, then find and tap .
, then find and tap .
.
.
Text and multimedia message options
To change your message notification settings
1
From your Home screen, tap
2
Press
3
To set a notification sound, tap Notification tone and select an option.
4
For other notification settings, check or uncheck the relevant checkboxes.
, then tap Settings.
, then find and tap .
48
This is an Internet version of this publication. © Print only for private use.
Page 49

To change the delivery report settings for outgoing messages
1
From your Home screen, tap , then find and tap .
2
Press
3
Tap Delivery report to activate or deactivate delivery reports.
, then tap Settings.
To view messages saved on the SIM card
1
From your Home screen, tap
2
Press , then tap Settings > SIM messages.
, then find and tap .
49
This is an Internet version of this publication. © Print only for private use.
Page 50

Use the Email application in your phone to send and receive emails through your
regular email account or through your corporate account. Or you can do both. Your
phone can handle several email accounts at the same time. You can set up these
accounts to run through one combined inbox, or through separate inboxes. Note that
emails you receive to your Gmail™ account can be accessed in the phone from both
the Email and the Gmail™ applications.
Your corporate Microsoft® Outlook® email messages have to be stored on a
Microsoft® Exchange server for the functionality described above to work. See Synchronising
your corporate email, calendar and contacts on page 71 for more information.
To set up an email account in your phone
1
From your Home screen, tap .
2
Find and tap Email.
3
Enter your email address and password, then tap Next.
4
If the settings for the email account cannot be downloaded automatically,
complete the setup manually. If necessary, contact your email service provider
for detailed settings. For corporate email setup on your phone, select
Exchange Active Sync as the account type.
5
When you are prompted, enter a name for your email account, so that it is
easily identifiable. The same name shows in the emails you send from this
account. When you are finished, tap Done.
You can set up more than one email account. See To add an extra email account in your
phone on page 53.
Using email
To create and send an email message
1
From your Home screen, tap , then find and tap Email.
2
If you are using several email accounts, tap the account you want to send the
message from, then tap
3
Tap To and start typing the recipient's address. Matches are displayed in a
dynamic list. Tap the relevant match or continue typing the complete email
address. To add more recipients, enter a comma ( , ) or a semi colon ( ; ) and
start typing another name. To delete a recipient, tap the key.
4
To select an email address saved in your contacts, tap
the checkbox next to a recipient field. To add more than one recipient, mark
the checkboxes for the desired recipients. When you are finished, tap Done.
5
Tap Subject and enter the email subject.
6
To attach a file, tap . Select the type of file, then tap the file you want to
attach from the list that appears.
7
In the message area, enter your message text.
8
To set a priority level, press
9
To add Cc/Bcc fields, press
10
To send the email, tap
To receive email messages
1
From your Home screen, tap .
2
Tap Email.
3
If you are using several email accounts, tap the account that you want to
check. If you want to check all your email accounts at once, tap Combined
Inbox.
4
To download new messages, press
.
, then find and mark
, then tap Set priority and select an option.
, then tap Add Cc/Bcc.
.
, then tap Refresh.
If you have set up a corporate email account, you can set the checking frequency to
Automatic (Push).
50
This is an Internet version of this publication. © Print only for private use.
Page 51

To read your email messages
1
From your Home screen, tap .
2
Find and tap Email.
3
If you are using several email accounts, tap the account you want to check. If
you want to check all your email accounts at once, tap Combined Inbox.
4
In the email inbox, scroll up or down and tap the email you want to read.
To use the email preview pane
1
From your Home screen, tap
2
If you are using several email accounts, tap the account you want to check.
3
Press
4
Hold your phone horizontally. The email preview pane appears.
5
Scroll up or down in the email inbox and tap the email you want to read. The
, then tap More > Preview pane > Landscape.
, then find and tap Email.
email opens in the preview pane. To view more information about the email,
tap the downward arrow next to the sender's name. In the body text field,
pinch two fingers together, or spread them apart, to zoom out or in.
6
To view the email in fullscreen format, drag the split bar (located between the
email list and email body) accordingly. In fullscreen format, use the upward and
downward arrows at the bottom of the screen to read your previous or next
message.
7
To return to the inbox view, drag the split bar accordingly.
To hide the preview pane, hold your phone vertically, or change the preview pane settings.
To change email preview pane settings
1
From your Home screen, tap
2
If you are using several email accounts, tap the account you want to check.
3
Press
, then tap More > Preview pane and select an option.
, then find and tap Email.
To change email preview pane settings when you're using the combined inbox, press ,
then tap Preview pane and select an option.
To view an email message attachment
1
From your Home screen, tap .
2
Find and tap Email.
3
Find and tap the desired message in your email inbox. Emails with attachments
are identified by .
4
Tap the downward arrow beside the sender's name, tap an attachment, and
select Open or Save.
To save a sender's email address to your contacts
1
From your Home screen, tap
2
Find and tap Email.
3
Find and tap the desired message in your email inbox.
4
Tap the name of the sender at the top of the screen.
5
Tap OK when you are prompted to add the name to your contacts.
6
Select an existing contact, or tap Create new contact if you want to create a
.
new contact.
7
Edit the contact information and tap Done.
To reply to an email message
1
From your Home screen, tap
2
Tap Email.
3
In your email inbox, touch and hold the message you want to reply to.
4
Tap Reply or Reply all.
5
Enter your reply, then tap
.
.
51
This is an Internet version of this publication. © Print only for private use.
Page 52

To forward an email message
1
From your Home screen, tap .
2
Tap Email.
3
In your email inbox, touch and hold the message you want to forward.
4
Tap Forward.
5
Tap To and enter the recipient's address. Or tap
to select a recipient from
your contacts.
6
Enter your message text, then tap
.
To delete an email message
1
From your Home screen, tap .
2
Tap Email.
3
In your email inbox, touch and hold the message you want to delete, then tap
Delete.
To sort your emails
1
From your Home screen, tap
2
Tap Email.
3
If you are using several email accounts, tap the account that you want to
.
check. If you want to check all your email accounts at once, tap Combined
Inbox.
4
Press
5
Select a sorting option.
, then tap Sort.
To search for emails
1
From your Home screen, tap
2
If you are using several email accounts and want to check just one account,
. Then find and tap Email.
tap the account name. Press , then tap Search.
3
Tap Search, enter your search text, then tap
4
The search result appears in a list sorted by date. Tap the email you want to
.
open.
5
To change search options, tap
and select a different option.
To manage your email in batches
1
From your Home screen, tap
2
If you are using several email accounts, tap the account that you want to
, then find and tap Email.
check. If you want to check all your email accounts at once, tap Combined
Inbox.
3
Press , then tap Mark several.
4
Mark the checkboxes for the emails that you want to select.
5
When you are finished, tap one of the icons at the bottom of the screen to, for
example, delete the selected emails. You can also mark them as read or
unread. For more options, press
In an Exchange Active Sync account, you can also tap to move selected emails to another
folder.
.
To view all folders for one email account
1
From your Home screen, tap
2
If you are using several email accounts, tap the account you want to check.
3
Press
, then tap Folders to view all the folders in this account.
. Then find and tap Email.
To change the inbox checking frequency
1
From your Home screen, tap
2
Find and tap Email.
3
If you are using several email accounts, tap and hold the account you want to
.
adjust, then tap Account settings. If you are viewing the inbox of one account,
press
4
Tap Inbox check frequency and select an option.
, then tap More > Account settings.
52
This is an Internet version of this publication. © Print only for private use.
Page 53

To set an Out of Office auto-reply in an Exchange Active Sync account
1
From your Home screen, tap , then find and tap Email.
2
If you are using several email accounts, touch and hold the desired EAS
(Exchange Active Sync) account, then select Account settings > Out of office.
3
Mark the Out of office checkbox.
4
If needed, mark the Set time range checkbox and set the time range for the
auto reply.
5
Enter your Out of Office message in the body text field.
6
Tap OK to confirm.
Using email accounts
To add an extra email account in your phone
1
From your Home screen, tap
2
Find and tap Email.
3
If you have more than one email account in your phone, all accounts appear in
a list. If you only have one email account in your phone, press
More > Accounts.
4
Press , then tap Add account.
5
Enter the email address and password, then tap Next. If the settings for the
email account cannot be downloaded automatically, complete the setup
manually.
6
When prompted, enter a name for your email account so that it is easily
identifiable. The same name shows in the emails you send from this account.
7
When you are finished, tap Done.
.
, then tap
To set an email account as your default account
1
From your Home screen, tap
2
Find and tap Email.
3
Tap and hold the account you want to use as the default account for
composing and sending email, then tap Account settings.
4
Mark the Default account checkbox.
If you only have one email account, this account is automatically the default account.
To remove an email account from your phone
1
From your Home screen, tap .
2
Find and tap Email.
3
If you have several email accounts in your phone, go to step 4. If you only have
one email account, press
4
Touch and hold the account you want to remove, then tap Delete account >
OK.
.
, then tap More > Accounts.
Gmail™ and other Google™ services
If you have a Google™ account, you can use the Gmail™ application in your phone
to read, write and organise email messages. After you set up your Google™ account
to work in the phone, you can also chat to friends using the Google Talk™
application, synchronise your phone calendar application with your Google
Calendar™, and download applications and games from Google Play™.
The services and features described in this chapter may not be supported in all countries or
regions, or by all networks and/or service providers in all areas.
53
This is an Internet version of this publication. © Print only for private use.
Page 54

To set up a Google™ account in your phone
1
From your Home screen, tap .
2
Find and tap Settings > Accounts & sync > Add account > Google.
3
Follow the registration wizard to create a Google™ account, or sign in if you
already have an account. Your phone is now ready to use with Gmail™ ,
Google Talk™ and Google Calendar™.
You can also sign in or create a Google™ account from the setup guide the first time you start
your phone. Or you can go online and create an account at www.google.com/accounts.
To open the Gmail™ application
1
From the Home screen, tap .
2
Find and tap Gmail .
54
This is an Internet version of this publication. © Print only for private use.
Page 55

Google Talk™
You can use Google Talk™ instant messaging in your phone to chat with friends who
also use this application.
To start Google Talk™
1
From your Home screen, tap
2
Find and tap Talk.
To reply to an instant message with Talk
1
When someone contacts you on Talk,
2
Drag the status bar downwards, then tap the message and begin to chat.
.
appears in the status bar.
55
This is an Internet version of this publication. © Print only for private use.
Page 56
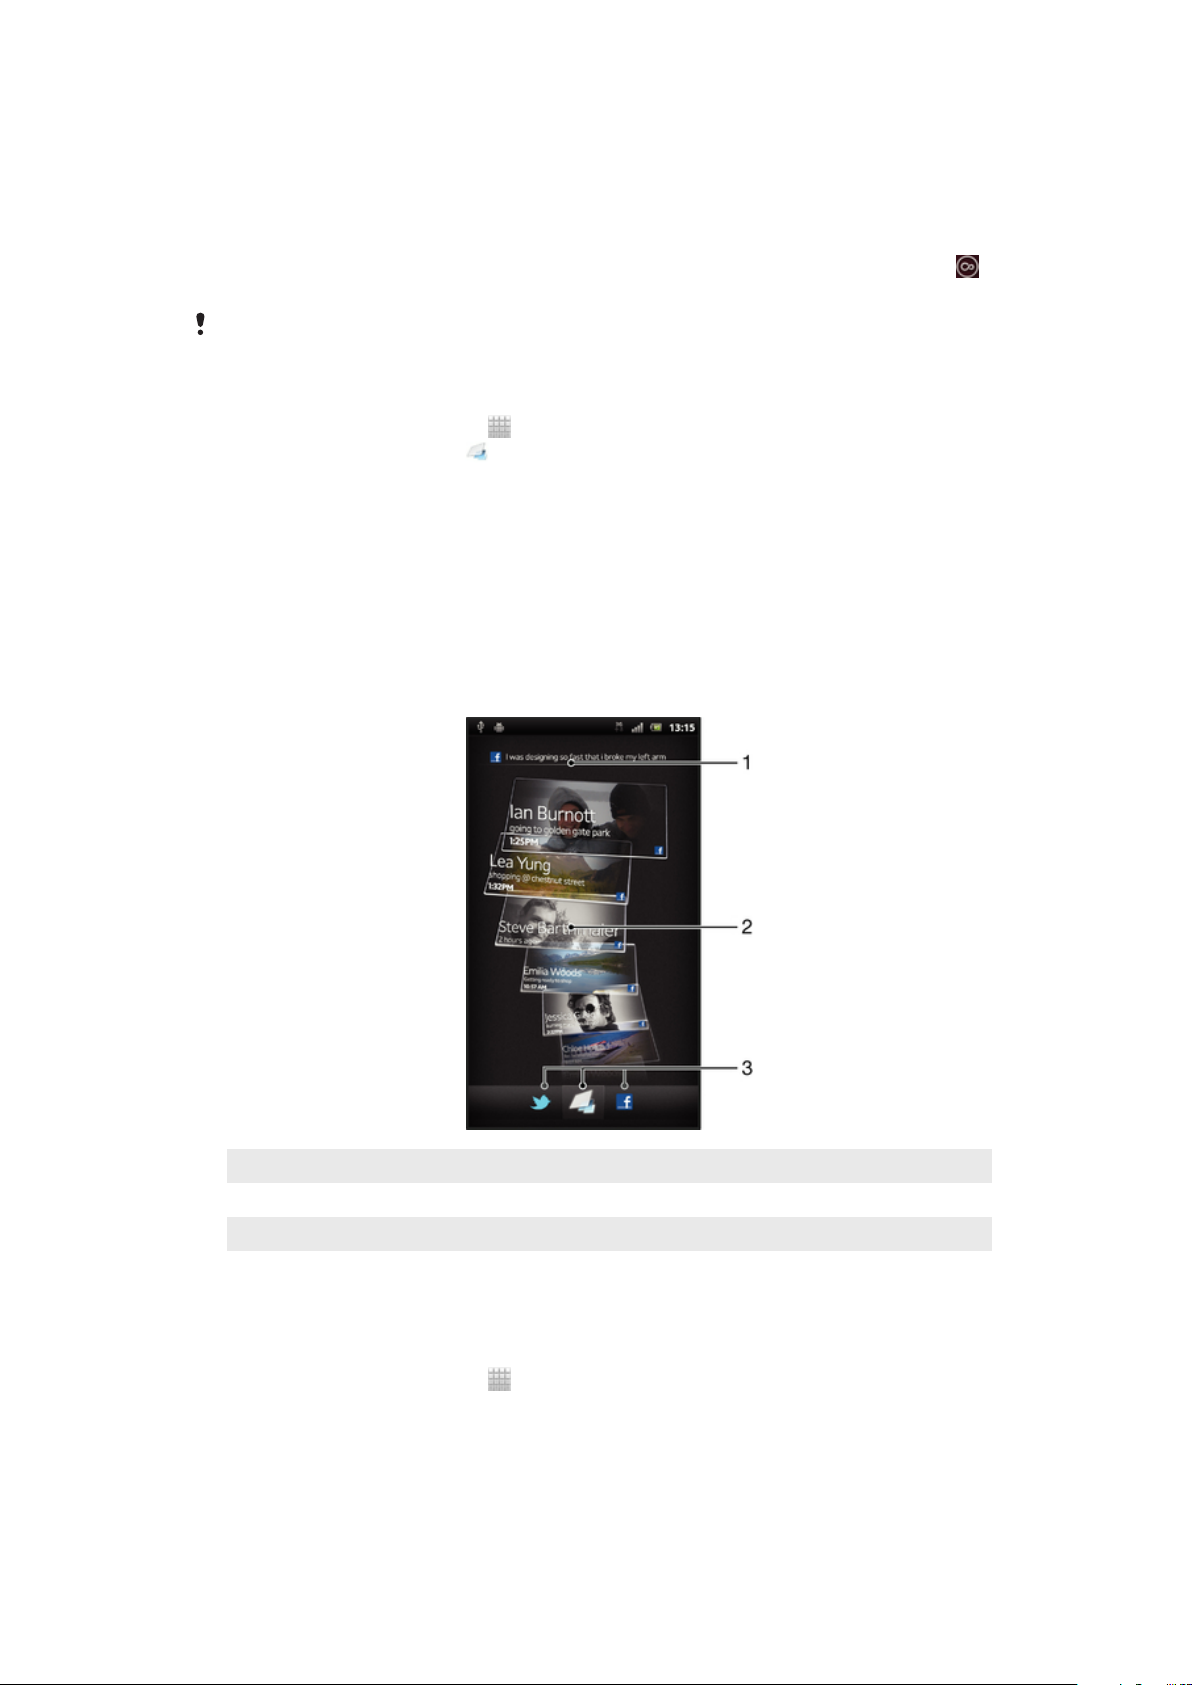
Timescape™
Timescape™ collects all your communications into one integrated view. Events such
as Facebook™ or Twitter™ updates appear as tiles in a chronological flow on the
screen. Browse the files to get a snack-size preview of events before choosing to
open them and view the full content. Timescape™ also features an infinite button
that gives you access to a range of content about the item you are currently viewing.
The services and features described in this chapter may not be supported in all countries or
regions, or by all networks and/or service providers in all areas.
To start Timescape™
1
From your Home screen, tap .
2
Find and tap Timescape™
3
If you are starting Timescape™ for the first time, tap the tile in the welcome
screen to set up Timescape.
4
Tap the Services screen to log in to social networking services such as
Facebook™ or Twitter™, or to search for Timescape-related extensions in
Google Play™.
5
If you do not want to log in to any social networking accounts or search
Google Play™, tap Done.
Timescape™ main view
.
1 Your status on the web services you have selected
2 Timescape™ tiles, in chronological order, with the most recent tile at the top
3 Timescape™ event filter
Using Timescape™
To scroll through tiles in Timescape™
1
From your Home screen, tap
2
Find and tap Timescape™.
3
Flick up or down to scroll through the tiles.
This is an Internet version of this publication. © Print only for private use.
.
56
Page 57

To preview a tile in Timescape™
1
From your Home screen, tap .
2
Find and tap Timescape™.
3
Scroll to the tile you want to preview, and then tap it.
Timescape™ event filter overview
All events
Updates from your Twitter™ contacts
Updates from your Facebook™ contacts
More events appear in the Timescape™ event filter if you have installed other Timescape
services.
To filter the events displayed in Timescape™
1
From your Home screen, tap .
2
Find and tap Timescape™.
3
Tap or flick through the filter icons.
To refresh the main view in Timescape™
•
When the Timescape™ event filter is set to show all events, press
Refresh.
When you refresh the main view, your phone may connect to the Internet to update
information from web service accounts that you have linked to Timescape™.
, then tap
To log in to Facebook™ or Twitter™ from Timescape™
1
From your Home screen, tap
2
Find and tap Timescape™.
3
Press , then tap Settings > Set up services.
4
Tap the service you want to log in to.
5
Enter your login details.
When you have logged in to a web service, you can update your status or view updates from
the web service in Timescape™.
.
To update your Facebook™ or Twitter™ status in Timescape™
1
From your Home screen, tap
2
Find and tap Timescape™.
3
Tap
4
Tap the service for which you want to update your status. If you are not signed
> Update status.
.
in to the service, you need to sign in before proceeding. When you have
selected the desired service, tap Continue.
5
Tap the text field and enter your new status, then tap Post.
To log out of Facebook™ or Twitter™ from Timescape™
1
From your Home screen, tap
2
Find and tap Timescape™.
3
Press , then tap Settings > Set up services.
4
Tap the service you want to log out of.
.
Your account information gets deleted when you log out.
Downloading new services for Timescape™
You can perform an extension search in Google Play™ and download new services
for Timescape™. Such services include applications and plug-ins that add extra
features to Timescape. For example, you can download applications that update
Timescape with your activities on various social networking sites.
57
This is an Internet version of this publication. © Print only for private use.
Page 58

To download and install new services for Timescape™
1
From your Home screen, tap .
2
Find and tap Timescape™.
3
Press
4
If you don't have a Google account set up on your phone, follow the on-screen
instructions to add one. Otherwise, you are directed straight to Google Play™.
5
In Google Play™, select a service to download from the list that appears, then
follow the instructions to download and install it.
You can delete installed Timescape services the same way you delete any other installed
application.
To view an event in Timescape™
1
From the Home screen, tap .
2
Find and tap Timescape™.
3
Scroll to and tap the tile for the desired event so it appears in preview mode.
Then tap the tile again.
, then tap Settings > Set up services > Extension search.
The infinite button in Timescape™
When you tap a tile, the infinite button appears in the upper right corner. If the tile
is connected to a contact, you can access related content by tapping the infinite
button.
To view all communication with a contact in Timescape™
1
From your Home screen, tap
2
Find and tap Timescape™.
3
Tap a tile for an event related to a contact.
4
Tap
5
Tap or flick the filter items at the bottom of the screen to view communication
with the contact through other media.
. All communication with the contact appears.
.
Timescape™ settings
To access Timescape™ settings
1
From the Home screen, tap
2
Find and tap Timescape™.
3
Press , then tap Settings.
To schedule web service content updates in Timescape™
1
From your Home screen, tap
2
Find and tap Timescape™.
3
Press
4
Tap the desired option. If you select Manual, no automatic updates get
scheduled.
, then tap Settings > Update mode.
.
.
Timescape™ Feed widget
The Timescape™ Feed widget shows all your most recent Timescape™ events in
one view. You can flick up or down within the widget to view the full content of every
event. You can also tap an event to view its content in fullscreen format or react to it
using comments, likes and retweets.
58
This is an Internet version of this publication. © Print only for private use.
Page 59
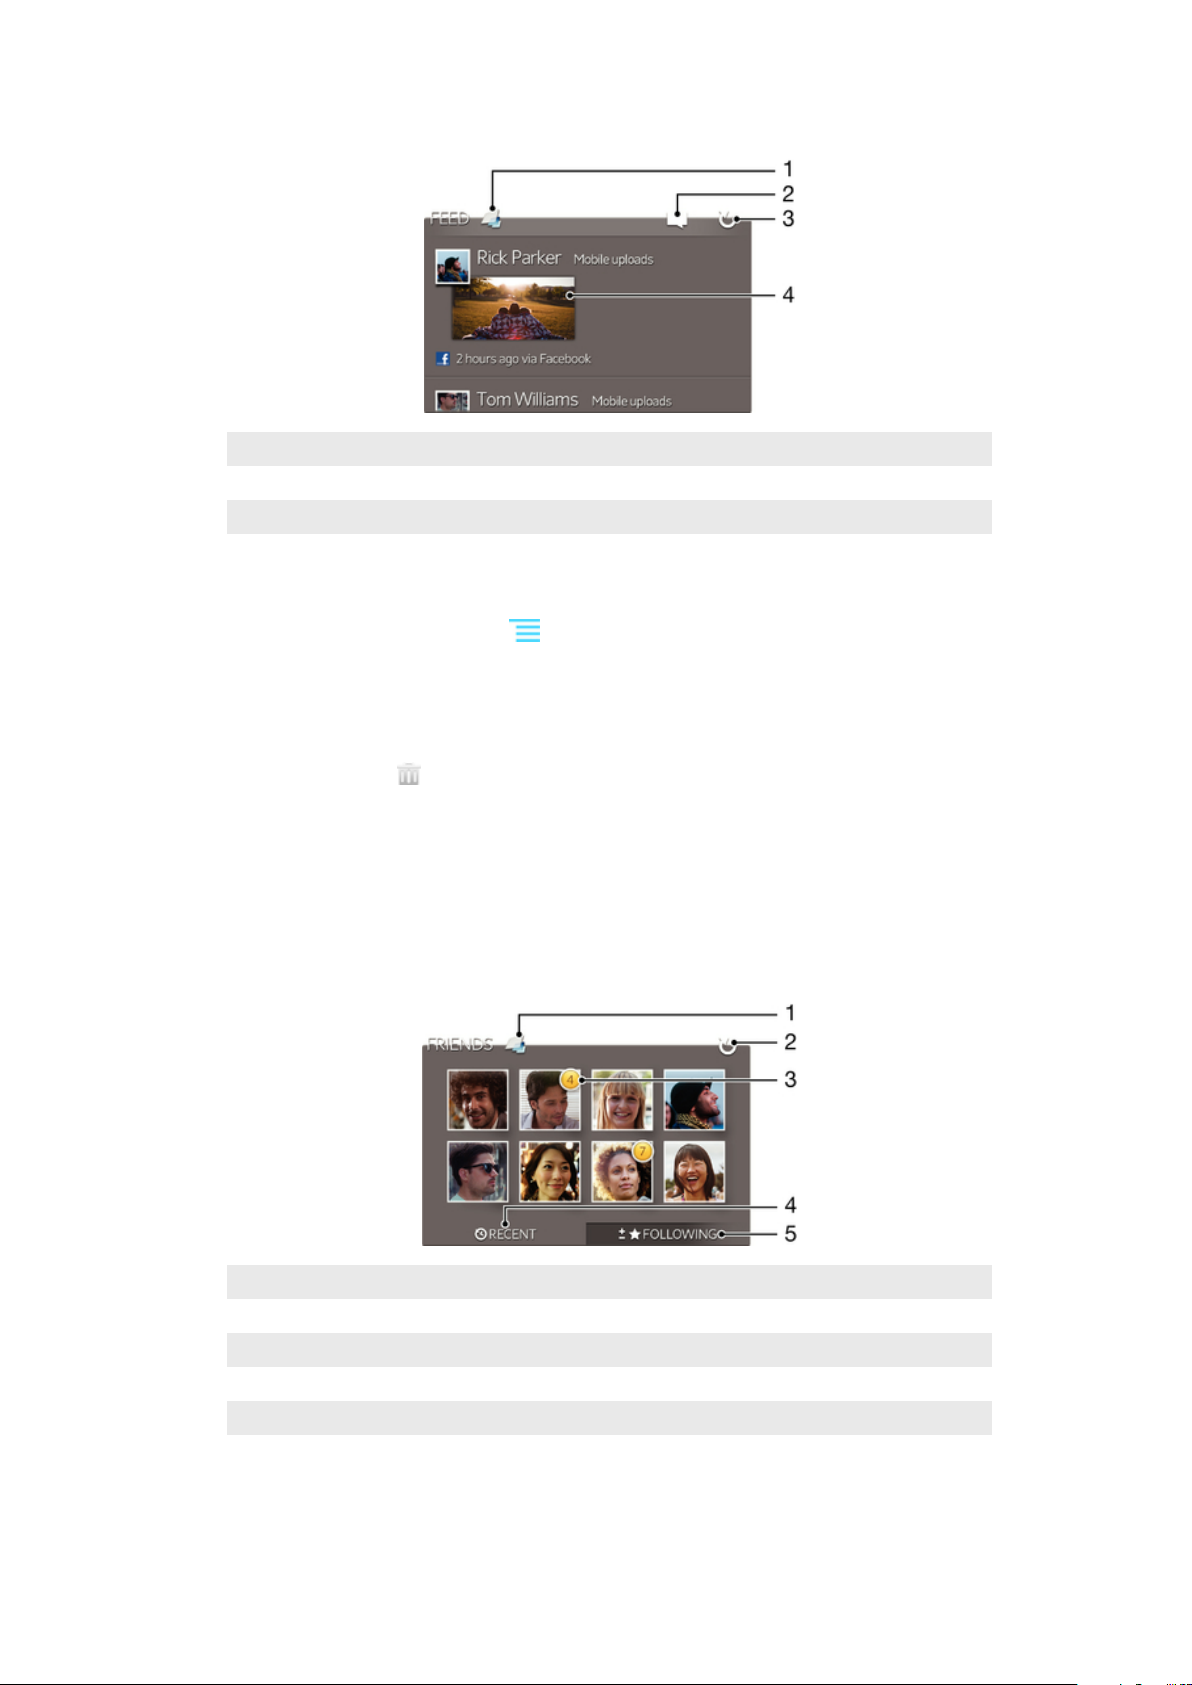
Timescape™ Feed widget view
1 Shortcut to the Timescape™ main view
2 Shortcut to update status
3 Refresh the widget view
4 Most recent online event
To add the Timescape™ Feed widget to your Home screen
1
From your Home screen, press .
2
Tap Add > Widgets.
3
Tap Timescape™ Feed.
To remove the Timescape™ Feed widget from your Home screen
1
From your Home screen, touch and hold the Timescape™ Feed widget.
2
Drag the widget to
.
Timescape™ Friends widget
The Timescape™ Friends widget notifies you of the latest social networking activities
related to you and your friends. You can view all activities and communicate with
your friends using comments, likes and retweets.
Timescape™ Friends widget view
1 Shortcut to the Timescape™ main view
2 Tap to refresh the view
3 Activity indicator – indicates updates to feeds
4 Tap to show friends with most recent social networking activity
5 Open this tab to show the friends you are following and add other friends
59
This is an Internet version of this publication. © Print only for private use.
Page 60
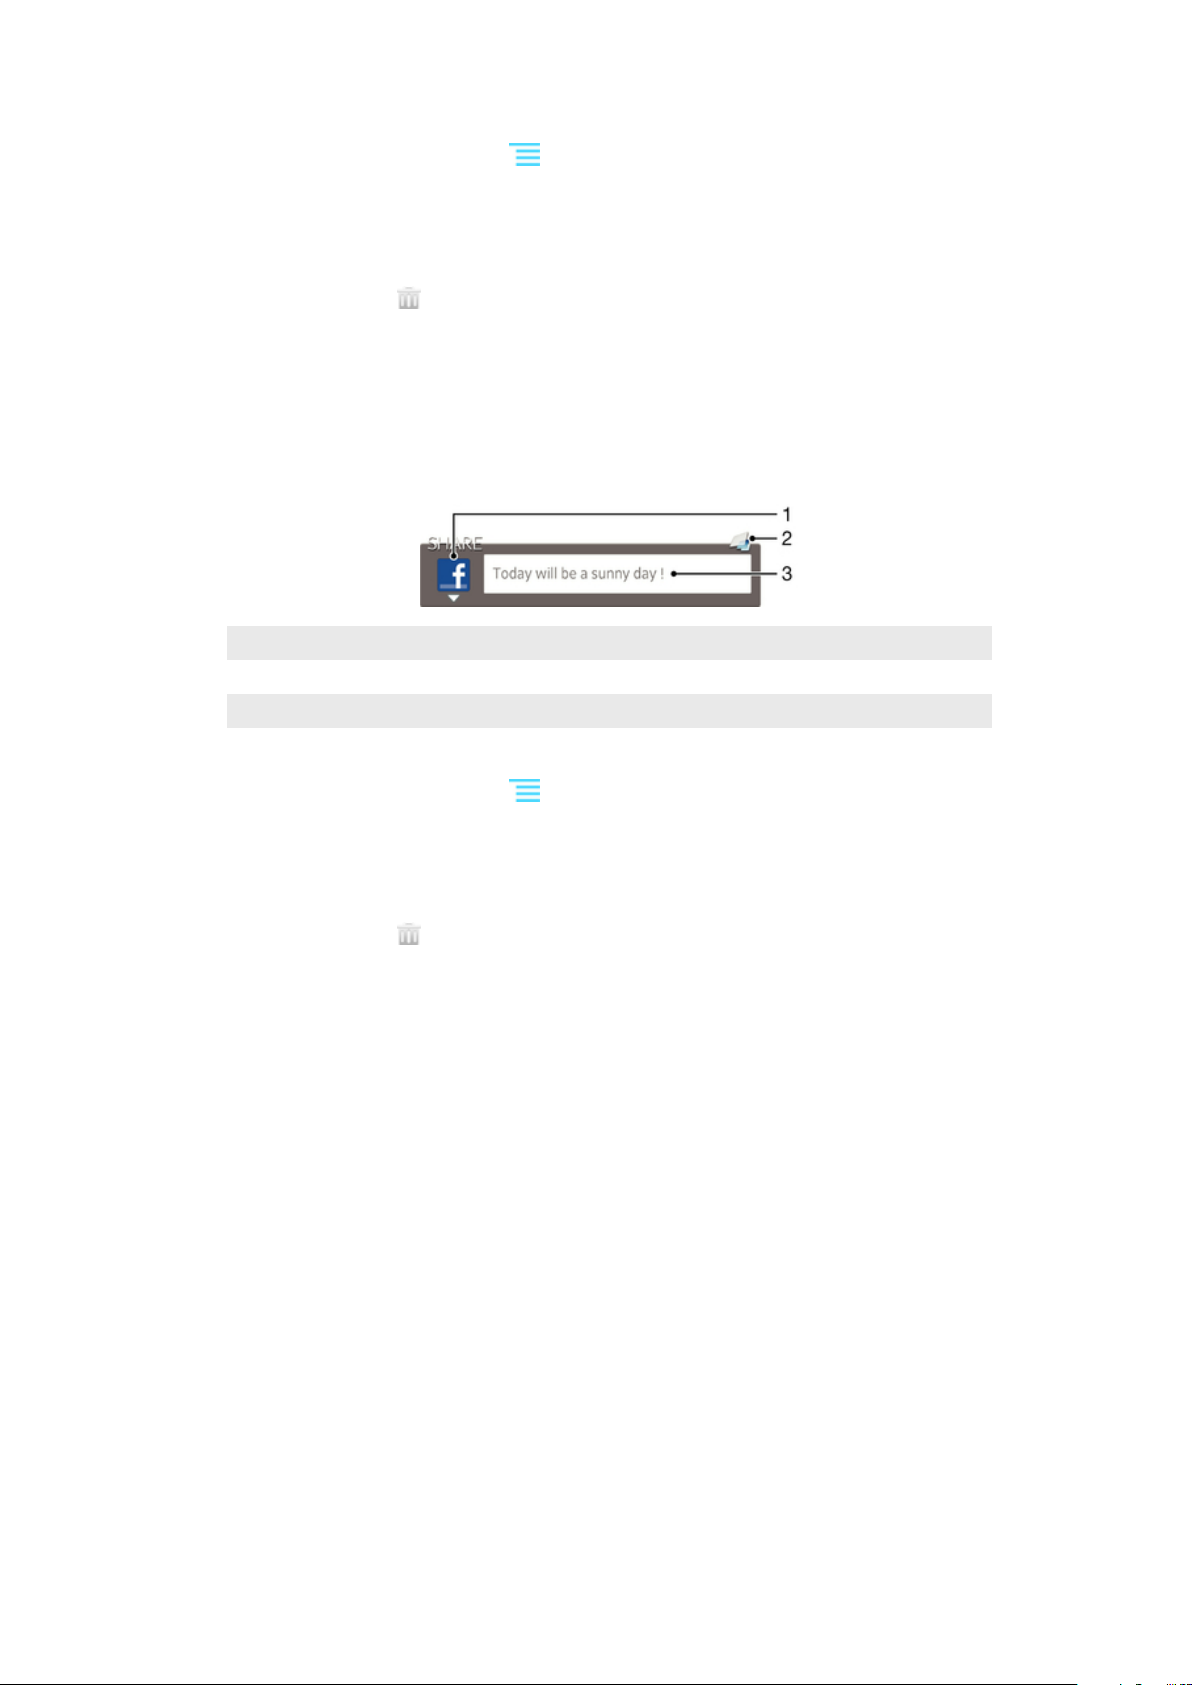
To add the Timescape™ Friends widget to your Home screen
1
From your Home screen, press .
2
Tap Add > Widgets.
3
Tap Timescape™ Friends.
To remove the Timescape™ Friends widget from your Home screen
1
From your Home screen, touch and hold the Timescape™ Friends widget.
2
Drag the widget to
.
Timescape™ Share widget
Share your status through one of the services that you have logged into from your
phone. For example, you can post updates on Facebook™ or Twitter™.
Timescape™ Share widget view
1 Icon showing the service currently used to send posts
2 Shortcut to the Timescape™ main view
3 Enter new posts here
To add the Timescape™ Share widget to your Home screen
1
From your Home screen, press
2
Tap Add > Widgets.
3
Tap Timescape™ Share.
.
To remove the Timescape™ Share widget from your Home screen
1
From your Home screen, touch and hold the Timescape™ Share widget.
2
Drag the widget to .
60
This is an Internet version of this publication. © Print only for private use.
Page 61

Getting started with Google Play™
Open Google Play™ and enter a world of applications and games. You can browse
these applications and games through different categories. You can also rate an
application or game and send feedback on it.
To use Google Play™, you need to have a Google™ account. See To set up a
Google™ account in your phone on page 54.
Google Play™ may not be available in all countries or regions
To open Google Play™
1
From the Home screen, tap .
2
Find and tap Play Store.
Downloading from Google Play™
You can download all kinds of applications from Google Play™, including free
applications.
Before you download applications
Before you start downloading from Google Play™, make sure that you have a
working Internet connection.
Also, remember that you might incur data traffic charges when you download content
to your phone. Contact your operator for more information.
To download a free application
1
In Google Play™, find an item you wish to download by browsing categories,
or by using the search function.
2
Tap the item to view its details, and follow the instructions to complete the
installation.
3
If the application you want to download requires access to your data or control
of any functions on your phone, an additional screen appears with details.
Read this screen carefully because the functionality of your phone may be
seriously affected if you proceed. Tap OK if you agree, or Cancel if you wish to
cancel the download.
To download a paid application
1
In Google Play™, find an item you wish to download by browsing categories,
or by using the search function.
2
Tap the item to view its details, and follow the instructions in your phone to
complete your purchase.
3
If the application you want to download requires access to your data or control
of any functions on your phone, an additional screen appears with details.
Read this screen carefully because the functionality of your phone may be
seriously affected if you proceed. Tap OK if you agree, or Cancel if you wish to
cancel the download.
To open a downloaded application
1
In Google Play™, press
2
Tap the downloaded application.
, then tap My Apps.
You can also access downloaded applications from the Application screen.
Clearing your application data
You may sometimes need to clear data for an application. This might happen if, for
example, the application memory becomes full, or you want to clear high scores for a
61
This is an Internet version of this publication. © Print only for private use.
Page 62

game. You might also want to erase incoming email, text and multimedia messages
in some applications.
To clear all cache for an application
1
From your Home screen, tap .
2
Find and tap Settings.
3
Tap Applications > Manage applications.
4
Tap the application for which you want to clear all cache.
5
Tap Clear cache.
It is not possible to clear the cache for some applications.
To delete an installed application
1
From the Home screen, tap
2
Find and tap Settings.
3
Tap Applications > Manage applications.
4
Tap the desired application.
5
Tap Uninstall.
It is not possible to delete some preinstalled applications.
.
Permissions
Some applications need to access parts of your phone to be able to work properly.
For example, a navigation application needs permissions to send and receive data
traffic, and access your location. Some applications might misuse their permissions
by stealing or deleting data, or reporting your location. Make sure you only install and
give permissions to applications you trust.
To view permissions of an application
1
From the Home screen, tap .
2
Find and tap Settings.
3
Tap Applications > Manage applications.
4
Tap the desired application.
5
Scroll down to view Permissions.
Installing applications not from Google Play™
Installing applications of unknown or unreliable origin can damage your phone. By
default, your phone is set to block such installations. However, you can change this
setting and allow installations from unknown sources.
Sony does not warrant or guarantee the performance of any third-party applications or content
transferred via download or other interface to your phone. Similarly, Sony is not responsible for
any damage or reduced performance of your phone attributable to the transfer of third-party
content. Only use content from reliable sources. Contact the content provider if you have any
questions or concerns.
To allow the installation of applications not from Google Play™
1
From your Home screen, tap .
2
Find and tap Settings > Applications.
3
Mark the Unknown sources checkbox.
62
This is an Internet version of this publication. © Print only for private use.
Page 63

PlayNow™ service
You can use the PlayNow™ service to download applications, music, games,
ringtones and wallpapers. The PlayNow™ service offers both free and non-free
downloads.
The PlayNow™ service is not available in all countries.
Before you download content
Before you download, make sure that you have an Internet connection. Also, you may
need to have a memory card inserted in your phone to download content.
When you download content to your phone, you might be charged for the amount of data
transferred. Contact your operator for information about data transfer rates in your country.
To start PlayNow™
1
From the Home screen, tap .
2
Find and tap
Downloading from the PlayNow™ service
Download a range of content from the PlayNow™ service direct to your phone.
Choose from a variety of applications, games, music, ringtones and other content.
Note that payment options for non-free applications may vary per country.
.
To download a PlayNow item to your phone
1
From your Home screen, tap .
2
Find and tap PlayNow™.
3
Find an item you want to download by browsing categories, or by using the
search function.
4
Tap the item to view its details.
5
Click “Buy now!” to start the purchase process. After your purchase has been
validated, you can start to download your content.
63
This is an Internet version of this publication. © Print only for private use.
Page 64
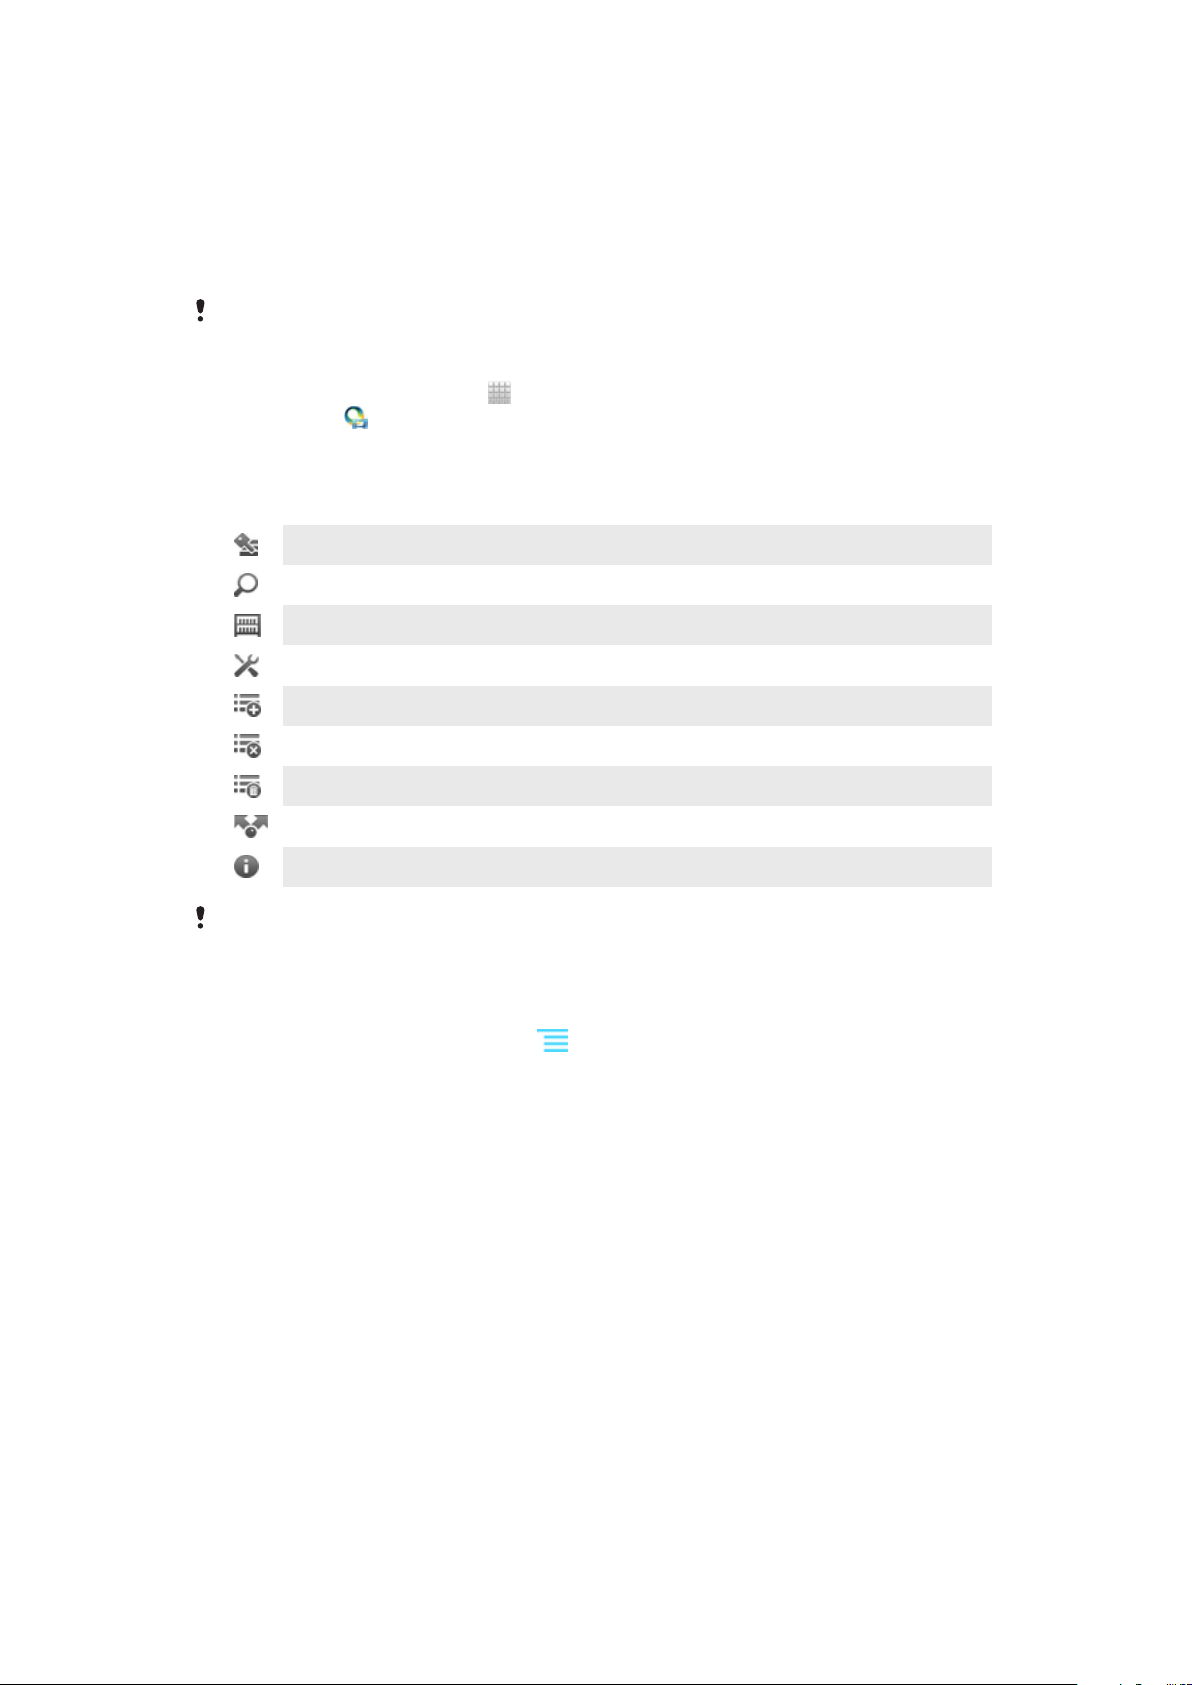
Video Unlimited™
Use the Video Unlimited™ service to rent and purchase videos that you can view not
only on your phone, but also on your PC, PlayStation® Portable (PSP®) and
PlayStation® 3. Select your pick from the latest Hollywood releases, action movies,
comedies, classics, and a range of other categories.
Video Unlimited™ might not be available in all countries or regions.
To open Video Unlimited™
1
From your Home screen, tap .
2
Find and tap .
Video Unlimited™ menu overview
View your account information
Search for a video
View the download status for all your items
View and change settings for your account, purchases, and downloads
Add the current video to a wish list
Delete all items in your wish list
Delete the video you're currently viewing from the wish list
Share information about the current video via a social network, email, Bluetooth or other method
View legal information
The Video Unlimited™ menu is dynamic, which means that all options are not always available.
For example, the option to delete all items in your wish list is only available when you are
viewing the list.
To open the Video Unlimited™ menu
•
Open Video Unlimited, then press
.
Creating a Video Unlimited™ account
You need to create a Video Unlimited™ account if you want to buy or rent movies
through the Video Unlimited™ service. If you already have a PlayStation® network
account, then you can use that account instead.
Exploring the Video Unlimited™ selection
Browse videos by category, or enter text to search for a particular item. You can also
choose to preview videos you're interested in.
Renting or buying a video
When you rent a video, you have a fixed amount of time in which to view it. This time
period varies from market to market. You can also choose to download a purchased
video to most Sony™ devices that are connected to your Video Unlimited™ account.
64
This is an Internet version of this publication. © Print only for private use.
Page 65
Video Unlimited™ notifications overview
When you buy or rent videos, the following notifications may appear:
Downloading of video is completed
Downloading has failed. You need to check that, for example, your phone is
connected to a Wi-Fi® network, and that you have enough free space on your
memory card.
Downloading of video is ongoing
Downloading is paused
Confirmation of successful purchase
Rental countdown period has started
Watching a video from Video Unlimited™
You can watch your rented or purchased videos on most Sony™ device that are
connected to your Video Unlimited™ account.
Video menu overview
When you watch a video from Video Unlimited™, you can open a menu to get the
following options:
Delete the current video
View information about the current video
Change the audio language
Change the language of subtitles, or remove subtitles
65
This is an Internet version of this publication. © Print only for private use.
Page 66

Music Unlimited™
Music Unlimited™ is a subscription-based service that offers access to millions of
songs over a 3G or Wi-Fi® connection. You can manage and edit your personal
music library in the cloud from a variety of devices, or sync your playlists and music
using a PC that runs the Windows® operating system. For more information, visit
www.sonyentertainmentnetwork.com.
Music Unlimited™ might not be available in all countries or regions.
To open Music Unlimited™
1
From your Home screen, tap
2
Find and tap .
.
66
This is an Internet version of this publication. © Print only for private use.
Page 67

Getting organised
Calendar
Your phone has a calendar for managing your time schedule. If you have a Google™
account, you can also synchronise your phone calendar with your web calendar. See
Synchronising data on your phone on page 71.
To set the calendar view
1
From your Home screen, tap , then find and tap Calendar.
2
Tap Month, Week or Day to select an option.
To view multiple calendars
1
From your Home screen, tap
2
Press
3
Select the calendars you want to view.
To create a calendar event
1
From your Home screen, tap , then tap Calendar.
2
Press
3
Enter the name, time, location and description for the event.
4
If desired, select another option under Repetition.
5
Select a reminder for the event. To add a new reminder for the event, tap
6
Tap Save.
, then tap Calendars.
, then tap New event.
, then find and tap Calendar.
.
When the appointment time approaches, your phone plays a short sound to remind you. Also,
appears in the status bar.
To view a calendar event
1
From your Home screen, tap
2
Tap the event you want to view.
To change the calendar settings
1
From your Home screen, tap , then tap Calendar.
2
Press
3
Tap the setting you want to change, then edit as desired.
, then tap Settings.
, then tap Calendar.
Alarm clock
Use your phone as an alarm clock and select any sound in your phone as your alarm
signal. The alarm does not sound if your phone is turned off. But it does sound when
your phone is set to silent mode.
To open the alarm clock
1
From your Home screen, tap
2
Find and tap Alarm.
To set a new alarm
1
From your Home screen, tap
2
Find and tap Alarm.
3
Tap Add alarm.
4
Adjust the time by scrolling up and down.
5
If desired, edit other alarm settings.
6
Tap Done.
.
.
67
This is an Internet version of this publication. © Print only for private use.
Page 68

To edit an existing alarm
1
From your Home screen, tap .
2
Find and tap Alarm.
3
Tap the alarm you want to edit.
4
Scroll up or down to adjust the time.
5
If desired, edit other alarm settings.
6
Tap Done.
The alarm time format displayed is the same as the format you select for your general time
settings, for example, 12-hour or 24-hour.
To deactivate an alarm
1
From your Home screen, tap .
2
Find and tap Alarm.
3
Unmark the checkbox next to the alarm you want to deactivate.
To activate an existing alarm
1
From your Home screen, tap
2
Find and tap Alarm.
3
Tap the checkbox next to the alarm you want to activate.
.
To delete an alarm
1
From your Home screen, tap .
2
Find and tap Alarm.
3
Touch and hold the alarm you want to delete.
4
Tap Delete alarm, then tap Yes.
To set the ringtone for an alarm
1
From your Home screen, tap
2
Find and tap Alarm.
3
Tap the alarm you want to edit.
4
Unmark Style settings checkbox.
5
Tap Alarm sound and select an option.
6
Tap Done.
.
To set a recurring alarm
1
From your Home screen, tap
2
Find and tap Alarm.
3
Tap the alarm you want to edit.
4
Tap Repeat.
5
Mark the checkboxes for the desired days, then tap OK.
.
To set the title for an alarm
1
From your Home screen, tap
2
Find and tap Alarm.
3
Tap the alarm you want to edit.
4
Tap the Alarm text field and enter a name for the alarm.
5
Tap Done.
.
To activate the vibrate function for an alarm
1
From your Home screen, tap .
2
Find and tap Alarm.
3
Tap the alarm you want to edit.
4
Mark the Vibrate checkbox.
To set alarms to sound when the phone is in silent mode
1
From your Home screen, tap
2
Find and tap Alarm, then tap to select an alarm.
3
Mark the Alarm in silent mode checkbox, then tap Done.
.
68
This is an Internet version of this publication. © Print only for private use.
Page 69

To snooze an alarm when it sounds
•
Tap Snooze - min.
To turn off an alarm when it sounds
•
Slide to the right.
69
This is an Internet version of this publication. © Print only for private use.
Page 70

Scanning with the NeoReader™
application
Use your phone as a barcode scanner to find out more about items you scan. For
example, you see a coat in a magazine ad and want to find the nearest retail outlet to
buy it. If the ad contains a readable barcode, the NeoReader™ application uses this
code to access mobile web content, such as a web page with more product
information or a map of nearby outlets. NeoReader™ supports most standard
barcode types.
To start the NeoReader™ application
1
From the Home screen, tap
2
Find and tap
To scan a barcode
1
When the NeoReader™ application is open, hold the phone camera over the
barcode until the complete barcode is visible in the viewfinder.
2
The phone automatically scans the barcode, and vibrates when the barcode is
recognised. If the barcode is not recognised, tap
To enter a barcode manually
1
When the NeoReader™ application is open, tap .
2
Tap the text field, then enter the numbers of the barcode.
NeoReader™.
.
to scan the code manually.
NeoReader™ application menu overview
The following menu options are available in the NeoReader™ application:
Capture the barcode using a higher image resolution in cases where NeoReader™ does not
recognise the barcode automatically
Enter the bar code numbers manually. This option can be used if your camera has difficulty
reading the bar code
View a list of previously scanned bar codes
Select preferences for how you use the NeoReader™ application
View information about the NeoReader™ application
Read more about different bar code types, and about how to use NeoReader™
Select your personal settings, such as language or country. This information is used to
personalise bar code content
Send a text message to invite a friend to download the NeoReader™ application
70
This is an Internet version of this publication. © Print only for private use.
Page 71

Synchronising data on your phone
You can sync contacts, email, calendar events, and other information with your
phone from multiple email accounts, synchronisation services and other kinds of
accounts, depending on the applications installed on your phone. Synchronising your
phone with other information sources is an easy and practical way to stay up to date.
You can:
•
access your Gmail™ , Google Calendar™, Google™ contacts and other Google
services you use.
•
access your corporate email, contacts and calendar applications.
•
access your Facebook™ contacts, calendar, albums and other services you use.
•
synchronise your phone with an Internet server using SyncML™.
Synchronising with Google™
Synchronise your phone with your Gmail™ , Google Calendar™, Google™ contacts
and data from other Google services you use. View and manage them from your
phone just as easily as you would from a computer.
After synchronising, you can find Gmail™ in the Gmail™ application; Google
Calendar™ in the Calendar application; Google™ contacts in the Contacts
application; and other data in corresponding Google applications that you have
installed.
To set up a Google™ account in your phone for automatic synchronisation
1
From your Home screen, tap .
2
Tap Settings > Accounts & sync.
3
Make sure that synchronisation is turned on so that applications can
synchronise data automatically.
4
Tap Add account > Google.
5
Follow the registration wizard to create a Google™ account, or sign in if you
already have an account.
6
Tap Next.
7
Tap your newly created Google™ account, then tap the items you want to
synchronise.
To synchronise manually with your Google™ account
1
From the Home screen, tap
2
Tap Settings > Accounts & sync.
3
Tap the Google™ account you want to synchronise.
4
Press
To remove a Google™ account from your phone
1
From your Home screen, tap .
2
Tap Settings > Accounts & sync.
3
Tap the Google™ account you want to remove from the accounts list.
4
Tap Remove account.
5
Tap Remove account again to confirm.
You can remove all your Google™ accounts from the accounts list, except for the first one. To
remove the first account, you have to completely reset your phone. See Resetting the phone
on page 134.
, then tap Sync now.
.
Synchronising your corporate email, calendar and contacts
Access your corporate email messages, calendar appointments and contacts directly
from your phone. View and manage them just as easily as you would from a
71
This is an Internet version of this publication. © Print only for private use.
Page 72

computer. After setup, you can find your information in the Email, Calendar and
Contacts applications.
For you to access the functionality described above, your corporate information must be
stored on a Microsoft® Exchange server.
To set up corporate email, calendar and contacts in your phone
1
From your Home screen, tap .
2
Tap Settings > Accounts & sync.
3
Make sure the Activate auto-sync checkbox is marked so that your data will
synchronise automatically according to the sync interval you set.
4
Tap Add account > Exchange Active Sync.
5
Enter your corporate email address and password.
6
Tap Next.
7
Follow the steps to configure your account and select the kinds of data you
want to sync to the phone, such as contacts and calendar. If the settings for
your corporate account are not found automatically, complete the setup
manually. Contact your corporate network administrator if you need more
information.
8
When the setup is done, enter a name for this corporate account, so that it is
easily identifiable, then tap Done.
9
If prompted, activate the device administrator to allow your corporate server to
control certain security features in your phone. Device administrators for your
phone are typically email, calendar, or other applications to which you grant
authority to implement security policies on the phone when you connect to
enterprise services that require this authority.
To edit the setup of corporate email, calendar and contacts
1
From your Home screen, tap
2
Tap Settings > Accounts & sync and select your corporate account.
3
Tap Account settings.
4
Change the settings to suit your needs. For example, you can decide:
•
how often the phone should check for new email messages.
•
to get your corporate calendar and contacts in your phone.
•
server settings in Incoming settings.
.
To set a synchronisation interval for a corporate account
1
From your Home screen, tap
2
Tap Settings > Accounts & sync and select your corporate account.
3
Tap Account settings.
4
Tap Inbox check frequency and select an interval option.
.
To remove a corporate account from your phone
1
From your Home screen, tap .
2
Tap Settings > Accounts & sync, then tap your corporate account.
3
Tap Remove account.
4
Tap Remove account again to confirm.
Synchronising with Facebook™
Set up your phone to synchronise your Facebook™ contacts, calendar entries,
photos, and data from other services you use. When you set up Facebook to work in
your phone, you may get the option to create a Sony™ Facebook integration
account, which allows easier access to Facebook from other applications in your
phone.
72
This is an Internet version of this publication. © Print only for private use.
Page 73

To set up a Facebook™ account on your phone
1
From your Home screen, tap .
2
Tap Settings > Accounts & sync.
3
Make sure that synchronisation is turned on so that applications can
synchronise data automatically.
4
Tap Add account > Facebook.
5
Follow the registration wizard to create a Facebook™ account, or sign in if you
already have a Facebook account.
To synchronise manually with your Facebook™ account
1
From your Home screen, tap
2
Tap Settings > Accounts & sync.
3
Tap the Facebook™ account or the Sony™ Facebook integration account.
4
Press
, then tap Sync now.
.
To remove a Facebook™ account from your phone
When you remove a Facebook™ account from your phone, the Facebook account is not
deleted and you can still access it from a computer.
1
From your Home screen, tap
2
Tap Settings > Accounts & sync.
3
Tap the Facebook account.
4
Tap Remove account.
5
Tap Remove account again to confirm. The Facebook account and the Sony™
.
Facebook integration account are now removed from your phone.
Synchronising using SyncML™
Synchronise your phone with an Internet server using SyncML™. View and manage
contacts, calendar and bookmarks from your phone just as easily as you would from
a computer.
To set up a SyncML™ account in your phone
1
From your Home screen, tap
2
Find and tap Settings > Accounts & sync.
3
Make sure the Activate auto-sync checkbox is marked so that your data will
synchronise automatically according to the interval you set.
4
Tap Add account > SyncML.
5
Tap the Name, Server address, Username and Password fields, and enter the
information required.
6
Tap Sync interval and select how often you want the phone to synchronise
automatically.
7
Tap a field that you want to synchronise, for example, Contacts. Then enter the
information required. Repeat this step for each item you want to synchronise.
8
When you're finished, tap Done.
Contact your SyncML™ service provider for more information about your account settings.
To synchronise manually with your SyncML™ account
1
From your Home screen, tap
2
Tap Settings > Accounts & sync.
3
Tap the SyncML™ account that you want to synchronise.
4
Press
, then tap Sync now.
.
.
To set a synchronisation interval
1
From your Home screen, tap .
2
Tap Settings > Accounts & sync, then tap your SyncML™ account.
3
Tap Account settings.
4
Tap Sync interval and select an interval option.
73
This is an Internet version of this publication. © Print only for private use.
Page 74

To remove a SyncML™ account from your phone
1
From your Home screen, tap .
2
Tap Settings > Accounts & sync, then tap your SyncML™ account.
3
Tap Remove account.
4
Tap Remove account again to confirm.
74
This is an Internet version of this publication. © Print only for private use.
Page 75

Connecting to wireless networks
You can access the Internet wirelessly from your phone using Wi-Fi® technology.
This way you can browse the web and access cheaper call and data rates. You can
also share media files over the same Wi-Fi® network with other DLNA Certified™
devices, for example, TVs, computers and tablets.
If your company or organisation has a virtual private network (VPN), you can connect
to this network with your phone. You can use a VPN to access intranets and other
internal services at your company.
Wi-Fi®
Using Wi-Fi® technology you can access the Internet wirelessly with your phone. To
access the Internet using a Wi-Fi® connection, you first need to search for and
connect to an available Wi-Fi® network. The signal strength of the Wi-Fi® network
may differ depending on your phone's location. Moving closer to the Wi-Fi® access
point may increase the signal strength.
Before using Wi-Fi®
To browse the Internet using a Wi-Fi® connection, you need to search for and
connect to an available Wi-Fi® network and then open the Internet browser. The
signal strength of the Wi-Fi® network may differ depending on your phone's location.
Move closer to the Wi-Fi® access point to increase the signal strength.
To turn on Wi-Fi®
1
From the Home screen, tap .
2
Find and tap Settings > Wireless & networks.
3
Mark the Wi-Fi checkbox. The phone scans for available Wi-Fi® networks.
It may take a few seconds before Wi-Fi® is enabled.
To connect to a Wi-Fi® network
1
From the Home screen, tap .
2
Find and tap Settings > Wireless & networks > Wi-Fi settings.
3
Available Wi-Fi® networks are displayed under Wi-Fi networks. The available
networks may be open or secured. Open networks are indicated by and
secured networks are indicated by next to the Wi-Fi® network name.
4
Tap a Wi-Fi® network to connect to it. If you are trying to connect to a secure
Wi-Fi® network, you are asked to enter a password. is displayed in the
status bar once you are connected.
Your phone remembers Wi-Fi® networks you connect to. The next time you come within reach
of a previously connected Wi-Fi® network, your phone automatically connects to it.
In some locations, open Wi-Fi® networks require you to log in to a web page before you can
get access to the network. Contact the relevant Wi-Fi® network administrator for more
information.
To connect to another Wi-Fi® network
1
From the Home screen, tap .
2
Find and tap Settings > Wireless & networks > Wi-Fi settings. Detected WiFi® networks are displayed in the Wi-Fi networks section.
3
Tap another Wi-Fi® network to connect to it.
Wi-Fi® network status
When you are connected to a Wi-Fi® network or when there are Wi-Fi® networks
available in your vicinity, it is possible to see the status of these Wi-Fi® networks.
You can also enable the phone to notify you whenever an open Wi-Fi® network is
detected.
75
This is an Internet version of this publication. © Print only for private use.
Page 76

To enable Wi-Fi® network notifications
1
Turn on Wi-Fi®, if it is not already on.
2
From your Home screen, tap .
3
Find and tap Settings > Wireless & networks > Wi-Fi settings.
4
Mark the Network notification checkbox.
To scan for Wi-Fi® networks manually
1
From your Home screen, tap
2
Find and tap Settings > Wireless & networks > Wi-Fi settings.
3
Press
4
Tap Scan. The phone scans for Wi-Fi® networks and displays available
networks in a list.
5
Tap a Wi-Fi® network in the list to connect to it.
.
.
Advanced Wi-Fi® settings
Before you add a Wi-Fi® network manually, you need to turn on the Wi-Fi® setting in
your phone.
To add a Wi-Fi® network manually
1
From the Home screen, tap .
2
Find and tap Settings > Wireless & networks > Wi-Fi settings.
3
Tap Add Wi-Fi network.
4
Enter the Network SSID for the network.
5
Tap the Security field to select a security type.
6
If required, enter a password.
7
Tap Save.
Contact your Wi-Fi® network administrator to get the Network SSID name and Wireless
password.
To view detailed information about a connected Wi-Fi® network
1
From the Home screen, tap
2
Find and tap Settings > Wireless & networks > Wi-Fi settings.
3
Tap the Wi-Fi® network that you are currently connected to. Detailed network
information is displayed.
.
Wi-Fi® sleep policy
By adding a Wi-Fi® sleep policy, you can specify when to switch from Wi-Fi to
mobile data.
If you are not connected to a Wi-Fi® network, the phone uses mobile data connection to
access the Internet (if you have set up and enabled a mobile data connection in your phone).
To add a Wi-Fi® sleep policy
1
From the Home screen, tap .
2
Find and tap Settings > Wireless & networks > Wi-Fi settings.
3
Press
4
Tap Advanced .
5
Tap Wi-Fi sleep policy.
6
Select a Wi-Fi sleep policy to use.
.
Using a static IP address
You can set up the phone to connect to a Wi-Fi® network using a static IP address.
76
This is an Internet version of this publication. © Print only for private use.
Page 77

To set up a static IP address
1
From the Home screen, tap .
2
Find and tap Settings > Wireless & networks > Wi-Fi settings.
3
Press
4
Tap Advanced
5
Mark the Use static IP checkbox.
6
Tap and enter the information needed for your Wi-Fi® network:
.
.
• IP address
• Gateway
• Netmask
• DNS 1
• DNS 2
7
Press and tap Save .
WPS
WPS (Wi-Fi Protected Setup) is a computing standard that helps you establish secure
wireless network connections. If you have little background knowledge of wireless
security, WPS makes it easy for you to set up Wi-Fi Protected Access (WPA)
encryption to secure your network. You can also add new devices to an existing
network without entering long passwords.
Use one of these methods to enable WPS:
•
Push button method – simply push a button on a WPS access point, for example, a
router.
•
PIN method – your phone creates a random PIN (Personal Identification Number),
which you enter on the network access point device.
To connect to a Wi-Fi® network using a WPS button
1
From your Home screen, tap
2
Find and tap Settings > Wireless & networks.
3
Mark the Wi-Fi checkbox.
4
Tap Wi-Fi settings > Auto setup (WPS).
5
Press the WPS button on the access point within two minutes.
.
To connect to a Wi-Fi® network using a WPS PIN
1
From your Home screen, tap
2
Find and tap Settings > Wireless & networks.
3
Mark the Wi-Fi checkbox.
4
Tap Wi-Fi settings.
5
Tap a network indicated by
6
Follow the instructions that appear.
.
and select Use PIN.
Sharing your phone’s mobile data connection
You can share your phone’s mobile data connection with a single computer using a
USB cable. This process is called USB tethering. You can also share your phone’s
data connection with up to eight devices at once, by turning your phone into a
portable Wi-Fi® hotspot.
When your phone is sharing its data connection, the following icons may appear in
the status bar or in the Notification panel:
USB tethering is active
Portable Wi-Fi® hotspot is active
Both USB tethering and portable hotspot are active
77
This is an Internet version of this publication. © Print only for private use.
Page 78

To share your phone’s data connection using a USB cable
1
Deactivate all USB cable connections to your phone.
2
Using the USB cable that came with your phone, connect your phone to a
computer.
3
From your Home screen, tap .
4
Find and tap Settings > Wireless & networks > Tethering.
5
Mark the USB tethering checkbox. The phone starts sharing its mobile
network data connection with the computer over the USB connection. An
ongoing notification appears in the status bar and the Notification panel.
6
Unmark the USB tethering checkbox, or disconnect the USB cable to stop
sharing your data connection.
You cannot share your phone’s data connection and SD card over a USB cable at the same
time. For more information, see Connecting your phone to a computer on page 118.
You may need to prepare your computer to establish a network connection via USB cable. Go
to android.com/tether to get the most current information.
To share your phone’s data connection as a portable Wi-Fi® hotspot
1
From the Home screen, tap .
2
Find and tap Settings > Wireless & networks > Tethering.
3
Tap Portable Wi-Fi hotspot settings > Configure Wi-Fi hotspot.
4
Enter the Network SSID for the network. Tap the Security field to select a
security type.
5
If required, enter a password.
6
Tap Save.
7
Mark the Portable Wi-Fi hotspot checkbox. The phone starts broadcasting its
Wi-Fi® network name (SSID). You can now connect to this network with up to
8 computers or other devices.
8
Unmark the Portable Wi-Fi hotspot checkbox when you want to stop sharing
your data connection via Wi-Fi®.
To rename or secure your portable hotspot
1
From the Home screen, tap
2
Find and tap Settings > Wireless & networks > Tethering.
3
Make sure the Portable Wi-Fi hotspot checkbox is marked.
4
Tap Portable Wi-Fi hotspot settings > Configure Wi-Fi hotspot.
5
Enter the Network SSID for the network.
6
Tap the Security field to select a security type.
7
If required, enter a password.
8
Tap Save.
.
Virtual private networks (VPNs)
Use your phone to connect to virtual private networks (VPNs), which allow you to
access resources inside a secured local network from outside the actual network. For
example, VPN connections are commonly used by corporations and educational
institutions for users who need to access intranets and other internal services when
they are outside of the internal network, for example, when they are travelling.
VPN connections can be set up in many ways, depending on the network. Some
networks may require you to transfer and install a security certificate in your phone.
See Connecting your phone to a computer on page 118 for more information on how
to transfer content to your phone. For detailed information on how to set up a
connection to your virtual private network, please contact the network administrator
of your company or organisation.
78
This is an Internet version of this publication. © Print only for private use.
Page 79

To add a virtual private network
1
From the Home screen, tap .
2
Find and tap Settings > Wireless & networks > VPN settings.
3
Tap Add VPN.
4
Select the type of VPN to add.
5
Enter your VPN settings.
6
Press
and tap Save.
To connect to a virtual private network
1
From the Home screen, tap
2
Find and tap Settings > Wireless & networks > VPN settings.
3
In the list of available networks, tap the VPN you want to connect to.
4
Enter the required information.
5
Tap Connect.
.
To disconnect from a virtual private network
1
Drag the status bar downwards.
2
Tap the notification for the VPN connection to turn it off.
79
This is an Internet version of this publication. © Print only for private use.
Page 80
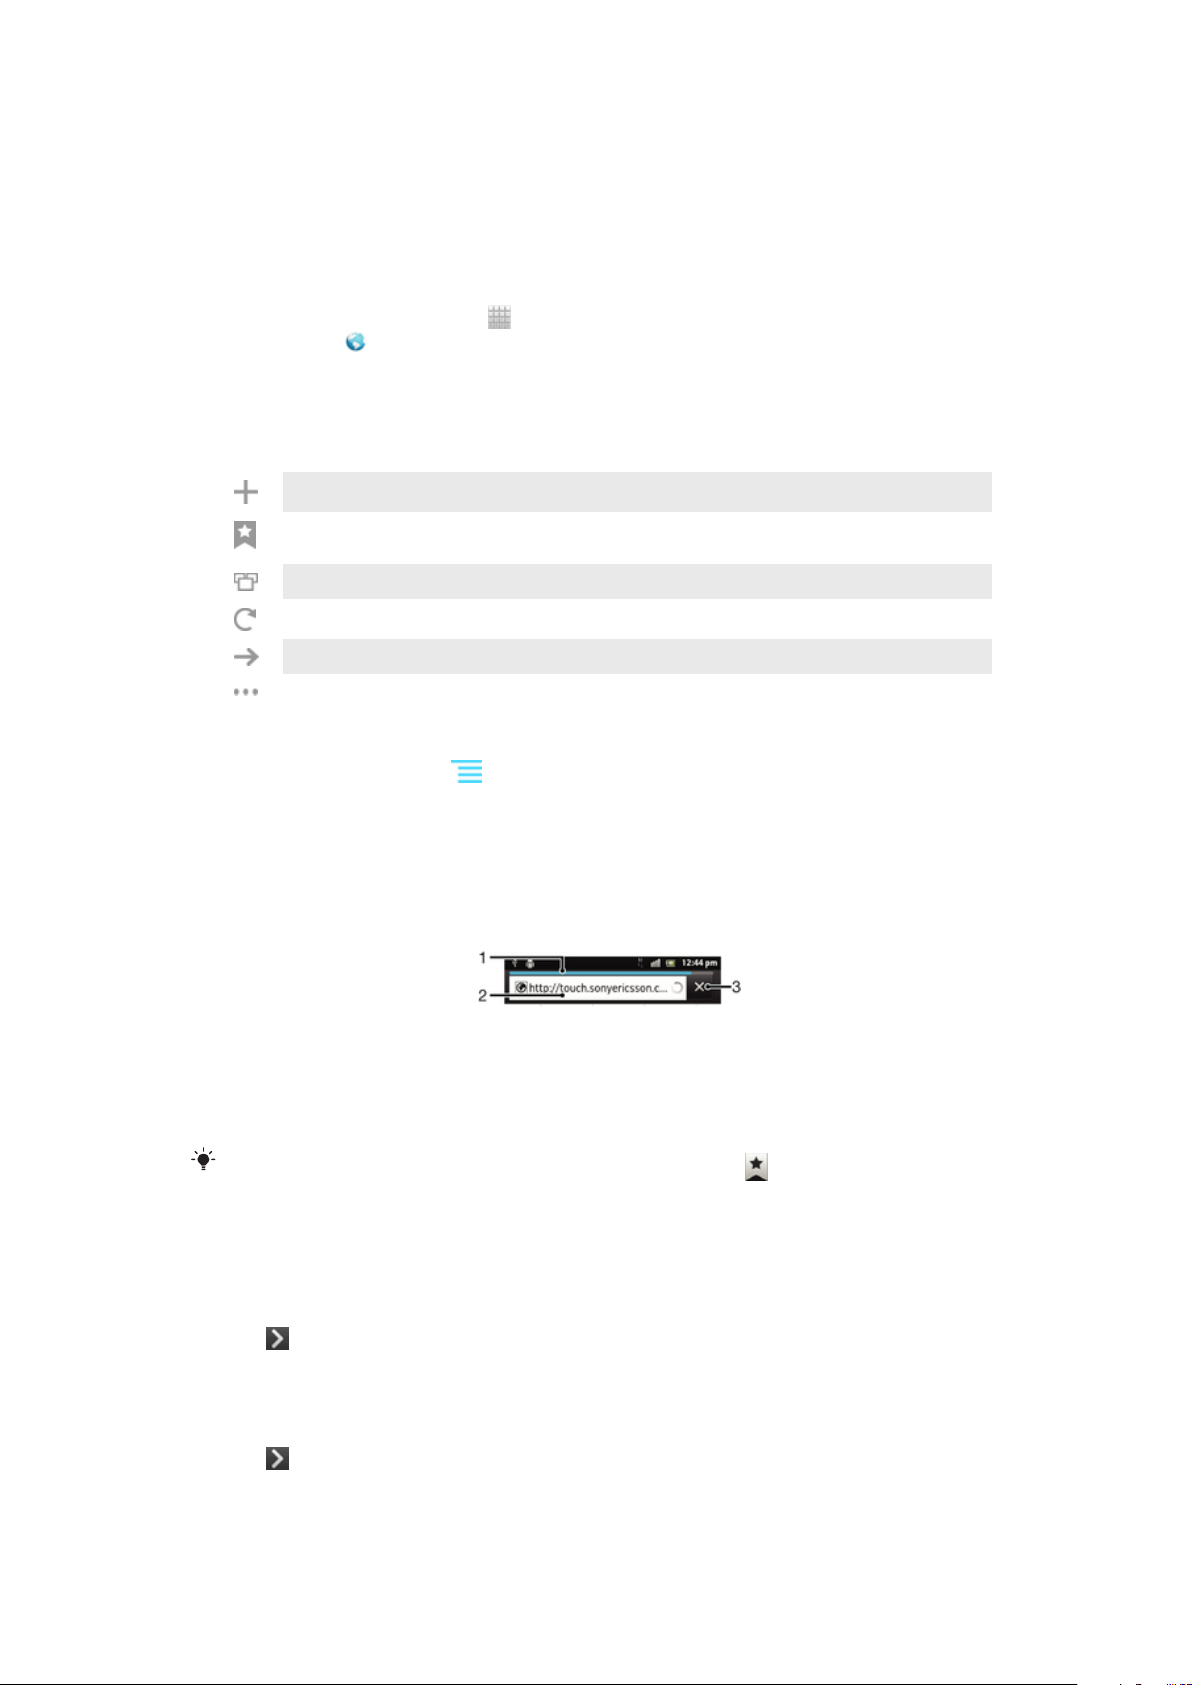
Web browser
Use your web browser to view and navigate web pages, add pages as bookmarks,
and create shortcuts to your Home screen. You can open several browser windows
at the same time and use the zoom function when navigating a web page.
To open the web browser
1
From your Home screen, tap
2
Find and tap
.
Toolbar
The toolbar options make browsing easy:
Open a new browser window
Add, open or edit a bookmark. View your most visited web pages or open web pages from the
browser history
View open windows
Refresh the current web page
Go forward one page in the browsing history
Open a menu to see more options
.
To open the toolbar
•
From the browser, press .
Browsing the web
Search and address bar
Use the search and address bar to browse the web.
1 View the download progress of the current web page
2 Enter a search word to search for a web page, or enter a web page address to load a web page
3 Cancel the download of the current web page
When a page has finished downloading, tap the bookmark icon next to the search and
address bar to bookmark it.
To go to a web page
1
In your Browser, tap the text field in the search and address bar to activate the
keypad.
2
Enter a web address.
3
Tap .
To search a web page
1
Tap the search and address text field to activate the keypad.
2
Enter a search word.
3
Tap
.
80
This is an Internet version of this publication. © Print only for private use.
Page 81

To exit the web browser
•
While browsing, press .
When you open the browser again, the browser appears exactly as it did before you exited,
that is, with the same number of windows, position and zoom levels.
Navigating web pages
To select a link
•
To select a link in a web page, tap the link. The selected link is highlighted in
orange, and the web page is loaded when you release your finger.
If you select a link by mistake before releasing your finger, you can deselect it by dragging
your finger away until the link is no longer highlighted.
To go to the previous page while browsing
•
Press .
To zoom in or out on a web page
Use one of the following methods to zoom in or out on a web page:
•
Touch an area of the page with two fingers at once and spread them apart to
zoom in, or pinch them together to zoom out.
•
Slide your finger on the screen to make the zoom controls appear. Tap the
icon to zoom in, or tap to zoom out.
•
Double-tap to zoom in on the web page, or double-tap again to zoom out.
To reload the current web page
•
Press
, then tap Refresh.
To add a web page shortcut to your Home screen
1
When viewing a web page, press .
2
Tap Bookmarks > Add.
3
If desired, you can edit the name and the web address. When you're done, tap
OK.
4
Tap and hold the bookmark to open a menu.
5
Tap Add shortcut to Home.
To share a link to the current web page
1
While browsing, press
2
Tap More > Share page.
3
Select an available transfer method, and follow the on-screen instructions.
.
Managing bookmarks
Bookmarks let you access your favourite and frequently visited web pages quickly.
Depending on your network operator, some bookmarks may be pre-installed on your
phone.
To bookmark a web page
1
While you are viewing a web page, press
2
Tap Bookmarks > Add.
3
If desired, you can edit the name and the web address.
4
When you're done, tap OK.
.
To bookmark a web page, you can also tap the icon to the right of the search and address
field.
81
This is an Internet version of this publication. © Print only for private use.
Page 82

To open a bookmark
1
When the Browser is open, press .
2
Tap Bookmarks.
3
Tap the bookmark you want to open.
To edit a bookmark
1
When the Browser is open, press
2
Tap Bookmarks.
3
Touch and hold a bookmark to open a menu.
4
Tap Edit bookmark.
5
Edit the name and the web address, as desired.
6
When you're done, tap OK.
To delete a bookmark
1
When the Browser is open, press
2
Tap Bookmarks.
3
Touch and hold a bookmark to open a menu.
4
Tap Delete bookmark to delete the selected bookmark.
To bookmark a previously visited web page
1
When the Browser is open, press .
2
Tap Bookmarks.
3
Tap the History tab, or the Most visited tab, to view a list of previously visited
web pages.
4
Tap the
icon to the right of the web page you want to add as a bookmark.
.
.
Managing text and images
To find text within a web page
1
When you are viewing a web page, press
2
Tap More > Find on page.
3
Enter your search text. Matching characters appear highlighted in green.
4
Tap the left or right arrow to go to the previous or next matching item.
5
Tap
To copy text from a web page
1
Locate the text you want to copy.
2
Press .
3
Tap More > Select text.
4
Place your finger at the start of the text you want to select and then drag it to
the desired end point. The text you select becomes highlighted.
5
Tap the selected text to copy it.
6
To paste text into an email, text message or multimedia message, touch and
hold the text field in the relevant application and tap Paste in the menu that
appears.
To save an image from a web page
1
On the active web page, touch and hold the desired image until a menu
appears.
2
Tap Save image.
3
If an SD card is inserted, you can select where you want to save the image.
Select a location. If you prefer to making the current download setting the
default setting, mark the Set as default download memory checkbox.
to close the search bar.
.
If both the internal storage and the SD card are unavailable, the image cannot be saved.
82
This is an Internet version of this publication. © Print only for private use.
Page 83

Multiple windows
Your browser can run in up to eight different windows at the same time. You can, for
example, log in to your webmail in one window and read today's news in another.
You can easily switch from one window to another.
To open a new browser window
1
When the Browser is open, press .
2
Tap New window.
To open a link in a new browser window
1
Touch and hold a link until a menu appears.
2
Tap Open in new window.
To switch between browser windows
1
When the Browser is open, press
2
Tap Windows to see a list of all open windows.
3
Tap the window you want to switch to.
.
Downloading from the web
You can download applications and content when you browse the web using the web
browser in your phone. Usually you have to touch a download link for the desired file
and the download then starts automatically.
To view your downloaded files
1
When the Browser is open, press .
2
Tap More > Downloads.
To cancel an ongoing download
1
When the Browser is open, press .
2
Tap More > Downloads.
3
Mark the checkbox beside the downloading file you want to delete.
4
Tap Cancel.
Browser settings
You can change the browser settings and customise your browser view. For
example, you can change the size of the text displayed to suit your needs, or you can
clear cache, cookies, browser history, and other data linked to the websites you visit.
To change your browser settings
1
When the Browser is open, press
2
Tap More > Settings.
To change the text size on web pages
1
When the browser is open, press
2
Tap More > Settings > Text size.
3
Select a text size.
.
.
To clear the cache memory from your phone
1
When the browser is open, press
2
Tap More > Settings.
3
Find and tap Clear cache, then tap OK to confirm.
To clear your browser cookies
1
When the browser is open, press .
2
Tap More > Settings.
3
Find and tap Clear all cookie data, then tap OK to confirm.
This is an Internet version of this publication. © Print only for private use.
.
83
Page 84

To clear your browser history
1
When the browser is open, press .
2
Tap More > Settings.
3
Find and tap Clear history, then tap OK to confirm.
Auto-fitting web pages
The auto-fit option makes it easier for you to read large websites with text and
images, such as news sites. For example, if you zoom in on a web page when auto-fit
is enabled, the text automatically adjusts to the new screen size. If auto-fit is
disabled, you might need to scroll sideways to read a full sentence.
To auto-fit web pages
1
When the Browser is open, press
2
Tap More > Settings > Auto-fit pages.
.
Plug-in settings
You can adjust how a plug-in functions on a web page. For example, you can enable
plug-ins to get optimal visual effect when you view a web page. Alternatively, to
increase browsing speed, you can configure your browser to only run plug-ins on
demand, or you can disable plug-ins completely.
To enable plug-ins on demand
1
When the browser is open, press
2
Tap More > Settings.
3
Find and tap Enable plug-ins.
4
Tap On demand.
.
You may need to restart your browser for the setting to take effect.
84
This is an Internet version of this publication. © Print only for private use.
Page 85
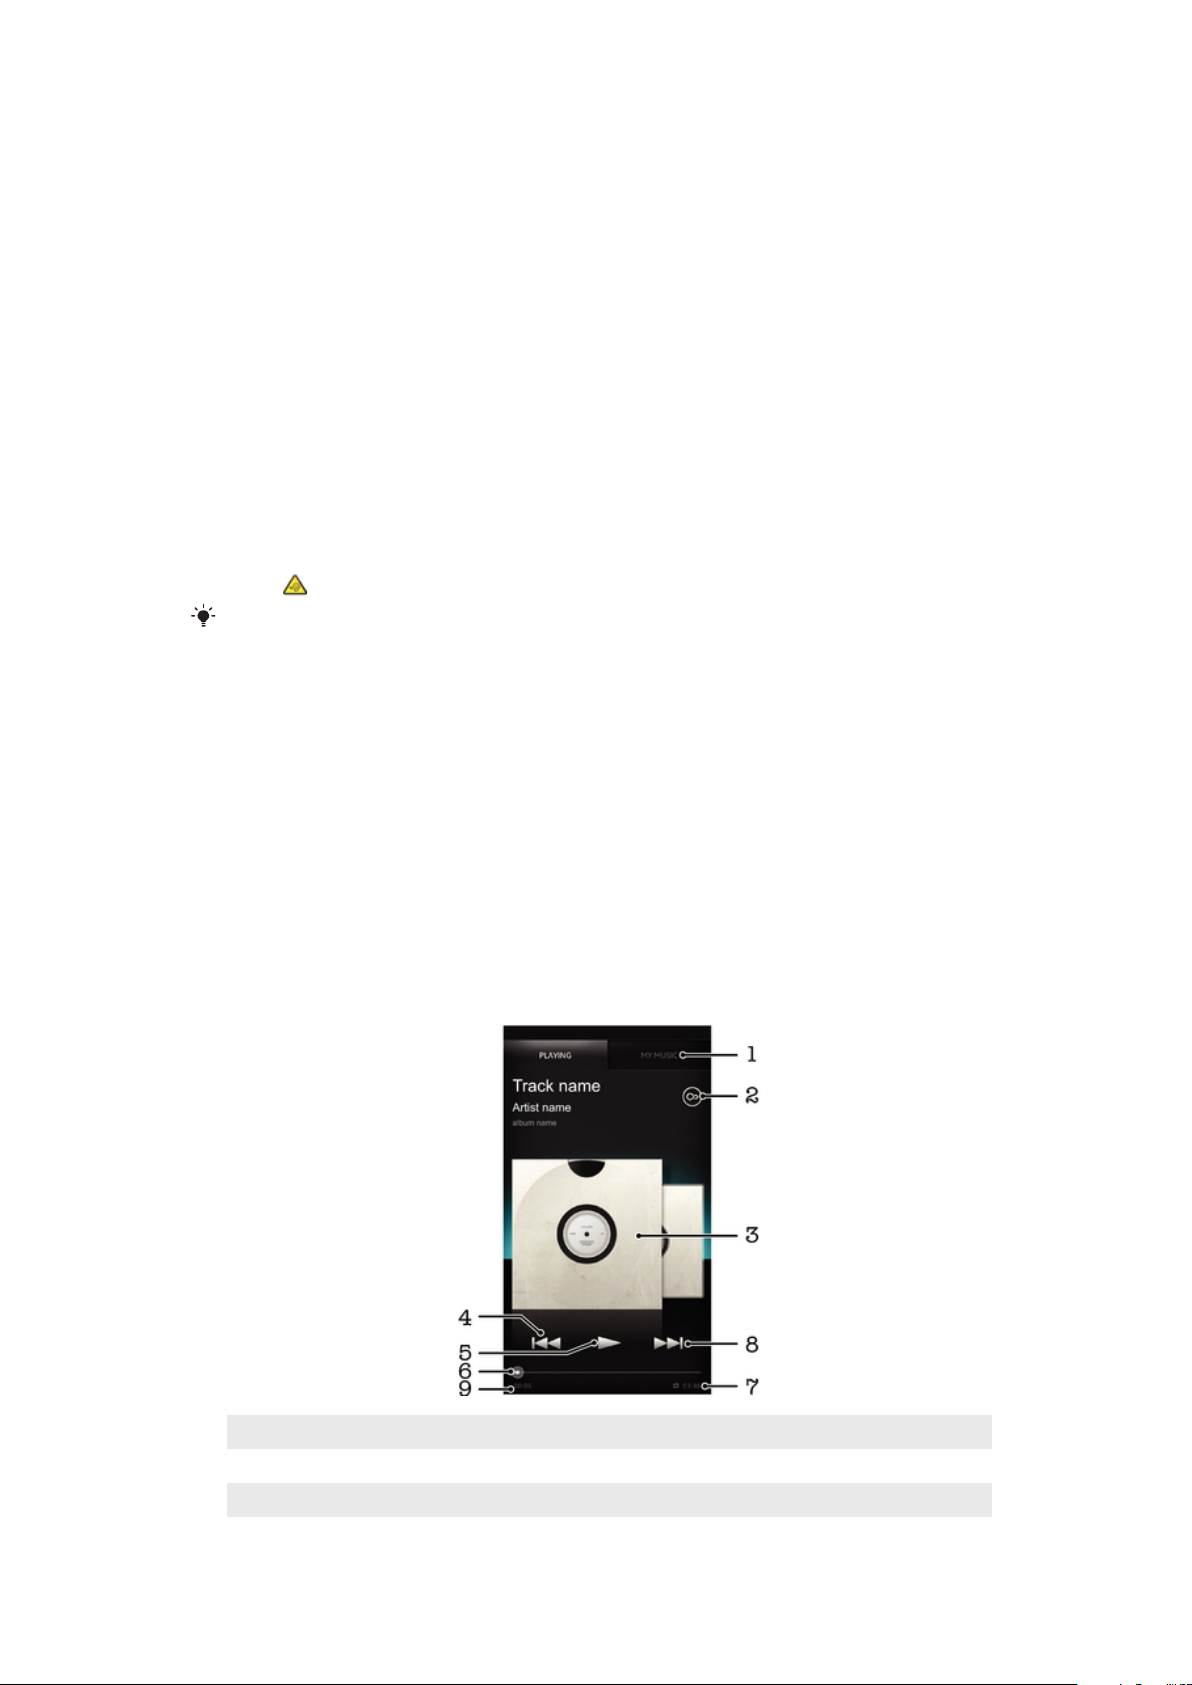
Music
Get the most out of your music player. Listen to and organise music, audio books
and podcasts that you have transferred to your memory card from a computer, or
purchased and downloaded from online stores.
To make content easily available to the music player, you can use the Media Go™
application. Media Go™ helps transfer music content between a computer and a
phone. For more information, see Connecting your phone to a computer
on page 118.
Protecting your hearing
Listening to the music player or other media players for a prolonged period of time
can damage your hearing, even when the volume is at a moderate level. To alert you
to such risks, a volume level warning appears when the volume is too high, and after
the music player is used for over 20 hours.
To turn off the volume level warning
•
When appears, tap OK to dismiss the warning.
Every time you restart your phone, the media volume is automatically set to a safe level.
Copying media files to your memory card
Copy all your favourite media content from computer to phone and start using your
phone's entertainment features to the full. It's easy to transfer music, photos, videos
and other files. Just connect your phone to a computer with a USB cable and use
either the computer's file manager application or the Media Go™ application to
transfer your files.
See Connecting your phone to a computer on page 118 for more general information
about connecting your phone to a computer and transfering files.
Using the music player
Music player overview
1 Browse the music on your memory card
2 Tap the infinite button to find related information online and plug-ins from Android Market™
3 Album art (if available)
85
This is an Internet version of this publication. © Print only for private use.
Page 86

4 Go to the previous track in the current play queue, or rewind
5 Play/Pause button
6 Progress indicator – drag the indicator or tap along the line to fast forward or rewind
7 Total time length of the track
8 Go to the next track in the current play queue, or fast forward
9 Elapsed time of current track
To change tracks
•
When a track is playing, tap or .
•
When a track is playing, swipe the album art left or right.
To pause a track
•
In the music player, tap
.
To fast forward and rewind music
•
In the music player, touch and hold
You can also drag the progress indicator marker right or left.
or .
To adjust the audio volume
•
When the music player is playing a track, press the volume key.
To improve the sound quality using the equalizer
1
When the music player is open, press .
2
Tap Equaliser. If you want to adjust the sound manually, drag the frequency
band buttons up or down.
3
If you prefer to adjust the sound automatically, tap
and select a style.
To turn on the Surround sound
1
When the music player is open, press
2
Tap Equaliser > More > Headphone surround.
3
Select a setting.
4
Tap OK.
.
To view the current play queue
•
While a track is playing in the music player, tap the album art and then tap
To minimise the music player
•
When the music player is playing, press to go to the previous screen, or
press to go to the Home screen. The music player stays playing in the
background.
To return to the music player when it is playing in the background
1
Drag the status bar downwards to open the Notification panel.
2
Tap the track title to open the music player.
.
Alternatively, you can press and hold and then tap to return to the music player.
To delete a track
1
Open the music player library and browse to the track you want to delete.
2
Touch and hold the track title, then tap Delete.
You can also delete albums this way.
86
This is an Internet version of this publication. © Print only for private use.
Page 87
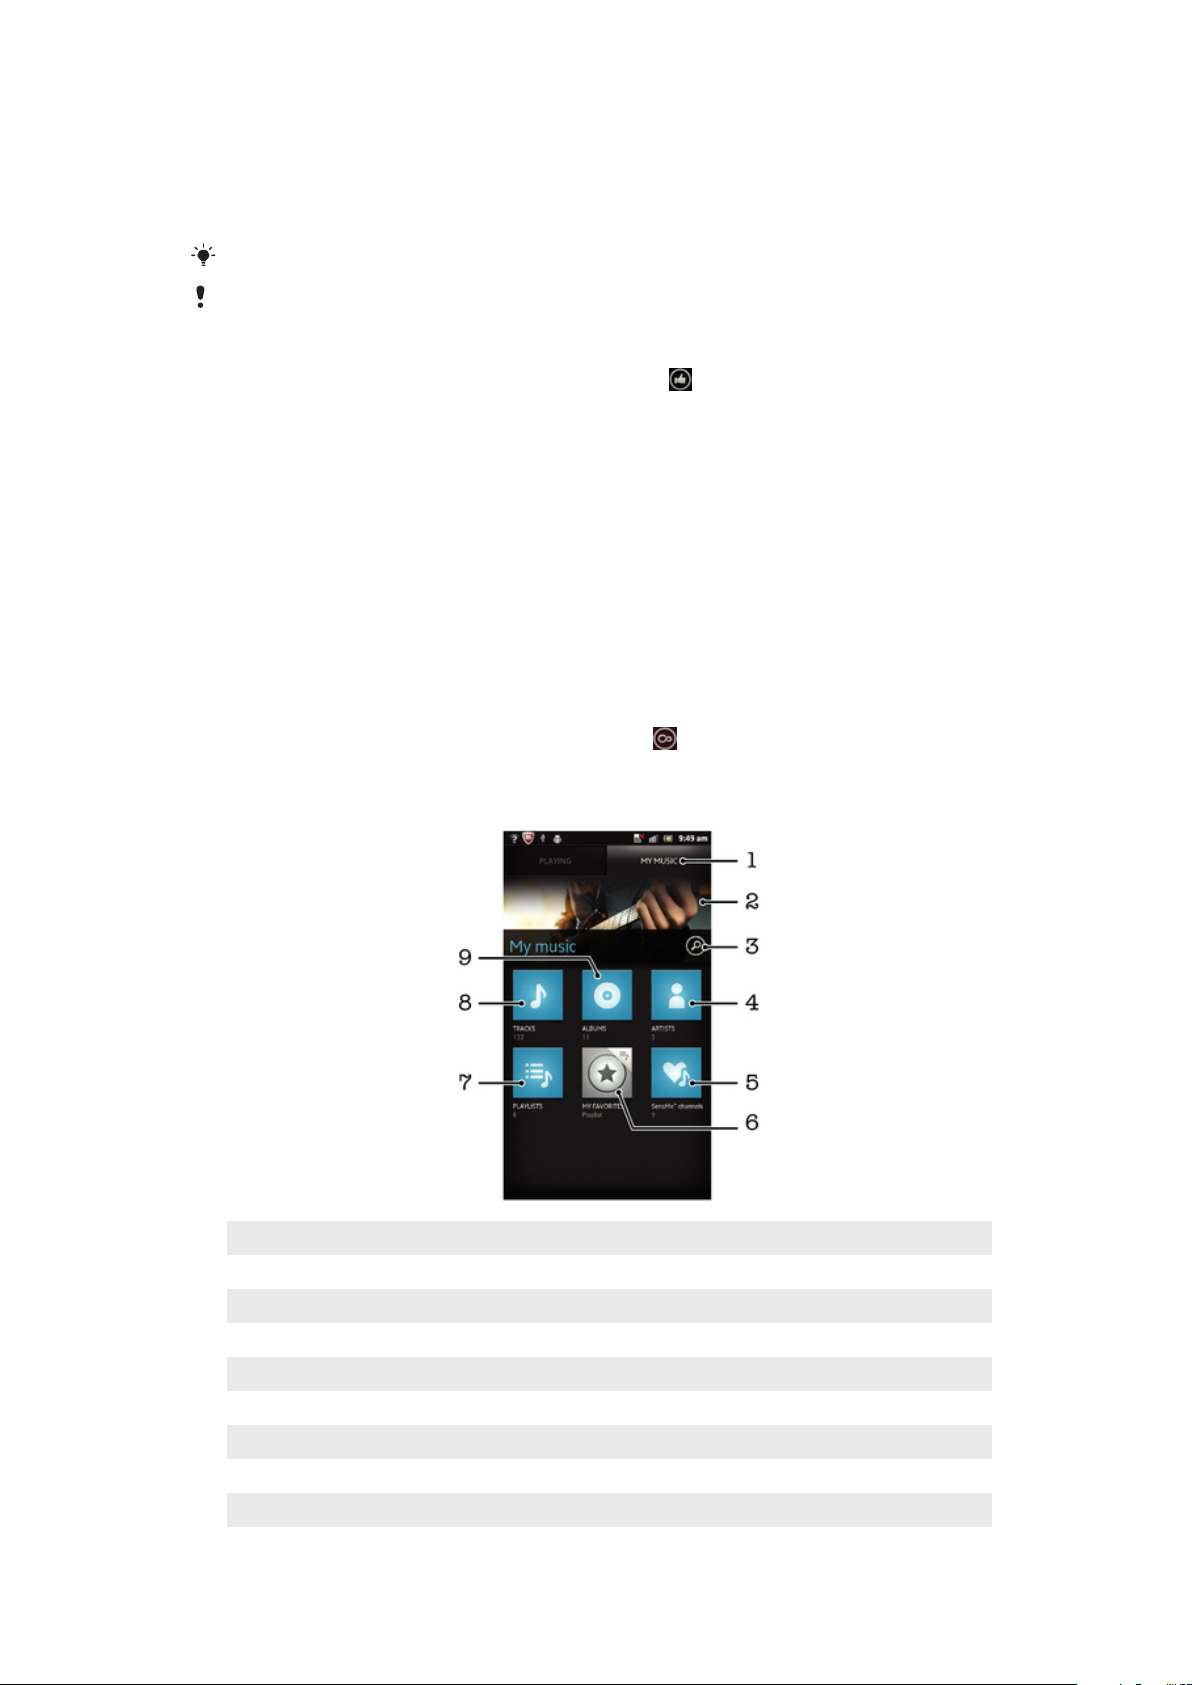
To share a track
1
When browsing your tracks in the music player library, touch and hold a track
title.
2
Tap Send.
3
Select an available transfer method, and follow the on-screen instructions.
You can also share albums and playlists this way.
You might not be able to copy, send or transfer copyright-protected items.
To recommend a track on Facebook™
1
While the track is playing in the music player, tap to show that you "Like" it
on Facebook™. If desired, add a comment in the comments field.
2
Tap Share to send the track to Facebook™. If the track is received
successfully, you will get a confirmation message from Facebook™.
Searching for related content with the infinite button
When a track is playing in the music player, you can use the infinite button to
instantly search for audio content that is related to the artist or track.
The infinite button launches a search for the following:
•
music and karaoke videos on YouTube™
•
artist info on Wikipedia™
•
lyrics on Google.com
To search for related content using the infinite button
•
When a track is playing in the music player, tap
Overview of My music
1 Browse the music on your memory card
2 Picture of the currently playing artist (if available)
3 Search all tracks saved on your phone
4 Browse your music by artist
5 Categorise your music using SensMe™ channels
6 Browse your favorite playlists
7 Browse all playlists
8 Browse audio by track
9 Browse by album
.
87
This is an Internet version of this publication. © Print only for private use.
Page 88

Using My music to organise your tracks
Tap the My Music tab in the Music player to get an overview of all the tracks you've
saved to your phone's memory card. In My Music you can manage your albums and
playlists, create shortcuts, and arrange music by mood and tempo.
To add a music track as a shortcut
1
In the music player, tap MY MUSIC.
2
Tap , or , and browse to the track that you want to save as a shortcut.
3
Touch and hold the track title.
4
Tap Add as shortcut. The shortcut now appears in the My music main view.
To rearrange shortcuts
1
In the music player, tap MY MUSIC.
2
Touch and hold a shortcut until it magnifies and the phone vibrates, then drag
the item to a new location.
To delete a shortcut
1
In the music player, tap MY MUSIC.
2
Touch and hold a shortcut until it magnifies and the phone vibrates, then drag
the item to
You can't delete the following tabs: Tracks, Albums, Artists, Playlists and SensMe™
channels.
To update your music with the latest information
1
In My music, press .
2
Tap . Your phone searches online and downloads the latest available album
art and track information for your music.
.
Downloading music information also enables SensMe™ channels.
Categorising your music using SensMe™ channels
The SensMe™ channels application helps you arrange your music by mood and
tempo. SensMe™ groups all your tracks into twelve categories, or channels, so you
can select music that matches your mood or suits the time of day.
To enable the SensMe™ channels application
1
In the music player, tap MY MUSIC.
2
Press , then tap download music info.
Playing music in random order
You can play tracks in playlists in random order. A playlist can be, for example, a
playlist you have created yourself or an album.
To play tracks in random order
1
In the music player, tap MY MUSIC.
2
Tap
3
Tap the album or playlist, to open it.
4
Tap
or and browse to an album or playlist.
.
When an album or playlist is open, you can also tap and choose shuffle mode or repeat
mode.
Playlists
The music player automatically creates Smart playlists on the playlist tab in the
music player library. You can also create your own playlists from the music that is
saved on your memory card.
88
This is an Internet version of this publication. © Print only for private use.
Page 89

In addition, you can install the Media Go™ application on a computer and use it to
copy playlists from the computer to your phone's memory card. For more
information, see Connecting your phone to a computer on page 118.
To create your own playlists
1
In the music player, tap MY MUSIC.
2
To add an artist, album or a track to a playlist, touch and hold the name of the
artist or the title of the album or track.
3
In the menu that opens, tap Add to playlist > Create new playlist.
4
Enter a name for the playlist and tap OK.
To add tracks to a playlist
1
When browsing the music player library, touch and hold the name of the artist
or the title of the album or track you want to add.
2
Tap Add to playlist.
3
Tap the name of the playlist to which you want to add the artist, album or
track. The artist, album or track is added to the playlist.
To play your own playlists
1
In the music player, tap MY MUSIC.
2
Tap .
3
Under Playlists, tap a playlist.
4
Tap a track to play it.
To remove a track from a playlist
1
In a playlist, touch and hold the title of the track you want to delete.
2
Tap Delete from playlist.
To delete a playlist
1
In the music player, tap MY MUSIC, then select Playlists.
2
Touch and hold the playlist you want to delete.
3
Tap Delete.
4
Tap Delete again to confirm.
Music player widget
The music player widget is a miniature application that gives you direct access to the
music player from your Home screen. You need to add this widget to your Home
screen before you can use it.
To add the music player widget to your Home screen
1
From your Home screen, press
2
Tap Add > Widgets.
3
Tap
.
.
89
This is an Internet version of this publication. © Print only for private use.
Page 90

Identifying music using TrackID technology
Use the TrackID™ music recognition service to identify a music track you hear
playing in your surroundings. Just record a short sample of the song and you’ll get
artist, title and album info within seconds. You can purchase tracks identified by
TrackID™ and you can view TrackID charts to see what TrackID users around the
globe are searching for. For best results, use TrackID™ technology in a quiet area. If
you have problems using this application, see I cannot use Internet-based services on
page 135.
The TrackID™ application and the TrackID™ service are not supported in all countries/regions,
or by all networks and/or service providers in all areas.
To open the TrackID™ application
1
From your Home screen, tap .
2
Find and tap TrackID™.
You can also use the TrackID™ widget to open the TrackID™ application.
To search for track information using TrackID™
1
When the TrackID™ application is open, hold the phone towards the music
source.
2
Tap . If the track is recognised by the TrackID™ service, the results appear
on the screen.
To return to the TrackID™ start screen, press .
To view TrackID™ charts
1
When the TrackID™ application is open, tap the
a chart, it is set to your own region.
2
To see charts of the most popular searches in other regions, tap
Regions.
3
Select a country or region.
tab. The first time you view
>
Using TrackID™ technology results
Track information appears when the TrackID™ application recognises a track. You
can choose to purchase the track, recommend it on Facebook™, or share it using
email, Bluetooth or SMS. You can also get more information about the track's artist,
or search for related track content on YouTube™.
To buy a track using TrackID™ technology
1
When the TrackID™ application is open, tap a track title.
2
In the track information screen, tap Download.
3
Follow the instructions in your phone to complete your purchase.
The track purchase feature may not be supported in all countries/regions, or by all networks
and/or service providers in all areas.
To share a track using email or SMS
1
When the TrackID™ application is open, tap a track title.
2
Select a sharing method.
3
Follow the instructions in your phone to complete the procedure.
To view the artist information for a track
1
When the TrackID™ application is open, tap a track title.
2
Tap Artist info.
90
This is an Internet version of this publication. © Print only for private use.
Page 91

To delete a track from the track history
1
When the TrackID™ application is open, tap .
2
Tap a track title, then tap Delete.
3
Tap Yes.
91
This is an Internet version of this publication. © Print only for private use.
Page 92
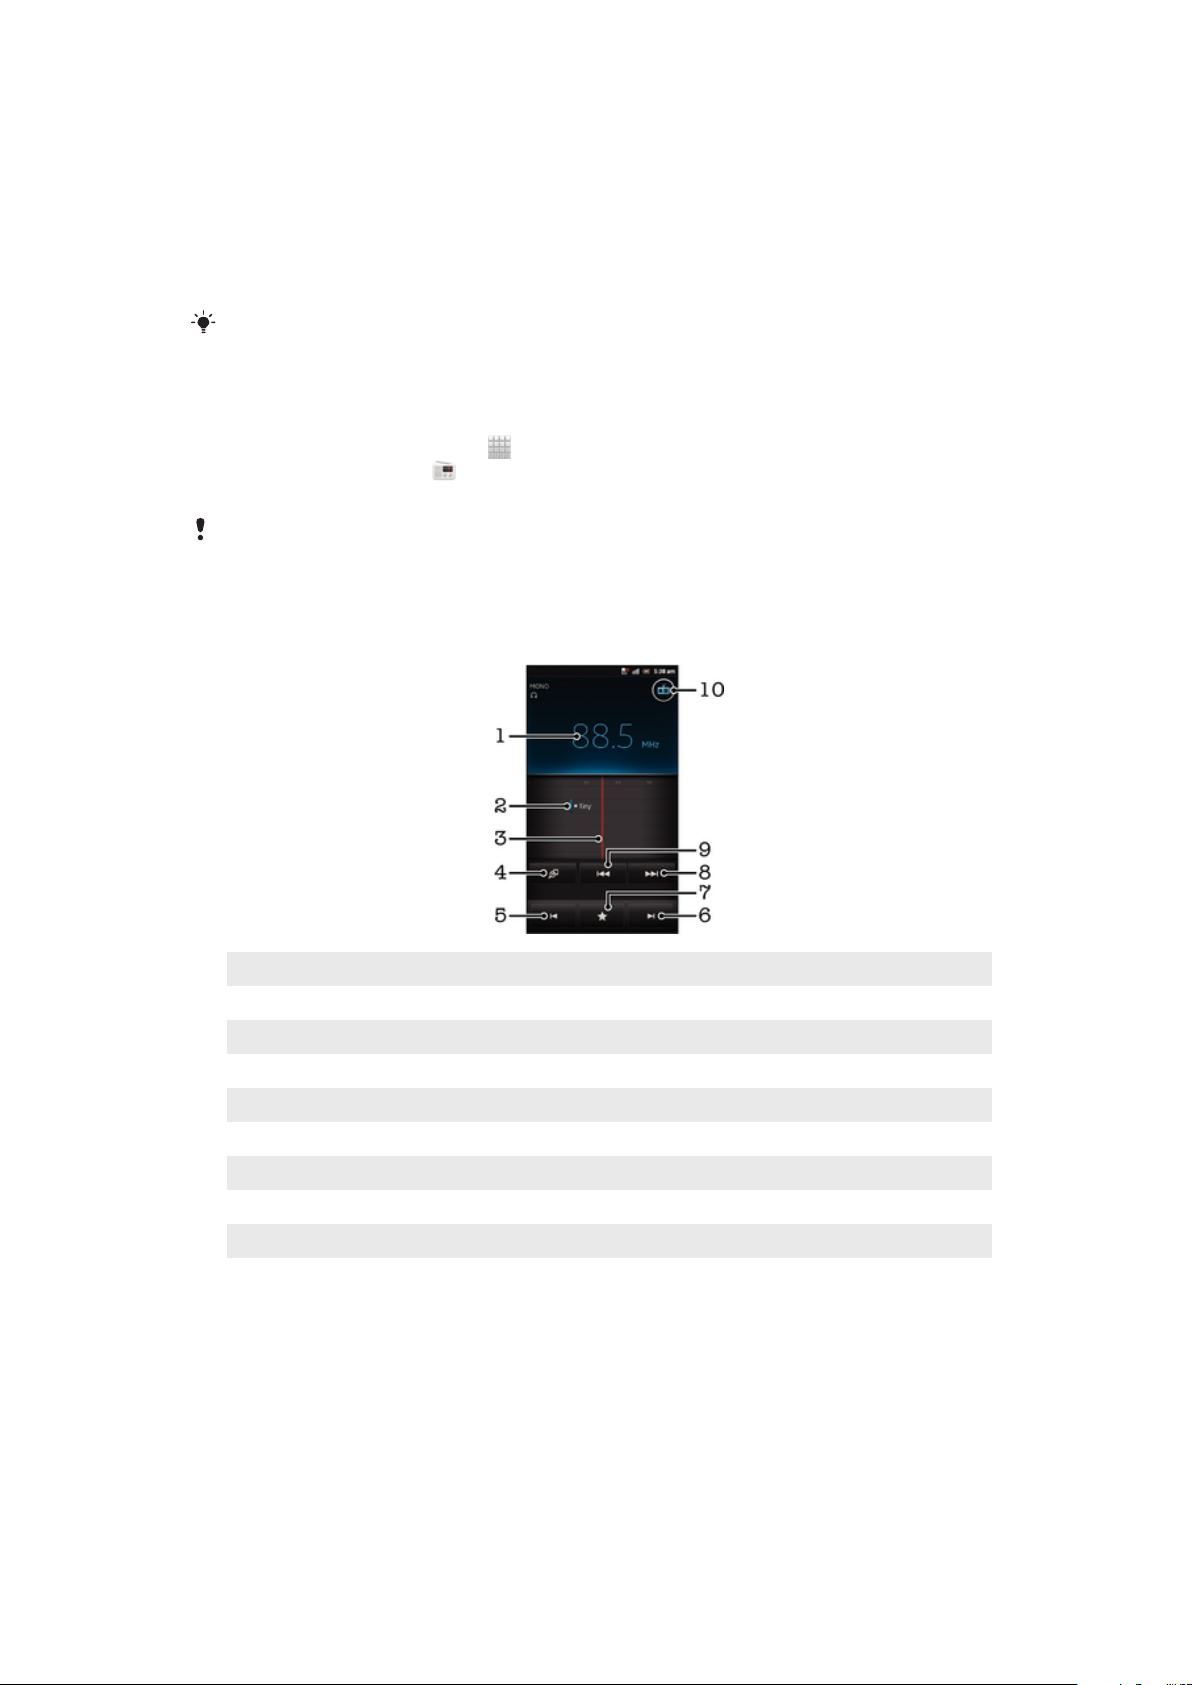
Using the FM radio
The FM radio in your phone works like any FM radio. For example, you can browse
and listen to FM radio stations and save them as favourites. You must connect a
wired headset or headphones to the phone before you can use the radio. This is
because the headset or headphones act as an antenna. After one of these devices is
connected, you can then switch the radio sound to the phone speaker, if desired.
When you open the FM radio, available channels appear automatically. If a channel has RDS
information, it appears a few seconds after you start listening to the channel.
To start the FM radio
1
Connect a headset or a set of headphones to your phone.
2
From your Home screen, tap .
3
Find and tap FM radio
the frequency band.
When you start the FM radio, available channels appear automatically. If a channel has RDS
information, it appears a few seconds after you start listening to the channel.
FM radio overview
. The available channels appear as you scroll through
1 Tuned frequency
2 A saved favourite channel
3 Tuning dial
4 Launch the TrackID™ music recognition application
5 Move down the frequency band to the next favourite channel
6 Move up the frequency band to the next favourite channel
7 Save or remove a channel as a favourite
8 Move up the frequency band to search for a channel
9 Move down the frequency band to search for a channel
10 Radio on/off button
To move between radio channels
•
Flick your finger left or right along the frequency band.
•
Drag the tuning dial right or left.
Using your favourite radio channels
You can save the radio channels you most frequently listen to as favourites. By using
favourites you can quickly return to a radio channel.
92
This is an Internet version of this publication. © Print only for private use.
Page 93

To save a channel as a favourite
1
When the radio is open, navigate to the channel that you want to save as a
favourite.
2
Tap , then select .
3
Enter a name for the channel, then press Save.
To remove a channel as a favourite
1
When the radio is open, tap
2
Tap
3
Tap Delete.
To move between favourite channels
•
When the radio is open, tap or .
To move between favourites, you must first save at least two channels as favourites.
next to the channel that you want to remove.
.
Making a new search for radio channels
If you have moved to a new location or the reception has improved in your current
location, you can start a new scan for radio channels.
Any favourites you have saved are not affected by a new scan.
To start a new search for radio channels
1
When the radio is open, press
2
Tap Search for channels. The radio scans the whole frequency band, and all
available channels are displayed.
.
Switching the radio sound between devices
You can listen to the radio through a wired headset or through wired headphones.
Once either device is connected, you can switch the sound to the phone speaker, if
desired.
To switch the radio sound to the phone speaker
1
When the radio is open, press
2
Tap Play in speaker.
To switch the sound back to the wired headset or headphones, press and tap Play in
headphones.
.
Switching between mono and stereo sound mode
You can listen to your FM radio in either mono or stero mode. In some situations,
switching to mono mode can reduce noise and improve sound quality.
To switch between mono and stereo sound mode
1
When the radio is open, press
2
Tap Enable stereo sound.
3
To listen to the radio in mono sound mode again, press
mono sound.
.
and tap Force
Identifying radio tracks using TrackID™
Use TrackID™ technology to identify music tracks as they play on your phone's FM
radio.
93
This is an Internet version of this publication. © Print only for private use.
Page 94

To identify a song on the FM radio using TrackID™
1
While the song is playing on your phone's FM radio, tap .
2
A progress indicator appears while the TrackID™ application samples the
song. If successful, you are presented with a track result, or a list of possible
tracks.
3
Press
The TrackID™ application and the TrackID™ service are not supported in all countries/regions,
or by all networks and/or service providers in all areas.
to return the FM Radio.
Sharing the details of music you like on Facebook™
When you listen to music using the FM Radio, you can share details of tracks you like
on Facebook. You need to be a Facebook user and must be logged in to Facebook.
To share details of music you like on Facebook™
1
When the FM radio is playing a music track that you want to share, find and
tap .
2
Add a comment in the comment field, if desired.
3
Tap Share to send details of the track to Facebook.
4
Tap Cancel to return to the FM radio application.
5
Once you have posted a track to your Facebook account, a confirmation
message appears on the FM radio screen.
will not appear on the FM radio screen if you are not logged in to Facebook.
94
This is an Internet version of this publication. © Print only for private use.
Page 95
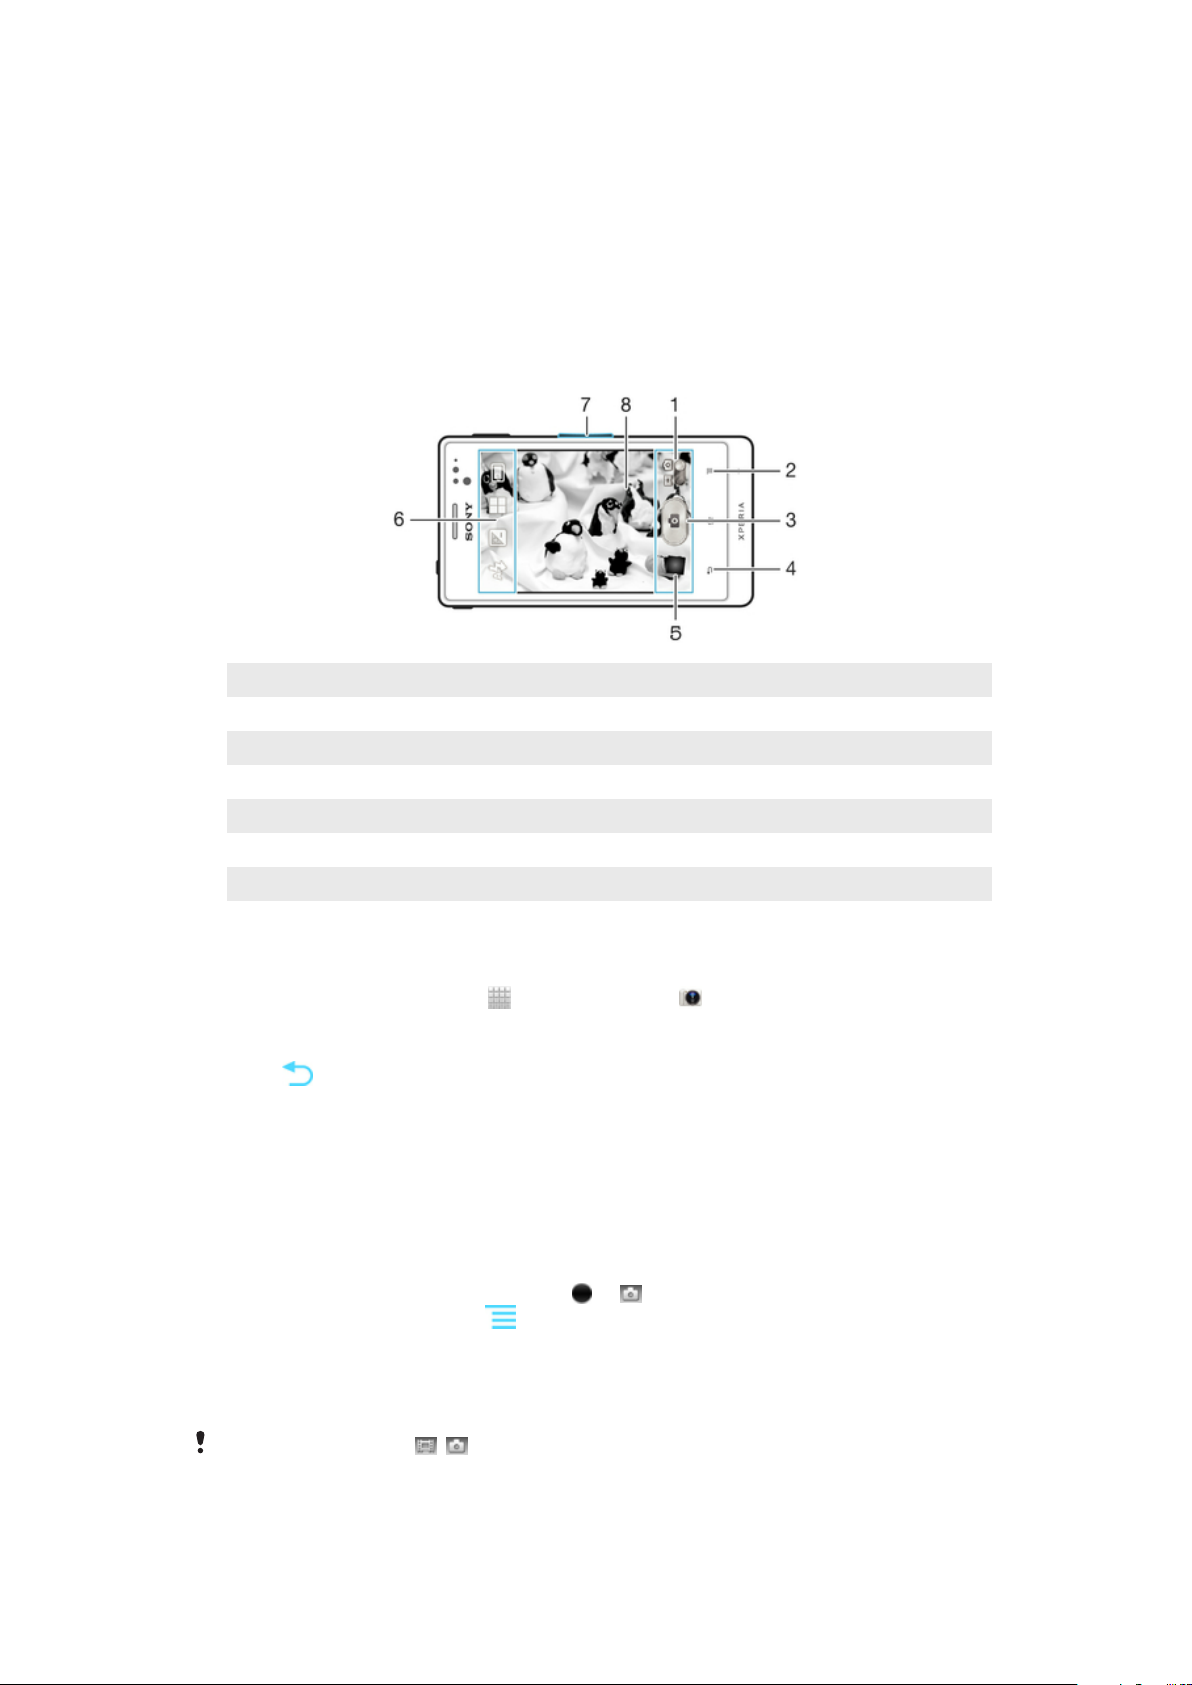
Taking photos and recording videos
Your phone camera is equipped with the highly sensitive Exmor R™ sensor, which
enables sharp photos and videos even in low lighting conditions. With your phone
camera, you can take regular 2D photos or you can shoot 3D photos in 3D Sweep
Panorama mode and Sweep Multi Angle mode. Send your photos and videos to
friends as multimedia messages, or upload them to a web service.
Camera controls overview
1 Switch between still and video camera
2 Display all settings
3 Take photos or record video clips
4 Go back a step or exit the camera
5 View photos and videos
6 Camera setting icons
7 Zoom in or out
8 Main camera screen
To open the camera
•
From your Home screen, tap , then find and tap .
To close the camera
•
Press
from the main camera screen.
Using the still camera
There are two ways to take photos with the still camera. You can tap the on-screen
camera button, or touch a spot on the screen.
To take a photo by touching the screen
1
Activate the camera.
2
If the still camera is not selected, drag
3
To display all settings, press .
4
Tap Capturing method and select Touch capture if it is not already selected.
5
Point the camera towards the subject.
6
To activate auto focus, touch and hold a spot on the screen. When the focus
frame turns green, lift your finger to take the photo.
Be careful not to touch , or other icons when touching the screen to take a photo.
to .
95
This is an Internet version of this publication. © Print only for private use.
Page 96

To take a photo by tapping the on-screen button
1
Activate the camera.
2
If the still camera is not selected, drag to .
3
To display all settings, press .
4
Tap Capturing method and select On-screen button if it is not already
selected.
5
Point the camera towards the subject.
6
Tap the on-screen button
. The photo is taken as soon as you release your
finger.
To use the zoom function
•
When the camera is open, press the volume key up or down to zoom in or out.
To use the still camera flash
1
When the camera is open, press
2
Tap Flash, and select your desired flash setting.
3
Take the photo.
.
To view your photos and videos
1
Open the camera, then tap a thumbnail at the bottom of the screen to open a
photo or video.
2
Flick left or right to view your photos and videos. Videos are identified by .
In step 1, you can also flick the thumbnails from right to left and then select the one you want
to view.
To delete a photo
1
Open the photo you want to delete.
2
Press
To delete a recently taken photo or video, you can also flick the thumnail at the bottom right
of the viewfinder and then press and hold the item you want to delete.
, and then tap .
Face detection
You can use face detection to bring an off-centre face into focus. The camera
automatically detects up to five faces, indicated by white frames. A yellow frame
shows which face has been selected for focus. Focus is set to the face closest to the
camera. You can also tap one of the frames to select which face should be in focus.
To turn on face detection
1
Activate the camera.
2
If the still camera is not selected, drag
3
Tap the icon on the top left, then select Normal.
4
To display all settings, press
5
Tap Focus mode > Face detection.
.
To take a photo using face detection
1
When the camera is open and Face detection turned on, point the camera at
your subject. Up to five faces can be detected, and each detected face is
framed.
2
Tap the frame you want to select for focus. Do not tap if you want the camera
to select focus automatically.
3
A green frame shows which face is in focus. Tap the screen to take the photo.
to .
Smile detection
Smile detection allows you to capture a face just as it smiles. The camera detects up
to five faces and selects one face for smile detection and auto focus. A green frame
shows which face is selected. When the selected face smiles, the camera
automatically takes a photo.
96
This is an Internet version of this publication. © Print only for private use.
Page 97

To turn on smile detection
1
Activate the camera.
2
If the still camera is not selected, drag to .
3
To display all settings, press .
4
Tap Smile detection and select a smile level.
To take a photo using smile detection
1
When the camera is open and Smile detection is turned on, point the camera
at your subject. Each detected face is framed in the viewfinder (not more than
five faces).
2
The camera selects which face to focus on.
3
The face selected appears inside a green frame and the photo is taken
automatically.
4
If no smile is detected, tap the screen to take the photo manually.
Adding the geographical position to your photos
Turn on geotagging to add the approximate geographical location (a geotag) to
photos when you take them. The geographical location is determined either by
wireless networks (mobile or Wi-Fi® networks) or GPS technology.
When
geographical position has not been found. When appears, geotagging is turned on
and the geographical location is available, so your photo can get geotagged. When
neither of these two symbols appears, geotagging is turned off.
appears on the camera screen, geotagging is turned on but the
To turn on geotagging
1
Activate the camera.
2
If the still camera is not selected, drag to .
3
Press , then tap Geotagging > On.
4
Tap OK to agree to enable GPS and/or wireless networks.
5
Check the options you want to select under My Location.
6
After you confirm your settings, press
7
If appears on the camera screen, your location is available and your photo
to return to the camera screen.
can get geotagged. If not, check your GPS and/or wireless network
connection.
Using still camera settings
To adjust the still camera settings
1
Activate the camera.
2
If the still camera is not selected, drag
3
Tap one of the settings icons on the left of the screen.
4
To display all settings, press .
5
Select the setting you want to adjust, then edit as desired.
To customise the still camera settings panel
1
When the camera is open, press
2
Touch and hold the setting you want to move and drag it to the desired
position.
to .
to display all settings.
If you drag the setting outside of the settings panel, the change is cancelled.
Still camera settings overview
Normal
3D Sweep Panorama
Use 3D Sweep Panorama to take wide-angle, panoramic photos of any scene in 3D. Just tap the
screen and move the camera steadily from one side to the other.
97
This is an Internet version of this publication. © Print only for private use.
Page 98

Sweep Multi Angle
In Sweep Multi Angle mode, the camera takes several images at different angles as you sweep
across the scene. These images are saved together in an MPO (Multiple Picture Object) file.
Sweep Panorama
Use this setting to take wide-angle, panoramic photos. Just tap the screen and move the camera
steadily from one side to the other.
Focus mode
The focus function controls which part of a photo should be sharp. When continuous
autofocus is on, the camera keeps adjusting focus so that the area within the white
focus frame stays sharp.
Single auto focus
The camera automatically focuses on the selected subject. Continuous autofocus is on. Touch and
hold the camera screen until the white focus frame turns green, indicating that the focus is set. The
photo is taken when you release your finger.
Multi auto focus
The focus is automatically set on several areas of the image. Touch and hold the camera screen
until the white focus frame turns green, indicating that the focus is set. The photo is taken when
you release your finger. Continuous autofocus is off.
Face detection
The camera automatically detects up to five human faces, indicated by frames on the camera
screen. The camera automatically focuses on the nearest face. You can also select which face to
focus on by tapping it on the screen. Touch and hold the camera screen until the white focus frame
turns green, indicating that the focus is set. The photo is taken when you release your finger. Face
detection cannot be used for all scene types. Continuous autofocus is on.
Infinity
Use when taking photos from a distance. Focus is set on subjects far away. Subjects close to the
camera may be blurred. Continuous autofocus is off.
Touch focus
Touch a specific area on the camera screen to set the area of focus. Continuous autofocus is off.
Touch and hold the camera screen until the white focus frame turns green, indicating that the focus
is set. The photo is taken when you release your finger.
This Focus function is only available in Normal capturing mode.
Exposure value
Determine the amount of light in the photo you want to take. A higher value indicates an increased
amount of light.
This setting is only available in Normal capturing mode.
Metering
This function automatically determines a well-balanced exposure by measuring the
amount of light striking the image you want to capture.
Centre
Adjusts the exposure to the centre of the image.
Average
Calculates the exposure based on the amount of light striking the whole image.
Spot
Adjusts the exposure in a very small part of image you want to capture.
This setting is only available in Normal capturing mode.
White balance
The white balance setting adjusts the colour balance according to the lighting
conditions.
98
This is an Internet version of this publication. © Print only for private use.
Page 99

Auto
Adjusts the colour balance automatically to suit the lighting conditions.
Incandescent
Adjusts the colour balance for warm lighting conditions, such as under light bulbs.
Fluorescent
Adjusts the colour balance for fluorescent lighting.
Daylight
Adjusts the colour balance for sunny outdoor conditions.
Cloudy
Adjusts the colour balance for a cloudy sky.
This setting is only available in Normal capturing mode.
Scenes
Use the Scenes feature to quickly set up the camera for common situations using
pre-programmed scenes. The camera determines a number of settings for you to fit
the selected scene, ensuring the best possible photo.
Off
The Scenes feature is off and photos can be taken manually.
Portrait
Use for portrait photos. Settings are optimised to give slightly softer skin tones.
Landscape
Use for landscape photos. The camera focuses on distant objects.
Night scene
Use when taking photos at night or in poorly lit environments. Due to long exposure time, the
camera must be held still or placed on a stable surface.
Night portrait
Use for portrait photos at night or in poorly lit environments. Due to long exposure time, the
camera must be held still or placed on a stable surface.
Beach and snow
Use in bright environments to avoid underexposed photos.
Sports
Use for photos of fast-moving objects. Short exposure time minimises motion blurring.
Party
Use for indoor photos in poorly lit environments. This scene picks up indoor background lighting or
candlelight. Due to long exposure time, the camera must be held still or placed on a stable surface.
Document
Use for photos of text or drawings. Gives the photo increased, sharper contrast.
This setting is only available in Normal capturing mode.
ISO
You can reduce image blurring caused by dark conditions or moving subjects by
increasing the ISO sensitivity.
Auto
Sets the ISO sensitivity automatically.
100
Sets the ISO sensitivity to 100.
200
Sets the ISO sensitivity to 200.
400
Sets the ISO sensitivity to 400.
800
99
This is an Internet version of this publication. © Print only for private use.
Page 100

Sets the ISO sensitivity to 800.
This setting is only available in Normal capturing mode.
Flash
Use the flash to take photos when lighting conditions are poor or when there is a
backlight.
Auto
The camera automatically determines if the lighting conditions require the use of a flash.
Fill flash
Use this setting when the background is brighter than the subject. This removes unwanted dark
shadows.
Off
The flash is turned off. Sometimes photo quality can be better without the flash, even if lighting
conditions are poor. Taking a good photo without using the flash requires a steady hand. Use the
self-timer to avoid blurred photos.
Red-eye reduction
Reduces the red colour of eyes when taking a photo.
Resolution
Choose between several picture sizes and aspect ratios before taking a photo. A
photo with a higher resolution requires more memory.
5MP 4:3
5 megapixel picture size with 4:3 aspect ratio. Suitable for photos you want to view on nonwidescreen displays or print in high resolution.
3MP 16:9
3 megapixel picture size with 16:9 aspect ratio. A high resolution widescreen format. Has a higher
resolution than full HD. Suitable for photos you want to view on widescreen displays.
2MP 4:3
2 megapixel picture size with 4:3 aspect ratio. Suitable for photos you want to view on nonwidescreen displays.
2MP 16:9
2 megapixel picture size with 16:9 aspect ratio. Suitable for photos you want to view on
widescreen displays.
Self-timer.
With the self-timer you can take a photo without holding the phone. Use this function
to take self-portraits, or group photos where everyone can be in the photo. You can
also use the self-timer to avoid shaking the camera when taking photos.
On (10 s.)
Set a 10-second delay from when you tap the camera screen until the photo is taken.
On (2 s.)
Set a 2-second delay from when you tap the camera screen until the photo is taken.
Off
The photo is taken as soon as you tap the camera screen.
Smile detection
Use the smile detection function to determine what kind of smile the camera reacts to
before taking a photo.
Geotagging
Tag photos with details of where you took them.
On
100
This is an Internet version of this publication. © Print only for private use.
 Loading...