

Page 1
Help Guide
Wireless Speaker
SRS-XB501G
The following explains how to use this speaker. Select a topic from the navigation pane.
Getting started
Parts and controls
Installing the Google Home app and making the initial settings
Changing your Google Assistant language
Power source/charging
Connecting the speaker to an AC outlet
Turning the power on
Turning the power off
Charging USB devices such as smartphones
Lighting function
Turning on/off the speaker’s light (Lighting function)
Using Google Assistant
1
Page 2
Talking to your Google Assistant
Notes on using the Wi-Fi 5 GHz band
Disabling the Wi-Fi 5 GHz band
Using as a BLUETOOTH speaker
Pairing and connecting with BLUETOOTH® devices
Connecting with an NFC-compatible device by One-touch (NFC)
Connecting with a computer via a BLUETOOTH connection (Windows)
Connecting with a computer via a BLUETOOTH connection (Mac)
Listening to music from the connected BLUETOOTH device
Terminating the BLUETOOTH connection (After use)
Enjoying switching the sound effects
Using “Sony | Music Center”
What you can do with “Sony | Music Center”
Installing “Sony | Music Center”
Information
About the indicators
About software update
Notes on use
Precautions
Notes on charging
Notes on disposing of or giving away this speaker
Notes on water resistant and dust proof features
How to care for the speaker
Trademarks
Customer support website
Troubleshooting
When you have an issue
Power supply
Unable to charge the built-in battery
2
Page 3
4-739-042-11(1) Copyright 2018 Sony Corporation
Unable to turn on the speaker or the speaker suddenly turns off
Voice commands
The speaker is not responding to any voice commands
Sound
No sound is output or the playback sound distorts/interrupts
Sound becomes low while in use
Network connection
Unable to connect to a network via a Wi-Fi connection
BLUETOOTH
Pairing (device registration) fails
Unable to connect the speaker to a BLUETOOTH device with One-touch connection (NFC)
LED
The LINK indicator is flashing in white
The status indicators (Google Assistant) are flashing in blue or purple
The power indicator is flashing in red
When you find the speaker not working properly
Restarting the speaker
Initializing the speaker
3
Page 4
Help Guide
Wireless Speaker
SRS-XB501G
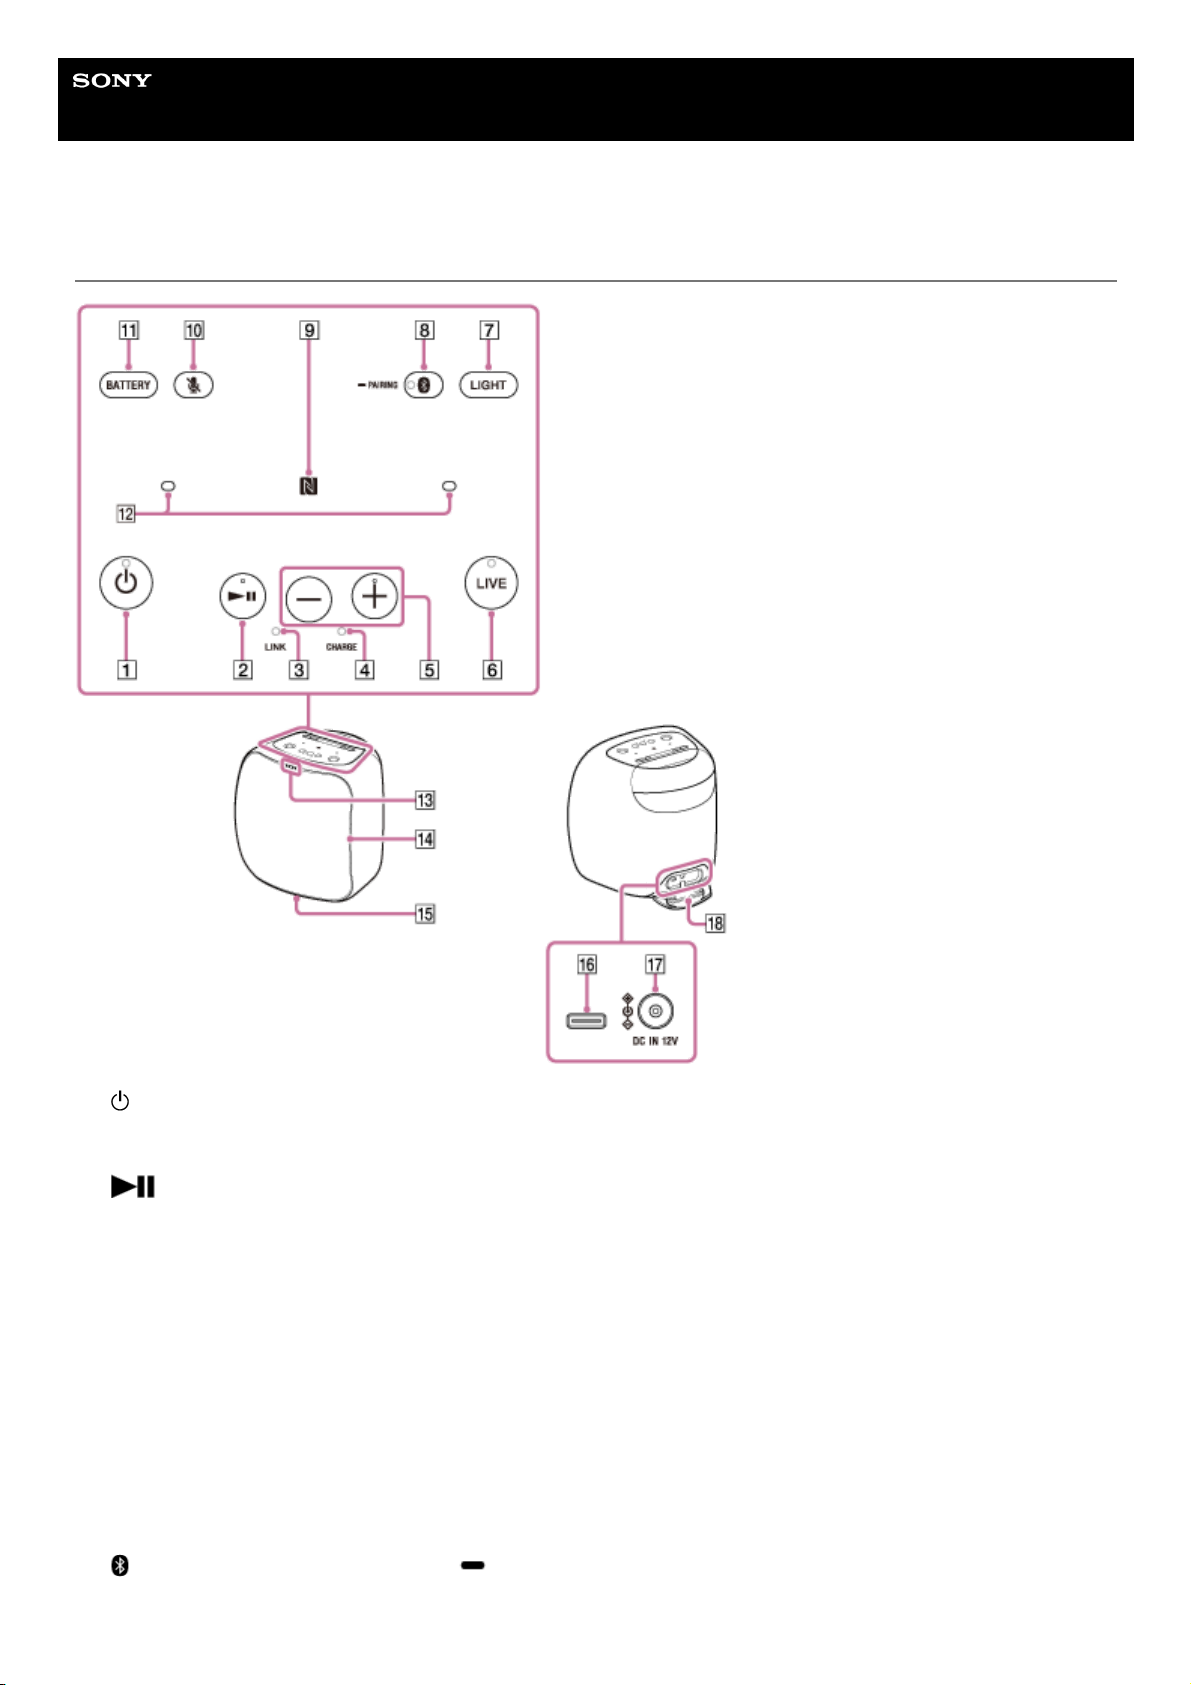
Parts and controls
(power) button with indicator
Restart: You can press and hold this button for about 8 seconds to restart*1 the speaker.
1.
*2 (play) button
Google Assistant trigger: You can press and hold this button for about 3 seconds to start talking with Google
Assistant.
2.
LINK indicator3.
CHARGE indicator4.
–/+*2 (volume) buttons
5.
LIVE button with indicator6.
LIGHT button
Turns on/off the lighting. By default, the lighting is turned on.
7.
(BLUETOOTH) button with indicator / PAIRING button
This button is disabled before the Google Assistant setup is complete.
8.
4
Page 5

Related Topic
About the indicators
4-739-042-11(1) Copyright 2018 Sony Corporation
N-mark
This function is disabled before the Google Assistant setup is complete.
9.
(microphone off) button10.
BATTERY button11.
Built-in microphone12.
Status indicators (Google Assistant)13.
Lighting14.
Screw hole for tripod attachment (on the bottom surface)
Designed for using the 1/4-inch screw of 12 mm (1/2 in) in length.
Use a tripod (commercially available) that can withstand the weight of 5 kg (11 lb 1 oz) or more.
Depending on the tripod specifications, the speaker attached on the tripod may not face in an adequate direction.
15.
USB Type-C™ connector
This connector supports 2-way charging. It can be used for charging this speaker or an external device.
Depending on the specifications of the USB device, power charging from the speaker may not be available.
16.
DC IN 12V connector17.
Cap
The cap plays a very important role in maintenance of the water resistant and dust proof performance.
18.
The information including the Google Assistant settings will be retained.
*1
The + (volume) button and the
(play) button have a tactile dot that helps you locate the button by touching.
*2
5
Page 6
Help Guide
Wireless Speaker
SRS-XB501G
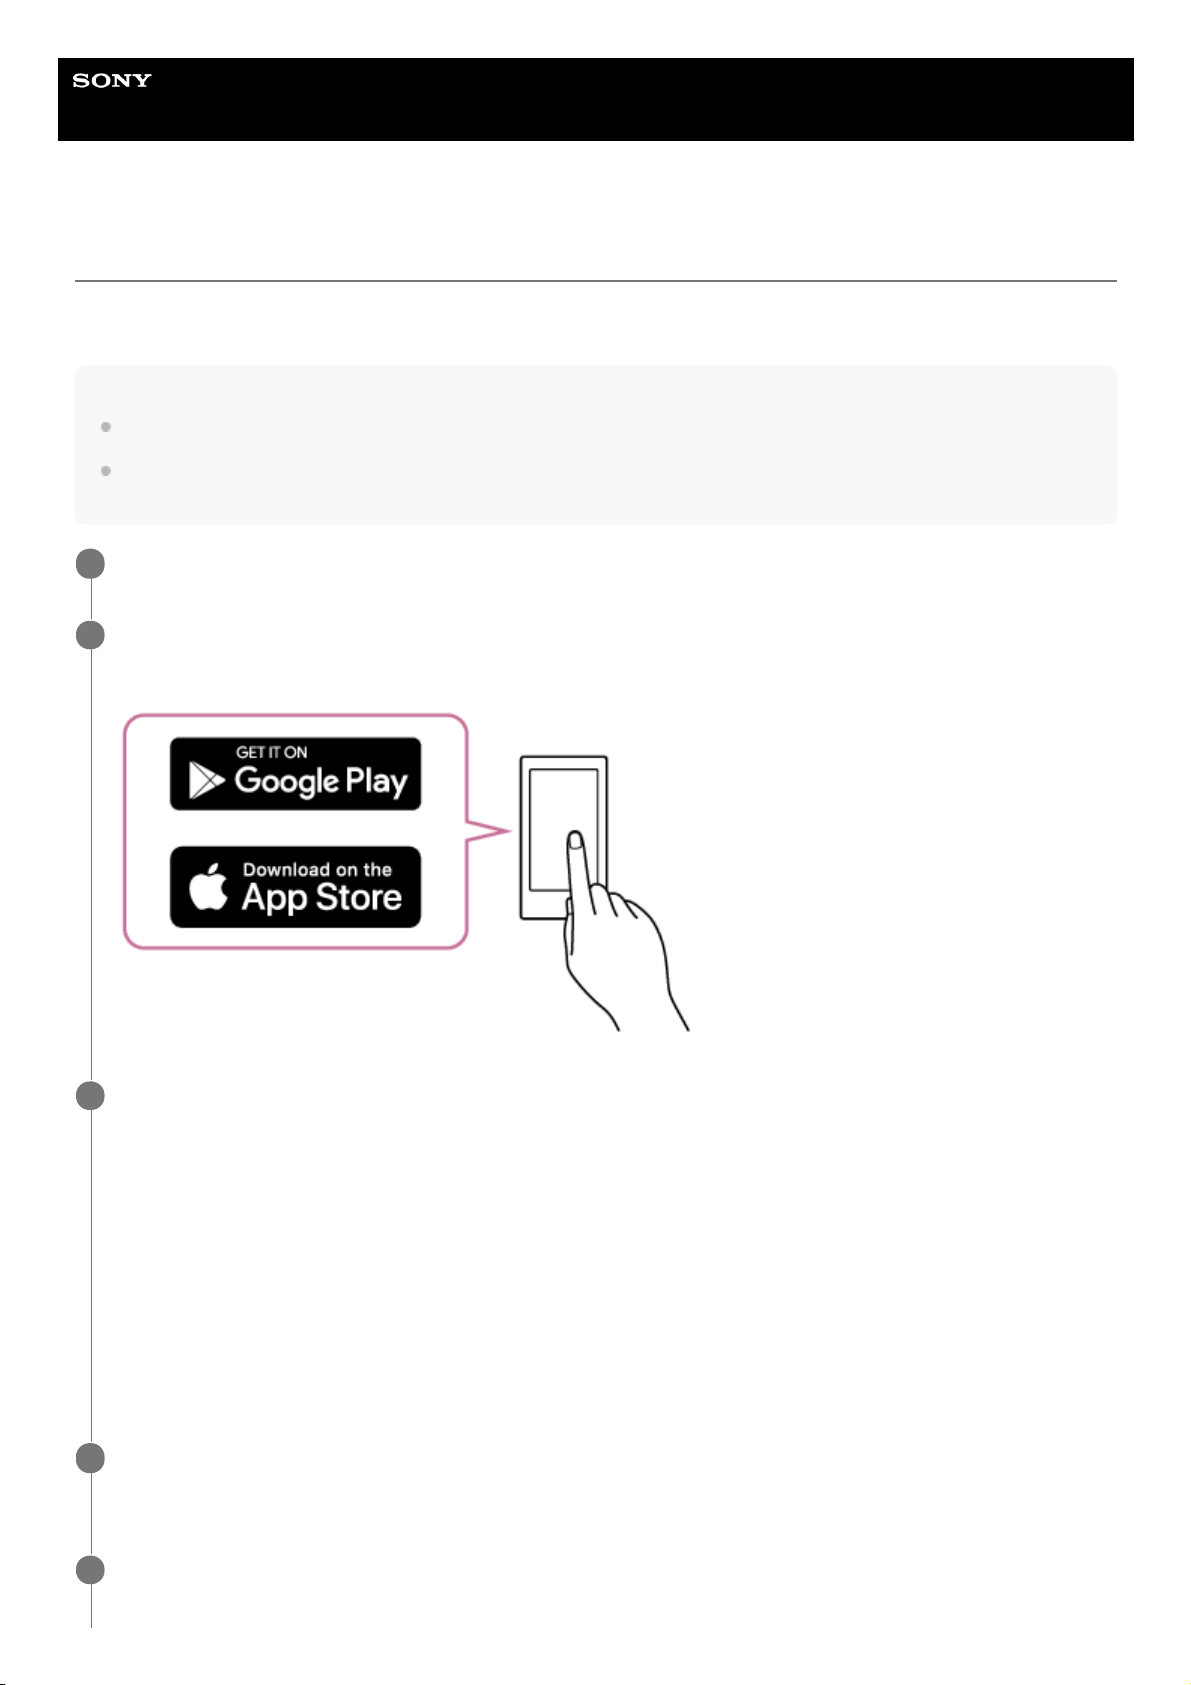
Installing the Google Home app and making the initial settings
To use your speaker, you first need to install the Google Home app on your smartphone/iPhone and make the initial
settings for the speaker.
Note
To use the Google Home app, you need to create a Google account and log in to the account beforehand.
To download the app and use network services, additional registrations and payment of communication charges and other fees
may be required.
Access Google Play or App Store from the smartphone/iPhone.
1
Install the Google Home app on the smartphone/iPhone.
For details, visit the website at https://www.google.com/cast/setup/.
2
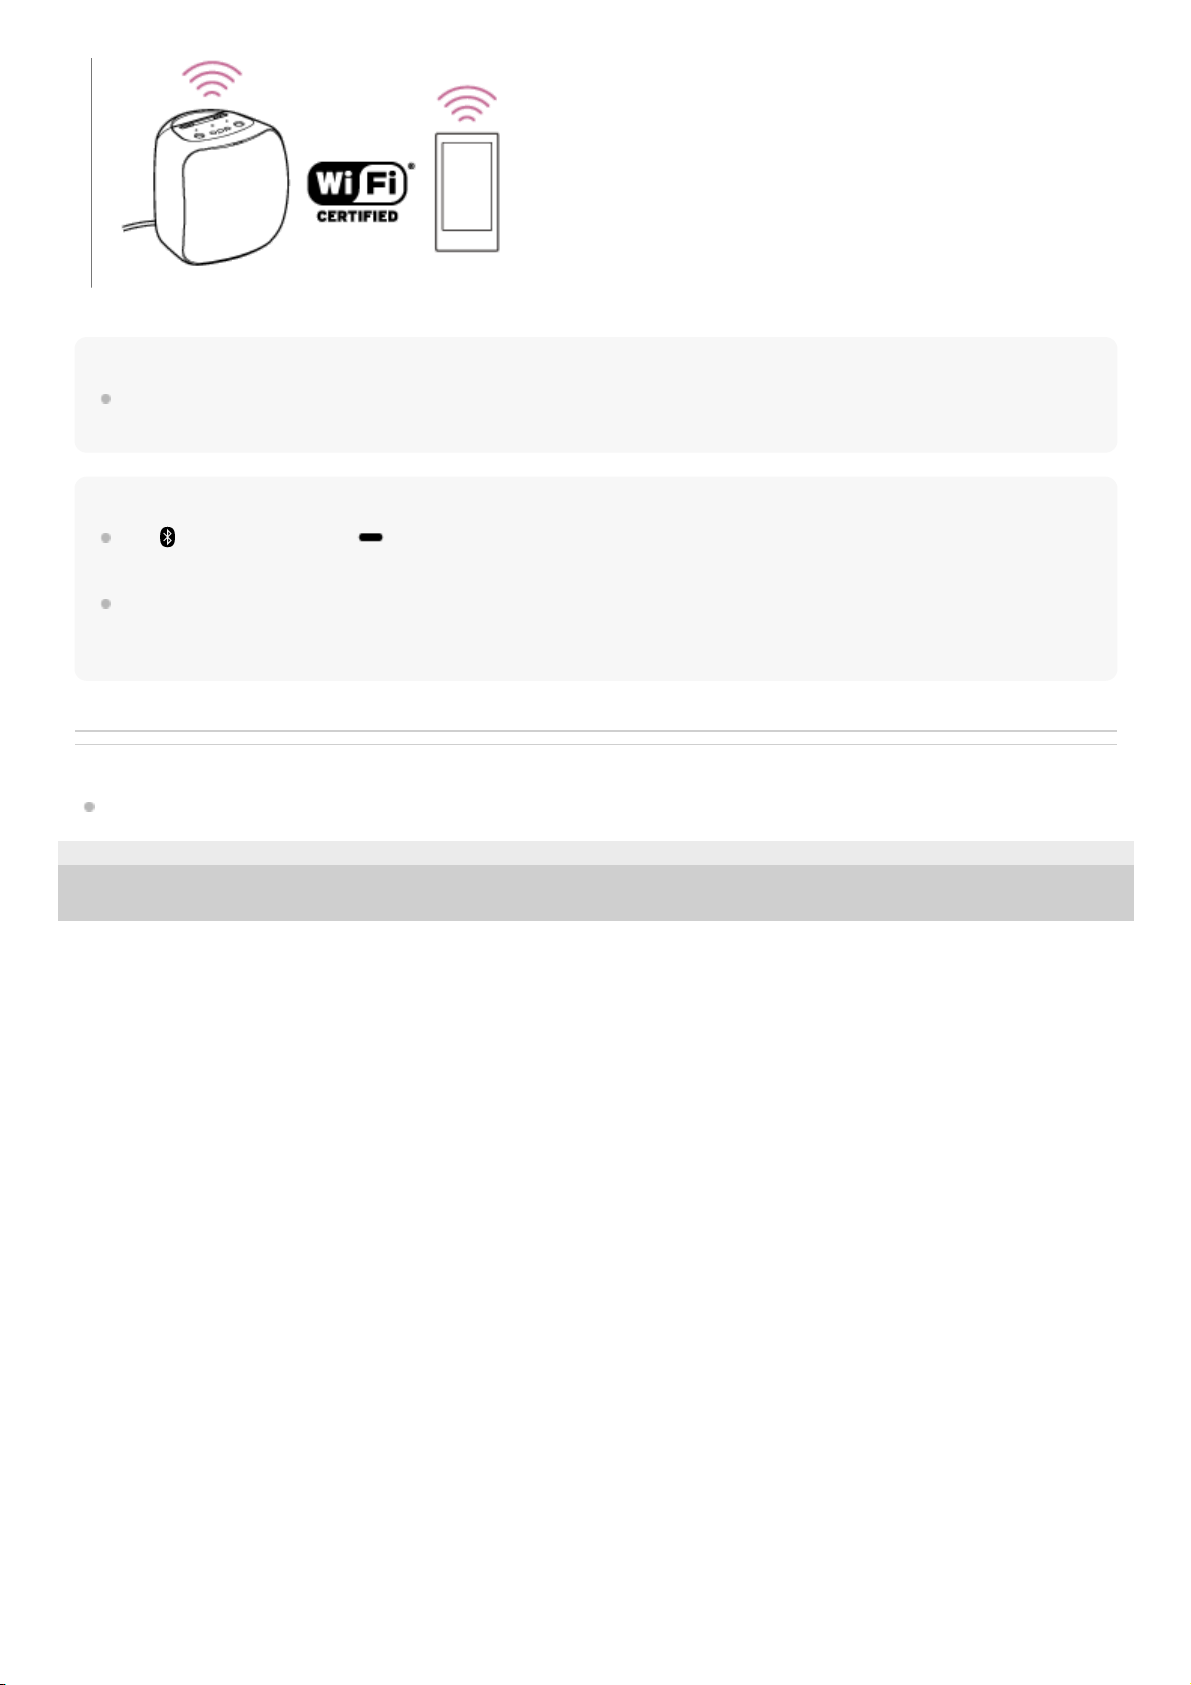
Place the speaker as close to a wireless LAN router as possible.
3
Establish a wireless connection from the smartphone/iPhone to the wireless LAN router.
1.
Take a note of the SSID and the password (encryption key) of the connected wireless LAN router.
Some of the wireless LAN routers have multiple SSIDs.
Be sure to take a note of the SSID that you used for establishing the wireless connection from the
smartphone/iPhone.
For details, refer to the operating instructions supplied with the wireless LAN router.
2.
On the iPhone*, activate the BLUETOOTH function.
On the smartphone, this step is not required.
3.
The Google Home app uses the BLUETOOTH function to identify the speaker.
*
Connect the supplied AC adaptor to the speaker and turn on the power.
Connecting the speaker to an AC outlet
4
Start the app and follow the on-screen instructions to make the initial settings for the speaker.
Depending on your service, you may have to create an account in advance.
5
6
Page 7
Hint
You can change your Google Assistant language. For details, refer to the following topic.
Changing your Google Assistant language
Note
The
(BLUETOOTH) button/ PAIRING button and the NFC function are disabled before the Google Assistant setup is
complete.
Use of the Wi-Fi 5 GHz band is restricted to indoors only.
When using wireless connections outdoors, disable the Wi-Fi 5 GHz band.
For details on the wireless LAN settings, refer to the operating instructions supplied with the wireless LAN router.
Related Topic
Disabling the Wi-Fi 5 GHz band
4-739-042-11(1) Copyright 2018 Sony Corporation
7
Page 8
Help Guide
Wireless Speaker
SRS-XB501G
Changing your Google Assistant language
You can change your Google Assistant language. The Google Assistant is available in English, French, German, Italian,
Spanish, and Japanese. (as of July, 2018)
Related Topic
Installing the Google Home app and making the initial settings
4-739-042-11(1) Copyright 2018 Sony Corporation
Make sure that your smartphone/iPhone is connected to the same wireless LAN as your speaker.
1
On your smartphone/iPhone, open the Google Home app
.
2
At the top left of the app's Home screen, tap
.
3
Verify that the Google Account listed is the one linked to Google Home. To switch accounts, tap the triangle
to the right of the account name.
4
Tap “More settings.”
5
Under “Devices,” tap the name of the speaker you set up for Google Assistant.
6
Tap “Assistant language” and then choose a language.
7
8
Page 9
Help Guide
Wireless Speaker
SRS-XB501G
Connecting the speaker to an AC outlet
This speaker can run on power either from the AC outlet to which it is connected by the supplied AC adaptor or from the
built-in battery.
When using the speaker for the first time, be sure to charge the built-in battery for more than 1 hour before turning on the
power.
You can operate the speaker with the built-in battery by charging the speaker before use.
Note
Depending on your countries/regions, the shape of the AC adaptor may be different from the one illustrated below.
Checking the built-in battery level of the rechargeable built-in battery
After pressing the BATTERY button, when the speaker is turned on, the voice guidance listed below is output from the
speaker depending on the remaining built-in battery power.
The voice guidance is available in English only.
80% or more: “Battery fully charged”
Make sure that the speaker is turned off.
1
If an AC power cord is supplied, connect it to the supplied AC adaptor*.
If an AC power cord is not supplied, proceed to step
.
2
According your country or region, the shape of the plug on the AC adaptor and the connection method differ.
*
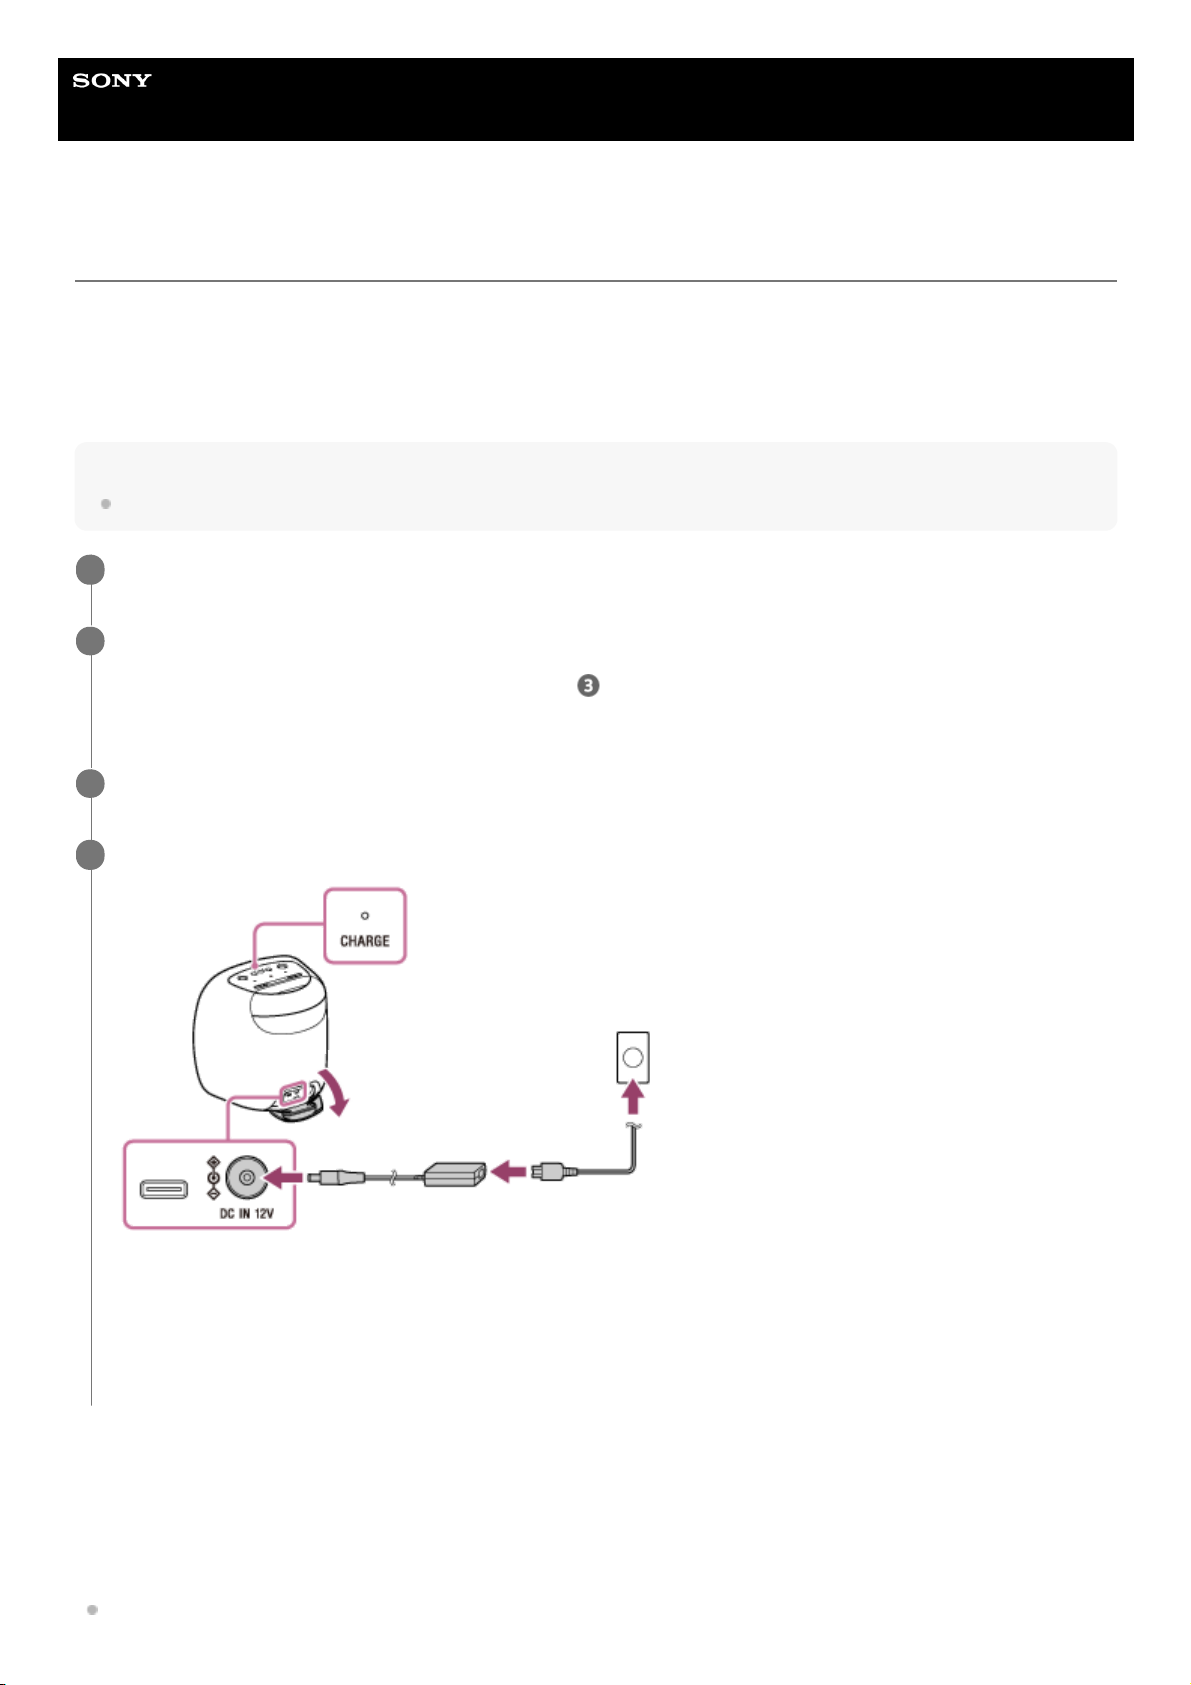
Connect the AC adaptor to the DC IN 12V connector on the speaker.
3
Plug the power cord plug into an AC outlet.
The CHARGE indicator lights up in orange while charging. Charging is completed in about 5 hours* and the
indicator turns off.
If the built-in battery is fully charged when you connect the speaker to an AC outlet, the CHARGE indicator lights up
in orange then turns off after about 1 minute.
4
Time that is required to charge the empty built-in battery to its full capacity when the speaker turns off.
*
9
Page 10

60% or more: “Battery about 80%”
40% or more: “Battery about 60%”
20% or more: “Battery about 40%”
10% or more: “Battery about 20%”
Less than 10%: “Battery level low, please charge”
Less than 10%: “Battery level low” (while charging is in progress)
Built-in battery life
About 16 hours
The volume level of the speaker is set to 58%.
The lighting function is set to off.
The Sound Mode is set to STANDARD.
About 3 hours
The volume level of the speaker is set to maximum.
The lighting function is set to on.
The Sound Mode is set to EXTRA BASS.
The built-in battery life above is measured using the specified music source.
The built-in battery life above varies depending on the content to be played, ambient temperature or conditions of
use.
When the built-in battery is running low
When the CHARGE indicator flashes slowly in orange, the built-in battery is running low and needs to be charged.
When the CHARGE indicator flashes 3 times in orange and turns off, the built-in battery is empty and needs to be
charged.
Using a USB AC adaptor (commercially available) for charging
Connect one end of a USB Type-C™ cable to the USB Type-C™ connector on the speaker and the other end to a USB
AC adaptor (commercially available). Then, connect the USB AC adaptor to an AC outlet.
10
Page 11

If the recommended USB AC adaptor which has the ability to output in 3.0 A is used, charging will complete in about 5
hours and the CHARGE indicator will turn off.
Hint
The speaker that is in use can be charged if it is connected to an AC outlet via the supplied AC adaptor or a USB AC adaptor
(commercially available). In this case, it may take longer to charge the built-in battery compared to when the speaker is turned off
depending on the conditions of use. Therefore, it is recommended to turn off the speaker when charging.
Note
When you use the speaker at a loud volume, the built-in battery may run low even if the speaker is connected to an AC outlet. If
you want to use the speaker while charging, lower the volume of the speaker. Otherwise, turn off the speaker and charge the
built-in battery sufficiently.
When you use the speaker at a loud volume for a long time, the built-in battery may run low even if the speaker is connected to
an AC outlet. As a result, sound becomes low. This is not a malfunction. Turn off the speaker and charge the built-in battery
sufficiently.
The maximum power output will be lower when the built-in battery is running low.
In an extremely cold or hot environment, charging stops for safety. If charging takes a long time, it also makes charging of the
speaker stop. To resolve these issues, disconnect the supplied AC adaptor or a USB AC adaptor (commercially available), and
then connect it again within an operating temperature between 5 °C and 35 °C (41 °F and 95 °F).
Do not charge in places where water may splash on the speaker.
Even if you do not intend to use the speaker for a long time, charge the built-in battery sufficiently once every 6 months to
maintain its performance.
Related Topic
Turning the power on
Notes on charging
4-739-042-11(1) Copyright 2018 Sony Corporation
11
Page 12
Help Guide
Wireless Speaker
SRS-XB501G
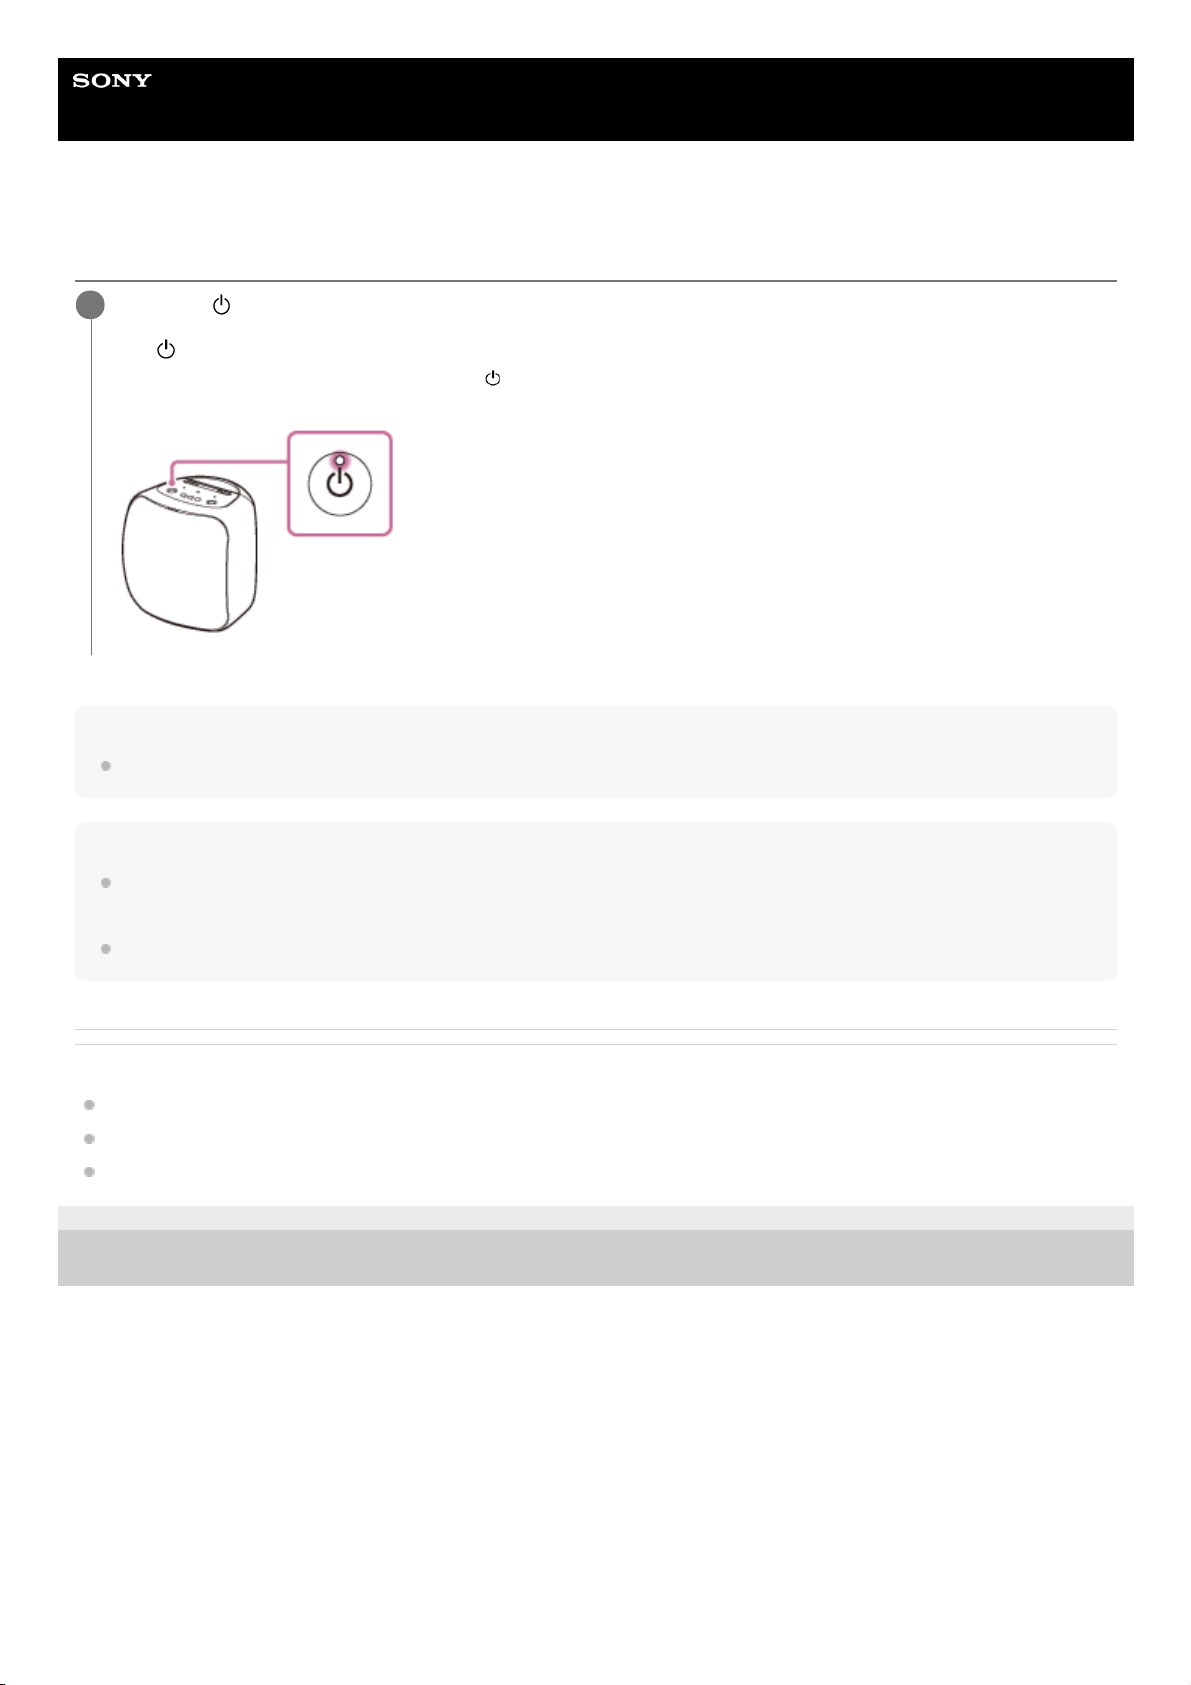
Turning the power on
Hint
When you turn on the speaker for the first time after purchase, the lighting function is on. The front part of the speaker lights up.
Note
If the CHARGE indicator flashes 3 times in orange and turns off when you turn on the speaker, the built-in battery is empty. In this
state, the speaker turns off automatically. Charge the built-in battery.
When the CHARGE indicator flashes slowly in orange, the built-in battery is running at less than 10% and needs to be charged.
Related Topic
Turning the power off
Connecting the speaker to an AC outlet
Turning on/off the speaker’s light (Lighting function)
4-739-042-11(1) Copyright 2018 Sony Corporation
Press the
(power) button.
The
(power) indicator lights up in white*.
1
Depending on the Sound Mode, the color of the
(power) indicator varies. For details, refer to the following topic.
About the indicators
*
12
Page 13
Help Guide
Wireless Speaker
SRS-XB501G
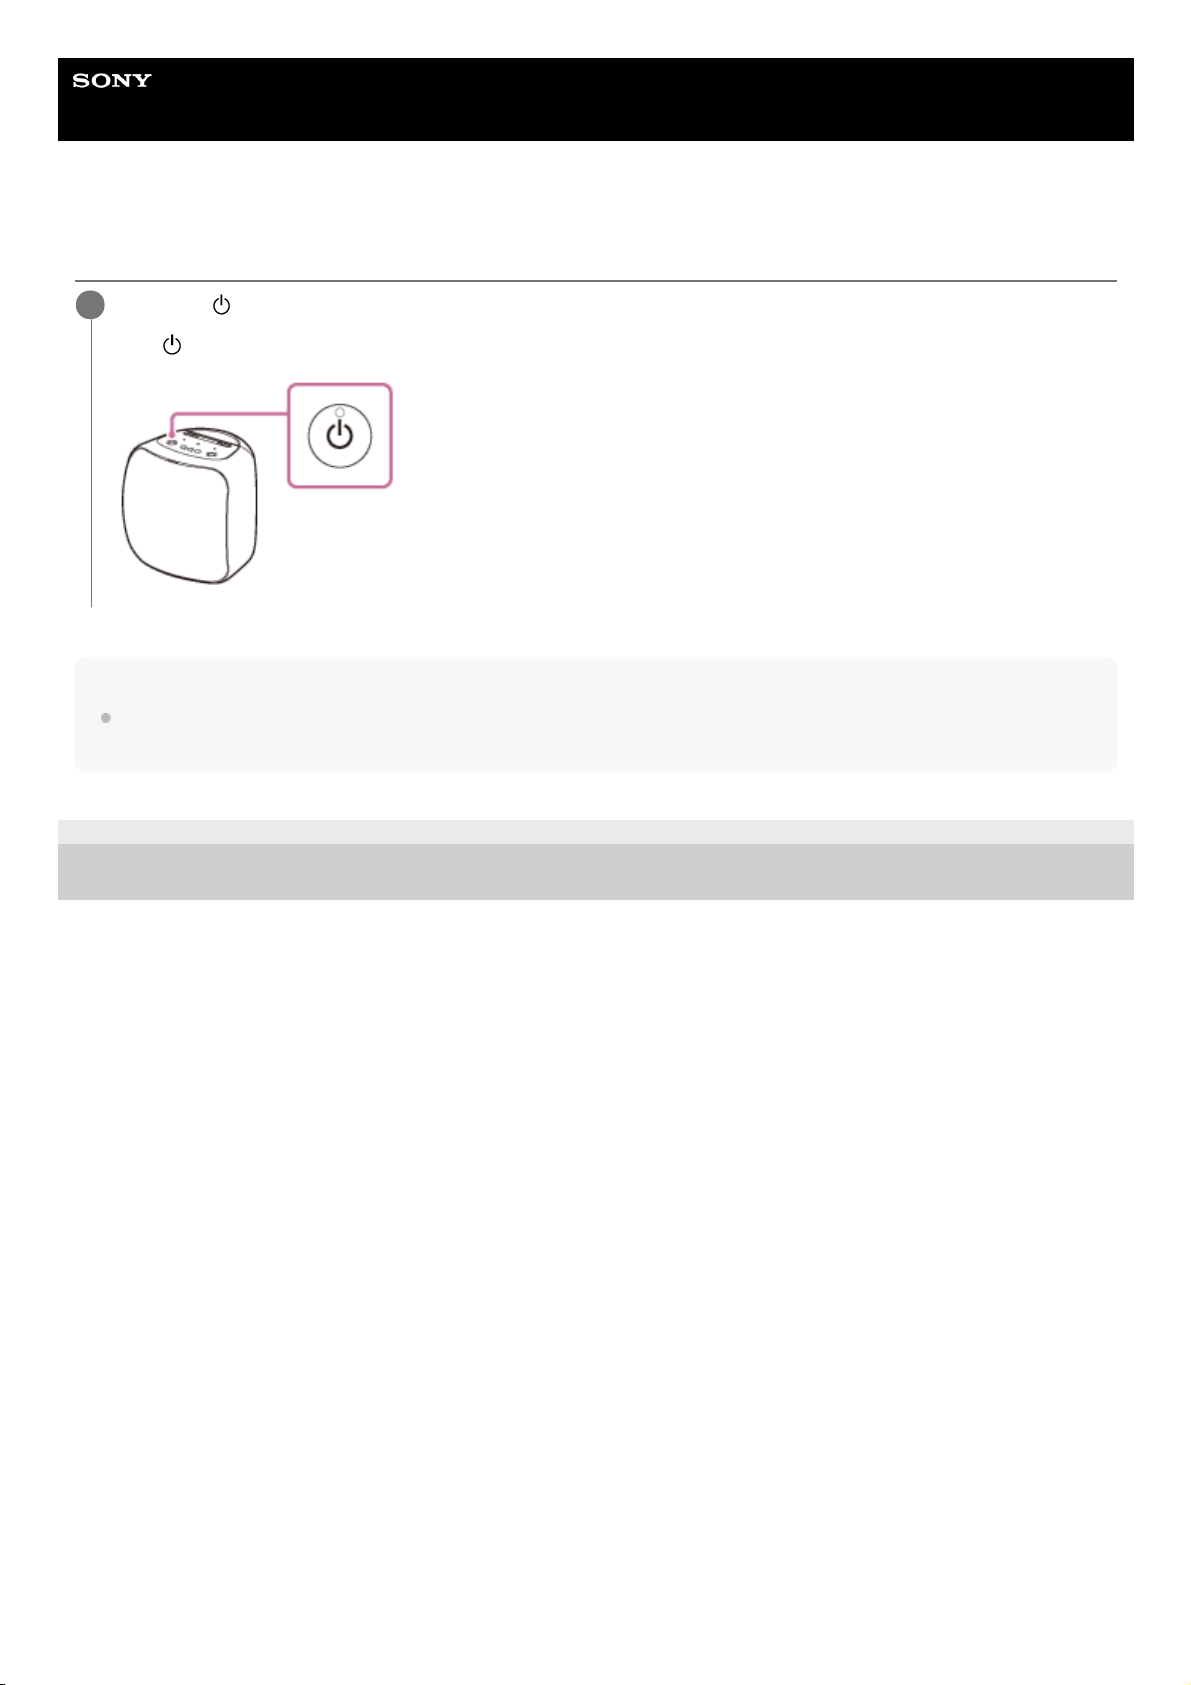
Turning the power off
Note
When the alarm/timer settings are specified on Google Assistant, do not turn off the power. Once the speaker is turned off, the
alarm/timer may not work successfully.
4-739-042-11(1) Copyright 2018 Sony Corporation
Press the
(power) button.
The
(power) indicator turns off.
1
13
Page 14

Help Guide
Wireless Speaker
SRS-XB501G
Charging USB devices such as smartphones
You can charge a USB device, such as a smartphone or iPhone, by connecting it to the speaker with a USB cable
(commercially available). Even if the speaker is not connected to an AC outlet, its built-in battery can supply power to a
USB device.
Note
When the CHARGE indicator flashes slowly in orange, the battery is running low and needs to be charged. Charge the built-in
battery.
The USB Type-C™ connector does not support music playback.
Depending on the specifications of the USB device, power charging from the speaker may not be available.
Related Topic
Connecting the speaker to an AC outlet
Turning the power on
4-739-042-11(1) Copyright 2018 Sony Corporation
Connect a USB device such as a smartphone or iPhone to the USB Type-C™ connector using a USB TypeC™ cable (commercially available).
1
14
Page 15
Help Guide
Wireless Speaker
SRS-XB501G
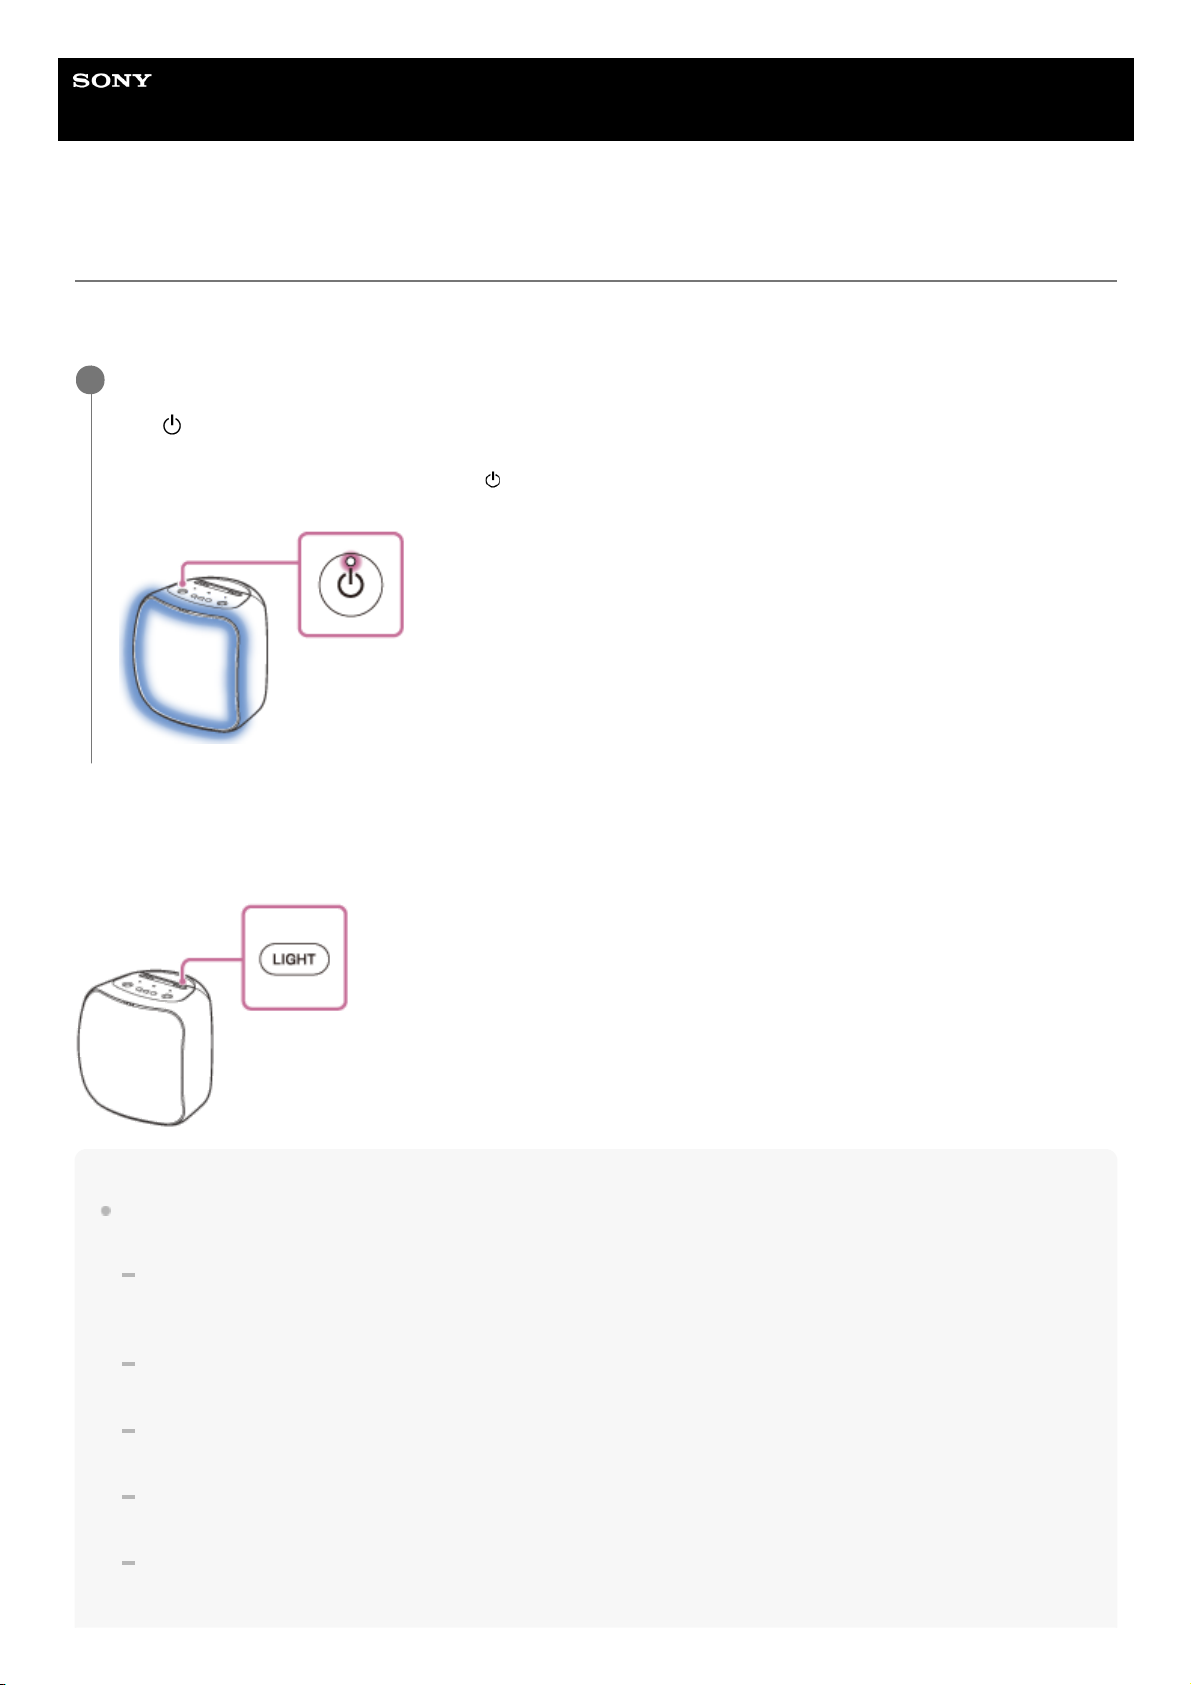
Turning on/off the speaker’s light (Lighting function)
The speaker lights up with the music to liven up the atmosphere. When you purchase the speaker, the lighting function is
set to on.
To turn off (light off)/turn on (light on) the lighting function
Pressing the LIGHT button turns off (lights off)/turns on (lights on) the lighting function.
Hint
By using the “Illumination” function on “Sony | Music Center,” you can turn on/off the lighting function or choose the various
lighting modes.
RAVE:
For dance music with heavy use of flashes
When you purchase the speaker, RAVE is set.
CHILL:
For relaxing music
RANDOM FLASH OFF:
For all kinds of music including dance music with no use of flashes
HOT:
Lighting with warm-color flashes
COOL:
Lighting with cool-color flashes
Turn on the speaker.
The
(power) indicator lights up in white*.
The front part of the speaker lights up.
1
Depending on the Sound Mode, the color of the
(power) indicator varies. For details, refer to the following topic.
About the indicators
*
15
Page 16

STROBE:
Lighting with white flashes
Note
When the speaker's light is strong, brighten the room or turn off the lighting.
Related Topic
What you can do with “Sony | Music Center”
4-739-042-11(1) Copyright 2018 Sony Corporation
16
Page 17
Help Guide
Wireless Speaker
SRS-XB501G
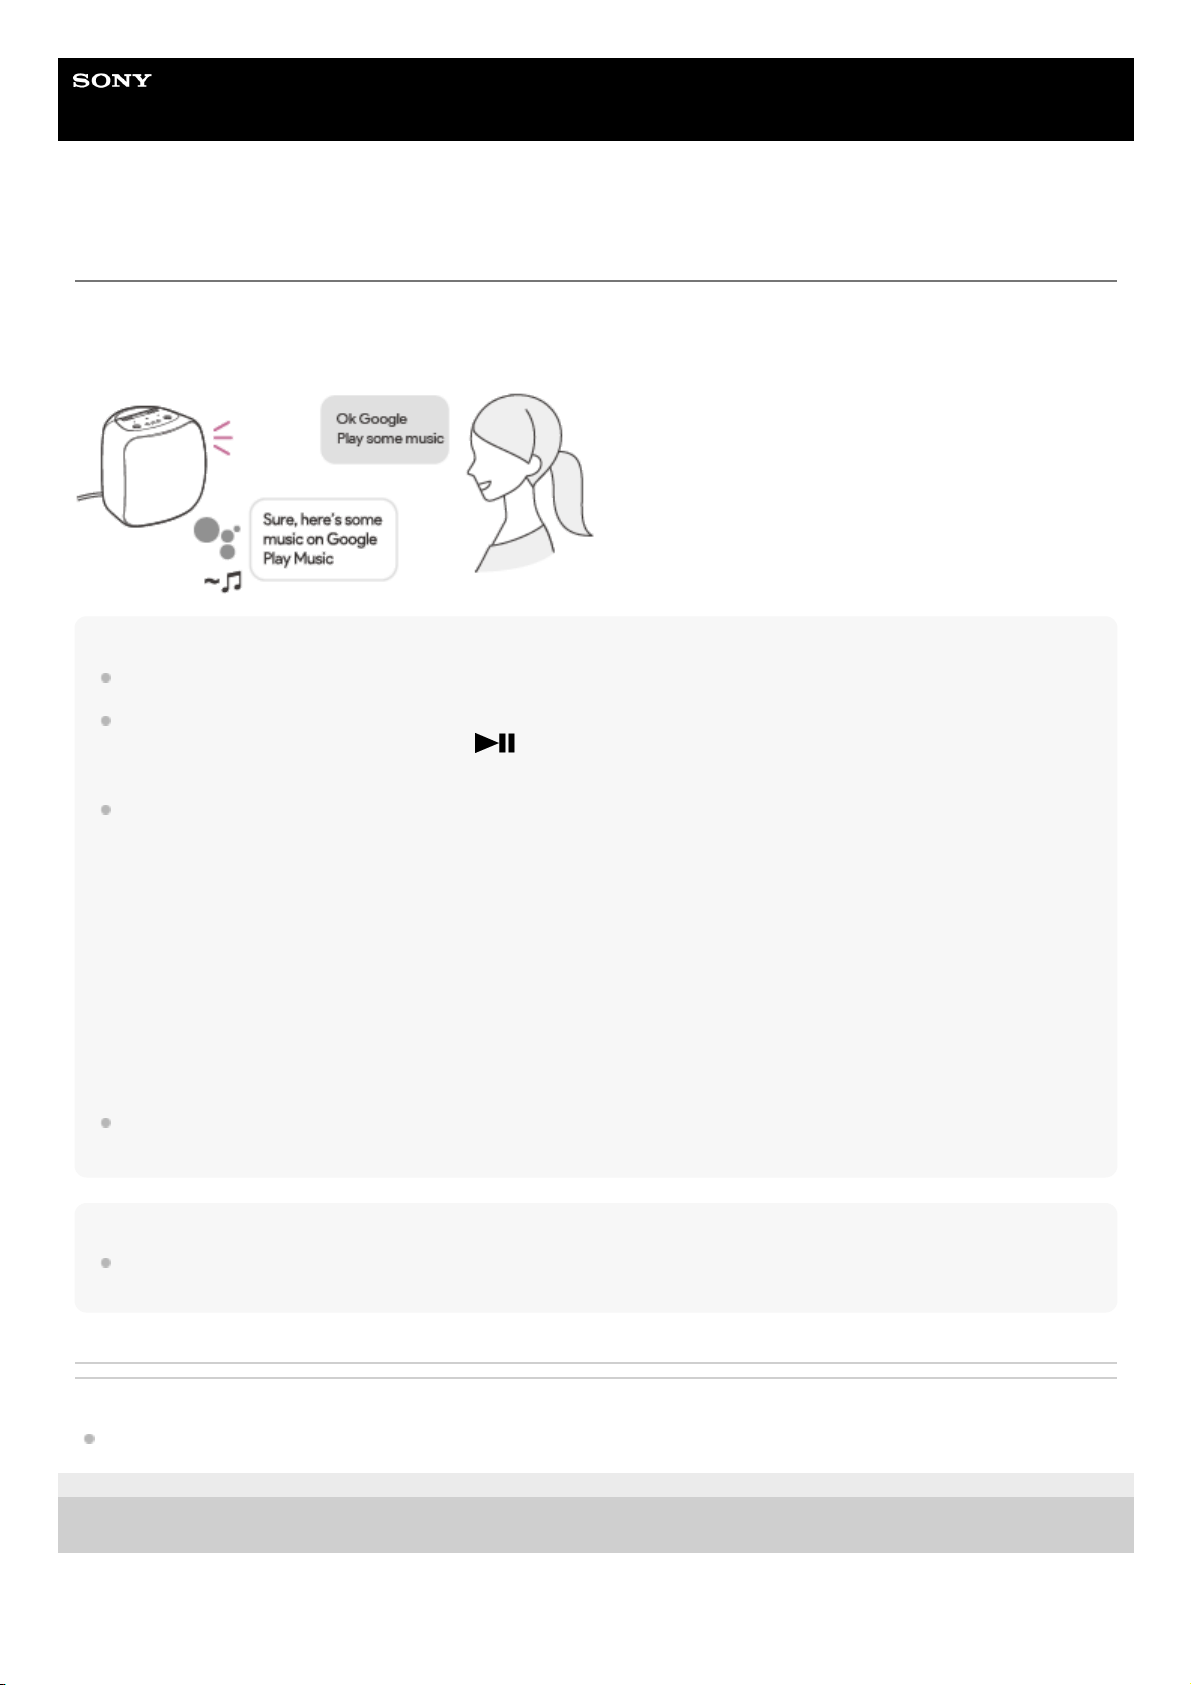
Talking to your Google Assistant
You can use a wide variety of voice commands to control the operation of your speaker in conjunction with Google
Assistant. Just say a voice command to the speaker. Then, the speaker will perform the Google Assistant activity
associated with the voice command.
Hint
To play music, registration with a music distribution service, such as Google Play Music, is required.
In a noisy place or a place that is exposed to strong winds or echoes (sound reflections), the speaker may fail to detect the voice
command. In such a case, press and hold the
(play) button for about 3 seconds. This action is equivalent to saying “Ok
Google” to the speaker.
For the latest voice commands, visit one of the websites listed below.
For customers in the USA:
assistant.google.com/intl/en_us/
For customers in Canada:
assistant.google.com/intl/en_ca/
For customers in the United Kingdom:
assistant.google.com/intl/en_uk/
For customers in France:
assistant.google.com/intl/fr_fr/
For customers in Germany:
assistant.google.com/intl/de_de/
For customers in Australia:
assistant.google.com/intl/en_au/
You can change your Google Assistant language. For details, refer to the following topic.
Changing your Google Assistant language
Note
When the alarm/timer settings are specified on Google Assistant, do not turn off the power. Once the speaker is turned off, the
alarm/timer may not work successfully.
Related Topic
The speaker is not responding to any voice commands
4-739-042-11(1) Copyright 2018 Sony Corporation
17
Page 18

Help Guide
Wireless Speaker
SRS-XB501G
Disabling the Wi-Fi 5 GHz band
Depending on your country or region, outdoor use of the wireless devices that use the Wi-Fi 5 GHz band may be
prohibited by law.
Follow the instructions below to disable the Wi-Fi 5 GHz band on this speaker.
To disable the Wi-Fi 5 GHz band
Press and hold the LIVE button and the LIGHT button simultaneously until the LINK indicator flashes in orange
(about 4 seconds).
The Wi-Fi 5 GHz band is disabled.
To enable the Wi-Fi 5 GHz band
Press and hold the LIVE button and the LIGHT button simultaneously until the LINK indicator flashes in green (about
4 seconds).
The Wi-Fi 5 GHz band is enabled.
For details on the wireless LAN settings, refer to the operating instructions supplied with the wireless LAN router.
Related Topic
About the indicators
4-739-042-11(1) Copyright 2018 Sony Corporation
18
Page 19

Help Guide
Wireless Speaker
SRS-XB501G
Pairing and connecting with BLUETOOTH® devices
When pairing with two or more BLUETOOTH devices, perform the following pairing procedure for each device.
Before operating the speaker, be sure to do the following:
Place the BLUETOOTH device within 1 m (3 ft) from the speaker.
Connect the speaker to an AC outlet via the AC adaptor (supplied) or charge the built-in battery sufficiently.
Stop playback on the BLUETOOTH device.
Turn down the volume of the BLUETOOTH device and the speaker to avoid any sudden loud sound output from the
speaker. Depending on the paired BLUETOOTH device, the volume of the BLUETOOTH device may be
synchronized with the volume of the speaker when you start playing music after a BLUETOOTH connection is
established.
Hint
For details on operating a BLUETOOTH device, refer to the operating instructions supplied with the BLUETOOTH device.
After the Google Assistant setup is complete, press and hold the
(BLUETOOTH) button/ PAIRING
button until the
(BLUETOOTH) indicator starts flashing quickly.
The speaker is placed in BLUETOOTH pairing mode.
1
Perform the pairing procedure on the BLUETOOTH device to detect the speaker.
When a list of detected devices appears on the display of the BLUETOOTH device, select the speaker you set up
for Google Assistant.
If passkey* entry is prompted on the BLUETOOTH device, enter “0000.”
2
A passkey may also be called “Passcode,” “PIN code,” “PIN number” or “Password.”
*
Follow the instructions on the BLUETOOTH device screen to establish a BLUETOOTH connection.
When the BLUETOOTH connection is established, the
(BLUETOOTH) indicator switches from flashing to a
steady light.
3
19
Page 20
With the previously connected BLUETOOTH device, you can establish a BLUETOOTH connection simply by pressing the
(BLUETOOTH) button/ PAIRING button on the speaker, provided that the BLUETOOTH function is active on the
BLUETOOTH device.
Note
The
(BLUETOOTH) button/ PAIRING button is disabled before the Google Assistant setup is complete.
The speaker goes out of BLUETOOTH pairing mode in about 3 minutes and the
(BLUETOOTH) indicator goes out.
Once the speaker is paired with the BLUETOOTH device, there is no need to pair them again, except in the following cases:
Pairing information is deleted due to repair work, etc.
The pairing information of the speaker is deleted from the BLUETOOTH device.
The speaker is initialized.
All pairing information will be deleted.
The speaker can be paired with multiple devices, but can only have a BLUETOOTH connection with one paired device at a time.
Video viewing using a BLUETOOTH connection is not recommended. A slight misalignment occurs in video and audio.
Related Topic
Listening to music from the connected BLUETOOTH device
Terminating the BLUETOOTH connection (After use)
4-739-042-11(1) Copyright 2018 Sony Corporation
20
Page 21

Help Guide
Wireless Speaker
SRS-XB501G
Connecting with an NFC-compatible device by One-touch (NFC)
By touching the speaker with an NFC-compatible device, such as a smartphone, while the speaker is powered, the
speaker starts pairing and proceeds to a BLUETOOTH connection.
Compatible smartphones
NFC-compatible smartphones with Android™ 4.1 or later installed
Compatible WALKMAN® models
NFC-compatible WALKMAN® models
*
NFC
NFC (Near Field Communication) is a technology enabling short-range wireless communication between various
devices, such as smartphones and IC tags.
Thanks to the NFC function, data communication - for example, BLUETOOTH pairing - can be achieved easily by simply
touching NFC-compatible devices together (i.e., at the N-mark symbol or location designated on each device).
Do the following before starting.
Stop playback on the device.
Turn down the volume of the device and speaker to avoid sudden loud sound output from the speaker. Depending on
the device, the volume of the device will be synchronized with the speaker.
Cancel the screen lock on the device.
Even if your WALKMAN® is compatible with the NFC function, it may not be able to make a BLUETOOTH connection with the speaker by
Onetouch. For details on the compatible models, refer to the operating instructions supplied with the WALKMAN® .
*
Set the NFC function of the device to on.
1
Press the
(power) button.
Make sure that the speaker is powered.
2
Touch and hold the N-mark symbol of the speaker with the N-mark symbol of the device until the device
vibrates. (It may take a few seconds.)
3
Follow the instructions on the BLUETOOTH device screen to establish a BLUETOOTH connection.
4
21
Page 22

Hint
The NFC function is disabled before the Google Assistant setup is complete.
To disconnect the BLUETOOTH connection, touch the N-mark symbol on the NFC-compatible device to the N-mark symbol on
the speaker once again.
If the BLUETOOTH connection is not established, try the following:
Keep the NFC-compatible device touched on the N-mark symbol on your speaker until the device vibrates.
Move the device over the N-mark symbol of the speaker slowly.
If the NFC-compatible device is in a case, remove the case.
If the speaker is connected with another device via a BLUETOOTH connection, touching the NFC-compatible device to the
speaker disconnects the connection and establishes a BLUETOOTH connection with the speaker (One-touch connection
switching).
Related Topic
Listening to music from the connected BLUETOOTH device
4-739-042-11(1) Copyright 2018 Sony Corporation
When the BLUETOOTH connection is established, the
(BLUETOOTH) indicator switches from flashing to a
steady light.
22
Page 23

Help Guide
Wireless Speaker
SRS-XB501G
Connecting with a computer via a BLUETOOTH connection (Windows)
Pairing is the process required to mutually register the information on BLUETOOTH devices to be connected wirelessly.
It is necessary to pair a device with the speaker to be able to make a BLUETOOTH connection for the first time. Perform
the same procedures to pair to other devices.
Supported operation systems
Windows 10, Windows 8.1, Windows 8, Windows 7 SP1
Do the following before starting.
Place your computer within 1 m (3 ft) of the speaker.
Connect the speaker to an AC outlet via the AC adaptor (supplied) or a USB AC adaptor (commercially available), or
charge the built-in battery sufficiently.
Prepare the operating instructions supplied with the computer for reference.
Stop playback on the computer.
Turn down the volume of the computer and speaker to avoid any sudden loud sound output from the speaker.
Prepare to search for the speaker on the computer.
For Windows 10
Select [
(Action Center)] - [Connect] in the taskbar on the right-bottom of the screen.
For Windows 8.1
Right-click on [Start], and then click [Control Panel].
When [All Control Panel Items] is displayed, select [Devices and Printers].
If the [Control Panel] screen appears instead of [All Control Panel Items], select [Large icons] or [Small icons] from
the [View by] menu in the top right corner of the screen.
1
23
Page 24

For Windows 7
Click the [Start] button and then [Devices and Printers].
Turn on the speaker.
The
(power) indicator lights up in white*1.
2
Depending on the Sound Mode, the color of the
(power) indicator varies. For details, refer to the following topic.
About the indicators
*1
After the Google Assistant setup is complete, press and hold the
(BLUETOOTH) button/ PAIRING
button until the
(BLUETOOTH) indicator starts flashing quickly.
The speaker enters pairing mode.
3
Search for the speaker on the computer.
Connecting the speaker to the computer via a BLUETOOTH connection
4
24
Page 25

For Windows 10/Windows 8.1
For Windows 7
Select [Connect] in the Action Center on the right-bottom of the screen.1.
Select the name of the speaker you set up for Google Assistant.
If the speaker's name does not appear on the screen, repeat the procedure from step .
After pairing, the BLUETOOTH connection establishes automatically and [Connected music] will be displayed
on the screen. Proceed to step
.
2.
Click [Add a device].
1.
Select the name of the speaker you set up for Google Assistant and click [Next].2.
25
Page 26

If a passkey*2 is required, enter “0000.”
If speaker's name does not appear, perform the operation again from step
.
The passkey may be called a “passcode,” “PIN code,” “PIN number,” or “password.”
*2
When the following screen appears, click [Close].
The computer begins installing the driver.
The “ ” mark will appear in the bottom left of the speaker icon during installation. When the “ ” mark
disappears, driver installation is complete. Proceed to step
.
3.
Register the speaker to the computer.
For Windows 10
After pairing, the BLUETOOTH connection establishes automatically and [Connected music] will be displayed on
the screen. Proceed to step
.
For Windows 8.1
5
Right-click on the name of the speaker you set up for Google Assistant in [Devices] and select [Sound settings]
from the menu that appears.
1.
26
Page 27

Confirm the speaker's name on the [Sound] screen.
If there is a checkmark (green) on the speaker icon, proceed to step
.
If there is not a checkmark (green) on the speaker icon, proceed to the next step (substep 3).
If the name of the speaker you set up for Google Assistant does not appear, right-click on the [Sound]
screen, and select [Show Disabled Devices] from the menu that appears. Then proceed to the next step
(substep 3).
2.
Right-click on the speaker's name, and select [Connect] from the menu that appears.3.
27
Page 28

For Windows 7
When the speaker is connected, a checkmark will appear on the speaker icon on the [Sound] screen. Proceed
to step
.
If you cannot click [Connect] for the speaker, select [Disable] for the [Default Device] that currently has a
checkmark (green).
Double-click on the name of the speaker you set up for Google Assistant in [Devices].1.
28
Page 29

Hint
The procedure explained above is for guidance only. For details, refer to the operating instructions supplied with the computer.
Click [Listen to Music].
When the speaker is connected, a checkmark will appear.
2.
Follow the instructions on the BLUETOOTH device screen to establish a BLUETOOTH connection.
When the BLUETOOTH connection is established, the
(BLUETOOTH) indicator switches from flashing to a
steady light.
6
29
Page 30

With the previously connected BLUETOOTH device, you can establish a BLUETOOTH connection simply by pressing the
(BLUETOOTH) button/ PAIRING button on the speaker, provided that the BLUETOOTH function is active on the
BLUETOOTH device.
Note
The
(BLUETOOTH) button/ PAIRING button is disabled before the Google Assistant setup is complete.
The speaker goes out of BLUETOOTH pairing mode in about 3 minutes and the
(BLUETOOTH) indicator goes out.
Once the speaker is paired with the computer, there is no need to pair them again, except in the following cases:
Pairing information is deleted due to repair work, etc.
The pairing information of the speaker is deleted from the computer.
The speaker is initialized.
All pairing information will be deleted.
The speaker can be paired with multiple devices, but can only have a BLUETOOTH connection with one paired device at a time.
The passkey of the speaker is “0000.” If a passkey besides “0000” is set on the computer, pairing with the speaker fails.
Related Topic
Listening to music from the connected BLUETOOTH device
Terminating the BLUETOOTH connection (After use)
4-739-042-11(1) Copyright 2018 Sony Corporation
30
Page 31

Help Guide
Wireless Speaker
SRS-XB501G
Connecting with a computer via a BLUETOOTH connection (Mac)
Pairing is the process required to mutually register the information on BLUETOOTH devices to be connected wirelessly.
It is necessary to pair a device with the speaker to be able to make a BLUETOOTH connection for the first time. Perform
the same procedures to pair to other devices.
Supported operation systems
macOS High Sierra (version 10.13)
Do the following before starting.
Confirm that the BLUETOOTH wireless technology is installed in your computer.
Place your computer within 1 m (3 ft) of the speaker.
Connect the speaker to an AC outlet via the AC adaptor (supplied) or a USB AC adaptor (commercially available), or
charge the built-in battery sufficiently.
Prepare the operating instructions supplied with the computer for reference.
Stop playback on the computer.
Turn down the volume of the computer and speaker to avoid any sudden loud sound output from the speaker.
Depending on your computer, turn on the built-in BLUETOOTH adaptor.
If you do not know how to turn on the BLUETOOTH adaptor or whether your computer has the built-in BLUETOOTH
adaptor, refer to the operating instructions of your computer.
Set the speaker of your computer to on.
If the speaker of your computer is set to
(Mute), sound does not output on the BLUETOOTH speaker.
When the speaker of your computer is set to on:
Turn on the speaker.
The
(power) indicator lights up in white*1.
1
Depending on the Sound Mode, the color of the
(power) indicator varies. For details, refer to the following topic.
About the indicators
*1
31
Page 32

After the Google Assistant setup is complete, press and hold the (BLUETOOTH) button/ PAIRING
button until the
(BLUETOOTH) indicator starts flashing quickly.
The speaker enters pairing mode.
2
Search for the speaker on the computer.
3
Select [
(System Preferences)] - [Bluetooth] in the taskbar on the right-bottom of the screen.1.
Select the name of the speaker you set up for Google Assistant from the Bluetooth screen, then click [Pair].
2.
Check that the
(BLUETOOTH) indicator has switched from flashing to a steady light.
When the speaker is connected to the computer, the
(BLUETOOTH) indicator stays lit.
4
32
Page 33

Hint
The procedure explained above is for guidance only. For details, refer to the operating instructions supplied with the computer.
With the previously connected BLUETOOTH device, you can establish a BLUETOOTH connection simply by pressing the
(BLUETOOTH) button/ PAIRING button on the speaker, provided that the BLUETOOTH function is active on the
BLUETOOTH device.
Note
The
(BLUETOOTH) button/ PAIRING button is disabled before the Google Assistant setup is complete.
The speaker goes out of BLUETOOTH pairing mode in about 3 minutes and the
(BLUETOOTH) indicator goes out.
Once the speaker is paired with the computer, there is no need to pair them again, except in the following cases:
Pairing information is deleted due to repair work, etc.
The pairing information of the speaker is deleted from the computer.
The speaker is initialized.
All pairing information will be deleted.
The speaker can be paired with multiple devices, but can only have a BLUETOOTH connection with one paired device at a time.
The passkey of the speaker is “0000.” If a passkey besides “0000” is set on the computer, pairing with the speaker fails.
Related Topic
Listening to music from the connected BLUETOOTH device
Terminating the BLUETOOTH connection (After use)
4-739-042-11(1) Copyright 2018 Sony Corporation
Click the speaker icon in the top-right of the screen and select the name of the speaker you set up for
Google Assistant from [Output Device].
You can enjoy playing back music, etc. from your computer.
5
33
Page 34

Help Guide
Wireless Speaker
SRS-XB501G
Listening to music from the connected BLUETOOTH device
You can enjoy listening to music of a BLUETOOTH device and operate it by the speaker via a BLUETOOTH connection
if it supports the following BLUETOOTH profiles.
A2DP (Advanced Audio Distribution Profile)
Enables you to enjoy high-quality audio contents wirelessly.
AVRCP (Audio Video Remote Control Profile)
Enables you to adjust the volume and operate to play, pause or skip to the beginning of the next/current track.
Operations may vary depending on the BLUETOOTH device. Refer also to the operating instructions supplied with the
BLUETOOTH device.
Note
Make sure beforehand that the volume on the BLUETOOTH device and speaker are set to a moderate level to avoid sudden loud
sound output from the speaker.
Depending on the BLUETOOTH device, adjusting the volume of the speaker may not be possible on the BLUETOOTH device
while playback on the device is stopped/paused.
On the BLUETOOTH device, make sure that a BLUETOOTH connection is established with the speaker.
1
Start playing music on the BLUETOOTH device.
2
Adjust the volume by pressing the –/+ (volume) buttons on the speaker or operating the BLUETOOTH
device.
When you press the –/+ (volume) buttons on the speaker or adjust the volume on the BLUETOOTH device, the
(power) indicator flashes once or 3 times.
When you press and hold the (play) button on the speaker for about 3 seconds, the action is equivalent to
saying “Ok Google” to the speaker.
During playback, you can use the
(play) button on the speaker to perform the following operations.
Pause
Press the
(play) button during playback to pause. Press it again to cancel pause.
Skip to the beginning of the next track
Press the
(play) button twice quickly during playback.
Skip to the beginning of the current track
Press the
(play) button 3 times quickly during playback.
3
34
Page 35

Hint
If the communication condition is poor, the BLUETOOTH device may react incorrectly to the operations on the speaker.
When using in a place with a high temperature, the volume may decrease to protect the built-in battery.
If the built-in battery level is low, the maximum output of the speaker decreases.
Depending on the BLUETOOTH device, it may be necessary to adjust the volume or set the audio output setting on the
connected device.
Noise or sound interruption may occur depending on the BLUETOOTH device connected with the speaker, the communication
environment or the usage environment.
Video viewing using a BLUETOOTH connection is not recommended. A slight misalignment occurs in video and audio.
Related Topic
Pairing and connecting with BLUETOOTH® devices
Terminating the BLUETOOTH connection (After use)
4-739-042-11(1) Copyright 2018 Sony Corporation
35
Page 36

Help Guide
Wireless Speaker
SRS-XB501G
Terminating the BLUETOOTH connection (After use)
When you finish playing music with the BLUETOOTH device, perform any of the following operations to terminate the
BLUETOOTH connection.
Turn off the BLUETOOTH function on the BLUETOOTH device. For details, refer to the operating instructions
supplied with the device.
Turn off the BLUETOOTH device.
Turn off the speaker.
Touch the NFC-compatible device on the N-mark symbol of the speaker again (if your device has the NFC function).
Note
When you finish playing music, the BLUETOOTH connection may terminate automatically depending on the BLUETOOTH
device.
Related Topic
Turning the power off
4-739-042-11(1) Copyright 2018 Sony Corporation
36
Page 37

Help Guide
Wireless Speaker
SRS-XB501G
Enjoying switching the sound effects
You can enjoy three different Sound Modes. When you purchase the speaker, the EXTRA BASS mode is set.
Switching the Sound Mode between LIVE SOUND and EXTRA BASS
Switching the Sound Mode between EXTRA BASS and STANDARD
When setting the Sound Mode with “Sony | Music Center”
Sound Mode The color of the LIVE indicator The color of the (power) indicator Feature
STANDARD Turns off Green Power saving
EXTRA BASS Turns off White Heavy bass sound
LIVE SOUND White White Realistic sound
Press the LIVE button.
Each time you press the button, the LIVE SOUND mode and the EXTRA BASS mode are switched.
1.
Press and hold the BATTERY button and the LIVE button at the same time for about 5 seconds.
The color of the
(power) indicator is changed to green from white, and the Sound Mode switches to the
STANDARD mode.
If you press and hold the BATTERY button and the LIVE button at the same time again for about 5 seconds, the color
of the
(power) indicator is changed to white from green, and the Sound Mode switches to the EXTRA BASS
mode.
1.
Tap [Music Center] on your smartphone, iPhone, etc. to start up the application.
1.
37
Page 38

Note
Depending on the music, the LIVE SOUND or EXTRA BASS effects may not be so noticeable.
Related Topic
Listening to music from the connected BLUETOOTH device
What you can do with “Sony | Music Center”
4-739-042-11(1) Copyright 2018 Sony Corporation
Music Center
Tap the name of the speaker you set up for Google Assistant.2.
Tap [Settings] - [Sound] - [Sound Mode] - [Preset Mode] to select the Sound Mode.
STANDARD
EXTRA BASS
LIVE SOUND
3.
38
Page 39

Help Guide
Wireless Speaker
SRS-XB501G
What you can do with “Sony | Music Center”
“Sony | Music Center” is an app for controlling Sony audio devices which are compatible with “Sony | Music Center”
using your smartphone/iPhone.
For details about “Sony | Music Center,” refer to the following URL:
http://www.sony.net/smcqa/
Operations that can be performed on a speaker with “Sony | Music Center”
Sound quality setting and equalizer adjustment
Built-in battery level indication
Lighting (Illumination) setting (switching the lighting mode)
Hint
What you can control with “Sony | Music Center” varies depending on the connected device.
Be aware that “Sony | Music Center” and “Music Center for PC” are different apps.
The specifications and design of the app may change without notice.
Related Topic
Installing “Sony | Music Center”
Connecting the speaker to an AC outlet
Turning on/off the speaker’s light (Lighting function)
Enjoying switching the sound effects
4-739-042-11(1) Copyright 2018 Sony Corporation
39
Page 40

Help Guide
Wireless Speaker
SRS-XB501G
Installing “Sony | Music Center”
Install “Sony | Music Center” on your smartphone, iPhone, etc. from Google Play or the App Store.
Note
Be sure to use the latest version of “Sony | Music Center.”
If you cannot connect the speaker and a smartphone/iPhone via BLUETOOTH, or if there is a problem such as no sound being
emitted, uninstall “Sony | Music Center” and try to connect via BLUETOOTH again.
For details about “Sony | Music Center,” refer to Google Play or the App Store.
Depending on your contract, downloading the app may require communication charges.
Related Topic
What you can do with “Sony | Music Center”
4-739-042-11(1) Copyright 2018 Sony Corporation
Download “Sony | Music Center” from Google Play or the App Store and install it.
1
When the installation is complete, start “Sony | Music Center.”
2
40
Page 41

Help Guide
Wireless Speaker
SRS-XB501G
About the indicators
(power) indicator
CHARGE indicator (orange)
Note
The speaker that is in use can be charged if it is connected to an AC outlet via the supplied AC adaptor or a USB AC adaptor
(commercially available). In this case, it may take longer to charge the built-in battery depending on the conditions of use.
Therefore, it is recommended to turn off the speaker when charging.
When you use the speaker at a loud volume for a long time, the built-in battery may run low even if the speaker is connected to
an AC outlet. As a result, sound becomes low. This is not a malfunction. Turn off the speaker and charge the built-in battery
sufficiently.
In an extremely cold or hot environment, charging stops for safety. If charging takes a long time, it also makes charging of the
speaker stop. To resolve these issues, disconnect the supplied AC adaptor or a USB AC adaptor (commercially available) from
the speaker and connect it within an operating temperature between 5 ℃ and 35 ℃ (41 °F and 95 °F). Then, charge the built-in
battery again.
LINK indicator
Turns off The speaker is turned off.
Lights up (white)
The speaker is turned on. The EXTRA BASS mode or LIVE SOUND mode is set. When you
purchase, the EXTRA BASS is set.
Lights up (green)
The speaker is turned on. The STANDARD mode is set. (The EXTRA BASS and LIVE SOUND
modes are not set.)
Flashes (white or
green)
The speaker is shifting from the power-off state to the power-on state or vice versa.
Each time you press the –/+ (volume) buttons, the indicator flashes once.
When you operate the –/+ (volume) buttons and the volume is set at the lowest or highest level,
the indicator flashes 3 times.
The speaker is being initialized.
Flashes (red) The speaker has an error.
Turns off The speaker has completed charging.
Lights up The speaker is being charged.
Flashes The speaker has a charging error.
Flashes slowly The built-in battery is running at less than 10% and needs to be charged.
Flashes 3 times
and turns off
If the CHARGE indicator flashes 3 times and goes off when you turn on the speaker, the built-in
battery is empty and needs to be charged.
Turns off No connection information is found.
41
Page 42

(BLUETOOTH) indicator
LIVE indicator
Status indicators (Google Assistant)
Related Topic
Parts and controls
4-739-042-11(1) Copyright 2018 Sony Corporation
Lights up (green) The speaker is in Wi-Fi 5 GHz: ON/2.4 GHz: ON mode.
Lights up (orange) The speaker is in Wi-Fi 5 GHz: OFF/2.4 GHz: ON mode.
Flashes (green) The speaker is switching form Wi-Fi 5 GHz: OFF mode to Wi-Fi 5 GHz: ON mode.
Flashes (orange) The speaker is switching form Wi-Fi 5 GHz: ON mode to Wi-Fi 5 GHz: OFF mode.
Flashes 3 times (white) The software has completed updating.
Lights up The speaker is connected to a BLUETOOTH device.
Flashes quickly (3 times a second) The speaker enters the pairing mode.
Flashes The speaker is attempting to detect NFC signals.
Lights up The LIVE SOUND mode is set.
Turns off The EXTRA BASS or STANDARD mode is set. (The LIVE SOUND mode is not set.)
Flash (blue)
When two of the four indicators flash, the speaker is preparing for initialization.
When each one of the four indicators flashes subsequently from left to right, the speaker is installing
the software.
All light up
(white)
The speaker is attempting to detect the voice command.
All light up
(orange)
The built-in microphone is turned off.
To turn it on, press the
(microphone off) button.
All light up
(green)
The speaker is being initialized.
Flash (purple)
When each one of the four indicators flashes subsequently from left to right, the speaker is
downloading the latest software.
All light up
(purple)
The speaker has downloaded the latest software. When the speaker is restarted, software
installation starts.
All light up
(blue)
The speaker has installed the software.
42
Page 43

Help Guide
Wireless Speaker
SRS-XB501G
About software update
The software of your speaker will be automatically updated to the latest software while the speaker is connected to the
Internet via a Wi-Fi network.
No user operations to obtain updates are required.
Note
Check the status indicators (Google Assistant) and the LINK indicator for the state of software update.
Related Topic
About the indicators
The LINK indicator is flashing in white
4-739-042-11(1) Copyright 2018 Sony Corporation
43
Page 44

Help Guide
Wireless Speaker
SRS-XB501G
Precautions
On safety
Refer to the Reference Guide supplied with the speaker.
Notes on the AC adaptor
Use only the supplied AC adaptor. To avoid damaging the unit, do not use any other AC adaptor.
The supplied AC adaptor is exclusively designed for the speaker. It does not work with any other devices.
On placement
Do not set the unit in an inclined position.
Do not leave the unit in a place subject to high temperatures, such as direct sunlight, near a heat source or under
lighting equipment.
Do not use or leave the unit in a car.
Others
Do not use or leave the unit in an extremely cold or hot environment (temperature outside the range of 5 °C – 35 °C
(41 °F – 95 °F)). If the unit is used or left in outside the above range, the unit may automatically stop to protect
internal circuitry.
At high temperature, the charging may stop or the volume may reduce to protect the battery.
Even if you do not intend to use the unit for a long time, charge the battery to its full capacity once every 6 months to
maintain its performance.
4-739-042-11(1) Copyright 2018 Sony Corporation
44
Page 45

Help Guide
Wireless Speaker
SRS-XB501G
Notes on charging
Life span of the rechargeable built-in battery
Even if you do not intend to use the speaker for a long time, charge the built-in battery sufficiently once every 6
months to maintain its performance.
If the speaker is not used for a long time, it may take longer to charge the built-in battery.
The rechargeable built-in battery has a life span. As time passes and the number of times that the built-in battery is
used increases, the capacity of the rechargeable built-in battery slowly decreases. When the amount of time that the
built-in battery can be used seems significantly shorter, despite having been fully charged, contact your nearest Sony
dealer.
The life span of the rechargeable built-in battery differs depending on the usage, environment, and storage method.
Caution
When the speaker detects a problem for the following causes while charging the built-in battery, the CHARGE indicator
(orange) turns off even if charging is not completed.
Ambient temperature exceeds the range of 5 °C – 35 °C (41 °F – 95 °F).
There is a problem with the built-in battery.
When charging to the built-in battery continues for a long time.
Note
Charging time varies depending on built-in battery usage conditions.
Charge the speaker in an ambient temperature between 5 °C and 35 °C (41 °F and 95 °F).
The speaker becomes warm during charging. This is not a malfunction.
Avoid exposure to rapid temperature change, direct sunlight, mist, sand, dust, or mechanical shock. Also, never leave the
speaker in a car parked in the sun.
A speaker that is in use can be charged if it is connected to an AC outlet via a USB AC adaptor (commercially available). In this
case, it may take longer to charge the built-in battery depending on the conditions of use. Therefore, it is recommended to turn off
the speaker when charging.
In an extremely cold or hot environment, charging stops for safety. If charging takes a long time, it also makes charging of the
speaker stop. To resolve these issues, disconnect the micro-USB cable from the speaker and connect it again within an operating
temperature between 5 °C and 35 °C (41 °F and 95 °F).
4-739-042-11(1) Copyright 2018 Sony Corporation
45
Page 46

Help Guide
Wireless Speaker
SRS-XB501G
Notes on disposing of or giving away this speaker
When disposing of or giving away this speaker, erase information from the speaker. Make sure you to initialize it to
reset all settings to the factory defaults.
If you use in Internet service such as music service, information about the speaker may be retained by the service
provider. In this case, contact the network service provider to delete that information.
The speaker has a built-in rechargeable battery. When you dispose of this speaker, contact your nearest Sony
dealer.
Related Topic
Initializing the speaker
4-739-042-11(1) Copyright 2018 Sony Corporation
46
Page 47

Help Guide
Wireless Speaker
SRS-XB501G
Notes on water resistant and dust proof features
Water resistant performance of the unit
This unit, with the cap fastened securely, has a water resistant specification of IPX5*1 as specified in “Degrees of
protection against water immersion” of the IEC60529 “Ingress Protection Rating (IP Code)”*3, and a dust proof
specification of IP6X*2 as specified in “Degrees of protection against solid foreign objects”*3.
However, this unit is not completely water-tight.
Do not drop the unit into hot water in a bathtub or purposely use it in water.
Liquids that the water resistant performance specifications apply to
The water resistant performance of the unit is based on our measurements under the conditions herein described. Note
that malfunctions as a result of water immersion caused by misuse by the customer are not covered by the warranty.
To avoid the deterioration of the water resistant performance
Check the following and use the unit correctly.
Be careful not to drop the unit or subject it to mechanical shock. Deformation or damage may cause deterioration of
the water resistant performance.
This unit does not have a design that is resistant to water pressure. Use of the unit in a location where high water
pressure is applied, such as in the shower, may cause a malfunction.
Do not pour high-temperature water or blow hot air from a hair dryer or any other appliance on the unit directly. Also,
never use the unit in high temperature locations such as in saunas or near a stove.
Handle the cap (
) with care. The cap plays a very important role in maintenance of the water resistant
performance. When using the unit, make sure that the cap is closed completely.
When closing the cap, be careful not to allow foreign objects inside. If the cap is not closed completely the water
resistant performance may deteriorate and may cause a malfunction of the unit as a result of water entering the unit.
Applicable fresh water, tap water
Not
applicable
liquids other than the above (soapy water, water with detergent or bath agents, shampoo, hot spring
water, pool water, seawater, etc.)
IPX5 (Degree of protection against jets of water): The speaker has been tested and found to remain functional after exposure to direct jet
streams of water using a nozzle of 6.3 mm (about 1/4 in) internal diameter from any direction where approximately 12.5 L/min of water is applied
for a period of more than 3 minutes from a distance of about 3 meters (about 10 ft).
*1
IP6X (Degrees of protection against dust): The speaker has been tested to and continues to block dust after stirring for 8 hours in a testing
device which contains dust particles.
*2
The supplied accessories and the connectors of this unit (USB/DC IN) are neither water resistant nor dust proof.
*3
47
Page 48

4-739-042-11(1) Copyright 2018 Sony Corporation
48
Page 49

Help Guide
Wireless Speaker
SRS-XB501G
How to care for the speaker
If you leave the speaker wet, the speaker may develop scales, molds, etc. We recommend that you wipe off water
droplets after use and dry it in a well-ventilated place until moisture disappears.
Especially in cold regions, be sure to wipe off the moisture after using the speaker. Leaving moisture on its surface
may cause the speaker to freeze and malfunction.
Prevent chemical products such as sunscreen or suntan oil from sticking onto the speaker. Wipe it off quickly if it has
made contact. Leaving it on the surface of the speaker may cause discoloration or damage (surface cracks, etc.) of
the speaker.
If the surface of the speaker gets dirty, wipe it with a soft cloth containing a little neutral detergent. Do not use thinner,
benzine, alcohol, etc., to clean the speaker because it will damage the finish of the surface.
4-739-042-11(1) Copyright 2018 Sony Corporation
49
Page 50

Help Guide
Wireless Speaker
SRS-XB501G
Trademarks
Android, Google Play, Chromecast built-in and other related marks and logos are trademarks of Google LLC.
The Wi-Fi CERTIFIED ™ logo is a certification mark of Wi-Fi Alliance® .
Wi-Fi CERTIFIED ™ is a trademark of Wi-Fi Alliance.
The BLUETOOTH ® word mark and logos are registered trademarks owned by the Bluetooth SIG, Inc. and any use
of such marks by Sony Corporation is under license.
The N Mark is a trademark or registered trademark of NFC Forum, Inc. in the United States and in other countries.
Apple, the Apple logo, iPhone, Mac and macOS are trademarks of Apple Inc., registered in the U.S. and other
countries.
App Store is a service mark of Apple Inc., registered in the U.S. and other countries.
Use of the Made for Apple badge means that an accessory has been designed to connect specifically to the Apple
product(s) identified in the badge, and has been certified by the developer to meet Apple performance standards.
Apple is not responsible for the operation of this device or its compliance with safety and regulatory standards.
Please note that the use of this accessory with an Apple product may affect wireless performance.
USB Type-C™ and USB-C™ are trademarks of USB Implementers Forum.
Microsoft and Windows are registered trademarks or trademarks of Microsoft Corporation in the United States and/or
other countries.
™ and ® marks are omitted in the documents.
Other trademarks and trade names are those of their respective owners.
4-739-042-11(1) Copyright 2018 Sony Corporation
50
Page 51

Help Guide
Wireless Speaker
SRS-XB501G
Customer support website
When you need support assistance, visit one of the customer support websites listed below.
For customers in the USA:
http://esupport.sony.com/US/
For customers in Canada:
http://esupport.sony.com/CA/
For customers in European countries:
http://www.sony.eu/support
For customers in other countries/regions:
http://www.sony-asia.com/
4-739-042-11(1) Copyright 2018 Sony Corporation
51
Page 52

Help Guide
Wireless Speaker
SRS-XB501G
When you have an issue
Do the following before you request a repair service.
Read the relevant instruction and troubleshooting topics in this Help Guide.
Charge the speaker.
You may be able to resolve some issues by charging the built-in battery. Use the supplied AC adaptor for charging.
Restart the speaker.
Press and hold the
(power) button on the speaker for about 8 seconds.
Initialize the speaker.
All the settings, including the volume setting, are cleared and the pairing (device registration) information is deleted.
Visit our customer support home page.
If none of the above works, consult your nearest Sony dealer.
Related Topic
Customer support website
Restarting the speaker
Initializing the speaker
4-739-042-11(1) Copyright 2018 Sony Corporation
52
Page 53

Help Guide
Wireless Speaker
SRS-XB501G
Unable to charge the built-in battery
When using the supplied AC adaptor, make sure the AC adaptor is firmly connected to the speaker and AC outlet.
When using a USB AC adaptor (commercially available), make sure the USB cable is firmly connected to the
speaker and the USB AC adaptor.
In addition, make sure the USB AC adaptor is firmly connected to an AC outlet.
When using a USB AC adaptor (commercially available), make sure the USB AC adaptor has the ability to output in
3.0 A or more.
Depending on the type and specification of the USB AC adaptor and USB Type-C™ cable, the charging time may
take a long time.
Using a USB AC adaptor with an output current of 3.0 A or more and a USB Type-C™ cable conforming to the USB
standard is recommended. Charging from the other device is not guaranteed.
The charging time may vary depending on the ambient temperature or conditions of use.
Related Topic
Connecting the speaker to an AC outlet
4-739-042-11(1) Copyright 2018 Sony Corporation
53
Page 54

Help Guide
Wireless Speaker
SRS-XB501G
Unable to turn on the speaker or the speaker suddenly turns off
The built-in battery may be empty. Charge the built-in battery by connecting the AC adaptor (supplied) to an AC
outlet.
The protection circuit is in operation due to a rise in the internal temperature. (The power indicator is flashing in red.)
You may be able to resolve the issues by restarting the speaker.
Related Topic
Connecting the speaker to an AC outlet
Turning the power on
Restarting the speaker
The power indicator is flashing in red
4-739-042-11(1) Copyright 2018 Sony Corporation
54
Page 55

Help Guide
Wireless Speaker
SRS-XB501G
The speaker is not responding to any voice commands
When all of the status indicators (Google Assistant) on the front of the speaker are lit in orange, the built-in
microphone is turned off and the speaker is incapable of detecting voice commands. Press the
(microphone off)
button.
In a noisy place or a place that is exposed to strong winds or echoes (sound reflections), the speaker may fail to
detect the voice command. In such a case, press and hold the
(play) button for about 3 seconds. This action is
equivalent to saying “Ok Google” to the speaker.
Make sure that the built-in microphone is not blocked.
You may have given the voice command too quickly for your speaker to detect. Try talking to the speaker a little more
slowly.
4-739-042-11(1) Copyright 2018 Sony Corporation
55
Page 56

Help Guide
Wireless Speaker
SRS-XB501G
No sound is output or the playback sound distorts/interrupts
Check the volume of your speaker and the connected BLUETOOTH device.
Make sure that playback is in progress on the connected BLUETOOTH device.
If you are connecting a computer to the speaker, make sure the audio output setting of the computer is set for a
BLUETOOTH device.
Make sure that a BLUETOOTH connection is established between your speaker and the BLUETOOTH device.
Pair your speaker with the BLUETOOTH device (device registration) once again.
Make sure that the equalizer function of the connected BLUETOOTH device is not active. For detailed instructions,
refer to the operating instructions supplied with the BLUETOOTH device.
Move your speaker away from a microwave oven or a wireless LAN device.
Bring the BLUETOOTH device closer to your speaker. If there is an object between the speaker and the
BLUETOOTH device, move the object out of the way.
If the CHARGE indicator and
(power) indicator flash slowly, turn off the speaker and charge the built-in battery
sufficiently.
A device with a built-in radio or tuner cannot be connected to the speaker via a BLUETOOTH connection since noise
may occur in broadcasts.
Locate the speaker farther away from a TV, radio or tuner, etc. since noise may occur in broadcasts.
4-739-042-11(1) Copyright 2018 Sony Corporation
56
Page 57

Help Guide
Wireless Speaker
SRS-XB501G
Sound becomes low while in use
The sound may become low in the following cases. This is not a malfunction.
When the built-in battery is running low and the CHARGE indicator flashes slowly, while the speaker is being
powered by the built-in battery only.
When the built-in battery is running low due to long-term use at a loud volume even though the speaker was
connected to a USB AC adaptor (commercially available).
If the sound becomes low while in use, follow the procedure below.
Related Topic
Connecting the speaker to an AC outlet
4-739-042-11(1) Copyright 2018 Sony Corporation
Turn off the speaker.1.
Charge the built-in battery sufficiently.2.
57
Page 58

Help Guide
Wireless Speaker
SRS-XB501G
Unable to connect to a network via a Wi-Fi connection
Make sure that your smartphone/iPhone is connected to a Wi-Fi network. For detailed instructions, refer to the
operating instructions supplied with the smartphone/iPhone.
Make sure that your speaker is connected to the same wireless LAN as your smartphone/iPhone. For detailed
instructions, refer to the operating instructions supplied with the smartphone/iPhone.
Make sure that the wireless LAN router (access point) is turned on.
When a wireless LAN connection is in use, bring the speaker and the wireless LAN router (access point) closer
together, and then make the wireless LAN settings all over again.
Make sure that the wireless LAN router (access point) settings are correct. If the SSID stealth mode of the wireless
LAN router is turned on, turn it off. For detailed instructions on setting the wireless LAN router, refer to the operating
instructions supplied with the router.
If the connection attempt fails even when the correct SSID for the wireless LAN router is selected, make sure that the
correct password (encryption key) is used.
The password (encryption key) is case-sensitive. Be sure to check the case of each letter while entering the
SSID. No double-byte characters are accepted for the SSID. Be sure to enter single-byte characters.
Example of confusing characters:
“I (upper-case I)” and “l (lower-case L)”
“0 (numeral 0)” and “O (upper-case O)”
“d (lower-case D)” and “b (lower-case B)”
“9 (numeral 9)” and “q (lower-case Q)”
Bring the wireless LAN router closer to the speaker. Devices that use the 2.4 GHz frequency range, including
microwave ovens, BLUETOOTH devices, and digital cordless devices, may prevent the speaker from establishing a
wireless connection. Move the speaker away from such devices or turn off the devices.
The speaker does not support IEEE 802.11ac. Use the 2.4 GHz frequency range (11b, 11g, or 11n) or the 5 GHz
frequency range (11a, or 11n) for wireless connection.
If connection attempt fails even with the correct settings, try the following.
Turn off the access point (wireless LAN router), wait for a while, and then turn it back on.
Turn off the speaker, wait for a while, and then turn it back on.
Related Topic
Installing the Google Home app and making the initial settings
Disabling the Wi-Fi 5 GHz band
4-739-042-11(1) Copyright 2018 Sony Corporation
58
Page 59

Help Guide
Wireless Speaker
SRS-XB501G
Pairing (device registration) fails
Make sure that your speaker is connected to your network.
Bring the BLUETOOTH device to your speaker closer than 1 m (3 ft).
You may have initialized your speaker. Initializing the speaker may cause the speaker to fail to establish a
BLUETOOTH connection with a BLUETOOTH device. In such a case, delete the device information of the speaker
from the BLUETOOTH device and perform the pairing procedure once again.
Update the software on the connected BLUETOOTH device.
Related Topic
Pairing and connecting with BLUETOOTH® devices
Connecting with a computer via a BLUETOOTH connection (Windows)
4-739-042-11(1) Copyright 2018 Sony Corporation
59
Page 60

Help Guide
Wireless Speaker
SRS-XB501G
Unable to connect the speaker to a BLUETOOTH device with One-touch connection
(NFC)
The
(BLUETOOTH) button/ PAIRING button and the NFC function are disabled before the Google Assistant
setup is complete.
The screen of the NFC-compatible device may be locked. Unlock the screen before you touch the device to your
speaker. For detailed instructions, refer to the operating instructions supplied with the NFC-compatible device.
Keep the NFC-compatible device close to the speaker until the device vibrates. If the device does not react, move
the device slowly over the N-marked symbol of the speaker.
Make sure that the NFC function is active on the NFC-compatible device. For detailed instructions, refer to the
operating instructions supplied with the NFC-compatible device.
If the NFC-compatible device is in a case, remove the case.
NFC receiving sensitivity varies depending on the NFC-compatible device. If you keep failing to connect/disconnect
your speaker with the NFC-compatible device by One-touch (NFC), perform the on-screen connection/disconnection
operations on the NFC-compatible device. For detailed instructions, refer to the operating instructions supplied with
the NFC-compatible device.
Make sure that your speaker is turned on.
Related Topic
Connecting with an NFC-compatible device by One-touch (NFC)
4-739-042-11(1) Copyright 2018 Sony Corporation
60
Page 61

Help Guide
Wireless Speaker
SRS-XB501G
The LINK indicator is flashing in white
The software of your speaker has been updated. Wait until the LINK indicator stops flashing.
Related Topic
About the indicators
About software update
4-739-042-11(1) Copyright 2018 Sony Corporation
61
Page 62

Help Guide
Wireless Speaker
SRS-XB501G
The status indicators (Google Assistant) are flashing in blue or purple
The software of your speaker has been downloading or installing the latest software updates. Wait until the status
indicators (Google Assistant) stop flashing.
Related Topic
About software update
About the indicators
4-739-042-11(1) Copyright 2018 Sony Corporation
62
Page 63

Help Guide
Wireless Speaker
SRS-XB501G
The power indicator is flashing in red
The protection circuit is in operation due to a rise in the internal temperature.
Immediately disconnect the AC adaptor from the speaker, disconnect the connection with Google Home on the
smartphone or iPhone or the BLUETOOTH connection, and restart the speaker.
Then, leave the speaker unused for a while and restart the speaker once again.
If the
(power) indicator still flashes in red after you have left the speaker unused and restarted it, contact your
nearest Sony dealer.
Related Topic
About the indicators
Restarting the speaker
Initializing the speaker
4-739-042-11(1) Copyright 2018 Sony Corporation
63
Page 64

Help Guide
Wireless Speaker
SRS-XB501G
Restarting the speaker
In the event of the following, press and hold the
(power) button for about 8 seconds to reset and turn on the
speaker.
The speaker does not turn on.
You cannot operate the speaker after you have turned it on.
You cannot operate the speaker after you have resolved the issues with pairing.
Hint
The information including the Google Assistant settings will be retained.
4-739-042-11(1) Copyright 2018 Sony Corporation
64
Page 65

Help Guide
Wireless Speaker
SRS-XB501G
Initializing the speaker
With the speaker turned on, press and hold the
(microphone off) button until the four status indicators (Google
Assistant) light up in green.
Initialization takes about 80 seconds. When initialization completes, the
(power) indicator lights up.
Initializing the speaker deletes all the information including the Google Assistant settings.
4-739-042-11(1) Copyright 2018 Sony Corporation
65
 Loading...