

Page 1
2-179-931-12(1)
English
Before operating the unit, please read this manual
thoroughly and retain it for future reference.
WARNING
To prevent fire or shock hazard, do not expose the
Active Speaker System
Operating Instructions
Manual de instrucciones
unit to rain or moisture.
To avoid electrical shock, do not open the cabinet. Refer
servicing to qualified personnel only.
To prevent fire, do not Cover the ventilation of the
apparatus with news papers, table-cloths, curtains, etc. Do
not place lighted candles on the apparatus.
To prevent fire or shock hazard, do not place objects filled
with liquids, such as vases, on the apparatus.
Do not install the appliance in a confined space, such
as a bookcase or built-in cabinet.
CAUTION
You are cautioned that any changes or modification not
expressly approved in this manual could void your
authority to operate this equipment.
For the customers in the U.S.A.
SRS-T10PC
© 2004 Sony Corporation Printed in China
A
1
INFORMATION
This equipment has been tested and found to comply with
the limits for a Class B digital device, pursuant to Part 15
of the FCC Rules. These limits are designed to provide
reasonable protection against harmful interference in a
residential installation. This equipment generates, uses,
and can radiate radio frequency energy and, if not
installed and used in accordance with the instructions,
may cause harmful interference to radio communications.
However, there is no guarantee that interference will not
occur in a particular installation. If this equipment does
cause harmful interference to radio or television
reception, which can be determined by turning the
equipment off and on, the user is encouraged to try to
correct the interference by one or more of the following
measures:
– Reorient or relocate the receiving antenna.
– Increase the separation between the equipment and
receiver.
– Connect the equipment to an outlet on a circuit
different from that to which the receiver is connected.
– Consult the dealer or an experienced radio/TV
technician for help.
If you have any questions about this product, you may
call;
Sony Customer Informaion Services Center
1-800-222-7669 or http://www.sony.com/
Customer Support
Cover
23
B
To the USB
connecting
terminal of a
computer
C
Image
The following URLs contain information on the latest
customer support for the speaker, and frequently asked
questions and answers.
Customers in the U.S.A.
http://www.sonystyle.com/support
Customers in Canada
http://www.sony.ca/sonyca/view/english/
support_electronics.shtml
http://fr.sony.ca/sonyca/view/french/
support_electronics.shtml
Customers in Europe
http://www.support-nwwalkman.com/
Customers in Asia Pacific
http://www.css.ap.sony.com/
Declaration of Conformity
Trade Name: SONY
Model No.: SRS-T10PC
Responsible Party: Sony Electronics Inc.
Address: 16450 W. Bernardo Dr,
Telephone No.: 858-942-2230
This device complies with Part 15 of the FCC Rules.
Operation is subject to the following two conditions:
(1) This device may not cause harmful interference,
and (2) this device must accept any interference
received, including interference that may cause
undesired operation.
• Microsoft and Windows are registered trademarks of
Microsoft Corporation in the United States and/or
other countries.
• In this manual, Microsoft
and Microsoft
to as Windows XP.
• In this manual, Microsoft® Windows® 2000 Professional
is referred to as Windows 2000.
• In this manual, Microsoft
Edition is referred to as Windows Me.
• In this manual, Microsoft
is referred to as Windows 98SE.
• All other names of systems and products are
trademarks or registered trademarks of their respective
owners. ™ and
Features
Compact design
• Compact, portable speaker system to carry along with
your laptop. With a USB connection to your computer,
clear sound is readily available.
• This system utilizes the USB bus power; the connection
of the AC power adaptor or batteries are not necessary.
(Note that when your computer is running on batteries,
the life span of the battery is reduced.)
• The USB cable can be stored within the speakers.
Simple settings
• Requires a simple USB cable connection only.
Clear sound
• Newly developed 39 mm, thin type speaker provides
clear, balanced sound.
1
POWER indicator
San Diego, CA 92127 USA
®
®
Windows® XP Professional are referred
®
Windows® XP Home Edition
®
Windows® Millennium
®
Windows® 98 Second Edition
marks are omitted in this manual.
Precautions
• After operating the system, disconnect the USB cable
from the computer if the system is not to be used for an
extended period.
• Do not open the cabinet. Refer servicing to qualified
personnel only.
• Do not leave the system in a location near heat sources,
or in a place subject to direct sunlight, excessive dust,
moisture, rain or mechanical shock.
• Should any solid object or liquid fall into the system,
remove the USB cable and have the system checked by
qualified personnel before operating it any further.
• Do not use alcohol, benzine, or thinner to clean the
cabinet.
• Although this system is magnetically shielded, do not
leave recorded tapes, watches, personal credit cards or
floppy disks using magnetic coding in front of the
system for an extended period.
If the TV picture or monitor display is
magnetically distorted
Although this system is magnetically shielded, there may
be cases that the picture on some TV sets/personal
computers sets may become magnetically distorted. In
such a case, turn off the power of the TV set/personal
computer set once, and after 15 to 30 minutes turn it on
again. For the personal computer set, take the appropriate
measures such as data storage before turning it off.
When there seems to be no improvement
Locate the system farther away from the TV set/personal
computer set. Furthermore, be sure not to place objects in
which magnets are attached or used near the TV set/
personal computer set, such as audio racks, TV stands,
toys etc. These may cause magnetic distortion to the
picture.
If you have any questions or problems concerning your
system that are not covered in this manual, please consult
your nearest Sony dealer.
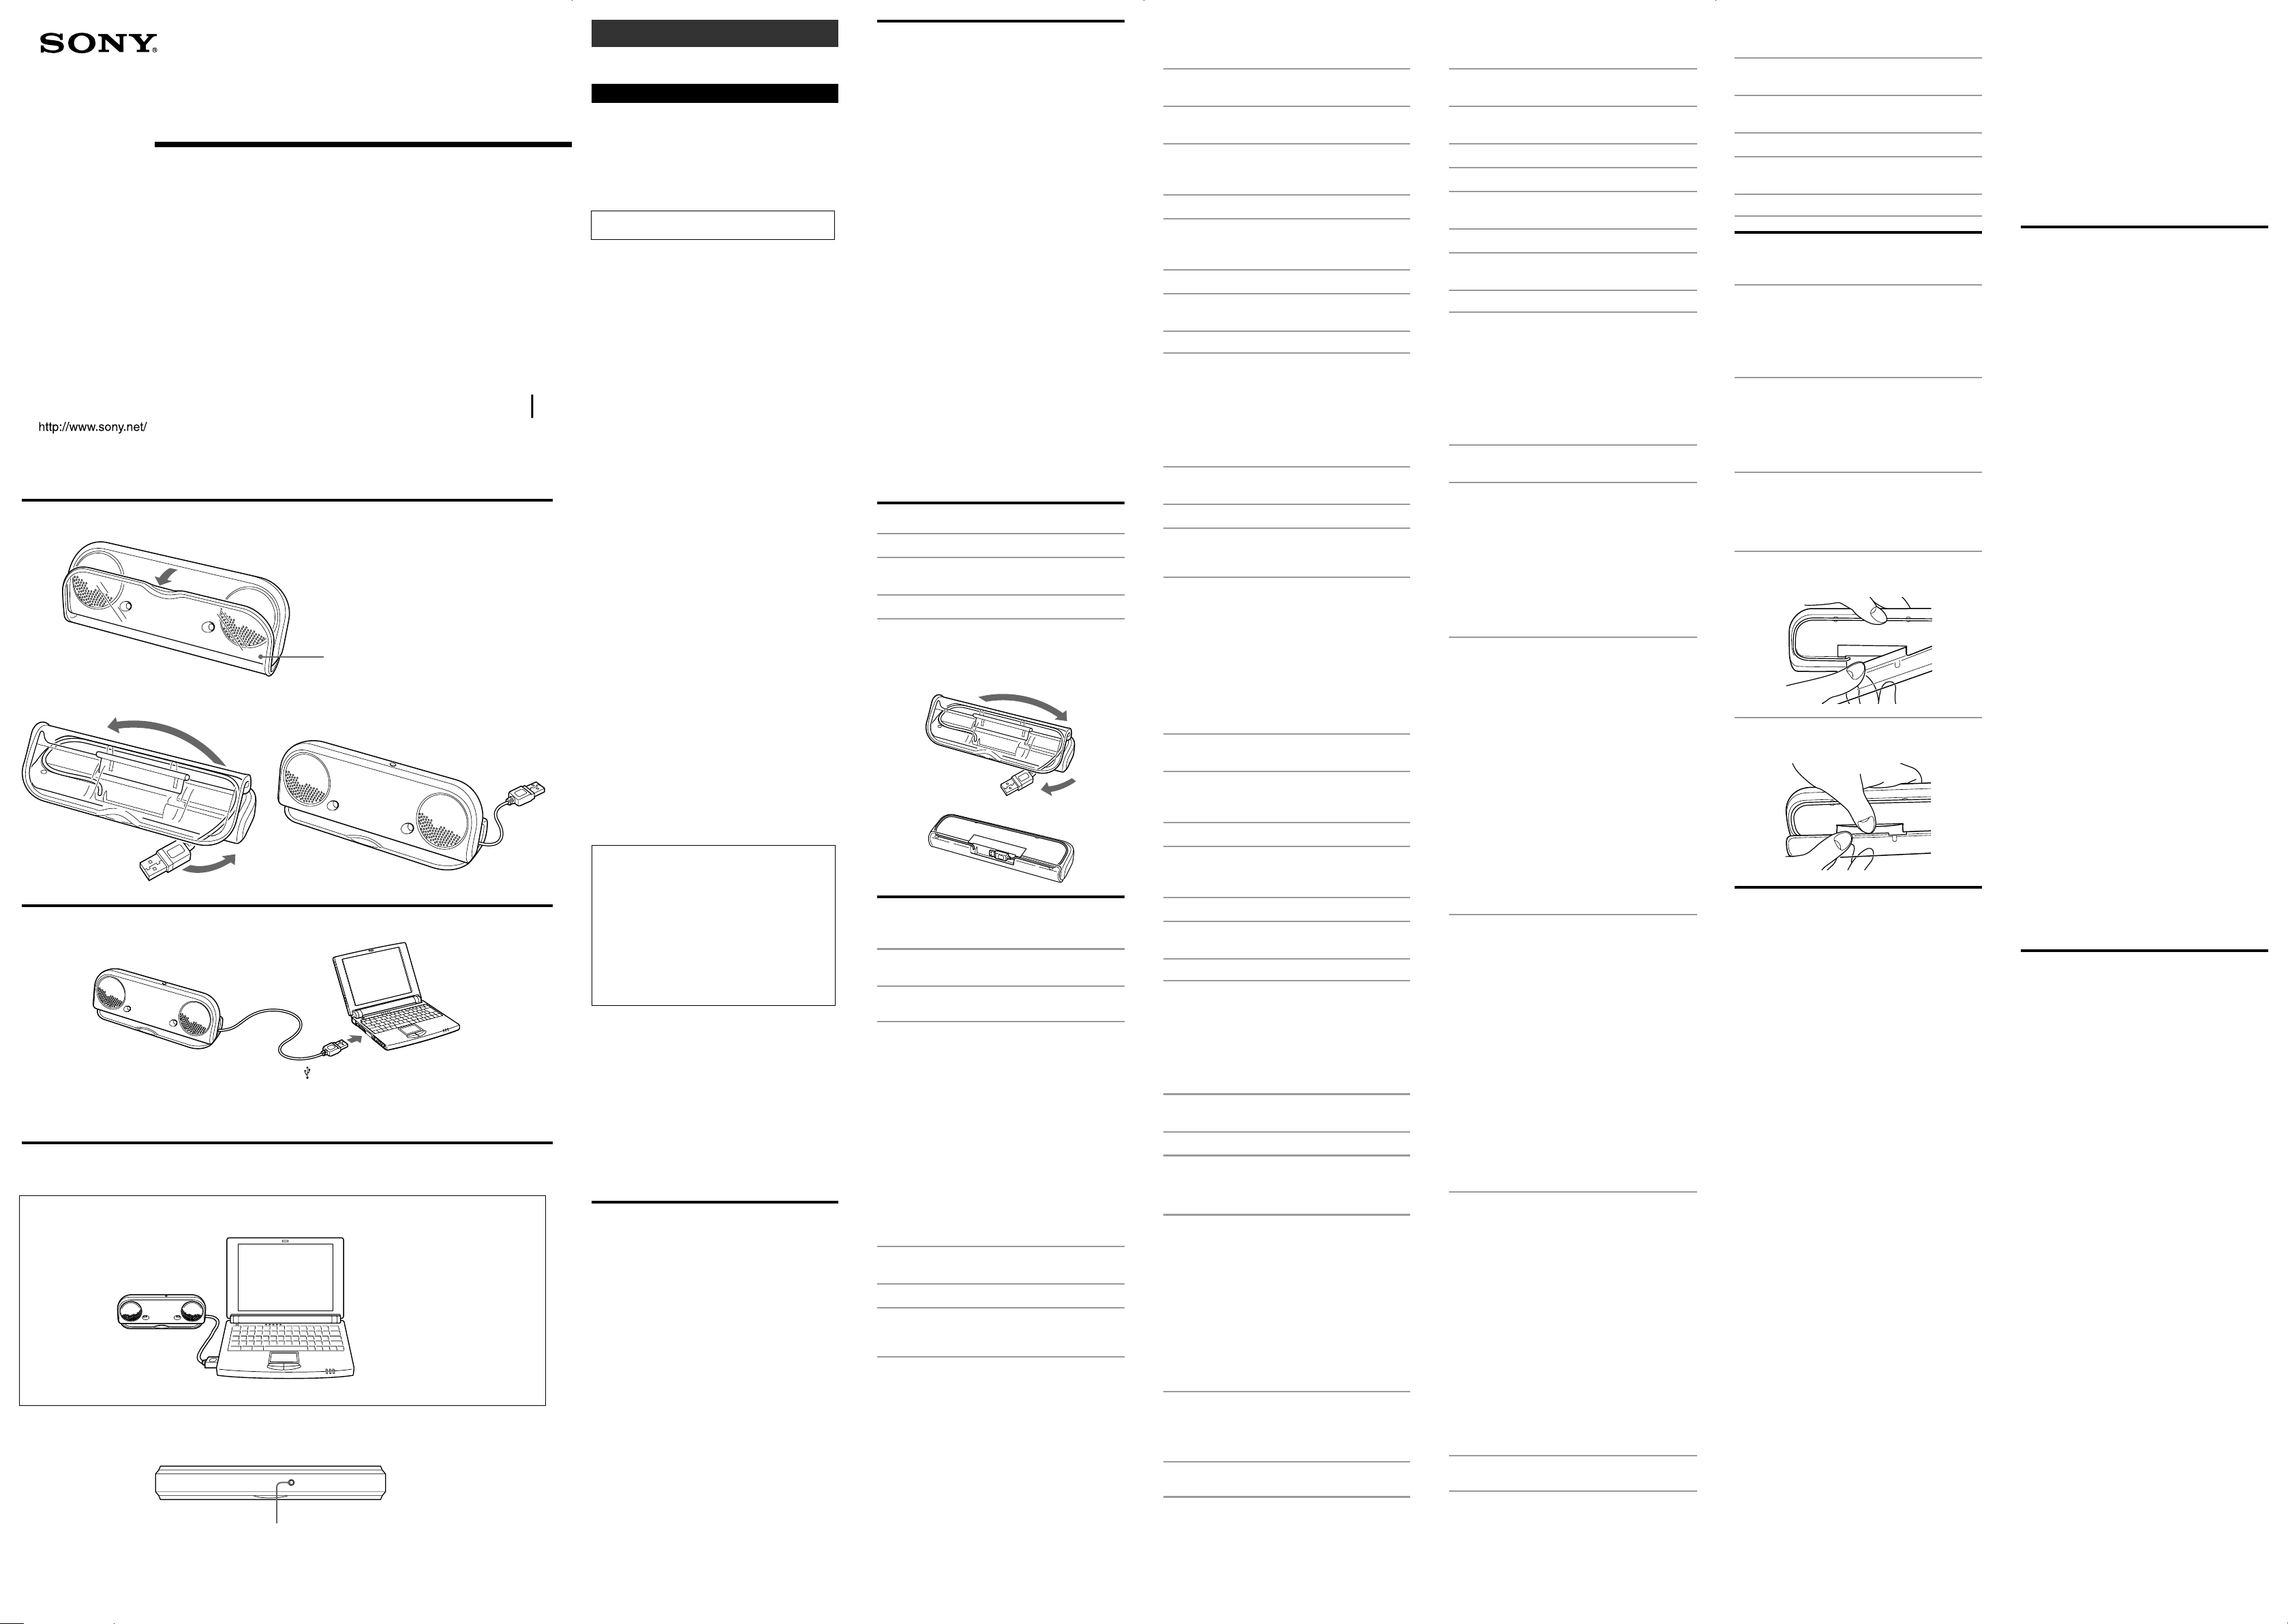
Setting the speaker (see fig. A)
1 Open the cover.
2 Pull out the USB cable from the system
storage section.
3 Stand the speaker on the cover.
Putting the USB cable back in the system
storage section
See illustration.
Preparations
Preparation 1: Connection (see fig. B)
1 Pull out the USB cable from the system
storage section.
2 Connect the USB cable to the USB
connecting terminal of your computer.
Notes on USB connection
•If your computer is connected to other USB devices via a
hub, there may be no sound or malfunction may occur.
Connect the system directly to your computer with the
USB cable to avoid a problem.
•If the USB cable is not properly connected, the system
may not be recognized by your computer. Check the
direction of the USB connecting terminal and connect it
properly.
Preparation 2: Installation of device drivers
(Windows XP)
The device drivers have to be installed, when connecting
to the USB connecting terminal of your computer for the
first time.
The device drivers are included in Windows XP and are
not supplied with the system.
For details, refer to the manual of your computer.
1 Switch on your computer and start
Windows XP.
2 Connect the system to your computer.
3 The “USB Composite Device/USB Audio
Device/USB Human Interface Device”
drivers are automatically installed.
Notes
•You need not perform the above installation procedure
when connecting for the second time or later. (For
different USB connecting terminals, you may have to
install again.)
•During and after installing the device drivers, “C-Media
USB Headphone Set” is displayed in the [USB Audio
Device] properties.
Setting of music CD replay
This setting is necessary when playing back the music CD
in the CD-ROM drive.
1 Select “Control Panel” from the “Start”
menu.
2 Click “Sounds, Speech, and Audio
Devices.”
3 Click “Sounds and Audio Devices” icon
and open “Sounds and Audio Devices
Properties.”
4 Select “Hardware.”
5 Select the CD-ROM icon for replaying the
music from “Devices” and click
“Properties.”
6 Select “Properties.”
7 Click the check box “Enable digital CD
audio for this CD-ROM device.”
8 Select “OK” and exit.
Preparation 2: Installation of device drivers
(Windows 2000)
The device drivers have to be installed, when connecting
to the USB connecting terminal for the first time.
The device drivers are included in Windows 2000 and are
not supplied with the system.
For details, refer to the manual of your computer.
1 Switch on your computer and start
Windows 2000.
2 Connect the system to your computer.
3 The “USB Composite Device/USB Human
Interface Device/USB Audio Device”
drivers are automatically installed.
Notes
•You need not perform the above installation procedure
when connecting for the second time or later. (For
different USB connecting terminals, you may have to
install again.)
•During and after installing the device drivers, “C-Media
USB Headphone Set” is displayed in the [USB Audio
Device] properties.
Setting of music CD replay
This setting is necessary when playing back the music CD
in the CD-ROM drive.
1 Select “Settings” – “Control Panel” from
the “Start” menu.
2 Double click the icon “Sounds and
Multimedia” and open “Sounds and
Multimedia Properties.”
3 Select “Hardware.”
4 Select the CD-ROM icon for replaying the
music from “Devices” and open
“Properties.”
5 Select “Properties.”
6 Click the check box “Enable digital CD
audio for this CD-ROM device.”
7 Select “OK” and exit.
Preparation 2: Installation of device drivers
(Windows Me)
The device drivers have to be installed, when connecting
to the USB connecting terminal for the first time.
The device drivers are included in Windows Me and are
not supplied with the system.
For details, refer to the manual of your computer.
1 Switch on your computer and start
Windows Me.
2 Connect the system to your computer.
3 Install the “USB Composite Device”
driver.
The “USB Composite Device” driver is
automatically installed.
4 Install the “USB Audio Device” driver.
1 [Add New Hardware Wizard] is displayed just
after the “USB Composite Device” driver is
installed.
2 Check that “USB Audio Device” is displayed in
[Windows has found the following new
hardware] window, and check that the
“Automatic search for a better
driver[Recommended]” check box is selected
and click “Next.”
3 The “USB Audio Device” driver is automatically
installed.
4 When [Windows has finished installing the
new hardware device] is displayed, click
“Finish.”
5 Install the “USB Human Interface Device”
driver.
The “USB Human Interface Device” driver is
automatically installed after “USB Audio Device”
driver is installed.
6 Restart your computer with the system
connected.
Note
You need not perform the above installation procedure
when connecting for the second time or later. (For
different USB connecting terminals, you may have to
install again.)
Settings of music CD replay
This setting is necessary when playing back a music CD in
the CD-ROM drive.
1 Select “Settings” – “Control Panel” from
the “Start” menu.
2 Double click the “System” icon and open
“System Properties.”
3 Select “Device Manager.”
4 Double click the “CD-ROM” icon.
5 Select the drive for replaying music, and
click “Properties.”
6 Select “Properties.”
7 Click the check box “Enable digital CD
audio for this CD-ROM device.”
8 Select “OK” and exit.
Preparation 2: Installation of device drivers
(Windows 98SE)
The device drivers have to be installed, when connecting
to the USB connecting terminal for the first time.
The device drivers are included in Windows 98SE and are
not supplied with the system.
Furthermore, you will need the Windows 98SE CD-ROM
to install the device drivers.
For details, refer to the manual of your computer.
1 Switch on your computer and start
Windows 98SE.
2 Connect the system to your computer.
When the system is connected to the computer, [Add
New Hardware Wizard] is displayed and the
installation of the device driver automatically starts.
Install each driver following the on-screen
instructions.
* When a message such as Insert the disk labeled
Windows 98SE CD-ROM is displayed, insert the
Windows 98SE CD-ROM in the CD-ROM drive and
click “OK.”
Depending on the kind of computer you are using,
you may have to specify the drive names (such as
D:) or file names.
3 Install the “USB Composite Device”
driver.
1 Check that “USB Composite Device” is displayed
in the [This wizard searches for new drivers
for] window, and click “Next.”
[What do you want Windows to do?] is
displayed.
2 Check that the “Search for the best driver for
your device.[Recommended].” check box is
selected and click “Next.”
[Windows will search for new drivers in its
driver database on your hard drive, and in any
of the following selected locations.] is
displayed.
3 For items checked at the beginning, check the
“CD-ROM drive” check box and click “Next.”
[Windows driver file search for the device] is
displayed.
4 Check that [USB Composite Device] is displayed
and click “Next.”
The driver is copied.
5 When [Windows has finished installing the
software that your new hardware device
requires.] is displayed, click “Finish.”
4 Install the “USB Human Interface Device”
driver.
1 Check that “USB Human Interface Device” is
displayed in the [This wizard searches for new
drivers for] window, and click “Next.”
[What do you want Windows to do?] is
displayed.
2 Check that the “Search for the best driver for
your device.[Recommended].” check box is
checked, and click “Next.”
[Windows will search for new drivers in its
driver database on your hard drive, and in any
of the following selected locations.] is
displayed.
3 For items checked at the beginning, check the
“CD-ROM drive” check box, and click “Next.”
[Windows driver file search for the device] is
displayed.
4 Check that [USB Human Interface Device] is
displayed, and click “Next.”
The driver is copied.
5 When [Windows has finished installing the
software that your new hardware device
requires.] is displayed, click “Finish.”
5 Install the “USB Audio Device” driver.
1 Check that “USB Audio Device” is displayed in
the [This wizard searches for new drivers for]
window, and click “Next.”
[What do you want Windows to do?] is
displayed.
2 Check that the “Search for the best driver for
your device.[Recommended].” check box is
selected and click “Next.”
[Windows will search for new drivers in its
driver database on your hard drive, and in any
of the following selected locations.] is
displayed.
3 For items checked at the beginning, check the
“CD-ROM drive” check box and click “Next.”
[Windows driver file search for the device] is
displayed.
4 Check that [USB Audio Device] is displayed, and
click “Next.”
The driver is copied.
5 When [Windows has finished installing the
software that your new hardware device
requires.] is displayed, click “Finish.”
6 Restart your computer with the system
connected.
Note
You need not perform the above installation procedure
when connecting for the second time or later. (For
different USB connecting terminals, you may have to
install again.)
Setting of music CD replay
This setting is necessary when playing back the music CD
in the CD-ROM drive.
1 Select “Settings” – “Control Panel” from
the “Start” menu.
2 Double click the icon “Multimedia” and
open “Multimedia Properties.”
3 Select “CD Music.”
4 Click the check box “Enable digital CD
audio for this CD-ROM device.”
5 Select “OK” and exit.
How to use (see fig. C)
Before starting, refer to “Setting the speaker.”
1 Switch on the computer.
The POWER indicator lights up.
Note
When connecting the system to your computer, the
volume of your computer may increase to the
maximum level. Turn down the volume of your
computer before playing the music software.
2 Start the software for replaying the
music in your computer.
Note
If the system is connected while the music software
is running in your computer, music may not come
from the system. Stop the music software once and
start again. Music can be heard from the system.
To adjust the volume
To set the appropriate volume, adjust the volume control
of your computer.
If the cover is detached
1 Insert one side of the hook of the cover
in the rear hole.
2 Insert the other side of the hook in the
rear hole.
Notes on use
• If the volume is too low, the volume of the computer
may be set at a low level. Check the computer’s volume
from the control panel. The volume may differ,
depending on the software’s recording levels.
• If you can only hear music from the system with the
computer running on batteries, battery charge has
dropped. Use the AC adaptor when using the system
for an extended period.
• Do not continuously cause the “Beep” to sound in your
system, to avoid reducing battery life span or
malfunction from excess current.
• Do not use the system via a USB hub or USB extension
cable as a malfunction may occur. Connect the system
directly to the USB connecting terminal of your
computer.
• When connecting the system to the USB connecting
terminal of your computer, do not pull out or insert the
plug repeatedly or forcibly as the system may not be
recognized by computer, there may be no sound from
the system, or the system may malfunction.
• Connect the system to the USB connecting terminal of
your computer. For details, refer to the manual of your
computer.
• When checking the connection between the system and
the computer, check the device manager of the
computer. For details, refer to the manual of your
computer.
• When the computer has two or more USB connecting
terminals, the system may not be used with other USB
devices at the same time as low-output, sound skipping
or noise may occur. For details, refer to the manual of
your computer.
• Operations are not guaranteed with Windows OS
installed in do-it-yourself computers, upgraded
Windows OS, and non-compliant OS.
• Sony recommends a Pentium II CPU speed of 300 MHz
or faster, or Celeron speed of 500 MHz or faster. If the
requirements of the CPU is insufficient, or when other
applications are running simultaneously, reading data
may skip and cause noise or intermittent sound.
• If the sound from the speakers is distorted, or noise is
excessive, adjust the volume of the computer through
the control panel.
• If the sound from the alarm of your computer and that
of playback is unbalanced, adjust by following the
manual of your computer.
• Sony recommends that you take a back up of important
data before installing the USB device drivers. Sony will
not be responsible in the case that the computer cannot
be used or data is lost due to a mistaken operation or
breakdown.
• When using the suspension resume function (system
suspend, system hibernation, etc.), the system speakers
may not work correctly. In such a case, restart either the
application or the computer.
• Do not disconnect and reconnect the USB cable while
playing music in a CD player or in a media player. It
may cause a malfunction or a breakdown.
• Do not disconnect and reconnect the USB cable of the
system while running music playback software as a
malfunction may occur. If, however, you have
disconnected and connected the USB cable, restart it
after shutting down any currently running software.
• If the USB plug is inclined or is connected slowly
between the system to the USB connecting terminal,
malfunction may occur. Connect the plug squarely and
promptly. If your computer malfunctions, reconnect the
system to your computer or restart your computer.
• If you start the music playback software soon after the
system is connected to your computer, malfunction may
occur. Start the software 5 seconds after the system is
connected.
• When playing a music CD, be sure to click the check
box “Enable digital CD audio for this CD-ROM
device.” If not, the music CD may not be played. For
details on how to click the check box, refer to the
manual of your computer.
• While using the system with Windows 2000, the volume
of your computer may be increased when resuming
from stand-by mode. In such a case, adjust the volume
of your computer.
Troubleshooting
Sound is distorted.
The input signal is too high.
c Reduce the volume of the computer.
c Depending on the software you are using, the plot
comes closer to being flat by adjusting the equalizer.
Sound is low.
The volume control of the computer or the volume of the
music playback software must be turned down.
c Adjust the volume control of your computer.
There is no sound.
• The USB cable is not connected properly.
c Connect the USB cable properly.
• The system is connected while music software is being
replayed.
c Stop playback of the music software and start again.
• The audio replaying device of your computer is not set
correctly.
c Windows XP : Select “Audio,” in [Sounds and Audio
Devices Properties], and select “C-Media USB
Headphone Set” for [Default device] in the Sound
Playback menu.
c Windows 2000 : Select “Audio” in [Sounds and
Multimedia Properties], and select “USB Audio
Device” for [Preferred device] in the Sound Playback
menu.
c Windows Me : Select “Audio” in [Sounds and
Multimedia Properties], and select “USB Audio
Device” for [Preferred device] in the Sound Playback
menu.
c Windows 98SE : Select “Audio” in [Multimedia
Properties], and select “USB Audio Device” for
[Preferred device] in the Playback menu.
• The volume control of the computer or the music
playback software is set at “Mute.”
c Remove the mute.
• The USB port is not recognized.
c Restart after quitting the playback software. If the
problem persists, restart your computer.
• USB is not available.
c Check the device manager of your computer.
There is noise or no sound.
• The CPU of your computer is overloaded.
c Exit other applications.
• The system is being used via the USB hub.
c Connect the system directly to the USB connecting
terminal of your computer.
There is no sound from the speakers when
using the built-in mike or external mike of
the connected computer.
• The audio recording device of your computer is not set
correctly.
c Change the audio recording device of your computer,
from “USB Audio Device” to the audio device or
external mike installed in your computer.
For details on the operation of your computer, refer to the
manual of your computer.
There can be some breakdowns that cannot be solved
even with “Troubleshooting.” In such cases, contact your
nearest Sony dealer.
Specifications
Speaker section
Enclosure type Full range, Bass reflex,
Speaker system 39 mm
Impedance 4 Ω
Rated input power 0.25 W
Maximum input power 0.3 W
Amplifier section
Maximum output power 0.25 W + 0.25 W
Input USB cable, Type A plug,
System required
Compliant computer IBM PC/AT or compatible
Compliant OS* Windows XP Professional,
Recommended CPU Pentium II 300 MHz or faster/
General
Power supply USB bus power compliant
Dimensions (w × h × d) Approx. 170 × 60 × 24 mm
Mass Approx. 190 g (7 oz.)
Supplied accessory Operating instructions (1)
Design and specifications are subject to change without
notice.
* Complies with the original manufacturer-installed
English operating system. Trouble-free operations are
not guaranteed for all computers with the above
systems installed.
magnetically shielded
(10 % T.H.D., 1 kHz, 4 Ω)
7
Approx. 30 cm (11
computers with USB port
Windows XP Home Edition,
Windows 2000 Professional,
Windows Millennium Edition,
Windows 98 Second Edition
Celeron 500 MHz or faster
(5 V, 500 mA or less)
3
/4 × 2 3/8 × 31/32 inch)
(6
/8 inch)
Page 2
A
1
Español
Antes de utilizar la unidad, lea este manual atentamente y
consérvelo para consultarlo en el futuro.
Para los clientes en México
Sistema de altavoces activo
POR FAVOR LEA DETALLADAMENTE ESTE MANUAL
DE INSTRUCCIONES ANTES DE CONECTAR Y
OPERAR ESTE EQUIPO.
RECUERDE QUE UN MAL USO DE SU APARATO
PODRÍA ANULAR LA GARANTÍA.
Cubierta
23
ADVERTENCIA
Para evitar incendios o riesgo de electrocución, no
exponga la unidad a la lluvia ni a la humedad.
Para evitar descargas eléctricas, no abra la unidad. En caso
de avería, solicite los servicios de personal cualificado
solamente.
Para evitar el riesgo de incendio, no cubra la ventilación
del aparato con periódicos, manteles, cortinas, etc., ni
ponga velas encendidas encima del aparato.
Para evitar el riesgo de incendio o electrocución, no coloque
sobre el aparato objetos que contengan líquidos como, por
ejemplo, un jarrón.
No instale el aparato en un espacio cerrado, como una
estantería para libros o un armario empotrado.
Asistencia al cliente
Las direcciones URL que encontrará a continuación
contienen información actualizada sobre el servicio de
asistencia al cliente para los altavoces, así como preguntas
y respuestas frecuentes.
Para los clientes en los EE.UU.
B
Al terminal de
conexión USB del
equipo
C
http://www.sonystyle.com/support
Para los clientes en Canadá
http://www.sony.ca/sonyca/view/english/
support_electronics.shtml
http://fr.sony.ca/sonyca/view/french/
support_electronics.shtml
Para los clientes en Europa
http://www.support-nwwalkman.com/
Para los clientes en la región Asia Pacífico
http://www.css.ap.sony.com/
• Microsoft y Windows son marcas comerciales
registradas de Microsoft Corporation en los Estados
Unidos y/u otros países.
• En este manual, el término Windows XP se utiliza para
indicar Microsoft
Microsoft® Windows® XP Professional.
• En este manual, el término Windows 2000 se utiliza
para indicar Microsoft
• En este manual, el término Windows Me se utiliza para
indicar Microsoft® Windows® Millennium Edition.
• En este manual, el término Windows 98SE se utiliza
para indicar Microsoft
• Todos los demás nombres de sistemas y productos son
marcas comerciales o marcas comerciales registradas de
sus respectivos propietarios. Las marcas ™ y
omiten en este manual.
Imagen
Características
Diseño compacto
• Sistema de altavoces compacto y portátil para llevarlo
con el ordenador portátil. Con la conexión USB al
ordenador, dispondrá enseguida de sonido muy claro.
• Este sistema utiliza la alimentación del bus USB; no es
necesario conectar ninguna batería ni adaptador de
alimentación de CA. (Tenga en cuenta que cuando el
ordenador funciona con la batería, se reducirá la vida
útil de la batería.)
• El cable USB puede guardarse dentro de los altavoces.
Ajustes sencillos
• Sólo se requiere una conexión de cable USB.
Sonido claro
• Los nuevos altavoces de 39 mm de tipo plano ofrecen
sonido claro y equilibrado.
1
Indicador de
POWER
Precauciones
• Si no va a utilizar el sistema durante un período de
tiempo prolongado, desconecte el cable USB del equipo
al finalizar el uso.
• No abra la unidad. Solicite asistencia técnica únicamente
a personal cualificado.
• No deje el sistema cerca de fuentes de calor, ni en
lugares expuestos a la luz solar directa, polvo excesivo,
humedad, lluvia o golpes mecánicos.
• Si se introduce algún objeto sólido o líquido en el
sistema, retire el cable USB y hágalo revisar por personal
cualificado antes de seguir utilizándolo.
• No utilice alcohol, bencina o disolvente para limpiar la
unidad.
• Aunque este sistema está magnéticamente protegido, no
deje cintas grabadas, relojes, tarjetas de crédito ni
disquetes que utilicen codificación magnética frente al
sistema durante un largo período de tiempo.
Si la imagen del televisor o la pantalla del
monitor aparece distorsionada debido al
magnetismo
Aunque este sistema está magnéticamente protegido, es
posible que, en ocasiones, la imagen de algunos
ordenadores personales o televisores se distorsione
debido al magnetismo. En tal caso, desactive una vez la
alimentación del televisor o del ordenador personal y,
transcurridos de 15 a 30 minutos, vuelva a activarla. En el
caso del ordenador personal, tome las debidas medidas de
precaución, como guardar los datos antes de
desconectarlo.
Si el problema persiste
Coloque el sistema más alejado del televisor o del
ordenador personal. Además, asegúrese de no colocar
objetos que tengan o utilicen imanes cerca del televisor o
del ordenador personal, como soportes de audio, soportes
de televisor, juguetes, etc. Éstos podrían ser la causa de la
distorsión magnética en la imagen.
Si tiene preguntas o problemas referentes al sistema y no
encuentra la solución en este manual, póngase en contacto
con su distribuidor Sony más cercano.
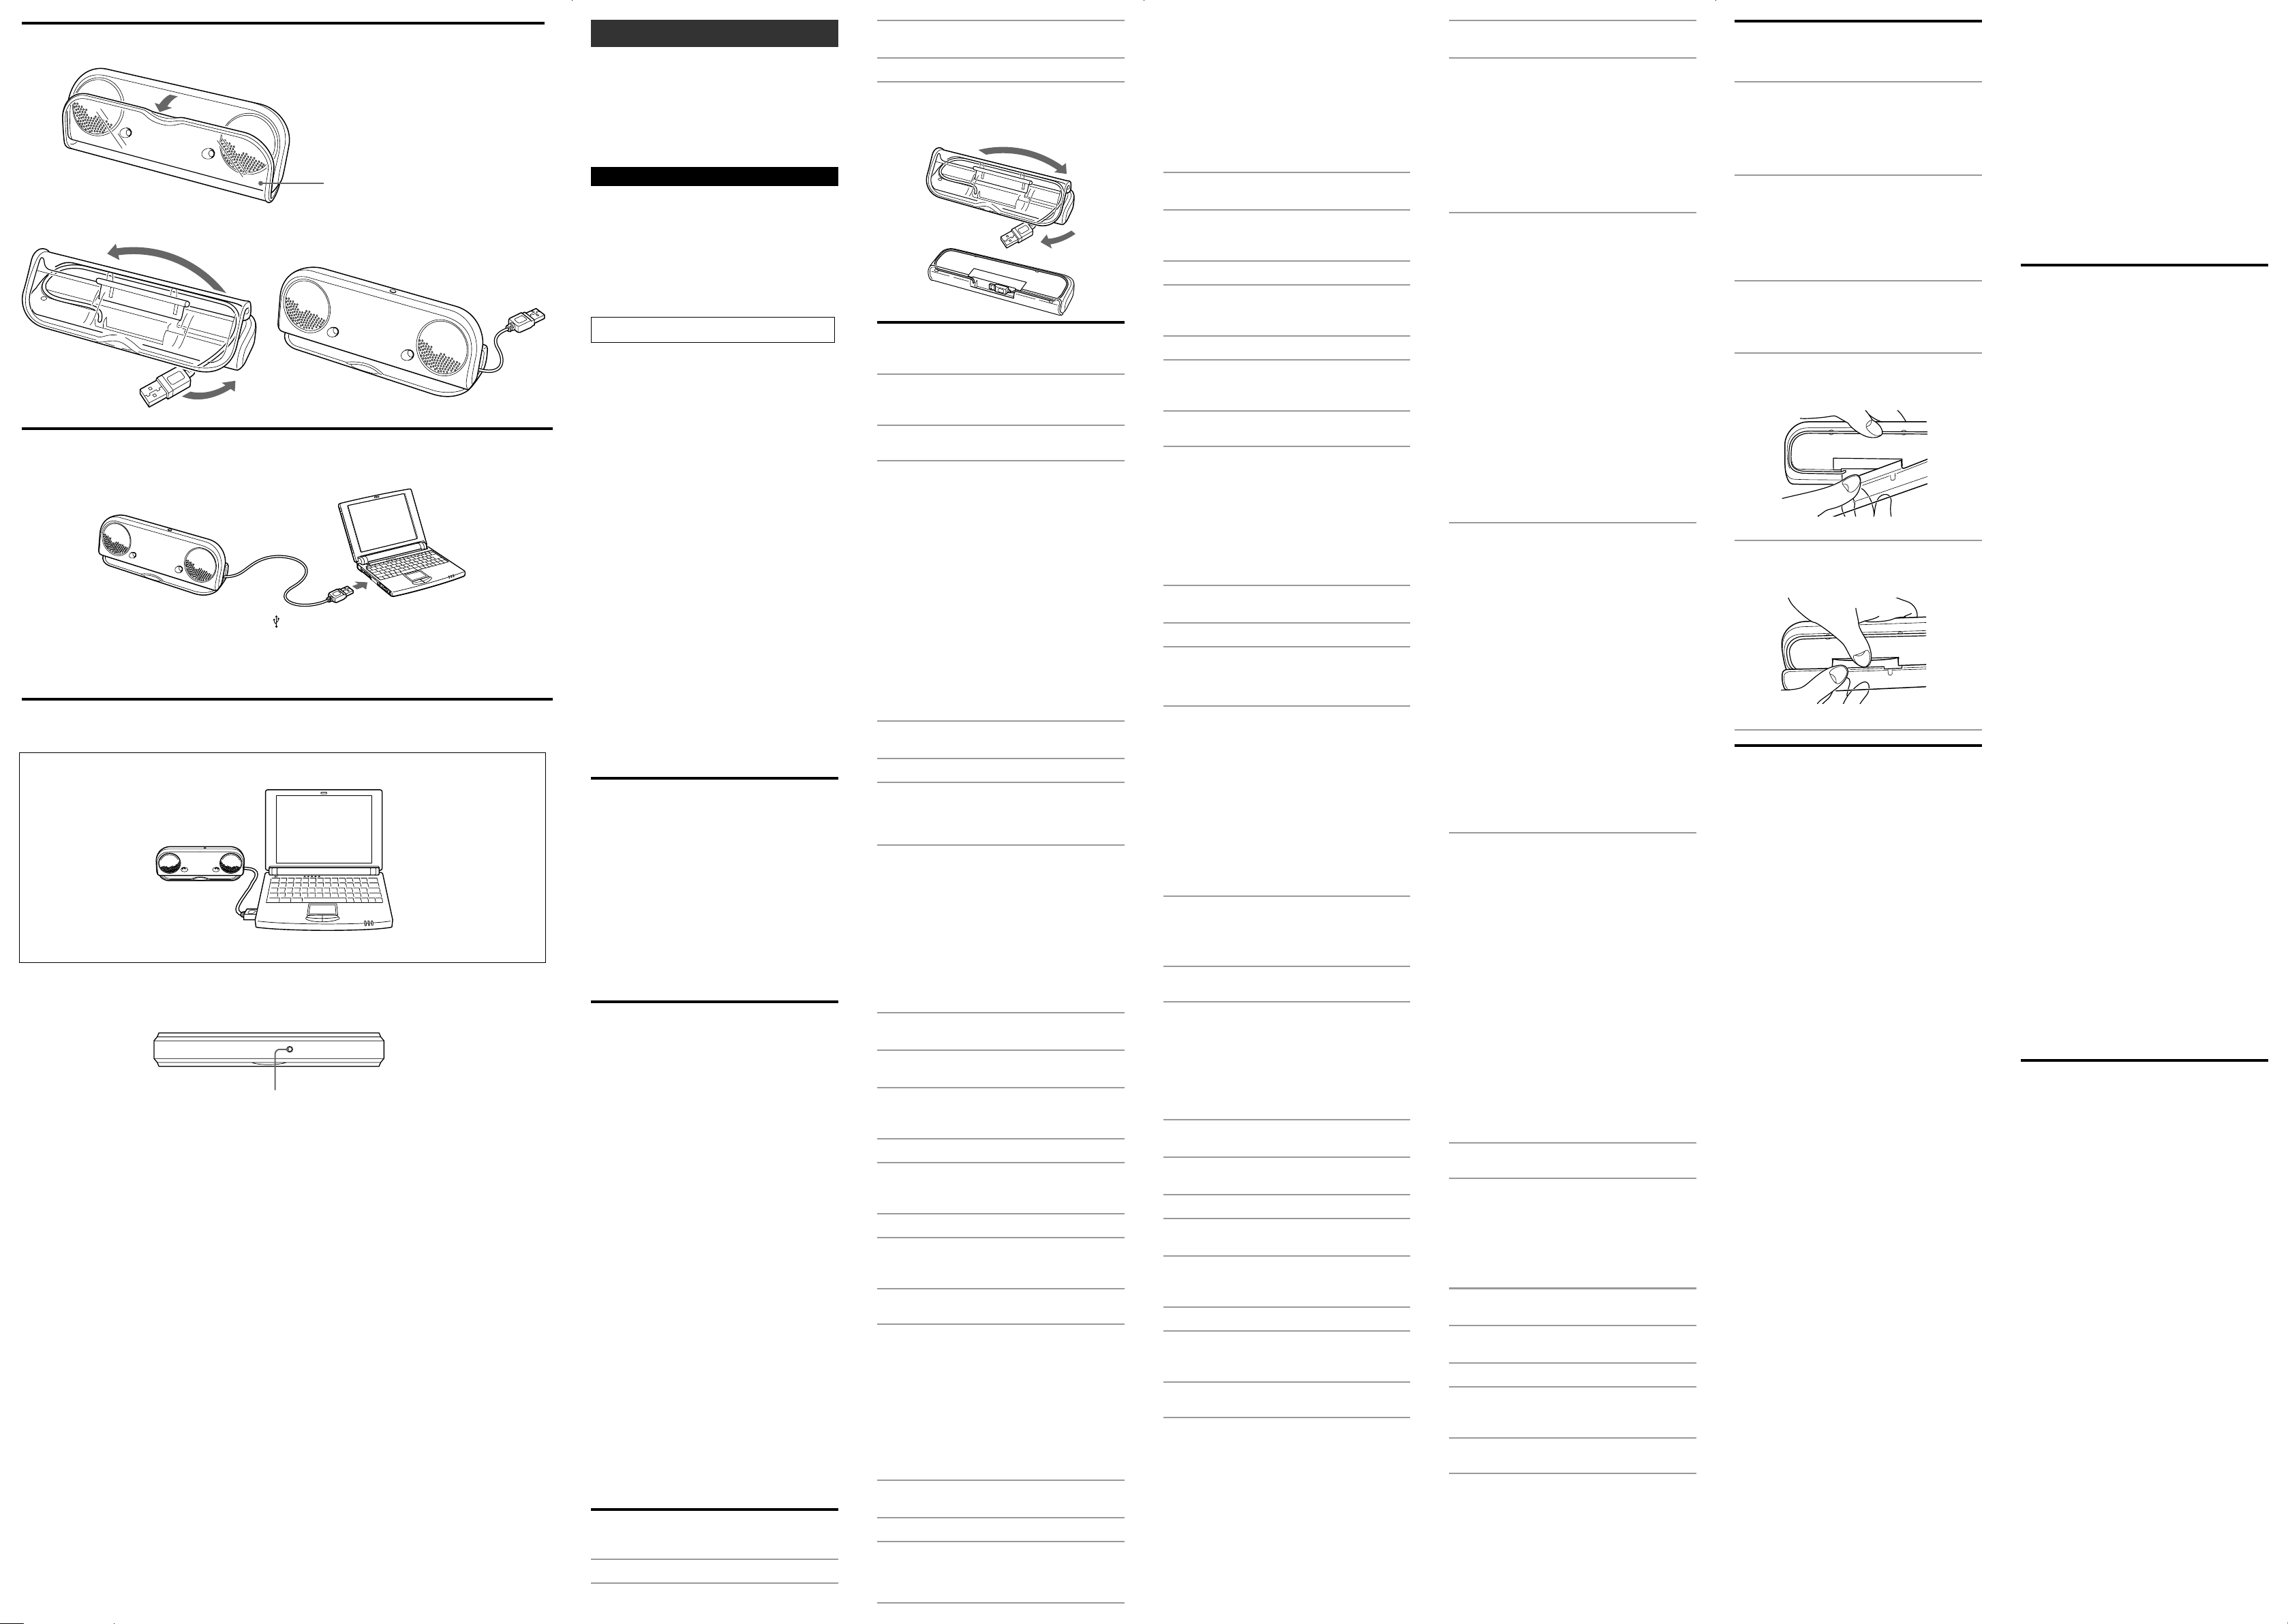
Colocación del altavoz (consulte
la figura A)
1 Abra la cubierta.
®
Windows® XP Home Edition y
®
Windows® 2000 Professional.
®
Windows® 98 Second Edition.
2 Tire del cable USB para sacarlo de la
sección de almacenaje del sistema.
3 Coloque el altavoz sobre la cubierta.
Para volver a poner el cable USB en la
sección de almacenaje del sistema
Vea la ilustración.
Preparativos
Preparativo 1: Conexión (consulte la figura B)
1 Extraiga el cable USB tirando de él desde
la sección de almacenamiento del
sistema.
2 Conecte el cable USB al terminal de
conexión USB del equipo.
Notas sobre la conexión USB
•Si hay otros dispositivos USB conectados al ordenador a
través de un concentrador, es posible que no se emita
sonido o que se produzca un mal funcionamiento.
Conecte el sistema directamente al ordenador con el
cable USB para evitar problemas.
•Si el cable USB no está conectado correctamente, es
posible que el equipo no reconozca el sistema.
Compruebe la dirección del terminal de conexión USB y
conéctelo correctamente.
Preparativo 2: Instalación de los
controladores del dispositivo
(Windows XP)
Los controladores del dispositivo deben instalarse al
conectar el sistema por primera vez al terminal de
conexión USB del equipo.
Los controladores del dispositivo están incluidos en
Windows XP, por lo que no se suministran con el sistema.
Para ver los detalles, consulte el manual de instrucciones
de su ordenador.
®
se
1 Encienda el ordenador e inicie Windows
XP.
2 Conecte el sistema al ordenador.
3 Los controladores de “USB Composite
Device/USB Audio Device/USB Human
Interface Device” se instalarán
automáticamente.
Notas
•No es necesario realizar el procedimiento de instalación
anterior cuando conecte el sistema a partir de la segunda
vez. (Es posible que cuando lo conecte a conectores USB
distintos, sí deba realizar la instalación otra vez.)
•Durante la instalación de los controladores del
dispositivo y después de la instalación, aparecerá “C-
Media USB Headphone Set” en Propiedades de [USB
Audio Device].
Ajuste para reproducir un CD de música
Este ajuste es necesario si reproduce un CD de música en
la unidad de CD-ROM.
1 Seleccione “Control Panel” del menú
“Start”.
2 Haga clic en “Sounds, Speech, and Audio
Devices”.
3 Haga clic en el icono “Sounds and Audio
Devices” para abrir “Sounds and Audio
Devices Properties”.
4 Seleccione “Hardware”.
5 Seleccione el icono del CD-ROM que
utilizará para reproducir música de
“Devices” y haga clic en “Properties”.
6 Seleccione “Properties”.
7 Haga clic en la casilla de verificación
“Enable digital CD audio for this CDROM device”.
8 Seleccione “OK” para salir del cuadro de
diálogo.
Preparativo 2: Instalación de los
controladores del dispositivo
(Windows 2000)
Los controladores del dispositivo deben instalarse al
conectar el sistema por primera vez al terminal de
conexión USB.
Los controladores del dispositivo están incluidos en
Windows 2000, por lo que no se suministran con el
sistema.
Para ver los detalles, consulte el manual de instrucciones
de su ordenador.
1 Encienda el ordenador e inicie Windows
2000.
2 Conecte el sistema al ordenador.
3 Los controladores de “USB Composite
Device/USB Human Interface Device/USB
Audio Device” se instalan
automáticamente.
Notas
•No será necesario realizar el procedimiento de
instalación descrito anteriormente en conexiones
posteriores. (Si utiliza terminales de conexión USB
distintos, es posible que deba volverlos a instalar.)
•Durante la instalación de los controladores del
dispositivo y después de la instalación, aparecerá “C-
Media USB Headphone Set” en Propiedades de [USB
Audio Device].
Ajuste para reproducir un CD de música
Este ajuste es necesario si reproduce un CD de música en
la unidad de CD-ROM.
1 Seleccione “Settings” – “Control Panel”
en el menú “Start”.
2 Haga doble clic en el icono “Sounds and
Multimedia” para abrir “Sounds and
Multimedia Properties”.
3 Seleccione “Hardware”.
4 Seleccione el icono del CD-ROM que
utilizará para reproducir música de
“Devices” y abra las “Properties”.
5 Seleccione “Properties”.
6 Haga clic en la casilla de verificación
“Enable digital CD audio for this CDROM device”.
7 Seleccione “OK” para salir del cuadro de
diálogo.
Preparativo 2: Instalación de los
controladores del dispositivo
(Windows Me)
Los controladores del dispositivo deben instalarse al
conectar el sistema por primera vez al terminal de
conexión USB.
Los controladores del dispositivo están incluidos en
Windows Me, por lo que no se suministran con el sistema.
Para ver los detalles, consulte el manual de instrucciones
de su ordenador.
1 Encienda el ordenador e inicie Windows
Me.
2 Conecte el sistema al ordenador.
3 Instale el controlador de “USB
Composite Device”.
El controlador de “USB Composite Device” se
instala de manera automática.
4 Instale el controlador de “USB Audio
Device”.
1 El [Add New Hardware Wizard] aparece
inmediatamente después de instalar el
controlador de “USB Composite Device”.
2 Compruebe que aparece “USB Audio Device” en
la ventana [Windows has found the following
new hardware] y que la casilla de verificación
“Automatic search for a better
driver(Recommended)” está seleccionada. A
continuación, haga clic en “Next”.
3 El controlador de “USB Audio Device” se instala
de manera automática.
4 Cuando aparezca [Windows has finished
installing the new hardware device], haga clic
en “Finish”.
5 Instale el controlador de “USB Human
Interface Device”.
El controlador de “USB Human Interface Device” se
instala automáticamente una vez instalado de el
controlador de “USB Audio Device”.
6 Reinicie el ordenador con el sistema
conectado.
Nota
No será necesario realizar el procedimiento de instalación
descrito anteriormente en conexiones posteriores. (Si
utiliza terminales de conexión USB distintos, es posible
que deba volverlos a instalar.)
Ajuste para reproducir un CD de música
Este ajuste es necesario si reproduce un CD de música en
la unidad de CD-ROM.
1 Seleccione “Settings” – “Control Panel”
en el menú “Start”.
2 Haga doble clic en el icono “System”
para abrir “System Properties”.
3 Seleccione “Device Manager”.
4 Haga doble clic en el icono del “CD-
ROM”.
5 Seleccione la unidad que desea utilizar
para reproducir música y haga clic en
“Properties”.
6 Seleccione “Properties”.
7 Active la casilla de verificación “Enable
digital CD audio for this CD-ROM
device”.
8 Seleccione “OK” para salir del cuadro de
diálogo.
Preparativo 2: Instalación de los
controladores del dispositivo
(Windows 98SE)
Los controladores del dispositivo deben instalarse al
conectar el sistema por primera vez al terminal de
conexión USB.
Los controladores del dispositivo están incluidos en
Windows 98SE, por lo que no se suministran con el
sistema.
Además, necesitará el CD-ROM de Windows 98SE para
poder instalar los controladores del dispositivo.
Para ver los detalles, consulte el manual de instrucciones
de su ordenador.
1 Encienda el ordenador e inicie Windows
98SE.
2 Conecte el sistema al ordenador.
Al conectar el sistema al ordenador, aparece el [Add
New Hardware Wizard] y se inicia la instalación
automática del controlador de dispositivo.
Instale cada uno de los controladores siguiendo las
instrucciones que aparecen en pantalla.
* Cuando aparezca un mensaje del tipo Inserte el
disco Windows 98SE CD-ROM, inserte el CD-ROM
de Windows 98SE en la unidad de CD-ROM y haga
clic en “OK”.
En función del tipo de ordenador que utilice, es
posible que deba especificar los nombres de unidad
(como, por ejemplo, D:) o los nombres de archivo.
3 Instale el controlador de “USB
Composite Device”.
1 Compruebe que aparece “USB Composite
Device” en la ventana [This wizard searches for
new drivers for] y haga clic en “Next”.
Aparecerá [What do you want Windows to
do?].
2 Compruebe que la casilla de verificación “Search
for the best driver for your device.
[Recommended].” está seleccionada y haga clic
en “Next”.
Aparecerá [Windows will search for new
drivers in its driver database on your hard
drive, and in any of the following selected
locations.].
3 Para los elementos comprobados al principio,
coloque una marca en la casilla de verificación
“CD-ROM drive” y haga clic en “Next”.
Aparecerá [Windows driver file search for the
device].
4 Compruebe que aparece [USB Composite
Device] y haga clic en “Next”.
Se copiará el controlador.
5 Cuando aparezca [Windows has finished
installing the software that your new
hardware device requires.], haga clic en
“Finish”.
4 Instale el controlador de “USB Human
Interface Device”.
1 Compruebe que aparece “USB Human Interface
Device” en la ventana [This wizard searches for
new drivers for] y haga clic en “Next”.
Aparecerá [What do you want Windows to
do?].
2 Compruebe que la casilla de verificación “Search
for the best driver for your device.
[Recommended].” está marcada y haga clic en
“Next”.
Aparecerá [Windows will search for new
drivers in its driver database on your hard
drive, and in any of the following selected
locations.].
3 Para los elementos comprobados al principio,
coloque una marca en la casilla de verificación
“CD-ROM drive” y haga clic en “Next”.
Aparecerá [Windows driver file search for the
device].
4 Compruebe que aparece [USB Human Interface
Device] y haga clic en “Next”.
Se copiará el controlador.
5 Cuando aparezca [Windows has finished
installing the software that your new
hardware device requires.], haga clic en
“Finish”.
5 Instale el controlador de “USB Audio
Device”.
1 Compruebe que aparece “USB Audio Device” en
la ventana [This wizard searches for new
drivers for] y haga clic en “Next.”.
Aparecerá [What do you want Windows to
do?].
2 Compruebe que la casilla de verificación “Search
for the best driver for your device.
[Recommended].” está seleccionada y haga clic
en “Next”.
Aparecerá [Windows will search for new
drivers in its driver database on your hard
drive, and in any of the following selected
locations.].
3 Para los elementos comprobados al principio,
coloque una marca en la casilla de verificación
“CD-ROM drive” y haga clic en “Next”.
Aparecerá [Windows driver file search for the
device].
4 Compruebe que aparece [USB Audio Device] y
haga clic en “Next”.
Se copiará el controlador.
5 Cuando aparezca [Windows has finished
installing the software that your new
hardware device requires.], haga clic en
“Finish”.
6 Reinicie el ordenador con el sistema
conectado.
Nota
No será necesario realizar el procedimiento de instalación
descrito anteriormente en conexiones posteriores.
(Si utiliza terminales de conexión USB distintos, es posible
que deba volverlos a instalar.)
Ajuste para reproducir un CD de música
Este ajuste es necesario si reproduce un CD de música en
la unidad de CD-ROM.
1 Seleccione “Settings” – “Control Panel”
en el menú “Start”.
2 Haga doble clic en el icono “Multimedia”
para abrir “Multimedia Properties”.
3 Seleccione “CD Music”.
4 Haga clic en la casilla de verificación
“Enable digital CD audio for this CDROM device”.
5 Seleccione “OK” para salir del cuadro de
diálogo.
Utilización (consulte la figura C)
Antes de comenzar, consulte el apartado “Colocación del
altavoz”.
1 Encienda el ordenador
El indicador POWER se enciende.
Nota
Cuando conecte el sistema al ordenador, es posible
que el volumen del ordenador aumente hasta el
nivel máximo. Baje el volumen del ordenador antes
de reproducir música.
2 Inicie el software de reproducción de
música en el ordenador
Nota
Si el sistema está conectado mientras se ejecuta el
software de música en el ordenador, es posible que
el sistema no emita música. Detenga el software de
música una vez y reinícielo. El sistema emitirá
música.
Para ajustar el volumen
Para establecer el volumen apropiado, ajústelo con el
control de volumen del ordenador.
Si se ha separado la cubierta
1 Inserte el gancho de la cubierta en el
orificio posterior.
2 Inserte el otro lado de gancho en el
orificio posterior.
Notas sobre el uso
• Si el volumen es demasiado bajo, es posible que el
volumen del ordenador esté ajustado a un nivel bajo.
Compruebe el volumen del ordenador desde el panel
de control. El volumen puede variar en función de los
niveles de grabación del software.
• Si sólo puede oír música del sistema cuando el
ordenador funciona con la batería, significa que la
batería está bastante descargada. Emplee el adaptador
de ca cuando utilice el sistema durante un período de
tiempo prolongado.
• Procure que el sistema no emita pitidos continuamente;
de este modo evitará que se reduzca la duración de la
batería así como posibles fallos de funcionamiento
provocados por un exceso de corriente.
• No utilice el sistema mediante un concentrador USB o
un cable de extensión USB, ya que podrían producirse
errores en el funcionamiento. Conecte el sistema
directamente al terminal de conexión USB del equipo.
• Cuando conecte el sistema al terminal de conexión USB
del equipo, no tire de la clavija ni la inserte de forma
insistente o forzada, ya que el equipo podría no
reconocer el sistema, el sistema podría no emitir sonido
alguno o podrían producirse errores en el
funcionamiento del mismo.
• Conecte el sistema al terminal de conexión USB del
equipo. Si desea obtener información detallada,
consulte el manual del equipo.
• Cuando verifique la conexión entre el sistema y el
ordenador, compruebe el administrador de dispositivos
del ordenador. Si desea obtener más información,
consulte el manual del ordenador.
• Si el equipo dispone de dos o más terminales de
conexión USB, es posible que el sistema no pueda
utilizarse con otros dispositivos USB al mismo tiempo,
ya que podría producirse una emisión de baja
intensidad, interrupciones en el sonido o ruidos. Si
desea obtener más información, consulte el manual del
equipo.
• No se garantiza el funcionamiento con sistemas
operativos Windows instalados en equipos de
instalación propia, sistemas operativos Windows
actualizados o sistemas operativos no compatibles.
• Sony recomienda la utilización de ordenadores con una
CPU Pentium II a 300 MHz o superior, o Celeron a una
velocidad de 500 MHz o superior. Si la CPU no cumple
los requisitos mínimos o si se ejecutan otras aplicaciones
simultáneamente, la lectura de los datos podría saltarse,
lo que provocaría ruido o sonido intermitente.
• Si el sonido de los altavoces se emite distorsionado o
con excesivo ruido, ajuste el volumen del ordenador
mediante el panel de control.
• Si el sonido de alarma del ordenador y el de
reproducción no están equilibrados, ajústelos siguiendo
las instrucciones del manual del ordenador.
• Sony recomienda realizar una copia de seguridad de los
datos importantes antes de instalar los controladores de
dispositivo USB. Sony no se responsabilizará en caso de
imposibilidad de uso del ordenador o de pérdida de
datos debido a un funcionamiento incorrecto o a una
avería.
• Cuando utilice la función de reanudación tras
suspensión (suspensión del sistema, hibernación del
mismo, etc.), es posible que los altavoces del sistema no
funcionen correctamente. En tal caso, reinicie la
aplicación o el ordenador.
• No desconecte ni vuelva a conectar el cable USB mientras
reproduce música con un reproductor de CD o un
reproductor multimedia. Si lo hace, es posible que se
produzcan fallos de funcionamiento o incluso una avería.
• No desconecte ni vuelva a conectar el cable USB del
sistema mientras reproduce música porque podría
producirse mal funcionamiento. Sin embargo, si ha
desconectado y ha vuelto a conectar el cable USB,
reinicie el sistema tras cerrar todas las aplicaciones de
software abiertas.
• Si la clavija USB está inclinada o si se conecta
lentamente entre el sistema y el terminal de conexión
USB, pueden producirse errores en el funcionamiento.
Conecte la clavija debidamente y con rapidez. Si el
equipo no funciona correctamente, vuelva a conectarlo
al sistema o reinícielo.
• Si empieza enseguida a reproducir música después de
haber conectado el sistema al ordenador, puede
producirse mal funcionamiento. Inicie el programa de
reproducción 5 segundos después de haber conectado el
sistema.
• Cuando desee reproducir un disco CD de música,
asegúrese de hacer clic para marcar la casilla de
verificación “Enable digital CD audio for this CD-ROM
device”. De lo contrario, no podrá reproducir discos CD
de música. Para ver los detalles para marcar la casilla de
verificación, consulte el manual de su ordenador.
• Mientras emplee el sistema con Windows 2000, es
posible que aumente el volumen del ordenador cuando
reanude la operación desde el modo de suspensión. En
este caso, ajuste el volumen del ordenador.
Solución de problemas
El sonido está distorsionado.
La señal de entrada es demasiado alta.
c Baje el volumen del ordenador.
c En función del software que utilice, puede ajustar el
ecualizador para que la curva se haga más plana.
El sonido es bajo.
El control de volumen del ordenador o el volumen del
programa musical que se reproduce tienen un nivel bajo.
c Ajuste el control de volumen del ordenador.
No se emite ningún sonido.
• El cable USB no está conectado correctamente.
c Conéctelo adecuadamente.
• El sistema se ha conectado mientras se reproducía el
software de música.
c Detenga la reproducción del software de música y
empiece de nuevo.
• El dispositivo de reproducción de audio del ordenador
no se ha ajustado correctamente.
c Windows XP: Seleccione “Audio,” en [Sounds and
Audio Devices Properties] y, a continuación,
seleccione “C-Media USB Headphone Set” como
[Default device] en el menú Reproducción de sonido.
c Windows 2000: Seleccione “Audio” en [Sounds and
Multimedia Properties] y, a continuación, seleccione
“USB Audio Device” como [Preferred device] en el
menú Reproducción de sonido.
c Windows Me: Seleccione “Audio” en [Sounds and
Multimedia Properties] y, a continuación, seleccione
“USB Audio Device” como [Preferred device] en el
menú Reproducción de sonido.
c Windows 98SE: Seleccione “Audio” en [Multimedia
Properties] y, a continuación, seleccione “USB Audio
Device” como [Preferred device] en el menú
Reproducción.
• El control de volumen del ordenador o el software de
reproducción de música se ha ajustado en “Mute”.
c Quite la función de silenciamiento.
• No se reconoce el puerto USB.
c Tras salir del software de reproducción, reinícielo. Si el
problema persiste, reinicie el ordenador.
• USB no está disponible.
c Compruebe el administrador de dispositivos del
ordenador.
Hay ruido o no se emite sonido.
• La CPU del ordenador está sobrecargada.
c Cierre las demás aplicaciones.
• Se está utilizando el sistemae mediante un concentrador
USB.
c Conecte el sistema directamente al terminal de
conexión USB del equipo.
Los altavoces no emiten ningún sonido al
utilizar el micrófono incorporado o externo
del ordenador conectado.
• El dispositivo de grabación de audio del ordenador no
se ha ajustado correctamente.
c Cambie el dispositivo de grabación de audio del
ordenador del “USB Audio Device” al dispositivo de
audio o al micrófono externo instalado.
Para obtener más información acerca del funcionamiento
del ordenador, consulte el manual de instrucciones
suministrado con el mismo.
El apartado “Solución de problemas” no puede resolver
todas las averías. En caso de avería que no pueda
resolverse mediante este apartado, póngase en contacto
con el distribuidor Sony más cercano.
Especificaciones
Sección de altavoces
Tipo de caja acústica Rango completo, reflector de
Sistema de altavoces 39 mm
Impedancia 4 Ω
Potencia de entrada nominal
Potencia de entrada máxima
Sección del amplificador
Potencia máxima de salida
Entrada cable USB, Clavija tipo A,
Sistema requerido
Ordenador compatible IBM PC/AT o equipos
Sistemas operativos compatibles*
CPU recomendada Pentium II a 300 MHz o
Generales
Fuente de alimentación Compatible con alimentación
Dimensiones (an x al x prf)
Peso Aprox. 190 g
Accesorio suministrado Manual de instrucciones (1)
El diseño y las especificaciones están sujetos a cambios sin
previo aviso.
* Compatible con el sistema operativo inglés instalado
por el fabricante. No se garantiza el funcionamiento
adecuado en todos los equipos que tienen instalados los
sistemas indicados anteriormente.
graves, magnéticamente
protegidos
0,25 W
0,3 W
0,25 W + 0,25 W
(10 % THD, 1 kHz, 4 Ω)
Aprox. 30 cm
compatibles con puerto USB
Windows XP Professional,
Windows XP Home Edition,
Windows 2000 Professional,
Windows Millennium Edition,
Windows 98 Second Edition
superior/Celeron a 500 MHz o
superior
mediante bus USB
(5 V, 500 mA o menos)
Aprox. 170 × 60 × 24 mm
 Loading...