

Page 1

2-347-836-22 (1)
Digital Powered
Mixer
Operating Instructions
Before operating the unit, please read this manual
thoroughly and retain it for future reference.
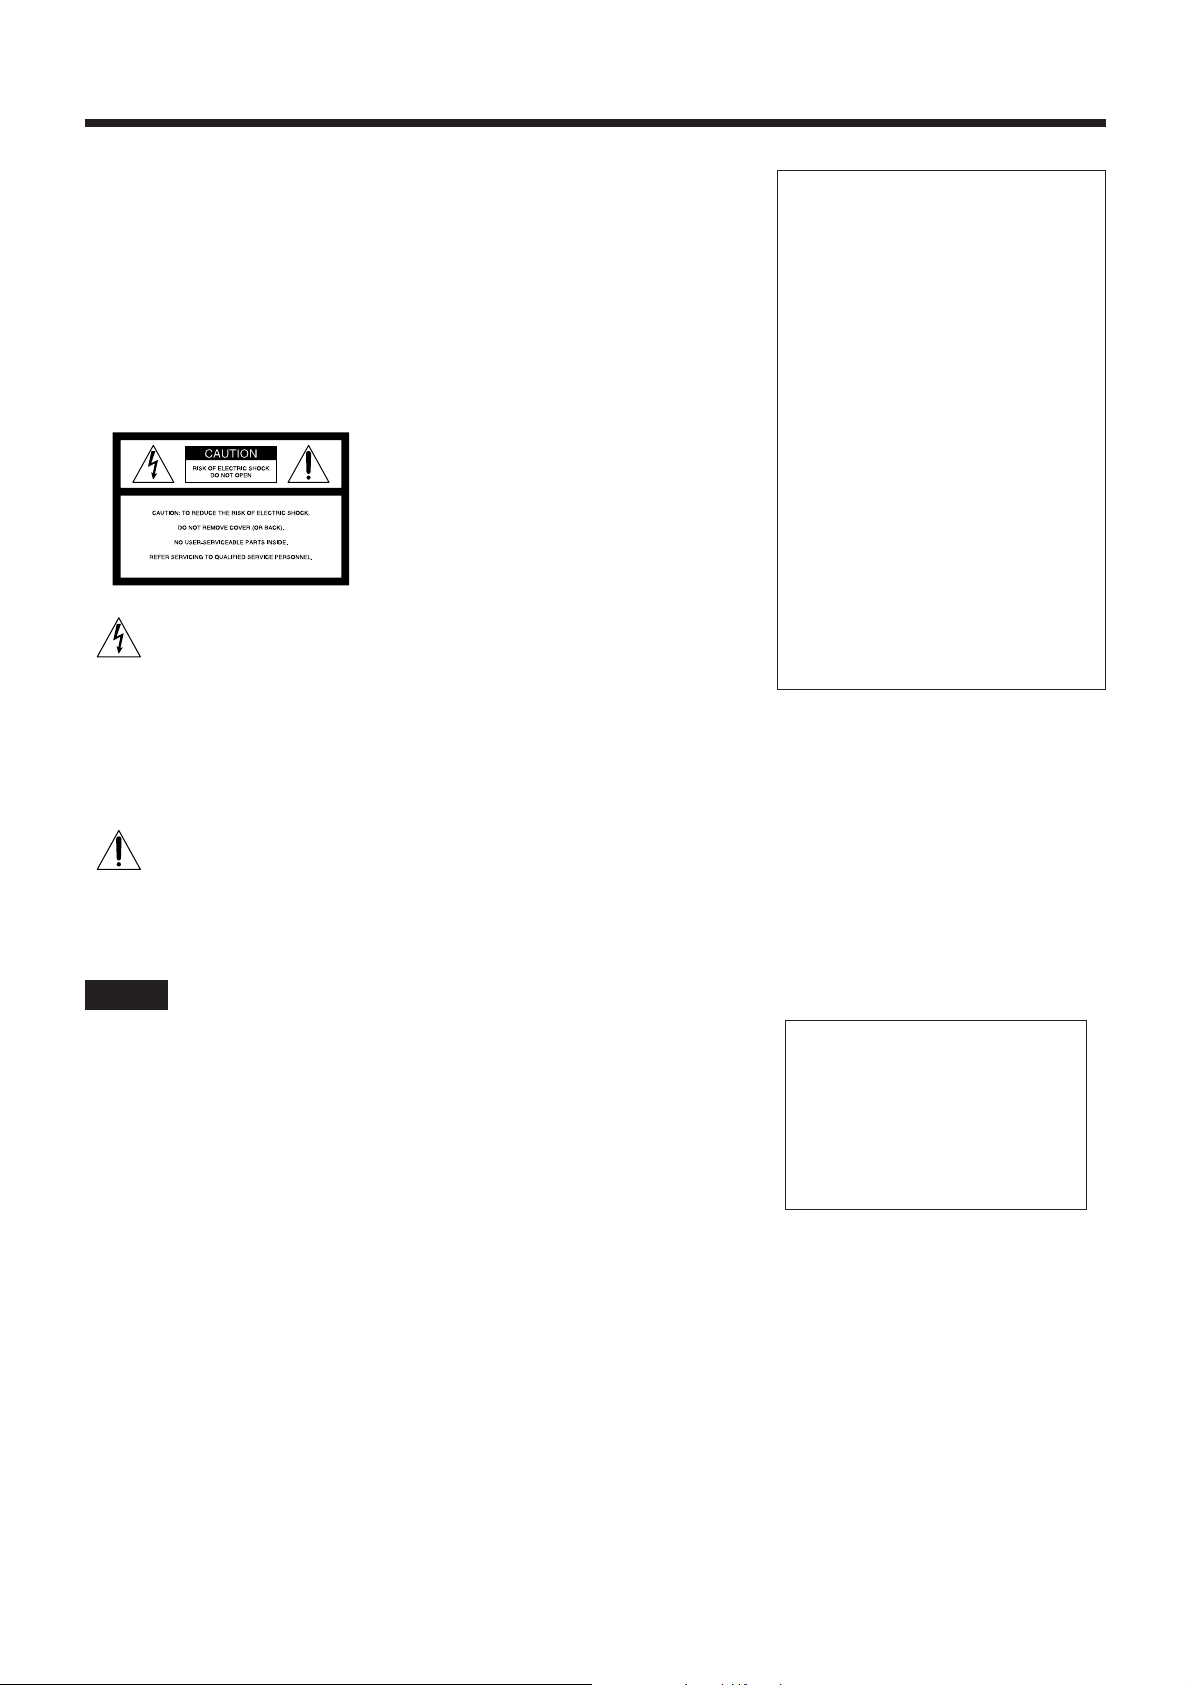
Note
The supplied CD-ROM includes operating instructions for
the SRP-X700P Digital Powered Mixer (English, Japanese,
French, German, Spanish, Italian and Chinese versions).
SRP-X700P
2003 Sony Corporation
Ver. 1.3
Page 2
WARNING
For customers in the U.S.A.
To prevent fire or shock
hazard, do not expose the
unit to rain or moisture.
To avoid electrical shock,
do not open the cabinet.
Refer servicing to qualified
personnel only.
This symbol is intended to alert
the user to the presence of
uninsulated “dangerous
voltage” within the product’s
enclosure that may be of
sufficient magnitude to
constitute a risk of electric
shock to persons.
This symbol is intended to alert
the user to the presence of
important operating and
maintenance (servicing)
instructions in the literature
accompanying the appliance.
Français
AVERTISSEMENT
Afin d’éviter tout risque d’incendie ou
d’électrocution, ne pas exposer l’appareil
à la pluie ou à l’humidité.
Afin d’écarter tout risque
d’électrocution, garder le coffret fermé.
Ne confier l’entretien de l’appareil qu’à
un personnel qualifié.
• Faites uniquement fonctionner cet
appareil sur une tension de 120 V CA,
50/60 Hz.
CAUTION
You are cautioned that any changes or
modification not expressly approved in
this manual could void your authority
to operate this equipment.
INFORMATION
This equipment has been tested and
found to comply with the limits for a
Class B digital device, pursuant to Part
15 of the FCC Rules. These limits are
designed to provide reasonable
protection against harmful interference
in a residential installation. This
equipment generates, uses, and can
radiate radio frequency energy and, if
not installed and used in accordance
with the instructions, may cause
harmful interference to radio
communications.
However, there is no guarantee that
interference will not occur in a
particular installation. If this equipment
does cause harmful interference to
radio or television reception, which can
be determined by turning the equipment
off and on, the user is encouraged to try
to correct the interference by one or
more of the following measures:
• Reorient or relocate the receiving
antenna.
• Increase the separation between the
equipment and receiver.
• Connect the equipment into an outlet
on a circuit different from that to
which the receiver is connected.
• Consult the dealer or an experienced
radio/TV technician for help.
If you have any questions about this
product, you may call:
Sony’s Business Information Center
(BIC) at 1-800-686-SONY (7669)
or Write to:
Sony Customer Information Services
Center 6900-29 Daniels Parkway,
PMB 330 Fort Myers, Florida 33912
Declaration of Conformity
Trade Name : SONY
Model No. : SRP-X700P
Responsible Party : Sony
Electronics Inc.
Address : 680 Kinder-
kamack Road,
Oradell,
NJ. 07649
U.S.A.
Telephone No. : 201-930-6972
This device complies with Part 15 of
the FCC Rules.
Operation is subject to the following
two conditions;
(1) This device may not cause
harmful interference, and
(2) this device must accept any
interference received, including
interference that may cause
undesired opreration.
For customers in Canada
This ClassB digital apparatus complies
With Canadian ICES-003.
Owner’s Record
The model and serial numbers are located
on the rear of the unit. Record the serial
number in the space provided below.
Refer to them whenever you call upon
your Sony dealer regarding this product.
Model No. SRP-X700P
Serial No.
IN NO EVENT SHALL SELLER BE
LIABLE FOR ANY DIRECT,
INCIDENTAL OR
CONSEQUENTIAL DAMAGES OF
ANY NATURE, OR LOSSES OR
EXPENSES RESULTING FROM
ANY DEFECTIVE PRODUCT OR
THE USE OF ANY PRODUCT.
_______________
2
Page 3

Table of Contents
Features
Features ......................................................................................... 3
Location and function of parts .................................................... 4
Front panel ................................................................................. 4
Rear panel .................................................................................. 6
Tuner Unit ................................................................................. 8
How to install the tuner unit ................................................. 8
How to remove the tuner unit ............................................... 8
How to Control the Display from the SRP-X700P .................... 9
PROJECTOR CONTROL RS-232C Terminal ........................... 9
PROJECTOR CONTROL CONTROL S IN/OUT Terminal ...... 9
How to Control the SRP-X700P from External Equipment .... 9
REMOTE RS-232C Terminal ................................................... 9
REMOTE PARALLEL Terminal ........................................... 10
How to Control AV Equipment from the SRP-X700P ............ 11
Connecting the Speaker ........................................................... 11
System Configuration ................................................................. 12
System example when operating the SRP-X700P
with the default setting when shipped from the factory .......... 12
System example when external operation panel
and environment equipment are connected ............................. 13
System example when operating the SRP-X700P
from the REMOTE PARALLEL terminal .............................. 14
Default settings ............................................................................ 15
Block Diagram ............................................................................ 17
Specifications .............................................................................. 18
Dimensions .................................................................................. 19
Troubleshooting .......................................................................... 20
This unit can be used even without setting the parameters
by using the supplied SRP-X700P Manager software.
See page 15 for the default parameters when shipped from
the factory.
The SRP-X700P is a versatile digital powered mixer that
incorporates an audio mixer, RGB/video switcher, processor
and power amplifier in the 3U rack size.
Built-in digital mixer
The digital mixer incorporates A/D and D/A converters operating at
24 bit/48 kHz sampling and a high-performance DSP. In addition to
the usual functions of conventional ordinary audio mixers, the
SRP-X700P offers functions such as a feedback reducer in the
independent channel and automatic mixing by using digital
technology.
Many audio input/output terminals
Six microphone input systems and two stereo line input systems
can be freely assigned to ten output systems.
Support for RGB/Component signals
The SRP-X700P is equipped with three composite/S video input
systems and three RGB/component input systems. This broad input
system eliminates need for a separate RGB switcher and video
switcher and enables simple system configuration. The SRP-X700P
supports high-resolution component signals such as 480 p and
1080 i, and also supports SXGA
signals.
1)
(1280 × 1024 pixels) of RGB
Built-in power-saving digital amplifier
A power amplifier of 150 W + 150 W (8 Ω) or 200 W + 200W
(4 Ω) is incorporated. The rated power consumption is almost half
that of the conventional amplifier. The SRP-X700P also supports
high impedance speakers 150 W (70 V LINE, 32 Ω).
Support for 5.1-channel audio input
4D and 4E INPUT terminals of LINE4 INPUT terminal support
5.1-channel audio input.
Useful external remote terminal
• RS-232C terminal
This terminal enables outside personal computer and system
controller to control various operations of the SRP-X700P. This
terminal can also be used to turn on the power of a Sony
projector and plasma display, or put it in STANDBY. It also can
be used to select the input signals.
• Equipped with Control S output terminal
Basic operations (playback, stop, fast forward, rewind, etc.) of
the Sony AV products are possible.
• Equipped with parallel input and output terminals
Input selection, volume control and scene control of the SRPX700P can be performed in the input terminal. Operation of
environment equipment such as screen and lighting, and the
status display of the SRP-X700P can be performed via the output
terminal.
ABOUT SUPPLIED CD-ROM
The supplied CD-ROM contains the two applications SRP-X700P
Manager and User Control Panel. In addition to the two
applications, the supplied CD-ROM contains the dedicated USB
driver software, the Control Software Manual and the SRP-X700P
Operating Instructions.
The Control Software Manual and the SRP-X700P Operating
Instructions are supplied as PDF files.
To open these files, Adobe Acrobat Reader must be installed into
your PC.
To get Adobe Acrobat Reader, download from www.adobe.com
Microsoft and Windows are registered trademarks of Microsoft Corporation
(U.S.A. and other countries).
Adobe and Adobe Acrobat Reader are trademarks of the Adobe Systems
Incorporated.
Installation of two systems of 800 MHz band
wireless tuner units WRU-806B (option)
Mountable in the EIA standard 19-inch rack
(occupying 3U size)
Setting up and operating the SRP-X700P using the
supplied software
The CD-ROM supplied with the SRP-X700P contains two software
applications. One is the User Control Panel that enables an external
personal computer to perform basic operations (sound volume
adjustment, input selection and scene control) of the SRP-X700P
and also the basic operations (playback, stop, fast forward, rewind,
etc.) of a Sony DVD, VCR, CD, MD and the like. The other is
SRP-X700P Manager, which enables you to perform internal
settings of the SRP-X700P.
1)
SXGA are registered trade marks of the International Business Machines
Corporation, U.S.A.
3
Page 4
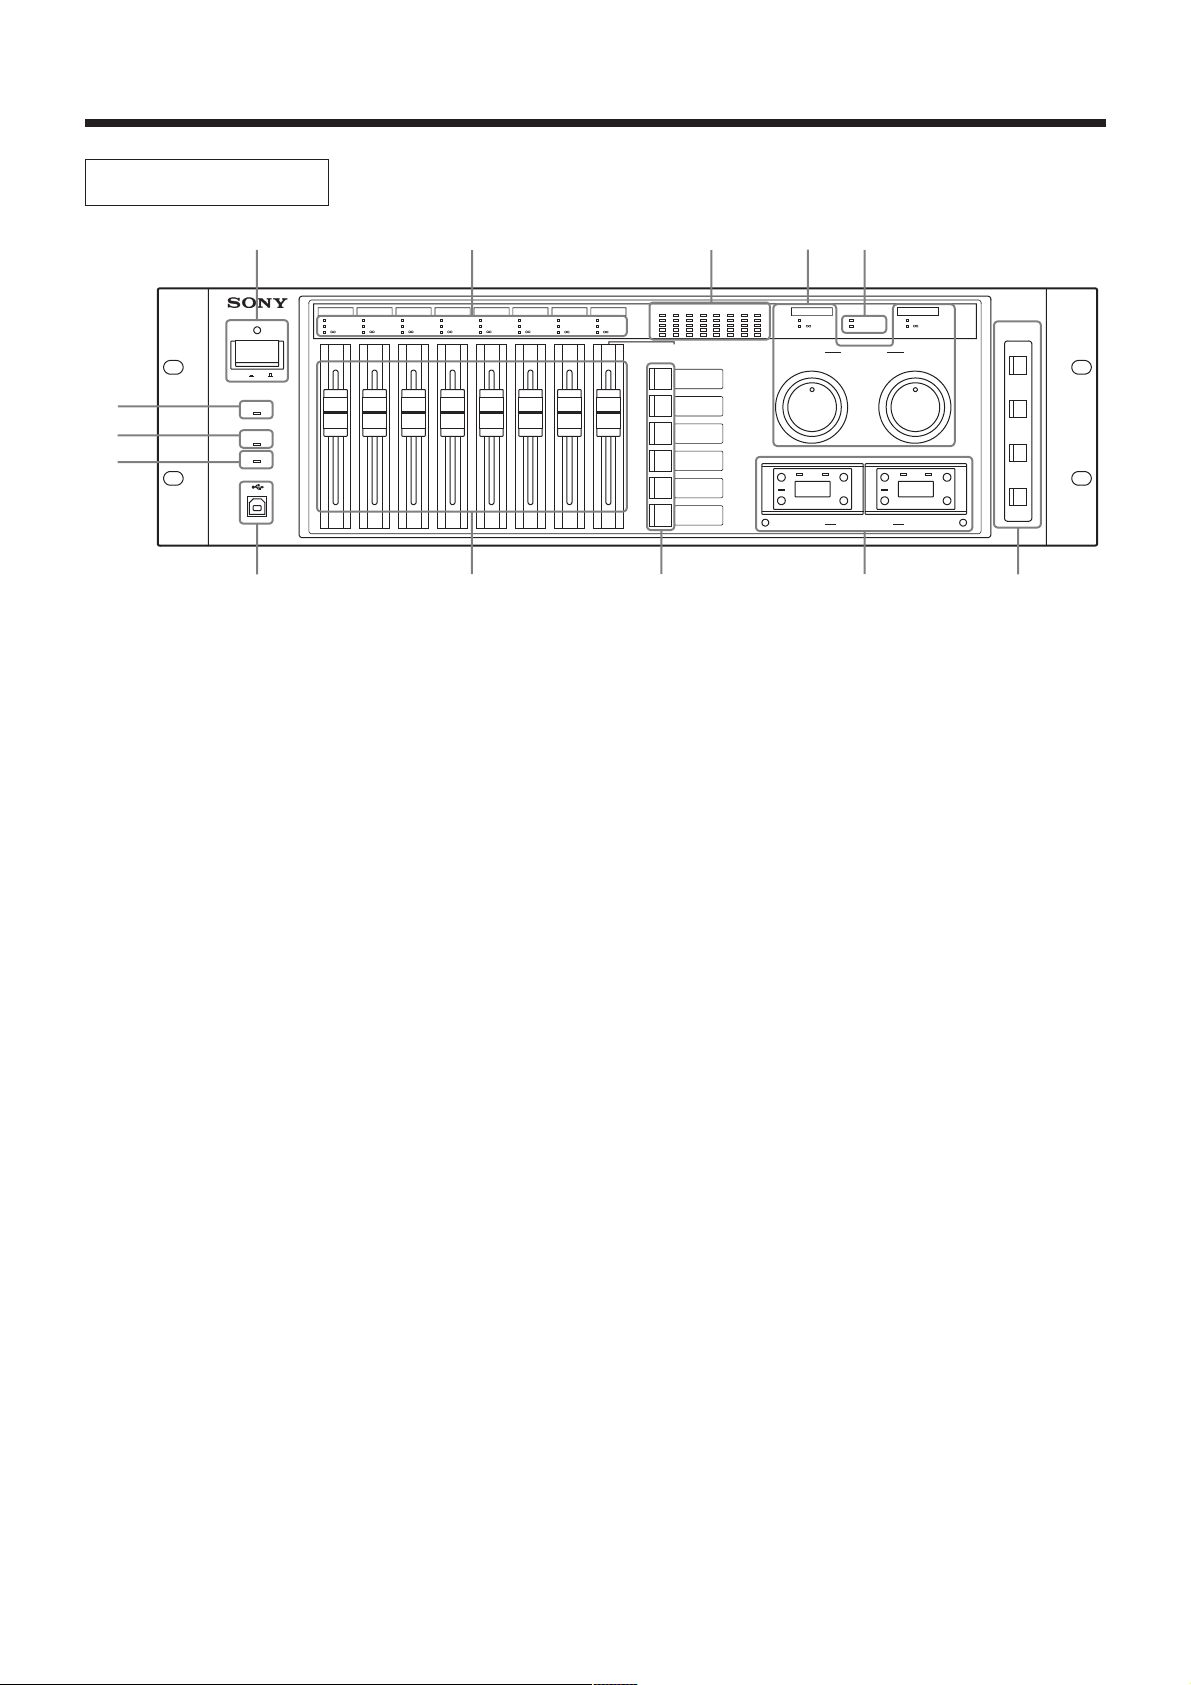
Location and function of parts
Front panel
9
0
qa
1
POWER
ON OFF
LOCK
RS-232C
USB
MIC1/WL1 MIC2/WL2 MIC3 MIC4 MIC5/LINE1 MIC6/LINE2 LINE3 LINE4
SIGNAL
SIGNAL
OVER GAIN
OVER GAIN
-
-
3867
SIGNAL
SIGNAL
OVER GAIN
-
SIGNAL
OVER GAIN
-
OVER GAIN
-
1 POWER button and POWER indicator
Pressing the POWER button turns on the power. The POWER
indicator lights in green when the power turns on.
You can switch the projectors and displays connected to the
SRP-X700P, to power-on state or to power standby state from
the SRP-X700P as they are interlocked by the SRP-X700P
Manager setup.
By default when shipped from the factory, the projectors and
displays powers are interlocked with the POWER button of the
SRP-X700P.
Turning on the POWER button of the SRP-X700P, sets the AV
equipment connected to the CONTROL S OUT terminals 1
through 4, to power-on state. Note that the AV equipment does
not enter the power standby state when the POWER button of
the SRP-X700P is turned off.
2 Input faders
• MIC1/WL1 and MIC2/WL2 faders
Adjusts the level of the signals supplied from the MIC1/
WL1 and MIC2/WL2 input terminals.
Either a wireless microphone or wired microphone can be
connected. When the wireless tuner receives the signal, the
wireless microphone is selected automatically.
• MIC3 and MIC4 faders
Adjusts the level of the signals supplied from the MIC3 and
MIC4 input connectors.
• MIC5/LINE1 and MIC6/LINE2 faders
Adjusts the level of the signals supplied from the MIC5/
LINE1 and MIC6/LINE2 input terminals. The MIC/LINE
selector button on the rear panel can be used to switch the
reference input level.
By default, LINE is selected.
• LINE3 and LINE4 faders
Adjusts the level of the signals supplied from the LINE3
and LINE4 input terminals.
These input faders are not the “moving” type.
SIGNAL
OVER GAIN
-
SIGNAL
OVER GAIN
-
0
-5
-10
-20
LINE 4 SELECT
A
B
C
D
E
F
SIGNAL
OVER GAIN
-
OUTPUT
2VU
1345678
+3
3 Input indicators
• SIGNAL indicator
The SIGNAL indicator lights in green when a signal is input
to each input terminal.
• OVER GAIN indicator
The OVER GAIN indicator lights in red when the input
level exceeds the GAIN LIMIT value that is set up by the
SRP-X700P Manager.
By default, the GAIN LIMIT is set to 10 dB.
–
•
∞ indicator
The –∞ indicator lights in yellow when no audio is output in
such cases as muting or when the INPUT fader is located at
the –∞ level position.
4 Tuner slots (WL 1/2)
This slot accepts the 800 MHz band wireless tuner unit WRU806B (option). It accepts up to two units. (For installation,
refer to page 8.) The WRU-806B Operating Instructions
provide full details on operating the tuner unit.
For operation of the tuner unit, read the WRU-806B Operating
Instructions thoroughly.
5 LINE 4 SELECT button
You can select a device to be connected to the input
connectors from 4A to 4F of LINE 4.
6 Master volume
With the master volume, you can control multiple faders that
are set as a single group. The faders to be controlled by the
master volume are set by the SRP-X700P Manager.
By default, the MASTER A is set to MIC1 to MIC4 input
faders, and the MASTER B is set to LINE1 to LINE4 input
faders.
The master volume is not the “moving” type.
• OVER GAIN indicator
The OVER GAIN indicator lights in red when the input
level exceeds the GAIN LIMIT value that is set by the SRPX700P Manager.
By default, the GAIN LIMIT is set to 10 dB.
–
•
∞ indicator
The –∞ indicator lights in yellow when no audio is output in
such cases as muting or when the INPUT fader is located at
the –∞ level position.
VU
MASTER A MASTER B
+3
0
-5
-10
-20
PROTECTION
OVER GAIN
CLIP
-
MASTER
AB
WL 1 WL 2
MIC TUNER
OVER GAIN
-
A
B
C
D
SCENE
RECALL
qd452qs
4
Page 5

7 Power amplifier indicators
• PROTECTION indicator
The PROTECTION indicator lights in red when the
protection circuit of the internal power amplifier works.
• CLIP indicator
The CLIP indicator lights in red when the output level of the
internal power amplifier is excessive such that the output
signal is distorted.
Notes
When the PROTECTION indicator lights
The protection circuit operates (PROTECTION indicator
lights) and the speaker and amplifier are protected from
damage by decreasing or cutting the output signal in case of
the following:
• If the temperature of the heat sink inside the amplifier
exceeds the specified value.
The connected speaker impedance is too low.
Air intake and exhaust holes (on the right and left sides of
the SRP-X700P) are choked by dust.
• The SPEAKERS terminal is short-circuited.
In such a case, turn the POWER button to the OFF position
and remove the cause of the fault before using the unit
again.
• If DC voltage appears in the SPEAKERS terminal due to
failure.
Turn off the POWER button and contact your local Sony
Sales office or Dealer.
8 Level meters
Displays the output signal levels of the LINE OUTPUT 1 to
LINE OUTPUT 8 terminals, with the 5-point LED.
9 LOCK indicator
The LOCK indicator lights in red when the SRP-X700P
Manager locks the front panel of the SRP-X700P to prevent
illegal operation. While lit, you cannot control any operations
from the front panel of the SRP-X700P.
0 RS-232C indicator
The RS-232C indicator lights in green when a command is
sent or received through the REMOTE RS-232C terminal.
qa USB indicator
The USB indicator lights in green when a command is sent or
received through the USB terminal or the REMOTE USB
terminal.
qs USB terminal
Connect the SRP-X700P to a computer in which the supplied
software (SRP-X700P Manager and User Control Panel) is
installed using the USB terminal.
qd SCENE RECALL button
You can recall the scene memories A to D.
Use the SRP-X700P Manager to assign the scenes to the scene
memories A to D.
By default, the scene memory A is assigned to scene No. 1, the
scene memory B is assigned to scene No. 2, the scene memory
C is assigned to scene No. 3 and the scene memory D is
assigned to scene No. 4.
5
Page 6
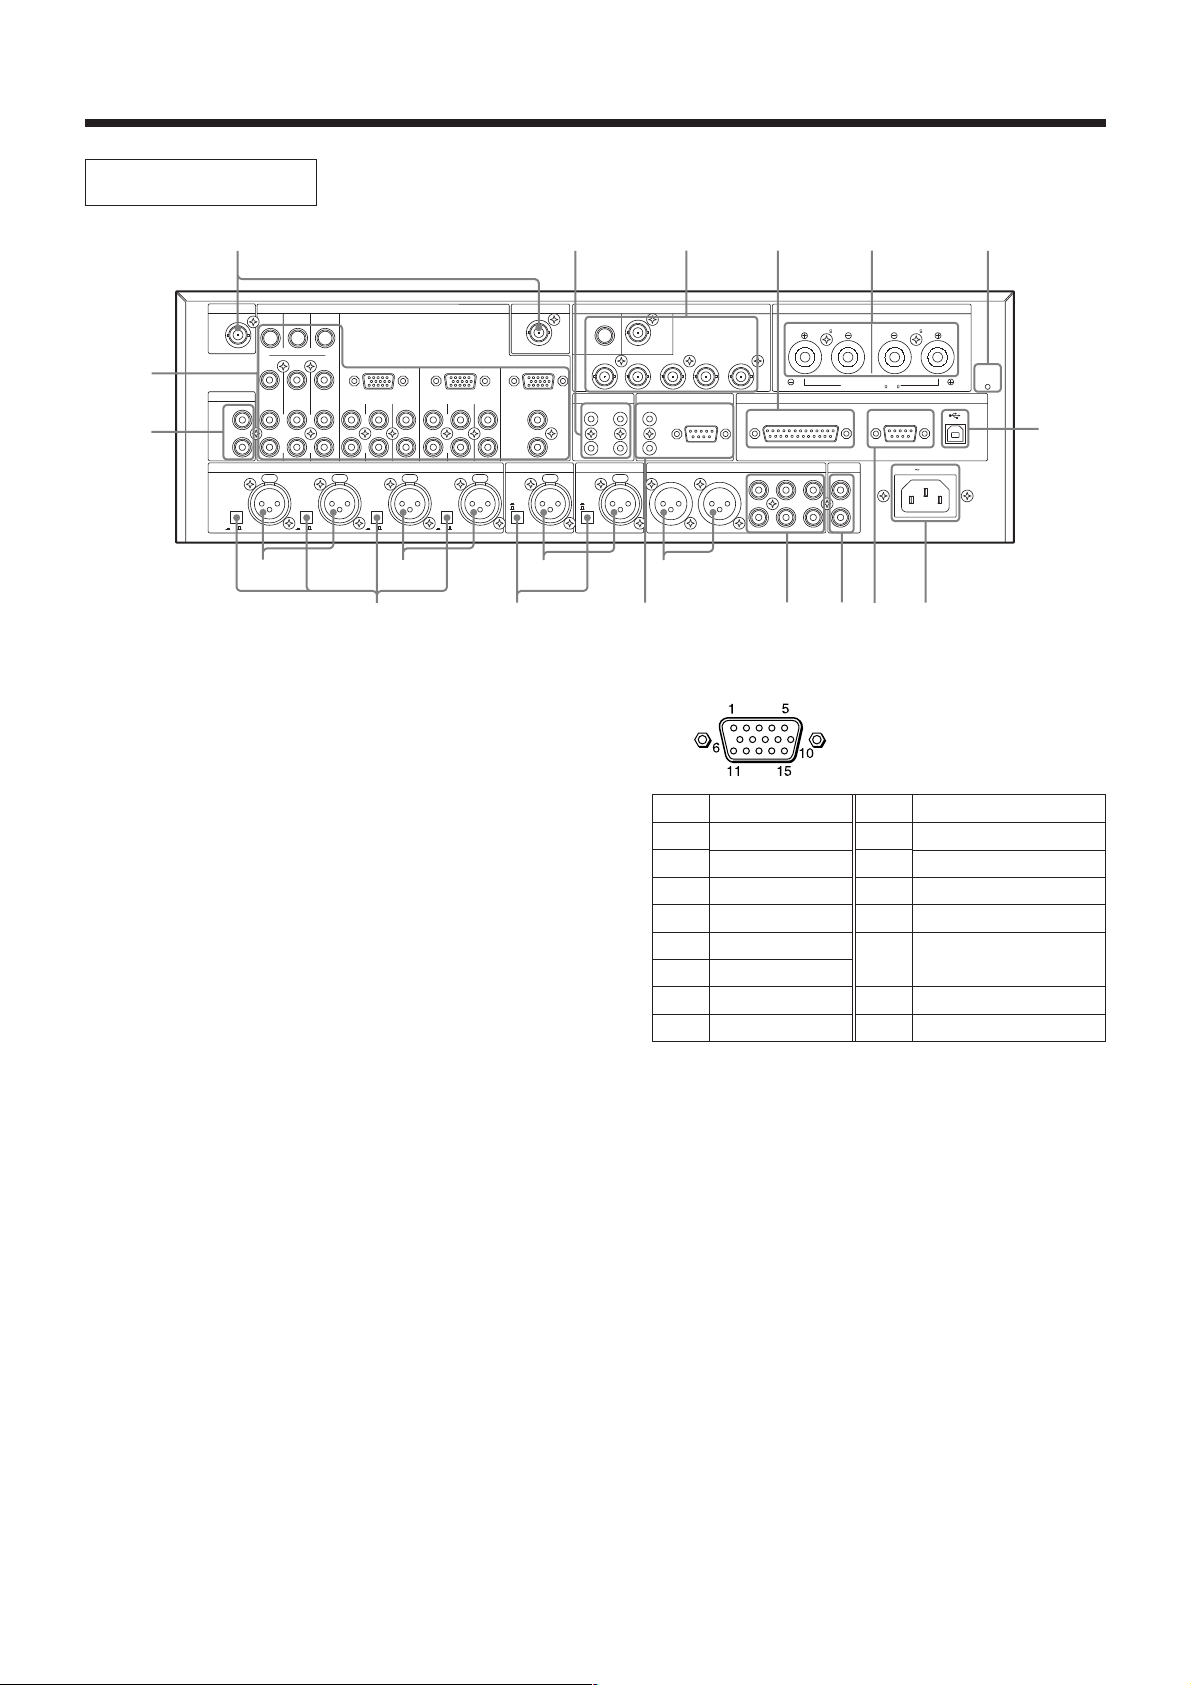
Location and function of parts
Rear panel
qh qa 0 qd 9 w;
ANT IN a ANT IN b OUTPUT
DC
9V OUT
35mA MAX
S VIDEO
VIDEO
LINE4 INPUT
COMPONENT/RGB
DC
9V OUT
35mA MAX
5
4
LINE3 IN
L
R
+48V +48V +48V +48V
ON OFF ON OFF ON OFF ON OFF
B
ACD E F
L
L
R
R
1234 21
CENTER
FRONT
REAR
L
WOOFER
R
MIC INPUT LINE OUTPUT
FRONT
CENTER
REAR
L
WOOFER
R
(+48V) (+48V)
MIC
LINE
1236
qk ql qs 7 8 qf qj
1 MIC INPUT 1 and MIC INPUT 2 terminals
The microphone input terminals.
The wireless microphone has the first priority when the tuner
unit is installed but you can use the wired microphone up until
you turn ON the POWER of the wireless microphone.
2 MIC INPUT 3 and MIC INPUT 4 terminals
The microphone input terminals.
3 MIC 5/LINE 1 IN and MIC 6/LINE 2 IN
terminals
The microphone and line input terminals.
You can select the input level of these input terminals with the
ql MIC/LINE selector button. When you select the
microphone level, the DC +48 V power is output to the
condenser microphone automatically.
By default, they are set to the LINE (4).
4 LINE 3 IN terminals
The input terminals for audio products.
5 LINE 4 INPUT terminals
The input terminals for AV equipment.
As to the video input signals, the combination of composite
signal and S video signal or the combination of component
signal and RGB signal is selected by the SRP-X700P Manager
for each channel.
• 4A, 4B and 4C input terminals
The video input terminals for accepting the composite and
S video signals, and the stereo audio input terminal.
By default, they are set to –10 dBu with the composite
signal.
• 4D and 4E input terminals
The video input terminals for accepting the component and
RGB signals, and the audio input terminal accepting the 5.1channel surround audio signal.
By default, 4D is set to –10 dBu with the component signal
and 4E is set to –10 dBu with the RGB signal.
• 4F input terminal
The video input terminals for accepting the component and
RGB signals, and the stereo audio input terminal.
By default, it is set to –10 dBu with the RGB signal.
L
R
MIC5/LINE1 IN
SPEAKERS
CONTROL S
1
2
MIC6/LINE2 IN
MIC
LINE
S VIDEO
R/R-Y
OUTPUT
3
4
VIDEO
G/Y B/B-Y
PROJECTOR CONTROL
CONTROL S
IN
OUT
SYNC/HD
RS-232C
IMPEDANCE USE
4-16
VD
IMPEDANCE USE 32 -10k
PARALLEL
REC OUT
781
345
2
6
REMOTE
70V LINE
RS-232C
CH-1CH-2
IMPEDANCE USE
4-16
AC IN
CIRCUIT
BREAKER
PUSH RESET
<LINE4 INPUT COMPONENT/RGB terminal>
(HD D-sub 15-pin, female)
Pin No.
1
2
3
4
5
6
7
8
Function
Video input R/R-Y
Video input G/Y
Video input B/B-Y
GND
N.C
GND
GND
GND
Pin No.
9
10
11
12
13
14
15
Function
N.C
GND
N.C
N.C
Composite sync signal/
horizontal sync signal, SYNC/HD
Vertical sync signal VD
N.C
6 LINE OUTPUT 1 and LINE OUTPUT 2 terminals
The audio output terminals.
7 LINE OUTPUT 3 to LINE OUTPUT 8 terminals
The audio output terminals.
8 REC OUT terminal
The audio output terminal.
Usually, connect this terminal to an MD unit for recording.
9 SPEAKERS terminal
The output terminal of the internal power amplifier.
You can connect a high impedance speaker (70 V LINE). (In
the case of high impedance speaker 70 V LINE, the output
signal becomes monaural.) You can select the output signal
and operating mode with the SRP-X700P Manager.
By default, the operating mode is set to Lo impedance and the
output signal is set to LINE OUT1 and LINE OUT2.
For the speaker connection, see “Connecting the Speaker” on
page 11.
qg
6
Page 7

0 Video output terminals
The video signal that is selected by the LINE 4 SELECT
button on the front panel is output from this terminal. (The
video signal format is not converted from each other.)
• 5BNC output terminals
The RGB and component signal output terminals.
• VIDEO terminal
The composite signal output terminal.
• S VIDEO terminal
The S VIDEO signal output terminal.
qa CONTROL S OUTPUT 1 to CONTROL S
OUTPUT 4 terminals
You can control AV equipments connected to the LINE 3 IN
terminal and LINE 4 INPUT terminal by remote control
through these terminals.
Note
The AV equipment connected to the LINE3 IN terminal
cannot be controlled from supplied software User Control
Panel.
You can perform the basic operations of Sony DVD, VCR,
CD, MD and CD-R audio, such as playback, stop, fast forward
and rewind. You can select either the wired connection or the
wireless connection for each terminal from the SRP-X700P
Manager.
qs PROJECTOR CONTROL terminals
The SRP-X700P can controls a applicable projector and
plasma display connected to the video output terminals from
this terminal.
By default, connection to use the VPL-FX50 is set through
RS-232C.
• RS-232C terminal
This terminal is for a projector or plasma display having the
RS-232C terminal.
• CONTROL S IN/OUT terminal
The SRP-X700P can control a projector without the RS232C terminal through the CONTROL S.
When controlling a projector using the CONTROL S OUT
terminal, mixed use of the component signal and the RGB
signal is not possible.
qd REMOTE PARALLEL terminal
The parallel remote terminal contains 12 INPUTs and 10
OUTPUTs.
You can control the SRP-X700P from external remote
equipment using the INPUT parallel remote pins. You can
control the external remote equipment from the SRP-X700P
using the OUTPUT parallel remote pins. You can select the
functions of the respective terminals using the supplied SRPX700P Manager software.
qf REMOTE RS-232C terminal
The RS-232C remote terminal.
You can control the SRP-X700P with external equipment
connected to the RS-232C terminal from a remote location.
qg REMOTE USB terminal
You can connect a personal computer in which the supplied
software (SRP-X700P Manager and User Control Panel) is
installed, to the SRP-X700P through the USB terminal.
Note that the USB terminal on the front panel has priority if
the USB terminal on the front panel is being used.
qh ANT IN terminal
The antenna input terminal for the wireless tuner.
Connect a UHF antenna of the AN-820A (option).
9V power is supplied from this terminal as the power for the
antenna booster. Do not connect any antenna other than the AN820A, otherwise the system may not work or may cause failure.
Note
For details of installation and connection of an antenna,
thoroughly read the operating instructions supplied with the
antenna.
If the antenna is not installed correctly, it may cause defective
reception resulting in intermittent sound. Especially, if the
location cannot be changed easily after installing the antenna,
check the operations thoroughly prior to installation.
Connect the antenna using coaxial cable having the impedance
of 50 Ω. The maximum length of the cable is approximately
50 m with 5D-FB. Do not use the cable of a
75 Ω system such as 5C-2V, as its maximum length is half that
of the 5D-FB and it may cause a trouble.
If noise occurs:
There can be a case that a specific channel cannot be used due
to external noise or the noise caused by interference radio
wave depending on the installation location. In such a case,
find a channel that does not illuminate the RF indicator when
the wireless microphone power and the transmitter power are
turned off (i.e., the channel that is not adversely affected by
noise and interference radio wave). Use the unaffected
channel. Select the same unaffected channel for the wireless
microphone and the transmitter.
qj AC IN terminal
Connect the power cord supplied to this terminal.
qk + 48 V button
Press this button to supply the DC +48V condenser
microphone power to the MIC INPUT 1 to MIC INPUT 4
terminals. When this button is pressed ON ($), DC +48 V is
output.
By default, this button is set to OFF (4).
ql MIC/LINE selector button
You can select the input level of the MIC 5/LINE 1 IN and MIC
6/LINE 2 IN terminals with this button. (Refer to page 18.)
Also, when this button is set to the (+48 V) MIC ($) position,
the DC +48 V condenser microphone power is output
automatically.
By default, this button is set to LINE (4).
Notes
• The depressed position, which is the ON position, of both
the qk +48 V button and the ql MIC/LINE selector button
is lower than the face of the rear panel. The depressed ON
position is designed intentionally to prevent mis-operation.
• Before you make any attempt to disconnect and connect
cables or to press any of the +48 V button, MIC/LINE
selector button or other buttons, be sure to decrease the
input fader completely or to turn off the power.
w; CIRCUIT BREAKER
The circuit breaker works to turn off the main power of this unit
if an excessive current flows in the power supply of this unit.
If the circuit breaker trips, please contact your local Sony
Sales office or Dealer.
7
Page 8

Location and function of parts
Tuner Unit
How to install the tuner unit
1 Turn off the power of this unit.
2 Remove the tuner cover.
3 Check the up and down sides of the tuner unit, and insert it into
the slot. (Fig. 1)
NE
SCE
L
ECAL
R
B
MASTER
Tuner unit
Fig. 1
4 After installation of the tuner unit, turn on the power of the unit
and turn on the power of the wireless microphone to check it is
receiving. While receiving, the RF/SIGNAL indicator lights
up. The RF/SIGNAL indicator will not light up when the
setting channel of the microphone is different from the setting
of the tuner unit, or when the microphone power is consumed.
Notes
Take the following precautions to prevent interference and noise.
• If there is a TV broadcasting station nearby, to avoid possible
interference from its broadcasting, do not use that station’s channel.
• When simultaneously using two tuners, always set the tuners to
different channels within the same group (other than group 00).
• Please make a choice of model in accordance with your area to
use picking up an unused TV channel.
• Make sure that the channel selected on the microphone is the
same as that selected on the tuner being used in the same system.
How to remove the tuner unit
1 Turn off the power of this unit.
2 Insert a screwdriver having the shaft diameter of 2 to 4 mm or
less with shaft length of 30 mm or longer, into the hole under
the lower part of the tuner slot as shown. Remove the tuner
unit. (Fig. 2)
LINE 4 SELECT
A
B
C
D
E
F
A
T
T
A
B
F
A
GP
F
R
H
C
P
G
Please refer to the table Sony 800 MHz-band system models
frequency range in the Operating Manual of Wireless Microphone
or Transmitter.
13
GP
CH
AF
RF
24
BATT
GP CH
Display
5
6
7
AF
RF
BATT
8
9
GP CH
0
qa
1 GP (group) button
To change the group, press the + or – button while holding this
button down.
2 CH (channel) button
To change the channel in a group, press the + or – button while
holding this button down.
3 + button
To go to a higher group or channel, press this button while
holding the GP or CH button.
Press this button changes the indication from GP/CH to
frequency.
4 – button
To go to a lower group or channel, press this button while
holding the GP or CH button.
ENE
SC
LL
CA
RE
B
MASTER
A
LINE 4 SELECT
A
B
C
D
E
F
T
T
A
B
F
A
GP
F
R
H
C
P
G
Tuner unit
Fig. 2
Note
Insert it deeply into the slot.
Do not insert or remove the tuner unit while the power is on. This
may cause noise.
CAUTION
To prevent breakdown or injury, do not put your hand inside of the
slot.
8
5 AF (audio frequency) indicator
6 AF (audio frequency) level indications
The indicator lights and the indications appear when the audio
output level is higher than the reference level.
7 BATT (battery) indicator
8 BATT (battery) indication
Indicate the condition of the wireless microphone transmitter
batteries. The indicator and indication appear and start
flashing about one hour before the transmitter batteries go flat.
The time at which flashing begins will depend on the type of
battery used in the transmitter, and its condition.
9 GP/CH (group/channel) indication
Shows the reception channel group and respective channel
number.
Pressing the + button changes this indication to the frequency
indication.
0 RF (ratio frequency) level indications
qa RF (ratio frequency) indicator
The indicator lights and the indications (dots) appear when the
antenna reception is optimal. Depending on the RF input level,
the number of dots changes.
Page 9

How to Control the Display from the SRP-X700P
PROJECTOR
IN
OUT
<SRP-X700P>
CONTROL S
Remote
commander
Projector
For the projectors that the SRP-X700P supports by default, refer to the “List of supported projectors” on a separate document.
PROJECTOR CONTROL RS-232C Terminal
To connect the RS-232C terminal of applicable projectors and that of plasma display to this terminal;
This model can switch the input signals and power ON/STANDBY of the projector and plasma display in interlocked condition.
<SRP-X700P side>
(D-sub 9-pin, male)
Pin No. Signal Function
1 FG Frame ground
2 RD Receive data
3 TD Send data
4 ER Not connected
5 SG Signal line ground
6 DR Not connected
7 RS Not connected
8 CS Not connected
9 N. C Not connected
<Sony projector/
plasma display side>
Pin No. Signal Function
1 FG Frame ground
2 RX DA Receive data
3 TX DA Send data
4 DTR Data terminal ready
5 GND Ground
6 DSR Data set ready
7 RTS Request to send
8 CTS Clear to send
9 RI Called display
(D-sub 9-pin, female)
PROJECTOR CONTROL CONTROL S IN/OUT Terminal
The SRP-X700P can switch the input signals and power ON/STANDBY of
the projector automatically when CONTROL S cable is connected to Sony’s
projector as interlocked operation. The RGB signal and the component
signal cannot be connected at the same time for the interlocked operation.
Connect the wired remote commander supplied with a projector to the
CONTROL S IN terminal. Then you can establish various setups of a
projector from the SRP-X700P. If you want to use the wired remote
commander on battery, locally fabricate a connecting cord with STEREO
mini plug connected at one end, for supplying the power.
How to Control the SRP-X700P from External Equipment
Note
The USB terminal and the REMOTE USB terminal are the dedicated terminal to control this unit from the SRP-X700P Manager and User
Control Panel.
REMOTE RS-232C Terminal
Use of this terminal enables you to control the SRP-X700P from an external
controller.
Terminal shape : D-sub 9-pin, male (with inch-type screws)
Electrical specifications : Conforms to RS-232C standard
Recommended cable : Multi-core shielded cable for data communication
Cable length : 15 m or less
Communication format
Baud rate : 9600 bps
Bit length : 8 bits
Stop bit : 1 bit
Parity : ODD (odd number)
Note
Use the null modem cable when connecting the SRP-X700P with computer.
Pin No. Signal Function
1 FG Frame ground
2 RD Receive data
3 TD Send data
4 ER Not connected
5 SG Signal line ground
6 DR Not connected
7 RS Not connected
8 CS Not connected
9 N. C Not connected
9
Page 10

How to Control the SRP-X700P from External Equipment
REMOTE PARALLEL Terminal
The REMOTE PARALLEL terminal enables the SRP-X700P to be
remotely controlled with a simple circuit connected externally to
this terminal.
(D-sub 25-pin, female)
Terminal shape : D-sub 25-pin, female
Recommended cable : Multi-core shielded cable for data
communication
Cable length : 50 m or less
INPUT terminal
You can set the functions of the respective terminals from the
PARALLEL INPUT FUNCTION setup box in the REMOTE
screen of the supplied SRP-X700P Manager software.
All faders and sound volume controls can be controlled from a
remote location by connecting a variable resistor as shown, in the
range of 0 to –∞ dB.
You can perform the following operations by adding a make contact.
• Input selection of LINE 4 system
• Muting
• Scene recall
• Sound volume adjustment (Up/Down)
• Controlling the AV equipment connected to the CONTROL S
terminal
• Power-ON/STANDBY selection of a projector
OUTPUT terminal
The turning ON conditions of the respective pins of the OUTPUT
terminal can be set from the following.
• Input selector state of LINE 4 system
• Turning ON the OVER and –∞ indicators
• Turning ON the scene recall button
• Generation of the Power-ON/STANDBY command of a
projector
You can select the ON conditions from the PARALLEL OUTPUT
FUNCTION setup box on the REMOTE screen of the supplied
SRP-X700P Manager software.
<Example of input circuit>
SRP-X700P
Input terminal
(No. 2 to No. 13)
GND
(Nos. 1, 14 and 25)
SRP-X700P
Input terminal
(No. 2 to No. 13)
10 kΩ
Curve-B variable
resistor
GND
(Nos. 1, 14 and 25)
–
∞ dB
0 dB
<Example of output circuit>
SRP-X700P
Output terminal
(No. 15 to No. 24)
Notes
• Do not apply any reverse voltage across the output terminal.
• Do not connect the shield cable of the REMOTE wire and the
GND wire to the terminal table or the like. It can cause
malfunction and noise.
• Install the REMOTE cable away from the dimmer, motor and
others.
• When the PARALLEL input terminal is used to set the projector
power to either the power-ON state or to the power-STANDBY
state, the projector power enters the power-ON state when the
PARALLEL input is set to ON. The projector power enters the
power-STANDBY state when the PARALLEL input is set to
OFF. Therefore, use an alternate type switch for power control.
40 mA MAX
N
LED
24 V
GND
(Nos. 1, 14 and 25)
MAX
Pin No.
1
2
3
4
5
6
7
8
9
10
11
12
13
14
15
16
17
18
19
20
21
22
23
24
25
Function
GND
INPUT1
INPUT2
INPUT3
INPUT4
INPUT5
INPUT6
INPUT7
INPUT8
INPUT9
INPUT10
INPUT11
INPUT12
GND
OUTPUT1
OUTPUT2
OUTPUT3
OUTPUT4
OUTPUT5
OUTPUT6
OUTPUT7
OUTPUT8
OUTPUT9
OUTPUT10
GND
10
Page 11

How to Control AV Equipment from the SRP-X700P
The SRP-X700P can control the Sony equipment connected to the CONTROL S OUTPUT1 through 4 terminals. The procedure to set up the
MACHINE CONTROL on the SRP-X700P Manager, and the functions, which can be operated, from the SRP-X700P are shown in the table below.
Note that the functions of REC, POWER ON, and POWER STANDBY cannot be operated from the supplied software SRP-X700P Manager
and User Control Panel, to prevent the system from malfunctioning.
a
a
a
a
a
a
a
a
a
a
a
Operations
PLAY
a
a
a
a
a
a
a
a
a
a
a
F. F.
a
a
a
a
a
a
a
a
a
a
a
PAUSE
a
a
a
a
a
a
a
a
a
a
a
REC
—
a
a
a
a
—
a
a
—
a
a
POWER ON/
STANDBY
a
a
a
a
a
a
a
a
a
a
a
MACHINE
TYPE
∗1
DVD
VTR1 (Beta)
VTR2 (8mm)
VTR3 (VHS)
VTR4 (DV)
CD
MD
CD-R
Blu-ray Disc
Inst. VTR
Cassette Deck
*1 Set the remote control mode of the deck in use, to the DVD1 mode before use.
*2 The “Recording” function of the DVD recorder and that of the Blu-ray disc recorder are not supported so that they cannot be controlled.
*3 Set the remote control mode of the deck in use, to the BD1 mode before use.
*4 If you want to use the control S terminal of the DSR series to control the VCR, select “Inst. VCR”. If you want to use the AV mouse VM-50 (option) to
*5 For the network player (NSP-100), only the Play, Pause and Stop functions on the play list that is set for the Play button one-touch playback are enabled.
*6 If you use the double cassette audio deck, only the deck B can be controlled.
∗3
control the VCR, select the VCR4 (DV) mode.
Supported equipment
DVD player
DVD recorder
Betamax VCR
8 mm video VCR
VHS VCR
Digital video VCR
CD player
MD recorder
CD-R for audio
Blu-ray disc recorder
Professional use VCR
Network player
Audio cassette deck
∗2
(DVCAM and others)
∗5
PREV.
∗2
∗4
∗6
NEXT
a
—
—
—
—
a
a
a
a
a
—
STOP
a
—
—
—
—
a
a
a
a
a
—
REW.
a
a
a
a
a
a
a
a
a
a
a
Use the supplied IR transmitter VM-50 to control the Sony equipment that is not equipped with the
CONTROL S terminal.
• Confirm location of the remote control signal receptor part of the Sony equipment that you want to control, and fix the supplied IR
transmitter VM-50 with a both-sided adhesive tape as shown below.
Setting Requirements
5cm 5cm
View from the front
View from the top
Install the VM-50 inside a rack. Recess the
IR receiver behind the IR LED by more than
10 cm. Install the IR receiver in the location
that is within the range of 20 cm higher and
20 cm lower than the IR LED (as shown by
IR LED
IR receiver
the dotted line of the illustration). The IR
receiver of the equipment should be located
more than 5 cm far from the IR LED in the
right and left.
20cm 20cm
Front panel side
10cm
of the equipment
Note
If any screening object is placed in between
the IR LED and the IR receiver, the infrared
ray is blocked to disable control of the
VM-50
Service area
VM-50
external equipment.
• Operate the SRP-X700P Manager or the User Control Panel to confirm that it can control the Sony equipment. If they cannot control the
equipment, change position of the supplied IR transmitter VM-50 until they can control the equipment.
Connecting the Speaker
Speaker connection method changes depending on the
operating mode.
When the “70 V LINE” mode is selected, the output
signal becomes monaural. Connect the (+) terminal of a
speaker to the (+) terminal (red) of SPEAKERS CH-1
and the (–) terminal of a speaker to the (+) terminal
(red) of SPEAKERS CH-2.
• Connecting speakers with
low impedance [Lo imp.]
+
CH-1
CH-1
CH-2
CH-2
+
–
–
–
–
+
Impedance
4Ω to 16Ω
+
• Connecting speakers with
high impedance [70 V LINE]
+
CH-1
CH-1
CH-2
CH-2
+
–
–
–
+
Impedance
32Ω to 10kΩ
The table below shows the number of speakers that can be connected in the high impedance [70 V LINE] mode.
Impedance
1 kΩ
3.3 kΩ
10 kΩ
Power applied to
each speaker
5 W
1.5 W
0.5 W
Number of speakers
you can connect
30
100
300
∗ The notation in [ ] is displayed in the
SRP-X700P Manager.
11
Page 12

System Configuration
LINE4 INPUT
LINE3 IN
AC IN
+48V
+48V
+48V
+48V
1234
21
3
4
5
6
L
R
FRONT
RS-232C
COMPONENT/RGB
B
7
8
1
2
MIC INPUT
LINE OUTPUT
ACD E F
VIDEO
ANT IN a
ANT IN b OUTPUT
R/R-Y
VIDEO
SPEAKERS
REC OUT
REMOTE
PARALLEL
S VIDEO
S VIDEO
CONTROL S
IN
OUT
PROJECTOR CONTROL
MIC5/LINE1 IN
OUTPUT
IMPEDANCE USE
4-16
70V LINE
G/Y B/B-Y
SYNC/HD
VD
L
R
L
L
R
REAR
CENTER
WOOFER
FRONT
L
R
REAR
CENTER
WOOFER
L
R
ON
OFF ON
OFF ON
OFF ON
OFF
MIC
(+48V)
LINE
MIC
(+48V)
LINE
1
2
3
4
CH-1CH-2
IMPEDANCE USE
4-16
IMPEDANCE USE 32
-10k
DC
9V OUT
35mA MAX
DC
9V OUT
35mA MAX
R
CIRCUIT
BREAKER
PUSH RESET
MIC6/LINE2 IN
CONTROL S
RS-232C
IR
transmitter
MD recorder
Component
5.1 channel surround
VHS VCR
RGB
AUDIO
RGB
AUDIO
PC 1
PC 2
CD player
To power outlet
Center speaker (C) Sub woofer (SW)
Power amplifier
Power amplifier
Power amplifier
Ceiling speaker
Surround speaker (LS) Surround speaker (RS)
USB
USER CONTROL PANEL
To power outlet
LCD data projector
Front speaker (L) Front speaker (R)
R/G/B/HD/VD Y/R-Y/B-Y
VIDEO
S VIDEO
RS-232C
DVD player
System example when operating the SRP-X700P with the default setting when shipped from the factory
12
on page 11.
”
• You can realize the above system configuration with the default setting of the SRP-X700P. You can use the system without changing any setups from the supplied software SRP-X700P Manager.
• You can control the VHS, DV and DVD, can select channel of the LINE4 INPUT terminal, and can control the sound volume of microphone and AV equipment from the supplied software User
Control Panel. (CD and MD cannot be controlled.)
• VHS, DV and DVD cannot be controlled from the front panel of the SRP-X700P.
• The system configuration shown above uses the two unit of the UHF synthesizer tuner unit WRU-806B (option).
Control AV Equipment from the SRP-X700P
• If you want to use an electret condenser microphone for MIC3 and MIC4, set the +48 V button of the corresponding channel to ON.
• Connect the VPL-FX51 as a projector through RS-232C.
• Install the IR transmitter VM-50 in the SRP-X700P or in the location inside a rack that allows its receptor block to receive the remote control signal. For the installation of the VM-50, see “How to
• If you use VHS and DV that can select their remote control mode, set the remote control mode of VHS to “VTR3” and set the remote control mode of DV to “VTR4”.
Page 13

System example when external operation panel and environment
LINE4 INPUT
LINE3 IN
AC IN
+48V
+48V
+48V
+48V
1234
21
3
4
5
6
L
R
FRONT
RS-232C
COMPONENT/RGB
B
7
8
1
2
MIC INPUT
LINE OUTPUT
ACD E F
VIDEO
ANT IN a
ANT IN b OUTPUT
R/R-Y
VIDEO
SPEAKERS
REC OUT
REMOTE
PARALLEL
S VIDEO
S VIDEO
CONTROL S
IN
OUT
PROJECTOR CONTROL
MIC5/LINE1 IN
OUTPUT
IMPEDANCE USE
4-16
70V LINE
G/Y B/B-Y
SYNC/HD
VD
L
R
L
L
R
REAR
CENTER
WOOFER
FRONT
L
R
REAR
CENTER
WOOFER
L
R
ON
OFF ON
OFF ON
OFF ON
OFF
MIC
LINE
MIC
LINE
1
2
3
4
CH-1CH-2
IMPEDANCE USE
4-16
IMPEDANCE USE 32
-10k
DC
9V OUT
35mA MAX
DC
9V OUT
35mA MAX
R
CIRCUIT
BREAKER
PUSH RESET
MIC6/LINE2 IN
CONTROL S
RS-232C
(+48V)(+48V)
I/F
BOX
I/F
BOX
Component
5.1 channel surround
RGB
AUDIO
RGB
AUDIO
PC 1
PC 2
To power outlet
Center speaker (C) Sub woofer (SW)
Power amplifier
Power amplifier
Power amplifier
Ceiling speaker
Surround speaker (LS) Surround speaker (RS)
USB
USER CONTROL PANEL
External operation panel
To power outlet
LCD data projector
Front speaker (L) Front speaker (R)
R/G/B/HD/VD Y/R-Y/B-Y
VIDEO
S VIDEO
RS-232C or CONTROL S
RS-232C
Screen Curtain
Illumination
Operation terminal
External system controller
I/F
BOX
IR
transmitter
MD recorder
VHS VCR
CD player
DVD player
equipment are connected
ed in the system connection. The component signal
ipment cannot be mix
” on page 11.
output equipment such as DVD should use the 4A to 4C LINE 4 INPUT terminals connecting the video or S video signal.
• You can control the SRP-X700P from a remote location by one of the three methods (either from the User Control Panel or from the external operation panel or from external system controller.)
• You can control the SRP-X700P and the equipment connected to the SRP-X700P by sending command from external system controller to the SRP-X700P. (The system controller software is separately necessary.)
• If you use a projector that is controlled through the CONTROL S terminal, the RGB signal equipment and the component signal equ
Equipment from the SRP-X700P
• The system configuration shown above uses the two unit of the UHF synthesizer tuner unit WRU-806B (option).
• If you want to use an electret condenser microphone for MIC3 and MIC4, set the +48 V button of the corresponding channel to ON.
• Install the IR transmitter VM-50 in the SRP-X700P or in the location inside a rack that allows its receptor block to receive the remote control signal. For the installation of the VM-50, see “How to Control AV
• If you want to control the environment equipment such as screen, curtain and illuminations from the REMOTE PARALLEL output terminal, use the optional interface box (I/F box).
• For the external operation panel and interface box (I/F Box), see “System example when operating the SRP-X700P from the REMOTE PARALLEL terminal” on page 14.
13
Page 14

System Configuration
System example when operating the SRP-X700P from the REMOTE PARALLEL terminal
The REMOTE PARALLEL terminal of the SRP-X700P is shipped from the factory with the default setting on the premise of the external
operation panel as described below.
Camera
START
FINISH
EMG STOP
START button (SCENE No. 1 recall): Sets OUTPUT7 and OUTPUT9 to ON to lower the screen, to close the curtain, to darken the illumination and to start presentation.
FINISH button (SCENE No. 2 recall): Sets OUTPUT8 and OUTPUT10 to ON to raise the screen, to open the curtain, to turn on the illumination and to end the presentation.
EMG STOP button (SCENE No. 3 recall): Sets OUTPUT7 through OUTPUT10 to OFF to stop moving the screen and the curtain, and to turn on the illumination.
Selector block: Switches the LINE4 INPUT terminals A through F.
MIC volume control: Controls the microphone sound volume.
AV volume control: Controls sound volume of the AV equipment.
VHS
Stand
SRP-X700P REMOTE PARALLEL terminal
D-sub 25-pin connector
Terminal name
Pin No.
1
2
3
4
5
6
7
8
9
10
11
12
13
14
15
16
17
18
19
20
21
22
23
24
25
GND
INPUT1
INPUT2
INPUT3
INPUT4
INPUT5
INPUT6
INPUT7
INPUT8
INPUT9
INPUT10
INPUT11
INPUT12
GND
OUTPUT1
OUTPUT2
OUTPUT3
OUTPUT4
OUTPUT5
OUTPUT6
OUTPUT7
OUTPUT8
OUTPUT9
OUTPUT10
GND
GND
VHS selection
CAMERA selection
LINE4C selection
DVD selection
PC1 selection
PC2 selection
START
FINISH
EMG STOP
Microphone sound volume
AV equipment sound volume
———
GND
VHS selection tally
DV selection tally
Camera selection tally
DVD selection tally
PC1 selection tally
PC2 selection tally
Lowers the screen.
Raises the screen.
Close the curtain/turn off illumination.
Open the curtain/turn on illumination.
GND
Precaution on the environment interface box specifications
• The REMOTE PARALLEL output terminal provides the open-collector output of
alternate operation. It means that the output terminal keeps outputting the ON signal
after an output command is issued to operate the environment equipment by using
scene recall and others, regardless of the operating condition of the environment
equipment. The environment equipment motors should be stopped when you want to
stop raising or lowering the screen or curtain, by the Interface Box.
• The Emergency Stop signal turns off the output signals at the OUTPUT7 to
OUTPUT10 terminals.
Please create an Interface Box that stops moving the screen and the curtain, and turns
on illumination when the output terminals are turned off.
DVD PC1 PC2 MIC AV
LINE4C
Function name
External operation panel
VHS VCR selector button
Picture presentation camera selector button
LINE4C input selector button
DVD selector button
PC1 selector button
PC2 selector button
START (presentation start) button
FINISH (presentation finish) button
Emergency stop button
Microphone sound volume control (10kΩ B-curve)
AV equipment sound volume control (10kΩ B-curve)
40mA or less
VHS VCR selection LED
DV VCR selection LED
Picture presentation camera selection LED
DVD selection LED
PC1 selection LED
LED
PC2 selection LED
DC 24V or less
Lowers the screen.
Raises the screen.
Closes the curtain.
Opens the curtain.
Turns off illumination.
Turns on illumination.
Screen
interface box
Curtain
interface box
Illumination
interface box
Example of controlling the environment equipment by scene recall operation
Open
Close
OFF
ON
OFF
ON
Illumination
Bright
Bright
Dark
Turning on
the power
START
(SCENE No. 1 recall) (SCENE No. 2 recall)
FINISH
START
(SCENE No. 1 recall)
Terminal
name
Environment
equipment
OUTPUT 7,9
OUTPUT 8,10
Screen
Raise
Stop
Lower
Curtain
14
EMG STOP
(SCENE No. 3 recall)
Page 15

Default settings
INPUT
Item Initial setting
MIC1 - MIC4 –50 dBu
TRIM MIC5/LINE1, MIC6/LINE2 +4 dBu
LINE3, LINE4A - 4F 0 dBu
LCF
PEQ OFF
FR OFF
COMP SOFT
MUTING OFF
GAIN LIMIT +10 dB
INPUT FADER 0 dB
MIC1 - MIC4
MIC5/LINE1,
MIC6/LINE2
PEQ
LINE3, LINE4
PEQ Q
MIC1 - MIC4 ON
MIC5/LINE1, MIC6/LINE2 OFF
Band 1 63 Hz
FREQ Band 2 2.5 kHz
Band 3 20 kHz
Band 1 1.0
Q Band 2 1.5
Band 3 0.47
GAIN Band 1 - 3 0 dB
FREQ
GAIN Band 1,2 0dB
Band 1 63 Hz
Band 2 20 kHz
Band 1 1.0
Band 2 0.47
AUTOMATIC MIXER SETUP
Item Initial setting
ON/OFF ON
DEFAULT/EDIT DEFAULT
COMPRESSOR
INPUT
AUTOMATIC
MIXER
OUTPUT
GATE HOLD 1000 ms
NOM OFF
ONLY ONE OFF
LAST ON OFF
SELECT
LIMITER ATTACK 0.47 ms
SELECT
THRESHOLD –3 dB
RATIO 3 : 1
ATTACK 22 ms
RELEASE 100 ms
THRESHOLD –30 dB
RELEASE 470 ms
MIC1-MIC6/LINE2
THRESHOLD +10 dB
RELEASE 100 ms
OUTPUT1-REC OUT2
ON
ON
ROUTING
Routing
MIC1/WL1
MIC2/WL2
MIC3
MIC4
MIC5/LINE1 LINE OUT1, REC OUT1 0 dB
MIC6/LINE2 LINE OUT2, REC OUT2 0 dB
LINE3
A⋅B⋅C⋅F
LINE4 C LINE OUT5 0 dB
D⋅E R LINE OUT2, REC OUT2 0 dB
SP OUT
LINE OUT1, LINE OUT2 –20 dB
LINE OUT7, LINE OUT8, REC OUT1, REC OUT2
LINE OUT1, LINE OUT2 –20 dB
LINE OUT7, LINE OUT8, REC OUT1, REC OUT2
LINE OUT1, LINE OUT2 –20 dB
LINE OUT7, LINE OUT8, REC OUT1, REC OUT2
LINE OUT1, LINE OUT2 –20 dB
LINE OUT7, LINE OUT8, REC OUT1, REC OUT2
L LINE OUT1 0 dB
R LINE OUT2 0 dB
L LINE OUT1, REC OUT1 0 dB
R LINE OUT2, REC OUT2 0 dB
L LINE OUT1, REC OUT1 0 dB
SW LINE OUT6 0 dB
LS LINE OUT3 0 dB
RS LINE OUT4 0 dB
ROUTING
CH1 LINE OUT1 –10 dB
CH2 LINE OUT2 –10 dB
Mix level
0dB
0 dB
0 dB
0 dB
ATT LEVEL
15
Page 16

Default settings
Item Initial setting
OUTPUT1, OUTPUT2 +4 dBu
REF LEVEL OUTPUT3 - OUTPUT8 –5 dBu
REC OUT1, REC OUT2 –5 dBu
HCF OFF
EQ OFF
DELAY 0 ms
MUTING OFF
GAIN LIMIT +10 dB
OUTPUT FADER 0 dB
Band 1 25 Hz
Band 2 40 Hz
Band 3 80 Hz
Band 4 160 Hz
Band 5 315 Hz
OUTPUT1, FREQ Band 6 630 Hz
OUTPUT2 Band 7 1.25 kHz
EQ Band 8 2.5 kHz
Band 9 5 kHz
Band 10 10 kHz
Band 11 20 kHz
Q Band 1 - 11 1.5
GAIN Band 1 - 11 0 dB
HCF OFF
Band 1 63 Hz
FREQ
OUTPUT3 - Band 4 20 kHz
OUTPUT8 Band 1 1.0
EQ Q Band 2, 3 1.5
GAIN Band 1 - 4 0 dB
HCF OFF
MODE Lo Imp.
SPEAKER SELECT
OUTPUT
ATT
Band 2 250 Hz
Band 3 2.5 kHz
Band 4 0.47
CH1 OUTPUT 1
CH2 OUTPUT 2
CH1 15 dB
CH2 15 dB
REMOTEOUTPUT
Item Initial setting
INPUT1 AV SEL A
INPUT2 AV SEL B
INPUT3 AV SEL C
INPUT4 AV SEL D
INPUT5 AV SEL E
INPUT INPUT6 AV SEL F
INPUT7 RECALL 1
INPUT8 RECALL 2
INPUT9 RECALL 3
INPUT10 LVL Master A
PARALLEL I/O
OUTPUT OUTPUT5 AV SEL E
LINE3
LINE4A
LINE4B
MACHINE CTRL S OUTPUT CH 1
CONTROL
PROJECTOR REMOTE POWER ENABLE ON
CONTROL
LINE4C
LINE4D
LINE4E, MACHINE TYPE NONE
LINE4F CTRL S OUTPUT CH 1
CONNECTION CH2 IR
TYPE CH3 WIRED
I/F TYPE RS-232C
PROJECTOR PROTOCOL VPL-FX51/50
INPUT VIDEO
TYPE
INPUT11 LVL Master B
INPUT12 NONE
OUTPUT1 AV SEL A
OUTPUT2 AV SEL B
OUTPUT3 AV SEL C
OUTPUT4 AV SEL D
OUTPUT6 AV SEL F
OUTPUT7 RECALL 1
OUTPUT8 RECALL 2
OUTPUT9 RECALL 1
OUTPUT10 RECALL 2
MACHINE TYPE MD
CTRL S OUTPUT CH 1
MACHINE TYPE VTR3 (VHS)
CTRL S OUTPUT CH 2
MACHINE TYPE NONE
CTRL S OUTPUT CH 1
MACHINE TYPE NONE
MACHINE TYPE DVD
CTRL S OUTPUT CH 2
CH1 WIRED
CH4 WIRED
LINE4A - LINE4C VIDEO
LINE4D COMPONENT
LINE4E, LINE4F RGB
16
GROUP FADER
Item Initial setting
MASTER A MIC1/WL1, MIC2/WL2, MIC3, MIC4
MASTER B MIC5/LINE1, MIC6/LINE2, LINE3, LINE4
REMOTE1 - REMOTE6 Not assigned
Page 17

Block Diagram
+48V
TUNER
SLOT
A/D
RF IND.
LCF
+48V
LINE
COMP
A/D
A
B
C
D
E
F
COMPONENT
/RGB OUT
VIDEO
OUT
RS-232C for
projector control
RS-232C for external
system controller
PARALLEL
REMOTE
PROJECTOR
CTRL S IN
PROJECTOR
CTRL S OUT
CTRL S OUT
1,2,3,4
USB (FRONT)
USB(REAR)
MAIN CPU
TRIM
TRIM
INPUT
SELECTOR
FADER
14IN 10OUT
AUTOMATIC
MIXER
DELAY
11BAND
PEQ
LINE
OUT 1,2
DELAY
4BAND
PEQ
LINE
OUT 3-8
REC OUT
LEVEL
METER
D/A
D/A
D/A
SELECTOR
POWER
AMP
CLIP
PROTECTION
AT T
SP OUT
1,2
MODE
70V LINE
D/A
FADER
SIGNAL
REMOTE
USB
RS-232C
LOCK
A
B
C
S VIDEO
OUT
WL1,2
SIGNAL
SIGNAL
FR
3BAND
PEQ
2BAND
PEQ
2BAND
PEQ
OUTPUT
LEVEL
OVER
GAIN -
+4/0/-5/-10
0/-5/-10
0/-5/-10
+
TRIM
TRIM
TRIM
MUTING
A/D
LCF
COMP
SIGNAL
FR
3BAND
PEQ
A/D
LCF
COMP
SIGNAL
FR
3BAND
PEQ
A/D
OVER
GAIN -
MUTING
MUTING
MUTING
MUTING
MUTING
FADER
FADER
FADER
MUTING FADER
FADER
MUTING
MUTING
LINE4
COMPONENT
/RGB IN
LINE 4A
|
4F
LINE 4D, 4E
RL/RR/C/W
MIC 1,2
LINE 3
MIC 3,4
MIC5/LINE1
MIC6/LINE2
LINE 4
VIDEO
IN
ANT a,b
LINE 4
S VIDEO IN
+48V
∞
∞
17
Page 18
Specifications
AUDIO INPUT/OUTPUT
Input Terminal shape Circuit Channel Reference input level Maximum input level Impedance
MIC 1/WL 1,
MIC 2/WL 2, XLR 3-31type∗Balanced Monaural –60 to –45 dBu –37 to –22 dBu 2.2 kΩ or more
MIC 3, MIC 4
MIC 5/LINE 1
MIC 6/LINE 2 –10 to +4 dBu +10 to +24 dBu 10 kΩ (in LINE mode)
LINE 3 Pin Unbalanced Stereo –10 to 0 dBu +10 dBu 10 kΩ or more
LINE 4 (A B C F) Pin Unbalanced Stereo –10 to 0 dBu +10 dBu 10 kΩ or more
LINE 4 (D E) Pin Unbalanced
Output Terminal shape Circuit Channel
LINE OUT 1-2 XLR 3-32type∗Balanced Monaural –10/–5/0/+4 dBu +24 dBu 600 Ω or more
LINE OUT 3-8 Pin Unbalanced Monaural –10/–5/0 dBu +15 dBu 10 kΩ or more
REC OUT 1-2 Pin Unbalanced Monaural –10/–5/0 dBu +15 dBu 10 kΩ or more
∗ Pin-1: GND Pin-2: HOT Pin-3: COLD
XLR 3-31type∗Balanced Monaural
Stereo/
5.1 surround
SPEAKERS OUTPUT
Output Terminal shape Impedance Maximum output
CH 1 4 Ω to 16 Ω 150 W + 150 W (8 Ω 1 kHz, T.H.D 10%)
CH 2 Screw-type terminal 4 Ω to 16 Ω 200 W + 200 W (4 Ω 1 kHz, T.H.D 10%)
70 V LINE 32 Ω to 10 kΩ 150 W (32 Ω 1 kHz, T.H.D 10%)
When ATT is set to 0 dB, 150 W + 150 W (across 8 Ω) power is output at the 0 VU setting of the output signal level.
–60 to –45 dBu –37 to –22 dBu 2.2 kΩ or more (in MIC mode)
–10 to 0 dBu +10 dBu 10 kΩ or more
Reference output level Maximum output level
Load impedance
VIDEO/RGB INPUT/OUTPUT
Input Terminal shape Signal format Level Impedance
LINE 4 (A B C)
LINE 4 (D E F) HD D-sub 15-pin Component/RGB
Output Terminal shape Signal format Level Impedance
R/R-Y, G/Y, B/B-Y,
SYNC/HD, VD 1 to 5 V (sync signal) 47 kΩ (sync signal input)
S VIDEO MINI Din Y/C 1 Vp-p (Y)/0.286 Vp-p (C) 75 Ω
VIDEO BNC Composite 1 Vp-p 75 Ω
AUDIO
Frequency response 20 Hz to 20 kHz ± 0.5 dB
T.H.D 0.01 % or less (LINE OUT, 1 kHz)
S/N ratio 94 dB or more (LINE 3, LINE 4, IHF-A)
Crosstalk –85 dB or less (between LINE channels,
Equivalent input noise level
0 dBu = 0.775 V
VIDEO/S VIDEO
Frequency response 50 Hz to 10 MHz
Pin Composite 1 Vp-p (75Ω) 75 Ω
MINI Din Y/C 1 Vp-p (Y)/0.286 Vp-p (C) 75 Ω
0.7 Vp-p (video signal) 75 Ω (video signal)
1 to 5 V (sync signal) 47 kΩ (sync signal input)
BNC Component/RGB
0.7 Vp-p (video signal) 75 Ω (video signal)
REMOTE
PROJECTOR CONTROL
(with LINE OUT, 1 kHz reference)
1 kHz with input cutoff)
–124 dBu or less (–60 dBu, with input
terminated in 150 Ω, IHF-A)
RS-232C D-sub 9-pin (male)
CONTROL S IN/OUT Mini jack
REMOTE
PARALLEL I/O D-sub 25-pin (female)
IN Make contact input
OUT Open collector output
RS-232C D-sub 9-pin (male)
USB (front/rear) TYPE-B
Logic: C-MOS LEVEL active L
Input pulse width: 100 msec or more
Withstand voltage: +24 V or less
Maximum sink current: 40 mA
COMPONENT/RGB
Frequency response 50 Hz to 150 MHz
480 p, 1080 i,
1280 × 1024 60 Hz (SXGA) supported
18
OTHERS
ANT IN terminal BNC DC +9 V is supplied.
+48 V power supply Supplied to MIC 1 to MIC 6 XLR
terminals. (For MIC 1 to MIC 4,
supplied when the +48 V button is
ON.)
(For MIC 5 and MIC 6, supplied at
MIC level setting only.)
Page 19

General
Power requirement AC 120 V, 50/60 Hz
Power consumption 150 W
Dimensions 482 × 132 × 350 mm (w/h/d)
1
(19 × 5
/4 × 13 7/8 inches)
(excluding protrusions)
Mass Approx. 13 kg (28 lb 11 oz)
Operating temperature 0°C to 40°C
Storage temperature –20°C to 60°C
Supplied accessories Power cord (1), Foot (4), CD-ROM (1),
IR transmitter VM-50 (1),
Operating instructions (1)
Optional accessories UHF antenna AN-820A,
UHF synthesizer tuner unit WRU-806B
Design and specifications are subject to change without notice.
Dimensions
To prevent electromagnetic wave interference due to portable
communication devices:
If communication devices such as cellular phones are used
near this unit, incorrect operation may be caused or the image,
sound, etc. may be affected. Turn off the power of all portable
communication devices near this unit if possible.
3
16)
/
4 (
482 (19)
132 (5
16)
/
3
30 (1
)
8
/
7
350 (13
1
4)
/
1
8)
/
3 (
430 (17)
Unit : mm (inches)
* This drawing includes the supplied feet.
19
Page 20

Troubleshooting
Before contacting us, please check the following again. If the trouble persists, please contact your local Sony Sales office or Dealer.
Start the supplied software SRP-X700P Manager and check the settings of the SRP-X700P. Check the following if the problem still
cannot be solved.
Symptom
Power is not turned on.
No sound is output.
No microphone sound is output.
Sound is distorted.
No video comes out.
The SRP-X700P cannot be controlled
by RS-232C.
PROTECTION indicator remains lit.
Cause/Remedy
• Power cord is disconnected.
→ Firmly insert the power cord fully into the AC IN terminal and wall outlet.
• Input fader is decreased.
→ Increase the input fader.
• Master volume is decreased.
→ Increase the master volume.
• ROUTING setup is incorrect.
→ Set the ROUTING correctly using the SRP-X700P Manager.
• MIC/LINE selector button is set to LINE.
→ Set the MIC/LINE selector button to MIC.
• The LINE equipment is connected to MIC5/LINE 1 IN and MIC6/LINE 2 IN terminals
while the MIC/LINE selector button is set to the MIC position.
→ Set the MIC/LINE selector button to LINE.
• Video input signal setup is incorrect.
→ Set the video input signal correctly again.
• The cable routing method does not satisfy the specifications of this unit.
• The RS-232C parameter settings do not satisfy the specifications of this unit.
→ Connect cables following the instructions for “REMOTE RS-232C Terminal” described on
page 9.
• When DC voltage appears in the SPEAKER terminal due to failure.
→ Set the POWER button switch to OFF.
• If the heat sink temperature inside the amplifier exceeds the specified value.
The connected speaker impedance is too low.
→ Set the POWER button to OFF and connect the SRP-X700P to a speaker having the
correct impedance.
Air intake and exhaust holes (on the right and left sides of the SRP-X700P) are choked
by dust.
→ Clean the air intake and exhaust holes by removing dust with a vacuum cleaner.
• Speaker terminal is short-circuited.
→ Set the POWER button switch to OFF and remove the cause of the short-circuit.
Sony Corporation Printed in Japan
http://www.world.sony.com/
Printed on recycled paper
 Loading...