

3-864-117-31 (1)
FM Data Receiver
Operating instructions see 2-GB
Mode d’emploi voir 2-FR
Bedienungsanleitung seite 2-DE
Gebruiksaanwijzing zie 2-NL
Istruzioni per l’uso vedere 2-IT
SRF-DR2000
1998 by Sony Corporation
GB
FR
DE
NL
IT
General Information
For your assistance in reporting this unit in case of loss or
theft, please record below the model number and serial
number which are located on the back of the unit.
Please retain this information.
Model number
Serial number
Your ID number
Date of purchase
Place of purchase
FOR YOUR RECORDS
Digital DJ System E2 is a registered
trademark of Digital DJ Inc.
2-GB

Table of Contents
Before You Begin ............................................................................ 4
Features ............................................................................................ 4
Getting Started
Installing the Batteries ................................................................... 5
Selecting a Language...................................................................... 7
Operating the Radio
Manual Tuning ............................................................................... 9
Presetting Stations ........................................................................ 10
Receiving Visual FM Data
Receiving Information Visually on Your Receiver .................. 12
Saving Information That You Can Recall ................................. 17
Deleting Information That Has Been Saved ............................. 19
Monitoring Stock Prices, Sports News, etc. .............................. 20
Setting the Functions.................................................................... 28
Additional Information
ID Numbers ................................................................................... 32
Using the Stand ............................................................................. 36
Specifications................................................................................. 36
Precautions .................................................................................... 37
Troubleshooting............................................................................ 39
Index to Parts and Controls ........................................................ 40
Index ............................................................................................... 42
GB
3-GB

Before You Begin
Thank you for choosing the Sony FM data receiver!
The FM data receiver will give you many hours of listening
pleasure and will display up-to-date information.
Before operating the FM data receiver, please read these
instructions thoroughly and retain them for future reference.
Features
•FM stereo radio
•High-speed data receiver which can receive text and
graphics.
•Five Function buttons for user-friendly operations and
intuitive information-receiving operations.
•Automatic display of urgent messages from FM multiplex
broadcasts.
•Function to automatically turn off the power approximately
after 120 minutes (Auto Power OFF).
•Seven languages (English, French, German, Italian, Spanish,
Dutch, and Swedish) for the display indications to choose
from.
About FM multiplex broadcast
FM multiplex broadcast provides text and graphic data
through the open signal space in the frequencies of
normal radio broadcasts. It is transmitted by specific FM
broadcasting stations and the information cannot be
received using an ordinary radio. Some FM multiplex
broadcasts can be received free-of-charge, while others
may incur a subscription fee.
4-GB
”Getting Started
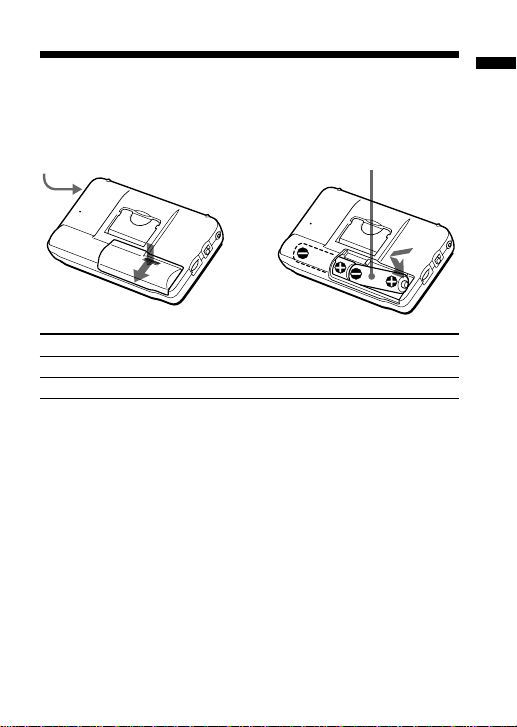
Installing the Batteries
Open the battery compartment lid and insert two R6 (size AA)
batteries (not supplied) with correct polarity.
DC IN 3V
÷
Battery Life (Approx. hours)
Sony Alkaline LR6(SG) Sony R6(SR)
Audio only 35 14
FM multiplex reception 23 9
* For maximum performance we recommend that you use alkaline
batteries.
When to replace the batteries
Replace the batteries when “LOW BATTERY” is displayed.
Notes
• Insert the batteries with correct polarity.
• The dry batteries cannot be charged.
• Turn off the radio, and then replace the batteries within 20
seconds after the batteries are removed from the battery
compartment. Otherwise, the saved FM data and the preset
stations will be erased. In this case, preset the stations again. Be
sure to take note of important data saved in the memory.
• When you are not going to use your unit for an extended period
of time, remove the batteries to prevent possible damage from
battery leakage and corrosion.
R6 (size AA) × 2
5-GB
Getting Started

When the radio turns off unexpectedly
When you set the Auto Power OFF function to ON, the radio
turns off automatically approximately after 120 minutes to
prevent unnecessary drain on the batteries. To listen to the
radio continuously, press POWER.
If the radio does not turn on after pressing POWER, or if the
radio turns off unrelated to the Auto Power OFF feature, the
batteries are exhausted.
Replace both batteries with new ones.
To set this function see “To set the Auto Power OFF” (page 29)
under “Setting the Functions” (page 28, 29).
Using external power sources
You can connect the following external power sources through
the DC IN 3 V jack located on the left side of the unit. (When
you plug a cord into the DC IN 3 V jack, the internal batteries
are automatically bypassed.)
•House current using a Sony AC-E30HG (not supplied) AC
power adaptor
•12/24 V car battery using a Sony DCC-E230 (not supplied)
car battery cord
Notes
• When operating the unit with an external power source, do not
remove the batteries in the battery compartment as they serve as
backup power for the memory.
• Use only the recommended AC power adaptor or car battery cord
manufactured by Sony. The polarity of the plugs of other
manufacturers may be different.
6-GB
Polarity of the plug
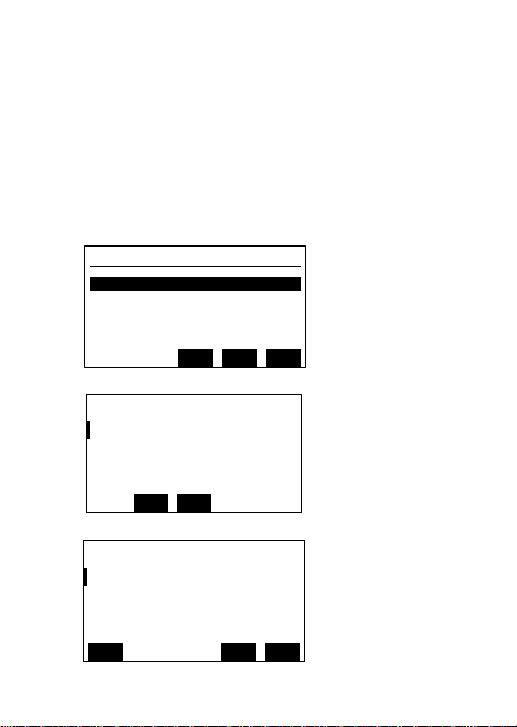
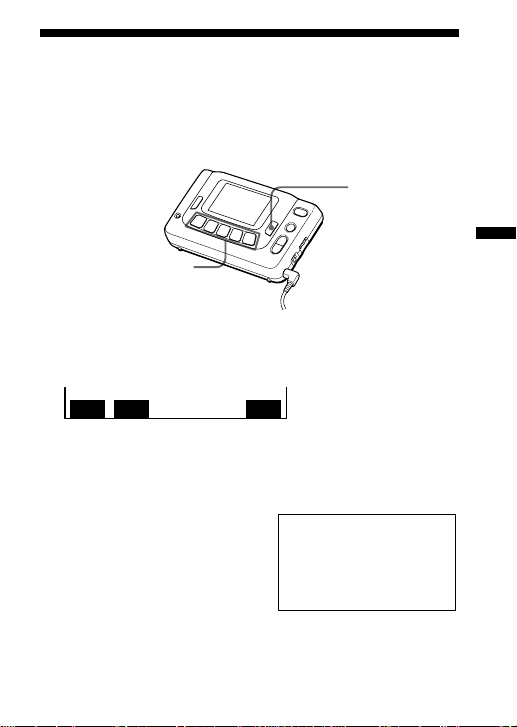
Selecting a Language
You can select from seven languages (English, French,
German, Italian, Spanish, Dutch, and Swedish) for the
indications in the display. The explanation in the following is
when English is selected. Consequently, the indications in the
display are in English.
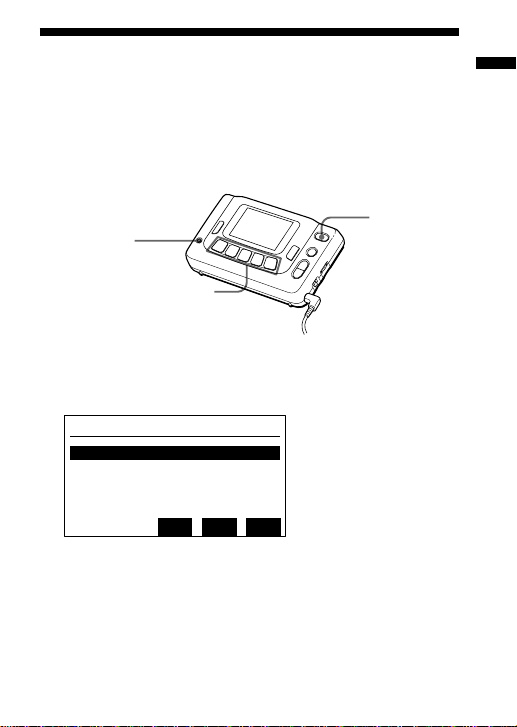
POWER
ENTER
Function buttons
2
1 While holding down ENTER, press POWER to turn on
the unit. The LANGUAGE SELECT MENU appears.
LANGUAGE SELECT MENU
1:English
2:French
3:German
4:Italian
5:Spanish
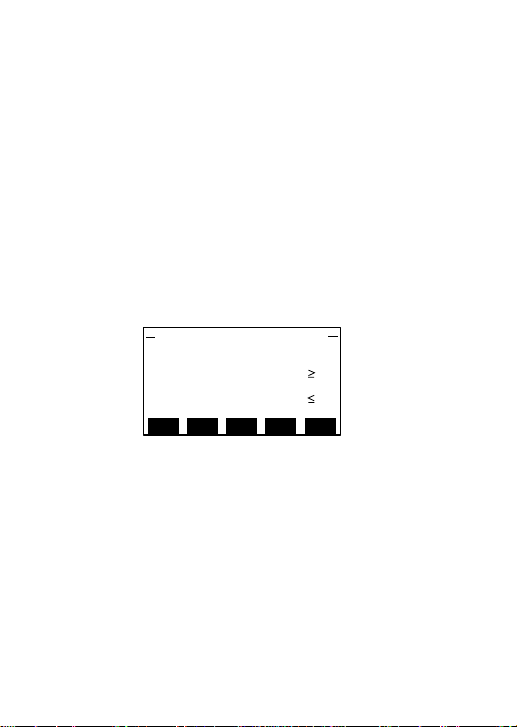
2 Press the Function button corresponding to ↑ UP or
↓ DWN to move the cursor to the language you want.
Then, press the Function button corresponding to ENT.
The indications in the display will switch over to the
selected language.
ENTVUP
vDWN
Getting Started
7-GB
To change the selected language
Press POWER to turn off the unit and follow steps 1 and 2
on the previous page.
Notes
• The receiver does not translate the FM data it receives. Only the
indications in the display will switch over to the selected
language. The FM data will be displayed in the language
originally broadcast.
• The three display windows shown below will be in English, even
when you select a different language.
LANGUAGE SELECT MENU
1:English
2:French
3:German
4:Italian
5:Spanish
(see page 7)
To Retrieve Stored
Data While Receiver
Downloads.
M1:Subscription
M2:Free Programs
(see page 13)
Choices for
Retrieving
Stored Data.
H-PAGE:Station Menu
MSG:Last Message
PAGE:Last Page
H-PAGE
(see page 13)
M1
ENTVUP
M2
MSG
vDWN
PAGE
8-GB
”Operating the Radio
Manual Tuning
FM DATA
2
POWER
VOLUME
NEWS•MUSIC
ENTER
Function
buttons
TUNE +/–
1 Connect the stereo headphones to the 2 jack.
2 Press POWER to turn on the unit.
If the frequency indication does not appear in the display, press
FM DATA.
3 Press TUNE +/– to manually tune in to the desired
station.
If you press and hold TUNE +/–, the frequency is scanned
rapidly. Release the button to stop scanning.
4 Adjust the volume with VOLUME.
To turn off the unit
Press POWER.
Operating the Radio
9-GB
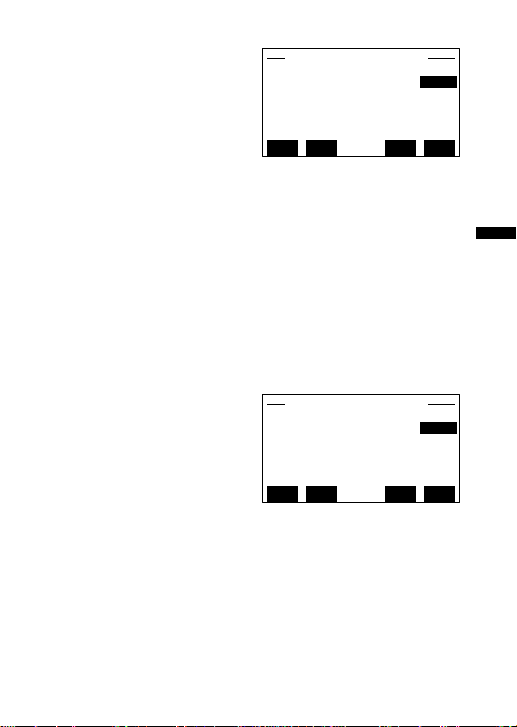
Presetting Stations
The unit is initially preset with five FM radio stations. You can
replace each of the five stations with a station of your choice.
1 Press POWER to turn on the unit.
2 Press TUNE +/– to manually tune in to the desired
station.
If the frequency indication does not appear in the display, press
FM DATA.
3 Press ENTER.
Press one of the Function buttons to preset the station,
“PRESET” flashes in the display.
4 Press and hold down the desired Function button until
you hear two beeps.
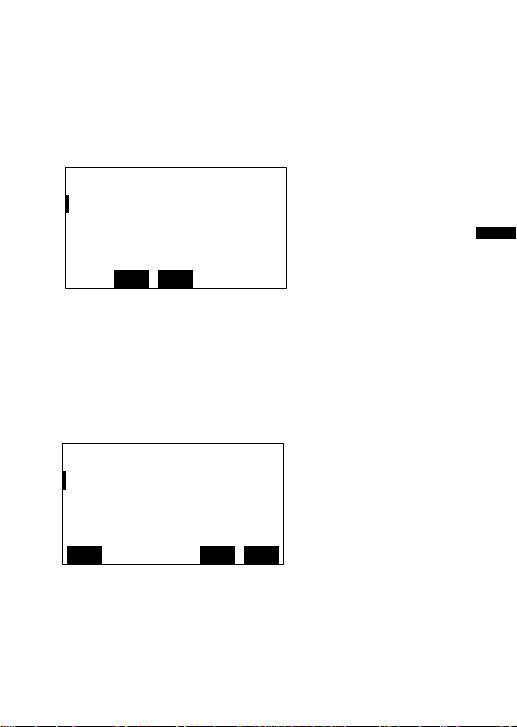
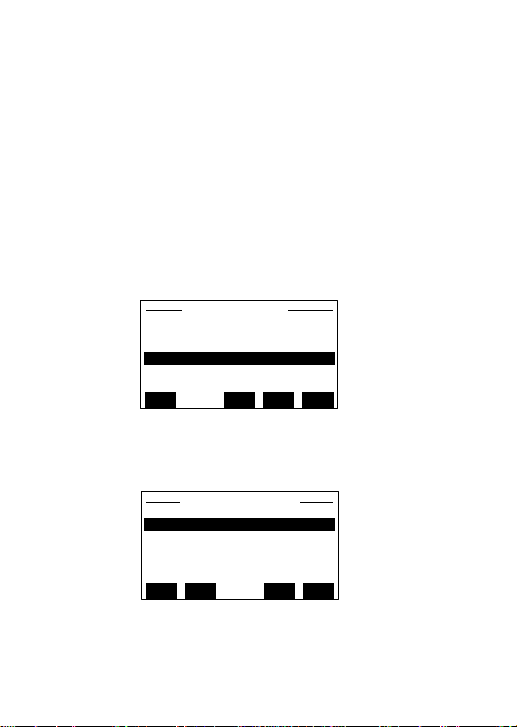
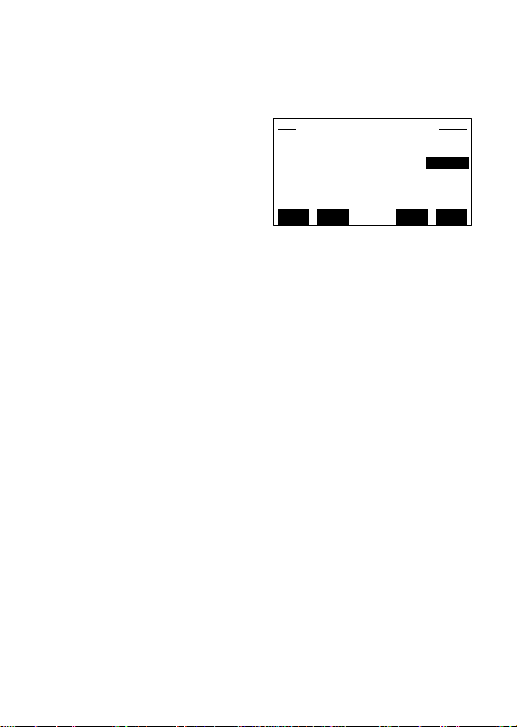
FM
97.5
PRESET
87.5
92.0 98.0
0
MHz
108.0104.3
FM
97.5
PRESET
97.5
92.0 98.0
0
MHz
108.0104.3
To change an existing preset station
Follow step 1 to 4 above. For step 4, press the Function button
of the station you wish to change.
The existing preset station of the selected Function button will
be erased and replaced with your new favorite station.
10-GB

Listening to a preset station
Once your favorite FM radio stations are preset, simply press
the corresponding Function button to tune in to the desired
station.
1 Press POWER to turn on the unit.
2 Press the desired Function button corresponding to the
preset station you wish to recall.
Improving FM radio reception
Fully extend the headphones cord which functions as an FM
antenna.
To listen with a clearer sound
When listening to the news, set the NEWS•MUSIC selector to
NEWS for optimum results. Vocal output will be sharper and
clearer. When listening to music, set the NEWS•MUSIC selector
to MUSIC for optimum results.
NEWS MUSIC
11-GB
Operating the Radio
”Receiving Visual FM Data
Receiving Information Visually on Your Receiver
You can receive up-to-date information that you can view in
the display through FM multiplex reception while listening to
FM radio broadcast. FM multiplex broadcast is available only
from stations offering this service. Also, you can choose from
seven languages (English, French, German, Italian, Spanish,
Dutch, and Swedish) for the indications in the display. (see
page 7 “Selecting a Language”)
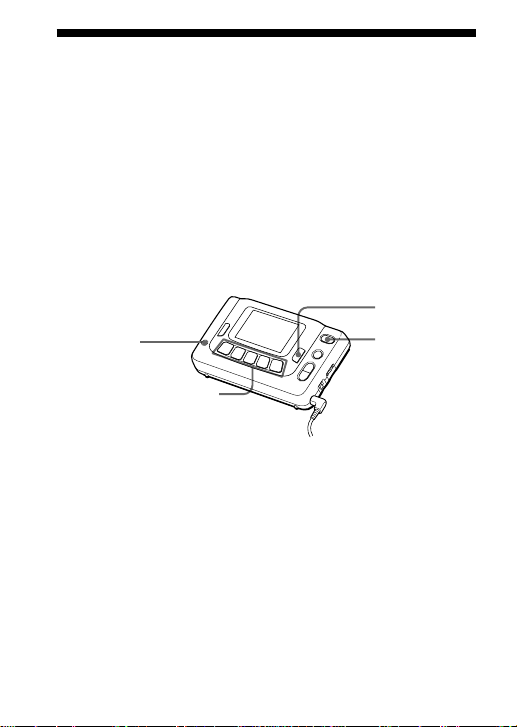
DATA indicator( )
Function buttons
POWER
FM DATA
2
1 Connect the stereo headphones to the 2 jack.
Since the headphones cord serves as an FM wire antenna, be
sure to connect the headphones even when receiving FM data
broadcast.
2 Press POWER to turn on the unit.
3 Tune in to an FM multiplex broadcasting station.
On how to tune in to a station, refer to pages 9 to 11.
12-GB
4 Press FM DATA to receive the FM multiplex broadcast.
The DATA indication appears when an FM multiplex broadcast
is receivable in the area. (For details on the DATA indication,
see page 14)
The following display (Total Index display) will then appear
with an operation menu that corresponds to the Function
buttons. *
To Retrieve Stored
Data While Receiver
Downloads.
M1:Subscription
M2:Free Programs
M2
M1
* The operation menu may differ depending on the participating
radio stations in your area.
5 Press the Function button corresponding to M1 or M2.
When M1 is pressed, the display shows the Subscription Index
of pay broadcasts. When M2 is pressed, the following display
appears.
Choices for
Retrieving
Stored Data.
H-PAGE:Station Menu
MSG:Last Message
PAGE:Last Page
H-PAGE
H-PAGE: FM Multiplex Broadcast
MSG: Urgent Message
PAGE: Paging Message
MSG
PAGE
Receiving Visual FM Data
continue to the next page m
13-GB
6 Select the desired operation in the menu by pressing the
corresponding Function button. The display will guide
you on how to proceed, where applicable.
Note
• When you press H-PAGE program, MSG or PAGE to receive
data, “RECEIVING DATA!” will be displayed. If there is no data
to be received, the display will return to the previous display
approximately after 20 seconds.
(( ))
RECEIVING DATA!
DATA indicator
The appearance of the DATA indicator(1) shows you the
availability of FM multiplex reception.
DATA
Indicator is on
The station you tuned in to is transmitting FM multiplex
information and the reception is strong.
Indicator is off
The station you tuned in to does not transmit FM
multiplex information or the reception is weak.
Note
• When the reception is poor, the DATA indicator disappears.
“RECEIVING DATA!” will appear for approximately 10 seconds,
followed by “SIGNAL TOO WEAK.” for approximately 10
seconds. The previous display will then come on again.
14-GB
(( ))
RECEIVING DATA! SIGNAL TOO WEAK.
When receiving FM multiplex broadcast
At times, you may be able to receive only the audio and not the
data for FM Data broadcasts. Inside buildings or underground
areas, data may not be received or reception may be poor, and
receiving FM data fully may take a while. Since the
headphones cord serves as an FM wire antenna, it should be
fully extended.
When receiving urgent information
When urgent information is broadcast while you are tuned in
to an FM Data broadcast, you will hear a beeping through the
headphones. The FM Data broadcast display will
automatically switch over to the urgent information, and the
DATA and MSG indications will appear on the left side of the
display. Press any button to stop the beeping.
DATA
MSG
To move to the next page, follow the instructions shown in the
display in the contents of the broadcast being received.
To return to the FM data broadcast display, press BACK.
Receiving Visual FM Data
15-GB
When receiving paging message
When you receive a paging message, you will
hear a beeping sound through the
headphones, and the PAGE indicator will
flash on the left side of the display. (However,
the display will not switch over to the
incoming message.)
Press any button to stop the beeping.
When you display the paging message, the
PAGE indicator stops flashing and stays on.
To view a paging message, press BACK and
select M2. Then, press the corresponding
Function button to PAGE.
DATA
PAGE
H-PAGE
To return to the FM Data Broadcast display, press BACK.
Note
• The personal messaging (Radio Paging Message) service, unlike
the general page service, cannot be received when the unit is
turned off or when the DATA indicator is not lit.
MSG
PAGE
To receive FM audio broadcast only,
change stations or pre-set stations
Press FM DATA.
To return to the previous display
Press BACK.
16-GB
Saving Information That You Can Recall
You can save up to eight pages of important information that
you can recall for later reference.
SAVE/MENU
Function buttons
2
1 Display the information you wish to save.
2 Press SAVE/MENU.
WRITE
READ
3 Press the Function button corresponding to WRITE in
the display.
Note
If you try to save another page of
information when eight pages of
information have already been
saved, the message on the right will
appear. In this case, delete
unnecessary data from the saved
information. (For details see
“Deleting Information That Has Been Saved” page 19)
CONFIG
Memory FULL!
Please delete
unnecessary data to
create space!
BACK:Return
Receiving Visual FM Data
17-GB

To recall information that has been
saved
Press SAVE/MENU. Then, press the Function button
corresponding to READ in the display.
To scroll to the next page, press the Function button
corresponding to READ again.
DEL
READ
8
CONFIG
18-GB
Deleting Information That Has Been Saved
1 Press the Function button corresponding to READ to
display the information you want to delete.
DEL
READ
8
2 Press the Function button corresponding to DEL.
DELETE? YES NO
To delete, press the Function button corresponding to
YES .
To cancel, press the Function button corresponding to NO .
CONFIG
Receiving Visual FM Data
19-GB
Monitoring Stock Prices, Sports News, etc.
For users who wish to regularly monitor information on stock
prices, sports news, etc., the use of symbols can be convenient.
A symbol is the unique identification assigned to a selected
stock, sports team, news category, etc. Data related to the
symbol are transmitted by a pay datacast program.
You can also select a setting whereby a beep will sound when
relevant information concerning a registered Symbol is
received. (Refer to “To set the Symbol IN Beep” and “To set
the High/Low Beep” page 31.)
SAVE/MENU
ENTER
Function buttons
To register symbols
You can categorize your symbols by registering them into
different groups.
This unit provides 10 symbol groups and a total of 128
symbols can be registered.
1 Press POWER to turn on the unit.
2 Press SAVE/MENU.
POWER
2
3 Press the Function button corresponding to CONFIG in
the display.
20-GB
4 Press the Function button corresponding to EDIT in the
display.
Note
When you press H·PAGE, the FM Multiplex Broadcast display
appears. When M1 is pressed, the Subscription Index of Pay
Broadcast display appears.
Mode1 Main Menu
Auto Power OFF OFF
Edit Symbols ###
Auto Page Down FAST
Symbol IN Beep ON
High/Low Beep OFF
H·PAGE
M1 EDIT SETUP
ID'S
5 Press the Function button corresponding to ↑ UP and
↓ DWN to move the cursor to your desired symbol
group. Then, press the Function button corresponding
to ENT to enter the selection.
6 Press the Function button corresponding to ADD to
switch over to the Symbol Editing display shown
below:
Symbol Group-* ###
ABCDEFGHIJKLMNOPQRST
UVWXYZabcdefghijklmn
opqrstuvwxyz@?!#$%&~
0123456789+-*/.,<=>\
^|`'":;()[]{}_
BLFT RHTb
ENT
ALERT
END
Receiving Visual FM Data
continue to the next page m
21-GB

7 Press the Function button corresponding to ← LFT and
→ RHT to select a character in the character palette for
input.
Press the Function button corresponding to ENT to
enter the character at the cursor into the entry area. Up
to 12 characters can be entered.
Function buttons in the Symbol Editing display:
← LFT : Moves the cursor one character to the left in the
→ RHT : Moves the cursor one character to the right in the
ENT : Enters the character at the cursor into the entry
ALERT : Switches the display over to the editing display of
END : Sets and exits symbol editing
Function buttons while the ENTER button is held down:
? LFT : Moves the entry position in the entry area one
/ RHT: Moves the entry position in the entry area one
← BS : Deletes one character before the entry position in
↑ UP : Moves the cursor up one line in the character
↓ DWN : Moves the cursor down one line in the character
character palette
character palette
area
the High/Low Alarm
character to the left
character to the right
the entry area
palette
palette
8 Press the Function button corresponding to END to set
and exit Symbol Editing.
22-GB

To correct the symbol that has been
registered
1 Repeat steps 1 to 5 of “To register symbols” (page 20) to
display the symbol list.
2 Press the Function button corresponding to ↑ UP or
↓ DWN to move the cursor to the symbol you want to
correct. Then press the Function button corresponding
to ENT to switch over to the Symbol Editing display.
3 Follow steps 6 to 8 of “To register symbols” to correct
the symbol data.
To delete the symbol that has been
registered
1 Follow steps 1 to 5 of “To register symbols” (page 20) to
display the symbol list.
2 Press the Function button corresponding to ↑ UP or
↓ DWN to move the cursor to the symbol you want to
delete. Then, press the Function button corresponding
to DEL, and the delete confirmation message will
appear at the end of the text. To delete the symbol data,
press the Function button corresponding to YES. To
cancel the delete operation, press the Function button
corresponding to NO.
Receiving Visual FM Data
23-GB
To register the prices of your selected
stocks, etc.
The High/Low function monitors fluctuations in the prices of
your selected stocks. You can set the receiver to beep when it
receives information that the price of the selected stock has
reached your stipulated top or bottom limit. For this function,
you can register up to eight symbols.
1 Follow steps 1 to 6 of “To register symbols” (page 20).
The Symbol Editing display for the symbol that you
wish to monitor will appear.
2 Press the Function button corresponding to ALERT.
The display will switch over to the High/Low Alert
mode.
Function buttons in the Symbol Editing display:
Set High&Low Alert
****
High OFF 000.000
Low ON 000.000
BLFT RHTb
← LFT : Moves the cursor one title to the left
→ RHT : Moves the cursor one title to the right
END : Sets and exits High/Low Alarm editing and
return to the Symbol Editing display
+ : Increases the value
– : Decreases the value
END
+
-
24-GB
Function buttons while the ENTER button is held
down:
←. : Moves one unit to the left of the decimal point of
your stipulated price limits
.→ : Moves one unit to the right of the decimal point
of your stipulated price limits
DEL : Deletes the entered memory of High/Low
Alarm (cancellation of the High/Low Alarm)
To cancel the entry or correction of High/Low Alarm,
press BACK or press the Function button corresponding to DEL while holding down ENTER.
3 Press the Function button corresponding to END to set
and exit Symbol Editing.
CAUTION:
SONY CORPORATION DOES NOT ASSUME ANY
RESPONSIBILITY OR LIABILITY FOR ANY FORM OF
DAMAGE OR LOSS RESULTING FROM THE FAILURE
OF THE UNIT IN RECEIVING INFORMATION DUE TO
MALFUNCTION OR IMPROPER SETUP OR ANY OTHER
REASON.
Receiving Visual FM Data
25-GB
To activate/deactivate a symbol group
1 Press POWER to turn on the unit.
2 Press SAVE/MENU.
3 Press the Function button corresponding to CONFIG in
the display .
4 Press the Function button corresponding to SETUP in
the display.
5 Press the Function button corresponding to ↑ UP or
↓ DWN to select Symbol Group Setup.
Set Up Menu
Function Setup
Maintenance Mode
Symbol Group Setup
TOP ENTVUP
vDWN
Press the Function button corresponding to ENT in the
display. The following display appears.
Symbol Gruop
Symbol Group-A
Symbol Group-B
Symbol Group-C
Symbol Group-D
Symbol Group-E
ON OFF
ON
ON
ON
ON
ON
VUPvDWN
26-GB

Select the desired symbol group by pressing the
Function buttons corresponding to ↑ UP or ↓ DWN. To
activate the symbol group, press the Function button
corresponding to ON. To deactivate the symbol group,
press the Function button corresponding to OFF.
Note
Deactivating a symbol group will not only disable reception of data
for the symbols in the group, but recollection of data stored in the
memory for this group as well. This will not, however, clear the
stored data.
Receiving Visual FM Data
27-GB
Setting the Functions
With this receiver, you can set the following functions:
• Auto Power ON/OFF
• Reception Area
• Auto Page Down
• Symbol IN Beep
• High/Low Beep
SAVE/MENU
POWER
Function buttons
2
1 Press POWER to turn on the unit.
2 Press SAVE/MENU.
3 Press the Function button
corresponding to CONFIG
in the display.
The Mode 1 Main Menu
will be displayed.
4 Press the Function button
corresponding to SETUP
in the display.
Set Up Menu
Function Setup
Maintenance Mode
Symbol Group Setup
TOP ENTVUP
vDWN
28-GB
5 Press the Function button
corresponding to ↑ UP or
↓ DWN to move the cursor
to Function Setup. Then,
press the Function button
corresponding to ENT.
The Function titles will be
displayed.
Note
If you enter the “Maintenance Mode” at the “Set Up Menu”, press
BACK to return to the previous display. The Maintenance Mode is
not needed for radio operations.
To set the Auto Power OFF
When you turn this to ON and there is no key operation for
120 minutes while the power is turned on, the power
automatically turns off.
1 Press the Function button
corresponding to ↑ UP or
↓ DWN to move the
cursor to Auto Power OFF.
2 Press the Function button
corresponding to either +
or – to select ON or OFF.
Note
If there is no key operation when the receiver is in the FM data
mode, and the data indicator is not displayed (indicating FM
multiplex broadcast is not received), the FM data mode will be
cancelled automatically in about 20 minutes and only the audio
will be received.
Set Up Function
Auto Power OFF ON
Reception Area EURO
Auto Page Down FAST
Symbol IN Beep OFF
High/Low Beep ON
+–VUP
Set Up Function
Auto Power OFF ON
Reception Area EURO
Auto Page Down FAST
Symbol IN Beep OFF
High/Low Beep ON
+–VUP
vDWN
vDWN
Receiving Visual FM Data
29-GB
To set the Reception Area
To enable proper reception of radio signals in your area, select
either EURO or USA.
1 Press the Function button
corresponding to ↑ UP or
↓ DWN to move the
cursor to Reception Area.
2 Press the Function button
corresponding to either +
or – to select EURO or USA.
When using the unit in the United States of America,
set it to USA.
Set Up Function
Auto Power OFF OFF
Reception Area EURO
Auto Page Down FAST
Symbol IN Beep OFF
High/Low Beep ON
+–VUP
vDWN
To set the Auto Page Down
This function sets the speed in which the display moves to the
next page for symbol data received.
You can choose from OFF-FAST-NORM-SLOW.
1 Press the Function button corresponding to ↑ UP or
↓ DWN to move the cursor to Auto Page Down.
2 Press the Function button corresponding to either + or
– to select OFF, FAST, NORM or SLOW.
30-GB

To set the Symbol IN Beep
You can set your receiver to beep or not to when receiving
information related to your symbols.
1 Press the Function button corresponding to ↑ UP or
↓ DWN to move the cursor to Symbol IN Beep.
2 Press the Function button corresponding to either + or –
to select ON or OFF.
To set the High/Low Beep
All symbols, when registered, are preset with the High/Low
Alarm function. You can set your receiver to beep or not when
the price of your selected stock reaches your stipulated limits.
1 Press the Function button corresponding to ↑ UP or
↓ DWN to move the cursor to High/Low Beep.
2 Press the Function button corresponding to either + or –
to select ON or OFF.
When receiving symbol data
When symbol data is being received the SYM indicator on the
left of the display lights up.
Note
When you press the Function button corresponding to ID’S in the
display, you can see Your ID and Password ID, but they are not
needed for the radio operations. Press the Function button
corresponding to TOP in the display to return to the previous
display.
(For details see “ID Numbers” page 32)
31-GB
Receiving Visual FM Data

”Additional Information
ID Numbers
Your receiver comes with the following three ID numbers:
Your ID: for personal messaging (Radio Paging Message)
services.
DDJ Group ID: for group information services.
Password ID: for free additional information services.
These ID numbers are factory set. You do not need to register
or confirm these ID numbers for radio operations.
For confirmation of the above IDs, follow the steps below.
1 Press POWER to turn on the unit.
2 Press SAVE/MENU.
3 Press the Function button corresponding to CONFIG in
the display.
4 Press the Function button corresponding to ID’S in the
display.
ID Numbers
Your ID 00########
DDJ Group ID ##
Password ID #
Expiration Dates ##
TOP ENTVUP
vDWN
From this display, you can confirm the ID numbers of your
receiver.
32-GB

To confirm the DDJ Group ID
Press the Function button corresponding to ↑ UP or ↓ DWN to
move the cursor to “DDJ Group ID”. Then, press the Function
button corresponding to ENT to enter the selection.
DDJ Group ID ##
########## Jan. 9,99
########## TFN
DG-ID 3
DG-ID 4
DG-ID 5
VUPvDWN
If the DDJ Group ID is registered, the ID number and
expiration date appear in the display. You can register up to 12
subscription services for DDJ-ID. Press the Function button
corresponding to ↑ UP and ↓ DWN to scroll the display.
If the expiration date appears as TFN, it means the service has
no cut-off date.
To confirm the Password ID
Press the Function button corresponding to ↑ UP or ↓ DWN to
move the cursor to the Password ID. Then, press the Function
button corresponding to ENT to enter the selection.
Password ID ##
Pwd-ID 1 2281701###
Pwd-ID 2
Pwd-ID 3
Pwd-ID 4
Pwd-ID 5
DEL ENTVUP
vDWN
Additional Information
continue to the next page m
33-GB

If the Password ID is registered, the ID number appears in the
display. You can register up to eight passwords. Press the
Function button corresponding to ↑ UP and ↓ DWN to scroll
the display.
To register and correct the Password ID
Press the Function button corresponding to ↑ UP or ↓ DWN to
move the cursor to an empty Password ID, or a Password ID to
correct, at the display above. Then, press the Function button
corresponding to ENT to switch over to the Password ID
editing display.
Password ID ##
Pwd-ID # 2281701###
END + –
Press the Function button corresponding to either + or – to
enter the Password ID number. The permissible range of the
number is 2281701376 to 2281701631. After setting the number,
press the Function button corresponding to END to enter and
exit the display.
To confirm the Expiration Dates
Press the Function button corresponding to ↑ UP or ↓ DWN to
move the cursor to Expiration Dates. Press the Function button
corresponding to ENT for the Expiration Dates display to
appear.
34-GB

Expiration Dates
Category 1 TFN
Category 2 Sep.10,99
Category 3
Category 4
Category 5
VUPvDWN
If the expiration date is registered, the date appears in the
display. You may register up to 15 expiration dates. Press the
Function button corresponding to ↑ UP and ↓ DWN to scroll
the display.
Additional Information
35-GB

Using the Stand
To see the display at an optimum angle, lift the stand at the
base of the unit.
Specifications
Frequency range 87.5 – 108 MHz
FM multiplex DARC type
Output 2 jack (stereo minijack)
Power output 8 mW + 8 mW (at 10 % harmonic
Power requirements DC 3 V, two R6 (size AA)/LR6 batteries
Auto Power OFF function Approx. 120 minutes
Dimensions 116 x 70.5 x 28 mm (w/h/d)
Mass Approx. 150 g (5.3 oz) incl. batteries
Supplied accessory Stereo headphones (1)
Design and specifications are subject to change without notice.
64 x 132 FSTN LCD display
distortion)
5
(Approx. 4
projecting parts and controls
⁄8 x 27⁄8 x 11⁄8 inches) not incl.
36-GB

Precautions
• Operate the unit only on 1.5 V DC with two R6 (size AA)
batteries.
• Avoid exposure to temperature extremes, direct sunlight,
moisture, sand, dust or mechanical shock. Never leave the unit
in a car parked in the sun.
• Should anything fall into the unit, remove the batteries and have
the unit checked by qualified personnel before operating it any
further.
• To clean the casing, use a soft cloth dampened with a mild
detergent solution.
• In vehicles or buildings, radio reception may be difficult or
noisy. Try listening near a window.
Notes on headphones
Road safety
Do not use headphones while driving, cycling, or operating
any motorized vehicle. It may create a traffic hazard and is
illegal in many areas. It can also be potentially dangerous to
play your headphones at high volume while walking,
especially at pedestrian crossings. You should exercise extreme
caution or discontinue use in potentially hazardous situations.
Preventing hearing damage
Avoid using headphones at high volume.
Hearing experts advise against continuous, loud and extended
play. If you experience a ringing in your ears, reduce volume
or discontinue use.
Caring for others
Keep the volume at a moderate level. This will allow you to
hear outside sounds and to be considerate to people around
you.
37-GB
Additional Information

Warning
If there is lightning when you are using the unit, take off the
headphones immediately.
If you have any questions or problems concerning your unit,
please consult your nearest Sony dealer.
38-GB

Troubleshooting
Should any problem occur with the unit, make the following
checks to determine whether or not servicing is required. If the
problem persists, consult your nearest Sony dealer.
The reception is unstable and contains noise.
• The batteries may be weak. Replace with new ones.
• Reception may be poor when there are obstructions such as
buildings, etc, or when listening to the radio inside a moving
vehicle. Move to another location free of obstacles for optimum
reception conditions, or listen to the radio near the window of the
moving vehicle.
The desired preset station is not received when
the corresponding Function button is pressed.
• Make sure you have pressed the correct Function button.
FM multiplex reception is not possible.
• Make sure the headphones are connected.
• Make sure the radio station which you are listening to offers FM
multiplex services.
• Make sure the DATA indication is on.
Operation is not possible when a button is
pressed.
Press the RESET button on the back of the unit with a thin pointed
object. All preset stations and information that have been saved
will be erased. In this case, preset the stations again.
39-GB
Additional Information

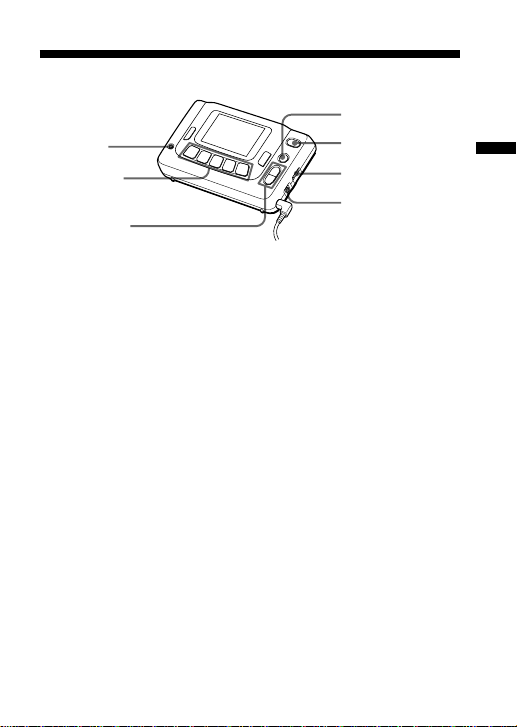
Index to Parts and Controls
Refer to the pages indicated in parentheses for details.
Main unit
1
2
3
4
5
1 Display (41)
2 DATA indicator (1) (12,
14)
3 BACK button (16)
4 ENTER button (7, 9, 20)
5 Function buttons (7, 9,
12, 17, 20, 28)
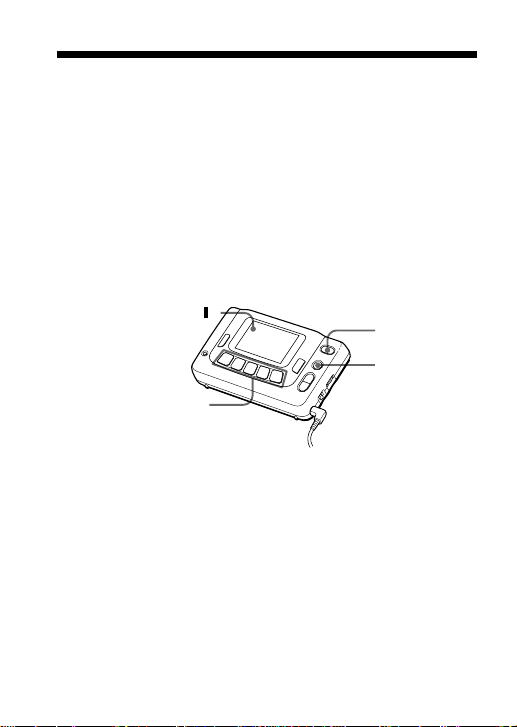
40-GB
6
7
8
9
!º
!¡
6 SAVE/MENU button
(17, 20, 28)
7 POWER button (7, 9,
12, 20, 28)
8 FM DATA button (12)
9 VOLUME (9)
0 NEWS•MUSIC
selector (9, 11)
!¡ TUNE +/– (9, 10)

Display
1
2
3
4
1 DATA indicator (1) (12,
14, 15, 16)
2 SYM (Symbol)
indicator (31)
3 MSG (Message)
indicator (15)
4 PAGE (Paging)
indicator (16)
FM
DATA
SYM
87.5
MSG
PAGE
PRESET
87.5
92.0 98.0
0
MHz
108.0104.3
5 Frequency (10)
6 Preset stations (10)
5
6
Additional Information
41-GB

Index
A
Auto Page Down ................... 30
Auto Power OFF .................... 29
B, C
Batteries..................................... 5
D
DATA indicator ...................... 14
DDJ Group ID ........................ 33
E
Expiration Dates .............. 34, 35
External power sources........... 6
F, G
FM multiplex broadcast.... 4, 15
H
High/Low Alert...................... 24
High/Low Beep ......................31
I, J, K
Improving reception.............. 11
L
Language, selecting a .............. 7
M, N, O
Manual Tuning ......................... 9
MSG indicator ........................ 15
42-GB

P, Q
PAGE indicator ...................... 16
Paging message...................... 16
Password ID ........................... 33
Preset Tuning .......................... 10
R
Receiving
radio broadcast ............... 9, 10
visual FM data .................... 12
Reception Area ....................... 30
S, T
Stand, using the ..................... 36
SYM indicator ........................ 31
Symbol IN Beep ..................... 31
Symbol groups ....................... 26
Symbols
correcting ............................. 23
deleting ................................ 23
registering ............................ 20
U
Urgent information ............... 15
V, W, X, Y, Z
Visual FM data
deleting ................................ 19
receiving............................... 12
saving ................................... 17
Additional Information
43-GB

Information d’ordre général
Pour toute référence en cas de perte ou de vol, veuillez
inscrire ci-dessous le numéro de votre modèle et le numéro
de série qui sont indiqués à l’arrière de l’appareil.
Conservez ces informations en lieu sûr.
Numéro de modèle
Numéro de série
Numéro ID de l’utilisateur
Date d’achat
Lieu d’achat
Référence de l’utilisateur
Digital DJ System E2 est une
marque déposée de Digital DJ Inc.
2-FR

Table des matières
Informations préliminaires ......................................................... 4
Caractéristiques ............................................................................ 4
Préparatifs
Mise en place des piles................................................................. 5
Sélection de la langue................................................................... 7
Fonctionnement de la radio
Accord manuel .............................................................................. 9
Préréglage des stations .............................................................. 10
Réception de données FM
Réception d’informations sur votre récepteur ....................... 12
Sauvegarde d’informations pour un rappel ultérieur........... 17
Suppression d’informations sauvegardées............................. 19
Consultation du cours de la Bourse,
d’informations sportives, etc. ................................................ 20
Réglage des fonctions ................................................................ 28
Informations diverses
Numéros d’identification (ID) .................................................. 32
Utilisation du pied...................................................................... 36
Spécifications............................................................................... 36
Précautions .................................................................................. 37
En cas de panne .......................................................................... 39
Description des éléments et commandes ................................ 40
Index ............................................................................................. 42
FR
3-FR

Informations préliminaires
Félicitations pour l’achat de ce récepteur de données FM Sony !
Ce récepteur vous offrira de nombreuses heures d’écoute
agréables et des informations de dernière heure que vous
pourrez lire sur l’afficheur.
Avant de mettre le récepteur de données FM en service,
veuillez lire attentivement ce mode d’emploi que vous
conserverez pour toute référence future.
Caractéristiques
•Radio stéréo FM
•Récepteur de données ultra-rapide permettant l’affichage
d’informations sous forme de texte et de graphiques.
•Cinq touches de fonction assurant un emploi convivial et une
exploitation intuitive des informations reçues.
•Affichage automatique des messages urgents dans le mode
de diffusion FM multiplex.
•Fonction d’extinction automatique de l’appareil au bout de
120 minutes environ (Arrêt automatique)
•Sélection de sept langues (anglais, français, allemand, italien,
espagnol, hollandais, suédois) pour l’affichage des
indications.
A propos de la diffusion d’émissions FM multiplex
La diffusion d’émissions FM multiplex s’effectue sous
forme de texte ou de graphiques sur l’espace libre de la
fréquence normale de radiodiffusion. Les émissions FM
multiplex sont diffusées par certaines stations FM
seulement. Certaines émissions FM multiplex peuvent
être reçues gratuitement, mais pour d’autres un
abonnement sera nécessaire.
4-FR

”Préparatifs
Mise en place des piles
Ouvrez le couvercle du logement des piles et insérez deux
piles R6 (format AA) (non fournies) en tenant compte de la
polarité.
DC IN 3V
÷
Autonomie des piles (Approx. en heures)
Alcalines Sony LR6 (SG) Sony R6 (SR)
Son seulement 35 14
Réception FM multiplex 23 9
* Pour une performance optimale, il est conseillé d’utiliser des piles
alcalines.
Remplacement des piles
Remplacez les piles lorsque “PILE FAIBLE” apparaît sur
l’afficheur.
Remarques
• Tenez compte de la polarité lorsque vous insérez les piles.
• Les piles sèches ne peuvent pas être rechargées.
• Eteignez la radio et remplacez les piles dans les 20 secondes qui
suivent leur retrait du logement, sinon les informations qui ont
été sauvegardées et les stations préréglées seront supprimées. Le
cas échéant, préréglez à nouveau les stations. N’oubliez pas de
noter quelque part les informations importantes que vous avez
sauvegardées en mémoire.
• Si vous prévoyez de ne pas utiliser l’appareil pendant un certain
temps, enlevez les piles pour éviter tout dommage pouvant
provenir d’une fuite des piles et de la corrosion qu’elle entraîne.
2 piles R6 (format AA)
5-FR
Préparatifs

Si la radio s’arrête soudainement
Si vous avez validé la fonction d’arrêt automatique, la radio
s’arrêtera automatiquement dans les 120 minutes pour éviter
une usure inutile des piles. Pour continuer à écouter la radio,
appuyez sur POWER.
Si la radio ne se met pas en marche après une pression sur
POWER, ou si elle s’arrête avant l’arrêt automatique, c’est que
les piles sont usées.
Remplacez-les par des neuves.
Pour mettre l’arrêt automatique en service, reportez-vous à
“Pour valider l’arrêt automatique” (page 29) dans “Réglage
des fonctions” (pages 28, 29).
Utilisation d’autres sources
d’alimentation
Vous pouvez raccorder les sources d’alimentation suivantes à
la prise DC IN 3 V sur la gauche de l’appareil. (Lorsque vous
raccordez un cordon à la prise DC IN 3 V, les piles sont
automatiquement déconnectées.)
•Courant secteur avec l’adaptateur secteur Sony AC-E30HG
(non fourni)
•Batterie de voiture 12/24 V avec le cordon allume-cigares
Sony DCC-E230 (non fourni)
Remarques
• Lorsque vous faites fonctionner l’appareil sur une source
d’alimentation externe, n’enlevez pas les piles du logement, car
elles servent pour la sauvegarde des informations en mémoire.
• Utilisez seulement l’adaptateur secteur ou le cordon allumecigares de marque Sony recommandés, à l’exclusion de tout
autre. La polarité des fiches d’autres marques peut être différente.
6-FR
Polarité de la fiche

Sélection de la langue
Vous pouvez sélectionner une des sept langues (anglais,
français, allemand, italien, espagnol, hollandais, suédois) pour
l’affichage des indications.
Les explications qui suivent se réfèrent à la sélection de
l’anglais comme langue d’affichage. Par conséquent, toutes les
indications sur l’afficheur seront en anglais.
POWER
ENTER
Touches de
fonction
1 Tout en tenant la touche ENTER enfoncée, appuyez sur
POWER pour mettre l’appareil sous tension. Le
message LANGUAGE SELECT MENU apparaît.
LANGUAGE SELECT MENU
1:English
2:French
3:German
4:Italian
5:Spanish
ENTVUP
vDWN
2 Appuyez sur la touche de fonction correspondant à
↑ UP ou ↓ DWN pour amener le curseur sur la langue
souhaitée et appuyez sur la touche de fonction
correspondant à ENT.
Les indications sur l’afficheur apparaissent maintenant
dans la langue sélectionnée.
2
7-FR
Préparatifs

Pour changer de langue
Appuyez sur POWER pour éteindre l’appareil et répétez les
étapes 1 et 2 sur la page précédente.
Remarques
• La langue sélectionnée ne s’applique qu’aux indications affichées
et non pas aux données FM transmises. Les données FM seront
donc dans la langue de la zone de diffusion.
•Les trois fenêtres d’affichage indiquées ci-dessous seront en
anglais, même si vous sélectionnez une autre langue.
LANGUAGE SELECT MENU
1:English
2:French
3:German
4:Italian
5:Spanish
(voir page 7)
To Retrieve Stored
Data While Receiver
Downloads.
M1:Subscription
M2:Free Programs
(voir page 13)
Choices for
Retrieving
Stored Data.
H-PAGE:Station Menu
MSG:Last Message
PAGE:Last Page
H-PAGE
(voir page 13)
M1
ENTVUP
M2
MSG
vDWN
PAGE
8-FR

”Fonctionnement de la radio
Accord manuel
FM DATA
2
POWER
VOLUME
NEWS•MUSIC
ENTER
Touches
de function
TUNE +/–
1 Branchez un casque stéréo sur la prise 2 .
2 Appuyez sur POWER pour mettre l’appareil sous
tension.
Si l’indication de fréquence n’apparaît pas sur l’afficheur,
appuyez sur FM DATA.
3 Appuyez sur TUNE +/– pour accorder manuellement la
station souhaitée.
Si vous maintenez la pression sur TUNE +/–, les fréquences
seront parcourues plus rapidement. Relâchez la touche pour
vous arrêter sur une station.
4 Ajustez le volume avec VOLUME.
Pour éteindre l’appareil
Appuyez sur POWER.
Fonctionnement de la radio
9-FR

Préréglage des stations
Cet appareil a été préréglé initialement sur cinq stations radio
FM. Vous pouvez cependant changer ces cinq stations et
choisir vos stations préférées.
1 Appuyez sur POWER pour mettre l’appareil sous
tension.
2 Appuyez sur TUNE +/– pour accorder manuellement la
station souhaitée.
Si l’indication de la fréquence n’apparaît pas, appuyez sur FM
DATA.
3 Appuyez sur ENTER.
Appuyez sur une des touches de fonction pour prérégler la
station, “PRÉRÉGLAGE clignote sur l’afficheur.
4 Appuyez sur la touche de fonction souhaitée jusqu’à ce
que vous entendiez deux bips.
FM
97.5
PRÉRÉGLAGE
87.5
92.0 98.0
0
MHz
108.0104.3
FM
97.5
PRÉRÉGLAGE
97.5
92.0 98.0
0
MHz
108.0104.3
Pour changer une station radio
préréglée
Effectuez les opérations des étapes 1 à 4 précédentes. Pour
l’étape 4, appuyez sur la touche de fonction de la station que
vous souhaitez changer.
La station préréglée sur la touche de fonction sélectionnée est
supprimée et remplacée par la nouvelle station.
10-FR

Ecoute d’une station préréglée
Une fois que vos stations préférées ont été préréglées, appuyez
simplement sur la touche de fonction correspondante pour
rappeler et accorder la station souhaitée.
1 Appuyez sur POWER pour mettre l’appareil sous
tension.
2 Appuyez sur la touche de fonction souhaitée
correspondant à la station préréglée que vous voulez
accorder.
Amélioration de la réception radio FM
Déployez complètement le cordon de casque qui sert
d’antenne FM.
Restitution d’un son plus clair
Pour écouter des informations, réglez le sélecteur
NEWS•MUSIC sur NEWS pour obtenir de meilleurs résultats.
Les voix seront plus aiguës et claires. Pour écouter de la
musique, réglez le sélecteur NEWS•MUSIC sur MUSIC pour
obtenir de meilleurs résultats.
NEWS MUSIC
11-FR
Fonctionnement de la radio

”Réception de données FM
Réception d’informations sur votre récepteur
Vous pouvez recevoir des informations de dernière minute
que vous pourrez lire sur l’afficheur pendant l’écoute
d’émissions radio FM grâce à la réception d’informations FM
multiplex. La diffusion d’informations FM multiplex n’est
disponible que sur les stations proposant ce service. Vous
pouvez aussi choisir une des sept langues (anglais, français,
allemand, italien, espagnol, hollandais, suédois) pour
l’affichage des indications. (Voir page 7 “Sélection de la
langue”.)
Indicateur de
données (DATA)( )
Touches de
fonction
1 Branchez un casque stéréo sur la prise 2 .
Comme le cordon de casque sert d’antenne FM, veillez à
raccorder le casque même lorsque vous lisez seulement les
données FM diffusées.
2 Appuyez sur POWER pour mettre l’appareil sous
tension.
3 Accordez une station de diffusion FM multiplex.
Pour accorder une station, consultez les pages 9 à 11.
12-FR
POWER
FM DATA
2

4 Appuyez sur FM DATA pour recevoir les émissions FM
multiplex.
L’indicateur de données (DATA) apparaît lorsqu’une émission
FM multiplex peut être reçue dans la région. (Pour les détails
sur l’indicateur de données, voir page 14.)
L’affichage suivant (Total Index display) apparaît ensuite avec
les menus d’exploitation qui correspondent aux touches de
fonction.*
To Retrieve Stored
Data While Receiver
Downloads.
M1:Subscription
M2:Free Programs
M2
M1
* Le menu d’exploitation peut être différent selon les stations radio
diffusant des données dans votre région.
5 Appuyez sur la touche de fonction correspondant à M1
ou M2.
Lorsque vous appuyez sur M1, l’index de souscription aux
émissions payantes apparaît. Lorsque vous appuyez sur
M2, l’affichage suivant apparaît.
Choices for
Retrieving
Stored Data.
H-PAGE:Station Menu
MSG:Last Message
PAGE:Last Page
H-PAGE
H-PAGE: Emission FM multiplex
MSG: Message urgent
PAGE: Message personnel
MSG
PAGE
voir page suivante m
13-FR
Réception de données FM

6Sélectionnez le menu souhaité en appuyant sur la
touche de fonction correspondante. Les messages qui
apparaissent sur l’afficheur vous indiquent la marche à
suivre.
Remarque
Lorsque vous appuyez sur le programme H-PAGE, MSG ou PAGE
pour recevoir des données, “Réception données ! ” apparaît. Si
aucune donnée n’est diffusée, l’affichage précédent réapparaîra
dans les 20 secondes.
(( ))
Réception données!
Indicateur de données
L’apparition de l’indicateur de données (DATA) (1) signale que
des informations FM multiplex peuvent être reçues.
DATA
Indicateur allumé
La station accordée transmet des informations FM multiplex et
le signal de réception est suffisamment puissant.
Indicateur éteint
La station accordée ne transmet pas d’informations FM
multiplex ou le signal de réception n’est pas assez
puissant.
Remarque
Si le signal de réception est trop faible, l’indicateur de données
(DATA) ( 1) disparaîtra.
“ Réception données ! ” apparaîtra pendant 10 secondes environ,
suivi de “Signal trop faible. ” pendant 10 secondes environ.
Ensuite, l’affichage précédent réapparaîtra.
14-FR

(( ))
Réception données! Signal trop faible
Réception d’informations FM multiplex
Vous ne pourrez parfois recevoir que le son mais aucune
donnée FM. En particulier, dans un bâtiment ou en sous-sol,
vous ne pourrez pas toujours recevoir les données ou la
réception sera de mauvaise qualité. Dans ce cas, la réception
de données FM peut prendre un certain temps. Déployez
complètement le cordon de casque car il sert d’antenne.
Réception d’informations urgentes
Si une information urgente est diffusée pendant la réception de
données FM, vous entendrez un bip par le casque et
l’information urgente sera automatiquement affichée à la place
des données FM. L’indicateur de données (DATA) et
l’indicateur de message urgent (MSG) apparaîtront sur la
gauche de l’afficheur. Appuyez sur une touche quelconque
pour arrêter le bip.
DATA
MSG
Pour passer à la page suivante, suivez les instructions qui
apparaissent sur l’afficheur.
Pour revenir à l’affichage des données FM, appuyez sur
BACK.
15-FR
Réception de données FM

Réception d’un message personnel
Lorsque vous recevez un message personnel, vous
entendez un bip par le casque et l’indicateur de
message personnel (PAGE) clignote sur la gauche
de l’écran. (Toutefois, ce message n’est pas affiché
automatiquement.)
Appuyez sur une touche pour arrêter le bip.
Lorsque vous affichez le message, l’indicateur de
message (PAGE) cesse de clignoter et reste allumé.
Pour voir un message personnel, appuyez sur
BACK et sélectionnez M2. Appuyez ensuite sur la
touche de fonction correspondant à PAGE.
DATA
PAGE
H-PAGE
Pour revenir à l’affichage des données FM, appuyez sur
BACK.
Remarque
• A la différence des services de messageries ordinaire, le service
de messagerie personnelle (radiomessagerie) ne peut pas être
reçu lorsque l’appareil est éteint ou lorsque l’indicateur de
données (DATA) est éteint.
MSG
PAGE
Pour recevoir seulement des émissions
audio FM, changer de stations ou de
stations préréglées
Appuyez sur FM DATA.
Pour revenir à l’affichage précédent
Appuyez sur BACK.
16-FR

Sauvegarde d’informations pour un rappel ultérieur
Vous pouvez sauvegarder jusqu’à huit pages d’informations
importantes que vous pourrez rappeler par la suite.
SAVE/MENU
Touches de
fonction
1 Affichez l’information que vous voulez sauvegarder.
2 Appuyez sur SAVE/MENU.
INSCR
LIRE
3 Appuyez sur la touche de fonction correspondant à
INSCR sur l’afficheur.
2
CONFIG
Réception de données FM
Remarque
Si vous essayez de sauvegarder une
nouvelle page d’informations alors
que huit pages sont déjà
sauvegardées, le message de droite
apparaîtra.
Le cas échéant, supprimez les
données dont vous n’avez plus besoin. (Pour les détails, voir
“Suppression d’informations sauvegardées” page 19.)
Mme pleine !
Supprimer données
inutiles pour créer
espace !
BACK : Retour
17-FR

Pour rappeler des informations
sauvegardées
Appuyez sur SAVE/MENU. Appuyez ensuite sur la touche de
fonction correspondant à LIRE sur l’afficheur.
Pour afficher la page suivante, appuyez une seconde fois sur la
touche de fonction correspondant à LIRE.
18-FR
SUPP LIRE
8
CONFIG

Suppression d’informations sauvegardées
1 Appuyez sur la touche de fonction correspondant à
LIRE pour afficher l’information que vous voulez
supprimer.
SUPP LIRE
8
CONFIG
2 Appuyez sur la touche de fonction correspondant à
SUPP.
SUPP ? OUI NON
Appuyez sur la touche de fonction correspondant à OUI
pour supprimer.
Appuyez sur la touche de fonction correspondant à NON
pour annuler.
19-FR
Réception de données FM

Consultation du cours de la Bourse, d’informations sportives, etc.
Pour les utilisateurs qui consultent régulièrement le cours de la
Bourse, des informations sportives ou d’autres informations,
l’utilisation de symboles peut être utile.
Ces symboles permettent d’identifier par exemple des actions,
des équipes sportives, des catégories d’informations, et
davantage. Les données spécifiées par ce symbole seront
transmises par un programme de diffusion payante de
données. Vous pouvez aussi faire un réglage pour qu’un bip
retentisse lorsque l’information correspondant à un symbole
enregistré est reçue. (Voir “Pour valider Symbole Bip In” et
“Pour valider Bip Fort/Faible” page 31.)
SAVE/MENU
ENTER
Touches de
fonction
Pour enregistrer des symboles
Vous pouvez regrouper les symboles par catégories.
L’appareil propose 10 groupes de symboles pour un total de 128
symboles.
1 Appuyez sur POWER pour mettre l’appareil sous tension.
2 Appuyez sur SAVE/MENU.
3 Appuyez sur la touche de fonction correspondant à
CONFIG sur l’afficheur.
20-FR
POWER
2

4 Appuyez sur la touche de fonction correspondant à
ÉDIT sur l’afficheur.
Menu Principal Mode1
Arrêt Auto
Symb.edition ###
Page bas Auto REP
Symbole Bip In OUI
Bip Fort/Faible
ORIG
Remarque
Lorsque vous appuyez sur ORIG, l’affichage d’informations
FM multiplex apparaît. Lorsque vous appuyez sur M1, l’index
de souscription aux émissions payantes apparaît.
M 1ÉDIT
CONFG
NON
NON
C ID
5 Appuyez sur la touche de fonction correspondant à
↑ HAUT et ↓ BAS pour amener le curseur sur le groupe
de symboles souhaité. Appuyez ensuite sur la touche
de fonction correspondant à ENT pour valider la
sélection.
6 Appuyez sur la touche de fonction correspondant à
ADD pour passer à l’affichage d’édition de symboles cidessous.
Groupe Symb ###
ABCDEFGHIJKLMNOPQRST
UVWXYZabcdefghijklmn
opqrstuvwxyz@?!#$%&~
0123456789+-*/.,<=>\
^|`'":;()[]{}_
BGHT DTEb
ENT
AVERT
FIN
Réception de données FM
voir page suivantem
21-FR

7 Appuyez sur la touche de fonction correspondant à
← GHE et → DTE pour sélectionner un caractère sur le
clavier de caractères et le saisir.
Appuyez sur la touche de fonction correspondant à
ENT pour saisir le caractère à la position du curseur
dans la zone de saisie. En tout 12 caractères peuvent
être saisis.
Touches de fonction sur l’affichage d’édition de symboles :
← GHE : Déplacement du curseur d’un caractère vers la
→ DTE : Déplacement du curseur d’un caractère vers la
ENT : Saisie du caractère à la position du curseur dans
AVERT : Commutation de l’affichage d’édition de
FIN : Validation et sortie de l’édition des symboles.
Touches de fonction avec pression sur la touche ENTER :
? GHE : Déplacement de la position de saisie dans la zone
/ DTE : Déplacement de la position de saisie dans la zone
← ARR : Suppression d’un caractère avant la position de
↑ HAUT : Déplacement du curseur d’une ligne vers le haut
↓BAS : Déplacement du curseur d’une ligne vers le bas
gauche sur le clavier de caractères
droite sur le clavier de caractères
la zone de saisie.
l’avertisseur Haut/Bas
de saisie d’un caractère vers la gauche
de saisie d’un caractère vers la droite
saisie dans la zone de saisie
sur le clavier de caractères
sur le clavier de caractères
8 Appuyez sur la touche de fonction correspondant à FIN
pour valider et quitter l’édition de symboles.
22-FR

Pour corriger le symbole qui a été
enregistré
1 Répétez les opérations 1 à 5 de “Pour enregistrer des
symboles” (page 20) pour afficher la liste de symboles.
2 Appuyez sur la touche de fonction correspondant à
↑ HAUT ou ↓ BAS pour amener le curseur sur le
symbole que vous voulez corriger. Appuyez ensuite sur
la touche de fonction correspondant à ENT pour passer
à l’affichage d’édition de symboles.
3 Effectuez les opérations de 6 à 8 de “Pour enregistrer
des symboles” pour corriger les données de symbole.
Pour supprimer un symbole enregistré
1 Effectuez les opérations 1 à 5 de “Pour enregistrer des
symboles” (page 20) pour afficher la liste de symboles.
2 Appuyez sur la touche de fonction correspondant à
↑ HAUT ou ↓ BAS pour amener le curseur sur le
symbole que vous voulez supprimer. Appuyez ensuite
sur la touche de fonction correspondant à SUPP. Le
message de confirmation de suppression apparaît à la
fin du texte. Pour supprimer les données des symboles,
appuyez sur la touche de fonction correspondant à
OUI. Pour annuler l’opération, appuyez sur la touche
de fonction correspondant à NON.
Réception de données FM
23-FR

Pour enregistrer le cours des actions
sélectionnées, etc.
La fonction Haut/Bas surveille les fluctuations du cours des
actions sélectionnées. Vous pouvez régler le récepteur pour
qu’il émette un bip lorsqu’il reçoit des informations indiquant
que le cours maximal ou minimal que vous avez fixé pour une
action est atteint. Vous pouvez ainsi enregistrer jusqu’à huit
symboles pour cette fonction.
1 Effectuez les étapes 1 à 6 de “Pour enregistrer des
symboles” (page 20).
L’affichage d’édition de symboles pour le symbole que
vous souhaitez surveiller apparaît.
2 Appuyez sur la touche de fonction correspondant à
AVERT.
L’affichage se règle sur le mode de Réglage Haut&Bas.
Réglage Haut&Bas
*****
Haut NON -###.###
Bas OUI ###.###
BGHE DTEb
Touches de fonction dans l’afficheur d’édition de
symboles :
← GHE : Déplacement du curseur d’un titre vers la gauche
→ DTE : Déplacement du curseur d’un titre vers la droite
FIN : Validation et sortie de l’édition d’avertisseur
Haut/Bas et retour à l’affichage d’édition de
symboles
+ : Augmentation de la valeur
- : Diminution de la valeur
24-FR
FIN
+
-

Touches de fonction avec pression sur la touche ENTER :
←. : Déplacement d’une place vers la gauche du
point décimal des cours limites stipulés.
.→ : Déplacement d’une place vers la droite du point
décimal des cours limites stipulés.
SUPP : Suppression du réglage d’avertisseur Haut/Bas
effectué (annulation de l’avertisseur Haut/Bas).
Pour annuler l’entrée ou la correction de l’avertisseur
Haut/Bas, appuyez sur BACK ou appuyez sur la
touche de fonction correspondant à SUPP tout en
tenant ENTER enfoncée.
3 Appuyez sur la touche de fonction correspondant à FIN
pour valider et quitter l’édition de symboles.
ATTENTION :
SONY DÉCLINE TOUTE RESPONSABILITÉ POUR LES
DOMMAGES OU PERTES RÉSULTANT DE LA NONRÉCEPTION DE DONNÉES DUE À UN MAUVAIS
FONCTIONNEMENT OU À UN MAUVAIS RÉGLAGE
DE L’APPAREIL, OU À TOUTE AUTRE RAISON.
Réception de données FM
25-FR

Pour activer et désactiver un groupe de
symboles
1 Appuyez sur POWER pour mettre l’appareil sous
tension.
2 Appuyez sur SAVE/MENU .
3 Appuyez sur la touche de fonction correspondant à
CONFIG sur l’afficheur.
4 Appuyez sur la touche de fonction correspondant à
CONFG sur l’afficheur.
5 Appuyez sur la touche de fonction correspondant à
↑ HAUT ou ↓ BAS pour sélectionner Confg Groupe
Symb.
Menu de réglage
Confg Fonctions
Mode d'entretien
Confg Groupe Symb
DÉBUT
ENT
VHAUT
vBAS
Appuyez sur la touche de fonction correspondant à
ENT sur l’afficheur. L’affichage suivant apparaît.
Groupe Symb
Groupe Symb- A
Groupe Symb- B
Groupe Symb- C
Groupe Symb- D
Groupe Symb- E
OUI NON
VHAUT
OUI
OUI
OUI
OUI
OUI
vBAS
26-FR

Sélectionnez le groupe de symboles souhaité en
appuyant sur les touches de fonction correspondant à
↑ HAUT et ↓ BAS. Pour activer le groupe de symboles,
appuyez sur la touche de fonction correspondant à
OUI. Pour désactiver un groupe de symboles,
appuyez sur la touche de fonction correspondant à
NON.
Remarque
Lorsque vous désactivez un groupe de symboles, non seulement la
réception de données pour ces symboles sera désactivée, mais
toutes les données stockées dans la mémoire pour ce groupe seront
rappelées. Elles ne seront toutefois pas effacées.
Réception de données FM
27-FR

Réglage des fonctions
Vous pouvez régler les fonctions suivantes sur ce récepteur.
• Arrêt Auto OUI/NON
• Zone réception
• Page bas Auto
• Symbole Bip In
• Bip Fort/Faible
SAVE/MENU
POWER
Touches de
fonction
1 Appuyez sur POWER pour mettre l’appareil sous
tension.
2 Appuyez sur SAVE/MENU .
2
3 Appuyez sur la touche de
fonction correspondant à
CONFIG.
L’affichage Menu principal
Mode 1 apparaît.
4 Appuyez sur la touche de
fonction correspondant à
CONFG sur l’afficheur.
28-FR
Menu de réglage
Confg Fonctions
Mode d'entretien
Confg Groupe Symb
DÉBUT
ENT
VHAUT
vBAS

5 Appuyez sur la touche
de fonction correspondant
à ↑ HAUT ou ↓ BAS pour
amener le curseur sur
“Confg Fonctions”, puis
appuyez sur la touche de
Fonction de réglage
Arrêt Auto OUI
Zone réception EURO
Page bas Auto REP
Symbole Bip In OUI
Bip Fort/Faible NON
+–
VHAUT
vBAS
fonction correspondant à ENT. Les noms des fonctions
apparaissent.
Remarque
Si vous entrez dans “Mode d’entretien” de “Menu de réglage”,
appuyez sur BACK pour revenir à l’affichage précédent. Le
Mode d’entretien ne sert pas pour le fonctionnement de la radio.
Pour valider l’arrêt automatique
Lorsque que vous validez l’arrêt automatique (ON) et ne
touchez aucune touche en l’espace de 120 minutes, lorsque
l’appareil est sous tension, l’alimentation de l’appareil est
automatiquement coupée.
1 Appuyez sur la touche de
fonction correspondant à
↑ HAUT ou ↓ BAS pour
amener le curseur sur
“Arrêt Auto”.
Fonction de réglage
Arrêt Auto OUI
Zone réception EURO
Page bas Auto REP
Symbole Bip In OUI
Bip Fort/Faible NON
+–
VHAUT
vBAS
2 Appuyez sur la touche de
fonction correspondant à + ou – pour valider ou non la
fonction.
Remarque
Si vous n’effectuez aucune opération lorsque le récepteur est dans
le mode de réception de données FM et que l’indicateur de données
n’est pas affiché (ce qui indique qu’aucune donnée FM multiplex
n’est reçue), le mode de réception d’informations FM est
automatiquement annulé dans les 20 minutes environ et seul le son
est reçu.
29-FR
Réception de données FM

Pour sélectionner la zone de réception
Pour une réception optimale des signaux radio dans votre
région, sélectionnez EURO ou USA.
1 Appuyez sur la touche de
fonction correspondant à
↑ HAUT ou ↓ BAS pour
amener le curseur sur
“Zone réception”.
Fonction de réglage
Arrêt Auto OUI
Zone réception EURO
Page bas Auto REP
Symbole Bip In OUI
Bip Fort/Faible NON
+–
VHAUT
vBAS
2 Appuyez sur la touche de fonction correspondant à +
ou – pour régler le mode de réception sur EURO ou
USA.
Si vous utilisez l’appareil aux Etats-Unis, réglez le
mode sur USA.
Changement automatique de page
Cette fonction sert à régler la vitesse à laquelle la page change
sur l’afficheur lors de la réception de données de symbole.
Vous avez le choix entre NON (désactivé), REP (rapide),
NORM (normal) et LENT (lent).
1 Appuyez sur la touche de fonction correspondant à
↑ HAUT ou ↓ BAS pour amener le curseur sur Page bas
Auto .
2 Appuyez sur la touche de fonction correspondant à +
ou - pour sélectionner NON, REP, NORM ou LENT.
30-FR

Pour valider Symbole Bip In
Vous pouvez régler le récepteur pour qu’un bip retentisse lors
de la réception des informations spécifiées par des symboles.
1 Appuyez sur la touche de fonction correspondant
↑ HAUT ou ↓ BAS pour amener le curseur sur Symbol
Bip In.
2 Appuyez sur la touche de fonction correspondant à +
ou - pour sélectionner OUI ou NON.
Pour valider Bip Fort/Faible
Tous les symboles enregistrés sont préréglés pour l’avertisseur
Haut/Bas. Vous pouvez régler votre récepteur pour qu’il
émette un bip lorsque le cours de vos actions atteint des limites
que vous avez fixées à l’avance.
1 Appuyez sur la touche de fonction correspondant ↑ HAUT
ou ↓ BAS pour amener le curseur sur Bip Fort/Faible.
2 Appuyez sur la touche de fonction correspondant à +
ou - pour sélectionner OUI ou NON.
Lors de la réception de données de
symbole
Lorsque vous recevez des données de symbole, l’indicateur de
symbole SYM sur la gauche de l’afficheur s’allume.
Remarque
Lorsque vous appuyez sur la touche de fonction correspondant aux
ID de l’afficheur, vous pouvez voir votre ID et l’ID de code mais
vous n’en avez pas besoin pour la réception radio. Appuyez sur la
touche de fonction correspondant à DÉBUT sur l’afficheur pour
revenir à l’affichage précédent.
(Pour les détails, voir “Numéros d’ID” page 32)
31-FR
Réception de données FM

”Informations diverses
Numéros d’identification (ID)
Le récepteur offre les trois numéros d’identification suivants :
Votre ID : pour la messagerie personnelle (radiomessagerie).
ID de groupe DDJ : pour les services d’informations groupés.
ID de code : pour d’autres services complémentaires.
Ces trois numéros ont été réglés en usine. Vous n’avez pas
besoin de les enregistrer ni de confirmer ces numéros pour la
réception radio.
Pour vérifier les numéros précédents, procédez de la façon
suivante.
1 Appuyez sur POWER pour mettre l’appareil sous
tension.
2 Appuyez sur SAVE/MENU.
3 Appuyez sur la touche de fonction correspondant à
CONFIG sur l’afficheur.
4 Appuyez sur la touche de fonction correspondant à
C ID sur l’afficheur.
Numéro ID
Votre ID ##########
ID de groupe DDJ ##
ID de code ##
Dates expiration ##
ENT
V
HAUT
DÉBUT
vBAS
Vous pouvez vérifier votre numéro d’identification sur cet
afficheur.
32-FR

Pour vérifier l’ID de groupe DDJ
Appuyez sur la touche de fonction correspondant à ↑ HAUT
ou ↓ BAS pour amener le curseur sur “ID de groupe DDJ”,
puis appuyez sur la touche de fonction correspondant à ENT
pour sélectionner “ID de groupe DDJ.
ID Groupe DDJ ##
########## Jan. 9,99
########## DENF
DG-ID 3 Fév.11,99
DG-ID 4 Mar.12,00
DG-ID 5 Avr.13,01
V
HAUT
vBAS
Si le numéro ID de groupe DDJ est enregistré, le numéro ID et
la date d’expiration apparaîtront sur l’afficheur. Vous pouvez
souscrire un abonnement à 12 services DDJ-ID. Appuyez sur la
touche de fonction correspondant à ↑ HAUT ou ↓ BAS pour
faire défiler l’affichage.
Si DENF est affiché comme date d’expiration, le service n’a pas
de date d’arrêt.
Pour vérifier l’ID de code
Appuyez sur la touche de fonction correspondant à ↑ HAUT
ou ↓ BAS pour amener le curseur sur “ID de code”, puis
appuyez sur la touche de fonction correspondant à ENT pour
valider la sélection.
ID de code ##
Code-ID1 2281701###
Code-ID2
Code-ID3
Code-ID4
Code-ID5
SUPP
ENTVHAUT
voir page
vBAS
suivantem
33-FR
Informations diverses

Lorsque le code est enregistré, le numéro ID apparaît sur
l’afficheur. Vous pouvez enregistrer en tout huit codes.
Appuyez sur la touche de fonction correspondant à ↑ HAUT
ou ↓ BAS pour faire défiler l’affichage.
Pour enregistrer et corriger l’ID de code
Appuyez sur la touche de fonction correspondant à ↑ HAUT
ou ↓ BAS pour amener le curseur sur un code vide ou sur le
code à corriger sur l’affichage précédent. Appuyez ensuite sur
la touche de fonction correspondant à ENT pour passer à
l’affichage d’édition de code.
ID de code ##
Code-ID # 2281701###
FIN + –
Appuyez sur la touche de fonction correspondant à + ou –
pour entrer le numéro de code. Les numéros autorisés vont de
2281701376 à 2281701631. Après avoir réglé le numéro,
appuyez sur la touche de fonction correspondant à FIN pour le
valider et sortir de l’affichage.
Pour vérifier les dates d’expiration
Appuyez sur la touche de fonction correspondant à ↑ HAUT
ou ↓ BAS pour amener le curseur sur les dates d’expiration.
Appuyez sur la touche de fonction correspondant à ENT pour
afficher les dates d’expiration.
34-FR

Dates expiration
Catégor. 1 DENF
Catégor. 2 Sep.10,99
Catégor. 3 Jun. 2,99
Catégor. 4 Jul. 3,00
Catégor. 5 Aoû. 4,01
Lorsque les dates d’expiration sont enregistrées, elles
apparaissent sur l’afficheur. Vous pouvez enregistrer en tout
15 dates d’expiration. Appuyez sur la touche de fonction
correspondant à ↑ HAUT ou ↓ BAS pour faire défiler
l’affichage.
V
HAUT
vBAS
Informations diverses
35-FR

Utilisation du pied
Levez le pied derrière l’appareil pour mieux voir l’afficheur.
Spécifications
Plage de fréquences 87,5 – 108 MHz
FM multiplex Type DARC
Sortie Prise 2 (minijack stéréo)
Puissance de sortie 8 mW + 8 mW (à 10% de distorsion
Alimentation CC 3 V, deux piles R6 (format AA)/
Fonction d’arrêt automatique
Dimensions 116 x 70,5 x 28 mm (l/h/p)
Poids Approx. 150 g (5,3 on) avec les piles
Accessoire fourni Casque stéréo (1)
Pour les utilisateurs en France
En cas de remplacement du casque/écouteurs, référez-vous au
modèle de casques/écouteurs adaptés à votre appareil et
indiqué ci-dessous.
MDR-E741
La conception et les spécifications peuvent être modifiées sans
préavis.
36-FR
Afficheur LCD FSTN 64 x 132
harmonique)
Piles LR6
Approx. 120 minutes
5
⁄8 x 27⁄8 x 11⁄8 pouces) projections
(Env. 4
et saillies non comprises

Précautions
• Faites fonctionner l’appareil sur le courant continu de 1,5 V
seulement avec deux piles R6 (format AA).
• Evitez d’exposer l’appareil à des températures extrêmes, à la
lumière directe du soleil, à l’humidité, au sable, à la poussière
et à des chocs mécaniques. Ne laissez jamais l’appareil dans
une voiture garée en plein soleil.
• Si un solide ou un liquide tombe dans l’appareil, enlevez les
piles et faites-le vérifier par un technicien avant de le remettre
sous tension.
• Pour nettoyer le coffret, utilisez un chiffon doux imprégné
d’une solution neutre de détergent.
• Dans les véhicules et les bâtiments, la réception radio peut
être difficile ou parasitée. Essayez d’écouter près
d’une fenêtre.
Remarques sur le casque
A pleine puissance, l’écoute prolongée du baladeur peut
endommager l’oreille de l’utilisateur.
Sécurité routière
N’écoutez pas au casque pendant la conduite d’une voiture,
d’une moto ou de tout autre véhicule motorisé. Vous risquez de
causer un accident de la circulation. Il est interdit dans certains
pays d’écouter au casque en conduisant.
Il peut être également dangereux d’écouter au casque à volume
élevé en marchant, en particulier aux croisements. Soyez toujours
extrêmement prudent et n’utilisez pas l’appareil dans
les situations présentant des risques d’accident.
Prévention des lésions auditives
Evitez d’écouter au casque à volume élevé. Les spécialistes
déconseillent une écoute continue à un volume trop élevé.
Si vous percevez un sifflement dans les oreilles, réduisez
le volume ou cessez d’écouter.
Informations diverses
37-FR

Civisme
Ecoutez à un volume modéré. Vous pourrez entendre les sons
extérieurs et ne gênerez pas les gens autour de vous.
Avertissement
En cas d’éclairs, cessez d’écouter et enlevez immédiatement le
casque.
Pour toute question ou difficulté concernant cet appareil, veuillez
consulter votre revendeur Sony.
38-FR

En cas de panne
Si un problème se présente lorsque vous utilisez l’appareil,
faites les vérifications suivantes pour déterminer si une
réparation est nécessaire. Si le problème persiste, consultez
votre revendeur Sony.
La réception est instable et parasitée.
• Les piles sont faibles. Remplacez-les par des neuves.
• La réception est de mauvaise qualité, lorsque des obstacles,
bâtiments, etc. font obstruction, ou lorsque vous écoutez dans
une voiture. Allez dans un endroit dégagé pour mieux recevoir le
signal, ou écouter la radio près d’une fenêtre.
Vous ne recevez pas la station souhaitée lorsque
vous appuyez sur la touche de fonction
correspondante.
• Assurez-vous d’avoir appuyé sur la bonne touche.
La réception FM multiplex est impossible.
• Assurez-vous que le casque est raccordé.
• Assurez-vous que la station radio que vous écoutez offre des
services FM multiplex.
• Assurez-vous que l’indicateur de données (DATA) (1) est affiché.
L’appareil ne fonctionne pas lorsque vous
appuyez sur une touche.
Appuyez sur la touche RESET au dos de l’appareil avec un objet fin
et pointu. Toutes les stations radio et les informations sauvegardées
seront supprimées. Le cas échéant, préréglez à nouveau les stations.
Informations diverses
39-FR

Description des éléments et commandes
Reportez-vous aux pages entre parenthèses pour les détails.
Appareil principal
1
2
3
4
5
1 Afficheur (41)
2 Indicateur de données
(DATA) (1) (12, 14)
3 Touche de retour
(BACK) (16)
4 Touche de validation
(ENTER) (7, 9, 20)
5 Touches de fonction (7,
9, 12, 17, 20, 28)
40-FR
6
7
8
9
!º
6 Touche de
sauvegarde/menu
(SAVE/MENU) (17, 20,
28)
7 Interrupteur
d’alimentation
(POWER) (7, 9, 12, 20,
28)
8 Touche de données FM
(FM DATA) (12)
9 Réglage de volume
(VOLUME) (9)
0 Sélecteur
Informations/Musique
(NEWS•MUSIC) (9, 11)
!¡ Touche d’accord (9, 10)
!¡

Afficheur
1
2
3
4
1 Indicateur de données
(DATA) (1) (12, 14, 15,
16)
2 Indicateur de Symbole
(SYM) (31)
3 Indicateur de message
urgent (MSG) (15)
4 Indicateur de message
personnel (PAGE) (16)
FM
DATA
SYM
87.5
MSG
PAGE
87.5
PRÉRÉGLAGE
92.0 98.0
0
MHz
108.0104.3
5 Fréquence (10)
6 Stations préréglées (10)
5
6
Informations diverses
41-FR

Index
A, B, C
Accord manuel ...................... 9
Amélioration de la
réception .............................. 11
Arrêt automatique .............. 29
A vertisseur Haut/Bas ........ 24
Bip de symbole.................... 31
Bip Haut/Bas ...................... 31
Changement
automatique de page.......... 30
D
Dates d’expiration ........ 34, 35
Données FM visuelles
suppression....................... 19
réception ........................... 12
sauvegarde........................ 17
E, F, G, H
Groupes de symboles ......... 26
I, J, K, L
ID de code ............................ 33
ID de groupe DDJ ............... 33
Indicateur DATA ................. 14
Indicateur MSG ................... 15
Indicateur PAGE ................. 16
Indicateur SYMB................. 31
Information urgente ........... 15
Langue, Sélection de la ........ 7
42-FR

M, N, O
Message personnel ............. 16
P, Q, R
Pied, Utilisation du............. 36
Piles......................................... 5
Préréglage de stations ........ 10
Réception
d’émissions radio......... 9, 10
de données visuelles FM 12
Réception d’informations
FM multiplex ................... 4, 15
Réglage Haut/Bas .............. 24
S, T
Sources d’alimentation
externes .................................. 6
Symbole Bip In .................... 31
Symboles
correction .......................... 23
enregistrement ................. 20
suppression....................... 23
U, V, W, X, Y
Z
Zone de réception ............... 30
Informations diverses
43-FR

Vor dem Betrieb
Füllen Sie bitte die folgende Liste aus, um die
Informationen zur Hand zu haben, wenn Sie das Gerät als
gestohlen melden müssen. Serien- und Modellnummer
stehen auf der Rückseite des Geräts.
Wichtige Informationen zum Gerät:
Modellnummer
Seriennummer
ID-Nummer
Kaufdatum
Kaufort
Bitte eintragen
Digital DJ System E2 ist ein
eingetragenes Warenzeichen der
Digital DJ Inc.
2-DE

Inhaltsverzeichnis
Vorbereitungen .............................................................................. 4
Merkmale ....................................................................................... 4
Die ersten Schritte
Einlegen der Batterien.................................................................. 5
Wahl der Sprache.......................................................................... 7
Radiobetrieb
Manuelle Abstimmung ................................................................ 9
Stationsvorwahl .......................................................................... 10
Anzeigen von UKW-Daten
Anzeigen der empfangenen Informationen ........................... 12
Sichern der angezeigten Informationen .................................. 17
Löschen von gesicherten Informationen ................................. 19
Empfang von aktuellen Börsenkursen, Sportmeldungen,
Nachrichten usw. ..................................................................... 20
Funktionseinstellungen ............................................................. 28
Zusatzinformationen
Die ID-Nummern ....................................................................... 32
Verwendung des Ständers ......................................................... 36
Technische Daten........................................................................ 36
Zur besonderen Beachtung ....................................................... 37
Störungsüberprüfungen ............................................................ 39
Bezeichnung der Bedienungselemente ................................... 40
Stichwortverzeichnis .................................................................. 42
DE
3-DE

Vorbereitungen
Wir beglückwünschen Sie zu diesem Sony UKW-DatenReceiver und sind überzeugt davon, daß Sie lange Freude an
diesem modernen Gerät haben werden.
Bevor Sie das Gerät in Betrieb nehmen, lesen Sie bitte diese
Anleitung sorgfältig durch, und bewahren Sie sie zum
Nachschlagen gut auf.
Merkmale
•UKW-Stereoempfang
•Empfang von Text- und Grafikdaten mit hoher
Geschwindigkeit.
•Fünf praktische Funktionstasten zur bequemen Steuerung
des Datenempfangs.
•Automatische Anzeige von Alarmmeldungen (nur bei UKWMultiplexempfang).
•Ausschaltautomatik schaltet das Gerät automatisch nach
etwa 120 Minuten aus, um unnötigen Stromverbrauch zu
vermeiden.
•Für die Menüanzeige kann zwischen sieben Sprachen
(Englisch, Französisch, Deutsch, Italienisch, Spanisch,
Holländisch und Schwedisch) gewählt werden.
Was ist UKW-Multiplexempfang?
Einige UKW-Sender strahlen im sogenannten
Multiplexverfahren neben dem eigentlichen Programm
noch Zusatzdaten (Text und Grafik) aus. Der Empfang
dieser Zusatzdaten ist teils kosten los und teils
kostenpflichtig. Mit normalen Radios können die
Zusatzdaten jedoch nicht empfangen werden.
4-DE

”Die ersten Schritte
Einlegen der Batterien
Öffnen Sie den Batteriefachdeckel und legen Sie zwei R6/AABatterien (nicht mitgeliefert) mit richtiger Polarität ein.
DC IN 3V
÷
Batterie-Lebensdauer (ungefähre Angaben in Stunden)
Sony Alkalibatterie LR6(SG) Sony Batterie R6(SR)
Nur Tonwiedergabe 35 14
UKW-Multiplexempfang 23 9
• Für optimale Leistung wird die Verwendung von Alkalibatterien
empfohlen.
Wann müssen die Batterien ausgewechselt werden?
Wechseln Sie die Batterien aus, wenn „BATTERIE SCHWACH”
angezeigt wird.
Hinweise
• Legen Sie die Batterien mit richtiger Polarität ein.
• Trockenbatterien können nicht wieder aufgeladen werden.
• Schalten Sie das Gerät vor dem Batteriewechsel aus. Der
Batteriewechsel sollte nicht länger als 20 Sekunden dauern, da sonst
die gespeicherten Informationen und die gespeicherten Sender
gelöscht werden. Notieren Sie sich vor dem Batteriewechsel
sicherheitshalber alle wichtigen Daten. Falls erforderlich, speichern Sie
die Sender nach dem Batteriewechsel erneut ab.
• Wenn das Gerät längere Zeit nicht verwendet wird, nehmen Sie
die Batterien heraus, um Korrosionsschäden durch ausgelaufene
Batterien zu vermeiden.
zwei Mignonzellen
(R6/Größe AA)
5-DE
Die ersten Schritte

Automatische Ausschaltung
Wenn die Funktion “Automatische Ausschaltung” auf EIN
gesetzt ist, schaltet sich das Radio automatisch nach etwa 120
Minuten aus, um unnötigen Stromverbrauch zu vermeiden.
Wenn Sie weiter Radio hören wollen, drücken Sie POWER .
Wenn sich das Radio vor Ablauf der Zeitspanne ausschaltet
und mit POWER nicht mehr eingeschaltet werden kann, sind
die Batterien erschöpft. Wechseln Sie die Batterien dann aus.
Zum Einstellen diesr Funktion siehe „Einstellen der
automatischen Ausschaltfunktion” auf Seite 29 im Kapitel
„Funktionseinstellungen”(Seite.28, 29).
Externe Stromversorgung
An der DC IN 3V-Buchse an der Linken Seite des Geräts
können folgende externe Stromquellen angeschlossen werden.
(Die internen Batterien werden dabei automatisch
abgeschaltet.)
•Sony Netzadapter AC-E30HG (nicht mitgeliefert) für Betrieb
am Stromnetz.
•Sony Autobatteriekabel DCC-E230 (nicht mitgeliefert) für
Betrieb an 12/24-V-Autobatterie.
Hinweise
• Auch bei externer Stromversorgung sollten die internen Batterien
nicht herausgenommen werden, da sie als Pufferbatterien für den
Speicher dienen.
• Verwenden Sie nur den empfohlenen Sony Netzadapter und das
empfohlene Sony Autobatteriekabel. Polarität und Steckerform
sind bei anderen Herstellern möglicherweise unterschiedlich.
6-DE
Polarität des Steckers

Wahl der Sprache
Für die Anzeigen im Display kann unter den Sprachen
Englisch, Französisch, Deutsch, Italienisch, Spanisch,
Holländisch und Schwedisch gewählt werden. Im folgenden
wird die Wahl der Sprache “Englisch” gezeigt.
POWER
ENTER
Funktionstasten
2
1 Halten Sie ENTER gedrückt, und drücken Sie
gleichzeitig POWER, um das Gerät einzuschalten. Das
LANGUAGE SELECT MENU erscheint.
LANGUAGE SELECT MENU
1:English
2:French
3:German
4:Italian
5:Spanish
2 Drücken Sie die Funktionstaste ↑ UP oder ↓ DWN, um
die gewünschte Sprache zu wählen, und drücken Sie
dann die Funktionstaste ENT. Die Anzeigen im Display
ändern sich entsprechend der gewählten Sprache.
ENTVUP
vDWN
Die ersten Schritte
Bitte wenden
7-DE
mm
m
mm

Ändern der Sprache
Schalten Sie das Gerät durch Drücken von POWER aus, und
führen Sie dann die Schritte 1 und 2 der vorausgegangenen Seite
aus.
Hinweise
• Die empfangenen UKW-Daten werden so angezeigt, wie sie der
Sender ausstrahlt. Die Sprache dieser Daten kann nicht geändert
werden. Die Umschaltung der Sprache betrifft nur die
Menüanzeigen im Display.
• Die folgenden drei Menüs sind stets in Englisch, auch wenn Sie
eine andere Sprache gewühlt haben.
LANGUAGE SELECT MENU
1:English
2:French
3:German
4:Italian
5:Spanish
(auf Seite 7)
To Retrieve Stored
Data While Receiver
Downloads.
M1:Subscription
M2:Free Programs
(auf Seite 13)
Choices for
Retrieving
Stored Data.
H-PAGE:Station Menu
MSG:Last Message
PAGE:Last Page
H-PAGE
(auf Seite 13)
M1
ENTVUP
M2
MSG
vDWN
PAGE
8-DE

”Radiobetrieb
Manuelle Abstimmung
FM DATA
2
POWER
VOLUME
NEWS•MUSIC
ENTER
Funktion-
stasten
TUNE +/–
1 Schließen Sie den Stereo-Kopfhörer an die 2 -Buchse
an.
2 Drücken Sie POWER, um das Gerät einzuschalten.
Wenn die Frequenz nicht im Display angezeigt wird, drücken
Sie FM DATA.
3 Drücken Sie TUNE +/–, um auf den gewünschten
Sender abzustimmen.
Wenn Sie TUNE +/– gedrückt halten, ändern sich die
Frequenzziffern in schneller Folge. Beim Loslassen der Taste
stoppen die Frequenzziffern.
4 Stellen Sie mit VOLUME die Lautstärke ein.
Zum Abschalten des Geräts
Drücken Sie POWER.
Radiobetrieb
9-DE

Stationsvorwahl
Werksseitig sind bereits fünf UKW-Sender gespeichert. Zum
Ändern einer Speicherung verfahren Sie wie folgt:
1 Drücken Sie POWER, um das Gerät einzuschalten.
2 Drücken Sie TUNE +/–, um manuell auf den Sender
abzustimmen.
Wenn die Frequenz nicht im Display angezeigt wird, drücken
Sie FM DATA.
3 Drücken Sie ENTER.
Drücken Sie dann die Funktionstaste, auf der der Sender
gespeichert werden soll. “VORWAHL” blinkt im Display.
4 Halten Sie die Funktionstaste gedrückt, bis zwei
Pieptöne zu hören sind.
FM
0
97.5
VORWAHL VORWAHL
87.5
92.0 98.0
MHz
108.0104.3
FM
97.5
97.5
92.0 98.0
0
MHz
108.0104.3
Ändern der Stationsvorwahl
Wiederholen Sie die obigen Schritte 1 bis 4. Drücken Sie im
Schritt 4 die gewünschte neue Stationstaste.
Die alte Speicherung dieser Funktionstaste wird gelöscht und
durch die neue ersetzt.
10-DE

Abrufen eines gespeicherten Senders
Ein gespeicherter UKW-Sender kann wie folgt durch ein
einfaches Drücken der Funktionstaste abgerufen werden:
1 Drücken Sie POWER, um das Gerät einzuschalten.
2 Drücken Sie die Funktionstaste des gewünschten
Senders.
Für optimalen Empfang
Breiten Sie das Kopfhörerkabel auf volle Länge aus. Das Kabel
dient gleichzeitig als UKW-Antenne.
Für optimale Verständlichkeit bzw.
optimalen Klang
Stellen Sie den NEWS•MUSIC-Wähler bei
Nachrichtensendungen auf NEWS. Die Sprecherstimme ist
dann klarer und besser verständlich. Bei Musiksendungen
stellen Sie den NEWS•MUSIC-Wähler auf MUSIC, um optimale
Klangqualität zu erhalten.
NEWS MUSIC
Radiobetrieb
11-DE

”Anzeigen von UKW-Daten
Anzeigen der empfangenen Informationen
Während Sie ein UKW-Radioprogramm empfangen, können
Sie die vom Sender im Multiplexverfahren zusätzlich
ausgestrahlten aktuellen Informationen im Display anzeigen.
Beachten Sie, daß nicht alle Sender solche Zusatzdaten
ausstrahlen. Für die Menüanzeige im Display können Sie unter
sieben Sprachen (Englisch, Französisch, Deutsch, Italienisch,
Spanisch, Holländisch und Schwedisch) wählen (siehe “Wahl
der Sprache” auf Seite 7).
DATA-Anzeige( )
Funktionstasten
1 Schließen Sie den Stereokopfhörer an die 2-Buchse an.
Da das Kopfhörerkabel als UKW-Antenne dient, muß
es auch dann angeschlossen werden, wenn nur die
empfangenen UKW-Daten im Display angezeigt
werden sollen.
2 Drücken Sie POWER, um das Gerät einzuschalten.
3 Stimmen Sie auf einen UKW-Multiplexsender ab.
Einzelheiten zum Abstimmen finden Sie auf Seite 9 bis
11.
12-DE
POWER
FM DATA
2

4 Drücken Sie FM DATA, um die UKW-Multiplexdaten
zu empfangen.
Wenn ein UKW-Multiplexprogramm in Ihrem Gebiet
empfangbar ist, erscheint die DATA-Anzeige. (Einzelheiten zur
DATA-Anzeige finden Sie auf Seite 14.)
Anschließend erscheint eine Übersichtsanzeige mit der
momentanen Belegung der Funktionstasten.*
To Retrieve Stored
Data While Receiver
Downloads.
M1:Subscription
M2:Free Programs
M2
M1
* Die Belegungen der Funktionstasten hängt von den Sendern in
Ihrem Gebiete ab.
5 Drücken Sie die Funktionstaste M1 oder M2.
Wenn Sie M1 drücken, erscheint eine Abonnementübersicht
von kostenpflichtigen Programmen. Bei Drücken von M2
erscheint die folgende Anzeige.
Choices for
Retrieving
Stored Data.
H-PAGE:Station Menu
MSG:Last Message
PAGE:Last Page
H-PAGE
H-PAGE: UKW-Multiplexempfang
MSG: Alarmmeldung
PAGE: Pager-Meldung
MSG
PAGE
Anzeigen von UKW-Daten
Bitte wenden
13-DE
mm
m
mm

6 Wählen Sie mit der Funktionstaste die gewünschte
Option. Falls erforderlich, folgen Sie dann den
Anweisungen im Display.
Hinweis
• Wenn Sie H-PAGE, MSG oder PAGE drücken, erscheint
“EMPFANGSDATEN”. Wenn keine Daten empfangen werden
können, erscheint im Display nach 20 Sekunden wieder die
vorausgegangene Anzeige.
(( ))
EMPFANGSDATEN
Die DATA-Anzeige
An der DATA-Anzeige (I) können Sie erkennen, ob ein UKWMultiplexprogramm empfangbar ist.
DATA
Wenn die Anzeige erscheint
Der Sender wird mit ausreichender Stärke empfangen und
überträgt UKW-Multiplexdaten.
Wenn die Anzeige erloschen ist
Der empfangene Sender überträgt keine UKWMultiplexdaten, oder der Empfang ist zu schwach.
Hinweis
• Bei schwachem Empfang erlischt die DATA-Anzeige.
“EMPFANGSDATEN” und “SIGNAL ZU SCHWACH.”
erscheinen dann nacheinander etwa 10 Sekunden lang.
Anschließend erscheint wieder die ursprüngliche Anzeige.
14-DE

(( ))
EMPFANGSDATEN
Wissenswertes zum UKWMultiplexempfang
Manchmal ist zwar der Ton des Senders zu hören, die
Multiplexdaten werden jedoch nicht einwandfrei empfangen.
Insbesondere in Gebäuden und unter der Erde ist häufig kein
oder kein einwandfreier Datenempfang möglich oder es
dauert relativ lange, bis die Daten vollständig empfangen sind.
Beachten Sie auch, daß das Kopfhörerkabel als UKW-Antenne
dient und auf volle Länge ausgebreitet werden sollte.
Empfang von Alarmmeldungen
Wenn der empfangene UKW-Multiplexsender eine
Alarmmeldung ausstrahlt, ertönt über den Kopfhörer ein
Piepton und im Display erscheint statt der Datenanzeige die
Alarmmeldung. Dabei erscheint links im Display die DATAund die MSG-Anzeige. Durch Drücken einer beliebigen Taste
können Sie den Piepton abschalten.
DATA
MSG
Wenn Sie die nächste Seite sehen wollen, folgen Sie den
Anweisungen im Display. Diese Anweisungen werden vom
Sender ausgestrahlt.
Durch Drücken von BACK können Sie zur UKWMultiplexdatenanzeige zurückkehren.
SIGNAL ZU SCHWACH
15-DE
Anzeigen von UKW-Daten

Empfang von Pager-Meldungen
Wenn eine Pager-Meldung empfangen wird,
ertönt ein Piepton über Kopfhörer und die
PAGE-Anzeige blinkt links im Display. (Das
Display schaltet jedoch nicht auf die
empfangene Meldung um.)
Durch Drücken einer beliebigen Taste können
Sie den Piepton abschalten.
Wenn die Pager-Meldung im Display angezeigt wird, hört die
PAGE-Anzeige auf zu blinken (sie erscheint dann ständig).
Zum Anzeigen der Pager-Meldung drücken
Sie BACK, wählen Sie dann M2, und drücken
Sie die Funktionstaste PAGE.
DATA
PAGE
H-PAGE
Um wieder die UKW-Multiplexdaten anzuzeigen, drücken Sie
BACK.
Hinweis
• Im Gegensatz zu anderen Pager-Systemen wird bei diesem Gerät
die Pager-Meldung nicht empfangen, wenn das Gerät
ausgeschaltet oder die DATA-Anzeige erloschen ist.
MSG
PAGE
Zum ausschließlichen Empfang des
UKW-Tons und Wählen eines anderen
Senders
Drücken Sie FM DATA.
Zum Zurückschalten auf die
vorausgegangene Anzeige
Drücken Sie BACK.
16-DE
 Loading...