

Page 1
Cordless Telephone
Operating Instructions
Manual de instrucciones (verso)
Owner’s Record
The model and the serial numbers are located at the bottom
of the unit. Record the serial number in the space pro vide d
below. Refer to these numbers whenever you call upon your
Sony dealer regarding this product.
Model No. SPP-N1003 Serial No.
SPP-N1003
Sony Corporation © 2000 Printed in China
For the customers in the USA
3-048-610-11 (1)
For the customers in the USA
IMPORTANT SAFETY
INSTRUCTIONS
When using your telephone equipment, basic safety precautions should
always be followed to reduce the ri sk of fire, electric shock and injury to
persons, including the following:
1. Read and understand all instructions.
2. Follow all warnings and instructio ns mark ed on the prod u ct .
3. Unplug this product from the wall outlet before cleaning. Do not use
liquid cleaners or aerosol cleaners. Use a damp cloth for cleaning.
4. Do not use this product near water, f or example, near a bath tub, wash
bowl, kitchen sink, or laundry tub, in a wet basement, or near a
swimming po ol.
5. Do not place this product on an unstable cart, stand, or table. The
product may fall, cau sing serious damage to the product.
6. Slots and openings in the cabinet and the back or bottom are pr ovided
for ventilation. To protec t it fro m ov erhea ting, these o pening s must not
be blocked or covered. The openings should never be blocked by
placing the product on the bed, sofa, rug, or other similar surface. This
product should never be placed near or over a radiator or heat register.
This product should not be placed in a built-in installation unless proper
ventilation is provided.
7. This product should be operated only from the type of power source
indicated on the marking label. If you are not sure of the type of power
supply to your ho me, consult your dealer or local power company.
8. Do not allow anyth ing to rest on the power cord. Do not locate this
product where the cord will be abused by persons walking on it.
9. Do not overload wall outlet s and extension cords as this can result in the
risk of fire or electric shock.
10. Never push objects of any kind into this product through cabinet slots
as they may touch dangerous voltage points or short out parts that could
result in a risk of fire or electric shock. Never spill liquid of any kind on
the product.
11. To reduce the risk of electric shock, do not disassemble this product, but
take it to a qua lified service person nel when some service or repair work
is required. Ope ning or re mov ing c overs ma y exp ose yo u to dang erou s
voltages or other risks. Incorrect reassembly can cause electric shock
when the appliance is subsequently used.
12. Unplug this product from the wall o utlet and refer servic ing to qualified
service personnel under the following conditions:
A. When the power cord or plug is damaged or frayed.
B. If liquid has been spilled into the product.
C. If the product has been exp osed to rain or water.
D. If the product does not operate normally by following the operation
instructions. Adjust only those controls that are covered by the
operating instru ctions because improper adjustment of ot her
controls may r esult in dama ge and will of ten require extensive wo rk
by a qualified technician to restore the product to normal operation.
E. If the product has been drop ped or the cabinet has been damaged.
F. If the product exhibits a distinct change in performance.
13. Avoid using a telephone (other than a cordless type) during an electrical
storm. There may be a remote risk of electric shock from lightning.
14. Do not use the telephone to report a gas leak in the vicinity of the leak.
Be sure to save the receipt and attach it to your WARRANTY card when having your
equipment repaired at an authorized Sony service station.
SAVE THESE
INSTRUCTIONS
CAUTION:
To reduce the risk of fire or injury to persons by battery, read and follow
these instructions.
1. Use only the following type and size battery pack: Sony BP-T50.
2. Do not dispose of the battery pack in a f ire. The cell may explode.
Check with local codes for possible special disposal instructions.
3. Do not open or mutilate the battery pack. Released electrolyte is
corrosive and may cause damage to the eyes or skin. It may be toxic if
swallowed.
4. Exercise care in handling battery in order not to short the battery with
conducting mater ials such as rings, bracelets, and keys. The battery or
conductor may overheat and cause burns.
5. Charge the battery pack provided with or identified for use with this
product only in accordance with the instructions and limitations
specified in the instruction manual provided for this product.
6. Observe proper pol arity orientation between the battery pack and
battery charger.
INFORMATION FOR
GENERAL TELEPHONES
1. This equipment comp lies with Part 68 of the FCC rule s. On the bo ttom
of this equipment is a label that conta in s , amo ng o th er in formation, the
FCC registration number and ringer equivalence number (REN) for this
equipment. If requested, this information must be provided to the
telephone company.
2. The applicable registration jack (connector) USOC-RJ11C is used for
this equipment.
Page 2
3. This equipment is designed to be conne cted to the telephone ne twork or
1
2
1, 4
2
TALK/BATT
LOW lamp
premises wiring using a compatible modular jack that is Part 68
compliant.
The FCC compliant telephone cord an d mod ular plu g is pro vide d with
this equipment.
4. The REN is used to determine the quantity of devices that may be
connected to the telephone line. Excessive RENs on the telep hone lin e
may result in the devices not ringing in response to an incoming call.
Typically, the sum of the REN’s should not exceed five (5.0). To be
certain of the number of devices that may be connected to a line, as
determined by the total RENs, contact the local telephone company.
5. If this equipment (SPP-N1003) causes harm to the telephone network,
the telephone com pa n y will notify you in advan ce t hat tem p or a r y
discontinuance of service may be required. But if advance no tice isn’t
practical, the telephone company will notify the customer as soon as
possible. Also, you will be advised of your right t o file a complaint with
the FCC if you believe it is necessary.
6. The telephone company may make changes in its facilities, equip ment,
operations or procedures that co uld affect the operation of the
equipment. If this happens the telephone company will provide advance
notice so you can make necessary modifications to maintain
uninterrupted service.
7. If trouble is experienced with this equipment (SPP-N1003), for repair or
warranty information, please contact Sony Direct Response Center: Tel
1-800-222-7669. If the equipment is causing harm to the telephone
network, the telephone company may request that you disconnect the
equipment until the problem is resolved.
8. All repairs will be performed by an authorized Sony service station.
9. This equipment can not be used to party li nes or coin lines.
10. This equipment is hearing aid compatible.
If your telephone is equipped with automatic dialers
When programming emer gency numbers and (or) mak ing test calls to
emergency numbers:
1. Remain on the line and briefly explain t o the dispatcher the reason for
the call.
2. Perform such activities in the off-peak hours, such as early morning or
late evenings.
Caution
You are cautioned that any changes or modifications not expressl y
approved in this manual could void your authority to operate this
equipment.
Note
This equipment has been tested and found to comply with the limits for a
Class B digital device, pursuant to Part 15 of the FCC Rules. These limits
are designed to provide reasonable protection against harmful interference
in a residential installation. This equipment generates, uses and can radiate
radio frequency energy and, if not installed and used in accordance with the
instructions, may cause harmful interference to radio communications.
However, there is no guarantee that interference will not occur in a
particular installation . If this equipme nt does cause harmful int erferen ce to
radio or television reception, which can be determined by turning t he
equipment off and on, the user is encouraged to try to correct the
interference by one or more of the following measures:
– Reorient or relocate the receiving antenna.
– Increase the separation between the equipment and receiver.
– Connect the equipment into an outlet on a circuit different from that
to which the receiver is connected.
– Consult the dealer or an ex perienced radio/TV technician for help.
Setting up the phone
Caution
The cordless telephone operates at a frequency that may cause interference to nearby
TVs and VCRs; the base unit should not be placed near or on the top of a TV or VCR;
and, if interference is experienced, moving the cordless telephone farther away from
the TV or VCR will often reduce or eliminate the interference.
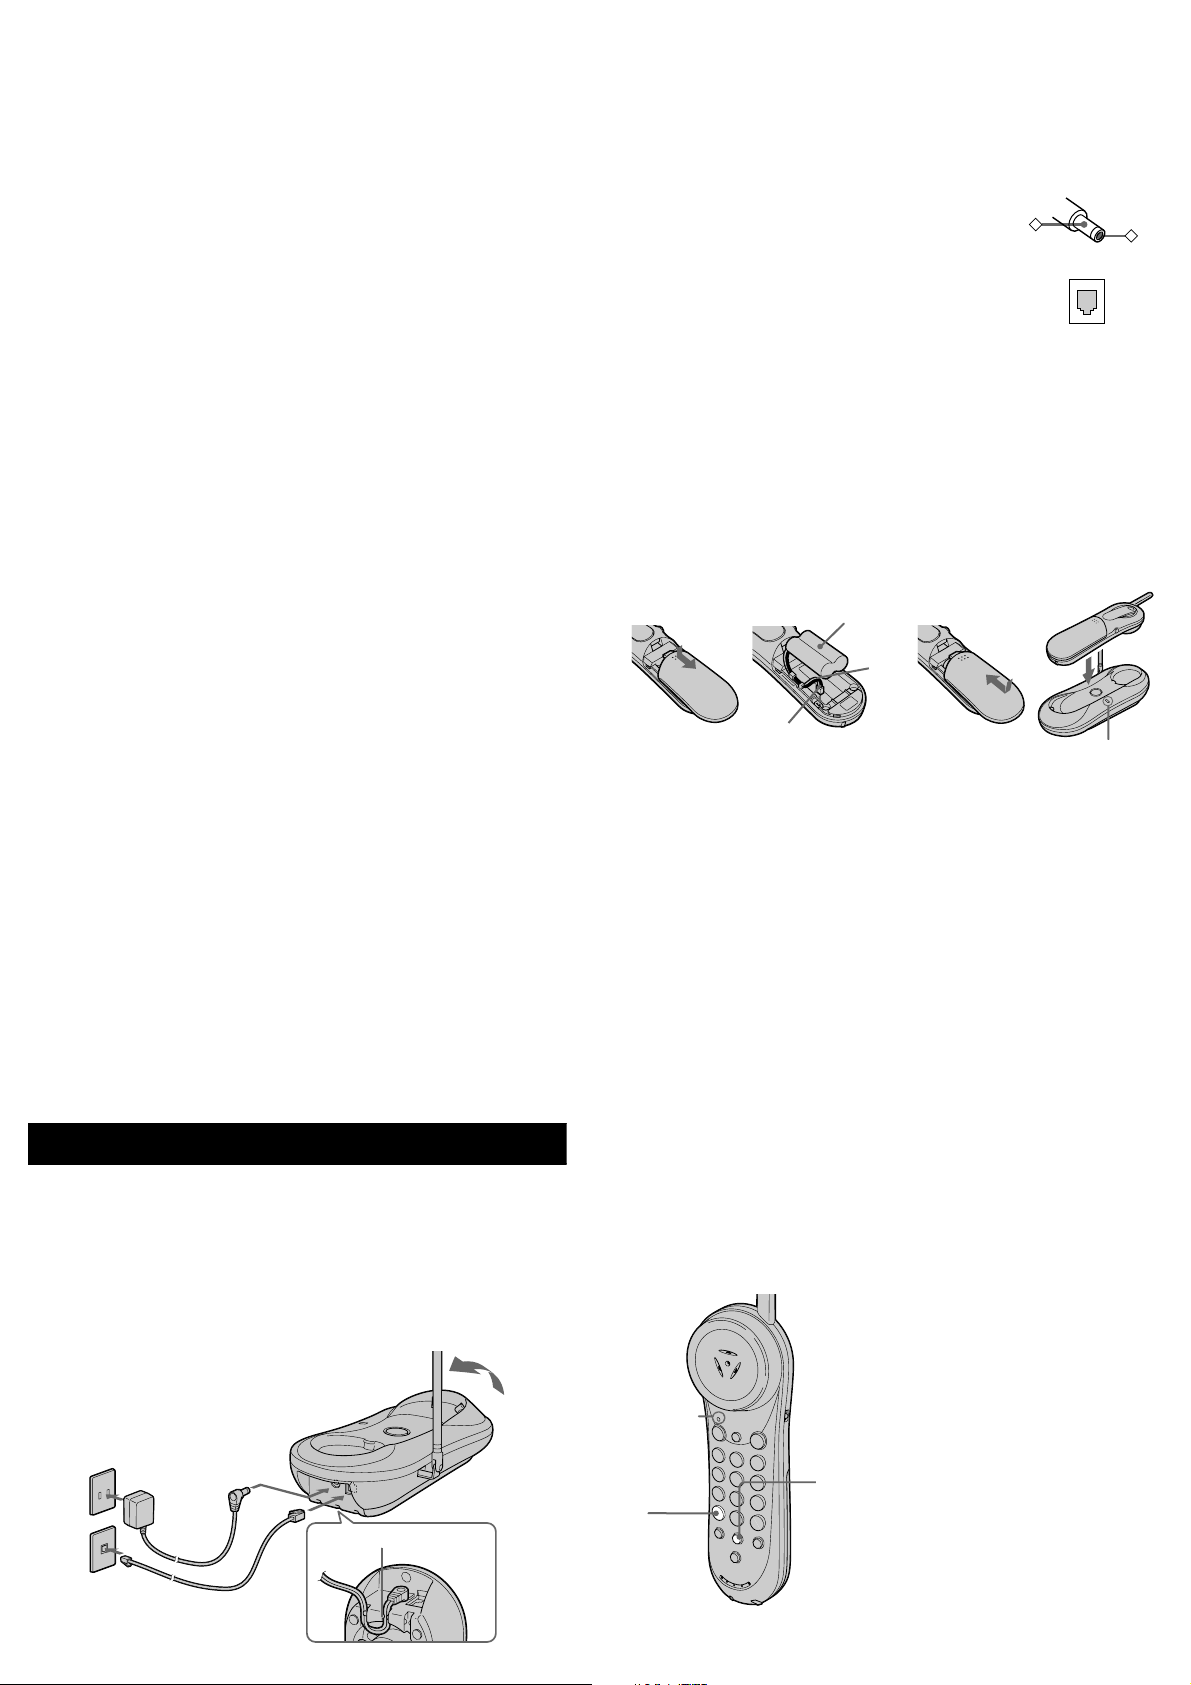
Connect the base unit
If you want to hang the base unit on the wall, mount the unit first (see “Mounting the
base unit on the wall”).
3
2
AC power adaptor
To AC ou tlet
To telephone
outlet
(supplied AC-T127)
To DC IN 9V
1
Telephone line cord
(supplied)
Hook the cord.
To LINE
1
Connect the telephone line cord to the LINE jack and to a telephone
outlet.
2
Connect the AC power adaptor to the DC IN 9V jack and to an AC
outlet.
3
Raise the antenna. Make sure it points toward the ceiling.
Notes
• Use only the supplied AC-T127 AC power adaptor. Do not use
any other AC power adaptor.
• Connect the AC power adaptor to a continuous power supply.
• Place the base unit close to the AC outlet so that you can unplug
the AC power adaptor easily.
Tip
If your telephone outlet is not modular, contact your telephone
service company for assistance.
Polarity of the plug
–
Modular
+
Prepare the battery pack
Insert the battery into the handset and charge first before you start using your phone.
1
Slide open the battery compartment lid of the hand set .
2
Connect the battery con nector with co rrect pola rity (black wi re goes on
lower side and red wire goes on upper side), and hook the cords.
3
Insert the battery pack, and close the lid.
4
Place the handset on the base unit.
The LINE/CHARGE lamp lights up when the hand set is properly seated
on the charge terminals of the base unit. Charge the batte ry pa ck for
more than 12 hours so that the battery is fully charged. The LINE/
CHARGE lamp remains lit even after charging is completed.
Black
BP-T50
3
Red
4
LINE/CHARGE lamp
Battery duration
A fully charged battery pack lasts for about:
• 10 hours when you use t he handset continuously.
• 30 days when the handset is in standing by.
Notes
• The battery pack will gradually discharge over a long period of time, even if not in us e.
• If you leave the battery pack in the handset without charging it, the battery pack will be
completely discharged. It may require several times of charging to recover to its full capacity.
• If the battery runs out completely, the setting of dialing mode, the speed dial numbers and the
digital security code will be erased. If this happens, charge it on the base unit for over 12 hours.
Then choose the dialing mode, set the ringer type, reprogram the speed dial numbers, and
assign a new digital security code (see “Resetting the digital security code”). You may need to
charge the battery several times before it is recha rged to its full c a paci ty.
To obtain the best performance from battery
Do not place the han dset on the ba se unit af ter each call. The ba ttery work s best if the
handset is returned to the base unit after two or three calls. However, do not leave the
handset off the base unit for a long period of time as thi s will completely discharge
the battery pack.
When to purchase a new battery pack
If the battery lasts only a few minutes even after
life of the battery has expi red and needs replacement. Contact your loca l Sony
authorized dealer or service center, and ask for Son y
pack.
Note
Battery life may vary depending on usage condition and ambient temperature.
12 hours
of charging, the usable
rechargeable ba ttery
BP-T50
Choose the dialing mode
For the telephone to work properly, select an appropriate dialing mode (tone or
pulse). The de fault setting is tone.
1
Press (PGM).
The TALK/BATT LOW lamp
flashes.
The dialing keys light up.
2
Press (* TONE).
You hear a confirmation beep.
3
Press (1) for pulse dialing or
(2) for tone diali ng.
4
Press (PGM).
You hear a long confirmation
beep and the TALK/BATT LOW
lamp goes off.
Note
Do not allow more than 20 seconds to elapse between each step of the procedure.
Page 3
Making and receiving calls
2
1, 5
(REDIAL/PAUSE)
TALK/BATT
LOW lamp
(HANDSET LOCATOR)
1
Making calls
1
Pick up the handset from th e
base unit.
2
Press (TALK), and wait until
TALK/BATT
LOW lamp
2
(* TONE)
Microphone
(CHANNEL/RINGER)
(FLASH)
VOL
switch
4
(REDIAL/PAUSE)
Receiving calls
1
When you hear the phone ring;
• Press (TALK) (or an y ke y except (OFF)).
or
• Pick up the handset from the base unit when the handset is placed on
the base unit.
The TALK/BATT LOW lamp lights up.
2
When you’re done talking, replace the handset on the base unit or press
(OFF).
The TALK/BATT LOW lamp goes off.
Additional tasks
To Do this
Adjust the handset
volume
Switch to tone
dialing temporarily
Set the ringer type While the handset is not in use, press
Switch to another
call (“call waiting
service”*)
* You need to subscribe to the service from your telephone company.
Notes
• Do not cover the microphone during the conversation; otherwise, the other party cannot hear
your voice.
• If you hear beeps during the conversation, move closer to the base unit; otherwise, the call will
be disconnected after 15 seconds. Note that, however, you may not hear beeps if it’s noisy on
the hand set.
Set the VOL switch to H (high) , M ( middle) or L (low).
Press
(* TONE)
The line will remain in tone dialing until disconnected.
press of
four type.
Press
(FLASH)
Press the button again to get back to the first caller.
after you’re connected.
(CHANNEL/RINGER)
.
If interference occurs on the handset
When you press
best reception. Howev er, if you notice interferenc e during a conversation, move
closer to the bas e unit.
If interference persists , press
improve the sound quali ty of your telephone conv ersa tion.
Note
If you hear five short beeps when you press
(TALK)
, the handset automatically searches for the channel with the
(CHANNEL/RINGER)
(CHANNEL/RINGER)
If the handset battery becomes weak during a call
The handset will beep every three seconds with the TALK/BATT LOW lamp
flashing at the same tim e. Finish your call and charge the battery pack.
Caution
If this occurs, you cannot use the handset without charging it for more than one minutes.
Redialing
1
Press (TALK), and wait until the TALK/BATT LOW lamp lights up.
2
Press (REDIAL/PAUSE) to redial the number last dialed.
Note
If the number exceeds 32 digits, the beeps will alert you that the number cannot be dialed.
To erase the last phone number dialed
(REDIAL/PAUSE)
Press
The number will be erased from the memory, and you ’ll hear a long confirmati on
beep.
twice.
the TALK/BATT LOW lamp
lights up.
The dialing keys light up.
You then hear a dial tone. If
you hear beeps, move closer to
the base unit.
3
Dial the phone number.
4
When you’re done talking,
press (OFF).
The TALK/BATT LOW lamp
goes off.
(CHANNEL/RINGER)
switches the ringer type by one of
to switch to another ch annel to
, move closer to the base unit.
. Each
Speed dialing
You can dial with a touch of a few keys by storing a phone number on a dialing key.
Storing phone numbers
1
Press (PGM).
The TALK/BATT LOW lamp
flashes.
2
Press (SPEED DIAL).
The dialing keys light up.
3
Press one of the dialing keys ((0)
to (9)) to store a phone number on.
You hear a conf i r m at ion beep.
4
Enter the phone number you want
to store.
You can enter up to 20 digit s,
including a tone and a pause, each
of which is counted a s one digit.
5
Press (PGM).
You hear a lo ng confi rmati on beep ,
and number is stored. The TALK/
BATT LOW lamp goes off.
Note
Do not allow more than 20 seconds to elapse between each step of the procedure.
Tips
• If you enter a wrong number, press
• Affix the supplied directory to a desired place.
, then start from the beginning.
(PGM)
To store a number to be dialed via Private Branch Exchange (PBX)
Before entering a phone number in step 4, do as follo ws:
1
Enter the outside line access digit (e.g., 9).
2
Press (REDIAL/PAUSE).
To change a stored number
Store a new number, as described pre viously.
Note
You can replace the stored number with a new number, but you cannot just erase it.
Making calls with speed dialing
1
Press (TALK) and wait until the TALK/BATT LOW lamp lights up.
The dialing keys light up.
2
Press (SPEED DIAL).
3
Enter the desired speed dialing number ((0) to (9)).
The phone number stored in the speed dialing number will be dialed.
Paging
You can page the handset from the base unit. Note that you cannot page if the handset
is in use.
Press (HANDSET LOCATOR).
The handset rings for about one
minute.
To end the page, press (OFF) on
the handset.
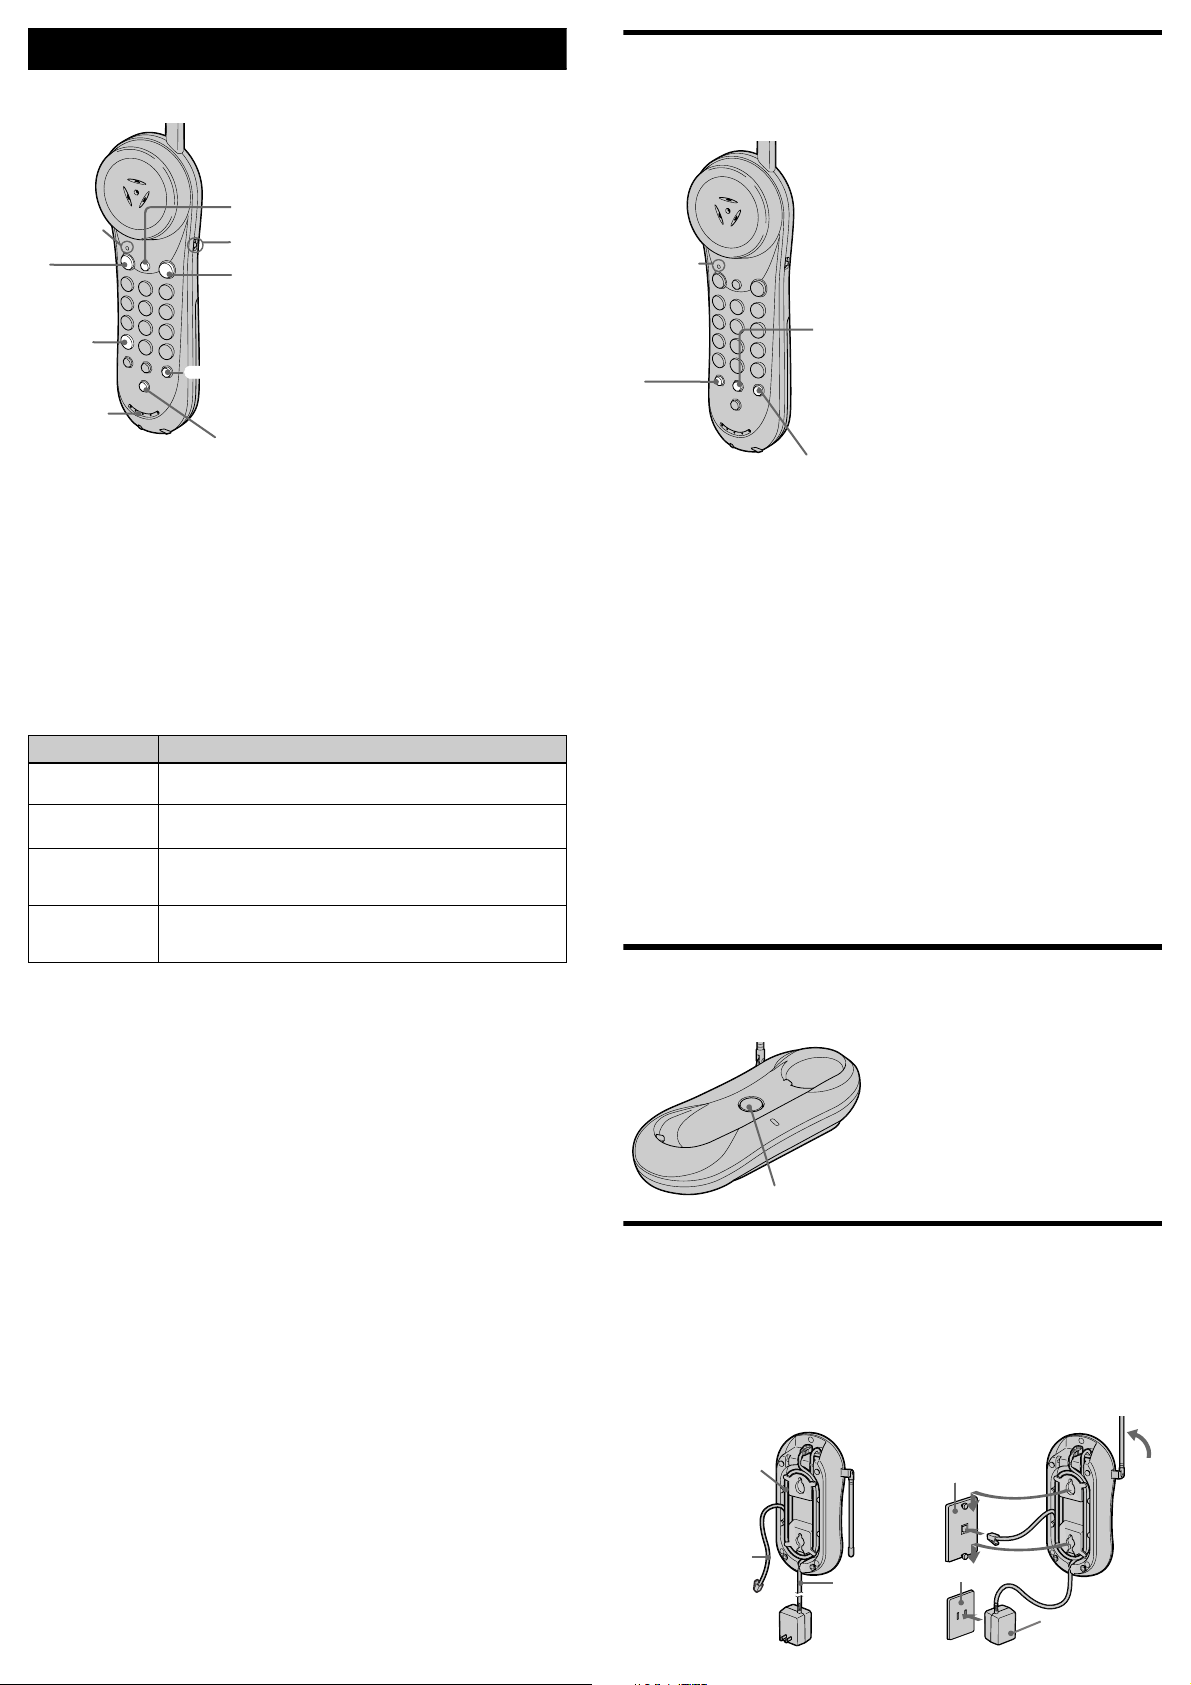
Mounting the base unit on a wall
1
Attach the telephone line cord and AC power adaptor cord to the base
unit. Bundle the loose telephone line cord or AC power adaptor cord, if
necessary.
2
Plug the telephone lin e cord into th e telephone outlet, and hook the b ase
unit to the wall plate as illustrated. P lug the AC power adaptor to an AC
outlet. Then raise the antenna so that it points towards the ceiling.
2
Bundle the loose
telephone l ine cord
or AC power
adaptor cord, if
necessary.
Telephone
line cord
AC power
adaptor cord
Wall plate
AC outlet
AC power
adaptor
Page 4

Making and receivin g calls using the
1, 4
2
TALK/BATT
LOW lamp
headset
When the suppli ed headset is conne cted to the I (HEADSET) jack, you can talk
through the headset.
headset does not fit comfortably to your ear or you would prefer to use a headset with
your right ear, please purchase a headset which is sol d separately.
1
Connect the headset cord to the I (HEADSET) jack on the handset.
2
Wear the neckband around th e back of your head. The cord should be
hanging from the left side.
3
Put your left ear between the earpad and the neckband, and adjust th e
angle of the neckban d to fit the headphones on your left ear.
Open the belt clip of handset by pressing the top of it, and then attach
the handset to the belt.
4
Position the headset microphone in front of your mouth.
1
The supplied headset is for use with the left ear.
2
I
(HEADSET)
jack
3, 4
If the
Resetting the digital secu rity code
The first time you charge the battery pac k, a random security code is a utomatically
assigned betw een the base unit and the handset. On ly a handset which has this
security code can make calls through the base unit. This system prevents the
possibility of other cordless telephone handsets making calls through your base unit.
You normally do not need to reset the security code. However, in the unlikely event
that you suspect that another cor dle ss phone uses the same security code, you can
manually change the cod e. Pick up the handset from the base unit, and proceed as
follows:
1
Press (PGM).
The TALK/BATT LOW lamp
flashes.
2
Press (#).
You hear a confirmation beep.
The dialing keys light up.
3
Press three of the dialing keys
(001 to 999) to store a new cod e.
4
Press (PGM).
You hear a long confirmation
beep and the TALK/BATT LOW
lamp goes off.
5
Immediately replace the handset
on the base unit.
You hear a long confirmation
beep and the phone stores the
new code.
Note
If the battery pack in the handset is completely discharged, or is removed from the handset for
more than several seconds, the digital security code stored will be lost. If this happens, charge the
battery pack and a new security code will be automatically assigned.
Tip
This procedure will change the code in both the base unit and the handset. The code can be
changed as often as desired.
Precaution
Avoid listening your headset at so loud a volume that extended play might affect your
hearing.
Reattaching the belt clip
The belt clip will detach from the handset if more than 7
kilograms of continuous force is appli ed. In such a case,
refer to the illus tration and reattach the belt clip.
Maintenance
• Clean the cabinets with a soft cloth slightly moistened with water or a mild
detergent solution. Do not use any type of abrasive pad, scouring powder or
solvent such as alcoho l or benzine as they ma y da mage the finish of the cabinet.
• If the charge terminals of the base unit and handset are soiled, wipe them with a
soft cloth.
If you have any questions or problems concerning your phone, please consult your
nearest Sony dealer.
Notes on power sources
On battery pack
• Store the battery pack at a temperature between 41°F (5°C) and 95°F (35°C) for
best performance.
• If you do not use the cordless handset for a long period of time, remove the battery
pack.
On power failure
• During a powe r interruption, you cannot make or receive cal ls.
For the customers in the USA
RECYCLING NICKEL-CADMIUM BATTERIES
Nickel-Cadmium batteries are recyclable. You can help preserve our
environment by returning your unwanted batteries to your nearest
point for collection, recycling or proper disposal.
Note: In some areas the disposal of nickel-cadmium batteries in
household or business trash may be prohibited.
RBRC (Rechargeable Battery Recycling Corporation) advises you
about spent battery collection by the following phone number.
Call toll free number: 1-800-822-8837 (United States and
Canada only)
Caution: Do not handle damaged or leaking nickel-cadmium batteries.
Page 5

Troubleshooting
Should any problem persi st aft e r you have made these checks, consult your nearest
authorized Sony dea le r.
Symptom Remedy
The handset does not make
or receive a call.
Y ou hear no dial tone. • Make sure the telephone line cord is securely connected
The handset does not
connect at all, even the
numbers you dial are
correct.
The handset does not redial
correctly.
The handset does not make a
speed dialing call.
The handset does not ring. • Make sure the base unit is connected to an AC outlet.
The handset does not ring
when paging from the base
unit.
You hear a beep every three
seconds and the TALK/
BATT LOW lamp fla shes.
The handset does not work. • The battery pack m ay be discharged. Charge the battery
You cannot here anything
from the headset.
• Reset the digital security code.
• Place the base unit a way from noise sourc es such as TV,
FM radio or PC.
• Make sure the base unit is connected to an AC outlet.
• The battery pack may be disch arged . Charge the battery
pack for more than 12 hours.
to the telephone outlet.
• Choose an appropria te dia ling mode again.
• Make sure the number (including the tone and pause
digits, if used) you last dialed is less than 32 digits.
• Make sure there is a phone numbe r corr ectl y stored in
the speed dialing.
• Store the desired phone number once more.
• The battery may have little or no power. Charge the
battery pack for more than 12 hours.
• Place the base unit away from noise sources.
• Charge the battery pack for more than 12 hours.
pack for more than one min ute. After this initial one
minute, you may be able to use the handset , but more
than 12 hours are necessary for full charging.
• Unplug the headset cord, an d plug it again into the
(HEADSET) jack on the handset.
I
• Wipe the tip of the head se t cord plug.
Specifications
General
Operating frequency 902-928 MHz bands
Frequency control Crystal-controlled PLL
Operation mode FM, duplex
Operation channel 30 channels
Supplied accessories AC power adaptor AC-T127
Handset
Power source Rechargeable battery pack BP-T50
Battery life Standby: Approx. 30 days
Dimensions Approx. 2 1/4 × 7 1/8 × 1 15/16 inches (w/h/d), antenna excluded
Mass Approx. 5.5 oz (approx. 155 g), battery included
Base unit
Power source DC 9V from AC power adaptor
Battery charging time Approx. 12 hours
Dimensions Approx. 4 1/4 × 2 1/8 × 8 3/8 inches (w/h/d), antenna excluded
Mass Approx. 7.6 oz (approx. 215 g)
Headset (TL-HD10, for the use of the left ear only)
Cord length Approx. 47 1/4 inches (approx. 1.2 m)
Mass Approx. 2 oz (approx. 55 g)
Design and specifications are subject to change without notice.
Telephone line cord
Headset TL-HD10, for the use of the left ear only
Rechargeable battery pack BP-T50
Directori e s (2 sh eets)
Talk: Approx. 10 hours
(approx. 55 × 180 × 48 mm)
Antenna: Approx. 1 15/16 inches (approx. 48 mm)
(approx. 107 × 52 × 212 mm)
Antenna: Approx. 4 5/8 inches (approx. 115 mm)
Page 6

Para clientes en EE. UU.
8. No deje que nada descanse sobre el cable eléctrico. No sitúe este
producto en un lu gar donde el cable esté expuesto a abuso debido al
tránsito de la gente.
9. No sobrecargue los tomacorrientes de pared y cables de extensió n, ya
que esto puede ocasionar el riesgo de incendio o shock eléctrico.
10. Nunca introduzca a presión objetos de ningún tipo en este producto a
través de las ranuras del gabinete, ya que pueden hacer contacto con un
punto de voltaje peligroso u ocasionar un cortocircuito entre piezas que
podría conducir a incendios o shock eléctrico. Nunca derrame líquidos
de ningún tip o sobre el producto.
11. Para reducir el riesgo de shock eléctrico, no desarme este producto; en
caso de necesitarse servicio o re paració n, lléve lo a perso nal de servicio
calificado. El abrir o q uitar las tapas pued e exponerle a vo ltaje peligroso
u otros riesgos. El reensamblaje incorrecto puede ocasionar shock
eléctrico cuando el aparat o se use posteriormente.
12. Desconecte este producto de la línea telefónica y refiera el servicio a
personal de servicio calificado bajo las siguientes condiciones:
A. Cuando el cable eléctrico o el enchufe se encuentra dañado o
deshilachado.
B. Si se ha derramado líquido dentro del producto.
C. Si el producto ha estado expuesto a lluvia o agua.
D. Si el producto no opera normalmente al seguir las instrucciones de
operación. Sólo debe ajustar los controles incluidos en las
instrucciones de operación, ya que el ajuste incorrecto de otro s
controles p uede p rod ucir daño s y a me nudo exi girá tra baj o ex tens o
por un técnico calificado para restaurar el producto a las
operaciones normales.
E. Si el producto se ha dej a do caer o el gabinete está dañado.
F. Si el producto e xhibe un cambio perceptible de operación.
13. Evite usar un teléfono (que no sea del tipo inalámbrico) durante una
tormenta eléctrica. Existe la remota posibilidad de shock eléctrico
debido a rayos.
14. Para notificar una fuga de gas, no utilice el teléfono en la vecindad de
dicha fuga.
Guarde el recibo y únalo a su tarjeta de GARANTÍA para el caso de tener que llevar
su equipo a reparar a un cent ro de reparaciones autoriz a do por Sony.
Registro del propietario
Los números de modelo y de seri e se encuentran en la parte inferior del
teléfono. Anote el número de serie en el espacio que se proporciona a
continuación. Refiérase a estos números cada vez que se comunique con su
distribuidor Sony con respecto al producto.
Modelo N
o
SPP-N1003 Serie No
Para clientes en EE. UU.
IMPORTANTES
INSTRUCCIONES DE
SEGURIDAD
A fin de reducir el riesgo de incendio, descarga eléctrica y lesion es a las
personas cuando usted use su equipo telefónico , siempre debe observar
precauciones básicas de seguridad, entre ellas:
1. Lea y entienda todas la s instrucciones.
2. Siga todas las advertencias e instrucciones indicadas en el prod ucto.
3. Desconecte este producto de la línea telefónica antes de limpiarlo. No
use limpiadores líquidos ni en aerosol. Use un paño húmedo par a
limpiarlo.
4. No use este producto cerca del agua, por ejemplo, cerca de una bañera,
lavabo, fregadero de cocina o lavadora, en un sótano mojado o cerca de
una piscina.
5. No ponga este producto sobre un carrito, estante o mesa inestables. El
aparato se puede caer y ocasionar d años graves al teléfono.
6. Las ranuras y aberturas situadas en la parte posterior o inferior son parte
del sistema de ventilación. Para evitar e l calentamiento de l aparato, no
obstruya o cubra las ranuras de ventilación y evite dejarlo sobre la cama,
sofá, sillón o superficie similar. Este producto nunca debe colocarse
cerca de un radiador o calefacción, o encima de éste. Este producto no
debe colocarse en una instalación empotrada salv o que se provea
ventilación apropiada.
7. Este producto sólo debe operar se desde el tipo de fuente de
alimentación indicada en la etiqueta de especificaciones. Si no está
seguro del tipo de fuente de alimentación en su hogar, consulte con su
distribuidor o compañía de electricidad local.
GUARDE ESTAS
INSTRUCCIONES
PRECAUCIÓN:
Para reducir el ries go de ince ndio o les ión a pers ona s de bido a la pi la, lea y
siga estas instrucciones:
1. Sólo debe utilizar un paquete de pila s del sigu iente tipo y tama ño: Sony
BP-T50.
2. No deseche el paquete de pilas en una hoguera ya que la pila puede
explotar. Compruebe los reglamentos locales sobre posibles
instrucciones especi ales de desecho.
3. No abra ni mutile el paquete de pilas. El electrólito liberado es corrosivo
y puede ocasionar daños a los ojos o la pie l. Puede ser tóxico si se
ingiere.
4. Tenga cuidado al manejar la pila a fin de evitar cortocircuitos de la pila
con materiales conductores tales como anillos, pulseras y llaves. La pila
o el conductor puede sobrec alentarse y ocasionar quemaduras.
5. Sólo debe cargar el paquete de pilas su m inistrado o identificado para
uso con este producto de acuerdo con las instrucciones y limit aciones
especifi ca das en el manual de instruc c i on es correspondiente al
producto.
6. Observe la orientación de polaridad correcta entre el paquete de pilas y
el cargador de pilas.
INFORMACIÓN GENERAL
SOBRE LOS TELÉFONOS
1. Este equipo cumple con la Parte 68 de las reglas de la FCC. En la ba se
de este equipo hay una etiqueta que contiene, entre otra información, el
número de regis tro de l a FCC y el núm ero de eq uivale ncia de timbre d e
llamada (REN) para este equipo. Cuando se solicite, esta información
deberá ofrecerse a la compañía telefónica.
2. La toma (conector) de registro aplicable USOC-RJ11C se utiliza para
este equipo.
3. Este equipo ha sido diseñado para conectarse a la red telefónica o la de
un usuario utilizando una toma modular compatible que esté de acuerdo
con la Parte 68 de la FCC. Con este equipo se suministran un cable y
una clavija modular que cumplen con las normas de la FCC.
4. El REN se utiliza para determinar la cantidad de dispositivos que
podrán conectarse a la línea t elefónica. El exceso de REN conectados
a la línea telefónica puede resultar en que los dispositivo s no conteste n
a llamadas entrantes. Normalmente, la suma de REN no deberá ser
superior a cinco (5). Para enterarse del número total de REN que
pueden conectarse a una lí nea, póngase en contacto con la compañía
telefónica.
5. Si este equipo (SPP-N1003) produce daños en la red telefónica, la
compañía telefónica le notificará con antelación que es posible que se
requiera la interrupción temporal del servicio. Pero si la notificación
con antelación no es práctica, la compañía telefónica lo notificará al
cliente lo antes posible. Además, se le notificará el derecho a realizar
una reclamación a la FCC si usted lo considera necesario.
Page 7

6. La compañía telefónica puede realizar cambios en sus instalacio nes,
1
2
1, 4
2
Lámpara
TALK/BATT
LOW
equipos, operaciones, o procedimientos que pueden afectar la operación
del equipo. Cuando suceda esto, la compañía telefónica le avisará con
antelación para que usted real ice las modificaciones necesarias para
mantener ininterrumpido el servicio.
7. Si experimenta algún problema con este equipo (SPP-N100 3), con
respecto a la reparación o a la información sobre la garantía, póngase en
contacto con Sony Direct R e sponse Center: Tel 1-800-222-7669 (EE.
UU. solamente). Si el equipo causa problemas en la línea, la compañía
telefónica puede solicit arle que desconecte el equipo hasta que se
resuelva el prob le ma .
8. Todas las reparaciones deberá realizarlas un centro de reparaciones
Sony.
9. Este equipo no deberá utilizarse en líneas compartidas ni en líneas de
pago previo.
10. Este equipo es compatible con dispositivos para ayuda a la audición.
Si su teléfono dispone de marcadores
automáticos
Cuando programe números de emergencia y (o) realice llamadas de prueba a los
mismos:
1. Permanezca poco tiempo en la línea y explique a la otra parte la razón de la
llamada.
2. Realice tales actividades en horas no punta, como por la mañana
temprano o a ltimas horas de la tarde.
Precaución
Se le advierte que cualquier cambio o modificación no aprobado
expresamente en el presente manual podría anular su autorización para
operar este equipo.
Nota
Este equipo se ha sometido a pruebas y se ha determinado que cumple los
límites para un aparato digital Clase B de conformidad co n la Parte 15 de
las Reglas FCC. Dichos límites están diseñados para brindar protección
razonable contra interferencia dañina en una instalación residencial. Este
equipo genera, utiliza y pu ede radiar energía de radiofrecuen cia y, si no se
instala y se usa de acuerdo con las i nst rucciones, puede ocasionar
interferencia dañina en las radiocomunicaciones. Sin embargo, no hay
garantía de que no ocurra interferencia en una instalación específica. En
caso de que este equipo ocasi one interferencia dañina en la recep ción de
radio o televisión, que se puede determinar apagando y encendiendo el
equipo, se le insta al usuario a que trate de cor regir la interferencia mediante
una o más de las siguientes medidas:
– Reorientar o re ubicar la antena de recepción.
– Aumentar la separación entre el equipo y el receptor.
– Conectar el equipo en un enchufe de un circuito distinto al circuito al
cual está conectado el recepto r.
– Consultar con el distribuidor o con un técnico experime ntado de
radio/televisión para ayuda.
Configuración del teléfono
Precaución
La frecuencia en la que funciona el teléfono inalámbrico puede causar interferencias
en televisores o videograbadoras que se encuentren en las proximidades. El teléfono
base no debe colocarse cerca o sobre estos aparatos. En caso de interferencias, basta
con alejar el teléfono inalámbrico para reducir o eliminar este efecto.
Conexión de la unidad base
Si desea colgar la unidad base en una pared, monte en prim er lugar la unidad
(consulte “Montaje de la unidad base en una pared”).
3
2
Adaptador de
alimentación de
A un tomacorriente
de CA
A una toma
telefónica
1
Conecte el cable de línea telefónica a la toma LINE y a una toma
telefónica.
2
Conecte el adaptador de alimentación de CA a la toma DC IN 9V y a un
tomacorriente de CA.
3
Levante la antena. Cerciórese de que quede apuntando hacia el t echo.
CA (AC-T127
suministrado)
A DC
IN 9V
A LINE
1
Cable de línea telefónica
(suministrado)
Enganche el cable.
Notas
• Utilice solamente el adaptador de alimentación de CA ACT127 suministrado. No emplee ningún otro adaptador de
alimentación de CA.
• Conecte el adaptador de alimentación de CA a una fuente de
alimentación continua.
• Coloque la unidad base cerca del tomacorriente de CA para
poder desenchufar fácilmente el adaptador de alimentación de CA.
Sugerencia
Si su toma telefónica no es modular, póngase en contacto con la
compañía telefónica para solicitar ayuda.
Polaridad de la clavija
–
Toma modular
+
Preparación de la batería
Inserte la batería e n el mi croteléfono y cárgu el a antes de utilizar su telé fono.
1
Deslice y abra la tapa del compartimiento de la batería del
microteléfono.
2
Conecte el conector de la batería con la polaridad correcta (conductor
negro a la parte baja y rojo a la parte alta), e enganche los cables.
3
Inserte la batería, y después cierre la tapa.
4
Coloque el microteléfono en la unidad base.
La lámpara LINE/CHARGE se encenderá cuando el microteléfono esté
completamente asentado en los term inales de la unidad base. Cargue la
batería durante más de 12 horas a fin de que quede completamente
cargada. La lámpara LINE/CHARGE permanecerá encendida incluso
aunque haya terminado la carga.
Negro
BP-T50
3
Rojo
4
Lámpara LINE/CHARGE
Duración de la batería
Una batería comp le tamente cargada durará aproximadam ente:
• 10 horas cuando utilice continuamente el microteléfono.
• 30 días con el microteléfono en el modo de espera .
Notas
• La batería se descargará gradualmente con el tiempo, incluso aunque no se utilice.
• Si deja la batería en el microteléfono sin cargarla, se descargará completamente. Para que la
batería recupere su plena capacidad, pueden requerirse varias cargas.
• Si la batería se agota por completo, el ajuste del modo de marcación, los números de marcación
abreviada, y el código de seguridad digital se borrarán. Cuando suceda esto, cárguela en la
unidad base durante más de 12 horas. Después vuelva a programar los números de marcación
abreviada, ajuste el tipo de generador de llamada, vuelva a programar los números de
marcación abreviada, y asigne un nuevo código digital de seguridad (consulte "Reposición del
código digital de seguridad"). Usted quizás tenga que cargar varias veces la batería para que
se recargue hasta su plena capacidad.
Para obtener el máximo rendimiento de la batería
No coloque el microtel éfono base en la unidad base después de cada llamada . La
batería trabajará mejor si devuelve el microteléfono a la unidad base después de dos
o tres llamadas. Sin emba rgo, no deje el teléfono fuera de la unidad base durante
mucho tiempo, ya que la batería podría descarga rse com pletamente.
Cuándo adquirir una nueva batería
Si la batería dura solamente algunos minutos incluso después de
la duración útil de la m isma habrá expirad o, y habrá que reemplazarla. Póngase en
contacto con su proveedor o con un centro de reparaciones autorizado por Sony, y
solicite una nueva batería
Nota
La duración de la batería puede variar dependiendo de las condiciones de utilización y de la
temperatura ambiental.
BP-T50
Sony.
12 horas
de carga,
Elección del modo de marcación
Para que el teléfono funci one correctamente, sel ec ci one el modo de marcació n
apropiado (por tonos o por pulsos). El ajuste predeterminado es marcación por tonos.
1
Presione (PGM).
La lámpara TALK/BATT LOW
parpadeará.
Las teclas de marcación se
encenderán.
2
Presione (* TONE).
Usted oirá un pi tido de
confirmación.
3
Presione (1) para la marcación
por pulsos o (2) para la
marcación por tonos.
4
Presione (PGM).
Usted oirá un pi tido largo de
confirmación y la lámpara
TALK/BATT LOW se apagará.
Nota
No deje que transcurran más de 20 segundos entre cada paso del procedimiento.
Page 8

Realización y recepción de
2
1, 5
(REDIAL/PAUSE)
Lámpara
TALK/BATT
LOW
(HANDSET LOCATOR)
llamadas
Para borrar el último número de teléfono marcado
Presione dos veces
El número se borrará de la memoria, y usted oirá un pitido largo de confirmación.
(REDIAL/PAUSE)
.
Realización de llamadas
1
Tome el microteléfono de la
unidad base.
2
Lámpara
TALK/
BATT LOW
2
(FLASH)
Selector
VOL
4
Presione (TALK) y espere
hasta que s e en cienda la
lámpara TALK/BATT LOW.
Las teclas de marcación se
encenderán.
Después oirá el tono de
invitación a marcar. Si oye
pitidos, acérquese a la unidad
(* TONE)
(REDIAL/PAUSE)
Micrófono
(CHANNEL/RINGER)
base.
3
Marque el número de teléfono.
4
Cuando termine de conversar,
presione (OFF).
La lámpara TALK/BATT
LOW se apagará.
Recepción de llamadas
1
Cuando suene el teléfono:
•Presione (TALK) (o cualquier tecla excepto (OFF)).
o
• Tome el microteléfono de la unidad base si está colocado en ella.
La lámpara TALK/BATT LOW se encenderá.
2
Cuando termine de conversar, col oque el microteléfono en la unidad
base o presione (OFF).
La lámpara TALK/BATT LOW se apagará.
Tareas adicionales
Para Haga lo siguiente
Ajustar el volumen
del microteléfono
Cambiar
temporalmente a
marcación por
tonos
Ajuste del tipo de
generador de
llamada
Cambiar a otra
llamada (servicio
de “llamada en
*)
espera”
* Para a bonarse a este servi cio, póngase en co nt acto con la compa ñía telefónica.
Notas
• No cubra el micrófono durante la conversación, ya que la otra parte no podría escuchar su voz.
• Si oye pitidos durante la conversación, acérquese a la unidad base, ya que de lo contrario la
llamada se desconectaría después de 15 segundos. Sin embargo, tenga en cuenta que es posible
que no oiga pitidos si hay ruido en el microteléfono.
Ponga el selector VOL en H (alto), M (medio), o L (bajo).
Presione
(* TONE)
La línea permanecerá en el modo de marc ación por t onos hasta q ue
la desconecte.
Mientras no esté utilizando el microteléfono, pre sione
(CHANNEL/RINGER)
(CHANNEL/RINGER)
entre uno de los cuatro disponib les.
Presione
(FLASH)
Para volver a la primera llamada, presione de nuevo la tecla.
después de haberse conectado la llam ad a.
. Cada vez que presione
, el tipo de generador de llamad a cam biará
.
Si se producen interferencias en el microteléfono
Cuando presione
mejor recepción. Sin embargo, si nota interferencias durante una conversación,
acérquese a la unidad base.
Si la interferencia persiste, presione
a fin de que mejore la cali dad del sonido de su conversaci ón por teléfono.
Nota
Si oye cinco pitidos cortos cuando presione
Si la batería se debilita durante una llamada
El microteléfono em it irá un pitido cada tres segundos y la lámpara TALK/BAT T
LOW parpadeará al m ism o t ie mpo. Finalice su llamada y c argue la batería.
Precaución
Cuando ocurra esto, no podrá utilizar el microteléfono sin haber cargado su batería durante más
de un minuto.
(TALK)
, el microteléfono buscará automáticamente el canal con la
(CHANNEL/RINGER)
(CHANNEL/RINGER)
para cambiar a otro canal
, acérquese a la unidad base.
Repetición de la marcación
1
Presione (TALK) y espere hasta que se enciend a la lámpara TALK/
BATT LOW.
2
Para repetir la marcación del últi mo número marcado, presione
(REDIAL/PAUSE).
Nota
Si el número es de 32 dígitos, unos pitidos le indicarán que el número no puede volver a marcarse.
Marcación abreviad a
Usted podrá marcar un número de teléfono presionando unas pocas teclas después de
haber almacena do ta l número en una tecla de marcación abrevia d a .
Almacenamiento de números de teléfono
1
Presione (PGM).
La lámpara TALK/BATT LOW
parpadeará.
2
Presione (SPEED DIAL).
Las teclas de marcación se
encenderán.
3
Presione una de las teclas de
marcación ((0) a (9)) para
almacenar un número de teléfono
en ella.
Usted oirá un pi tido de
confirmación.
4
Introduzca el número de teléfono
que desee almacenar.
Usted podrá introducir hasta 20
dígitos, incluye ndo un tono y una
pausa, cada uno de los cua le s se
contará como un dígito.
5
Presione (PGM).
Usted oirá un pi tido largo de
confirmación, y el número se
almacenará. La lámpara TALK/
BATT LOW se apagará.
Nota
No deje que transcurran más de 20 segundos entre cada paso del procedimiento.
Sugerencias
• Si introdujo un número erróneo, presione
• Fije el directorio suministrado en el lugar deseado.
, y vuelva a comenzar desde el principio.
(PGM)
Para almacenar un número a marcarse a través de una
centralita privada (PBX)
Antes de introducir el núm ero de teléfono en el paso 4, real ice lo siguiente:
1
Introduzca el dígito de acceso a la línea exterior (p. ej., 9).
2
Presione (REDIAL/PAUSE).
Para cambiar un número almacenado
Almacene otro nuev o, com o se ha descrito anteriormente.
Nota
Usted podrá reemplazar el número almacenado por otro nuevo, pero no podrá borrarlo.
Realización de llamadas con la marcación abreviada
1
Presione (TALK) y espere hasta que se encienda la lámpara TALK/
BATT LOW.
Las teclas de marcación se encenderán.
2
Presione (SPEED DIAL).
3
Introduzca el número de marcación abreviada deseado ((0) a (9)).
El número de teléfono almacenado en las teclas de marcación abreviada
se marcará.
Buscapersonas
Usted podrá llamar al microteléfono desde la unidad base. Sin embargo, tenga en
cuenta que no podrá reali za r est o si e stá utilizándose el microt el éfono.
Presione
(HANDSET LOCATOR).
El microteléfono sonará durant e
unos minuto.
Para terminar la llamada
buscaperso na s , pr e s ione (OFF)
del microteléfono.
Page 9

Montaje de la unidad base en un a pa red
1, 4
2
Lámpara
TALK/BATT
LOW
Reposición del código digital de
1
Enchufe el cable de la línea telefónica y el adaptador de alimentación de
CA en la unidad base. Si es necesario, enrolle el cable de línea telefónica
o el del adaptador de alimenta ción de CA sobrante.
2
Enchufe el cable de línea telefónica en la toma telefónica y enganche la
unidad base en la placa mural como se muestra en la ilustración.
Enchufe el adaptador de alimentación de CA en un tomacorriente de
CA. Después levante la antena de forma que quede apuntando haci a e l
techo.
1
Si es necesario,
enrolle el cable de
línea telefónica o
el del adapta dor de
alimentación de
CA sobrante.
Cable de la línea
telefónica
Cable del
alimentación
de CA
2
Placa mural
Tomacorriente de CA
Adaptador de
alimentación
de CA
Realización y recepción de llamadas utilizando el casco
Si conecta el casco suministrado a la toma I (HEADSET), podrá conversar a través
del mismo.
Si el casco no encaja cómodamente en su oído, o si prefiere utilizar otro para el oído
derecho, adquiéral o a p arte.
1
2
3
4
El casco suministrado es para utilizarse en el oído izquierdo.
Conecte el cable del casco en la toma I (HEADSET) del
microteléfono.
Colóquese la banda para la nuca alrededor de su cabeza. El cable deberá
quedar colgando por la parte izquierda.
Coloque su oído izquierdo entre el auricular y la banda para la nuca, y
ajuste el ángulo de dicha banda para fijar el auricular en su oído
izquierdo.
Abra la presilla par a el cinturón presionando su parte superior, y
después fije el microteléfono a su cint urón.
Coloque el micrófono del casco frente a su boca.
1
I
Toma
(HEADSET)
2
seguridad
La primera vez que cargue la batería, se a si gnará automática m ente un código de
seguridad aleatorio entre la uni dad base y el microte lé fono. A través de la un ida d
base solamente podrán realizarse llamadas utilizando un microteléfono que pose este
código de seguridad. Este sistema evita la posibilidad de que puedan realizarse
llamadas a través de su unidad bas e co n otros microtelé fonos inalámbric os . U s te d
normalmente no necesit ar á re poner el código de seguridad. S in embargo, en el
improbable cas o de que sospeche que otro tel éfono inalámbrico e s tá utilizando el
mismo código de seguridad, podrá cambiar manualmente dicho código. Tome el
microteléfono de la unidad base, y realice lo siguiente.
1
Presione (PGM).
La lámpara TALK/BATT LOW
parpadeará.
2
Presione (#).
Usted oirá un pi tido de
confirmación.
Las teclas de marcación se
encenderán.
3
Presione tres de las tecla de
marcación (00 1 a 999) para
almacenar un nuevo códi go.
4
Presione (PGM).
Usted oirá un pi tido largo de
confirmación y la lámpara
TALK/BATT LOW se apagará.
5
Coloque inmediatamente el
Nota
Si la batería del micrófono se agota por completo, o si desconecta el cable de alimentación del
microteléfono durante varios segundos, el código digital de seguridad almacenado se perderá.
Cuando suceda esto, cargue la batería, y se asignará automáticamente un nuevo código de
seguridad.
Sugerencia
El procedimiento cambiará tanto el código de la unidad base como del microteléfono. Es posible
cambiar el código tantas veces como desee.
microteléfono en la uni dad base.
Usted oirá un pi tido largo de
confirmación y el teléfono
almacenará el nuevo código.
Mantenimiento
• Limpie e l ex terior con un paño suave li geramente humedecido con agua o una
solución detergente poco concentrada. No utilice estropajos, productos abrasivos
ni disolventes como alcohol o bencina, ya que pueden dañar el acabado.
• Si se ensucian los te rminales de carga de la uni da d base y del microteléfono,
límpielos con un paño.
3, 4
Precaución
Evite escuchar con s u casc o a un volu me n tal q ue la rep rod ucci ón pr olo nga d a pued a
afectar su sentido del oí do.
Reinstalación de la presilla para el cinturón
La presilla para el cinturón se de sp re nderá del
microteléfono si se le aplic a un a fuerza continua de 7
kilogramos. En tal caso, consulte la ilustración y vuelva
a instalarla.
En caso de cualquier duda o problema con el teléfono, póngase en contacto c on el
proveedor Sony más próximo .
Notas sobre las fuentes de alimentación
Batería
• Almacen e la batería a temperatura s ent r e 5°C (41°F) y 35°C (95°F) para un
rendimiento óptimo.
• Si no va a uti li za r el microteléfono in alámbrico duran te un periodo de tiempo
prolongado, extra i ga la batería.
Interrupciones en el suministro eléctrico
• Durante las interrupciones del suministro eléctrico, no es posible realizar ni recibir
llamadas.
Para clientes en EE.UU.
RECICLAJE DE PILAS DE NÍQUEL-CADMIO
Las pilas de níquel-cadmio son reciclables. Puede ayudar a conserval
el medio ambiente devolviendo las pilas que no desee al punto de
recogida o de reciclaje más próximo.
Nota: En ciertas zonas, el desecho de pilas de níquel-cadmio en
contenedores domésticos o industriales puede estar prohibido.
La RBRC (Rechargeable Battery Recycling Corporation) le aconsejar á
sobre la recogida de pilas usadas en el siguiente número de teléfono:
Llamada gratuita: 1-800-822-8837 (sólo Estados Unidos y
Canadá)
Aviso: No maneje pilas de níquel-cadmio dañadas o con fugas.
Page 10

Solución de problemas
Si el problema persiste después de haber realizado estas comprobaciones, consulte a
su proveedor Sony.
Síntoma Solución
No es posible realizar ni
recibir llamadas.
No se oye el tono de
invitación a marcar.
El teléfono no se conecta en
absoluto, incluso aunque el
número marcado es
correcto.
El microteléfono no repite
correctamente la marcación.
No es posible realizar la
marcación ab reviada.
El microteléfono no suena. • Compruebe si la unidad base está conectada a un
El microteléfono no suena
cuando se le llama desde la
unidad base.
Se oye un pitido cada tres
segundos y parpadea la
lámpara TALK/BATT
LOW.
El microteléfono no trabaja. • Es posible que la batería esté descargada. Cárguela
No se oye nada a través del
casco.
• Reponga el código digita l de seguri da d.
• Coloque la unidad base ale ja da de fue ntes de ruido,
como un televisor, un aparato de radio de FM, o un PC.
• Compruebe si la unidad base está conectada a un
tomacorriente de CA.
• Es posible que la batería e sté desca rgada. Cárguela
durante más de 12 horas.
• Compruebe si el cab le de lí nea telef ónica está conectado
con seguridad a la toma telefónica.
• Vuelva a elegir el modo de marcación apropiado.
• Compruebe si el último número marcado tiene más de
32 dígitos (incluyendo tono y pausa, si los ha utilizado).
• Compruebe si el número está correctamente
almacenado en la memoria.
• Vuelva a almacenar el número de teléfono deseado.
tomacorriente de CA.
• La batería puede estar débil o agotada. Cárguela durante
más de 12 horas.
• Coloque la unidad base alejada de fuentes de ruido.
• Cárguela durante más de 12 horas.
durante más de un minuto. Después de este m inut o
inicial, usted podrá utilizar el microteléfono, per o pa ra
la carga completa de la batería serán necesarias 12
horas.
• Desenchufe el cable del casco y vuel v a a enchu f arlo en
la toma I (HEADSET) del microteléfono.
• Limpie la clavija del cable del casco.
Especificaciones
Generales
Frecuencia de funcionamiento 902-928 MHz bandas
Control de frecuencia Bucle de enganche de fase (PLL)
Modo de operación FM, dúplex
Canales de operación 30 canales
Accesorios suministrados Adaptador de alimentación de CA AC-T127
Microteléfono
Fuente de alimentación Batería BP-T50
Duración de la batería Espera: Aprox. 30 días
Dimensiones Aprox. 2 1/4 × 7 1/8 × 1 15/16 pulgadas (an/al/prf), excluyendo la antena
Masa Aprox. 5,5 oz (aprox. 155 g), incluyendo la batería
Unidad base
Fuentes de alimentación 9V CC del adaptador de alimentación de CA
Tiempo de carga de la batería Aprox. 12 horas
Dimensiones Aprox. 4 1/4 × 2 1/8 × 8 3/8 pulgadas (an/al/prf), excluyendo la antena
Masa Aprox. 7,6 oz (aprox. 215 g)
Casco (TL-HD10, para utilizarse en el oído izquierdo solamente)
Longitud del cable Aprox. 47 1/4 pulgadas (aprox. 1,2 m)
Masa Aprox. 2 oz (aprox. 55 g)
El diseño y las especificaciones están sujetos a cambio sin previo aviso.
controlado por cristal
Cable de línea telefónica
Casco TL-HD10, para utilizarse en el oído izquierdo solamente
Batería BP-T50
Directorios (2 hojas)
Conversación: Aprox. 10 horas
(aprox. 55 × 180 × 48 mm)
Antena: Aprox. 1 15/16 pulgadas (aprox. 48 mm)
(aprox. 107 × 52 × 212 mm)
Antena: Aprox. 4 5/8 pulgadas (aprox. 115 mm)
 Loading...