

Page 1

LOCATION AND FUNCTION OF CONTROLS
BASE UNIT
SECTION 1
GENERAL
[T~| Charge terminals
|~2~| LINE (telephone) jack
IT] DC IN 9V jack
|T] Antenna
[T] DIAL MODE switch
Selects pulse ertone dialing
[¥] POWER lamp
[7] LINE lamp
[¥] CHARGE lamp
PAGE button
HANDSET
14
[T~| Microphone
[T] SPEED DIAL
|T| CHANNEL button
B Dialing keys
[5] TALK button
|T~| Speaker
B Antenna
0 TALK/BATT lamp
FLASH button
VOL button
[TTl MUTE button
[Tij REDIAL/PAUSE button
^13
A
PGM button
13
14 Charge terminals
14
Page 2

step 1
Step 2
Checking the package contents
Make sure you have received the following items in the package.
If anything is missing, contact your local Sony dealer.
Handset
(fi
a
n
3
(/)
r+
S)
;;
(D
a
Setting up the base unit
Do the following steps:
• Choose the best location
• Connect the base unit
• Choo.se the dialing mode
Choose the best location
Where you place the base unit affects the reception quality of the
hand.set.
Away from noise sources such as a
window by a street with heavy traffic
Away from
television sets
and other
electronic
equipment
Away from heat sources, such as
radiators, airducts, and sunlight
Away from a microwave oven
Away from excessive
moisture, extremely low
temperatures, dust,
mechanical vibration, or
shock
Téléphoné line codes (2) Screws (4) Wall bracket for base unit
Rechargeable battery pack Belt clip
(BP-T18)
Getting Started I 7^^*
Near a central
location and on a
level surface
8^" I Getting Started
H
Away from a
personal computer
Away from another cordless
telephone
Page 3
Oi
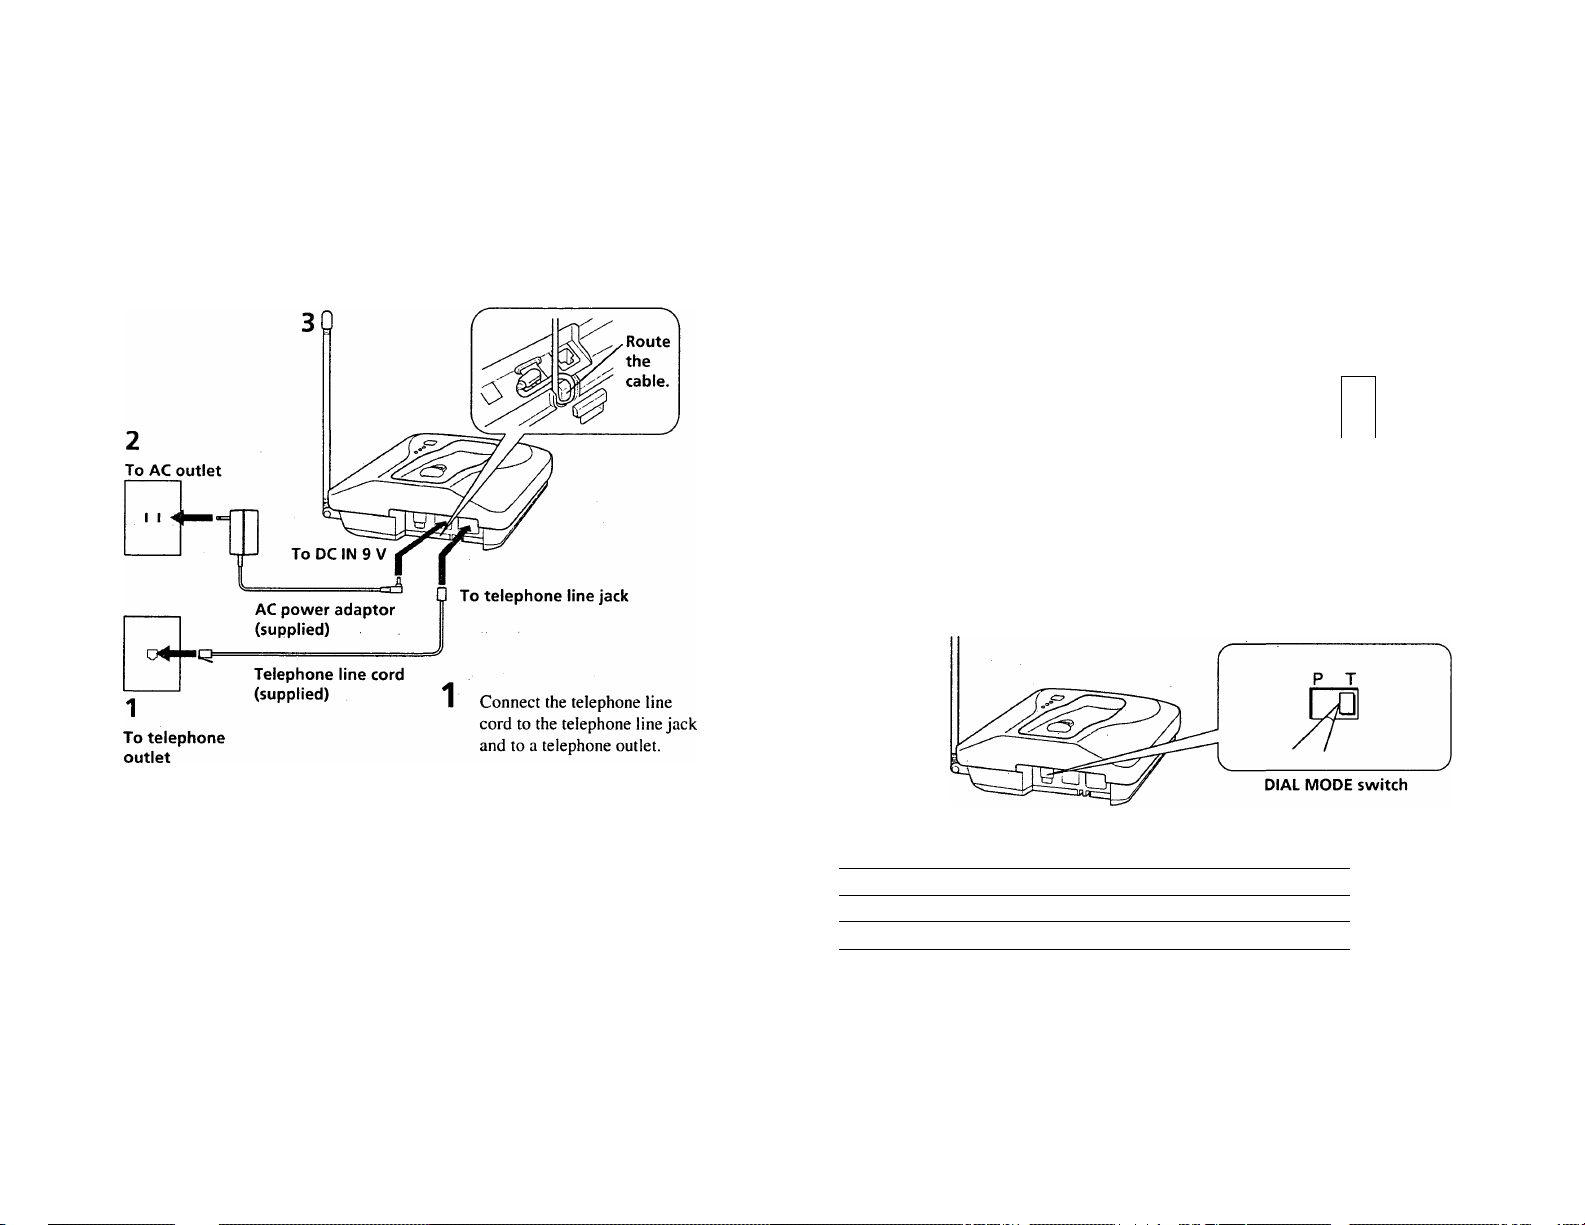
Connect the base unit
If you want to hang the base unit on the wall, mount the unit/irst (see
page 20). ,
(Q
C\
o
r+
5'
in
f+
t)
o
a
step 2: Setting up the base unit (continued)
Notes
• Use only the supplied AC-T48 AC power uduptor.
Do not use any other AC power adaptor.
• Connect the AC power adaptor to a continuous power supply.
• Place the ba.se unit close to the AC outlet so that you can
unplug the AC power adaptor easily.
Tips
• If your telephone outlet isn't modular, contact your
telephone service company for assistance.
• If you have two phone lines on a single jack with the first
phone line connected to center pair of wires, and need to
connect the second phone line (outer pair of wires),
contact your telephone company for rewiring.
Choose the dialing mode
For the telephone to work properly, select an
appropriate dialing mode (tone or pulse).
Polarity of the plug
Modular
□
Center pair
Connect the AC power adaptor
to the DC IN 9V jack and to an
AC outlet.
Raise the antenna vertically.
continued
Getting Started 9^'“
Depending on your dialing system, set the DIAL MODE switch as
follows.
If your dialing system is
Tone
Pulse
Set the switch to
T
P
If you aren't sure of your dialing system
Make a trial call with the DIAL MODE switch set to T.
If the call connects, leave the switch as it is; otherwise, set to P.
10^'^ I Getting Started
Page 4

steps
Step 3: Preparing the battery pack for the handset (continued)
О)
Preparing the battery pack for the handset
Insert the battery pack into the handset, then place the handset on the
base unit. C\
insert the battery pack
1
Slide open the battery compartment lid of the handset. Si
2 Connect the cord of the battery pack correctly.
3 Insert the battery pack into the battery compartment.
Replace the battery compartment lid.
Charge the battery pack
Place the handset on the base unit.
A
3
Battery duration
A fully charged battery pack lasts for about:
• 7 hours when you use the hand.set continuously.
• 7 days when the handset is in standby mode.
You can save the handset battery power by setting the RING ON/
ВАТТ SAVE switch to ВАТТ SAVE. The handset won't ring (see
page 16).
Notes
• The battery pack will gradually discharge over a long period of time, even if not in
use.
• The CHARGE lamp of the base unit is always lighted when the handset is placed
on the base unit, even if the battery pack has been fully charged.
Getting Started I 11' 12™ I Getting Started
Page 5

When to charge the battery pack
As long as the handset is placed on the base unit after each call, the
battery pack will be recharged continuously.
If the handset battery becomes weak
You will hear a beep every three seconds during the conversation.
The call will be di.sconnected in one minute.
When to purchase a new battery pack
If the battery la.sts only a few minutes even after 18 hours of
charging, the usable life of the battery has expired and needs
replacement.
Contact your local Sony authorized dealer or service center, and ask
for Sony BP-T18 rechargeable battery pack.
Note
If the handset battery is completely discharged, the digital security code will be erased
and all programmed numbers will be lost from memory.
In this case, first recharge the battery for more than 18 hours, then store the numbers
into the memory for speed dialing again (see page 17). The security code will be
automatically set when you replace the handset onto the base unit.
(O
Ci
n
3
V)
I-+
fi)
(D
a
Basics
Making calls
1
Press (TALK) and wait until the TALK
lamp lights up.
You then hear a dial tone. If you hear
beeps, move clo.ser to the ba.se unit.
2
Dial the phone number.
3
When you’re done talking, press
(TALK), or replace the handset on the
ba.se unit.
The TALK lamp goes off.
Additional tasks
To
Select better channel
Put a call on mute
Switch to tone dialing temporarily Press TONE CD after you’re connected.
Do this
Press (CHANNEL).
Press (MUTE).
Press the button again to resume the
conversation.
The line will remain in tone dialing until
disconnected.
If the handset battery becomes weak during a call
The handset will beep every three seconds. The call will be disconnected
after one minute. Replace the handset on the base unit to charge.
Note
If you hear a beep every second and reception becomes poor during conversation,
move closer to the base unit. Otherwise, the call will be disconnected after 15
seconds.
Getting Started I 13^" 14^'^ I Basics
Page 6

Redialing
1 Press (TALK) and wait until the TALK lamp lights up.
2 Press ( REDIAL/PAUSE) to redial the number last dialed.
Note
If the number exceeds .12 digits or there is no previous number dialed, the beeps will
alert you that the number can't be dialed.
To erase the last phone number dialed
Set the RING ON/BATT SAVE .switch to RING ON. While the
hand.set isn’t in u.se, pre.ss (REDlAiyPAUSE) twice.
The number will be era.sed from the memory, and you’ll hear a long
confirmation beep.
Ш
a
!S.
n’
(Л
Receiving calls
TALK lamp
1
When you hear the phone ring, pre.ss
(TALK) (or any dialing key
including ® and CD).
The TALK lamp lights up.
When you’re done talking, press
(FLASH)
(TALK), or replace the hand.set on
the base unit.
The TALK lamp goes off.
(MUTE)
RING ON/BATT SAVE
00
Basics 15^'^
Additional tasks
To
Put a call on mute
Switch to another call*
(“call waiting” service)
Adjust the volume of incoming
calls
• You need to subscribe to this service from your telephone company.
Tip
If you do not want to be disturbed by telephone calls, you can turn the ringer off.
Move the RING ON/BATT SAVE switch to:
• RING ON to turn the ringer on.
• ВАТТ SAVE to turn the ringer off to save battery power. In this setting, the
handset does not ring when a call comes in. However, as the LINE lamp on the
ba.se unit Hashes and informs you of incoming calls, you can still receive calls. This
setting is useful if you u.se this cordless telephone as an extension telephone and
you can hear the other phone ring.
Basics
Do this
Press CMUTE).
Press the button again to resume the
conversation.
Press f FLASH).
Press the button again to get back to the
first caller.
Press (VOL). High or low volume
can be selected alternately.
Page 7

Advanced Features
(O
Speed dialing
You can dial with a touch of a few keys by storing phone number on
a dialing key.
Storing phone numbers
1
Press Cpgm^.
The TALK lamp flashes.
Press (SPEED DIAL).
2
Press one of the dialing keys (®
to CE>) for the phone number to be
stored.
Enter the phone number you want
to store.
You can enter up to 16 digits,
including a tone and a pause, each
of which is counted as one digit.
Press (PGm.
You hear a long confirmation
beep, and the number is stored.
The TALK lamp goes off.
>
a
<
u
3
n
(D
a
■n
(D
fil
Speed dialing (continued)
To Store a number to be dialed via Private Branch Exchange (PBX)
Before entering a phone number in Step 4 on the previou.s page, do as
follows;
1 Enter the outside line access digit (e.g. 9).
2 Press C REDIAL/PAUSE) to enter a pau.se.
To change a stored number
Store a new number, as described on the previous page.
Making calls with speed dialing
1 Press (TALK~) and wait until the TALK lamp lights up.
2 Press (SPEED DIAL).
3 Enter the desired speed dialing number (QD to CD).
The phone number stored in the speed dialing number will be dialed.
Paging
Notes
• To store the previous number dialed, press REDIAL/
PAUSE directly after step 3. Then go to step 5. If the
number exceeds 16 digits or there is no previous number
dialed, five short error beeps sound and storing is
canceled.
• Do not allow more than 20 seconds to elapse between
each step of the procedure.
• Make sure that RING ON/BATT SAVE switch is set to
RING ON.
Tips
• If you enter a wrong number, start from the beginning.
• You can't receive calls while you're storing numbers.
You can page from the ba.se unit to the handset.
0
Press (PAGE).
The paging signal is heard from the handset.
When you press (PAGE) for a moment, the
paging signal sounds for one .second. Or, the
paging signal .sounds continuously as long as
you keep pressing ( PAGE).
Note
If a call comes in during paging, paging is canceled.
Advanced Features 17^'^ 18^'“ I Advanced Features
Page 8

Additional Information
Resetting the digital security
code
Since a random security code is automatically assigned between the
base unit and the handset when you charge the battery pack for the
first time, you normally do not need to reset the security code.
However, in the unlikely event that you suspect that another cordless
phone uses the same .security code, you can manually change the
code as follows:
1
Replace the handset on the ba.se unit.
Press (PAGE).
2
3
Lift the handset for a while. Then replace the
hand.set on the base unit to complete the code
change.
Note
If the battery pack in the hand.set is
completely di.scharged, or is removed from
the handset for more than several seconds, the
digital security code stored will be lost. If this
happens, charge the battery pack, and a new
.security code will be automatically assigned.
Tip
This procedure will change the code in both
the base unit and the hand.set. The code can
be changed as often as desired.
>
CL
<
S)
3
n
o
a
■n
to
Ot
Mounting the base unit on a wall
1
Attach the AC power adaptor
cord and the telephone line
Wall bracket
Telephone line cord
AC power adaptor cord
cord to the wall bracket.
U.se the shorter cord for
mounting.
Hook the wall bracket to the
wall plate, and plug the
telephone line cord into the
telephone outlet.
Instead of hooking to the wall
plate, you can mount the wall
bracket directly using the four
supplied .screws.
Insert the upper tabs first,
then press down the base unit
so that the lower tabs on the
bracket go into the base unit.
Then, raise the antenna
vertically and attach the
hang-up tab upside down.
Advanced Features I 19™ 20™ Additional Information
Page 9

Carrying the handset by the belt clip
You can hang the handset on the belt by attaching the belt clip to the
handset.
Attaching the belt clip
1 In.sert the upper tab of the
belt clip into the hole on the
top of the hand.set.
Press the belt clip to the
handset. Make sure that the
side tabs click and go into the
holes on the sides of the
handset.
Note
To prevent the handset from dropping, make sure that each tab is completely inserted.
Detaching the belt clip
Pull the sides of the belt clip
until the tabs come off from
the holes.
Additional Information 21™
>
Q.
a
S*'
o‘
3
3
o
3
u
o'
3
 Loading...