

Page 1

SONT?:
3-800-940-11(2)
Clear
Automatic Channel Selection
Cordless Telephone
with Answering
System
Operating Instructions
Ik'ioro operating the unit, please read this manual
thoroughU and retain it tor future relerence.
The table of contents is located on page 6,
Manual de instrucciones
Antes de utilizar la unidad, lea detenidamente este manual de
instrucciones, v consérc elo para futuras referencias.
El índice se encuentra en la página 48.
_______________________________
SPP-AQ25
©1995 by Sony Corporation Printed in Hong Kong
Page 2

Owner's Record
The model and the serial numbers are located at the bottom of tire unit. Record the serial
number in the space pro\'ided below. Refer to these numbers vvhene\ er you call upon your
Sony dealer regarding this product.
Model No. SPP-
Serial No.
IMPORTANT SAFETY INSTRUCTIONS
When using your telephone equipment, basic safety precautions shoulcf always be followed to
reduce the risk of fire, electric shock and injur\' to persons, including the following:
1. Read and understand all instructions.
2. Follow all warnings and instructions marked on the product.
3. Unplug this product from the wall outlet before cleaning. Do not use liquid cleaners or
aerosol cleaners. Use a damp cloth for cleaning.
4. Do not use this product near w'ater, for example, near a bath tub, wash bowl, kitchen sink,
or laundry tub, in a wet basement, or near a swimming pool.
5. Do not place this product on an unstable cart, stand, or table. The product may fall, causing
serious damage to the product.
6. Slots and of>enings in the cabinet and the back or bottom are provicied for ventilation. To
protect it from civerheating, these openings must not be blockecf or covered. The openings
should never be blocked b\' placing the product on the bed, sofa, rug, or other similar
surface. This jaroduct should never be placed near or over a radiator or heat register. This
product should not be placed in a built-in installation unless proper ventilation is provided.
7. This product should be operated only from the type of power source indicated on the
marking label. If you are not sure of the type of power supply to your home, consult your
dealer or local power company.
8. Do not allow anything to rest on the power cord. Do not locate this product where the cord
will be abused by persons u alking on it.
9. Do not overload wall outlets and extension cords as this can result in the risk of the fire or
electric shock.
10. Never push objects of an\' kind into this product through cabinet slots as they may touch
dangerous \ oltage points or short out parts that coulci result in a risk of fire or electric
shock.
Newer spill liquid of any kind on the product.
11. To reduce the risk of electric shock, dii not disassemble tlris product, but take it to a
c]ua!ified service personnel u hen some ser\ ice or repair work is rec]uirod. Opening or
reirun ing cox ers max e.xpose voii to dangerous x'ollages or other risks. Incorrect reassembly
can cause electric shock xx'hen the' appliance is subsequently used.
Page 3

12. Unplug this product from the wall outlet and refer servicing to qualified service personnel
under the following conditions.
A. When the power cord or plug is damaged or frayed.
B.
If liquid has been spilled into the product.
If the product has been exposed to rain or u ater.
C.
D.
If the product does not operate normally bv following the operating instructions.
Adjust only those controls that are cov ered bv the operating instructions because
improper adjustment of other controls may result in damage and will often reauire
extensive work by a qualified technician to restore the product to normal operation.
If the product has been dropped or the cabinet has been damageci.
If the product exhibits a distinct change in performance.
13. Avoid using a telephone (other than cordless type) during an electrical storm. There may be
a remote risk of electric shock from lightning.
14. Do not use the telephone to report a gas leak in the vicinity of the leak.
SAVE THESE INSTRUCTIONS
CAUTION: TO REDUCE THE RISK OF FIRE OR IN'JURY TO PERSONS BY BATTERY, READ
AND FOLLOW THESE INSTRUCTIONS.
1. Use only the following type and size battery pack: SONY BP-T16.
2. Do not dispose of the battery pack in a fire. The cell may explode. Check with local codes
for possible special disposal instructions.
3. Do not open or mutilate the battery pack. Released electrolyte is corrosive and may cause
damage to the eyes or skin. It may be toxic if swallowed.
4. Exercise care in handling battery in order not to short the battery with conducting materials
such as rings, bracelets, and key_The battery or conductor may overheat and cause burns.
5. Charge the battery pack provided with or identified for use with this product only in
accordance with the instructions and limitations specified in the instruction manual
provided for this product.
6. Observe proper polarity orientation between the batterv pack and battery charger.
Page 4

• «^1 (.11«; cusiomers m the U.S.A.
RECYCLING NICKEL-CADMIUM BATTERIES
NICKEL-CADMIUM BATTERY.
MUST BE DISPOSED OF PROPERLY.
Nickd-Ciidmium batteries are rec\ clable. You can help preserve our
environment bv returning vcHir unwanted batteries to vour nearest Sony Serr ice
Ni-Cd
hor the Sony Sen ice Center nearest you call ! -lS0G-222-SON^' (United States only)
Caution; Do not handle damaged or leaking nickel-cadmium batteries.
DIGITAL SECURITY CODE
Your model (SPP-AQ25) has the circurily for digital security code to provide protection against
unintentional access.
One of 65, 5,36 kinds of digital security code is ranctomly selected and fixed automatically when
you initially charge the battery pack. Therefore, there is few chance that more than two units
have the same digital security code.
Center for collection, recycling or proper disposal.
.\'ote: In .some areas the disposal of nickel-cacfminm batteries in househcild or
business trasli may be prohibited.
IMPORTANT INSTALLATION INSTRUCTION
f. Never install telephone wiring during a lightning storm.
2. Never install telephone jacks in wet location unless the jack is specifically designed for wet
location.
3. Never touch uninsulated telephone wires or terminals unless telephone line has been
disconnected at the network interface.
4. Use caution when installing or modifying telephone lines.
Page 5

For the customers in the U.S.A. (continued)
INFORMATION FOR GENERAL
TELEPHONES
(1) This equipmont complies w ith i’art 68 of the FCC rules. On the bottom of this equipment is
a label that contains, among other information, the FCC registration number and ringer
equivalence number (RFN) for this equipment. If requested, this information must be
provided to the telephone company.
(2) The applicable registration jack (connector) L'SOC-RJl 1C use for your equipment.
(3) This equipment is designed to be connected to the telephone network or premises wiring
using a compatible modular jack which is Part 68 compliant.
The FCC compliant telephone cord and modular plug is provided with this ec^uipmont.
(4) The REN is used to determine the quantity of devices which may be connected to the
telephone line. Excessive RENs on the telephone line may result in the devices not ringing
in response to an incoming call, in most, but not all areas, the sum of the REN's should not
exceed five (5.0). To be certain of the number of devices that may bo connected to a line, as
determined by the total RENs, contact the local telephone company.
(5) If your equipment (SPP-AQ25) causes harm to the telephone network, the telephone
company will notify you in advance that temporary discontinuance of service may be
required. But if advance notice isn’t practical, the telephone company will notify the
customer as soon as possible. Also, you will be advised of your right to file a complaint
with the FCC if you believe it is necessary.
(6) The telephone company may make changes in its facilities, equipment, operations or
procedures that could affect the operation of the equipment. If this happens the telephone
company will provide advance notice in order for you to make necessary modifications to
maintain uninterrupted service.
(7) If trouble is experienced with this equipment (SPP-AQ25), for repair or warranty
information, please contact SonyTelecommunications Helpline: Tel 1-(800)-222-7669. If
the equipment is causing harm to the telepihone network, the telephone company may
request that you disconnect the equipment until the problem is resolved.
(8) All repairs will be performed by an authorized Sony service station.
(9) This equipment cannot be used to party lines or coin lines.
(10) This equipment is hearing aid compatible.
If your telephone is equipped with automatic dialers
When programming emergency numbers and (or) making test calls to emergency numbers:
1. Remam on the line and brieflv explain to the dispatcher the reason for the call.
2. Perform such activities in ihe off-peak hours, such as early morning or late evenings.
Caution
You are cautioned that any changes or modifications not expressly appro\'ed in this manual
could void your authority to operate this equipment.
"Warning: This telephone operates as a radio transmitter. Conx'ersations over this cordless
telephone may beju'ard bv others on radios within the area of its range of transmission."
Page 6

Table of contents
Before operating the phone
Setting up Checking the package contents 8
Identifving the parts 9
I’lacing the phone 12
Choosing the best location for the base unit
Connecting the base unit 13
Hanging the base unit on a wall 14
Preparing the battery pack 15
Getting started Choosing tone or pulse dialing 16
Setting the dial mode 16
Using the touch-tone services with pulse dialing systems
16
Adjusting the \ olume 17
Operating the phone
12
Using as a telephone
Making and recei\ ing calls 18
Making calls 18
Receiving calls 18
Redialing 19
If interference crccurs 20
Memory dialing 21
Storing memorv dialing numbers 21
Making memory dialing calls 22
Paging from the base unit to the handset 22
Operating the phone during calls 23
Using "call waiting" service 23
6 Setting up
Page 7

Using as a telephone
answering machine
Preparing the answering machine 24
Installing the microcassette 24
Selecting the answering mode 23
Recording the greeting 26
Turning the answering machine on or off 27
Playing back messages 28
Starting playback 28
Erasing messages 29
Screening calls 30
Recording a telephone conversation 31
Recording a memo message 32
Operating the answering machine from the handset 33
-Remote control
functions
Other information
Handling the phone
General Troubleshooting 39
Operating the answering machine from a touch-tone phone
34
Setting your security code 34
Using the toll-saver feature 34
Operating the answering machine from a touch-tone
phone 35
Setting the digital security code 36
Precautions/Maintenance 37
On power source 37
On installation 37
Cleaning the cabinets 37
Cleaning the battery terminals 37
Tepe head cleaning 38
Specifications 41
LIMITED WARRANTY 42
Setting up 7
Page 8
■ Before operating the phone
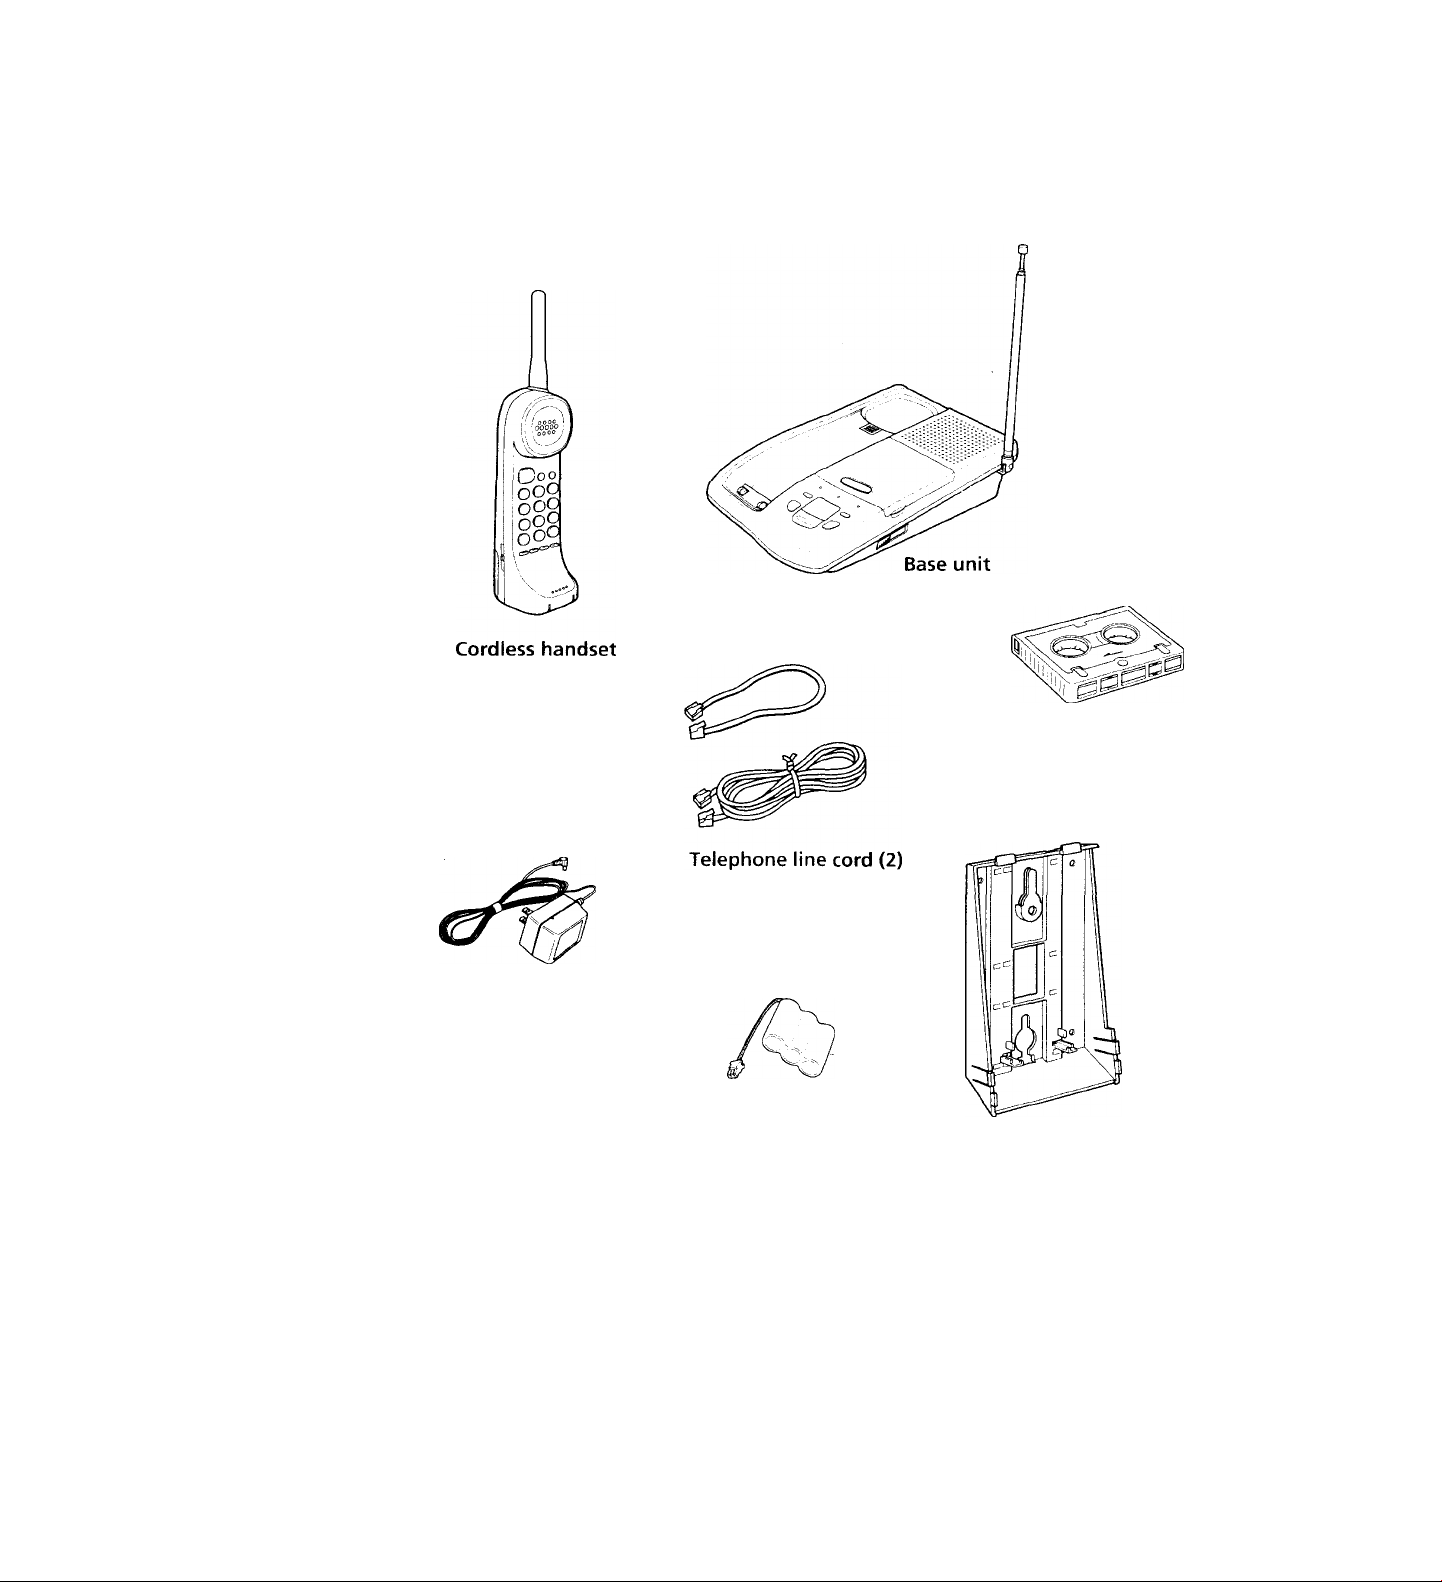
Checking the package contents
Make sure the following items are included in the package.
If any thing is missing, contact your local Sony dealer.
AC power adaptor
(AC-T42)
Microcassette
(MC30)
Rechargeable battery
pack (BP-T16)
Wall bracket
and 4 screws
8 Setting up
Page 9
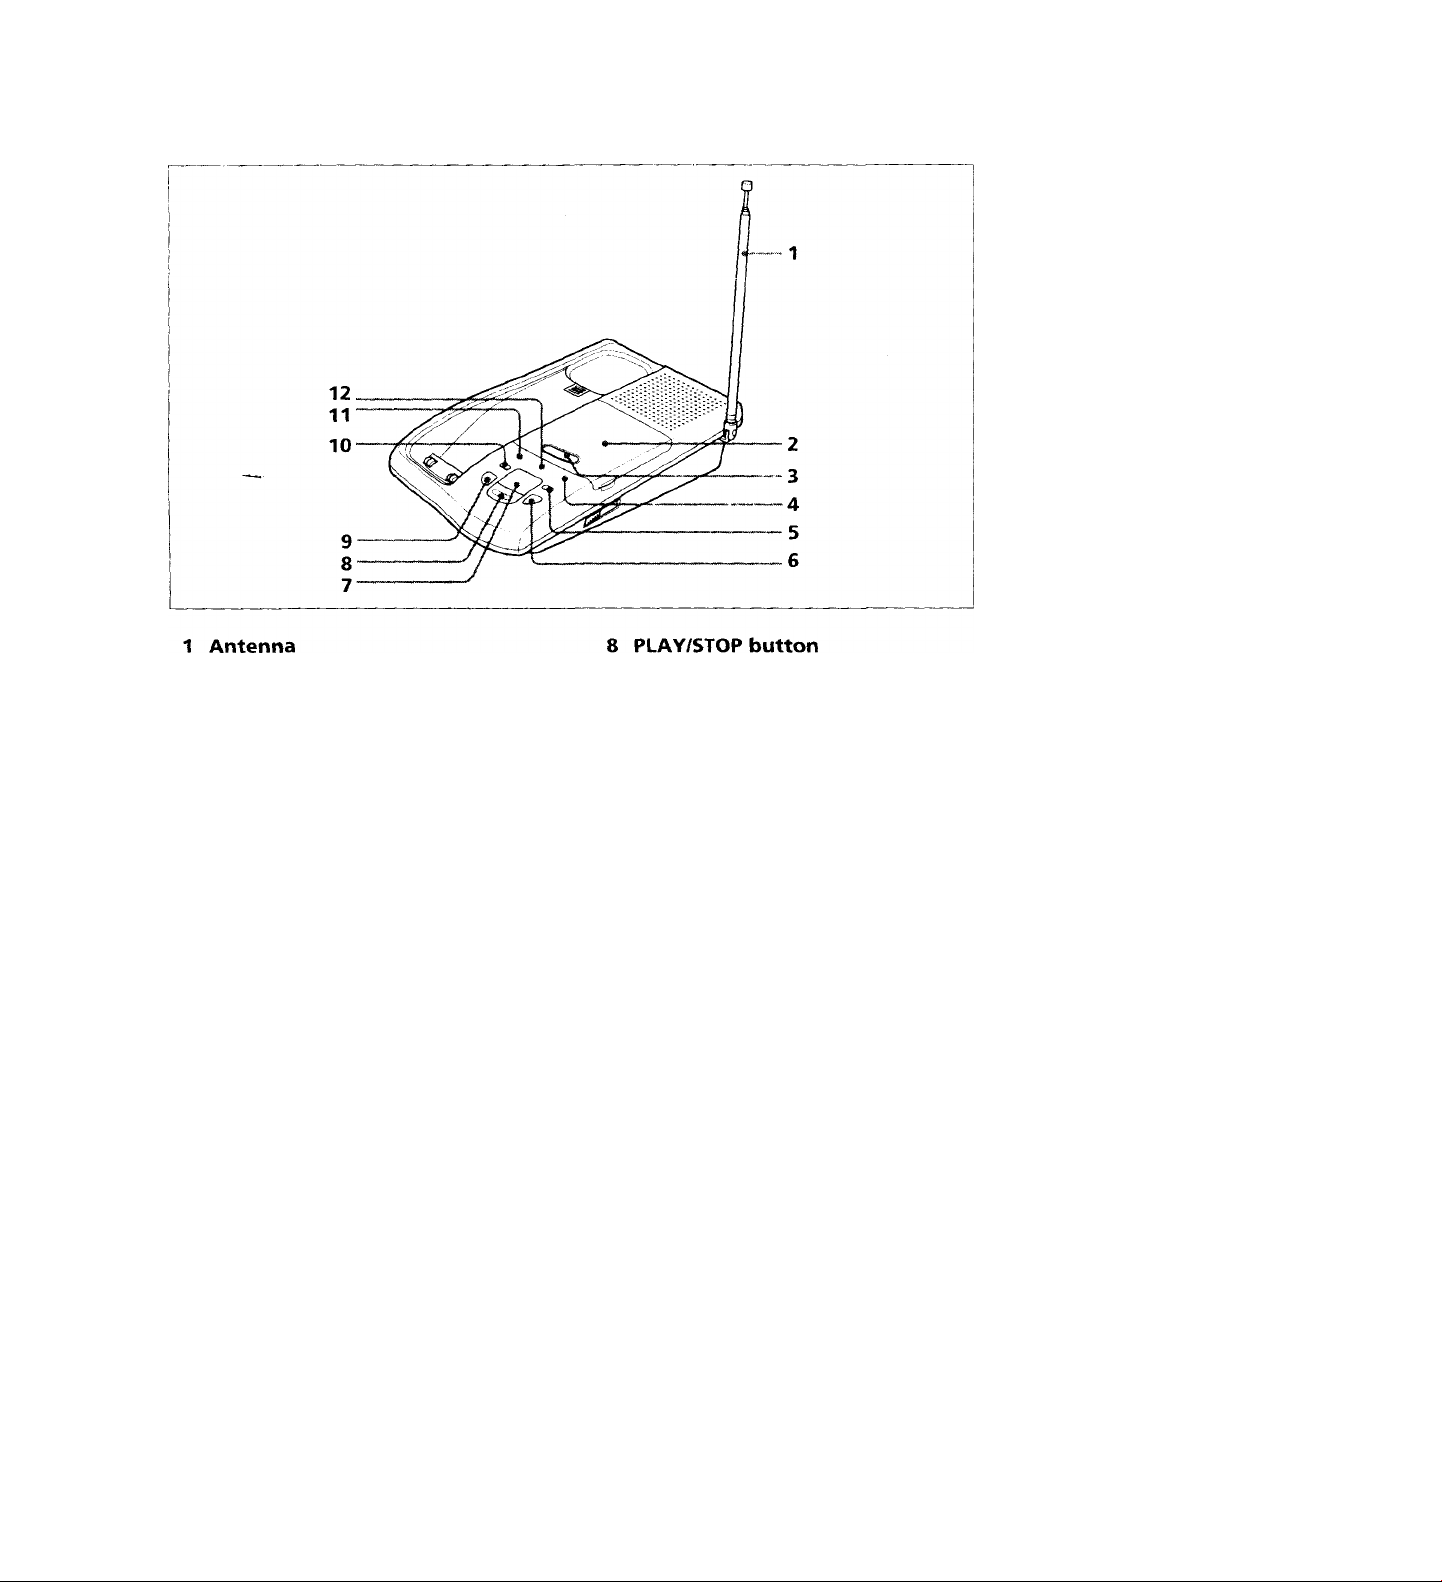
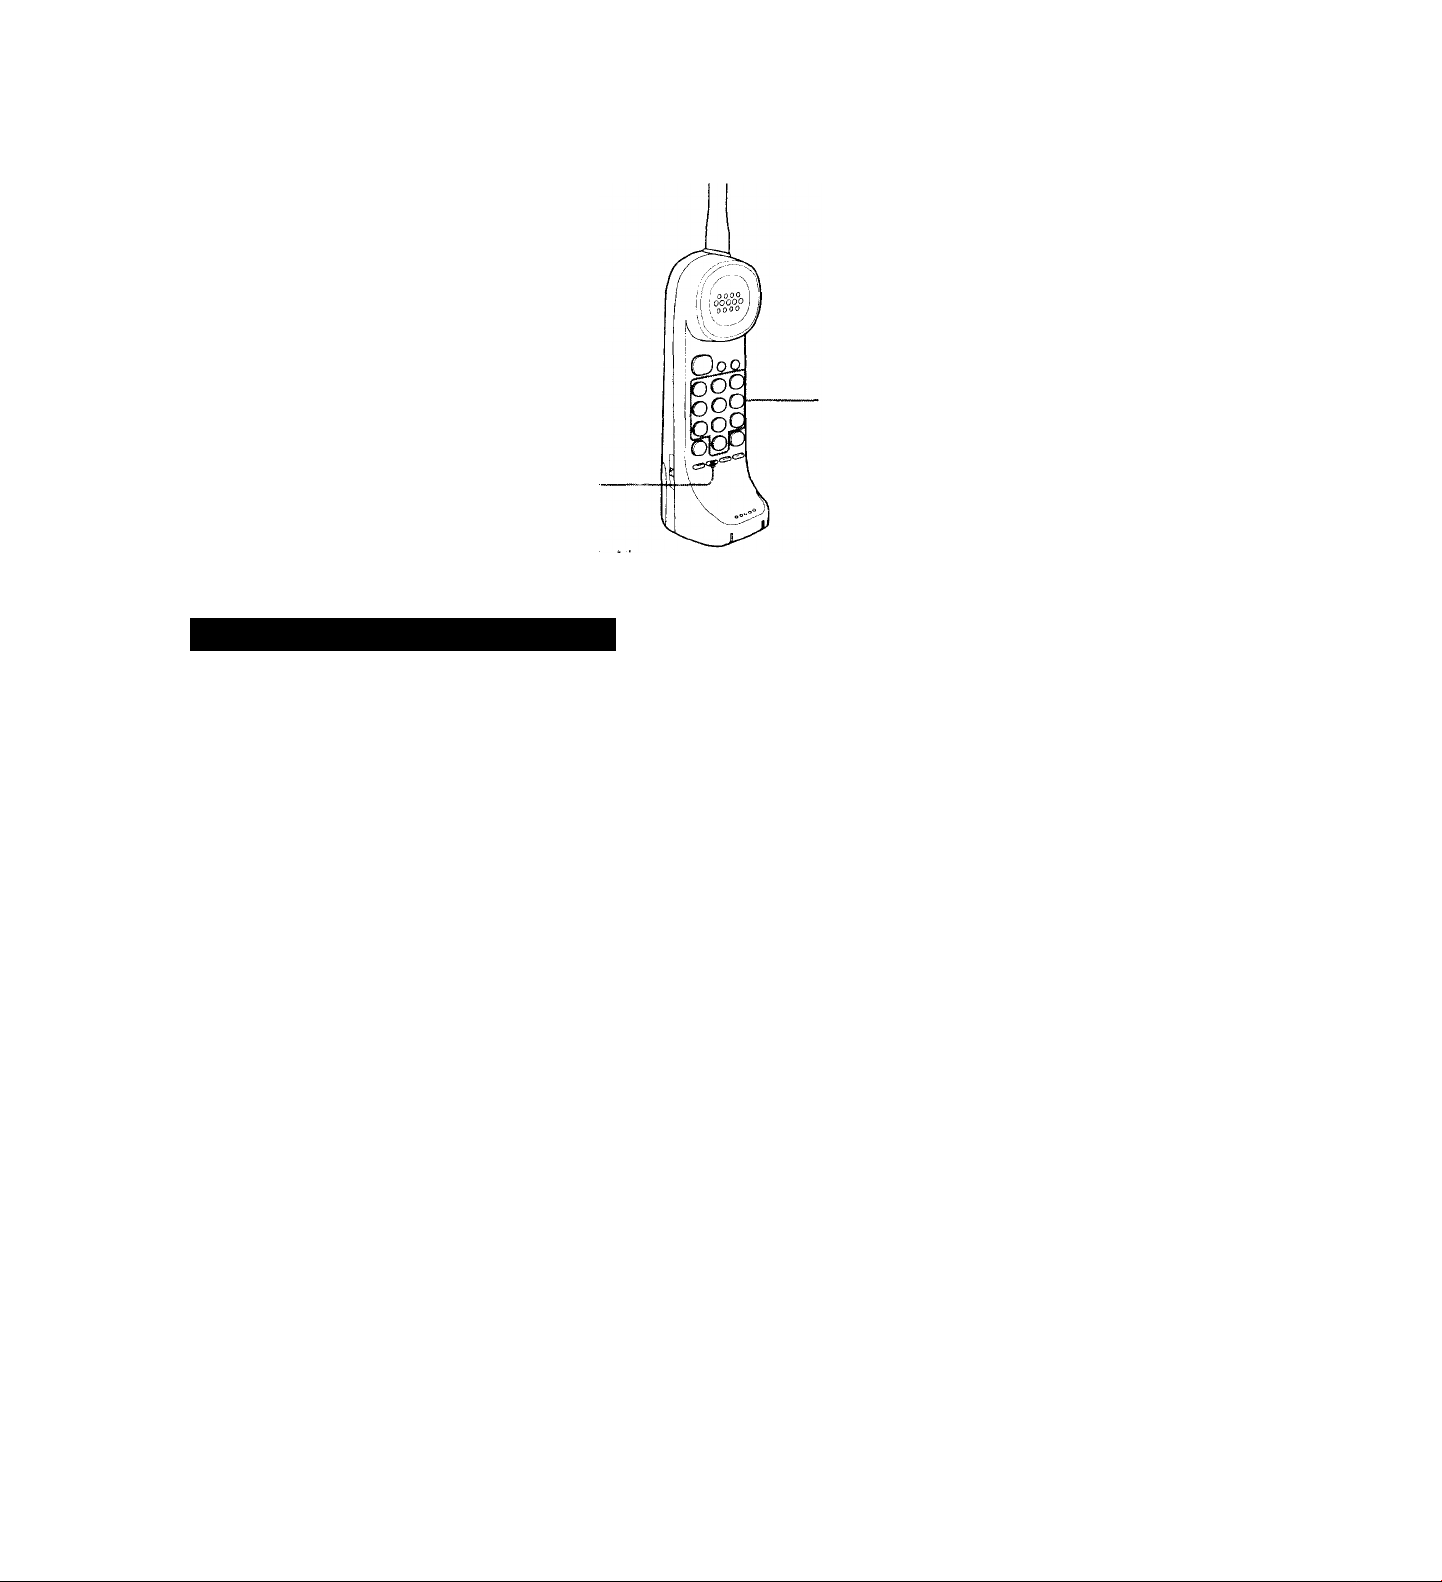
Identifying the parts
2 Microcassette compartment
3 PAGE button
Allows you to call the handset.
4 CHARGE indicator
Lights while the battery is being
charged.
5 CLEAR MESSAGES button
Rewinds the tape to the beginning.
New messages will be recorded over
old ones.
6 SKIP/FF (fast forward) button
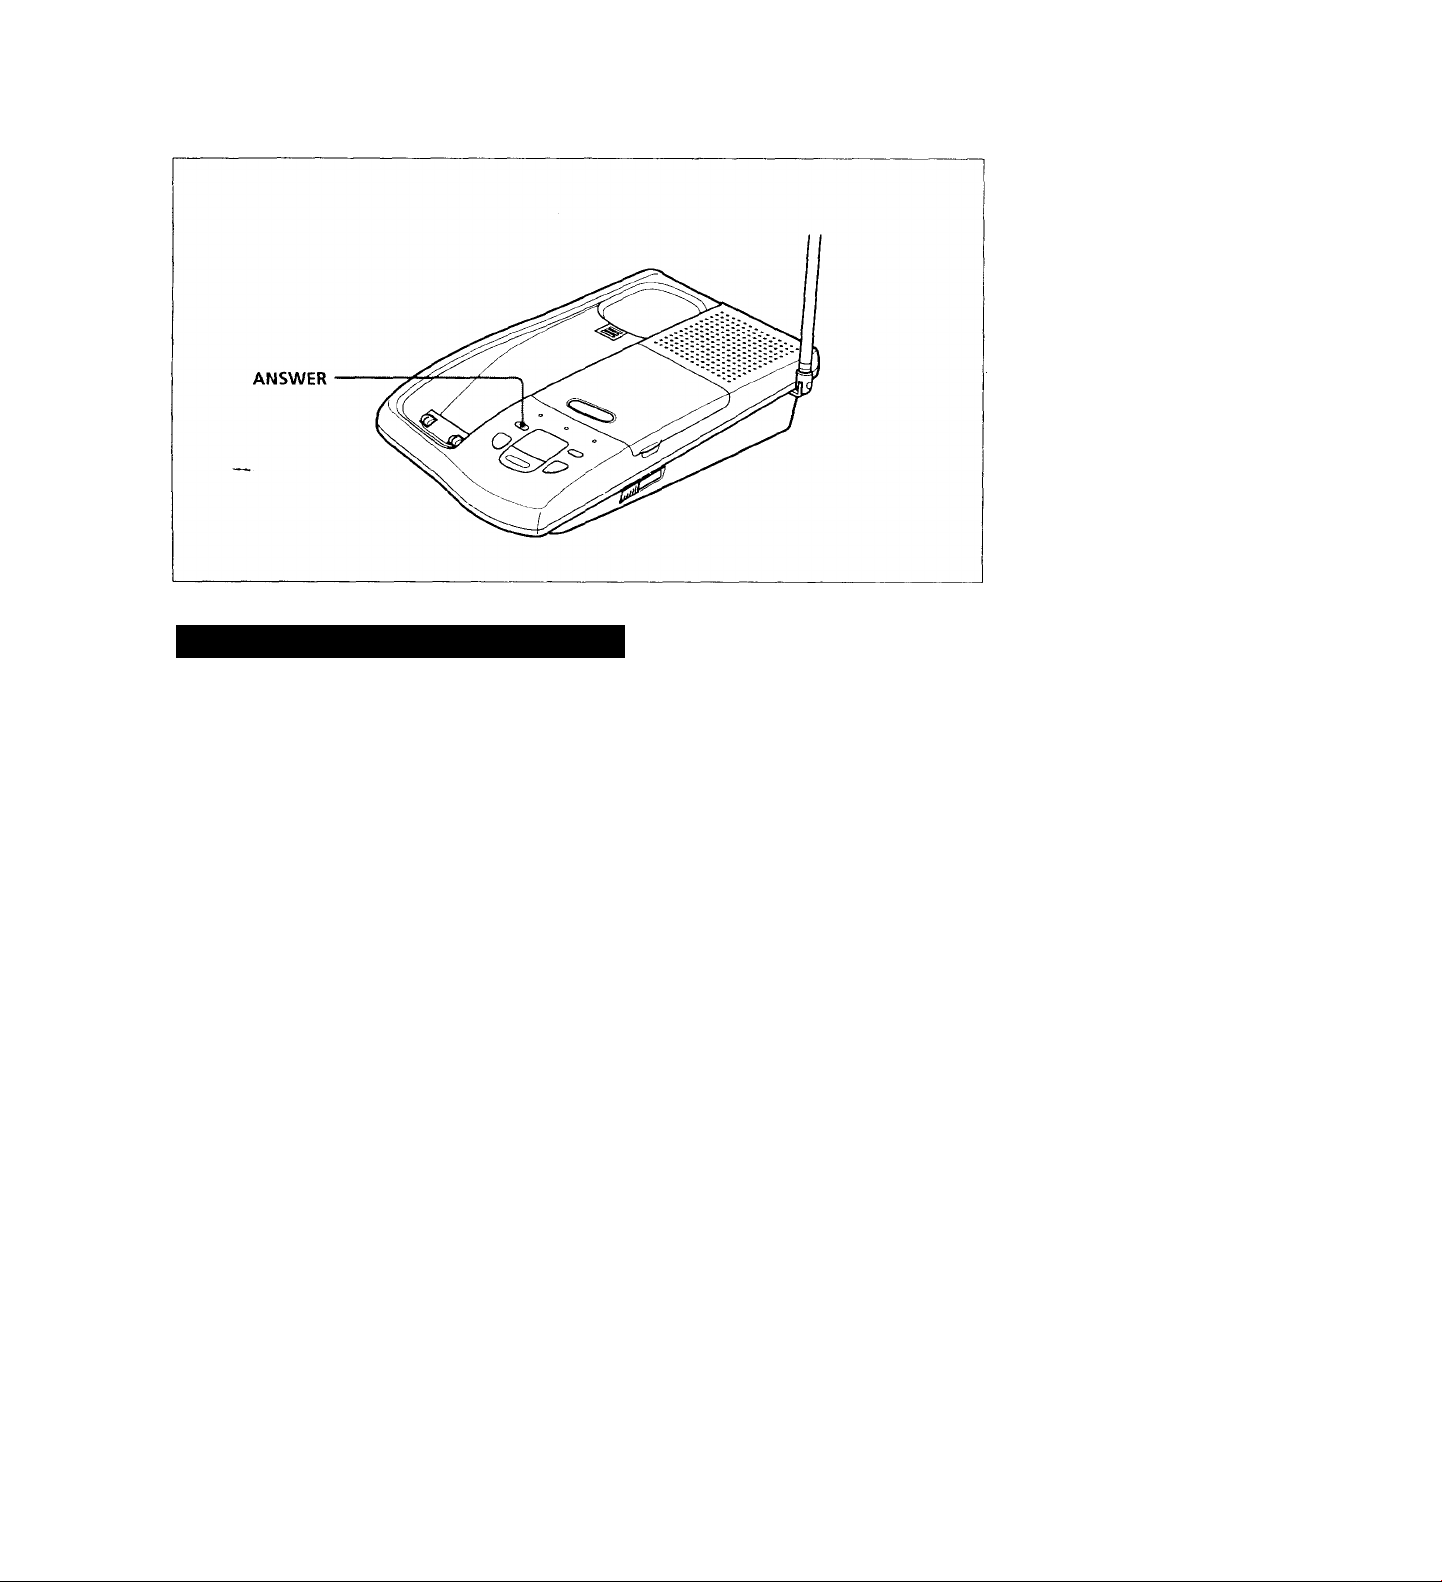
7 ANSWER lamp and MESSAGE
lamp
The ANSWER lamp lights when the
answering function is activated.
The MESSAGE lamp flashes when
there are new messages not yet plaved
back.
9 REPEAT/REW (rewind) button
10 ANSWER button
Turns the answering machine on or
off.
11 POWER indicator
Lights when the base unit is connected
to the AC power line.
12 IN USE lamp
Lights when the handset is in use.
Setting up 9
Page 10
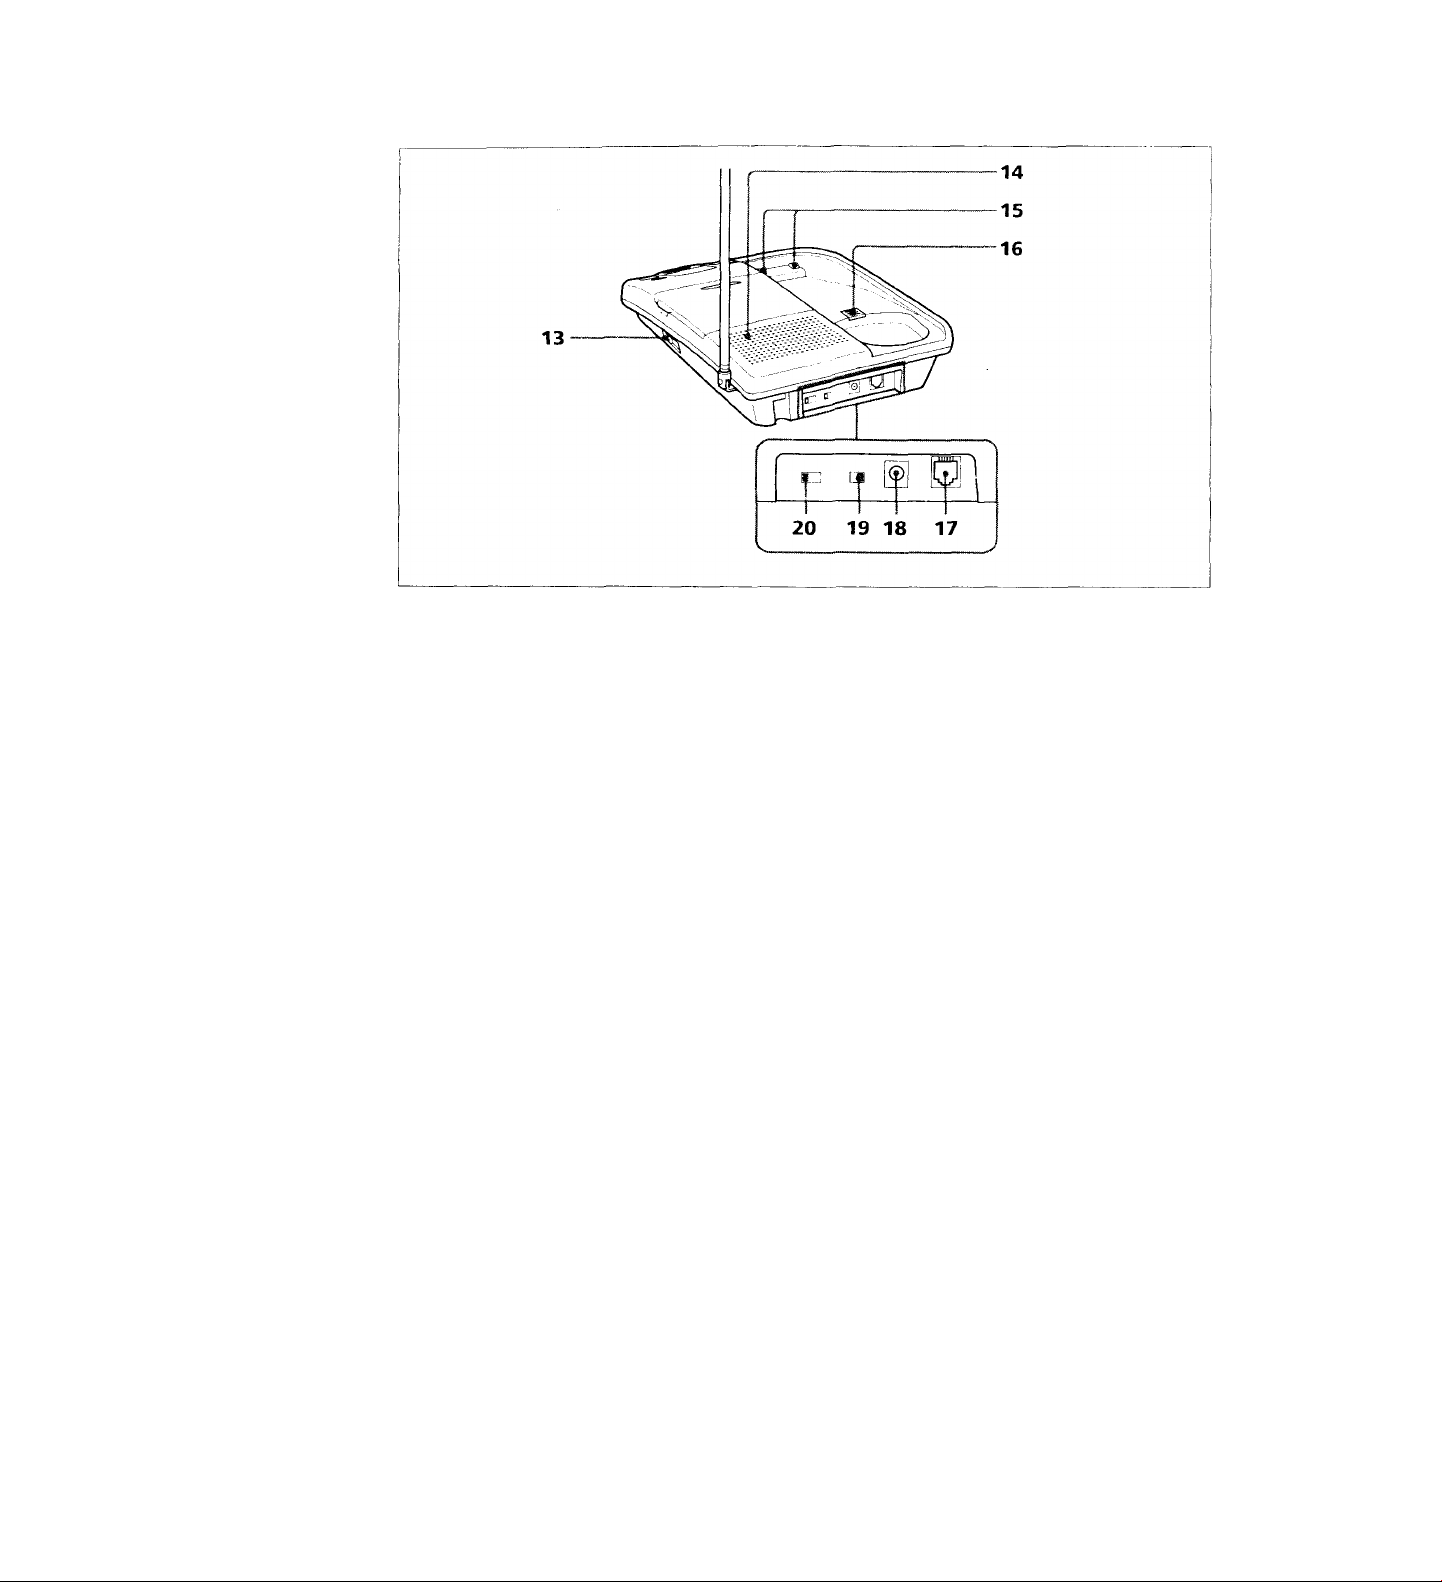
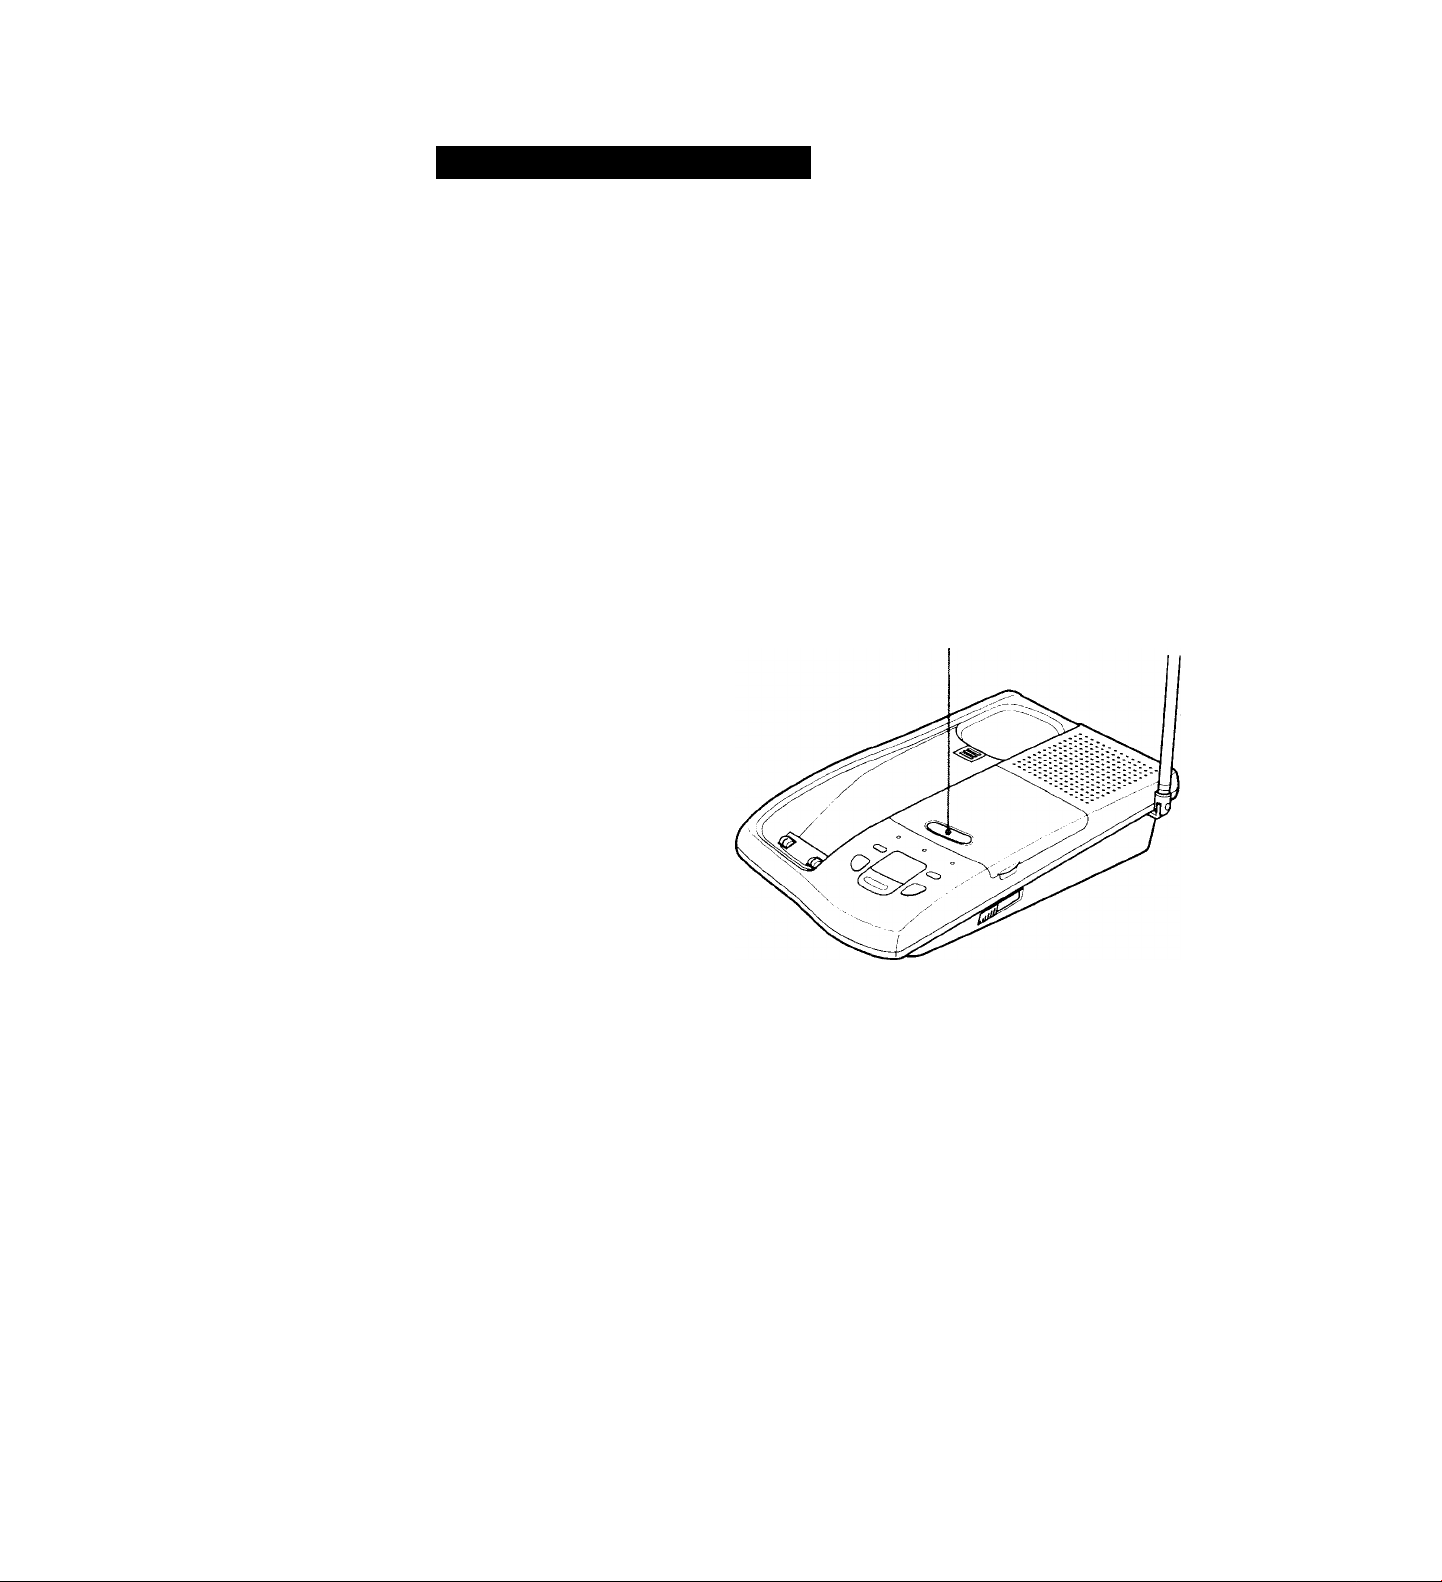
• Identifying the parts
13 VOLUME control
14 Speaker
15 Charge terminals
16 Handset hanger hook
17 TEL (telephone) LINE jack
18 DC IN 9V jack
19 01 AL'MODE switch
Selects pulse or tone dialing.
20 AUDIBLE IND/ANN ONLY (audible
indicator/announce only) switch
Turns on or off the audible indicator
mode which informs you if there are
any new messages recorded.
Also selects the annoucement only
mode.
10 Settingup
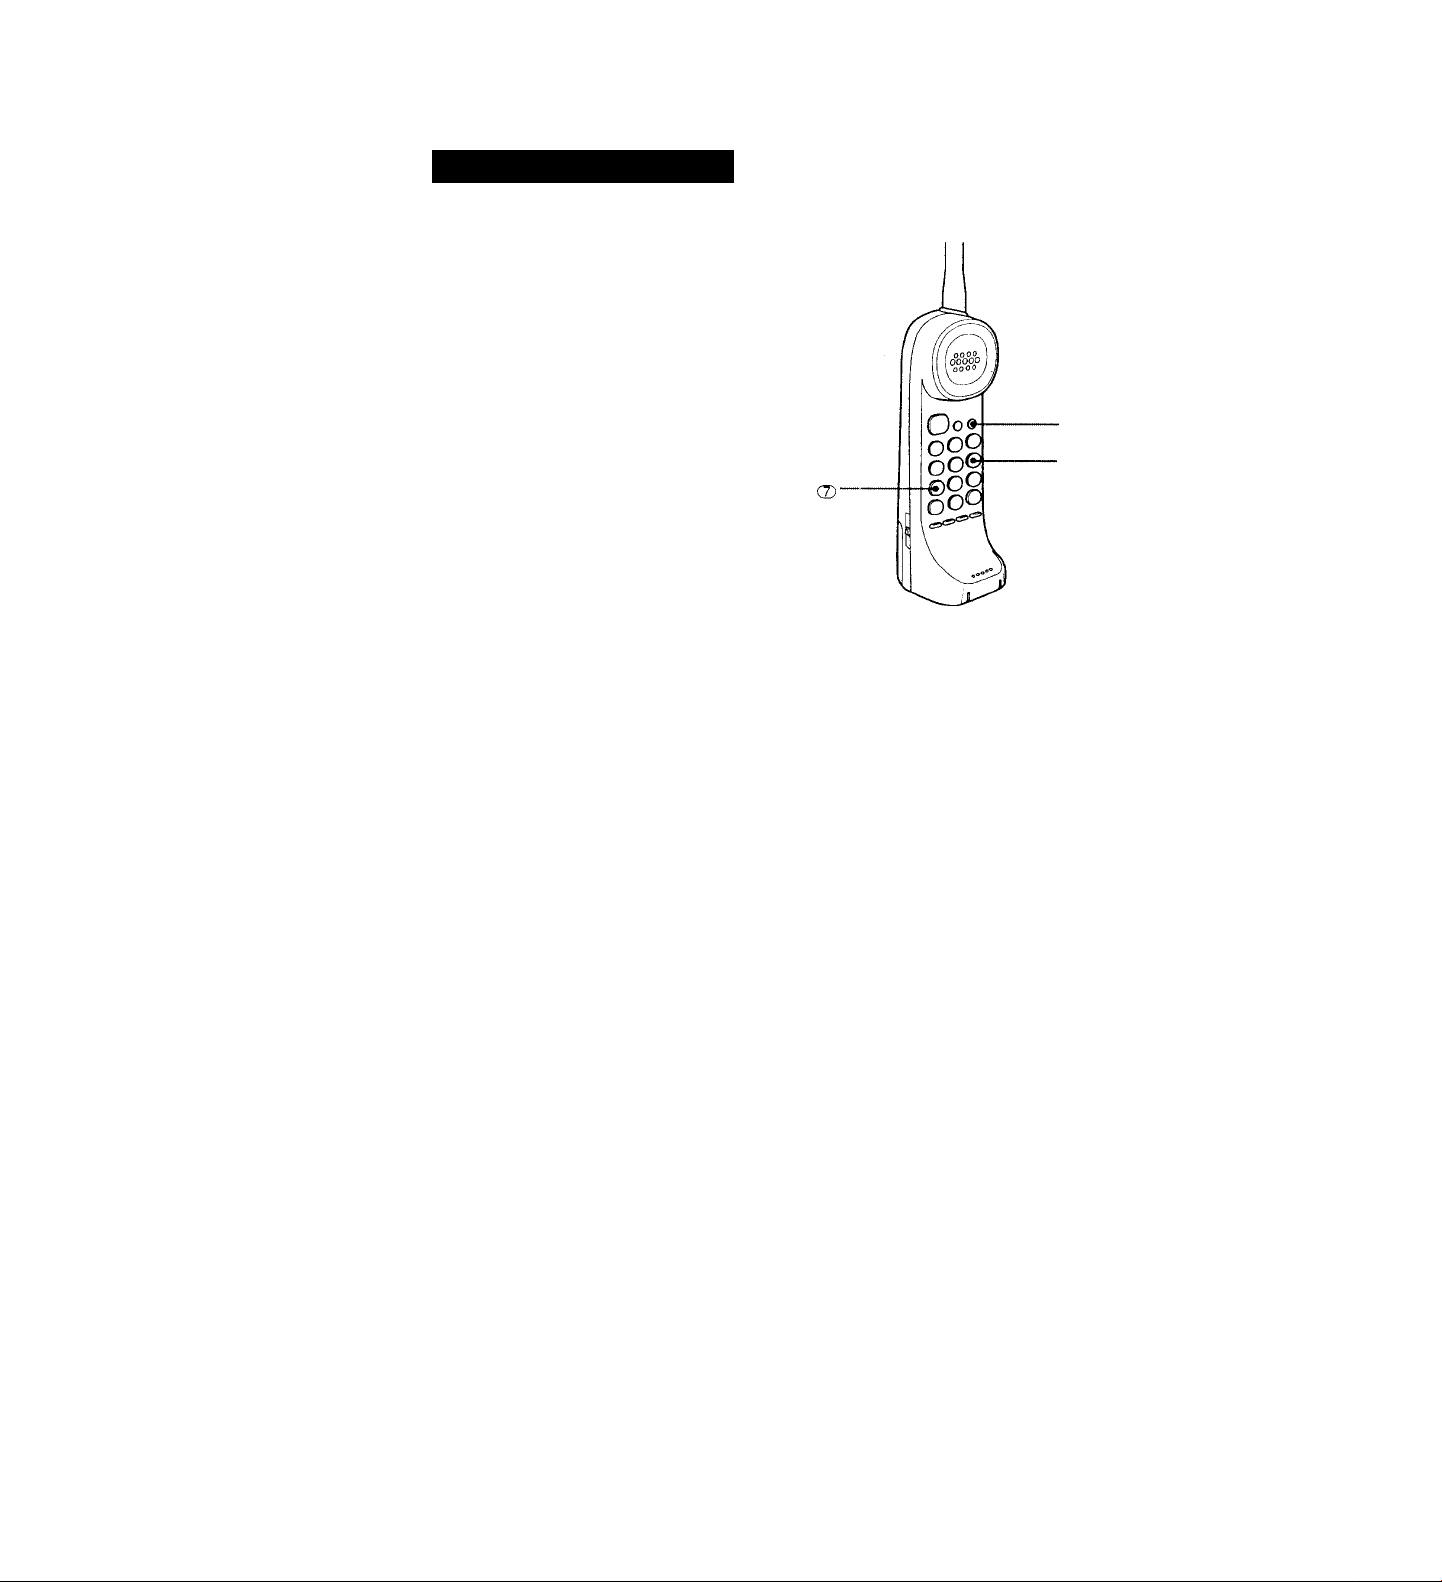
Page 11
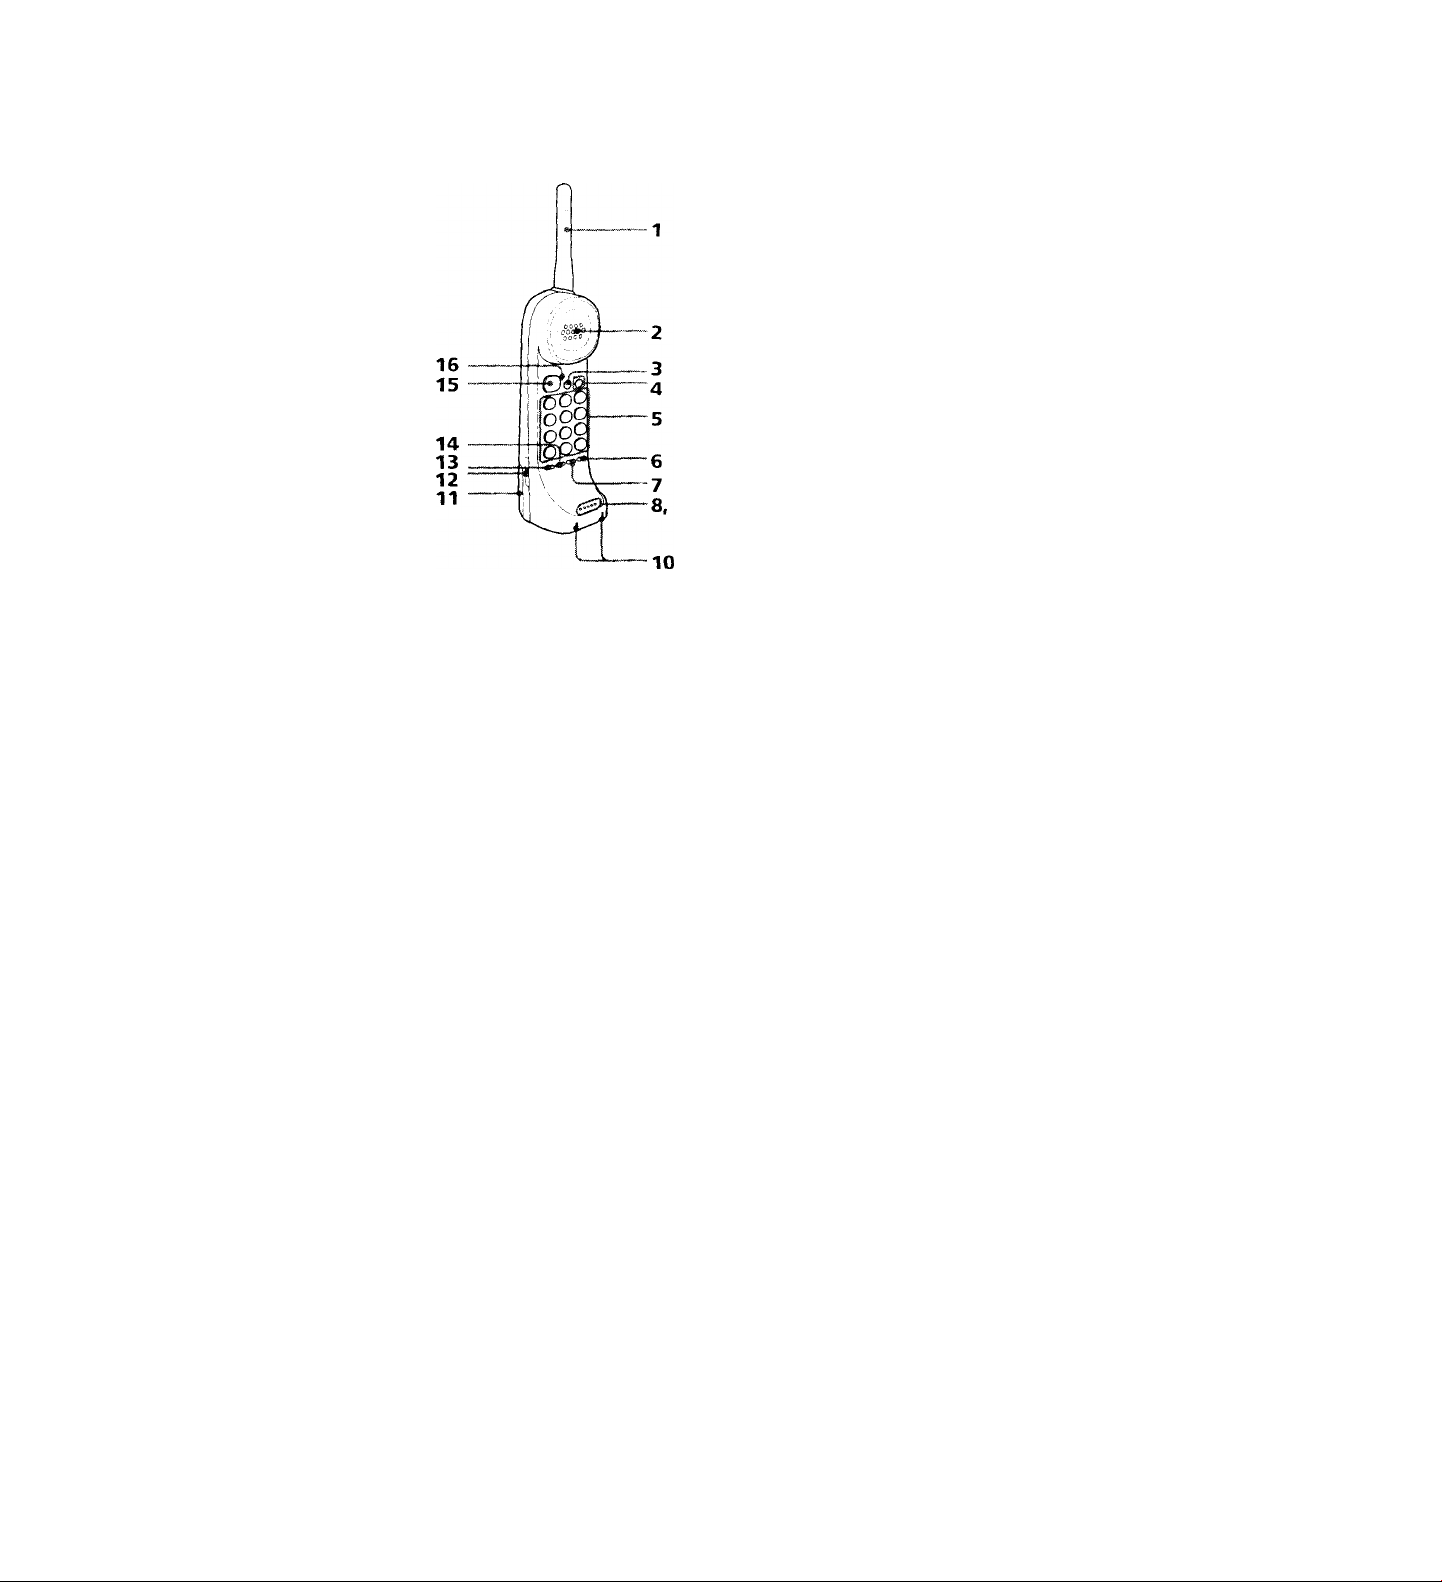
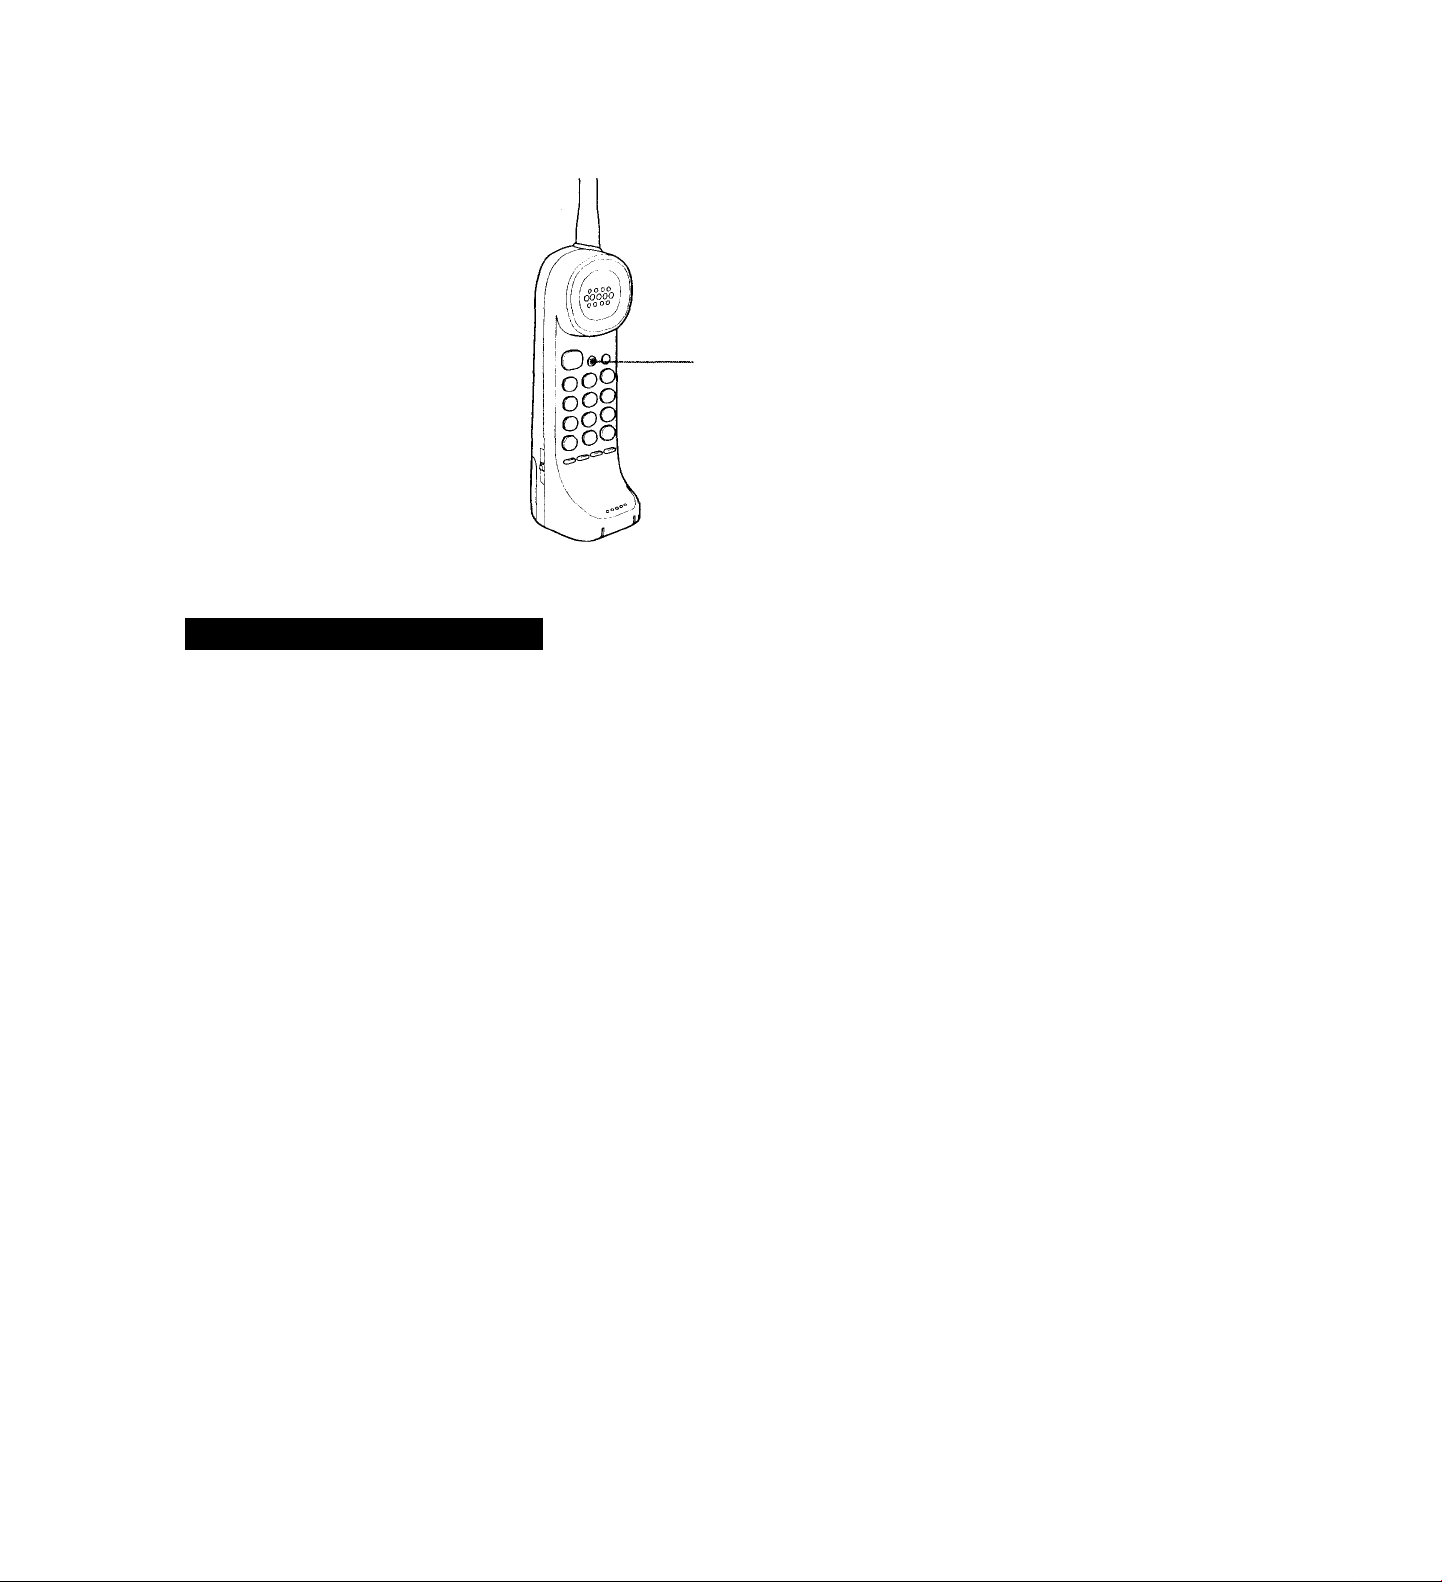
1 Antenna
11 Battery compartment 2 Speaker 3 FLASH button
Switches to a second call if you have
"call waiting" service, or lets you
make a new call.
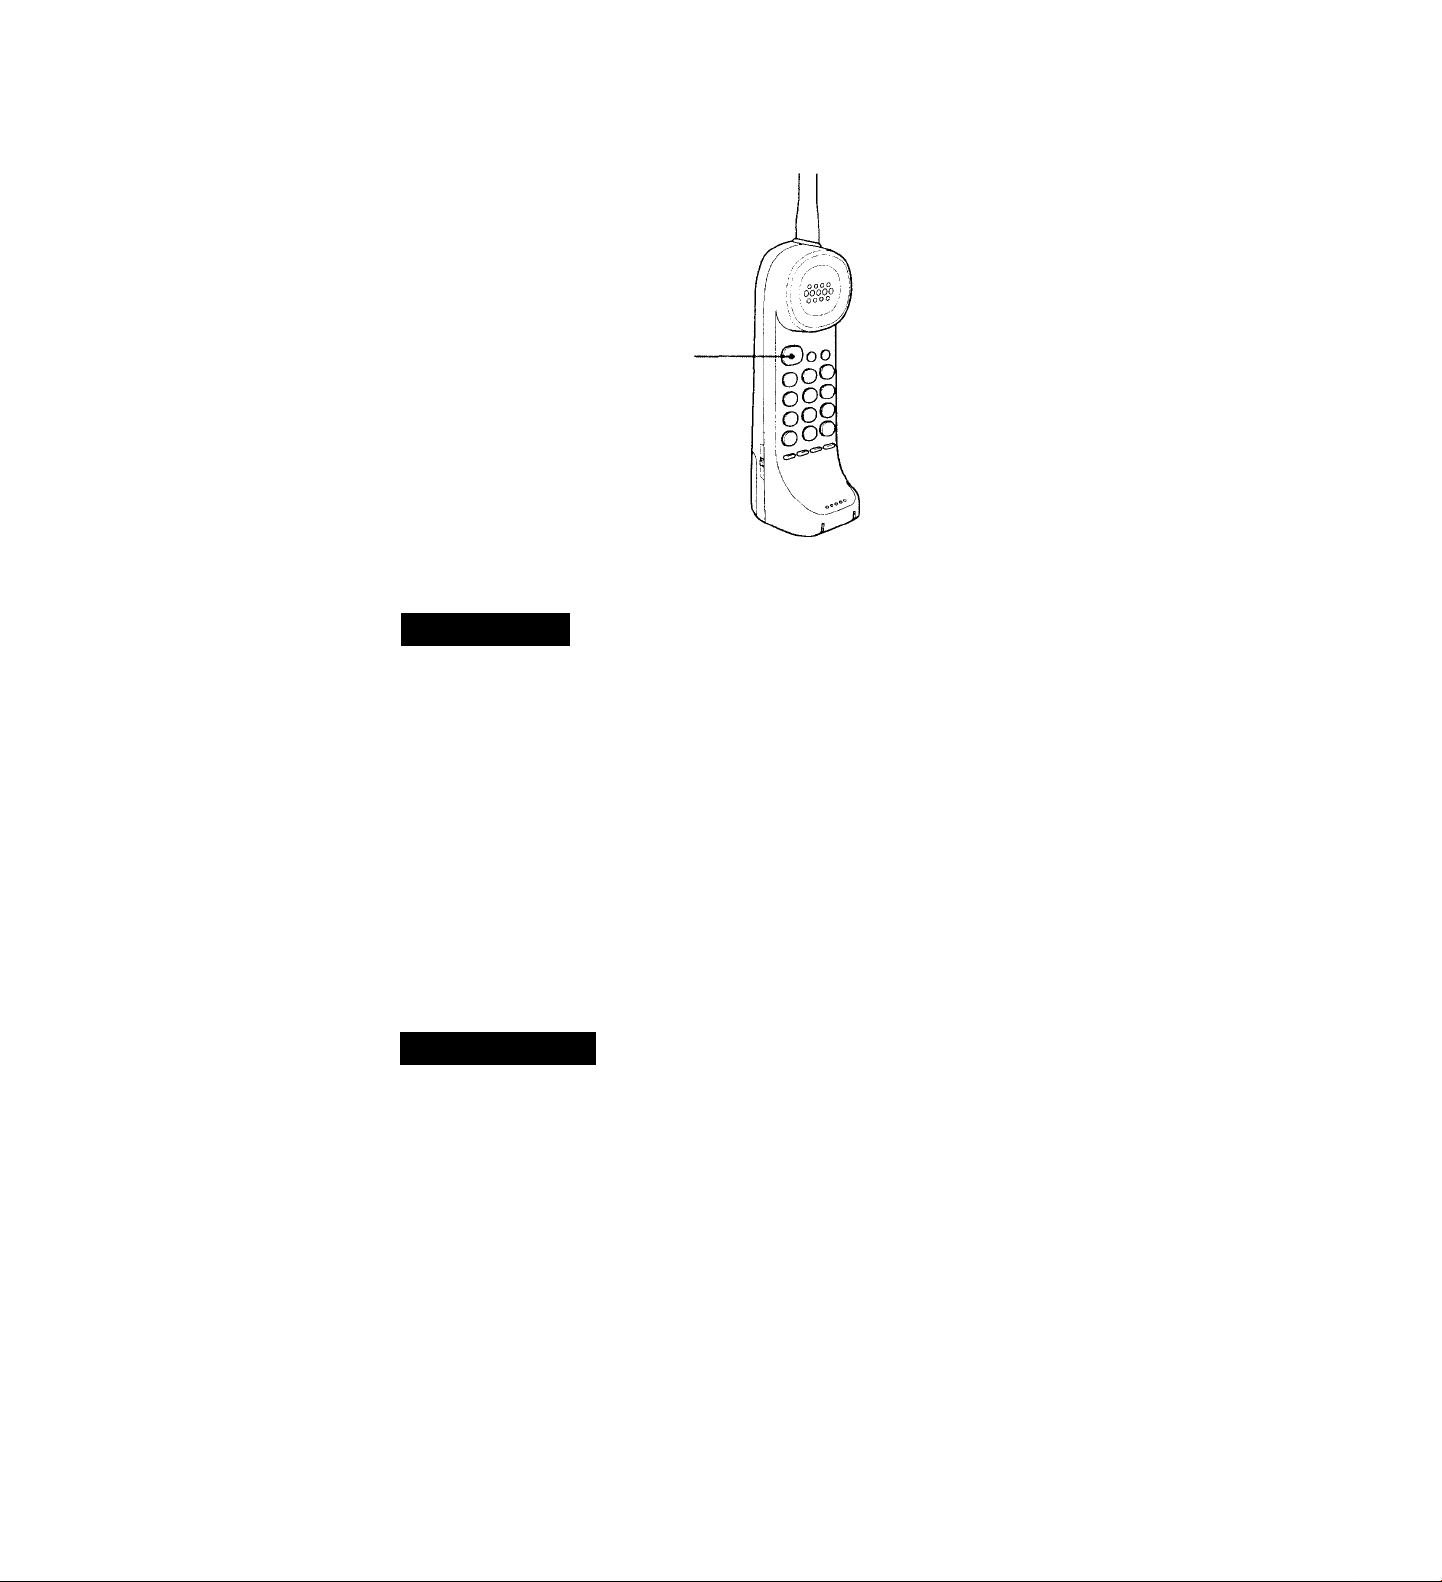
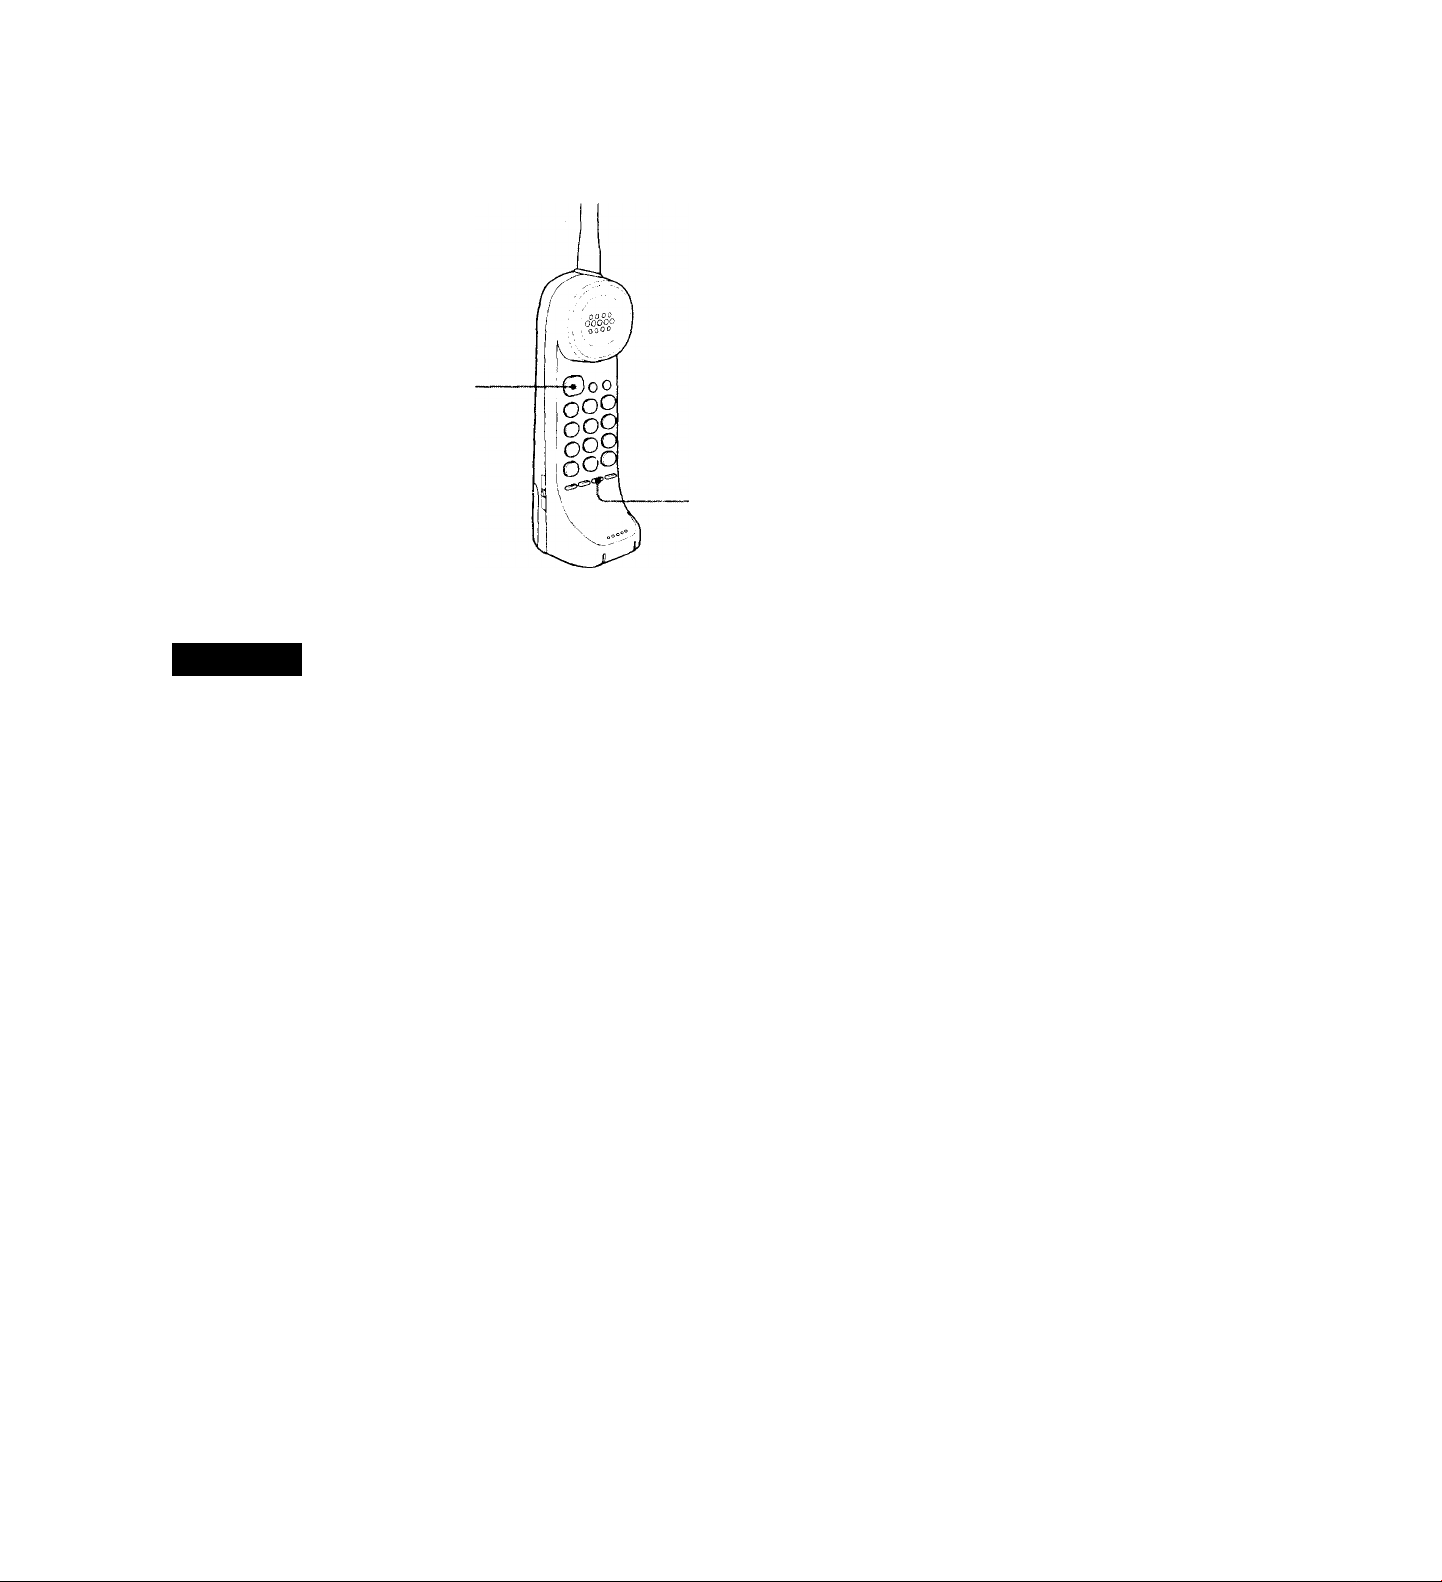
4 REMOTE button and lamp
Allows vou to operate the answering
machine from the handset. The lamp
lights while the remote operation
mode is activated.
5 Dialing keys/Remote operation
buttons
6 CONV REC (conversation
recording) button
Records phone conversations.
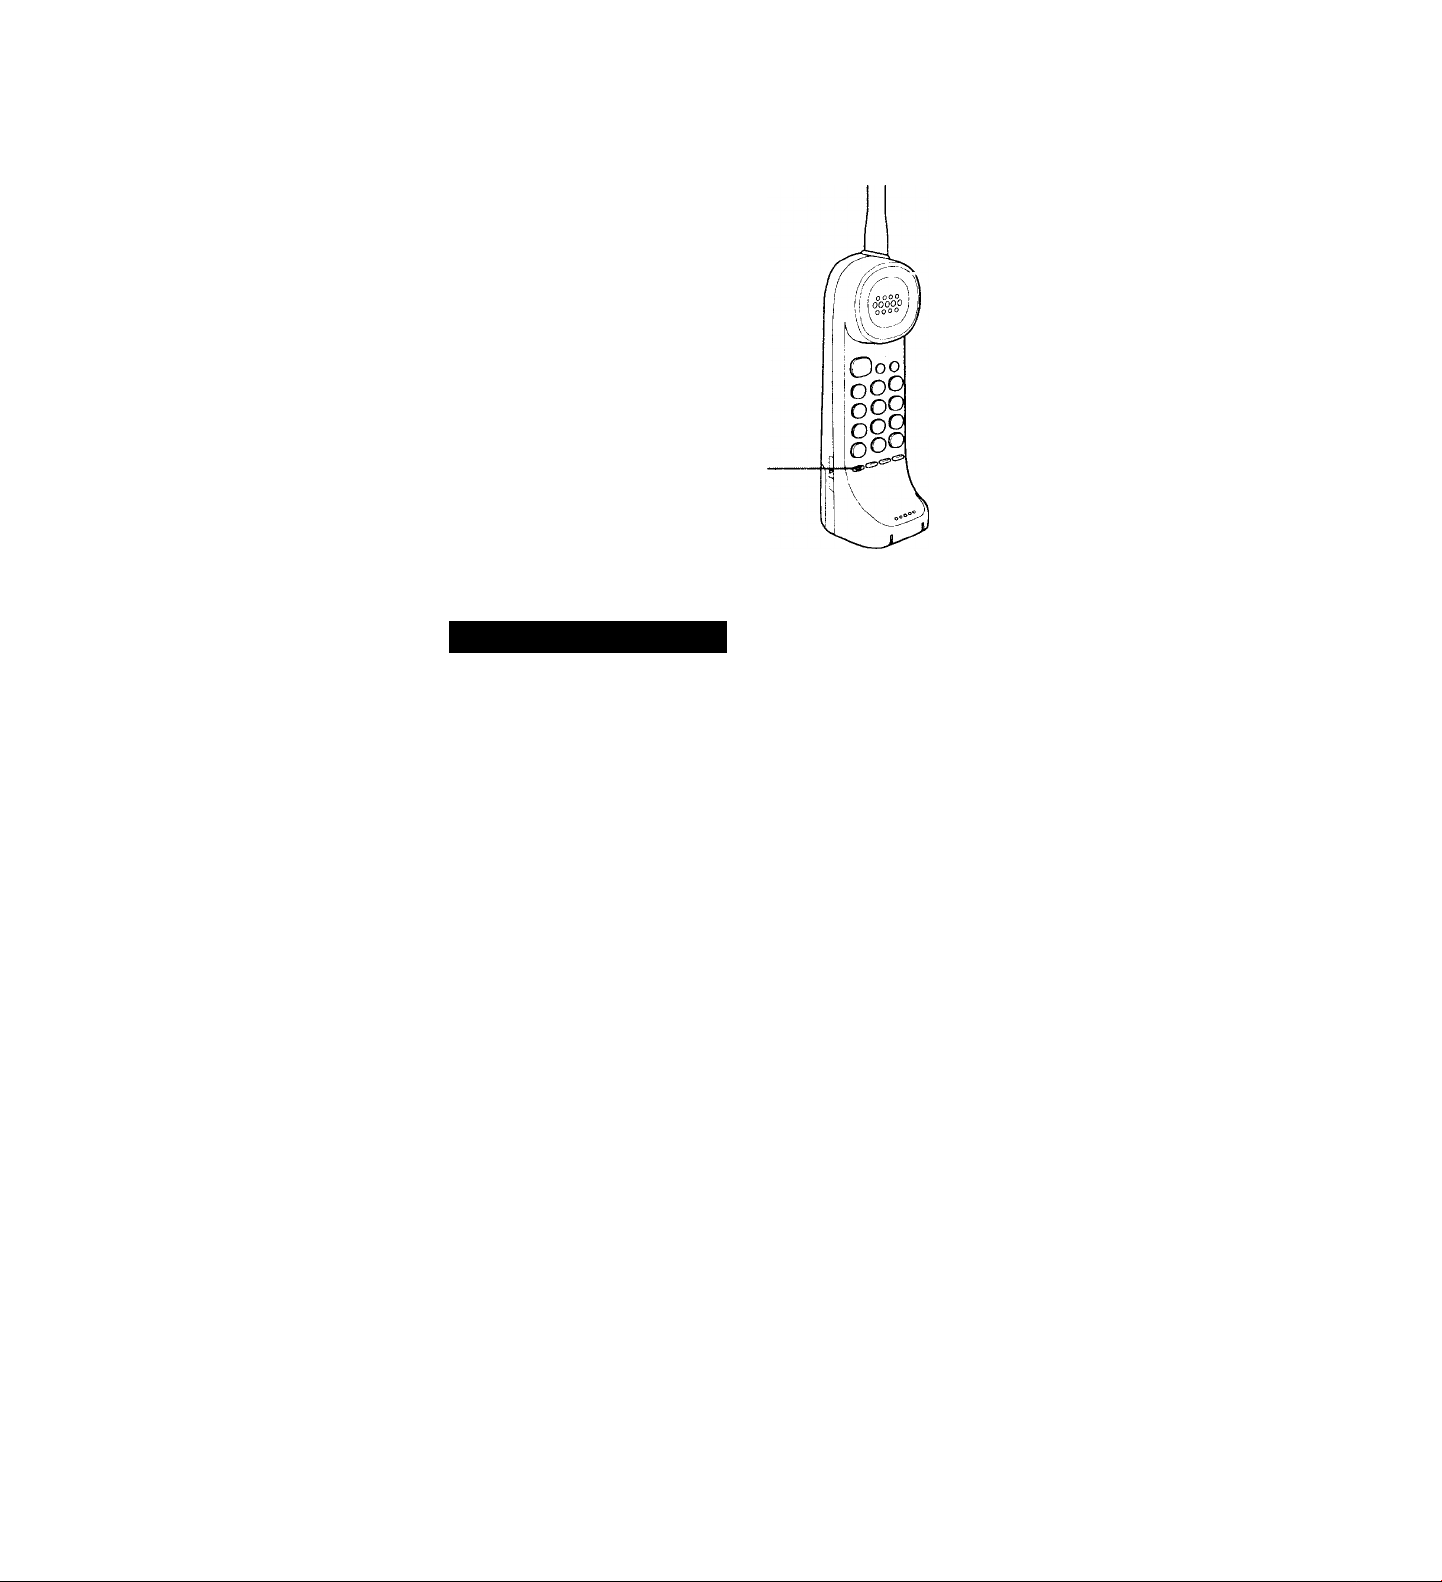
7 REDIAL/PAUSE button
Redials the last number called.
Also inserts a pause in the dialing
sequence.
8 Microphone 9 Ringer speaker
10 Charging terminals
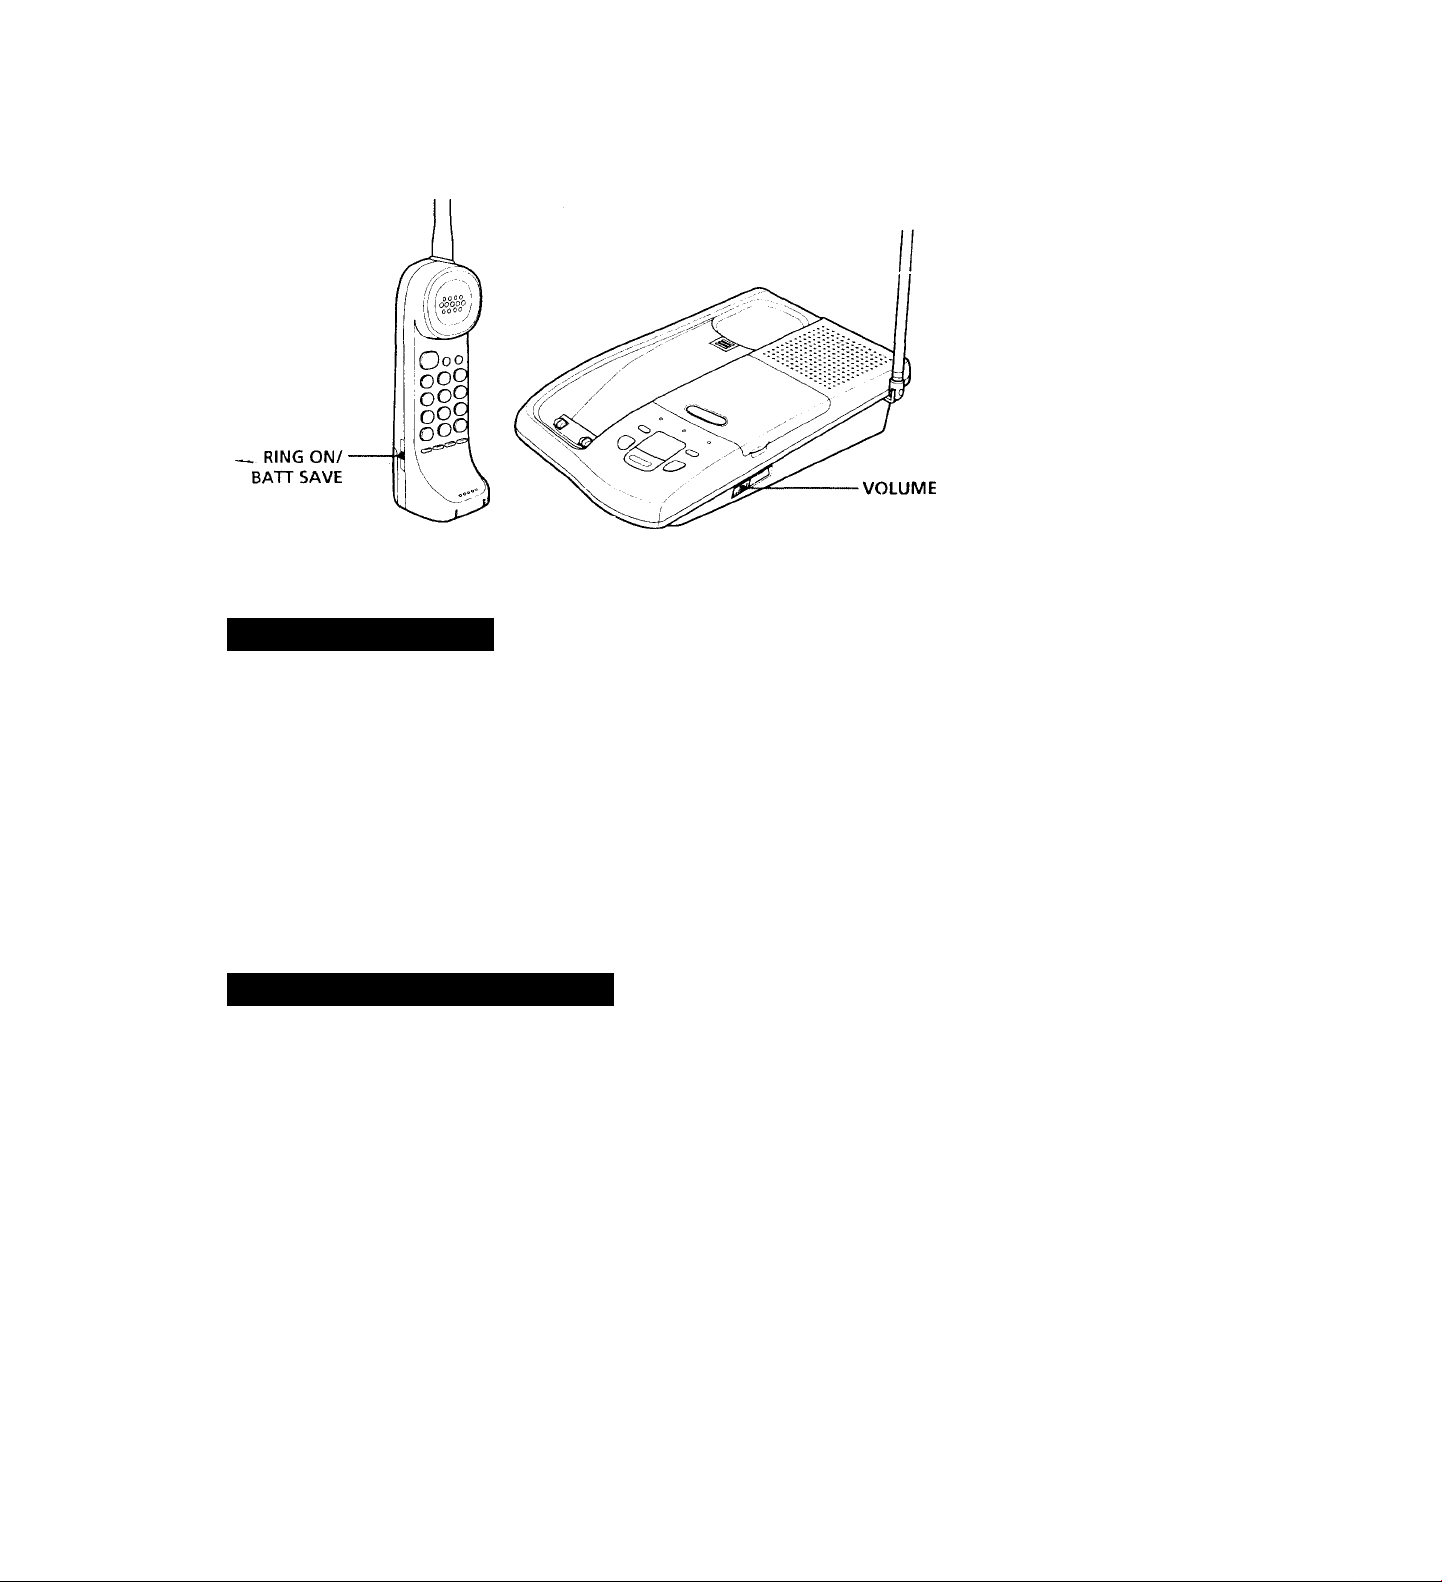
12 ВАТТ (battery) SAVE/RING ON
switch
Set to RING ON to turn the ringer on.
Set to ВАТТ SAVE to turn the ringer
off and conserve battery power.
13 CHANNEL button
Allows you to change channels if
interference occurs.
14 SPEED DIAUPROGRAM button
Stores phone number in the speed
dialing memory.
15 TALK button
Lets you make or receive a call.
16 TALK/BATT (battery) LOW lamp
Lights to indicate that the handset is
ready for dialing or is engaged in
con\’ersation. Also indicates level of
ba tter\- power.
When TALK is pressed, the lamp;
• liglits fc)r a few seconds when there is
sufficient battery left.
• flashes when the battery is low.
• does not light nor flash when the
battery is completelv discharged.
Setting up 11
Page 12
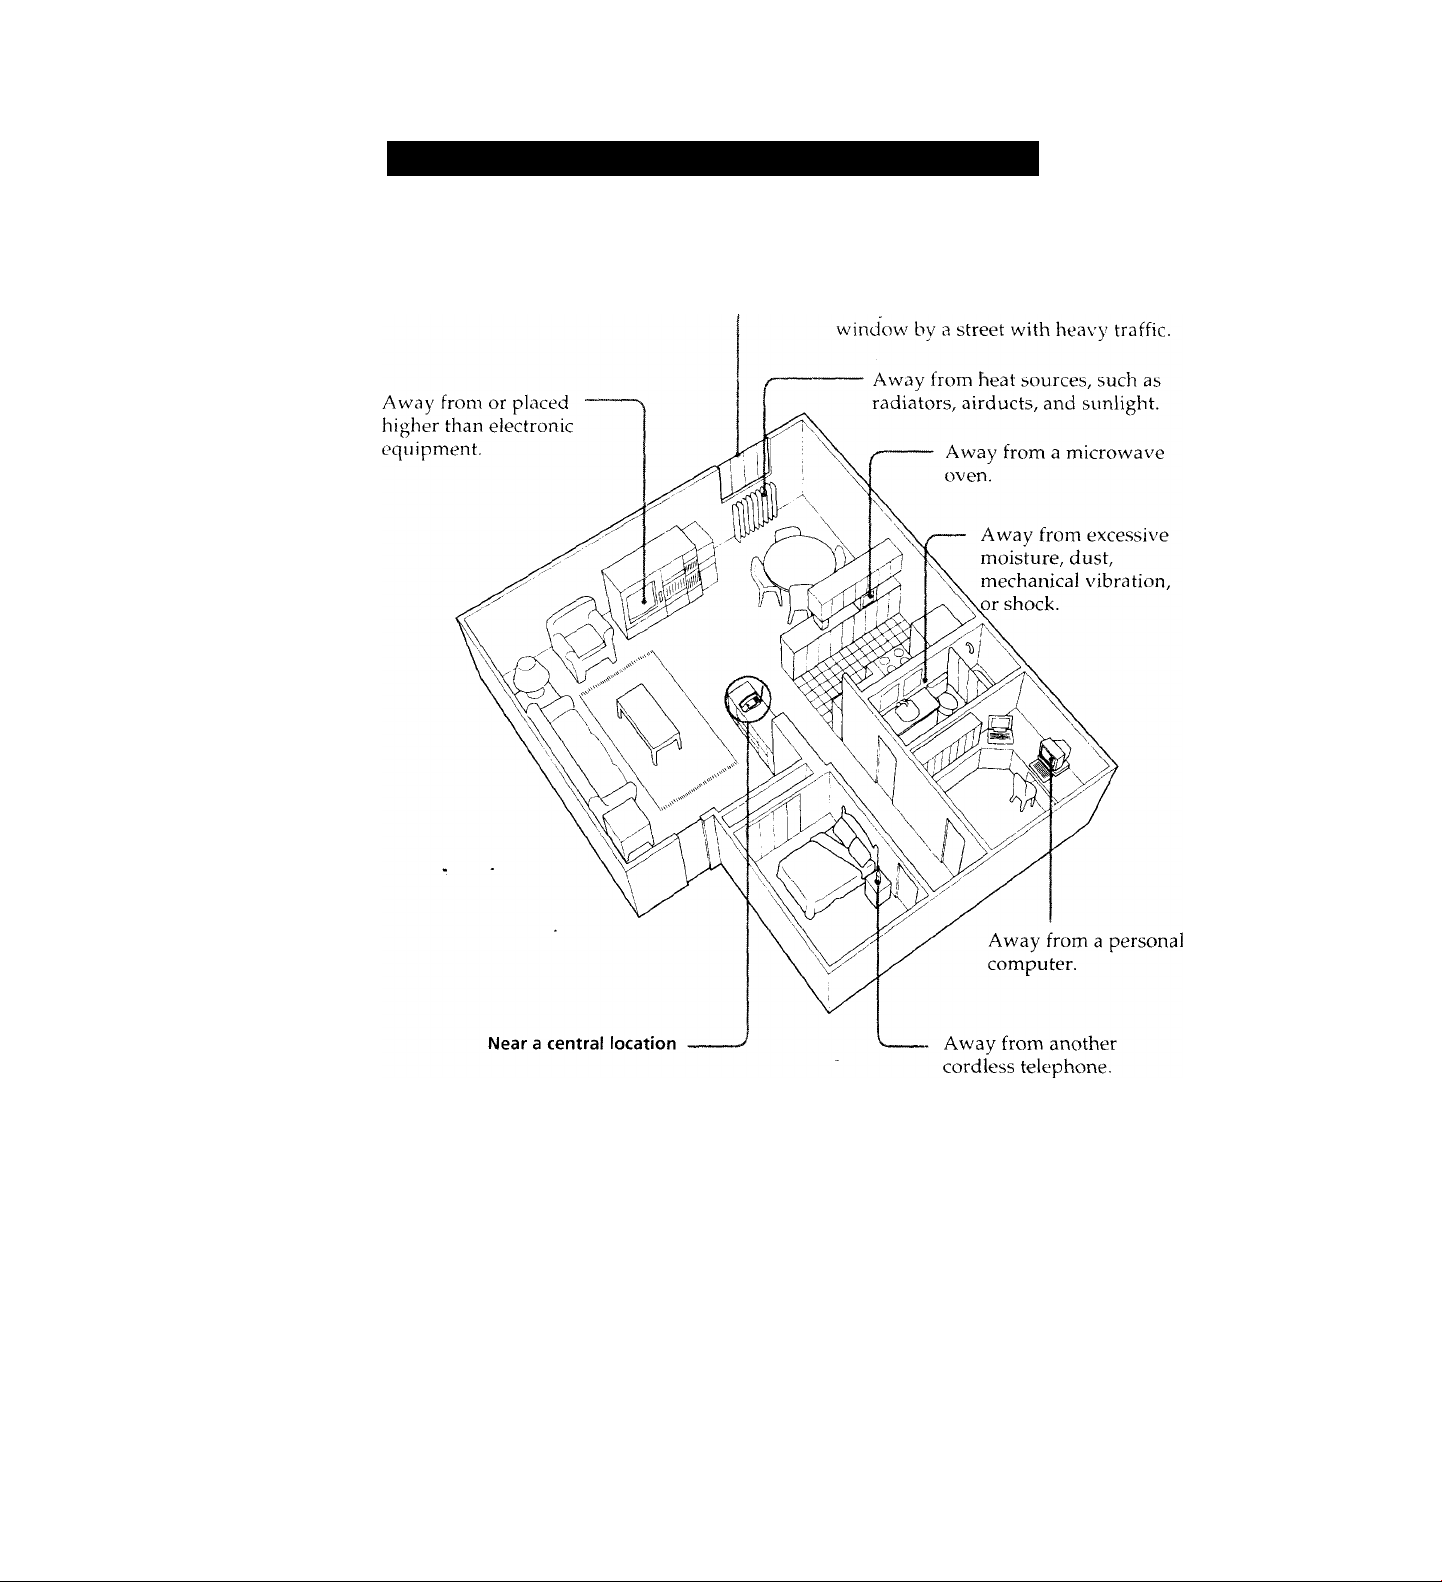
Placing the phone
Choosing the best location for the base unit
Where you place the base unit affects the reception quality
of the cordless handset. Therefore, refer to the following
when placing the base unit.
Awav from noise sources such as a
12 Setting up
CAUTION
The cordless telephone operates at a frequency that may
cause interference to nearby TVs and VCRs; the base unit
should not be placed near or on top of a TV or
VCR; and, if interference is experienced, moving the
cordless telephone farther away from the TV or VCR will
often reduce or eliminate the interference.
Page 13
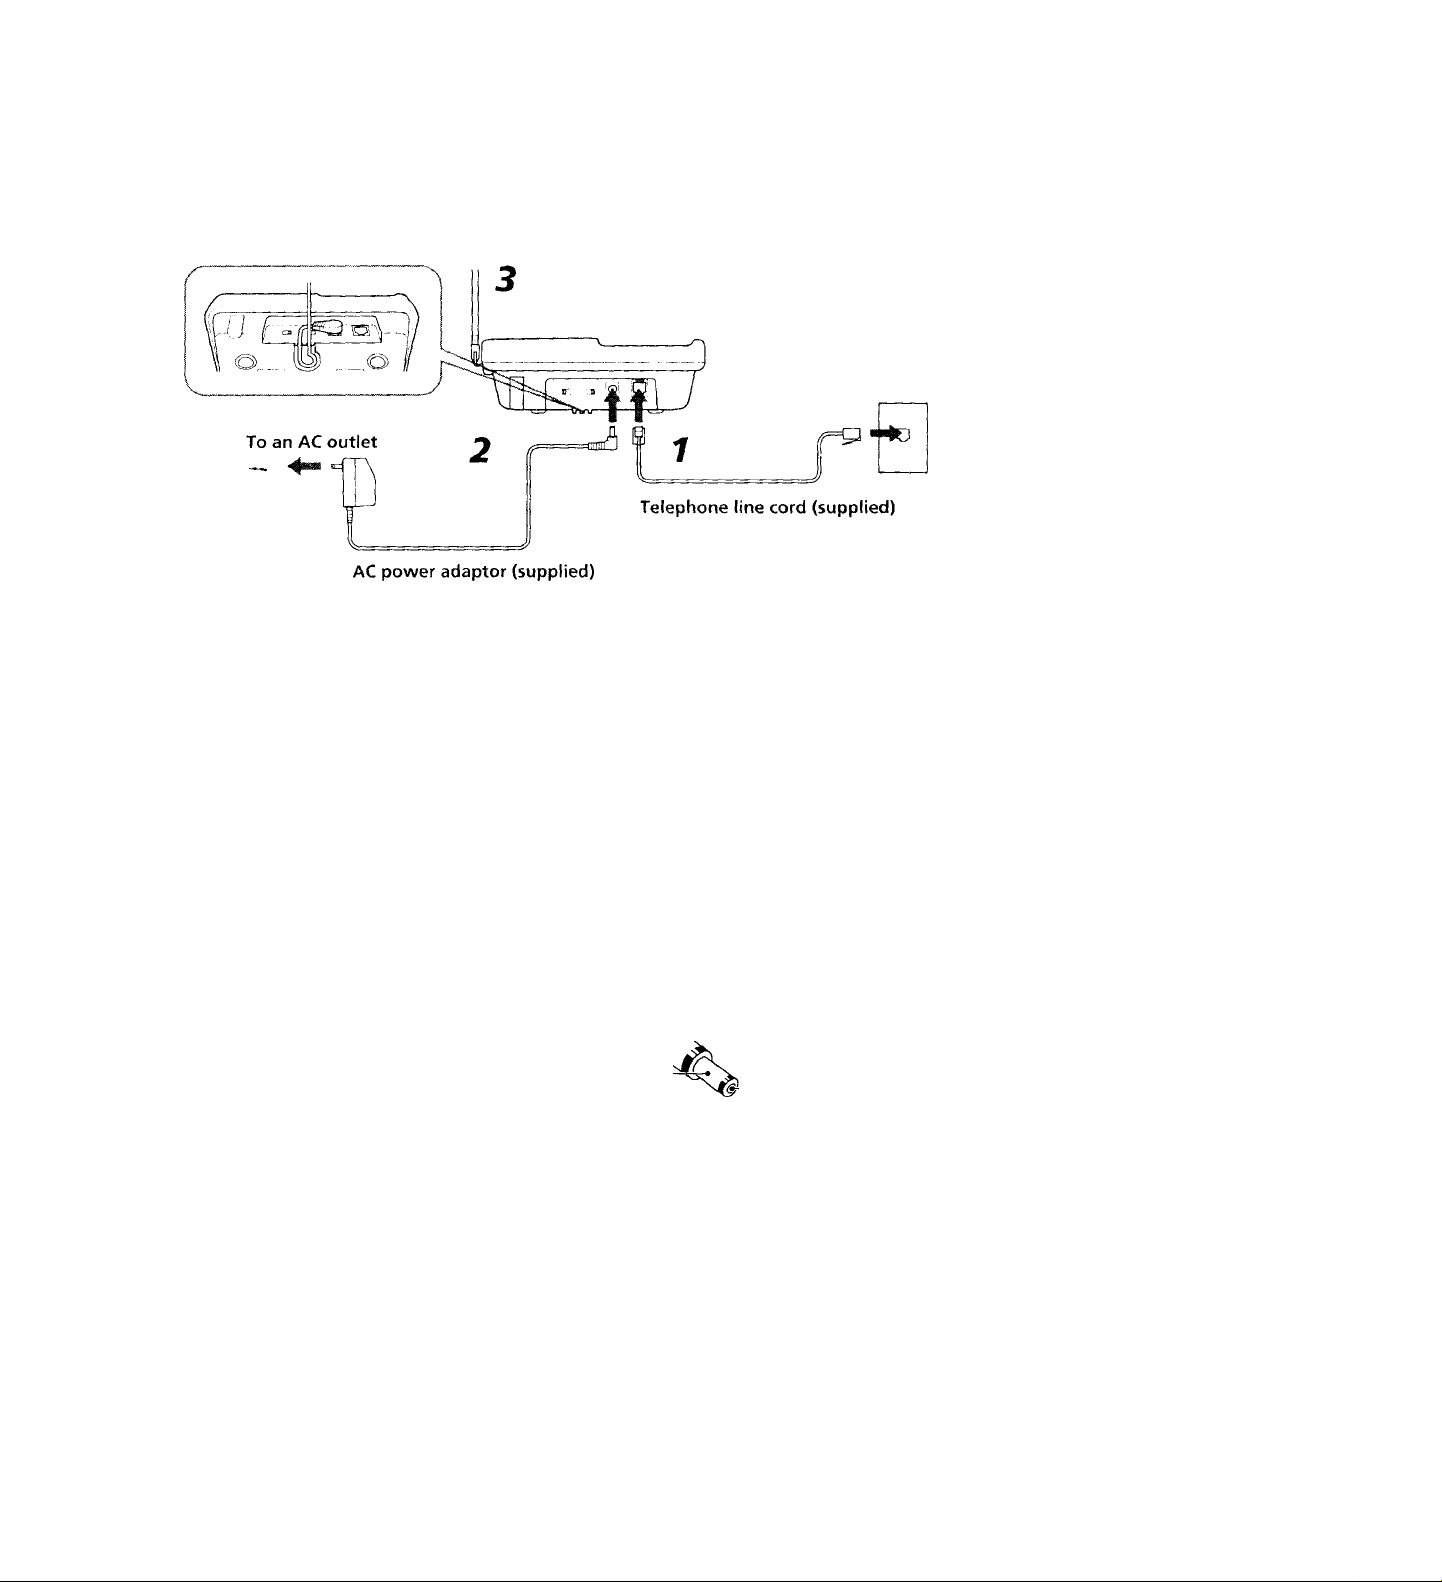
Connecting the base unît
Read t!ie next page first if you want to hang the base unit
on a wall.
j
Connect the AC power adaptor
to a continuous power supply.
Otherwise the battery pack
being charged will have a
shorter life.
I
If your phone jack is not
modular, contact your
telephone service company for
assistance.
O
Modular
I
If you have 2 phone lines on a
single RJ-14 phone jack with 4
wires, the answering machine
will only answer the first phone
ane on the center pair of wires,
’lease consult your telephone
ompanv for rewiring if you
leed to answer the second
ihone line which uses the outer
lair of wires.
Center pair
7 Plug one end of the long telephone line cord
(supplied) into the TEL LINE jack, and the
other end into a telephone outlet.
2 Connect the AC power adaptor (supplied) into
the DC IN 9V jack and to an AC outlet, as
shown above.
Be sure to pass the AC power adaptor cord around the
. hook.
3 Fully extend the antenna.
Make sure it points toward the ceiling.
■ Note on the AC power adaptor
Use only the AC power adaptor supplied. Do not use
any other AC power adaptor.
Polarity of the plug
-----------------------------
Setting up 13
Page 14
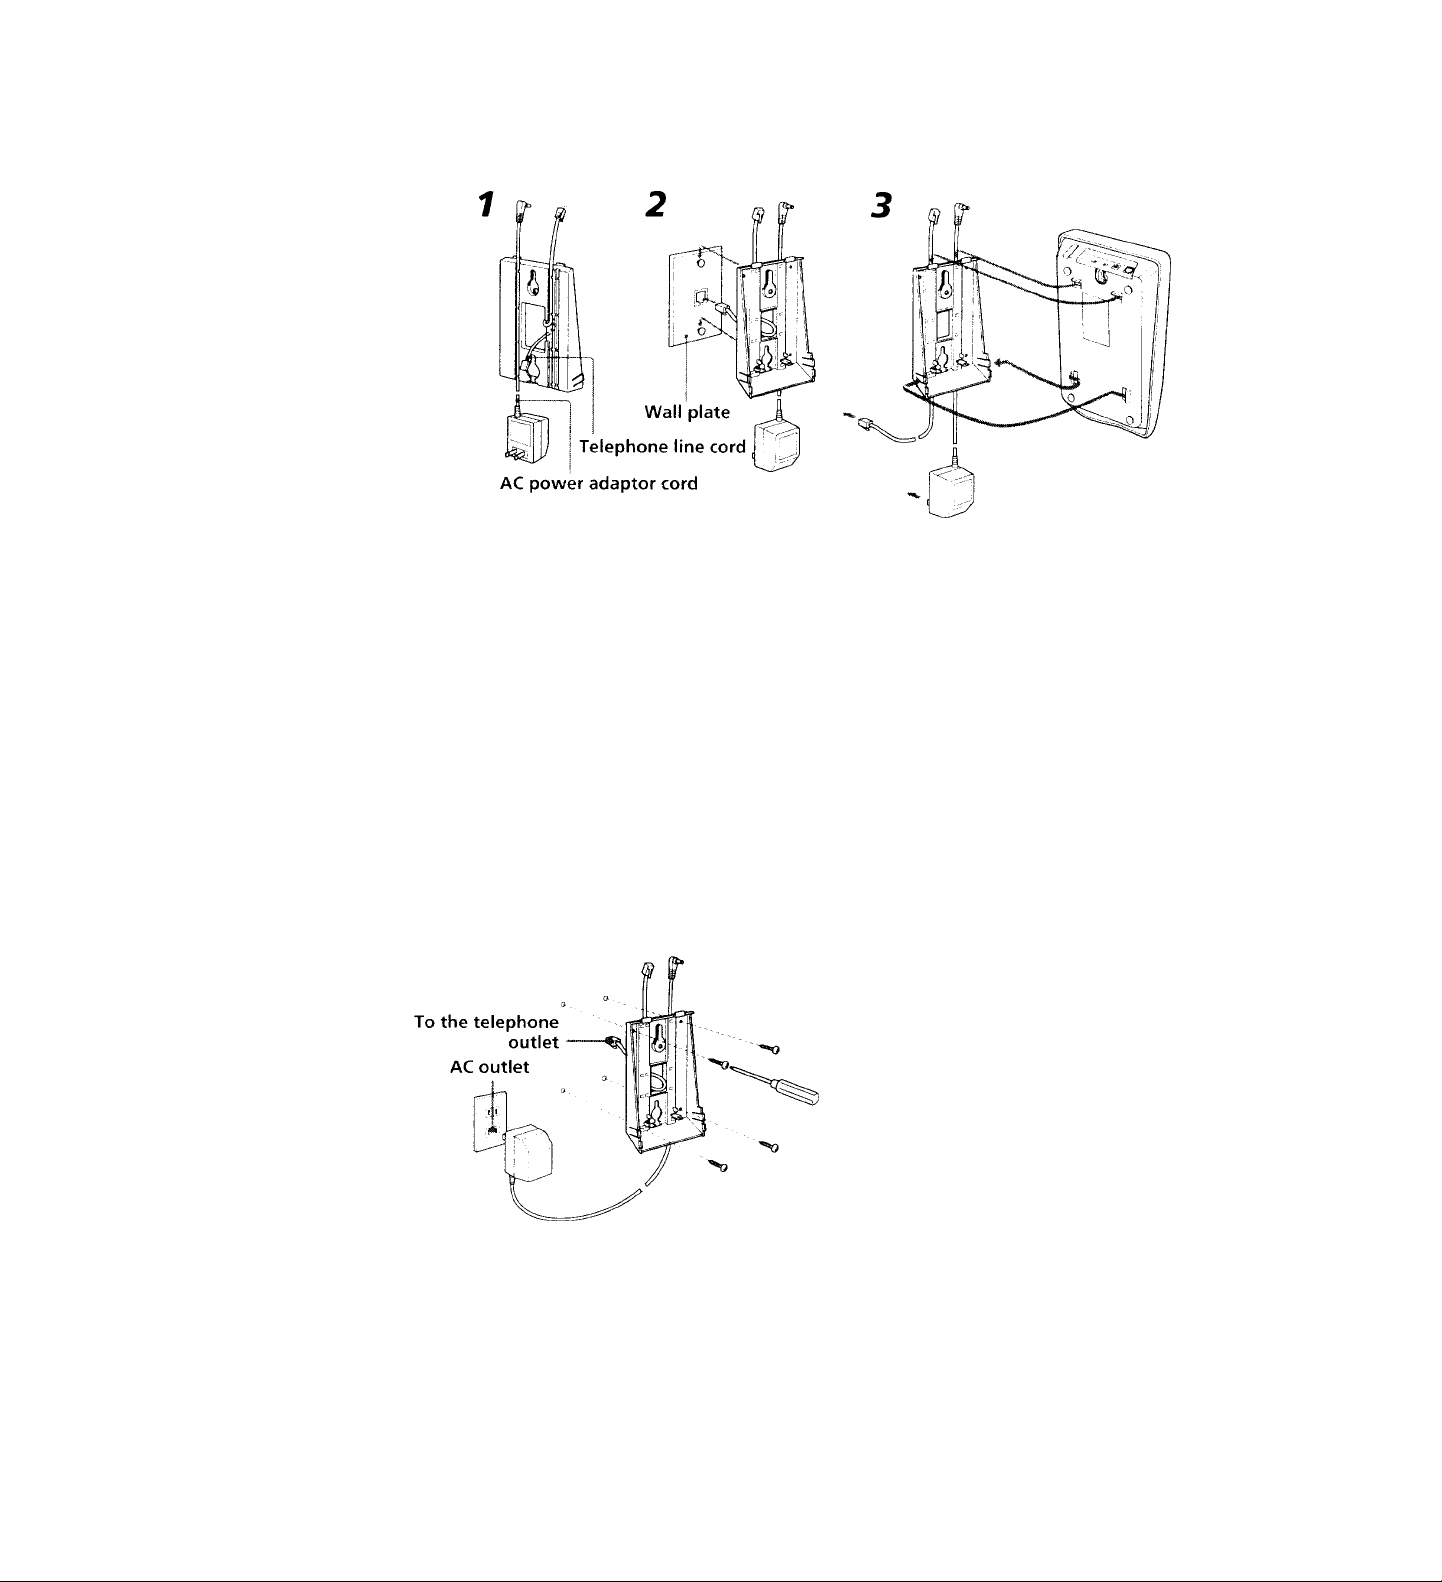
Hanging the base unit on a wall
I
If your phone jack is not
modular, contact your
telephone ser\'ice company for
assistance.
Modular
D
!
To mount the wall bracket
directly on the wall, use the
supplied screws.
1 Attach the AC power adaptor cord and the
short telephone line cord to the wall bracket.
2 Hook the wall bracket to the wall plate and
plug the telephone line cord into the modular
jack.
3 Insert the tabs on the top of the wall bracket
into the base unit and press the unit so that
the lower tabs on the wall bracket go into the
unit. Then extend the antenna fully.
4 Connect the AC power adaptor and the
telephone line cord.
For details, see the “Connecting the base unit" section
(page 13).
14 Setting up
Page 15

Preparing the battery pack
The supplied battery pack must be charged before you can
use it. Allow the battery pack to charge for about 12 hours.
7 Connect the jack.
Make sure that the red cord is on the right side.
I
Clean the charge terminals with
a soft cloth about once a month;
otherwise, the battery pack
may not be fully charged.
{
The battery works best when
charged every few days. For
best performance, don't return
the handset to the base unit
after every call.
If the battery becomes low
In the stand by mode, the
TALK/ВАТТ LOW lamp will
flash every 3 seconds for 1
minute.
During conx'ersation, the
TALK/BATT LOW lamp will
flash every 3 seconds and
warning beeps will be heard.
The line will be disconnected
after 1 minutes.
If this happens, disconnect the
line and replace the handset
onto the base unit to charge the
battery pack.
rhe battery should be fuiU
chan't'd for hours.
2 Insert the battery pack into the handset. 3 Place the handset onto the base unit.
■ Notes on charging------------------------------------------
• Make sure the CHARGE indicator on the base unit
lights when you place the handset onto the base unit.
• The CHARGE indicator remains on after charging is
. completed.
■ When to replace the battery
The battery can be recharged many, many times.
However, if the battery only lasts for a few minutes
even after 12 hours of charging, it needs replacement.
Please visit your local Sony authorized dealer or
service center. Please use onlv Sony BP-T16 battery.
Battery duration-------------------------=
A fully charged battery pack in the cordless handset
will last approximately:
• 6 hours in continuous talk mode
• 160 hours (7 days) in RING ON mode
• 1 month in ВАТТ SAVE mode
------------------------------
--------------
Setting up
15
Page 16
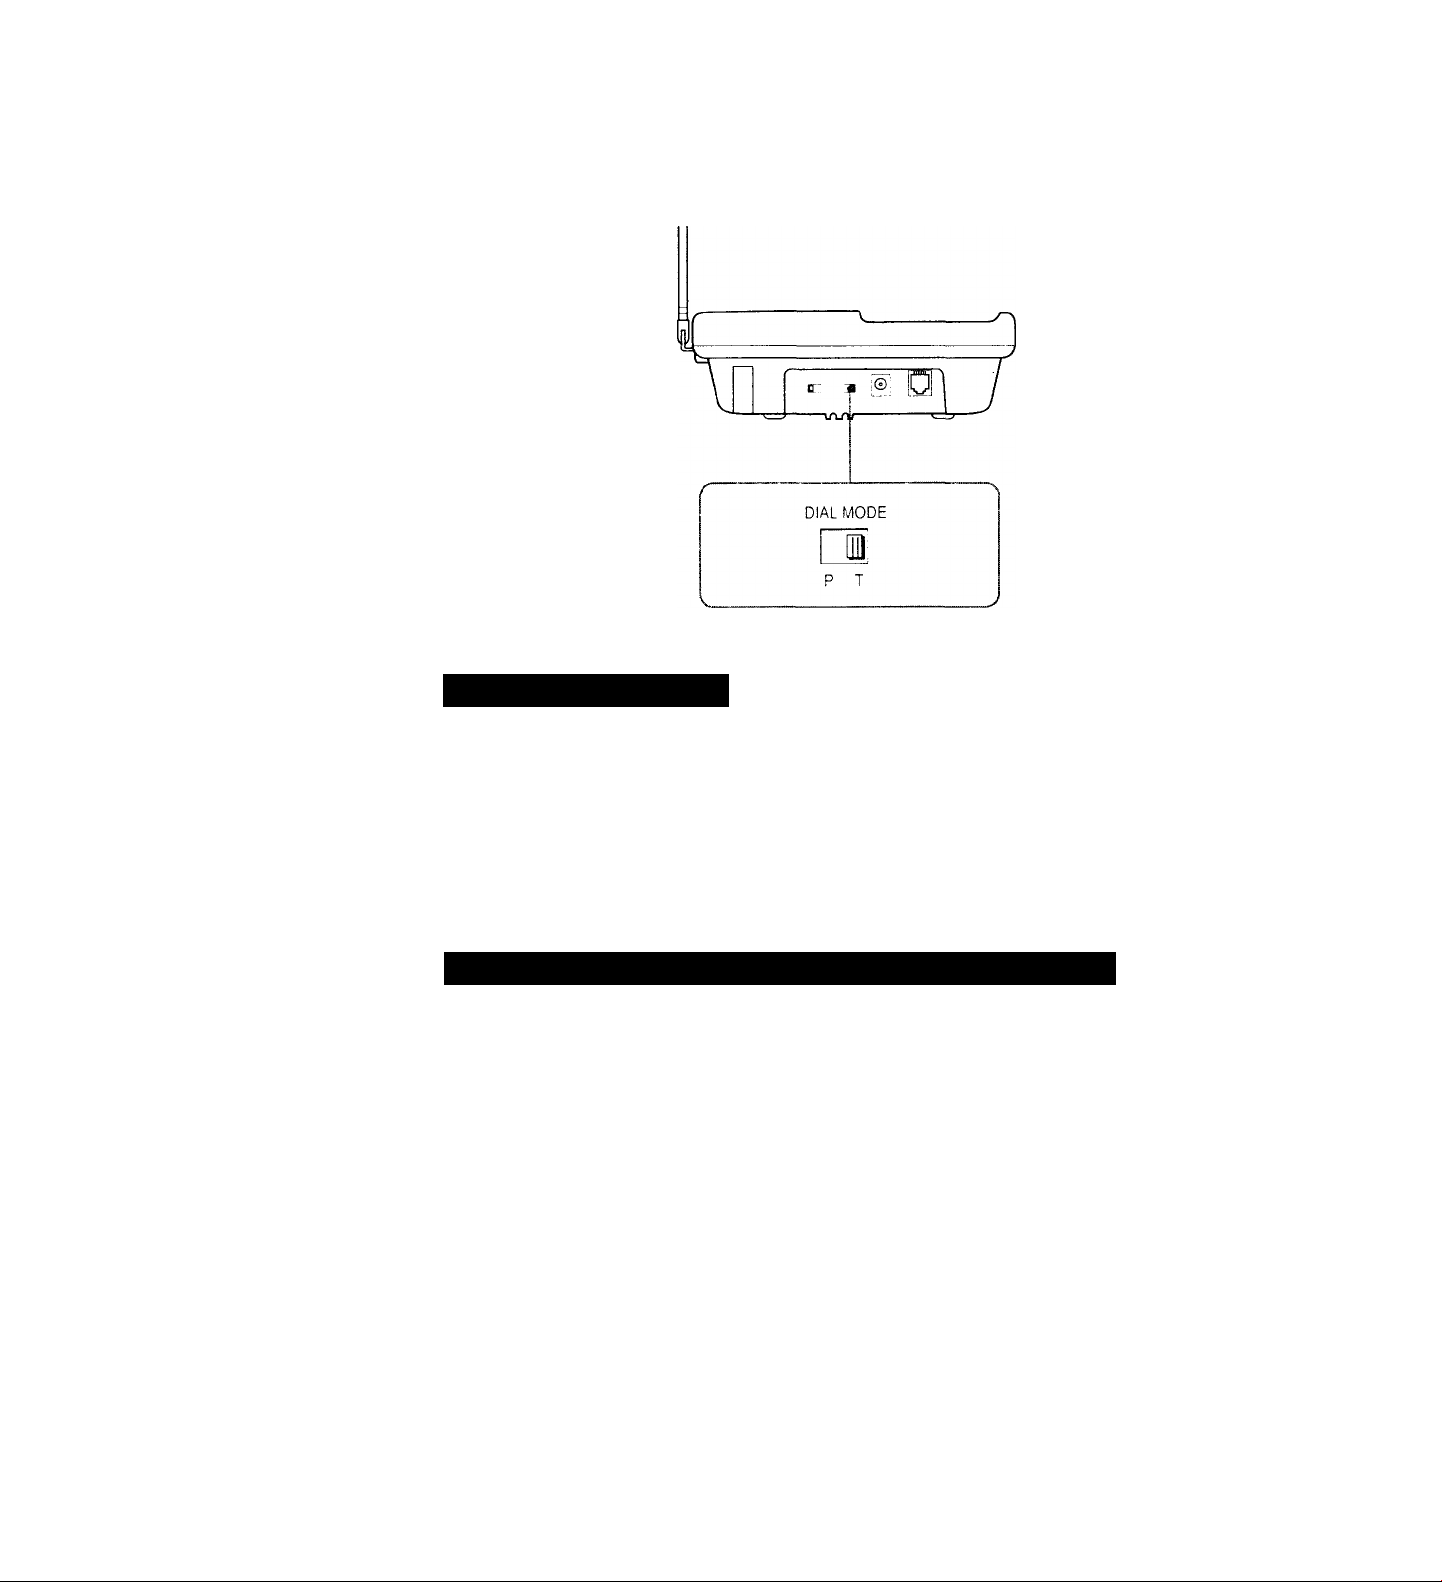
Choosing tone or pulse dialing
For the telephone to work correctly, you must set it to the
type of vour dialing system: tone or pulse dialing.
Setting the dial mode
Set the DIAL MODE switch to:
T (tone) if your dialing system is tone.
P (pulse) if your dialing system is pulse.
■ If you are not sure
Make a trial call with the DIAL MODE switch set to T.
If the call is connected, leave the switch at T.
Otherwise, set the switch to P.
--------------------------------
Using touch-tone services with pulse dialing systems
Some serx ices require you to use touch-tone. This is not a
problem if \our phone already uses tone dialing. If your
phone uses pulse dialing, however, you need to follow the
steps below to use these services.
For details on making calls, see the "Making calls" section
(page 18).
I
You onlv need to press lONI:
once to turn dialing to tone; this
will remain effective until the
call is disconnected.
1 Dial the service number.
2 When connected to the service, press TONE
(®).
3 Press the dialing keys as required.
16 Getting started
Page 17
Adjusting the volume
Adjusting the ringer
The RING ON/BATT SAVE switch on the handset turns
the ringer on or off.
Set the RING ON/BATT SAVE switch to
• RING ON to turn the ringer on.
or
• ВАТТ SAVE to turn the ringer off to save battery
I
■ -
If the handset is set to the
ВАТТ SAVE mode, the base
unit cannot page the handset.
power.
This is useful if you plan to use the handset in a location
where you can hear another phone ring.
In this setting, the handset will not ring, but you can still
make or receiv'e calls by pressing the TALK button.
Adjusting the speaker volume
The VOLUME control on the base unit adjusts the volume
of the speaker. It has no effect on the recording level.
Slide the VOLUME control toward the right to increase
the volume, or toward the left to decrease it.
,oOL
VOLUME
Getting started 17
Page 18
' Operating the phone
Making and receiving calls
TALK
Making calls
I
■
If you are too away from the
base unit or there is excessive
interference when you press
TALK, you will hear five short
error beeps. In this case, move
closer to the base unit to
improve reception.
I
If reception is poor, you will
hear three short beeps (out-ofrange alarm) and the TALK/
ВАТТ LOW lamp flashes. If this
happens, move closer to the
base unit.
Receiving calls
I
The handset will not ring on
incoming call if the ВАТТ
SAVE/RING ON switch is set
to ВАТТ SAVE. Howe\ er, vou
can receive calls bv pressing
TALK.
7 Press TALK, and wait until the TALK/BATT LOW
lamp lights.
You hear a dial tone.
2 Dial the phone number. 3 When you finish talking, replace the handset
onto the base unit, or press TALK again.
The call is disconnected.
1 When you hear the phone ring, press TALK.
2 When you finish talking, replace the handset
onto the base unit, or press TALK again.
18 Using as a telephone
Page 19
Redialing
TALK
REDIAL/PAUSE
I
The number must not be longer
than 32 digits (the tone and
pause digits are each counted
as one digit); otherwise you
will hear five short error beeps
and the call will not be
connected.
Make sure that the handset is in
RING ON mode.
You can redial the last number called with just one touch of
the REDIAL/PAUSE button.
1 Press TALK, and wait until the TALK/BATT LOW
lamp lights.
2 Press REDIAL/PAUSE.
The last sequence of numbers dialed will be
automatically redialed.
To erase the last phone number dialed
While the phone is not in use, press REDIAL/PAUSE
twice.
The number is erased from the memory.
-----------------
Using as a telephone 19
Page 20
■^Making and receiving calls
CHANNEL
if interference occurs
The cordless handset can work on 25 channels, so if you
experience interference while using one channel, you can
switch to another channel to improve the sound quality of
your cordless phone conversation.
Interference while dialing
If interference noise occurs during dialing the line will
not be connected. When this occurs, move closer to the
base unit.
Interference during a conversation--------------------
Press CHANNEL.
The phone will select a new channel. You may hear
noise for a moment. When the noise stops, continue
your conversation. If interference continues, move
closer to the base unit.
20 Using as a telephone
Page 21
Memory dialing
You can store the
numbers you frequently
call into the memory so
that you can dial a
number with the touch of
two buttons. While
storing a number, you
cannot receive calls.
SPEED DIAL/
PROGRAM
Storing memory dialing numbers
-CO) —d)
I
■
If more than 20 seconds elapse
between pressing buttons, the
operation will be canceled and
you must start over again.
I
•
Do not enter a memory dialing
number that exceeds 16 digits
(the tone and pause digits are
each counted as one digit);
otherwise you will hear five
short error beeps and you must
start over again.
Make sure that the handset is in RING ON mode.
7 Press SPEED DIAUPROGRAM.
2 Press a dialing key between 0 and 9.
You w'ill hear a confirmation beep.
3 Dial the phone number you wish to store.
4 Press SPEED DIAL/PROGRAM.
You will hear a confirmation beep.
■ If you use a Private Branch Exchange (PBX)
You need to dial a digit (such as 9) to access an outside line
before you dial a phone number.
To store the phone number:
1 Enter the outside line access digit.
2 Press REDIAL/PAUSE to enter a pause (to allow the
phone time to access the outside line).
3 Enter the phone number you want to store.
■ To change a stored number
----------------------------
If you store a new phone number in a memory dialing
button that already has a number stored in it, the old
number will be erased.
--------
Using as a telephone 21
Page 22
^Memory dialing
Making memory dialing calls
I
If vou press a mcmorv dialing
button that does not ha\ e a
phone number stored in it, you
will hear five short error beeps.
Once you hn\’e stored numbers in the memory dialing
buttons, you can make a call with the touch of two (speed
dialing) buttons.
1 Press TALK. 2 Press SPEED DIAL/PROGRAM. 3 Press the desired speed dialing button (CO to
CO).
The phone number stored in the button will be dialed.
Paging from the base unit to the handset
You can page the handset
from the base unit.
PAGE
You cannot page the handset in
the ВАТТ SAVE mode.
I
You cannot page when the
handset is engaged iir
conversation.
22 Using as a telephone
Press PAGE on the base unit.
The handset rings. The handset continues to ring as long as
you keep PAGE pressed.
Page 23
operating the phone during calls
FLASH
Using "call waiting" service
I
If you have not subscribed to
"call waiting" service, pressing
FLASH will disconnect the call.
If you have subscribed to "call waiting" service, you can
continue receiving calls while talking on the cordless
handset. When a new call comes in, you can put the current
call on hold and switch to the new call.
1 When a new call comes in while you are
talking, press FLASH.
The current caller is put on hold and you can answer
the new call.
2 When you want to switch back to the first
caller, press FLASH again.
Pressing FLASH lets you switch between the two calls.
Using as a telephone 23
Page 24
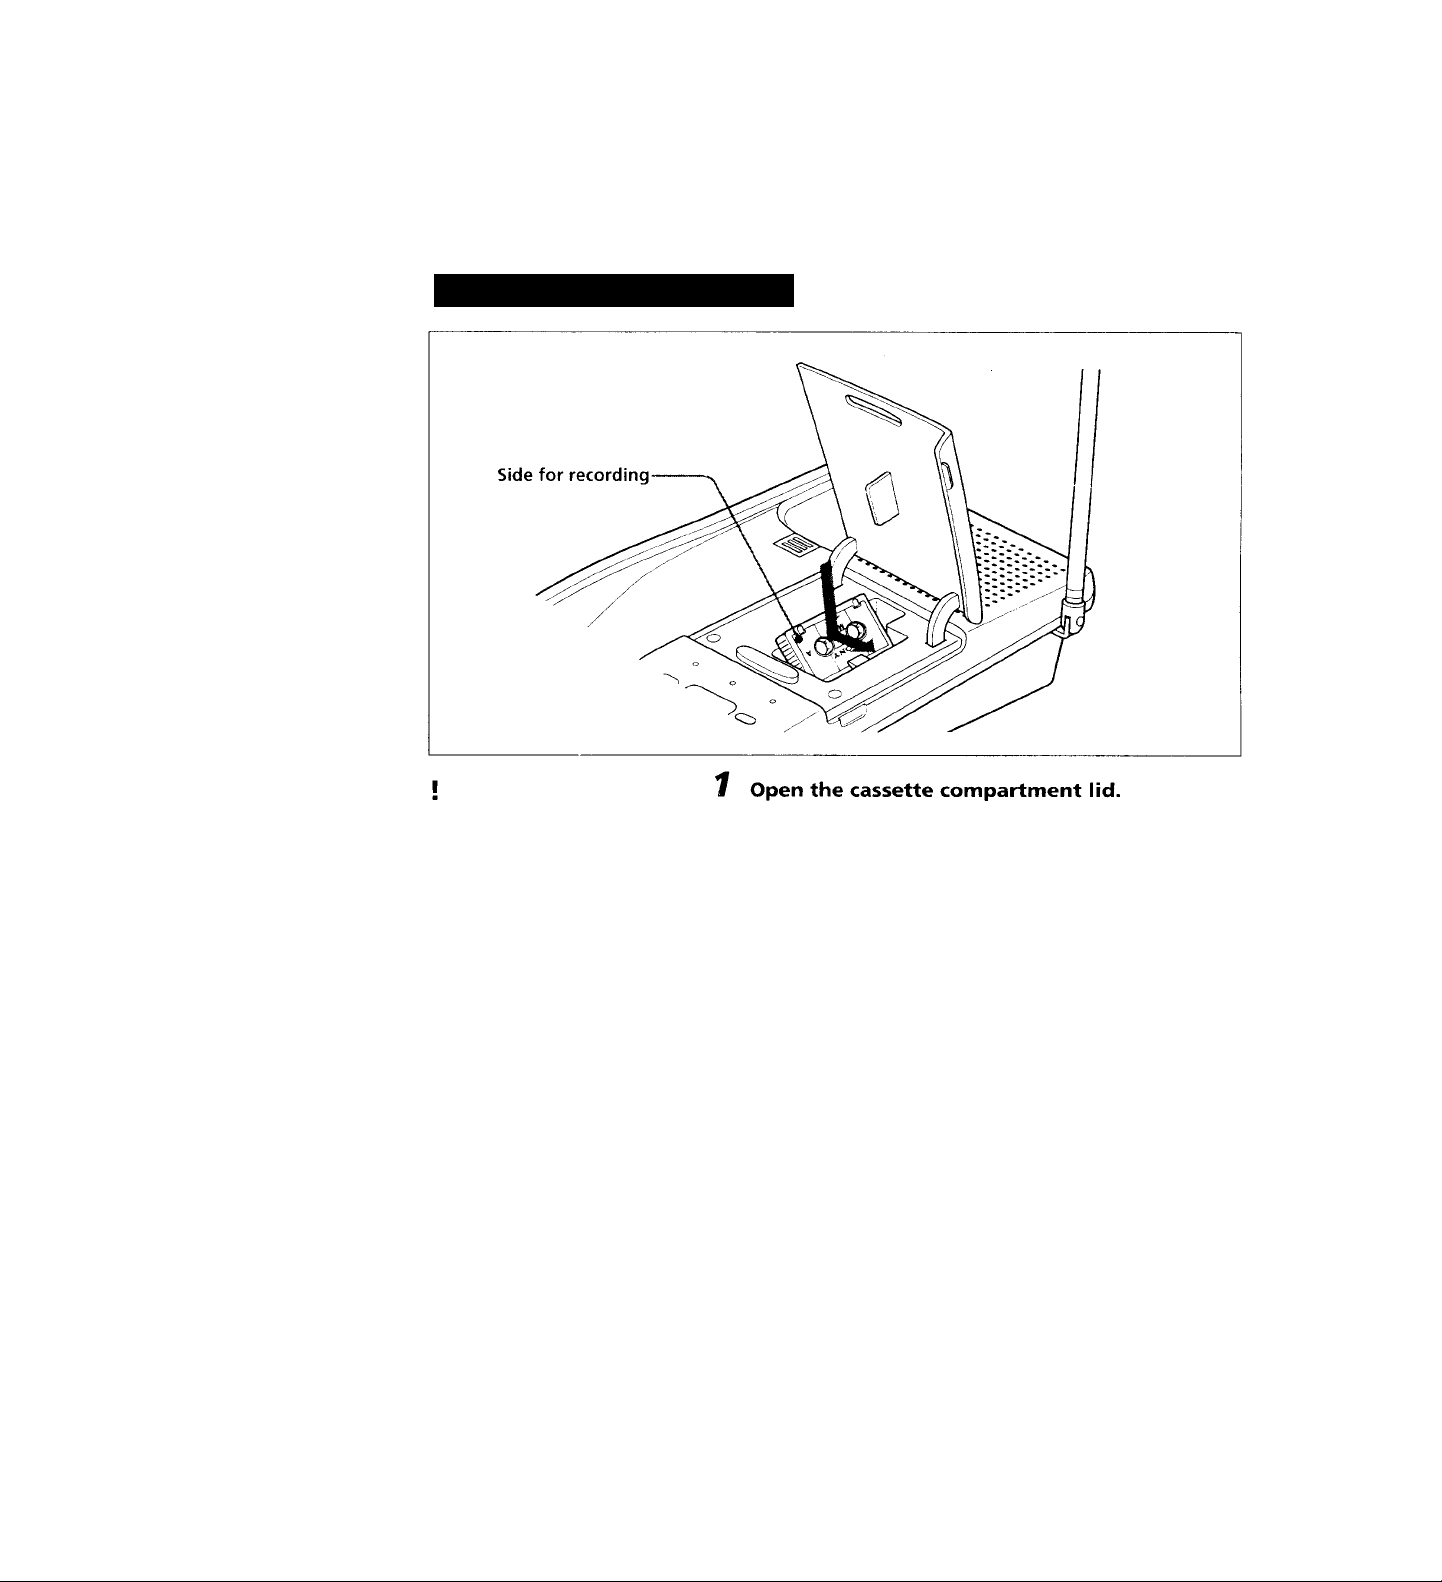
Preparing the answering machine
To use the answering function, you need to:
1 Install the microcassette.
2 Select the answer mode.
3 Record the greeting.
Installing the microcassette
Make sure there is no slack in
the tape.
2 Install the supplied microcassette with the
side for recording (Side A) facing up.
3 Close the cassette compartment lid.
When you change to a new tape
We recommend a 30-minute microcassette, such as the
Sony MC30.
--------------------------
24 Using as a telephone answering machine
Page 25

Selecting the answering mode
You can set the answering machine to record incoming messages (normal mode), or just to
make an announcement without recording messages (announcement only mode).
In the normal answering mode, you also have the option of having a beep to tell you if you
have received any new messages.
Answering mode Useful when
Normal
You want to play a
When you want beeps (audible
indicator)
greeting to ask the
caller to leave a
message.
• When you do not want to have
beeps
Announcement only
You want to make an announcement to the caller without
accepting incoming messages when, for example, you are
away on a long vacation.
Set the AUDIBLE switch
at the rear of the base
unit to:
AUDIBLE
OFF ON ANN
ONLY
AUDIBLE
II
OFF ON ANN
ONLY
AUDIBLE
m
OFF ON ANN
ONLY
Using as a telephone answering machine 25
Page 26
Preparing the answering machine
Recording the greeting
Your greeting is recorded
from the handset. For best
sound quality, perform
this operation close to the
base unit.
REMOTE
■d)
1
If your greeting is shorter than
2 seconds, five short error
beeps sounds and your
greeting is not recorded.
I
If the cassette is not installed,
five short error beeps sounds
and the answering machine
will not be turned on.
Greeting backup function
If a power interruption occurs,
your greeting will be retained
in memory for about 30
minutes.
I
If there is no greeting, you will
hear five short error beeps.
1 Press REMOTE.
The REMOTE lamp lights.
2 Press (Z).
You will hear a confirmation beep.
3 Speak into the handset.
You can record up to 16 seconds. If 16 seconds have
passed, the recording stops automatically.
4 To stop recording, press (E>.
You will hear a confirmation beep, and then your
greeting from the handset speaker. The answering
machine is turned on automatically.
5 Press REMOTE.
The REMOTE lamp goes off.
■ When the answering machine is turned on —
The ANSWER lamp lights up. In the ANN ONLY
mode, the ANSWER lamp flashes.
■ To confirm your greeting
1 Press REMOTE.
2 Press ®.
You will hear a confirmation beep, and then your
greeting from the handset speaker.
3 Press REMOTE again.
The REMOTE lamp goes off.
-------------------------------
26 Using as a telephone answering machine
Page 27
Turning the answering machine on or off
I
Turning on the answering machine
I
If there is no greeting, five short
error beeps sound.
I
■
If there is no cassette installed,
five short error beeps sound
(except the ANN ONLY mode).
I
■
If 4 minutes have passed while
recording the message, the line
is disconnected automatically.
I
If the tape finishes during
recording, the caller will hear a
beep and the line is
disconnected.
I
■
If the power interruption
occurs for more than 30
minutes, the greeting will be
erased. If this happens, the
POWER indicator flashes when
the power is restored.
Press ANSWER on the base unit.
The answering machine can record up to 19 messages.
To turn off the answering machine, press ANSWER again.
Using as a telephone answering machine 27
Page 28

Playing back messages
starting playback
I
■
If a call comes in during
playback, playback stops.
I
■
The unit only counts up to 19
messages. However, if there is
tape remaining, the unit will
continue to record incoming
messages. In this case,
however, the 20th and all
following messages will be
counted as one message, and
you will not be able to skip or
repeat between them.
If there is a newly recorded message;
You will hear beeps in the AUDIBLE INDICATOR ON
mode. The MESSAGE lamp flashes.
To play back the messages, press PLAY/STOP ^ ■ on
the base unit.
The unit rewinds the tape and plays back from the first
new message. After playback, the unit returns to the
answer mode.
To skip the current message-----------
Press SKIP/FF during playback.
To repeat the current message
----------------
Press REPEAT/REW during playback.
To stop the tape
Press PLAY/STOP I
If you do not press any button for 10 seconds, the unit
returns to the answer mode. The tape will be
automatically forwarded to the end of the message to
prevent new incoming messages from recording over
the current ones.
To resume playback, press PLAY/STOP ► ■ again.
28
Using as a telephone answering machine
Page 29

Erasing messages
To fast forward the tape
---------------------
First stop the tape and then press SKIP/FF
To rewind the tape-----------------------------------
First stop the tape and then press REPEAT/REW
To play back the messages you have listened
to ----------------------------------------------------------
1 Turn off the answering machine by pressing
ANSWER.
2 Rewind the tape by pressing REPEAT/REW
3 Press PLAY/STOP ► ■ to stop the tape.
• To play back, press PLAY/STOP ► ■.
• To stop playback, press PLAY/STOP ► ■.
• To fast forward the tape, press SKIP/FF
I
■
If there are messages which
have not been played back yet,
you will hear five short error
beeps and the tape does not
rewind.
I
The tape should be reset if
messages do not need to be
saved. This will speed up new
message playback.
Make sure the answering machine is on. and press
CLEAR MESSAGES.
The tape rewinds to the beginning. New messages will be
recorded over the old ones.
Using as a telephone answering machine 29
Page 30

Screening calls
You can screen calls by
leaving the answering
machine on while you are
at home. When a call is
answered, you can hear
the message being
recorded through the
base unit or through the
cordless handset. You
can then decide either to
continue recording, or to
switch to conversation.
-REMOTE
I
■
If the RING ON/BATT SAVE
switch is set to ВАТТ SAVE, the
TALK lamp and the REMOTE
lamp will not flash.
Make sure that the answering machine is in normal
answering mode (see page 25).
■ On the base unit--------------------------------------
When a call is answered, the base unit's speaker will
be turned on automatically, and you will be able to
hear the caller recording the message. The caller
cannot hear you. If you decide to talk to the caller,
press TALK on the cordless handset.
On the cordless handset
---------------------------------
To screen a call, the RING ON/BATT SAVE switch
must be set to RING ON. When the base unit is
answering an incoming call, the TALK lamp and the
REMOTE lamp will flash on the cordless handset.
While the lamps are flashing, press REMOTE.
You can listen to the caller recording the message, but
the caller cannot hear you. The answering machine
will still continue to record the message until the caller
hangs up. ^
If you wish to speak to the caller, press TALK.
The base unit will stop recording.
30
Using as a telephone answering machine
Page 31

Recording a telephone conversation
Using the answering
machine, you can record a
telephone conversation.
-CONV REC
1
■
If the answering machine is not
on, five short error beeps sound
when you press CONV REC
and you will not be able to
record the conversation.
I
■
Even if 19 messages are already
recorded, if there is remaining
tape, you can record the
conversation.
Make sure the answering machine is on.
1 During the phone conversation, press CONV
REC.
The conversation recording starts.
2 To stop recording, press CONV REC again.
You can play back the conversation as the same way as for
incoming messages.
Using as a telephone answering machine
31
Page 32

Recording a memo message
I
■
If a call comes in during
recording, the recording is
canceled.
The REMOTE lamp lights.
2
Press ®.
Speak into the handset to record your
3
message.
4
Press (D to stop recording.
You will hear a long confirmation beep.
Press REMOTE.
5
The REMOTE lamp goes off.
You can play back the memo message as the same way as
for incoming messages.
32
Using as a telephone answering machine
Page 33

Operating the answering machine from
the handset
Using the handset, you
can operate the
answering machine.
REMOTE
1
■
Make sure that the ВАТТ
7 Press REMOTE.
The REMOTE lamp lights.
SAVE/RING ON switch is set
2
to RING ON.
1
■
If a call comes in during remote
operation, the remote operation
Press the dialing keys for the desired control
codes within 20 seconds.
When you finish, press REMOTE.
3
is canceled.
Table of control codes
Operation
to play back messages
to repeat current messages CD
to skip current messages СЮto clear messages
to record memo message CD Press CD to stop recording.
to stop recording
to record or change your
greeting
to check your greeting —
to turn on answering
machine
to turn off answering
machine
to set security code (ЮППСЮ See page 34.
Press:
(2)
CD See page 29.
СЮ
(Z)
СШ
(g)(1)
Notes
The messages are played back from the
first one.
Press during playback.
Press during playback.
—
Press C© to stop recording.
See page 27.
—
Using as a telephone answering machine
33
Page 34

Operating the answering machine from a
touch-tone phone
Setting your security code
By setting security code,
you can operate the
answering machine from
a touch-tone phone while
you are away from your
home.
REMOTE
C© — d)
■d)
I
Make sure that the BATT
SAVE/RING ON switch is set
to RING ON.
Using the toll-saver feature
Press REMOTE.
The REMOTE lamp lights.
2
Press the d) key.
3
Press any two digits for security code (QD®
®®).
4 Press the (D key again.
You will hear a long confirmation beep.
5 Press REMOTE again.
The REMOTE lamp goes off.
If any new messages are recorded, the answering machine
will answer after two rings. If no new messages are
recorded it will answer after four rings. When you call
from a touch-tone phone and hear more than two rings,
you will know that there are no new messages and you can
then hang up, saving you the cost of the call.
34 Remote control functions
Page 35

Operating the answering machine from a touch-tone phone
1 Call your phone from a touch-tone phone.
2 When you hear the greeting, press (D, then
your security code (page 34).
If there are messages which have not been played back
yet, you will be informed by beep sound.
■ If you did not turn on the answering machine
Your phone will pick up after 10 rings. Press CD and
I —
■
If 20 seconds elapse without
pressing a control code, the line
will be disconnected.
Table of control codes
your security code.
3 Press dialing keys for the desired operation
command within 20 seconds.
4 When you finish, disconnect the line.
Operation
to play back messages
to repeat current messages
to skip current messages
to clear messages
to record memo message
to interrupt operation and
wait for the next operation
to record or change your
greeting
to check your greeting
to turn on answering
machine
to turn off answering
machine
Press:
(DCS)
(D(D Press during playback.
CD(3)
CD(4)
CDC5)
®®
®©
®CD
®®
(S)(Q)
Notes
The messages are played back from the
first one.
Press during playback.
See page 29.
Press ®® to stop recording.
—
Press ®® to stop recording.
—
See page 27.
—
Remote control functions 135
Page 36

other information
Setting the digital security code
You normally do not need to change the digital secutity
code. However, in the unlikely event that another cordless
phone uses the same digital security code, you can
manually change the code.
SAVE/RING ON switch is set
to RING ON.
I
■
A prolonged power failure will
erase the digital security code.
To reprogram, place the
handset on the base unit.
I
Five short error beeps give
warning if you press any
number other than 0-65535
(such as 65536).
Z Press CHANNEL.
You will hear a confirmation beep.
3 Press the number between 0-65535 by using
the dialing keys.
4 Press 5PEED DIALfPROGRAM.
You will hear a long confirmation beep.
5 Immediately place the handset onto the base
unit to complete the code change.
This procedure will change the code in both the base unit
and the handset.
36 Handling the phone
Page 37

Precautions/Maintenance
On power source
Before initial use, insert the battery pack into the cordless
handset and charge it for 12 hours.
Operate the base unit only on 9V DC. Use the AC power
adaptor supplied with the unit. Do not use any other AC
power adaptors as they may cause malfunction.
Plug the base unit into an AC outlet which has a
continuous power supply. Avoid outlets where power
may be cut off.
Store the battery pack at a temperature between 5°C and
35°C (41°F and 95°F) for best performance.
On installation
Do not expose the base unit to:
• heat sources such as radiators or air ducts.
• extremely low temperatures.
• direct sunlight.
• excessive dust.
• moisture or rain.
• mechanical vibration or shock.
• inclined position.
Cleaning the cabinets
Clean the cabinets with a soft cloth slightly moistened with
water or a mild detergent solution. Do not use any type of
abrasive pad, scouring powder or solvent such as alcohol
or benzine as they may damage the finish of the cabinet.
Cleaning the battery terminals
Regularly clean the charging terminals on the base unit and
the cordless handset with a dry, soft cloth. If the terminals
are soiled, the battery pack may not be charged.
Handling the phone 37
Page 38

Operating the answering machine from a
touch-tone phone
Setting your security code
By setting security code,
you can operate the
answering machine from
a toucli-tone phone while
you are away from your
home.
REMOTE
■ (0) — (S)
■(E)
I
Make sure that the BATT
SAVE/RING ON switch is set
to RING ON.
Using the toll-saver feature
7 Press REMOTE.
The REMOTE lamp lights.
2 Press the (S) key. 3 Press any two digits for security code (CQ)®
®®).
4 Press the ® key again.
You will hear a long confirmation beep.
5 Press REMOTE again.
The REMOTE lamp goes off.
If any new messages are recorded, the answering machine
will answer after two rings. If no new messages are
recorded it will answer after four rings. When you call
from a touch-tone phone and hear more than two rings,
you will know that there are no new messages and you can
then hang up, sa\’ing you the cost of the call.
34 Remote control functions
Page 39

Operatirig^^e answering machine from a toudh-tone phphe
1 Call your phone from a touch-tone phone.
2 When you hear the greeting, press CE, then
your security code (page 34).
If there are messages which have not been played back
yet, you will be informed by beep sound.
■ If you did not turn on the answering machine
Your phone will pick up after lO rings. Press (S) and
!
If 20 seconds elapse without
pressing a control code, the line
will be disconnected.
your security code.
3 Press dialing keys for the desired operation
command within 20 seconds.
4 When you finish, disconnect the line.
Table of control codes
Operation
to play back messages
to repeat current messages
to skip current messages
to clear messages
to record memo message
to interrupt operation and
wait for the next operation
to record or change your
greeting
to check your greeting
to turn on answering
macliine
to turn off answering
machine
Press: Notes
(DCS) The messages are played back from the
first one.
(DCD
CDC3)
CD(4) See page 29.
(DCS)
(DCS)
(DCD •
(DCS)
(DCS) See page 27.
(DCS)
Press during playback.
Press during playback.
Press (DCD to stop recording.
—
Press (DCD to stop recording.
—
—
Remote control functions |35
Page 40

uuijuntiuijn
Setting the digital security code
You normally do not need to change the digital secutity
code. Ho\\'e\ er, in the unlikely event that another cordless
phone uses the same digital security code, you can
manuallv change the code.
I
Make sure that the BATT
SAVE/RING ON switch is set
to RING ON.
A prolonged power failure will
erase the digital security code.
To reprogram, place the
handset on the base unit.
I
Five short error beeps give
warning if you press any
number other than 0-65535
(such as 65536).
1 Press SPEED DIAL/PROGRAM.
The TALK/BATT LOW lamp lights.
2 Press CHANNEL.
You will hear a confirmation beep.
3 Press the number between 0-65535 by using
the dialing keys.
4 Press SPEED DIAL/PROGRAM.
You will hear a long confirmation beep.
5 immediately place the handset onto the base
unit to complete the code change.
This procedure will change the code in both the base unit
and the handset.
36 Handling the phone
Page 41

Precautions/Maintenance
On power source
Before initial use, insert the battery pack into the cordless
handset and charge it for 12 hours.
Operate the base unit only on 9V DC. Use the .AC power
adaptor supplied with the unit. Do not use any other AC
power adaptors as they may cause malfunction.
Plug the base unit into an AC outlet which has a
continuous power supply. Avoid outlets where power
may be cut off.
Store the battery pack at a temperature between 5°C and
35°C (41 °F and 95°F) for best performance.
On ïnstariatîoh
Do not expose the base unit to:
• heat sources such as radiators or air ducts.
• extremely low temperatures.
• direct sunlight.
• excessive dust.
• moisture or rain.
• mechanical vibration or shock.
• inclined position.
Cleaning the cabinets
Clean the cabinets with a soft cloth slightly moistened with
water or a mild detergent solution. Do not use any type of
abrasive pad, scouring powder or solvent such as alcohol
or benzine as they may damage the finish of the cabinet.
Cleaning the battery terminals
Regularly clean the charging terminals on the base unit and
the cordless handset with a dry, soft cloth.4f the terminals
are soiled, the battery pack may not be charged.
Handling the phone 37
Page 42

Tape head cleaning
Clean the tape head regularly. Open the cassette
compartment and remove the microcassette. Wipe the tape
head, pinch roller, and capstan with a cotton swab slightly
moistened in cleaning tiuid or denatured alcohol. You can
also use a soft cloth.
38
Handling the phone
Page 43

Troubleshooting
Problem Cause/Solution
Setting up
The POWER lamp flashes when
the AC power adaptor is
connected or after a power
interruption.
Storing memory dialing numbers
You hear five short error
beeps and cannot store a
memory dialing number.
Making calls
You hear five short error beeps. Extend the antenna of the base unit vertically.
Press any key.
• Make sure you follow the procedure in storing the
number correctly (page 21).
• Make sure the number (including the tone and
pause digits, if used) is less than 16 digits.
Move the cordless handset closer to the base unit.
Place the base unit away from noise sources (page
12).
Return the handset to the base unit for a while.
I
The TALK/ВАТТ LOW lamp
flashes.
You hear no dial tone. Make sure the RING ON/BATT SAVE switch is set
The telephone is always connected
to the wrong number, or not
connected at all, even when the
numbers you dial are correct.
Charge the battery pack in the cordless handset for
12 hours (page 15).
to RING ON.
Make sure the telephone line cord is securely
connected to the telephone outlet.
Charge the battery pack in the cordless handset
(page 15).
Make sure the dial mode setting is correct (page
16).
General 39
Page 44

Problem
Using the answering machine
Cause/Solution
You hear five short error beeps • There is no greeting recorded (page 26).
when you try to turn on the • No tape is installed (page 24).
answering machine. • The tape is full anci there are messages that have
not been played back yet. Plav back the messages
and rewind the tape (page 28).
No sound from the speaker of the
base unit.
The caller's message is
interrupted.
When you call your phone from a
touch-tone phone, the line is
disconnected.
• Check the VOLUME control (page 17).
• The caller's message is too long.
• The caller's voice is too low. The unit disconnects
the line w'hen it detects 7 seconds of silence.
• You ha\’e entered the wrong security code 3 times.
40 General
Page 45

Specifications
General
Cordless handset
Base unit i Dimensions
I'i'oqucncv control
C)por<ition mode
Operation channel
Supplied accessc'ries
I’ovyer source
Battery charging time
Battery life
Dimensions
Mass
j Power source
Mas:
Crystal-controlled Phi.
I'M, duplex
25 channels
AC power adaptor AC-T42 (1)
Telephone line cord (2)
Rechargeable battery pack >'r>-ri6 (1)
Microcassette MC30 (1)
Wall bracket and screws (1 set)
Operating instructions (1)
Quick Start Guide (1)
Remote Control Card (1)
Rechargeable battery pack BP-T16
Approx. 12 hours
Standby: Approx. 160 hours (Approx.
7 days)
Talk: Approx. 6 hours
Approx. 59 X 203 x 58 nani (w/h/d),
antenna excluded (2 x 8 x 2 '/>.
inches)
Antenna: 100.4 mm (4 inches)
Approx. 255 g, battery included
(9
07
.)
DC 9V from AC power adaptor
Approx. 155.6 X 57.5 x 224 mm (w/h/
d), antennas excluded (6 '/j x 2 x
8 Qs inches)
Antenna: 173 mm (6 '/s inches)
Approx. 670 g (1 lb 8 oz)
Greeting message
Incoming message
Incorporated 1C, up to 16 seconds
Microcassette, recording time 4
minutes, up to 19 messages
Memo message recording No time limit
Telephone con\ ersation recording
No time limit
Design and specifications are subject to change without notice.
General 41
Page 46

SONY®
Telephone
LIMITED WARRANTY
SONY ELECTRONICS INC. ("SONY") warrants this Product (including any accessories) against
defects in material or workmanship as follows:
1. LABOR: For a period of one (1) year from the date of purchase, if this Product is deter
mined to be defective, Sony will repair the Product at no charge, or pay the labor charges to any
SONY authorized service facility. After the Warranty Period, you must pay for all labor charges.
2. PARTS: In addition, SONY will supply, at no charge, new or rebuilt replacements in ex
change for defective parts for a period of one (1) year. After the warranty period, you must pay
for all parts costs.
3. ACCESSORIES: Parts and labor for all accessories are for one (1) year.
To obtain warranty service, you must take the Product, or deliver the Product freight prepaid, in
either its original packaging or packaging affording an equal degree of protection, to any autho
rized SONY service facility.
This warranty does not cover customer instruction, installation, set up adjustments or signal
reception problems.
This warranty does not cover cosmetic damage or damage due to acts of God, accident, misuse,
abuse, negligence, commercial use, or modification of, or to any part of the Product, including the
antenna. This warranty does not cover damage due to improper operation or maintenance, con
nection to improper voltage supply, or attempted repair by anyone other than a facility authorized
by Sony to service the Product. This warranty does not cover Products sold AS IS or WITH ALL
FAULTS, or consumables (such as fuses or batteries). This warranty is valid only in the United
States.
Vi?;
m
Proof of purchase in the form of a bill of sale or receipted invoice which is evidence that the unit
is within the Warranty period must be presented to obtain warranty service.
This warranty is invalid if the factory applied serial number has been altered or removed from the
Product.
REPAIR OR REPLACEMENT AS PROVIDED UNDER THIS WARRANTY IS THE EXCLUSIVE REME
DY OF THE CONSUMER. SONY SHALL NOT BE LIABLE FOR ANY INCIDENTAL OR CONSE
QUENTIAL DAMAGES FOR BREACH OF ANY EXPRESS OR IMPLIED WARRANTY ON THIS
PRODUCT. EXCEPT TO THE EXTENT PROHIBITED BY APPLICABLE LAW, ANY IMPLIED WAR
RANTY OF MERCHANTABILITY OR FITNESS FOR A PARTICULAR PURPOSE ON THIS PRODUCT
IS LIMITED IN DURATION TO THE DURATION OF THIS WARRANTY.
Some states do not allow the exclusion or limitation of incidental or consequential damages, or
allow limitations on how long an implied warranty lasts, so the above limitations or exclusions
may not apply to you. In addition, if you enter into a service contract vyith the Sony Partnership
within 90 days of the date of sale, the limitation on how long an implied warranty lasts does not
apply to you. This warranty gives you specific legal rights, and you may have other rights which
vary from state to state.
FOR FREQUENTLY CALLED TELEPHONE NUMBERS. PLEASE SEE THE BACK COVER.
42 General
Page 47

Registro del propietario
Los números de modelo y de serie se encuentran en el londo de la base del teledono. Anote ei
número de serie en el espacio prtn isto a continuación. RetieVase a estits números cada vez que
se comunique con su distribuielor Son\ con respecto al producto.
Modelo N" SPP-_
SERIE N"
IMPORTANTES INSTRUCCIONES DE
SEGURIDAD
A fin de reducir el riesgo de incendio, shock eléctrico y lesiones a las personas cuando usted use
su equipo telefónico, siempre debe observar precauciones básicas de seguridad, entre ellas:
1. Lea y entienda todas las instrucciones.
2. Siga todas las advertencias e instrucciones indicadas en el producto.
3. Desconecte este producto del tomacorriente de pared antes de limpiarlo. No use
limpiadores líquidos ni en aerosol. Use un paño húmedo para limpiarlo.
4. No use este producto cerca del agua, por ejemplo, cerca de una bañera, lavamanc's,
fregadero de cocina o batea, en un sótano mojado ni cerca de una piscina.
5. No ponga este producto sobre un carrito, estante o mesa inestable. El aparato puede caer y
ocasionar daños graves al teléfono.
6. Las ranuras y aberturas en el gabinete y en la parte trasera o el fondo del aparato se
proporcionan a fines de ventilación. Para evitar que el aparato se sobrecaliente, dichas
aberturas no deben obturarse ni cubrirse, fas aberturas nunca deben bloquearse colocancio
ef aparato sobre la cama, sofá, alfombra u otra superficie similar. Este producto nunca debe
colocarse cerca de, ni sobre un radiador o registro de calefacción. Este producto no debe
colocarse en una instalación empotrada sal\ o que se provea ventilación apropiada.
7. Este producto sólo debe operarse desde el tipo de fuente de alimentación ineficacia en la
etiqueta de especificaciones. Si no está seguro del tipo de fuente de alimentaciém en su
hogar, consulte con su distribuidor o compañía de electricidad local.
8. No deje que nada descanse sobre el cable eléctrico. No sitúe este producto en un lugar
donde el cable esté expuesto a abuso debido al tránsito de la gente.
9. No sobrecargue los tomacorrientes de pared v cables de extensión, va que esto puede
ocasionar el riesgo de incendio o shock eléctrico.
10. Nunca introduzca a presiém objeto> de ningún tipo en este producto a través de las ranuras
del gabinete, ya que pueden hacer contacto con un punto de \ oltaje peligroso u ocasionar
un cortocircuito entre piezas que podría conducir a incendiris o shock eléctrico. Nunca
derrame líquidos de ningún tipo sobre el producto.
44
Page 48

11. PfiM reducir el riesgo de shock eléctrico, no desarme este producto; en caso de necesitarse
servicio o reparación, llé\ elo a personal de ser\'icio calificado. El abrir o quitar las tapas
puede exponerle a voltaje peligroso u otros riesgos. El reensamblaje incorrecto puede
ocasionar shock eléctrico cuando el aparato se use posteriormente.
12. Desconecte este producto ciel tomacorriente de pareci y refiera el ser\ icio a personal de
ser\'icio calificacfo bajo las siguientes condiciones;
Cuando el cable eléctrico o enchufe se encuentra dañado o deshilacliado.
A.
B.
Si se ha derramado líc"]uido dentro del producto.
Si el producto ha estado expuesto a lluvia o agua.
C.
Si el producto no opera normalmente al seguir las instrucciones de operación. Sólo
D.
dehe ajustar los controles incluidos en las instrucciones de operación, ya que el
ajuste incorrecto de otros controles puede producir daños v a menudo exigirá
trabajo extenso por un técnico calificado para restaurar el producto a las operaciones
normales.
Si el producto se ha dejado caer o el gabinete está dañado.
Si el producto exhibe un cambio perceptible de opración.
13. E\’ite usar un teléfono (que no sea del tipo sin cordones) durante una tormenta eléctrica.
Existe la remota posibilidad de shock eléctrico debido a rayos.
14. Para notificar una fuga de gas, no utilice el teléfono en la vecindad de dicha fuga.
GUARDE ESTAS INSTRUCCIONES
PRECAUCION: PARA REDUCIR EX RIESGO DE INCENDIO O LESIÓN A PERSONAS
DEBIDO A LA PILA, LEA Y SIGA ESTAS INSTRUCCIONES:
1. Sólo debe utilizar un bloque de pilas del siguiente tipo \- tamaño: SONA' BP-T16
2. No deseche el bloque de pilas en una hoguera ya que la pila puede explotar. Compruebe
los códigos locales sobre posibles instrucciones especiales de desecho.
3. No abra ni mutile el bloque de pilas. El electrólito liberado es corrosivo v puede ocasionar
daños a los ojos o la piel. Puede ser tóxico si se ingiere.
4. Tenga cuidado al manejar la pila a fin de evitar cortocircuitos de la pila con materiales
conductores tales como anillos, pulseras y llaves. La pila o el conductor puede
sobrecalentarse y ocasionar quemaduras.
5. Sólo debe cargar el bloque de pilas suministrado o identificado para uso con este producto
de acuerdo con las instrucciones v limitaciones especificadas en el manual de instrucciones
correspondiente al producto.
6. Obserx e la orientación de polaridad correcta entre el bloque de pilas \' el cargador de pilas.
45
Page 49

Para clientes en EE. UU.
RECICLADO DE BATERÍAS DE NÍQUEL-CADMIO
BATERIAS DE NIQUEL-CADMIO
DEBERÁN SER DESECHADAS DE FORMA ADECUADA.
Las baterías de níquoLcadniio pueden reciclarse. Usted podrá ayudar a
conservar el medio ambiente de\'olviendo las baterías que no desee utilizar a un
Ni-Cd
Para información sobre el centro de reparaciones más cercano, llame a 1-800-222-SONY (FE.UU.
solamente)
Precaución; No maneje baterías de níquel-cadmio dañadas o con escape de su electrólito.
CÓDIGO DE SEGURIDAD DIGITAL
El modelo (SPP-AQ25) dispone de una circuitería de código de seguridad digital que
proporciona proteccicín contra el acceso accidental.
De forma aleatoria se selecciona uno de los 65.536 tipos de código de seguridad digital y se
ajusta automáticamente al cargarse por primera vez la batería.
De este modo, es muy improbable que más de dos unidades tengan asignado el mismo código
de seguridad digital.
centro de reparaciones Sony para su recopilación, reciclado, y eliminación
apropiada.
Nota: En ciertas zonas, puede estar prohibido desechar baterías de níquel-
cadmio en lugares de recogida do basura de x'ivicndas o comercios.
IMPORTANTES INSTRUCCIONES DE INSTALACIÓN
1. Nunca instale el teléfono durante una tormenta eléctrica.
2. Nunca instale las tomas del teléfono en lugares húmedos, a menos que la toma esté
específicamente diseñada para ello.
3. Nunca toque los hilos o terminales telefónicos sin aisiar, a menos que se haya desconectado la
línea telefónica en el interfaz de red.
4. Sea precavido al instalar o modificar las líneas telefónicas.
46
Page 50

Para clientes en EE. UU. (continuación)
INFORMACIÓN GENERAL SOBRE LOS
TELÉFONOS
(1) i;stc equipe.) está de iicuerdo con la Parte 68 de las reglas de la FCC. En la base de este
equipo hay una etiqueta que contiene, entre otra inleirmación, el número de registro de la
FCC V el número de equivalencia de generador de llamada (REN) para este eejuipo.
Cuando se solicite, esta información deberá ofrecerse a la compañía telefónica.
(2) La toma (conector) de registro aplicable para su equipo es USOC-R|l IC.
(3) Este equipo ha sido diseñado para conectarse a la red telefónica o la de un usuario
utilizando una toma modular compatible que esté de acuerdo con la Parte 68 de la FCC.
Con este equipo se suministran un cable v una cla\ ija modular que están de acuerdo con las
normas de la FCC.
(4) El REN se utiliza para determinar la cantidad de dispositivos que podrán conectarse a la
línea telefónica. El exceso de REN conectados a la línea telefónica puede resultar en que ios
■*Ttispositivos no ccmtesten a llamadas entrantes. En la mayoría cié las zonas, no en todas, la
suma de REN no deberá ser superior a cinco (3i. Para enterarse ciel número total de REN
que pueden conectarse a una línea, póngase en contacto con la compañía telefónica.
(5) Si su equipo (SPP-AQ25) produce ciaños en la red telefónica, la compañía telefónica le
notificará con antelación que es posible que se requiera la interrupción temporal del
servicio. Pero si la notificación con antelación no es práctica, la compañía telefónica lo
notificará al cliente lo antes posible. Además, se le notificará el eferecho a realizar una
reclamación a la FCC si usted lo considera necesario.
(6) La compañía telefónica puede realizar cambios en sus instalaciones, equipos, operaciones, o
procedimientos que pueden afectar la operación del equipo. Cuando suceda esto, la
compañía telefónica le avisará con antelación para que usted realice las modificaciones
necesarias para mantener ininterrumpicio el servicio.
(7) Si experimenta algún problema con este equipo (SPP-AQ25), con respecto a la reparación o
a la información sobre la garantía, póngase en contacto con Sony Telecommunicatíons
Helpline: Tel 1-(800)-222-7669 (Inglés solamente). Si el equipo causa problemas en la
línea, la compañía telefónica puede solicitarle que desconecte el equipo hasta que se
resuelva el problema.
(8) Todas las reparaciones deberá realizarlas un centro de reparaciones Sony.
(9) Este equipo no deberá utilizarse en líneas compartidas ni en líneas de pago pre\ io.
(10) Este equipo es compatible con dispositi\’os para avuda al oído.
Si su teléfono dispone de marcadores automáticos
Cuando programe números de emergencia y (o) realice llamadas de f)rueba a los mismos.
1. Permanezca poco tiempo en la línea y explique a la otra parte la razón de la llamada.
2. Realice tales acti\'idacfcs en horas de poco tráfico, como por la mañana tempranc) o a últimas
horas de la tarde.
Precaución
Se le advierte que cualquier cambio o modificación no aprobado expresamente en el presente
manual podría anular su autorización para operar este equipo.
"Adc’ertencia: Este teléfono funciona como radiotransmisor. Las conversaciones sostenidas con
este teléfono sin cordones pueden ser escuchadas por terceros en equipos de radio dentro del
área de su alcance de transmisiérn".
47
Page 51

índice
Antes de utilizar el teléfono
Instalación
Preparativos
Comprobación del contenido del paquete 50
Identificación de partes 51
Ubicación del teléfono 54
blccción del mejor lugar para la unidad base
Conexión de la unidad base 55
Instalación de la unidad base en una pared 56
Preparación de la batería 57
Selección de marcacicm por tonos o por pulsos 58
Establecimiento del modo de marcación 58
Utilización de servicio de tonos con el sistema de
marcación por pulsos 58
Ajuste del volumen 59
Utilización del teléfono
utilización como
teléfono
Realización y recepción de llamadas 60
Realización de llamadas 60
Recepción de llamadas 60
Repetición automática de la marcación 61
Si se producen interferencias 62
Marcación memorizada 63
Almacenamiento de números en la memoria 63
Marcación de números memorizados 64
Función buscapersonas de la unidad base al microteléfono
64
Operación del teléfono durante la llamada 65
Utilización del servicio de "llamada en espera" 65
■
54
48 Instalación
Page 52

utilización como
contestador de
llamadas
l^rcparatix’os dol contostador do llamadas 66
Colocación dol micrcicassotto 66
Solocción del modir do contostaci(')n 67
Grabación de un mensaje de contestación 68
Activación o desactix'ación del contestad(.)r de llamadas 69
Reproducción de mensajes 70
Comienzo de la reproducción 70
Borrado de mensajes 71
Selección de las llamadas 72
Grabación de una conversación telefónica 73
Grabación de un mensaje de memorando 74
Operación del contestador de llamacias desde el
microteléfono 75
Funciones de control
remoto
Operación del contestador de llamadas desde un teléfono de
teclado 76
Información adicional
Manejo del teléfono
General
Ajuste del código de seguridad digital 78
Precauciones/Mantenimiento 79
Solución de problemas 81
Especificaciones 83
GARANTÍA LIMITADA 84
Introducción del código de seguridad 76
Empleo de la fundón del ahorro de cosfe de la llamada
76
Operación del contestador de llamadas desde un teléfono
de teclado 77
Fuente de alimentación 79
Instalación 79
Limpieza del exterior 79
Limpieza de los terminales de la batería
79
Limpieza de la cabeza de la cinta 80
Instalación 149
Page 53

Comprobación del contenido del
paquete
Compruebo si el paquete contiene todo lo siguiente. Si
falta algo, póngase en contacto con su prcu'eedor Sony.
ÍOoo
loo£
Microteléfono
inalámbrico
Adaptador de
alimentación de CA
(AC-T42)
Microcassette
(MC30)
Cables para línea
telefónica (2)
Bateria (BP-T16)
Soporte mural
y 4 tornillos
50 Instalación
Page 54

Identificación de partes
1 Antena
2 Compartimiento del
microcassette
3 Tecla de buscapersonas (PAGE)
Para llamar al microteléfono
4 Indicador de carga (CHARGE)
Se encenderá durante la carga de la
batería.
5 Tecla de borrado de mensajes
(CLEAR MESSAGES)
Rebobinará la cinta hasta su comienzo.
Los nuevos mensajes se grabarán
sobre los antiguos.
6 Tecla de exploración/avance
rápido (SKIP/FF)
7 Lámparas de contestación
(ANSWER) y de mensajes
(MESSAGE)
La lámpara ANSWER se encenderá
cuando active la función de
contestación.
La lámpara MESSAGE parpadeará
cuando haya nue\’OS mensajes no
reproducidos todavía.
8 Tticla de reproduce i ón/pa rada
(PLAY/STOP)
9 Tecla de repetición/rebobinado
(REPEAT/REW)
10 Tecla de contestación (ANSWER)
Activará o desactivará el contestador
de llamadas.
11 Indicador de alimentación
(POWER)
Se encenderá cuando conecte la
unidad base a la red de alimentación
de CA.
12 Lámpara de ocupado (IN USE)
Se encenderá cuando el microteléfono
esté en uso.
Instalación 51
Page 55

Identificación de partes
13 Control de volumen (VOLUME)
14
15
16
14 Altavoz
15 Terminales de carga
16 Gancho para el microteléfono
17 Toma para la línea telefónica
(TEL UNE)
18 Toma de entrada de
- alimentación exterior (DC IN 9V)
19 Selector de modo de marcación
(DIAL MODE)
Para seleccionar entre marcación por
tonos o por pulsos.
20 Interruptor del indicador de
modo audible/anuncio
solamente (AUDIBLE IND/ANN
ONLY)
Activará o desactivará el indicador del
modo audible que le indicará si ha\’
algún nuevo mensaje grabado.
También seleccionará el modo de
anuncio solamente.
52 Instalación
Page 56

1 Antena
2 Altavoz
3 Tecla de accionamiento del
conmutador del gancho (FLASH)
Para cambiar a una segunda llamada
si dispone del servicio de "llamada en
espera", o para realizar una nueva
llamada.
4 Tecla y lámpara de control
remoto (REMOTE)
Para controlar el contestador de
llamadas desde el microteléfono. La
lámpara permanecerá encendida
mientras el modo de control remoto
esté activado.
5 Teclas de marcación/operación
por control remoto
6 Tecla de grabación de
conversación (CONV REC)
Para grabar conversaciones
telefónicas.
7 Tecla de repetición de
marcación/pausa (REDIAL/PAUSE)
Para repetir la marcación del último
número llamado.
Además, para insertar una pausa en la
secuencia de marcación.
8 Micrófono
9 Generador de llamada
10 Terminales de carga
11 Compartimiento de la batería
12 Interruptor de ahorro de batería/
activación de generador de
llamada (ВАТТ SAVE/RING ON)
Póngalo en RING ON para activar el
generador y póngalo en ВАТТ SAVE
para desactivar el generador y ahorrar
energía de la batería.
13 Tecla de cambio de canal
(CHANNEL)
Para cambiar el canal cuando se
produzcan interferencias.
14 Tecla de marcación abreviada/
programación (SPEED DIAL/
PROGRAM)
Para almacenar números de teléfono
en la memoria de marcación
abreviada.
15 Tecla de conversación (TALK)
Para realizar o contestar llamadas
16 Lámpara de conversación/
batería débil (TALK/BATT LOW)
Se encenderá para indicar que el
microteléfono se encuentra disponible
para la marcación o está utilizándose
para la con\'ersación. También
indicará el nivel de energía de la
batería.
Si presiona TALK, la lámpara:
• se encenderá durante unos segundos
cuando la batería tenga capacidad
suficiente.
• parpadeará cuando la batería esté
débil.
• no se encenderá ni parpadeará
cuando la batería esté completamente
agotada.
Instalación 53
Page 57

Ubicación del teléfono
Elección del mejor lugar para la unidad base
El lugar de instalación de la unidad base afectará la calidad
de la recepción del microteléfono inalámbrico. Por lo tanto,
antes de ubicar la unidad base, consulte la ilustración
siguiente.
Alejada de fuentes de ruido, como una
v'entana que dé a una calle de mucho
tráfico.
Alejada de fuentes térmicas, tales
Alejada de un equipo
electrónico, o colocada
a mayor altura que el
mismo.
como radiadores, conductos de aire
cálido, y de la luz solar directa.
Alejada de un horno de
microondas.
Alejada de humedad
excesiva, polvo,
vibraciones mecánicas,
golpes.
54 Instalación
Cerca de un lugar central
Alejada de un
ordenador personal.
Alejada de otro
microteléfono inalámbrico.
PRECAUCION
Los teléfonos inalámbricos functionan a una frecuencia que
podría prcrducir interferencias con televisores y
\’ideograbadoras cercanas; por lo tanto, la unidad base no
deberá colocarse cerca o sobre un televisor o una
\ ideograbadora. Cuando se produzcan interferencias,
podrá reducir o eliminarlas alejando el teléfono
inalámbrico del tele\'isor o la videograbadora.
Page 58

Cònexión de la unidad base
Si desea colgar la unidad base en una pared, lea en primer
lugar la página siguiente.
Adaptador de alimentación de CA
(suministrado)
I
Conecte el adaptador de
alimentación de C A a un
tomacorriente que esté
permanentemente activo.
De lo contrario, la duración de
la batería que estuviese
cargándose se acortaría.
I
Si su toma para teléfono no es
modular, póngase en contacto
con la compañía telefónica para
solicitar ayuda.
ü
Modular
I
Si usted posee 2 líneas telefónicas en
una sola toma telefónica RJ-14 con 4
hilos, el contestador de llamadas
solamente responderá a la primera
línea telefónica del par central de
hilos.
Si desea responder a la segunda
línea telefónica, que utiliza el par
exterior de hilos, solicite a la
compañía telefónica el intercambio
de estos pares. ^
........
par central
1
Enchufe un extremo del cable para línea
telefónica largo (suministrado) en la toma TEL
LiNE, y el otro en una toma para teléfono.
2
Conecte el adaptador de alimentación de CA
(suministrado) en la toma DC IN 9V, y a un
tomacorriente de CA como se muestra arriba.
Cerciórese de pasar el cable del adaptador de
alimentación de CA por el gancho.
Extienda completamente la antena.
Cerciórese de cjue haya quedado apuntando hacia el
techo.
Nota sobre el adaptador de alimentación de
CA------------------------------------------------------------
Utilice solamente el adaptador de alimentación de CA
suministrado. No use ningún otro adaptador.
Polaridad de la clavija
Instalación 55
Page 59

Instalación de la unidad base en una pared
alimentación de CA
Fije el cable del adaptador de alimentación de
Si su toma para teléfono no es
modular, póngase en contacto
con la compañía telefónica para
solicifar ayuda.
Modular
CA y el cable para línea telefónica corto al
soporte mural.
Enganche el soporte mural en la placa mural y
enchufe el cable para línea telefónica en la
toma modular.
ü
I
Para fijar el soporte mural
directamente a la pared, utilice
los tornillos suministrados.
Inserte las lengüetas de la parte superior del
soporte mural en la unidad base, y presione
ésta de forma que las lengüetas inferiores del
soporte entren en la unidad base. Después,
extienda completamente la antena.
Conecte el adaptador de alimentación de CA y
el cable para línea telefónica.
Para los detalles, consulte la sección "Conexión de la
unidad base" (página 55).
56 Instalación
Page 60

Preparación de la batería
Antes de utilizar la batería suministrada tendrá que
cargarla. Deje que se cargue durante unas 12 horas.
7 Conecte ia toma.
Cerciórese de que el cable rojo esté en el lado derecho.
¡
Limpie los terminales de carga
con un paño suave
aproximadamente una vez al
mes; si no, la batería puede no
cargarse completamente.
I
La batería funcionará mejor si
la carga cada unos días. Para
obtener un mejor rendimiento,
no vuelva a colocar el
microteléfono sobre la unidad
base después de cada llamada.
I
■
Si la batería se debilita
En el modo de espera, la
lámpara TALK/BATT LOW
parpadeará cada 3 segundos
durante 1 minuto.
Durante la conversación, la
lámpara TALK/BATT LOW
parpadeará cada 3 segundos y
se oirán pitidos de ad\'ertencia.
La llamada se desconectará
después de 1 minuto.
En este caso, desconecte la línea
y coloque el microteléfono
sobre la unidad base para
cargar la batería. Cárguela
completamente durante 12
horas.
2 inserte la batería en el microteléfono. 3 Coloque el microteléfono sobre la unidad
base.
■ Notas sobre la carga
• Cerciórese de que el indicador CHARGE de la
unidad base se encienda cuando coloque el
microteléfono sobre la unidad base.
• Una vez completada la carga, el indicador CHARGE
permanecerá encendido.
■ Cuándo reemplazar la batería
La batería podrá recargarse muchas veces. Sin
embargo, cuando la batería dure sólo unos minutos
después de haberla cargado 12 horas, deberá
reemplazar la batería. Póngase en contacto con su
proveedor o centro de reparación autorizado por Sony.
Utilice solamente una batería BP-T16 Sony.
Duración de la batería
Una batería completamente cargada en el
microteléfono inalámbrico durará aproximadamente:
• 6 horas en el modo de conversación continua
• 160 horas (7 días) en ei modo RING ON
• 1 mes en el modo ВАТТ SAVE
---------------------------------------
-----------------------------
-------------------------------------
Instalación |57
Page 61

Selección de marcación por tonos o por pulsos
Para que el teléfono funcione correctamente, tendrá que
establecer el tipo de su sistema de marcación: por tonos o
por pulsos.
Estáblecimiento del modo de marcación
Ponga el selector DIAL MODE en:
T (tono) si su sistema de marcación es de tonos.
P (pulso) si su sistema de marcación es de pulsos.
■ Si no conoce su sistema de marcación
Realice una llamada de prueba con el selector DIAL
MODE en T.
Si la llamada se conecta, deje el selector en T.
En caso contrario, ponga el selector en P.
-------------------
Utiliiación de servicio de tonos con el sistema de marcación por pulsos
Algunos servicios requieren emplear la marcación por
tonos. Esto no supondrá ningún problema si su teléfono ya
utiliza la marcación por tonos. Sin embargo, si su teléfono
utiliza la marcación por pulsos, tendrá que realizar los
pasos siguientes para utilizar estos servicios.
Para los detalles sobre la realización de llamadas, consulte
la sección de "Realización de llamadas" (página 60).
Usted solamente tendrá que
presionar una vez TONE para
cambiar la marcación al de
tonos; este modo permanecerá
actix’ado hasta que desconecte
la llamada.
1 Marque el número de servicio.
2 Cuando se conecte al servicio, presione TONE
(®).
3 Presione las teclas de marcación requeridas.
58 Preparativos
Page 62

Ajuste del volumen
Ajuste del generador de llamada
El interruptor RING ON/BATT SAVE del microteléfono
activará у desactivará el generador.
Ponga el interruptor RING ON/BATT SA VE en
• RING ON para activar el generador,
o
• ВАТТ SAVE para desactivar el generador y ahorrar
energía de la batería.
.Esto será útil para utilizar el microteléfono en un lugar
Cuando ei microteléfono esté
en el modo ВАТТ SAVE, la
unidad base no podrá buscar el
microteléfono.
desde el que pueda oír la llamada de otro teléfono.
En este ajuste, el microteléfono no sonará, pero podrá
seguir-realizando y recibiendo llamadas presionando la
tecla TALK.
Ajuste del volumen del altavoz
Con el control VOLUME de la unidad base, podrá ajustar
el volumen del altavoz. El ajuste no afectará el nivel de
grabación.
Deslice el control VOLUME hacia la derecha para
aumentar el volumen, o hacia la izquierda para
reducirlo.
VOLUME
Preparativos 59
Page 63

utilización del teléfono
Realización y recepción de llamadas
TALK
Realización de llamadas
Si usted está demasiado lejos de
la unidad base o hay
interferencias excesivas cuando
presione TALK, oirá cinco
pitidos cortos de error. En este
caso, acerqúese a la unidad
base para mejorar la recepción.
I
■ «
Si la recepción es mala, oirá tres
pitidos cortos (alarma de fuera
de alcance) v la lámpara
TALK/BATT LOW
parpadeará. En este caso,
acérquese a la unidad base.
Recepción de llamadas
I
El microteléfono no sonará
cuando entre una llamada de
exterior si el interruptor ВАТТ
SAVE/RING ON está en ВАТТ
SAVE. Sin embargo, podrá
recibir llamadas presionando
TALK.
7 Presione TALK y espere hasta que se encienda
la lámpara TALK/BATT LOW.
Podrá oír el tono de invitación a marcar.
2 Marque el número de teléfono.
3 Cuando finalice la conversación, coloque el
microteléfono sobre la unidad base o presione
nuevamente TALK.
La llamada se desconectará.
1
Cuando suene el teléfono, presione TALK.
2
Cuando finalice la conversación, coloque el
microteléfono sobre la unidad base o presione
nuevamente TALK.
60 utilización como teléfono
Page 64

TALK
Repetición automática de la marcación
REDIAL/PAUSE
I
El número no deberá ser
superior a 32 dígitos (el tono y
la pausa se cuentan cada uno
como un dígito), ya que de lo
contrario oirá cinco pitidos
cortos de error y la llamada no
se conectará.
Cerciórese de que el
microteléfono esté en el modo
RING ON.
Usted podrá repetir la marcación del último número
llamado presionando simplemente la tecla REDIAL/
PAUSE.
7 Presione TALK y espere hasta que se encienda
la lámpara TALK/BATT LOW.
2 Presione REDIAL/PAUSE.
- Se repetirá automáticamente la marcación del último
número llamado.
Para borrar el último número de teléfono
marcado-----------------------------------------------
Con el teléfono sin utilizar, presione dos v'eces
REDIAL/PAUSE.
El número se borrará de la memoria.
Utilización como teléfono
61
Page 65

•"^Realización у recepción de llamadas
CHANNEL
Si se producen interferencias
El microteléfono inalámbrico puede funcionar en 25
canales. Por lo tanto, si experimenta interferencias durante
la utilización de un canal, cambie a otro para mejorar la
calidad del sonido de su conversación a través del
microteléfono inalámbrico.
■ Interferencias durante la marcación-------------------------
Si se produce ruido de interferencias durante la
marcación, la línea no se conectará. Cuandcr suceda
esto, acérquese a la unidad base.
Interferencias durante la conversación
-------------------
Presione CHANNEL.
El teléfono seleccionará un nuevo canal. Es posible que
se oiga ruido durante un instante. Cuando cese el
ruido, continúe conversando. Si las interferencias
continúan, acérquese a la unidad base.
62 utilización como teléfono
Page 66

Mafrcación memorizada
Usted podrá almacenar
los números que utilice
más frecuentemente en la
memoria a fin de poder
marcarlos presionando
dos teclas. Durante el
almacenamiento de
números, no podrá recibir
llamadas.
SPEED DIAL/
PROGRAM
Almacenamiento de números eii la memoria
-(0) — d)
I
Si transcurren más de 20
segundos entre la presión de las
teclas, la operación se cancelará
y tendrá que v'olver a comenzar
desde el principio.
I
No introduzca en la memoria
un número de más de 16
dígitos (el tono y la pausa se
cuentan cada uno como un
dígito), ya que de lo contrario
oirá cinco pitidos cortos de
error y tendrá que x'olver a
comenzar.
Cerciórese de que el microteléfono esté en el modo RING
ON.
7 Presione SPEED DIAL/PROGRAM.
2 Presione una tecla de marcación entre 0 y 9.
Se oirá un pitido de confirmación.
3. Marque el número de teléfono que desee
almacenar.
4 Presione SPEED DIAL/PROGRAM.
Se oirá un pitido de confirmación.
■ Para utilizar una centralita privada (PBX)
Usted tendrá que marcar un dígito (como el 9) para acceder
a la línea exterior antes de marcar un número de teléfono.
Para almacenar un número de teléfono: -
1 Intrciduzca el dígito de acceso a la línea exterior.
2 Presione REDIAL/PAUSE para introducir una pausa (a
fin de dar tiempo al teléfono para que logre el acceso a la
línea exterior).
3 Introduzca el número de teléfono que desee almacenar.
■ Para cambiar un número almacenado
Si usted almacena un nuevo número de teléfono en una
tecla de marcación memorizada que ya tenga otro
almacenado, el número antiguo se borrará.
-----------------
---------------------
Utilización como teléfono 163
Page 67

■^Marcación memorìzada
Marcación de números memorizados
I
Si presiona una tecla de
marcacitín memorizada que no
tenga número cíe teléfono
almacenado, oirá cinco pitidos
cortos de error.
Después de haber almacenado números en las teclas de
marcación memorizada, podrá realizar llamadas
presionando dos teclas (marcación abreviada).
1 Presione TALK. 2 Presione SPEED DIAL/PROGRAM. 3 Presione la tecla de marcación abreviada
deseada (Q) a (D).
Se marcará el número de teléfono almacenado en tal
tecla.
Función buscapersonas de la unidad base al microteléfono
Usted no podrá buscar el
microteléfono en el modo
ВАТТ SAVH.
I
Usted no podrá buscar el
microteléfono cuando el mismo
esté en uso.
64 utilización como teléfono
El microteléfono sonará. El microteléfono seguirá sonando
mientras presione PAGE.
Page 68

Operación del teléfono durante la llamada
FLASH
Utilización del servicio "llamada en espera'
I
Si no está subscrito al servicio
de "llamada en espera", la
llamada se desconectará al
presionar FLASH.
Si usted está subscrito al servicio de "llamada en espera",
podrá seguir recibiendo llamadas mientras se encuentre
conversando a través del microteléfono inalámbrico.
Cuando llegue una nueva llamada, usted podrá poner la
actual en retención y cambiar a la nueva.
1 Cuando llegue una nueva llamada mientras se
encuentre conversando, presione FLASH.
-La llamada actual se pondrá en retención y usted
podrá responder a la nueva.
2 Cuando desee volver a la primera llamada,
presione nuevamente FLASH.
Presionando FLASH podrá cambiar entre las dos
llamadas.
Utilización como teléfono i 65
Page 69

Preparativos del contestador de llamadas
Para utilizar la función de contestador cte llamadas, deberá:
1 Colocar el microcassette.
2 Seleccionar el modo de contestación.
3 Grabar los mensajes.
Colocación del microcassette
¡
Cerciórese de que la cinta no
esté floja.
1 Abra ia tapa del compartimiento del
microcassette.
2 Coloque el microcassette suministrado con la
cara para grabación (cara A) hacia arriba.
3 Cierre la tapa del compartimiento.
Cuando reemplace el microcassette por otro
nuevo
-----------------------------------------------------
66 UtiUazación como contestacJor de llamadas
Page 70

Selección del modo de contèstacló
-■•■'• X A.®
Usted podrá ajustar el contcstador de llamadas de forma que grabe mensajes entrantes
(modo normal), o que conteste sin grabar mensajes (modo de anuncio solamente).
En el modo de contestación normal, tiene opción de hacer que el telefono emita un pitido
para indicarle que haya nuevos mensajes grabados.
Modo de
contestación
Normal
Se reproduce un
Útil cuando
Si desea oír pitidos (indicador
audible)
mensaje para
solicitar a quien
llame que deje un
mensaje.
Anuncio solamente
Si no desea oír pitidos
Usted podrá dejar un anuncio a quienes llamen sin aceptar
mensajes de los mismos cuando, por ejemplo, se encuentre
en unas vacaciones largas.
Ajuste el interruptor AUDIBLE
en la parte posterior de la
unidad base a:
AUDIBLE
m
OFF ON ANN
ONLY
AUDIBLE
m
OFF ON ANN
ONLY
AUDIBLE
w
OFF ON ANN
ONLY
Utiliazación como contestador de llamadas 67
Page 71

Preparativos del contestador de llamadas
Un mensaje de
contestación se grabará a
través del microteléfono.
Para mejorar la calidad de
sonido, realice este
procedimiento cerca de la
unidad base.
Grabación de un mensaje de contestación
REMOTE
I
Si su mensaje dura menos de 2
segundos, se oirán cinco pitidos
cortos de error y el mensaje no
se grabará.
I
Cuando el microcassette no esté
colocado, se oirán cinco pitidos
cortos de error y el contestador
de llamadas no se activará.
Función de protección del
mensaje
Cuando se produzca un corte
del suministro eléctrico, su
mensaje se mantendrá
memorizado durante unos .30
minutos
I
Si no hav ningún mensaje
grabado, se oirán cinco pitidos
cortos de error.
1
Presione REMOTE.
Se encenderá la lámpara REMOTE.
2
Presione (Z).
Se oirá un pitido de confirmación.
Hable ante el microteléfono.
3
Usted podrá grabar durante 16 segundos como
má,\imo. Al transcurrir 16 segundos, la grabación
cesará automáticamente.
Para cesar la grabación, presione ®.
Se oirá un pitido de confirmación, y después su
mensaje a través del altavoz del microteléfono. El
contestador de llamadas se activará automáticamente.
Presione REMOTE.
La lámpara REMOTE se apagará.
Cuando el contestador de llamadas esté activado —
La lámpara ANSWER se encenderá. En el modo ANN
ONLY, la lámpara ANSWER parpadeará.
Para confirmar su mensaje
1 Presione REMOTE.
2 Presione ®.
--------------------------------
Se oirá un pitido de confirmación a través del altavoz
del microteléfono, y después su mensaje grabado.
3 Vuelva a presionar REMOTE.
La lámpara REMOTE se apagará.
68
Utiliazadón como contestador de llamadas
Page 72

Activación o desactivación del contestador
de llamadas
ANSWER
Activación del contestador de llamadas
I
Si no hay mensajes grabados, se
oirán cinco pitidos cortos de
error.
I
Cuando el microcassette no esté
colocado, se oirán cinco pitidos _
cortos de error (excepto el
modo ANN ONLY).
¡
Si el mensaje dura más de 4
minutos, la línea se
desconectará automáticamente.
I
Si la cinta finaliza durante la
grabación, la persona que llame
oirá un pitido y la línea se
desconectará.
¡
Si se produce un corte del
sum.inistro eléctrico de más de
30 minutos, el mensaje de
contestación podrá borrarse.
Cuando suceda esto, el
indicador de alimentaciém
parpadeará al restablecerse la
alimentaciéin.
Presione ANSWER de la unidad base.
El contestador de llamadas podrá grabar hasta 19
mensajes. Para desactivar el contestador de llamadas,
presione nuevamente ANSWER.
Utiliazación como contestador de llamadas
69
Page 73

Reproducción de mensajes
REPEAT/REW
PLAY/STOP
Comienzo de la reproducción
I
Si entra una llamada durante la
reproducción, ésta se detendrá.
!
La unidad contará sólo hasta 19
mensajes. Sin embargo, si hay
cinta remanente, la unidad
seguirá grabando los mensajes
entrantes. Pero, en este caso, el
mensaje 20 y todos los
posteriores se contarán como
un mensaje y no podrá saltar ni
repetirlos.
Si hay nuevos mensajes grabados:
Se oirán pitidos en el modo AUDIBLE INDICATOR ON.
Parpadeará la lámpara MESSAGE.
Para reproducir mensajes, presione PLAY/STOP de
la unidad base.
La unidad rebobinará la cinta y reproducirá mensajes
nuevos desde el primero. Después de la reproducción, la
unidad volverá al modo de contestación.
Para saltar el mensaje actual
Durante la reproducción, presione SKIP/FF
Para repetir el mensaje actual
Durante la reproducción presione REPEAT/REW
Para detener la cinta
--------------------------------------
Presione PLAY/STOP
Si no presiona ninguna teda durante 10 segundos, la
unidad voh'erá al modo de contestación. La cinta
avanzará automáticamente hasta el fin del último
mensaje grabado para evitar c^ue los nuevos mensajes
se graben sobre los existentes.
Para reanudar la reproducción, vuelva a presionar
PLAY/STOP
70 Utiliazación como contestador de llamadas
Page 74

Para avanzar rápidamente la cinta
-----------------------
Primero detenga la cinta, y después presione SKIP/FF
Borrado de mensajes
Para rebobinar la cinta
-------------------------------------
Primero detenga la cinta y después presione REPEAT/
REW
Para reproducir los mensajes que haya
escuchado ----------------------------------------
1 Desactive el contestador de llamadas
presionando ANSWER.
2 Rebobine la cinta presionando REPEAT/REW
3 Presione PLAY/STOP ► ■ para detener la cinta.
• Para reproducir la cinta, presione PLAY/STOP ► ■.
• Para detener la reproducción, presione PLAY/STOP
► ■.
• Para avanzar rápidamente la cinta, presione SKIP/
FF
I
Si hay mensajes no
reproducidos todavía, se oirán
cinco pitidos cortos de error v
la cinta no se rebobinará.
I
Si no desea conser\’ar los
mensajes, reajuste la cinta. Esto
acelerará la reprociucción de los
nue\ (ís mensajes.
Cerciórese de que el contestador de llamadas esté
activado y presione CLEAR MESSAGES.
La cinta se rebobinará hasta su comienzo. Los nue\ os
mensajes se grabarán scabre los antiguos.
Utiliazación como contestador de llamadas 71
Page 75

Selección de las llamadas
Usted podrá seleccionar
las llamadas dejando
acti\ ado el contestador de
llamadas mientras esté en
su hogar. Cuando el
teléfono conteste, podrá
oír el mensaje que esté
grabándose a través de la
unidad base o el
microteléfono
inalámbrico. Después,
podrá decidir si deja que
el mensaje continúe
grabándose o contesta
usted mismo.
-REMOTE
I
Si el interruptor RING ON/
ВАТТ SAVE está en ВАТТ
SAVE, las lámparas TALK у
REMOTE no parpadearán, v
sólo oirá cinco pitidos cortos de
error al presionar REMOTE.
Cerciórese de que el contestador de llamadas esté en el
modo de contestación normal (Consulte página 67).
■ En la unidad base
----------------------------------------
Cuando el teléfono conteste, el altavoz de la unidad
base se activará automáticamente y usted podrá oír la
voz de quien esté grabando el mensaje, pero esta
persona no podrá oírlo. Si desea hablar con esta
persona, presione TALK del microteléfono
inalámbrico.
En el microteléfono inalámbrico
-------------------------
Para seleccionar la llamada, el interruptor RING ON/
ВАТТ SAVE deberá estar en RING ON.
Cuando la unidad base esté contestando a la llamada
entrante, tas lámparas TALK y REMOTE parpadearán
en el microteléfono inalámbrico.
Mientras estén parpadeando las lámparas, presione
REMOTE.
Usted podrá oír la voz de quien esté grabando el
mensaje, pero esta persona no podrá oírlo. El
contestador de llamadas seguirá grabando c! mensaje
hasta que la persona que está llamando desconecte la
línea.
Si desea hablar con quien esté llamando, presione
TALK.
La unidad base dejará de grabar.
72 Utiliazación como contestador de llamadas
Page 76

Grabación de una conversación telefónica
Utilizando el contestadiír
de llamadas, usted podrá
grabar una con\’ersadón
telefónica.
CONV REC
Cerciórese de que el contestador de llamadas esté activado.
Si el contestador de llamadas
no está actix’ado, se oirán cinco
pitidos cortos de error cuancfo
presione CONV REC y la
conversación no podrá
grabarse.
I
Aunque ya se hayan grabado
19 mensajes, si hav cinta
remanente, la con\ ersación
podrá grabarse.
T Durante la conversación telefónica, presione
CONV REC.
Se iniciará la grabación de la con\'crsación.
2 Para cesar la grabación, vuelva a presionar
CONV REC.
La conversación podrá reproducirse igual que los mensajes
entrantes.
Utiliazación como contestador de llamadas 73
Page 77

Grabación de un mensaje de memorando
Utilizando d contestador
de llamadas, podrá dejar
mensajes de memorando
a otros usuarios del
teléfono.
REMOTE
(Jj
(I)
Cerciórese de que el contestador de llamadas esté activado.
T Presione REMOTE.
Se encenderá la lámpara-REMOTE.
I
Si entra una llamada durante la
grabación, la grabación se
cancelará.
2 Presione ©.
3 Hable ante el microteléfono para grabar su
mensaje.
4 Presione (D para cesar la grabación.
Se oirá un pitido largo de confirmación.
5 Presione REMOTE.
La lámpara REMOTE se apagará.
Usted podrá reproducir mensajes de memorando igual que
los mensajes entrantes.
74 Utiliazadón como contestador de llamadas
Page 78

Operación del contestador de llamadas desde el microteléfono
Utilizando el
microteléfono, usted
podrá operar el
contestador de llamadas.
REMOTE
I
Cerciórese de que el interruptor
ВАТТ SAVE/RING ON esté en
RING ON.
I
Si entra una llamada durante la
operación de control remoto, la
operación se cancelará.
Tabla de códigos de control
Operación Presione:
para reproducir mensajes
para repetir el mensaje actual
para saltar el mensaje actual
para borrar los mensajes
para grabar mensajes de
memorando
para cesar la grabación
para grabar o cambiar su mensaje
para comprobar su mensaje
para activar el contestador de
llamadas
para desacti\ ar el contestador de
llamadas
para introducir ol códigci de
seguridad
1 Presione REMOTE.
Se encenderá la lámpara REMOTE.
2 Antes de 20 segundos, presione las teclas de
marcación correspondientes a los códigos de
control deseados.
3 Cuando finalice, presione REMOTE.
œœ
сю
CD
(4)
® —
(D ~
Notas
Los mensajes se reproducirán desde ei primero.
Presione durante la reproducción.
Presione durante la reproducción.
Consulte la página 71.
Presione ® para cesar la grabación.
—
Consulte la página 69.
—
Consulte la página 76.
Utiliazación como contestador de llamadas
75
Page 79

Operación del contestador de llamadas desde un teléfono de teclado
Introducción del código de seguridad
Estableciendo un código
de seguridad, usted
podrcá controlar el
contestador de llamadas
desde un teléfono de
teclado cuando esté lejos
de su hogar.
REMOTE
(Ю—СЮ
-СЮ
I
Cerciórese de que el interruptor
ВАТТ SAVE/RING ON esté en
RING ON.
7 Presione REMOTE.
Se encenderá la lámpara REMOTE.
2 Presione la tecla (D. 3 Presione dos dígitos cualquieras del código de
seguridad ((®(o) - (S)®).
4 Vuelva a presionar la tecla (S).
Se oirá un pitido largo de confirmación.
5 Vuelva a presionar REMOTE.
La lámpara REMOTE se apagará.
Empleo de la función del ahorro de coste de la llamada
Cuando se ha\ an grabado nuevos mensajes, el contestador
de llamadas contestará después de sonar dos veces, y si no
ha\' nuevos mensajes grabados contestará después de sonar
cuatro veces. Cuando llame desde un teléfono de feclado y
oiga más de dos \ eces el tono de llamada, sabrá que no hay
nue\ os mensajes grabados y podrá colgar el teléfono
ahorrándose el coste de la llamada.
76
Funciones de control remoto
Page 80

Ol^ración del contestador de llamadas desde un teléfono de teclado
1
Llame a su teléfono desde un teléfono de
teclado.
2
Mientras escuche el mensaje de contestación,
presione CD, y después el código de seguridad
(página 76).
Si hay mensajes no reproducidos todavía, el teléfono se
lo indicará con el pitido.
Si no ha activado el contestador de llamadas
El teléfono aceptará la operación después de sonar 10
veces. Presione (2) e introduzca el código de
seguridad.
3
I
Si no introduce un código de
control antes de 20 segundos, la
línea se desconectará.
Tabla de códigos de control
Presione las teclas de marcación
correspondientes a la operación deseada antes
de 20 segundos.
4
Cuando finalice, desconecte la línea.
Operación
para reproducir mensajes
para repetir el mensaje actual
para saltar el mensaje actual
para horrar los mensajes
para grabar mensajes de
memorando
para interrumpir la operación
V esperar la siguiente
operación
para grabar o cambiar su
mensaie
para comprobar su mensaje
para actu ar el contestador do
llamadas
para desactix’ar el contestador
de llamadas
Presione:
(DŒ)
(Dœ
Œ)Œ>
Ϩ
Ϩ
®®
®CD
®(Q)
COCO)
Notas
Los mensajes se reproducirán descte el primero.
Presione durante la reprociucción.
Presione durante la reproducción.
Consulte la página 71.
Presione ®® para cesar la grabación.
—
Presione ®® para cesar la grabación.
—
Consulte la página 69.
Fundones de control remoto 77
Page 81

UÌIUI ni<H.íUn ctUÌi,itjn<H
Ajuste del código de seguridad digital
Normalmente usted no necesitará cambiar el códigcr de
seguridad digital. Sin embargo, en un caso raro como
cuando haya otro teléfono inalámbrico que utilice el mismo
código de seguridad digital, podrá cambiar manualmente
el código.
I
Cerciórese de que el interruptor
ВАТТ SAVE/RING ON esté en
RING ON.
¡
Si se produce un corte
prolongado del suministro
eléctrico, el código de
seguridad se borrará. Para
\ ol\ er a programarlo, coloque
el microteléfono sobre la
unidad base.
Si introduce un número que no
sea cié entre 0 y ú.S.S.i.S (por
ejemplo 6.S536), se oirán cinco
piticios cortos de aciv ertencia.
7 Presione SPEED DIAL/PROGRAM.
Se encenderá la lámpara TALK/BATT LOW.
2 Presione CHANNEL.
Se oirá un pitido de confirmación.
3 Introduzca un número entre 0 y 65535
utilizando las teclas de marcación.
4 Presione SPEED DIAL/PROGRAM.
Se oirá un pitido largo de confirmación.
5 Coloque inmediatamente el microteléfono
sobre la unidad base para completar el cambio
del código.
Con este procedimiento, se cambiará el código tanto en la
unidad base como en el microteléfono.
78 Manejo del teléfono
Page 82

Precauciones/Mantenimiento
Fuente de alimentación
Antes de utilizar por primera \ ez el teléfono, inserte la
batería en el microteléfono inalámbrico y cargúela
durante 12 horas.
Alimente la unidad base sólo con 9 V CC. Utilice el
adaptador de alimentación de CA suministrado. No use
ningún otro adaptador, ya que podría causar un mal
funcionamiento.
Enchufe la unidad base y el cargador de la batería en un
tomacorriente que esté permanentemente energizado.
Evite tomacorrientes cuyo suministro pueda cortarse.
Para obtener el máximo rendimiento, mantenga la batería
a una temperatura comprendida entre 5 y 35‘^C.
Instalación
No exponga la unidad base a:
• fuentes térmicas tales como radiadores o conductos de
aire cálido.
• temperaturas extremadamente bajas.
• la luz solar directa.
• polvo excesi\’o.
• humedad o llmáa.
• vibraciones mecánicas ni golpes.
• lugares inclinados.
Limpieza del exterior
Limpie el exterior del teléfono con un paño suave
ligeramente humedecido en agua o una solución poco
concentrado de detergente. No utilice ningún tipo de
estropajos, pob os abrasi\ os, ni disoK-entes como alcohol o
bencina, porque podría dañar el acabado.
Limpieza de los terminales de la batería
Limpie periódicamente los terminales de carga en la
unidad base y en el microteléfono inalámbrico con un paño
suave y seco. Si los terminales estén sucios, es posible que
la batería no se carctue.
Manejo del teléfono 79
Page 83

Limpie periódicamente la cabeza de la cinta. Abra e!
compartimiento del microcassette v extraiga el
microcassette. Frote la cabeza de la cinta, el rodillo
compresor \' el eje de arrastre con iin palillo de algodón
humedecido ligeramente en líquido limpiador o alcohol
desnaturalizado. También podrá utilizar un paño suave.
80 Manejo del teléfono
Page 84

Solución de problemas
Problema
Instalación
La lámpara POWER parpadea
Presione cualquier tecla.
cuando conecta el adaptador de
alimentación de CA o después de
un corte del suministro eléctrico.
Almacenamiento de números de marcación memorizada
Se oyen cinco pitidos cortos de
error y no es posible almacenar un
número de marcación
memurizada.
• Cerciórese de realizar correctamente el
procedimiento de almacenamiento de números
(página 63).
• Cerciórese de que el número sea inferior alò
dígitos (incluyendo el tono y la pausa, si los
utiliza).
Realización de llamadas
Se oyen cinco pitidos cortos de
error.
' Extienda verticalmente la antena de la unidad
base.
' Acerque el microteléfono inalámbrico a la unidad
base.
' Aleje la unidad base de cualquier fuente de ruido
(página 54).
Coloque el microteléfono sobre la unidad base
durante cierto tiempo.
Cause/solución
La lámpara ТАLK/ВАТТ LOW
parpadea.
No se oye el tono de invitación a
marcar.
El teléfono se conecta siempre a un
número erróneo, o no se conecta
en absoluto, a pesar de marcar los
números correctos.
Cargue la batería del microteléfono inalámbrico
durante 12 horas (página 57).
Cerciórese de que el interruptor RING ON/ВАТТ
SAVE esté en RING ON.
Compruebe si el cable para línea telefónica está
conectado con seguridad a la toma del teléfono.
Cargue la batería del microteléfono inalámbrico
(página 57).
Compruebe si el rriodo de marcación es el correcto
(página 58).
General 81
Page 85

Problema
Utilización del contestador de llamadas
Cause/solución
Se oyen cinco piticios cortos de
error cuancio activa el contestador
de llamadas.
No se oye sonido a través del
altavoz de la unidad base.
El mensaje de c'|uien llamó se
interrumpió.
Cuando llama a su teléfono desde
un teléfono de teclado, la línea se
desconecta.
No se ha grabado un mensaje de contestación
(página 68).
El microcassette no está colocado (página 66).
La cinta está llena v hay mensajes no reproducidos
todavía. Reproduzca los mensajes y rebobine la
cinta (página 70).
Compruebe el control VOLUME (página 59).
El mensaje de quien llamó fue demasiado largo.
La \’oz de quien llamó fue muy baja. La unidad
desconecta la línea cuando detecta un
silenciamiento de 7 segundos.
Ha introducido tres \'eces un código de seguridad
erróneo.
82 General
Page 86

Especificaciones
Generales
Microteléfono
inalámbrico
Control de frecuencia
Mocio de operación
Canal de (operación
Accesorios suministrados
Fuente cié alimentación
Tiempo de carga
Duración de la batería
Dimensiones
Masa
Fuente de alimentación
Dimensiones
Masa
PLl, controlado por cristal
FM, dúplex
25 canales
Adaptador de alimentación de CA
AC-T42 (1)
Cable para línea telefónica (2)
Batería BP-TI6 (1)
Microcassette MC30 (1)
Soporte mural v tornillos (1 juego)
Manual de instrucciones (I)
Referencia rápida (1)
Tarjeta para control remoto (1)
Batería BP-T16
Aprox. 12 horas
Espera: Aprox. 160 horas (unos 7
días)
Conversación: Aprox. 6 horas
Aprox. 59 X 203 x 58 mm (an/al/prf),
excluyendo la antena
Antena: 100,4 mm
Aprox. 255 g, incluyendo la batería
9 V CC con el adaptador de
alimentación de CA
Aprox. 155,6 x 57,5 x 224 mm (an/al/
prf), excluyendo la antena
Antena: 173 mm
Aprox. 670 g
Contestador de
llamadas
Mensaje de contestación
.Mensajes entrantes
Grabación de memorando Sin límite del tiempo
Grabación de la conversación telefónica
Diseño y especificaciones sujetos a cambio sin previo aviso.
IC incorporado, hasta 16 segundos
Microcassette, 4 minutos de
grabación, hasta 19 mensajes
Sin límite del tiempo
General 83
Page 87

SONY®
Productos telefónicos
GARANTÍA LIMITADA
SONY ELECTRONICS INC. ("SONY”) garantiza este produciu contra defectos de materiales o
hechura, según se expone a continuación:
1. Durante un período de I año a partir de la fecha de compra, SONY pagará los cargos de
mano de obra de su centro de servicio SONY autorizado por concepto de reparación del producto
defectuoso. Después de dicho período de I año, usted debe pagar todos los cargos de mano de
obra.
2. Adicionalmente, SONY suministrará, sin cargo, sustitutos nuevos o reconstruidos para las
piezas defectuosas durante un periodo de I año a partir de la fecha original de compra.
A fin de obtener servicio bajo garantía, usted debe llevar el producto o entregar el producto, con
frangueo prepagado, a una instalación de servicio SONY autorizado.
Síp;
La presente garantía no cubre daños estéticos ni daños debido a casos fortuitos, accidentes, mal
uso, abuso o negligencia de este producto, incluso la antena. Esta garantía sólo es válida en Esta
dos Unidos de América.
Para obtener servicio bajo garantía, debe presentarse comprobación de compra en la forma de una
factura de venta o recibo de pago que evidencie que la unidad está amparada bajo el período de
garantía.
Esta garantía sólo es válida si el número de serie aparece en el producto.
LA REPARACIÓN O REEMPLAZO SEGÚN LO ESTIPULADO BAJO LA PRESENTE GARANTÍA ES
EL EXCLUSIVO REMEDIO DEL CONSUMIDOR. SONY NO SERÁ RESPONSABLE DE CUALESQUIER DAÑOS INCIDENTALES O CONSECUENTES DEBIDO A LA VIOLACIÓN DE CUALQUIER
GARANTÍA EXPRESA O IMPLÍCITA SOBRE EL PRESENTE PRODUCTO, EXCEPTO EN LA MEDIDA
EN OUE DICHA ESTIPULACIÓN SEA PROHIBIDA EN VIRTUD DE LEGISLACIÓN PERTINENTE. LA
DURACIÓN DE CUALQUIER GARANTÍA IMPLÍCITA DE COMERCIABILIDAD Q IDQNEIDAD PARA
UN PRQPÓSITO ESPECÍFICQ DEL PRESENTE PRODUCTO QUEDA LIMITADA A LA DURACIÓN
DE LA'PRESENTE GARANTÍA.
Ciertos estados no permiten la exclusión o limitación de daños incidentales o consecuentes, o no
permiten limitaciones sobre la duración de una garantía implícita, y por ende es posible que las
limitaciones o exclusiones que anteceden no se aplican a usted. La presente garantía le confiere
derechos legales específicos, y es posible que tenga otros derechos que varían de acuerdo con
el estado.
Para su conveniencia, SQNY ELECTRQNICS INC. ha establecido un Centro de Información para
Clientes para ofrecerle información sobre productos o servicio.
Importante; Sí devuelve un producto para servicio, por favor, véase a la contraportada para su Centro de
Servicio Sony más cercano.
w
.•ó'.
.V-
W
m
p
p
p
P
P
84
Línea de asistencia de telecomunicaciones "
1-(800)-222-7669
Por favor, llámenos con sus preguntas
y comentarios sobre los productos telefónicos SONY
SONY ELECTRONICS INC.
Sony Drive, Park Ridge, New Jersey 07656
Page 88

For your convenience, SONY ELECTRONICS INC. has established telephone numbers for frequent
ly asked questions:
To locate the servicer or dealer nearest you, call:
1(800)342-5721
For service assistance or resolution of a service problem, call:
SONY CUSTOMER RELATIONS CENTER
1-(800l-282-2848
For Product information or operation, call:
TELECOMMUNICATIONS HELPLINE
or write to:
Sony Customer Information Center
Park Ridge, New Jersey 07656-8003
For an accessory or part not available from your authorized dealer, call:
Para su comodidad, SONY ELECTRONICS INC, ha dispuesto números de teléfono a fin de con
testar a las preguntas más frecuentes:
Para localizar el reparador o distribuidor de Sony más cercano, llame a:
Para solicitar asistencia técnica o la solución de algún problema técnico, lame a:
1-(800)-222-7669
One Sony Drive
1-(800)-488-SONY (7669)
1-800-342-5721
SONY CUSTOMER RELATIONS CENTER
1-800-282-2848
Con respecto a la información u operación de productos, llame a:
o escriba a:
Con respecto a la información sobre accesorios o piezas que no ofrezca el proveedor autorizado,
llame a:
UDZZ01362ZA
TELECOMMUNICATIONS HELPLINE
1-800-222-7669
Sony Customer Information Center
One Sony Drive
Park Ridge, New Jersey 07656-8003
1-800-488-SONY (7669)
 Loading...