

Page 1

Cordless
Telephone
with Answering System
3-043-640-21 (1)
Operating Instructions
Mode d’emploi
US
FR
SPP-A947
©2000 Sony Corporation
Page 2

WARNING
To prevent fire or shock hazard, do
not expose the unit to rain or
moisture.
To avoid electrical shock, do not open
the cabinet. Refer servicing to
qualified personnel only.
INDUSTRY CANADA NOTICE
NOTICE: The Industry Canada label
identifies certified equipment. This
certification means that the equipment
meets certain telecommunications
network protective, operational and
safety requirements as prescribed in the
appropriate Terminal Equipment
Technical Requirements document(s).
The Department does not guarantee the
equipment will operate to the user’s
satisfaction.
Before installing this equipment, users
should ensure that it is permissible to be
connected to the facilities of the local
telecommunications company. The
equipment must also be installed using
an acceptable method of connection.
The customer should be aware that
compliance with the above conditions
may not prevent degradation of service
in some situations.
Repairs to certified equipment should be
coordinated by a representative
designated by the supplier. Any repairs
or alterations made by the user to this
equipment, or equipment malfunctions
may give the telecommunications
company cause to request the user to
disconnect the equipment.
Caution: Users should not attempt to
make such connections themselves, but
should contact the appropriate electric
inspection authority, or electrician, as
appropriate.
NOTICE: The Ringer Equivalence
Number (REN) assigned to each
terminal device provides an indication
of the maximum number of terminal
allowed to be connected to a telephone
interface. The termination on an
interface may consist of any
combination of devices subject only to
the requirement that the sum of the
Ringer Equivalence Number of all the
devices does not exceed 5.
IMPORTANT INSTRUCTION TO
USERS
Your model (SPP-A947) has been
approved by the Industry Canada.
Note
Operation is subject to the following two
conditions: (1) this device may not cause
interference, and (2) this device must
accept any interference, including
interference that may cause undesired
operation of the device.
Privacy of communications may not be
ensured when using this telephone.
DIGITAL SECURITY CODE
Your SPP-A947 has a random digital
security code which automatically
selects one of over 65,000 digital security
codes.
Users should ensure for their own
protection that the electrical ground
connections of the power utility,
telephone lines and internal metallic
water pipe system, if present, are
connected together. This precaution may
be particularly important in rural areas.
US
2
Page 3

Table of contents
Getting Started
4 Read this first
5 Step 1: Checking the package
contents
6 Step 2: Setting up the base phone
9 Step 3: Preparing the battery
pack
11 Identifying the parts
Basics
14 Making calls
16 Redialing
17 Receiving calls
Telephone Features
18 Speed dialing
18 Storing phone numbers on the
handset
19 Storing phone numbers on the
base phone
20 Making calls with speed
dialing on the handset
20 Making calls with speed
dialing on the base phone
21 Setting the ringer type
21 Turning off the ringer
22 Checking the ringer type
22 Adjusting the ringer volume
level of the base phone
23 Switching the phones during a
call
23 To switch from the base
phone to the handset
24 To switch from the handset
to the base phone
25 Talking between the handset and
the base phone (Intercom)
25 To talk from the handset to
the base phone
26 To talk from the base phone to
the handset
27 Transferring a call
27 To transfer from the base
28 To transfer from the handset
29 Having a three-way conference
29 To join the phone
phone to the handset
to the base phone
conversation
Answering Machine
Features
30
Setting up the answering machine
30 Setting the time and day of
31 Recording the greeting
33 Setting the number of rings
34 Setting the audible message
35 Turning on the answering
37 Playing back messages
38 Adjusting the speaker volume
38 Erasing messages
40 Selecting the Announcement
41 Screening calls
42 Recording a memo message
43 Operating from an outside phone
43 Setting the remote ID code
44 Picking up new messages
the week
alert
function
Only Mode
(security code)
Additional Information
45
Mounting the base phone on a wall
46 Notes on power sources
47 Maintenance
48 Troubleshooting
51 Specifications
52 Index
Table of contents
US
US
3
Page 4
Getting Started
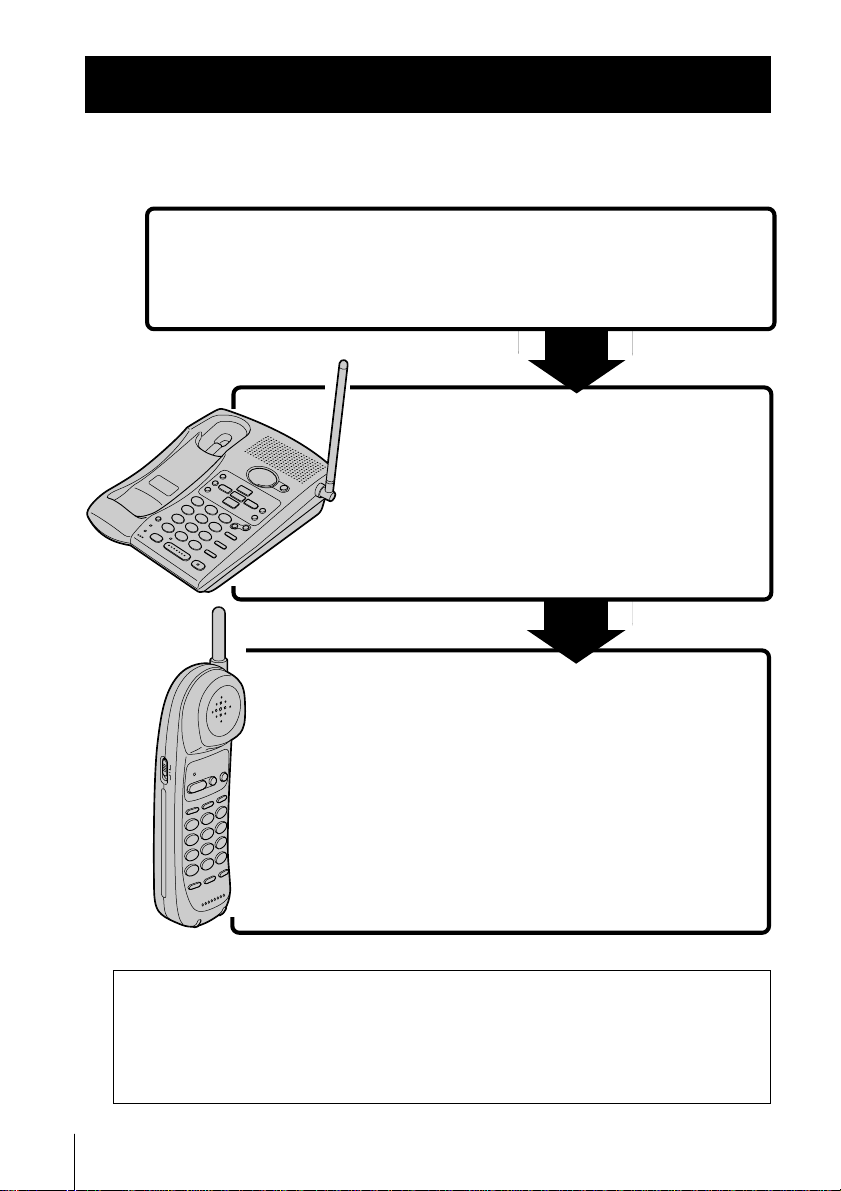
Read this first
Before you use your phone, you must first set it up. Here’s a quick way
to set up your phone: Steps 1, 2 and 3.
Step 1 (page 5)
First, unpack the phone and the supplied
accessories.
Step 2 (pages 6 to 8)
Next, you need to do three things to set
up the base phone, including finding the
best location for the base phone.
Base phone
US
Getting Started
4
Step 3 (pages 9 to 10)
Then, insert the battery pack into the
handset and charge it for more than 12
hours.
Handset
About the digital security code
The cordless telephone uses a digital security code to provide protection against unwanted
access to your base phone.
The security code blocks other cordless handsets to make calls through your base phone.
A random security code will be assigned automatically between your base phone and
handset when you charge the battery pack for the first time.
That’s it!
Page 5
Step 1
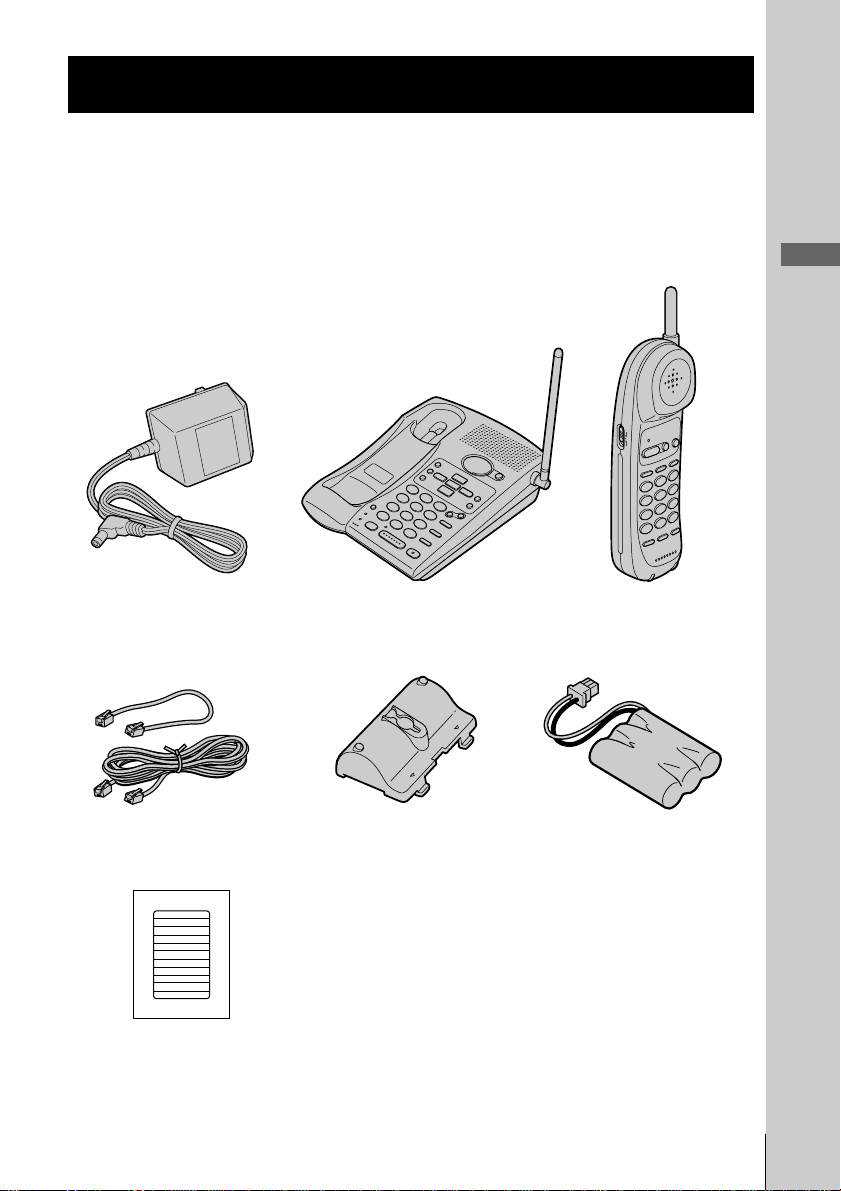
Checking the package contents
Make sure you have received the following items in the package.
If anything is missing, contact your local Sony dealer.
Getting Started
Base phone
Telephone line cords (2) Wall bracket/stand
for base phone
SPEED DIALING
1
2
3
4
5
6
7
8
9
0
Directories (2)
HandsetAC power adaptor (AC-T129)
Rechargeable battery
pack (BP-T18)
Getting Started
US
5
Page 6
Step 2
Setting up the base phone
Do the following steps:
• Choose the best location
• Connect the base phone
• Choose the dialing mode
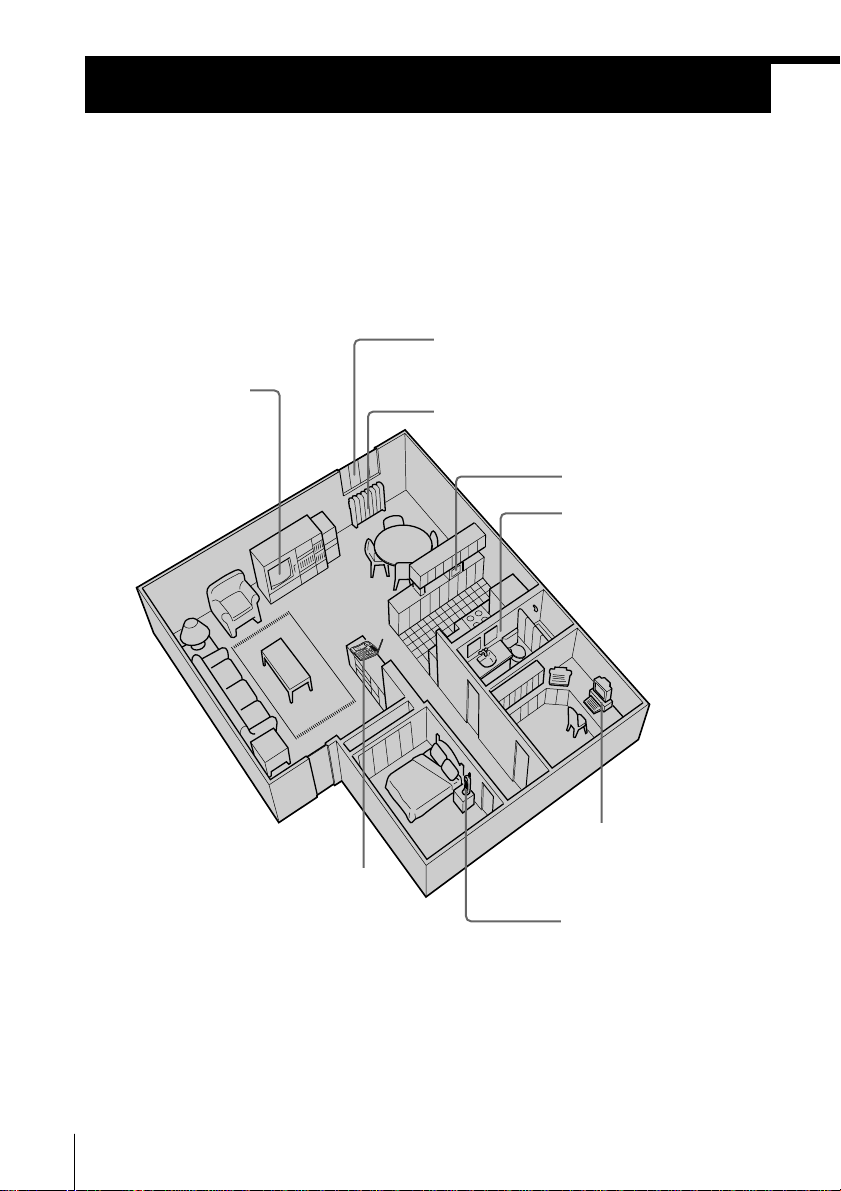
Choose the best location
Where you place the base phone affects the reception quality of the
handset.
Away from television
sets and other
electronic equipment
Away from noise sources such as a window
by a street with heavy traffic
Away from heat sources, such as radiators,
airducts, and sunlight
Away from a microwave
oven
Away from excessive
moisture, extremely low
temperatures, dust,
mechanical vibration, or
shock
Away from a personal
computer
Near a central location
and on a level surface
Away from another
cordless telephone
CAUTION: • Should you experience intermittent loss of audio during a conversation, try
US
Getting Started
6
moving closer to the base or move base phone away from other noise sources.
• The cordless telephone operates at a frequency that may cause interference to
nearby TVs and VCRs; the base phone should not be placed near or on the top
of a TV or VCR; and, if interference is experienced, moving the cordless
telephone farther away from the TV or VCR will often reduce or eliminate the
interference.
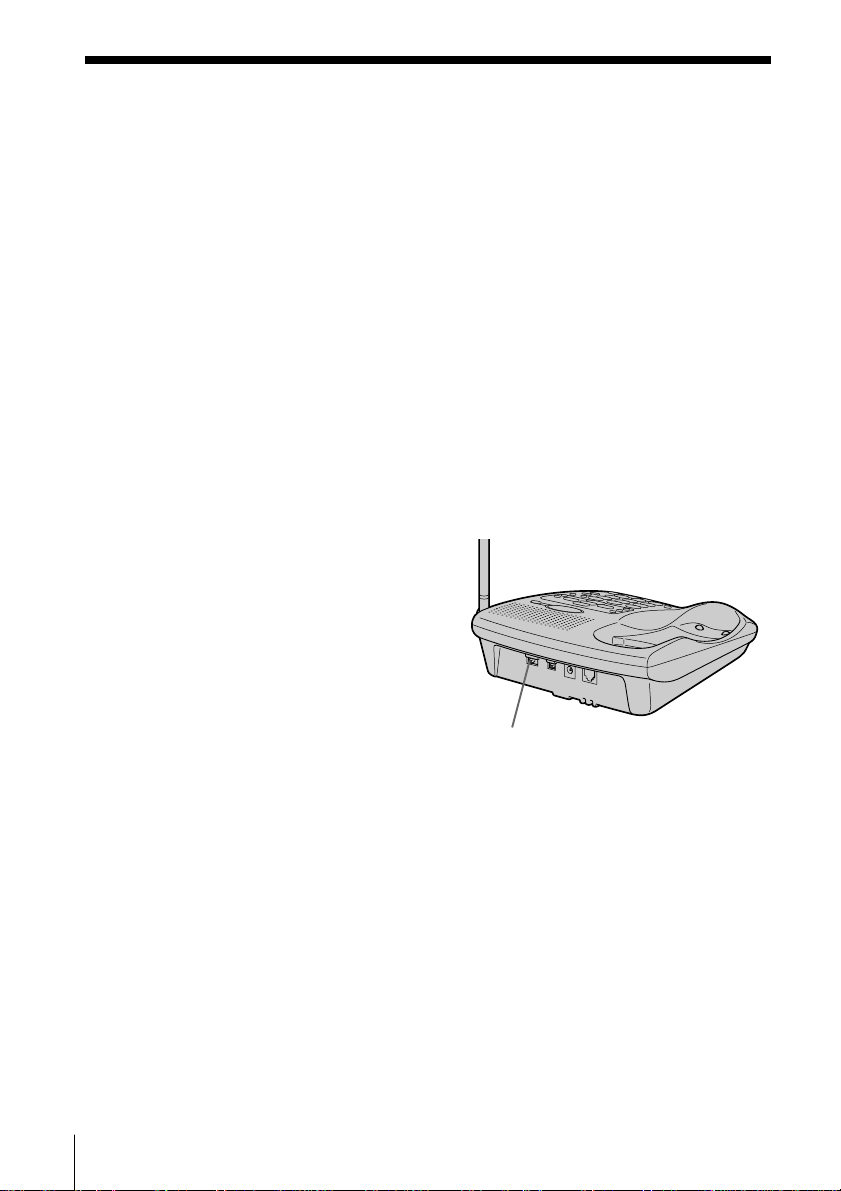
Page 7
2
1
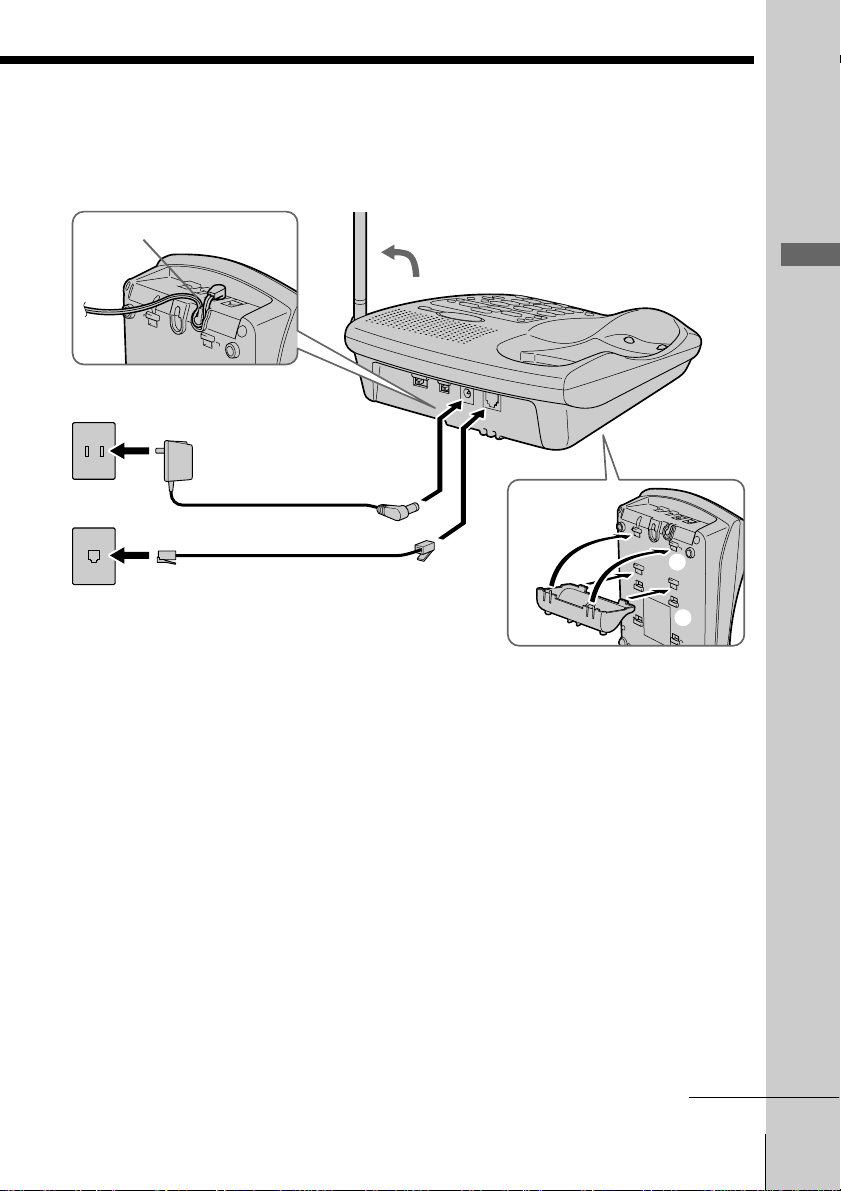
Connect the base phone
If you want to hang the base phone on the wall, see page 45.
Route the code
To an AC outlet
To DC IN 9V
AC power adaptor
2
(supplied AC-T129)
Telephone line cord
1
To the
telephone outlet
If you want to use the wall bracket as the stand, attach it on the bottom
of the base phone before step 1 as illustrated above.
(supplied)
3
To LINE
Align the
f marks.
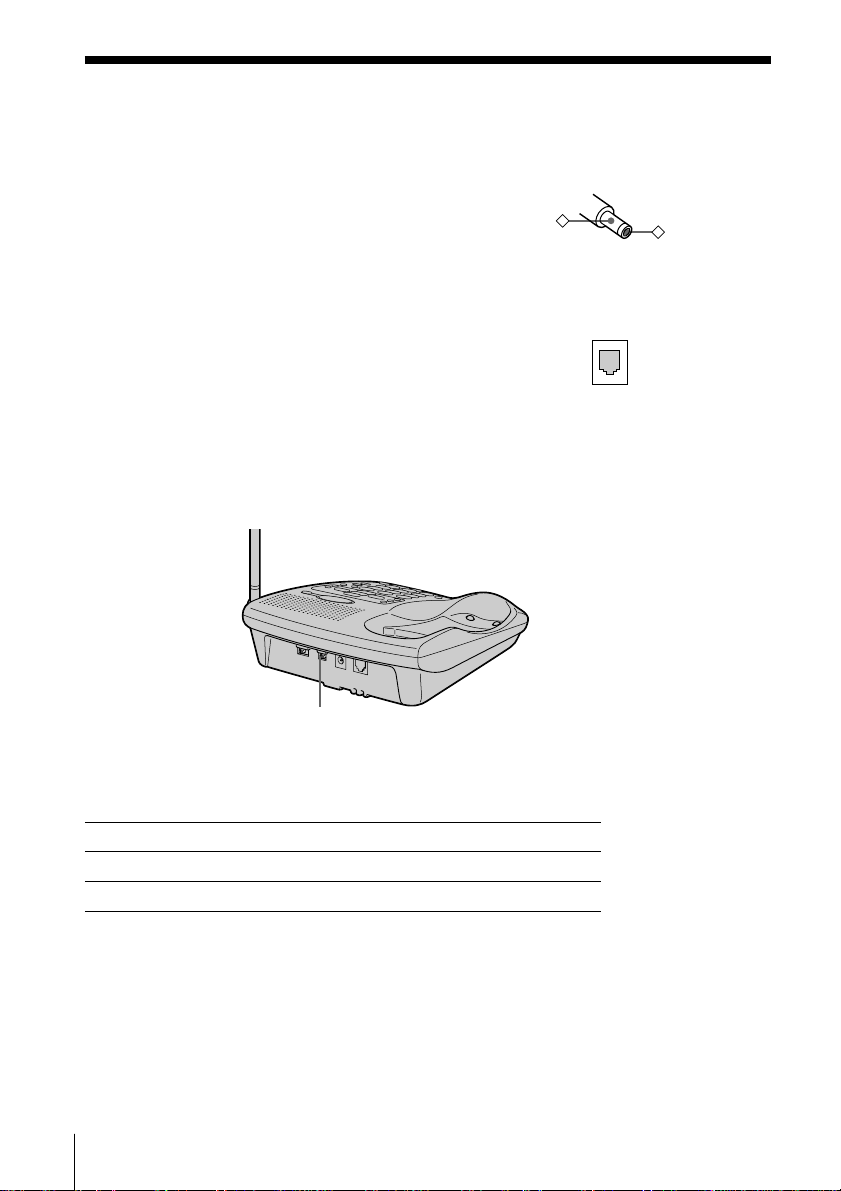
1 Connect the telephone line cord
to the LINE jack and to a
telephone outlet.
Getting Started
2 Connect the AC power adaptor
to the DC IN 9V jack and to an
AC outlet.
3 Raise the antenna. Make sure it
points towards the ceiling.
continued
Getting Started
US
7
Page 8
Step 2: Setting up the base phone (continued)
Notes
• Use only the supplied AC-T129 AC power adaptor.
Do not use any other AC power adaptor.
• Connect the AC power adaptor to a continuous power
supply.
• Place the base phone close to the AC outlet so that
you can unplug the AC power adaptor easily.
Polarity of the plug
–
+
Tip
If your telephone outlet is not modular, contact your
telephone service company for assistance.
Modular
Choose the dialing mode
For the telephone to work properly, select an appropriate dialing mode
(tone or pulse).
DIAL MODE switch
Depending on your dialing system, set the DIAL MODE switch as
follows:
If your dialing system is Set the switch to
Tone TONE
Pulse PULSE
If you aren't sure of your dialing system
Make a trial call with the DIAL MODE switch set to TONE.
If the call connects, leave the switch as is; otherwise, set to PULSE.
US
Getting Started
8
Page 9
Step 3
Preparing the battery pack
Charge the battery pack for more than 12 hours before you start using
your phone.
BP-T18
Black
Red
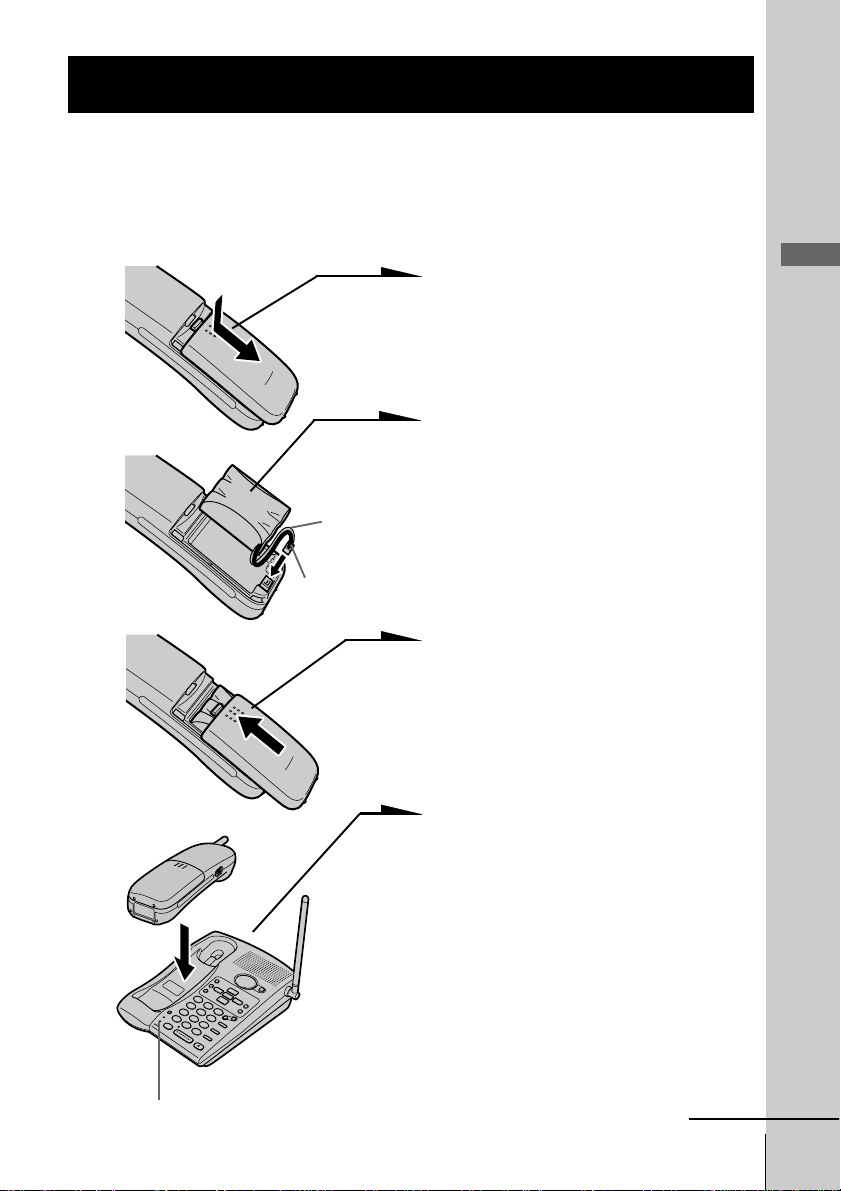
1 Slide open the battery
compartment lid of the handset.
2 Connect the battery connector
with correct polarity (black wire
goes on left side and red wire
goes on right).
3 Close the battery compartment
lid.
4 Place the handset on the base
phone.
The CHARGE lamp lights up
when the handset is properly
seated on the charge terminals
of the base phone. Charge the
battery pack for more than 12
hours so that the battery is fully
charged. The CHARGE lamp
remains lit even after charging
is completed.
Getting Started
CHARGE lamp
continued
Getting Started
US
9
Page 10

Step 3: Preparing the battery pack (continued)
Battery duration
A fully charged battery pack lasts for about:
• approx. 7 hours when you use the handset continuously.
• approx. 7 days when the handset is in standby mode.
Notes
• The battery pack will gradually discharge over a long period of time, even if
not in use.
• If you leave the battery pack in the handset without charging it, the battery
pack will be completely discharged.
It may require several times of charging to recover its full capacity.
To obtain the best performance from the battery
Do not place the handset on the base phone after each call. The battery
works best if the handset is returned to the base phone after two or
three calls. However, do not leave the handset off the base phone for a
long period of time as this will completely discharge the battery pack.
When to purchase a new battery pack
If the battery lasts only a few minutes even after 12 hours of charging,
the usable life of the battery has expired and needs replacement.
Contact your local Sony authorized dealer or service center, and ask
for a Sony BP-T18 rechargeable battery pack.
Note
Battery life may vary depending on usage condition and ambient temperature.
US
Getting Started
10
Page 11
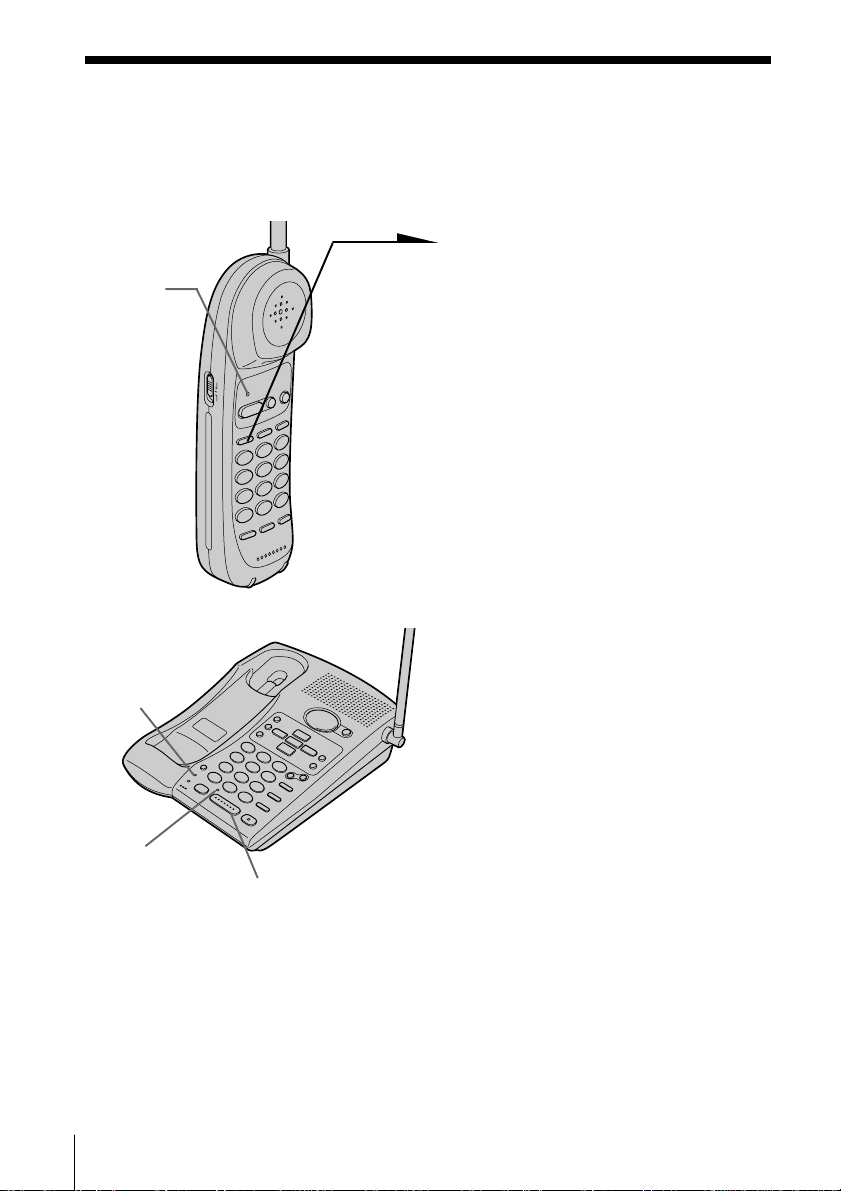
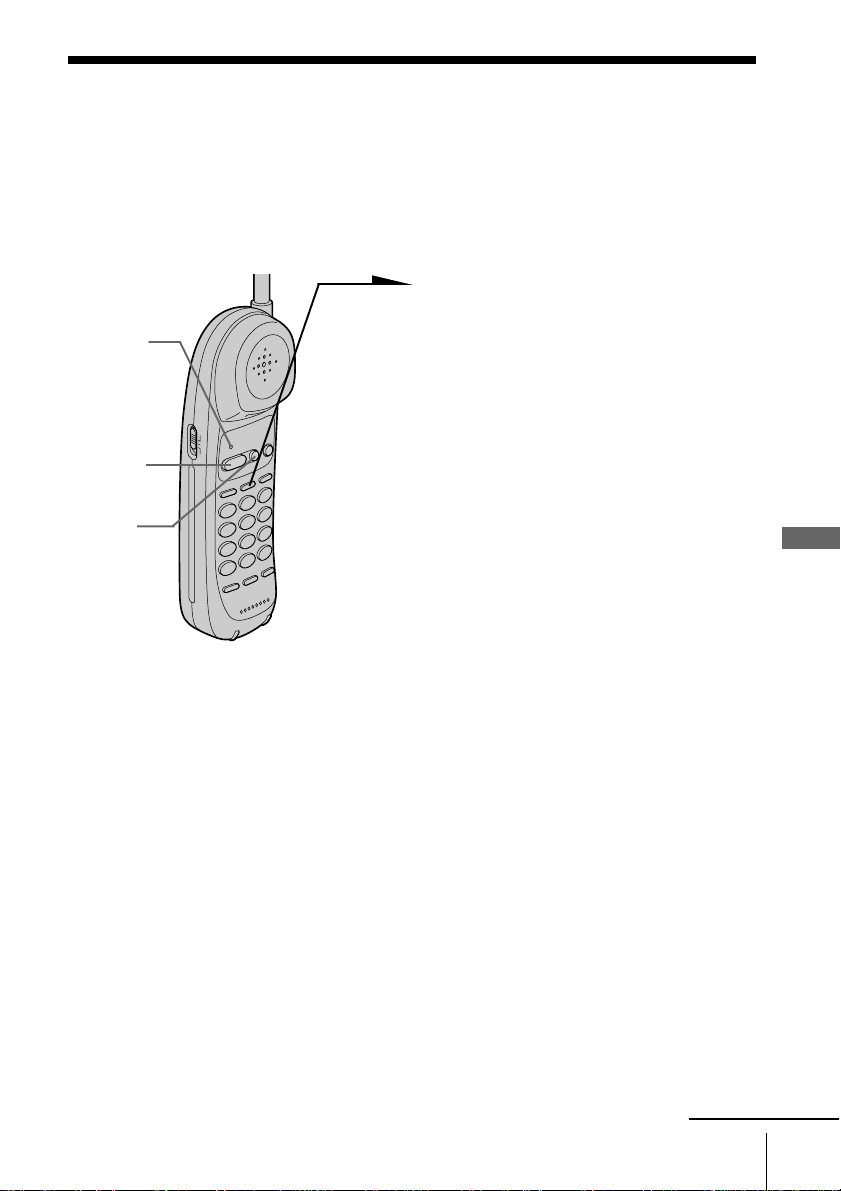
Identifying the parts
Refer to the pages indicated in parentheses for details.
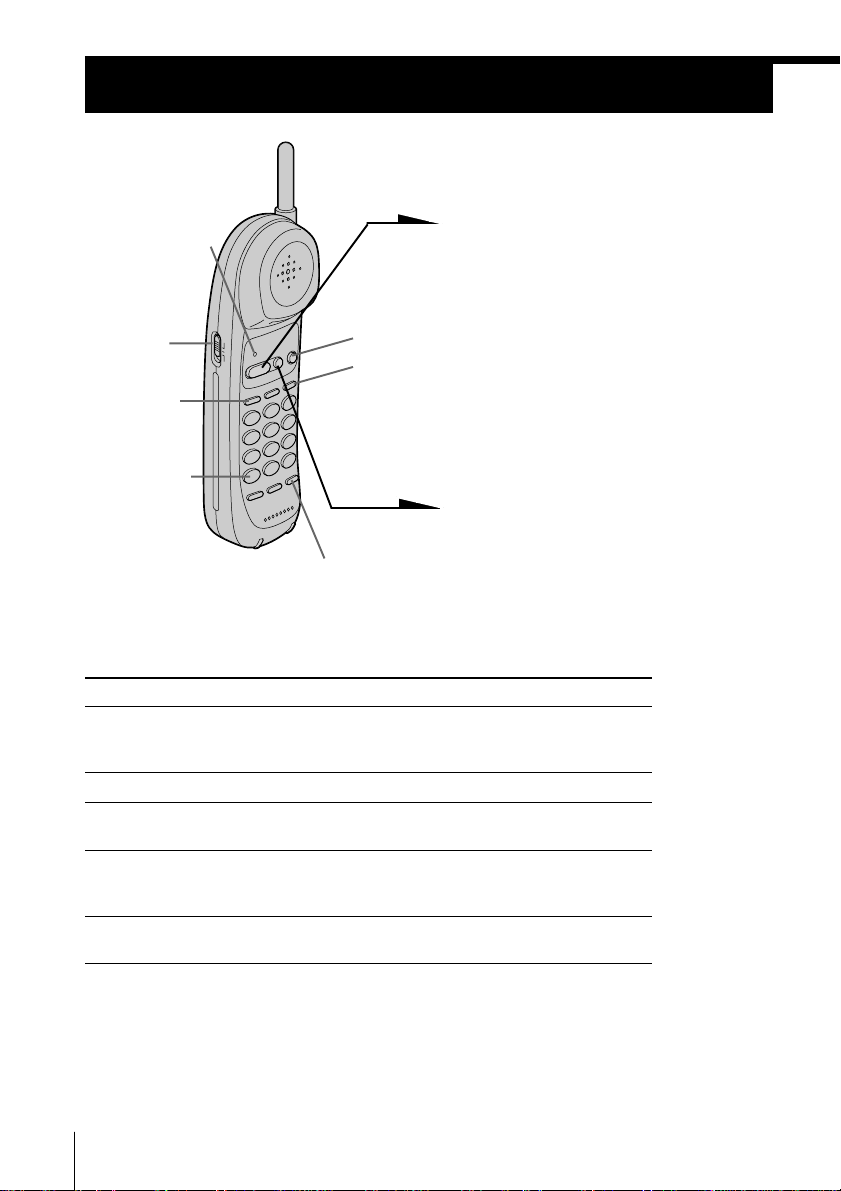
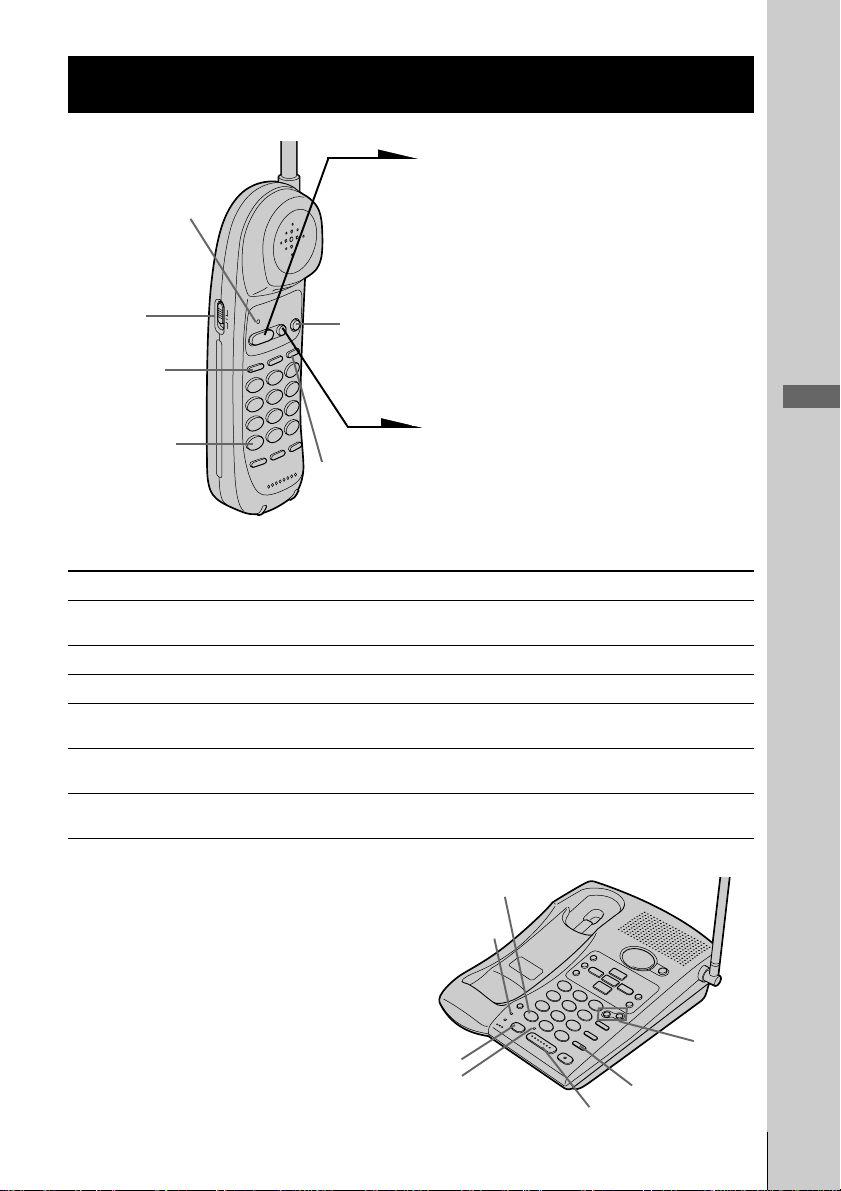
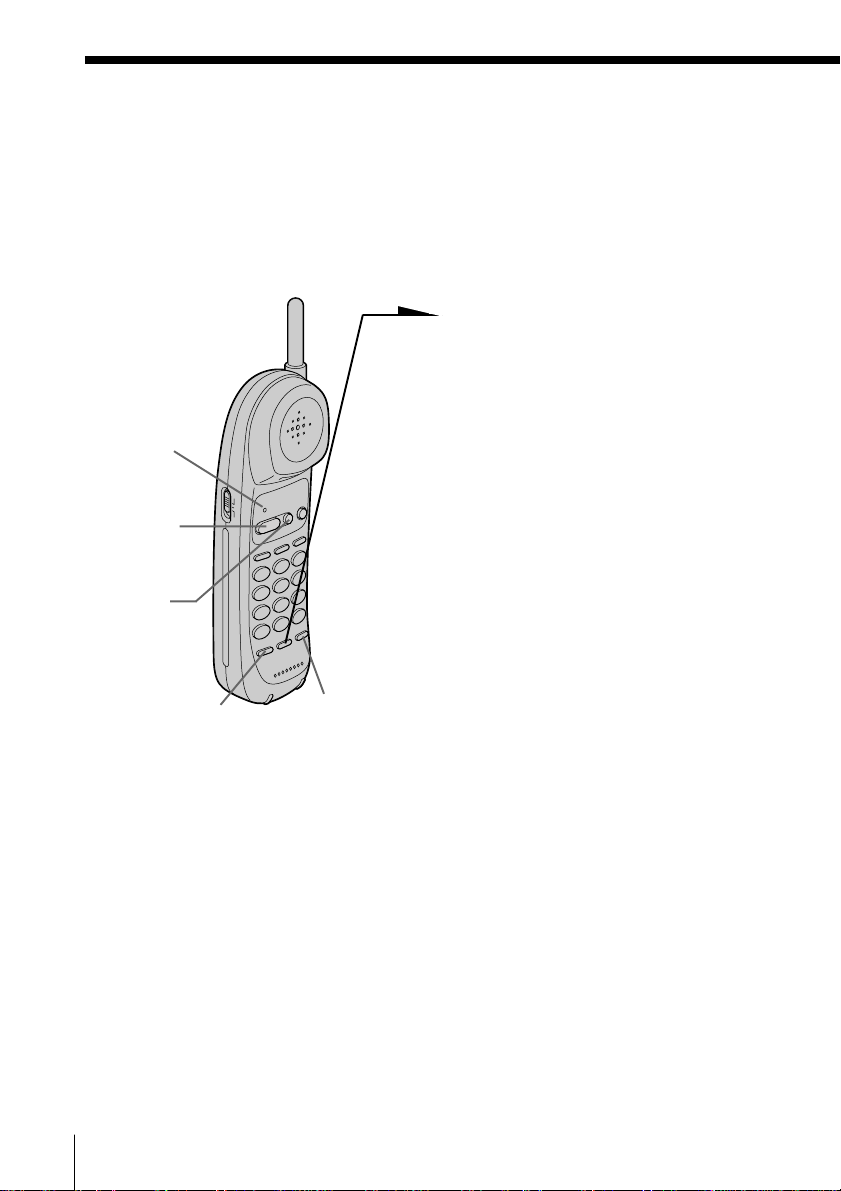
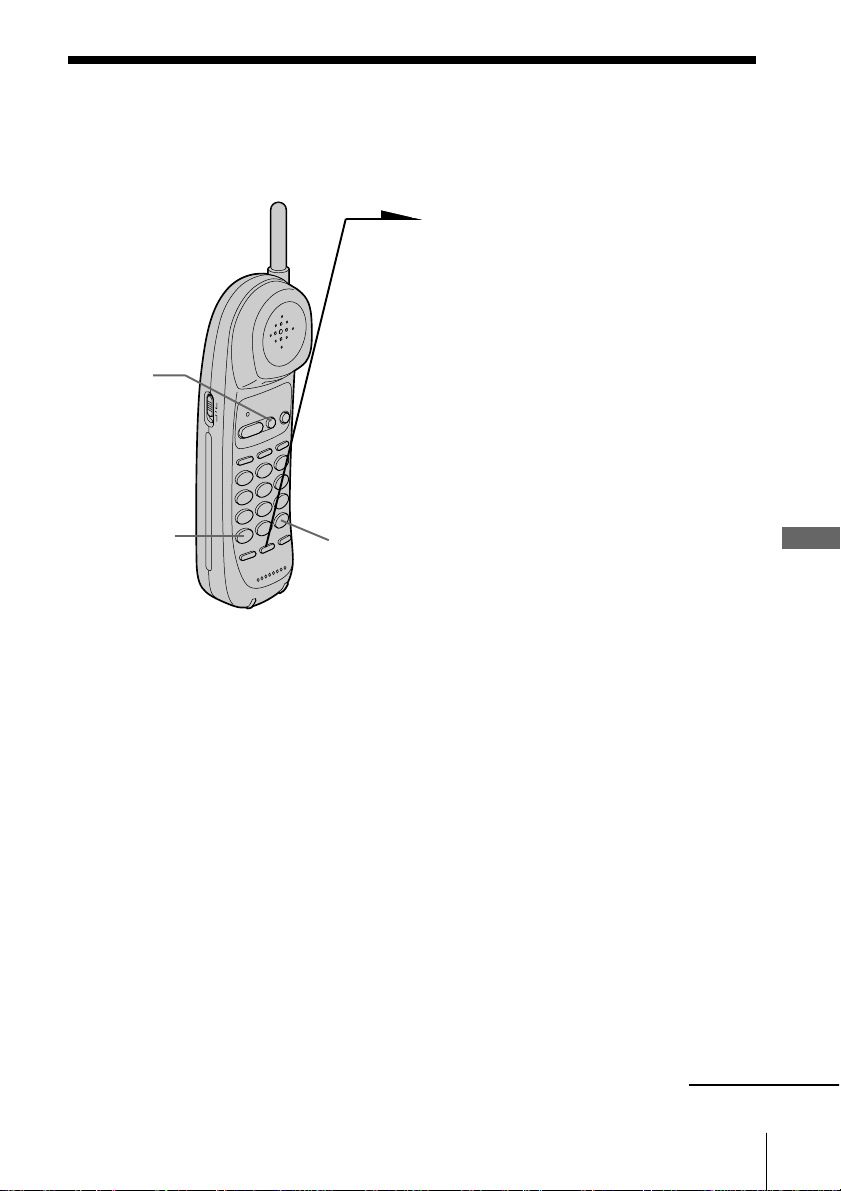
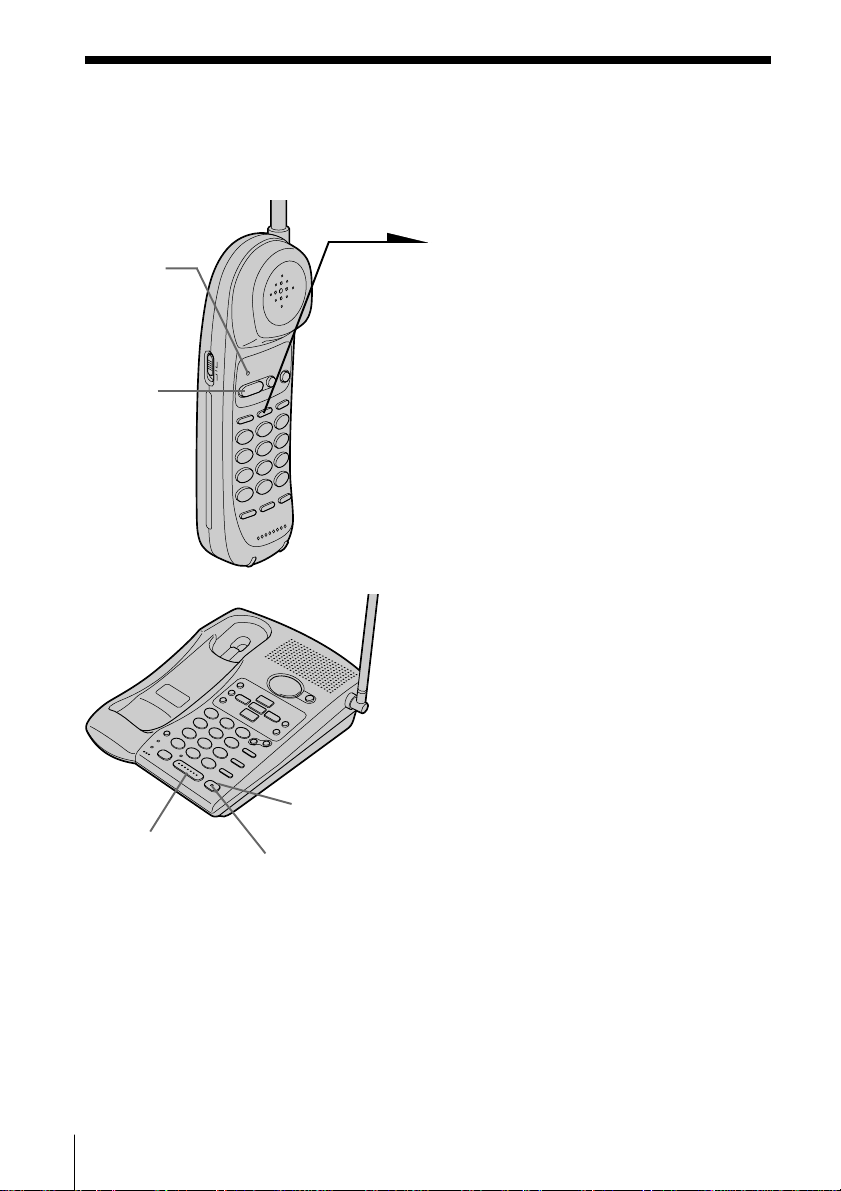
Handset
1
2
3
4
5
6
7
8
9
Getting Started
0
qa
qs
qd
qf
qg
qh
qj
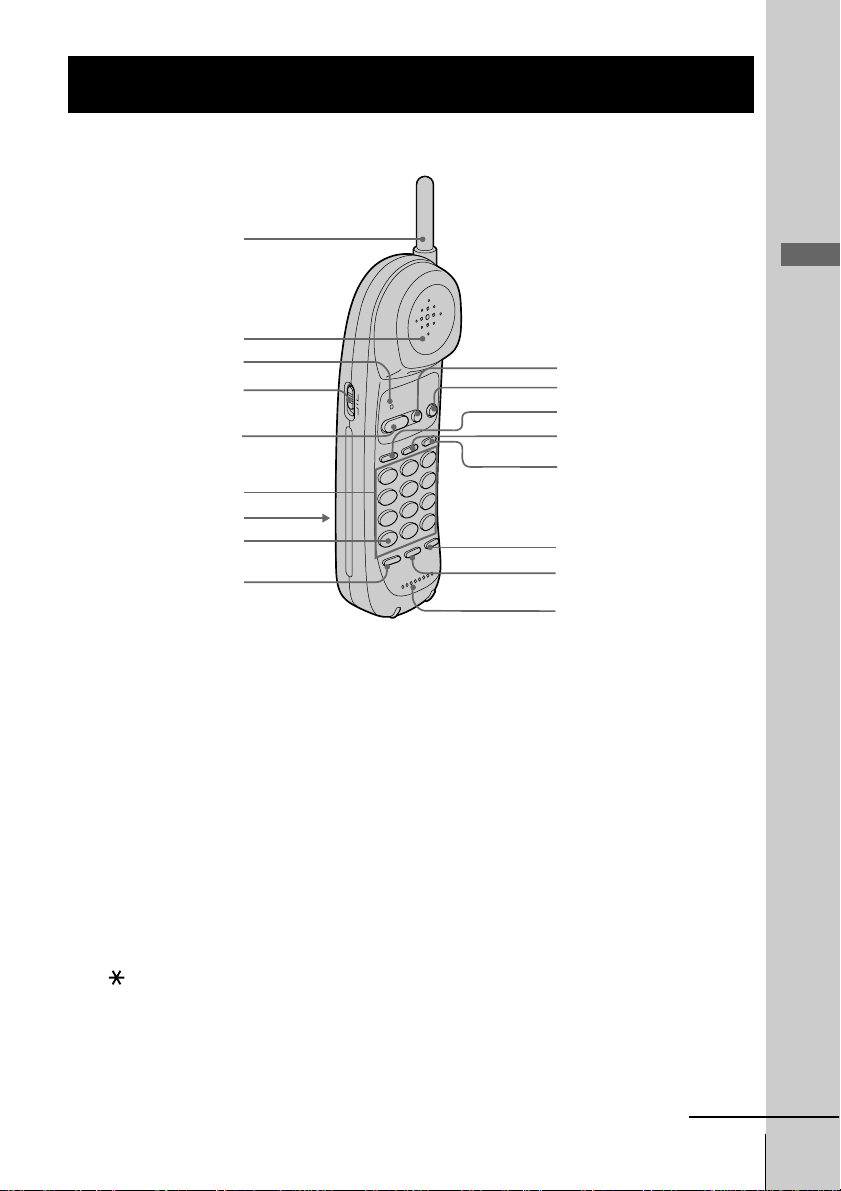
1 Antenna
2 Speaker
3 TALK/BATT LOW lamp
(p. 14, 18)
Lights up during a call, flashes
when you store a phone number for
speed dialing.
4 VOL (volume) switch (p. 14, 17)
Adjusts the handset volume.
5 TALK button (p. 14, 17)
Lets you make or receive a call.
6 Dialing keys (p. 14)
7 Battery compartment (p. 9)
8 TONE button (p. 14, 17)
Allows you to switch temporarily to
tone dialing.
9 SPEED DIAL button (p. 20)
Used to make a call with speed
dialing.
0 OFF button (p. 14, 17)
Allows you to disconnect the call.
qa FLASH button (p. 14, 17)
qs HOLD button (p. 14, 17, 24)
Used to hold a call.
qd INTERCOM button (p. 25)
Used to make an intercom call.
qf CHANNEL button (p. 14, 17)
Used to select a better channel.
qg REDIAL/PAUSE button
(p. 16, 20)
Redials the last number called,
inserts a pause in the dialing
sequence.
qh PGM (Program) button
(p. 18)
Used to store numbers for speed
dialing.
qj Microphone
continued
Getting Started
11
US
Page 12

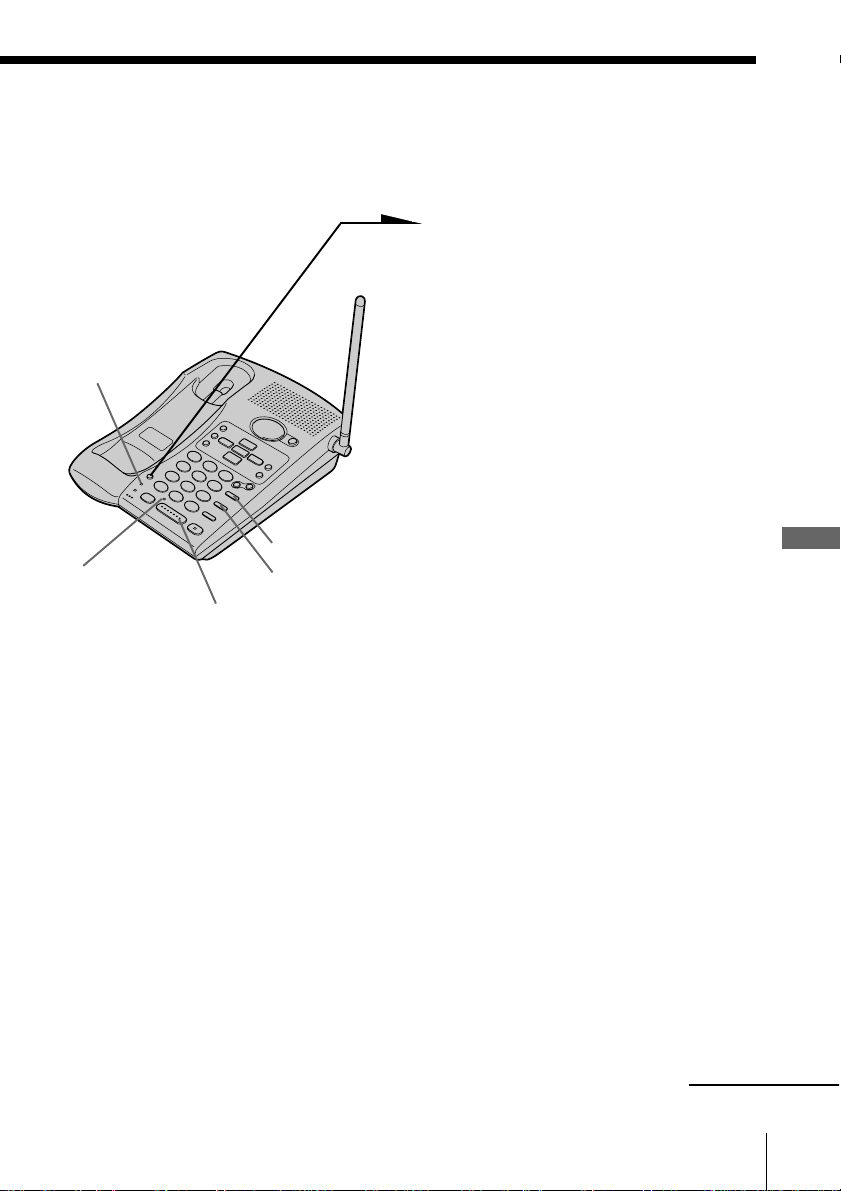
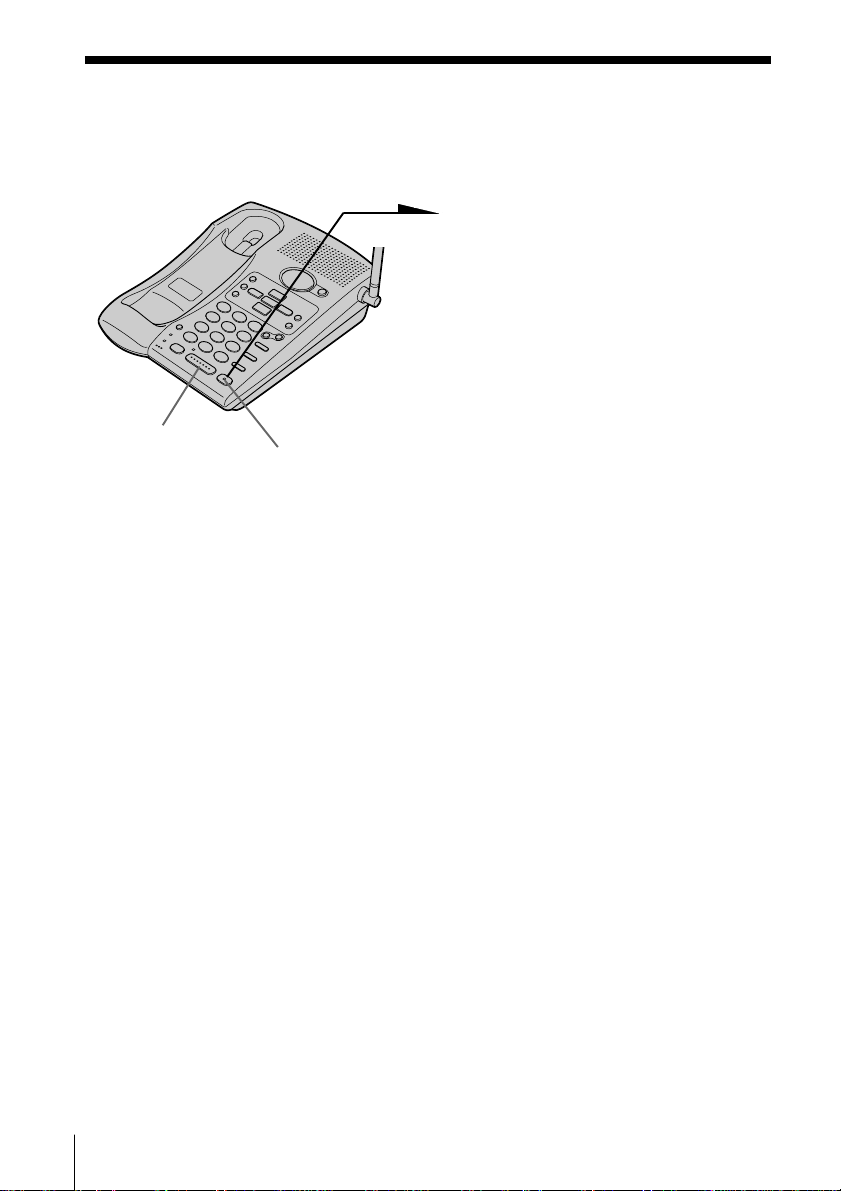
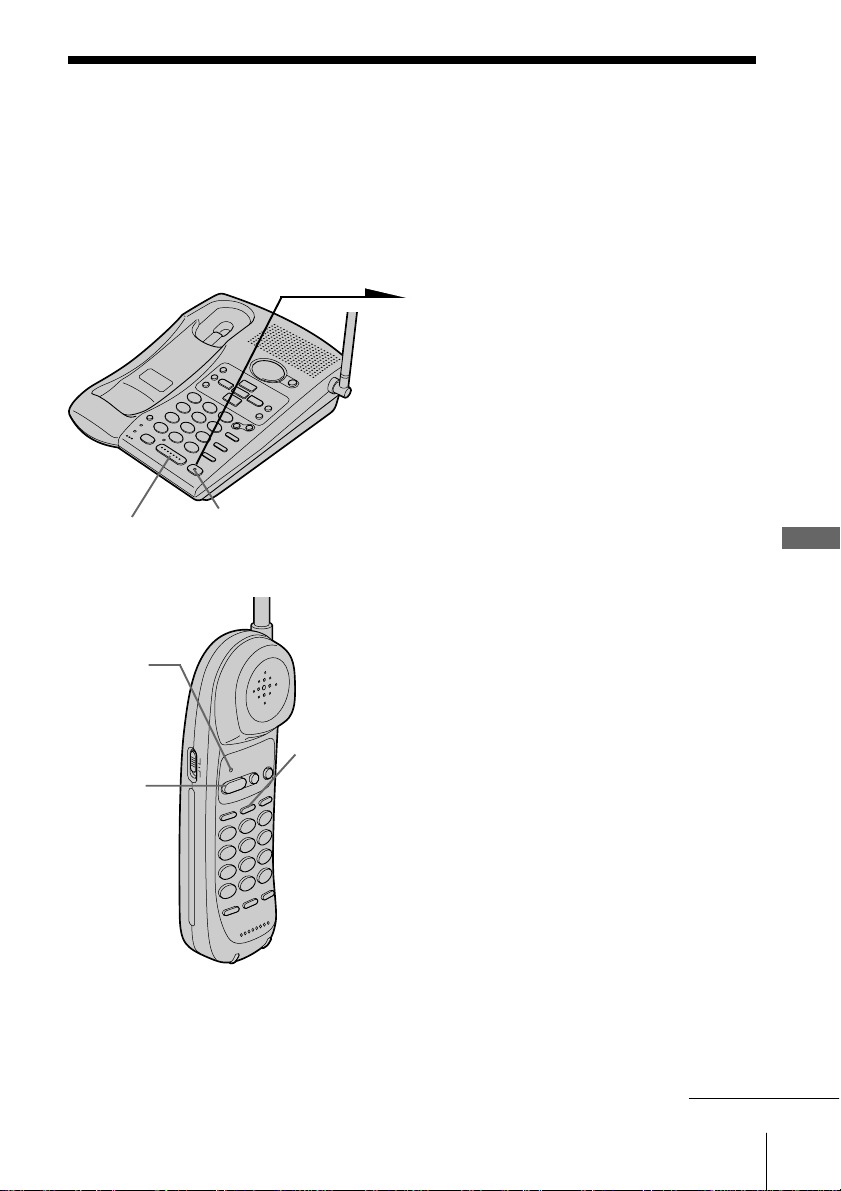
Identifying the parts (continued)
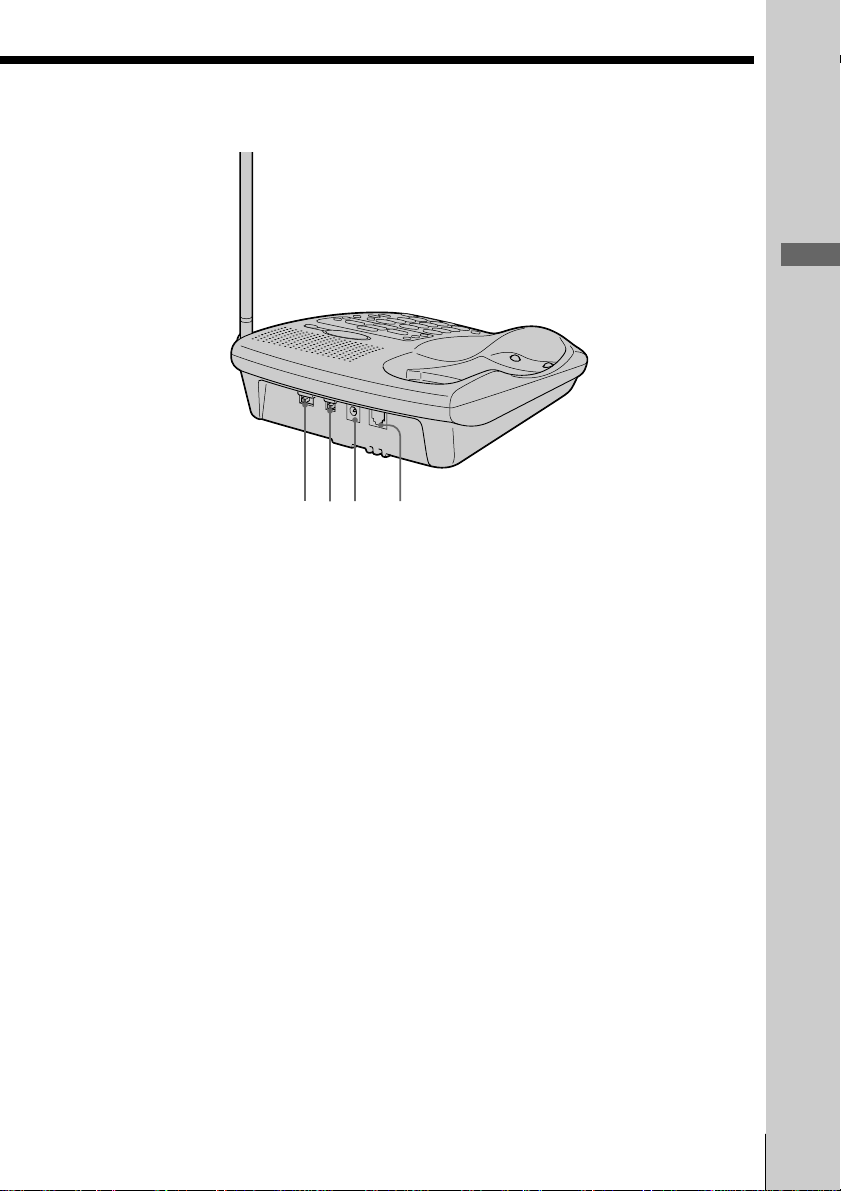
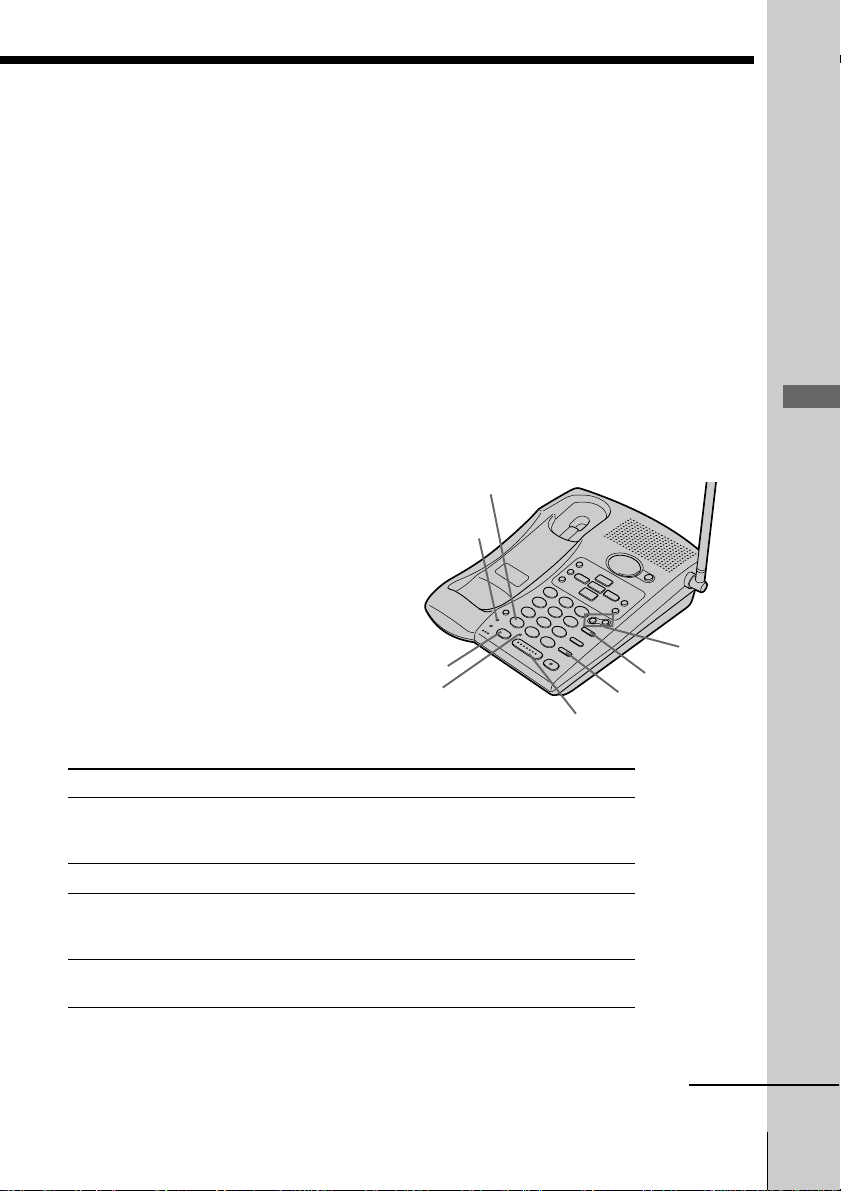
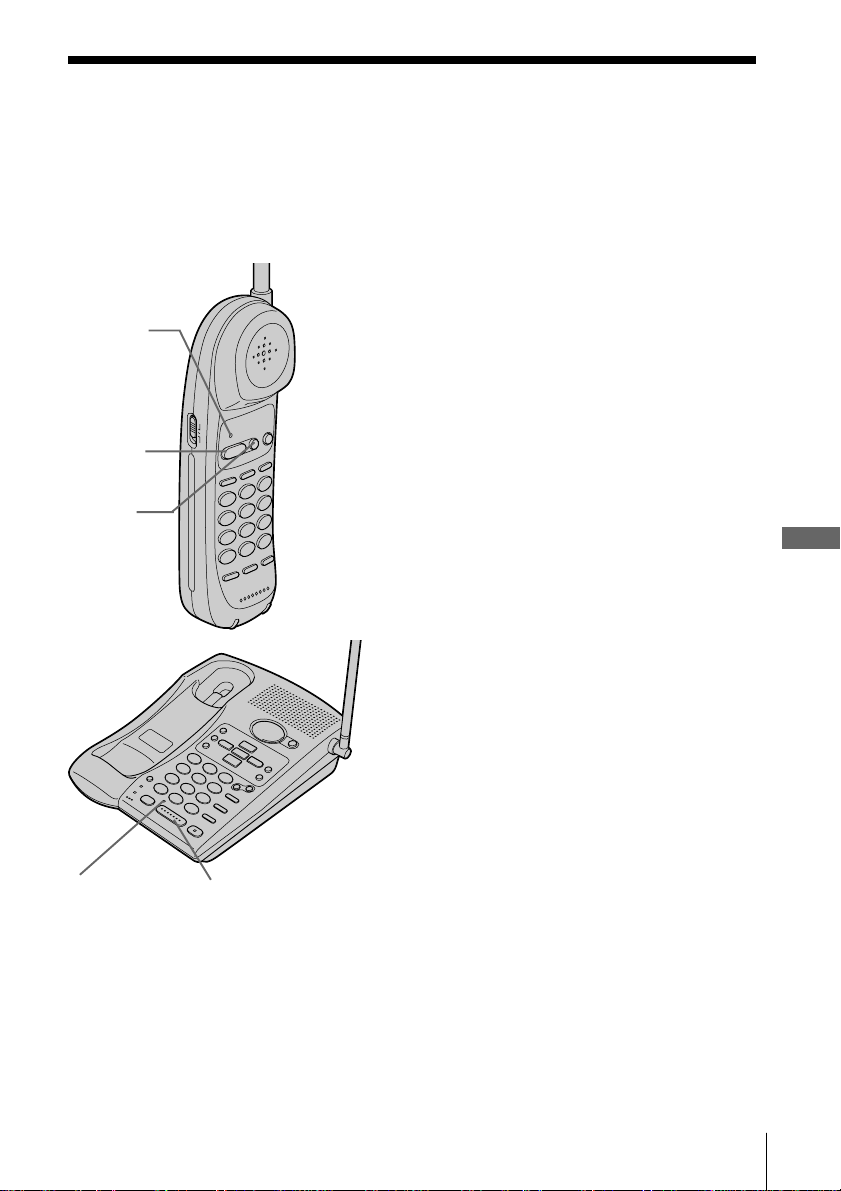
Base Phone
1
qd
2
3
4
5
6
7
8
9
0
qa
qs
1 Message counter (p. 35)
Indicate the number of new
messages recorded. “A” appears in
the announcement only mode. “FL”
appears when there is no space to
record messages.
2 TIME/SET button (p. 30, 43)
Press when setting the day and
time, or to check the current time.
Also used when setting the remote
ID code (security code).
3 SELECT button (p. 30)
4 MENU button (p. 30)
5 REPEAT/SLOW button
(p. 30, 37)
Press to repeat the current message
or go back to the previous message.
Keep the button pressed for slow
playback of messages.
6 Dialing keys (p. 15)
7 PGM (Program) button (p. 19)
Used to store numbers for speed
dialing.
qf
qg
qh
qj
qk
ql
w;
wa
ws
wd
wf
wg
wh
wj
8 IN USE lamp (p. 15, 17, 23)
Lights when one of the phones is in
use.
9 CHARGE lamp (p. 9)
Lights while the battery is being
charged.
0 MIC (microphone) (p. 31, 42)
qa TONE button (p. 15, 17)
Allows you to switch temporarily to
tone dialing.
qs HOLD button (p. 15, 17, 23)
Used to hold a call.
qd Speaker
qf Antenna (p. 7, 45)
qg SKIP/QUICK button (p. 30, 37)
Press to skip to the next message.
Keep the button pressed for quick
playback of messages.
qh
ANSWER ON/OFF button (p. 35)
Turns the answering function on or
off.
12
US
Getting Started
Page 13
Getting Started
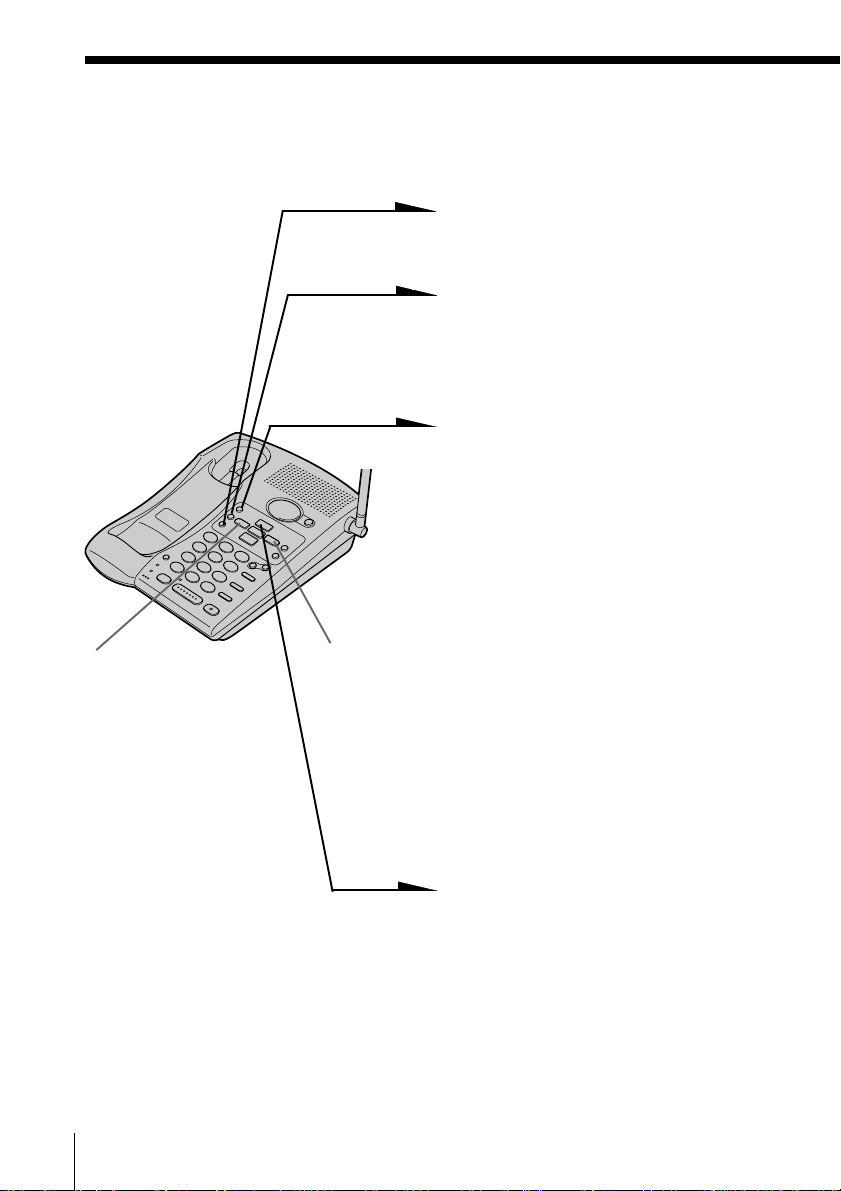
eae;wlwk
qj REC/MEMO button (p. 31, 42)
Records a greeting or memo
message.
qk ERASE button (p. 32, 38)
Erases the recorded greeting or
messages.
ql PLAY/STOP (MAILBOX 1,2,3)
button (p. 37)
Plays back the messages in each
mailbox.
w; VOL (Volume) +/– button
(p. 15, 17, 38)
Adjusts the speaker volume.
wa REDIAL/PAUSE button
(p. 16, 20)
Redials the last number called,
inserts a pause in the dialing
sequence.
ws SPEED DIAL button (p. 20)
Used to make a call with speed
dialing.
wd FLASH button (p. 15, 17)
wf INTERCOM button (p. 26)
Used to make an intercom call.
wg INTERCOM lamp (p. 25)
Lights up during an intercom call.
wh SPEAKERPHONE button
(p. 15, 17)
Used to make or receive a call with
the base phone.
wj SPEAKERPHONE lamp
(p. 15, 17)
Lights while making or receiving a
call with the base phone.
wk RINGER switch (p. 22)
Adjusts the ringer volume.
wl DIAL MODE switch (p. 8)
Selects pulse or tone dialing.
e; DC IN 9V jack (p. 7, 45)
ea LINE (telephone line) jack
(p. 7, 45)
Getting Started
13
US
Page 14
Basics
Making calls
1 Pick up the handset from the
base phone.
TALK/BATT
LOW lamp
2 Press (TALK).
The TALK/BATT LOW lamp on
the handset and the IN USE
lamp on the base phone light up.
VOL
switch
(HOLD)
(FLASH)
(CHANNEL)
The dialing keys on the handset
light up for 10 seconds.
Then you’ll hear a dial tone. If
you hear error beeps, move
closer to the base phone.
(*TONE)
3 Dial the phone number.
4 When you’re done talking, press
(OFF) or replace the handset on
(REDIAL/PAUSE)
Additional tasks
To
Put a call on hold
Select a better channel
Adjust the handset
volume
Switch to tone dialing
temporarily
Switch to another call
(“call waiting” service*)
* You need to subscribe to the service from your telephone company.
Notes
• Before dialing, make sure you can hear the dial tone, otherwise you cannot
dail correctly.
• When the TALK/BATT LOW lamp repeats a set of two flashes, the base
phone is in use.
• When you set the handset volume to H (high), the volume will be raised
considerably. Under normal circumstances, set the volume to M (middle).
US
Basics
14
Do this
Press (HOLD).
The TALK/BATT LOW lamp flashes slowly.
Press (TALK) to resume the conversation.
Press (CHANNEL).
Set the VOL switch to H (high), M (middle) or L
(low).
Press (*TONE) while using the telephone after
you’re connected.
The line remains in tone dialing until disconnected.
Press (FLASH) to access the flash function.
Press (FLASH) again to return to the first caller.
the base phone.
The TALK/BATT LOW lamp on
the handset and the IN USE
lamp on the base phone
go off.
Page 15
If the handset battery becomes weak during a call
You hear a beep every three seconds and the TALK/BATT LOW lamp
on the handset flashes.
The call will disconnect soon. Replace the handset on the base phone to
charge.
For optimum performance, charge the battery for a full 12 hours.
Note that during the first 10 - 15 minutes of charging, the phone will be
inactive, i.e., unable to make or receive a call.
After this initial 10 - 15 minutes, you may be able to use the phone, but
the battery duration will be very short; thus it is recommended that
you fully charge the battery before the next usage.
Making calls through the speakerphone
Press (SPEAKERPHONE) on the base phone.
The SPEAKERPHONE lamp and the
IN USE lamp light up.
“- -” appears on the display.
Dial the phone number.
When you are done talking, press
(SPEAKERPHONE) again.
(HOLD)
(*TONE)
IN USE
lamp
SPEAKERPHONE
lamp
(FLASH)
(SPEAKERPHONE)
Additional tasks
To
Put a call on hold
Adjust the speaker volume
Switch to tone dialing
temporarily
Switch to another call
(“call waiting” service*)
* You need to subscribe to the service from your telephone company.
Do this
Press (HOLD).
The IN USE lamp flashes slowly.
Press (SPEAKERPHONE) to resume the conversation.
Press (VOL +) or (VOL --).
Press (*TONE) while using the telephone after
you’re connected.
The line remains in tone dialing until disconnected.
Press (FLASH) to access the flash function.
Press (FLASH) again to return to he first caller.
Basics
(VOL)
(REDIAL/PAUSE)
continued
Basics 15
US
Page 16

Making calls (continued)
To obtain the best speakerphone performance
• You may not be able to hear the other party’s voice in a noisy place.
Therefore, use the speakerphone in a quiet room.
• Do not bring your hand or other object too close to the microphone
or you will hear a shrill noise (“feedback”).
• When the speaker volume is loud, or the telephone has been placed
close to a wall, you may find that the volume drops suddenly. This is
due to a circuit in the telephone designed to protect against
feedback. In such cases, lower the speaker volume slightly.
Redialing
On the handset
1 Press (TALK).
The TALK/BATT LOW lamp lights up. The dialing keys
light up for 10 seconds.
2 Press (REDIAL/PAUSE) to redial the number last dialed.
On the base phone
1 Press (SPEAKERPHONE).
The SPEAKERPHONE lamp lights up.
“- -” appears on the display.
2 Press (REDIAL/PAUSE) to redial the number last dialed.
Note
If the number last dialed exceeds 32 digits, only the first 32 digits are dialed.
Tip
The number to be redialed is the last number dialed either on the handset or on
the base phone.
US
Basics
16
Page 17
Receiving calls
1 When you hear the phone ring;
TALK/BATT
LOW lamp
VOL
switch
(HOLD)
(*TONE)
(FLASH)
(CHANNEL)
Additional tasks
To
Put a call on hold
Select a better channel
Adjust the handset volume
Switch to tone dialing
temporarily
Switch to another call
(“call waiting” service*)
Turn on/off the ringer
of the handset
* You need to subscribe to the service from your telephone company.
Do this
Press (HOLD). The TALK/BATT LOW lamp flashes slowly.
Press (TALK) to resume the conversation.
Press (CHANNEL).
Set the VOL switch to H (high), M (middle) or L (low).
Press (*TONE) while using the telephone after you’re connected.
The line remains in tone dialing until disconnected.
Press (FLASH) to access the flash function.
Press (FLASH) again to return to the first caller.
See “Setting the ringer type” on page 21.
Receiving calls through the speakerphone
When the phone rings, press (SPEAKERPHONE)
on the base phone.
The SPEAKERPHONE lamp and the
IN USE lamp light up.
“- -” appears on the display.
To adjust the speaker volume,
press (VOL +) or (VOL --).
When you are done talking, press
(SPEAKERPHONE) again.
To obtain the best speakerphone
performance, see page 16.
To adjust the ringer volume, see page 22.
•Press (TALK)
(or any key except (OFF)) .
•Pick up the handset from the
base phone when the handset
is placed on the base phone.
The TALK/BATT LOW lamp on
the handset and the IN USE
lamp on the base phone light up.
The dialing keys light up for 10
seconds.
2 When you’re done talking, press
(OFF) or replace the handset on
the base phone.
The TALK/BATT LOW lamp on
the handset and the IN USE
lamp on the base phone
(*TONE)
IN USE
lamp
(HOLD)
SPEAKERPHONE
lamp
or
go off.
(FLASH)
(SPEAKERPHONE)
(VOL)
Basics 17
Basics
US
Page 18
Telephone Features
Speed dialing
You can dial with a touch of a few buttons by storing a phone number
on a dialing key. You can store up to 10 different phone numbers
separately on the handset and on the base phone.
Storing phone numbers on the handset
1 Press (PGM).
The TALK/BATT LOW lamp
flashes.
TALK/BATT
LOW lamp
The dialing keys light up for 10
seconds.
2 Press one of the dialing keys
((0) to (9)) for the phone
(TALK)
number to be stored.
You’ll hear a confirmation beep.
(OFF)
(SPEED DIAL)
(REDIAL/PAUSE)
3 Enter the phone number you
want to store.
You can enter up to 16 digits,
including a tone and a pause,
each of which is counted as one
digit.
4 Press (PGM) again.
You’ll hear a confirmation beep,
and the number is stored. The
TALK/BATT LOW lamp goes
off.
Notes
• In step 3, if you don’t enter the phone number, the previously stored number
will be erased.
• Do not allow more than 20 seconds to elapse between each step of the
procedure.
• Before storing phone numbers, make sure the handset is not in use.
Tips
• If you enter a wrong number, press (OFF), then start from the beginning.
• Use the supplied directory to write down what you stored on the speed
dialing numbers.
US
Telephone Features
18
Page 19
Storing phone numbers on the base phone
1 Press (PGM).
The SPEAKERPHONE lamp
flashes quickly.
2 Press one of the dialing keys
((0) to (9)) for the phone
IN USE lamp
number to be stored.
You’ll hear a confirmation beep.
3 Enter the phone number you
want to store.
You can enter up to 16 digits,
including a tone and a pause,
(REDIAL/PAUSE)
SPEAKERPHONE
lamp
Notes
• In step 3, if you don’t enter the phone number, the previously stored number
will be erased.
• Do not allow more than 20 seconds to elapse between each step of the
procedure.
• You cannot store phone numbers on the base phone while the handset is
being used. The IN USE lamp will light up to indicate this condition.
Tips
• If you enter a wrong number, press (PGM), then start from the beginning.
• Use the supplied directory to write down what you have stored to the speed
dialing numbers.
(SPEED DIAL)
(SPEAKERPHONE)
each of which is counted as one
digit.
4 Press (PGM) again.
You’ll hear another
confirmation beep, and the
number is stored.
Telephone Features
continued
Telephone Features
19
US
Page 20

Speed dialing (continued)
To store the previous number dialed
Press (REDIAL/PAUSE) directly after step 2, then go to step 4.
To store a number to be dialed via Private Branch Exchange (PBX)
Before entering a phone number in step 3 on the previous page, do as
follows:
1 Enter the outside line access digit (e.g. 9).
2 Press (REDIAL/PAUSE).
To change a stored number
To store a new number, follow the instructions described previously.
To clear a number from memory
1 Press (PGM).
2 Press the speed dialing key you want to clear.
3 Press (PGM) again.
Making calls with speed dialing on the handset
1 Press (TALK).
The TALK/BATT LOW lamp lights up. The dialing keys light up for 10
seconds.
2 Press (SPEED DIAL).
3 Enter the desired speed dialing number ((0) to (9)).
The phone number stored in the speed dialing number will be dialed.
Making calls with speed dialing on the base phone
1 Press (SPEAKERPHONE).
The SPEAKERPHONE lamp lights up.
2 Press (SPEED DIAL).
3 Enter the desired speed dialing number ((0) to (9)).
The phone number stored in the speed dialing number will be dialed.
US
Telephone Features
20
Page 21
Setting the ringer type
You can select a ringer type from four types.
1 Press (PGM).
2 Press (#) or (*TONE).
3 Press a number button, (1) to
(OFF)
4 Press (OFF).
(4), to select a ringer type.
You’ll hear the corresponding
ringer tone.
(*TONE)
(#)
Turning off the ringer
1 Press (PGM).
2 Press (#) or (*TONE).
3 Press (5).
4 Press (OFF).
The ringer on the handset is turned off.
To turn the ringer on again
Follow the instructions described in “Setting the ringer type.”
Note
Do not allow more than 20 seconds to elapse between each step of the
procedure.
Telephone Features
continued
Telephone Features
21
US
Page 22
Setting the ringer type (continued)
Checking the ringer type
1 Press (PGM).
2 Press (#) or (*TONE).
3 Press (0).
The currently selected ringer sounds.
4 Press (OFF).
Note
If you hear no sound (only key beep), the ringer on the handset has been turned
off.
Adjusting the ringer volume level of the base phone
Set the RINGER switch on the base phone to HIGH or LOW. To turn
the ringer off, set it to OFF.
US
Telephone Features
22
RINGER switch
Page 23
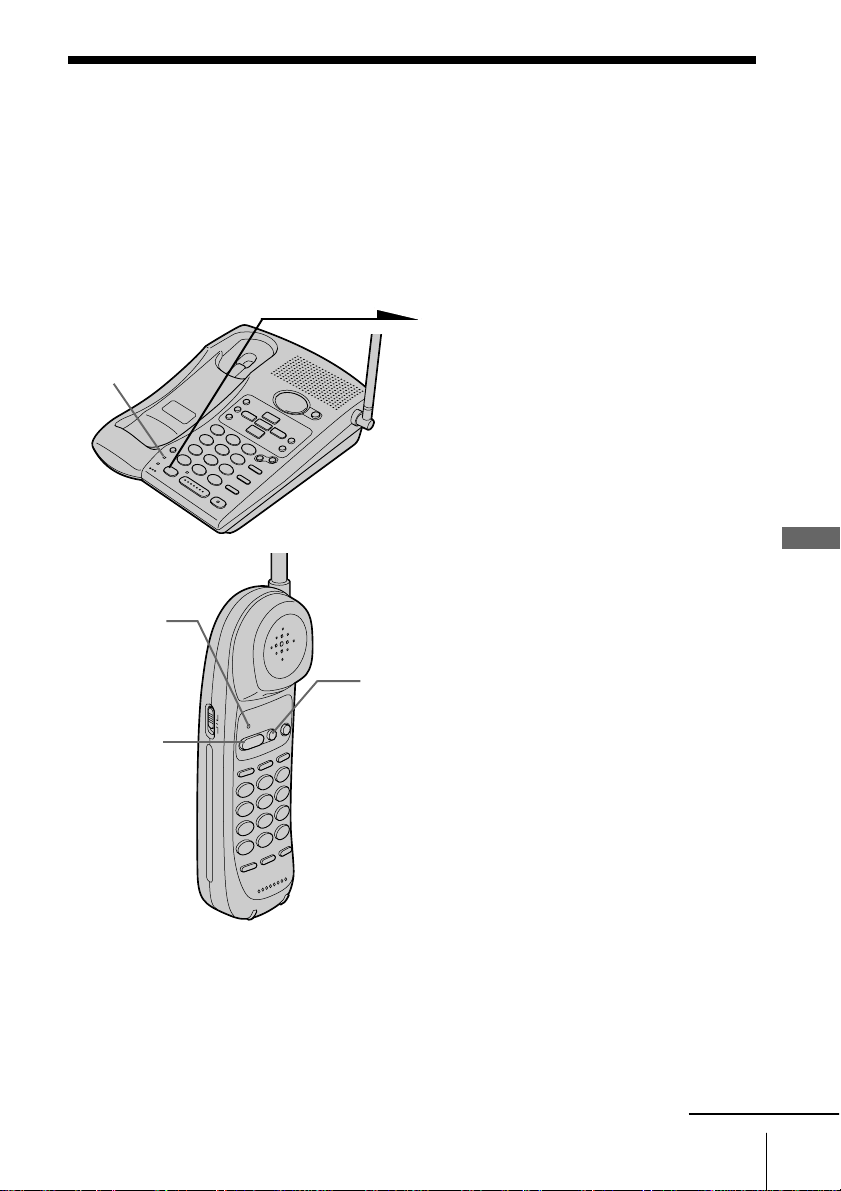
Switching the phones during a call
When you put a call on hold, you can return to the call on the other
phone without disconnecting the call.
To switch from the base phone to the handset
1 Press (HOLD) on the base
phone.
IN USE lamp
The IN USE lamp and the
TALK/BATT LOW lamp on the
handset will flash slowly.
2 Press (TALK) or pick up the
handset from the base phone.
The IN USE lamp and the
TALK/BATT LOW lamp on the
TALK/BATT
LOW lamp
handset will light up.
The dialing keys on the handset
will light up for 10 seconds.
Telephone Features
(OFF)
3 When you are done talking,
(TALK)
Notes
• If you pick up the handset while talking through the speakerphone on the
base phone, the call will be switched to the handset.
• If you do not press (HOLD) in step 1, and press (TALK) in step 2, you can
make a three-way conversation (see “Having a three-way conference” on
page 29).
• When the call is put on hold on the base phone, if you pick up the handset,
the call will be switched to the handset.
press (OFF) or replace the
handset to the base phone.
continued
Telephone Features
23
US
Page 24
Switching the phones during a call (continued)
To switch from the handset to the base phone
TALK/BATT
LOW lamp
IN USE lamp
1 Press (HOLD) on the handset.
The TALK/BATT LOW lamp
and the IN USE lamp on the
base phone will flash slowly.
2 Press (SPEAKERPHONE).
The SPEAKERPHONE lamp on
the base phone will light up.
The TALK/BATT LOW lamp
will flash.
3 When you are done talking,
press (SPEAKERPHONE) again.
SPEAKERPHONE
lamp
US
Telephone Features
24
(SPEAKERPHONE)
Page 25
Talking between the handset and the base phone (Intercom)
You can talk between the base phone and the handset. You can start
the intercom from either phone.
To talk from the handset to the base phone
Press (INTERCOM) on the handset.
TALK/BATT
LOW lamp
(TALK)
(OFF)
The TALK/BATT LOW lamp lights
up, and INTERCOM lamp flashes.
The base phone rings.
The dialing keys light up for 10
seconds.
You will be connected
automatically after 3 seconds.
When a person at the base phone
answers, you can talk.
The TALK/BATT LOW lamp on
the handset and INTERCOM lamp
will light up.
When you are done talking or if
no one answers the phone
Press (OFF).
Telephone Features
Tips
• You can receive an intercom call on the base phone even when the RINGER
switch on the base phone is set to OFF. The base phone will ring at a low
level.
• When a person at the base phone want to answer the intercom call within 3
seconds, press (INTERCOM) on the base phone. If a person at the base phone
press (INTERCOM) after the intercom call is automatically connected, the
intercom call will be disconnected.
continued
Telephone Features
25
US
Page 26
Talking between the handset and the base phone (Intercom)
(continued)
To talk from the base phone to the handset
Press (INTERCOM) on the base
phone.
The handset rings. TALK/BATT
LOW lamp flashes.
When the person at the handset
presses (INTERCOM), you can talk.
The call to the handset will stop by
pressing (OFF) on the handset.
The TALK/BATT LOW lamp on the
(SPEAKERPHONE)
INTERCOM lamp
Notes
• If there is an incoming call while on the intercom, only the base phone rings
at a low level. To answer the call, press (TALK) on the handset or
(SPEAKERPHONE) on the base phone. The intercom is canceled and you can
talk to the outside caller.
• While conversing with an outside caller via the base phone or handset, you
cannot make an intercom call. If you press (INTERCOM) on the handset, you
will hear a busy tone. If you press (INTERCOM) on the base phone, it is
invalid.
Tip
You can receive an intercom call on the handset even when the ringer is set to
off. The handset will ring at a high level.
handset will light up. The
INTERCOM lamp on the base
phone will light up.
The dialing keys on the handset
light up.
When you are done talking or if
no one answers the phone
Press (INTERCOM) again.
US
Telephone Features
26
Page 27
Transferring a call
You can transfer a call between the handset and base phone without
disconnecting the call.
To transfer from the base phone to the handset
1 Press (INTERCOM).
The call is put on hold, the
handset rings.
The TALK/BATT LOW lamp on
the handset flashes.
2 Press (INTERCOM) on the
handset.
(SPEAKERPHONE)
TALK/BATT
LOW lamp
INTERCOM
lamp
The TALK/BATT LOW lamp on
the handset and INTERCOM
lamp on the base phone light up.
The dialing keys light up for 10
seconds.
You can talk between the base
phone and the handset.
Telephone Features
3 Press (TALK) on the handset to
talk to the caller with the handset.
(INTERCOM)
(TALK)
Tip
You can receive an intercom call on the handset even when the ringer is set to
off. The handset will ring at a high level.
If no one answers the phone
Press (SPEAKERPHONE) on the base
phone.
continued
Telephone Features
27
US
Page 28
Transferring a call (continued)
To transfer from the handset to the base phone
TALK/BATT
LOW lamp
(TALK)
(SPEAKERPHONE)
1 Press (INTERCOM).
The call is put on hold, the base
phone rings.
The INTERCOM lamp on the
base phone flashes.
You will be connected
automatically after 3 seconds.
The TALK/BATT LOW lamp on
the handset lights up.
The dialing keys on the handset
light up for 10 seconds.
When a person at the base phone
answers, you can talk.
2 Press (SPEAKERPHONE) on the
base phone to talk to the caller
with the base phone.
If no one answers the phone
Press (TALK) on the handset.
(INTERCOM)
INTERCOM lamp
Tips
• You can receive an intercom call on the base phone even when the RINGER
switch on the base phone is set to OFF. The base phone will ring at a low
level.
• When a person at the base phone want to answer the intercom call within 3
seconds, press (INTERCOM) on the base phone. If a person at the base phone
press (INTERCOM) after the intercom call is automatically connected, the
intercom call will be disconnected.
US
Telephone Features
28
Page 29
Having a three-way conference
The handset and the base phone operate like two extensions on the
same line. Both phones can operate at the same time, so that you, the
outside caller, and the person at the other phone can engage in a threeway conversation.
To join the phone conversation
TALK/BATT
LOW lamp
(TALK)
(OFF)
Press (TALK).
The TALK/BATT LOW lamp on the
handset lights up.
The dialing keys on the handset
light up for 10 seconds.
If you are at the base phone, simply
press (SPEAKERPHONE).
The SPEAKERPHONE lamp on the
base phone lights up.
Telephone Features
SPEAKERPHONE
lamp
(SPEAKERPHONE)
When you are done talking
Press (OFF) on the handset (or press (SPEAKERPHONE) if you’re at the
base phone).
Tip
While talking through the speakerphone on the base phone, if you pick up the
handset, the conversation will be continued between the handset and outside
caller.
Telephone Features
29
US
Page 30
Answering Machine Features
Setting up the answering machine
Setting the time and day of the week
1 Press (MENU) repeatedly until
you hear “Set day and time”.
“- -” appears on the display.
2 Press (SELECT), and you’ll hear
voice guidance.
3 Press (REPEAT/SLOW) or
(SKIP/QUICK) repeatedly to
select the day of the week.
4 Press (TIME/SET).
The day is set and the hour is
announced.
5 Press (REPEAT/SLOW) or
(SKIP/QUICK) repeatedly to
select the hour.
6 Press (TIME/SET).
(REPEAT/SLOW)
(SKIP/QUICK)
The hour is set and the minute is
announced.
7 Press (REPEAT/SLOW) or
(SKIP/QUICK) repeatedly to
select the minute.
8 Press (TIME/SET).
The day and time you just
entered is announced and the
clock restarts.
9 Press (PLAY/STOP) to exit the
menu setup mode.
Notes
• The time and day are preset to Monday, 12:00 AM.
• “PF” flashes when the day and time is cleared or delayed due to a power
interruption, or when you connect the base phone to the AC outlet for the first time.
• Do not allow more than 20 seconds (or 60 seconds when setting the minute) to elapse
between each step of the procedure.
• If a power interruption occurs, the day and time will be erased.
• If the current day and time are not set, you will not hear a time stamp when you play
back recorded messages. If you try to check the current time, you will hear five short
error beeps.
US
Answering Machine Features
30
Page 31

Tip
All the mailbox buttons ((MAILBOX 1), (MAILBOX 2) and (MAILBOX 3)) work as
the (PLAY/STOP) button; press any of the three in this case.
To hear the current time
Press (TIME/SET). The current time setting is announced.
Recording the greeting
This answering machine has prerecorded greetings (see page 32).
However, you can record your own greeting.
The greeting must be between 2 seconds and 90 seconds long.
You can record two greetings for the answering mode (“normal” and
“announcement only” modes. See page 40). One greeting can be
assigned in each mode, so you record a new greeting to match for each
mode.
When you have already recorded two greetings, and you want to use a
prerecorded greeting for one of the modes, erase your own greeting in
the mode you want to change. Your own greeting in the mode you
select is erased, and a prerecorded greeting is set automatically.
1 Press (MENU) repeatedly until
“Set greeting message” is
announced.
“- -” appears on the display.
Answering Machine Features
MIC
(ERASE)
2 Press (REC/MEMO).
“Now recording” is announced
and a long beep sounds.
3 Speak into the base phone
microphone (MIC). The display
starts counting. You can record
up to 90 seconds.
4 To stop recording, press
(PLAY/STOP).
Your greeting replays
automatically.
Answering Machine Features
continued
31
US
Page 32

Setting up the answering machine (continued)
Notes
• If you do not record your own greeting, the prerecorded greeting will be
assigned automatically (see page 33).
• If your greeting is less than two seconds, the greeting is not recorded. The
prerecorded greeting will be assigned automatically.
• If a call comes in during recording, recording stops automatically.
• If 90 seconds have passed or memory becomes full in step 3, recording stops
automatically.
• “Memory full” is announced if no recording space is available when you
press (REC/MEMO). Erase unnecessary messages (see page 38).
Tips
• To record the greeting from a touch-tone phone, see “Operating from an
outside phone” on page 44.
• Even if a power interruption occurs, your own greeting is not erased.
To check the greeting
Press (MENU) repeatedly until “Set greeting message” is announced.
“- -” appears on the display. Then press (PLAY/STOP) to play back the
greeting.
To change the greeting
Record a new greeting by following the instructions on the previous
page. The new greeting replaces the old one.
To erase the greeting
1 Press (MENU) repeatedly until “Set greeting message” is
announced. “- -” appears on the display.
2 Press (ERASE), and “Greeting message has been erased” is
announced.
To go back to the factory prerecorded greeting
Press (ERASE) while playing back the greeting.
This will bring back the original greeting, but your own greeting is
erased.
Notes
• You can also erase the greeting during playback.
• If you have erased your own greeting, the prerecorded greeting will be
assigned automatically.
US
Answering Machine Features
32
Page 33

Prerecorded greetings
Normal mode: “Hello, I’m unable to answer your call
right now. Please leave your name,
number and message after the tone.”
Announcement only mode: “Hello, I’m unable to answer your call
right now. Please call again. Thank you.”
Setting the number of rings
You can select the number of times the phone rings before it answers
to take a message.
There are three modes: 2, 5, and Toll Saver.
1 Press (MENU) repeatedly until you hear “Set number of
ring”.
“- -” appears on the display.
2 Press (SELECT).
The present selected number of ring is announced.
3 Press (REPEAT/SLOW) or (SKIP/QUICK) repeatedly to select a
ring duration (2, 5, or Toll Saver).
To answer after 2 rings, select “2”.
To answer after 5 rings, select “5”.
Select “Toll Saver” to answer after 2 rings when there are
new messages, and 5 rings when there are no new messages.
4 Press (TIME/SET).
The ring duration setting is announced.
5 Press (PLAY/STOP) to exit the menu setup mode.
Answering Machine Features
Notes
• When the number of rings is set to “Toll Saver”, the phone answers after 2
rings if new messages are recorded. If no new message are recorded, it
answers after 5 rings. When you hear 3 rings, you will know that there are no
new messages. You can save the toll for the call when you pick up messages
from an outside phone.
• The number of rings is preset to Toll Saver.
Answering Machine Features
continued
33
US
Page 34

Setting up the answering machine (continued)
Setting the audible message alert
You can set the answering machine to record incoming messages
(normal mode), or just make an announcement without recording
messages (announcement only mode). To set an announcement only
mode, see page 40.
In the normal mode, you have the option of having a beep to tell you if
you have received any new incoming messages.
When you use this option, set the message alert to on. If you want the
caller to leave message but not to use this option, set the message alert
to off.
1 Press (MENU) repeatedly until
you hear “Set message alert”.
“- -” appears on the display.
2 Press (SELECT).
The present selected setting is
announced. The display shows
“On” or “OF” (off).
3 Press (REPEAT/SLOW) or
(SKIP/QUICK)to set the audible
message alert on or off. The
display shows “On” or “OF”
(off).
4 Press (TIME/SET).
The setting is announced.
5 Press (PLAY/STOP) to exit the
(SKIP/QUICK)
(REPEAT/SLOW)
Notes
• When the audible message alert is turned on, you will hear a beep every 5
seconds if there are any new messages.
• To stop the beep, press any button related to the answering machine function
or (VOL +)/(VOL -).
• The audible message alert is preset to “On”.
US
Answering Machine Features
34
(VOL)
menu setup mode.
Page 35

Turning on the answering function
Message counter
Press (ANSWER ON/OFF) on the
base phone.
The ANSWER ON/OFF button
lights up. “Answering function is
on” is announced.
(ANSWER ON/OFF)
Mailbox usage
This phone offers you three voice mailboxes, providing a convenient way to share the
mailbox feature with other members of your household or business.
When a caller calls
The caller can choose one of the two ways to leave a message:
• If calling from a touch-tone phone, the caller select a mailbox by pressing (*)(1)
(MAILBOX 1), (*)(2) (MAILBOX 2) or (*)(3) (MAILBOX 3) while the caller hears
the greeting. The greeting stops and a beep will sound, then the caller can start
recording a message.
• Wait until the greeting finishes, then start recording a message. When the caller
does not select a mailbox, the message is automatically recorded to MAILBOX 1.
Notes
• If four minutes have passed while recording the incoming message, the line will be
disconnected automatically.
• If the message is shorter than two seconds, it will not be recorded.
Tip
Even if a power interruption occurs, the incoming messages are not erased.
To turn off the answering function
Press (ANSWER ON/OFF) on the base phone.
The ANSWER ON/OFF button goes off. “Answering function is off” is announced.
Note
The answering function is preset to on.
Tips
• The answering machine will automatically answer a call after 10 rings, even if
the answering function is off and announces greeting message to prompt the
caller to turn on the answering function.
• You can also turn on or off the answering function from an outside phone, see
“Operating from an outside phone” on page 44.
Answering Machine Features
continued
Answering Machine Features
35
US
Page 36

Setting up the answering machine (continued)
When the memory is full
The total recording time of this answering machine is approximately
15 minutes (including the greeting, messages, and memo).
When the remaining recording time becomes less than 30 seconds,
“FL” flashes on the display and the answering machine goes into the
memory full status.
To avoid this erase unnecessary messages (see page 38). You can also
erase the messages from an outside phone (see page 44).
US
Answering Machine Features
36
Page 37

Playing back messages
If there are new messages, the display flashes the number of new
messages.
You will hear beeps if the audible message alert setting is on (see page 34).
Press a mailbox button
(REPEAT/SLOW)
(SKIP/QUICK)
(VOL)
Additional tasks when playing back messages
((MAILBOX 1), (MAILBOX 2) or
(MAILBOX 3)) to play back new
messages in the selected mailbox.
To
Adjust the speaker volume
Stop playback
Repeat the current message
Skip the current message
Go back to the previous message
Play back slowly
Play back quickly
Notes
• If a call comes in, the play back will stop.
• A time and day stamp is announced after each message if you set the time
and day (see page 30).
• The old messages will not be played back unless all new messages are played
back.
Tips
• If there are no new messages, all the previously reviewed messages are
played back.
• The messages are saved even after a power failure.
Do this
Press (VOL +) or (VOL -).
Press a mailbox button ((MAILBOX 1),
(MAILBOX 2) or (MAILBOX 3)).
Press (REPEAT/SLOW) during play back.
Press (SKIP/QUICK).
Press (REPEAT/SLOW) within the first 2.5
seconds of the current message playback.
Press and hold (REPEAT/SLOW) during play
back.
Release (REPEAT/SLOW) to return to normal.
Press and hold (SKIP/QUICK) during play
back.
Release (SKIP/QUICK) to return to normal.
Answering Machine Features
continued
Answering Machine Features
US
37
Page 38

Playing back messages (continued)
Adjusting the speaker volume
To adjust the speaker volume, press
(VOL +) or (VOL -).
Note
You cannot adjust the speaker volume while the phone is ringing.
Tip
There are 10 steps for the volume level (1 to 10). The volume level is preset to 6.
Erasing messages
1 Press and hold (ERASE) for
more than one second.
“Please select mailbox” is
announced.
2 Press a button for the mailbox
you want to erase ((MAILBOX 1),
(MAILBOX 2) or (MAILBOX 3)).
All “old” messages in the
selected mailbox are erased.
“All of your messages has been
erased” is announced.
To erase individual messages
Press (ERASE) while playing back the message that you want to erase.
“Message has been erased” is announced.
US
Answering Machine Features
38
Page 39

Notes
• The display shows the total number of “new” (i.e. unreviewed) messages.
Therefore, the display is reset to “0” when you have played back all new
messages, whether they have been erased or not. Be sure to erase
unnecessary messages before the memory becomes full.
• When the number of new messages exceeds 59, “FL” flashes on the display
window.
• If you try to erase all messages in a mailbox with any new messages
remaining. You hear five short error beeps and you cannot erase the
messages.
Tip
You can also listen to the messages or erase the messages from a touch-tone
phone, see “Operating from an outside phone” on page 44.
Answering Machine Features
Answering Machine Features
39
US
Page 40

Selecting the Announcement Only Mode
You can set the answering machine to play the greeting without
recording incoming messages (announcement only mode). You might
want to select this mode when, for example, you expect to be away for
a while and you cannot pick up messages.
1 Press (MENU) repeatedly until
you hear “Set announce only”.
“- -” appears on the display.
2 Press (SELECT).
The present selected setting is
announced. The display shows
“On” or “OF” (off).
3 Press (REPEAT/SLOW) or
(SKIP/QUICK)to set the
announcement only mode on or
off.
4 Press (TIME/SET).
The setting is announced.
5 Press (PLAY/STOP) to exit the
menu setup mode. The display
shows “A” when the answering
machine is set to the
announcement only mode.
(REPEAT/SLOW)
Notes
• To activate announcement only mode, you have to turn on the answering
machine.
• The announcement only mode is preset to off.
US
Answering Machine Features
40
(SKIP/QUICK)
Page 41

Screening calls
You can screen calls by leaving the answering machine on while you
are at home. When a call is answered, you can hear the message being
recorded through the base phone. You can decide either to continue
recording or to answer the call.
The message will be recorded, but to hear it you will need to play back
the message (see page 37).
To answer the call
Press (TALK) on the handset.
Notes
• Press (VOL +) or (VOL -) to
is set at its minimum level, you will not be able to hear incoming calls.
• The answering machine will stop automatically when the handset or a parallel
phone is picked up. If the answering machine does not stop, press either
(PLAY/STOP) on the base phone.
The recording will remain as a new message.
adjust the speaker volume. If the speaker volume
Answering Machine Features
Answering Machine Features
US
41
Page 42

Recording a memo message
You can leave messages for other users of the phone.
1 Press (REC/MEMO).
“Please select mailbox” is
announced.
2 Press a mailbox button
((MAILBOX 1), (MAILBOX 2) or
(MAILBOX 3)) to which you
want to leave the message.
“Now recording” is announced
and counting starts.
3 Speak into the base phone
microphone (MIC) to record
MIC
your message.
A memo can be up to four
minutes in length.
4 Press (PLAY/STOP) to stop
recording.
The message number on the
display increases by one.
Notes
• If the memory becomes full, the answering machine will stop recording.
• “Memory full” is announced if no recording space is available when you
press (REC/MEMO).
• If your message is shorter than two seconds, the recording will be canceled.
• The display flashes “99” if you record a memo for more than 99 seconds.
• If a call comes in during recording, the recording will be stopped.
Tips
• If four minutes have passed in step 3, recording stops automatically, and the
recorded memo is counted as a new message.
• Even if a power interruption occurs, the memos are not erased.
US
Answering Machine Features
42
Page 43

Operating from an outside phone
Setting the remote ID code (security code)
To operate the answering machine from a touch-tone phone while you
are away from home, you need to set the remote ID code (security
code).
1 Press (MENU) repeatedly until
you hear “Set security code”.
2 Press (SELECT).
3 Press (REPEAT/SLOW) or
(SKIP/QUICK) to change the
remote ID code (security code)
setting.
4 Press (TIME/SET) to confirm
your choice.
The new remote ID code
(security code) is announced.
5 Press (PLAY/STOP) to exit the
menu setup mode.
(REPEAT/SLOW)
To change the remote ID code (Security code)
Enter a new remote ID code (Security code). The new code will replace
the old one.
Tip
Even if a power interruption occurs, the remote ID code is erased.
(SKIP/QUICK)
Answering Machine Features
continued
Answering Machine Features
US
43
Page 44

Operating from an outside phone (continued)
Picking up new messages
1 Call your telephone number from a touch-tone phone.
2 When you hear the greeting, press (#) and enter your remote ID code
(security code).
You will hear a confirmation beep.
The number of new messages will be announced.
3 Press the keys in the “Table of control codes” below for the desired
operation command.
4 When you finish, disconnect the line.
Notes
• Do not let two seconds elapse between each digit of the remote ID code (security code) and
the control code.
• If you did not turn on the answering machine, your phone answers automatically after 10
rings.
• If you enter wrong remote ID code (security code) three times, the line will disconnect.
• If no keys are pressed within 20 seconds, the line will disconnect.
Tip
Cut off the Remote Control Card and carry it with you to see how to operate from an outside
phone.
Table of control codes
To Key
Play back messages in MAILBOX1 (#)(1)
Play back messages in MAILBOX2 (#)(2)
Play back messages in MAILBOX3 (#)(3)
Repeat backward (#)(4)
Skip forward (#)(6)
Erase individual message (#)(9)
Erase all the messages in MAILBOX1 (#)(9)(#)(1)
Erase all the messages in MAILBOX2 (#)(9)(#)(2)
Erase all the messages in MAILBOX3 (#)(9)(#)(3)
Record greeting (*)(7)
Turn answering machine on (*)(0)
Turn answering machine off (#)(0)
Stop operation (*)(*)
US
Answering Machine Features
44
Notes
Plays back from the first new message.
Plays back from the first new message.
Plays back from the first new message.
Press during play back to repeat a
message.
Press during play back to skip forward.
Press during play back.
“Now recording” is announced.
Turns the system on. “Answering
function is on” is announced.
Turns the system off. “Answering
function is off” is announced.
Stops every function.
Page 45

Additional Information
Mounting the base phone on a wall
1
2
AC power
adaptor cord
Hang-up tab
Telephone
line cord
1 Raise the hang-up tab.
2 Plug the telephone line cord to
the LINE jack and the AC power
adaptor to the DC IN 9V jack,
and hook the cords. Use the
shorter cord for mounting.
3 Attach the wall bracket to the
center of the base phone.
Align the f marks of the wall
bracket with those of the base
phone.
4 Plug the telephone line cord to
the telephone outlet, and hook
the base phone to the wall plate.
5 Plug the AC power adaptor to
an AC outlet. Then raise the
antenna so that it points
towards the ceiling.
3
Wall
plate
Wall
bracket
Tip
To remove the wall bracket, press the lower tabs.
AC outlet
4,5
AC power
adaptor
Additional Information 45
Telephone
line cord
Additional Information
US
Page 46

Notes on power sources
On battery pack
• Store the battery pack at a
temperature between 41°F (5°C) and
95°F (35°C) for best performance.
• If you do not use the handset for a
long period of time, remove the
battery pack after charging for more
than 12 hours. This maintains battery
life.
• Keep the battery pack away from fire.
• Do not short-circuit the battery
terminals.
• Do not disassemble the battery pack.
On safety
• Do not unnaturally bend or crimp the
cord, and do not place heavy objects
on it.
• If the cord or plug is damaged, do not
continue to use it. Contact your local
Sony dealer for replacement.
On power failure
During a power interruption, you
cannot make or receive calls, and you
cannot use the answering machine.
US
Additional Information46
Page 47

Maintenance
On handling
• Do not attempt to disassemble the
casing. Refer servicing to qualified
personnel only.
• Do not put foreign objects into the
unit. Should any liquid or solid object
fall into the unit, unplug the unit and
have it checked by qualified personnel
before operating the unit any further.
• Do not put anything in the DC IN 9V
(external power input) jack.
• Do not drop the unit as a malfunction
may result.
On cleaning
• Clean the cabinets with a soft cloth
slightly moistened with water or a
mild detergent solution. Do not use
any type of abrasive pad, scouring
powder or solvent such as alcohol or
benzine as they may damage the
finish of the cabinet.
• If the charge terminals of the base
phone and handset are soiled, wipe
them with a soft cloth.
If you have any questions or problems
concerning your phone, please consult
your nearest Sony dealer.
Additional Information 47
Additional Information
US
Page 48

Troubleshooting
If you’ve experienced any of the following difficulties while using your
phone, use this troubleshooting guide to help you remedy the problem.
Should any problem persist, consult your nearest Sony dealer.
Symptom
You hear five short error
beeps when you press
(TALK).
You hear no dial tone.
Making calls
The phone does not connect at
all, even though the number
you have dialed is correct.
The phone does not redial
correctly.
The handset does not ring.
Receiving calls
The base phone does not ring.
You hear interference during
conversation.
You hear a beep every three
seconds during
During conversation
the conversation.
You cannot store a speed
dialing number.
You cannot make a speed
dialing call.
Speed dialing
Speed dialing is incorrect.
Remedy
• Make sure you have set up the base phone correctly
(page 6).
• Move the handset closer to the base phone.
• Replace the handset to the base phone for a while to
reset the random security code.
• Make sure the telephone line cord is securely
connected to the telephone outlet.
• Make sure the battery is fully charged (page 9).
• Make sure the dialing mode is set correctly (page 8).
• Before dialing, make sure you hear a dial tone.
• Make sure the last dialed number is really the one you
want to dial.
• Make sure the ringer is turned on (page 21).
• The battery may be weak. Charge the battery for more
than 12 hours (page 9).
• Make sure you have set up the base phone correctly
(page 6).
• Move the handset closer to the base phone.
• Replace the handset to the base phone for a while to
reset the random security code.
• Make sure the telephone line cord is securely
connected to the telephone outlet.
• Make sure the ringer is turned on (page 22).
• Move the handset closer to the base phone.
• Place the base phone away from noise sources
(page 6).
• Press (CHANNEL) for a channel that gives better
reception.
• The battery is weak. Charge the battery for more than
12 hours.
• Make sure you follow the procedure in storing the
number correctly (page 18).
• When the handset is in use, you cannot store a speed
dialing number on the base phone.
• Replace the handset to the base phone for a while.
• You pressed the number button to which no phone
number has been stored.
• Store a correct number (page 18) .
US
48
Additional Information
Page 49

Symptom
The handset does not ring
when calling from the base
phone.
Intercom
Message is not recorded.
No sound from the speaker of
the base phone.
The caller’s message is
Answering machine
interrupted.
The clock is incorrect.
The phone does not accept your
remote ID code (security code).
The line is disconnected when
outside phone
you call your phone from a
Operating from an
touch-tone phone.
The CHARGE lamp does not
light up when you place the
handset to charge.
The battery duration is short.
Power source/battery
Remedy
• The handset may be engaged in conversation.
• The battery may be weak. Charge the battery for more
than 12 hours (page 9).
• Move the handset closer to the base phone.
• Place the base phone away from noise sources
(page 6).
• The remaining recording time is less than 30 seconds
or 59 messages were recorded. The answering
machine becomes “Memory full” status and does not
record messages. Erase messages (page 38).
• The message is less than two seconds. The answering
machine does not record messages less than two
seconds in length.
• Adjust the speaker volume (page 38).
• The caller’s message is too long.
• The caller’s voice is too low. The phone disconnects
the line when it detects seven seconds of silence.
• There was a power interruption. Reset the time
(page 30).
• Make sure you call from a touch-tone phone.
• Make sure the remote ID code (security code) is
correct.
• Make sure you entered the remote ID code (security
code) within two seconds after you‘ve entered (#).
• You entered wrong remote ID codes (security codes)
three times.
• Wipe the charge terminals of the base phone and the
handset with a soft cloth for better contact of the
charge terminals.
• Make sure the handset is placed on the base phone
properly.
• The battery pack was charged less than 12 hours (due
to power failure, etc.).
• The usage life of the battery has expired and needs
replacement.
Additional Information
continued
Additional Information
49
US
Page 50

Troubleshooting (continued)
Message counter
The message counter on the base phone shows the following
information.
When the counter shows
Flashing number
PF
A
FL
It means
Number of messages not yet played back.
Flashes when the day and time is cleared due to a power
interruption. Reset the time correctly (page 30).
The announcement only mode is selected (page 40).
The recording area is full. Erase unnecessary messages
(page 39).
US
50
Additional Information
Page 51

Specifications
General
Frequency band
902 - 928 MHz (0.4 mW)
Operating channel
40 channels
Dial signal
Tone, 10 PPS (pulse) selectable
Supplied accessories
See page 5.
Handset
Power source
Rechargeable battery pack BP-T18
Battery charging time
Approx. 12 hours
Battery life
Standby: Approx. 7 days
Talk: Approx. 7 hours
Dimensions
Approx. 54 x 178 x 46 mm (w/h/d),
antenna excluded
(approx. 2 1⁄4 x 7 1⁄8 x 1 13⁄16 inches)
Antenna: Approx. 35 mm
(approx. 1 7⁄16 inches)
Mass
Approx. 210 g
(approx. 7.4 oz), battery included
Base phone
Power source
DC 9V from AC power adaptor
AC-T129
Dimensions
Approx. 170 x 65 x 220 mm (w/h/d),
antenna excluded
(approx. 6 3⁄4 x 2 5⁄8 x 8 3⁄4 inches)
Antenna: Approx. 150 mm
(approx. 6 inches)
Mass
Approx. 600 g
(approx. 1 lb 5 oz), wall bracket excluded
Answering machine
Maximum recording time
About 15 minutes, using incorporated IC
Greeting message
Up to 90 seconds per each
Incoming and Memo message
Up to 4 minutes per message
Design and specifications are subject to
change without notice.
For the customers in Canada
RECYCLING NICKEL-CADMIUM
BATTERIES
Nickel-Cadmium batteries
are recyclable. You can help
preserve our environment
by returning your
unwanted batteries to your
nearest point for collection,
recycling or proper
disposal.
Note: In some areas the disposal of nickel-
cadmium batteries in household or
business trash may be prohibited.
RBRC (Rechargeable Battery Recycling
Corporation) advises you about spent battery
collection by the following phone number.
Call toll free number: 1-800-822-8837
(United States and Canada only)
Caution: Do not handle damaged or leaking
nickel-cadmium batteries.
Additional Information
Additional Information
51
US
Page 52

Index
A
Adjusting volume
handset volume 14, 17
speaker volume 15, 17,
38
Announcement only
mode 40
Answering machine
playing back
messages 37
setting up 30
turning on 35
Audible message alert 34
B
Battery pack
charging 9
duration 10
C
Connection 7
Control codes for remote
operations 44
D
Day and time stamp 30, 37
Dialing mode
choosing 8
switching to the tone
temporarily 14, 17
E, F
Erasing
messages 38
G, H
Greeting 31
I, J, K
Identifying the parts 11
Intercom 25
L
Location, base phone 6
M
Mailbox 35
Making calls 14
Memo 42
Messages
pick up from an outside
phone 44
playing 37
Mounting the base phone
on a wall 45
N
Number of rings 33
O
Operating from an outside
phone 43
P, Q
Package contents 5
Playing back 37
Pulse dialing 8
R
Receiving calls 17
Recording
greeting 31
memo 42
Redialing 16
Remote ID code
(security code) 43
Ringer
adjusting the base ringer
22
setting the ringer
type 21
turning on/off 21
S
Screening calls 41
Setting up
answering machine 30
base phone 6
handset 9
Speaker 15, 17, 38
Speed dialing 18
Stamping messages with
day and time 30, 37
Switching the phones
during a call 23
T, U
Talking between the
phones 25
Three-way conference 29
Toll saver 33
Tone dialing
dialing mode 8
switching to 14, 17
Transferring a call 27
Troubleshooting 48
V, W, X, Y, Z
Volume
handset 14, 17
speaker 15, 17, 38
US
Additional Information52
Page 53

Page 54

AVERTISSEMENT
Afin d’éviter tout risque d’incendie ou
d’électrocution, ne pas exposer cet
appareil à la pluie ou à l’humidité.
Afin d’écarter tout risque
d’électrocution, garder le coffret
fermé. Ne confier l’entretien de
l’appareil qu’à un personnel qualifié.
AVIS DE L’INDUSTRIE CANADA
AVIS: L’étiquette d’Industrie Canada
identifie le matériel homologué.
Cette étiquette certifie que le matériel est
conforme aux normes de protection,
d’exploitation et de sécurité des réseaux
de télécommunications, comme le
prescrivent les documents concernant
les exigences techniques relatives au
matériel terminal. Le Ministrère n’assure
toutefois pas que le matériel
fonctionnera à la satisfaction de
l’utilisateur.
Avant d’installer ce matériel, l’uilisateur
doit s’assurer qu’il est permis de la
raccorder aux installations de
l’entreprise locale de
télécommunication. Le matériel doit
également être installé en suivant une
méthode acceptée de raccordement.
L’abonné ne doit pas oublier qu’il est
possible que la conformité aux
conditions énoncées ci-dessus
n’empêche pas la dégradation du service
dans certaines situations.
Les réparations de matériel homologué
doivent être coordonnées pas un
représentant désigné par le fournisseur.
L’entreprise de télécommunications
peut demander à l’utilisateur de
débrancher un appareil à la suite de
réparations ou de modifications
effectuées par l’utilisateur ou à cause de
mauvais fonctionnement.
Avertissement: L’utilisateur ne doit pas
tenter de faire ces raccordements luimême; il doit avoir recours à un service
d’inspection des installations
électriques, ou à un électricien, selon le
cas.”
AVIS: L’indice d’équivalence de la
sonnerie (IES) assigné à chaque
dispositif terminal indique le nombre
maximal de terminaux qui peuvent être
raccordés à une interface.
La terminaison d’une interface
téléphonique peut consister en une
combination de quelques dispositifs, à la
seule condition que la somme d’indices
d’équivalence de la sonnerie de tous les
dispositifs n‘excède pas 5.
NOTICE IMPORTANTE POUR
L’UTILISATEUR
Votre (SPP-A947) a été approuvé par
l’Industrie Canada.
Remarque
L’utilisation de cet appareil est soumise
à deux conditions: (1) cet appareil ne
peut causer aucune interférence; (2) cet
appareil doit accepter toute les
interférences, y compris les interférences
pouvant entraîner un fonctionnement
imprévu de l’appareil.
Le caractère privé des communications
ne peut êntre garanti lors de l’uilisation
de ce téléphone.
CODE DE SECURITE
Votre SPP-A947 a reçu un code de
sécurité numérique aléatoire qui a été
sélectionné parmi plus de 65.000 codes
de sécurité numériques.
Pour sa propre protection, l’utilisateur
doit s’assurer que tous les fils de mise à
la terre de la source d’énergie électrique,
des lignes téléphoniques et des
canalisations d’eau métalliques, s’il y en
a, sont raccordés ensemble. Cette
précaution est particulièrement
importante dans les régions rurales.
FR
2
Page 55

Table des matières
Informations préliminaires
4 A lire en premier
5 Etape 1: Vérification du contenu
6 Etape 2: Installation de la base
9 Etape 3: Préparation de la
11 Identification des éléments
du carton d’emballage
batterie
Opérations de base
14 Emission d’un appel
16 Recomposition d’un numéro
17 Réception d’un appel
Fonctions du téléphone
18 Composition rapide
18 Mémorisation d’un numéro
de téléphone sur le combiné
19 Mémoriser des numéros de
téléphone sur la base
20 Emission d’un appel à l’aide
des touches de composition
rapide du combiné
20 Emission d’un appel à l’aide
des touches de composition
rapide de la base
21 Réglage du type de sonnerie
21 Pour désactiver la sonnerie
22 Vérification du type de
sonnerie sélectionné
22 Réglage du volume de la
23 Changement de téléphone
23 Passer de la base au combiné
24 Passer du combiné à la base
25 Communication entre le combiné
25
26
sonnerie de la base
pendant un appel
et la base (Communication
interne)
Appeler la base par le combiné
Appeler le combiné par la base
27 Transfert d’un appel
27 Transférer un appel de la base
28 Transférer un appel du
29 Conversation à trois
29 Se joindre à une conversation
sur le combiné
combiné sur la base
téléphonique
Fonctions du répondeur
30 Préparation du répondeur
automatique
30 Réglage de l’heure et du jour
de la semaine
31 Enregistrement d’un message
33
34 Réglage de l’avertisseur
35 Mise en service du répondeur
37 Ecoute des messages
38 Réglage du volume du haut-
38 Effacement des messages
40 Sélection du mode d’annonce
41 Filtrage des appels
42 Enregistrement d’un mémo
43 Commande à distance depuis un
43 Enregistrement du code
44
d’accueil
Réglage du nombre de sonneries
sonore de messages
parleur
seulement
téléphone extérieur
d’identification (code de
sécurité)
Relevé des nouveaux messages
Informations complémentaires
45 Fixation murale de la base
46 Remarques sur les sources
d’alimentation
47 Entretien
48 Guide de dépannage
51 Spécifications
Couverture dos Index
Table des matières
FR
FR
3
Page 56

Informations préliminaires
A lire en premier
Avant d’utiliser le téléphone, vous devez l’installer. Voici une
description rapide de la façon dont le téléphone doit être installé :
Suivez les étapes 1, 2 et 3.
Etape 1 (page 5)
Déballez d’abord le téléphone et les accessoires
fournis.
Etape 2 (pages 6 à 8)
Vous devez effectuer les choses
suivantes pour installer la base, et avant
tout trouver l’emplacement idéal.
Base
A propos du code de sécurité numérique
Ce téléphone sans fil utilise un code de sécurité numérique qui empêche à un tiers d’accéder à
la base.
Le code de sécurité bloque les appels que d’autres personnes seraient tentées de faire par la
base avec d’autres combinés sans fil.
Un code de sécurité aléatoire est automatiquement attribué à la base et au combiné la première
fois que vous chargez la batterie.
FR
Informations préliminaires
4
Combiné
Etape 3 (pages 9 à 10)
Ensuite, insérez la batterie dans le
combiné et chargez-la pendant au
moins 12 heures.
C’est tout !
Page 57

Etape 1
Vérification du contenu du carton d’emballage
Assurez-vous que le carton d’emballage contient bien tous les
accessoires suivants. Si un accessoire manque, contactez votre
revendeur Sony.
Informations préliminaires
Cordons de ligne
téléphonique (2)
SPEED DIALING
1
2
3
4
5
6
7
8
9
0
Répertoires (2)
Base
Applique murale/support
pour la base
CombinéAdaptateur secteur (AC-T129)
Batterie rechargeable
(BP-T18)
Informations préliminaires
FR
5
Page 58

Etape 2
Installation de la base
Procédez de la façon suivante:
• Choisissez l’emplacement idéal
• Raccordez la base
• Choisissez le mode de numérotation
Choisissez l’emplacement idéal
L’emplacement de la base affecte la qualité de la réception du combiné.
à l’écart des sources de bruit, comme une
fenêtre donnant sur une route à grande
à l’écart de téléviseurs
et d’autres appareils
électriques
circulation
à l’écart des sources de chaleur, comme les
radiateurs, les bouches d’air chaud et la
lumière du soleil
à l’écart d’un four à microondes
à l’écart d’une humidité
excessive, de températures
extrêmes, de la poussière,
de vibrations mécaniques
ou de chocs
ATTENTION: •
FR
Informations préliminaires
6
à l’écart d’un
ordinateur personnel
à proximité d’une
position centrale et sur
une surface plane
Si le son est souvent coupé pendant une communication téléphonique,
rapprochez-vous de la base ou éloignez le poste des sources de bruits.
• Le téléphone sans fil fonctionne à une fréquence qui peut provoquer des
interférences sur la réception télévisée ou radio. Le poste de base ne doit
pas être placé à proximité de ou sur un téléviseur ou un magnétoscope. En
cas d’interférences, il suffit en général d’éloigner le téléphone du téléviseur
ou du magnétoscope pour réduire ou éliminer les interférences.
à l’écart d’un autre
téléphone sans fil
Page 59

2
1
Raccordez la base
Si vous voulez la suspendre au mur, reportez-vous à la page 45.
Insérez le cordon.
A une prise secteur
Adaptateur secteur
2
(fourni AC-T129)
Cordon de ligne
1
A la prise de
téléphone
Si vous voulez utiliser l’applique murale comme support, fixez-la sous
la base, comme indiqué sur l’illustration ci-dessus, avant l’étape 1.
téléphonique (fourni)
3
A DC IN 9V
A LINE
Alignez les
marques f.
1 Raccordez le cordon de ligne
téléphonique à la prise LINE et
à une prise téléphonique.
Informations préliminaires
2 Raccordez l’adaptateur secteur à
la prise DC IN 9V et à une prise
secteur.
3 Levez l’antenne et assurez-vous
qu’elle est dirigée vers le
plafond.
suite
Informations préliminaires
FR
7
Page 60

Etape 2 : Installation de la base (suite)
Remarques
• Utilisez seulement l’adaptateur secteur fourni ACT129 à l’exclusion de tout autre.
• Raccordez l’adaptateur secteur à une source
d’alimentation toujours sous tension.
• Placez la base le plus près possible d’une prise murale
pour que l’adaptateur secteur puisse être facilement
débranché.
Polarité de la fiche
–
+
Conseil
Si votre prise de téléphone n’est pas de type modulaire,
contactez votre compagnie de téléphone qui vous
renseignera à ce sujet.
Prise modulaire
Choisissez le mode de numérotation
Pour que le téléphone fonctionne correctement, le mode de
numérotation approprié (décimal ou à fréquences vocales) doit être
sélectionné.
Commutateur DIAL MODE
Selon le système de numérotation de votre ligne téléphonique, réglez
le commutateur DIAL MODE de la façon suivante :
Si votre système est Réglez le commutateur sur
A fréquences vocales TONE
Décimal PULSE
En cas d’incertitude
Faites un essai en réglant le commutateur DIAL MODE sur TONE.
Si l’appel aboutit, laissez le commutateur sur cette position, sinon
réglez-le sur PULSE.
FR
Informations préliminaires
8
Page 61

Etape 3
Préparation de la batterie
Chargez la batterie pendant au moins 12 heures avant d’utiliser le
téléphone.
BP-T18
Noir
Rouge
1 Ouvrez le couvercle du
logement de la batterie du
combiné en le faisant coulisser.
2 Brachez le connecteur de
batterie en respectant la polarité
(le fil noir du côté gauche et le
rouge du côté gauche).
3 Fermez le couvercle du
logement.
4 Posez le combiné sur la base.
Le témoin CHARGE s’allume si
le combiné repose correctement
sur les plots de charge de la
base. Chargez la batterie
pendant plus de 12 heures pour
qu’elle soit pleine. Le témoin
CHARGE reste allumé lorsque
la recharge est terminée.
Informations préliminaires
Témoin CHARGE
suite
Informations préliminaires
FR
9
Page 62

Etape 3 : Préparation de la batterie (suite)
Autonomie de la batterie
Une batterie complètement chargée dure environ:
• approx. 7 heures lors d’une communication continue avec le
combiné.
• approx. 7 jours lorsque le combiné est en veille.
Remarques
• La batterie se décharge lentement à longue terne, même si elle n’est pas
sollicitée.
• Si vous laissez la batterie dans le combiné sans la charger, elle se déchargera
complètement.
Il faut recharger plusieurs fois de suite une batterie complètement déchargée
pour qu’elle retrouve sa capacité d’origine.
Pour tirer le meilleur parti de la batterie
Ne reposez pas le combiné sur la base après chaque appel. La batterie
fonctionne mieux si le combiné est remis sur la base après deux ou
trois appels. Toutefois, si le combiné ne reste pas pendant longtemps
sur la base, la batterie de déchargera.
Achat d’une nouvelle batterie
Si la batterie dure moins de quelques minutes malgré 12 heures de
charge, c’est qu’elle est usée et qu’elle doit être remplacée.
Contactez votre revendeur ou un service après-vente agréé Sony et
demandez une batterie rechargeable Sony BP-T18.
Remarque
L’autonomie de la batterie varie selon les conditions d’utilisation et la
température ambiante.
FR
Informations préliminaires
10
Page 63

Identification des éléments
Reportez-vous aux pages indiquées entre parenthèses pour les détails.
Combiné
1
2
3
4
5
6
7
8
9
1 Antenne
2 Haut-parleur
3 Témoin TALK/BATT LOW
(p. 14, 18)
S’allume pendant un appel, clignote
lorsque le numéro de composition
rapide est mémorisé.
4 Commutateur VOL (volume)
(p. 14, 17)
Pour régler le volume du combiné.
5 Touche TALK (p. 14, 17)
Pour recevoir ou émettre un appel.
6 Touches de composition
(p. 14)
7 Logement de la batterie (p. 9)
8 Touche TONE (p. 14, 17)
Pour passer provisoirement à la
numérotation à fréquences vocales.
9 Touche SPEED DIAL (p. 20)
Pour faire ur appel en utilisant la
composition rapide.
0 Touche OFF (p. 14, 17)
Pour interrompre un appel.
qa Touche FLASH (p. 14, 17)
qs Touche HOLD (p. 14, 17, 24)
Pour mettre un appel en attente.
qd Touche INTERCOM (p. 25)
Pour les communications internes.
qf Touche CHANNEL (p. 14, 17)
Pour sélectionner un autre canal.
qg Touche REDIAL/PAUSE
(p. 16, 20)
Pour recomposer le dernier numéro
appelé, insérer une pause dans la
séquence de composition.
qh Touche PGM (programme)
(p. 18)
Pour mémoriser des numéros de
composition rapide.
qj Microphone
0
qa
qs
qd
qf
qg
qh
qj
Informations préliminaires
suite
Informations préliminaires
FR
11
Page 64

Identification des éléments (suite)
Base
1
qd
2
3
4
5
6
7
8
9
0
qa
qs
1 Compteur de messages (p. 35)
Indique le nombre de nouveaux
messages enregistrés. “A” apparaît
dans le mode d’annonce seulement
et “FL” apparaît lorsqu’il n’y a plus
de place pour l’enregistrement de
messages.
2 Touche TIME/SET (p. 30, 43)
Appuyez sur cette touche pour
régler le jour et l’heure, ou pour
vérifier l’heure actuelle. Cette
touche sert aussi à régler votre code
d’identification (code de sécurité).
3 Touche SELECT (p. 30)
4 Touche MENU (p. 30)
5 Touche REPEAT/SLOW
(p. 30, 37)
Pour réécouter le message actuel ou
revenir au message précédent.
Maintenez la pression sur la touche
pour écouter au ralenti vos messages.
6 Touches de composition (p. 15)
7 Touche PGM (programme)
(p. 19)
Pour mémoriser des numéros de
compositon rapide.
FR
Informations préliminaires
12
qf
qg
qh
qj
qk
ql
w;
wa
ws
wd
wf
wg
wh
wj
8 Témoin IN USE (p. 15, 17, 23)
S’allume lorsqu’un des téléphones
est utilisé.
9 Témoin CHARGE (p. 9)
S’allume lorsque la batterie est
chargée.
0 MIC (microphone) (p. 31, 42)
qa Touche TONE (p. 15, 17)
Pour passer provisoirement à la
numérotation à fréquences vocales.
qs Touche HOLD (p. 15, 17, 23)
Pour mettre un appel en attente.
qd Haut-parleur
qf Antenne (p. 7, 45)
qg Touche SKIP/QUICK (p. 30, 37)
Pour passer au message suivant.
Maintenez la pression sur la touche
pour une écoute rapide des
messages.
qh Touche ANSWER ON/OFF
(p. 35)
Pour mettre la fonction de
répondeur en et hors service.
Page 65

Informations préliminaires
eae;wlwk
qj Touche REC/MEMO (p. 31, 42)
Pour enregistrer un message
d’accueil ou un mémo.
qk Touche ERASE (p. 32, 38)
Pour effacer le message d’accueil ou
le mémo.
ql Touches PLAY/STOP
(MAILBOX 1, 2, 3) (p. 37)
Pour écouter les messages de
chaque boîte postale.
w; Touches VOL (volume) +/–
(p. 15, 17, 38)
Pour ajuster le volume du hautparleur.
wa Touche REDIAL/PAUSE
(p. 16, 20)
Pour recomposer le dernier numéro
appelé, insérer une pause dans la
séquence de composition.
ws Touche SPEED DIAL (p. 20)
Pour faire un appel en utilisant la
compositon rapide.
wd Touche FLASH (p. 15, 17)
wf Touche INTERCOM (p. 26)
Pour les communications internes.
wg Témoin INTERCOM (p. 25)
S’allume pendant une
communication interne.
wh Touche SPEAKERPHONE
(p. 15, 17)
Pour émettre ou recevoir un appel
sur la base.
wj Témoin SPEAKERPHONE
(p. 15, 17)
S’allume pendant l’émission ou la
réception d’un appel sur la base.
wk Commutateur RINGER (p. 22)
Pour régler le volume de la
sonnerie.
wl Commutateur DIAL MODE
(p. 8)
Pour sélectionner la numérotation
décimale ou à fréquences vocales.
e; Prise DC IN 9 V (p. 7, 45)
ea Prise LINE (ligne téléphonique)
(p. 7, 45)
Informations préliminaires
13
FR
Page 66

Opérations de base
Emission d’un appel
1
Décrochez le combiné de la base.
2 Appuyez sur (TALK).
Le témoin TALK/BATT LOW
Témoin
TALK/BATT
LOW
Commutateur
VOL
(HOLD)
(FLASH)
(CHANNEL)
sur le combiné ainsi que le
témoin IN USE sur la base
s’allument.
Les touches de composition
s’allument pendant 10 secondes.
Vous entendez à ce moment une
tonalité. S
i vous entendez des
bips d’erreur, rapprochez-vous
de la base
.
3 Composez le numéro de
(*TONE)
téléphone.
4 Lorsque vous avez terminé,
(REDIAL/PAUSE)
Autres fonctions
Pour
Mettre un appel en attente
Sélectionner un autre canal
Régler le volume
Passer temporairement à la
numérotation à fréquences
vocales
Prendre un autre appel
(service de mise en attente*)
* Vous devez souscrire un abonnement à ce service auprès de votre compagnie de téléphone.
Remarques
• Avant de composer un numéro, assurez-vous d’entendre la tonalité de ligne, sinon vous ne
pourrez pas composer le numéro.
• Lorsque le témoin TALK/BATT LOW répète des doubles clignotements, c’est que la base est
utilisée.
• Lorsque vous réglez le volume du combiné sur H (fort), le volume est extrêmement fort.
Normalement, réglez le volume sur M (moyen).
FR
Opérations de base
14
Vous devez
Appuyer sur (HOLD).
Le témoin TALK/BATT LOW clignote lentement.
Appuyer sur (TALK) pour reprendre l’appel.
Appuyer sur (CHANNEL).
Réglez le commutateur VOL sur H (fort), M (moyen) ou L (faible).
Appuyer sur (*TONE) après la connexion.
La ligne reste dans ce mode jusqu’à ce que vous raccrochiez.
Appuyer sur (FLASH) pour prendre le deuxième appel.
Appuyer une nouvelle fois sur (FLASH) pour revenir au premier
appel.
appuyez sur (OFF) ou reposez
le combiné sur la base.
Le témoin TALK/BATT LOW
sur le combiné ainsi que le
témoin IN USE sur la base
s’éteignent.
Page 67

Si la batterie du combiné s’épuise en cours d’appel
Vous entendez un bip toutes les trois secondes et le témoin TALK/
BATT LOW du combiné clignote.
L’appel sera bientôt interrompu. Reposez le combiné sur la base pour
recharger la batterie.
Pour des performances optimales, rechargez la batterie pendant
au moins 12 heures.
Sachez que pendant les 10 - 15 premières minutes de recharge, le
téléphone est désactivé et il n’est pas possible d’émettre ni de recevoir
un appel.
Lorsque ces 10 - 15 minutes se sont écoulées, vous pouvez utiliser le
téléphone, mais l’autonomie de la batterie sera très courte. Il est
conseillé de recharger complètement la batterie avant de réutiliser le
téléphone.
Opérations de base
Emission d’un appel par le haut-parleur
Appuyez sur (SPEAKERPHONE) sur la base.
Le témoin SPEAKERPHONE ainsi que le
témoin IN USE s’allument.
“- -” apparaît sur l'afficheur.
Composez le numéro de téléphone.
Lorsque vous avez terminé, appuyez
une nouvelle fois sur (SPEAKERPHONE).
(HOLD)
(*TONE)
Témoin
IN USE
Témoin
SPEAKERPHONE
(VOL)
(REDIAL/PAUSE)
(FLASH)
(SPEAKERPHONE)
Autres fonctions
Pour
Mettre un appel en attente
Régler le volume du hautparleur
Passer temporairement à la
numérotation à fréquences
vocales
Prendre un autre appel
(service de mise en attente*)
* Vous devez souscrire un abonnement à ce service auprès de votre compagnie de téléphone.
Vous devez
Appuyer sur (HOLD).
Le témoin IN USE clignote lentement.
Appuyer sur (SPEAKERPHONE) pour reprendre l’appel.
Appuyez sur (VOL +) ou (VOL -).
Appuyer sur (*TONE) après la connexion.
La ligne reste dans ce mode jusqu’à ce que vous raccrochiez.
Appuyer sur (FLASH) pour prendre le deuxième appel.
Appuyer une nouvelle fois sur (FLASH) pour revenir au premier
appel.
suite
Opérations de base 15
FR
Page 68

Emission d’un appel (suite)
Pour obtenir du haut-parleur des performances optimales
• Vous risquez de ne pas entendre votre correspondant dans un
environnement bruyant.
Utilisez donc le haut-parleur dans une pièce silencieuse.
• Ne mettez pas la main ou un autre objet trop près du microphone,
sinon vous entendrez un bruit aigu (rétroaction).
• Si le volume du haut-parleur est trop élevé, ou si le téléphone a été
installé trop près d’un mur, le volume risque d’être subitement
réduit. Ceci est dû à un circuit anti-rétroaction du téléphone. Dans ce
cas, réduisez légèrement le volume du haut-parleur.
Recomposition d’un numéro
Sur le combiné
1 Appuyez sur (TALK).
Le témoin TALK/BATT LOW s’allume. Les touches de
composicion s’allument pendant 10 secondes.
2 Appuyez sur (REDIAL/PAUSE) pour recomposer le dernier
numéro composé.
Sur la base
1 Appuyez sur (SPEAKERPHONE).
Le témoin SPEAKERPHONE s’allume.
“- -” apparaît sur l'afficheur.
2 Appuyez sur (REDIAL/PAUSE) pour recomposer le dernier
numéro composé.
Remarque
Si le dernier numéro composé a plus de 32 chiffres, seuls les 32 premiers chiffres
seront composés.
Conseil
Le numéro à recomposer est le dernier numéro formé sur le combiné ou sur la
base.
FR
Opérations de base
16
Page 69

Réception d’un appel
1 Lorsque vous entendez le téléphone
sonner :
• Appuyez sur (TALK) (ou sur toute
Témoin
TALK/BATT
LOW
Commutateur
VOL
(FLASH)
autre touche sauf (OFF)).
ou
• Décrochez le combiné de la base s’il
est accroché.
Le témoin TALK/BATT LOW sur le
combiné ainsi que le témoin IN USE
sur la base s’allument.
(HOLD)
Les touches de composition s’allument
pendant 10 secondes.
2 Lorsque vous avez terminé, appuyez
(*TONE)
(CHANNEL)
Autres fonctions
Pour
Mettre un appel en attente
Sélectionner un autre canal
Régler le volume
Passer temporairement à la
numérotation à fréquences
vocales
Prendre un autre appel
(service de mise en attente*)
Mettre en/hors service la
sonnerie du combiné
* Vous devez souscrire un abonnement à ce service auprès de votre compagnie de téléphone.
Vous devez
Appuyer sur (HOLD).
Le témoin TALK/BATT LOW clignote lentement.
Appuyer sur (TALK) pour reprendre l’appel.
Appuyer sur (CHANNEL).
Réglez le commutateur VOL sur H (fort), M (moyen) ou L (faible).
Appuyer sur (*TONE) après la connexion.
La ligne reste dans ce mode jusqu’à ce que vous raccrochiez.
Appuyer sur (FLASH) pour prendre le deuxième appel.
Appuyer une nouvelle fois sur
Voir “Réglage du type de sonnerie” à la page 21.
Réception d’un appel par le haut-parleur
Lorsque le téléphone sonne, appuyez sur
(SPEAKERPHONE) sur la base.
Le témoin SPEAKERPHONE ainsi que le
témoin IN USE s’allument.
“- -” apparaît sur l'afficheur.
Pour régler le volume du haut-parleur,
appuyez sur (VOL +) ou (VOL
Lorsque vous avez terminé, appuyez une
nouvelle fois sur (SPEAKERPHONE).
Pour un fonctionnement optimal du haut-
parleur, voir page 16.
Pour régler le volume de la sonnerie,
voir page 22.
-
).
sur (OFF) ou reposez le combiné sur
la base.
Le témoin TALK/BATT LOW sur le
combiné ainsi que le témoin IN USE
sur la base s’éteignent.
(FLASH)
Témoin
IN USE
(HOLD)
Témoin
SPEAKERPHONE
pour revenir au premier appel.
(*TONE)
(VOL)
(FLASH)
(SPEAKERPHONE)
Opérations de base 17
Opérations de base
FR
Page 70

Fonctions du téléphone
Composition rapide
Vous pouvez composer un numéro de téléphone à l’aide d’une seule
touche en mémorisant ce numéro sur une touche de composition
rapide. Vous pouvez mémoriser jusqu'à 10 numéros de téléphone
différents sur le combiné et la base.
Mémorisation d’un numéro de téléphone sur le combiné
1 Appuyez sur (PGM).
Le témoin TALK/BATT LOW
clignote.
Témoin
TALK/BATT
LOW
(TALK)
Les touches de composition s’allument
pendant 10 secondes.
2 Appuyez sur une des touches de
composition ((0) à (9)) pour
mémoriser le numéro souhaité.
Vous entendez un bip de confirmation.
3 Indiquez le numéro de téléphone
(OFF)
(SPEED DIAL)
(REDIAL/PAUSE)
souhaité.
Vous pouvez indiquer un numéro de
16 chiffres au maximum, tonalité et
pause comprises, chacune d’elles
comptant pour un chiffre.
4 Appuyez une nouvelle fois sur (PGM).
Vous entendez un bip de confirmation,
et le numéro est enregistré. Le témoin
TALK/BATT LOW s’éteint.
Remarques
• Le numéro précédent sera effacé si vous n’indiquez pas de nouveau numéro
à l’étape 3.
• Ne laisser pas s’écouler plus de 20 secondes entre chaque étape.
• Avant de mémoriser un numéro de téléphone, assurez-vous que le combiné
n’est pas utilisé.
Conseils
• Si vous vous trompez de numéro, appuyez sur (OFF), puis recommencez
depuis le début.
• Utilisez le répertoire fourni pour inscrire les coordonnées de chaque numéro
mémorisé.
FR
Fonctions du téléphone
18
Page 71

Mémoriser des numéros de téléphone sur la base
1 Appuyez sur (PGM).
Le témoin SPEAKERPHONE
clignote rapidement.
2 Appuyez sur une des touches de
composition ((0) à (9)) pour
mémoriser le numéro souhaité.
Vous entendez un bip de
Témoin IN USE
confirmation.
3 Indiquez le numéro de téléphone
que vous voulez enregistrer.
Vous pouvez enregistrer 16
chiffres, y compris une tonalité et
une pause, chacune d’elle
comptant pour un chiffre.
4 Appuyez une nouvelle fois sur
(PGM).
Vous entendez un autre bip de
confirmation et le numéro est
mémorisé.
Témoin
SPEAKERPHONE
(REDIAL/PAUSE)
(SPEED DIAL)
(SPEAKERPHONE)
Fonctions du téléphone
Remarques
• A l’étape 3, si vous n’indiquez pas le numéro de téléphone, le numéro
précédent sera effacé.
• N’attendez pas plus de 20 secondes entre chaque étape de la procédure.
• Vous ne pouvez pas mémoriser des numéros de téléphone sur la base quand
le combiné est utilisé, ce qui est signalé par l’éclairage du témoin IN USE.
Conseils
• Si vous mémorisez un mauvais numéro, appuyez sur (PGM) puis
recommencez à partir du début.
• Utilisez le répertoire fourni pour écrire les numéros de téléphone mémorisés
sous les numéros de composition rapide.
Fonctions du téléphone
suite
19
FR
Page 72

Composition rapide (suite)
Pour mémoriser le dernier numéro composé
Appuyez sur (REDIAL/PAUSE) directement après l’étape 2 et passez à l’étape 4.
Pour mémoriser un numéro passant par un standard
téléphonique (PBX)
Avant d’entrer un numéro de téléphone à l’étape 3 de la page précédente, effectuez
les points suivants:
1 Entrez le numéro d’accès à la ligne extérieure (par ex. 9).
2 Appuyez sur (REDIAL/PAUSE).
Pour changer un numéro numérisé
Pour mémoriser un nouveau numéro, suivez les instructions précédentes.
Pour supprimer un numéro de la mémoire
1 Appuyez sur (PGM).
2 Appuyez sur la touche de composition rapide où se trouve le numéro que
vous voulez supprimer.
3 Appuyez une nouvelle fois sur (PGM).
Emission d’un appel à l’aide des touches de composition rapide du combiné
1 Appuyez sur (TALK).
Le témoin TALK/BATT LOW s’allume. Les touches de composition
s’allument pendant 10 secondes.
2 Appuyez sur (SPEED DIAL).
3 Tapez le numéro de composition rapide souhaité ((0) à (9)).
Le numéro de téléphone mémorisé sur le numéro de composition rapide
est composé.
Emission d’un appel à l’aide des touches de composition rapide de la base
1 Appuyez sur (SPEAKERPHONE).
Le témoin SPEAKERPHONE s’allume.
2 Appuyez sur (SPEED DIAL).
3 Tapez le numéro de composition rapide souhaité ((0) à (9)).
Le numéro de téléphone mémorisé sur le numéro de composition rapide
est composé.
FR
Fonctions du téléphone
20
Page 73

Réglage du type de sonnerie
Vous avez le choix entre quatre types de sonnerie.
1 Appuyez sur (PGM).
2 Appuyez sur (#) ou sur
(*TONE).
(OFF)
(*TONE)
(#)
3 Appuyez sur une touche
numérique de (1) à (4) pour
sélectionner le type de sonnerie.
Vous entendrez la sonnerie
correspondante.
4 Appuyez sur (OFF).
Pour désactiver la sonnerie
1 Appuyez sur (PGM).
2 Appuyez sur (#) ou sur (*TONE).
3 Appuyez sur (5).
4 Appuyez sur (OFF).
Le sonnerie du combiné est désactivée.
Pour activer à nouveau la sonnerie
Suivez les instructions de “Réglage du type de sonnerie”.
Remarque
Ne laissez pas s’écouler plus de 20 secondes entre chaque étape de la
procédure.
Fonctions du téléphone
suite
Fonctions du téléphone
21
FR
Page 74

Réglage du type de sonnerie (suite)
Vérification du type de sonnerie sélectionné
1 Appuyez sur (PGM).
2 Appuyez sur (#) ou sur (*TONE).
3 Appuyez sur (0).
La sonnerie actuellement sélectionnée retentit.
4 Appuyez sur (OFF).
Remarque
La sonnerie du combiné est désactivée si vous n’entendez aucun son (seulement
la tonalité des touches).
Réglage du volume de la sonnerie de la base
Réglez le commutateur RINGER de la base sur HIGH ou LOW. Pour
désactiver la sonnerie, réglez-la sur OFF.
FR
Fonctions du téléphone
22
Commutateur
RINGER
Page 75

Changement de téléphone pendant un appel
Si vous avez mis l’appel en attente, vous pourrez le reprendre sur
l’autre téléphone sans interrompre la communication.
Passer de la base au combiné
1 Appuyez sur (HOLD) sur la base.
Témoin IN USE
Le témoin IN USE ainsi que le
témoin TALK/BATT LOW sur le
combiné clignotent lentement.
2 Appuyez sur (TALK) ou prenez
le combiné de la base.
Le témoin IN USE ainsi que le
témoin TALK BATT/LOW du
combiné s’allument.
Les touches de composition du
Témoin
TALK/BATT
LOW
combiné s’allument pendant 10
secondes.
Fonctions du téléphone
(OFF)
(TALK)
Remarques
• Si vous prenez le combiné pendant que vous parlez par le haut-parleur de la
base, l’appel sera commuté sur le combiné.
• Si vous n’appuyez pas sur (HOLD) à l’étape 1 et si vous appuyez sur (TALK)
à l’étape 2, vous pourrez communiquer à trois personnes (voir “Conversation
à trois” à la page 29).
• Lorsque l’appel est mis en attente sur la base, vous pouvez prendre le
combiné et continuer à parler par le combiné.
3 Quand vous avez fini de parler,
appuyez sur (OFF) ou reposez le
combiné sur la base.
Fonctions du téléphone
suite
23
FR
Page 76

Changement de téléphone pendant un appel (suite)
Passer du combiné à la base
1 Appuyez sur (HOLD) du
Témoin
TALK/BATT
LOW
combiné.
Le témoin TALK/BATT LOW
ainsi que le témoin IN USE de la
base clignotent lentement.
2 Appuyez sur (SPEAKERPHONE).
Le témoin SPEARKERPHONE
sur la base s’allume.
Le témoin TALK/BATT LOW
clignote.
3 Quand vous avez fini de parler,
appuyez une nouvelle fois sur
(SPEAKERPHONE).
Témoin
IN USE
Témoin
SPEAKERPHONE
FR
Fonctions du téléphone
24
(SPEAKERPHONE)
Page 77

Communication entre le combiné et la base (Communication interne)
La communication entre la base et le combiné est également possible.
L’appel peut venir de l’un ou l’autre.
Appeler la base par le combiné
Appuyez sur (INTERCOM) sur le
Témoin
TALK/BATT
LOW
(TALK)
(OFF)
combiné.
Le témoin TALK/BATT LOW s’allume
et le témoin INTERCOM clignote.
La base sonne.
Les touches de composition s’allument
pendant 10 secondes.
La liaison sera établie dans les 3
secondes qui suivent.
Lorsqu’une personne répond à la base,
vous pouvez parler.
Le témoin TALK/BATT LOW du
combiné et le témoin INTERCOM
s’allument.
Quand vous avez fini de parler, ou si
personne ne répond au téléphone
Appuyez sur (OFF).
Fonctions du téléphone
Conseils
• Vous pouvez recevoir un appel sur la base même lorsque le commutateur
RINGER de la base est réglé sur OFF. La sonnerie de la base sera faible.
• Pour répondre à un appel interne dans les 3 secondes, appuyez sur
(INTERCOM) sur la base. Si la personne à la base appuie sur (INTERCOM)
après la connexion de l’appel interne, la communication interne sera coupée.
suite
Fonctions du téléphone
25
FR
Page 78

Communication entre le combiné et la base
(Communication interne) (suite)
Appeler le combiné par la base
Appuyez sur (INTERCOM) sur la
base.
Le combiné sonne. Le témoin
TALK/BATT LOW clignote.
Lorsque l’autre personne au
combiné appuie sur la touche
(INTERCOM), vous pouvez parler.
La communication s’interrompt sur
le combiné par une pression sur
(OFF) du combiné.
(SPEAKERPHONE)
Témoin
INTERCOM
Le témoin TALK/BATT LOW sur le
combiné et le témoin INTERCOM
sur la base s’allument. Les touches
de composition du combiné
s’allument.
Quand vous avez fini de parler ou
si personne ne répond au
téléphone
Appuyez une nouvelle fois sur
(INTERCOM).
Remarques
• S’il y a un appel entrant pendant une communication interne, seule la base
sonnera à un faible niveau. Pour répondre à l’appel, appuyez sur (TALK) du
combiné ou (SPEAKERPHONE) de la base. La communication interne sera
annulée et vous pourrez parler à l’appelant extérieur.
• Pendant une communication avec un correspondant extérieur par la base ou
le combiné, il n’est pas possible d’effectuer un appel interne. Si vous appuyez
sur (INTERCOM) du combiné, vous entendrez le signal de ligne occupée. Si
vous appuyez sur (INTERCOM) sur la base, la touche n’agira pas.
Conseil
Vous pouvez recevoir un appel interne sur le combiné même lorsque la
sonnerie est hors service. La sonnerie du combiné sera forte.
FR
Fonctions du téléphone
26
Page 79

Transfert d’un appel
Vous pouvez transférer un appel du combiné sur la base sans couper
la communication.
Transférer un appel de la base sur le combiné
1 Appuyez sur (INTERCOM).
L’appel est mis en attente et le
combiné sonnet.
Le témoin TALK/BATT LOW
sur le combiné clignote.
2 Appuyez sur (INTERCOM) du
combiné.
(SPEAKERPHONE)
Témoin
TALK/BATT
LOW
(TALK)
Témoin
INTERCOM
Le témoin TALK/BATT LOW
sur le combiné et le témoin
INTERCOM sur la base
s’allument.
Les touches de composition
s’allument pendant 10 secondes.
Vous pouvez maintenant
communiquer entre la base et le
combiné.
(INTERCOM)
3 Appuyez sur (TALK) du
combiné pour parler à l’autre
personne par le combiné.
Fonctions du téléphone
Si personne ne répond
Appuyez sur (SPEAKERPHONE) de
la base.
Conseil
Vous pouvez recevoir un appel interne sur le combiné même lorsque la
sonnerie est hors service. La sonnerie du combiné sera forte.
suite
Fonctions du téléphone
27
FR
Page 80

Transfert d’un appel (suite)
Transférer un appel du combiné sur la base
Témoin
TALK/BATT
LOW
(TALK)
1 Appuyez sur (INTERCOM).
L’appel est mis en attente et le
combiné sonnet.
Le témoin INTERCOM sur la
base clignote.
La liaison sera établie dans les 3
secondes qui suivent.
Le témoin TALK/BATT LOW sur
le combiné s’allumet.
Les touches de composition du
combiné s’allument pendant 10
secondes.
Lorsqu’une personne répond à la
base, vous pouvez parler.
2 Appuyez sur (SPEAKERPHONE)
de la base pour parler à l’autre
personne par la base.
Si personne ne répond
Appuyez sur (TALK) de la base.
(INTERCOM)
(SPEAKERPHONE)
Témoin
INTERCOM
Conseils
• Vous pouvez recevoir un appel interne sur la base même lorsque le
commutateur RINGER de la base est réglé sur OFF. La sonnerie de la base
sera faible.
• Pour répondre à un appel interne dans les 3 secondes, appuyez sur
(INTERCOM) sur la base. Si la personne à la base appuie sur (INTERCOM)
après la connexion de l’appel interne, la communication interne sera coupée.
FR
Fonctions du téléphone
28
Page 81

Conversation à trois
Le combiné et la base fonctionnent comme deux extensions de la
même ligne. Ils peuvent donc être utilisés en même temps pour une
conversation à trois entre le correspondant, la personne sur l’autre
téléphone et vous-même.
Se joindre à une
Témoin
TALK/BATT
LOW
(TALK)
(OFF)
conversation
téléphonique
Appuyez sur (TALK).
Le témoin TALK/BATT LOW du
combiné s’allumet.
Les touches de composition du
combiné s’allument pendant 10
secondes.
Si vous utilisez la base, appuyez
simplement sur (SPEAKERPHONE).
Le témoin SPEAKERPHONE de la
base s’allume.
Fonctions du téléphone
Témoin
SPEAKERPHONE
(SPEAKERPHONE)
Quand vous avez fini de parler
Appuyez sur (OFF) du combiné (ou sur (SPEAKERPHONE) si vous
utilisez la base).
Conseil
Si vous prenez le combiné quand vous parlez par le haut-parleur de la base, la
conversation continuera entre le combiné et votre correspondant extérieur.
Fonctions du téléphone
29
FR
Page 82

Fonctions du répondeur
Préparation du répondeur automatique
Réglage de l’heure et du jour de la semaine
1 Appuyez de façon répétée sur (MENU)
jusqu’à ce que vous entendiez “Set day
and time (Réglez le jour et l’heure)”.
“ - - ” apparaît sur l’afficheur.
2 Appuyez sur (SELECT) et vous
entendrez le guide vocal.
3 Appuyez sur (REPEAT/SLOW) ou de
façon répétée sur (SKIP/QUICK) pour
sélectionner le jour de la semaine.
4 Appuyez sur (TIME/SET).
Le jour est réglé et l’heure est
annoncée.
5 Appuyez de façon répétée sur
(REPEAT/SLOW) ou sur (SKIP/QUICK)
pour sélectionner les heures.
6 Appuyez sur (TIME/SET).
Les heures sont réglées et les minutes
sont annoncées.
(REPEAT/SLOW)
(SKIP/QUICK)
7 Appuyez de façon répétée sur
(REPEAT/SLOW) ou sur (SKIP/QUICK)
pour sélectionner les minutes.
8 Appuyez sur (TIME/SET).
Le jour et l’heure que vous venez de
régler sont annoncées et l’horloge se
met en marche.
9 Appuyez sur (PLAY/STOP) pour
quitter le mode de réglage.
Remarques
• L’heure et le jour ont été préréglés sur le lundi, 12:00 du matin.
• “PF”clignote lorsque le jour et l’heure sont effacés ou retardent en raison d’une coupure de
courant et lors du premier branchement de la base sur la prise secteur.
• Ne laissez pas s’écouler plus de 20 secondes (ou 60 secondes lors du réglage des minutes)
entre chacune des étapes de la procédure.
• Si une panne de courant se produit, le jour et l’heure seront effacés.
• Si le jour et l’heure n’ont pas été programmés, vous n’entendrez pas le jour et l’heure où les
messages entrants ont été enregistrés. Et si vous essayez de vérifier l’heure, vous entendrez
cinq brefs bips d’erreur.
FR
Fonctions du répondeur
30
Page 83

Conseil
Toutes les touches de boîte postale ((MAILBOX 1), (MAILBOX 2) et (MAILBOX 3))
fonctionnent comme touche (PLAY/STOP). Vous pouvez appuyer sur n’importe
laquelle de ces touches.
Pour écouter l’heure actuelle
Appuyez sur (TIME/SET). L’heure actuelle est annoncée.
Enregistrement d’un message d’accueil
Ce répondeur automatique comporte des messages d’accueil préenregistrés (voir
page 32). Vous pouvez cependant enregistrer votre propre message d’accueil.
La durée du message d’accueil doit être comprise entre 2 secondes et 90 secondes.
Vous pouvez enregistrer deux messages d’accueil pour les modes de répondeur
(modes “normal” et “annonce seulement”. Voir page 40.) Un message peut être
affecté à chaque mode. Vous pouvez donc enregistrer un nouveau message
d’annonce pour chaque mode.
Si vous avez déjà enregistré deux messages d’annonce et que vous voulez utiliser un
message préenregistré pour un des modes, effacez votre propre message dans le
mode que vous voulez changer. Lorsque votre message est effacé, le message
préenregistré est automatiquement utilisé.
1 Appuyez de façon répétée sur (MENU)
jusqu’à ce que “Set greeting message
(Enregistrer message d’accueil)”soit
annoncé.
“ - - ” apparaît sur l’afficheur.
Fonctions du répondeur
MIC
(ERASE)
2 Appuyez sur (REC/MEMO).
“Now recording (Maintenant parlez)”
est annoncé et un long bip est audible.
3 Parlez dans le microphone de la base
(MIC). Le temps est indiqué sur
l’afficheur. Vous pouvez enregistrer
pendant 90 secondes au maximum.
4 Pour arrêter l’enregistrement, appuyez
sur (PLAY/STOP).
Votre message d’accueil est
automatiquement reproduit.
suite
Fonctions du répondeur
31
FR
Page 84

Préparation du répondeur automatique (suite)
Remarques
• Si vous n’enregistrez pas votre propre message, le message préenregistré sera
automatiquement utilisé (voir page 33).
• Si votre message dure moins de 2 secondes, il ne sera pas enregistré et le
message préenregistré sera automatiquement utilisé.
• Si un appel entre pendant l’enregistrement d’un message, l’enregistrement
s’arrêtera.
• Si le message dure plus de 90 secondes ou si la mémoire est pleine à l’étape 3,
l’enregistrement s’arrêtera.
• “Memory Full (Mémoire pleine)” est annoncé si la mémoire est pleine lorsque
vous appuyez sur (REC/MEMO). Effacez les messages inutiles (voir page 38).
Conseils
• Pour enregistrer un message d’accueil depuis un téléphone à touches, voir
“Commande à distance depuis un téléphone extérieur” à la page 44.
• Votre message personnel ne sera pas effacé lors d’une coupure de courant.
Pour vérifier le message d’accueil
Appuyez de façon répétée sur (MENU) jusqu’à ce que “Set greeting
message (Réglez le message d’accueil)” soit annoncé. “ - - ” apparaît
sur l’afficheur. Appuyez ensuite sur (PLAY/STOP) pour écouter le
message.
Pour changer de message d’accueil
Enregistrez un nouveau message en suivant les instructions de la page
précédente. Le nouveau message remplace l’ancien.
Pour effacer le message d’accueil
1 Appuyez de façon répétée sur (MENU) jusqu'à ce que “Set
greeting message (Réglez le message d’accueil)” soit
annoncé. “- -” apparaît sur l’afficheur.
2 Appuyez sur (ERASE), et “Greeting message has been
erased (Le message d’accueil a été effacé)” est annoncé.
Pour revenir au message d’accueil préenregistré
Appuyez sur (ERASE) pendant l’écoute du message.
Le message d’origine est rétabli et votre propre message est supprimé.
Remarques
• Vous pouvez aussi effacer le message d’accueil tout en l’écoutant.
• Si vous effacez votre propre message, le message préenregistré sera
automatiquement utilisé.
FR
Fonctions du répondeur
32
Page 85

Messages préenregistrés
Mode normal : “Hello, I’m unable to answer your call right now. Please
Mode d’annonce seulement
leave your name, number and message after the tone.”
(Bonjour, je suis actuellement absent. Veuillez indiquer
votre nom, votre numéro de téléphone et votre message
après le bip.)
: “Hello, I’m unable to answer your call right now. Please
call again. Thank you .” (Bonjour, je suis actuellement
absent. Veuillez rappeler ultérieurement.)
Réglage du nombre de sonneries
Vous pouvez sélectionner le nombre de fois que le téléphone doit
sonner avant d’enregistrer un message.
Il y a trois modes: 2, 5 et Economie.
1 Appuyez de façon répétée sur (MENU) jusqu’à ce que vous
entendiez “Set number of ring (Réglez le nombre de
sonneries).”
“ - - ” apparaît sur l’afficheur.
2 Appuyez sur (SELECT).
Le nombre de sonneries actuellement sélectionné est annoncé.
3 Appuyez de façon répétée sur (REPEAT/SLOW) ou sur
(SKIP/QUICK) pour sélectionner la durée de la sonnerie (2, 5 ou
Economie).
Pour que le répondeur fonctionne après 2 sonneries,
sélectionnez “2”.
Pour que le répondeur fonctionne après 5 sonneries,
sélectionnez “5”.
Sélectionnez “Toll Saver (Economie)” pour que le répondeur
fonctionne après 2 sonneries lorsqu’il y a de nouveaux message
et après 5 sonneries lorsqu’il n’y a pas de nouveaux messages.
4 Appuyez sur (TIME/SET).
Le réglage de durée de la sonnerie est annoncé.
5 Appuyez sur (PLAY/STOP) pour quitter le mode de réglage.
Fonctions du répondeur
Remarques
• Lorsque le nombre de sonneries est réglé sur “Toll Saver (Economie)”, le répondeur
fonctionne après 2 sonneries si de nouveaux messages ont été enregistrés. Si aucun nouveau
message n’a été enregistré, il fonctionnera après 5 sonneries. Lorsque vous entendez 3
sonneries, vous savez que vous n’avez pas de nouveaux messages. Vous pouvez ainsi
économiser le prix de la communication lorsque vous relevez vos message depuis un
téléphone extérieur.
• Le nombre de sonneries a été réglé sur Economie.
Fonctions du répondeur
suite
33
FR
Page 86

Préparation du répondeur automatique (suite)
Réglage de l’avertisseur sonore de messages
Vous pouvez régler le répondeur pour qu’il enregistre les messages
entrants (mode normal) ou juste pour faire une annonce sans
enregistrer de messages (mode d’annonce seulement). Pour valider le
mode d’annonce seulement, voir page 40.
En mode normal, vous avez la possibilité de choisir un bip qui vous
signalera la présence de nouveaux messages.
Lorsque vous utilisez cette option, validez l’avertisseur sonore de
message. Si vous voulez que l’appelant laisse un message mais si vous
ne voulez pas utiliser cette option, invalidez l’avertisseur sonore de
message.
1 Appuyez de façon répétée sur
(MENU) jusqu’à ce que vous
entendiez “Set message alert
(Réglez l’avertisseur sonore de
messages).”
“ - - ” apparaît sur l’afficheur.
2 Appuyez sur (SELECT).
Le réglage actuellement
sélectionné est annoncé. “On”
ou “OF” (hors service) apparaît
sur l'afficheur.
3 Appuyez sur (REPEAT/SLOW)
ou sur (SKIP/QUICK) pour
mettre l’avertisseur sonore de
messages en ou hors service.
“On” ou “OF” (hors service)
apparaît sur l'afficheur.
4 Appuyez sur (TIME/SET).
Le réglage est annoncé.
(VOL)
(REPEAT/SLOW)
Remarques
• Lorsque l’avertisseur sonore de messages est en service, un bip retentit toutes les 5 secondes
en présence de nouveaux messages.
• Pour arrêter le bip, appuyez sur une touche du répondeur ou sur (VOL +)/(VOL -).
• L’avertisseur sonore de messages a été mis en service en usine.
FR
Fonctions du répondeur
34
(SKIP/QUICK)
5 Appuyez sur (PLAY/STOP) pour
quitter le mode de réglage.
Page 87

Mise en service du répondeur
Compteur de messages
Appuyez sur (ANSWER ON/OFF)
sur la base.
La touche ANSWER ON/OFF
s’allume. “Answering function is on
(le répondeur est en service)” est
annoncé.
(ANSWER ON/OFF)
Utilisation des boîtes postales
Ce téléphone a trois boîtes postales qui permettent à d’autres membres de votre
famille ou de votre société de vous transmettre des informations.
Lorsqu’une personne appelle
L’appelant peut laisser un message de deux façons:
• S’il appelle depuis un téléphone à touches, il peut sélectionner une boîte postale en
appuyant sur (*)(1) (MAILBOX 1), (*)(2) (MAILBOX 2) ou (*)(3) (MAILBOX
3) pendant qu’il écoute le message d’accueil. Le message d’accueil s’arrête et un bip
retentit. L’appelant peut alors commencer à enregistrer son message.
• Il peut attendre que le message d’accueil soit terminé pour enregistrer son message.
Si l’appelant ne sélectionne pas de boîte postale, son message sera automatiquement
enregistré dans la boîte postale 1.
Remarques
• Si l’enregistrement du message dure plus de quatre minutes, la ligne sera coupée.
• Si le message dure moins de deux secondes, il ne sera pas enregistré.
Conseil
En cas de coupure de courant, le message ne sera pas effacé.
Pour mettre le répondeur hors service
Appuyez sur (ANSWER ON/OFF) de la base.
La touche ANSWER ON/OFF s’éteint. “Answering function is off (le répondeur est
hors service)” est annoncé.
Remarque
Le répondeur a été mis en service en usine.
Conseils
• Le répondeur répondra automatiquement à un appel après 10 sonneries,
même s’il n’a pas été mis en service et un message demandera à l’appelant de
mettre le répondeur en service.
• Pour activer ou désactiver la fonction de répondeur depuis un téléphone extérieur, voir
“Commande à distance depuis un téléphone extérieur” à la page 44.
suite
Fonctions du répondeur
Fonctions du répondeur
35
FR
Page 88

Préparation du répondeur automatique (suite)
Lorsque la mémoire est pleine
Le temps total d’enregistrement du répondeur est de 15 minutes
environ (avec le message d’accueil, les messages et le mémo).
Lorsque le temps d’enregistrement disponible est inférieur à 30
secondes, “FL” clignote sur l’afficheur et le répondeur se règle sur
Mémoire pleine.
Pour éviter cette situation, effacez les messages inutiles (voir page 38).
Vous pouvez aussi effacer les messages depuis un téléphone extérieur
(voir page 44).
FR
Fonctions du répondeur
36
Page 89

Ecoute des messages
En présence de nouveaux messages, l’afficheur clignote autant de fois
qu’il y a de nouveaux messages.
Vous entendez des bips si l’avertisseur sonore de messages a été mis en
service (voir page 34).
(REPEAT/SLOW)
(SKIP/QUICK)
(VOL)
Autres fonctions lors de l’écoute des messages
Pour
Ajuster le volume du haut-parleur.
Arrêter les messages
Répéter le message actuel
Passer un message
Revenir sur le message précédent
Ecouter le message au ralenti
Ecouter le message à une vitesse
rapide
Vous devez
Appuyer sur (VOL+) ou (VOL-).
Appuyer sur une touche de boîte postale
((MAILBOX 1), (MAILBOX 2) ou (MAILBOX 3)).
Appuyer sur (REPEAT/SLOW) pendant l’écoute.
Appuyer sur (SKIP/QUICK).
Appuyer sur (REPEAT/SLOW) pendant les
2,5 premières secondes de l’écoute du message
actuel.
Appuyer en continu sur (REPEAT/SLOW) pendant
l’écoute.
Relâchez (REPEAT/SLOW) pour revenir à la vitesse
normale.
Appuyer en continu sur (SKIP/QUICK) pendant
l’écoute.
Relâchez (SKIP/QUICK) pour revenir à la vitesse
normale.
Appuyez sur une touche de boîte
postale ((MAILBOX 1), (MAILBOX 2)
ou (MAILBOX 3)) pour écouter les
nouveaux messages de la boîte
postale sélectionnée.
Fonctions du répondeur
Remarques
• Si un appel entre, le message s’arrêtera.
• L’heure et la date sont annoncées après chaque message si elles ont été
réglées (voir page 30).
• Les anciens messages ne seront lus qu’après les nouveaux.
Conseils
• S’il n’y a aucun nouveau message, tous les messages antérieurs seront lus.
• Les messages sont sauvegardés en cas de coupure de courant.
Fonctions du répondeur
suite
37
FR
Page 90

Ecoute des messages (suite)
Réglage du volume du haut-parleur
Pour régler le volume du hautparleur, appuyez sur (VOL +) ou
sur (VOL -).
Remarque
Vous ne pouvez pas régler le volume du haut-parleur lorsque le téléphone sonne.
Conseil
Le volume peut être réglé sur 10 niveaux (1 à 10). Il a été préréglé en usine sur le niveau 6.
Effacement des messages
1 Appuyez plus d’une seconde
sur (ERASE).
“Please select mailbox
(sélectionnez la boîte postale)”
est annoncé.
2 Appuyez sur le bouton de la
boîte postale dont vous voulez
effacer le contenu ((MAILBOX 1),
(MAILBOX 2) ou (MAILBOX 3)).
Tous les anciens messages dans
la boîte postale sélectionnée sont
effacés.
“All of your messages has been
erased (tous vos messages ont
été effacés)” est annoncé.
Pour effacer seulement certains messages
Appuyez sur (ERASE) pendant que vous écoutez le message que vous voulez effacer.
“Message has been erased (le message a été effacé)” est annoncé.
FR
Fonctions du répondeur
38
Page 91

Remarques
• Le nombre total de “nouveaux” messages (non écoutés) est indiqué sur
l’afficheur.
Le compteur revient à “0” lorsque vous avez lu tous les nouveaux messages,
même s’ils n’ont pas été effacés. Veillez à effacer les messages inutiles avant
que la mémoire ne soit pleine.
• Lorsqu’il y a plus de 59 nouveaux messages, “FL” clignote dans l’afficheur.
• Si vous essayez de supprimer tous les messages d’une boîte aux lettres, alors
qu’il reste de nouveaux messages, vous entendrez cinq bips brefs et vous ne
pourrez pas supprimer les messages.
Conseil
Pour écouter ou supprimer les messages depuis un téléphone à touches, voir
“Commande à distance depuis un téléphone extérieur” à la page 44.
Fonctions du répondeur
Fonctions du répondeur
39
FR
Page 92

Sélection du mode d’annonce seulement
Vous pouvez régler le répondeur pour qu’il lise seulement le message
d’accueil sans enregistrer de messages (mode d’annonce seulement).
Vous pourrez sélectionner ce mode, par exemple, lorsque vous partez
pour un certain temps et ne pouvez pas relever vos messages.
1 Appuyez de façon répétée sur
(MENU) jusqu’à ce que vous
entendiez “Set announce only
(Annonce seulement)”.
“ - - ” apparaît sur l’afficheur.
2 Appuyez sur (SELECT).
Le réglage actuellement
sélectionné est annoncé. “On”
ou “OF” (hors service) apparaît
sur l'afficheur.
3 Appuyez sur (REPEAT/SLOW)
ou sur (SKIP/QUICK) pour
mettre le mode d’annonce
seulement en ou hors service.
4 Appuyez sur (TIME/SET).
Le réglage est annoncé.
5 Appuyez sur (PLAY/STOP) pour
quitter le mode de réglage. “A”
est affiché lorsque le répondeur
(REPEAT/SLOW)
Remarques
• Pour activer le mode d’annonce seulement, le répondeur doit être aussi mis
en service.
• Le mode d’annonce seulement a été désactivé en usine.
FR
Fonctions du répondeur
40
(SKIP/QUICK)
est réglé sur le mode d’annonce
seulement.
Page 93

Filtrage des appels
Vous pouvez filtrer les appels en laissant votre répondeur en service
lorsque vous êtes chez vous. Lors d’un appel, vous pouvez entendre le
message enregistré par la base. Vous pouvez alors répondre ou non à
cet appel.
Le message sera enregistré, mais pour l’entendre vous devrez le
réécouter (voir page 37).
Pour répondre à l’appel
Appuyez sur (TALK) du combiné.
Remarques
• Appuyez sur (VOL +) ou sur (VOL -) pour ajuster le volume du hautparleur. Si le haut-parleur est réglé sur le niveau minimal, vous n’entendrez
pas les appels entrants.
• Le répondeur s’arrête automatiquement lorsque le combiné ou un autre
téléphone est décroché. Si le répondeur ne s’arrête pas, appuyez soit sur
(PLAY/STOP) de la base.
Le message restera comme nouveau message.
Fonctions du répondeur
Fonctions du répondeur
FR
41
Page 94

Enregistrement d’un mémo
Vous pouvez laisser des messages pour d’autres utilisateurs du
téléphone.
1 Appuyez sur (REC/MEMO).
“Please select mailbox
(sélectionner la boîte postale)”
est annoncé.
2
Appuyez sur la touche de boîte
postale ((MAILBOX 1), (MAILBOX 2)
ou (MAILBOX 3)) sur laquelle vous
voulez laisser un message.
“Now recording (Maintenant
parlez)” est annoncé et le temps
est compté.
3 Parlez dans le microphone de la
MIC
base (MIC) pour enregistrer
votre message.
Le mémo peut durer quatre
minutes au maximum.
4 Appuyez sur (PLAY/STOP) pour
arrêter l’enregistrement.
Le nombre de message sur
l’afficheur augmente d’une
unité.
Remarques
• Si la mémoire est pleine, l’enregistrement s’arrêtera.
• “Memory Full” est annoncé s’il n’y a plus d’espace libre au moment où vous
appuyez sur (REC/MEMO).
• Si votre message dure moins de deux secondes, l’enregistrement sera annulé.
• “99” clignote sur l’afficheur si vous enregistrez un mémo de plus de 99
secondes.
• Si un appel entre pendant l’enregistrement, l’enregistrement s’arrêtera.
Conseils
• Si l’enregistrement du mémo dure plus de quatre minutes à l’étape 3,
l’enregistrement s’arrêtera automatiquement et le mémo enregistré comptera
comme nouveau message.
• En cas de coupure de courant les mémos ne sont pas supprimés.
FR
Fonctions du répondeur
42
Page 95

Commande à distance depuis un téléphone extérieur
Enregistrement du code d’identification (code de sécurité)
Pour relever les messages de votre répondeur depuis un téléphone à
touches extérieur, vous devez enregistrer votre code d’identification
(code de sécurité).
1 Appuyez de façon répétée sur
(MENU) jusqu’à ce que vous
entendiez “Set security code
(Réglez code sécurité)”.
2
Appuyez sur
3
Appuyez sur
sur (SKIP/QUICK) pour changer le
réglage du code d’identification
(code de sécurité).
(SELECT)
(REPEAT/SLOW)
4 Appuyez sur (TIME/SET) pour
valider votre choix.
Le nouveau code
d’identification (sécurité) est
annoncé.
.
ou
Fonctions du répondeur
5 Appuyez sur (PLAY/STOP) pour
quitter le mode de réglage.
(REPEAT/SLOW)
Pour changer le code d’identification à distance (code de
sécurité)
Introduisez un nouveau code d’identification à distance (code de
sécurité). Le nouveau code remplace l’ancien.
Conseil
En cas de coupure de courant, le code d’identification à distance ne sera pas
effacé.
(SKIP/QUICK)
suite
Fonctions du répondeur
43
FR
Page 96

Commande à distance depuis un téléphone extérieur (suite)
Relevé des nouveaux messages
1 Composez votre numéro depuis un téléphone à touches.
2 Lorsque vous entendez le message d’accueil, appuyez sur (#) et indiquez
votre code d’identification (code de sécurité).
Un bip de confirmation est audible.
Le nombre de nouveaux messages est annoncé.
3 Appuyez sur les touches indiquées dans la “Liste des codes de
commande” ci-dessous correspondant à la commande souhaitée.
4 Lorsque vous avez terminé, raccrochez.
Remarques
• Ne laissez pas plus de deux secondes s’écouler entre chaque chiffre du code d’identification
(code de sécurité) et le code de commande.
• Si vous n’avez pas mis le répondeur en service, votre téléphone répondra automatiquement
après la 10e sonnerie.
• Si vous vous trompez de code d’identification (code de sécurité) trois fois, la ligne sera coupée.
• Si vous n’appuyez sur aucune touche en l’espace de 20 secondes, la ligne sera coupée.
Conseil
Découpez la carte de commande à distance et emportez-la avec vous pour savoir ce qu’il faut
faire depuis un téléphone extérieur.
Liste des codes de commande
Pour
Ecouter les messages de MAILBOX 1
Ecouter les messages de MAILBOX 2
Ecouter les messages de MAILBOX 3
Réécouter messages précédents
Passer au message suivant
Effacer des messages particuliers
Effacer tous les messages dans
MAILBOX1
Effacer tous les messages dans
MAILBOX2
Effacer tous les messages dans
MAILBOX3
Enregistrer le message d’accueil
Mettre le répondeur en service
Mettre le répondeur hors service
Arrêter l’opération
FR
Fonctions du répondeur
44
Touche
(#)(1)
(#)(2)
(#)(3)
(#)(4)
(#)(6)
(#)(9)
(#)(9)(#)(1)
(#)(9)(#)(2)
(#)(9)(#)(3)
(*)(7)
(*)(0)
(#)(0)
(*)(*)
Remarques
Ecoute depuis le premier nouveau message.
Ecoute depuis le premier nouveau message.
Ecoute depuis le premier nouveau message.
Appuyez pendant l’écoute pour répéter un
message.
Appuyez pendant l’écoute pour passer au
message suivant.
Appuyez pendant l’écoute.
Annonce de “Now recording (Maintenant
parlez)”.
Mise en service du répondeur. Annonce de
“Answering function is on (le répondeur
est en service)”.
Mise hors service du répondeur. Annonce
de “Answering function is off (le
répondeur est hors service)”.
Arrêt de toutes les fonctions.
Page 97

Informations complémentaires
Fixation murale de la base
Contacteur du combiné
1
2
Cordon
d’adaptateur
secteur
Cordon de
ligne
téléphonique
1 Levez le contacteur du combiné.
2 Branchez le cordon de ligne
téléphonique sur la prise LINE
et l’adaptateur secteur sur la
prise DC IN 9V et accrochez les
cordons. Utilisez le cordon le
plus court pour le montage.
3 Fixez l’applique murale au
centre de la base.
Alignez les repères f de
l’applique murale sur ceux de la
base.
4 Branchez le cordon de ligne
téléphonique sur la prise de
téléphone et accrochez la base
sur la plaquette murale.
5 Branchez l’adaptateur secteur
sur une prise secteur. Levez
l’antenne de sorte qu’elle soit
dirigée vers le plafond.
3
Plaquette
murale
Applique
murale
Prise
secteur
Conseil
Pour enlever l’applique murale, appuyez sur les deux taquets inférieurs.
4,5
Adaptateur
secteur
Informations complémentaires 45
Cordon de
ligne
téléphonique
Informations complémentaires
FR
Page 98

Remarques sur les sources d’alimentation
Batterie
• Rangez la batterie à une température
comprise entre 5 °C (41 °F) et 35 °C
(95 °F) de manière à pouvoir en
obtenir les meilleures performances.
• Si vous prévoyez de ne pas utiliser le
combiné pendant une période
prolongée, retirez-en la batterie après
l’avoir chargée pendant au moins 12
heures. L’autonomie de la batterie sera
ainsi préservée.
• Gardez les batteries à l’écart des
flammes nues.
• Ne court-circuitez pas les bornes des
batteries.
• Ne démontez pas les batteries.
Sécurité
• Ne pliez et ne tordez pas le cordon de
façon excessive et ne posez pas
d’objets lourds dessus.
• Si le cordon ou la fiche sont
endommagés, ne les utilisez plus.
Consultez votre revendeur Sony pour
un cordon de rechange.
Pannes de courant
Pendant une interruption de
l’alimentation, vous ne pouvez pas
composer ni recevoir d’appels et vous
ne pouvez pas utiliser le répondeur
automatique.
FR
Informations complémentaires46
Page 99

Entretien
Manipulation
• N’essayez pas de démonter le boîtier.
Confiez-en l’entretien exclusivement à
un personnel qualifié.
• N’introduisez pas d’objets étrangers
dans la base. Si des liquides ou des
corps étrangers s’introduisent dans la
base, débranchez l’appareil et faites-le
vérifier par un personnel qualifié
avant de le remettre en service.
• N’introduisez rien dans la prise
(d’alimentation externe) DC IN 9V.
• Ne laissez pas tomber l’appareil, car il
pourrait en résulter un
dysfonctionnement.
Nettoyage
• Nettoyez les boîtiers avec un chiffon
doux légèrement imprégné d’eau ou
d’une solution détergente neutre.
N’utilisez aucun type de tampon
abrasif, de poudre à récurer ou de
solvant tel que de l’alcool ou de la
benzine, car ils pourraient ternir le fini
des boîtiers.
• Si les bornes de charge du poste de
base et du combiné sont souillées,
essuyez-les à l’aide d’un chiffon doux.
Si vous avez des questions ou des
problèmes au sujet de votre téléphone,
consultez votre revendeur Sony.
Informations complémentaires 47
Informations complémentaires
FR
Page 100

Guide de dépannage
Si vous rencontrez l’un des problèmes suivants lorsque vous utilisez le
téléphone, référez-vous à ce guide pour essayer de le résoudre. Si le
problème persiste, consultez votre revendeur Sony.
Symptôme
Vous entendez cinq bips brefs
lorsque vous appuyez sur
(TALK).
Vous n’entendez pas la tonalité
de ligne.
La connexion est impossible
bien que le numéro composé
Emission d’appels
soit correct.
Le téléphone ne recompose pas
correctement le numéro.
Le combiné ne sonne pas.
Le poste de base ne sonne pas.
Réception d’appels
Vous entendez des
interférences.
Vous entendez un bip toutes les
Pendant la
trois secondes pendant la
communication
conversation.
Impossible de mémoriser un
numéro de composition rapide.
Impossible de faire un appel
avec la composition rapide.
Composition rapide
Composition rapide incorrecte.
Solution
• Assurez-vous que la base est installé correctement
(page 6).
• Rapprochez le combiné de la base.
• Remettez le combiné sur la base pendant quelques
instants pour réinitialiser le code de sécurité aléatoire.
• Assurez-vous que le cordon de ligne téléphonique est
bien branché sur la prise de téléphone.
• Assurez-vous que la batterie est pleine (page 9).
• Assurez-vous que le mode de numérotation est
correct (page 8).
• Avant de composer le numéro, assurez-vous
d’entendre la tonalité de ligne.
• Assurez-vous que le numéro recomposé est bien celui
que vous voulez.
• Assurez-vous que la sonnerie est en service (page 21).
• La batterie est peut-être faible. Chargez-la pendant
plus de 12 heures (page 9).
• Assurez-vous que la base a été installé correctement
(page 6).
• Rapprochez le combiné du la base.
• Remettez le combiné sur la base pendant quelques
instants pour réinitialiser le code de sécurité aléatoire.
• Assurez-vous que le cordon de ligne téléphonique est
bien branché sur la prise de téléphone.
• Assurez-vous que la sonnerie n’a pas été désactivée
(page 22).
• Rapprochez le combiné du la base.
• Installez la base à l’écart des sources de bruit (page 6).
• Appuyez sur (CHANNEL) pour choisir un canal sur
lequel la réception est meilleure.
• La batterie est faible. Rechargez-la pendant plus de 12
heures.
• Veillez à suivre les instructions pour mémoriser
correctement le numéro (page 18).
• Lorsque le combiné est utilisé, vous ne pouvez pas
enregistrer de numéro de composition rapide sur la
base.
• Reposez un moment le combiné sur la base.
• Vous avez appuyé sur une touche numérique sur
laquelle aucun numéro n’est mémorisé.
• Mémorisez le numéro correct (page 18).
FR
48
Informations complémentaires
 Loading...