

Page 1

3-860-766-11 (1)
Cordless
Telephone with
Answering System
Operating Instructions I
Manual de instrucciones I
SPP-A940
©1997 by Sony Corporation
Page 2

Owner's Record
The model and the serial numbers are
located at the bottom of the unit. Record
the serial number in the space provided
below. Refer to these numbers
whenever you call upon your Sony
dealer regarding this product.
Model No. SPP-A940
Serial No.
___________________
IMPORTANT
SAFETY
INSTRUCTIONS
When using your telephone equipment,
basic safety precautions should always
be followed to reduce the risk of fire,
electric shock and injury to persons,
including the following:
1. Read and understand all instructions.
2. Follow all warnings and instructions
marked on the product.
3. Unplug this product from the wall
outlet before cleaning. Do not use
liquid cleaners or aerosol cleaners.
Use a damp cloth for cleaning.
4. Do not use this product near water,
for example near a bath tub, wash
bowl, kitchen sink, or laundry tub, in a
wet basement, or near a swimming
pool.
5. Do not place this product on an
unstable cart, stand, or table. The
product may fall, causing serious
damage to the product.
6. Slots and openings in the cabinet and
the back or bottom are provided for
ventilation. To protect it from
overheating, these openings must
not be blocked or covered. The
openings should never be blocked by
placing the product on a bed, sofa,
rug, or other similar surface. This
product should never be placed near
or over a radiator or heat register.
This product should not be placed in
a built-in installation unless proper
ventilation is provided.
7. This product should be operated
only from the type of power source
indicated on the marking label. If
you are not sure of the type of power
supply to your home, consult your
dealer or local power company.
8. Do not allow anything to rest on the
power cord. Do not locate this
product where the cord will be
abused by persons walking on it.
9. Do not overload wall outlets and
extension cords as this can result in
the risk of fire or electric shock.
10. Never push objects of any kind into
this product through cabinet slots as
they may touch dangerous voltage
points or short out parts that could
result in a risk of fire or electric
shock. Never spill liquid of any kind
on the product.
11. To reduce the risk of electric shock,
do not disassemble this product, but
take it to a qualified service
personnel when some service or
repair work is required. Opening or
removing covers may expose you to
dangerous voltages or other risks.
Incorrect reassembly can cause
electric shock when the appliance is
subsequently used.
12. Unplug this product from the wall
outlet and refer servicing to qualified
service personnel under the
following conditions:
A. When the power cord or plug is
damaged or frayed.
Page 3

B. If liquid has been spilled into the
product.
C. If the product has been exposed
to rain or water.
D. If the product does not operate
normally by following the
operating instructions; adjust
only those controls that are ^
covered by the operating
instructions because improper
adjustment of other controls may
result in damage and will often
require extensive work by a
qualified technician to restore the
product to normal operation.
E. If the product has been dropped
or the surface has been damaged.
F. If the product exhibits a distinct
change in performance.
13. Avoid using a telephone (other than
a cordless type) during an electrical
storm. There may be a remote risk of
electric shock from lightning.
14. Do not use the telephone to report a
gas leak in the vicinity of the leak.
SAVE THESE INSTRUCTIONS
CAUTION:
To reduce the risk of fire or injury to persons by
battery, read and follow these instructions.
1. Use only the following type and size battery
pack: SONY BP-T23.
2. Do not dispose of the battery pack in a fire.
The cell may explode. Check with local codes
for possible special disposal instructions.
3. Do not open or mutilate the battery pack.
Released electrolyte is corrosive and may
cause damage_to the eyes or skin. It may be
toxic if swallowed.
4. Exercise care in handling the battery in order
not to short the battery with conducting
materials such as rings, bracelets, and keys.
The battery or conductor may overheat and
cause burns.
5. Charge the battery pack provided with or
identified for use with this product only in
accordance with the instructions and
limitations specified in the instruction manual
provided for this product.
6. Observe proper polarity orientation between
the battery pack and battery charger.
INFORMATION FOR GENERAL TELEPHONES
1. This equipment complies with Part 68 of the
FCC rules. On the bottom of this equipment
is a label that contains, among other
information, the FCC registration number and
ringer equivalence number (REN) for this
equipment. If requested, this information
must be provided to the telephone company.
2. T4\e applicable registration jack (connector)
USOC-RJllC or USOC-RJllW is used for this
equipment.
3. This equipment is designed to be connected to
the telephone network or premises wiring
using a compatible modular jack which is Part
68 compliant.
The FCC compliant telephone cord and
modular plug is provided with this
equipment.
4. The REN is used to determine the quantity of
devices which may be connected to the
telephone line. Excessive RENs on the
telephone line may result in the devices not
ringing in response to an incoming call. In
most, but not all areas, the sum of the RENs,
should not exceed five (5.0). To be certain of
the number of devices that may be connected
to a line, as determined by the total RENs,
contact the local telephone company.
5. If your equipment (SPP-A940) causes harm to
the telephone network, the telephone
company will notify you in advance that
temporary discontinuance of service may be
required. But if advance notice isn't practical,
the telephone company will notify the
customer as soon as possible. Also, you will
be advised of your right to file a complaint
with the FCC if you believe it is necessary.
6. The telephone company may make changes in
its facilities, equipment, operations, or
procedures that could affect the operation of
the equipment. If this happens, the telephone
company will provide advance notice in order
for you to make necessary modifications to
maintain uninterrupted service.
Page 4

If trouble is experienced with this equipment
(SPP-A940), please contact Sony Direct
Response Center for repair or warranty
information: Tel 1-800-222-7669. If the
equipment is causing harm to the telephone
network, the telephone company may
request that you disconnect the equipment
until the problem is resolved.
All repairs will be performed in an
authorized Sony service station.
This equipment cannot be used to party lines
or coin lines.
This equipment is hearing and compatible.
10.
If your telephone is equipped with automatic dialers
When programming emergency numbers and
(or) making test calls to emergency numbers;
1. Remain on the line and briefly explain to the
dispatcher the reason for the call.
2. Perform such activities in the off-peak hours,
such as early morning or late evenings.
CAUTION
You are cautioned that any changes or
modifications not expressly approved in this
manual could void your authority to operate this
equipment.
Note
This equipment has been tested and found to
comply with the limits for a Class B digital
device, pursuant to Part 15 of the FCC Rules.
These limits are designed to provide reasonable
protection against harmful interference in a
residential installation. This equipment
generates, uses, and can radiate radio frequency
energy and, if not installed and used in
accordance with the instructions, may cause
harmful interference to radio communications.
However, there is no guarantee that interference
will not occur in a particular installation. If this
equipment does cause harmful interfence to
radio or television reception, which can be
determined by turning the equipment off and on,
the user is encouraged to try to correct the
interference by one or more of the following
measures:
- Reorient or relocate the receiving antenna.
- Increase the separation between the
equipment and receiver.
- Connect the equipment into an outlet on a
circuit different from that to which the receiver
is connected.
- Consult the dealer or an experienced radio/TV
technician for help.
Page 5

Table of contents
Getting Started
6 Read this first
7
Step 1; Checking the package
contents
8 Step 2: Setting up the base unit
11 Step 3: Preparing the battery
pack for the handset
Basics
14 Making calls
15
Rprpi\/ing rallc
16
Telephone Features
17 Speed dialing
17 Storing phone numbers
18 Making calls with speed
dialing
19 Setting the ringer type
19 Turning off the ringer
20 Checking the ringer type
20 Setting the base ringer
20 Paging
24
25
26
27
28 Adjusting the speaker volume
28 Erasing messages
29
Setting the number of rings
Setting the audible message
alert
Turning on the answering
function
Playing back messages
Setting an announcement only
29 Screening calls
30 Recording a memo message
31 Operating from an outside phone
31 Setting your security code
32
Picking up new messages
Additional Information
33 Mounting the base unit on a wall
34 Notes on power sources
34 Maintenance
35 Troubleshooting
37 Counter message
38 Specifications
39 Index
Answering Machine Features
21 Setting up the answering machine
21 Setting the time and day of
the week
22 Recording the greeting
40 LIMITED WARRANTY
Table of contents
Page 6

Getting Started
Read this first
Before you use your phone, you must set it up. Here's a quick way to
set up your phone: Step 1, 2 and 3.
Step 1 (page 7)
First, unpack the phone and the supplied accessories.
Step 2 (page 8 to 10)
Next, do three things to set up the base
unit.
Step 3 (page 11 to 13)
Finally, insert the battery pack into the
handset, and place the handset on the base
unit to charge the battery pack for more than
10 hours.
Handset
About the cordless telephone
Each time you place the handset on the base unit, a random security
code is automatically assigned between the base unit and the handset.
(The IN USE lamp flashes during the initialization, then turns off when
the initialization is complete.) Only a handset which has this unique
security code can make calls through the base unit. This system
prevents the possibility of other cordless telephone handsets making
calls through your base unit.
Getting Started
ThaVs it!
Page 7
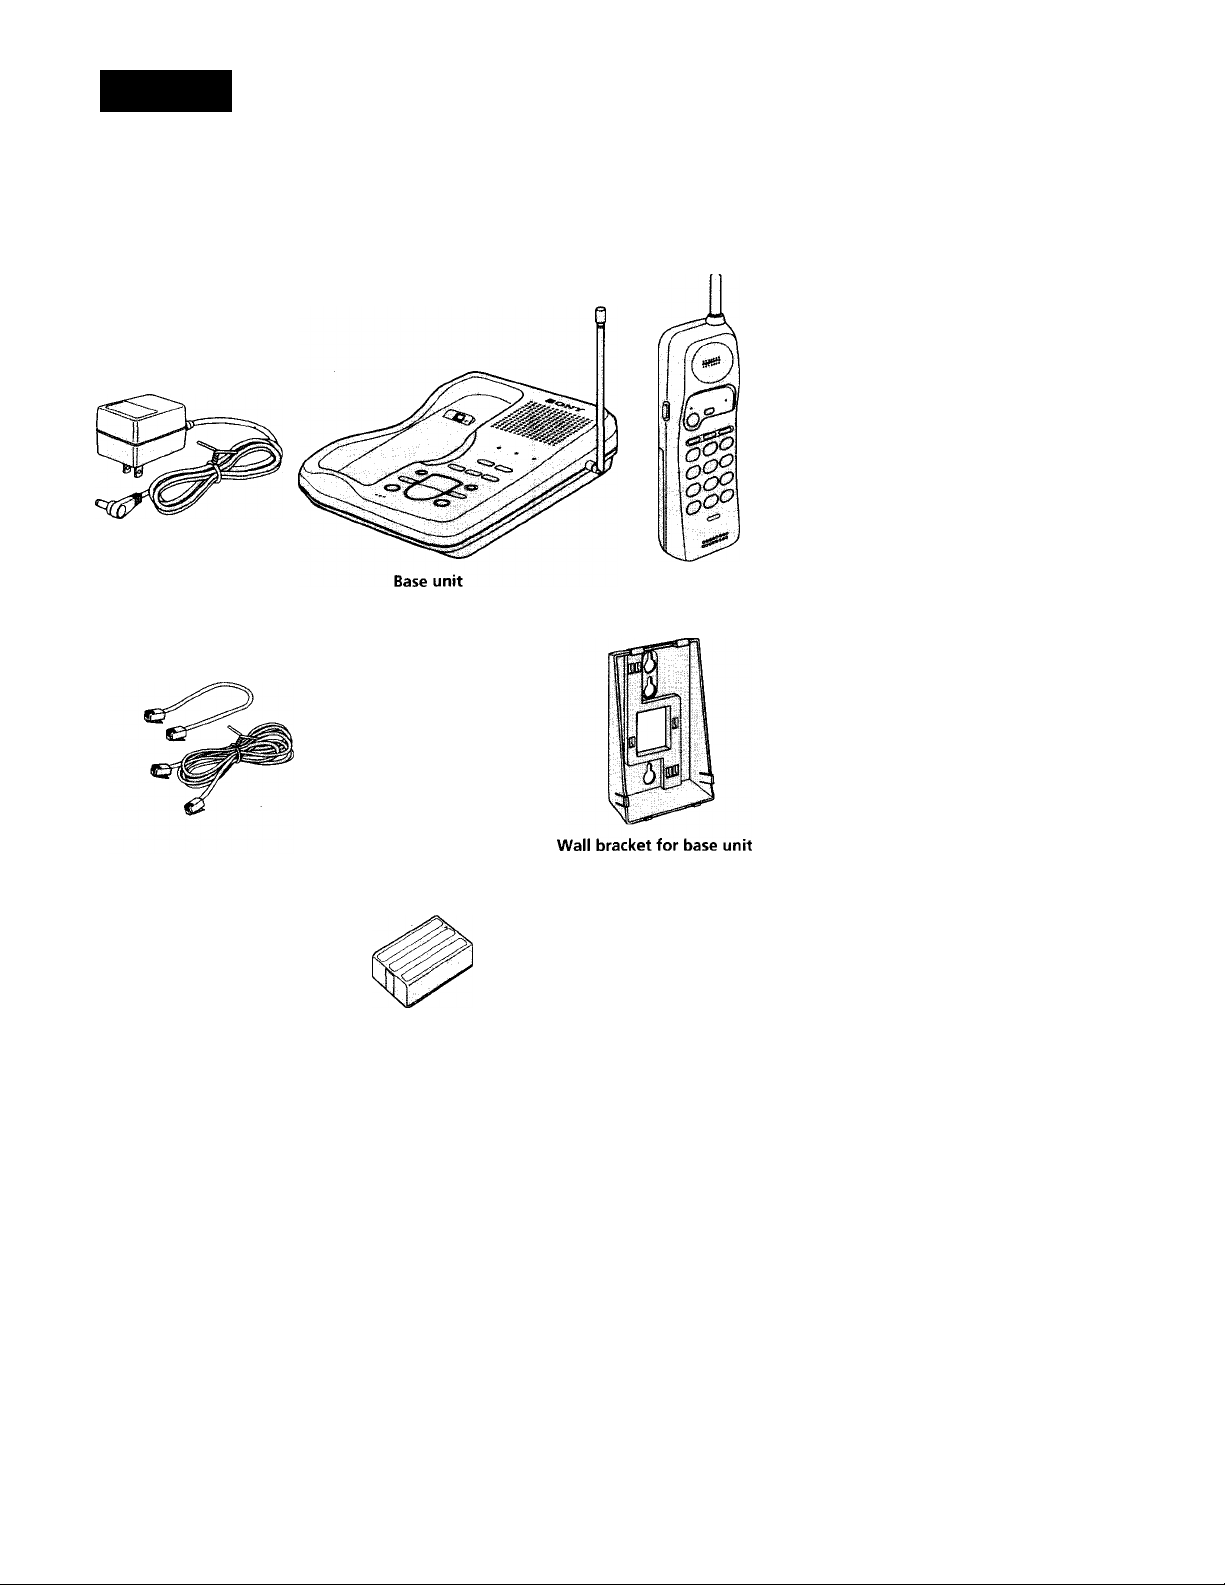
step 1
Checking the package contents
Make sure you have received the following items in the package. If
anything is missing, contact your local Sony dealer.
(fi
Gi
9
A
3
V)
I*
9
s
a
AC power adaptor
(AC-T24)
Telephone line cords (2) Screws and caps (2)
Directory
Rechargeable battery pack
(BP-T23)
Handset
Getting Started 7'
Page 8

step 2
Setting up the base unit
Do the following steps:
• Choose the best location
• Connect the base unit
• Choose the dialing mode
Choose the best location
where you place the base unit affects the reception quality of the
handset.
CAUTION: The cordless telephone operates at a frequency that may cause interference to
nearby TVs and VCRs; the base unit should not be placed near or on top of a TV
or VCR; and if interference is experienced, moving the cordless telephone
farther away from the TV or VCR will often reduce or eliminate the
interference.
Getting Started
Page 9
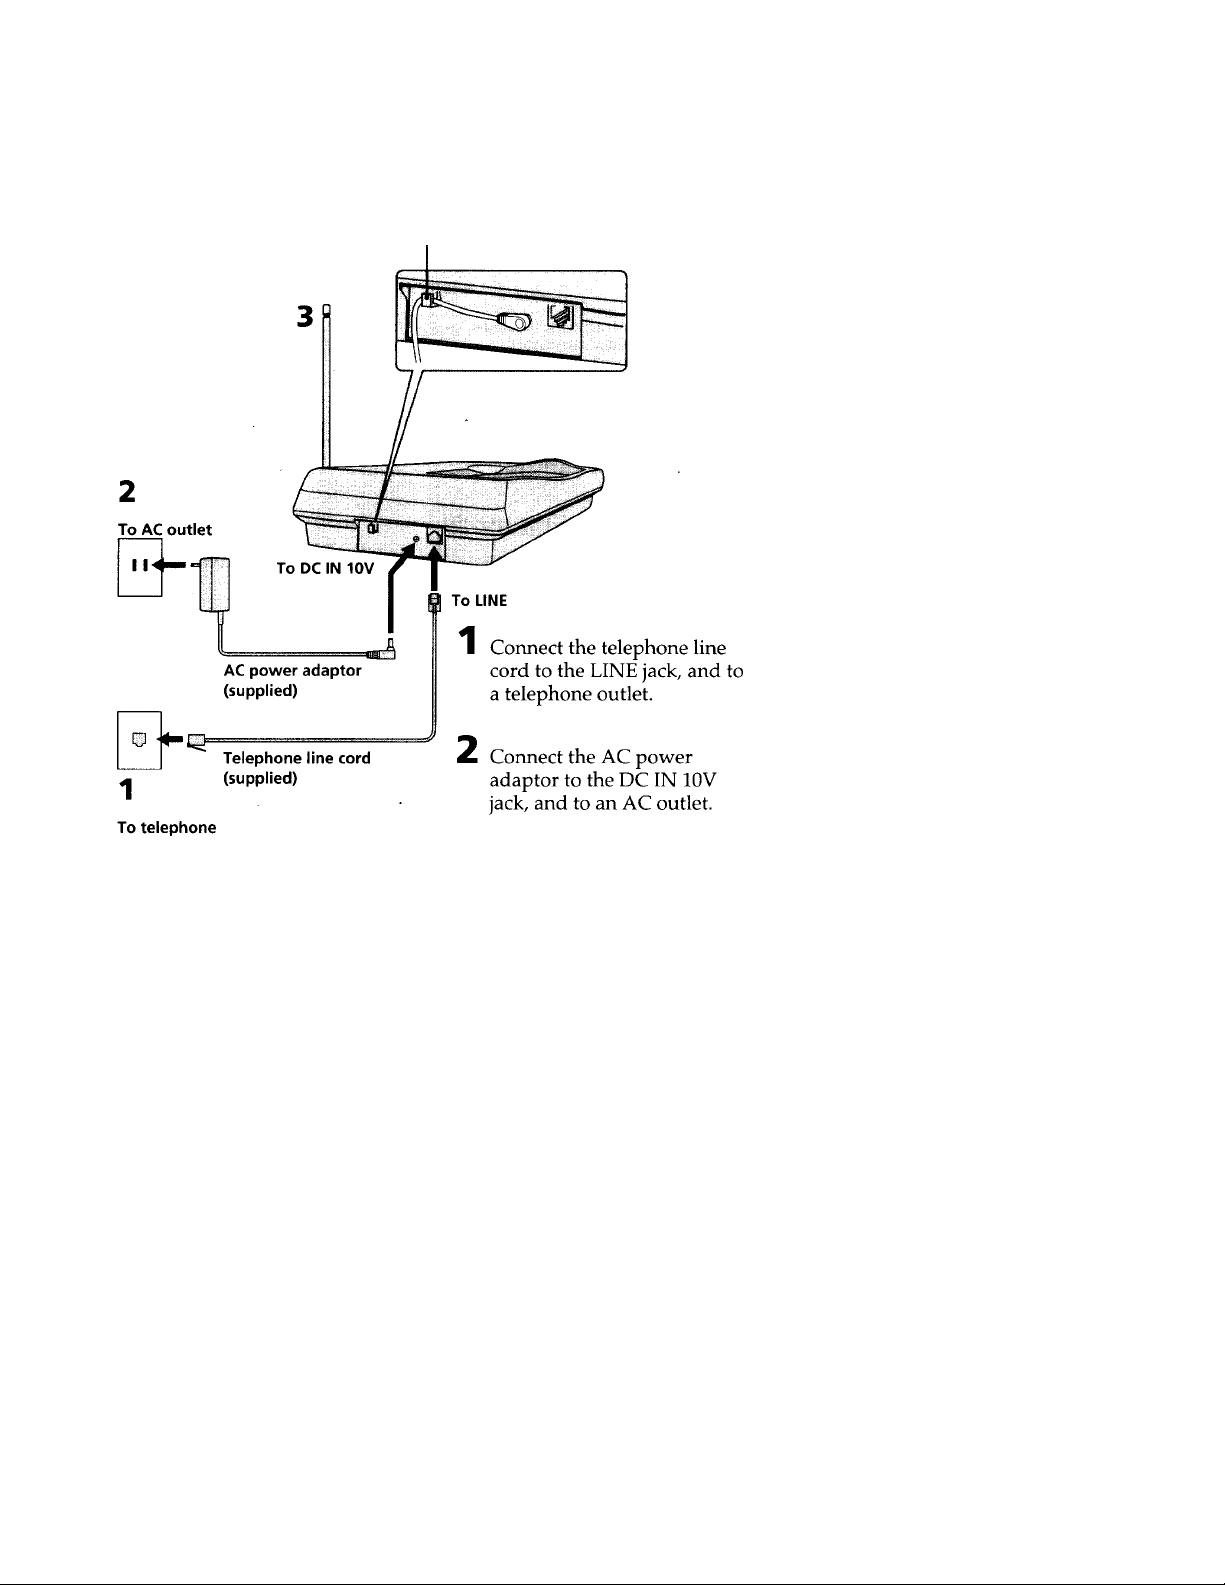
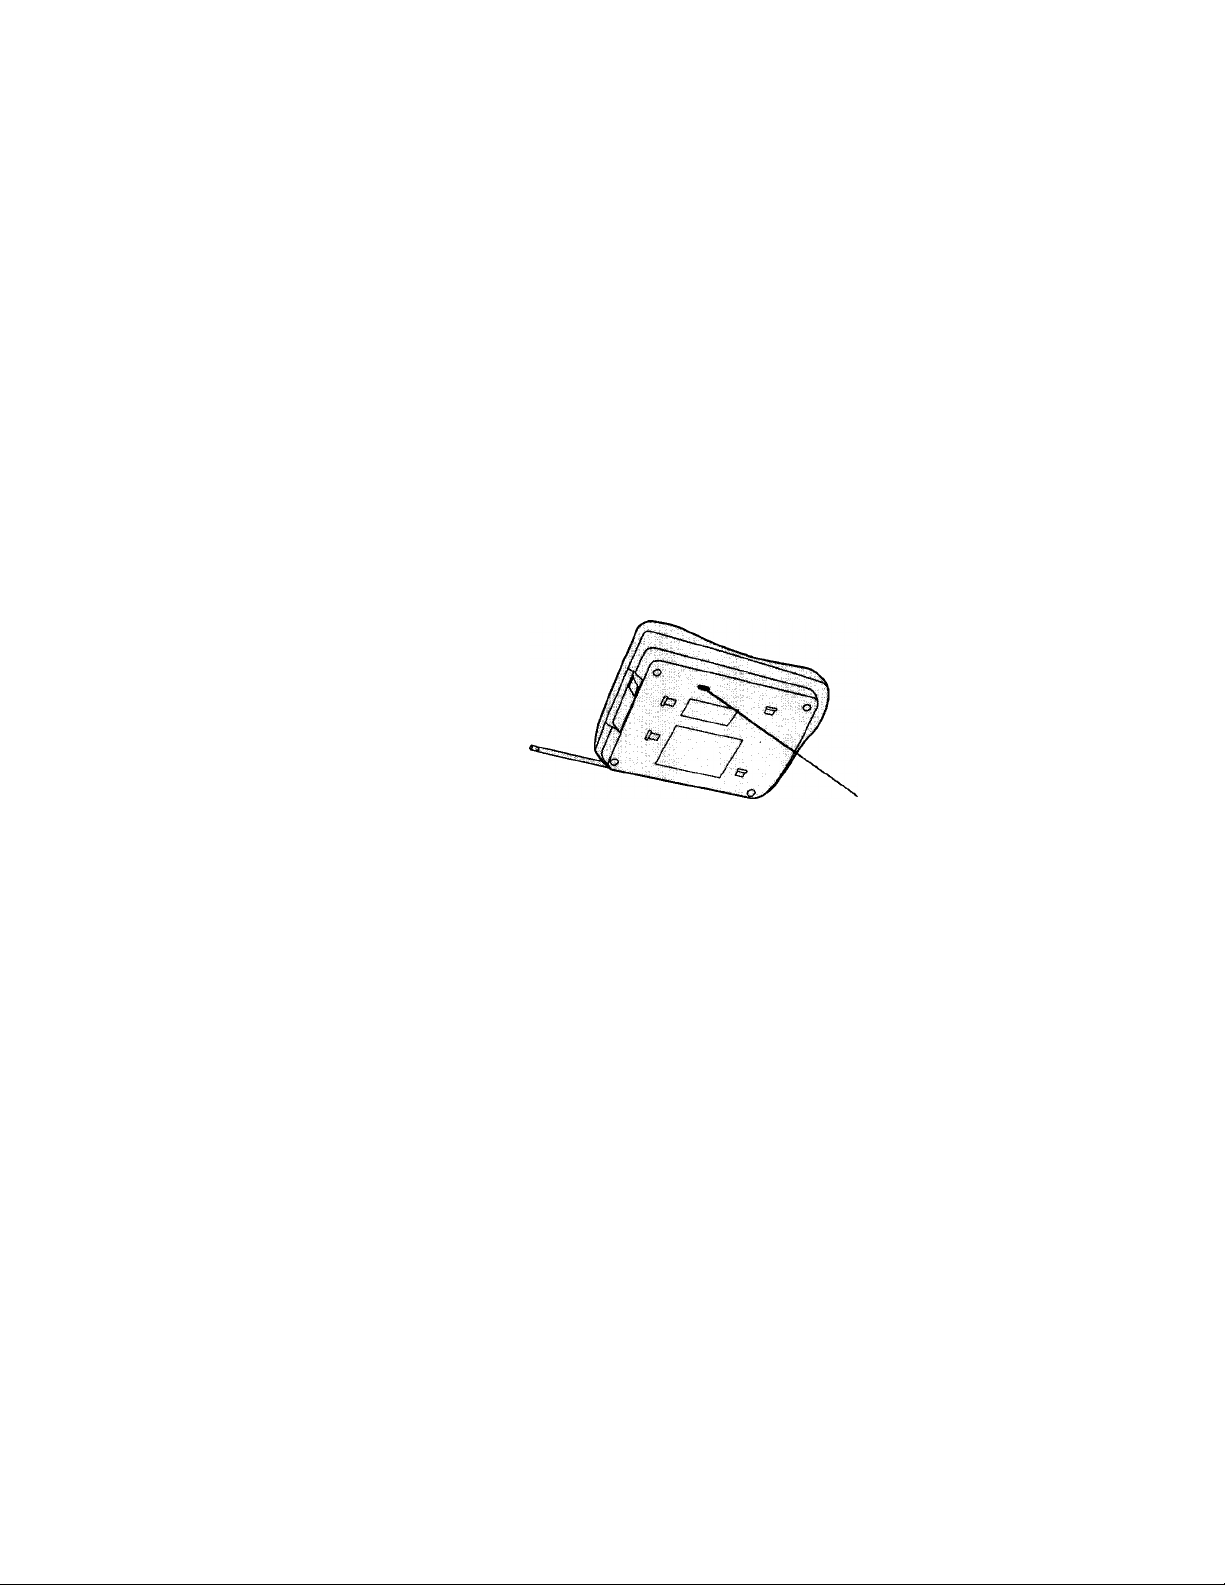
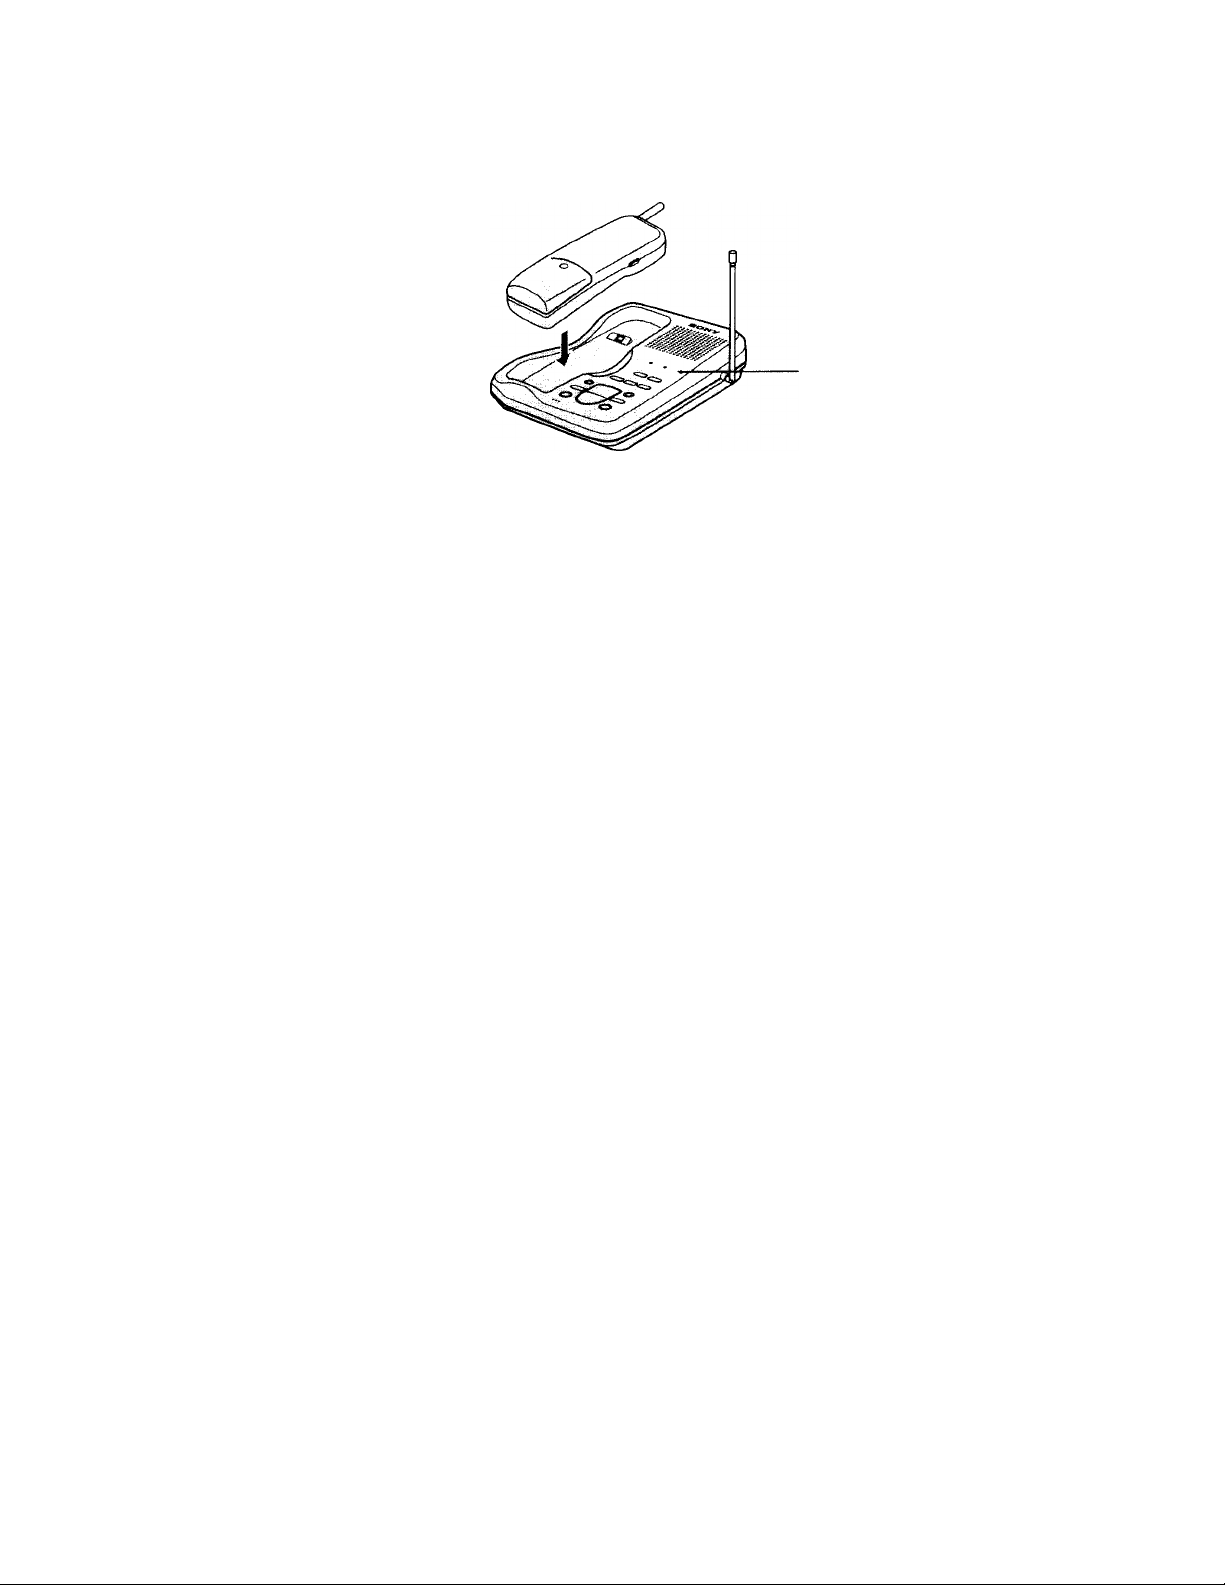
Connect the base unit
If you want to hang the base unit on the wall, mount the unit first (see
page 33).
Route the cable.
Ci
s
■ mmh
3
<0
»
fli
Ì
Q.
outlet
Raise the antenna vertically.
continued
Getting Started
Page 10
step 2: Setting up the base unit (continued)
Notes
• Use only the supplied AC-T24 AC power adaptor.
Do not use any other AC power adaptor.
• Connect the AC power adaptor to a continuous power supply.
• Place the base unit close to the AC outlet so that you can
easily unplug the AC power adaptor.
Tips
If your telephone outlet isn't modular, contact your telephone
service company for assistance.
If you have two phone lines on a single jack with the first
phone line connected to a center pair of wires, and you need
to connect the second phone line (outer pair of wires), contact
your telephone company for rewiring.
Polarity of the plug
Modular
Center pair
Choose the dialing mode
For the telephone to work properly, select an appropriate dialing mode
(tone or pulse).
DIAL MODE switch
If you aren't sure of your dialing system
Make a trial call with the DIAL MODE switch set to TONE.
If the call connects, leave the switch as it is; otherwise, set to PULSE,
Getting Started
Page 11
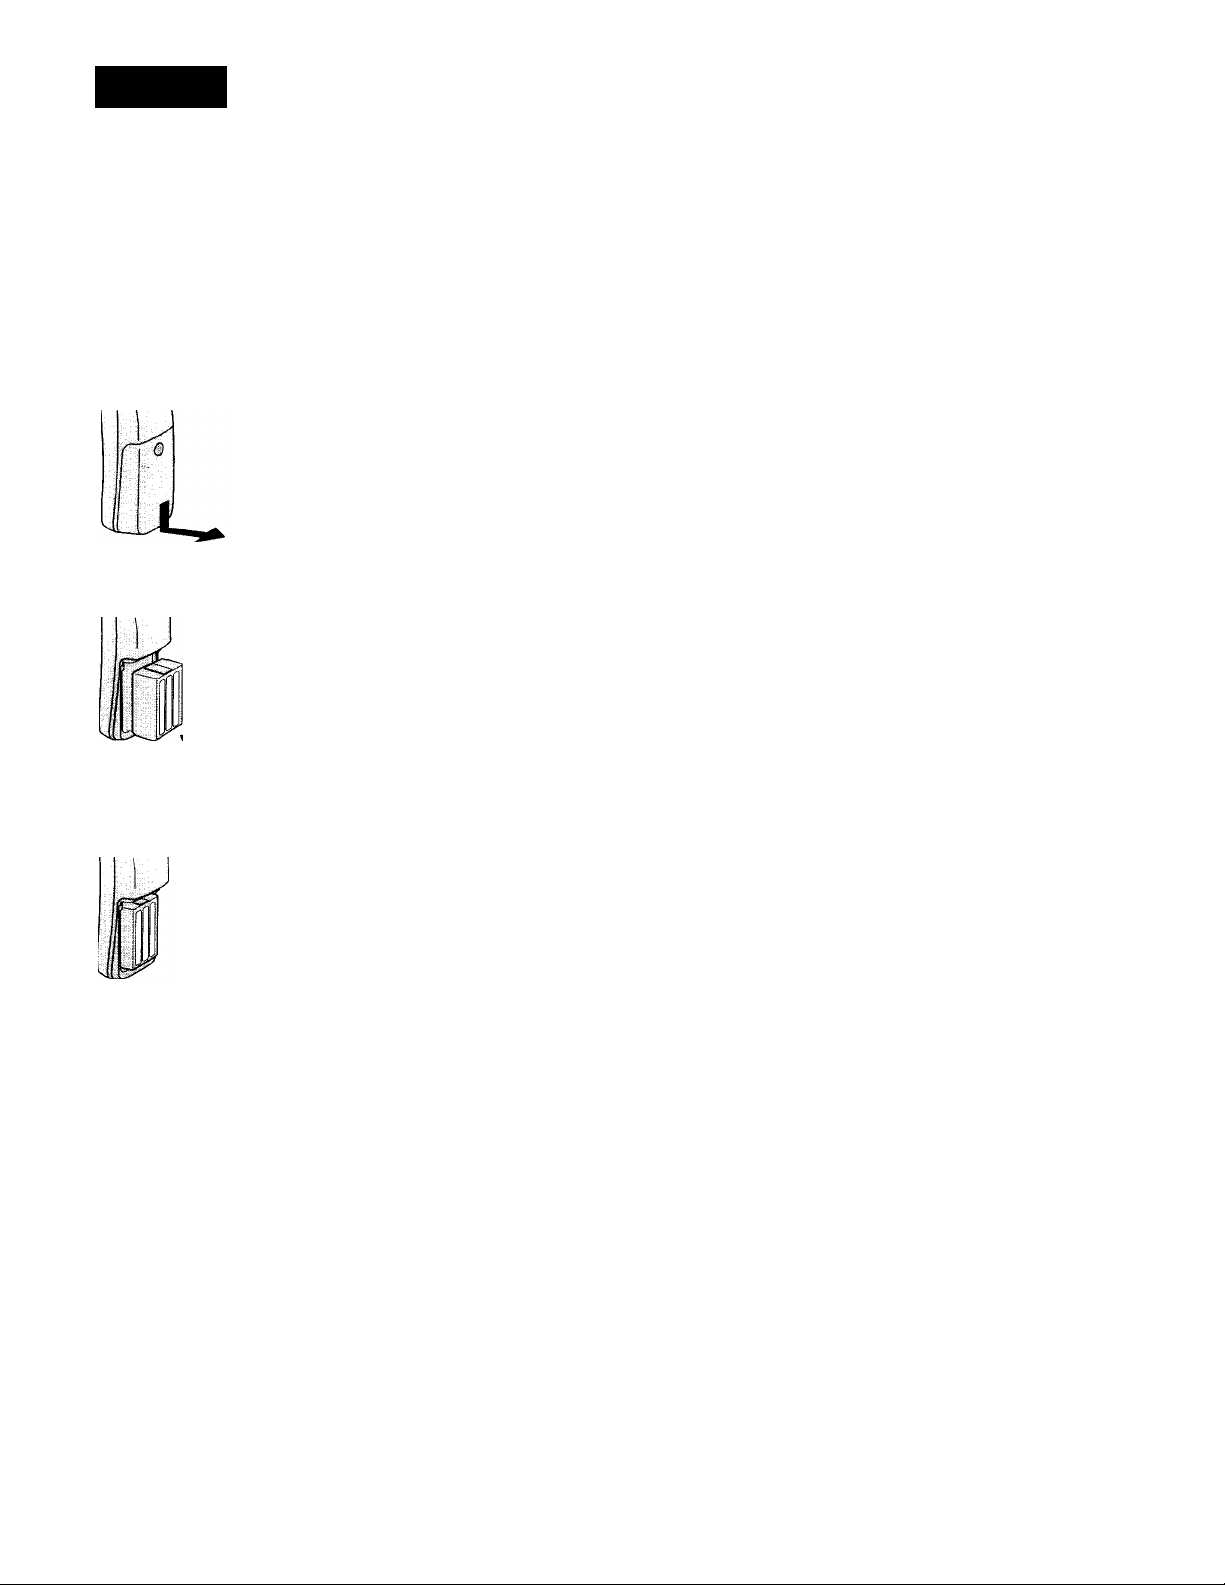
step 3
Preparing the battery pack for the handset
Insert the battery pack into the handset, then place the handset on the
base unit.
Insert the battery pack
1 Slide open the battery compartment lid of the
handset.
2 Insert the battery pack (with contacts facing down)
into the battery compartment.
*
A
■■■
3
<0
o
Replace the battery compartment lid.
continued
Getting Started 11^''^
Page 12
step 3: Preparing the battery pack for the handset (continued)
Charge the battery pack
Place the handset on the base unit.
The CHARGE lamp lights up. It takes about
10 hours to charge the battery pack.
CHARGE lamp
Battery duration
A fully charged battery pack lasts for about:
• Seven hours when you use the handset continuously.
• Seven days when the handset is in standby mode.
Notes
• The battery pack gradually discharges over a long period of time, even if not
in use.
• The CHARGE lamp of the base unit is always lighted when the handset is
placed on the base unit, even if the battery pack has been fully charged.
When to charge the battery pack
For the best perfomance, return the handset to the base unit after
several calls.
12™ Getting Started
Page 13

If the handset battery becomes weak
You hear a beep during the conversation, and the ВАТТ LOW lamp on
the handset flashes.
The call will disconnect soon. Recharge the battery for more than 10
hours.
When to purchase a new battery pack
If the battery lasts only a few minutes even after 10 hours of charging,
the usable life of the battery has expired and needs replacement.
Contact your local Sony authorized dealer or service center, and ask
for a Sony BP-T23 rechargeable battery pack.
A
I
3
tt
VI
ST
Л
Ф
o.
Getting Started
Page 14
Basics
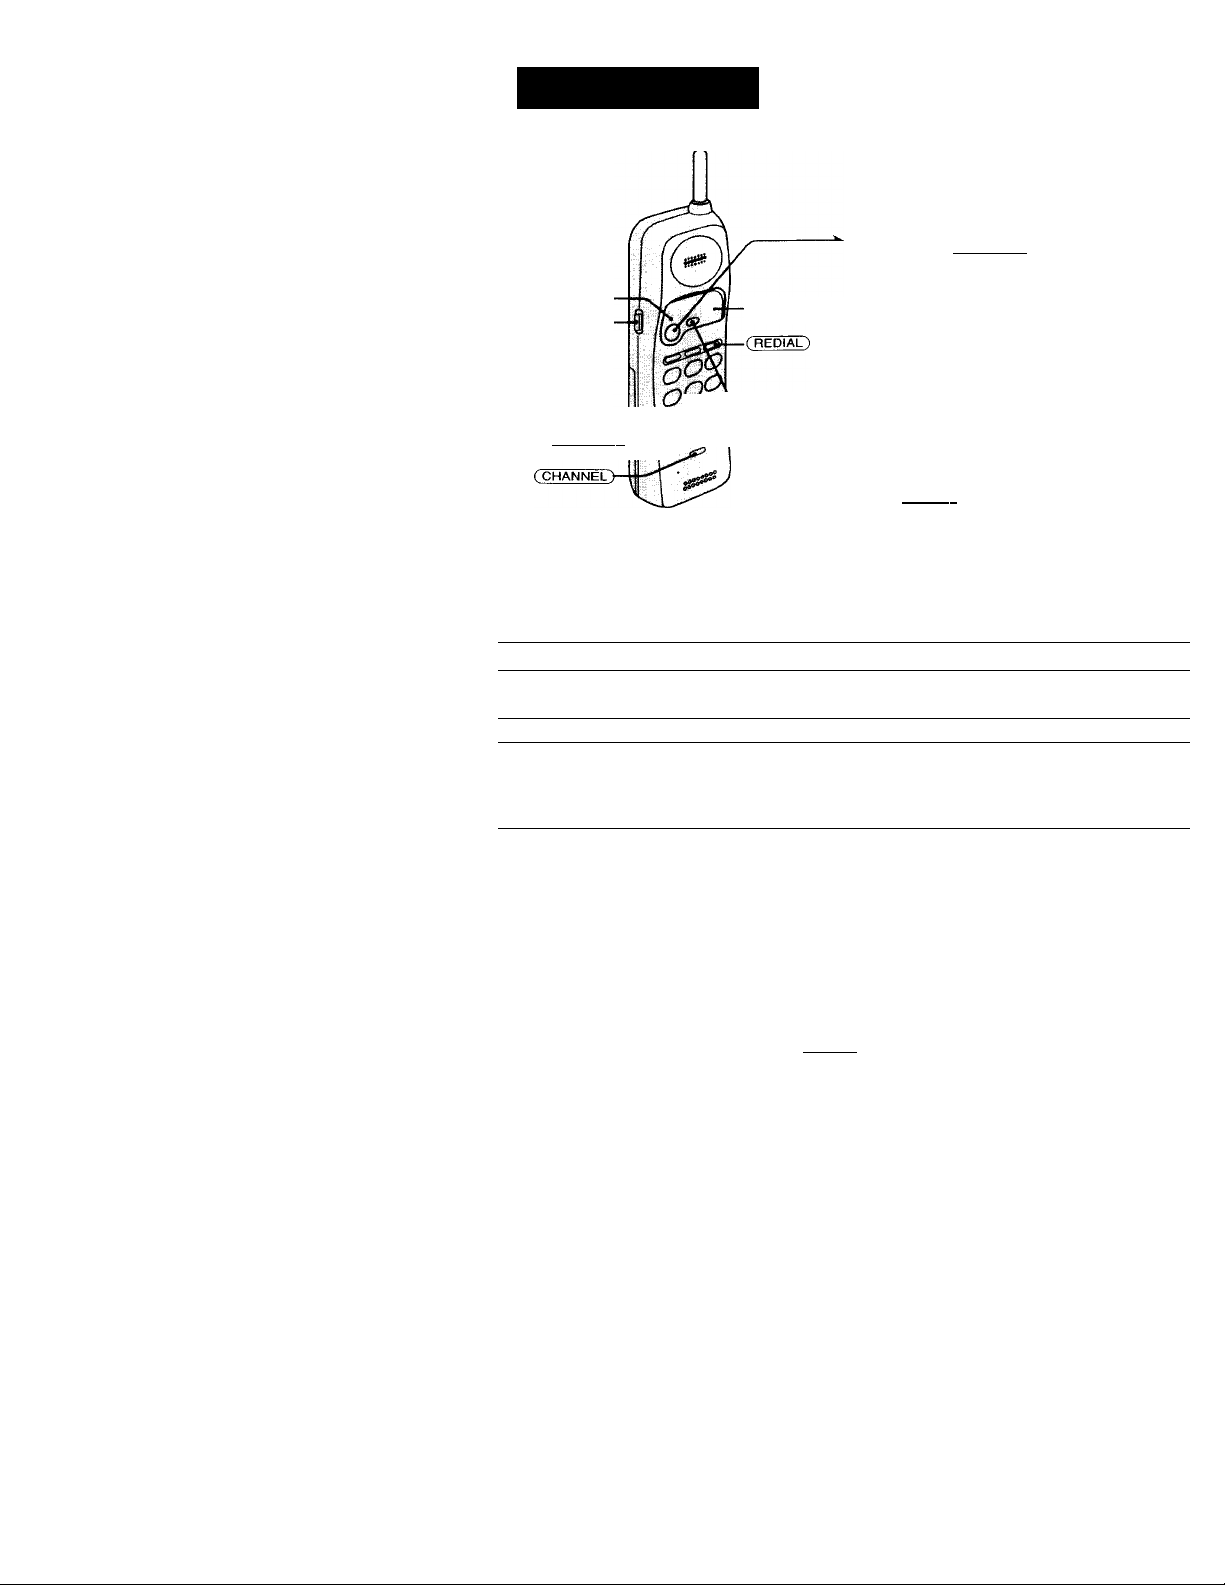
Making calls
TALK lamp.
VOL.
( »TONE >-
Additional tasks
To
Adjust the volume
Select a better channel
Switch to tone dialing temporarily
ВАТТ LOW lamp
Do this
Slide VOL up or down.
High or low volume can be selected.
Press (CHANNEL).
Press (*TONE) while using the
telephone after you're connected.
The line remains in tone dialing
until disconnected.
Press (TALK).
The TALK lamp lights up, then
you'll hear a dial tone. If you
hear beeps, move closer to the
base unit.
Dial the phone number.
2
3
When you're done talking, press
(OFF) or replace the handset on
the base unit.
The TALK lamp goes off.
If the handset battery becomes weak during a call
You hear a beep and the ВАТТ LOW lamp on the handset flashes.
The call will disconnect soon. Replace the handset on the base unit to
charge.
Notes
• Before dialing, make sure you can hear the dial tone, otherwise you cannot
dial correctly.
• When the TALK lamp lights up by pressing (TALK), the IN USE lamp on the
base unit lights up simultaneously.
14"
Basics
Page 15

Redialing
1 Press (TALK).
The TALK lamp lights up.
2 Press (REDIAL) to redial the number last dialed.
Note
If the number last dialed exceeds 16 digits, only the first 16 digits are dialed.
n
Ql
!S.
S'
V)
Basics
Page 16

Receiving calls
when you hear the phone ring:
• Press (TALK) (or any key
except (OFF)).
or
• Pick up the handset from the
base unit when the handset is
placed on the base unit.
The TALK lamp lights up at the
same time the IN USE lamp on
the base unit lights up.
When you're done talking, press
(OFF) or replace the handset on
the base unit.
The TALK and IN USElamps
go off.
Additional tasks
To Do this
Switch to another call
("call waiting" service*)
Adjust the volume of incoming
calls
* You need to subscribe to this service from your telephone company.
Press (TALK/FLASH ) to access the flash
function.
Press the ( talk/FLASH ) button again to
return to the first caller.
Slide VOL up or down.
High or low volume can be selected.
16^‘
Basics
Page 17

Telephone Features
Speed dialing
You can dial with a touch of a few keys by storing a phone number on
a dialing key. You can store up to 10 different phone numbers.
Storing phone numbers
1 Press (PGM).
The TALK lamp flashes.
2 Press one of the dialing keys
(® to (S)) for the phone number
to be stored.
3 Enter the phone number you
want to store.
You can enter up to 16 digits,
including a tone and a pause,
each of which is counted as one
digit.
Press (SPEED DIAL).
You'll hear a confirmation beep,
and the number is stored. The
TALK lamp goes off.
Notes
• In step 3, if you don't enter the phone number; the previously stored number
will be erased.
• Do not allow more than 30 seconds to elapse between each step of the
procedure.
• The handset must be OFF to store phone numbers.
Tip
If you enter a wrong number, start from the beginning.
continued
Telephone Features 17'
£.
<D
TJ
3
o
3
<D
T1
№
fil
? w
a
i/i
"
Page 18

Speed dialing (continued)
To store the previous number dialed
Press (REDIAL) directly after step 2, then go to step 4.
To store a number to be dialed via Private Branch Exchange
(PBX)
Before entering a phone number in step 3 on the previous page, do as
follows:
1 Enter the outside line access digit (e.g. 9).
2 Press and hold the number button down before the position
where the pause is to be inserted.
For example, 9, pause, 555-1234 would be programmed by
pressing and holding the 9 button until it beeps twice, then
entering 5, 5, 5, 1, 2, 3, 4. The pause is two seconds in length.
To enter a longer pause, press and hold the button down
until the handset beeps three or four times. Each additional
beep indicates an additional two second pause.
Note
Each pause is counted as a digit.
To change a stored number
To store a new number, follow the instructions described on the
previous page.
Making calls with speed dialing
1 Press (TALK).
The TALK lamp lights up.
2 Press (SPEED DIAL).
3 Enter the desired speed dialing number (CQ) to d)).
The phone number stored in the speed dialing number will
be dialed.
18‘
Telephone Features
Page 19

Setting the ringer type
You can select a ringer type from four fypes.
Turning off the ringer
1 Press (PGM)-
2 Press CM)-
3 Press CD-
4 Press (OEE)-
The ringer on the handset is turned off.
1 Press ( PGM ).
2 Press (W).
3 Press a dialing key, CD to CD/
to select a ringer type.
Press CoEE)-
¡L
(D
■o
o
3
(D
Tl
(D
tu
I II
<D
i/i
To turn the ringer on again
Follow fhe instructions described in "Setting the ringer type.'
continued
Telephone Features ^9‘
Page 20

Setting the ringer type (continued)
Checking the ringer type
1 Press (PGM).
2 Press
3 Press
The currently selected ringer sounds.
4 Press (OFF).
Note
If you hear no sound (only key beep), the ringer on the handset has been turned off.
Setting the base ringer
Press (MENU) until you hear
"Set base ringer."
// // 1
blinks on the display.
Press (SELECT) to turn the
2
ringer on or off.
Press (TIME/SET).
3
The base ringer setting is
announced.
^ Press (PLAY/STOP)to exit the
menu set up mode.
Note
The base ringer is preset to on.
Paging
You can page from the base unit to the handset.
20^
Telephone Features
Press (PAGE).
The base unit rings the handset four
times before automatically ending
the page. To end the page at the base
unit, press (PAGE).
Note
If a call comes in during paging, paging is
canceled.
Tip
To end a page at the handset, press (OFF).
Page 21

Answering Machine Features
Setting up the answering machine
Setting the time and day of the week
1
Press (MENU) until you hear
"Set day and time."
"- blinks on the display.
2
Press (SELECT) to change the
day of the week.
Press (TIME/SET).
3
The day is set and the hour is
announced.
4
Press (SELECT) to change the
hour.
Press (TIME/SET).
5
The hour is set and the minute is
announced.
Press ( SELECT ) to change the
6
minute.
iD
>
3
ut
s
IÙ
5'
s
01
ft
3
5'
to
•n
(0
at
r*
c
to
ut
-
Press (TIME/SET).
7
The day and time you just
entered is announced and the
clock restarts.
8 Press ( PLAY/STOP ) to exit the
menu set up mode.
continued
Answering Machine Features 21
Page 22

Setting up the answering machine (continued)
Notes
• Press and hold ( SELECT) to increase the minute setting by 10.
• The time and day arc preset to Monday, 12:00 AM.
• "CL" flashes when the day and time is cleared or delayed due to a power
interruption, or when you connect the base unit to the AC outlet for the first
time.
To hear the current time
Press (TIME/SET). The current time setting is announced.
Recording the greeting
You can record your own greeting for the "normal" and
"armouncement only" modes.
Press (MENU) until "Set out
going message" is announced.
"- -" blinks on the display.
Press ( RECORD/MEMO).
"Now recording" is announced
and a long beep sounds.
Speak into the base unit
microphone (MIC). The display
starts counting and you can
record up to 90 seconds.
To stop recording, press
( PLAY/STOP).
Your greeting replays
automatically.
Notes
• If you don't record your own greeting, prerecorded greeting will be assigned
automatically (see page 23).
• If your greeting is less than two seconds, the greeting is not recorded. The
prerecorded greeting will be assigned automatically.
• If a call comes in during recording, recording stops automatically.
• If 90 seconds have passed or memory becomes full in step 3, recording stops
automatically.
• "Memory full" is announced if no recording space is available when you
press ( RECORD/MEMO). Erase unnecessary messages (see page 27).
Tip
To record an armouncement only greeting, set the announcement only mode at
first (see page 29), then follow the above instructions. Otherwise, the normal
greeting will be recorded.
It
Answering Machine Features
Page 23

To check the greeting
Press (MENU) until "Set out-going message" is announced. Then press
C PLAY/STOP ) to play back the greeting.
To change the greeting
Follow the same instructions as described on the previous page. The
new greeting replaces the old one.
To erase the greeting
1 Press (MENU) until "Set out-going message" is announced.
2 Press (ERASE).
Notes
• You can also erase the greeting during playback.
• After erasing your owri greeting, the prerecorded greeting will be assigned
automatically.
Prerecorded greetings
Normal mode:
Announce only mode;
"Hello, Tm unable to answer your call right
now. Please leave your name, number and
message after the tone."
"Hello, Tm unable to answer your call right
now. Please call again. Thank you."
(fi
>
3
VI
t
(D
5'
S
fit
n
3;
5'
(D
■n
(D
ai
r*
c
(D
VI
continued
Answering Machine Features
23"
Page 24

Setting up the answering machine (continued)
Setting the number of rings
You can select the number of rings before fhe phone answers to take a
message.
There are four modes: 2, A, 6, and Toll Saver.
1
Press (MENU) until you hear “Set number of rings."
blinks on the display.
2
Press (SELECT) until you hear the desired ring type (2, 4, 6,
or Toll Saver).
To answer after 2 rings, select "1."
To answer after 4 rings, select "4."
To answer after 6 rings, select "6."
Select "Toll Saver" to answer after 2 rings when there are
new messages, and 4 rings where there are no new
messages.
3
Press (TIME/SET).
The ring time setting is announced.
4
Press (PLAY/STOP) to exit the menu set up mode.
Notes
• If Toll Saver is active and your answering machine rings three times when
you call, you can hang-up to avoid any long distance charges.
• The number of rings is preset to answer after 4 rings.
24‘
Answering Machine Features
Page 25

Setting the audible message alert
You have the option of having a beep tell you if you have received any
new incoming messages.
Press Cmenu ) until you hear
"Set audible message alert"..
blinks on the display.
2
Press ( SELECT) to set the
audible message alert on or off.
Press (TIME/SET).
3
The setting is announced.
4’ Press (PLAY/STOP)to exit the
menu set up mode.
Notes
• You can hear a beep every 10 seconds.
• If you press any key on the base except PAGE, the beep stops.
• The audible message alert is preset to off.
(O
r*
>
3
l/i
i
<D
5'
S
0»
ft
y
5'
(D
n
(D
fit
c
<D
tfi
continued
Answering Machine Features
25"
Page 26

Setting up the answering machine (continued)
Turning on the answering function
Press (ANSWER) on the base unit.
The ANSWER lamp lights up.
To turn off the answering function
Press ( ANSWER) on the base unit.
The ANSWER lamp goes off.
Note
The answering function is preset to on.
Tips
• The answering machine will automatically answer a call after 10 rings, even if
the answering function is off and to prompt the caller to turn on the
answering function, announces "Please enter your security code."
When the memory is full
The total recording time of this answering machine is approximately
18 minutes (including the greeting, messages, and memo).
When the remaining recording time becomes less than 30 seconds "F"
flashes on the display and the answering machine will be memory full
status.
In this status, the answering machine will not answer a call until after
10 rings even if the answering function is on.
To avoid this to happen, erase unnecessary messages (see page 28).
You can also erase the messages from an outside phone. ( See page 32).
26"
Answering Machine Features
Page 27

Playing back messages
If there are new messages, the display flashes the number of new messages.
You will hear beeps if the audible message alert setting is on (see page 25).
Press C PLAY/STOP ) to play back from
the first new message.
Note
If a call comes in, the play back will stop.
If there are no new messages, all the previously
reviewed messages are played back.
\ PLAY/STOP )
Additional tasks when playing back messages
To
Stop play back Press ( PLAY/STOP).
Repeat the current message Press ( REPEAT) during plav back.
Skip the current message Press (SKIP/QUICK).
Go back to the previous message
Play back quickly
Note
A time and day stamp is announced after each message is played.
Tip
The messages are saved even after a power failure.
Do this
Press ( REPEAT) within the first 2 seconds of the
current message play back.
Press and hold (SKIP/QUICK) during plav back.
Release (SKIP/QUICK) to return to normal.
(Q
>
3
t
(D
5'
s
Bl
n
3;
5'
(D
■n
(D
U
r*
C
(D
l/l
continued
Answering Machine Features 27'
Page 28

Playing back messages (continued)
Adjusting the speaker volume
Notes
• If the volume level is at its minimum or maximum setting, four short beeps
sound.
• During the ringing, you can't adjust the speaker volume.
Tip
There are 7 steps for the volume level (1..7). The volume level is preset to 4.
Erasing messages
Press and hold (ERASE )for more than 2
seconds. All previously reviewed
messages are erased.
To erase individual messages
Press ( ERASE ) while playing back the message that you want to erase.
Note
The display shows the total number of "new" messages. Therefore, it is reset to
"0" when you play back all new messages, even they are not erased yet. Be sure
to erase unnecessary messages before the memory becomes full.
28^^ Answering Machine Features
Page 29

Setting an announcement only
You can play the greeting only without recording incoming messages
(Announcement only). You might want to set the announcement only when,
for example, you're away for a while and you can't pick up messages.
1
Press (MENU) until you hear
"Set announce only."
Press (SELECT) to set the
2
announcement only on or off.
Press (TIME/SET).
3
The setting is announced.
4
Press (PLAY/STOP)to exit the
menu set up mode. Display
shows "A" when you set
announcement only.
Note
• To activate announcement only, you should turn on the answering machine.
• The announcement only is preset to off.
Screening calls
You can screen calls by leaving the answering machine on while you
are at home. When a call is answered, you can hear the message being
recorded through the base unit. You can decide either to continue
recording or to switch to conversation.
>
3
(A
g
A
-t
3
to
S
A
n
3"
5'
A
Tl
A
A
f*
C
A
l/i
To answer the call
Press (TALK) on the handset.
Notes
• The call screen speaker volume can be controlled by the ( VOLUMET) or
(VOLUME -) button. If the speaker volume is set at its minimum level, you
will not be able to hear incoming calls.
• The answering machine will stop automatically when the handset or a parallel
phone is picked up. If the answering machine does not stop, press either
(PLAY/STOP) on the base unit, or (5) (D on the handset or parallel phone.
The recording will remain as a new message.
Answering Machine Features
continued
29"
Page 30

Recording a memo message
You can leave messages for other users of the unit.
1
Press (RECORD/MEMO). "Now
recording" is announced and
counting starts.
2
Speak into the base unit
microphone to record your
message.
A memo can be up to four
minutes in length.
Press (PLAY/STOP) to stop
recording.
The message number on the
display increases by one.
Notes
• If memory is full, the answering machine stops recording.
• "Memory full" is announced if no recording space is available when you
press ( RECORD/MEMO).
• If your message is shorter than two seconds, the recording is canceled.
• The display flashes "99" if you record a memo more than 99 seconds.
• If a call comes in during recording, the recording is stopped.
30*=
Answering Machine Features
Page 31

Operating from an outside phone
Setting your security code
By setting your security code, you can operate the answering machine
from a touch-tone phone while you are away from home.
1 Press (MENU) until you hear
"Set security code."
2 Press (SELECT) to change the
security code setting.
3 Press (TIME/SET) to confirm
your choice.
The new security code is
announced.
4 Press (PLAY/STOP) to exit the
menu set up mode.
Note
Press and hold (SELECT) to increase the security code by 10.
(Q
>
3
i/i
i
n
s
S
u
n
3;
5'
n
■n
<D
fil
r*
c
<D
i/i
continued
Answering Machine Features 31
Page 32

Operating from an outside phone (continued)
Picking up new messages
1 Call your telephone number from a touch-tone phone.
2 when you hear the greeting, press CM) and enter your
security code.
A confirmation beep sounds.
If there are new messages, they are played back
automatically.
3 Press the keys in the "Table of control codes" for the desired
operation command.
4 When you finish, disconnect the line.
Notes
• Don't let two seconds elapse between each digit of the security code and the
control code.
• If you did nof fum on the answering machine, your phone picks up
automatically after ten rings,
• If the message recording memory runs out, the answering machine turns off
automatically. "Memory full. Please enfer your security code" is announced.
• If you enter wrong security codes three times, the line disconnects.
• If no keys are pressed wifhin 20 seconds, fhe line disconnects.
Tip
Press QT) (o) on the touch-tone keypad or ( PLAY/STOP) on the base unit to
disconnect the line.
Table of control codes
To Key Notes
Get help
Play back messages
Repeat/skip backward
Stop operation
Skip forward
Record greeting
Check greeting
Record a memo
Erase individual messages
Turn answering machine on/off
32^
Answering Machine Features
®(D
CD®
CD®
CD®
CD®
CD®
D®
CD®
®®
®®
Press to access simple voice menu. Press again to
access advanced voice menu.
Plays back all messages
Press during play back to repeat a message. To
skip backward, press within two seconds after the
current message starts.
Stops every function
Press during play back to skip forward.
"Now recording" is announced.
Review your greeting
"Now recording" is announced.
Press during play back
Toggles the system on/off. "Answer machine is
on" or "Answer machine off" is announced.
Page 33

Additional Information
Mounting the base unit on a wall
Attach the AC power adaptor
cord and the telephone line cord
' Wall bracket
- Telephone line cord
AC power adaptor cord
to the wall bracket.
Hook the wall bracket to the
wall plate, and plug the
telephone line cord into the
telephone outlet.
If the wall plate is not available,
use the two screws provided to
mount the bracket.
HXE
----
<ssmQ
Insert the upper tabs first, then
press down the base unit so that
the lower tabs on the bracket go
into the base unit. Then, raise
the antenna vertically and attach
the hang-up tab upside down.
Additional Information 33^
>
a
Q.
o
3
fit
0
t
3
Ql
r*
o'
3
Page 34

Notes on power sources
On battery pack
• Store the battery pack at a temperature
between 41 °F (5°C) and 95°F (35°C)
for best performance.
• If you don't use the handset for a long
period of time, remove the battery
pack.
On power failure
• During a power interruption, the base
unit won't operate, and a phone
conversation can't be made on the
handset.
Maintenance
RECYCLING NICKELCADMIUM BATTERIES
NICKEL-CADMIUM
BATTERY.
MUST BE DISPOSED OF
Ni-Cd
Nickel-Cadmium batteries are recyclable.
You can help preserve our environment by
returning your unwanted batteries to your
nearest Sony Service Center or Factory Servic.
Center for collection, recycling or proper
disposal.
Note: In some areas the disposal of nickel-
cadmium batteries in household or business
trash may be prohibited.
For the Sony Service Center nearest you call
1-800-222-SONY (United States only)
Caution: Do not handle damaged or leaking
nickel-cadmium batteries.
PROPERLY.
Clean the surface with a soft cloth
slightly moistened with water or a
mild detergent solution. Do not use
any type of abrasive pad, scouring
powder or solvent, such as alcohol or
benzine, as they may damage the
surface.
If the terminals (metal parts on the
base unit and the handset) are soiled,
wipe them with a soft cloth or paper.
34«
Additional Information
• Clean the charge terminals of the
handset and the base unit at least
every one month with a soft cloth or
paper.
If you have any questions or problems
concerning your phone, please consult
your nearest Sony dealer.
Page 35

Troubleshooting
If you've experienced any of the following difficulfies while using your
phone, use this troubleshooting list to help you remedy the problem.
Should any problem persist, consult your nearest Sony dealer.
Symptom
You hear four short error
beeps when you press
(TALK).
You hear no dial tone.
n
u
O)
The telephone always • Make sure fhe number you last dialed (including the
(0
connects with the wrong
number or doesn't connect at
all, even though the number • Make sure the dialing mode is set correctly
you dial is correct.
The phone doesn't redial • Make sure the last dialed number is really the one
correctly.
The handset doesn't ring. • The battery may be weak. Charge the battery for more
«/1
*55
c
>
s
0)
cc
You hear interference during
c
conversation.
о
n
V)
о
>
c
You hear a beep during • The battery is weak. Charge the battery for
о
u
conversation and the ВАТТ -
LOW lamp flashes.
3
о
Remedy
• Make sure you set up the base unit correctly (page 9).
• Move the handset closer to the base unit.
• Replace the handset to the base unit for a while to
reset the random security code.
• Make sure the telephone line cord is securely
connected to the telephone outlet.
• Make sure the battery is fully charged (page 12).
tone and pause digits, if used)
is 16 digits or less.
(page 10).
• Before dialing, make sure you can hear a dial
tone.
you want to dial.
• If the number last dialed exceeds 16 digits, only the
first 16 digits are dialed.
fhan 10 hours (page 12).
• Make sure you sef up the base unit correctly (page 9).
• Move the handset closer to the base unit.
• Replace the handset to the base unit for a while to
reset the random security code.
• Make sure the ringer is turned on (page 19).
• Move the handset closer to the base unit.
• Rress (CHANNEL) tor a channel that gives better
reception.
• Place the base unit away from noise sources (page 8).
more than 10 hours (page 12).
>
a.
fi.
S'
o'
3
Ш
3
о
3
ai
r*
o'
3
continued
Additional Information 35"
Page 36

Troubleshooting (continued)
Symptom
You can't store a speed
dialing number.
oi
c
"D
01
You can't make a speed
W
a
dialing call.
i/>
Speed dialing is incorrect.
The handset doesn't ring
when calling from the base
o>
c
unit.
'&
IS
Q.
Message is not recorded.
OI
_c
No sound from the speaker of
the base unit.
S
ifl
c
The caller's message is
<
interrupted.
The clock is incorrect.
The phone doesn't accept
your security code.
^ Q.
? Qi
The line is disconnected when
.£ "0
PD jÛ
you call your phone from a
touch-tone phone.
IS
o
The CHARGE lamp doesn't
light up when you place the
'—
handset on the base unit.
a;
u
w
3
£ The battery pack has a shorter
o
0)
V)
life.
Ima
01
$
o
Û.
Remedy
Make sure you follow the procedure in storing the
number correctly (page 17).
When you hear four short error beeps, move the
handset closer to the base unit or make sure you set
up the base unit correctly.
You pressed the number button to which no phone
number has been stored.
Store a correct number (page 17).
The handset may be engaged in conversation.
The battery may have little or no power. Charge the
battery for more than 10 hours (page 12).
Replace the handset to the base unit.
Extend the antervna of the base unit vertically.
Move the handset closer to the base unit.
Place the base unit away from noise sources (page 8).
The remaining recording time is less than 30 seconds
or 99 messages were recorded. The answering
machine becomes "Memory full" status and does not
record messages. Erase messages (page 28).
The message is less than 2 seconds. The answering
machine does not record messages less than 2 second;
in length.
Adjust the volume (page 28).
The caller's message is too long.
The caller's voice is too low. The unit disconnects the
line when it detects seven seconds of silence.
There was a power interruption. Reset the time (page
21).
Make sure you call from a touch-tone phone.
Make sure the security code is correct.
Make sure you entered the security code within two
seconds after you've entered (5)-
You entered wrong security codes three times.
Clean the terminal on the base unit and the handset
with a dry, soft cloth.
Make sure the handset is placed on the base unit
properly.
The power wasn't continuously supplied to the base
unit during charging.
The battery pack was charged less than 10 hours (due
to power failure, etc.).
The usable life of the battery has expired and need
replacement.
36^
Additional Information
Page 37

Counter message
The message counter on the base unit shows the following information.
When the counter shows
Flashing number
CL
A
F
It means
-Number of messages not yet played back.
Flashes when the day and time is cleared or
delayed due to a power interruption, or when
you connect the base unit to the AC outlet for the
first time. Reset the time correctly (page 21).
The announcement only mode is selected (page 29).
The recording area is full. Erase unnecesary
messages (page 28).
>
a
Q.
i+
o'
3
Si.
3
Hi
o
3
tu
f*
o'
3
Additional Information 37^
Page 38

Specifications
General
Operating frequency
900 MHz ISM bands/10 channels
Dial signal
Tone, 10 PPS (pulse) selectable
Supplied accessories
See page 7.
Handset
Power source
Rechargeable battery pack BP-T23
Battery life
Talk time: Approx. 7 hours
Standby; Approx. 7 days
Dimensions
Approx. 2^/jX7'/4x1V, inches (w/h/d),
antenna excluded
(approx. 60 x 185 x 38 mm)
Antenna: 1 '/^ inches (32 mm)
Mass
Approx. 9 oz (approx. 250 g), battery
included
Base unit
Power source
DC 10 V from AC power adaptor
Battery charging time
Approx. 10 hours
Dimensions
Approx. 5V2 x2V, X8V2 irit^hes
(w/h/d), antenna excluded
(approx. 140 X 55 X 215 mm)
Antenna : Approx. 4 ^/^ inches
(approx. 120 mm)
Mass
Approx. 22 oz (approx. 600 g)
Answering machine
Maximum recording time
About 18 minutes, using incorporated IC
Greeting message
Up to 90 seconds per each
Incoming and Memo message
Up to 4 minutes per message
Design and specifications are subject to
change without notice.
Additional Information
38"'
Page 39

Index
A
Adjusting volume
handset volume 14,16
speaker volume 28
Announcement only 29
Answering machine 21
Audible message alert 25
B
Battery pack
charging 12
duration 12
Call waiting service 16
Channel 14
Connection 9
Control codes, table 32
Operating from an outside phone 31
P, Q
Package contents 7
Paging 20
Play back 27
Pulse dialing 10
Receiving calls 16
Recording
greeting 22
memo message 30
Redialing 15
Ringer
setting the ringer type 19
turning off 19
Day and time stamp 21, 27
Dialing mode
choosing 10
switching to the tone temporarily 14
E, F, G, H, I
Erasing
greeting 24
messages 27
Location, base unit 8
M, N
Making calls 14
Memo, recording 30
Messages
picking up new 32
playing 27
Mounting the base unit on a wall 33
Number of ring 24
Screening call 29
Security code 31
Setting up
answering machine 21
base unit 8
handset 11
Speed dialing 17
Stamping messages with day and time
21, 27
T, u
Toll saver 24
Tone dialing
choosing 10
switching to temporarily 14
Troubleshooting 35
V, W, X, Y, Z
Volume
handset 14,16
base speaker 28
Additional Information
39"
>
a
Q.
o
3
fit
o
3
fit
f*
o'
3
Page 40

SONY.
Telephone
LIMITED WARRANTY
Sony Electronics Inc. (“Sony”) warrants this Product (including any accessories) against defects in material or
workmanship as follows;
1. LABOR: For a period of one (1) year from the date of purchase, if this Product is determined to be defective. Sony
will repair or replace the Product, at its option, at no charge, or pay the labor charges to any SONY authorized service
facility. After the Warranty Period, you must pay for all labor charges.
2. PARTS: In addition, SONY will supply, at no charge, new or rebuilt replacements in exchange for defective parts
for a period of one (1) year. After the warranty period, you must pay for all parts costs.
3. ACCESSORIES: Parts and labor for all accessories are for one (1) year.
To obtain warranty service, you must take the Product, or deliver the Product freight prepaid, in either its original packaging
or packaging affording an equal degree of protection, to any authorized Sony service facility.
This warranty does not cover customer instruction, installation, set up adjustments or signal reception problems.
This warranty does not cover cosmetic damage or damage due to acts of God, accident, misuse, abuse, negligence,
commercial use, or modification of, or to any part of the Product, including the antenna, This warranty does not cover
damage due to improper operation or maintenance, connection to improper voltage supply, or attempted repair by anyone
other than a facility authorized by Sony to service the Product. This warranty does not cover Products sold AS IS or WITH
ALL FAULTS, or consumables (such as fuses or batteries). This warranty is valid only in the United States.
Proof of purchase in the form of a bill of sale or receipted invoice which is evidence that the unit is within the Warranty period
must be presented to obtain warranty service.
This warranty is invalid if the factory applied serial number has been altered or removed from the Product.
REPAIR OR REPLACEMENT AS PROVIDED UNDER THIS WARRANTY IS THE EXCLUSIVE REMEDY OF THE
CONSUMER. SONY SHALL NOT BE LIABLE FOR ANY INCIDENTAL OR CONSEQUENTIAL DAMAGES FOR
BREACH OF ANY EXPRESS OR IMPLIED WARRANTY ON THIS PRODUCT. EXCEPTTO THE EXTENT PROHIBITED
BY APPLICABLE LAW, ANY IMPLIED WARRANTY OF MERCHANTABILITY OR FITNESS FOR A PARTICULAR
PURPOSE ON THIS PRODUCT IS LIMITED IN DURATION TO THE DURATION OF THIS WARRANTY.___________________________
Some states do not allow the exclusion or limitation of incidental or consequential damages, or allow limitations on how
long an implied warranty lasts, so the above limitations or exclusions may not apply to you. In addition, if you enter into
a service contract with the Sony Partnership within 90 days of the date of sale, the limitation on how long an implied
warranty lasts does not apply to you. This warranty gives you specific legal rights, and you may have other rights which
vary from state to state.
For your convenience, Sony Electronics Inc. has established telephone number for frequently asked questions;
To locate the servicer or dealer nearest you. or for service assistance or resolution of a service problem, or for product
information or operation, call:
Sony Direct Response Center
1*(800)-222-7669
or write to;
Sony Direct Response Center
12451 Gateway Blvd.
Fort Myers, FL 33913
For an accessory or part not available from your authorized dealer, call;
40"'
1-(800)-488-SONY (7669)
Page 41

3-860-767-11(1)
Cordless Telephone with
Quick Start Guide
Answering System
SPP-A940
;sj^^the: ba^juiiit' m
D
Route the cable.
3. Raise the antenna
vertically.
2 Connect the AC power adaptor.
To AC outlet
1 Connect the telephone line cord.
To telephone outlet
To DC IN 10V
To LINE
4 Set the DIAL MODE (on
the bottom) switch to:
• TONE; Tone dialing
• PULSE; Pulse dialing
Ihstallthe Battery.Pack
1 Slide open the
battery
compartment
lid.
2 insert the
battery pack
(with contacts
facing down)
into the battery
compartment.
3 Close the battery compartment lid.
Charge^he Battery Pack
Place the handset on the base unit.
CHARGE
lamp
Charge the battery pack for more
than 10 hours so that the battery is
fully charged.
Sony Corporation ©1996 Printed in USA
.'^86076711
Page 42

Making calls
Receiving calls
Speed dialing
1 Press (TALK).
2 Dial the phone
number.
3 When you're
done talking,
press (OFF).
7 When you hear
the phone ring;
• Press (TALK) (or
any key except
(OFF))
or
• Pick up the
hanset from the
base unit.
2 When you're
done talking,
press (OFF).
storing numbers
(on the handset only)
7 Press (PGM).
2 Press one of the
dialing keys ((X> to
(D).
3 Enter the phone
number you want
to store.
4 Press (SPEED DIAL).
Making calls
7 Press (TALK).
2 Press
(SPEED DIAL).
3 Enter the desired
speed dialing
number ((o) to
(D).
The phone number
stored in the speed
dialing number will be
dialed.
Page 43

Using the Answering Machine
Setithe.-Day an
7 Press (MENU) until you hear "Set day and
time."
2 Press (SELECT) to change the day of the
week.
3 Press (TIME/SET).
The day is set and the hour is announced.
4 Press (SELECT) to change the hour.
SPress (TIME/SET).
The hour is set and the minute is announced.
6 Press (SELECT) to change the minute.
7 Press (TIME/SET).
The day and time is annoimced and the clock
restarts.
8 Press (PLAY/STOP).
1 Press (MENU) until "Set out-going
message" is announced.
2 Press (RECORD/MEMO).
3 Speak into the base unit microphone
(MIC).
4 Press (PLAY/STOP) to stop recording.
MIC (Microphone)
Page 44

ANSWER
Playing Back Messages
■UIJCAion
Press (ANSWER) on the base unit.
The ANSWER lamp lights up.
If the display flashes the number of new
messages, press ( play/stop).
(ERASE )
(QUICK/SKIP)
To adjust the speaker volume
Press (VOLUME+) or (VOLUME
To stop playback
Press (PLAY/STOP).
To replay the messages
Press (PLAY/STOP).
To skip to the next message
Press (SKIP/QUICK) during playback.
To repeat the current message
Press (REPEAT) during playback.
To go back to previous messages
Press (REPEAT) within the first two
seconds of the current message.
Page 45

Téléphone sans fil à
Guide d'utilisation
Déployez l'antenne
verticalement.
Raccordez l'adaptateur secteur.
Vers une
prise murale
Raccordez le cordon de ligne téléphonique.
0
Vers la prise téléphonique
Vers DC IN 10V
répondeur automatique
Faites cheminer le câble.
Vers LINE
4 Réglez le sélecteur DIAL
MODE (sur le fond) sur:
• TONE; composition par
tonalités
• PULSE: composition par
impulsions
SPP-A940
‘ . ■»
Instâllëz la battérïe
7 Faites glisser le
couvercle du
compartiment
de la batterie et
ouvrez-le.
2 Introduisez la
batterie (avec
les contacts
orientés vers le
bas) dans le
compartiment
de la batterie.
3 Refermez le couvercle du
compartiment de la batterie.
ChargéZ: la batterie
Placez le combiné sur le poste de
base.
Témoin
CHARGE
Chargez la batterie pendant au
moins 10 heures de façon à ce que la
batterie soit complètement chargée.
Page 46

Composer un appel
Recevoir un appel
1 Appuyez sur
(TALK).
2 Composez le
numéro d'appel.
3 Lorsque vous
avez terminé la
conversation,
appuyez sur
(OFF).
Composition abrégée
Mémorisation de numéros
7 Lorsque vous
entendez le
téléphone sonner:
•Appuyez sur
(TALK) (ou toute
autre touche à
l'exception de
(OFF))
OU
• Décrochez le
combiné du poste
de base.
2 Lorsque vous avez
terminé la
conversation,
appuyez sur (off).
Composer un appel
d'appel (sur le combiné
uniquement)
7 Appuyez sur
(P^M).
2 Appuyez sur l'une
des touches de
composition (® à
CD).
3 introduisez le
numéro d'appel
que vous voulez
mémoriser.
4 Appuyez sur
(SPEED DIAL).
7 Appuyez sur
(TALK).
2 Appuyez sur
(SPEED DIAL).
1
(ÎÎPt
.Jf
]i
3 Introduisez le
numéro de
composition
abrégée voulu (CD
à CD).
Le numéro d'appel
mémorisé sous ce
numéro de
composition abrégée
est numéroté.
Page 47

utilisation du répondeur automatique
1 Appuyez sur (MENU) jusqu'à ce que vous
entendiez "Set day and time."
2 Appuyez sur ( SELECT ) pour changer le
jour de la semaine.
3 Appuyez sur (TIME/SET).
Le jour est réglé et l'heure est annoncée.
4 Appuyez sur ( SELECT ) pour changer
l'heure.
5 Appuyez sur (TIME/SET).
L'heure est réglée et les minutes sont annoncées.
6 Appuyez sur (SELECT) pour changer les
minutes.
^gîSfg|.b,ï|
MIC (microphone)
7 Appuyez sur (TIME/SET).
Le jour et l'heure sont annoncés et l'horloge
redémarre.
8 Appuyez sur ( PLAY/STOP).
1 Appuyez sur ( MENU ) jusqu'à ce que "Set
out-going message" soit annoncé.
2 Appuyez sur ( RECORD/MEMO).
3 Parlez dans le microphone (MIC) du
poste de base.
4 Appuyez sur ( PLAY/STOP ) pour arrêter
l'enregistrement.
Page 48

Témoin ANSWER
Lecture des messages
Appuyez sur la touche C answér ) du
poste de base.
Le témoin ANSWER s'allume.
Si un chiffre clignote dans la fenêtre
d'affichage pour indiquer le nombre de
nouveaux messages, appuyez sur
(PLAY/STOP).
(ERASE)
Pour régler le volume du haut-parleur
Appuyez sur C VOLUME +) ou (volume -).
Pour arrêter la lecture
Appuyez sur (PLAY/STOP).
Pour répéter les messages
Appuyez sur (PLAY/STOP).
(QUICK/SKIP)
Pour passer au message suivant
Appuyez sur (SKIP/QUICK) en cours de
lecture.
Pour répéter le message en cours
Appuyez sur ( REPEAT ) en cours de lecture.
Pour revenir aux messages précédents
Appuyez sur ( REPEAT ) durant les deux
premières secondes du message en cours.
 Loading...