

Page 1

SONY.
3-759-108-21(1)
Cordless Telephone
with Answering
System
Operating Instructions
Before operating the unit, please read this manual thoroughly
and retain it for future reference.
The table of contents is located on page 6.
Manual de instrucciones
Antes de utilizar la unidad, lea detenidamente este manual de
instrucciones, y consérvelo para futuras referencias.
El índice se encuentra en la página 60.
___________________________
_______
SPP-A5000
®1994 by Sony Corporation Printed in Taiwan, R.O.C.
Page 2

Owner's Record
The model and the serial numbers are located at the bottom of the unit. Record the serial number in
the space provided below. Refer to these numbers whenever you call upon your Sony dealer
regarding this product.
Model No. SPP-A5000 Serial No.
________________
IMPORTANT SAFETY INSTRUCTIONS
When using your telephone equipment, basic safety precautions should always be followed to
reduce the risk of fire, electric shock and injtuy to persons, including the following:
1. Read and understand all instructions.
2. Follow all warnings and instructions marked on the product.
3. Unplug this product from the wall outlet before cleaning. Do not use liquid cleaners or aerosol
cleaners. Use a damp cloth for cleaning.
4. E)o not use this product near water, for example, near a bath tub, wash bowl, kitchen sink, or
laundry tub, in a wet basement, or near a swimming pool.
5. Do not place this product on an unstable cart, stand, or table. The product may fall, causing
serious damage to the product.
6. Slots and openings in the cabinet and the back or bottom are provided for ventilation. To protect
it from overheating, these openings must not be blocked or covered. The openings should never
be blocked by placing the product on the bed, sofa, rug, or other similar surface. This product
should never placed near or over a radiator or heat register. This product should not be
placed in a built-in installation unless proper ventilation is provided.
7. This product should be operated only fix>m the type of power source indicated on the marking
label. If you are not sure of the t)rpe of power supply to your home, consult your dealer or local
power company.
8. Do not allow anything to rest on the power cord. Do not locate this product where the cord will
be abused by persons walking on it.
9. Do not overload wall outlets and extension cords as this can result in the risk of fire or electric
shock.
10. Never push objects of any kind into this product through cabinet slots as they may touch
dangerous voltage points or short out parts that could result in a risk of fire or electric shock.
Never spill liquid of any kind on the product.
11. To reduce the risk of electric shock, do not disassemble this product, but take it to a qualified
service personnel when some service or repair work is required. Opetüng or removing covers
may expose you to dangerous voltages or other risks. Incorrect reassembly can cause electric
shock when the appliance is subsequently used.
(to be continued)
Page 3

12. Unplug this product from the wall outlet and refer servicing to qualiBed service personnel
und«*r the following conditions:
A. When the power cord or plug is damaged or frayed.
B. If liquid has been spilled into the product.
C. If the product has been exposed to rain or water.
D. If the product does not operate normally by following the operating instructions. Adjust only
those controls that are covered by the operating instructions because improper adjustment of
other controls may result in damage and will often require extensive work by a qualified
technician to restore the product to normal operation.
E. If the product has been dropped or the cabinet has been damaged.
F. If the product exhibits a distinct change in performance.
13. Avoid using a telephone (other than a cordless type) during an electrical storm. There may be a
remote risk of electric shock from lightning.
14. Do not use the telephone to report a gas leak in the vicinity of the leak.
SAVE THESE INSTRUCTIONS
CAUTIO N:to reduce the risk of hre or injury to persons by battery, read and
FOLLOW THESE INSTRUCTIONS.
1. Use only the following type and size batteries; R03 (SIZE AAA) x 4 and SONY BP-T40.
2. Do not dispose of the batteries in a fire.
The < ell may explode. Check with local codes for possible special disposal instructions.
3. Do not open or mutilate the batteries.
Released electrolyte is corrosive and may cause damage to the eyes or skin. It may be toxic if
swallowed.
4. Exenise care in handling batteries in order not to short the battery with conducting materiab
such as rings, bracelets, and keys. The battery or conductor may overheat and cause bums.
For R03 (size AAA)
1. Do not attempt to recharge the batteries provided with or identified for use with this product.
The latteries may leak corrosive electrolyte or explode.
2. Do n->t attempt to rejuvenate the batteries provided with or identiBed for use with this product
by heating them. Sudden release of the battery electrolyte may occur causing bums or irritadon
to eyes or skin.
3. When replacing batteries, all batteries should be replaced at the same dme. Mixing fresh and
discharged batteries could increase internal cell pressure and mpture the discharged batteries.
4. Whai inserting batteries into this product, the proper polarity or direction must be observed.
Reverse insertion of batteries can cause charging, and that may result in leakage or explosion.
5. Remove the batteries fi’om this product if the product will not be used for a long period of time
(several months or more) since during this time the battery could leak in the product.
(to be continued)
13
Page 4

6. Discard "dead" batteries as soon as possible since "dead" batteries are more likely to leak in a
product.
7. Do not store this product, or the batteries provided with or identified for use with this product,
in high-temperature areas. Batteries that are stored in a freezer or refrigerator for the purpose of
extending shelf life should be protected from condensation during storage and defrosting.
Batteries should be stabilized at room temperature prior to use after cold storage.
For BP-T40
1. Charge the battery pack provided with or identified for use with this product only in accordance
with the instructions and limitations specified in the instruction manual provided for this
product.
2. Observe proper polarity orientation between the battery pack and battery charger.
3. Do not mix old and new batteries in this product.
4. Do not mix batteries of different sizes or from different manufacturers in this product.
For the customers in the U.S.A.
RECYCLING SEALED LEAD BATTERIES
SEALED LEAD BATTERY.
CSX
MUST BE DISPOSED OF PROPERLY.
Sealed lead acid batteries are recyclable. You can help preserve our environment by
Pb
returning your unwanted batteries to your nearest Sony Service Center for collection,
recycling or proper disposal.
Note: In some areas the disposal of sealed lead acid batteries in household or
business trash may be prohibited.
For the Sony Service Center nearest you call 1-800-222-SONY (United States only)
Caution: Do not handle damaged or leaking sealed lead acid batteries.
"Warning: This telephone operates as a radio transmitter. Conversations over this cordless telephone
may be heard by others on radios within the area of its range of transmission."
DIGITAL SECURITY CODE
Your model (SPP-A50(K)) has the circuitry for digital security code to provide protection against
unintentional access.
One of 1,024 kinds of digital security code is randomly selected and fixed in each telephone as it is
manufactured.
Therefore, there is few chance that more than two units have the same digital security code.
■W' AV.--.
v-*.rr<A
Page 5

For the customers in the U.S.A. (continued)
INFORMATION FOR GENERAL
TELEPHONES
1. This iquipment complies with Part 68 of the FCC rules. On the bottom of this equipment is a
label that contains, among other information, the FCC registration number and ringer
equh’alence number (REN) for this equipment. If requested, this information must be provided
to the telephone company.
2. The applicable registration jack (connector) USOC-RJllC is used for this equipment.
3. This equipment is designed to be coimected to the telephone network or premises wiring using a
compatible modular jack which is Part 68 compliant.
The ICC compliant telephone cord and modular plug is provided with this equipment.
4. The KEN is used to determine the quantity of devices which may be connected to the telephone
line. Excessive RENs on the telephone line may result in the devices not ringing in response to
an incoming call. In most, but not all areas, the sum of the RENs should not exceed five (S.O).To
be certain of the number of devices that may be connected to a line, as determined by the total
RENi, contact the local telephone company.
5. If your equipment (SPP-A5000) causes harm to the teiephone network, the telephone company
will notify you in advance that temporary discontinuance of service may be required. But if
advance notice isn't practical, the telephone company will notify the customer as soon as
possible. Also, you will be advised of your right to file a complaint with the FCC if you believe it
is necessary.
6. The telephone company may make changes in its facilities, equipment, operations or procedures
that could affect the operation of the equipment. If this happens the telephone company will
provide advance notice in order for you to make necessary modifications to maintain
uninterrupted service.
7. If trouble is experienced with this equipment (SPP-A5000), for repair or warranty information,
please contact Sony Telecommunications Helpline: Tel (201)391-6111. If the equipment is causing
harm to the telephone network, the telephone company may request that you disconnect the
equi)7ment until the problem is resolved.
8. All repairs will be performed in an authorized Sony service station.
9. This equipment cannot be used to party lines or coin lines.
10. This equipment is hearing aid compatible.
If your telephone is equipped with automatic dialers
When programming emergency numbers and (or) making test calls to emergency numbers:
1. Remain on the line and briefly explain to the dispatcher the reason for the call.
2. Perform such activities in the off-peak hours, such as early morning or late evenings.
Caution
You are cautioned that any changes or modifications not expressly approved in this nuinual could
void your authority to operate this equipment.
Page 6

Table of Contents
Before operating the phone
Setting up
Getting started
Operating the phone
Checking the package contents 8
Identifying the parts 9
Setting up the base unit 12
Choosing the best location for the base unit 12
Inserting the batteries 13
Connecting the base unit 14
Hanging the base unit on a wall 15
Preparing the battery packs for the cordless handset 16
Charging the battery packs 16
Installing a charged battery pack 17
Choosing tone or pulse dialing 19
Setting the dial mode 19
Using touch-tone services vdth pulse dialing systems 19
Setting the day and time 20
Setting the security code 22
Adjusting the volume 23
Adjusting the ringer 23
Adjusting the speaker volume 24
Using as a telephone
Communicating between
the phone units
Making and receiving calls 25
Making calls 25
Receiving calls 25
Redialing 26
if interference occurs on the cordless handset 26
Monitoring calls through the base unit 27
Memory dialing 28
Storing memory dialing numbers 28
Making memory dialing calls 30
Operating the phone during calls 31
Putting a call on hold 31
Using "call waiting" service 31
Paging 32
From the base unit to the cordless handset 32
From the cordless handset to the base unit 32
Page 7

Using as a telephone
answering machine
Preparing the answering machine 33
Selecting the answering mode/types of greetings 33
Recording a greeting 35
Turning on the answering function 37
Setting a beep for incoming messages 38
Selecting the ringer mode 38
Playing back messages 39
Starting playback 39
During playback of each message 40
Erasing messages 42
Screening calls 43
Recording a telephone conversation 44
Recording a memo message 45
Operating the answering machine from the cordless handset 46
Remote control
functions
Other information
Handling the phone
General
Calling from a remote phone 48
I
Control codes for remote operations 49
Precautions 50
On power source 50
On installation 50
On maintenance 50
On power failure 50
Troubleshooting 51
Specifications 54
Page 8
Before operating the phone
Checking the package contents
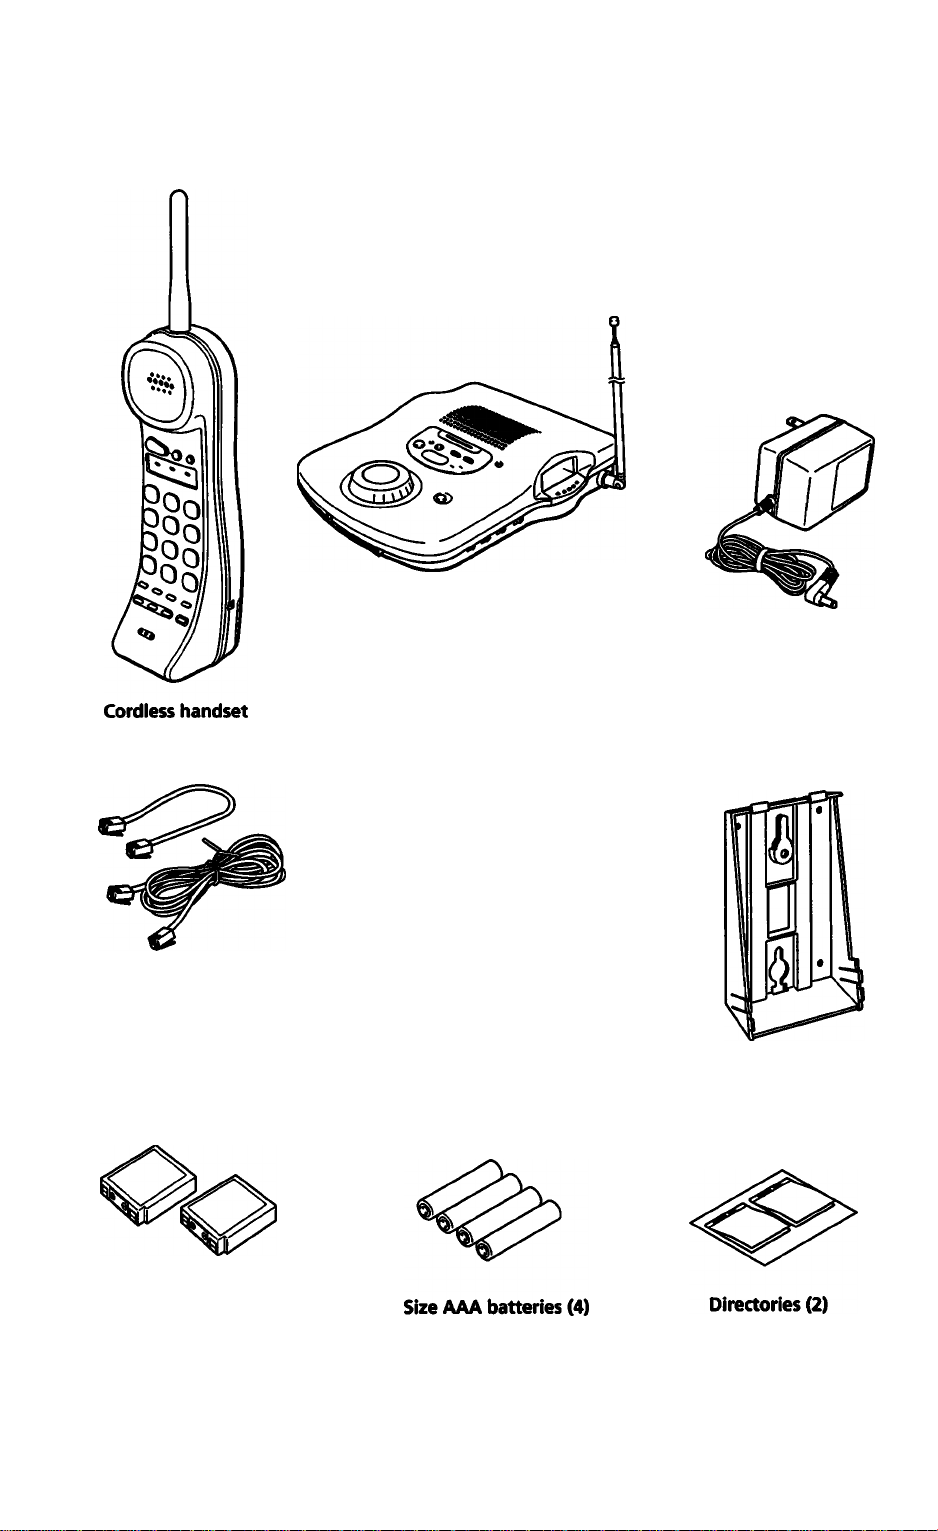
Make sure the following items are included in the package. If
an)dhing is missing, contact your local Sony dealer.
Base unit
AC power adaptor (AC-T46)
(The shape of the AC power adaptor
may differ from the illustration, but
the performance is identical.)
Telephone line cords (2)
Rechargeable
battery packs
BP-T40 (2)
8 Setting up
Screws (4)
Wall bracket for base unit
Page 9
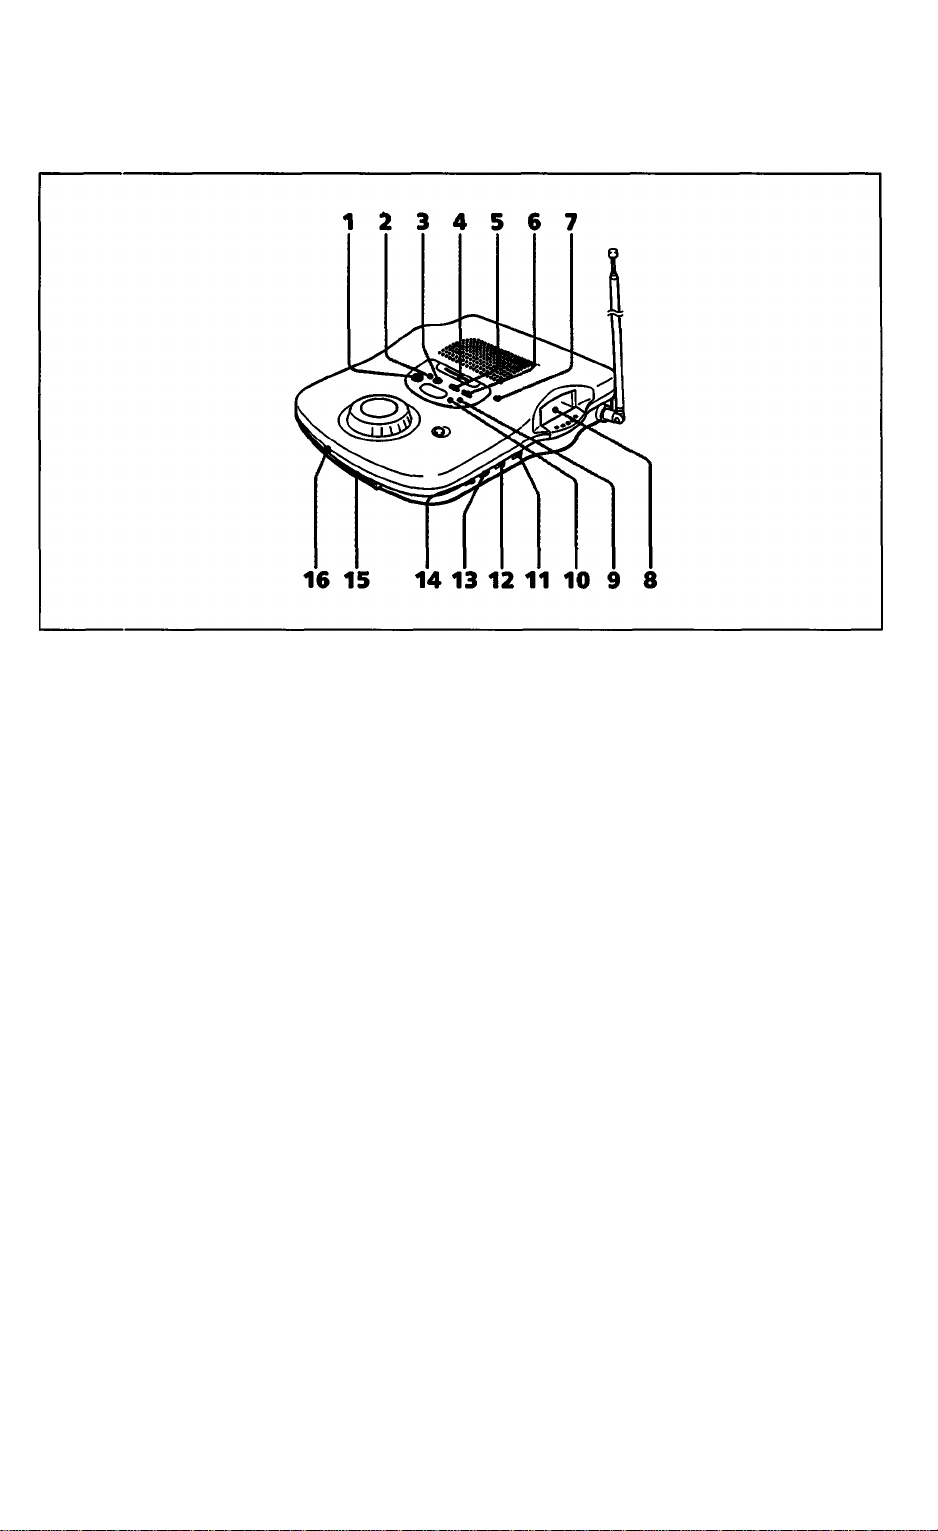
Identifying the parts
MEMiO button
Records a memo message.
Ansv^er on indicator
Light:« when the answering function is
turned on.
ANSWER ON/OFF button
Turns the answering function on or off.
PAGE button
Allows you to call the cordless handset.
GREETING PLAY button
Plays back the greeting message.
GREETING RECORD button
6
Records a greeting.
7
CHARGE indicator
Light!» while the battery is being charged.
8 Changing compartment
Used for charging the supplied battery
packs.
9 IN USE lamp
Lighbi when the cordless handset is in use.
10 POWER indicator
Lights when the base unit is connected to
the AC power line. Also indicates that the
memory backup batteries have sufficient
power.
Blinks if backup batteries have not been
inserted or if their power is low.
11 RINGER SELECT switch
Selects the number of rings before the
answering machine responds.
12 RINGER LEVEL switch
13 AUDIBLE IND/ANN ONLY (audible
indicator/announce only) switch
Turns on or off the audible mode which
informs you if there are any messages
recorded.
Also selects the announcement only mode.
14 DIAL MODE switch
Selects pulse or tone dialing.
15 SPEAKER VOLUME control
16 Microphone
Setting up 19
Page 10

Identifying the parts
1 Speaker
2 ERASE button
Erases messages.
3 Message counter
Indicates the following information.
Qp
Number of messages not yet played back
• The maximum possible number indicated
is "19". If the actual number of messages is
20 or more, "19" blinks in the message
counter.
Appears when you connect the base unit to
an AC power line for the first time.
Also appears when all memory contents
(messages and settings) are cleared due to a
power interruption.
Appears when the announcement only
mode is selected.
QD
Appears when the memory is full.
Appears when messages are erased.
4 PLAY/STOP button
5 Digital message shuttle
Controls playback conditions.
6 Backup battery compartment
7 DC IN 9V jack
8 TEL (telephone) LINE Jade
9 I Setting up
Page 11
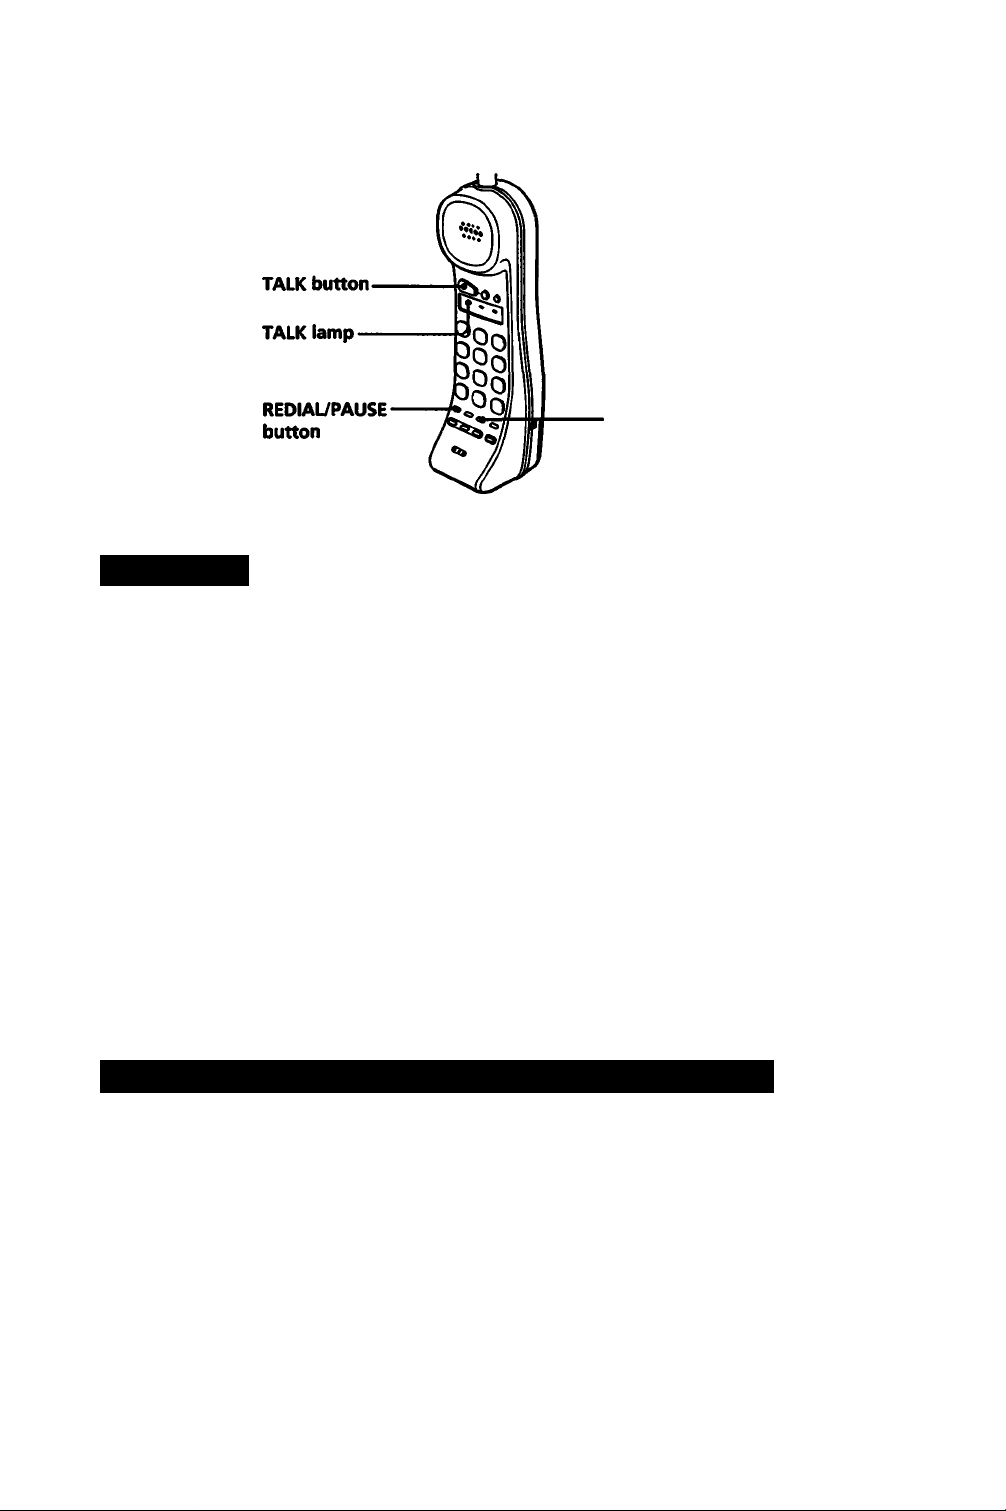
1 TAU( button
Lets you make or receive a call.
10 PAGE button
Allows you to call the base unit.
2 Battery lamps
Indicate level of battery power.
See page 18 for details.
3 TALICIamp
Ligh s to indicate that the cordless handset
is re£ dy for dialing or is engaged in
conversation.
4 REMOTE lamp
Lights while the remote operation mode is
activated.
5 Dialling keys/Remote operation
buttons
6 REDDAUPAUSE button
Redials the last number called.
Also inserts a pause in the dialing sequence.
7 PGMi (program) button
Stores phone numbers in the speed dialing
memory.
8 REMOTE button
Alloavs you to operate the answering
machine from the cordless handset.
9 CONV REC (conversation recording)
button
Records phone conversations.
11 Microphone
12 Speaker
13 OFF button
Allows you to disconnect the call.
14 FLASH button
Switches to a second call if you have "call
waiting" service, or lets you make a new
call.
15 RING ON/BATT SAVE (ringer on/
battery save) switch
Set to RING ON to turn the ringer on.
Set to ВАТТ SAVE to turn the ringer off and
conserve battery power.
16 Battery compartment
17 HOLD button
Puts a call on hold.
18 CHANNEL button
Allows you to change channels if
interference occurs.
19 SPEED DIAL button
Accesses cordless handset's speed dialing
numbers.
Setting up 111
Page 12
Setting up the base unit
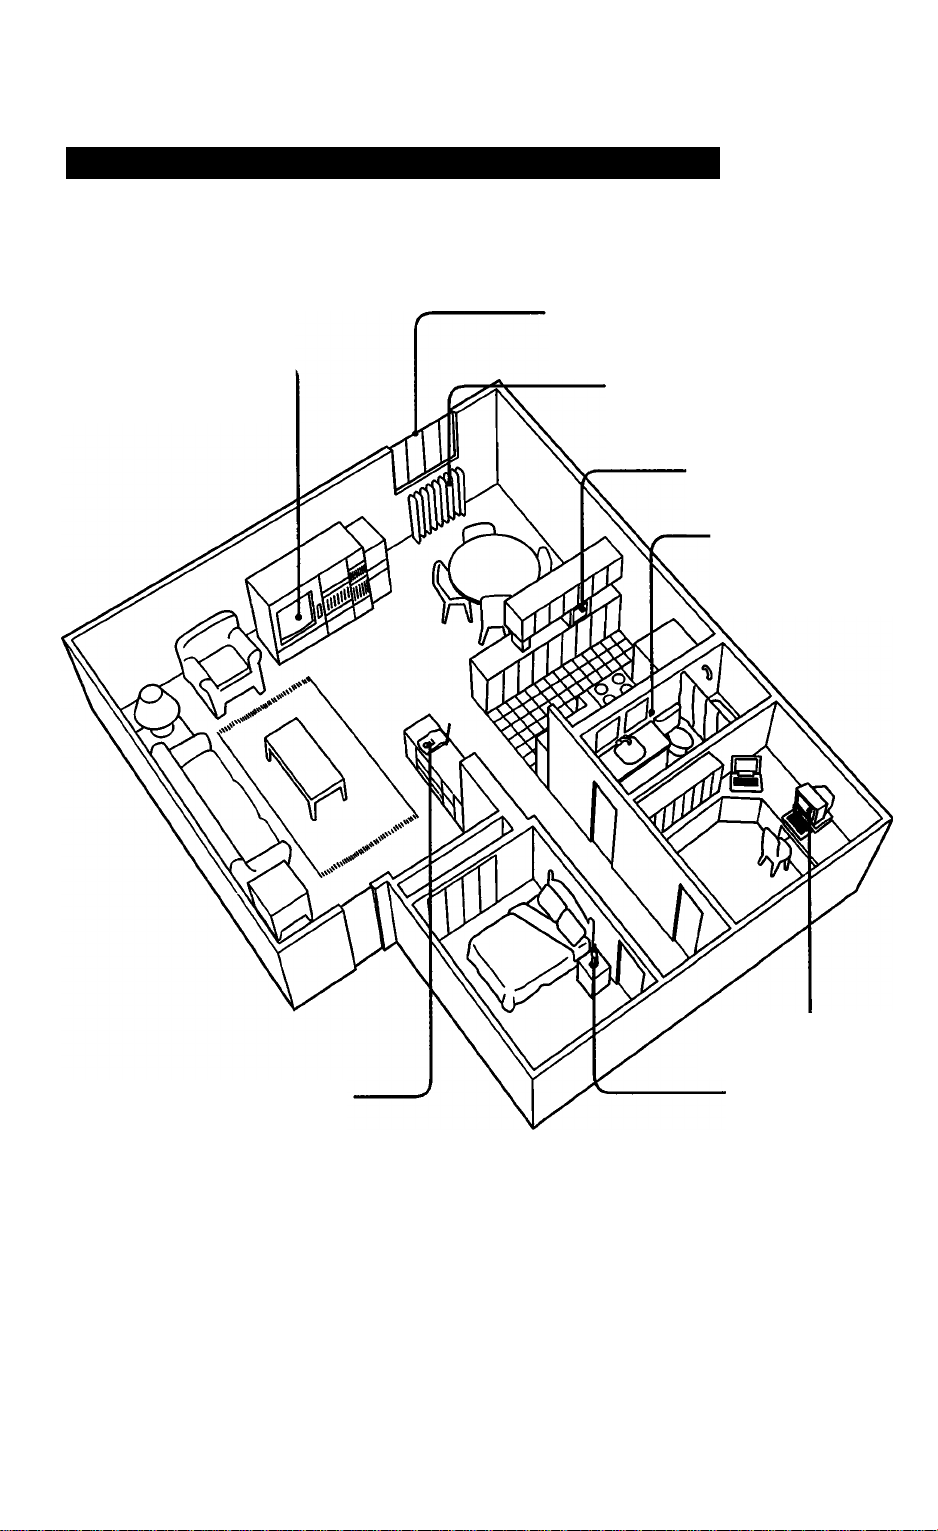
Choosing the best location for the base unit
Where you place the base unit affects the reception quality of the
cordless handset. Therefore, refer to the following when hnding a
place for the base unit.
Away from noise sources
such as a window by a
Away from television
sets and other
electronic equipment
street with heavy traffic.
Away from heat sources,
such as radiators, airducts,
and sunlight
Away from a
microwave oven.
Away from excessive
moisture, dust
mechanical vibration,
or shock.
Away from a personal
computer.
Near a central location
IMPORTANT INSTALLATION INSTRUCTION
Away from another
cordless telephone.
1. Never install telephone wiring during a lightning storm.
2. Never install telephone jacks in wet location unless the jack is specihcally designed for wet location.
3. Never touch uninsulated telephone wires or terminals unless the telephone line has been
disconnected at the network interface.
4. Use caution when installing or modifying telephone lines.
Setting up
12
Page 13
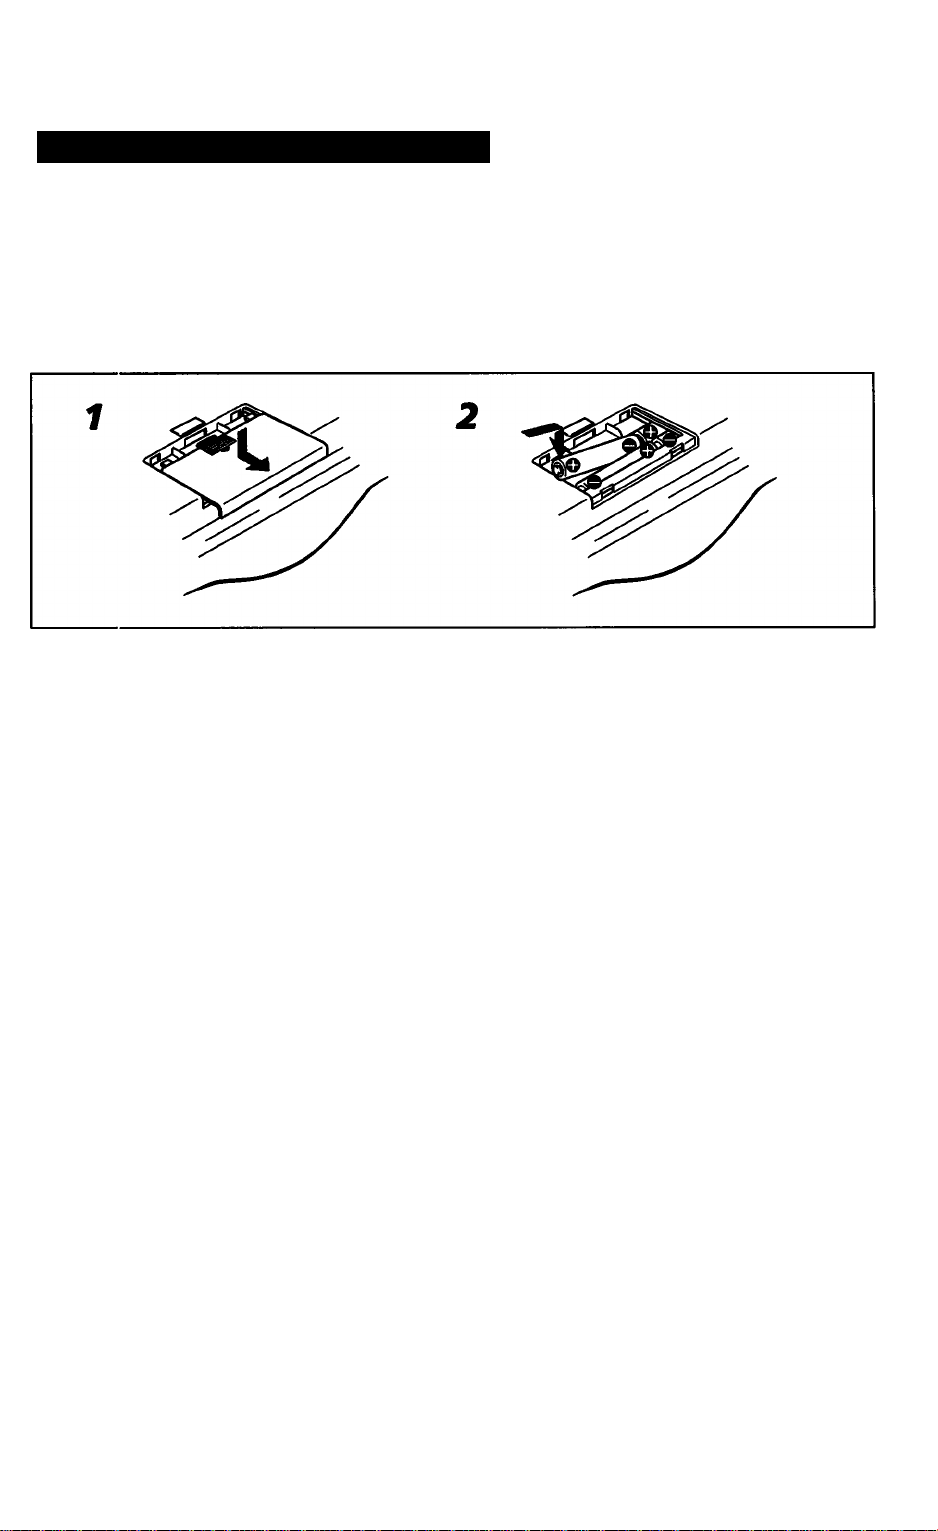
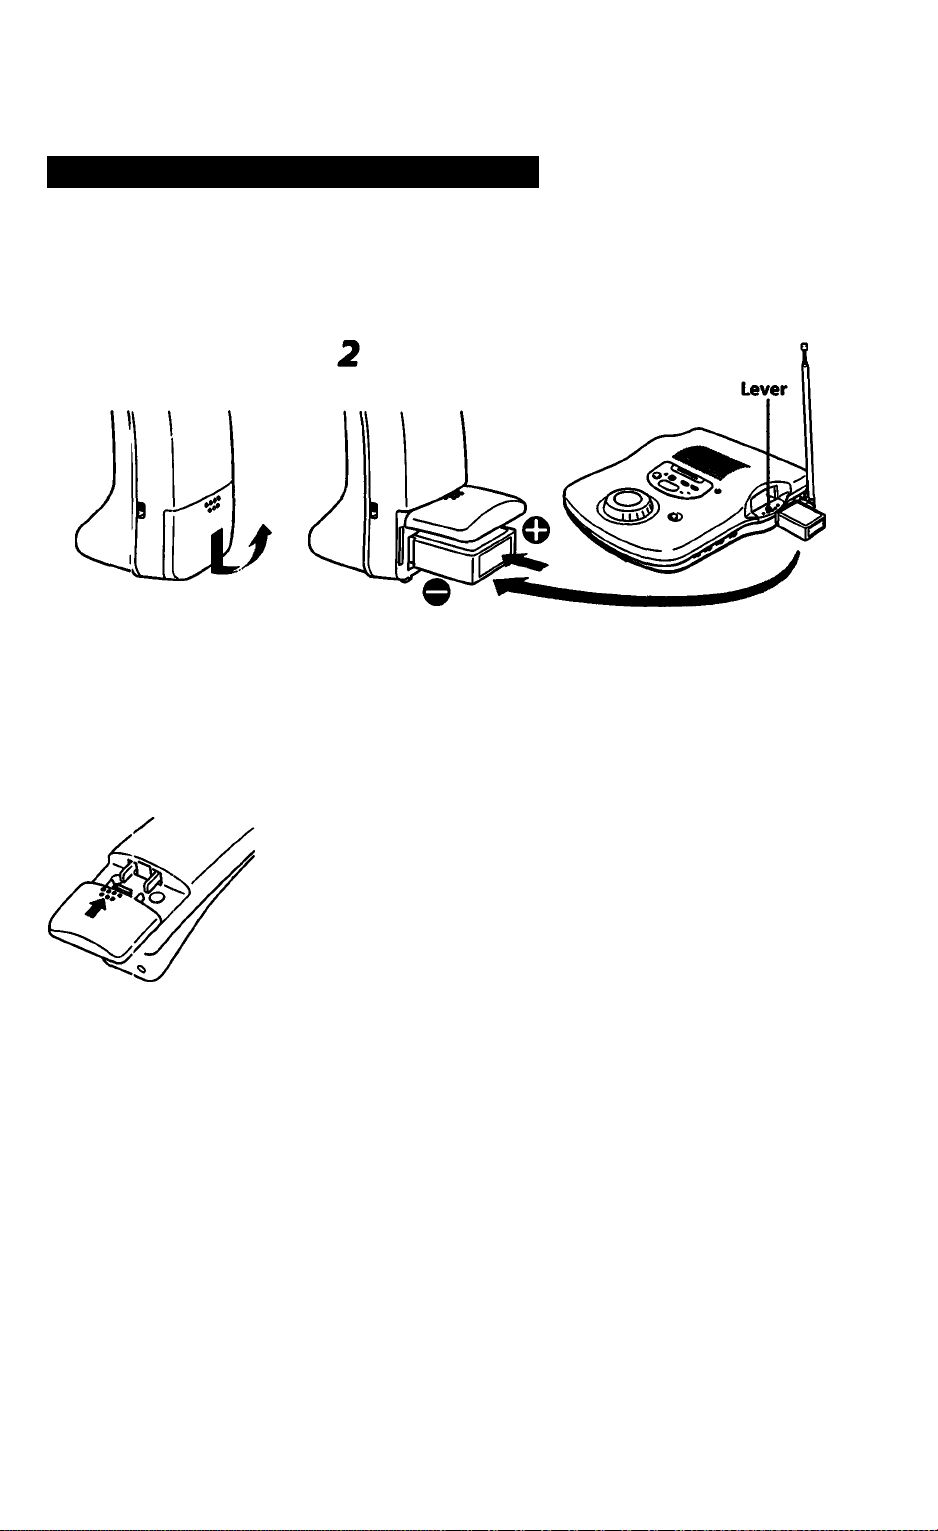
Inserting the backup batteries
Your recorded messages and settings are stored in the phone's
memory.
They will be lost if a power interruption occurs (such as if the AC
plug is accidentally disconnected, or if there is a temporary power
failure).
Inserting four size AAA batteries lets you back up the memory
contents in case of a power interruption.
1 Slide open the backup battery compartment
cover.
I
0
If the base unit is not connected
to an AC outlet while the backup
batteries arc inserted, the
batteries wi I soon be consumed.
Be sure to connect the base unit
to an AC outlet as soon as
possible.
1
•
Replace the backup batteries
about once a year.
When repla ring the batteries,
make sure the phone is plugged
into an AC outlet, or all your
messages and settings wU) be
lost.
2 insert the four size AAA (R03) batteries
(supplied).
Make sure the ® and © on the batteries match the
markings in the backup battery compartment.
3 Slide the cover back untii it snaps into place. 4 Connect the base unit to an AC outlet.
See the next page for how to connect the base unit to an
AC outlet.
Backup duration--------------------------------------------
The supplied (manganese) batteries provide backup power if an
AC power failure occurs. The backup duration is approximately 7
hours.
When the backup batteries become weak
The POWER lamp on the base unit blinks.
The lamp also blinks when no backup batteries are inserted while
the base unit is connected to an AC outlet.
-----------------
Settingup 113
Page 14
^ Setting up the base unit
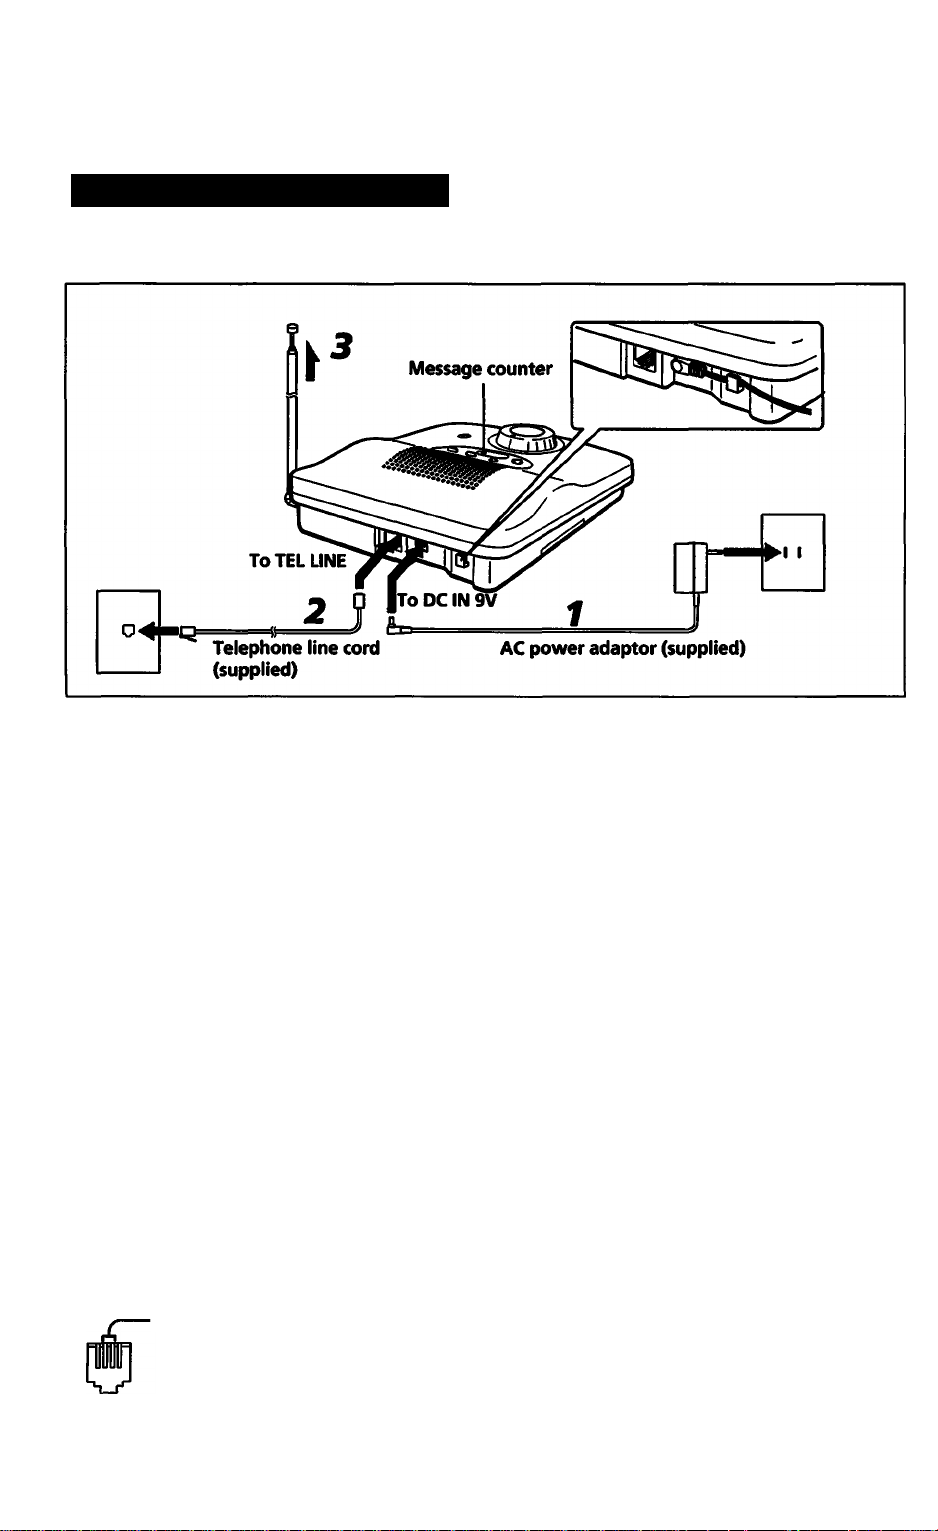
Connecting the base unit
See the next page first if you want to hang the base unit on a wall.
I
a
Connect the AC power adaptor
to a continuous power supply;
otherwise, the battery pack being
charged will have a shorter life.
I
a
If your telephone outlet is not
modular, contact your telephone
service company for assistance.
0
Modular
I
a
If you have 2 phone lines on a
single RJ-14 phone pck with
4 wires, the phone will only
answer the first phone line on
the center pair of wires.
Please consult your telephone
company for rewiring if you
need to answer the second
phone line which uses the
outer pair of wires.
-Center pair
1 Connect the AC power adaptor (supplied) to the
DC IN 9V jack and to an AC outlet, as shown
above.
When you connect the AC power adaptor, the base unit
takes about 10 seconds to reset.
Observe the message counter, and when it shows blinking
"P', the base unit is ready for use.
2 Plug one end of the long telephone line cord
(supplied) into the TEL LINE Jack, and the other
end into a telephone outlet.
3 Fully extend the antenna.
Make sure it points toward the ceiling.
Note on the AC power adaptor
Use only the AC power adaptor supplied. Do not use any other
AC power adaptor.
---------------------------
14 I Setting up
Polarity of the plug
Page 15
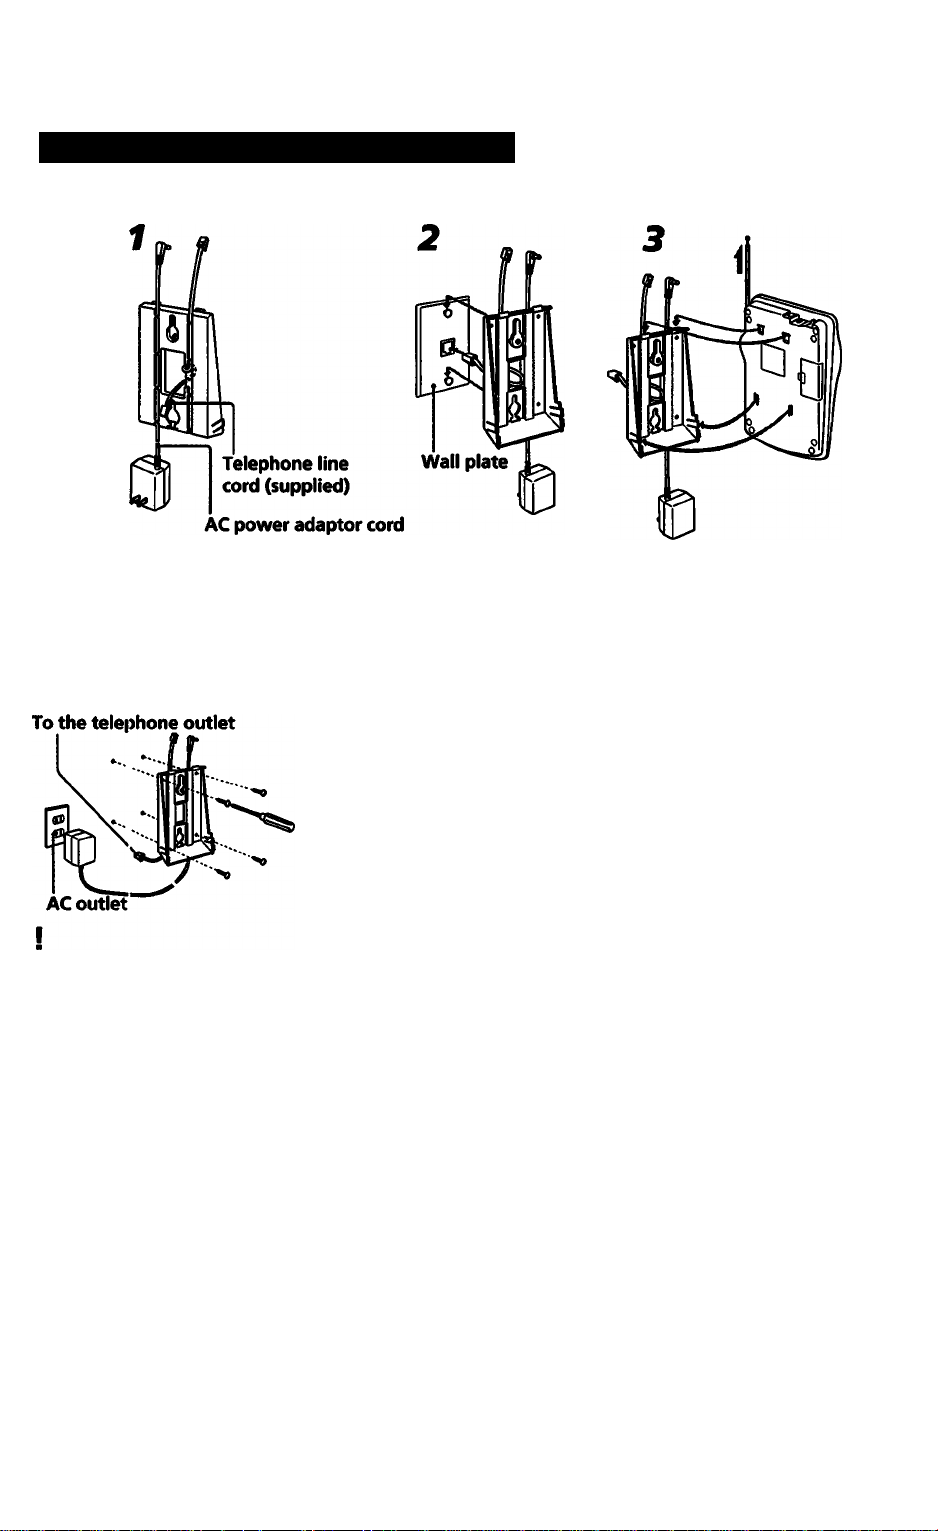
Hanging the base unit on a wall
I
■
To mount the wall bracket
directly on the wall, use the
supplied screws.
Attach the AC power adaptor cord and the short
telephone line cord to the wall bracket.
Hook the wall bracket to the wall plate and plug
the telephone line cord into the telephone
outlet.
If your telephone outlet is not
modular, contact your telephone ^
service compily for assistance.
u
Modular
Insert the tabs on the top of the wall bracket
into the base unit and press it so that the lower
tabs on the wall bracket go into the base unit.
Then extend the antenna fully.
Connect the AC power adaptor and the
telephone line cord.
For detaUs, see the "Connecting the base unit" section
(page 14).
Settingup I IS
Page 16
Preparing the battery packs for the cordless handset
Charging the battery packs
Charge one of the supplied two battery packs for about 10 hours and
insert it in the cordless handset. Charge the other one so you can
exchange with the first one when the latter becomes discharged.
You may leave a battery pack in the charging compartment of the
base unit even if it is completely charged.
I
•
If a battery pack is brand new or
completely discharged, it may
take 10 minutes or more before
the CHARGE lamp lights up.
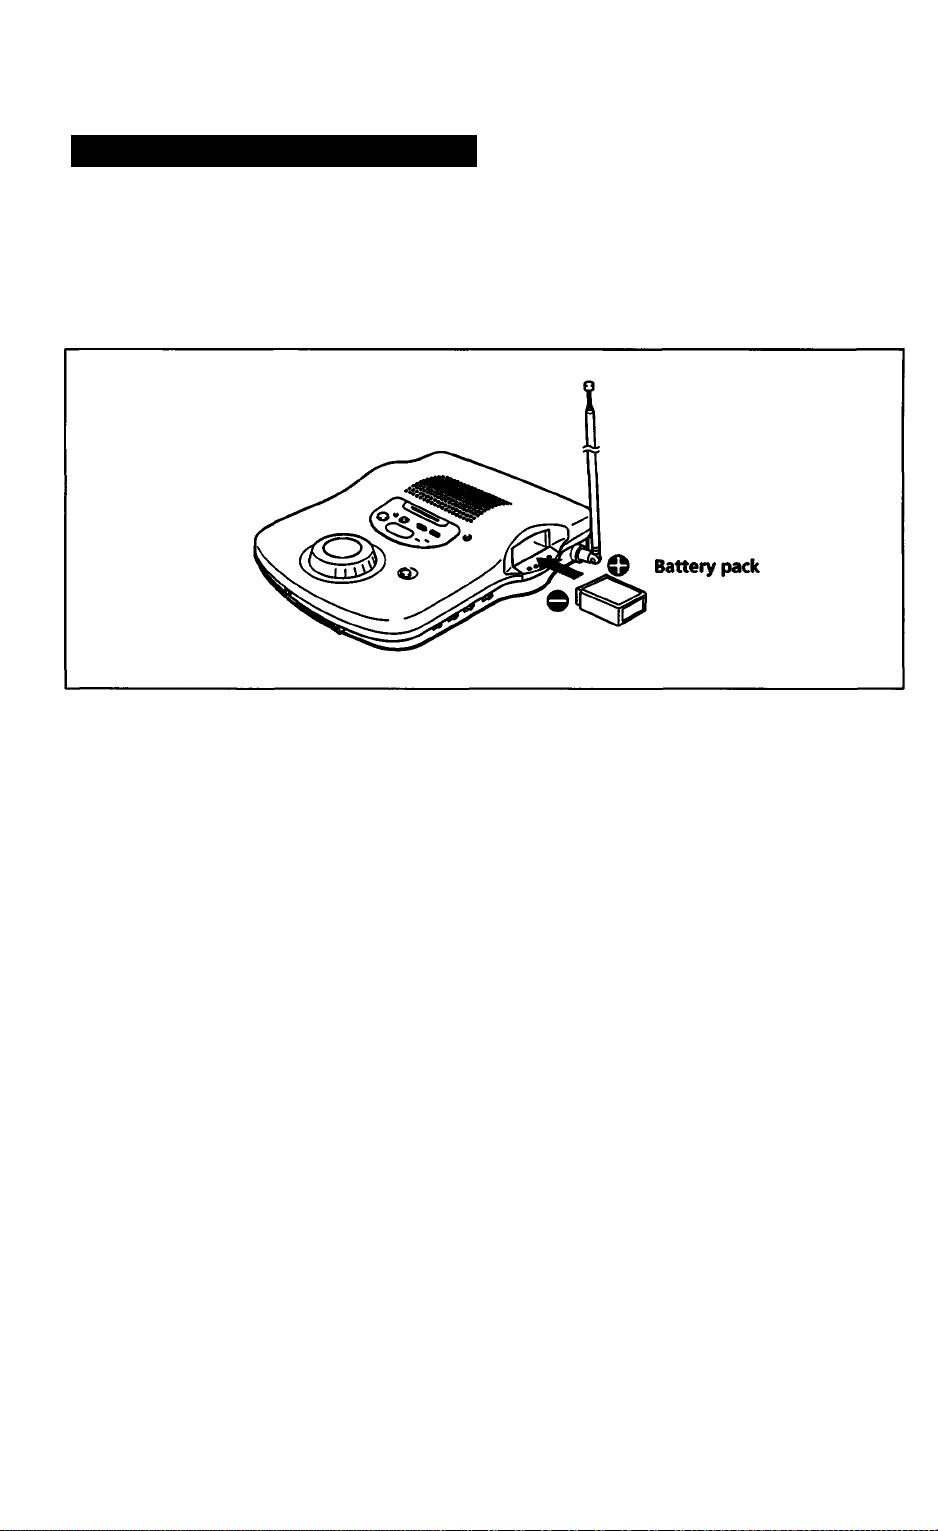
f Insert one of the supplied battery packs
completely into the charging compartment.
The CHARGE lamp on the base unit lights.
2 Charge the battery pack for about 10 hours.
When charging is completed, the CHARGE lamp will go
off.
Note-------------------------------------------------------
Make sure that the base unit is connected to a continuous power
supply.
If the battery pack is charged for less than 10 hours due to a
power interruption, the battery will not be fully charged. It will,
therefore, be effective for a shorter period of time than a fully
charged battery pack.
16
SetUng up
Page 17
Installing a charged battery pack
After you have fully charged a battery pack in the base unit, install it
in the cordless handset as follows.
I
■
If the lid con es off, you can
replace it easily by snapping it
ito place.
1 Slide open the battery compartment lid.
2 Remove the charged battery pack from the base
unit and insert it into the handset's battery
compartment.
Press the lever on the base unit's charging compartment
to release the battery pack.
3 Replace the battery compartment lid.
Notes on charging------------------------------------------
• The battery pack supplied uses a unique lead acid battery which
works best when recharged often. Unlike nickel-cadmium
batteries, you do not need to wait until the battery becomes
weak to recharge.
• Avoid leaving the handset without charging the battery for an
extended period of time so that the battery runs down
completely. This can shorten the battery's life. If this happens,
recharge the battery. You may need to charge the battery
several times before it is recharged to its full capacity.
• When charging a battery pack which is completely discharged,
the battery lamps may not light up for a while (10 minutes or
less). There is nothing wrong with your telephone. Continue
charging.
Setting up 11
Page 18

^ Preparing the battery packs for the cordless handset
I
•
The battery packs will gradually
discharge over a long period of
time even if not in use.
I
•
When not using the handset for
an extended period of time, take
the battery out of the handset
and store it after charging for
over 10 hours.
Battery duration
----------------------------------------
A fully chat^ged battery pack in the cordless handset will last
approximately:
• 10 hours in continuous talk mode
• 30 days (1 month) in RING ON mode
• 2 months in ВАТТ SAVE mode
To determine the remaining battery power
Press TALK. The battery lamps will give you the follovnng
information:
Battery lamps Amount of battery power
•О* “О— «»О«»
/»14 /,\ /,ч
'вС 'o' •
Full power
Some power (Exchange the battery as
soon as possible).
Little power (Exchange the battery
"Т”
immediately).
No power (Cordless handset cannot
- - -
operate any more without charging the
battery).
I
a
If a power interruption lasts for
more than several days, or when
unplugging the base unit from
the AC outlet, remove the battery
pack from the base unit and store
it away.
If the battery becomes weak during a phone call
---------------------------------------------------------
The phone will beep every three seconds. Within one minute you
must exchange the battery pack; otherwise the call will be
disconnected.
Exchanging the battery during phone call—
1 Press HOLD to put the call on hold.
The TALK lamp flashes.
2 Exchange the battery in the cordless handset with a fully
charged one in the base unit
3 Press TALK.
The TALK lamp flashes again.
4 Press HOLD to resume the conversation.
When to replace the battery pack
------------------------
• The battey can be recharged many, many times. However, if the
battery lasts only for a few minutes even after 10 hours of
charging, it needs replacement.
• To purchase a replacement battery, please visit your local Sony
authorized dealer or service center.
Be sure to use only Sony BP*T40 batteries.
18
Setting up
Page 19

Choosing tone or pulse dialing
For the telephone to work correctly, you must set it to the type of
your dialing system: tone or pulse dialing.
DIAL MODE switch
Setting the dial mode
Set the DIAL MODE switch to:
T (tone) if your dialing system is tone.
P (pulse) if your dialing system is pulse.
If you are not sure---------------------------------
Make a trial call with the DIAL MODE switch set to T.
If the call connects, leave the switch at T.
Otherwise, set the switch to P.
Usinq touch-tone services with pulse dialing systems
Some services require you to use touch-tone. This is not a problem if
your phone already uses tone dialing. If yotu* phone uses pulse
dialing, however, you need to follow the steps below to use these
services.
For details on making calk, see the "Making calls" section (page 25).
1 Dial the service's number.
I
•
You only need to press TONE
once to turn dialing to tone; this
will remain in effect imtil the call
is disconnected.
2 When connected to the service, press TONE (D. 3 Press the dialing keys as required.
Getting started
19
Page 20

Setting the day and time
Incoming messages are
automatically stamped with the
day and time.
Setting the correct day and time
enables you to know when a
message was recorded.
Using the cordless handset, set the day and time near the base unit so
that you can hear the recorded instructions from the base unit clearly.
I
•
If you enter a wrong day of the
week, you can correct it, if you
have not yet pressed the d> key,
by pressing the correct dialing
key.
If you press wrong keys for the
hour or the minute, you can
correct it, if you have not yet
pressed the (D key, by first
pressing any dialing key then
pressing the correct dialing
keys.
If you notice a mistake after
pressing the 3) key, press OFF
once, and start from the
beginning.
7 Press REMOTE.
Wait until the REMOTE lamp lights.
2 Press the (S) key.
Enter the current day of the week and the
current time by pressing the diaiing keys and the
(E> key in the foiiowing order.
1 Press the key G3) to CD that corresponds to the days
of the week as follows:
CD Simday (Z) Monday (3) Tuesday
CD Wednesday <5) Thursday (E) Friday
CD Saturday
2 Press the (Z> key.
3 Enter the hour and press the CD key.
4 Enter the minute and press the CD key.
5 Press the CD key for AM, or CD key for PM, and then
press the CD key.
You will hear a long confirmation beep. You will then
hear the current time from the base unit speaker and
the cordless handset speaker.
For a single digit hour or minute, be sure to press CD first.
Example
To enter Thursday 6:45 PM, press the keys as follows:
CDCDCDCDCDCDCDCD®CD
D I Getting started
4 Press OFF.
The REMOTE lamp goes off.
Page 21

To check the current time
1 Press REMOTE.
--------------------------------
Wait until the REMOTE lamp lights.
2 Press the CE) key.
You will hear a long conBrmation beep, and then the current
day of the week and the time.
3 Press OFF.
The REMOTE lamp goes off.
If the current day and time are not set
--------------------
When playing back recorded incoming messages, you will not
hear a time stamp.
If you try to check the current time, you will hear five short error
Note----------------------------------------------------
If a power interruption occurs when the backup batteries are
either dead or not installed, the current day and time will be
erased. In this case, set the current day and time again.
Getting started \ 21
Page 22

Setting the security code
You must first set the security
code, if you want to operate the
answering function hrom a
remote phone away from
home.
This feature is useful when, for
example, you are away from
home and you want to check to
see if any new messages have
been received.
OFF button
■ REMOTE lamp
■ CD key
I
a
To keep your security code
confidential, the phone does not
announce it for your
confirmation.
I
e
Try not to forget the security
code as it cannot be checked.
REMOTE
button
-CD key
f Press REMOTE.
Wait until the REMOTE lamp lights.
2 Press the <E> key. 3 Enter a two-digit number between 00 to 99 using
the dialing keys.
4 Press the (D key.
The security code is set, and you hear a long confirmation
beep.
5 Press OFF to end the operation.
Changing the security code--------------------------------
Set any other two-digit security code as described above, and the
old security code will be cleared automatically.
11 Getting started
Page 23

Adjusting the volume
Adjusting the ringer
RINGER LEVEL switch
■ RING ON/BATTSAVE
switch
I
■
With the ringer set to off, the
base unit still rings at the 'T.ow"
volume when paged from the
cordless handset.
I
•
If the cordless handset is set to
the ВАТТ SAVE mode, the base
unit cannot page the cordless
handset.
The RINGER LEVEL switch on the base unit controls the volume of
the ringer. The RING ON/BATT SAVE switch on the cordless
handset turns the ringer on or off.
On the base unit
Set the RINGER LEVEL switch to H (High) or L (Low) to adjust
the ringer volume.
Set the RINGER LEVEL switch to OFF to turn the ringer off.
-------------------------------------------
On the cordless handset ■
Set the RING ON/BATT SAVE swKch to:
• RING ON to turn the ringer on.
or
• ВАТТ SAVE to turn the ringer off to save battery power.
This is useful if you plan to use the cordless handset in a
location where you can hear the base unit ring.
In this setting, the cordless handset will not ring, but you can
still make or receive calls by pressing the TALK button.
Getting started 123
Page 24

^ Adjusting the volume
Adjusting the speaker volume
The SPEAKER VOLUME control on the base unit adjusts the volume
of the speaker. It has no effect on the recording level.
Slide the SPEAKER VOLUME control to the right to increase
the volume, or to the left to decrease H.
I SPEAKER VOLUME
nn
I
Getting started
Page 25

Making and receiving calls
Making calls
(grating the phone
OFF button
I
•
If reception is poor when you
press TALK, you will hear five
short error beeps. In this case,
move closer to the base unit to
improve reception.
I
■
If reception liecomes poor during
conversation, you will hear a
beep (the out-of-range alarm)
every second. If this happens,
move closer to the base unit;
otherwise, tl>e call will be
discoimected after 15 seconds.
Note, however, that you may not
hear beeps ii it is noisy on the
cordless handset.
Receiving calls
I
a
The cordless handset will not
ring on an incoming call if the
RING ON/E ATT SAVE switch is
set to ВАТТ SAVE. However,
you can receive calls by pressing
TALK.
1 Press TALK, and wait until the TALK lamp lights.
You then hear a dial tone.
2 Dial the phone number. 3 When you finish talking, press OFF.
The TALK lamp goes off.
Receiving calls on the cordless handset is easy: just press any key
except OFF ("any key talk" function).
This allows you to receive calls in any situation (e.g. in the dark).
1 When you hear the phone ring, press TALK or
any other key except OFF.
2 When you finish talking, press OFF.
The TALK lamp goes off.
Using as a telephone \ 25
Page 26
Making and receiving calls
Redialing
CHANNEL button
You can redial the last number called with just one touch of the
REDIAL/PAUSE button.
1 Press TALK, and wait until the TALK lamp lights.
I
a
The number must not be longer
than 32 digits (the tone and
pause digits are each counted as
one digit); otherwise, you will
hear five short error b^ps and
the call will not be connected.
2 Press REDIAL/PAUSE.
The last sequence of numbers dialed will be automatically
redialed.
To erase the last phone number dialed
While the cordless handset is not in use. press REDIAL/PAUSE
twice.
The number is erased from the memory, and you will hear a
comfirmation beep.
If interference occurs on the cordless handset
When you press TALK, the cordless handset automatically searches
for the channel with the best reception. However, if you notice
interference during a conversation, move closer to the base unit. If
interference persists, you can switch to another channel to improve
the sound quality of your telephone conversation.
I
e
If you change the channel when
you are far from the base unit,
the call may be disconnected.
During a conversation, press CHANNEL.
The phone will select a new chaimel.
--------------------
5 I Using as a telephone
Page 27

Monitoring calls through the base unit
This feature allows you to hear
the other party through the
base unit's speaker. It is
especially convenient for
accessing touch-tone services
which do not require you to
talk. Sino> you do not need to
put the hiindset to your ear,
you can keep the handset in
front of you while you enter
numbers using the dialing key^.
1 Press PGM on the cordless handset.
The TALK lamp flashes.
Press TALK.
The base unit's speaker is turned on, and the IN USE
lamp lights.
OFF button
Dial the phone number.
You wiU hear the ringing tone through the base unit's
speaker.
When the call is answered, you will hear the other party
through the base unit's speaker.
Once connected, you can either switch to a normal phone
conversation, or continue monitoring the other par^s
voice through the base unit.
4 To switch to normal phone conversation, press
TALK.
The base imit's speaker is turned off, and you can switch
to phone conversation using the cordless handset.
5 To disconnect the call, press OFF.
Using as a telephone \ 27
Page 28

Memory dialing
You can store the numbers you
frequently call into the memory
so that you can dial a number
with the touch of two buttons;
the SPEED DIAL button and a
key between 0 and 9.
PGM button
Storing memory dialing numbers
-SPEED DIAL
button
While storing a number, you
cannot receive calls.
I
•
Do not enter a memory dialing
number that exceeds 16 digits
(the tone and pause digits are
each counted as one digit);
otherwise, you will hear five
short error beeps and you must
start over again.
1 Press PGM.
The TALK lamp flashes.
2 Press SPEED DIAL. 3 Press a dialing key between 0 and 9.
You hear a coitfirmation beep.
4 Enter the phone number you wish to store.
If you enter a wrong number, press PGM and start again
ftximstepl.
5 Press PGM.
You hear a confirmation beep, and the TALK lamp goes
off.
Note on storing numbers
Do not let more than 20 seconds elapse between any two steps of
the storing procedure.
----------------------------------
B I Using as a telephone
To change a stored number
Program a new number using the procedure above. The old
number will be erased automatically.
-------------------------------
Page 29

If you use a Private Branch Exchange (PBi
You need to dial a digit (such as 9) to access an outside line
you dial a phone number.
To store the phone number:
1 Enter the outside line access digit.
2 Press REDIAL/PAUSE to enter a pause (to allow the pi
time to access the outside line.)
3 Enter the phone number you want to store.
To keep a directory
----------------------------------
Use the directories supplied. Following is an example of dii
usage.
Write down the names o
persons or places whose
numbers you have store(
the buttons.
Remove.
Attach back to directory.
hole. If you do, it will be
difficult to hear the ringer.
Using as a telep
Page 30

^ Memory dialing
Making memory dialing calls
Once you have stored numbers in the memory dialing buttons, you
can make a call with the touch of two buttons.
1 Press TALK and wait until the TALK lamp lights.
You then hear a dial tone.
2 Press SPEED DIAL.
I
a
If you press a speed dialing key
that does not have a phone
number stored in it, you will
hear five short error beeps.
3 Press the desired speed dialing key (0 to 9).
The phone number stored in the key will be dialed.
to I Using as a telephone
Page 31

Operating the phone during calls
FLASH button
HOLD button
Putting a call on hold
The HOLD button allows you to temporarily suspend a phone
conversation without disconnecting tihe call. When a call is on hold,
you cannot hear the caller and the caller caimot hear you.
I
•
If you have subscribed to "call
waiting" ser\ ice, you cannot hear
the "call waiting" tone of a new
call while the call is put on hold.
Press HOLD.
The TALK lamp flashes.
To resume the conversation-
Press HOLD again.
The TALK lamp lights up steadily.
Using! "call waiting" service
If you have subscribed to "call waiting" service, you can switch to a
new call during conversation.
I
a
If you press FLASH when there
is no new inroming call, the call
will be disccnnected.
1 If a new call conies in while you are talking,
press FLASH.
The current caller is put on hold and you can answer the
new call.
2 When you want to switch back to the first caller,
press FLASH again.
Pressing FLASH lets you switch back and forth between
the two calls.
Using as a telephone 31
Page 32

Paging
From the base unit to the cordless handset
!
You cannot page the cordless
handset when the handset is in
use.
To page someone near the cordless handset, the RING ON/BATT
SAVE switch of the cordless handset should be set to RING ON.
Press PAGE on the base unit.
The cordless handset rings, and continues to ring until you release
PAGE.
From the cordless handset to the base unit
Press PAGE on the cordless handset.
If the RINGER LEVEL switch of
the base unit is set to OFF, the
base unit still rings at the "Low"
volume level when paged from
the cordless handset.
The base unit rings, and continues to ring until you release PAGE.
32 Communicating between the phone units
Page 33

Preparing the answering machine
Selecting the answering mode/types of greetings
You can set the answering machine to record incoming messages
(normal mode), or just to make an announcement without recording
messages (announcement only mode).
You can record your own greeting, or use the factory pre-recorded
greetings.
In the normal answering mode, you also have the option of having a
beep (page 38) to tell you if you have received any new messages.
Answering
mode
Normal
Useful when
You want to play a greeting to ask the caller to
leave a message.
Pre-recorded greeting*:
"Hello, I'm unable to answer your call right now.
To select this mode,
set AUDIBLE IND/ANN
ONLY switch to:
ANN
ONLY ON OFF
AUDIBLE IND
or
Please leave yotu* name, number and message after
the tone."
ANN
_______
ONLY ON OFF
AUDIBLE IND
Announcement
only (ANN
ONLY)
You want to make an announcement to the caller
without accepting incoming messages when, for
example, you are away on a long vacation.
Pre-recorded greeting*:
"Hello, I'm unable to answer your call right now.
ANN
ONLY ON OFF
AUDIBLE IND
Please call again. Thank you."
Although there are two separate factory pre-recorded greetings for normal mode and announcement only mode,
you can reix>rd only one greeting, and it will be used regardless of the mode.
Therefore, if you decide to change modes, make sure that you record a new greeting to match the answering mode.
Using as a telephone answering machine (3
Page 34

^ Preparing the answering machine
When there is not enough memory to record
an incoming message--------------------------------------
The phone can record messages (including incoming messages,
your own greeting and memo messages) of up to about 15
minutes in its memory. If the remaining portion of the memory is
less than a minute, the phone automatically switches to the
announcement only m<^e.
How the AUDIBLE IND/ANN ONLY switch works
When this switch is set to ANN ONLY, the answering machine
will be set to the annotmcement only mode. When the switch is
set to either AUDIBLE IND ON or OFF, the answering machine
will operate in the normal mode. Select ON if you want a beep to
tell you if have received any new messages, and OFF if you do
not. See also page 38.
------------------------------------------------------
34 Using as a telephone answering machine
Page 35

Recording your greeting
You can K cord your own
greeting. If you want to use the
pre-recorded greetings, skip
this sectio 1.
Your own greeting will be used
for both tlie normal and
announcement only modes.
The pre-K<»rded greetings
cannot be used unless you erase
your own recorded greeting.
GREETING RECORD button
Microphone ERASE button
!
You can onl> record one
greeting, anc it will be used
regardless of the answering
mode. Therefore, if you decide to
change mod<<s, mate sure that
you record a new greeting to
match the answering mode.
!
If the remait'ing memory space
becomes full while recording,
you will hear five short error
beeps and the recording will be
canceled.
You can record your greeting using the cordless handset, too.
(See page 46).
t Press GREETING RECORD.
You will hear the recorded ii\structioi\s and a tone.
Start recording.
Speak about 30 cm (12 inches) away from the
microphone.
The greeting must be between 2 seconds and 4 minutes.
If it is less than 2 seconds, you will hear five short error
beeps, and you must start over again.
If the 4-minute limit is exceeded, recording will
automatically stop.
3 Press GREETING RECORD again to stop recording.
The phone automatically replays the greeting you
recorded.
To check the greeting
Press GREETING PLAY on the base unit
The phone replays the greeting. If no greeting was recorded, the
pre-recorded message will be heard instead.
-------------------------------------
Using as a telephone answering machine :
Page 36

^ Preparing the answering machine
I
a
The pre-recorded greeting
messages cannot be erased.
To change the greeting
Record a new greeting.
------------------------------------
The new greeting replaces the old one.
To use the pre-recorded messages
------------------------
If you want to use the pre-recorded messages, erase your own
greeting as follows using the base unit:
1 Press GREETING PLAY.
2 While the greeting is being replayed, press ERASE.
If a power interruption occurs
-----------------------------
• If a power interruption occurs and there are fresh backup
batteries in the base unit, the greeting you recorded will be
retained in the memory for about 7 hours.
• If a power interruption occurs and the backup batteries in the
base unit are dead, the greeting you recorded will be cleared. If
this happens, the indicator will appear in the message
counter when the power is restored. Record the greeting and set
the current day and time (page 20) again.
Using as a telephone answering machine
Page 37

Turning on the answering function
ANSWER ON/OFF button
Answer on indicator
RINGER SELECT switch
AUDIBLE IND/ANN ONLY switch
I
•
First select the answering mode
as described on page 33.
You can change the answering
mode after turning the
answering function on.
You can turn the answering function on using the cordless handset,
too. See page 46.
Press ANSWER ON/OFF so that the answer on indicator
lights.
If remaining memory space is not enough
-----------------
• If the remaining time for recording messages is less than 4
minutes, the phone announces the remaining time minute by
minute when you turn on the answering function.
• If the remaining time is less than a minute, the phone will
instruct you to erase the messages in the memory when you
turn on the aivswering function. You cannot turn on the
answering function unless you erase the messages.
To turn off the answering function
Press ANSWER ON/OFF so that the answer on indicator goes
off.
Understanding the forget-to-set feature
------------------------
-------------------
The answering machine will automatically answer a call after 10
rings even if the answering function is off. The answering
function will remain on for all subsequent calls. This feature is
useful for turning the answering function on from a remote
location.
See the "Calling from a remote phone" section (page 48) for more
information.
Using as a telephone answering machine | 37
Page 38

Preparing the answering machine
Setting a beep for incoming messages
You can set the phone to beep and alert you of recorded incoming
messages.
To turn on the beep, set the AUDIBLE IND/ANN ONLY
switch to AUDIBLE IND ON.
Selecting the ringer mode
The RINGER SELECT switch allows you to vary the number of rings
before the phone answers to take a message. There are three modes,
3,5, and TS. Normally, set it to TS (Toll Saver).
Mode
Useful when How the phone works
3 You are at home. The phone rings three times and then answers the
call.
5 You are at home. The phone rings Eve times and then answers the
call.
TS
(Toll saver)
You want to know if any
new messages have been
received away from home.
If any new messages have been recorded, the
phone answers after three rings. If no new
messages are recorded, it answers after Eve rings.
When you call from a pushbutton phone and hear
more than three rings, you know that there are no
new messages. If you hang up at this point before
the phone answers, you can save the toll for the
call.
Using as a telephone answering machine
38
~ i£ - ‘ >r -I, vr
Page 39

Playing back messages
Starting playback
The message counter reflects
the total number of newly
recorded messages. When the
AUDIBLE IND/ANN ONLY
switch is set to AUDIBLE IND
ON, the phone will beep to
indicate tluit there are new
messages.
SPEAKER VOLUME control
This section explains how to play back messages using the base unit.
You can also control playback using the cordless handset. See the
"Operating the answering machine from the cordless handset"
section on page 46.
PLAY/STOP button
I
S
If there are more than 19
recorded messages, the
maximum possible number that
will appwar on the counter is 19.
"F' win appear when the
memory is full.
I
•
To stop the beep of the audible
indicator, puih any button on the
base unit. It ilso stops if you set
the AUDIBUi IND/ANN ONLY
switch to AUDIBLE IND OFF.
I
•
Even when tne message counter
returns to zero, the messages will
still remain in the memory until
you erase them. We recommend
that you regularly clear the old
messages to make room for new
ones.
To start playback, press PLAY/STOP.
Messages, regardless of their type (incoming, memo message, or
telephone conversation), are played back in the order they were
recorded. The sequence is indicated on the message coimter.
When all the messages are played back, the message counter returns
to zero and playback stops.
To play back the messages you have listened to
----------------------------------------------------------
When the new messages are all played back, press PLAY/
STOP again.
If there are no new recordings
The old messages will be replayed.
To adjust the speaker volume
Slide the SPEAKER VOLUME control to the right to increase
the volume, or to the left to decrease K.
Using as a telephone answering machine
Page 40

“► Playing back messages
During playback of each message
During playback of each
message, you can perform
various operations using the
digital message shuttle.
You can repeat, skip and stop
messages using the cordless
handset also (see page 46).
Pointer
PLAY/STOP button
Digital message shuttle
I
a
Changing playback speed does
not affect the speed at which the
time/day stamp is announced.
I
a
If you turn the digital message
shuttle to the REPEAT indicator
during the Erst three seconds of
the current message, the phone
will jump back to the previous
message.
To change the playback speed
Turn and hold the digital message shuttle with the pointer
pointing approximately at one of the following:
-----------------------------
-30% Replays at 30% slower than the normal speed
•l■30% Repla)^ at 30% faster than the normal sp^
+60% Replays at 60% faster than the normal speed
If you want to keep playback at the new speed
While holding the digital message shuttle at the new speed press
PLAY/STOP. Even if you release it, the new speed will remain in
effect until all the messages are replayed. If you want to return to
the normal speed immediately, turn the digital message shuttle in
either direction to release the speed lock.
To repeat the last few seconds-----------------------
Turn the digital message shuttle until the pointer is
approximately at the BACK SPACE indicator.
The phone goes back by about a few seconds then resumes
playback.
To repeat the current message
Turn the digital message shuttle until the pointer is
approximately at the REPEAT indicator.
Playback resumes from the beginning of the current message.
40 Using as a telephone answering machine
Page 41

To go back to previous messages
Turn the digital message shuttle until the pointer is
approximately at the REPEAT indicator, then hold the shuttle
until the phone jumps to the desired message.
-------------------------
When the digital message shuttle is released, the phone resumes
playback.
To skip the current message
Turn the digital message shuttle until the pointer is
approximately at the SKIP indicator.
To jump to foiiowing messages
Turn and hold the shuttle until the phone skips to the desired
message.
-------------------------------
----------------------------
When the digital message shuttle is released, the phone resumes
playback.
Stopping piayback-
Press PLAY/STOP.
Using as a telephone answering machine
Page 42

Erasing messages
You can erase each message
during its playback, or erase all
messages after they are played
back. Once erased, they cannot
be recovered.
This section explains how to erase messages using the base unit.
You can also erase messages using the cordless handset. See the
"Opereating the answering machine from the cordless handset"
section on page 46.
I
•
The operation will be canceled if
there are any new messages you
have not played back yet.
Erasing one message at a time
During the message playback, press ERASE.
You hear a confirmation beep.
Erasing aii piayed messages
When the phone is not playing back any messages, press
ERASE.
The phone announces that all of your messages have been erased.
----------------------------
-------------------------------
42 I Using as a telephone answering machine
Page 43

Screening calls
You can sceen calls by leaving
the answering machine on while
you are at home. When a call is
answered, you can hear the
message b<>ing recorded through
the base unit or through the
cordless hcndset.
You can then decide either to
continue ncording, or to switch
to conversiition.
Make sure that the answering machine is in normal answering
mode (see page 33).
On the base unit-
When a call is answered, the base unit's speaker will be turned on
automatically, and you will be able to hear the caller recording
the message. The caller cannot hear you. If you decide to talk to
the caller, press TALK on the cordless handset.
On the cordless handset------------------------------------
To screen a call, the RING ON/BATT SAVE switch must be set to
RING ON.
When the base unit is answering an incoming call, the TALK
lamp and the BIEMOTE lamp will flash on the cordless handset.
While the lamps are flashing, press REMOTE.
You can listen to the caller recording the message, but the caller
caimot hear you. If you decide not to talk to this caller, press
OFF. The answering machine will sitll continue to record the
message until the caller hangs up.
If you wish to speak to the caller, press TALK.
The base unit will stop recording.
Using as a telephone answering machine
Page 44

Recording a telephone conversation
You can record the
conversation while you are
talking on the phone. The
recorded conversation is
counted as a message and can
be played back like any
incoming messages.
1 During the phone conversation, press CONV REC
on the cordless handset.
The REMOTE lamp flashes, and recording starts.
REMOTE lamp
!
If the 4-minute message limit is
exceeded, recording
automatically stops.
2 To stop recording, press CONV REC again.
The REMOTE lamp goes off.
■ If the memory becomes full during
recording
The "F" indicator will flash in the message counter, and recording
will stop automatically.
44 Using as a telephone answering machine
Page 45

Recording a memo message
You can leive memo messages
to remind yourself or other
users of th'i answering
machine.
The memo message is counted
as a message and can be played
back like any incoming
message.
I
•
If the 4-minui e message limit is
exceeded, recording
automaticall) stops.
MEMO button
Microphone
You can record memo messages using the cordless handset, too.
See page 46.
T Press MEMO on the base unit.
You hear the recorded instructions.
^ Start recording.
Speak about 30 cm (12 inches) away from the microphone.
3 To stop recording, press MEMO again.
If a call comes in during recording
The phone will ring while recording continues.
To receive the call, stop recording the memo message.
If the memory becomes full during recording
The "¥" indicator will flash in the message counter, and recording
will stop automatically.
Using as a telephone answering machine | ^
Page 46

Operating the answering machine from the cordless handset
nePEAT ABC PLAY DEF SKIP
OFF button
REMOTE lamp
REMOTE button
I
■
If there are messages, the number
of messages will be announced
alter you press REMOTE.
(I)@ (1)
ant ERASE ML MEHO MNOSTOP
© (D (D
>RS GREET TUV WXY
@ (© ®
(*)(^ ®
You can record your greeting, play back messages and perform other
functions from the cordless handset.
To operate the answering machine from the cordless handset,
proceed as follows:
1 Press REMOTE.
Wait until the REMOTE lamp lights.
^ Press the dialing key (dD to (D and (D) for the
desired operation.
Refer to the table on the next page for each operation.
When an operation is completed, you hear continuous beeps for
20 seconds. During this period, you can start another operation
by pressing the desired tey.
3 Press OFF (or REMOTE) to quit the remote
> I Using as a t^^hona answering machine
operation mode.
Notes-
• When more than 20 seconds elapse between pressing buttons
(except when recording), a long beep sounds and the remote
operation is canceled and you must start over again.
• If someone else is operating the base unit, fr ve short error beeps
will sound.
• If the phone receives a call during remote operation, the remote
operation is automatically canceled and the phone rings except
when recording a greeting.
• For more explanation about each operation, refer also to the
pages that describe operation using the base unit.
Page 47

Description of operation from the cordless
handset-------------------------------------------------
Function
Play back messages
Control key
®(PLAY)
Repeat messages CD (REPEAT)
Skip messccges
Erase mesiages
Record memo message
(3)(SKIP) Press to skip the current message. You cannot skip
® (ERASE) To erase a specific message, press ® (ERASE) during
(S> (MEMO)
Description
Press to start playback. (See page 39 for operation
with the base unit.)
Press to repeat the current message. To repeat the
previous message, press within three seconds after
the current message starts.
the last message.
its playback.
To erase all played messages, press <S> (ERASE) when
the phone is not playing back any messages.
This operation is canceled if there are any new
messages. (See page 42 for operation with the base
unit.)
Press <S> and speak into the cordless handset's
microphone after the recorded instruction.
To stop recording, press ® (STOP).
(See page 45 for operation with the base unit.)
Record greeting
Check the current time
Interrupt operation
Turn on tire answering
function
Turn off the answering
function
Set the security code
Set the day and time
(Z) (GREET)
<S>
® (STOP)
®(ANS-ON)
® <D
(ANS-OFF)
Press CZ> and speak into the cordless handset's
microphone after the recorded instruction.
To stop recording, press ® (STOP).
(See page 35 for operation with the base unit.)
You cannot play back your greeting from the cordless
handset.
The current time is announced at the base unit and
the cordless handset.
Press to stop the current operation.
Press to turn on the answering function.
(See page 37 for operation with the base unit.)
Press ®, and after five short beeps, press ® again.
(See page 37 for operation with the base unit.)
See page 22 for detailed explanation.
See page 20 for detailed explanation.
Using as a telephone answering machine (4
Page 48

Calling from a remote phone
You can call from a pushbutton (tone) phone and "pick up" new
messages recorded on the phone, using the control codes for remote
operations.
However, you must first set the security code (see page 22) and turn
on the answering function.
1 Call your phone number from a pushbutton
phone.
1
a
к you make a mistake, you can
try again, up to three times and
then you will be disconnected.
Also, if you do not enter the
security code within 20 seconds,
you wUl be disconnected.
I
■
If 20 seconds elapse without
pressing a control code, the call
will be disconnected.
2 When you hear the greeting, press (D and your
security code.
The two-digit security code must be entered within two
seconds.
Example: If your security code is 48, press <D, (D, <S>.
You hear a long confirmation beep, emd the greeting
stops. The number of messages recorded on the
answering machine will be announced, (depending on the
recorded messages, the answering machine operates as
follows:
If there are:
new messages (messages
that have not been played
back)
only old messages (messages
that already have been
played back)
no new or old messages
then the answering machine:
plays back the messages
automatically.
stands by for you to enter a
control code.
stands by for you to enter a
control <^e.
3 If you want to continue with another operation,
enter the control code within 20 seconds (see
page 49).
4 Hang up when you finish.
3 I Remote control functions
Page 49

Using the toll-saver feature
--------------------------------
When the RINGER SELECT switch is set to TS, if any new
messages are recorded, the phone will answer after three rings. If
no new messages are recorded, it will answer after flve rings.
When you call from a pushbutton phone and hear more than
three rings, you will know that there are no new messages and
you can then hang up, saving you the cost of the call.
For more information, see also "Selecting the ringer mode"
section (page 38).
Using the forget-to-set feature
----------------------------
If you left home and later realized that you forgot to turn the
answering function on, you can turn it on by calling the
answering machine and l^ng it ring for 10 rings. The answering
machine will automatically answer a call after 10 rings even if
the answering function is off.
The answering function will renaain on for all subsequent calls.
Control codes for remote operations
Task
Play back new messages.
Repeat the current message.
If the operation is done within the first three seconds of a message, the phone will
jump to the previous message instead.
Skip to the beginning of the next message. (DCS)
Erase messages.
To erase a specific message, press <D, d) while the message is being played back.
To erase all messages that have been played back, press d), (D when your phone
is waiting for further codes.
Control code
® ®
®®
®®
Record a new greeting (up to about a minute).
To record, proceed as follows:
1 Press (i), <D,
2 When you hear the recorded instructions and a long beep, start speaking.
3 When you finish, press ®, ® or hang up to stop recording.
If you stop recording, you will hear your new greeting for confirmation.
Turn on the answering function so that callers can record messages.
Turn off the answering function so that incoming calls are not answered.
Interrupt the current operation.
Your phone waits for further codes.
®<z>
®(!D
® (H)
<S)<S)
Remote control functions 149
Page 50

other Inht/mation
Precautions
On power source
On installation
• Before initial use, insert the battery pack into the base unit and
charge it for 10 hours.
• Operate the base unit only on 9V EXT. Use the AC power adaptor
supplied with the unit. Do not use any other AC power adaptors as
they may cause malfunction.
• Coimect the base unit to an AC outlet which has a continuous
power supply. Avoid outlets where power may be cut off.
• Store the battery pack at a temperature between 5* C (41* F) and
35* C (95* F) for best performance.
Do not expose the base uiüt to:
• heat sources such as radiators or air ducts.
• extremely low temperatures.
• direct sunlight.
• excessive dust.
• moisture or rain.
• mechanical vibration or shock.
Do not place the base unit on a sloping surface.
On maintenance
On power failure
Cleaning the cabinets
Qean the cabinets with a soft cloth slightly moistened with water
or a mild detergent solution. Do not use any type of abrasive pad,
scouring powder or solvent such as alcohol or benzine as they
may damage the finish of the cabinet.
Cleaning the battery terminals-----------------------------
If the terminals (metal parts on the battery pack) are soiled, the
battery life will become shorter. When this occurs, repeatedly
attach and remove the battery from the battery compartment. This
will improve the contact of the battery pack and the battery
compartment of the cordless handset or the base unit. Also, wipe
the terminals with a soft cloth or paper.
> During a power interruption, the base unit does not operate, and a
phone conversation cannot be made on the cordless handset.
> If backup batteries are not installed or the batteries are dead, then
the'T" indicator will flash in the message counter as soon as power
is restored following a power interruption. This means that the
greeting message, any recorded messages, and the current day and
time have all been cleared. In this case set and record all these
again.
--------------------------------------
50 I Handling the phone
Page 51

Troubleshooting
Problem Cause/Solution
Making a call
You hear five short error
beeps when pressing TALK.
You hear no dial tone.
The telephone always
connects with the wrong
number, or does not connect
at all, even though the
numbers you dial are correct.
The phone c oes not redial
correctly.
Talking on the cordless handset
You hear interference during
conversation.
• Make sure the base unit is connected to an AC outlet.
• Extend the antenna of the base unit vertically.
• Move the cordless handset closer to the base unit.
• Place the base unit away from noise sources (page 12).
• Make sure the telephone line cord is securely connected to the
telephone outlet.
• The battery may be weak or completely discharged.
Charge the battery for more than 10 hours (page 16).
• Make sure the dial mode setting is correct (page 19).
• Make sure the number you last dialed (including the tone and
pause digits, if used) is fewer than 32 digits.
• Make sure the last dialed number is really the one you want to dial.
• Move the cordless handset closer to the base unit.
• Press CHANNEL on the cordless handset for a channel that gives
better reception.
• Place the base unit away from noise sources (page 12).
You hear a 1)eep every second
during conversation.
You hear a Ijeep every three
seconds.
Receiving calls
The cordless handset does
not ring.
• It is an out-of-range alarm. Move the cordless handset closer to the
base unit within 15 seconds (page 25).
• The battery is weak. Charge the battery for more than 10 hours
(page 16).
• Move the RING ON/BATT SAVE switch to RING ON.
• The battery may be weak. Chaise the battery for more than 10
hours (page 16).
• Extend the antenna of the base unit vertically.
• Move the cordless handset closer to the base unit.
• Place the base imit away from noise sources (page 12).
• If you are storing a memory dialing number, you caimot receive
any calls. This is not a problem.
(to be continued)
General I!
Page 52

-► Troubleshooting
(continued)
Storing memory dialing numbers
You hear an error beep and
cannot store a memory
dialing number.
Paging the cordless handset
The cordless handset does
not ring when calling from
the base unit.
Operating the answering machine
You cannot hear anything
from the speaker.
No time stamp is heard.
Recording
You cannot record your
greeting properly.
• Make sure you follow the procedure in storing the number
correctly (page 28).
• Make sure the number (including the tone and pause digits, if used)
is fewer than 16 digits.
• Move the RING ON/BATT SAVE switch to RING ON.
• The battery may be weak. Charge the battery for more than 10
hours (page 16).
• Extend the antenna of the base unit vertically.
• Move the cordless handset closer to the base unit.
• Place the base unit away from noise sources (page 12).
• Use the SPEAKER VOLUME control to increase the speaker
volume.
• Make sure the day and time are set (page 20).
• The day and time may have been cleared due to a power
interruption. Set them again.
> Keep your message between 2 seconds and 4 minutes.
' Make sure you speak about 30 cm (12 inches) away from the
microphone when recording on the base unit.
Using remote operations
The phone does not accept
your security code.
You hear error beeps when
you enter your security code.
A long beep does not sound
when you enter your security
code.
Playback
Playback speed cannot return
to nonnal.
General
52
(?.r.m-.r.-fif-.Vi*
• Make sure you call from a pushbutton (tone) phone.
• Make sure the two digits are entered within two seconds.
• Make sure the correct security code is entered.
• Enter your security code as you hear the greeting b^n to play.
• Make sure you are calling from a pushbutton (tone) phone.
• Timi the digital message shuttle in either direction to release the
speed lock.
Page 53

Operating llie i>ase unit from the cordiess handset
Remote oper.ition is canceled. • 20 seconds have elapsed after you pressed REMOTE.
Start again by pressing REMOTE.
Five short error beeps sound
when you press REMOTE.
The phone rings and the
remote operation is canceled.
Others
"F' blinks in the message
counter.
• Someone else is operating the base unit.
Press REMOTE again to cancel the remote operation.
• There is an incoming call.
Receive the call.
• You are connecting the base unit to an AC outlet for the Erst time or
after a power interruption.
Press any button to turn it off.
TTie POWER lamp blinks. • The backup batteries are not installed in the base unit.
Install the backup batteries (page 13).
• The backup batteries are dead.
Replace them with new ones.
General 53
Page 54

Specifications
Frequency control
Operation mode
Curating frequency
Supplied accessories
Power source
Battery life
Dimensions
Mass
Power source
Battery charging time
Dimensions
Mass
Crystal-controlled PLL
FM, duplex
46 MHz/10 channel
49 MHz/lO channel
AC power adaptor AC-T46 (1)
Telephone line cords (2)
Rechargeable battery pack BP-T40 (2)
Size AAA (R03) batteries (4)
Wall bracket and screws (1 set)
Directories (2)
Operating instructions (1)
Remote control card (1)
Quick start guide (1)
Rechargeable battery pack BP-T40
Standby: Approx. 30 days (1 month)
Approx. 58 X 205 x 69 mm (w/h/d),
antenna excluded
(Approx. 2 •'/« X 8'/«X 2 ’/4 inches)
Anteima: 81 mm (3 '/4 inches)
Approx. 300 g, battery included
(Approx. 10.5 oz)
DC 9V from AC power adaptor
Approx. 10 hours
Approx. 183 X 51 X 222 mm (w/h/d),
antenna excluded
(Approx. 7 '/4 X 2 V« X 8 ’'/»inches)
Antenna: 610 mm (24 V> inches)
Approx. 645 g (Approx. 1 lb 7 oz),
battery included
Answering machine
General
Maximum recording time About 15 minutes, using incorporated
1C
Greeting message
Incoming message
Memo/conversation
Design and specifications are subject to change without notice.
Up to 4 minutes when recording using
the base unit or the cordless handset
Up to 1 minute when recording from a
remote phone
Up to 4 minutes/message
Up to 4 minutes/message
Page 55

Page 56

Registro del propietario
Los números de modelo y de serie se encuentran en el fondo de la base del teléfono. Anote el
número de serie en el espacio previsto a continuación. Refiérase a estos números cada vez que se
comunique con su distribuidor Sony con respecto al producto.
Modelo N»SPP-A5000
SERIEN»
IMPORTANTES INSTRUCCIONES DE
SEGURIDAD
A fin de reducir el riesgo de incendio, shock eléctrico y lesiones a las personas cuando usted use su
equipo telefónico, siempre debe observar precauciones básicas de seguridad, entre ellas:
1. Lea y entienda todas las instrucciones.
2. Siga todas las advertencias e instrucciones indicadas en el producto.
3. Desconecte este producto de la toma de corriente de pared antes de limpiarlo. No use
limpiadores líquidos ni en aerosol. Use un paño húmedo para limpiarlo.
4. No use este producto cerca del agua, por ejemplo, cerca de una bañera, lavamanos, fregadero de
cocina o batea, en un sótano mojado ni cerca de una piscina.
5. No ponga este producto sobre un carrito, estante o mesa inestable. El aparato puede caer y
ocasionar daños graves al teléfono.
6. Las ranuras y aberturas en el gabinete y e la parte trasera o el fondo del aparato se proporcionan
a fines de ventilación. Para evitar que el aparato se sobrecaliente, dichas aberturas no deben
obturarse ni cubrirse. Las aberturas nunca deben bloquearse colocando el aparato sobre la cama,
sofá, alfombra u otra superfície similar. Este producto nunca debe colocarse cerca de, ni sobre un
radiador o registro de calefacción. Este producto no debe colocarse en una instalación
empotrada salvo que se provea ventilación apropiada.
7. Este producto sólo debe operarse desde el tipo de fuente de alimentación indicada en la etiqueta
de especifícaciones. Si no está seguro del tipo de fuente de alimentación en su hogar, consulte
con su distribuidor o compañía de electricidad local.
8. No deje que nada descanse sobre el cable eléctrico. No sitúe este producto en un lugar donde el
cable esté expuesto a abuso debido al tránsito de gente.
9. No sobrecargue las tomas de corriente de pared y cables de extensión, ya que esto puede
ocasionar el riesgo de incendio o shock eléctrico.
10. Nunca introduzca a presión objetos de ningún tipo en este producto a través de las ranuras del
gabinete, ya que pueden hacer contacto con un punto de voltaje peligroso u ocasionar un
cortocircuito entre piezas que podría conducir a incendios o shock eléctrico. Ntmca derrame
líquidos de ningún tipo sobre el producto.
11. Para reducir el riesgo de shock eléctrico, no desarme este producto; en caso de necesitarse
servicio o reparación, llévelo a personal de servicio caliñcado. el abrir o quitar las tapas puede
exponerle a voltaje peligroso u otros riesgos. El reensamblaje incorrecto puede ocasionar shock
eléctrico cuando el aparato se use posteriormente.
56
(continúa)
Page 57

12. Descor ecte este producto de la toma de corriente de pared y reñera el servicio a personal de
servido caliñcado bajo las siguientes condidones:
A. Cuando el cable eléctrico o enchufe se encuentra dañado o deshílachado.
B. Si se ha derramado líquido dentro del producto.
C. Si el produdo ha estado expuesto a lluvia o agua.
D. Si el producto no opera normalmente al seguir las instrucdones de operadón. Sólo debe
ajustar los controles incluidos en las instrucdones de operadón, ya que el ajuste incorrecto de
otros controles puede produdr daños y a menudo exigirá trabajo extenso por un técnico
calificado para restaurar el produdo a las operadones normales.
E. Si el producto se ha dejado caer o el gabinete está dañado.
F. Si el producto exhibe un cambio perceptible de operadón.
13. Evite usar un teléfono (que no sea del tipo sin cordones) durante una tormenta eléctrica. Existe la
remota posibilidad de shock eléctrico debido a rayos.
14. Para notifícar una fuga de gas, no utilice el teléfono en la vedndad de dicha fuga.
GUARDE ESTAS INSTRUCCIONES
PRECAUCION: PARA REDUCIR EL RIESGO DE INCENDIO O LESION A PERSONAS DEBIDO A
LA PILA, LEA Y SIGA ESTAS INSTRUCOONES:
1. Sólo dobe utilizar un bloque de pilas de los siguientes tipos y tamaños: R03 (tamaño AAA) y
SONYBP-T40
2. No d«»che el bloque de pilas en una hoguera.
La pik puede explotar. Compruebe los códigos locales sobre posibles instrucdones espedales de
desedo.
3. No abra ni mutile el bloque de pilas.
El electrólito liberado es corrosivo y puede ocasionar daños a los ojos o la piel. Puede ser tóxico
siseirgiere.
4. Tenga cuidado al manejar la pila a ñn de evitar cortodrcuitos de la pila con materiales
conductores tales como anillos, pulseras y llaves. La pila o el conductor puede sobrecalentarse y
ocasionar quemaduras.
Pilas R03 (tamaño AAA)
1. No intente cargar las pilas suministradas o identifícadas para uso con este produdo. Pueden
producirse fugas de electrólito corrosivo, o las pilas pueden explotar.
2. No intente calentar las pilas suministradas o identifícadas para uso con este producto para
prolongar su vida útil. Puede producirse una inesperada fuga de electrólito de las pilas, con
riesgo de quemaduras o irritación en la piel o los ojos.
3. Sustituya todas las pilas al mismo tiempo. Si combina pilas nuevas con otras descargadas, puede
producirse una sobrepresión interna que ocasione la ruptura de las pilas descargadius.
4. Cuando coloque las pilas en este producto, observe a polaridad o dirección correcta. Si coloca las
pilas en sentido inverso, éstas pueden cargarse y ocasionar fugas o explotar.
(continúa)
i
57
Page 58

5. Si no piensa utilizar este producto durante largo tiempo (un mes o más) extraiga las pilas, ya que
podrían producirse fugas.
6. Deseche inmediatamente las pilas totalmente agotadas, ya que son más propensas a sufrir fugas.
7. No guarde este producto, ni las pilas suministradas o identiñcadas para uso con este producto,
en zonas sometidas a altas temperaturas. Si guarda las pilas en un refrigerador para prolongar
su duración en condiciones de almacenamiento, debe protegerlas de la condensanción durante
su almacenamiento y durante el desescarchado. Antes de utilizarlas, debe dejarlas a temperatura
ambiente hasta que recuperen la temperatura normal de funcionamiento.
Bloque de pilas SONY BP-T40
1. Cargue el bloque de pilas suministrado o identifícado para uso con este producto de acuerdo
con las instrucciones y limitaciones especificadas en el manual de instrucciones correspondiente
al producto.
2. Observe la orientación de polaridad correcta entre el bloque de pilas y el cargador de pilas.
3. No combine pilas nuevas con otras descargadas en este producto.
4. No utilice conjuntamente pilas de distintos tamaños o diferentes marcas.
Para clientes en EE.UU:
RECICLADO DE BATERIAS DE PLOMO HERMETICAS
BATERIAS DE PLOMO HERMETICAS.
DEBERAN SER DESECHADAS DE FORMA ADECUADA.
las baterías de plomo herméticas pueden reciclarse. Usted podrá ayudar a conservar
Pb
Para ínformadón sobre el centro de reparadones más cercano, llame a 1-800-222-SONY (EE.UU.
solamente)
Precaución: No maneje baterías de plomo herméticas dañadas o con escape de su electrólito.
"Advertencia: Este teléfono fundona como un radiotransmisor. Las conversadones mantenidas
mediante el teléfono inalámbrico pueden ser escuchadas desde otros aparatos de radio dentro de la
zona de alcance de la transmisión".
CODIGO DE SEGURIDAD DIGITAL
El modelo (SPP-A5000) dispone de una drcuitería de código de seguridad digital que propordona
protecdón contra el acceso acddental. De forma aleatoria se selecciona uno de los 1.024 tipos de código
de seguridad digital y se ajusta en cada teléfono durante su fabricadón.
De este modo, es muy improbable que más de dos unidades tengan asignado el mismo código de
seguridad digital.
el medio ambiente devolviendo las baterías que no desee utilizar a un centro de
reparaciones Sony para su recopilación, recidado, y eliminadón apropiada.
Nota: En dertas zonas, puede estar prohibido desechar baterías de plomo
herméticas en lugares de recogida de basura de viviendas o comerdos.
58
Page 59

Para clicmtes en EE.UU: (continuación)
INFORMACION GENERAL SOBRE LOS
TELÉFONOS
1. Este equipo está de acuerdo con la Parte 68 de las reglas de la FCC. En la base de este equipo hay
una etiqueta que contiene, entre otra información, el número de registro de la FCC y el número
de equivalencia de generador de llamada (REN) para este equipo. Cuando se solicite, esta
información deberá ofrecerse a la compañía telefónica.
Z La toma (conector) de registro aplicable para su equipo es USOC-RJ11C.
3. Este equipo ha sido diseñado para conectarse a la red telefónica o a la de un usuario utilizando
una toma modular compatible que esté de acuerdo con la Parte 68 de la FCC. Con este equipo se
suministra un cable y una clavija modular que está de acuerdo con las normas de la FCC.
4. EL REN se utiliza para determinar la cantidad de dispositivos que podrán conectarse a la línea
telefónica. El exceso de REN conectados a la línea telefónica puede resultar en que los
dispos: tivos no contesten a llamadas entrantes. En la mayoría de las zonas, no en todas, la suma
de REN no deberá ser superior a cinco (5). Para enterarse del número total de REN que pueden
conectarse a una línea, póngase en contacto con la compañía telefónica.
5. Si su ei^uipo SPP-A5000 produce daños en la red telefónica, la compañía telefónica le notifícará
con an relación que es posible que se requiera la interrupción temporal del servicio. Pero si la
notificación con antelación no es práctica, la compañía telefónica lo notifícará al cliente lo antes
posible. Además se le notificará el derecho a realizar una reclamación a la FCC si usted lo
considera necesario.
6. La compañía telefónica puede realizar cambios en sus instalaciones, equipos, operaciones, o
procedimientos que pueden afectar la operación del equipo. Cuando suceda esto, la compañía
telefónica le avisará con antelación para que usted realice las modifícadones necesarias para
mantener ininterrumpido el servido.
7. Si experimenta algún problema con este equipo (SPP-A5000), con respecto a la reparación o a la
informadón sobre la garantía, póngase en contado con Sony Telecommunications Helpline
(201)3('1-6111. Si el equipo causa problentas en la línea, la compañía telefónica puede solidtarle
que desconecte el equipo hasta que se resuelva el problema.
8. Todas las reparadones deberá realizarlas un centro de reparadones Sony.
9. Este ecjuipo no deberá utilizarse en líneas compartidas ni en líneas de pago previo.
10. Este ec|Uipo es compatible con dispositivos para ayuda al oído.
Si su teléfono dispone de marcadores automáticos
Cuando programe números de emergenda y (o) realíce llamadas de prueba a los mismos.
1. Permanezca poco tiempo en la línea y explique a la otra parte la razón de la llamada.
2. Realíce tales actividades en horas de poco tráfico, como por la mañana temprano o a últimas
horas de la tarde.
Precaución:
Cualquier cambio o modificación no aprobado expresamente en este manual puede anular su
autoridad para utilizar este equipo.
Page 60

Indice
Pasos previos a la utilización del teléfono
Ajuste
Procedimientos iniciales
Comprobación del contenido del paquete 62
Identificación de componentes 63
Instalación de la unidad base 66
Selección de la mejor ubicación para la unidad base 66
Colocación de las pilas 67
Conexión de la unidad base 68
Colocación de la unidad base en la pared 69
Preparación del bloque de pilas para el teléfono inalámbrico 70
Carga del bloque de pilas 70
Instalación de un bloque de pilas cargado 71
Selección de la marcación por tonos o impulsos 73
Ajuste del modo de marcación 73
Utilización de servicios por tonos con el sistema de marcación
por impulsos 73
Ajuste de la fecha y hora 74
Introducción del código de seguridad 76
Regulación del voliunen 77
Ajuste del timbre 77
Ajuste del volumen del altavoz 78
Utilización como teléfono
Realización y recepción
de llamadas
Comunicación entre las
unidades telefónicas
Realización y recepción de llamadas 79
Marcación mediante la función de memoria 82
Utilización del teléfono durante llamadas 85
Función de aviso 86
Realización de llamadas 79
Recepción de llamadas 79
Remarcación 80
Marcación con interferencias en el teléfono inalámbrico 80
Escucha de llamadas desde la unidad base 81
Almacenamiento de números de teléfono en memoria 82
Marcación de números almacenados en la memoria 84
Retención de una llamada 85
Uso del servicio "llamada en espera" 85
Desde la unidad base al teléfono inalámbrico 86
Desde el teléfono inalámbrico a la unidad base 86
Page 61

utilización como
contestaclor de llamadas
Preparación del contestador automático 87
Selección del modo de contestación/tipos de mensajes de
contestación 87
Grabación de un mensaje de contestación 89
Activación de la función de contestador de llamadas 91
Activación de la alarma de mensajes recibidos 92
Selección del modo de timbre 92
Reproducción de los mensajes recibidos 93
Inicio de la reproducción 93
Durante la reproducción de cada mensaje 94
Borrado de mensajes 96
Filtrado de llamadas 97
Grabación de una conversación telefónica 98
Grabación de un mensaje recordatorio 99
Utilización del contestador de llamadas desde el teléfono
inalámbrico 100
Funciones de control
remoto
I
Información adicional
Mamsjo dei teléfono
Generales I Solución de problennas 105
Llamada desde im teléfono remoto 102
Códigos de control para operaciones remotas 103
Precauciones 104
Fuente de alimentación 104
Instalación 104
Mantenimiento 104
Cortes de suministro eléctrico 104
I Especifícaciones Contraportada
161
Page 62

Pasos previos a la utilixación riel teléfono
Comprobación del contenido del paquete
Compruebe si el paquete contiene todos los elementos siguientes. Si
falta alguno, póngase en contacto con su proveedor Sony.
Unidad base
Adaptador de alimentación CA (AC-T46)
(La forma del adaptador puede ser
diferente del que se muestra en la
Teléfono inalámbrico
ilustración, pero su funcionamiento es
idéntico).
Cables de línea telefónica (2)
Bloques de pilas
recargables
BP-T40(2)
62 I Ajuste
Tomillos (4)
Soporte mural
Pilas tamaño AAA (4) Listines (2)
Page 63

Identificación de componentes
1 Tecla MEMO
Para grabar mensajes recordatorios.
2 lndica<dor de modo de contestador
Se ilumina cuando se encuentra activada la
funciór de contestador de llamadas.
3 Tecla ANSWER ON/OFF
Activa y desactiva la función de contestador
dellannadas.
4 Tecla PACE
Permite realizar llamadas al teléfono
inalámbrico.
5 Tecla GREETING PLAY
Reproduce el mensaje de contestación
grabado.
6 Tecla GREETING RECORD
Para gi abar el mensaje de contestación.
7 Indicador CHARGE
Se iluniina mientras se cargan las pilas.
8 Compartimiento de carga
Para cíirgar los bloques de pilas
suministrados.
9 Indicador IN USE
Se iluntina mientras se utiliza el teléfono
inalámbrico.
10 Indicador POWER
Se ilumina cuando la unidad base se
encuentra conectada a la toma de corriente
CA. También indica que las pilas de reserva
de la memoria tienen carga suñciente.
Parpadea si no se han instalado las pilas de
reserva, o si éstas no tienen carga suñciente.
11 Selector RINGER SELECT
Selecciona el número de veces que debe
sonar el timbre antes de que se active el
contestador de llamadas.
12 Selector RINGER LEVEL
13 Selector AUDIBLE IND/ANN ONLY
(indicador audible^lo aviso)
Activa y desactiva el modo audible que
informa de la existencia de mensajes
grabados.
Selecciona asimismo el modo de sólo aviso.
14 Selector DIAL MODE
Selecciona marcación por impulsos o por
tonos.
15 Control SPEAKER VOLUME
16 Micrófono
Aiuste
Page 64

^ Identificación de componentes
1 Altavoz
2 Tecla ERASE
Borra mensajes.
3 Contador de mensajes
Ofrece la información siguiente:
Qp
Número de mensajes que aún no se han
reproducido.
• El número más alto posible es el "19". Si el
número real de mensajes es 20 o superior,
la indicación "19" parpadea en el contador
de mensajes.
Cp
Esta indicación aparece cuando se conecta
por primera vez la unidad base a una toma
de corriente CA.
También aparece cuando se borra el
contenido de la memoria (mensajes y
ajustes) debido a una interrupción del
suministro eléctrico.
Aparece cuando se encuentra activado el
modo de sólo aviso.
Aparece cuando la memoria está saturada
de mensajes.
Aparece cuando se borran todos los
mensajes.
4 Tecla PLAY/5TOP
5 Anillo de lanzadera de mensajes
Ajusta las condiciones de reproducción.
6 Compartimiento de pilas de reserva
7 Clavija DCIN 9V
8 Toma TEL UNE (línea telefónica)
I
Aiuste
Page 65

1 Tecla TALK
Permití realizar o recibir llamadas.
10 Tecla PAGE
Permite llamar a la unidad base.
2 Indicadores de pilas
Indican el nivel de carga de las pilas.
Consulte la página 72 para obtener
información detallada.
3 Indicador TALK
Se ilumina cuando el teléfono inalámbrico
está listo para marcar o durante la
conversación.
4 lndica>dor REMOTE
Se ilumina cuando está activado el modo de
operaciones remotas.
5 Teclas de marcaciónAteclas de
operaciones remotas
6 Tecla REDIAL/PAUSE
Vuelve a marcar el último número marcado.
Asimismo, inserta una pausa en la secuencia
de ma'cadón.
7 Tecla PGM (programa)
Almacena números de teléfono en la
memoria de marcación rápida.
8 Tecla REMOTE
Para manejar el contestador de llamadas
desde el teléfono inalámbrico.
9 Tecla CONV REC (graimción de
conversaciones)
Para grabar conversaciones telefónicas.
11 Micrdfono
12 Altavoz
13 Tecla OFF
Permite desconectar la llamada.
14 Tecla FLASH
Pasa a una segunda llamada si dispone del
servicio "llamada en espera", o permite
realizar una segunda llamada.
15 Selector RING ON/BATTERY SAVE
(timbre activadofmodo de ahorro de
pilas)
Seleccione RING ON para activar el timbre.
Seleccione BATTERY SAVE para desactivar
el timbre y ahorrar pilas.
16 Compartimiento de pilas
17 Tecla HOLD
Retiene la llamada.
18 Tecla CHANNEL
Permite cambiar de canal cuando se
producen interferencias.
19 Tecla SPEED DIAL
Accede a los números de marcación rápida
del teléfono inalámbrico.
Afuste 11
Page 66

Instalación de la unidad base
Selección de la mejor ubicación para la unidad base
El lugar donde coloque la unidad base afectará a la calidad de
recepción del teléfono inalámbrico. Por tanto, consulte la siguiente
información al asignar un lugar a la unidad base.
Alejado de una fuente de
ruidos, como una ventana a
Alejado de los —
televisores y otros
equipos electrónicos.
la calle con tráfico intenso.
Alejado de fuentes de calor,
como radiadores, tubos de
ventiladón y la luz directa del sol.
Alejado de un homo
microondas.
Alejado de humedad
excesiva, polvo,
vibraciones mecánicas
o sacudidas.
Alejado de ordenadores
personales.
Cerca de una localización
central.
IMPORTANTES INSTRUCCIONES DE INSTALACION
Alejado de otros
teléfonos inalámbricos
1. Nunca instale el teléfono durante una tormenta eléctrica.
2. Nunca instale las tomas del teléfono en lugares húmedos, a menos que la toma esté específícamente
diseñada para ello.
3. Nunca toque los hilos o terminales telefónicos sin aislar, a menos que se haya desconectado la línea
telefónica en el interfaz de red.
4. Sea precavido al instalar o modificar las lineas telefónicas.
Ajuste
66
Page 67

Colocación de las pilas
Los mensajes grabados y los ajustes se almaœnan en la memoria.
Estos mensajes y ajustes se borran si se produce una interrupción del
suministro eléctrico (por ejemplo, si se desconecta accidentalmente el
enchufe de CA, o durante un corte del suministro de corriente).
La inserción de cuatro pilas de tamaño AAA le permitirá conservar el
contenido de la memoria en caso de interrupción del suministro.
1 Deslice y abra la tapa del compartimiento de las
pilas de reserva.
I
m
Si la unidad base no está
conectada a una toma de
corriente CA cuando se insertan
las pilas, éstas se agotarán
rápidamente. Conecte la unidad
base a una toma de corriente lo
antes posible
I
S
Sustituya las pilas de reserva al
menos una viz al año.
Al sustituir Lis pilas, cerciórese
de que el teléfono se encuentre
conectado a una toma de
corriente CA, ya que de lo
contrario petderá todos los
mensajes y aiustes.
2 Introduzca las cuatro pilas de tamaño AAA (ROS)
suministradas.
Cerciórese de que los polos 0 y © de las pilas coincidan
con las marcas del compartimiento de pilas.
3 Deslice la tapa hasta que encaje en su lugar con
un chasquido.
4 Conecte la unidad base a una toma de corriente
CA.
Consulte la página siguiente para obtener información
acerca de cómo conectar la unidad base a una toma de
corriente CA.
Duración de las pilas de reserva
Las pilas (de manganeso) suministradas proporcionan
alimentación de reserva cuando se produce una interrupción del
suministro eléctrico. Su duración es de unas 7 horas
aproximadamente.
Cuando se descargan las pilas------------------------------
Parpadea el indicador POWER de la unidad base.
Este indicador parpadea también si, estando la unidad base
conectada a una toma de corriente CA, no se han insertado en ella
las pilas de reserva.
---------------------------
Ajuste 167
Page 68

^ Instalación de la unidad base
Conexión de la unidad base
Si desea colgar la unidad base en la pared, lea en primer lugar la
página siguiente.
Conecte el adaptador de corriente
CA a una fuente de alimentación
continua; de otro modo el bloque
de pilas cargado durará menos.
I
•
Si la toma de teléfono no es
modular, póngase en contacto
con la compañía telefónica para
solicitar asistencia técnica.
□
Modular
I
■
Si ha conectado dos lineas
telefónicas a una sola toma de
teléfono RJ-14 con 4 hilos, el
teléfono sólo contestará a la
primera línea telefónica
correspondiente al par de hilos
central.
Póngase en contacto con la
compañía telefónica para que
modifiquen los hilos si necesita
que el teléfono conteste la
segunda línea telefónica, que
emplea el par de hilos exterior.
■ Par central
CA (suministrado) a la toma DC IN 9V y el otro
extremo a una toma de corriente CA como se
indica en la ilustración.
Cuando conecte el adaptador de corriente CA, la unidad
base tardará unos 10 segundos en activarse.
Observe el contador de mensajes. Cuando aparezca la
indicación “P" parpadeante, la unidad base estará lista
para su uso.
2 Enchufe un extremo del cable de línea telefónica
largo (suministrado) en la toma TEL UNE y el
otro extremo a la toma del teléfono.
3 Extienda la antena completamente.
Compruebe que los extremos están dirigidos al techo.
Nota sobre el adaptador de corriente CA
Utilice solamente el adaptador de corriente CA suministrado. No
utilice ningún otro.
Polaridad del enchufe
------------------
! I Aiuste
Page 69

Colocación de la unidad base en la pared
Cable de línea
telefónica
(suministrado)
Cable del adaptador
de corriente CA
I
•
Para acoplar é soporte de pared
directamente ¿ la pared, uUIice
los tomillos suministrados.
A la toma de teléfono
Conecte el cable del adaptador de corriente CA y
el cable de línea telefónica corto al soporte de
pared.
Enganche el soporte de pared a la placa de pared
y enchufe el cable de línea telefónica en la toma
de teléfono.
I
•
Si la toma de teléfono no es
modular, póngase en contacto
con la compaiiía telefónica para
solicitar asistencia técnica.
0
Modular
Inserte las pestañas de la parte superior del
soporte de pared en la unidad base y presione el
teléfono de forma que las pestañas inferiores del
soporte de pared se inserten en la unidad base. A
continuación, extienda la antena completamente.
Conecte el adaptador de corriente CA y el cable
de línea telefónica.
Para obtener información detallada, consulte la sección
"Conexión de la unidad base" (página 68).
Ajuste 16
Page 70

Preparación del bloque de pilas para el teléfono inalámbrico
Carga del bloque de pilas
Cargue uno de los dos bloques de pilas suministradas durante 10
horas aproximadamente e insértelo en el teléfono inalámbrico.
Cargue también el otro bloque, de forma que pueda sustituirlo por el
primero cuando se descargue. Es preciso dejar un bloque de pilas en
el compartimiento de caiga de la unidad base incluso si está
completamente cargada.
I
•
Si un bloque de pilas es
totalmente nuevo o está
descargado por completo, el
indicador CHARGE puede
tardar más de 10 minutos en
iluminarse.
Inserte por completo uno de los bloques de pilas
suministrados en el compartimiento de carga.
Se ilumina el indicador CHARGE de la unidad base.
Cargue el bloque de pilas durante 10 horas aproximadamente.
Al terminar la carga, se apaga el indicador CHARGE.
Nota
-------------------------------------------------------
Cerciórese de que la unidad base se encuentra conectada a una
fuente de alimentación continua.
Si se interrumpe el suministro de corriente durante el proceso de
carga, antes de que transcurran 10 horas, las pilas no se cargarán
totalmente y, por tanto, durarán menos tiempx) que un bloque de
pilas totalmente cargado.
\ Aiuste
Page 71

Instalación de un bloque de pilas cargado
Una vez que haya cai;gado completamente un bloque de pilas en la
tmidad base, instálelo en el teléfono inalámbrico de la forma
siguiente.
I
■
Sí se desprende la tapa, puede
volver a colocarla fácilmente
ejerciendo una ligera presión.
1 Abra la tapa del compartimiento de pilas.
2 Extraiga el bloque de pilas de la unidad base e
insértelo en el compartimiento del teléfono
inalámbrico.
Presione la palanca de la base del compartimiento de
carga de la unidad base para recuperar el bloque de pilas.
3 Cierre la tapa del compartimiento de pilas.
Notas sobre la carga----------------------------------------
• El bloque de pilas suministrado contiene una sola pila de plomo
hermética, que ofrece los mejores resultados cuando se recarga
con frecuencia. A diferencia de las pilas de níquel-cadmio, no es
preciso esperar hasta que la pila instalada en la unidad se agote
para recargarla.
• Evite dejar el aparato sin cargar durante mucho tiempo de
forma que la pila se agote por completo, ya que con ello puede
acortarse la vida de la pila. Si ocurre esto, vuelva a cargar el
bloque de pilas. Es posible que haya que cargarlo varias veces
para que se cargue completamente.
• Al cargar un bloque de pilas totalmente descargado, es posible
que los indicadores de las pilas tarden algún tiempo en
iluminarse (10 minutos a lo sumo). Ello no indica que el teléfono
esté averiado. Siga con la carga.
Aiuste 171
Page 72

Preparación del bloque de pilas para el teléfono inalámbrico
I
a
Los bloques de pilas se descargan
gradualmente con el paso del
tiempo, aunque no se utilicen.
I
a
Si no piensa utilizar el teléfono
inalámbrico durante varios dias,
extraiga la pila y guárdela en
lugar seguro después de haberla
cargado durantre 10 horas al
menos.
Duración de las pilas------------------------------------
Un bloque de pilas contenido en el teléfono inalámbrico dura,
aproximadamente:
• 10 horas en modo de conversación continua
• 30 días (1 mes) en modo RING ON
• 2 meses en modo ВАТТ SAVE
Para determinar la cantidad de energía del
bloque de pilas------------------------------------------
Presione TALK. El indicador ВАТТ proporciona la siguiente
información:
Indicadores de pila Cantidad de energía del bloque de pilas
\ly \l^
yfs
Completa
Queda algo (cambie la pila lo antes
posible)
Muy poco (cambie la pila
■ 74
...
iiunediatamente)
Nada (el teléfono inalámbrico no puede
funcionar si no se recarga la pila).
I
•
Si se produce una interrupción
del suministro eléctrico y ésta se
prolonga por espacio de varios
días, o se desenchufa la unidad
base de la toma de corriente,
extraiga el bloque de pilas de la
unidad base y guárdela en lugar
seguro.
Si las pilas se agotan en el transcurso de una
conversación telefónica-----------------------------------
El teléfono emite un pitido cada tres segundos. Deberá cambiar el
bloque de pilas en el plazo de un minuto, o de lo contrario se
desconectará la llanuida.
Cambio del bloque de pilas durante una
conversación telefónica
1 Presione HOLD para retener la llamada.
------------------------------------
El indicador TALK parpadea.
2 Cambie el bloque de pilas del teléfono inalámbrico por el
bloque, totalmente cargado, que se encuentra en la unidad
base.
3 Presione TALK.
El indicador TALK parpadea de nuevo.
4 Presione HOLD para reanudar la conversación.
Cuándo sustituir el bloque de pilas-------------------------
• El bloque de pilas puede cargarse un gran número de veces. No
obstante, si sólo dura unos minutos después de cargarlo
durante 10 horas, es preciso sustituirlo.
• Para adquirir uno nueva, póngase en contacto con un proveedor
autorizado Sony local o un centro de servicio técnico.
Cerciórese de utilizar solamente pilas Sony BP-T40.
72 I Ajuste
Page 73

Selección de marcación por tonos o impulsos
Para que el teléfono funcione correctamente, es preciso ajustar el tipo
de sistema de marcación: por tonos o impulsos.
Selector DIAL MODE
Ajuste del modo de marcación
Sitúe el selector DIAL MODE en la posición:
T (tone) si su sistema es por tonos.
P impulso) si su sistema es por impuisos.
■ Si no está seguro--------------------------------------------
Haga una llamada de prueba con el selector DIAL MODE en la
posición T.
Si la ilamada se conecta, deje el selector en la posición T.
En caso contrario, sitúelo en la posición P.
Utilizac ón de servicios por tonos con el sistema de marcación por impulsos
Algunos servicios requieren el uso del sistema de tonos. Esto no
supone un problema si el teléfono ya utiliza la marcación por tonos.
En caso de que utilice la marcación por impulsos, tendrá que seguir
los pasos siguientes para emplear estos servicios.
Para obtener información detallada acerca de la realización de
llamadas, consulte la sección "Realización de llamadas" en la página
79.
T Marque el número de servicio.
I
■
Sólo ha de piesionar TONE una
vez para activar la marcación por
tonos, que pt-rmanecerá activada
hasta que se desconecte la
llamada.
2 Una vez conectado ai servicio, presione TONE (D.
3 Presione las teclas numéricas adecuadas.
Procedimientos inidaies
Page 74

Ajuste de la fecha y hora
Los mensajes recibidos se
registran automáticamente con
la fecha y hora de la llamada.
Deñniendo la fecha y hora
correctas, podrá saber en qué
momento se ha recibido cada
mensaje.
Ajuste la fecha y hora desde el teléfono inalámbrico, cerca de la
unidad base, de modo que pueda oir con claridad las instrucciones
grabadas en ésta.
I
•
Si introduce un dia de la semana
incorrecto, es posible
solucionarlo si no ha presionado
todavía la tecla (D. Para ello,
presione la tecla de marcación
correcta.
Si no presiona las teclas correctas
para ajustar la hora o los
minutos, es posible solucionarlo
si no ha presionado todavía la
tecla (Z>. Para ello, presione
primero cualquier tecla de
marcación y, a continuación, las
teclas de marcación correctas.
Si advierte algún error después
de presionar la tecla d>, presione
OFF una vez y comience desde el
principio.
T Presione REMOTE.
Espere a que se ilumíne el indicador REMOTE.
2 Presione la tecla <D.
Introduzca el día de la semana y la fecha actual
utilizando las teclas de marcación y la tecla CD en
el siguiente orden:
1 Presione la tecla de marcación, de la (D a la d>,
correspondiente al día de la semana, según el
siguiente orden:
(D Domingo <Z) Lunes <S) Martes
<DMiércoles ©Jueves ©Viernes
d> Sábado
2 Presione la tecla ©.
3 Introduzca la hora y presione la tecla ©.
4 Introduzca los minutos y presione la tecla ©.
5 Presione la tecla © si la hora especificada
corresponde a la mañana (AM), o la tecla © si
corresponde a la tarde (PM). A continuación
presione ©.
Oirá un pitido prolongado de confirmación.
Seguidamente se escuchará la hora actual a través de
los altavoces de la unidad base y del teléfono
inalámbrico.
11 Procedimientos iniciaies
Page 75

Sí introduce una cifra de un solo dígito para la hora o los
minutos, cerciórese de pulsar QD en primer lugar.
Ejemplo:
Para introducir la fecha y hora: Jueves, 6:45 PM, presione
las teclas siguientes en el orden que se indica:
(5)(D(!DC5)CE)(DC5)(i)<2)<D
4 Presione OFF.
Se apaga el indicador REMOTE.
Para comprobar la hora actual
1 Presione REMOTE.
-----------------------------
Espere a que se ilumine el indicador REMOTE.
2 Presione la tecla de marcación (3).
Oirá un pitido prolongado de confírmadón, y a continuadón
se escuchará el día de la semana y la hora actual.
3 Presione OFF.
Se apaga el indicador REMOTE.
Si no se ha definido la fecha y hora actuales—
Al reproducir los mensajes grabados no se oirá la indicadón de la
hora.
Si trata de comprobar la hora actual, oirá dnco pitidos breves de
error.
Nota--------------------------------------------------------
Si se produce una interrupdón del suministro eléctrico estando
agotadas, o sin instalar, las pilas de reserva, se borrará la fecha y
hora actuales. En tal caso, ajústelas de nuevo.
Procedimientos iniciales 17
Page 76

Introducción del
Sí desea utilizar la función de
contestador de llamadas desde
un teléfono situado fuera de su
hogar, debe establecer, en
primer lugar, el código de
seguridad.
Esta función resulta útil
cuando, por ejemplo, no se
encuentra en su domicilio y
desea comprobar si se han
recibido nuevos mensajes.
T Presione REMOTE.
de seguridad
Tecla OFF
■ Indicador
REMOTE
-Tecla (D
Tecla REMOTE
Espere a que se ilumine el indicador REMOTE.
•Tecla d)
I
a
A fin de mantener la
confidencialidad, el teléfono no
notifica el código de seguridad
para pedir su confirmación.
I
a
Procure no olvidar el código de
seguridad, ya que no hay forma
de comprobarlo.
2 Presione la tecla CS>.
3 Con las teclas de marcación, introduzca un
número de dos dígitos, comprendido entre 00 y
99.
4 Presione la tecla (D.
El código de seguridad queda registrado y se oye un
pitido prolongado de confirmación.
5 Presione OFF para dar por terminada la
operación.
Para cambiar el código de seguridad
Introduzca otro código de seguridad de dos dígitos como se ha
descrito anteriormente y el código anterior se cancelará
automáticamente.
--------------------
76 Procedimientos iniciaies
Page 77

Ajuste del timbre
del volumen
Selector RING ON/
ВАТТ SAVE
Selector RINGER LEVEL
I
•
Aun cuando haya desactivado el
timbre de la unidad base, éste
sonará a bajo volumen cuando la
unidad reciba una llamada del
teléfono inalámbrico.
I
o
En el modo ВАТТ SAVE, el
teléfono inalámbrico no puede
recibir llamadas procedentes de
la unidad base.
El selector RINGER LEVEL de la unidad base regula el voliunen del
timbre. El selector RING ON/BATT SAVE del teléfono inalámbrico
activa y desactiva el timbre.
■ En la unidad base
Sitúe el selector RINGER LEVEL en la posición H (alto) o L
(bajo) para regular el volumen del timbre.
Sitúe el selector RINGER LEVEL en la posición OFF para
desactivar el timbre.
------------------------------------------
En el teléfono inalámbrico---------------------------------
Sitúe el selector RING ON/BATT SAVE en la posición:
• RING ON para activar el timbre.
o
• ВАТТ SAVE para desactivar el timbre y ahorrar energía.
Esta opción es muy conveniente si piensa utilizar el teléfono
inalámbrico en un lugar desde el que pueda oir el timbre de la
unidad base.
Con el selector en esta posición, el timbre del teléfono
inalámbrico no sonará, pero podrá hacer y recibir llamadas
presionando la tecla TALK.
1 i' ’S*- Л.' Л ii «»i-
Procedimientos initíaies
77
Page 78

^ Regulación del volumen
Ajuste del volumen del altavoz
El control SPEAKER VOLUME de la unidad base regula el volumen
del altavoz. No influye en absoluto en el nivel de grabación.
Deslice el control SPEAKER VOLUME hacia la derecha para
aumentar el volumen, o hacia la izquierda para
disminuirlo.
I SPEAKER VOLUME
on
'8 I Procedimientos iniciales
Page 79

UtUiMación como teléfono
Realización y recepción de llamadas
Teda OFF
Realización de llamadas
I
m
Si la recepción es pobre, al
presionar TALK se escucharán
cinco pitidos breves de error. En
este caso, acérquese a la unidad
base para mejorar la recepción.
I
•
Si la recepción se hace deficiente
durante la conversación, se oirá
un pitido (alarma de fuera de
alcance) cada segundo. Si esto
ocurre, acérqiiese a la unidad
base. De otro modo, la llamada se
cortará después de 15 segundos.
Observe, no obstante, que puede
no oir los pitidos si hay ruido en
el teléfono inalámbrico.
1 Presione TALK y espere a que se ilumine el
indicador TALK.
A contínuación oirá un tono de marcación.
2 Marque un número de teléfono.
3 Cuando termine de hablar, presione OFF.
Se apaga el indicador TALK.
Recepción de llamadas
I
o
El teléfono uulámbrico no sonará
si se produce una llamada y el
selector RING ON/BATT SAVE
se encuentra 'tn la posición ВАТТ
SAVE. No obstante, puede
realizar y recibir Uamadas
presionando TALK.
La recepción de llamadas en el teléfono inalámbrico resulta fácil;
basta con presionar cualquier tecla, excepto OFF (función "cualquier
tecla talk").
Esto le permite recibir llamadas en cualquier situación (por ejemplo,
en la oscuridad).
1 Al sonar el teléfono, presione TALK o cualquier
otra tecla, excepto OFF.
2 Cuando termine de hablar, presione OFF.
Se apaga el indicador TALK.
Realización y recepción de llamadas 179
Page 80

Realización y recepción de llamadas
Remarcadón
Es posible volver a marcar el último número marcado con sólo
presionar una vez la tecla REDIAL/PAUSE.
•Teda CHANEL
1 Presione TALK y espere a que se ilumine el
indicador TALK.
I
a
El número no debe superar 32
citias (cada uno de los dígitos de
tonos y de impulsos se cuentan
como una cifra). De otro modo,
oirá cinco pitidos breves de error
y no se activará la llamada.
Marcación con interferencias en el teléfono inalámbrico
Presione REDiAUPAUSE.
La última secuencia de números marcados volverá a
marcarse automáticeimente.
Para borrar ei último número de teléfono marcado
Sin estar en uso el teléfono Inalámbrico, presione REDIAL/
PAUSE dos veces.
------------------------------------------------
El número se borrará de la memoria y se oirá un pitido de
confírmación.
Cuando se presiona la tecla TALK, el teléfono inalámbrico busca
automáticamente el canal que ofrece la mejor recepción. Si observa
interferencias durante una conversación, acérquese a la unidad base.
Si la interferencia no desaparece, puede cambiar a otro canal para
mejorar la calidad del sonido de la conversación telefónica.
I
o
Si cambia el canal estando muy
alejado de la unidad base, puede
cortarse la llamada.
D I Realización y recepción de llamadas
Durante la conversación, presione CHANNEL
El teléfono selecciona un nuevo canal.
Page 81

Escucha de llamadas desde la unidad base
Esta característica le permite
escuchar .i su interlocutor a
través del altavoz de la unidad
base. Le resultará
espedabr ente útil cuando
acceda a s ervicios de tonos que
no requieran su intervención en
la conveniación. Como no
necesita llevarse el teléfono
inalámbrico al oído, puede
colocarlo frente a usted
mientras introduce los números
con las te<;las de marcación.
1 Presione PGM en el teléfono inalámbrico.
El indicador TALK parapadea.
Presione TALK.
Se activa el altavoz de la unidad base y se ilumina el
indicador IN USE.
Marque un número de teléfono.
Oirá un tono de marcación a través del altavoz de la
unidad base.
Cuando responda a la llamada, oirá la voz de su
interlocutor a través del altavoz de la unidad base.
Una vez realizada la conexión puede cambiar al modo de
conversación normal o seguir escuchando a la otra parte
desde la unidad base.
Para volver al modo de conversación normal, presione TALK.
Se desconecta el altavoz de la unidad base, y podrá
cambiar al teléfono inalámbrico para proseguir la
conversación.
S Para desconectar la llamada, presione OFF.
Realización y recepción de llamadas \ 81
Page 82

Marcación mediante ia función de memoria
Es posible almacenar en la
memoria los números a los que
llama con más frecuencia, de
forma que pueda marca un
número con sólo presionar dos
teclas, la tecla SPEED DIAL y
una tecla del 0 al 9.
Almacenamiento de números de teléfono en memoria
I
•
Mientras se almacena el número
no es posible recibir llamadas.
1 Presione PGM.
El indicador TALK parpadea.
I
a
No introduzca un número de
marcación en memoria
compuesto por más de 16 dígitos
(cada uno de los dígitos de tonos
y de impulsos se cuentan como
uno). De otro modo se oirán
cinco pitidos breves de error y
deberá empezar de nuevo.
2 Presione SPEED DIAL. 3 Presione una tecla de marcación comprendida
entre 0 y 9.
Se oye un pitido de confirmación.
4 Introduzca el número de teléfono que desea
almacenar.
Si introduce vin número incorrecto, presione PGM y
vuelva a paso 1.
5 Presione PGM.
Se oye un pitido de confirmación y el indicador TALK se
apaga.
Nota sobre el almacenamiento de números-
No deje pasar más de 20 segundos entre dos pasos del
procedimiento de almacenamiento.
Para cambiar un número almacenado
Programe el número nuevo de la forma indicada en los pasos
anteriores. El número previo se borra automáticamente.
-----------------
i I Realizadón y recepaón de llamadas
Page 83

Si utiliza PBX (Private Branch Exchange)
----------------
Es preciso inarcar un digito (corno 9) para acceder a una linea
exterior antes de marcar un nùmero de teléfono.
Para almacenar el número de teléfono:
1 Introduzca el dígito de acceso a la línea exterior.
2 Presione REDIAL/PAUSE para introducir una pausa (de
forma que el teléfono tenga tiempo de acceder a la línea
exterior).
3 Introduzca el número de teléfono que desee almacenar.
Para llevar un directorio-
utilice los directorios suministrados. El ejemplo siguiente muestra
cómo se utilizan.
Escriba los nombres de la
personas o lugares cuyos
números ha almacenado en
las teclas.
Quite.
Vuelva a unir al directorio.
Cerciórese de no cubrir ei orificio
dei timbre. En caso contrario puede
tener dificuitades para oÍr ei
timbre.
Realización y recepción de llamadas 183
Page 84

"¥■ Marcación mediante la función de memoria
Marcación de números almacenados en la memoria
Una vez almacenados los números en las teclas de marcación en
memoria, es posible realizar una llamada con sólo presionar dos
teclas.
1 Presione TALK y espere a que se ilumine el
indicador TALK.
A continuación, se oye el tono de marcación.
2 Presione SPEED DIAL.
I
a
Si presiona una tecla de
marcación en memoria que no
tiene ningún número de teléfono
almacenado, oirá dnco pitidos
breves de error.
3 Presione la tecla de marcación rápida que desee
(de 0 a 9).
Se marca el número de teléfono almacenado en la tecla.
Realización y recepción de llamadas
Page 85

utilización del teléfono durante llamadas
■ Tecla FLASH
■ Tecla HOLD
Retención de una llamada
La tecla HOLD permite suspender temporalmente una conversación
telefónica sin desconectar la llamada. Cuando una llamada se
encuentra retenida, no podrá oir a su interlocutor, ni éste podrá oirle
a usted.
I
m
Mientras la llamada esté
retenida, no |K)drá oir el tono de
"llamada en ospera" cuando se
produzca una nueva llamada,
aunque esté suscrito a este
servicio.
Presione HOLD.
El indicador TALK parpadea.
■ Para reanudar la conversadón
Presione HOLD nuevamente.
El indicador TALK se ilumina de forma continua.
Uso del servicio "llamada en espera'
Si ha contratado el servicio "llamada en espera", puede continuar
recibiendo llamadas mientras habla por el teléfono inalámbrico.
I
■
Si presiona FLASH sin que se
haya producido una nueva
llamada, se desconectará la
llamada en cirso.
Si se produce una nueva llamada mientras habla por teléfono, presione FLASH.
La llamada en curso queda retenida y puede contestar la
nueva llamada.
Cuando desee volver a la primera llamada, vuelva a presionar FLASH.
Presionando FLASH puede pasar de una llamada a otra
en ambos sentidos.
---------------
Realización y recepción de llamadas \ C
Page 86

Función de aviso
Desde la unidad base al teléfono inalámbrico
I
•
No es posible pasar un aviso al
teléfono inalámbrico si está
siendo utili2ado.
Para avisar a una persona situada en las proximidades del teléfono
inalámbrico, el selector RING ON/ВАТТ SAVE del mismo debe
hallarse en la posición RING ON.
Presione PAGE en la unidad base.
Sonará el timbre del teléfono inalámbrico, y seguirá sonando hasta
que deje de presionar la tecla PAGE.
Desde el teléfono inalámbrico a la unidad base
I
•
Aunque el selector RINGER
LEVEL de la unidad base se
encuentre en la posición OFF, el
timbre sonará, a bajo volumen,
cuando envíe un aviso desde el
teléfono inalámbrico.
Presione PAGE en ei teléfono inalámbrico.
Sonará el timbre en la unidad base, y seguirá sonando hasta que deje
de presionar la tecla PAGE.
Б I Comunicación entra ias unidades teiefónicas
Page 87

Preparación del contestador automático
Selecc ón del modo de contestación/tipos de mensajes de contestación
El contestador de llamadas puede configurarse de modo que grabe
los mensajes recibidos (modo normal) o se limite a dejar un recado
(modo de recado).
Puede grabar un mensaje de contestación propio, o utilizar uno de los
mensajes pregrabados de fábrica.
En el modo de contestación normal, tiene asimismo la oportunidad
de activar un pitido (página 92) que le avise si ha recibido algún
mensaje nuevo.
Modo de
contest'ición
Normal
Utilícelo cuando
Desee que el mensaje de contestación indique a
quien llame que deje un mensaje.
Mensaje pregrabado*:
Para seleccionar este
modo, sitúe el selector
AUDIBLE IND/ANN
ONLY en la posición:
ANN
ONLY ON OFF
AUDIBLE IND
"Helio, l'm unable to answer your call right now.
Please leave your name, number and message after
the tone".
ANN
ONLY ON OFF
AUDIBLE IND
Recado (ANN ONLY)
Desee dejar un recado a quien llame sin aceptar tm
mensaje por su parte, por ejemplo, cuando se
encuentre en unas vacaciones largas.
ANN________
Mensaje pregrabado*:
"Helio, l'm unable to answer your call right now.
ONLY ON OFF
AUDIBLE IND
Please call again. Thank you".
Aunque existen dos mensajes pregrabados diferentes para el modo normal y el modo de recado, sólo podrá grabar
uno de ellos, que se reproduciiá independientemente del modo de contestación seleccionado.
Por tanto, si dedde cambiar de modo, cerciórese de grabar un mensaje de contestación acorde al modo seleccionado.
Utilización como amtestador de llamadas I
Page 88

Preparación del contestador automático
Si no queda memoria suficiente para grabar
un mensaje recibido
El teléfono puede grabar en la memoria mensajes (incluidos los
mensajes recibidos y el mensaje de contestación) hasta una
duración total de 15 minutos aproximadamente. Cuando el
espacio disponible en la memoria se reduce a menos de un
minuto, el teléfono se sitúa automáticamente en el modo de
recado.
Funcionamiento del selector AUDIBLE IND/
ANN ONLY
-------------------------------------------------
Si este selector se sitúa en la posición ANN ONLY, el contestador
de llamadas entra en el modo de recado. Si se sitúa en las
posiciones AUDIBLE IND ON u OFF, se activa el modo normal.
Seleccione ON si desea activar el pitido para que le avise si se
reciben nuevos mensajes, u OFF en caso contrario. Consulte
además la página 92.
11 Utilizatíón como contestador de llamadas
Page 89

Grabación de un mensaje de contestación
Si Io desea, puede grabar su
propio mensaje de contestación.
Si va a utilizar los mensajes
pregraba ios, pase por alto esta
sección. i:i mensaje que grabe,
puede utilizarlo tanto en modo
normal o)mo en modo de
recado. En cambio, no podrá
utilizar los mensajes
pregraba ios a no ser que borre
previamt nte su propio mensaje
grabado.
I
s
Sólo puede (pabar un ntensaje de
contestación, que se utilizará
cualquiera que sea el modo de
contestación. Por tanto, si decide
cambiar de modo, cerciórese de
grabar un mensaje de
contestación acorde al modo
seleccionado.
I
•
Si durante Ui grabación se agota
el espacio disponible en la
memoria, oirá cinco pitidos
breves de error y se cancelará la
grabación.
Tecla GREETING RECORD
Micrófono Tecla ERASE
También es posible grabar el mensaje de contestación utilizando el
teléfono inalámbrico (consulte la página 1(X)).
f Presione GREETING RECORD.
Oirá las instrucciones grabadas y un tono de señal.
Comience ia grabación.
Hable a unos 30 cm (12 puigadas) de distancia
dei micrófono.
El mensaje puede durar entre 2 segundos y 4 minutos.
Si dura menos de 2 segundos, oirá cinco pitidos breves de
error y deberá comenzar de nuevo.
Si se supera el plazo de 4 minutos, la grabación se detiene
automáticamente.
Presione nuevamente GREETiNG RECORD para
detener ia grabación.
El teléfono reproduce automáticamente el mensaje
grabado.
Para comprobar el mensaje de contestación —
Presione GREETING PLAY en la unidad base.
El teléfono reproduce el mensaje de contestación. Si no se ha
grabado ningún mensaje, se reproducirá el mensaje pregrabado.
Utilización como con testador de llamadas I f
Page 90

Preparación del contestador automático
Para cambiar el mensaje de contestación —
Grabe un nuevo mensaje.
Este mensaje sustituirá al que hubiera grabado previamente.
I
o
Los mensajes pregrabados no
pueden borrarse.
Para usar los mensajes pregrabados
----------------------
Si desea utilizar los mensajes pregrabados, borre en primer lugar
el que haya grabado, de la forma siguiente utilizando la unidad
base:
1 Presione GREETING PLAY. 2 Mientras se reproduce ei mensaje, presione ERASE.
Si se produce una interrupción del suministro
eléctrico----------------------------------------------------
• Si al producirse la interrupción la unidad base tiene instaladas
pilas de reserva cargadas, el mensaje de contestación se
conservará en la memoria durante unas 7 horas.
• Si al producirse la interrupción las pilas de reserva de la unidad
base están agotadas, el mensaje de contestación grabado se
borrará. En este caso, al reanudarse el suministro eléctrico
aparecerá la indicación "F' en el contador de meirsajes. Vuelva
a grabar el mensaje de contestación y ajuste nuevamente la
fecha y la hora (págiira 74).
I Utilizadón como contestador de llamadas
Page 91

Activación de la función de contestador de llamadas
Tecla ANSWER ON/OFF
Indicador de contestador activado
Selector RINGER SELECT
Selector AUDIBLE IND/ANN ONLY
I
•
En primer lugar, seleccione el
modo de contestador como se
describe en la página 87.
Es posible cunbiar el modo de
contestación después de activar
la función de contestador de
llamadas.
También es posible activar la función de contestador de llamadas
utilizando el teléfono inalámbrico (consulte la página 100).
Presione ANSWER ON/OFF de modo que se ilumine el
indicador de contestador activado.
Si no hay suficiente espacio en ia memoria —
• Si el tiempo que resta en la memoria para la grabación de
mensajes es inferior a 4 minutos, al activar la función de
contestador de llamadas el teléfono notifíca, minute a minute, el
tiempo restante.
• Si este tiempo es inferior a un minuto, el teléfono le indicara
cómo debe proceder para borrar algunos mensajes almacenados
en la memoria al activar la función de contestador. No podrá
activar la función de contestador de llamadas si no borra alguno
de los mensajes.
Para desactivar la función de contestador de
llamadas----------------------------------------------------
Presione ANSWER ON/OFF de modo que se apague el
indicador de contestador activado.
Característica de reactivación de la función de
contestador-------------------------------------------------
El contestador automático contestará automáticamente una
llamada después de 10 tonos incluso si está desactivada la
función de contestador. La función de contestador permanecerá
activada para todas las llamadas posteriores. Esta función resulta
útil para activar la función de contestador a distancia.
Para obtener más información, consulte la sección "Llamada
desde un teléfono remoto" en la página 102.
Utíttzadón como contestador de llamadas 191
Page 92

^ Preparación del contestador automático
Activación de la alarma de mensajes recibidos
Puede ajustar el teléfono de modo que emita un pitido para alertarle
de la existencia de mensajes grabados.
Para activar la alarma, sitúe el selector AUDIBLE IND/ANN
ONLY en la posición AUDIBLE IND ON.
Selección del modo de timbre
El selector RINGER SELECT permite variar el número de veces que
debe sonar el timbre antes de que el teléfono conteste a la llamada
para recibir un mensaje. Existen tres modos, 3,5 y T5. Normalmente,
el teléfono se encuentra ajustado en el modo T5 (ahorro de llamada).
Modo Utilícelo cuando
3
5
TS
(ahorro de
llamada)
Esté en su domicilio
Esté en su domicilio
Esté fuera de su domicilio y
desee saber si se ha recibido
algún mensaje nuevo.
El teléfono funciona de la siguiente forma
Espera a que el timbre suene tres veces y entonces
contesta a la llamada.
Espera a que el timbre suene cinco veces y
entonces contesta a la llamada.
Si se ha recibido algún mensaje nuevo, el teléfono
contesta a la llamada cuando el timbre suena tres
veces. Si no hay mensajes nuevos, el teléfono
contesta cuando el timbre suena cinco veces. Si
llama desde un teléfono de marcación por tonos y
oye sonar el timbre más de tres veces, sabrá que
no ha recibido mensajes nuevos. Si cuelga el
auricular en ese momento, antes de que el
teléfono conteste, se ahorrará el precio de la
llamada.
utilización como contestador de llamadas
92
•-i—■
Л- - .--iV=T
Page 93

Reproducción de los mensajes
Inicio de la reproducción
Cuando ie han grabado
mensaje: nuevos, el contador
de mensitjes indica el número
de total de éstos. Al situar el
selector AUDIBLE IND/ANN
ONLY ejí la posición AUDIBLE
IND ON, el teléfono emitirá un
pitido p£ ra indicar que se han
recibido nuevos mensajes.
Control SPEAKER VOLUME
En esta sección se explica cómo puede reproducir mensajes desde la
unidad base.
También puede controlar la reproducción desde el teléfono
inalámbrico. Consulte la sección 'XTtilización del contestador de
llamadas desde el teléfono inalámbrico" en la página 100.
Tecla PLAY/STOP
I
■
Sí se han gr ibado más de 19
mensajes, e) número máximo
indicado se *á de 19. "F' se
mostrará cuando se complete la
memoria.
I
•
Para detener el pitido del
indicador ».ilstico, presione
cualquier tecla de la unidad base.
También se detiene sí sitúa el
selector AUDIBLE IND/ANN
ONLY en U posición AUDIBLE
IND OFF.
I
■
Aunque el <x>ntador de mensajes
se ponga a cero, los mensajes se
conservarán en la memoria hasta
que los borre. Es conveniente que
los borre p< riódicamente con el
En de d^r espacio para otros
nuevos.
Para iniciar la reproducción, presione PLAY/STOP.
Los mensajes, de cualquier tipo (recibidos, recordatorios o
conversaciones), se reproducen en el orden en que se hayan grabado.
La secuencia se indica en el contador de mensajes.
Cuando se hayan reproducido todos los mensajes, el contador se
pondrá a cero y se detendrá le reproducción.
Para reproducir mensajes que ya haya
escuchado anteriormente
Una vez que se hayan reproducido todos los mensajes
nuevos, presione PLAY/STOP de nuevo.
------------------------
Si no existen mensajes nuevos —
Volverán a reproducirce los mensajes antiguos.
Para ajustar el volumen del altavoz
Deslice el control SPEAKER VOLUME hacia la derecha para
aumentar el volumen, o hacia la izquierda para reducirlo.
--------------------
Utífízadón como contestador de Hamadas I
Page 94

^ Reproducción de ios mensajes recibidos
Durante la reproducción de cada mensaje
Durante la reproducción de
cada mensaje, puede realizar
diversas operaciones utilizando
el anillo digital de lanzadera de
mensajes y las teclas del
teléfono inalámbrico.
Es posible repetir, omitir y
detener mensajes utilizando el
teléfono inalámbrico también
(consulte la página 1(X)).
lanzadera de mensajes
I
m
El cambio de la velocidad de
reproducción no afecta a la
velocidad con que el teléfono
notiñca la fecha/hora.
I
e
Si gira el anillo hasta la
indicación REPEAT en el
transcurso de los tres primeros
segundos del mensaje, la
reproducción se reanudará desde
el principio del mensaje anterior.
Cambio de la velocidad de reproducción —
Mantenga girado el anillo con el señalador apuntando,
aproximadamente, hacia una de las posiciones siguientes:
-30% Reproducción a un 30% más lento que la velocidad
normal.
•••30% Reproducción a un 30% más rápido que la velocidad
normal.
•«•60% Reproducción a im 60% más rápido que la velocidad
normal.
Si desea seguir reproduciendo los mensajes a la misma velocidad
Mantenga el anillo en la indicación de velocidad escogida y pulse
al mismo tiempo PLAY/STOP. Aunque suelte el anillo, la
velocidad elegida se mantendrá hasta que todos los mensajes se
hayan reproducido. Si desea volver inmediatamente a la
velocidad normal, gire el anillo en cualquier dirección para
desbloquear el ajuste de velocidad.
Para repetir los últimos segundos
Gire el anillo digital de lanzadera de modo que el señalador
apunte, aproximadamente, hacia la indicación BACK SPACE.
------------------------
El teléfono retrocederá unos segundos y reanudará la
reproducción.
Para repetir el mensaje actual
Gire el anillo digital de lanzadera de modo que el señalador
apunte, aproximadamente, hacia la indicación REPEAT.
----------------------------
La reproducción se reanudará desde el principio del mensaje en
curso.
94 Utilizadón como con testador de llamadas
Page 95

Para volver a ios mensajes anteriores
Gire el anillo digital de lanzadera de modo que el señalador
apunte, aproximadamente, hacia la indicación REPEAT, y
manténgalo así hasta alcanzar el mensaje deseado.
-------------------
Cuando suelte el anillo, el teléfono reanudará la reproducción.
Para omitir el mensaje actual-----------------------------
Gire el anillo digital de lanzadera de modo que el señalador
apunte, aproximadamente, hacía la indicación SKIP.
Para avanzar a los mensajes siguientes
Gire y detenga la lanzadera con el puntero en la posición SKIP
hasta alcanzar el mensaje deseado.
--------------------
Cuando suelte el anillo, el teléfono reanudará la reproducción.
Para detener la reproducción-
Presione PLAY/STOP.
Utilización como contestador de llamadas 19
Page 96

Borrado de mensajes
En esta sección se explica cómo se borran los mensajes desde la
unidad base.
También puede borrar mensajes desde el teléfono inalámbrico.
Consulte la sección "Utilización del contestador de llamadas desde el
teléfono inalámbrico" en la página 100.
I
•
La operación se cancelará si
existen mensajes nuevos que aún
no hayan sido reproducidos.
Borrado de mensajes uno a uno
Presione ERASE mientras se reproduce el mensaje.
Oirá un pitido de confírmación.
Borrado de todos los mensajes reproducidos
Presione ERASE cuando el teléfono no esté reproduciendo
ningún mensaje.
El teléfono le notificará que se han borrado todos los mensajes.
--------------------------
6
I
Utilización como con testador de llamadas
Page 97

Filtrado de llamadas
Es posiblo fíitrar llamadas
dejando activado el contestador
automático mientras se
encuentra en su domicilio. Al
atender una llamada, es posible
oír el mensaje que está
grabándose mediante la unidad
base o el ;eléfono inalámbrico.
A continuación, puede decidir
entre continuar la grabación o
cambiar a la conversación.
Asegúrese de que el contestador automático se encuentra en el modo
de contestación normal (consulte la página 87).
Desde la unidad base
Al contestar una llamada, el altavoz de la unidad base se activará
automáticamente y podrá oír al interlocutor grabar el mensaje. El
interlocutor no puede escucharle. Si decide hablar con el
interlocutor, presione TALK en el teléfono inalámbrico.
-Tecla OFF
’ Indicador
REMOTE
Desde el teléfono inalámbrico
-----------------------------
Para ñltrar una llamada, el selector RING ON/BATT SAVE debe
hallarse en la posición RING ON.
Cuando la imidad base contesta a una llamada, parpadean los
indicadores TALK y REMOTE del teléfono inalámbrico.
Mientras parpadean estos indicadores, presione REMOTE.
Es posible escuchar cómo graba el interlocutor el mensaje, pero
éste no puede escucharle a usted. Para no conversar con el
interlocutor, presione OFF. El contestador automático seguirá
grabando el mensaje hasta que el interlocutor cuelgue.
Si desea hablar con la persona que llama, presione TALK.
La unidad base deja de grabar.
Utilización como contestador de llamadas I
Page 98

Grabación de una conversación telefónica
Si lo desea, puede grabar la
conversación que mantiene a
través del teléfono. La
conversación grabada cuenta
como un mensaje y puede
reproducirse como cualquier
mensaje recibido.
1 Durante la conversación, presione CONV REC en
el teléfono inalámbrico.
El indicador REMOTE parpadea y se inicia la grabación.
Indicador
REMOTE
I
a
Si se supera el plazo máximo de
4 minutos estaUecido para los
mensajes, la grabación se detiene
automáticamente.
2 Para detener la grabación, presione nuevamente
CONV REC.
Se apaga el indicador REMOTE.
■ Si se agota la memoria durante la
grabación--------------------------------------------------
La indicación "F' parpadea en el contador de mensajes y la
grabación se detiene automáticamente.
11 Utilizadón como contestador de llanadas
Page 99

de un mensaje recordatorio
Si lo desea, puede dejar
mensajes lecordatorios para
usted mismo o para otros
usuarios del contestador
automático. Cada mensaje
recordatotio cuenta como un
mensaje y puede reproducirse
como cualquier mensaje
recibido.
I
■
Si se supera d plazo máximo de
4 minutos estaÜeddo para los
mensajes, la fp-abación se detiene
automáticamente.
Tecla MEMO
Micrófono
También es posible grabar mensajes recordatorios mediante el
teléfono inalámbrico.
Consule la página 100.
f Presione MEMO en la unidad base.
Oirá las instrucciones grabadas.
2 Comience la grabación.
Hable a unos 30 cm (12 pulgadas) de distancia del micrófono.
Para detener la grabación, presione MEMO nuevamente.
Si se recibe una llamada durante la
grabación.
Sonará el timbre pero no se detendrá la grabación.
Para recibir la llamada, detenga la grabación del mensaje
recordatorio.
Si se agota ia memoria durante la
grabación---------------------------------------------
La indicación "F' parpadea en el contador de mensajes y la
grabación se detiene automáticamente.
--------------------------------------------
Utilización como contestador de llamadas
I
Page 100

utilización del contestador de llamadas desde el teléfono inalámbrico
REPEAT ABC PLAY D£F SKIP
Tecla OFF
Indicador REMOTE
Tecla REMOTE
I
■
Si se han recibido mensajes, al
presionar REMOTE recibirá
notificación del número de ellos.
(I) @ (1)
SHI ERASE JKL MEMO MNO STOP
® ® (6)
»RS GREET TUV WXY
® ® ®
TONE OPER ON - ANS - OFF
® ® ®
Si lo desea, puede grabar el mensaje de contestación, reproducir
mensajes y realizar otras funciones desde el teléfono inalámbrico.
Para utilizar el contestador de llamadas desde el teléfono
inalámbrico, proceda de la siguiente forma:
f Presione REMOTE.
Espere a que se ilumine el indicador REMOTE.
2 Pulse la tecla de marcación ((¡D a (S), (D y <D)
correspondiente a la operación que desee
realizar.
Consulte la tabla de la página siguiente para obtener
información sobre cada operación. Al completar una
operación, se oirán pitidos continuos durante 20
segundos. Durante este periodo, es posible iniciar otra
operación presionando la tecla deseada.
Notas-
• Si deja transcurrir más de 20 segimdos entre la pulsación de
• Si se recibe una llamada mientras el teléfono se encuentra en el
11 Utilizatíón como contestador de llamadas
Presione OFF (o REMOTE) para cancelar el modo de operaciones remotas.
teclas (excepto al grabar), oirá un pitido prolongado que indica
que se ha cancelado el modo de operaciones remotas y es
preciso comenzar de nuevo.
• Si alguien está utilizando la unidad base, oirá cinco pitidos
breves de error.
modo de operaciones remotas, éste se cancela automáticamente
y suena el timbre, a no ser que esté grabando el mensaje de
contestación.
• Para obtener más infomtación sobre cada operación, consulte
asimismo las páginas que describen la operación utilizando la
unidad base.
 Loading...