

Page 1
Cordless
Telephone
with Answering System
3-232-153-11 (1)
Operating Instructions
Hearing-Aid Compatible
US
SPP-A2780
©2001 Sony Corporation
Page 2

IMPORTANT
SAFETY
INSTRUCTIONS
When using your telephone
equipment, basic safety precautions
should always be followed to reduce
the risk of fire, electric shock and
injury to persons, including the
following:
1.Do not use this product near
water, for example, near a bath
tub, wash bowl, kitchen sink, or
laundry tub, in a wet basement, or
near a swimming pool.
2.Avoid using a telephone (other
than a cordless type) during an
electrical storm. There may be a
remote risk of electric shock from
lightning.
3.Do not use the telephone to report
a gas leak in the vicinity of the
leak.
4.Use only the power cord and
batteries indicated in this manual.
Do not dispose of batteries in a
fire. They may explode. Check
with local codes for possible
special disposal instructions.
SA VE THESE
Caution
You are cautioned that any changes or
modifications not expressly approved in this
manual could void your authority to operate this
equipment.
Privacy of communications may not be ensured
when using this phone.
Note
This equipment has been tested and found to
comply with the limits for a Class B digital
device, pursuant to Part 15 of the FCC Rules.
These limits are designed to provide reasonable
protection against harmful interference in a
residential installation. This equipment
generates, uses and can radiate radio frequency
energy and, if not installed and used in
accordance with the instructions, may cause
harmful interference to radio communications.
However, there is no guarantee that interference
will not occur in a particular installation. If this
equipment does cause harmful interference to
radio or television reception, which can be
determined by turning the equipment off and
on, the user is encouraged to try to correct the
interference by one or more of the following
measures:
– Reorient or relocate the receiving antenna.
– Increase the separation between the
equipment and receiver.
– Connect the equipment into an outlet on a
circuit different from that to which the
receiver is connected.
– Consult the dealer or an experienced radio/
TV technician for help.
Operation is subject to the following two
conditions: (1)This device may not cause
interference, and (2)This device must accept any
interference, including interference that may
cause undesired operation.
INSTRUCTIONS
Owner’s Record
The model and the serial numbers are
located at the bottom of the unit. Record
the serial number in the space provided
below. Refer to these numbers
whenever you call upon your Sony
dealer regarding this product.
Model No. SPP-A2780
Serial No. ________________
US
2
IMPORTANT NOTE
To comply with FCC RF exposure compliance
requirements, please follow the following
guidelines in order to protect body from
exposing to RF electromagnetic energy.
1. Avoid direct body contact with transmitting
antenna during telephone conversation.
2. Do not replace or modify the transmitting
antenna in any way.
Page 3

INFORMATION FOR FCC
REGURATION CLAIM
1. This equipment complies with Part 15
and Part 68 of the FCC rules for the
United States. On the bottom of this
equipment is a label that contains,
among other information, the FCC
certification number and ringer
equivalence number (REN) for this
equipment. If requested, this
information must be provided to the
telephone company.
2. This equipment connect to
nationwide telephone network
through a modular telephone jack
which applicable certification jack
(connector) is USOC-RJ11C.
3. The FCC compliant telephone cord
and modular plug is provided with
this equipment. This equipment is
designed to be connected to the
telephone network or premises
wiring using a compatible modular
jack that is part 68 compliant.
4. The REN is used to determine the
quantity of devices that may be
connected to the telephone line.
Excessive RENs on the telephone line
may result in the devices not ringing
in response to an incoming call.
Typically, the sum of the RENs
should not exceed five (5.0).To be
certain of the number of devices that
may be connected to a line, as
determined by the total RENs, contact
the local telephone company.
5. If this equipment (SPP-A2780) causes
harm to the telephone network, the
telephone company will notify you in
advance that temporary
discontinuance of service may be
required. But if advance notice isn’t
practical, the telephone company will
notify the customer as soon as
possible. Also, you will be advised
of your right to file a complaint with
the FCC if you believe it is necessary.
6. The telephone company may make
changes to it’s facilities, equipment,
operations or procedures that could
affect the operation of the equipment.
If this happens the telephone
company will provide advance notice
so you can make the necessary
modifications to maintain
uninterrupted service.
7. If trouble is experienced with this
equipment (SPP-A2780), for repair or
warranty information, please contact
Sony Direct Response Center: Tel 1800-222-7669. If the equipment is
causing harm to the telephone
network, the telephone company may
request that you disconnect the
equipment until the problem is
resolved.
8. All repairs will be performed in an
authorized Sony service station.
9. This equipment may not be used on
coin service provided by the Phone
Company or Party Lines.
10.This equipment is hearing aid
compatible.
When programming emergency
numbers and (or) making test calls to
emergency numbers:
1. Remain on the line and briefly
explain to the dispatcher the reason
for the call.
2. Perform such activities in the off-peak
hours, such as early morning or late
evenings.
US
3
Page 4

IMPORTANTES
INSTRUCCIONES
DE SEGURIDAD
A fin de reducir el riesgo de
incendio, descarga eléctrica y
lesiones a las personas cuando usted
use su equipo telefónico, siempre
debe observar precauciones básicas
de seguridad, entre ellas:
1.No use este producto cerca del
agua, por ejemplo, cerca de una
bañera, lavabo, fregadero de
cocina o lavadora, en un sótano
mojado o cerca de una piscina.
2.Evite usar un teléfono (que no sea
del tipo inalámbricos) durante una
tormenta eléctrica. Existe la
remota posibilidad de shock
eléctrico debido a rayos.
3.Para notificar una fuga de gas, no
utilice el teléfono en la vecindad
de dicha fuga.
4.Utilice solamente el cable de
alimentación y las pilas indicados
en este manual. No tire las pilas al
fuego. Podrían explotar.
Compruebe los códigos locales
con respecto a las instrucciones
especiales sobre cómo deshacerse
de ellas.
Precaución
Se le advierte que cualquier cambio o
modificación no aprobado expresamente en el
presente manual podría anular su autorización
para operar este equipo.
El secreto de las comunicaciones puede no
asegurarse cuando utilice este teléfono.
Nota
Este equipo se ha sometido a pruebas y se ha
determinado que cumple los límites para un
aparato digital Clase B de conformidad con la
Parte 15 de las Reglas FCC. Dichos límites están
diseñados para brindar protección razonable
contra interferencia dañina en una instalación
residencial. Este equipo genera, utiliza y puede
radiar energía de radiofrecuencia y, si no se
instala y se usa de acuerdo con las instrucciones,
puede ocasionar interferencia dañina en las
radiocomunicaciones. Sin embargo, no hay
garantía de que no ocurra interferencia en una
instalación específica. En caso de que este equipo
ocasione interferencia dañina en la recepción de
radio o televisión, que se puede determinar
apagando y encendiendo el equipo, se le insta al
usuario a que trate de corregir la interferencia
mediante una o más de las siguientes medidas:
– Reorientar o reubicar la antena de recepción.
– Aumentar la separación entre el equipo y el
receptor.
– Conectar el equipo en un enchufe de un
circuito distinto al circuito al cual está
conectado el receptor.
– Consultar con el disstribuidor o con un
técnico experimentado de radio / televisión
para ayuda.
La operación está sometida a las dos condiciones
siguientes: (1) Este dispositivo puede no causar
interferencia, y (2) Este dispositivo deberá
aceptar cualquier interferencia, incluyendo la
que pueda causar una operación indeseada.
GUARDE ESTAS
INSTRUCCIONES
US
4
NOTA IMPORTANTE
Para cumplir los requisitos de exposición a RF
de la FCC, siga las guías indicadas a
continuación a fin de proteger el cuerpo contra
la exposición a la energía electromagnética de
RF.
1. Evite el contacto directo con la antena de
transmisión durante la conversación
telefónica.
2. No reemplace ni modifique de ninguna
manera la antena.
Page 5

INFORMACIÓN PARA LA
DEMANDA DE LA
REGLAMENTACIÓN DE LA FCC
1. Este equipo cumple con la Parte 15 y
la Parte 68 de las reglas de la FCC
para EE.UU. En la base de este
equipo hay una etiqueta que contiene,
entre otra información, el número de
certificado de la FCC y el número de
equivalencia de timbre de llamada
(REN) para este equipo. Cuando se
solicite, esta información deberá
ofrecerse a la compañía telefónica.
2. Este equipo se conecta a la red
telefónica nacional a través de una
toma telefónica modular cuya toma
(conector) de certificado aplicable es
USOC-RJ11C.
3. Con este equipo se suministran un
cable telefónico y una clavija modular
que cumplen las normas de la FCC.
Este equipo ha sido diseñado para
conectarse a la red telefónica o la
instalación de un usuario utilizando
una toma modular compatible que
esté de acuerdo con la Parte 68.
4. El REN se utiliza para determinar la
cantidad de dispositivos que podrán
conectarse a la línea telefónica. El
exceso de REN conectados a la línea
telefónica puede resultar en que los
dispositivos no contesten a llamadas
entrantes. Normalmente, la suma de
REN no deberá ser superior a cinco
(5,0). Para enterarse del número total
de REN que puede conectarse a una
línea, póngase en contacto con la
compañía telefónica.
5. Si este equipo (SPP-A2780) produce
daños en la red telefónica, la
compañía telefónica le notificará con
antelación que es posible que se
requiera la interrupción temporal del
servicio. Pero si la notificación con
antelación no es práctica, la compañía
telefónica lo notificará al cliente lo
antes posible. Además, se le
notificará el derecho a realizar una
reclamación a la FCC si usted lo
considera necesario.
6. La compañía telefónica puede realizar
cambios en sus instalaciones, equipos,
operaciones, o procedimientos que
pueden afectar la operación del
equipo. Cuando suceda esto, la
compañía telefónica le avisará con
antelación para que pueda realizar las
modificaciones necesarias a fin de
mantener ininterrumpido el servicio.
7. Si experimenta algún problema con
este equipo (SPP-A2780), con respecto
a la reparación o a la información
sobre la garantía, póngase en contacto
con Sony Direct Response Center: Tel
1-800-222-7669 (EE. UU. solamente).
Si el equipo causa problemas en la
línea, la compañía telefónica puede
solicitarle que desconecte el equipo
hasta que se resuelva el problema.
8. Todas las reparaciones deberá
realizarlas un centro de reparaciones
Sony.
9. Este equipo puede no utilizarse en el
servicio de pago previo
proporcionado por la compañía
telefónica o la línea compartida.
10.Este equipo es compatible con
dispositivos para ayuda a la audición.
Cuando programe números de
emergencia y (o) realice llamadas de
prueba a los mismos:
1. Permanezca poco tiempo en la línea y
explique a la otra parte la razón de la
llamada.
2. Realice tales actividades en horas no
punta, como por la mañana temprano
o a últimas horas de la tarde.
US
5
Page 6

Table of contents
Getting Started
8 Welcome
9 Read this first
10 Step 1: Checking the package
contents
11 Step 2: Setting up the base phone
14 Step 3: Preparing the battery
pack
16 Step 4: Choosing the dialing
mode
17 Step 5: Entering the area code
21 Step 6: Setting the day and time
23 Setting up the EZ Access function
25 Registering additional cordless
handsets
27 Changing the language of the
display
28 Identifying the parts
Basics
32 Making calls
32 Making calls with the
cordless handset
35 Making call with the base
phone
37 Redialing
39 Receiving calls
39 Receiving calls with the
cordless handset
41 Receiving calls with the base
phone
Telephone Features
43 Phone Directory
43 Storing phone numbers and
names
46 Making calls from the Phone
Directory
48 Changing a stored name
and/or phone number
49 Erasing a memory location
50 Transferring the Phone
Directory memory
52 Switching the phones during a
call
52 Switching from the base
phone to the cordless
handset
52 Switching from the cordless
handset to the base phone
53 Switching from the cordless
handset to another cordless
handset
Intercom Operation
54 Talking between the phones
– Intercom
54 Talking from the cordless
handset to the base phone
55 Talking from the base phone
to the cordless handset
56 Talking between the cordless
handsets – Walkie-Talkie
function
57 Transferring a call
57 Transferring from the
cordless handset to the base
phone
US
Table of contents
6
Page 7

58 Transferring from the base
phone to the cordless
handset
59 Transferring between the
cordless handsets
Answering Machine
Features
60 Preparing the answering machine
60 Recording the greeting
62 Selecting the ring time
63 Selecting the recording
quality
64 Selecting the answering
mode
66 Setting the audible message
indicator
67 Turning on the answering
function
68 Playing back messages
68 When you come home
70 Displaying remaining
available recording time for
message
71 Erasing messages
72 Screening incoming calls
72 Screening incoming calls on
the cordless handset
72 To answer the call
73 Recording a memo
74 Operating from an outside
phone
74 Setting the remote ID code
(security code)
75 Picking up new messages
Caller ID Features
76 Understanding the Caller ID
service
76 When you receive a call
77 Looking at the Caller ID list
77 Viewing the Caller ID list
78 Erasing data from the
Caller ID list
80 Using the Caller ID list
80 Calling back a number from
the Caller ID list
81 Playing back a message from
the Caller ID list – Direct
Message Access function
82 Storing a number of the
Caller ID list into the Phone
Directory
83 To change the number of
digits of the phone number
85 Using “Caller ID with call
waiting” service
Additional Information
86 Mounting the base phone on a
wall
87 Carrying the cordless handset by
the belt clip
88 Notes on power sources
89 Maintenance
90 Troubleshooting
95 Specifications
96 Index
Back cover LIMITED WARRANTY
Table of contents
US
7
Page 8

Getting Started
Welcome
Thank you for purchasing Sony QuadraStation 2.4!
The phone systems can be expanded to a total of four cordless
handsets and realizes the Intercom conversation* between a couple of
cordless handsets (walkie-talkie function).
* Also includes a communication between the base phone and the cordless
handset.
First, read the followings.
• The system includes a cordless handset. If you utilize the walkietalkie feature, it is necessary to purchase the SPP-H273 Sony cordless
handset used for the QuadraStation 2.4 exclusively.
• Be sure to register the additional cordless handset(s) to the base
phone before use. (See “Registering additional cordless handsets” on
page 25.)
• Some procedures may vary according to the number of the cordless
handset assigned to the system. The distinctions are explicitly
explained in this manual. In such a case, see the appropriate
procedure.
Other convenient features are as follows:
• Walkie-Talkie function — enables you to make an intercom
conversation between a couple of cordless handsets of the same
phone system far from the base phone (e.g. use out of doors) (page
56).
• Direct Message Access function — enables you to play back the
recorded messages from the caller ID list (page 81).
• EZ Access function — enables you to access to any set of numbers
up to 32 digits long by simple one-touch (page 23).
US
Getting Started
8
Page 9
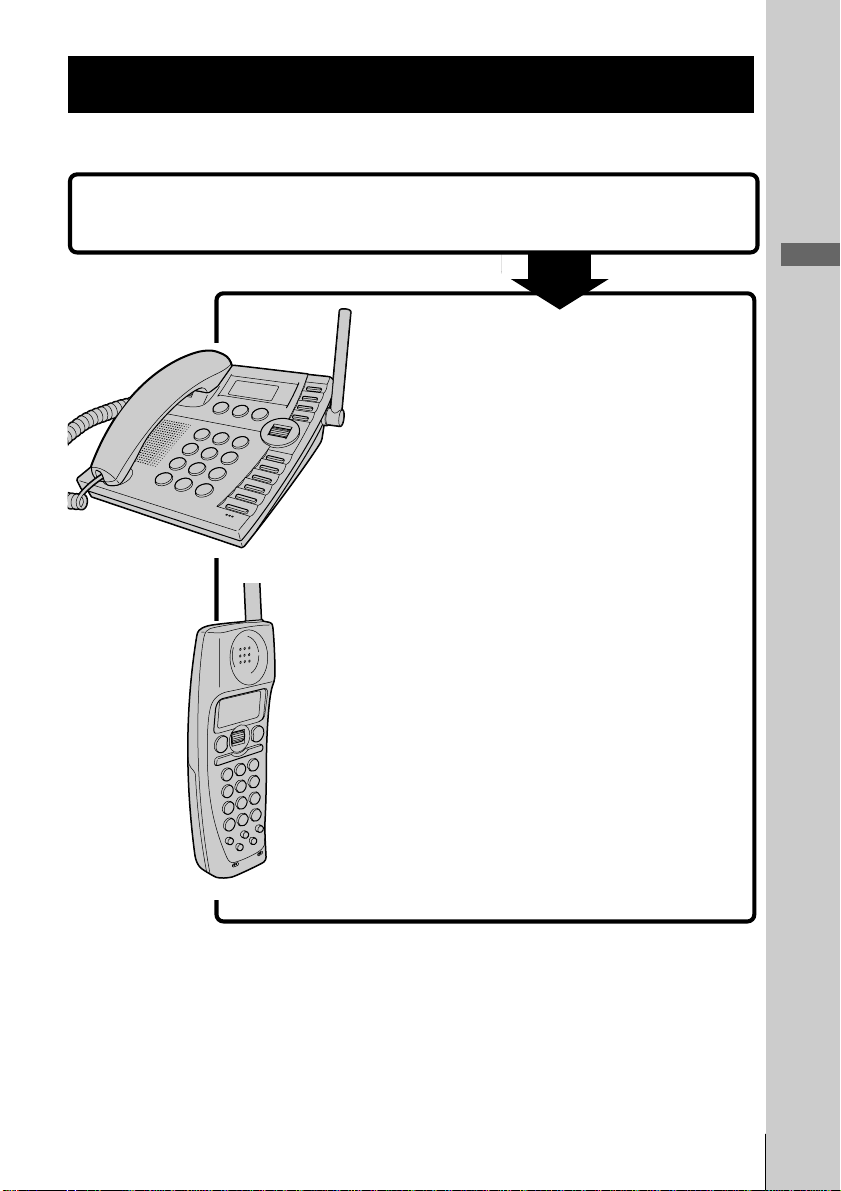
Read this first
Before you use your phone, you must first set it up. Here’s a quick way
to set up your phone: Steps 1 to 6.
Step 1 (page 10)
First, unpack the phone and the supplied accessories.
Step 2 (pages 11 to 13)
You need to do two things to set up the
base phone, including finding the best
location for the base phone.
Step 3 (pages 14 to 15)
Insert the battery pack into the cordless
handset and charge it for more than 12
Base phone
hours.
Step 4 (page 16)
Choose an appropriate dialing mode.
Getting Started
Step 5 (pages 17 to 20)
Enter the area code to use the Caller ID
service.
Step 6 (pages 21 to 22)
Set the day and time to stamp day and
time for the incoming messages.
Cordless handset
For using the EZ Access function, follow the procedure in
“Setting up the EZ Access function” on page 23.
For using optional cordless handsets, follow the procedure
in “Registering additional cordless handsets” on page 25.
For changing the language of the display, follow the
procedure in “Changing the language of the display” on
page 27.
That’s it!
Getting Started
US
9
Page 10
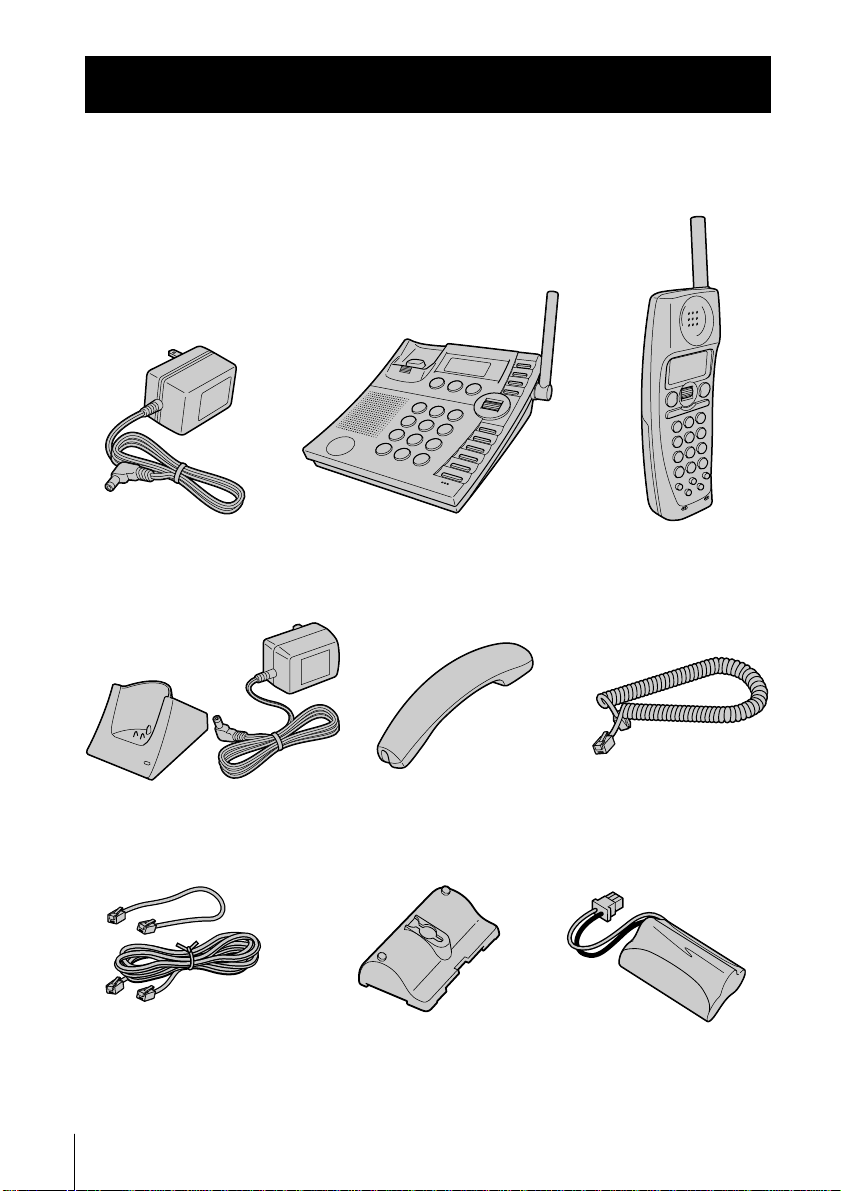
Step 1
Checking the package contents
Make sure you have received the following items in the package.
If anything is missing, contact your local Sony dealer.
the base phone (AC-T46)
Charger/AC power
adaptor for the charger
(AC-T127)
Telephone
line cords (2)
Base phone
Handset Handset cord
Wall bracket/
stand for base
phone
Cordless handsetAC power adaptor for
Rechargeable
battery pack
(BP-T38)
10
US
Getting Started
Page 11
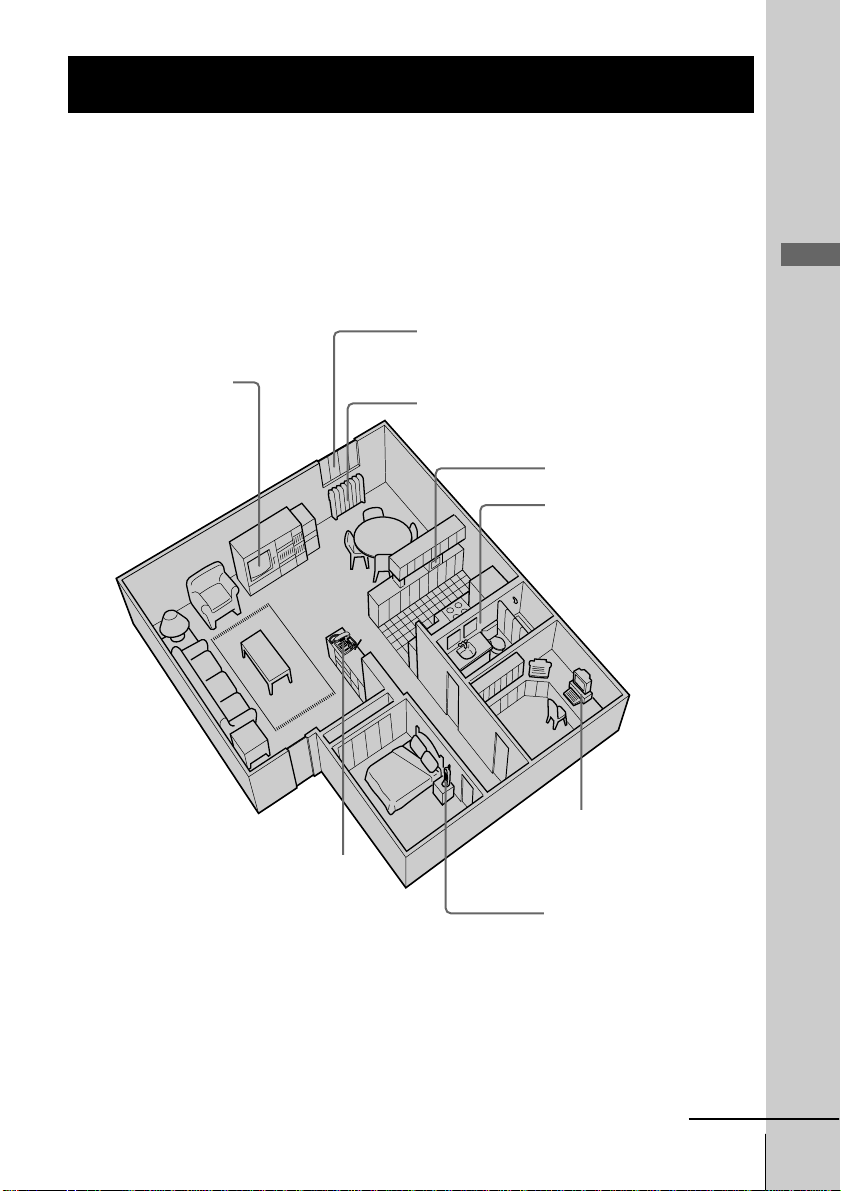
Step 2
Setting up the base phone
Do the following steps:
• Choose the best location
• Connect the base phone
Choose the best location
Where you place the base phone affects the reception quality of the
cordless handset.
Away from television
sets and other
electronic equipment
Near a central location
and on a level surface
Away from noise sources such as a window
by a street with heavy traffic
Away from heat sources, such as radiators,
airducts, and sunlight
Away from a microwave
oven
Away from excessive
moisture, extremely low
temperatures, dust,
mechanical vibration, or
shock
Away from a personal
computer
Away from another
cordless telephone
Getting Started
CAUTION: •Should you experience intermittent loss of audio during a conversation, try
moving closer to the base or move base phone away from other noise sources.
• The cordless telephone operates at a frequency that may cause interference to
nearby TVs, VCRs, and microwave oven; the base phone should not be placed
near or on the top of a TV or VCR; and, if interference is experienced, moving
the cordless telephone farther away from the TV, VCR, or microwave oven will
often reduce or eliminate the interference.
continued
Getting Started
11
US
Page 12
Step 2: Setting up the base phone (continued)
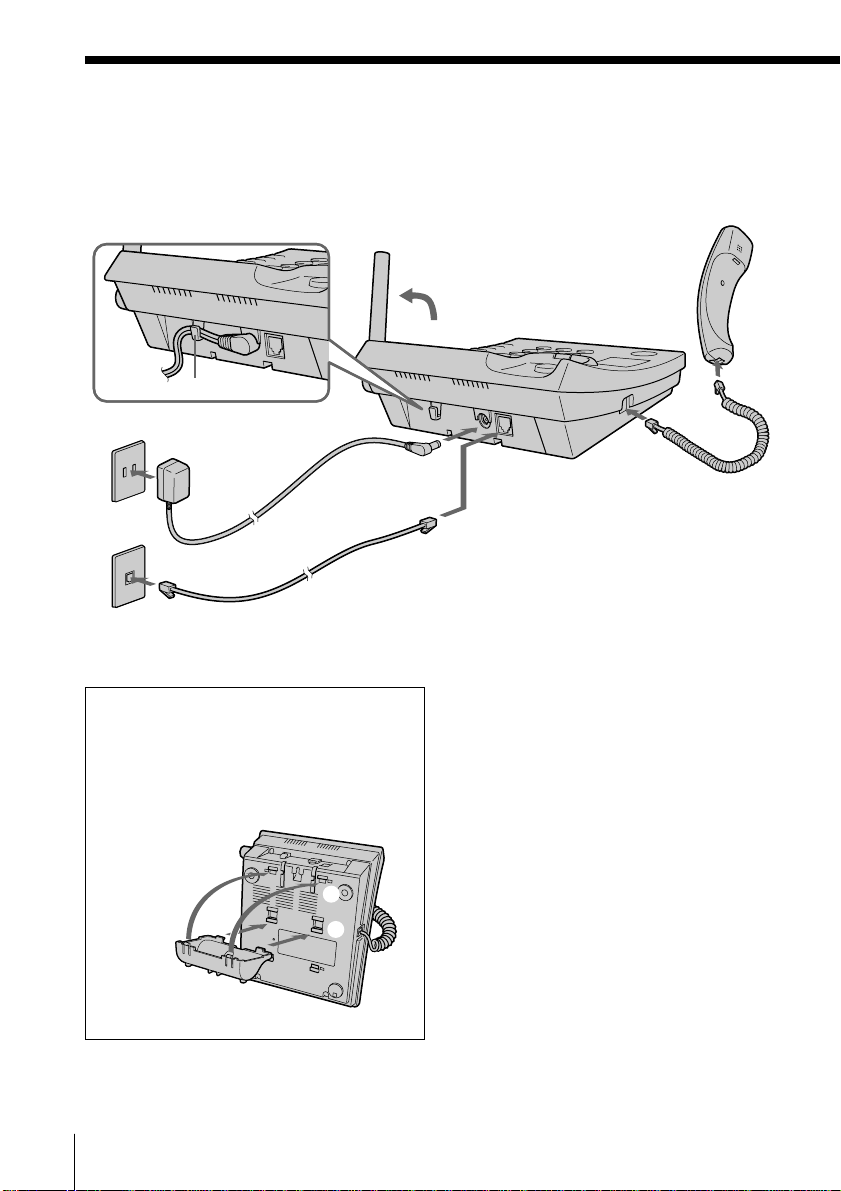
Connect the base phone
If you want to hang the base phone on the wall, see page 86.
4
Hook the cord.
1
To an AC outlet
3
2
To a telephone
outlet
To tilt the phone
If you want to tilt the phone, attach the
supplied wall bracket on the bottom of
the base phone.
Align the
f marks.
To DC IN 9V
AC power adaptor
(supplied
AC-T46)
Telephone line cord
(supplied)
2
1
To LINE
To
HANDSET
1 Connect the handset cord to the
HANDSET jack and to the
handset.
2 Connect the telephone line cord
to the LINE jack and to a
telephone outlet.
3 Connect the AC power adaptor
to the DC IN 9V jack and to an
AC outlet.
12
US
4 Raise the antenna. Make sure it
points towards the ceiling.
Getting Started
Page 13
Notes
• Use only the supplied AC-T46 AC power adaptor.
Do not use any other AC power adaptor.
• Connect the AC power adaptor to a continuous power
supply.
• Place the base phone close to the AC outlet so that
you can unplug the AC power adaptor easily.
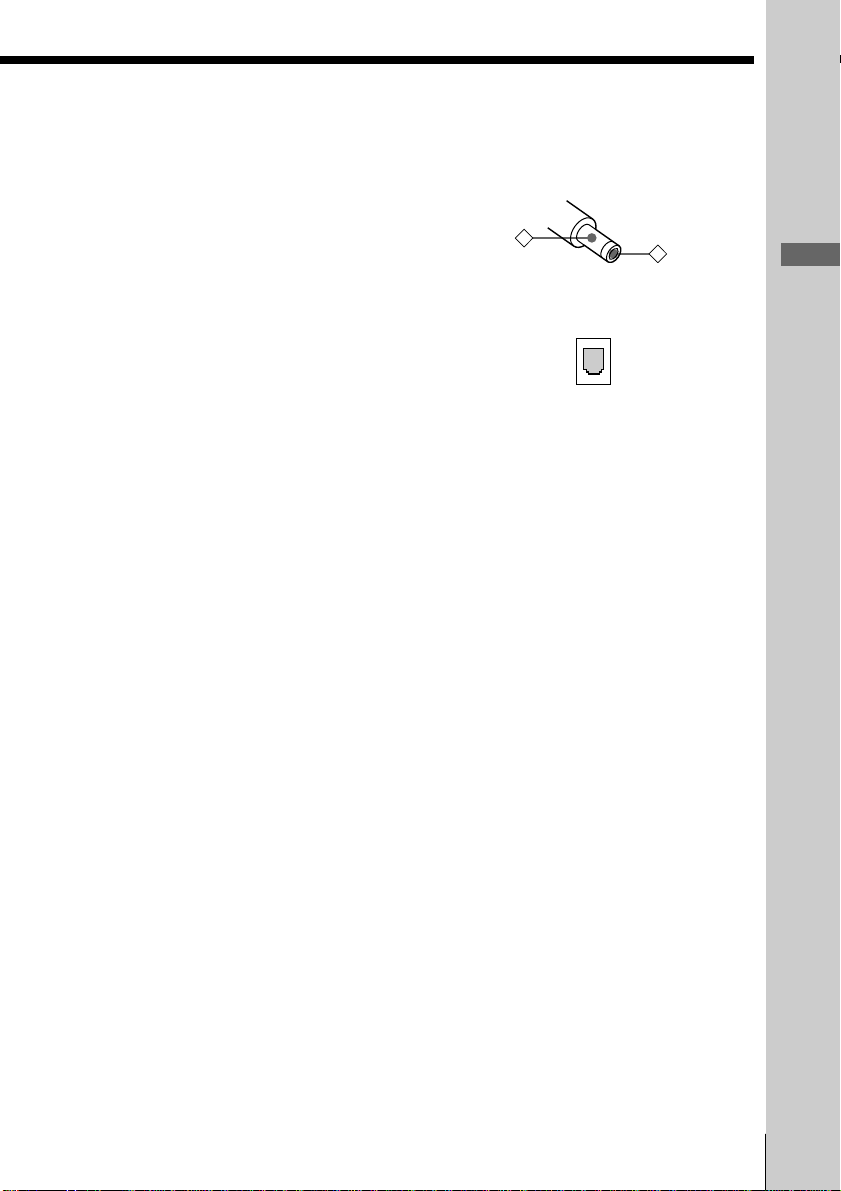
Polarity of the plug
–
+
Getting Started
Tip
If your telephone outlet is not modular, contact your
telephone service company for assistance.
Modular
Getting Started
13
US
Page 14
Step 3
Preparing the battery pack
Charge the battery pack for more than 12 hours before you start using
your cordless handset.
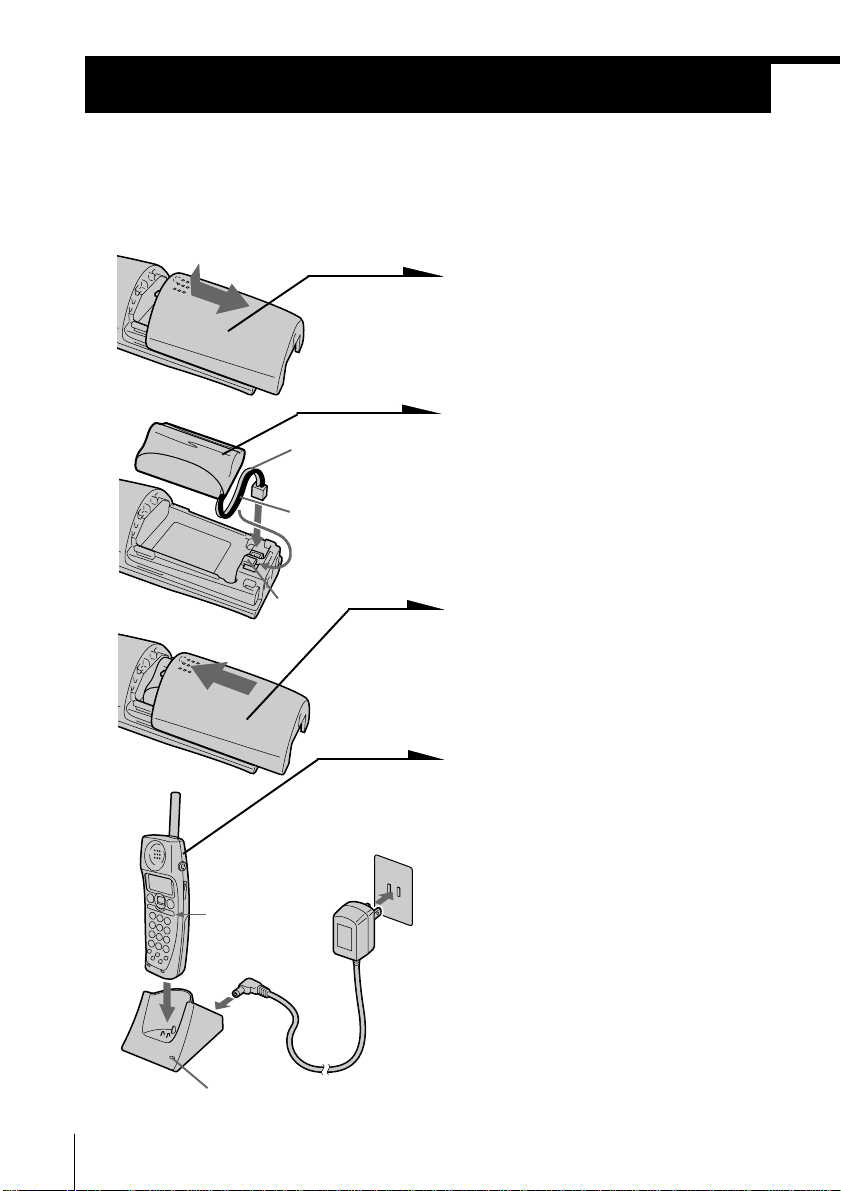
1 Slide open the battery
compartment lid of the cordless
handset.
14
US
Getting Started
BP-T38
Front side
To DC
IN 9V
CHARGE lamp
Red
Black
Hook
To an AC outlet
AC-T127
2 Connect the battery connector
with correct polarity (black wire
goes on lower side and red wire
goes on upper side).
3 Hook the cords and insert the
battery pack. Then close the lid.
4 Connect the AC power adaptor
to the DC IN 9V jack of the
charger and to an AC outlet and
place the cordless handset on
the charger.
The CHARGE lamp on the
charger lights up and
“HANDSET 1” appears on the
display of the cordless handset
when the cordless handset is
properly seated on the charge
terminals of the charger. Charge
the battery pack for more than
12 hours so that the battery is
fully charged. The CHARGE
lamp remains lit even after
charging is completed.
Page 15

About the station number
When you start charging the battery, “HANDSET 1”
appears on the display of the cordless handset. This
shows the ID number for each cordless handset and base
phone of the system, called “station number.” The station
number of the base phone is set to 0 and that of the
cordless handset (supplied with the base phone) is set to
1 at the factory. The station number of the cordless
handset newly added to the system will be one of the
number 2 through 4 in the order of registration. (See
“Registering additional cordless handsets” on page 25.)
HANDSET 1
Battery duration
A fully charged battery pack lasts for about:
• Approx. 5 hours when you use the cordless handset continuously
• Approx. 6 days when the cordless handset is in standby mode.
Notes
• The battery pack will gradually discharge over a long period of time, even
when not in use.
• If you leave the battery pack in the cordless handset without charging it, the
battery pack will be completely discharged.
It may require several times of charging to recover to its full capacity.
• While charging, the battery pack warms up. This is not a malfunction.
To obtain the best performance from the battery
Do not place the cordless handset on the charger after each call. The
battery works best if the cordless handset is returned to the charger
after two or three calls. However, do not leave the cordless handset off
the charger for a long period of time as this will completely discharge
the battery pack.
RING OFFMASSAGEOLDNEW
Getting Started
When to purchase a new battery pack
If the battery lasts only a few minutes even after 12 hours of charging,
the usable life of the battery has expired and needs replacement.
Contact your local Sony authorized dealer or service center, and ask
for a Sony BP-T38 rechargeable battery pack.
Note
Battery life may vary depending on usage condition and ambient temperature.
Getting Started
15
US
Page 16
Step 4
Choosing the dialing mode
For the telephone to work properly, select an appropriate dialing mode
(tone or pulse).
You can select the dialing mode on both the base phone and cordless
handset. The dialing mode that has been last set either with the base
phone or cordless handset is selected.
When you set the dialing mode with the cordless handset, make sure
the base phone* is not in use before you start the setting. You cannot
set the dialing mode while the system is in use.
* If the system includes additional cordless handsets, it is necessary to stop
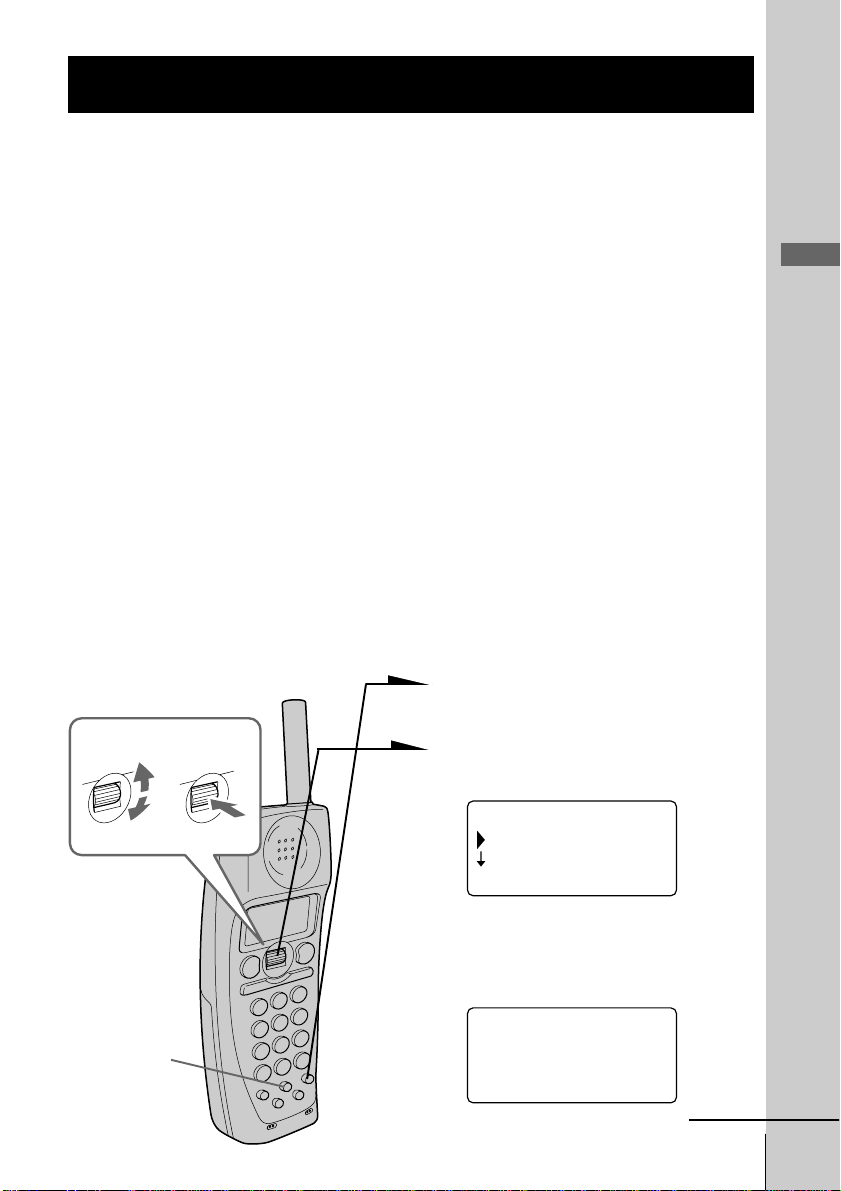
using them before you start the setting as well.
1 Press (PGM). (Press
(PROGRAM) on the base phone.)
2 Press (*TONE).
You hear a confirmation beep.
DIAL MODE
1:TONE
2:PULSE
RING OFFMASSAGEOLDNEW
3 Press (1) for tone dialing or (2)
for pulse dialing.
You hear a long confirmation
beep.
If you aren't sure of your dialing system
Make a trial call with the dialing mode set to TONE.
If the call connects, leave the setting as is; otherwise, set to PULSE.
Note
Do not allow more than 60 seconds to elapse during the operation procedure.
US
Getting Started
16
Page 17
Step 5
Entering the area code
When you use this phone for the first time, or move to an area that has a
different area code, you must enter the area code. Otherwise, you cannot use
some functions of this phone and the Caller ID functions.
This is also necessary because the phone must be able to select an area code to
properly dial a call from the Caller ID list.
Depending on your region, enter the 3-digit area code as follows:
Case 1.
If 7-digit dialing (no area code) is accepted for local calls in your area, see “To enter
your home area code” below.
If you live in an area where calls from or to other local areas can also be made by 10-digit dialing
(area code + number), you can register up to 5 local area codes with this telephone to take
advantage of this system. See “To enter the local area code (For 10 digits phone number users)”
on page 19.
Case 2.
If 10-digit dialing (area code + number) is required for all local calls in your area, see
“To enter the local area code (For 10 digits phone number users)” on page 19.
Entering the area code is only possible on the cordless handset. Make sure the base
phone* is not in use before you start the setting. You cannot enter the area code while
the system is in use.
* If the system includes additional cordless handsets, it is necessary to stop
using them before you start the setting as well.
To enter your home area code
Getting Started
Turn Press
(ERASE)
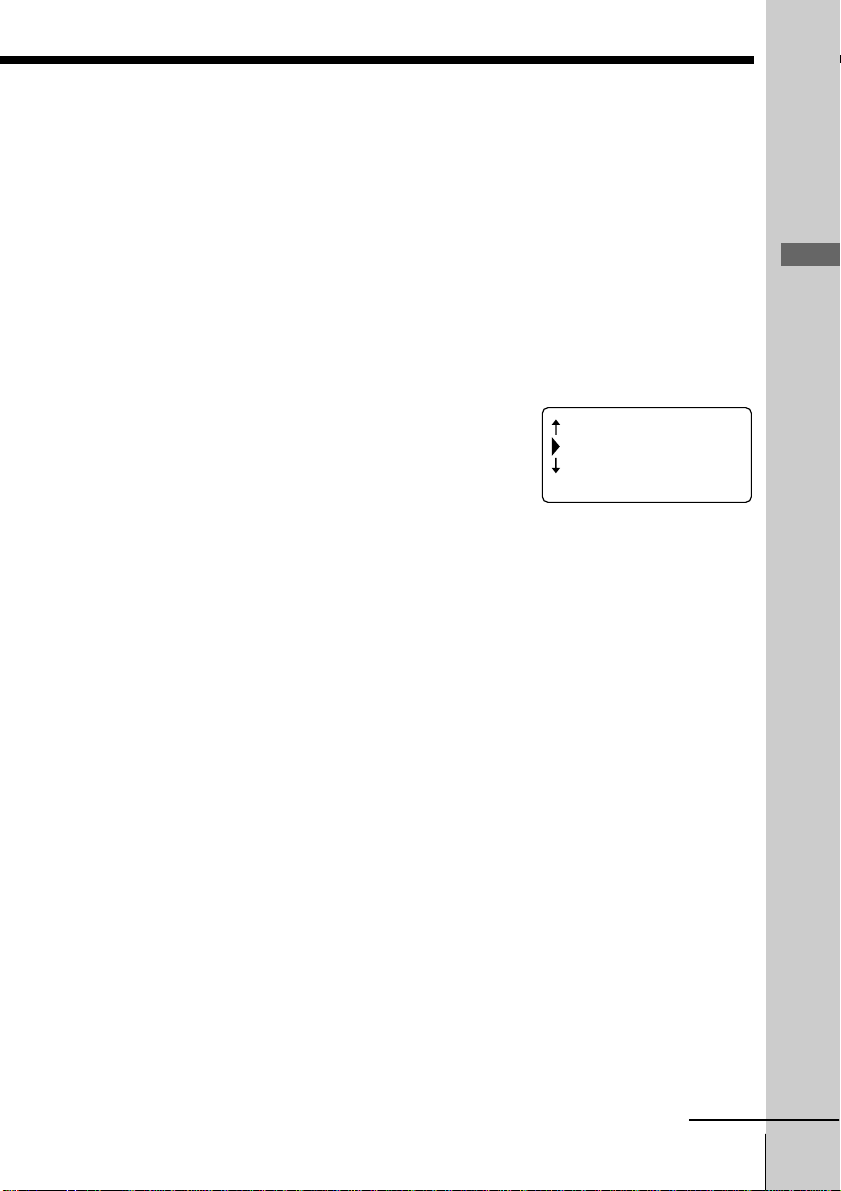
1 Press (PGM).
2 Turn Jog Dial to choose “AREA
CODE”, and then press Jog Dial.
(GO BACK)
HOME :
LOCAL 1:
RING OFFMASSAGEOLDNEW
3 Press Jog Dial again.
“ENTER HOME AREA
CODE” appears on the display.
ENTER
HOME AREA CODE
_
RING OFFMASSAGEOLDNEW
continued
Getting Started
17
US
Page 18

Step 5: Entering the area code (continued)
4 Enter the three digits of your home area code
using the dialing keys.
5 Press (PGM).
You hear a long confirmation beep.
Notes
• If the home area code is already entered, it appears on the display in step 2.
To enter a different home area code, see “To change the home area code”
below.
• Do not allow more than 60 seconds to elapse during the operation procedure.
• If the area code has not been entered, calling back from the Caller ID list and
storing the Caller ID data into the Phone Directory cannot be performed.
• If the home area code is not correctly entered, “ERROR” will appear on the
display and five short error beeps will be heard after (PGM) is pressed in
step 5. Move the cordless handset closer to the base phone, make sure the
base phone* is not in use before you start the setting.
* If the system includes additional cordless handsets, it is necessary to stop
using them before you start the setting as well.
Tips
• When you select “(GO BACK)”, you can return to the previous set display by
pressing Jog Dial.
• To check the current home area code, perform steps 1 and 2. The home area
code appears on the display for about 60 seconds.
To change the home area code
1 Perform steps 1 to 3 on page 17.
The current home area code appears on the display.
2 Press (ERASE) to erase the current home area code.
3 Enter a new home area code using the dialing keys.
4 Press (PGM).
You hear a long confirmation beep.
To erase the home area code
You can erase the home area code. Perform steps 1 and 2 above, then
press (PGM).
The home area code will be erased, and you hear a long confirmation
beep.
US
Getting Started
18
Page 19
To enter the local area code (For 10 digits
phone numbers users)
If a call matches one of the local area codes you entered, the phone
number will be registered with 10 digits in the Caller ID list (area code
+ number). If a call does not match one of the local area codes you
entered, the phone number will be registered with 11 digits in the
Caller ID list (1 + area code + number). Some regions of the country
allow you to have more than one local area code. (Up to five local area
codes can be entered in this phone.)
1 Perform steps 1 and 2 on page 17.
2 Select the number (“LOCAL 1” to “LOCAL 5”)
to enter the local area code by turning Jog Dial.
HOME :
LOCAL 1:
LOCAL 2:
3 Press Jog Dial.
“ENTER LOCAL AREA CODE 1” appears on
the display when you select “LOCAL 1” in step
2.
4 Enter the three digits of the local area code using
the dialing keys.
5 Press (PGM).
You hear a long confirmation beep.
Getting Started
RING OFFMASSAGEOLDNEW
Notes
• If the local area code is already entered, it appears on the display in step 2.
To enter a different local area code, see “To change the local area code” on
page 20.
• Do not allow more than 60 seconds to elapse during the operation procedure.
• If the local area code is not correctly entered, “ERROR” will appear on the
display and five short error beeps will be heard after (PGM) is pressed in
step 5. Move the cordless handset closer to the base phone, make sure the
base phone* is not in use before you start the setting.
* If the system includes additional cordless handsets, it is necessary to stop
using them before you start the setting as well.
Tips
• When you select “(GO BACK)”, you can return to the previous set display by
pressing Jog Dial.
• To check the current local area code, perform steps 1 and 2. The local area
code appears on the display for about 60 seconds.
continued
Getting Started
19
US
Page 20

Step 5: Entering the area code (continued)
To change the local area code
1 Perform steps 1 to 3 on page 19.
The current local area code appears on the display.
2 Press (ERASE) to erase the current local area code.
3 Enter a new local area code using the dialing keys.
4 Press (PGM).
You hear a long confirmation beep.
To erase the local area code
You can erase the local area code. Perform steps 1 and 2 avobe, then
press (PGM). The local area code will be erased, and you hear a long
confirmation beep.
20
US
Getting Started
Page 21
Step 6
Setting the day and time
Set the day and time so that you can stamp day and time for the
incoming messages. You will hear the recorded day and time when
you play back messages. You can set the day and time only with the
cordless handset. Make sure the base phone* is not in use before you
start the setting.
* If the system includes additional cordless handsets, it is necessary to stop
using them before you start the setting as well.
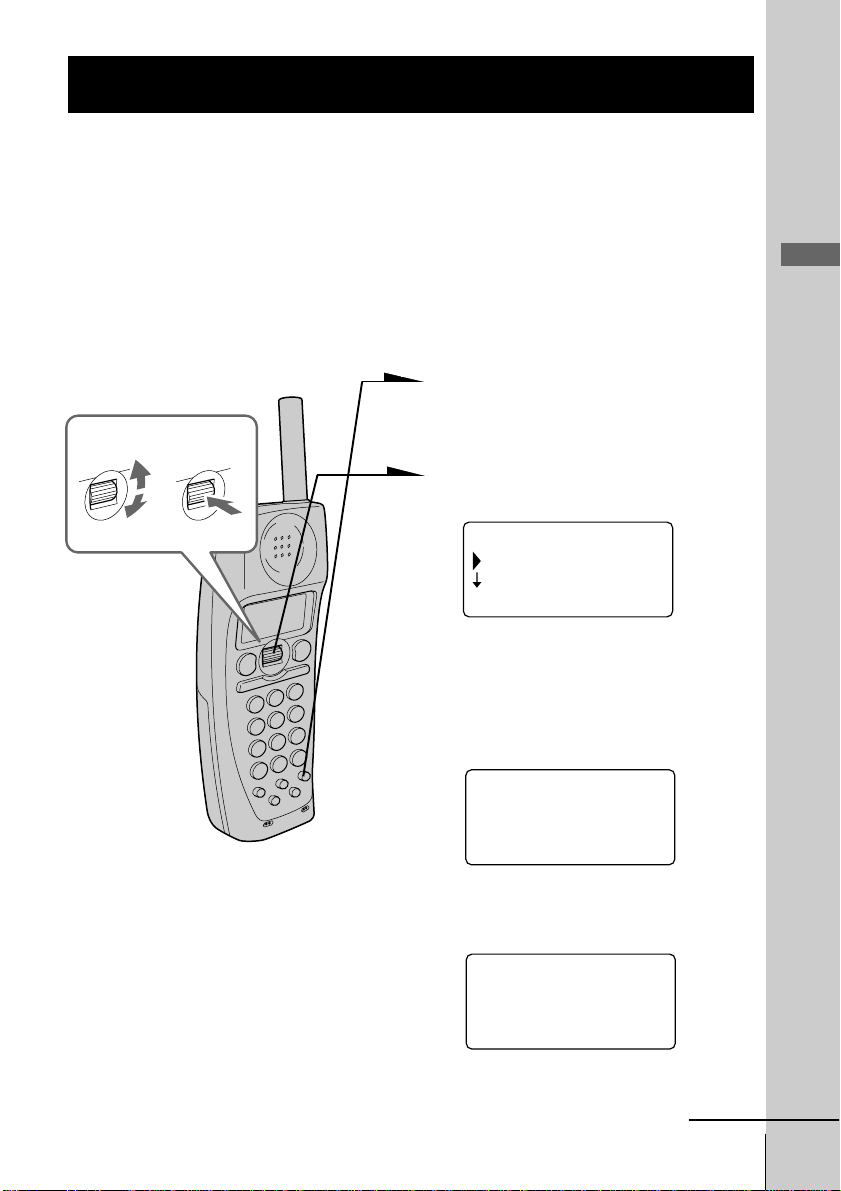
1 Press (PGM).
Turn Press
2 Turn Jog Dial to choose “DAY/
TIME”, and then press Jog Dial.
(GO BACK)
SUNDAY
MONDAY
3 Set the correct day of the week
by turning Jog Dial, and then
press Jog Dial. The time that has
been last set appears on the
display.
Getting Started
RING OFFMASSAGEOLDNEW
ENTER HOUR AND
PRESS JOG DIAL
12:00AM
RING OFFMASSAGEOLDNEW
4 Set the hour (1 to 12) by turning
Jog Dial
ENTER HOUR AND
PRESS JOG DIAL
11:
RING OFFMASSAGEOLDNEW
continued
Getting Started
21
US
Page 22
Step 6: Setting the day and time (continued)
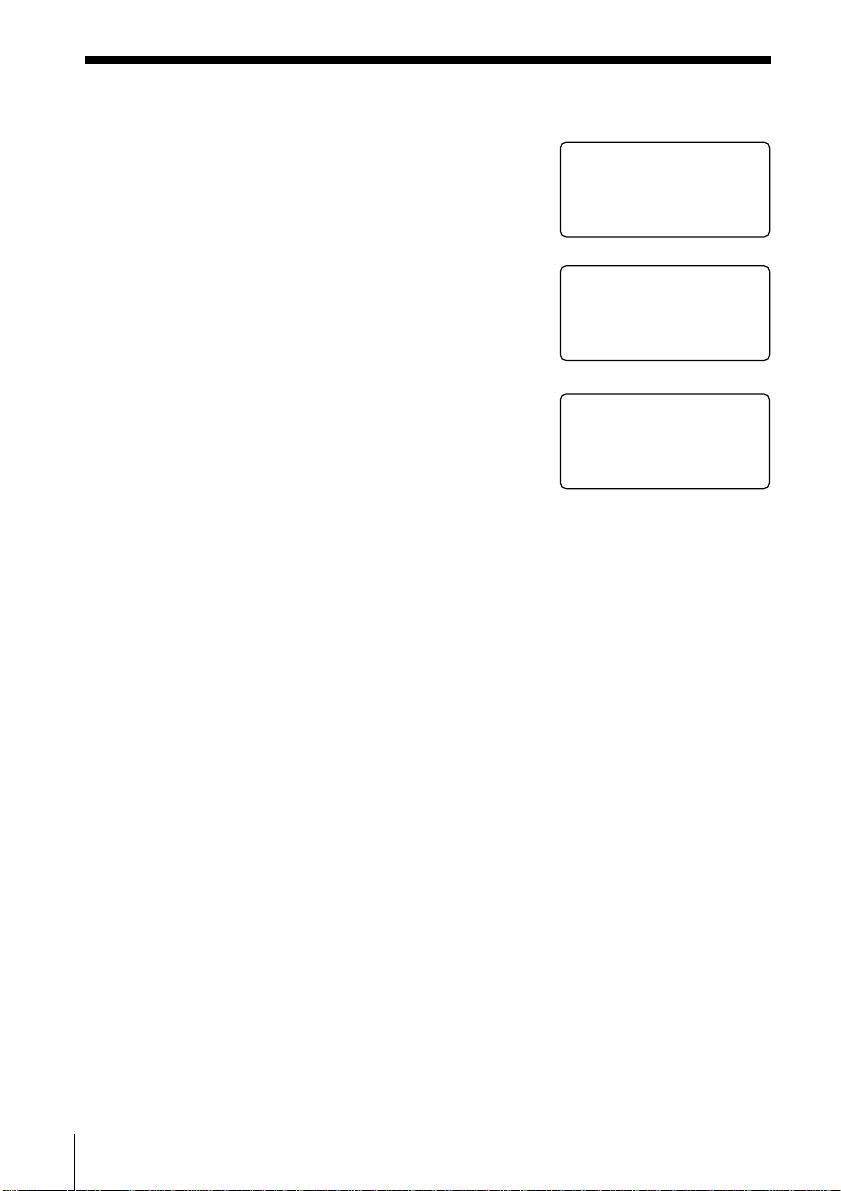
5 Press Jog Dial.
ENTER MIMUTE AND
PRESS JOG DIAL
11:00
6 Set the minute (00 to 59) by turning Jog Dial.
ENTER MINUTE AND
PRESS JOG DIAL
11:01
7 Press Jog Dial.
SELECT AM/PM AND
PRESS JOG DIAL
11:01AMAM
8 Select “AM” or “PM” by turning Jog Dial, and
then press Jog Dial.
You hear a long confirmation beep. Then the
phone starts counting time.
Notes
• Do not allow more than 60 seconds to elapse during the operation procedure.
•“SUN 12:00AM” on the display of the base phone flashes when the day and
time is cleared due to a power interruption, or when you connect the base
phone to the AC outlet for the first time.
• If the current day and time are not set, you will not hear a time stamp when
you play back recorded messages.
• When “ERROR” appears on the display and five short error beeps are heard
after Jog Dial is pressed in step 8, move the cordless handset closer to the
base phone, make sure the base phone* is not in use before you start the
setting.
* If the system includes additional cordless handsets, it is necessary to stop
using them before you start the setting as well.
Tip
When you select “(GO BACK)”, you can return to the previous set display by
pressing Jog Dial.
RING OFFMASSAGEOLDNEW
RING OFFMASSAGEOLDNEW
RING OFFMASSAGEOLDNEW
22
US
Getting Started
Page 23
Setting up the EZ Access function
The EZ Access function enables you to access to any set of numbers up
to 32 digits long by simple one-touch. Use for calling cards plus PIN,
voice mail, long distance provider, or any other set of frequently used
number.
After setting up the access number, you only need to press
(EZ ACCESS) for dialing the access number of your special services
e.g. long distance provider.
Also, you can set up just a phone number with the function for onetouch dialing.
You can set up the EZ Access function on both the base phone and the
cordless handset, further more, you can assign a different access
number to each unit (base phone and cordless handset).
1 Press (PGM). (Press
(PROGRAM) on the base phone.)
2 Press (EZ ACCESS).
EZ ACCESS
ENTER NUMBER
RING OFFMASSAGEOLDNEW
Getting Started
3 Enter the access number using
the dialing keys.
(ERASE)
(REDIAL/PAUSE)
Notes
• Do not allow more than 60 seconds to elapse during the operation procedure.
• You can register up to 32 digits as an access number.
Tip
When you select “(GO BACK)”, you can return to the previous set display by
pressing Jog Dial.
4 Press (PGM) (or (PROGRAM)).
You hear a long confirmation
beep.
continued
Getting Started
23
US
Page 24

Setting up the EZ Access function (continued)
To use the EZ Access
–for making calls, see page 33, 35.
–for redialing, see page 37.
–for making calls from the Phone Directory, see page 47.
–for making calls from Caller ID list, see page 80.
To change the access number
1 Perform steps 1 and 2 on page 23.
The current access number appears on the display.
2 Press (ERASE) to erase the current access number.
3 Enter a new access number using the dialing keys.
4 Press (PGM). (Press (PROGRAM) on the base phone.)
You hear a long confirmation beep.
To store a number to be dialed via Private Branch Exchange
(PBX)
Before entering a phone number in step 3 on page 23, do as follows:
1 Enter the outside line access digit (e.g., 9).
2 Press (REDIAL/PAUSE).
24
US
Getting Started
Page 25
Registering additional cordless handsets
The phone system includes a cordless handset. You can expand the
system including a total of four cordless handsets. Be sure to register
the ID number of the additional cordless handset called “station
number” to the base phone before using the additional cordless
handset. The station number of the base phone is set to 0 and that of
the cordless handset (supplied with the base phone) is set to 1 at the
factory. The station number of the cordless handset newly added to the
system will be one of the number 2 through 4 in the order of
registration.
Before you start registering, set all the unit of the system in standby
mode and place them close to each other (within a distance of 12
inches). Then do the following procedure only on the additional
cordless handsets one bye one.
within 12 inches
Base phone cordless handset
Getting Started
1 Press (PGM).
2 Press (INTERCOM).
You hear a confirmation beep.
ENTER SYSTEM ID
_
RING OFFMASSAGEOLDNEW
continued
Getting Started
25
US
Page 26
Registering additional cordless handsets (continued)
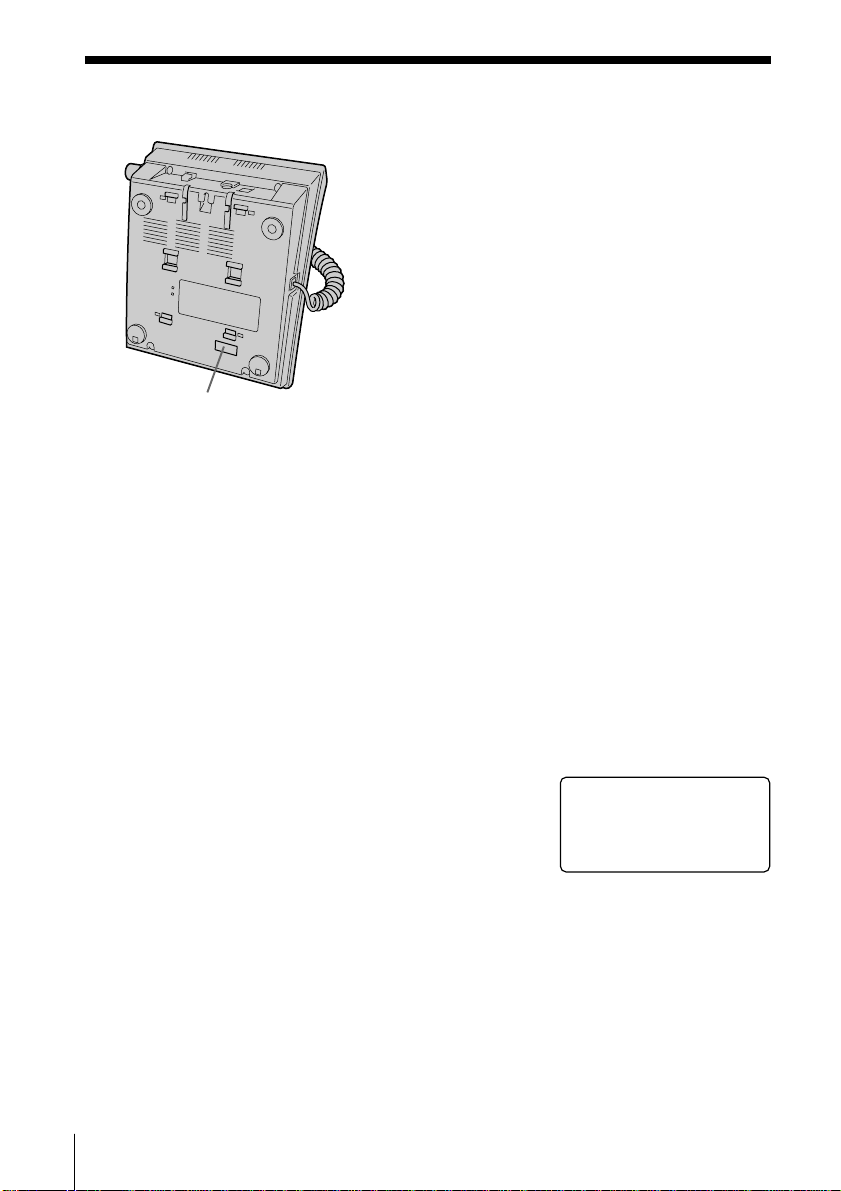
3 Enter the 10 digits system ID by
pressing the dialing keys.
The system ID is shown on a sticker
affixed to the bottom of the base phone.
4 Press (PGM).
You hear a long confirmation beep and
the assigned station number is
displayed.
System ID
Notes
• Do not allow more than 60 seconds to elapse during the operation procedure.
• Once you add a cordless handset to the base phone system, you cannot change the
station numbers, or cancel the additional registrations.
• When you press any button other than (PGM) to use an unregistered cordless
handset, the message “PLEASE REGISTER THIS HANDSET” will appear on the
display, and five short error beeps will be heard. You must first register the cordless
handset you want to add to the system.
• If you try to register a cordless handset which you have already added to the system,
the five short error beeps will be heard and the registration will be canceled.
• If the registration is unsuccessful, “ERROR” will appear on the display, and five short
error beeps will be heard after (PGM) is pressed in step 4. Move all the cordless
handsets closer to the base phone, and then start over the procedure.
To check the station number assigned to the additional
cordless handset
The station number of the cordless handset appears on
the display of the cordless handset while it is seated on
the charger. You can also utilize the supplied sticker of
the station number and attaching on the cordless
handset. (For details, see Operating Instructions of
SPP-H273.)
US
Getting Started
26
HANDSET 2
RING OFFMASSAGEOLDNEW
Page 27
Changing the language of the display
You can choose English or Spanish as the display language by
following the procedure below.
You can select the display language both the base phone and the
cordless handset, further more, you can select the display language on
each unit (base phone and cordless handset).
To change the language from English to Spanish
1 Press (PGM). (Press
(PROGRAM) on the base phone.)
Turn Press
2 Turn Jog Dial to choose
“ESPANOL”, and then press Jog
Dial.
(GO BACK)
NO
SI
RING OFFMASSAGEOLDNEW
3 Turn Jog Dial to choose “SI”,
and then press Jog Dial.
You will hear a long
confirmation beep.
Getting Started
Note
Do not allow more than 60 seconds to elapse during the operation procedure.
To change the language from Spanish to English
1 Press (PGM). (Press (PROGRAM) on the base
phone.)
2 Turn Jog Dial to choose “ENGLISH”, and then
press Jog Dial.
3 Turn Jog Dial to choose “YES”, and then press
Jog Dial.
You will hear a long confirmation beep.
(REGRESAR)
NO
YES
Getting Started
RING OFFMASSAGEOLDNEW
US
27
Page 28
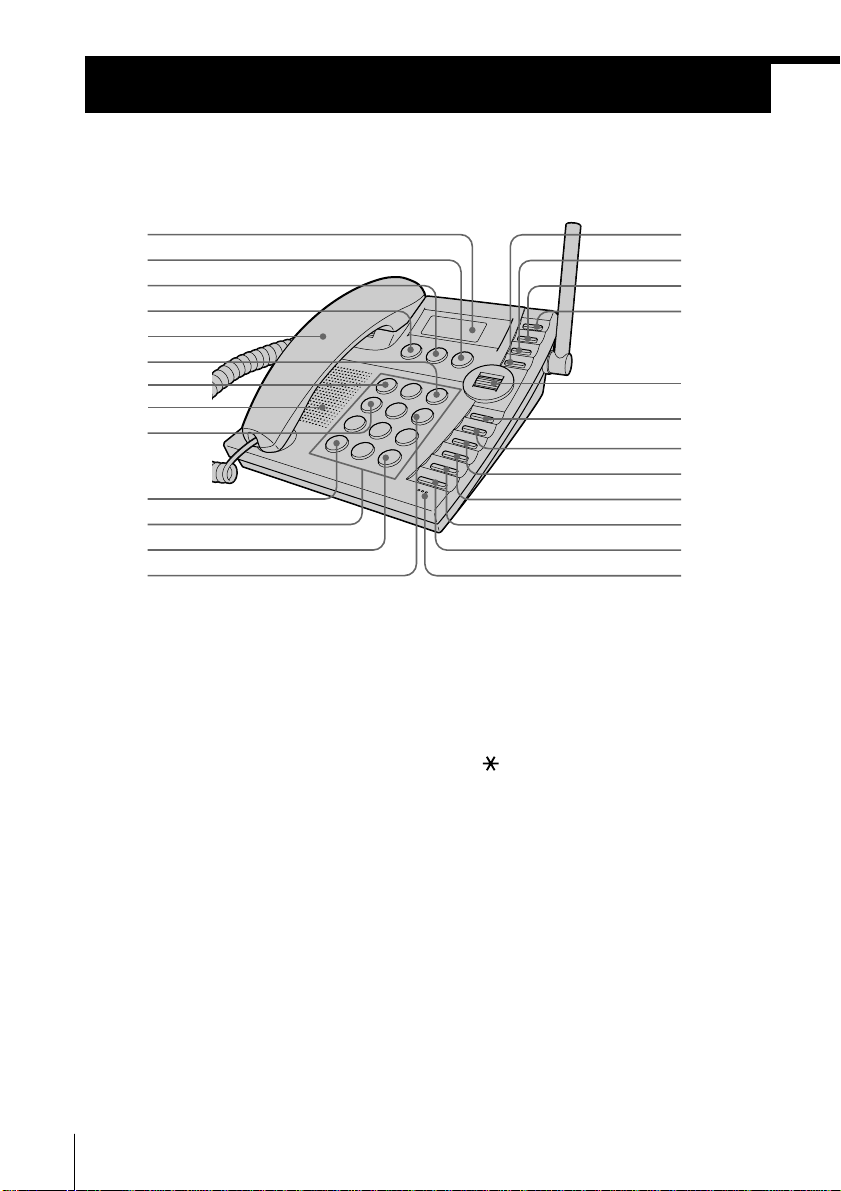
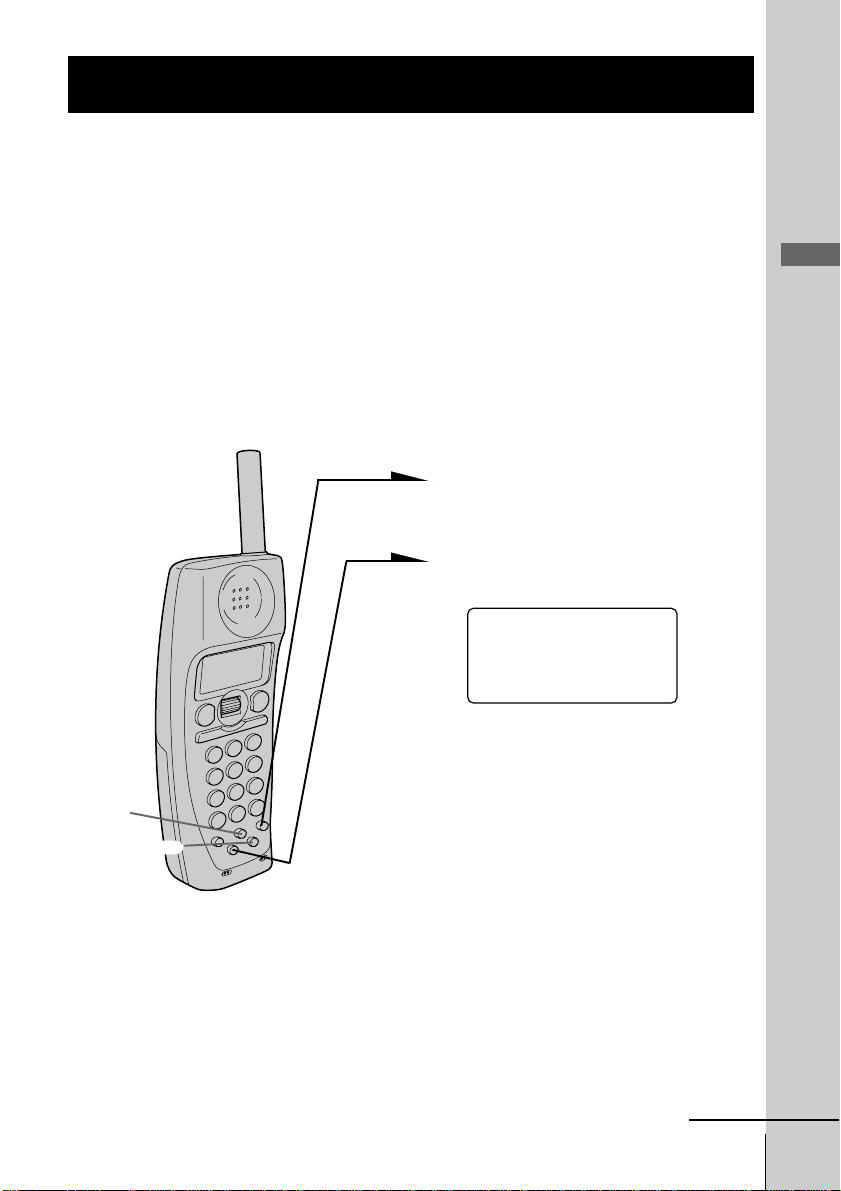
Identifying the parts
Refer to the pages indicated in parentheses for details.
Base phone
1
2
3
4
5
6
7
8
9
0
qa
qs
qd
1 Display window (p. 35, 68, 76)
2 MEMO REC button (p. 73)
Records a memo message.
3 MESSAGE PLAY/STOP button
(p. 68)
Plays back recorded messages.
4 ANSWER ON/OFF button
(p. 67, 68)
Turns the answering function on or
off. Lights when the answering
function is on, and flashes when a
new message is recorded.
5 Handset (p. 12, 35, 41)
6 > SKIP button (p. 69)
Press to skip to the next message.
7 . REPEAT button (p. 69)
Press once to repeat the current
message or twice to go back to the
previous message.
US
Getting Started
28
qf
qg
qh
qj
qk
ql
w;
wa
ws
wd
wf
wg
8 Speaker
9 REVIEW button (p. 69)
Keep the button pressed for a
playback review of the current
message.
0 TONE button (p. 33)
Allows you to switch temporarily to
tone dialing.
qa Dialing keys (p. 35)
qs # button (p. 83)
Used to change the number of
digits of the phone number in the
Caller ID list.
qd QUICK button (p. 69)
Keep the button pressed for quick
playback of messages.
qf ERASE button (p. 24, 71)
qg PROGRAM button (p. 23)
Page 29

wh
Getting Started
wkwj wl e;
qh VOL – button
(p. 35, 69)
Adjusts the handset or speaker
volume.
qj VOL + button
(p. 35, 69)
Adjusts the handset or speaker
volume.
qk Jog Dial (p. 21, 77)
ql EZ ACCESS button (p. 23, 35)
Lets you make a call with the
registered access number.
w; REDIAL/PAUSE button (p. 37)
Redials one of the last five numbers
called/inserts a pause in the dialing
sequence.
wa CALL WAITING/FLASH button
(p. 36, 85)
Switches to a second call if you
have “call waiting” service, or lets
you make a new call.
ws INTERCOM button (p. 55)
Lets you talk between the base
phone and cordless handset.
wd HOLD button (p. 36)
Puts a call on hold.
wf SPEAKERPHONE button
(p. 35)
Lets you make or receive a call.
wg MIC (microphone) (p. 60, 73)
wh Antenna (p. 12, 86)
wj Hook for AC power adaptor
cord (p. 12, 86)
wk DC IN 9V jack (p. 12, 86)
wl LINE (telephone line) jack
(p. 12, 86)
e; HANDSET jack (p. 12)
continued
Getting Started
29
US
Page 30
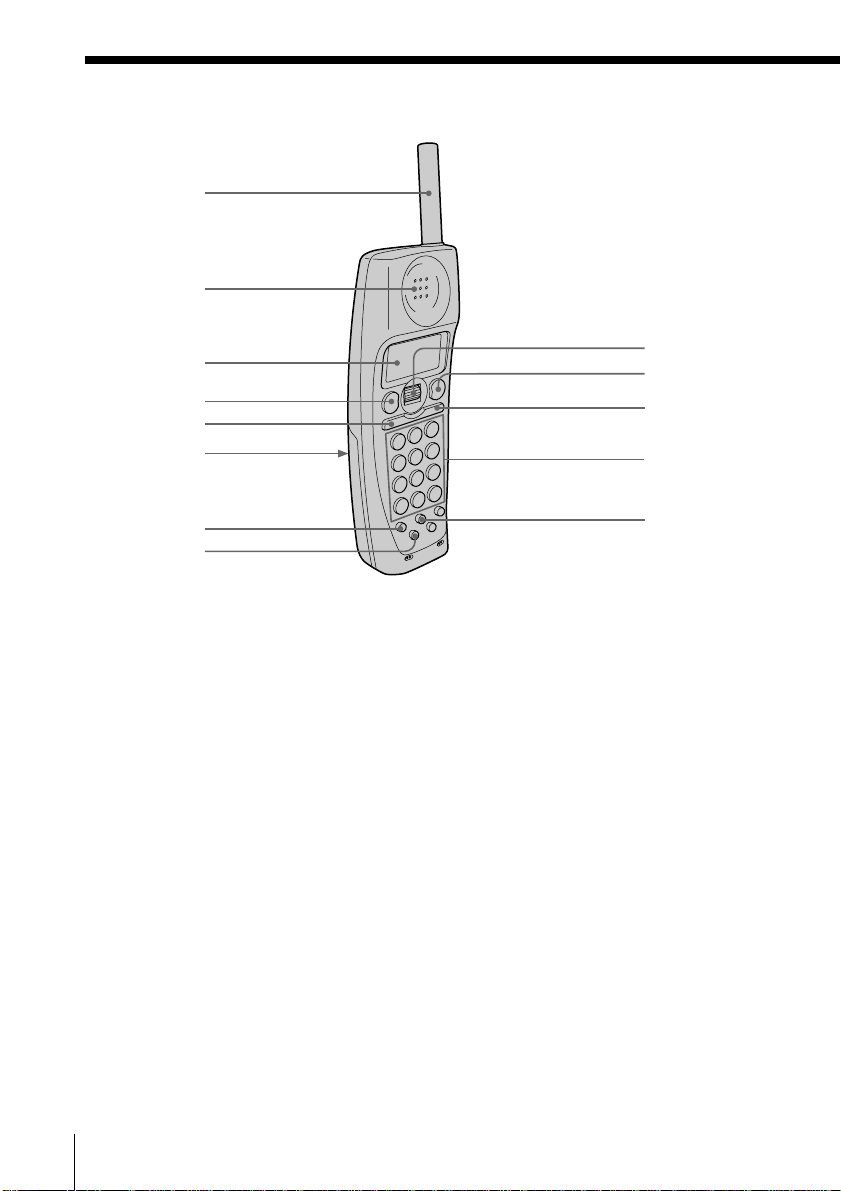
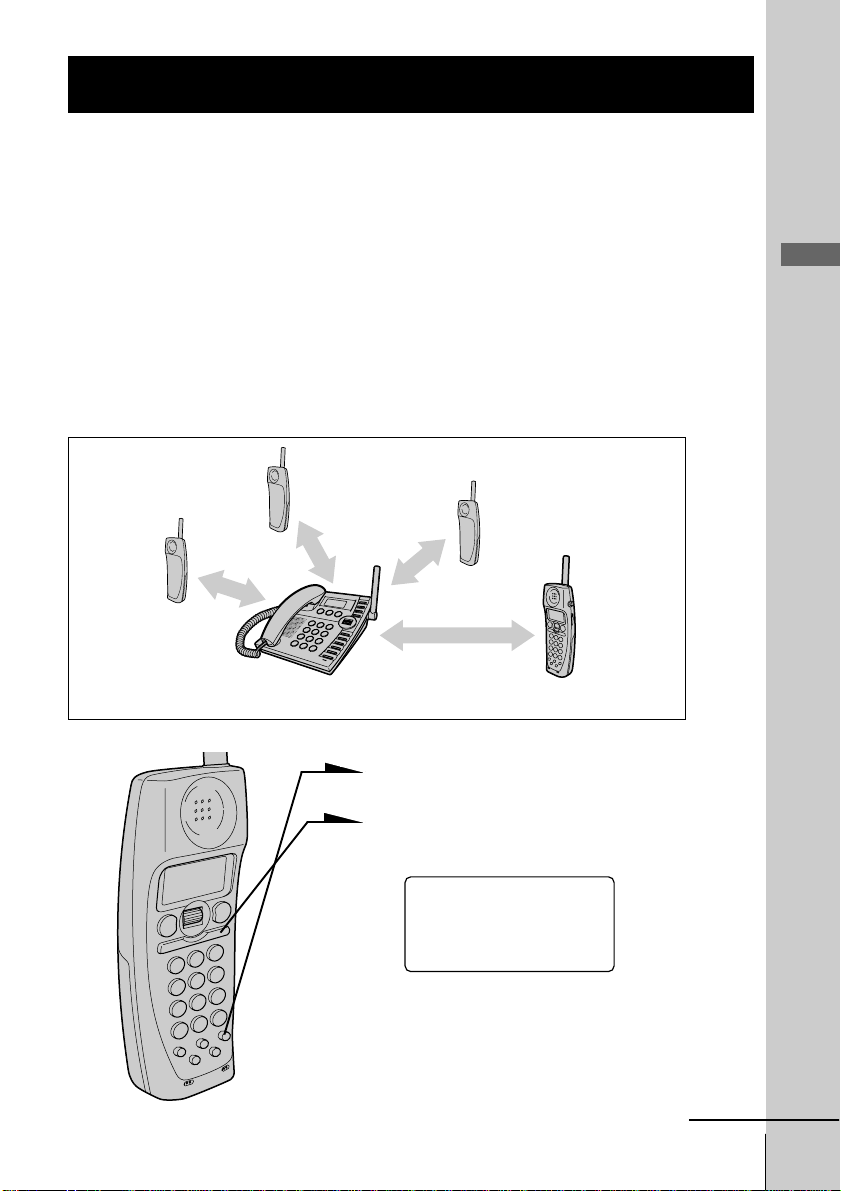
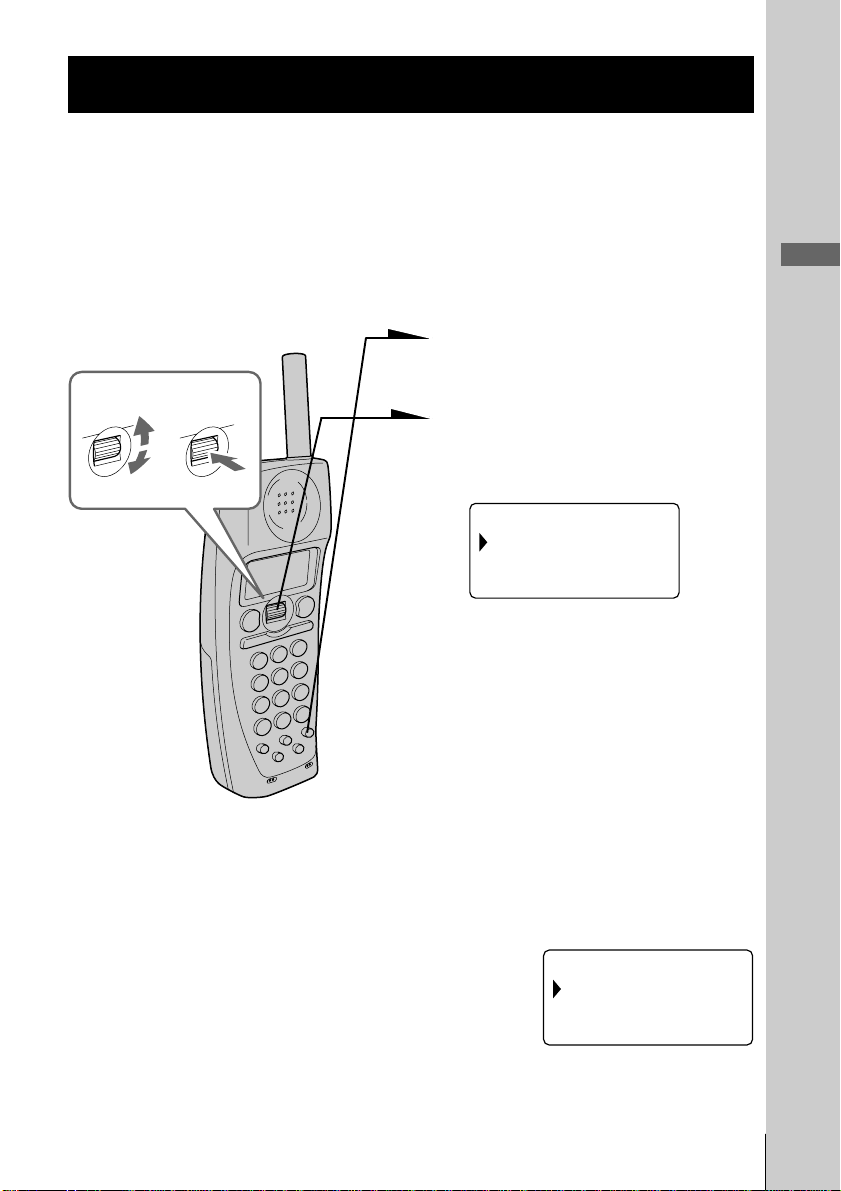
Identifying the parts (continued)
Cordless handset
1
2
3
4
5
6
7
8
1 Antenna
2 Speaker
3 Display window (p. 32, 76)
4 TALK button (p. 32)
Lets you make or receive a call.
5 HOLD/PLAY button
(p. 33, 68, 72)
Puts a call on hold/plays back
recorded messages.
6 Battery compartment (p. 14)
7 CALL WAITING/FLASH button
(p. 33, 85)
Switches to a second call if you
have “call waiting” service, or lets
you make a new call.
9
0
qa
qs
qd
8 EZ ACCESS button (p. 23, 33)
Lets you make a call with the
registered access number.
9 Jog Dial (p. 17, 43, 77)
0 OFF button (p. 32, 40)
Allows you to disconnect the call.
qa INTERCOM button (p. 54, 56)
Lets you talk between the base
phone and the cordless handset.
qs Dialing keys (p. 32)
qd ERASE button (p. 18, 45, 71)
30
US
Getting Started
Page 31

qj
qk
Getting Started
qf
qg
qh
qf REPEAT . button (p. 69)
Press once to repeat the current
message or twice to go back to the
previous message.
qg TONE button (p. 33)
Allows you to switch temporarily to
tone dialing.
qh RINGER
qj I (HEADSET) jack (p. 33, 39, 87)
qk VOL (volume) switch (p. 33)
Adjust the cordless handset
volume.
ql SKIP > button (p. 69)
Press to skip to the next message.
ql
w;
wa
ws
wd
w; # button (p. 83)
Used to change the number of
digits of the phone number in the
Caller ID list.
wa PGM (program) button
(p. 17, 43)
ws REDIAL/PAUSE button
(p. 24, 37)
Redials one of the last five numbers
called/inserts a pause in the dialing
sequence.
wd MIC (Microphone)
Getting Started
31
US
Page 32

Basics
Making calls
Making calls with the cordless handset
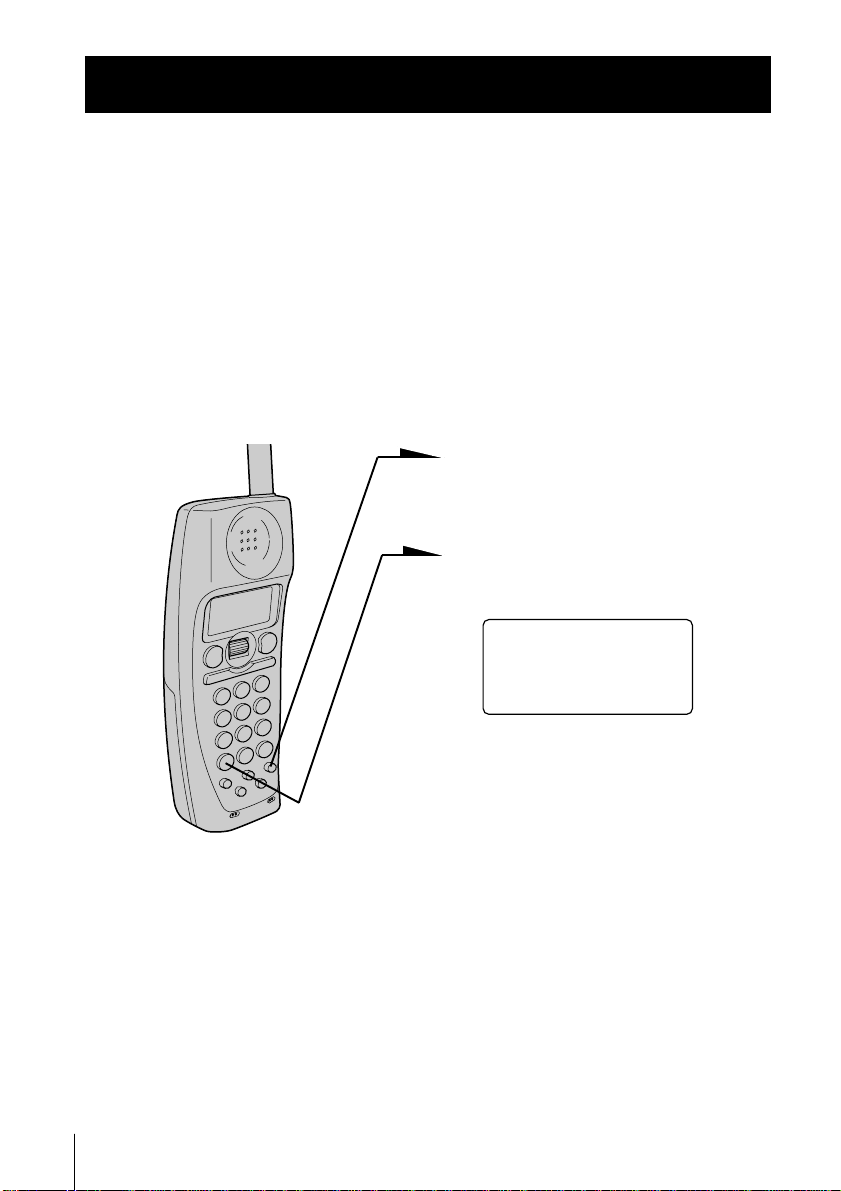
1 Pick up the cordless handset
from the charger.
2 Press (TALK) and wait until
“TALK” appears on the display
and the display also shows the
talk time in hours, minutes and
seconds.
(HOLD)
(*TONE)
(EZ ACCESS)
(CALL WAITING/FLASH)
(ERASE)
I (HEADSET)
jack
VOL switch
The dialing keys light up.
You then hear a dial tone.
“HANDSET 1 IN USE”
appears on the display of the
base phone when the cordless
handset with the station number
“1” is in use.
If you hear five short error
beeps and “NO
CONNECTION” appears on the
display, move closer to the base
phone.
3 Dial the phone number.
4 When you’re done talking, press
(OFF) or replace the cordless
handset on the charger.
The display turns off.
To make a call after checking the phone number
You can dial the phone number before pressing (TALK) or
(EZ ACCESS). If you make a mistake when dialing the phone number,
press (ERASE) to erase the number.
US
Basics
32
Page 33

Making calls when the headset is connected
When a headset (optional) is connected to the I
(HEADSET) jack on the cordless handset, you can
talk through the headset.
Making calls using the EZ Access function
To set up the access number, see “Setting up the EZ
Access function” on page 23.
1 Pick up the cordless handset from the charger.
2 Dial the phone number (e.g.,
1-201-123-4567, or 011-...).
3 Press (EZ ACCESS).
The system dials first, the access number set up
with the EZ access function, and then the phone
number you dialed in step 2. “TALK” appears
on the display.
TALK
4 When you’re done talking, press (OFF) or
replace the cordless handset on the charger.
Note
If you have set up a phone number with the EZ access function, just press
(EZ ACCESS) to dial the phone number (i.e. skip step 2).
Open
Basics
E12011234567
RING OFFMASSAGEOLDNEW
Additional tasks
To
Adjust the cordless
handset volume
Put a call on hold
Switch to tone dialing
temporarily
Switch to another call
(“call waiting” service*)
* You need to subscribe to this service from your telephone company.
Do this
Set the VOL switch to H (high), M (middle) or L (low).
Press (HOLD). “HOLD” appears on the display.
Press (HOLD) again or pick up the cordless handset
from the charger (When Quick talk is set to “ON”; see
page 40) to resume the conversation.
Press (*TONE) after you’re connected.
The line will remain in tone dialing until disconnected.
Press (CALL WAITING/FLASH).
Press (CALL WAITING/FLASH) again to return to the first
caller.
continued
Basics 33
US
Page 34

Making calls (continued)
Notes
• When making a call on the cordless handset, “ ” appears on the display
indicating the receiver sensitivity with the base phone. Three bars indicate a
good reception, no bar indicates a bad reception. When calling from an area
with poor reception, you may experience interference or the call may be
disconnected, so try to use the cordless handset in areas that have a good
reception.
• When you increase the sound volume, in some cases the back ground noise
may be increased as well. You should adjust the volume accordingly.
• If the cordless handset beeps every second during a conversation and “ ”
appears on the display, move closer to the base phone; otherwise, you will
hear five short error beeps and “NO CONNECTION” will appear on the
display, and the call will be disconnected after 30 seconds.
• While talking with an outside caller via the base phone, you cannot make a
call with the cordless handset. If you press (TALK), “NO CONNECTION”
appears on the display and you will hear five short error beeps.
• When the talk time exceeds 9:59:59, the display counts from 0:00:00 again.
If the battery becomes weak during a call
The cordless handset will beep twice per second, “BATTERY LOW”
appears on the display. Finish your call and replace the cordless
handset on the charger to charge the battery pack.
For optimum performance, charge the battery for a full 12 hours.
Note that during the initial charge time (approx. 10 minutes), “PLEASE
WAIT...” and “BATTERY LOW” appear on the display and the
cordless handset cannot be used.
After “BATTERY LOW” turns off, you may be able to use the cordless
handset, but the battery duration will be very short; thus it is
recommended that you fully charge the battery before next use.
34
US
Basics
Page 35

Making calls with the base phone
1 Pick up the handset or press
(SPEAKERPHONE) on the base
phone.
“TALK” or “SPEAKERPHONE”
appears on the display and the
display also shows the talk time in
hours, minutes and seconds.
(CALL WAITING/ FLASH)
(REDIAL/PAUSE)
2 Dial the phone number.
3 When you’re done talking, replace
the handset in the cradle or press
(SPEAKERPHONE) again.
To make a call after checking the phone number
You can dial the phone number before picking up the handset or
before pressing (SPEAKERPHONE). If you make a mistake when
dialing the phone number, press (ERASE) to erase the number.
Making calls using the EZ Access function
To set up the access number, see “Setting up the EZ
Access function” on page 23.
(*TONE)
(SPEAKERPHONE)
Jog Dial
(HOLD)
(PROGRAM)
(VOL +)
(VOL -)
(ERASE)
(EZ ACCESS)
Basics
1 Dial the phone number (e.g.,
1-201-123-4567, or 011-...).
2 Press (EZ ACCESS).
The system dials first, the access number set up
with the EZ access function, and then the phone
number you dialed in step 1.
“SPEAKERPHONE” appears on the display.
SPEAKERPHONE
3 When you’re done talking, or press
(SPEAKERPHONE) again.
Note
If you have set up a phone number with the EZ access function, just press
(EZ ACCESS) to dial the phone number (i.e. skip step 1).
E12011234567
RING OFFMASSAGEOLDNEW
continued
Basics 35
US
Page 36

Making calls (continued)
Additional tasks
To
Adjust the handset or
speakerphone volume
Put a call on hold
Switch to tone dialing
temporarily
Switch to another call
(“call waiting” service*)
* You need to subscribe to the service from your telephone company.
Notes
• While talking with an outside caller via the cordless handset, the display on
the base phone shows “HANDSET 1 IN USE” when the cordless handset
with the station number “1” is in use, and you cannot make a call with the
base phone.
• When the talk time exceeds 9:59:59, the display counts from 0:00:00 again.
Tip
You can switch between phone conversations via the handset and those via the
speakerphone, simply by picking up the handset while talking over the
speakerphone, or by pressing (SPEAKERPHONE) while talking over the handset.
Do this
During phone conversation, press (VOL -) or
(VOL +).
There are 3 steps for the handset volume level, and
7 steps for the speakerphone volume level.
Press (HOLD). “HOLD” appears on the display.
Press (HOLD), (SPEAKERPHONE), or pick up the
handset from the base phone to resume the
conversation.
Press (*TONE) after you’re connected.
The line will remain in tone dialing until
disconnected.
Press (CALL WAITING/ FLASH).
Press (CALL WAITING/ FLASH) again to return to the
first caller.
To obtain the best speakerphone performance
• You may not be able to hear the other party’s voice in a noisy place.
Therefore, use the speakerphone in a quiet room.
• Do not bring your hand or other object too close to the microphone
or you will hear a shrill noise (“feedback”).
• When the speaker volume is loud, or the base phone has been placed
close to a wall, you may find that the volume drops suddenly. This
is due to a circuit in the telephone designed to protect against
feedback. In such cases, lower the speaker volume slightly.
US
Basics
36
Page 37

Redialing
Both the base phone and the cordless handset can each individually
store five dialed phone numbers.
Turn Press
1 Press (REDIAL/PAUSE).
2 Display the name or phone
number you want to call by
turning Jog Dial.
3 Press Jog Dial.
4 Turn Jog Dial to choose “DIAL”,
and then press Jog Dial.
The phone number will be
redialed.
(PGM)
(EZ ACCESS)
Notes
• The redial memory only registers up to 32 digits. Exceeding numbers will not
be redialed.
• If an access number of the long distance call is registered in (EZ ACCESS), the
number cannot be stored for the redial button use. To redial long distance
calls with (EZ ACCESS), press (EZ ACCESS) instead of above steps 3 and 4.
Tips
• Although the phone number displayed on the redial list is up to 15 digit, the
redialing will be successful.
• If you redial the same number repeatedly, this number will only be counted
as one number of the total five registered numbers that can be redialed.
• When dialing from a phone number with a registered name, that name will
be displayed in the list in step 2.
Basics
continued
Basics 37
US
Page 38

Making calls (continued)
To erase the dialed phone number one by one
1 Display the name or phone number you want to erase by
doing steps 1 to 3 on page 37.
2 Turn Jog Dial to choose “ERASE REDIAL”, and then press
Jog Dial.
3 Turn Jog Dial to choose “YES”, and then press Jog Dial.
You hear a long confirmation beep, and the number is
erased.
To erase the entire dialed phone numbers at once
1 Press (PGM). (Press (PROGRAM) on the base phone.)
2 Turn Jog Dial to choose “MEMORY MANAGE”, and then
press Jog Dial.
3 Turn Jog Dial to choose “ERASE ALL RDL”, and then press
Jog Dial.
4 Turn Jog Dial to choose “ERASE REDIAL”, and then press
Jog Dial.
You hear a long confirmation beep, and the entire number
are erased.
To store the dialed phone number into the Phone Directory
See page 45.
US
Basics
38
Page 39

Receiving calls
Receiving calls with the cordless handset
1 When you hear the phone ring:
• Press (TALK).
or
I (HEADSET)
jack
VOL switch
(HOLD)
(CALL WAITING/FLASH)
(PGM)
• Pick up the cordless handset
from the charger when the
cordless handset is placed on
the charger. (When Quick talk
is set to “ON”; see page 40)
“TALK” appears on the display
and the display also shows the
talk time in hours, minutes and
seconds.
“HANDSET 1 IN USE”
appears on the display of the
base phone when the cordless
handset with the station number
“1” is in use.
Basics
2 When you’re done talking, press
(OFF) or replace the cordless
handset on the charger.
The display turns off.
Receiving calls when the headset is connected
When a headset (optional) is connected to the I
(HEADSET) jack on the cordless handset, you can
talk through the headset.
Open
continued
Basics 39
US
Page 40

Receiving calls (continued)
Additional tasks
To
Adjust the cordless handset
volume
Put a call on hold
Switch to another call
(“call waiting” service*)
Receive a call by only picking
up the cordless handset from
the charger, without pressing
(TALK)(Quick talk)
Adjust the ringer volume of
the cordless handset
* You need to subscribe to this service from your telephone company.
Do this
Set the VOL switch to H (high), M (middle) or L
(low).
Press (HOLD). “HOLD” appears on the display.
Press (HOLD) again or pick up the cordless
handset from the charger (When Quick talk is
set to “ON”; see below) to resume the
conversation.
Press (CALL WAITING/FLASH).
Press (CALL WAITING/FLASH) again to return to
the first caller.
Press (PGM). Turn Jog Dial to choose “QUICK
TALK”, then press Jog Dial.
Turn Jog Dial to choose “ON”, then press Jog
Dial.
While the cordless handset is ringing: Turn Jog
Dial to adjust the volume.
While the cordless handset is not in use: Press
(PGM). Turn Jog Dial to choose “RINGER
VOLUME” then press Jog Dial to adjust the
volume. Press (OFF).
The ringer volume can be adjusted to three
different levels: high, low and off. If the ringer
is set off, “RING OFF” will appear on the
display.
Tip
To inform you of an incoming call, the display shows “** RINGING **” even
when you set the ringer volume on the cordless handset to off. You can still
make calls, and also receive calls if another telephone connected to the same
line rings to inform you of incoming calls. You can also receive an intercom call.
If you have subscribed to the Caller ID service;
• the caller’s number and/or name appears on the display when you receive a
call (see page 76) or when another call comes in by “call waiting” service.
• the name stored in the Phone Directory appears on the display if the call
matches the number stored in the Phone Directory (memory match function;
see page 76).
• the ringer sound changes to a higher tone if the call matches the number
stored in the Phone Directory (memory match function; see page 76).
US
Basics
40
Page 41

Receiving calls with the base phone
1 When you hear the phone ring,
pick up the handset or press
(SPEAKERPHONE) on the base
phone.
“TALK” or “SPEAKERPHONE”
appears on the display and the
display also shows the talk time in
hours, minutes and seconds.
(CALL WAITING/ FLASH) (VOL +)
2 When you’re done talking, replace
the handset in the cradle or press
(SPEAKERPHONE) again.
To obtain the best speakerphone
performance, see page 36.
Additional tasks
To
Adjust the handset or
speakerphone volume
Put a call on hold
Switch to another call
(“call waiting” service*)
Adjust the ringer volume
of the base phone
* You need to subscribe to the service from your telephone company.
Do this
During phone conversation, press (VOL +) or
(VOL -).
There are 3 steps for the handset volume level, and
7 steps for the speakerphone volume level.
Press (HOLD). “HOLD” appears on the display.
Press (HOLD), (SPEAKERPHONE), or pick up the
handset from the base phone to resume the
conversation.
Press (CALL WAITING/ FLASH).
Press (CALL WAITING/ FLASH) again to return to the
first caller.
Press (VOL +) or (VOL -). The ringer volume can
be adjusted to three different levels: high, low, and
off. If the ringer is set to off, “RING OFF” will
appear on the display.
(VOL -)
Basics
(HOLD)
(SPEAKERPHONE)
continued
Basics 41
US
Page 42

Receiving calls (continued)
Note
Even when you set the ringer volume on the base phone to off, the cordless
handset will ring when the ringer volume on the cordless handset is set to high
or low.
Tips
• To inform you of an incoming call, the display shows “** RINGING **”
even when you set the ringer volume on the base phone to off.
• You can switch between phone conversations via the handset and those via
the speakerphone, simply by picking up the handset while talking over the
speakerphone, or by pressing (SPEAKERPHONE) while talking over the
handset.
42
US
Basics
Page 43

Telephone Features
Phone Directory
You can dial a number by scrolling through the Phone Directory.
Both the base phone and the cordless handset can each store up to 50
separate numbers.
Storing phone numbers and names
Example: to store “SONY” “123-
4567”.
1 Press (PGM). (Press
(PROGRAM) on the base phone.)
Turn Press
(GO BACK)
PHONE DIRECTORY
MEMORY MANAGE
If “PHONE DIRECTORY” is
not selected, turn Jog Dial to
select it.
RING OFFMASSAGEOLDNEW
Telephone Features
(ERASE)
(REDIAL/PAUSE)
2 Press Jog Dial.
“ENTER NAME” appears on
the display.
ENTER NAME
ABCDEFGHIJKLMN
OPQRSTUVWXYZ
RING OFFMASSAGEOLDNEW
3 Enter the name by turning Jog
Dial.
You can enter up to 15
characters.
Turn Jog Dial until the desired
character is selected, and then
press Jog Dial.
continued
Telephone Features
43
US
Page 44

Phone Directory (continued)
RING OFFMASSAGEOLDNEW
ENTER NAME
A BCDEFGHIJKLMN
OPQRSTUVWXYZ
RING OFFMASSAGEOLDNEW
ENTER NAME
a bcdefghijklmn
opqrstuvwxyz
RING OFFMASSAGEOLDNEW
ENTER NAME
0 123456789
"#$&
'()*+,-./:;
Each press of Jog Dial after choosing “M” or
“m” switches the characters from upper case
letters t lower case letters t numbers and
symbols.
Enter successive characters in the same way.
To enter a “space”, turn Jog Dial to choose
“ ” (space), and then press Jog Dial.
4 Press (PGM) (or (PROGRAM)).
“ENTER NUMBER” appears on the display.
5 Enter the phone number by pressing the dialing
keys.
You can enter up to 20 digits, including a tone
and a pause, each of which is counted as one
digit.
When the phone number of 16 digits or more
has been entered, the phone number appears in
US
44
two lines.
6 Press (PGM) (or (PROGRAM)).
You hear a long confirmation beep, and the
name and the number are stored.
The display goes off.
Telephone Features
SONY
ENTER NUMBER
RING OFFMASSAGEOLDNEW
SONY
1234567_
RING OFFMASSAGEOLDNEW
SONY
1234567890123456
78_
RING OFFMASSAGEOLDNEW
Page 45

Notes
• If you try to save a 51st phone number, you will hear five short error beeps
and “THE MEMORY IS FULL” will be displayed. You cannot store the
phone number. To store another phone number, erase one of the stored
phone numbers (see page 49).
• Names cannot be entered using the dialing keys.
• Do not allow more than 60 seconds to elapse during the operation procedure.
Tips
• When you select “(GO BACK)”, you can return to the previous set display by
pressing Jog Dial.
• If you have entered a wrong name or number in step 3 or 5, turn Jog Dial to
choose “P” then press Jog Dial or press (ERASE) to erase it. Then enter the
correct name or number.
To store a number to be dialed via Private Branch Exchange
(PBX)
Before entering a phone number in step 5 on page 44, do as follows:
1 Enter the outside line access digit (e.g., 9).
2 Press (REDIAL/PAUSE).
To store the dialed phone number into the Phone Directory
The dialed phone numbers of up to 20 digits can be stored in the
Phone Directory.
1 Press (REDIAL/PAUSE).
2 Display the name or phone number you want to call by
turning Jog Dial, and then press Jog Dial.
3 Turn Jog Dial to choose “PROGRAM”, and then press Jog
Dial.
4 Enter the name by doing steps 3 and 4 on pages 43 to 44.
5 Press (PGM). (Press (PROGRAM) on the base phone.)
You hear a long confirmation beep, and the name and the
number are stored.
Telephone Features
continued
Telephone Features
45
US
Page 46

Phone Directory (continued)
Making calls from the Phone Directory
Turn Press
(TALK)
(PGM)
(EZ ACCESS)
1 Press Jog Dial.
2 Turn Jog Dial to select an alphabet group
([ABC], [DEF]...) which includes the initial
character of the name you want to search for,
and then press Jog Dial.
If a numbers or a symbol is the initial character,
select the “[etc]” group.
“PHONE DIRECTORY”
appears on the display.
PHONE DIRECTORY
ABC
DEF
TUV
WXYZ
etc
RING OFFMASSAGEOLDNEW
RING OFFMASSAGEOLDNEW
3 Select the name you want to call by turning Jog
Dial.
4 Press Jog Dial.
US
Telephone Features
46
BROWN JOHN
SONY
SMITH JOHN
(GO BACK)
DIAL
EDIT
RING OFFMASSAGEOLDNEW
RING OFFMASSAGEOLDNEW
Page 47

5 Turn Jog Dial to choose “DIAL”, and then press
Jog Dial.
The phone number will be dialed.
Tips
• When you select “(GO BACK)”, you can return to the previous set display by
pressing Jog Dial.
• If there is no data recorded in the selected alphabet group in step 2, the data
memory of the next following group will be displayed.
• You may press (TALK) on the cordless handset (on the base phone, pick up
the handset or press (SPEAKERPHONE)) to make a call instead of doing steps
4 and 5.
• If an access number of the long distance call is set up with the EZ access
function, you can add the access number to the phone number and make a
call by pressing (EZ ACCESS) after step 3. For setting up the EZ access
function, see page 23.
Telephone Features
continued
Telephone Features
47
US
Page 48

Phone Directory (continued)
Changing a stored name and/or phone
number
1 Display the name you want to change by doing
steps 1 to 3 on page 46.
2 Press Jog Dial.
3 Turn Jog Dial to choose “EDIT”, and then press
Jog Dial.
The cursor “_” is at the right of the name.
4 Turn Jog Dial to choose “P”, then press Jog Dial
or press (ERASE) to erase the characters, and
enter the new name.
If you want to change only the number, skip this
step.
5 Press (PGM). (Press (PROGRAM) on the base
phone.)
The cursor is at the right of the phone number.
BROWN JOHN
SONY
SMITH JOHN
RING OFFMASSAGEOLDNEW
(GO BACK)
DIAL
EDIT
RING OFFMASSAGEOLDNEW
SONY_
ABCDEFGHIJKLMN
OPQRSTUVWXYZ
RING OFFMASSAGEOLDNEW
SONY
1234567_
RING OFFMASSAGEOLDNEW
6 Press (ERASE) to erase the number, and enter
the new number.
If you don’t want to change the number, skip
this step.
7 Press (PGM) (or (PROGRAM)).
You hear a long confirmation beep and the
name and/or the number is changed.
US
Telephone Features
48
Page 49

Erasing a memory location
To erase the phone number one by one
1 Display the name you want to erase by doing
steps 1 to 3 on page 46.
BROWN JOHN
SONY
SMITH JOHN
RING OFFMASSAGEOLDNEW
2 Press Jog Dial.
3 Turn Jog Dial to choose “ERASE DIRECTORY”,
and then press Jog Dial.
4 Turn Jog Dial to choose “YES”, and then press
Jog Dial.
You hear a long confirmation beep and the
memory location is erased.
To erase the entire memory at once
1 Press (PGM). (Press (PROGRAM) on the base
phone.)
2 Turn Jog Dial to choose “MEMORY
MANAGE”, and then press Jog Dial.
3 Turn Jog Dial to choose “ERASE ALL DIR”,
and then press Jog Dial.
(GO BACK)
DIAL
EDIT
RING OFFMASSAGEOLDNEW
(GO BACK)
NO
YES
RING OFFMASSAGEOLDNEW
(GO BACK)
PHONE DIRECTORY
MEMORY MANAGE
RING OFFMASSAGEOLDNEW
(GO BACK)
NO
ERASE DIRECTORY
RING OFFMASSAGEOLDNEW
Telephone Features
4 Turn Jog Dial to choose “ERASE DIRECTORY”,
and then press Jog Dial.
You hear a long confirmation beep and the
entire memory is erased.
continued
Telephone Features
49
US
Page 50

Phone Directory (continued)
Transferring the Phone Directory memory
The Phone Directory memory can be transferred one by one or all at
once (with a maximum of 50 numbers) from a cordless handset to the
base phone or to an additional cordless handset, or from a base phone
to one of the cordless handsets.
Make sure the base phone* is not in use before you start the setting.
* If the system includes additional cordless handsets, it is necessary to stop
using them before you start the setting as well.
To transfer one phone number from the Phone Directory
1 Display the name you want to transfer by doing
steps 1 to 3 on page 46.
BROWN JOHN
SONY
SMITH JOHN
RING OFFMASSAGEOLDNEW
2 Press Jog Dial.
3 Turn Jog Dial to choose “SEND DIRECTORY”,
and then press Jog Dial.
4 When the system has one cordless handset
You hear a long confirmation beep and the
memory is transferred.
When the system has an additional cordless
handset
Turn Jog Dial to choose “TO BASE” or station
number of the cordless handset to which you
are forwarding the memory, and then press Jog
Dial.
You hear a long confirmation beep and the
memory is transferred.
(GO BACK)
DIAL
EDIT
(Cordless handset)
(GO BACK)
TO BASE
TO HANDSET 2
RING OFFMASSAGEOLDNEW
RING OFFMASSAGEOLDNEW
US
Telephone Features
50
Page 51

To transfer all phone numbers from the Phone Directory
The Phone Directory receiving the transfer will be totally overwritten.
1 Press (PGM). (Press (PROGRAM) on the base
phone.)
2 Turn Jog Dial to choose “MEMORY
MANAGE”, and then press Jog Dial.
3 Turn Jog Dial to choose “SEND ALL DIR”, and
then press Jog Dial.
4 When the system has one cordless handset
Skip this step.
When the system has an additional cordless
handset
Turn Jog Dial to choose “TO BASE” or station
number of the cordless handset to which you
are forwarding the memory, and then press Jog
Dial.
5 Turn Jog Dial to choose “SEND DIRECTORY”,
and then press Jog Dial.
“SENDING…” appears on the display during
the transfer.
You hear a long confirmation beep and the
entire memory is transferred.
(GO BACK)
REC. CAPACITY
SEND ALL DIR
(Cordless handset)
RING OFFMASSAGEOLDNEW
(GO BACK)
TO BASE
TO HANDSET 2
RING OFFMASSAGEOLDNEW
(GO BACK)
NO
SEND DIRECTORY
RING OFFMASSAGEOLDNEW
Telephone Features
Notes
• If there are already 50 numbers stored in the Phone Directory receiving the
transferred number one by one from the other Phone Directory,
“RECEIVER’S MEMORY IS FULL” will appear on the display and five
short error beeps will be heard to indicate that the transfer was unsuccessful.
To make the transfer possible, erase one of the stored phone numbers existing
in the Phone Directory (see page 49).
• If the transfer is unsuccessful, “ERROR” will appear on the display, and five
short error beeps will be heard. Move the sending unit closer to the receiving
unit, make sure the receiving unit is not in use, and then start over the
procedure.
• To check the station number assigned to the cordless handset, see page 26.
Telephone Features
51
US
Page 52

Switching the phones during a call
You can easily switch between the cordless handset and the base
phone, or between the cordless handsets without disconnecting the
call.
Switching from the base phone to the
cordless handset
1 Press (HOLD) on the base
phone.
The call is on hold and “HOLD”
appears on the display.
2 Pick up the cordless handset
from the charger (When Quick
talk is set to “ON”; see page 40),
or press (TALK) or (HOLD) on
the cordless handset.
You can continue talking to the
caller through the cordless
(SPEAKERPHONE)
Switching from the cordless handset to the
base phone
handset.
US
Telephone Features
52
(TALK)
1 Press (HOLD) on the cordless
handset.
The call is on hold and “HOLD”
appears on the display.
2 Pick up the handset from the
base phone, or press
(SPEAKERPHONE) or (HOLD)
on the base phone.
You can continue talking to the
caller through the base phone.
Page 53

Switching from the cordless handset to
another cordless handset (When the system
has an additional cordless handset)
1 Press (HOLD) on the cordless handset.
The call is on hold and “HOLD” appears on the display.
2 Pick up another cordless handset from the charger (When
Quick talk is set to “ON”; see page 40), or press (TALK) or
(HOLD) on the cordless handset.
You can continue talking to the caller through the cordless
handset.
Telephone Features
Telephone Features
53
US
Page 54

Intercom Operation
Talking between the phones – Intercom
You can make an intercom call between the cordless handset and base phone, or
between the cordless handsets. You can start the intercom from any phone.
Talking from the cordless handset to the base phone
Example: Making intercom call from the
cordless handset whose station
number is 1 to the base phone.
1 Press (INTERCOM).
2
When the system has one cordless handset
Skip this step.
When the system has an additional
cordless handset
Turn Jog Dial to choose “TO BASE”, and
then press Jog Dial.
3 The cordless handset and base phone ring
and “** INTERCOM 0 **” appears on the
display of the cordless handset and
“** INTERCOM 1 **” appears on the
display of the base phone.
When a person at the base phone picks up
the handset from the base phone, or presses
(SPEAKERPHONE) or (INTERCOM), you can
talk with each other.
4 When you are done talking, replace the
cordless handset on the charger or press
(OFF) on the cordless handset.
If no one answers the phone
Press (INTERCOM) again.
Notes
• If there is an incoming call during intercom conversation between the base
phone and the cordless handset, intercom call will be disconnected, and both
the base phone and the cordless handset will ring.
• While talking with an outside caller via the base phone, you cannot make an
intercom call. If you press (INTERCOM) on the cordless handset, “NO
CONNECTION” appears on the display and you will hear five short error
beeps.
Tip
You can receive an intercom call on the base phone even when the ringer
volume on the base phone is set to off. The phone will ring at a low level.
US
Intercom Operation
54
Page 55

Talking from the base phone to the cordless handset
Example: Making intercom call from the
base phone to the cordless
handset whose station number is
1.
1 Press (INTERCOM).
2 When the system has one cordless
handset
Skip this step.
When the system has an additional
cordless handset
Turn Jog Dial to choose “TO
HANDSET 1”, and then press Jog Dial.
3 The base phone and cordless handset
ring and “** INTERCOM 1 **”
appears on the display of the base
phone and “** INTERCOM 0 **”
appears on the display of the cordless
handset.
When a person at the cordless handset
picks up the cordless handset from the
charger (When Quick talk is set to
“ON”; see page 40), or presses (TALK)
or (INTERCOM), you can talk with each
other.
Intercom Operation
4 When you are done talking, replace the
handset in the cradle or press
(SPEAKERPHONE) on the base phone.
If no one answers the phone
Press (INTERCOM) again.
Notes
• If there is an incoming call during intercom conversation between the base
phone and the cordless handset, intercom call will be disconnected, and both
the base phone and the cordless handset will ring.
• While talking with an outside caller via the cordless handset, you cannot
make an intercom call. If you press (INTERCOM) on the cordless handset,
“NO CONNECTION” appears on the display and you will hear five short
error beeps.
Tip
You can receive an intercom call on the cordless handset even when the ringer
volume on the cordless handset is set to off. The phone will ring at a low level.
continued
Intercom Operation
55
US
Page 56

Talking between the phones – Intercom (continued)
Talking between the cordless handsets
– Walkie-Talkie function (When the system has an
additional cordless handset)
You can make an intercom conversation between a couple of cordless
handsets (Walkie-Talkie function) of the same phone system far from
the base phone (e.g. use out of doors).
Example: Making intercom call from
station number 1 to station
number 2.
1 Press (INTERCOM).
2 Turn Jog Dial to choose “TO
HANDSET 2”, and then press Jog
Dial.
Both cordless handsets ring and
“** INTERCOM 2 **” appears
on the display of the cordless
(TALK)
handset whose station number is 1
and “** INTERCOM 1 **”
appears on the display of the
cordless handset whose station
number is 2.
When a person at the cordless
handset whose station number is 2
picks up the cordless handset from
the charger (When Quick talk is set
to “ON”; see page 40), or presses
(TALK) or (INTERCOM), you can
talk with each other.
3 When you are done talking,
replace the cordless handset on the
charger or press (OFF).
If no one answers the phone
Press (INTERCOM) again.
Notes
• If there is an incoming outer line call during the intercom conversation
between a couple of cordless handsets (Walkie-Talkie function), intercom call
will not be disconnected. When you answer the outer line call, press (OFF) to
end the intercom conversation.
• To check the station number assigned to the cordless handset, see page 26.
Tip
You can receive an intercom call on the cordless handset even when the ringer
volume is set to off. The cordless handset will ring at a low level.
US
Intercom Operation
56
Page 57

Transferring a call
You can transfer a call between the cordless handset and base phone, or between the
cordless handsets without disconnecting the call.
Transferring from the cordless handset to the base phone
Example: Transferring a call from the
cordless handset whose station
number is 1 to the base phone.
(OFF)
1 Press (INTERCOM).
The call is put on hold.
2 When the system has one cordless
handset
Skip this step.
When the system has an additional
cordless handset
Turn Jog Dial to choose “TO BASE”,
and then press Jog Dial.
3 The cordless handset and base phone
ring and “** INTERCOM 0 **”
appears on the display of the cordless
handset and “** INTERCOM 1 **”
appears on the display of the base
phone.
4 Pick up the handset from the base
phone, or press (SPEAKERPHONE) or
(INTERCOM) on the base phone.
You can talk between the cordless
handset and the base phone.
5 To talk to the caller with the base
phone, replace the cordless handset on
the charger or press (OFF) on the
(INTERCOM)
(SPEAKERPHONE)
If no one answers the phone
Press (INTERCOM) again.
Tip
You can receive an intercom call on the base phone even when the ringer
volume on the base phone is set to off. The base phone will ring at a low level.
cordless handset.
“TALK” or “SPEAKERPHONE”
appears on the display of the base
phone.
continued
Intercom Operation
Intercom Operation
US
57
Page 58

Transferring a call (continued)
Transferring from the base phone to the cordless handset
Example: Transferring a call from the
base phone to the cordless
handset whose station number
is 1.
1 Press (INTERCOM).
The call is put on hold.
2 When the system has one cordless
handset
Skip this step.
When the system has an
additional cordless handset
Turn Jog Dial to choose “TO
(SPEAKERPHONE)
HANDSET 1”, and then press Jog
Dial.
3 The base phone and cordless
handset ring and
“** INTERCOM 1 **” appears on
the display of the base phone and
“** INTERCOM 0 **” appears on
the display of the cordless handset.
4 Pick up the cordless handset from
the charger (When Quick talk is set
(TALK)
(INTERCOM)
to “ON”; see page 40), or press
(TALK) or (INTERCOM) on the
cordless handset.
You can talk between the base phone
and the cordless handset.
5 To talk to the caller with the cordless
handset, replace the handset in the
cradle or press (SPEAKERPHONE) on
the base phone.
“TALK” appears on the display of
the cordless handset.
If no one answers the phone
Press (INTERCOM) again.
Tip
You can receive an intercom call on the cordless handset even when the ringer
volume is set to off. The phone will ring at a low level.
US
Intercom Operation
58
Page 59

Transferring
between the cordless handsets (When the
system has an additional cordless handset)
Example: Transferring a call from
station number 1 to station
number 2.
1 Press (INTERCOM).
The call is put on hold.
2 Turn Jog Dial to choose “TO
HANDSET 2”, and then press Jog
Dial.
Both cordless handsets ring and
(OFF)
“** INTERCOM 2 **” appears
on the display of the cordless
handset whose station number is 1
and “** INTERCOM 1 **”
appears on the display of the
cordless handset whose station
number is 2.
3 Pick up the cordless handset
whose station number is 2 from
the charger (When Quick talk is set
to “ON”; see page 40), or press
(TALK) or (INTERCOM) on the
cordless handset.
You can talk with each other.
4 To talk to the caller with the
cordless handset whose station
number is 2, replace the cordless
handset on the charger or press
(OFF) on the cordless handset
whose station number is 1.
“TALK” appears on the display of
the cordless handset whose station
number is 2.
If no one answers the phone
Press (INTERCOM) again.
Tip
You can receive an intercom call on the cordless handset even when the ringer
volume is set to off. The cordless handset will ring at a low level.
Intercom Operation
Intercom Operation
US
59
Page 60

Answering Machine Features
Preparing the answering machine
Recording the greeting
This answering machine has prerecorded greetings (see page 61).
However, you can record your own greeting.
The greeting must be between two seconds and one minute long.
You can record only one greeting, and it is used regardless of the
answering mode (“normal” and “announcement only” modes. See
page 64). Therefore, if you decide to change the mode, make sure that
you record a new greeting to match the answering mode.
Greeting recording is only available on the base phone.
1 Press (PROGRAM).
2 Turn Jog Dial to choose
“GREETING”, and then press
Jog Dial.
(GO BACK)
PLAY BACK
RECORD
RING OFFMASSAGEOLDNEW
US
60
Answering Machine Features
MIC (Microphone)
3 Turn Jog Dial to choose
“RECORD”, and then press Jog
Dial.
You hear a voice guidance and a
long confirmation beep.
4 After the tone, start recording.
Speak about 12 inches (30 cm)
away from the microphone.
5 Press (MESSAGE PLAY/STOP) to
stop recording.
The phone automatically
replays the recorded greeting.
Page 61

Notes
• Do not allow more than 60 seconds to elapse during the operation procedure.
• If recording did not succeed, you hear five short error beeps. Start over the
procedure.
• If a call comes in while recording a greeting, recording is cancelled. Start
over the procedure.
• If you hear five short error beeps while recording, the recording area may be
full. In this case, erase unnecessary messages (see page 71).
Tips
• When you select “(GO BACK)”, you can return to the previous set display by
pressing Jog Dial.
• If one minute have passed in step 4, recording stops automatically.
• To record the greeting from a touch-tone phone, see page 75.
Prerecorded greeting
Normal mode: “Hello, I’m unable to answer your call right now.
Please leave your name, number and message after
the tone.”
Announcement only mode: “Hello, I’m unable to answer your call right now.
Please call again. Thank you.”
Tips
• If you wish to record your own “announcement only” greeting, follow the
above sequence after setting “ANSWERING MODE” to “ANNOUNCE
ONLY” (page 64). Otherwise, the “normal” greeting will be recorded.
• You have to change the message each time you change the mode.
To check the greeting
Perform steps 1 and 2 on page 60, then press Jog Dial.
Answering Machine Features
To change the greeting
Record a new greeting. The new greeting replaces the old one.
To erase the greeting
Perform steps 1 and 2 on page 60, and turn Jog Dial to choose “ERASE
GREETING” then press Jog Dial.
To go back to the factory preset greeting
Erase your own greeting by doing step above. This will bring back the
original greeting.
Answering Machine Features
continued
61
US
Page 62

Preparing the answering machine (continued)
Selecting the ring time
You can select the number of rings before the answering machine starts
to play back the greeting and records incoming messages. There are three
options of ring time. The ring time is preset to “TOLL SAVER”.
You can set the ring time only with the cordless handset. Make sure
the base phone* is not in use before you start the setting.
* If the system includes additional cordless handsets, it is necessary to stop
using them before you start the setting as well.
Turn Press
1 Press (PGM).
2 Turn Jog Dial to choose
“ANSWERING”, and then press
Jog Dial.
3 Turn Jog Dial to choose
“RINGER TIMES”, and then
press Jog Dial.
(GO BACK)
2 TIMES
5 TIMES
4 Turn Jog Dial to select a ring
duration, and then press Jog
Dial. (See the table for details.)
You hear a long confirmation
beep.
Set “RINGER TIMES” to Mode
“TOLL SAVER” If new messages have been recorded, the phone
“5 TIMES” The phone always answers at the fifth ring and
“2 TIMES” The phone always answers at the second ring and
US
62
Answering Machine Features
answers at the second ring and records incoming
messages; if no new messages are recorded, it
answers at the fifth ring. When you call from an
outside phone and hear three rings, you know that
there are no new messages. If you hang up at this
point before the phone answers, you can save the
toll for the call.
records incoming messages.
records incoming messages.
RING OFFMASSAGEOLDNEW
Page 63

Note
• Do not allow more than 60 seconds to elapse during the operation procedure.
• When “ERROR” appears on the display and five short error beeps are heard
after Jog Dial is pressed in step 4, move the cordless handset closer to the
base phone, make sure the base phone is not in use, and then start over the
procedure.
Tip
When you select “(GO BACK)”, you can return to the previous set display by
pressing Jog Dial.
Selecting the recording quality
For the user who does not utilize the maximum recording capacity
(about 20 minutes), you can select a higher recording grade and enjoy
superior sound quality and clarity compared to the standard (NORM)
grade. As higher sound quality uses up more memory capacity, the
maximum recording time changes accordingly.
You can set the recording quality only with the cordless handset. Make
sure the base phone* is not in use before you start the setting.
* If the system includes additional cordless handsets, it is necessary to stop
using them before you start the setting as well.
Turn Press
1 Press (PGM).
2 Turn Jog Dial to choose
“ANSWERING”, and then press
Jog Dial.
3 Turn Jog Dial to choose
“RECORD QUALITY”, and
then press Jog Dial.
(GO BACK)
HI(SHORT PLAY)
MID
RING OFFMASSAGEOLDNEW
4 Turn Jog Dial to choose “HI
(SHORT PLAY)”, “MID” or
“NORM (LONG PLAY)”, and
then press Jog Dial.
You hear a long confirmation
beep.
continued
Answering Machine Features
Answering Machine Features
US
63
Page 64

Preparing the answering machine (continued)
Notes
• Do not allow more than 60 seconds to elapse during the operation procedure.
• The approx. length of the three recording grades are:
“HI (SHORT PLAY)”– 8 minutes
“MID”– 15 minutes
“NORM (LONG PLAY)”– 20 minutes
Actual recording time may vary.
• When “ERROR” appears on the display and five short error beeps are heard
after Jog Dial is pressed in step 4, move the cordless handset closer to the
base phone, make sure the base phone is not in use, and then start over the
procedure.
Tip
When you select “(GO BACK)”, you can return to the previous set display by
pressing Jog Dial.
Selecting the answering mode
You can set the answering machine to record incoming messages
(normal mode), or just make an announcement without recording
messages (announcement only mode). You can record your own
greeting, or use the factory pre-recorded greetings.
You can set the answering mode only with the cordless handset. Make
sure the base phone* is not in use before you start the setting.
* If the system includes additional cordless handsets, it is necessary to stop
using them before you start the setting as well.
Turn Press
US
64
Answering Machine Features
1 Press (PGM).
2 Turn Jog Dial to choose
“ANSWERING”, and then press
Jog Dial.
(GO BACK)
ANSWERING MODE
AUDIBLE INDIC.
RING OFFMASSAGEOLDNEW
3 Turn Jog Dial to choose
“ANSWERING MODE”, and
then press Jog Dial.
Page 65

4 Turn Jog Dial to choose “ANNOUNCE ONLY” or
“NORMAL”, and then press Jog Dial.
You hear a long confirmation beep.
Answering mode When you wish to Pre-recorded greeting
“ANSWERING MODE”
is set to “NORMAL”
(normal mode)
“ANSWERING MODE”
is set to “ANNOUNCE
ONLY” (announcement
only mode)
Notes
• Do not allow more than 60 seconds to elapse during the operation procedure.
• The same greeting is used regardless of the answering mode. Therefore, if
you decide to change the mode, make sure that you record a new greeting to
match the answering mode.
• When “ERROR” appears on the display and five short error beeps are heard
after Jog Dial is pressed in step 4, move the cordless handset closer to the
base phone, make sure the base phone is not in use, and then start over the
procedure.
Tips
• When the base phone is in announcement only mode, “ANNOUNCE
ONLY” will appear on the standby mode display.
• When you select “(GO BACK)”, you can return to the previous set display by
pressing Jog Dial.
play a greeting to ask the caller
to leave a message.
make an announcement to the
caller without accepting
incoming messages when, for
example, you are away on a
long vacation.
“Hello, I’m unable to answer
your call right now. Please leave
your name, number and
message after the tone.”
“Hello, I’m unable to answer
your call right now. Please call
again. Thank you.”
Answering Machine Features
continued
Answering Machine Features
65
US
Page 66

Preparing the answering machine (continued)
When the memory is full
The recording area of this phone’s memory is about 20 minutes*
(including the greeting, messages, and memo). If the remaining
recording area becomes less than 30 seconds, the phone automatically
switches to announcement only mode, which does not record
messages, and the greeting will be switched to the pre-recorded
greeting. Confirm the available time left for recording (page 70).
* Available time for recording at “NORM (LONG PLAY)” sound quality.
If you wish to record more messages, erase the existing messages (see
page 71). You can also erase the messages from an outside phone (see
page 75).
Setting the audible message indicator
You have the option of having a beep to tell you if you have received
any new messages. The audible message indicator is preset to “ON”.
You can set the audible message indicator only with the cordless
handset. Make sure the base phone* is not in use before you start the
setting.
* If the system includes additional cordless handsets, it is necessary to stop
using them before you start the setting as well.
1 Press (PGM).
2 Turn Jog Dial to choose “ANSWERING”, and then press Jog
Dial.
3 Turn Jog Dial to choose “AUDIBLE INDIC.”, and then press
Jog Dial.
4 Turn Jog Dial to choose “ON” or “OFF”, and then press Jog
Dial.
You hear a long confirmation beep.
Note
When “ERROR” appears on the display and five short error beeps are heard
after Jog Dial is pressed in step 4, move the cordless handset closer to the base
phone, make sure the base phone is not in use, and then start over the
procedure.
US
66
Answering Machine Features
Page 67

Turning on the
answering function
Press (ANSWER ON/OFF) so that
it lights up in red.
Notes
• When the memory is full, you hear five short error beeps and you cannot
turn on the answering function. Erase unnecessary messages (see page 71).
• If four minutes have passed while recording the incoming message, the line is
automatically disconnected.
• If the message is shorter than two seconds, it will not be recorded.
Tips
• The answering machine will automatically answer a call after 10 rings even if
the answering function is off.
• You can also turn on or off the answering function from an outside phone
(see page 75).
To turn off the answering function
Press (ANSWER ON/OFF) so that the red light goes off.
Answering Machine Features
Answering Machine Features
67
US
Page 68

Playing back messages
You can play back messages on both the base phone and the cordless handset.
When the phone is not in use and not in announcement only mode, the display of the
base phone shows the following.
TUE 4:53PM
NEW MESSAGE 05
NEW CALL 08
RING OFFMASSAGEOLDNEW
Total number of new
messages
(ANSWER ON/OFF)
(1) . REPEAT
(4) REVIEW
Jog Dial
(HOLD/PLAY)
(1) REPEAT .
(MESSAGE PLAY/STOP)
(VOL +)
(VOL -)
(PROGRAM)
(ERASE)
Jog Dial
(3) > SKIP
(6) QUICK
VOL switch
(OFF)
(3) SKIP >
When you come home
If (ANSWER ON/OFF) flashes in
red and display on the base
phone shows the number of
new messages, press
(MESSAGE PLAY/STOP) on the
base phone or (HOLD/PLAY) on
the cordless handset.
The machine plays back from
the newest message received.
(ERASE)
US
68
Answering Machine Features
(PGM)
Page 69

Additional tasks when playing back messages
To Do this
Adjust the answering volume During playback, press (VOL +) or (VOL -)
on the base phone. There are 7 steps for the
answering volume level.
Adjust the cordless handset Set the VOL switch on the cordless handset to
volume H (high), M (middle) or L (low).
Stop playback Press (MESSAGE PLAY/STOP) on the base phone
or (OFF) on the cordless handset.
Skip to the next message Press (3) > SKIP while the current message
is playing.
Repeat the current message Press (1) . REPEAT while the current
message is playing.
Go back to previous messages Press (1) . REPEAT within the first three
seconds of the current message.
Review playback Keep (4) REVIEW on the base phone pressed
during playback.
Play back quickly Keep (6) QUICK on the base phone pressed
during playback.
Notes
• The display shows the total number of “new” messages. Therefore, it is reset
to “00” when you play back all new messages, even they are not erased yet.
Be sure to erase unnecessary messages before the memory becomes full.
Confirm the available time left for recording (page 70).
• The phone can record up to 99 messages including the greeting and memo.
• If a call comes in during playback, the playback stops.
• You cannot reproduce a message in quick play or review play with the
cordless handset.
Tips
• You can also listen to the messages or erase the messages from a outside
phone (page 75).
• During playback of messages with Caller ID data, the name and phone
number will appear on the display. If there is no name and phone number
data, “NO CALLER ID” will appear on the display.
During playback of memo, “MEMO MESSAGE” will appear on the display.
Answering Machine Features
continued
Answering Machine Features
69
US
Page 70

Playing back messages (continued)
Displaying remaining available recording
time for message
You can see how much recordable message quantity remains available
simply by checking the display.
The message recordable quantity is displayed in 14 levels. When all of
the squares on the display are black, it means that the memory is full.
1 Press (PGM). (Press (PROGRAM) on the base
phone.)
2 Turn Jog Dial to choose “MEMORY
MANAGE”, and then press Jog Dial.
3 Turn Jog Dial to choose “REC. CAPACITY”,
and then press Jog Dial.
RECORDING MEMORY
CAPACITY
E F
4 Press (OFF) on the cordless handset or
(MESSAGE PLAY/STOP) on the base phone to
return to the standby mode display.
RING OFFMASSAGEOLDNEW
Note
When the memory is full, “REC. MEMORY FULL” will appear on the standby
mode display of the base phone.
US
70
Answering Machine Features
Page 71

Erasing messages
To erase the message one by one
Press (ERASE) while the message is being played back.
You hear a voice guidance and the message is erased.
To erase the entire messages at once
Entire message deletion can only be made on the base phone.
Note that new messages that have not as yet been played back will also
be erased.
1 Press (PROGRAM).
2 Turn Jog Dial to choose “MEMORY MANAGE”, and then
press Jog Dial.
3 Turn Jog Dial to choose “ERASE ALL MSG”, and then
press Jog Dial.
4 Turn Jog Dial to choose “ERASE MESSAGES”, and then
press Jog Dial.
You hear a long confirmation beep, and the entire messages
are erased.
Note
If a power interruption occurs or the AC power adaptor is disconnected while
erasing a message, all recorded message may be erased.
Answering Machine Features
Answering Machine Features
71
US
Page 72

Screening incoming calls
You can screen calls by leaving the answering function on (see page 67) while you are
at home. When a call is answered, you can hear the message being recorded through
the base phone or cordless handset but the caller cannot hear you. Then, you can
decide whether to answer the call or not. This function is available both the base
phone and the cordless handset. However, the following procedures are required in
order to screen incoming calls on the cordless handset.
Screening incoming calls
on the cordless handset
Press (HOLD/PLAY) while
“** ANSWERING **” is displayed.
“CALL SCREENING” appears on
(TALK)
(OFF)
the display of the cordless handset.
To answer the call
Pick up the handset from the base
phone or press (SPEAKERPHONE)
on the base phone, or press (TALK)
on the cordless handset.
Recording is stopped and you can
speak to the caller.
(SPEAKERPHONE)
Note
If the answering volume is set to minimum, you cannot screen the calls on the base phone.
Tips
• You can conclude call screening by pressing (OFF) on the cordless handset.
• You can also answer the call by picking up the handset on another phone if it is connected to
the same line.
US
72
Answering Machine Features
Page 73

Recording a memo
You can record a “memo” (up to four minutes) as a personal reminder
or as a message for other people. You can play back the recorded
memo like any incoming messages (see page 68).
Memo recording is only available on the base phone.
1 Press (MEMO REC).
You hear a voice guidance and a
long confirmation beep.
2 After the tone, start recording.
Speak about 12 inches (30 cm)
away from the microphone.
3 Press (MEMO REC) to stop
MIC (Microphone)
recording.
The message number in the
display increases by one.
Notes
• If you press (MEMO REC) when the memory is full (available time for
recording is displayed as running short), you hear five short error beeps and
you cannot record a memo.
• If a call comes in while recording a memo, recording is canceled. Start over
the procedure.
• If the remaining memory becomes full while recording, recording stops
automatically.
Tip
If four minutes have passed in step 2, recording stops automatically, and the
recorded memo is counted as a new message.
Answering Machine Features
Answering Machine Features
US
73
Page 74

Operating from an outside phone
You can call from a touch-tone phone and pick up new messages
recorded on the phone. First, you just set the remote ID code (security
code) and turn on the answering function before going out.
The remote ID code (security code) setting can only be made on the
cordless handset.
Setting the remote ID code (security code)
Turn Press
1 Press (PGM).
2 Turn Jog Dial to choose
“ANSWERING”, and then press
Jog Dial.
3 Turn Jog Dial to choose
“SECURITY CODE”, and then
press Jog Dial.
4 Enter four digits of remote ID
code (security code) between
0000 and 9999 using the dialing
keys.
5 Press (PGM).
The remote ID code (security
code) is set, and you hear a long
confirmation beep.
Note
Do not allow more than 60 seconds to elapse during the operation procedure.
Tip
When you select “(GO BACK)”, you can return to the previous set display by
pressing Jog Dial.
To change the remote ID code (security code)
Enter a new remote ID code (security code). The new code will replace
the old one.
US
74
Answering Machine Features
Page 75

Picking up new messages
1 Call your phone from a touch-tone phone.
2 While you hear your greeting play, press (#). The greeting
stops.
After confirming the greeting stops, enter your remote ID
code (security code). You hear a long confirmation beep.
Following the voice guidance informing you of the number
of messages recorded, the phone stands by for you to enter a
control code.
3 To do other operations, enter the control code within 20
seconds (see the table below). To quit, hang up the phone.
Control codes for remote operations
To Press
Play back messages (#) (2)
Repeat the current message (#) (1) while the message is being played back
Skip the current message (#) (3) while the message is being played back
Erase the current message (#) (9) while the message is being played back
Erase all messages (#) (9)
Record a new greeting (*) (7). When you hear a long beep, start recording your
(up to one minute) greeting. Press (*) (*) to stop recording.
Turn on the answering function (*) (0)
Turn off the answering function (#) (0)
Stop the current operation (*) (*)
Answering Machine Features
If you forgot to turn the answering function on
Call your phone and let it ring 10 times until it answers. Then do steps
2 and 3 above. The control code for turning on the answering function
is (*) and (0).
Note
If you enter a wrong remote security code three times, the line will be
disconnected.
To use the toll-saver feature
Set “RINGER TIMES” to “TOLL SAVER”. See page 62 for details.
Answering Machine Features
75
US
Page 76

Caller ID Features
Understanding the Caller ID service
Caller ID allows the caller’s phone number to be shown on the display
before you answer the call. In order to use this feature, you must first
subscribe to Caller ID service. The name of this service may vary
depending on your telephone company.
To use this feature, be sure to enter the area code (see page 17).
When you receive a call
The phone number appears on the display as shown in the following
example.
If your Caller ID service includes the caller name service or if the
phone number stored in the Phone Directory matches with the Caller
ID data phone number, the caller’s name also appears on the display
(up to 15 letters).
The caller’s name will appear by the name stored in the Phone
Directory if you receive a call from a phone number which is stored in
the Phone Directory.
Caller’s name
Caller’s phone number
When you answer the call, the Caller ID display changes to the
“TALK” or “SPEAKERPHONE” display.
Notes
• The caller’s phone number and/or name will not appear in the following
cases:
—“UNKNOWN NUMBER/NAME/CALLER” (out of area) : when the call is
made through a telephone company which does not offer Caller ID service
(including international calls).
—“BLOCKED NUMBER/NAME/CALL” (private) : when the call is
“blocked”. For privacy reasons, many states allow callers the option to
prevent his or her telephone data from being displayed on the other
party’s Caller ID display.
• If the call is from an office which uses multiple lines, the displayed phone
number may not match the number you use to call the extension.
SMITH JOHN
1-201-123-4567
RING OFFMASSAGEOLDNEW
About the memory match function
The name stored in the Phone Directory will appear on the display and
the ringer sound will change to a higher tone from the second ring if
you receive a call from a phone number which is stored in the Phone
Directory on the base phone or the cordless handset (see page 43).
Note
The memory match function does not work with “UNKNOWN NUMBER/
NAME/CALLER” or “BLOCKED NUMBER/NAME/CALL” calls; and it may
not work with calls made from an office which uses multiple lines because the
number does not always match the one you stored in this phone.
US
Caller ID Features
76
Page 77

Looking at the Caller ID list
The phone stores the data of the last 70 calls received including
“UNKNOWN NUMBER/NAME/CALLER” and “BLOCKED
NUMBER/NAME/CALL” calls. It keeps track of all calls received;
even if they were not answered.
Viewing the Caller ID list
You can look through the Caller ID list on both the base phone and the
cordless handset to check the phone number and/or name of the calls
received.
Turn Press
1 Turn Jog Dial.
The display shows the number
of “NEW CALL” (calls which
you have not viewed) and
“OLD CALL” (calls which you
have viewed) calls.
CALLER ID
NEW CALL 08
OLD CALL 12
2 Turn Jog Dial down to display
(PGM)
Notes
• If a 71st call is received, the oldest data is automatically erased.
• When you have checked all data, “END OF LIST” appears.
Tips
• The number of “NEW CALL” can be confirmed with the standby mode
display of the base phone. In addition, after playing back messages, a voice
guidance will provide notice in regards to new calls.
• When there are messages in the displayed Caller ID data, “MESSAGE” will
appear at the very bottom of the display. See “Playing back a message from
the Caller ID list” on page 81.
older data or up to display
newer data.
RING OFFMASSAGEOLDNEW
Caller ID Features
continued
Caller ID Features
77
US
Page 78

Looking at the Caller ID list (continued)
Erasing data from the Caller ID list
Old data will be erased automatically when a 71st call comes in, but
you can also manually erase unnecessary data one by one or erase the
entire list.
To erase the phone number one by one
1 Display the phone number you want to erase
from the Caller ID list (see page 77).
SMITH JOHN
1-201-123-4567
01 7.04 4:53PM
RING OFF
MASSAGEOLDNEW
2 Press Jog Dial.
(GO BACK)
DIAL
PLAY BACK
3 Turn Jog Dial to choose “ERASE CALLER ID”,
and then press Jog Dial.
(GO BACK)
NO
YES
4 Turn Jog Dial to choose “YES”, and then press
Jog Dial.
You hear a long confirmation beep and the data
is erased.
Note
Do not allow more than 60 seconds to elapse during the operation procedure.
Tip
When you select “(GO BACK)”, you can return to the previous set display by
pressing Jog Dial.
RING OFFMASSAGEOLDNEW
RING OFFMASSAGEOLDNEW
78
US
Caller ID Features
Page 79

To erase the entire list at once
Entire Caller ID list deletion can only be made on the cordless handset.
Note that Caller ID data in the list that has not been viewed will also
be erased.
1 Press (PGM).
2 Turn Jog Dial to choose “MEMORY
MANAGE”, and then press Jog Dial.
(GO BACK)
REC. CAPACITY
SEND ALL DIR
3 Turn Jog Dial to choose “ERASE ALL CID”,
and then press Jog Dial.
(GO BACK)
NO
ERASE CALLER ID
4 Turn Jog Dial to choose “ERASE CALLER ID”,
and then press Jog Dial.
You hear a long confirmation beep and the
entire list is erased.
Notes
• Do not allow more than 60 seconds to elapse during the operation procedure.
• When “ERROR” appears on the display and five short error beeps are heard
after Jog Dial is pressed in step 4, move the cordless handset closer to the
base phone, make sure the base phone is not in use, and then start over the
procedure.
Tip
When you select “(GO BACK)”, you can return to the previous set display by
pressing Jog Dial.
RING OFFMASSAGEOLDNEW
RING OFFMASSAGEOLDNEW
Caller ID Features
Caller ID Features
79
US
Page 80

Using the Caller ID list
By using the Caller ID list, you can call back a phone number from the
Caller ID list easily, play back messages, or store numbers from the
Caller ID list into the Phone Directory.
Calling back a number from the Caller ID list
1 Display the phone number you
Turn Press
want to call from the Caller ID
list (see page 77).
SMITH JOHN
1-201-123-4567
01 7.04 4:53PM
MASSAGEOLDNEW
2 Press Jog Dial.
RING OFF
(TALK)
DIAL
PLAY BACK
3 Turn Jog Dial to choose “DIAL”,
and then press Jog Dial.
The phone automatically dials
(GO BACK)
(EZ ACCESS)
Notes
• If the area code is not entered, “ENTER AREA CODE” will appear on the
display, and you will not be able to call back. Enter the area code (see page
17).
• Do not allow more than 60 seconds to elapse during the operation procedure.
• If the number displayed in step 1 is not the one you should call back, you can
change the number of digits of the phone number as described on page 83.
• If the phone is connected to a Private Branch Exchange (PBX), you may not
be able to call back from the Caller ID list because an outside line access digit
is necessary.
Tips
• You may press (TALK) on the cordless handset (on the base phone, pick up
the handset or press (SPEAKERPHONE)) to make a call instead of doing steps
2 and 3.
• If an access number of the long distance call is set up with the EZ access
function, you can add the access number to the phone number and make a
call by pressing (EZ ACCESS) after step 3. For setting up the EZ access
function, see page 23.
• When you select “(GO BACK)”, you can return to the previous set display by
pressing Jog Dial.
US
Caller ID Features
80
the displayed number.
RING OFFMASSAGEOLDNEW
Page 81

Playing back a message from the Caller ID list
– Direct Message Access function
When there is a message in the received Caller ID data, you can play
back the message while continuing to display the Caller ID list.
Turn Press
(HOLD/PLAY)
1 Display the phone number you
want to play back a message
from the Caller ID list (see page
77).
SMITH JOHN
1-201-123-4567
01 7.04 4:53PM
RING OFF
MESSAGEOLDNEW
“MESSAGE” appears on the
display.
2 Press Jog Dial.
(GO BACK)
DIAL
PLAY BACK
RING OFFMASSAGEOLDNEW
3 Turn Jog Dial to choose “PLAY
BACK”, and then press Jog Dial.
The message is played back.
Caller ID Features
Note
Do not allow more than 60 seconds to elapse during the operation procedure.
Tips
• When you select “(GO BACK)”, you can return to the previous set display by
pressing Jog Dial.
• Messages can be played back by pressing (MESSAGE PLAY/STOP) on the base
phone or (HOLD/PLAY) on the cordless handset in step 1.
continued
Caller ID Features
81
US
Page 82

Using the Caller ID list (continued)
Storing a number of the Caller ID list into
the Phone Directory
1 Display the name and phone number you want
to store from the Caller ID list (see page 77).
2 Confirm the number and press Jog Dial.
3 Turn Jog Dial to choose “PROGRAM”, and then
press Jog Dial.
The cursor “_” is at the right of the name.
Enter or change the name, if necessary (see page
48).
4 Press (PGM). (Press (PROGRAM) on the base
phone.)
The cursor is at the right of the phone number.
Enter or change the phone number, if necessary
(see page 48).
5 Press (PGM) (or (PROGRAM)).
You hear a long confirmation beep and the
name and number are stored.
SMITH JOHN
1-201-123-4567
01 7.04 4:53PM
RING OFF
MASSAGEOLDNEW
(GO BACK)
DIAL
PLAY BACK
RING OFFMASSAGEOLDNEW
SMITH JOHN_
ABCDEFGHIJKLMN
OPQRSTUVWXYZ
RING OFFMASSAGEOLDNEW
SMITH JOHN
12011234567_
RING OFFMASSAGEOLDNEW
82
US
Caller ID Features
Page 83

Notes
• If the area code is not entered, “ENTER AREA CODE” will appear on the
display, and you will not be able to store into the Phone Directory. Enter the
area code (see page 17).
• Do not allow more than 60 seconds to elapse during the operation procedure.
• If the number displayed in step 1 is not the one you should store, you can
change the number of digits of the phone number as described below.
• If the phone is connected to a Private Branch Exchange (PBX), you may need
to add an outside line access digit.
Tip
When you select “(GO BACK)”, you can return to the previous set display by
pressing Jog Dial.
To change the number of digits of the phone
number
If the number of digits of the phone number in the Caller ID list is
different from the actual phone number, you need to adjust the
number of digits of the phone number to call back or store into the
Phone Directory.
1 While the phone number from the Caller ID list is displayed,
press (#) repeatedly until the phone number with the
correct number of digits appears on the display.
Each time you press (#), the number of digits changes as
follows:
When the home area code and the local area code do
not match
SMITH JOHN
1-201-123-4567
01 7.04 4:53PM
RING OFF
MASSAGEOLDNEW
SMITH JOHN
123-4567
01 7.04 4:53PM
RING OFF
MASSAGEOLDNEW
SMITH JOHN
201-123-4567
01 7.04 4:53PM
RING OFF
MASSAGEOLDNEW
SMITH JOHN
1-123-4567
01 7.04 4:53PM
RING OFF
MASSAGEOLDNEW
continued
Caller ID Features
Caller ID Features
US
83
Page 84

Using the Caller ID list (continued)
When the home area code matches
SMITH JOHN
123-4567
01 7.04 4:53PM
RING OFF
MASSAGEOLDNEW
SMITH JOHN
1-123-4567
01 7.04 4:53PM
RING OFF
MASSAGEOLDNEW
SMITH JOHN
1-201-123-4567
01 7.04 4:53PM
RING OFF
MASSAGEOLDNEW
SMITH JOHN
201-123-4567
01 7.04 4:53PM
RING OFF
MASSAGEOLDNEW
When the local area code matches
SMITH JOHN
201-123-4567
01 7.04 4:53PM
RING OFF
MASSAGEOLDNEW
SMITH JOHN
1-201-123-4567
01 7.04 4:53PM
RING OFF
MASSAGEOLDNEW
SMITH JOHN
1-123-4567
01 7.04 4:53PM
RING OFF
MASSAGEOLDNEW
SMITH JOHN
123-4567
01 7.04 4:53PM
RING OFF
MASSAGEOLDNEW
2 Continue the operation to call or store the phone number
with the correct number of digits (pages 80 and 82).
Notes
• You need to adjust the number of digits each time you call back from the
Caller ID list as the changes to the Caller ID data is not stored in memory.
• You may not be able to change the number of digits depending on the Caller
ID data.
US
Caller ID Features
84
Page 85

Using “Caller ID with call waiting”
service
This telephone is compatible with the “Caller ID with call waiting”
service. Make sure that your telephone company offers this service.
Like the basic Caller ID service, you need to subscribe to “Caller ID
with call waiting” in order to use this service.
Even though you may have already subscribed to “Caller ID” and
“call waiting” as two separate services, you need to request a
subscription to “Caller ID with call waiting” as a single service.
This is a new service that combines the two services.
Even though you now have a “Caller ID with call waiting”
compatible phone, unless you subscribe to the combined “Caller ID
with call waiting” service, you will not be able to see the name
and number of the second caller.
When a new call comes in while you are talking, the caller’s name
and/or phone number of the new call appears on the display for about
20 seconds.
To switch to another caller
1 To switch to the new caller,
press (CALL WAITING/FLASH).
2 To switch back to the first caller,
press (CALL WAITING/FLASH)
again.
Caller ID Features
Caller ID Features
US
85
Page 86

Additional Information
Mounting the base phone on a wall
1
Hang-up tab
2
AC power
adaptor cord
3
Telephone
line cord
1 Reverse the hang-up tab.
2 Plug the telephone line cord to
the LINE jack and the AC power
adaptor to the DC IN 9V jack,
and hook the cords. Use the
shorter cord for mounting.
3 Attach the wall bracket to the
center of the base phone.
Align the f marks of the wall
bracket with those of the base
phone.
4 Plug the telephone line cord to
the telephone outlet, and hook
the base phone to the wall plate.
5 Plug the AC power adaptor to
an AC outlet. Then raise the
antenna so that it points
towards the ceiling.
1
2
Wall bracket
Tip
To remove the wall bracket, press the lower tabs.
US
Additional Information86
4, 5
Wall plate
Telephone
line cord
AC outlet
AC power
adaptor
Page 87

Carrying the cordless handset by the
belt clip
You can hang the cordless handset on the belt using the belt clip.
Open the belt clip of the cordless
handset by pressing the top of it,
and then attach the cordless handset
to the belt.
Using the headset
You can talk on the cordless
handset without using your hands
by connecting a headset (optional)
to the I (HEADSET) jack on the
cordless handset.
I (HEADSET)
jack
Information
Additional Information 87
Additional
US
Page 88

Notes on power sources
On battery pack
• Store the battery pack at a
temperature between 41°F (5°C) and
95°F (35°C) for best performance.
• If you do not use the cordless handset
for a long period of time, remove the
battery pack after charging for more
than 12 hours.
On power failure
During a power interruption, you
cannot make or receive calls, and you
cannot use the answering machine.
For the customers in the USA
RECYCLING NICKEL-CADMIUM
BATTERIES
Nickel-Cadmium batteries
are recyclable. You can help
preserve our environment
by returning your
unwanted batteries to your
nearest point for collection,
recycling or proper
disposal.
Note: In some areas the disposal of nickel-
cadmium batteries in household or
business trash may be prohibited.
RBRC (Rechargeable Battery Recycling
Corporation) advises you about spent battery
collection by the following phone number.
Call toll free number: 1-800-822-8837
(United States and Canada only)
Caution: Do not handle damaged or leaking
nickel-cadmium batteries.
US
Additional Information88
Page 89

Maintenance
• Clean the cabinets with a soft cloth
slightly moistened with water or a
mild detergent solution. Do not use
any type of abrasive pad, scouring
powder or solvent such as alcohol or
benzine as they may damage the
finish of the cabinet.
• If the charge terminals of the charger
and cordless handset are soiled, wipe
them with a soft cloth.
If you have any questions or problems
concerning your phone, please consult
your nearest Sony dealer.
Information
Additional Information 89
Additional
US
Page 90

Troubleshooting
If you’ve experienced any of the following difficulties while using your
phone, use this troubleshooting guide to help you remedy the problem.
Should any problem persist, consult your nearest Sony dealer.
Symptom
The base phone does not
operate properly.
General
You hear five short error
beeps when you press (TALK).
You hear no dial tone.
The phone does not connect at
Making calls
all, even though the number
you dial is correct.
The phone does not redial
correctly.
You cannot hear anything from
the speakerphone.
Even by pressing (EZ ACCESS) ,
the desired call is not being
made.
function
EZ Access
The cordless handset does not
ring.
Receiving calls
The base phone does not ring.
Remedy
• Make sure the AC-T46 Sony AC power adaptor is
connected to the base phone and an AC outlet. Do not
use the AC-T127 Sony AC power adaptor with the
base phone.
• Make sure you have set up the base phone correctly
(page 11).
• Move the cordless handset closer to the base phone.
• Make sure the base phone or another cordless handset
is not making intercom call or outside call.
• Make sure another cordless handset is not checking
the Caller ID list, etc.
• Make sure the telephone line cord is securely
connected to the telephone outlet.
• Make sure the battery is fully charged (page 14).
• Make sure the dialing mode is set correctly (page 16).
• Make sure the dialed number is really the one you
want to dial.
• During phone conversation, press (VOL +) on the base
phone to increase the speakerphone volume.
• Make sure that the registered call number is correct.
• Set the ringer volume on the cordless handset to high
or low. (page 40, 41)
• The battery may be weak. Charge the battery for more
than 12 hours (page 14).
• Make sure you have set up the base phone correctly
(page 11).
• Move the cordless handset closer to the base phone,
and confirm a dial tone is heard by pressing (TALK)
on the cordless handset.
• Press (VOL +) on the base phone to increase the ringer
volume.
• Make sure the telephone line cord is securely
connected to the telephone outlet.
US
90
Additional Information
Page 91

Symptom
You hear interference during
conversation.
You hear a beep every second
during a conversation and “ ”
appears on the display.
You hear a beep twice per
During conversation
second and “BATTERY LOW”
appears on the display.
The cordless handset does not
ring when you use the intercom
from the base phone or an
additional cordless handset,
and the base phone does not
ring when you use the intercom
from the cordless handset.
When pressing (INTERCOM) on
Intercom
the cordless handset, you hear
five short error beeps and
cannot make an intercom call.
You cannot make an Intercom
conversation between a couple
of cordless handsets (WalkieTalkie function).
You cannot assign a station
number on the additional
cordless handset.
You do not know the station
number of the cordless handset.
handset
Additional cordless
Remedy
• Move the cordless handset closer to the base phone.
• Place the base phone away from noise sources (page
11).
• Place the base phone so that the antenna keeps away
from metal products.
• This is the out-of-range alarm. Move the cordless
handset closer to the base phone within 30 seconds.
• The battery is weak. Charge the battery for more than
12 hours (page 14).
• The battery may be week. Charge the battery for more
than 12 hours (page 14).
• Move the cordless handset closer to the base phone.
• Place the base phone away from noise sources
(page 11).
• Make sure a station number is assigned on the
additional cordless handset.
• Make sure another cordless handset or the base phone
is not in use.
• The base phone is being used to converse with an
outside caller.
• Move the cordless handset close to the base phone.
• Register the additional cordless handset to the base
phone (page 25).
• Move the cordless handsets closer to each other.
• Check the battery. If the battery becomes weak, charge
it.
• Make sure the system ID is correct.
• The cordless handset is charged enough.
• Make sure all the cordless handset is placed close to
the base phone.
• Place the cordless handset on the charger. The station
number of the cordless handset appears on the
display.
• Attach the supplied station number sticker on the
cordless handset for remembrance’ sake.
continued
Additional Information
Information
Additional
US
91
Page 92

Troubleshooting (continued)
Symptom
You cannot hear anything from
the speaker.
No time stamp is heard.
You cannot record the greeting
properly.
The phone does not record
messages.
Answering machine
The phone does not accept
your remote ID code (security
code).
You hear error beeps when you
enter your remote ID code
(security code).
A long confirmation beep does
outside phone
not sound when you enter your
Operating from an
remote ID code (security code).
Remedy
• During playback, press (VOL +) on the base phone to
increase the answering volume.
• Make sure the day and time are set (page 21).
• The day and time may have been cleared due to a
power interruption. Set them again (page 21).
• Keep your message between two seconds and one
minute.
• Make sure you speak about 12 inches (30 cm) away
from the microphone when recording.
• Check the answering mode. The phone cannot record
messages in announcement only mode (page 64).
• Make sure that the memory is not full. When the
remaining recording area is less than 30 seconds, the
phone switches to announcement only mode
automatically.
• The phone does not record a message that is shorter
than two seconds.
• Even if the message is longer than four minutes, the
phone only records up to four minutes.
• Make sure you call from a touch-tone phone.
• Make sure you entered your remote ID code (security
code) within two seconds after you have entered (#).
• Make sure the remote ID code (security code) is
correct.
• Enter your remote ID code (security code) while the
greeting is being played back.
• Make sure you are calling from a touch-tone phone.
US
92
Additional Information
Page 93

Symptom
The caller’s name and/or
phone number does not appear
on the display.
The caller’s name and/or
phone number does not appear
on the display during call
waiting.
You cannot dial the number
from the Caller ID list.
Caller ID
The memory match function
does not work.
The CHARGE lamp on the
charger does not light up when
you place the cordless handset
to charge.
The battery duration is short.
Power source/battery
Remedy
• Make sure you have subscribed to Caller ID service.
• Caller ID service may not work when the phone is
connected to a Private Branch Exchange (PBX).
• The call is made through company which does not
offer Caller ID service. “UNKNOWN NUMBER/
NAME/CALLER” will appear on the display.
• The call was “blocked.” “BLOCKED NUMBER/
NAME/CALL” will appear on the display.
• You have answered the call while “ ** RINGING **”
was displayed. Please answer the call after the second
ringer sound.
• Make sure you have subscribed to “Caller ID with call
waiting” service (page 85).
• Make sure nobody is talking with another phone on
the same telephone line.
• Make sure you entered your area code correctly
(page 17).
• You may need to change the number of digits of the
phone number (page 83).
• This function may not work when the phone is
connected to a Private Branch Exchange (PBX).
• If the call is from an office which uses multiple lines,
the phone number may not match the number you
put in the memory.
• If you have stored phone number with an outside line
access digit in the Phone Directory because the phone
is connected to a Private Branch Exchange (PBX), the
phone number will not match the Caller ID data.
• If you have stored phone number of less than 7 digits
in the Phone Directory, the phone number will not
match the Caller ID data.
• Wipe the charge terminals of the charger and the
cordless handset with a soft cloth for better contact of
the charge terminals.
• Make sure the cordless handset is placed on the
charger properly.
• Make sure the cordless handset is placed on the
charger with front side facing forward.
• Use only the supplied AC-T127 AC power adaptor.
• The battery pack was charged less than 12 hours (due
to power failure, etc.).
• The usage life of the battery has expired and needs
replacement.
• Use only the supplied AC-T127 AC power adaptor.
Information
Additional
continued
Additional Information
93
US
Page 94

Troubleshooting (continued)
Note
Should any problems persist, press RESET on the bottom of the base phone
with the tip of a toothpick or some other sharp instrument. This has no effect on
the memory in the base phone and handset.
RESET
US
94
Additional Information
Page 95

Specifications
General
Spread method
Direct-Sequence Spread-Spectrum
Access method
FDMA-TDD
Frequency band
2.4075 - 2.4720 GHz
Operating channel
40 channels
Dial signal
Tone, 10 PPS (pulse) selectable
Supplied accessories
See page 10.
Cordless handset
Power source
Rechargeable battery pack BP-T38
Battery life
Standby: Approx. 6 days
Talk: Approx. 5 hours
Battery charging time
Approx. 12 hours
Dimensions
Approx. 2 3⁄8 x 6 5⁄8 x 1 15⁄16 inches (w/h/d),
antenna excluded
(approx. 58 x 166 x 48 mm)
Antenna: Approx. 2 7⁄8 inches
(approx. 72 mm)
Mass
Approx. 8.1 oz
(approx. 230 g), battery included
Base phone
Power source
DC 9V from AC power adaptor
AC-T46
Dimensions
Approx. 7 3⁄8 x 3 3⁄4 x 8 1⁄8 inches (w/h/d),
antenna excluded
(approx. 187 x 93 x 206 mm)
Antenna: Approx. 4 3⁄ 8 inches
(approx. 108 mm)
Mass
Approx. 1 lb 8 oz
(approx. 680 g), wall bracket excluded
Charger
Power source
DC 9V from AC power adaptor
AC-T127
Dimensions
Approx. 3 1⁄4 x 2 5⁄8 x 4 1⁄8 inches (w/h/d)
(approx. 80 x 64 x 102 mm)
Mass
Approx. 2.7 oz (approx. 75 g)
Answering machine
Maximum recording time
About 20 minutes (at “NORM (LONG
PLAY)” recording quality), using
incorporated IC
Greeting message
Up to one minute
Incoming message
Up to 4 minutes/message
Memo
Up to 4 minutes/message
Design and specifications are subject to
change without notice.
Additional Information
Information
Additional
US
95
Page 96

Index
A
Adjusting volume
answering 69
cordless handset volume
33, 40
handset volume 36, 41
ringer volume 40, 41
speakerphone volume
36, 41
Answering machine
turning on 67
Answering mode 64
Area code 17
Audible indicate 66
B
Battery pack
charging 14
duration 15
BLOCKED NUMBER/
NAME/CALL 76
C
Call waiting service 33, 40
Caller ID 76
Caller ID list 77
calling back 80
memory match function
76
playing back a message
from the Caller ID list
81
storing in Phone
Directory 82
Caller ID with call waiting
85
Carrying the cordless
handset by the belt clip 87
Connection 12
Control codes for remote
operations 75
D
Day and time stamp 21
Dialing mode
choosing 16
switching to the tone
temporarily 33
Direct Message Access
function 81
Directory
Phone Directory 43
E, F
Erasing
Caller ID data 78
phone numbers dialed
38
messages 71
Phone Directory 49
EZ Access function 23, 33
G
Greeting 60
H
Headset 33, 39, 87
Hold 33, 40
Home area code 17
I, J, K
Identifying the parts 28
Intercom 54
L
Language of the display
27
Local area code 19
Location, base phone 11
M
Making calls 32
Memo 73
Memory match function
76
Messages 68
Mounting the base phone
on a wall 86
N
NO CONNECTION 32
O
Operating from an outside
phone 74
P, Q
Package contents 10
Playing back a message
from the Caller ID list 81
Phone Directory 43
Playing
announcement only 64
messages 68, 81
Pulse dialing 16
R
Receiving calls 39
Recording
greeting 60
memo 73
Recording quality 63
Redialing 37
Registering additional
cordless handsets 25
Remote ID code
(security code) 74
US
Additional Information96
Page 97

S
Screening calls 72
Setting up
base phone 11
cordless handset 14
Speakerphone 36
Stamping messages with
day and time 21
Storing Caller ID list into
Phone Directory 82
Switching phones during a
call 52
T
Toll-saver feature 62
Talking between the
phones 54
Tone dialing
dialing mode 16
switching to 33
Transferring a call 57
Troubleshooting 90
U
UNKNOWN NUMBER/
NAME/CALLER 76
V
Volume
answering 69
cordless handset 33, 40
handset 36, 41
ringer 40, 41
speakerphone 36, 41
W, X, Y, Z
Walkie-Talkie function 56
Additional Information
Information
Additional
US
97
Page 98

US
Additional Information98
Page 99

Additional Information
Information
Additional
US
99
Page 100

For the customers in the USA
Be sure to save the receipt and attach it to your WARRANTY card when having
your equipment repaired at an authorized Sony service center.
For online product registration, please contact
www.sony.com/productregistration
Sony Corporation Printed in Taiwan, R.O.C.
 Loading...