

Page 1
3-062-331-
Video Cassette
Recorder
Operating Instructions
The SmartFile function in this model meets the requirements of EU, EFTA,
Central and Eastern Eu rope
12
(1)
PAL NTSC 4.43
SLV-SF950N
© 2000 Sony Corporation
Chlorine free paper
Page 2

WARNING
To prevent f ire or shock hazard, d o not expose the
unit to rain or moisture.
To avoid electrical shock, do not open the cabinet.
Refer servicing to qualified personnel only.
Mains lead must only be changed at a qualified
service shop.
Precautions
Safety
• This unit operates on 220 – 240 V AC, 50 Hz.
Check that the unit’s operating voltage is
identical with your local power supply.
• If anything falls into the cabinet, unplug the unit
and have it checked by qualified personnel before
operating it any further.
• The unit is not disconnected from the mains as
long as it is connected to the mains, even if the
unit itself has been turned off.
• Unplug the unit from the wall outlet if you do not
intend to use it for an extended period of time. To
disconnect the cord, pull it out by the plug, never
by the cord.
Installing
• Allow adequate air circulation to prevent internal
heat buildup.
• Do not place the unit on surfaces (rugs, blankets,
etc.) or near materials (curtains, draperies) that
may block the ventilation slots.
• Do not install the unit near heat sources such as
radiators or air ducts, or in a place subject to
direct sunlight, excessive dust, mechanical
vibration or shock.
• Do not install the unit in an inclined position. It is
designed to be operated in a horizontal position
only.
• Keep the unit and cassettes away from equipmen t
with strong magnets, such as microwave ovens o r
large loudspeakers.
• Do not place heavy objects on the unit.
• If the unit is brought directly from a cold to a
warm location, moisture may condense inside the
VCR and cause damage to the video head and
tape. When you first install the unit, or when you
move it from a cold to a warm location, wait for
about three hours before operating the unit.
Compatible colour systems
This VCR is designed to record using the PAL (B/G
or D/K) or MESECAM (B/G or D/K) colour system
and playback using the PAL (B/G or D/K) or
MESECAM (B/G or D/K) and NTSC 4.43 colo ur
systems. Rec ording of video so urces based on other
colour systems cannot be guaranteed.
HOWVIEW
S
Development Corporation. The S
is manufactured under license from Gemstar
Development Corporation.
SmartFile is a trademark of Sony Corporation.
is a registered trademark of Gemstar
HOWVIEW
system
Caution
Television programmes, films, video tapes and other
materials may be copyr i gh te d. Un a uth or i z ed
recording of such material may be contrary to the
provisions of the copyright laws. Also, use of this
recorder with cable television transmission may
require authorization from the cable television
transmitter and/or programme owner.
2
WARNING
Page 3

Table of contents
Getting Started
4
Step 1 : Unpacking
5
Step 2 : Setting up the remote commander
9
Step 3 : Connecting the VCR
16
Step 4 : Tuning your TV to the VCR
19
Step 5 : Setting up the VCR with the Auto Set Up function
21
Step 6 : Setting the clock
25
Selecting a language
26
Presetting channels
30
Setting/changing the station names
32
Changing/disabling programme positions
36
Setting the PAY-TV/Canal Plus decoder
Basic Operations
41
Playing a tape
44
Recording TV programmes
48
Recording TV programmes using the
ShowView system
53
Setting the timer manually
Additional Operations
56
Playing/searching at various speeds
58
Setting the recording duration time
59
Synchronized Recording
61
Checking/changing/cancelling timer
settings
63
Recording stereo and bilingual
programmes
65
Searching using the index function
66
Adjusting the picture
68
Changing menu options
Editing
71
Connecting to a VCR or stereo
system
73
Basic Editing
74
76
81
82
84
92
94
96
98
104
105
110
Back cover
Getting Started
SmartFile function
About the SmartFile function
Recording using the SmartFile
function
Selecting and playing a programme
Checking the contents of a tape
Labelling a recorded programme and
tape
Registering the contents of a
recorded tape in the SmartFile label
Protecting a recorded programme
Erasing the data of an unwanted
programme
Additional Information
Troubleshooting
Specifications
Index to parts an d controls
Menu chart
Index
Table of contents
3
Page 4
Getting Started
Step 1 : Unpacking
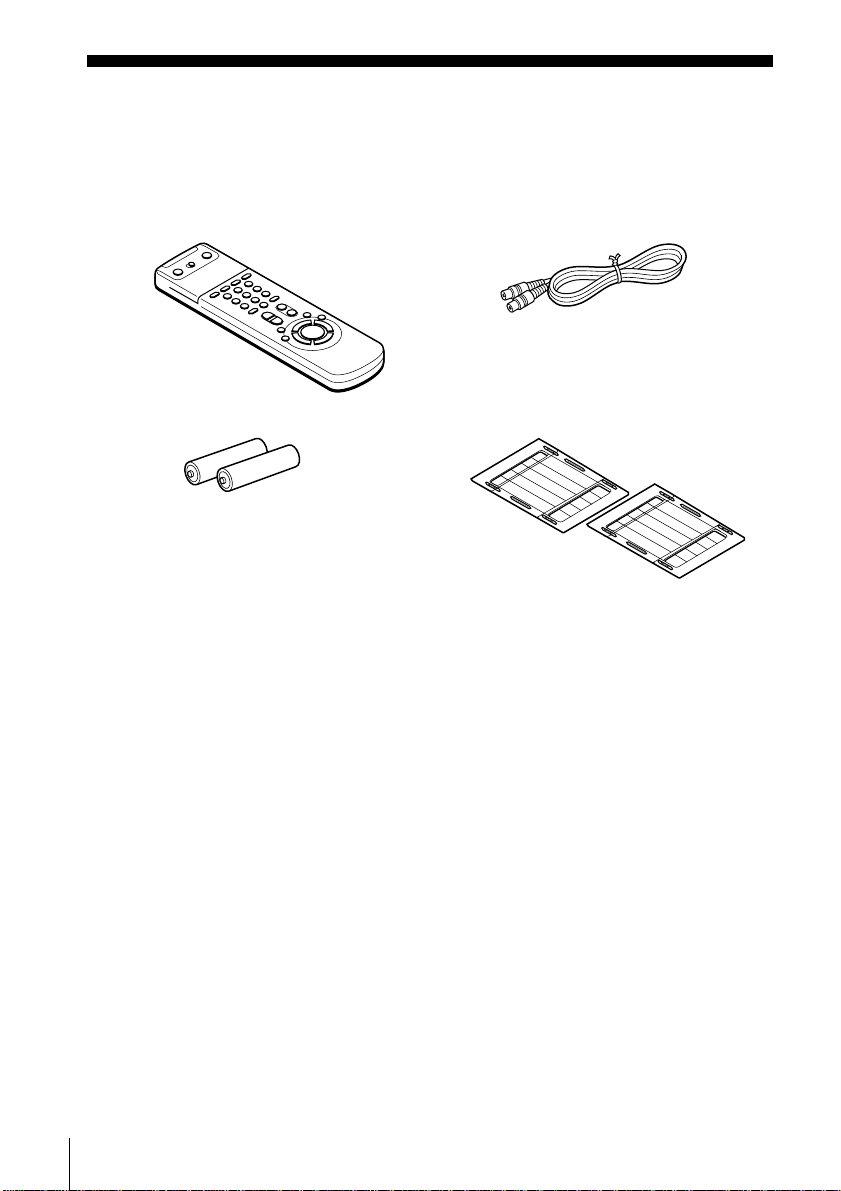
Check that you have received the following items with the VCR:
• Remote commander • Aerial cable
• R6 (size AA) batteries • SmartFile labels
4
Unpacking
Page 5
Step 2 : Setting up the remote commander
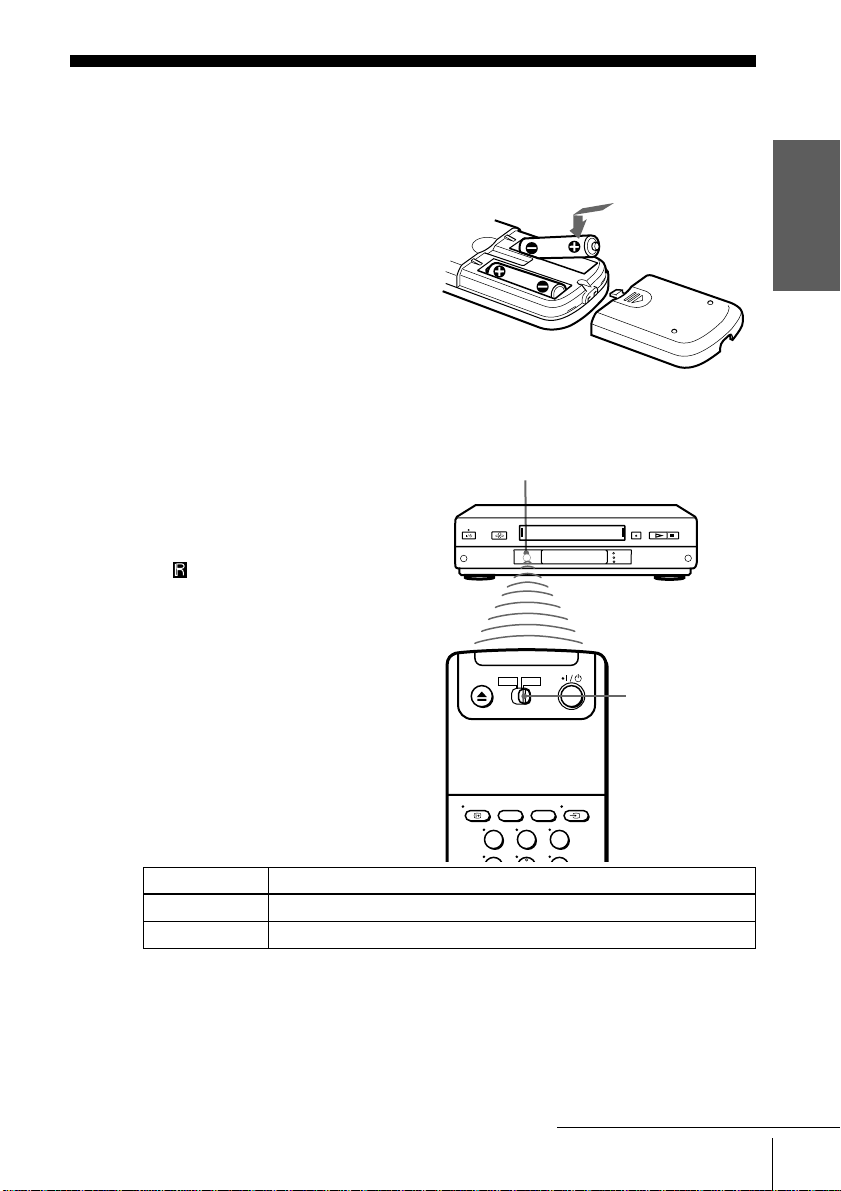
Inserting the batteries
Insert two R6 (size AA) batteries
by matching the + and – on the
batteries to the diagram inside the
battery compartment.
Insert the negative (–) end first,
then push in and down until the
positive (+) end clicks into
position.
Using the remote commander
You can use this remote
commander to operate this VCR
and a Sony TV. Buttons on the
remote commander marked with a
dot (•) can be used to operate your
Sony TV. If the TV does not have
the symbol near the remote
sensor, this remote commander
will not operate the TV.
Remote sensor
g
[TV]
[VID EO]
/
Getting Started
To operate Set
the VCR
a Sony TV
[VIDEO]
[TV]
123
[TV]
[VIDEO]
/
and point at the remote sensor on the VCR
and point at the remote sen s or on the TV
to
Setting up the remote commander
continued
5
Page 6
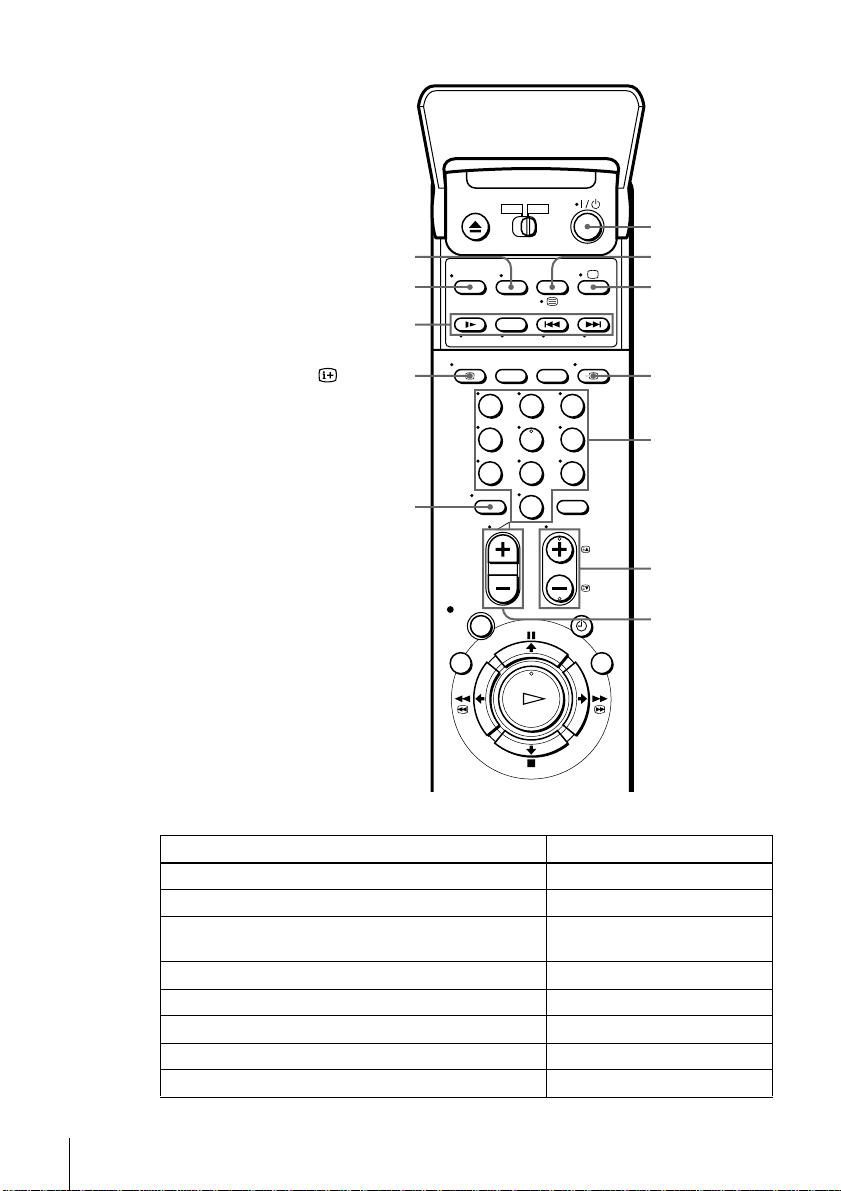
s
WIDE
AUDIO MONITOR
FASTEXT buttons
?/1
/
a
DISPLAY
t
TV/VIDEO
123
456
Programme
number button
789
–/– –
0
PROG +/–
c/C
2
+/–
TV control buttons
To Press
Set the TV to standby mode
Select an input source aerial in or line in
Select the TV’s programme position Programme number buttons,
Adjust the TV ’s volume
Switch to TV (Teletext off)
Switch to Teletext
Select the sound AUDIO MONITOR
Use FASTEXT FASTEXT buttons
?/1
TV/VIDEO
t
–/– –, PROG +/–
2
+/–
(TV)
a
(Teletext)
/
6
Setting up the remote commander
Page 7

To Press
Call up the on- s cr een display
Change the Teletext page
Switch to/from wide mode of a Sony wide TV (For othe r
manufactures’ wide TVs, see “Controlling other TVs with
the remote co mmander”.)
Notes
• With normal use, the batteries should last about three to six months.
• If you do not use the remote commander for an extended period of time, remove the batteries
to avoid possible damage from batter y le akage.
• Do not use a new battery with an old one together.
• Do not use different types of batteries together.
• Some buttons may not work with certain Sony TVs.
c/C
WIDE
DISPLAY
Controlling other TVs with the remote commander
The remote commander is preprogrammed to control non-Sony TVs. If your TV is
listed in the table below, set the appropriate manufacturer’s code number.
Set TV/VIDEO at the top of the remote commander to TV.
1
Hold down ?/1, and enter your TV ’s code number(s) using the programme
2
number buttons.Then release ?/1.
Now you can use the following TV contr ol buttons to control your T V:
?/1
, TV/VIDEO, programme number buttons, –/– – (ten’s digit), PROG +/–,
2
+/–, a (TV), / (Teletext), FASTEXT buttons, WIDE
*
,
, and OK*.
*
, MENU*,
*
*
M
m
<
/
/
Getting Started
*
/
*
These buttons may not wo rk wit h al l TVs.
Tip
• When you set your TV’s code number correctly while the TV is turned on, the TV turns off
automatically.
continued
Setting up the remote commander
7
Page 8

Code numbers of controllable TVs
If more than one code number is listed, try entering them on e at a time until you f ind
the one that works with your TV.
To switch to wide mode, see the footnotes below this table for the applicable code numbers.
Manufacturer Code number
Sony
*1
, 02, 03, 04, 05
01
Aiwa 32
Akai 68
Blaupunkt 10, 21
Brionvega 40
C.G.M 09
Colonad 03
Dual 44
Emerson 03, 04
Fenner 30, 31
Ferguson 52
Goldstar 03, 04, 17
*1
Grundig
*1
10
, 11
Hitachi 24
Hyper 31
Inno-Hit 41
Irradio 20
ITT
15, 16, 69
*3
JVC 33
Loewe 45
Mitsubishi
*1
27
, 28*1, 50*1, 51
Mivar 09
Manufacturer Code number
NEC 66
Nokia
15, 16, 69
*3
Nordmende 35, 42
Orion 47, 48
Panasonic
Philips
17
06
*1
, 49
*1
, 07*1, 08
*1
Phonola 18, 19
Pioneer 26
Saba 12, 13
Samsung 22, 23
Sanyo 25
Schneider 46
Seleco 14
Sharp 29
Siemens 39
Sinudyne 37
TEAC 67
Telefunken 36
Thomson
*2
43
Toshiba 38
*1
White Westinghouse 34
*1
Press WIDE to switch to the wide picture mode you w a nt.
*2
Press WIDE, then press 2 +/– to select the wide picture mode you want.
*3
Press WIDE. The menu app ears o n the TV sc reen .The n, pres s M/m/</, to select the wide
picture you want and press OK.
Notes
• If the TV uses a different remote control syst em from the one programmed to work with the
VCR, you cannot contro l your TV with the remote comma nder.
• If you enter a new code number, the code numb er previously entered will be erased .
• If you remove the batteries of the remote commander for more than a few minut es, th e code
number may be reset to 01 (Sony). In this case, reset the appropriate code number.
8
Setting up the remote commander
Page 9
Step 3 : Connecting the VCR
AERIAL
ANTENNE
IN
ENTREE
OUT
SORTIE
AERIAL
ANTENNE
IN
ENTREE
OUT
SORTIE
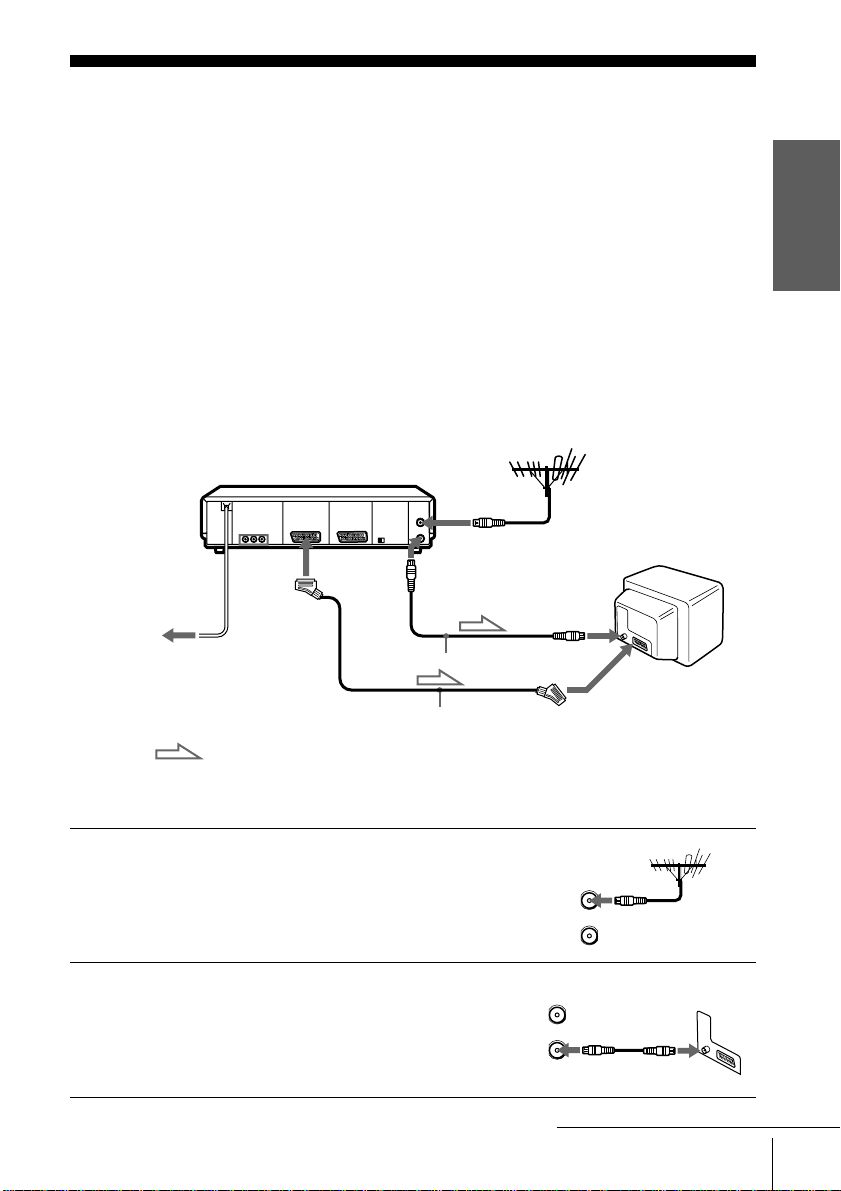
We recommend connecting your VCR to your TV using a Scart (EUROAV) cable. You must still connect your VCR to your TV with an aerial
cable as well.
If you use the Scart (EURO-AV) cable for connecting, you will improve
the picture and sound quality playback of your VCR and make the setting up easier.
• Connection to TV with an ae rial cable only, see page 12.
• Connection to TV and Set-Top Box, see page 13.
• Connection to TV and decoder, see page 36.
Connection to your TV with a Scart (EURO-AV) connector
AERIAL IN
i
Mains lead
to mains
LINE-1
(TV)
Scart cable (not supplied)
AERIAL OUT
AERIAL IN
Aerial cable (supplied)
Getting Started
Scart
(EURO-AV)
1
2
: Signal flow
Disconnect the aerial cable from yo ur
TV and connect it to AERIAL IN on
the rear panel of the VCR.
Connect AERIAL OUT of the VCR
and the aerial input of your TV using
the supplied aerial cable.
continued
Connecting the VCR
9
Page 10

3
LIGNE-1 (TV
)
LINE-1 (TV
)
Connect LINE-1 (TV) on the VCR
and the Scart (EURO-AV) co nnector
on the TV with the optional Scart
cable.
This connection improves picture and
sound quality.Whenever you want to
watch the VCR picture, press t TV/
VIDEO to display the VIDEO
indicator in the display window.
4
Connect the mains lead to the mains.
You can now tune your TV to the VCR , see page 18.
Notes
• If the TV is connected to the LIN E-1 (TV) conne ctor, setting the RF ch annel to OFF is
recommended (see page 18) . In the O FF posi ti on, only the signal from the aerial is out put
through the AERIA L OU T connector.
• For correct SmartLink connection, please refer to your TV’s instruction manual.
10
Connecting the VCR
Page 11

About the SMARTLINK features
If the connected TV complies with
SMARTLINK, NexTView Link,
MEGALOGIC
CinemaLink*2, Q-Link*3 or T-V
*
LINK
*1
, EASYLINK/
,you can use the
AUTO SET UP
VPS
PDC
EDIT
SMARTLINK
OPC
SMARTLINK function after you complete the steps on the previous page (the SMARTLINK
indicator appears in the VCR’s display window when you turn on the TV).You can enjoy the
following SMARTLINK features.
• Preset Download
You can download yo ur TV tun er pres et data to this VCR and tun e the VCR a ccording to that
data in Auto Set Up.This greatly simplifies the Auto Set Up procedure. Be careful not to
disconnect the cables or exit the Auto Set Up function during the procedure.
See “Setting up the VCR with the Auto Set Up function” on page 19.
• TV Direct Rec
You can easily record what y ou are watc hing on th e TV (other th an ta pes be ing played o n th is
VCR). For details, see “Recording what you are watching on the TV (TV Direct Rec)” on
page 47.
• One Touch Play
With One Touch Play, you can start playback automati cal ly without turning on the TV. For
details, see “Starting playback automatically with one button (One Touch Play)” on page 43.
• One Touch Menu
You can turn on the VCR and TV, set the TV to the video channel, and display the VCR’s on-
screen display automatically by pressing MENU on the remote commander.
• One Touch Timer
You can turn on the VCR and TV, set the TV to the video channel, and display the timer
recording menu (the TIMER METHOD menu, the TIMER menu or the SHOWVIEW menu)
automatically by pressing TIMER on the remote commander. You can set which timer
recording menu is displayed using TIMER OPTIONS in the OTHER OPTIONS menu (see
page 70).
• Automatic Power off
You can have the VCR turn off automatically, if the VCR is not used for about 1 minute, after
you turn off the TV.
• NexTView Download
You can easily set the timer by using the NexTView Download function on your TV. Please
refer to your TV’s instruction manual.
EP
SP
LP
VIDEO
STEREO
NICAM
TV
SMH
Getting Started
*1
“MEGALOGIC” is a registered trademark of Grundig Corporat ion.
*2
“EASYLINK/CinemaLink” is a trademark of Phil ips Corporation.
*3
“Q-Link” is a trademark of Pan as onic Corporation.
*4
“T-V LINK” is a trademark of JVC Corporation.
Note
• Not all TVs respond to the functions above.
continued
Connecting the VCR
11
Page 12
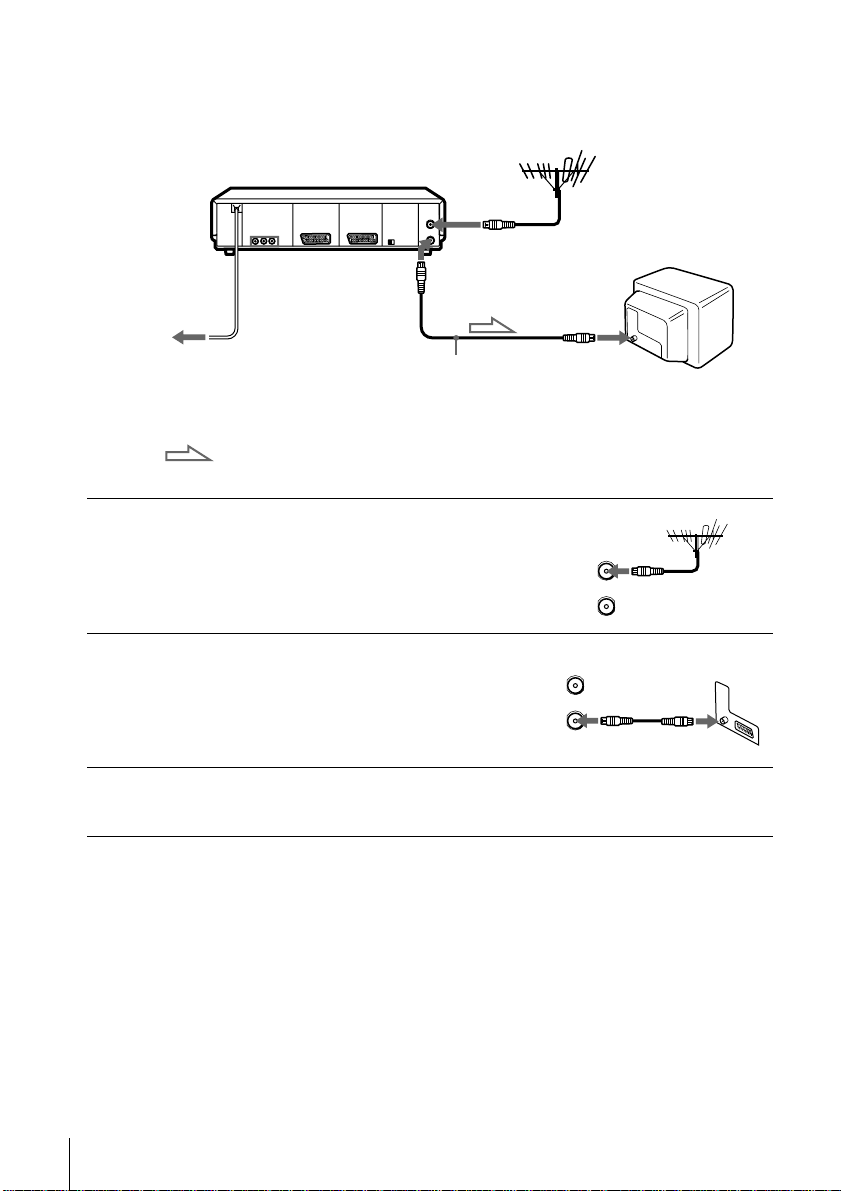
Connection to your TV with an aerial cable only
AERIAL
ANTENNE
IN
ENTREE
OUT
SORTIE
AERIAL
ANTENNE
IN
ENTREE
OUT
SORTIE
AERIAL IN
to mains
1
2
3
Mains lead
AERIAL OUT
AERIAL IN
Aerial cable (supplied)
: Signal flow
Disconnect the aerial cable from your
TV and connect it to AERIAL IN on
the rear panel of the VCR.
Connect AERIAL OUT of the VCR
and the aerial input of your TV using
the supplied aerial cable.
Connect the mains lead to the mains.
You can now tune your TV to the VCR , see page 16.
12
Connecting the VCR
Page 13
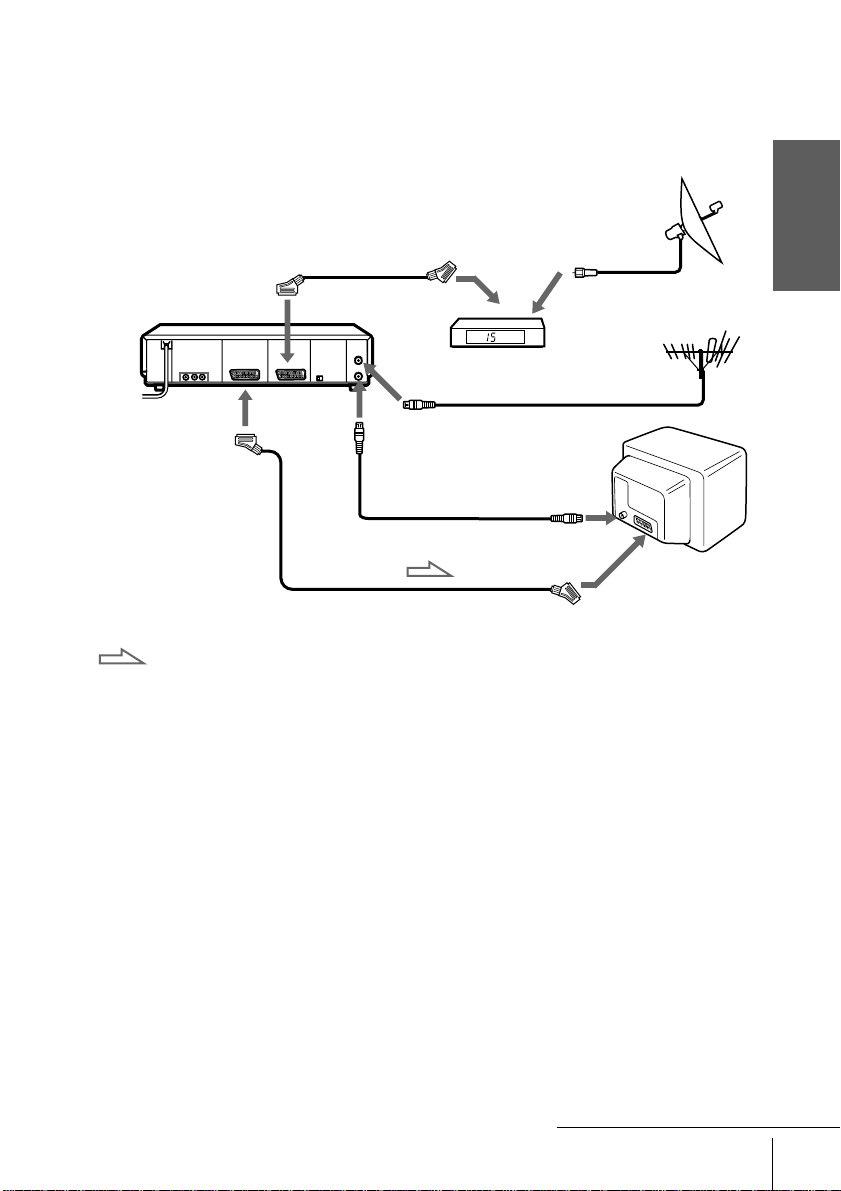
Connection to your TV and Set-Top Box (STB)
If you don’t use a STB, skip to page 16.
The illustration below shows an example of connecting the STB to LINE-3 IN.
Scart cable (supplied with SetTop Box)
Getting Started
t
LINE-3 IN
i
LINE-1
(TV)
:Signal flow
Y ou can watch programmes from the Set-T op Box connected to this VCR on your TV
even when the V CR is tu rned of f us ing t he Lin e Thro ugh fu nctio n. Wh en yo u tur n on
the STB, this VCR automatically sends the signal from the STB to the TV without
turning itself on
Connect the STB to the DECODER/LINE-3IN connector as shown above.
1
Set DECODER/LINE-3 to LINE-3 in the OTHER OPTIONS menu.
2
Scart
(EURO-AV)
AERIAL
IN
AERIAL
OUT
Aerial cable (supplie d)
Scart cable (not supplied)
Set-Top
Box
Scart
(EURO-AV)
Set POWER SAVE to OFF in the OTHER OPTIONS menu.
3
Turn off the VCR.
4
To watch a programme from the STB, turn on the STB and your TV.
Note
• You cannot watch programm e s from your STB on the TV while reco rding unless you record
a programme from your STB.
continued
Connecting the VCR
13
Page 14
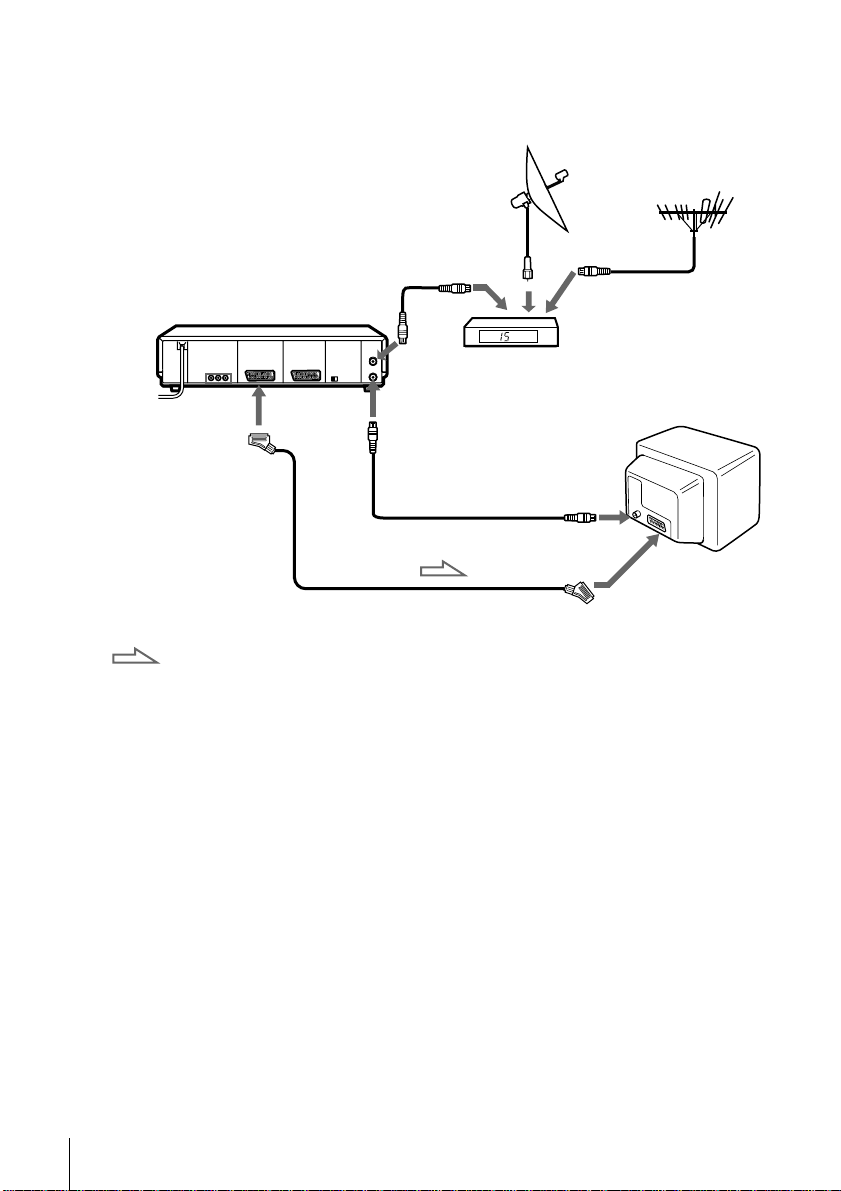
If your STB does not have a Scart (EURO-AV) connector
Aerial cable (not supplied )
Set-Top
Box
i
LINE-1
(TV)
AERIAL
IN
AERIAL
OUT
Aerial cable (supplie d)
Scart cable (not supplied)
Scart
(EURO-AV)
14
Connecting the VCR
:Signal flow
Page 15
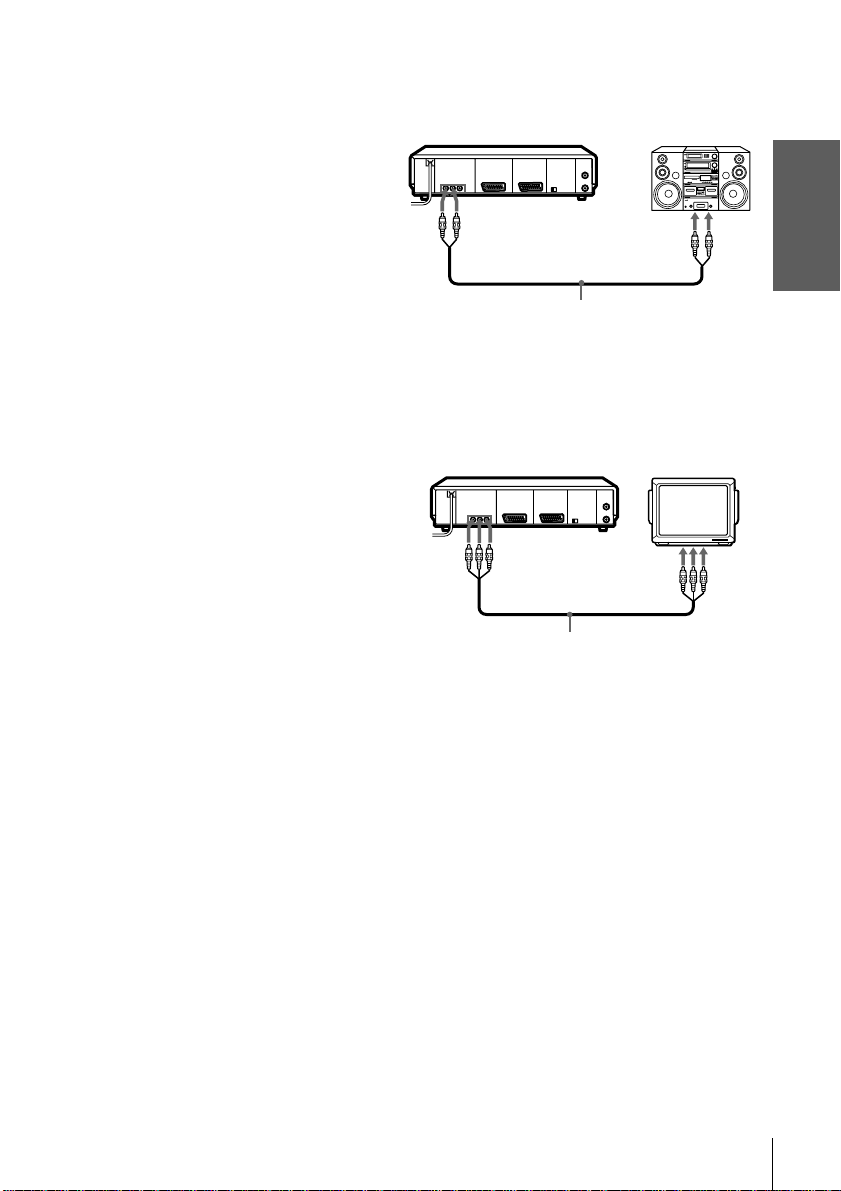
Additional connections
To a stereo system
You can improve sound quality by
connecting a stereo system to the AUDIO
OUT R/L jacks as shown on the right.
To a TV that has phono type audio/
video input jacks (only if you don’t
connect the VCR and your TV using a
Scart connector)
This additional connection improves picture
and sound quality. Connect the TV as shown
on the right using a commercially available
connecting cable like the Sony VMC-810. If
your TV has only one audio input jack, use a
connecting cable like the Sony VMC910MS.
AUDIO OUT
R/L
Audio cable (not supplied)
AUDIO OUT
R/L
VMC-810 cable (not supplied)
LINE IN
LINE IN
Getting Started
Connecting the VCR
15
Page 16
Step 4 : Tuning your TV to the VCR
If you have connected the VCR to your TV using th e Scart cable, skip to pa ge 18.
If you have connected the VCR to your TV with an aerial cable only
1
2
3
•
AUTO SET UP
RF CHANNEL
?/1
g
PROGRAM +/–
RF CHANNEL
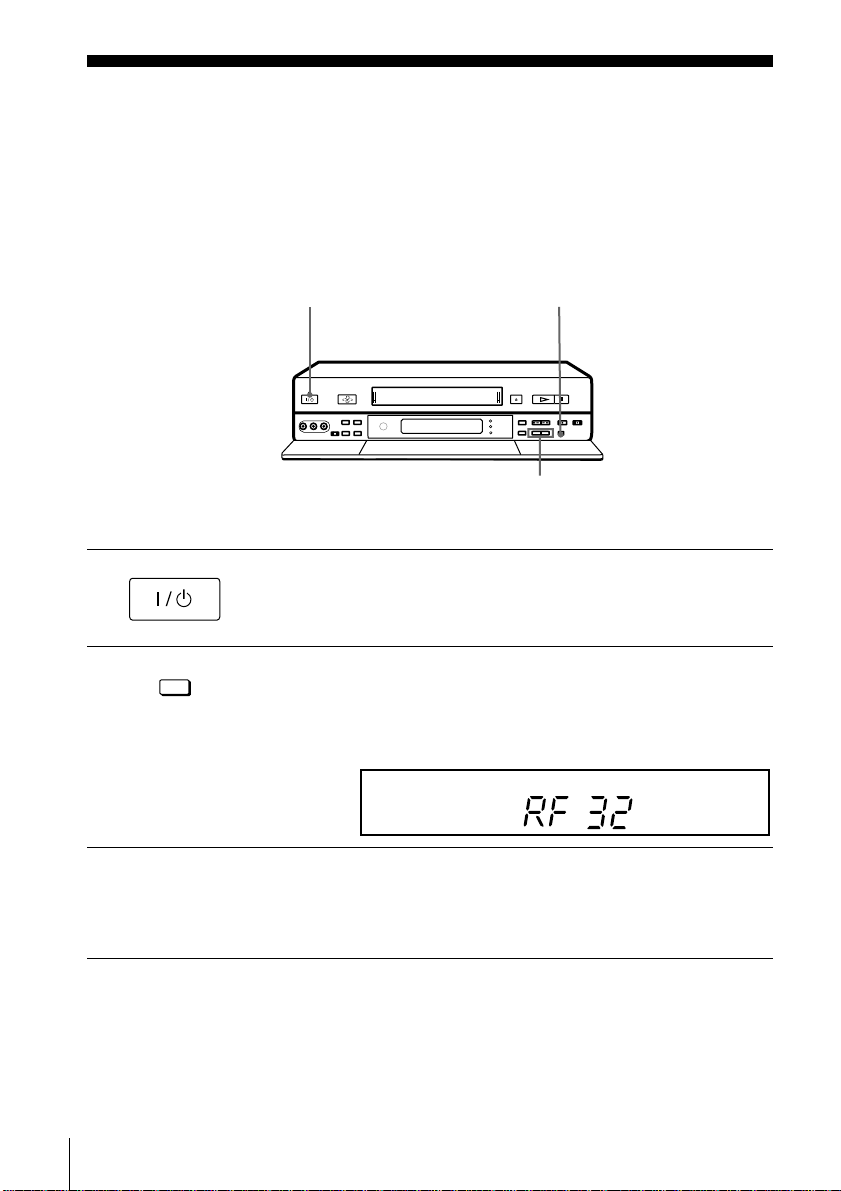
Turn on your TV and press ?/1 (on/standby) to turn on the VCR.
Pull down the drop down panel.
Press briefly RF CHANNEL on the VCR.
The factory-preset RF (Radio Frequency) c hannel appears in the disp lay
window.
.
AUTO SET UP
VPS
PDC
EDIT
SMARTLINK
OPC
EP
SP
LP
VIDEO
STEREO
NICAM
TV
SMH
Turn on your TV and select an unused pro gram me po sitio n for the VCR
picture (for ex. programme positio n "0") .
This programme position will be referred to as the video channel (for
watching your VCR on the TV) after tuning is completed.
16
Tuning your TV to the VCR
Page 17

4
SONY VIDEO CASSETTE RECORDER
AUTO SET UP
RF CHANNEL
Press RF CHANNEL.
The TV system appears in the display window.
AUTO SET UP
EDIT
VPS
PDC
SMARTLINK
OPC
EP
SP
LP
VIDEO
STEREO
NICAM
TV
Getting Started
SMH
5
6
7
Press PROGRAM +/- (repeatedly) to select the correct TV system. If you
watch the system B/G, select "G". If you watch the system D/K, select "K".
AUTO SET UP
VPS
PDC
EDIT
SMARTLINK
OPC
SP
LP
VIDEO
SMH
EP
Tune in the program m e positio n yo u have
selected (for ex. programme position "0")
until the picture on the right appears
clearly on the TV screen (background must
be green).
Refer to your TV manual for tuning
instructions.
If the picture does not appear clearly, see
“To obtain a clear pic ture from the VCR”
below.
AUTO SET UP
RF CHANNEL
Press RF CHANNEL.
You have now tuned your TV to the VCR. From now on, whenever you
want to play a tape, set the TV to the video channel (for ex. programme
position "0 ").
To check if the TV tuning is correct
Set the TV to the video channel (for ex. programma position "0") and press
PROGRAM +/– on the VCR. If the TV screen changes to a different programme each
time you press PROGRAM +/–, the TV tuning is correct.
STEREO
NICAM
TV
To obtain a clear picture from the VCR
If the picture does not appear clearl y i n st ep 6 above, go to step 7 to finish this
procedure once. Then start from step 2. After pressing RF CHANNEL in step 2 to
display the RF CHANNEL, press PROGRAM +/–, so that another RF channel
appears.Then tune the TV to the new RF channel until a clear picture appears.
continued
Tuning your TV to the VCR
17
Page 18
1
SONY VIDEO CASSETTE RECORDER
If you have connected your VCR to the TV with a Scart
(EURO-AV) connector and an aerial cable as well
In order to avoid any interferences with existing broadcasts, we recommend you to set RF channel to the OFF position.
RF CHANNEL
g
PROGRAM +/–
•
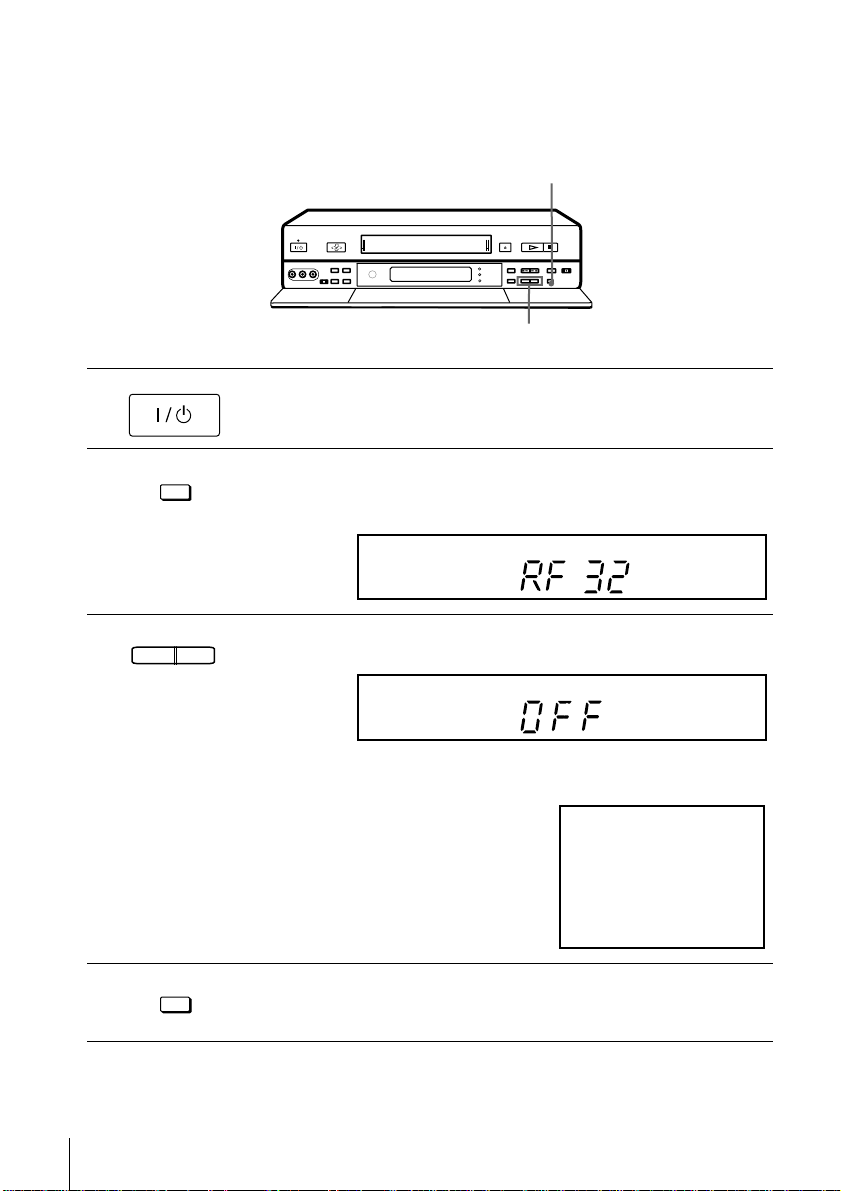
Turn on your TV and press ?/1 (on/standby) to turn on the VCR.
Pull down the drop down panel.
2
3
4
AUTO SET UP
RF CHANNEL
- PROGRAM +
TRACKING
AUTO SET UP
RF CHANNEL
Press briefly RF CHANNEL on the VCR.
The factory-preset RF (Radio Frequency) c hannel appears in the disp lay
window..
AUTO SET UP
VPS
PDC
EDIT
SMARTLINK
OPC
EP
SP
LP
VIDEO
STEREO
NICAM
TV
SMH
Press PROGRAM +/- until the OFF indication appears in the display
window. The RF channel is then switched off.
AUTO SET UP
VPS
PDC
EDIT
SMARTLINK
OPC
EP
SP
LP
VIDEO
STEREO
NICAM
TV
SMH
The picture shown below appears clearly on the TV screen (background
must be green).
Press RF CHANNEL.You can now set the VCR with the Auto Set Up
function (see pag e 19 ) .
18
Tuning your TV to the VCR
Note
• If in step 3 the green screen does not appear, select the "A V/EXTERNAL" source on your TV
(please refer to your TV instruction ma nua l) .
Page 19
Step 5 : Setting up the VCR with the Auto Set Up function
Before using the VCR for the first time, set up the VCR using the Auto Set Up
function.With this function, you can set the language for the on-screen display, TV
channels, guide channel s for the ShowView system, and VCR clock automat ically.
Before you start ...
• Turn on the STB if it is connected to the VCR only by the aerial cable and not to the Scart cable.
1
AUTO SET UP
RF CHANNEL
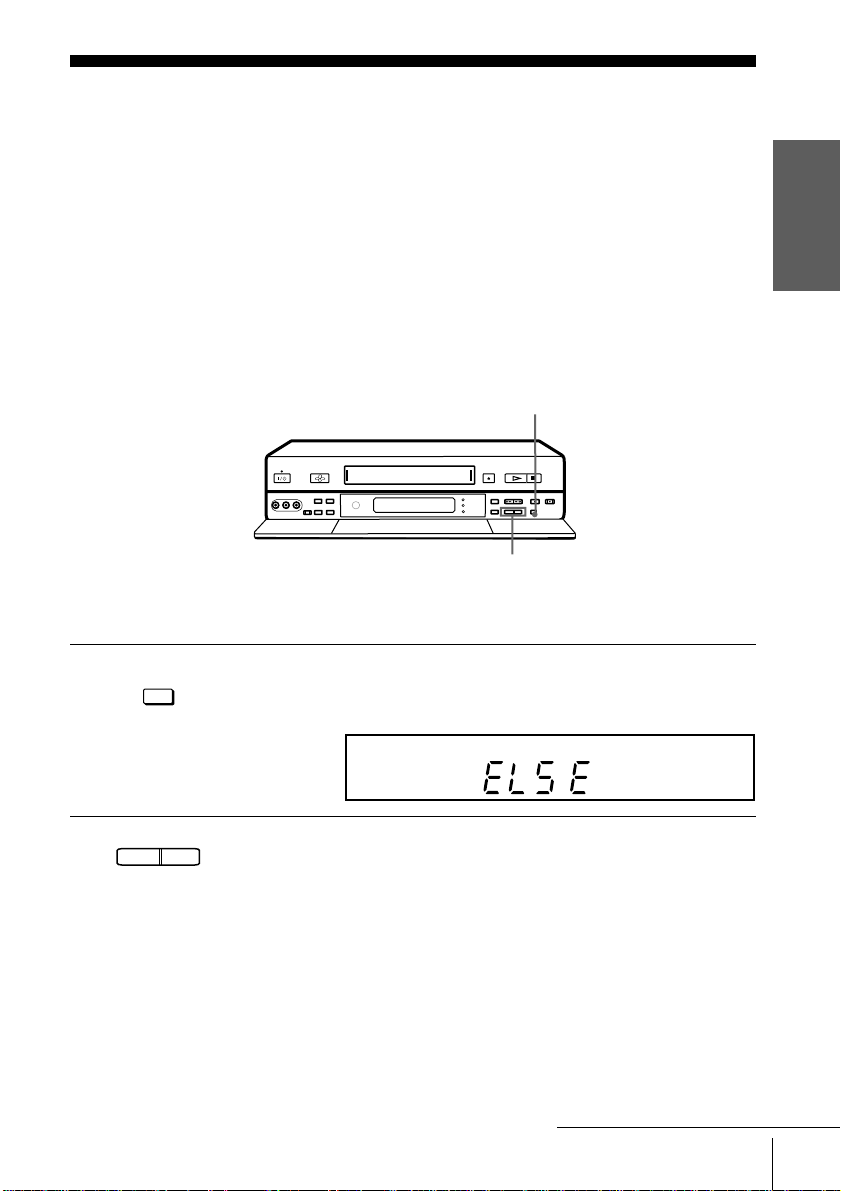
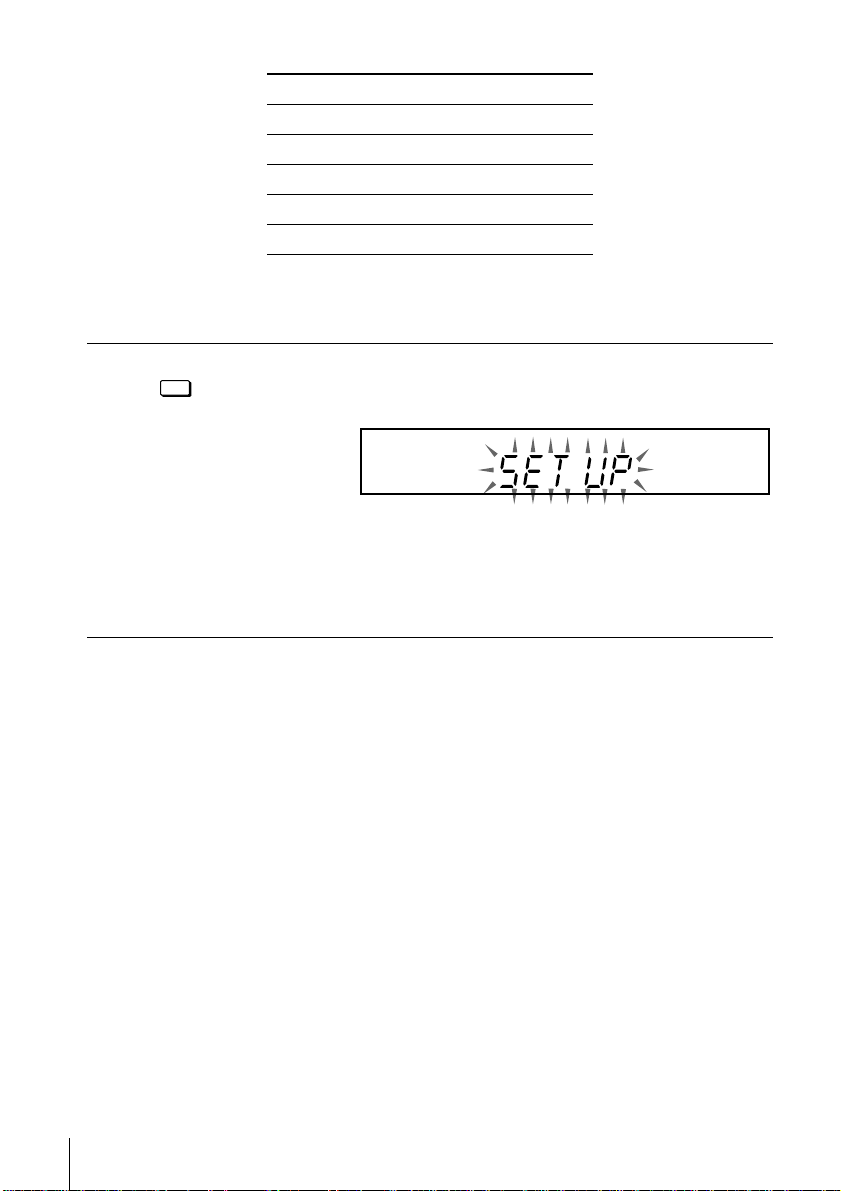
Hold down AUTO SET UP on the VCR for more than 3 seconds.
The VCR automatically turns on, and the country abbreviation appears in
the display window.
Getting Started
AUTO SET UP
g
PROGRAM +/–
AUTO SET UP
VPS
PDC
EDIT
SMARTLINK
OPC
EP
SP
LP
VIDEO
STEREO
NICAM
TV
SMH
2
- PROGRAM +
TRACKING
Press PROGRAM +/– to highlight the abbreviati on of your country.
For some countries, there is a selection of languages to choo se from.
The abbreviations of the countries and languages are as follows :
continued
Setting up the VCR with the Auto Set Up function
19
Page 20
Abbreviation Country Language
CZ Czech Czech
HUN Hungary Hungarian
PL Poland Polish
RUS Russia Russian
ELSE Other countries English
If your country does not appear in the list, select ELSE.
3
AUTO SET UP
RF CHANNEL
Press AUTO SET UP.
The VCR starts searching for all of the receivable channels and presets them
in the appropriate order for your local area.
AUTO SET UP
VPS
PDC
EDIT
SMARTLINK
OPC
EP
SP
LP
VIDEO
SMH
If you use the SMARTLINK connection, the Preset Download function
starts and the SMARTLINK indicator flashes in the display window during
download.
After the search or download is complete, the current time appears in the
display window for any stations that transmit a time signal.
To cancel the Auto Set Up function
Press AUTO SET UP.
Tip
• If you want to change the language for the on-screen displa y from the one preset in the Au to
Set Up function, see page 25.
Notes
• Do not cancel the Auto Set Up function during step 3. If you do, repeat Auto Set Up from the
beginning.
• When you operate the Auto Set Up function, some of the settings (ShowView, timer etc...)
will be reset. In this case, you have to set them again.
STEREO
NICAM
TV
20
Setting up the VCR with the Auto Set Up function
Page 21
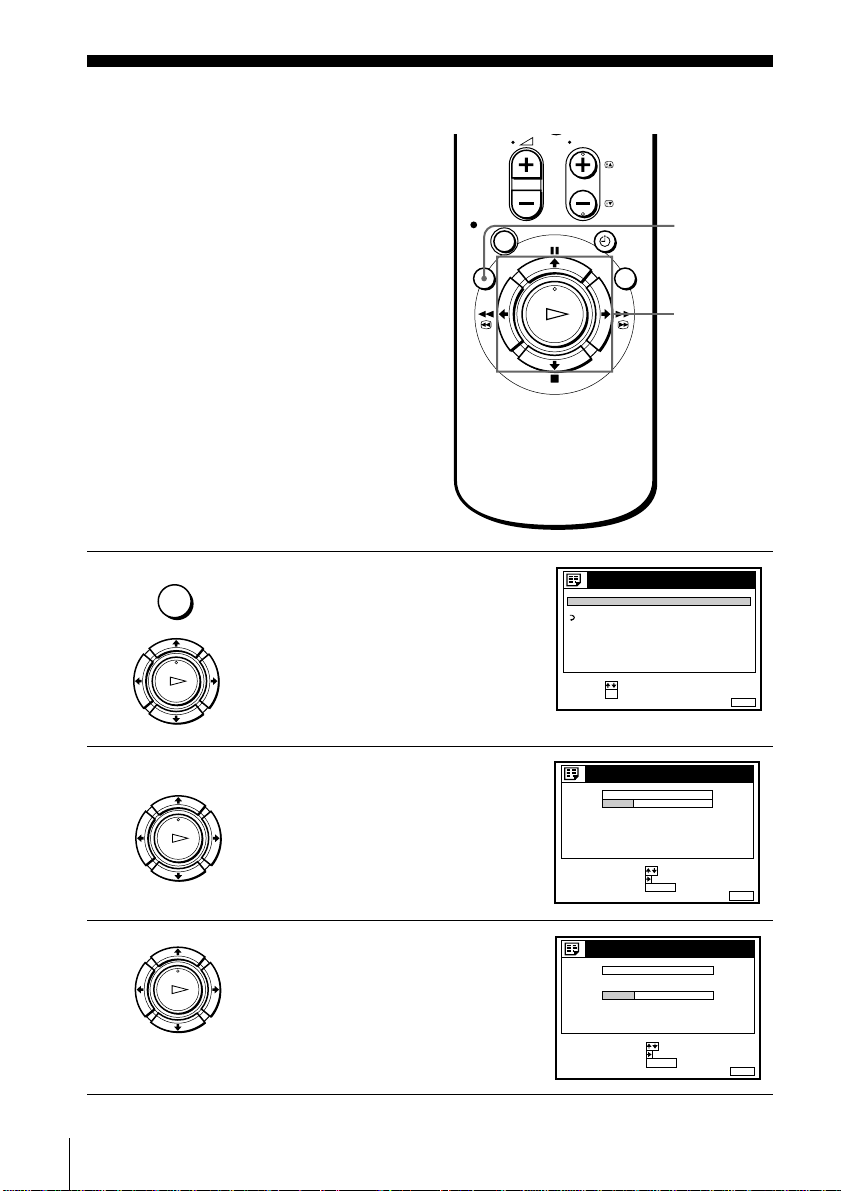
Step 6 : Setting the clock
SET :
SELECT :
OK
MENUEXIT :
SETTINGS
TUNER
CLOCK
RETURN
TV GUIDE PAGE
LANGUAGE
SET :
SELECT :
OK
MENUEXIT :
CLOCK
OFFAUTO ADJUST
MANUAL ADJUST
.1 1 . 2 0 00 SAT 0 : 0 0
CONFIRM :
SET :
OK
MENUEXIT :
CLOCK
OFFAUTO ADJUST
MANUAL ADJUST
1 .1 .2000 SAT 0: 00
SELECT :
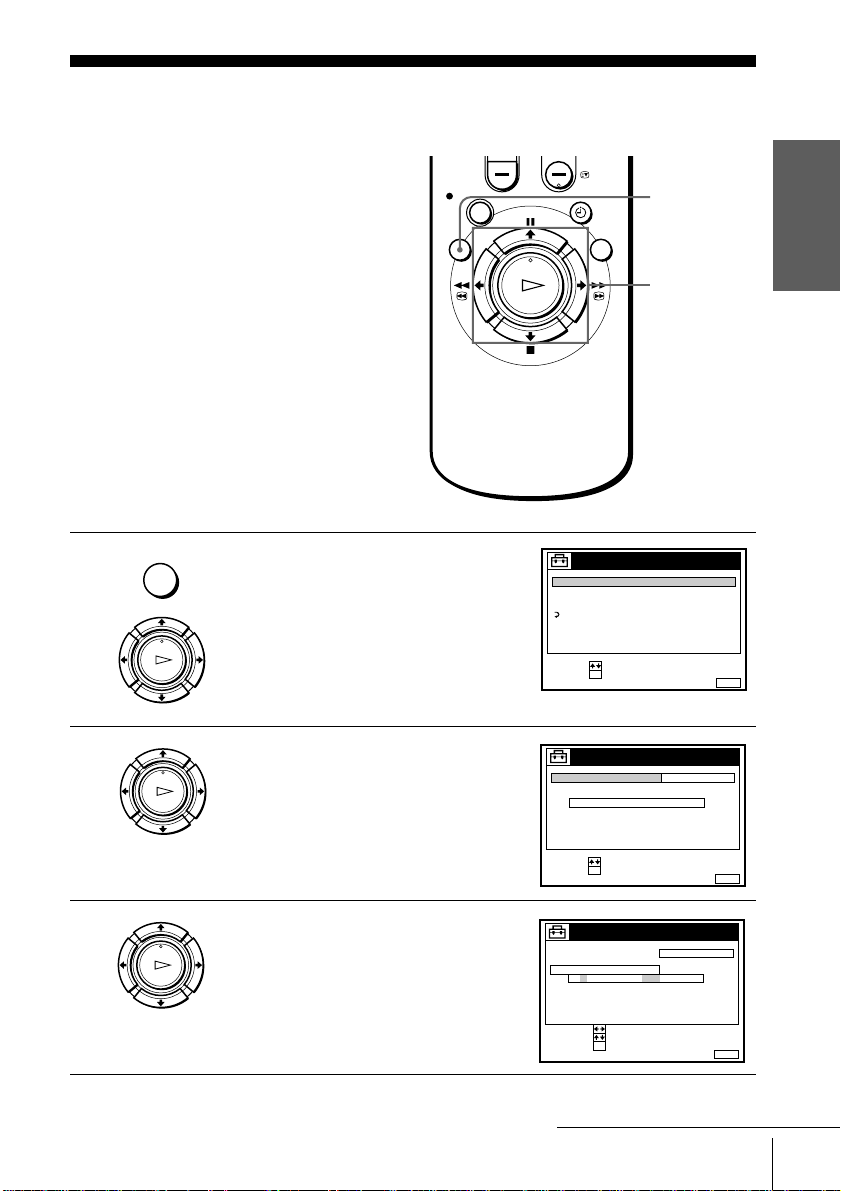
Y ou must set the tim e and date on the VCR to
use the timer recording features properly.
If the VCR clock was not set in the Auto Set
Up procedure, you need to set it manually.
The Auto Clock Set function works only if a
station in your area is broadcasting a time
signal. If the Auto Set Up fu nction did n ot set
the clock cor r e ctly for your local are a , try
another station for the Auto Clock Set
function.
Setting the clock manually
Before you start
• Turn on the VCR and the TV.
• Set the TV to the video channel.
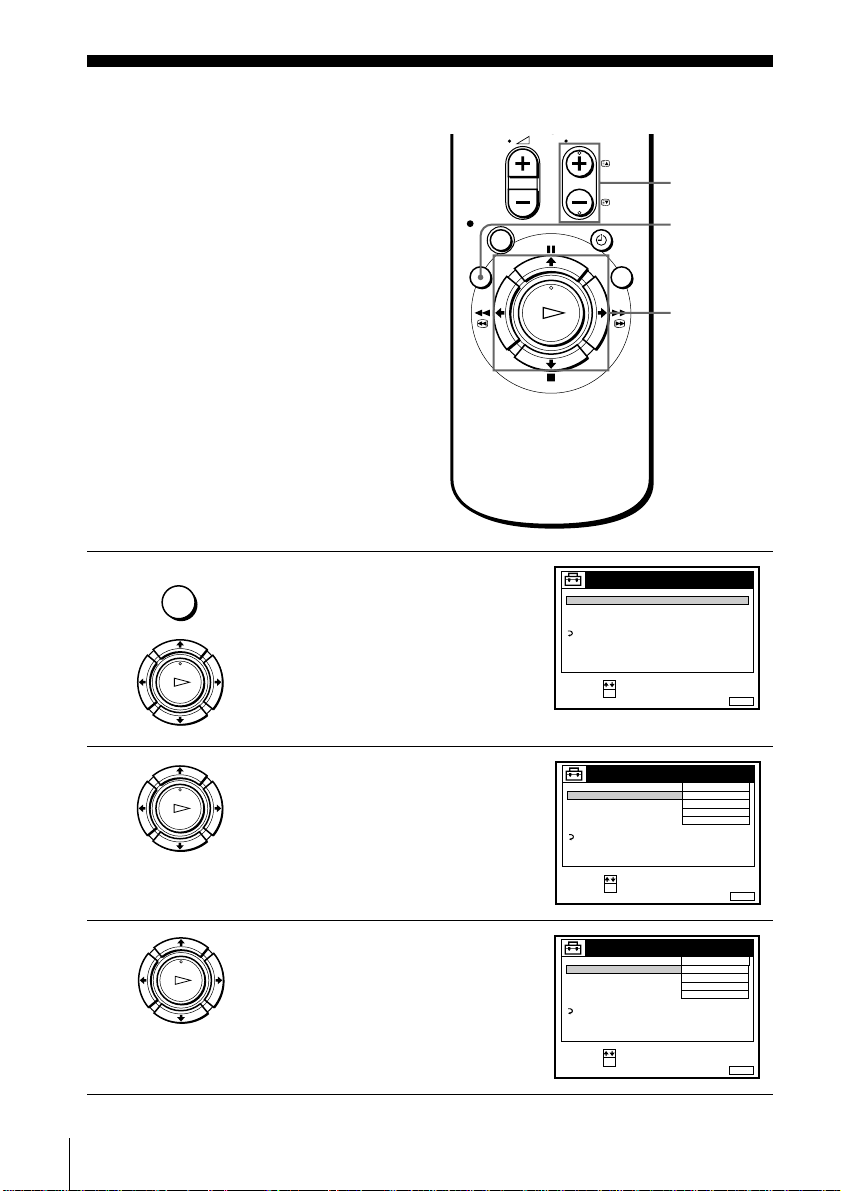
1
MENU
…
Press MENU, then press M/m to
highlight SETTINGS and press OK.
PLAY
OK
Getting Started
MENU
M/m/</,
OK
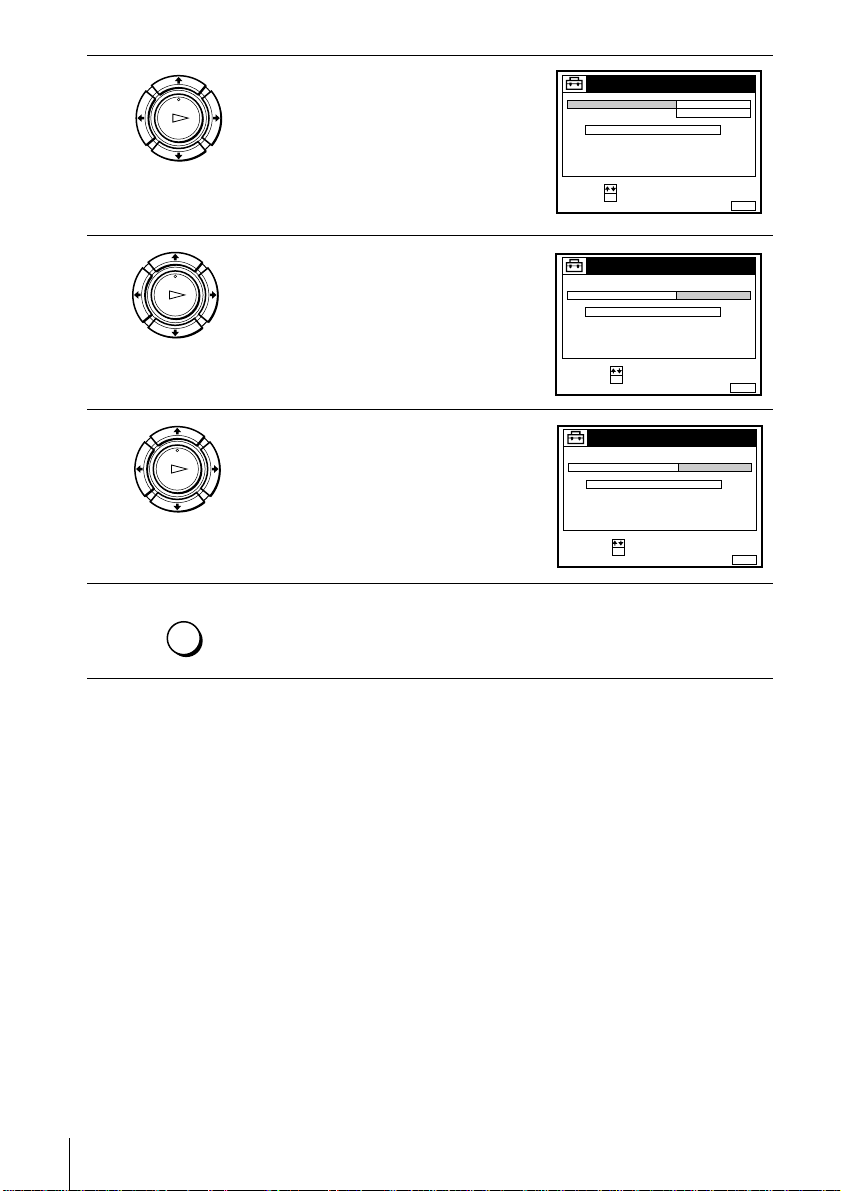
2
3
Press M/m to highlight CLOCK, then
PLAY
OK
press OK.
Press M/m to highlight MANUAL
PLAY
OK
ADJUST, then press OK.
continued
Setting the clock
21
Page 22
4
CONFIRM :
SET :
OK
MENUEXIT :
CLOCK
OFFAUTO ADJUST
MANUAL ADJUST
28 . 1 . 2 0 0 0 FRI 0 : 0 0
SELECT :
CONFIRM :
SET :
OK
MENUEXIT :
CLOCK
OFFAUTO ADJUST
MANUAL ADJUST
8 .9 .2000 THU 0 :00
SELECT :
2
CONFIRM :
SET :
OK
MENUEXIT :
CLOCK
OFFAUTO ADJUST
MANUAL ADJUST
8 .9 .2000 THU 8 :00
SELECT :
21
MENUEXIT :
CLOCK
OFFAUTO ADJUST
MANUAL ADJUST
8.9.2000 THU 8:00
21
SET :
SELECT :
OK
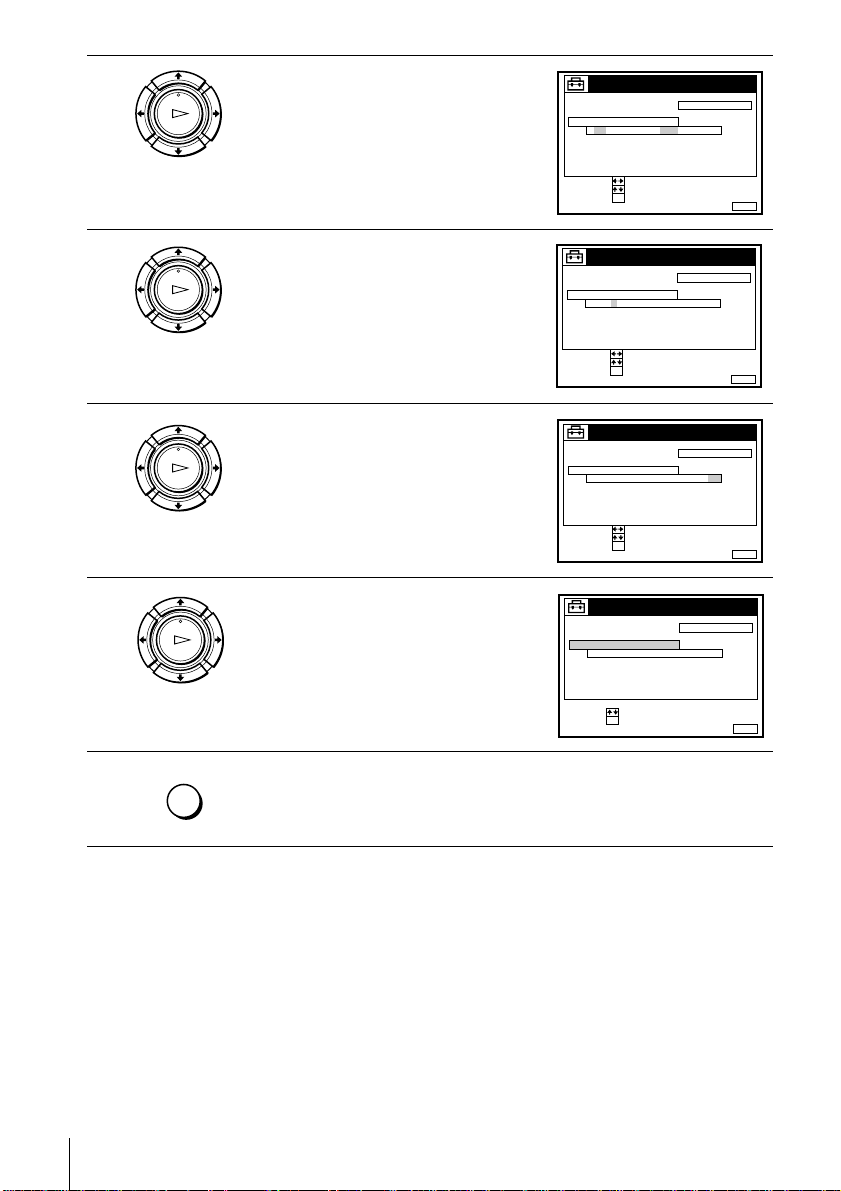
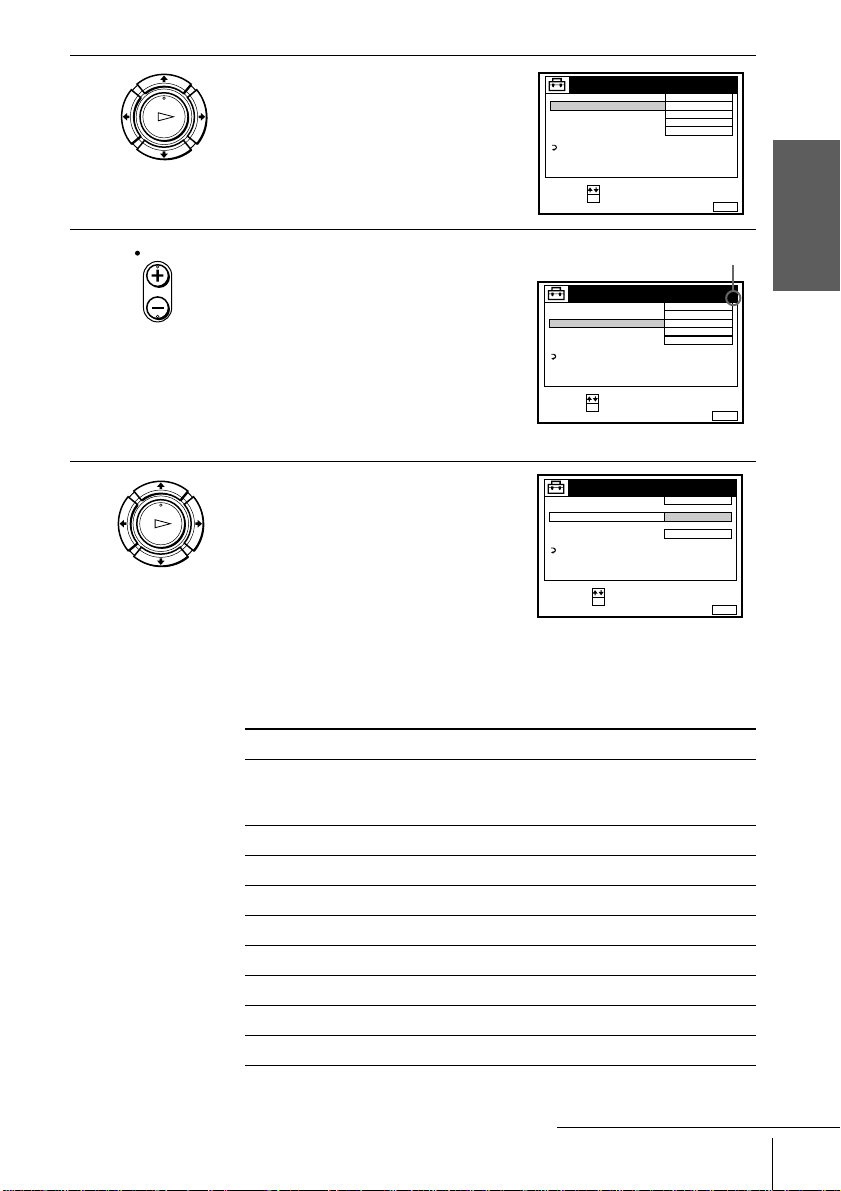
Press M/m to set the date.
PLAY
OK
5
6
7
8
PLAY
OK
PLAY
OK
PLAY
OK
MENU
Press , to highlight the month and set
the month pressing M/m.
Set the year, hour, and minutes in
sequence, pressing , to highlight the
item to be set, and press M/m to select the
digits.
The day of the week is set automatically.
Press OK to confirm the setting and start
the clock.
Press MENU to exit the menu.
22
Setting the clock
Tip
• To chan ge the digits w hile setting, p r es s
the digits pressing
M/
.
m
< to return to the item to be ch anged, and select
Note
• The menu disappears automatically if you don’t proceed for more than a few minutes.
Page 23
Changing the station for the Auto Clock Set function
SET :
SELECT :
OK
MENUEXIT :
SETTINGS
TUNER
CLOCK
RETURN
TV GUIDE PAGE
LANGUAGE
SET :
SELECT :
OK
MENUEXIT :
CLOCK
OFFAUTO ADJUST
MANUAL ADJUST
.1 1 . 2 0 00 SAT 0 : 0 0
CONFIRM :
SELECT :
OK
MENUEXIT :
CLOCK
OFF
AUTO ADJUST
CLOCK PROGRAM
MANUAL ADJUST
. 2 0 0 0 THU 8 : 0 0
8.9ON21
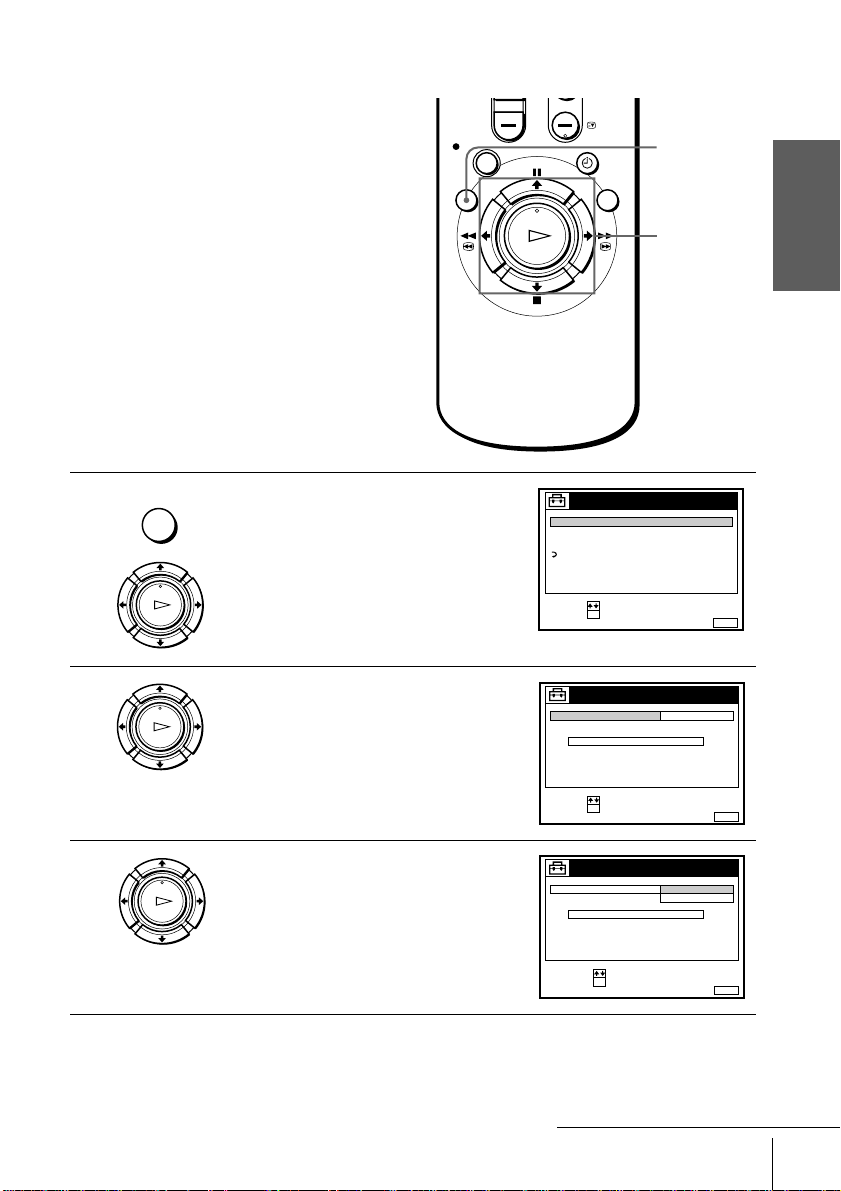
Before you start…
• Turn on the VCR and the TV.
• Set the TV to the video channel.
MENU
M/m/</,
OK
Getting Started
1
MENU
PLAY
OK
2
PLAY
OK
3
PLAY
OK
Press MENU, then press M/m to
highlight SETTINGS and press OK.
Press M/m to highlight CLOCK, then
press OK.
AUTO ADJUST is highlighted.
Press OK.
continued
Setting the clock
23
Page 24
4
SET :
SELECT :
OK
MENUEXIT :
CLOCK
ON
1 AAB
AUTO ADJUST
CLOCK PROGRAM
MANUAL ADJUST
.8 9 . 2 0 0 0 THU 8 : 0 0
12
CONFIRM :
SELECT :
OK
MENUEXIT :
CLOCK
AUTO ADJUST
CLOCK PROGRAM
MANUAL ADJUST
. 2 0 0 0 THU 8 : 0 0
8.9
1 AAB
21
CONFIRM :
SELECT :
OK
MENUEXIT :
CLOCK
AUTO ADJUST
CLOCK PROGRAM
MANUAL ADJUST
. 2 0 0 0 THU 8 : 0 0
8.9
2 CDE
21
PLAY
OK
Press M/m to highlight ON, then press
OK.
5
6
7
Press m to highlight CLOCK
PLAY
OK
PROGRAM, then press OK.
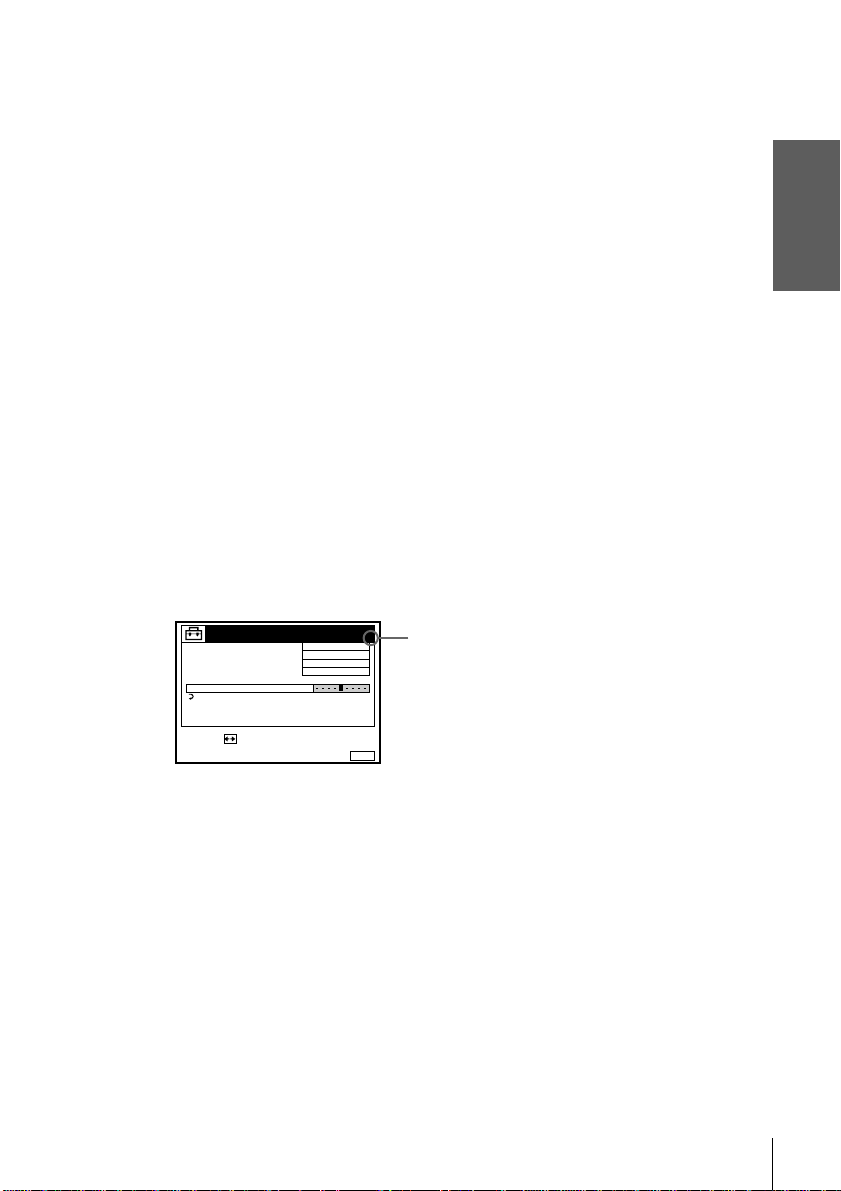
Press M/m until the programme position
PLAY
OK
of the station that carries the time signal
appears.
If the VCR does not receive the time
signal from any station, AUTO ADJUST
returns to OFF automatically.
MENU
Tips
• To chan ge the digits w h ile setting, pr ess < to return to the item to be changed, and select
the digits using
• If you set AUTO ADJUST to ON, the Auto Cloc k Set function is activated whenever the
VCR is turned off. The time is adjusted automatically by making reference to the time signal
from the station whose programme posi ti on is di spl ayed in the “CLOCK PROGRAM” row.
If you do not need the Auto Clock Set fun ctio n, select OFF.
Press MENU to exit the menu.
.
M/m
24
Setting the clock
Note
• The menu disappears automatically if you don’t proceed for more than a few minutes.
Page 25

Selecting a language
SET :
SELECT :
OK
MENUEXIT :
SETTINGS
TUNER
CLOCK
RETURN
TV GUIDE PAGE
LANGUAGE
SET :
SELECT :
OK
MENUEXIT :
LANGUAGE
POLSKI
ČESKÝ
MAGYAR
SLOVENČINA
TÜRKÇE
ENGLISH
РУССКИЙ
You can change the on-screen display
language from the one you selected with the
Auto Set Up function.
Before you start…
• Turn on the VCR and the TV.
• Set the TV to the video channel.
1
2
MENU
PLAY
OK
PLAY
OK
Press MENU, then press M/m to
highlight SETTINGS and press OK.
Press M/m to highlight LANGUAGE,
then press OK.
MENU
M/m/</,
OK
Getting Started
3
Press M/m/</, to highlight the desired language, then press OK.
PLAY
OK
Note
• The menu disappears automat ical l y if you don’t proceed for more than a few minutes.
Selecting a language
25
Page 26
Presetting channels
SET :
SELECT :
OK
MENUEXIT :
SETTINGS
TUNER
CLOCK
RETURN
TV GUIDE PAGE
LANGUAGE
SET :
SELECT :
OK
MENUEXIT :
TUNER
C
AAB12
PROG. 1
NORMAL / CATV
CHANNEL SET
PAY - TV / CANAL+
AFT
FINE TUNING
NORMAL
OFF
ON
RETURN
SYSTEM
D/K
SET :
SELECT :
OK
MENUEXIT :
TUNER
C
AAB12
PROG. 1
NORMAL / CATV
CHANNEL SET
PAY - TV / CANAL+
AFT
FINE TUNING
NORMAL
OFF
ON
RETURN
SYSTEM
D/K
If some channels could not be preset us ing
the Auto Set Up function, you can preset
them manually.
PROG +/–
Before you start…
• Turn on the VCR and the TV.
• Set the TV to the video channel.
1
2
MENU
PLAY
OK
PLAY
OK
Press MENU, then press M/m to
highlight SETTINGS and press OK.
Press M/m to highlight TUNER, then
press OK.
MENU
M/m/</,
OK
26
3
PLAY
OK
Presetting channels
Press M/m to highlight NORM AL/CA T V,
then press OK.
Press M/m to highlight NORMAL, then
press OK.
To preset CATV (Cable Television)
channels, select CATV.
Page 27
4
SET :
SELECT :
OK
MENUEXIT :
TUNER
C
AAB12
PROG. 1
NORMAL / CATV
CHANNEL SET
PAY - TV / CANAL+
AFT
FINE TUNING
NORMAL
OFF
ON
RETURN
SYSTEM
D/K
SET :
SELECT :
OK
MENUEXIT :
TUNER
C
AAB12
PROG. 4
NORMAL / CATV
CHANNEL SET
PAY - TV / CANAL+
AFT
FINE TUNING
NORMAL
OFF
ON
RETURN
SYSTEM
D/K
Selected programme
position
MENUEXIT :
TUNER
C
TUV27
PROG.
NORMAL / CATV
CHANNEL SET
PAY - TV / CANAL+
AFT
FINE TUNING
ON
RETURN
4
CONFIRM :
SELECT :
OK
SYSTEM
D/K
Press M/m to highlight CHANNEL SET.
PLAY
OK
Getting Started
5
6
PROG
PLAY
OK
Press PROG + /– to select the programme
position.
Press OK to highlight the c hannel
number row, then press M/m to start
tuning.
The VCR starts searching for a channel
and displays the first one it finds on the
TV screen. Press M/m repeatedly until
the channel you want is displayed.
The channels are scanned in the
following order:
B/G TV system D/K TV system
Channel number in
the CHANNEL SET
field
C02 E2 C02 R1
C03 E3 C05 R6
C04 E4 C06 R7
C05 E5 C12 R12
C06 E6 C13 R2
C07 E7 C14 R3
C08 E8 C15 R4
C09 E9 C16 R5
Channel Channel num b e r in
the CHANNEL SET
field
continued
Channel
Presetting channels
27
Page 28

B/G TV system D/K TV system
SET :
SELECT :
OK
MENUEXIT :
TUNER
C
AAB12
PROG. 1
NORMAL / CATV
CHANNEL SET
PAY - TV / CANAL+
AFT
FINE TUNING
NORMAL
OFF
ON
RETURN
SYSTEM
D/K
Channel number in
the CHANNEL SET
field
Channel Channel number in
the CHANNEL SET
field
Channel
C10 E10 C17 R8
C11 E11 C18 R9
C12 E12 C19 R10
C21-C69 E21-E69 C20 R11
CATV S01-S41 S01-S41 C21-C69 R21-R69
CATV S42-S46 S01-S05
If you know the number of the channel you want, press the programme number
buttons. For example, for channel 05, first press “0” and then press “5.”
7
8
9
10
PLAY
OK
PLAY
OK
MENU
If the sound is distorted or noisy, press
OK then to highlight SYSTEM, then
select B/G or D/K so that you can get the
better sound. .
Press OK.
T o alloc ate anothe r channel to a nother pro gramme po sition, repe at steps 4
to 8.
Press MENU to exit the menu.
28
Presetting channels
Page 29
Disabling unwanted programme positions
After tuning the TV channels, you can disable unused programme positions. The
disabled positions will be skipped later when you press the PROG +/– buttons.
You can also disable unwanted programme positions u sing the CHANNEL LIST
menu (see page 32).
In step 6 above, press programme number button “0” twice to display the number
1
“00” beside CHANNEL SET.
Press OK to confirm the setting, then MENU to exit the menu.
2
If the picture is not clear
Normally, the Auto Fine Tuning (AFT) function automatically tunes in channels
clearly. If the picture is not clea r, you may also use the manual tuning fu nction.
Press PROG +/– or the programme number buttons to select the programme
1
position for which you cannot obtain a clear picture.
Press MENU, then select SETTINGS and press OK.
2
Select TUNER, then press OK.
3
Select FINE TUNING.
4
The fine tuning meter appears.
TUNER
SYSTEM
NORMAL / CATV
CHANNEL SET
PAY - TV / CANAL+
AFT
FINE TUNING
RETURN
D/K
NORMAL
C
27
OFF
PROG.
TUV
4
Selected programme
position
Getting Started
SET :
Press </, to get a clearer picture, then press MENU to exit the menu.
5
MENUEXIT :
Note that the AFT (Auto Fine Tuning) setting switches to OFF.
Note
• The menu disappears automat ical l y if you don’t proceed for more than a few minutes.
Presetting channels
29
Page 30
Setting/changing the station names
RETURN
SET :
SELECT :
OK
MENUEXIT :
LISTS
CHANNEL LIST
TIMER LIST
MENUEXIT :
CHANNEL LIST
ERASE PROGRAM
MOVE PROGRAM::
PROG
SELECT :
1
2
3
4
5
AAB
CDE
FGH
C
C
C
C
1
0
5
0
2
3
6
9
NAME
CH
C
27
CLEAR
MENUEXIT :
CHANNEL LIST
ERASE PROGRAM
MOVE PROGRAM::
PROG
SELECT :
1
2
3
4
5
AAB
CDE
FGH
C
C
C
C
1
0
5
0
2
3
6
9
NAME
CH
C
27
CLEAR
You can also set and change station names as
you like up to 5 characters. The set station
names are displayed on the TV screen when
you change the programme positio n on the
VCR.
Before you start…
• Turn on the VCR and the TV.
• Set the TV to the video channel.
MENU
M/m/</,
OK
30
1
2
3
MENU
PLAY
OK
PLAY
OK
PLAY
OK
Press MENU, then press M/m to
highlight LISTS and press OK.
Press M/m to highlight CHANNEL LIST,
then press OK.
Press M/m to highlight the row on which
you want to set or change the station
name.
To display other pages for programme
positions 6 to 60, pres s M/m repeatedly.
Setting/changing the station names
Page 31

4
AAB
MENUEXIT :
CHANNEL LIST
CONFIRM OK
NEXT
:
:
PROG
SELECT A CHARACTER :
1
2
3
4
5
CDE
FGH
C
C
C
C
1
0
5
0
2
3
6
9
NAME
CH
C
27
AAB
MENUEXIT :
CHANNEL LIST
PREVIOUS
NEXT
:
:
PROG
SELECT A CHARACTER :
1
2
3
4
5
CDE
FGH
C
C
C
C
1
0
5
0
2
3
6
9
NAME
CH
C
27
L
MENUEXIT :
CHANNEL LIST
ERASE PROGRAM
MOVE PROGRAM::
PROG
SELECT :
1
2
3
4
5
AAB
CDE
FGH
C
C
C
C
1
0
5
0
2
3
6
9
NAME
CH
C
27
CLEAR
LMO
PLAY
OK
• If you want to set the station name, press , twice to highlight the station name column only.
• If you don ’t want to set the station name, go to step 7.
Getting Started
5
6
7
8
PLAY
OK
PLAY
OK
MENU
Enter the station name.
1
Press M/m to select a character.
Each time you press M, the character
changes as shown below.
At Bt ... t Z t a t b t...
z t 0 t 1 t ... t 9 t
t
(symbols) t(blank space) t A
2
Press CURSOR, to set the next character.
The next space is highlighted.
To correct a character, press CURSOR
<
until the character you w ant
to correct is highlighted, then reset it.
You can set up to 5 characters for the station name.
To change or to set the stat ion name of another station, repeat step s 2 to 4.
Press OK to confirm the setting.
Press MENU to exit the menu.
Note
• The menu disappears automat ical l y if you don’t proceed for more than a few minutes.
Setting/changing the station names
31
Page 32

Changing/disabling programme positions
RETURN
SET :
SELECT :
OK
MENUEXIT :
LISTS
CHANNEL LIST
TIMER LIST
MENUEXIT :
CHANNEL LIST
ERASE PROGRAM
MOVE PROGRAM::
PROG
SELECT :
1
2
3
4
5
AAB
CDE
FGH
C
C
C
C
1
0
5
0
2
3
6
9
NAME
CH
C
27
CLEAR
After setting the channels, you can change
the programme positions as you like. If any
programme positions are unused or contain
unwanted channels, yo u can disable them.
Before you start…
• Turn on the VCR and the TV.
• Set the TV to the video channel.
Changing programme positions
MENU
M/m/</,
OK
32
1
2
MENU
PLAY
OK
PLAY
OK
Press MENU, then press M/m to
highlight LISTS and press OK.
Press M/m to highlight CHANNEL LIST,
then press OK.
Changing/disabling programme positions
Page 33

3
MENUEXIT :
CHANNEL LIST
CONFIRM
SET STATION NAME::
PROG
SELECT :
1
2
3
4
5
AAB
LMO
FGH
C
C
C
C
1
0
5
0
2
3
6
9
NAME
CH
C
27
OK
CDE
MENUEXIT :
CHANNEL LIST
PROG
1
2
3
4
5
LMO
AAB
FGH
C
C
C
C
5
1
0
0
6
2
3
9
NAME
CH
C
27
CONFIRM
SET STATION NAME::
SELECT :
OK
CDE
PLAY
Press M/m to highlight the row on which
you want to change the programme
OK
position, then press
.
,
To display other pages for programme
Getting Started
positions 6 to 60, press M/m repeatedly.
4
5
6
7
PLAY
OK
PLAY
OK
MENU
Press M/m until the selected channel row
moves to the desired programme
position.
The selected channel is inserted at the
new programme position an d the
intermediate channels are displaced to fill
the gap.
Press OK to confirm the setting.
To change the programme position of another station, repeat steps 3 to 5.
Press MENU to exit the menu.
Changing/disabling programme positions
continued
33
Page 34

Disabling unwanted
123
456
789
0
RETURN
SET :
SELECT :
OK
MENUEXIT :
LISTS
CHANNEL LIST
TIMER LIST
MENUEXIT :
CHANNEL LIST
ERASE PROGRAM
MOVE PROGRAM::
PROG
SELECT :
1
2
3
4
5
AAB
CDE
FGH
C
C
C
C
1
0
5
0
2
3
6
9
NAME
CH
C
27
CLEAR
programme positions
After presetting channels, you can di sable
unused programm e positions.The disabled
positions will be skipped later when you
press the PROG +/– buttons.
CLEAR
MENU
M/m/</,
OK
34
1
MENU
Press MENU, then press M/m to
highlight LISTS, and pr e s s OK.
PLAY
OK
2
PLAY
OK
Press M/m to highlight CHANNEL LIST,
then press OK.
Changing/disabling programme positions
Page 35

3
MENUEXIT :
CHANNEL LIST
ERASE PROGRAM
MOVE PROGRAM::
PROG
SELECT :
1
2
3
4
5
AAB
CDE
FGH
C
C
C
C
1
0
5
0
2
3
6
9
NAME
CH
C
27
CLEAR
LMO
MENUEXIT :
CHANNEL LIST
ERASE PROGRAM
MOVE PROGRAM::
PROG
SELECT :
1
2
3
4
5
AAB
CDE
FGH
C
C
C
1
0
0
2
3
9
NAME
CH
C
27
CLEAR
PLAY
OK
Press M/m to highlight the r ow whic h
you want to disable.
Getting Started
4
5
6
CLEAR
Press CLEAR.
The selected row will be cleared as
shown on the righ t.
Repeat steps 3 and 4 for any other programme positions you want to
disable.
MENU
Notes
• The menu disappears automat ical l y if you don’t proceed for more than a few minutes.
• Be sure to select the programme posit io n you want to disable correctly. If you disable a
programme position by mistake, you need to reset that channel manually.
Press MENU to exit the menu.
Changing/disabling programme positions
35
Page 36

Setting the PAY-TV/Canal Plus decoder
You can watch or record PAY-TV/Canal Plus programmes if you connect a decoder
(not supplied) to the VCR.
Connecting a decoder
Scart cable
(supplied with decoder)
DECODER/t LINE-3 IN
i
LINE-1
(TV)
:Signal flow
Scart
(EURO-AV)
AERIAL IN
AERIAL OUT
Aerial cable
(supplied)
Scart cable (not supplied)
PAY-TV/Canal Plus
decoder
AERIAL IN
Scart
(EURO-AV
36
Setting the PAY-TV/Canal Plus decoder
Page 37

Setting PAY-TV/Canal Plus
RETURN
SET :
SELECT :
OK
MENUEXIT :
OPTIONS
VIDEO OPTIONS
AUDIO OPTIONS
TAPE OPTIONS
OTHER OPTIONS
SET :
SELECT :
OK
MENUEXIT :
OTHER OPTIONS
BUZZER
DIMMER
DECODER/LINE3
POWER SAVE
TIMER OPTIONS
TV DIRECT REC
ON
OFF
DECODER
OFF
VARIABLE
ON
RETURN
CONFIRM :
SELECT :
OK
MENUEXIT :
OTHER OPTIONS
BUZZER
DIMMER
DECODER/LINE3
POWER SAVE
TIMER OPTIONS
TV DIRECT REC
ON
DECODER
LINE3
ON
RETURN
channels
To watch or r e cord PAY-TV/Canal Plus
programmes, set your VCR to receive the
channels using t he on-screen displ ay.
Before you start…
• Turn on the VCR, the TV, and the decoder.
• Set the TV to the video channel.
PROG +/–
MENU
M/m/</,
OK
Getting Started
1
MENU
PLAY
OK
2
PLAY
OK
3
PLAY
OK
Press MENU, then press M/m to
highlight OPTIONS and press OK.
Press M/m to highlight OTHER
OPTIONS, then press OK.
Press M/m to highlight DECODER/
LINE3, then press OK.
continued
Setting the PAY-TV/Canal Plus decoder
37
Page 38

4
SET :
SELECT :
OK
MENUEXIT :
OTHER OPTIONS
BUZZER
DIMMER
DECODER/LINE3
POWER SAVE
TIMER OPTIONS
TV DIRECT REC
ON
OFF
DECODER
OFF
VARIABLE
ON
RETURN
SET :
SELECT :
OK
MENUEXIT :
SETTINGS
TUNER
CLOCK
RETURN
TV GUIDE PAGE
LANGUAGE
SET :
SELECT :
OK
MENUEXIT :
TUNER
C
AAB12
PROG. 1
NORMAL / CATV
CHANNEL SET
PAY - TV / CANAL+
AFT
FINE TUNING
NORMAL
OFF
ON
RETURN
SYSTEM
D/K
CONFIRM :
SELECT :
OK
MENUEXIT :
TUNER
C
ATV
PROG. 1
NORMAL / CATV
CHANNEL SET
PAY - TV / CANAL+
AFT
FINE TUNING
NORMAL
ON
RETURN
SYSTEM
PLAY
OK
Press M/m to highlight DEC., then press
OK.
5
6
7
8
MENU
MENU
PLAY
OK
PLAY
OK
PLAY
OK
Press MENU to exit the menu.
Press MENU, then press M/m to
highlight SETTINGS and press OK.
Press M/m to highlight TUNER, then
press OK.
Press M/m to highlight NORMAL/
CATV, then press OK.
38
Setting the PAY-TV/Canal Plus decoder
Page 39

9
SET :
SELECT :
OK
MENUEXIT :
TUNER
C
AAB12
PROG. 1
NORMAL / CATV
CHANNEL SET
PAY - TV / CANAL+
AFT
FINE TUNING
NORMAL
OFF
ON
RETURN
SYSTEM
D/K
SET :
SELECT :
OK
MENUEXIT :
TUNER
C
AAB12
PROG. 4
NORMAL / CATV
CHANNEL SET
PAY - TV / CANAL+
AFT
FINE TUNING
NORMAL
OFF
ON
RETURN
SYSTEM
D/K
Selected programme
position
CONFIRM :
SELECT :
OK
MENUEXIT :
TUNER
C
AAB12
PROG. 4
NORMAL / CATV
CHANNEL SET
PAY - TV / CANAL+
AFT
FINE TUNING
ON
RETURN
SYSTEM
D/K
SET :
SELECT :
OK
MENUEXIT :
TUNER
C
PQR02
PROG. 4
NORMAL / CATV
CHANNEL SET
PAY - TV / CANAL+
AFT
FINE TUNING
NORMAL
OFF
ON
RETURN
SYSTEM
D/K
CONFIRM :
SELECT :
OK
MENUEXIT :
TUNER
PROG. 4
NORMAL / CATV
CHANNEL SET
PAY - TV / CANAL+
AFT
FINE TUNING
NORMAL
ON
OFF
RETURN
SYSTEM
D/K
PLAY
OK
Press M/m to highlight NORMAL, then
press OK.
To preset CATV (Cable Television)
channels, select CATV.
Getting Started
10
11
12
13
PROG
PLAY
OK
PLAY
OK
PLAY
OK
Press PROG +/– to select the desired
programme position.
Press M/m to highlight CHANNEL SET,
then press OK.
Press M/m to select the PAY-TV/Canal
Plus channel.
When the desired channel is tuned, press
OK.
Press M/m to highlight PAY-TV/
CANAL+, then press OK.
continued
Setting the PAY-TV/Canal Plus decoder
39
Page 40

14
SET :
SELECT :
OK
MENUEXIT :
TUNER
C
PQR02
PROG. 4
NORMAL / CATV
CHANNEL SET
PAY - TV / CANAL+
AFT
FINE TUNING
NORMAL
ON
ON
RETURN
SYSTEM
D/K
SET :
SELECT :
OK
MENUEXIT :
TUNER
C
PQR02
PROG. 4
NORMAL / CATV
CHANNEL SET
PAY - TV / CANAL+
AFT
FINE TUNING
NORMAL
ON
ON
RETURN
SYSTEM
D/K
PLAY
OK
Press M/m to highlight ON, then press
OK.
15
16
If the sound is distorted or noisy, press
PLAY
OK
MENU
M/m/ </,
select B/G or D/K so that you ge t the
better sound.
Press MENU to exit the menu.
Notes
• The menu disappears automatically if you don’t proceed for more than a few minutes.
• To superimpose subt i tles whi le watchin g PAY-TV/Canal Plus prog rammes, make both
decoder-VCR and VCR-TV connections using 21-pin Scart cables that are compatible with
the RGB signals.You cannot record subtitles on the VCR.
• Some PAY -TV/Canal Plus decoders may not work if you set the PAY-TV/CANAL + setting to
ON. In this case, set it to OFF.
to highlight SYSTEM, then
40
Setting the PAY-TV/Canal Plus decoder
Page 41

Basic Operations
g
Playing a tape
123
456
789
0
Z
EJECT
DISPLAY
CLEAR
Basic Operations
H
PLAY
X
PAUSE
M
FF
x
STOP
m
REW
NTSC PB
1
2
Turn on your TV and set it to the video channel.
Insert a tape.
The VCR turns on and starts playing
automatically if you insert a tape with its
safety tab removed.
continued
Playing a tape
41
Page 42

3
Press H PLAY.
PLAY
When the tape reaches the end, it will rewind automatically.
OK
Additional tasks
To Press
Stop play
Pause play
Resume play after pause
Fast-forward the tape
Rewind the tape
Eject the tape
STOP
x
PAUSE
X
PAUSE or H PLAY
X
FF during stop
M
REW during stop
m
EJECT
Z
To set the colour system
If the playback picture has no co l our or streaks appeat during playback, set the
COLOUR SYSTEM option in the VIDEO OPTIONS menu to contorm to the system
that the tape was recorded (see page 68). (Normally set the option to AUTO)
To play an NTSC-recorded tape
Set NTSC PB at the rear of the VCR according to the colour system of your TV.
When your TV is Set NTSC PB to
PAL only ON PAL TV
PAL and NTSC NTSC 4.43
42
Playing a tape
To use the time counter
Press CLEAR at the point on the tape that you want to find later. The counter in the
display window resets to “0:00:00.” Search for the point afterwards by referring to
the counter.
AUTO SET UP
VPS
PDC
EDIT
OPC
EP
SP
LP
VIDEO
H M S
STEREO
NICAM
TV
To display the counter on the TV screen, press DISPLAY.
Page 43

Notes
• The counter resets to “0:00:00” whenever a tape is reinserted.
• The counter stops counting when it comes to a portion with no record ing.
• Depending on your TV, the following may occur while playing an NTSC-r ec orded tape:
– The picture becomes black an d white.
– The picture shakes.
– No picture appears on the TV screen.
– Black streaks appear horizontally on the TV screen.
– The colour density increases or decrea s es.
• If you playback a tape in LP or EP mode with the NTSC system, the sound is heard in
monaural.
/</,
• While setting the menu on the TV screen, you cannot use
operation.
M/m
buttons for tape
Starting playback automatically with one button (One Touch Play)
If you use the SMARTLINK connection, you can turn on the VCR and the TV , set the
TV to the video channel, and start playback automatically with one button.
Insert a tape.
1
The VCR automatically turns on.
If you insert a tape with its safety tab removed, the TV turns on and switches to
the video channel. Pla yback starts automatically.
Press H PLAY.
2
The TV turns on and switches to the video channel automatically. Playback
starts.
Basic Operations
Tip
• When there already is a tape in the VCR, the VCR and the TV turn on, the TV is set to the
video channel, and playb ac k sta rts automatically in one sequence whe n you press H PLAY.
Note
• When you use the One Touch Play function, leave the TV on or in the standby mode.
Playing a tape
43
Page 44

Recording TV programmes
123
456
789
0
COUNTER/REMAIN
DISPLAY
SP/LP
t
TV/VIDEO
INPUT SELECT
PROG +/–
z
REC
1
2
44
Recording TV programmes
Turn on your TV and set it to the video channel.
To record from a decoder or other source, turn it on.
Insert a tape with its safety tab in place.
x
STOP
Page 45

3
PROG
INPUT
SELECT
• To record a terrestrial channel.
Press PROG +/– until the programme position number you want appears
in the display window.
AUTO SET UP
VPS
PDC
EDIT
OPC
EP
SP
LP
VIDEO
STEREO
TV
SMH
• To record a video source from the LINE-1 (TV) or LINE-3 (Scart)
connector, or th e LINE-2IN jacks. Pre ss INPUT SELECT until L1, L2 or
L3 appears in the display window.
AUTO SET UP
VPS
PDC
EDIT
OPC
EP
SP
LP
VIDEO
TV
SMH
NICAM
STEREO
NICAM
Basic Operations
4
5
SP/LP
Press SP/LP to select the tape speed, SP or LP.
LP (Long Play) provides recording time twice as long as SP. However, SP
(Standard Play) produces better pictu re and audio quality.
REC
Press z REC to start recording.
The recording indicator lights up red in the display window.
Recording
indicator
To stop recording
Press x STOP.
AUTO SET UP
VPS
PDC
EDIT
AUTO SET UP
VPS
PDC
EDIT
OPC
OPC
EP
SP
LP
VIDEO
STEREO
NICAM
TV
SMH
EP
LP
VIDEO
STEREO
NICAM
TV
SMH
continued
Recording TV programmes
45
Page 46

To check the remaining time
6M1H4
Safety tab
Press DISPLAY. With the display on, press COUNTER/REMAIN to check the
remaining time. Each time you press COUNT ER/REMAIN, the time count er and the
remaining time appear alternately. The indicator indicates the remaining time.
SP 20:00:2
Remaining timeTime counter
In order to get an accurate remaining time indication, be sure the TAPE LENGTH
item in the TAPE OPTIONS menu i s set a cco rdi ng to th e ta p e typ e y ou u s e (see page
68).
To watch another TV programme while recording
Press t TV/VIDEO on the remote commander to turn o ff the VIDEO indicator
1
in the display window.
Select another programme position on the TV.
2
46
Recording TV programmes
To protect a recording
To prevent accidental erasure, break off the safety
tab as illustrated. To record on a tape agai n, co ver
the tab hole with adhesive tape.
You can also protect a recording by using the SmartFile function (see page 94).
Tips
• To select a program me position, you can use the
programme number buttons on the remote
commander. For two-digit numbers, pre s s t he –/– –(ten’s digit) button followed by the
programme number buttons.
• The display appears on the TV scre en indicating information ab out the tape, but the
information won’t be recorded on the tape.
• If you don’t want to watch TV while recording, you can turn off the TV.
When using a decoder or othe r sourc e, m ake sure to l eave it on.
Page 47

Notes
• If a tape has portions recorded in both PAL and NTSC systems, the time counter reading will
not be correct. This disc re pancy is due to the difference between the counting cycles of the
two video systems.
• You cannot watch a PAY-TV/Canal Plus programme while recording another PAY-TV/Canal
Plus programme.
• The remaining time is intended for rough measurement only.
• The remaining time will be displa yed for only about 30 seconds after tap e start s pla yba ck.
Recording what you are watching on the TV (TV Direct Rec)
If you use the SMARTLINK connection, you can easily record what you are
watching on the TV (other than tapes being played on the VCR).
Insert a tape with its safety tab in place.
1
Press z REC while you are watching a TV programme or external source.
2
The VCR automatically turns on, then the TV indicator lights up and the VCR
starts recording what you are watching on the TV.
Tips
• The TV indicator appears in the display window after you press z REC in some situations such as:
– when you are watching a source connected to the TV’s line inp ut, or
– when the TV tuner preset data for the programme posi tion is different from the data pre set
in the VCR tun er.
• If there already is a tape with its safety tab in place in the VCR, the VCR automatically turns
on and starts recording wha t you are watc hin g on the TV when you press z REC.
• You can turn the TV Direct Rec function ON and OFF in the OTHER OPTIONS menu (see page 68).
Basic Operations
Notes
• You cannot record what you are watching using this method when the VCR is in the
following modes : pause, timer standby, tuner preset, Auto Set Up, and recording.
• When the TV indicator is lit in the display window, do not turn off the TV nor change the TV
programme position. Whe n the TV i ndi cator is not lit, the VCR continues recordi ng the
programme even if you change the TV programme position on the TV.
Recording TV programmes
47
Page 48

Recording TV programmes using the
123
456
789
0
ShowView system
The ShowView system is a feature that
simplifies programming the VCR to mak e
timer recordings. Just enter the ShowView
number listed in the TV programme guide.
The date, times, and programme position of
that programme are set automatically. You
can preset up to eight programmes at a time.
?/1
Before you start
• Check that the VCR clock is set to the
correct time and date.
• Insert a tape with its safety tab in place.
Make sure the tape is longer than the total
recording time.
• Turn on your TV and set it to the video
channel.
• If you insert a tape with the SmartFile
function, make sure the total recording
time doesn’t overlap the protected
programme. For details about the
SmartFile function, see page 74 .
• Set TIMER OPTIONS to SHOWVIEW or
VARIABLE in the OTHER OPTIONS
menu (see page 70).
…
SP/LP
CLEAR
Programme
number
buttons
TIMER
M/m/</,
OK
x
STOP
48
Recording TV programmes using the ShowView system
Page 49

1
SET :
SELECT :
OK
MENUEXIT :
TIMER METHOD
STANDARD
SHOWVIEW
MENUEXIT :
SHOWVIEW
SET :
–
0–9
SHOWVIEW NO.
––––––– –
THU28 .9
MENUEXIT :
SHOWVIEW
SET :
–
0–9
SHOWVIEW NO.
1246––– –
THU28 .9
CANCEL
CONFIRM::
OK
CLEAR
TIMER
PLAY
OK
Press TIMER.
• When you set TIMER OPTIONS to
VAR IA BLE :
The TIMER METHOD menu appears
on the TV screen. Press M/m to select
SHOWVIEW, then press OK.
2
123
456
789
0
CLEAR
• When you set TIMER OPTIONS to
Basic Operations
SHOWVIEW:
The SHOWVIEW menu appears on
the TV screen.
Press the programme number buttons to
enter the ShowView number.
If you make a mistake, press CLEAR and
re-enter the correct number.
continued
Recording TV programmes using the ShowView system
49
Page 50

3
DATE
CANCEL
SET::
SELECT :
CLEAR
MENUEXIT :
TIMER
SP / LP
LIST
TIME PROG.
TODAY AB20: 00 21 : 00 A
SP VPS / PDC OFF
THU28 .9
DATE
CANCEL
SET::
SELECT :
CLEAR
MENUEXIT :
TIMER
SP / LP
LIST
TIME PROG.
TODAY AB20: 00 21 : 00 A
SP VPS / PDC OFF
THU28 .9
PLAY
OK
CLEAR
Press OK.
The date, start and stop times,
programme position, tape speed, and
VPS/PDC setting appear on the TV
screen.
If “– –” appears in the “PROG.”
(programme) colu mn (this may happen
for local broadcasts), you hav e to set the
appropriate programme positio n
manually.
• To select a terrestrial channel.
Press M/m to select the desired pr ogramme position.
• To select a video source from the LINE-1 (TV) or LINE-3 IN
connector, or the LINE-2 IN jacks.
Press INPUT SELECT to select the desired video source.
You will only ha ve to do this operation o nce fo r t he refe rred channel. The
VCR will then store your setting.
For details about the VPS/PDC function, see “Timer recording with VPS/
PDC signals” on page 51.
If the information is incorrect, press CLEAR to cancel the setting.
4
50
Recording TV programmes using the ShowView system
PLAY
OK
CLEAR
If you want to change the date, tape
speed, and the VPS/PD C function
setting:
1
Press </, to highlight the item y ou want to change.
2
Press M/m to reset it.
• To record the same programme every
day or the same day every week, see “Daily/weekly recording” on page
51.
• To use the VPS/PDC function, set VPS/PDC to ON. For details about
the VPS/PDC function, see “Timer recording with VPS/PDC signals”
on page 51.
• To change the setting, press MENU, and highlight LIST, then select
TIMER LIST and press OK. Then enter the new timer setting and press
OK.
If the informations are not correct, press CLEAR to cancel the settings.
Page 51

5
Press OK to confirm the setting.
PLAY
OK
6
Press ?/1 to turn off the VCR.
The indicator appears in the display window and the VCR stands by for
recording.
To stop recording
To stop the VCR while recording, press x STOP.
Daily/weekly recording
In step 4 above, press m to select the recording pattern. Each time you press m, the
indication change s as shown below. Press M to change the indication in reverse
order.
TODAY t SUN-SAT (Sunday to Saturday) t MON-SAT (Monday to
Saturday)
MON (every Monday) t SUN (every Sunday) t 1 month later
t
(dates count down)
t
Timer recording with VPS/PDC signals
Some broadcast systems transmit VPS (Video Programme System) or PDC
(Programme Delivery Control) signals with their TV programmes. These signals
ensure that your timer recordings are made regardless of broadcast delays, early
starts, or broadcast interruptions (when the VPS or PDC indicator in the display
window is lit).
In step 4 above, press M/m to turn on/off the VPS/PDC indication after you set the
recording date. If you do not want to set the VPS/PDC functi on, turn off the VPS/
PDC indicatio n.
You can also use the VPS/PDC function for a source connected to the LINE-1 (TV)
and LINE-3 IN (Scart) connectors, or the LINE-2 IN jacks.
MON-FRI (Monday to Friday) t SAT (every Saturday) .....
t
TOMORROW t TODAY
t
Basic Operations
continued
Recording TV programmes using the ShowView system
51
Page 52

To use the VCR after setting the timer
To use the VCR before a timer recording begins, just press ?/1. The indi cator
turns off and the VCR switches on. Remember to press ?/1 to reset the VCR after
using the VCR.
You can also do the following tasks while the VCR is recording:
• Reset the counter.
• Display tape information on the TV screen.
• Check the timer settings (see “Setting the timer manually” on page 53).
• Watch another TV programme.
Tips
• To set the programm e po sition with a two digit number, press –/– – (ten’s digit) button
followed by the programme number button.
• To set the programm e po sit ion , yo u ca n al so use the PROG +/– or programme number buttons.
• To set the tape speed, you can also use the SP/LP button.
• When you are recording a programme in the SP mode and the remaining tape becomes
shorter than the recording time, the tape speed is automatically changed to the LP mode.
Note that some interference will appear on the picture at the point the tape speed is changed.
If you want to keep the same tape speed, set AUTO LONG PLAY to OFF in the TAPE
OPTIONS menu (see pa ge 68).
• To check, change, or cancel the programme setting, press </, to choose LIST, then press
OK after step 4. For details, see step 3 in “Checking/changing/cance ll in g ti mer settings on
page 61.
Notes
• When setting the timer with VPS/PDC signals, enter the start and stop times exactly as
indicated in the TV progra m me guide, otherwise the VPS/PDC function won’t work and the
recording won’t start.
• If the VPS/PDC signal is too weak or the broadcasting station failed to transmit VPS/PDC
signals, the VCR will start recording at the set time without using the VPS/PD C function.
• The indic at or fl ashe s in t he di spl ay window when you press ?/1 with no tape inserted.
• The VPS/PDC function is automatically set to OFF for the timer recording of a satellite
programme.
• When you set TIMER OPTIONS to STANDARD in the OTHER OPTIONS menu, the
SHOWVIEW menu does not appear on the TV screen. Select SHOWVIEW or VARIABLE.
52
Recording TV programmes using the ShowView system
Page 53

Setting the timer manually
,
If the ShowView system is not available in
your area, follow the inst ructions belo w to set
the timer to record programmes.
Before you start
…
• Check that the VCR clock is set to the
correct time and date.
• Insert a tape with its safety tab in place.
Make sure the tape is longer than the total
recording time.
• To record from a decoder or other source,
turn it on.
• Turn on your TV and set it to the video
channel.
• If you insert a tape with the SmartFile
function, make sure the total recording
time doesn’t overlap the protected
programme. For details about the
SmartFile function, see page 74.
• Set TIMER OPTIONS to STANDARD or
VARIABLE in the OTHER OPTIONS
menu (see page 70).
123
456
789
0
?/1
INPUT
SELECT
TIMER
M/m/</
OK
x
STOP
Basic Operations
continued
Setting the timer manually
53
Page 54

1
SET :
SELECT :
OK
MENUEXIT :
TIMER METHOD
STANDARD
SHOWVIEW
DATE
CANCEL
SET::
SELECT :
CLEAR
MENUEXIT :
TIMER
SP / LP
LIST
TIME PROG.
TODAY ––– : –– ––: –– –
SP VPS / PDC OFF
THU28 .9
DATE
CANCEL
SET::
SELECT :
CLEAR
MENUEXIT :
TIMER
SP / LP
LIST
TIME PROG.
2 CDE
LP VPS / PDC ON
THU28 .9
10 :00 11:30.10
PLAY
OK
TIMER
Press TIMER.
• When you set TIMER OPTIONS to
VAR IA BLE :
The TIMER METHOD menu appears
on the TV screen. Press M/m to select
STANDARD, then press OK.
• When you set TIMER OPTIONS to STANDARD: The TIMER menu appears on the TV screen.
2
3
54
Setting the timer manually
PLAY
OK
INPUT
SELECT
PLAY
OK
Set the date, start and stop times,
programme position, tape speed, and
VPS/PDC function:
1
Press , to highlight each item in turn.
2
Press M/m to set each item.
T o correct a setting, press < to return to
that setting and reset it.
• To record the same programme every day or the same day every week,
see “Daily/weekly recording” on page 55.
• To use the VPS/PDC function, set VPS/PDC to ON. For details about
the VPS/PDC function, see “Timer recording with VPS/PDC signals”
on page 51.
• To record from a decoder or other source connected to the LINE-1 (TV)
or LINE-3 IN connectors, the LINE-2 IN jacks, press INPUT SELECT
to display “L1,” “L2,” “L3” in the “PROG.” position.
Press OK to confirm the setting.
Page 55

4
Press ?/1 to turn off the VCR.
The indicator appears in the display window and the VCR stands by for
recording.
To record from a decoder or other sources, leave the connected equipment
switched on.
To stop recording
To stop the VCR while recording, press x STOP.
Daily/weekly recording
In step 2 above, press m to select the recording pattern. Each time you press m, the
indication change s as shown below. Press M to change the indication in reverse
order.
TODAY t SUN-SAT (Sunday to Saturday) t MON-SAT (Monday to
Saturday)
MON (every Monday) t SUN (every Sunday) t 1 month later
t
(dates count down)
t
Tips
• To set the programm e position, you can also use the PROG +/– or programme number buttons.
• To set the tape speed, yo u ca n al so use the SP/LP button.
• When you are recording a pro gra mme in the SP mode and the remainin g tape becomes
shorter than the recordin g ti me, the tape speed is automatically changed to the LP mode.
Note that some interference will appear on the picture at the point the tape speed is changed.
If you want to ke ep the same tape speed, set AUTO LONG PLAY to OFF in the TAPE
OPTIONS menu (see page 68).
• Even if you set TIMER OPTIONS to SHOWVIEW in the O THER OPTIONS menu, you can
set the timer manually. Press MENU to select TIMER, then go to step 2.
Notes
• When setting the timer with VPS/PDC signals, enter the start and stop times exactly as
indicated in the TV progr amme guide, otherwise the VPS/PD C function won’t work and the
recording won ’t start.
• If the VPS/PDC signal is too weak or the broadcasting station failed to transmit VPS/PDC
signals, the VCR will start recording a t the set time without using the VPS/PDC function.
• The indicator flashes in the display window when you press ?/1 with no tape inserted.
MON-FRI (Monday to Friday) t SAT (every Saturday) .....
t
TOMORROW t TODAY
t
Basic Operations
Setting the timer manually
55
Page 56

Additional Operations
123
456
789
0
Playing/searching at various speeds
H
m
M
X 2
y SLOW
Playback opt ions Operation
Fast-forward /rewind
View the picture during fast-
forward or rewind
Play at high speed • During playback, press
Play at twice the normal speed During playback, press X2.
56
Playing/searching at various speeds
During stop, press
During fast-forward, hold
m
remote comm ander.
• During playback, hold dow n
you release the button, normal playback resumes.
REW down.
M
(fast-forward) or
M
M
m
( rewind) and release.
FF down. During rewind, hold
FF or
m
m
FF down or
M
M
FF
m
REW
REW on the
REW. When
Page 57

Playback options Operation
Play in slow motion During playback, press y SLOW.
Play frame by frame • During pause, press
remote commander. Hold down
play one frame each second.
Rewind and start play During stop, hold m (rewind) down on the VCR
(playback) on the VCR
FF down or
M
M
then release bo th .
m
FF or
To resume normal playback
Press
Tip
• Adjust the pictu re using the TRACKIN G +/– buttons if:
Notes
• The playback sound is muted during the ope ra ti ons in the above table.
• In the LP mode, noise may appear or there may be no colour.
• If the playback mode mark doesn’t appear on the TV sc re en, press DISPLAY.
(playback)
H
– Streaks appear while playing in slow motion.
– Bands ap pea r at the top or bottom while pausing.
– The picture shakes while pausing.
To set tracking to the centre position, press both TRACKING +/– buttons at the same time.
.
REW on the
m
and press H
REW to
Operations
Additional
Playing/searching at various speeds
57
Page 58

Setting the recording duration time
After you start recording in the normal way,
you can have the VCR stop recording
automatically after a specified duration.
While recording, press z REC.
1
The indicator appears in the display window.
EP
SP
LP
Normal recording
Press z REC repeatedly to set the duration.
2
AUTO SET UP
EDIT
VPS
PDC
OPC
Each press advances the time in increments of 30 minutes.
0:30 1:00
5:30 6:00
VIDEO
z
REC
STEREO
NICAM
TV
The tape counter decreases minute by minute to 0:00, then the VCR stops
recording and turns off automatically.
To extend the duration
Press z REC repeatedly to set a new duration.
To cancel the duration
Press z REC repeatedly until the indicator disappears and the VCR returns to normal recording mode.
To stop recording
To stop the VCR while recording, press x STOP.
Note
• You cannot display the curre nt t ape ti m e in the display window when setting the recording
duration.
58
Setting the recording duration time
Page 59

Synchronized Recording
You can set the VCR to automatically record programmes from equipment such as a
programmable set top box by connecting the equipment to the LINE-3 IN connector.
The connected equipment must have a timer function
When the connected equipment turns on, the VCR also automatically turns on and
starts recording a programme from LINE-3 IN.
How to connect for Synchronized Recording.
Connect the LINE-3 IN of the VCR to the TV Scart connector of the Set-Top Box.
Then connect the LINE-1 (TV) conn ector to the TV.
Scart cable (not supplied)
t
i
(TV)
LINE-1
LINE-3 IN
for this feature to work.
TV Scart connector
Programmable
Set -Top Box
Operations
Additional
: Signal flow
Scart cable (not supplied)
Scart (EURO-AV)
continued
Synchronized Recording
59
Page 60

Recording programmes using
123
456
789
0
the Synchronized Recording
function
Before you start
• Insert a tape with its safety tab in place.
Make sure the tape is longer than the total
recording time.
1
2
3
…
SYNCHRO REC
g
Set the timer on the STB to the time of the programme you want to record, then
turn it off.
Press SP/LP to select the tape speed on the VCR.
Hold down SYNCHRO REC for more than two seconds.
The SYNCHRO REC indicator lights up on the front panel and the VCR stands
by for recording.
The VCR automatically turns on and starts recording when it receives an input
signal from the STB.
The VCR automatically stops recording when the tape reaches the end or when
the STB stops transmitting an input signal.
SP/LP
INPUT
SELECT
PROG +/-
To cancel the Synchronized Recording function
Press SYNCHRO REC. The SYNCHRO REC indicator turns off.
To stop recording
Press x STOP while recording.
Notes
• This functio n may not work with some types of s atellite tune r s .
60
Synchronized Recording
• If the settings for timer recording and Syn ch roni zed Recording overlap, the programme that
• The Auto Clock Set function does not work while th e V CR stands by for Synchronized
starts first has p r iority and the second progra mme starts recording only af ter the first
programme has finished.
Recording.
Page 61

Checking/changing/cancelling timer
MENUEXIT :
TIMER LIST
CANCEL
SET::
SELECT :
OK
CLEAR
RETURN
DATE TIME PROG.
––: –– – : –– – ––– . ––
VPS
PDC
––: –– – : –– – ––– . ––
––: –– – : –– – ––– . ––
THU28 .9
20 :00 21:00
SPTODAY
AAB
20 :00 21:00 AAB SP03.9
20:001:30
CDE LP.10
VPS
PDC
11
MON
14 :00 15:00 LP– FRI FGH
SUN 6 :30 7: 00
LPIJK
settings
Before you start
…
• Turn on your TV and set it to the video
channel.
123
456
789
0
?/1
CLEAR
MENU
M/m/</,
OK
Operations
Additional
Press ?/1 to turn on the VCR.
1
Press MENU, then press M/m to highlight LISTS and press OK.
2
Press M/m to highlight TIMER LIST, then press
3
OK:
• If you want to change or cancel a settin g, go on to the next step.
• If you do not need to change or cancel the
settings, press MENU, then turn off the VCR
to return to recording standby.
continued
Checking/changing/cancelling timer settings
61
Page 62

Press M/m to select the setting you want to
DATE
CANCEL
SET::
SELECT :
CLEAR
MENUEXIT :
TIMER
SP / LP
LIST
TIME PROG.
2 . 10 DE10 :00 11: 30 C
SP VPS / PDC ON
THU28 .9
4
change or cancel, then press OK.
The selected setting appears in the TIMER
menu.
• To change the setting, press </, to highlight the item you want to change,
5
and press M/m to change it.
• To cancel the setting, press CLEAR.
Press MENU.
6
If any settings remain, turn off the VCR to return to recording standby.
When the timer settings overlap
The programme that starts first has priority and the second programme starts
recording only after the first programme has finished. If the programmes start at the
same time, the programme listed first in the menu has priority.
62
Checking/changing/cancelling timer settings
Programme 1
about 20 seconds
Programme 2
will be cut off
Programme 1
Programme 2
about 20 seconds will be cut off
Tip
• In step 5 above, you can check the TIMER LIST by selecting LIST and pressing OK. Press
MENU to exit the TIMER LIST.
Page 63

Record ing stereo and bilingual programmes
In ZWEITON (German stereo) system
This VCR automatically receives and records stereo and bilingual programmes based
on the ZWEITON system. When a stereo or bilingual programme is received, the
STEREO indicator appears in the display wi ndow.
To select bilingual sound while recording
Press AUDIO MONITOR to select the sound you want.
To listen to On-screen display Display window
Main MAIN STEREO
Sub SUB STEREO
Main and sub MAIN/SUB STEREO
In NICAM system
This VCR receives and records stereo and bilingual programmes based on the
NICAM system (the NICAM indicator appears). When a stereo or bilingual
programme is received, the STEREO indicator appears in the display window.
To record a NICAM programme, HIFI AUDIO in the AUDIO OPTIONS menu
should be set to NICAM (initial setting). To check the menu setting, see page 69 for
details.
To select the sound while recording
Press AUDIO MONITOR to select the sound you want.
Operations
Additional
Stereo programme
To listen to On-screen display Display window
Stereo STEREO STEREO
Standard sound
*
Usually the mixed sound of left and right channels (monaural)
*
No indicator No indicator
Bilingual programme
To listen to On-screen display Display window
Main MAIN STEREO
Sub SUB STEREO
Main and sub MAIN/SUB STEREO
Standard sound
*
Usually the main sound (monaural)
*
No indicator No indicator
continued
Recording stereo and bilingual programmes
63
Page 64

Selecting the sound during playback
Press AUDIO MONITOR to select the sound you want.
To listen to On-screen display Display window
Stereo/mai n an d sub (left and
right channels)
Left channel/main LCH STEREO
Right channel/sub RCH STEREO
Standard sound No indicator No indicator
STEREO STEREO
How sound is recorded on a video tape
The VCR records sound onto two separate tracks. Hi-fi audio is recorded onto the
main track along with the picture. Monaural sound is recorded onto the normal audio
track along the edge of th e tape.
Stereo
Usually mixed
left/right channels
Normal audio track
(monaural)
Hi-fi audio trac k
(main track)
Stereo sound
(left/right channels)
Bilingual
Usually main sound
Main (left channel)
Sub (right channel)
Notes
• To listen to playback sounds in stereo, you must use the EURO-AV or AUDIO OUT connections.
• When you play a tape recorded in monaural, the sound is heard in monaural regardless of the
AUDIO MONITOR setting.
• If the AUDIO MONITOR button does not function, check that AUDIO MIX in the AUDIO
OPTIONS menu is set to OFF (see page 69).
• If HIFI AUDIO is set to STANDARD, the standard sound will be recorded on bot h th e hi -fi
and normal audio tracks. Pressin g AUDIO MONITOR wil l no t change the sound.
64
Recording stereo and bilingual programmes
Page 65

Searching using the index function
123
SEARCH
INDEX 2
The VCR marks the tape with an index signal
at the point where each recording begins. Use
these signals as references to find a specific
recording. The VCR can search up to 99
index signals ahead or behind the current
position.
./>
INDEX
SEARCH
Insert an indexed tape into the VCR.
1
Press ./> INDEX SEARCH repeatedly to
2
specify ho w ma ny in de x si gn als ahe ad or be hi nd
you want to search :
• To search ahead, press > INDEX SEARCH.
• To search backwards, press . INDEX SEARCH.
The VCR starts searching and th e index number
on the TV s creen counts down to zero. Playback
starts automatically from that point.
To stop searching
Press x STOP.
Note
• No index signal will be added when recording starts from recording pause. However, an
index signal will be marked if you chang e the programme position during recor din g pause.
Operations
Additional
Searching using the index function
65
Page 66

Adjusting the picture
TRACKING
Tracking meter
SET :
SELECT :
OK
MENUEXIT :
VIDEO OPTIONS
OPC
EDIT
SHARPNESS
RR
ON
OFF
NORMAL
NORMAL
RETURN
COLOUR SYSTEM AUTO
Adjusting the tracking
Although the VCR automatically adjusts the
tracking when playing a tape (t he indicator
flashes in the display window, then goes off),
distortion may occur if the tape was recorded in poor
condition. In this case, manu ally a d just t he tra c king.
During playback, press TRACKING +/– to display
the tracking meter . The distortio n should disapp ear
as you press one of the two buttons (the indicator
lights up). To resume automatic tracking
adjustments, eject the tape and re-in s ert it.
T o set the tracking to the centr e positio n, press
TRACKING + and
About the Reality Regenerator (RR) function
The Reality Regenerator (RR) function automatically restores the picture to its
original quality during playback.
To use the RR function, press
REALITY REGENERATOR button.
The REALITY REGENERATOR
indicator lights up. You can set RR to
HIGH or NORMAL in the VIDEO
OPTIONS menu (see page 68).
To turn it off, press REALITY REGENERATOR. The REALITY REGENERATOR indicator lights off.
–
buttons at the same time.
g
REALITY REGENERATOR
66
Adjusting the picture
About the Optimum Picture Control (OPC) function
The Optimum Picture Control (OPC) function
automatically improves recording and playback
quality by adjusting the VCR to the condition of the
video heads and tape . To maintain bette r pic t u re
quality, we recommend that you set OPC to ON in
the VIDEO OPTIONS menu (with the OPC
indicator in the display window lit). For details, see
page 68.
OPC playback
The OPC function automatically works on all types of tapes, including rental tapes
and tapes that were not recorded with OPC.
Page 67

OPC recor di ng
Whenever you insert a tape and start recording for the first time, the VCR adjusts to
the tape using the OPC function (the OPC indicator flas hes rapidly). This adjustmen t
is retained until the tape is ejected.
To deactivate the OPC function
Set OPC to OFF in the VIDEO OPTIONS menu. The OPC indicator in the display window turns off.
Notes
• With the Auto Long Play function ON, the OPC function will wor k onl y in SP mode . If the
tape speed automatically switches fro m SP to LP, the OPC function tur ns off . Howe ver, if the
entire programme is recorded in LP mode, the OPC function will work.
• There is a delay of ab out te n second s before the VCR act uall y starts recor ding whi le the VCR
analyses the tape. To avoid the delay, first set the VCR to recording pause (the OPC indicator
flashes slowly) and press z REC to have the VCR analys e the tape (the OPC indicator
flashes rapidly) and returns to recording pause. After the OPC indicator stops flashing, press
PAUSE to start recording immediately. If you want to start recording quickly without
X
using the OPC function, first set the VCR to recording pause (the OPC indicator flashes
slowly) and press X PAUSE to start recording.
Operations
Additional
Adjusting the picture
67
Page 68

Changing menu options
RETURN
SET :
SELECT :
OK
MENUEXIT :
OPTIONS
VIDEO OPTIONS
AUDIO OPTIONS
TAPE OPTIONS
OTHER OPTIONS
SET :
SELECT :
OK
MENUEXIT :
VIDEO OPTIONS
OPC
EDIT
SHARPNESS
RR
ON
OFF
NORMAL
NORMAL
RETURN
COLOUR SYSTEM AUTO
Press MENU, then select OPTIONS and press
1
OK.
Press M/m to highlight the k ind of option to change, VIDE O O P TI O NS, AUDIO
2
OPTIONS, TAPE OPTIONS or OTHER OPTIONS, then press OK
Press M/m to select the option, then press OK to enter the pop up menu.
3
Press M/m to select the desired setting, then press OK.
4
Press MENU to exit the menu.
5
VIDEO OPTIONS menu
Initial settings are indicated in bold print.
68
Changing menu options
Menu option Set this option to
OPC •ON to switch on the OPC (Optimum Picture Control ) function
and improve picture quality.
• OFF to switch off OPC.
EDIT • ON to minimize picture det erioration when edit ing.
•
to turn off EDIT.
OFF
SHARPNESS • LOW to playback a poor quality tape.
•
NORMAL
to playback an average quality tape.
• HIGH to playback a good quality tape.
COLOUR SYSTEM •
to detect automatically the colour system of a tape.
AUTO
• PAL to playback a tape recorded in the PAL system.
• MESECAM to playback a tape recorded in the MESECAM
system.
RR •
NORMAL
for normal everyday use.
• HIGH for well-used video tapes such as rented tapes. Select this
option when NORMAL does not improve the picture quality.
Note
• When you playback with the ED IT func ti on O N, the OPC and the SHARPNESS func ti ons
For details, see page 66.
don’t work.
Page 69

• When you turn off your VCR or eject the ta pe, the colour system is set automati cally to
SET :
SELECT :
OK
MENUEXIT :
AUDIO OPTIONS
AUDIO MIX
HIFI AUDIO
OFF
NICAM
RETURN
SET :
SELECT :
OK
MENUEXIT :
TAPE OPTIONS
AUTO LONG PLAY
TAPE LENGTH
OFF
E180
RETURN
AUTO.
AUDIO OPTIONS menu
Initial settings are indicated in bold print.
Menu option Set this opti on to
AUDIO MIX • ON to listen to the hi-fi and normal audio tracks at the same
HIFI AUDIO • STANDARD to record standard sound on the hi-fi audio track.
Note
• If you eject the tape, AUDIO MIX is automatically s et to OFF.
time. The AUDIO MONITOR button will not function.
•
to listen to the hi-fi and normal audio tracks separate l y.
OFF
Select the sound using the AUDIO MONITOR button.
For details, see page 63.
•
to record NICAM broadcasts on the hi-fi audio track.
NICAM
For details, see page 63.
Operations
Additional
TAPE OPTIONS menu
Initial settings are indicated in bold print.
Menu option Set this opti on to
AUTO LONG PLAY • ON to automatically record from SP (Standard Pla y) to LP
TAPE LENGTH •
(Long Play) when the tape length is not long enough.
•
to normally record in SP (Standard Play).
OFF
to use an E-180 or shorter tape type.
E180
• E195 to use an E-195.
• E240 to use an E-240.
• E300 to use an E-300.
continued
Changing menu options
69
Page 70

OTHER OPTIONS menu
SET :
SELECT :
OK
MENUEXIT :
OTHER OPTIONS
BUZZER
DIMMER
DECODER/LINE3
POWER SAVE
TIMER OPTIONS
TV DIRECT REC
ON
OFF
DECODER
OFF
VARIABLE
ON
RETURN
Initial settings are indicated in bold print.
Menu option Set this option to
BUZZER •ON to output a beep sound.
• OFF to deactivate it.
DIMMER • ON to make th e di spla y w i ndow di m.
•
to make it brighter.
OFF
DECODER/LINE3 •
DECODER
PAY-TV/Canal Plus decoder connector.
• LINE3 to use the DECODER/LINE-3 IN connector as a line
input connector.
POWER SAVE • ON to turn off the indicators in the display window to save the
VCR power.
•
OFF
VCR is standing by.
TIMER OPTIONS •
VARIABLE
selecting STANDARD or SHOWVIEW when pressing the
TIMER button.
• STANDARD to display only the TIMER menu when pressing
the TIMER button.
• SHOWVIEW to display only the SHOWVIEW menu when
pressing the TIMER button.
For details, see page 48 and 53.
TV DIRECT REC •ON to activate the TV Dire ct R ec function.
• OFF to deactivate it.
to use the DECODER/LINE- 3 IN con nect or as th e
to turn on the indicators in th e display win d ow w h ile the
to display the TIMER METHOD menu for
70
Note
• When you set a timer recording or a sychronized recording, the indicators in the display
window remain on, even though POWER SAVE is set to ON.
Changing menu options
Page 71

Editing
Connecting to a VCR or stereo system
How to connect to record on your VCR
Connect the line outputs of the o ther VCR to the LINE IN connector or jacks of your
VCR. Refer to the examples A or B and choose the connection that best suits your
VCR.
Example A
Example B
LINE-2 IN
Your VCR (Recorder)
t
DECODER/
LINE-3 IN
: Signal flow
Your VCR (Recorder)
g
TV
Other VCR (Player)
Scart
(EURO-AV)
VMC-2121HG Scart cable (not supplied)
Editing
TV
: Signal flow
VMC-820 audio/video cable
(not supplied)
Other VCR (Player)
LINE OUT
continued
Connecting to a VCR or stereo system
71
Page 72

Tip
You can also use the LINE-3 IN connector instead.
Notes
• Make sure you connect the plugs to jack s of the same c olo ur.
• If the other VCR is a monaural type , l eave the red pl ugs unconnected.
• If you connect your VCR to both the LINE IN and LINE OUT jacks of the other VCR, select
the input correctly to prevent a hum m ing noise.
• If the other VCR does not have a Scart (EURO-AV) connector, use the VMC-2106HG cable
instead and connect the cable to the line out jacks o f th e other VCR.
• When you connect another VCR to the DECODER/LINE3 IN connector, set DECODER/
LINE3 to LINE3 in the OTHER OPTIONS menu.
How to connect to a stereo system
Connect the LINE-2 IN AUDIO L/R jacks of your VCR to the audio output jacks on
the stereo system, using the RK-C510HG audio cabl e ( not supplied).
72
Connecting to a VCR or stereo system
Page 73

Basic Editing
SET :
SELECT :
OK
MENUEXIT :
VIDEO OPTIONS
OPC
EDIT
SHARPNESS
RR
ON
ON
NORMAL
NORMAL
RETURN
COLOUR SYSTEM AUTO
(when recording on your VCR)
Before you start editing...
• Turn on your TV and set it to the video
channel. Press INPUT SELECT to di spla y
“L2” (or “L1” or “L3”) in the di splay
window.
• Press SP/LP to select the tape speed, SP or
LP.
• On your VCR, set EDIT to ON in the
VIDEO OPTIONS menu to display
“EDIT” in the display wi ndo w . If the other
VCR has a similar feature, activate this one
as well.
Insert a source tape with its safety tab removed into the other (playback) VCR.
1
Search for the point to start playback and set it to playback pause.
Insert a tape with its safety tab in place into your (recording) VCR. Searc h for
2
the point to start recording and press X (pause).
Press z (record) on your VCR to set it to recording pause.
3
z
g
X
Editing
To start editing, press the X (pause) buttons on both VCRs at the same time.
4
To stop editing
Press the x (stop) buttons on both VCRs.
Tip
• To cut out unwanted scenes while editing, press X (pause) on yo ur VCR
scene begins. When it ends, press X (pause) again to resume recording.
Note
• If you start editing following the procedure above, the VCR won’t start recording with th e
OPC function. To record a tape with the OPC function, press z (record) again during
recording pause in step 3 so the VCR ana ly s es the tape. Then press X (pause) after
indicator stops flashing to start recording. If you press X (pause) before
stops flashing, the OPC function is c ancelled.
when an unwanted
the OPC
the OPC indicator
Basic Editing
73
Page 74

SmartFile function
SEARCH :
SELECT :
OK
MENUEXIT :
2 . 8 . 00 - 10 . 10 . 00 PAGE 1
SPORTS
1 . 10 NEWS SEVEN
CCB SP 1H 30M
30 . 9 SAT 7 : 00
SP 0H 30M
SP 1H 30MFILMS
PROG .32
START
END
BLANK TIME SP 1H 55M
10 . 10 SPORTS FESTIVAL
SmartFile search list
NEXT :
MENUEXIT :
2 . 8 . 00 - 10 . 10 . 00 PAGE 1
1 . 10 NEWS SEVEN
30 . 9 SAT 7 : 00 PROG .32
BLANK TIME SP 1H 55M
10 . 10 SPORTS FESTIVAL
22 . 9 FRI SARU
10 . 9 SUN STB098
2 . 9 SAT STB
9 : 00
2 3 : 00
1 2 : 00
g
SmartFile check list
About the SmartFile function
SmartFile allows you to view the contents of your video tape (recording date,
channel, name etc.) on the TV screen. It is no l onger necessary to rewind, fastforward, or playback a tape to find out what is recorded on it. You can also locate and
start playback of a specific programme or find the place from which you want to start
recording by using this list. Program me data is store d in the memory of the Sm artFile
label attached to the tape.
The following functions are possible using SmartFile :
Recording using the SmartFile function (page 76)
To use the SmartFile function, attach the SmartFile
label to the tape. If you record a programme on a tape
with a SmartFile label, the contents will appear on the
SmartFile search list. W ith th e SmartFile list, you can
also easily find the beginning of the available
recording space.
Selecting and playing a programme (page 81)
To playback a recorded programme, select the programme you want to watch using
the SmartFile search list. The VCR locates the programme and playback starts
automatically.
74
About the SmartFile function
Checking the contents of a tape (page 82)
When you bring the SmartFile label close to the
SMARTFILE sensor on the VCR, a summary of
the recorded programmes appears in the SmartFile
check list. It is not necessary to insert the tape into
the VCR and press H PLAY to find out what is
recorded on it. This feature allows you to easily
find the programme you want to watch, or to
quickly find a tape with enough recording space.
Page 75

Labelling a recorded programme and tape (page 84)
You can attach an electronic "label" to the video tap e and its programmes on the
SmartFile list. Labelling the recorded programmes enables you to find a programme
easily when you want to play it back. If TV guide pages are available in the Teletext,
recorded programmes are labelled automatically. Also, once you label a programme
which you set to record regularly (i.e everyday, same day of the week), the VCR
recognizes the label and will automatically label all future recordings of the same
programme.
Registering the contents of a recorded tape in the
Smart F ile la b e l (p age 92)
You can register programmes recorded on a tape in the memory of a new SmartFile label.
Protecting a recorded programme (page 94)
You can protect a recorded programme from accidental over-recording or erasure.
Erasing the data of an unwanted programme (page 96)
By erasing a programme from the SmartFile list, the VCR will record over the unwanted programme.
Running a demonstration
This VCR can give a demonstration
of the various SmartFile functions.
To run a demonstration, turn on the
VCR and hold the SMARTFILE
button for 3 seconds while no tape is
inserted. To stop the demonstration,
press any key.
g
SMARTFILE
About the SmartFile function
SmartFile function
75
Page 76

Recording using the SmartFile function
SMARTFILE SENSOR
T o use the Sma rtF ile function, attach the SmartFile label to the spine of the cassette.
If you record a programme for more than 20 minutes in LP mode and 11 minutes in
SP mode on a tape with a SmartFile label, programme data, such as the name, date
and channel, is automatically stored in the memory of the SmartFile label. Some
stations may not offer this service.
Attaching the SmartFile label to the cassette
To use the SmartFile function, attach the supplied
SmartFile label to the cassette. Remo ve an y sta ins
or dirt from the surface of the spine of the tape.
Then, holding both edges of the SmartFi le label so
that it doesn’t bend, attach it along the guide line
to the spine of the cassette. This tape is henceforth
referred to as a SmartFile tape.
Note on the purchase of SmartFile labels
• If you want to order additional SmartFile labe ls, con tact your nearest Sony service facility.
Notes
• The SmartFile label is equipped with a memory chip. The memory chip may be dammaged
and cannot be used when you:
- twist or fold the SmartFile label.
- remove the SmartFile label and re-attach it to a tape.
- attach more than one SmartFile label to a tape.
- attach metal, or sticker which has metal, to the SmartFile label.
- write too str ongly on the SmartF ile label using a bal l point pen or similar sharp instrument.
- disassemble or remodel a label.
• Do not leave the SmartFile label in a place subj ect to excessive dust or dirt, direct sunlight,
humidity, mildew , strong magnetism or near heat sources.
• If you attach the SmartFile label to a tape shorter than an E-30, the SmartFile function may
not work correctly.
76
Recording using the SmartFile function
Page 77

Recording a programme on the SmartFile tape
0
START
END
BLANK TIME SP 1H 55M
PAGE 1
When recording a programme on the
SmartFile tape, no matter what method you
use to record the programme (normal
recording, showview recording, etc.),
programme data (dat e, name, channel,
recording start time , etc.) is stored in the
memory of the SmartFile label. The
SmartFile label can contai n data for up to 1 2
programmes. When the number of stored
programmes goes over 12, the oldest
programme data is erased from the
SmartFile list. However, a programme
which lasts less than about 2 0 minutes in LP
mode or about 11 minutes in SP mode
cannot be stored in t he memory. When you
record a programme on a SmartFile tape
which already contai ns programme data,
see “Recording after locating the Blank
Time space” on page 79.
SMARTFILE
M/m/</,
OK
Before you start
…
• Turn on your TV and set it to the video channel
• Check that the VCR clock i s set to the correct time and date.
Insert a SmartFile tape with its safety tab in pl ace . Th e SmartF ile ind ica tor lig h ts
1
up.
Press SMARTF ILE.
2
The SmartFile search list appears on the TV
screen.
Use M to select BLANKTIME and press OK.
3
The VCR starts searching for the longest blank part of the tape. The SmartFile
search list disappears.
You can now start recording a programme.
Tip
• You can protect a recorded programme from accidental over-recording or erasures(see page
94.)
Note
• If you press the PAUSE button one or more times during rec ord ing, thereby creating short
lengths of recorded time between such pauses, programme data may not be stored in the
SmartFile label.
SmartFile function
continued
Recording using the SmartFile function
77
Page 78

Checking the information of a recorded programme
e
Press SMARTFILE. The SmartFile search list appears. The recording day of the
week, start time, programme position, date, name, recording time and tape speed
appear on the list.The lon gest space which doesn’t have any programme dat a (Blank
Time space) appears as "BLANK TIME":
Initial and la test dates of us
for this SmartFile tape
Recording start time
Remaining time
Programme position *
Recording time
T ape speed
MENUEXIT :
Date
Day of the week
Estimated position
of the recorded
programme
2 . 8 . 00 - 10 . 10 . 00 PAGE 1
BLANK TIME SP 1H 55M
30 . 9 SAT 7 : 00
CCB SP 1H 30M
START
SELECT :
SEARCH :
OK
END
Station name*
* When the station name is not available, the programme position is displayed instead.
Tip
• You can manually nam e a rec orde d programme and select the cat egory. You can also na me
the SmartFile tape.
Notes
• If you don’t set the clock or th e cloc k isn ’t set to the correct time and date, the recording start
time won’t be sto red cor rect ly on the S martf il e list. Also the progra mme labe l won ’t be stored
correctly if the TV guide page information of Teletext is not set correctly (see page 76).
• When you set the AUT O LONG PLAY option to ON in the TAPE OPTIONS menu, and the
tape speed automatically changes from SP to LP during recording, the VCR displays the
entire reco rding time converted to S P mode in the Sm artFile list.
• The recordin g time length in the SmartFile list is an estimation and may be slightly different
from the actual recorded ti m e l eng ht.
78
Recording using the SmartFile function
Page 79

Recording after locating the Blank Time space
SEARCH :
SELECT :
OK
MENUEXIT :
2 . 8 . 00 - 10 . 10 . 00 PAGE 1
SPORTS
1 . 10 NEWS SEVEN
CCB SP 1H 30M
30 . 9 SAT 7 : 00
SP 0H 30M
SP 1H 30MFILMS
PROG .32
START
END
BLANK TIME SP 1H 55M
10 . 10 SPORTS FESTIVAL
The SmartFile function identifies not only
the largest amount of available blank space,
but also recorded material that doesn’t have
corresponding programme data stored in the
SmartFile label. The longest available
recording space (including programmes that
are not stored on the SmartFile label) is
referred to as "Blank Time space". You can
locate the beginning of the Blank Time
space for recording. If there is a recorded
programme after the Blank Time space, the
VCR will record over on that prog ramme
unless you stop recording. If there is a
programme you want to prevent from being
recorded over or erased, protect that
programme befo r e yo u st art recording
another programm e see page 94.
123
456
789
0
SP/LP
Before you start
…
• Turn on your TV and set it to the video channel.
Insert a SmartFile tape with its safety tab in place.
1
The SMARTFILE indicator lights up on the VCR.
Press SMARTF ILE.
2
The SmartFile search list appears on the TV
screen. The Blank Time space appears in the
"BLANK TIME" row.
The Blank Time space also appears in the
display window.
Press M repeatedly to select BLANK TIME.
3
SMARTFILE
M/m/</,
OK
SmartFile function
continued
Recording using the SmartFile function
79
Page 80

Press SP/LP to select the tape speed, SP or LP.
SEARCH :
SELECT :
OK
MENUEXIT :
2 . 8 . 00 - 10 . 10 . 00 PAGE 1
SPORTS
1 . 10 NEWS SEVEN
CCB SP 1H 30M
30 . 9 SAT 7 : 00
SP 0H 30M
SP 1H 30MFILMS
PROG .32
START
END
BLANK TIME LP 3H 50M
10 . 10 SPORTS FESTIVAL
2 . 8 . 00 - 10 . 10 . 00 PAGE 1
NOW SEARCHING
START
END
4
The BLANK TIME changes according to the
selected tape speed. Sele ct a tape speed that
matches the length of the programme you want
to record.
Press OK.
5
The VCR goes to the beginning of the Blank
Time space and stops.
Press PROG +/– to select the programme position you want to record.
6
Press z REC to start recording.
7
Notes
• You may not be able to loca te the beginning of the Blank Time space correctly in the step 4
above when :
- the SmartFile tape contains on e or m ore sh ort le ngt h (le ss than about 20 minutes in the LP
mode and about 11 minute s in the SP mode) programmes for which progr amme data is not
stored in the SmartFile la b el.
- the SmartFile tape is dama ged or dirty.
- the SmartFile tape has a portion recorded in the NTSC syst em .
• If a newly recorded programme overlaps a stored programme, the stored programme
information is er as ed from the SmartFile list as shown below when :
- the remaining length of the stored programme becomes less than about 20 minutes in the LP
mode and about 11 minute s in th e SP m ode .
- the stored programme is over-recorded for more than 20 minutes in the LP mode and ab out
11 minutes in the SP mode.
80
Recording using the SmartFile function
Stored programme
Newly recorded
programme
necessary portion
unnecessary portion
or
or
20 minutes in the LP mode
11 minutes in the SP mode
Page 81

Selecting and playing a programme
SEARCH :
SELECT :
OK
MENUEXIT :
2 . 8 . 00 - 10 . 10 . 00 PAGE 1
SPORTS
1 . 10 NEWS SEVEN
CCB SP 1H 30M
30 . 9 SAT 7 : 00
SP 0H 30M
SP 1H 30MFILMS
PROG .32
START
END
BLANK TIME SP 1H 55M
10 . 10 SPORTS FESTIVAL
SEARCH :
SELECT :
OK
MENUEXIT :
2 . 8 . 00 - 10 . 10 . 00 PAGE 1
SPORTS
1 . 10 NEWS SEVEN
CCB SP 1H 30M
30 . 9 SAT 7 : 00
SP 0H 30M
SP 1H 30MFILMS
PROG .32
START
END
BLANK TIME SP 1H 55M
10 . 10 SPORTS FESTIVAL
You can automatically locate and start
playback of a pro gra m m e r ec o rde d on the
SmartFile tape. Select a programme in the
SmartFile search list. The SmartFile search
list can contain up to 12 programm es.
Before you start
• Turn on your TV and set it to the video channel.
1
2
3
…
Insert a SmartFile tape.
The SMARTFILE indicator lights up on the VCR.
Press SMARTF ILE.
The SmartFile search list appears on the TV
screen.
Press M/m to select a programme.
Press M/m repeatedly to turn the pages.
SMARTFILE
M/m/</,
OK
Press OK.
4
The VCR starts searching for the beginning of the selected programme.
Playback starts automatically from that point.
To stop searching
Press x STOP.
Note
• You may not be able to loc at e t he beginning of the selected programme correctly when :
- the SmartFile tape contains one or more short length (less than about 20 minutes in the LP
mode and about 11 minutes in SP m ode ) programmes for which programme da ta is not
stored in the SmartFile label.
- the SmartFile tape is damage d or di rty.
- the SmartFile tape has a portion recorded in the NTSC system.
Selecting and playing a programme
SmartFile function
81
Page 82

Checking the contents of a tape
NEXT :
MENUEXIT :
2 . 8 . 00 - 10 . 10 . 00 PAGE 1
1 . 10 NEWS SEVEN
30 . 9 SAT 7 : 00 PROG .32
BLANK TIME SP 1H 55M
10 . 10 SPORTS FESTIVAL
22 . 9 FRI SARU
10 . 9 SUN STB098
2 . 9 SAT STB
9 : 00
2 3 : 00
1 2 : 00
g
BACK :
MENUEXIT :
2 . 8 . 00 - 10 . 10 . 00 PAGE 2
2 . 8 GOLF
BLANK TIME SP 1H 55M
31 . 8 24HOURS TV
You can display the programme data list of
a SmartFile tape on the TV screen. It is not
necessary to insert the tape into the VCR.
This feature allows you to quickly find a
specific pr o gramme or to find a tape with
enough recording space. The SmartFile
check list can contain up to 12 programmes.
Before you start
…
• Turn on your TV and set it to the video
channel.
• Turn on your VCR.
Hold the label side of th e Smar tFile ta pe close to
1
the SmartFile sensor.
Slowly bring the c e nt er of t he la b el withi n 3 cm
of the SmartFile sensor.
There is a short beep, the SMAR TFILE indicato r
lights up on the VCR, and the SmartFile check
list appears. The BLANK TIME space also
appears in the display wi ndow.
SmartFile sensor
g
CURSOR
M/m
82
Checking the contents of a tape
AUTO SET UP
VPS
DNR
PDC
BL
EDIT
Press CURSOR M/m to turn the pages.
2
Press MENU to exit the SmartFile check list.
3
SMARTLINK
OPC
H
SP
LP
EP
VIDEO
STEREO
NICAM
TV
SM
Page 83

Tip
• If you press any button other than SP/LP or M/m, the SmartFile check list disappears.
Notes
• You cannot display the SmartFile check list while :
- you display the SmartFile list of a di fferent Sma rt F ile ta pe inse rt ed into the VCR.
- you display any other menu.
• If the SmartFil e chec k li st does n’t appear on the TV scr een, try drawing the SmartFile tape at
least 5 cm away f r om the SmarFile sensor, then bring it back to within 3 cm of the se n s or.
• The menu disappears automat ical l y if you don’t proceed for more than a few minutes.
Checking the contents of a tape
SmartFile function
83
Page 84

Labelling a recorded prog ramme and tape
123
456
789
0
,
Some broadcast systems ensure a Teletext
service in which the complete programmes
and their data (title, date, channel, recording
start time etc.) are stored day by day. A TV
guide page corresponds to each day of the
week. When recording a programme, th e
VCR automatically takes the label
information from the Teletext pages and
stores it in the SmartF ile lab el. The TV gu ide
page numbers depend entirely on the
broadcast itself and may be subje ct to
change. If so, you may have to set those TV
guide page numbers manually in the TV
GUIDE PAGE menu.
Setting the TV guide page number
Tape title
Category
Programme
label
MY VIDEO TAPE PAGE 1
BLANK TIME SP 1H 55M
10 . 10 SPORTS FESTIVAL
SPORTS
CCB SP 1H 30M
START
SELECT :
SEARCH :
OK
END
MENUEXIT :
Before you start
…
• Turn on your TV and set it to the video
channel.
CLEAR
Programme
number
buttons
PROG +/–
MENU
M/m/</
OK
84
Labelling a recorded programme and tape
Page 85

Select the programme po sitio n fo r whic h yo u want to set or change the TV guide
SET :
SELECT :
OK
MENUEXIT :
SETTINGS
TUNER
CLOCK
LANGUAGE
RETURN
TV GUIDE PAGE
SET :
SELECT :
OK
MENUEXIT :
TV GUIDE PAGE
MON
TUE
WED
THU
FRI
SAT
SUN
PROG . 5
P - - P - - P - - -
P - - P - - -
P - - -
P - - -
SET : 0
–9
CANCEL
CONFIRM::
OK
CLEAR
MENUEXIT :
TV GUIDE PAGE
MON
TUE
WED
THU
FRI
SAT
SUN
PROG . 5
P - - P - - -
P - - P - - -
P - - -
P - - -
SET :
SELECT :
OK
MENUEXIT :
TV GUIDE PAGE
MON
TUE
WED
THU
FRI
SAT
SUN
PROG . 5
P 3 0 1
P - - P - - -
P - - P - - -
P - - -
P - - -
1
page.
Press MENU, then press M/m to highlight SETTINGS and press OK.
2
Press M/m to highlight T V GUIDE PAGE and
3
press OK.
• The TV guide page num bers appear automatically when the VCR detects them (P301).
• If the VCR does not detect them (P---), you have to set the TV guide page number manually.
Press M/m to select the TV guide page number
4
you want to modify and press OK.
Press the programme number buttons to enter
5
the TV guide page number and press OK to
confirm the setting.
If you make a mistake, press CLEAR to re-enter
the correct number.
To set or change another TV guide page number, repeat steps 3 and 4 above.
6
Press MENU to exit the menu.
7
continued
Labelling a recorded programme and tape
SmartFile function
85
Page 86

Notes
• In step 4 above, enter "000" if you don’t want to use the TV g uide pa ge nu mber for automat ic
labelling. The VCR wil l in ste ad store default data (date, programme posi ti on, dura tion etc.)
in the label.
• Refer to the Teletext information on your TV screen to get the T V guide page number with
the programme titles and their start times.
• If the Teletext TV guide has a page which always shows the programmes for the current day,
this page should be input for all days.
• If you start recording more than two minutes before the programme is scheduled to start, the
correct label information may not be transferred. The VCR receives the label information two
minutes after the recordin g starts.
• If you set a timer recording with VPS/PDC OFF, the title information will be transferred in
the middle of the rec ordi ng.
• Note that this f u nction may not work correctly with programmes broadcast from som e stations.
• If the Broadcast system updates the Teletext information at the momen t re cording starts, the
title on the label may not correspond to the one of the recorded programme. In this case, you
may have to manually enter the correct title us ing the SMARTFILE EDIT MENU.
• You cannot get the label inform ation from sources connected to the LINE input or the
satellite c h annels.
86
Labelling a recorded programme and tape
Page 87

Labelling a recorded progra mme manual ly
SMARTFILE EDIT
CATEGORY :
SELECT :
MENUEXIT :
SPORTS
1 . 10 NEWS SEVEN
CCB SP 1H 30M
30 . 9 SAT 7 : 00
SP 1H 30M
SP 1H 30MFILMS
PROG .32
2 . 8 . 00 - 10 . 10. 00
10 . 10 SPORTS FESTIVAL
PAGE 1
TITLE
:
If Teletext data is not available, label and
select the appropriate category of t he
recorded programme manually. Labelling
manually takes priority over labelling
automatically. You can also label the tape.
Up to 18 characters can be input for a
programme and tape label.
123
456
789
CLEAR
0
MENU
M/m/</,
OK
Before you start
…
• Turn on your TV and set it to the video channel.
Insert a SmartFile tape.
1
The SMARTFILE indicator lights up on the VCR.
Press MENU and select SMAR TFILE EDIT and
2
press OK.
The SMARTFILE EDIT menu appears.
continued
Labelling a recorded programme and tape
SmartFile function
87
Page 88

3
SMARTFILE EDIT
CATEGORY :
SELECT :
MENUEXIT :
SPORTS
1 . 10 NEWS SEVEN
CCB SP 1H 30M
30 . 9 SAT 7 : 00
SP 1H 30M
SP 1H 30MFILMS
PROG .32
2 . 8 . 00 - 10 . 10. 00
10 . 10 SPORTS FESTIVAL
PAGE 1
TITLE
:
SMARTFILE EDIT
BACK :
SELECT :
MENUEXIT :
SPORTS
1 . 10 NEWS SEVEN
CCB SP 1H 30M
30 . 9
SP 1H 30M
SP 1H 30MFILMS
2 . 8 . 00 - 10 . 10. 00
10 . 10 SPORTS FESTIVAL
PAGE 1
CONFIRM
:
:
NEXT
OK
SMARTFILE EDIT
BACK :
SELECT :
MENUEXIT :
SPORTS
1 . 10 NEWS SEVEN
CCB SP 1H 30M
30 . 9
SP 1H 30M
SP 1H 30MFILMS
2 . 8 . 00 - 10 . 10. 00
10 . 10 SPORTS FESTIVAL
PAGE 1
CONFIRM
:
:
NEXT
OK
N
SMARTFILE EDIT
BACK :
SELECT :
MENUEXIT :
SPORTS
1 . 10 NEWS SEVEN
CCB SP 1H 30M
30 . 9
SP 1H 30M
SP 1H 30MFILMS
2 . 8 . 00 - 10 . 10. 00
10 . 10 SPORTS FESTIVAL
PAGE 1
CONFIRM
:
:
NEXT
OK
N
CONFIRM :
SELECT :
MENUEXIT :
SMARTFILE EDIT
SPORTS
1 . 10 NEWS SEVEN
CCB SP 1H 30M
30 . 9
SP 1H 30M
SP 1H 30M
2 . 8 . 00 - 10 . 10. 00
10 . 10 SPORTS FESTIVAL
PAGE 1
NICK & MATT
FILMS
OK
4
Press
Press ,.
to select a programme
M/m
.
The cursor moves to the programme lab el inpu t
position.
Label the programme.
5
1
Press
Each time you press
to select a character.
M/m
, the char acte r c ha nge s
M
as shown below.
At Bt ... t Z t special characters t
! t& t, (comma) t - (hyphen) t .
(period) t 0 t 1 ... t9 t(blank space)
You can also select a blank space by pressing
CLEAR.
2
To set the next character, press
,
.
The cursor moves to the next positio n.
88
3
Repeat steps 1 and 2 to label the programme.
Press OK.
6
Labelling a recorded programme and tape
Page 89

7
CONFIRM :
SELECT :
MENUEXIT :
SMARTFILE EDIT
SPORTS
1 . 10 NEWS SEVEN
CCB SP 1H 30M
30 . 9
SP 1H 30M
SP 1H 30M
2 . 8 . 00 - 10 . 10. 00
10 . 10 SPORTS FESTIVAL
PAGE 1
NICK & MATT
SHOW
OK
Press
to select a category.
M/m
Each time you press M, the category changes as
shown below.
SPECIAL t FILMS t NEWS t SHOW
SPORTS t CHILDREN t MUSICt
ARTS t SERIES t EDUCATION
t
LEISURE t SHOPPING t VARIETY t
(blank)
Press OK.
8
The programme label and a selected category are stored.
Press MENU to exit the menu.
9
To erase the programme label
Press CLEAR after step 3 above. The programme label is eras ed and the default
recording data reappear.
To erase the selected category
Press CLEAR in step 7 above. The selected category is erased and the space becomes blank.
To label a regularly scheduled timer-r ecorded programme
Once you label a progra mme which is set to record regularly (i.e everyday, same day
of the week) in the ShowView system or timer recording mod e, th e VCR recog nizes
the label and will automatically label all future recordings of the same programme.
The set label is assigned even when an information signal containing the programme
name, category name or other information is broadcast with the programme.
However , if you change the programme label and the category several times, the VCR
may automatically assign the set label only to the la st recorded prog ramme for which
the programme label and category were changed.
SmartFile function
continued
Labelling a recorded programme and tape
89
Page 90

Labelling a tape
SMARTFILE EDIT
CATEGORY :
SELECT :
MENUEXIT :
SPORTS
1 . 10 NEWS SEVEN
CCB SP 1H 30M
30 . 9 NICK & MATT
SP 1H 30M
SP 1H 30MSHOW
2 . 8 . 00 - 10 . 10. 00
10 . 10 SPORTS FESTIVAL
PAGE 1
TITLE
:
Before you start
• Turn on your TV and set it to the video channel.
…
CLEAR
123
456
789
0
MENU
Insert a SmartFile tape.
1
The SMARTFILE indicator lights up on the VCR.
Press MENU and select SMARTFILE EDIT,
2
then press OK.
The SMARTFILE EDIT menu appears.
M/m/</,
OK
90
Labelling a recorded programme and tape
Page 91

Press M to select the tape title.
SMARTFILE EDIT
TITLE EDIT :
SELECT :
MENUEXIT :
SPORTS
1 . 10 NEWS SEVEN
CCB SP 1H 30M
30 . 9 NICK & MATT
SP 1H 30M
SP 1H 30MSHOW
2 . 8 . 00 - 10 . 10. 00
10 . 10 SPORTS FESTIVAL
PAGE 1
BACK :
SELECT :
MENUEXIT :
CONFIRM
:
:
NEXT
OK
SMARTFILE EDIT
SPORTS
1 . 10 NEWS SEVEN
CCB SP 1H 30M
30 . 9 NICK & MATT
SP 1H 30M
SP 1H 30MSHOW
10 . 10 SPORTS FESTIVAL
PAGE 1
BACK :
SELECT :
MENUEXIT :
CONFIRM
:
:
NEXT
OK
SMARTFILE EDIT
SPORTS
1 . 10 NEWS SEVEN
CCB SP 1H 30M
30 . 9 NICK & MATT
SP 1H 30M
SP 1H 30MSHOW
10 . 10 SPORTS FESTIVAL
PAGE 1
M
BACK :
SELECT :
MENUEXIT :
CONFIRM
:
:
NEXT
OK
SMARTFILE EDIT
SPORTS
1 . 10 NEWS SEVEN
CCB SP 1H 30M
30 . 9 NICK & MATT
SP 1H 30M
SP 1H 30MSHOW
10 . 10 SPORTS FESTIVAL
PAGE 1
M
SMARTFILE EDIT
TITLE EDIT :
SELECT :
MENUEXIT :
SPORTS
1 . 10 NEWS SEVEN
CCB SP 1H 30M
30 . 9 NICK & MATT
SP 1H 30M
SP 1H 30MSHOW
MY VIDEO TAPE
10 . 10 SPORTS FESTIVAL
PAGE 1
3
Press ,.
4
The cursor moves to the title input position.
Label the tape.
5
1
M/m
Press
to select a character.
Each time you press
M
, the character changes
as shown below.
At Bt ... t Z t special characters t
! t& t, (comma) t - (hyphen) t .
(period) t 0 t 1 ... t9 t(blank space)
You can also select a blank space by pressing CLEAR.
2
To set the next character, press
,
.
The cursor moves to the next position.
3
Repeat steps 1 and 2 to label the tape.
Press OK.
6
The tape title is stored.
Press MENU to exit the menu.
7
To erase the tape title
Press CLEAR after step 3 above. The tape title is erased and the recording date
reappears. When you want to erase the recording date from the tape title column,
press CLEAR again.
Labelling a recorded programme and tape
SmartFile function
91
Page 92

Registering the contents of a recorded
SMARTFILE SENSOR
2 . 8 . 00 - 10 . 10 . 00 PAGE 1
SMARTFILE INDEXING IS
START
END
IN PROGRESS
tape in the SmartFile label
The VCR will register programmes
recorded on a tape ( even a non-S m ar tFile
recorded tape) in the memory of a new
SmartFile label by detecting the index
signals indicating the start of recorded
programmes. Y ou can register up to the 12th
programme from the start of the tape. The
programmes appear from the bottom of the
screen as PROGRAM NO. 1, PROGRAM
NO.2, ... PROGRAM NO.12 in this order.
The 13th and subsequent programmes are
ignored. Yo u can manually name the
registered programme numbers and select
the category (see page 84).
SMARTFILE GENERATOR
g
Before you start
…
• Turn on your TV and set it to the video channel.
• Turn on your VCR.
Attach the SmartFile label to the spi ne of the
1
cassette as shown on the right and insert the
tape.
Press the SMARTFILE GENERATOR button on
2
the VCR.
A message appears indicating that the recorded
programmes are being registered. The index
signals are detected from the start of the tape,
and the registration stops when the end of the
tape is reached. The message disappears when
registration is complete.
To stop registration to the SmartFile label
Press SMARTFILE GENERATOR.
The data registered before the button is pressed remains in the SmartFile label. You
can register the programmes again by pressing SMARTFILE GENERATOR again.
92
Registering the contents of a recorded tape in the SmartFile label
Page 93

To check the information of a registered programme
Press SMARTFILE.
The SmartFile search list appear s. The registered programme number, registration
date and recording time appe ar in this list. Note that the registration d at e differs from
the recorded date.
Registration date
Programme located in
a recorded tape
Estimated position of the
registered progra m m e
MY VIDEO TAPE SP 1H 55M
15 . 11 PROGRAM NO.11
15 . 11 PROGRAM NO.10
15 . 11 PROGRAM NO. 9
START
SELECT :
SEARCH :
OK
SP 0H 30M
LP 2H 00M
SP 0H 45M
PAGE 1
Recording time
END
MENUEXIT :
Tips
• The programmes recorded on the tape can be registered again in a SmartFile label that
already contains programme data. However, the recorded date and time, program me name
and information input m anually (such as the programm e la be l a nd ca tegory) are replaced
with "PROGRAM NO. XX".
• If the SmartFile label contains stored programme data that includes protected programmes, a
message appears and the registration stops.
Notes
• Programme data is not registered correctly in the SmartFile label when :
– the programm e length is about 20 minutes or less in LP mode or about 11 min utes in SP
mode.
– the programme does not have an index signal or the index signal has been recorded over and
erased.
– the tape is damaged or dirty.
• If you don’t set the clock or the clock isn’t set to the correct date, the registration date won’t
be stored corr ec tly on the SmartFile list.
• After you press SMARTFILE GENERA TOR and start registration, registration is interrupted
if you press x STOP, H PLA Y,
M
FF
,
m
REW
, ?/
1
./>
INDEX SEARCH
or
In these cases as well, th e da ta r egistered up to the point when re g is tration was interrupt ed
remains in the SmartFile label.
• When you set AUTO LONG PLAY to ON in the TAPE OPTIONS menu, and the tape speed
automatically changes from SP to LP during recording, the VCR displays the entire recording
time converted to SP mode in the SmartFile list.
• The estimated position of the registered prog ram m es may not be correct if many short
programmes are recorded on long tapes.
SmartFile function
.
Registering the contents of a recorded tape in the SmartFile label
93
Page 94

Protectin g a recorded programme
SEARCH :
SELECT :
OK
MENUEXIT :
MY VIDEO TAPE PAGE 1
SPORTS
1 . 10 NEWS SEVEN
CCB SP 1H 30M
30 . 9 NICK & MATT
SP 0H 30M
SP 1H 30MSHOW
START
END
BLANK TIME SP 1H 55M
10 . 10 SPORTS FESTIVAL
SEARCH :
SELECT :
OK
MENUEXIT :
MY VIDEO TAPE PAGE 1
1 . 10 NEWS SEVEN
30 . 9 NICK & MATT
SP 0H 30M
SP 1H 30MSHOW
START
END
BLANK TIME SP 1H 55M
10 . 10 SPORTS FESTIVAL
SPORTS CCB SP 1H 30M
Y ou can protect a recorded programme from
accidental over-recording or erasure using
the SmartFile function.
When you start record ing from a position
prior to the protected programme, the
recording stops automatically before the
protected programme.
Before you start
• Turn on your TV and set it to the video channel.
1
…
Insert a SmartFile tape.
The SMARTFILE indicator lights up on the
VCR.
SMARTFILE
M/m/</,
94
Protecting a recorded programme
Press SMARTFILE.
2
The SmartFile search list appear s on the TV screen.
Press M/m to select the programme you wa n t to
3
protect.
Page 95

Press ,.
SEARCH :
SELECT :
OK
MENUEXIT :
MY VIDEO TAPE PAGE 1
1 . 10 NEWS SEVEN
30 . 9 NICK & MATT
SP 0H 30M
SP 1H 30MSHOW
START
END
BLANK TIME SP 1H 55M
10 . 10 SPORTS FESTIVAL
SPORTS CCB SP 1H 30M
4
The indicator appears to the left of the
selected programme and the programme is now
protected.
Press SMARTF ILE.
5
The SmartFile search list disappears.
To unlock the protected programme
Press
in step 4 above. The indicator disappears and you can record over this
<
programme.
Tips
• When you start recording fro m a positi on prior to the protected programm e, th e re cording
automatically stops no more than about four minutes in SP mode and about eight minutes in
LP mode before the beginning of the protected programme. The BLANK TIME indicator
flashes in the display windo w.
• If you protect a programme just after the Blank Time space, BLANK TIME is shortened by
about four minutes in SP mode and about ei ght minutes in LP mode.
• If you try to record on a SmartFil e ta pe containing a protected programme, a message
indicating that ther e is a pr ot ected programme on this tape appears on the TV screen.
Notes
• When you record another pro gra mme just after a protected program me, locate the beginning
of the Bl an k Time space by following the instructions in “Recording after locati ng th e Blan k
Time space“ on page 79. Otherwise, if the recording start point overlaps the prot ected
programme, the VCR may over-record the protected progra mm e .
• If you insert a SmartFile tape which contains a protected programme or protect a programme
for the first time on a new tape, the VCR will ana lyse the position of the protect ed
programme for a few seconds. You cannot operate the VCR w hile the VCR is analysing the
tape.
• If the SmartFile list contains 12 protected programmes, the next programme you record won’t
be stored in the SmartFile lis t.
• When you try to turn off the VCR after setting a ShowView or timer recording on the
protected programme, the VCR automatically ejects the cassette.
• The protect function may not work w i th an NTSC-recorded tape.
SmartFile function
Protecting a recorded programme
95
Page 96

Erasing the data of an unwanted
SEARCH :
SELECT :
OK
MENUEXIT :
MY VIDEO TAPE PAGE 1
SPORTS
1 . 10 NEWS SEVEN
CCB SP 1H 30M
30 . 9 NICK & MATT
SP 0H 30M
SP 1H 30MSHOW
START
END
BLANK TIME SP 1H 55M
10 . 10 SPORTS FESTIVAL
programme
You can erase an unwanted programme
from the SmartFile list.
When you erase a programme from the list,
that portion of tape becomes Blank Time
space.
Before you start
…
• Turn on your TV and set it to the video channel.
123
456
789
0
DISPLAY
CLEAR
SMARTFILE
M/m/</,
96
Erasing the data of an unwanted programme
Insert a SmartFile tape.
1
The SMARTFILE indicator lights up on the
VCR.
Press SMARTFILE.
2
The SmartFile search list appear s on the TV screen.
Page 97

Press M/m to select a programme you want to
SEARCH :
SELECT :
OK
MENUEXIT :
MY VIDEO TAPE PAGE 1
SPORTS
1 . 10 NEWS SEVEN
CCB SP 1H 30M
SP 1H 30MSHOW
START
END
BLANK TIME SP 1H 55M
10 . 10 SPORTS FESTIVAL
SP 0H 30M
30 . 9 NICK & MATT
SEARCH :
SELECT :
OK
MENUEXIT :
MY VIDEO TAPE PAGE 1
SPORTS
30 . 9 NICK & MATT
CCB SP 1H 30M
START
END
BLANK TIME SP 1H 55M
10 . 10 SPORTS FESTIVAL
SP 1H 30M
SHOW
3
erase from the list.
Press CLEAR.
4
The selected programme is erased from the
SmartFile list.
If you erase a programme by mistake, press
DISPLAY to make the programme reappear.
Press SMARTF ILE.
5
The SmartFile search list disappears.
Notes
• You cannot erase a protected programme from the SmartFile list. You have to first unlock the
protected programme by following the instructions in “To unlock the protected programme“
on page 95, then erase that programme from the list.
• The erased programme disappears from the SmartFile list, but it still remains on the tape.
• If the remaining lenth of a program is abou t 11 min ut es or less in SP mode or about 20
minutes or less in LP mode, you ca nnot make the programme reappe ar by using the
DISPLAY button.
SmartFile function
Erasing the data of an unwanted programme
97
Page 98

Addition a l Information
Troubleshooting
If you hav e an y ques tions or if you r prob lems are not co ve red belo w, please co nsult y our nea rest
Sony service facility.
Problem summary
The following table summarizes the reference numbers for the problems you might face. In
order to solve your problem, please refer to the corresponding r eference (S1=symptom1,
S2=symptom2 ...) in the righ t colum n below.
CATEGORY REFER TO
Picture
• while watching broadcast tuned by the TV
• while watching broadcast tuned by the VCR.
• while playing a tape.
S2, S6
S1, S6
S3, S4, S5
Sound
Functional
• while playing a tape.
• Playback
• Normal recordin g
• SmartFile
• Timer recording
• Synchronized Recording
• Canal Plus
• Line selection
• Remote commander
• Cleaning
• Clock
• Power
• Tape
• SMARTLINK
• Set-T o p Box
S7, S8, S9
S4, S9, S10
S11, S12
S13, S14
S15, S16
S17, S18, S19
S20, S21, S22
S23
S24, S25
S26
S27
S28, S29, S30, S31, S32
S33, S34
S35
S36
98
Troubleshooting
Page 99

Picture
The VCR picture
S1
does not appear on
the TV screen.
The TV programme
S2
is not clear or has
some interference.
The playback pi ctur e
S3
is not clear or has
some interference.
The tracking meter
S4
does not appear on
the TV screen.
Make sure the TV is set to the video ch annel. If you are using a
t
monitor, set it to video input.
If the VCR is connected to the TV with a Scart cable, make sure the
t
TV/VIDEO indicator is li t in the display w indow. Use the TV/
VIDEO key on the remote comma n der to lit the TV /V IDEO
indicator.
If your VCR is connected to the TV with only anaerial cable, make
t
sure the TV is correctly tuned to the VCR (see page 12).
If your TV is connected to the VCR with a Scart and an aerial
t
cables, make sure the RF MODULATOR is set to OFF (see page
18).
If your VCR is c onnect ed to t he TV w it h only an ae ri al ca bl e, m ake
t
sure the TV is correctly tuned to the VCR (see page 12).
If your TV is connected to the VCR with a Scart and an aerial
t
cables, make sure the RF MODULATOR is set to OFF (see page
18).
Existing broadcasts may interfere with the VCR. Reset the RF
t
MODULATOR output of your VCR (see page 18).
Adjust the trackin g wi th the TRACKING +/– buttons (see page 66).
t
The video heads are dirty (see below). Clean the video heads using
t
the Sony T-25CLD, E-25CLDR, or T-25CLW video head cleaning
cassette. If these cleaning cassettes are not available in your area,
have the heads cleaned at your nearest Sony service facility (a
standard service charge will be required). Do not use a
commercially available liqu id type cleaning cassette other than
Sony’s, as it may damage the video heads.
The video heads may have to be replaced. Consult your local Sony
t
service facility for more information.
The recording condition of the tape is very poor and tracking
t
cannot be ajusted.
Symptoms caused by contaminated video heads
•Normal picture •Rough picture
initial
contamination
Unclear picture •No picture (or
continued
black & white
screen appears)
terminal
99
Information
Additional
Page 100

Picture
The picture rol ls
S5
vertically during
picture search.
TV reception is poor.
S6
Sound
The picture has no
S7
sound.
The sound is
S8
unstable or has an
echo.
Y ou cannot select the
S9
left or the right
channel while
playing a tape
Playback
The tape starts
S10
playing as soon as it
is inserted.
Normal recording
The tape is ejected
S11
when you press z
REC.
Nothing happens
S12
when you press z
REC.
SmartFile
The programme label
S13
cannot be taken
properly.
Recording stops
S14
halfway.
Adjust the vertical hold contr ol on the TV or monitor.
t
Make sure the aerial cables are connected securely.
t
Adjust the TV aerial.
t
Make sure SYSTEM (B/G or D/K) in the TUNER menu is set to
t
the system in your area.
The tape is defective. P lease use a new tape.
t
Make sure SYSTEM (B/G or D/K) in the TUNER menu is set to
t
the system in your area.
When you play a tape with the same sound recorded on both the hi-
t
fi and normal sound tracks, make sure AUDIO MIX in the AUDIO
OPTIONS menu is set to OFF (see page 69).
Make sure AUDIO MIX is set to OFF in the AUDIO OPTIONS
t
menu (see page 69).
Make sure you are playing a hi-fi tape.
t
This is normal. When you insert a tape with no safety tab, the VCR
t
starts playing automatically.
The safety ta b h as been removed. To record on th is tape, cover the
t
tab hole (see page 46).
Make sure the tape is not at its end.
t
If the BL indicator is flashing in the display window, the tape
t
contains a programme protected by the SmartFile function (see
page 94).
Make sure the clock and the date are set correctly.
t
Check the setting of the TV guide pages. Some stations may not
t
offer this service (see page 84).
If you start recording more than two minutes before the beginning
t
of the programme, the title on the label may not correspond to the
one of the recorded prog ramme. Manually enter the c orrect title
using the SMARTFILE EDIT menu (see page 87).
If the TV reception is poor, the VCR will not be able to take the title
t
correctly. Manually en ter the correct title using the SMARTFILE
EDIT menu (see page 87 ).
If the tape contains a programme protected by the SmartFile
t
function, recording autom at ic ally stops before the protected
programme. Use another tape wh ich has enough recording space.
100
 Loading...