

Page 1

Video Cassette
Recorder
Operating Instructions
For hookup and setup, see the supplied hookup/setup manual.
Owner's record
The model and serial numbers are located at the rear of the
unit. Record these numbers in the spaces provided below.
Refer to them whenever you call upon your Sony dealer
legcuding this product.
Model No.
Serial No. ■
_______________________
___________^_________
3-865-759-11(1)
Declaration of Conformity
Trade Name; SONY
Model No.: SLV-M9IHF
Responsible Party: Sony Electronics Inc.
Address; 1 Sony Drive, Park Ridge, NJ.07656 USA
Telephone No.: 201-930-6970
This device complies with Prui 15 of the FCC Rules.
Operation is subject to the following two conditions; (1) This
device may not cause harmful interference, and (2) this
device must accept any interference received, including
interference that may cause undesired operation.
VHSI K1d=1FB
GOlX>
SLV-M91HF
©1999 by Sony Corporation
Page 2

• Do not install the unit near heat sources
such as radiators or air ducts, or in a place
To prevent fire or shock hazard, do not expose the unit to rain or moisture.
CAUTION
A
CMTHON: TO REDUCE THE MSK OF BfCrmc SHOCK,
OO NOT REMOVE COVER (OR BACK).
RgERSenWOMQTOQUAURmSCnVICCPDtBONMQ.
This symbol is intended to alert the
user to the presence of uninsulated
A
product's enclosure that may be of sufficient
magnitude to constitute a risk of electric shock
to persons.
(servicing) instructions in the literature
accompanying the appliance.
CAUTION
To prevent electric shock, do not use this
polarized AC plug with an extension cord,
receptacle or other outlet uiUess the blades can
be fully inserted to prevent blade exposure.
Precautions
Safety
• Operate the unit only on 120 V AC, 60 Hz.
• If anything falls into the cabinet, unplug the
• This unit is not disconnected from the AC
• Unplug the unit from the wall outlet if you
• One blade of the plug is wider than the
Installing
• Allow adequate air circulation to prevent
• Do not place the unit on surfaces (rugs,
"dangerous voltage" within the
This symbol is intended to alert the
user to the presence of important
A
operating and maintenance
urut and have it checked by qualified
personnel before operating it any further.
power source (mains) as long as it is
connected to the wall outlet, even if the unit
itself has been turned off.
do not intend to use it for an extended
period of time. To discormect the cord, pull
it out by the plug, never by the cord.
other for the purpose of safety ainl will fit
into the power outlet only one way. If you
are unable to insert the plug fully into the
outlet, contact your Sony dealer.
internal heat buildup.
blankets, etc.) or near materials (curtains,
draperies) that may block the ventilation
slots.
subject to direct sunlight, excessive dust,
mechanical vibration or shock.
• Do not install the unit in an inclined
position. It is designed to be operated in a
horizontal position only.
• Keep the unit and cassettes away from
equipment with strong magnets, such as
microwave ovens or large loudspeakers.
• Do not place heavy objects on the unit.
• If the unit is brought directly from a cold to
a warm location, moisture may condense
inside the VCR and cause damage to the
video head atvl tape. When you first install
the urut, or when you move it from a cold to
a warm location, wait for about three hours
before operating the unit.
Information
For customers in the USA CAUTION
You are cautioned that any changes or
modifications not expressly approved in this
manual could void your authority to operate
this equipment
NOTE:
This equipment has beefi tested and found to
comply with the limits for a Class B digital
device, pursuant to Part 15 of the FCC Rules.
These limits are designed to provide
reasonable protection against harmful
interference in a residential installation.
This equipment generates, uses, and can
radiate radio frequency energy and, if not
installed and used in accordance with the
instructions, may cause harmful interference to
radio communications. However, there is no
guarantee that interference will not occur in a
particular installation. If this equipment does
cause harmful interference to radio or
television reception, which can be determined
by turning the equipment off and on, the user
is encouraged to try to correct the interference
by one or more of the following measures:
• Reorient or relocate the receiving antenna.
• Increase the separation between the
equipment and receiver.
• Connect the equipment into an outlet on a
circuit different from that to which the
receiver is connected.
• Consult the dealer or an experienced radio/
TV technician for help.
Caution
Television programs, films, video tapes and
other materials may be copyrighted.
Unauthorized recording of such material may
be contrary to the provisions of the copyright
laws. Also, use of this recorder with cable
television transnussion may require
authorization from the cable television
transmission and/or program owner.
Page 3

Table of contents
Basic Operations
4 Playing a tape
6 Recording TV programs
10 Locating a channel by Station ID
12 Recording TV programs using the
VCR Plus+* GOLD system
15 Setting the timer manually
Additional Operations
19 Playing / searching at various
speeds
22 Creating a favorite channel list
with Station ID
24 Setting the recording duration
time
25 Checking/changing/canceling
timer settings
27 Recording stereo and bilingual
programs
29 Searching using the index
function
30 Adjusting the picture
32 Changing menu options
35 Watching the camcorder picture
without connecting cables
— LASER LINK
SmartFile Function
About the SmartFile function
42
Recording using the SmartFile
44
function
Selecting and playing a program
53
Checking the contents of a tape
55
Labeling a recorded program and
56
tape
Protecting a recorded program
61
Erasing the data of an unwanted
63
program
Registering the contents of a
65
recorded tape in the SmartFile
label
Storing program data from the
67
DIRECTV digital satellite receiver
(Program Data Dowirload)
Additional information
69 Troubleshooting
72 -Specifications
73 Index to parts and controls
79 Index
back cover
Quick reference to using the VCR
Editing
37 Editing methods
38 Hooking up to a VCR or stereo
system
39 Basic editing
40 In^rt editing
* VCR Plus+, C’, AliSet and PlusCode are trademarks of Gemstar Development Corporation. The
VCR Plus+system is manufactured under license from Gemstar Development Corporation. ,
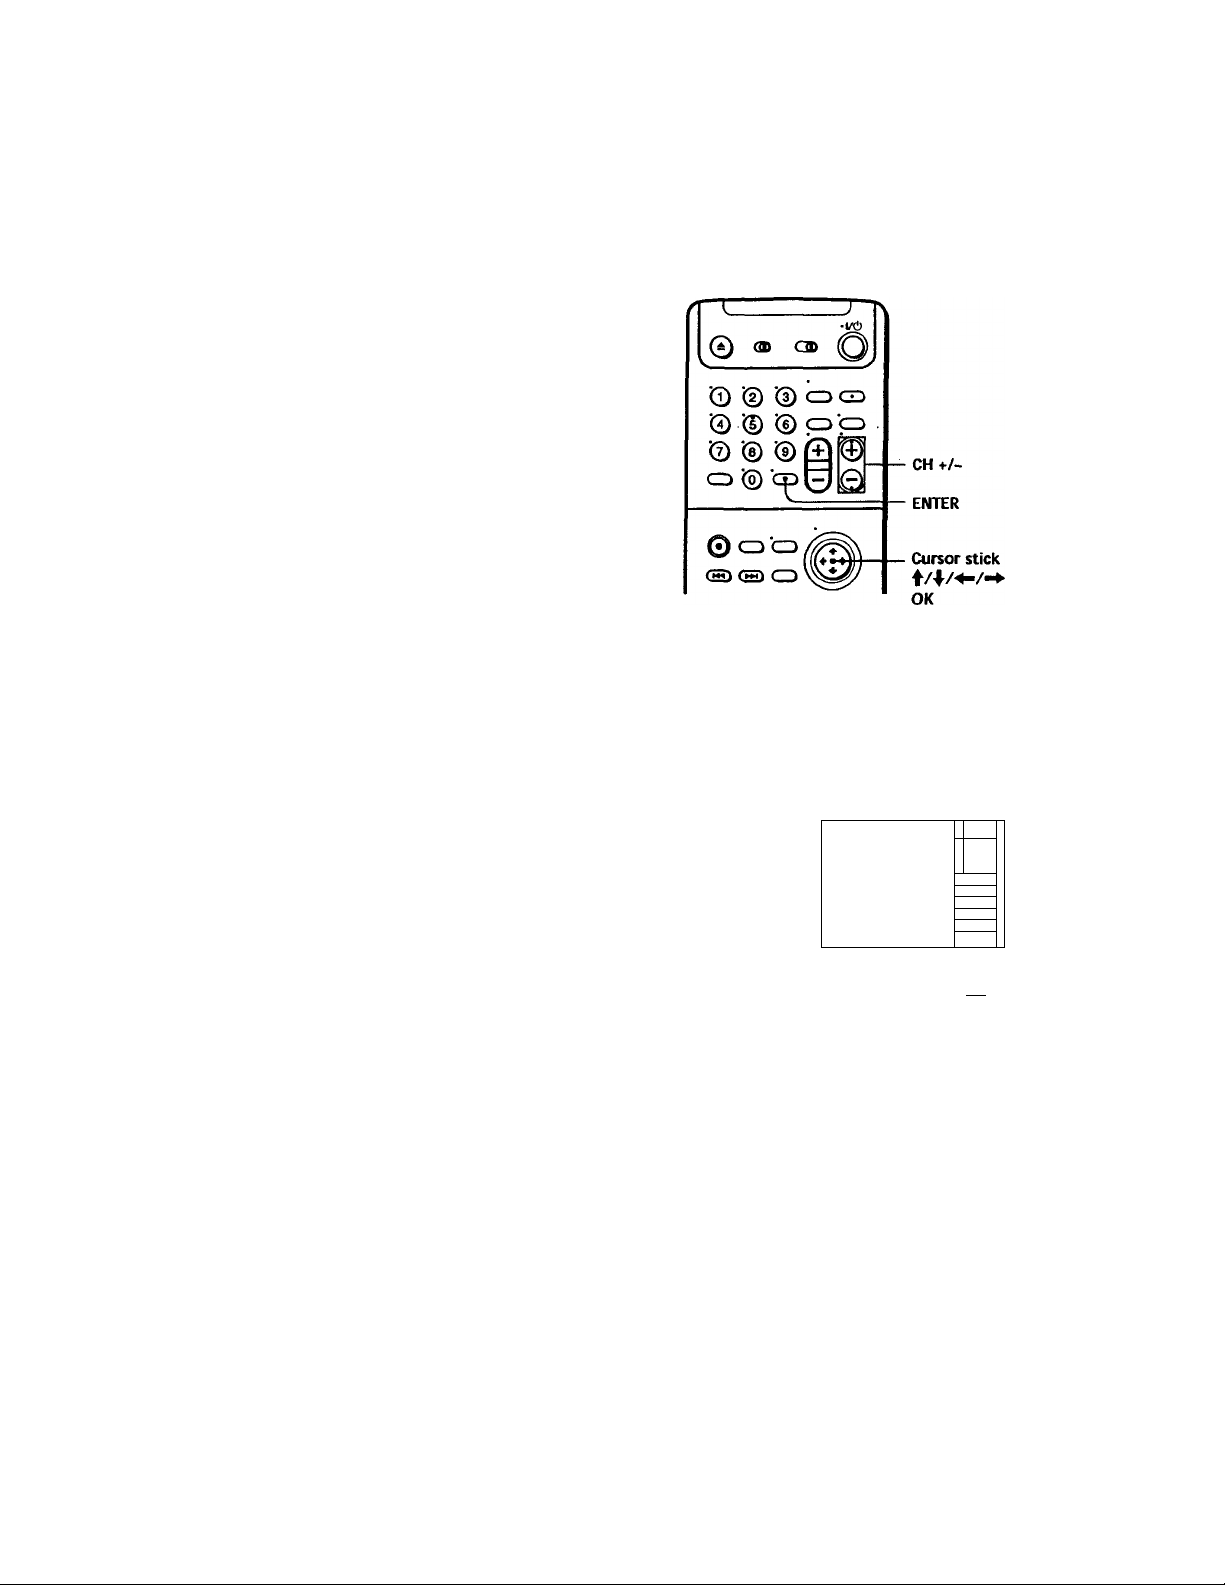
Introduction
Page 4

Basic Operations
Playing a tape
REJECT
CLEAR
DISPLAY
SMART CUE
FF
II PAUSE
IREW
OPLAY
I STOP
1
Turn on your TV and set it to the video channel.
2 Insert a tape.
The VCR turns on and starts playing
automatically if you insert a tape with
its safety tab removed.
^ XplayX
4 Basic Operations
Press OPLAY.
f ]
When the tape reaches the end, it will rewind automatically.
BJOTK^
Page 5

Additional tasks
To
Stop play
Pause play
Resume play after pause
Fast-forward the tape
Rewind the tape
Eject the tape
To skip playback
Press
■ STOP
II PAUSE
II PAUSE or t> PLAY
►► FF during stop
REW during stop
REJECT
You can skip a portion of playback you don't want to watch such as a
commercial and restart playback by pressing a single button.
1 Press SMART CUE during playback of the scene you want to skip. The
VCR starts searching.
2 Press SMART CUE again when you find the scene you want to watch.
The VCR stops searcf^g, rewinds a few seconds, then resumes normal
playback.
If you press and hold SMART CUE while the VCR is skip searching, the VCR
wUi stop searching, and continue rewinding until you release SMART CUE.
Tip
• You can ch2inge the length of rewinding tinie on the ADVANCED OPTIONS menu.
for details, see page 33.
To use the time counter
At the point on the tape that you want to find later, press CLEAR. The
counter in the display window resets to "0:00:00". Search for the point
afterwards by referring to the counter.
«DE0 EPAK
nn nn n r
DO'
UUUUU J
To display die counter on the TV screen, press DISPLAY.
Notes
• Tapes recorded in the LP mode on other VCRs can be played back on this VCR but
the picture quality cannot be guaranteed.
• The counter resets to "0:00KX)" whenever a tape is reinserted.
• The counter stojjs counting when it comes to a portion with no recording.
Basic Operations
Page 6

Recording TV
programs
1
6 Basic Operations
Turn on your TV and set it to the video channel.
To record from a cable box, turn it on.
Insert a tape with its safety tab in place.
Page 7

INPUT
SELECT
a
Press INPUT SELECT until a channel number appears in the display
window.
ñoco EPAK
n n n n n r
DO
Press CH +/- to select tíie chaimel you want to record.
U U LI LI LI J
VDEO EP APC
nnn-nn
uuuu u
IS
5 SP/EP
0 REC
Press SP/EP to select the tape speed, SP or EP.
CD
To Stop recording
Press ■ STOP.
EP (Extended Play) provides recording time three times as long as
SP (Standard Play), however, SP produces better picture and audio
quality.
Press • REC to start recording.
The recording indicator lights up red in the display window.
Recording indicator
nOEO tr APC
nnn-nn
LI LI LI U U I _J
VIDEO SP APC
"5b
n -n n - 1 n
U LI LI- 1 LI
/c
1 c
.1 _/
continued
Basic Operations
Page 8

Recording TV programs (continued)
To check the remaining tape length
Press DISPLAY. The white bar indicates the approximate length of tape
remaining. With the display on, press COUNTER/REMAIN to check the
remaining time. Each time you press COUNTER/REMAIN, the time
counter and flie remaining tape lertgth appear alternately. The remaining
tape length with the 0 indicator also appears in the display window.
fsT! — Remaining tape length
0:00:221
SP
To check the remaining tape length of a T-140 or T-180 tape, set TAPE
SELECT in the ADVANCED OPTIONS menu to 180. (For details, see
page 33.)
To watch another TV program while recording
Press TV/VIDEO to turn off the VIDEO indicator in the display
1
window.
If the TV is connected to the VCR's LINE OUT jacks, set the TV to TV
2
input; if not, skip this step.
Select another channel on the TV.
3
To select the channel using the shuttle ring
To select a channel in step 4. above, you can also use the shuttle ring. During
stop, turn the shuttle ring clockwise for higher channels or counterclockwise
for lower channels. The VCR switches the chaimel in the preset order.
To save a recording
To prevent accidental erasure, break off the
safety tab as illustrated. To record on a tape
again, cover the tab hole with adhesive tape.
----
Time counter
TAPE REMAINING
3Bj\
Safety tab
1 :46
8 Basic Operations
Page 9

Tips
• To select a channel you can use the number buttons on the remote commander.
Enter the channel number, then press ENTER.
• You can select a video source from the LINE-1 IN or LINE-2 IN jacks using the
INPUT SELECT button.
• "L3" is reserved for LASER LINK input when viewing the camcorder picture
(page 35). Cable connection is recommended when recording the picture from the
camcorder (p>age 38).
• The display appears on the TV screen indicating information about the tape, but the
information won't be recorded on the tape.
• If you don't want to watch TV while recording, you can turn off the TV. When
using a cable box, make sure to leave it on.
• You can set the chaimel with the shuttle ring during stop. However, you caimot set
the channel with the shuttle ring on the remote commander when:
-you set CABLE MOUSE in the CABLE BOX CONTROL menu to ON.
-you press JOG so that the remote commander is in jog mode.
Notes
• The remaming tape length may not be indicated accurately for short tapes such as
T-20 orT-30, or tapes recorded in the LP mode.
• The display does not appear during still (pause) mode or slow-motion playback.
• It may take up to one minute for the VCR to calculate and display the remaining
tape length after you press DISPLAY.
Basic Operations
Page 10

Locating a
channel by
Station ID
You can select the TV program from
station ID.
Before you start...
• Set FAVORITE CH to OFF in the
ADVANCED OPTIONS menu
(page 33).
1
2 «enter
CD
10 Basic Operations
Turn on your TV and set it to the video channel.
To record from a cable box, turn it on.
Press ENTER.
The station ID appears on the TV screen.
AA8
3
COE
9
'p
UK
12
LMN
13
OPQ
15
IBT'
19
22
uvw
XYZ
43
ABB
45
Page 11

3 • CH Press CH + /- to select the station ID
you want.
4 Press ENTER.
Note
• If the TV channel has no station ID, the channel number appears on the TV screen.
The selected station ID
Basic Operations
Page 12

Recording TV
programs using
the VCR Plus+
GOLD system
Just enter the PlusCode number listed in
the TV program guide. The date, time
and channel number of that program are
set automatically. You can preset up to
eight programs at a time.
Before you start...
• Check that the VCR clock is set to the
correct time.
• Turn on your TV and set it to the
video channel. When using a cable
box, turn it on.
• Insert a tape with its safety tab in
place. Make sure the tape is longer
than the total recording time.
• If you insert a tape with the SmartFile
function, make sure the total recording
time doesn't overlap the protected
program. For details about the
SmartFile function, see page 42.
l/(!)
CUAR
Number
buttons,
ENTER
VCR PIUS+
Cursor stick
I STOP
12 Basic Operations
Page 13

2 © '© '© Press the number buttons to enter the
® ® ® PlusCode number.
■® ■© ‘®
If you make a mistake, press CLEAR and
N re-enter the correct number.
PlusCodo
Useff^keys tar:
To con 1 i fm:ERRB
To cancol :bLEAra
SP/EP
»ILY WffiKLV 1
4
SP/EP
o
•CURSOR
CLEAR
o
•I/Ó
Press SP/EP to select the tape speed, SP or
EP.
PiuaCoda SP/EP
Uaal^kava tor
msaSmiSZ
To contt fm.'ÉNTEJ
To cancol ifctEAl
WEEKLY 1
Move the cursor stick •^/^ to select
ONCE, DAILY, or WEEKLY, flien press
ENTER:
To record
Only once
Everyday Monday to Friday
Once a week
Select
ONCE
DAILY
WEEKLY
Plu«Cod« SP/EP
|532»2
-------
1 gg
SeSSromgtme
DATE ST/mr STOP CH
B/30TW B:OOW 11:30/11 52 a
To sot timor, push IPOWERI
To cancol. push CLEARl
The date, start and stop time, channel number and tape speed
appear on the TV screen. If the information is not correct, press
CLEAR to cancel the setting. -
To enter another setting, repeat steps 1 to 4.
Press 1/(1) to turn off the VCR.
The © indicator appears in ffie display window and the VCR stands
by for recording. When using a cable box, leave it on.
To stop recording
To stop the VCR while recording, press ■ STOP.
continued
Basic Operations
Page 14

Recording TV programs using the VCR Plus+ GOLD system
(continued)
To use the VCR after setting the timer
To use the VCR before a timer recording begins, just press 1/(1)- The ©
indicator disappears from the display window and the VCR switches on.
Remember to press l/(!) to reset the VCR to the timer recording standby
mode after using the VCR.
You can also do the following tasks while the VCR is recording:
• Reset the counter.
• Display tape information on the TV screen.
• Check the timer settings.
• Watch another TV program.
To lock the VCR after setting the timer (Child Lock)
While the VCR turns on, hold down I/Ô POWER on the VCR until the o-n
indicator appears in the display window. The VCR turns off eind the °-n
indicator remains lit. The VCR will not work except for timer recording.
To unlock the VCR, hold down I/Ô POWER on the VCR until the o-«
indicator disappears from the display window. The VCR is unlocked and
turns on.
To stop timer recording while the VCR is locked, press ■ STOP. The
recording stops and the VCR is unlocked.
Tips
• To cancel the VCR Plus+ GOLD system recording, press VCR Plus+ before pressing
ENTER in step 4 above.
• When you are recording a program in the SP mode and the remaining tape becomes
shorter than the recording time; the tape speed is automatically changed to the EP
mode. Note that some noises will appear on the picture when the tape speed is
changed. If you want to keep the tape speed, set AUTO TAPE SPEED to OFF in the
ADVANCED OPTIONS menu (page 33).
• When a tape with a SmartFile label attached is inserted, the AUTO BLANK
SEARCH screen appears after step 5. Wait about ten seconds for the screen to
appear before pressing the l/(!) button in step 6. For details, see "Setting timer
recording in die Blank Time space" (page 50).
Notes
• If the VCR does not accept the PhisCode number, diis means that
-The PlusCode number is incorrect.
-ONCE, DAILY, or WEEKLY was selected incorrectly. You cannot select DAILY or
WEEKLY for a program that airs more than seven days ahead.
• The VCR will be unlocked when:
- you stop timer recording by pressing ■ STOP
-you insert a tape
- the AC jxiwer cord is disconnected or power supply stops.
14 Basic Operations
Page 15

Setting the timer manually
If the VCR Plus+ GOLD system is not
available in your area, follow the
instructions below to set the timer to
record programs.
Before you start...
• Check that the VCR clock is set to the
correct time.
• Turn on your TV and set it to the
video channel. When using a cable
box, turn it on.
• Insert a tap>e with its safety tab in
place. Make sure the tape is longer
than the total recording time.
• If you insert a tape with the SmartFile
function, make sure the total recording
time doesn't overlap the protected
program. For details about the
SmartFile Function, see page 42.
0 ®
■© ■© ‘(3)
© '© '©
@ ® ©
CD
J -
•ia!)
OD ^
1/(1)
INPUT
SELECT
Number
buttons
CH +/-
Cursor stick
OK
1
«MENU
CD
•CURSOR
PUSH OK
0 ®
CD ci) CD CD CD
CD CD CD CD CD
Press MENU, then move the cursor stick
♦/♦to select TIMER SET/CHECK and
push the cursor stick (OK).
)
■vt>
ca> Q
SP/EP
DATE START STOP CH
continued
Basic Operations
Page 16

Setting the timer manually (continued)
• CURSOR
PUSH OK
• CURSOR
PUSH OK
INPUT
SELECT
CD
Move the cursor stick to select the line that is to be set.
Set the date, start and stop time, channel
number and tape speed:
1 Move the cursor stick to highlight
each item in turn.
2 Move the cursor stick ■♦ /■♦ to set each
DATE START STOP CH
-I —
-I —
-I —
item.
To correct a setting, move the cursor stick
to return to that setting and reset.
When you set the channel number, the Channel number Station ID
station ID appears on the TV screen. You
can set it vviiile checking the station ID.
To record the same program every day or
the same day every week, move the cursor
DATE START STOP
-I—
<><>«ffgl8'l
stick \ while the date is highlighting. For
details, see "Daily/weekly recording"
below.
To record from a source connected to the LINE-1 IN or LINE-2 IN
jacks, press INPUT SELECT to display "LINEl" or "LINE2" in the
"CH" position.
• CURSOR
PUSH OK
• CURSOR
PUSH OK
16 Basic Operations
Move the cursor stick to confirm the setting.
The cursor appears at the beginning of the line. To enter another
setting, select the next line and repeat step 3.
Push the cursor stick (OK).
Page 17

• 1/(1)
Press 1/(1) to turn off the VCR.
The 0 indicator appears in the display window and the VCR stands
by for recording. When using a cable box, leave it on.
To stop recording
To stop the VCR while recording, press ■ STOP.
Daily/weekly recording
In step 3 above, move the cursor sticJc ♦ to select the recording pattern. Eacdi
time you move the cursor stick ♦/ the indication changes as shown below.
Move the cursor stick ♦ to change the indication in reverse order.
the current date -► SUN-SAT -► MON-SAT -► MON-FRI -► EVERY SAT -♦
-► EVERY MON -» EVERY SUN -♦ 1 month later -► (date counts down) -♦
the current date
To use the VCR after setting the timer
To use the VCR before a timer recording begins, just press l/(!). The ©
indicator disappears from the display window and the VCR switches on.
Remember to press
l/(!) to reset the VCR to the timer recording standby
mode after using the VCR.
You can also do the following tasks while the VCR is recording;
• Reset the counter.
• Display tape information on the TV screen.
• Check the timer settings,
• Watch another TV program.
To lock the VCR after setting the timer (Child Lock)
While the VCR turns on, hold down l/C!) POWER on the VCR until the o-n
indicator appears in the display window. The VCR turns off and the o-"
indicator remains lit. The VCR will not work except for timer recording.
To unlock the VCR, hold down l/(!) POWER on the VCR until the o-"
indicator disappears from the display window. The VCR is urUocked and
turns on.
To stop timer recording while the VCR is locked, press ■ STOP. The
recording stops and the VCR is unlocked.
...........
continued
Basic Operations
Page 18

Setting the timer manually (continued)
Tips
• To set the channel, you can also use the CH + /- or nunaber buttons.
• You can set the channel with the shuttle ring during stop. However, you cannot set
the chaimel with the shuttle ring on the remote commander when;
- you set CABLE MOUSE in the CABLE BOX CONTROL menu to ON.
- you press JOG so that the remote commander is in Jog mode.
• To set the tape speed, you can also use the SP/EP button.
• When you are recording a program in the SP mode and the tem«iirung tape becomes
shorter than the recording time, the tape speed is automatically dianged to the EP
mode. Note that some noises will appear on the picture when the tape speed is
changed. If you want to keep the tape speed, set AUTO TAPE SPEED to OFF in the
ADVANCED OPTIONS menu (page 33).
• "LINE3" is reserved for LASER LINK input when viewing the camcorder picture
(page 35). Cable coimection is r ecommended when recording the picture from the
camcorder (page 38).
• When a tape with a SmartFile label attached is inserted, the AUTO BLANK
SEARCH screen appears after closing the menu in step 5. For details, see "Setting
timer recording in the Blank Time space" (page 50).
Notes
• If you are using cable box control, you cannot select "LINEl", "LINE2" or "LINE3".
• The station ID appears on the TV screen only when you complete Smart Channel
Mapping and the VCR receives the program information signal (see page 54 of the
. supplied hookup/setup manual).
18 Basic Operations
Page 19

Additional Operations
Playing/searching at various speeds
^REW ►►FF
OI
>LAY
I
Q a Q Q
a a aa a a cud
JOG
!► SLOW
+/-
CLEAR
TAPE
RETURN
x2
FF
JOG
IREW
OPLAY
(STOP
Shuttle ring
Playback options
\^ew the picture during
fast-forward or rewind
Search forward
Search backward
Play at twice the normal speed
Play in slow motion
Shuttle ring
Operation
During fast-forward, hold down ►► FF. During rewind, hold
down ◄◄ REW.
During playback, press ►► FF.
During playback, press -♦d REW.
During playback, press x2.
During playback or pause, press SLOW + /-. Press the + /-
buttons to change the speed.
continued
Additional Operations 19
Page 20

Playing/searching at various speeds (continued)
Playback options
Replay a scene
Rewind and start play
To resume normal playback
Operation
During playback, first press CLEAR when you come to a scene
you want to replay later. When you are ready to replay the
scene, press ■ STOP. Then press TAPE RETURN and
O- PLAY in quick succession.
During stop, press O- PLAY on the VCR while holding down
◄◄ REW on the VCR.
Press t> PLAY.
Using the shuttle ring
Wth the shuttle ring, you can operate a variety of playback options. There
are two ways for using the shuttle ring, normal mode and jog mode.
To use the shuttle ring in normal mode
During playback or pause, turn the shuttle ring clockwise or
coimterclockwise. Each change in the shuttle ring position changes the
playback mode, and the corresponding mark appears on the TV screen for a
few seconds in the following way if the on-screen display function is on;
Playback mode Normal speed
Mark on the TV screen
►
______
!
Slow motion
Double speed
X2
Pause
High speed
I>»1
Slow motion
in reverse
20 I Additional Op»erations
High speed
in reverse
1-»<1
Double speed
in reverse
-X2
Normal speed
in reverse
-XI
Page 21

To use the shuttle ring in jog mode
Use this mode for frame-by-frame playback.
Press JOG to enter the jog mode. The JOG button lights up. If you change to
the jog mode during any playback mode, the playback pauses so you can see
a still picture. Each change in the shuttle ring position shifts the picture one
frame. To shift frames in reverse, turn the shuttle ring counterclockwise.
The frame shift speed depends on the speed you turn the shuttle ring.
To resume normal mode, press JOG again. Tlie JOG button goes off.
Tip
• Adjust the picture using the TRACKING +/- buttons if;
-Streaks appear while playing in slow motion.
- The picture shakes while pausing.
To set tracking to the center position, press both buttons (+/-) at the same time.
Notes
• The sound is muted during these operations.
• Tapes recorded in the LP mode on other VCRs can be played back on this VCR but
the picture quality cannot be guaranteed.
• The picture may have snow:
- when playing at high speed in reverse
- when playing in reverse slow motion
- when playing in reverse
• If the playback mode mark doesn't appear on the TV screen, press DISPLAY.
• The picture may flutter a bit when playing in slow motion.
Additional Operations 21
Page 22
Creating a
favorite channel
list with Station
ID
You can create your favorite channel list
of the TV channels with station ID. You
can store up to 10 chaimels with station
ID arid select the channel from your
favorite channel list.
Before you start..
• Set FAVORITE CH to ON in the
ADVANCED OPTIONS menu
(page 33).
Creating your favorite channel list
1 Press ENTER.
The FAVORITE CH screen appears on the TV screen.
Press CH +/- to select the station ID you
want to replace.
You can also use the cursor stick ♦ / 4^ instead.
The selected station ID
FAVORITE CH 12 UK
15
OPQ
9
!
13
LMN
RST
19
3 AAB
ABB
45
43 XYZ
22
UVW
FGH
10
3 Move the cursor stick to select the
station ID you want to set.
4 Repeat steps 2 and 3 to set the station IDs as required.
5 Press ENTER.
You can also use the cursor stick (OK) instead.
Note
• If the TV diannel has no station ID, the channel number appears on the TV screen.
22 Additional Operations
OPQ
AN
Page 23

Selecting a channel from
your favorite channel list
1 Turn on your TV and set it to die video channel.
To choose a channel from a cable box, turn the cable box on.
2 Press ENTER.
Your FAVORITE CH screen appears on the TV
screen.
(3) QD
© ■© ■© CD GD
■© (D ■© <=> O
■© ® ® (5
CD © to
•1/6
Cursor stick
♦/4
OK
FAVOfilTE CH 12 UK
IS
27
WHsa
13
RST
19
3 AAB
45
43
22
10
ÓPQ
IMN
ABB
XYZ
UWV
TOH
3 Press CH + /- to select the station ID you
want.
You can also use the cursor stick ♦/4 instead.
The selected
FAVORITE CH 12
____1___
4 Press ENTER.
You can also use the cursor stick (OK) instead.
Note
If file TV channel has no station ID, the channel number appears on the TV screen.
Additional Operations 23
station ID
iJ-UK Jl
IS ■ K51
27
13
nuia
19
AAB j
3
45 JABB
43
22
uvw II
FGH11
10
Page 24

Setting the
recording
duration time
After starting recording in the normal
way, you can have the VCR stop
recording automatically after a specified
duration.
While recording, press # REC.
The © indicator appears in the display window.
Press • REC repeatedly to set the duration.
Each press advances the time in increments of 30 minutes.
- 0:30-► 1:00---------►5:30-►6:00-*-N001131 recording-
r
■"T
-------------
0 ®
V
■© ■© ® CD GD
© ■© ■© CD CD
© © ©Q|0
CD © CdHK
do""
r-
•V6
0,
meo SP APC
~i n
n
J LI
u-
• REC
1 C
1 J
The tape counter decreases minute by minute to 0:00, then the VCR
stops recording and turns off automatically.
To extend the duration
Press • REC repeatedly to set a new duration.
To cancel the duration
Press • REC repeatedly until the © indicator disappears and the VCR
returns to normal recording mode.
To stop while recording
Press ■ STOP.
Note
• You cannot display flie current tape time in the display window when setting the
recording duration.
24 Additional Operations
Page 25

Checking/
changing/
canceling timer
settings
Before you start...
• Turn on your TV and set it to the
video channel.
1 Press l/(!) to turn on the VCR.
2 Press MENU, then move the cursor stick'1/4^
to select TIMER SET / CHECK and push the
cursor stick (OK).
• If you want to change a setting, go on to the
next step.
• If you do not need to change the settings,
push the cursor stick (OK), then turn off the
VCR to return to recording standby.
3 Move the cursor stick ♦ / 4 to select the setting you want to change or
cancel:
• To change the setting, move the cursor stick to highlight the
item you want to change, and move the cursor stick 4 / 4 to reset it.
Then, move the cursor stick repeatedly until the cursor appears at
the begirming of the line.
• To cancel the setting, press CLEAR.
4 Push the cursor stick (OK).
If any timer settings remain, turn off the VCR to return to recording
standby.
—T
--------
© ®
0 © @ QGD
■© © ©
© © ©
CD © CD 0 O
© CD'ct/g
(h«> CD
J
•ia!)
l/(!)
CLEAR
MENU
Cursor stick
OK
DATE START STOP CH
■ 1/30111 7;00We:00«6
tt/2 W 10:30tt (1:15W SO
MON-W 1:00M 3:00« UNE1 9
Pftfti SUN 6:55« l:30fU 12 V
continued
Additional Operations
25
Page 26

Checking/changing/canceling timer settings (continued)
When the timer settings overlap
The program that starts first has priority and the second program starts
recording only after the first program has finished. If the progranw start at
the same time, the program listed first in the menu has priority.
Program 1
Program 2
Program 1
I—About 20 seconds
in
Will be cut off
v^^^A^ut 20 seconds will be cut off
Program 2
26 Additional Operations
Page 27

Recording stereo and bilingual
programs
Recording stereo programs
This VCR automatically receives and records stereo programs. When a
stereo program is received, the STEREO indicator lights up. If there is noise
in the stereo program, set AUTO STEREO in the ADVANCED OPTIONS
menu to OFF. The sound will be recorded in monaural (on both hi-fi and
normal audio trades) but with less noise. For details, see page 32.
Recording bilingual programs
Normally, this VCR records only the main sound. When a SAP (Second
Audio Program) is received, the SAP indicator lights up. To record only SAP
sound, set TUNER AUDIO in die ADVANCED OPTIONS menu to SAP. For
details, see page 33.
Selecting the sound during playback
Press AUDIO MONITOR to select the sound you want. (The sound being
recorded will not change.)
To listen to
Stereo
Left channel
Right channel
Monaural sound on the
normal audio track
On-screen display
STEREO STEREO
LEFTCH
RIGHT CH STEREO
No indicator
Display window
STEREO
No indicator
Additional Operations
continued
27
Page 28

Recording stereo and biUnguai programs (continued)
How sound is recorded on a video tape
The VCR records sound onto two separate tracks. Hi-fi audio is recorded
onto the main track along with the picture. Monaural sound is recorded
onto the normal audio track along the edge of the tape.
Monaural sound
Normal audio track
Hi-fi audio track
(main track)
Notes
• To play a tape in stereo, you must use the A/V connections.
• When you play a tape recorded in monaural, the sound is heard in monaural
regardless of the AUDIO MONITOR setting.
• If the AUDIO MONITOR button does not function, check that AUDIO MIX in the
ADVANCED OPTIONS menu is set to OFF.
t
Stereo sound
(left/right channels)
28 I Additional Operations
Page 29

Searching using
the index
function
The VCR marks the tape with an index
signal at the point where each recording
begins. Use these signals as references
to find a specific recording. The VCR
can search up to 99 index signals ahead
of dr behind the current position.
1 Insert an indexed tape into the VCR.
2 . Press /►►! INDEX SEARCH repeatedly to specify how many
index signals ahead or behind you want to search:
• To search ahead, press INDEX
SEARCH.
• To search backwards, press INDEX
SEARCH.
The VCR starts searching and the index
number on the TV screen counts down to
zero. Playback starts automatically from
that point.
rr^
dD (JD
© © '© CD CD
'© i® © CD CD
'© ■© ©
CD ■© CD 0 l0l
© CD CD
|(g)(B)ICD
1
■V<!>
INDEX
SEARCH
To stop searching
Press ■ STOP.
Note
• No index signal will be added when recording starts from recording pause.
However, an index signal will be marked if you change the program position
during recording pause.
Additional Operations 29
Page 30

Adjusting the picture
Adjusting the tracking
Although the VCR automatically adjusts the tracking when playing a tape
(the g indicator flashes in the display window, then goes off), distortion
may occur if the tape was recorded in poor condition. In this case, manually
adjust the tracking.
Press the TRACKING +/- buttons to display
the tracking meter. The distortion should
disappear as you press one of the two buttons
(the g indicator lights up). To resume
automatic tracking adjustment, eject the tape
and reinsert it.
About the Reality Regenerator function
The Reality Regenerator function automatically restores the picture to its
original quality during playback.
To use the Reality Regenerator ^
function, press REALITY
REGENERATOR. The REALITY
REGENERATOR indicator lights up.
To turn it off, press REALITY
REGENERATOR. The REALITY
REGENERATOR indicator goes off.
Tracking meter
--------------------------------------
n D 11®
1 1 a □ o o
/ aaaaaacDsa
REALITY REGENERATOR
REAUTY REGENERATOR indicator
30 Additional Operations
Page 31

About the Adaptive Picture Control (APC) function
The Adaptive Picture Control (APC) function automatically improves
recording and playback quality by adjusting die VCR to the condition of the
video heads and tape. To maintain better picture quality, we recommend
that you set APC to ON in the ADVANCED OPTIONS menu (with the APC
indicator in the display window lit). For details, see page 33.
APC playback
The APC function automatically works on all types of tapes, including rental
tapes and tapes that were not recorded with APC.
APC recording
Whenever you insert a tape and first start recording, the VCR adjusts to the
tape using the APC function (the APC indicator dashes rapidly). This
adjustment is retained until the tape is ejected.
Notes
• The automatic tracking adjustment cannot be guaranteed to work with tapes
recorded in the LP mode on other VCRs.
• The APC function does not work if the tape speed is automatically changed from
the SP to EP mode during a timer recording when AUTO TAPE SPEED is set to ON
in the ADVANCED OPTIONS menu, unless the tape has been recorded in the EP
mode with the APC function.
• There is a delay of about ten seconds before the VCR actually starts recording while
the VCR analyzes the tape. To avoid the delay, first set the VCR to recording pause
(the APC indicator flashes slowly) and press • REC to have the VCR analyze the
tape (the APC indicator flashes rapidly). After the APC indicator stops flashing,
press II PAUSE to start recording inunediately.
If you want to start recording quickly without using the APC function, first set the
VCR to recording pause (the APC indicator flashes slowly) and press II PAUSE to
start recording.
Additional Operations
31
Page 32

Changing menu options
Press MENU, then move the cursor stick
Page 1
f/♦ to select ADVANCED OPTIONS and
push the cursor stick (OK).
Move the cursor stick ♦'/4 to select the
option to change, flien move the cursor
stick to change the setting.
The ADVANCED OPTIONS menu has 3
pages. Moving the cursor stick /■I'
AUTO STEREO
AUDIO MIX
TUNER AUDIO
SHARPNESS
Um to teltcjan
lt*m, then puah
Page 2
repeatedly will turn the pages.
Push the cursor stick (OK) to return to the
original screen.
DIMMER
AUTO TARE SPEED |
TAPE SEliCT
SMART CUE
Use 14 t o select an
Hem, then push
Page3
AUTO LASER LINK
DEFAULT SPEB)
BLANK SEARCH
SMARTFILE UST
Use 14 ♦{ to select an
item, then push 55
Menu choices
Initial settings are indicated in bold print.
Menu option. Set this option to
AUTO ANT SEL • ON it your TV is connected only to VHF/UHF OUT on
AUTO STEREO • ON to receive stereo programs.
AUDIO MIX
the VCR. To play a tape, set the TV to the VCR channel
(channel 3 or 4).
• OFF if your TV is connected to both VHF/UFIF OUT and
LINE OUT on the VCR. To play a tape, set the TV to the
VCR input.
• OFF to reduce noise. The sound changes to motuiural.
• ON to listen to the sound recorded on hi-fi and normal
audio tracks at the same time. The AUDIO MONTTOR
button will not function.
• OFF to listen to hi-fi and normal audio tracks separately.
Select the sound using the AUDIO MONITOR button.
32 Additional Operations
Page 33

Menu option Set this option to
TUNER AUDIO
SHARPNESS
APC
DIMMER
• MAIN to record the main sound on both hi-fi and normal
audio tracks.
• SAP to record the SAP (Second Audio Program) sound on
both hi-fi and normal audio tracks.
L (Low) through H (High) to adjust the sharpness of the
picture. L to turn off the sharpness control.
• ON to switch on the APC (Adaptive Picture Control)
function and improve picture quality.
• OFF to switch off APC.
• ON to make the display window dim.
• OFF to make it brighter.
AUTO TAPE SPEED • ON to change the timer recording tape speed
TAPE SELECT
SMART CUE
FAVORITE CH
AUTO LASER UNK
DEFAULTSPEED
automatically to the EP mode when the remaining tape
length becomes shorter than the recording time. To
operate AUTO TAPE SPEED, set TAPE SELECT correctly.
• OFF to keep the tape speed.
• AUTO when using a T-160 length tape or any tape shorter
than a T-140 length tape.
• 180 when using a T-140 or T-180 length tape.
For details, see page 8.
• MEDIUM to set the automatic rewinding time on skip
playback to a medium length.
• SHORT to set to a short length.
• LONG to set to a long length.
• ON when using favorite chaimel list.
• OFF when using station ID list.
For details, see pages 10 and 22.
• ON to switch the video input automatically to "L3" and
display the camcoder picture on the TV screen when the
camcorder is aimed at the LASER LINK IR receiver of the
VCR.
• OFF to not switch the video input automatically.
For details, see page 35.
• EP to set the recording tape speed automatically back to
EP after recording.
• SP to set the recording tape speed automatically back to
SP after recording.
• FLOAT to set the recording tape speed to the last position
selected from the SP/EP button.
continued
Additional Operations
33
Page 34

Changing menu options (continued)
Menu option
BLANK SEARCH
SMARTFILEUST
Set this option to
• MANUAL to display a screen asking whether to search for
the Blank Time when the timer is set.
• AUTO to set the VCR to perform the Blank Time search
automatically each time the timer is set.
• OFF to switdi off the Blank Time search function.
For details, see page 51.
• MANUAL to display the SmartFile search list only when
you press the SMARTFILE button.
• AUTO to display the SmartFile search list automatically
when you insert a SmartFile tape.
Note
If you set the DEFAULT SPEED option to EP, you caii still change the recording tape
speed to SP, or vice versa by pressing the SP/EP button only for that program. Next
time you record a program, the recording tape speed is automatically set to the
pxjsition you set in the DEFAULT SPEED option.
34 Additional Operations
Page 35

Watching the camcorder picture without connecting cables — LASER LINK
This VCR has a built-in AV cordless IR receiver which lets you watch
the picture of a A LASER LINK* compatible camcorder on your TV
without connecting cables. LASER LINK is a s)^tem which transmits
and receives pictures and sound between A LASER LINK compatible
video equipment by using infrared rays.
Before you start...
• Turn on your TV and set it to the video channel.
1 Press l/(!) POWER to turn on this VCR.
2 Adjust the angle and direction of the LASER LINK IR emitter of the
camcorder to match the LASER LINK IR receiver of this VCR.
Place the camcorder directly in front of this VCR widiin the range
specified below.
LASER UNK IR receiver
LASER LINK is a trademark of Sony Corporation.
continued
Additional Operations 35
Page 36

Watching the camcorder picture without connecting cables
— LASER LINK (continued)
3 Start camcorder playback using LASER LINK.
The VCR input automatically switches to "L3" and the camcorder
picture appears on the TV screen.
Refer to the operating instructions of the camcorder for camcorder
operations using LASER LINK.
4 Adjust the distance and angle between the camcorder and the VCR so
that die playback picture appears clearly on the TV.
To stop watching the camcorder picture
Move the camcorder so that its LASER LINK IR emitter no longer points at
the LASER LINK IR receiver of this VCR. The video channel or input
returns to the position selected before using LASER LINK.
Tips
• Cable connection is recommended when recording or editing the picture from the
camcorder (page 38).
• If you do not want to automatically switch the video input and display the picture
on the TV when the camcorder is aimed at the IR receiver of the VCR, set AUTO
LASER LINK to OFF in the ADVANCED OITIONS irienu. In this case, you can
view the picture by pressing the INPUT SELECT button to switch the input to "L3"
(see page 33).
Notes
• Do not cover the IR emitter of the camcorder or the IR receiver of the VCR with
your hands or other objects.
• Infrared rays cannot pass through walls or opaque glass. Be sure to place the VCR
in an unobstructed position. Using LASER LINK through glass will shorten the
transmission range.
• Do not place the camcorder too close to the VCR, as this may cause noise and/or
beat.
• When connecting the VCR to the TV using only the antenna cable, press the
TV/VIDEO button to display the VIDEO indicator in the VCR's display window
before starting to use LASER LINK.
• The IFT-AVl Cordless AV Transmitter System uses a different frequency band, so it
cannot be used with this VCR.
36
Additional Operations
Page 37

Editing
Editing methods
This section introduces you to various ways to edit tape recordings.
Basic editing
You can make a copy of a tape.
Insert editing
You can replace an existing scene with
material from another recording. There
are three kinds of insert editing.
Video insert
Replaces the original video and hi-fi
audio. The monaural sound on the
normal audio track is retained.
Audio insert
Replaces the original monaural sound
on the normal audio track. The video
and hi-fi sound are left intact. For
example, you can use this feature to add
commentary to a tape recorded on a
camcorder.
Source tape
Edited tape
Vidéo insert
Source tape
Edited tape
Audio insert
- Normal audio
. Normal audio
A/V insert
Replaces the original video and both hifi and monaural sound.
Editing I 37
Page 38

Hooking up to a VCR or stereo system
How to hook up to record on this VCR
This VCR (Recorder) TV
É1 O 1 1
n f • 1 loooo
LINE-2 IN
I
Other VCR (Player)
UNE OUT
------------------^----------
VMC-810HG audio/video cable
Crî:^: Signal flow (not supplied)
How to hook up to a stereo system
Connect LINE-2 IN AUDIO on this VCR to the audio output jacks on the
stereo system, using the RK-C510KS audio cable (not supplied).
If the other VCR has a CONTROL S OUT jack for synchronized editing
Hook up to record on the other VCR, ^en connect the VCRs via the
CONTROL S jacks. Thé CONTROL S connection lets you control (pause and
release pause) both VCRs from the recording VCR.
Notes
• Make sure you connect the plugs to jacks of the same color.
• If the other VCR is a monaural type and connected to this VCR's LINE-2 IN jacks,
cormect tile audio plug to tiie AUDIO L (white) jack. The sound is recorded on both
right and left chaimels. When connecting to the AUDIO R (red) jack, the sound is
recorded only on the right chaimeL
• If you connected this VCR to both the LINE IN and LINE OUT jacks of the other
VCR, select the input correctly to prevent a humming noise.
• You can also use the LINE-1 IN jacks for editing. If the other VCR is a monaural
type, the sound is recorded only on the chaimel whose jack is coimected to the
audio plug. To record on both right and left chaimels, cormect the audio plugs to
the AUDIO R/L jacks using a VMC-910HG audio/video cable (not supplied).
• If the CONTROL S IN jack is used for S-Link™ (A/V bus control) with a TV, the
CONTROL S cormection carmot be used for editing.
38 Editing
Page 39

Basic editing
(when recording on this
VCR)
Before you start editing
• Turn on your TV and set it to the
video channel.
• Press INPUT SELECT to display ‘
(or "LI") in the display window.
• Press SP/EP to select die tape speed, SP or EP.
• On this VCR, press EDIT to display "EDIT" in the display window. If
the other VCR has a similar button, press it to activate edit function.
Insert a source tape with its safety tab removed into the other
(playback) VCR. Search for the point to start playback and set it to
playback pause.
Insert a tape into this (recording) VCR. Search for the point to start
recording and press II PAUSE.
Press • REC on this VCR and set it to recording pause.
3
To start editing, press the II PAUSE buttons on both VCRs at the same
4
time.
To stop editing
Press the ■ STOP buttons on both VCRs.
Tip ,
• To cut out unwanted scenes while editing, press II PAUSE on this VCR when an
unwanted scene begins. When it ends, press II PAUSE again to resume recording.
Note
• If you start recording following the procedure above, the VCR won't start recording
with the APC function. To record a tape with the APC function, press # REC again
during recording pause in step 3 so that the VCR analyzes the tape. Then when you
start recording in step 4, press II PAUSE immediately after the APC indicator stops
flashing. If you press II PAUSE before the APC indicator stops flashine. the APC
function is canceled.
"L2"
m
□
□ t
o a a a o o gna
II PAUSE
] ca
M
IREC
Editing 39
Page 40

Insert editing
Before you start editing
• Turn on your TV and set it to the
video channel.
• Press INPUT SELECT to display "L2"
in the display window.
• Press SP/EP to select the tape speed,
SP or EP.
• On this VCR, press EDIT to display
"EDIT" in the display window. If the
other VCR has a similar switch, set it
to ON as well.
0 (» OD O
CD CD CD CD CD
<pCpCD
c£)CD
CLEAR
VIDEO
INSERT
AUDIO
INSERT
II PAUSE
40 Editing
1 Insert a source tajje into the playback VCR or the stereo system. Search
for the point to start playback and set it to playback pause.
2 Insert a prerecorded tape into this (recording) VCR. Search for the end
of the scene to be replaced and press II PAUSE.
3 Press CLEAR on this VCR to reset the counter to "0:00:00".
4 Rewind the prerecorded tape to the beginning of the scene to be
replaced.
The VCR pauses.
Page 41

5 Press the INSERT buttons:
To replace
Picture and hi-fi sound
Monaural sound only
Picture, hi-fi and
monaural sound
Press
VIDEO INSERT.
"VID INS II" appears on the TV screen and
"VINSER T" appears in the display window.
AUDIO INSERT.
"AUD INS II" appears on the TV screen and
"A INSER T" appears in the display window.
AUDIO INSERT, then VIDEO INSERT.
"A/V INS H" appears on the TV screen and
"AV INSER T" appears in the display window.
To cancel the video or audio insert function, press VIDEO INSERT or
AUDIO INSERT again.
6 To start editing, press the II PAUSE buttons on this VCR and the other
VCR (or stereo system) at the same time.
To stop editing
Press the ■ STOP buttons on this VCR and the other VCR (or stereo system).
To listen to both the hi-fi and normal audio
Set.AUDIO MIX to ON in the ADVANCED OPTIONS menu (page 32). Use
this feature to listen to inserted audio together with the original hi-fi audio.
When AUDIO MIX is set to ON, the AUDIO MONITOR button does not
function. Remember to reset AUDIO MIX to OFF after playing the tape.
Note
• To use the INSERT function, this VCR must be set to playback pause, not recording
pause.
Editing 41
Page 42

SmartFile Function
About the SmartFile function
SmartFile* allows you to view the contents of your video tape (recording
date, channel, etc.) on the TV screen. It is no longer necessary to rewind,
fast-forward, or play back a tape to find out what is recorded. You can also
locate and start playback of a specific program, or find the position from
which you want to start recording by using this list. Program data is stored
in the memory of the SmartFile label attached to the tape.
The following functions are possible using SmartFile:
Recording using the SmartFile
function (page 44)
To use the SmartFile function, attach the
SmartFile label to the tape. If you record a
program on a tape with a SmartFile label, the
contents will appear on the SmartFile search list.
With the SmartFile list, you can also easily find
the beginning of the available recording space.
Selecting and playing a program (page 53)
To play back a recorded program, select the program you want to watch
using the SmartFile search list. The VCR locates the program and playback
starts automatically.
SmartFile search list
6:30m c*< 16
6:00pm cm 12
2:30pm cm B
STAHf
CP li«48M
0h30m CP
B/10l
p 1,
e/i3
OhSOm ,,
Checking the contents of a tape
(page 55)
when you bring the SmartFile label close to the
SMARTFILE sensor on the VCR, a summary of
the recorded programs appears in the SmartFile
check list. It is not necessary to insert the tape
into the VCR and press C>- PLAY to find out
what is recorded on it. This feature allows you
to easily find the program you want to watch, or
to quickly find a tape with enough recording
space.
* SmartFile is a trademark of Sony Corporation.
42 SmartFile Function
la B'l -I
SmartFile check list
BLANK miE V 1H48M
HON 9:60phpi16
9M 6:30phcn4
m i:00PHCMl2
rtl S ;4Spm ch 7 8727
BB 1 :00» 0( 12
IS 4:30pm ch8
N6XT:B
o o o c
6/30
6/2«
8/26
8/24
Page 43

Labeling a recorded program and tape (page 56)
You can attach an electronic "label" to the video tap>e and it's programs on
the SmartFile list. Labeling the recorded programs enables you to find a
program easily when you want to play it back. Also, once you label a
program whidi you set to record regularly (i.e. everyday, same day of a
week, etc.), the VCR recognizes the label and will automatically label all
future recordings of the same program.
Protecting a recorded program (page 61)
You can protect a recorded program from accidental over-recording or
erasure.
Erasing the data of an unwanted program (page 63)
By erasing a program from the SmartFile list, the VCR will record over the
unwanted program.
Registering the contents of a recorded tape in the
SmartFile label (page 65)
You can register programs recorded on a tape in the memory of a new
SmartFile label.
Storing program data from the DIRECTV digital satellite receiver (Program Data Download) (page 67)
If you connect a DIRECTV digital satellite receiver equipped with the
Program Data Download function, you can store the program and category
name transmitted from the DIRECTV digital satellite receiver on a SmartFile
tape. The DIRECTV digital satellite receiver equipped with the Program
Data Download function will be available in the future.
SmartFile Function
43
Page 44

Recording using the SmartFile function
To use the SmartFile function, attach the SmartFile label to the spine of the
cassette tap>e. If you record a program on a tape with a SmartFile label,
program data, such as the date and channel, is automatically stored in the
memory of the SmartFile label.
Attaching the SmartFile label to the cassette tape
To use the SmartFile function, attach the
supplied SmartFile label to the cassette tape.
Remove any stains or dirt from the surface of
the spine of the tape. Then, holding both
edges of the SmartFile label so that it doesn't
bend, attach it along the guide line to the spine
of the cassette tape. This tape is henceforth
referred to as a SmartFile tape.
Note on the purchase of SmartFile labels
• For the customers in the USA
To order additional SmartFile labels, see the back page.
• For the customers in Canada
Additional SmartFile labels can be purchased at Sony of Canada Ltd. Authorized
VHS Dealers.
Notes
• The SmartFile label is equipped with a memory chip. The memory chip may be
damaged and cannot be used when you:
- twist or fold the SmartFile label.
- remove the SmartFile label and re-attach it to a tape.
- attach more than one SmartFile label to a tape.
- attach some metal, or sticker which has met2d, to the SmartFile label.
- write too strongly on the SmartFile label using a ballpoint pen or similar sharp
instrument.
- disassemble or remodel a label
• Do not leave the SmartFile label in a place subject to excessive dust or dirt, direct
sunlight, humidity, mildew, strong magnetism, or near heat sources.
• If you attach the SmartFile label to a short length tape, such as T-30 or shorter, you
cannot use the SntartFile functiort.
44 SmartFile Function
Page 45

Recording a program on the SmartFile tape
when recording a program on the SmartFile tape, no matter what method
you use to record die program (normal recording, the VCR Plus+ GOLD
system recording, etc.), program data (date, channel, recording start time,
etc.) is stored in the memory of the SmartFile label. The SmartFile label can
contain up. to 12 programs' data. When the number of the stored programs
goes over 12, the oldest program data is erased from the SmartFile list.
However, a program which lasts less than about 15 minutes in EP mode or
about 5 minutes in SP mode cannot be stored in the memory.
When you record a program on the SmartFile tape which already contains
program data, see "Recording after locating the Blank Hme space" on
page 47.
Tip
• You can protect a recorded program from accidental over-recording or erasure (see
page 61).
Note
• If you press II PAUSE one or more times during recording, thereby creating short
lengths of recorded time between such pauses, program data may not be stored in
the SmartFile label.
To check the information of a recorded program
Press SMARTFILE. The SmartFile search list appears. The recording day of
the week, start time, channel date, station ID, recording time, and tape
speed appear on the list. The longest space which doesn't have any program
data (Blank Time space) appears as "BLANK TIME".
Initial and latest dates of use for this
' Channel
' Date
' Tape speed
' Recording time
' Station ID
Estimated position of the recorded program
SmartFile Function 45
continued
Page 46

Recording using the SmartFUe function (continued)
Tips
• The station ID appears on the TV screen only when you complete Smart Channel
Mapping and the VCR receives the program information signal (see page 54 of the
supplied hookup/setup mamual).
• When the VCR receives the program information signal, flie program name may
appear in place of the day of the week, recording start time and Carmel.
• You can manually name a recorded program and select the category. You can also
name the SmartFile tape (see page 56).
Notes
• If you don't set the dock or the dock isn't set to the correct time, the initial and
latest dates of use for the SmartFile, the recording date and day of the week, and the
recording start time won't be stored correctly on the SmartFile list.
• When you record a program using the normal recording mode while CABLE
MOUSE is set to ON in the CABLE BOX CONTROL menu, the channel number is
stored as "CH
• When you set AUTO TAPE SPEED to ON in the ADVANCED OPTIONS menu, and
the tape speed automatically changes from SP to EP during recording, the VCR
displays the entire recording time converted in SP mode to the SmartFile list.
• The recording time length in the SmartFile list is an estimation and may be slightiy
different from the actual recorded time length.
------
".
46 SmartFile Function
Page 47

Recording after locating the
Blank Time space
The SmartFile function identities not
only the largest amount of available
blank space, but also recorded material
that doesn't have corresponding
program data stored in the SmartFile
label. The longest available recording
space (including programs that are not
stored on the SmartFile label) is referred
to as "Blank Time space". You can locate
the beginning of the Blank Time space
for recording. If there is a recorded
program after the Blank lime space, the
VQR will record over that program
unless you stop recording. If there is a
program you want to prevent from
being recorded over or erased, protect
that program before you start recording
another program (see page 61).
Before you start...
• Turn on your TV and set it to the video channel.
1 Insert a SmartFile tape with its safety tab in place.
The VCR turns on and the SMARTFILE indicator lights up.
2 Press SMARTFILE.
The SmartFile search list appears on the TV
screen. The Blank Time space appears in the
"BLANK TIME" row.
The BLANK indicator lights up and the Blank
Time space also appears in the display
window.
3 Move the cursor stich 'f'/^ to select BLANK
TIME.
BLANK TIME is on page 1 of the SmartFile
search list.
SP/EP
SMARTFILE
Cursor stick
OK
H8^0«9<«16/99 0.1
<
BLANK tlÜÉ
MON 613001 CH16 8/16
FR 8 :00m CH 12 8/13
niE 2:30oich6
TAflT .
s
EP 1h48u
OhSOm tp
0h30m 0
8/10
continued
SmartFile Function
47
Page 48

Recording using the SmartFile function (continued)
4 Press SP/EP to select the tape speed, SP or EP.
The BLANK TIME changes according to the
selected tape speed. Select a tape speed that
matches the length of the program you want
to record.
<
1
BtAhKilME
K» «:90wcn16
H
_____
«:00w< PM12
№ 2 :30m ch B
sTART^^
_______
fp 0h36u
8/16
Oh30u ip
8/13
OhSOu m
8/10
Oh30m f*
Push the cursor stick (OK).
The VCR goes to the beginning of the Blank
Time space and stops.
6 Start recording.
If the recordings overlap
If a newly recorded program overlaps a stored program, the data appearing
in the SMARTFILE list is as follows.
• If the second program overwrites the first program for 15 minutes or more in EP
■ mode or 5 minutes or mor e in SP mode from where the first program starts, the first
program data is erased.
. 15 minutes or more in EP mode,
5 minutes or more in SP mode
Program 1
L
Program 2 c:
If the remaining length of the first program is 15 minutes or less in EP mode or
5 minutes or less in SP mode after being overwritten by the second program, the
first program data is erased.
15 minutes or less in EP mode,
5 minutes or less in SP mode
Program 1
I
Program 2
Information will be erased
Information will be erased
=>
48 SmartFile Function
Page 49

If the second program starts recording 15 minutes or more in EP mode or 5 minutes
or more in SP mode after the first program starts, the data for both programs
appears. In this case, the stored program's recording time is updated to the time
when the second program starts.
15 minutes or more in EP mode,
5 minutes or more in SP mode
Program 1
X
Program 2
Tip
• If you set SMARTFILE LIST to AUTO in the ADVANCED OPTIONS menu, the
SmartFile search list appears automatically when you insert a SmartFile tape (see
page 34).
Note
• You may not be able to locate the beginning of the Blank Time space correctly in the
above step 5 when:
- the SmartFile tape contains one or more short length (less than about 15 minutes
in EP mode and about 5 minutes in SP mode) programs that are not stored in the
SmartFile label.
- the SmartFile tape is damaged or dirty.
t
The recording time is updated to
the time until overwriting starts.
continued
SmartFile Function I 49
Page 50

Recording using the SmartFile function (continued)
Setting timer recording in f] C
the Blank Time space
If you set the timer to record programs
while a SmartFile tape is inserted, the
VCR searches for the Blank Time space.
When the Blank Time space is located,
the VCR goes to the beginning of the
Blank Time space and stands by for
recording. If there is a recorded
program after the Blank Time space, the
VCR will record over that program
unless you stop recording. If there is a
program you want to prevent from <s> O CD
being recorded over or erased, protect
that program before you start recording
another program (see page 61).
Before you Start...
• Turn on your TV and set it to the video channel.
® C3)
■© © ■© O CO
© © © QO
© ® ®
cp®joP
© co m
1 Insert a SmartFile tape with its safety tab in place.
The VCR turns on and the SMARTFILE indicator lights up.
2 Set the timer.
• When using the VCR Plus+ GOLD system
(for details, see page 12);
O Press VCR Plus+.
© Enter the PlusCode number.
• When setting the timer manually (for
details, see page 15):
O Press MENU, then move the cursor stick
f /-!■ to select TIMER SET/CHECK and
push the cursor stick (OK).
o Set the date, start and stop times, channel
number and tape speed.
© Move the cursor stick to confirm the
setting and push the cursor stick (OK).
•ia!>
VCR Plus^
MENU
Cursor stick
OK
En le r p_rog r«m‘s PlusCod«
us ing ro-9l k«ys
To chango tape spaed,
push ISP/EPI
___________________________
DATE START STOP CH
Hi
_/—
50 SmartFile Function
Page 51

The AUTO BLANK SEARCH screen appears.
BLANK SEARCH?
Use 53 to sel ec I
Then pueh
Push IMÉÑU to quit
3 Move the cursor stick ◄“/■♦to select YES
and push the cursor stick (OK).
The Blank Time search screen appears.
The VCR goes to the beginning oí the Blank
Hme space and stops, then turns off
automatically.
The © indicator appears in the display
window and the VCR stands by for recording.
If you are using a cable box, leave it on.
If the recordings overlap
If a newly recorded program overlaps a stored program, the data appearing
in the SMARTFILE list is as follows.
• If the second program overwrites the first program for 15 minutes or more in EP
mode or 5 minutes or mor e in SP mode from where the first program starts, the first
program data is erased.
^ 15 minutes or more in EP mode,
5 minutes or more in SP mode
Program 1
T
Program 2
Information will be erased
If the remaining length of the first program is 15 minutes or less in EP mode or
5 minutes or less in SP mode after being overwritten by the second program, the
first program data is erased.
15 minutes or less in EP mode,
S minutes or less in SP mode
Program 1
Program 2
Information will be erased
continued
SmartFile Function 51
Page 52

Recording using the SmartFile function (continued)
If the second program starts recording 15 minutes or more in EP mode or 5 minutes
or more in SP mode after the first program starts, the data for both programs
appears. In this case, the stored program's recording time is updated to the time
when the second program starts.
. 15 minutes or more in EP mode,
5 minutes or more in SP mode
Program 1
Program 2
The recording time is updated to the time until overwriting starts.
Tip
• You can set BLANK SEARCH in the ADVANCED OPTIONS menu so that Blank
■fime search is automatically performed eadi time the timer is set (AUTO). Sel^
OFF to cancel this option (see page 34).
Note
• You may not be able to locate the beginning of the Blank Time space correctly in the
above step 3 when:
- the Sm<u-tFile tape contains one or more short length fless than about 15 minutes
in EP mode and about 5 minutes in SP mode) programs that are not stored in the
SmartFile label.
- the SmartFile tape is damaged or dirty.
52 SmartFile Function
Page 53

Selecting and playing a program
You can automatically locate and start
playback of a program recorded on die
SmartFile tape. Select a program in the
SmartFile search list. The SmartFile
search list can contain up to 12
programs.
Before you start...
• Turn on your TV and set it to the
video channel.
Insert a SmartFile tape.
1
The VQR turns on and the SMARTFILE indicator lights up.
Press SMARTFILE.
2
The SmartFile search list appears on the TV
screen.
The BLANK indicator lights up and the Blank
Time space also appears in the display
window.
Move the cursor stick /4" to select a
program.
Moving the cursor stick repeatedly will
turn the pages.
f —1
0 ®
0) (D <D CDGD
■@ ■© ■© CD CD
'© © © Qfe
CD © CD 0 Ip
r-
•li^
SMARTFILE
Cursor stick
OK
Ma/i(»9-8rt6«9
1 BLANk llMt EF 1h46m
MON 6130»WCH16
Fn B:00m cn12 B/13
nt 2:30fwe<e
Han<yB9-8f16/!39
•
MON 6;30fucHl6
k
m 8:OOpv ch 12
TUE 2 :30ph ch 8
STAftT .
B/16
0h30u »
OhSOm »
B/10
0h30m №
: sio
V 1h48m
8/16
0h30m ip
8/13
OhSOm sp
8/10
0h30h 9
P.1
0.11
END
4 Push the cursor stick (OK).
The VCR starts searching for the beginning of the selected program.
Playback starts automatically from that point.
To stop searching
Press ■ STOP.
continued
SmartFile Function
53
Page 54

Selecting and playing a program (continued)
Tip
• If you set SMARTFILE LIST to AUTO in the ADVANCED OPTIONS menu, the
SmartFile search list appears automatically when you insert a SmartFile tape (see
page 34).
Note
• You may not be able to locate the begiiming of the selected program correctly when:
- the SmartFile tape contains one or more short length (less than about 15 minutes
in EP mode and about 5 minutes in SP mode) programs that are not stored in the
SmartFile label.
- the SmartFile tape is damaged or dirty.
54 SmartFile Function
Page 55

Checking the contents of a tape
You can display the program data list of
SmartFile sensor CURSOR
____
ill
m
□
: 1 |o¿iT
a SmartFile tap>e on the TV screen. It is
not necessary to insert the tap>e into the
VCR. This feature allows you to quickly find a specific program or to
find a tape with enough recording space.
The SmartFile check list can contain up to 12 programs.
Before you start...
• Turn on your TV and set it to the video chaimel.
1 Hold the label side of the SmartFile tape
close to the SmartFile sensor.
Slowly bring the center of the label within
3 cm of the SmartFile sensor.
There is a short beep, the SMARTFILE
indicator lights up, and the SmartFile
check list appears.
The BLANK indicator lights up and the Blank
lime space also appears in the display
window.
2 Press CURSOR 4^/'^ repeatedly to turn the
pages.
Press OK on the VCR to exit the menu.
3
Tips
• The SmartFile check list automatically disappears after about 3 minutes of nonuse.
• If you press SP/EP while the SmartFile check list is displayed, the BLANK TIME
remaining tape display changes.
• You can edso use the cursor stick 4/4 and OK on the remote commander.
• If you press a button other than SP/EP or the cursor stick (OK), the SmartFile check
list disappears.
Notes
• You cannot display the SmartHIe check list while:
-you display the SmartFile list of a different SmeutFile tape inserted into the VCR.
- you display any other menu.
- you play back the tape at any speed other than normal.
-you view the camcorder picture using LASER LINK.
• If the SmartFile check list doesn't appear on the TV screen, try again by drawing the
SmartFile tape away from die SmartFile sensor at least 5 cm, then bring it back to
within 3 cm of the sensor.
R1AM( TME CP 1m48m
)KJK 9:00w CH 16 8/30
m
m
7HÜ
lii
NEXT:®
BLANK TIME EP 1h48m
SIIN
IVF
MTM
n
TUE
BACK:®
1
OK
6 : SOW CH 4
8:00m ch 12
S:4Sm cm 7
1 OOw CM IP e/26
4 :30m cm 8
6:30m cm 16
8 :00m ch 12
0 :30m ch 16 8/17
6 :30m ch 16
8 :00m ch 12 8/13
2:30m ch B 8/10
Í724
6/22
6/20
6/16
QUrr
EZS
8/20
8/27
0/27
SmartFile Function
55
Page 56

Labeling a recorded program and tape
You can electronically "label" a program and select a category, such as
SPECIAL or MOVIE, fo’r a recorded program in the SmartFile list. You can
also label a tape. Up to 18 characters can be input for a program and tape
label.
Labeling a recorded
program and selecting a
category
<SD QD
Before you start...
• Turn on.your TV and set it to the
video channel.
1 Insert a SmartFile tape.
The VCR turns on and the SMARTFILE indicator lights up.
2 Press MENU, then move the cursor stick ^
to select SMARTFILE EDIT and push the
cursor stick (OK).
The SMARTFILE EDIT menu appears.
© (¿) ® QG3
■© ■© ■© <±) 0
■© © © Q I©
CD © cdRO
lliai_6:3QM_CHl6
IRI
iWE 2:30m cm 8
SELECT
CATEGORY
___
e : OOm cm 12
CLEAR
MENU
Cursor stick
OK
_____
_____
8/1&I
___
0h30m »
_____
8/iaj
OhSOm If
8/101
OmSOm g
QUIT:^^
rmE:0^
56 SmartFile Function
Page 57

3 Move the cursor stick ♦■/1” to select a
program.
£i(V99-gfia9»
inai »:3owcHi<i
liw e:oowicMi2
nut Z:30wicm8
SELECT :g
CATEGORY
331
P"30m tr
iZijj
OhSOm ip
aTToi
0h30m
QUTT
TITLE :|
4 Move the cursor stick
The cursor moves to the program label input
position.
Label the program.
O Move the cursor stick to select a
character.
Each time you move the cursor stick
the character changes as shown below.
A —» B Z —► symbol —♦ 0 —»
1—*... 9—► a —» b—♦ ► z—►
(blank space)
If you make a mistake, press CLEAR.
0
To set the next character, move the cursor
stick
The cursor moves to the next position.
© Repeat steps O and 0 to label the
program.
6 Push the cursor stick (OK).
mgi 8:30» Pile
\
nut 2:301« chU
SELECT:H
BACK:i HbarS
ISMAHtfU.E EDIT
a/io«a.^i^~
MOH 6:301« CH 16
HI
nut 2:301. ck6
SELECT CONRRM :g
BACK:g NEXT;i
rSMAfiTPO ECxT
8/10/99-6/16/99
JWON 6.-30« 04 16
1»
1 ^ 1
[TIE 2:30mc*4 8
SELCCT CONRHM :®
BACK:B NEXT:g
(SmarTRlE
a/iQ^yi
1&Y9
MH 6;30^cn16
INick A M«a
2:30w CM P
SELECT
OmSOm
0h30w
CONRRM :E
. 6/161
OhSOu
OmSOm
________
OmSOm
OmSOm w
0h30m
CONRRM
»/lei
i»7i3
8/10
33)
eTio
8/16
0h30m ip
18/13
OhSOm »
6/10
0h30m g
Z5m
una
91M
P.Tl
T.
P.J
continued
SmartFile Function 57
Page 58

Labeling a recorded program and tape (continued)
Move the cursor stick ■f' / 4’ to select a
category.
Each time you move the cursor stick 4/ the
category changes as shown below.
SPECIAL -♦ MOVIE -» NEWS -► SHOW -♦
ISMARtFILE EOfr
a/1<y99~a/16^
ÍM0N 6:30pm CH 16
INick & lüUtt
(TIC FTiom CH 8
SELECT :S
OhSOm IP
Oh30m
CONFIRM
SPORTS -* KIDS -► MUSIC -► ARTS -►
SERIES EDUCATI (education) -► HOBBY -►
SHOPPIN (shopping) -► VARIETY -►
COMEDY -♦ DRAMA -► DAYTIME -►
HOW TO-► OTHERS-* (blank)
Push the cursor stick (OK).
8
The program label and a selected category are stored.
Press MENU to exit the menu.
9
To erase the program label
Press CLEAR after step 3 above. The program label is erased and the
recording start time and channel number reappear.
To erase the selected category
Press CLEAR in step 7 above. The selected category is erased and the space
becomes blank.
To label a regularly scheduled timer-recorded program
Once you label a program which is set to record regularly (i.e. everyday
same day of the week, etc.) in the VCR Plus+ GOLD system or timer
recording mode, the VCR recognizes the label and will automatically label
all future recordings of the same program. The set label is assigned even
when an information signal containing the program name, category name or
other information is broadcast with the program. However, if you change
the program label and category several times, the VCR may automatically
label only the last program of which the program label and category are
changed.
bTTTI
ié/Í3
BMP
58 SmartFile Function
Page 59

Labeling a tape
Before you start...
• Turn on your TV and set it to the
video channel.
1 Insert a SmartFile tape.
2 Press MENU, then move the cursor stick
to select SMARTFILE EDIT and push the
cursor stick (OK).
The SMARTFILE EDIT menu appears.
---------------
0 ®
■I/O
0 0 ■© QCD
0 0 © c£) CD
0 0 0
£
CD 0 CD t
ISUaRTTIlF
[NicI t M.I
_____
SELECT :H_
CATEGORYtB
r~
ibh
DRAMA
. Man
COjjtbY
MDäiC
CLEAR
MENU
Cursor stick
OK
«/161
On««“
g/131
B71Ö1
0h30m
QUITiiÜÑi]
TITLE
3 Move the cursor stick ♦ to select the tape title.
4 Move the cursor stick
The cursor moves to the tape title input
position.
IsmarTrLE Edit D . 11
iie/i(V99>e/i&99 1
ISomedav 0/161
6hAMA
INick & Man
COMEDY
IRock Box 6/101
MUSIÓ
SELECT :g
TITLE EDIT:®
I.smaRTTILE ghtT
SomedA'
dhalIa
INicA A Man
coMeDy
EÜ
raü"
SELECT :g
6ACK:g
I
IEXT:B
OhSOw ap
OUlTiBERa
OhSOm -
0h30m .
CONFIRM
OmSOu tf
8/131
0h30m tf
P ■ II
ÍHB
B7T31
6/101
continued
SmartFile Function 59
Page 60

Labeling a recorded program and tape (continuerò
Label the tape.
O Move the cursor stick 't'/'l' to select a
character.
Each time you move the cursor stick 4"/
the character changes as shown below.
A —♦ B Z —► symbol -
■ 0-»
1 —► 9 —» a —♦ b —♦ » z —►
(blank space)
If you make a mistake, press CLEAR.
© To set the next character, move the cursor
sticks.
The cursor moves to the next position.
O Repeat steps O and © to label the tape.
6 Push the cursor stick (OK).
The tape title is stored.
I^aHTFilE EOIT
Eom»dw~
[WAIlW
Nijr t Ml
MI
iTfILE EDIT
»
IN«* 6 «toll
!£DI_
SELECT :H
BACK:i ^EXT:g
ISt^lTILE
IIFavoiil—
.
INick A Matt
COMEDY
[Rock Box ~
MUSIC
SELECT
TITLE EDIT.g
mi-
0h30m m
OhSOm r
CONRRM:6
0m30m g
«/101
0h30m
CONRRM:g
0h30m P>
QmSOm y
0h30m
OUIT:6iliDI
p. II
g/161
B/131
«71Ò1
0n90m_
«/161
ma
p. II
a/161
b7To1
7 Press MENU to exit the menu.
To erase the tape title
Press CLEAR after step 3 above. The tape title is erased and the recording
date reappears. When you want to erase the recording date from the tape
title column, press CLEAR again.
60 SmartFile Function
Page 61

Protecting a recorded program
т:
(3D OD
You can protect a recorded program
using the SmartFile function from
accidental over-recording or erasure.
When you start rec»rding from a
position prior to the protected program,
the recording stops automatically before
the protected program.
Before you start...
• Turn on your TV and set it to the
video channel.
1 Insert a SmartFile tape.
The VCR turns on and the SMARTFILE indicator lights up.
2 Press SMARTFILE.
The SmartFile search list appears on the TV
screen.
The BLANK indicator lights up and the Blank
Time space also appears in the display
window.
3 Move the cursor stick ♦ / ^ to select the
program you want to,protect.
■(D ■© ■© CD GD
© © © CD О
© ® ©is 101
CD © О0(0|
ИвЛ0«9-вП6«в
*
¥aSNÍíflMÉ ЁГ 1h48m
ИМ 6:a0w CM 16
m »:00m сн12 6/1Э
TUE 9-30fV сив
SТАЯТ .
4Р18Л(У99-в/16в9
bíaKIK Time
UM 6:30mcHl6
¥ РЯ в:00п1сн12
nt 2:30nf CH В
b
SMARTFILE
Cursor stick
P.1
ОмЭОы tr
______
ОнЗОм IF
OhSOm ip
ОнЭОм 9
e7l6
OhSOm »
END
9 1н4вм
g/16
e/13
B/10
. END
0.11
__________ОнЭОм »
Move the cursor stick
The A indicator appears to the left of the
selected program and the program becomes
protected.
5 Press SMARTFILE.
The SmartFile search list disappears.
КЛЙКТШЕ
MON 6:30я1сн1в_______в>18
HI в:00мс«12
, V, .т,
rUE 2: ЗОРИ сн8
___________________________V
START .
ОнЗОм IP
ОнбОм т
continued
SmartFile Function 61
» »и?«
8/13
ilia
0.11
Page 62

Protecting a recorded program (continued)
To unlock the protected program
Move the cursor stick 4“ in step 4 above. The A indicator disappears and
you can record over this program.
Tips
• When you start recording from a position prior to the protected program, the
recording automatically stops no more than about 3 minutes in SP mode and about
8 minutes in EP mode before the begiiming of the protected program.
• If you protect a program just after the Blank Time space, BLANK TIME becomes
shortened by about 3 minutes in SP mode and about 8 nunutes in EP mode.
• If you try to record on a SmartFile tape containing a protected program, a message
indicating that there is a protected program on this tape appears on the TV screen.
• If you set SMARTFILE LIST to AUTO in the ADVANCED OPTIONS menu, the
SmartFile search list appears automatically when you insert a SmartFile tape (see
page 34).
Notes
• When you record another program just after a protected program, locate the
beginning of the Blank Time space by following the instructions in "Recording after
locating the Blank Time space" on page 47. Otherwise, if the recording start point
overlaps the protected program, the VCR may record over the protected program.
• If the VCR Plus+ GOLD system or timer recording program overlaps the protected
program, the VCR automatically stops recording before the protected program and
ejects the tape.
• If you insert a SmartFile tape which contains a protected program or protect a
program for the first time on a new tape, the VCR will analyze the position of the
protected program for a few seconds. You cannot operate the VCR while the VCR is
analyzing the tape.
• If the SmartFile list contains 12 protected programs, the next program you record
won't be stored in the SmartFile list.
62 SmartFile Function
Page 63

Erasing the data
of an unwanted
program
You can erase an unwanted program
from the SmartFile list. When you erase
a program from the list, that portion of
tape is subject to Blank Hme space
priority.
Before you start...
• Turn on your TV and set it to the
video channel.
Insert a SmartFile tape.
1
The VCR turns on and the SMARTFILE indicator lights up.
Press SMARTFILE.
2
The SmartFile search list appears on the TV
screen.
The BLANK indicator lights up and the Blank
Time space also appears in the display
window.
Move the cursor stick ♦ / to select a
program you want to erase from the list.
CLEAR
DISPLAY
SMARTFILE
’ Cursor stick
f/f
4M8/1(V99«a/16/99
MBLANK TIME
MON 6 :30m ch 16 sTTe
1 0h30m tf
in B;00m ch 12 8/13
I OhSOm V
mf ? -30m ch 8 8/10
1 0h30m fiP
START . ^ END
BIANK TIME EP 1k48m
HON 6:30mch16
__________________
>n 8 :00m CH 12 8/13
_________
RE 2:30mch8
tart .:
________
______
-OhSOm g
tP 1h48m
e/16
pH30M_g
OhSOm e
^ END
D . 11
8/10
P.1
4 Press CLEAR.
The selected program is erased from the
SmiulFile list
If you erase a program by mistake, press
DISPLAY to make the program reappear.
5 Press SMARTFILE.
The SmartFile search list disappears.
■ON 6:a0wcHl6
Itf 2:30mcK9
START
SmartFile Function 63
2h30m
_QM3QM_g
_ ¿7iOL
0h3Om bp
~EFig
continued
Page 64

Erasing the data of an unwanted program (continued)
Tip
• If you set SMARTFILE LIST to AUTO in the ADVANCED OPTIONS menu, the
SmartFile search list appears automatically when you insert a SmartFile tape (see
page 34).
Notes
• You carmot erase a protected program from the SmartFile list. You have to first
unlock the protected program by following the instructions in 'To unlock the
protected program" on page 62, then erase that program from the list.
■ If a program is left about 15 minutes or less in EP mode, or about 5 minutes or less
in SP mode, you cannot make the program reappear by using the DISPLAY button.
64 SmartFile Function
Page 65

Registering the contents of a recorded
tape in the SmartFile label
The VCR will register programs
recorded on a tape in the memory of a
new SmartFile label by detecting the
index signals indicating the start of
recorded programs. You can register up
to the 12th program from the start of the
tape. The programs appear from the
bottom of the screen as Program No. 1,
Program No. 2,... Pr ogram No. 12 in
order from the start of the tape. The
13th and subsequent programs are
ignored. You can manually name the
registered program numbers and select
the category (see page 56).
Before you start...
• Turn on your TV and set it to the video channel.
--------------
1 . Attach a new SmartFile label to a recorded cassette tape.
2 Insert the SmartFile tape.
3 Press SMARTFILE GENERATOR.
A message appears indicating that the
recorded programs are being registered. The
index signals are defected from the Start of the
tape, and registration stops if the end of the
tap>e is reached. The message disappears
when registration is complete.
□ L
m
Q.
SMARTFILE GENERATOR
3:
a ip oo a a
3 ca
ii
SMARTFILE INDEXING IS
IN PROCESS
To stop registration to the SmartFile label
Press SMARTFILE GENERATOR.
The data registered before the button is pressed remains in the SmartFile
label. You can register the programs again by pressing SMARTFILE
GENERATOR.
continued
SmartFile Function 65
Page 66

Registering the contents of a recorded tape in the SmartFUe label
(continued)
To check the information of a registered program
Press SMARTFILE.
The SmartFile search list appears. The registered program number, registration date and recording time appear in diis list. Note that the registration date differs from the recorded date.
lEal
roarwn No.«
Program located in
a recorded tape
Program No.t
Proorom No.4
Estimated position of the registered program
Tips
• The programs recorded on the tape can be registered again in a SmartFile label that
already contains program data. However, the recorded date rmd time, program
name and information input manually (such as the program label and category) are
replaced with "Program No. XX".
• If the SmartFile label contains stored program data that includes protected
programs, a message appears and registration stops.
Notes
• Program data is not registered correctly in the SmartFile label when;
- the program length is about 20 minutes or less in EP mode or about 7 minutes or
less in SP mode.
- the program does not have an index signal or the index signal has been recorded
over and erased.
- the tape is damaged or dirty.
• If you don't set the clock or the clock isn't set to the correct date, the registration
date won't be stored correctly on the SmartFile list.
• After you press SMARTFILE GENERATOR and start registration, registration is
interrupted if you press ■ STOP, I> PLAY, ►► FF, ◄◄ REW, 1/(1) or /►►!
INDEX SEARCH. In these cases as welL the data registered up to the point when
registration was interrupted remains in the SmartFile label.
• Tape speed may not be registered correctly when;
-you set AUTO TAPE SPEED to ON in the ADVANCED OPTIONS menu, and the
tape speed automatically changes from SP to EP during recording.
- you use tapes recorded in the LP mode on other VCRs.
g 2h10m
0^
m
Registration date
— Recording time
66 SmartFile Function
Page 67

Storing program data from the DIRECTV digital satellite receiver (Program Data Download)
If you connect a DIRECTV digital satellite receiver equipped with the
Program Data Dowidoad function and use the timer recording of the
DIRECTV digital satellite receiver, the program and category name
transmitted from the DIRECTV digital satellite receiver are stored on the
SmartFile tape. The DIRECTV digital satellite receiver equipped with the
Program Data Download function will be available in the future.
How to hook up to the DIRECTV digital satellite receiver
You should connect CPD IN of the VCR and VCR CONTROL of the
DIRECTV digital satellite receiver using the supplied monaural cable.
Wall
r ”
or
t
' ’
______
LINE-1 IN
AUDIO R/L/
VIDEO
VCR
MW—
-
: VHFAJHFIN
LLf.j
VHF/UHF OUT
Audio/video cable'
(not supplied)
UNEOUT
AUDIO/VIDEO
DIRECTV digital
satellite receiver
Monaural cable
(supplied).
VCR
CONTROL V fi VHF/UHF IN
Iff
VHF/UHF
OUT
— Coaxial cable (supplied)
T
4.
To TV
t
J
Coaxiai cable (not supplied)
SmartFile Function 67
continued
Page 68

storing program data from the DIRECTV digital satellite receiver
(Program Data Download) (continued)
Setting up the DIRECTV digital satellite receiver
You have to set the VCR brand number on the DIRECTV digital satellite
receiver. For example, select "99" in the VCR CONTROL menu to use a
Sony VCR with the SmartFile function. For details, refer to the instruction
manual of your DIRECTV digital satellite receiver.
Storing program data on the SmartFile tape
When you record a DIRECTV digital satellite program using the DIRECTV
digital satellite receiver's timer, £he program and category name are
automatically stored on the SmartFile tape.
Program name
Category name
Notes
• Do not operate the VCR, the DIRECTV digital satellite receiver, and any other
equipment connected to these units for at least 2 minutes after timer recording
starts. If you operate these equipment immediately after timer recording starts, the
correct program data may not be sent from the DIRECTV digital satellite receiver.
• When you use the VCR's timer for recording, program data from the DIRECTV
digital satellite receiver is not stored on the SmartFile tape.
68 SmartFile Funrtion
Page 69

Additional Information
Troubleshooting
If you have any questions or problems not covered below, please consult your
nearest Sony dealer.
Symptom Remedy
The l/C!) switch does not
function.
o --------------------------------------
The power is turned on but the
VCR does not operate.
^ The clock has stopped and
o lights in the display
^ window.
The playback picture does not
app>ear on the TV screen.
The picture is not dear.
n
S3
>>
n
The picture rolls vertically
during picture search.
The picture has no sound.
Connect the AC power cord securely.
Make sure the VCR is not locked. To unlock, hold
down l/(!) POWER on the VCR until the o-" indicator
disappears.
Moisture condensation occurs. Turn the power off,
unplug the AC power cord and leave the VCR to dry
for over three hours.
The clock stops if the VCR is discormected from the
wall outlet for more than one hour. Reset the clock
(and timer).
• Make sure the TV is set to the chaimel for the VCR. If
you are using a monitor, set it to video input.
' Adjust the tracking with the TRACKING +/- buttons.
The video heads are dirty (see below). Qean the video
heads using the Sony T-25CLD, T-25CLDR, or
T-25CLW video head deaning cassette. If these
cleaning cassettes are not available in your areri, have
the heads cleaned at your nearest Sony service fadlity
(a standard service fee will be charged). Do not use a
commerdally available liquid type cleaning cassette
other than Sony's, as it may damage the video heads.
The video heads may have to be replaced. Consult
your local Sony dealer for more information.
Adjust the vertical hold control on the TV or monitor.
The tape is defective.
If you made A/V connections, check the audio cable
connection.
Symptoms caused by contaminated video heads
Normal picture • Rough picture < Unclear picture
initial
contamination
No picture (or
black & white
screen appears)
Additional Information 69
Page 70

Troubleshooting (continued)
Symptom Remedy
A TV program does not appear
on the TV screen.
TV reception is poor. • Adjust the TV antenna.
D>
C
The tape starts playing as soon
f
as it is inserted.
o
The tape is ejected when you
press # REC.
Nothing happens when you
press # REC.
Recording stops halfway.
The timer does not operate.
O)
c
f
0
1
b.
0)
E
P
• Make sure the TV is set to the channel for the VCR. If
you are using a monitor, set it to video input.
• Select the correct source with the INPUT SELECT
button. Select a diarmel number when recording TV
programs; select "LI" or "L2" when recording from
other equipment.
• The safety tab has been removed. To record on this
tape, cover the tab hole.
• Check that the safety tab has not been removed.
• Make sure the tape is not at its end.
• The current position of tfie tape is record protected.
Search for the recording available space.
If the tape contains a protected program, recording
automatically stops before die protected program. Use
another tape which has enough recording space.
Check that the dock is set.
Make sure a tape has been inserted.
Check that the safety tab has not been removed.
Make sure the tape is not at its end.
The recording start point overlaps the protected
program.
Make sure a program has been set for timer recording.
Make sure your timer settings have not already passed
the current time.
Check that the cable box is turned on.
The clock stops if the VCR is disconnected from the
wall outlet for more than one hour. Reset the clock and
timer.
When you use cable box control, make sure the CABLE
BOX CONTROL option is set to ON.
70 Additional Information
Page 71

Symptom
A tape cannot be inserted.
The remote commander does
not function.
Tlie diannels on the VCR
cannot be changed.
The tracking meter does not
appear on the screen.
You cannot control other TVs.
The SMARTFILE screen
appears when a tape is not
inserted..
The VCR needs to be cleaned.
Remedy
• Check that a tape isn't already in the tajje
compartment.
• Make sure you are pointing the remote commander at
the remote sensor on the VCR.
• Replace all the batteries in the remote commander with
new ones if they are weak.
• Make sure the iTVl/IVIDEOl switch is set correctly.
• If you are not using S-Link™, make sure that both
miniplugs are unconnected.
• The command mode of the remote commander is
different from the one of the VCR.
• Make sure the CABLE BOX CONTROL option is set to
OFF.
• The recording condition of the tape is very poor and
tracking cannot be adjusted.
• Set your TV's code number. The code number may
change when you replace the batteries of the remote
commander.
• Press ■ STOP to close the SMARTFILE demonstration
screen.
• Qean the cabinet, panel and controls with a dry, soft
cloth, or a soft cloth slightly moistened with a mild
detergent solution. Do not use any type of solvent,
such as alcohol or betmne.
Additional Information
71
Page 72

Specifications
System
Format
VHSNTSCsUndani
Video recording system
Rotary head helical scanning FM system
Video heads
Double azimuth four heads
Video signal
NTSC ooloi; ElA standards
Tape speed
SP: 3335mm/s(l’/«inches/s)
EP: 11.11 mm/s P/u inches/s)
LP: 16.67 mm/s ("/»inches/s),
playback only
Maximum recording/playback time
8 hrs. in EP mode (with T-160 tape)
Fast-forward and rewind time
Approx. 1 min. (with T-120 tape)*
* The time may vary according to the brand
and/or type of tape or the operating
condition of foe VCR.
Tuner section
Channel coverage
VHF2tol3
UHF14to69
CATV A-8 to A-1, A to W, W+1 to W+84
Antenna
75-ohm antenna terminal for VHF/UHF
Inputs and outputs
UNE-lINand-2IN
VIDEO IN, phono jack (1 each)
Input signal; 1 Vp-p, 75 ohms, unbalanced,
sync negative
AUDIO IN, phono jacks (2 each)
Input level; 327 mVrms
Input impedance; more than 47 kilohms
UNEOUT
VIDEO OUT, phono jack (1)
Output signal; 1 Vp-p, 75 ohms, unbalanced,
sync negative
AUDIO OUT, phono jacks (2)
Standard output: 327 mVrms
Load impedance; 47 kilohms
Output impedance: less than 10 kilohms
S-UNK (CONTROL S IN)
Mini jade (1)
CABLE BOX CCfolTROL (CONTROL S OUT)
Stereo mini jack (plug in power) (1)
CPDIN
Mini jack (1)
Timer section
Qock
Quartz locked
Timer indication
12-hour cycle
Timer setting
8 programs per month (max.)
Power back-up
Built-in self-charging capadtor
Back-up duration: up to 1 hour at a time
General
Power requirements
120VAC60HZ
Power consumption
35W
Operating temperature
S^C to 40X (4I"F to I04**F)
Storage temperature
- 20“C to 60“C (- 4°F to 140°F)
Dimensions
Approx. 430 X 100 X 281 mm (w /h /d)
Approx. (17 X 4 X11' /»inches)
including projecting parts and controls
Mass
Approx. 4.6 kg (10 lb 2 oz)
Supplied accessories
Remote commander .(1)
Size AA (R6) batteries (2)
75K)hm coaxial cable with F-type connectors (1)
Audio/video cable (3-phono, 1-mini to 3-phono,
1-mini) (1)
Monaural cable (1-mini to 1-mini) (1)
Cable Mouse (cable box controller) (1)
SmartFile labels (5)
Design and specifications are subject to change
without notice.
72 Additional Information
Page 73

Index to parts and controls
Refer to the pages indicated in parentheses ( ) for details.
Front panel
l/(!) POWER switch/indicator (13)
ffl
Remote sensor
SmartFile sensor (42,55)
SMARTFILE indicator (47, 55)
a
REALITY REGENERATOR
indicator (30)
Tape compartment
SMARTFILE button (45, 53,61)
m
CURSOR -f/f buttons (55)
= EJECT button (5)
63
o
E3
REW (rewind) button (5,19)
C> PLAY button (4,20)
►► FF (fast-forward) button (5,19)
JOG button (21)
# REC (record) button (7,24,39)
■ STOP button (5,39)
Shuttle ring (8,20)
II PAUSE button (5,39)
OK button (15,48,55)
CHANNEL/TRACKING +/-
buttons (7,30)
EDIT button (39)
REALITY REGENERATOR button
(30)
EASY SET UP button
COMMAND MODE button
SMARTFILE GENERATOR button
(65)
INPUT SELECT button (7, 9,39)
LINE-2 IN VIDEO/AUDIO L/R
jacks (38)
LASER LINK IR receiver (35)
continued
Additional Information 73
Page 74

Index to parts and controls (continued)
Display window
m[2]
m Timer indicator (13,17)
[2] Child Lock indicator (14)
[3] STEREO indicator (27)
0 SAP (Second Audio Program)
indicator (27)
[5] VIDEO indicator (8)
fSl Tape speed indicator (7)
[t1 APC (Adaptive Picture Control)
indicator (31)
[8l EDIT indicator (39)
[3][4][|][6]Cil[|][9]
^^J^REOIS^IViDW gl№CII^6^IAVIWSERTI ^
B31
® ® /1/4
ihi @
d] BLANK indicator (47)
0 AV INSERT indicator (41)
fill Tracking indicator (30)
01 Line / channel indicator (7,39)
01 Time counter/clock indicator (5)
05 Remaining time indicator (8)
01 COMMAND MODE indicator
01 Tape/recording indicator (7)
74 Additional Information
Page 75

Rear panel
m AC power cord
[2] S-LINK(CONTROLSIN)jack(38)
[3] CABLE BOX CONTROL
(CONTROL S OUT) jack
El LINE-1 IN AUDIO R/L/VIDEO
jacks (38, 67)
[5] CPD (Control and Program Data) IN
jack (67)
[6] VHF/UHF IN connector (67)
[7] VHF/UHF OUT connector (67)
Is] RF (Radio Frequency) UNIT switch
g] LINE OUT AUDIO R/L/VIDEO
jacks
continued
Additional Information 75
Page 76

Index to parts and controls (continued)
Remote commander
m
a
El
m
m
A EJECT button (5)
Number buttons (13)
VCR Plus+button (12)
ENTER button (10,13,22)
SMARTFILE button (45, 53,61)
# REC (record) button (7,24)
/►M INDEX SEARCH buttons
(29)
a
a
H
M
REW (rewind) button (5,19)
FF (fast-forward) button (5,19)
l> PLAY button (4, 20)
■ STOP button (5)
Shuttle ring (8,20)
76 Additional Information
Page 77

01 [tv]/IVIDEO| switch
03 (X)MMAND MODE switch
01 l/(!) (power) switch (13)
01 TV/VTOEO button (8)
03 INPUT SELECT button (7,9,39)
01 CLEAR button (5,13,25,57)
01 DISPLAY button (8)
51 CH (channel) + /- buttons (7)
5ll VOL (volume) +/-buttons
H MENUbutton(15,25)
H Cursor stick (15,25,47)
OK
M SMART CUE button (5)
H II PAUSE button (5)
^ JOG button (21)
continued
Additional Information 77
Page 78

Index to parts and controls (continued)
m COUNTER/REMAIN button (8)
[2] SP (Standard Play)/EP (Extended
g] AUDIO MONITOR button (27)
El AUDIO/VIDEO INSERT buttons
g] !► SLOW+/-buttons (19)
[6] x2 button (19)
[7] TV/VIDEO button (8)
g] INPUT SELECT button (7,9,39)
HI TAPE RETURN button (20)
gg CLEAR button (5,13,25,57)
E3 DISPLAY button (8)
01 CH (channel) +/- buttons (7)
in VOL (volume)+/-buttons
H Receiver operation buttons
' MUTING button
Play) button (7,48)
(41)
RECEIVER VOL (volume) +/-
buttons
78 Additional Information
Page 79

Index
A,B
Adjusting
picture 30
tracking 30
Advanced option 32
APC (Adaptive Picture
Control) 31
Audio track 28
Audio / video insert 40
Auto Tape Speed 33
c
Child Lock 14
Cleaning the video
heads 69
Counter 5
DIRECTV System 67
Dubbing. See Editing.
Editing 37
EP mode 7
F,G
Favorite channel 22
H
Hi-fi audio track 28
I, J,K
Index Search 29
Laser Link 35
Locking the VCR 14
LP mode 9
M
Monaural 27
Monitoring audio during
playback 27
N, O
Normal audio track 28
P,Q
Picture adjustment. See
Adjusting.
Playback 4
at various speeds 19
frame-by-frame 20
selecting the sound 27
skip 5
slow motion 19
Reality Regenerator 30
Recording 6
bilingual programs 27
SAP broadcasts 27
saving 8
stereo broadcasts 27
timer setting 15 '
using VCR Plus+
GOLD 12
while watching another
program 8
s
Safety tab 8
SAP (Second Audio
Program) 27
Searching at various
speeds 19
S-Link™ 38
SmartFile 42
checking the contents of
a tape 55
erasing the data of an
unwanted program 63
labeling a recorded
program and tape 56
protecting a recorded
program 61
recording 44
registering the contents
of a recorded tape 65
selecting 53
SmartFile label 44
storing program data
from the DIRECTV
digital satellite
receiver 67
SP mode 7
Station ID 10
Stereo 27
T,u
Hmer setting 15
canceling 25
changing 25
checking 25
daily/weekly
recording 17
using VCR Plus+
GOLD 12
Tracking adjustment. See
Adjusting.
V, W, X, Y, Z
VCR Plus-t GOLD
recording 12
Additional Information
79
Page 80

uick reference to using the VCR
2 Enter the PiusCode
To play a tape
1 Set the TV to channel 3 or
4 (or to video input, if you
made A /V connections.)
2 Insert a tape and press
OPLAY.
To record a program
1 Turn on the cable box.
2 Press VCR Plus+on the
remote conunander.
3 Enter the PiusCode
nuiiibec
4 Select ONCE, DAILY, or
WEEKLY, then press
ENTER.
5 Insert a tape.
6 Press l/(!) to turn off the
VCR.
7 Leave the cable box on.
To watch TV
1 Turn off your VCR, or
press the VCR's TV/
VIDEO button until the
VIDEO indicator in the
display window goes off.
2 Turn on your cable box.
3 Set the TV to the cable box
output charmel (usually 2,
3,or4).
4 Set the cable box to the
channel you want to
watdi.
To play a tape
1 If you made A/V
connections, set the TV to
video input.
If you didn't use A/V
hookup:
• Turn on the cable box.
• Set the cable box to
channel 3 or 4.
• Set the TV to the output
channel of the cable box
(usually 2,3, or 4).
2 Insert a tape and press
OPLAY.
To record a program
1 Press VCR Plus+ on the
remote commander.
number.
3 Select ONCE, DAILY, or
.WEEKLY, then press
ENTER.
4 Insert a tape.
5 Press 1/(1) to turn off the
VCR.
To watch TV
1 Turn off your VCR, or
press the VCR's TV /
VIDEO button until the ■
VIDEO indicator in the
display window goes off.
2 Select the charmel with
your cable box (if you have
one) or with your TV.
To play a tape
1 Set the TV to channel 3 or
4 (or to video input, if you
made A/V connections.)
2 Insert a tape and press
I> PLAY. If there's no
picture on your TV, press
the VCR's TV/VIDEO
button until the VIDEO
indicator comes on in the
display window.
To record a program
1 Press VCR Plus-t on the
remote commander.
2 Enter the PiusCode
number.
3 Select ONCE, DAILY, or
WEEKLY, then press
ENTER.
4 Insert a tape.
5 Press I/Ô to turn off the
vœ.
To watch TV
1 Turn off your VCR, or
press the VCR's TV /
VIDEO button until the
VIDEO indicator in the
display window goes off.
2 Set the TV to the channel
you want to watch.
Sony^mline http://www.world.sony.com/
Sony Corporation Printed in Malaysia —
To play a tape
1 Set the TV to channel 3 or
4 (or to video input, if you
made A/V connections.)
2 Insert a tape and press
[> PLAY.
To record a program
1 Turn on the cable box.
2 Set the cable box to the
channel you want to
record.
3 Press VCR Plus+ on the
remote commander.
4 Enter the PiusCode
number.
5 Select ONCE, DAILY, or
WEEKLY, then press
ENTER.
6 Insert a tape.
7 Press l/(!) to turn off the
VCR.
8 Leave the cable box on.
To watch TV
1 Turn off your VCR, or
press the VCR's TV /
VIDEO button until the
VIDEO indicator in the
display window goes off.
2 Turn on your cable box.
3 Set the TV to the cable box
output channel (usually 2,
3, or 4).
4 Set the cable box to the
channel you want to
watch.
To order additional
SmartFile Labels
Please caU 1-888-293-9885.
Cost is $9.95 for a package of
5 labels.
If you have any questions
about this product, you may
call:
Sony Customer
Information Center 1-8(K)-
222-SONY (7669) or write to:
Sony Customer information
Center Sony Drive, Mail
Drop #T1-11, Park Ridge, NJ
07656
 Loading...