

Page 1
Connections
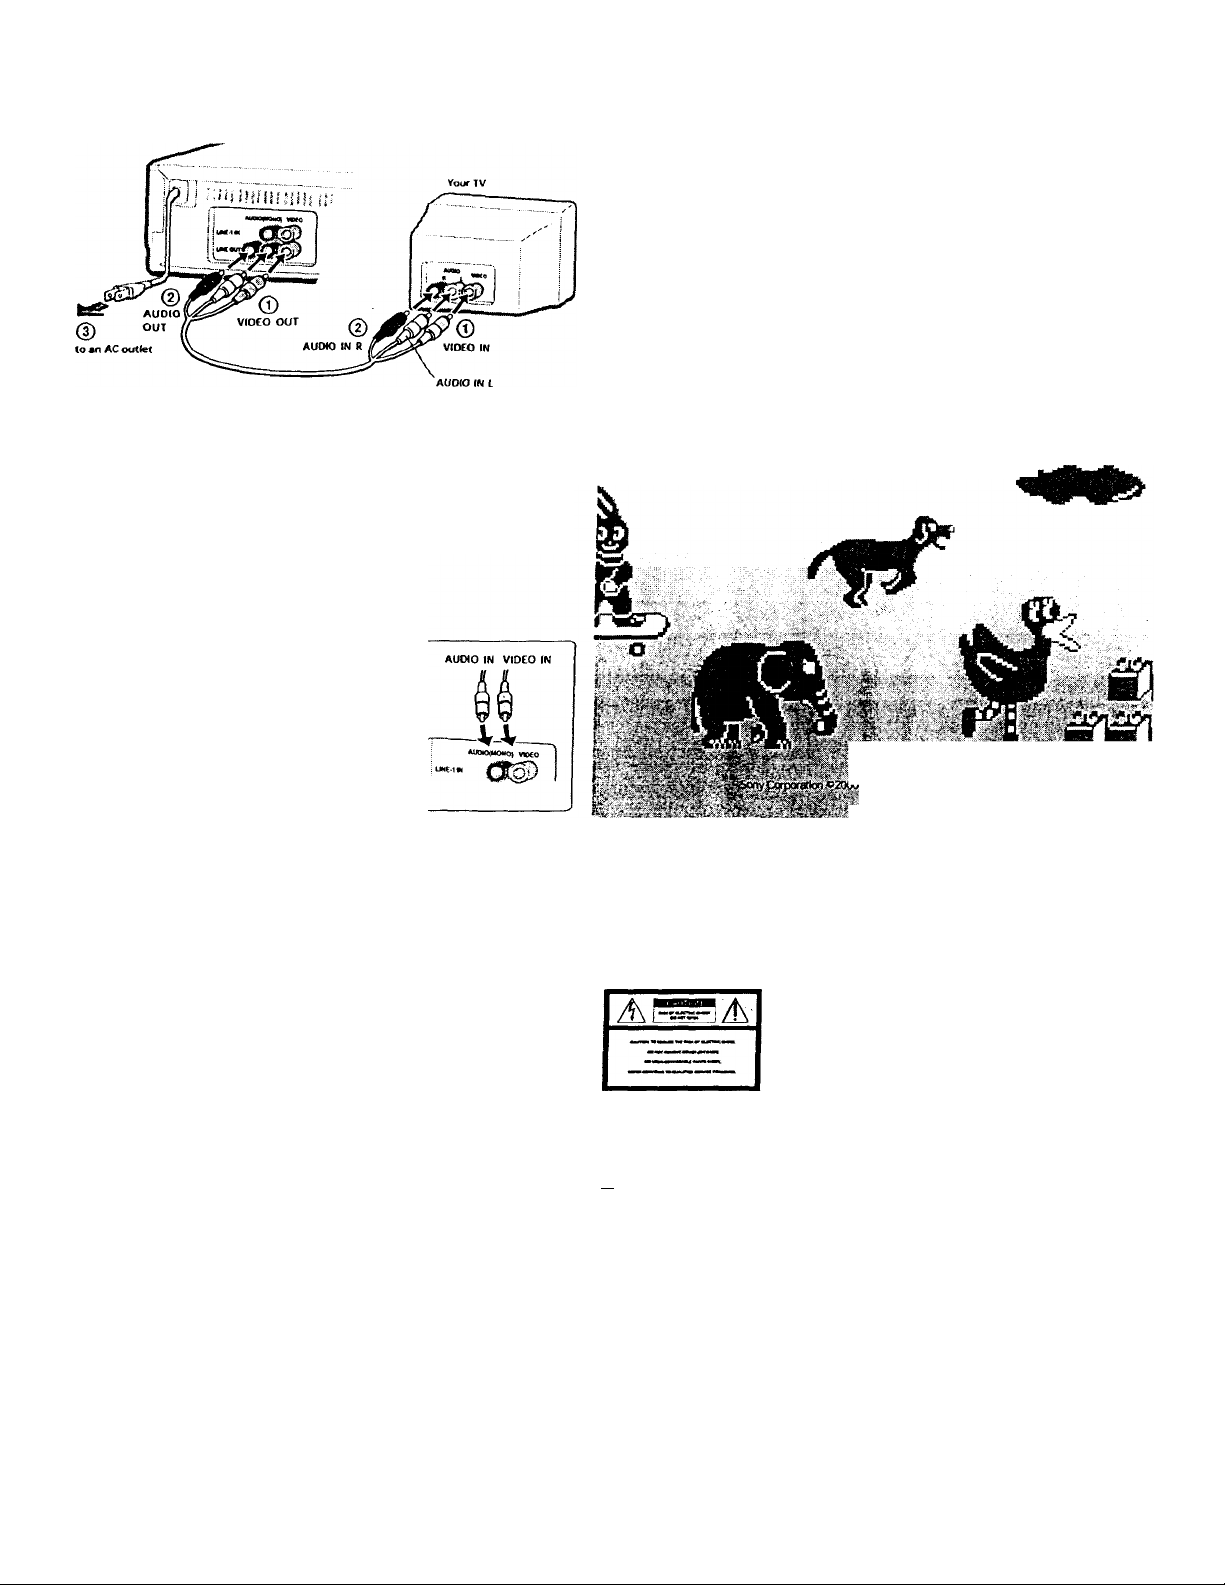
Follow Ни* Slops Ih’Iow to гопп«ч:1 усжг TV to Нж VCR.
%
soisne:
5 0G2-072-11(i;
Vlel0o i^ssette
Recorder
Line recording capability only
Step 1
Using (ho sti{i|>Hod audJo/vidcocibJc. connect one of the yellow plugs to VIDEO of LINE OUT on
this VCR. and the оНкт yellow plug to VIDEO of LINE IN on yourTVA
Step 2
Connect both of (ÍKMrd and white plugs, hi any order, to Hie black AUDIO LINE OUT jacks on iJiis
VCR. aiKl (he oHtci cixls to (he AUDIO LINE IN jacks on your TV. If your TV is monaural (only one
AUDIO LINE IN jack), you only m*ed to use one of the red or wtiUe plugs. Just be sure to connect
the same color plug to both the VCR and your TV.
step 3
Plug 1« (he power cord (o an AC ou(Je(.
Using the LINE-1 IN jacks
When you want to use (his VCR (o make a reconiing. connect
UNE-1 IN on this VCR to LINE OUT of your other video source
(such as a video camera or anotlier video deck) using an audio/
video cable (not supplied). If your olhet' video source has a
stereo LINE OUT (three jacks), use die audio/video cable VMCyiOMS (sold separately). Play tlic original ta|)con the other
video source and use this VCR to make the recording. Sec
"C Recording and Tapt* Sfxjcd Buttons' on Hie reverse for more
information
Note
• fioMoi c >-.»11« rv s LINE OUT Ja«ks lo iIk- LINE I INjw l«.
Help
TIkt power is on but (1к‘ VCR does not
ojxirate.
Tlie playback pinurc docs not appear on
yotir TV screen.
Tlw picture Is not clear.
The picture has no sound.
TTic VCR liuuofis don't work or the
power doesn't turn on.
Ybu cannot make a recording. ’ Check (hat (he cassette's safety tab has not been removed.
A tape cannot bo inserted.
You canntrt control oilier TVs.
Moisiure condensation has occurred. Unplug the power cord
and leave the VCR to diy for over three liouis.
Make sun* yoei have selected the v'idco Input jack «in your TV
Tl>c vkh» heads are dirty. Clean the video heads using tlte Sony
T-Z5CLD. T-25CLDR. or T-25CLW video head cleaning cassette.
If these cieaaing cassettes arc not av'aiUblc in your area, have
the heads cleaned at your neatest Sony dealer (a standard
service fee will l>e charged). Do not use a conitncrctallv'
available liguld type cleaning cassette other than Sony’s . as It
may damage the video heads
Check the audio (red or while plugs) ronitections.
The Play Timer Is on and tlie VCR has entered (he lock mode.
Set Play Timer to OFF. (see Play Timer)
■ Tlie Timer Is on. Set Play Hmerio OFF. (see Play TinKr)
• Check (hat a tape Isn't already in the tafie camfiartment.
• Clieck that (Im* cassette door is not kicked.
• The Play Timer Is on. Set Play Tlinef io OFF. (see Play Timer)
Set )”Our TV's code number. The code number may change
vvlicn you replace (he retnote CiHi/rol's baOerics.
Specifications
System
Fonnat VHS NTSC siaiKUfd
Wdeo remrdifif; sy stem Rotaiy head helical scanning
Video heads Doubt« «zlinulh four iM-ads
Vkteo signal NTSC.' cnior. HA sUindards
General
P<iwn rcguirefnenis 120VAC,60Hг
Power ronsuin|Xiou Zt W
Oprrailng (emiseraiurr 5‘C to ^IVC I'Fto lOt'F)
Dimensions Appmic. 3Sfi x 96 x Zk5.S mm
Mass Appmx 3.6 kg (71b ISoy)
FM system
(w/h/d)
(AppniK. 14x3 Vix n l/i
indies) iiM'ludiiig (>rajectiog
|Kiru and rontruls
Demonstration mode
This VCR has a demonstration mode tltat allows (ho tiser. such as a sak'sperson. to
aulomatkally display l|ye animations. To activate demonsiratton mode, jwess the l/(i) POWER
button on the VCR for more than five seconds. The animations will start. To deactivate the
mode, disconnect (he power coixl fixiin the AC oullet.
Supplied accessories
Remote ronimaixW
Siic AA fR6) batteries (2)
Audio/video cable {3 pharx) io3-pluifKi) (I)
Design aixl sperttk^-Hluos are subierT fa dtange wKhcKtc
notice.
ENl'iK.5 SrsK* is a U S n-gistered maili.
As an Enijicv Sim<‘ Parmer. Sony Corporation lias
determined that this jxoduct meets Ute ENfcitCY Stait*
gukkliiMrs for encrey flhcieticy.
VMS
^^jQovieTime
Owners record
TIh- model «tiKl serml TUitni>crsafV lcK<<u-d ;«( tlie ivji of
ilMUnit.
K4*cot'd (tiese iiumlx-ts iti the piovi<kst t>el(t\v
kefer to thi-ni wlwfHrvei jnutall »HKiii vvhu S<*ny d«*«ler
jvt4**fdin|’ ihis firoditct
Model No
___________________________
Si iial No.
_________________________
WARNING
To prevent fir« or shock (vsianL do not eipose the
unit to rain or moisture.
Thh ^'mbnl is (ntended to alert the user to the
A
presence of urilrwAard 'dattgenjtts voltage'
w'ithiri (he produa's enclosure Utat may be of
sufTkient magnituiie to consiHute a risk of
electric slwirk to persons.
• Tilts symlxjl is intetMled to alert die user to die
presence of irnfxxtaMnprM AtingarKl
/ ! \ maimenanre (servidnji imtructlons In the
literature accompanying (he appllame.
CAUTION
To prevent electric sliuck. dunoi use (bis poUrtaed AC
l>(ug wKb an extension cord, icoeptacfe or other outlet
unless the blades can be fully inserted to prevent blade
exposure.
Prccautiom
Safety
• C^>?rate (he unit only txi tatf AC. 60 Hz.
• If anytlilng falls into die cabinet, un|»lug tlie unb and
have It chwkod by <|uaUnedfwsonnel tx-fore
nperallrig it any furtlier.
• This unit ts nut disconnected in>m die AC ptmer
source (mains} as long as It isaNHierted in ihe wall
outlet, evsm If (lie unit itselfitos been turned off.
« Unfilug (lie unit from die mnl outbH If you do not
bitend to use it for an extended period of Kinr. lo
dtSTonnect the curd, pull It nut Ihe plug, never l>y
die cord.
< One blade of die (dug is ividerthan dieodier fur itw
|>uqxfse ol safery and wilHkinro dx* puwrs- (Hitler
rwily OTIC way. If you arr unaWe lo insert ilie plug fully
in«» the outlet. cont.TCt your Sony dealer.
Operating Instructions
kntalling
• Allow a«l<-<|uai4' ait i irculation «»p«-v«-nt Imetiwl lie at
iiuilthip
' 1X> nut plj<<- the uim un suilaces (rugs. liUiikeis. etc )
neat iiwiteri.tls (< itriaiiis. drafxni-s) itun mny bl<x k
lite venlllaiiuii slots
*■ Do (XX install the unit near beiM sntin es mkIi as
ladiatofs <r’ ai< duels, nr in a place suliject «■ tbte« i
sunbglii. «Lst essivr- dust, rix-vliaruc.'il vrbrarioti or
siMxk.
* Du IHH install the unit in an iaxiiiHsI ixfsitkju. b »s
d<-sigixsl «I lx-o(H-f aicd in a li<xiu>ix.-il posit am txiiy
* Keep (Ik- unit aiirl cassettes away from eguipnieiii willi
strung inngiu'ts. such as microwave ovens or Large
kxidsfieakets.
• Do tux pl.'u:«' ÍM-avv ubjeris uii dx' unit
- If ilx'unit is bciHigtir directly Awn a mid (<ia «'arm
loi'adun. niuistuie tnay cotxtense inside die VCR and
I anse damage to tlx: video licad at id u«|h% When you
nirst insiaff tile ntiit. ur ivfwn )sm move •( frciin a mirt
to a warm loraikin. wait for alxjul ibiee hours hefure
uficfadng die unit
Information
for cwttomcrs in the USA
CAUTION
Tbu ate. caulioixHl di.'K any clianges <x nxMjintatkH« not
ex(x«ssly a|)pn>v«<l in this matitial coultf vokl vtxir
autlxirky (u u(x;ra(e diis cquiptiiem.
«OTC;
This equipnietK has hecn tested and found lo roni|ily
witfi (he limits Ax a Class R rligbat devkv. pursuant to
faníSuTihuFCC Rules.
TIxiM* linrilsare rbrsignerl to pmvkle masonalJk:
prurcctkwi against harmful intcrfererKe In a rrsidcntial
tost alUt ion.
TIhs M)Ui|xiieti( gr-neiaies. uses, and can radiate radio
Avqirrtiryetx'rgy aixl. if ixx InsiaKed aixi uses! in
arcordante wHIi dx- instniciioiis. may rxust.* Itatmful
wterferenre to rarlki communitatioiis.
HmAvs-er. rlxrre is no guManiee that inirxfereyire «'ill ikm
«rnir In a prutiruLtr installatiun IfthhequiiMnent rkies
cause liamiful interbseiice to radiooi telcviskm
aec«-(Xion. wbx ti can Ixr drrtonnined/jy rorcwngdic
eigjj|xneiii u(T and uu. die user b encouraged to tiy (u
OMTeci (lie Interiwix-e hy orx: or tnore of ilxf fuikiwing
measut«»:
• Reurienior lelut aie die receiving antenna.
• Inrrrase ilx- uyxnaixm Ixtvve«! the equ^xiwnt aixl
reoelvTi
• Coiwrct dx- emiipnieni into an rxKlet ixi a «ircuit
didetent fiwii ilijii to whk'b (1« receiver is oonnected
• I'cHisull the d<-;<k'( <H an ex|H-rierxv<l ra<li«/T\'
K-dinkian i<x licl|)
It ;i*ou iiave any itu<-sn«us abnu* (Ids prudixi. >-ou may
call. Sony Castomec Information Center 1-800-222
SONY (7669) or wi tie to: Sony Cortomw Information
Center I Sony Olive Mail OiopfTl-l I. Park ftidgi-. N|
07G56
Page 2
■ STOf button
Г)nr 1>1А Uni Ч1 In ЫАр {it^ Un»* vrlmi il Ь
lr«*J4 Ml)« îe» ГиГ.>м.-Ом{ ( ■
t'rerording NÍ Л ' 'i- -
^ 1V I/O uni»«
Um; dm liiiiUNi (>i un n ynui W
nri and оП.
U TV/VUJF.OUiuyn:
T7(cv üutKni »vvtfciifs youi TV
U4WWU cvm«la« TV ptu);riiiiis
aiK< fi«; vidi'o (П(л1(
U CH ♦/- lRlUoп^;
11н*м: bufiouscliangf ilic
rlwiifMrls fui yout T\/
U VOL*/- iHiilons:
Tl ICM* linuom ( liaiigc d«^ xolunic
on your TV.
Y<»u fTKisi fira imigrani >-<Kir iTmou*
ccmtrol Ut wm tiw* Ъпоми i thmtmh 4
aixi4-v (scc liclow)
O l/OlH«U<»n:
AI(ÍR)ugli (iiK iiudcKi (fk-
VCR on and off. llw* VCR will
lurn on «uumuKically when you
inMtit л Ц||)г orpren dir
► PLAY. FF. REW.
• RëC üf PlAY TIMER SET üf'
liultocis. Tl«; VCR will lurn olf
л1иол1а(1га11у ii no butions air
pntSMXl for mon; cliaii five
minotvs after the tafx- h siofiped
orcjoncil
ó OISRjtY bufion;
ThÎN button wiM lum ou nr off ihr
anienatiom ifM appear wfien yuu
insert a lape. ne.
Ú PAUSE button:
Press Ibis Ixiimn ta niotnentarily
stop die tape.
You can set your remote control to control the power, channel, volume, and video Input of your TV.
First find the manufacturer 's name of your TV. Then, while holding down the TV power button
Oiution TV I/O) on tl»e remote control. i>ress iIh* operation buttons in the order shown in the diart.
Manufacturer
Sony
Akaí/AíXr/EíiKfTVKi/Goííl Star /
J.C.Penny/Мйглсмг/МСА/
Mitsiitilshi/MEiVPhilcu/RCA/
Wirds
OnturkMi/Curtbi-M«il>es/
Dayiron/J.C.Penny/Magnavux/
MCA/Mlisubislii/NEC/Sampo/
Scüu/Sylvania/W^ids/YorV
Conxiado/Eini'ivm/Gold Star/
Hicadh/KMC/Magiwvox/Philaj/'
Portbiifl/Shai^i/Tcknlka/Wardv
Dnervon/Radio Sluck/Teknika
Fishei/Sanyu/Staj^
Cenriat £кч1г1г/ f'iin»vonic/CluAv.ir
Press
►- (hen ■
► fliffi II
llM-n ■
► i!«n
•<-< |j«*n ►►>- ihcii ►
■ flM-n *«4
Manufacturer Press
Gene ral Ekctcic/fff A.^Sears
Cold Siar/MCA/Miisiiblsiii
Hiuichi ► liten ►►
JVC
Klagna vox / РЫЦа / S y1 vai lis /
Tcknlkx
Marani^/MCA/Miisuhlsld
PaiutMinIr 11 titeo
rkmtm
Quavir/Sharp
Radio Shack/Stwp ■ liten
Srarx/TtAhlUi
Z/4iiih
•^then II
II ilicn ►-
liten
■ liten ^
•4^ (lien II
•^4 irten
II liten ■
■ tltnill
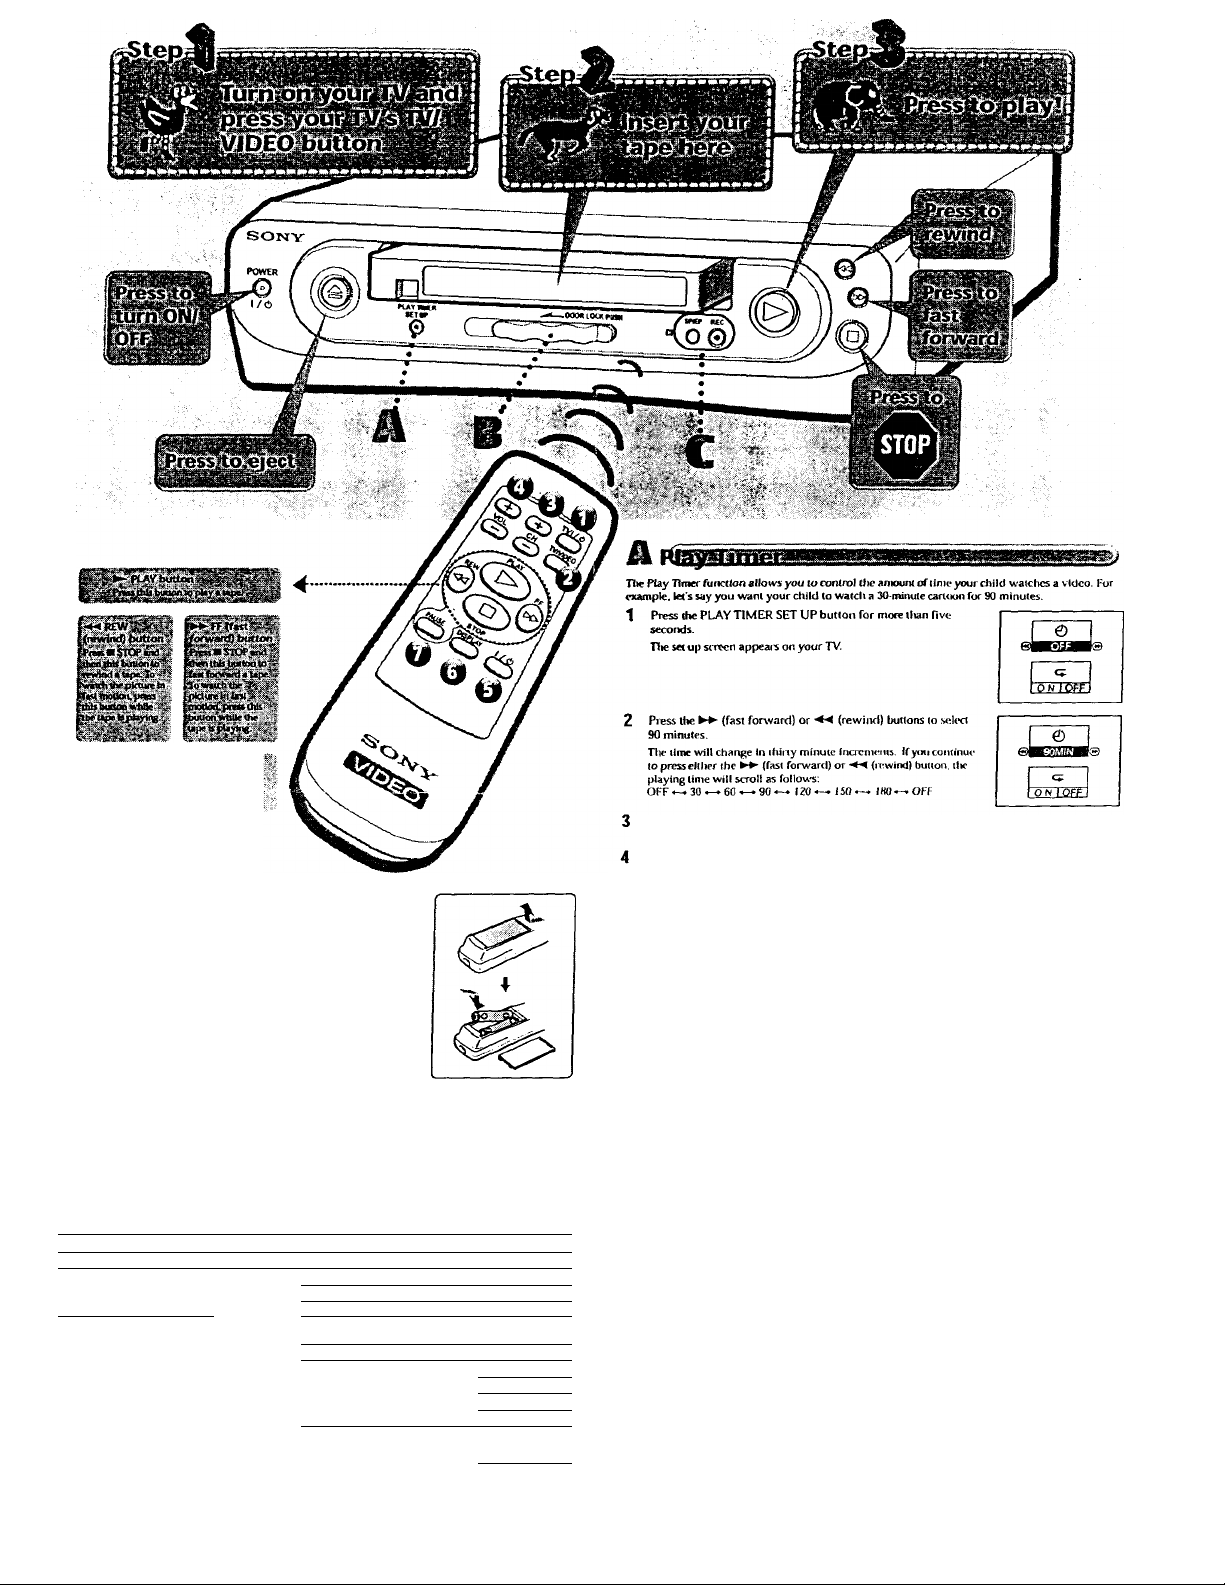
After you select the playing time, press the PLAYTIMER SET UP biiiion
The ON/OFF row of the ^ (repeal) option is Itighliglitcil.
Press the ►► (fast forward) or (rewimi) button so (liât ON is selected.
By selerting ON. ilïe 30 minute tape will rew'iixi aiKl playautomaticaily vvlicn it nvjc^n’i iIm-i ihI.
5 Press the PLAY TIMER SET UP button again
The set up screen will disappear and the tinKn' will start. Follow ihc steps atxive to start
watching a video.
Wlicn your diHd is watching a vidt* *o. all of the buttotis (except tlic • REC (rc'corcl) bidton) will
work. After the set playing time has elapsed, (he fKiwer will torn off and all of the buiions will lx*
locked for one hour. If you press a button while the VCR is locked. iIm’ light on the |X)Wci iuittnn
will flash for five scHronds.
To check the remaining time
Press the PLAY TIMER SET UP button once. Tl»e reinainir^ tiiiK* will appear on yout TV si rc-en.
When five minutes are left, the remaining time wilt automadcatly ajipoar on your TV screen
To cancel the Play Timer
Press the PLAY TIMER SET UP button for more tiian five seconds. When the set up scivett appears
on your TV. use the ►► (fast forward) or ■« (rewind) buuom to set the timer to OFF.
Notes
• A.1 soon n you nMiipl<4<- si«*p S above, «hr Unier will sian co i ijhcv«i ify«>u turn off tlx* V'CR. This nH'aris <lwt iIh.-
VCR may ener die lock niode wliile die power Is off. ot lliitl you (uro tlic VCR biick oo. die Play Time« will
mum In tlie last v<Ui^ you mnde. Follow the «xpUnatioiis aUn» to dung«; orcaorid fhi; f’Uy Tiro«.
• The Re|)eat TuncikKi wiff rewind die Upe no mare dun five dnin.fvganlkei.sordM’ ui|)ek-n);di oriliiwseUlop
You can lock the cassette door to prevent your child fixMU inserting or
Reefing tassrffe tapes. To Jock the door, press dow'n the PUSH button and
move the DOOR LOCK slide to (he left until it dicks in place.
1b unlock the door, press down (he PUSH button and move (tie IXX)R
LOCK slide (o the right.
You can use this VCR to record images input tlirougli the LINE-1 IN jacks. For example, let s say
you want to record images of your child that you took with your video caiucra.
1 Connect your video camera’s LINE OUT Jacks to tfte LINE-J IN jacks on the back of this
VCR, and inseit a blank tape with Its safety lab intact into this VCR.
2 Start playing the tape in your video camera.
3 Press the • REC (record) button on this VCR
Tlie REC mark aixi tape speed (EP or SP) apfiear on your TV screen.
EP Extended Play) {>rovkíes recording time thivc times as ioi^ as SP (Stanciard Play). However. SI’
produces better picture and audio quality. To stop «ecfwding. laess ■ STOP.
Note
' Tlte • REC bullón will m« function wlien llw PUy Ttn«*r (i rtOivantl I .m<< ( ««• I’liiv Tinici li.-hin- y<Ki tn.iK<- n
nxuntlttg.
 Loading...