

Page 1

3-065-583-E1 (1)
Video Cassette
Recorder
Operating Instructions
PAL NTSC
SLV-ED313MJ/SG
© 2001 Sony Corporation
01GB01COV-ED313.p65 12/3/01, 11:12 AM1
SLV-ED313_GB 3-065-583-E1 (1)
Page 2
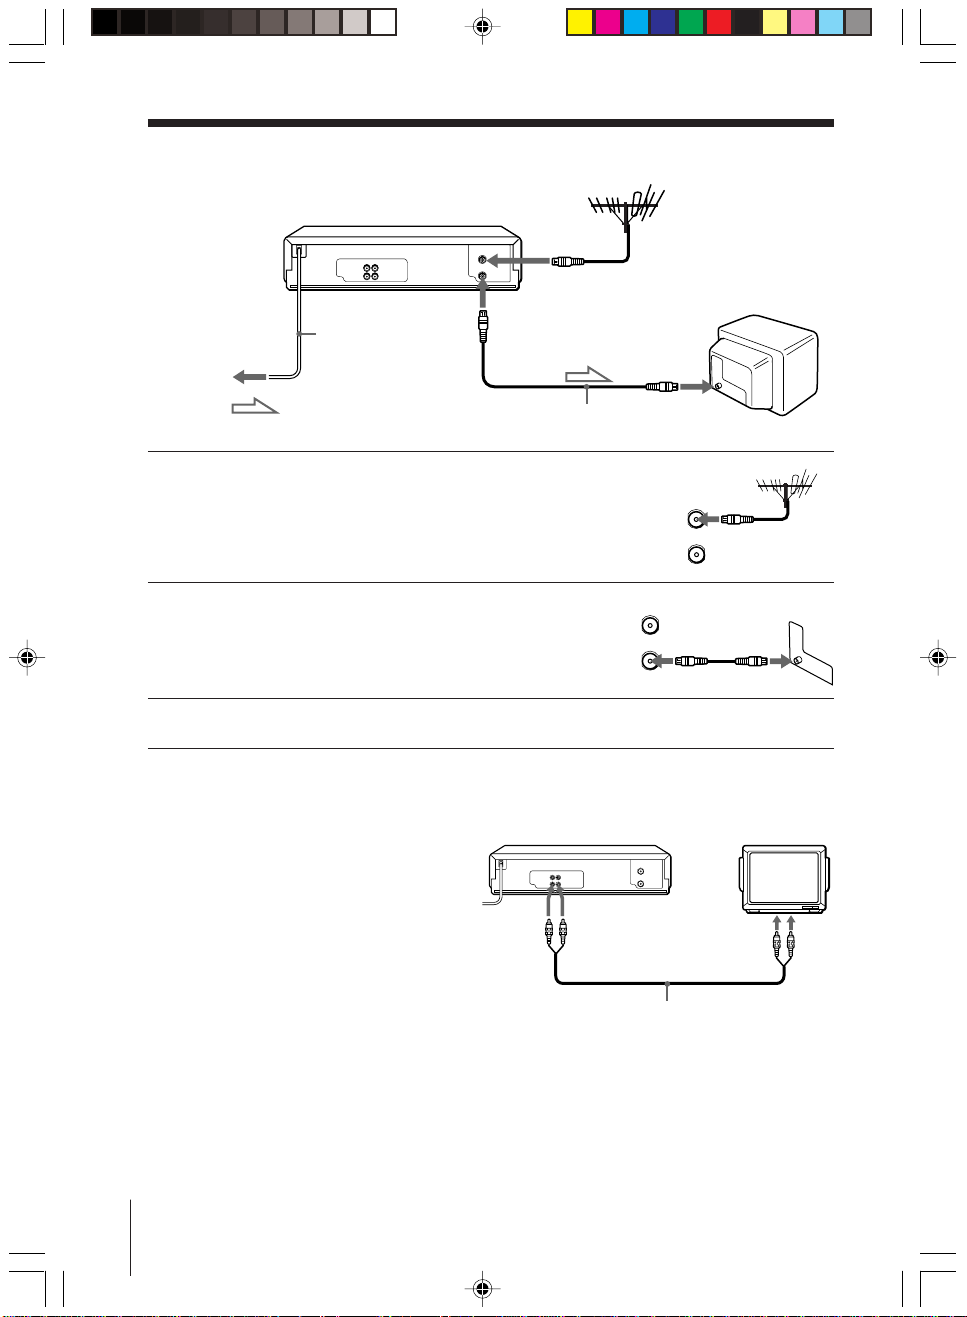
Connecting the VCR
AERIAL OUT
Mains lead
to mains
: Signal flow
AERIAL IN
AERIAL IN
Aerial cable (supplied)
1 Disconnect the aerial cable from your TV
and connect it to AERIAL IN on the rear
panel of the VCR.
2 Connect AERIAL OUT of the VCR and
the aerial input of your TV using the
supplied aerial cable.
3 Connect the mains lead to the mains.
Additional connections
To a TV that has audio/video input
jacks
This additional connection improves
picture and sound quality. Connect the
TV as shown on the right.
LINE OUT
Audio/video cable (not supplied)
AERIAL
IN
OUT
AERIAL
IN
OUT
LINE IN
2
01GB02CNT-ED313.p65 12/3/01, 11:13 AM2
Page 3
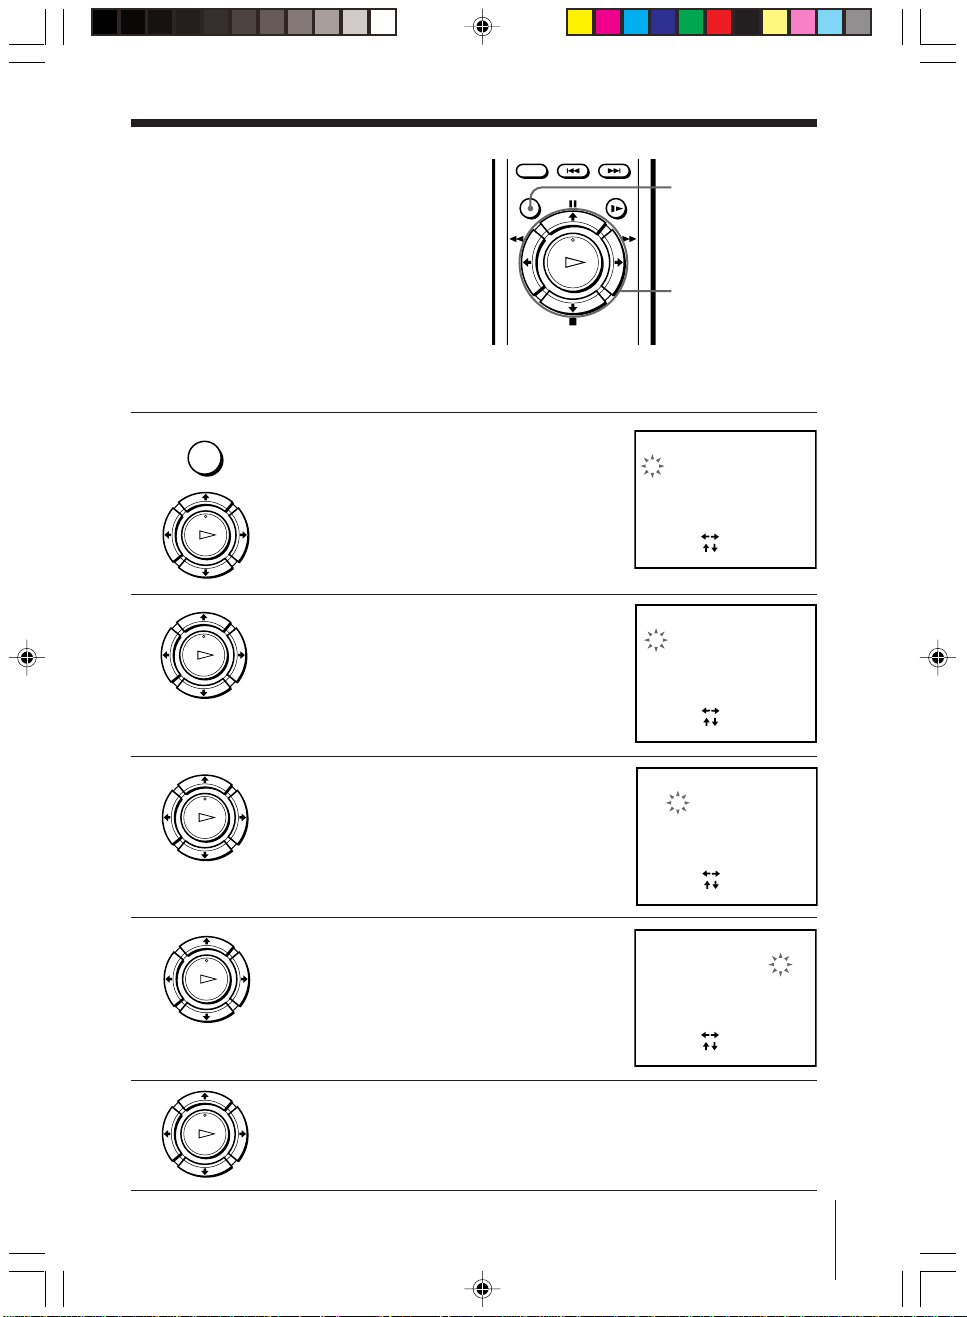
Setting the clock
CLOCK SET
2.1.200 0:0052
1
TUE
SELECT
SET
END:[ OK ]
:
[]
:
[
]
You must set the time and date on the
VCR to be able to use the timer
recording features properly.
Before you start…
• Turn on the VCR and the TV.
• Set the TV to the video channel.
MENU
OK
M/m/</,
MENU
1 Press MENU, then press M/m to move the
cursor (B) to CLOCK SET and press OK.
PLAY
OK
2 Press M/m to set the date.
PLAY
OK
The day of the week is set automatically.
3 Press , to select the month and set the
PLAY
OK
month using M/m.
4 Set the year, hour and minute in sequence,
PLAY
OK
using , to select the item to be set, and
M/m to select the digits.
CLOCK SET
1.1.2001 MON 0:00
[]
SELECT
:
[
SET
:
[]
:
[
:
]
]
END:[ OK ]
CLOCK SET
2 .1 . 2001 THU 0: 005
SELECT
SET
END:[ OK ]
CLOCK SET
2 . 1 . 20 01 TUE52 5:301
5 Press OK to start the clock.
01GB02CNT-ED313.p65 12/3/01, 11:13 AM3
PLAY
OK
[]
SELECT
:
[
SET
:
END:[ OK ]
]
3
Page 4
Presetting channels
First, we recommend that you preset the receivable channels in your area
using the One Touch Tuning function or AUTO PRESET in the TUNER
PRESET menu. Then, if some channels cannot be preset automatically, set
them manually. If there are any unwanted channels among the preset ones,
you can disable the channels.
Presetting all receivable
channels using the One
Touch Tuning function
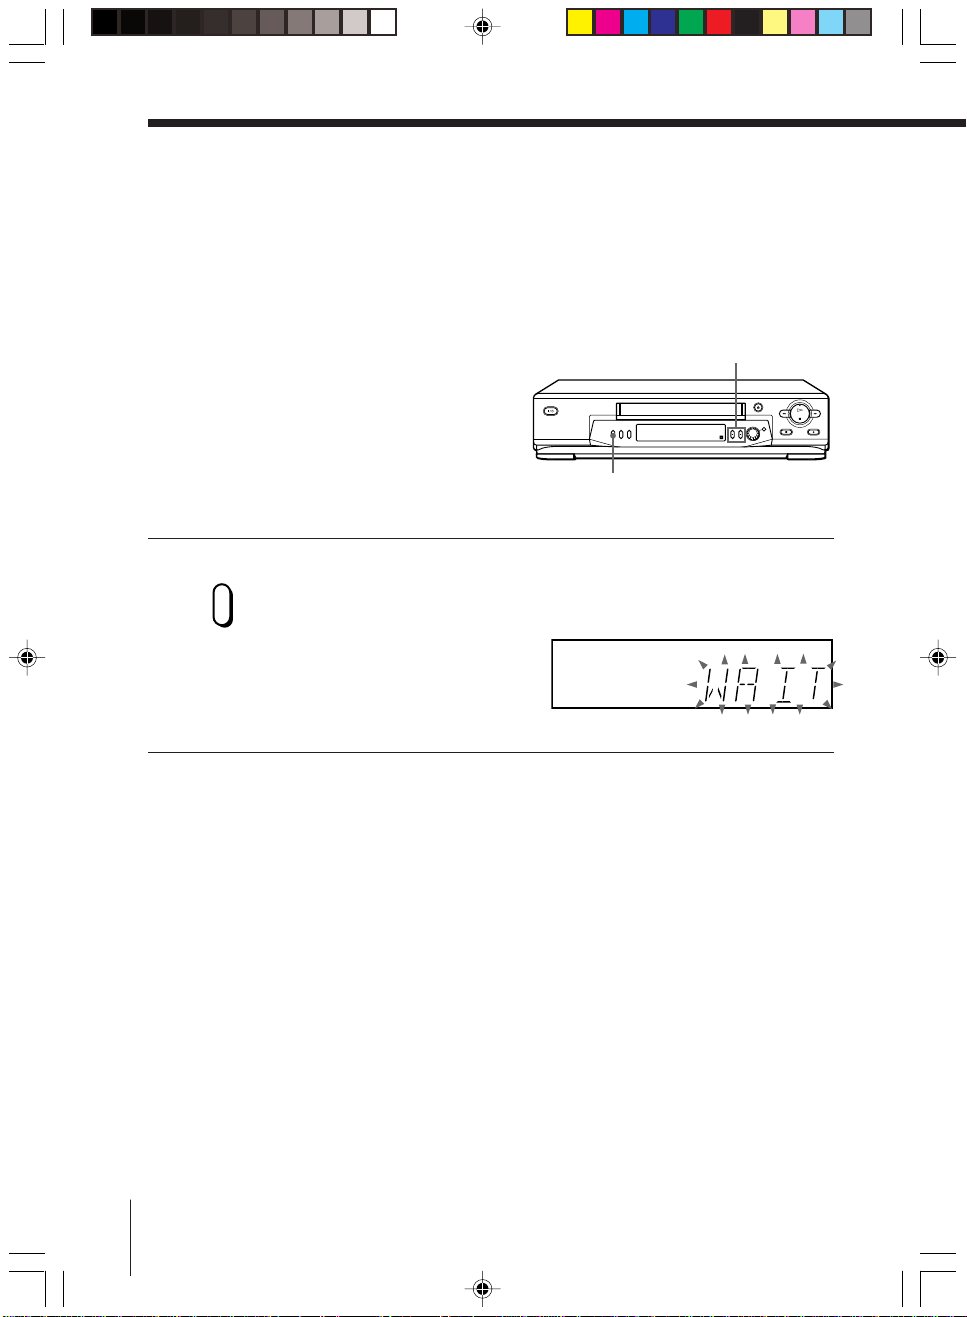
ONE TOUCH
TUNING
To check if the channels are preset correctly
Set the TV to the video channel and press PROGRAM +/– on the VCR.
If the TV screen changes to a different programme each time you press
PROGRAM +/–, the channels are preset correctly.
If the sound is distorted or noisy, the VCR is set to a TV system different
from your area’s system. Select the correct TV system and preset channels
using the TUNER PRESET menu as shown on the next page.
Press and hold ONE TOUCH TUNING on the VCR for more than
three seconds.
The VCR starts presetting the channels.
The WAIT indicator goes off when all receivable channels are preset.
ONE TOUCH
TUNING
SP
PROGRAM +/–
APC
Tip
• To stop the One Touch Tuning function, press ONE TOUCH TUNING or p STOP
on the VCR during the setting.
4
01GB02CNT-ED313.p65 12/3/01, 11:13 AM4
Page 5
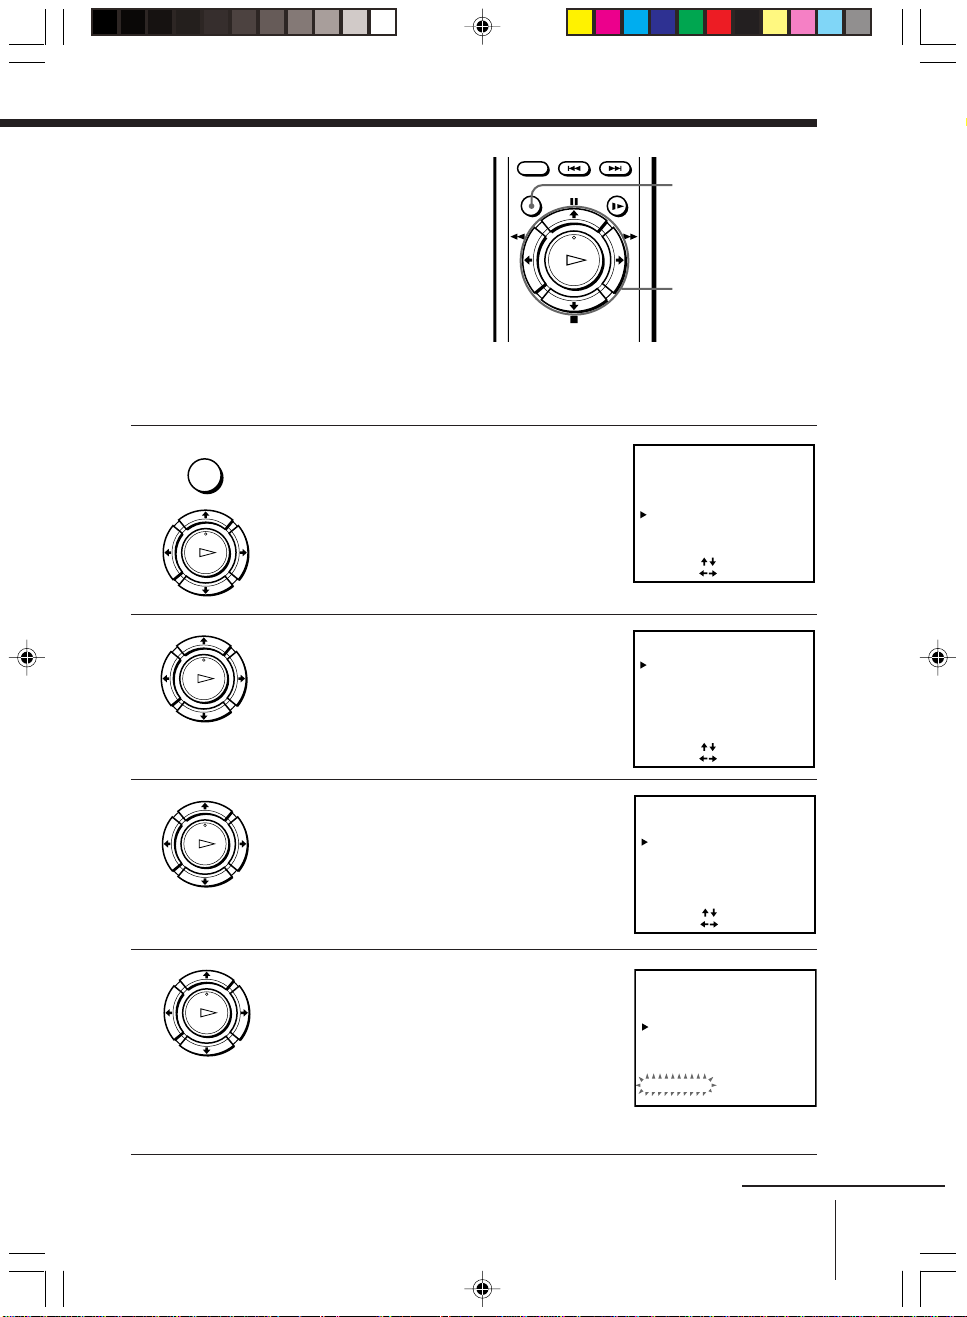
Presetting all receivable
TUNER PRESET PROG 1
NORMAL / CATV
SYSTEM
AUTO PRESET
CHANNEL SET
AFT
FINE TUNING
NORM
ON••
CATV
B / G
• D / K
I
OFF
1
SELECT
SET
:
[]
:
[
]
TUNER PRESET PROG 1
NORMAL / CATV
SYSTEM
AUTO PRESET
CHANNEL SET
AFT
FINE TUNING
NORM
ON••
CATV
B / G
• D / K
I
OFF
1
SELECT
SET
:
[]
:
[
]
channels automatically
This VCR is capable of receiving B/G,
D/K and I system channels. For
receivable channel details, see page 7.
Before you start…
• Turn on the VCR and the TV.
• Set the TV to the video channel.
MENU
1 Press MENU, then press M/m to move the
cursor (B) to TUNER PRESET and press
OK.
PLAY
OK
2 Press M/m/</, to move the cursor (B)
PLAY
OK
to SYSTEM, then select B/G, D/K or I,
whichever is applicable in your area. If
SYSTEM is set to the wrong position, the
sound will be distorted or noisy.
MENU
OK
M/m/</,
3 Press M/m/</, to move the cursor
4 Press M/m to move the cursor (B) to
01GB02CNT-ED313.p65 12/3/01, 11:13 AM5
TUNER PRESET PROG 1
•
[]
:
[
:
]
•
B / G
B / G
NORM
ON••
NORM
•
ON
•
D / K I
1
D / K
1
CATV
OFF
CATV
OFF
I
PLAY
OK
PLAY
(B) to NORMAL/CATV, then select
NORM.
To preset CATV channels, select CATV.
AUTO PRESET, then press OK.
OK
All receivable channels are preset in
numerical sequence. When no more
receivable channels can be found,
presetting stops and the picture from the
SYSTEM
NORMAL / CATV
AUTO PRESET
CHANNEL SET
AFT
FINE TUNING
SELECT
SET
TUNER PRESET PROG 1
SYSTEM
NORMAL / CATV
AUTO PRESET
CHANNEL SET
AFT
FINE TUNING
PLEASE WAIT
lowest numbered channel is displayed on
the TV screen.
continued
5
Page 6
Presetting channels (continued)
TUNER PRESET PROG10
NORMAL / CATV
SYSTEM
AUTO PRESET
CHANNEL SET
AFT
FINE TUNING
NORM
ON••
CATV
B / G
• D / K
I
OFF
2
1
SELECT
SET
:
[]
:
[
]
TUNER PRESET PROG10
NORMAL / CATV
SYSTEM
AUTO PRESET
CHANNEL SET
AFT
FINE TUNING
NORM
ON••
CATV
B / G
•
D / K
I
OFF
2
1
SELECT
SET
:
[]
:
[
]
TUNER PRESET PROG14
NORMAL / CATV
SYSTEM
AUTO PRESET
CHANNEL SET
AFT
FINE TUNING
NORM
ON••
CATV
B / G
• D / K
I
OFF
2
1
SELECT
SET
:
[]
:
[
]
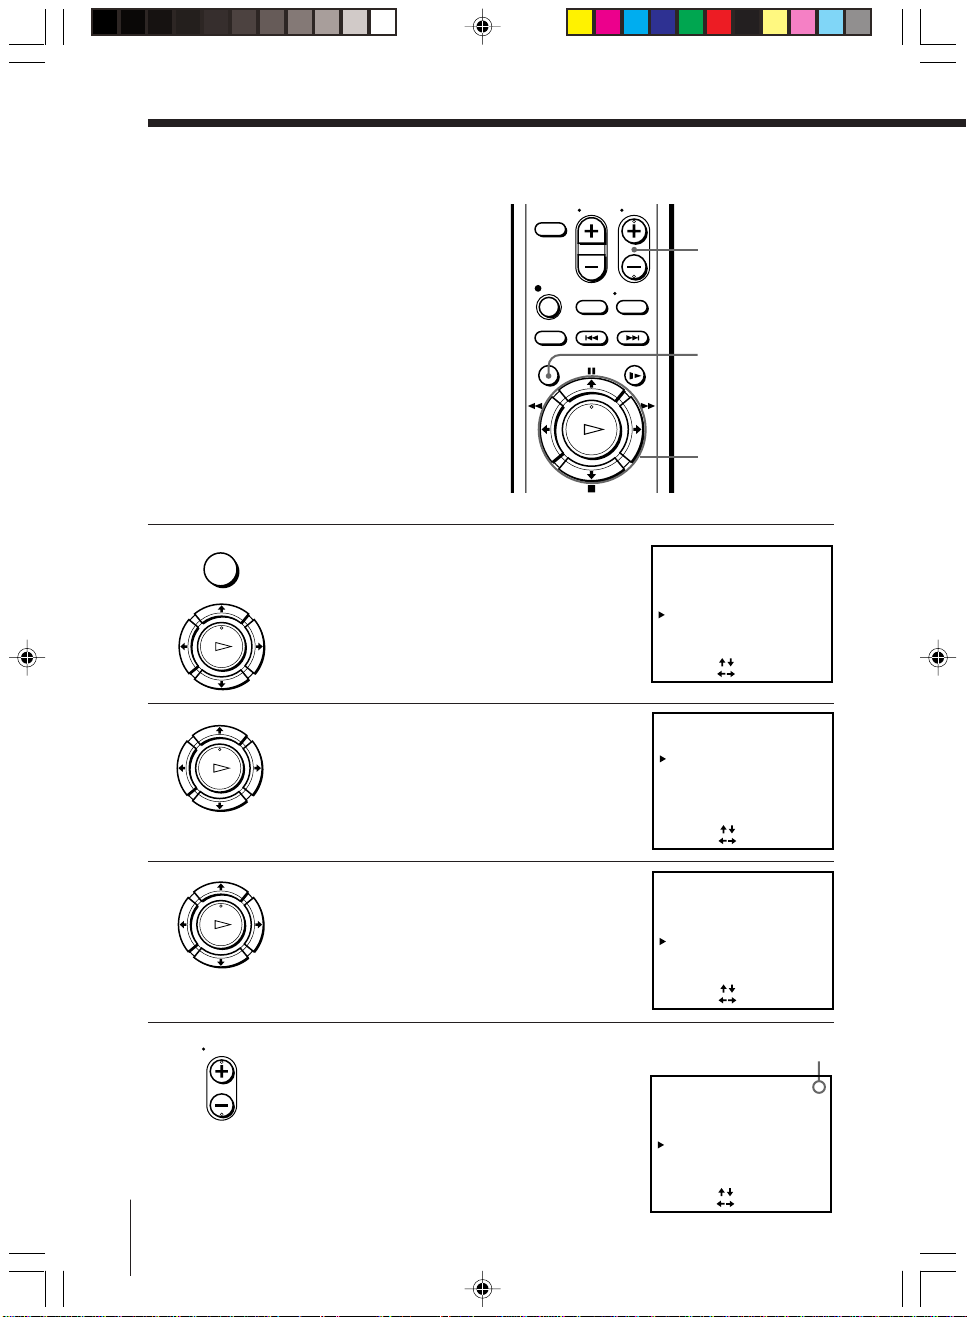
Presetting channels
manually
MENU
1 Press MENU, then press M/m to move the
cursor (B) to TUNER PRESET and press
OK.
PLAY
OK
PROG +/–
MENU
OK
M/m/</,
2 Press M/m/</, to move the cursor (B)
3 Press >/. to move the cursor (B) to
4 Press PROG +/– to select the programme
6
01GB02CNT-ED313.p65 12/3/01, 11:13 AM6
TUNER PRESET PROG10
B / G
[]
:
[
:
• D / K
]
NORM
2
ON••
I
CATV
1
OFF
Selected programme
position
PLAY
OK
PLAY
OK
to NORMAL/CATV, then select NORM.
To preset CATV channels, select CATV.
CHANNEL SET.
SYSTEM
NORMAL / CATV
AUTO PRESET
CHANNEL SET
AFT
FINE TUNING
SELECT
SET
PROG
position.
Page 7
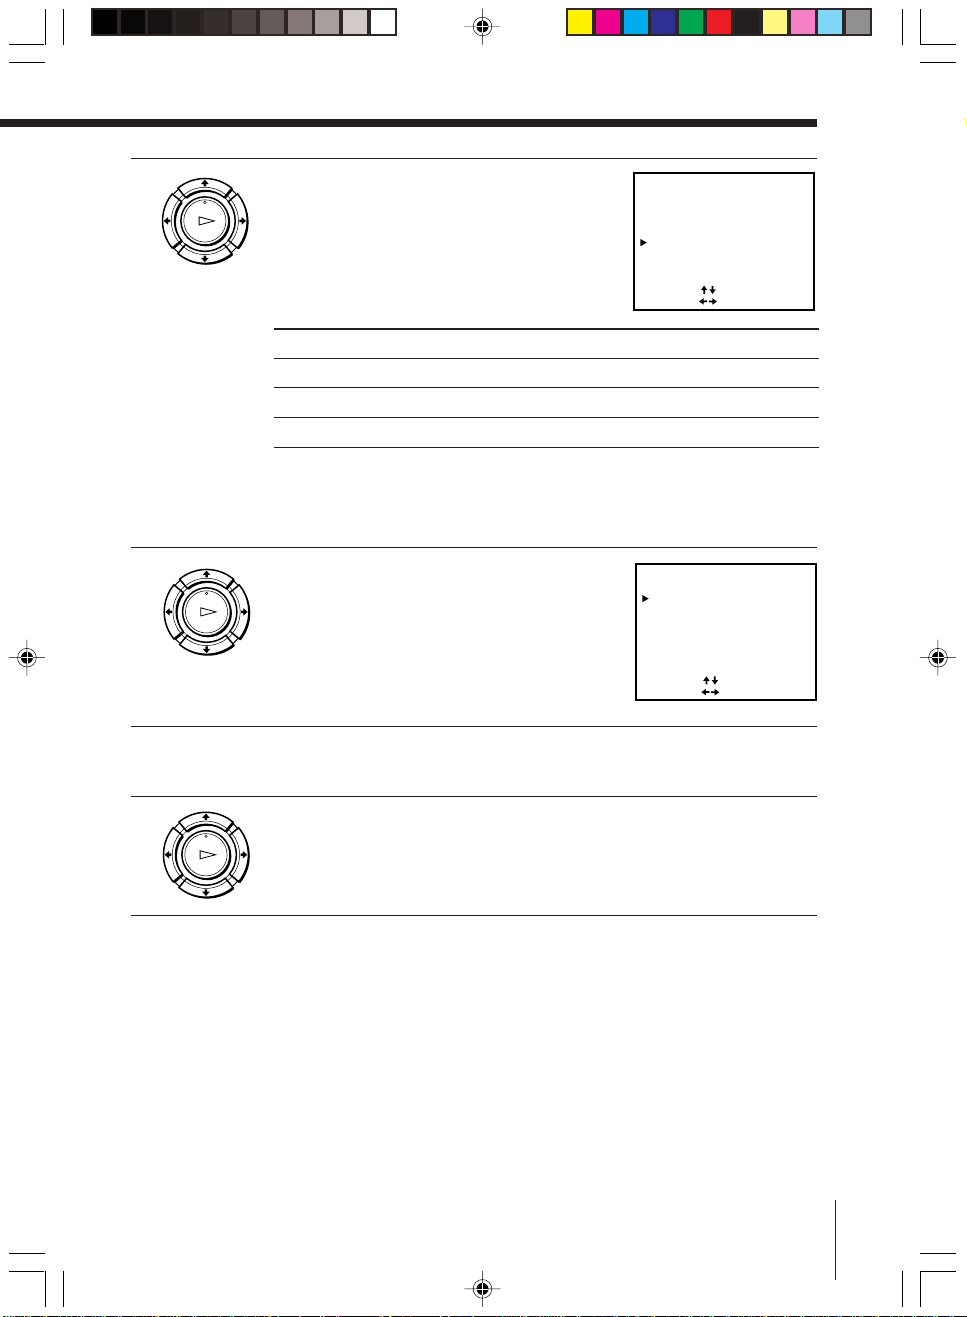
5 Press , repeatedly until the channel you
PLAY
OK
want is displayed.
Pressing < goes back to the previous
channels.
The channels are scanned in the following
order:
Channel coverage
VHF
UHF
CATV (TV distribution)
System B/G
E2–E12
E21–E69
S1–S41, S01–S05
System D/K
R1–R12
R21–R69
If you know the number of the channel you want, press the
programme number buttons. For example, for channel 5, first press
“0” and then press “5.”
TUNER PRESET PROG14
SYSTEM
NORMAL / CATV
AUTO PRESET
CHANNEL SET
AFT
FINE TUNING
[]
:
SELECT
[
SET
:
System I
SA4–SA13
B21–B69
–
S1–S41, S01–S05
B / G
• D / K
NORM
3
5
ON••
]
CATV
OFF
I
6 If the TV sound is distorted or noisy, press
PLAY
OK
M/m/</, to move the cursor (B) to
SYSTEM, then select B/G, D/K or I
whichever is applicable in your area.
TUNER PRESET PROG14
B / G
[]
:
[
:
•
D / K
NORM
CATV
3
5
ON••
]
SYSTEM
NORMAL / CATV
AUTO PRESET
CHANNEL SET
AFT
FINE TUNING
SELECT
SET
7 To allocate another channel to another programme position, repeat
steps 4 and 5.
8 Press OK.
PLAY
OK
Disabling unwanted programme positions
After presetting channels, you can disable unused programme positions. The
disabled positions will be skipped later when you press the PROG +/–
buttons.
1 In step 5 above, press programme number button “0” twice to display
the number “0” beside CHANNEL SET.
2 Press OK.
I
OFF
01GB02CNT-ED313.p65 12/3/01, 11:13 AM7
7
Page 8
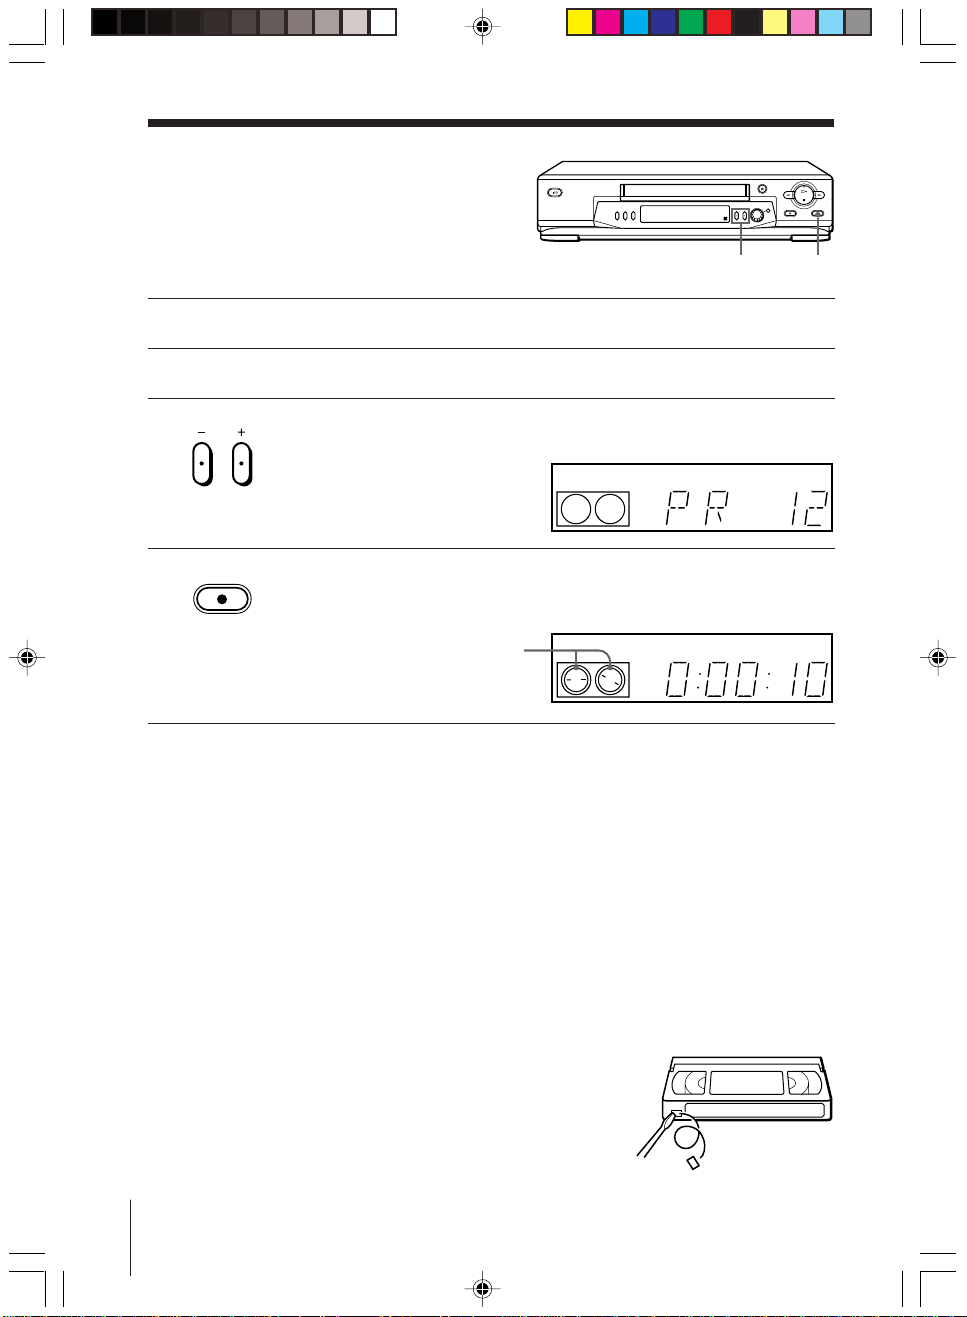
Recording TV
programmes
z RECPROGRAM +/–
1 Turn on your TV and set it to the video channel.
2 Insert a tape with its safety tab in place.
PROGRAM
3 Press PROGRAM +/– to select the programme position you want to
record.
SP
APC
4 Press z REC to start recording.
REC
The recording indicator lights up red in the display window.
Recording indicator
To stop recording
Press x STOP.
To check the remaining tape length
Press DISPLAY on the remote commander. The white bar indicates the
approximate length of tape remaining.
To watch another TV programme while recording
1 If the TV is connected to the VCR using an audio/video cable, set the
TV to TV input. If the TV is connected to the VCR using only the aerial
cable, skip this step.
2 Select another programme position on the TV.
To save a recording
To prevent accidental erasure, break off the safety
tab as illustrated. To record on the tape again,
cover the tab hole with adhesive tape.
LP
APC
Safety tab
8
01GB02CNT-ED313.p65 12/3/01, 11:13 AM8
Page 9
Recording TV programmes using the
Easy Timer function
The Easy Timer function allows you to make a timer recording of a
programme without turning on your TV. Set the recording timer to record
only one programme that will be broadcast within the next 24 hours using
the EASY TIMER knob. If the VCR clock has not been set, you can also set
the clock before setting the timer recording.
SP
SP
SP
PROGRAM +/–
EASY TIMER
knob
START
APC
START
APC
STOP
APC
Setting the Easy Timer
Before you start…
• Insert a tape with its safety tab in
place. Make sure the tape is longer
than the recording time.
REC SPEED
SP/LP (SP/EP)
EASY TIMER
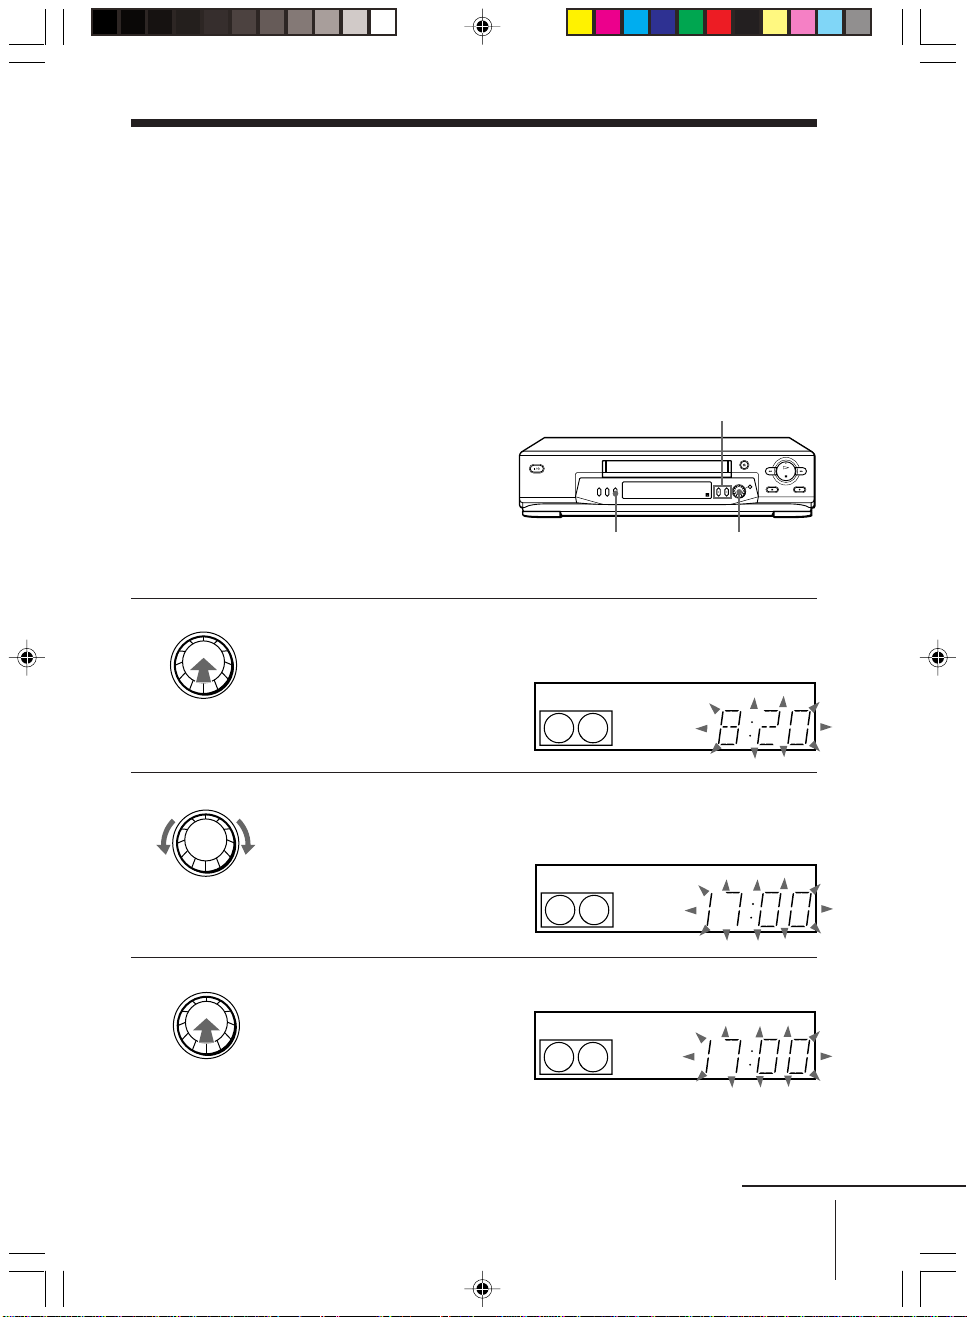
1 Push the EASY TIMER knob.
The START indicator appears in the display window.
If the clock has not been set,
“–:– –” appears. Go to step 2
in “Setting or changing the
Easy Clock” on page 11.
EASY TIMER
2 Set the recording start time by turning the EASY TIMER knob
clockwise or counterclockwise to increase or decrease the time by 15
minutes.
To increase or decrease the
time by one minute, press
PROGRAM +/–.
EASY TIMER
3 Push the EASY TIMER knob to confirm the start time setting.
The STOP indicator appears.
01GB02CNT-ED313.p65 12/3/01, 11:13 AM9
continued
9
Page 10
Recording TV programmes using the Easy Timer function
(continued)
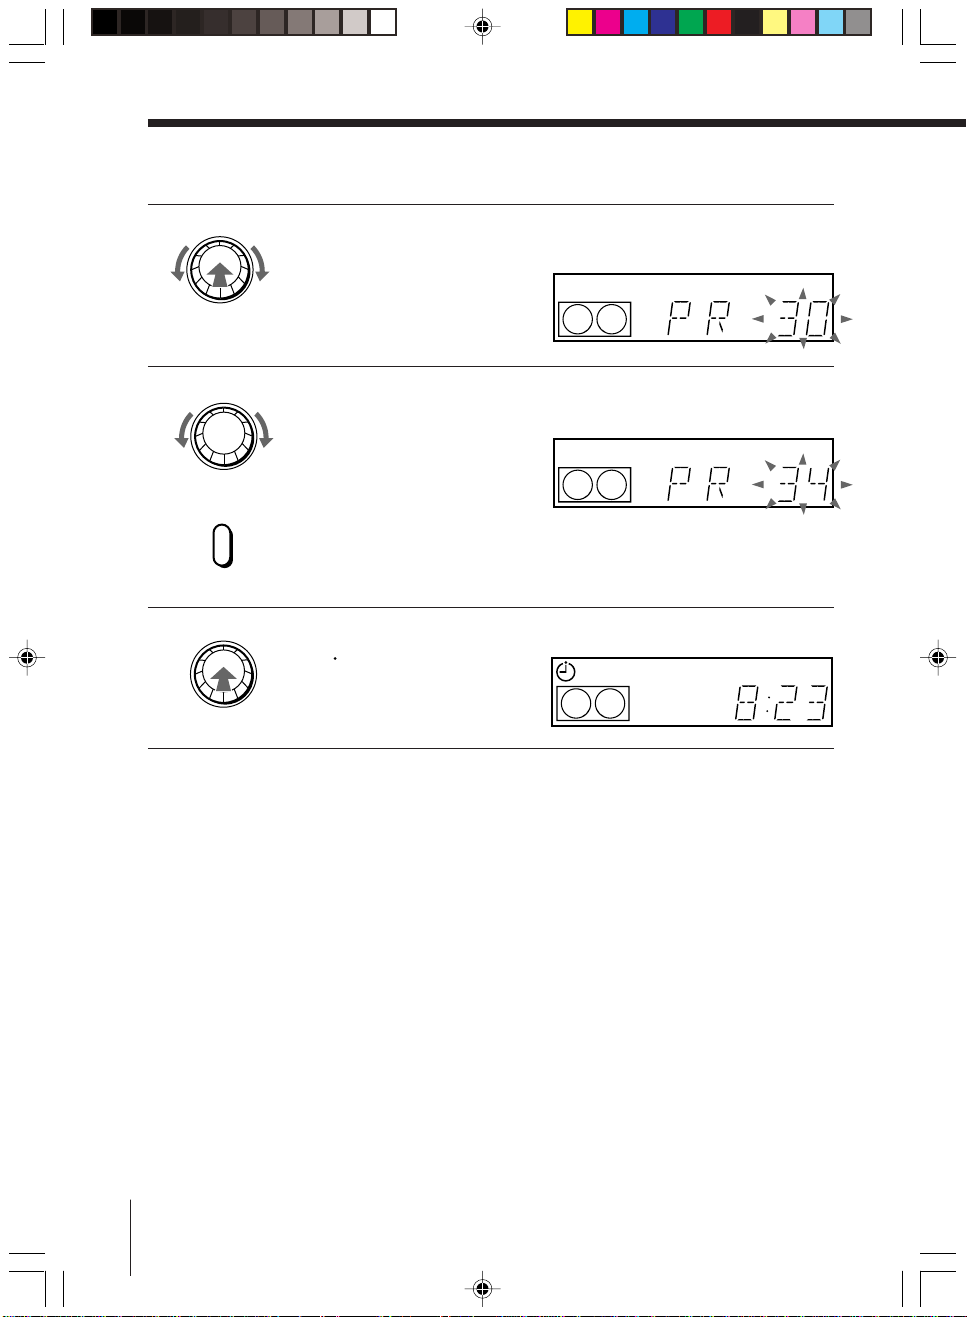
EASY TIMER
4 Set the recording stop time in the same way as in step 2, then push
the EASY TIMER knob.
SP
LP
SP
APC
APC
A programme number flashes.
EASY TIMER
5 Turn the EASY TIMER knob clockwise or counterclockwise to select
the programme you want to record.
To select the tape speed, press
REC SPEED.
REC SPEED
SP/LP
(SP/EP)
EASY TIMER
6 Push the EASY TIMER knob to confirm the setting.
The t indicator appears in
the display window and the
VCR stands by for recording.
10
01GB02CNT-ED313.p65 12/3/01, 11:13 AM10
Page 11
Setting or changing the
Easy Clock
When “–:– –” is displayed in the display
window, the VCR clock has not been set.
You need to set the clock using the Easy
Clock function before setting the timer.
You can also change the current time
using the Easy Clock function.
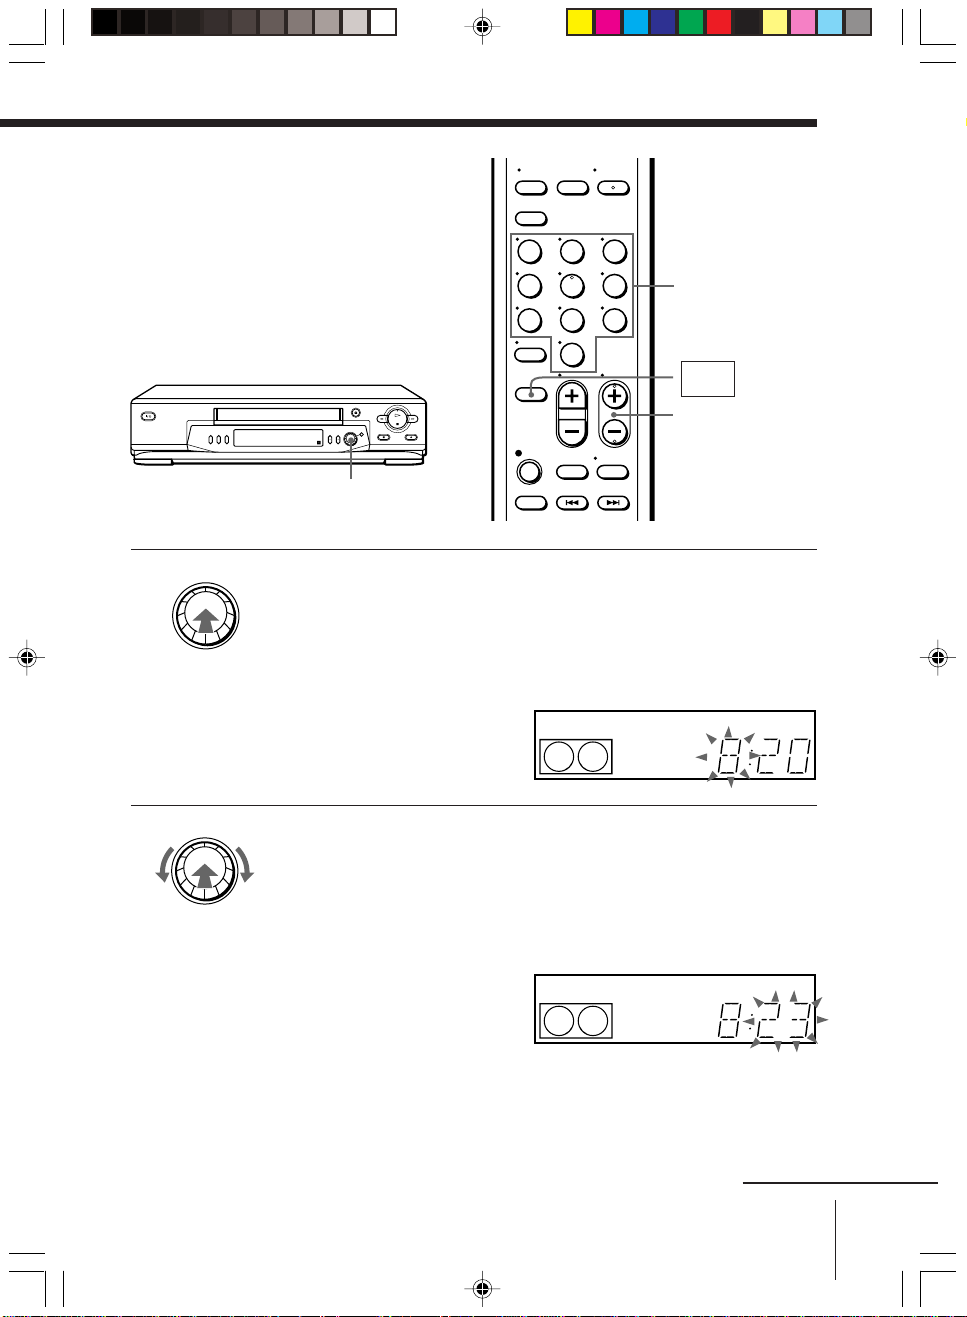
EASY TIMER
knob
EASY TIMER
1 • When “–:– –” is displayed in the display window, push EASY
TIMER.
• To change the clock setting, push and hold the EASY TIMER knob
on the VCR for more than three seconds.
The CLOCK indicator and the current clock setting appear in the
display window.
123
456
789
0
SP
CLOCK
Programme
number
buttons
EASY
TIMER
PROG +/–
START
APC
EASY TIMER
2 Set the current time using the EASY TIMER knob.
1 Turn the EASY TIMER knob clockwise or counterclockwise to
enter the current hour.
2 Push the EASY TIMER knob to confirm the hour setting.
3 Turn the EASY TIMER knob to increase or decrease the minutes
setting by a minute at a time.
01GB02CNT-ED313.p65 12/3/01, 11:13 AM11
SP
CLOCK
START
APC
continued
11
Page 12
Recording TV programmes using the Easy Timer function
(continued)
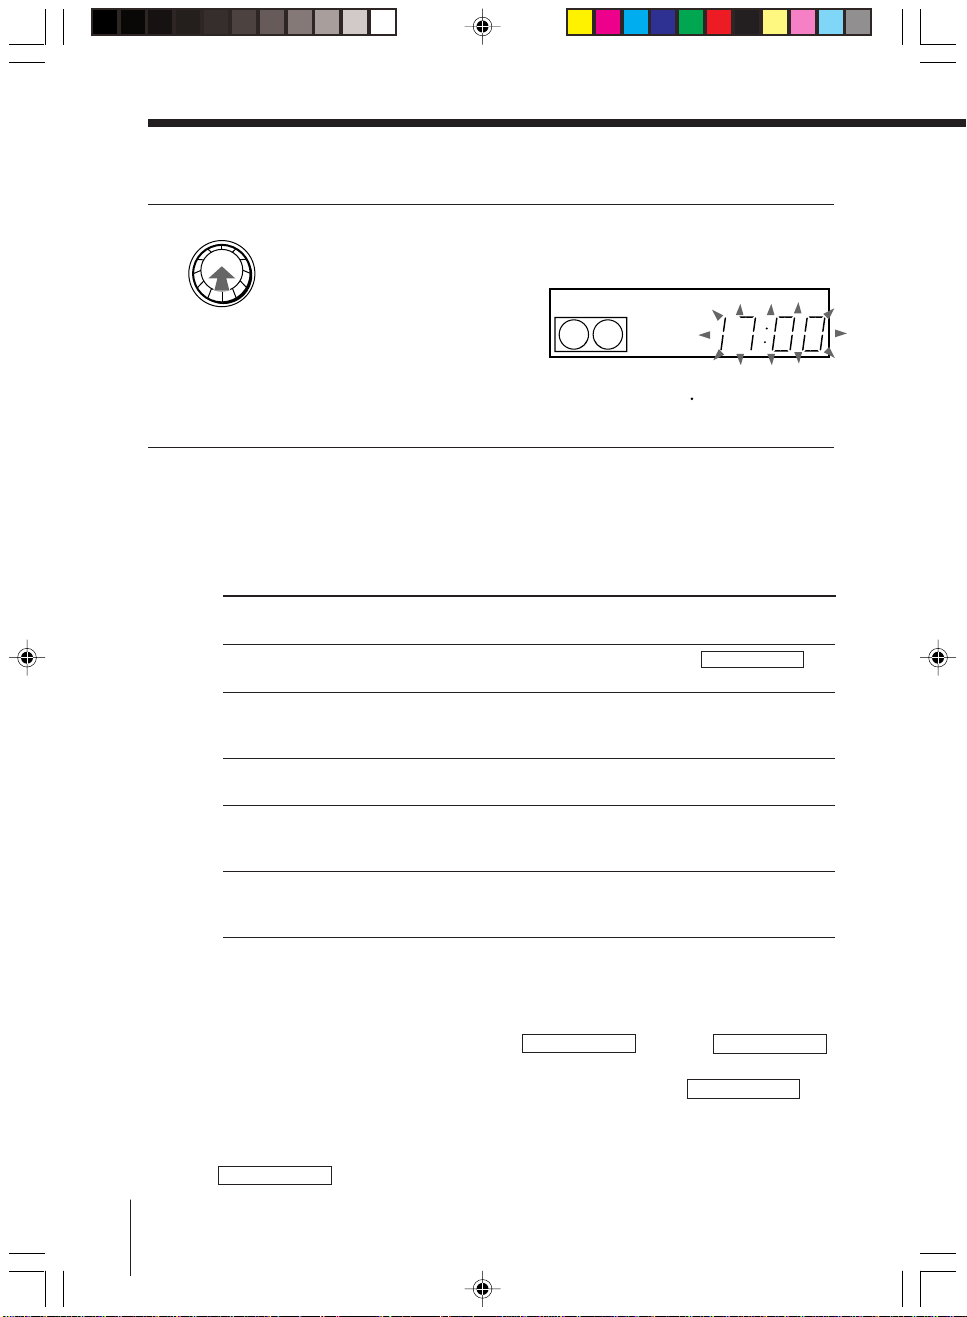
EASY TIMER
3 Push the EASY TIMER knob to finish setting the clock.
The VCR enters the timer recording setting mode.
To continue the Easy Timer
SP
setting, go to step 2 in
“Setting the Easy Timer” on
page 9.
To quit the Easy Timer setting mode without changing any settings,
push the EASY TIMER knob repeatedly until the
appears in the display window.
To set the timer and clock setting using the remote commander
You can also use the remote commander to set the Easy Timer and Easy
Clock. The operations on the VCR and the remote commander correspond as
follows:
To
Confirm the setting and go to
the next setting
Change the time by 15 minutes
(in START/STOP mode)
Change the time by one minute
(in START/STOP mode)
Select the programme
Change the hour/minute by
one hour/minute (in CLOCK
mode)
Do this on the VCR
Push the EASY TIMER
knob
Turn the EASY TIMER
knob or hold PROGRAM
+/– down
Press PROGRAM +/–
Turn the EASY TIMER
knob or press PROGRAM
+/–
Turn the EASY TIMER
knob or press PROGRAM
+/–
START
indicator
t
Do this on the remote
commander
Press EASY TIMER
Hold PROG +/– down
Press PROG +/–
Press PROG +/– or
INPUT SELECT
Press PROG +/–
APC
You can also use the programme number buttons to set the clock, start and
stop times, and the programme you want to record. Just press the
programme number buttons to enter the hours and minutes. For example:
• To set the clock to “8:20”, press 0, 8, EASY TIMER , 2, 0 and EASY TIMER
in sequence.
• To set the start or stop time to “8:20”, press 0, 8, 2, 0 and EASY TIMER in
sequence.
If you make a mistake, re-enter the correct digits before pressing
EASY TIMER .
12
01GB02CNT-ED313.p65 12/3/01, 11:13 AM12
Page 13

To stop recording
To stop the VCR while recording, press x STOP.
To check or change the timer setting
Push EASY TIMER knob repeatedly until the setting you want to check or
change flashes. Then re-enter the new setting, if necessary. If you do not
want to change any of the settings, push the EASY TIMER knob repeatedly
until the
indicator appears in the display window.
t
You can also change the timer setting using the TIMER SET/CHECK menu.
For details, see page 40 in the English Operating Instructions.
To cancel the timer setting
To cancel the Easy Timer setting while entering a setting, press CLEAR on
the remote commander or press PROGRAM + and – on the VCR at the same
time.
To use the VCR after setting the timer
To use the VCR before a timer recording begins, just press ?/1. The
t
indicator turns off and the VCR switches on. Remember to press ?/1 to reset
the VCR to the timer recording standby mode after using the VCR.
You can also do the following tasks while the VCR is recording:
• Reset the counter.
• Display tape information on the TV screen.
• Check the timer settings.
• Watch another TV programme.
To watch the recorded programme right after recording with the Easy
Timer
The SEARCH MODE indicator starts flashing when the VCR finishes the
Easy Timer recording. To watch the recorded programme, push the EASY
TIMER knob. The VCR turns on, starts searching, then automatically starts
playback from the beginning of the recording. For details, see page 32 in the
English Operating Instructions.
01GB02CNT-ED313.p65 12/3/01, 11:13 AM13
continued
13
Page 14

Recording TV programmes using the Easy Timer function
(continued)
Tips
• To record from a source connected to the LINE-1 IN jacks, press INPUT SELECT or
PROG +/– or turn the EASY TIMER knob to display “L” in the display window.
• To record NTSC signals, set the tape speed to SP or EP. To record in the EP mode,
set the tape speed to “LP” in the display window.
Notes
• You cannot set the Easy Timer if eight programmes have already been set.
• You can set the timer for only one programme using the Easy Timer function. If you
want to set the timer for other programmes, use the TIMER SET/CHECK menu.
For details, see the next page.
• You cannot set the date using the Easy Timer function. Set the date using the
CLOCK SET menu if you want to set the timer with the menu. For details, see page
3.
• The t indicator flashes in the display window when you complete the setting with
no tape inserted.
14
01GB02CNT-ED313.p65 12/3/01, 11:13 AM14
Page 15
Setting the timer
TIMER SET / CHECK TUE
25 .1
DATE
START STOP PROG
– .–– –:–– –: –– –– –
– .–– –:–– –: –– –– –
– .–– –:–– –: –– –– –
– .–– –:–– –: –– –– –
– .–– –:–– –: –– –– –
– .–– –:–– –: –– –– –
– .–– –:–– –: –– –– –
– .–– –:–– –: –– –– –
2
manually
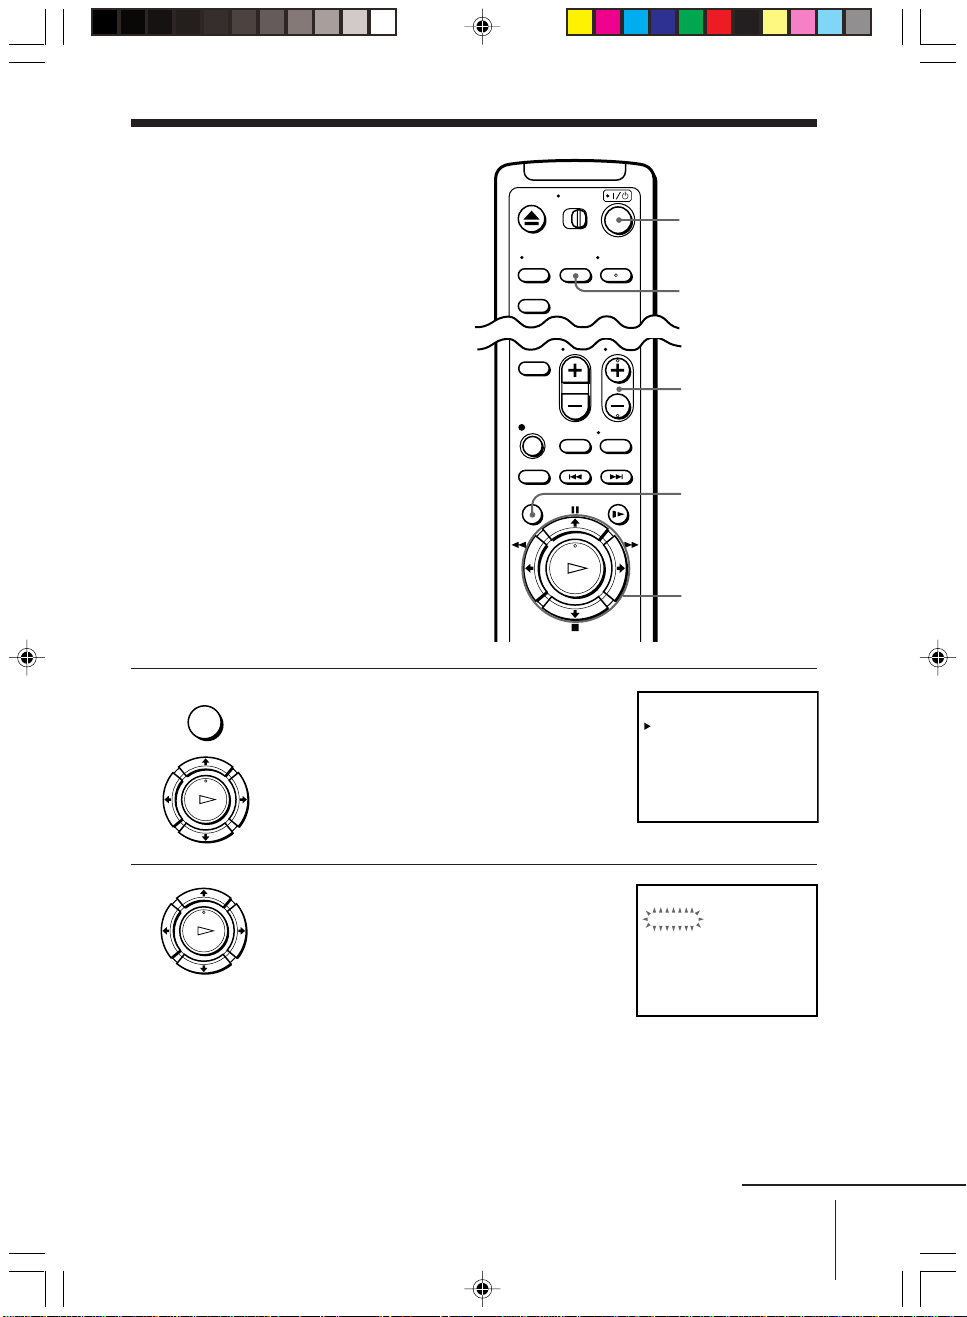
You can preset up to eight programmes
at a time.
Before you start…
• Check that the VCR clock is set to the
correct time.
• Insert a tape with its safety tab in
place. Make sure the tape is longer
than the total recording time.
• Turn on your TV and set it to the
video channel.
MENU
1 Press MENU and select TIMER SET/
CHECK, then press OK.
?/1
INPUT SELECT
PROG +/–
MENU
OK
M/m/</,
2 Set the date, start and stop times,
01GB02CNT-ED313.p65 12/3/01, 11:13 AM15
PLAY
PLAY
OK
OK
25 . 1
programme position, and tape speed:
1 Press , to select each item in turn.
2 Press M/m to set each item.
To correct a setting, press < to return to
that setting and reset it.
TIMER SET / CHECK TUE
DATE START STOP PROG
12
TUE
– : –– – : –– ––
2.5
– .–– –: –– – : –– –– –
– .–– –: –– – : –– –– –
– .–– –: –– – : –– –– –
– .–– –: –– – : –– –– –
– .–– –: –– – : –– –– –
– .–– –: –– – : –– –– –
– .–– –: –– – : –– –– –
2
SP
To record the same programme every day or the same day every
week, press m while the date is flashing. For details, see “Daily/
weekly recording” next page.
To record from a source connected to the LINE-1 IN jacks; press
INPUT SELECT or PROG +/– to display “L” in the “PROG”
position.
continued
15
Page 16
Setting the timer manually (continued)
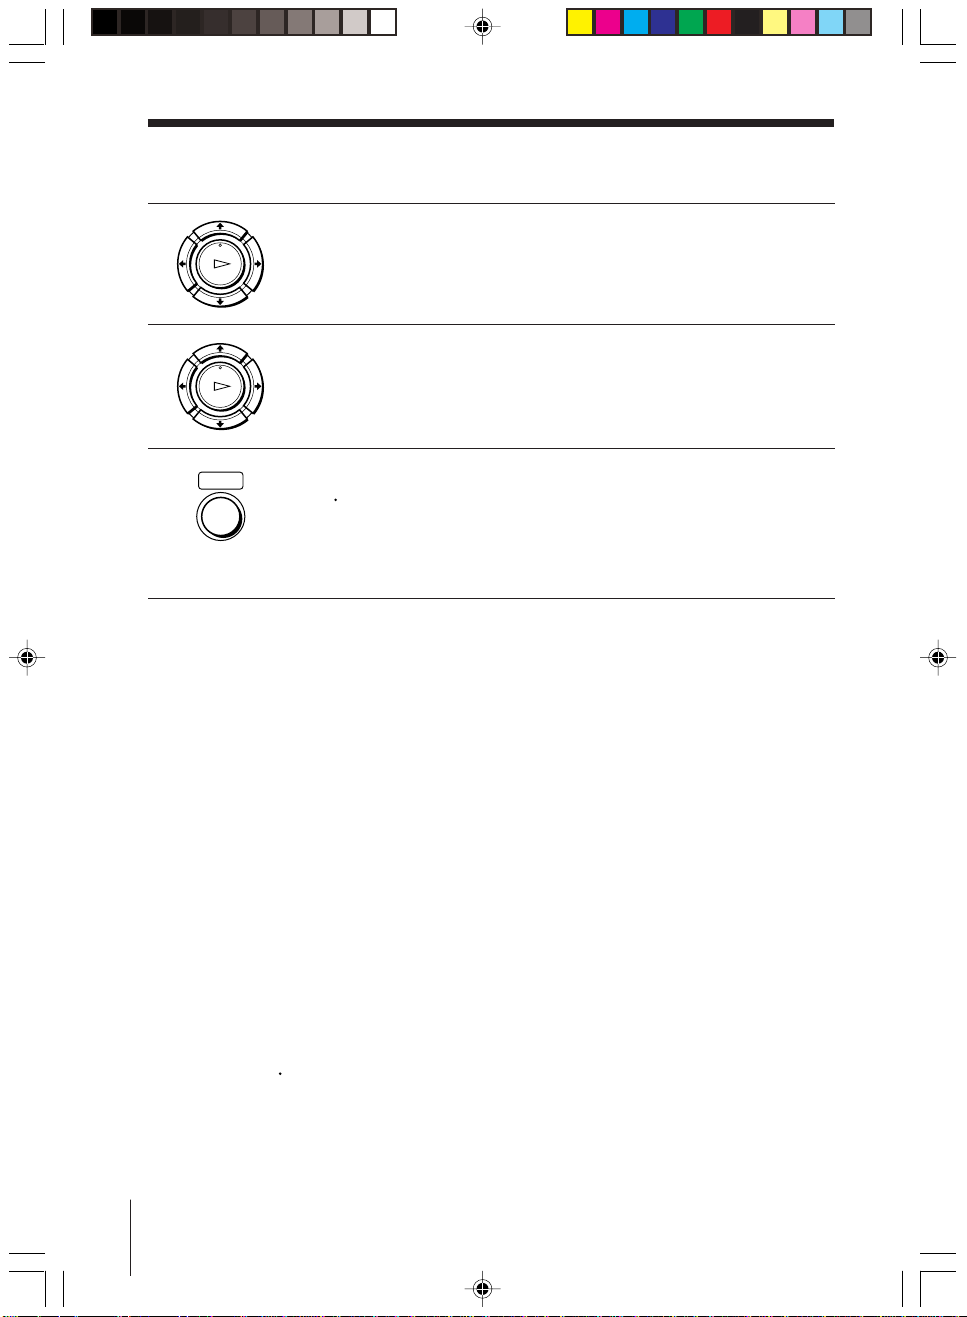
3 Press , to confirm the setting.
PLAY
OK
The cursor (B) appears at the beginning of the line. To enter another
setting, move the cursor to the next line and repeat step 2.
4 Press OK.
PLAY
OK
5 Press ?/1 to turn off the VCR.
• ]/1
The t indicator appears in the display window and the VCR
stands by for recording.
To record from other equipment, leave the connected equipment
switched on.
To stop recording
To stop the VCR while recording, press x STOP.
Daily/weekly recording
In step 2 on page 15, press m to select the recording pattern. Each time you
press m, the indication changes as shown below. Press M to change the
indication in reverse order.
the current date t SUN-SAT (Sunday to Saturday) t MON-SAT (Monday
to Saturday) t MON-FRI (Monday to Friday) t EVERY SAT ..... t EVERY
MON t EVERY SUN t 1 month later t (dates count down) t the
current date
Tips
• To set the programme position, you can also use the PROG +/– or programme
number buttons.
• To set the tape speed, you can also use the REC SPEED button.
• To record NTSC signals, set the tape speed to SP or EP. To record in the EP mode, set
the tape speed to “LP”.
Note
• The t indicator flashes in the display window when you press ?/1 with no tape
inserted.
16
01GB02CNT-ED313.p65 12/3/01, 11:14 AM16
Page 17
Playing/searching
at various speeds
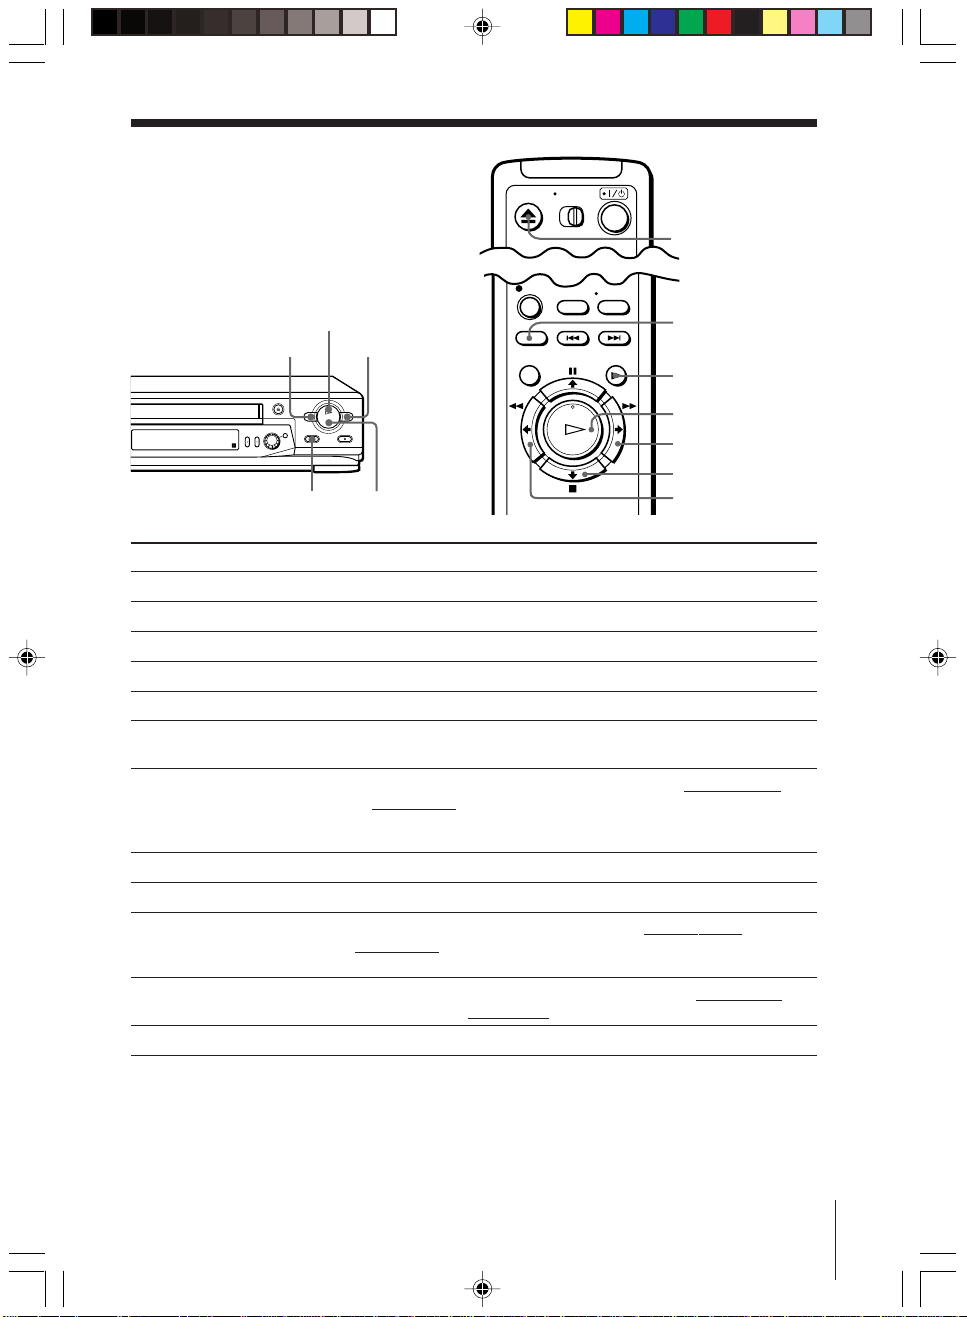
Z EJECT
H PLAY
m REW M FF
Playback options
Play a tape
Stop play
Pause play
Resume play after pause
Fast-forward/rewind
View the picture during fastforward or rewind
Play at high speed
Play at twice the normal speed
Play in slow motion
Play frame by frame
Rewind and start play
Eject the tape
×2
y SLOW
H PLAY
M FF
x STOP
x STOPX PAUSE
Operation
Press H PLAY.
Press x STOP.
Press X PAUSE.
Press X PAUSE or H PLAY.
Press M FF or m REW during stop.
During fast-forward, hold down M FF. During rewind, hold
down m REW.
• During playback, press M FF or m REW on the remote
commander.
• During playback, hold down M FF or m REW. When you
release the button, normal playback resumes.
During playback or pause, press ×2.
During playback or pause, press y SLOW.
During pause, press M FF or m REW on the remote
commander. Hold down the button to play one frame each
second.
While the tape is stopped, hold down m REW on the VCR and
press H PLAY on the VCR.
Press Z EJECT.
m REW
To resume normal playback
Press H PLAY.
01GB02CNT-ED313.p65 12/3/01, 11:14 AM17
17
Page 18
Setting the
recording
duration time
After you have started recording in the
normal way, you can have the VCR stop
recording automatically after a specified
duration.
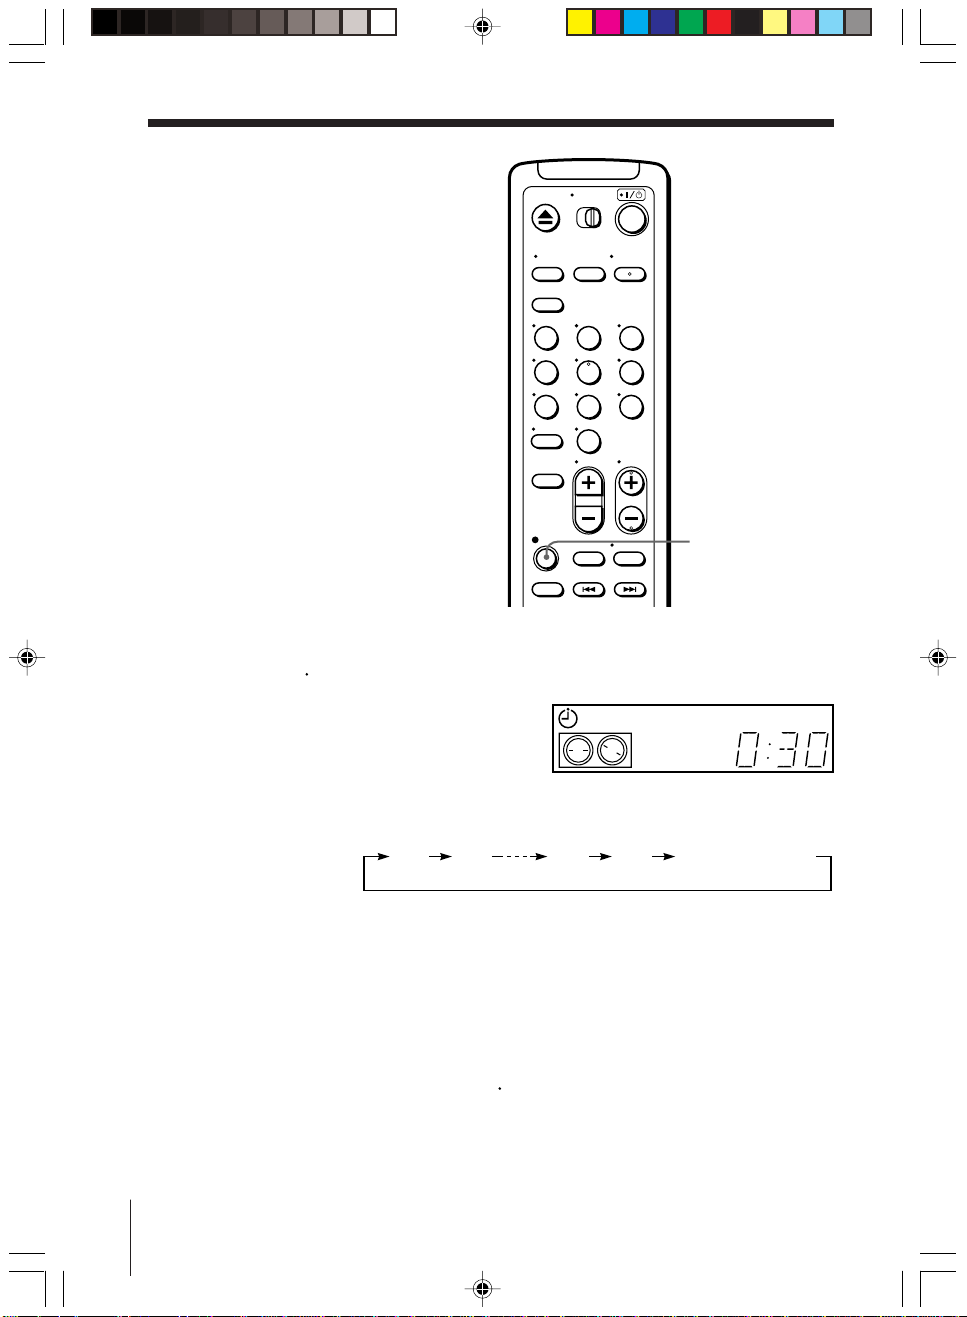
1 While recording, press z REC.
The t indicator appears in the display window.
123
456
789
0
SP
z REC
APC
2 Press z REC repeatedly to set the duration.
Each press advances the time in increments of 30 minutes.
The tape counter decreases minute by minute to 0:00, then the VCR
stops recording and turns off automatically.
To extend the duration
Press z REC repeatedly to set to the new duration.
To cancel the duration
Press z REC repeatedly until the
to normal recording mode.
To stop recording
To stop the VCR while recording, press x STOP.
18
01GB02CNT-ED313.p65 12/3/01, 11:14 AM18
0:30 1:00 6:005:30 Normal recording
indicator turns off and the VCR returns
t
Page 19
Editing with another VCR
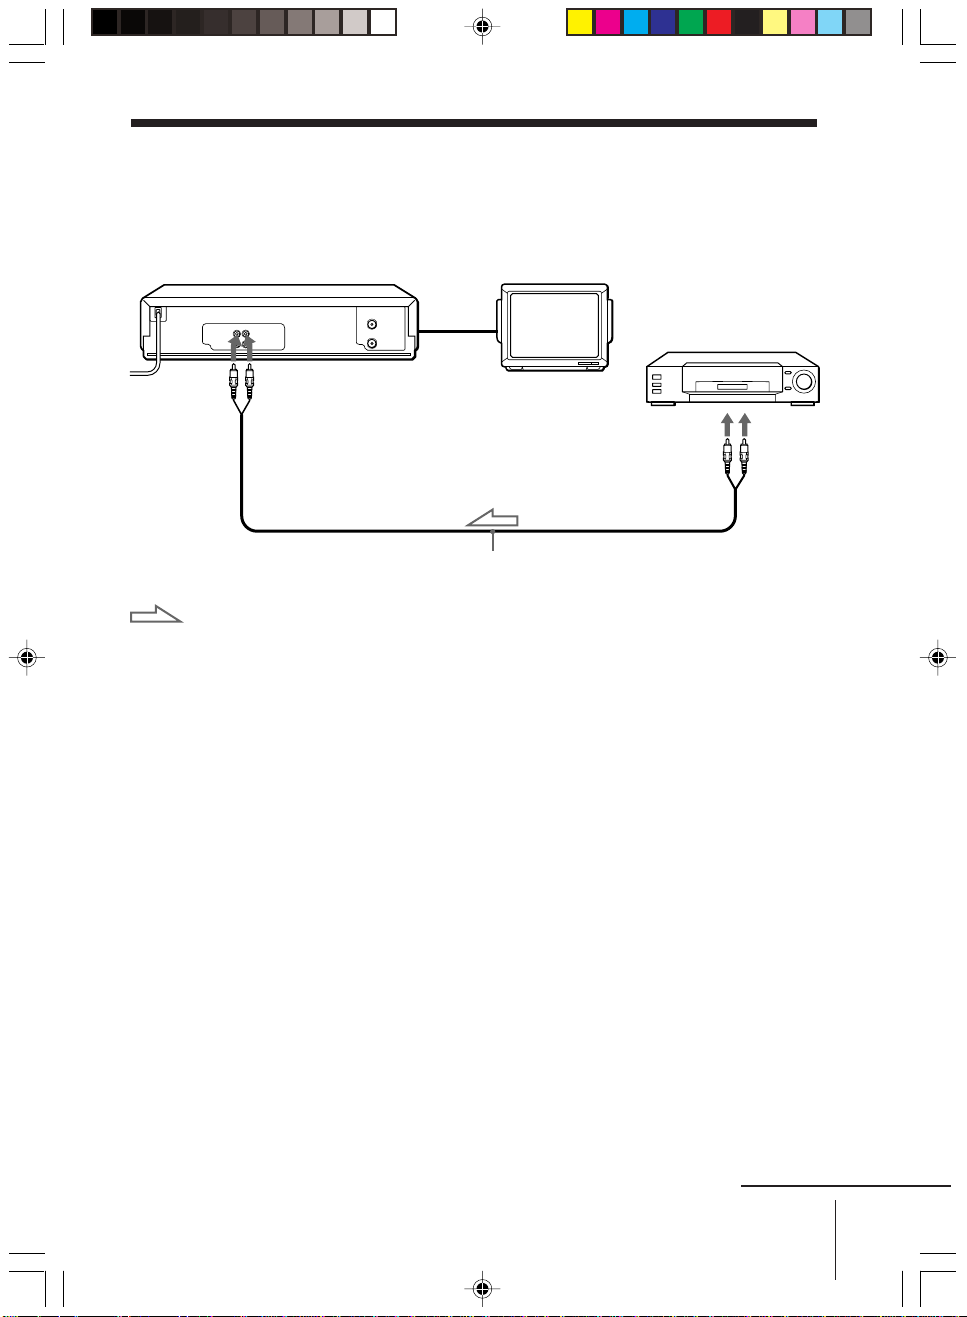
How to connect to record on this VCR
This VCR (Recorder)
LINE-1 IN
VMC-710HG/720HG audio/video cable (not supplied)
: Signal flow
Tip
• Connect LINE-1 IN on this VCR to the line output jacks on the other VCR using a
commercially available audio/video cable such as Sony VMC-710HG/720HG (not
supplied). If the other VCR has the AUDIO L and R jacks, use a Sony VMC-910HG
audio/video cable (not supplied).
Notes
• Make sure you connect the plugs to the jacks of the same colour.
• If you connect this VCR to both the LINE IN and LINE OUT jacks of the other VCR,
select the input correctly to prevent a humming noise.
TV
Other VCR (Player)
LINE OUT
01GB02CNT-ED313.p65 12/3/01, 11:14 AM19
continued
19
Page 20
Editing with another VCR (continued)
Operation
(when recording on this VCR)
Before you start editing
• Turn on your TV and set it to the
video channel.
• Press INPUT SELECT or PROG +/–
to display “L” in the display window.
• Press REC SPEED to select the tape
speed (SP or LP for the PAL system,
and SP or EP for the NTSC system).
1 Insert a source tape with its safety tab removed into the other
(playback) VCR. Search for the point to start playback and set it to
playback pause.
2 Insert a tape with its safety tab in place into this (recording) VCR.
Search for the point to start recording and press X PAUSE.
3 Press z REC on this VCR and set it to recording pause.
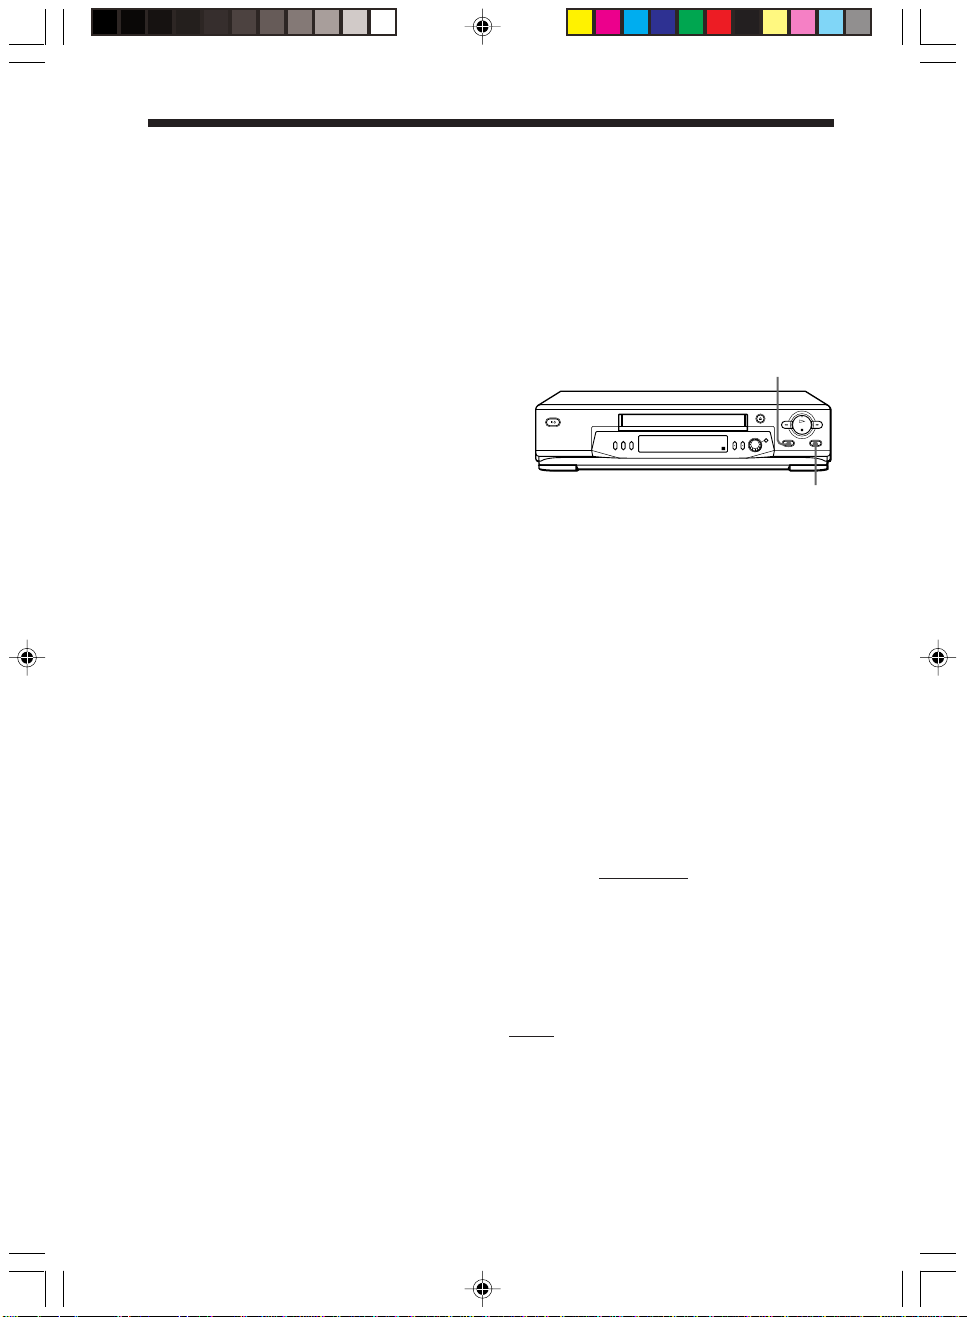
4 To start editing, press the X PAUSE buttons on both VCRs at the same
time.
X PAUSE
z REC
To stop editing
Press the x STOP buttons on both VCRs.
Tips
• To edit more precisely, press the X PAUSE buttons on the VCRs to release pause.
• To cut out unwanted scenes while editing, press X PAUSE on this VCR when an
unwanted scene begins. When it ends, press X PAUSE again to resume recording.
Note
• If you start recording following the procedure above, the VCR will not start
recording with the APC function. To record a tape with the APC function, press
z REC again during recording pause in step 3 so that the VCR analyses the tape.
Then when you start recording in step 4, press X PAUSE after the APC indicator
stops flashing. If you press X PAUSE before the APC indicator stops flashing, the
APC function is cancelled.
Sony Corporation
20
01GB02CNT-ED313.p65 12/3/01, 11:14 AM20
 Loading...