

Sony SLV-751HF, SLV-750HF Owner’s Manual
SONY®
3-756-090-21 (2}
/;')_ :,:.,.>I_ _ g -_ .sC_,
VideoCassetteRecorder
Operating Instructions
SLV-750HF/751 HF
iii £i-11i
© 1992 by Sony Corporation
WARNING Owner'sRecord
To prevent fire or shock hazard, do not
expose the unit to rain or moisture.
RISK OF ELECTRIC SHOCK
DO NOT OPEN
CAUIION: 10 HEDUCE I HE HI_SKOt- ELECTRIC ..SHOCK,
DO NOT REMOVE COVER (OR BACK).
NO USER-SERVICEABLE PARTS INSIDE.
REFER SERVICING TO QUALIFIED SERVICE PERSONNEL.
lhLs symbol is intended to alert the user to
the presence of uninsulated "dangerous
voltage" within the product's enclosure that
may be of sufficient magnitude to constitute
a risk of electric shock to persons.
This symbol is intended to alert the user to
the presence of important operating and
maintenance (servicing) instructions in the
literature accompanying the appliance.
The model number is located at the rear and front of the unit
and the serial number on the top. Record the serial number
in the space provided below. Refer to these numbers
whenever you call upon your Sony service dealer regarding
this product.
Model No. SLV-750HF Serial No.
Model No. SLV-751HF Serial No.
F_'_111,_'_[_ t;li"tF'J_ 1171R="t'_JBI[,.'-W-'!
WARNING
This equipment has been tested and found to comply with
the limits for a Class B digital device, pursuant to Part 15
of the FCC Rules. These limits are designed to provide
reasonable protection against harmful interference in a
residential installation. This equipment generates, uses,
and can radiate radio frequency energy and, if not
installed in accordance with the instructions, may cause
harmful interference to radio communications. However,
there is no guarantee that interference will not occur in a
particular installation. If this equipment does cause
harmful interference to radio or television reception, which
can be determined by turning the equipment off and on,
the user is encouraged to try to correct the interference
by one or more of the following measures:
Reorient or relocate the receiving antenna.
Increase the separation between the equipment and
receiver.
Connect the equipment into an outlet on a circuit
different from that to which the receiver is connected.
Consult the dealer or an experienced radioi'l-V
technician for help.
You are cautioned that any changes or modifications not
expressly approved in this manual could void your
authority to operate this equipment.
Preliminaries
Caution
TO PREVENT ELECTRIC SHOCK, DO NOT USE THIS
POLARIZED AC PLUG WITH AN EXTENSION CORD,
RECEPTACLE OR OTHER OUTLET UNLESS THE
BLADES CAN BE FULLY INSERTED TO PREVENT
BLADE EXPOSURE.
NOTE TO CATV SYSTEM INSTALLERS IN THE U.S.A.:
This reminder is provided to call the cable TV system
installer's attention to Article 820-40 of the NEC that
provides guidelines for proper grounding and, in
particular, specifies that the cable ground shall be
connected to the groundingsystem inthe building, as
close to the point of cable entry as practical.

TableofContents
TableofContents
WARNING ......................................................................... 2
Owner's Record ............................................................... 2
For Customers in the U.S,A............................................ 2
Precautions ...................................................................... 4
Safety ............................................................................. 4
Installation .................................................................... .. 4
Operation ....................................................................... 4
Cleaning .......................................................................... 4
Introduction ...................................................................... 5
How to Use This Manual ................................................ 5
Overview ........................................................................ 5
Hookups and Getting Started ..................................... 6
Hookup 1
AudioNideo (A/V) Hookup ............................................. 7
Hookup 2
Cable Hookup ............................................................... 8
VCR Setup ..................................................................... 9
VCR Plus+ Channel Setup ............................................. 9
Hookup 3
Cable Hookup ................................................................ 10
VCR Setup ..................................................................... 11
VCR Plus+ Channel Setup ............................................ 11
Hookup 4
Cable Hookup ................................................................ 12
VCR Setup ..................................................................... 13
VCR Plus+ Channel Setup ............................................ 13
Hookup 5
Antenna Hookup ............................................................ 14
VCR Setup ..................................................................... 15
VCR Plus+ Channel Setup ............................................ 15
Preparing the Remote Commander ................................ 16
Inserting Batteries .......................................................... 16
Operating the VCR with the Remote Commander ......... 16
How to use the Remote Commander ............................. 16
Setting the Time and Date ............................................... 17
Example of Time and Date Setting ................................ 17
Presetting the Active Channels ...................................... 19
Presetting All Receivable Channels Automatically ......... 19
Presetting Desired Channels or Disabling Unwanted
Channels ....................................................................... 20
Fine-tuning ..................................................................... 21
Cable TV Channel Assignment ...................................... 21
Activating the Cable Box Control Function ................... 22
Setting the Cable Box Control ........................................ 23
Checking the Cable Box Control Setting ........................ 24
Using the SETUP MENU .................................................. 25
Menu Choices ................................................................ 26
Playback ........................................................................... 27
Inserting a Video Cassette ............................................. 27
Playback ........................................................................ 28
The Display .................................................................... 29 =_
Indexing Tape Contents ................................................. 29
Playing Back Externally-Recorded Tapes ...................... 30 _z
Selecting the Monitor Sound .......................................... 30 -....
Listening to Mixed Hi-Fi and Normal Track Sound ......... 31
Recording 13/Programs .................................................. 32 =
Recording TV Programs ................................................ 32 _-
Pausing .......................................................................... 33 =o
Recording with the "IV Off .............................................. 34 _=
Watching One TV Program While Recording Another ...34 _,
Recording Multi-Channel TV Sound (MTS) .................... 34 ==
Timer Recording .............................................................. 35 _"
Setting the Timer ........................................................... 35 o
Overlapping Timer Recordings ................. : .................... 38
Checking the Timer Settings .......................................... 39
Changing or Cancelling the Timer Settings .................... 40 "
Using the VCR Before Timer Recording Starts .............. 41
Introducing VCR Plus+ ......... :.......................................... 42
VCR Plus+ Setup Instructions ....................................... 42
Recording Programs Using VCR Plus+ ......................... 44
Variable Speed Playback ................................................ 46
Variable Speed Playback ............................................... 46
Still Picture ..................................................................... 46
Picture Search ............................................................... 46
Locked Picture Search ................................................... 47
Skip Playback ................................................................ 47
Slow Motion Playback .................................................... 47
Frame-by-Frame Picture ................................................ 47
Picture Adjustment During Variable Speed Playback ....47
Index Function ................................................................. 48
Index Signals ................................................................. 48
Playing Back from the Index Point - Index Scan ............ 49
Locating an Index - Index Search .................................. 50
APC (Adaptive Picture Control) ...................................... 51
Using the APC Function when Recording ...................... 51
Using the APC Function when Playing Back a Tape ..... 51
Quick-Timer Recording ................................................... 52
Quick-Timer Recording .................................................. 52
Editing .............................................................................. 53
Editing from Another VCR .......,....................................... 53
Editing onto Another VCR .............................................. 54
General Setup Information .............................................. 55
Setting the RF UNIT ...................................................... 55
Attaching the External Antenna Connector (supplied) ... 56
Attaching the EAC66 UN Band Separator / Mixer
(not supplied) ................................................................. 56
Identifying the Parts and Controls .................................. 57
Front Panel .................................................................... 57
Rear Panel ..................................................................... 58
Display Window Indicators ............................................. 59
Remote Commander ..................................................... 60
Troubleshooting .............................................................. 61
Specifications .................................................................. 63
Index ...............................................................................64
z
€ID
o"
Preliminaries 3
Precautions
• Operate the unit only on 120 V AC, 60 Hz.
• If anything falls into the cabinet, unplug the unit and have
it checked by qualified personnel before operating it any
further.
• One blade of the plug is wider than the other for the
purposes of safety and will fit into the power outlet only
one way. If you are unable to insert the plug fully into the
outlet, contact your dealer.
• Unplug the unit from the wall outlet if you do not intend to
use it for an extended period of time. To disconnect the
cord, pull it out by the plug, never by the cord.
• Allow adequate air circulation to prevent internal heat
buildup.
• Do not place the unit on surfaces (rugs, blankets, etc.) or
near materials (curtains, draperies) that may block the
ventilation slots.
• Do not install the unit near heat sources such as radiators
or air ducts, or in a place subject to direct sunlight,
excessive dust, mechanical vibration or shock.
• Do not install the unit in an inclined position. It is designed
to be operated in a horizontal position only.
• Keep the unit and cassettes away from equipment with
strong magnets, such as microwave ovens or large
loudspeakers.
• Do not place heavy objects on the unit.
• When the unit is not in use, turn the power off to conserve
energy and to extend its life.
• Remove and store video cassettes after recording or
playback.
• Clean the cabinet, panel arid cu_trols with a clry, soft
cloth, or a soft cloth slightly moistened with a mild
detergent solution.
• Do not use any type of solvent, such as alcohol or
benzine.
Preliminaries
Introduction
"O
This manual includes information on two video cassette
recorder (VCR) models, the SLV-750HF and the
SLV-751HF. The model name is indicated on the rear and
front panels.
This manual is divided into five chapters.
The chapters and their contents are as follows:
Preliminaries (page 2)
Preparation (page 6)
Basic Operations (page 27)
Advanced Operations (page 46)
Additional Information (page 55)
If you are using your VCR for the firsttime, start from the
section "Hookups and Getting Started" (page 6). This
section explains how to hookup, set up, and operate your
VCR so that you can start enjoying it right away.
For information about the VCR's basic operations, such as
Playback (page 27), Recording TV Programs (page 32), or
Timer Recording (page 35), see Basic Operations.
If you are already familiar with the basic operations, see
Advanced Operations,
If you have any problems inoperating the VCR, refer to
Troubleshooting. If your VCR isin need of repair, contact
your nearest Sony Service Center facility.
Conventions of this manual
This manual explains operations using the VCR Remote
Commander. However, the buttons on the VCR with the
same name or mark as those on the Remote Commander
function exactly the same as those on the Remote
Commander.
When you are reading through the manual, remember:
• Buttons and switches are shown in uppercase letters.
Example: Press I_ PLAY.
• Numbers in the illustrationscorrespond to numbers in the
text.
• _ indicates signal flow.
• Notes and cautions are enclosed in boxes.
Unpacking
Check that you have received the following accessories:
• Remote Commander (1)
• Size AA (R6) batteries (2)
• External antenna connector (1)
• 75-ohm coaxial cable with F-type connectors (1)
• AC powercord (1)
• Audio/video connecting cable (3 phono to 3 phono) (1)
• Cable Mouse (Cable Box Controller) (1)
Functions
VCR Plus+ TM system
Allows you to quickly and easily preset up to eight TV
programs.
• Cable box control
Allows your VCR to control channel selection on most
cable boxes.
• APC (Adaptive Picture Control) function
Automatically optimizes recording and playback
performance by adjusting the video circuitry for each tape
that you use.
• Auto tracking function
Automatically adjusts the tracking condition for optimum
picture quality.
• Timer recordings of eight programs In a month
Recording of up to eight TV programs can be preset up to
one month in advance.
• DUAL MODE SHUTTLE ring
Allows quick access to the desired scene and playback in
various speeds in forward and reverse directions.
• Input connectors on the front panel
Allows easy connection to a video camera recorder.
• Index function
The beginning of a desired scene can be located easily
with the index search function.
• Auto head cleaner
Cleans the video heads each time a cassette is inserted
or ejected.
On-screen display
• ON SCREEN HELP message
The VCR gives a message on screen with a beep tone to
warn that you have attempted an incorrect operation.
• DISPLAY
Tape counter, cassette speed, operation mode, and
remaining cassette length can be displayed on the TV
screen.
• TIMER SET/CHECK display
Timer recording settings can be set and checked by
referring to the TV screen.
• LANGUAGE (Canadian versions only)
You can preset yourVCR to display screen information in
either English or French.
High-quality picture
• High-quality picture
Your Sony VCR provides sharp, finely detailed pictures
through High Quality (HQ) picture technology. Your VCR
incorporates VHS high-quality picture technology and is
compatible with any VCR bearing the _ mark.
i
_=-.
o
3
p,,
VCR Plus+ and PlusCodeare trademarks of
Gemstar Development Corp.
Preliminaries 5
HookupsandGettingStarted
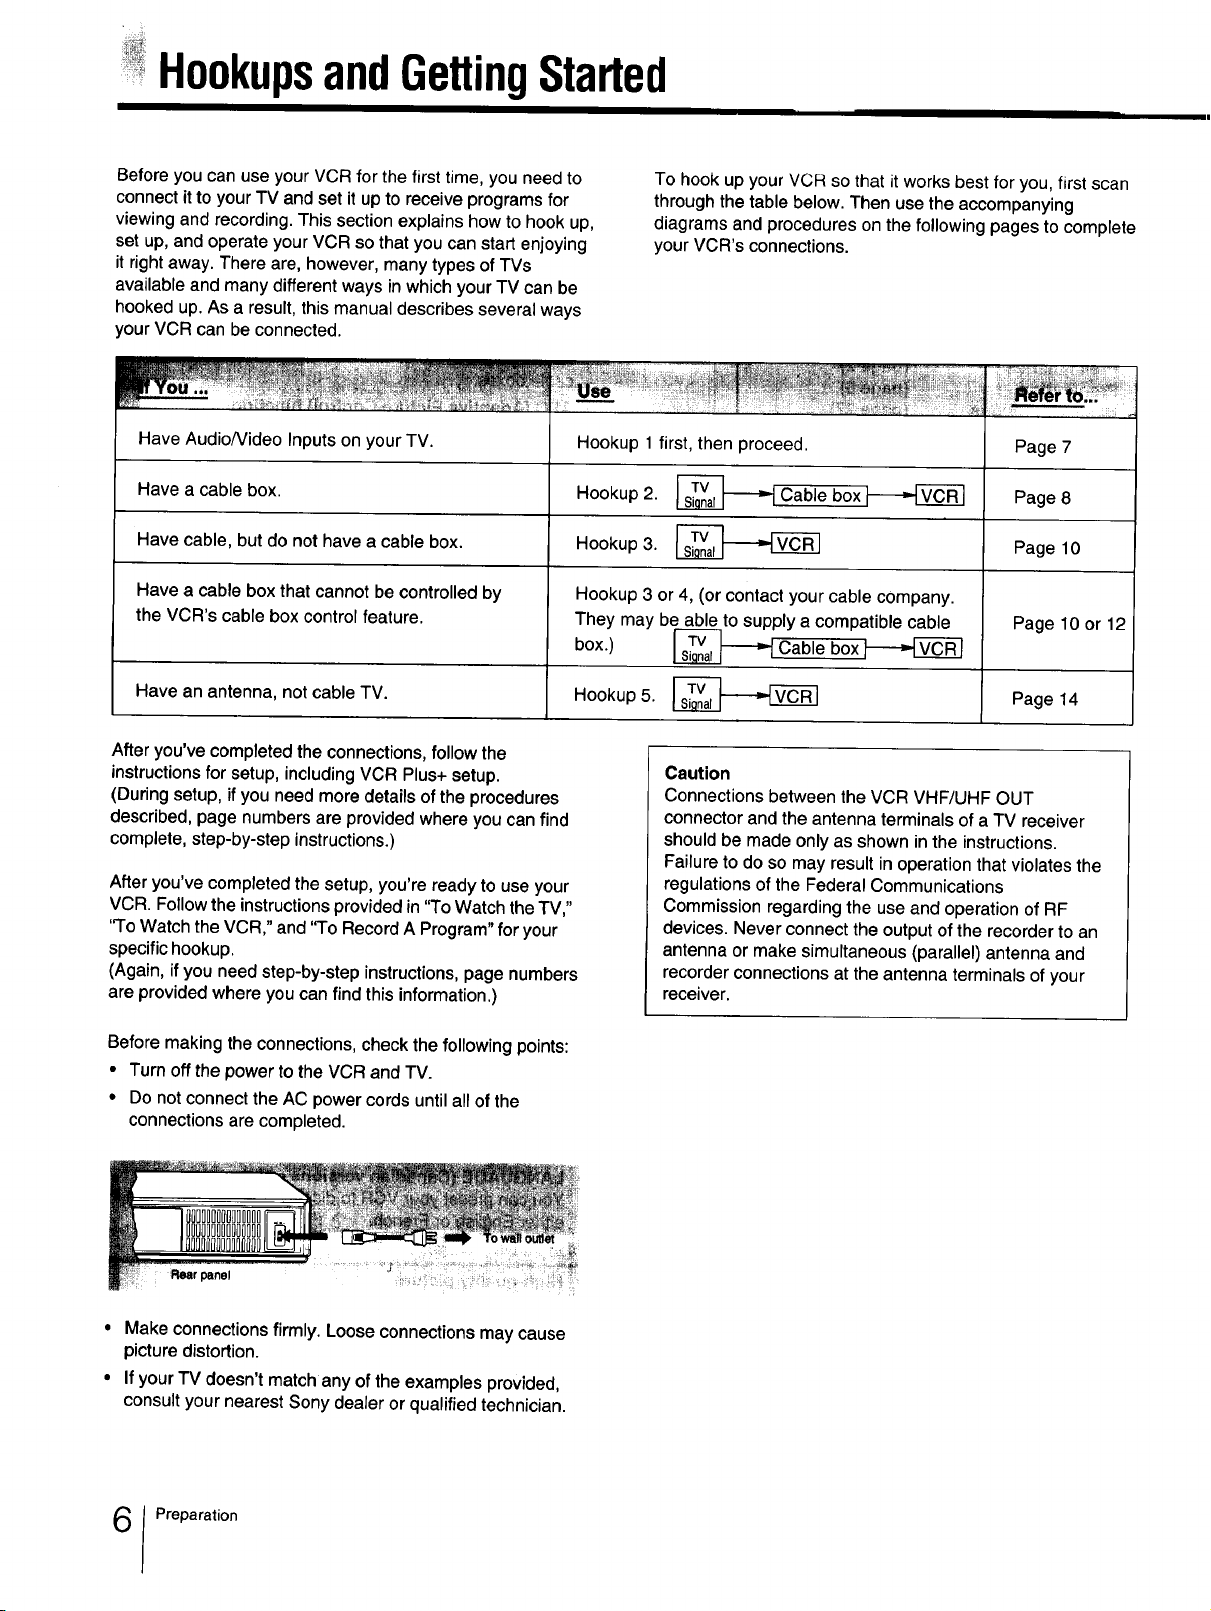
Before you can use your VCR for the first time, you need to
connect it to your TV and set it up to receive programs for
viewing and recording. This section explains how to hook up,
set up, and operate your VCR so that you can start enjoying
it right away. There are, however, many types of TVs
available and many different ways in which your TV can be
hooked up. As a result, this manual describes several ways
your VCR can be connected.
Have Audio/Video Inputs on your TV.
Have a cable box.
Have cable, but do not have a cable box.
Have a cable box that cannot be controlled by
the VCR's cable box control feature.
Have an antenna, not cable TV.
After you've completed the connections, follow the
instructions for setup, including VCR Plus+ setup.
(During setup, if you need more details of the procedures
described, page numbers are provided where you can find
complete, step-by-step instructions.)
After you've completed the setup, you're ready to use your
VCR. Follow the instructions provided in "To Watch the TV,"
'qo Watch the VCR," and "To Record A Program" for your
specific hookup.
(Again, if you need step-by-step instructions, page numbers
are provided where you can find this information.)
To hook up your VCR so that it works best for you, first scan
through the table below. Then use the accompanying
diagrams and procedures on the following pages to complete
your VCR's connections.
Hookup 1 first, then proceed.
Hookup 2. _Cable box'l-_-_
Hookup 3.
Hookup 3 or 4, (or contact your cable company.
They may be able to supply a compatible cable
box.)
Hookup 5. _
Caution
Connections between the VCR VHF/UHF OUT
connector and the antenna terminals of a TV receiver
should be made only as shown in the instructions.
Failure to do so may result in operation that violates the
regulations of the Federal Communications
Commission regarding the use and operation of RF
devices. Never connect the output of the recorder to an
antenna or make simultaneous (parallel) antenna and
recorder connections at the antenna terminals of your
receiver.
Cable box
Page 7
Page 8
Page 10
Page 10 or 12
Page 14
Before making the connections, check the following points:
• Turn off the power to the VCR and rv.
• Do not connect the AC power cords until all of the
connections are completed.
Rear panel _i
• Make connections firmly. Loose connections may cause
picture distortion.
• If your TV doesn't match any of the examples provided,
consult your nearest Sony dealer or qualified technician.
Preparation
HookupI
-r
o
o
e,-
1/)
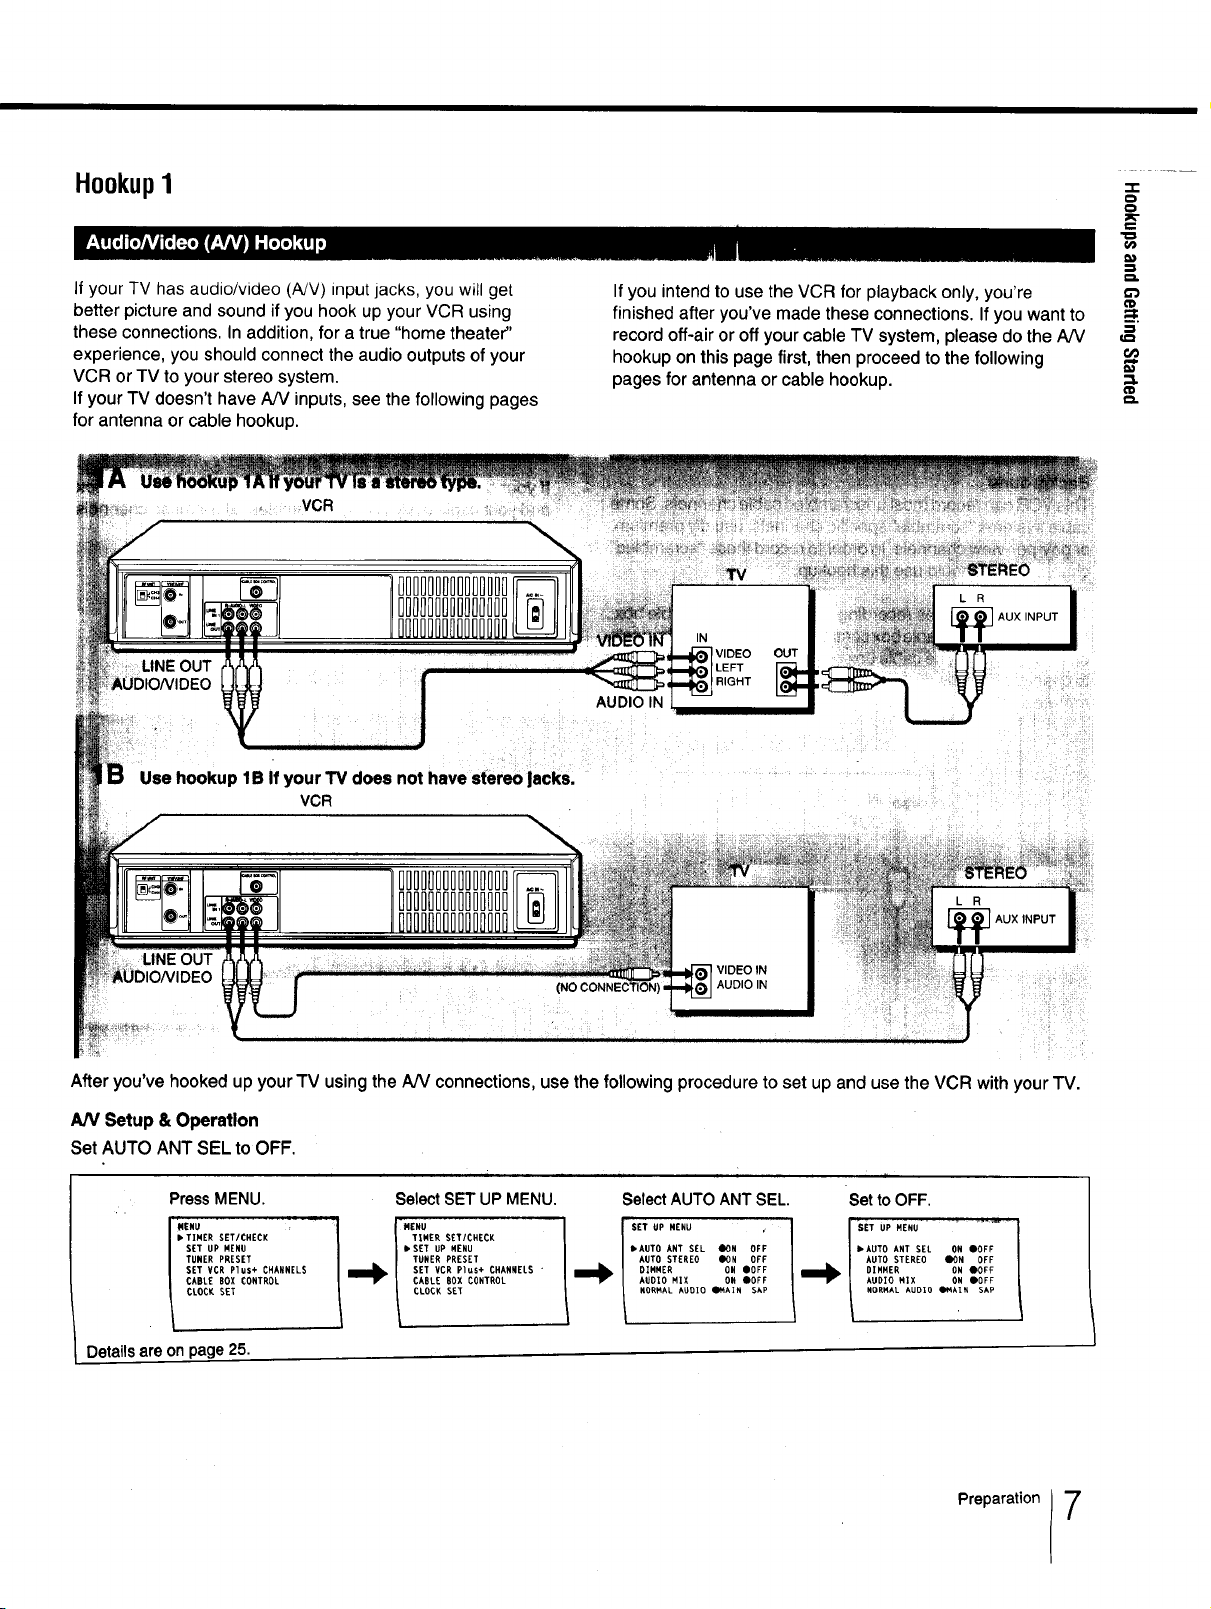
If your TV has audio/video (A/V) input jacks, you will get
better picture and sound if you hook up your VCR using
these connections. In addition, for a true "home theater"
experience, you should connect the audio outputs of your
VCR or TV to your stereo system.
If your TV doesn't have A/V inputs, see the following pages
for antenna or cable hookup.
VCR
Use hookup IB If your TV does not have stereo lacks.
VCR
If you intend to use the VCR for playback only, you're
finished after you've made these connections. If you want to
record off-air or off your cable TV system, please do the AN
hookup on this page first, then proceed to the following
pages for antenna or cable hookup.
VIDEO OUT
AUDIO IN
_=.
=1
Do
€}.
OUT VIDEO IN
AUDIO IN
After you've hooked up your TV using the AiV connections, use the following procedure to set up and use the VCR with your TV.
AN Setup & Operation
Set AUTOANT SEL to OFF.
PressMENU. SelectSET UP MENU.
I •TINER SET/CHECK I TINER SET/CHECK
TUNER PRESET
I SET UP RENU • SET UP RENU
| CABLE BOX CONTROL CABLE BOX CONTROL
l CLOCK SET CLOCK SET
Detailsare onpage25.
SET VCR Plus+ CHANNELS "SET VCR Plus+ CHANNELS
SelectAUTO ANT SEL. Set to OFF.
• AUTO ANT SEL _OH OFF _AUTO ANT SEL ON eOFF
AUTO STEREO _ON OFF AUTO STEREO liON OFF
DINNER eOFF OIHREN ON OOFF
AUDIO MIX ON _OFF AUDIO MiX ON _OFF
NORHAL AUOIO QNAIN SAP NORMAL AUDIO Q¢4AIN SAP
s.U,.ENUOH U'MENU
Preparation 7
HookupsandGettingStarted
Hookup2 - UsingVCRCableBoxControl
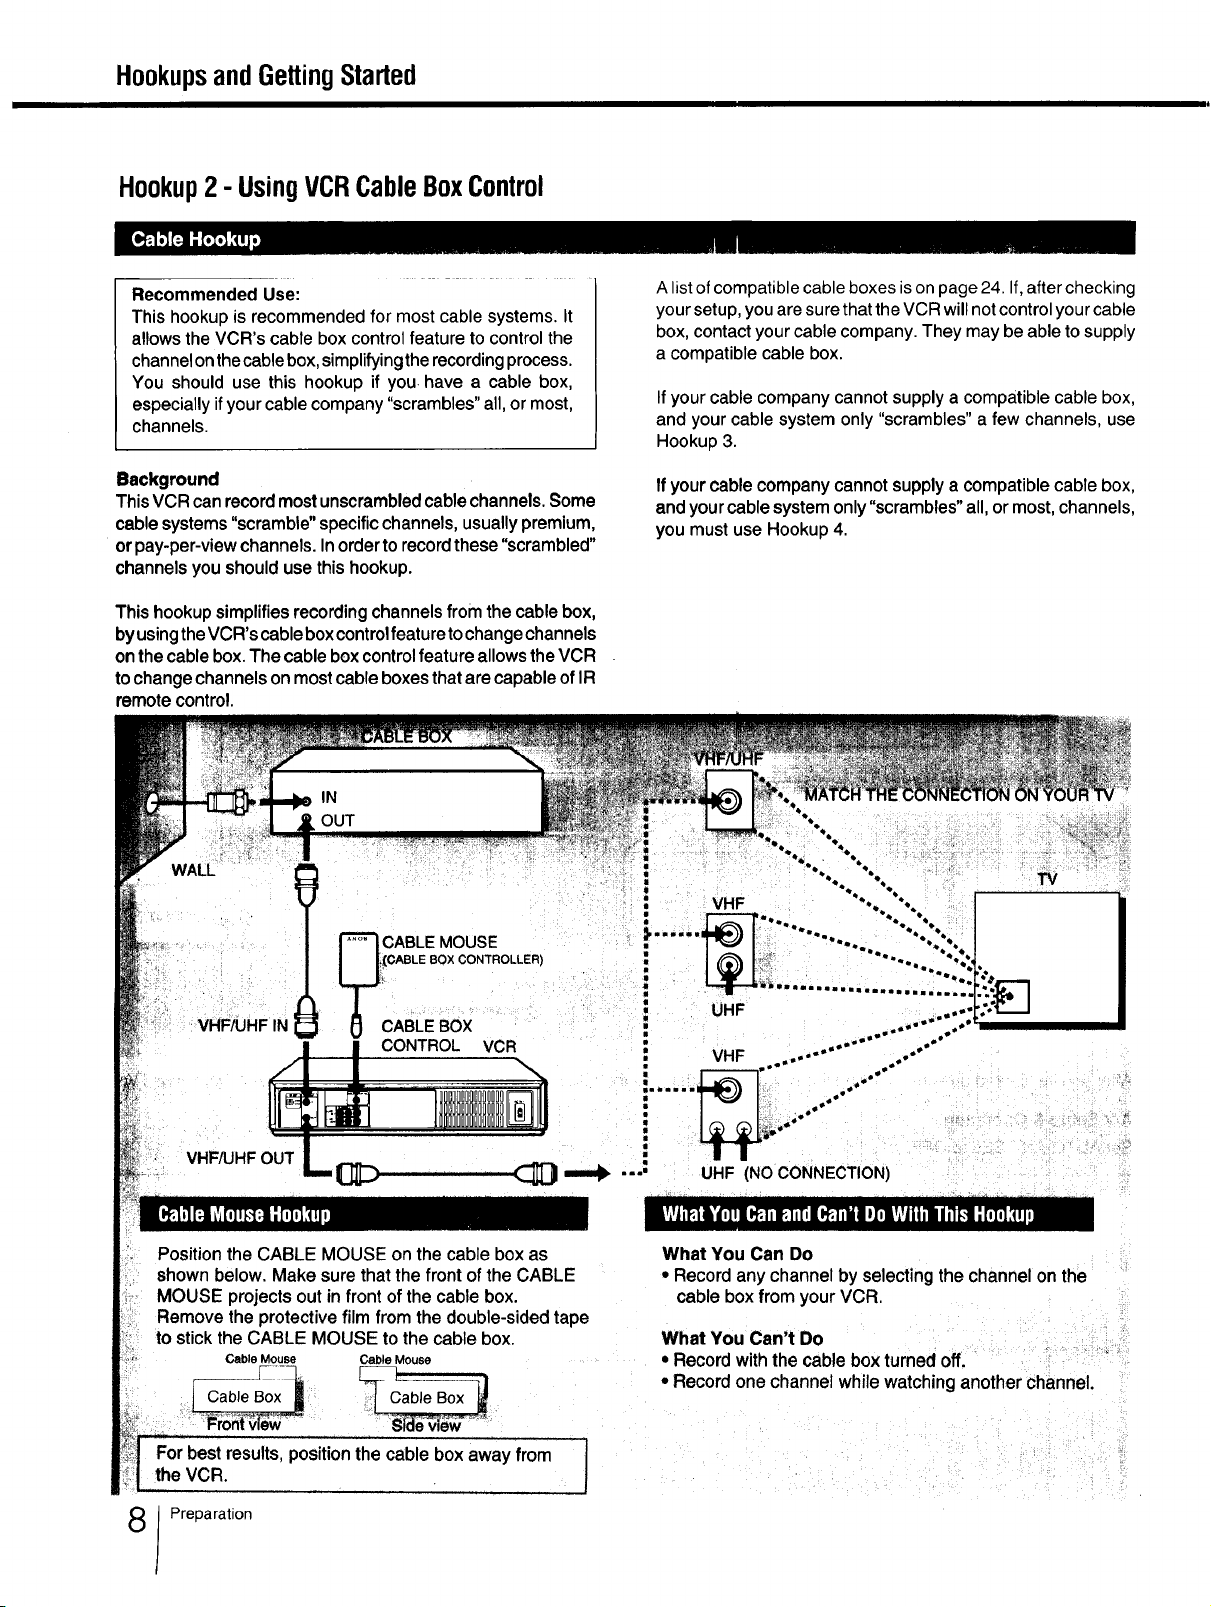
Recommended Use:
This hookupis recommended for most cable systems. It
allowsthe VCR's cable box control feature to control the
channelonthecablebox,simplifyingthe recordingprocess.
You should use this hookup if you. have a cable box,
especially ifyour cable company "scrambles" all, or most,
channels.
Background
ThisVCRcanrecordmostunscrambledcablechannels.Some
cablesystems"scramble"specificchannels,usuallypremium,
orpay-per-viewchannels.Inordertorecordthese"scrambled"
channelsyou shouldusethishookup.
Thishookupsimplifiesrecordingchannelsfromthecablebox,
byusingtheVCR'scableboxcontrolfeaturetochangechannels
onthecablebox.ThecableboxcontrolfeatureallowstheVCR
tochangechannelsonmostcableboxesthatarecapableofIR
remotecontrol.
IN
OUT
WALL
A list of compatible cable boxes is on page 24. If, after checking
your setup, you are sure that the VCR will not control your cable
box, contact your cable company. They may be able to supply
a compatible cable box.
If your cable company cannot supply a compatible cable box,
and your cable system only "scrambles" a few channels, use
Hookup 3.
Ifyour cable company cannot supply a compatible cable box,
and your cable system only "scrambles" all, or most, channels,
you must use Hookup 4.
TV
VHF
_CABLE MOUSE
!_CCABLE8OXCONTROLLER)
VHF/UHF IN
VHF_HF OUT
Position the CABLE MOUSE on the cable box as
shown below. Make sure that the front of the CABLE
MOUSE projects out infront of the cable box.
Remove the protective film from the double-sided tape
to stickthe CABLE MOUSE to the cable box.
Cable Mouse Cable Mouse
For best results, position the cable box away from
the VCR.
Preparation
CABLE Box
CONTROL VCR
What You Can Do
• Recordanychannelby selectingthe channelonthe
cableboxfrom yourVCR.
What You Can't Do
• Record with the cable box turned off.
• Record one channel while watching another channel.
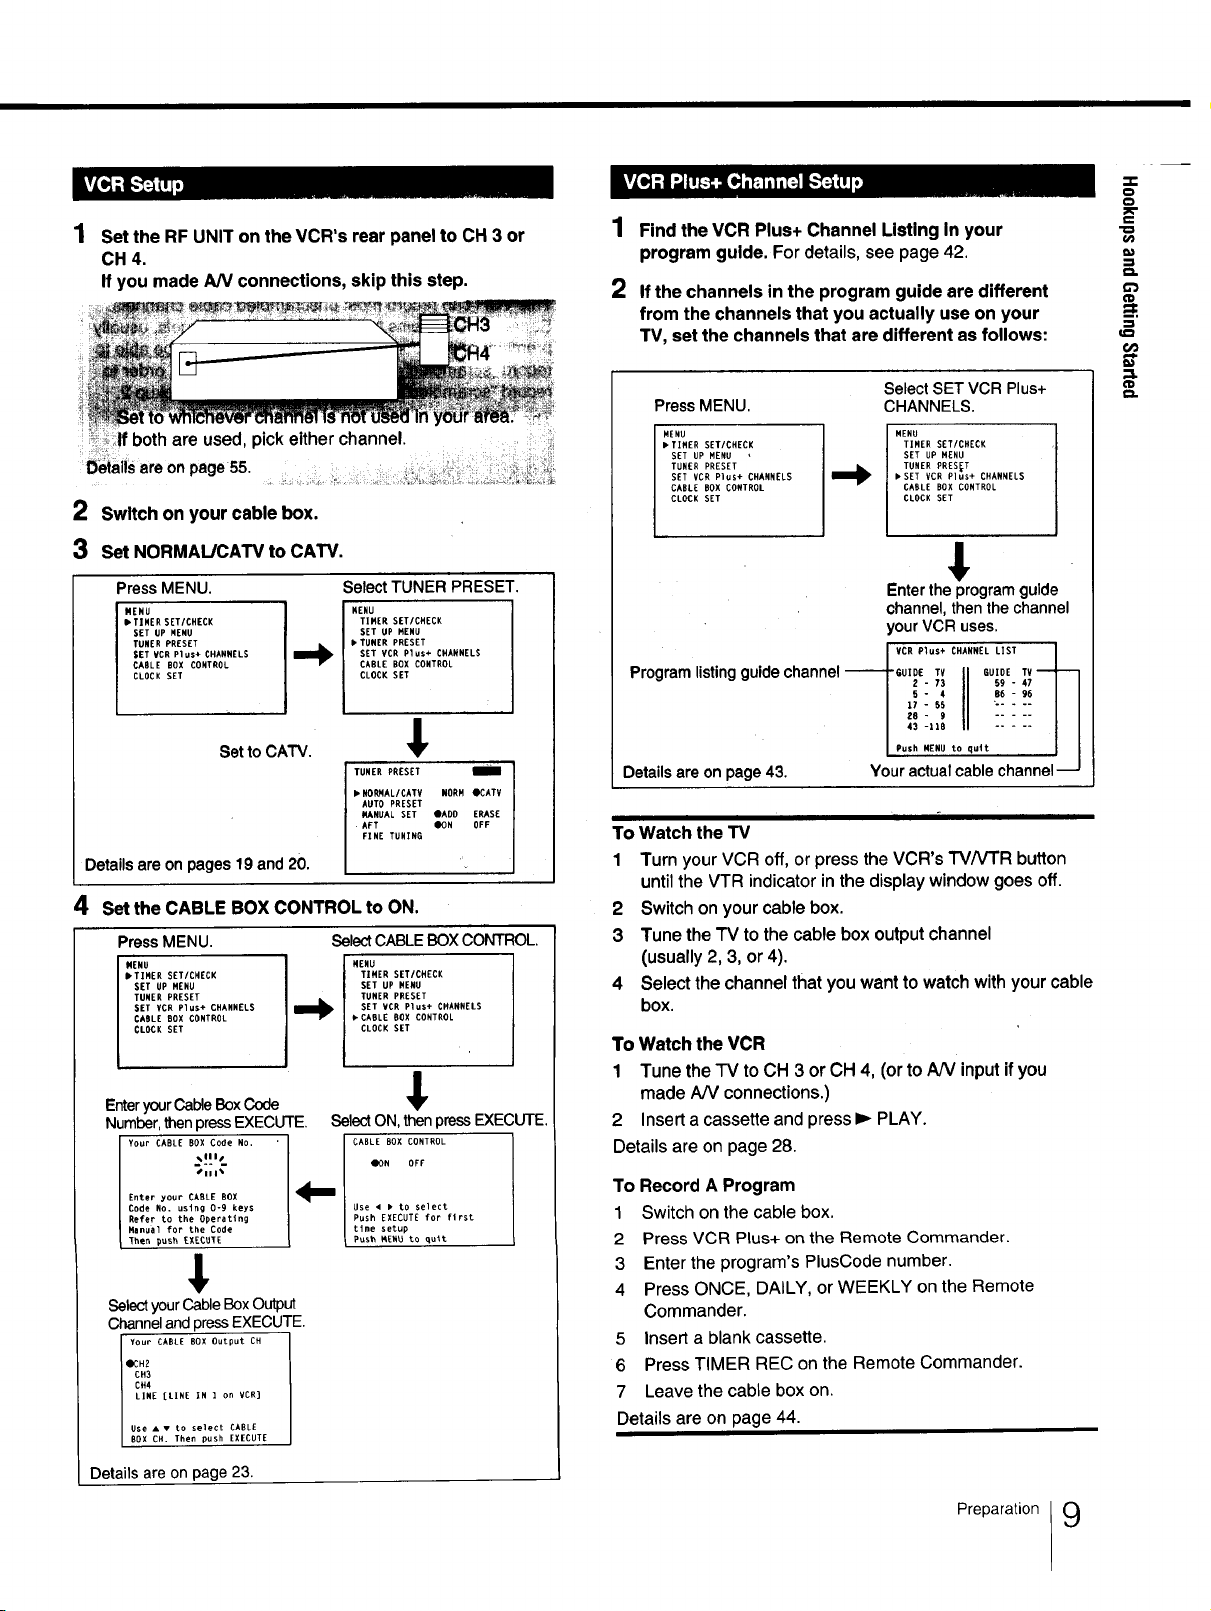
Set the RF UNIT on the VCR's rear panel to CH 3 or
CH 4.
If you made AN connections, skip this step.
_;Jf both are used, pick either channel.
Deiallsare on page 55. _....... _,.__:_
2 Switch on your cable box.
3 Set NORMAL/CAW to CATV.
k_tl;1;JIft'JLe[dlTt11111_Jlk- .
1
Find the VCR Plus+ Channel Listing In your
program guide. For details, see page 42.
2
If the channels in the program guide are different
from the channels that you actually use on your
TV, set the channels that are different as follows:
Press MENU. CHANNELS.
MENU
• TIMER SETICHECK
SET UP MENU
TUNER PRESET
SET VCR Plus+ CHANNELS
CABLE BOX CONTROL
CLOCK SET
Select SET VCR Plus+
MENU
TIMER SET/CHECK
SET UP MENU
TUNER PRESET
• SET VCR Plus+ CHANNELS
CABLE BOX CONTROL
CLOCK SET
ee_
-i-
o
o
PC"
e-
(ID
_=.
;z
€ID
t=.
Press MENU.
MENU
• TIMER SET/CHECK
SET UP NENU
TUNER PRESET
SET UCR Plus÷ CHANNELS
CABLE BOX CONTROL
CLOCK SET
Select TUNER PRESET,
HENU
TIMER SET/CHECK
SET UP MENU
• TUNER PRESET
--b
SET VCR Plus+ CHANNELS
CABLE BOX CONTROL
CLOCK SET
1
SettoCAW. _IV
TUNER PRESEt I
• NORNAL/CATV NORM OCATV
AUTO PRESET
MANUAL SET OADD ERASE
AFT ION OFF
FINE TUNING
Detailsare onpages 19and 20.
4 set the CABLE BOX CONTROL to ON.
PressMENU. SelectCABLEBOXCONTROL.
MENU
• TIMER SET/CHECK
SET UP HENU
TUNER PRESET
SET VCR Plus+ CHANNELS
CABLE BOX CONTROL
CLOCK SET
EnteryourCableBoxCode
Number,thenpressEXECUTE.
Your CABLE BOX Code No.
Enter your CABLE BOX
Code No. using 0-9 keys
Refer to the Operating
Hanua] for the Code
Then push EXECUTE
%111t
t111%
MENU
TIHER SET/CHECK
SET UP NEHU
TONER PRESET
SET VCR Plus+ CHANNELS
CABLE BOX CONTROL
CLOCK SET
,!,
SelectON,thenpressEXECUTE.
CABLE BOX CONTROL
dON OFF
Use • • tO select
Push EXECUTE for first
tlme setup
Pus_ MEHU to quit
&
SelectyourCableBoxOutput
ChannelandpressEXECUTE.
Your CABLE BOX Output CH
0CH2
OH3
CH4LINE [LINE IN ] on VCR]
I Use • • to select CABLEBOX OH. Then push EXECUTE
Entertheprogramguide
channel,thenthe channel
yourVCR uses.
CHANNELLISTm
Programlisting guidechannel"-------I-GUIdETV II BUIOETV
I I I
m _):1,I II ::::: i I
mR.sh MENU to qult l I
Detailsare onpage 43. Youractualcablechannel---J
To Watch the TV
1 Turn your VCR off,or press the VCR's I'V/V'FR button
untilthe VTR indicator inthe display window goes off.
2 Switch on your cable box.
3 Tune the TV to the cable box output channel
(usually 2, 3, or4).
4 Select the channel that you want to watch with your cable
box.
To Watchthe VCR
1 Tune the TV toCH 3 orCH 4, (or toAN inputifyou
madeAN connections.)
2 Inserta cassetteandpressl_ PLAY.
Detailsare onpage28.
To Record A Program
1 Switch on the cable box.
2 Press VCR Plus+ on the Remote Commander.
3 Enter the program's PlusCode number.
4 Press ONCE, DAILY, or WEEKLY on the Remote
Commander.
5 Insert a blank cassette.
6 Press TIMER REC on the Remote Commander.
7 Leave the cable box on.
Details are on page 44.
Details are on page 23.
Preparation 9
HookupsandGettingStarted
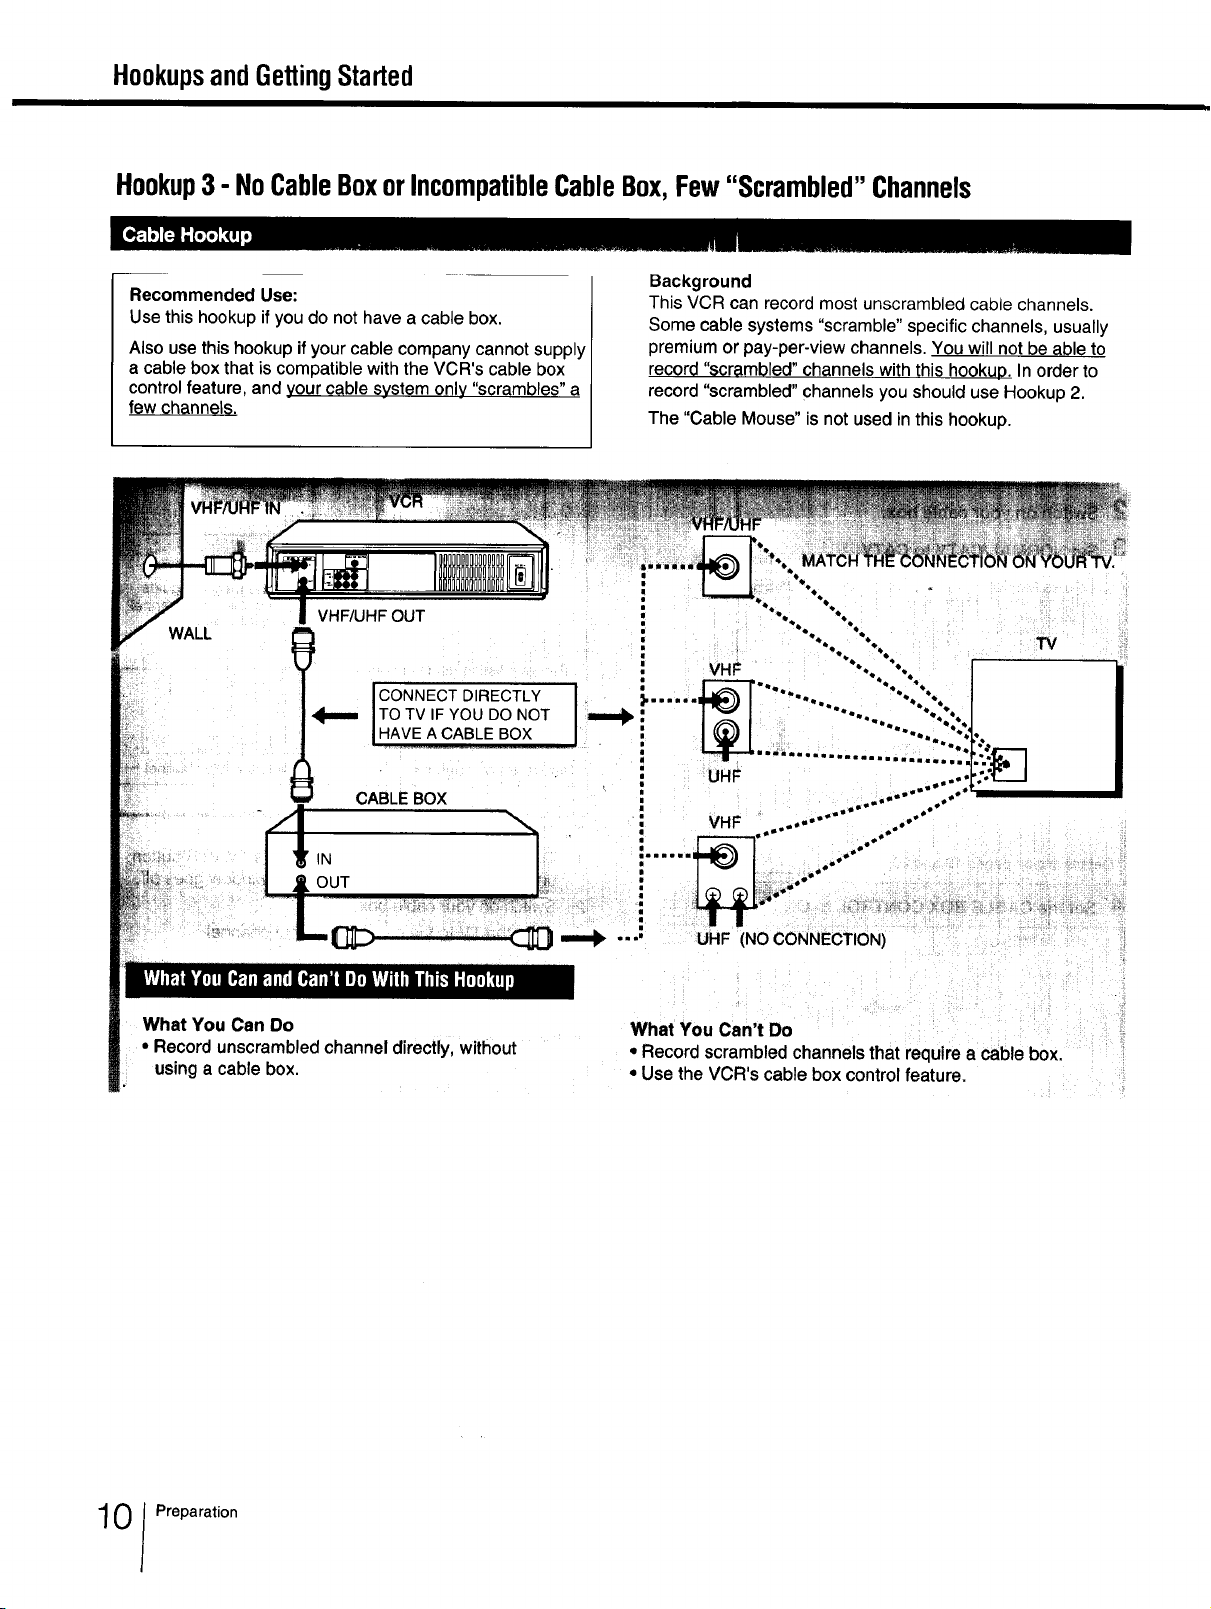
Hookup3 - NoCableBoxorIncompatibleCableBox,Few"Scrambled"Channels
Recommended Use:
Use this hookupif you do not have a cable box.
Also use this hookup if your cable company cannot supply
a cable box that is compatible with the VCR's cable box
control feature, and your cable system only "scrambles" a
few channels.
WALL
VHF/UHF OUT
JTOTV IFYOU DO NOT
JCONNECT DIRECTLY J
IHAVE A_c;_BLEB.OX.................
CAB'E OX ! ...........".
_3?:"_'!
IN ...... ,"'"
Background
This VCR can record most unscrambled cable channels.
Some cable systems "scramble" specific channels, usually
premium or pay-per-view channels. You will not be able to
record "scrambled" channels with this hookup. In order to
record "scrambled" channels you should use Hookup 2.
The "Cable Mouse" is not used in this hookup.
UHF
• :; _i "" °°°°
" VHF....... ..'"
TV
What You Can Do
• Recordunscrambled channel directly, without
usinga cablebox.
======_.... UHF (NO CONNECTION)
What You Can't Do
• Record scrambled channels that require a cable box.
• Use the VCR's cable box control feature.
0 Preparation
O
o
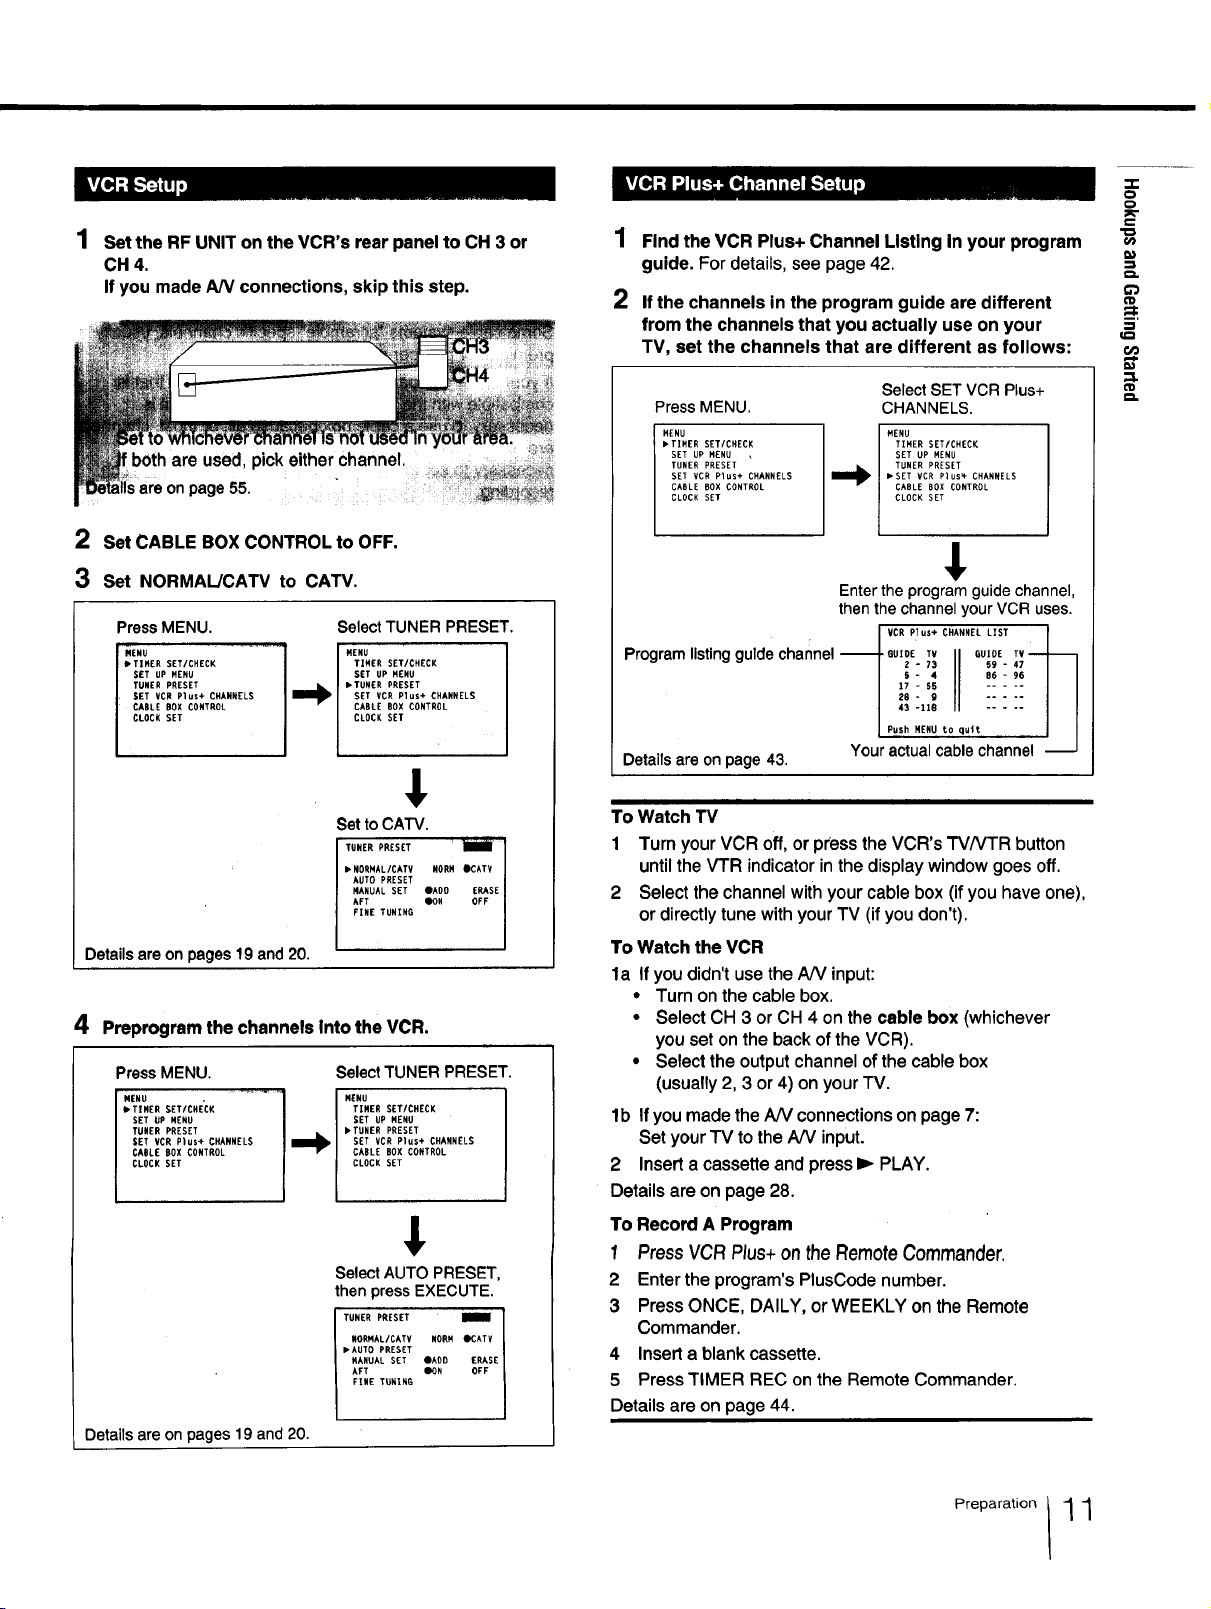
Set the RF UNIT on the VCR's rear panel to CH 3 or
CH 4.
If you made AN connections, skip this step.
are on page55.
2 Set CABLE BOX CONTROL to OFF.
3 Set NORMAL/CAW to CATV.
PressMENU.
MENU
• TIMER SET/CHECK
SET UP MENU
TUNER PRESET
GET VCR Plus+ CHARNELS
CABLE BOX CONTROL
CLOCK SET
SelectTUNER PRESET.
TIMER SET/CHECK
SET UP MENU
• TUNER PRESET
SET VCR Plus+ CHANNELS
CABLE BOX CONTROL
I_l MENU
CLOCK SET
€
Set to CATV.
• NORNAL/CATV NORM
AUTO PRESET
MANUAL SET OAO0
AFT iON
FINE TUNING
Detailsare onpages 19and 20.
4 Preprogram the channels Into the VCR.
PressMENU.
•TIMERSE.CNECK
SET UP MENU
TUNER PRESET
SET VCR Plus÷ CHARNELS
CABLE BOX CONTROL
CLOCK SET
.ENu ...............11"4
Details are on pages 19 and 20.
SelectTUNER PRESET.
MENU
TIMER SET/CHECK
SET UP MENU
• TUNER PRESET
SET VCR Plus+ CHANNELS
CABLE BOX CONTROL
CLOCK SET
SelectAUTO PRESET,
thenpressEXECUTE.
RORMAL/CATV NORM _ATV
• AUTO PRESET
MANUAL SET OAUD ERASE
AFT DON
FINE TUNING
TUNER PRESET 1OFF 1
1
Findthe VCR Plus+ Channel Listingin your program
guide. Fordetails,see page42.
2
Ifthe channelsin the program guide are different
from the channelsthat you actually useon your
TV, set the channels that are different asfollows:
Press MENU. CHANNELS.
MENU
• TIMER SET/CHECK
SET UP MENU
TUNER PRESET
SET VCR Plus+ CHANNELS
CABLE BOX CONTROL
CLOCK SET
Select SET VCR Plus+
MENU
TIMER SETtCHECK
SET UP MENU
TUNER PRESET
• SET VCR Plus_ CHANNELS
CABLE BOX CONTROL
CLOCK SET
€
Enter the programguide channel,
thenthe channel your VCR uses.
Programlisting guidechannel--
Detailsare onpage 43.
I i
To Watch TV
1 Turn your VCR off, or press the VCR's TVNTR button
until the VTR indicator in the display window goes off.
2 Select the channel with your cable box (ifyou have one),
or directly tune with your TV (if you don't).
To Watch the VCR
la If you didn't use the A/V input:
• Turn on the cable box.
• Select CH 3 or CH 4 on the cable box (whichever
you set on the back of the VCR).
• Select the output channel of the cable box
(usually 2, 3 or 4) on your TV.
lb If youmade the A/V connections on page 7:
Set yourTV to the A/V input.
2 Insert a cassette and press I_ PLAY.
Details are on page 28.
To Record A Program
I Press VCR Plus+onthe RemoteCommander.
2 Enter the program's PlusCode number.
3 Press ONCE, DAILY, or WEEKLY on the Remote
Commander.
4 Insert a blank cassette.
5 Press TIMER REC on the Remote Commander.
Details are on page 44.
QUIOE TV II GUIDE TV
2 - 73 59 -
5- 4
/ 17- 55 86 -
43 -118
28- g
l Push MENU to qult
Youractual cable channel --
,mL
=},=
Preparation 1 1
HookupsandGettingStarted
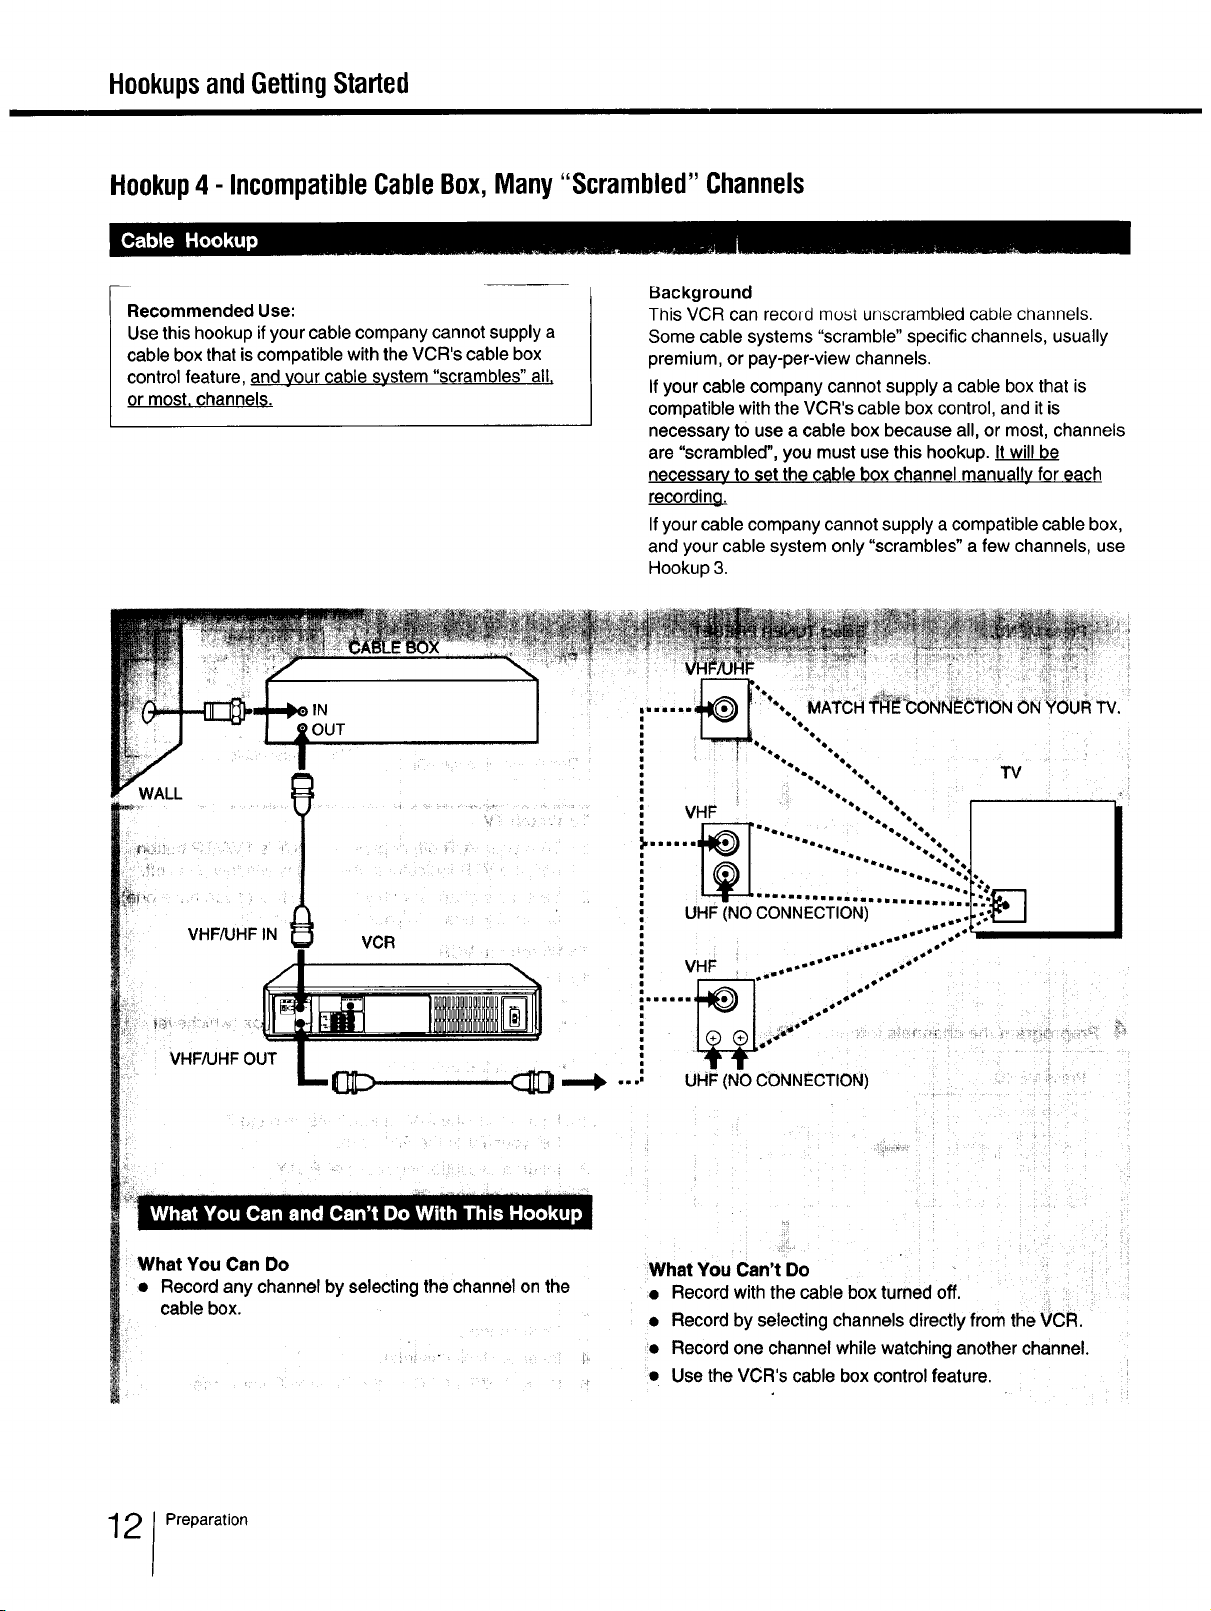
Hookup4 - IncompatibleCableBox,Many "Scrambled" Channels
ecommended Use:
se this hookup ifyour cable company cannot supplya
able box that iscompatible with theVCR's cable box
ontrolfeature, and your cable system "scrambles" all.
r most, channels. -
WALL
Background
This VCR can recold most unscrambled cable channels.
Some cable systems "scramble" specific channels, usually
premium, or pay-per-view channels.
If your cable company cannot supply a cable box that is
compatible with the VCR's cable box control, and it is
necessary tO use a cable box because all, or most, channels
are "scrambled", you must use this hookup.
necessary_to set the cable box channel manually for each
recording.
Ifyour cable company cannot supply a compatible cable box,
and your cable system only "scrambles" a few channels, use
Hookup 3.
TV
VHF_HFIN
VHF_HFOUT
What You Can Do
• Record any channel by selecting the channel on the
cable box.
VCR
UHF(NO CONNECTION)
What You Can't Do
• Record with the cable box turned off.
• Record by selecting channels directly from the VCR.
• Record one channel while watching another channel.
• Use the VCR's cable box control feature.
2 Preparation
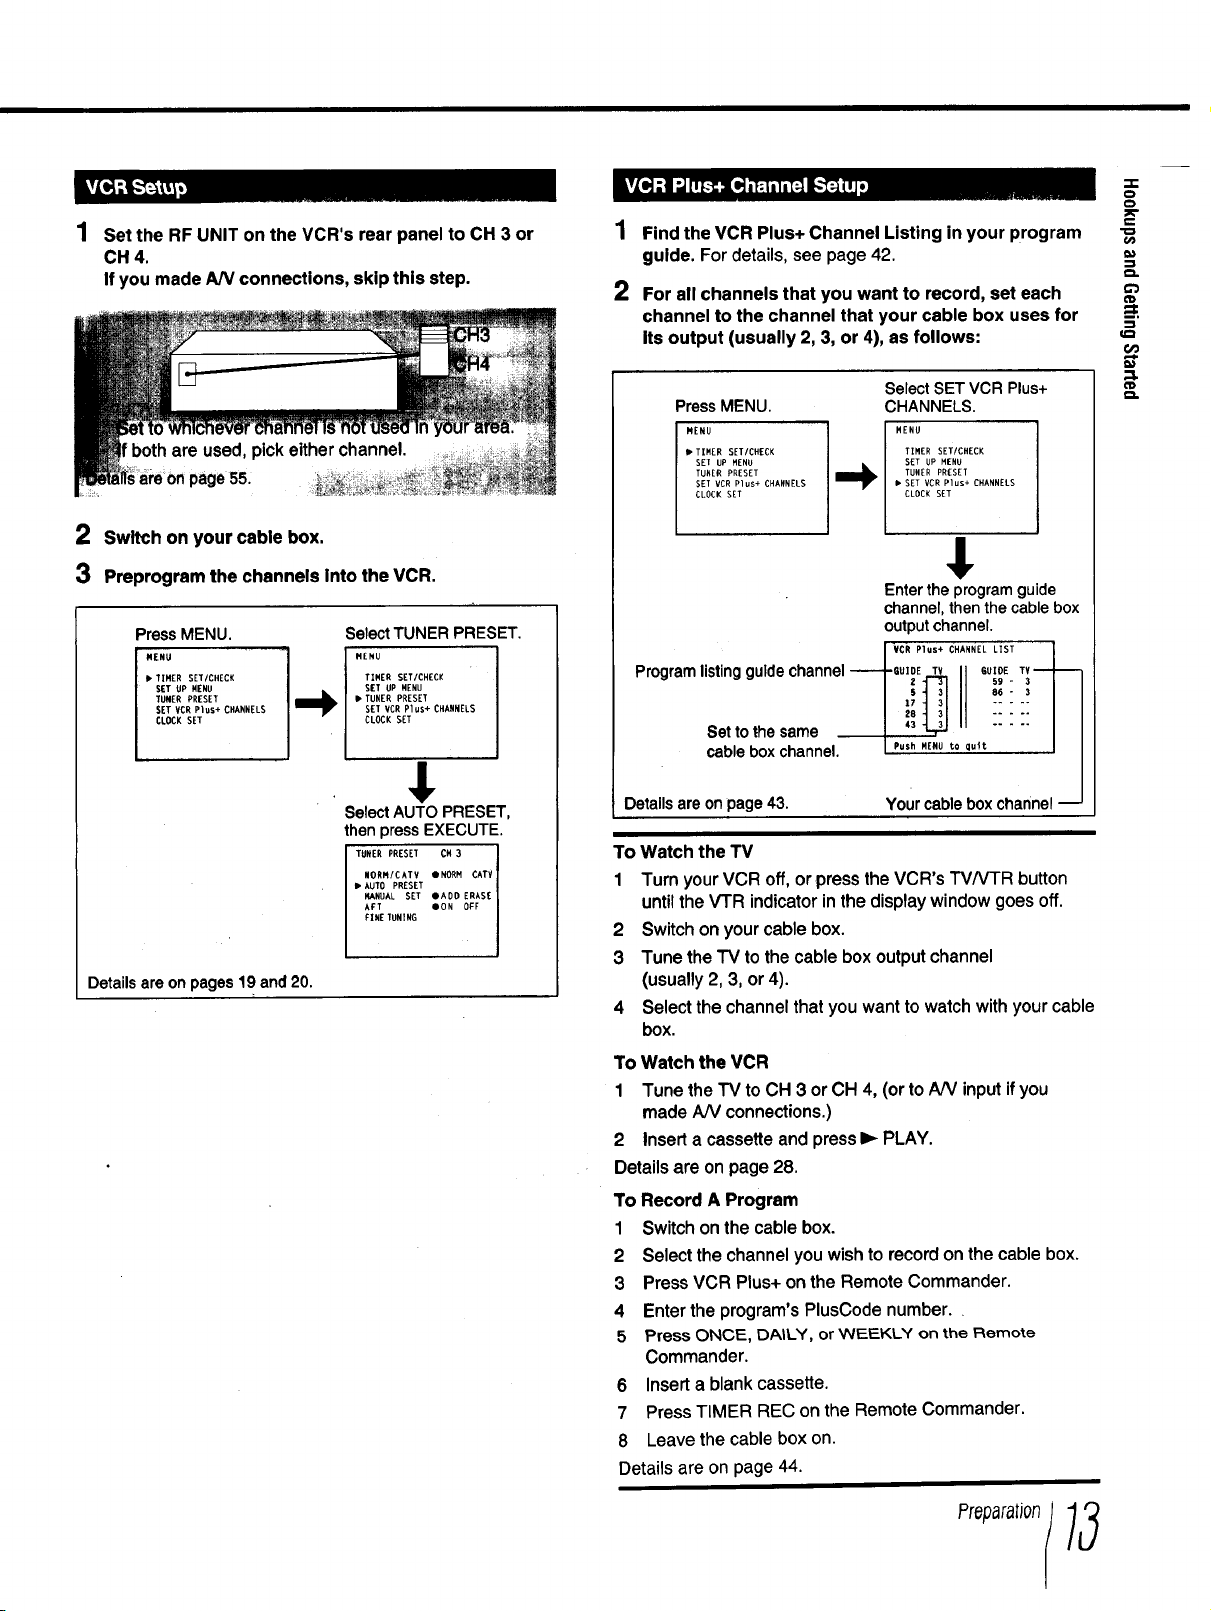
Set the RF UNIT on the VCR's rear panel to CH 3 or
CH 4.
If you made AN connections, skip this step.
1
Find the VCR Plus+ Channel Listing in your program
guide. For details, see page 42.
2
For all channels that you want to record, set each
channel to the channel that your cable box uses for
Its output (usually 2, 3, or 4), as follows:
o
o
€
page5&
2 Switch on your cable box.
3 Preprogram the channels into the VCR.
PressMENU.
• TIMER SETICHECK
Select TUNER PRESET.
MENU
TINER SET/CHECK
SET UP MENU
• TUNER PRESET
SET VCR PLUS+ CHANNELS
CLOCK SET
€
SelectAUTO PRESET,
then pressEXECUTE.
TUNER PRESEI" CH 3
NORM/CATV •NORM CATV
• AUTO PRESET
14ANUAL SET •ADO ERAS[
AFT ION OFF
FINE IUNING
Details are on pages 19 and 20.
PressMENU.
MENU
• TIMER SET/CHECK
SET UP MENU
TUNER PRESET
SET VCR Plus+ CHANNELS
CLOCK SET
SelectSETVCRPlus+
CHANNELS.
NENU
,.+
• SET VCR Plus+ CHANNELS
TIMER SETICHECK
SET UP MENU
TUNER PRESET
CLOCK SET
$
Entertheprogram guide
channel,thenthe cablebox
output channel.
Programlistingguidechannel GUlOETV II 6UlO[TV
cablebox channel. PushMENUto qu+t ---J I
Detailsare onpage43. Yourcablebox channellJ
To Watch the TV
1 Turn your VCR off, or press the VCR's TV/VI'R button
until the VTR indicator inthe displaywindow goes off.
2 Switch on your cable box.
3 Tune the "IV to thecable box output channel
(usually 2, 3, or 4).
4 Select the channel that you want to watch with your cable
box.
To Watch the VCR
1 Tune the TV to CH 3 orCH 4, (or to A/V input ifyou
made AN connections.)
2 Insert a cassette and press I_ PLAY.
Details are on page 28.
To Record A Program
1 Switch on the cable box.
2 Select the channel you wish to recordon the cable box.
3 Press VCR Plus+ on the Remote Commander.
4 Enter the program's PlusCode number.
5 Press ONCE, DAILY, or WEEKLY on the Remote
Commander.
6 Insert a blank cassette.
7 Press TIMER REC on the Remote Commander,
8 Leave the cable box on,
Details are on page 44.
.__.._L}IcR Plus* CHANNEL LIST _._
1_ 86 - 3
I Z 59 - 3
!iii!ll
flip
HookupsandGettingStarted
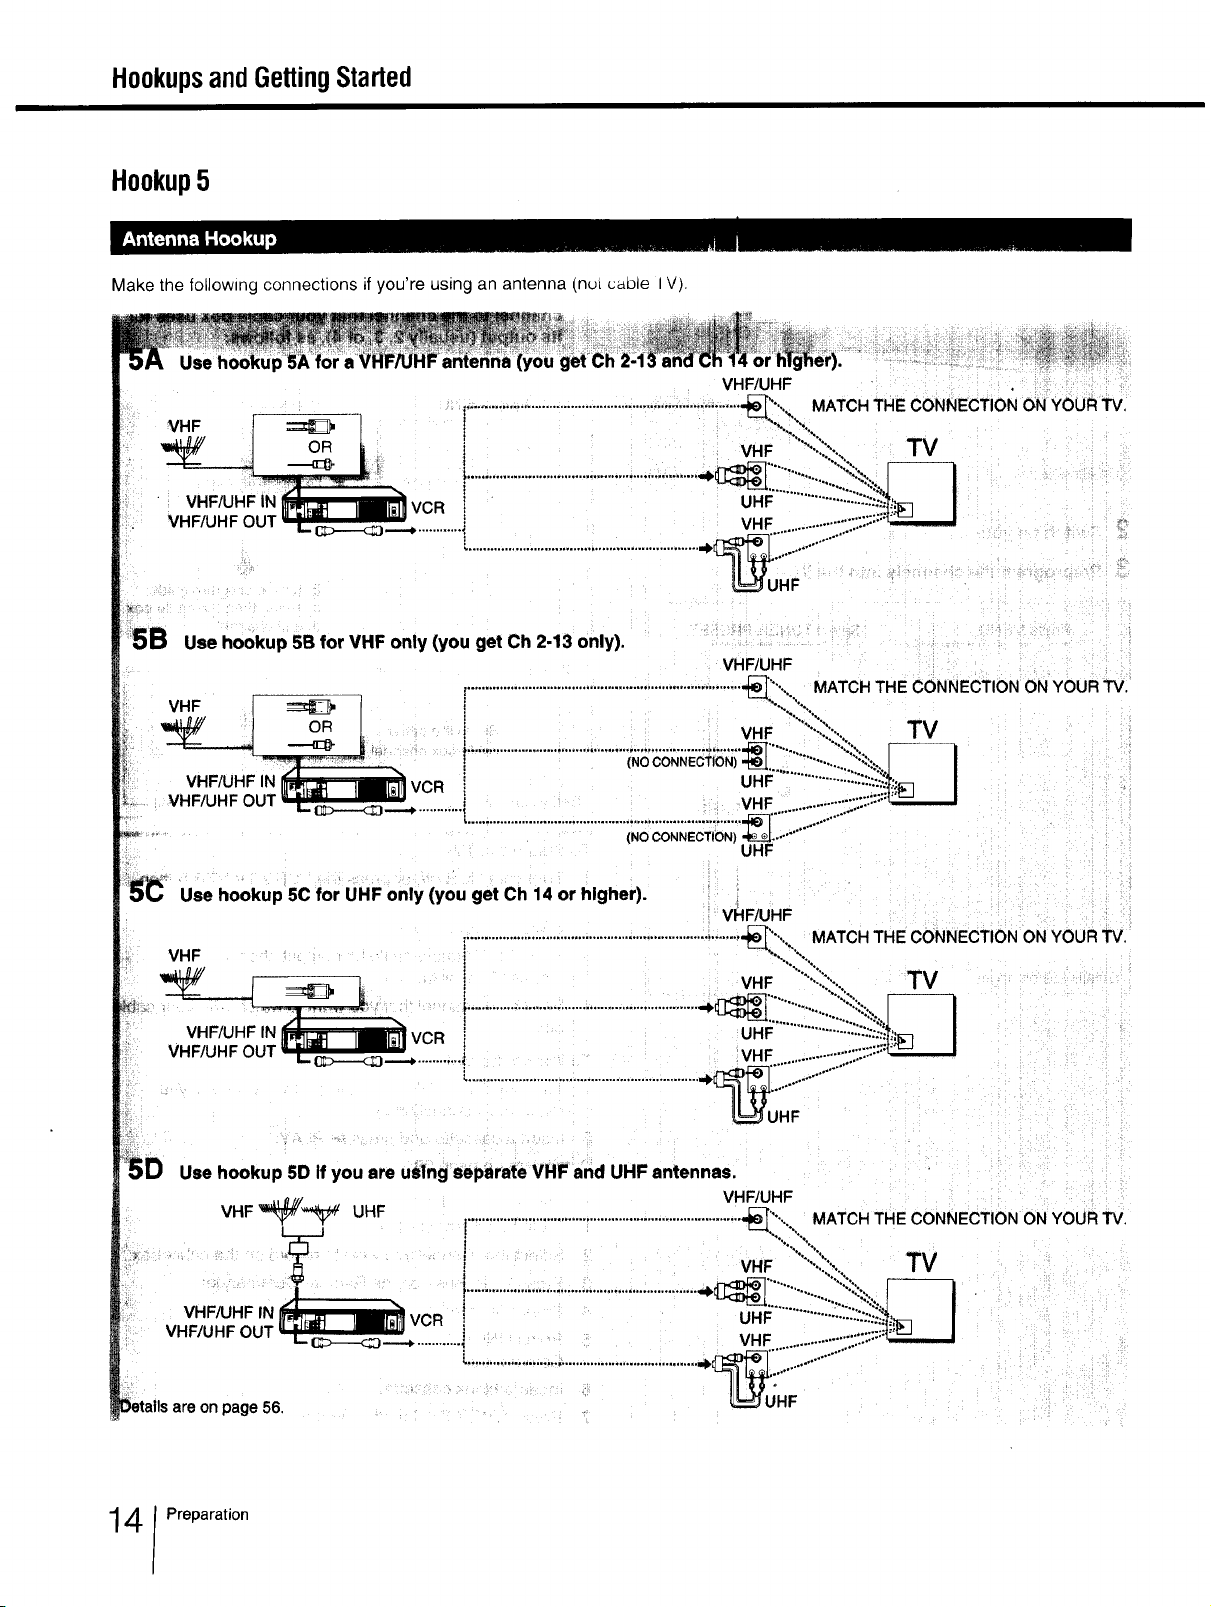
Hookup5
Make the following connections if you're using an antenna (nui cable I V).
5B Use hookup 5B for VHF only (you get Ch 2-13 only).
............................................................................-_'..,., MATCH THE CONNECTION ON YOUR "IV.
VHF/UHF
VHF/LJHF
"l _.__OR L J VHF ......:'_::::..., TV
(NOOONNEOTI_";_...."'" !-----q
VHF/UHF IN _ VCR ! UHF .....:........:-";_"..{';_I
VHF/UHF OUT _..._ } , VHF .............::,.::::F"rJ I
Use hookup 5C for UHF only (you get Ch 14 or higher).
Use hooku p 5D if you are uSlng separate VHF and UHF antennas.
VHF _# UHF
.... i VHF
VHFAJHF IN C UHF
VHF/UHF OUT ___._ ! VHF
............t............................................................................_ ........:;:.............
(NO CONNECTION) "_ ........
UHF
VHF_HF
VHF/UHF
MATCH THE CONNECTION ON YOUR 'IV.
TV
are on page 56.
4 Preparation
UHF
_o_'tktS']!'l 9
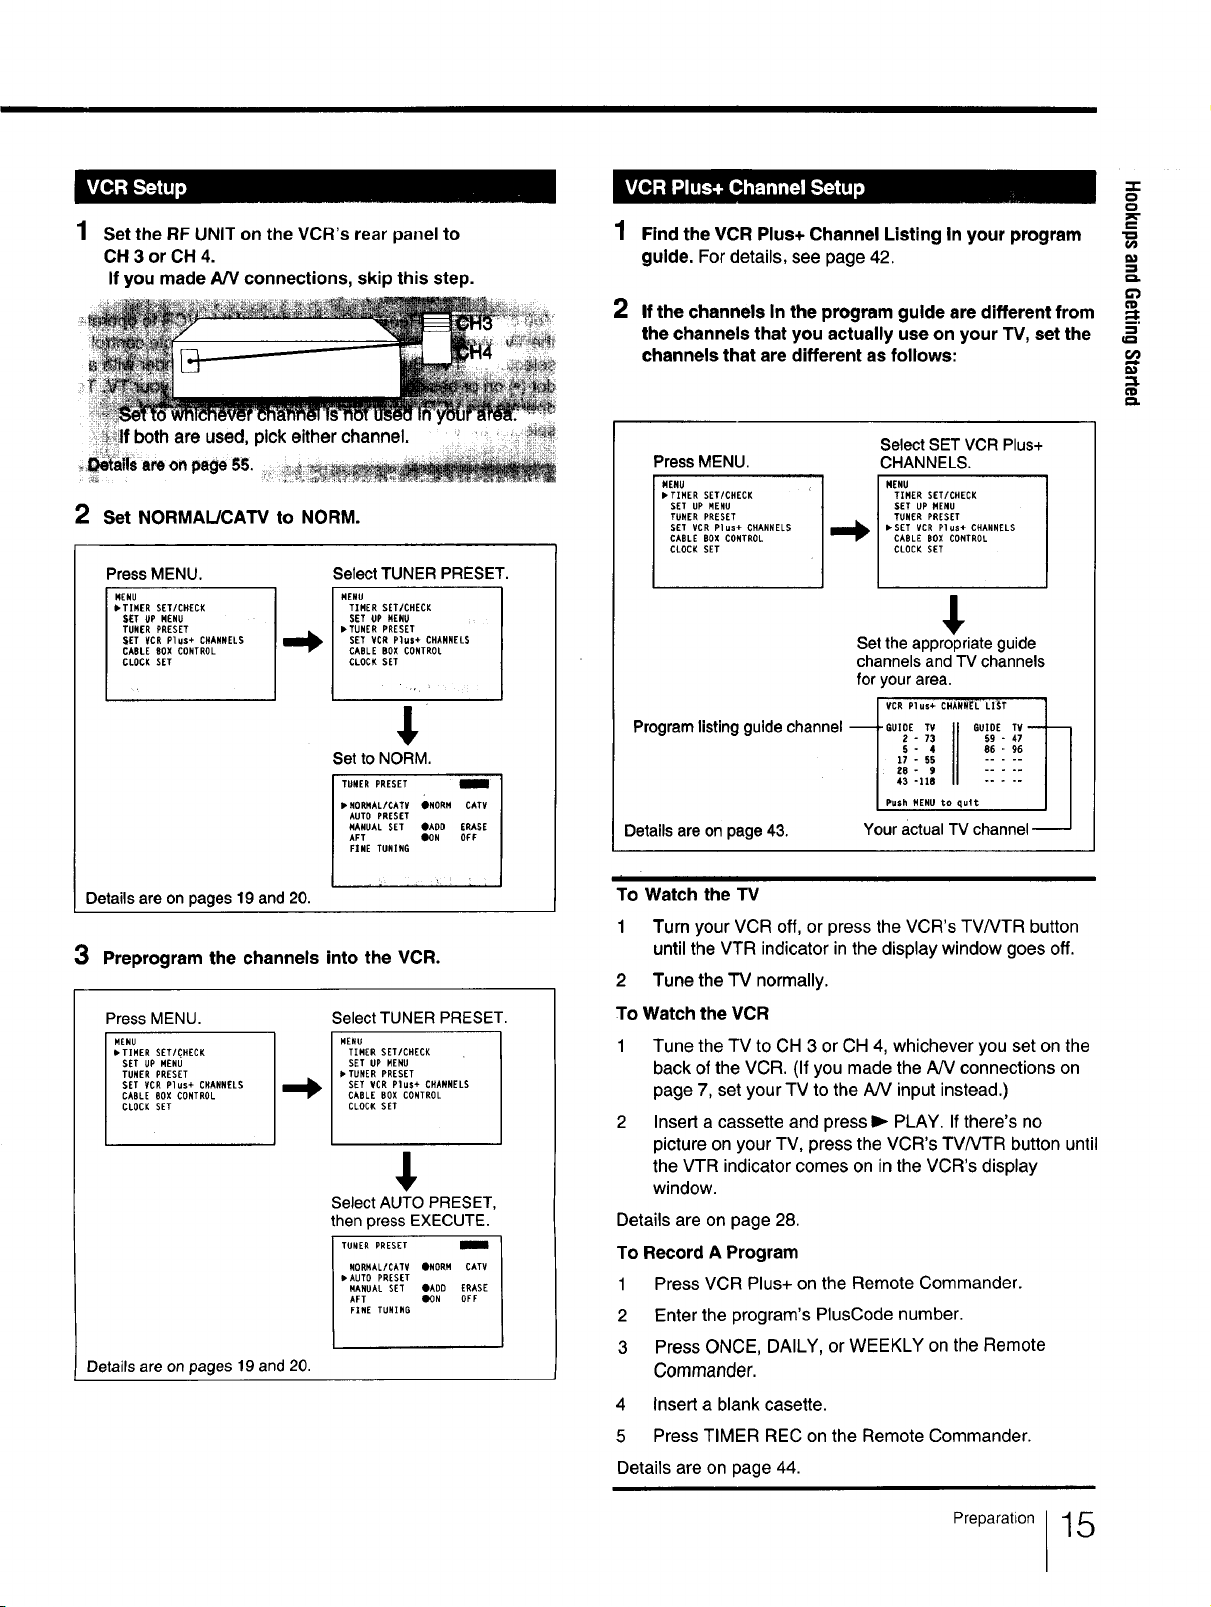
1 Set the RF UNIT on the VCR's rear panel to
OH 3 or OH 4.
If you made A/V connections, skip this step.
Find the VCR Plus+ Channel Listing in your program
guide. For details, see page 42.
2
If the channels In the program guide are different from
the channels that you actually use on your TV, set the
channels that are different as follows:
:z:
o
o
€
_t
-!
!i_lf both are used, pick either channel. ....
_a Is areonpageS5. _ ._:_
..... ,_ _:__._
2 Set NORMAL/CAW to NORM.
Press MENU.
HENU
• TIHER SET/CHECK
SET UP MENU
TUNER PRESET
_ET ¥CR Plus+ CHANNELS
CABLE BOX CONTROL
CLOCK SET
Select TUNER PRESET.
MENU
TIHER SETICHECK
SET UP HENU
• TUNER PRESET
SET VCR Plus+ CHANNELS
CABLE BOX CONTROL
CLOCK SET
$
Setto NORM.
• HORNAL/CATV ONORH CATV
AUTO PRESET
MANUAL SET OAUD ERASE
AFT OON OFF
FENE TUNING
I TUNER PRESET
Details are on pages 19 and 20.
3 Preprogram the channels into the VCR.
Press MENU.
MENU
• TIHER SET/CHECK
SET UP MENU
TUNER PRESET
SET VCR Plus+ CHANNELS
CABLE BOX CONTROL
CLOCK SET
Details are on pages 19 and 20.
SelectTUNER PRESET.
MENU
TIMER SET/CHECK
SET UP MENU
• TUNER PRESET
SET VCR Plus+ CHANNELS
CABLE BOX CONTROL
CLOCK SET
Select AUTO PRESET,
then press EXECUTE.
TUNER PRESET
NORNALfCATV ONORH CATV
• AUTO PRESET
MANUAL SET OADD ERASE
AFT OON OFF
FINE TUNING
Press MENU. CHANNELS.
Select SET VCR Plus+
MENU
• T]HER SET/CHECK
SET UP MENU
TUNER PRESET
SET VCR Plus+ CHANNELS
CABLE BOX CONTROL
CLOCK SET
NENU
T[HER SET/CHECK
SET UP MENU
TONER PRESET
• SET VCR Plus÷ CHANNELS
CABLE BOX CONTROL
CLOCK SET
Set theappropriateguide
channels and TV channels
foryour area.
/,cR !
Detailsare onpage43. YouractualTV channel
I
To Watch the "IV
1 Turn your VCR off, orpress the VCR's TV/VTR button
until the VTR indicator in the display window goes off.
2 Tune the "IV normally.
To Watch the VCR
1 Tune the TV to CH 3 or CH 4, whichever you set on the
back of the VCR. (If you made the AN connections on
page 7, set your TV to the AiV input instead.)
2 Insert a cassette and press I_ PLAY. If there's no
picture on your TV, press the VCR's TVNTR button until
the VTR indicator comes on in the VCR's display
window.
Details are on page 28.
To Record A Program
1 Press VCR Plus+ on the Remote Commander.
2 Enter the program's PlusCode number.
3 Press ONCE, DAILY, or WEEKLY on the Remote
Commander.
4 Insert a blank casette.
5 Press TIMER REC on the Remote Commander.
JPush HENU to quit J J
Details are on page 44.
Preparation 1 5
PreparingtheRemoteCommander
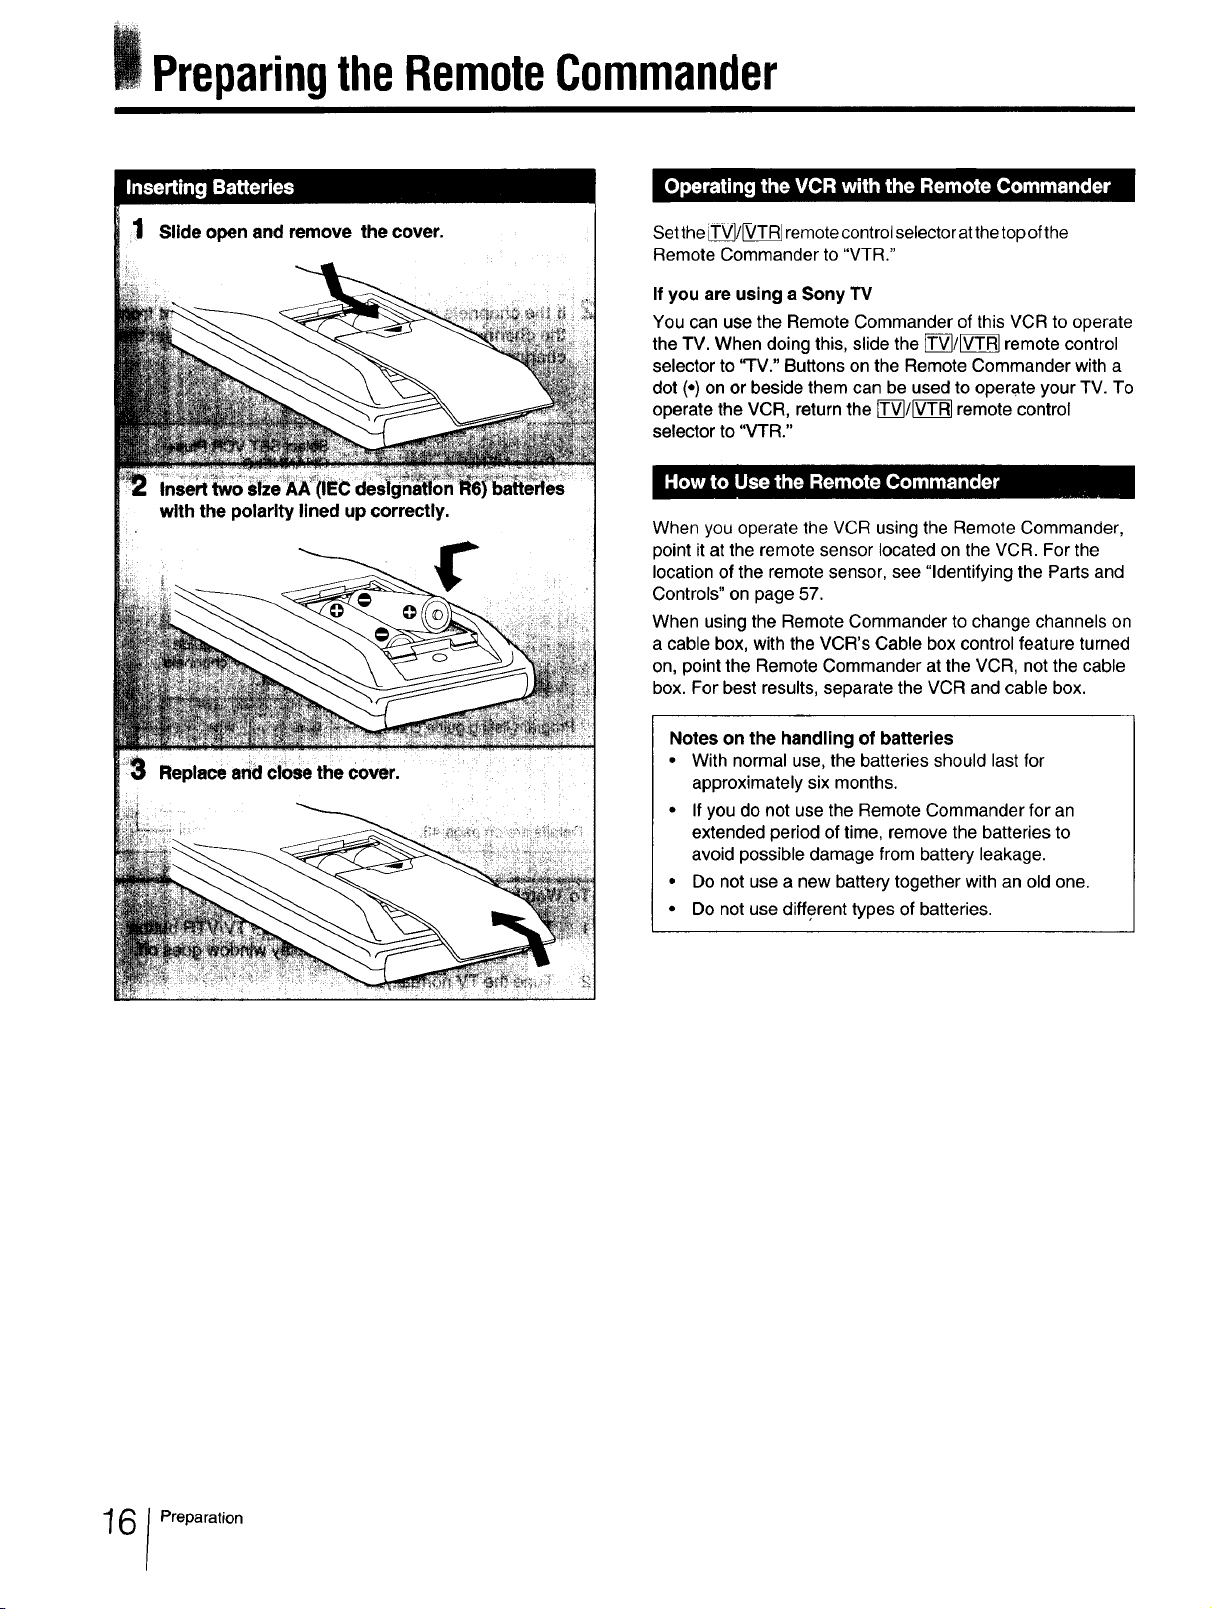
Slide open end remove the cover. Set the _/V_RJ remote control selector atthe top ofthe
Remote Commander to "VTR."
If you are using a Sony "IV
You can use the Remote Commander of this VCR to operate
the TV. When doing this, slide the _]/[_ remote control
selector to 'q-V." Buttons on the Remote Commander with a
dot (*) on or beside them can be used to operate your TV. To
operate the VCR, return the rT_/[_ remote control
selector to "VTR."
When you operate the VCR using the Remote Commander,
point it at the remote sensor located on the VCR. For the
location of the remote sensor, see "Identifying the Parts and
Controls" on page 57.
When using the Remote Commander to change channels on
a cable box, with the VCR's Cable box control feature turned
on, point the Remote Commander at the VCR, not the cable
box. For best results, separate the VCR and cable box.
Notes on the handling of batteries
• With normal use, the batteries should last for
approximately six months.
• If you do not use the Remote Commander for an
extended period of time, remove the batteries to
avoid possible damage from battery leakage.
• Do not use a new battery together with an old one.
• Do not use different types of batteries.
6 Preparation
SettingtheTimeandDate
You can set the VCR time and date on the TV screen using
the Remote Commander.
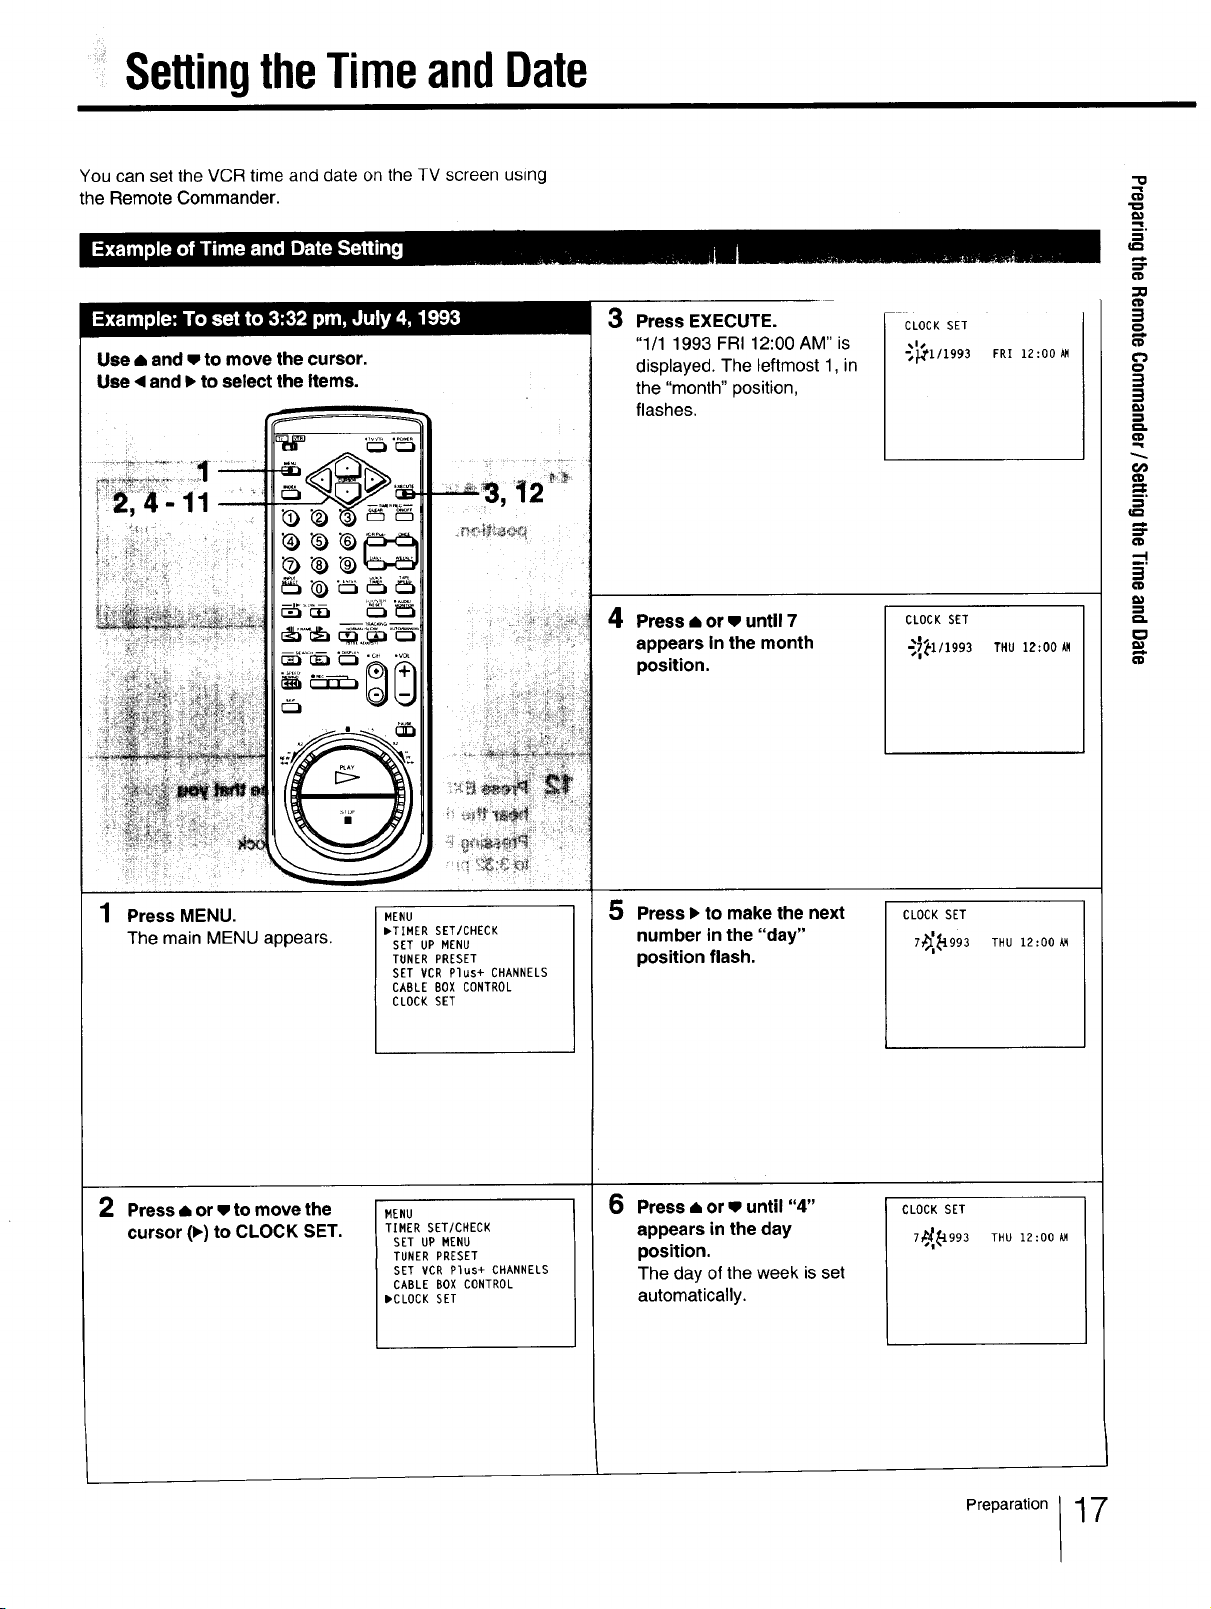
Use • and w to move the cursor,
Use 4 and • to select the items.
3 Press EXECUTE.
"1/1 1993 FRI 12:00 AM" is
displayed. The leftmost 1, in
the "month" position,
flashes.
4 Press • or • until 7
appears in the month
position.
CLOCK SET
FRI 12:00
CLOCK SET
_!_1/1993 THU 12:00_
-0
B,
=0
(I}
o
€/}
1:1
o.
Press MENU.
The main MENU appears.
2 Press • or • to move the
cursor (•) to CLOCK SET.
MENU
_TIMER SET/CHECK
SET UP MENU
TUNER PRESET
SET VCR Plus+ CHANNELS
CABLE BOX CONTROL
CLOCK SET
MENU
TIMER SET/CHECK
SET UP MENU
TUNER PRESET
SET VCR Plus+ CHANNELS
CABLE BOX CONTROL
mCLOCK SET
number in the "day"
position flash.
Press • or • until "4"
6
appears in the day
position.
The day of the week isset
automatically.
CLOCK SET5 Press • to make the next
7_'_993 THU 12:00_
CLOCK SET
THU 12:00 kM
Preparation 17
SettingtheTimeandDate
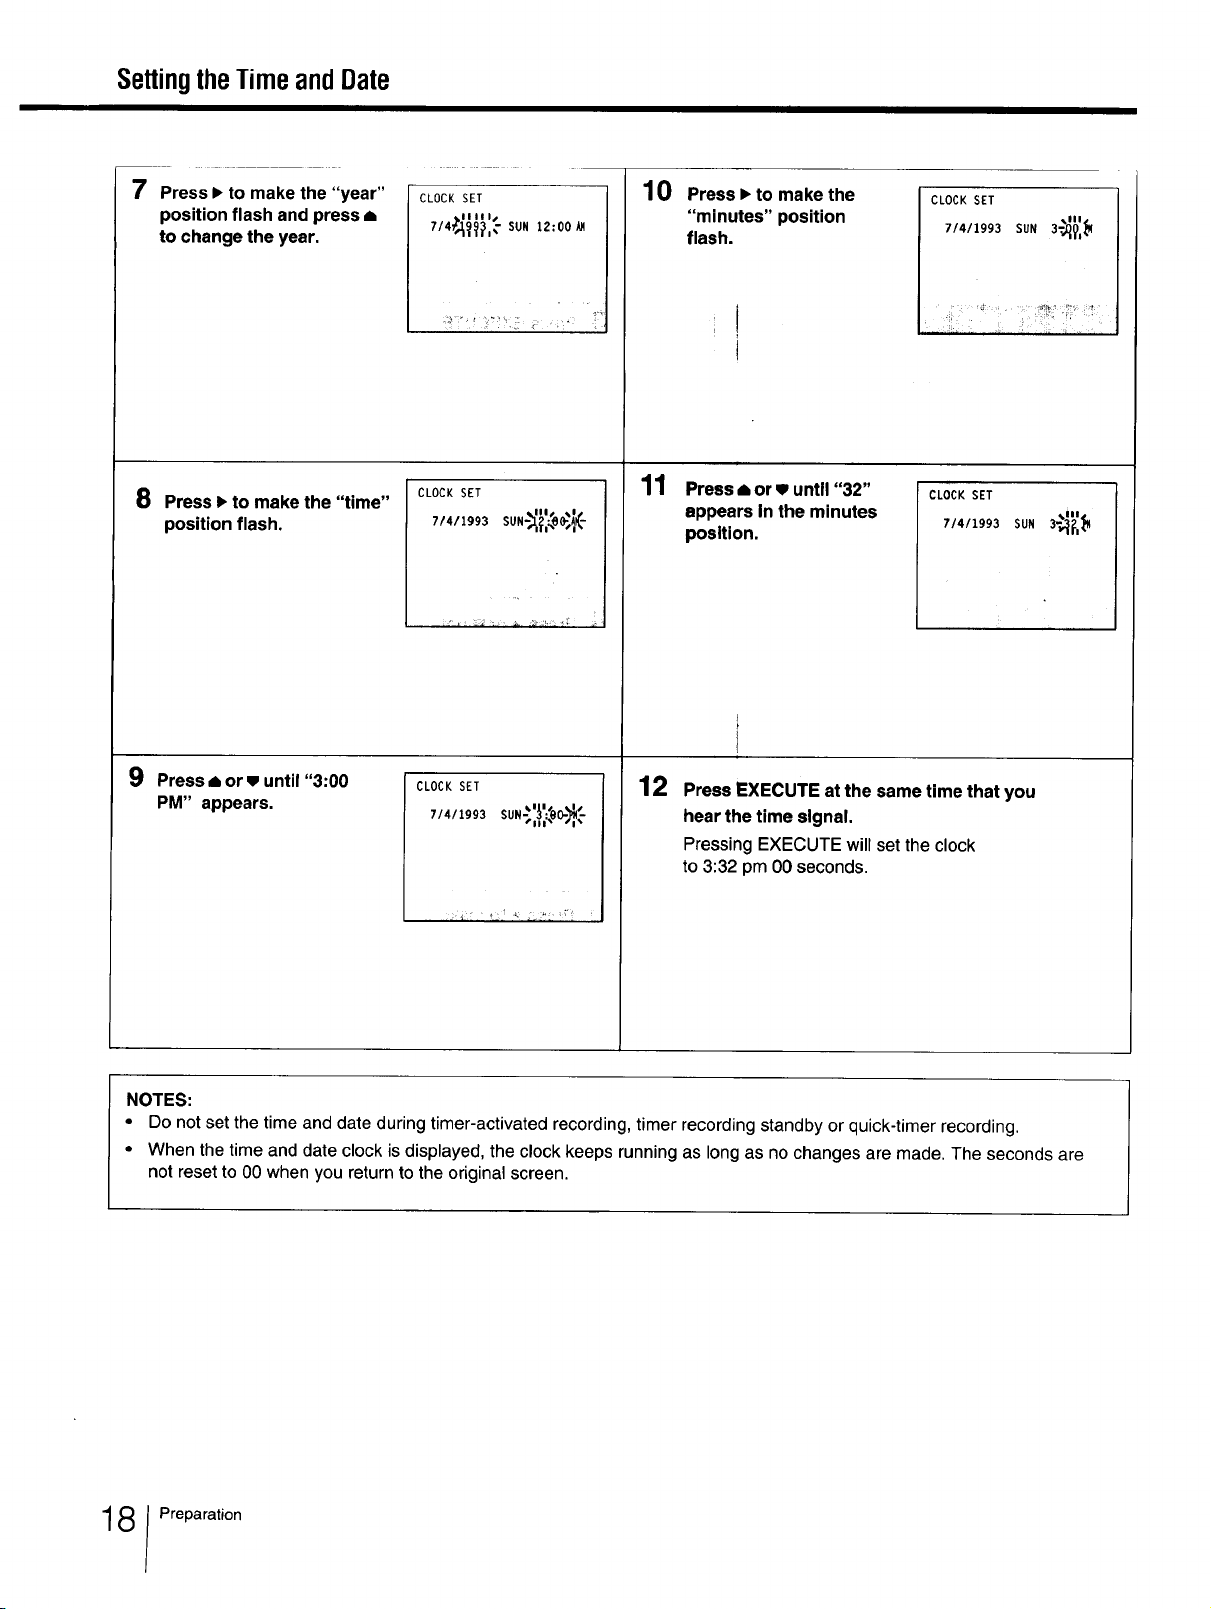
7 Press I_to make the "year"
position flash and press a
to change the year.
8
Press _ to make the "time"
position flash.
CLOCK SET
IIIII/
7/4_J:993,;.... SUN 12:00
CLOCK SET
7/411993 SUN-:_,_e_K-
10
Press • to make the
"minutes" position
flash.
:I
t
11
Press ,=or w until "32"
appears In the minutes
position.
CLOCK SET
7/4/1993
CLOCK SET
71411993
3_IIII
SUN _?,_w
SUN
9 Press _ or • until "3:00
PM" appears.
NOTES:
• Do not set the time and date during timer-activated recording, timer recording standby or quick-timer recording.
• When the time and date clock is displayed, the clock keeps running as long as no changes are made. The seconds are
not reset to 00 when you return to the original screen.
CLOCK SET
_1 I_ I S
12
Press EXECUTE at the same time that you
hear the time signal.
Pressing EXECUTE will set the clock
to 3:32 pmO0 seconds.
8 Preparation
PresettingtheActiveChannels
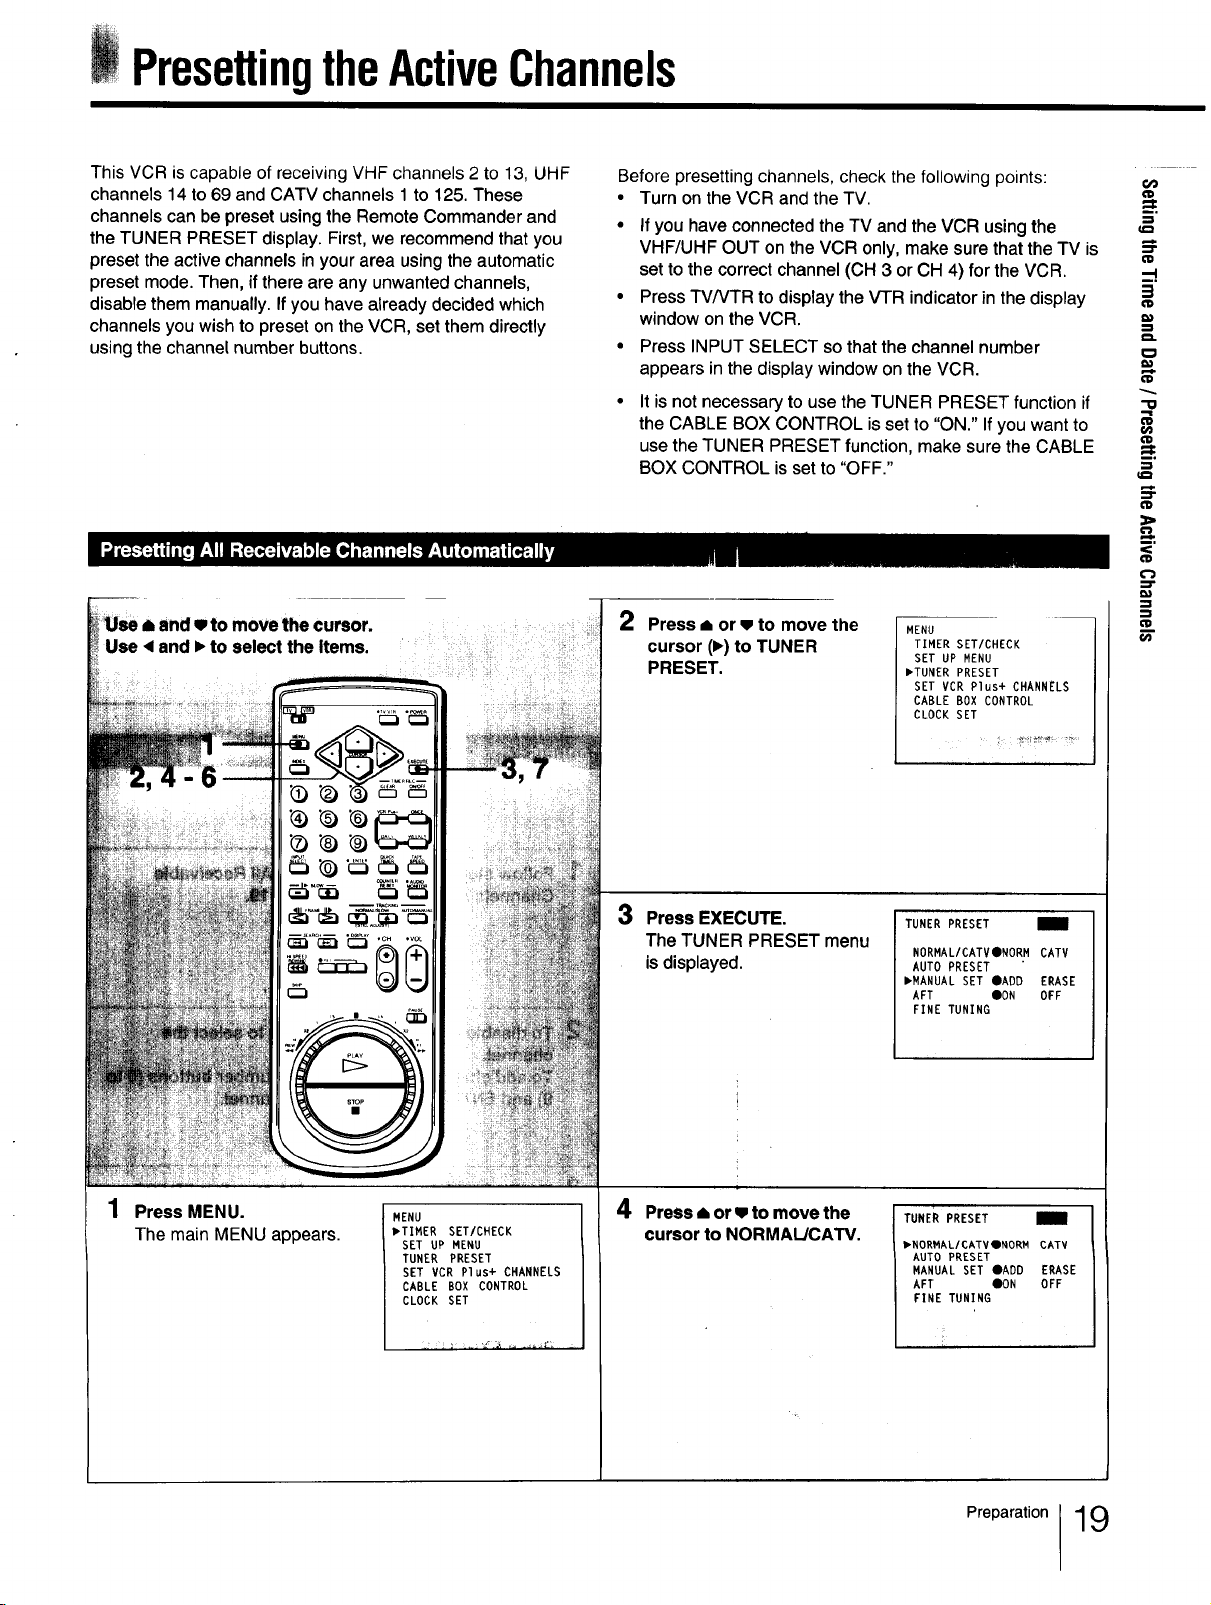
This VCR is capable of receiving VHF channels 2 to 13, UHF
channels 14 to 69 and CATV channels 1to 125. These
channels can be preset using the Remote Commander and
the TUNER PRESET display. First, we recommend that you
preset the active channels in your area using the automatic
preset mode. Then, if there are any unwanted channels,
disable them manually. If you have already decided which
channels you wish to preset on the VCR, set them directly
using the channel number buttons.
8 and w to move the cursor.
4 and I_to select the Items.
>
o,
Before presetting channels, check the following points:
• Turn on the VCR and the TV.
• if you have connected the TV and the VCR using the
VHF/UHF OUT on the VCR only, make sure that the TV is
set to the correct channel (CH 3 or CH 4) for the VCR.
• Press TV/VTR to display the VTR indicator in the display
window on the VCR.
• Press INPUT SELECT so that the channel number
appears in the display window on the VCR.
It is not necessary to use the TUNER PRESET function if
the CABLE BOX CONTROL is set to "ON." If you want to
use the TUNER PRESET function, make sure the CABLE
BOX CONTROL is set to "OFF."
2
Press • or w to move the
cursor (1_)to TUNER
PRESET.
MENU
TIMER SET/CHECK
SET UP MENU
_TUNER PRESET
SET VCR Plus+ CHANNELS
CABLE BOX CONTROL
CLOCK SET
O0
lID
_=.
§.
(I}
==.
$"
"tO
:=1
(D
(ID
(ID
f_
Press MENU.
The main MENU appears.
MENU
,TIMER SET/CHECK
SET UP MENU
TUNER PRESET
SET VCR Plus+ CHANNELS
CABLE BOX CONTROL
CLOCK SET
3 Press EXECUTE.
The TUNER PRESET menu
is displayed.
4 PreSs • or • to move the
cursor to NORMAL/CAW.
TUNER PRESET
NORMAL/CATVONORM CATV
AUTO PRESET
,MANUAL SET OADD ERASE
AFT CON OFF
FINE TUNING
TUNER PRESET
PMOR_ALICATV ONORM CATV
AUTO PRESET
MANUAL SET OADD ERASE
AFT CON OFF
FINE TUNING
Prepa,ation19

PresettingtheActiveChannels
5 Press • or • to select
NORM or CATV.
NORM presets the VHF and
UHF channels; CATV presets
your cable TV channels. The
lowest channel number, 2 for
NORM and 1 for CATV, will
appear on the screen.
6 Press • or v to move the
cursor to AUTO PRESET.
TUNER PRESET
,NORMAL/CATVONORM CATV
AUTO PRESET
MANUAL SET OADD ERASE
AFT OON OFF
FINE TUNING
TUNER PRESET m
NORMAL/CATVONORM CATV
,AUTO PRESET
MANUAL SET OADD ERASE
AFT OON OFF
FINE TUNING
7 Press EXECUTE
Receivablechannels are presetinnumerical
sequence.Whennomorechannelscanbefound, the
presettingstopsandthepictureofthe lowest
numberedchannelisdisplayedonthetape counter.
The message "Please wait"isflashing whilepresetting
ontheTV screen.
NOTE:
The VCR automatically exits from the TUNER PRESET
menu if you don't proceed for more than one minute.
After auto_Hatic presetting, you carl disable and/or add channels.
1 Follow steps I to 3 in "Presetting All Receivable
Channels Automatically" on page 19.
2
To disable channels,press CH+!- to selectthe
channel.
To add channels, presschannel number buttons(0to
9) and ENTER key to select the channel.
3 To disable channels, press • or • to select ERASE.
To add channels, press • or • to select ADD.
4 Press EXECUTE.
When you press CH +/-, the disabled channels are
removed and the added channels are displayed.
0 Preparation
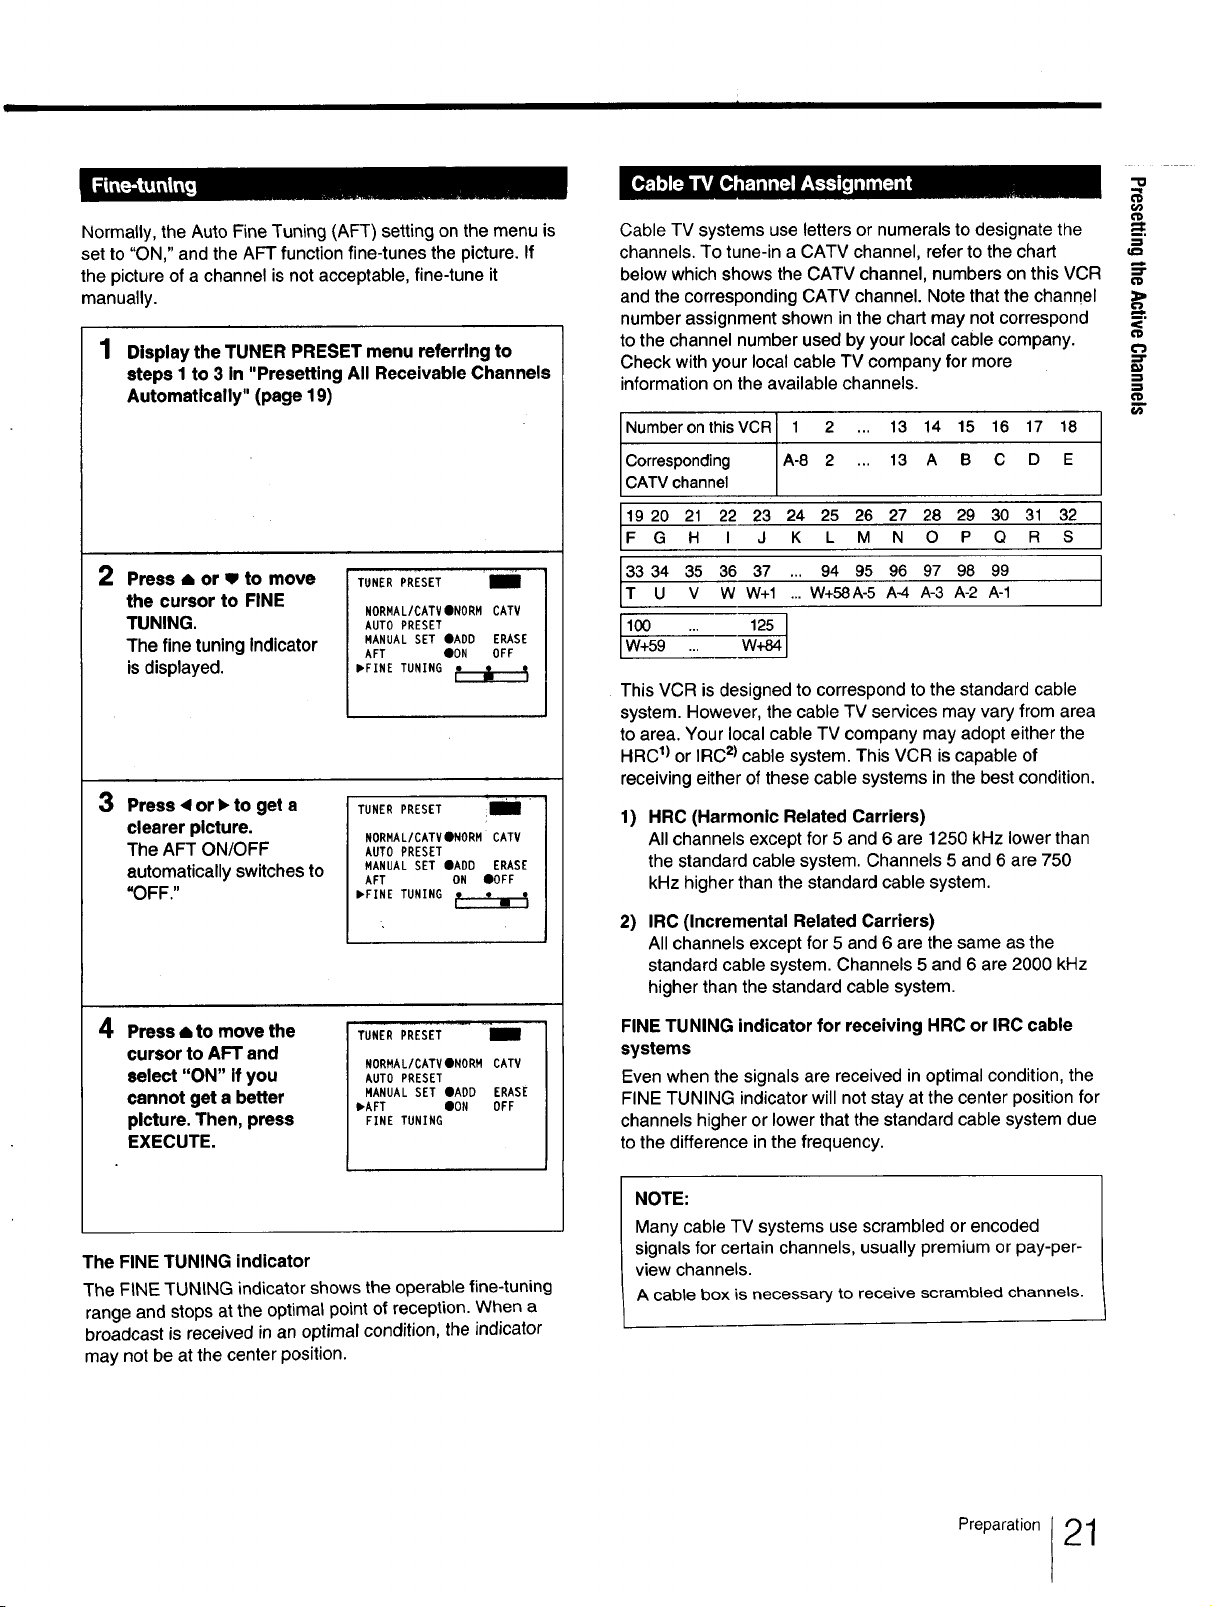
Normally, the Auto Fine Tuning (AFT) setting on the menu is
set to "ON," and the AFT function fine-tunes the picture. If
the picture of a channel is not acceptable, fine-tune it
manually.
1 Display the TUNER PRESET menu referring to
steps I to 3 in "Presetting All Receivable Channels
Automatlcally" (page 19)
2
Press • or w to move
the cursor to FINE
TUNING.
The fine tuning Indicator
is displayed.
3 Press < or • to get a
clearer picture.
The AFT ON/OFF
automatically switches to
"OFF."
TUNER PRESET 'i
NORMAL/CATV ONORM CATV
AUTO PRESET
MANUAL SET QADD ERASE
AFT CON OFF
,FINE TUNING
TUNER PRESET _i
NORMAL/CATVeNORM CATV
AUTOPRESET
MANUAL SET aADD ERASE
AFT ON OOFF
,FINE TUNING ___
Cable TV systems use letters or numerals to designate the
channels. To tune-in a CATV channel, refer to the chart
below which shows the CATV channel, numbers on this VCR
and the corresponding CATV channel. Note that the channel
number assignment shown in the chart may not correspond
to the channel number used by your local cable company.
Check with your local cable TV company for more
information on the available channels•
Number on this VCR 1 2 ... 13 14 15 16 17 18
Corresponding A-8 2 ... 13 A B C D E
CATV channel
19 20 21 22 23 24 25 26 27 28 29 30 31 32
F G H I J K L M N O P Q R S
33 34 35 36 37 ... 94 95 96 97 98 99
T U V W W+I ... W+58A-5 A-4 A-3 A-2 A-1
100 ... 125 ]
W+59 ... W_] '
This VCR is designed to correspond to the standard cable
system• However, the cable TV services may vary from area
to area. Your local cable TV company may adopt either the
HRC1)or IRC2)cable system• This VCR is capable of
receiving either of these cable systems in the best condition.
1)
HRC (Harmonic Related Carriers)
All channels except for 5 and 6 are 1250 kHz lower than
the standard cable system. Channels 5 and 6 are 750
kHz higherthan the standard cable system.
IRC (incremental Related Carriers)
2)
All channels except for 5 and 6 are the same as the
standard cable system. Channels 5 and 6 are 2000 kHz
higher than the standard cable system.
"{3
€1}
_=.
=T
4 Press i to move the
cursor to AFT and
select "ON" if you
cannot get a better
picture. Then, press
TUNER PRESET i
NORMAL/CATVONORM CAW
AUTO PRESET
MANUAL SET QADD ERASE
,AFT ION OFF
FINE TUNING
EXECUTE.
The FINE TUNING indicator
The FINE TUNING indicator shows the operable fine-tuning
range and stops at the optimal point of reception• When a
broadcast is received in an optimal condition, the indicator
may not be at the center position.
FINE TUNING indicator for receiving HRC or IRC cable
systems
Even when the signals are received in optimal condition, the
FINE TUNING indicator will not stay at the center position for
channels higher or lower that the standard cable system due
to the difference in the frequency.
NOTE:
Many cable TV systems use scrambled or encoded
signals for certain channels, usually premium or pay-per-
view channels•
A cable box is necessary to receive scrambled channels.
Preparation 21
 Loading...