

Sony SLV-750HF User Manual

3-756-090-23(1)
Video Cassette Recorder
Operating Instmctions
SLV-750HF/751HF
a 17=10
vus
01992 bv Sony Corporation
WARNING Owner's Record
To prevent fire or shock hazard, do not
ex|Mse the unit to rain or moisture.
This symbol is intended to alert the user to
the presence of uninsulated 'dangerous
voltage* within the product's enclosure that
may be of sufficient magnitude to constitute
a risk of electric shock to persons.
This symbol is intended to alert the user to
the presence of important operating and
maintenance (servicing) instructions in the
literature accompanying the appliance.
The model number is located at the rear and front of the unit
and the serial number on the top. Record the serial number
in the space provided below. Refer to these numbers
whenever you call upon your Sony sen/ice dealer regarding
this product.
Model No. SLV-750HF Serial No..
Model No. SLV-751HF Serial No..
For the Customers in the U.S.A.
WARNING
This equipment has been tested and found to comply with
the limits for a Class B digital device, pursuant to Part 15
of the FCC Rules. These limits are designed to provide
reasonable protection against harmful interference in a
residential installation. This equipment generates, uses,
and can radiate radio frequency energy and, if not
installed in accordance with the instructions, may cause
harmful interference to radio communications. However,
there is no guarantee that interference will not occur in a
particular installation. If this equipment does cause
harmful interference to radio or television reception, which
can be determined by turning the equipment off and on,
the user is encouraged to try to correct the interference
by one or more of the following measures;
- Reorient or relocate the receiving antenna.
- Increase the separation between the equipment and
receiver.
• Connect the equipment into an outlet on a circuit
different from that to which the receiver is connected.
- Consult the dealer or an experienced radio/TV
technician for help.
You are cautioned that any changes or modifications not
expressly approved in this manual could void your
authority to operate this equipment.
Preliminaries
Caution
TO PREVENT ELECTRIC SHOCK. DO NOT USE THIS
POLARIZED AC PLUG WITH AN EXTENSION CORD.
RECEPTACLE OR OTHER OUTLET UNLESS THE
BLADES CAN BE FULLY INSERTED TO PREVENT
BLADE EXPOSURE.
NOTE TO CATV SYSTEM INSTALLERS IN THE U.S.A.;
This reminder is provided to call the cable TV system
installer's attention to Article 820-40 of the NEC that
provides guidelines for proper grounding and, in
particular, specifies that the cable ground shall be
connected to the grounding system in the building, as
close to the point of cable entry as practical.

Table of Contents
Table of Contents
Preliminaries
WARNING.................................................................................. 2
Owner’s Record
For Customers in the U.S.A.............................................................. 2
Precautions................................................................................. 4
Safety
installation..................................................................................... 4
Operation....................................................................................... 4
Cleaning..........................................................................................4
Introduction................................................................................ 5
How to Use This Manual................................................................. 5
Overview........................................................................................ 5
Preparation
Hookups and Getting Started............................................................. 6
Hookup 1
Audio/Video (AA/) Hookup............................................................ 7
Hookup 2
Cable Hookup................................................................................ 8
VCR Setup...................................................................................... 9
VCR Plus+ Channel Setup............................................................... 9
Hookup 3
Cable Hookup............................................................................... 10
VCR Setup....................................................................................11
VCR Plus+ Channel Setup
Hookup 4
Cable Hookup............................................................................... 12
VCR Setup.....................................................................................13
VCR Plus+ Channel Setup.............................................................. 13
Hookup 5
Antenna Hookup
VCR Setup.....................................................................................15
VCR Plus+ Channel Setup.............................................................. 15
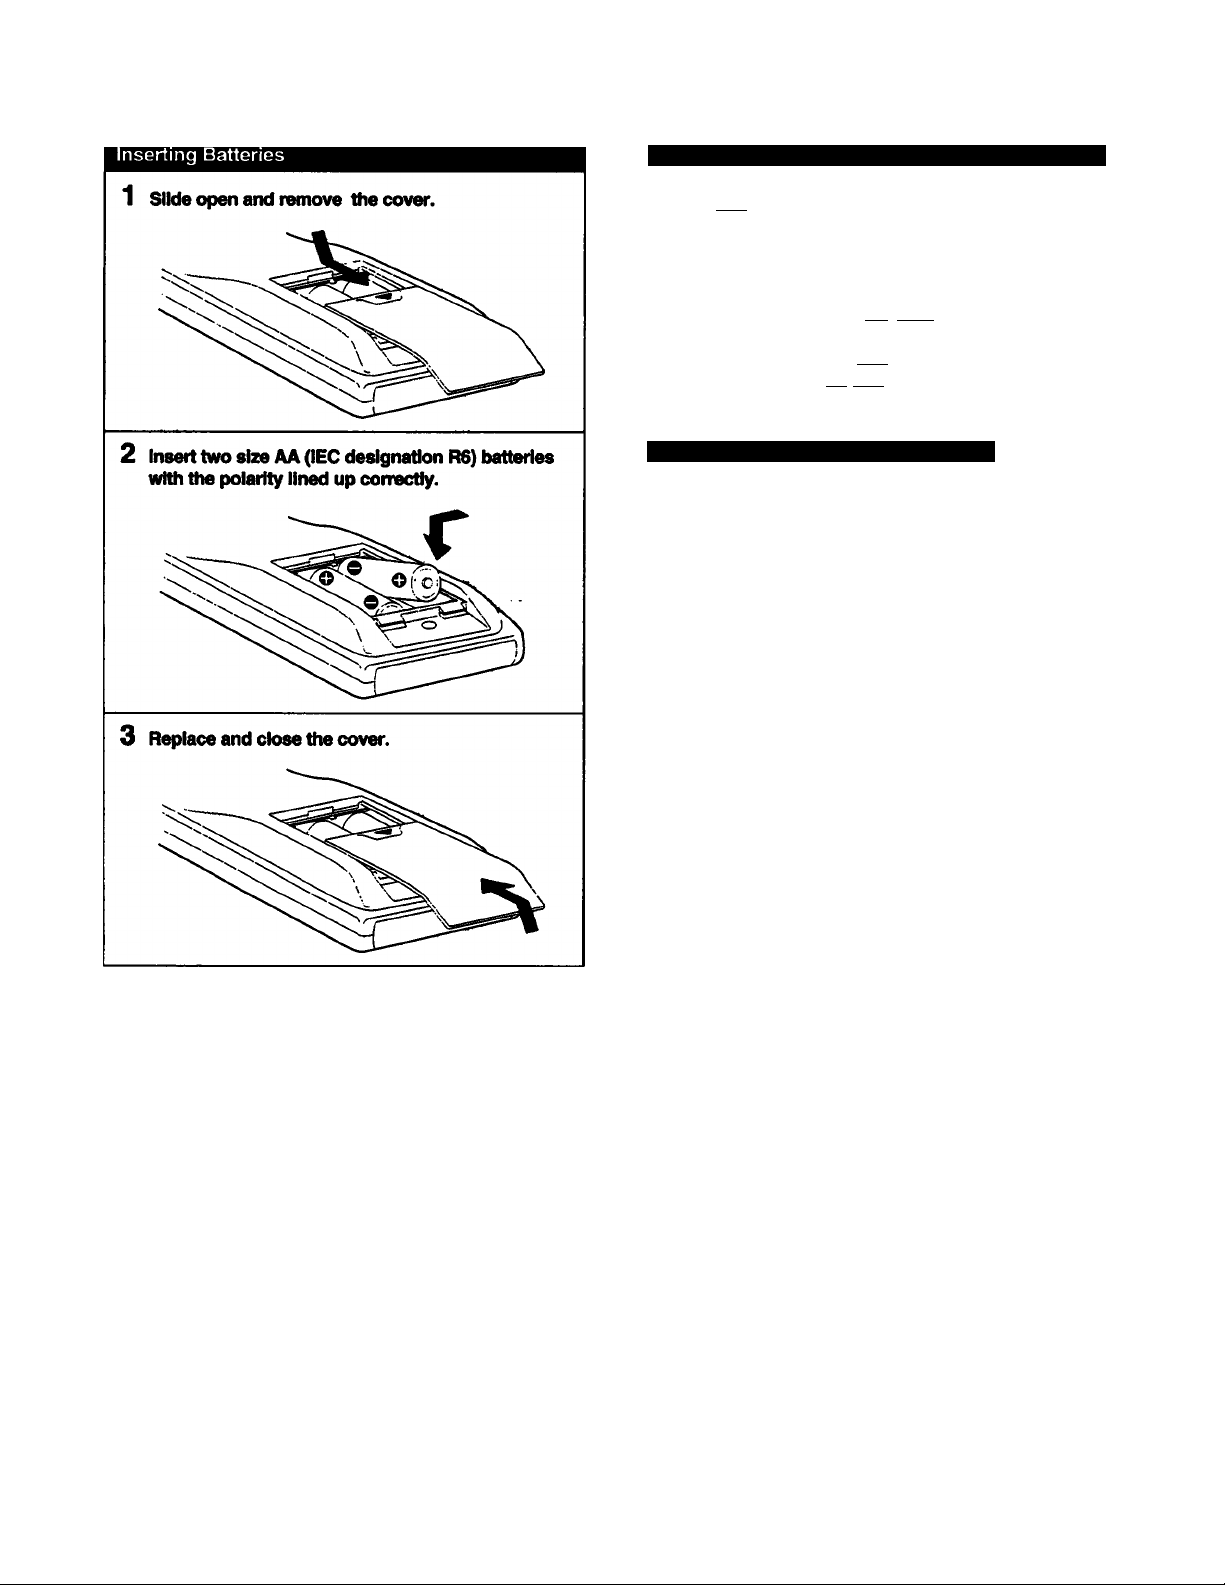
Preparing the Remote Commander...................................................16
Inserting Batteries......................................................................... 16
Operating the VCR with the Remote Commander
How to use the Remote Commander
Setting the Time and Date................................................................. 17
Example of Time and Date Setting.................................................17
Presetting the Active Channels
Presetting All Receivable Channels Automatically...........................19
Presetting Desired Channels or Disabling Unwanted
Channels....................................................................................... 20
Fine-tuning...................................................................................21
Cable TV Channel Assignment
Activating the Cable Box Control Function
Setting the Cable Box Control........................................................23
Checking the Cable Box Control Setting.........................................24
Using the SETUP MENU
Menu Choices
Basic Operations
Playback....................................................................................27
Inserting a Video Cassette........................................................................27
Playback.......................................................................................28
..........................................................................
............................................................................................
.............................................................
..........................................................................
..........................
............................................
..........................................................
......................................................
.........................................
....................................................................
...............................................................................
11
14
16
16
19
21
22
25
26
The Display...................................................................................... 29 £
Indexing Tape Contents................................................................... 29 5
Playing Back Externally-Recorded Tapes
Selecting the Monitor Sound............................................................30 a
Listening to Mixed Hi-Fi and Normal Track Sound
2
4
Recording TV Programs....................................................................... 32 g
Recording TV Programs................................................................... 32 JJ-
Pausing........................................................................................... 33 »
Recording with the TV Off
Watching One TV Program While Recording Another...34 ^
Recording Multi-Channel TV Sound (MTS).......................................34 »
Timer Recording..................................................................................35 «
Setting the Timer............................................................................. 35 S.
Overlapping Timer Recordings.........................................................38 o
Checking the Timer Settings.............................................................39 §•
Changing or Cancelling the Timer Settings
Using the VCR Before Timer Recording Starts................................41
Introducing VCR Plus+......................................................................42
VCR Plus+ Setup Instructions.........................................................42
Recording Programs Using VCR Plus+...........................................44
Variable Speed Playback....................................................................46
Variable Speed Playback................................................................46
Still Picture....................................................................................46
Picture Search............................................................................... 46
Locked Picture Search
Skip Playback................................................................................47
Slow Motion Playback................................................................... 47
Frame-by-Frame Picture................................................................47
Picture Adjustment During Variable Speed Playback ....47
Index Function..................................................................................48
Index Signals.................................................................................48
Playing Back from the Index Point - Index Scan
Locating an Index - Index Search
APC (Adaptive Picture Control)
Using the APC Function when Recording
Using the APC Function when Playing Back a Tape.........................51
Quick-Timer Recording
Quick-Timer Recording
Editing.............................................................................................. 53
Editing from Another VCR.............................................................53
Editing onto Another VCR
General Setup Information
Setting the RF UNIT.......................................................................55
Attaching the External Antenna Connector (supplied) ...56
Attaching the EAC66 UA/ Band Separator / Mixer
(not supplied)................................................................................56
Identifying the Parts and Controls......................................................57
Front Panel
Rear Panel.....................................................................................58
Display Window Indicators............................................................59
Remote Commander.....................................................................60
Troubleshooting............................................................................... 61
Specifications....................................................................................63
Index................................................................................................64
...................................................................................
...............................................................
...................................................................
.........................................................
.....................................................................
.................................................................
.............................................................
................................................................
..........................................
.........................
.......................................
.............................
...................................................
......................................
30 S
31 ^
34 g
40 ^
47
49
50
51
51
52
52
54
55
57
Preliminaries | 0

Precautions
Safety
Operate the unit only on 120 V AC, 60 Hz.
If anything falls into the cabinet, unplug the unit and have
it checked by qualified personnel before operating it any
further.
One blade of the plug is wider than the other for the
purposes of safety and will fit into the power outlet only
one way. If you are unable to insert the plug fully into the
outlet, contact your dealer.
Unplug the unit from the wall outlet if you do not intend to
use it for an extended period of time. To disconnect the
cord, pull it out by the plug, never by the cord.
Installation
• Allow adequate air circulation to prevent internal heat
buildup.
• Do not place the unit on surfaces (rugs, blankets, etc.) or
near materials (curtains, draperies) that may block the
ventilation slots.
• Do not install the unit near heat sources such as radiators
or air ducts, or in a place subject to direct sunlight,
excessive dust, mechanical vibration or shock.
• Do not install the unit in an inclined position. It is designed
to be operated in a horizontal position only.
• Keep the unit and cassettes away from equipment with
strong magnets, such as microwave ovens or large
loudspeakers.
• Do not place heavy objects on the unit.
Operation
When the unit is not in use. turn the power off to conserve
energy and to extend its life.
Remove and store video cassettes after recording or
playback.
Cleaning
Clean the cabinet, panel and controls with a dry. soft
cloth, or a soft cloth slightly moistened with a mild
detergent solution.
Do not use any type of solvent, such as alcohol or
benzine.
^ I Preliminaries

Introduction
How to Use This Manual
This manual includes information on two video cassette
recorder (VCR) models, the SLV-750HF and the
SLV-751HF. The model name is indicated on the rear and
front panels.
This manual is divided into five chapters.
The chapters and their contents are as follows:
Preliminaries (page 2)
Preparation (page 6)
Basic Operations (page 27)
Advanced Operations (page 46)
Additional Information (page 55)
If you are using your VCR for the first time, start from the
section “Hookups and Getting Started” (page 6). This
section explains how to hookup, set up, and operate your
VCR so that you can start enjoying it right away.
For information about the VCR’s basic operations, such as
Playback (page 27), Recording TV Programs (page 32), or
Timer Recording (page 35), see Basic Operations.
If you are already familiar with the basic operations, see
Advanced Operations.
If you have any problems in operating the VCR, refer to
Troubleshooting. If your VCR is in need of repair, contact
your nearest Sony Sen/ice Center facility.
Conventions of this manual
This manual explains operations using the VCR Remote
Commander. However, the buttons on the VCR with the
same name or mark as those on the Remote Commander
function exactly the same as those on the Remote
Commander.
When you are reading through the manual, remember:
• Buttons and switches are shown in uppercase letters.
Example: Press ► PLAY.
• Numbers in the illustrations correspond to numbers in the
text.
• indicates signal flow.
• Notes and cautions are enclosed in boxes.
Unpacking
Check that you have received the following accessories:
• Remote Commander (1)
• Size AA (R6) batteries (2)
• External antenna connector (1)
• 75-ohm coaxial cable with F-type connectors (1)
• AC power cord (1)
• Audio/video connecting cable (3 phono to 3 phono) (1)
• Cable Mouse (Cable Box Controller) (1)
Overview
Functions
• VCR Plus+™ system
Allows you to quickly and easily preset up to eight TV
programs.
• Cable box control
Allows your VCR to control channel selection on most
cable boxes.
• APC (Adaptive Picture Control) function
Automatically optimizes recording and playback
performance by adjusting the video circuitry for each tape
that you use.
• Auto tracking function
Automatically adjusts the tracking condition for optimum
picture quality.
• Timer recordings of eight programs in a month
Recording of up to eight TV programs can be preset up to
one month in advance.
• DUAL MODE SHUTTLE ring
Allows quick access to the desired scene and playback in
various speeds in forward and reverse directions.
• Input connectors on the front panel
Allows easy connection to a video camera recorder.
• Index function
The beginning of a desired scene can be located easily
with the index search function.
• Auto head cleaner
Cleans the video heads each time a cassette is inserted
or ejected.
On-screen display
______________________________________________________
• ON SCREEN HELP message
The VCR gives a message on screen with a beep tone to
warn that you have attempted an incorrect operation.
• DISPLAY
Tape counter, cassette speed, operation mode, and
remaining cassette length can be displayed on the TV
screen.
• TIMER SET/CHECK display
Timer recording settings can be set and checked by
referring to the TV screen.
• LANGUAGE (Canadian versions only)
You can preset your VCR to display screen information in
either English or French.
High-quality picture
•
• High-quality picture
Your Sony VCR provides sharp, finely detailed pictures
through High Quality (HQ) picture technology. Your VCR
incorporates VHS high-quality picture technology and is
compatible with any VCR bearing the mark.
3
S
5
a
B
S.
VCR Plus+ and PlusCode are trademarks of
Gemstar Development Corp.
Preliminaries
Hookups and Getting Started
Before you can use your VCR for the first time, you need to
connect it to your TV and set it up to receive programs for
viewing and recording. This section explains how to hook up,
set up, and operate your VCR so that you can start enjoying
it right away. There are, however, many types of TVs
available and many different ways in which your TV can be
hooked up. As a result, this manual describes several ways
your VCR can be connected.
If You,
Have Audio/Video Inputs on your TV.
Have a cable box.
Have cable, but do not have a cable box.
Have a cable box that cannot be controlled by
the VCR’s cable box control feature.
Have an antenna, not cable TV.
After you’ve completed the connections, follow the
instructions for setup, including VCR Plus-f setup.
(During setup, if you need more details of the procedures
described, page numbers are provided where you can find
complete, step-by-step instructions.)
After you’ve completed the setup, you’re ready to use your
VCR. Follow the instructions provided in To Watch the TV,”
To Watch the VCR." and To Record A Program” for your
specific hookup.
(Again, if you need step-by-step instructions, page numbers
are provided where you can find this information.)
To hook up your VCR so that it works best for you. first scan
through the table below. Then use the accompanying
diagrams and procedures on the following pages to complete
your VCR’s connections.
Use
Hookup 1 first, then proceed.
Hookup 2. 13^1
Hookups. IsS!^ I
Hookup 3 or 4, (or contact your cable company.
They may be able to supply a compatible cable
box.)
Hookups. [¿]
-----------
-----------
TV
[jficaL
---------------
H Cable boxi
HVCRl
I Cable box h
>fVCRl
---------
*^VCRl
Hv^
Caution
Connections between the VCR VHF/UHF OUT
connector and the antenna terminals of a TV receiver
should be made only as shown in the instructions.
Failure to do so may result in operation that violates the
regulations of the Federal Communications
Commission regarding the use and operation of RF
devices. Never connect the output of the recorder to an
antenna or make simultaneous (parallel) antenna and
recorder connections at the antenna terminals of your
receiver.
Refèrto..
Page 7
Pages
Page 10
Page 10 or 12
Page 14
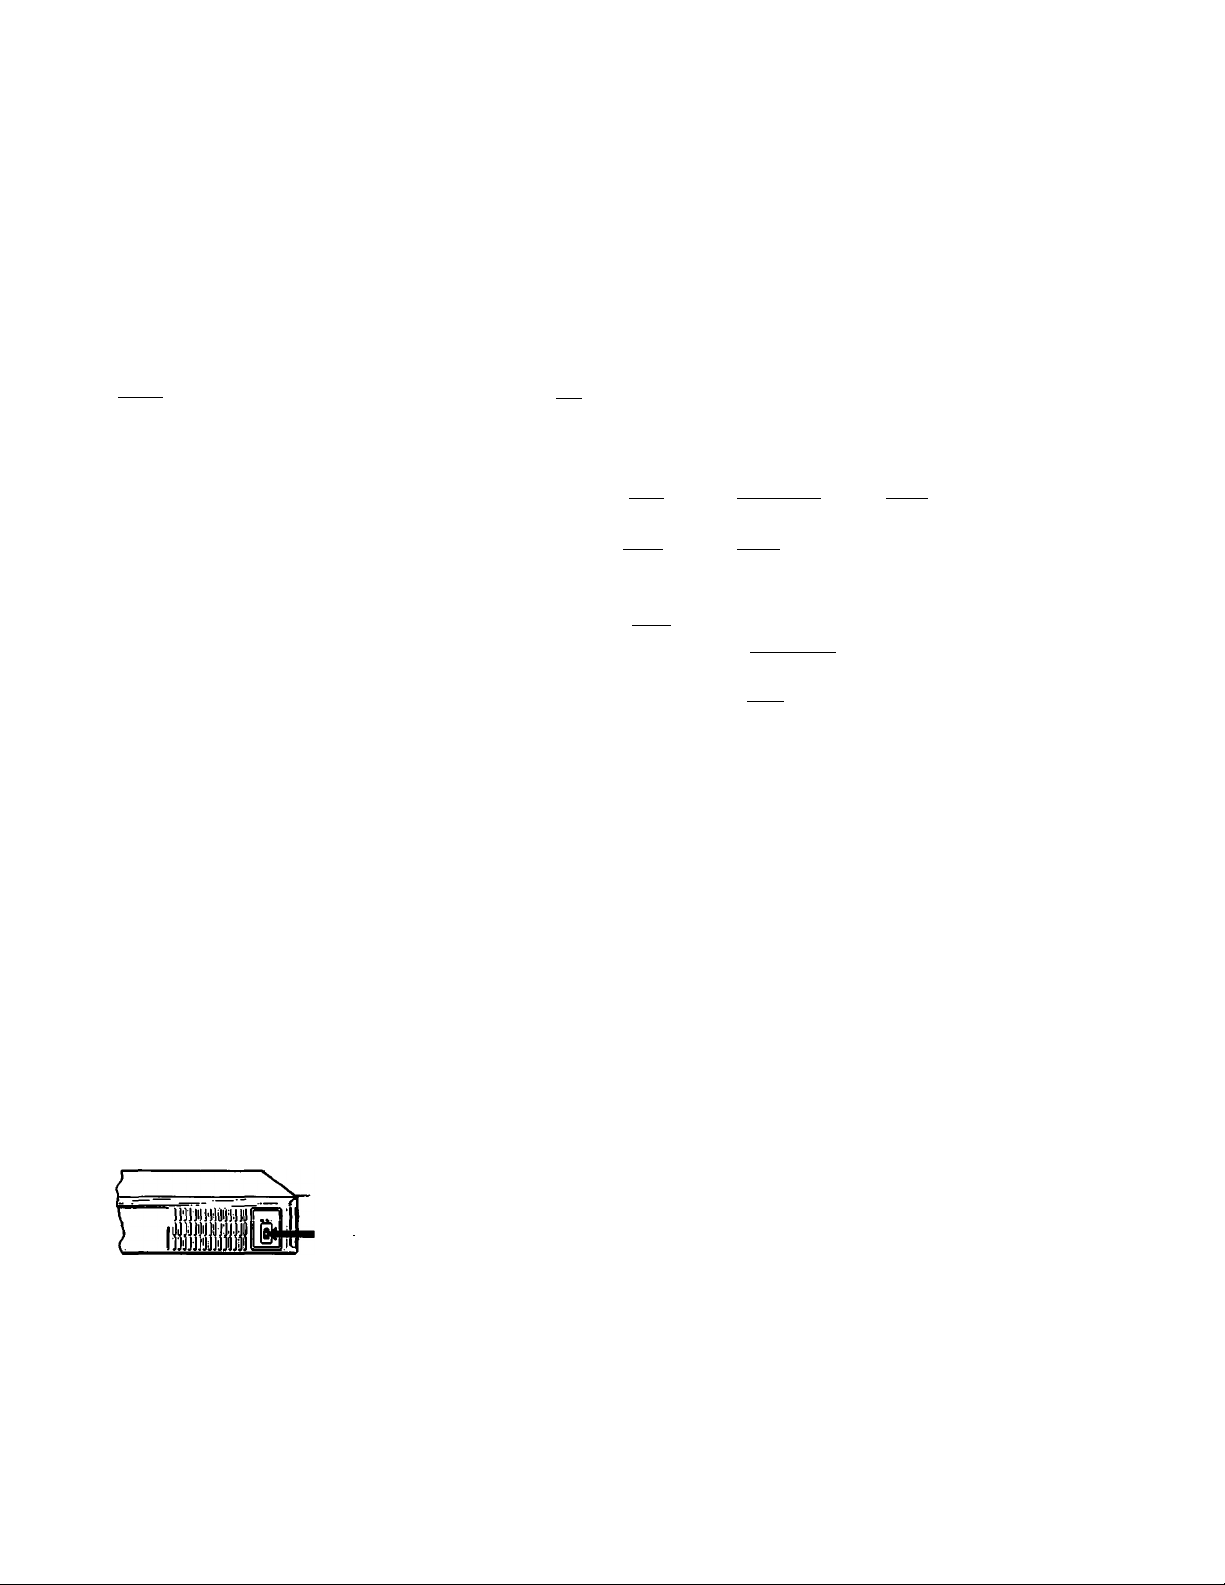
Before making the connections, check the following points:
• Turn off the power to the VCR and TV.
• Do not connect the AC power cords until all of the
connections are completed.
CB3»i TowalouM
R«ar panel
• Make connections firmly. Loose connections may cause
picture distortion.
• If your TV doesn't match any of the examples provided,
consult your nearest Sony dealer or qualified technician.
Preparation
6
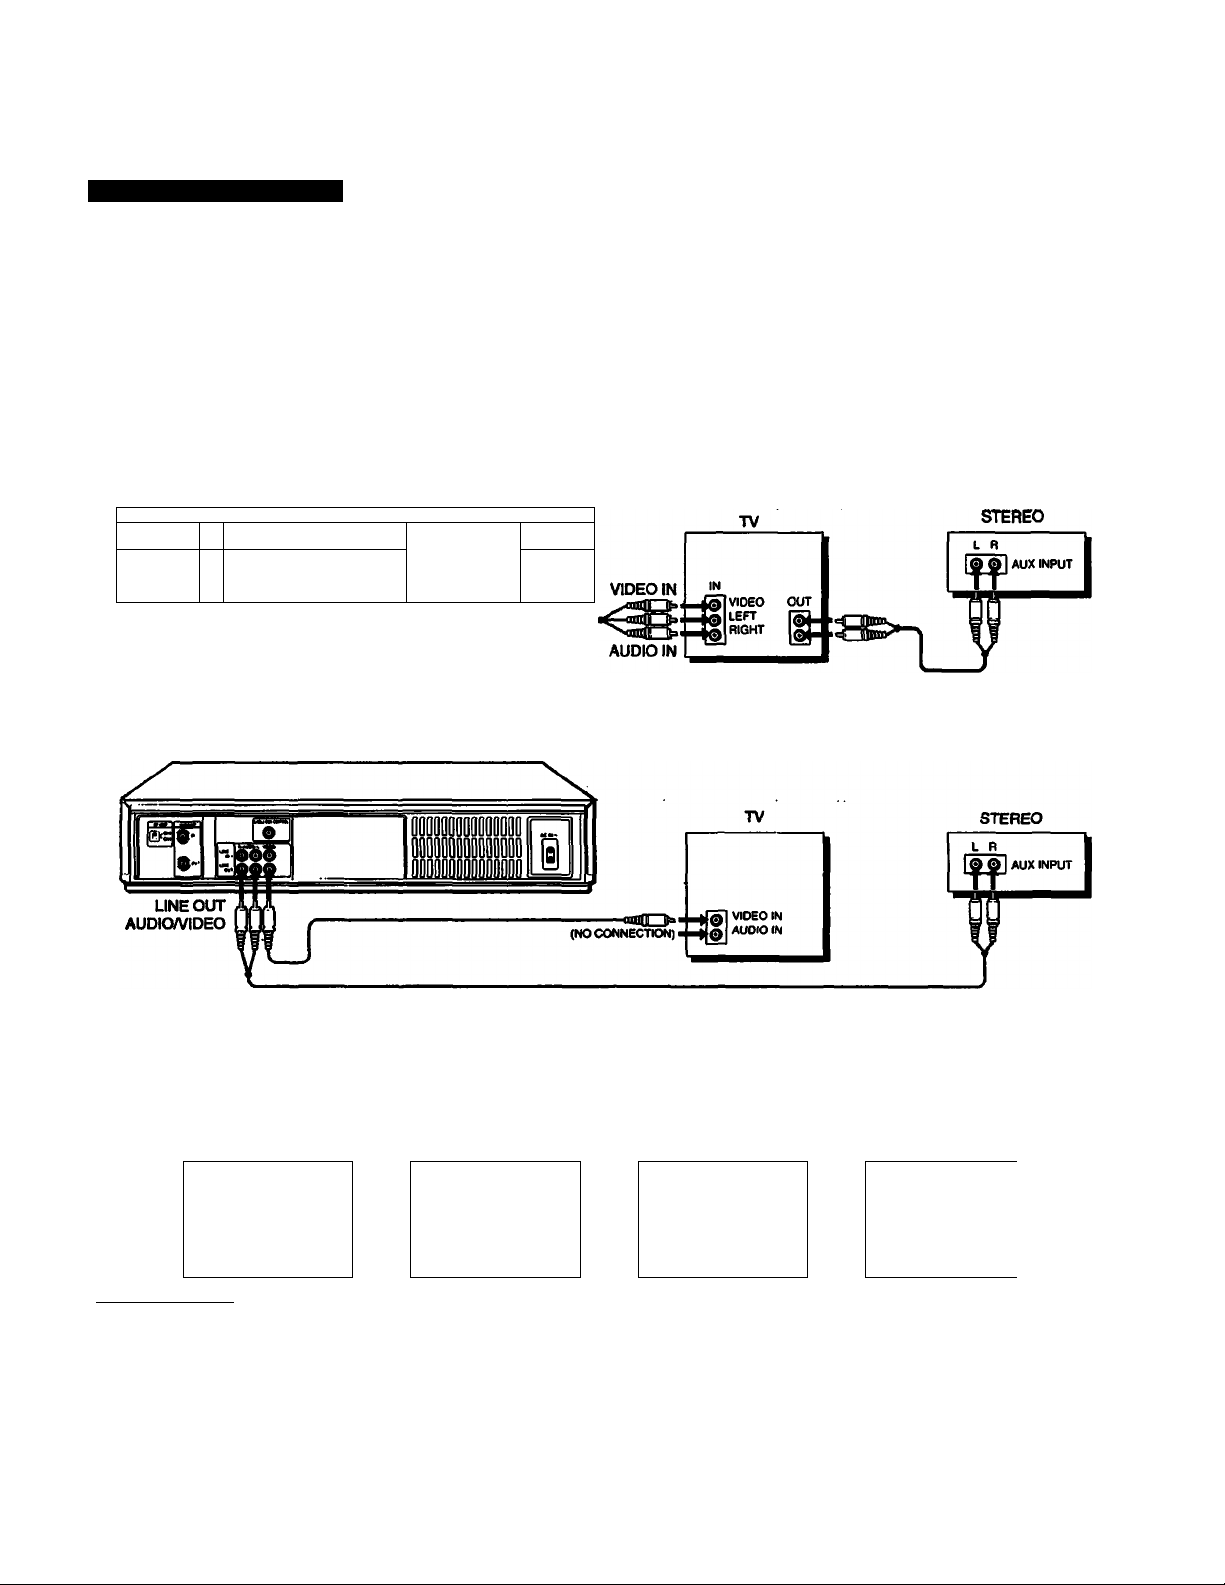
Hookup 1
Audio/Video (A/V) Hookup
If your TV has audio/video (AA/) input jacks, you will get
better picture and sound if you hook up your VCR using
these connections. In addition, for a true “home theater”
experience, you should connect the audio outputs of your
VCR or TV to your stereo system.
If your TV doesn’t have AA/ inputs, see the following pages
for antenna or cable hookup.
1A Urn hookup 1A If your TV Is a stereo type.
VCR
V-- - -— ^— ----------------------------------------------------------------
lago-
%
«Till
г
1 1
--------------- ----------------------------------------
II
QiQDQDQQOiQ 0
DDDDDPODQDDD D
ODODOkaaDDD D
UNEOUT
AUDIO/VIDEO
IB Use hookup IB if your TV does not have stereo Jacks.
VCR
----------------------
«te»
----------------------
--------
If you intend to use the VCR for playback only, you’re
finished after you’ve made these connections. If you want to
record off-air or off your cable TV system, please do the /W
hookup on this page first, then proceed to the following
pages for antenna or cable hookup.
✓
fil
О
After you’ve hooked up your TV using the A/V connections, use the following procedure to set up and use the VCR with your TV.
A/V Setup & Operation
Set AUTO ANT SEL to OFF.
Press MENU.
HCN U MC NU SET UP M EN U
|»пиев $ ст/сиеск
$ет UP и ски
rwt» РН %€Т ru«EP PPESer
$СТ VCf t Plus* CH AKN CiS
CAe u bo t coNTRO i CAO IE a os CONTROL
CLO CK U T
Select SET UP MENU. Select AUTO ANT SEL. Set to OFF.
TIN Eft S ET/C HCCK
P SET UP ME NU PAU TO ANT SEL BO N OE P
$CT VCP Plus* CH ANN ELS
CLO CK S ET
Aur o STCNEO
OIN MER
AUDIO N IK
no rma l au dio «MA IN SAP
BON 0РГ
ON BOP P
ON BOF F
SET UP M EN U
PAU TO ANT SEL ON
AUTO STERE O BON OFF
DIM MER
AUDIO M IX O N BOFF
NO RMA L AU DIO BMA IN Sa p
Details are on page 25.
BOF F
ON
BOF F
Preparation 1 "7
Hookups and Getting Started
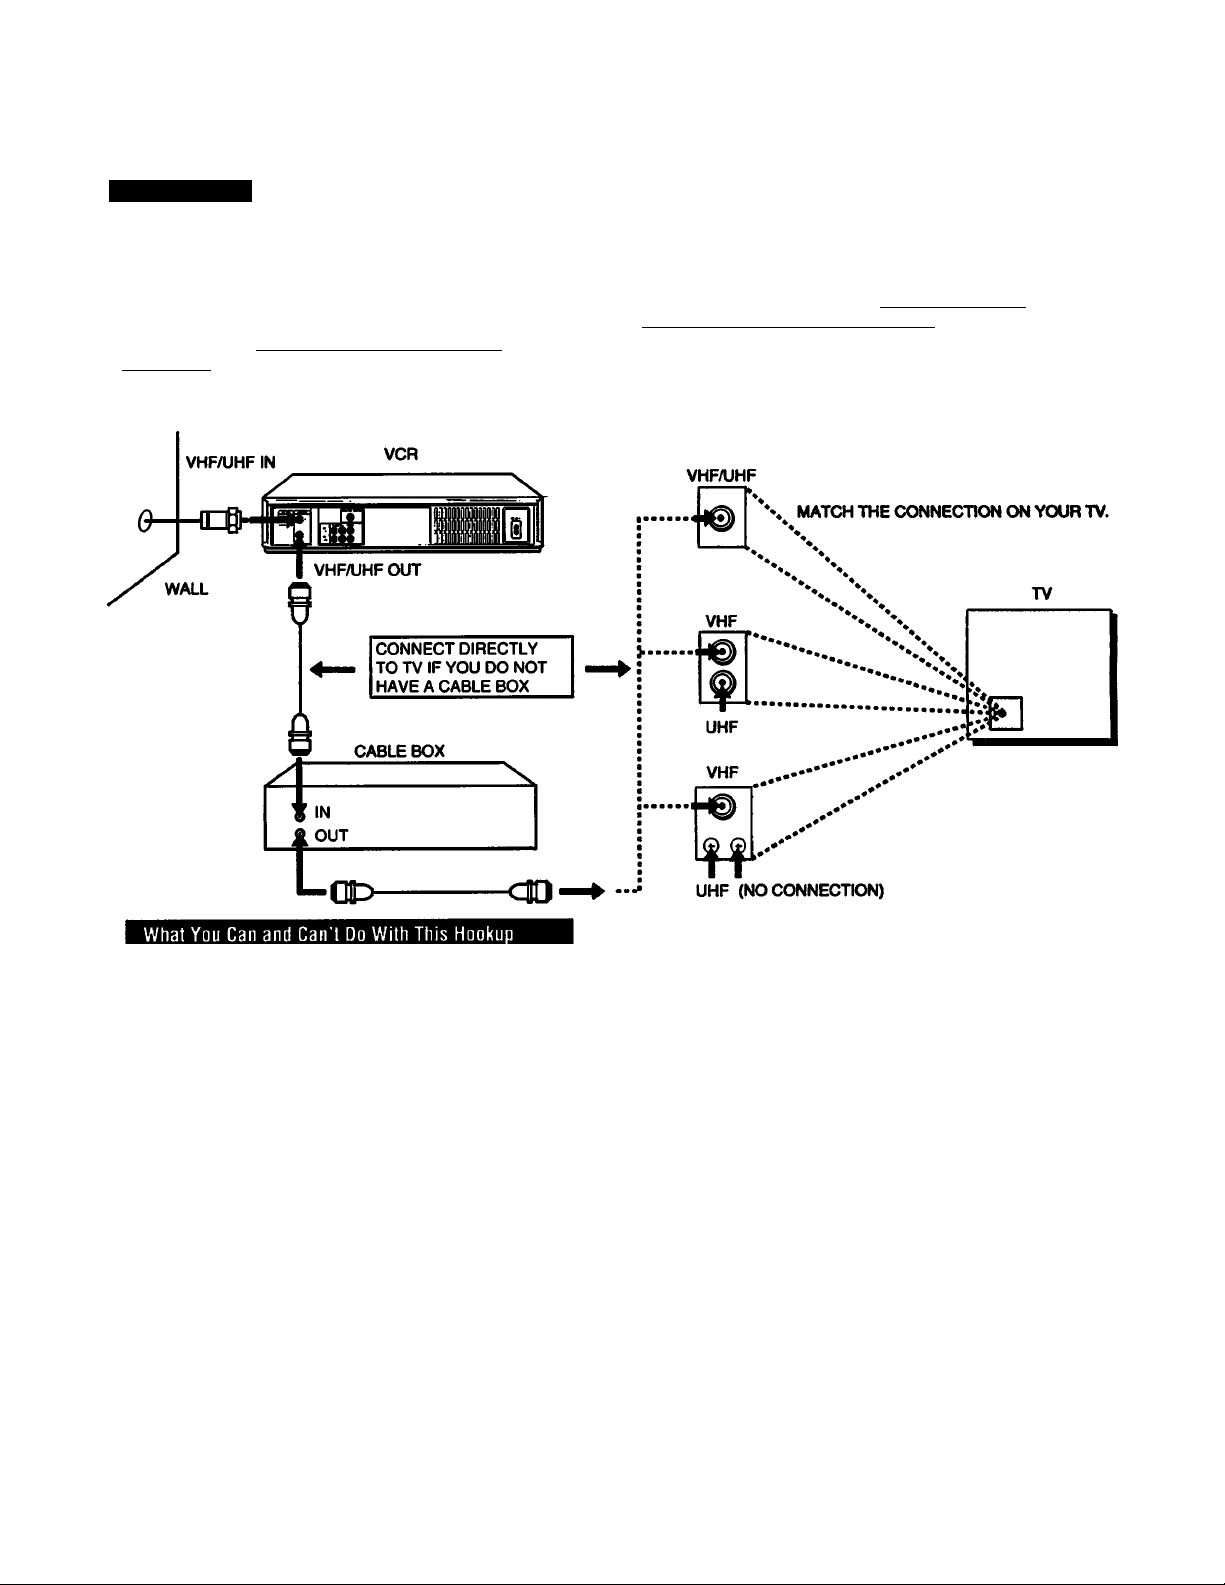
Hookup 2 - Using VCR Cable Box Control
Cable Hookup
Recommended Use:
This hookup is recommended for most cable systems. It
allows the VCR's cable box control feature to control the
channel on the cable box, simplifying the recording process.
You should use this hookup if you have a cable box,
especially if your cable company “scrambles” all, or most,
channels.
Background
This VCR can record most unscrambled cable channels. Some
cable systems “scramble” specific channels, usually premium,
or pay-per-view channeis. In order to record these “scrambled”
channels you should use this hookup.
This hookup simplifies recording channels from the cable box,
by using the VCR’s cable box control feature to change channels
on the cable box. The cable box control feature allows the VCR
to change channels on most cable boxes that are capable of IR
remote control.
CABLE BOX
Hn@-.
0-
IN
OUT
A list of compatible cable boxes is on page 24. If, after checking
your setup, you are sure that the VCR will not control your cable
box, contact your cable company. They may be able to supply
a compatible cable box.
If your cable company cannot supply a compatible cable box,
and your cable system only “scrambles” a few channels, use
Hookup 3.
If your cable company cannot supply a compatible cable box,
and your cable system only “scrambles” all. or most, channels,
you must use Hookup 4.
VHFAJHF
MATCH THE CONNECTION ON YOUR TV
WALL
CABLE MOUSE
(CABLE BOX CONTROLLER)
VHF/UHF IN I
VHF/UHF OUT
CABLE BOX
CONTROL VCR
Cable Mouse Hookup
Position the CABLE MOUSE on the cable box as
shown below. Make sure that the front of the CABLE
MOUSE projects out in front of the cable box.
Remove the protective film from the double-sided tape
to stick the CABLE MOUSE to the cable box.
For best results, position the cable box away from
the VCR.
CablaMo<M C«M>Mou»e
r~Sable Box
Front view
3 ”
Cable Box
Side view
UHF (NO CONNECTION)
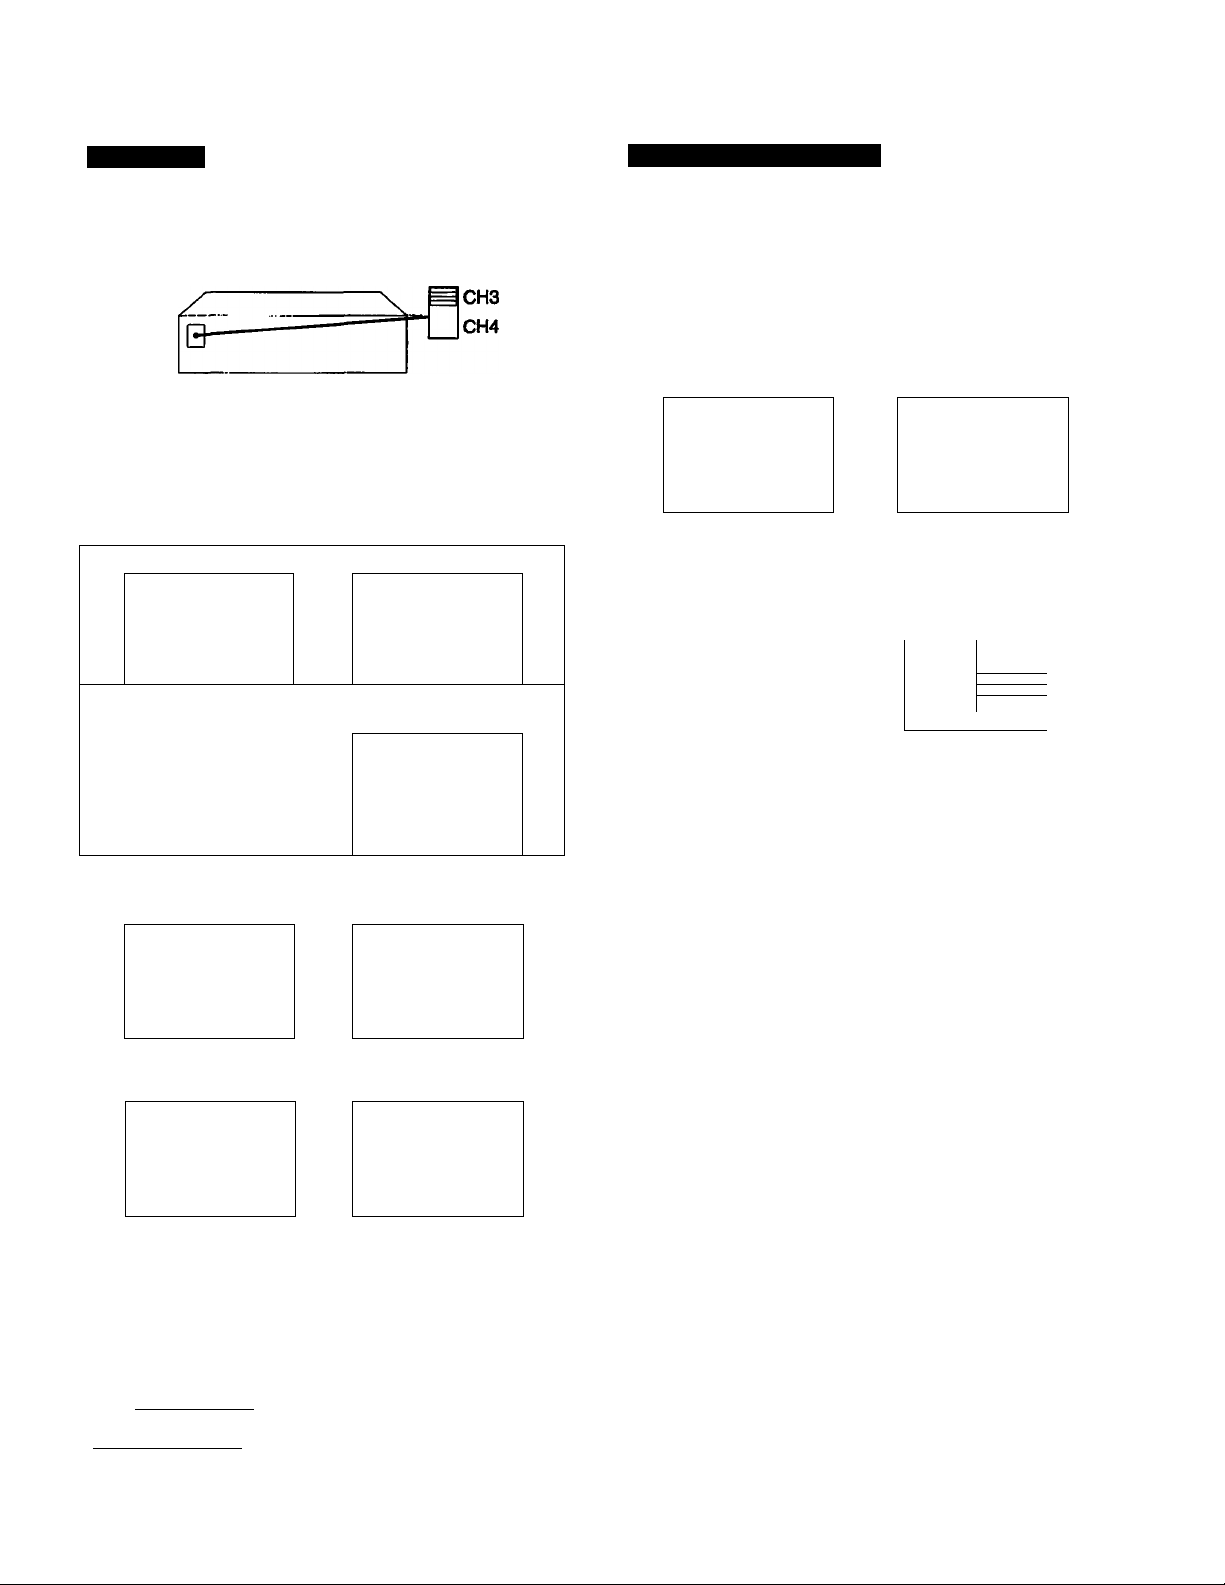
What You Can and Can't Do With This Hookup
What You Can Do
• Record any channel by selecting the channel on the
cable box from your VCR.
What You Can’t Do
• Record with the cable box turned off.
• Record one channel while watching another channel.
8
Preparation
VCR Setup
VCR Plus+ Channel Setup
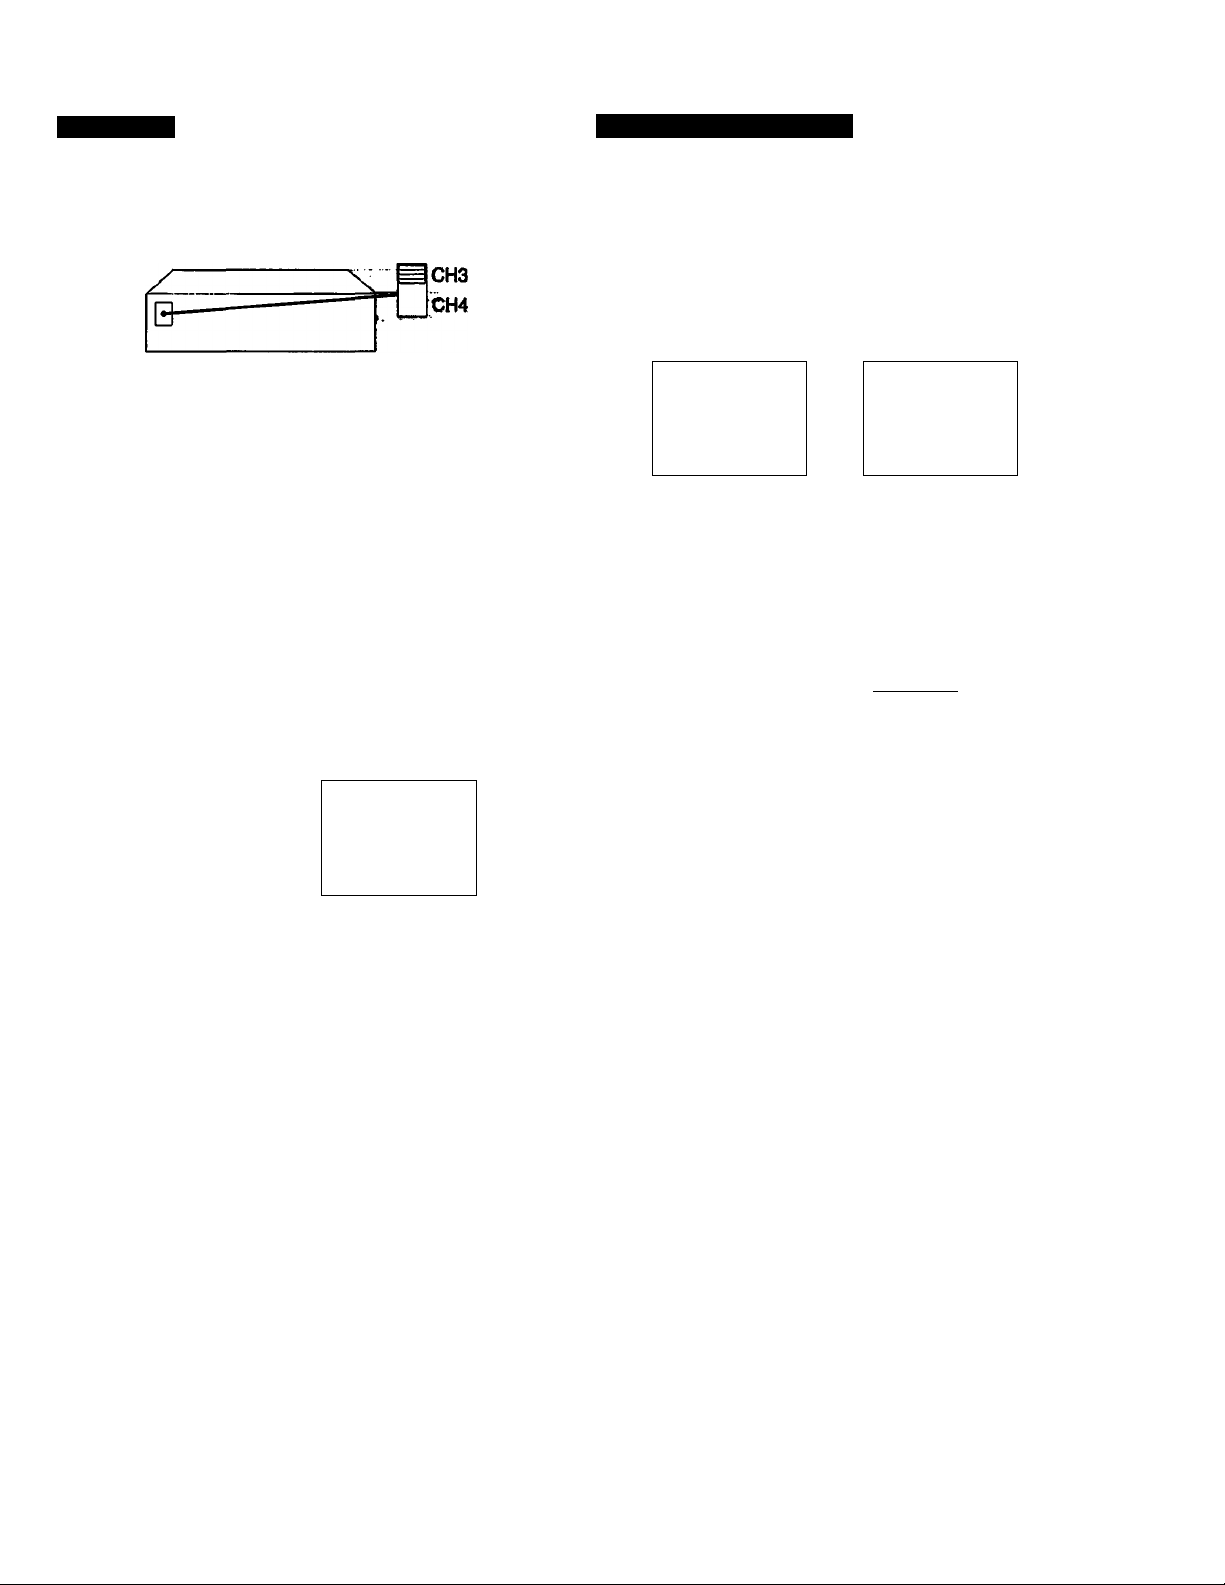
1 Set the RF UNIT on the VCR's rear panel to CH 3 or
CH4.
If you made A/V connections, skip this step.
Set to whichever channel is not used in your area.
If both are used, pick either channel.
Details are on page 55.
2 Switch on your cable box.
3 SetNORMAL/CATVtoCATV.
Press MENU.
N(NU
PTIHCRSCT/CHCCK TIHER SET/CHECK
$cr UP игми SET UP MENU
ruNCR PRESeT PTUNER PRESET
SET VCR Plui« CHANNELS SET VCR P1u4« CHANNELS
CARLE MX CONTROL
CLOCK SET CLOCK SET
Set to CATV. i
Details are on pages 19 and 20.
4 Set the CABLE BOX CONTROL to ON.
Press MENU. Select CABLE BOX CONTROL
MENU HENU
PTIMER SET/CHECK
SET UP MENU SET UP MENU
TUNER PRESET TUNER PRESET
SET VCR Plus* CHANNELS
carle ROx CONTROL pcarle rok control
CLOCK SET CLOCK SET
Enter your Cable Box Code
Number. Ihen press EXECUTE.
Tour CARLE ROX COUR NO.
EAtor your carle ROX
Codo No. uSfAR 0*$ ko/S
Rofor 10 the OPOrntAR
NOAuo) For the Codo
Then push EXECUTE Push MENU to ouit
Select your Cable Box Output
Channel and press EXECUTE.
Tour CAIU 60X Output Ch
•CH?
CHi
CH4
UNc ume tu i on VCR]
use A V to $«Uct CAOiC
»0« CH. ihea puth CXCCUU
4»»»/
Aim *
Select TUNER PRESET.
HENU
w
CAOlE eOX CONTROL
PNORNAL/CATV NORN ФСАТУ
AUTO PRESET
MANUAL SET «АОО ERASE
AFT «ON OFF
FINE TUNING
TIHER SET/CHECK
SET VCR Plus* CHANNELS
Select ON, then press EXECUTE.
CARLE ROX CONTROL
•ON OFF
U$0 d p to soioct
Push EXECUTE for first
t<«o sotup
TUNER PRESET ШШ
1 Find the VCR Plus+ Channel Listing in your
program guide. For details, see page 42.
2 If the channels in the program guide are different
from the channels that you actually use on your
TV, set the channels that are different as follows:
Press MENU.
HENU MENU
PTIMER SET/CHECK
SET UP MENU
TUNER PRESET TUNER PRESET
SET VCR Plus* CHANNELS PSET VCR Plus* CHANNELS
CARLE ROX CONTROL
CLOCK SET
Program listing guide channel
Details are on page 43.
To Watch the TV
1 Turn your VCR off, or press the VCR’s TV/VTR button
until the VTR indicator in the display window goes off.
2 Switch on your cable box.
3 Tune the TV to the cable box output channel
(usually 2,3, or 4).
4 Select the channel that you want to watch with your cable
box.
To Watch the VCR
1 Tune the TV to CH 3 or CH 4, (or to A/V Input if you
made A/V connections.)
2 Insert a cassette and press I
Details are on page 28.
To Record A Program
1 Switch on the cable box.
2 Press VCR Plus+ on the Remote Commander.
3 Enter the program’s PlusCode number.
4 Press ONCE, DAILY, or WEEKLY on the Remote
Commander.
5 Insert a blank cassette.
6 Press TIMER REC on the Remote Commander.
7 Leave the cable box on.
Details are on page 44.
Select SET VCR Plus+
CHANNELS.
TIHER SET/CHECK
SET UP MENU
CARLE ROX CONTROL
CLOCK SET
Enter the program guide
channel, then the channel
your VCR uses.
VCR Plus* CHANHCL LIST
GUIDE TV
г • n
s
17
?R • 9
43
Push
• 4
• ss
•UR
HENU
to OuU
GUIDE
S9 •
66 •
Your actual cable channel—^
•PLAY.
s
•S
ai
3
SL
e>
s
TV
47
96
Details are on page 23.
Preparation
Hookups and Getting Started
Hookup 3 - No Cable Box or Incompatible Cable Box, Few “Scrambled” Channels
Cable Hookup
Recommended Use:
Use this hookup if you do not have a cable box.
Also use this hookup if your cable company cannot supply
a cable box that is compatible with the VCR's cable box
control feature, and vour cable system only “scrambles’* a
few channels.
Background
This VCR can record most unscrambled cable channels.
Some cable systems “scramble” specific channels, usually
premium or pay-per-view channels. You will not be able to
record “scrambled* channels with this hookup. In order to
record “scrambled” channels you should use Hookup 2.
The “Cable Mouse” is not used in this hookup.
What You Can Do
• Record unscrambled channel directly, without
using a cable box.
Preparation
10
What You Can’t Do
• Record scrambled channels that require a cable box.
• Use the VCR's cable box control feature.
VCR Setup
VCR Plus+ Channel Setup
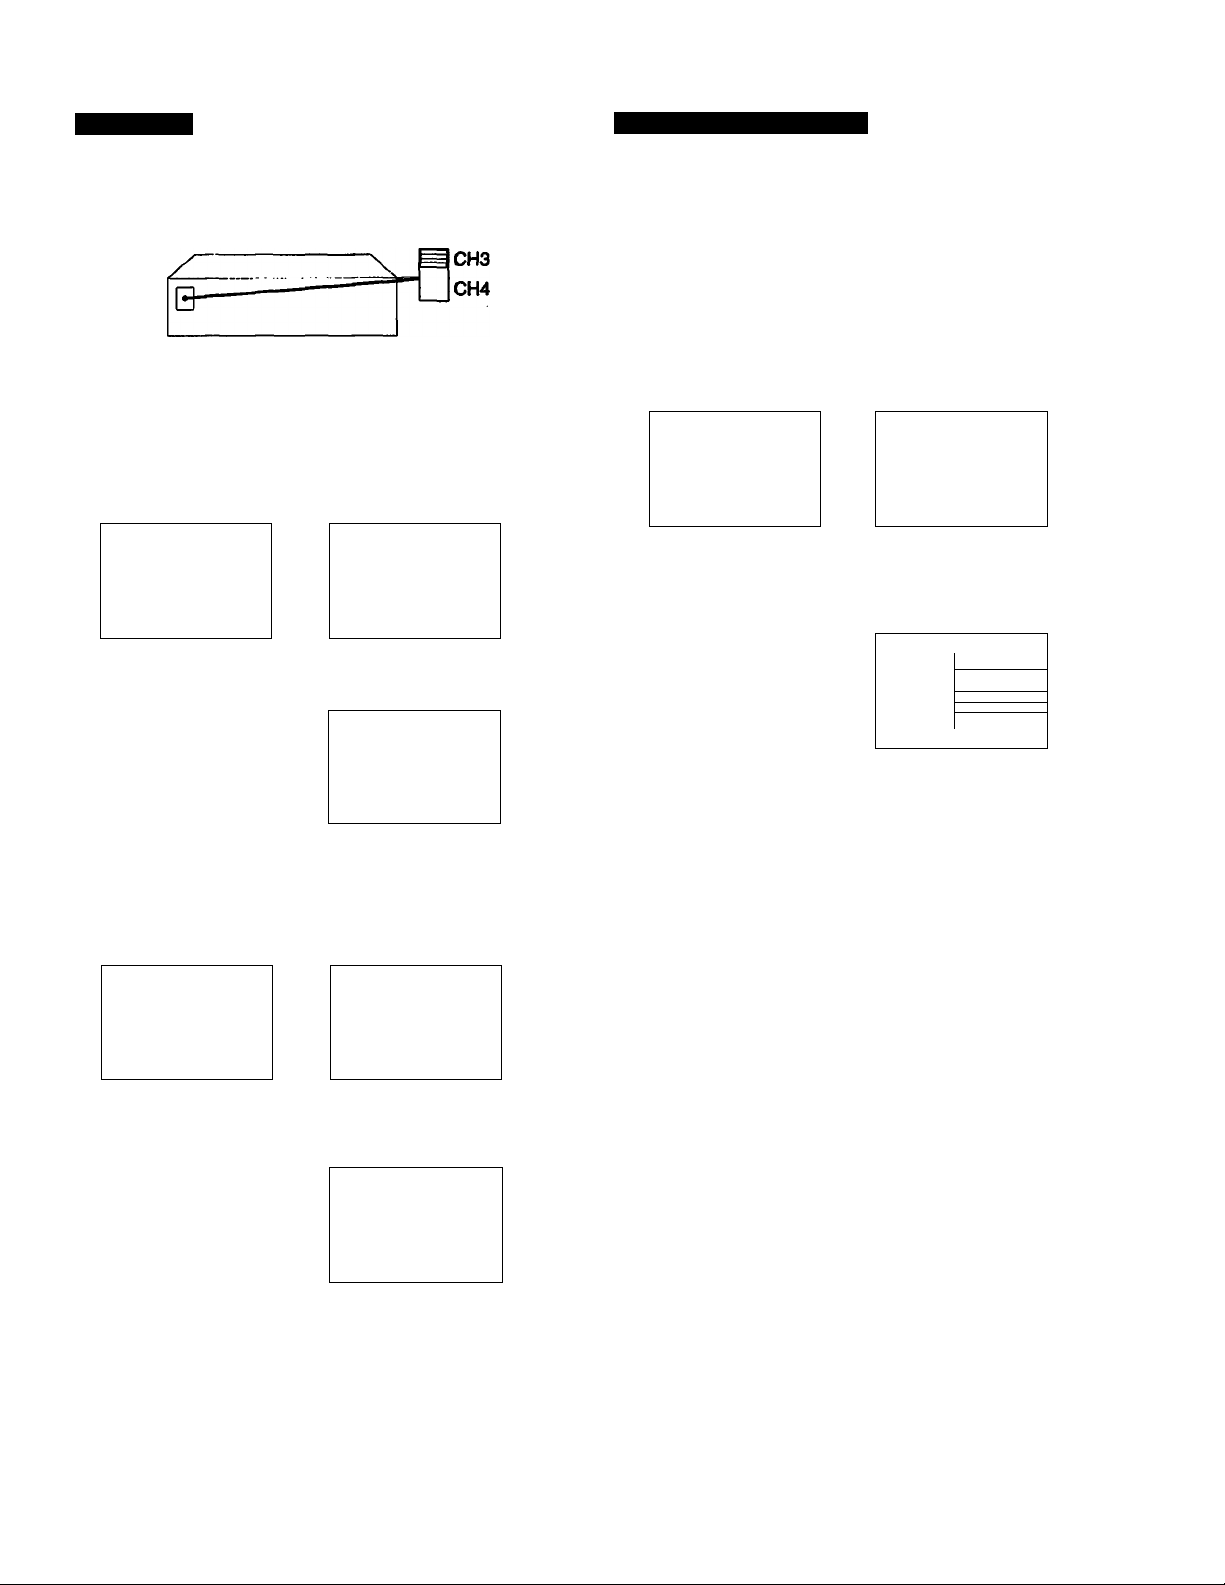
1 Set the RF UNIT on the VCR’s rear panel to CH 3 or
CH4.
If you made A/V connections, skip this step.
Set to whichever channel is not used in your area.
If both are used, pick either channel.
Details are on page 55.
2 Set CABLE BOX CONTROL to OFF.
3 Set NORMAL/CATV to CATV.
Press MENU. Select TUNER PRESET.
NCNU
PTINCR SCT/CHCCK
SCT UF NCNU
TUNCR FNCSCT
SCI VCR Flu»« CHANNCIS
CA6LC OOX CONTROL CAOLC eOX CONTROL
CLOCK SCT CLOCK SCT
NCNU
TINCR SCT/CHCCK
SCT UF NCNU
PTUNCR FRCSCT
SCT VCR Flu»« CHANNCLS
Set to CATV.
TUNCR FRCSCT
PNORNAl/CATV NORN •CATV
AUTO FRCSCT
NANUAL SCT eADO CRASC
AFT eoN OFF
riNC TUNING
ueiaiis are on pages ana
4 Preprogram the channels into the VCR.
Press MENU. Select TUNER PRESET.
NCNU NCNU
PTlNCft SCT/CHCCK
$er UF NCNU
TURCft
SCI VCR Flu»« CHANNCIS SCT VCR Flu»« CHANNCIS
CAeiC 90t CONTROl CAOIC eOX CONTROL
CLOCK SCT
Details are on pages 19 and 20.
ПМСЯ SCT/CHCCK
SCT UP NCNU
PTUNCN FRCSCT
CLOCK SCT
Select AUTO PRESET,
then press EXECUTE.
TUNCR FRCSCT
nornal/catv
PAUTO FRCSCT
NANUAl SCT
AfT
MNC TUNING
#A00
•ON
NORN
mm
■at
•CATV
CRASC
Off
1 Find the VCR Plus-i- Channel Listing in your program
guide. For details, see page 42.
2 if the channels in the program guide are different
from the channels that you actually use on your
TV, set the channels that are different as follows:
Press MENU.
NCNU
^TINCR SCT/CHCCK
SCT UF NCNU
TUNCR FRCSCT
SCT VCR fiu»4 channels
CAOlC eOX CONTROL
CLOCK set
Program listing guide channel -
Details are on page 43.
To Watch TV
1 Turn your VCR off, or press the VCR’s TV/VTR button
until the VTR indicator in the display window goes off.
2 Select the channel with your cable box (if you have one),
or directly tune with your TV (if you don’t).
To Watch the VCR
la If you didn’t use the A/V input:
• Turn on the cable box.
• Select CH 3 or CH 4 on the cable box (whichever
you set on the back of the VCR).
• Seiect the output channel of the cable box
(usually 2,3 or 4) on your TV.
1b If you made the A/V connections on page 7:
Set your TV to the A/V input.
2 Insert a cassette and press ► PLAY.
Details are on page 28.
To Record A Program
1 Press VCR Plus+ on the Remote Commander.
2 Enter the program’s PlusCode number.
3 Press ONCE, DAILY, or WEEKLY on the Remote
Commander.
4 Insert a blank cassette.
5 Press TIMER REC on the Remote Commander.
Details are on page 44.
Select SET VCR PIUS+
CHANNELS.
NCNU
TINCR SCT/CHCCK
SCT UF NCNU
TUNCR FRCSCT
► SCT VCR Flu»« CHANNCLS
CAOlC eOX CONTROL
CLOCK SCT
Enter the program guide channel,
then the channel your VCR uses.
VCR Flu»« CHANNCL LIST
> 6UI0C TV
2 • 73 S9 • 47
5 • 4 OG • 90
17 • SS
20 • 9
43 -tlO
Fu»h NCNU U Rult
ÜUI0C TV
Your actual cable channel
-----
CD
<6.
Ш
Preparation 111
Hookups and Getting Started
Hookup 4 - Incompatible Cable Box, Many “Scrambled” Channels
Cable Hookup
Recommended Use:
Use this hookup if your cable company cannot supply a
cable box that is compatible with the VCR's cable box
control feature, and vour cable system “scrambles" all.
or most, channels.
Background
This VCR can record most unscrambled cable channels.
Some cable systems “scramble* specific channels, usually
premium, or pay-per-view channels.
If your cable company cannot supply a cable box that is
compatible with the VCR's cable box control, and it is
necessary to use a cable box because all, or most, channels
are “scrambled”, you must use this hookup. It will be
necessary to set the cable box channel manually for each
recording.
If your cable company cannot supply a compatible cable box.
and your cable system only “scrambles* a few channels, use
Hookup 3.
VHFAJHF
♦» MATCH THE CONNECTION ON YOUR TV.
TV
VHF
......................
............
..
UHF (NO CONNECTION)
What You Can and Can't Do With This Hookup
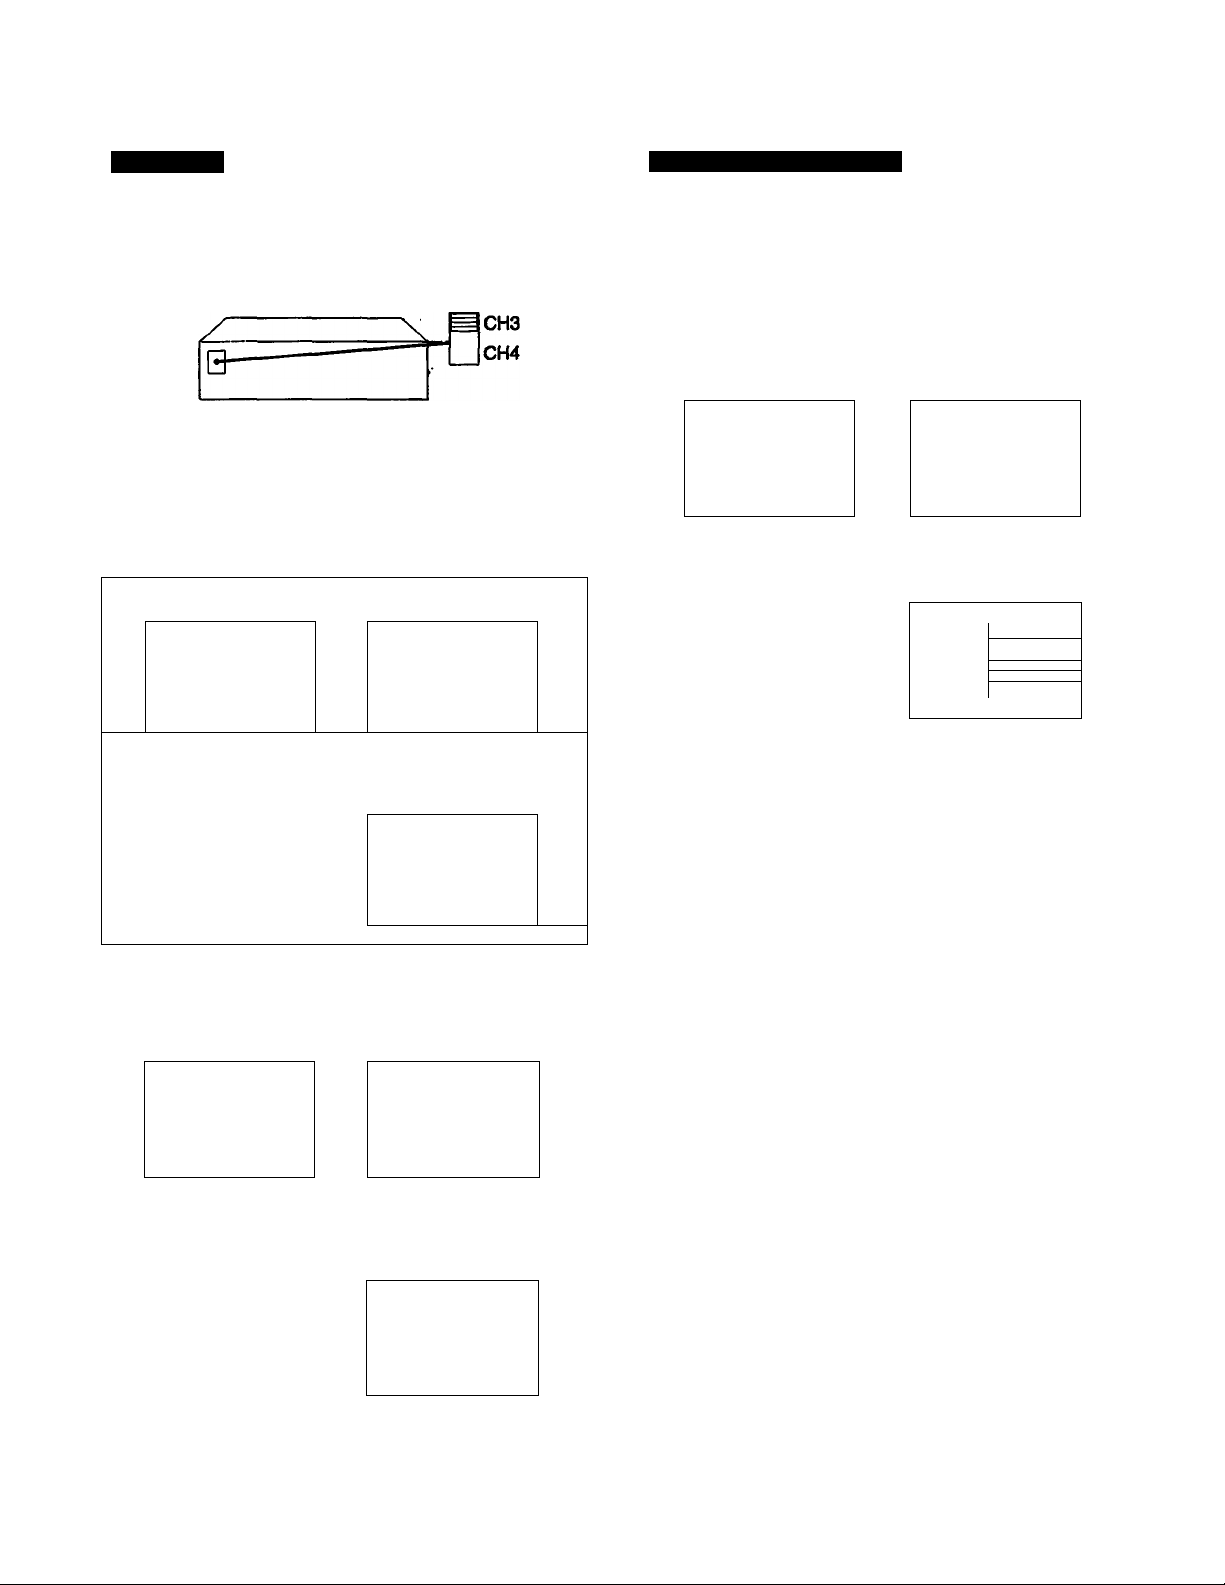
What You Can Do
• Record any channel by selecting the channel on the
cable box.
121 Preparation
VHF
..........................
...........
14
UHF (NO CONNECTION)
What You Can’t Do
• Record with the cable box turned off.
• Record by selecting channels directly from the VCR.
• Record one channel while watching another channel.
• Use the VCR's cable box control feature.
VCR Setup
VCR Plus+ Channel Setup
1 Set the RF UNIT on the VCR's rear panel to CH 3 or
CH4.
If you made A/V connections, skip this step.
^ to whichever channel is not used in your area,
lif both are used, pick either channel.
Details are on page 55.
2 Switch on your cable box.
3 Preprogram the channels into the VCR.
Press MENU.
P(NU
PMMlIt SCr/CH(Ck
set UP H(Nu
Twin PAcser
set VCA Plus* CHANNClS
CLOCK set
Select TUNER PRESET.
tIHEft Set/CHECK
set UP MENU
A tuNEP PAESet
set VCA Piuso CHANNElS
CLOCK set
1 Find the VCR Plus-«- Channel Listing in your program
guide. For details, see page 42.
2 For all channels that you want to record, set each
channel to the channel that your cable box uses for
its output (usually 2,3, or 4), as follows:
Press MENU.
MENU
P fIMEA SET/ChECk
SET UP MENU
ruNEA PAESFT TUNEA PAfSFT
SET VCA Plus* CHANNELS
ClOC« SEI
Program listing guide channel
Set to the same _
cable box channel.
Select SET VCR Plus-«CHANNELS.
MENU
riMEA SET/CheCk
SEI UP MENU
N SET VCA Plus* CHANNFiS
CLOCK SEI
Enter the program guide
channel, then the cable box
output channel.
VCA Plus« CHANNCL Lt$T
OUlOE TV
2 fTl
i
17
28
43
Push MENU to quit
6UI0E TV-
> 3
88 • 3
<a
S'
fi}
G>
g
a
s
Details are on pages 19 and 20.
Select AUTO PRESET,
then press EXECUTE.
TUNEA PAESET
NOAH/CATV • NOAM CATV
PAUTO PAESE r
MANUAL SET
AFT • ON OFF
FINE TUNING
CM3
• AOO eaase
Details are on page 43.
Your cable box channel —'
To Watch the TV
1 Turn your VCR off, or press the VCR’s TV/VTR button
until the VTR indicator in the display window goes off.
2 Switch on your cable box.
3 Tune the TV to the cable box output channel
(usually 2,3, or 4).
4 Select the channel that you want to watch with your cable
box.
To Watch the VCR
1 Tune the TV to CH 3 or CH 4, (or to A/V input if you
made A/V connections.)
2 Insert a cassette and press l
PLAY.
Details are on page 28.
To Record A Program
1 Switch on the cable box.
2 Select the channel you wish to record on the cable box.
3 Press VCR Plus+ on the Remote Commander.
4 Enter the program’s PlusCode number.
5 Press ONCE, DAILY, or WEEKLY on the Remote
Commander.
6 Insert a blank cassette.
7 Press TIMER REC on the Remote Commander.
8 Leave the cable box on.
Details are on page 44.
Preparation M3
Hookups and Getting Started
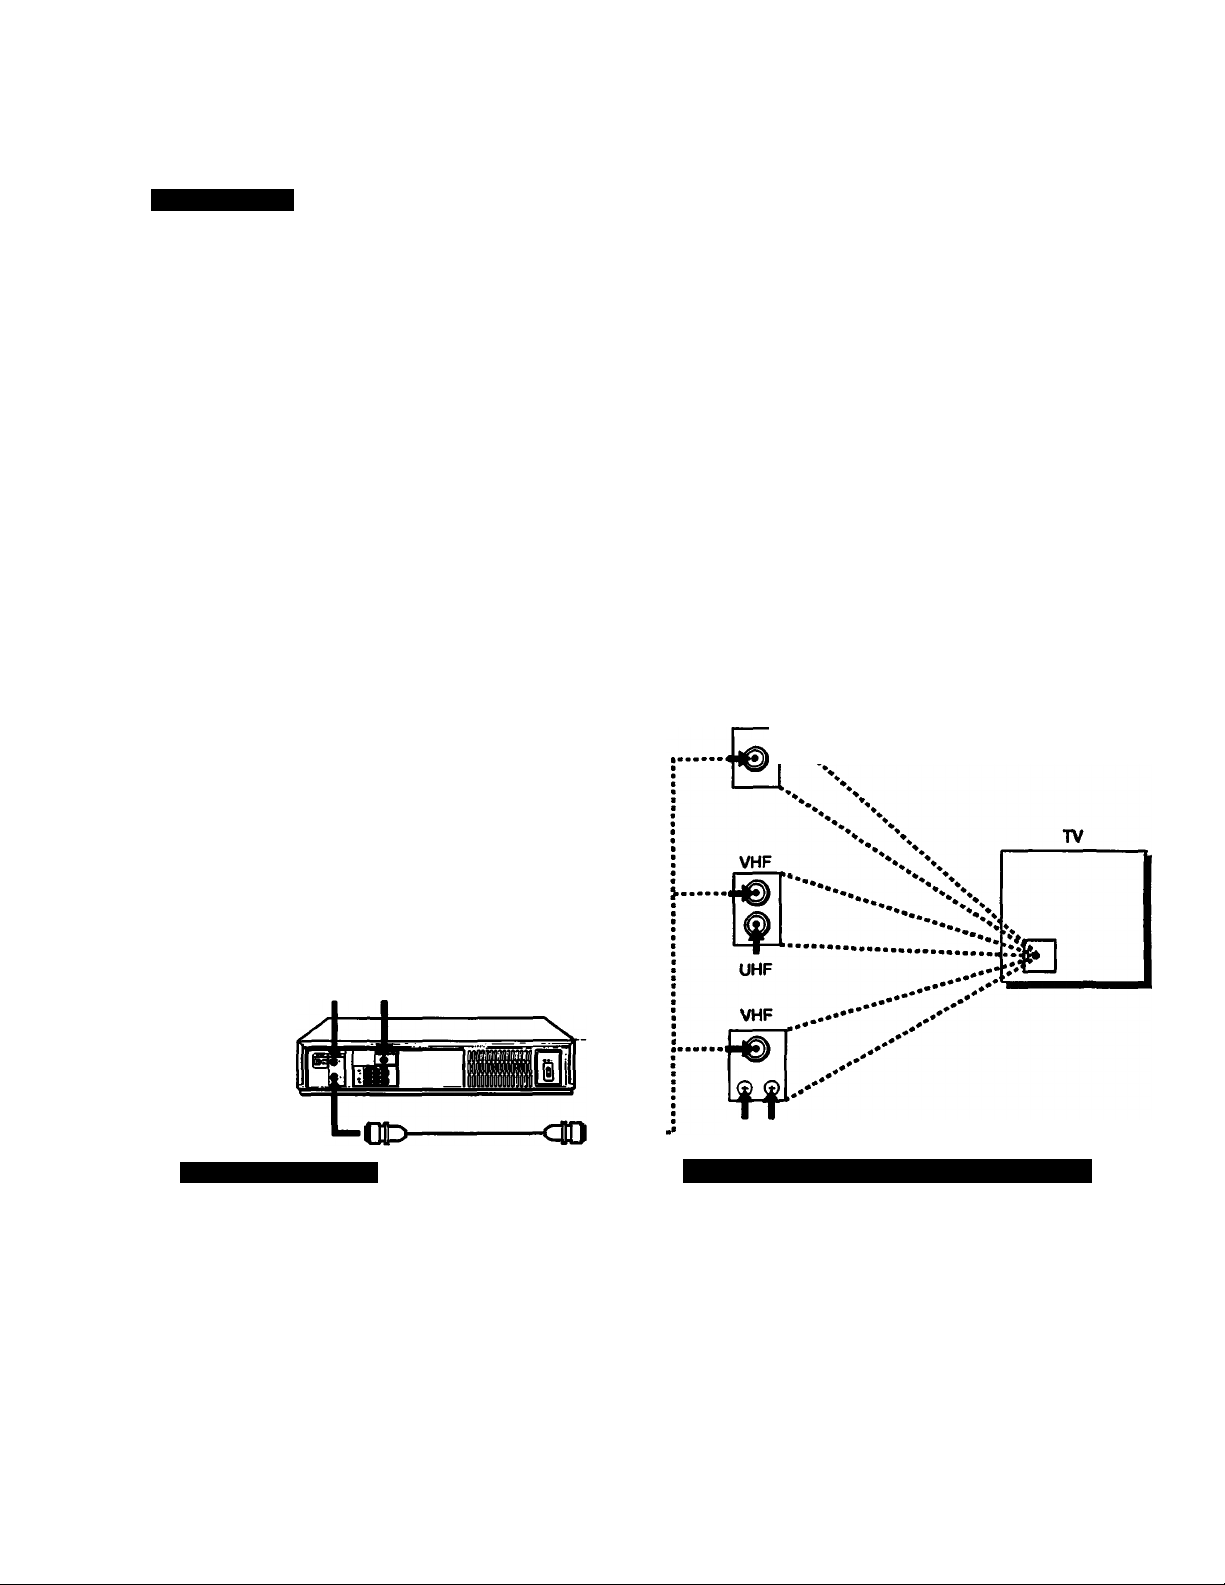
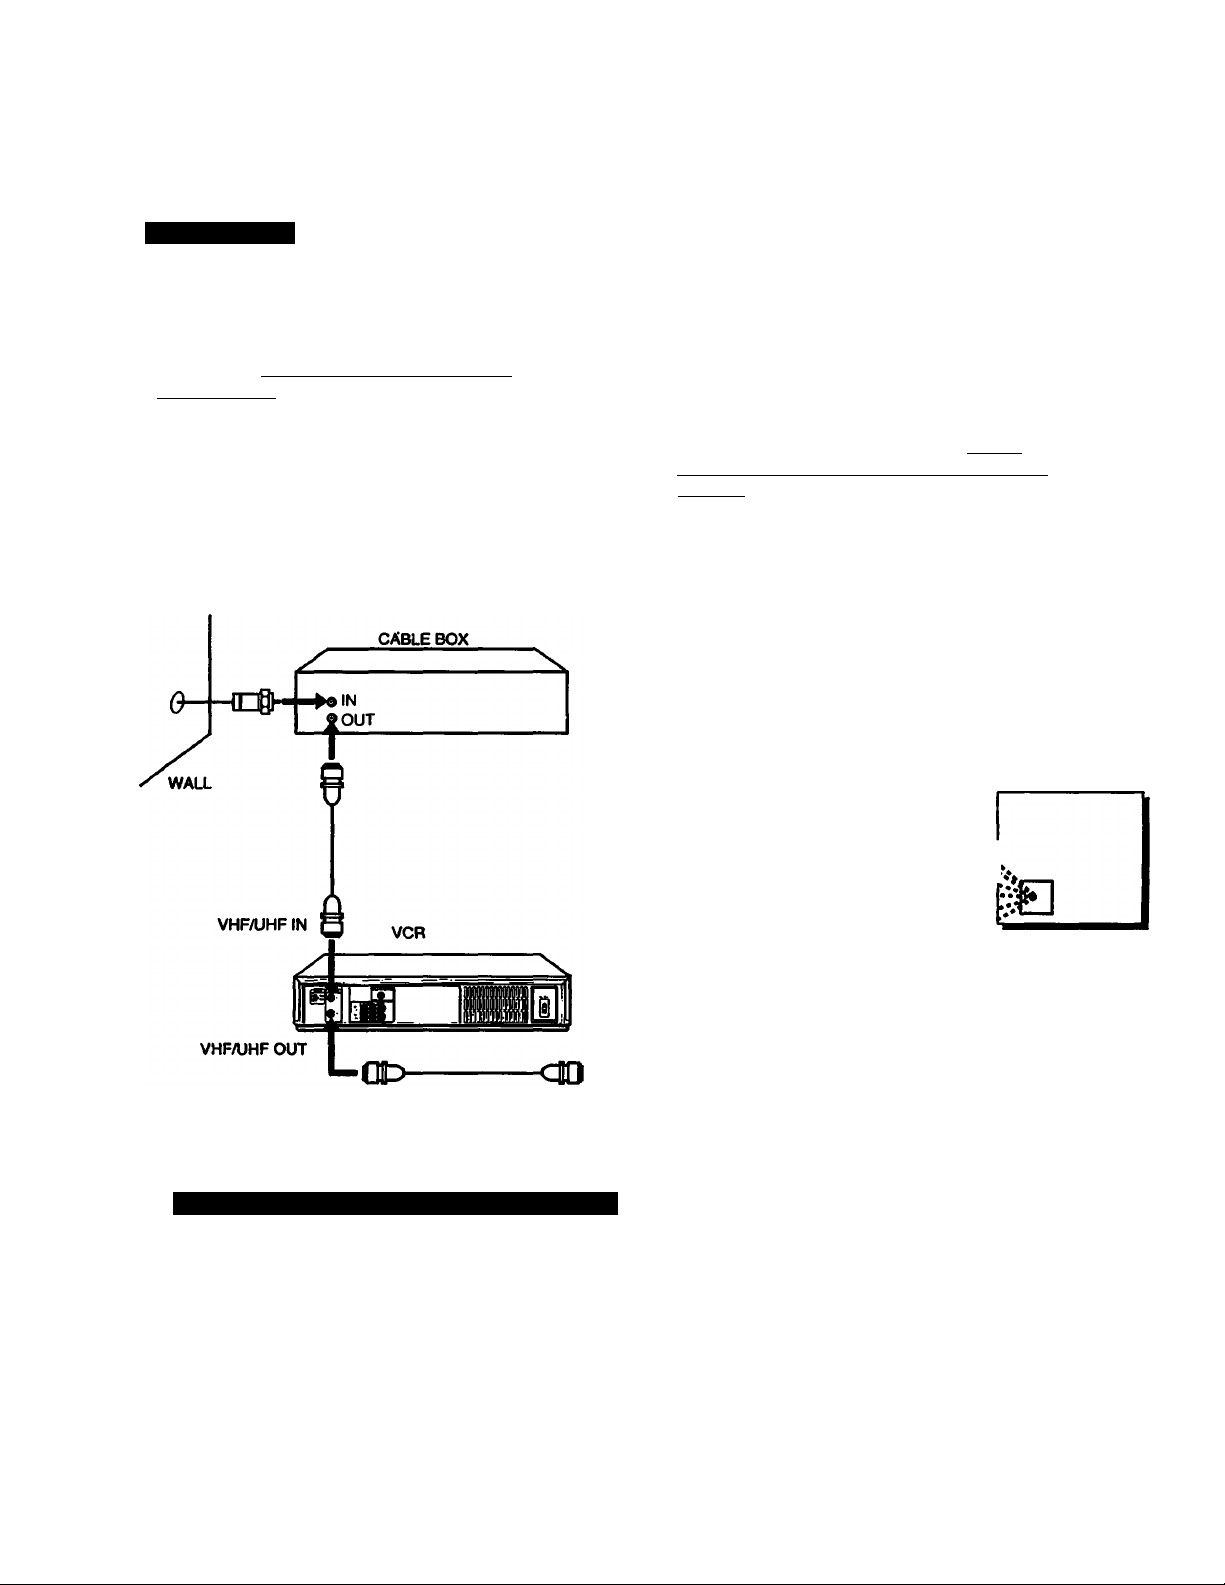
Hookup 5
Antenna Hookup
Make the following connections if you’re using an antenna (not cable TV).
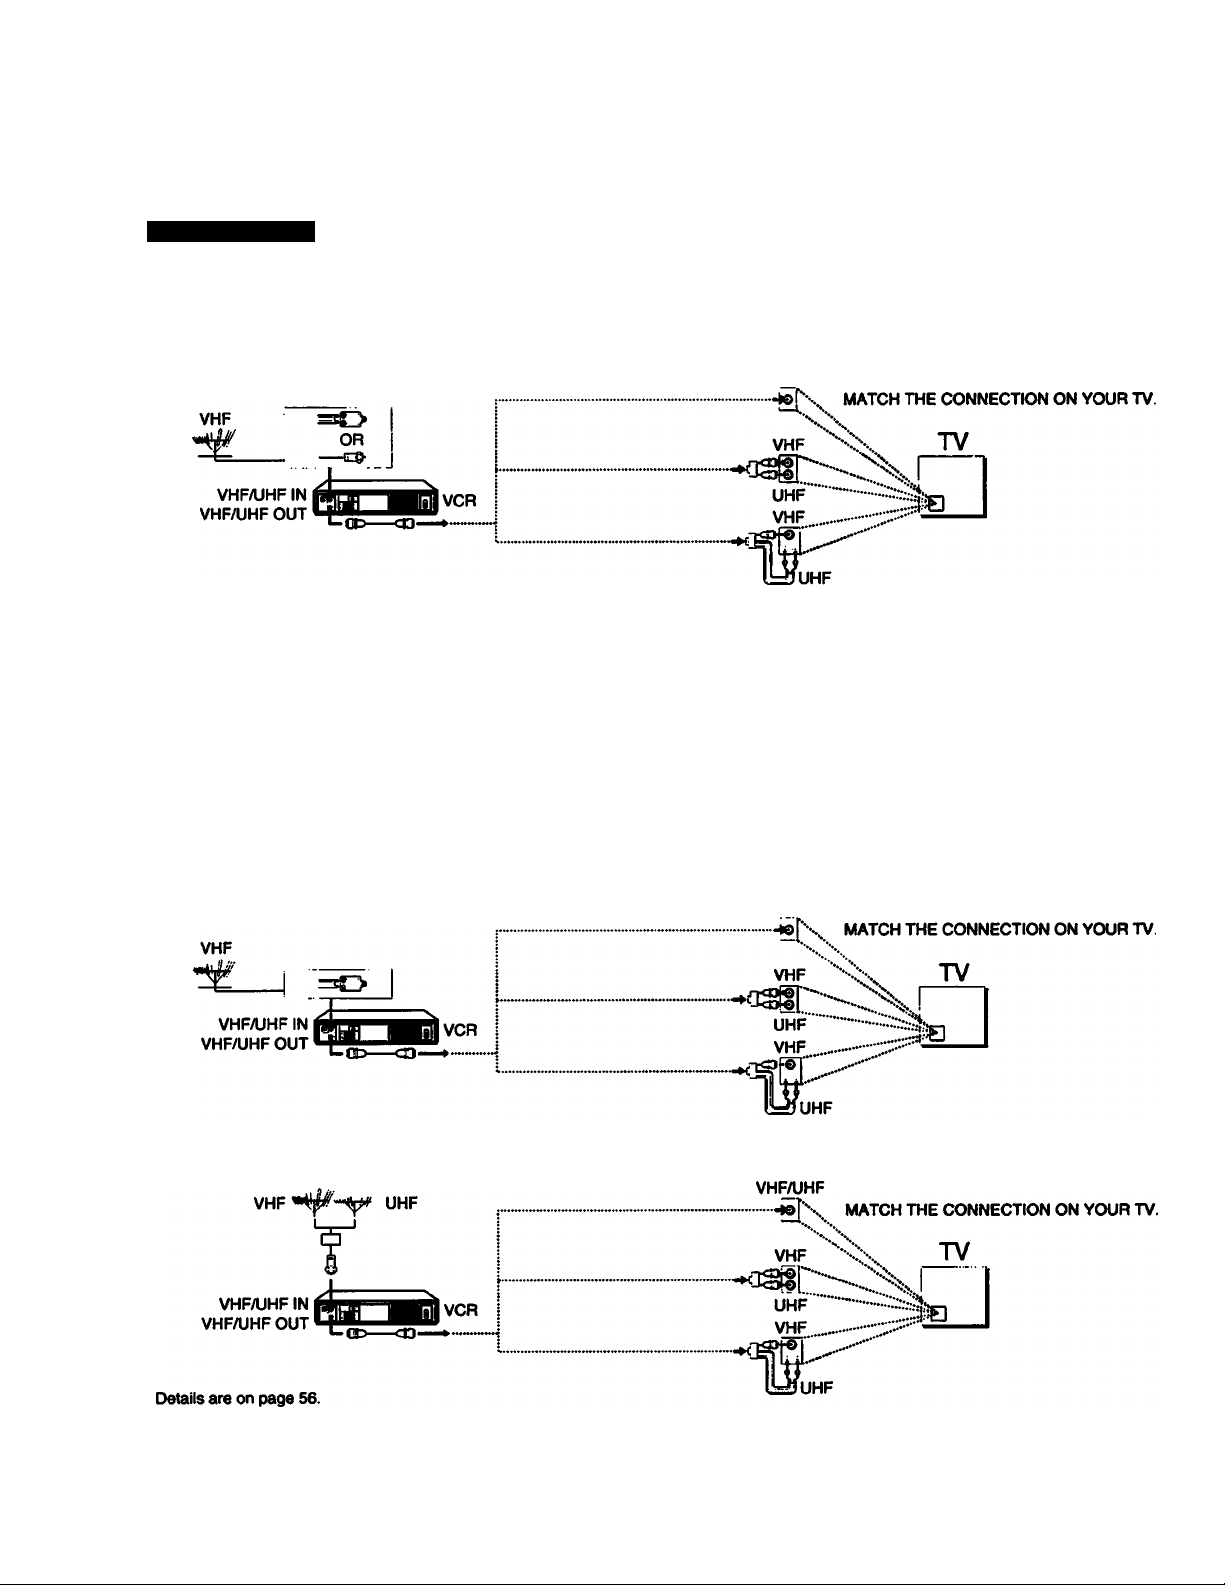
5A Use hookup SA for a VHF/UHF antenna (you get Ch 2>13 and Ch 14 or higher).
5B Use hookup SB for VHF only (you get Ch 2-13 only).
VHF
OR
------------------
VHF/UHF IN
VHFAJHF OUT
I—rt>—^
CtJ—CD-
VCR i
(NO CONNECTION) "'ix I
(NO CONNECTION)
VHFAJHF
VH^HF
—U«7\ MATCH THE CONNECTION ON YOUR TV.
\X
VHF
Xx I
UHF --XS!!
VHF ---------
UHF
—
TV
5C Use hookup SC for UHF only (you get Ch 14 or higher).
5D Use hookup SD if you are using separate VHF and UHF antennas.
VHF/UHF
14
Preparation
VCR Setup
1 Set the RF UNIT on the VCR’s rear panel to
CH3orCH4.
If you made A/V connections, skip this step.
Set to whichever channel is not used in your area,
if both are used, pick either channel.
Details ate on page S5.
2 Set NORMAL/CATV to NORM.
Press MENU.
NCNU
► TiNCk SCt/CHUX
$CT UP NCNU
TUtKk
$CT VCk Plus* CHANIICIS
CA»ie 90X COMTROl
CLOCK $(T
Select TUNER PRESET.
NeNU
TIMCk $CT/CHCCK
S(T UP NtNU
-
u^Tunek pRtscT
$cr
w
VCP Plus* CHANNELS
CAOLE
eoi
CLOCK SET
Set to NORM.
TUNtk PRESET
► NORNAL/CATV
AUTO PRESET
MANUAL SET
AFf
FINE TUNING
CONtkOL
•NORM
•ADO
•ON
mtm
CATV
ERASE
OFF
VCR Plus+ Channel Setup
1 Find the VCR Plus4- Channel Listing in your program
guide. For details, see page 42.
2 If the channels in the program guide are different from
the channels that you actually use on your TV, set the
channels that are different as follows;
Press MENU.
MENU
► TIMER SET/CHECK TIMER SET/CHECK
SET UP MENU SET UP MENU
TUNER PRESET TUNER PRESET
SET VCR Plus* CHANNELS
CARLE ROX CONTROL CARLE ROX CONTROL
CLOCK SET CLOCK SET
Program listing guide channei
-----------
Details are on page 43.
Select SET VCR PIUS+
CHANNELS.
MENU
► SET VCR Plus* CHANNELS
Set the appropriate guide
channels and TV channels
lor your area.
VCR P>us* channel list
>GUtOE TV GUIDE TV
2 • 73 SO • 47
S • 4
17 • $$
2R • 0
43 -UR
Push MENU So Quit
RR * 90
Your actual TV channel -
------
<a
?
01
a
5*
3
3
Details are on pages 19 and 20.
3 Preprogram the channels into the VCR.
Press MENU.
MENU MENU
► TIMER SET/CHECK
SET UP MENU SET UP MENU
TUNER PRESET
SET VCR Plus* CHANNELS
carle rox control
CLOCK SET CLOCK SET
Details are on pages 19 and 20.
Select TUNER PRESET.
TIMER SET/CHECK
► TUNER PRESET
SET VCR Plus* CHANNELS
CARLE ROX CONTROL
Select AUTO PRESET,
then press EXECUTE.
TUNER PRESET
NORMAL/CATV
► AUTO PRESET
MANUAL SET •ADD
AFT
FINE TUNING
•NORM
•ON
CATV
ERASE
OFF
To Watch the TV
1 Turn your VCR off, or press the VCR’s TV/VTR button
until the VTR indicator in the display window goes off.
2 Tune the TV normally.
To Watch the VCR
1 Tune the TV to CH 3 or CH 4, whichever you set on the
back of the VCR. (If you made the A/V connections on
page 7, set your TV to the A/V input instead.)
2 Insert a cassette and press ► PLAY. If there’s no
picture on your TV, press the VCR’s TV/VTR button until
the VTR indicator comes on in the VCR’s display
window.
Details are on page 28.
To Record A Program
1 Press VCR Plus+ on the Remote Commander.
2 Enter the program’s PlusCode number.
3 Press ONCE. DAILY, or WEEKLY on the Remote
Commander.
4 Insert a blank casette.
5 Press TIMER REC on the Remote Commander.
Details are on page 44.
Preparation
15
Preparing the Remote Commander
Operating the VCR with the Remote Commander
SettheiTVi/iVTR remote control selector at the top of the
Remote Commander to “VTR.”
If you are using a Sony TV
You can use the Remote Commander of this VCR to operate
the TV. When doing this, slide the ÎTV /lVTR' remote control
selector to TV.” Buttons on the Remote Commander with a
dot (•) on or beside them can be used to operate your TV. To
operate the VCR. return the TVi/iVTR remote control
selector to “VTR.”
How to Use the Remote Commander
When you operate the VCR using the Remote Commander,
point it at the remote sensor located on the VCR. For the
location of the remote sensor, see “Identifying the Parts and
Controls” on page 57.
When using the Remote Commander to change channels on
a cable box, with the VCR's Cable box control feature turned
on, point the Remote Commander at the VCR. not the cable
box. For best results, separate the VCR and cable box.
Notes on the handling of batteries
• With normal use, the batteries should last for
approximately six months.
• If you do not use the Remote Commander for an
extended period of time, remove the batteries to
avoid possible damage from battery leakage.
• Do not use a new battery together with an old one.
• Do not use different types of batteries.
16
Preparation
Setting the Time and Date
You can set the VCR time and date on the TV screen using
the Remote Commander.
Example of Time and Date Setting
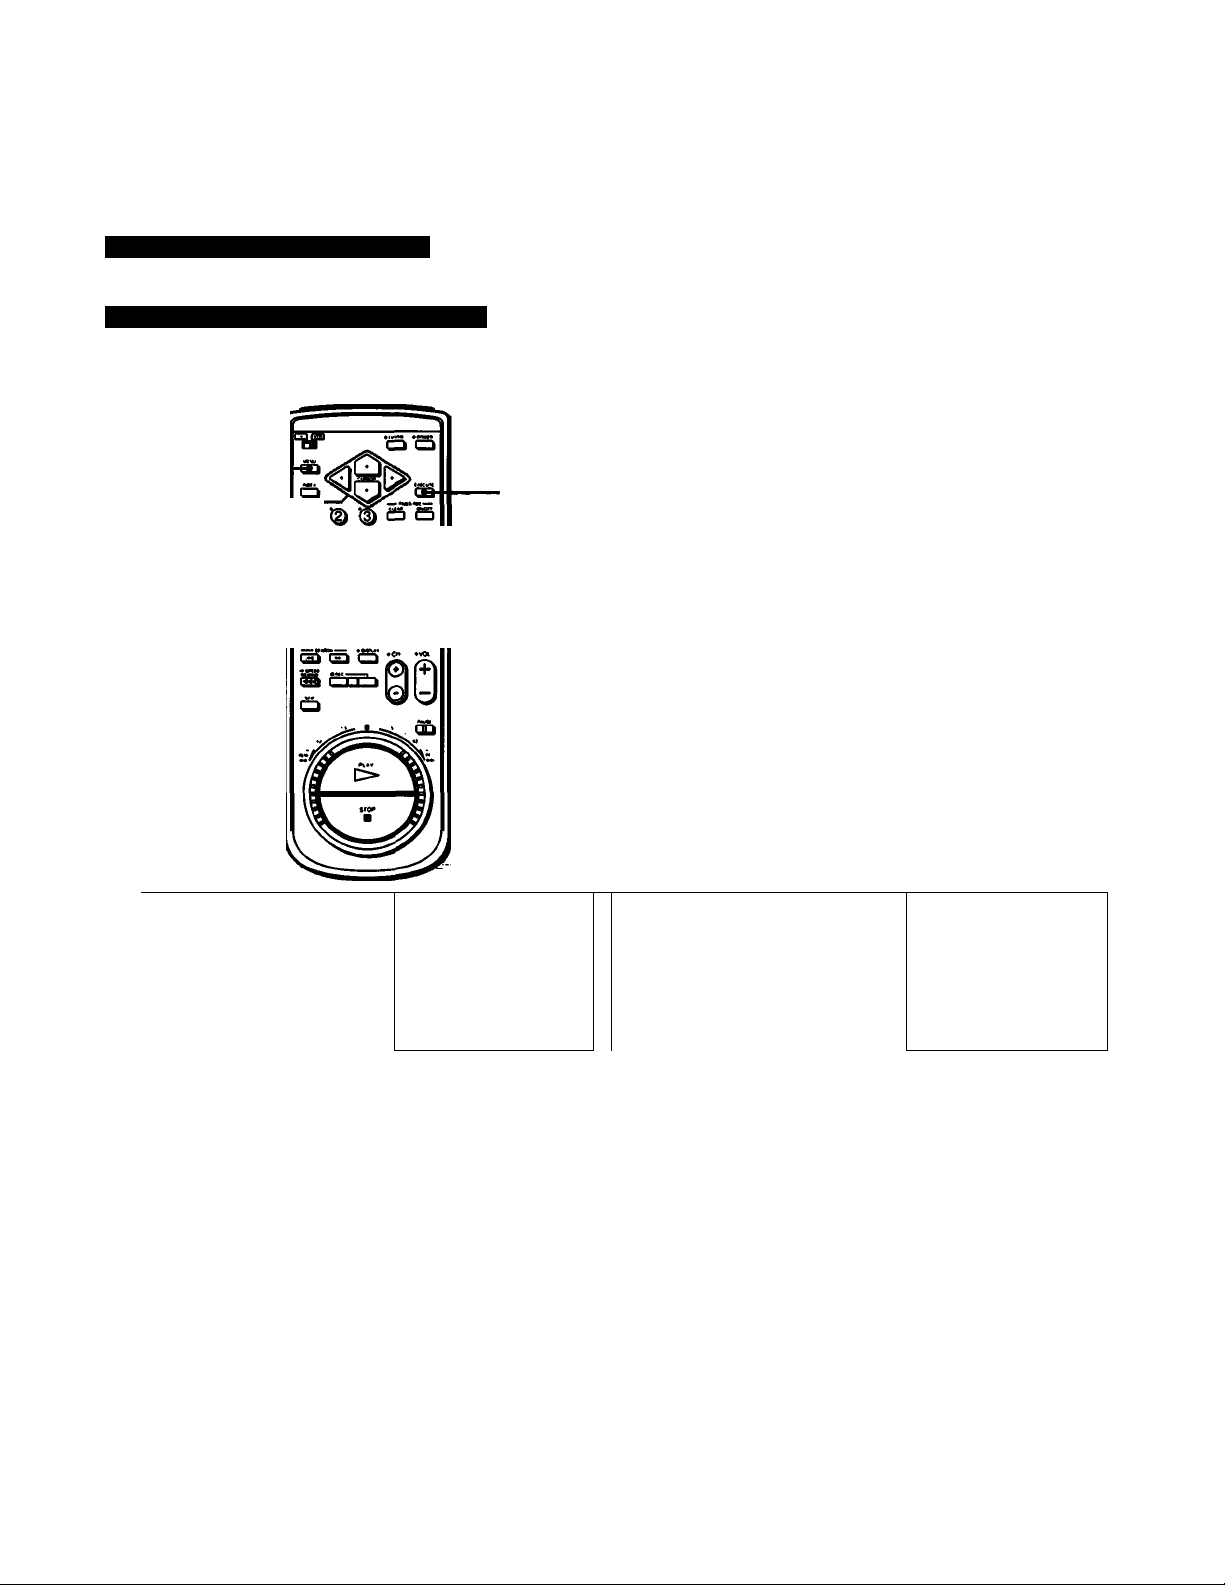
3
Example: To set to 3:32 pm, July 4, 1993
Use A and <9 to move the cursor.
Use < and > to select the Items.
1
2,4
11
*(D ID,
*(D ^
â t§> â â
lirdb c^.&"i3r
3,12
Press EXECUTE.
“1/1 1993 FR112:00 AM” is
displayed. The leftmost 1, in
the “month" position,
flashes.
4 Press A or A until 7
appears in the month
position.
CLOCK SET
7|Jin993 FRt 12:00 W
CLOCK SET
■•7^1/1993
THU 12:00«
<D
3
§
n
S
CD
3
CD
D»
Press MENU. MENU 5 Press ► to make the next
The main MENU appears.
2 Press A or A to move the
cursor (^) to CLOCK SET.
►TIMER SET/CHECK
SET UP MENU
TUNER PRESET
SET VCR Plus+ CHANNELS
CABLE BOX CONTROL
CLOCK SET
MENU
TIMER SET/CHECK
SET UR MENU
TUNER PRESET
SET VCR Plus-:^ CHANNELS
CABLE BOX CONTROL
MCLOCK SET
number in the “day”
position flash.
Press A or A until “4”
appears in the day
position.
The day of the week is set
automatically.
CLOCK SET
71^1^993 THU 12:00 «
CLOCK SET
7«^^993 THU 12:00«
Preparation 117

Setting the Time and Date
Press P to make the “year”
position flash and press a
to change the year.
8 Press ^ to make the “time”
position fiash.
CLOCK SET
CLOCK SET
7/4/1993 SUK-)|j¡:^fr^-
12:00 J«
10 Press P to make the
“minutes” position
flash.
11 Press A or w until “32”
appears in the minutes
position.
CLOCK SET
7/4/1993 SOU 3^{»'il
CLOCK SET
7/4/1993 SUN 3Í^f|í<
9 Press*orvuntii“3:00
PM” appears.
CLOCK SET
7/4/1993
12 Press EXECUTE at the same time that you
hear the time signai.
Pressing EXECUTE will set the clock
to 3:32 pm 00 seconds.
NOTES:
• Do not set the time and date during timer-activated recording, timer recording standby or quick-timer recording.
• When the time and date clock is displayed, the clock keeps running as long as no changes are made. The seconds are
not reset to 00 when you return to the original screen.
18
Preparation
Presetting the Active Channeis
This VCR is capable of receiving VHP channels 2 to 13, UHF
channels 14 to 69 and CATV channels 1 to 125. These
channels can be preset using the Remote Commander and
the TUNER PRESET display. First, we recommend that you
preset the active channels in your area using the automatic
preset mode. Then, if there are any unwanted channels,
disable them manually. If you have already decided which
channels you wish to preset on the VCR, set them directly
using the channel number buttons.
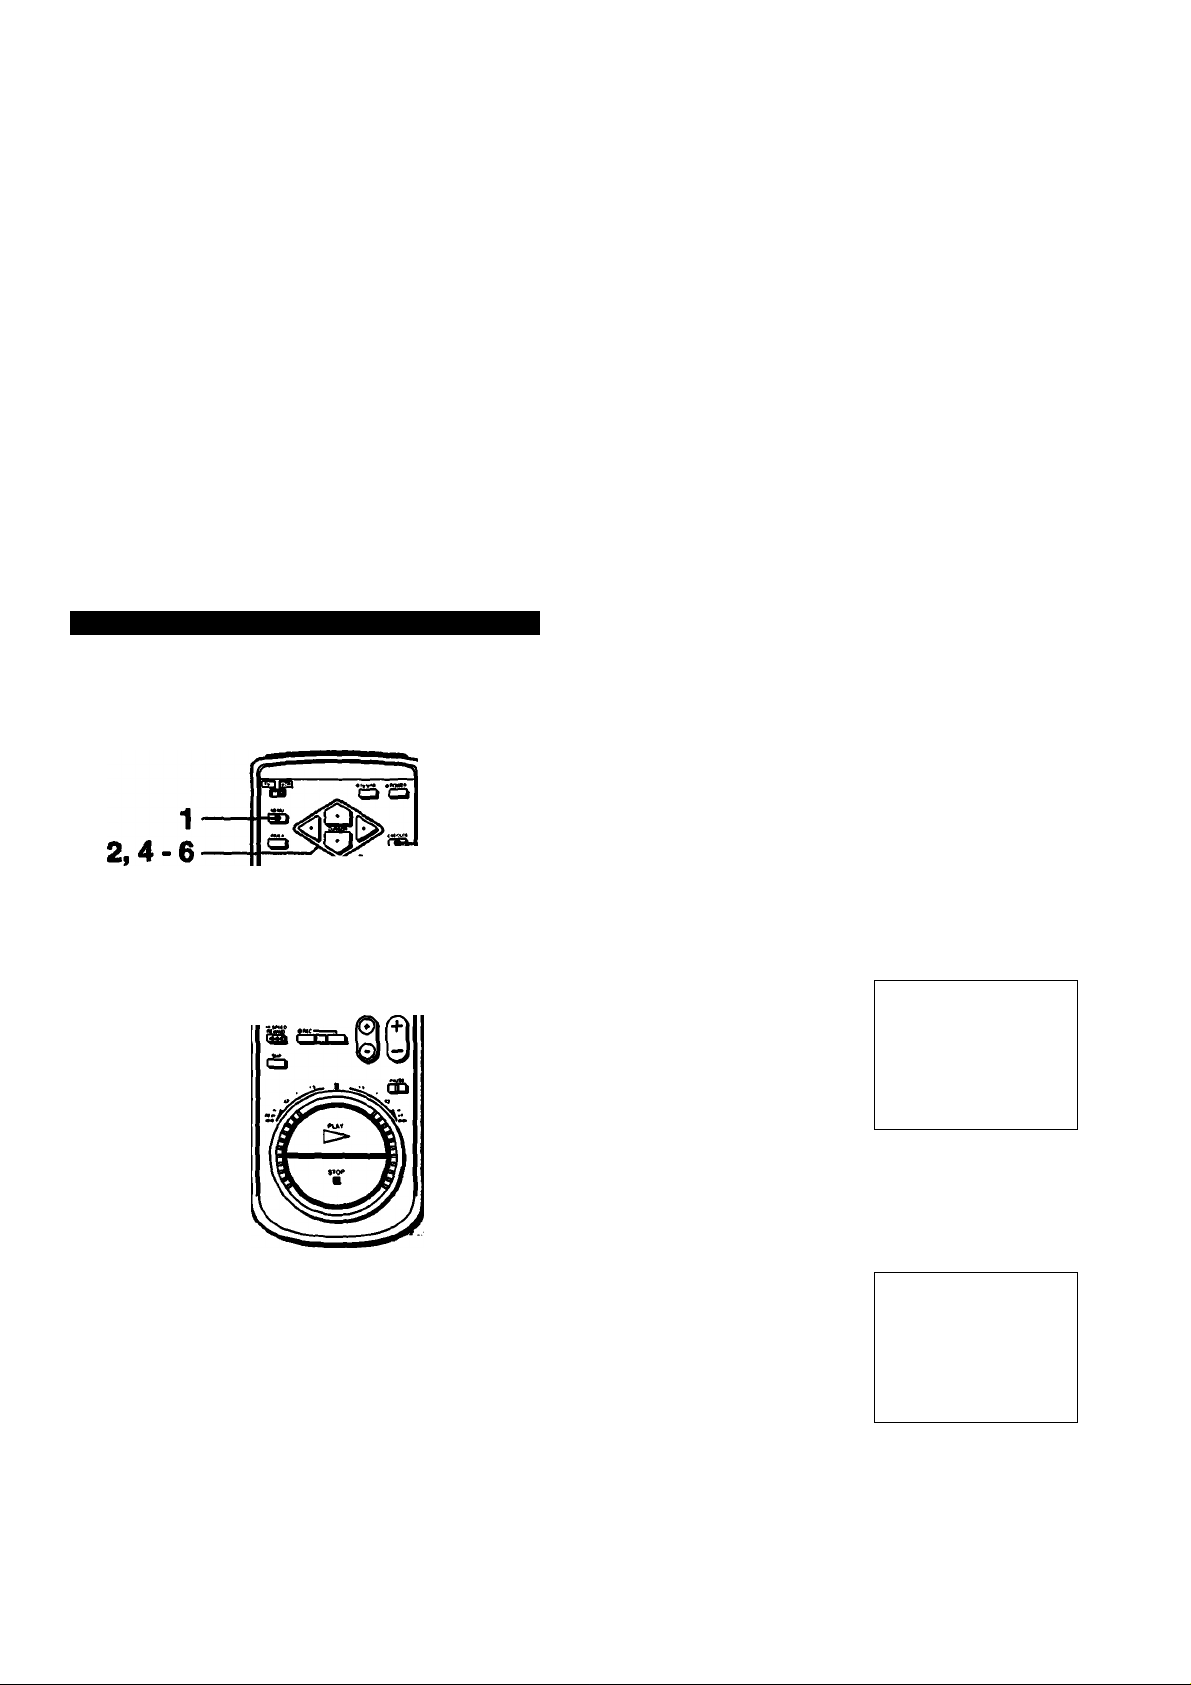
Presetting All Receivable Channels Automatically
Use A and to move the cursor. Use 4 and >■ to select the items.
Before presetting channels, check the following points;
• Turn on the VCR and the TV.
• If you have connected the TV and the VCR using the
VHFAJHF OUT on the VCR only, make sure that the TV is
set to the correct channel (CH 3 or CH 4) for the VCR.
• Press TVA/TR to display the VTR indicator in the display
window on the VCR.
• Press INPUT SELECT so that the chartnel number
appears in the display window on the VCR.
• It is not necessary to use the TUNER PRESET function if
the CABLE BOX CONTROL is set to “ON." If you want to
use the TUNER PRESET function, make sure the CABLE
BOX CONTROL is set to “OFF.”
Press A or V to move the
cursor (►) to TUNER
PRESET.
HENU
TIMER SET/CHECK
SET UP MENU
►TUNER PRESET
SET VCR P1u$+ CHANNELS
cable box control
CLOCK SET
CO
<D
s
(D
—(
3
(D
S’
*n
3
M
S
»
o
£
1 Press MENU.
The main MENU appears.
0
) ID ^ a s
fD ID
ID ID ID
£) ID 1^
rsnThrh 'O' "o
MENU
►TIMER SET/CHECK
SET UP HENU
TUNER PRESET
SET VCR P1US+ CHANNELS
CABLE BOX CONTROL
CLOCK SET
3,7
Press EXECUTE.
The TUNER PRESET menu
is displayed.
Press A or V to move the
cursor to NORMAUCATV.
TUNER PRESET
NORHAL/CATVSNORM
AUTO PRESET
►MANUAL SET SAOO
AFT SON
FINE TUNING
TUNER PRESET
►NORHAL/CATVSNORM
AUTO PRESET
MANUAL SET SABO
AFT SON
FINE TUNING
■1
CATV
ERASE
OFF
■■
CATV
ERASE
OFF
Preparation 119
Presetting the Active Channels
Press 4 or ► to select
NORM or CATV.
NORM presets the VHP and
UHF channels; CATV presets
your cable TV channels. The
TUNER PRESET
NNORMAl/CATveNORH
AUTO PRESET
MANUAL SET eAOO
AFT SON
FtNE TUNING
wm
CATV
ERASE
OFF
lowest channel number, 2 for
NORM and 1 for CATV, will
appear on the screen.
PressAor vto move the
cursor to AUTO PRESET.
TUNER PRESET
NORMAl/CATVSNORM CATV
PAUTO PRESET
MANUAL SET #A00 ERASE
AFT eoN OFF
FtNE TUNING
1 1
Presetting Desired Channels or Disabling Unwanted Channels
Press EXECUTE
Receivable channels are preset in numerical
sequence. When no more channels can be found, the
presetting stops and the picture of the lowest
numbered channel is displayed on the tape counter.
The message 'Please wait" is flashing while presetting
on the TV screen.
NOTE:
The VCR automatically exits from the TUNER PRESET
menu if you don't proceed for more than one minute.
1___________________________________________________________________________ 1
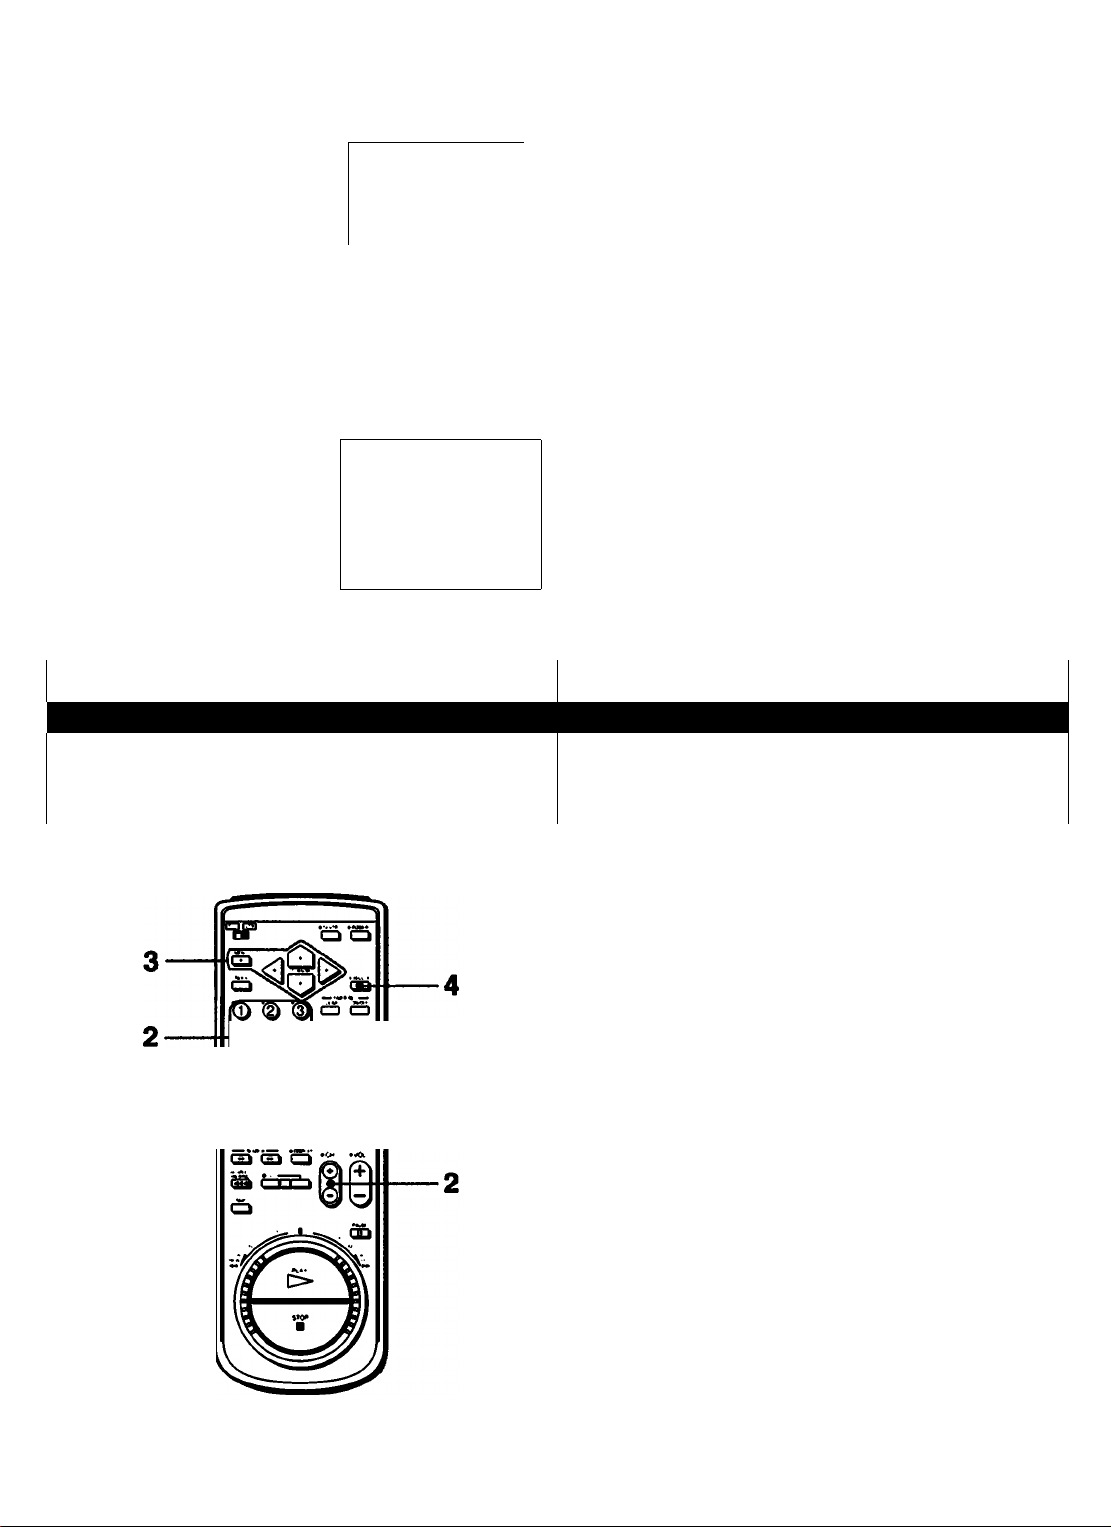
After automatic presetting, you can disable and/or add channels.
1------------------------------------------------------------------------------11----------------------------------------------------------------------------- 1
Use * and w to move the cursor.
Use < and >■ to select the items.
1 Follow steps 1 to 3 in “Presetting All Receivable
Channels Automatically” on page 19.
2 To disable channels, press CH -t/- to select the
'<S> '<D I
© I
árá»
channel.
To add channels, press channel number buttons (0 to
9) and ENTER key to select the channel.
3 To disable channels, press ^ or to select ERASE.
To add channels, press ^ or ^ to select ADD.
4 Press EXECUTE.
When you press CH +/-, the disabled channels are
removed and the added channels are displayed.
20
Preparation
 Loading...