

Page 1
3-864-865-21(2)
External HiFD™ Drive
Operating Instructions Page 2
Mode d’emploi Page 24
Bedienungsanleitung Seite 44
Guía de instrucciones Página 64
Istruzioni per l’uso Pagina 84
SFD200S
GB
FR
DE
ES
IT
-BP
1998 by Sony Corporation
Page 2

Owner’s Record
The model number and the serial number are located on the bottom of the drive unit. Record
the serial number in the space provided below. Refer to these numbers whenever you call
upon your Sony dealer regarding this product.
Model No. SFD200S(-BP) Serial No.
WARNING
To prevent fire or shock hazard, do not expose the unit to
rain or moisture.
To avoid electrical shock, do not open the cabinet. Refer
servicing to qualified personnel only.
CAUTION
This equipment has been tested and found to
comply with the limits for a Class B digital device,
pursuant to Part 15 of the FCC Rules. These
limits are designed to provide reasonable
protection against harmful interference in a
residential installation. This equipment generates,
uses, and can radiate radio frequency energy
and, if not installed and used in accordance with
the instructions, may cause harmful interference
to radio communications. However, there is no
guarantee that interference will not occur in a
particular installation. If this equipment does
cause harmful interference to radio or television
reception, which can be determined by turning the
equipment off and on, the user is encouraged to
try to correct the interference by one or more of
the following measures:
— Reorient or relocate the receiving antenna.
— Increase the separation between the
equipment and receiver.
— Connect the equipment into an outlet on a
circuit different from that to which the receiver
is connected.
— Consult the dealer or an experienced radio/TV
technician for help.
This shielded interface cable recommended in this
manual must be used with this equipment in order
to comply with the limits for a digital device
pursuant to subpart B of Part 15 of FCC.
You are cautioned that any changes or
modifications not expressly approved in this
manual could void your authority to operate this
equipment.
Declaration of Conformity
Trade Name: SONY
Model No: SFD200S
Responsible Party: Sony Electronics Inc.
Address: 1 Sony Drive, Park Ridge, NJ.07656 USA
Telephone No.: 201-930-6970
This device complies with Part 15 of the FCC Rules. Operation is subject to the following two
conditions:
(1) This device may not cause harmful interference, and
(2) This device must accept any interference received, including interference that may cause
undesired operation.
2
Page 3

NOTICE TO USERS
Program ©1998 Sony Corporation/Documentation ©1998 Sony Corporation
All rights reserved. This manual or the software described herein, in whole or in
part, may not be reproduced, translated or reduced to any machine readable form
without prior written approval from Sony Corporation.
IN NO EVENT SHALL SONY CORPORATION BE LIABLE FOR ANY
INCIDENTAL, CONSEQUENTIAL OR SPECIAL DAMAGES, WHETHER
BASED ON TORT, CONTRACT, OR OTHERWISE, ARISING OUT OF OR IN
CONNECTION WITH THIS MANUAL, THE SOFTWARE OR OTHER
INFORMATION CONTAINED HEREIN OR THE USE THEREOF.
Sony Corporation reserves the right to make any modification to this manual or
the information contained herein at any time without notice.
The software described herein may also be governed by the terms of a separate
user license agreement.
Trademarks
• HiFD is a trademark of Sony Corporation.
• Microsoft®, MS-DOS®, Windows®, Windows® 95, Windows® 98, and Windows
NT® are registered trademarks of Microsoft Corporation.
• PC DOS and PC/AT are registered trademarks of International Business
Machines Corporation.
• The TM and ® marks are not indicated in the text of this manual.
GB
English
All other trademarks and registered trademarks are trademarks or registered
trademarks of their respective holders.
CE Sicherheitsbestimmungen
Diese Ausrüstung erfüllt die Europäischen EMC-Bestimmungen für die
Verwendung in folgender / folgenden Umgebung(en):
• Wohngegenden
• Gewerbegebiete
• Leichtindustriegebiete
(Diese Ausführung erfüllt die Bestimmungen der Norm EN55022, Klasse B.)
3
Page 4

Caution
The mains plug on this equipment must be used to disconnect mains power.
Please ensure that the socket outlet is installed near the equipment and shall be
easily accessible.
Précaution
La prise principale de cet appareil doit être utilisée pour arrêter l’alimentation
principale. Prière de s’assurer que la prise murale est installée à côté de l’appareil
et facilement accessible.
Achtung
Zur Trennung vom Netz ist der Netzsecker aus der Steckdose zu ziehen, welche
sich in der Nähe des Gerätes befinden muß und leicht zugänlich sein soll.
Precaución
Para desconectar la alimentación debe desenchufarse la clavija del cable de
alimentación. Asegúrese de que la toma de corriente esté instalada cerca del
equipo, en un lugar al que pueda accederse fácilmente.
Attenzione
Per spegnere quest’unità, toglierne la spina di alimentazione dalla presa.
Controllare che la presa sia vicina all’unità e facilmente accessibile.
Hinweis
Der höchste Schalldruckpegel beträt 70 dB(A) order weniger gemäß ISO7779.
4
Page 5

Contents
Introduction...................................................................... 6
Installation........................................................................ 8
Operation........................................................................ 17
The Utility Program ....................................................... 20
Additional Information .................................................. 22
Specifications ................................................................ 23
Features...........................................................................6
System requirements.......................................................6
Precautions......................................................................6
Package Contents............................................................ 8
Front/Rear of drive ......................................................... 9
Hardware Installation....................................................11
Connecting to an AC outlet ..........................................13
Software Installation .....................................................14
Software Installation for DOS ......................................16
Using the HiFD drive....................................................17
Inserting a disk..............................................................18
Removing a disk ...........................................................18
Write protecting data ....................................................19
Usable floppy disks ...................................................... 19
Running “Connect It” ...................................................20
Connecting the HiFD drive...........................................21
Disconnecting the HiFD drive ......................................21
Maintenance, cleaning the case ....................................22
Troubleshooting ............................................................22
Service & Support Contacts in Europe .........................23
Table of Contens 5
Page 6

Introduction
Introduction
Features
This HiFD (High-Capacity Floppy Disk) 3.5 inch floppy drive
system offers the following:
• 200 MB formatted storage capacity
• Compatibility with 1.44 MB & 720 kB diskettes
• High speed data access time (49 ms average)
• Parallel port interface
• Printer connector for printer attachment to drive
• 600 kB/s max transfer rate (with EPP/ECP port)
System requirements
• IBM-compatible PC, 486DX or higher
• MS-DOS/PC-DOS 5.0 or higher, Windows 3.x, Windows 95/
98 or Windows NT 4.0.
• 8 MB or more system RAM
• 5 MB of hard disk space
• Printer port with DB25 connector
• 3.5" floppy disk drive
Precautions
On Installation
Avoid areas with high humidity or temperature, mechanical
vibration and direct sunlight.
During Operation
• Operate drive only on a sturdy, flat surface.
• Do not move drive during operation, it may cause a
malfunction.
• Avoid sudden temperature change, it may cause internal
condensation. If ambient temperature suddenly changes, wait
at least 1 hour before turning unit off. Immediate operation
after sudden temperature change may cause malfunction.
6
Page 7
On Transportation
• Save original packaging for later use.
• Always remove diskette before moving unit.
General Safety
• If any solid object falls into drive, unplug it and before further
operation, have qualified personnel inspect the unit.
• Do not place foreign objects into DC IN 5V jack.
On Power Sources
• Unplug the AC power cord only via its plug end.
• Turn off drive unit only by unplugging AC power cord from
wall outlet.
On the Drive Unit
• Avoid heat sources (includes closed vehicles in sunlight) and
direct sunlight. Avoid exposure to dust or sand, moisture,
rain, mechanical shock.
• If unit causes radio or television reception interference, move
it to another area to operate.
HiFD/Floppy Disk Handling
Please follow these steps to protect diskette/data:
• Avoid magnets and magnetic fields (TV, radio).
• Avoid heat sorces and direct sunlight.
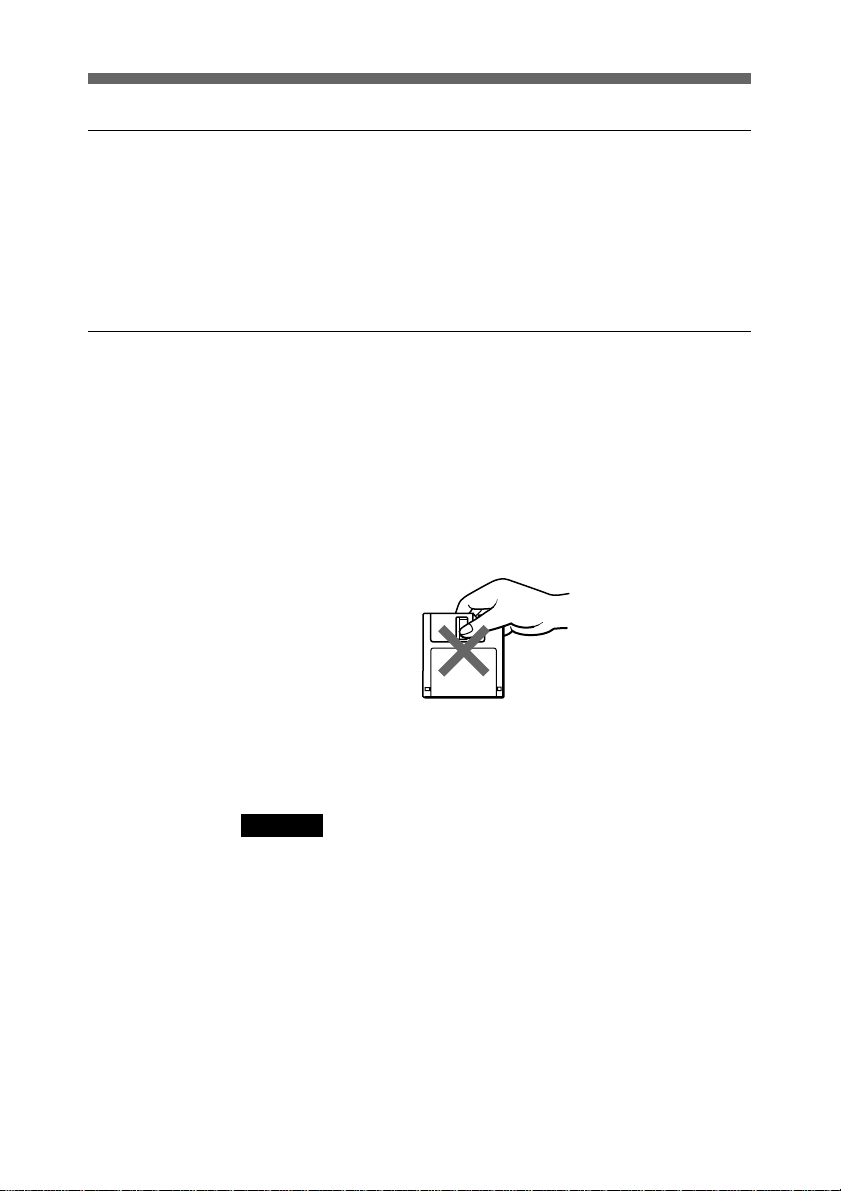
• Never touch the disk surface (do not open shutter by hand), as
dirt on or marring of surface will render data unreadable and
disk unwritable.
• Avoid letting liquids contact HiFD/floppy disks.
• Store diskette in its case, not in drive.
Caution
Cleaning diskettes for ordinary floppy drives will damage
this drive. Never insert such a diskette into this drive.
7
Page 8
Installation
Installation
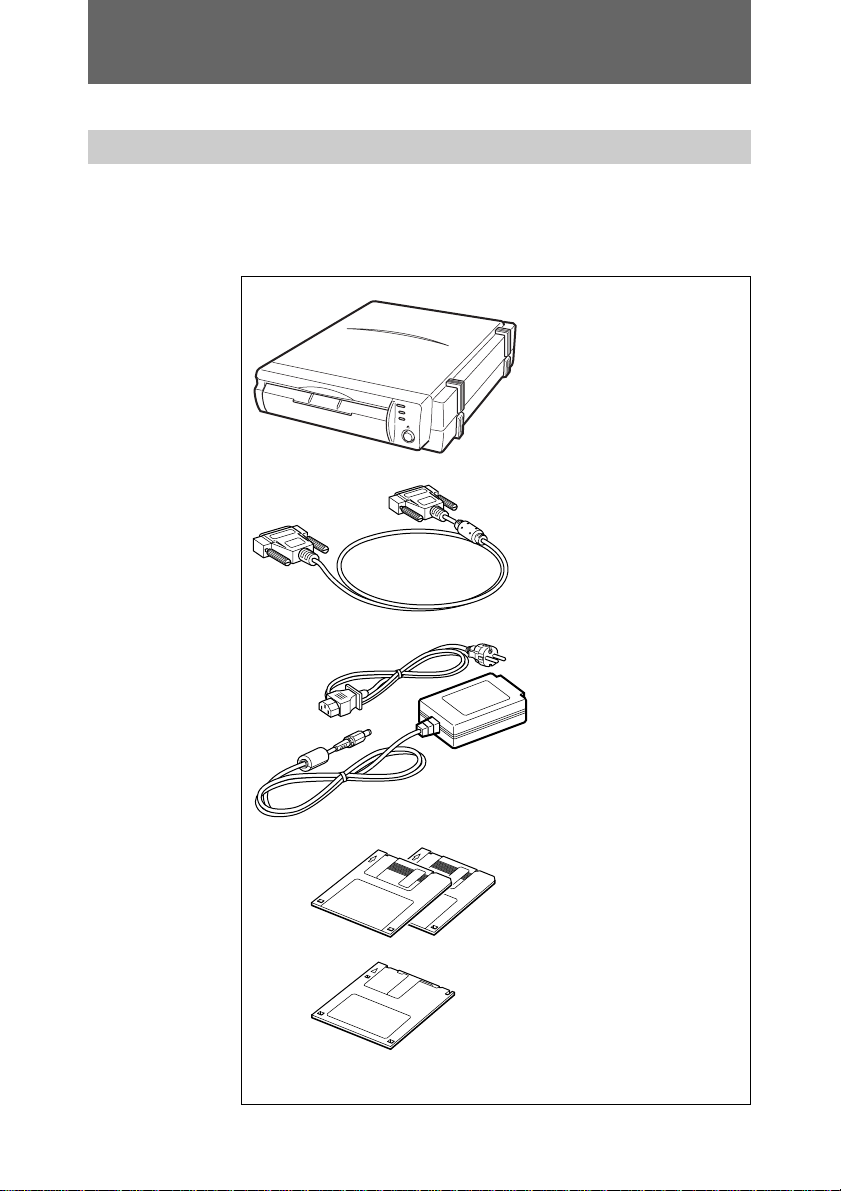
Package Contents
Assure the following items are included in the package.
Should anything be missing, contact local dealer or Sony.
HiFD Drive
Interface cable
AC power cord
AC power adaptor
SA10-0515V
Software disk 2 pcs
HiFD blank disk (200 MB)
Quick Start Guide
Operating Instructions
Warranty/Registration card
8
Page 9
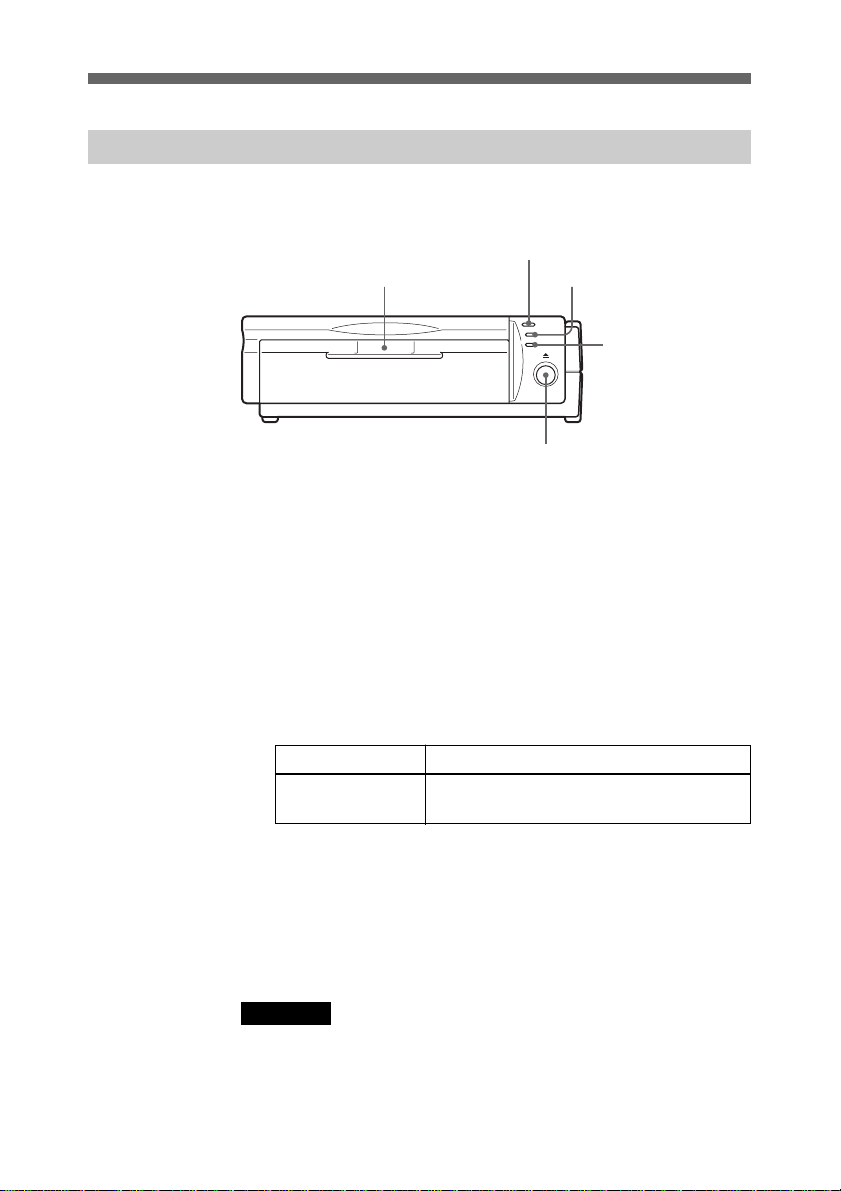
Front/Rear of drive
Front View
1 Disk Slot
Insert a HiFD or floppy disk here.
2 200 MB Indicator
When a HiFD disk is present and the HiFD drive is on, this
lamp lights in green.
3 BUSY Indicator
This lamp blinks Amber while the HiFD drive is operating.
Disk Slot
200 MB Indicator
2
BUSY Indicator
31
EJECT Button
5
POWER Indicator
4
Status Meaning
Blinks Amber During seeking, reading and writing
4 POWER Indicator
This lamp lights green when HiFD power is on.
5 EJECT Button
Press this button to remove the HiFD or floppy disk from
the drive.
Note
Do not press the EJECT button too hard.
It may cause damage to the HiFD drive.
9
Page 10
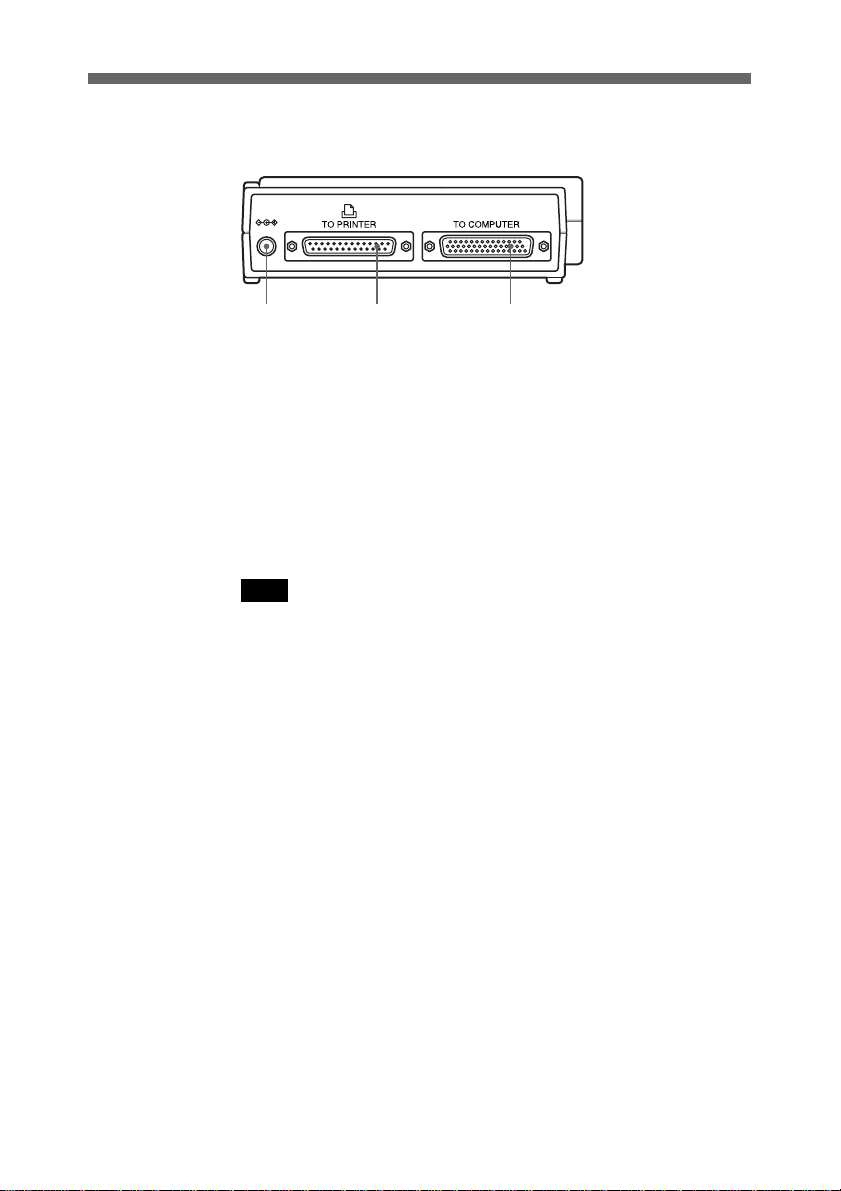
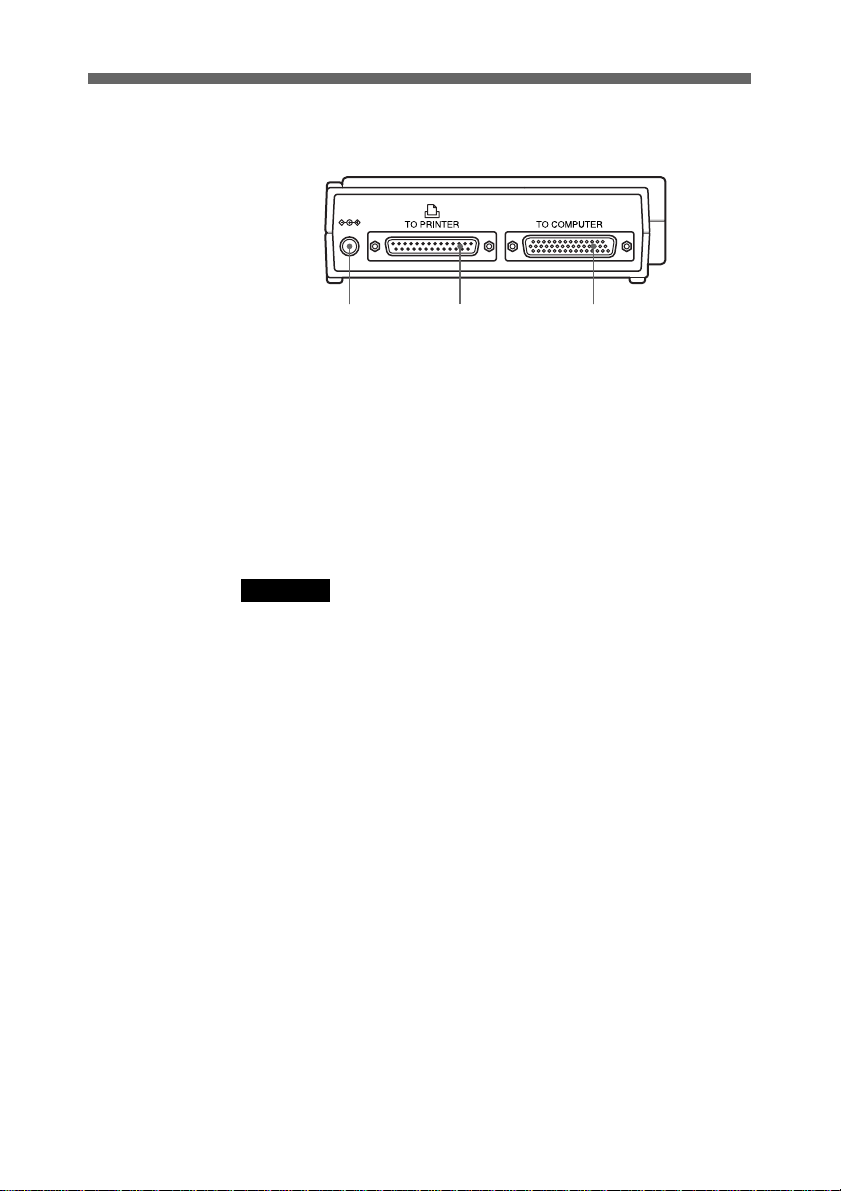
Installation
Rear View
DC IN Jack
1 2 3
Printer Port
Connector
PC Connector
1 DC IN Jack
Connect the supplied AC power adaptor here.
2 Printer Port Connector
When using a printer, connect the printer cable (sold
separately) here.
3 PC Connector
Connect the supplied interface cable here.
Note
Drive may be used either horizontally or vertically.
10
Page 11
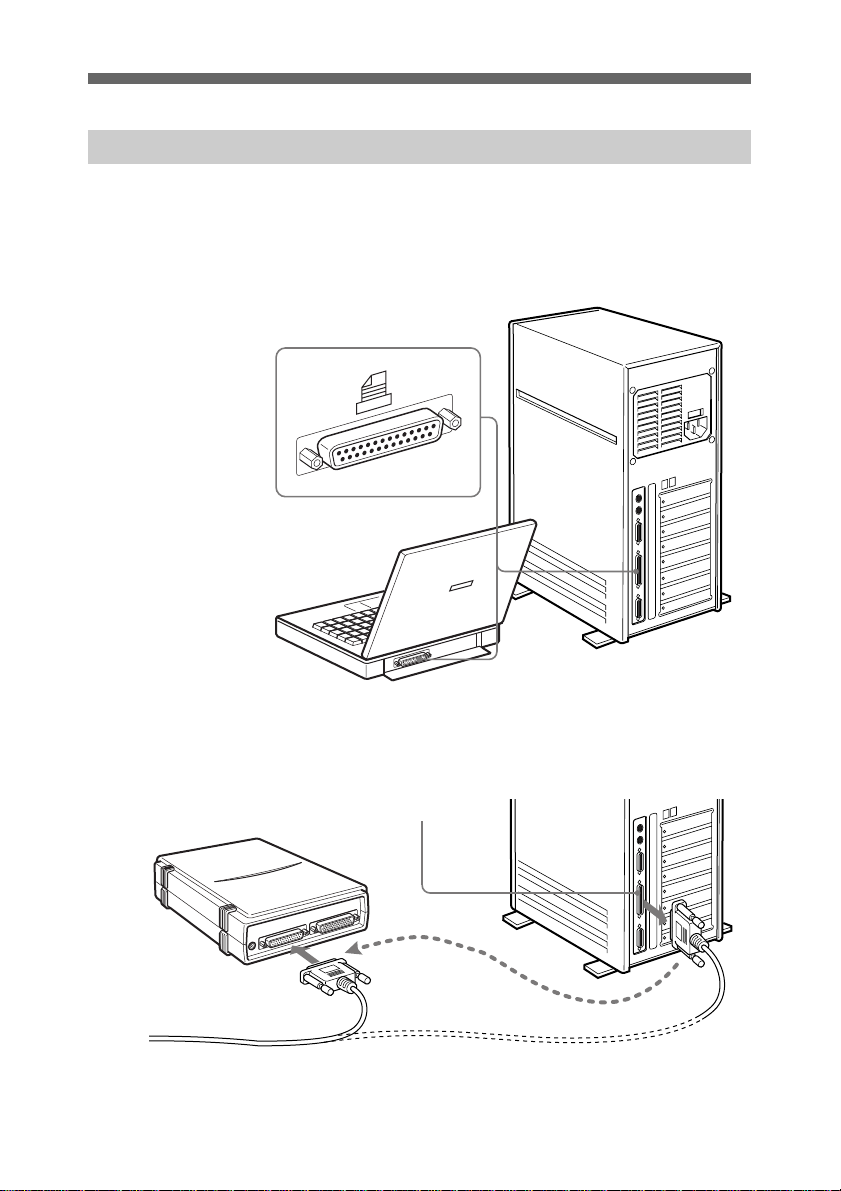
Hardware Installation
1 Locate the connection port.
The parallel port is a 25-pin connector either vertically or
horizontally positioned. It may be labelled “printer” or
with printer symbol.
2 Connect the printer cable.
If a printer is connected, disconnect its cable and reconnect
it to the HiFD’s port labelled “To Printer”.
PC’s 25 pin parallel port
Printer Cable
11
Page 12
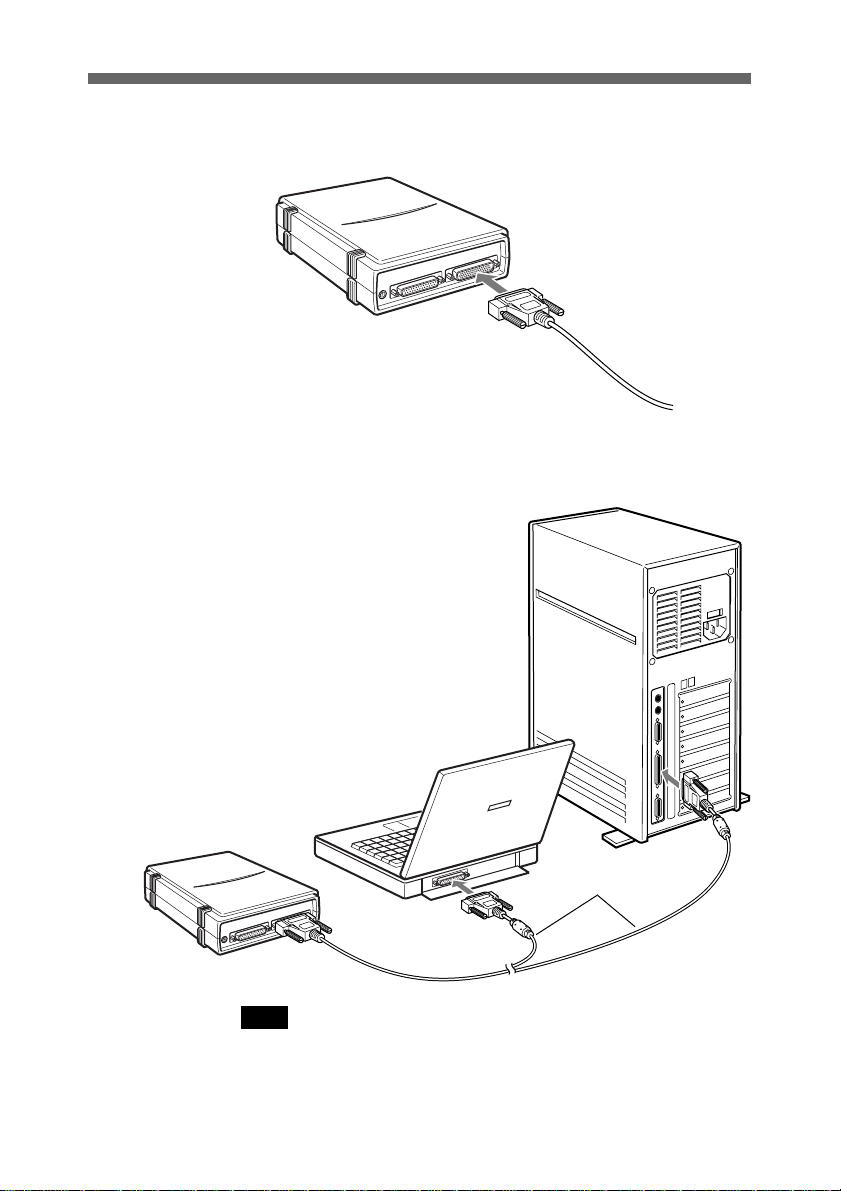
Installation
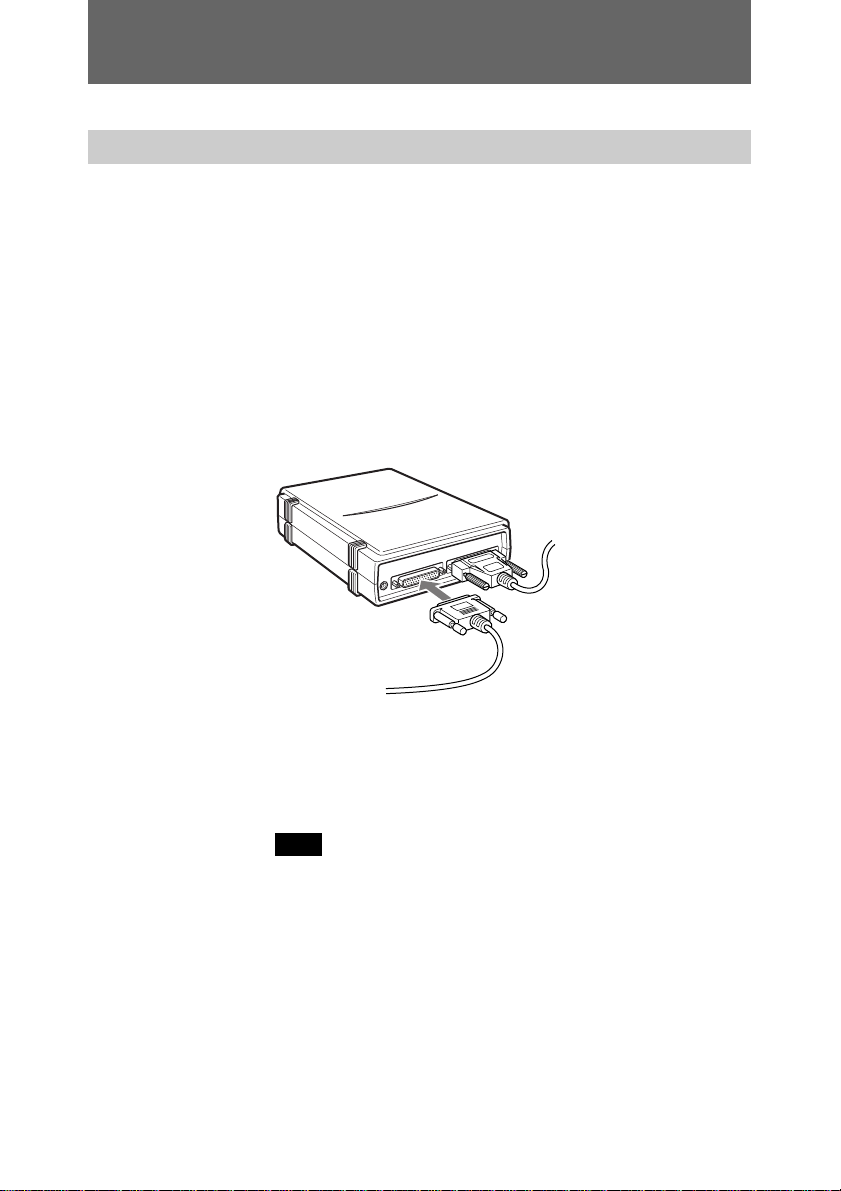
3 Attach the supplied cable to other HiFD drive port.
4 Attach other end (25-pins) of same interface cable to PC’s
parallel port.
12
Connect to
either port
Note
Avoid tugging on cables, it may cause damage.
Page 13
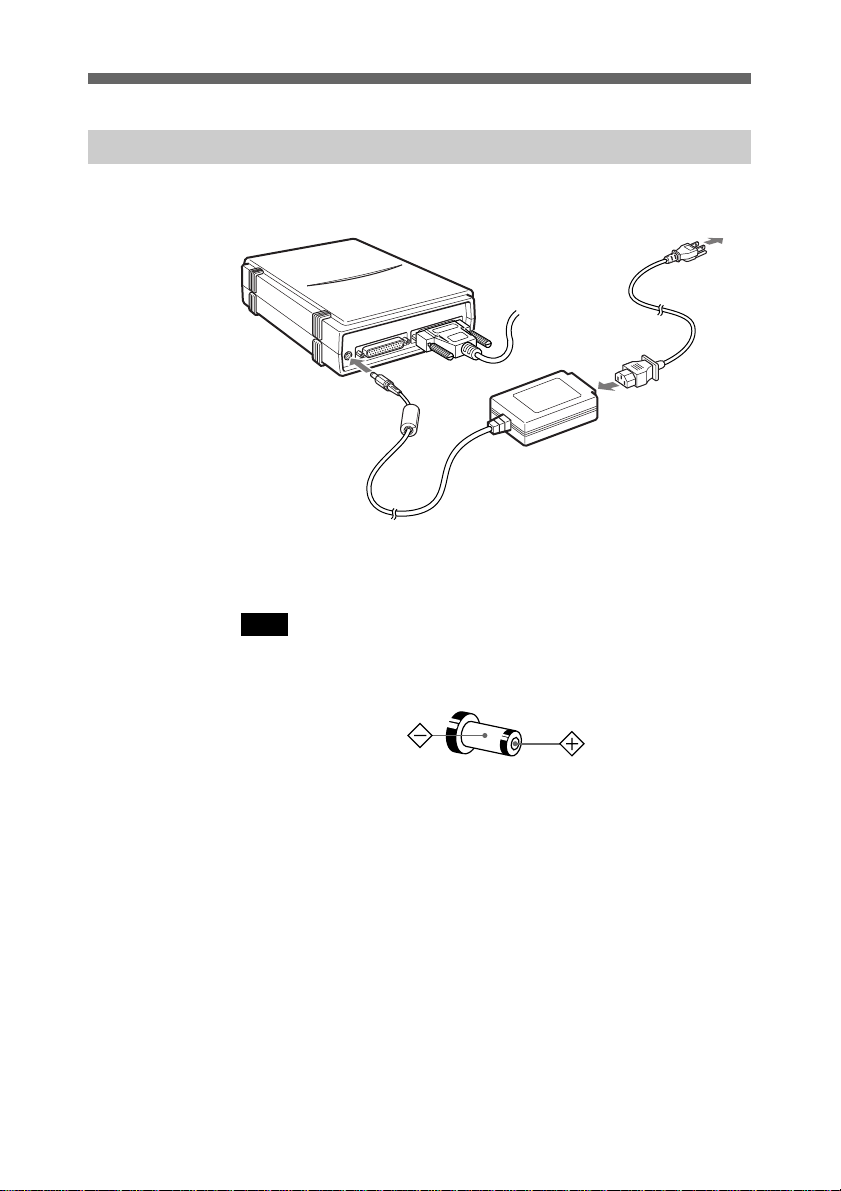
Connecting to an AC outlet
Connect the drive to an AC outlet as illustrated.
to AC outlet
to DC IN 5V jack
AC power adaptor
(supplied)
AC power cord
(supplied)
To switch unit off, disconnect AC power cord from outlet.
Drive has no power switch on its own.
Note
Supplied AC power cord may differ depending on country.
Use only the supplied cord and power adapter.
Plug polarity
13
Page 14
Installation
Software Installation
Sony’s HiFD driver software must be installed
from supplied disk before the drive may be used.
For Windows 3.x/95/98 and NT4.0
1 Install HiFD hardware and switch it on.
2 Turn on PC.
3 Insert supplied “Disk 1” in PC’s floppy drive.
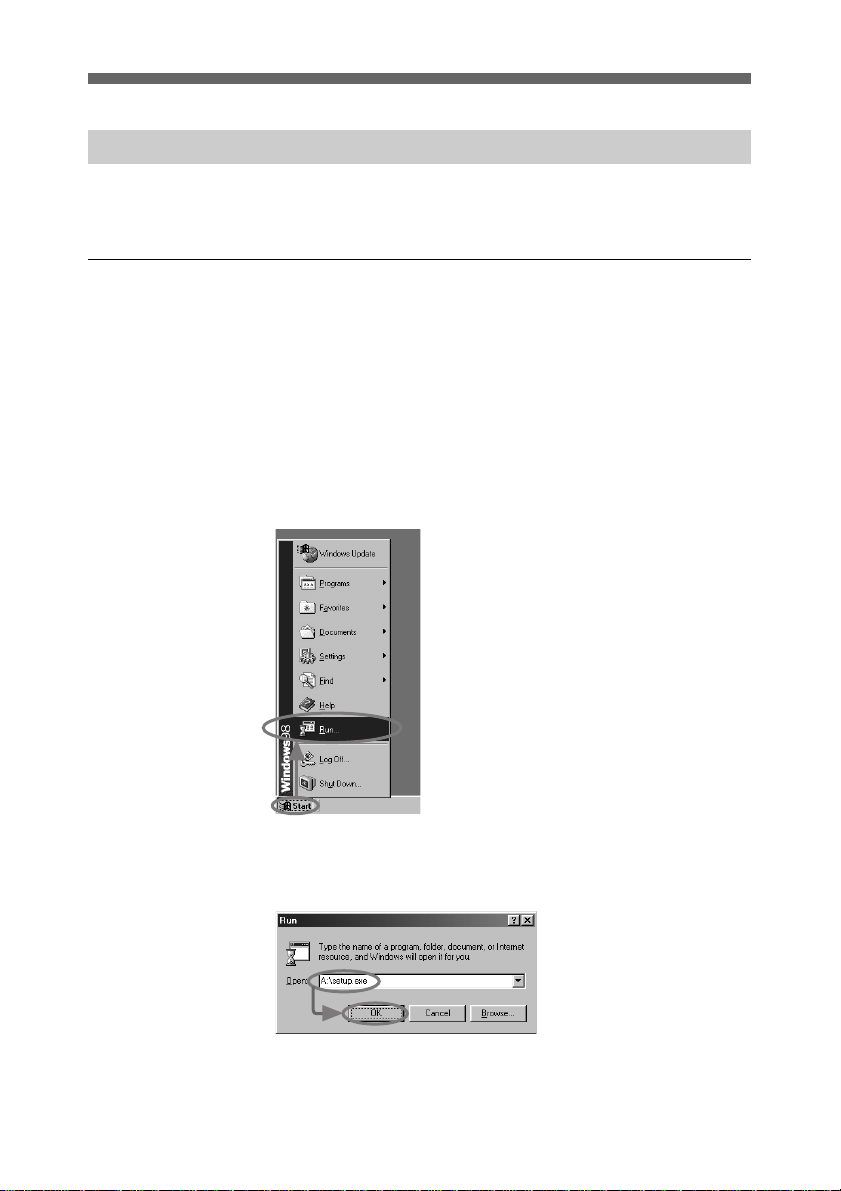
4 For Windows95/98/NT4.0, click Start button on the task
bar and click Run.
14
5 Type “A:\setup.exe” and click OK.
Installation is finished, computer may be restarted.
Page 15
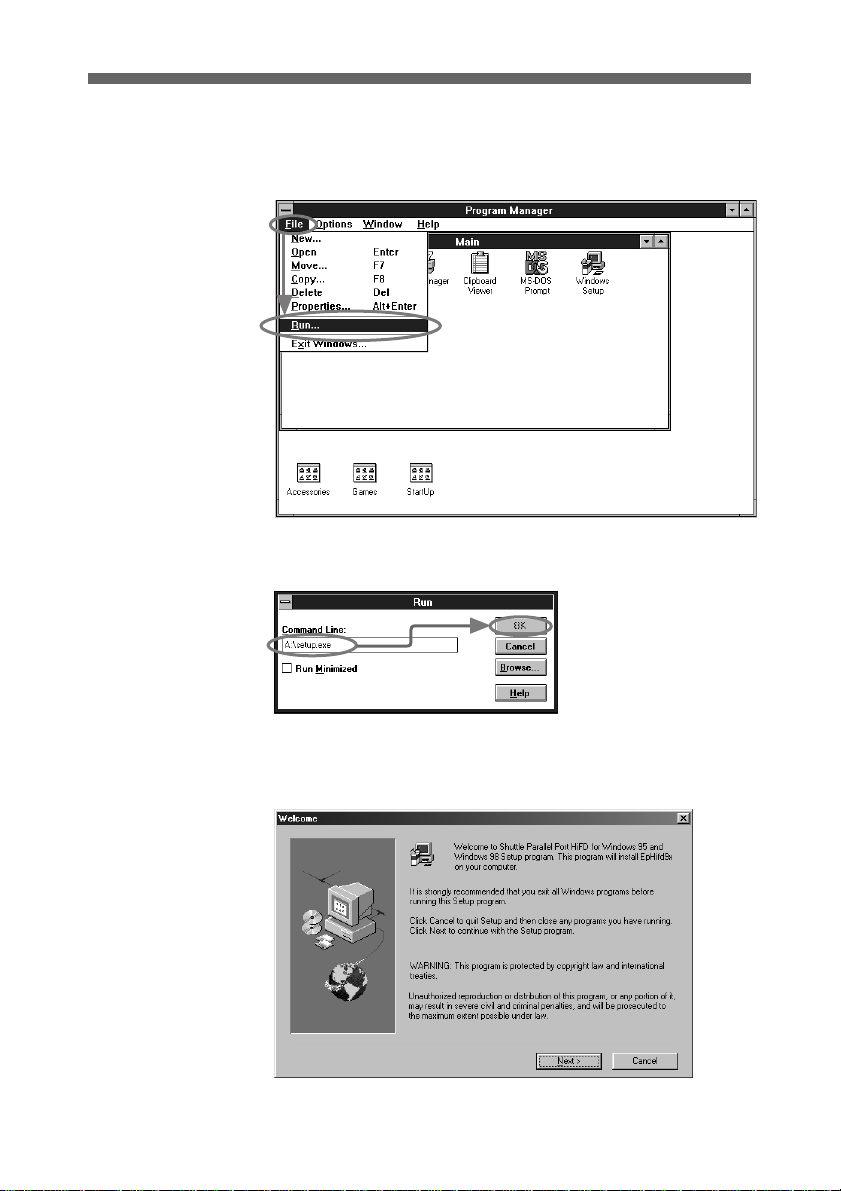
6 For Windows 3.x, click File Menu of the “Program
Manager” and click Run.
7 Type “:\setup.exe” and click OK.
8 When the following screen appears, continue following the
instructions displayed by installer.
15
Page 16

Installation
To Uninstall
Click the task bar’s Start button, point to Programs, Sony HiFD
and select UNINSTALL.
To Uninstall under Windows 3.x
In Sony HiFD Group, click on uninstall icon to remove drivers.
Restart the PC after installing or uninstalling.
Software Installation for DOS
1 Connect HiFD drive to PC and plug drive in.
2 Switch on the PC. Insert supplied “Disk 2” into PC’s
floppy drive.
3 Type “A:” <enter>, type “cd dos” <enter>
4 Type “Install.exe” <enter>.
To Uninstall
16
5 Reboot the PC.
Installer adds labels to Config.sys file which may cause error
messages, these may be ignored when system works.
Change to directory where HiFD software was installed and
type:
uninstall.exe <enter>.
Reboot PC.
Page 17
Operation
Using the HiFD drive
Follow these steps to connect and power up the system.
The correct power-on sequence must be followed.
1 Attach supplied 44-pin interface cable to drive.
(See step 3 on page 12)
2 Attach other end of cable to PC’s parallel port.
(See step 4 on page 12)
3 If using a printer, connect it to drive’s printer port.
(See step 2 on page 11)
4 Plug AC power cord into an appropriate outlet.
5 Switch PC on. HiFD software must first be installed in
order for drive to operate.
Note
For Windows to recognize the HiFD drive, it must be
powered-on before starting the PC.
17
Page 18
Operation
Inserting a disk
Insert a HiFD/Floppy disk into the drive.
Before a floppy disk may be used, it must be formatted.
Commercially available pre-formatted 200 MB HiFD or 1.44
MB DOS disks do not need to be reformatted.
See Usable Floppy Disks on page 19 for compatibility details.
Removing a disk
Confirm BUSY indicator is not lit and press EJECT button.
Should disk not eject after pressing EJECT, contact Hotline
Support listed at the end of this manual.
18
BUSY
Indicator
EJECT
Button
Page 19
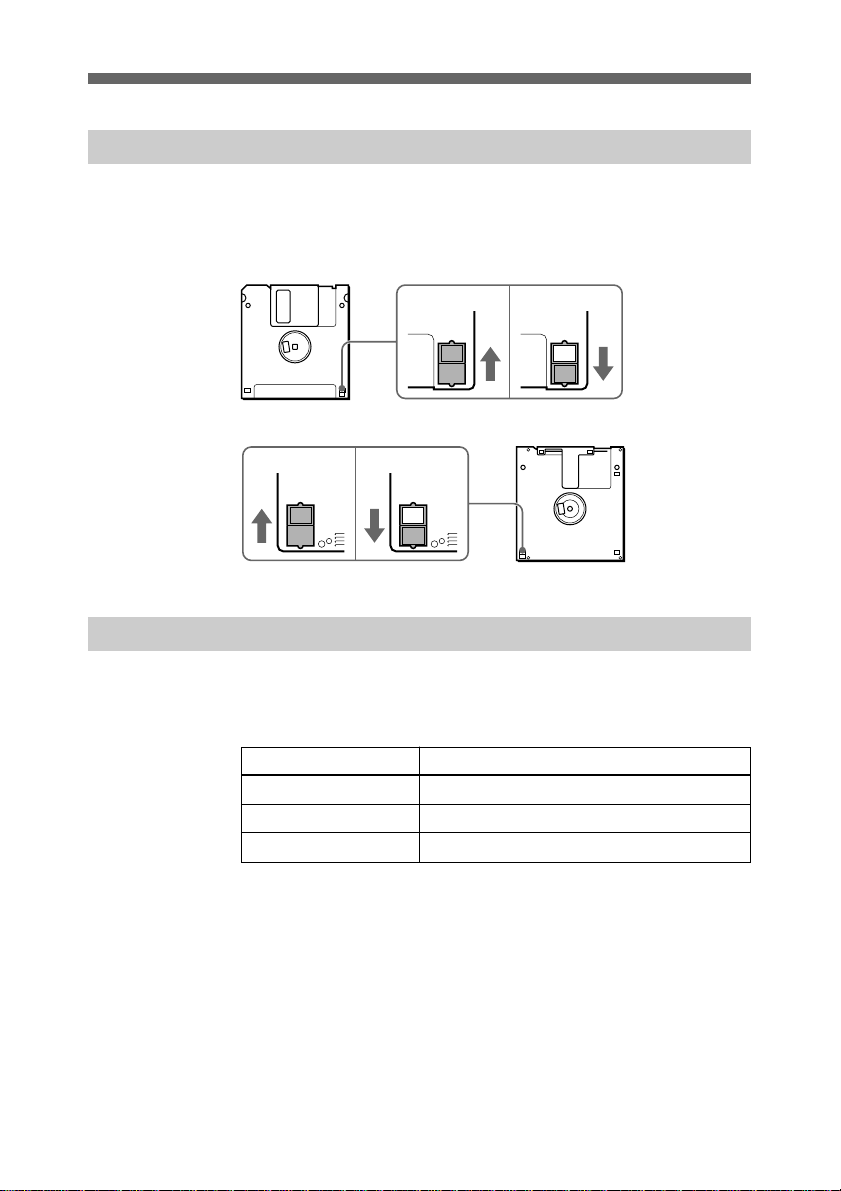
Write protecting data
Floppy disks have a “write protect” tab to prevent accidentally
erasing data. Illustrated below are its settings.
Rear View of Floppy Disk
Rear View of HiFD
Write-Enabled
Usable floppy disks
HiFD, 2HD and 2DD 3.5" disks are supported in this drive.
Their formatted capacity and capabilities are listed below:
Write-Enabled
Write-Protected
Write-Protected
Media Type Capabilities
2HD 1.44 MB Format, read and write
2DD 720 kB Format, read and write
HiFD 200 MB Format, read and write
19
Page 20
The Utility Program
The Utility Program
The “Connect It” utility program is supplied with the HiFD
drive.
It is installed in the SONY HiFD Group or folder, selected in
the Programs Menu, during installation. The following is based
on Windows 95/98.
DOS & Windows 3.x have no “Connect It”.
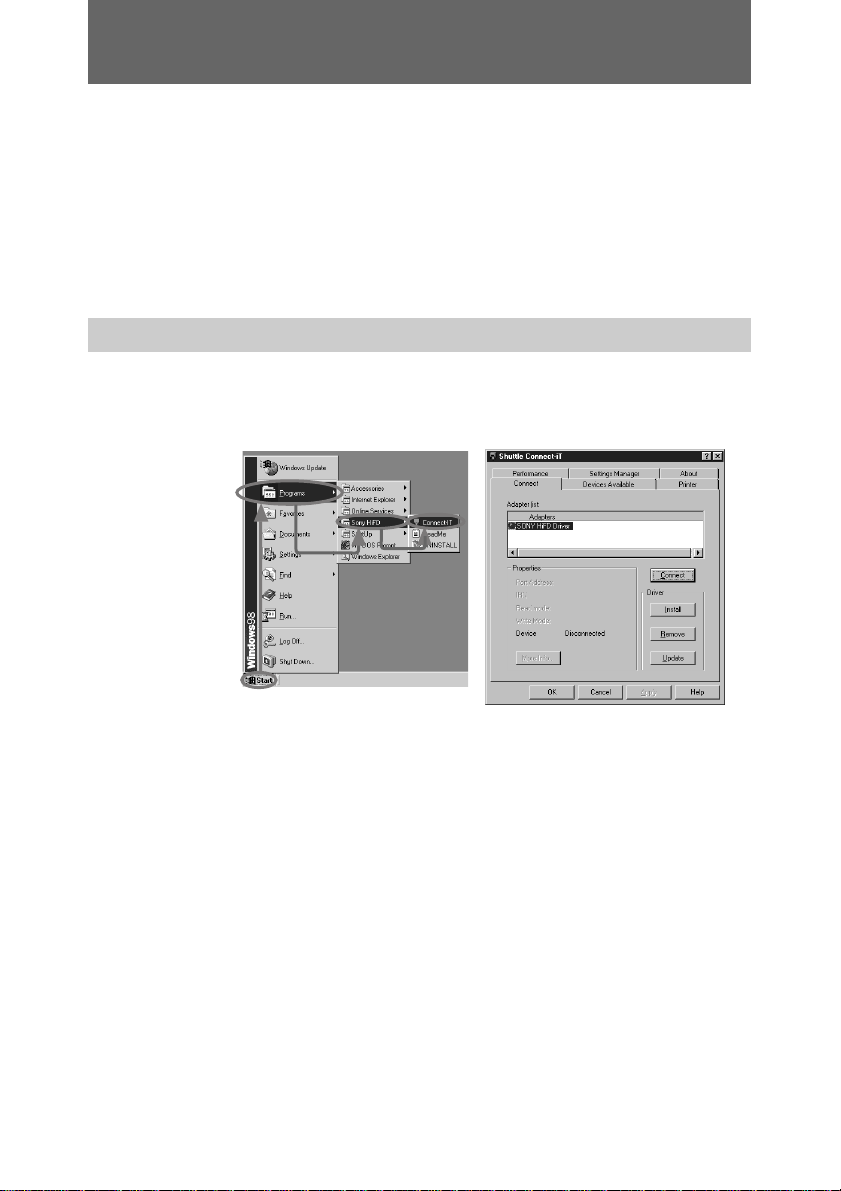
Running “Connect It”
Click the task bar’s Start button, point to Programs, then
SONY HiFD, and click Connect It.
20
HiFD drive’s displayed properties depend on it being poweredon when PC was started.
If power was supplied, [Connected] appears in the [Device] of
[Properties] box. Port address, IRQ and read/write mode of
HiFD also appear in this box.
If power was not supplied, [Disconnected] appears in the
[Device] of the [Properties] box.
Page 21

Connecting the HiFD drive
If PC was booted with HiFD drive unplugged, „Connect It“
may be used to cause Windows to recognize the drive.
1 Run “Connect It”.
2 Click the [Connect] tab, and click Connect button.
[Connected] appears in the [Device] of [Properties] box.
Disconnecting the HiFD drive
To remove the HiFD drive without shutting down the PC,
perform the same steps as above, except instead of selecting
Connect button, select Disconnect.
Connect/Disconnect function not supported under NT.
21
Page 22
Additional Information
Additional Information
Maintenance, cleaning the case
The HiFD drive case may be cleaned with a soft cloth slightly
moistened with water or a mild detergent. Never use any type
of abrasive pad, scouring powder or solvent.
Troubleshooting
Should a problem or difficulty occur, please consult the
Internet at http://www.sony-hifd.com or the following table
before contacting Sony’s Hotline Support.
Problem Cause/Solution
The POWER or BUSY
lanp does not light when
power is on.
The drive is not
recognized by the PC, or
it does not operate
correctly.
The drive unit or AC
power adaptor become
warm.
Confirm that the AC power adaptor is
connected correctly.
The AC power adaptor’s protection circuit
may have tripped: try unplugging it, waiting
a few minites, and plugging it back in.
The driver may not be installed.
The interface cable may not be connected
correctly.
An interface cable connector pin may be
bent or broken.
Not necessarily a malfunction (if they
become very hot, unplug the AC power
adaptor and contact the Technical Support
Center)
22
Page 23

Service & Support Contacts in Europe
Should further support or service be required, please contact
the local technical support professionals.
For Central Europe (German or English) contact the hotline at:
Tel. +49 (0) 2389 – 951047 or SONY-HOTLINE@SUPLIE.COM
(Monday – Thursday, 8:00 am – 4:30 pm / Friday, 8:30 – 2:00 pm)
For France or French-speaking countries (Switzerland,
Benelux), please call: Tel. +33 (0)1 55 87 08 66
E-mail: HT-SONY@nati.fr
(Monday – Friday, 9:00 am to 6:00 pm)
For DK, N, SW & FIN, please call: Tel. +47 (0) 6281 8666
(Monday – Friday, 8:30 am to 4:00 pm Norwegian time)
Within the UK, please call: Tel. 0870 900 8166
(Monday – Friday, 8:45 am to 5:00 pm)
All this information and more can be downloaded at:
http://www.sony-cp.com
Specifications
Please see “Features” on page 6 for other specifications.
Operating & Storage
Environments
Operating temperature
5 to 40°C (41 to 104°F)
Operating humidity
20 to 80% (non-condensing)
Storage temperature
-20 to 55°C (non-condensing)
Power Requirements
Power source
5 volt power jack supplied
from an adapter connected
to 100 to 240 VAC
Size
143 × 42 × 214 mm
(W/H/D)
Weight
950 g (drive unit only)
Note
All specifications and design subject
to change without notice.
23
Page 24

Table des Matières
Table des matières
Introduction.................................................................... 25
Caractéristiques.............................................................25
Configuration requise ...................................................25
Précautions....................................................................26
Installation...................................................................... 28
Contenu du coffret ........................................................28
Avant/Arrière du lecteur ...............................................29
Installation matérielle ...................................................31
Connexion à une prise de courant.................................33
Installation logicielle ....................................................34
Installation sous DOS ...................................................36
Fonctionnement............................................................. 37
Utilisation du lecteur de HiFD......................................37
Insertion d’une disquette...............................................38
Ejection d’une disquette ...............................................38
Protection des données en écriture ...............................39
Disquettes utilisables ....................................................39
L’utilitaire ....................................................................... 40
Exécution de “Connect It” ............................................40
Connexion du lecteur de HiFD .....................................41
Déconnexion du lecteur de HiFD .................................41
Informations supplémentaires ..................................... 42
Entretien, nettoyage du boîtier......................................42
Dépannage ....................................................................42
Contacts du support technique en Europe ....................42
Caractéristiques techniques ........................................ 43
24
Table of Contens
Page 25

Introduction
Caractéristiques
Ce lecteur de disquettes HiFD (High-Capacity Floppy Disk)
3,5 pouces présente les caractéristiques suivantes :
• Capacité de stockage de 200 Mo de données formatées
• Compatibilité avec les disquettes 1,44 Mo et 720 Ko
• Temps d’accès aux données ultra rapide (49 ms en moyenne)
• Interface port parallèle
• Connecteur imprimante pour connexion de l’imprimante au
lecteur
• Vitesse de transfert max. de 600 ko/s (avec port EPP/ECP)
Configuration requise
• PC compatible IBM doté d’un processeur 486DX ou
supérieur
• Système d’exploitation MS-DOS/PC-DOS 5.0 ou supérieur,
Windows 3.x, Windows 95/98, ou Windows NT 4.0.
• 8 Mo ou plus de mémoire vive
• 5 Mo d’espace disque
• Port imprimante avec connecteur DB25
• Lecteur de disquette 3,5 pouces
FR
Français
25
Page 26

Introduction
Précautions
Lors de l’installation
Evitez les endroits exposées à une humidité ou une température
élevée, aux vibrations mécaniques et en plein soleil.
En cours de fonctionnement
• Faites fonctionner le lecteur uniquement sur une surface
solide et plane.
• Ne déplacez pas le lecteur pendant son fonctionnement. Cela
pourrait entraîner une défaillance.
• Évitez les variations brusques de température, il risquerait de
se former de la condensation à l’intérieur du lecteur. En cas
de changement soudain de la température ambiante, attendez
au moins 1 heure avant d’éteindre l’unité.
L’utilisation juste après un changement brusque de
température risque de provoquer une panne.
Pendant le transport
• Conservez l‘emballage d‘origine pour transporter le lecteur.
• Vérifiez toujours que le lecteur est vide avant de le déplacer.
Mesures générales de sécurité
• Si un objet solide tombe dans l‘unité, débranchez-la et avant
toute tentative d‘utilisation, faites-la inspecter par un
personnel qualifié.
• Ne laissez aucun élément pénétrer dans la fiche 5V DC IN.
Au niveau des sources d‘alimentation
• Débranchez le cordon d‘alimentation uniquement par
l‘extrémité de sa prise.
• Éteignez l‘unité du lecteur uniquement en débranchant le
cordon d‘alimentation de la prise murale.
26
Page 27
Au niveau de l‘unité du lecteur
• Évitez les sources de chaleur (notamment les véhicules
fermés exposés en plein soleil) et la lumière directe du soleil.
Évitez l‘exposition à la poussière et au sable, à l‘humidité, à
la pluie et aux chocs mécaniques.
• Si l‘unité crée des interférences avec la radio ou la télévision,
changez-la d’emplacement.
Manipulation des disquettes (HiFD et standard)
Respectez les étapes ci-dessous pour protéger la disquette et les
données :
• Évitez les aimants et les champs magnétiques (TV, radio).
• Évitez les sources de chaleur et l’exposition en plein soleil.
• Ne touchez jamais la surface de la disquette (n’ouvrez pas le
volet à la main), le dépôt de saletés sur la surface ou
l‘endommagement de la surface risque d‘empêcher la lecture
des données et l‘écriture sur la disquette.
• Évitez de laisser des liquides entrer en contact avec les
disquettes HiFD/standard.
• Stockez la disquette dans son étui, pas dans le lecteur.
Attention
Les disquettes de nettoyage pour lecteurs de disquette
ordinaires risquent d’endommager ce lecteur. Veillez à ne
jamais en insérer dans ce lecteur.
27
Page 28
Installation
Installation
Contenu du coffret
Assurez-vous que les éléments suivants sont inclus dans le
coffret. En cas d’élément manquant, prenez contact avec votre
revendeur local ou avec Sony.
Lecteur de HiFD
Câble Interface
28
Câble secteur
Adaptateur secteur
SA10-0515V
2 disquettes du logiciel
Disquette vierge HiFD
(200 MB)
Guide de démarrage rapide
Mode d’emploi
Carte de garantie
Page 29
Avant/Arrière du lecteur
Face avant
1 Fente d’insertion du disque
Insérer une disquette HiFD ou floppy.
2 Témoin 200 MB
Lorsque une disquette HiFD est présente et le lecteur sous
tension ce voyant s’allume en vert.
3 Témoin d’activité
Ce voyant clignote en vert lorsque le lecteur est en
fonctionnement.
Fente d’insertion
du disque
Témoin 200 MB
2
31
Boutton d’éjection
5
Témoin d’activité
Témoin
4
d’alimentation
Etat Signification
Clignotant Ambre Lors des phases d’accès de lecture et
écriture
4 Témoin d’alimentation
Ce voyant est vert lorsque le lecteur est sous tension.
5 Boutton d’éjection
Appuyer sur ce bouton pour éjecter la disquette HiFD ou
floppy.
Remarque
Ne pas appuyer trop violemment.
Cela peut détruire le lecteur de HiFD.
29
Page 30
Installation
Face arrière
Prise Jack
1 2 3
Connecteur
d’imprimante
Connecteur PC
1 Prise Jack
Connecter l’adaptateur secteur fourni ici.
2 Connecteur d’imprimante
Si une imprimante est utilisé connecter son câble (vendu
séparément) ici.
3 Connecteur PC
Connecter le câble interface fourni ici.
Remarque
Le lecteur peut être utilisé horizontalement ou verticalement.
30
Page 31

Installation matérielle
1 Localisez le port de connexion
Le port parallèle est un connecteur à 25 broches positionné
horizontalement ou verticalement. Il porte parfois
l’indication “Printer” ou avec un logo d’imprimante.
2 Connectez le câble de l‘imprimante.
Si une imprimante est connectée, débranchez son câble et
reconnectez- le sur le port portant l‘indication “To Printer”
du lecteur de HiFD.
Connecteur port parallèle 25 points
Câble imprimante
31
Page 32

Installation
3 Reliez le câble fourni à l’autre port du lecteur de HiFD.
4 Reliez l’autre extrémité (25 broches) du même câble
d’interface au port parallèle du PC.
32
Connecter à
l’un ou à l’autre
Remarque
Évitez de tirer sur les câbles, cela pourrait les endommager.
Page 33

Connexion à une prise de courant
Connectez le lecteur à une prise de courant comme indiqué sur
l’illustration.
Vers la prise
secteur
Vers la prise
jack 5V continu
Adaptateur secteur
(fourni)
Cordon secleur
(fourni)
Pour éteindre l’unité, débranchez le cordon d’alimentation de
la prise.
Le lecteur ne comporte aucun interrupteur d’alimentation
propre.
Remarque
Le cordon d’alimentation fourni peut varier d’un pays à un
autre. Utilisez uniquement le cordon et l’adaptateur fournis.
Polarité de la prise
33
Page 34

Installation
Installation logicielle
Vous devez installer le pilote HiFD de Sony à partir de la
disquette fournie avant de pouvoir utiliser le lecteur..
Pour Windows 3.x/95/98 et Windows NT 4.0
1 Installez le matériel HiFD et mettez-le sous tension.
2 Allumez le PC.
3 Introduisez la disquette 1 fournie dans le lecteur de
disquette du PC.
4 Sous Windows 95/98/NT 4.0, cliquez sur le bouton
Démarrer de la barre des tâches, puis sur Exécuter.
34
5 Tapez “A:\setup.exe” et cliquez sur OK.
L’installation est terminée ; vous pouvez redémarrer
l’ordinateur.
Page 35

6 Sous Windows 3.x, cliquez sur le menu Fichier du
Gestionnaire de programmes, puis sur Exécuter.
7 Tapez “A:\setup.exe” et cliquez sur OK.
8 Lorsque l’écran ci-dessous apparaît, suivez les instructions
affichées par le programme d’installation.
35
Page 36

Installation
Pour désinstaller
Dans la barre des tâches, cliquez sur Démarrer, pointez sur
Programmes, Sony HiFD et sélectionnez UNINSTALL.
Pour désinstaller sous Windows 3.x
Dans le groupe Sony HiFD, cliquez sur l’icône de
désinstallation pour supprimer les pilotes.
Redémarrez le PC après installation ou désinstallation.
Installation sous DOS
1 Connectez le lecteur de HiFD au PC et branchez le lecteur.
2 Allumez le PC. Introduisez la disquette 2 (Disk 2) fournie
dans le lecteur de disquette.
3 Tapez “A:” <Entrée>, puis tapez “cd dos” <Entrée>.
4 Tapez “Install.exe” <Entrée>.
5 Relancez le PC.
Le programme d’installation ajoute des instructions au fichier
Config.sys. Cela peut provoquer parfois des messages d’erreur
que vous pouvez ignorer au cours de l’installation.
Pour désinstaller
Passez au répertoire dans lequel le logiciel HiFD a été installé
et tapez :
uninstall.exe <Entrée>.
Relancez ensuite le PC.
36
Page 37

Fonctionnement
Utilisation du lecteur de HiFD
Procédez comme suit pour connecter et mettre sous tension le
système.
Il est très important de suivre correctement les étapes de mise
sous tension.
1 Reliez le câble d’interface à 44 broches fourni au lecteur.
2 Reliez l’autre extrémité du câble au port parallèle du PC.
3 Si vous utilisez une imprimante, branchez-la sur le port
imprimante du lecteur.
4 Branchez le cordon d’alimentation dans la prise secteur.
5 Allumez le PC. Le logiciel HiFD doit avoir été installé au
préalable pour que le lecteur puisse fonctionner.
Remarque
Pour que Windows reconnaisse le lecteur HiFD, le lecteur doit
être mis sous tension avant de démarrer le PC.
37
Page 38

Fonctionnement
Insertion d’une disquette
Insérez une disquette HiFD/standard dans le lecteur.
Pour pouvoir être utilisée, une disquette doit être formatée. Des
disquettes HiFD 200 Mo ou DOS 1,44 Mo préformatées sont
disponibles dans le commerce et n’ont pas besoin d’être
reformatées. Consultez la section Disquettes utilisables à la
page 39 pour obtenir des détails de compatibilité.
Disquette HiFD/Floppy
Ejection d’une disquette
Assurez-vous que l’indicateur d’occupation n’est pas allumé et
appuyez sur EJECT.
Dans le cas où la disquette ne s’éjecte pas lorsque vous
appuyez sur EJECT, appelez le support technique au numéro
qui figure à la fin de ce manuel.
38
Voyant
d’activité
Bouton
d’EJECTION
Page 39

Protection des données en écriture
Les disquettes comportent un onglet de protection à l’écriture
pour empêcher l’effacement accidentel de données. Les
illustrations ci-dessous vous indiquent son fonctionnement.
Vue arrière de la disquette Floppy
Ecriture validée
Vue arrière du HiFD
Ecriture validée
Protégé en
ecriture
Disquettes utilisables
Ce lecteur est compatible avec les disquettes 3,5 pouces HiFD,
2HD et 2DD. Leurs capacités formatées sont énumérées cidessous :
Protégé en
ecriture
Types de Média Capacités
2HD 1,44 MB Formatter, lire, écrire
2DD 720 kB Formatter, lire, écrire
HiFD 200 MB Formatter, lire, écrire
39
Page 40

L’utilitaire
L’utilitaire
L’utilitaire “Connect It” est fourni avec le lecteur HiFD. Il est
installé au cours de l’installation dans le groupe ou dossier
SONY HiFD que vous pouvez sélectionner dans le menu
Programmes. Les indications qui suivent sont basées sur
Windows 95/98. Connect It n’est pas disponible sous DOS &
Windows 3.x.
Exécution de “Connect It”
Dans la barre des tâches, cliquez sur Démarrer, pointez sur
Programmes, puis sur SONY HiFD et cliquez sur Connect It.
40
Les propriétés du lecteur HiFD affichées varient selon qu’il
était sous tension ou non lors du démarrage du PC.
S’il était sous tension, la mention Connecté s’affiche dans la
zone Propriétés du périphérique. L’adresse du port, l’IRQ et le
mode lecture/écriture de HiFD s’affichent également dans cette
zone.
S’il n’était pas sous tension, le mention Déconnecté s’affiche
dans la zone Propriétés du périphérique.
Page 41

Connexion du lecteur de HiFD
Si vous avez lancé le PC tandis que le lecteur de HiFD était
débranché, vous pouvez utiliser “Connect It” pour faire
reconnaître le lecteur par Windows.
1 Exécutez “Connect It”
2 Cliquez sur l’onglet [Connect], puis sur le bouton Connect.
La mention [Connecté] s’affiche dans la zone [Propriétés] du
périphérique.
Déconnexion du lecteur de HiFD
Pour retirer le lecteur de HiFD sans éteindre le PC, effectuez
les mêmes étapes que ci-dessus, en sélectionnant le bouton
Disconnect au lieu du bouton Connect.
La fonction Connect/Disconnect n’est pas supportée sous NT.
41
Page 42

Informations supplémentaires
Informations supplémentaires
Entretien, nettoyage du boîtier
Vous pouvez nettoyer le lecteur de HiFD à l’aide d’un chiffon
doux légèrement humidifié avec de l’eau ou un détergent léger.
N’employez jamais de tampon abrasif, de poudre à récurer ou
de solvant.
Dépannage
En cas de problème ou de difficulté, pensez à consulter le site
Internet à l’adresse http://www.sony-hifd.com ou le tableau
suivant avant d’appeler le support technique de Sony.
Problème Cause/Solution
Les voyants
d’alimentation ou
d’activité Ne s’allument
pas en vert lors de la
mise sous tension du
lecteur.
Le lecteur n’est pas
reconnu par le PC ou ne
fonctionne pas
correctement.
Le lecteur ou
l’adaptateur secteur
chauffent.
Vérifier que l’adaptateur secteur est sous
tension et correctement branché.
La protection de l’adaptateur secteur est
peut être activée.
Le débrancher, attendre quelques minutes
et le remettre sous tension.
La pilote n’est pas installé.
Le câble interface n’est pas connecté
correctement.
Le connecteur du câble interface a une
broche pliée ou cassée.
Ce n’est pas un signe de mauvais
fonctionnement.
(Si ils deviennent vraiment très chaud
débrancher l’adaptateur secteur et
contacter le centre support technique.)
Contacts du support technique en Europe
Pour tout autre service ou question technique, contactez
l’équipe locale du support technique.
En Europe centrale (allemand ou anglais) contactez la ligne
directe au :
Tél. +49 (0) 2389 – 951047 ou SONY-HOTLINE@SUPLIE.COM
(Lundi – Jeudi, 8:00 – 16:30 / Vendredi, 8:30 – 14:00 pm)
42
Page 43

Pour la France ou les pays Francophones (Suisse, Benelux),
composez le : Tél. +33 (0)1 55 87 08 66 E mail HTSONY@nati.fr
(Lundi – Vendredi, 9:00 à 18:00)
Pour le Danemark, la Norvège, la Suisse et la Finlande,
composez le :
Tél. +47 (0) 6281 8666
(Lundi – Vendredi, 8:30 à 16:00, heure norvégienne)
Au Royaume-Uni, composez le : Tél. 0870 900 8166
(Lundi – Vendredi, 8:45 à 17:00)
Retrouvez et téléchargez ces informations et d’autres
renseignements utiles sur le site Web Sony :
http://www.sony-cp.com
Caractéristiques techniques
Prière de voir “Caractéristiques” en page 25 pour d’autres
spécifications.
Environnement de
fonctionnement et de
stockage
Température de fonctionnement
5 à 40 °C (41 à 104 °F)
Humidité en fonctionnement
20 à 80% (sans
condensation)
Température de stockage
-20 à 55 °C (sans
condensation)
Alimentation
5 volts fournie par un
adaptateur relié au secteur
de 100 à 240 V
Dimensions
143 × 42 × 214 mm
(L × H × P)
Poids
950 g (unité seule)
Remarque
La présentation et les caractéristiques
peuvent être modifiées sans préavis.
43
Page 44

Inhalt
Inhalt
Einleitung ....................................................................... 45
Eigenschaften................................................................45
Systemanforderungen ...................................................45
Vorsichtsmaßnahmen ...................................................46
Installation...................................................................... 48
Packungsinhalt ..............................................................48
Vorder-/Rückseite des Laufwerks ................................49
Hardware-Installation ...................................................51
Anschluß an eine Netz-Steckdose ................................53
Software-Installation.....................................................54
DOS-Installation ...........................................................56
Bedienung ...................................................................... 57
Gebrauch des HiFD-Laufwerks ....................................57
Einlegen einer Diskette.................................................58
Entnehmen einer Diskette.............................................58
Schreibschutz von Disketten.........................................59
Verwendbare Disketten ................................................59
Dienstprogramm ............................................................ 60
Ausführen von “Connect It” .........................................60
Verbindung zum HiFD-Laufwerk herstellen................61
Verbindung zum HiFD-Laufwerk abbrechen ...............61
Zusätzliche Information ................................................ 62
Wartung, Reinigung des Gehäuses ...............................62
Fehlerbehebung.............................................................62
Service-Kontaktadressen in Europa..............................62
Technische Daten.......................................................... 63
44
Table of Contens
Page 45

Einleitung
Eigenschaften
Das HiFD (High Capacity Floppy Disk) 3,5-ZollDiskettenlaufwerk weist folgende Leistungsmerkmale auf:
• 200 MB Speicherkapazität (formatiert)
• Kompatibilität mit 1,44 MB- & 720 KB-Disketten
• Hochgeschwindigkeits-Datenzugriff (im Durchschnitt 49 ms)
• Paralleler Schnittstellenanschluß
• Druckeranschluß
• Max. Übertragungsgeschwindigkeit von 600 KB/s
(mit EPP/ECP-Anschluß)
Systemanforderungen
• IBM-kompatibler PC, 486DX oder höher
• MS-DOS/PC-DOS 5.0 oder höher, Windows 3.x, Windows
95/98 oder Windows NT 4.0.
• 8 MB oder mehr Arbeitsspeicher (RAM)
• 5 MB-Festplattenspeicher
• Drucker mit DB25-Anschluß
• 3,5-Zoll-Diskettenlaufwerk
DE
Deutsch
45
Page 46

Einleitung
Vorsichtsmaßnahmen
Installation
Meiden Sie hohe Luftfeuchtigkeit oder Temperatur,
mechanische Erschütterungen und direkte Sonneneinstrahlung.
Betrieb
• Stellen Sie das Laufwerk nur auf eine feste, ebene Fläche.
• Das Laufwerk während des Betriebs nicht bewegen, da dies
zu Störungen beim Lesen oder Schreiben führen kann.
• Setzen Sie das Laufwerk keinen plötzlichen
Temperaturschwankungen aus, da dies zu Kondensation im
Laufwerk führen kann. Sollte sich die Umgebungstemperatur
plötzlich ändern, warten Sie mindestens eine Stunde, bevor
Sie das Laufwerk ausschalten. Benutzung unmittelbar nach
einer starken Temperaturänderung kann zu Störungen führen.
Transport
• Bewahren Sie die Originalverpackung für einen späteren
Transport des Gerätes auf.
• Vor dem Transport des Gerätes entnehmen Sie stets die
Diskette.
Allgemeine Sicherheitsbestimmungen
• Sollte ein Fremdkörper in das Laufwerk geraten, ziehen Sie
stets den Netzstecker, und lassen Sie das Gerät vor erneuter
Inbetriebnahme von einem qualifizierten Fachmann
überprüfen.
• Achten Sie darauf, daß keine Fremdkörper in die DC IN 5VBuchse gelangen.
Stromversorgung
• Ziehen Sie das Netzkabel nur an seinem Stecker aus der
Buchse.
• Schalten Sie die Stromzufuhr des Laufwerks durch Ziehen
des Netzsteckers aus.
46
Page 47

Laufwerk
HiFD/Diskette
• Setzen Sie das Laufwerk weder Hitze oder direktem
Sonnenlicht (z.B. in sonnenbeschienenen Autos) noch Staub,
Sand, Feuchtigkeit, Regen oder mechanischen
Erschütterungen aus.
• Sollte das Gerät beim Radio- oder Fernsehempfang Störungen
hervorrufen, stellen Sie es an einem anderen Ort auf.
Befolgen Sie bitte folgende Vorsichtsmaßnahmen, um die
Daten auf der Diskette zu schützen:
• Vermeiden Sie die Nähe von Magneten oder magnetischen
Feldern (TV, Radio).
• Vermeiden Sie Hitze und direktes Sonnenlicht.
• Berühren Sie unter keinen Umständen die
Diskettenoberfläche (öffnen Sie den Verschluß nicht
manuell), da die Daten durch Schmutz oder Kratzer an der
Oberfläche unlesbar werden und die Diskette nicht mehr
verwendbar ist.
• Die HiFD-Diskette darf nicht mit Flüssigkeit in Berührung
kommen.
• Bewahren Sie die Disketten in der dafür vorgesehenen Box
und nicht im Laufwerk auf.
Achtung
Legen Sie niemals eine für gewöhnliche Diskettenlaufwerke
vorgesehene Reinigungsdiskette in das HiFD-Laufwerk ein,
da es dadurch beschädigt wird.
47
Page 48

Installation
Installation
Packungsinhalt
Vergewissern Sie sich, daß Ihre Packung vollständig ist. Ist
dies nicht der Fall, wenden Sie sich an Ihren Händler vor Ort
oder an Sony.
HiFD-Laufwerk
Schnittstellenkabel
48
Netzkabel
Netzadapter
SA10-0515V
Installationssoftware
(2 Disketten)
Leere HiFD-Diskette
(200 MB)
Kurzanleitung
Bedienungsanleitung
Garantiekarte
Page 49

Vorder-/Rückseite des Laufwerks
Vorderansicht
DiskettenEinschub
1 Disketten-Einschub
Legen Sie die HiFD oder Floppy-Diskette hier ein.
2 200 MB-Anzeige
Diese Anzeige leuchtet grün, wenn eine HiFD–Diskette
eingelegt und das Laufwerk eingeschaltet ist.
3 In-Betrieb-Anzeige
Diese Anzeige blinkt bernsteinfarben wenn das HiFDLaufwerk arbeitet.
200 MB-Anzeige
2
In-Betrieb-Anzeige
31
EJECT-Taste
5
POWER-Anzeige
4
Anzeige Status
Blinkt bernsteinfarben Suchen, Lesen und Schreiben
4 POWER-Anzeige
Diese Anzeige leuchtet grün wenn die Stromzufuhr des
HiFD-Laufwerks eingeschaltet ist.
5 EJECT-Taste
Durch Betätigung dieser Taste wird die HiFD oder FloppyDiskette ausgeworfen.
Hinweis
Die EJECT–Taste nur leicht antippen, da ansonsten das HiFD–
Laufwerk beschädigt werden kann.
49
Page 50

Installation
Rückansicht
DC IN-
1 2 3
Anschluß
Druckeranschluß
PC-Anschluß
1 DC IN-Anschluß
Schließen Sie hier den mitgelieferten Netzadapter an.
2 Druckeranschluß
Wenn Sie einen Drucker verwenden, schließen Sie das
Druckerkabel (nicht im Lieferumfang) hier an.
3 PC-Anschluß
Schließen Sie das mitgelieferte Schnittstellenkabel hier an.
Hinweis
Das Laufwerk kann in senkrechter oder waagerechter Lage
verwendet werden.
50
Page 51

Hardware-Installation
1 Suchen Sie den Anschluß.
Der Parallelanschluß verfügt über 25 Pole und kann
sowohl senkrecht als auch waagerecht angebracht sein. Er
ist möglicherweise mit “Drucker” oder einem
Druckersymbol beschriftet.
2 Schließen Sie das Drucker-Kabel an.
Ziehen Sie das Kabel des angeschlossenen Druckers heraus
und schließen es an den mit “To Printer” beschrifteten
HiFD-Anschluß an.
25-polige parallele PC-Schnittstelle
Druckerkabel
51
Page 52

Installation
3 Schließen Sie das vorgesehene Kabel an den anderen
HiFD-Anschluß an.
4 Schließen Sie das andere Ende (25 Pole) desselben
Schnittstellenkabels an den Parallelanschluß des PCs an.
52
Mit einem der
Anschlüsse verbinden
Hinweis
Zerren Sie nicht an den Kabeln, da dadurch Schäden entstehen
können.
Page 53

Anschluß an eine Netz-Steckdose
Schließen Sie das Laufwerk an eine Netz-Steckdose an (siehe
Abbildung).
zur Steckdose
zum
DC IN 5V-Anschluß
Netzadapter
(im Lieferumfang)
Netzkabel
(im Lieferumfang)
Die Stromzufuhr des Laufwerks schalten Sie durch Ziehen des
Netzsteckers aus, da das Laufwerk über keinen eigenen
Netzschalter verfügt.
Hinweis
Netzkabel können von Land zu Land verschieden sein.
Benutzen Sie nur das mitgelieferte Kabel und den Adapter.
Steckerpolung
53
Page 54

Installation
Software-Installation
Vor Gebrauch des Laufwerks muß die HiFDTreibersoftware von Sony installiert werden.
Für Windows 3.x/95/98 und NT4.0
1 Installieren Sie das HiFD-Laufwerk und schalten Sie es
ein.
2 Schalten Sie den PC ein.
3 Legen Sie “Diskette 1” in das Diskettenlaufwerk des PCs
ein.
4 Für Windows95/98/NT4.0 klicken Sie den Start-Button auf
der Task-Leiste und wählen Sie Ausführen.
54
5 Geben Sie “A:\setup.exe” ein und klicken Sie auf OK und
folgen Sie den Anweisungen des Installationsprogramms.
Die Installation ist damit beendet, der Computer kann neu
gestartet werden.
Page 55

6 Für Windows 3.x, klicken Sie im “Programm-Manager”
auf das Menü Datei und wählen dann Ausführen.
7 Geben Sie “A:\setup.exe” ein und klicken dann auf OK.
8 Bei der Anzeige dieses Bildschirms folgen Sie weiterhin
den Anweisungen des Installationsprogramms.
55
Page 56

Installation
Deinstallieren
Zum Deinstallieren klicken Sie auf der Task-Leiste auf Start,
dann auf Programme, Sony HiFD, und wählen Sie
DEINSTALLATION.
Deinstallieren unter Windows 3.x
Zur Deinstallation der Treiber unter Windows 3.x klicken Sie
in der
Sony HiFD-Gruppe auf das Deinstallationssymbol.
DOS-Installation
1 Schließen Sie das HiFD-Laufwerk an den PC an.
2 Schalten Sie den PC ein. Legen Sie die mitgelieferte “Disk
2” in das Diskettenlaufwerk des PCs ein.
3 Geben Sie “A:” <Eingabe> und “cd dos” <Eingabe> ein.
Deinstallation
56
4 Geben Sie “Install.exe” <Eingabe> ein.
5 Starten Sie den Computer neu.
Das Installationsprogramm fügt der Datei “Config.sys” Labels
hinzu, was zu Fehlermeldungen führen kann. Diese sind bei
funktionierendem System nicht zu beachten.
Zur Deinstallation ändern Sie das Verzeichnis, in dem die
HiFD-Software instaliert wurde, und geben Sie
uninstall.exe <Eingabe> ein.
Starten Sie den Computer neu.
Page 57

Bedienung
Gebrauch des HiFD-Laufwerks
Befolgen Sie die folgenden Schritte, um das Gerät
einzuschalten.
Die Reihenfolge muß beachtet werden.
1 Schließen Sie das 44-Pol-Schnittstellenkabel an das
Laufwerk an.
2 Schließen Sie das andere Ende des Kabels an den
Parallelanschluß des PCs an.
3 Für den Drucker ist der Druckeranschluß zu benutzen.
4 Stecken Sie das Stromanschlußkabel in den dafür
vorgesehenen Ausgang.
5 Schalten Sie den PC ein. Die HiFD-Software muß
installiert sein, damit das Laufwerk benutzt werden kann.
Hinweis
Damit Windows das HiFD-Laufwerk erkennen kann, muß
dieses vor Starten des PCs eingeschaltet werden.
57
Page 58

Bedienung
Einlegen einer Diskette
Legen Sie eine HiFD-Diskette in das Laufwerk.
Die Diskette muß zunächst formatiert werden. Im Handel
erhältliche vorformatierte 200 MB-HiFD- oder 1,44 MB-DOSDisketten müssen nicht nochmals formatiert werden. Genauere
Informationen zur Kompatibilität finden Sie unter
“Verwendbare Disketten” auf Seite 59.
HiFD/Floppy-Diskette
Entnehmen einer Diskette
Vergewissern Sie sich, daß die Betriebszustand-Anzeige nicht
leuchtet,
und drücken Sie auf die Auswurf-Taste.
Sollte sich die Lade nicht öffnen, wenden Sie sich an die
Hotline, deren Adresse Sie am Ende dieser
Bedienungsanleitung finden.
58
InBetriebAnzeige
EJECTTaste
Page 59

Schreibschutz von Disketten
Damit Daten nicht versehentlich gelöscht werden, haben
Disketten einen “Schreibschutz”, dessen Einstellungen unten
abgebildet sind.
Rückseite einer Floppy-Diskette
Nicht
schreibgeschützt
Rückseite einer HiFD-Diskette
Nicht
schreibgeschützt
Schreibgeschützt
Verwendbare Disketten
In diesem Laufwerk können HiFD, 2HD and 2DD 3,5-ZollDisketten mit folgenden Eigenschaften benutzt werden:
Schreibgeschützt
Disketten-Typ Eigenschaften
2HD 1,44 MB Formatieren, Lesen und Schreiben
2DD 720 kB Formatieren, Lesen und Schreiben
HiFD 200 MB Formatieren, Lesen und Schreiben
59
Page 60

Dienstprogramm
Dienstprogramm
Das Dienstprogramm “Connect It” ist im Lieferumfang des
HiFD-Lauf-werks enthalten. Es wird in der SONY HiFDProgrammgruppe oder in dem während der Installation
ausgewählten Verzeichnis des “Programme”–Menüs installiert.
Der folgenden Beschreibung liegt Windows 95/98 zugrunde.
DOS & Windows 3.x verfügen über kein “Connect It”Dienstprogramm.
Ausführen von “Connect It”
Klicken Sie in der Task-Leiste auf Start, Programme und
SONY HiFD, und wählen Sie anschließend Connect It.
60
Ob die Eigenschaften des HiFD-Laufwerks angezeigt werden
hängt davon ab, ob das Laufwerk während des Startens des
PCs eingeschaltet war.
Wenn ja, erscheint [Connected] im Abschnitt [Device] des
Feldes [Properties]. Die Anschlußadresse, IRQ und der
Schreib-/Lese-Modus erscheinen ebenfalls in diesem Feld.
Wenn es nicht eingeschaltet war, erscheint [Disconnected] im
Abschnitt [Device] des Felds [Properties].
Page 61

Verbindung zum HiFD-Laufwerk herstellen
War das HiFD-Laufwerk beim Booten des PCs nicht
eingeschaltet, kann Windows das Laufwerk mit Hilfe von
“Connect It” erkennen.
1 Führen Sie “Connect It” aus.
2 Klicken Sie auf das [Connect]-Register und anschließend
Connect.
Im Abschnitt [Device] des Felds [Properties] erscheint
[Connected].
Verbindung zum HiFD-Laufwerk abbrechen
Wollen Sie die Verbindung zum HiFD-Laufwerk abbrechen,
ohne den PC auszuschalten, führen Sie die oben aufgeführten
Schritte aus. Wählen Sie jedoch statt Connect die Taste
Disconnect.
Unter NT kann die Funktion Verbindung/Verbindung
abbrechen nicht ausgeführt werden.
61
Page 62

Zusätzliche Information
Zusätzliche Information
Wartung, Reinigung des Gehäuses
Das HiFD-Laufwerk kann mit einem weichen, leicht mit
Wasser oder mildem Reinigungsmittel angefeuchteten Tuch
gereinigt werden. Benutzen Sie unter keinen Umständen
irgendein rauhes Material, Scheuer- oder Lösungsmittel.
Fehlerbehebung
Sollten Probleme auftreten, schauen Sie erst im Internet unter
http://www.sony-hifd.com nach, oder gehen Sie folgende Liste
durch, bevor Sie sich an die Sony-Hotline wenden.
Problem Ursache/Fehlerbehebung
Die POWER oder BUSY
Anzeige leuchtet nicht
obwohl die Stromzufuhr
eingeschaltet ist.
Das Laufwerk wird nicht
vom PC erkannt oder
arbeitet nicht ordnungsgemäß.
Das Laufwerk oder der
Netzadapter wird warm.
Überprüfen Sie, ob der Netzadapter
richtig angeschlossen ist.
Möglicherweise wurde die Schutzschaltung des Netzadapters aktiviert:
Lösen Sie die Kabelverbindung,
warten Sie einige Minuten und
stecken Sie die Kabel wieder ein.
Die Treiber sind möglicherweise nicht
installiert.
Das Schnittstellenkabel ist
möglicherweise nicht richtig
angeschlossen.
Ein Kontaktstift des Schnittstellen-kabels
ist möglicherweise verbogen oder
abgebrochen.
In diesem Fall muß nicht unbedingt
ein Fehler vorliegen.
(Wenn eine sehr hohe Temperatur auftritt,
sollten Sie den Netzadapter lösen und
sich an die Hotline wenden.)
Service-Kontaktadressen in Europa
Bei weiteren Fragen wenden Sie sich bitte an Ihren Fachmann
vor Ort.
Für Mitteleuropa (Deutsch oder Englisch) wenden Sie sich
bitte an die Hotline unter folgenden Nummern:
62
Page 63

Tel. +49 (0) 2389 – 951047 oder SONYHOTLINE@SUPLIE.COM
(Montag – Donnerstag, 8.00 – 16.30 Uhr / Freitag, 8.30 – 14.00 Uhr)
Für Frankreich oder französchsprachige Länder (Schweiz,
Benelux)
wählen Sie bitte:
Tel. +33 (0)1 55 87 08 66 E-mail: HT-SONY@nati.fr
(Montag – Freitag, 9.00 bis 18.00 Uhr)
Für DK, N, SW & FIN wählen Sie bitte: Tel. +47 (0) 6281
8666
(Montag – Freitag, 8.30 bis 16.00 Uhr Norwegischer Zeit)
In GB wählen Sie bitte: Tel. 0870 900 8166
(Montag – Freitag, 8.45 bis 17.00 Uhr)
Sie können sich diese Information herunterladen von:
http://www.sony-cp.com
Technische Daten
Informationen zu den Leistungsmerkmalen finden Sie auch auf
Seite 45 unter “Eigenschaften”.
Betriebs- und
Lagerungsbedingungen
Temperatur im Betrieb
5 bis 40°C (41 bis 104°F)
Luftfeuchtigkeit im Betrieb
20 to 80% (ohne
Kondensierung)
Lagerungstemperatur
-20 bis 55°C (ohne
Kondensierung)
Stromaufnahme
Stromquelle
5 Volt-Eingang, versorgt von
einem Netzadapter für 100
bis 240 V Netzanschluß
Abmessungen
143 × 42 × 214 mm (B/H/T)
Gewicht
950 g (nur Laufwerk)
Hinweis
Änderungen an Design und
technischen Daten vorbehalten.
63
Page 64

Índice
Índice
Introducción................................................................... 65
Características...............................................................65
Requerimientos del sistema ..........................................65
Precauciones .................................................................66
Instalación...................................................................... 68
Contenido del embalaje ................................................68
Panel frontal y posterior................................................69
Instalación del hardware ...............................................71
Conexión a la red ..........................................................73
Instalación del software ................................................74
Instalación bajo DOS ....................................................76
Funcionamiento............................................................. 77
Utilización de la unidad HiFD ......................................77
Insertar un disquete.......................................................78
Extracción del disquete.................................................78
Protección de los datos contra la escritura....................79
Disquetes compatibles ..................................................79
El programa de utilidades............................................. 80
Utilización de “Connect It” ..........................................80
Conexión de la unidad HiFD ........................................81
Desconexión de la unidad HiFD...................................81
Información adicional ................................................... 82
Mantenimiento, limpieza de la carcasa.........................82
Guía para la solución de problemas..............................82
Servicio técnico en Europa ...........................................82
Especificaciones ........................................................... 83
64
Table of Contens
Page 65

Introducción
Características
Esta unidad de disquete HiFD (disquete de alta capacidad) de
3,5 pulgadas ofrece las siguientes características:
• Capacidad de almacenamiento de 200 MB
• Compatibilidad con disquetes de 1,44 MB y de 720 kB
• Tiempo de acceso de alta velocidad (49 ms de media)
• Interface de puerto paralelo
• Conexión de la impresora a la unidad
• Velocidad de transferencia máx. de 600 kB/s (con puerto
EPP/ECP)
Requerimientos del sistema
• PC compatible con IBM, 486DX o superior
• MS-DOS/PC-DOS 5.0 o posterior, Windows 3.x, Windows
95/98 o Windows NT 4.0
• Mínimo de 8 MB de RAM
• 5 MB de espacio libre en el disco duro
• Puerto de impresora con conector DB25
• Unidad de disquete de 3.5"
ES
Español
65
Page 66

Introducción
Precauciones
Durante la instalación
Evite zonas con humedad o temperaturas elevadas, vibraciones
mecánicas o luz del sol directa.
Durante el funcionamiento
• Utilice la unidad solamente en una superficie estable y plana.
• No mueva la unidad mientras esté funcionando, pueden
producirse errores.
• Evite cambios repentinos de temperatura, ya que se puede
producir condensación. Si la temperatura ambiental cambiara
de repente, espere al menos una hora antes de apagar la
unidad. Usar la unidad
inmediatamente después de un cambio brusco de temperatura
puede provocar fallos.
Durante el transporte
• Conserve el embalaje original para su uso futuro.
• Siempre ha de sacarse el disquete antes de mover la unidad.
Seguridad en general
• Si cualquier objeto sólido cayera dentro de la unidad,
desconéctela, y antes de usarla de nuevo, debe inspeccionada
por personal cualificado.
• No coloque objetos extraños en el conector CC de 5V.
Fuente de alimentación
• Desenchufe el cable de la red únicamente por el enchufe.
• Apague la unidad solamente desenchufando el adaptador de la
pared.
En la disquetera
• Evite fuentes de calor (incluyendo vehículos cerrados bajo el
sol) y exposición directa al sol. Evite exponerla al polvo o a la
arena, a la humedad, a la lluvia y a choques mecánicos.
• Si la disquetera interfiere con la recepción de radio o de
televisión, utilícela en otro lugar.
66
Page 67

Manejo del disquete/HiFD
Siga las siguientes instrucciones para proteger el disquete y los
datos:
• Evite imanes y campos magnéticos (TV, radio).
• Evite fuentes de calor y la exposición directa al sol.
• No tocar nunca la superficie del disquete (no abrir la
ventanilla con la mano), la suciedad o las marcas en la
superficie pueden dejar los datos ilegibles y el disquete
inservible.
• Evite que los líquidos entren en contacto con los disquetes/
HiFD.
• Almacene el disquete en su caja, no en la disquetera.
Precaución
Los disquetes de limpieza para disqueteras normales
dañarán esta unidad. No introduzca nunca uno de estos
disquetes en esta unidad.
67
Page 68

Instalación
Instalación
Contenido del embalaje
Compruebe que los siguientes elementos están incluidos en el
embalaje.
Si faltase alguno, póngase en contacto con el distribuidor o con
Sony.
Unidad HiFD
Cable de Interface
68
Cable de red AC
Adaptador de red AC
SA10-0515V
2 disquetes de Software
Disquete HiFD en blanco
(200 MB)
Guía de inicio rápido
Guía de instrucciones
Tarjeta de garantía/registro
Page 69

Panel frontal y posterior
Vista frontal
1 Disquetera
Inserte un disquete o un HiFD
2 Indicador de 200 MB
Cuando un disquete de HiFD esté introducido y la unidad
HiFD esté encendida, el indicador estará en verde.
3 Indicador de ACTIVIDAD
Este indicador estará en ambar mientras la unidad HiFD
esté en funcionamiento.
Disquetera
Indicador de 200 MB
2
Indicador de
31
ACTIVIDAD
4
Botón de
5
EXPULSION
Indicador de
ENCENDIDO
Estado Significado
Luz ambar Durante búsqueda, lectura y escritura
4 Indicador de ENCENDIDO
Este indicador estará en verde cuando la unidad HiFD esté
encendida.
5 Botón de EXPULSION
Presione este botón para extraer el disquete o el HiFD de la
unidad.
Nota
No presione el botón de EXPULSIÓN demasiado fuerte.
Esto puede dañar la unidad HiFD.
69
Page 70

Instalación
Vista posterior
Conector del
Clavija DC IN
1 2 3
puerto de
impresora
Conector de PC
1 Clavija DC IN
Conecte el adaptador de red AC suministrado aquí.
2 Conector del puerto de impresora
Cuando use una impresora, conecte su cable (no
suministrado) aquí.
3 Conector de PC
Conecte el cable de interface suministrado aquí.
Nota
La unidad puede ser utilizada tanto horizontal como
verticalmente.
70
Page 71

Instalación del hardware
1 Localice el puerto de conexión.
El puerto paralelo, es un conector de 25 contactos, en
orientación vertical u horizontal. Puede que esté marcado
“impresora” o con símbolo de impresora.
2 Conecte el cable de la impresora
Si hubiera una impresora conectada, desconecte el cable y
conéctelo al puerto de la unidad HiFD con la indicación
“To Printer” (a la impresora).
Puerto paralelo de 25 pin del PC
Cable de impresora
71
Page 72

Instalación
3 Conecte el cable que se suministra al otro puerto de la
unidad HiFD.
4 Conecte el otro extremo del mismo cable (25 contactos) al
puerto paralelo del PC.
72
Conectelo a
otro puerto
Nota
Evite tirar de los cables, podría causar daños.
Page 73

Conexión a la red
Enchufe la unidad a la red de la forma en que se indica.
Al enchufe de AC
A la clavija DC IN 5V
Adaptador de red AC
(suministrado)
Cable de red AC
(suministrado)
Para apagar la unidad, desenchúfelo de la red.
La unidad no tiene interruptor propio.
Nota
El cable para enchufar el adaptador puede variar de un país a
otro. Use solamente el cable y el adaptador que se suministran.
Polaridad del conector
73
Page 74

Instalación
Instalación del software
Es necesario instalar desde el disquete el software de
controlador para la unidad HiFD de Sony antes de poder usar la
unidad.
Para Windows 3.x/95/98 y NT4.0
1 Instale el hardware HiFD y encienda la unidad.
2 Encienda el PC.
3 Introduzca el disquete denominado “Disk 1” en la
disquetera del PC.
4 Para Windows95/98/NT4.0, haga clic en el botón Inicio de
la barra de tareas, y haga clic en Ejecutar.
74
5 Teclee “A:\setup.exe” y haga clic sobre Aceptar.
Una vez terminada la instalación, se puede reinicializar el
ordenador.
Page 75

6 Para Windows 3.x, haga clic en el menú Archivos en el
“Administrador de Programas” y después sobre Ejecutar.
7 Teclee “A:\setup.exe” y confirme con el botón Aceptar.
8 Cuando aparezca la pantalla siguiente, siga las
instrucciones que muestra el programa de instalación.
75
Page 76

Instalación
Para desinstalar
Para desinstalar, haga clic sobre el botón Inicio en la barra de
tareas, seleccione Programas, Sony HiFD y elija la opción
UNINSTALL (desinstalar).
Para desinstalar bajo Windows 3.x
En el grupo Sony HiFD, haga clic en el icono de desinstalación
para quitar los controladores.
Reinicialice el PC después de instalar o desinstalar.
Instalación bajo DOS
1 Conecte la unidad HiFD al PC y enchufe la unidad.
2 Encienda el PC. Introduzca el disquete “Disk 2” en la
disquetera del PC.
3 Teclee “A:” <Intro> y a continuación “cd dos” <Intro>
4 Teclee “Install.exe” <Intro>.
5 Reinicialice el PC.
El instalador añade algunas etiquetas al archivo Config.sys que
podrían generar algunos mensajes de error, pero se pueden
ignorar cuando el sistema funciona.
Para desinstalar
cambiar al directorio donde se instaló el software de HiFD y
teclear:
Reinicializar el PC.
76
uninstall.exe <Intro>.
Page 77

Funcionamiento
Utilización de la unidad HiFD
Siga estas instrucciones para conectar y encender el sistema.
Hay que realizar las operaciones en el orden indicado.
1 Conecte el cable de interface de 44 contactos a la unidad.
2 Conecte el otro extremo del cable al puerto paralelo del
PC.
3 Si se usa una impresora, conéctela al puerto de impresora
de la unidad.
4 Enchufe el adaptador a la pared.
5 Encienda el PC. Es necesario instalar el software de HiFD
primero antes de que funcione la unidad.
Nota
Para que Windows reconozca la unidad HiFD, ésta deberá estar
enchufada antes de encender el PC.
77
Page 78

Funcionamiento
Insertar un disquete
Inserte un disquete o HiFD en la unidad.
Antes de que se pueda usar un disquete, es necesario
formatearlo.
De usarse discos HiFD de 200 MB o disquetes de 1,44 MB
preformateados bajo DOS, no será necesario formatearlo de
nuevo. Ver Disquetes compatibles en la página 79 para detalles
sobre la compatibilidad.
Disquete HiFD/Floppy
Extracción del disquete
Confirme que el indicador de actividad esté apagado y pulse el
botón de expulsión.
Si no saliera el disquete al pulsar el botón de expulsión,
póngase en contacto con la Línea de atención al cliente en el
número que se indica al final de este manual.
78
Indicador de
ACTIVIDAD
Botón de
EXPULSION
Page 79

Protección de los datos contra la escritura
Los disquetes tienen una pestaña de “protección” contra la
escritura para evitar que se puedan perder datos
accidentalmente. Éstas son sus posiciones.
Vista posterior del disquete
Escritura
permitida
Protección
contra escritura
Vista posterior del HiFD
Escritura
permitida
Protección
contra escritura
Disquetes compatibles
Esta unidad se puede usar con disquetes HiFD, 2HD y 2DD de
3.5".
Éstas son sus capacidades una vez formateados:
Tipo de soporte Capacidades
2HD 1.44 MB Formato, lectura y escritura
2DD 720 kB Formato, lectura y escritura
HiFD 200 MB Formato, lectura y escritura
79
Page 80

El programa de utilidades
El programa de utilidades
El programa de utilidades “Connect It” viene con la unidad
HiFD.
Se instala bajo el grupo o carpeta SONY HiFD, seleccionado
en el menú de Programas durante la instalación. La siguiente
descripción está basada en Windows 95/98. Connect It no está
disponible bajo DOS y Windows 3.x.
Utilización de “Connect It”
Haga clic en el botón Inicio de la barra de tareas, elija
Programas,
y SONY HiFD, y sobre el botón Connect It.
80
Las propiedades que aparecen bajo HiFD dependen de que
haya sido enchufado antes de inicializar el PC.
Si la unidad estaba enchufada, [Connected] (Conectado)
aparece bajo [Device] (Dispositivo) en el recuadro [Properties]
(Propiedades).
También aparecerán en este recuadro la dirección del puerto, el
IRQ y el modo de lectura/escritura del HiFD.
Si la unidad no estaba enchufada, se verá [Disconnected]
(Desconectado) bajo [Device] (Dispositivo) en recuadro
[Properties] (Propiedades).
Page 81

Conexión de la unidad HiFD
Si se arrancó el PC con la unidad HiFD desenchufada, se puede
usar “Connect It” para hacer que Windows reconozca la
unidad.
1 Ejecute “Connect It”
2 Haga clic en la ficha [Connect] (Conectar), y en el botón
Connect.
Aparecerá [Connected] (Conectado) bajo [Device]
(Dispositivo) en el recuadro [Properties].
Desconexión de la unidad HiFD
Para quitar la unidad HiFD sin tener que apagar el PC, realice
las operaciones anteriores, pero en vez de seleccionar el botón
Connect (conectar), seleccione Disconnect (Desconectar).
La función de conectar/desconectar no está soportada bajo NT.
81
Page 82

Información adicional
Información adicional
Mantenimiento, limpieza de la carcasa
La carcasa de la unidad HiFD se puede limpiar con un paño
ligeramente humedecido con agua o un detergente suave. No
use ningún tipo de estropajo, detergente en polvo o disolventes.
Guía para la solución de problemas
En el caso de encontrar algún problema o dificultad, consulte
en Internet bajo la direccion http://www.sony-hifd.com.
Consulte la siguiente tabla antes de ponerse en contacto con la
línea telefónica de atención al cliente.
Problemas Causa/Solución
El indicador de
ENCENDIDO o
ACTIVIDAD no se ilumina
estando encendida la
unidad.
El PC no reconoce la
unidad o ésta no funciona
correctamente.
La unidad o el adaptador
de red AC se calientan.
Compruebe que el adaptador de red AC
esté correctamente conectado.
El circuito de protección del adaptador de
red AC puede haber cortado la
alimentación: pruebe a desconectarla,
espere unos minutos, y conectela de
nuevo.
La unidad puede no estar instalada.
El cable de interface puede no estar
conectado correctamente.
Un pin de conexión del cable de interface
puede estar doblado o roto.
No es por mal funcionamiento
necesariamente (si se calentara mucho,
desconecte el adaptador de red AC y
contacte con el centro de soporte técnico)
Servicio técnico en Europa
Para cualquier información relativa a soporte o servicio
técnico, diríjase a los centros de servicio técnico locales.
Para Europa central (alemán o inglés) marque el número:
Tel. +49 (0) 2389 – 951047 o SONY-
HOTLINE@SUPLIE.COM
(Lunes – jueves, de 08.00 a 16.30 / Viernes de 08.30 a 14.00)
82
Page 83

Para Francia o paises de habla francesa (Suiza, Benelux), por
favor llame:
Tel. +33 (0)1 55 87 08 66 E-mail: HT-SONY@nati.fr
(Lunes – viernes, de 09.00 a 18.00)
Para DK, N, SW y FIN, marque: Tel. +47 (0) 6281 8666
(Lunes – viernes, de 08.30 a 16.00 hora noruega)
En el Reino Unido, marque: Tel. 0870 900 8166
(Lunes – viernes, de 08.45 a 17.00)
Toda esta información y más se puede encontrar en la dirección
siguiente de Internet:
http://www.sony-cp.com
Especificaciones
Consulte “Características” en la página 65 para conocer otras
especificaciones.
Condiciones ambientales de
funcionamiento y almacenaje
Temperatura de funcionamiento
5 a 40°C (41 a 104°F)
Humedad de funcionamiento
20 a 80%
(sin condensación)
Temperatura de almacenaje
-20 a 55°C
(sin condensación)
Alimentación
Fuente de alimentación
Conector de 5 voltios para
adaptador de red
enchufado a un voltaje
entre 100 y 240 V, CA.
Dimensiones
143 × 42 × 214 mm
(Ancho/Alto/Profundo)
Peso
950 g (unidad solamente)
Nota
Todas las especificaciones y el diseño
pueden ser cambiados sin previo
aviso.
83
Page 84

Sommario
Sommario
Introduzione ................................................................... 85
Installazione ................................................................... 88
Funzionamento .............................................................. 97
Il programma “Connect It”.......................................... 100
Informazioni supplementari........................................ 102
Specifiche..................................................................... 103
Caratteristiche ...............................................................85
Requisiti minimi di sistema ..........................................85
Precauzioni ...................................................................86
Contenuto della confezione ..........................................88
Vista anteriore e posteriore del drive............................89
Installazione hardware ..................................................91
Collegamento a una presa c.a. ......................................93
Installazione software ...................................................94
Installazione DOS .........................................................96
Uso del drive HiFD.......................................................97
Inserimento di un disco.................................................98
Espulsione di un disco ..................................................98
Protezione dei dati dalla scrittura .................................99
Floppy disk utilizzabili .................................................99
Esecuzione di “Connect It”.........................................100
Collegamento del drive HiFD.....................................101
Scollegamento del drive HiFD ...................................101
Manutenzione e pulizia del rivestimento esterno .......102
Soluzione dei problemi ...............................................102
Assistenza e supporto tecnico in Europa ....................102
84
Table of Contens
Page 85

Introduzione
Caratteristiche
Questo drive HiFD (High-Capacity Floppy Disk, floppy disk
ad alta capacità) per floppy disk da 3,5 pollici presenta le
seguenti caratteristiche:
• Capacità di memorizzazione fino a 200 MB (disco
formattato).
• Compatibilità con i dischetti da 1,44 MB e da 720 KB.
• Elevata velocità di accesso ai dati (49 ms in media).
• Interfaccia parallela.
• Connettore stampante per collegare la stampante al drive.
• Velocità di trasferimento massima di 600 KB/s (con porta
abilitata ai protocolli EPP/ECP).
Requisiti minimi di sistema
• PC IBM compatibile, processore 486DX o superiore
• MS-DOS/PC-DOS 5.0 o versione successiva, Windows 3.x,
Windows 95/98 o Windows NT 4.0
• 8 MB di RAM
• 5 MB di spazio libero su disco rigido
• Porta parallela provvista di connettore DB25
• Drive per floppy disk da 3,5 pollici
IT
Italiano
85
Page 86

Introducción
Precauzioni
Installazione
Funzionamento
Trasporto
Evitare di installare il drive in luoghi soggetti a temperature o
tassi di umidità elevati, a vibrazioni meccaniche e alla luce
diretta del sole.
• Collocare il drive esclusivamente su una superficie piana e
resistente.
• Non spostare il drive durante il funzionamento: potrebbero
verificarsi errori in lettura o scrittura.
• Evitare sbalzi improvvisi di temperatura, onde impedire la
formazione di condensa all’interno del drive. Se la
temperatura ambiente dovesse cambiare improvvisamente,
attendere almeno un’ora prima di accendere il drive.
L’accensione del drive dopo un improvviso sbalzo di
temperatura potrebbe comprometterne il funzionamento.
• Conservare l’imballo originale per eventuali trasporti del
drive.
• Rimuovere sempre il dischetto prima di spostare il drive.
Norme generali di sicurezza
• Se un oggetto solido dovesse entrare nel drive, scollegarlo e
prima di riaccenderlo, farlo controllare da personale
qualificato.
• Non inserire oggetti estranei nel jack di ingresso da 5 volt c.c.
Precauzioni per l’uso dei cavi
• Per estrarre il cavo di alimentazione c.a., afferrarlo
esclusivamente dall’estremità provvista di spina.
• Per spegnere il drive, disinserire il cavo di alimentazione c.a.
dalla presa a parete.
86
Page 87

Precauzioni per il drive
• Evitare di esporre il drive a fonti di calore (inclusa la
permanenza del drive a bordo di veicoli esposti al sole) e alla
luce solare diretta. Evitare inoltre che venga a contatto
con polvere o sabbia, umidità, pioggia e che venga sottoposto
a urti meccanici.
• Cambiare la posizione del drive se dovesse provocare
interferenze alla ricezione radiotelevisiva.
Gestione dei floppy disk/HiFD
Per proteggere i dischetti e i dati:
• Evitare di avvicinare i dischetti a calamite e campi magnetici
(TV, radio).
• Evitare di esporli a fonti di calore e alla luce solare diretta.
• Non toccare mai la superficie dei dischi (evitare di aprire
manualmente la finestrella metallica), poiché se la superficie
si dovesse sporcare o graffiare, non sarà possibile leggere o
scrivere sui dischi stessi.
• Evitare che i floppy disk/HiFD entrino a contatto con
sostanze liquide.
• Non lasciare i dischetti nel drive, riporli nella custodia.
Attenzione
L’impiego dei dischetti di pulizia usati per i normali floppy
drive rischia di danneggiare questo drive. Non inserire mai
tali tipi di dischetti nel drive HiFD Sony.
87
Page 88

Installazione
Installazione
Contenuto della confezione
Accertarsi che la confezione contenga quanto illustrato di
seguito. Se dovesse mancare qualcosa, contattare il proprio
rivenditore locale o la Sony.
Drive HiFD
Cavo dati
88
Cavo di alimentazione
Adattatore di rete
SA10-0515V
Driver software (2 dischi)
Un disco HiFD vuoto
(200 MB)
Guida rapida
Istruzioni per l’uso
Garanzia/Cartolina di
registrazione
Page 89

Vista anteriore e posteriore del drive
Vista frontale
Vano di
inserimento
1 Vano di inserimento
Inserire qui un disco HiFD o un floppy.
2 LED HiFD
Quando il drive è acceso ed è inserito un disco HiFD il
LED è di colore verde.
3 LED lettura/scrittura
Quando il drive sta lavorando in lettura/scrittura il LED è
di colore ambra.
LED HiFD
2
LED lettura/scrittura
31
4
Pulsante di espulsione
5
LED di
alimentazione
Condizione Significato
Lampeggio color Ambra
Durante la ricerca dati, lettura e scrittura
4 LED di alimentazione
Quando il drive è acceso il LED è di colore verde.
5 Pulsante di espulsione
Premere questo pulsante per l’espulsione del disco.
Nota
Evitare di premere il pulsante di espulsione con violenza.
89
Page 90

Installazione
Vista posteriore
Connettore di
1 2 3
alimentazione
Connettore
della porta
stampante
Connettore della
porta PC
1 Connettore di alimentazione
Collegare qui l’adattatore di rete.
2 Connettore della porta stampante
Per l’utilizzo di una stampante, collegarne qui il relativo
cavo (non fornito).
3 Connettore della porta PC
Collegare qui il cavo dati fornito nella confezione del
drive.
Nota
Il drive può essere utilizzato sia in posizione orizzontale che
verticale.
90
Page 91

Installazione hardware
1 Individuare la porta di collegamento (parallela).
La porta parallela è un connettore a 25 pin disposto
verticalmente od orizzontalmente sul retro del PC. Può
essere identificata come “stampante” o con simbolo della
stampante.
2 Collegare il cavo dati.
Se è già collegata una stampante, scollegarne il cavo e
ricollegarlo alla porta dell’HiFD contrassegnata “To
Printer” (Alla stampante).
Porta parallela
Cavo stampante
91
Page 92

Installazione
3 Collegare il cavo dati in dotazione all’altra porta del drive
HiFD.
4 Collegare l’altra estremità (a 25 pin) dello stesso cavo dati
alla porta parallela del PC.
92
Collegare ad
entrambe le porte
Nota
Evitare di tirare eccessivamente i cavi per non danneggiarli.
Page 93

Collegamento a una presa c.a.
Collegare il drive a una presa c.a. come illustrato nella figura.
Alla presa c.a.
Al connettore DC IN 5V
Adattatore di rete
(fornito nella confezione)
Cavo di alimentazione
(fornito nella confezione)
Per spegnere il drive, disinserire il cavo di alimentazione c.a.
dalla presa.
Il drive HiFD non è dotato di interruttore di accensione e
spegnimento.
Nota
Il cavo di alimentazione c.a. in dotazione potrebbe variare a
seconda dei paesi. Usare solo il cavo e l’adattatore di
alimentazione forniti con il prodotto.
Polarità del connettore
93
Page 94

Installazione
Installazione software
Prima di usare il drive, occorre installare il driver software
HiFD Sony contenuto nei dischi forniti nella confezione.
Per Windows 3.x/95/98 e NT 4.0
1 Installare l’hardware HiFD e accendere il drive.
2 Accendere il PC e attendere il caricamento di Windows.
3 Inserire nel drive floppy del PC il disco 1 (Disk 1) fornito
con il drive Sony.
4 Per Windows 95/98/NT 4.0, fare clic sul pulsante Avvio/
Start nella barra delle applicazioni, quindi selezionare
Esegui.
94
5 Digitare “A:\setup.exe” e fare clic su OK.
Al termine dell’installazione, riavviare il computer.
Page 95

6 Per Windows 3.x, fare clic sul menu File del Program
Manager, quindi selezionare Esegui.
7 Digitare “A:\setup.exe” e fare clic su OK.
8 Quando compare la seguente schermata, continuare a
seguire le istruzioni visualizzate dal programma di
installazione.
95
Page 96

Installazione
Per disinstallare
Fare clic sul pulsante Avvio/Start nella barra delle applicazioni,
selezionare Programmi, Sony HiFD e quindi UNINSTALL.
Per disinstallare in Windows 3.x
Nel gruppo Sony HiFD fare clic sull’icona di disinstallazione
per rimuovere i driver.
Dopo l’installazione o la disinstallazione, riavviare il PC.
Installazione DOS
1 Collegare il drive HiFD al PC e alla presa di
alimentazione.
2 Accendere il PC e attendere il caricamento del DOS.
Inserire nel drive floppy del PC il disco 2 (Disk 2) fornito
con il drive Sony.
3 Digitare “A:” <Invio>, quindi digitare “cd dos” <Invio>
4 Digitare “Install.exe” <Invio>.
5 Riavviare il PC.
Il programma di installazione aggiunge dei comandi al file
Config.sys che possono causare la comparsa di messaggi di
errore. Tali messaggi possono essere ignorati durante il
funzionamento del sistema.
Per disinstallare
Passare alla directory in cui è stato installato il software di
HiFD e digitare
Riavviare il PC.
96
uninstall.exe <Invio>.
Page 97

Funzionamento
Uso del drive HiFD
Per collegare e alimentare il sistema, eseguire tutte le
operazioni nell’ordine riportato nel seguente elenco:
1 Collegare al drive il cavo dati a 44 pin in dotazione.
2 Collegare l’altra estremità del cavo alla porta parallela del
PC.
3 Se si usa una stampante, collegarla alla porta stampante del
drive HiFD.
4 Collegare il cavo di alimentazione c.a. a una presa a parete.
5 Accendere il PC. Per un corretto funzionamento del drive,
occorre prima installare il driver software Sony HiFD.
Nota
Per fare in modo che Windows riconosca il drive HiFD,
occorre accenderlo prima di avviare il PC.
97
Page 98

Funzionamento
Inserimento di un disco
Inserire un floppy disk/HiFD nel drive.
Prima di usare un floppy disk, occorre formattarlo. I dischi
preformattati da 200 MB HiFD o da 1,44 MB DOS reperibili in
commercio non devono essere formattati di nuovo. Per i
dettagli sulla compatibilità, vedere
Floppy disk utilizzabili a pagina 99.
Disco HiFD/Floppy disk
Espulsione di un disco
Controllare che la spia luminosa di attività (BUSY) non sia
accesa e premere il pulsante di espulsione EJECT.
Se il disco non viene espulso dopo avere premuto EJECT,
contattare la linea di assistenza diretta ai numeri riportati alla
fine di questo manuale.
98
LED
lettura/
scrittura
Tasto di
espulsione
Page 99

Protezione dei dati dalla scrittura
I floppy disk sono provvisti di una linguetta di protezione dalla
scrittura che impedisce la cancellazione accidentale dei dati. La
figura illustra le impostazioni della linguetta.
Vista posteriore di un Floppy Disk
Scrittura
abilitata
Vista posteriore di un disco HiFD
Scrittura
abilitata
Scrittura
disabilitata
Floppy disk utilizzabili
Questo drive consente di usare i dischi HiFD, 2HD e 2DD da
3,5 pollici. Le capacità di tali dischi formattati sono illustrate di
seguito:
Scrittura
disabilitata
Supporto Possibilità operative
2HD 1,44 MB Formattazione, lettura e scrittura
2DD 720 kB Formattazione, lettura e scrittura
HiFD 200 MB Formattazione, lettura e scrittura
99
Page 100

Il programma “Connect It”
Il programma “Connect It”
“Connect It” è un programma fornito con il drive HiFD e,
durante l’installazione, viene collocato nel gruppo o nella
cartella SONY HiFD, selezionabile dal menu Programmi. Le
istruzioni elencate di seguito si basano sull’uso di Windows 95/
98. Le versioni per DOS e Windows 3.x non sono dotate di
Connect It.
Esecuzione di “Connect It”
Fare clic sul pulsante Avvio/Start nella barra delle applicazioni,
selezionare Programmi, SONY HiFD e quindi Connect It.
100
Le proprietà del drive HiFD visualizzate possono variare se il
drive viene acceso prima di avviare il PC.
Se il drive è stato acceso, nel campo [Device] (Dispositivo) del
riquadro [Properties] (Proprietà) viene visualizzato
[Connected] (Collegato). Questo riquadro riporta anche
l’indirizzo della porta, l’IRQ (segnale di richiesta interruzione)
e la modalità di lettura/scrittura del drive HiFD.
Se il drive non è stato acceso, nel campo [Device] del riquadro
[Properties] viene visualizzato [Disconnected] (Non collegato).
 Loading...