

SONY SEL1635Z User Manual

交換レンズ
Interchangeable Lens
Objectif interchangeable
取扱説明書
Operating Instructions
Mode d’emploi
Manual de instrucciones
Vario-Tessar T
FE 16-35mm F4 ZA OSS
©2014 Sony Corporation
SEL1635Z
Printed in Thailand
2
3 4
1
5
–1
(1) (2)
–2
4-541-032-01(1)
E-mount
6
7
電気製品は、安全のための注意事項を守ら
ないと、人身への危害や火災などの財産へ
の損害を与えることがあります。
この取扱説明書には、事故を防ぐための重要な注意事項と製品
の取り扱いかたを示しています。この取扱説明書をよくお読
みの上、製品を安全にお使いください。お読みになったあとは、
いつでも見られる所に必ず保管してください。
この「取扱説明書」ではレンズの使いかたを説明
しています。使用上のご注意など、レンズに共
通したご注意や説明については別冊の「使用前
のご注意」でご覧頂けます。
必ずご使用の前に、本書と合わせてよくお読み
のうえでご使用ください。
マウントカメラ専用のレンズです。Aマウ
本機は
E
ントカメラにはお使いになれません。
Vario-Tessar T FE 16-35mm F4 ZA OSS
ニーとカールツァイスの共同開発によるEマウント
カメラ専用のレンズです。カールツァイスの品質
基準に基づき、カールツァイスによって設定された
品質保証システムにより生産されています。
また、
判相当の撮像素子範囲に対応してい
35mm
ます。
判相当の撮像素子搭載機種ではカメラ設定
35mm
によって
サイズで撮影が可能です。
APS-C
カメラの設定方法については、カメラの取扱説明書
をご覧ください。
(カメラ本体との互換情報については)専用サポー
トサイトでご確認ください。
http://www.sony.co.jp/DSLR/support/
使用上のご注意
レンズを取り付けてカメラを持ち運ぶときは、カメラと
レンズの両方をしっかり持ってください。
ズームにより繰り出されたレンズ部分でカメラを保持し
ないでください。
本機は防じん、防滴性に配慮して設計されていますが、防
水性能は備えていません。雨中使用時などは、水
からないようにしてください。
フラッシュ使用時のご注意
カメラ内蔵、もしくは同梱フラッシュではレンズがフ
ラッシュ光を妨げ、写真の下部に影ができることがあり
ます。
レンズの焦点距離に対応した照射角を持つ別売フラッ
シュをお使いください。
周辺光量について
レンズは原理的に画面周辺部の光量が中心部に比べ低下
します。周辺光量の低下が気になる場合は、開放絞りか
段絞り込んでご使用ください。
ら1〜
2
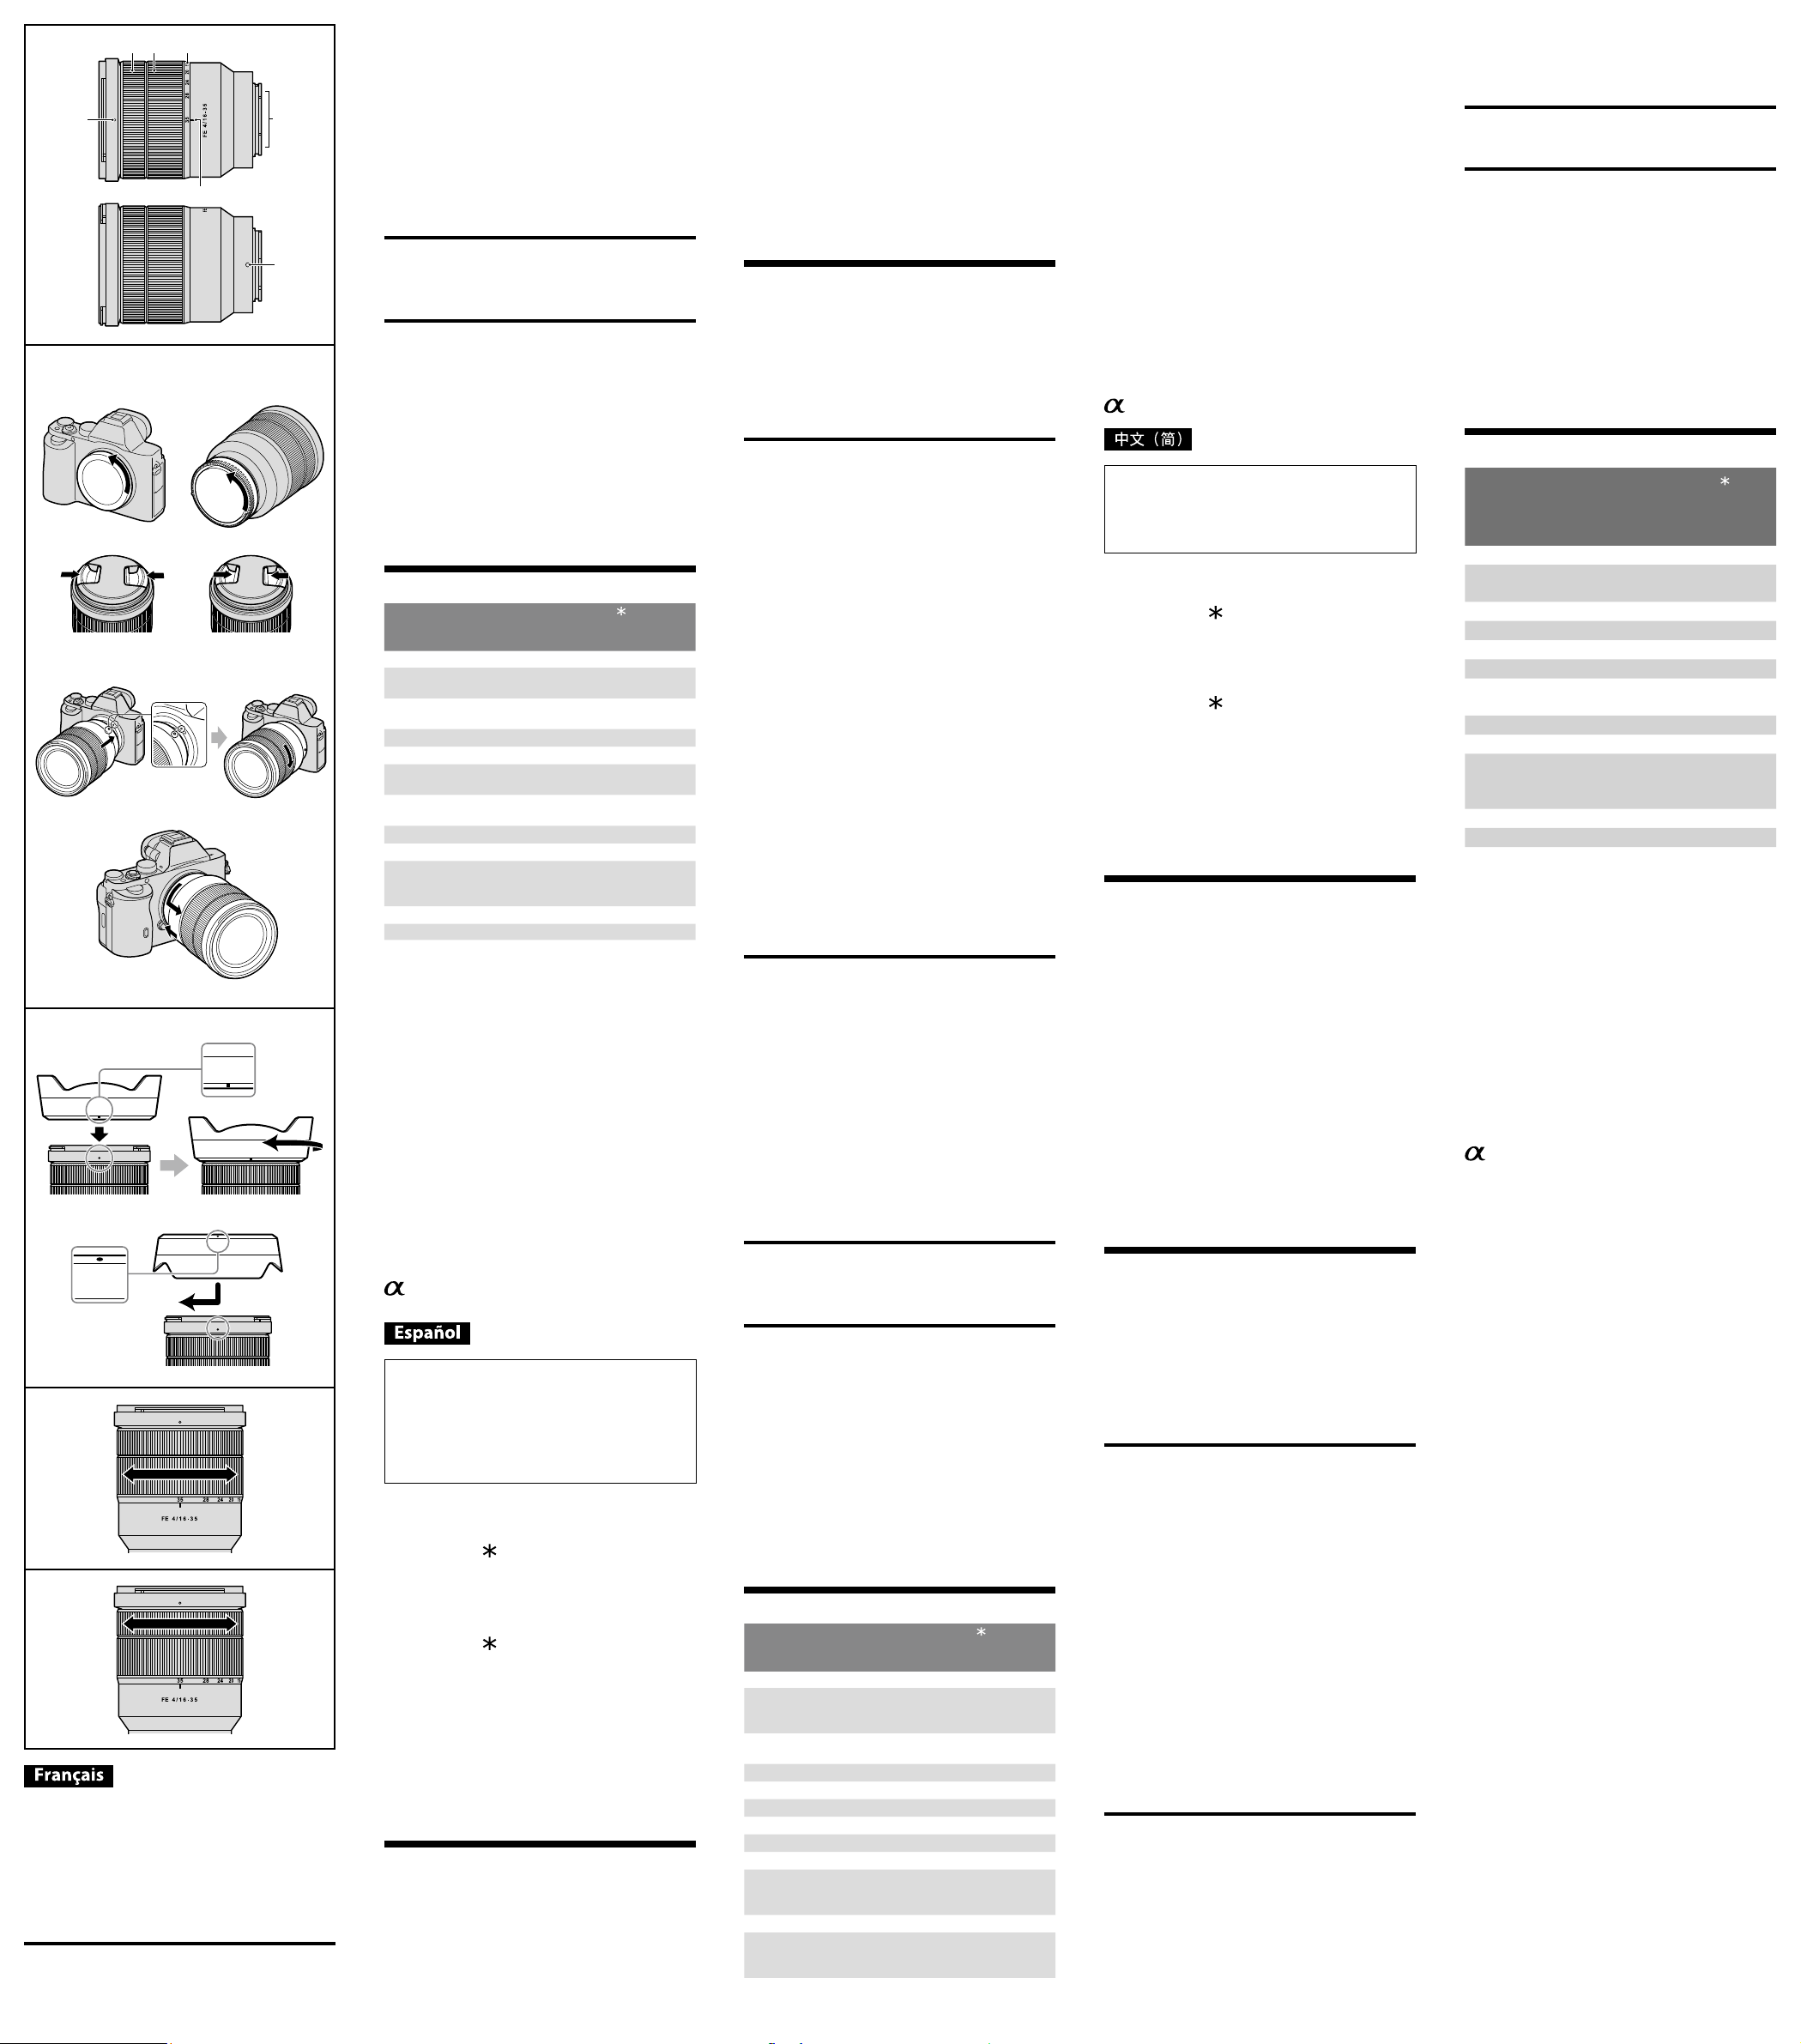
各部のなまえ
レンズフード指標
1
フォーカスリング
2
ズームリング
3
焦点距離目盛
4
焦点距離指標
5
レンズ信号接点
6
マウント標点
7
直接手で触れないでください。
*
*
はソ
滴がか
レンズの取り付けかた/取りはず
しかた
取り付けかた(イラスト
前後のレンズキャップとカメラのボディ
1
–
参照)
キャップをはずす。
レンズフロントキャップは図の(1)、(2)の2通りの方
法で取り付け/取りはずしができます。(
ズフードを付けた状態でのレンズキャップの取り付
け/取りはずしに便利です。
レンズとカメラの白の点(マウント標点)を
2
)は、レン
2
合わせてはめ込み、レンズを軽くカメラに押
し当てながら、時計方向に「カチッ」とロック
がかかるまでゆっくり回す。
レンズを取り付けるときは、カメラのレンズ取りは
ずしボタンを押さないでください。
レンズを斜めに差し込まないでください。
取りはずしかた(イラスト
–
参照)
カメラのレンズ取りはずしボタンを押したま
ま、レンズを反時計方向に回してはずす。
レンズフードを取り付ける
画面外にある光が描写に影響するのを防ぐために、
レンズフードの使用をおすすめします。
レンズフードの赤線をレンズの赤点(レンズ
フード指標)に合わせてはめ込み、レンズフード
の赤点とレンズの赤点が合って「カチッ」という
まで時計方向に回す。
外付けフラッシュを使って撮影するときは、フラッシュ
光が遮られることがありますので、レンズフードをはず
してください。
撮影後レンズフードを収納するときは、逆向きにレンズ
に取り付けてください。
ズームする
ズームリングを回して、希望の焦点距離(ズーム
の位置)に合わせる。
ピントを合わせる
ピント合わせは、以下3つの設定方法があります。
・オートフォーカス
ピント合わせを自動で行う。
(ダイレクトマニュアルフォーカス)
・
DMF
オートフォーカスでピントを合わせた後に、マニュ
アルでピントを微調整する。
・マニュアルフォーカス
ピント合わせを手動で行う。
各モードの設定方法は、カメラの取扱説明書をご覧
ください。
主な仕様
APS-C
APS-C
サイズ相
サイズ相当の撮
商品名
(型名)
焦点距離(
35mm
(mm)
レンズ群一枚
画角
1*
画角
2*
最短撮影距離
最大撮影倍率(倍)
最小絞り
フィルター径(
外形寸法(最大径×長さ)
(約:mm)
質量(約:
手ブレ補正機能 あり
ここでの
*1
当の撮像素子を搭載したレンズ交換式デジタルカメラ
での値を表します。
*2 画角1は35mm
像素子を搭載したレンズ交換式デジタルカメラでの値
を表します。
最短撮影距離とは、撮像素子面から被写体までの距離を
*3
表します。
レンズの機構によっては、撮影距離の変化に伴って焦点
距離が変化する場合があります。記載の焦点距離は撮影
距離が無限遠での定義です。
)
mm
判換算焦点距離
2
2
3
(m)
*
mm
)
g
35mm
判カメラ、画角2は
Vario-Tessar T
FE 16-35mm F4 ZA OSS
(SEL1635Z)
16-35
*1
24-52.5
10-12
107°-63°
83°-44°
0.28
0.19
F22
72
)
78×98.5
518
判換算焦点距離とは、
同梱物
レンズ(
)、レンズフロントキャップ(1)、
1
レンズリヤキャップ(1)、レンズフード(1)、
レンズケース(1)、印刷物一式
仕様および外観は、改良のため予告なく変更するこ
とがありますが、ご了承ください。
はソニー株式会社の商標です。
This instruction manual explains how to use
lenses. Precautions common to all lenses such
as notes on use are found in the separate
“Precautions before using”. Be sure to read both
documents before using your lens.
This lens is designed for E-mount cameras. You
cannot use it on A-mount cameras.
The Vario-Tessar T FE 16-35mm F4 ZA OSS was
developed jointly by Carl Zeiss and Sony Corporation
and designed for E-mount cameras manufactured by
Sony. This lens is produced under the strict standards
and quality assurance system of Carl Zeiss.
The Vario-Tessar T FE 16-35mm F4 ZA OSS is
compatible with the range of a 35mm format image
sensor.
A camera equipped with a 35mm format image
sensor can be set to shoot at APS-C size.
For details on how to set your camera, refer to its
instruction manual.
For further information on compatibility, visit the web
site of Sony in your area, or consult your dealer of
Sony or local authorized service facility of Sony.
Notes on Use
When carrying a camera with the lens attached, always
firmly hold both the camera and the lens.
Do not hold by the part of the lens that protrudes when
zooming.
This lens is not water-proof, although designed with
dust-proofness and splash-proofness in mind. If using
in the rain etc., keep water drops away from the lens.
Precautions on using a flash
When using a built-in flash or supplied flash, the lens
may partially block the light of the flash, resulting in a
shadow at the bottom of the picture.
Use a separately sold flash that has a flash coverage
compatible with the focal length of the lens.
Vignetting
When using the lens, the corners of the screen become
darker than the center. To reduce this phenomena
(called vignetting), close the aperture by 1 to 2 stops.
Identifying the Parts
1 Lens hood index
2 Focusing ring
3 Zooming ring
4 Focal-length scale
5 Focal-length index
6 Lens contacts*
7 Mounting index
* Do not touch the lens contacts.
Attaching and Detaching the
Lens
To attach the lens
(See illustration –.)
Remove the rear and front lens caps and
1
the camera body cap.
You can attach/detach the front lens cap in two
ways, (1) and (2). When you attach/detach the lens
cap with the lens hood attached, use method (2).
Align the white index on the lens barrel
2
with the white index on the camera
(mounting index), then insert the lens
into the camera mount and rotate it
clockwise until it locks.
Do not press the lens release button on the
camera when mounting the lens.
Do not mount the lens at an angle.
To remove the lens
(See illustration –.)
While holding down the lens release
button on the camera, rotate the lens
counterclockwise until it stops, then detach
the lens.
Attaching the Lens Hood
It is recommended that you use a lens hood to
reduce flare and ensure maximum image quality.
Align the red line on the lens hood with the
red dot on the lens (lens hood index), then
insert the lens hood into the lens mount and
rotate it clockwise until it clicks into place
and the red dot on the lens hood is aligned
with the red dot on the lens.
When using an external flash attached to the camera,
remove the lens hood to avoid blocking the flash light.
When storing, fit the lens hood onto the lens
backwards.
Zooming
Rotate the zooming ring to the desired focal
length.
Focusing
There are three ways to focus.
Auto focus
The camera focuses automatically.
DMF (Direct manual focus)
After the camera focuses in auto focus, you can make
a fine adjustment manually.
Manual focus
You focus manually.
For details on mode settings, refer to the instruction
manual supplied with the camera.
Specifications
Product name
(Model name)
Focal length (mm) 16-35
Equivalent 35mm-format
focal length*
Lens groups-elements 10-12
Angle of view 1*
Angle of view 2*
Minimum focus*
1
(mm)
2
2
3
(m (feet)) 0.28 (0.92)
Vario-Tessar T
FE 16-35mm F4 ZA OSS
(SEL1635Z)
24-52.5
107°-63°
83°-44°
Product name
(Model name)
Maximum magnification (X) 0.19
Minimum aperture f/22
Filter diameter (mm) 72
Dimensions (maximum
diameter × height)
(approx., mm (in.))
Mass (approx., g (oz)) 518 (18.3)
Shake compensation
function
1
*
The values shown above for equivalent 35mm-format
focal length are for Interchangeable Lens Digital
Cameras equipped with an APS-C sized image sensor.
2
*
Angle of view 1 is the value for 35mm cameras, and
angle of view 2 is the value for Interchangeable Lens
Digital Cameras equipped with an APS-C sized image
sensor.
3
*
Minimum focus is the distance from the image sensor
to the subject.
Depending on the lens mechanism, the focal length
may change with any change in shooting distance. The
focal lengths given above assume the lens is focused
at infinity.
Included items
Lens (1), Front lens cap (1), Rear lens cap (1),
Lens hood (1), Lens case (1), Set of printed
documentation
Design and specifications are subject to change
without notice.
is a trademark of Sony Corporation.
Cette notice explique comment se servir des
objectifs. Les précautions communes à tous les
objectifs, par exemple les remarques sur l’emploi,
se trouvent sur la feuille « Précautions avant toute
utilisation ». Veuillez lire les deux documents
avant d’utiliser votre objectif.
Cet objectif est conçu pour les appareils photo
à monture E. Il ne peut pas être utilisé pour les
appareils photo à monture A.
Le Vario-Tessar T
mis au point communément par Carl Zeiss et Sony
Corporation et conçu pour les appareils photo à
monture E fabriqués par Sony. Cet objectif a été
fabriqué selon les normes strictes et le système
d’assurance qualité de Carl Zeiss.
Le Vario-Tessar T FE 16-35 mm F4 ZA OSS est
compatible avec la plage d’un capteur d’image de
format 35 mm.
Un appareil photo équipé d’un capteur d’image de
format 35 mm peut être réglé pour la prise de vue en
APS-C.
Pour les détails sur la manière de régler l’appareil
photo, reportez-vous à son mode d’emploi.
Pour plus d’informations sur la compatibilité,
consultez le site de Sony de votre pays, ou adressezvous à un revendeur Sony ou à un service aprèsvente agréé Sony.
Vario-Tessar T
FE 16-35mm F4 ZA OSS
(SEL1635Z)
78 × 98.5
(3 1/8 × 4)
Yes
FE 16-35mm F4 ZA OSS a été
Remarques sur l’emploi
Lorsque vous portez un appareil photo avec l’objectif
dessus, tenez toujours fermement l’appareil photo et
l’objectif.
Ne tenez pas l’appareil photo par la partie de l’objectif
qui ressort lors d’un zoom.
Cet objectif n’est pas étanche à l’eau bien qu’il soit
conçu pour résister à la poussière et aux éclaboussures.
Si vous l’utilisez sous la pluie, etc. veillez à ce que de
l’eau ne tombe pas dessus.
Précautions concernant l’emploi d’un flash
Lors de l’utilisation d’un flash d’appareil photo ou
d’un flash fourni, l’objectif peut bloquer partiellement
la lumière du flash et produire une ombre au bas de
l’image.
Utilisez un flash du commerce dont la portée est
compatible avec la focale de l’objectif.
Vignetage
Lorsque l’objectif est utilisé, les coins de l’écran
deviennent plus sombres que le centre. Pour réduire ce
phénomène (appelé vignetage), fermez l’ouverture de
1 ou 2 crans.
Identification des éléments
1 Repère de parasoleil
2 Bague de mise au point
3 Bague de zoom
4 Échelle de focale
5 Repère de focale
6 Contacts d’objectif*
7 Repère de montage
* Ne touchez pas les contacts d’objectif.
Pose et dépose de l’objectif
Pour poser l’objectif
(Voir l’illustration –.)
Déposez les capuchons d’objectif avant
1
et arrière et le capuchon de l’appareil
photo.
Vous pouvez poser et déposer les capuchons
d’objectif avant de deux façons, (1) et (2). Si vous
posez/déposez le capuchon d’objectif avec le
parasoleil, utilisez la méthode (2).
Alignez le repère blanc du barillet
2
d’objectif sur le repère blanc de l’appareil
photo (repère de montage), puis posez
l’objectif sur la monture de l’appareil
photo et tournez-le dans le sens horaire
de sorte qu’il s’encliquette.
N’appuyez pas sur le bouton de libération de
l’objectif sur l’appareil photo lorsque vous posez
l’objectif.
Ne posez pas l’objectif de biais.
(Suite à la page arrière)
头可能会遮住闪光灯的部分亮光,从而造成
图片的底部出现阴影。
请使用另售且其闪光范围与镜头焦距兼容的
闪光灯。
晕影
使用镜头时,屏幕的角落要比其中心暗。为
避免这种现象(称之为晕影),请将光圈推
近 1 ~ 2 圈。
部件识别
1 镜头遮光罩标记
2 对焦环
3 可变焦距圈
4 焦距刻度
5 焦距标记
6 镜头接点*
7 安装标记
* 请勿触摸镜头接点。
安装/拆下镜头
安装镜头(参见插图 –。)
1
拆下前、后镜头盖和相机机身罩。
可以用 (1) 和 (2) 两种方式安装/拆下前
镜头盖。在不取下镜头遮光罩的情况下
安装/拆下镜头盖时,请使用方法 (2)。
2
将镜筒上的白色标记与相机上的白色标
记(安装标记)对准,然后将镜头插入
相机安装部位并顺时针旋转,直至镜头
锁紧。
请勿在安装镜头时按相机上的镜头释放
按钮。
请勿倾斜安装镜头。
拆下镜头 (参见插图 –。)
按住相机上的镜头释放按钮,逆时针转动镜
头直至其停止,然后拆下镜头。
安装镜头遮光罩
建议使用镜头遮光罩以减少反光,从而确保最
佳画质。
将镜头遮光罩上的红线与镜头上的红点(镜
头遮光罩标记)对准,然后将镜头遮光罩插
入镜头安装部位并顺时针旋转,直至其咔哒
一声就位,且镜头遮光罩上的红点与镜头上
的红点对准。
2
3 4
1
6
5
7
–1
(1) (2)
–2
(Suite de la page avant)
Pour déposer l’objectif
(Voir l’illustration –.)
Tout en appuyant sur le bouton de libération
de l’objectif sur l’appareil photo, tournez
l’objectif dans le sens antihoraire jusqu’à
l’arrêt, puis déposez l’objectif.
Fixation du parasoleil
Il est conseillé d’utiliser un parasoleil pour réduire
la lumière parasite et obtenir la meilleure image
possible.
Alignez la ligne rouge du parasoleil sur
le point rouge de l’objectif (repère de
parasoleil), puis insérez le parasoleil sur
la monture d’objectif et tournez-le dans le
sens horaire jusqu’à ce qu’il s’encliquette et
le point rouge du parasoleil s’aligne sur le
point rouge de l’objectif.
Si vous utilisez un flash externe fixé à l’appareil photo,
retirez le parasoleil pour éviter de bloquer la lumière
du flash.
Pour ranger le parasoleil, insérez-le à l’arrière de
l’objectif.
Zooming
Tournez la bague de zoom selon la focale
souhaitée.
Mise au point
La mise au point peut être faite de trois façons.
Autofocus
L’appareil photo fait automatiquement la mise au
point.
DMF (Mise au point manuelle directe)
Après la mise au point en autofocus, vous pouvez
effectuer un réglage plus fin manuellement.
Mise au point manuelle
Vous faites vous-même la mise au point.
Pour le détail sur les réglages de mode, reportezvous au mode d’emploi fourni avec l’appareil photo.
Spécifications
Nom de produit
(Nom de modèle)
Longueur focale (mm)
Focale équivalente en
format 35 mm*
Éléments-groupes de
lentilles
Angle de champ 1*
Angle de champ 2*
Mise au point minimale*
(m (pieds))
Grossissement maximal
(X)
Ouverture minimale
Diamètre d’objectif (mm)
Dimensions (diamètre
maximal × hauteur)
(environ, mm (po.))
Poids (environ, g (oz))
Fonction Antibougé Oui
1
*
Les valeurs indiquées ci-dessus pour une focale
équivalente au format 35 mm concernent les appareils
photo à objectif interchangeable équipés d’un capteur
d’image APS-C.
2
*
L’angle de vue 1 est la valeur correspondant aux
appareils photo 35 mm et l’angle de vue 2 est la
valeur corrspondant aux appareils photo à objectif
interchangeable équipés d’un capteur d’image APS-C
3
*
La mise au point minimale est la distance du capteur
d’image au sujet.
Selon le mécanisme de l’objectif, la focale peut
changer lorsque la distance de prise de vue change.
Les focales indiquées ci-dessus présupposent que
l’objectif est réglé sur l’infini.
Articles inclus
Objectif (1), Capuchon d’objectif avant (1),
Capuchon d’objectif arrière (1), Parasoleil (1),
Boîtier d’objectif (1), Jeu de documents imprimés
La conception et les spécifications peuvent être
modifiées sans préavis.
est une marque commerciale de Sony
Corporation.
En este manual se explica cómo utilizar objetivos.
Las precauciones comunes a todos los objetivos,
como notas sobre la utilización, se encuentran
en las “Precauciones previas a la utilización del
producto” suministradas por separado. Cerciórese
de leer ambos documentos antes de utilizar su
objetivo.
Este objetivo está diseñado para cámaras con
montura E. No podrá utilizarse con cámaras con
montura A.
El Vario-Tessar T
sido desarrollado conjuntamente por Carl Zeiss y
Sony Corporation y diseñado para cámaras con
montura E fabricadas por Sony. Este objetivo ha sido
producido bajo las normas estrictas y el sistema de
aseguramiento de calidad de Carl Zeiss.
El Vario-Tessar T FE 16-35mm F4 ZA OSS es
compatible con la gama de un sensor de imágenes
de formato de 35 mm
Una cámara equipada con un sensor de imágenes
de formato de 35 mm puede establecerse para
fotografiar con tamaño APS-C.
Con respecto a los detalles sobre cómo configurar su
cámara, consulte su manual de instrucciones.
Para más información sobre compatibilidad, visite
el sitio Web de Sony de su área, o consulte a su
proveedor Sony o a un centro de servicio local
autorizado por Sony.
1
(mm)
Vario-Tessar T
FE 16-35mm F4 ZA OSS
(SEL1635Z)
16-35
24-52,5
10-12
2
107°-63°
2
83°-44°
3
0,28 (0,92)
0,19
f/22
72
78 × 98,5
(3 1/8 × 4)
518 (18,3)
FE 16-35mm F4 ZA OSS ha
Notas sobre la utilización
Cuando transporte una cámara con el objetivo fijado,
sujete siempre firmemente tanto la cámara como el
objetivo.
No sujete por la parte del objetivo que sobresale
cuando se utiliza el zoom.
Este objetivo no es impermeable, aunque se ha
diseñado teniendo en cuenta la resistencia al polvo
y a las salpicaduras. Si se utiliza bajo la lluvia, etc.,
mantenga las gotas de agua alejadas del objetivo.
Precauciones sobre la utilización de un
flash
Cuando utilice un flash incorporado en la cámara
o el flash suministrado, el objetivo puede bloquear
parcialmente la luz del flash, lo que resultará en una
sombra en la parte inferior de la fotografía.
Utilice un flash vendido aparte que tenga una
cobertura de flash compatible con la distancia focal del
objetivo.
Viñeteado
Si utiliza el objetivo, las esquinas de la pantalla se
vuelven más oscuras que el centro. Para reducir este
fenómeno (llamado viñeteado), cierre la apertura de
1a 2 puntos.
Identificación de las partes
1 Índice del parasol del objetivo
2 Anillo de enfoque
3 Anillo de zoom
4 Escala de distancia focal
5 Índice de distancia focal
6 Contactos del objetivo*
7 Índice de montaje
* No toque los contactos del objetivo.
Colocación y extracción del
objetivo
Para colocar el objetivo
(Consulte la ilustración –.)
Extraiga las tapas posterior y frontal
1
del objetivo y la tapa del cuerpo de la
cámara.
Usted podrá colocar/extraer la tapa frontal del
objetivo de dos formas, (1) y (2). Cuando coloque/
extraiga la tapa del objetivo con el parasol fijado,
utilice el método (2).
Alinee el índice blanco del barril del
2
objetivo con el índice blanco de la
cámara (índice de montaje), y después
inserte el objetivo en la montura de la
cámara y gírelo hacia la derecha hasta
que se bloquee.
No presione el botón de liberación del objetivo de
la cámara cuando monte el objetivo.
No monte el objetivo de forma inclinada.
Para extraer el objetivo
(Consulte la ilustración –.)
Manteniendo presionado el botón de
liberación del objetivo de la cámara, gire
el objetivo hacia la izquierda hasta que se
pare, y después extraiga el objetivo.
Colocación del parasol
Es recomendable utilizar un parasol para reducir los
reflejos y garantizar la máxima calidad de la imagen.
Alinee la línea roja del parasol del objetivo
con el punto rojo del objetivo (índice del
parasol del objetivo), después inserte el
parasol del objetivo en la montura del
objetivo, y gírelo hacia la derecha hasta que
chasquee en su lugar y el punto rojo del
parasol del objetivo quede alineado con el
punto rojo del objetivo.
Cuando utilice un flash externo fijado a la cámara,
extraiga el parasol del objetivo para evitar que se
bloquee la luz del flash.
Cuando guarde la cámara, fije el parasol hacia atrás.
Utilización del zoom
Gire el anillo de zoom hasta la distancia focal
que desee.
Enfoque
Existen tres formas de enfocar.
Enfoque automático
La cámara enfocará automáticamente.
DMF (Enfoque manual directo)
Después de que la cámara enfoque
automáticamente, podrá realizar manualmente un
ajuste fino.
Enfoque manual
Usted enfocará manualmente.
Con respecto a los detalles sobre los ajustes
de modo, consulte el manual de instrucciones
suministrado con la cámara.
Especificaciones
Nombre del producto
(Nombre del modelo)
Distancia focal (mm)
Distancia focal*
equivalente al formato de
35 mm
Grupos y elementos del
objetivo
Ángulo de visión 1*
Ángulo de visión 2*
Enfoque mínimo*
Ampliación máxima (X)
Apertura mínima
Diámetro del filtro (mm)
Dimensiones (diámetro
máximo × altura)
(Aprox., mm)
Peso (Aprox., g)
Función de
compensación de
sacudidas
1
(mm)
3
(m)
2
2
Vario-Tessar T
FE 16-35mm F4 ZA OSS
(SEL1635Z)
16-35
24-52,5
10-12
107°-63°
83°-44°
0,28
0,19
f/22
72
78 × 98,5
518
Sí
1
*
Los valores mostrados arriba para la distancia focal
equivalente al formato de 35 mm son para cámaras
digitales de lentes intercambiables equipadas con un
sensor de imágenes de tamaño APS-C.
2
*
El ángulo de visión 1 es el valor para cámaras de
formato de 35 mm, y el ángulo de visión 2 es el valor
para cámaras digitales de lentes intercambiables
equipadas con un sensor de imágenes de tamaño
APS-C.
3
*
El enfoque mínimo es la distancia desde el sensor de
imágenes al motivo.
En función del mecanismo del objetivo, es posible
que la distancia focal varíe si la distancia de toma
de imagen también lo hace. Las distancias focales
indicadas arriba asumen que el objetivo está enfocado
al infinito.
Elementos incluidos
Objetivo (1), Tapa frontal del objetivo (1),
Tapa posterior del objetivo (1), Parasol (1),
Funda del objetivo (1), Juego de documentación
impresa
El diseño y las especificaciones están sujetos a
cambios sin previo aviso.
es marca comercial de Sony Corporation.
本说明书介绍镜头的用法。有关所有镜头
的一般注意事项(如使用须知)可以在另
外的“使用前注意事项”中找到。务必在
使用镜头前阅读以上两份文件。
本镜头是专为 E 卡口系统相机而设计的。不
能将其用于 A 卡口系统相机。
Vario-Tessar T
FE 16-35mm F4 ZA OSS
由 Carl Zeiss 和 Sony Corporation 共同研
发,设计用于 Sony 制造的 E 卡口系统相机。
本镜头是按照 Carl Zeiss 的严格标准以及质量
保证系统制造而成。
Vario-Tessar T
FE 16-35mm F4 ZA OSS
与 35mm 规格的图像传感器系列兼容。
配备 35mm 规格图像传感器的相机可设定为
以 APS-C 尺寸进行拍摄。
有关如何设定相机的详情,请参阅相机的使用
说明书。
有关兼容性的详细信息,请访问所在地区的
Sony 网站,或者咨询您的 Sony 经销商或当
地的 Sony 授权服务机构。
使用须知
当在装有镜头的情况下携带相机时,请务必
同时握紧相机和镜头。
请勿握住变焦时镜头突出的任何部分。
尽管本镜头采用了防尘和防溅水设计,但不
具备防水性能。在雨中等环境下使用时,应
确保镜头远离水滴。
闪光灯使用注意事项
使用内置相机闪光灯或随附的闪光灯时,镜
头可能会遮住闪光灯的部分亮光,从而造成
图片的底部出现阴影。
请使用另售且其闪光范围与镜头焦距兼容的
闪光灯。
晕影
使用镜头时,屏幕的角落要比其中心暗。为
避免这种现象(称之为晕影),请将光圈推
近 1 ~ 2 圈。
部件识别
1 镜头遮光罩标记
2 对焦环
3 可变焦距圈
4 焦距刻度
5 焦距标记
6 镜头接点*
7 安装标记
* 请勿触摸镜头接点。
安装/拆下镜头
安装镜头(参见插图 –。)
拆下前、后镜头盖和相机机身罩。
1
可以用 (1) 和 (2) 两种方式安装/拆下前
镜头盖。在不取下镜头遮光罩的情况下
安装/拆下镜头盖时,请使用方法 (2)。
将镜筒上的白色标记与相机上的白色标
2
记(安装标记)对准,然后将镜头插入
相机安装部位并顺时针旋转,直至镜头
锁紧。
请勿在安装镜头时按相机上的镜头释放
按钮。
请勿倾斜安装镜头。
拆下镜头 (参见插图 –。)
按住相机上的镜头释放按钮,逆时针转动镜
头直至其停止,然后拆下镜头。
安装镜头遮光罩
建议使用镜头遮光罩以减少反光,从而确保最
佳画质。
将镜头遮光罩上的红线与镜头上的红点(镜
头遮光罩标记)对准,然后将镜头遮光罩插
入镜头安装部位并顺时针旋转,直至其咔哒
一声就位,且镜头遮光罩上的红点与镜头上
的红点对准。
当使用相机上安装的外部闪光灯时,请取下
镜头遮光罩,以免遮住闪光灯的亮光。
存放时,请将镜头遮光罩倒过来放在镜头
上。
变焦
将可变焦距圈转至所需焦距。
对焦
对焦方式有三种。
自动对焦
相机将自动进行对焦。
DMF(直接手动对焦)
在相机完成自动对焦后,可以对其进行手动
微调。
手动对焦
通过手动方式进行对焦。
有关模式设定的详情,请参阅相机随附的使用
说明书。
规格
Vario-Tessar T
产品名称
(型号名称)
FE 16-35mm F4 ZA
OSS
(SEL1635Z)
焦距 (mm) 16-35
相当于 35mm 规格
1
(mm)
焦距*
24-52.5
镜头组-片 10-12
视角 1*
视角 2*
最小对焦*
最大放大倍数
2
2
3
(m) 0.28
107°-63°
83°-44°
0.19
(倍)
最小光圈 f/22
滤光镜直径 (mm) 72
尺寸
78×98.5
(最大直径×高)
(约 mm)
质量(约 g) 518
震动补偿功能 是
1
如上所示相当于 35mm 规格焦距的数值是
*
基于配备 APS-C 尺寸图像传感器的可更换
镜头数码相机。
2
视角 1 的值针对 35mm 相机,而视角 2 的
*
值针对配备 APS-C 尺寸图像传感器的可更
换镜头数码相机。
3
最小对焦是从图像传感器至物体的距离。
*
视镜头结构而异,焦距可能会随拍摄距离的
改变而变化。假设镜头对焦在无限远处。
所含物品
镜头 (1)、前镜头盖 (1)、
后镜头盖 (1)、镜头遮光罩 (1)、
镜头袋 (1)、成套印刷文件
设计或规格如有变动,恕不另行通知。
是 Sony Corporation 的商标。
 Loading...