

Page 1
交換レンズ
Interchangeable Lens
Objectif interchangeable
取扱説明書
Operating Instructions
Mode d’emploi
Manual de instrucciones
1.4X Teleconverter
2X Teleconverter
E-mount
SEL14TC/SEL20TC
©2016 Sony Corporation
Printed in Thailand
1
LA-EA2/LA-EA4
2
6
5 9
–2
–4
(a)
4-584-579-01(2)
3
4
5
7
8
(b)
–1
(c)
–2
(d)
電気製品は、安全のための注意事項を守ら
ないと、人身への危害や火災などの財産へ
の損害を与えることがあります。
この取扱説明書には、事故を防ぐための重要な注意事項と製品
の取り扱いかたを示しています。この取扱説明書をよくお読
みの上、製品を安全にお使いください。お読みになったあとは、
いつでも見られる所に必ず保管してください。
この「取扱説明書」ではレンズの使いかたを説明し
ています。使用上のご注意など、レンズに共通した
ご注意や説明については別冊の「使用前のご注意」
でご覧頂けます。
必ずご使用の前に、本書と合わせてよくお読みのう
えでご使用ください。
この取扱説明書は、複数のレンズを対象としています。
1.4X Teleconverter(SEL14TC)/2X Teleconverter
(SEL20TC)(以下、本機とする)は、対応レンズとソニー
製αカメラシステムEマウントカメラ(以下カメラとす
る)の間に取り付けると、レンズの焦点距離をそれぞれ
1.4倍(SEL14TC)、2.0倍(SEL20TC)にするテレコンバー
ジョンレンズです。
カメラ本体との互換情報については専用サポートサイ
トでご確認ください。
http://www.sony.jp/support/ichigan/
• 本書のイラストはSEL14TCを使用しています。
使用上のご注意
• レンズを絶対に太陽や強い光源に向けたままにしないで
ください。レンズの集光作用により、発煙や火災、ボディ・
レンズ内部の故障の原因になります。やむを得ず太陽光
下等におく場合は、前後レンズキャップを取り付けてく
ださい。
• 逆光撮影時は、太陽を画角から充分にずらしてください。
太陽光がカメラ内部で焦点を結び、発煙や火災の原因と
なることがあります。また、太陽を画角からわずかに外
しても発煙や火災の原因となることがあります。
• レンズを取り付けてカメラを持ち運ぶときは、カメラと
レンズの両方をしっかり持ってください。
• 本機はソニー製αカメラシステムEマウントカメラ専用
のレンズです。Aマウントカメラにはお使いになれませ
ん。
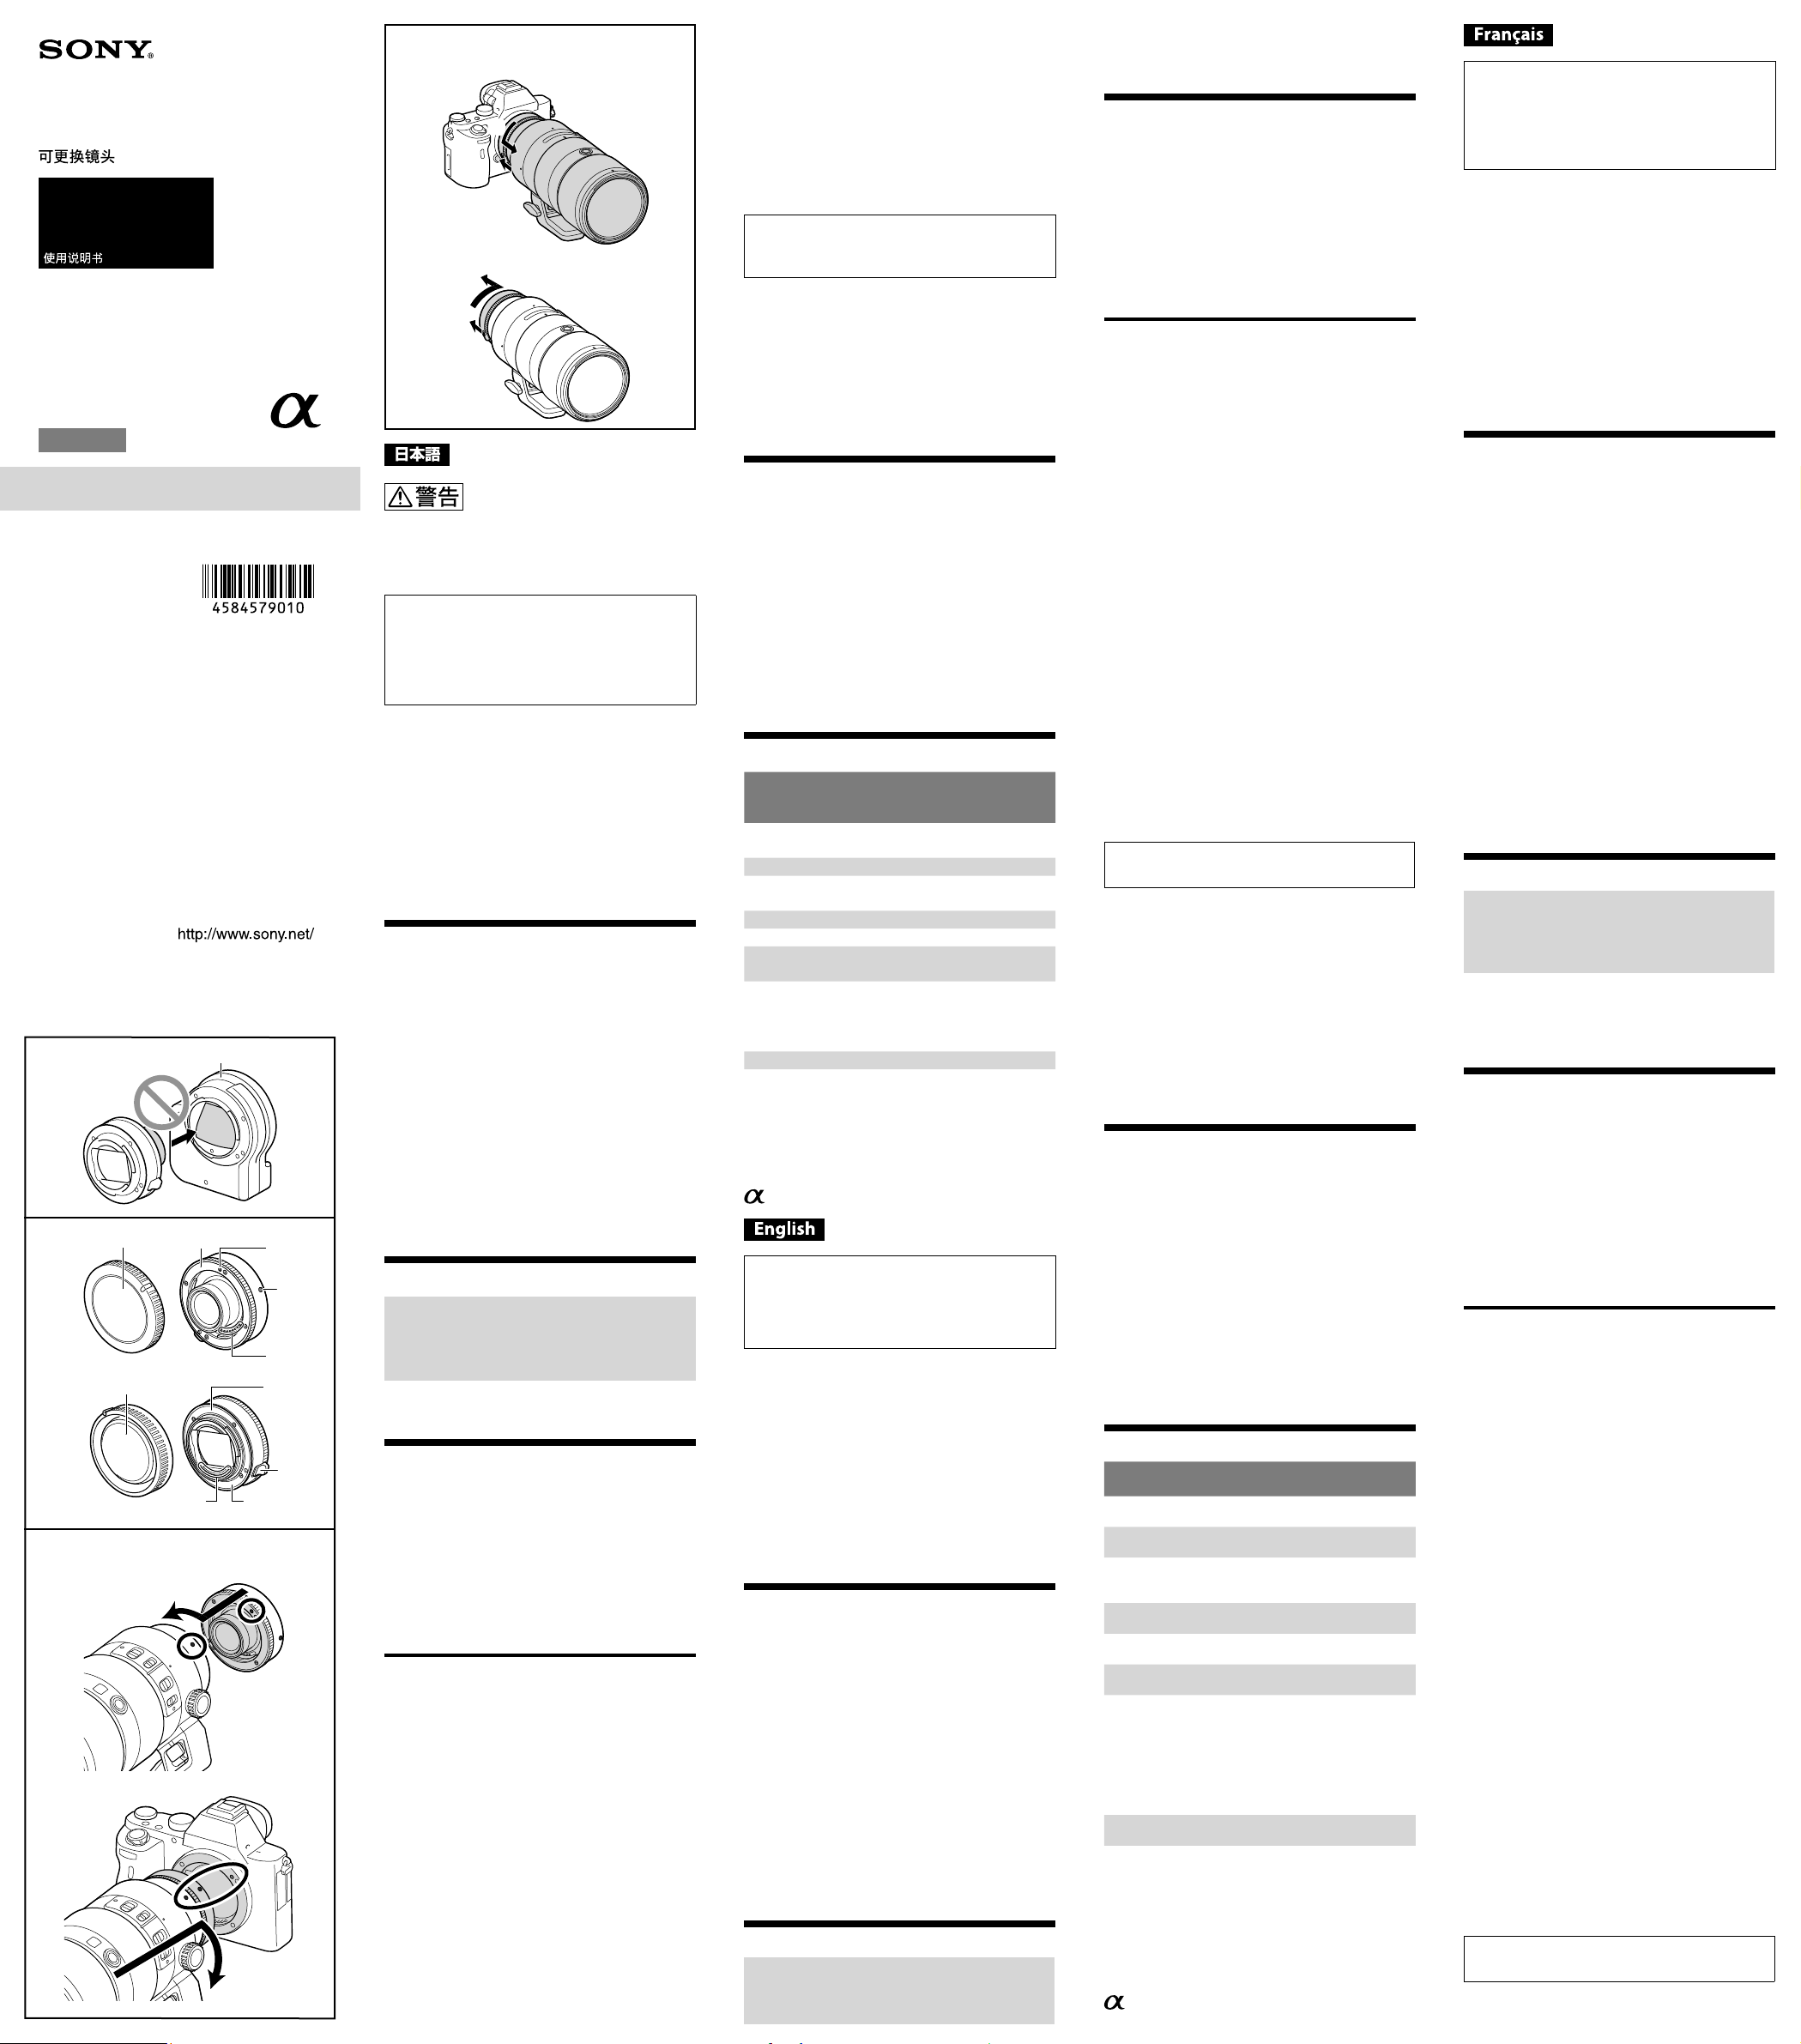
• LA-EA2/LA-EA4などのマウントアダプターを装着する
と、本機、対応レンズおよびマウントアダプターを破損す
る恐れがありますので、絶対に取り付けないでください。
(イラスト参照)
使用可能なレンズと機能
本機は、ソニー製Eマウントテレコンバーター対応レ
ンズ専用です。
その他のレンズを装着すると、本機およびレンズを
破損する恐れがありますので、絶対に取り付けない
でください。
最新のテレコンバーター対応レンズについては専用サ
ポートサイトでご確認ください。
http://www.sony.jp/support/ichigan/
各部のなまえ
1 フロントキャップ(前側キャップ)
2 Eマウント(レンズ装着側)
3 マウント指標
4 マウント標点
5 レンズ信号接点*
6 レンズリヤキャップ(後側キャップ)
7 Eマウント(カメラ装着側)
8 レンズ交換レバー
9 レンズマウントゴムリング
*直接手で触れないでください。
取り付けかた/取りはずしかた
取り付けかた(イラスト–参照)
本機のフロントキャップ(前側キャップ)と
1
レンズのリヤキャップをはずす。
本機のフロントキャップとレンズリヤキャップはそ
れぞれ反時計方向に回すとはずれます。
本機の白の点(マウント指標)を、レンズの白
2
の点(マウント標点)に合わせてはめ込み、本
機を軽くレンズに押し当てながら、図の矢印
(a)の方向に「カチッ」とロックがかかるまで
ゆっくり回す。
本機を取り付けるときに、レンズ交換レバーを押さ
ないでください。
本機をレンズに斜めに差し込まないようにしてくだ
さい。
本機のレンズリヤキャップ(後側キャップ)
3
とカメラのボディキャップをはずす。
レンズに取り付けた本機の白の点(マウント
4
標点)を、カメラの白の点(マウント指標)に
合わせてはめ込み、軽くカメラに押し当てな
がら、図の矢印(b)の方向に「カチッ」とロッ
クがかかるまでゆっくり回す。
本機を取り付けたレンズをカメラに取り付けるとき
に、カメラのレンズ取りはずしボタンを押さないで
ください。
本機を取り付けたレンズを斜めに差し込まないよう
にしてください。
本機は必ず1個でご使用ください。複数個の使用は
できません。無理に取り付けると、本機が破損する
恐れがあります。
取りはずしかた(イラスト–参照)
カメラのレンズ取りはずしボタンを押しな
1
がら、本機をレンズに取り付けたまま図の矢
印(c)の方向に回してはずす。
本機のレンズ交換レバーを矢印の方向に引
2
きながら、本機を図の矢印(d)の方向に回し
てレンズから取りはずす。
撮影上のご注意
本機を装着すると焦点距離は長くなりますが、装着し
たレンズの実効絞り値は暗くなります。*
カメラの測光により実効絞りは自動的に補正されま
す 。*
被写界深度は、本機を装着していない場合に比べて浅
くなります。*
* 詳細は「主な仕様」をご覧ください。
• 本機を装着すると、焦点距離が望遠になり、実効絞り値も
暗くなりますので、カメラぶれにご注意ください。三脚
のご使用をおすすめします。
• 本機装着後、蛍光灯照明の比較的暗いところでは、AFで
はピントが合いにくいことがあります。コントラスト
のはっきりしたものでピントを合わせるか、マニュアル
フォーカスに切り替えてピント合わせをしてください。
主な仕様
商品名
(型名)
対応撮像
画面サイズ
焦点距離倍率 使用レンズの1.4倍 使用レンズの2.0倍
絞り
レンズ群-枚 5-6 5-8
最大撮影倍率 使用レンズの1.4倍 使用レンズの2.0倍
被写界深度
外形寸法
(最大径×長さ*)
(約:mm)
*前後マウント面からの突出部を除く
質量(約:g) 167 207
同梱物(( )内の数字は個数)
テレコンバーター(1)、フロントキャップ(前側キャッ
プ)(1)、レンズリヤキャップ(後側キャップ)(1)、レン
ズケース(1)、印刷物一式
仕様および外観は、改良のため予告なく変更すること
がありますが、ご了承ください。
はソニー株式会社の商標です。
This instruction manual explains how to use
lenses. Precautions common to all lenses such
as notes on use are found in the separate
“Precautions before using”. Be sure to read both
documents before using your lens.
This manual is for several different lenses.
The 1.4X Teleconverter (SEL14TC)/2X Teleconverter
(SEL20TC) (referred to below as “this unit”) functions
to increase the focal length of the attached lens
by 1.4X (SEL14TC) or 2.0X (SEL20TC) when mounted
between a Sony α camera system E-mount camera
(referred to below as “camera”) and compatible
lens.
For further information on compatibility, visit the
web site of Sony in your area, or consult your dealer
of Sony or local authorized service facility of Sony.
The illustrations in this manual show the SEL14TC.
1.4X
Teleconverter
(SEL14TC)
35mmフルサイズ 35mmフルサイズ
使用レンズ
プラス1段
使用レンズの
約1/1.4倍
62.4×17.2 62.4×27.2
2X
Teleconverter
(SEL20TC)
使用レンズ
プラス2段
使用レンズの
約1/2倍
Notes on Use
Do not leave the lens exposed to the sun or a bright
light source. Internal malfunction of the camera body
and lens, smoke, or a fire may result due to the effect
of light focusing. If circumstances necessitate leaving
the lens in sunlight, be sure to attach the lens caps.
When shooting against the sun, keep the sun
completely out of the angle of view. Otherwise, solar
rays may be concentrated at a focal point inside
the camera, causing smoke or a fire. Keeping the
sun slightly out of the angle of view may also cause
smoke or a fire.
When carrying a camera with the lens attached,
always firmly hold both the camera and the lens.
This lens is designed for Sony α camera system
E-mount cameras. You cannot use it on A-mount
cameras.
Do not attach a mount adaptor (LA-EA2/LA-EA4
etc.). Otherwise this unit, lens or the mount
adaptor may be damaged. (See illustration )
Compatible Lenses and Functions
This unit is designed for the lenses compatible
with Sony E-mount teleconverter.
Do not attach other lenses, otherwise this unit or
lens may be damaged.
For information on the latest lens model compatible
with the teleconverter, visit the web site of Sony in
your area, or consult your dealer of Sony or local
authorized service facility of Sony.
Identifying the Parts
1 Front cap (front side cap)
2 E-mount (lens attachment side)
3 Lens mounting index
4 Mounting index for camera body
5 Lens contacts*
6 Lens rear cap (rear side cap)
7 E-mount (camera attachment side)
8 Lens release lever
9 Lens mount rubber ring
* Do not touch the lens contacts on the front and rear
mounts.
Attaching and Detaching
To attach this unit
(See illustration –)
Remove the front cap (front side cap) of
1
this unit and rear cap of the lens.
To remove this unit’s caps, turn the front cap and
lens rear cap counterclockwise.
Align the white lens mounting index on
2
this unit with the white mounting index
on the lens barrel. Insert this unit into the
lens mount, and turn it in the direction of
the arrow (a) until it clicks into place.
Do not press the lens release lever on this unit
when mounting this unit.
Do not mount this unit at an angle.
Remove the lens rear cap (rear side cap)
3
of this unit and body cap of the camera.
Align the white mounting index for
4
camera body on this unit attached to the
lens, with the white index on the camera.
Insert this unit into the camera mount,
and turn it in the direction of the arrow
(b) until it clicks into place.
Do not press the lens release button on the
camera when mounting the lens attached this
unit.
Do not insert the lens attached to this unit at an
angle.
Do not use more than one of this unit with a
lens. Damage may result.
To remove the lens
(See illustration –)
While holding down the lens release
1
button on the camera, rotate the lens
and this unit attached to the lens in the
direction of the arrow (c) until they stop,
then detach them.
While pulling the lens release lever on
2
this unit in the arrow’s direction, rotate
this unit in the direction of the arrow (d)
until it stops, then detach this unit.
Notes on Shooting
While this unit increases the focal length of the
attached lens, it reduces the effective aperture of
the attached lens.*
The camera’s photometry compensates for the
effective aperture automatically.*
The lens’ depth of field is shallower when using this
unit.*
* See the following specifications for further
information.
Because of the increase in focal length and decrease
in effective aperture, use a tripod to reduce camera
shake when this unit is attached.
In low light conditions, such as with dim fluorescent
light, the camera may not be able to focus in AF. Use
focus lock on high contrast subject or manual focus
after attaching this unit.
Specifications
Product name
(Model name)
Shooting
screen size
Effective focal
length
f-stop
Lens groupselements
Maximum
magnification
Depth of field
Dimensions
(maximum
diameter ×
height*)
(approx., mm
(in.))
* Excluding the parts projecting from the front and rear
mounts
Mass (approx.,
g (oz))
Included items
(The number in parentheses indicates the number
of pieces.)
Teleconverter (1), Front cap (front side cap) (1), Lens
rear cap (rear side cap) (1), Lens case (1), Set of
printed documentation
Design and specifications are subject to change
without notice.
is a trademark of Sony Corporation.
1.4X Teleconverter
(SEL14TC)
35mm FULL FRAME
size
1.4X the attached
lens
1 f-stop higher
than the attached
lens
5–6 5–8
1.4X the attached
lens
Approx. 1/1.4 the
attached lens
62.4 × 17.2
(2 1/2 × 11/16)
167 (5.9) 207 (7.4)
2X Teleconverter
(SEL20TC)
35mm FULL FRAME
size
2.0X the attached
lens
2 f-stop higher
than the attached
lens
2.0X the attached
lens
Approx. 1/2 the
attached lens
62.4 × 27.2
(2 1/2 × 1 1/8)
Cette notice explique comment se servir des
objectifs. Les précautions communes à tous
les objectifs, par exemple les remarques sur
l’emploi, se trouvent sur la feuille « Précautions
avant toute utilisation ». Veuillez lire les deux
documents avant d’utiliser votre objectif.
Ce mode d’emploi couvre différents objectifs.
Le téléconvertisseur 1.4X (SEL14TC)/2X (SEL20TC)
(appelé ci-dessous « cet article ») fonctionne pour
augmenter la longueur focale de l’objectif fixé par
un facteur de 1,4 fois (SEL14TC) ou 2,0 fois (SEL20TC)
lorsqu’il est installé entre un appareil photo à
monture E de type Sony α (appelé ci-dessous
«appareil photo») et un objectif compatible.
Pour plus d’informations sur la compatibilité,
consultez le site de Sony de votre pays, ou
adressez-vous à un revendeur Sony ou à un service
après-vente agréé Sony.
Les illustrations de ce mode d’emploi présentent le
SEL14TC.
Remarques sur l’emploi
Ne laissez pas la lentille orientée vers le soleil ou une
source de lumière intense. Cela risque de provoquer
un problème de fonctionnement interne du boîtier
de l’appareil photo et de l’objectif, de dégager de la
fumée, voire de provoquer un incendie. Si toutefois
vous ne pouvez pas faire autrement, veillez à fixer les
capuchons sur l’objectif.
Lors d’une prise de vue en direction du soleil, veillez
à ce que le soleil ne soit pas dans l’angle de vue.
Dans le cas contraire, les rayons solaires peuvent être
concentrés vers le point focal dans l’appareil photo,
et provoquer un incendie ou dégager de la fumée.
Vous pouvez provoquer un incendie ou dégager de la
fumée même si le soleil est légèrement en dehors de
l’angle de vue.
Lorsque vous portez un appareil photo sur lequel est
installé l’objectif, tenez toujours fermement l’appareil
photo et l’objectif.
Votre objectif est conçu pour les appareils photo à
monture E de type Sony α. Il ne peut pas être utilisé
sur un appareil photo à monture A.
Ne fixez pas un adaptateur pour monture (LA-EA2/
LA-EA4, etc.). Dans le cas contraire, cet article,
l’objectif ou l’adaptateur pour monture risque d’être
endommagé. (Voir l’illustration
)
Fonctions et objectifs compatibles
Cet article est conçu pour les objectifs
compatibles avec un téléconvertisseur à monture
E de type Sony.
Ne fixez pas d’autres types d’objectifs, sinon, cet
article ou l’objectif risque d’être endommagé.
Pour plus d’informations sur les derniers modèles
d’objectif compatibles avec le téléconvertisseur,
consultez le site de Sony de votre pays, ou
adressez-vous à un revendeur Sony ou à un service
après-vente agréé Sony.
Identification des éléments
1 Capuchon avant (capuchon de l’avant)
2 Monture E (côté de fixation de l’objectif)
3 Repère de montage de l’objectif
4 Repère de montage de l’appareil photo
5 Contacts d’objectif*
6 Capuchon arrière de l’objectif (capuchon de
l’arrière)
7 Monture E (côté de fixation de l’appareil photo)
8 Bouton de libération de l’objectif
9 Bague en caoutchouc de montage de l’objectif
* Ne touchez pas les contacts d’objectif sur les
montures avant et arrière.
Pose et dépose
Pour poser cet article
(Voirl’illustration –.)
Retirez le capuchon avant (capuchon
1
de l’avant) de cet article et le capuchon
arrière de l’objectif.
Pour retirer les capuchons de cet article, tournez-
les dans le sens contraire des aiguilles d’une
montre.
Alignez le repère de montage de
2
l’objectif blanc de cet appareil sur le
repère de montage blanc du barillet
d’objectif. Insérez cet appareil dans la
monture d’objectif, puis tournez-le dans
le sens de la flèche (a) jusqu’à ce que
vous entendiez un déclic.
N’appuyez pas sur le bouton de libération de
l’objectif de cet article pendant sa pose.
N’introduisez pas cet article de biais.
Retirez le capuchon arrière d’objectif
3
(capuchon de l’arrière) de cet article et le
capuchon de l’appareil photo.
Alignez le repère de montage blanc pour
4
appareil photo de cet appareil fixé à
l’objectif sur le repère blanc de l’appareil
photo. Insérez cet appareil dans la
monture d’appareil photo, puis tournezle dans le sens de la flèche (b) jusqu’à ce
que vous entendiez un déclic.
N’appuyez pas sur le bouton de libération de
l’objectif de l’appareil photo lorsque vous posez
l’objectif fixé à cet article.
N’introduisez pas l’objectif fixé à cet article de
biais.
N’utilisez pas plusieurs articles sur un seul
objectif. Des dommages peuvent se produire.
(Suite à la page arrière)
Page 2

本装置是专为兼容 Sony E 卡口系统增距镜
的镜头而设计的。
切勿安装其他镜头,否则本装置或镜头可能
会损坏。
有关与增距镜兼容的最新镜头型号的信息,
请访问所在地区的 Sony 网站,或者咨询您的
Sony 经销商或当地的 Sony 授权服务机构。
部件识别
1 前盖(正面盖)
2 E 卡口系统(镜头安装侧)
3 镜头安装标记
4 相机机身安装标记
5 镜头接点*
6 镜头后盖(背面盖)
7 E 卡口系统(相机安装侧)
8 镜头释放杆
9 镜头安装橡胶环
* 切勿触摸前后卡座上的镜头接点。
安装/拆下
安装本装置
(参见插图 –)
1
取下本装置的前盖(正面盖)及镜头
的后盖。
若要取下本装置的前后盖,请逆时针转
动前盖及镜头后盖。
2
将本装置上的白色镜头安装标记对准
镜筒上的白色安装标记。 将本装置插
入镜头的卡座中,并沿箭头 (a) 方向
转动,直至其咔哒一声就位。
安装本装置时切勿按压本装置上的镜头
释放杆。
切勿倾斜安装本装置。
3
取下本装置的镜头后盖(背面盖)及
相机的机身盖。
4
将本装置(已安装至镜头)上的白色
相机机身安装标记对准相机上的白色
标记。 将本装置插入相机的卡座中,
并沿箭头 (b) 方向转动,直至其咔哒
一声就位。
安装镜头(已安装本装置)时切勿按压
相机上的镜头释放按钮。
切勿倾斜插入已安装本装置的镜头。
一个镜头切勿与多个本装置配合使用。 否
则可能导致损坏。
拆下镜头
(参见插图 –)
1
按住相机上的镜头释放按钮,并沿箭
头 (c) 方向转动镜头和安装在镜头上
的本装置,直至转动停止,然后将二
者拆下。
2
LA-EA2/LA-EA4
1
2
3
4
6
5
7
–2
–4
5 9
(a)
(b)
8
–1
(c)
–2
(d)
(Suite de la page précédente)
Pour déposer l’objectif
(Voirl’illustration –.)
Tout en appuyant sur le bouton de
1
libération de l’objectif de l’appareil
photo, tournez l’objectif et cet appareil
fixé à l’objectif dans le sens de la flèche
(c) jusqu’à ce qu’ils s’arrêtent, puis
déposez-les.
Tout en poussant le levier de libération
2
de l’objectif de cet appareil vers le sens
de la flèche, tournez cet appareil dans
le sens de la flèche (d) jusqu’à ce qu’il
s’arrête, puis déposez cet appareil.
Remarques sur la prise de vue
Cet article augmente la longueur focale de l’objectif
fixé, mais il réduit l’ouverture effective de l’objectif
fixé.*
La photométrie de l’appareil photo compense
automatiquement pour l’ouverture effective.*
La profondeur de champ de l’objectif est moins
importante en utilisant cet article.*
* Reportez-vous aux spécifications ci-dessous pour plus
d’informations.
En raison de l’augmentation de la longueur focale
et de la diminution de l’ouverture effective, utilisez
un trépied pour réduire le bougé de l’appareil photo
lorsque cet article est posé.
Par faible éclairage, tel qu’un éclairage fluorescent
faible, l’appareil photo risque de ne pas pouvoir
mettre au point en mode AF. Utilisez le blocage de
mise au point sur des sujets à contraste marqué ou la
mise au point manuelle après la pose de cet article.
Spécifications
Nom de
produit (Nom
de modèle)
Taille de
l’écran de
prise de vue
Longueur
focale effective
Ouverture du
diaphragme
Élémentsgroupes de
lentilles
Grossissement
maximal
Profondeur de
champ
Dimensions
(diamètre
maximal ×
hauteur*)
(Environ, mm
(po.))
* Sans les parties saillantes des montures avant et
arrière
Poids
(environ, g
(oz))
Articles inclus
(Le chiffre entre parenthèses indique le nombre
d’unités.)
Téléconvertisseur (1), Capuchon avant (capuchon de
l’avant) (1), Capuchon arrière (capuchon de l’arrière)
(1), Boîtier d’objectif (1), Jeu de documents imprimés
La conception et les spécifications peuvent être
modifiées sans préavis.
est une marque commerciale de Sony
Corporation.
En este manual se explica cómo utilizar
objetivos. Las precauciones comunes a todos
los objetivos, como notas sobre la utilización,
se encuentran en las “Precauciones previas a
la utilización del producto” suministradas por
separado. Cerciórese de leer ambos documentos
antes de utilizar su objetivo.
Este manual es para varios objetivos diferentes.
El teleconversor 1.4X Teleconverter (SEL14TC)/2X
Teleconverter (SEL20TC) (a partir de ahora “esta
unidad”) funciona para aumentar la distancia focal
del objetivo instalado en 1,4X (SEL14TC) o 2,0X
(SEL20TC) cuando se monta entre de cámara con
montura E del sistema de cámara Sony α (a partir de
ahora “cámara”) y un objetivo compatible.
Para más información sobre compatibilidad, visite
el sitio Web de Sony de su área, o consulte a su
proveedor Sony o a un centro de servicio local
autorizado por Sony.
En las ilustraciones de este manual se muestra el
SEL14TC.
1.4X Teleconverter
(SEL14TC)
Taille FULL FRAME
de 35 mm
1,4 fois celle de
l’objectif fixé
1 ouverture du
diaphragme
plus grande que
l’objectif fixé
5–6 5–8
1,4 fois celui de
l’objectif fixé
Environ 1/1,4 de
l’objectif fixé
62,4 × 17,2
(2 1/2 × 11/16)
167 (5,9) 207 (7,4)
2X Teleconverter
(SEL20TC)
Taille FULL FRAME
de 35 mm
2,0 fois celle de
l’objectif fixé
2 ouvertures du
diaphragme plus
grandes que
l’objectif fixé
2,0 fois celui de
l’objectif fixé
Environ 1/2 de
l’objectif fixé
62,4 × 27,2
(2 1/2 × 1 1/8)
Notas sobre la utilización
No deje el objetivo expuesto al sol o a fuentes de
luz intensas. Es posible que se produzcan fallos de
funcionamiento interno del cuerpo de la cámara y del
objetivo, humo, o un incendio como efecto de la luz
directa. Si las circunstancias exigen dejar el objetivo
expuesto a la luz solar, asegúrese de colocar las tapas
del objetivo.
Cuando fotografíe contra el sol, mantenga el sol
completamente fuera del ángulo de visión. De lo
contrario, los rayos solares podrían concentrarse en
un punto en el interior de la cámara, causando humo
o un incendio. Mantener el sol ligeramente fuera del
ángulo de visión también puede causar humo o un
incendio.
Cuando transporte una cámara con el objetivo
instalado, sujete siempre firmemente tanto la cámara
como el objetivo.
Este objetivo está diseñado para cámaras con
montura E del sistema de cámara Sony α. No podrá
utilizarse con cámaras con montura A.
No instale un adaptador de montura (LA-EA2/LA-EA4
etc.). De lo contrario, esta unidad, el objetivo, o el
adaptador de montura podrían dañarse. (Consulte la
ilustración )
Objetivos compatibles y funciones
Esta unidad está diseñada para objetivos
compatibles con teleconversor de montura E
Sony.
No instale otros objetivos, ya que esta unidad o
el objetivo podrían dañarse.
Para información sobre el modelo de objetivo más
reciente compatible con el teleconversor, visite
el sitio Web de Sony de su área, o consulte a su
proveedor Sony o a un centro de servicio local
autorizado por Sony.
Identificación de las partes
1 Tapa frontal (tapa del lado frontal)
2 Montura E (lado de fijación del objetivo)
3 Índice de de montaje del objetivo
4 Índice de montaje para el cuerpo de la cámara
5 Contactos del objetivo*
6 Tapa posterior del objetivo (tapa del lado
posterior)
7 Montura E (lado de fijación de la cámara)
8 Palanca de liberación del objetivo
9 Anillo de caucho de montaje del objetivo
* No toque los contactos del objetivo de las monturas
frontal y posterior.
Colocación y extracción
Para colocar esta unidad
(Consulte la ilustración –)
Extraiga la tapa frontal (tapa del lado
1
frontal) de esta unidad y la tapa posterior
del objetivo.
Para extraer las tapas de esta unidad, gire hacia
la izquierda la tapa frontal y la tapa posterior del
objetivo.
Alinee el índice blanco de montaje del
2
objetivo de esta unidad con el índice de
montaje del barril del objetivo. Inserte
esta unidad en la montura del objetivo, y
gírela en el sentido de la flecha (a) hasta
que chasquee en su lugar.
No presione la palanca de liberación del objetivo
de esta unidad cuando monte dicha unidad.
No monte esta unidad de forma inclinada.
Extraiga la tapa posterior del objetivo
3
(tapa del lado posterior) de esta unidad y
la tapa del cuerpo de la cámara.
Alinee el índice blanco de montaje para
4
el cuerpo de la cámara de esta unidad
fijada al objetivo, con el índice blanco
de la cámara. Inserte esta unidad en
la montura de la cámara, y gírela en
el sentido de la flecha (b) hasta que
chasquee en su lugar.
No presione la palanca de liberación del objetivo
de la cámara cuando monte el objetivo instalado
esta unidad.
No inserte el objetivo instalado en esta unidad de
forma inclinada.
No utilice más de una de estas unidades con un
objetivo. Podrían producirse daños.
Para extraer el objetivo
(Consulte la ilustración –)
Manteniendo presionado el botón de
1
liberación del objetivo de la cámara,
gire el objetivo y esta unidad fijada
al objetivo en el sentido de la flecha
(c) hasta que se paren, y después
extráigalos.
Tirando de la palanca de liberación del
2
objetivo de esta unidad en el sentido de
la flecha, gire esta unidad en el sentido
de la flecha (d) hasta que se pare, y
después extraiga esta unidad.
Notas sobre el fotografiado
Si bien esta unidad aumenta la distancia focal del
objetivo instalado, reduce la apertura efectiva de
dicho objetivo.*
La fotometría de la cámara compensa
automáticamente la apertura efectiva.*
La profundidad de campo del objetivo es menos
profunda cuando se utiliza esta unidad.*
* Para más información, consulte las especificaciones
siguientes.
Debido al aumento de longitud focal y la reducción
de la apertura efectiva, utilice un trípode para reducir
sacudidas de la cámara cuando esta unidad esté
instalada.
En condiciones de poca luz, como con luz
fluorescente tenue, la cámara puede no ser capaz
de enfocar en AF. Después de instalar esta unidad,
con un motivo de alto contraste utilice el bloqueo del
enfoque o enfoque manual.
Especificaciones
Nombre del
producto
(Nombre del
modelo)
Tamaño de
la pantalla de
fotografiado
Distancia focal
efectiva
f-stop
Grupos y
elementos del
objetivo
Ampliación
máxima
Profundidad
de campo
Dimensiones
(diámetro
máximo ×
altura*)
(aprox., mm)
* Excluyendo las partes salientes de las monturas
frontal y posterior.
Peso
(aprox., g)
Elementos incluidos
(El número entre paréntesis indica el número de
piezas.)
Teleconversor (1), Tapa frontal (tapa del lado
frontal) (1), Tapa posterior del objetivo (tapa del
lado posterior) (1), Funda del objetivo (1), Juego de
documentación impresa
El diseño y las especificaciones están sujetos a
cambios sin previo aviso.
es marca comercial de Sony Corporation.
1.4X Teleconverter
(SEL14TC)
Tamaño FULL
FRAME de 35 mm
1,4X del objetivo
instalado
1 f-stop superior
al del objetivo
instalado
5–6 5–8
1,4X del objetivo
instalado
Aprox. 1/1,4 del
objetivo instalado
62,4 × 17,2 62,4 × 27,2
167 207
2X Teleconverter
(SEL20TC)
Tamaño FULL
FRAME de 35 mm
2,0X del objetivo
instalado
2 f-stop superior
al del objetivo
instalado
2,0X del objetivo
instalado
Aprox. 1/2 del
objetivo instalado
保留备用
本说明书介绍镜头的用法。有关所有镜头
的一般注意事项(如使用须知)可以在另
外的“使用前注意事项”中找到。务必在
使用镜头前阅读以上两份文件。
本说明书适用于数种不同的镜头。
将 1.4X Teleconverter(1.4X 增距镜,
SEL14TC)/2X Teleconverter(2X 增距
镜,SEL20TC)(以下简称“本装置”)安
装在 Sony α 相机中的 E 卡口系统相机(以
下简称“相机”)与兼容镜头之间,便能使所
装镜头的焦距增加 1.4 倍 (SEL14TC) 或 2.0
倍 (SEL20TC)。
有关兼容性的详细信息,请访问所在地区的
Sony 网站,或者咨询您的 Sony 经销商或当
地的 Sony 授权服务机构。
本说明书中的插图以 SEL14TC 为例。
使用须知
请勿将镜头置于阳光或强光下,由于光线
聚集的结果可能会导致相机机身和镜头的内
部故障,或引起冒烟或者火灾。如果在必须
将镜头置于阳光的情况下,请务必盖上镜头
盖。
对着阳光方向拍摄时,不要让太阳进入视
角中。否则,阳光可能会在相机的焦点上聚
集,从而引起冒烟或者火灾。即便是在让太
阳略微偏出视角的情况下,仍可能会引起冒
烟或者火灾。
当在装有镜头的情况下携带相机时,请务必
同时握紧相机和镜头。
本镜头是专为 Sony α 相机中的 E 卡口系
统相机而设计的。 不能将其用于 A 卡口系
统相机。
请勿安装卡口适配器(LA-EA2/LA-EA4
等)。 否则,可导致本装置、镜头或卡口适
配器受损(参见插图
)。
兼容镜头和功能
本装置是专为兼容 Sony E 卡口系统增距镜
的镜头而设计的。
切勿安装其他镜头,否则本装置或镜头可能
会损坏。
有关与增距镜兼容的最新镜头型号的信息,
请访问所在地区的 Sony 网站,或者咨询您的
Sony 经销商或当地的 Sony 授权服务机构。
部件识别
1 前盖(正面盖)
2 E 卡口系统(镜头安装侧)
3 镜头安装标记
4 相机机身安装标记
5 镜头接点*
6 镜头后盖(背面盖)
7 E 卡口系统(相机安装侧)
8 镜头释放杆
9 镜头安装橡胶环
* 切勿触摸前后卡座上的镜头接点。
安装/拆下
安装本装置
(参见插图 –)
取下本装置的前盖(正面盖)及镜头
1
的后盖。
若要取下本装置的前后盖,请逆时针转
动前盖及镜头后盖。
将本装置上的白色镜头安装标记对准
2
镜筒上的白色安装标记。 将本装置插
入镜头的卡座中,并沿箭头 (a) 方向
转动,直至其咔哒一声就位。
安装本装置时切勿按压本装置上的镜头
释放杆。
切勿倾斜安装本装置。
取下本装置的镜头后盖(背面盖)及
3
相机的机身盖。
将本装置(已安装至镜头)上的白色
4
相机机身安装标记对准相机上的白色
标记。 将本装置插入相机的卡座中,
并沿箭头 (b) 方向转动,直至其咔哒
一声就位。
安装镜头(已安装本装置)时切勿按压
相机上的镜头释放按钮。
切勿倾斜插入已安装本装置的镜头。
一个镜头切勿与多个本装置配合使用。 否
则可能导致损坏。
拆下镜头
(参见插图 –)
按住相机上的镜头释放按钮,并沿箭
1
头 (c) 方向转动镜头和安装在镜头上
的本装置,直至转动停止,然后将二
者拆下。
沿箭头方向拉动本装置上的镜头释
放杆,同时沿箭头 (d) 方向转动本装
置,直至转动停止,然后将本装置拆
下。
拍摄注意事项
在本装置增加所装镜头焦距时,会减小所装镜
头的有效光圈。*
相机的测光系统会自动对有效光圈进行补
偿。 *
使用本装置时,镜头的景深将变浅。*
* 有关详细信息,请参见下列规格。
在安装本装置的情况下,由于增加了焦距以
及减小了有效光圈,请使用三脚架以减轻相
机震动。
在光线不足的情况下,如在昏暗的荧光灯
下,相机可能无法通过 AF 进行对焦。 安装
本装置后,对于对比度高的拍摄对象,请使
用对焦锁定,或进行手动对焦。
规格
产品名称
(型号名称)
拍摄屏幕大小
有效焦距
光圈值
1.4X
Teleconverter
(SEL14TC)
35mm FULL
FRAME 尺寸
所装镜头焦距
的 1.4 倍
比所装镜头高
1 个光圈
镜头组-片 5–6 5–8
最大放大倍数
景深
所装镜头的
1.4 倍
约为所装镜头
的 1/1.4
尺寸
(最大直径
×长*)
62.4 × 17.2 62.4 × 27.2
(约 mm)
*不包括前后卡座的突出部位
质量(约 g) 167 207
所含物品
(括号中的数字代表件数。)
增距镜 (1)、前盖(正面盖)(1)、镜头后盖
(背面盖)(1)、镜头袋 (1)、成套印刷文件
设计或规格如有变动,恕不另行通知。
是 Sony Corporation 的商标。
2X
Teleconverter
(SEL20TC)
35mm FULL
FRAME 尺寸
所装镜头焦距
的 2.0 倍
比所装镜头高
2 个光圈
所装镜头的
2.0 倍
约为所装镜头
的 1/2
 Loading...