

Page 1
TFT LCD Color
Computer Display
1-796-576-23 (1)
Operating Instructions
Mode d’emploi
Manual de instrucciones
US
FR
ES
SDM-V72W
© 2002 Sony Corporation
Page 2
Owner’s Record
The model and serial numbers are located at the rear of
the unit. Record these numbers in the spaces provided
below . Refer to them whenever you call upon your dealer
regarding this product.
Model No. ______________________________
Serial No. ________________________________
WARNING
To prevent fire or shock hazard, do not expose
the unit to rain or moisture.
Dangerously high voltages are present inside
the unit. Do not open the cabinet. Refer
servicing to qualified personnel only.
As an ENERGY STAR Partner,
Sony has determined that this
product or product models meets
NERGY STAR guidelines
the E
for energy efficiency.
ENERGY STAR is a U.S. registered mark.
®
®
®
FCC Notice
This equipment has been tested and found to comply with
the limits for a Class B digital device, pursuant to Part 15 of
the FCC Rules. These limits are designed to provide
reasonable protection against harmful interference in a
residential installation. This equipment generates, uses,
and can radiate radio frequency energy and, if not installed
and used in accordance with the instructions, may cause
harmful interference to radio communications. However,
there is no guarantee that interference will not occur in a
particular installation. If this equipment does cause
harmful interference to radio or television reception, which
can be determined by turning the equipment off and on,
the user is encouraged to try to correct the interference by
one or more of the following measures:
■ Reorient or relocate the receiving antenna.
■ Increase the separation between the equipment and
receiver.
■ Connect the equipment into an outlet on a circuit
different from that to which the receiver is
connected.
■ Consult the dealer or an experienced radio/TV
technician for help.
You are cautioned that any changes or modifications
not expressly approved in this manual could void your
authority to operate this equipment.
For questions regarding your product or for the Sony
Customer Information Service Center nearest you call:
1-800-222-SONY (7669)
The number below is for FCC related matters only.
Declaration of Conformity
Trade Name: SONY
Model No.: SDM-V72W
Responsible Party: Sony Electronics Inc.
Address: 680 Kinderkamack Road,
Oradell, NJ 07649 USA
Telephone No.: 201-930-6972
This device complies with Part 15 of the FCC Rules.
Operation is subject to the following two conditions:
(1) This device may not cause harmful interference,
and (2) this device must accept any interference
received, including interference that may cause
undesired operation.
NOTICE
This notice is applicable for USA/Canada only.
If shipped to USA/Canada, install only a UL
LISTED/CSA LABELLED power supply cord
meeting the following specifications:
SPECIFICATIONS
Plug Type Nema-Plug 5-15p
Cord Type SVT or SJT unshielded,
minimum 3 x 18 AWG
Length Maximum 15 feet
Rating Minimum 7 A, 125 V
NOTICE
Cette notice s’applique aux États-Unis et au
Canada uniquement.
Si cet appareil est exporté aux États-Unis ou
au Canada, utiliser le cordon d’alimentation
portant la mention UL LISTED/CSA LABELLED
et remplissant les conditions suivantes :
SPÉCIFICATIONS
Type de fiche Fiche Nema 5-15 broches
Cordon Type SVT ou SJT, non blindé,
minimum 3 x 18 AWG
Longueur Maximum de 15 pieds
Tension Minimum 7 A, 125 V
- 1 -
Page 3
Table of Contents
■ Macintosh is a trademark
licensed to Apple Computer,
Inc., registered in the U.S.A.
and other countries.
■ Windows
®
is registered
trademark of Microsoft
Corporation in the United
States and other countries.
■ IBM PC/AT and VGA are
registered trademarks of IBM
Corporation of the U.S.A.
■ VESA and DDC
TM
are
trademarks of the Video
Electronics Standards
Association.
Precautions - - - - - - - - - - - - - - - - - - - - - - - - - -3
Identifying parts and controls - - - - - - - - - - - - - - - - -5
Setup - - - - - - - - - - - - - - - - - - - - -8
Setup 1: Activating and replacing a battery for remote card -9
Setup 2: Connecting your display to your computer - - - - - - 10
Setup 3: Connecting the audio cord - - - - - - - - - - - - - 11
Setup 4: Connecting video cables - - - - - - - - - - - - - - 12
Setup 5: Connecting the AC adapter- - - - - - - - - - - - - 13
Setup 6: Organizing the cables and replacing the back panel 14
Setup 7: Connecting the power cord- - - - - - - - - - - - - 15
Setup 8: T urning on the display, computer , or other equipment 16
Setup 9: Adjusting the tilt - - - - - - - - - - - - - - - - - - 17
Navigating through Video menus- - - - - - - - - - - - - - 25
PICTURE CONTROL options (for Video, S-Video, or Component) 26
AUDIO CONTROL options (for Video, S-Video, or Component) 27
SCREEN CONTROL options (for Video, S-Video, or Component) 28
SETUP options (for Video, S-Video or Component) - - - - - - 31
Technical Features - - - - - - - - - - - - - 32
Power save function- - - - - - - - - - - - - - - - - - - - - 32
Preset and user modes - - - - - - - - - - - - - - - - - - - 32
Controlling the volume - - - - - - - - - - - - - - - - - - - 33
Using the headphones - - - - - - - - - - - - - - - - - - - 33
Troubleshooting - - - - - - - - - - - - - - 34
■ ENERGY STAR is a U.S.
registered mark.
■ All other product names
mentioned herein may be
the trademarks or registered
trademarks of their
respective companies.
■ is a trademark of
SRS Labs, Inc. SRS WOW
technology is incorporated
under license from SRS Labs,
Inc.
■ Furthermore, “
TM
” and “®”
are not mentioned in each
case in this manual.
Using the Remote Card - - - - - - - - - - 18
Customizing Your Display - - - - - - - - - 19
Navigating through PC menus- - - - - - - - - - - - - - - - 19
PC PICTURE CONTROL options - - - - - - - - - - - - - - - - 20
PC AUDIO CONTROL options- - - - - - - - - - - - - - - - - 21
PC SCREEN CONTROL options - - - - - - - - - - - - - - - - 22
PC SETUP options - - - - - - - - - - - - - - - - - - - - - - 24
PC on-screen messages - - - - - - - - - - - - - - - - - - - 34
Self-diagnosis function - - - - - - - - - - - - - - - - - - - 39
Specifications - - - - - - - - - - - - - - - 40
Appendix A - - - - - - - - - - - - - - - - 41
Appendix B- - - - - - - - - - - - - - - - - 42
- 2 -
Page 4
Precautions
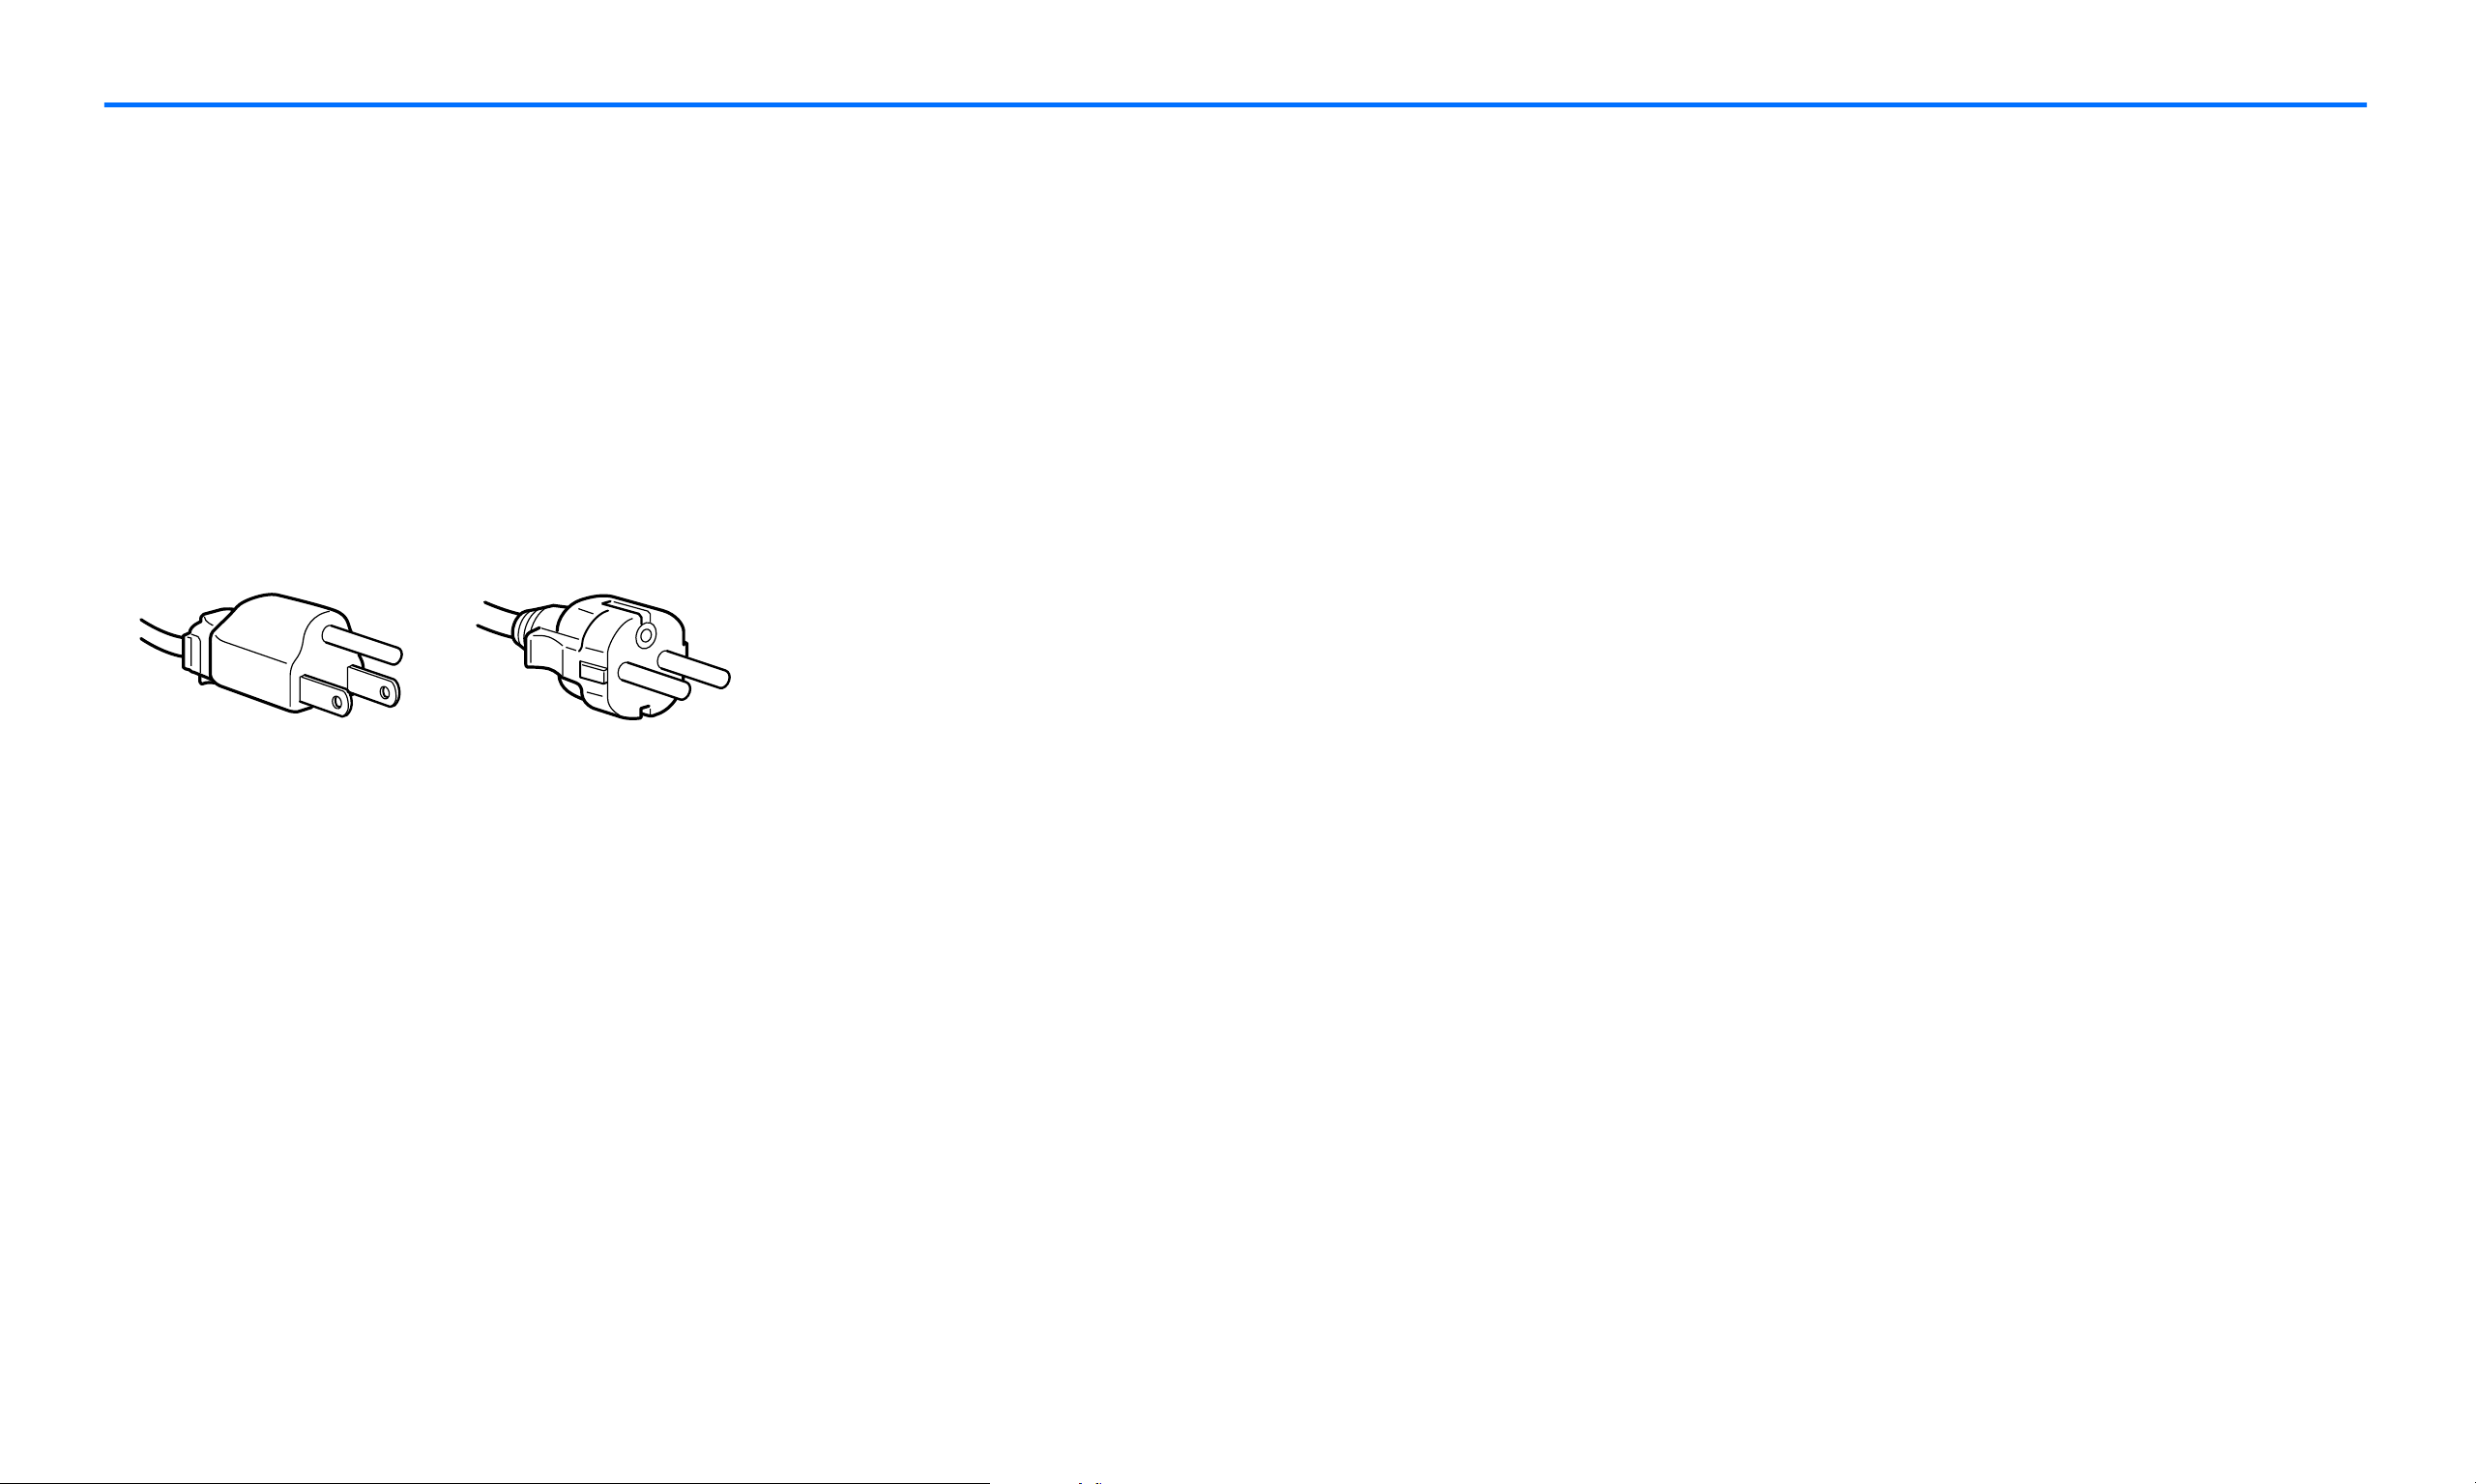
Warning on power connections
Use the supplied power cord. If you use a
different power cord, be sure that it is
compatible with your local power supply.
If you do not use the appropriate cord, this
display will not conform to mandatory FCC
standards.
for 100 to 120 V AC for 200 to 240 V AC
Installation
Do not install or leave the display:
■ In places subject to extreme temperatures, for
example near a radiator, heating vent, or in
direct sunlight. Subjecting the display to high
temperatures, such as in an automobile
parked in direct sunlight, could cause
deformations of the casing or malfunctions.
■ In places where the display may tip and fall,
such as locations subject to any vibration or
shock or an unstable surface.
■ Near any equipment that generates a strong
magnetic field, such as a TV or various other
household appliances.
Handling the LCD screen
■ Do not leave the LCD screen facing the sun as
it can damage the LCD screen. Take care when
you place the display by a window.
■ Do not push on or scratch the LCD screen. Do
not place a heavy object on the LCD screen.
This may cause the screen to lose uniformity or
cause LCD panel malfunctions.
■ If the display is used in a cold place, a residual
image may appear on the screen. This is not a
malfunction. The screen returns to normal as
the temperature rises to a normal operating
level.
■ If a still picture is displayed for a long time, a
For use only with AC adapter, Sony AC-DP001
The equipment should be installed near an
easily accessible outlet.
■ In places subject to inordinate amounts of
dust, dirt, or sand, for example near an open
window or an outdoor exit. If setting up
temporarily in an outdoor environment, be
sure to take adequate precautions against
airborne dust and dirt. Otherwise irreparable
malfunctions could occur.
■ In places where the display may come in
contact with extreme moisture or liquid, such
as in bathroom or area near pool. Avoid
placing glasses or cups on top of the display
that may cause liquid to spill inside.
residual image may appear for a while. The
residual image will eventually disappear.
■ The LCD panel becomes warm during
operation. This is not a malfunction.
- 3 -
Page 5

About the built-in stereo speakers
Maintenance
Transportation
Be sure to keep magnetic recor ding equipment,
tapes, and floppy discs away from the speaker’s
opening as the speakers generate a magnetic
field. This magnetic field may affect data stored
on magnetic tapes and discs.
Handling the headphones
Be sure to remove the headphones before
moving away from the display. If the
headphone cord is pulled away from the display
abruptly, injury or damage may occur.
Note on the LCD (Liquid Crystal
■ Be sure to unplug the power cord from the
power outlet before cleaning your display.
■ Clean the LCD screen with a soft cloth. If you
use a glass cleaning liquid, do not use any type
of cleaner containing an anti-static solution or
similar additive as this may scratch the LCD
screen’s coating.
■ Clean the cabinet, panel, and controls first
with a soft cloth lightly moistened with a mild
detergent solution, then dry off with a soft
cloth. Do not use any type of abrasive pad,
scouring powder, or solvent, such as alcohol or
benzine.
■ Do not rub, touch, or tap the surface of the
■ Disconnect all cables from the display and
grasp the support and base sections of the
display stand firmly with both hands when
transporting. If you drop the display, you may
be injured or the display may be damaged.
■ The back panel is designed to come off; do not
lift the display by its back panel alone.
■ When you transport this display for repair or
shipment, use the original carton and packing
materials.
Disposal of the display
■ Do not dispose of this display with general
household waste.
Display)
Please note that the LCD screen is made with
high-precision technology. However, black
points or bright points of light (red, blue, or
green) may appear constantly on the LCD
screen, and irregular colored stripes or
brightness may appear on the LCD screen. This
is not a malfunction.
(Effective dots: more than 99.99%)
screen with sharp or abrasive items such as a
ballpoint pen or screwdriver. This type of
contact may result in a scratched LCD display
screen.
■ Note that material deterioration or LCD screen
coating degradation may occur if the display is
exposed to volatile solvents such as insecticide,
or if prolonged contact is maintained with
rubber or vinyl materials.
■ The LCD contains a small amount of liquid
crystal and mercury. The fluorescent tube used
in this display also contains mercury. Follow
your local ordinances and regulations for
disposal.
- 4 -
Page 6

Identifying parts and controls
See the pages in parentheses for further details.
POWER
1
MENU
Front of the LCD display
3
4
2
q;
OK
5
WIDE
6
8
INPUT
7
1 Power button (page 16)
This button turns the display on. To turn the
display off, press this button again.
2 Power LED indicator (page 16)
This LED indicates power ON/OFF, power
save, and remote off status.
3 MENU button (pages 19 and 25)
This button turns the menu screen on and
off.
4 +/- buttons (pages 19, 25, and 33)
These buttons are used to select the menu
items and make adjustments, and also to
control the volume when the menu screen is
not active.
5 OK button (pages 19 and 25)
7 INPUT button (pages 19 and 25)
This button switches between connected
input sources, including PC input,
Composite video input, S-Video input, and
Y/Pb/Pr Component video input.
8 Stereo speakers (page 33)
These output the audio signals.
9 Headphones jack (page 33)
This jack outputs audio signals to the
headphones.
q; Remote card IR (Infrared Receiver) sensor
window
This window detects signals from the remote
card.
9
Side view of the LCD display
This button activates the selected menu item
and enables adjustments using the +/-
POWER
MENU
DK
WIDE
INPUT
buttons 4.
6 WIDE button (pages 22 and 29)
This button switches between different
screen size modes in both PC and Video
modes.
- 5 -
Page 7
Identifying parts and controls - cont.
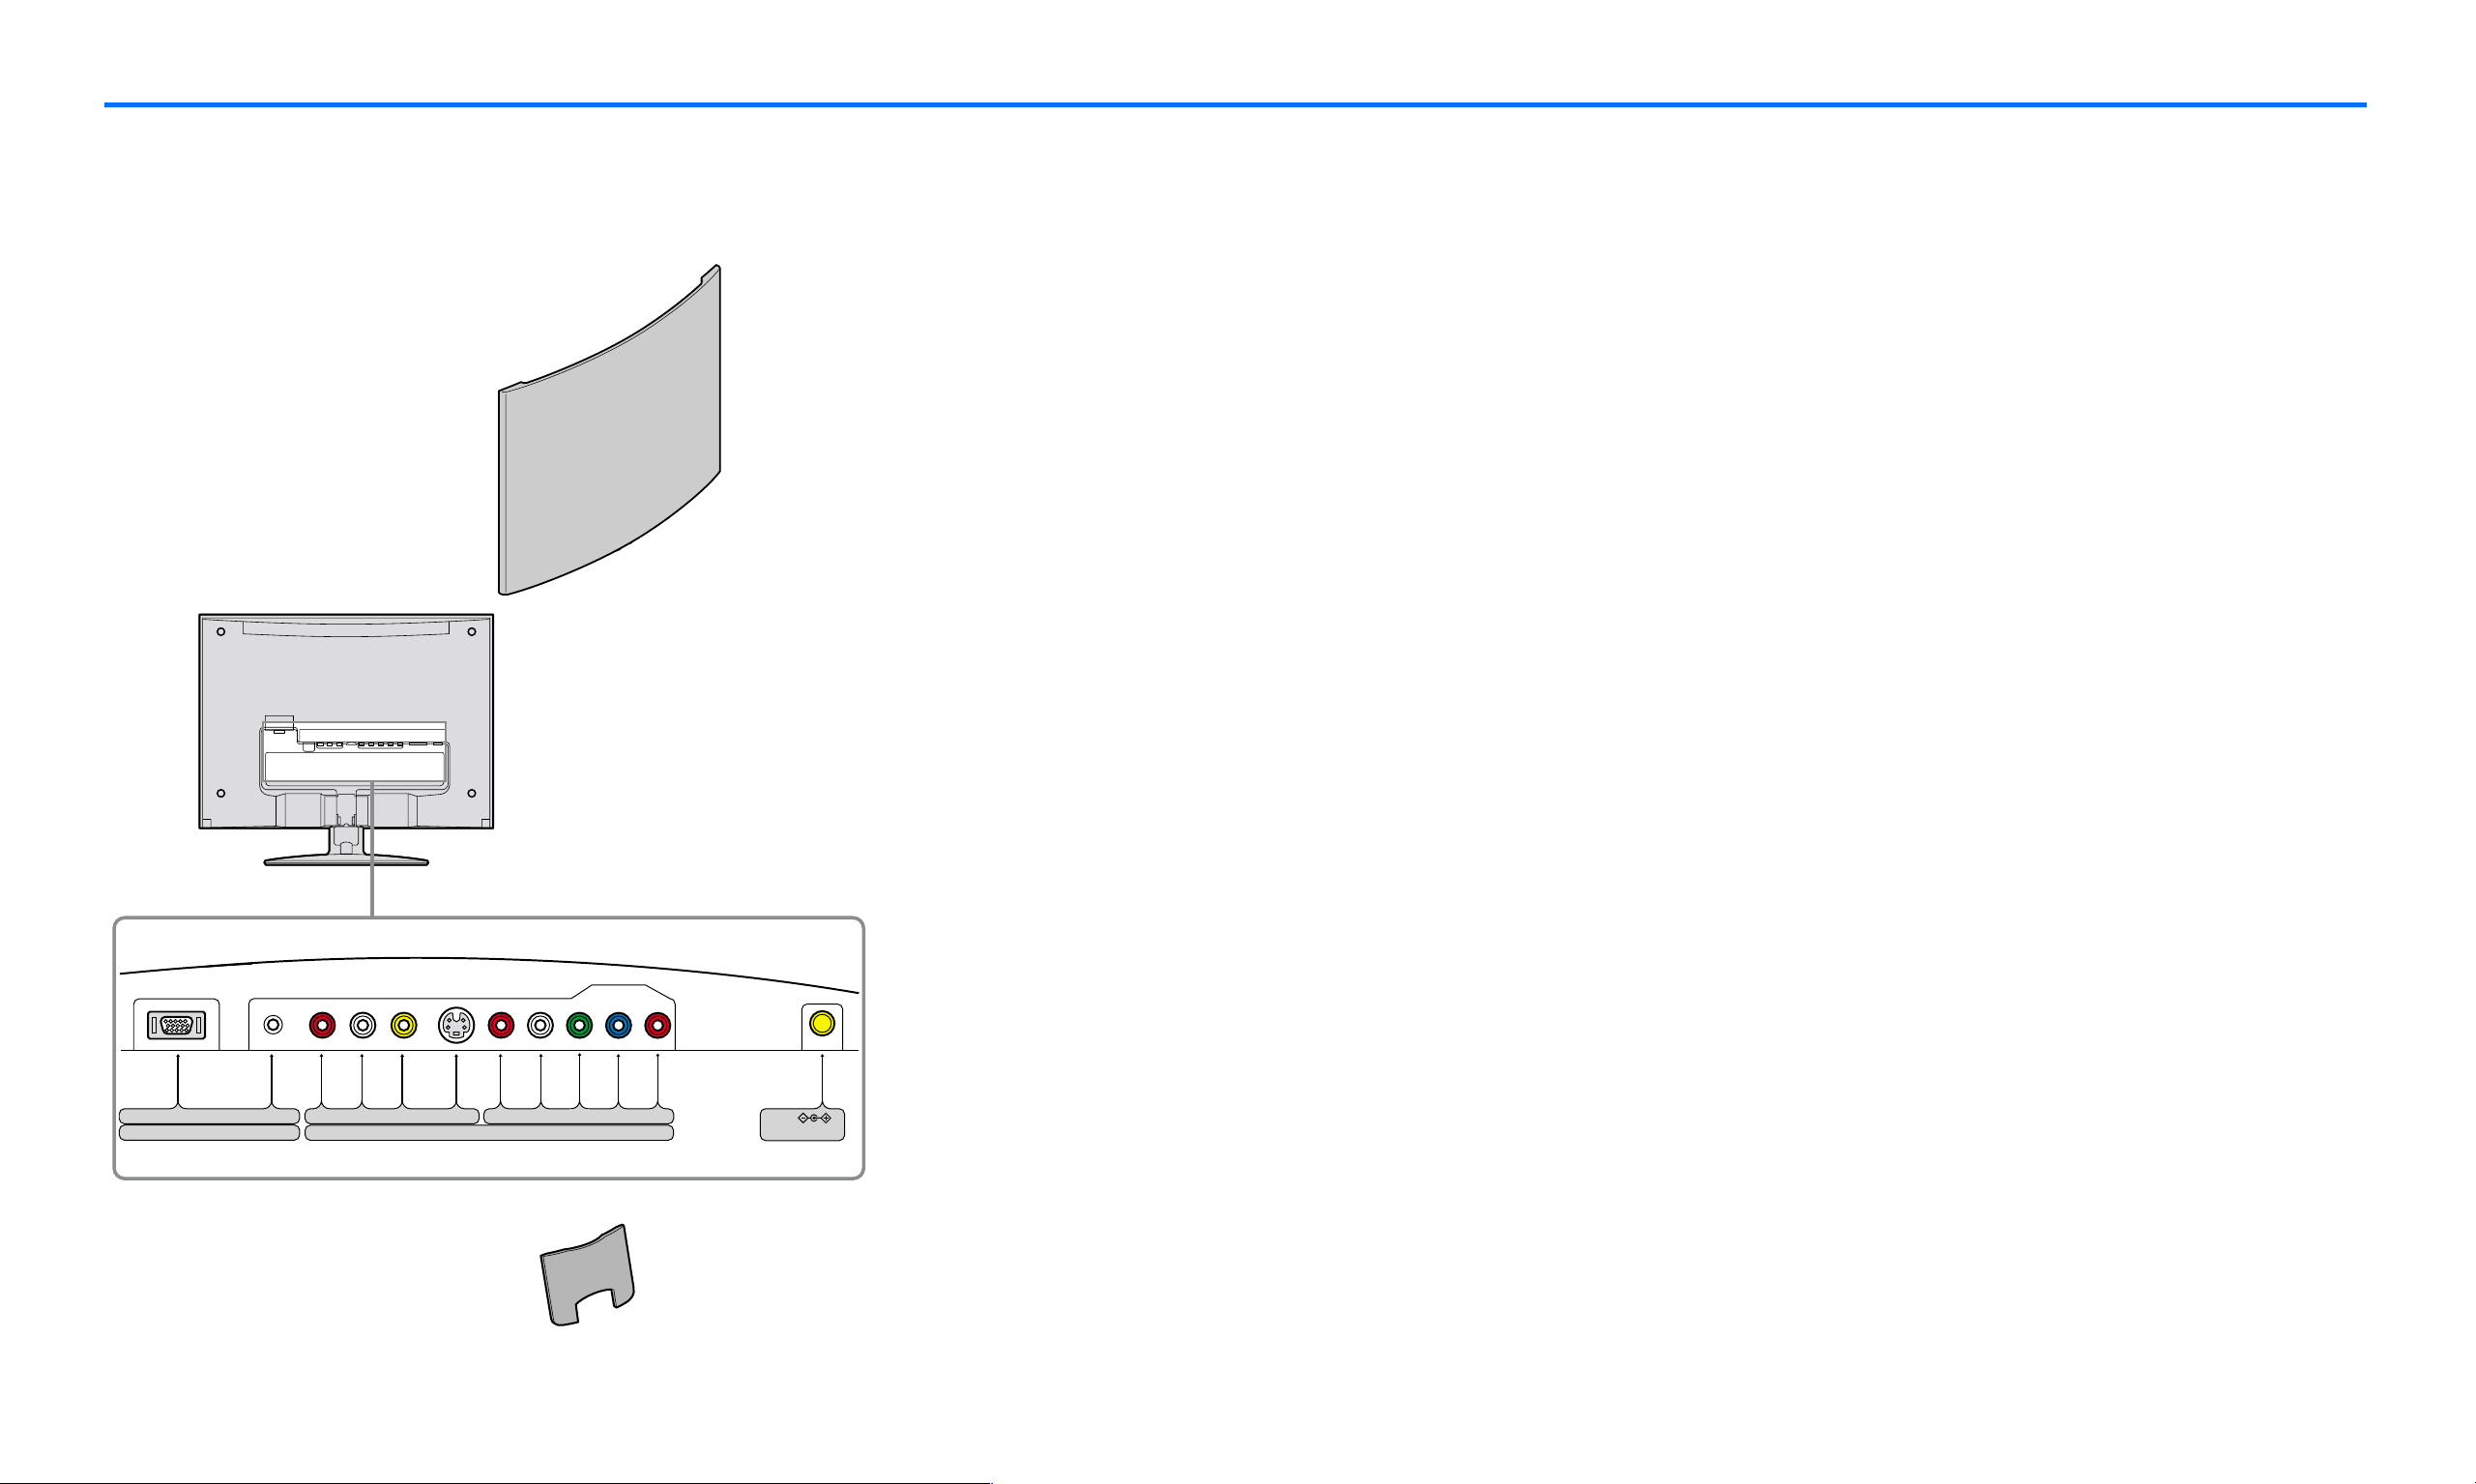
Rear of the LCD display
qa
qa Back panel (pages 10 and 14)
Remove this panel to access power and
input connections for the display.
qs HD15 input for PC Input (analog RGB)
This connector inputs analog RGB video
signals (0.700 Vp-p, positive) and SYNC
signals.
qd Audio input jack for PC Input (page 11)
This jack inputs audio signals when
connected to the audio output jack of a
computer or other audio equipment.
qf Composite Input (page 12)
qh Y/Pb/Pr Component Video and Audio
Input (page 12)
These jacks input high quality video and
audio signals when connected to equipment
with component output.
qj DC IN connector (page 13)
This connector provides 16.5V DC power to
the display. Connect the AC adapter
(provided) to this connector.
qk Cable cover (pages 10 and 14)
Remove this cover to organize the cables
connected to the display monitor.
PC IN
AUDIO IN
S VIDEOVIDEOR L PBR LHD15
VIDEO IN
Y
P
R
DC IN 16.5V
qs qd qf qg qh qj
qk
These jacks input audio/video signals when
connected to the composite output jack of
video equipment.
qg S-Video Input (page 12)
This jack inputs video signals when
connected to the S-Video output jack of
video equipment for better picture quality
than the composite video. You will need to
connect audio cables for sound (S-Video
carries only the video signal).
- 6 -
Page 8
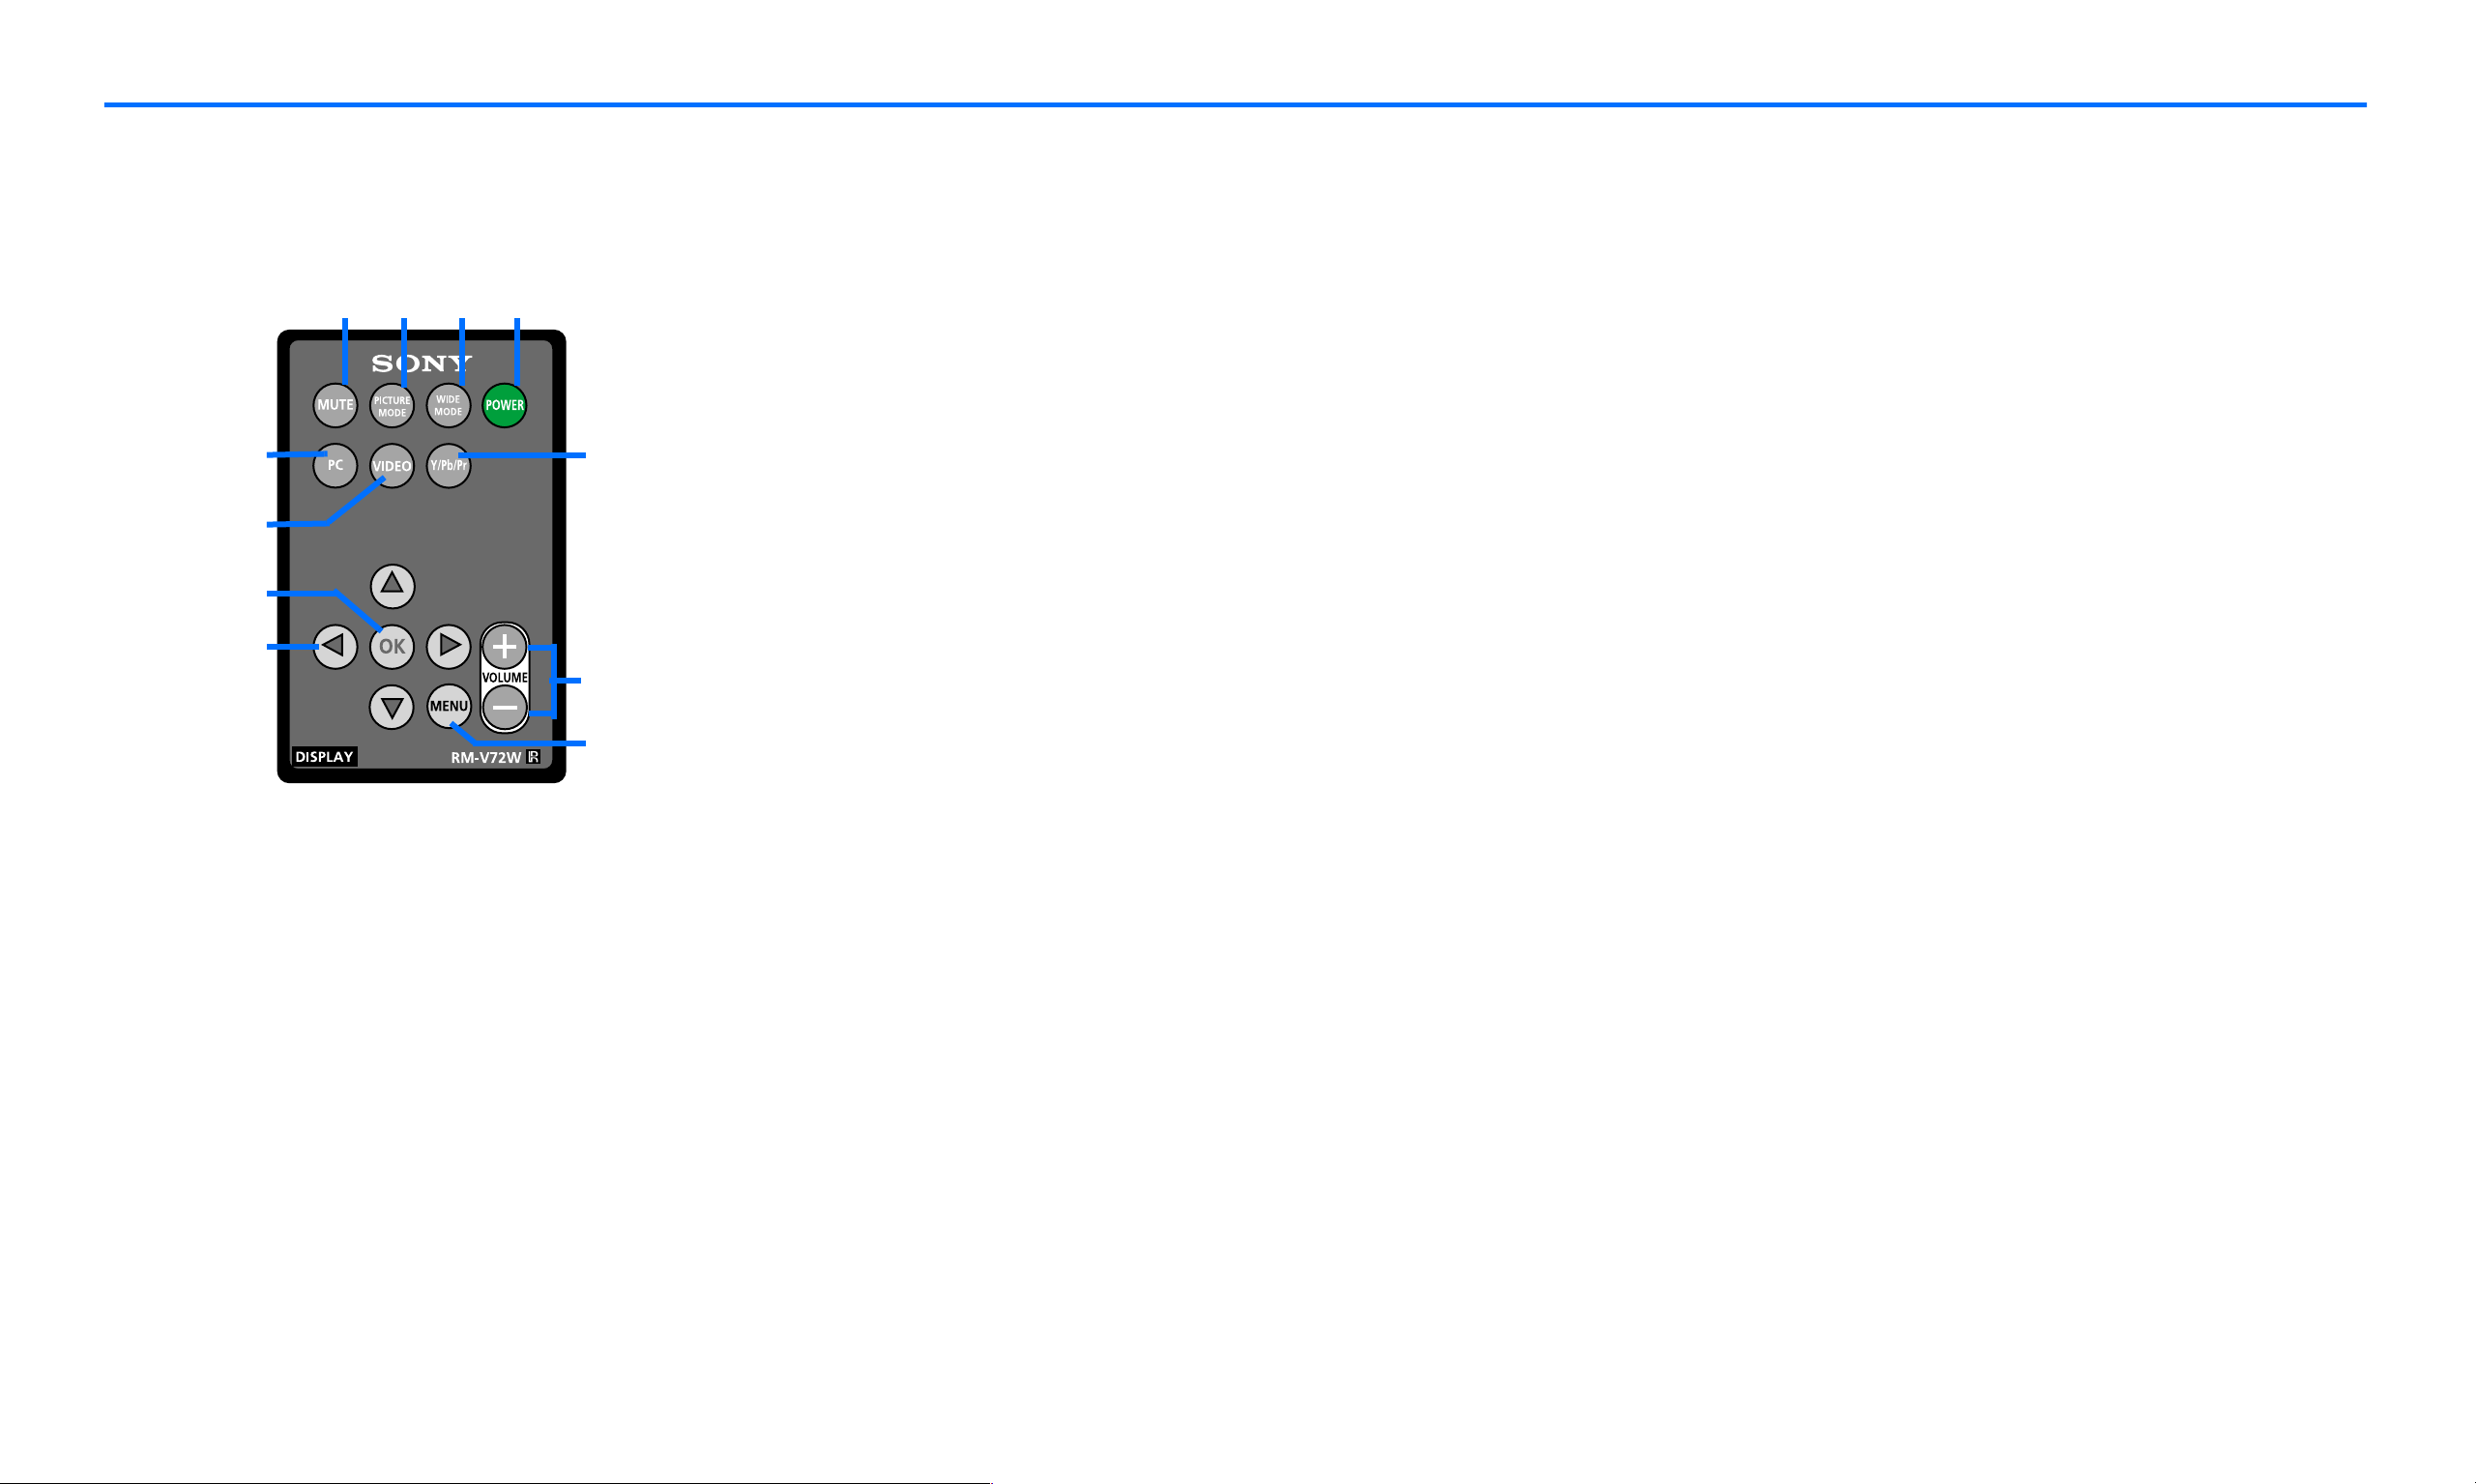
Identifying parts and controls - cont.
Remote Card
ql MUTE button (page 33)
ql w; wa ws
wg Y/Pb/Pr Component Video button
(page 12)
Press this button to mute the sound. Press
wd
wf
wk
wj
wg
wl
wh
again or + Volume button to restore the
sound.
w; PICTURE MODE button (page 26)
Press this button to switch between diff erent
picture mode settings.
wa WIDE MODE button (pages 22 and 29)
Press this button to switch between diff erent
screen size modes in both PC and Video
modes.
ws POWER button (page 16)
Press this button to turn the display on when
the power LED indicator is red. To turn the
display off (remote off mode), press this
Press this button to display Y/Pb/Pr
Component Video input signal.
wh MENU button (pages 19 and 25)
Press this button to turn the menu screen on
and off.
wj Arrow buttons (pages 19 and 25)
Use these buttons to select the menu items
and make adjustments.
wk OK button (pages 19 and 25)
Press this button to activate the selected
menu item and adjustments using the arrow
buttons wj.
button again. For remote off, see page 18.
wd PC input button (page 12)
Press this button to display PC input signal.
wf VIDEO input button (page 12)
Press this button to display either Composite
video or S-Video signal.
- 7 -
wl +/- VOLUME buttons (pages 19, 25 and 33)
Press these buttons to control the volume.
Page 9
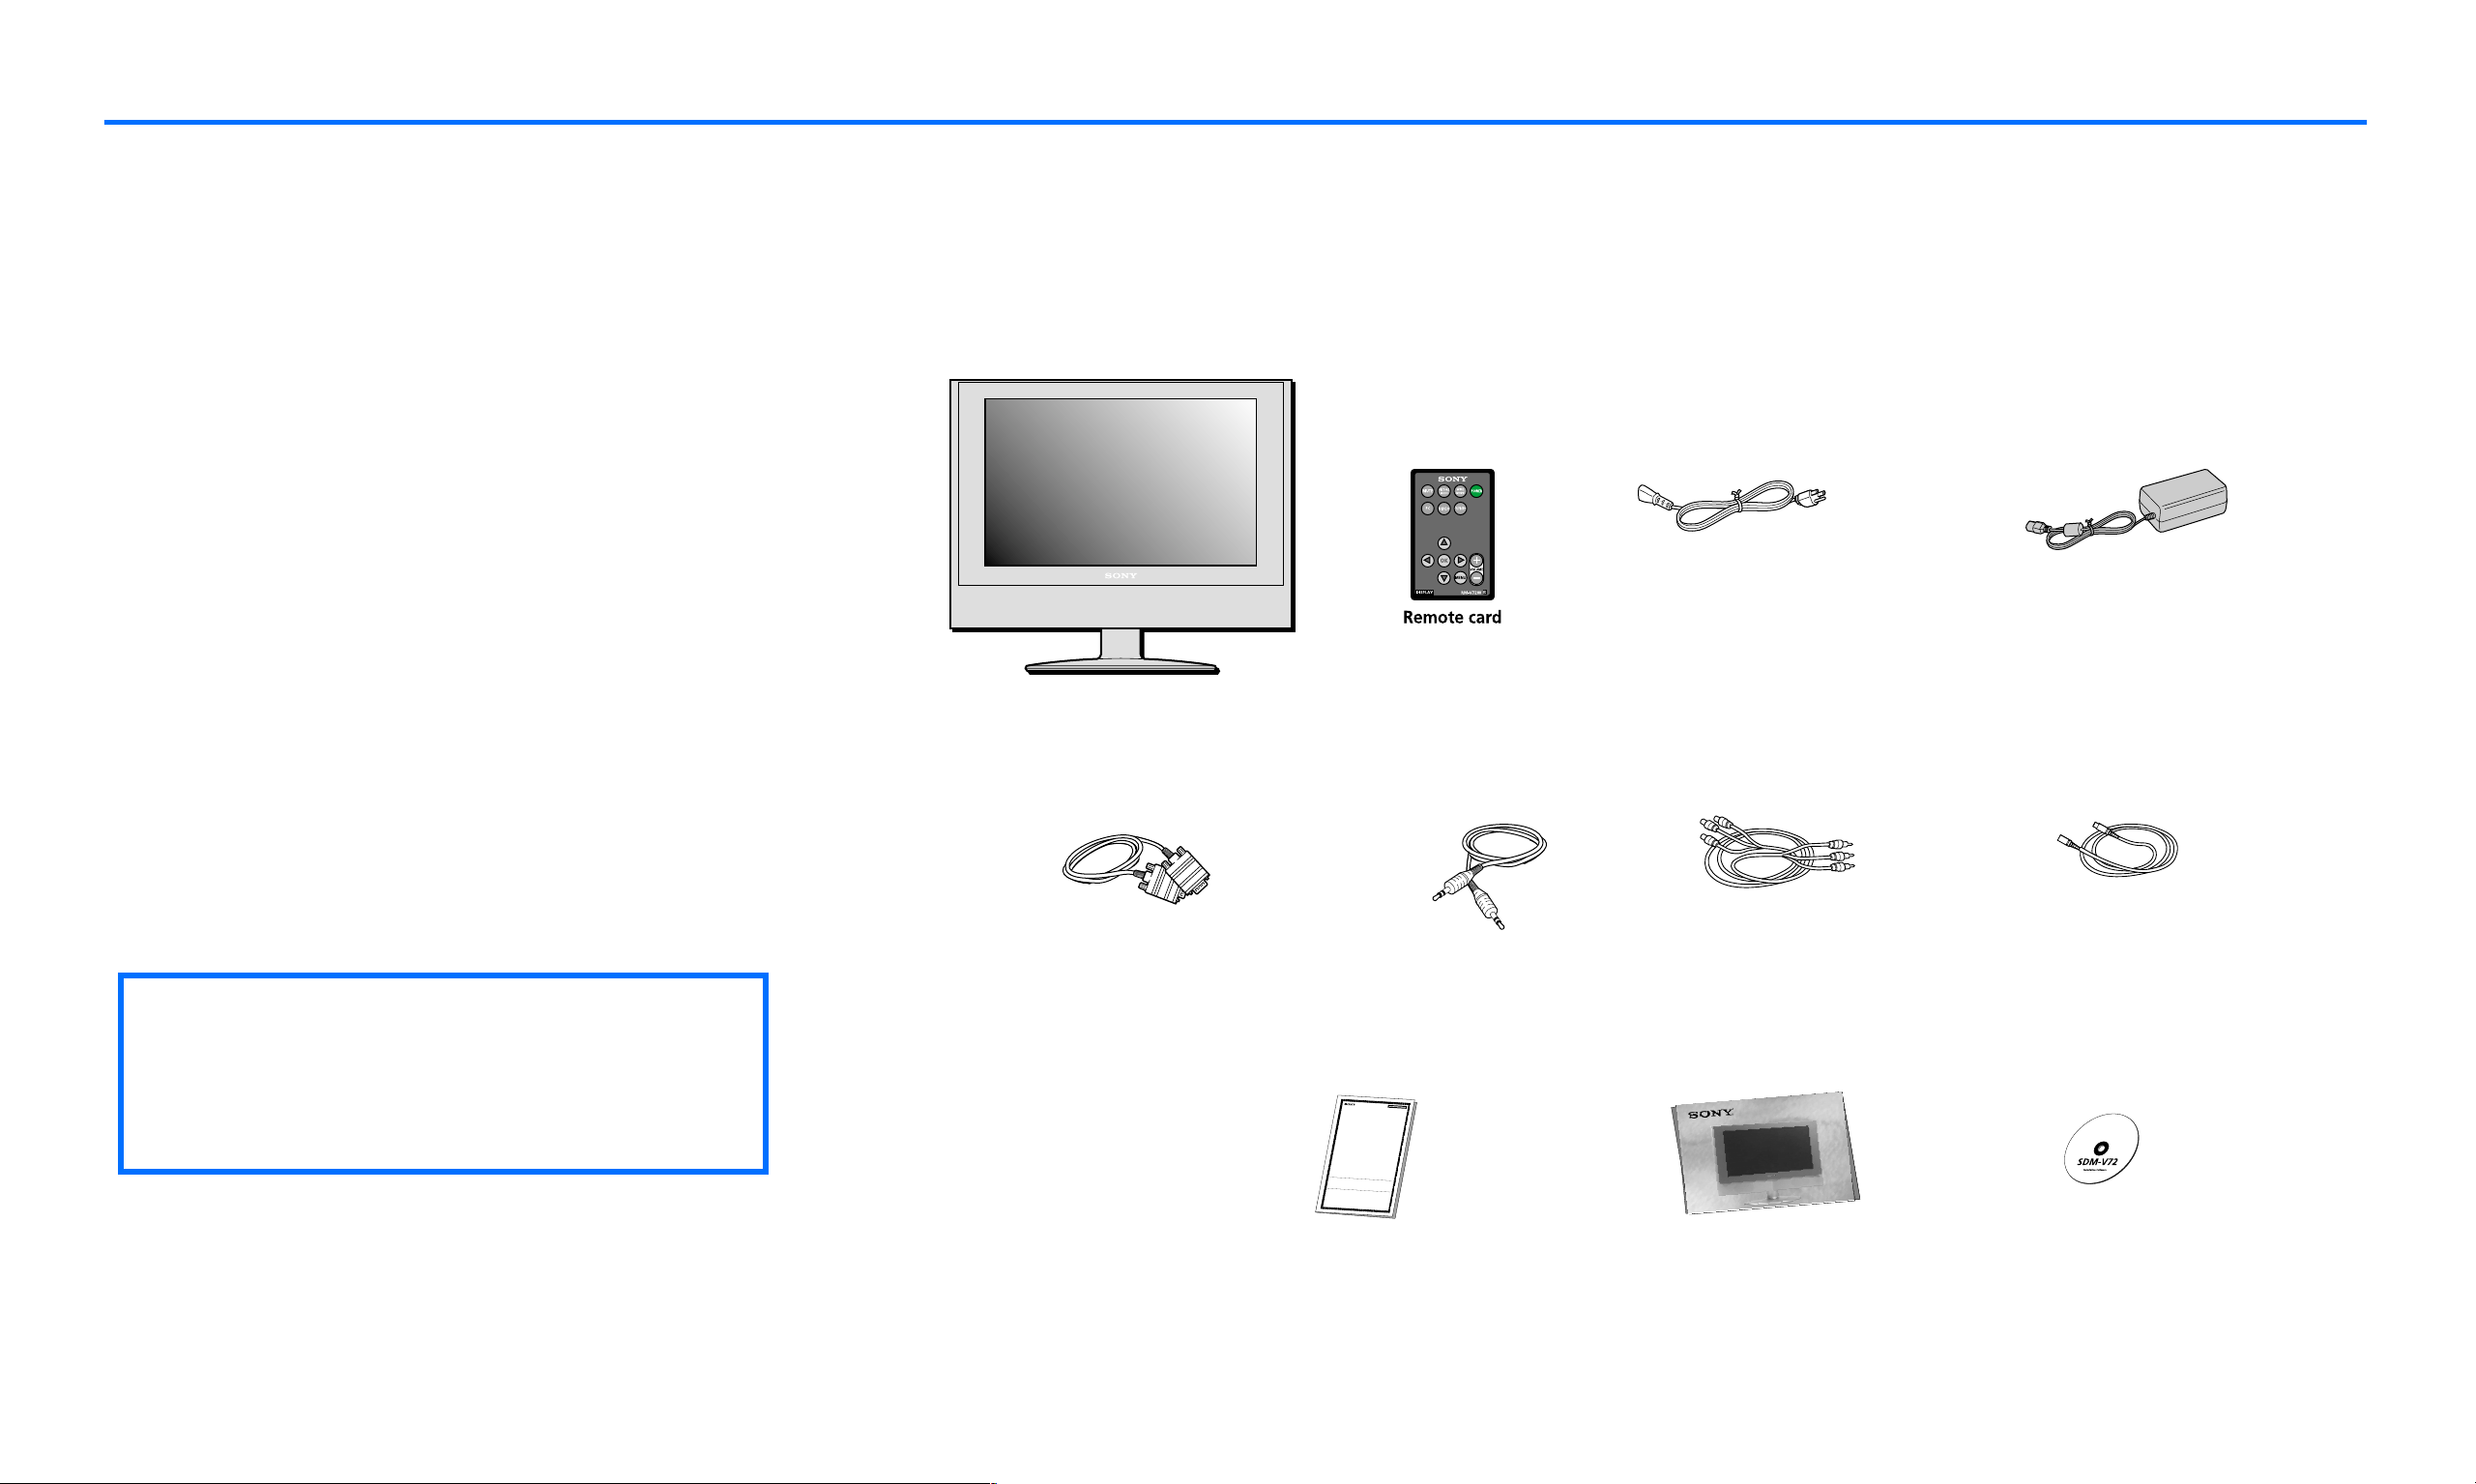
Setup
Before using your display, check that the following items are included in your carton:
■ LCD display
■ Remote card
■ AC Power cord
■ AC Adapter (AC-DP001)
■ HD15/D-sub video signal cable (analog RGB)
■ Audio cord (stereo miniplug)
■ Composite video extension cable
■ S-Video extension cable
■ Warranty card
■ Quick Setup Guide
■ This instruction manual on CD-ROM
✍
zThis display can be wall mounted
with VESA Standard Wall Mount. For
instruction and mounting bracket
please refer to your local retailer.
Display
HD15/D-sub video signal cable
4-062-412-
13
C
o
m
p
u
t
e
r
D
i
s
p
l
a
y
P
r
o
d
u
c
t
LIM
IT
E
D
W
A
R
R
A
N
TY
S
o
n
y
E
l
e
c
t
r
o
n
i
c
s
I
n
c
.
a
n
d
S
o
n
y
o
f
C
a
n
a
d
a
L
t
m
d
.
a
(
t
“
e
S
r
O
i
a
N
l
o
Y
r
”
w
)
w
o
r
a
k
r
m
r
a
a
n
n
t
s
s
h
t
i
h
p
i
s
a
P
s
r
f
o
o
d
l
l
u
o
c
w
t
s
a
:
g
a
i
n
s
t
d
e
f
e
c
t
s
i
1
.
L
A
B
t
o
b
e
d
e
f
e
p
a
y
t
h
e
l
a
p
a
y
f
o
r
a
l
l
2
.
P
AR
T
S
f
o
r
d
e
f
e
c
t
i
v
e
p
a
r
t
s
c
o
s
t
.
T
o
o
b
t
a
i
n
w
a
r
e
i
t
h
e
r
i
t
s
o
r
i
g
i
n
S
o
n
y
S
e
r
v
i
c
e
f
T
h
i
s
w
a
r
r
a
n
t
y
d
o
p
r
o
b
l
e
m
s
.
T
h
i
s
w
a
r
r
a
n
t
y
d
o
e
a
n
y
o
n
e
o
t
h
e
r
t
h
a
n
n
u
m
b
e
r
h
a
s
b
e
e
n
a
d
u
e
t
o
a
c
t
s
o
f
G
o
d
,
a
n
y
p
a
r
t
o
f
t
h
e
P
r
o
m
a
i
n
t
e
n
a
n
c
e
,
c
o
n
n
e
A
S
I
S
o
r
W
I
T
H
A
L
L
F
T
h
i
s
w
a
r
r
a
n
t
y
i
s
v
a
l
i
d
p
u
r
c
h
a
s
e
.
P
r
o
o
f
o
f
p
u
r
c
h
a
s
e
i
n
t
h
w
i
t
h
i
n
t
h
e
W
a
r
r
a
n
t
y
p
e
r
T
h
i
s
w
a
r
r
a
n
t
y
i
s
i
n
v
a
l
i
d
i
P
r
o
d
u
c
t
.
R
E
P
A
I
R
O
R
R
E
P
L
A
C
E
M
E
N
T
O
F
T
H
E
C
O
N
S
U
M
E
R
.
S
O
N
D
A
M
A
G
E
S
F
O
R
B
R
E
A
C
H
O
F
T
O
T
H
E
E
X
T
E
N
T
P
R
O
H
I
M
E
R
C
H
A
N
T
A
B
I
L
I
T
Y
O
R
F
I
T
N
D
U
R
A
T
I
O
N
T
O
T
H
E
D
U
R
A
T
I
O
S
o
m
e
s
t
a
t
e
s
a
n
d
p
r
o
v
i
n
c
e
s
d
o
d
a
m
a
g
e
s
,
o
r
a
l
l
o
w
l
i
m
i
t
a
t
i
o
n
s
e
x
c
l
u
s
i
o
n
s
m
a
y
n
o
t
a
p
p
l
y
t
o
y
o
o
t
h
e
r
r
i
g
h
t
s
w
h
i
c
h
v
a
r
y
f
r
o
m
s
t
a
FOR FREQ
UENTL
Y CALL
ED TELEPHONE NUM
n
O
R
:
F
o
r
a
p
e
r
i
o
d
o
f
t
h
r
e
e
(
3
)
y
e
a
r
s
f
r
o
m
t
h
e
d
a
t
c
e
t
i
v
o
e
f
,
p
S
u
o
r
c
n
h
y
a
w
s
e
i
l
,
l
i
r
f
e
t
h
p
i
a
s
i
r
P
o
r
o
r
d
r
u
e
p
c
t
l
a
i
s
c
e
d
e
t
h
t
e
e
r
m
P
r
i
o
n
d
e
u
d
c
t
b
w
o
i
r
t
h
c
h
a
a
n
r
g
e
e
w
s
t
o
o
r
a
r
e
n
b
y
u
S
i
l
o
t
n
u
y
n
i
a
t
,
u
a
t
h
t
o
n
r
o
i
z
c
e
h
d
a
s
r
e
g
r
e
v
,
i
o
c
e
r
f
a
l
c
a
i
b
l
i
o
t
y
r
.
A
c
h
f
t
a
e
r
r
g
t
e
h
s
e
.
W
a
r
r
a
n
t
y
P
e
r
i
o
d
,
y
o
u
m
u
s
t
:
I
n
a
d
d
i
t
i
o
n
,
S
o
n
y
w
i
l
l
s
u
p
p
l
y
,
a
t
n
o
c
h
a
r
g
e
,
n
e
p
w
a
r
o
t
s
r
f
r
o
e
r
b
u
a
i
l
p
t
e
r
r
e
i
p
o
l
d
a
c
o
e
f
m
t
h
e
r
n
e
t
e
s
(
i
3
n
)
e
y
x
e
c
a
h
r
a
s
n
.
g
A
e
f
t
e
r
t
h
e
w
a
r
r
a
n
t
y
p
e
r
i
o
d
,
y
o
u
m
u
s
t
p
a
y
f
o
r
a
l
l
r
a
n
t
y
s
e
r
v
i
c
e
,
y
o
u
m
u
s
t
t
a
k
e
t
h
e
P
r
o
d
u
c
t
,
o
r
d
a
e
l
p
l
i
v
a
e
c
k
r
a
t
g
h
i
e
n
g
P
r
o
o
r
d
p
u
a
c
c
t
k
f
a
r
g
e
i
i
g
n
h
g
t
a
p
f
f
r
o
e
r
p
d
a
i
n
i
d
g
,
a
i
n
n
e
q
u
a
l
a
d
c
e
i
g
l
i
t
r
y
e
.
e
o
f
p
r
o
t
e
c
t
i
o
n
,
t
o
a
n
y
a
u
t
h
o
r
i
z
e
d
e
s
n
o
t
c
o
v
e
r
c
u
s
t
o
m
e
r
i
n
s
t
r
u
c
t
i
o
n
,
i
n
s
t
a
l
l
a
t
i
o
n
,
s
e
t
u
p
a
d
j
u
s
t
m
e
n
t
s
o
r
s
i
g
n
a
l
r
e
c
e
p
t
i
o
n
s
n
o
t
c
o
v
e
r
a
n
y
u
n
i
t
s
w
h
i
c
h
h
a
v
e
b
e
e
n
p
r
e
v
i
o
u
a
s
l
s
y
e
a
r
v
l
t
i
e
c
r
e
e
f
d
a
,
c
r
i
e
l
i
p
t
y
a
i
a
r
u
e
t
d
h
o
o
r
r
i
s
z
e
e
r
d
v
b
i
c
y
e
S
d
o
b
n
y
y
,
o
r
a
u
n
i
t
o
l
n
t
e
w
r
e
h
d
i
c
o
h
r
t
r
h
e
e
m
f
a
o
c
v
t
e
o
d
r
y
.
-
T
a
h
p
i
p
s
l
w
i
e
a
d
r
s
r
a
e
n
r
i
t
a
y
l
d
o
e
s
n
o
t
c
o
a
v
c
e
c
r
i
d
c
e
o
n
s
t
m
,
m
e
t
i
i
s
c
u
d
s
a
e
m
,
a
a
b
g
u
e
s
o
e
,
r
n
d
e
a
g
m
l
i
a
g
g
e
e
n
c
e
,
c
o
m
m
e
r
d
c
u
i
a
c
l
t
.
u
s
T
e
h
,
i
s
o
r
w
m
a
o
r
r
d
a
i
n
f
i
t
c
y
a
t
d
i
o
o
n
e
s
o
f
n
,
o
o
t
r
t
c
o
o
v
e
r
d
a
m
a
g
e
c
t
i
d
o
u
n
e
t
o
t
o
i
m
i
m
p
r
p
o
r
p
o
e
p
r
e
v
r
o
o
l
t
p
a
e
g
r
e
a
s
t
i
u
o
p
n
p
o
l
y
r
.
T
h
i
s
w
a
r
r
a
n
A
t
y
U
d
L
T
o
S
e
s
.
n
o
t
c
o
v
e
r
p
r
o
d
u
c
t
s
s
o
l
d
o
n
l
y
i
n
t
h
e
U
n
i
t
e
d
S
t
a
t
e
s
a
n
d
C
a
n
a
d
a
a
n
d
o
n
l
y
i
n
t
h
e
r
e
s
p
e
c
t
i
v
e
c
o
u
n
t
r
y
o
f
e
f
o
r
m
o
f
a
b
i
l
l
o
f
s
a
l
e
o
r
r
e
c
e
i
p
t
e
d
i
n
v
o
i
c
e
,
w
h
i
i
o
c
h
d
,
i
s
m
e
u
v
s
i
t
d
b
e
n
e
c
p
e
r
e
t
h
s
e
a
n
t
t
t
e
h
d
e
t
u
o
n
o
i
t
b
i
s
t
a
i
n
w
a
r
r
a
n
t
y
s
e
r
v
i
c
e
.
f
t
h
e
f
a
c
t
o
r
y
a
p
p
l
i
e
d
s
e
r
i
a
l
n
u
m
b
e
r
h
a
s
b
e
e
n
a
l
t
e
r
e
d
o
r
r
e
m
o
v
e
d
f
r
o
m
t
h
e
A
S
P
R
O
V
I
D
E
D
U
N
D
E
R
T
H
I
S
W
A
R
R
A
N
T
Y
I
S
T
Y
H
S
E
H
E
A
X
L
C
L
L
N
U
O
S
T
I
V
B
E
E
R
L
E
I
M
A
B
E
L
D
E
Y
F
O
R
A
N
Y
I
N
C
I
D
E
N
T
A
L
A
N
O
Y
R
E
C
X
O
P
N
R
S
E
E
S
Q
S
U
O
E
R
N
I
T
M
I
A
P
L
L
I
E
D
W
A
R
R
A
N
T
Y
O
N
T
B
H
I
T
I
S
E
D
P
R
O
B
D
Y
U
A
C
P
T
.
P
E
L
X
I
C
C
E
A
P
B
T
L
E
L
A
W,
A
N
Y
I
M
P
L
E
I
S
E
S
D
F
O
W
R
A
A
R
P
R
A
A
RT
N
I
T
C
Y
U
L
O
A
F
R
P
U
R
P
O
S
E
O
N
T
H
I
S
P
N
R
O
O
D
F
U
T
C
H
T
I
S
I
S
W
L
A
I
M
R
R
I
T
A
E
N
D
T
I
N
Y
.
n
o
t
a
l
l
o
w
t
h
e
e
x
c
l
u
s
i
o
n
o
r
l
i
m
i
t
a
t
i
o
n
o
f
i
n
c
i
d
o
e
n
n
t
h
a
o
l
o
w
r
l
c
o
o
n
n
g
s
e
a
q
n
u
i
e
m
n
p
t
i
l
a
i
e
l
d
w
a
r
r
a
n
t
y
l
a
s
t
s
,
s
o
t
h
e
u
.
a
T
b
h
o
i
v
s
e
w
l
i
a
m
r
r
i
a
t
a
n
t
t
i
y
o
n
g
s
i
v
o
e
r
s
y
o
u
s
p
e
c
i
f
i
c
l
e
g
a
l
r
i
g
h
t
t
s
e
,
a
t
o
n
d
s
t
y
a
o
t
e
u
o
m
r
a
p
y
r
o
h
v
a
i
n
v
e
c
e
t
o
p
r
o
v
i
n
c
e
.
BERS, PLEASE SEE REVERSE SIDE.
P
r
i
n
t
e
d
i
n
U
S
A
Warranty Card
Audio cord
(T1)
P
s
AC Power Cord
Composite video extension cable
Quick Setup Guide
AC Adapter
S-Video Extension Cable
CD
- 8 -
Page 10
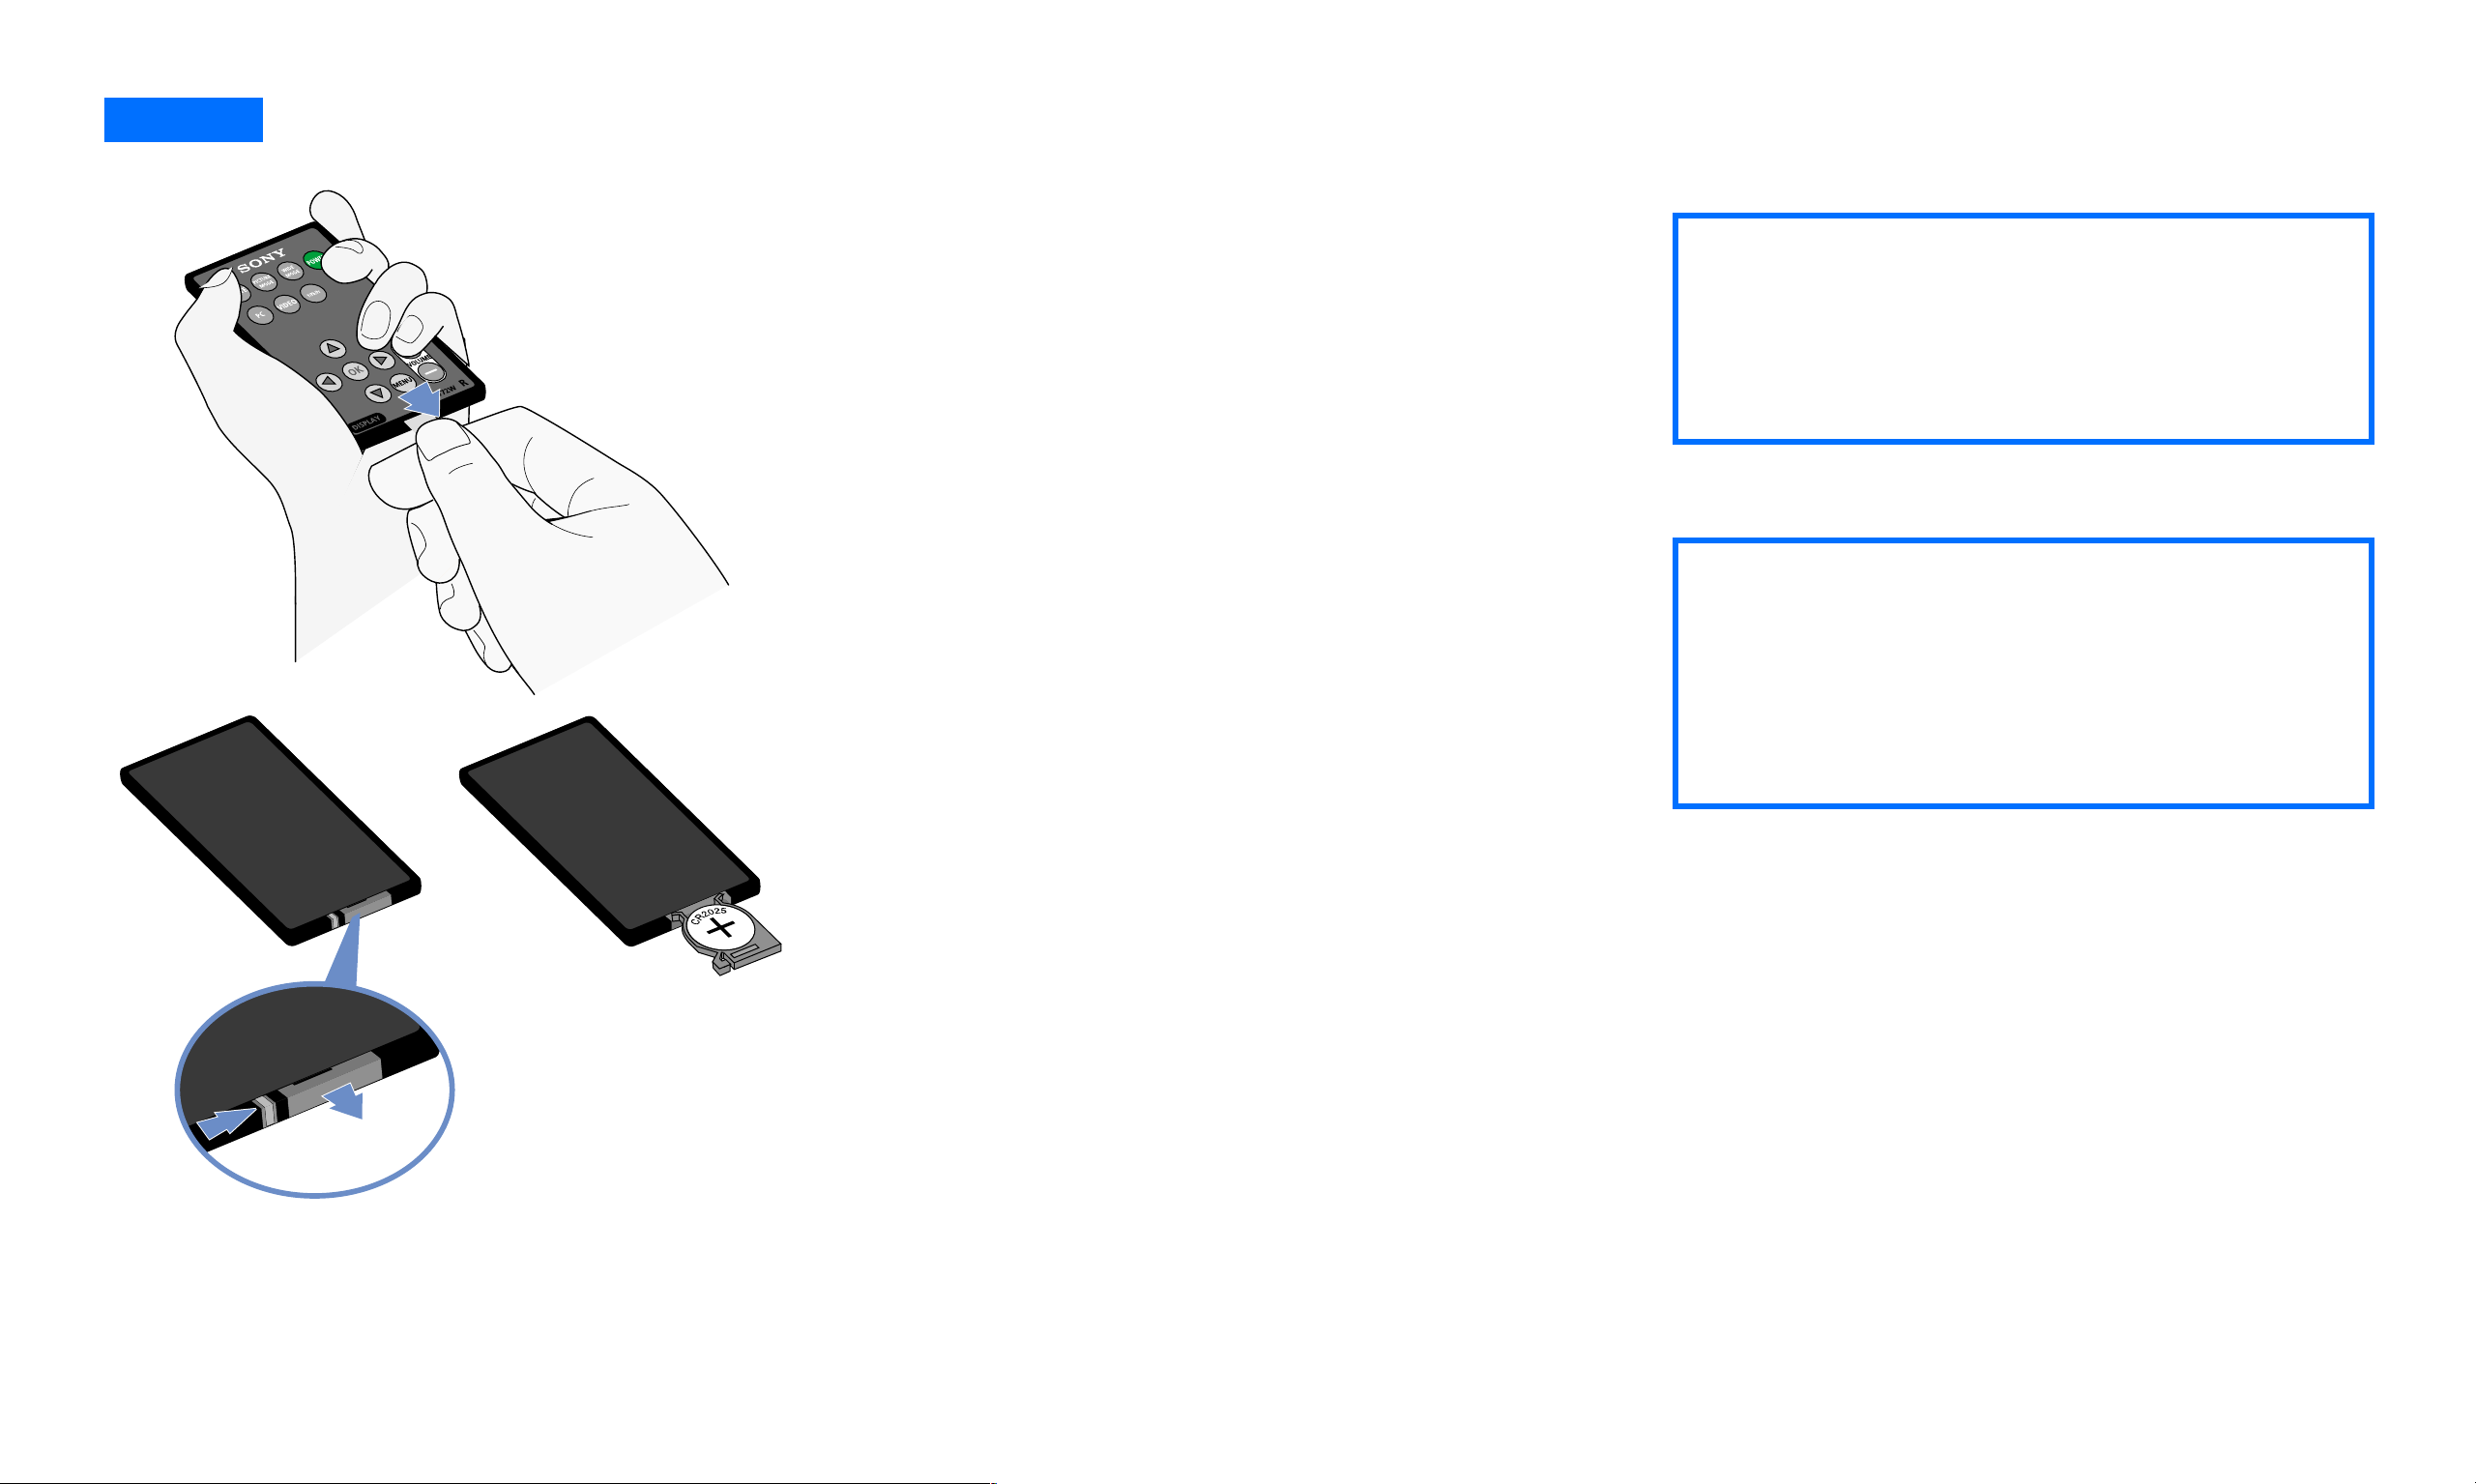
Setup 1
Activating and replacing a battery for remote card
Activating the remote card
To activate the battery for the remote card,
remove the plastic slip by pulling the tab.
Replacing the remote card battery
1 To replace the worn battery with a new
one, remove the battery compartment
from the remote card by pressing the
lock latch to the right, then pull out the
compartment.
2 Be sure that the positive terminal (+) of
the CR2025 lithium battery is facing
upward.
✍
not try to bend it, drop it or get it wet. Avoid
placing it near a heater, in direct sunlight, or
where humidity is high.
Caution: Keep the batteries away from the
reach of young children. Batteries may pose
a potential health hazard if put in their
mouth (i.e., they may swallow it or choke on
it).
zHandle the remote card with care. Do
1
2
3 Close the battery compartment to with a
gentle push until you hear the click.
The worn battery should be disposed
properly. Check with your local regulations.
- 9 -
Page 11
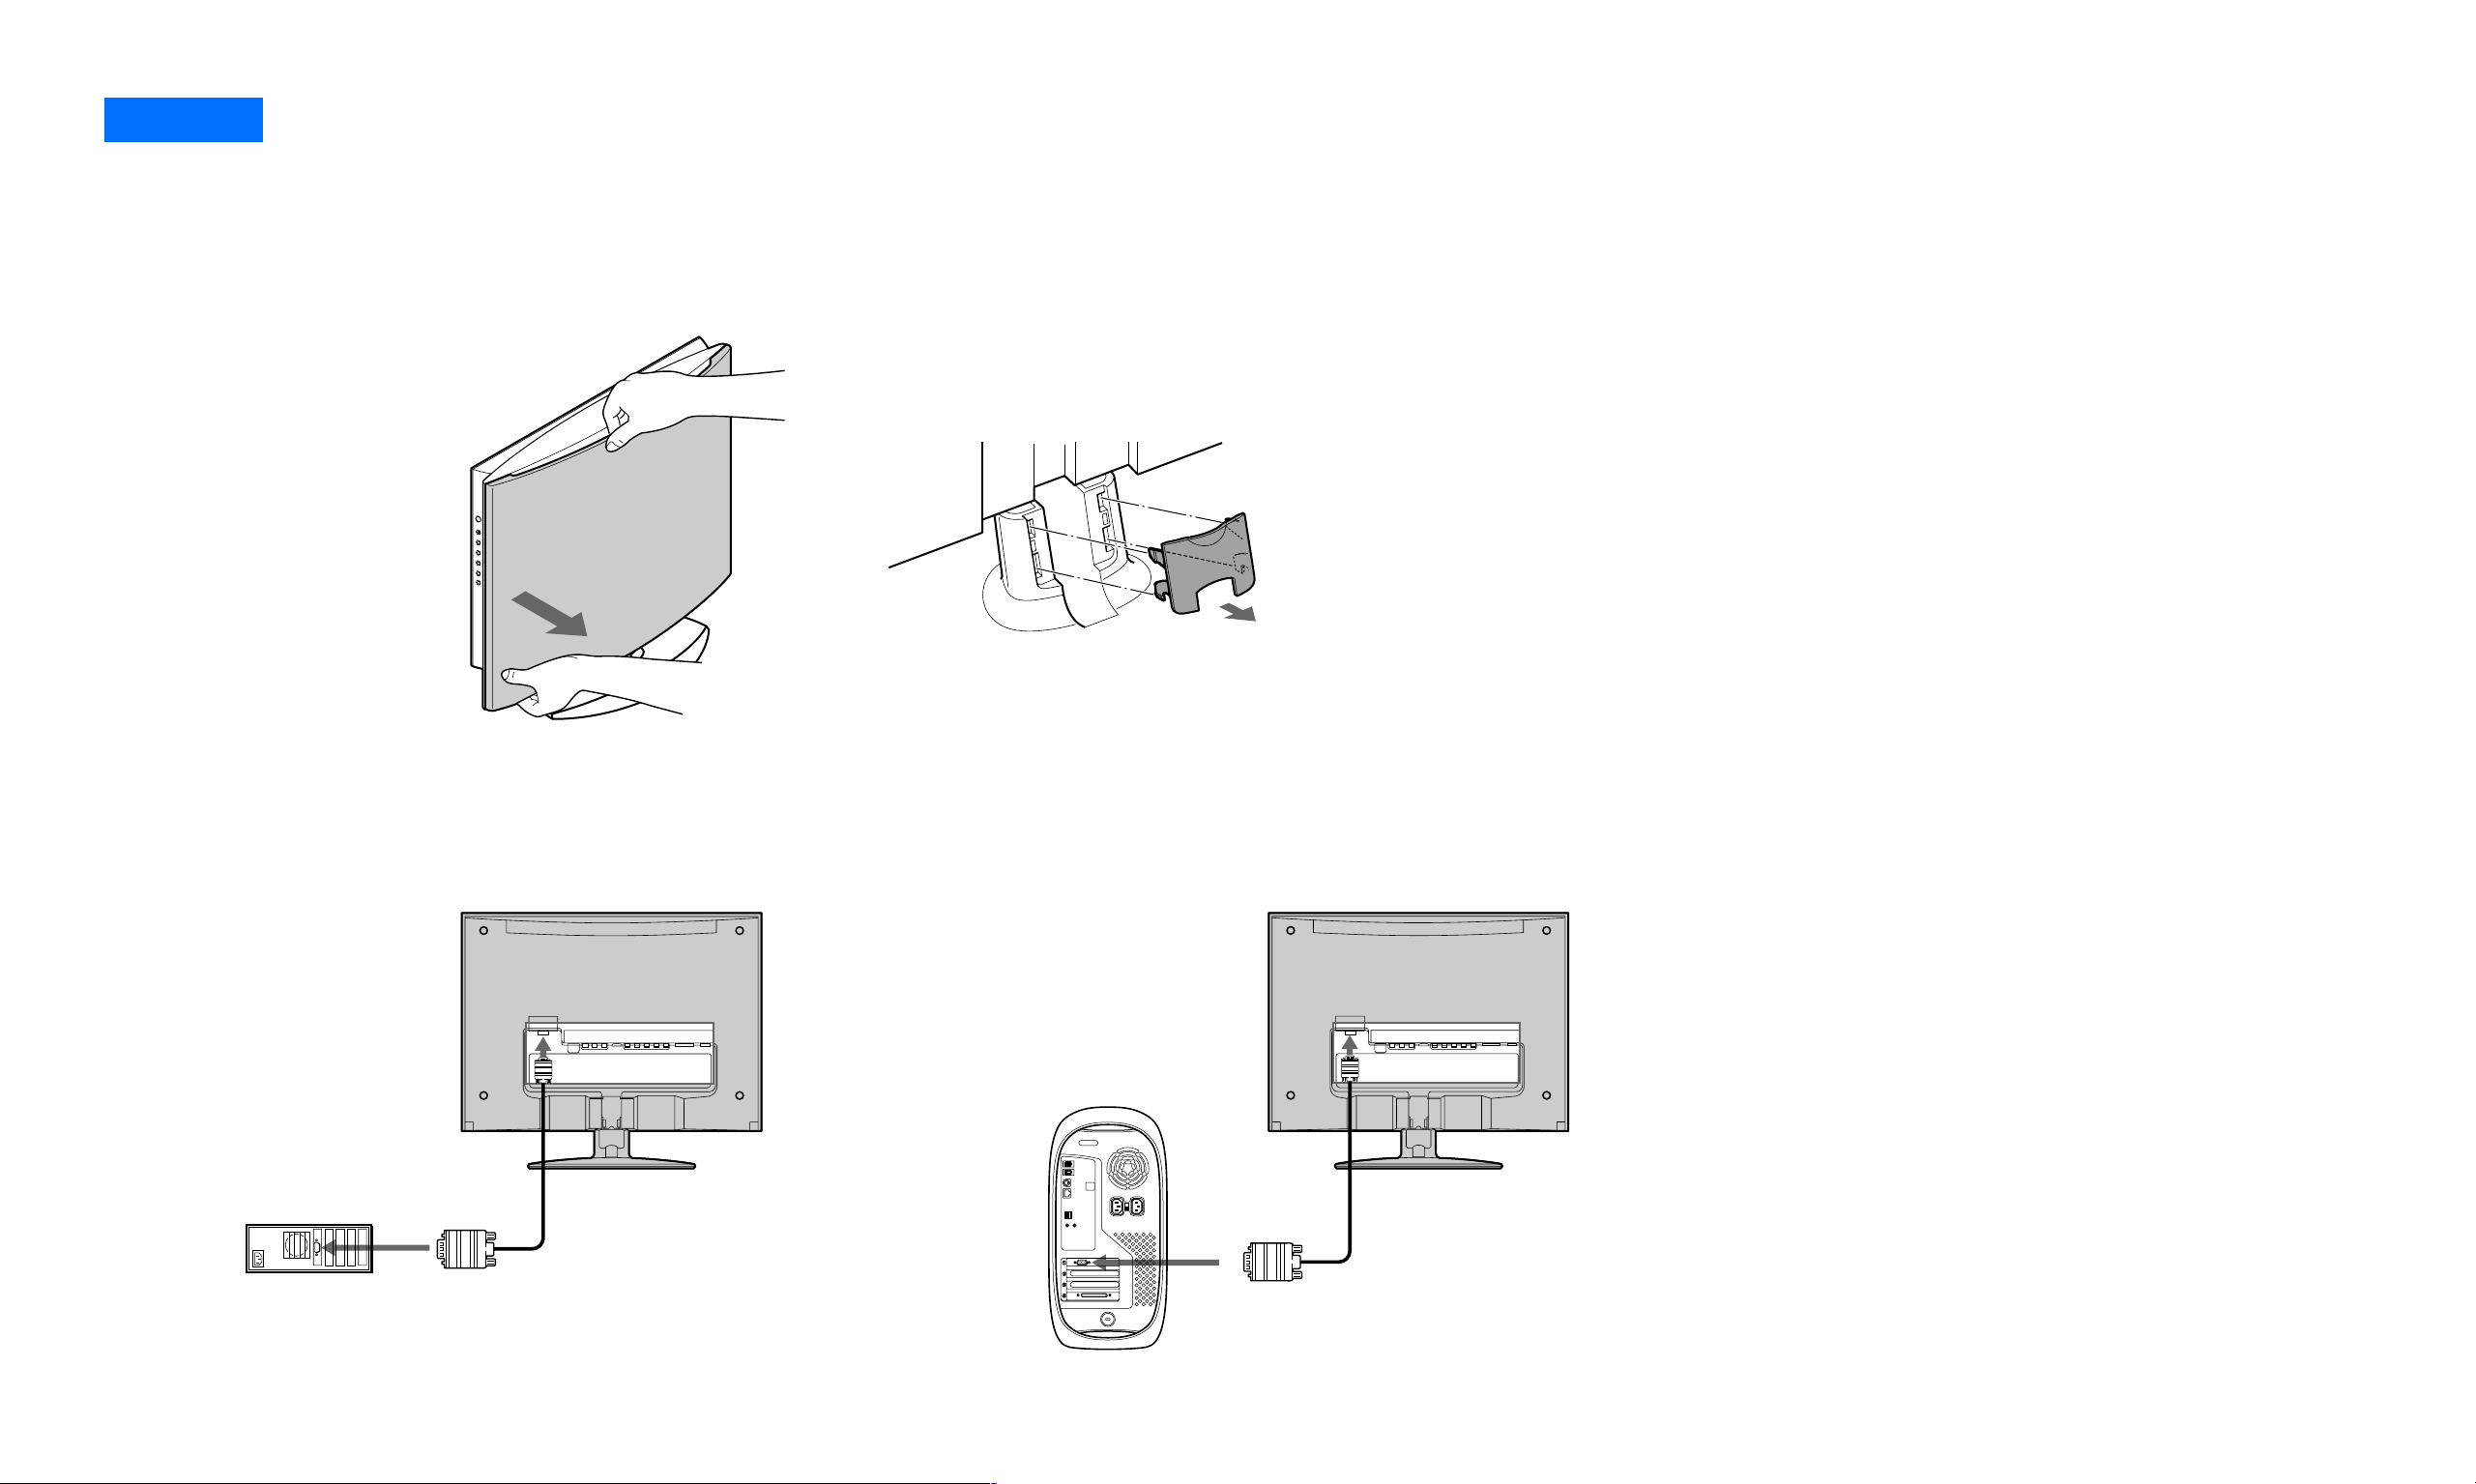
Setup 2
Turn off the display and computer before connecting. Do not touch the pins of the video signal cable connector as this might bend the pins.
Connecting your display to your computer
1 Remove the back panel by holding top
with one hand as in the illustration then
snap out the buttons located at each
corner.
1
2
2 Remove the cable cover by lightly pulling
top concave portion.
■ Connecting to an IBM PC/AT or compatible
computer
Using the HD15/D-sub cable (supplied),
connect the computer to the display’s HD15
input connector.
Connecting a MacintoshConnecting to an IBM PC/AT
Be sure to check the alignment of the HD15/
D-sub cable. Do not force the connector in
the wrong way or the pins might bend.
- 10 -
■ Connecting a Macintosh
When connecting a Macintosh computer,
use an adapter (not supplied) if necessary.
Connect the adapter to the computer before
connecting the video signal cable.
Page 12
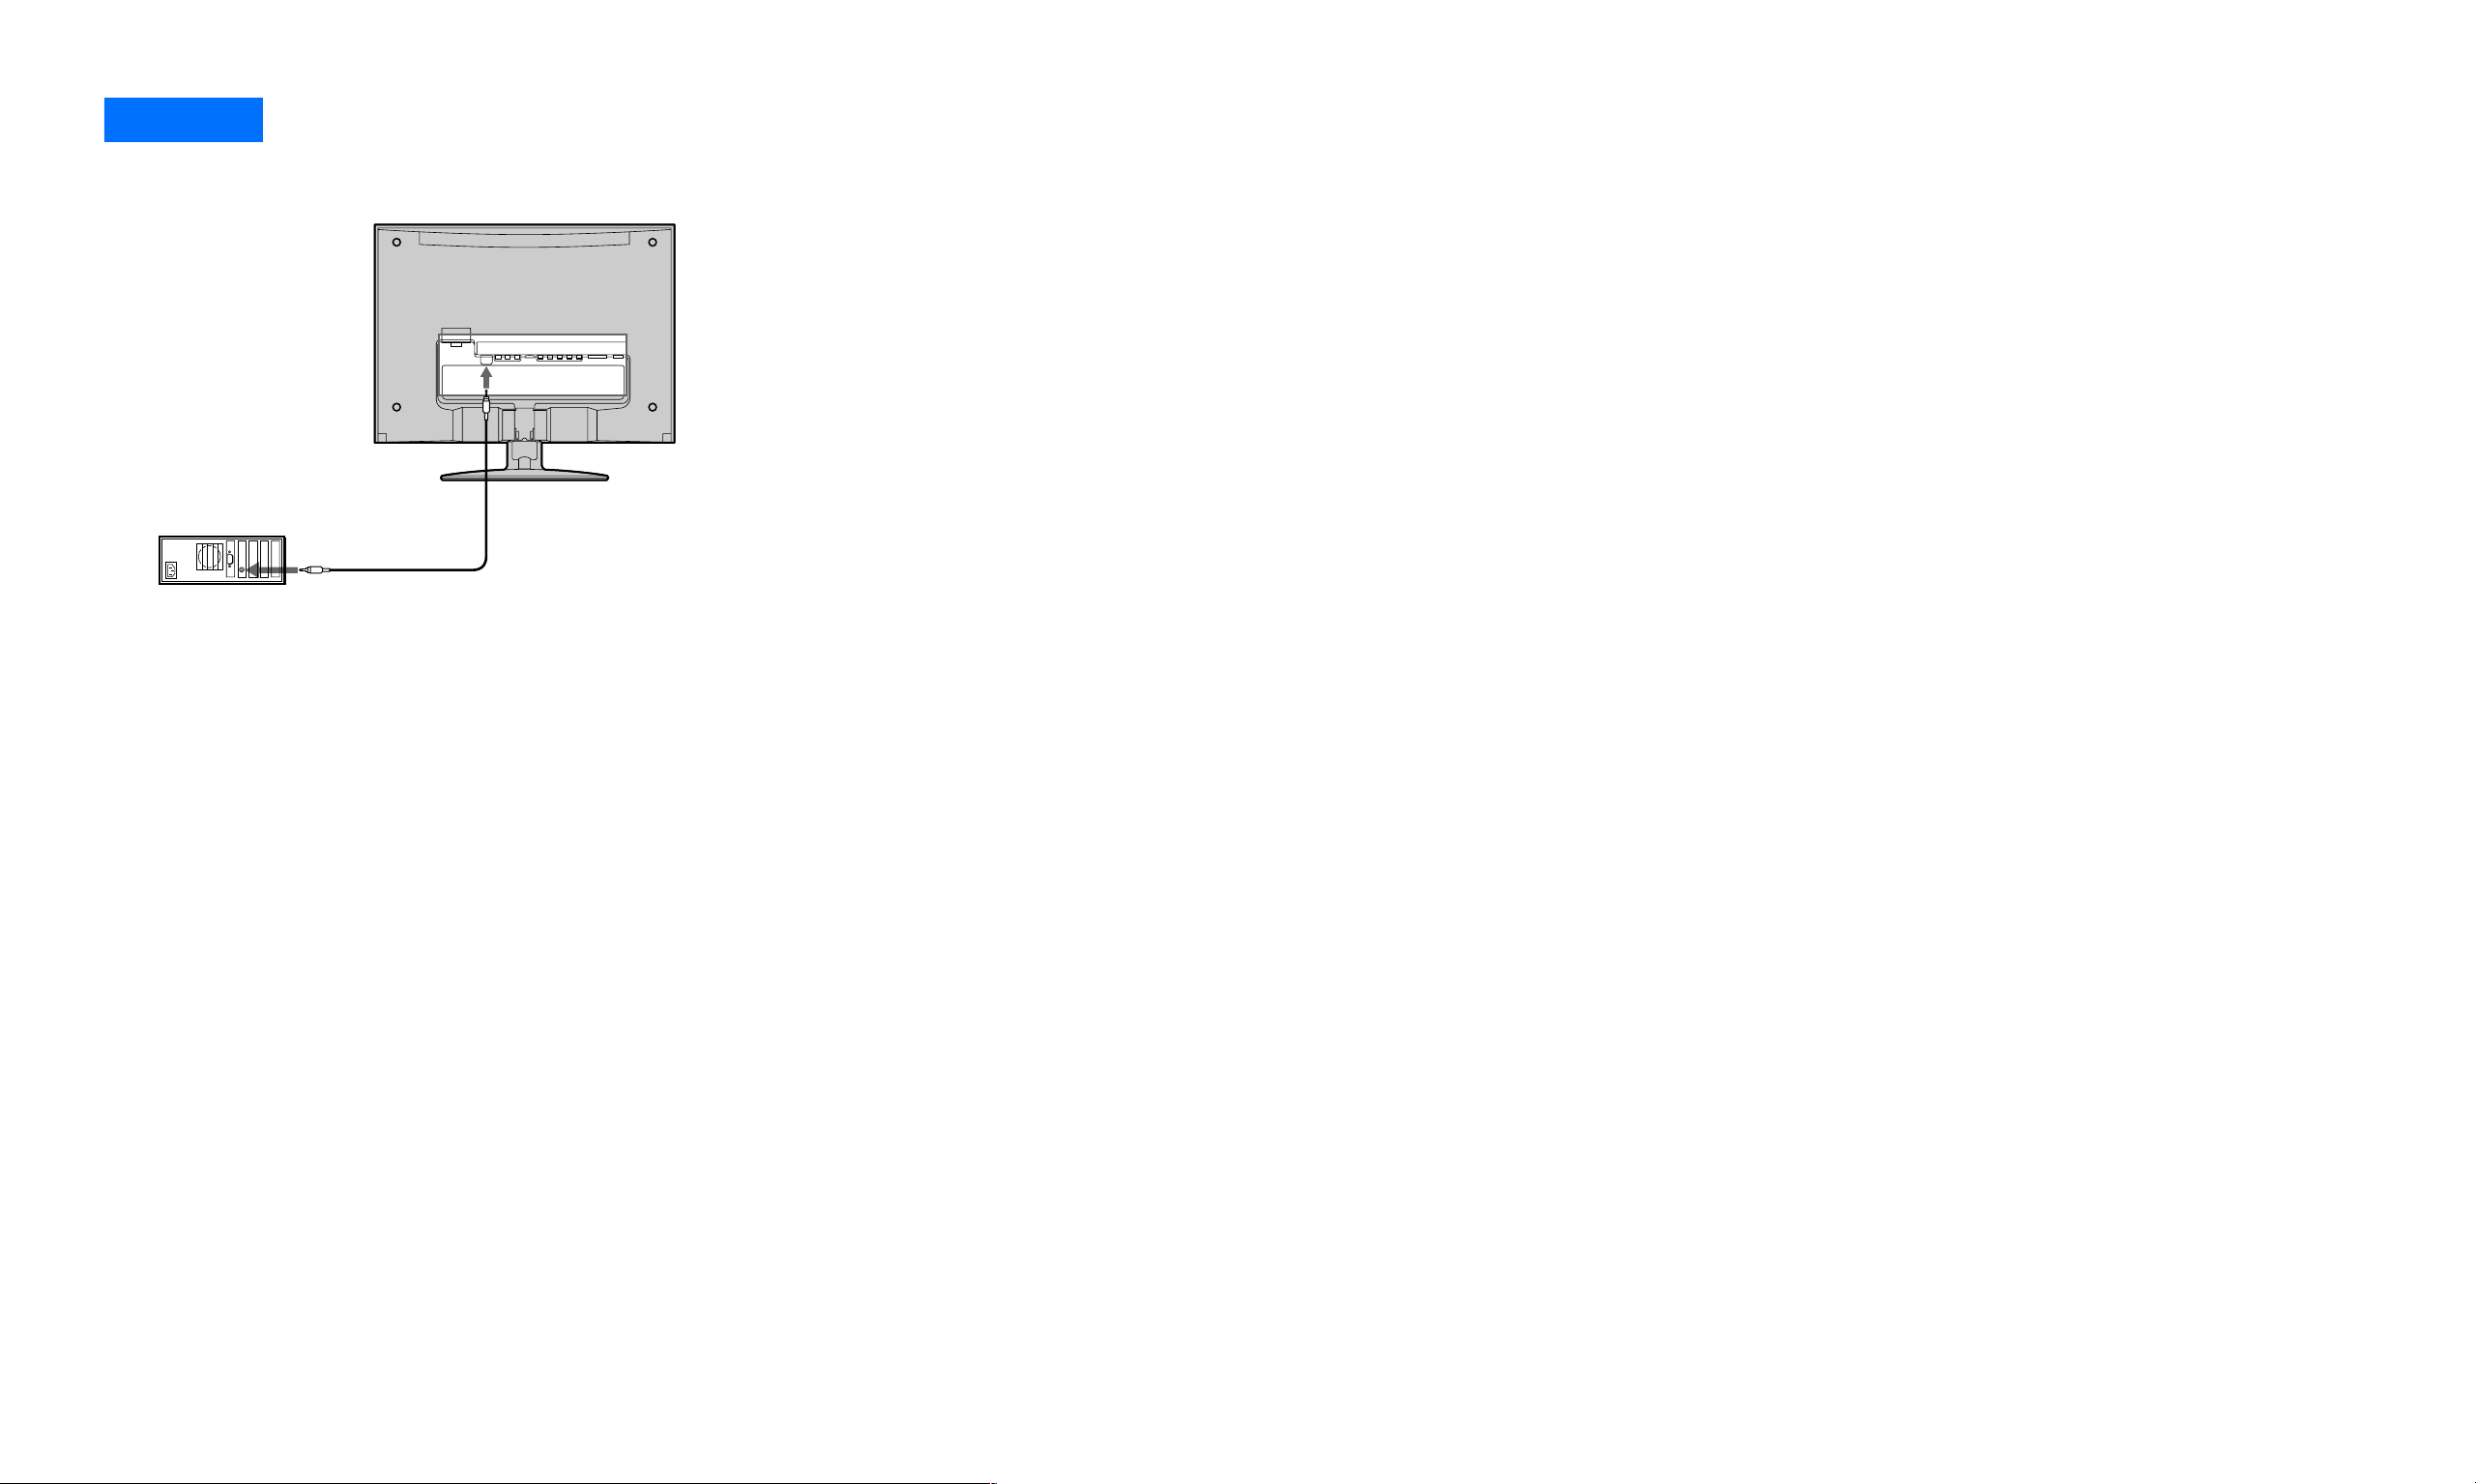
Setup 3
Connecting the audio cord
Connect the supplied audio cord to the display’s
PC audio input jack. The audio cord connector
and the audio input jack are color coded. Match
like colors to connect.
Using the display’s speakers or headphones, you
can listen to sound from your computer or other
audio equipment connected to the display’s
audio input jacks.
For more information, see “Controlling the
volume” on page 33.
- 11 -
Page 13
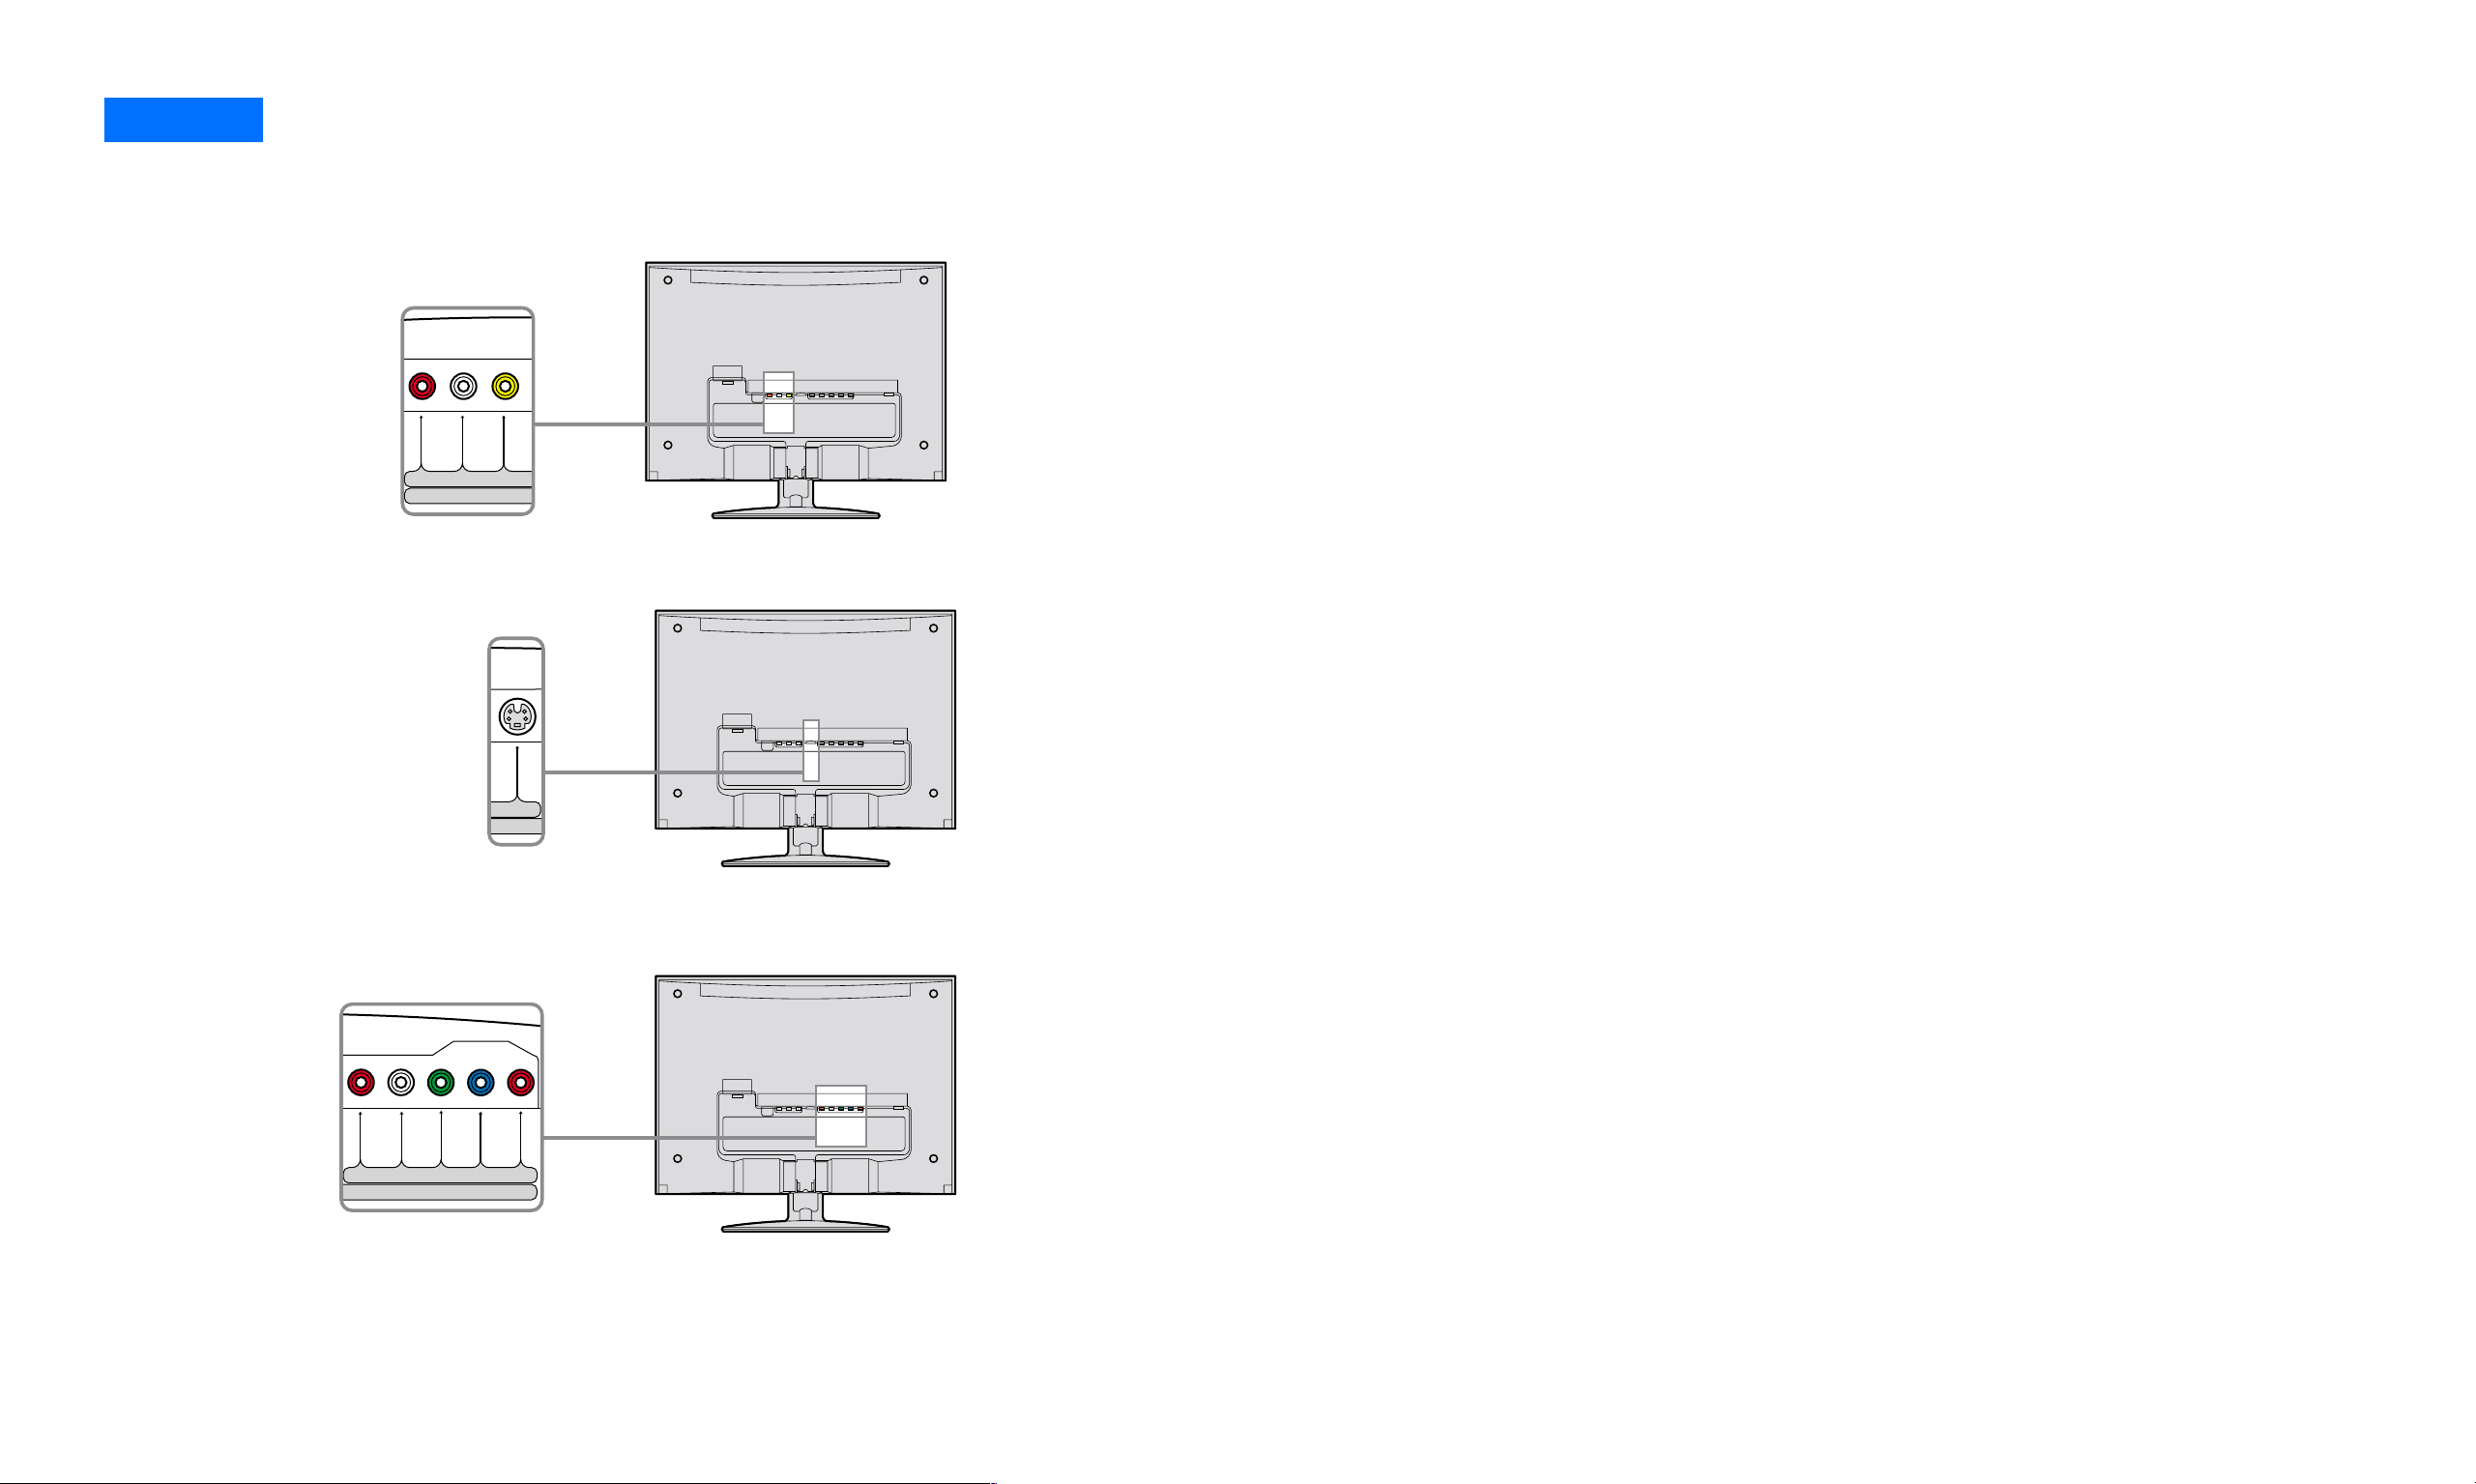
Setup 4
PBR L
P
R
Y
VIDEOR L
VIDE
S VIDEO
Connecting video cables
You can connect composite video cables, S-Video cable, and also Y/Pb/Pr Component Video cables for your video needs.
■ Connecting with composite video cables
Composite video sends combined signal of color shade
(chrominance) and brightness (luminance) through a
single cable. For this connection use the traditional A/V
cable. (Combined audio L/R and video cable)
■ Connecting with S-Video cables
If your equipment has an S-Video output, use this
connection for better picture quality than the
composite video connection. You will need to connect
audio cables (audio L/R) for the sound (S-Video carries
only the video signal).
■ Connecting with Y/Pb/Pr Component Video cables
If your equipment has a Y/Pb/Pr Component Video
output, use this connection for the highest quality
color picture. Y/Pb/Pr Component Video sends signals
of two color shades (chrominance) and brightness
(luminance) separately. Y/Pb/Pr Component Video
cables are usually marked with Y, Pb and Pr. In addition
to the Y/Pb/Pr Component Video, you will also need to
connect an audio L/R cable for sound.
- 12 -
Page 14

Setup 5
Connecting the AC adapter
Connect the AC adapter (supplied) to the display.
AC adapter
(supplied)
DC IN 16.5V
- 13 -
Page 15
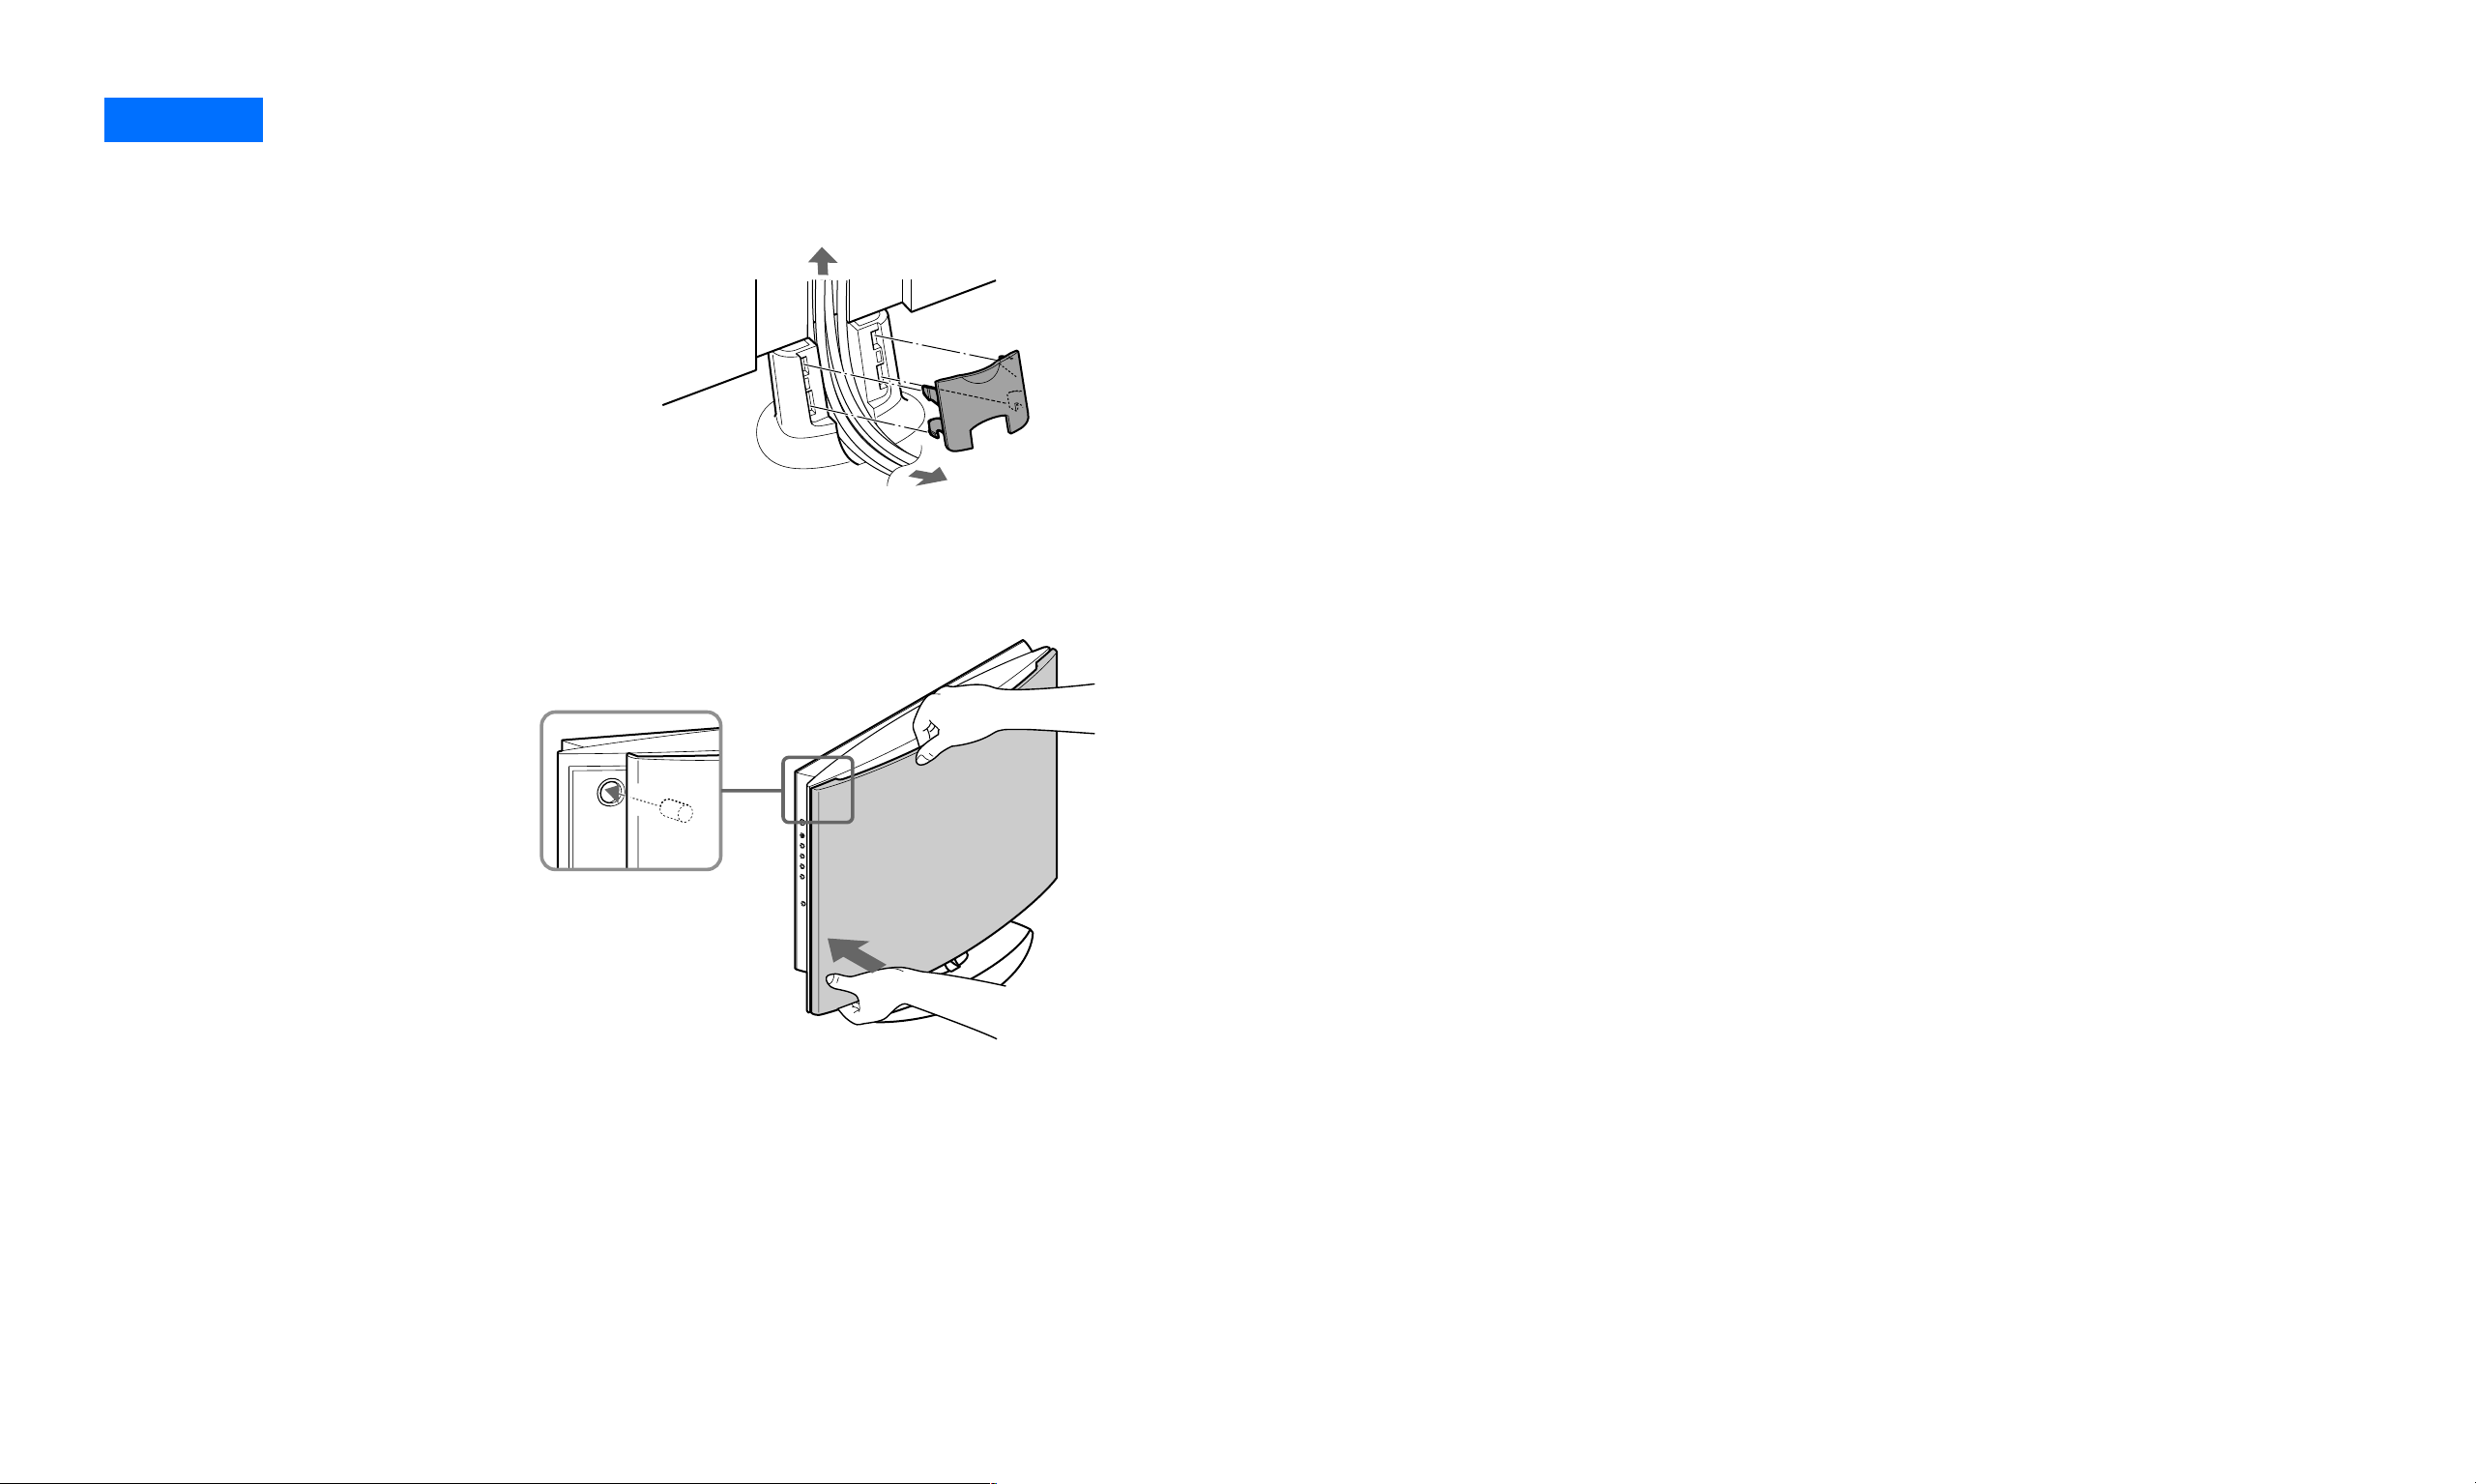
Setup 6
Organizing the cables and replacing the back panel
1
2
1 Bundle the cables and cords; then route
through the base stand.
2 Replace the cable cover by aligning the
cylindrical pegs to the holes, then press.
3 Hold the back panel with one hand and
press the panel at the corners.
3
- 14 -
Page 16
Setup 7
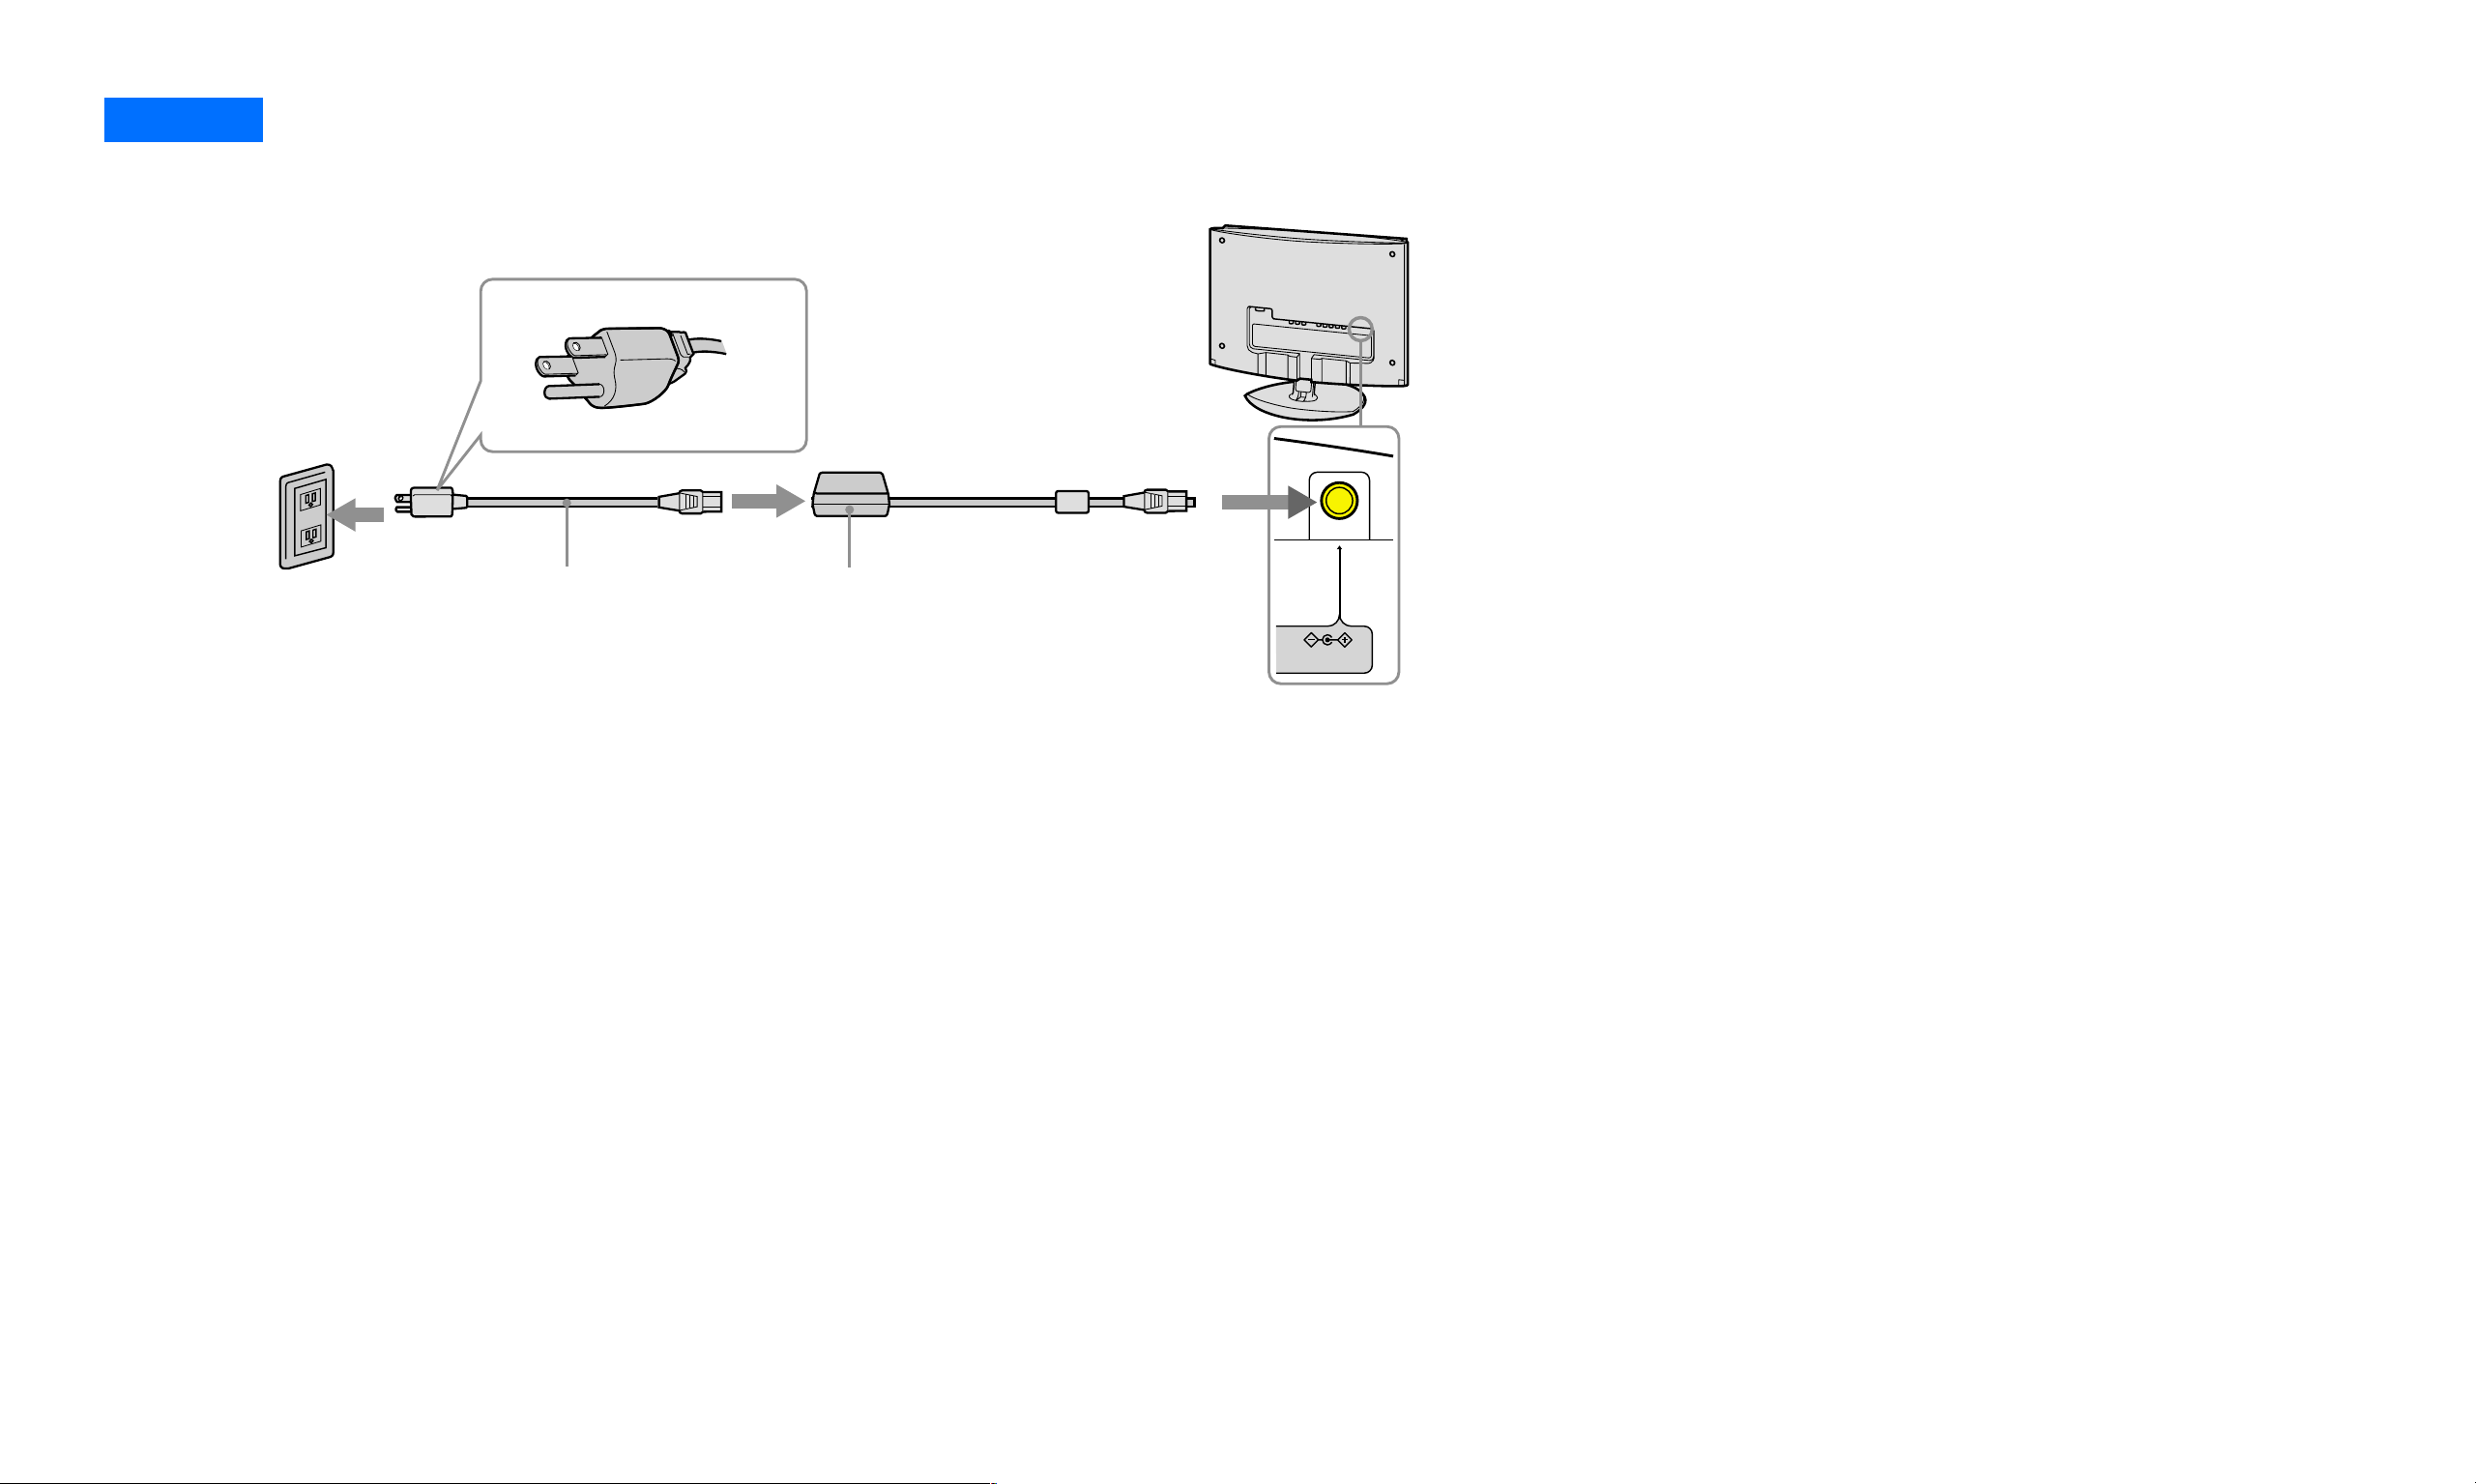
Connecting the power cord
1 First, connect the AC adapter to the
display as shown in Setup 5 (see
page 13).
2 Connect the power cord to the AC
To power outlet
3
Power cord
(supplied)
adapter (supplied).
3 Connect the power cord to the nearest
power outlet.
12
AC adapter
(supplied)
DC IN 16.5V
- 15 -
Page 17

Setup 8
Turning on the display, computer, or other equipment
1 Press the POWER button on the right
side of the display.
The power LED indicator lights up in green.
POWER
2 Turn on the computer or your video
source equipment.
Press the INPUT button on the right side of
the display repeatedly to select the desired
input signal. Or with your remote car d select
The display complies with the “DDC” Plug
& Play standard and automatically detects
all the display’s information. No specific
driver needs to be installed to the computer
to operate.
The first time you turn on your computer
after connecting the display, the setup
Wizard may appear on the screen. In this
case, follow the on-screen instructions. The
Plug & Play display is automatically selected
so that you can use this display.
✍
The remote card POWER button
will only turn your display on from
remote off mode, indicated by red
power LED indicator. When the
display is in power OFF mode,
indicated by unlit power LED, the
POWER button on the right side of
the display must be used to power
and press the desired input signal.
Pressing the POWER button on the
remote card while the power LED
indicator is green will turn the power
LED to red. A red power LED indicates
the display is in remote off.
For more information, see INPUT button on
page 5 and Remote card on page 18.
✍
zThe POWER button on the side
of the display must initially be
pressed (to have unlit LED turned on)
Note: Not all video graphic cards will
support 1280 x 768 wide aspect resolution.
Use with some devices may require
updated drivers. Please consult your video
graphic manufacturer for updated drivers.
If no picture appears on your screen
See Trouble symptoms and remedies on pages
34-38.
ON, indicated by green power LED
indicator.
to operate with the remote card.
- 16 -
Page 18
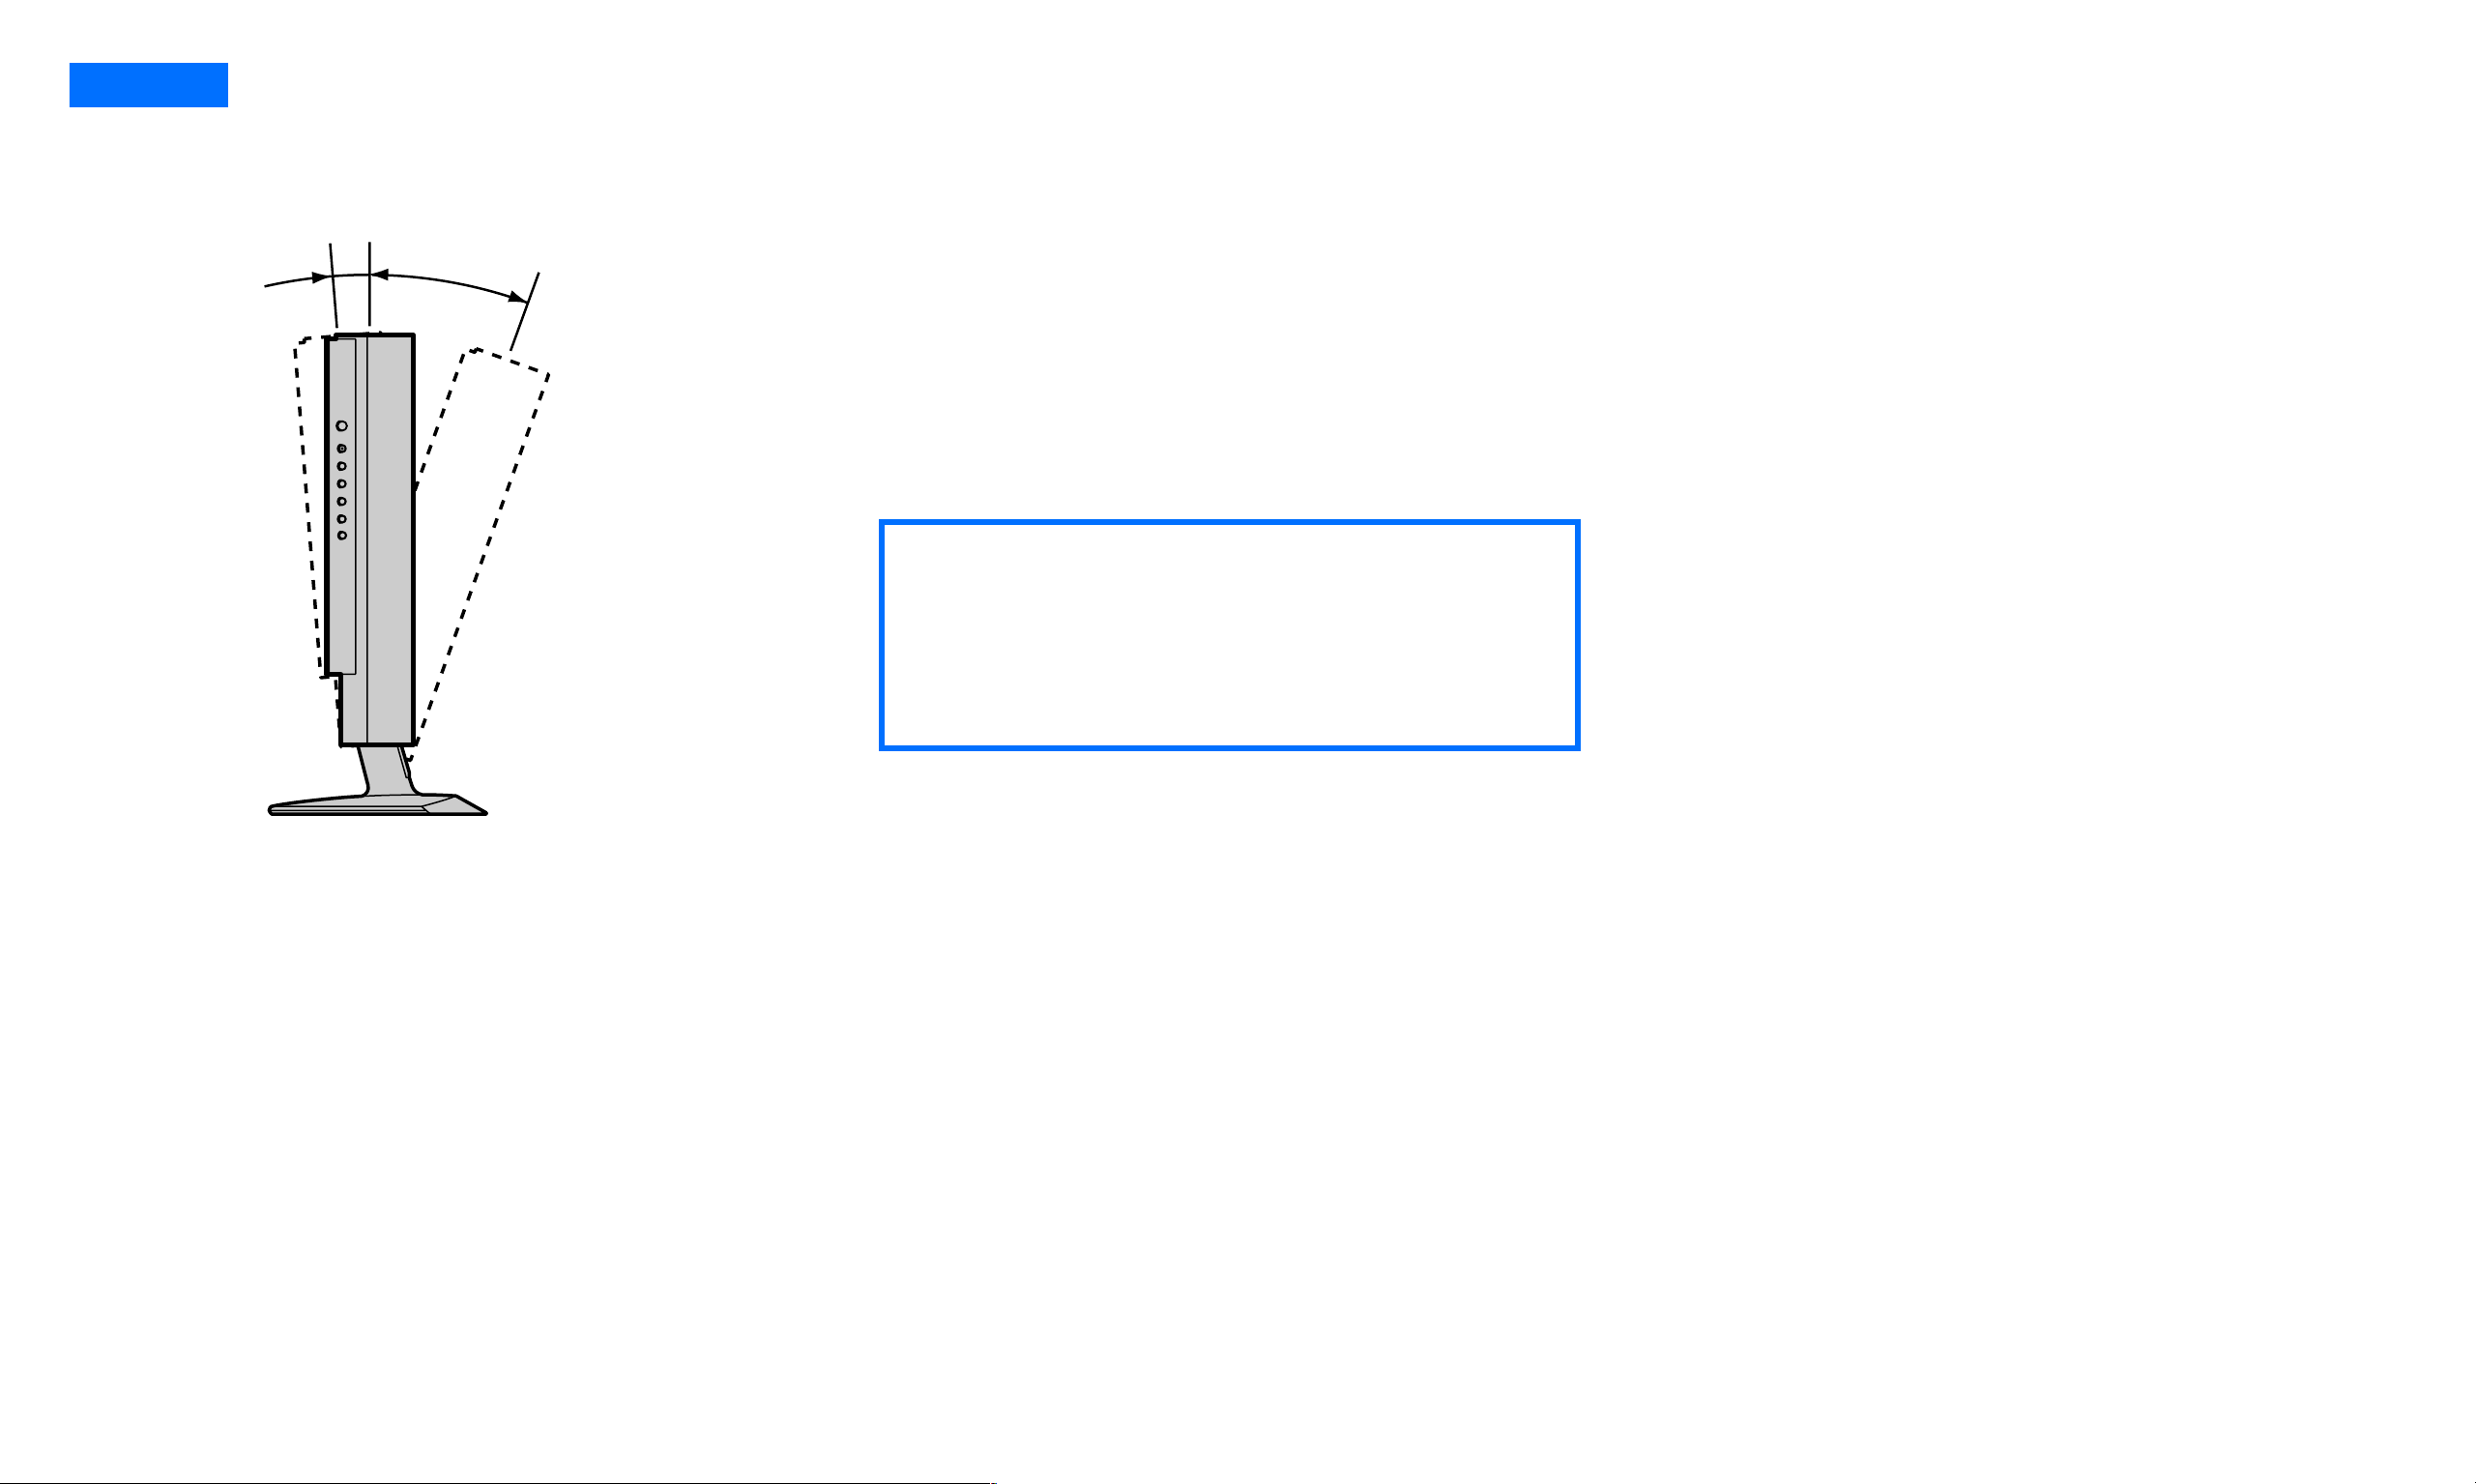
Setup 9
The display will tilt 3 degrees forward and 15 degrees backward.
Adjusting the tilt
3°
15°
To use the display comfortably
Adjust the viewing angle of your display
according to the height of your desk and chair,
and so that light is not reflected from the screen
to your eyes.
WheWWhen adjusting the screen tilt, proceed
✍
slowly and carefully, being sure not to hit the
display against the desk or the base of the
display stand.
Grasp the lower middle part of the LCD panel
while holding the display stand, then tilt the LCD
panel adequately backward.
- 17 -
Page 19
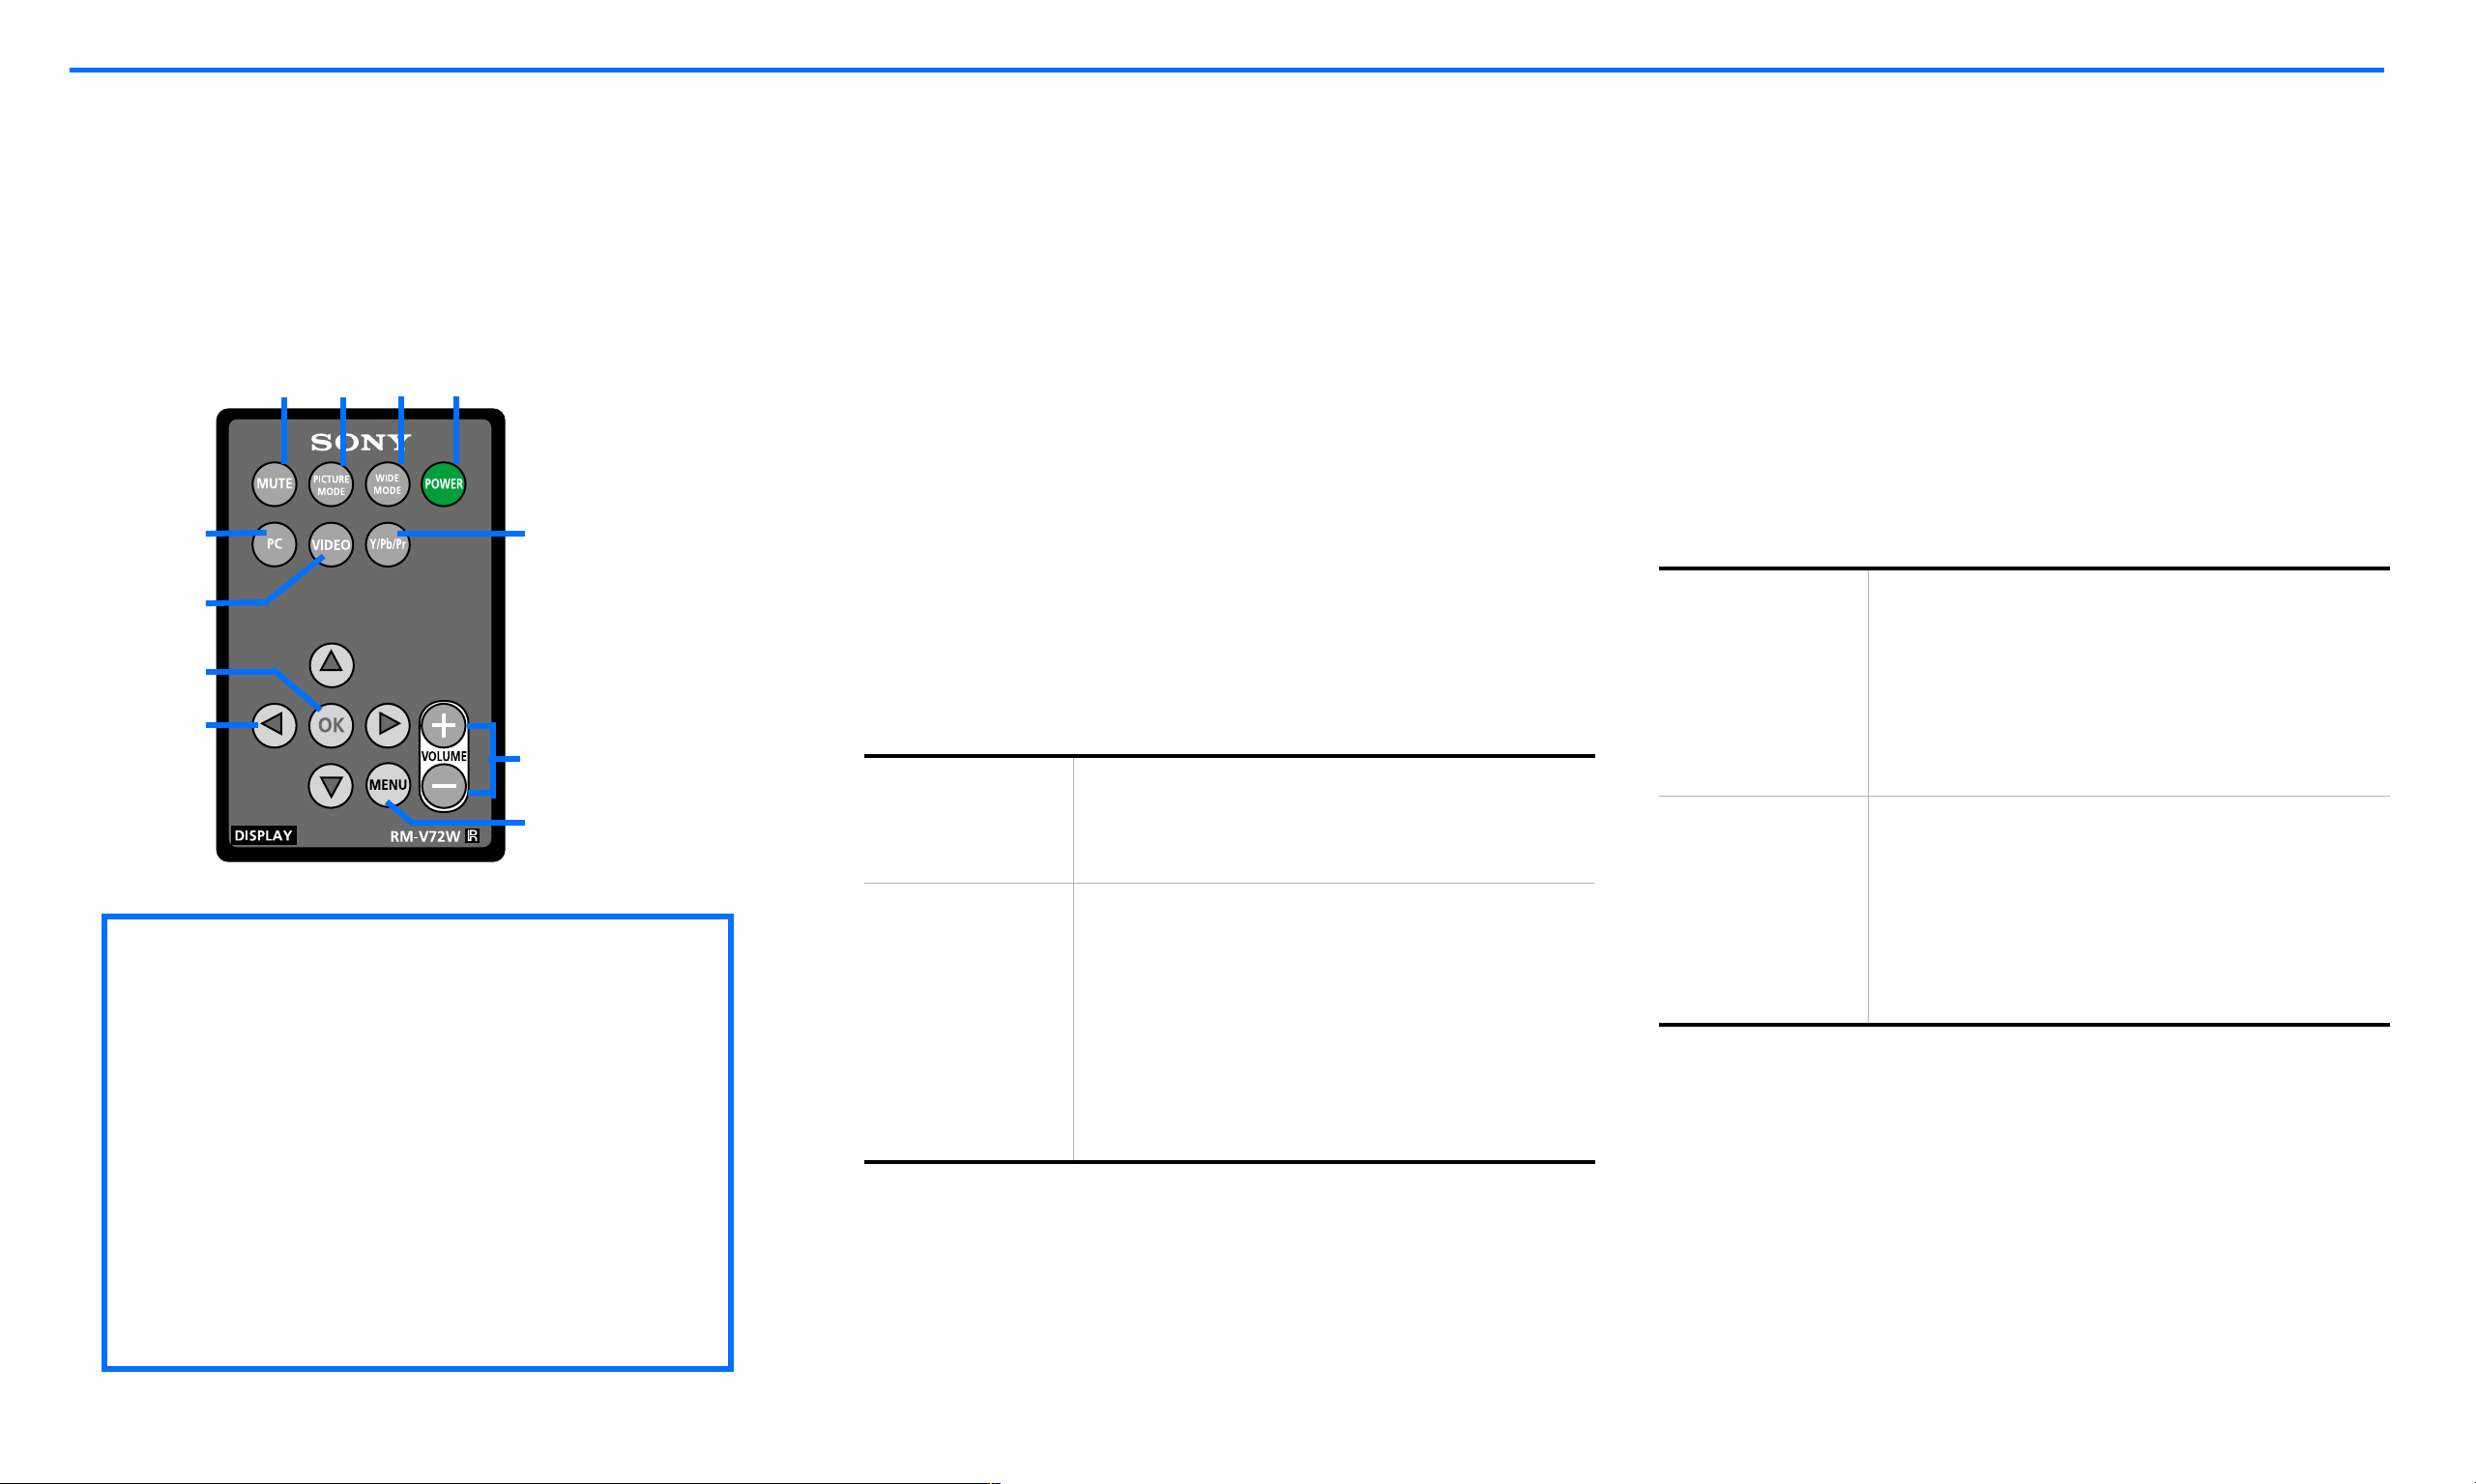
Using the Remote Card
Here is a closer look at the remote card. ql Press to mute the sound.
w; Press the PICTURE MODE button to select
one of the following Picture Modes for video
and Y/Pb/Pr component video:
■ Vivid
■ Standard
■ Movie
■ Game
■ Pro
wd
wf
wk
ql w; wa ws
wg
wa Press the WIDE MODE button to switch
between different screen size modes:
wj
wl
PC menu
■
Normal
wh
■ Full
✍
Video menu
The remote card POWER button
■
Wide Zoom
■ Zoom
will only turn your display on from
■ Letterbox
remote off mode, indicated by red
power LED indicator. When the
■ Full
display is in power OFF mode,
■ Normal
wd Press the PC button to receive PC input
signal.
wf Press the VIDEO button to receive composite
or S-Video signal.
wg Press the Y/Pb/Pr button to receive
Y/Pb/Pr component A/V signal.
wh Press the MENU button to display the main
menu of each input:
PC main menu
displays
Video
(or S-Video)
main menu
displays
■
PICTURE CONTROL
■ AUDIO CONTROL
■ SCREEN CONTROL
■ SETUP
PICTURE CONTROL
■
■ AUDIO CONTROL
■ SCREEN CONTROL
■ SETUP
wj Press the V v B b buttons for Menu
navigation.
indicated by unlit power LED, the
POWER button on the right side of
the display must be used to power
ON, indicated by green power LED
indicator.
ws Press the POWER button to turn on your
display from remote of f mode or to switch to
remote off. See Note.
- 18 -
wk Press the OK button to confirm your
selection.
wl Press the Volume +/- buttons to adjust the
audio volume for all inputs.
Page 20
Customizing Your Display
You can make numerous adjustments to your
display using the on-screen menu. You can select
your menu and adjustments using the buttons
on the side of the display or by using your
remote card.
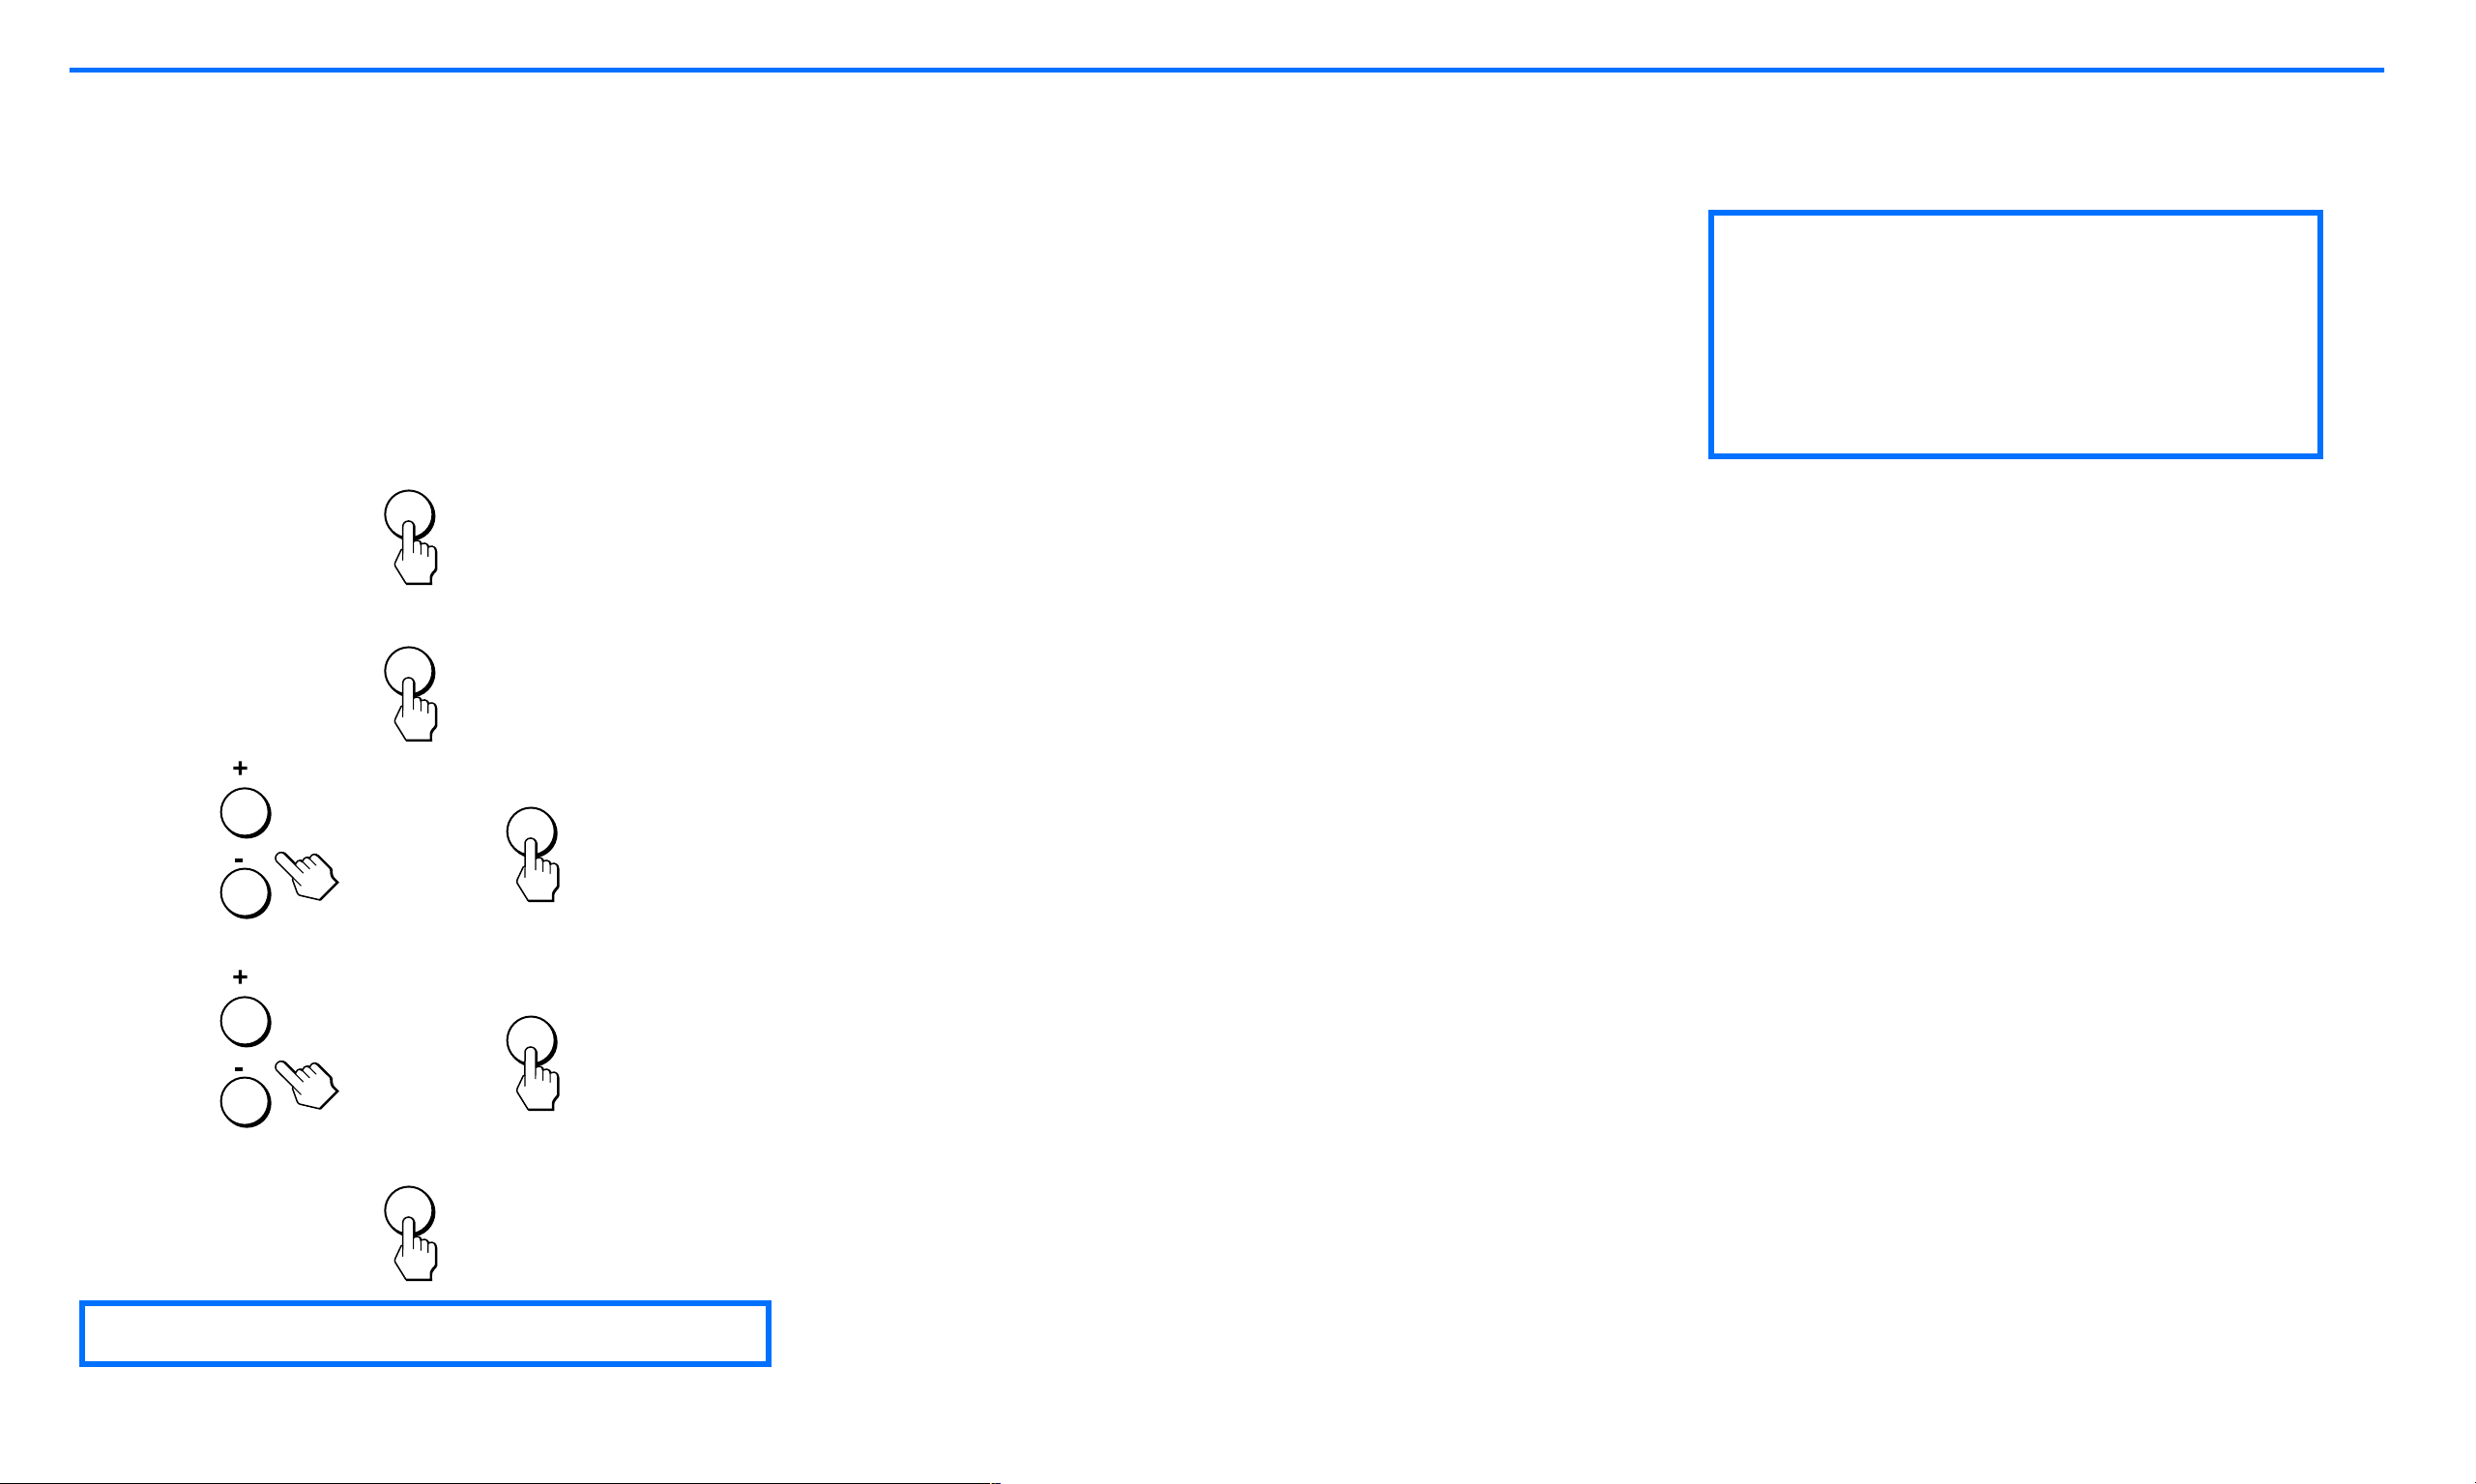
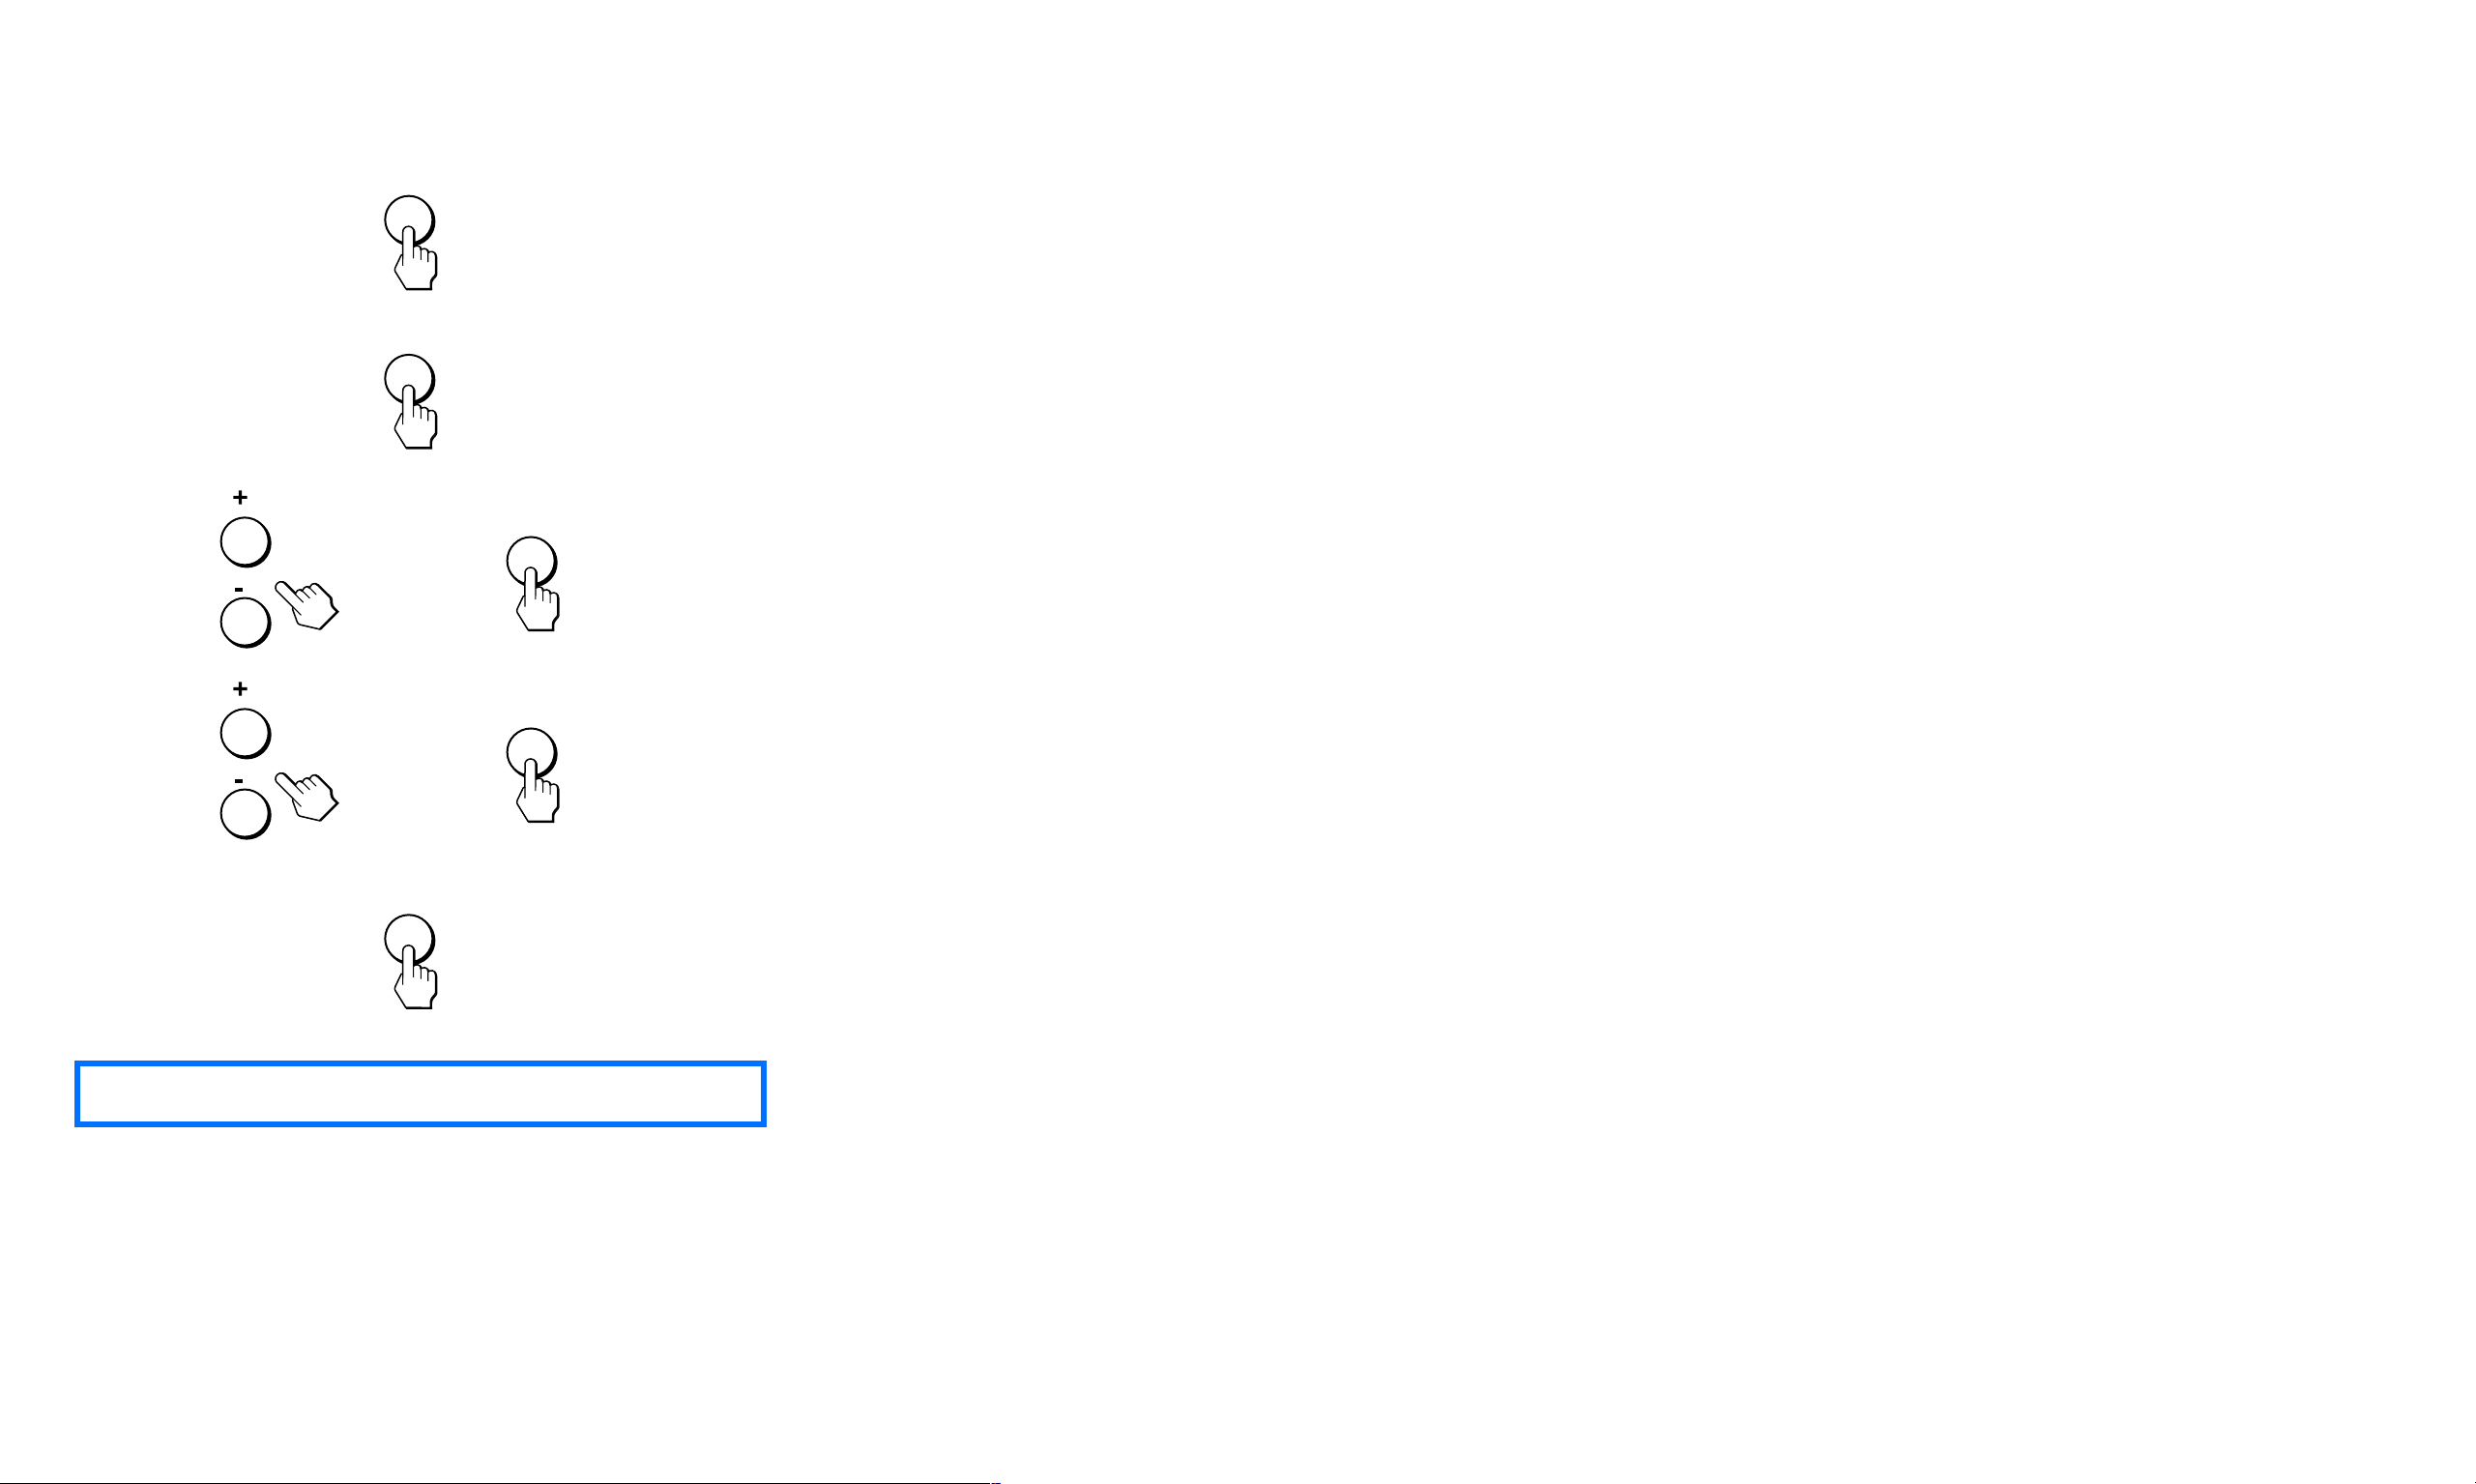
Navigating through PC menus
INPUT
MENU
1 Select the PC input.
Press the INPUT button on the right side of
the display until you find the PC input you
want to select and press the OK button or
press the PC button on your remote card.
2 Display the main menu.
Press the MENU button to display the main
menu on your screen and then press the OK
button.
3 Select the menu you want to adjust.
Press the +/- buttons to display the desired
Before making adjustments
Connect the display and the
computer , and turn them on. W ait for
at least 30 minutes before making
adjustments for the best results.
,
,
MENU
OK
OK
menu. Press the OK button to select the
menu item.
4 Adjust the menu.
Press the +/- buttons to make the adjustment,
and then press the OK button. When you
press the OK button, the setting is stored,
then the display returns to the previous menu.
5 Close the menu.
Press the MENU button once to return to
normal viewing. If no buttons are pr essed, the
menu closes automatically after about 45
seconds.
✍
Button layouts are different on the remote card.
- 19 -
Page 21
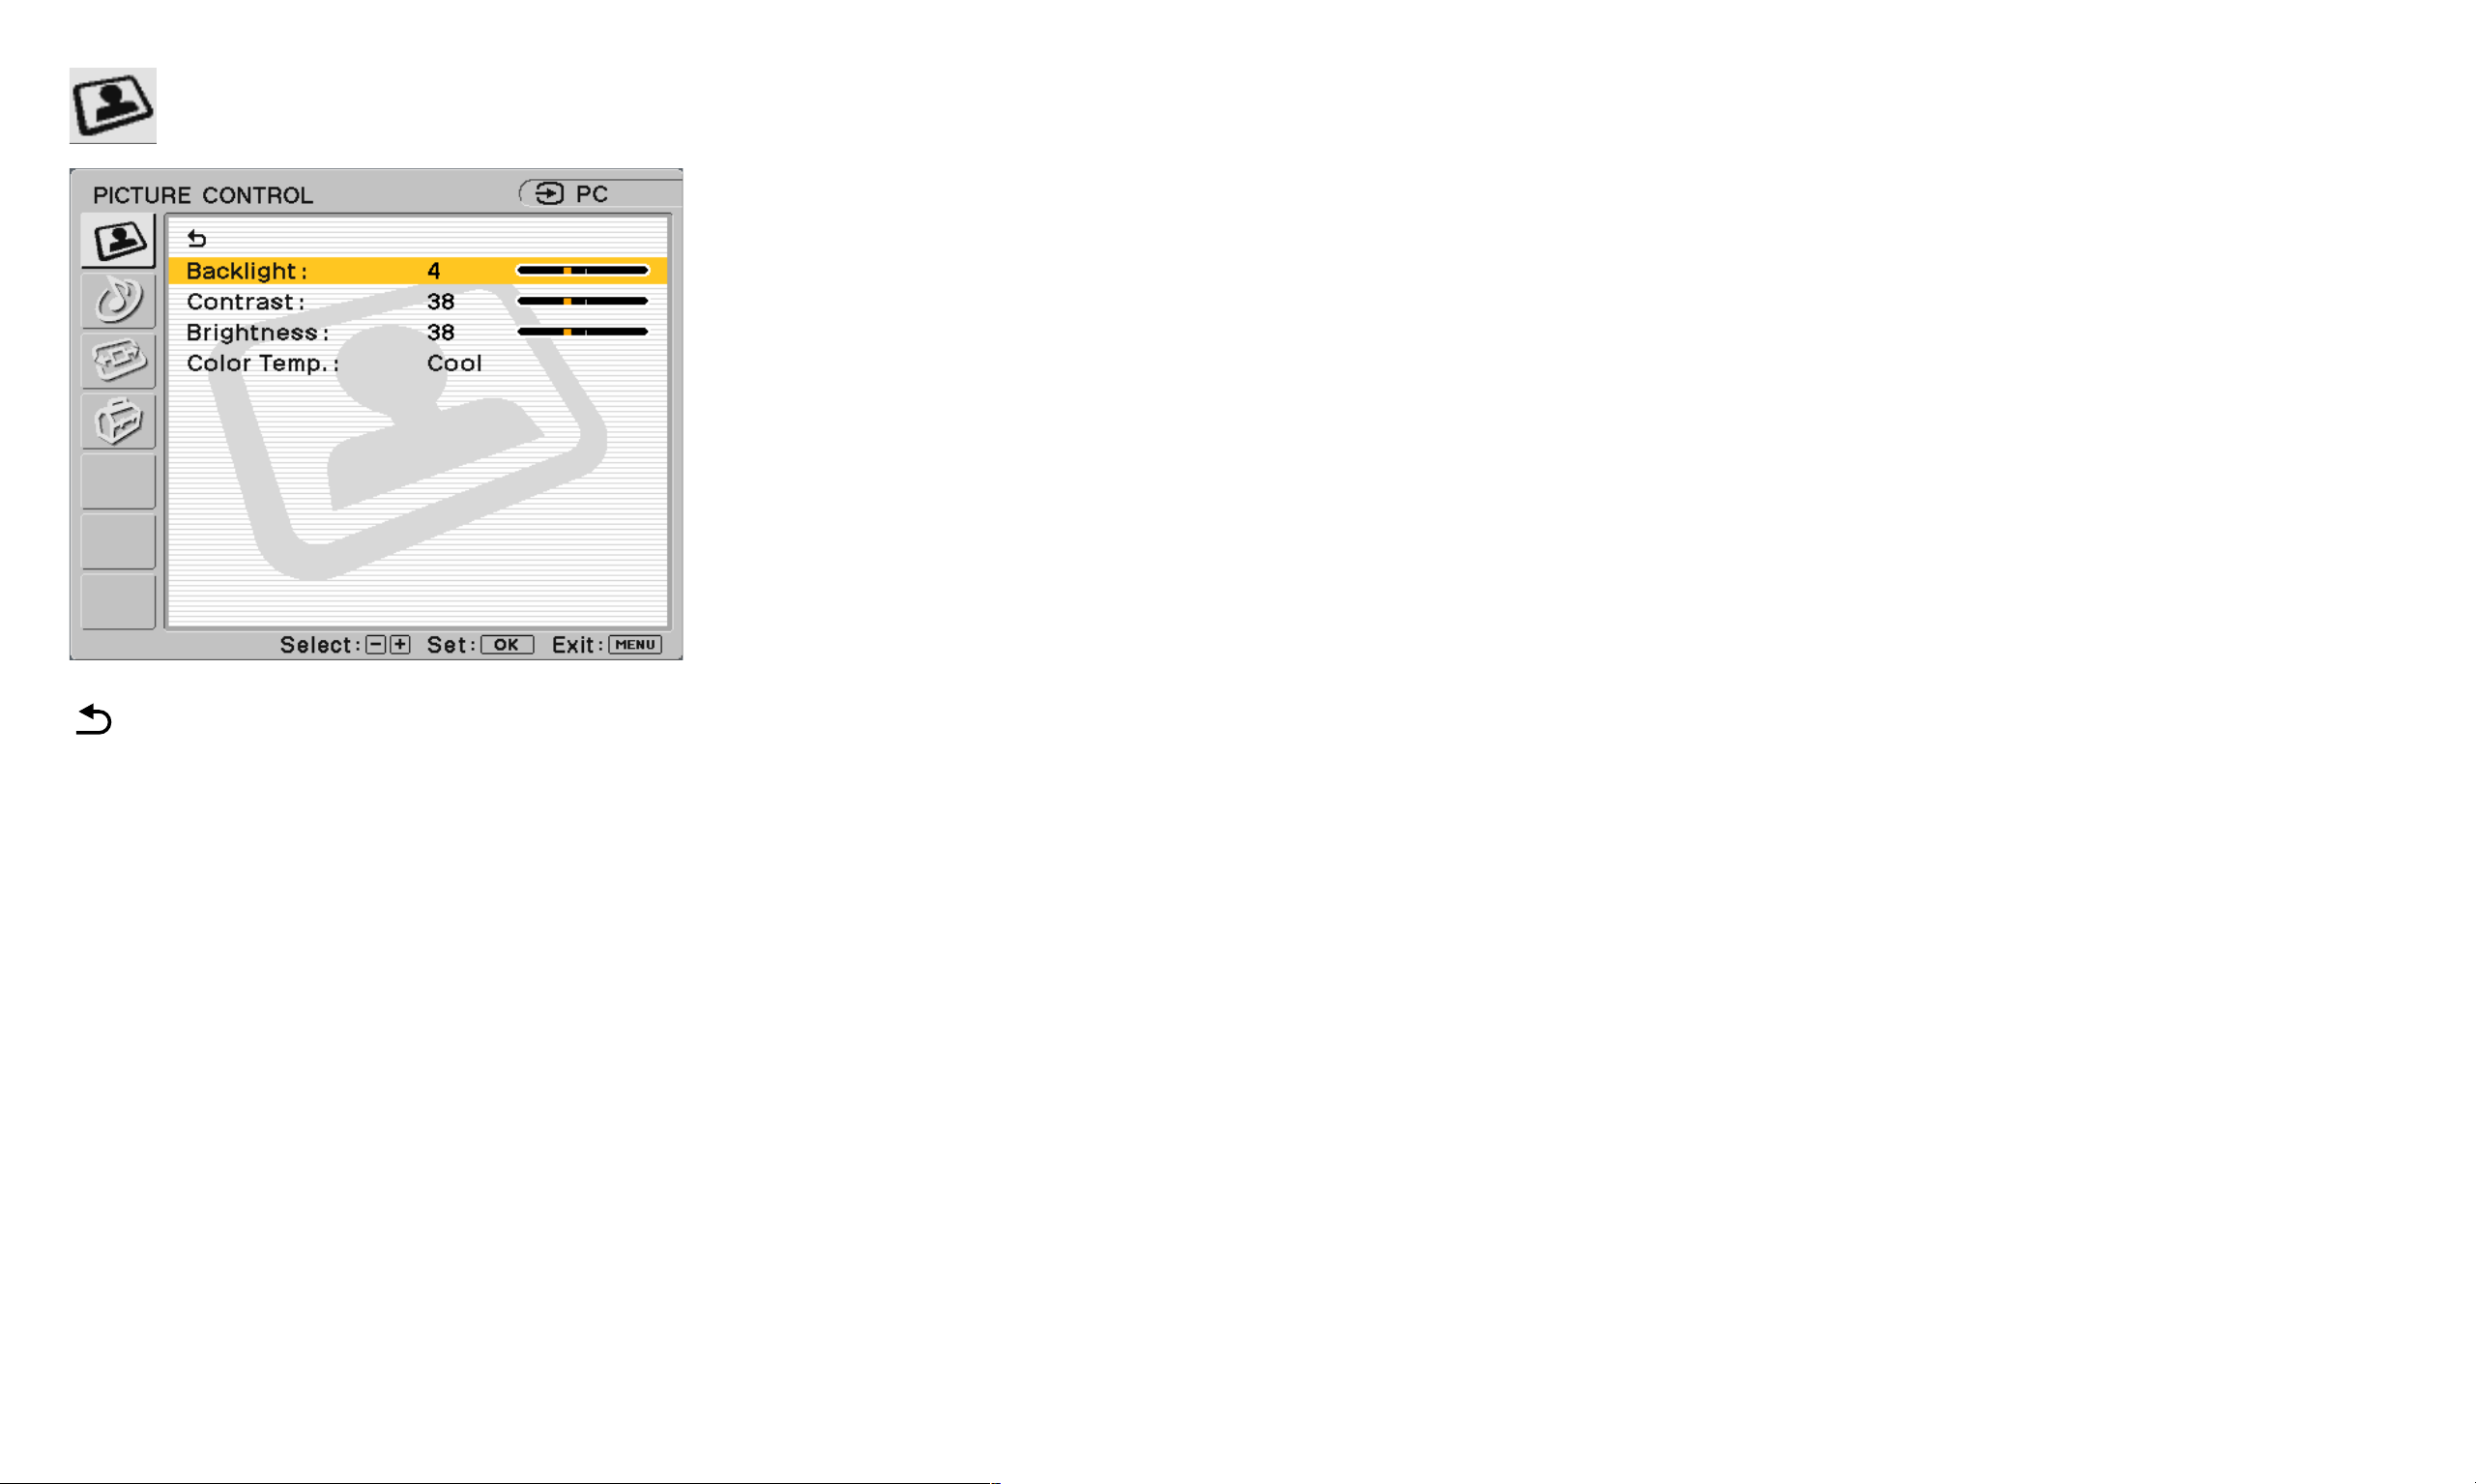
PC PICTURE CONTROL options
Will take you back to the previous menu.
Backlight: Adjust to the desired level of light to
make the screen easier to see.
Contrast: Adjust to increase contrast and
deepen the color, or decrease picture contrast
and soften the color.
Brightness: Adjust to brighten or darken the
picture.
Color Temp. (Color Temperatur e): The default
setting gives out the most white. If the color
temperature is low, the screen will appear warm
and reddish; if the color temperature is high, the
screen will appear cool and bluish.
■ User Adjustment: Select to manually set the
color temperature between Cool and Warm. A
sliding scale is displayed from 0 to 100 with
Neutral at 50. Adjustments to this setting will
affect all PC signals.
You can select the picture’s color level of the
white color field from the default color
temperature settings. Also you can fine-tune the
color temperature you desire.
■ Cool: Select to raise the color temperature
and give white colors a blue tint.
■ Neutral: Select to give white colors a neutral
tint.
■ Warm: Select to lower the color temperature
and give white colors a red tint.
- 20 -
Page 22
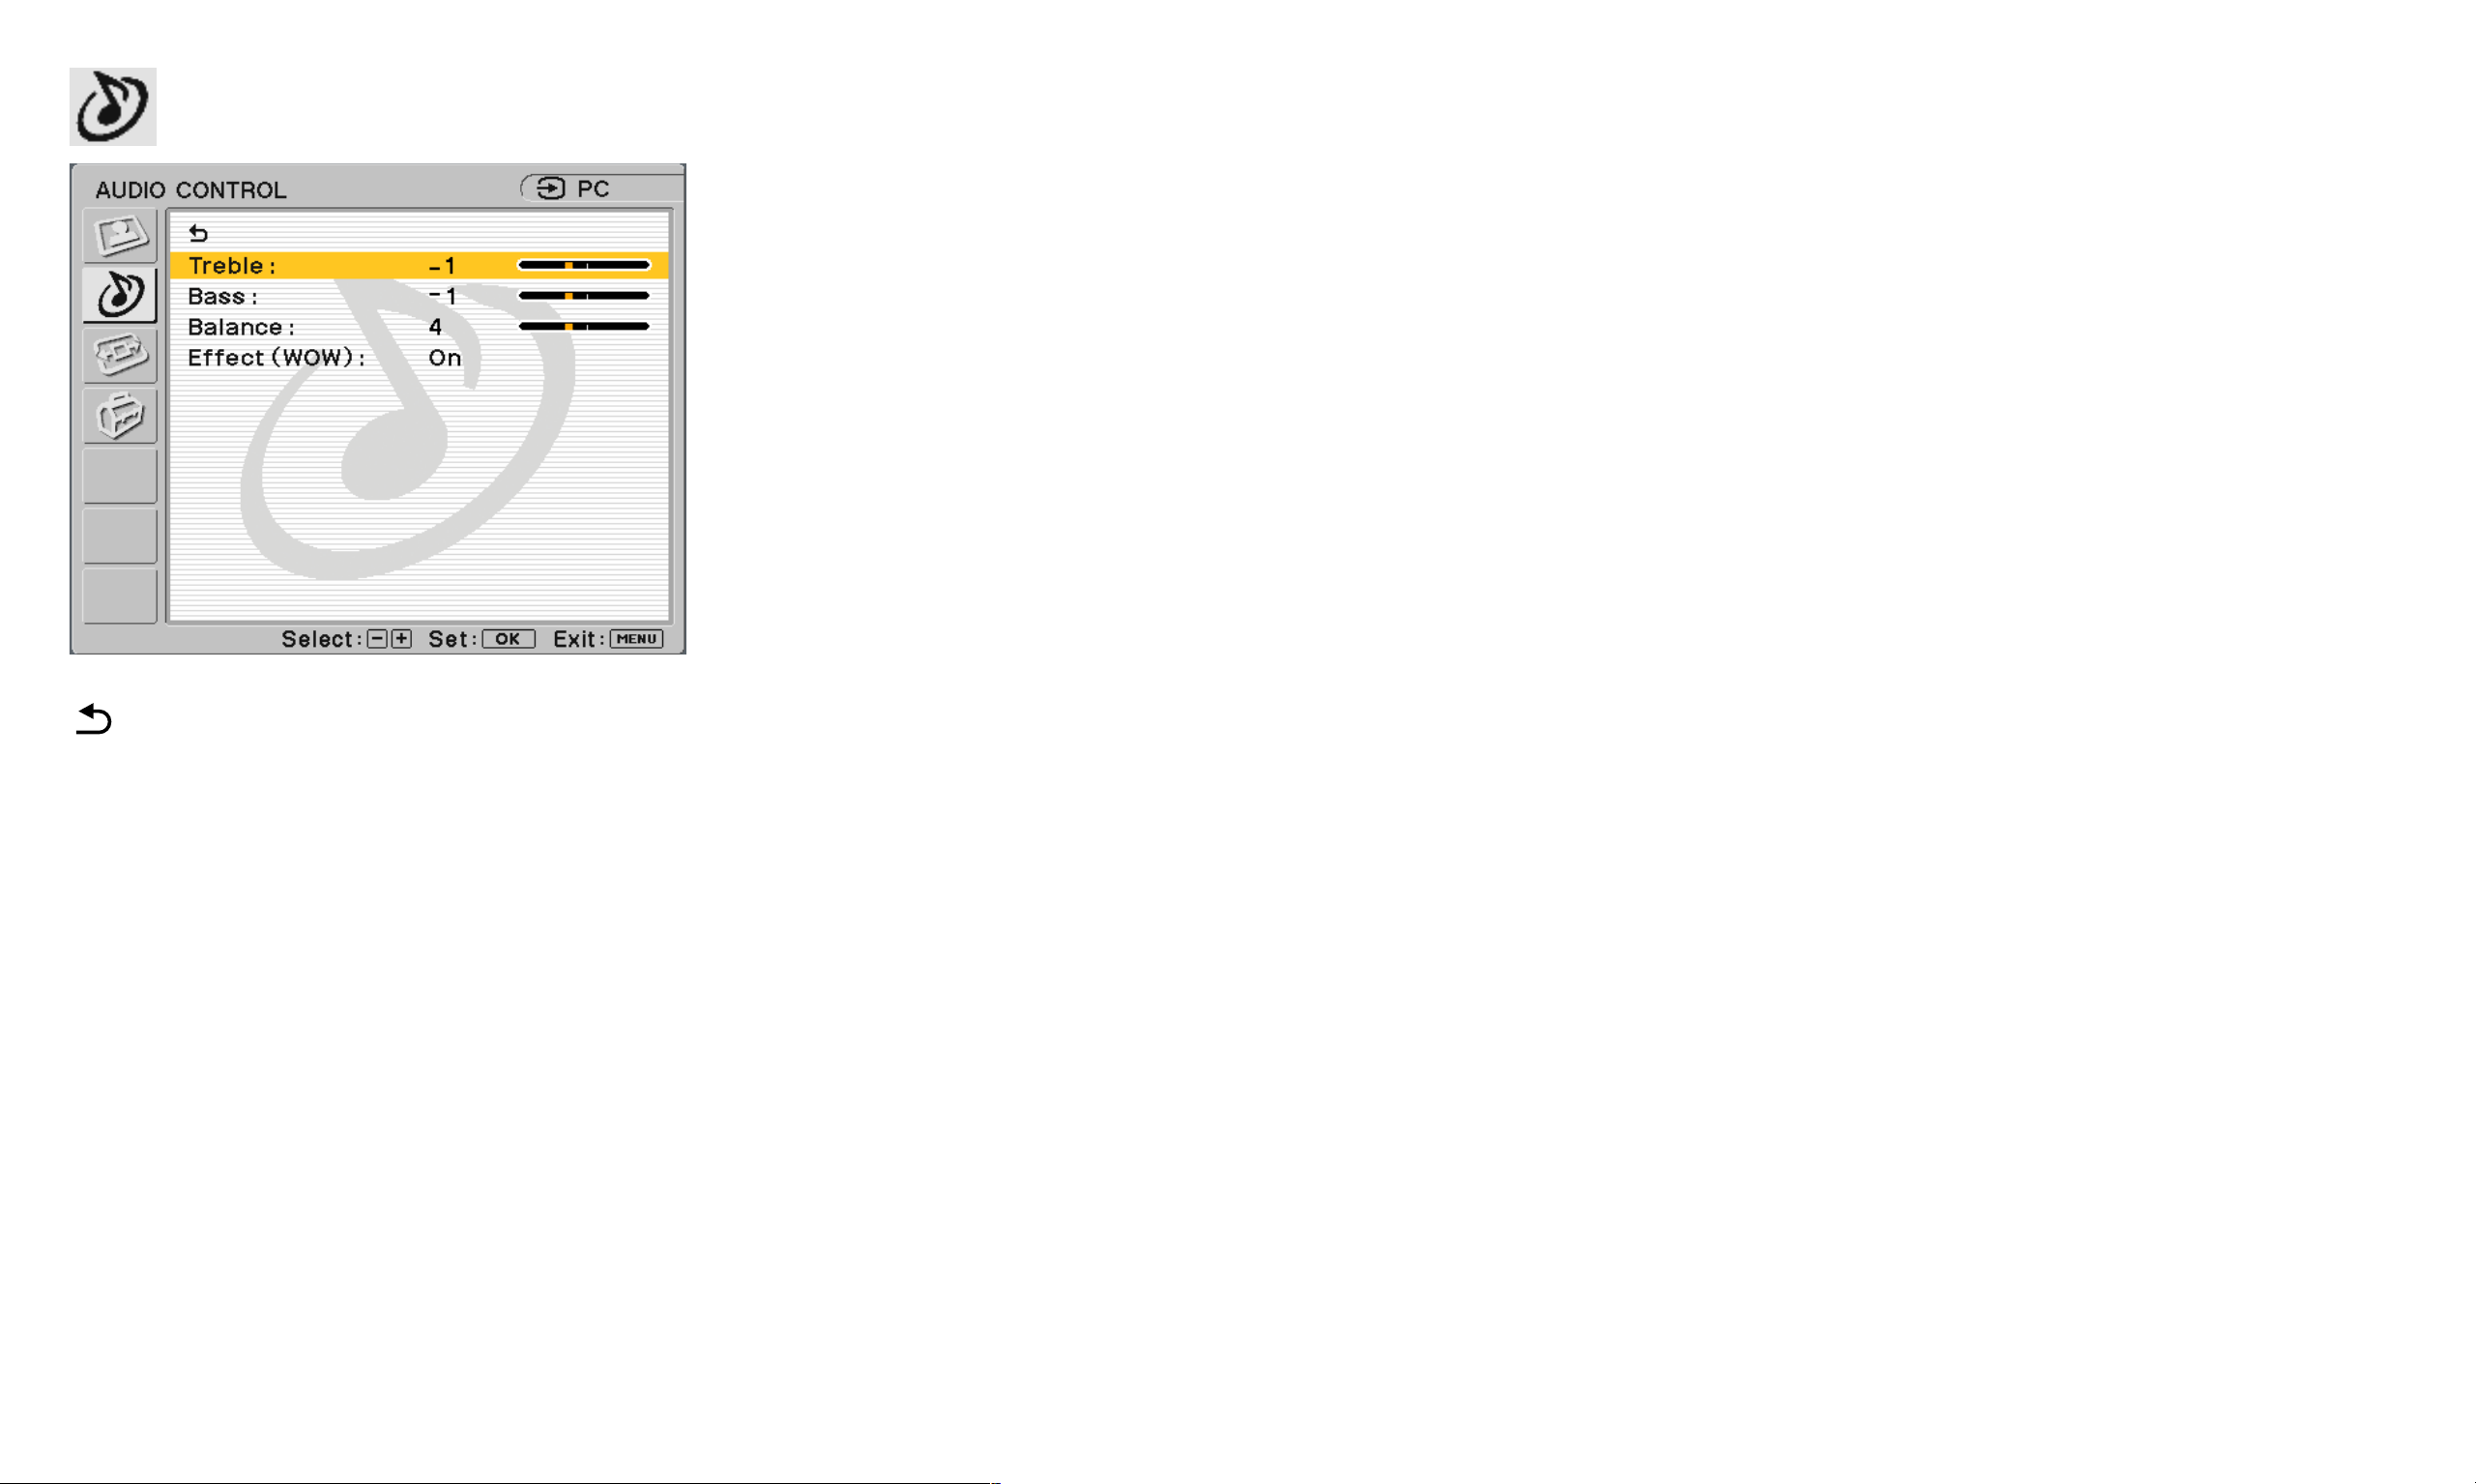
PC AUDIO CONTROL options
Treble: Adjust to decrease or increase
higher-pitched sounds.
Bass: Adjust to decrease or increase
lower-pitched sounds.
Balance: Adjust to emphasize left or right
speaker balance.
Effect (WOW): Select one of the following
options.
■ On: Select to activate SRS WOW™ audio.
Sound is enriched by processing "spatial
Will take you back to the previous menu.
cues" which gives audio a fuller, wider,
and more dynamic performance.
■ Off: Select for normal stereo, mono reception
or non-Internet audio.
- 21 -
Page 23
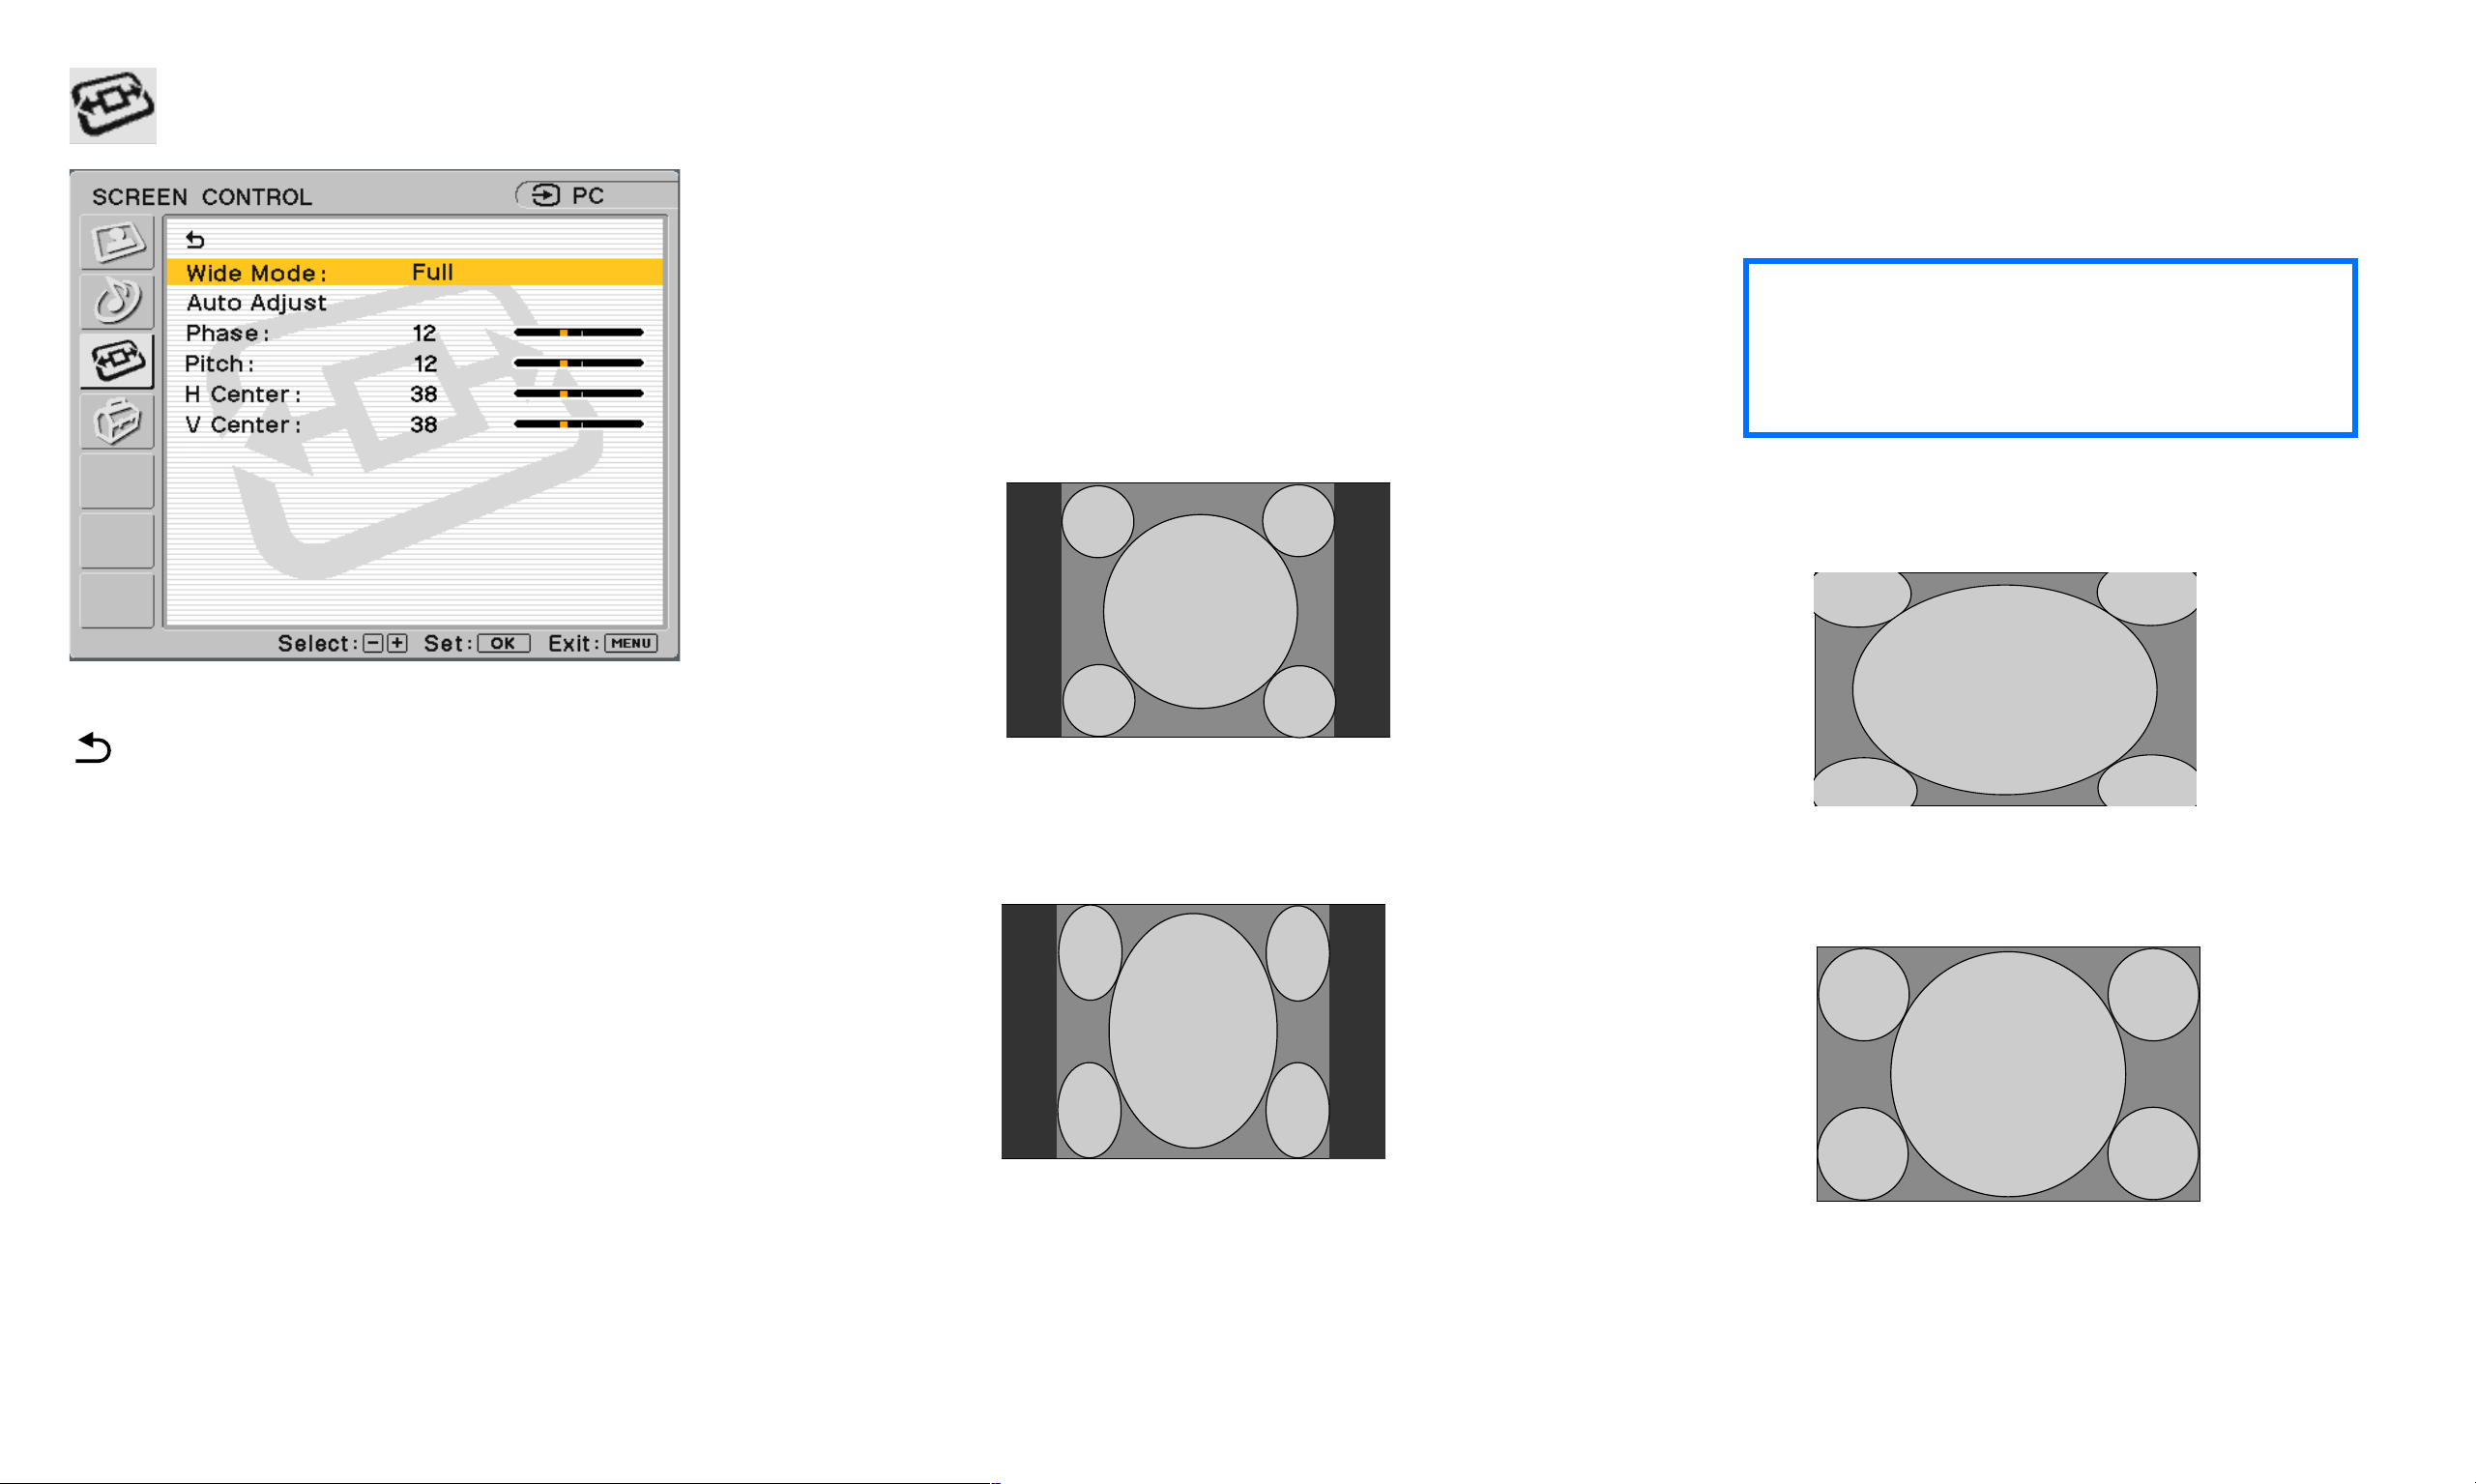
PC SCREEN CONTROL options
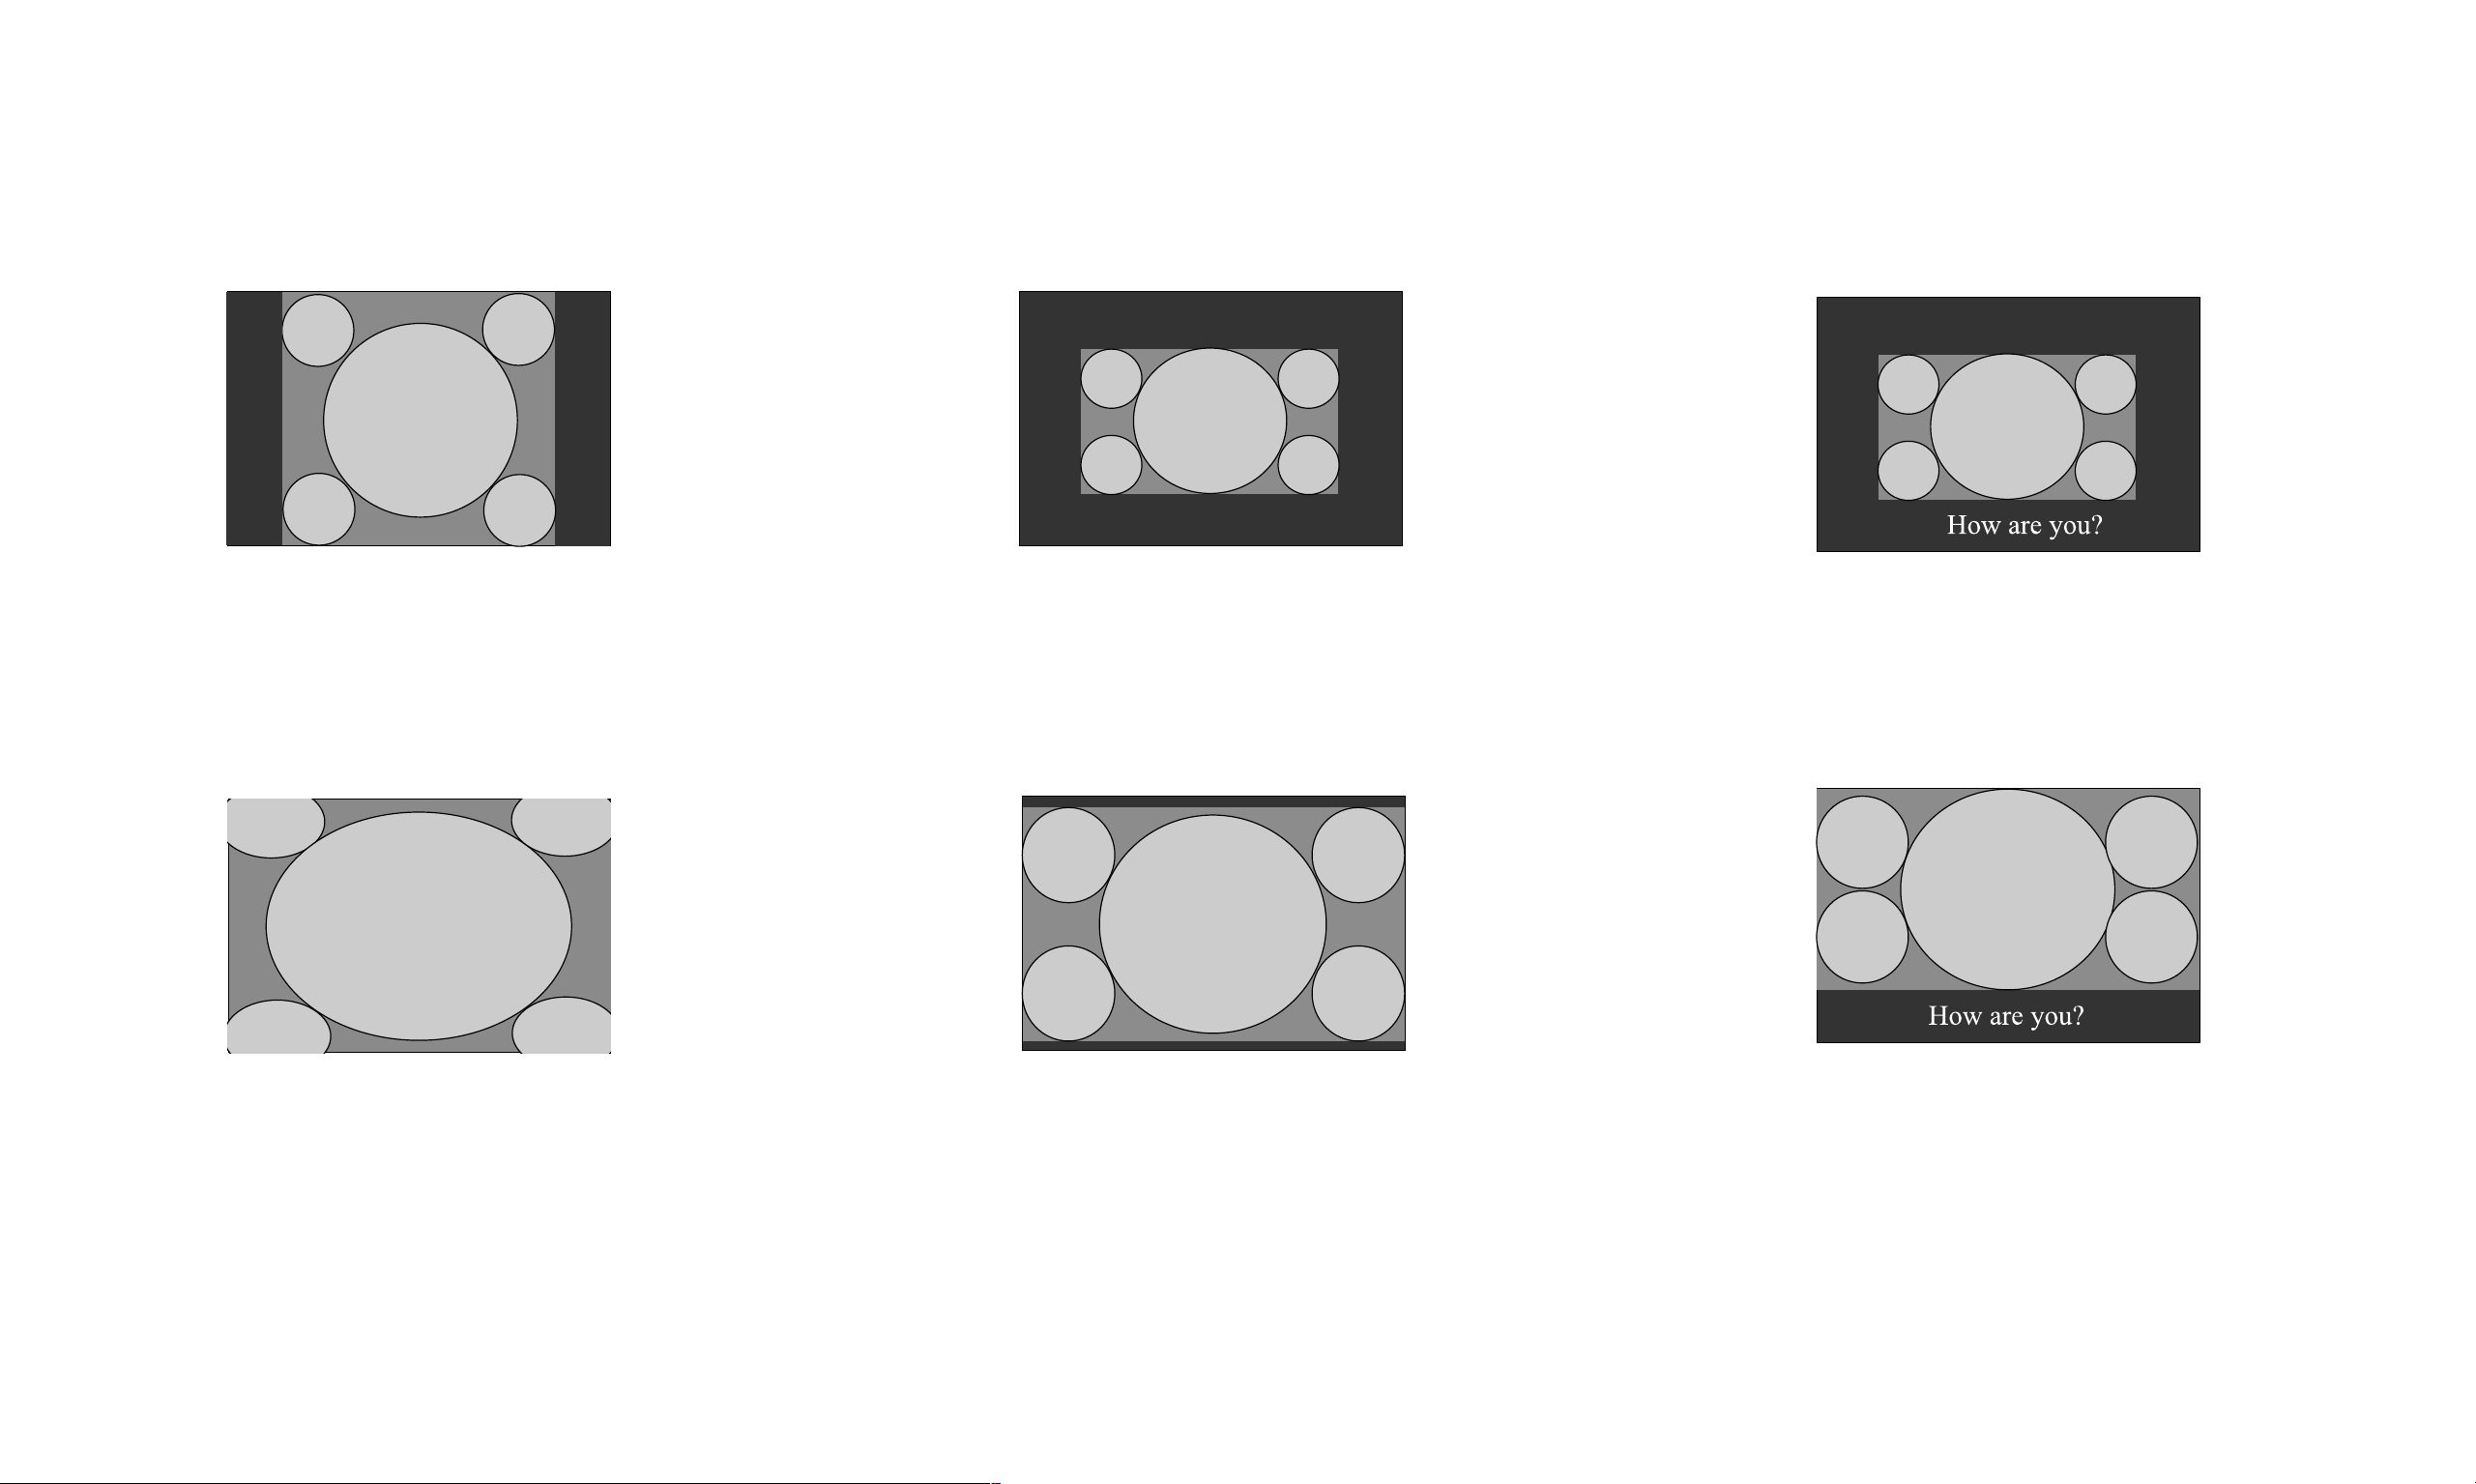
Wide Mode: This option comes with choice of
selecting the image appearance on your screen:
■ Normal: Select to view the images as signals
are received.
The following illustrates how images are
viewed on your wide screen display.
■ Full: Select to view the images fit to the screen
size.
✍
zSome distortion or stretching of
4:3 ratio screen images may occur
when Full mode is used.
The following illustrates how images are
fit to the screen by selecting this option.
Will take you back to the previous menu.
Ordinary 4:3 signals viewed on
your wide screen display
.
16:9 signals viewed on your
wide screen display
4:3 signals viewed to fit on the
wide screen display
Signals originally received as
16:9 wide screen display
- 22 -
Page 24
PC SCREEN CONTROL options - Cont.
Auto Adjust: Select OK for the auto
adjustment of picture quality. When the
display receives an input signal, it
automatically detects and it adjusts the
picture’s position and deformity (phase/
pitch) and ensures that a clear picture
appears on the screen. After the automatic
adjustment the cursor returns to the Auto
Adjustment PC Screen Control option.
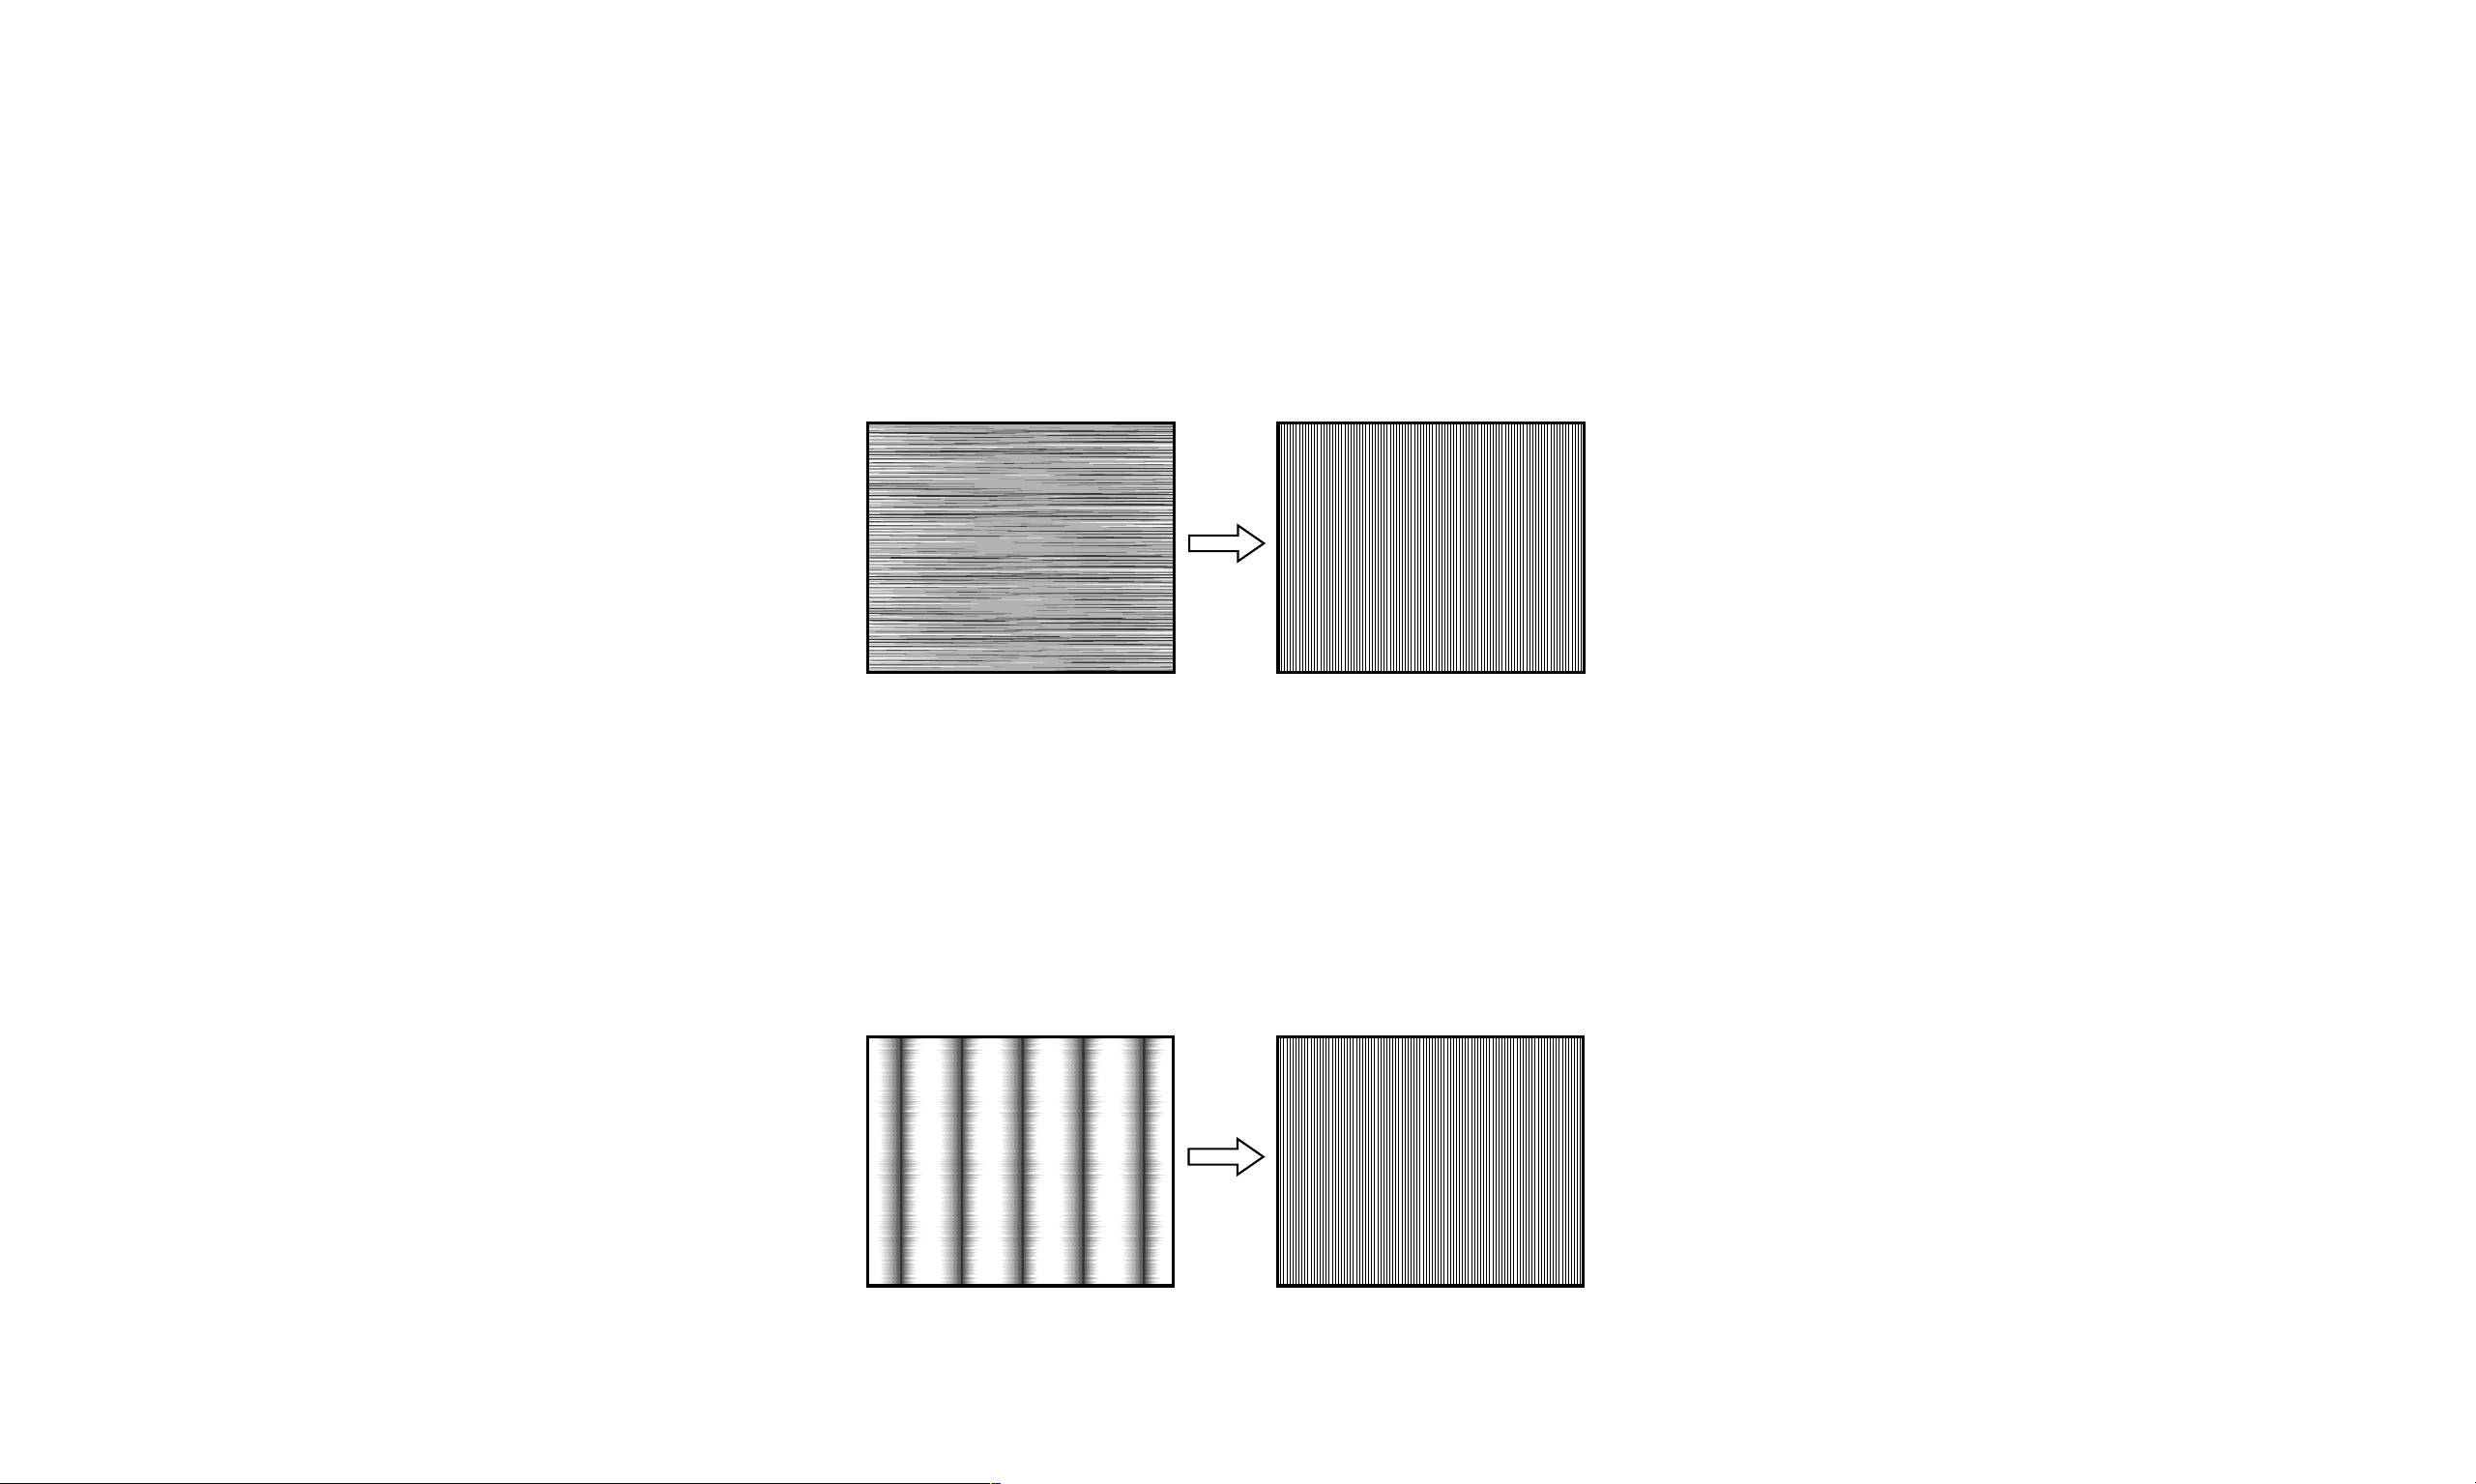
Phase: Select to adjust the quality of the
picture image. Adjust until video noise
(horizontal stripes) is eliminated so that the
horizontal stripes are at a minimum and a
clear picture is achieved.
H Center: Select to adjust the horizontal
centering of the picture so the image on the
screen will be centered between the left and
the right sides of the frame.
V Center: Select to adjust the vertical
centering of the picture so the image on the
screen will be centered between the top and
the bottom of the frame.
Pitch: Select to adjust the quality of the
picture image when vertical stripes are
observed. Adjust until sampling (vertical
stripes) is show at an even width across the
screen.
- 23 -
Page 25
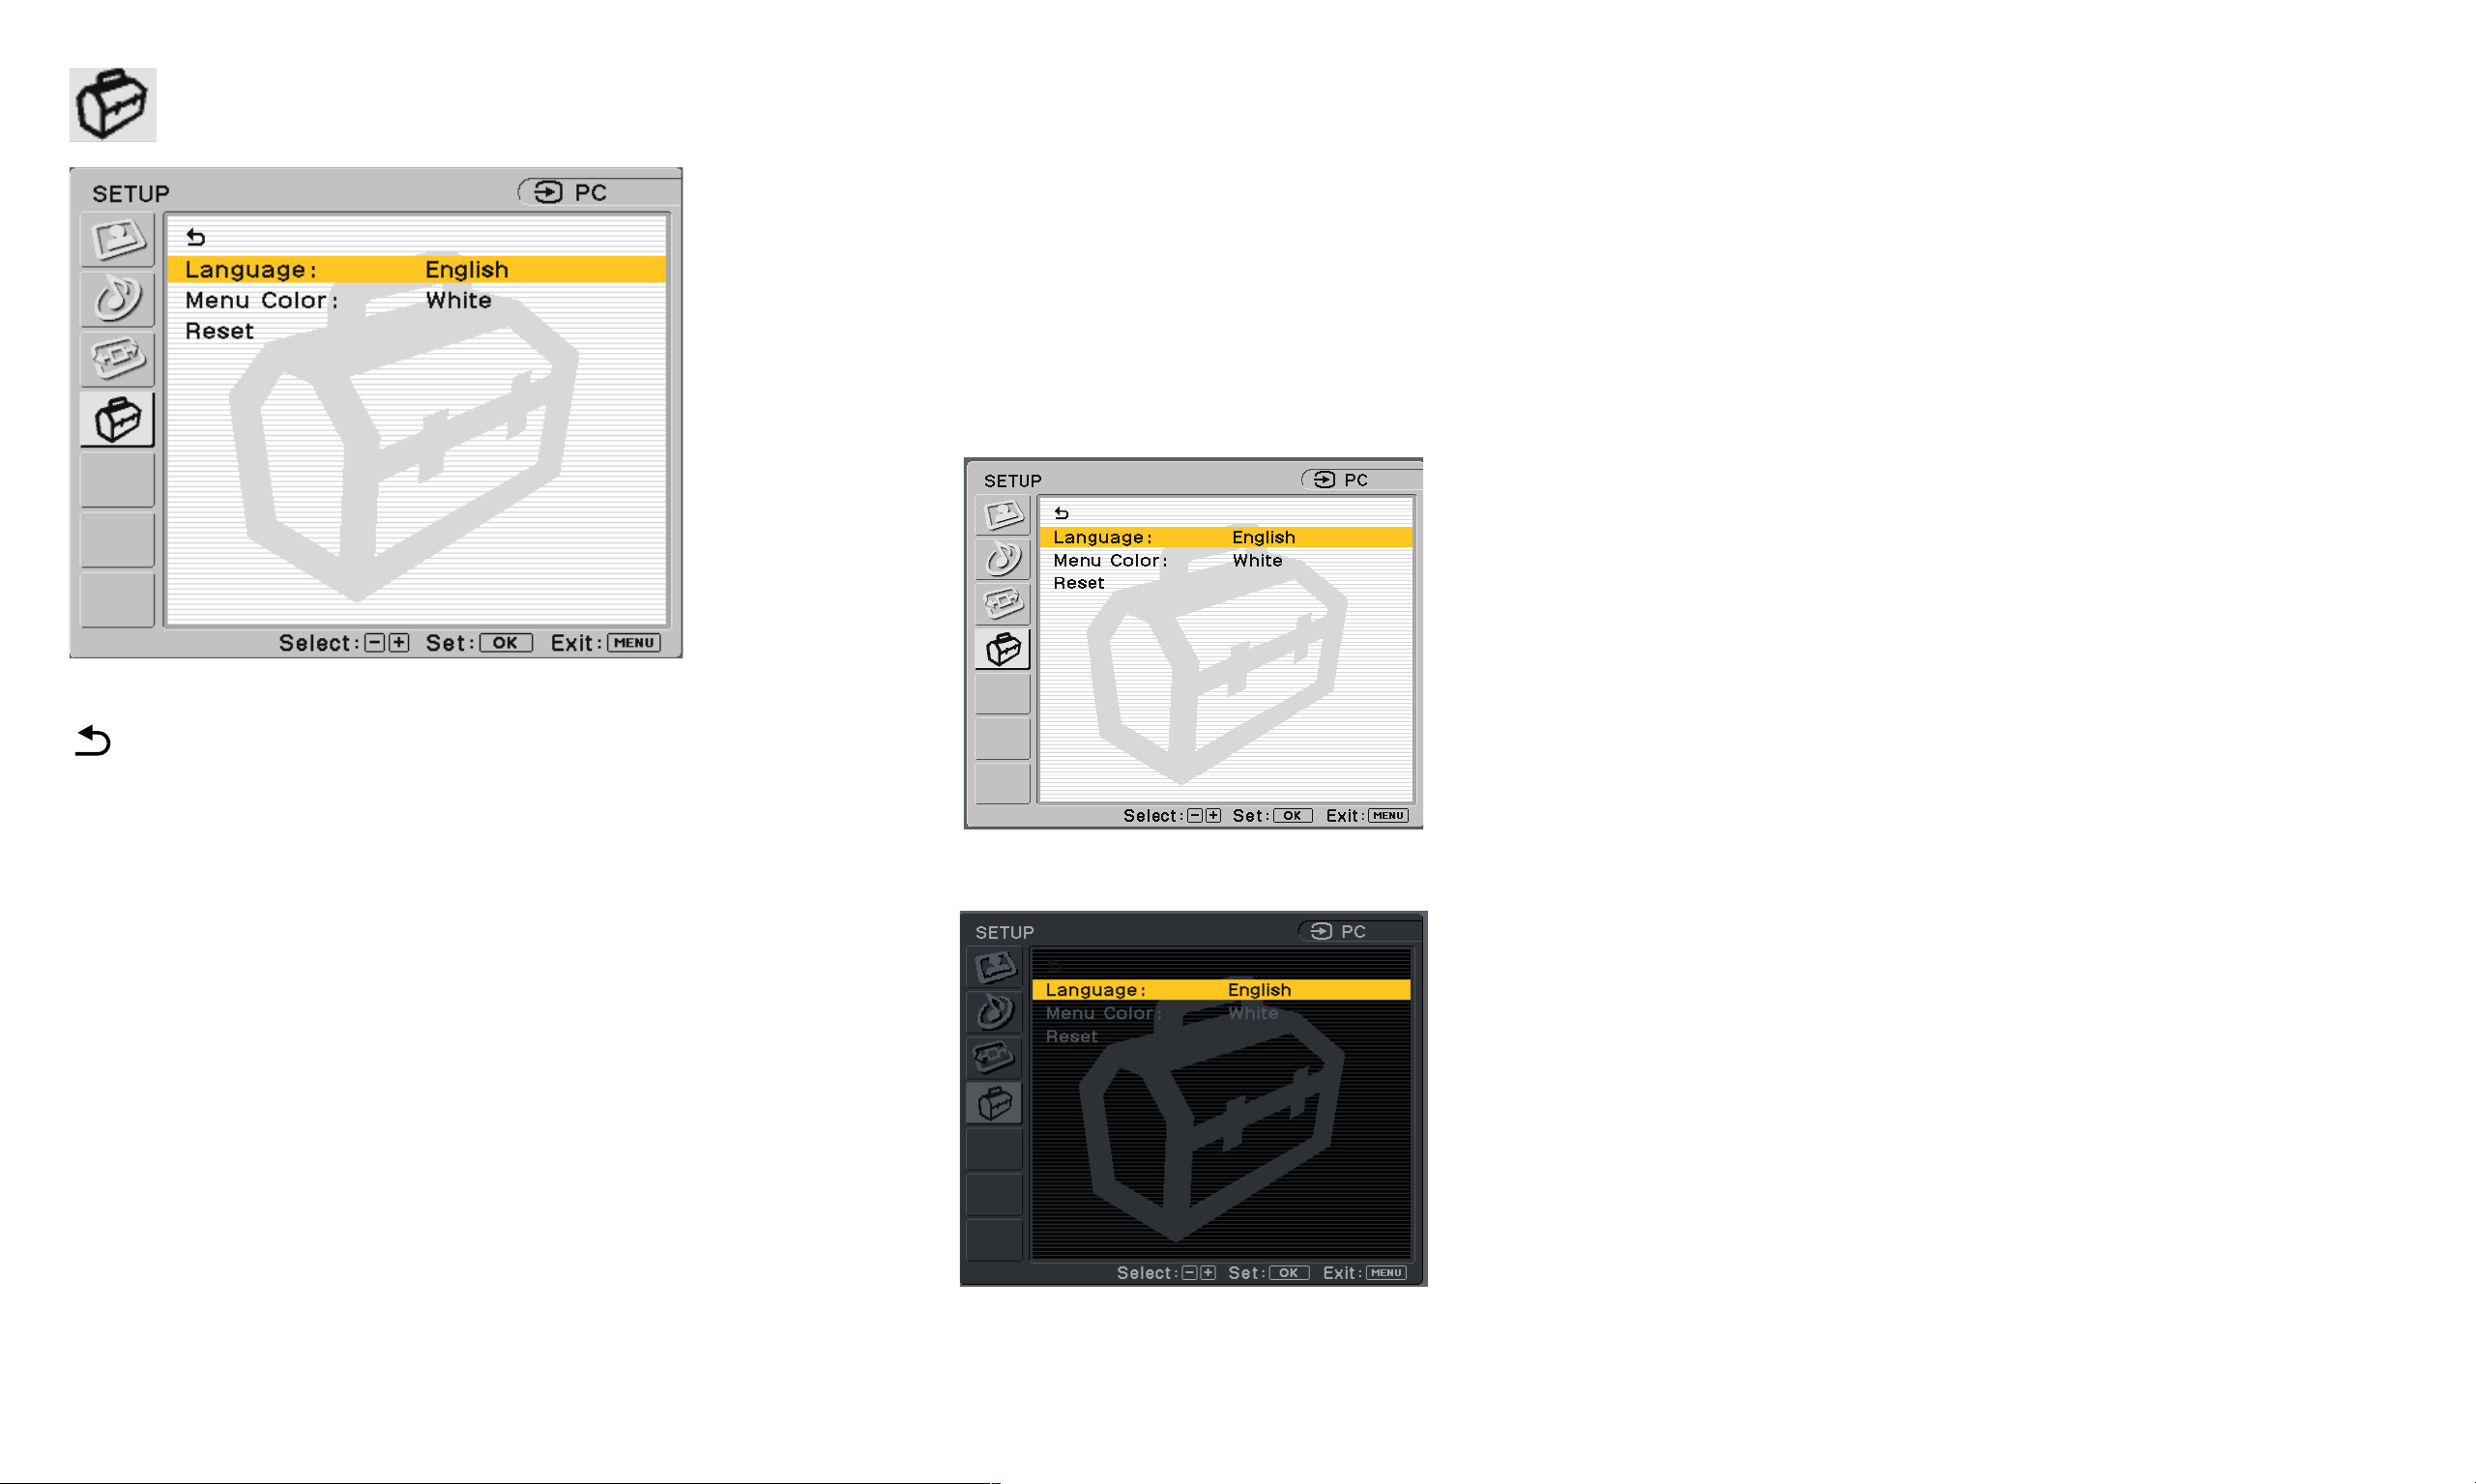
PC SETUP options
Language:
language to display in English, Spanish, or French.
Factory setting is English.
Select to change the on-screen
Menu Color: Select to change the menu color to
meet with your viewing environment.
White menu color
Reset: Enables adjustments to be reset to factory
defaults.
■ OK: Select to reset all of the adjustment
data to the factory setting.
■ Cancel: Select to cancel resetting and return
to the menu screen.
Will take you back to the previous menu.
Black menu color
- 24 -
Page 26
Navigating through Video menus
INPUT
MENU
1 Select the video or component input
If you have connected the video with an
S-Video cable, your display will display
S-Video rather than Composite Video.
Press the video input of your choice and pr ess
the OK button.
2 Display the main menu.
,
,
MENU
OK
OK
Press the MENU button to display the main
menu on your screen and then press the OK
button.
3 Select the menu you want to adjust.
Press the +/- buttons to display the desired
menu. Press the OK button to select the
menu item.
4 Adjust the menu.
Press the +/- buttons to make the adjustment,
and then press the OK button. When you
press the OK button, the setting is stored,
then the display returns to the previous menu.
✍
Button layouts on the remote card are different.
5 Close the menu.
Press the MENU button once to return to
normal viewing. If no buttons are pr essed, the
menu closes automatically after about 45
seconds.
- 25 -
Page 27
PICTURE CONTROL options (for Video, S-Video, or Component)
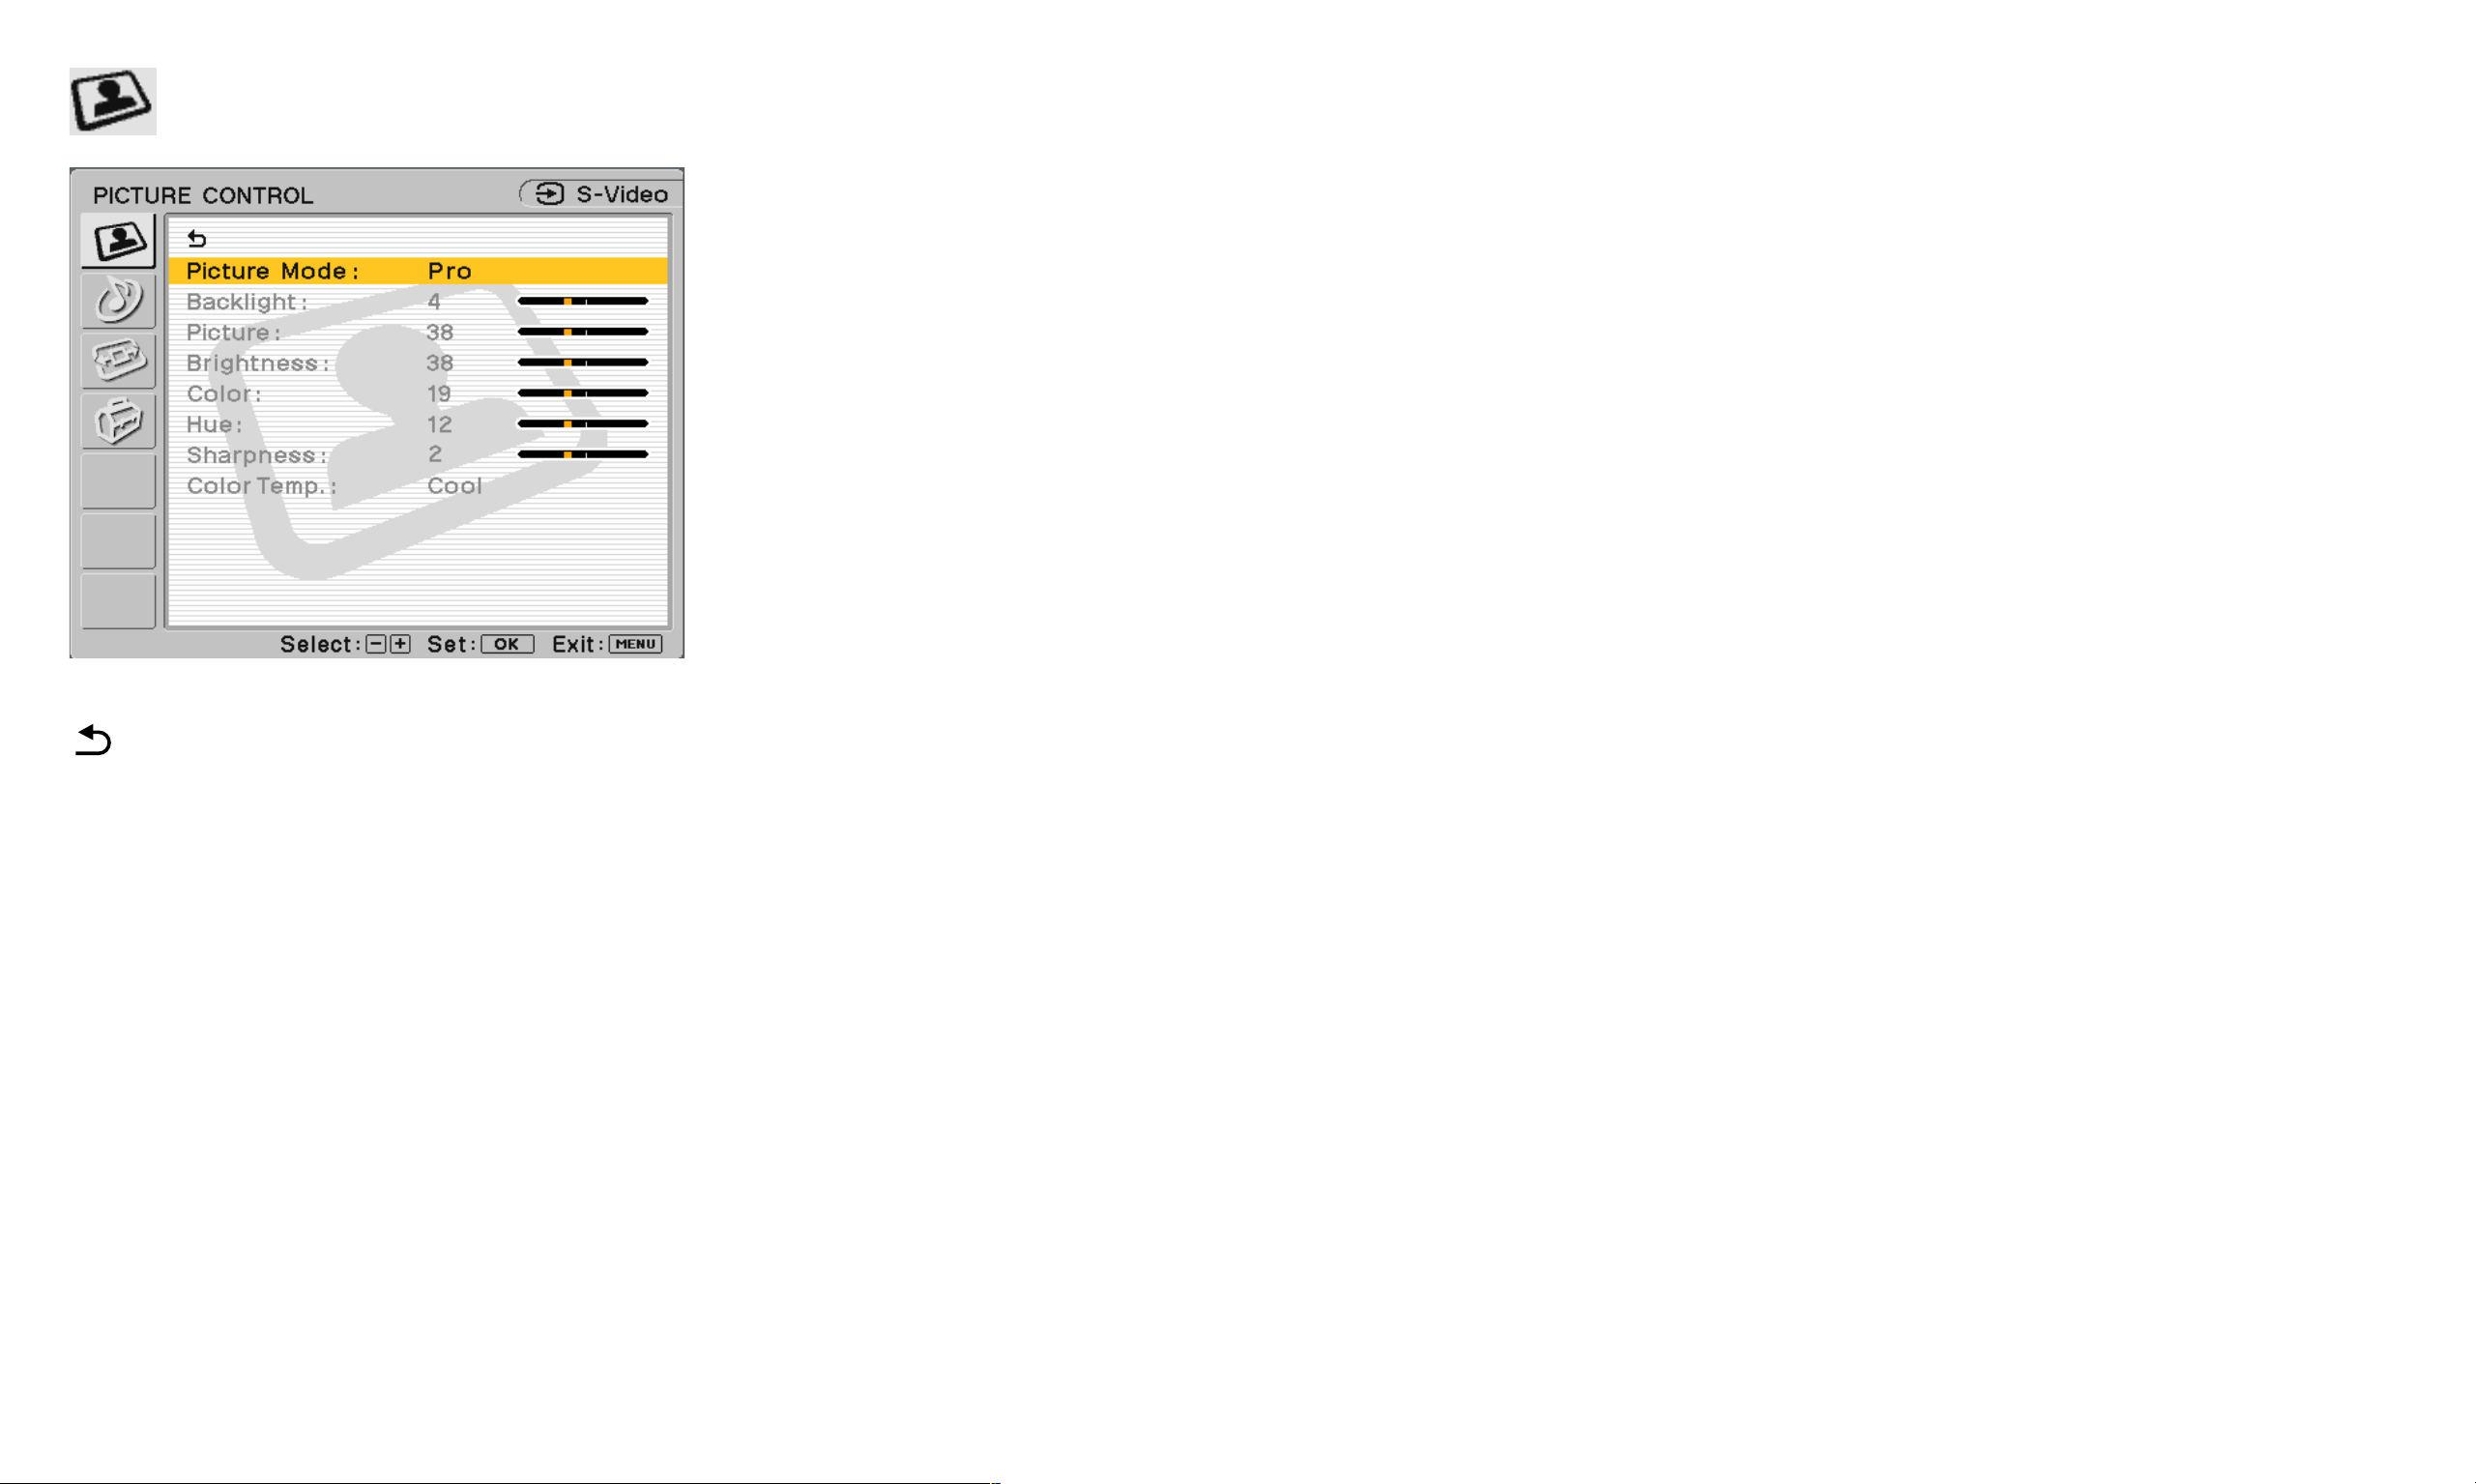
Will take you back to the previous menu.
Picture Mode: Select one of the following
modes to suit your video needs.
■ Vivid: Select for enhanced picture contrast
and sharpness.
■ Standard:Select for standard picture settings.
■ Movie: Select to display a softer picture.
■ Game: Select to play video games.
■ Pro: Select to set your personal setting. It
allows you to manually adjust the
picture.
Backlight: Adjust to the desired level of light to
make the screen easier to see.
Color Temp (Color Temperature): The default
setting gives out the most white. If the color
temperature is low, the screen will appear warm
and reddish; if the color temperature is high, the
screen will appear cool and bluish.
You can select the picture’s color level of the
white color field from the default color
temperature settings. Also you can fine-tune the
color temperature you desire.
■ Cool: Select to raise the color temperature
and give white colors a blue tint.
■ Neutral: Select to give white colors a neutral
tint.
Picture: Adjust to increase picture contrast and
deepen the color, or decrease picture contrast
■ Warm: Select to lower the color temperature
and give white colors a red tint.
and soften the color.
Brightness: Adjust to brighten or darken the
picture.
Color*: Adjust to increase or decrease color
intensity.
Hue*: Adjust to increase or decrease the green
tone.
Sharpness*: Adjust to sharpen or soften the
picture.
* Manual adjustment is not available for component video with signals of 480p, 1080i, and 720p.
- 26 -
Page 28
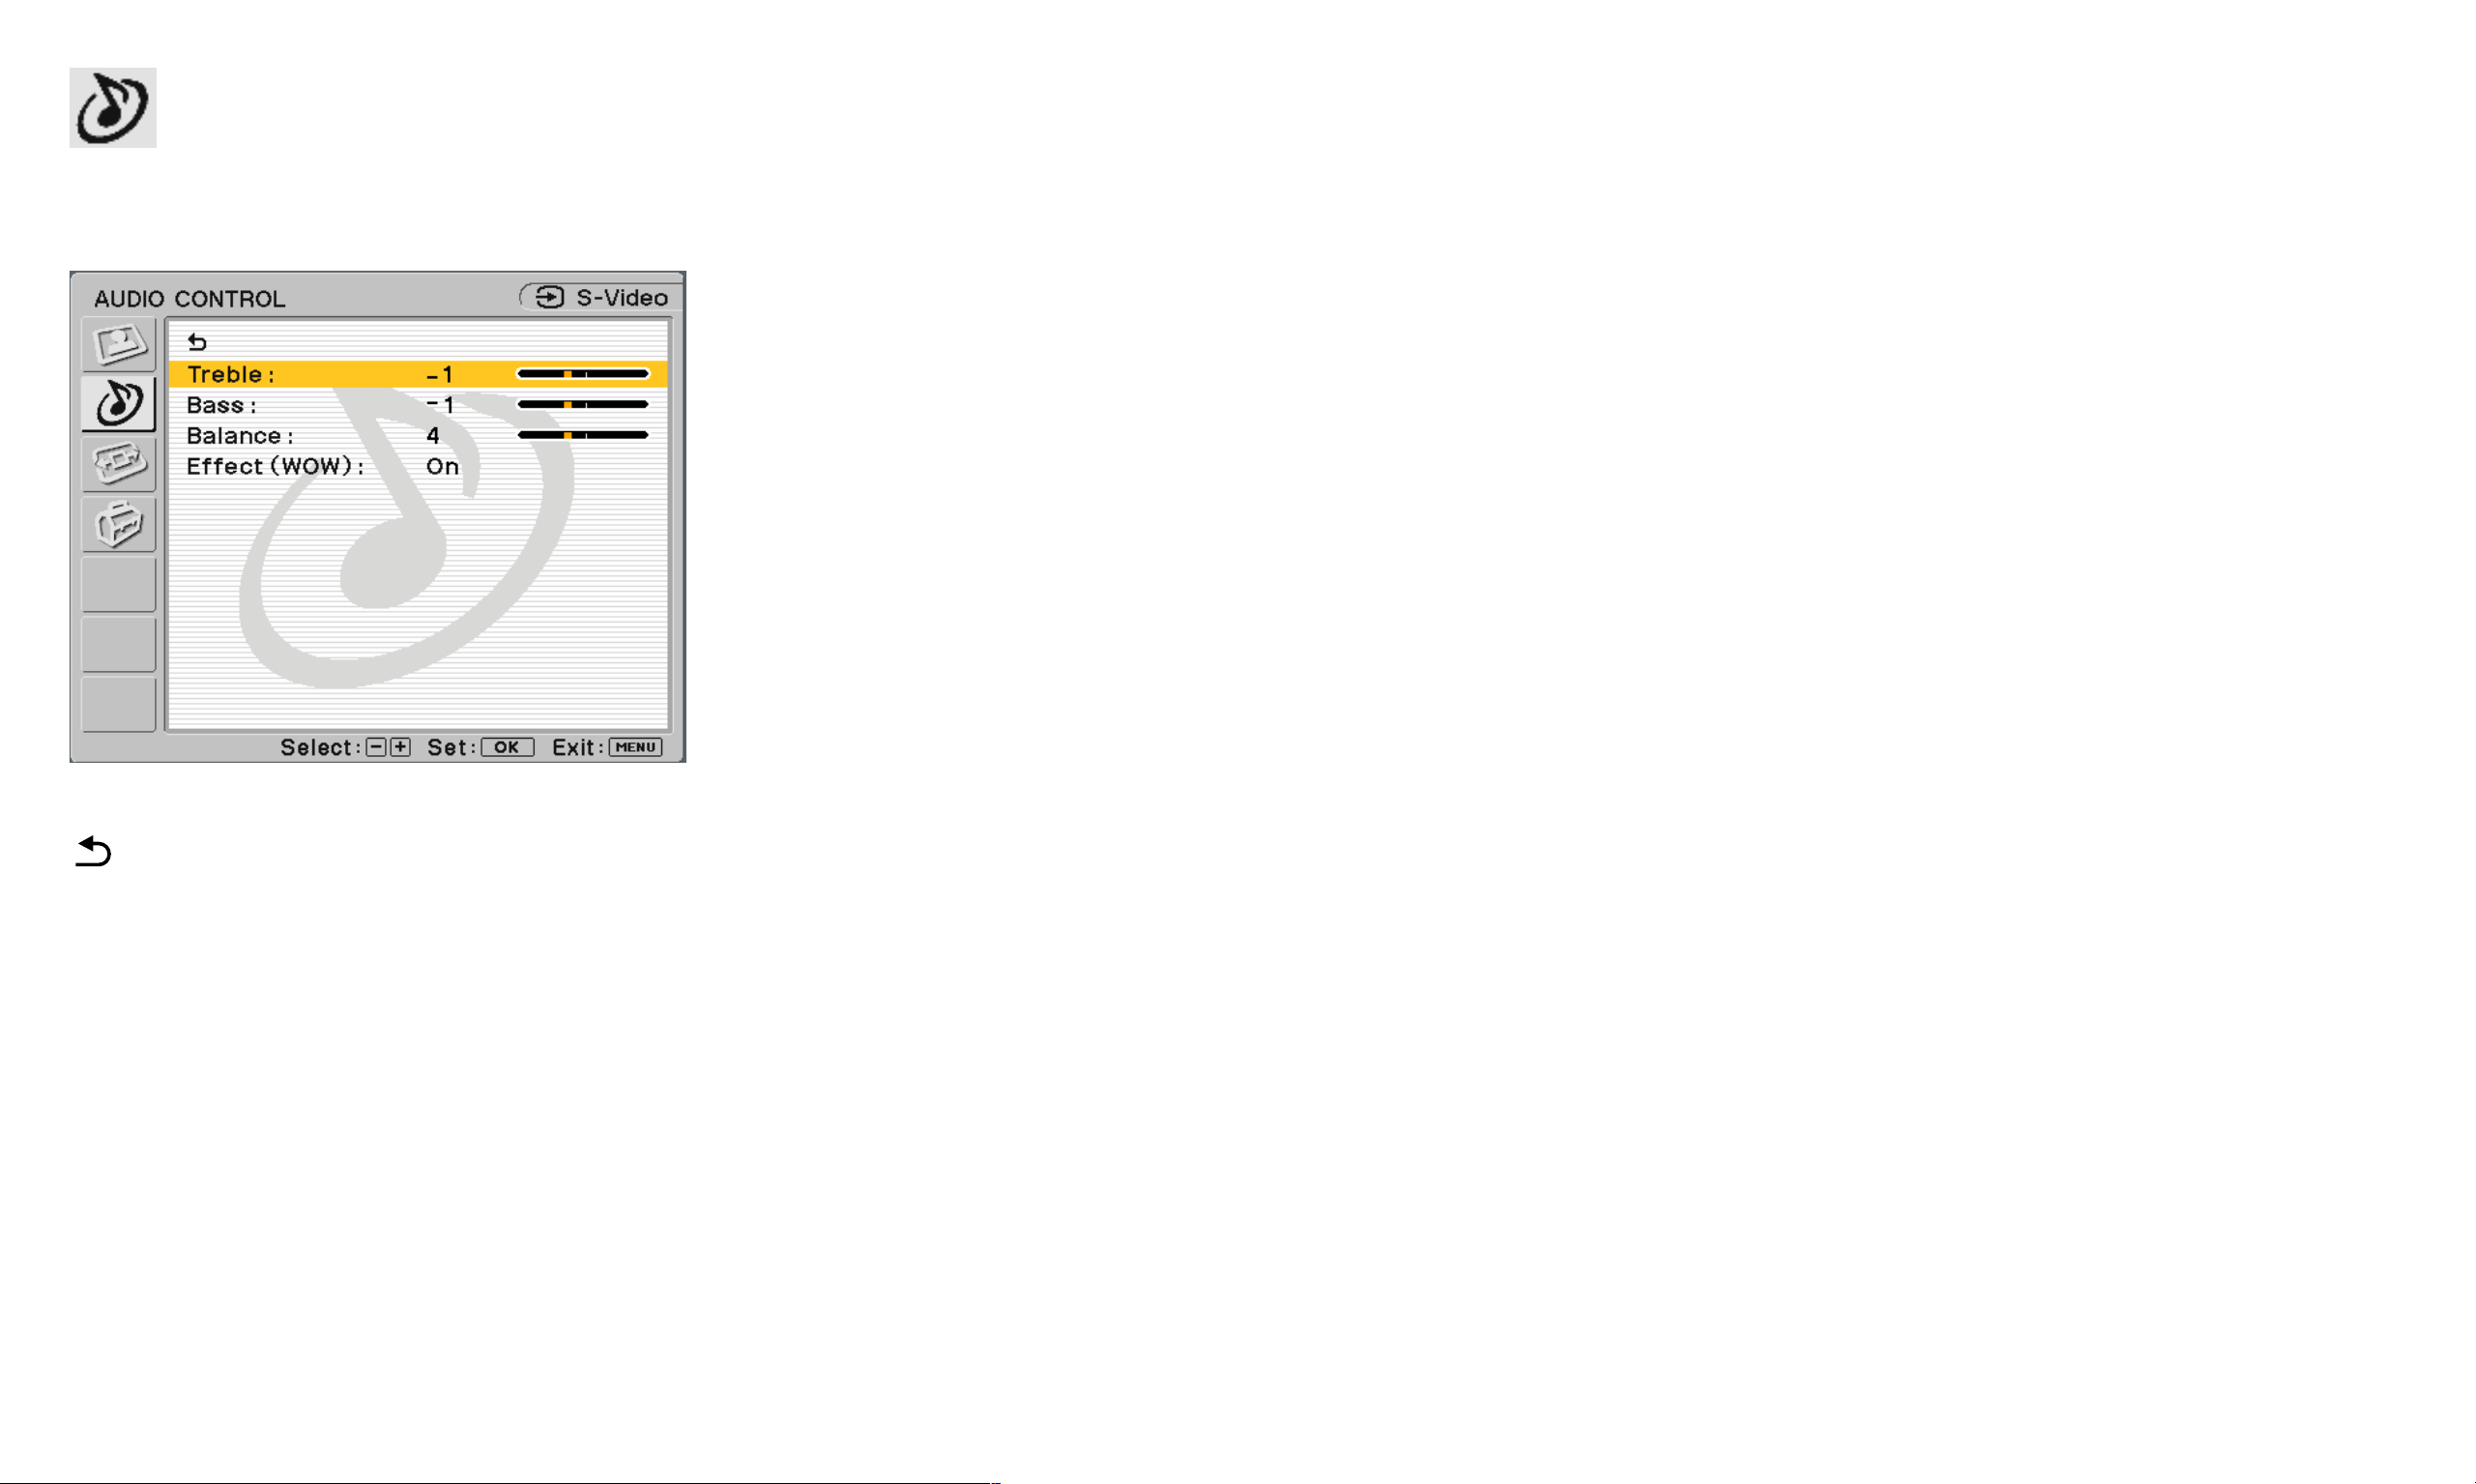
AUDIO CONTROL options (for Video, S-Video, or Component)
You can enjoy the quality sound for your video viewing as in the PC mode.
Treble: Adjust to decrease or increase
higher-pitched sounds.
Bass: Adjust to decrease or increase
lower-pitched sounds.
Balance: Adjust to emphasize left or right
speaker balance.
Effect (WOW): Select one of the following
Will take you back to the previous menu.
options.
■ On: Select to activate SRS WOW™ audio.
Sound is enriched by processing "spatial
cues" which gives audio a fuller, wider,
and more dynamic performance.
■ Off: Select for normal stereo, mono reception
or non-Internet audio.
- 27 -
Page 29

SCREEN CONTROL options (for Video, S-Video, or Component)
Auto Wide: Select one of the following options
to automatically adjust picture format.
■ On: Select to automatically switch the
different viewing modes of Wide Zoom,
Zoom, Letterbox, Full, and Normal
(described on page 29) when an
appropriate signal is received.
Will take you back to the previous menu.
✍
zAuto Wide will effectively
work when the signal received
has the detective input signs. If
the detective input sign is not
detected, it switches to the
factory default setting or viewing
mode selected by the user from
Wide Mode selections.
■ Off: Select to make picture-viewing format
adjustments manually.
- 28 -
Page 30
Wide Mode: Select one of the following modes
for optimal video viewing Wide Mode.
■ Wide Zoom: Select to view the 4:3 signals fit to
the wide screen.
Original Picture
• Normal 4:3 aspect ratio picture
• DTV 4:3 aspect ratio picture
■ Zoom: Select to view wide screen creation
programs.
Original Picture
• Letterbox movie of a videotape or
a DVD disk
■ Letterbox: Select to view movies with subtitles.
Original Picture
• Letterbox movies with subtitles
outside the picture (2.35:1 aspect
ratio)
Wide Zoom Mode
”Wide Zoom” enlarges the 4:3 picture to
fill the 16:9 screen, keeping the original
image as much as possible. Slight
distortion or stretching of 4:3 signal
images occur.
m
Zoom Mode
”Zoom” enlarges the 4:3 picture
horizontally and vertically to an equal
aspect ratio that fills the 16:9 screen.
The image is expanded proportionally
to fill the screen horizontally while
leaving some black band at the top
and bottom. Useful for watching
m
m
Letterbox Mode
”Letterbox” enlarges the picture
horizontally and vertically to an equal
aspect ratio that fills the screen, while
the subtitle area is compressed to fit the
screen.
letterbox movies.
- 29 -
Page 31

■ Full: Same effect is obtained as in the PC Wide
■ Normal: Select to view the images as signals
V Center: Select to adjust the vertical centering
mode.
Original
Picture
• 4:3 squeezed video camera or DVD
picture
• DTV 16:9 aspect ratio picture
m
are received.
Ordinary 4:3 signals in normal viewing
of the picture so that the image on the screen
will be centered between the top and the
bottom of the frame.
Full Mode
Any movies designed for aspect ratio of
16:9 or movies with subtitles and also
signals from DVD and video cameras
”Full” stretches the 4:3 picture
horizontally only, to fill the 16:9 screen.
Some DVD titles and images from video
cameras in normal viewing
- 30 -
Page 32

SETUP options (for Video, S-Video or Component)
Language:
language to display in English, Spanish, or French.
Factory setting is English.
Select to change the on-screen
Menu Color: Select to change the menu color to
meet with your viewing environment.
White menu color
Reset: Enables adjustments to be reset to factory
defaults.
■ OK: Select to reset all of the adjustment
data to the factory setting.
■ Cancel: Select to cancel resetting and return to
the menu screen.
Will take you back to the previous menu.
Black menu color
- 31 -
Page 33

Technical Features
Power save function
This display meets the Power Save guidelines set
by VESA, E
is connected to a computer or video graphics
board that is DPMS (Display Power Management
Signaling) compliant, the display will
automatically reduce power consumption as
shown.
Normal Operation 49 W (max.) Green
Active Off * 3 W (max.)
NERGY STAR, and NUTEK. If the display
Power
Mode
Power
Consumption
< 2 W (typ.)
Power
indicator
Amber
Preset and user modes
When the display receives an input signal, it
automatically matches the signal to one of the
factory preset modes stored in the display’s
memory to provide a high quality picture at the
center of the screen. (See appendix on pages 41
and 42 for a list of the factory preset modes.)
For input signals that do not match one of the
factory preset modes, the automatic picture
quality adjustment function of this display
automatically adjusts the picture position, phase,
and pitch to ensure that a clear picture appears
on the screen for any timing within the display’s
clock speed range.
In all modes mentioned previously, if the picture
is adjusted, the adjustment data is stored as a
user mode and automatically recalled whenever
the same input signal is received.
Remote Off 3 W (max.)
< 2 W (typ.)
Power Off 3 W (max.)
< 1 W (typ.)
* When your computer enters “Active Off” Power Mode, the
picture disappears from the screen and “No Input Signal”
appears. After 5 seconds, the display enters power save mode.
Red
Off
Horizontal frequency 28 - 70 kHz
Vertical frequency 48 - 85 Hz
Resolution 1280 x 768/60 Hz or less
Pixel clock 94.5 MHz max.
Consequently, the first time the display receives
input signals that do not match one of the
factory preset modes, the display may take a
longer time than normal to display the picture on
the screen. This adjustment data is automatically
stored in memory so that next time, the display
will function in the same way as when the
display receives the signals that match one of the
factory preset modes.
- 32 -
Page 34

Controlling the volume
Using the headphones
Using the display’s speakers or headphones, you
POWER
MENU
DK
WIDE
INPUT
can listen to sound from your computer or other
audio equipment connected to the display’s
audio input jacks.
You can control the volume by using + /- buttons
located at the right side of the display or on the
remote card. When either button is pressed
volume status will appear on your display screen.
By connecting your headphones to the display’s
headphone jack, you can listen to sound from
your computer or other audio equipment
connected to the display’s audio input jacks.
Be sure to remove the headphones before
moving away from the display. If the headphone
cord is pulled away from the display abruptly,
injury or damage may occur.
1 Press the +/- buttons to display volume
status.
2 Press the +/- buttons to control the
volume.
✍
the screen, use the +/- Volume buttons on
zWhile displaying the main menu on
The volume status will automatically disappear
after about 3 seconds.
Use the MUTE button to mute the sound. Press
MUTE again or + Volume button on the remote
card to restore the sound.
the remote card to adjust the volume. The
+/- Volume buttons on the side of the
display become selection buttons when the
main menu is displayed.
When your display is in power save mode (in
PC mode), no sound comes from the
speakers or the headphones.
- 33 -
Page 35

Troubleshooting
Before contacting technical support, refer to this section.
PC on-screen messages
If there is something wrong with the PC input
signal, one of the following messages appears
on the screen. See pages 35 to 38 for possible
remedies.
If “Not Supported Signal” appears
This indicates that the input signal is not
supported by the display’s specification. Set the
resolution and refresh rate of the computer’s
graphics board as indicated in the message. Also
check to see cables are connected to the
appropriate input connectors.
If “No Input Signal” appears
This indicates that no signal is being input via the
connected computer. Check to see if a cable is
connected to this input signal. Also check if the
computer is in Power Save mode by pressing any
key on the keyboard or by moving the mouse.
The ”No Input Signal” message will disappear
after 5 seconds and enter Power Save mode.
Trouble symptoms and remedies
If a problem occurs as a result of a
connected computer or other equipment,
refer to the connected computer/
equipment’s instruction manual.
Use the self-diagnosis function (page 39)
if these recommendations do not resolve
the problem.
If “Cable Disconnected” appears
This indicates that the cable has been
disconnected from the connector. Check to see
cables are securely connected to the appropriate
connector. The “Cable Disconnected” message
will disappear after 5 seconds and enter Power
Save mode.
- 34 -
Page 36

Symptom Check these items
No picture
If the Power LED indicator is not
lit, or if the Power LED indicator
will not light up when the Power
button is pressed
The Power LED indicator
turns on red
If the Power LED indicator
is green, or flashing amber
If “Cable Disconnected” appears
on the screen
■ Check that the power cord and AC adapter are properly connected.
■ Press the display power button once.
■ The display is in remote off mode. Try pressing the power button of the display twice or remote card once.
■ Use the self-diagnosis function (page 39).
■ Check that the video signal cable is properly connected and all plugs are firmly seated in their sockets (pages 6, 10, and 12).
■ Check that the video input connector’s pins are not bent or pushed in.
■ Check that the input select setting is correct (pages 5, 6, and 12).
■ A non-supplied video signal cable is connected. If you connect a non-supplied video signal cable, “Cable Disconnected” may appear on the
screen before entering the power save mode. This is not a malfunction.
If “No Input Signal” appears on
the screen, or the Power LED
indicator is either amber or
alternating between green and
amber
Problem caused by a
connected computer or other
equipment, and not caused
by the display
■ Check that the video signal cable is properly connected and all plugs are firmly seated in their sockets (pages 6, 10, and 12).
■ Check that the video input connector’s pins are not bent or pushed in.
■ Check that the input select setting is correct (pages 5, 6, and 12).
The computer is in power saving mode. Try pressing any key on the keyboard or moving the mouse.
■
■ Check that your graphics board is attached to the computer properly.
■ Check that the computer or other equipment are powered “on.”
- 35 -
Page 37

Symptom Check these items
If “Not Supported Signal”
appears on the screen (page 34)
Problem caused by a
connected computer or other
equipment, and not caused by
the display
If using Windows ■ If you replaced an old display with this display , r econnect the old display and do the following. Select “SONY” from the “Manufacturers” list and
If using a Macintosh system ■ When connecting a Macintosh computer, use an adapter (not supplied) if necessary. Connect the adapter to the computer before connecting
Picture flickers, bounces,
oscillates, or is scrambled
■ Check that the video resolution and refr esh rate is within that specified for the display. If you replaced an old display with this display, reconnect
the old display and then set the computer’s graphics board to the following resolution and refresh rate.
1280 x 768 / 60 Hz
1024 x 768 / 60 Hz
select “SDM-V72W” from the “Models” list in the Windows device selection screen. If it does not appear in the list, try “Plug & Play” or install
the information file for this display using the Windows Monitor Information Disk.
the video signal cable.
■ Adjust the pitch and phase (analog RGB signal only) (page 23).
■ Isolate and eliminate any potential sources of electric or magnetic fields such as other monitors, laser printers, electric fans, fluorescent lighting,
Problem caused by a connected
computer or other equipment, and
not caused by the display
Picture is fuzzy
Problem caused by a connected
or televisions.
■ Move the display away from power lines or place a magnetic shield near the display.
■ Try plugging the display into a different AC outlet, preferably on a different circuit.
■ Change the orientation of the display.
■ Check your graphics board manual for the proper monitor setting.
■ Confirm that the graphics mode (VESA, Macintosh 19'' Color, etc.) and the frequency of the input signal are supported by this display. Even if
the frequency is within the proper range, some graphics boards may have a sync pulse that is too narrow for the display to sync correctly.
■ Adjust the computer’s refresh rate (vertical frequency) to obtain the best possible picture (60 Hz is recommended).
■ Adjust the brightness and contrast (page 20 and 26).
■ Adjust the pitch and phase (analog RGB signal only) (page 23).
computer or other equipment, and
not caused by the display
■ Set the resolution and refresh rate to 1280 x 768 / 60 Hz or 1024 x 768 / 60 Hz on your computer.
- 36 -
Page 38

Symptom Check these items
Picture is ghosting
Picture is not centered or sized
properly
Picture is too small
Problem caused by a connected
computer or other equipment, and
not caused by the display
Picture is dark
■ Eliminate the use of video cable extensions and/or video switch boxes.
■ Check that all plugs are firmly seated in their sockets.
■ Adjust the pitch and phase (analog RGB signal only) (page 23).
■ Adjust the picture position (analog RGB signal only) (page 23).
Note that some video modes do not fill the screen to the edges.
■ Set the zoom setting to Full (pages 22 and 30).
■ Set the resolution to the screen resolution.
■ Adjust the brightness (pages 20 and 26).
■ Adjust the backlight (pages 20 and 26).
Wavy or elliptical pattern (moire)
is visible
Color is not uniform
White does not look white
The display turns off after a
while
■ Adjust the pitch and phase (analog RGB signal only) (page 23).
■ Adjust the pitch and phase (analog RGB signal only) (page 23).
■ Adjust the color temperature (pages 20 and 26).
■ Try pressing a key on the keyboard to exit from Power Save mode.
- 37 -
Page 39

Troubleshooting - cont.
Displaying this display’s name, serial number, and date
of manufacturer
While the display is receiving a video signal, press
and hold the MENU button for more than five
seconds. The display’s information box appears.
Press the MENU button again to make the box
disappear.
Example
MENU
If any problem persists, call your authorized Sony
dealer and give the following information:
■ Model name
■ Serial number
■ Name and specifications of your computer and
graphics board
■ Type of input signal (analog RGB)
- 38 -
Page 40

Self-diagnosis function
This display is equipped with a self-diagnosis
function. If there is a problem with your display
or computer(s), the screen will go blank and the
Power LED indicator will either light up green or
flash amber. If the Power LED indicator is lit in
amber, the computer is in power saving mode.
Try pressing any key on the keyboard or moving
the mouse.
If the picture disappears from the
screen and the Power LED indicator is
green
1 T urn off the Power button and disconnect
the video signal cables from the display.
If the picture disappears from the
screen and the Power LED indicator is
flashing amber
Press the Power button twice to turn the display
off and then on.
If the Power LED indicator lights up green, the
display is working properly.
If the Power LED indicator is still flashing, there is
a potential display failure. Count the number of
seconds between amber flashes of the Power
LED indicator and inform your authorized Sony
dealer of the display’s condition. Be sure to note
the model name and serial number of your
display. Also note the make and model of your
If you have any questions after reading this
manual, please visit our website or click here
www.sony.com/displays/support for Sony
Technical Support.
2 Turn the display on by pressing the Power
button.
If all four color bars appear (white, red, green,
blue), the display is working properly. Reconnect
the video input cables and check to see if the
condition persists; if so you may have a computer
problem.
If the color bars do not appear, there is a
potential display failure. Inform your authorized
Sony dealer of the display’s condition.
computer and graphics board.
If the Power LED indicator lights up in
amber
Try pressing any key on the keyboard or moving
the mouse.
The display’s Power Save mode is awakened and
the Power LED indicator lights up in green, and
the picture appears on the screen.
- 39 -
Page 41

Specifications
LCD panel
Display Resolution
Input signal
format
PC Input signal
levels
Component
Video IN 2/RGB IN
Panel type: a-Si TFT Active Matrix
Display size: 17.1 inch (diagonally)
Horizontal: Max. 1280 dot
Vertical: Max. 768 lines
RGB operating frequency*
Horizontal: 28-70 kHz
Vertical: 48-85 Hz
Pixel clock: 94.5 MHz max.
Analog RGB video signal:
0.7 Vp-p, 75
SYNC signal:
TTL level, 2.2k
negative
(Separate horizontal and vertical,
or composite sync)
0.3 Vp-p, 75
(Sync on green)
Y: 1 Vp-p, 75 Ω, 0.3 V
negative sync
Pb: 0.7 Vp-p, 75
Pr: 0.7 Vp-p, 75 Ω
Ω, positive
Ω, positive or
Ω, negative
Ω
Audio Inputs
Power Requirements
Power Consumption
Operating
Temperature
Display dimensions
(w x h x d)
Mass
500 mVrms (100% modulation)
Impedance 47k
Monitor:
16.5 V 3.0 A
Adapter:
Input: 100–240 V~, 50/60 Hz, 1.5 A
Output: 16.5 V 3.03 A
Max. 49 W
(including AC adapter)
5 –35 C°
Upright with stand:
Approx. 472 x 405 x 184 mm
(18.6 x 15.9 x 7.2 inches)
Upright without stand:
Approx. 472 x 348 x 70 mm
(18.6 x 13.7 x 2.8 inches)
With stand:
Approx. 5.9 kg (13 lbs)
Ω
■ Horizontal sync width duty should be more
than 4.8% of total horizontal time or 0.8µs,
whichever is larger.
■ Horizontal blanking width should be more than
2.5µsec.
■ Vertical blanking width should be more than
450µsec.
■ Maximum video pixel clock should be less than
94.5 MHz.
Design and specifications are subject to change
without notice.
Video IN
Audio Output
S-Video In (4-pin mini DIN):
Y: 1 Vp-p, 75
negative
C: 0.286 Vp-p, 75
Composite Video (pin jack):
1 Vp-p 75
sync negative
Speaker output: 3W x 2
Headphone jack: Stereo minijack
Impedance 16-48
Ω unbalanced, sync
Ω
Ω unbalanced,
Ω acceptable
Without stand:
Approx. 5.1 kg (11.2 lbs)
Plug & Play
DDC2B
Accessories See page 8
*Recommended horizontal and vertical timing condition
- 40 -
Page 42

Appendix A
Preset PC mode timing table
No Resolution
(dots x lines)
Horizontal
Frequency
Vertical
Frequency
Graphics
Mode
1 640 x 480 31.5 kHz 60 Hz VGA-G
2 640 x 480 37.5 kHz 75 Hz VESA
3 640 x 480 43.3 kHz 85 Hz VESA
4 720 x 400 31.5 kHz 70 Hz VGA-Text
5 800 x 600 37.9 kHz 60 Hz SVGA
6 800 x 600 46.9 kHz 75 Hz VESA
7 800 x 600 53.7 kHz 85 Hz VESA
8 848 x 480 29.8 kHz 60 Hz VESA-CVT
9 848 x 480 37.6 kHz 75 Hz VESA-CVT
10 848 x 480 42.8 kHz 85 Hz VESA-CVT
11 1024 x 768 48.4 kHz 60 Hz XGA
12 1024 x 768 60.0 kHz 75 Hz VESA
13 1024 x 768 68.7 kHz 85 Hz VESA
14 1280 x 768 47.7 kHz 60 Hz WXGA
- 41 -
Page 43

Appendix B
Video mode timing table
Video Mode Aspect Timing Scan Type Standard Interface
NTSC 4:3 15.73Khz/30Hz Interlaced SMPTE 170M Composite/S-Video
720 x 480i 4:3/16:9 15.73Khz/30Hz Interlaced EIA-770.2-C Component (Y, Pb, Pr)
720 x 480p 4:3/16:9 31.47Khz/60Hz Progressive EIA-770.2-C Component (Y, Pb, Pr)
1280 x 720p 16:9 45.00Khz/60Hz Progressive EIA-770.3-C Component (Y, Pb, Pr)
1920 x 1080i 16:9 33.75Khz/30Hz Interlaced EIA-770.3-C Component (Y, Pb, Pr)
- 42 -
Page 44

Registro del propietario
Los números de modelo y de serie se encuentran en la
parte posterior de la unidad. Anote estos números en
los espacios siguientes. Cítelos cada vez que se
comunique con su concesionario para algún asunto
relacionado con este producto.
Núm. de modelo _________________________
Núm. de serie ____________________________
ADVERTENCIA
Par a evitar el riesgo de incendio o el peligro de
descarga eléctrica, no exponga la unidad a la
lluvia o humedad.
En el interior del aparato hay voltajes
peligrosamente altos. No abra el alojamiento.
Únicamente personal calificado debe brindar
Notificación de la FCC
Este aparato ha sido debidamente probado,
comprobándose que cumple con los límites impuestos a
dispositivos digitales Clase B de acuerdo con la Sección
15 de las normas de la Comisión Federal de
Comunicaciones (FCC) de EE.UU. Estos límites se
establecieron para ofrecer protección razonable contra
interferencias perjudiciales en las instalaciones
residenciales. Este aparato genera, usa y puede emitir
energía de frecuencia radioeléctrica. De no instalarse y
utilizarse de acuerdo con las instrucciones
correspondientes, podría producir interferencias
perjudiciales en las radiocomunicaciones. No obstante,
no puede garantizarse que no se produzcan estas
interferencias en una instalación determinada. Si este
aparato llega a interferir en la recepción de radio o
televisión, lo que podrá comprobarse encendiendo y
apagando el aparato, se recomienda al usuario tratar de
corregir la interferencia mediante una o más de las
siguientes medidas:
El número siguiente se usa únicamente para asuntos
relacionados con la FCC.
Declaración de cumplimiento
Razón social: SONY
Núm. de modelo: SDM-V72W
Parte responsable: Sony Electronics Inc.
Dirección: 680 Kinderkamack Road,
Oradell, NJ 07649 USA
Núm. telefónico: 201-930-6972
Este aparato cumple con lo establecido en la Parte 15
de las normas de la FCC. Su funcionamiento está
sujeto a las dos condiciones siguientes: (1) No se
permite que este aparato cause interferencia perjudicial
y (2) este aparato debe aceptar toda interferencia que
reciba, incluida la que pueda ocasionar su mal
funcionamiento.
servicio a esta unidad.
IMPORTANTE
Para prevenir cualquier mal funcionamiento y evitar
daños, por favor, lea detalladamente este manual de
instrucciones antes de conectar y operar este equipo.
As an ENERGY STAR Partner,
Sony has determined that this
product or product models meets
NERGY STAR guidelines
the E
for energy efficiency.
ENERGY STAR is a U.S. registered mark.
®
®
®
■ Reoriente o cambie de lugar las antenas receptoras.
■ Aumente la distancia que separa este aparato del
receptor afectado.
■ Enchufe el aparato en un tomacorriente de un
circuito distinto al que esté enchufado el receptor
afectado.
■ Consulte a un distribuidor o solicite los servicios de un
técnico capacitado en radio y televisión.
Se le informa que cualquier cambio o modificación
que no se detalla expresamente en el presente
manual podría invalidar su autorización para emplear
este aparato.
Si tiene preguntas acerca de su producto o para
encontrar el Centro de Servicios de Información al
Cliente de Sony más cercano, llame al:
1-800-222-SONY (7669)
DISTRIBUIDOR O IMPORTADOR:
Sony Electronicos de Mexico, S.A. de C.V.
Henry Ford No. 29
Fraccionamiento Industrial San Nicolas
Tlalnepantla, Estado de Mexico C.P. 54030
Tel (55) 3-21-10-00, RFC SEM-941001-BJA
FABRICANTE:
Sony EMCS Corporation Ichinomiya TEC
6 Aza Ikejiri, Ohaza Takada,
Ichinomiya-shi, Aichi-ken 491-0192, Japan
- 1 -
Page 45

Contenido
■ Macintosh es una marca
comercial cuya licencia
pertenece a Apple Computer,
Inc., registrada en Estados
Unidos y otros países.
■ Windows
®
es una marca
comercial registrada de
Microsoft Corporation en
Estados Unidos y otros países.
■ IBM PC/AT y VGA son marcas
comerciales registradas de
IBM Corporation en Estados
Unidos.
■ VESA y DDC
TM
son marcas
comerciales de Video
Electronics Standards
Association.
■ ENERGY STAR es una marca
registrada en EE.UU.
■ Todos los demás nombres de
productos mencionados aquí
pueden ser marcas
comerciales o marcas
comerciales registradas de
sus respectivas compañías.
■ es una marca
comercial de SRS Labs, Inc. La
tecnología SRS WOW queda
incorporada en virtud de la
licencia otorgada por SRS
Labs, Inc.
■ Además, en este manual “
®
” no se incluyen en cada
y “
TM
”
caso.
Precauciones- - - - - - - - - - - - - - - - - - - - - - - - - - 3
Identificación de las piezas y los controles- - - - - - - - - - -5
Instalación - - - - - - - - - - - - - - - - - - 8
Instalacón 1: Activación y cambio de la pila de la tarjeta de
control remoto- - - - - - - - - - - - - - - - - - - - - - - - - 9
Instalación 2: Conexión del monitor a la computadora - - - - 10
Instalación 3: Conexión del cable de audio - - - - - - - - - 11
Instalación 4: Conexión de los cables de video- - - - - - - - 12
Instalación 5: Conexión del adaptador de ca- - - - - - - - - 13
Instalación 6: Organización de los cables y colocación del
panel posterior - - - - - - - - - - - - - - - - - - - - - - - 14
Instalación 7: Conexión del cable de alimentación- - - - - - 15
Instalación 8: Encendido del monitor, la computadora u
otro equipo - - - - - - - - - - - - - - - - - - - - - - - - - 16
Instalación 9: Ajuste de la inclinación - - - - - - - - - - - - 17
Uso de la tarjeta de control remoto- - - - 18
Personalización de la pantalla- - - - - - - 19
Navegación por los menús para uso con la computadora - - 19
Opciones de CONTROL DE LA IMAGEN
para uso con la computadora - - - - - - - - - - - - - - - - 20
Opciones de CONTROL DE AUDIO
para uso con la computadora - - - - - - - - - - - - - - - - 21
Opciones de CONTROL DE PANTALLA
para uso con la computadora - - - - - - - - - - - - - - - - 22
Opciones de AJUSTES para uso con la computadora- - - - - 24
Navegación por los menús Video - - - - - - - - - - - - - - 25
Opciones de CONTROL DE LA IMAGEN
(de Video, S-Video o Componente) - - - - - - - - - - - - - 26
Opciones de CONTROL DE AUDIO
(de Video, S-Video o Componente) - - - - - - - - - - - - - 27
Opciones de CONTROLES DE PANTALLA
(de Video, S-Video o Componente) - - - - - - - - - - - - - 28
Opciones de CONFIGURACIÓN
(de Video, S-Video o Componente) - - - - - - - - - - - - - 31
Características técnicas - - - - - - - - - - 32
Función de ahorro de energía- - - - - - - - - - - - - - - - 32
Modos preestablecidos y del usuario - - - - - - - - - - - - 32
Control del volumen - - - - - - - - - - - - - - - - - - - - 33
Uso de los auriculares - - - - - - - - - - - - - - - - - - - - 33
Solución de problemas - - - - - - - - - - 34
Mensajes en pantalla para la computadora - - - - - - - - - 34
Función de autodiagnóstico- - - - - - - - - - - - - - - - - 39
Especificaciones - - - - - - - - - - - - - - 40
Apéndice A- - - - - - - - - - - - - - - - - 41
Apéndice B - - - - - - - - - - - - - - - - - 42
- 2 -
Page 46

Precauciones
Advertencia sobre las conexiones
de energía
Use el cable de alimentación de energía
suministrado. Si utiliza otro cable, asegúrese de
que sea compatible con el suministro local de
energía.
Si no utiliza el cable apropiado, este monitor no
cumplirá con las normas obligatorias
establecidas por la FCC.
para corriente alterna de
100 a 120 V
Utilice únicamente el adaptador de corriente alterna
modelo AC-DP001 de Sony
para corriente alterna de
200 a 240 V
Instalación
No instale ni coloque el monitor:
■ En lugares sujetos a temperaturas extremas,
por ejemplo, cerca de radiadores, ventilas de
calefacción o bajo la luz directa del sol. Si se
somete el monitor a altas temperaturas, por
ejemplo, dentro de un automóvil estacionado
bajo los rayos del sol, podría ocasionar la
deformación del alojamiento o el mal
funcionamiento de la unidad.
■ En lugares donde el monitor pudiera ladearse
y caerse, como aquéllos sujetos a vibraciones o
impactos, o los de superficies inestables.
■ Cerca de equipo que genere un campo
magnético fuerte, como un televisor u otros
aparatos electrodomésticos.
■ En lugares sujetos a cantidades excesivas de
polvo, suciedad o arena, por ejemplo, cerca de
una ventana abierta o una salida a exteriores.
Al instalar el monitor temporalmente en
Cuidado de la pantalla de cristal
líquido
■ No sitúe la pantalla de cristal líquido (LCD) de
cara al sol, ya que podría dañarse. Preste
atención a esto cuando coloque el monitor
cerca de una ventana.
■ No empuje ni raye la pantalla de cristal
líquido. No coloque objetos pesados sobre el
monitor, ya que la pantalla podría deformarse
o podrían producirse fallas en el panel de
cristal líquido.
■ Si el monitor se utiliza en un lugar frío, podría
aparecer una imagen residual en la pantalla.
Esto no significa que el monitor esté
funcionando incorrectamente. La pantalla
regresará a su estado normal cuando la
temperatura se eleve al nivel de
funcionamiento normal.
■ Si en la pantalla se visualizara una imagen fija
El equipo debe instalarse cerca de un
tomacorriente de fácil acceso.
exteriores, asegúrese de tomar las
precauciones adecuadas contra el polvo y la
suciedad que hay en el aire. De lo contrario,
podrían presentarse fallas irreparables.
■ En lugares en que el monitor pueda entrar en
contacto con humedad extrema o líquidos,
como en el baño o cerca de una piscina. Evite
colocar vasos o tazas sobre el monitor, ya que
esto podría causar que se introdujeran líquidos
al interior del monitor.
- 3 -
por un período prolongado, podría generarse
una imagen residual en la misma. Esta imagen
residual desaparecerá con el tiempo.
■ Durante el funcionamiento, la temperatura
del panel de pantalla de cristal líquido se
eleva. Esto no significa que el monitor esté
funcionando incorrectamente.
Page 47

Acerca de las bocinas
Mantenimiento
Traslado
estereofónicas integradas
Asegúrese de mantener los discos flexibles, las
cintas y el equipo magnético de grabación
alejados de las aberturas de bocina, ya que
éstas generan un campo magnético. Este
campo magnético puede afectar los datos
almacenados en discos y cintas magnéticas.
Manejo de los auriculares
Asegúrese de retirarse los auriculares antes de
alejarse del monitor. Si el cable se jala
bruscamente del monitor podría causar lesiones
o daños.
Nota sobre la pantalla de cristal
líquido (LCD)
Se hace notar que la pantalla de cristal líquido
se elaboró con tecnología de alta precisión. Sin
embargo, en la pantalla podrían aparecer
constantemente puntos negros o puntos
brillantes de luz (rojos, azules o verdes), así
■ Asegúrese de desconectar el cable de
alimentación del tomacorriente de energía
antes de limpiar el monitor.
■ Limpie la pantalla de cristal líquido con un
paño suave. Si usa un limpiador de cristales
líquido, use uno que no contenga una solución
contra estática ni un aditivo similar, ya que
ésta podía rayar el recubrimiento de la
pantalla de cristal líquido.
■ Limpie el alojamiento, el panel y los controles
primero con un paño suave ligeramente
humedecido en una solución de detergente
suave y después séquelos con un paño suave.
No use ningún tipo limpiador en polvo,
esponja abrasiva, ni solvente, como alcohol o
bencina.
■ No frote, toque ni dé golpes sobre la superficie
de la pantalla con objetos filosos o abrasivos
como bolígrafos o destornilladores, ya que
hacerlo podría rayar la pantalla de cristal
líquido.
■ Se hace notar que si la pantalla se expone a
solventes volátiles, como insecticidas, o si se
■ Al trasladar el monitor, desconecte todos los
cables y tómelo firmemente y con ambas
manos de las secciones de apoyo y de su base.
Si el monitor se le cae, puede dañarse o
causarle lesiones.
■ El panel posterior del monitor está diseñado
para que pueda retirarse, de manera que no lo
levante tomándolo sólo del panel posterior.
■ Cuando traslade este monitor para su
reparación o envío, use el embalamiento y los
materiales de empaque originales.
Desecho del monitor
■ No deseche este monitor junto con la basura
general del hogar.
■ La pantalla de cristal líquido contiene una
pequeña cantidad de cristal líquido y
mercurio. El tubo fluorescente de esta pantalla
también contiene mercurio. Cumpla con lo
establecido en las ordenanzas y los
reglamentos locales para su desecho.
como barras de colores irregulares o áreas
brillantes. Esto no significa que el monitor esté
funcionando incorrectamente.
(Puntos efectivos: más de 99,99%)
mantiene en contacto prolongado con
materiales de caucho o vinilo, el material
podría deteriorarse o el recubrimiento de la
pantalla de cristal líquido podría degradarse.
- 4 -
Page 48

Identificación de las piezas y los controles
Para obtener más detalles, consulte las páginas
indicadas entre paréntesis.
Vista frontal del monitor
POWER
1
MENU
3
4
2
q;
OK
5
WIDE
6
8
INPUT
7
1 Botón POWER (Encendido/Apagado)
(página 16)
Este botón enciende el monitor. Para
apagarlo, vuelva a presionarlo.
2 Luz de alimentación (página 16)
Esta luz indica si el monitor está encendido/
apagado y el estado de ahorro de energía y
del apagado a distancia.
3 Botón MENU (Menú) (páginas 19 y 25)
Este botón enciende y apaga la pantalla de
menús.
4 Botones +/- (páginas 19, 25 y 33)
Estos botones se utilizan para seleccionar las
opciones de menú y para hacer ajustes, así
como para controlar el volumen cuando la
pantalla de menús no está activa.
5 Botón OK (Aceptar) (páginas 19 y 25)
7 Botón INPUT (Entrada) (páginas 19 y 25)
Este botón alterna la unidad entre las
fuentes de entrada conectadas, incluida la
entrada de computadora, entrada de Video
compuesto, entrada de S-Video y entrada de
Video componente Y/Pb/Pr.
8 Bocinas estereofónicas (página 33)
Estas bocinas emiten las señales de audio.
9 Conector de auriculares (página 33)
Este conector emite las señales de audio a
los auriculares.
q; Ventana del sensor de señales infrarrojas
(receptor de señales infrarrojas) de la
tarjeta de control remoto
Esta ventana detecta las señales de la tarjeta
de control remoto.
9
Vista lateral del monitor
Este botón activa la opción de menú
POWER
MENU
DK
WIDE
INPUT
seleccionada y habilita los ajustes utilizando
los botones +/-
6 Botón WIDE (Panorámico) (páginas 22 y 29)
4.
Este botón alterna la unidad entre los distintos
modos de tamaño de pantalla tanto en el
modo de computadora como en el de video.
- 5 -
Page 49

Identificación de las piezas y los controles (continuación)
Vista posterior del monitor
qa
qa Panel posterior (páginas 10 y 14)
Retire este panel para tener acceso a las
conexiones de alimentación y entradas del
monitor.
qs Entrada HD15 para señal proveniente de
la computadora (RGB analógicas)
Este conector introduce señales de video
RGB analógicas (0,700 Vp-p, positivos) y
señales SYNC.
qd Conector de entrada de audio para señal
proveniente de la computadora (página
11)
Este conector introduce señales de audio al
conectarse al conector de salida de audio de
qg Entrada de S-Video (página 12)
Este conector introduce señales de video al
conectarse al conector de salida de S-Video
de equipo de video para obtener una mejor
calidad de imagen que la ofrecida por el
video compuesto. Es necesario conectar
cables de audio para obtener sonido (el
S-Video porta sólo la señal de video).
qh Entrada de video componente y de audio
(página 12)
Estos conectores introducen señales de
audio y video de alta calidad cuando se
conectan a equipo con salida de
componentes.
PC IN
AUDIO IN
S VIDEOVIDEOR L P
VIDEO IN
R LHD15
Y
B
P
R
DC IN 16.5V
qs qd qf qg qh qj
qk
una computadora u otro equipo de audio.
qf Entrada compuesta (página 12)
Estos conectores introducen señales de
audio/video al conectarse al conector de
salida compuesta de equipo de video.
qj Conector DC IN (entrada de corriente
continua) (página 13)
Este conector suministra corriente continua
de 16,5 voltios al monitor. Conecte el
adaptador de ca (incluido) a este conector.
qk Cubierta de los cables (páginas 10 y 14)
Retire esta cubierta para organizar los cables
conectados al monitor.
- 6 -
Page 50

Identificación de las piezas y los controles (continuación)
Tarjeta de control remoto
ql Botón MUTE (Silenciado) (página 33)
ql w; wa ws
Presione este botón para silenciar el sonido.
wf Botón Video (Entrada de video) (página
12)
wd
wf
wk
wj
wg
wl
wh
Para restaurar el sonido, pr esiónelo de nuevo
o presione el botón + Volume.
w; Botón PICTURE MODE (Modo de imagen)
(página 26)
Presione este botón para alternar entre las
distintas configuraciones del modo de
imagen.
wa Botón WIDE MODE (Modo panorámico)
(páginas 22 y 29)
Presione este botón para alternar entre los
distintos modos de tamaño de pantalla tanto en
el modo de computadora como en el de video.
ws Botón POWER (Encendido/Apagado)
(página 16)
Presione este botón para desplegar la señal
ya se de video compuesto o de S-Video.
wg Botón Component (Video componente
Y/ Pb/ Pr) (página 12)
Presione este botón para desplegar la señal
de entrada de video componente.
wh Botón MENU (Menú) (páginas 19 y 25)
Presione este botón para encender y apagar
el monitor.
wj Botones de flecha (páginas 19 y 25)
Use estos botones para seleccionar las
opciones de menú y para hacer ajustes.
wk Botón OK (Aceptar) (páginas 19 y 25)
Presione este botón para encender el
monitor cuando la luz de encendido/
apagado está iluminada en rojo. Para apagar
el monitor (modo de apagado a distancia),
vuelva a presionar este botón. Para ver el
apagado a distancia, consulte la página 18.
wd Botón PC (Entrada de computadora)
(página 12)
Presione este botón para desplegar la señal
de entrada proveniente de una
computadora.
- 7 -
Presione este botón para activar la opción de
menú y los ajustes que se han seleccionado
utilizando los botones de flecha wj.
wl Botones +/- VOLUME (Volumen) (páginas
19, 25 y 33)
Presione estos botones para controlar el
volumen.
Page 51

Instalación
Antes de utilizar el monitor, verifique que los artículos siguientes estén en la caja de empaque:
■ Monitor con pantalla de cristal líquido
■ Tarjeta de control remoto
■ Cable de alimentación de ca
■ Adaptador de ca (AC-DP001)
■ Cable de señal de video HD15/ D-sub
(RGB analógica)
■ Cable de audio (miniconector estereofónico)
Cable de alimentación de ca
Adaptador de ca
■ Cable de extensión de video compuesto
■ Cable de extensión de S-Video
■ Tarjeta de garantía
■ Guía para la instalación rápida
■ El manual de instrucciones en CD- ROM
✍
zEste monitor puede instalarse en
la pared con una pieza de instalación en
pared estándar VESA. Para obtener
instrucciones y la ménsula de
instalación, por favor consulte a su
Monitor
Cable de se
ñal de video
HD15/D-sub (RGB analógica)
4-062-412-
13
(T1)
P
C
o
m
p
u
t
e
r
D
i
s
p
l
a
y
P
r
o
d
u
c
t
s
LIM
IT
E
D
W
A
R
R
A
N
TY
S
o
n
y
E
l
e
c
t
r
o
n
i
c
s
I
n
c
.
a
n
d
S
o
n
y
o
f
C
a
n
a
d
a
L
t
m
d
.
a
(
t
“
e
S
r
O
i
a
N
l
o
Y
r
”
w
)
w
o
r
a
k
r
m
r
a
a
n
n
t
s
s
h
t
i
h
p
i
s
a
P
s
r
f
o
o
d
l
l
u
o
c
w
t
s
a
:
g
a
i
n
s
t
d
e
f
e
c
t
s
i
1
.
L
t
o
b
e
d
p
a
y
t
h
e
p
a
y
f
o
r
a
2
.
P
AR
f
o
r
d
e
f
e
c
t
p
a
r
t
s
c
o
s
t
.
T
o
o
b
t
a
i
n
w
e
i
t
h
e
r
i
t
s
o
r
i
S
o
n
y
S
e
r
v
i
c
T
h
i
s
w
a
r
r
a
n
t
y
p
r
o
b
l
e
m
s
.
T
h
i
s
w
a
r
r
a
n
t
y
d
a
n
y
o
n
e
o
t
h
e
r
t
h
n
u
m
b
e
r
h
a
s
b
e
e
d
u
e
t
o
a
c
t
s
o
f
G
o
a
n
y
p
a
r
t
o
f
t
h
e
m
a
i
n
t
e
n
a
n
c
e
,
c
o
n
A
S
I
S
o
r
W
I
T
H
A
L
T
h
i
s
w
a
r
r
a
n
t
y
i
s
v
a
p
u
r
c
h
a
s
e
.
P
r
o
o
f
o
f
p
u
r
c
h
a
s
e
i
n
w
i
t
h
i
n
t
h
e
W
a
r
r
a
n
t
y
p
T
h
i
s
w
a
r
r
a
n
t
y
i
s
i
n
v
a
l
i
P
r
o
d
u
c
t
.
R
E
P
A
I
R
O
R
R
E
P
L
A
C
E
M
E
O
F
T
H
E
C
O
N
S
U
M
E
R
.
S
O
D
A
M
A
G
E
S
F
O
R
B
R
E
A
C
H
T
O
T
H
E
E
X
T
E
N
T
P
R
O
M
E
R
C
H
A
N
T
A
B
I
L
I
T
Y
O
R
F
I
D
U
R
A
T
I
O
N
T
O
T
H
E
D
U
R
A
T
S
o
m
e
s
t
a
t
e
s
a
n
d
p
r
o
v
i
n
c
e
s
d
a
m
a
g
e
s
,
o
r
a
l
l
o
w
l
i
m
i
t
a
t
i
o
n
e
x
c
l
u
s
i
o
n
s
m
a
y
n
o
t
a
p
p
l
y
t
o
o
t
h
e
r
r
i
g
h
t
s
w
h
i
c
h
v
a
r
y
f
r
o
m
FOR FREQUENTL
Y CALLED TELEPHONE NUM
n
A
B
O
R
:
F
o
r
a
p
e
r
i
o
d
o
f
t
h
r
e
e
(
3
)
y
e
a
r
s
f
r
o
m
t
h
e
e
d
f
a
e
t
c
e
t
i
o
v
e
f
,
p
S
u
o
r
c
n
h
y
a
w
s
e
i
l
,
l
i
f
r
e
t
h
p
i
a
s
i
r
P
o
r
o
r
d
r
u
e
p
c
t
l
a
i
s
c
e
d
e
t
h
t
e
e
r
m
P
r
i
o
n
d
e
u
d
l
c
a
t
b
w
o
i
r
t
h
c
h
a
a
n
r
g
e
e
w
s
t
o
o
r
a
r
e
n
b
y
u
S
i
l
o
t
n
u
y
n
i
a
t
,
u
a
t
h
t
o
n
r
o
i
z
c
e
h
d
a
s
r
e
g
r
e
v
,
i
o
c
e
r
l
f
l
a
l
c
a
i
b
l
i
o
t
y
r
.
A
c
h
f
t
a
e
r
r
g
t
e
h
s
e
.
W
a
r
r
a
n
t
y
P
e
r
i
o
d
,
y
o
u
m
u
s
t
T
S
:
I
n
a
d
d
i
t
i
o
n
,
S
o
n
y
w
i
l
l
s
u
p
p
l
y
,
a
t
n
o
c
h
a
r
g
e
i
v
,
e
n
e
p
w
a
r
o
t
s
r
f
r
o
e
r
b
u
a
i
l
p
t
e
r
r
e
i
p
o
l
d
a
c
o
e
f
m
t
h
e
r
n
e
t
e
s
(
i
3
n
)
e
y
x
e
c
a
h
r
a
s
n
.
g
A
e
f
t
e
r
t
h
e
w
a
r
r
a
n
t
y
p
e
r
i
o
d
,
y
o
u
m
u
s
t
p
a
y
f
o
r
a
l
l
a
r
r
a
n
t
y
s
e
r
v
i
c
e
,
y
o
u
m
u
s
t
t
a
k
e
t
h
e
P
r
o
d
u
c
t
,
g
o
i
r
n
d
a
e
l
p
l
i
v
a
e
c
k
r
a
t
g
h
i
e
n
g
P
r
o
o
r
d
p
u
a
c
c
t
k
f
a
r
g
e
i
i
g
n
h
g
t
a
p
f
f
r
o
e
r
p
d
a
i
n
i
d
g
,
a
i
n
n
e
q
u
e
a
f
l
a
d
c
e
i
g
l
i
t
r
y
e
.
e
o
f
p
r
o
t
e
c
t
i
o
n
,
t
o
a
n
y
a
u
t
h
o
r
i
z
e
d
d
o
e
s
n
o
t
c
o
v
e
r
c
u
s
t
o
m
e
r
i
n
s
t
r
u
c
t
i
o
n
,
i
n
s
t
a
l
l
a
t
i
o
n
,
s
e
t
u
p
a
d
j
u
s
t
m
e
n
t
s
o
r
s
i
g
n
a
l
r
e
c
e
p
t
i
o
n
o
e
s
n
o
t
c
o
v
e
r
a
n
y
u
n
i
t
s
w
h
i
c
h
h
a
v
e
b
e
e
n
p
r
e
v
a
i
o
n
u
a
s
l
s
y
e
a
r
v
l
t
i
e
c
r
e
e
f
d
a
,
c
r
i
e
l
i
p
t
y
a
a
i
r
u
e
t
d
h
o
o
r
r
i
s
z
e
e
r
d
v
b
i
c
y
e
S
d
o
b
n
y
y
,
o
r
a
u
n
n
i
t
a
o
l
n
t
e
w
r
e
h
d
i
c
o
h
r
t
r
h
e
e
m
f
a
o
c
v
t
e
o
d
r
y
.
-
T
a
h
p
i
p
s
l
w
i
e
a
d
r
s
r
a
e
n
r
i
t
a
y
l
d
o
e
s
n
o
t
d
c
,
o
a
v
c
e
c
r
i
d
c
e
o
n
s
t
m
,
m
e
t
i
i
s
c
u
d
s
a
e
m
,
a
a
b
g
u
e
s
o
e
,
r
n
d
e
a
g
m
l
i
a
g
g
e
e
n
c
e
,
c
o
m
m
P
r
e
o
r
d
c
u
i
a
c
l
t
.
u
s
T
e
h
,
i
s
o
r
w
m
a
o
r
r
d
a
i
n
f
i
t
c
y
a
t
d
i
o
o
n
e
s
o
f
n
,
o
o
t
r
t
c
o
o
v
e
r
d
a
m
a
n
g
e
e
c
t
i
d
o
u
n
e
t
o
t
o
i
m
i
m
p
r
p
o
r
p
o
e
p
r
e
v
r
o
o
l
t
p
a
e
g
r
e
a
s
t
i
u
o
p
n
p
o
l
y
r
.
T
h
i
s
w
a
r
r
L
a
F
n
A
t
y
U
d
L
T
o
S
e
s
.
n
o
t
c
o
v
e
r
p
r
o
d
u
c
t
s
s
o
l
d
l
i
d
o
n
l
y
i
n
t
h
e
U
n
i
t
e
d
S
t
a
t
e
s
a
n
d
C
a
n
a
d
a
a
n
d
o
n
l
y
i
n
t
h
e
r
e
s
p
e
c
t
i
v
e
c
o
u
n
t
r
y
o
f
t
h
e
f
o
r
m
o
f
a
b
i
l
l
o
f
s
a
l
e
o
r
r
e
c
e
i
p
t
e
d
i
n
v
o
i
c
e
,
w
e
h
r
i
i
o
c
h
d
,
i
s
m
e
u
v
s
i
t
d
b
e
n
e
c
p
e
r
e
t
h
s
e
a
n
t
t
t
e
h
d
e
t
u
o
n
o
i
t
b
i
s
t
a
i
n
w
a
r
r
a
n
t
y
s
e
r
v
i
c
e
.
d
i
f
t
h
e
f
a
c
t
o
r
y
a
p
p
l
i
e
d
s
e
r
i
a
l
n
u
m
b
e
r
h
a
s
b
e
e
n
a
l
t
e
r
e
d
o
r
r
e
m
o
v
e
d
f
r
o
m
t
h
e
N
T
A
S
P
R
O
V
I
D
E
D
U
N
D
E
R
T
H
I
S
W
A
R
R
A
N
T
Y
I
S
N
T
Y
H
S
E
H
E
A
X
L
C
L
L
N
U
O
S
T
I
V
B
E
E
R
L
E
I
M
A
B
E
L
D
E
Y
F
O
R
A
N
Y
I
N
C
I
D
E
N
O
T
F
A
L
A
N
O
Y
R
E
C
X
O
P
N
R
S
E
E
S
Q
S
U
O
E
R
N
I
T
M
I
A
P
L
L
I
E
D
W
A
R
R
A
N
T
Y
O
H
N
I
T
B
H
I
T
I
S
E
D
P
R
O
B
D
Y
U
A
C
P
T
.
P
E
L
X
I
C
C
E
A
P
B
T
L
E
L
A
W,
A
N
Y
I
M
T
P
N
L
E
I
S
E
S
D
F
O
W
R
A
A
R
P
R
A
A
RT
N
I
T
C
Y
U
L
O
A
F
R
P
U
R
P
O
S
E
O
N
T
H
I
S
I
O
P
N
R
O
O
D
F
U
T
C
H
T
I
S
I
S
W
L
A
I
M
R
R
I
T
A
E
N
D
T
I
N
Y
.
d
o
n
o
t
a
l
l
o
w
t
h
e
e
x
c
l
u
s
i
o
n
o
r
l
i
m
i
t
a
t
i
o
n
o
f
i
n
c
s
i
d
o
e
n
n
t
h
a
o
l
o
w
r
l
c
o
o
n
n
g
s
e
a
q
n
u
i
e
m
n
p
t
i
l
a
i
e
l
d
w
a
r
r
a
n
t
y
l
a
s
t
s
,
s
o
y
t
h
o
e
u
.
a
T
b
h
o
i
v
s
e
w
l
i
a
m
r
r
i
a
t
a
n
t
t
i
y
o
n
g
s
i
v
o
e
r
s
y
o
u
s
p
e
c
i
f
i
c
l
e
g
a
l
r
i
g
s
h
t
a
t
t
s
e
,
a
t
o
n
d
s
t
y
a
o
t
e
u
o
m
r
a
p
y
r
o
h
v
a
i
n
v
e
c
e
t
o
p
r
o
v
i
n
c
e
.
BERS, PLEASE SEE REVERSE SIDE.
P
r
i
n
t
e
d
i
n
U
S
A
Tarjeta de garantía
Cable de audio
Cable de extensi
ón de video Compuesto
Guía para la instalación rápida
Cable de extensión de S-Video
CD
distribuidor local.
- 8 -
Page 52

Instalación 1
Activación y cambio de la pila de la tarjeta de control remoto
Para activar la tarjeta de control remoto
Para activar la pila del control remoto, jale
la lengüeta para retirar la pieza de plástico.
Para cambiar la pila del control remoto
1 Para retirar la pila agotada y colocar una
nueva, retire de la tarjeta de control
remoto el compartimiento de la pila
presionando el pestillo hacia la derecha y
extrayendo el compartimiento.
2 Asegúrese de que la terminal positiva (+)
de la pila de litio CR2025 esté hacia
arriba.
✍
con cuidado. No intente doblarla, no la deje
caer ni mojarse. Evite colocarla cerca de
calentadores, bajo la luz directa del sol o
donde la humedad sea alta.
Precaución: Mantenga las pilas fuera del
alcance de niños pequeños. Las pilas
podrían presentar un peligro para la salud si
se introducen a la boca (es decir, los niños se
las podrían tragar y ahogarse).
zManeje la tarjeta de control remoto
1
3 Cierre el compartimiento de la pila
empujándolo con cuidado hasta escuchar
un chasquido.
2
Deseche la pila agotada adecuadamente.
Consulte los reglamentos locales.
- 9 -
Page 53

Instalación 2
Apague el monitor y la computadora antes de conectarlos. No toque las espigas del conector del cable de señal proveniente de video, ya que podrían doblarse.
Conexión del monitor a la computadora
1 Retire el panel posterior sosteniendo la
parte superior con una mano, como se
indica en la ilustración, y después
1
2
Conexión a una PC/AT compatible con IBM Conexión a una Macintosh
desabroche los botones ubicados en cada
esquina.
2 Retire la cubierta de los cables jalando
ligeramente la porción cóncava hacia
arriba.
■ Conexión a una PC/AT compatible con IBM
Usando el cable HD15/D-sub (incluido),
conecte la computadora al conector de
entrada HD15 del monitor.
Asegúrese de verificar la alineación del cable
- 10 -
HD15/D-sub. No introduzca el conector a la
fuerza, ya que esto podría doblar las espigas.
■ Conexión a una Macintosh
Para conectar el monitor a una computadora
Macintosh, use un adaptador (no se incluye)
si fuera necesario. Conecte el adaptador a la
computadora antes de conectar el cable de
señal de video.
Page 54

Instalación 3
Conexión del cable de audio
Conecte el cable de audio incluido al conector de
entrada de audio proveniente de la computadora
del monitor. El conector del cable de audio y el
conector de entrada de audio están codificados
por color. Conecte los cables a las entradas del
mismo color.
Puede escuchar el sonido proveniente de su
computadora u otro equipo de audio que esté
conectado a los conectores de entrada de audio
del monitor utilizando las bocinas o los audífonos
del monitor.
Para obtener más información, consulte “Control
del volumen”, en la página 33.
- 11 -
Page 55

Instalación 4
PBR L
P
R
Y
VIDEOR L
VIDE
S VIDEO
Conexión de los cables de video
Para satisfacer sus necesidades, puede conectar cables de video compuesto, cable de S-Video, así como cables de video componente.
■ Conexión con cables de video compuesto
El video compuesto envía una señal combinada de
tono de colores (crominancia) y brillo (luminancia) a
través de un solo cable. Para realizar esta conexión, use
un cable tradicional de audio/video. (Cable combinado
de audio I/D y video).
■ Conexión con cables de S-Video
Si su equipo cuenta con una salida de S-Video, conecte
el equipo de esta forma para obtener una mejor
calidad de imagen que la que brinda la conexión de
video compuesto. Necesitará conectar cables de audio
(audio I/D) para obtener sonido (el cable de S-Video
porta sólo la señal de video).
■ Conexión con cables de video componente
Si su equipo cuenta con una salida de video
componente, conecte el equipo de esta forma para
obtener la más alta calidad de imagen a color. El cable
de video componente porta las señales de dos tonos de
colores (crominancia) y brillo (luminancia) por
separado. Generalmente, los cables de video
componente están identificados con las letras Y, Pb y
Pr. Además del cable de video componente, necesitará
también conectar un cable de audio I/D para obtener
sonido.
- 12 -
Page 56

Instalación 5
Conexión del adaptador de ca
Conecte el adaptador de ca (incluido) al monitor.
Adaptador de ca
(incluido)
DC IN 16.5V
- 13 -
Page 57

Instalación 6
Organización de los cables y colocación del panel posterior
1
3
2
1 Junte los cables y páselos por el pie de la
base.
2 Vuelva a colocar la cubierta de los cables
alineando las clavijas cilíndricas con los
orificios y después presiónela.
3 Sostenga el panel posterior con una
mano y presione las esquinas del panel.
- 14 -
Page 58

Instalación 7
Conexión del cable de alimentación
1 Primero, conecte el adaptador de ca al
monitor, como se muestra en Instalación
5 (consulte la página 13).
Al tomacorriente
de energía
3
Cable de
alimentación
Adaptador de ca
(incluido)
2 Conecte el cable de alimentación al
adaptador de ca (incluido).
3 Conecte el cable de alimentación al
12
DC IN 16.5V
tomacorriente de energía más cercano.
- 15 -
Page 59

Instalación 8
Encendido del monitor, la computadora u otro equipo
1 Presione el botón POWER ubicado en el
costado derecho del monitor.
✍
zPara que el monitor funcione con
la tarjeta de control remoto, antes
POWER
✍
control remoto sólo enciende el monitor
cuando el mismo está en el modo de
apagado a distancia, lo cual se indica por la
luz de encendido/apagado iluminada en
rojo
sea, cuando la luz de encendido/apagado
está apagada, deberá usar el botón
POWER ubicado en el costado derecho de
El botón POWER de la tarjeta de
. Cuando el monitor está apagado, o
La luz de encendido/apagado se iluminará
en verde.
2 Encienda la computadora o el equipo del
que provendrá la señal de video.
Presione varias veces el botón INPUT ubicado
en el costado derecho del monitor para
seleccionar la señal de entrada que desee. O
bien, utilice la tarjeta de control remoto para
seleccionar la señal de entrada que desee y
presione el botón correspondiente.
Presionar el botón POWER de la tarjeta
de control remoto mientras la luz de
encendido/apagado está iluminada en
verde hará que se ilumine en rojo.
Cuando la luz de encendido/apagado
está iluminada en rojo, significa que el
monitor está en el modo apagado a
distancia.
debe presionar el botón POWER
ubicado en el costado del monitor
(para que la luz se encienda).
El monitor cumple con la norma Plug & Play
“DDC” y detecta automáticamente toda la
información del monitor. No es necesario que la
computadora tenga instalados controladores
específicos para que funcioine.
La primera vez que encienda su computadora
después de conectar el monitor, podría aparecer
en pantalla el Asistente de instalación. Si esto
sucede, siga lo indicado en las instrucciones en
pantalla. Se seleccionará automáticamente el
monitor Plug & Play de manera que pueda
utilizar este monitor.
Nota: No todas las tarjetas de gráficos apoyan la
resolución de proporción ancha de 1280 x 768.
Podría ser necesario obtener controladores
actualizados para utilizarse con ciertos
dispositivos. Por favor consulte al fabricante de
la tarjeta de gráficos de video para obtener
controladores actualizados.
la pantalla para encenderlo. Cuando la luz
de encendido/apagado está iluminada en
verde, significa que el monitor está
encendido.
Para obtener más información, consulte lo
relacionado con el botón INPUT en la página
5 y con Tarjeta de control remoto en la
página 18.
- 16 -
Si no aparece nada en la pantalla
Consulte “Síntomas de problemas y sus
soluciones”, en las páginas 34-38.
Page 60

Instalación 9
La pantalla puede inclinarse 3 grados hacia delante y 15 grados hacia atrás.
Ajuste de la inclinación
3°
15°
Para utilizar este monitor con comodidad
Ajuste el ángulo en que verá la pantalla según la
altura de su silla y escritorio y de manera que la
pantalla no refleje luz a los ojos.
WheWAl ajustar la inclinación de la pantalla,
✍
hágalo lenta y cuidadosamente,
asegurándose de que la pantalla no golpee
contra el escritorio ni la base del monitor.
Tome la parte media inferior de la pantalla de
cristal líquido al mismo tiempo que sostiene la
base del monitor. Después, incline el panel hacia
atrás hasta donde lo desee.
- 17 -
Page 61

Uso de la tarjeta de control remoto
A continuación encontrará una explicación más
detallada de la tarjeta de control remoto.
ql w; wa ws
wd
wg
wf
wk
wj
wl
wh
ql Presiónelo para silenciar el sonido.
w; Presione el botón PICTURE MODE (Modo de
imagen) para seleccionar uno los siguientes
Modos de imagen para la señal de video y
de video componente Y/Pb/Pr:
■ Vívido
■ Estándar
■ Película
■ Juego
■ Pro
wa Presione el botón WIDE MODE (Modo
panorámico) para alternar entre los distintos
modos de tamaño de pantalla:
Menú
correspondiente
a la computadora
■
Normal
■ Completa
wd Presione el botón PC (computadora) para
recibir la señal de entrada proveniente de la
computadora.
wf Presione el botón VIDEO (Video) para recibir
la señal de video compuesto.
wg Presione el botón Y/Pb/Pr para r ecibir la señal
de audio/video proveniente de un
componente Y/Pb/Pr.
wh Presione el botón MENU (Menú) para
desplegar el menú principal de cada señal
de entrada:
Menú principal
correspondiente a
la computadora
despliega
CONTROL DE LA IMAGEN
■
■ CONTROL DE AUDIO
■ CONTROL DE PANTALLA
■ AJUSTES
✍
control remoto sólo enciende el monitor
cuando el mismo está en el modo de
apagado a distancia, lo cual se indica por la
luz de encendido/apagado iluminada en
rojo. Cuando el monitor está apagado, o
sea, cuando la luz de encendido/apagado
está apagada, deberá usar el botón
POWER ubicado en el costado derecho de
la pantalla para encenderlo. Cuando la luz
de encendido/apagado está iluminada en
verde, significa que el monitor está
encendido.
El botón POWER de la tarjeta de
Menú de video
■
Wide Zoom
■ Acercamiento
■ Letterbox
■ Completa
■ Normal
ws Presione el botón POWER (Encendido/
Apagado) para encender el monitor desde el
modo de apagado a distancia o para
cambiar al apagado a distancia. Vea la Nota.
- 18 -
Menú principal de
video (o S-Video)
despliega
■
CONTROL DE LA IMAGEN
■ CONTROL DE AUDIO
■ CONTROL DE PANTALLA
■ AJUSTES
wj Presione los botones V v B b para navegar
por el Menú.
wk Presione el botón OK (Aceptar) para
confirmar su selección.
wl Presione el botón +/- para ajustar el volumen
de audio de todas las señales que entren.
Page 62

Personalización de la pantalla
Puede realizar numerosos ajustes a su monitor
utilizando el menú en pantalla. Para seleccionar
el menú y los ajustes puede usar los botones
ubicados en el costado del monitor o la tarjeta
de control remoto.
Navegación por los menús para uso
con la computadora
INPUT
MENU
(entrada)
(menú)
1 Seleccione la entrada de la computadora.
Presione el botón INPUT ubicado en el
costado derecho del monitor hasta que
encuentre la entrada deseada de la
computadora y presione el botón OK o
presione el botón PC en la tarjeta de control
remoto.
2 Despliegue el menú principal.
Presione el botón MENU para desplegar el
menú principal en pantalla y después presione
el botón OK.
3 Seleccione el menú que desea ajustar.
5 Cierre el menú.
Presione el botón MENU una vez para
regresar a la visualización normal. Si no
presiona ningún botón durante 45 segundos,
el menú se cerrará automáticamente.
Antes de realizar ajustes
Conecte y encienda el monitor y la
computadora. Para obtener los
mejores resultados, espere por lo
menos 30 minutos antes de realizar
ajustes.
✍
OK (aceptar)
,
OK (aceptar)
,
MENU
Los botones de la tarjeta de control remoto
están dispuestos de manera distinta.
(menú)
Presione los botones +/- para desplegar el
menú deseado. Presione el botón OK para
seleccionar la opción deseada del menú.
4 Ajuste el menú.
Presione los botones +/- para realizar el ajuste
y después presione el botón OK. Cuando
presiona el botón OK, el parámetro queda
almacenado y la pantalla regresa al menú
anterior.
- 19 -
Page 63

Opciones de CONTROL DE LA IMAGEN para uso con la computadora
Le regresa al menú anterior.
RetroIlumin: Ajústela al nivel deseado de
iluminación de manera que pueda ver mejor la
pantalla.
Contraste: Ajústelo para aumentar el contraste
e intensificar el color o bien, reducir el contraste
de la imagen y atenuar el color.
Brillo: Ajústelo para iluminar más u oscurecer la
imagen.
Temp. Color (Temperatura de los colores): El
ajuste preestablecido emite la intensidad máxima
de blancos. Si la temperatura de los colores es
baja, la pantalla tendrá una apariencia cálida y
rojiza; si la temperatura es alta, la pantalla tendrá
■ Cálido: Seleccione éste para disminuir la
temperatura de colores para dar un
tono rojizo a los colores blancos.
■ Ajuste del usuario: Selecciónelo para ajustar
manualmente la temperatura del color entre
Frío y Cálido. Aparecerá una escala del 0 al 100
con el Neutro al nivel de 50. Los ajustes que se
hagan a este parámetro afectarán todas las
señales de computadora.
una apariencia fría y azulada.
Puede seleccionar el nivel de color de la imagen
del campo de colores de blancos a partir de los
ajustes de temperatura de colores
preestablecidos. También puede afinar la
temperatura que desee.
■ Frío: Seleccione éste para aumentar la
temperatura de colores para dar un
tono azulado a los colores blancos.
■ Neutro: Seleccione éste para dar un tono
neutro a los colores blancos.
- 20 -
Page 64

Opciones de CONTROL DE AUDIO para uso con la computadora
Agudo: Ajústelo para disminuir o aumentar los
tonos de alta frecuencia.
Graves: Ajústelo para disminuir o aumentar los
tonos de baja frecuencia.
Balance: Ajústelo para enfatizar el sonido de la
bocina izquierda o derecha.
Efecto (WOW): Seleccione una de las siguientes
opciones.
■ Sí: Selecciónelo para activar el sonido SRS
WOW™. El sonido se enriquece, pues se
Le regresa al menú anterior.
procesan “pistas de espacio”, las cuales
hacen que se escuche con más amplitud,
plenitud y dinamismo.
■ No: Seleccione para sonido estereofónico
normal, recepción monoaural o audio
que no provenga de Internet.
- 21 -
Page 65

Opciones de CONTROL DE PANTALLA para uso con la computadora
Wide Mode : Esta opción brinda la opción de
seleccionar cómo se verán las imágenes en la
pantalla:
■ Normal: Selecciónelo para ver las imágenes tal
cual se reciben.
Los siguientes diagramas ilustran la forma en
que las imágenes se ven en la pantalla ancha.
■ Completa: Selecciónelo para que la imagen
llene la pantalla.
✍
zCuando se usa el modo de pantalla
Completa, las imágenes para pantalla de
relación 4:3 podrían distorsionarse o
alargarse.
Los diagramas siguientes ilustran la forma
en que las imágenes se ven en la pantalla
al seleccionar esta opción.
Le regresa al menú anterior.
Señales normales 4:3 desplegadas
en la pantalla ancha
.
Señales 16:9 desplegadas en la
pantalla ancha
Las señales 4:3 desplegadas
para llenar la pantalla ancha
Las señales que se reciban
originalmente como 16:9
- 22 -
desplegadas en la pantalla ancha
Page 66

Opciones de CONTROL DE PANTALLA para uso con la computadora - (continuación)
Ajuste auto: Seleccione OK para que se
ajuste automáticamente la calidad de la
imagen. Cuando el monitor recibe una señal
de entrada, detecta y ajusta
automáticamente la posición y deformidad
(fase/tamaño de punto) de la imagen y
asegura que la imagen se despliegue con
nitidez. Después del ajuste automático, el
cursor regresa a la opción Ajuste automático
de las opciones de Control de pantalla para
uso con la computadora.
Fase: Selecciónelo para ajustar la calidad de
la imagen en pantalla. Ajústelo hasta que se
elimine el ruido del video (bandas
horizontales) a fin de reducir al mínimo este
tipo de bandas y obtener una imagen nítida.
Centrado H: Selecciónelo para ajustar la
ubicación del centro horizontal de la imagen
a fin de que ésta aparezca centrada en la
pantalla en relación con el lado izquierdo y
derecho del marco.
Centrado V: Selecciónelo para ajustar la
ubicación del centro vertical de la imagen a
fin de que ésta aparezca centrada en la
pantalla en relación con la parte superior e
inferior del marco.
Tamaño de punto: Selecciónelo para ajustar
la calidad de la imagen en pantalla cuando
se observen bandas verticales. Ajústelo hasta
que las bandas verticales de la prueba
aparezcan a intervalos uniformes en toda la
pantalla.
- 23 -
Page 67

Opciones de AJUSTES para uso con la computadora
Idioma: Selecciónelo para cambiar el idioma del
texto que aparece en pantalla. Puede seleccionar
inglés, español o francés. El idioma
preestablecido de fábrica es el inglés.
Menú Color: Selecciónelo para cambiar el color
de los menús a fin de que se acople con el
entorno de su pantalla.
Menú de color blanco
Restablecer: Permite restablecer los ajustes en
los preestablecidos de fábrica.
■ OK: Selecciónelo para restablecer todos
los datos de ajuste a los valores
preestablecidos de fábrica.
■ Cancelar: Selecciónelo para cancelar el
restablecimiento y regresar a la
pantalla de menú.
Le regresa al menú anterior.
Menú de color negro
- 24 -
Page 68

Navegación por los menús Video
INPUT
MENU
,
(entrada)
(menú)
OK (aceptar)
1 Seleccione la entrada de video o
componente.
Si conectó el video con un cable de S-Video,
el monitor desplegará la opción S-Video en
lugar de Video compuesto.
Presione la entrada de video que prefiera y
presione el botón OK.
2 Despliegue el menú principal.
Presione el botón MENU para desplegar el
menú principal en pantalla y después presione
el botón OK.
5 Cierre el menú.
Presione el botón MENU una vez para
regresar a la visualización normal. Si no
presiona ningún botón durante 45 segundos,
el menú se cerrará automáticamente.
✍
OK (aceptar)
,
MENU
Los botones de la tarjeta de control remoto
están dispuestos de manera distinta.
(menú)
3 Seleccione el menú que desea ajustar.
Presione los botones +/- para desplegar el
menú deseado. Presione el botón OK para
seleccionar la opción deseada del menú.
4 Ajuste el menú.
Presione los botones +/- para realizar el ajuste
y después presione el botón OK. Cuando
presiona el botón OK, el parámetro queda
almacenado y la pantalla regresa al menú
anterior.
- 25 -
Page 69

Opciones de CONTROL DE LA IMAGEN (de VIDEO, S-VIDEO o COMPONENTE)
Le regresa al menú anterior.
Modo de imagen: Seleccione uno de los modos
siguientes para satisfacer sus necesidades.
■ Vívido: Selecciónelo para obtener mejor
contraste y nitidez de imagen.
■ Estándar:Selecciónelo para obtener
parámetros de imagen estándar.
■ Película: Selecciónelo para desplegar una
imagen más atenuada.
■ Juego: Selecciónelo para ver juegos de
video.
■ Pro: Selecciónelo para configurar sus
parámetros personales. Le permite
ajustar manualmente la imagen.
Nitidez*: Ajústelo para atenuar más o delinear
más la imagen.
Temp. Color (Temperatura de los colores): El
ajuste preestablecido emite la intensidad máxima
de blancos. Si la temperatura de los colores es
baja, la pantalla tendrá una apariencia cálida y
rojiza; si la temperatura es alta, la pantalla tendrá
una apariencia fría y azulada.
Puede seleccionar el nivel de color de la imagen
del campo de colores de blancos a partir de los
ajustes de temperatura de colores
preestablecidos. También puede afinar la
temperatura que desee.
RetroIlumin: Ajústelo al nivel deseado de
iluminación para que le resulte más fácil ver la
pantalla.
Imagen: Ajústelo para aumentar el contraste e
intensificar el color o bien, reducir el contraste de
la imagen y atenuar el color.
Brillo: Ajústelo para iluminar más u oscurecer la
imagen.
Color*: Ajústelo para disminuir o aumentar la
intensidad de los colores.
Tinte*: Ajústelo para disminuir o aumentar el
tono verde.
■ Frío: Seleccione éste para aumentar la
temperatura de colores para dar un
tono azulado a los colores blancos.
■ Neutro: Seleccione éste para dar un tono
neutro a los colores blancos.
■ Cálido: Seleccione éste para disminuir la
temperatura de colores para dar un
tono rojizo a los colores blancos.
* El ajuste manual no está disponible para el video
componente con señales de 480p, 1080i y 720p.
- 26 -
Page 70

Opciones de CONTROL DE AUDIO (de VIDEO, S-VIDEO o COMPONENTE)
Puede disfrutar de un sonido de calidad al ver una señal proveniente de video de igual forma como si estuviera en el modo de computadora.
Agudo: Ajústelo para disminuir o aumentar los
tonos de alta frecuencia.
Graves: Ajústelo para disminuir o aumentar los
tonos de baja frecuencia.
Balance: Ajústelo para enfatizar el sonido de la
bocina izquierda o derecha.
Efecto (WOW): Seleccione una de las opciones
Le regresa al menú anterior.
siguientes.
■ Sí: Seleccione para activar el audio SRS
WOW™. El sonido se enriquece al
precesa “pistas de espacio”, lo cual hace
que el audio de Internet se escuche con
más amplitud y dinamismo.
■ No: Seleccione para sonido estereofónico
normal, recepción monoaural o audio
que no provenga de Internet.
- 27 -
Page 71

Opciones de CONTROL DE PANTALLA (de VIDEO, S-VIDEO o COMPONENTE)
Ancha auto: Seleccione una de las opciones
siguientes para ajustar automáticamente el
formato de la imagen.
■ Sí: Selecciónelo para alternar
automáticamente entre los distintos
modos de visualización de Acercamiento
panorámico, Acercamiento, Letterbox,
Completa y Normal (descritos en la
página 29), cuando se esté recibiendo
una señal apropiada.
Le regresa al menú anterior.
✍
zEl Ancho automático
funciona eficazmente cuando la
señal que se recibe tiene los signos
de entrada de detección. Si no se
detecta el signo de entrada,
cambiará a los valores
preestablecidos de fábrica o al
modo de visualización que el
usuario haya seleccionado a partir
de las selecciones del Modo
panorámico.
■ No: Selecciónelo para ajustar manualmente
el formato de visualización de la imagen.
- 28 -
Page 72

Modo panorámico: Para la visualización óptima
en el Modo panorámico, seleccione uno de los
modos siguientes.
■ Wide Zoom: Selecciónelo para que las señales
4:3 llenen la pantalla ancha.
Image original
• Imagen normal de proporción 4:3
• Imagen DTV de proporción 4:3
■ Acercamiento: Selecciónelo para ver los
programas creados para pantalla ancha
(proporción 16:9).
Image original
• Película en Letterbox de una cinta
de video o disco DVD
■ Letterbox: Selecciónelo para ver películas con
subtítulos.
Image original
• Películas en formato Letterbox con
subtítulos fuera de la imagen
(proporción de 2:35:1)
Modo Wide Zoom
El ”Wide Zoom” (Acercamiento panorámico)
agranda las imágenes de proporción 4:3 para
llenar la pantalla 16:9 manteniendo la
imagen original lo más posible. Las imágenes
de señal 4:3 se distorsionan o alargan
ligeramente.
m
m
Modo Zoom
El ”Zoom” (Acercamiento) agranda las imágenes de
proporción 4:3 tanto horizontal como verticalmente
en una proporción igual que llena una pantalla 16:9.
La imagen se expande proporcionalmente para
llenar la pantalla horizontalmente al mismo tiempo
que deja una banda negra en la parte superior e
inferior de la misma. Es útil para ver películas en
m
Modo Letterbox
El formato ”Letterbox” agranda la
imagen horizontal y verticalmente en
una proporción igual que llena la
pantalla al mismo tiempo que el área de
los subtítulos se comprime para
adaptarse a la pantalla.
formato Letterbox.
- 29 -
Page 73

■ Completa: Se obtiene el mismo efecto que en
■ Normal: Selecciónelo para ver las imágenes tal
Centrado V: Selecciónelo para ajustar la
el modo de pantalla ancha para señal
proveniente de la computadora.
Image original
• Imagen comprimida de proporción
4:3 proveniente de una cámara de
video o DVD
• Imagen DTV de proporción 16:9
cual se reciben.
Señales normales 4:3 en visualización
normal
ubicación del centro vertical de la imagen a fin
de que ésta aparezca centrada en la pantalla en
relación con la parte superior e inferior del
marco.
m
”Completa” solo estira la imagen de
proporción 4:3 horizontalmente para
llenar una pantalla de 16:9.
Cualquier película diseñada para
proporción 16:9 o películas con subtítulos,
así como señales de DVD y cámaras de
video
Algunos DVD e imágenes de cámaras
de video en visualización normal
- 30 -
Page 74

Opciones de AJUSTES (de VIDEO, S-VIDEO o COMPONENTE)
Idioma:
texto que aparece en pantalla. Puede seleccionar
inglés, español o francés. El idioma preestablecido
de fábrica es el inglés.
Selecciónelo para cambiar el idioma del
Menú Color: Selecciónelo para cambiar el color
de los menús a fin de que se acople con el entorno
de su pantalla.
Menú de color blanco
Restablecer: Permite restablecer los ajustes en
los preestablecidos de fábrica.
■ OK: Selecciónelo para restablecer todos
los datos de ajuste a los valores
preestablecidos de fábrica.
■ Cancelar: Selecciónelo para cancelar el
restablecimiento y regresar a la
pantalla de menú.
Le regresa al menú anterior.
Menú de color negro
- 31 -
Page 75

Características técnicas
Función de ahorro de energía
Este monitor satisface las pautas de ahorro de
energía establecidas por VESA, E
NUTEK. Si el monitor se conecta a una
computadora o tarjeta de gráficos de video que
cumple con DPMS (Display Power Management
Signaling), el consumo de energía
automáticamente se reducirá como se indica.
Modo
de energía
Funcionamiento
normal
Apagado activo * 3 W (máx.)
Apagado a distancia 3 W (máx.)
Consumo
de energía
49 W (máx.) Verde
< 2 W (tip.)
< 2 W (tip.)
NERGY STAR y
Indicador
de encendido
Ámbar
Rojo
Modos preestablecidos y del
usuario
Cuando el monitor recibe una señal de entrada,
la coteja automáticamente con uno de los
modos preestablecidos de fábrica almacenados
en su memoria para brindar una imagen de alta
calidad en el centro de la pantalla. (Consulte el
apéndice, en las páginas 41 y 42, para ver una
lista de los modos preestablecidos de fábrica.)
Para las señales de entrada que no coinciden con
uno de los modos preestablecidos de fábrica, la
función de ajuste automático de la calidad de la
imagen de este monitor automáticamente ajusta
la posición, fase y, tamaño de punto de la
imagen para asegurar que ésta se desplegará
con nitidez en la pantalla en cualquier
sincronización comprendida en el rango de
Por ende, la primera vez que el monitor recibe
señales de entrada que no coinciden con uno de
los modos preestablecidos de fábrica, podría
tomar un poco más de lo normal en desplegar la
imagen en la pantalla. Estos datos de ajuste se
almacenan automáticamente en la memoria de
manera que la próxima vez, el monitor
funcionará de la misma forma que cuando recibe
las señales que coinciden con uno de los modos
preestablecidos de fábrica.
En todos los modos mencionados anteriormente,
si se ajusta la imagen, los datos de ajuste se
almacenan como un modo de usuario y se
recuperan automáticamente cada vez que se
recibe la misma señal de entrada.
Apagado 3 W (máx.)
< 1 W (tip.)
* Cuando la computadora adopta el modo de energía
“Apagado activo”, la imagen desaparece de la pantalla y
aparece el mensaje “No hay señal de entrada”. Después de 5
segundos, el monitor adopta el modo de ahorro de energía.
Apagado
velocidades del reloj del monitor.
Frecuencia horizontal 28 - 70 kHz
Frecuencia vertical 48 - 85 Hz
Resolución 1280 x 768/60 Hz o menos
Reloj de los puntos 94,5 MHz máximo
- 32 -
Page 76

Control del volumen
Uso de los auriculares
Puede usar las bocinas del monitor o unos
POWER
MENU
DK
WIDE
INPUT
auriculares para escuchar el sonido de su
computadora u otro equipo de audio que esté
conectado a los conectores de entrada de sonido
del monitor.
Puede subir o bajar el volumen usando los
botones +/- ubicados en el costado derecho del
monitor o en la tarjeta de control remoto. Al
presionar cualquiera de estos botones, el estado
Al conectar los auriculares al conector de
auriculares del monitor, puede escuchar el sonido
de su computadora u otro equipo que esté
conectado a los conectores de entrada de sonido
del monitor.
Asegúrese de retirarse los auriculares antes de
alejarse del monitor. Si el cable se jala
bruscamente del monitor podría causar lesiones
o daños.
del volumen aparecerá en la pantalla del
monitor.
1 Presione los botones +/- para que
✍
zMientras el menú principal esté en
aparezca el estado del volumen.
pantalla, utilice los botones +/- de la tarjeta
2 Presione los botones +/- para subir o bajar
el volumen.
El estado del volumen desaparecerá
automáticamente después de alrededor de 3
segundos.
Presione el botón MUTE para silenciar el sonido.
Vuelva a presionar el botón MUTE o presione el
botón + del volumen en la tarjeta de control
remoto para restaurar el sonido.
de control remoto para ajustar el volumen.
Los botones +/- ubicados en el costado del
monitor se transforman en botones de
selección cuando el menú principal está en
pantalla.
Cuando el monitor está en el modo de
ahorro de energía (en el modo de
computadora), no se escuchará sonido
alguno de las bocinas o de los auriculares.
- 33 -
Page 77

Solución de problemas
Antes de comunicarse con el departamento de soporte técnico, consulte esta sección.
Mensajes en pantalla para
la computadora
Si la señal de entrada para la computadora (PC)
tiene algún problema, aparecerá uno de los
siguientes mensajes en la pantalla. Para
solucionar el problema, consulte la sección
“Síntomas de problemas y sus soluciones”, en
las páginas 35 a 38.
Si aparece el mensaje “Señal no apoyada”
Esto indica que la especificación del monitor no
apoya la señal de entrada. Fije la resolución y la
velocidad de actualización de la tarjeta de
gráficos de la computadora como se indique en
el mensaje. También verifique que los cables
estén conectados a los conectores de entrada
correctos.
Si aparece el mensaje “No hay señal de entrada”
Esto indica que la computadora conectada no
está enviando ninguna señal al monitor.
Verifique que haya un cable conectado a esta
entrada. También verifique que la computadora
esté en el modo de Ahorro de energía
presionando cualquier tecla o moviendo el
Síntomas de problemas y sus
soluciones
Si la computadora u otro equipo que esté
conectado al monitor causa algún
problema, consulte el manual de
instrucciones de dicho equipo o
computadora.
Utilice la función de autodiagnóstico
(página 39) si estas recomendaciones no
solucionan el problema.
mouse. El mensaje “No hay señal de entrada”
desaparecerá después de 5 segundos y el
monitor adoptará el modo de Ahorro de energía.
Si aparece el mensaje “Cable desconectado”
Esto indica que el cable se ha desconectado del
conector. Verifique que los cables estén bien
conectados al conector apropiado. El mensaje
“Cable desconectado” desaparecerá después de
5 segundos y el monitor adoptará el modo de
Ahorro de energía.
- 34 -
Page 78

Síntoma Verifique lo siguiente
No hay imagen
Si la luz de encendido/apagado
no está encendida o si no se
enciende cuando se presiona el
botón Power
La luz de encendido/apagado se
ilumina en rojo
Si la luz de encendido/apagado
se ilumina en verde o si parpadea
iluminada en ámbar
Si el mensaje “Cable
Desconectado” aparece en la
pantalla
■ Verifique que el cable de alimentación y el adaptador de ca estén conectados adecuadamente.
■ Presione una vez el botón de encendido/apagado del monitor.
■ El monitor está en el modo de apagado a distancia. Pruebe presionando el botón de encendido/apagado del monitor dos veces o el de la tarjeta
de control remoto una vez.
■ Utilice la función de autodiagnóstico (página 39).
■ V erifique que el cable de la señal de video esté bien conectado y que todos los conector es estén firmemente asentados en sus enchufes (páginas
6, 10 y 12).
■ Verifique que las espigas del conector de entrada de video no estén dobladas ni encajadas.
■ Verifique que el ajuste de selección de entrada sea el correcto (páginas 5, 6 y 12).
■ El cable conectado no cuenta con señal de video. Si conecta un cable que no cuenta con señal de video, el mensaje “Cable Desconectado”
podría aparecer en la pantalla antes de que el monitor adopte el modo de ahorro de energía. Esto no significa que el monitor esté funcionando
incorrectamente.
Si el mensaje “No hay señal de
entrada” aparece en la pantalla o
si la luz de encendido/apagado se
ilumina en ámbar o si alterna
entre verde y ámbar
Este problema se debe a la
computadora o a otro equipo
conectado y no al monitor
■ V erifique que el cable de la señal de video esté bien conectado y que todos los conector es estén firmemente asentados en sus enchufes (páginas
6, 10 y 12).
■ Verifique que las espigas del conector de entrada de video no estén dobladas ni encajadas.
■ Verifique que el ajuste de selección de entrada sea el correcto (páginas 5, 6 y 12).
La computadora está en el modo de ahorro de energía. Presione cualquier tecla del teclado o mueva el mouse.
■
■ Verifique que la tarjeta de gráficos esté conectada adecuadamente a la computadora.
■ Verifique que la computadora u otro equipo estén encendidos.
- 35 -
Page 79

Síntoma Verifique lo siguiente
Si el mensaje “Señal no
apoyada” aparece en la pantalla
(página 34)
Este problema se debe a la
computadora o a otro equipo
conectado y no al monitor
Si utiliza Windows ■ Si cambió otro monitor por éste, vuelva a conectar el anterior y realice lo siguiente. Seleccione “SONY” de la lista “Manufactur ers” (Fabricantes)
Si utiliza un sistema Macintosh ■ Cuando conecte este monitor a una computadora Macintosh, use un adaptador (no se incluye) si fuera necesario. Conecte el adaptador a la
La imagen parpadea, salta, oscila
■ Verifique que la resolución de video y la velocidad de actualización estén dentro de los valores especificados para la pantalla. Si cambió otro
monitor por éste, vuelva a conectar el anterior y fije la tarjeta de gráficos de la computadora a la resolución y la velocidad de actualización
siguientes.
1280 x 768 / 60 Hz
1024 x 768 / 60 Hz
y seleccione “SDM-V72W” en la lista “Models” (Modelos) en la pantalla de selección de dispositivos de Windows. Si esto no aparece en la lista,
pruebe con la opción “Plug & Play” o instale el archivo de información para este monitor utilizando el Windows Monitor Information Disk (Disco
de información de monitores de Windows).
computadora antes de conectar el cable de señal de video.
■ Ajuste el tamaño de punto y la fase (únicamente para señal RGB analógica) (página 23).
o está codificada
Este problema se debe a la
computadora o a otro equipo
conectado y no al monitor
■ Aísle y elimine todas las fuentes que pudieran emitir campos eléctricos o magnéticos, como otros monitores, impresoras láser, abanicos
eléctricos, iluminación fluorescente y televisores.
■ Aleje el monitor de cables eléctricos de energía o coloque un protector contra energía magnética cerca del monitor.
■ Pruebe conectando el monitor en otro tomacorriente de ca, preferentemente en un circuito distinto.
■ Cambie la orientación del monitor.
■ Verifique el manual de la tarjeta de gráficos para obtener los valores correctos para el monitor.
■ Confirme que este monitor apoya el modo de gráficos (VESA, Macintosh 19'' a color, etc.) y la frecuencia de la señal de entrada. Incluso si la
frecuencia se encuentra dentro del rango adecuado, el impulso de sincronismo de algunas tarjetas de gráficos podría ser demasiado angosto
como para un sincronismo correcto del monitor.
■ Ajuste la velocidad de actualización de la computadora (frecuencia vertical) para obtener la mejor imagen posible (se recomiendan 60 Hz).
- 36 -
Page 80

Síntoma Verifique lo siguiente
La imagen está borrosa
Este problema se debe a la
computadora o a otro equipo
conectado y no al monitor
La imagen tiene fantasmas
La imagen no está centrada o no
tiene el tamaño correcto
La imagen es demasiado
pequeña
■ Ajuste el brillo y el contraste (páginas 20 y 26).
■ Ajuste el tamaño de punto y la fase (únicamente para señal RGB analógica) (página 23).
■ Fije la resolución y velocidad de actualización en 1280 x 768 / 60 Hz or 1024 x 768 / 60 Hz en su computadora.
■ Elimine el uso de extensiones de cable de video y/o de cajas de selección de video.
■ Verifique que todos los conectores estén bien asentados en los enchufes.
■ Ajuste el tamaño de punto y la fase (únicamente para señal RGB analógica) (página 23).
■ Ajuste la posición de la imagen (únicamente para señal RGB analógica) (página 23).
Nota: En algunos modos de video la imagen no llena toda la pantalla hasta las esquinas.
■ Fije el parámetro de acercamiento en Completa (páginas 22 y 30).
Este problema se debe a la
computadora o a otro equipo
conectado y no al monitor
La imagen está oscura
Se ve un patrón ondulado o
elíptico (muaré)
El color no es uniforme
El blanco no se ve blanco
El monitor se apaga después de
cierto tiempo
■ Fije la resolución en la resolución de la pantalla.
■ Ajuste el brillo (páginas 20 y 26).
■ Ajuste la iluminación de fondo (páginas 20 y 26).
■ Ajuste el tamaño de punto y la fase (únicamente para señal RGB analógica) (página 23).
■ Ajuste el tamaño de punto y la fase (únicamente para señal RGB analógica) (página 23).
■ Ajuste la temperatura de los colores (páginas 20 y 26).
■ Pruebe presionando cualquier tecla del teclado o mueva el mouse para salir del modo de Ahorro de energía.
- 37 -
Page 81

Solución de problemas (continuación)
Despliegue del nombre, número de serie y fecha de
fabricante del monitor
Cuando el monitor esté recibiendo una señal de
video, presione el botón MENU y manténgalo
presionado por más de cinco segundos.
Aparecerá el recuadro de información del
monitor. Vuelva a presionar el botón MENU para
que desaparezca el recuadro.
Ejemplo
MENU
Si continúa teniendo problemas, llame a su
concesionario autorizado Sony y brinde la
siguiente información:
■ Nombre del modelo
■ Número de serie
■ Nombre y especificaciones de su computadora y
tarjeta de gráficos
■ Tipo de la señal de entrada (RGB analógica)
- 38 -
Page 82

Función de autodiagnóstico
Este monitor cuenta con una función de
autodiagnóstico. Si se presenta un problema con
su monitor o computadora(s), la pantalla se
pondrá en blanco y la luz de encendido/apagado
se iluminará en verde o parpadeará iluminada en
ámbar . Si la luz de encendido/apagado se ilumina
en ámbar, significa que la computadora está en
el modo de ahorro de energía. Presione cualquier
tecla o mueva el mouse.
Si la imagen desaparece de la pantalla y
la luz de encendido/apagado se ilumina
en verde
1 Apague el botón de encendido/apagado y
desconecte los cables de la señal de video
del monitor.
Si las barras de colores no aparecen, es posible
que el monitor tenga una falla. Informe de este
problema a su concesionario autorizado Sony.
Si la imagen desaparece de la pantalla y
la luz de encendido/apagado parpadea
en color ámbar
Presione el botón de encendido/apagado dos
veces para apagar y encender el monitor.
Si la luz de encendido/apagado se ilumina en
verde, significa que el monitor está funcionando
adecuadamente.
Si la luz de encendido/apagado continúa
parpadeando, es posible que el monitor tenga
una falla. Cuente los segundos transcurridos
entre cada parpadeo en color ámbar de la luz de
Si la luz de encendido/apagado se
ilumina en color ámbar
Presione cualquier tecla o mueva el mouse.
El monitor sale del modo de ahorro de energía,
la luz de encendido/apagado se ilumina en verde
y la imagen aparece en la pantalla.
Si después de leer este manual tiene alguna
pregunta, por favor visite nuestro sitio web o
haga clic aquí www.sony.com/displays/support
para ver el área de Sony Technical Support
(Soporte técnico de Sony).
2 Encienda el monitor presionando el botón
de encendido/apagado.
Si aparecen las cuatro barras de colores (blanca,
roja, verd e, azul), significa que el monitor está
funcionando correctamente. Vuelva a conectar
los cables de entrada de video y determine si
continúa presentándose el problema; de ser así,
el problema podría encontrarse en la
computadora.
encendido/apagado e informe de este problema
del monitor a su concesionario autorizado Sony.
Asegúrese de citar el nombre del modelo y
número de serie de su monitor, así como la
marca y el modelo de su computadora y tarjeta
de gráficos.
- 39 -
Page 83

Especificaciones
Panel de la pantalla
de cristal líquido
Resolución de la
pantalla
Formato de la señal
de entrada
Niveles de señal de
entrada de
computadora
Entrada de video
componente 2/RGB
IN
Señal de entrada de
video
Tipo de panel: a-Si TFT de matriz
activa
Tamaño del monitor: 17,1
pulgadas (en diagonal)
Horizontal: Máx. 1280 puntos
Vertical: Máx. 768 líneas
Frecuencia de funcionamiento de
RGB* Horizontal: 28-70 kHz
Vertical: 48-85 Hz
Reloj de los puntos: 94,5 MHz
máx.
Señal de video RGB analógica:
0,7 Vp-p, 75
Señal de sincronismo (SYNC):
Nivel TTL, 2,2k
negativo
(Sincronismo horizontal y vertical o
compuesto separado)
0,3 Vp-p, 75
(Sincronismo por el verde)
Y: 1 Vp-p, 75 Ω, 0,3 V
sync negativo
Pb: 0,7 Vp-p, 75
Pr: 0,7 Vp-p, 75 Ω
Entrada de S-Video (miniconector
DIN de 4 espigas):
Y: 1 Vp-p, 75
sincronismo negativo
C: 0,286 Vp-p, 75
Video compuesto (conector tipo pin
jack):
1 Vp-p 75
sincronismo negativo
Ω, positivo
Ω, positivo o
Ω, negativo
Ω
Ω sin balance,
Ω
Ω sin balance,
Señal de salida de
audio
Entradas de audio
Requisitos de
alimentatación
Consumo de energía
Temperatura de
Salida de las bocinas: 3W x 2
Conector de audífonos:
Miniconector estereofónico
Impedancia aceptable 16-48
500 mVrms (modulación del 100%)
Impedancia 47k
Monitor:
cc 16,5 V 3,0 A
Adaptador:
Entrada: ca 100 – 240 V~
50/60 Hz 1,5 A
Salida: cc 16,5 V 3,03 A
Máximo 49 W
(incluído el adaptador de ca)
5 –35 C°
Ω
funcionamiento
Dimensiones del
monitor
Vertical con base:
Aprox. 472 x 405 x 184 mm
(18,6 x 15,9 x 7,2 pulgadas)
(ancho x alto x fondo)
Vertical sin base:
Aprox. 472 x 348 x 70 mm
(18,6 x 13,7 x 2,8 pulgadas)
Peso
Plug & Play
Con la base:
Aprox. 5,9 kg (13 libras)
Sin la base:
Aprox. 5,1 kg (11,2 libras)
DDC2B
Accesorios Consulte página 8
*Condición de sincronización horizontal y vertical
recomendada
■ El servicio de amplitud de sincronismo
horizontal debe ser superior a 4,8% del tiempo
horizontal total o 0,8µs, lo que sea superior.
Ω
■ La amplitud de borrado horizontal debe ser
mayor a 2,5µseg.
■ La amplitud de borrado vertical debe ser mayor
a 450µseg.
■ La velocidad máxima del reloj de pixeles de
vídeo debe ser menor a 94,5 MHz.
El diseño y las especificaciones están sujetos a
cambios sin previo aviso.
- 40 -
Page 84

Apéndice A
Tabla de sincronización para los modos preestablecidos para uso con la computadora
Núm. Resolución
(puntos x líneas)
Frecuencia
horizontal
Frecuencia
vertical
Modo de
gráficos
1 640 x 480 31,5 kHz 60 Hz VGA-G
2 640 x 480 37,5 kHz 75 Hz VESA
3 640 x 480 43,3 kHz 85 Hz VESA
4 720 x 400 31,5 kHz 70 Hz VGA-Texto
5 800 x 600 37,9 kHz 60 Hz SVGA
6 800 x 600 46,9 kHz 75 Hz VESA
7 800 x 600 53,7 kHz 85 Hz VESA
8 848 x 480 29,8 kHz 60 Hz VESA-CVT
9 848 x 480 37,6 kHz 75 Hz VESA-CVT
10 848 x 480 42,8 kHz 85 Hz VESA-CVT
11 1024 x 768 48,4 kHz 60 Hz XGA
12 1024 x 768 60,0 kHz 75 Hz VESA
13 1024 x 768 68,7 kHz 85 Hz VESA
14 1280 x 768 47,7 kHz 60 Hz WXGA
- 41 -
Page 85

Apéndice B
Tabla de sincronización para los modos Video
Modo de video Proporción Sincronización Tipo de escaneo Norma Interfaz
NTSC 4:3 15,73Khz/30Hz Entrelazado SMPTE 170M Compuesto/S-Video
720 x 480i 4:3/16:9 15,73Khz/30Hz Entrelazado EIA-770,2-C Componente (Y, Pb, Pr)
720 x 480p 4:3/16:9 31,47Khz/60Hz Progresivo EIA-770,2-C Componente (Y, Pb, Pr)
1280 x 720p 16:9 45,00Khz/60Hz Progresivo EIA-770,3-C Componente (Y, Pb, Pr)
1920 x 1080i 16:9 33,75Khz/30Hz Entrelazado EIA-770,3-C Componente (Y, Pb, Pr)
- 42 -
Page 86

Enregistrement du propriétaire
Les numéros de modèle et de série se trouvent à
l’arrière de l’appareil. Veuillez noter ces numéros dans
les espaces prévus à cet effet ci-dessous. Reportez-vous
à ces numéros lorsque vous communiquez avec votre
détaillant au sujet de ce produit.
N° de modèle ____________________________
N° de série _______________________________
AVERTISSEMENT
Afin d’éviter les risques d’incendie ou
d’électrocution, n’exposez pas l’appareil à la
pluie ou à l’humidité.
Des niveaux de tension dangereuse se tr ouvent
à l’intérieur de l’appareil. N’ouvrez pas ce
coffret. Reportez-vous seulement à du
personnel qualifié pour toute réparation.
Avis de la FCC (Commission fédérale
des communications)
Cet appareil a été mis à l’essai et s’avère conforme
aux limites associées à un appareil numérique de
classe B, en vertu de la Partie 15 des règlements de la
FCC. Ces limites sont conçues en vue d’offrir une
protection raisonnable contre le brouillage nuisible
dans une installation résidentielle. Cet équipement
génère, utilise et peut radier de l’énergie
radiofréquence et, s’il n’est pas installé correctement
et utilisé conformément aux instructions, peut aussi
engendrer du brouillage nuisible à la réception
radiophonique ou de télévision. Cependant, il n’est
pas garanti qu’aucun parasite n’intervienne dans une
installation particulière. Si cet équipement produit du
brouillage nuisible à la réception radiophonique ou de
télévision, ce qui peut être déterminé en allumant et
en éteignant l’appareil, on suggère à l’utilisateur de
tenter de régler le problème au moyen d’une ou de
plusieurs des mesures suivantes :
Le chiffre ci-dessous ne concerne que la FCC.
Déclaration de conformité
Nom de commerce : SONY
N° de modèle : SDM-V72W
Partie responsable : Sony Electronics Inc.
Adresse : 680 Kinderkamack Road,
Oradell, NJ 07649 USA
N° de téléphone : 201-930-6972
Cet appareil est conforme à la Partie 15 des
règlements de la FCC. Le fonctionnement est
soumis aux deux conditions suivantes : (1) cet
appareil ne doit pas causer de brouillage nuisible et
(2) cet appareil doit accepter tout brouillage r eçu, y
compris le brouillage pouvant causer un
fonctionnement indésirable.
NOTICE
As an ENERGY STAR Partner,
Sony has determined that this
product or product models meets
NERGY STAR guidelines
the E
for energy efficiency.
ENERGY STAR is a U.S. registered mark.
®
■ Réorientez ou déplacez l’antenne de réception;
Cette notice s’applique aux États-Unis et au
Canada uniquement.
■ Accroître la distance entre l’appareil et le récepteur;
■ Raccordez l’appareil à une prise située sur un circuit
différent de celui sur lequel le récepteur est branché;
Si cet appareil est exporté aux États-Unis ou au
Canada, utiliser le cordon d’alimentation
portant la mention UL LISTED/CSA LABELLED et
remplissant les conditions suivantes :
■ Consultez le détaillant ou un technicien radio/télé
expérimenté pour obtenir de l’aide.
Veuillez noter que tout changement ou modification
non expressément approuvés dans ce manuel pourrait
annuler votre autorisation de faire fonctionner cet
SPÉCIFICATIONS
Type de fiche Fiche Nema 5-15 broches
Cordon Type SVT ou SJT, non blindé,
minimum 3 x 18 AWG
appareil.
Longueur Maximum de 15 pieds
®
®
Si vous avez des questions au sujet du produit ou
pour connaître le centre de service d’information à la
clientèle Sony le plus proche, composez le :
Tension Minimum 7 A, 125 V
1-800-222-SONY (7669)
- 1 -
Page 87

Table des matières
■ Macintosh est une marque de
commerce brevetée d’Apple
Computer, Inc., enregistrée
aux États-Unis et dans
d’autres pays.
■ Windows
®
est une marque de
commerce déposée de
Microsoft Corporation aux
États-Unis et dans d’autres pays.
■ IBM PC/AT et VGA sont des
marques de commerce
déposées d’IBM Corporation
des États-Unis.
■ VESA et DDC
TM
sont des
marques de commerce de la
Video Electronics Standards
Association.
■ ENERGY STAR est une marque
déposée des États-Unis.
Précautions - - - - - - - - - - - - - - - - - - - - - - - - - -3
Identification des pièces et commandes - - - - - - - - - - - -5
Installation- - - - - - - - - - - - - - - - - -8
Installation 1 : Activation et remplacement de la pile de la
télécarte - - - - - - - - - - - - - - - - - - - - - - - - - - - 9
Installation 2 : Connexion de l’écran à l’ordinateur - - - - - - 10
Installation 3 : Connexion du cordon audio - - - - - - - - - 11
Installation 4 : Connexion des câbles vidéo - - - - - - - - - 12
Installation 5 : Connexion de l’adaptateur c.a.- - - - - - - - 13
Installation 6 : Organisation des câbles et remplacement du
panneau arrière - - - - - - - - - - - - - - - - - - - - - - - 14
Installation 7 : Connexion du cordon d’alimentation - - - - 15
Installation 8 : Allumer l’écran, l’ordinateur et les
autres appareils- - - - - - - - - - - - - - - - - - - - - - 16
Installation 9 : Réglage de l’inclinaison - - - - - - - - - - - 17
Navigation des menus vidéo - - - - - - - - - - - - - - - - 25
Options de CONTRÔLE DE L’IMAGE
(pour Vidéo, S-Vidéo ou Composante) - - - - - - - - - - - 26
Options de CONTRÔLE AUDIO
(pour Vidéo, S-Vidéo ou Composante) - - - - - - - - - - - 27
Options de CONTRÔLE DE L’ÉCRAN
(pour Vidéo, S-Vidéo ou Composante) - - - - - - - - - - - 28
Options de RÉGLAGE
(pour Vidéo, S-Vidéo ou Composante) - - - - - - - - - - - 31
Caractéristiques techniques - - - - - - - - 32
Fonction d’économie d’énergie - - - - - - - - - - - - - - - 32
Modes préréglés et de l’utilisateur - - - - - - - - - - - - - 32
Contrôle du volume - - - - - - - - - - - - - - - - - - - - - 33
Utilisation des écouteurs - - - - - - - - - - - - - - - - - - 33
■ Tous les autres noms de
produits mentionnés aux
présentes peuvent être des
marques de commerce ou des
marques déposées de leurs
entreprises respectives.
■ est une marque de
commerce de SRS Labs, Inc.
La technologie SRS WOW est
incorporée sous licence par
SRS Labs, Inc.
■ De plus, “
TM
” et “®” ne sont
pas indiqués dans tous les
cas, dans ce manuel.
Utilisation de la télécarte - - - - - - - - - 18
Personnalisation de l’affichage - - - - - - 19
Navigation des menus PC - - - - - - - - - - - - - - - - - - 19
Options de CONTRÔLE DE L’IMAGE PC- - - - - - - - - - - - 20
Options de CONTRÔLE DE L’AUDIO PC- - - - - - - - - - - - 21
Options de CONTRÔLE DE L’ÉCRAN PC- - - - - - - - - - - - 22
Options de RÉGLAGE PC - - - - - - - - - - - - - - - - - - - 24
- 2 -
Dépannage- - - - - - - - - - - - - - - - - 34
Messages à l’écran pour ordinateur - - - - - - - - - - - - - 34
Fonction d’autodiagnostic- - - - - - - - - - - - - - - - - - 39
Spécifications - - - - - - - - - - - - - - - 40
Annexe A- - - - - - - - - - - - - - - - - - 41
Annexe B - - - - - - - - - - - - - - - - - - 42
Page 88

Précautions
Avertissement au sujet des
raccords d’alimentation
Utilisez le cordon d’alimentation fourni. Si vous
utilisez un autre cordon d’alimentation,
assurez-vous qu’il est compatible à votre
alimentation en électricité locale.
Si vous n’utilisez pas le cordon approprié,
l’écran ne se conformera pas aux normes
obligatoires de la FCC.
pour 100 à 120 volts c.a. pour 200 à 240 volts c.a.
Installation
N’installez pas l’écran et ne laissez pas ce dernier:
■ dans des endroits soumis à des températures
extrêmes, par exemple près d’un radiateur,
d’un évent de chauffage ou directement au
soleil. Soumettre l’écran à des températures
élevées, tel qu’à l’intérieur d’une voiture
stationnée directement au soleil, pourrait
causer des déformations au boîtier ou des
défauts de fonctionnement;
■ dans des endroits où l’écran risque de basculer
ou de tomber, tels que dans des endroits
soumis à des vibrations ou à des chocs ou sur
une surface instable;
■ près d’un appareil qui génère un champ
magnétique à haute fréquence, tel qu’un
téléviseur ou divers autres appareils
électroménagers;
Manipulation de l’écran à cristaux
liquides
■ Ne laissez pas l’écran à cristaux liquides face au
soleil puisque cela risquerait de
l’endommager. Faites attention avant de
placer l’écran près d’une fenêtre.
■ Ne poussez pas ou n’égratignez pas l’écran à
cristaux liquides et ne placez pas des objets
lourds sur ce dernier. L ’écran risquerait alors de
perdre son uniformité ou le panneau à cristaux
liquides de mal fonctionner.
■ Si l’écran est utilisé dans un endroit froid, il est
possible qu’une image résiduelle apparaisse à
l’écran. Il ne s’agit pas d’un défaut de
fonctionnement. L’écran revient à l’état
normal lorsque la température s’élève à un
À utiliser uniquement avec l’adaptateur c.a. AC-DP001
de Sony
Cet appareil doit être installé près d’une prise
de courant facilement accessible.
■ dans des endroits soumis à une quantité
démesurée de poussière, de saleté ou de sable,
par exemple près d’une fenêtre ouverte ou
d’une sortie vers l’extérieur. Si vous installez
l’écran à l’extérieur, temporairement,
assurez-vous de prendre les précautions
nécessaires contre la poussière et la saleté. Le
cas échéant, il risque de survenir des défauts
de fonctionnement.
■ dans des endroits où l’écran pourrait entrer en
contact avec de l’humidité ou des liquides, tels
que dans une salle de bains ou près d’une
piscine. Ne placez pas de verres ou de tasses sur
l’écran pour éviter que le liquide ne se
renverse à l’intérieur.
- 3 -
niveau normal de fonctionnement.
■ Si une image fixe est affichée pendant une
longue période de temps, une image
résiduelle peut apparaître pendant un certain
temps. L’image résiduelle disparaîtra
ultérieurement.
■ Le panneau à cristaux liquides devient chaud
pendant le fonctionnement. Il ne s’agit pas
d’un défaut de fonctionnement.
Page 89

Au sujet des haut-parleurs intégrés
Entretien
Transport
Assurez-vous de garder les appareils
d’enregistrement magnétique, les bandes et les
disquettes loin des ouvertures des haut-parleurs
puisque ces derniers génèrent un champ
magnétique. Ce dernier peut affecter les
données enregistrées sur les bandes
magnétiques et les disquettes.
Manipulation des écouteurs
Assurez-vous de retirer les écouteurs avant de
vous éloigner de l'écran. Si le cordon des
écouteurs est retiré de l’écran brusquement,
vous risquez de causer des blessures ou des
dommages.
■ Assurez-vous de débrancher le cordon
d’alimentation de la prise de courant avant de
nettoyer votre écran.
■ Nettoyez l’écran LCD au moyen d’un chiffon
doux. Si vous utilisez un liquide nettoyant
pour verre, n’utilisez pas un nettoyant
contenant une solution antistatique ou un
additif similaire, car cela risque d’égratigner le
revêtement de l’écran à cristaux liquides.
■ Nettoyez d’abord le coffret, le panneau et les
commandes au moyen d’un chiffon doux
légèrement humecté d’une solution de
détergent doux puis les assécher au moyen
d’un chiffon doux. N’utilisez pas des tampons
abrasifs, de la poudre à récurer ou des
solvants, tels que de l’alcool ou du benzène.
■ Débranchez tous les câbles de l’écran et
agrippez le support et la base du socle de
l’écran fermement avec les deux mains avant
de le déplacer. Si vous échappez l’écran, vous
risquez de vous blesser ou encore
d’endommager ce dernier.
■ Le panneau arrière est conçu pour être enlevé;
ne soulevez pas l’écran en agrippant
seulement le panneau arrière.
■ Lorsque vous transportez l’écran pour le faire
réparer ou l’expédier, utilisez la boîte et
l’emballage originaux.
Mise au rebut de l’écran
■ Ne jetez pas cet écran avec les ordures
ménagères.
Remarque au sujet du LCD (écran à
cristaux liquides)
Veuillez noter que l’écran à cristaux liquides est
fabriqué au moyen d’une technologie à haute
précision. Cependant, des points noirs ou des
points brillants de lumière (rouge, bleue ou
verte) peuvent apparaître constamment à
l’écran et des rayures irrégulières de couleur ou
de la luminosité peuvent aussi apparaître sur
l’écran à cristaux liquides. Il ne s’agit pas d’un
défaut de fonctionnement.
(Points effectifs : plus de 99,99%)
■ Ne frottez pas, ne touchez pas ou ne tapotez
pas la surface de l’écran au moyen d’articles
tranchants ou abrasifs, tels qu’un stylo à bille
ou un tournevis. Ce type de contact risque
d’égratigner l’écran à cristaux liquides.
■ Veuillez remarquer que les matériaux ou le
revêtement de l’écran à cristaux liquides
peuvent se détériorer si l’écran est exposé à
des solvants volatiles, tels que des insecticides,
ou en cas de contact prolongé avec des
matériaux en vinyle ou en caoutchouc.
■ L ’écran à cristaux liquides comprend une petite
quantité de mercure et de cristaux liquides. Le
tube fluorescent utilisé dans cet écran contient
également du mercure. Respectez les
règlements et les ordonnances locaux relatifs à
la mise au rebut.
- 4 -
Page 90

Identification des pièces et commandes
Reportez-vous aux pages qui se trouvent entre
par en th èse s pour obtenir de plus amples détails.
POWER
1
MENU
Partie avant de l’écran LCD
3
4
2
q;
OK
5
WIDE
6
8
INPUT
7
1 Touche POWER (page 16)
Cette touche permet d’allumer l’écran. Pour
éteindre l’écran, appuyez sur cette touche à
nouveau.
2 Voyant DEL de marche/arrêt (page 16)
Ce voyant indique la fonction marche/arrêt,
d’économie d’énergie et le statut d’arrêt à
distance.
3 Touche MENU (pages 19 et 25)
Cette touche permet d’activer ou de
désactiver l’écran du menu.
4 Touches +/- (pages 19, 25 et 33)
Ces touches sont utilisées pour sélectionner
les éléments du menu et effectuer des
réglages ainsi que pour contrôler le volume
lorsque l’écran du menu n’est pas activé.
5 Touche OK (pages 19 et 25)
7 Touche INPUT (pages 19 et 25)
Cette touche permet de basculer entre les
sources d’entrée raccordées, y compris
l’entrée PC, l’entrée composite Vidéo,
l’entrée S-Vidéo et l’entrée Vidéo
composante Y/Pb/Pr.
8 Haut-parleurs stéréo (page 33)
Ces derniers permettent de transformer les
signaux audio en son.
9 Prise pour écouteurs (page 33)
Cette prise transfère les signaux audio dans
les écouteurs.
q; Fenêtre de capteur de la télécarte IR
(récepteur infrarouge)
Cette fenêtre détecte les signaux de la
télécarte.
9
Vue latérale de l’écran LCD
Cette touche permet d’activer l’élément de
POWER
MENU
DK
WIDE
INPUT
menu sélectionné et d’effectuer des réglages
au moyen des touches +/-
6 Touche WIDE (pages 22 et 29)
4.
Cette touche permet de basculer entre
différents modes de format d’écran à partir du
mode PC ainsi que Vidéo.
- 5 -
Page 91

Identification des pièces et commandes (suite)
Partie arrière de l’écran LCD
qa
qa Panneau arrière (pages 10 et 14)
Retirez ce panneau pour accéder aux
connexions d’alimentation et d’entrée de
l’écran.
qs Entrée HD15 pour entrée PC
(RVB analogique)
Ce connecteur permet de recevoir les
signaux vidéo analogiques RVB (0,700 Vp-p,
positif) et les signaux SYNC.
qd Prise d’entrée audio pour entrée PC
(page 11)
Cette prise transforme les signaux audio
lorsqu’elle est raccordée à la prise de sortie
audio d’un ordinateur ou d’un autre appar eil
audio.
qg Entrée S-Vidéo (page 12)
Cette prise transforme les signaux vidéo
lorsqu’elle est raccordée à une prise de sortie
S-Vidéo d’un appareil vidéo pour obtenir
une image de meilleure qualité que celle du
vidéo composite. Vous devrez également
raccorder des câbles audio pour obtenir le
son (S-Vidéo ne transmet que le signal
vidéo).
qh Composante vidéo et entrée audio
(page 12)
Ces prises transmettent des signaux audio et
vidéo de haute qualité lorsqu’elles sont
raccordées à des appareils munis de prises
de sortie composante.
PC IN
AUDIO IN
S VIDEOVIDEOR L P
VIDEO IN
R LHD15
Y
B
P
R
DC IN 16.5V
qs qd qf qg qh qj
qk
qf Entrée composite (page 12)
Ces prises permettent de recevoir les signaux
audio-vidéo lorsqu’elles sont raccordées à la
prise de sortie composite d’un appareil vidéo
muni d’une sortie composite.
- 6 -
qj Connecteur d’entrée c. c. (page 13)
Ce connecteur fournit une alimentation de
16,5 volts c.c. à l’écran. Reliez l’adaptateur
c.a. (fourni) à ce connecteur.
qk Gaine de câble (pages 10 et 14)
Retirez cette gaine pour organiser les câbles
raccordés à l’écran.
Page 92

Identification des pièces et des commandes (suite)
Télécarte
ql Touche MUTE (page 33)
ql w; wa ws
Appuyez sur cette touche pour assourdir le
wg Touche composante vidéo Y/ Pb/ Pr
(page 12)
wd
wf
wk
wj
wg
wl
wh
son. Appuyez sur cette touche à nouveau ou
sur la touche Volume + pour rétablir le son.
w; Touche PICTURE MODE (page 26)
Appuyez sur cette touche pour basculer
entre les différents réglages du mode de
l’image.
wa Touche WIDE MODE (pages 22 et 29)
Appuyez sur cette touche pour basculer
entre les dif férents modes de format d’écran
à partir des modes PC ainsi que Vidéo.
ws Touche POWER (page 16)
Appuyez sur cette touche pour allumer
l’écran lorsque le voyant DEL de mise en
circuit est ro uge. Pour éteindre l’écran (mode
d’arrêt à distance), appuyez sur cette touche
à nouveau. Pour le mode d’arrêt à distance,
Appuyez sur cette touche pour afficher le
signal d’entrée composante vidéo.
wh Touche MENU (pages 19 et 25)
Appuyez sur cette touche pour activer et
désactiver l’écran du menu.
wj Flèches de défilement (pages 19 et 25)
Utilisez ces touches pour sélectionner les
éléments de menu et effectuer des réglages.
wk Touche OK (pages 19 et 25)
Appuyez sur cette touche pour activer
l’élément de menu sélectionné et les
réglages au moyen des flèches de défilement
wj.
wl Touches VOLUME +/- (pages 19, 25 et 33)
se reporter à la page 18.
wd Touche d’entrée PC (page 12)
Appuyez sur cette touche pour afficher le
signal d’entrée PC.
wf Touche d’entrée VIDÉO (page 12)
Appuyez sur cette touche pour afficher le
signal vidéo composite ou S-Vidéo.
- 7 -
Utilisez ces touches pour contrôler le
volume.
Page 93

Installation
Avant d’utiliser votre écran, assurez-vous que les articles suivants se trouvent dans la boîte :
■ Écran LCD
■ Télécarte
■ Cordon d’alimentation c.a.
■ Adaptateur c.a. (AC-DP001)
■ Câble de signal vidéo HD15/D-sub
(RVB analogique)
■ Cordon audio (miniprise stéréo)
Cordon d'alimentation c.a.
Adaptateur c.a.
■ Câble de rallonge composite vidéo
■ Câble de rallonge S-Vidéo
■ Carte de garantie
■ Guide d’installation rapide
■ Ce manuel d’utilisation sur CD- ROM
✍
zCet écran peut être installé au
mur au moyen du support mural
standard VESA. Pour obtenir les
directives et le support mural,
communiquez avec votre détaillant
local.
Écran LCD
C
âble de signal vidéo HD15/D-sub
(RVB analogique)
Carte de garantie
Cordon audio
4-062-412-
13
(T1)
P
C
o
m
p
u
t
e
r
D
i
s
p
l
a
y
P
r
o
d
u
c
t
s
LIM
IT
ED
W
A
R
R
A
N
TY
S
o
n
y
E
l
e
c
t
r
o
n
i
c
s
I
n
c
.
a
n
d
S
o
n
y
o
f
C
a
n
a
d
a
L
t
m
d
.
a
(
t
“
e
S
r
O
i
a
N
l
o
Y
r
”
w
)
w
o
r
a
k
r
m
r
a
a
n
n
t
s
s
h
t
h
i
p
i
s
a
P
s
r
f
o
o
d
l
l
u
o
c
w
t
s
a
:
g
a
i
n
s
t
d
e
f
e
c
t
s
i
1
.
L
t
o
b
e
d
p
a
y
t
h
e
p
a
y
f
o
r
a
2
.
P
AR
f
o
r
d
e
f
e
c
t
p
a
r
t
s
c
o
s
t
.
T
o
o
b
t
a
i
n
w
e
i
t
h
e
r
i
t
s
o
r
i
S
o
n
y
S
e
r
v
i
c
T
h
i
s
w
a
r
r
a
n
t
y
p
r
o
b
l
e
m
s
.
T
h
i
s
w
a
r
r
a
n
t
y
d
a
n
y
o
n
e
o
t
h
e
r
t
h
n
u
m
b
e
r
h
a
s
b
e
e
d
u
e
t
o
a
c
t
s
o
f
G
o
a
n
y
p
a
r
t
o
f
t
h
e
m
a
i
n
t
e
n
a
n
c
e
,
c
o
n
A
S
I
S
o
r
W
I
T
H
A
L
T
h
i
s
w
a
r
r
a
n
t
y
i
s
v
a
p
u
r
c
h
a
s
e
.
P
r
o
o
f
o
f
p
u
r
c
h
a
s
e
i
n
w
i
t
h
i
n
t
h
e
W
a
r
r
a
n
t
y
p
T
h
i
s
w
a
r
r
a
n
t
y
i
s
i
n
v
a
l
i
P
r
o
d
u
c
t
.
R
E
P
A
I
R
O
R
R
E
P
L
A
C
E
M
E
O
F
T
H
E
C
O
N
S
U
M
E
R
.
S
O
D
A
M
A
G
E
S
F
O
R
B
R
E
A
C
H
T
O
T
H
E
E
X
T
E
N
T
P
R
O
M
E
R
C
H
A
N
T
A
B
I
L
I
T
Y
O
R
F
I
D
U
R
A
T
I
O
N
T
O
T
H
E
D
U
R
A
T
S
o
m
e
s
t
a
t
e
s
a
n
d
p
r
o
v
i
n
c
e
s
d
a
m
a
g
e
s
,
o
r
a
l
l
o
w
l
i
m
i
t
a
t
i
o
n
e
x
c
l
u
s
i
o
n
s
m
a
y
n
o
t
a
p
p
l
y
t
o
o
t
h
e
r
r
i
g
h
t
s
w
h
i
c
h
v
a
r
y
f
r
o
m
FOR FREQUENTL
Y CALLED TELEPHONE NUM
n
A
B
O
R
:
F
o
r
a
p
e
r
i
o
d
o
f
t
h
r
e
e
(
3
)
y
e
a
r
s
f
r
o
m
t
h
e
e
d
f
a
e
t
c
e
t
i
v
o
e
f
,
p
S
u
o
r
c
n
h
y
a
w
s
e
i
l
,
l
i
r
f
e
t
h
p
i
a
s
i
r
P
o
r
o
r
d
r
u
e
p
c
t
l
a
i
s
c
e
d
e
t
h
t
e
e
r
P
m
r
i
o
n
d
e
u
d
l
c
a
t
b
w
o
i
r
t
h
c
h
a
a
n
r
g
e
e
w
s
t
o
o
r
a
r
e
n
b
y
u
S
i
l
o
t
n
u
y
n
i
a
t
,
u
a
t
h
t
o
n
r
o
i
z
c
e
h
d
a
s
r
e
g
r
e
v
,
i
c
o
e
r
l
f
l
a
l
c
a
i
b
l
i
o
t
y
r
.
A
c
h
f
t
a
e
r
r
g
t
e
h
s
e
.
W
a
r
r
a
n
t
y
P
e
r
i
o
d
,
y
o
u
m
u
s
t
T
S
:
I
n
a
d
d
i
t
i
o
n
,
S
o
n
y
w
i
l
l
s
u
p
p
l
y
,
a
t
n
o
c
h
a
r
g
e
i
v
,
e
n
e
p
w
a
r
o
t
s
r
f
r
o
e
r
b
u
a
i
l
p
t
e
r
r
e
i
p
o
l
d
a
c
o
e
f
m
t
h
e
r
n
e
t
e
s
(
i
3
n
)
e
y
x
e
c
a
h
r
a
s
n
.
g
A
e
f
t
e
r
t
h
e
w
a
r
r
a
n
t
y
p
e
r
i
o
d
,
y
o
u
m
u
s
t
p
a
y
f
o
r
a
l
l
a
r
r
a
n
t
y
s
e
r
v
i
c
e
,
y
o
u
m
u
s
t
t
a
k
e
t
h
e
P
r
o
d
u
c
t
,
g
o
i
r
n
d
a
e
l
p
l
i
v
a
e
c
k
r
a
t
g
h
i
e
n
g
P
r
o
o
r
d
p
u
a
c
c
t
k
f
a
r
g
e
i
i
g
n
h
g
t
a
p
f
f
r
o
e
r
p
d
a
i
n
i
d
g
,
a
i
n
n
e
q
u
e
a
f
l
a
d
c
e
i
g
l
i
t
r
y
e
.
e
o
f
p
r
o
t
e
c
t
i
o
n
,
t
o
a
n
y
a
u
t
h
o
r
i
z
e
d
d
o
e
s
n
o
t
c
o
v
e
r
c
u
s
t
o
m
e
r
i
n
s
t
r
u
c
t
i
o
n
,
i
n
s
t
a
l
l
a
t
i
o
n
,
s
e
t
u
p
a
d
j
u
s
t
m
e
n
t
s
o
r
s
i
g
n
a
l
r
e
c
e
p
t
i
o
n
o
e
s
n
o
t
c
o
v
e
r
a
n
y
u
n
i
t
s
w
h
i
c
h
h
a
v
e
b
e
e
n
p
r
e
v
a
i
o
n
u
a
s
l
s
y
e
a
r
v
l
t
i
e
c
r
e
e
f
d
a
,
c
r
i
e
l
i
p
t
y
a
i
a
r
u
e
t
d
h
o
o
r
r
i
s
z
e
e
r
d
v
b
i
c
y
e
S
d
o
b
n
y
y
,
o
r
a
u
n
n
i
t
a
o
l
n
t
e
w
r
e
h
d
i
c
o
h
r
t
r
h
e
e
m
f
a
o
c
v
t
e
o
d
r
y
.
-
T
a
h
p
i
p
s
l
w
i
e
a
d
r
s
r
a
e
n
r
i
t
a
y
l
d
o
e
s
n
o
t
d
c
,
o
a
v
c
e
c
r
i
d
c
e
o
n
s
t
m
,
m
e
t
i
i
s
c
u
d
s
a
e
m
,
a
a
b
g
u
e
s
o
e
,
r
n
d
e
a
g
m
l
i
a
g
g
e
e
n
c
e
,
c
o
m
m
P
r
e
o
r
d
c
u
i
a
c
l
t
.
u
s
T
e
h
,
i
s
o
r
w
m
a
o
r
r
d
a
i
n
f
i
t
c
y
a
t
d
i
o
o
n
e
s
o
f
n
,
o
o
t
r
t
c
o
o
v
e
r
d
a
m
a
n
g
e
e
c
t
i
d
o
u
n
e
t
o
t
o
i
m
i
m
p
r
p
o
r
p
o
e
p
r
e
v
r
o
o
l
t
p
a
e
g
r
e
a
s
t
i
u
o
p
n
p
o
l
y
r
.
T
h
i
s
w
a
r
r
L
a
F
n
A
t
y
U
d
L
T
o
S
e
s
.
n
o
t
c
o
v
e
r
p
r
o
d
u
c
t
s
s
o
l
d
l
i
d
o
n
l
y
i
n
t
h
e
U
n
i
t
e
d
S
t
a
t
e
s
a
n
d
C
a
n
a
d
a
a
n
d
o
n
l
y
i
n
t
h
e
r
e
s
p
e
c
t
i
v
e
c
o
u
n
t
r
y
o
f
t
h
e
f
o
r
m
o
f
a
b
i
l
l
o
f
s
a
l
e
o
r
r
e
c
e
i
p
t
e
d
i
n
v
o
i
c
e
,
w
e
h
r
i
i
o
c
h
d
,
i
s
m
e
u
v
s
i
t
d
b
e
n
e
c
p
e
r
e
t
h
s
e
a
n
t
t
t
e
h
d
e
t
u
o
n
o
i
t
b
i
s
t
a
i
n
w
a
r
r
a
n
t
y
s
e
r
v
i
c
e
.
d
i
f
t
h
e
f
a
c
t
o
r
y
a
p
p
l
i
e
d
s
e
r
i
a
l
n
u
m
b
e
r
h
a
s
b
e
e
n
a
l
t
e
r
e
d
o
r
r
e
m
o
v
e
d
f
r
o
m
t
h
e
N
T
A
S
P
R
O
V
I
D
E
D
U
N
D
E
R
T
H
I
S
W
A
R
R
A
N
T
Y
I
S
N
T
Y
H
S
E
H
E
A
X
L
C
L
L
N
U
O
S
T
I
V
B
E
E
R
L
E
I
M
A
B
E
L
D
E
Y
F
O
R
A
N
Y
I
N
C
I
D
E
N
O
T
F
A
L
A
N
O
Y
R
E
C
X
O
P
N
R
S
E
E
S
Q
S
U
O
E
R
N
I
T
M
I
A
P
L
L
I
E
D
W
A
R
R
A
N
T
Y
O
H
N
I
T
B
H
I
T
I
S
E
D
P
R
O
B
D
Y
U
A
C
P
T
.
P
E
L
X
I
C
C
E
A
P
B
T
L
E
L
A
W,
A
N
Y
I
M
T
P
N
L
E
I
S
E
S
D
F
O
W
R
A
A
R
P
R
A
A
RT
N
I
T
C
Y
U
L
O
A
F
R
P
U
R
P
O
S
E
O
N
T
H
I
S
I
O
P
N
R
O
O
D
F
U
T
C
H
T
I
S
I
S
W
L
A
I
M
R
R
I
T
A
E
N
D
T
I
N
Y
.
d
o
n
o
t
a
l
l
o
w
t
h
e
e
x
c
l
u
s
i
o
n
o
r
l
i
m
i
t
a
t
i
o
n
o
f
i
n
c
s
i
d
o
e
n
n
t
h
a
o
l
o
w
r
l
c
o
o
n
n
g
s
e
a
q
n
u
i
e
m
n
p
t
i
l
a
i
e
l
d
w
a
r
r
a
n
t
y
l
a
s
t
s
,
s
o
y
t
h
o
e
u
.
a
T
b
h
o
i
v
s
e
w
l
i
a
m
r
r
i
a
t
a
n
t
t
i
y
o
n
g
s
i
v
o
e
r
s
y
o
u
s
p
e
c
i
f
i
c
l
e
g
a
l
r
i
g
s
h
t
a
t
t
s
e
,
a
t
o
n
d
s
t
y
a
o
t
e
u
o
m
r
a
p
y
r
o
h
v
a
i
n
v
e
c
e
t
o
p
r
o
v
i
n
c
e
.
BERS, PLEASE SEE REVERSE SIDE.
P
r
i
n
t
e
d
i
n
U
S
A
Câble de rallonge composite vidéo
CD
Câble de rallonge S-Vidéo
Guide d'installation rapide
- 8 -
Page 94

Installation 1
Activation et remplacement de la pile de la télécarte
Activation de la télécarte
Pour activer la pile de la télécarte, retirez
languette en plastique en tirant sur
l’onglet.
Remplacement de la pile de la télécarte
1 Pour remplacer une pile usée par une
pile neuve, retirez le compartiment de la
pile de la télécarte en poussant le taquet
de sécurité vers la droite, puis en retirant
le compartiment.
2 Assurez-vous que la borne positive (+) de
la pile au lithium CR2025 est orientée
vers le haut.
✍
tentez pas de la plier, ne l’échappez pas ou
ne la mouillez pas. Évitez de la placer près
d’une source de chaleur, directement au
soleil ou dans un endroit où le taux
d’humidité est élevé.
Mise en garde : Gardez les piles hors de la
portée des jeunes enfants. Ces dernières
présentent un risque pour la santé si elles
sont placées dans la bouche (c.-à-d. qu’ils
peuvent les avaler ou s’étouffer).
zManipulez la télécarte avec soin. Ne
1
2
3 Fermez le compartiment de la pile en
poussant doucement jusqu’à ce que vous
entendiez le déclic.
La pile usée doit être jetée de façon
appropriée. Vérifiez la réglementation locale.
- 9 -
Page 95

Installation 2
Éteignez l’écran et l’ordinateur avant d’ef fectuer la connexion. Ne touchez pas aux br oches du connecteur de câble du signal vidéo pour éviter de les courber.
Connexion de l’écran à l’ordinateur
2
1
1 Retirez le panneau arrière en tenant la
partie supérieure d’une main, comme
dans l’illustration, puis détachez les
boutons qui se trouvent dans chaque
coin.
2 Retirez la gaine de câble en tirant
doucement sur la portion concave
supérieure.
Connexion à un ordinateur IBM PC/AT Connexion à un ordinateur Macintosh
■ Connexion à un ordinateur IBM PC/AT ou
compatible
Au moyen du câble HD 15/D-sub (fourni),
raccordez l’ordinateur au connecteur
d’entrée HD 15 de l’écran.
Assurez-vous de vérifier l’alignement du
câble HD15/D-sub. Ne forcez pas le
connecteur dans la mauvaise direction, car
vous risqueriez de courber les broches.
■ Connexion à un ordinateur Macintosh
Lors de la connexion à un ordinateur
Macintosh, utilisez un adaptateur (non
- 10 -
fourni) si nécessaire. Branchez l’adaptateur à
l’ordinateur avant de brancher le câble de
signal vidéo.
Page 96

Installation 3
Connexion du cordon audio
Raccordez le cordon audio fourni à la prise
d’entrée audio PC. Le connecteur du cordon
audio et la prise d’entrée audio sont
chromocodés. Faites correspondre les couleurs
similaires.
Au moyen des haut-parleurs ou des écouteurs de
l’écran, vous pouvez entendre les sons de votre
ordinateur ou des autres appareils audio
raccordés aux prises d’entrée audio de l’écran.
Pour de plus amples renseignements,
reportez-vous à « Contrôler le volume » à la
page 33.
- 11 -
Page 97

Installation 4
PBR L
PR
Y
VIDEOR L
VIDE
S VIDEO
Connexion des câbles vidéo
Vous pouvez raccorder les câbles composite vidéo, le câble S-Vidéo ainsi que les câbles composante vidéo pour vos besoins vidéo.
■ Connexion avec des câbles composite vidéo
Composite vidéo transmet un signal combiné de teinte
(chrominance) et de luminosité (luminance) au moyen
d’un seul câble. Pour cette connexion, utilisez le câble
A/V traditionnel. (Câble vidéo et audio G/D combiné).
■ Connexion avec des câbles S-Vidéo
Si votre appareil possède une sortie S-Vidéo, utilisez
cette connexion pour obtenir une image de meilleure
qualité que celle obtenue grâce à la connexion
composite vidéo. Vous devrez raccorder les câbles
audio (audio G/D) pour le son (S-Vidéo ne transmet que
le signal vidéo).
■ Connexion avec des câbles composante vidéo
Si votre appareil possède une sortie composante vidéo,
utilisez cette connexion pour obtenir la meilleure
qualité d’image couleur . La composante vidéo transmet
des signaux de deux teintes (chrominance) et
luminosité (luminance) séparément. Les câbles
composante vidéo sont habituellement marqués d’un
Y, Pb et Pr. En plus de la composante vidéo, vous aurez
aussi besoin de raccorder un câble audio G/D pour le
son.
- 12 -
Page 98

Installation 5
Connexion de l’adaptateur c.a.
Raccordez l’adaptateur c.a. (fourni) à l’écran.
Adaptateur c.a.
(fourni)
DC IN 16.5V
- 13 -
Page 99

Installation 6
Organisation des câbles et remplacement du panneau arrière
1
3
2
1 Liez les câbles et les cordons; ensuite,
acheminez-les à travers le socle de base.
2 Remplacez la gaine de câble en alignant
les chevilles cylindriques avec les trous,
puis appuyez.
3 Tenez le panneau arrière d’une main et
enfoncez-le aux quatre coins.
- 14 -
Page 100

Installation 7
Connexion du cordon d’alimentation
1 D’abord, raccordez l’adaptateur c.a. à
l’écran, tel qu’indiqué dans l’Installation
5. (Reportez-vous à la page 13).
2 Raccordez le cordon d’alimentation à
Vers la prise de
courant
3
Cordon
d’alimentation
(fourni)
l’adaptateur c.a. (fourni).
3 Raccordez le cordon d’alimentation à la
prise de courant la plus proche.
12
Adaptateur c.a.
(fourni)
DC IN 16.5V
- 15 -
 Loading...