

Page 1

Home Theater
Active Speaker System
3-800-386-23(1)
Operating instructions
SA-VA15
© 1995 by Sony Corporation
Page 2
WARNING
To prevent fire or shock
hazard, do not expose the
unit to rain or moisture.
- Reorient or relocate the receiving
antenna.
- Increase the separation between the
equipment and receiver.
- Cormect the equipment into an outlet
on a circuit different from that to which
the receiver is connected.
- Consult the dealer or an experienced
radio/TV technician for help.
Welcome!
Thank you for purchasing a Sony speaker
system.
Before operating the unit, please read this
manual thoroughly and retain it for
future reference.
CAUTION
A
RISK OF ELECTRIC SHOCK
DO NOT OPEN
CAUTION: TO REDUCE THE RISK OF ELECTRIC
DO NOT REMOVE COVER (OR BACK).
NO USER-SERVICEABLE PARTS INSIDE.
REFER SERVICING TO QUALIFIED SERVICE
SHOCK,
PERSONNEL.
A
A
This symbol is intended to alert the user
to the presence of uninsulated
"dangerous voltage" within the products
enclosure that may be of sufficient
magnitude to constitute a risk of electric
shock to persons.
This symbol is intended to alert the user
to the presence of important operating
and maintenance (servicing) instructions
in the literature accompanying the
appliance.
IMPORTANT
This equipment has been tested and
found to comply with the limits for a
Qass B digital device, pursuant to Part 15
of the FCC Rules.
These limits are designed to provide
reasoimble protection agaitrst harmful
interference in a residential installation.
This equipment generates, uses, and can
radiate radio frequency energy and, if not
installed and used in accordance with the
instructions, may cause harmful
interference to radio communications.
However, there is no guarantee that
interference will not occur in a particular
installation. If this equipment does cause
harmful interference to radio or television
reception, which can be determined by
turning the equipment off and on, the
user is encouraged to try to correct the
interference by one or more of the
following measures:
CAUTION
You are cautioned that any change or
modifications not expressly approved in
this manual could void your authority to
operate this equipment
Owner's record
The model and serial numbers are located
on the rear of the unit Record the serial
number in the space provided below.
Refer to them whenever you call upon
your Sony dealer regarding this product.
Model No. SA-VA15
Serial No.
For the customers in Canada CAUTION
TO PREVENT ELECTRIC SHOCK, DO
NOT USE THIS POLARIZro AC PLUG
WITH AN EXTENSION СОГО,
RECEPTACLE OR OTHER OUTLET
UNLESS THE BLADES CAN BE FULLY
INSERTED TO PREVENT BLADE
EXPOSURE.
________________
About This Manual
The instructions in this manual describe
the controls on the left speaker. You can
also use the controls on the remote if they
have the same or sinular names as those
on the left speaker.
• The following icotrs are used in this
manual:
Indicates that you can use the
remote to do the task.
1
Indicates hints and tips for
* making the task easier.
This speaker system incorporates the
Dolby Pro Logic Surround System.*
’ Manufactured under license from
Dolby Laboratories Licensing
Corporation. Additionally licensed
under Canadian patent number
1,037,877. "Dolby," the double-D
symbol m and "Pro Logic" are
trademarks of Dolby Laboratories
Licensing Corporation.
Page 3

Table of contents
Overview 4
Getting Started
Precautions 6
Unpacking 6
Installing the Speaker Stands 7
Choosing the Best Location 7
Speaker System Hookups 8
Audio Component Hookups 9
Home Theater Operations
Enjoying Surround Sound 10
Adjusting the Surround Sound 11
Adjusting the Sound 12
Using an External Center Speaker 12
Additional Information
Troubleshooting 13
Specifications 13
Glossary 14
Index 14
Page 4
The SA-VA15 is an active home-theater speaker system
incorporating a Dolby Pro Logic decoder and super
woofer speakers. Its design features include easy
connection to your current TV/VCR setup. You can
connect this speaker system without having to
reconnect the cords of your TV and VCR. Also, you
don't have to connect a center speaker to optimize the
surround effects. Easy operation via the supplied
remote ensures maximum enjoyment of the hometheater sound this system provides.
Three different types of surround sound accommodate a variety of program sources
Dolby Surround (Pro Logic) mode
Lets you enjoy superb theater-like presence and
surround effects in your home when playing back
video software encoded with the Dolby Surround
system.
HALL surround mode
Provides a sense of presence similar to that of an openair stadium. Ideal for maximum enjoyment of
broadcasts of sporting events like football.
SIMULATED surround mode
Creates simulated stereo surround effects from
monaural sound sources, like old movies or monaural
TV shows.
Page 5
Overview
Built-in center speakers let you enjoy Dolby Pro Logic Surround sound
The use of a center speaker is a key factor in obtaining
a full surround effect when playing sources encoded
with the Dolby Pro Logic Surround sound system.
Center speakers in a movie theater make central
sounds, such as dialogue, clearer and create a unified
sound image.
Normally, you have to install a center speaker
separately, but this speaker system makes it easy to set
up a high-performance home theater system by
incorporating a high-quality center speaker system into
the front speakers.
In addition, rear speakers are also provided with this
system to create a complete home-theater that lets you
enjoy the maximum surround effect.
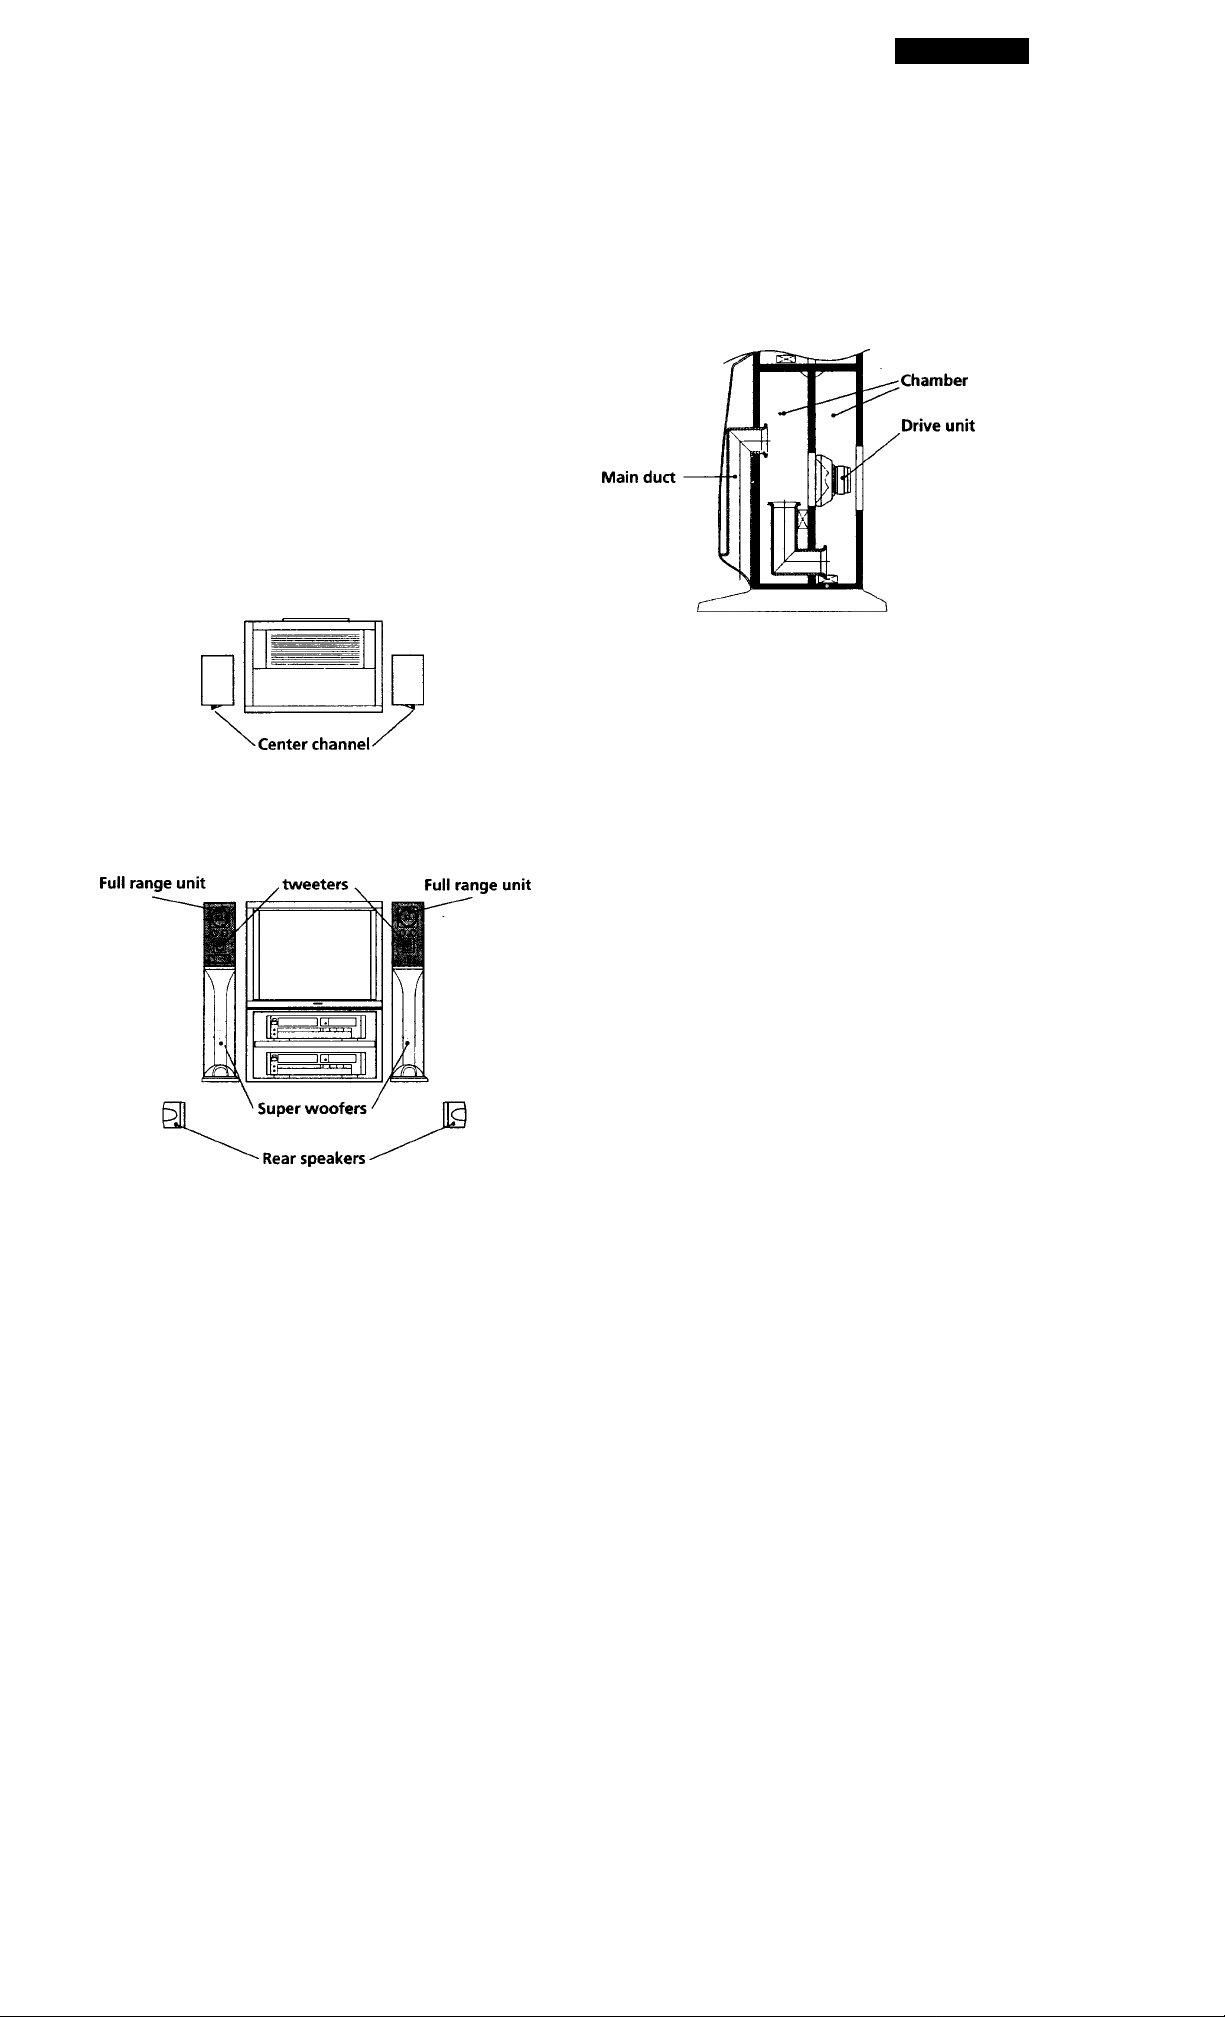
Top view
tweeters
Dynamic Bass Roar (DBR) super woofer system provides theater-like bass sound
To provide a theater-like experience complete with
dynamic bass sounds, this speaker system incorporates
the Super Acoustically-loaded Woofer (SAW) design
(see below) in the left and right front speakers to form
a DBR super woofer system.
What is the SAW design?
The SAW design features a centrally-positioned woofer drive
uiut, two chamber construction, and a long main duct.
Through precision control of the acoustics of the two chambers,
the unit can reproduce powerful ultra low frequencies without
muddiness.
Front view
Center channel
How the center speaker works
The front left and right speakers are equipped with center
channel tweeters (see above) angled inwards at 30“ to
reproduce high-frequency center channel sounds. Lowfrequency center channel sounds are mixed with the front
chaimel signals and reproduced through the front left and right
full range units. This design produces a high-quality
centralized sound image for the center channel which exactly
matches the quality of the front channel sound to provide
superior sound quality and a unified sound image without a
cumbersome external center speaker.
In addition, we also included two super woofer modes
designed to bring the dynamic bass sounds found in
movie theaters (mode 1) and concert halls (mode 2) to
your living room.
Power turns on and off automatically
The speakers turn on automatically when a sound
signal is input and turn off when you've finished
watching a program and the sound signal goes out. So
you don't have to bother using the power switch every
time you use the system.
Page 6

Getting Started
Precautions
On safety
• Should any solid object or liquid fall into the cabinet, unplug
the speaker system and have it checked by qualified
persomiel before operating it any further.
On power sources
• Before operating the speakers, check that the operating
voltage is identical with your local power supply. The
operating voltage is indicated on the nameplate on the rear
of the speakers.
• The speakers are not disconnected from the AC power
source as long as they are connected to the wall outlet, even
if the speakers themselves have been turned off.
• If you are not going to use the speakers for a long time, be
sure to discoimect the speakers from the wall outlet. To
discormect the AC power cord, grasp the plug itself; never
pull the cord.
• One blade of the plug is wider than the other for the purpose
of safety and will fit into the wall outlet only one way. If you
are unable to insert the plug fully into the outlet, contact
your dealer.
• Should the AC power cord need to be changed, have it done
at a qutilified service shop ordy.
Unpacking
Check that you received the following items with your
speaker system:
• Front L/R speaker connecting cord, 3.5 m
• Rear speakers SS-SR151 (2)
• Rear speaker connecting cords, 10 m (2)
• Audio connecting cord, 1.5 m (1)
• Remote commander (remote) RM-J15 (1)
• Size AA (R6) batteries (2)
• Speaker Stands (2)
• Screws (8)
Inserting batteries into the remote
Insert two size AA (R6) batteries with the + and - on
the battery compartment. When using the remote,
point it at the remote sensor B on the left front
speaker.
(1)
On placement
• Do not place the speakers near heat sources, or in a place
subject to direct sunligfit, excessive dust or mechanical
shock.
• Good ventilation is essential to prevent internal heat
buildup. Place the speakers in a location with adequate air
circulation, and in a way that does not block the rear
ventilation holes.
On cleaning
• Clean the cabinet, panel and controls with a soft cloth
slightly moistened with a mild detergent solution. Do not
use any type of abrasive pad, scouring powder or solvent
such as alcohol or benzine.
For the customers in the USA
For detailed safety precautions, see the "IMPORTANT
SAFEGUARDS" leaflet.
If you have any question or problem concerning your
receiver, please consult your nearest Sony dealer.
'Q' When to replace batteries
Under normal use, the batteries should last for about 6
months. When the remote no longer operates the
speakers, replace both batteries with new ones.
Notes
• Do not leave the remote in an extremely hot or humid place.
• Do not use a new battery with an old one.
• Do not expose the remote sensor to direct sunlight or
lighting apparatuses. Doing so may cause a malfunction.
• If you don't use the remote for an extended period of time,
remove the batteries to avoid possible damage from battery
leakage and corrosion.
Page 7

Getting Started
Installing the Speaker Stands
Be sure to install the supplied speaker stands'before
you use the speakers.
1 Spread a towel, or other soft cloth, over a table and
lay the speakers down.
2 Align the pins on the stands with the holes on the
bottom of the speakers.
Choosing the Best Location
To obtain high sound quality and a proper sound
image from the front speakers, place the speaker with
the built-in operation panel to the left of your TV and
the other to the right of your TV so that the center
channel tweeters angle towards the center of the room.
For the best central sound image, place the left and
right speakers within 8 feet of each other and
equidistant from the TV.
of the speakers with the supplied wood screws (4
for each speaker).
4 Make sure the stands are securely attached and
stand the speaker upright.
Place the rear speakers so that they fire directly across
at each other about 2 to 3 feet above your listening
position.
Page 8

Getting Started
Speaker System Hookups
This section describes how to connect the speaker system and how to connect your TV or VCR to the speakers.
The arrow'—^ indicates signal flow.
Right rear speaker
(SS-SR151)
Left rear speaker
{SS-SR15D
Right front
speaker
SIEPI
right speaker
To connect, depress the
middle of the male
connector until it clicks
into the female connector.
Connecting the front speakers
1 Twist the speaker cord coating and strip it from the
end of the cords.
left speaker
2 Insert the stripped wire into speaker terminals,
right left
To disconnect, pull the
connector out. Never pull
the cord itself.
STEP 2 Connecting the rear speakers
Use the supplied speaker cords to connect the rear
speakers to the REAR SPEAKER terminals on the back
of the left front speaker.
For Customers in Canada
Use only the supplied rear speakers SS-SR151.
Be sure to match the speaker cord to the appropriate
speaker terminal; + (red) to + (red) and - (black) to -
(black). If the cords are reversed, the sound will be
distorted and will lack bass.
8
Page 9

Getting Started
STEPS
Connecting your TV
If the audio and video output jacks on your TV and
VCR are already connected, and your TV has stereo
AUDIO OUT jacks, you can start enjoying surround
sound simply by connecting the speaker system to
your TV as shown below.
Important
• Set the volume on your TV to MIN (minimum).
• If your TV has an ON / OFF switch for its internal speaker,
set it to OFF and enjoy the sound from this speaker system.
TV front left speaker
If you use AUDIO OUT jacks marked VARIABLE
After making the connection as shown above, turn up the
volume on the TV. Use this speaker system's volume control
for regular volume adjustment. Turning down the volume on
the TV reduces the AUDIO OUT signal level and may cause a
loss in sound quahty and/or the auto-power off function (see
page 10) to activate.
If you have an additional VCR or LO player
Coimect it to the 2 IN jacks and connect the 2 OUT jacks to
the AUDIO IN jack on the back of your TV.
STEP 4
Connecting the AC power cord
Connect the AC power cbrd to a wall outlet.
Audio Component Hookups
Since this speaker system incorporates its own internal
amplifier and preamplifier, you can also connect an
audio component, such as a CD player.
CD front left speaker
Do not connect an amplified audio source. The combined
amplification from the component and the speaker's internal
amplifier may damage the speakers.
For the best possible sound (or if your TV only has a monaural AUDIO OUT jack, or no AUDIO OUT jacks)
Coimect the speaker system directly to your VCR or cable box.
The following connections suppress noise from the TV and let
you enjoy high quality sound.
1 Connect your VCR or cable box to the 1 IN jacks on the left
front speaker.
2 Connect your TV to the 1 OUT jacks on the left front speaker.
Make sure you use the 1 or 2 IN jacks that correspond to the
VIDEO IN jack you are using on your TV set (i.e., VIDEO 1).
TV
front left speaker
Hooking up the Sony HCD-VA550 (Optional Compact Disc Deck Receiver)
1 Connect the LINE OUT FIXED jacks on the HCD-VA550 to
the 2 IN jacks on the left front speaker. Be sure to connect it
to the 2 IN jacks.
HCD-VA550
2 Connect the CONTROL S OUT jack on the HCD-VA550
component to the CONTROL S IN jack on the front left
speaker.
HCD-VA550 front left speaker
Notes
• The automatic power on/6ff function (see page 10) is not
activated by the signal from the HCD-VA550 to prevent
unwanted outbursts of sound.
• See the operating instructions supplied with your HCDVA550 for details regarding its operation.
front left speaker
CONTROLS
Page 10

Home Theater Operations
Enjoying Surround Sound
You can take advantage of the speaker's surround
sound simply by choosing a surround mode according
to the type of program you are watching. This system
is provided with three different surround modes:
DOLBY SUR. (Dolby Pro Logic Surround)
Reproduces superb theater-like presence and surround
effects from video software encoded with Dolby
Surround.
HALL
Provides a sense of presence similar to that of an openair stadium. Ideal for maximum enjoyment of
broadcasts of sporting events like football.
SIMULATED
Creates simulated stereo sound effects from monaural
sound sources, like old movies or TV shows.
•POWER
• SURROUND OFF
4 Press either DOLBY SUR, HALL or SIMULATED on
the remote, or SURROUND on the operation panel a
few times, according to the program you want to
enjoy.
program
recent movies
concerts
DOLBY SUR
•
• •
HALL
SIMULATED
OFF
music •
sports
old movies
•
•
•
monaural TV
programs
education, news
To listen without surround effects
Press SURROUND OFF on the remote, or press
SURROUND on the operation panel a few times until OFF
is displayed.
•
•
5 Press MASTER VOL. (VOLUME) to adjust the
volume.
SUPER WOOFER
MODE (1.2,OFF)
MASTER VOL
1 Press POWER.
The POWER indicator lights (green) and the
speakers turn on. Once you turn the speakers on,
they turn themselves off and on automatically with
the auto power on/off function.
2 Press INPUT 1 or 2 on the remote or INPUT on the
operation panel to select the program source.
For example, if you connected your VCR to the 1 IN
jacks, select INPUT 1.
The respective INPUT indicator lights up.
3 Start playback from the program source.
To select a suitable SUPER WOOFER mode
Press SUPER WOOFER MODE 1 or 2.
SUPER WOOFER MODE 1 provides powerful bass sound
ideal for movies. SUPER WOOFER MODE 2 is a more
subtle effect designed for music.
To mute the sound
Press MUTING.
To restore the sound, press MUTING again.
For other sound adjustments, see page 12.
y' The speakers turn on and off automatically
(Auto power on/off function)
Three minutes after the sound signal goes out (when you
turn off the TV, or the currently playing video/laserdisc
ends), the speakers turn off automatically and the POWER
indicator turns red.
The speakers turn themselves back on the next time you
turn on the TV or start playback from the VCR
'Q' If you press POWER when the speakers are on
They enter standby mode and the auto power on/ off
function does not function. You have to press POWER
again to turn on the speakers.
Note
Some videos and laser discs may use Dolby Surround sound
even if it's not indicated on the package.
10
Page 11

Home Theater Operations
Changing the display
You can dim the display, or turn it off, according to
your preference.
Press DIMMER a few times until the display mode you
desire appears.
The display returns to full brightness temporarily
when you press one of the buttons on the control panel
or the remote.
Adjusting the Surround Sound []
Although this speaker system is factory preset to
provide balanced surround sound without adjustment,
you can adjust the volume of each speaker and the
delay time to accommodate the conditions in your
living room or your individual preference.
DELAY TIME
■ ADJUST +/-
RESET
To adjust the level
between the right and left
front speakers
of the center speaker
of the rear speaker
press
BALANCE L or R
CENTER, then press
ADJUST + or-
REAR, then press
ADJUST + or-
4 Press TEST TONE on the remote to turn off the test
tone.
To restore the center.rear, or balance levels to the factory setting
Press CENTER, REAR, or BALANCE L or R, then press RESET.
Note
Pressing buttons other than MASTER VOL., RESET, CENTER,
REAR, or BALANCE L or R cancels the test tone.
Adjusting the delay time
By adjusting the delay time you can enhance the spatial
characteristics of the sound to obtain a theater-like
presence regardless of the size of your room. If the rear
speakers are close to your listening position, choose a
longer delay time.
You can adjust the settings individually for DOLBY
SUR, HALL, and SIMULATED.
Adjusting the speaker volumes
The test tone feature lets you adjust the volume of the
sound coming from each speaker to the same level, so
that the surround sound will be even and natural.
Make the following adjustments from your listening
position.
1 Choose the DOLBY SUR mode.
2 Press TEST TONE on the remote.
The test tone comes from each speaker in sequence;
Left Front (L) < ► Center Right Front (R) ■
C
Adjust the volume levels so that you hear the test
tone from each speaker at the same volume level
when you are in your listening position:
Rear «- —"
1 Choose any surround mode.
2 Playback a program.
3 Press DELAY TIME on the remote once to display
the current delay time.
4 Press DELAY TIME a few times to choose the delay
time you prefer, either 15, 20, or 30 ms.
The factory setting is 20 ms.
To restore the delay time to the factory setting
Press DELAY TIME and then RESET.
Resetting an entire surround mode
Press the button for the surround mode you want to
reset (i.e., HALL) and then press RESET while the
name of the surround mode is being displayed.
All of the adjustments in that mode, including the bass
and treble (page 12), are reset to the factory settings.
11
Page 12

Home Theater Operations
Adjusting the Sound [i
Although this speaker system's sound quality is
already adjusted. You can change the settings, as you
like, for each surround mode individually. The
following settings remain stored in their respective
surround mode until you change them.
1 Playback a program and choose a surround mode.
2 Make the following sound adjustments according to
your preference and/or the type of program you are
watching.
To
press
Using an External Center Speaker
Since this system incorporates a center speaker (see
page 5), you don't have to connect a center speaker.
However, it is possible to connect an active center
speaker to the CENTER OUT terminal.
left front speaker active center speaker
■ Ql CCOTER
L
<H=>-
If you make this connection, be sure to make the
following adjustments for Dolby Pro Logic Surround.
Connecting a center speaker lets you choose from 4
different Dolby Pro Logic Surround center modes:
NORMAL, WIDE, 3 CH (3 Channel logic), or
PHANTOM. Use the NORMAL or WIDE mode when
center and rear speakers are connected. For details on
Dolby Pro Logic Surround sound, see page 14.
adjust the super
woofer level
adjust the bass level
adjust the treble level
adjust the balance
* Since BALANCE L and R control sound from the front
speakers, they have little effect on DOLBY SUR when the
source software has a high proportion of center<hannel
sound.
To restore the factory settings
Press RESET after pressing either S.WOOFER, BASS,
TREBLE, or BALANCE L or R.
S.WOOFER,
then press ADJUST + or -
BASS, then press ADJUST + or -
TREBLE, then press ADJUST + or -
BALANCE L or R'^
SURROUND
1 Press SURROUND on the front left speaker to
choose PRO LOGIC. ("PRO LOGIC" appears in the
display instead of "DOLBY SUR" when you connect
an external center speaker.)
CENTER MODE
2 Press CENTER MODE on the front left speaker a
few times until the center mode you want appears
in the display.
3 Adjust the speaker volume and delay time, if
necessary, by referring to page 11.
12
Page 13

Additional Information
Troubleshooting
Specifications
General
Power requirement AC 120 V, 60 Hz
If you experience any of the
following difficulties while using
the speakers, use this
troubleshooting guide to help you
remedy the problem. Should any
problem persist, consult your
nearest Sony dealer.
There's no sound from any of the
speakers.
Check that components are
connected securely to the
speakers.
^ Make sure you selected the
correct input (1 or 2).
Press MUTING to cancel the
muting function.
Press MASTER VOLUME +
to turn up the volume.
No sound or only a very low sound
level is heard from the rear speakers.
Surround sound is turned
off.
^ Adjust the volume of the
rear speakers (see page 11)_
^ Check the sound image
balance with TEST TONE
(see page 11).
Severe hum or noise is heard.
Move the connecting cord
away from any transformers
or motors and least 3 meters
(10 feet) from any
fluorescent lights.
Connect the speakers to
your VCR or cable box
instead of your TV
(see page 9).
Remote operations cannot be
performed.
Point the remote towards
the remote sensor on the left
' front speaker.
^ Remove any obstructions
between the remote and this
system's left front speaker.
Replace the batteries in the
remote.
Audio Power Spedfications
For front full range/center woofer
speakers: with 8 ohm loads, both
channels driven, from 70 Hz - 20 kHz;
rated 20 watts per channel minimum
RMS power, with no more than 0.9%
total harmonic distortion from 250
milliwatts to rated output.
Amplifier section
Continuous RFdS
power output
Center tweeter
Front full range/
Center woofer
Super woofer
Rear
Input sensitivity/
Impedance
Output
Tone control
Front/Center
Speaker section
Type
Front speaker Bassreflex type
DBR super woofer SAW type
Rear speaker Bassreflex type
Speaker unit
Front speaker
system
Rear speaker
total lOOW
20 W (8 ohms at 10
kHz,10 % THD)
20W + 20W (8 ohms at
1 kHz, 10 % THD)
20 W (8 ohms at 40 Hz,
10 % THD)
10 W + 10 W (8 ohms at
1 kHz, 10 % THD)
450 mV, 50 kilohms
1/2:450 mV, 1 kilohm
Center: 350 mV, 1
kilohm
Rear: Accepts only
supplied rear speakers
SS-SR151
R-ch: Accepts only SAVA15 R-ch speaker
with supplied exclusive
speaker cord
Bass: tlO dB at 100 Hz
Treble: ±10 dB at
10 kHz
Center tweeter: 5 cm
cone type (x2)
Front full range/Center
woofer: 10 cm cone
type(x2)
Super woofer: 13 cm
cone type (x2)
8 cm cone type (x2)
Power consumption USA: HOW
Canada: 120 W
Dimensions Approx. 180 x 1040 x
290 mm (w/h/d)
(77,x41x11V5
inches)
Approx. 250 X 1040 x
360 mm (w/h/d,
including speaker base)
(9V,x41xl4V,
inches)
Mass Front (L): 16 kg
(35 lb 3 oz)
Front (R): 13 kg
(28 lb 9 oz)
Rear: 700 g/pc
(1 lb 9 oz)
Supplied accessories Rear speakers SS-SR151
(2)
Front L/R speaker
coimecting cord, 3.5 m
(1)
Rear speaker
connecting cord, 10 m
(2)
Audio connecting cord,
1.5 m(l)
Remote Commander
RM-J15 (1)
Sony batteries SUM-3
(NS) (2)
13
Page 14

Additional Information
Glossary
Center mode
Speaker setting to enhance the Dolby Pro Logic
Surround mode. Select one of the following
four center modes according to your speaker
system.
• NORMAL mode
Select NORMAL mode if you connect a
small sized active center speaker to this
speaker system. Since a small speaker
cannot produce enough bass, the bass sound
of the center channel is output from the
front speakers.
Front Small Front
speaker(L) center speaker speaker(R)
Qn)i
Rear
speaker (L)
The test tone is output as shown on page 12.
PHANTOM mode
Select PHANTOM mode if you do not want
to use the center speaker to output sound.
The sound of the center channel is output
from the front speakers.
Front
speaker (L)
The test tone is output:
' Front (L) + (R) ^ Rear •
Delay time
Time lag between the surround sound output
from front speakers and rear speakers. By
adjusting the delay time of the rear speakers,
you can obtain the feeling of presence. Make
the delay time longer when you have placed
the rear speakers in a small room or close to
your listening position, and make it shorter
when you have placed them in a large room or
apart from your listening position.
Front
speaker(R)
Index
A,B
Adjusting
bass 12
delay time 11
speaker volume 11
super woofer level 10,12
treble 12
volume 10
Audio component hookups 9
Center mode 12,14
NORMAL mode 12,14
PHANTOM mode 12,14
3 CH LOGIC mode 12,14
WIDE mode 12,14
Connecting. See Hookups
D. E, F, G
Delay time 11,14
Dolby Pro Logic Surround 12,14
center mode 12,14
Dolby Surround sound 14
• WIDE mode
Select WIDE mode if you connect an active
center speaker equivalent to the two front
speakers. With the WIDE mode, you can
take full advantage of Dolby Surround
sound.
Front Center<speaker Front
speaker (L) speaker (R)
The test tone is output as shown on page 12.
• 3 CH LOGIC mode
Select 3 CH LOGIC mode if you don’t want
to use the rear speakers to output sound.
The sound of the rear channel is output
from the front speakers to let you experience
some of the surround sound without using
rear speakers.
Front Center speaker Front
speaker (L) speaker (R)
Dolby Pro Logic Surround
Decoding system of Dolby Surround sound
standardized in TV programs and movies.
Compared with the former Dolby Surround
system, Dolby Pro Logic Surround improves
sound image by using four separate channels:
off-screen audio effects, on-screen dialog, leftto-right panning, and music. These channels
manipulate the sound to be heard and enhance
the action as it happens on the screen. To take
advantage of Dolby Pro Logic, you should
have at least one pair of rear speakers and/or
one center speaker. You also need to select the
appropriate center mode to enjoy a full effect.
Dolby Surround
Encoding and decoding system of Dolby
Surround sound for consumer use. Dolby
Surround decodes the extra channels on the
Dolby Surround-encoded sound tracks of
movie videos and TV programs and produces
sound effects and echoes that make the action
seem to envelop you.
H, I, J, K, u M
Hookups
AC power cord 9
audio components 9
speakers 8, 9
TV/VCRs 9
N, O
NORMAL mode 12,14
P,Q
PHANTOM mode 12,14
Remote 10,11,12
Speakers
connection 8,9
placement 7
Speaker volume 11
Surround sound 10,11
Test tone 11
3CH LOGIC mode 12,14
Troubleshooting 13
TV/VCR hookups 9
14
The test tone is output:
Front (L) Center •
c
• Front (R) ■
u, V
Unpacking 4
w, X. Y, Z
Watching video programs 10
WIDE mode 12,14
 Loading...