

Page 1
DIRECTV Digital
Satellite Receiver
Operating Instructions
3-867-248-22 (1)
Before you begin using your Digital Satellite Receiver for
the first time, follow the instructions in “ Conne cting Your
Digital Satellite Receiver” on pages 6-13 and “Setting Up
Your Digital Satellite Receiver” on pages 22-33.
Also, make sure your Satellite Dish Antenna has been
properly installed and call your service provider to begin
service:
DIRECTV: 1-800-DIRECTV (347-3288)
SAT-A50 MODEL ONLY
RF ANTENNA: This Digital Satellite Receiver is shipped
with IR reception enabled and RF reception disabled. To
use the RF feature (and the RF Antenna) you must change
the factory setting (IR only) to the RF setting (RF only)
using the on-screen displays, as described in these
Operating Instructions.
®
SAT-A50
SAT-B50
© 1999by Sony Electronics Inc. Reproduction in whole or in part without written permissionisprohibited.
Page 2
WARNING
To reduce the risk of fire or shock hazard, do not expose the unit
to rain or moisture.
This symbol is intended to alert the user to the
presence of uninsulated “dangerous voltage”
within the product’s enclosure that may be of
significant magnitude to constitute a risk of
electric shock to persons.
This symbol is intended to alert the user to the
presence of important operating and
maintenance (servicing) instructions in the
literature accompanying the appliance.
Note to the CATV Installer
This reminder is provided to call the CATV system installer’s
attention to Article 820-40 of the NEC that provides guidelines for
proper grounding and, in particular, specifies that the cable
groundshallbe connectedto the grounding system of the building
as close to the point of cable entry as practical.
Note to the Satellite Dish Antenna Installer
This reminder is provided to call the Satellite Dish Antenna
installer’s attention to Article 810 and in particular Article 810-15
of the NEC, which covers proper installation and grounding of
television receiving equipment, as well as to Article 820-40 of the
NEC, which specifies that the Satellite Dish Antenna cable ground
shall be connected to the grounding system of the building as close
to the point of cable entry as practical.
Attention
Telephone Line Interruption
Periodically, information on your DIRECT TICKET®and Pay Pe r
View selectionsi s sent,free of charge, via your telephone line to an
800 number. If you use your telephone duri ng the time the
information is being forwarded, you will hear static noise for
approximately 30 seconds. If you would l ike touse your telephone
while the information is being sent, you can interrupt the sending
of this information at any time by temporarily unplugging the
phone line to the receiver.
You are cautioned that any changes or modificationsnot
expresslyapproved in this manual could voidyourauthority to
operate this equipment.
The Digital Satellite Receiver is intended for use only within the
United States.
Owner’s Record
The model and serial numbers are located on the bottom of the
DigitalSa tellite Receiver. The number for the Access Card is on the
back of the card and on the carton label. Record these numbers in
the space provided below. Refer to these numbers whenever you
need to call your sales or service representative regarding this
product.
Model Number:
Serial Number:
Access Card Number:
Customer Support
For Programming
For subscription information, or to resolve problems related to
programming, call:
DIRECTV at 1-800-DIRECTV (347-3288)
For Hardware and Installation
To arrange for the installation of your Digital Satellite Receiver,
call the dealer from whom you purchased your system.
For general information, or to resolve problems related to the
operation of your Digital Satellite Receiver or Satellite Dish
Antenna, please contact your Sony dealer. If your dealer or
installer is unable to answer your questions, callthe Sony Satellite
System Information Center at 1-800-838-7669.
Trademark and Copyrights
Sony, Media Window and SmartFile are trademarks of Sony.
DIRECTVisatrademarkofDIRECTV,Inc.,aunitofHughes
Electronics, and is used with permission.
Manufactured under license from Dolby Laboratories. “Dolby”
and the double-D symbol are trademarks of Dolby Laboratories.
Confidential Unpublished Works. © 1992–1997 Dolby
Laboratories Inc. All rights reserved.
Macrovision Information
This product incorporates copyright protection technology that is
protected by U.S. patents and other intellectual property rights.
Use of this copyright protection technology is granted by
Macrovision for home and other limited pay per view uses only.
Reverse engineering or disassembly is prohibited.
Note on Recording Programming
Programming may be taped for home viewing only. All other
taping is expressly prohibited. Some programming may not be
taped. An additional taping fee may be applied. Call your
program providers for details.
StarSight Licensed
The manufacture and sale of the television schedule feature of this
product was licensed under one or more of the following patents
of StarSight Telecast, Inc.: U.S. Patent Nos. 4,706,121; 4,977,455;
5,151,789; and 5,353,121; with use rights reserved.
About These Operating Instructions
These Operating Instructions describe how to use the SAT-A50
and its remote control. Any differences in operation for the
SAT-B50 are noted in the text.
The z icon indicates hints and tips for making the task easier.
A Note provides information that may be necessary to complete
the task.
2
Page 3

Getting Starte d!
Connecting Your Digital
Satellite Receiver (Page 6)
Setting Up Your Digital
Satellite Receiver (Page 22)
Using Your Remote Control
(Page 14)
+
1
2
3
4
5
6
9
7
8
0
S
SATELLITE
RECEIVER
Using the Program Guide
(Page 36)
Using the Favorite Stations
Guide (Page 39)
Setting Locks & Limits
(Page 53)
3
Page 4

Features
Congratulations on your purchase of the Sony Digital Satellite Receiver. This manual can
help you to become familiar with the many great features of the Digital Satellite Receiver.
Check below to find out about some of the most exciting features.
Convenience and Ease-of-Use
• Access all the system features and functio ns with the easy-to-use on-screen menu icons.
See page 21.
• The Program Guide showsthepictureand sound i n theMedia Window™ whileyoucheck
station and program information. See page 36.
• The Alpha List lets y ou search for your favorite programs by name. See page 35.
• The Category Guide displays program choices by type, including Sports and Movies, and
adds sub-categories like Drama and Comedy. See page 37.
• The Station Index with Surf feature lets you view your current program in the Media
Window while checking other stations in the Station Index. See pages 38 and 46.
• The One Button Record and VCR Control features allow you to easily record your favorite
programming on your VCR. See pages 25–27 and page 60.
• SAT-A50 model: Operate your Digital Satellite Receiver from another room or from
behind a cabinet by setting up the RF feature on your remote control. See pages 31–33.
Excellent Performance
•UsetheTimer&Recfeaturetobesureyouwon’tmissyourfavoriteprograms.
See page 60.
• The Auto Title Insert feature for VCR recording can display program information at the
beginning of any Timer & Rec event. You’ll have a convenient “title” recorded at the
beginning of your tapes. See page 25.
• Chose to listen to different audio tracks available with many programs. See page 64.
• SAT-A50 model: Select Dolby Digital audio to truly make your home theater come alive.
See page 64.
Easy to Customize
• Organize the channels your family watches most often by setting up the Favorite Stations
guide. See pages 39–41.
• Control access to programming with the Locks & Limits feature. See pages 53–58.
• Set up the Custom Stations feature to exclude stations that you don’t want to see from the
Program Guide, Category Guide and Station Index. See pages 49–50.
• Choose your favorite color palette for the on-screen displays. See pages 46–47.
• Select if stations are listed in numerical or alphabetical order with the Station Order
feature. See page 46.
4
Page 5

Contents
Connecting Your Digital Satellite
Receiver
Carton Contents ....................................................6
Connection Overview ...........................................7
Step 1: Inserting the Batteries..............................7
Step 2: Connecting the Satellite Dish Antenna
and Telephone Line............................................ 8
Step 3: Connecting Your TV..................................9
Step 4: Adding a VCR and Audio System ..........10
Step 5: Connecting the VCR Controller..............11
Connecting a Sony SmartFile™ VCR................................... 11
Step 6: Connecting the RF Antenna
(SAT-A50 only)..................................................12
Step 7: Connecting the AC Power Cord .............13
Step 8: Inserting the Access Card .......................13
Viewing Pictures From Your Digital
Satellite Receiver
Using Your Remote Control....... ....... ...... ....... ..... 14
RM-Y802 Remote Control (SAT-A50 model) ...................... 14
RM-Y139 Remote Control (SAT-B50 model)....................... 16
Selecting Items ....................................................18
Turning On the Power ........................................ 19
Changing Channels .............................................20
Using the On-Screen Displays
Using the Main Menu .........................................21
Setting Up Your Digital Satellite Receiver
(SYSTEM)...........................................................22
Using the System Menu ...................................................... 22
Setting Up the Satellite Dish Antenna ............................... 23
Setting Up the VCR Control Feature................ ................... 25
Performing a System Test................................................... 28
Setting the Aspect Ratio...................................................... 29
Replacing Your Access Card................................................30
Selecting RF or IR Remote Control Reception
(SAT-A50 only).................................................................. 31
Viewing Station and Program Information
(GUIDES)............................................................34
Using the Guides Menu....................................................... 34
Using the Alpha List................................................ ............. 35
Using the Program Guide.................................................... 36
Using the Category Guide................................................... 37
Using the Station Index.......................................................38
Using the Favorite Stations Guide...................................... 39
Using Other Guides............ .................................................. 42
Viewing Pay Per View Programs......................................... 44
Adjusting the Displays
(PREFERENCES)..................................................45
Using the Preferences Menu ...............................................45
Setting Display Options....................................................... 46
Setting Up Custom Stations ................................................49
Selecting Data Services........................................................51
Viewing Messages
(MESSAGES) ......................................................52
Setting Locks and Limits
(LOCKS & LIMITS)..............................................53
Using the Locks & Limits Display.........................................53
Locking Your Receiver.................................................. ........57
Unlocking Your Receiver......................... ......................... ....58
Checking Pay Per View Purchases
(PURCHASES).....................................................59
Checking Your Purchases.....................................................59
Scheduling Programs
(TIMER & REC) ...................................................60
Using One Button Timer & Rec............................................60
Using the Timer & Rec Feature............................................61
Editing Timer Events............................................................63
Setting Audio Options
(AUDIO) .............................................................64
Using the Audio Display......................................................64
Other Information
Setting Up the Remote Control ..........................65
Manufacturer Codes............................................66
Location and Function of Controls.....................68
Front Panel................ ............ ................................................68
SAT-A50 Back Panel..............................................................69
SAT-B50 Back Panel..............................................................70
Specifications .......................................................71
Troubleshooting ..................................................72
FCC Regulations and Information.......................74
Limited Warranty.................................................75
Index.....................................................................76
Satellite Receiver
Viewing Pictures From Your
Digital Satellite Receiver
Using the On-Screen DisplaysConnecting Your Digital
Other Information
5
Page 6
Connecting Your Digital Satellite Receiver
Carton Contents
Check to make sure the following items are in the Digital Satellite
Receiver’s carton.
If you are missing any items, contact your Sony dealer.
Digital Satellite
Receiver
AC Power Cord
+
Remote
Control*
RF Antenna**
3
6
2
9
5
1
8
4
0
7
S
E
IT
R
L
E
L
IV
E
T
E
A
C
S
E
R
Access Card
Size AA Batteries VCR Controller Audio/Video Cable
RF Coaxial Cable S-Video Cable**
Telephone Cord
* The RM-Y802 Remote Control shown.
** The RF Antenna and S-Video cable are not included with the SAT-B50
model.
Note
Keep the original carton and packing materials to safely transport the Digital Satellite
Receiver in the future.
6
Page 7
Connection
Step 1: Inserting the
Overview
Follow the procedures or make the connections in
each of the steps to connect your Digital Satellite
Receiver.
Step 1: Inserting the Batteries
Page 7
v
Step 2: Connecting the Satellite
Step 2: Connecting the Satellite
Dish Antenna and
Dish Antenna and
Telephone Line
Telephone Line
Page 8
Page 8
v
Step 3: Connecting Your TV
Page 9
v
Batteries
Before you can use the remote control, you must
insert the supplied batteries. If you want to use this
remote control to operate other audio/ video
equipment, such as a T V or VCR, you must set up the
remote control (see page 65).
1 Push and slide open the battery
compartment.
2 Insert two size AA batteries
(supplied).
Be sure to match the + and – marks on the
batteries with the + and – marks inside the battery
compartment.
Connecting Your Digital
Satellite Receiver
Step 4: Adding a VCR and
Audio System
(advanced connection)
Page 10
v
Step 5: Connecting the VCR
Controller
(advanced connection)
Page 11
v
Step 6: Connecting the RF
Antenna (SAT-A50 only)
(advanced connection)
Page 12
v
Step 7: Connecting the AC
Power Cord
Page 13
Notes
• When the batteries become weak, the Function button
indicators flash. If the remote control does not work
properly, the batteries may be weak.
• When replacing batteries, replace both batteries with new
ones. Do not mix different types of batteries together.
• When you remove the batteries, any manufacturer codes
you’ve set up may be erased. To set up the remote control
again, see “Setting Up the Remote Control” on page 65.
v
Step 8: Inserting the Access
Card
Page 13
7
Page 8
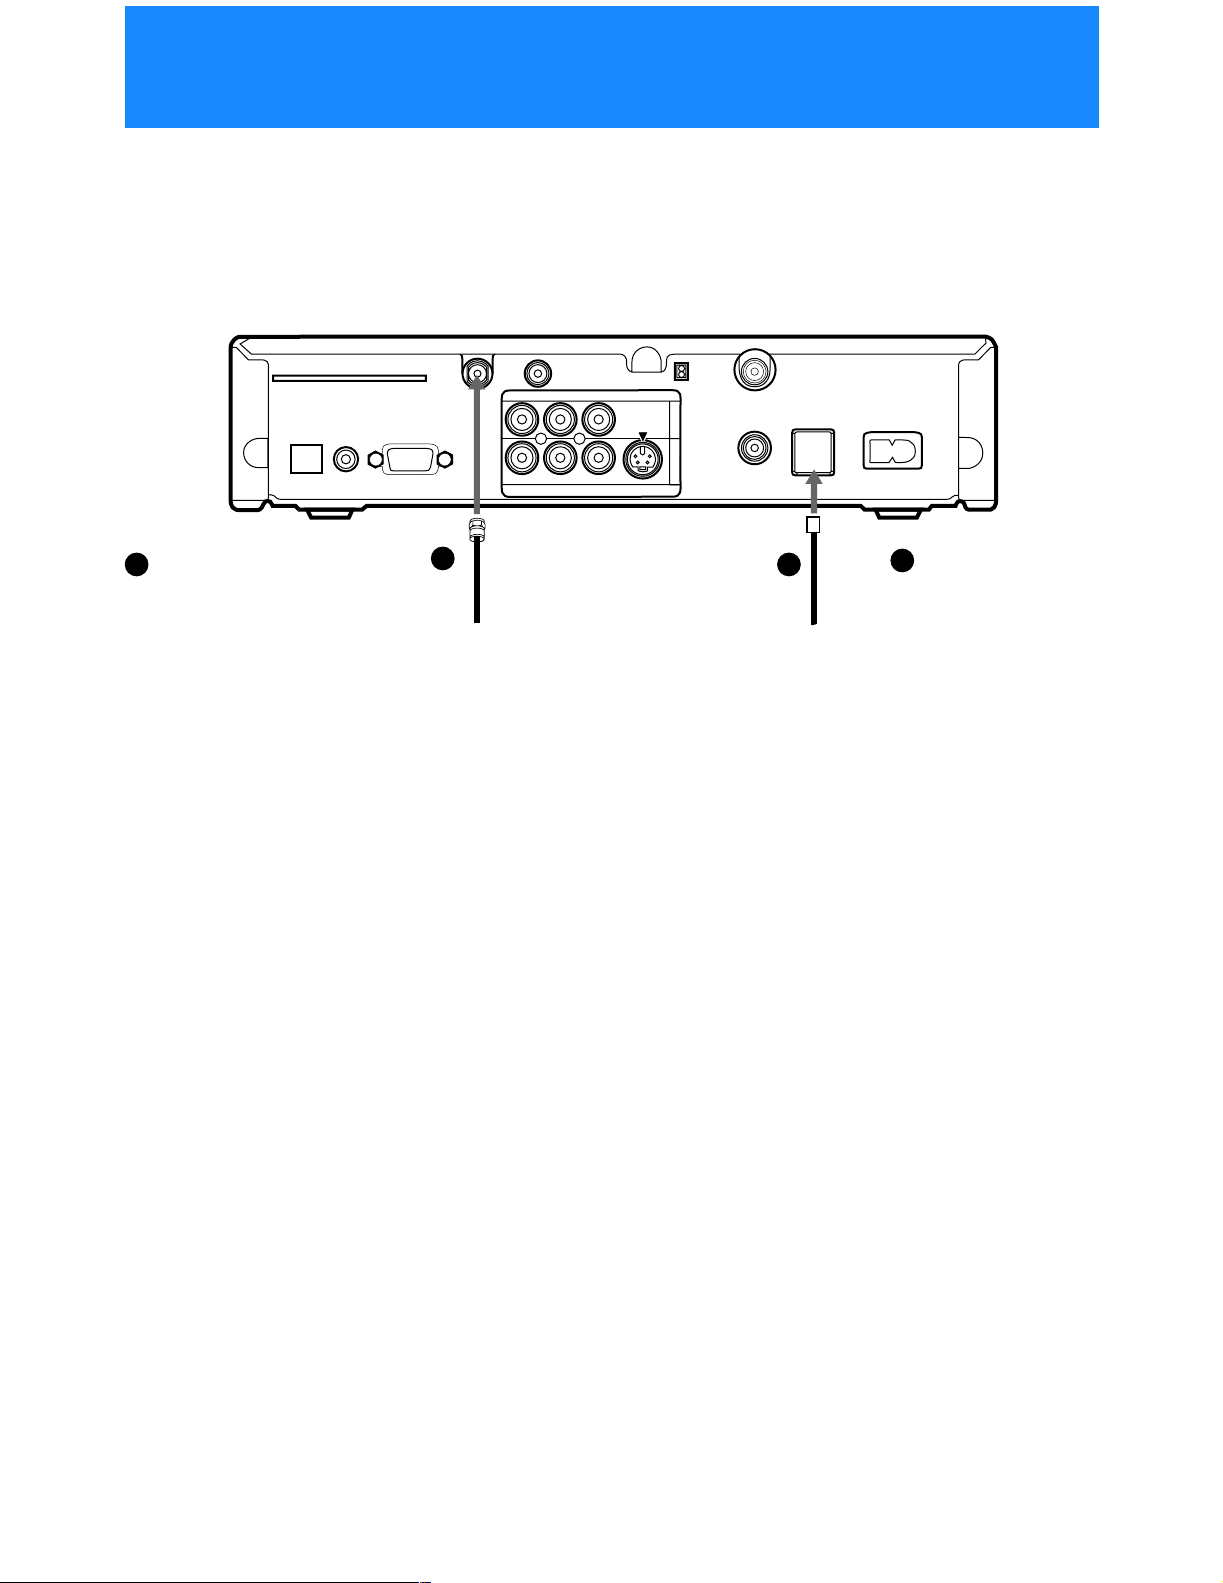
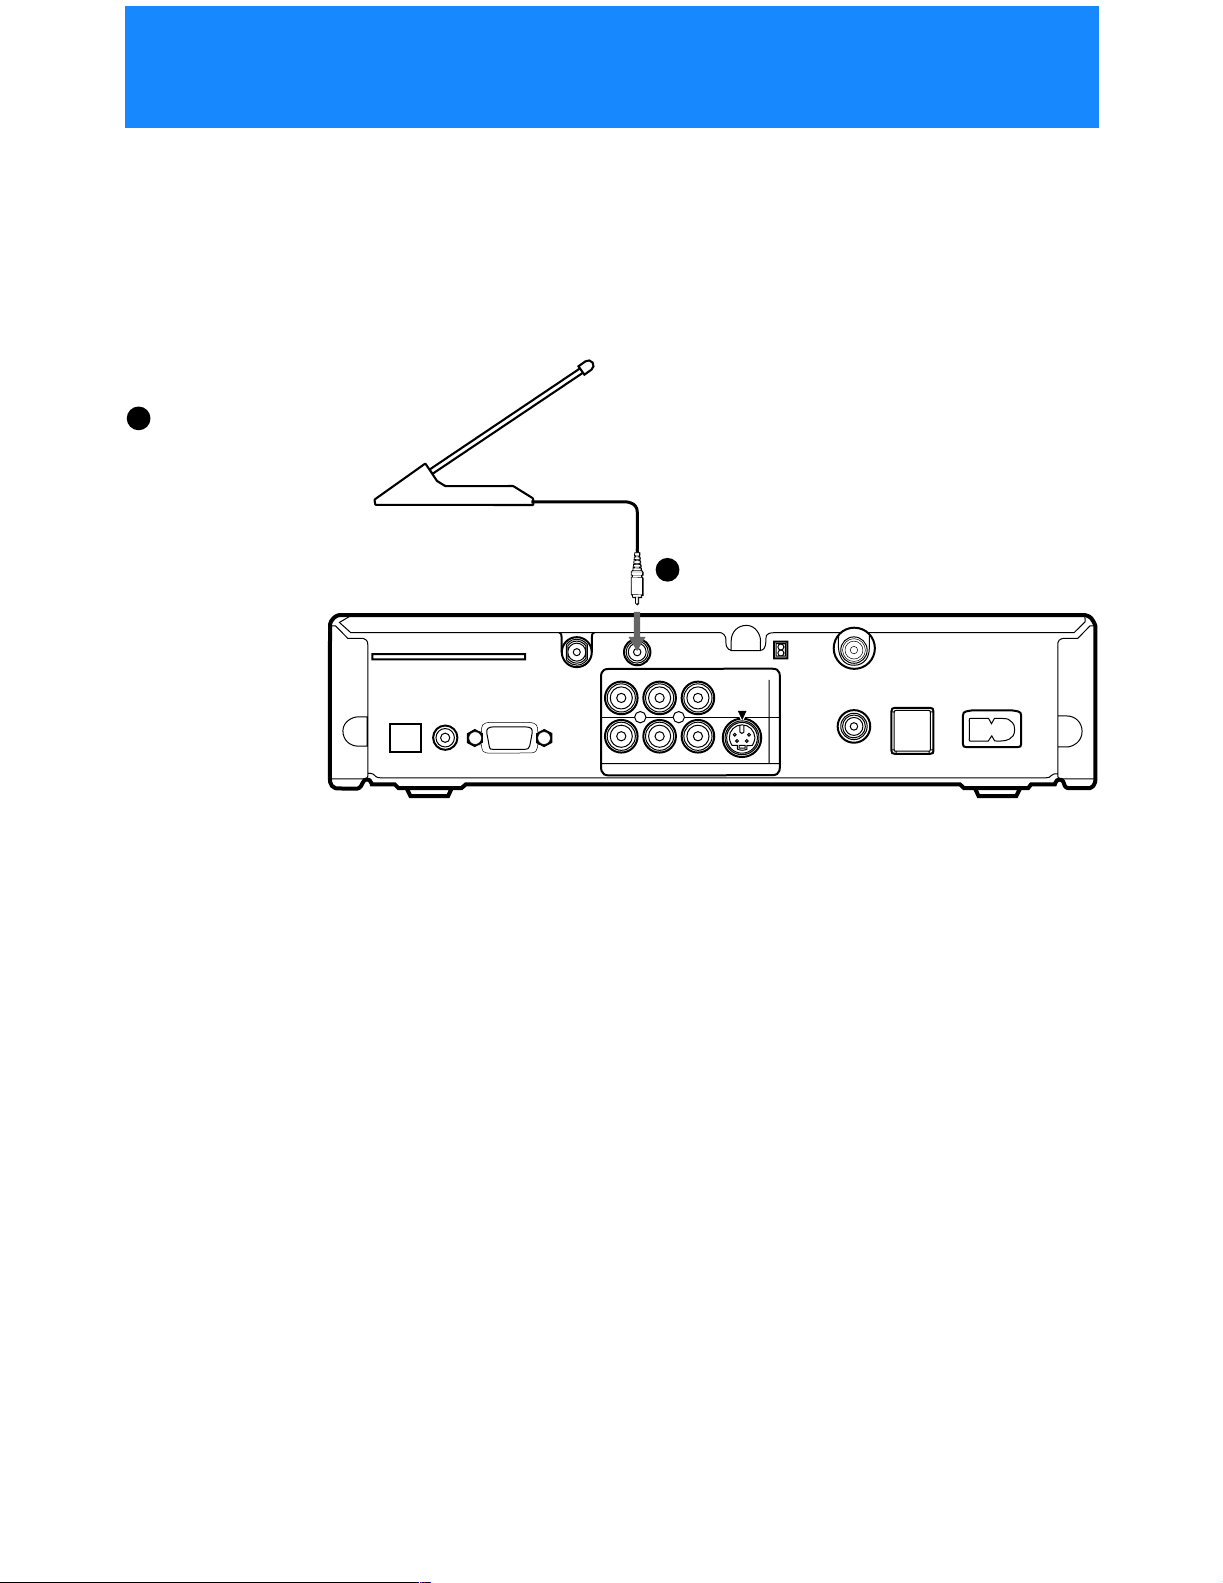
Step 2: Connecting the Satellite Dish Antenna and Telephone Line
The SATELLITE IN jack sends power to, and receives satellite signals
from, the Satellite Dish Antenna. The telephone line connection
periodicallysends information about your receiver and Access Card to
your service pro vider.
Digital Satellite Receiver
ACCESS CARD
DIGITAL
OUT
)
L
A
IC
T
P
(O
VCR CONTROL
1
Connect the SATELLITE IN
jack to your Satellite Dish
Antenna using RG-6
coaxial cable.
Notes
•TheSAT-A50modelisshown.
Connections for the SAT-B50
model are the same.
• Your Satellite Dish Antenna
Installation/Operating
Instructions provides detailed
instructions on how to install
RG-6 coaxial cable from your
Satellite Dish Antenna.
SATELLITE IN
LOW SPEED DATA
1
RG-6 Coaxial Cable from
Satellite Dish Antenna
RF REMOTE
IO
D
U
A
L(M
R
O
E
ID
V
S
)
O
N
O
T
U
O
O
E
ID
V
CH3
CH4
VHF/UHF IN
1
O
E
ID
V
2
VHF(SAT)/UHF
OUT
TEL LINE
2
AC IN~
2
Connect the TEL LINE
jack to a telephone
line wall jack using
the supplied
Telephone Cord
telephone cord.
CAUTION
Only connect your authorized
Satellite Dish Antenna to the
SATELLITE IN jack as described
in the Installation/Operating
Instructions.
Connecting any other equipment
to this jack could result in damage
to the equipment and/or receiver.
8
Page 9
.
.
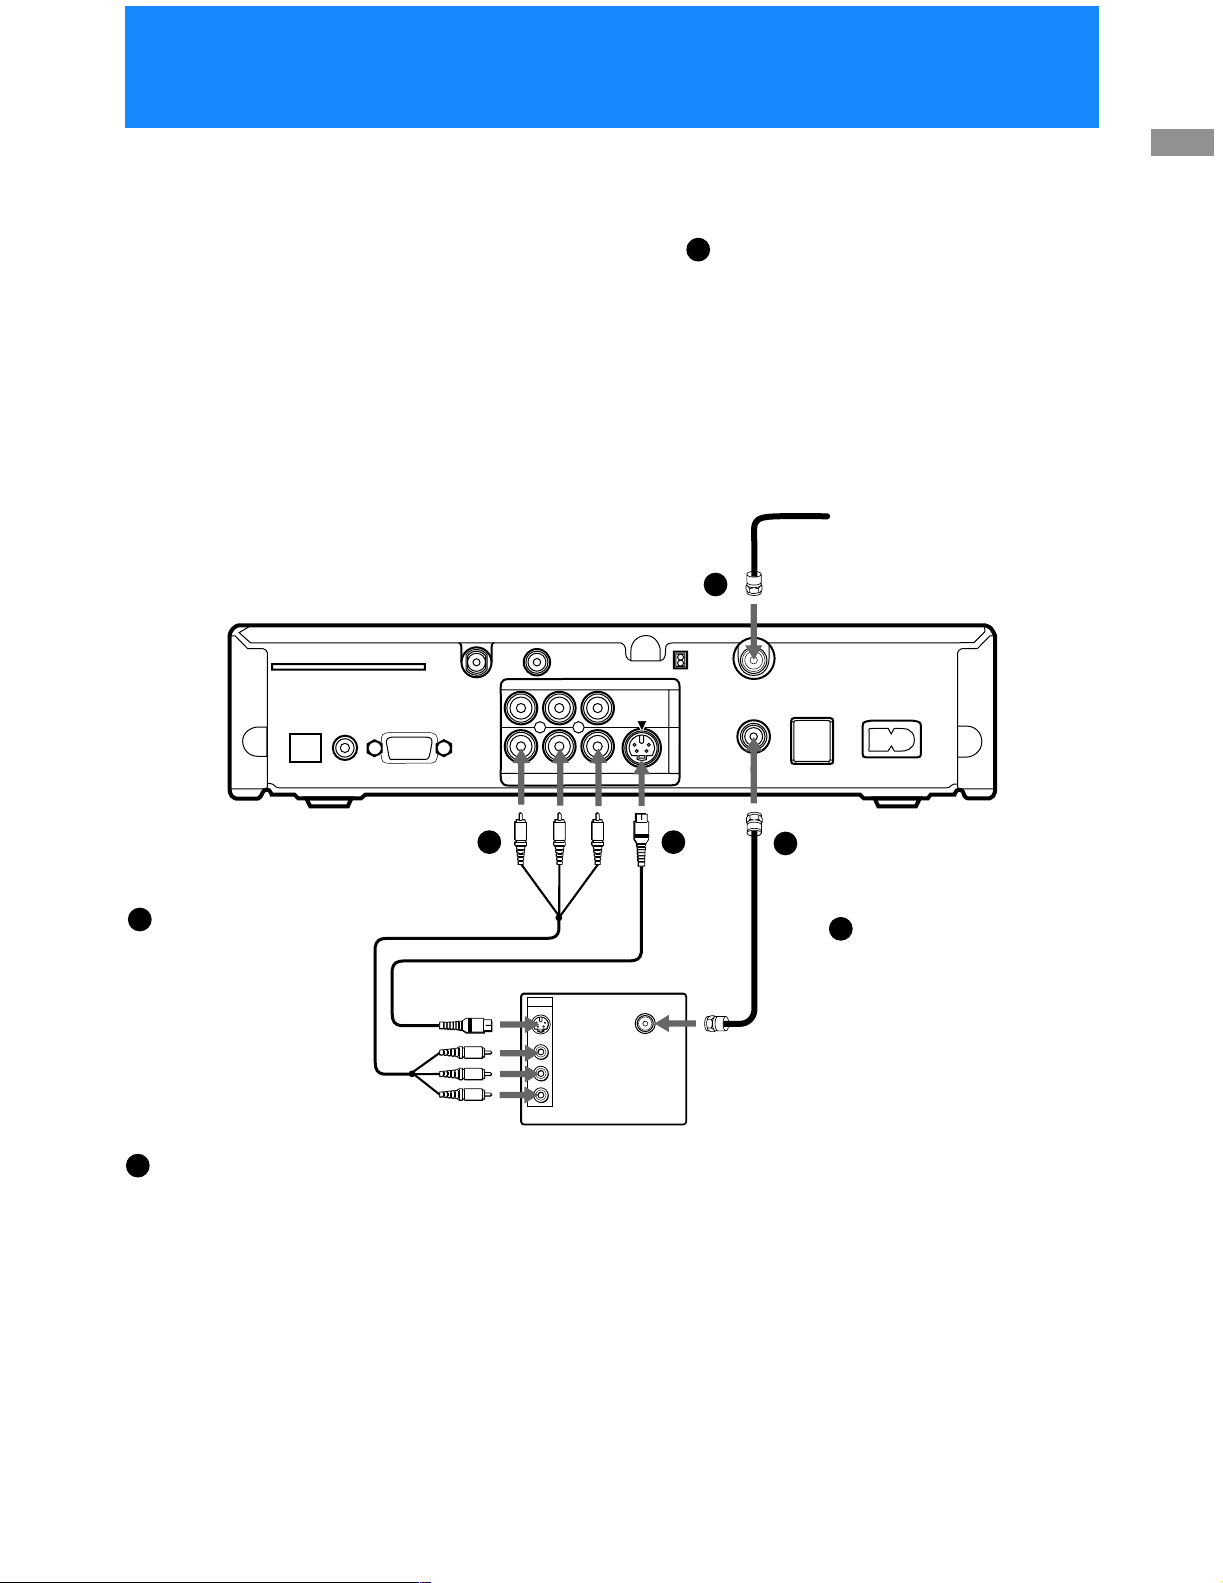
Step 3: Connecting Your TV
Connect your TV to the Digital Satellite Receiver as shown below. Refer
to your TV’s instruction manual for more information.
If you have a local TV antenna or cable
1
company service
Connectit to the VHF/UHFIN jack on your Digital
Satellite Receiver using a coaxial cable or RF
adapter (not supplied).
You can view loca l stations using your TV controls
Note
You must use the VHF(SAT)/UHF OUT jack to
connect to your TV orVCR when a localTV antenna
or cable company service is connected to the
VHF/UHFIN jack (see “2c”below and on page10)
Connecting Your Digital
Satellite Receiver
Digital Satellite Receiver
DIGITAL
(O
2a
If your TV has A/V input
jacks
Connect the VIDEO OUT
jacks on your Digital
Satellite Receiver to the
A/Vinputjacks on your TV
using the supplied A/V
cable.(Besuretomatchthe
colors on the jacks with the
colored plugs on the A/V
cable.)
If your TV has an S-Video
2b
input
Use the S-Video cable
instead of the yellow video
connection.
If your TV has only one
audio input, connect it to
the L(MONO) jack on the
receiver.
ACCESS CARD
OUT
)
L
A
IC
T
P
VCR CONTROL
SATELLITE IN
LOW SPEED DATA
A/V Cable
2a
R
TV
U
A
IO
D
L(M
IN
RF REMOTE
ID
V
)
O
N
O
O
E
ID
V
VIDEO
(yellow)
OR
S-Video
S VIDEO
VIDEO
L(MONO)
-AUDIO-
R
Coaxial
Cable
1
CH3
O
E
S
T
U
O
CH4
VHF/UHF IN
1
O
E
ID
V
2
2b
VHF(SAT)/UHF
OUT
TEL LINE
2c
AC IN~
S-Video
Cable
Coaxial
Cable
VHF/UHF
If your TV does not have
2c
A/V jacks
Connect th e VHF(SAT)/UHF
OUT jack to the VHF/UHF
input jack on your TV using
coaxial cable.
SettheCH3/CH4 switchto the
channel that does not carry offairbroadcastsinyourarea.
Note
With this connection, your
input source is channel 3 or
channel 4 depending on how
you set the CH3/CH4 switch
on t he receiver.
9
Page 10
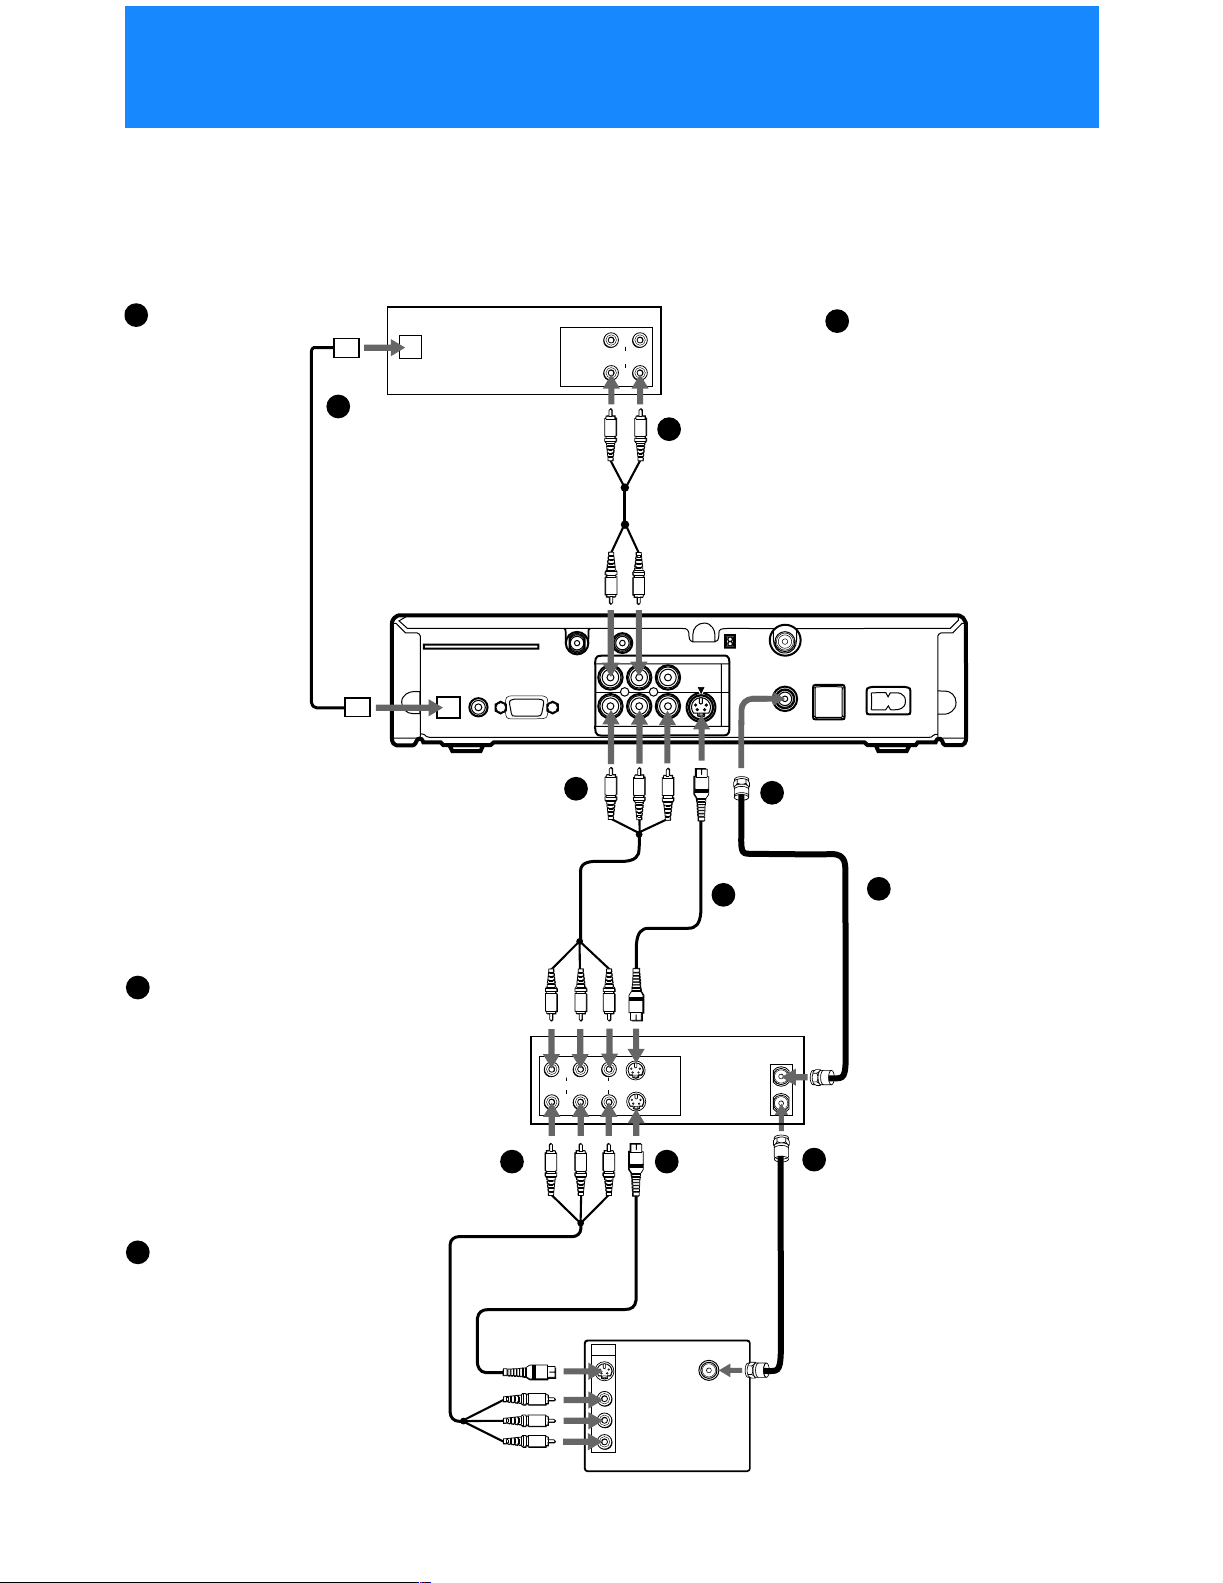
Step 4: Adding a VCR and Audio System
You can record programs by adding a VCR. You can also connect your
Digital Satellite Receiver to an audio system for enhanced sound
enjoyment.
Audio Receiver
If you have a
1a
digital or Dolby®
Digital audio
system (SAT-A50
only)
Connect the
DIGITAL OUT
(OPTICAL)ofthe
Digital Satellite
Receiver to the
optical digital
input of your audio
system.
1a
Optical Cable
(SAT-A50 only)
(optional Sony
accessory POC-15A)
OPTICAL
IN
1b
E
IN
L
T
U
O
LIN
IO
D
U
A
E
IN
If you have a stereo
or Dolby Pro Logic
audio system
Connect the upper
AUDIO R and L(MONO)
1b
jacks on the D igital
Satellite Receiver to the
audioinputsofyour
stereo amplifier.
Stereo
Cable
®
z Tip
If you connect your
Digital Satellite
Receiver to a D olby
Digitalreceiver, set
the Dolby Digital
optionof the Audio
display to Auto
Select. S ee “Setting
Audio Options
(AUDIO)” on page
64 for more
information.
2a
If your TV and VCR have A/V
jacks
Connectthe VIDEOOUTjacksof
your Digital Satellite Receiver to
the A/V input jacks of your VCR
using the supplied A/V cable.
Then, connect the A/V output
jacks of your VCR to the A/V
input jacks of your TV using an
A/V cable. (Be sure to match the
colors on the jacks with the
colored plugs on the A/V cable.)
2b
If your TV and VCR have
S-Video jacks
Use the S-Video cable instead of
the yellow video connection.
z Tip
To allow your Digital Satellite
Receiver to control the recording
functions of your VCR, See “Step
5: Connecting the VCR
Controller” on page 11.
ACCESS CARD
DIGITAL
OUT
(OPTICAL)
VCR CONTRO
A/V Cable
RF REMOTE
R
AUDIO
L(MONO)
VIDEO OUT
LOW
L
SATELLITE IN
SPEED DATA
2a
VIDEO
AUDIO
S VIDEO
2a 2b
IN
S VIDEO
VIDEO
L(MONO)
-AUDIOR
S-Video
Cable
VIDEO
(yellow)
OR
S-Video
LIN
LIN
O
VIDEO
IN
U
Digital Satellite Receiver
CH3
CH4
VHF/UHF IN
1
S VIDEO
2
VHF(SAT)/UHF
UT
O
TEL LINE
AC IN~
2c
If your TV and VCR do
2b
2c
not have A/V jacks
Connect the VHF(SAT)/
UHF OUT jack on the
Digital Satellite Receiver to
the VHF/UHF input jack
on your VCR using coaxial
VCR
cable.
Then, connect the VHF/
E
E
T
IN
T
U
O
UHFoutputjackonyour
VCR to the VHF/UHF
input jack on your TV using
coaxial cable.
Set the CH3/CH4 switch to
2c
the channel that does not
carry off-air broadcasts in
your area.
Note
Coaxial
Cable
TV
VHF/UHF
With this connection
your, input source is
channel 3 or channel 4
depending on how you
set the CH3/CH4 switch
on your VCR.
10
Page 11
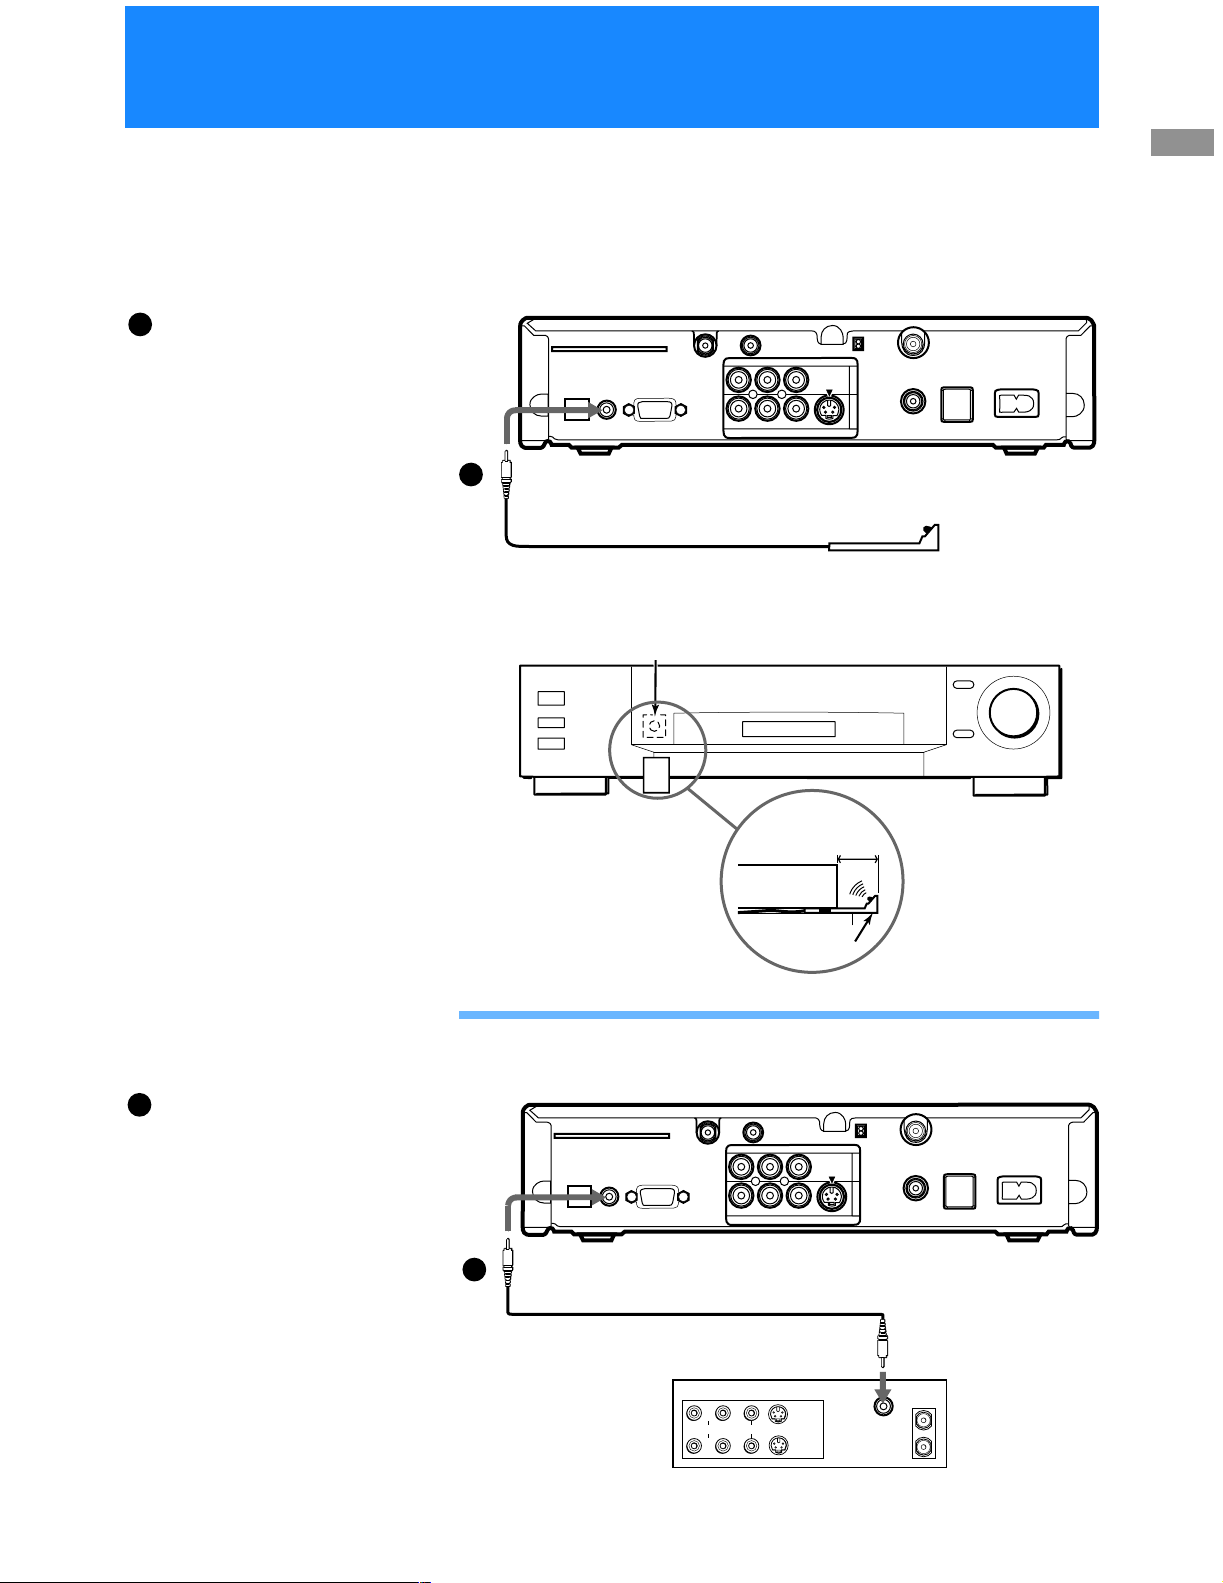
Step 5: Connecting the VCR Controller
Connect the VCR Controller to allow the Timer & Rec feature to
automatically operate your VCR.
See “Setting Up the VCR Control Feature” on page 25 for information
about setting up the Digital Satellite Receiver to work with your VCR.
Digital Satellite Receiver
1a
To allow the Digital
Satellite Receiver to
control your VCR
Connectthe VCRController
to the VCR CONTROL jack
on the receiver.
In front of the VCR
Place the VCR Controller under andin
front of the VCR.
The VCR Co ntroller must extend just
in front of the infrared sensor of the
VCR.
1a
D
ACCESS CAR
DIGITAL
UT
O
(OPTICAL)
W
LO
OL
ONTR
R C
VC
VCR Controller
Cable
IR Sensor VCR (front view)
SPEED
SATELLITE IN
DATA
RF REMOTE
AUDIO
VIDEO
L(MONO)
R
VIDEO OUT
VCR Controller
S VIDEO
CH3
CH4
VHF/U
1
2
F(SAT)/UHF
VH
Connecting Your Digital
Satellite Receiver
HF IN
UT
O
TEL LINE
AC IN~
z Tip
If the infrared sensor is not marked
on your VCR, shine a flashlight into
the front p anel of the VCR to locate
the sensor.
If you are using a Sony
1b
SmartFile VCR to take
advantage of the Pro gram Data
Download feature
Use this connection instead of the
VCR Controller connection. For
information about setting up the
VCR Control feature, see page 25.
For details about the Program Data
Download feature, refer to your
SmartFile VCR Operating
Instructions.
VCR (side view)
1
/2" to 1
"
VCR
Controller
Connecting a Sony SmartFile™ VCR
Digital Satellite Receiver
S VIDEO
CH3
CH4
VHF/UHF IN
1
2
VHF(SAT)/UHF
UT
O
TEL LINE
AC IN~
1b
DIGITAL
OUT
(OPTICAL)
ACCESS CARD
AUDIO
R
VCR CONTRO
W
LO
L
SATELLITE IN
SPEED DATA
Monaural Cable (supplied with
SmartFile VCR)
Sony SmartFile VCR
RF REMOTE
L(MONO)
VIDEO
VIDEO OUT
AUDIO
VIDEO
S VIDEO
IN
D
P
C
E
IN
L
IN
E
IN
L
T
U
O
IN
T
U
O
11
Page 12
Step 6: Connecting the RF Antenna (SAT-A50 only)
With the SAT-A50 model you can connect the RF Antenna and operate
the Digital Satellite Receiver when installed in a cabinet or from another
room in your house using the remote control. See page 31 for information
about how to set up the Digital Satellite Receiver to use the RF feature.
1
If you want to use the RF
feature
Connect the RF Antenna to
theRFREMOTEjackofthe
Digital Satellite Receiver.
Then, place the RF A ntenna
in a convenient location.
Digital Satellite Receiver
RF Antenna
1
(O
Notes
•DonotplacetheRFAntenna
directly on top of the Digital
Satellite Receiver or any other
metal object. For best results,
placethe RF Antenna in a visible
location.
• The operating range of the
remote control is about 1 00 feet
when using the RF feature. This
may decrease due to ambient
reception conditions, weak
batteries, etc.
ACCESS CARD
DIGITAL
OUT
A
IC
T
P
VCR CONTROL
)
L
SATELLITE IN
LOW SPEED DATA
R
U
A
RF REMOTE
IO
D
O
L(M
CH3
O
E
ID
V
S
)
O
N
T
U
O
O
E
ID
V
CH4
VHF/UHF IN
1
O
E
ID
V
2
VHF(SAT)/UHF
OUT
TEL LINE
AC IN~
12
Page 13
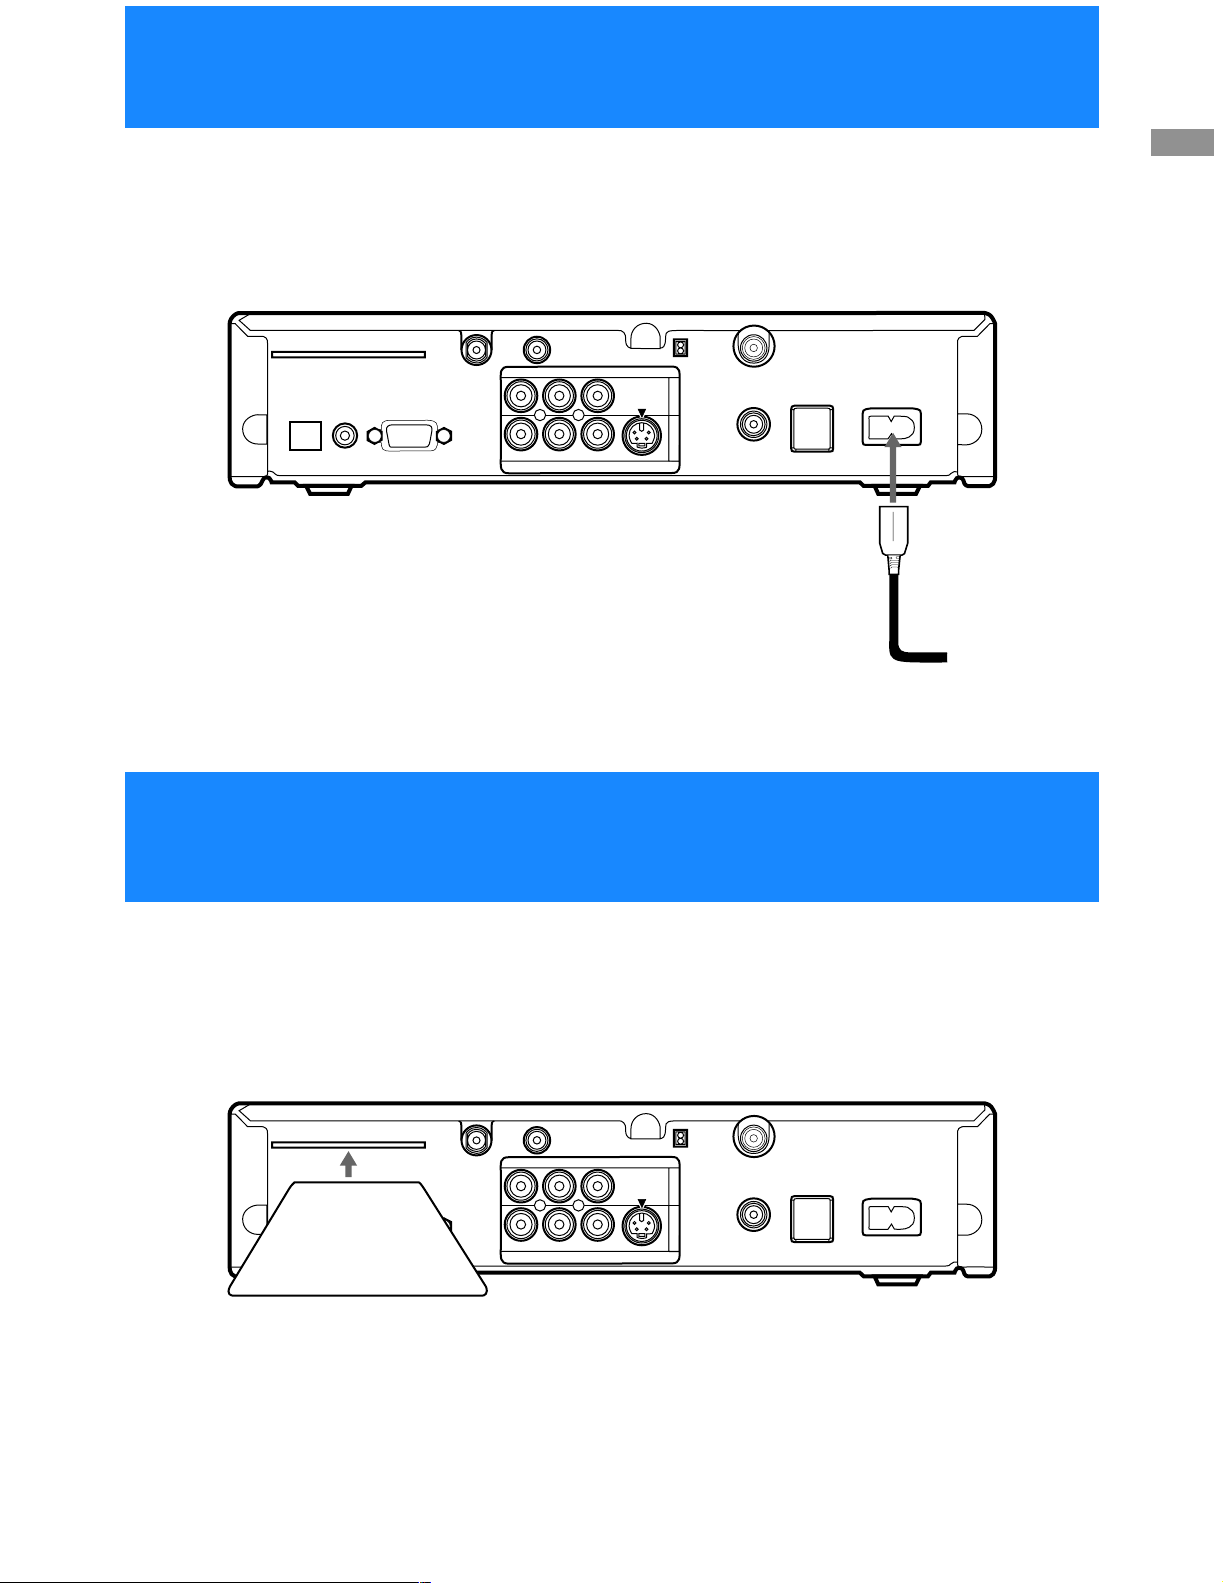
Step 7: Connecting the AC Power Cord
After all other connections are complete, connect the AC Power Cord to
the Digital Satellite Receiver.
Digital Satellite Receiver
Connecting Your Digital
Satellite Receiver
ACCESS CARD
DIGITAL
OUT
IC
T
P
(O
VCR CONTROL
)
L
A
SATELLITE IN
LOW SPEED DATA
R
U
A
RF REMOTE
IO
D
O
(M
L
O
E
ID
V
S
)
O
N
T
U
O
O
E
ID
V
CH3
CH4
VHF/UHF IN
1
O
E
ID
V
2
VHF(SAT)/UHF
OUT
TEL LINE
Step 8: Inserting the Access Card
AC IN~
AC Power Cord
to power outlet
Digital Satellite Receiver
ACCESS CARD
DIGITAL
OUT
IC
T
P
(O
LOW SPEED DATA
)
L
A
VCR CONTROL
Access Card
After you insert the Access Card and your Satellite Dish Antenna is
installed, you are ready to begin enjoying digital satellite programming.
Call DIRECTV at 1-800-DIRECTV (347-3288) to begin service.
CH3
CH4
VHF/UHF IN
1
O
E
ID
V
2
VHF(SAT)/UHF
OUT
TEL LINE
AC IN~
SATELLITE IN
R
U
A
RF REMOTE
IO
D
O
L(M
O
E
ID
V
S
)
O
N
T
U
O
O
E
ID
V
13
Page 14
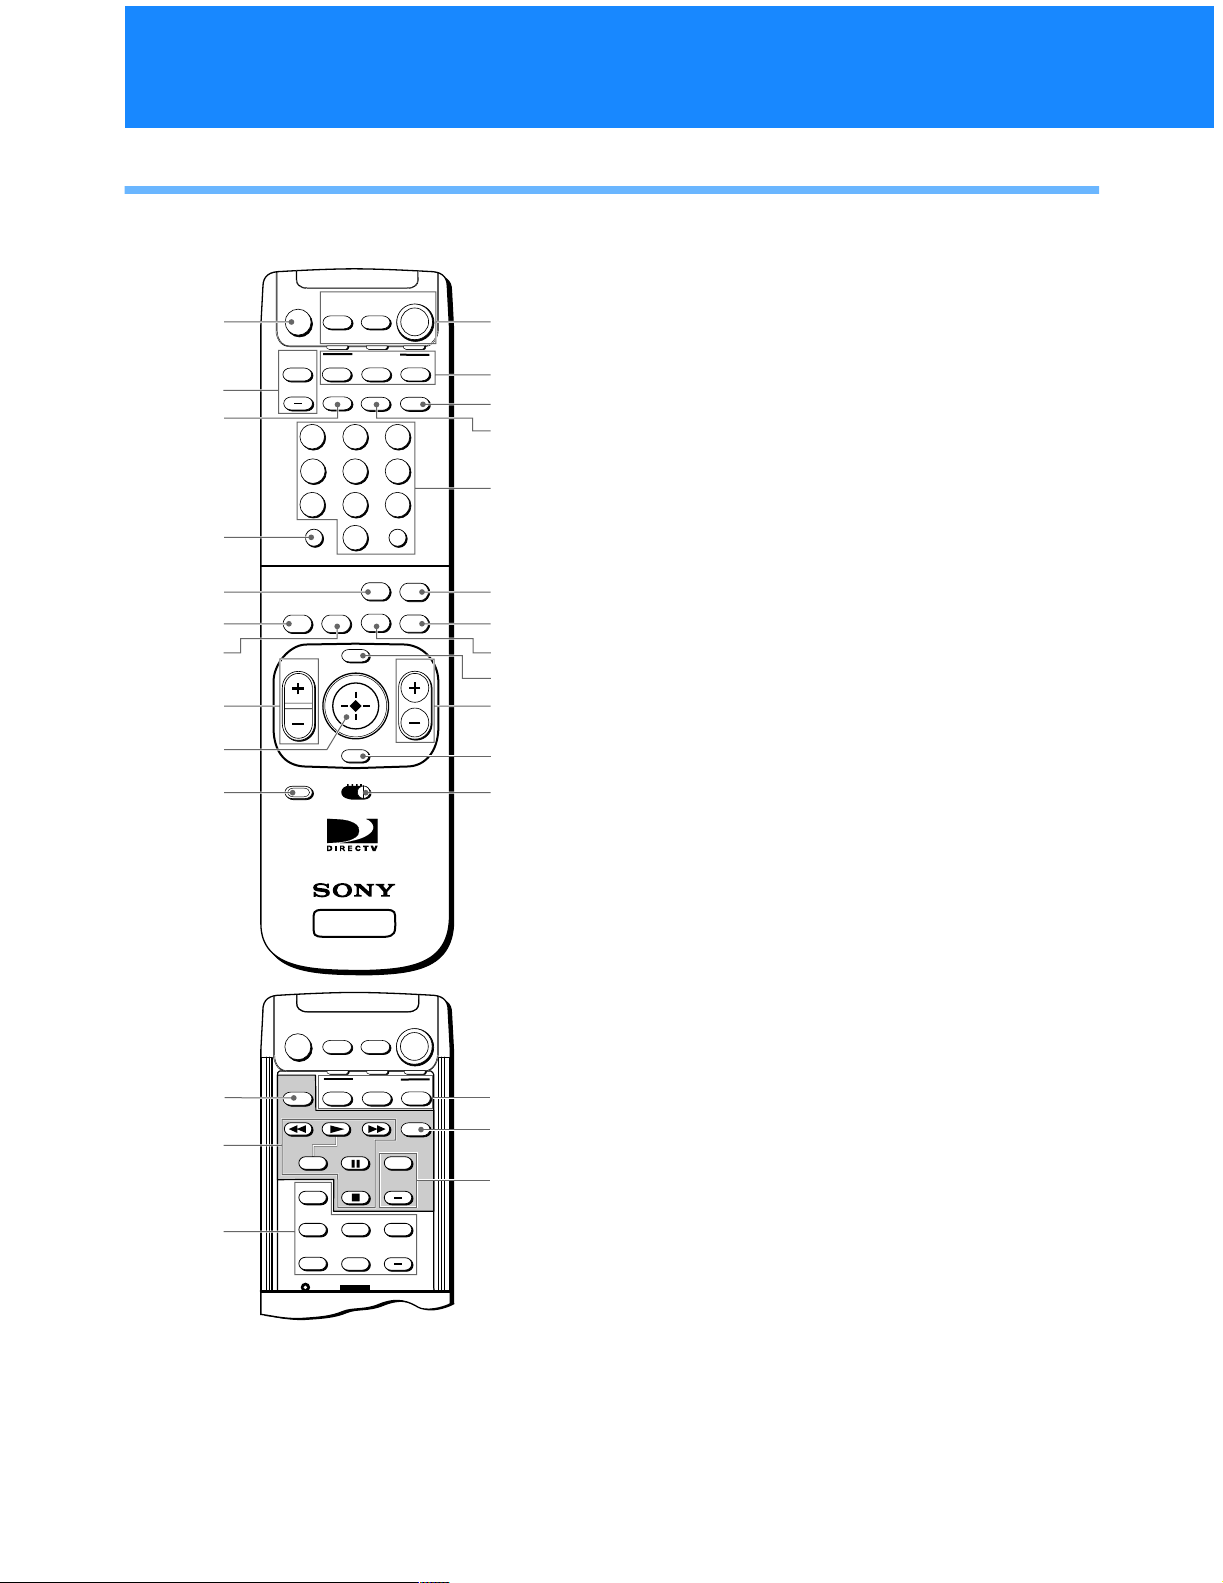
Viewing Pictures From Your Digital Satellite Receiver
Using Your Remote Control
RM-Y802 Remote Control (SAT-A50 model)
1 MUTING button
Mutes the volume. Press again to restore the
1
2
3
4
5
6
7
8
9
0
MUTING
AUDIO
VOLUME
+
VOL
CODE SET
CABLE TV
CABLE
SLEEP
1
4
7
INDEXFAVORITE
VTR3 2 DVD AMP
FUNCTION
TV/SAT
2
5
8
0
ALT AUDIO
CATEGORY
MENU
EXIT
POWER
SAT
TV
SAT
TV/VIDEO
3
6
9
ENTERDISPLAY
JUMP
GUIDE
qa
qs
qd
qf
qg
qh
qj
CH
qk
ql
w;
wa
RM-Y802
ws
volume. To operate your TV, you must first set
up the remote control (see page 65).
2 AUDIO VOLUME buttons
Adjust the volume of your audio receiver. To
operate your audio receiver,you must first set up
the remote control (see page 65).
3 SLEEP button
Sets the TV to turn off automatically after a
certain amount of time (if your TV has the Sleep
feature). To operate your TV, you must first set
up the remote control (see page 65).
4 DISPLAY button
Opens the program information display for the
current program.
5 ALT AUDIO button
Switches among the available audio broadcasts.
6 FAVORITE button
Opens the Favorite Stations guide.
SATELLITE
RECEIVER
TV
FUNCTION
TV
-
-
-
-
POWER
POWER
+
CH
+
CH
SAT
SAT
wh
wj
wk
wd
wf
wg
MUTING
POSITION
SWAP PIP
AUDIO OFF
CABLE
CABLETV/VTR
z Tip
You may need to set up the remote control to operate your
other audio/video equipment. See “Setting Up the Remote
Control” on page 65 for details.
7 INDEX button
Opens the Station Index.
8 VOL buttons
Adjust the volume. To operate your TV, you
must first set up the remote control (see page 65).
9 Joystick
Movingthejoystickup,down,left,right,and
diagonally moves the highlight in on-screen
displays. Press the joystick to select the
highlighted item.
q; CODE SET button
Lets you program the remote control to operate
your TV and other audio/video equipment (see
page 65).
14
Page 15

qa POWER buttons
Turn on and off the Digital Satellite Receiver, TV
and VTR (VCR). To operate your TV or VTR
(VCR), you must first set up the remote control
(see page 65).
qs FUNCTION buttons
Select the equipment (CABLE, TV or SAT) that
you want to operate. The indicators light up to
show which device the remote control is
operating. To operate your TV or cable box, you
must first set up the remote control (see page 65).
qd TV/VIDEO button
Switches between the various inputs of your TV.
To operate your TV, you must first set up the
remote control (see page 65).
qf TV/SAT button
Switches the output of your Digital Satellite
Receiver between regular TV and satellite
broadcasts. To receive regular TV bro adcasts,
you must have a local TV antenna or cable
company connection (see page 9).
wa EXIT button
Closes all on-screen displays including program
guides and menus.
ws VTR3/2/DVD/AMP switch
Sets the remote to operate other devices in your
A/V system. To operate these other devices, you
must first set up the remote control (see page 65).
wd TV/VTR button
Switches between the TV and VTR (VCR) inputs
of your TV. To operate your TV, you must first
set up the remote control (see page 65).
wf VCR Control buttons
Operate VCR features such as play, record,
pause,stop,andfastwind.TooperateyourVCR,
you must first set up the remote control (see page
65).
wg PIP control buttons
Operate the Picture-in-picture features of your
TV (if your TV has PIP). To operate your TV, you
must first set up the remote control (see page 65).
Viewing Pictures From Your
Digital Satellite Receiver
qg 0–9 and ENTER buttons
Change channels directly, and enter numerical
values in on-screen displays.
qh JUMP button
Changes channels to the previously tuned
channel.
qj GUIDE button
Opens the Program Guide.
qk CATEGORY button
Opens the Category Guide.
ql MENU button
Opens the Main Menu.
w; CH buttons
Change channels. When a program guide is
open, pressing the CH buttons pages through the
guide.
wh FUNCTION buttons
Select the equipment (CABLE, TV or SAT) that
you want to operate. The indicators light up to
show which device the remote control is
operating. To operate your TV or cable box, you
must first set up the remote control (see page 65).
wj POWER button
Turns on or off the equipment selected with the
VTR3/2/DVD/AMP switch.
wk CH +/– buttons
Change channels in numerical order on the
equipment selected w ith the VTR3/2/DVD/
AMP switch.
15
Page 16

Using Your Remote Control (continued)
RM-Y139 Remote Control (SAT-B50 model)
1 MUTING button
Mutes the volume. Press again to restore the
1
2
3
4
5
6
7
8
9
MUTING
VTR
VTR
TV/VTR
TV/SAT
1283
456
79
DISPLAY
CATEGORYINDEX
VOL
TV
FUNCTION
TVTV/VIDEO
0
ENTER
CH
POWER
GUIDE
FAVORITEMENUJUMP EXIT
SAT
SAT
PAGE
qa
qs
qd
qf
qg
qh
qj
qk
ql
w;
volume. To operate your TV, you must first set
up the remote control (see page 65).
2 TV/VIDEO button
Switches between the inputs of y our TV. To
operateyourTV, you mustfirstset up the remote
control (see page 65).
3 TV/VTR button
Switches between the inputs of you r VCR. To
operate your VCR, you must first set up the
remote control (see page 65).
4 TV/SAT button
Switches the output of your Digital Satellite
Receiver between regular TV and satellite
broadcasts. To receive regular TV broadcasts,
you must have a local TV antenna or cable
company connection (see page 9).
5 DISPLAY button
Opens the program information display for the
current program.
0
CODE SET
SATELLITE
RECEIVER
RM-Y139
z Tip
You may need to set up the remote control to operate your
other audio/video equipment. See “Setting Up the Remote
Control” on page 65 for details.
6 INDEX button
Opens the Station Index.
7 JUMP button
Changes channels to the previously tuned
channel.
8 EXIT button
Closes all on-screen displays including program
guides and menus.
16
Page 17

9 VOL buttons
Adjust the volume. To operate your TV, you
must first set up the remote control (see page 65).
q; CODE SET button
Lets you program the remote control to operate
your TV and other audio/video equipment (see
page 65).
qa POWER buttons
Turn on and off the Digital Satellite Receiver, TV
and VTR (VCR). To operate your TV or VTR
(VCR), you must first set up the remote control
(see page 65).
qs FUNCTION buttons
Select the equipment (SAT, TV, VTR) that you
want to operate. The indicators light up to show
which device the remo te control is operating. To
operateyourTV orVTR (VCR),youmust firstset
up the remote control (see page 65).
qd VCR Control buttons
Operate VCR features such as play, record,
pause, stop, and fast wind. To operate your VTR
(VCR), you must first set up the remote control
(see page 65).
qg GUIDE button
Opens the Program Guide.
qh CATEGORY button
Opens the Category Guide.
qj Arrow and buttons
The arrow buttons move the highlight in
on-screen displays. The button selects the
highlighted item.
qk FAVORITE button
Opens the Favorite Stations guide.
ql MENU button
Opens the Main Menu.
w; CH/PAGE buttons
Change channels. When a program guide is
open, these buttons page through the guide.
Viewing Pictures From Your
Digital Satellite Receiver
qf 0–9 and ENTER buttons
Change channels directly and enter numerical
values in on-screen displays.
17
Page 18
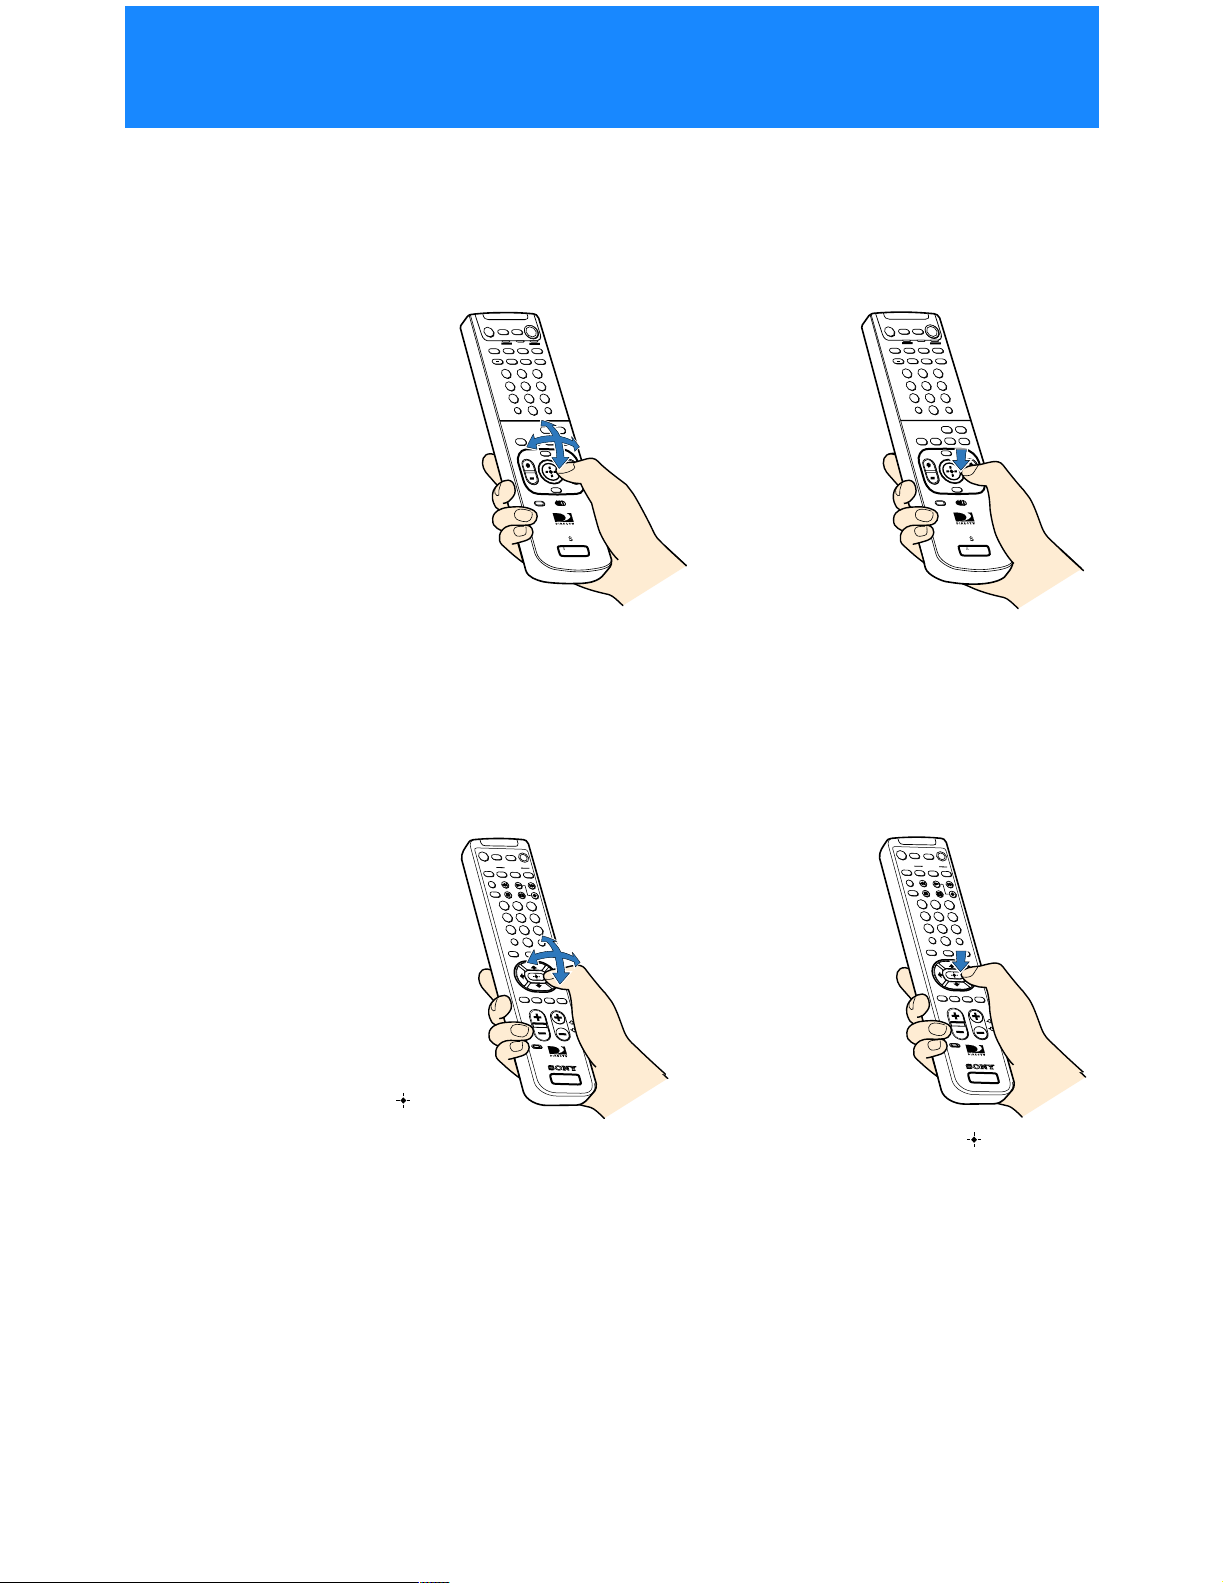
Selecting Items
In on-screen displays such as the Main Menu and program guides, you
must first move the highlight to the item you want, then select the item.
RM-Y802 Remote Control (SAT-A50 model)
+
1
2
3
4
5
6
9
7
8
0
S
SATELLITE
RECEIVER
1 Move the joystick in any
direction to move the
highlight to the item you
+
1
2
3
4
5
6
9
7
8
0
S
SATELLITE
RECEIVER
2 Pressdownonthejoystickto
select the item.
want.
RM-Y139 Remote Control (SAT-B50 model)
123
456
87
0
9
123
456
879
0
Note (SAT-B50 model)
Whenever these Operating Instructions
refer to using the joystick, use the arrow
V/v/B/b buttons surrounding the
button.
z Tip
Be sure to press the SAT FUNCTION
button before operating the Digital
Satellite Receiver with the remote control.
18
SATELLITE
RECEIVER
1 Press the V/v/B/b buttons
to move the highlight to the
item you want.
SATELLITE
REC
EIVER
2 Press the buttonto
select the item.
Page 19
Turning On the Power
Press the POWER SAT button to turn on the Digital
MUTING
AUDIO
VOLUME
+
VOL
POWER
TVCABLE
SAT
FUNCTION
CABLE
SLEEP
1
4
7
SAT
TV
TV/SAT
TV/VIDEO
2
3
5
6
9
8
ENTERDISPLAY
0
ALT AUDIO
JUMP
GUIDE
CATEGORY
INDEXFAVORITE
MENU
CH
1
Satellite Receiver.
The POWER indicator lights up.
Press the TV button to turn on the TV.
2
POWER
SAT
TV
Viewing Pictures From Your
Digital Satellite Receiver
EXIT
CODE SET
VTR3 2 DVD AMP
SATELLITE
RECEIVER
RM-Y802
z Tip
The FUNCTION button indicators light
up to show you which equipment the
remote control is operating.
Note
You may need to set up the remote
control to operate your other audio/
video equipment. See “Setting Up the
Remote Control” on page 65 for details.
Select the TV’s input source to which you
3
connected the Digital Satellite Receiver.
Depending on how you connected your Digital Satellite Receiver
to your TV, the input source could be channel 3 or channel4, oryou
may need to use the TV/VIDEO button to select one of the A/V
input sources.
FUNCTION
TV
3
/
TV/VIDEO
4
/
To make sure you are viewing satellite pictures
Press the SAT FUNCTION button, then press the MENU button to
open the Main Menu.
FUNCTION
If the Main Menu does not appear, turn off your equipment, check
your connections and repeat from step 1.
Press the EXIT button to close the Main Menu.
SAT
MENU
19
Page 20
Changing Channels
MUTING
AUDIO
VOLUME
+
VOL
CODE SET
1
4
7
CABLE
FUNCTION
CABLE
SLEEP
TV/SAT
2
5
8
0
ALT AUDIO
CATEGORY
INDEXFAVORITE
MENU
EXIT
VTR3 2 DVD AMP
POWER
TV
SAT
SAT
TV
TV/VIDEO
Press the SAT FUNCTION button.
1
FUNCTION
SAT
3
6
9
ENTERDISPLAY
JUMP
GUIDE
CH
RM-Y802
Press the CH +/– buttons.
1
2
The Digital Satellite Receiver tunes to the next channel, and the
Station ID and channel number appear in the upper right corner of
your TV screen.
CH
You can also change channels by entering the three digit channel
number using the 0–9 buttons, and either pressing the ENTER
button or waiting several seconds.
SATELLITE
RECEIVER
z Tip
You can see information about a
program you are watching by pressing
the DISPLAY button.
1 2 3
ENTER
The Digital Satellite Receiver tunes to that channel, and the Station
ID and channel number appear in the upper right corner of your
TV screen.
20
Page 21
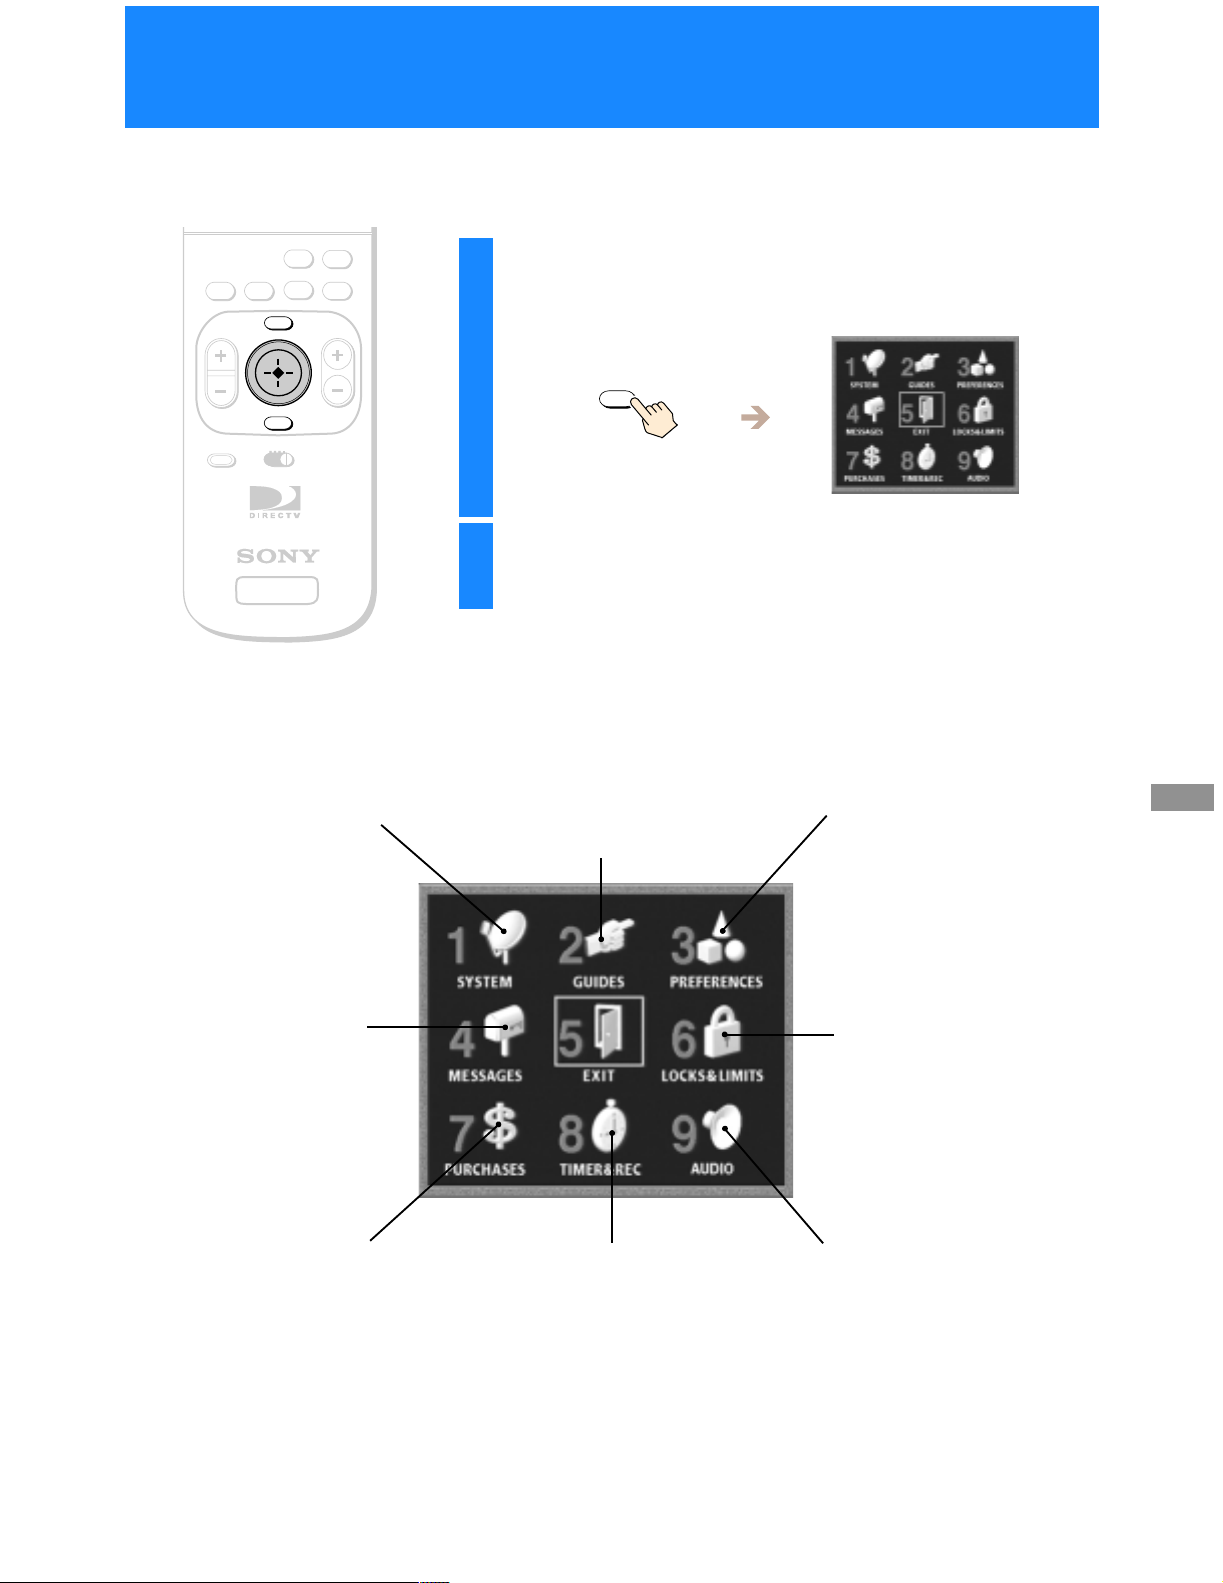
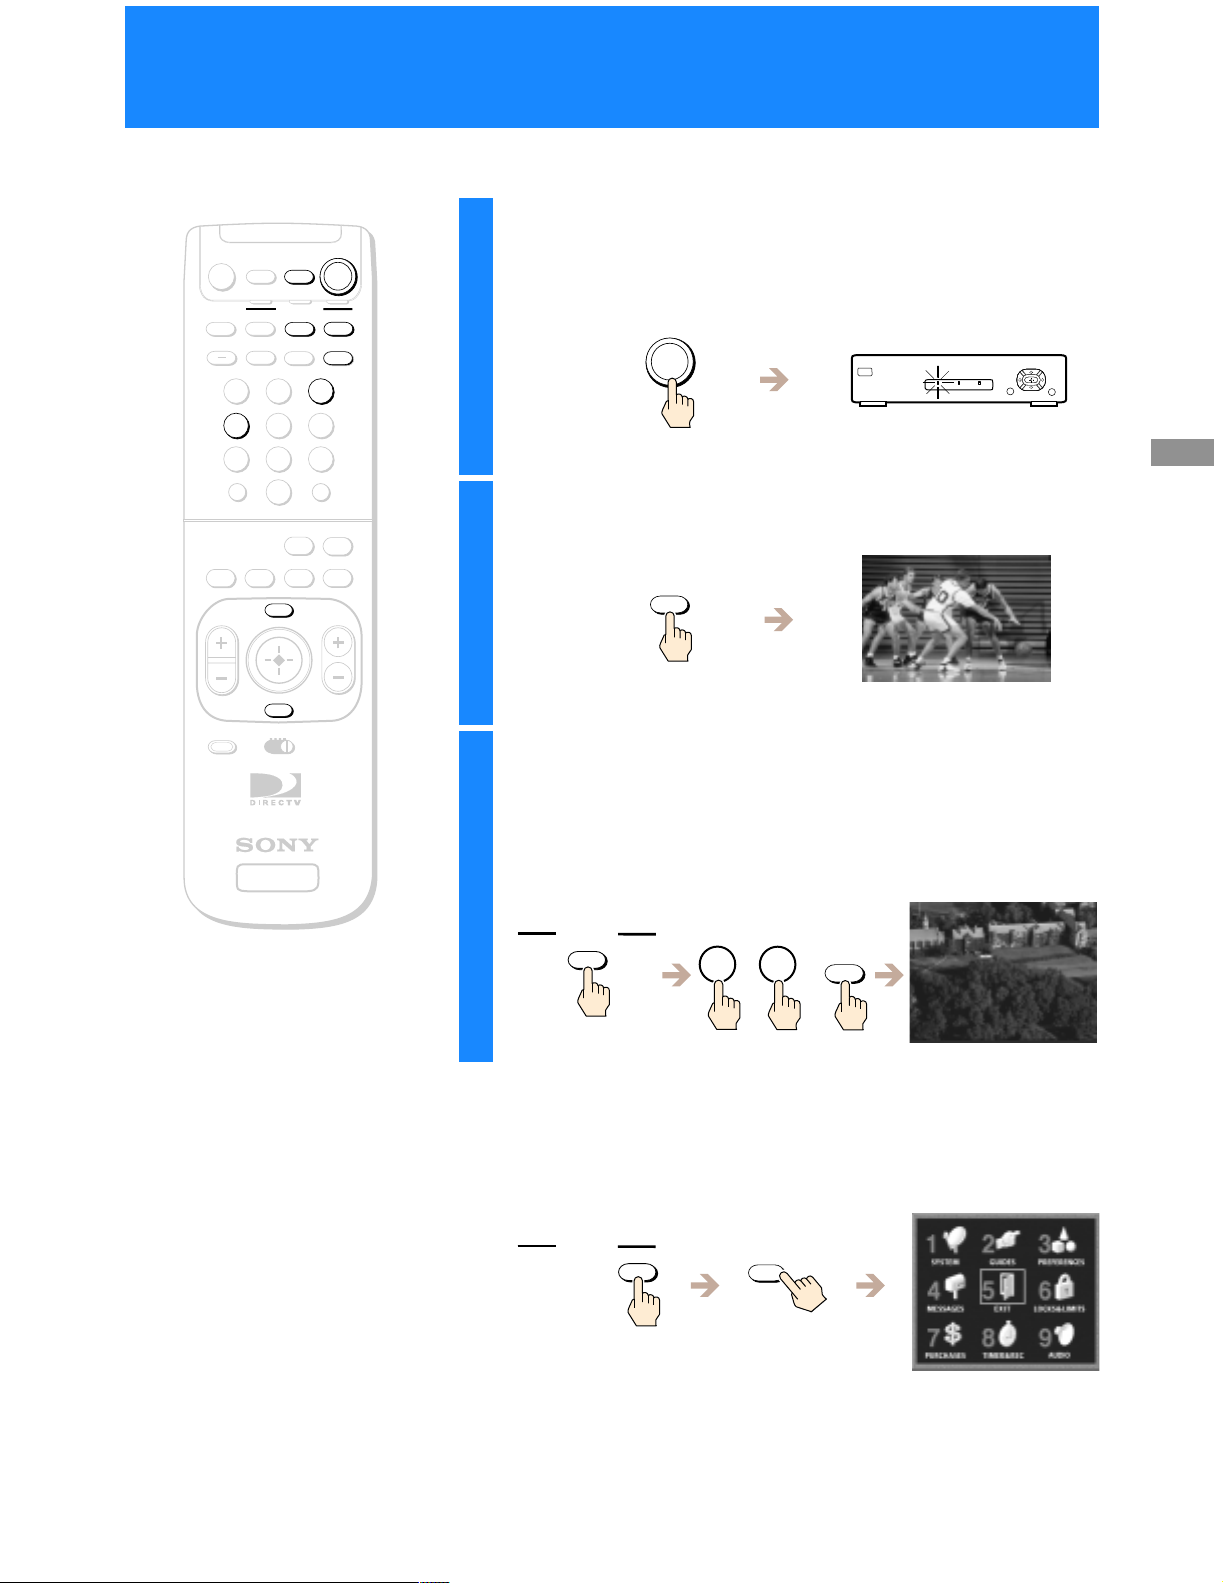
Using the On-Screen Displays
Using the Main Menu
The Main Menu acts as a gateway to all of the features your Digital
Satellite Receiver has to offer.
ALT AUDIO
JUMP
GUIDE
CATEGORY
INDEXFAVORITE
Press the MENU button.
1
The Main Menu appears.
VOL
MENU
EXIT
VTR3 2 DVD AMP
CODE SET
SATELLITE
RECEIVER
SYSTEM (Page 22)
Adjust and test your Digital
Satellite Receiver’s settings.
•Antenna
•VCR Control
•SystemTest
•AspectRatio
•AccessCard
•Remote Control
(SAT-A50 only)
CH
RM-Y802
MENU
Highlight and select the feature you want to
2
access.
GUIDES (Page 34)
Access the many guides that help you
find the program you want.
•Alpha List
•Program Guide
•Category Guide
•Station Index
•Favorite Stations
•Other Guides
PREFERENCES (Page 45)
Adjust the way menus and
information appear.
•Display Options
•Custom Stations
•Data Services
(future application)
Using the On-Screen Displays
MESSAGES (Page 52)
Read messages from your
service provider.
PURCHASES (Page 59)
Review the pay per view
program purchases and
cancellations you have made.
LOCKS & LIMITS (Page 53)
Set limits onspending and ratings.
Set locks on stations and pay per
view programs.
AUDIO (Page 64)
Choose a preferred language for the
default audio and current audio for
TIMER & REC (Page 60)
Schedule program tuning and
recording.
multiple language programs.
You can also select the Dolby Digital
settings (SAT-A50 only).
Closing the Main Menu
• Highlight and select EXIT to close the Main Menu (the current program
appears on your screen). You can also press the EXIT button on your
remote control.
• The on-screen displays close automatically after several minutes.
21
Page 22

Setting Up Your Digital Satellite Receiver (SYSTEM)
Using the System Menu
ALT AUDIO
JUMP
GUIDE
CATEGORY
INDEXFAVORITE
The System Menu provides many ways to adjust your Digital Satellite
Receiver so it matches your preferences and optimizes the conditions of
your home entertainment system.
VOL
MENU
EXIT
VTR3 2 DVD AMP
CODE SET
SATELLITE
RECEIVER
Return
Closes the SYSTEM pop-up to
show the Main Menu.
Antenna
Lets you find the position of the
satellite and helps you get the
strongest signal from your
Satellite Dish Antenna
(see page 23).
VCR Control
Lets you set up and test your
VCR using the VCR Controller
(see page 25).
System Test
Lets you test the connections
to your Satellite Dish Antenna,
and telephone line
(see page 28).
CH
RM-Y802
Press the MENU button, then h ighlight and select
1
SYSTEM.
The SYSTEM po p-up appears.
MENU
Highlight and select the item you want to set up.
2
Aspect Ratio
Letsyou set the receiver’s outputto
match the aspect ratio of your TV
(see page 29).
Access Card
Lets you initialize a replacement
card (see page 30).
Remote Control (SAT-A50 only)
Lets you set up the receiver so the
remote control can operate the
receiver from behind a cabinet or
from another room (see page 31).
22
Page 23
VOL
Setting Up the Satellite Dish
ALT AUDIO
JUMP
GUIDE
CATEGORY
INDEXFAVORITE
MENU
CH
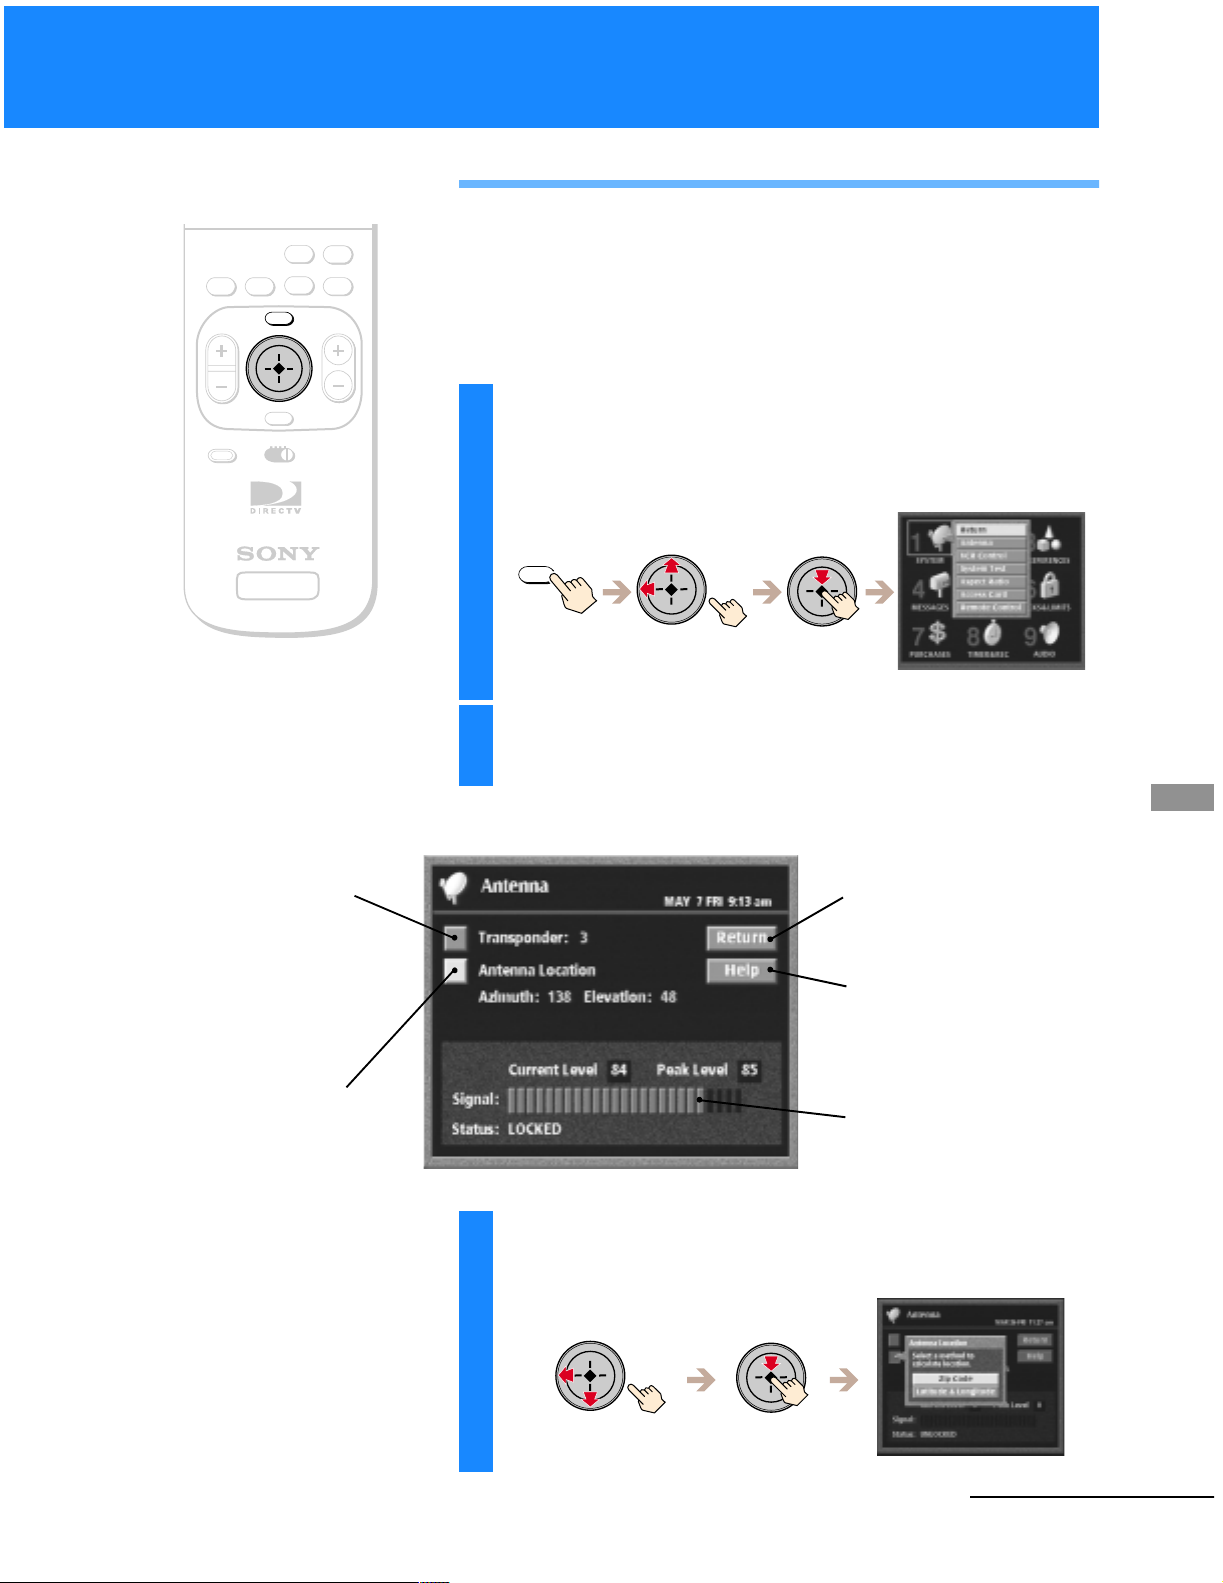
Antenna
This display helps you aim your Satellite Dish Antenna to get the
strongest signal.
For complete information on installation of your Satellite Dish Antenna,
see the Satellite Dish Antenna Installation/Operating Instructions.
EXIT
VTR3 2 DVD AMP
CODE SET
SATELLITE
RECEIVER
Transponder
Lets you select the transponder
from which the Satellite Dish
Antenna receives its signal.
You do not need to change this
setting unless instructed by
your service provider.
RM-Y802
Press the MENU button, then h ighlight and select
1
SYSTEM.
The SYSTEM po p-up appears.
MENU
Highlight and select “Antenna”.
2
The Antenna display appears.
Return
Closes the Antenna display to
show the Main Menu.
Help
Opens information about the
Antenna display.
Using the On-Screen Displays
Antenna Location
Lets you find o ut the
direction of the satellite
from your location.
Signal Strength Meter
Shows the current and peak
levels of the signal strength.
Highlight and select “Antenna Location”.
3
The Antenna Location pop-up appears.
continued
23
Page 24
Setting Up Your Digital Satellite Receiver (SYSTEM)
(continued)
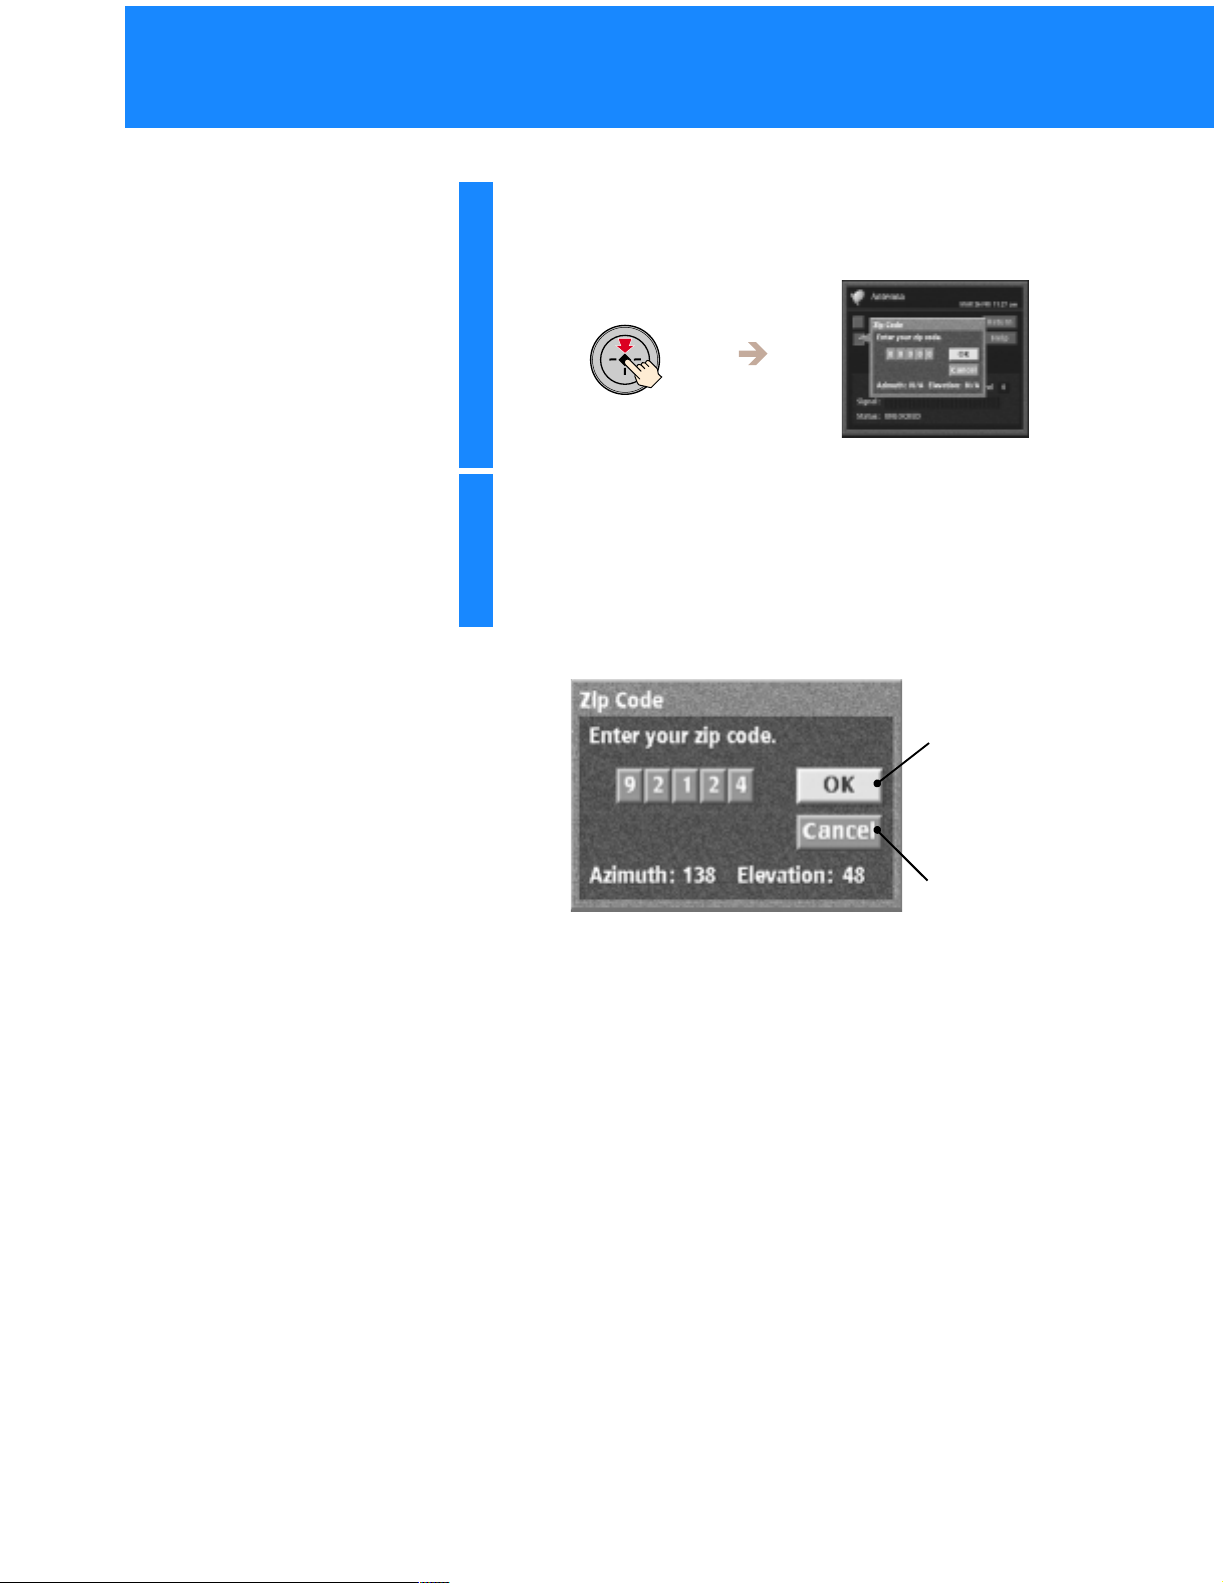
Select “Zip Code”.
4
The Zip Code pop-up appears.
z Tip
If it is more convenient for you to
enter latitude and longitude, select
“Latitude & Longitude” instead of
“Zip Code”.
Enter your Zip Code, then select “OK”.
5
The azimuth and elevation appear. Use these coordinates to aim
your Satellite Dish Antenna towards the satellite. Refer to your
Satellite Dish Antenna’s Operating/Installation Instructions for
more details.
M
To change
the number
m
To move to the
<,
Youcan also use the0–9buttonstoenter the number. The highlight
moves to the next position automatically.
next digit
OK
Closesthe pop-upand
saves your changes.
Cancel
Closes the pop-up
without saving the
changes.
24
Page 25

VOL
CODE SET
ALT AUDIO
CATEGORY
INDEXFAVORITE
MENU
EXIT
VTR3 2 DVD AMP
SATELLITE
RECEIVER
JUMP
GUIDE
CH
RM-Y802
Setting Up the VCR Control Feature
The VCR Control feature lets the Digital Satellite Receiver control your
VCRusingtheTimer&Recfeature(seepage60).TousetheVCRControl
feature you must connect the VCR Controller or a Sony SmartFile VCR
(see page 11).
Press the MENU button, then h ighlight and select
1
SYSTEM.
The SYSTEM po p-up appears.
MENU
Highlight and select “VCR Control”.
2
The VCR Control display appears.
Manufacturer
Lets you select the
manufacturer code for your
VCR (see page 26).
Auto Title Insert
Lets you turn on the Auto Title
Insertfeature(seepage27).
Using the On-Screen Displays
Return
Closes the VCR Control
display to show the Main
Menu.
Help
Opens information about the
VCR Control display.
25
Page 26

Setting Up Your Digital Satellite Receiver (SYSTEM)
(continued)
Setting the VCR Manufacturer Code
The VCR Manufacturer Code allows the Digital Satellite Receiver to
MUTING
AUDIO
VOLUME
+
FUNCTION
TV/SAT
2
5
8
POWER
TV
SAT
SAT
TV
TV/VIDEO
3
6
9
ENTERDISPLAY
CABLE
CABLE
SLEEP
1
4
7
0
ALT AUDIO
JUMP
GUIDE
CATEGORY
INDEXFAVORITE
control your VCR using the VCR Controller or a Sony SmartFile VCR.
1 Highlight and select “Manufacturer” from the VCR
Control display (see page 25).
The Manufacturer pop-up appears.
2 Highlight and select the manufacturer of your VCR.
The manufacturer’s pop-up appears.
VOL
CODE SET
MENU
EXIT
VTR3 2 DVD AMP
SATELLITE
RECEIVER
CH
RM-Y802
z Tips
• If you connected a Sony SmartFile
VCR, use the manufacturer code of 99.
• Do not stop or interrupt the VCR test
by pressing any buttons until after the
VCR test is complete.
3 Select a VCR manufacturer code from the list.
The Test pop-up appears.
Some manufacturers have more than one code to choose from.
If the VCR manufacturer code you select doe s not work in step 4
below you can select another code for that manufacturer.
4 Select “Yes” to perform a VCR test.
If you select “Yes”, a pop-up appears giving you instructions on
how to perform a VCR test.
26
If the test is unsuccessful, check your connections and the VCR
Controller placement, then repeat this procedure selecting a
different VCR manufacturer code in step 3 (if your VCR
manufacturer has more than one code).
Page 27

MUTING
AUDIO
VOLUME
+
Setting Up Auto Title Insert
TheAutoTitleInsertfeatureletsyoudisplayinformationaboutthe
FUNCTION
TV/SAT
2
5
8
POWER
TV
SAT
SAT
TV
TV/VIDEO
3
6
9
ENTERDISPLAY
CABLE
CABLE
SLEEP
1
4
7
0
ALT AUDIO
JUMP
GUIDE
CATEGORY
INDEXFAVORITE
program at the beginning of a Timer & Rec event. The Auto Title Insert
feature displays the program title, program description, total program
time, station logo, station name, channel number, and the program’s
content rating.
You can use the Auto Title Insert feature to display this information at the
beginning of a scheduled program.
1 Highlight and select “Auto Title Insert” from the VCR
Control display (see page 25).
The Auto Title Insert pop-up appears.
VOL
CODE SET
MENU
EXIT
VTR3 2 DVD AMP
SATELLITE
RECEIVER
CH
RM-Y802
Note
When you schedule two or more
consecutive programs, the Auto Title
Insert feature will only a ppear before the
first program.
2 Select “On” or “Off”.
The Auto Title Insert pop-up closes to show the VCR Control
display.
Using the On-Screen Displays
27
Page 28

Setting Up Your Digital Satellite Receiver (SYSTEM)
(continued)
Performing a System Test
MUTING
AUDIO
VOLUME
+
FUNCTION
TV/SAT
2
5
8
POWER
TV
SAT
SAT
TV
TV/VIDEO
3
6
9
ENTERDISPLAY
CABLE
CABLE
SLEEP
1
4
7
0
ALT AUDIO
JUMP
GUIDE
CATEGORY
INDEXFAVORITE
The system test checks your Access Card, telephone line, and Satellite
Dish Antenna connections for proper operation.
Press the MENU button, then h ighlight and select
1
SYSTEM.
The SYSTEM po p-up appears.
MENU
VOL
CODE SET
MENU
EXIT
VTR3 2 DVD AMP
SATELLITE
RECEIVER
CH
RM-Y802
Highlight and select “System Test”.
2
The System T est display appears.
Return
Closes the System Test
display to show the
Main Menu.
Test
Starts the system test.
Help
Opens information
about the Syste m Test
display.
Highlight and select “Test”.
3
The system test begins.
If the system test fails, check your connections before calling your
service provider or Sony.
28
Select “Return”.
4
The System Test display closes to show the Main Menu.
Page 29

MUTING
AUDIO
VOLUME
+
Setting the Aspect Ratio
The aspect ratio refers to the proportion of your TV screen. Some newer
TVs may offer the 16:9 ratio which is similar to the proportions of a movie
screen. Most TVs use the standard 4:3 ratio.
Press the MENU button, then h ighlight and select
1
SYSTEM.
The SYSTEM po p-up appears.
MENU
FUNCTION
TV/SAT
2
5
8
POWER
TV
SAT
SAT
TV
TV/VIDEO
3
6
9
ENTERDISPLAY
CABLE
CABLE
SLEEP
1
4
7
0
ALT AUDIO
JUMP
GUIDE
CATEGORY
INDEXFAVORITE
VOL
CODE SET
MENU
EXIT
VTR3 2 DVD AMP
SATELLITE
RECEIVER
CH
RM-Y802
Note
To us e the Wide aspect ratio feature, you
must receive a 16:9 aspect ratio signal.
Checkwith yourserviceprovidertosee if
16:9 programming is available.
Highlight and select “Aspect Ratio”.
2
The Aspect Ratio display appears.
Return
Closes the Aspect Ratio
display to show the
Main Menu.
Help
Opens information
about the Aspect Ratio
display.
Highlight and select the aspect ratio of your TV.
3
The highlight moves to “Return”.
Using the On-Screen Displays
Select “Return”.
4
The Aspect Ratio display closes to show the Main Menu.
29
Page 30

Setting Up Your Digital Satellite Receiver (SYSTEM)
(continued)
Replacing Your Access Card
MUTING
AUDIO
VOLUME
+
FUNCTION
TV/SAT
2
5
8
POWER
TV
SAT
SAT
TV
TV/VIDEO
3
6
9
ENTERDISPLAY
CABLE
CABLE
SLEEP
1
4
7
0
ALT AUDIO
JUMP
GUIDE
CATEGORY
INDEXFAVORITE
Occasionally your service provider may send you a new Access Card.
Use this display to set up your new card. See “Inserting the Access Card”
on page 13 for information about inserting the Access Card into the
Digital Satellite Receiver.
Press the MENU button, then h ighlight and select
1
SYSTEM.
The SYSTEM po p-up appears.
MENU
VOL
CODE SET
MENU
EXIT
VTR3 2 DVD AMP
SATELLITE
RECEIVER
CH
RM-Y802
Highlight and select “Access Card” from the
2
System pop-up.
The Access Card display appears.
Highlight and select “OK”.
3
The display shows instructions on how to proceed.
Return
Closes the Access Card
display to show the Main
Menu.
OK
Starts the Access Card
replacement process.
Help
Opens information
about the Access Card
display.
30
Follow the instructions in each display to
4
complete the replacement process.
Page 31

VOL
CODE SET
ALT AUDIO
CATEGORY
INDEXFAVORITE
MENU
EXIT
VTR3 2 DVD AMP
SATELLITE
RECEIVER
JUMP
GUIDE
CH
RM-Y802
Selecting RF or IR Remote Control Reception (SAT-A50 only)
The RF feature allows you to operate the Digital Satellite Receiver from
behind a cabinet or from another room within your home. The RF
Antenna must be connected to use the RF feature (see page 12).
Press the MENU button, then h ighlight and select
1
SYSTEM.
The SYSTEM po p-up appears.
MENU
Highlight and select “Remote Control”.
2
TheRemoteControldisplayappears.
Remote Signal
Letsyou select IR or RF as the type
of signal the receiver accepts.
RF Security Control
Lets you change the security code.
RF signals are used to control
many devices. You may need to
change the security code so that
this remote control operates the
Digital Satellite Receiver only.
Highlight and select “Remote Signal”.
3
The Remote Signal pop-up appears.
Return
Closes the Remote Control
display to show the Main Menu.
Help
Opens information about the
Remote Control display.
Using the On-Screen Displays
continued
31
Page 32

Setting Up Your Digital Satellite Receiver (SYSTEM)
(continued)
Highlight and select “RF”.
4
The Remote Signal pop-up closes to show the Remote Control
display.
Highlight and select “Return”.
5
The display closes to show the Main Menu, and the Digital Satellite
Receiver is set to receive RF signals from the remote control.
MUTING
AUDIO
VOLUME
+
VOL
CODE SET
1
4
7
CABLE
FUNCTION
CABLE
SLEEP
TV/SAT
2
5
8
0
ALT AUDIO
CATEGORY
INDEXFAVORITE
MENU
EXIT
VTR3 2 DVD AMP
Setting the Security Code
If the Digital Satellite Receiver is receiving signals from another RF
remote control in your home (or from your neighbor’s home), you can
eliminate this problem by changing the security codes for the Digital
POWER
TV
SAT
TV
TV/VIDEO
3
Satellite Receiver and remote control, or by selecting IR control.
Both the Digital Satellite Receiver and the remote control must use the
same three digit security code.
1 Select “Remote Control” from the SYSTEM pop-up (see
page 31).
TheRemoteControldisplayappears.
6
9
ENTERDISPLAY
JUMP
GUIDE
CH
MENU
2 Highlight and select “RF Security Code”.
The confirmation pop-up appears.
RM-Y802
32
SATELLITE
RECEIVER
Page 33

3 Select “Yes”.
N
TheRFSecurityCodepop-upappears.
4 Select a different security code.
The conformation pop-up appears.
5 Press the CODE SET button on the remote control.
The CABLE and TV FUNCTION indicators flash.
CODE SET
FUNCTION
CABLE
SAT
TV
Using the On-Screen Displays
6 Enter the three digit security code you selected for the
receiver in step 4 above.
7 Press the enter button.
The remote control and Digital Satellite Receiver are now set to a
new security code.
ENTER
8 Select “OK” to save your changes.
ote
If the remote control no longer operates
your Digital Satellite Receiver after
completing this procedure, use the
controls on the front panel to open the
Remote Control display (see page 31).
Then repeat the steps in “Setting the
Security Code” to t ry again .
TheRemoteControldisplayappears.
33
Page 34

Viewing Station and Program Information (GUIDES)
Using the Guides Menu
ALT AUDIO
JUMP
GUIDE
CATEGORY
INDEXFAVORITE
The Guides Menu helps y ou find the program you want to watch. You
can choose to see all stations or just a few. You can also create your own
favorite station guides for fast access to your favorite stations.
VOL
MENU
EXIT
VTR3 2 DVD AMP
CODE SET
SATELLITE
RECEIVER
Return
Closes the GUIDES Menu to
show the Main Menu.
Alpha List
Shows a list of categories
(movies,sports, etc.) and
only the programs that match
the category you select in
alphabetical order (see page 35).
Program Guide
Opens your custom list of
stations and shows program
informationforup to threedays
inadvance(seepage36).
Category Guide
Shows a list of categories
(movies,sports, etc.) and only
those stations broadcasting
programs that match the
category you select
(see page 37).
CH
RM-Y802
Press the MENU button, then h ighlight and select
1
GUIDES.
The GUIDES Menu appears.
MENU
Highlight and select the guide you want to use.
2
Station Index
Opens your custom list of
stations as a grid of station logos
(see page 38).
Favorite Stations
Opens the Favorite Stations
guide which allows you to create
and access up to four different
sets of stationsyou enjoy
watching most (see page 39).
Other Guides
Opens the Other Guides display
which shows a variety of special
categories provided by
DIRECTV. Each category is
dividedinto subcategories so you
can find exactly the kind of
program you want (see page 42).
z Tips
•BesuretopresstheSAT
FUNCTION button before
operating the Digital
Satellite Receiver with the
remote control.
• You can see information
about a program you are
watching by pressing the
DISPLAY button.
34
Page 35

MUTING
AUDIO
VOLUME
+
Using the Alpha List
The Alpha List shows program information in the category you select
(such as movies, sports, etc.) in alphabetical order. Program information
is available for up to four hours in advance.
Press the MENU button, then h ighlight and select
1
GUIDES.
The GUIDES Menu appears.
FUNCTION
TV/SAT
2
5
8
POWER
TV
SAT
SAT
TV
TV/VIDEO
3
6
9
ENTERDISPLAY
CABLE
CABLE
SLEEP
1
4
7
0
ALT AUDIO
JUMP
GUIDE
CATEGORY
INDEXFAVORITE
MENU
VOL
CODE SET
MENU
EXIT
VTR3 2 DVD AMP
SATELLITE
RECEIVER
CH
RM-Y802
Highlight and select “Alpha List”.
2
The Alpha List guide appears.
Highlight and select a category.
3
Programs appear in alphabetical order.
Highlight and select a program.
4
If you select a current program, the Alpha List guide closes. For
information about selecting a future program see “One Button
Timer & Rec” on page 60.
Using the On-Screen Displays
35
Page 36

Viewing Station and Program Information (GUIDES)
(continued)
Using the Program Guide
ALT AUDIO
JUMP
GUIDE
CATEGORY
INDEXFAVORITE
The Program Guide shows program information for up to three days in
advance.YoucanopentheProgramGuideusingtheMainMenuorby
pressing the GUIDE button.
VOL
MENU
EXIT
VTR3 2 DVD AMP
CODE SET
SATELLITE
RECEIVER
Media Window
CH
RM-Y802
M
Move the joystick up
and down to highlight
different stations.
Press the GUIDE button.
1
The Program Guide opens and the current program appears in the
Media Window.
GUIDE
Highlight the program you want.
2
The sound and the picture in the Media Window change as you
highlight different programs.
Skipped stations do not appear (see page 49).
Information Area
Press the CH V/v
buttons to move the
highlight to the next
page o f stations.
m
z Tip
Press the EXIT button to close the
Program Guide and return to the
previous station.
Note
If y ou select a program and the station is
locked or a limit has been reached, you
can temporarily unlock your Digital
Satellite Receiver using your passcode.
See “ Locking Your Receiver” on page 57
for information about the passcode.
36
List Area
Move the joystick right to
<,
highlight future programs.
Select the program you want.
3
If you select a current program, the Program Guide closes. For
information about selecting a future program, see “On e Button
Timer & Rec” on page 60.
Page 37

MUTING
AUDIO
VOLUME
+
Using the Category Guide
The Category Guide shows programs in the categoryyou select (such as
movies, sports, etc.). Program information is available for up to three
days in advance. You can open the CategoryGuide using the Main Menu
or by pressing the CATEGORY button.
Press the CATEGORY button.
1
The Catego r y Guide opens and the current program appears in the
Media Window.
CATEGORY
FUNCTION
TV/SAT
2
5
8
POWER
TV
SAT
SAT
TV
TV/VIDEO
3
6
9
ENTERDISPLAY
CABLE
CABLE
SLEEP
1
4
7
0
ALT AUDIO
JUMP
GUIDE
CATEGORY
INDEXFAVORITE
VOL
CODE SET
MENU
EXIT
VTR3 2 DVD AMP
SATELLITE
RECEIVER
CH
RM-Y802
z Tip
Press the EXIT button to close the
Category Guide and return to the
previous station.
Highlight and select the category you want.
2
The program list changes each time you select a different category.
Skipped stations do not appear (see page 49).
Highlight and select the program you want.
3
If you select a current program, the Program Guide closes. For
information about selecting a future program, see “On e Button
Timer & Rec” on page 60.
Using the On-Screen Displays
37
Page 38

Viewing Station and Program Information (GUIDES)
(continued)
Using the Station Index
MUTING
AUDIO
VOLUME
+
CABLE
CABLE
SLEEP
TV
FUNCTION
TV
TV/SAT
POWER
SAT
TV/VIDEO
The Station Index displays each station’s logo and channel number in a
grid format. Program information is availablefor the current time only.
You can open the Station Index using the Main Menu or by pressing the
INDEX button.
VOL
CODE SET
1
4
7
INDEXFAVORITE
2
5
8
0
ALT AUDIO
CATEGORY
MENU
EXIT
VTR3 2 DVD AMP
SATELLITE
RECEIVER
3
6
9
ENTERDISPLAY
JUMP
GUIDE
CH
RM-Y802
Press the INDEX button.
1
The Station Index opens and the current pro gram appears in the
Media Window.
INDEX
Highlight the station you want.
2
The sound and the picture in the Media Window change as you
highlight different stations.
Skipped stations do not appear (see page 49).
z Tip
Press the EXIT button to close the Station
Index and return to the p revious station.
To view the current prog ram while
checking the program information of
other stations, turn on the Surf feature
(see page 48).
38
Select the station you want.
3
The Station Index closes and the program broadcast by the station
you selected appears on your TV screen.
Page 39

MUTING
AUDIO
VOLUME
+
Using the Favorite Stations Guide
FUNCTION
TV/SAT
2
5
8
POWER
TV
SAT
SAT
TV
TV/VIDEO
3
6
9
ENTERDISPLAY
CABLE
CABLE
SLEEP
1
4
7
0
ALT AUDIO
JUMP
GUIDE
CATEGORY
INDEXFAVORITE
The Favorite Stations guide shows four Favorite Titles that you can
customize with eight stations each. Program information is available for
the current time only.
You can open the Favorite Stations guide using the Main Menu or by
pressing the FAVORITE button.
Before you can use the Favorite Stations guide, you must set up your
favorite stations in a personal guide by following the procedure on the
next page.
Press the FAVORITE button.
1
TheFavoriteStationsguideopensandthecurrentprogram
appears in the Media Window.
VOL
CODE SET
MENU
EXIT
VTR3 2 DVD AMP
SATELLITE
RECEIVER
CH
RM-Y802
FAVORITE
Highlight and select the Favorite Title you want.
2
The station list in the right half of the display changes as you
highlight different Favorite Titles.
Highlight and select the station you want.
3
The Favorite Stations guide closes and the program broadcast by
the station you selected appears.
Using the On-Screen Displays
z Tip
Press the EXIT button to close the
Favorite Stations guide and return to the
previous station.
39
Page 40

Viewing Station and Program Information (GUIDES)
(continued)
Customizing the Favorite Stations Guide
MUTING
AUDIO
VOLUME
+
VOL
CODE SET
1
4
7
CABLE
FUNCTION
CABLE
SLEEP
TV/SAT
2
5
8
0
ALT AUDIO
CATEGORY
INDEXFAVORITE
MENU
EXIT
VTR3 2 DVD AMP
POWER
TV
SAT
SAT
TV
TV/VIDEO
Highlight and select the Favorite Title you want to
1
customize.
The station list appears in the right half of the display.
3
6
9
ENTERDISPLAY
JUMP
GUIDE
CH
RM-Y802
2 Highlight and select “Edit”.
The Edit pop-up appears.
3 Highlight and select “Edit Stations”.
The station index appears in the right half of the display.
SATELLITE
RECEIVER
z Tip
Press the EXIT button to close the
Favorite Stations guide and return to the
previous station.
Note
The “Count” box indicates how many
stations are included in the personal
guide.
4 Highlight and select a station in the index.
A checkmark appears in the lower left part of the icon to indicate
that the station is included in the Favorite Title, and the number in
the “Count” box increases by one.
5 Repeat step 4 to add up to eight st ations to this Favor ite
Title.
When you have added all the stations you want in this Favorite
Title, highlight and select OK.
40
Page 41

Editing the Title of a Favorite Title
MUTING
AUDIO
VOLUME
+
VOL
CODE SET
1
4
7
CABLE
FUNCTION
CABLE
SLEEP
TV/SAT
2
5
8
0
ALT AUDIO
CATEGORY
INDEXFAVORITE
MENU
EXIT
VTR3 2 DVD AMP
POWER
TV
SAT
SAT
TV
TV/VIDEO
Highlight and select the Favorite Title you want to edit.
1
The station list appears in the right half of the display.
3
6
9
ENTERDISPLAY
JUMP
GUIDE
CH
RM-Y802
2 Highlight and select “Edit”.
The Edit pop-up appears.
3 Select “Edit Title” from the pop-up menu.
The Edit Title display appears in the lower left part of the display.
Using the On-Screen Displays
SATELLITE
RECEIVER
z Tip
Press the EXIT button to close the
Favorite Stations guide and return to the
previous program.
4 Enter a seven character title for this Favorite Ti tle.
You can enter upper and lower case letters, numbers, and symbols
in the title.
M
Move the joystick up and
down to select different
characters.
m
5 When your title is complete, highlight and select “OK”.
The Edit Title pop-up closes to show the Favorite Stations guide.
F a v 1
Move the joystick left or right to
highlight different positions. You can
<,
also press
position.
to move to the next
41
Page 42

Viewing Station and Program Information (GUIDES)
(continued)
Using Other Guides
MUTING
AUDIO
VOLUME
+
CABLE
CABLE
SLEEP
TV
FUNCTION
TV
TV/SAT
POWER
SAT
SAT
TV/VIDEO
The Other Guides display provides special categories supplied by
DIRECTV. Each category is divided into subcategories to help you find
the exact program you want to watch. Program information is available
for up to three days in advance.
VOL
CODE SET
1
4
7
INDEXFAVORITE
2
5
8
0
ALT AUDIO
CATEGORY
MENU
EXIT
VTR3 2 DVD AMP
SATELLITE
RECEIVER
3
6
9
ENTERDISPLAY
JUMP
GUIDE
CH
RM-Y802
Press the MENU button, then h ighlight and select
1
GUIDES.
The GUIDES pop-up appears.
MENU
Highlight and select “Other Guides”.
2
The Other G uides display appears.
Select the Guide Type you want.
3
The available time ranges appear.
z Tip
Press the EXIT button to close the Other
Guides display and return to the
previous station.
DIRECTV occasionally changes the
contents of the category and subcategory
lists.
42
Select the time range you want.
4
The available categories appear.
Page 43

Select the category you want.
5
If the category you select has subcategories, the available
subcategories appear.
Select the subcategory you want.
6
The programs that match your selections appear in the lower half
of the display.
Highlight and select the program you want.
7
If you select a current program, the Other Guides display closes.
For information about selecting a future program, see “One Button
Timer & Rec” on page 60.
Using the On-Screen Displays
43
Page 44

Viewing Station and Program Information (GUIDES)
(continued)
Viewing Pay Per View Programs
Many programs are available as pay per view. By selecting a pay per view
program you agree to be charged for that program.
Select a pay per view program using any of the
methods described in the “Viewing Station and
Program Information (GUIDES)” section on pages
34 through 42.
The Purchase Program display appears. This display shows
detailed information about the program including the cost.
Return
ClosesthePurchaseProgram
display to show the previous
screen.
Note
Toorderpayperviewbyremote,a
DIRECTV subscription is required and
the Digital Satellite Receiver must be
continuously connected to a land-based
phone line.
Purchase
Opens the Purchase pop-up.
Preview
ClosesthePurchaseProgram
display to show a preview of the
program if available.
Times
Opens the Other Show Times
display so you can select another
time to view the program.
Help
Opens information about the
Purchase Program display.
44
Page 45

Adjusting the Displays (PREFERENCES)
Using the Preferences Menu
ALT AUDIO
JUMP
GUIDE
CATEGORY
INDEXFAVORITE
The Preferences Menu lets you change the appearance of the
on-screen displays, the stations you want to appear in the program list
area,andtheorderinwhichthestationsarelisted.
VOL
CODE SET
MENU
EXIT
VTR3 2 DVD AMP
SATELLITE
RECEIVER
CH
RM-Y802
Return
Closes the PREFERENCES Menu to
show the Main Menu.
Display Options
Lets you change the color scheme of
the on-screen displays, choose how
the stations are ordered in the guides
and select what is displayed in the
Media Window when surfing
throughtheStationIndex
(see page 46).
Press the MENU button, then h ighlight and select
1
PREFERENCES.
The PREFERENCES Menu appears.
MENU
Highlight and select the item you want to adjust.
2
Custom Stations
Lets you customize which
stations appear in the program
guides (see page 49).
Data Service
A future application
(see pa ge 51).
Using the On-Screen Displays
45
Page 46

Adjusting the Displays (PREFERENCES) (continued)
Setting Display Options
Display Options lets you choose the color scheme of the on-screen
displays and the order in which stations are listed in the program list
area. You can also turn the surf option on or off.
Press the MENU button, then h ighlight and select
1
PREFERENCES.
The PREFERENCES Menu appears.
MENU
Highlight and select “Display Options”.
2
The Display Options display appears.
VOL
CODE SET
ALT AUDIO
CATEGORY
INDEXFAVORITE
MENU
EXIT
VTR3 2 DVD AMP
SATELLITE
RECEIVER
JUMP
GUIDE
CH
RM-Y802
Colors
Lets you change the color of the onscreen displays (see page 47).
Station order
Lets you select the order in which
stations appear in the list area
(see page 48).
Surf
Lets you view the Current Program
in the Station Index while view
other Program information
(see page 48).
Return
Closes the Display Options display
to show the Main Menu.
Help
Opens information about the
Display Options display.
46
Page 47

MUTING
AUDIO
VOLUME
+
Changing the Color Scheme
TV
FUNCTION
TV
TV/SAT
2
5
8
0
ALT AUDIO
CATEGORY
TV/VIDEO
3
6
9
ENTERDISPLAY
POWER
SAT
SAT
JUMP
GUIDE
Highlight and select “Colors” from the Dis p la y Options
1
display (see page 46).
The Colors pop-up appears.
2 Highlight and select the color scheme you like.
The display changes colors as you highlight each color scheme.
CABLE
CABLE
SLEEP
1
4
7
INDEXFAVORITE
VOL
CODE SET
MENU
EXIT
VTR3 2 DVD AMP
SATELLITE
RECEIVER
CH
RM-Y802
Using the On-Screen Displays
47
Page 48

Adjusting the Displays (PREFERENCES) (continued)
Changing the Station Order
MUTING
AUDIO
VOLUME
+
FUNCTION
TV/SAT
2
5
8
POWER
TV
SAT
SAT
TV
TV/VIDEO
3
6
9
ENTERDISPLAY
CABLE
CABLE
SLEEP
1
4
7
0
ALT AUDIO
JUMP
GUIDE
CATEGORY
INDEXFAVORITE
You can select numerical or alphabetical for the order in which stations
appear in the List Area of the Program Guide, CategoryGuide and Other
Guides display.
1 Highlight and select “Stati on Order” from the Display
Options display (see page 46).
The Station Order pop-up appears.
VOL
CODE SET
MENU
EXIT
VTR3 2 DVD AMP
SATELLITE
RECEIVER
CH
RM-Y802
2 Highlight and select the order you like.
The Station Order pop-up closes to show the Display Options
display.
Changing the Surf Setting
When the Surf setting is On you can view the current program in the
Media Window of the Station Index while viewing the program
information of other programs as you highlight them in the Station Index.
1 Highlight and select “Surf” fr om the Dis play Options
display (see page 46).
The Surf pop-up appears.
48
2 Highlight and select “On” or “Off”.
The Surf pop-up closes to show the Display Options display.
Page 49

VOL
Setting Up Custom Stations
ALT AUDIO
JUMP
GUIDE
CATEGORY
INDEXFAVORITE
MENU
CH
The Custom Stations display lets you choose which stations will be
skipped in the Program Guide, Category Guide and Station Index, and
when you change channels using the CH +/– buttons.
You can reduce the number ofstations that appear by skipping unwanted
stations.
CODE SET
EXIT
VTR3 2 DVD AMP
SATELLITE
RECEIVER
RM-Y802
Press the MENU button, then h ighlight and select
1
PREFERENCES.
The PREFERENCES Menu appears.
MENU
Highlight and select “Custom Stations”.
2
The Custom Stations display appears.
Return
Closes the Custom Stations display to
show the Main Menu.
Cancel
Closes the Custom Stations display
and cancels your changes.
Using the On-Screen Displays
Auto
Scans all stations and automatically
skipsany stationsto which you do not
subscribe.
Clear All
Removes all skip settings.
Help
Opens information about the Custom
Stations display.
“X” Skip Mark
Shows that the station will be skipped
when using the Program Guide,
Category Guide, Station Index, or
when using the C H +/– buttons.
continued
49
Page 50

Adjusting the Displays (PREFERENCES) (continued)
Highlight and select a station icon to add or
3
remove the “X” mark.
The “x” mark indicates that the station will be skipped when you
open the Program Guide, Category Guide or Station Index, or
change channels using the CH +/– buttons.
Highlight and select “Return”.
4
The Custom Stations display closes to show the Main Menu.
50
Page 51

Selecting Data Services
The Data Services feature is reserved for future applications.
Using the On-Screen Displays
51
Page 52

Viewing Messages (MESSAGES)
Your service provider may occasionally send messages to your Digital
Satellite Receiver to inform you of changes to your service and other
ALT AUDIO
VOL
CODE SET
CATEGORY
INDEXFAVORITE
MENU
EXIT
VTR3 2 DVD AMP
SATELLITE
RECEIVER
JUMP
GUIDE
CH
RM-Y802
special announcements.
Press the MENU button, then h ighlight and select
1
MESSAGES.
The Messages display appears.
MENU
Highlight and select the message you want to
2
read.
The message pop-up appears.
Delete
Closes the message pop-up and
deletes the message.
Return
Closes the message pop-up and
saves the m essage.
Note
Your receiver can hold a total of between
10 and 20 new and old messages,
depending on the size of the messages.
Your receiver will continue to hold a
message until you del e te itor until the AC
Power Cord is disconnected. If your
receiver’smemory is full, you must delete
old messages before you can receive new
ones.
Return
Closes the Messages display to
show the Main Menu.
Help
Opens information about the
Messagesdisplay.
Highlight and select “Return” or “Delete”.
3
The message pop-up closes to show the Messages display.
52
Page 53

Setting Locks and Limits (LOCKS & LIMITS)
Using the Locks & Limits Display
ALT AUDIO
VOL
CODE SET
CATEGORY
INDEXFAVORITE
MENU
EXIT
VTR3 2 DVD AMP
SATELLITE
RECEIVER
JUMP
GUIDE
CH
RM-Y802
The Locks & Limits feature gives you control over access to your Digital
Satellite Receiver. You can restrict program viewing by cost, ratings, and
station. You can als o set a lock to prevent the ordering of pay per view
programs.
Press the MENU button, then h ighlight and select
1
LOCKS & LIMITS.
The Locks & Limits display appears.
MENU
Highlight and select “Edit”.
2
The Locks & Limits edit display appears.
The following pages describe how to change the settings for each
of these items.
Spending Limit
Setsa miximum limit oncharges per
event (see page 54).
Rating Limit
Sets a maximum limit on rated
content(seepage55).
Pay Per View
Locks or unlocks access to pay per
view programs (see page 55).
Station Locks
Locks or unlocks access to specific
stations (see page 56).
Note
You must l ock the receiver before any
locks or limits take effect (see page 57).
Using the On-Screen Displays
Lock
Opens the passcode pop-up. You
mustenteryourpasscodetolockthe
receiver.
Unlock
Opens the passcode pop-up for
unlocking your receiver.
53
Page 54

Setting Locks and Limits (LOCKS & LIMITS) (continued)
Changing the Spending Limit
The spending limit pop-up lets you limit the amount you can spend per
MUTING
AUDIO
VOLUME
+
FUNCTION
TV/SAT
2
5
8
POWER
TV
SAT
SAT
TV
TV/VIDEO
3
6
9
ENTERDISPLAY
CABLE
CABLE
SLEEP
1
4
7
0
ALT AUDIO
JUMP
GUIDE
CATEGORY
INDEXFAVORITE
event on pay per view purchases.
1 Highlight and select “Spending Limit” from the Locks &
Limits edit display (see page 53).
The Spending Limit pop-up appears.
VOL
CODE SET
MENU
EXIT
VTR3 2 DVD AMP
SATELLITE
RECEIVER
CH
RM-Y802
2 Press the 0–9 buttons to enter the dollar value.
You can enter a value of less than $656.
6 5 5
3 Highlight and select “OK”.
The Spending Limit pop-up closes to show the Locks & Limits edit
display.
Select “Cancel” to close the SpendingLimit pop-up without saving
changes.
54
Page 55

MUTING
AUDIO
VOLUME
+
VOL
CODE SET
1
4
7
CABLE
FUNCTION
CABLE
SLEEP
2
5
8
0
ALT AUDIO
CATEGORY
INDEXFAVORITE
MENU
EXIT
VTR3 2 DVD AMP
TV
TV
TV/SAT
3
6
9
ENTERDISPLAY
POWER
SAT
SAT
TV/VIDEO
JUMP
GUIDE
CH
RM-Y802
Changing the Rating Limit
The Rating Limit pop-up lets you limit programs accordingto the content
rating.
1 Highlight and select “Rating Limit” from the Locks &
Limits edit display (see page 53).
The Rating Limit pop-up appears.
2 Highlight and select the highest content rat ing you want
your Digital Satellite Receiver to access.
The Rating Limit pop-up closes to show the Locks & Limits edit
display.
SATELLITE
RECEIVER
Using the On-Screen Displays
Changing the Pay Per View Lock Setting
Thepayperviewlocksettingletsyoulockorunlockaccesstopayper
view stations.
1 Highlight and select “Pay Per View” from the Locks &
Limits edit display (see page 53).
The Pay Per View Access pop-up appears.
2 Select “Yes” to prevent access to pay per view stations.
Select “No” to allow access to pay per view programs.
55
Page 56

Setting Locks and Limits (LOCKS & LIMITS) (continued)
Changing the Station Locks Settings
The Stations Locks feature lets you prevent access to specific stations.
FUNCTION
TV/SAT
2
5
8
0
ALT AUDIO
CATEGORY
MENU
POWER
TV
SAT
SAT
TV
TV/VIDEO
1 Highlight and select “Stati on Locks” from the Locks &
Limits edit display (see page 53).
The Station Locks display appears.
3
6
9
ENTERDISPLAY
JUMP
GUIDE
2 Highlight and select a station icon to change the setting
between lock and unlock.
CH
The lock symbol appears in the station icon to indicate that the
station is locked.
MUTING
AUDIO
VOLUME
+
VOL
CABLE
CABLE
SLEEP
1
4
7
INDEXFAVORITE
CODE SET
EXIT
VTR3 2 DVD AMP
SATELLITE
RECEIVER
Return
Closes the Station Locks display.
RM-Y802
Cancel
Closes the Stations Locks display
without saving your changes.
Lock All
Lock all stations.
Clear All
Unlocks all stations.
Help
Opens the help display.
Lock Icon
Showsthatthisstationislocked.
56
Page 57

MUTING
AUDIO
VOLUME
+
Locking Your Receiver
After you have made the changes you want to the Locks & Limits
settings, you must enter a passcode to lock the receiver.
Press the MENU button, then h ighlight and select
1
LOCKS & LIMITS.
The Locks & Limits display appears.
MENU
FUNCTION
TV/SAT
2
5
8
POWER
TV
SAT
SAT
TV
TV/VIDEO
3
6
9
ENTERDISPLAY
CABLE
CABLE
SLEEP
1
4
7
0
ALT AUDIO
JUMP
GUIDE
CATEGORY
INDEXFAVORITE
VOL
CODE SET
MENU
EXIT
VTR3 2 DVD AMP
SATELLITE
RECEIVER
CH
RM-Y802
z Tip
Do not forget your passcode.
You will need thisnumber to unlockyour
system or make any changes to the locks
or limits you have set. If you forget your
passcode,contactyour program provider
for assistance.
Highlight and select “Edit”, then select “Lock”.
2
The Lock Receiver pop-up appears.
Enter a four digit passcode using the 0–9 buttons.
3
Each number you enter appears as an asterisk (*) which keeps your
passcode secret.
1 2 3
Enter your passcode again.
4
This confirms your selection of a passcode number.
Highlight and select “Return”.
5
The Main Menu appears.
4
Your receiver is now locked with your passcode using the locks
and limits you have set.
Using the On-Screen Displays
57
Page 58

Setting Locks and Limits (LOCKS & LIMITS) (continued)
Unlocking Your Receiver
MUTING
AUDIO
VOLUME
+
FUNCTION
TV/SAT
2
5
8
POWER
TV
SAT
SAT
TV
TV/VIDEO
3
6
9
ENTERDISPLAY
CABLE
CABLE
SLEEP
1
4
7
0
ALT AUDIO
JUMP
GUIDE
CATEGORY
INDEXFAVORITE
If you want to make changes to the Locks & Limits settings, you must
enter your passcode to unlock the receiver.
Press the MENU button, then h ighlight and select
1
LOCKS & LIMITS.
The Locks & Limits display appears.
MENU
VOL
CODE SET
MENU
EXIT
VTR3 2 DVD AMP
SATELLITE
RECEIVER
CH
RM-Y802
Highlight and select “Edit”.
2
The Unlock Receiver pop-up appears.
Enter your four digit passcode using the 0–9
3
button.
Each number you enter appears as an asterisk (*) which keeps your
passcode secret.
The Locks & Limits edit display appears.
1 2 3
4
z Tip
You can temporarily unlock your Digital
Satellite Receiver with your passcode if
youselectaprogram from a guide and the
station is locked or a limit has been
reached.
58
Highlight and select “Unlock”.
4
Your receiver is now unlocked.
Highlight and select “Return”.
5
The Main Menu appears.
Page 59

Checking Pay Per View Purchases (PURCHASES)
Checking Your Purchases
ALT AUDIO
JUMP
GUIDE
CATEGORY
INDEXFAVORITE
You can view a history of the pay per view purchases you have made.
Thisdisplay alsoshows the future purchases you have ordered and those
that you have canceled.
VOL
CODE SET
MENU
EXIT
VTR3 2 DVD AMP
SATELLITE
RECEIVER
CH
RM-Y802
Press the MENU button, then h ighlight and select
1
PURCHASES.
The Purchases display appears.
MENU
Highlight and select the purchase number you
2
want to view.
The information pop-up for that purchase appears.
Return
Closes the Purchases display to
show the Main Menu.
Help
Opens information about the
Purchases display.
Using the On-Screen Displays
z Tip
Youcanuseanyoftheguidestopurchase
pay per view programs. See “Viewing
Pay P er View Programs” on page 44.
Cancel PPV
Cancels the Pay Per View
program.
OK
Closes the information pop-up to
show the Purchases display.
Highlight and select “OK”.
3
The informationpop-up closes to show the Purchases display.
59
Page 60

z
Scheduling Programs (TIMER & REC)
Using One Button Timer & Rec
You can easily set the timer to view or record programs by selecting
future programs directly from program guides.
To record a future program use the VCR Control feature to turn on your
VCR and start recording automatically. For information on how to set up
the VCR Control feature, see page 25.
Highlight and select a f uture program using any of
the methods described in “Viewing Station and
Program Information (GUIDES)” on pages 34
through 42.
Return
Closes the future
program pop-up to show
the current guide.
Tune to Station
Closesthe program guide
to show the current
program of the selected
station.
Add to Timer & Rec
Adds the program to the
Timer & Rec display for
recording, and opens the
schedule pop-up.
Add to Timer
Adds the program to the
Timer & Rec display for
tuning, and opens the
schedule pop-up.
Tips
• When using the VCR Control feature to record a
future program, make su re that the VCR is turned
off before the program begins. The VCR Control
feature will turn on your VCR and start recording.
• You can set up theDigitalSatelliteReceiver to send
program information to your VCR so it records the
information at the beginning of the recording. See
page 27 for information.
• Your D igital Satellite Receiver has a Program Data
Download feature and will automatically send the
followinginformationwhen you record aprogram
with a Sony SmartFile VCR: program title,
program category, program date/time and
duration.
For further information regarding the SmartFile
function, refer to your Sony SmartFile VCR
Operating Instructions.
• When you schedule two or more continuous
events to be recorded, the A uto Title Insert and
Program Data Download features will only send
information about the first of the recorded
programs.
Once
Adds the program to the
Timer&Recdisplayforone
time tuning and/or recording.
Monday–Friday
Adds the program to the
Timer&Recdisplayforthe
remaining week days of the
current week for tuning and/
or recording.
Weekly
Adds the program to the
Timer & Rec display for
tuning and/or recording on
thesamedayofthefollowing
four weeks.
Daily
Adds the program to the
Timer & Rec display for
tuning and/or recording
every day for the next 30 days.
60
Page 61

VOL
CODE SET
ALT AUDIO
CATEGORY
INDEXFAVORITE
MENU
EXIT
VTR3 2 DVD AMP
SATELLITE
RECEIVER
JUMP
GUIDE
CH
RM-Y802
Using the Timer & Rec Feature
The Timer & Rec feature lets you set up the Digital Satellite Receiver to
automatically tune to a program scheduled at a future time. You can also
use the One Button Timer & Rec feature to set up the timer by selecting a
future program.
To record a future program, use the VCR Control feature to turn on your
VCR and start recording automatically. For information on how to set up
theVCRControlfeatureseepage25.
Press the MENU button, then h ighlight and select
1
TIMER & REC.
The Timer & Rec display appears.
MENU
Highlight and select the next available timer event
2
number.
The Date/Day field is highlighted and the current date appears.
Using the On-Screen Displays
Date and day Start time End time
Channel number and
station name
Program title
z Tip
When using the VCR Control feature to
record a future pro gram, make sure that
your VCR is turned off before the
program begins. The VCR Control
feature will turn on the VCR and start
recording.
Return
Closes the Timer & Rec display
to show the Main Menu.
Help
Opens information about the
Timer & Rec display.
Record Event icon
Shows that an event will be
recorded.
61
Page 62

Scheduling Programs (TIMER & REC) (continued)
Follow the steps below to set the timer.
3
Move the joystick in the direction indicated in these steps.
1 Press V/v to select from
the following.
• Any date up to 30 days
from the current date
• EVERY SUN
•EVERYMON
•EVERYTUE
•EVERYWED
•EVERYTHU
•EVERYFRI
• EVERY SAT
•MON–FRI
•DAILY
8 Press .
The Timer & Rec pop-up
appears.
Highlight Timer & Rec or Timer
and press .
2 Press or b
to move to
the next
item.
– – / – – / – – – – : – – – – – – – : – – – –
1
– – – – – – – – – – – – –
4
3 Press V/v to
change the
starting hour.
Then, press or
b to move to the
next item.
7 Press V/v to select the
channel number.
Then, press or b to
move to the next item.
4 Press V/v to
change the
starting minute.
Then, press or b
to move to the
next item.
5 Press V/v to
change the ending
hour.
Then, press or b
to move to the
next item.
6 Press V/v to change the
ending minute.
Then, press or b to
move to the next item.
Highlight and select “Return” to close the TIMER &
REC display.
The Main Menu appears.
z Tips
• Shortly before beginning a scheduled
timer event, an information box
appears on your screen. You can press
the EXIT button on your remote control
to cancel the timer event.
• If the Auto Title Insert feature is on (see
page 27), the Auto Title will appear 10
seconds before the scheduled program.
62
Page 63

VOL
CODE SET
ALT AUDIO
CATEGORY
INDEXFAVORITE
MENU
EXIT
VTR3 2 DVD AMP
SATELLITE
RECEIVER
JUMP
GUIDE
CH
RM-Y802
Editing Timer Events
You can easily edit or delete timer events.
Press the MENU button, then h ighlight and select
1
TIMER & REC.
The Timer & Rec display appears.
MENU
Highlight and select the nu mber o f the event you
2
want to edit.
The edit pop-up appears.
Return
Closes the edit pop-up to show the Timer
&Recdisplay.
Using the On-Screen Displays
Delete
Removes the event from the list. Higher
numbered events move up to fill the gap.
Edit
Closes the edit pop-up to highlight the
date of that event.
Seepage62forinstructionsonhowto
change the timer settings.
63
Page 64

b
Setting Audio Options (AUDIO)
Using the Audio Display
ALT AUDIO
VOL
JUMP
GUIDE
CATEGORY
INDEXFAVORITE
MENU
CH
You can set your Digital Satellite Receiver to play the audio track in the
language you prefer if that language is available. You can set the
language for the current program and as the default language for all
programs when that language is available. You can also set your Digital
Satellite Receiver to receive Dolby Digital audio signals (SAT-A50 only).
EXIT
VTR3 2 DVD AMP
CODE SET
SATELLITE
RECEIVER
Current Audio
Opens a pop-up that displays the
languages available for the current
program.
Default Audio
Opens a pop-up that d i splays the eight
available default languages. When a
program broadcasts an audio track in the
default language, that language is
automatically selected.
Dolby Digital (SAT-A50 only)
Opens a pop-up that l ets you set your
Dolby Digital options.
Choose “Auto Select” (if you have a
Dolby Digital audio system) to enjoy
surround sound whenever a station
roadcasts a Dolby Digital audio track.
Select “Off” if you do not have a Dolby
Digital audio system.
RM-Y802
Press the MENU button, then h ighlight and select
1
AUDIO.
The Audio display appears.
MENU
Highlight and select the setting you want to
2
change.
Return
Closes the Audio display to
show the Main Menu.
Help
Opens information about
the Audio display.
z Tip (SAT-A50 only)
You can also use the ALT AUDIO buttonon
the remote control to select among the
currently available tracks.
64
Page 65

Other Information
Setting Up the Remote Control
The RM-Y139 and RM-Y802 remote controls can be programmed to
MUTING
AUDIO
VOLUME
+
FUNCTION
TV/SAT
2
5
8
POWER
TV
SAT
SAT
TV
TV/VIDEO
3
6
9
ENTERDISPLAY
CABLE
CABLE
SLEEP
1
4
7
0
ALT AUDIO
JUMP
GUIDE
CATEGORY
INDEXFAVORITE
operate your other audio/video equipment.
Find the code(s) for the manufacturer of the
1
device you want to operate with this remote
control.
You can find these codes on pages 66 and 67.
Press the CODE SET button.
2
All function indicators begin flashing.
CODE SET
CABLE
FUNCTION
TV
SAT
VOL
MENU
EXIT
VTR3 2 DVD AMP
CODE SET
SATELLITE
RECEIVER
z Tip
Rememberto aim the remotecontrol at
thedeviceyouaretryingtooperate.
CH
RM-Y802
Press the FUNCTION button for the device you
3
want to operate with this remote control.
The function indicator for only that device begins flashing.
You can set up the RM-Y802 remote control to operate extra
devices by sliding the device switch to VTR3, 2, DVD, or AMP and
pressing the CABLE FUNCTION button.
FUNCTION
TV
Press the 0–9 buttons to input the manufacturer
4
code, then press the ENTER button.
/
CABLE
FUNCTION
FUNCTION
TV
/
The function indicator goes off, and the remote is setup to operate
that device.
1 0 1
Test the remote control.
5
Press the POWER button for that equipment, then press other
ENTER
operation controls such as the CH +/– buttons.
If the device does not respond to the remote control, repeat from
step 2 and enter a different m anufacturer code in step 4.
CABLE
FUNCTION
Other Information
65
Page 66

Manufacturer Codes
TV Codes VCR Codes
Manufacturer Code
Sony
Admiral (M. W ards) 102, 114, 109
ABC 112
Bell & Howell
(M. Wards)
Broksonic 103, 112
Craig 122, 123, 120, 121
Croslex 111
Curtis Mathis 103, 119, 123
Daewoo 135, 136, 103
Daytron 113
Emerson 122, 113, 120, 121, 123, 103, 115
Fisher 125
General Electric 102, 118, 103, 107
Goldstar 103, 113, 112, 130
Hitachi 131, 113, 103, 132
JC Penney 103, 102, 130, 107
JVC 128, 129
KTV 133, 113, 103, 123, 134
LXI (Sears) 102, 103 111, 125, 119, 112
Magnavox 111, 112, 113, 107
Mitsubishi/MGA 124, 103, 112
NEC 103, 112
Panasonic 118,116, 117, 107
Philco 111,118,109
Philips 111
Pilot 103
Pioneer 137, 118, 119
Portland 103, 108
Quasar 110, 107
Radio Shack 102, 112, 124, 123
RCA/Proscan 102, 103, 104, 105,106, 107, 108
Samsung 126, 112, 113, 103
Sanyo 125
Scott 123, 112
Sharp 114,113,115
Signature 2000
(M. Wards)
Sylvania 111, 112, 108
Symphonic 123, 139
Tenika 109
Toshiba 119, 114
Videch 131, 103, 112
Wards 113, 103, 115, 112
Zenith 108, 110
101
114, 109, 138
114,109
Manufacturer Code
Sony 300, 301,302, 303
Aiwa 338
Audio Dynamic 314, 347
Bell & Howell
(M. Wards)
Broksonic 317, 319
Canon 309, 308
Citizen 332
Craig 315, 302, 332
Curtis Mathis 304, 338, 309
Daewoo 341, 312, 309
DBX 314, 336, 337
Dimensia 304
Emerson 319, 320, 316, 317, 318, 341
Fisher 330, 334, 335, 333
Funai 338
General Electric 329, 304, 309
Go Video 322, 339, 340
Goldstar 332
Hitachi 306, 304, 305, 338
HQ 315
Instant Replay 309, 308
JC Penney 309, 305, 304, 330, 314, 336,
JVC 314, 336, 337
Kenwood 314, 336, 332, 337
LXI (Sears) 332, 305, 333, 334, 330, 335,
Magnavox 310, 308, 309
Marantz 314, 336, 337
Marta 332
Memorex 309, 335
Minolta 305, 304
Mitsubishi/MGA 323, 324, 325, 326
Multitech 325, 338, 321
NEC 314, 336, 337
Olympic 309, 308
Optimus 327
Panasonic 308, 309, 306, 307
Pentax 305, 304
Philco 308, 309
Philips 310, 308, 309
Pioneer 308
Quasar 306, 308, 309
RCA/Proscan 304, 305, 308, 309, 310, 311,
330, 343
337
338
312, 313
66
Page 67

VCR Codes (continued)
Manufacturer Code
Realistic 309, 330, 328, 335, 324, 338
Sansui 314
Singer 315
Samsung 322, 313, 321
Sanyo 330, 335
Scott 312, 313, 321, 335, 323, 324,
Sharp 327, 325, 328
Shintom 315
Signature 2000
(M. Wards)
Sylvania 310, 308, 309, 338
Symphonic 338
Tashiro 332
Tatung 314, 336, 337
Teac 314, 336, 338, 337
Technics 309, 308
Teknika 338, 342
Toshiba 312, 311
Wards 327, 328, 335, 331, 332
Yamaha 330, 314, 336, 337
Zenith 331
325, 326
336, 327
DVD Codes (SAT-A50 Only)
Manufacturer Code
Sony 601
Panasonic 604
Pioneer 605
RCA 602
Toshiba 603
AMP (Amplifie r)
Codes (SAT-A50 Only)
Manufacturer Code
Sony 501
Denon (Sharp) 516, 517, 518
Harmon 519
JVC 506, 507, 508
Kenwood 504, 505
McIntosh 520
Onkyo 512, 513
Pioneer 502, 503
Technics 509, 510, 511
Yamaha 514, 515
Cable Box Codes
(SAT-A50 Only)
Manufacturer Code
Hamlin/Regal 222, 223, 224, 225, 228
Jerrold/G.I. 201, 202, 203, 204, 205, 206,
207 208, 218
Oak 227, 228, 229
Panasonic 219, 220, 221
Pioneer 214, 215
Scientific Atlanta 209, 210, 211
Tocom 216, 217
Zenith 212
67
Other Information
Page 68

Location and Function of Controls
Front Panel
1
POWER
1 POWER Button
Turns your Digital Satellite Receiver on and off.
2 Arr ow and
Thearrowbuttonsmovethehighlightinthe
on-screen displays. The
highlighted item.
3 MENU Button
Opens the Main Menu.
Buttons
button selects the
POWER TIMER MESSAGE
7
65 4 3
5 MESSAGE Indicator
Indicates that you have a new message.
6 TIMER Indicator
Indicates that the Timer is set.
7 POWER Indicator
Indicates whether the Digital Satellite Receiver is
on or off.
2
MENUGUIDE
4 GUIDE Button
Opens the Program Guide.
68
Page 69

SAT-A50 Back Panel
1
3 4 5
2
ACCESS CARD
DIGITAL
OUT
IC
T
P
(O
VCR CONTROL
qs
L)
A
LOW SPEED DATA
qa
SATELLITE IN
q; 9 8 7 6
1 A C CESS CARD sl o t
Do not remove the Access Card unless instructed
to do so by your service provider.
2 SATELLITE IN jack
Inputs satellite signals from your Satellite Dish
Antenna using RG-6 coaxial cable.
3 RF REMOTE jack
Inputs remote control signals using the RF
Antenna.
4 CH3/CH4 switch
When you use an RF connection (VHF(SAT)/
UHF OUT jack), this setting determines the TV
channel on which programs from the Digital
Satellite Receiver can be viewed.
5 VHF/UHF IN jack
Inputs off-air signals from your local TV off-air
antenna using coaxial cable. Some antennas
require an adapter (not supplied).
6 AC IN jack
Inputs AC power from a power outlet using the
AC Power Cord.
RF REMOTE
IO
D
U
A
L(M
R
O
E
ID
V
S
)
O
N
O
T
U
O
O
E
ID
V
CH3
CH4
VHF/UHF IN
1
O
E
ID
V
2
VHF(SAT)/UHF
OUT
TEL LINE
AC IN~
7 TEL LINE jack
Connects the Digital Satellite Receiver to a
telephone outlet using a telephone line cable.
8 VHF(SAT)/UHF OUT jack
Outputs audio and video signals to the VHF/
UHF input on your TV or VCR using coaxial
cable.
9 A/V OUTPUT jacks
Output audio and video signals to your TV and
other audio/video equipment using A/V cables.
q; LOW SPEED DATA
For future application.
qa VCR CONTROL jack
Allows the VCR Controller to control a VCR and/
or cable box. Also allows connection of a
monaural cable for use with Sony SmartFile
VCRs.
qs DIGITAL OUT (OPTICAL)
Other Information
Outputs digital audio signals to the digital optical
input of your audio receiver.
69
Page 70

Location and Function of Controls (continued)
SAT-B50 Back Panel
1 2 3 4
ACCESS CARD
SATELLITE IN
LOW SPEED DATA
VCR CONTROL
1 A C CESS CARD sl o t
Do not remove the Access Card unless instructed
to do so by your service provider.
2 SATELLITE IN jack
Inputs satellite signals from your Satellite Dish
Antenna using RG-6 coaxial cable.
3 CH3/CH4 switch
When you use an RF connection (VHF(SAT)/
UHF OUT jack), this setting determines the TV
channel on which programs from the Digital
Satellite Receiver can be viewed.
4 VHF/UHF IN jack
Inputs off-air signals from your local TV off-air
antenna using coaxial cable. Some antennas
require an adapter (not supplied).
CH3
IO
D
U
A
L
R
O
E
ID
V
S
)
O
N
O
(M
T
U
O
O
E
ID
V
CH4
VHF/UHF IN
1
O
E
ID
V
2
VHF(SAT)/UHF
OUT
TEL LINE
6
AC IN~
5789q;
5 AC IN jack
Inputs AC power from a power outlet using the
AC Power Cord.
6 TEL LINE jack
Connects the Digital Satellite Receiver to a
telephone outlet using a telephone line cable.
7 VHF(SAT)/UHF OUT jack
Outputs audio and video signals to the VHF/
UHF input on your TV or VCR using coaxial
cable.
8 A/V OUTPUT jacks
Output audio and video signals to your TV and
other audio/video equipment using A/V cables.
9 LOW SPEED DATA
For future application.
70
q; VCR CONTROL jack
Allows the VCR Controller to control a VCR and/
or cable box. Also allows connection of a
monaural cable for use with Sony SmartFile
VCRs.
Page 71

Specifications
Input Jacks
UHF/VHF IN 75 ohm f-type
SATELLITE IN 75 ohm f-type
RF REMOTE (SAT-A50)
AC IN (120 V, 60 Hz)
Output Jacks Cable Type
S-VIDEO OUT 4-pin mini DIN
VIDEO (2) RCA type
OPTICAL OUT (1)
(SAT-A50 only)
AUDIO R/L (2) RCA type
VHF (SAT)/UHF 75 ohm f-type
Low-Speed Data 9-pin D-Sub Female
TEL LINE RJ-11
VCR CONTROL (1) VCR Controller (or
General
Input Frequency 950–1450 MH z
Power Requirements 120 V, 60 Hz
Power Consumption 20 W max
Dimensions (w/h/d) 11 ∝ 2 ∝9inches
Weight
SAT-A50
Set: 6.0 lbs (2.7 kg)
Unit: 3.6 lbs (1.6 kg)
SAT-B50
Set: 5.4 lbs (2.5 kg)
Unit: 3.4 lbs (1.5 kg)
Optical Rectangular
monaural cable for
Sony SmartFile VCRs)
5
8
280 ∝ 66.5 ∝ 228.5 mm
Supplied Accessories
Remote Control RM-Y802 (SAT-A50)
RM-Y139 (SAT-B50)
Size AA Batteries (2)
Access Card (1)
Audio/Video Cable (1)
Coaxial RF Cable (1)
TelephoneLineCord(1)
AC Power Cord (1)
VCR Controller (1)
S-Video Cable (1) (SAT-A50)
RF Antenna (1) (SAT-A50)
Optional Sony-brand Digital Satellite Receiver
Accessories
Local TV Antenna
ANJ-AA1
Installation Kit
ANJ-DS2
Amplifier
EAC-DA1
Diplexer
EAC-DD1
Voltage Switch
EAC-DV1
Other Information
Design and specifications are subject to change without notice.
71
Page 72

Troubleshooting
Problem What you can do
Poor picture quality or no picture • If you are receiving only a few stations, (only 2 or 3 channels for example), call
Yo u cannot access a program. • Make sure you subscribe to the station you are trying to access. Your service
You cannot order a pay per view program• Make sure your Digital Satellite Receiver is connected to a telephone line (see
Yo u cannot find the station of the pay per
view program that you ordered
You c annot cancel a pay per view order • You cannot cancel pay per view orders that you have watched. Contact your
The program highlighted in the Program
Guide does not appear
your service provider to have your programming activated.
• Some pay per view programs may be protected by Macrovision copy
protection at the discretion of the copyright owner. You may want to connect
the Digital Satellite Receiver directly to your TV.
• Check the connections to your TV and other equipment (see pages 7–13).
• Make sure that your TV and other equipment are set to the input source to
which you connected your Digital Satellite Receiver, for example, channel 3 or
4, Video 1 or 2 (see pages 9–10).
• Check the Satellite Dish Antenna’s signal strength (see page 23).
• Make sure the RG-6 coaxial cable is properly connected to the Satellite Dish
Antenna.
• If the cable distance between the Satellite Dish Antenna and the Digital
Satellite Receiver is more than 100 feet, you must use the Sony Amplifier EACDA1.
• Make sure your Access Card is inserted correctly (see page 13).
• Move any antenna cables that may be directly above your Digital Satellite
Receiver .
• Change the setting of the CH3/CH4 switch on the back of the Digital Satellite
Receiver. This could improve picture quality only if you are using the UHF/
VHF IN jack of the Digital Satellite Receiver to connect a local TV antenna or
cable company service.
provider can tell you to which stations you subscribe.
•Makesurethestationyouaretryingtoaccessisnotsettobeskipped(seepage
49).
• Make sure the system is not locked (see page 58).
• Use the Program Guide to access the station (see page 36).
• Press the SAT FUNCTION button on the remote control before you select a
channel (see page 20).
page 8).
• Make sure the system is not locked (see page 58).
• Use the Program Guide to access the station (see page 36).
• If the message “Purchase information not available” appears, you must contact
your service provider to order the program.
• Your Access Card may be full. If so, contact your service provider.
• It may be too late to order the program you want. If so, check for other show
times(seepage44).
• See “Checking Pay Per ViewP urchases” on page 59 to get information (station,
start time, etc.) about programs that you have ordered.
service provider for details.
• Highlight and select the program. Although the program you highlight
appears in the Media Window, you must press the button to complete your
selection (see page 36).
72
Page 73

Problem What you can do
You cannot see any Favorite Stations • Set up your personal Favorite Titles before you try to use the Favorite Stations
Locks & Limits feature not working
properly
Yo u cannot access the Locks & Limits
screens
You cannot unlock the system • Make sure that you entered the passcode correctly. If you have lost or forgotten
Language of audio track is incorrect or
audio track is not available
Yo u cannot record programs with your
VCR
Access Card problems • Make sure your Access Card is inserted correctly (see page 13).
Remote control does not work • Make sure that the batteries are inserted correctly and that the batteries are not
Audio noise • SAT-A50 model only: If you connect the DIGITAL OUT jack to equipment that
“Frozen” picture or display • Press both the GUIDE and ARROW DOWN buttons at the same time on the
guide(seepage40).
• Make sure that the Spending, Rating, Pay Per View, and Station Locks are set
as you want them (see page 53). Then, make sure that the system is locked (see
page 57).
• The system must be unlocked before you can make changes to the Locks &
Limits (see page 58).
your passcode, contact your service provider.
• Check the default language setting. The program provider may not broadcast
all of the languages in the Default Audio pop-up (see page 64).
• Some programs may not offer audio tracks.
• Make sure that your VCR is connectedcorrectly (see page 10).
• If you want to use the VCR Control feature, make sure that the VCR Controller
is connected correctly (see page 11). Also make sure that you have selected the
correct VCR Manufacturer Code (see page 25).
• If you are using the VCR Control feature to record a future program, make sure
that your VCR is turned off before the program begins. The VCR Control
feature will turn on the VCR and start recording.
• Make sure that the program you are trying to record doesn't conflict with any
Locks & Limits you have set.
• If you are trying to record a pay per view program, you must first order the
program(seepage44).
• Some pay per view programs may be protected by Macrovision copy
protection at the discretion of the copyright owner. If so, it may not be possible
to record these programs.
• Contact your service provider with any other Access Card problems.
weak (see page 7).
• Remove and then reinsert the batteries without pressing any buttons on the
remote control.
• To operate your TV or other equipment, make sure that the remote control is
set up to operate that equipment (see page 65). If the batteries are removed or
become weak, you may need to set up the remote control to operate other
equipment again.
• Press the FUNCTION button on the remotecontrol of the equipment you want
to operate (SAT, TV, VTR, and/or CABLE). These buttons will flash to show
which equipment the remote control is set to operate.
• SAT-A50model only: If there is a problem when using the RF function, check
that the RF Antenna is connected correctly (see page 12).
• SAT-A50 model only: Make sure that the remote control and the Digital
Satellite Receiver are both using the same security code (see page 32).
is not Dolby Digital compatible, set the Dolby Digital option to “off” (see page
64). Not all optical jacks on audio systems are Dolby Digital compatible.
front panel of the Digital Satellite Receiver to reset the receiver.
Other Information
If you are unable to resolve problems with your system, see “Customer Support” inside the front cover.
73
Page 74

FCC Regulations and Information
Your Digital Satellite Receiver has been registered by the Federal
Communication Commission (FCC) as not being harmful to the
telephonenetworkwhen connected directly to the telephone lines.
In order to fully comply with the Rules o f the FCC, the following
instructions should be read carefully and followed completely
where applicable:
1 The Federal Co mmunication Com m iss ion (FCC) has
established Rules which permit this device to be directly
connected to the telephone network. Standardized jacks are
usedfor these connections. This equipment shouldn ot be used
on party lines or coin phones.
2 If this device is malfunctioning, it may also be causing harm to
the telephone network; this device should be disconnected
until the source of the problem can be determined and until
repairhasbeenmade.Ifthisisnotdone,thetelephone
company may temporarily disconnect service.
3 The telephone company may make changes in its technical
operationsand procedures;if such changes affect the
compatibility or use of this device, the telephone company is
required to give adequate notice of the changes. You will be
advised of your right to file a complaint with the FCC.
4 If the telephone company requests information on what
equipment is connected to their lines, inform them of:
a. The telephone number to which this unit is connected.
b. The ringer equivalence number.
c. The USOC jack required.
d. The FCC Registration Number.
5 Items (b) and (d) are indicated on the label. The Ringer
Equivalence Number (REN) is used to determine how many
devicescan be connected to your telephone line. In most areas,
thesumoftheRENsofalldevicesonanyonelineshouldnot
exceed five (5). If too many devices are attached, they may not
ring properly.
Service Requirements
In the event of equipment malfunction, all repairs should be
performed by our Company or an a uthorized agent. It is the
responsibility of users requiring service to report the need for
servicetoourcompanyortooneofourauthorizedagents.For
service, call 1-800-838-7669.
Radio Interference Information
This equipment has been tested and found to comply with the
limits for a Class B digital device, pursuant to Part 15 of the FCC
Rules. These limits are designed to provide reasonable protection
against harmful interference in a residential installation. This
equipment generates, uses and can radiate radio frequency energy
and, if not installed and used in accordance with the instructions,
may cause harmful interference to radio communications.
However, there is no guarantee that interference will not occur in
a particular installation. If this equipment does cause interference
to radio or television reception ( which you can determine by
turning the equipment off and on), you are encouraged to try to
correct the interference by one or more o f the following measures:
• R eorient or relocate the receiving antenna (the antenna for radio
or television that is receiving the interference)
• Change the position of the Digital Satellite Receiver with respect
to the radio or television equipment that is receiving the
interference
• Move the Digital Satellite Receiver away from the equipment
that is receiving the interference
• Plug the Digital Satellite Receiver into a different outlet so that
the Digital Satellite Receiver and the equipment receiving the
interference are on different branch circuits
Shielded cables and I/O cords must be used for this equipment to
comply with the r elevant FCC regulations. Changes or
modifications not expressly approved in writing by Sony
Electronics, Inc., void the u ser’s authority to operate this
equipment.
If these measures do not eliminate the interference, you should
consult your Digital Satellite Receiver dealer or an experienced
radio/television technician for additional suggestions. I n
addition, you may find the following booklet prepared by the
Federal Communications Commission helpful: “How to Identify
and Resolve Radio-TV Interference Problems.” This booklet is
available from the U.S. Government Printing Office, Washington,
D.C., 20402 Stock No. 004-000-00345-4.
Declaration of Conformity
Trade Name: Sony
Model No.: SAT-A50/SAT-B50
Responsible Party:Sony Electronics Inc.
Address: 1 Sony Drive, Park Ridge, NJ. 07656 USA
Telephone No.: 201-930-6973
This device complies with Part 15 of the FCC rules. Operation
is subject to the following two conditions: (1) This device may
not cause harmful interference, and ( 2) this device must accept
any interference received, including interference that may
cause undesired operation.
74
Page 75

Limited Warranty
Digital Satellite Receivers
SONYELECTRONICSINC.(“SONY”)warrantsthisProduct
(including any accessories) against defects in material or
workmanship as follows:
1 LABOR. For a period of 90 days from the original date of
purchase, if the Product is determined to be defective, SONY
will repair or replace the Product at no charge. After this 90
day period, you must pay for all labor charges.
2 PARTS. For a period of one (1) year from the original date of
purchase, SONY will supply, at no charge, new or rebuilt
replacements in exchange for defective parts. Any
replacements will be w arranted for the remainder of the
originalwarranty period or ninety(90) days from installation
by SONY’s authorized f acility, whichever is longer.
3 ACCESSORIES. Parts and labor for all accessories are for one
(1) year.
4 IN-HOME. For a period of one (1) year from installation date,
if the unit was professionally installed by a SONY authorized
Digital Satellite Receiver Installer and the LNB (Electronic
Antenna Element) fails to function properly, SONY will repair
or replace the LNB with a new or rebuilt part. Labor to repair
or replace the LNB (after 90 days from purchase) will be at
your expense. If no problem is found, o r any other item fails, it
will be your responsibility to pay the installer their regular rate
for an in-home service call.
To obtain warranty service, you must take the Product, or deliver
the Product freight prepaid, in either its original packaging or
packaging affording an equal degree of protection, to a SONY
authorized Digital Satellite Receiver service facility. Please see the
telephone number at the end of this section for a number to call to
locate the closest facility.
This warranty does not cover customer instruction, installation,
setup adjustments or signal reception problems.
This warranty does not cover cosmetic damage or damage due to
acts of God, accident, misuse, abuse, negligence, commercial use,
or modification of, or to any part of the Product, including the
antenna. This warranty does not cover improper installation (if
self-installed), loss of use of the product, or wasted programming
charges due to product malfunction. This warranty does not cover
damage due to improper operation or maintenance, connection to
improper voltage supply, or attempted repair by anyone other
than a facility authorized by SONY to service the Product. This
warranty does not cover Products sold AS IS or WITH ALL
FAULTS. This warranty is valid only in the United States.
Proofofpurchaseintheformofabillofsaleorreceiptedinvoice
which is evidence that the unit is within the Warranty period must
be presented to obtain warranty service.
This warranty is invalid if the factory applied serial number has
been altered or removed from the Product.
Some states do not allow the exclusion or limitation of incidental
or consequential damages, or allow limitations on how long an
implied warranty lasts, so the above limitations or exclusions may
not apply to you. In addition, if you enter into a service contract
with the SONY Partnership within 90 days of the d ate of sale, the
limitation on how long an implied warranty lasts does not apply
to you. This warranty gives you specific legal rights, and you may
have other rights which vary from state to state.
Foryourconvenience,SONYELECTRONICSINC.hasestablished
telephone numbers for frequently asked questions. To locate the
servicer or dealer nearest you, for assistance or resolution of a
service problem, or for product information or operation, call:
SONY SATELLITE SYSTEM INFORMA T ION CENTER
1-800-838-7669 (Sony)
For an accessory orpart not available from your authorized dealer,
call:
1-800-488-7669
About Sony Customer Support
EveryDIRECTV System manufactured by Sony comeswith Sony’s
Express Support at no charge to you. In the event of a system
failure, our Express Support Program can have a replacement
receiver on its way to you via overnight Federal Express (for calls
Monday-Friday until 7:30 pm Eastern Time; Saturday delivery
depends upon zip code). All it takes is a valid credit card to cover
a security deposit, and Sony will pay freight in both directions.
Our Express Support continues with our 800 number, staffed by
dedicated technical representatives who can answer questions on
dealer locations, system operation, installation, hookup,
accessories, and how to get the m ost out of your home
entertainment system. Sony’s Express Support program: another
expression of our commitment to excellence in customer service.
REPAIR OR REPLACEMENT AS PROVIDED UNDER THIS
WARRANTY IS THE EXCLUSIVE REMEDY OF TH E
CONSUMER. SONY SHALL NOT B E LIABLE FOR ANY
INCIDENTAL OR CONSEQUENTIAL DAMAGES FOR
BREACHOFANYEXPRESSORIMPLIEDWARRANTYON
THIS PRODUCT. IN N O EVENT SHALL SONY BE LIABLE
FOR ANY INCIDENTAL OR CONSEQUENTIAL DAMAGES
WHATSOEVER ARISING OUT OF THE USE OR INABILITY
TO USE THE PRODUCT. UNDER NO CIRCUMSTANCES
SHALL SONY’S LIABILITY, IF ANY, EXCEED THE
PURCHASEPRICEPAIDFORTHEPRODUCT.EXCEPTTO
THE EXTENT PROHIBITED BY APPLICABLE LAW, ANY
IMPLIED WARRANTY OR MERCHANTABILITY OR
FITNESS FOR A PARTI CULAR PURPOSE ON THIS
PRODUCT IS LIMITED IN DURATION TO THE DURATION
OF THIS WARRANTY.
Other Information
75
Page 76

Index
A
Access Card, inserting, 13
replacing, 30
slot, 13, 69, 70
AC Power Cord, connecting, 13
Adjusting the on-screen displays, 46
Alert. See Timer & Rec
ALT AUDIO button, 14
Alpha List, 35
Antenna. See RF antenna, satellite dish antenna, and
local TV off-air antenna.
Arrow buttons, on front panel, 68
on RM-Y139 remote control, 16
Aspect ratio, setting, 29
Audio, display, 64
track, 64
Audio system, connecting, 10
AUTO skip feature, 49
Auto Title Insert,27
Azimuth, 24
B
Back panel connections, SAT-A50, 69
SAT-B50, 70
Batteries, inserting into remote control, 7
C
Carton contents, 6
CATEGORY button, 14, 16, 37
CategoryGuide, 37
CH +/– buttons,14
CH/PAGE buttons, 16
Changing channels, 20
CODE SET button, 14, 17, 65
Codes, Manufacturer, 66, 67
RF security, 32
VCR manufacturer, 26
Colors, setting, 47
Connecting, audio system, 10
local TV off-air antenna, 9
IR Blaster, 11
RF antenna, 12
TV and VCR, 10
TV with A/V connectors, 9
TV with RF connector, 9
Controls, location and function, 68
Custom stations, 49
Customer support, 2
Customizing the Favorite Stations guide, 40
D
Data services, 51
Default language, setting, 64
DIGITAL OUT (OPTICAL) jack, 10, 69
DISPLAY button, 14, 16
Display options, 46
Displays, changing the colors, 47
Dolby Digital, 10, 64
E
Editing Favorite Stations, 40
Editing Favorite Titles, 41
Editing Locks & Limits, 53
Editing timer events, 63
Elevation, 24
ENTER button, 15, 17
EXIT button, 15, 16
F
FAVORITE button, 14, 17, 39
Favorite Stations guide, 39
changing the Favorite Title, 41
setting up, 40
FCC regulations, 74
Features, 3
Front panel controls, 68
FUNCTION buttons, 15, 17
G
Guides, using, 34
GUIDE button, 15, 17, 36
Guides Menu, 34
H
Highlight and Select, 18
I
INDEX button, 14, 16, 38
Information Area, 36
Input source, 9, 10, 19
IR remote control reception, 31
J
Joystick, 14, 18
Jump button, 15, 16
76
Page 77

L
Languages, 64
Latitude and longitude, for setting antenna, 24
Limited Warranty, 75
List Area, 36
Local TV off-air antenna, 9
Locking your receiver, 57
Locks and limits, 53
display, 53
locking, 57
setting, 54
unlocking, 58
LOW SPEED DATA port, 69, 70
M
Macrovision copy-protection, 2
Manufacturer codes, 66, 6 7
Mail. See messages.
Main Menu, 21
Media Window, 36
MENU button 15, 17, 21, 68
Messages, 52
indicator, 68
viewing, 52
MUTING button, 14, 16
O
One Button Timer & Rec, 60
Other Guides, 42
P
Passcode, setting, 57
Pay per view, cancelling programs, 59
locking, 55
checking purchases, 59
purchasing programs, 44
POWERbuttons,15,17,19
Power indicator, 68
Preferences Menu, 45
Problems, troubleshooting 72
Program Data Download, 11, 60
Program Guide, 36
Program information, 34
Purchases display, 59
R
Rating limit, setting, 55
Recording programs, with Timer, 60–63
Reminder. See Timer & Rec.
Remote control, buttons and functions, 14–17
insertingbatteries, 7
manufacturer codes, 66, 67
selecting items, 18
setting IR and RF, 31
setting up, 65
RF Antenna, connecting, 12
RF remote control reception, 31
RF security code, setting, 32
RF REMOTE jack, 69
S
Satellite Dish Antenna, connecting, 8
setting,23
SATELLITE IN jack, 8, 69, 70
Scheduling programs, 60
Security code. See RF security code and passcode.
Selecting items, 18
Setting up the receiver, 22
theremotecontrol,65
Signal Strength meter, 23
Skipping stations, 49
SLEEP button, 14
Specifications, 71
Spending limit, 54
Station and program information, 34
order, 48
Station Index, 38
Station locks, setting, 56
Surf setting, 48
S-VIDEO jack, 9, 10, 69, 70
System Menu, 22
System test, performing, 28
T
Telephone line, connecting, 8
Testing the system, 28
Timer & Rec, checking and editing, 63
display, 61
setting up, 61
Timer events, 60–63
indicator, 68
Transponder, 23
Troubleshooting, 72
TV, connecting, 9, 10
TV/SAT button, 15, 16
TV/VIDEO button, 15, 16
TV/VTR button, 15, 16
U, V
Unlocking your receiver, 58
VCR Control feat ure, 11, 25
VCR CONTROL jack, 11, 69, 70
VCR Controller, connecting, 11
VCR, connecting, 10
recording, 25, 60
Viewing pictures, 19
VOL buttons, 14, 17
VTR3/2/DVD/AMP switch, 15
W, Z
Warranty. See Limited Warranty.
Zip code, for setting antenna, 24
Other Information
77
Page 78

Page 79

Page 80

Printed in U.S.A.
 Loading...