

Sony SAT-A55 Operating Instructions (primary manual), SAT-B55 Operating Instructions Manual

4-075-080-21 (1)
© 1999 by Sony Electronics Inc. Reproduction in whole or in part without written
permission is prohibited. All rights reserved.
DIRECTV Digital
Satellite Receiver
Operating Instructions
SAT-A55
SAT-B55
Before you begin using your Digital Satellite Receiver for
the first time, follow the instructions in “Conne cting Your
Digital Satellite Receiver” on pages 6-13 and “Setting Up
Your Digital Satellite Receiver (SYSTEM)” on pages 22-34.
Also, make sure your Satellite Dish Antenna has been
properly installed and call your service provider to begin
service:
DIRECTV: 1-800-DIRECTV (347-3288)
SAT-A55 MODEL ONLY
RF ANTENNA: This Digital Satellite Receiver is shipped
with IR reception enabled and RF reception disabled. To
use the RF feature (and the RF Antenna ) y ou m ust chan ge
the factory setting (IR only) to the RF setting (RF only)
using the on-screen displays, as described in these
Operating Instructions.
2
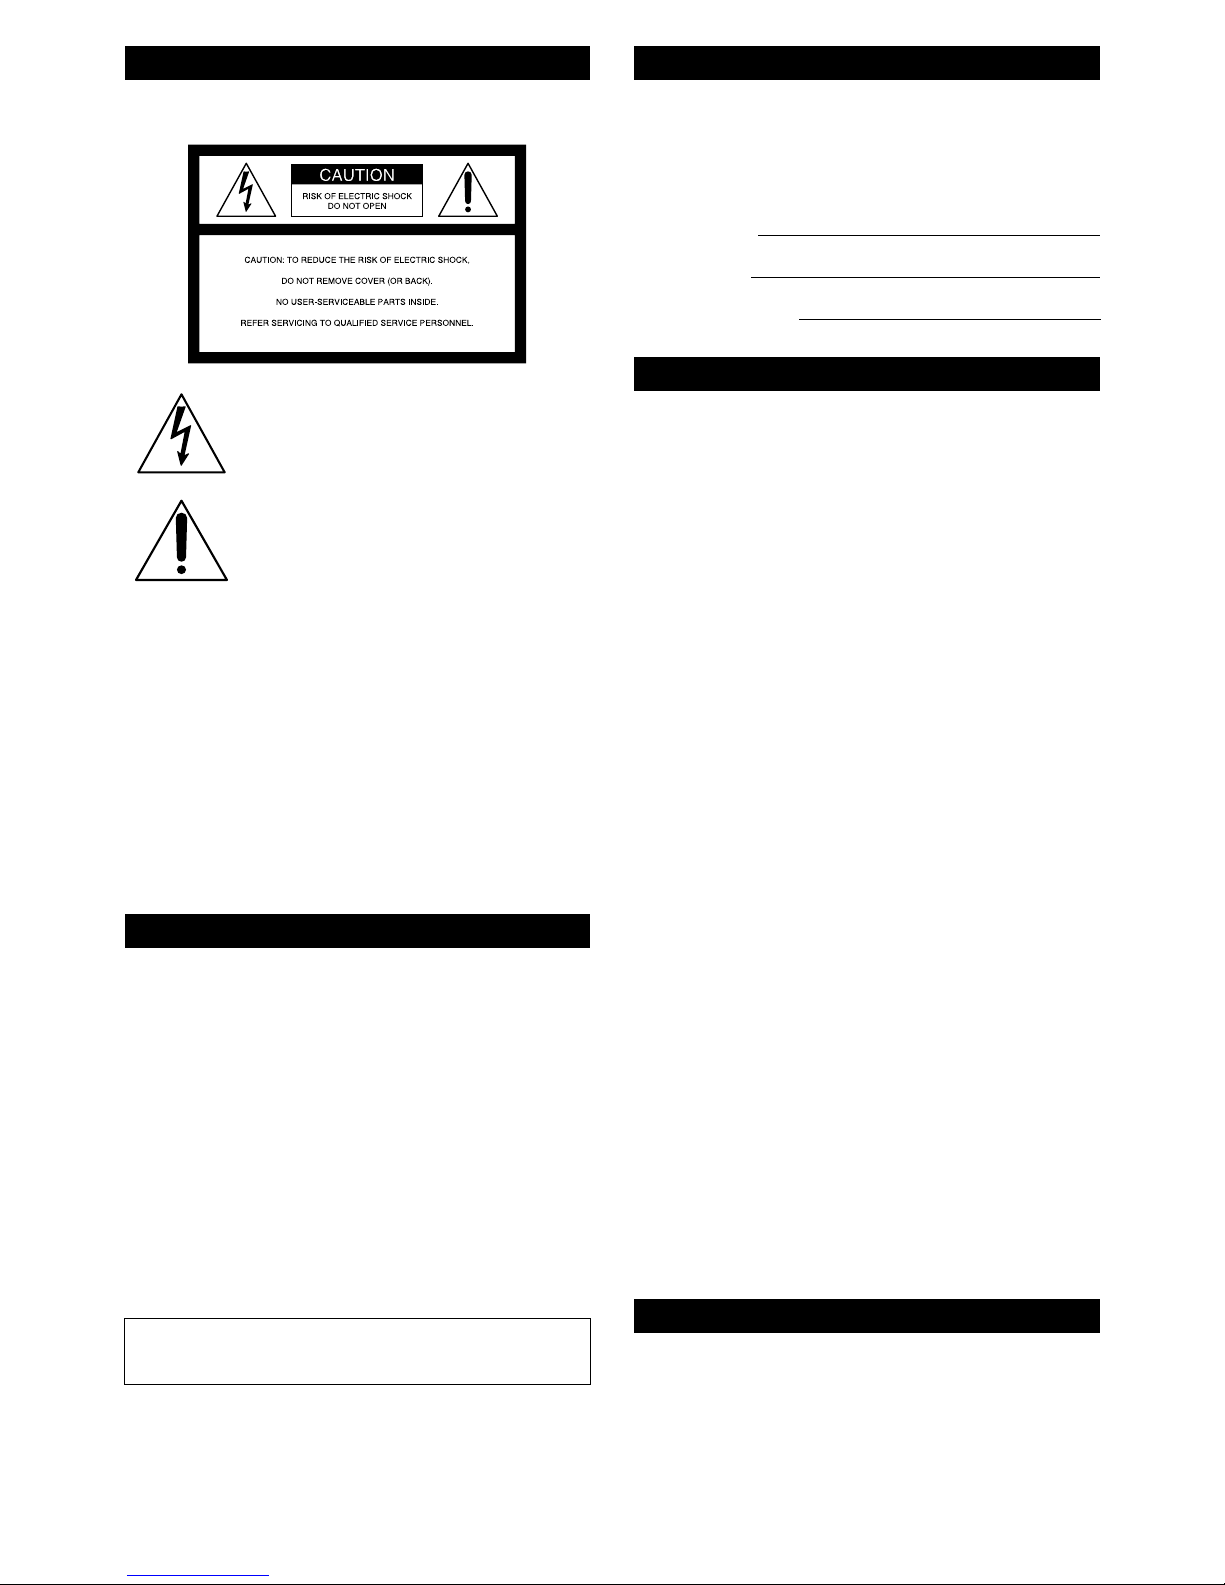
To reduce the risk of fire or shock hazard, do not expose the unit
to rain or moisture.
This symbol is intended to alert the user to the
presence of uninsulated “dangerous voltage”
within the product’s enclosure that may be of
significant magnitude to constitute a risk of
electric shock to persons.
This symbol is intended to alert the user to the
presence of important operating and
maintenance (servicing)instructions in the
literature accompanying the appliance.
Note to the CATV Installer
This reminder is provided to call the CATV system installer’s
attention to Article 820-40 of the NEC that provides guidelines for
proper grounding and, in particular, specifies that the cable
groundshall be connected to the groundingsystem of the building
as close to the point of cable entry as practical.
Note to the Satellite Dish Antenna Installer
This reminder is provided to call the Satellite Dish Antenna
installer’s attention to Article 810 and in particular Article 810-15
of the NEC, which covers proper installation and grounding of
television receiving equipment, as well as to Article 820-40 of the
NEC,whichspecifies that the SatelliteDish Antennacable ground
shall be connected to the grounding system of the building as close
to the point of cable entry as practical.
Telephone Line Interruption
Periodically, information on your DIRECT TICKET®and Pay Pe r
View selectionsis sent, free of charge, via your telephone lineto an
800 number. If you use your telephone during the time the
information is being forwarded, you will hear static noise for
approximately30 seconds. Ifyou would liketo use your telephone
while the information is being sent, you can interrupt the sending
of this information at any time by temporarily unplugging the
phone line to the receiver.
Local Programming
With this Digital Satellite Receiver and a DIRECTV Plus satellite
dish antenna, you may be able to receive local channels from
DIRECTVin certain areas.Additional equipmentmay be required
in some areas. Check with your retailer or visit www.directv.com for
information on availability of local channels from DIRECTV in
your area.
The Digital Satellite Receiver is intended for use only within the
United States.
The model and serial numbers are located on the bottom of the
DigitalSatellite Receiver. The number for theAccessCard is on the
back of the card and on the carton label. Record these numbers in
the space provided below. Refer to these numbers whenever you
need to call your sales or service representative regarding this
product.
For Programming
For subscription information, or to resolve problems related to
programming, call:
DIRECTV at 1-800-DIRECTV (347-3288)
For Hardware and Installation
To arrange for the installation of your Digital Satellite Receiver,
call the dealer from whom you purchased y our system.
For general information, or to resolve problems related to the
operation of your Digital Satellite Receiver or Satellite Dish
Antenna, please contact your Sony dealer. If your dealer or
installer is unable to answer your questions, call the Sony Satellite
System Information Center at 1-800-838-7669.
Trademark and Copyrights
Sony, Media Window, Signal Seeker, Remote Commander and
SmartFile are trademarks of Sony. DIRECTV is a trademark of
DIRECTV, Inc., a unit of Hughes Electronics, and is used with
permission.
Manufactured under license from Dolby Laboratories. “Dolby”
and the double-D symbol are trademarks of Dolby Laboratories.
Confidential Unpublished Works. © 1992–1997 Dolby
Laboratories Inc. All rights r eserved.
Macrovision Information
This product incorporates copyright protection technology that is
protected by U.S. patents and other intellectual property rights.
Use of this copyright protection technology is granted by
Macrovision for home and other limited pay per view uses only.
Reverse engineering or disassembly is prohibited.
Note on Recording Programming
Programming may be taped for home viewing only. All other
taping is expressly prohibited. Some programming may not be
taped. An additional taping fee may be applied. Call your
program providers for details.
StarSight Licensed
The manufacture and sale of the television schedule feature of this
product was licensed under one or more of the following patents
of StarSight Telecast, Inc.: U.S. Patent Nos. 4,706,121; 4,977,455;
5,151,789; and 5,353,121; with use rights reserved.
These Operating Instructions describe how to use the SAT-A55
and its remote control. Any differences in operation for the
SAT-B55 are noted in the text.
The z icon indicates hints and tips for making the task easier.
A Note provides information that may be necessary to complete
the task.
You are cautioned that any changes or modifications not
expressly approved in this manualcould void your authority to
operate this equipment.
WARNING
Attention
Model Number:
Serial Number:
Access Card Number:
Owner’s Record
Customer Support
About These Operating Instructions
3
S
SATELLITE
RECEIVER
+
2
8
3
4
5
6
9
1
7
0
Connecting Your Digital
Satellite Receiver (Page 6)
Using Your Remote Control
(Page 14)
Setting Up Your Digital
Satellite Receiver (Page 22)
Using the Program Guide
(Page 37)
Using the Favorite Stations
Guide (Page 40)
Setting Locks & Limits
(Page 53)
Getting to Know Your Digital Satellite Receiver

4
Features
Congratulations on your purchase of the Sony Digital Satellite Receiver. This manual can
help you to become familiar with the many great features of the Digital Satellite Receiver.
Check below to find out about some of the most exciting features.
Convenience and Ease-of-Use
• The Program Guide showsthe picture and soundinthe Media Window™while you check
station and program information. See page 37.
• The One Button Record and VCR Control features allow you to easily record your favorite
programming on your VCR. See pages 26–28 and page 60.
• SAT-A55 model: Operate your Digital Satellite Receiver from another room or from
outside a cabinet by setting up the RF feature on your remote control. See pages 32–34.
Excellent Performance
• The Auto Title Insert feature for VCR recording can display program information at the
beginning of any Timer & Rec event. You’ll have a convenient “title” recorded at the
beginning of your tapes. See page 26.
• Choose to listen to different audio tracks available with many programs. See page 64
• SAT-A55 model: Select Dolby Digital audio to truly make your home theater come alive.
See page 64.
Easy to Customize
• Organize the channels your family watches most often by setting up the Favorite Stations
guide. See pages 40–42.
• Control access to programming with the Locks & Limits feature. See pages 53–58.
• Set up the Custom Stations feature to exclude stations that you don’t want to see from the
Program Guide, Category Guide and Station Index. See pages 50–51.
• Choose your favorite color palette for the on-screen displays. See pages 47–48

Using the On-Screen DisplaysConnecting Your Digital
Satellite Receiver
5
Viewing Pictures From Your
Digital Satellite Receiver
Other Information
Table of Contents
Connecting Your
Digital Satellite Receiver
Carton Contents ...................................................6
Connection Overview .......................................... 7
Step 1: Inserting the Batteries .............................7
Step 2: Connecting the Satellite Dish Antenna
and Telephone Line ....................... ...... ....... ...... . 8
Step 3: Connecting Your TV ................................. 9
Step 4: Adding a VCR and Audio System .........10
Step 5: Connecting the VCR Controller .............11
Connecting a Sony SmartFile™ VCR .................................. 11
Step 6: Connecting the RF Antenna
(SAT-A55 only) ................................................. 12
Step 7: Connecting the AC Power Cord ............13
Step 8: Inserting the Access Card ......................13
Viewing Pictures From Your
Digital Satellite Receiver
Using Your Remote Control ................... ....... ..... 14
RM-Y802 Remote Control (SAT-A55 model) ..................... 14
RM-Y139 Remote Control (SAT-B55 model) ...................... 16
Selecting Items ...................................................18
Turning On the Power .......................................19
Changing Channels ............................................ 20
Using the On-Screen Displays
Using the Main Menu ........................................21
Setting Up Your Digital Satellite Receiver
(SYSTEM) ........................... ...............................22
Using the System Menu ..................................................... 22
Setting Up the Satellite Dish Antenna ........................ ...... 23
Setting Up the VCR Control Feature .................................. 26
Performing a System Test .................................................. 29
Setting the Aspect Ratio ..................................................... 30
Replacing Your Access Card ............................................... 31
Selecting RF or IR Remote Control Reception
(SAT-A55 only) ................................................................. 32
Using the Guides Menu ...................................................... 35
Viewing Station and Program Information
(GUIDES) ............................ ............................... 35
Using the Alpha List ............................................................ 36
Using the Program Guide ................................................... 37
Using the Category Guide .................................................. 38
Using the Station Index ......................... .............. ............... 39
Using the Favorite Stations Guide ..................................... 40
Using Other Guides ..................................................... ........ 43
Viewing Pay Per View Programs ..................... ................... 45
Adjusting the Displays
(PREFERENCES) ............................. .................... 46
Using the Preferences Menu ..............................................46
Setting Display Options ......................................................47
Setting Up Custom Stations ...............................................50
Selecting Data Services .......................................................51
Viewing Messages
(MESSAGES) .....................................................52
Setting Locks and Limits
(LOCKS & LIMITS) .............................................53
Using the Locks & Limits Display ........................................53
Locking Your Receiver .........................................................57
Unlocking Your Receiver .....................................................58
Checking Pay Per View Purchases
(PURCHASES) ................................ ....................59
Checking Your Purchases ....................................................59
Scheduling Programs
(TIMER & REC) ..................................................60
Using One Button Timer & Rec ...........................................60
Using the Timer & Rec Feature ...........................................61
Editing Timer Events ...........................................................63
Setting Audio Options
(AUDIO) ............................................................ 64
Using the Audio Display .....................................................64
Other Information
Setting Up the Remote Control .........................65
Manufacturer Codes ...........................................66
Location and Function of Controls ....................68
Front Panel ......................................................... ..................68
SAT-A55 Back Panel ............... ............... ............... .............. ..69
SAT-B55 Back Panel .............................................................70
Specifications ...................................................... 71
Troubleshooting .................................................72
FCC Regulations and Information ......................76
Limited Warranty ................................................77
Index ............................. ....................................... 78
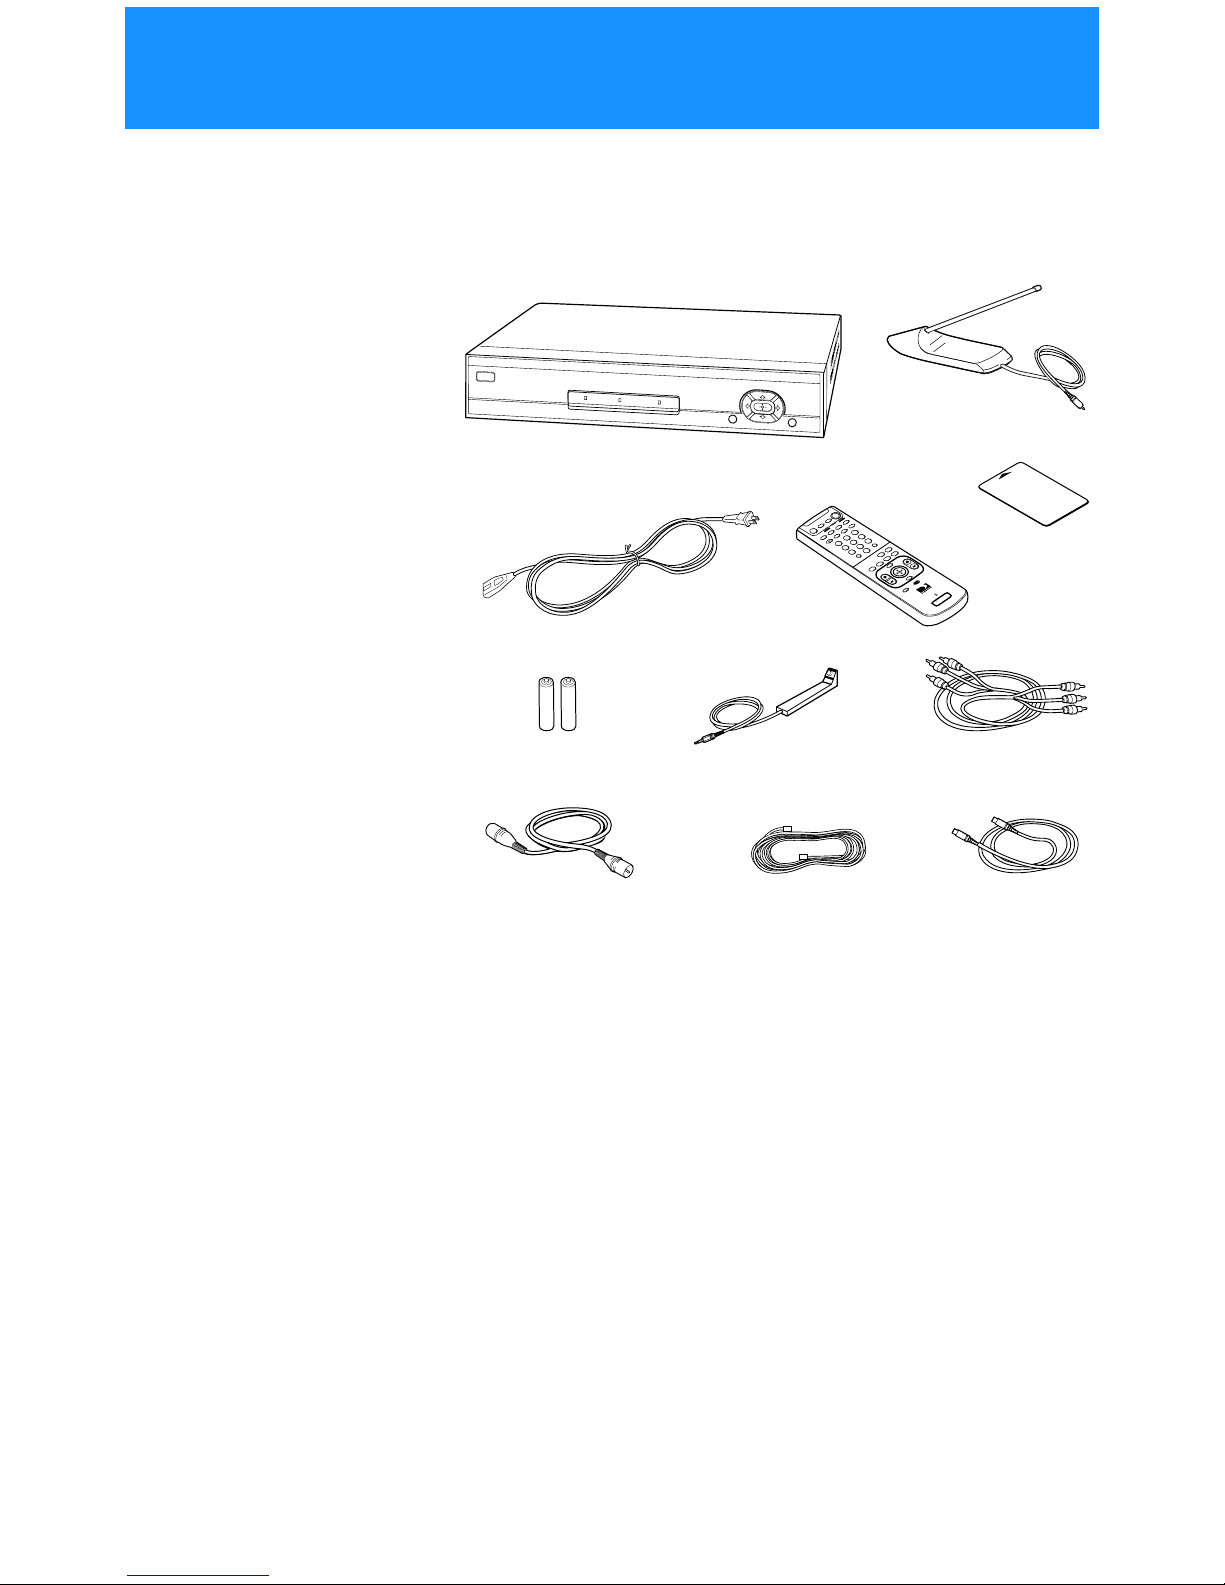
6
Check to make sure the following items are in the Digital Satellite
Receiver’s carton.
If you are missing any items, contact your Sony dealer.
* The RM-Y802 Remote Control shown.
** The RF Ant enna and S-Video cable are not included with the SAT-B55
model.
Note
Keep the original carton and packing materials to safely transp ort the Digital Satellite
Receiver in the future.
Digital Satellite
Receiver
Access Card
S
SATELLITE
RECEIVER
+
2
8
3
4
5
6
9
1
7
0
AC Power Cord
Telephone Cord
RF Antenna**
Remote
Control*
Size AA Batteries VCR Controller Audio/Video Cable
RF Coaxial Cable S-Video Cable**
Connecting Your Digital Satellite Receiver
Carton Contents
7
Connecting Your Digital
Satellite Receiver
Follow the procedures or make the connections in
each of the steps to connect your Digital Satellite
Receiver.
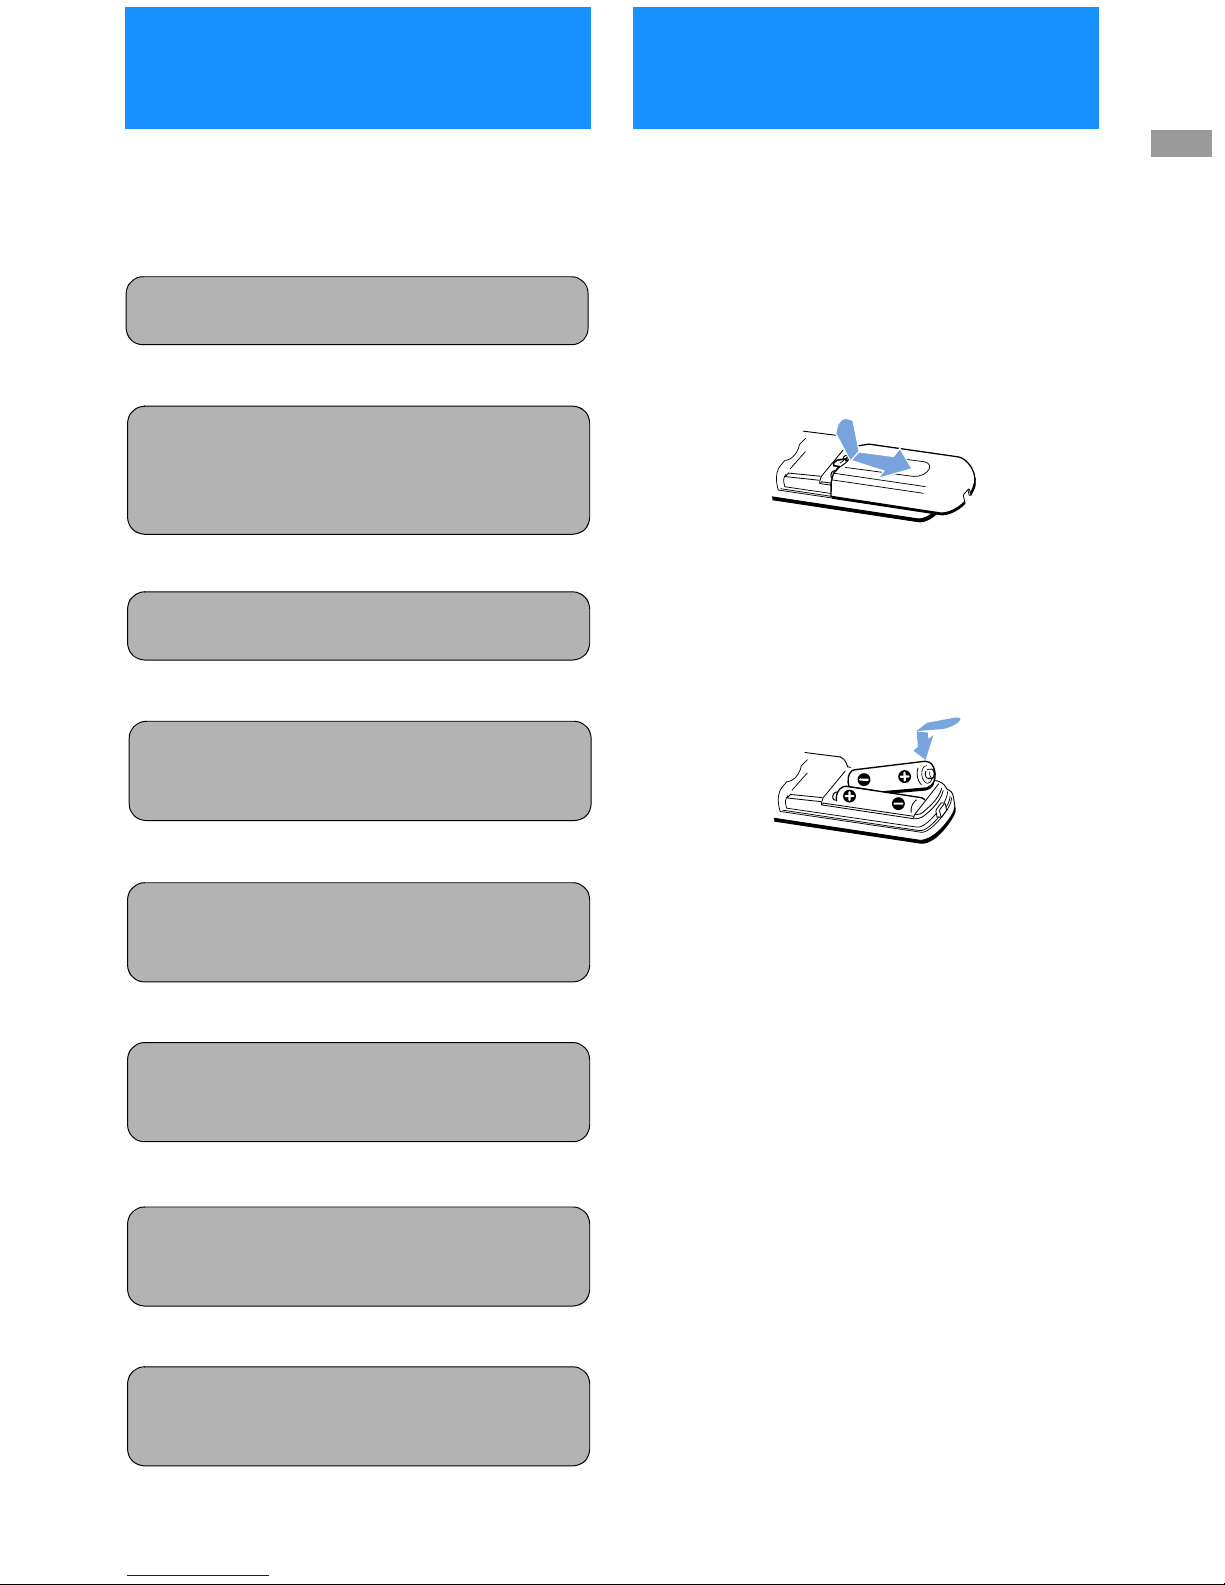
Before you can use the remote control, you must
insert the supplied batteries. If you want to use this
remote control to operate other audio/video
equipment, such as a TV or VCR, you must set up the
remote control (see page 65).
1 Push and slide open the battery
compartment.
2 Insert two size AA batteries
(supplied).
Be sure to match the + and – marks on the
batteries with the + and – marks inside the battery
compartment.
Notes
• When the batteries become weak, the Function bu tton
indicators flash. If the remote control does not work
properly, the batteries may be weak.
• When replacing batteries, replace both batteries with new
ones. Do not mix different types of batteries together.
• When you remove the batteries, any manu factu rer co des
you’ve set up may be erased. To set up the remote control
again, see “Setting Up the Remote Control” on page 65.
v
v
v
v
v
v
v
Step 1: Inserting the Batteries
Page 7
Step 2: Connecting the Satellite
Dish Antenna and
Telephone Line
Page 8
Step 2: Connecting the Satellite
Dish Antenna and
Telephone Line
Page 8
Step 3: Connecting Your TV
Page 9
Step 4: Adding a VCR and
Audio System
(advanced connection)
Page 10
Step 5: Connecting the VCR
Controller
(advanced connection)
Page 11
Step 6: Connecting the RF
Antenna (SAT-A55 only)
(advanced connection)
Page 12
Step 7: Connecting the AC
Power Cord
Page 13
Step 8: Inserting the Access
Card
Page 13
Connection
Overview
Step 1: Inserting the
Batteries
8
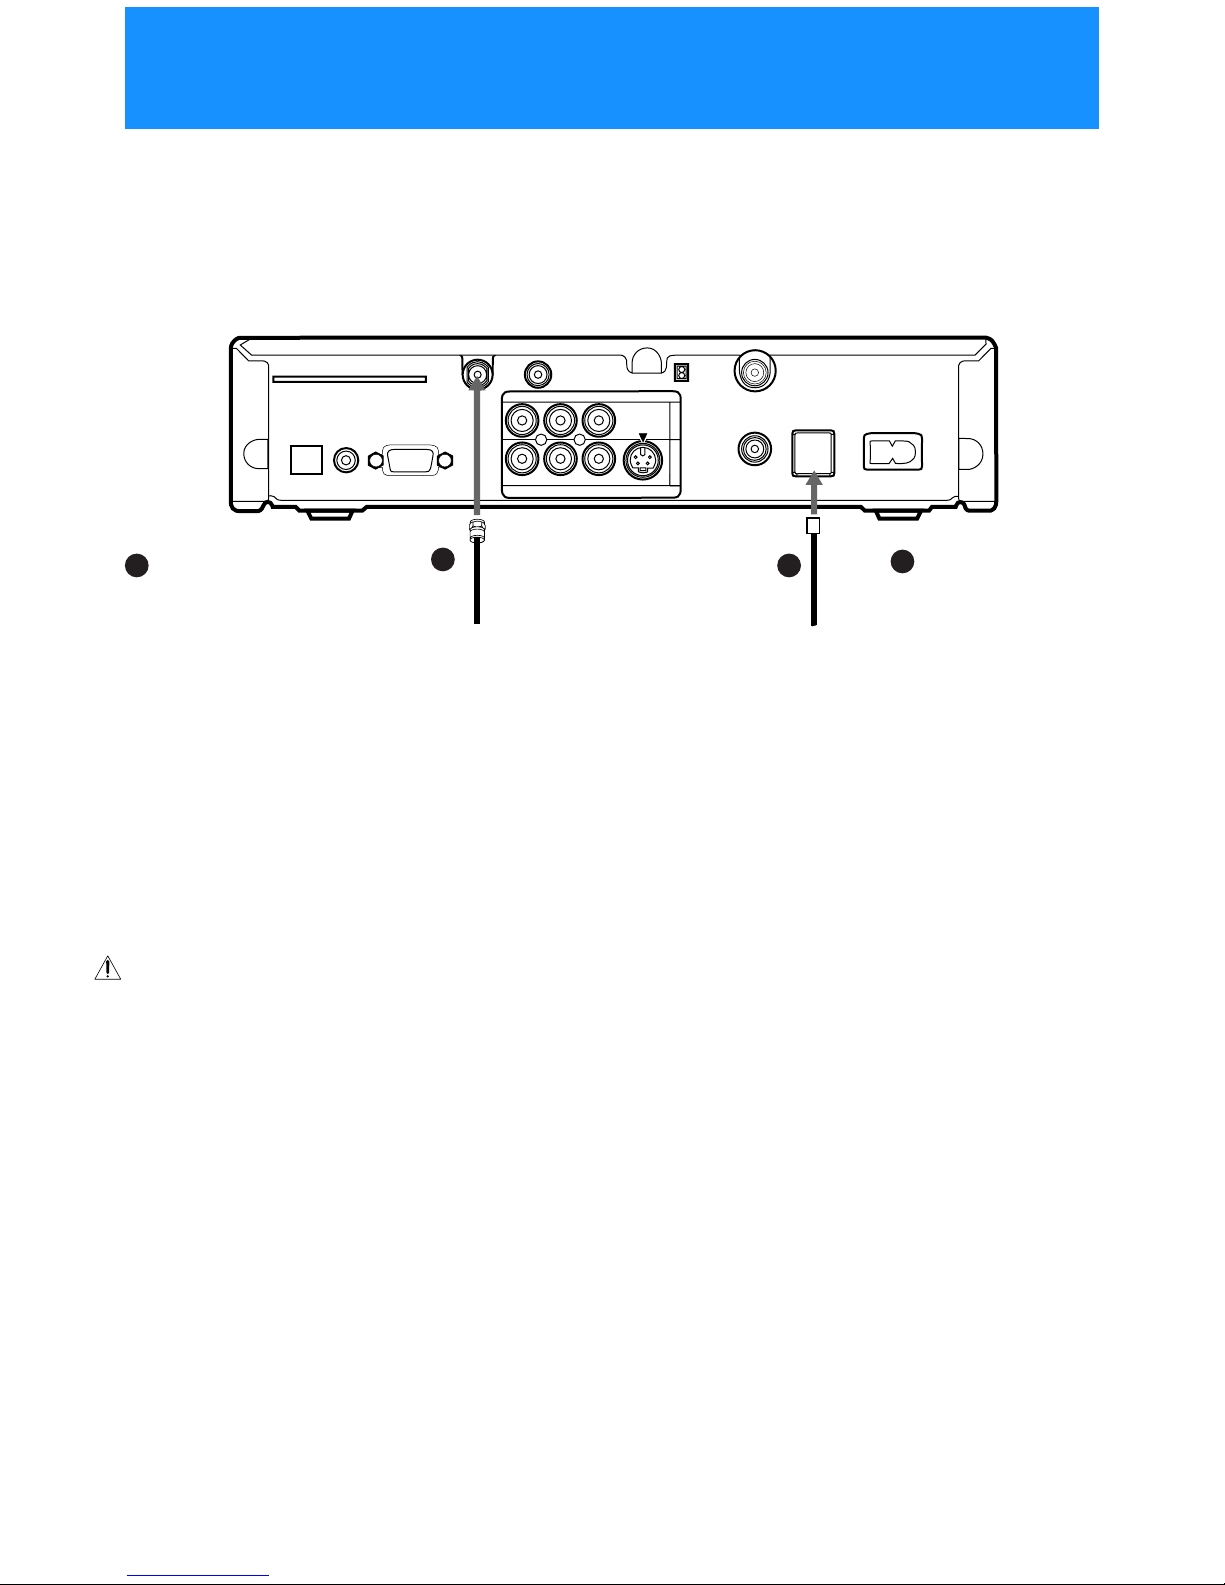
The SATELLITE IN jack sends power to, and receives satellite signals
from, the Satellite Dish Antenna. The telephone line connection
periodicallysends information about y our receiver and Access Card to
your service provider.
ACCESS CARD
LOW SPEED DATA
VCR CONTROL
DIGITAL
OUT
(OPTICAL)
SATELLITE IN
RF REMOTE
R
L(MONO)
VIDEO OUT
AUDIO
VIDEO
S VIDEO
CH3
CH4
VHF/UHF IN
VHF(SAT)/UHF
OUT
TEL LINE
AC IN~
1
2
Digital Satellite Receiver
Connect the SATELLITE IN
jack to your Satellite Dish
Antenna using RG-6
coaxial cable.
RG-6 Coaxial Cable from
Satellite Dish Antenna
Telephone Cord
Connect the TEL LINE
jack to a telephone
line wall jack using
the supplied
telephone cord.
Notes
• The SAT-A55 model is shown.
Connections for the SAT-B55
model are the same.
• Your Satellite Dish Antenna
Installation Instructions
provides detailed instructions
on how to install RG-6 coaxial
cable from your Satellite Dish
Antenna.
CAUTION
Only connect your authorized
Satellite Dish Antenna to the
SATELLITE IN jack as described
in the Installation Instructions.
Connecting any other equipment
to this j ack could result in damage
to the equi pment and/or receiver.
1
1
2
2
Step 2: Connecting the Satellite Dish Antenna
and Telephone Line
9
Connecting Your Digital
Satellite Receiver
Connect your TV to the Digital Satellite Receiver as shown below. Refer
to your TV’s instruction manual for more information.
ACCESS CARD
LOW SPEED DATA
VCR CONTROL
DIGITAL
OUT
(OPTICAL)
SATELLITE IN
RF REMOTE
R
L(MONO)
VIDEO OUT
AUDIO
VIDEO
S VIDEO
CH3
CH4
VHF/UHF IN
VHF(SAT)/UHF
OUT
TEL LINE
AC IN~
1
2
VHF/UHF
VIDEO
L(MONO)
R
S VIDEO
IN
-AUDIO-
If you have a local TV antenna or cable
company service
Connect it to the VHF/UHF IN jack on your Digital
Satellite Receiver using a coaxial cable or RF
adapter (not supplied).
You can view local stations using your TV controls
.
Note
You m ust use the VHF(SAT)/UHF OUT jack to
connect to your TV or VCR wh en a localTV antenna
or c able company service is connected to the
VHF/UHF IN jack (see “2c” belowand on page 10)
.
If your TV has A/V input
jacks
Connect the VIDEO OUT
jacksonyourDigital
Satellite Receiver to the
A/Vinputjacksonyour TV
using the supplied A/V
cable.(Besuretomatchthe
colors on the jacks with the
colored plugs on the A/V
cable.)
If your TV has an S-Video
input
Use the S-Video cable
instead of the yellow video
connection.
If your TV has only one
audio input, connect it to
the L(MONO) jack on the
receiver.
If your TV does not have
A/V jacks
Connect the VHF(SAT)/UHF
OUT jack to the VHF/UHF
input jack on your TV using
coaxial cable.
SettheCH 3/CH 4 switch to the
channel that does not carry offairbroadcastsinyourarea.
Note
With this connection, your
input source is channel 3 or
channel 4 depending on how
you set the CH3/CH4 switch
on the receiver.
Digital Satellite Receiver
Coaxial
Cable
A/V Cable
VIDEO
(yellow)
OR
S-Video
S-Video
Cable
TV
Coaxial
Cable
1
1
2a
2a
2b
2b
2c
2c
Step 3: Connecting Your TV
10
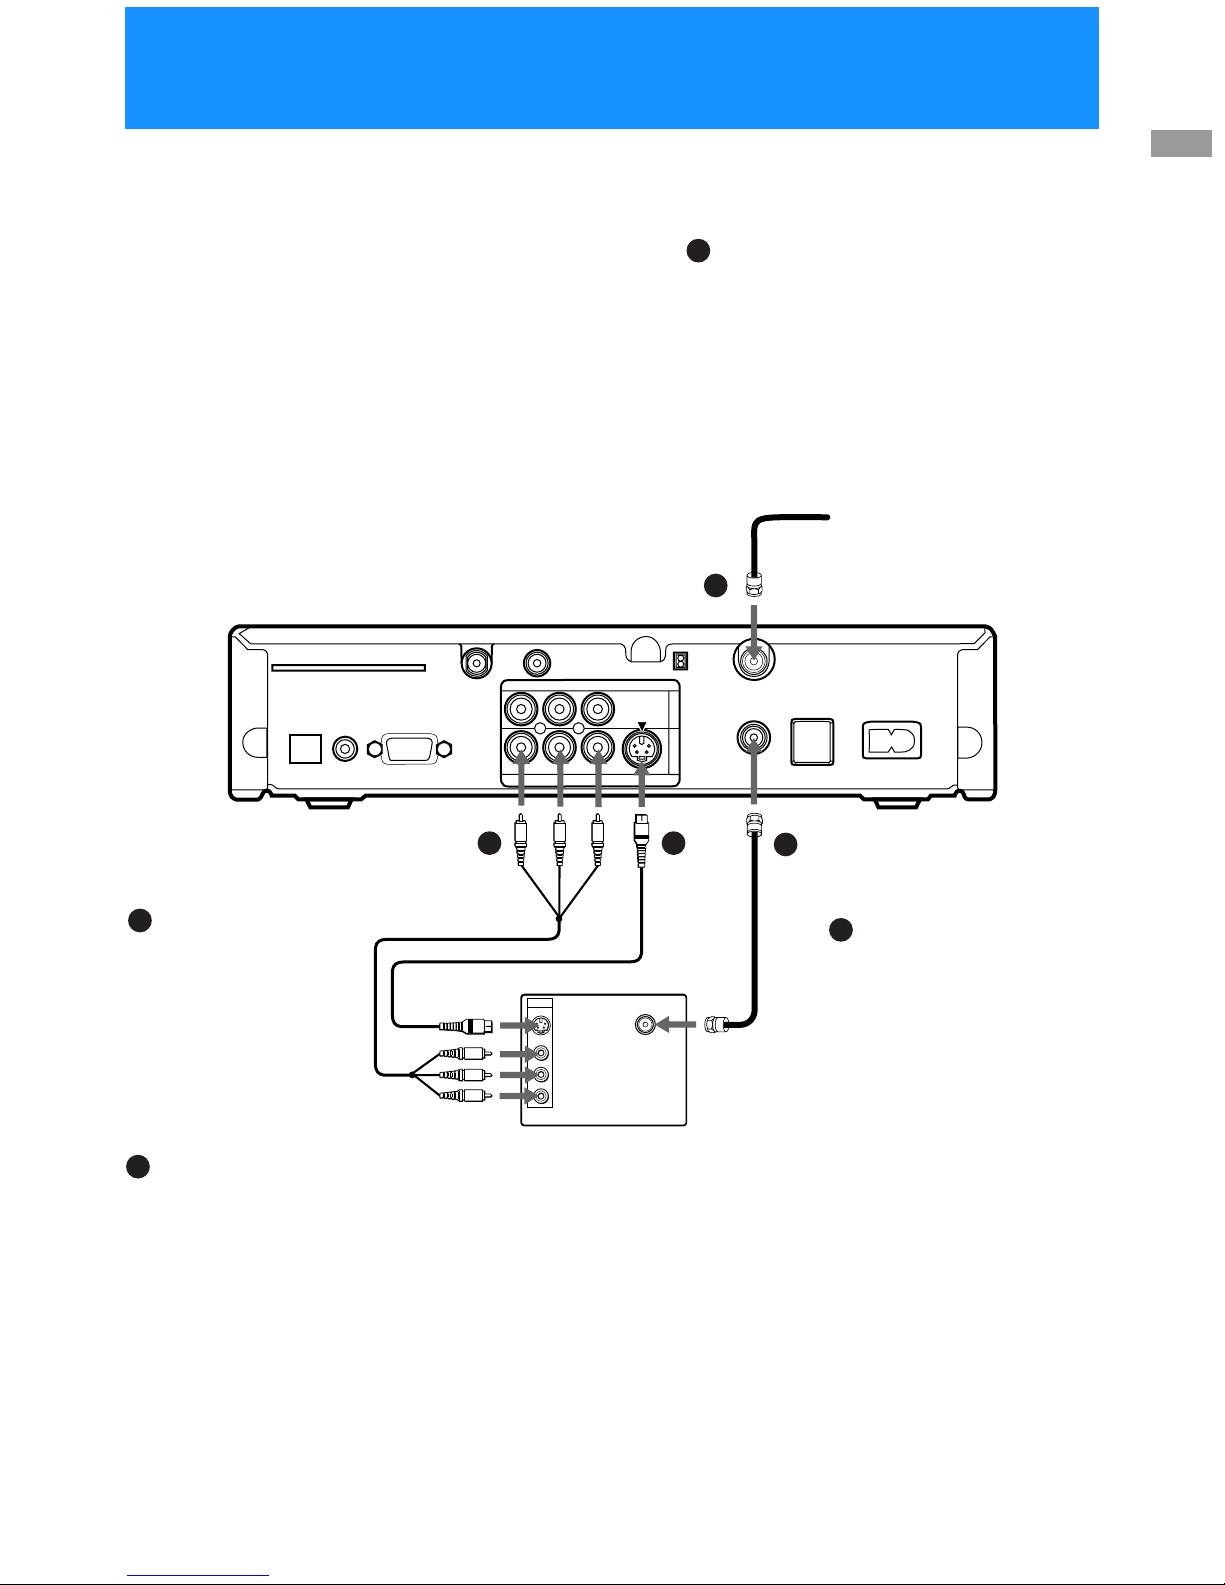
You can record programs by adding a VCR. You can also connect your
Digital Satellite Receiver to an audio system for enhanced sound
enjoyment.
VHF/UHF
VIDEO
L(MONO)
-AUDIOR
S VIDEO
IN
VIDEO
S VIDEO
AUDIO
LINE
IN
LINE
OUT
IN
OUT
ACCESS CARD
LOW SPEED DATA
VCR CONTROL
DIGITAL
OUT
(OPTICAL)
SATELLITE IN
RF REMOTE
R
L(MONO)
VIDEO OUT
AUDIO
VIDEO
S VIDEO
CH3
CH4
VHF/UHF IN
VHF(SAT)/UHF
OUT
TEL LINE
AC IN~
1
2
LINE
IN
LINE
OUT
AUDIO
OPTICAL
IN
If you have a
digital or Dolby®
Digital audio
system (SAT-A55
only)
Connect the
DIGITAL OUT
(OPTICAL)ofthe
Digital Satellite
Receiver to the
optical digital
input of your audio
system.
z Tip
If you connect your
Digital Satellite
Receiver to a Dolby
Digital receiver, set
the Dolby Digital
optionof theAudio
display to Auto
Select. S ee “Setting
Audio Options
(AUDIO)” on page
64 for more
information.
Audio Receiver
If you have a stereo
or Dolby Pro Logic®
audio system
Connect the upper
AUDIO R a nd L(MONO)
jacks on the Digital
Satellite Recei ver to the
audioinputsofyour
stereo amplifier.
If your TV and VCR have A/V
jacks
Connectthe VIDEOOUTjacks of
your Digital Satellite Receiver to
the A/V input jacks of your VCR
using the supplied A/V cable.
Then, connect the A/V output
jacks of your VCR to the A/V
input jacks of your TV using an
A/V cable. (Be sure to match the
colors on the jacks with the
colored plugs on the A/V cable.)
If your TV and VCR have
S-Video jacks
Use the S-Video cable instea d of
the yellow video connection.
z Tip
To allow your Digital Satellite
Receiver to control the recording
functions of your VCR, see “Step
5: Connecting the VCR
Controller” on page 11.
Stereo
Cable
Optical Cable
(SAT-A55 only)
(optional Sony
accessoryPOC-15A)
Digital Satellite Receiver
If your TV and VCR do
not have A/V jacks
Connect the VHF(SAT)/
UHF OUT jack on the
Digital Satellite Receiver to
the VHF/UHF input jack
on your VCR using coax ial
cable.
Then, connect the VHF/
UHFoutputjackonyour
VCR to the VHF/UHF
input jack on your TVusing
coaxial cable.
Set the CH3/CH4 swit ch to
the channel that does not
carry off-air broadcasts in
your area.
Note
With this connection,
your input source is
channel 3 or channel 4
depending on how you
set the C H 3/CH4 switch
on your VCR.
A/V Cable
VIDEO
(yellow)
OR
S-Video
S-Video
Cable
Coaxial
Cable
TV
1a
1a
1b
1b
2a
2a
2b
2b
2a 2b
2c
2c
VCR
2c
Step 4: Adding a VCR and Audio System
11
Connecting Your Digital
Satellite Receiver
Connect the VCR Controller to allow the Timer & Rec feature to
automatically operate your VCR.
See “Setting Up the VCR Control Feature” on page 26 for information
about setting up the Digital Satellite Receiver to work with your VCR.
ACCESS CARD
LOW SPEED DATA
VCR CONTROL
DIGITAL
OUT
(OPTICAL)
SATELLITE IN
RF REMOTE
R
L(MONO)
VIDEO OUT
AUDIO
VIDEO
S VIDEO
CH3
CH4
VHF/UHF IN
VHF(SAT)/UHF
OUT
TEL LINE
AC IN~
1
2
1
/2" to 1
"
ACCESS CARD
LOW SPEED DATA
VCR CONTROL
DIGITAL
OUT
(OPTICAL)
SATELLITE IN
RF REMOTE
R
L(MONO)
VIDEO OUT
AUDIO
VIDEO
S VIDEO
CH3
CH4
VHF/UHF IN
VHF(SAT)/UHF
OUT
TEL LINE
AC IN~
1
2
VIDEO
S VIDEO
AUDIO
LINE
IN
LINE
OUT
IN
OUT
CPD IN
To allow the Digital
Satellite Receiver to
control your VCR
Connectthe VCRController
to the VCR CONTROL jack
on the receiver.
If you are using a Sony
SmartFile VCR to take
advantage of the Prog ram Data
Download feature
Use this connection instead of the
VCR Controller connection. For
information about setting up the
VCR Control feature, see page 26.
FordetailsabouttheProgramData
Download feature, refer to your
SmartFile VCR Operating
Instructions.
Digital Satellite Receiver
VCR Controller
Cable
VCR Controller
IR Sensor VCR (front view)
VCR (side view)
VCR
Controller
Connecting a Sony SmartFile™ VCR
Digital Satellite Receiver
Monaural Cable (supplied with
SmartFile VCR)
Sony SmartFile VCR
In front of the VCR
Place theVCRController under andin
front of the VCR.
The VCR Controll er must extend just
in front of the infrared sensor of the
VCR.
z Tip
If the infrared sensor is not marked
on your VCR, shine a flashlightinto
the fro nt panel of the VCR to locate
the sensor.
1b
1b
1a
1a
Step 5: Connecting the VCR Controller
12
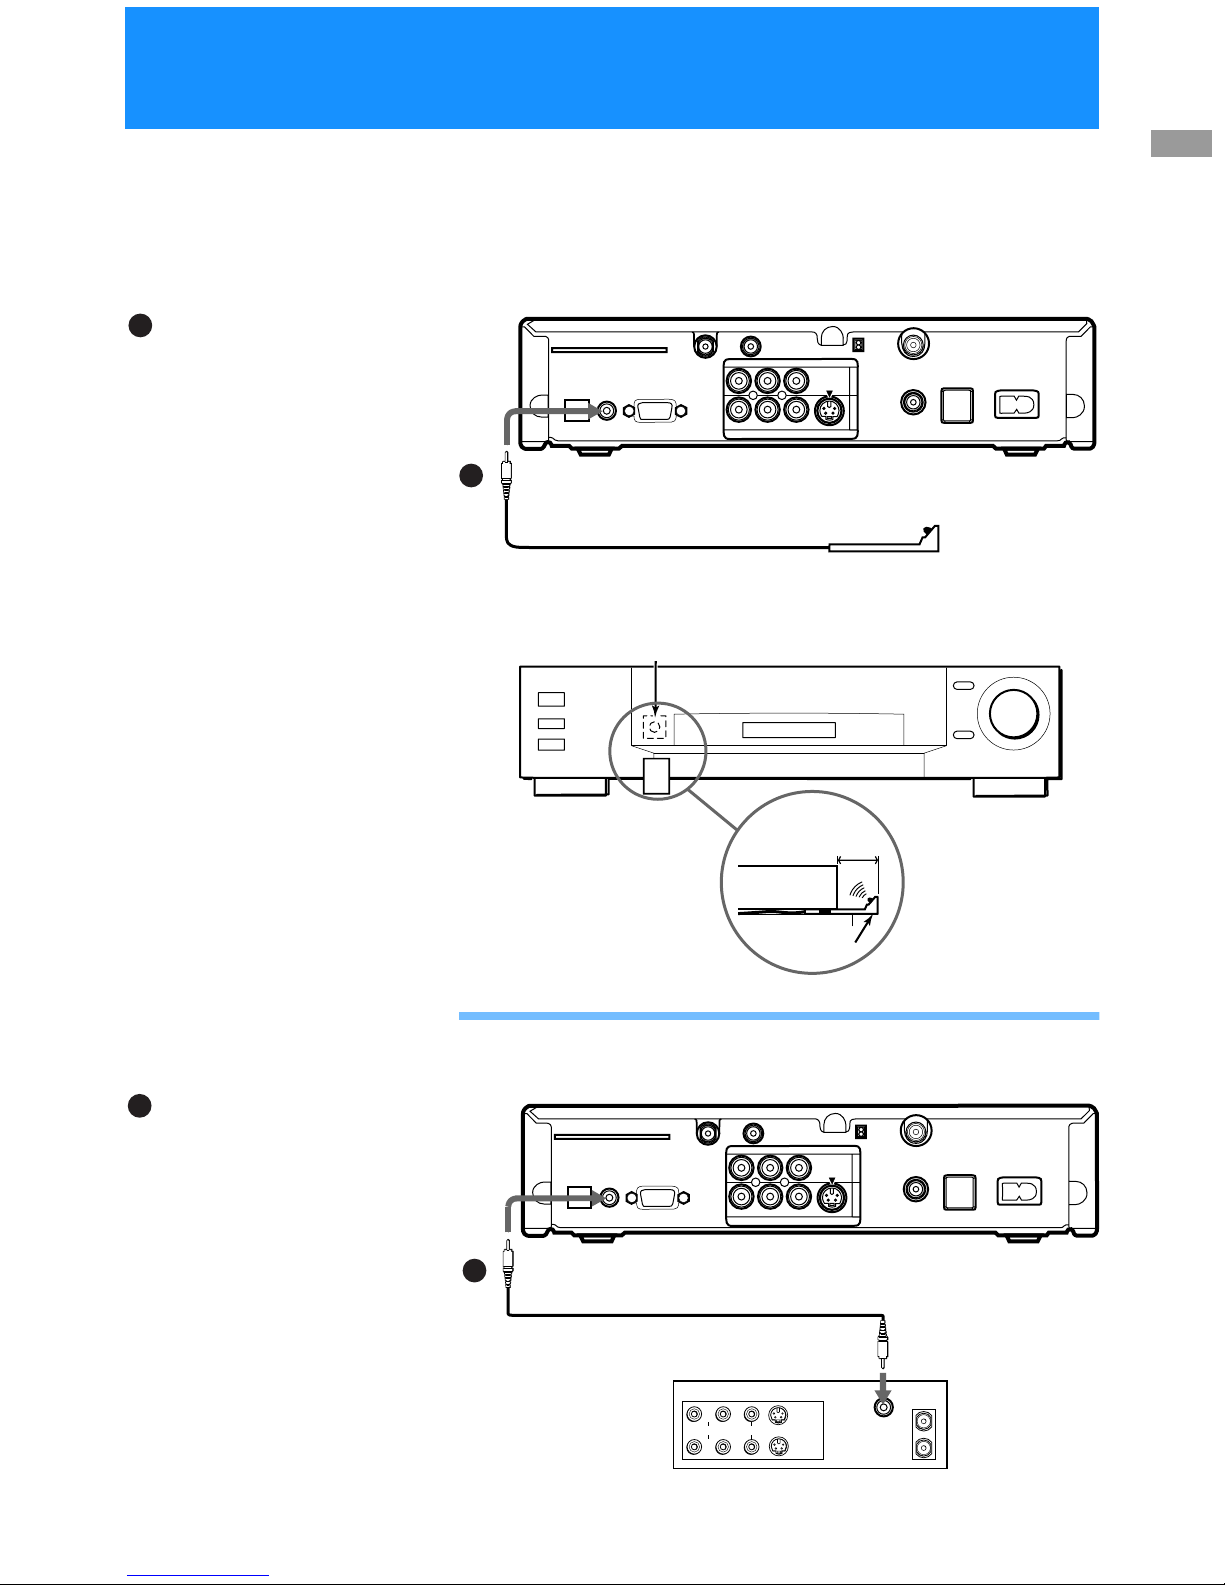
With the SAT-A55 model you can connect the RF Antenna and operate
the Digital Satellite Receiver when installed in a cabinet or from another
room in your house using the remote control. See page 32 for information
about how to set up the Digital Satellite Receiver to use the RF feature.
ACCESS CARD
LOW SPEED DATA
VCR CONTROL
DIGITAL
OUT
(OPTICAL)
SATELLITE IN
RF REMOTE
R
L(MONO)
VIDEO OUT
AUDIO
VIDEO
S VIDEO
CH3
CH4
VHF/UHF IN
VHF(SAT)/UHF
OUT
TEL LINE
AC IN~
1
2
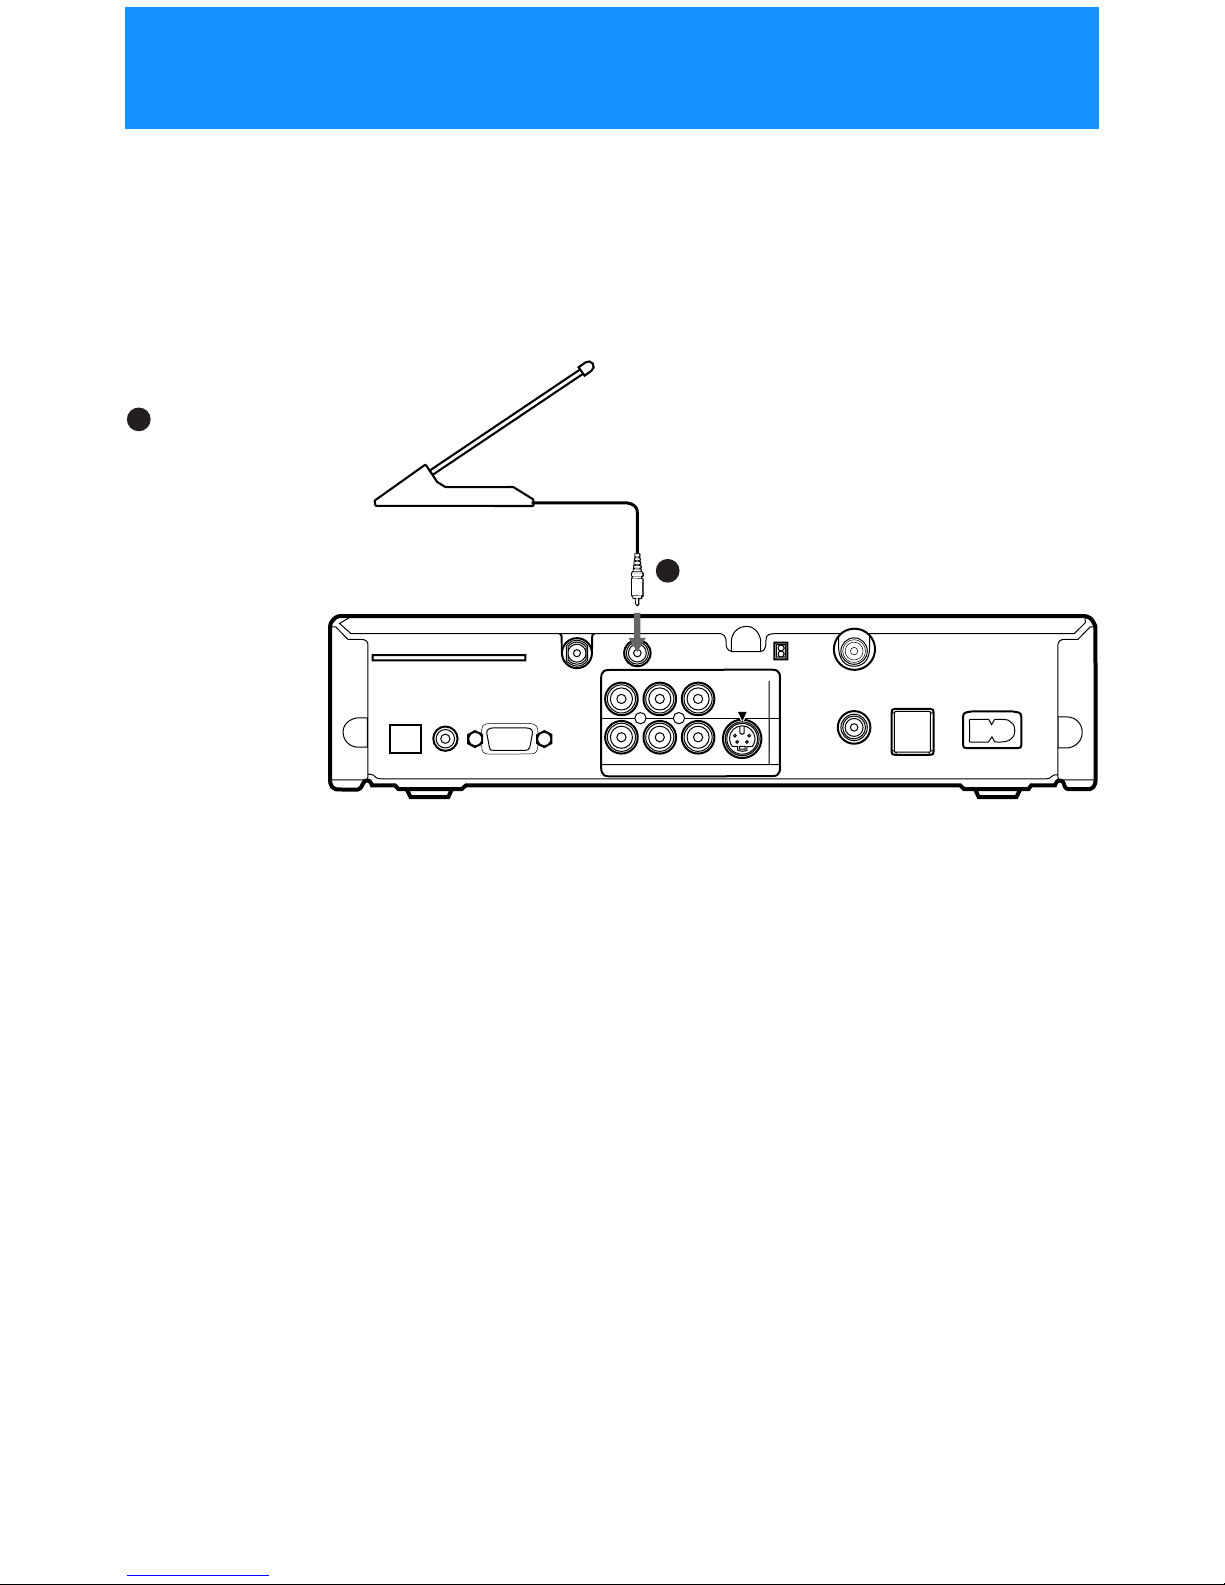
If you want to use the RF
feature
Connect the RF Antenna to
theRFREMOTEjackofthe
Digital Satellite Receiver.
Then,placetheRFAntenna
in a convenient location.
RF Antenna
Digital Satellite Receiver
Notes
• Do not place the RF Antenna
directly on top of the Digital
Satellite R eceiver or any other
metal o bject. For best results,
placethe RF Antenna in a visible
location.
• The operating range of the
remote control is about 100 feet
when using the RF feature. This
may decrease due to ambient
reception conditions, weak
batteries, etc.
1
1
Step 6: Connecting the RF Antenna
(SAT-A55 only)
13
Connecting Your Digital
Satellite Receiver
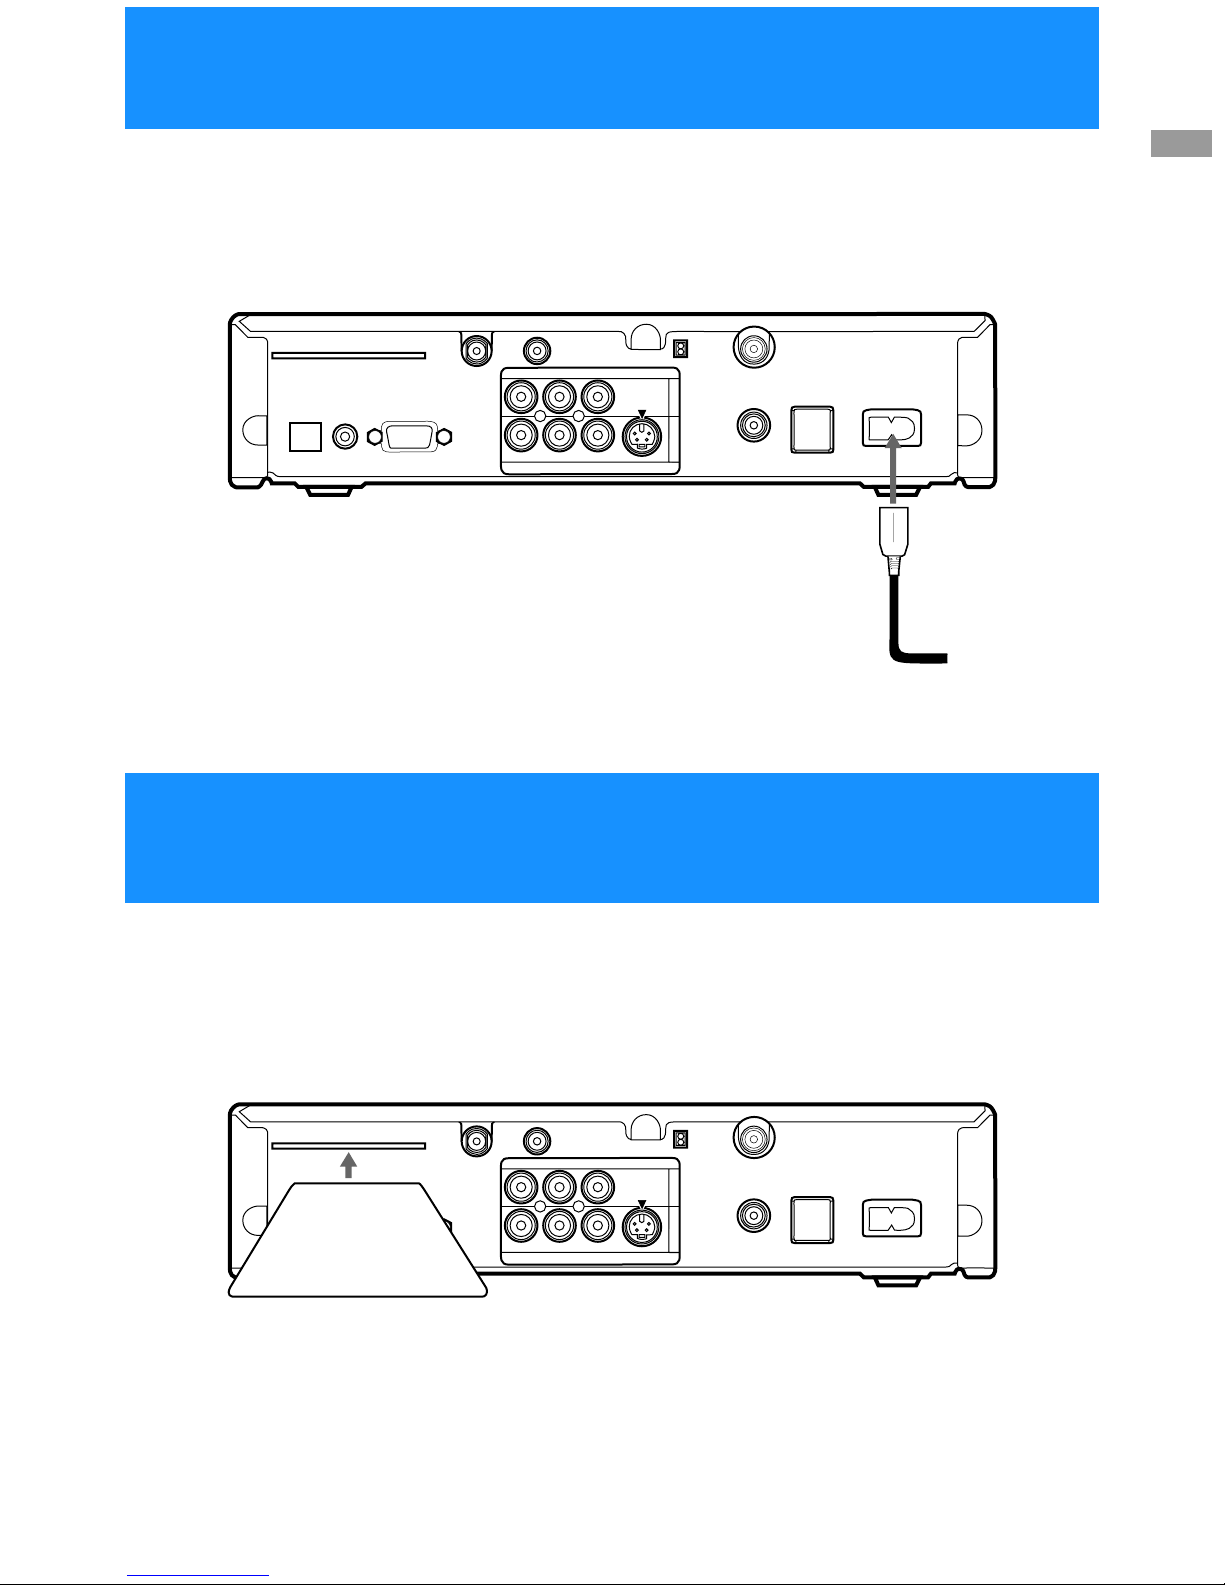
After all other connections are complete, connect the AC Power Cord to
the Digital Satellite Receiver.
After you insert the Access Card and your Satellite Dish Antenna is
installed, you are ready to begin enjoying digital satellite programming.
Call DIRECTV at 1-800-DIRECTV (347-3288) to begin service.
ACCESS CARD
LOW SPEED DATA
VCR CONTROL
DIGITAL
OUT
(OPTICAL)
SATELLITE IN
RF REMOTE
R
L(MONO)
VIDEO OUT
AUDIO
VIDEO
S VIDEO
CH3
CH4
VHF/UHF IN
VHF(SAT)/UHF
OUT
TEL LINE
AC IN~
1
2
AC Power Cord
to power outlet
Digital Satellite Receiver
ACCESS CARD
LOW SPEED DATA
VCR CONTROL
DIGITAL
OUT
(OPTICAL)
SATELLITE IN
RF REMOTE
R
L(MONO)
VIDEO OUT
AUDIO
VIDEO
S VIDEO
CH3
CH4
VHF/UHF IN
VHF(SAT)/UHF
OUT
TEL LINE
AC IN~
1
2
Digital Satellite Receiver
Access Card
Step 7: Connecting the AC Power Cord
Step 8: Inserting the Access Card
14
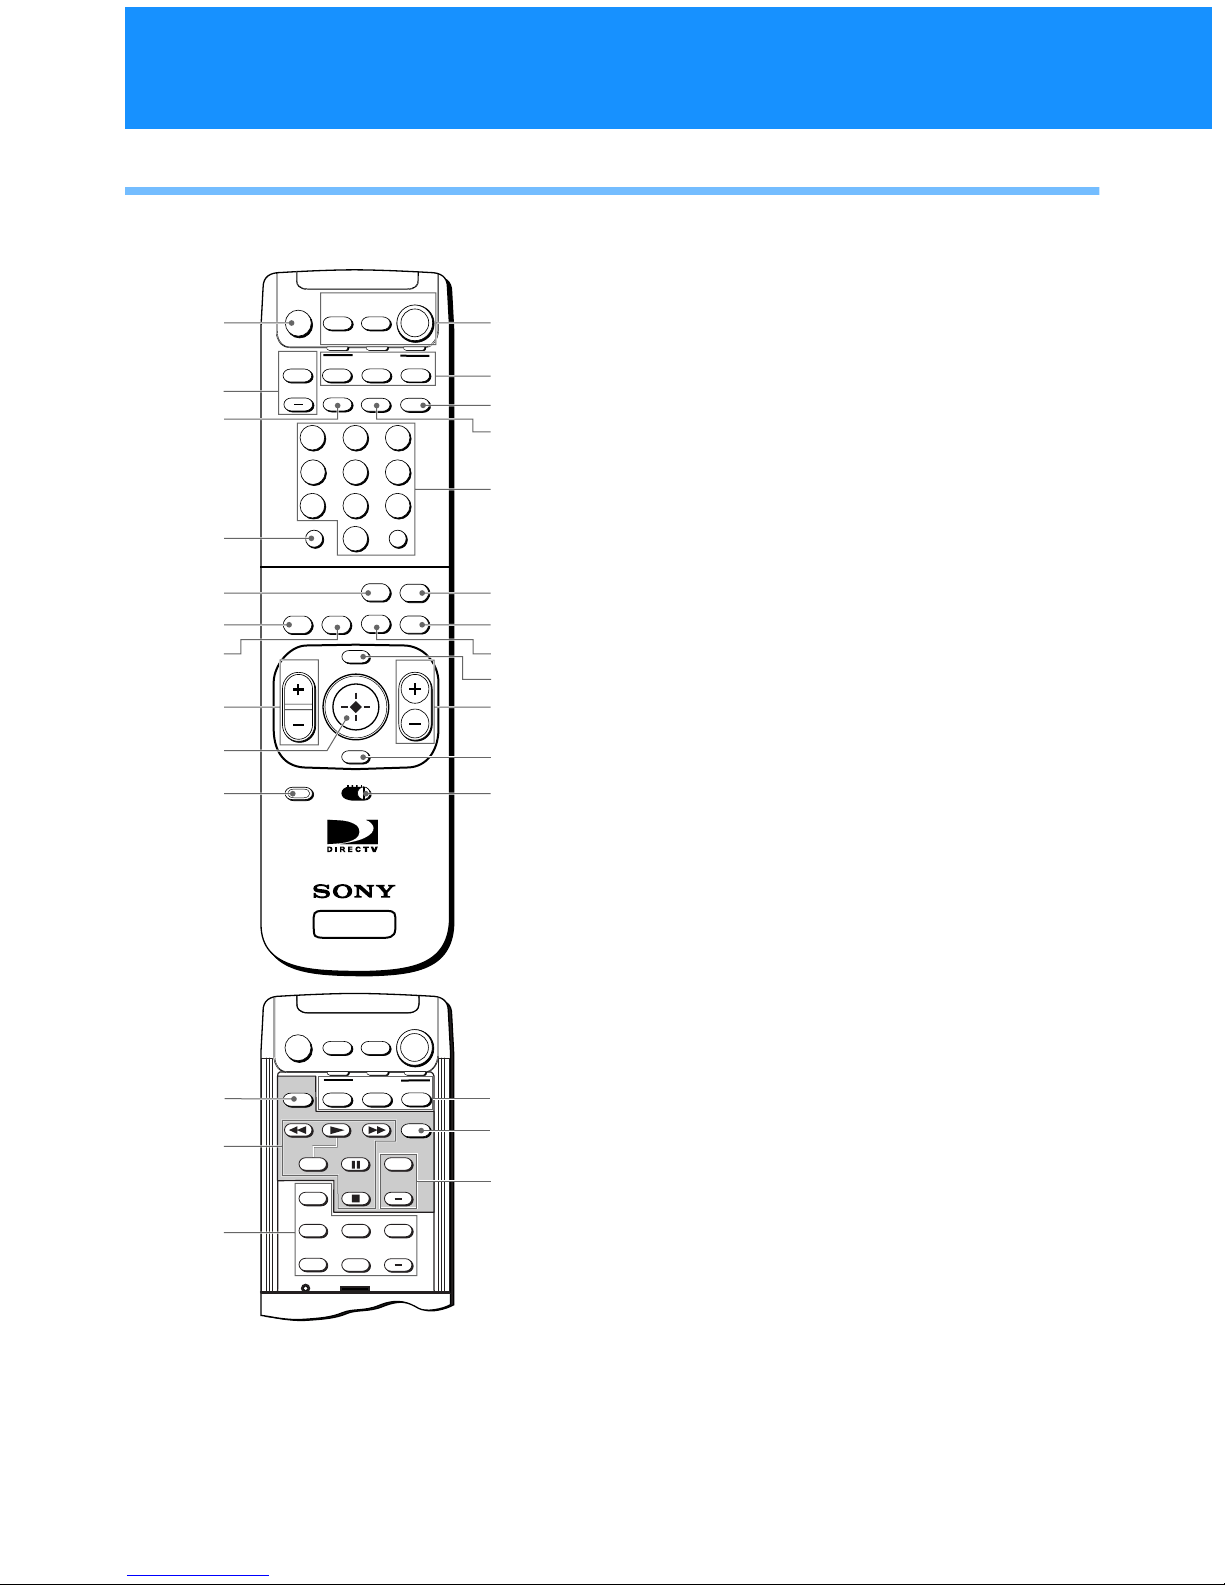
RM-Y802 Remote Control (SAT-A55 model)
Note
You may need to set up the remote control to operate your
other audio/video equipment. See “Setting Up the Remote
Control” on page 65 for details.
1 MUTING button
Mutes the volume. Press again to restore the
volume. To operate your TV, you must first set
up the remote control (see page 65).
2 AUDIO VOLUME buttons
Adjust the volume of your audio receiver. To
operateyour audio receiver, you must first set up
the remote control (see page 65).
3 SLEEP button
Sets the TV to turn off automatically after a
certain amount of time (if your TV has the Sleep
feature). To operate your TV, you must first set
up the remote control (see page 65).
4 DISPLAY button
Opens the program information display for the
current program.
5 ALT AUDIO button
Switches among the available audio broadcasts.
6 FAVORITE button
Opens the Favorite Stations guide.
7 INDEX button
Opens the Station Index.
8 VOL buttons
Adjust the volume. To operate your TV, you
must first set up the remote control (see page 65).
9 Joystick
Moving the joystick up, down, left, right, and
diagonally moves the highlight in on-screen
displays. Press the joystick to select the
highlighted item.
q; CODE SET button
Lets you program the remote control to operate
your TV and other audio/video equipment (see
page 65).
SLEEP
TV/SAT
TV/VIDEO
SATELLITE
RECEIVER
ALT AUDIO
JUMP
GUIDE
INDEXFAVORITE
VOL
RM-Y802
VTR3 2 DVD AMP
MENU
EXIT
CH
CATEGORY
CODE SET
+
2
8
3
4
5
6
9
FUNCTION
SAT
CABLE
AUDIO
VOLUME
ENTERDISPLAY
1
7
TV
0
MUTING
CABLE TV
POWER
1
2
3
4
5
6
8
9
0
7
qs
qd
qg
qh
qj
ql
w;
ws
qk
qf
qa
SAT
wa
-
-
POSITION
CH
SWAP PIP
+
TV
SAT
CABLETV/VTR
FUNCTION
-
-
AUDIO OFF
CH
+
POWER
MUTING
CABLE TV
POWER
wh
wj
wk
wd
wg
wf
SAT
Viewing Pictures From Your Digital Satellite Receiver
Using Your Remote Control

15
Viewing Pictures From Your
Digital Satellite Receiver
qa POWER buttons
Turn on and off the Digital Satellite Receiver, TV
and VTR (VCR). To operate your TV or VTR
(VCR), you must first set up the remote control
(see page 65).
qs FUNCTION buttons
Select the equipment (CABLE, TV or SAT) that
you want to operate. The indicators light up to
show which device the r e mote control is
operating. To operate your TV or cable box, you
must first set up the remote control (see page 65).
qd TV/VIDEO button
Switches between the various inputs of your TV.
To operate your TV, you must first set up the
remote control (see page 65).
qf TV/SAT button
Switches the output of your Digital Satellite
Receiver between regular TV and satellite
broadcasts. To receive regular TV broadcasts,
youmusthavealocalTVantennaorcable
company connection (see page 9).
qg 0–9 and ENTER buttons
Change channels directly, and enter numerical
values in on-screen displays.
qh JUMP button
Changes channels to the previously tuned
channel.
qj GUIDE button
Opens the Program Guide.
qk CATEGORY button
Opens the Category Guide.
ql MENU button
Opens the Main Menu.
w; CH buttons
Change channels. When a program guide is
open, pressing the CH buttons pages through the
guide.
wa EXIT button
Closes all on-screen displays including program
guides and menus.
ws VTR3/2/DVD/ AMP switch
Sets the remote to operate other devices in your
A/V system. To operate these other devices, you
must first set up the remote control (see page 65).
wd TV/VTR button
Switches between the TV and VTR (VCR) inputs
of your TV. To operate your TV, you must first
set up the remote control (see page 65).
wf VCR Control buttons
Operate VCR features such as play, record,
pause, stop, and fast wind. To operate your VCR,
you must first set up the remote control (see page
65).
wg PIP control buttons
Operate the Picture-in-picture features of your
TV (if your TV has PIP). To operate your TV, you
must first set up the remote control (see page 65).
wh FUNCTION buttons
Select the equipment (CABLE, TV or SAT) that
you want to operate. The indicators light up to
show which device the remote control is
operating. To operate your TV or cable box, you
must first set up the remote control (see page 65).
wj POWER button
Turns on or off the equipment selected with the
VTR3/2/DVD/AMP s witch.
wk CH +/– buttons
Change channels in numerical order on the
equipment selected with the VTR3/2/DVD/
AMP switch.
16
RM-Y139 Remote Control (SAT-B55 model)
Note
You may need to set up the remote control to operate your
other audio/video equipment. See “Setting Up the Remote
Control” on page 65 for details.
1 MUTING button
Mutes the volume. Press again to restore the
volume. To operate your TV, you must first set
up the remote control (see page 65).
2 TV/VIDEO button
Switches between the inputs of your TV. To
operate your TV, you must first set up the remote
control (see page 65).
3 TV/VTR button
Switches between the inputs of your VCR . To
operateyourVCR,youmustfirstsetupthe
remote control (see page 65).
4 TV/SAT button
Switches the output of your Digital Satellite
Receiver between regular TV and satellite
broadcasts. To receive regular TV broadcasts,
you must have a local TV antenna or cable
company connection (see page 9).
5 DISPLAY button
Opens the program information display for the
current program.
6 INDEX button
Opens the Station Index.
7 JUMP button
Changes channels to the previously tuned
channel.
8 EXIT button
Closes all on-screen displays including program
guides and menus.
CH
VOL
GUIDE
CATEGORYINDEX
ENTER
TV/VTR
FUNCTION
SAT
TVTV/VIDEO
DISPLAY
TV
POWER
PAGE
SAT
MUTING
VTR
VTR
TV/SAT
FAVORITEMENUJUMP EXIT
CODE SET
RM-Y139
SATELLITE
RECEIVER
0
1283
456
79
1
2
3
4
5
6
8
9
0
7
qs
qd
qf
qj
w;
qk
qa
qg
qh
ql
Using Your Remote Control (continued)

17
Viewing Pictures From Your
Digital Satellite Receiver
9 VOL buttons
Adjust the volume. To operate your TV, you
must first set up the remote control (see page 65).
q; CODE SET button
Lets you program the remote control to operate
your TV and other audio/video equipment (see
page 65).
qa POWER buttons
Turn on and off the Digital Satellite Receiver, TV
and VTR (VCR). To operate your TV or VTR
(VCR), you must first set up the remote control
(see page 65).
qs FUNCTION buttons
Select the equipment (SAT, TV, VTR) that you
want to operate. The indicators light up to show
which device the remote control is operating. To
operate your TV or VTR (VCR), you must first set
up the remote contro l (see page 65).
qd VCR Control buttons
Operate VCR features such as play, record,
pause, stop, and fast wind. To operate your VTR
(VCR), you must first set up the remote control
(see page 65).
qf 0–9 and ENTER buttons
Change channels directly and enter numerical
values in on-screen displays.
qg GUIDE button
Opens the Program Guide.
qh CATEGORY button
Opens the Category Guide.
qj Arrow and buttons
The arrow buttons move the highlight in
on-screen displays. The button selects the
highlighted item.
qk FAVORITE button
Opens the Favorite Stations guide.
ql MENU button
Opens the Main Menu.
w; CH/PAGE buttons
Change channe ls. When a program guide is
open, the se buttons page through the guide.
18
In on-screen displays such as the Main Menu and program guides, you
must first move the highlight to the item you want, then select the item.
RM-Y802 Remote Control (SAT-A55 model)
RM-Y139 Remote Control (SAT-B55 model)
S
SATELLITE
RECEIVER
+
2
8
3
4
5
6
9
1
7
0
S
SATELLITE
RECEIVER
+
2
8
3
4
5
6
9
1
7
0
2 Pressdownonthejoystickto
select the item.
1 Move the joystick in any
direction to move the
highlight to the item you
want.
0
123
456
879
SATELLITE
RECEIVER
0
123
456
879
SATELLITE
RECEIVER
1 Press the V/v/B/b buttons
to move the highlight to the
item you want.
2 Press the buttonto
select the item.
Note (SAT-B55 model)
Whenever these Operating Instructions
refer to using the joystick, use the arro w
V/v/B/b buttons surrounding the
button.
z Tip
Be sure to press the SAT FUNCTION
button before operating the Digital
SatelliteReceiver with the remote control.
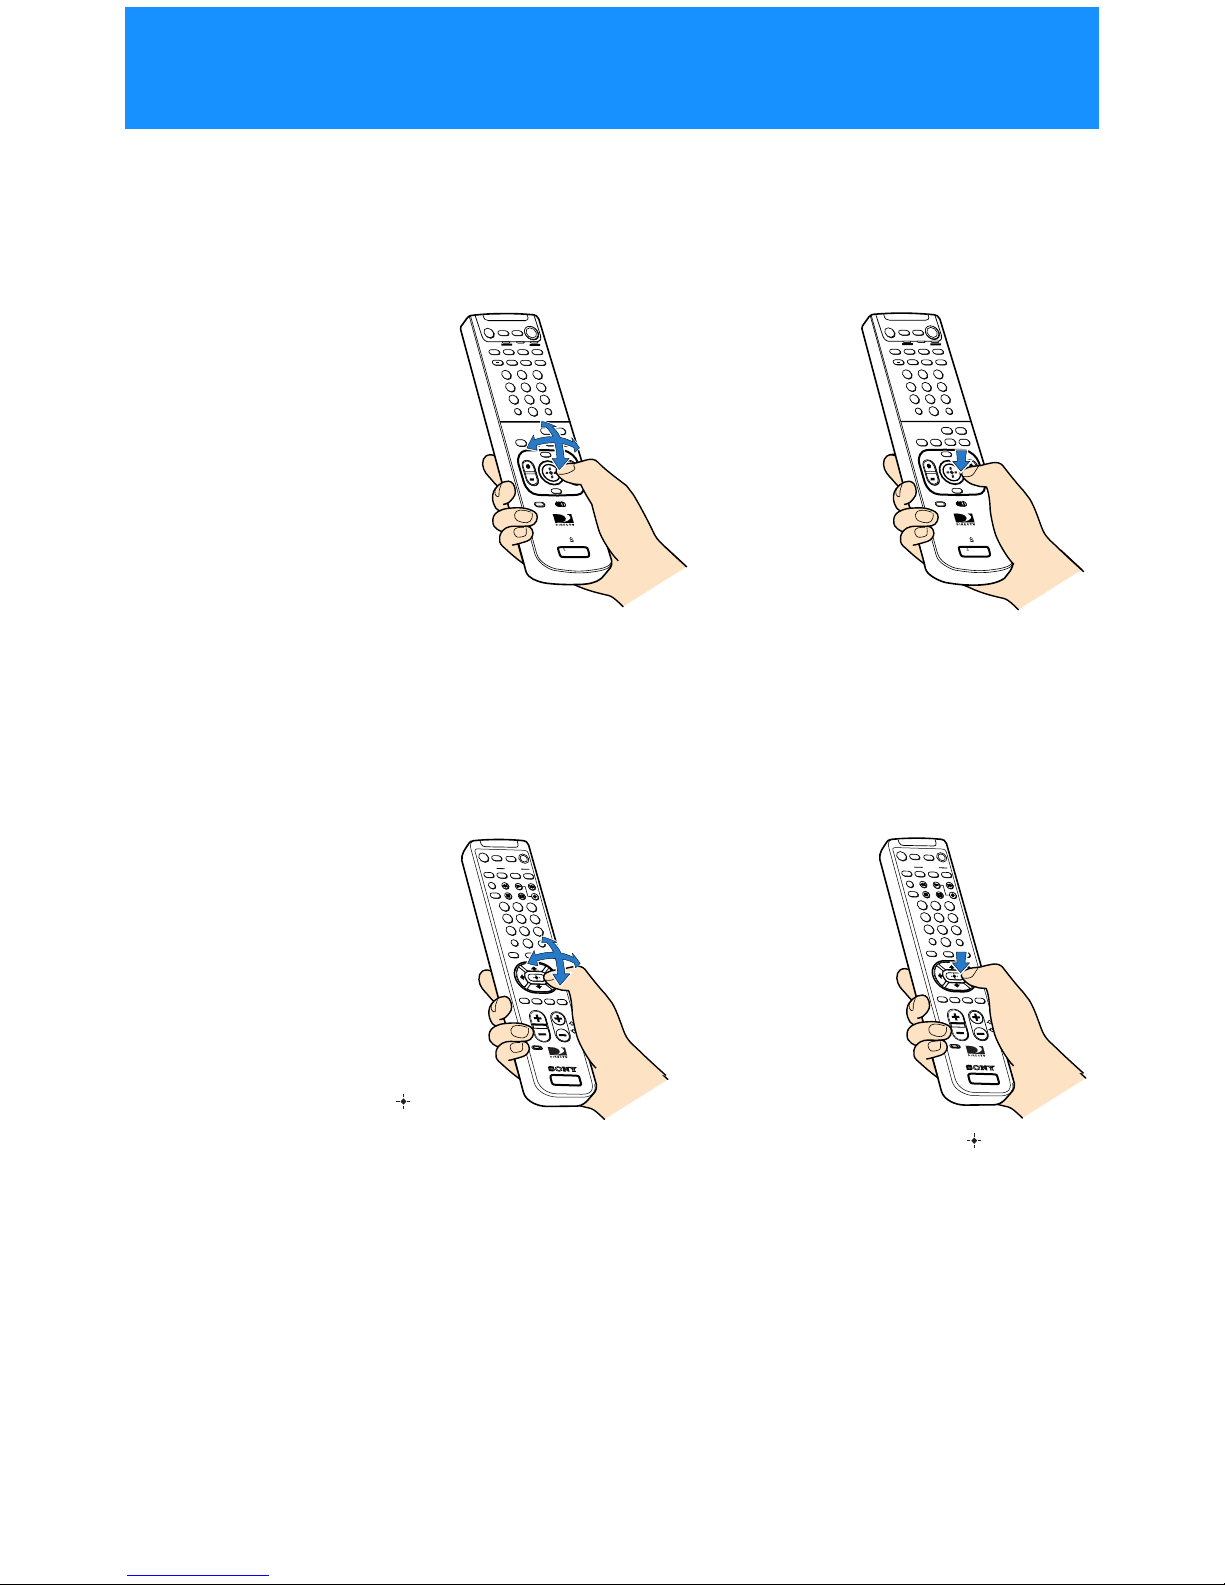
Selecting Items
19
Viewing Pictures From Your
Digital Satellite Receiver
+
SATELLITE
RECEIVER
1
2
8
3
4
5
6
7
9
SLEEP
TV/SAT
TV/VIDEO
FUNCTION
TV
SAT
CABLE
AUDIO
VOLUME
ENTERDISPLAY
MUTING
TVCABLE
ALT AUDIO
JUMP
CATEGORY
GUIDE
INDEXFAVORITE
MENU
EXIT
CH
VOL
RM-Y802
VTR3 2 DVD AMP
CODE SET
0
POWER
SAT
z Tip
The FUNCTION button indicators light
up to show you which equipment the
remote control is operating.
Note
You may need to set up the remote
control to operate your other audio/
video e q u ipment. See “Setting Up the
Remote Control” on page 65 for details.
RM-Y802
Remote Control
1
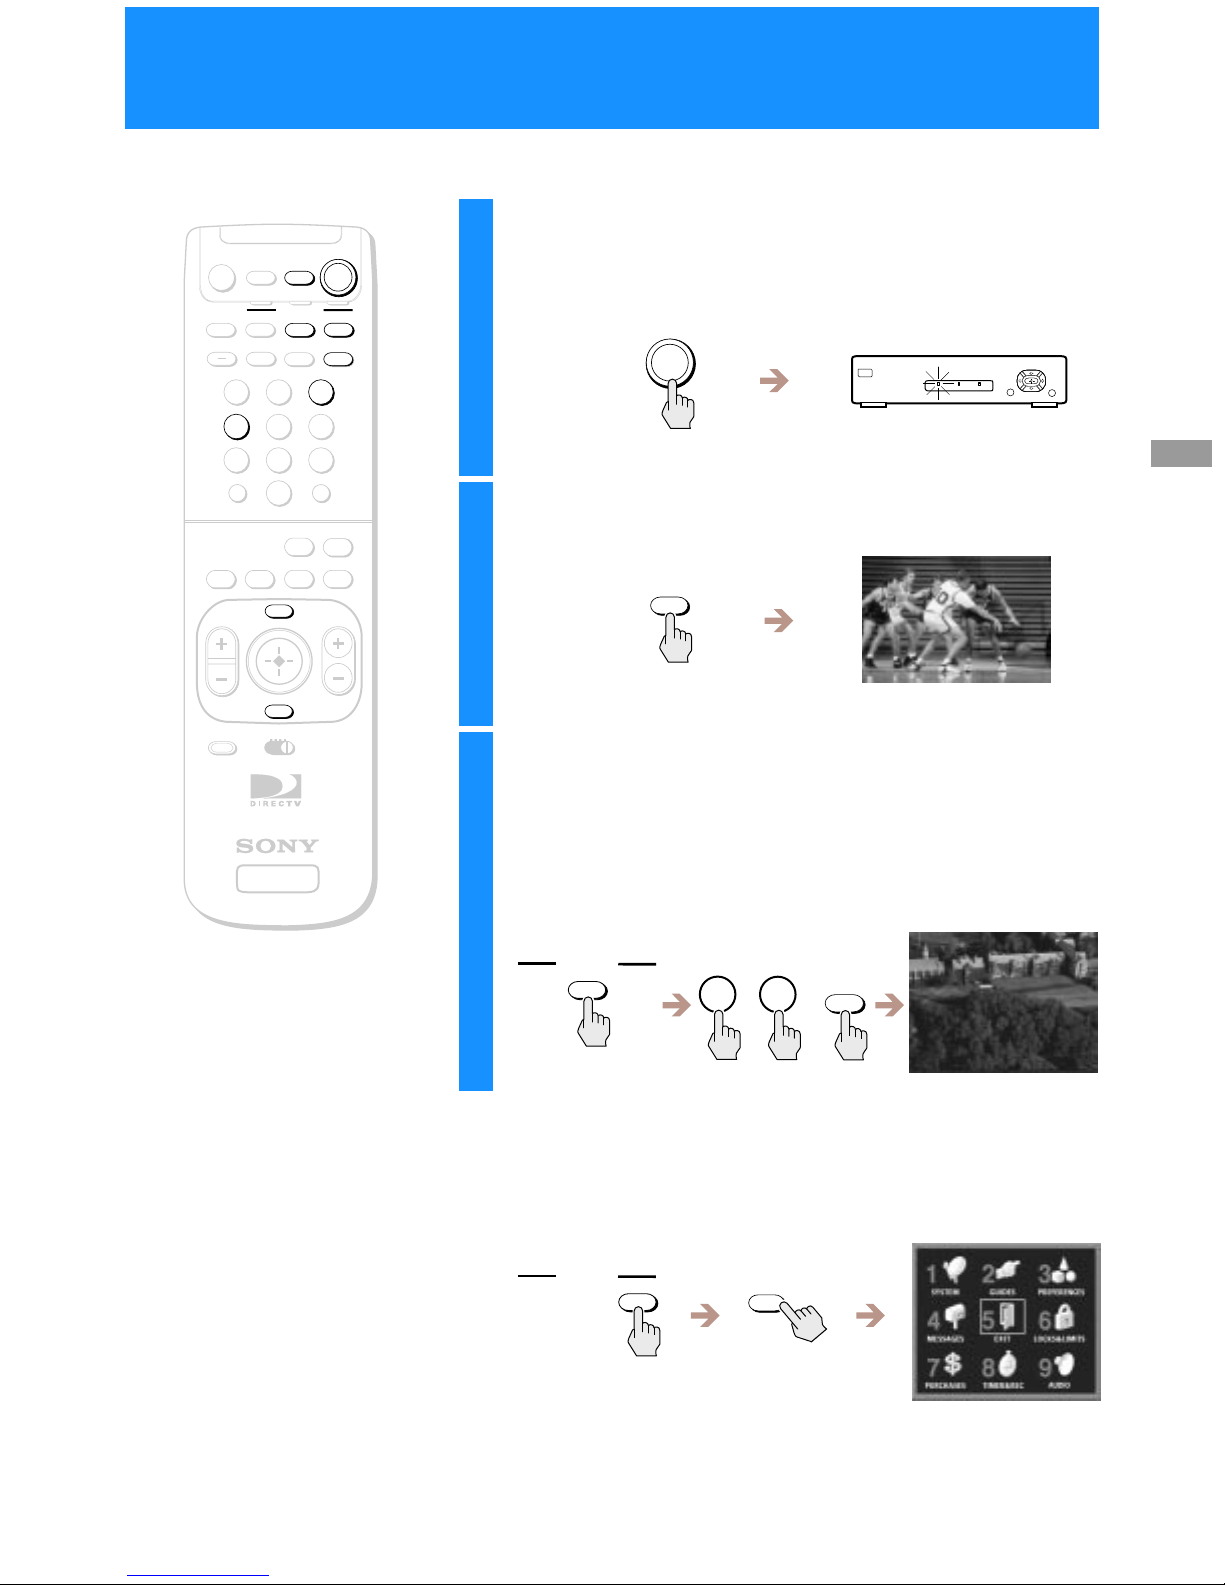
Press the POWER SAT button to turn on the Digital
Satellite Receiver.
The POWER indicator lights up.
2
Press the TV button to turn on the TV.
3
Press the TV FUNCTION button, then select the
TV’s input source to which you connected the
Digital Satellite Receiver.
Depending on how you connected your Digital Satellite Receiver
to your TV, the input source could be channel 3 or channel4, oryou
may need to use the TV/VIDEO button to select one of the A/V
input sources.
To make sure you are viewing satellite pictures
Press the SAT FUNCTION button, then press the MENU button to
open the Main Menu.
If the Main Menu does not appear, turn off your equipment, check
your connections and repeat from step 1.
Press the EXIT button to close the Main Menu.
POWER
SAT
TV
FUNCTION
TV
3
4
TV/VIDEO
/
/
FUNCTION
SAT
MENU
Turning On the Power
20
+
SATELLITE
RECEIVER
2
8
3
4
5
6
9
SLEEP
TV/SAT
TV/VIDEO
FUNCTION
SAT
CABLE
AUDIO
VOLUME
ENTERDISPLAY
MUTING
CABLE
ALT AUDIO
JUMP
CATEGORY
GUIDE
INDEXFAVORITE
VOL
RM-Y802
VTR3 2 DVD AMP
MENU
EXIT
CH
1
7
TV
TV
CODE SET
0
POWER
SAT
z Tip
You can see information about a
program you are watching by pressing
the DISPLAY button.
RM-Y802
Remote Control
1
Press the SAT FUNCTION button.
1
2
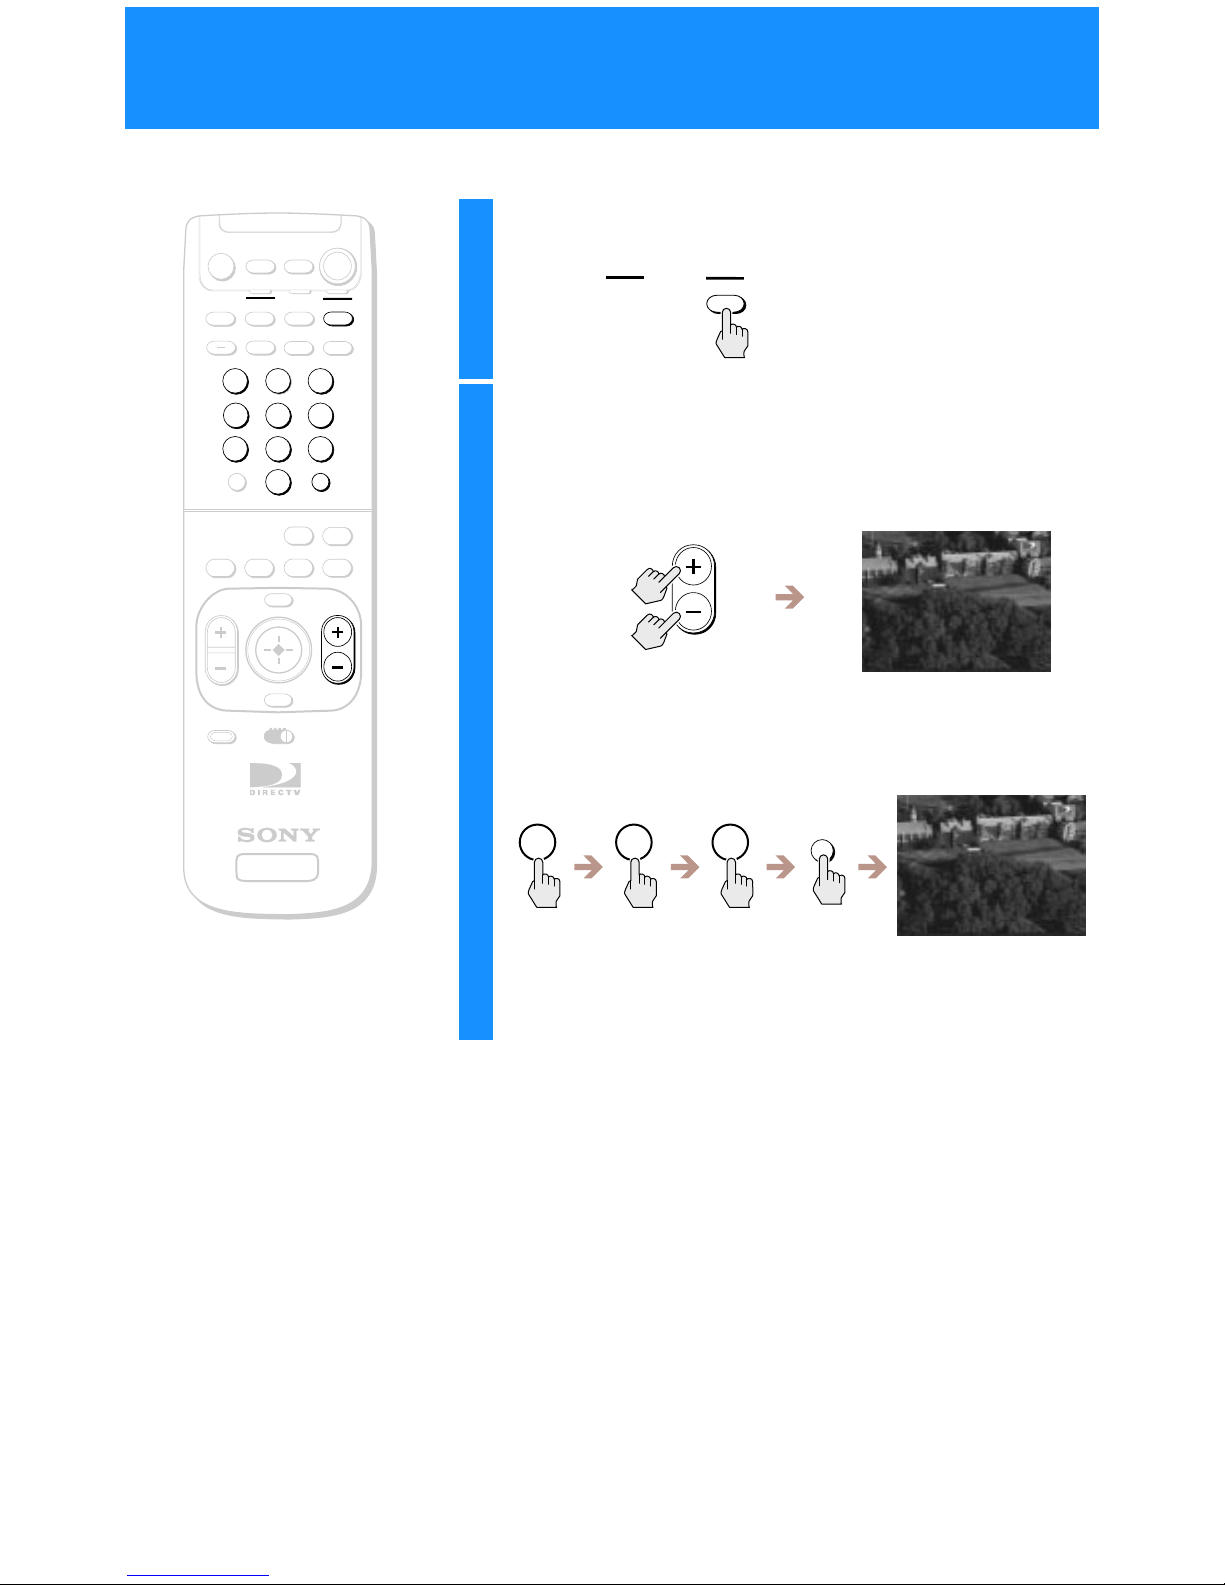
Press the CH +/– buttons.
The Digital Satellite Receiver tunes to the next channel, and the
Station ID and channel number appear in the upper right corner of
your TV screen.
You can also change channels by entering the three digit channel
number using the 0–9 buttons, and either pressing the ENTER
button or waiting several seconds.
The Digital Satellite Receiver tunes to that channel, and the Station
ID and channel number appear in the upper right corner of your
TV screen.
FUNCTION
SAT
CH
1 2 3
ENTER
Changing Channels
21
Using the On-Screen Displays
The Main Menu acts as a gateway to all of the features your Digital
Satellite Receiver has to offer.
Closing the Main Menu
• Highlight and select EXIT to close the Main Menu (the current program
appears on your screen). You can also press the EXIT button on your
remote control.
• The on-screen displays close automatically after several minutes.
SATELLITE
RECEIVER
ALT AUDIO
JUMP
GUIDE
INDEXFAVORITE
VOL
RM-Y802
VTR3 2 DVD AMP
MENU
EXIT
CH
CATEGORY
CODE SET
1
Press the MENU button.
The Main Menu appears.
2
Highlight and select the feature you want to
access.
MENU
SYSTEM (Page 22)
Adjust and test your Digital
Satellite Receiver’s settings.
•Antenna
•VCR Control
•System Test
•Aspect Ratio
•AccessCard
•Remote Control
(SAT-A55 only)
GUIDES (Page 35)
Access the many guides that help you
find the program you want.
•Alpha List
•Program Guide
•Category Guide
•Station Index
•Favorite Stations
•Other Guides
PREFERENCES (Page 46)
Adjust the way menus and
information appear.
•Display Options
•Custom Stations
•DataServices
(future application)
LOCKS & LIMITS (Page 53)
Set limits on spending and ratings.
Block stations and pay per view
programs.
AUDIO (Page 64)
Choose a preferred language for the
default au di o and current audio for
multiple language programs.
You can also select the Dolby Digital
settings (SAT-A55 only).
TIMER & REC (Page 60)
Schedule program tuning and
recording.
PURCHASES (Page 59)
Review the pay per view
program purchases and
cancellations you have made.
MESSAGES (Page 52)
Read messages from your
service provider.
RM-Y802
Remote Control
Using the On-Screen Displays
Using the Main Menu
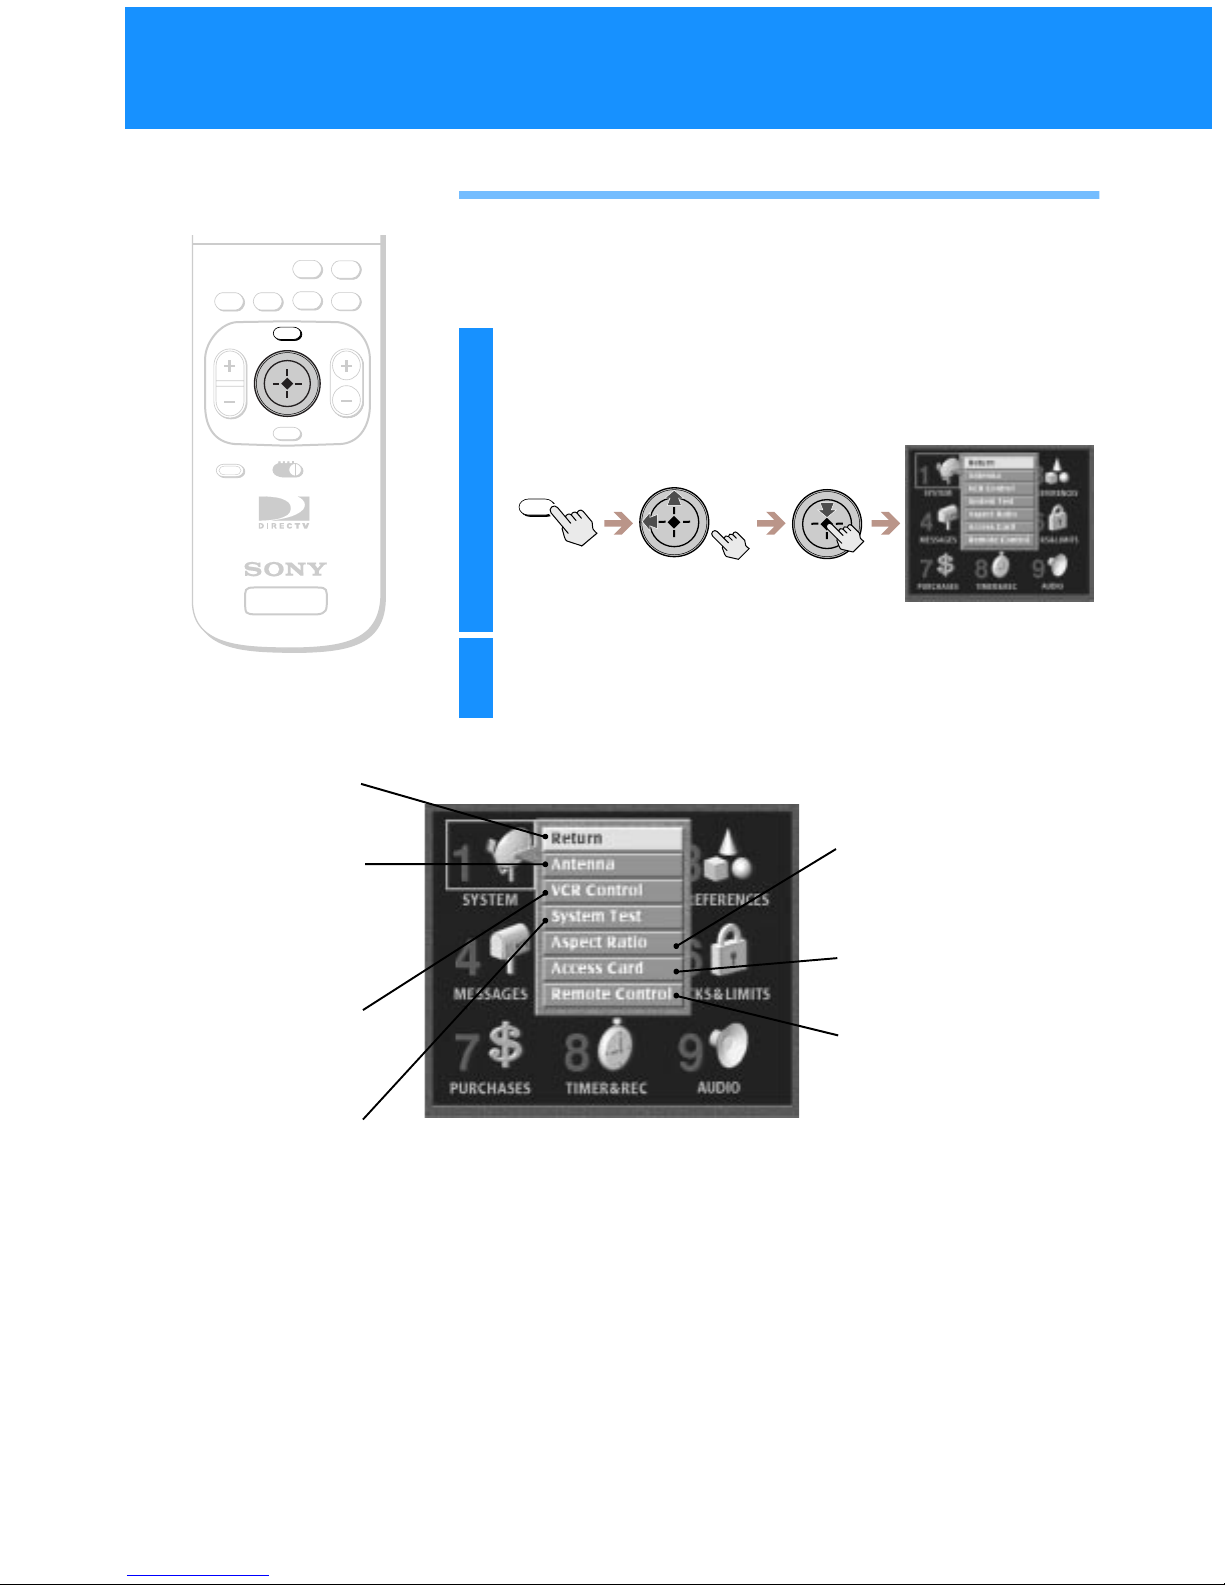
22
Using the System Menu
The System Menu provides many ways to adjust your Digital Satellite
Receiver so it matches your preferences and optimizes the conditions of
your home entertainment system.
1
Press the MENU button, then high light and selec t
SYSTEM.
The SYSTEM pop-up appears.
2
Highlight and select the item you want to set up.
SATELLITE
RECEIVER
ALT AUDIO
JUMP
GUIDE
INDEXFAVORITE
VOL
RM-Y802
VTR3 2 DVD AMP
MENU
EXIT
CH
CATEGORY
CODE SET
RM-Y802
Remote Control
MENU
Return
Closes the SYST E M pop-up to
show t he Main Menu.
Antenna
Letsyou find theposition of the
satellite and helps you get the
strongest signal from your
Satellite Dish Antenna
(see p age 23).
VCR Control
Lets you set up and test your
VCR using the VCR Controller
(see p age 26).
System Test
Lets you test the connections
to your Satellite Dish Antenna,
and telephone line
(see page 29).
Aspect Ratio
Letsyou set the receiver’soutput to
match the aspect ratio of your TV
(see page 30).
Access Card
Lets you initialize a replacement
card (see page 31).
Remote Control (SAT-A55 only)
Lets you set up the receiver so the
remote control can operate the
receiver from behind a cabinet or
from another room (see page 32).
Setting Up Your Digital Satellite Receiver
(SYSTEM)

23
Using the On-Screen Displays
Setting Up the Satellite Dish
Antenna
This display helps you aim your Satellite Dish Antenna to get the
strongest signal.
For complete information on installation of your Satellite Dish Antenna,
see the Satellite Dish Antenna Installation Instructions.
SATELLITE
RECEIVER
ALT AUDIO
JUMP
GUIDE
INDEXFAVORITE
VOL
RM-Y802
VTR3 2 DVD AMP
MENU
EXIT
CH
CATEGORY
CODE SET
1
Press the MENU button, then high light and selec t
SYSTEM.
The SYSTEM pop-up appears.
2
Highlight and select “Antenna”.
The Antenna display appears.
MENU
Note
Most areas of the United States will
not receive a peak signal strength of
100. Although there is no picture
quality difference between a signal
strength of 60 and 100, a higher
signal strength will limit any
negative effects in degraded
conditions such as rain or snow.
Antenna Type
Select Round, Oval 2-Sat or Oval 3- Sat
depending on your Satellite Dish
Antenna type.
Transponder
Lets you selec t the transpon de r from
which the Satellite Dish Antenna
receives its signal.
You do not need to change this setti ng
unless instructed by your service
provider.
Antenna Location
Lets you find out the direction of the
satellite from your location.
Return
Closes the Antenna display to
show the Main Menu.
Help
Opens information about the
Antenna display.
Signal Strength Meter
Shows the current and peak
levels of the signal strength.
Azimuth, Elevation and Tilt
Shows how to aim your Satellite Dish
Antenna depending on your antenna
type and location.
Status
“Locked”shows that your Satellite
DishAntennaisreceivingasignal.
“Unlocked” shows that a signal is not
being received.
Signal Seeker™
When using a Round antenna,
shows that your Satellite Dish
Antenna’s Signal Seeker can be
used.
RM-Y802
Remote Control

24
Selecting an Antenna Type
The Antenna Type display lets you or your professional installer enter
which type of Satellite Dish Antenna you use. After you have entered
your antenna type, you can use the Antenna Location pop-up to help aim
your antenna
1 Highlight and select “Antenna Type” from the Antenna
Display.
The Antenna Type display appears.
2 Highlight and select the Satelli te Dish Antenna type that
you have installed.
The Signal Seeker pop-up appears if you have selected “Round”.
The Antenna Type display closes if you have selected “Oval 2-Sat”
or “Oval 3-Sat”.
3 Highlight and select “On” if you selected “Round”.
The Signal S eeker pop-up closes to show the Antenna Display.
Setting Up Your Digital Satellite Receiver (SYSTEM)
(continued)
z Tip
Selecting “off” in the Signal Seeker
pop-up may allow you to see the
Signal Strength Meter if you use a
diplexer or certain other accessories
with your Satellite Dish Antenna.
Note
The Signal Seeker feature is available
onlywiththeRoundAntenna.Seeyour
Satellite D ish Antenna Installation
Instructions for more information
about this feature.
 Loading...